23050
Post by: Terraformer
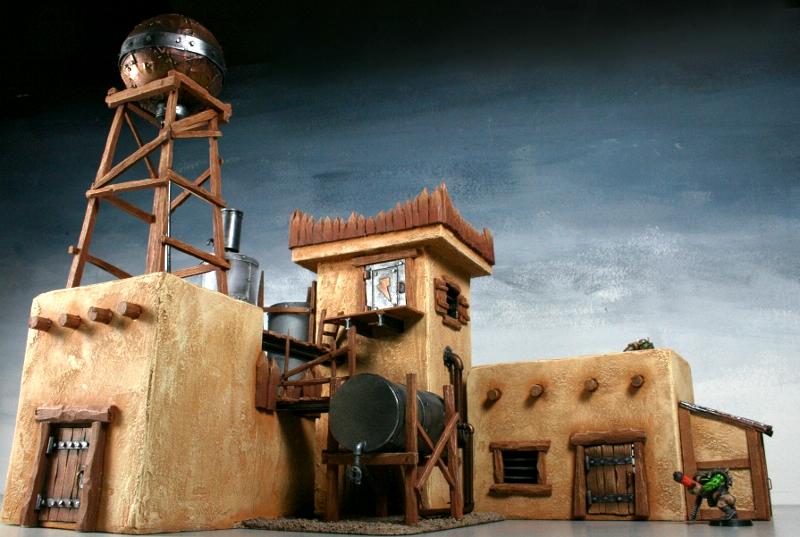
Greetings Dakkers, we’ve had a long running project for a client, for an entire city for his Orks, approximately 22 structures in all, including things like HQ buildings, armories, refineries, watchtowers, a cantina, fighta-bomba airstrip and hanger, and of course, a fighting arena for Squigs.
We’re not even at the halfway mark for this project yet, but we’re getting ready to tackle a very unique piece, which is the Squig Fighting Pit. Fortunately we’ve been given a fair amount of artistic freedom to do these pieces, because as you’ll see, our ideas tend to “evolve”. Case in point:
See this?

The idea was “let’s build an orkish power plant looking thing.”
Here is what that little doodle turned into:

We just don’t know how to stop at times.
So imagine how this concept could go, an arena where Orks gather and pit their squigs in fights to the death, placing bets and shoving each other into the pit, feeding captives to the caged monsters, with Ork warbosses, nobs and overseers watching the games and tossing back drinkies.
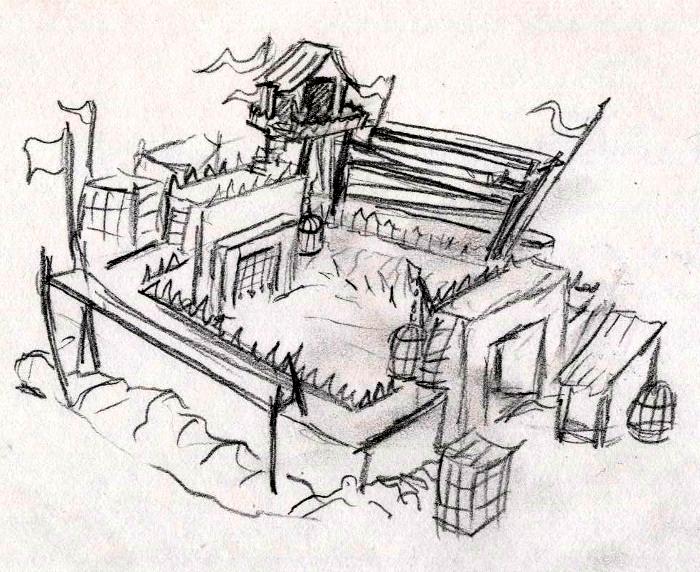
We threw around a couple of very rough sketches when we realized that this wasn’t going to be a small piece, this piece needed to tell a story!
The original “plan” called for a 5 piece set, including a central fighting pit, two separate bases for the bleachers designed to fit up against the wall of the pit, and two areas to either side for the Squig cages, guard posts, betting booth, and observation tower for the warboss and his retinue.
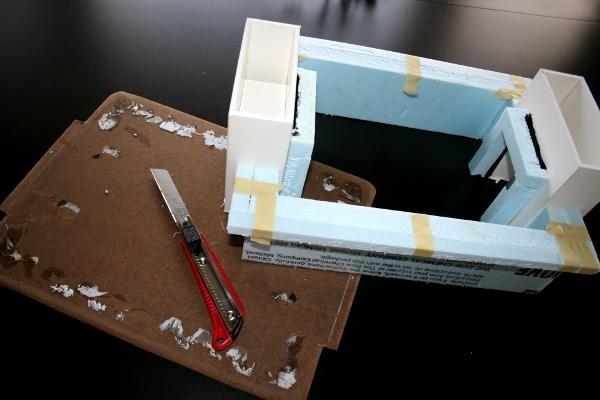
With a solid direction in mind, I gathered my sketches and headed towards the cutting area.
 MDF
MDF board is great stuff. It has a smooth finish and can slide around on a flocked table without the edges of the terrain piece turning into little flock-plows, and best of all, it’s really hard to warp MDF or chip it. Unfortunately all those qualities make cutting the stuff an adventure in itself.
Here is what I use for free-form bases. For precise or urban bases which need to be squared to look like sidewalks I would usually use a table-saw and/or a miter saw.
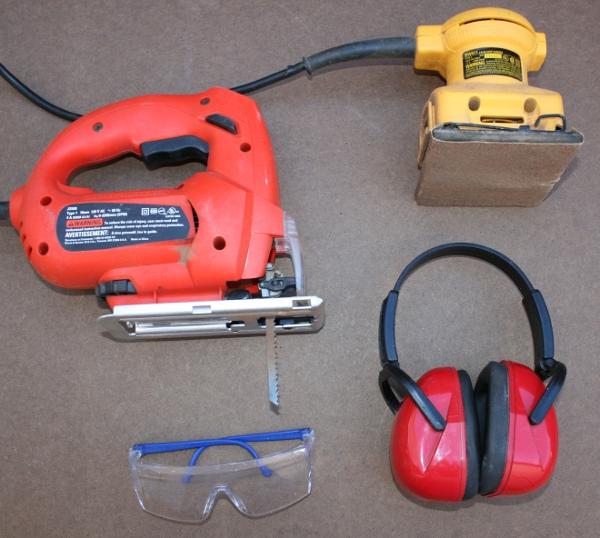
While this isn’t necessarily a do-it-yourself guide, I have to stress the importance of safety when using power tools of any kind. There’s a reason why soldiers in the 41st millennium bolt power tools on the ends of their guns, these things are SCARY. I’ve sliced right through my cutting table without realizing it. Always wear eye and ear protection, never use tools while under the influence of anything, and please get some instruction or help if you’ve never used power tools before.
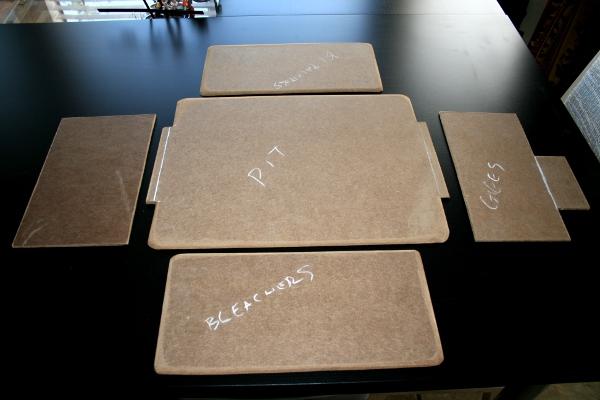
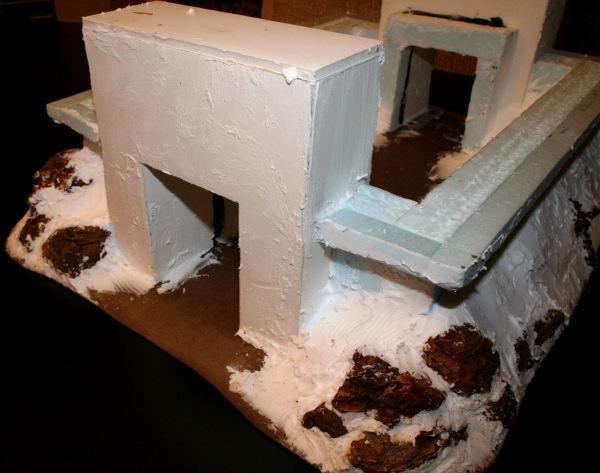
Here are the five pieces, cut and sanded. Since I know already how these projects can go, I decided to start with the central pit before anything else, that way if I run into issues I can make the other pieces to fit, rather than have to rebuild the whole thing.
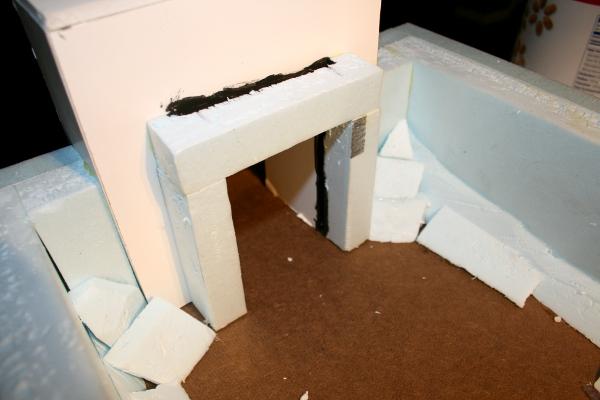
The image in my mind that was most important was the sliding portcullises at each end, with vicious, snarling squigs being prodded into the pit at the ends of spears, with cheering and jeering Orks above. So I wanted to get the gate houses built first, and build the whole rest of the structure around them.
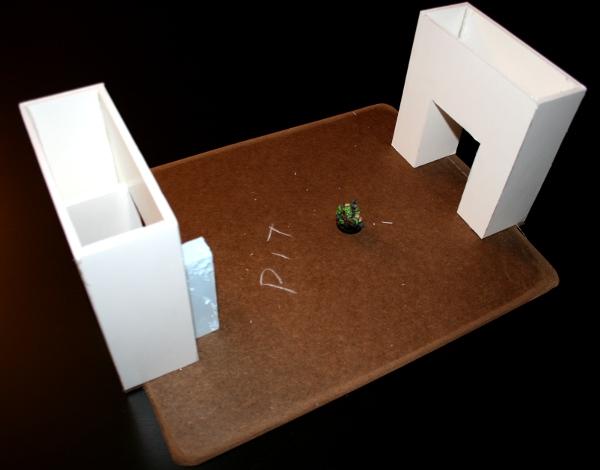
A few slabs of foamcore and some dulled razor blades later, I had a good shape. Now the walls.
I ran into my first change of plans at this point, and it would prove to change far more than I anticipated. The critical decision was that making the pit walls out of foamcore would be too thin and weak for this kind of structure, so I upgraded the walls to 1″ blue insulating foam, giving the walls thickness and enough room to build the walkways on top.
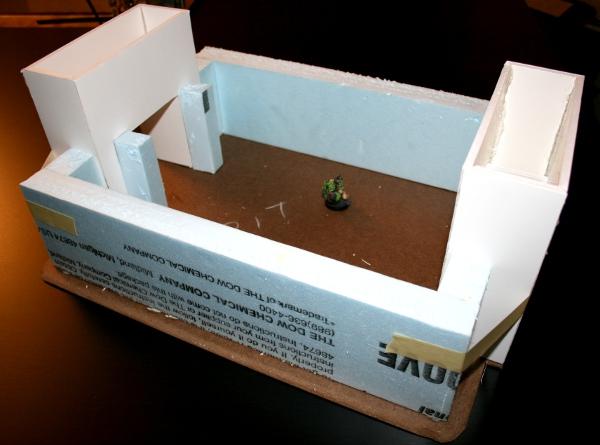
Yes, this seemed to work perfectly. I started attaching trim pieces and finished the pop-outs for the portcullises with no problems. I was on a roll! I sat back with a smug expression as the glue dried, content with the direction this project was going. 
And then MisMuse walked by.
Let me introduce Mismuse for those new to our studio. Here's a brief bio. She's my other lead artist, with a professional background in art, design, photography and miniature making. ( miniature food jewelry.) She's made other artists cry. Yet everything she touches turns to gold.
Remember where I decided that the walls needed to be thicker? Well that had the effect of pushing the whole structure just about to the edge of the board. Meaning the wide margin I left to pile up dirt around the sides was not so wide anymore.
MisMuse cheerfully brought this to my attention as she passed by and asked me “I thought you were going to make that thing look like a pit? It looks like a big Ork refrigerator laying on its side.”
“Well, I left a little space around the sides, I can still pile up a little…” I tried feebly to avoid what I knew was coming, it was inescapable and the worst part was the sinking feeling, the immediate knowledge of what I was about to hear, and what I had to do.
“It’s just square walls. It should be a pit, you know? a dug in look? But if you want to send it out like that, hey you’re the boss.”
Then she walked off as I slowly drew my knife.
And sliced that sucker from its foundations! Another typical day in our little ol’ studio.
She was right darn it. I tossed the old MDF base to the scrap pile and cut a new piece, this time it was much larger, with room to properly build up dirt and rocks around the sides and make this piece seem like it was carved into the ground.

I used white plain styrofoam to build out the shape of the sloped walls both inside and out, and began to sketch out the skull icon on the gatehouse just to aid me in visualizing how the finished piece will look.
I also decided that whatever happens, this thing has to have actual, working portcullis gates. I knew it wouldn’t be fun or easy, but I’m from the generation of toys that have spring loaded missile launchers, working doors and hatches and blinking lights. I crave interactivity with my creations and usually go far out of my way to make a big piece do something.
I carved notches into the pop-outs and pre-painted them black, knowing how hard they will be to paint later. At the same time I raided the Plastruct bin and primed the channels that I’d use to make the gates slide smoothly. I’ll add those later after I do the texture and painting to avoid gumming up the channels.
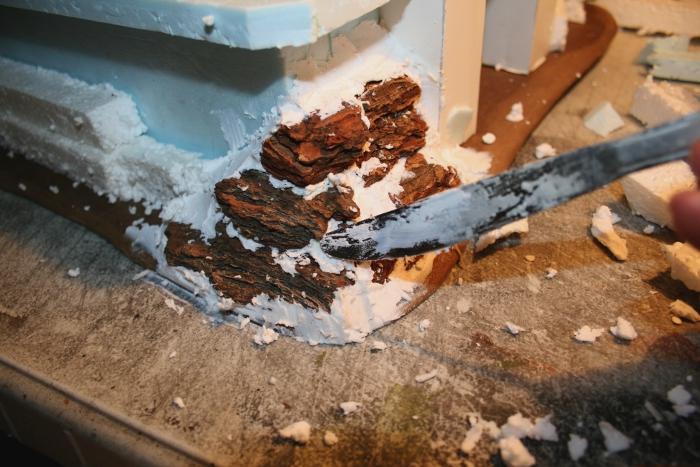
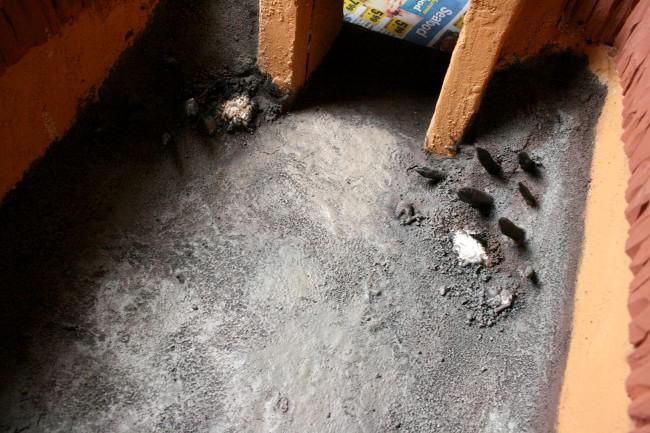
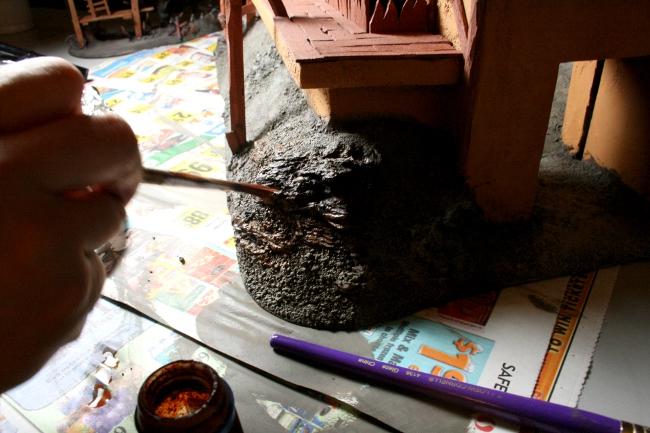
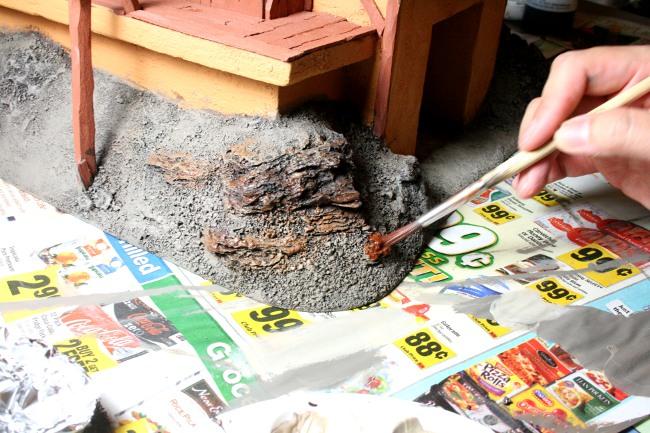
I carved away styrofoam in places that I wanted to construct rocky outcroppings, then glued together piles of decorative bark, paying careful attention to the grain so that it would look like bits of flaking, shale-like rock poking out of the slope. The slope itself is then slathered on lovingly, using lightweight spackle. If you were to use plaster or any other kind of filler on a project this size, it would weigh about 40 pounds after completion. Spackle is light and hard, doesn’t shrink, and it’s really easy to shape and carve. This is one of our trade secrets, don’t anyone here tell anyone else.
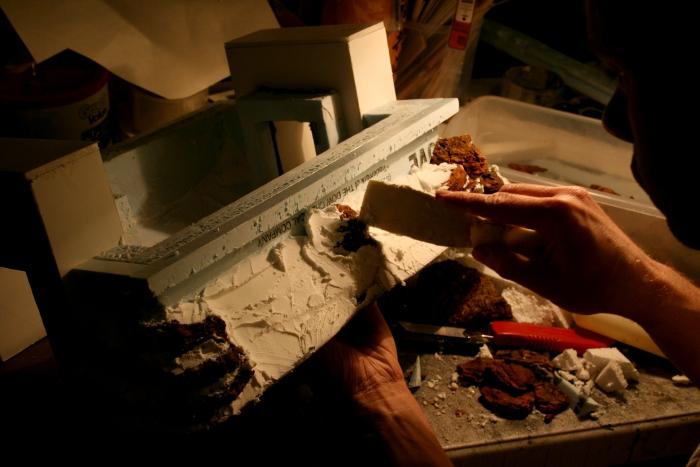
This step took a while, working into the wee hours of the morning. In the darkened silence of the workshop, I found myself pondering my place in life. Why why am I here? How did I end up in this place, living the life of a terrain maker? Was it the money, fame and glory that drove me to this lifestyle? Or just the women? Sometimes in the hectic pace of it all, with the fast cars and huge parties, life rushes by so fast, one can easily forget what’s important.
“ Never forget, it’s the terrain that matters most.” My old master told me during one of my visits to the peaks of Bhutan. “ Breath life into it, feel it in your soul, and most of all, make it rockin’ awesome.”
Yes it looked like the worst cake ever, but this was a crucial step.
However something occurred to me: With the new base, the bleacher sections won’t fit flush against the sides. For that matter I looked at my original sketch and decided it was all wrong. It was too boxy, symmetrical and didn’t look like something Orks haphazardly threw together.
A new sketch and plan was in order!
In the new plan, I would make ramshackle bleachers integrated with the structure, and give everything a more precarious feel, as if Orks grabbed more panels and tied them together just to have places where they could see the action. This would make the central piece much bigger than our average large shipping box, but I’ll let our shipping guy, Pedro, worry about that.
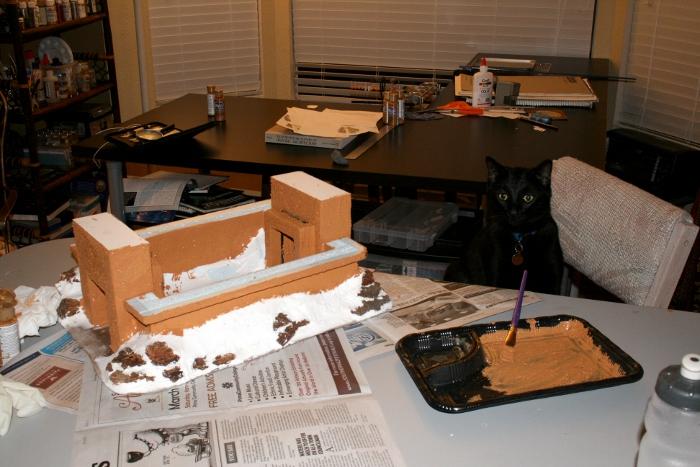
I mixed dry paint texture from a hardware store with my honey brown acrylic paint, thinned just a little. I let one of our other artists do the textured basecoat for the stucco. Believe it or not, he does rather well once you get the lil’ guy focused on a task.
Now there’s one more important step to take care of while the paint dries.
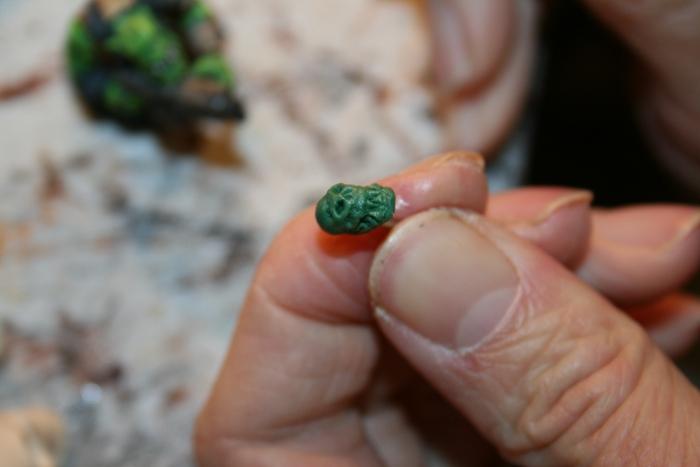
We needed skulls, lots of skulls of Orks, humans and whatever else to litter the cages and floor of the pit. Since I was already sculpting master skull models for another project, I went to work on a few Ork skulls to do alongside. (This skull is only partially finished, final product will be smoother and better defined.)
Next comes ground cover, spikes in the pit, and LOTS of wood carving.
To be continued...
25700
Post by: Space_Potato
This looks awesome, man. Can't wait to see the end result.
Subscribed.
S_P
29979
Post by: Anthony_D
Concession stand like brew and hotdogz, Could the bleachers be on stilts and a ramshackle scaffholding supporting it?
Tried drawing it in ASSCCI but it didn't work. sorry
23050
Post by: Terraformer
Anthony_D wrote:Concession stand like brew and hotdogz, Could the bleachers be on stilts and a ramshackle scaffholding supporting it?
Tried drawing it in ASSCCI but it didn't work. sorry
The bleachers will be supported in a way very close to your idea, we steered away from the neat, orderly rows of seats we originally planned and made the seating more like long, crude planks lashed to poles and stilts sticking into the side of the structure.
As for food and refreshments, we actually have a whole cantina planned for sometime after this project, so stay tuned for that one too.
29979
Post by: Anthony_D
Sounds sweet. Have you heard of an old game called brewhouse bash?
And a mek workshop? there are some great Gorkamorka garages about to borrow ideas from? 
23050
Post by: Terraformer
Anthony_D wrote:Sounds sweet. Have you heard of an old game called brewhouse bash?
And a mek workshop? there are some great Gorkamorka garages about to borrow ideas from?
I had to google Brewhouse bash, but when I did it rang a bell, never got to play it though. Reminds me of a much older, very obscure cut-out board game from the Lone Wolf series' companion book. A million points if anyone knows what I'm talking about.
And Mekshop you say?
More pics in our gallery.
29979
Post by: Anthony_D
looks awesome.
I wish I had the time, patience and space to make scenery or store it once built.
24687
Post by: JDM
I DEMAND YOU STOP BLOWING OUR MINDS!
26790
Post by: Gitsplitta
Really interesting... looking forward to following your progress!
29279
Post by: jackanory
MOREMOREMORE!!!
(sorry)
29979
Post by: Anthony_D
check out the webpage for and i quote "MOREMOREMORE!!!"
19086
Post by: Tjyven
Wow...
9394
Post by: Malika2
Looking great man! You just need to do something about the wood, add more details to it and make it look dirtier or something, it looks too plain compared to the rest of the pieces.
23050
Post by: Terraformer
Malika2 wrote:Looking great man! You just need to do something about the wood, add more details to it and make it look dirtier or something, it looks too plain compared to the rest of the pieces.
If you mean the wood shown on this piece in our blog, yes I do plan on attacking the wood and stucco as well with all manner of weathering, shading and grime. Thanks for looking 
21467
Post by: Contact-wait-out
looks great! subscribed! will be watching this closely!!!
19585
Post by: McNutty
This project is pretty amazing. Good terrain is underrated. I will be checking out your site for more.
23050
Post by: Terraformer
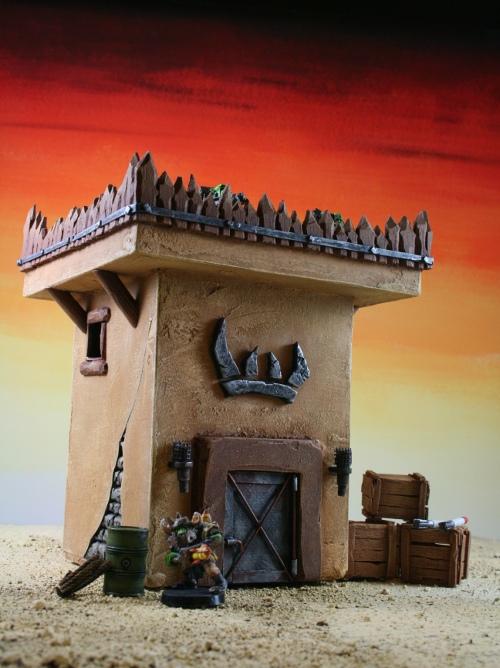
When we last left our Squig fighting pit, we were barely shaping the base and walls, and after sanding down the textured coatings we applied the first base coats of paint.
Some projects we follow the logical order of: build, detail/accessorize, prime, paint base-coats, highlight. And some projects, like this one, we have to apply a more flexible strategy. This thing was going to have a lot of woodwork and details, and getting a brush, or even airbrush stream into all the corners and crevices would be nearly impossible, and my cardinal rule for painting that I instill into all my henchmen or aspiring artists is this: If you do only one thing right, make sure your base-coats are clean!
Just like figure painting, scenery has (and should have) many different contrasting colored areas, and the sharper and more well-covered those areas look, the nicer the whole model will look. That being said, we started painting the woodwork the moment we glued it on, or even beforehand.
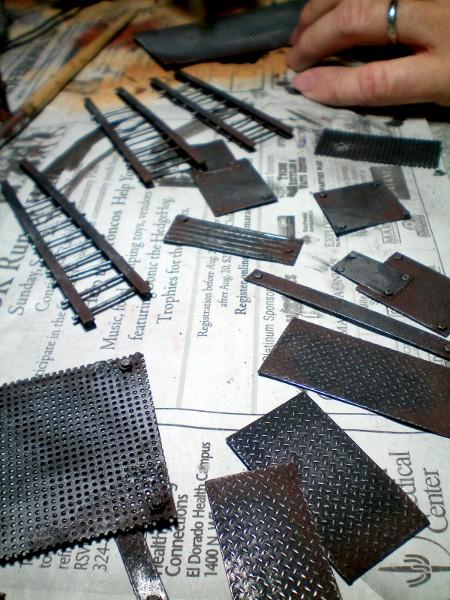
Spiky trim, support beams for the seating areas, plank floors, misc. woodwork was now being attached. All the wood we we attach we hack at a little with a blade, to notch corners and edges and make the whole thing look roughly chopped with an axe. These uneven textures would also nicely capture the highlights and shading later on in the project.
This part is tough. We build all our Orky scenery to a certain standard of pointy-ness and defensibility. For a structure this big, that means lots and LOTS of wooden planks, carved into rough-hewed spikes or boards, glued on, then painted in three or more consecutive coats of base-color. And even that rarely covers all the little nooks where raw balsa can peek out from.
Every square foot of our floor looked like this, in every room.
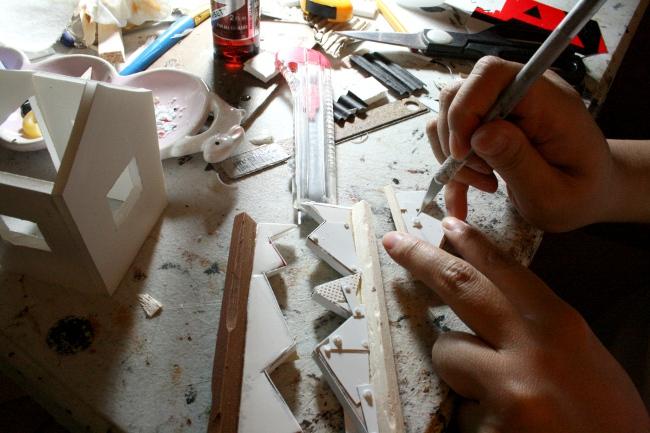
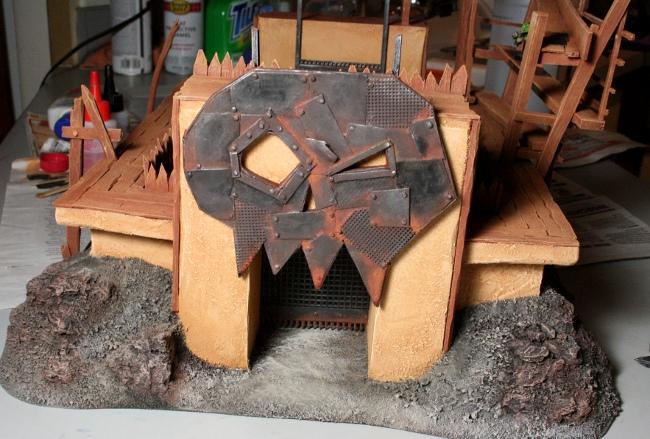
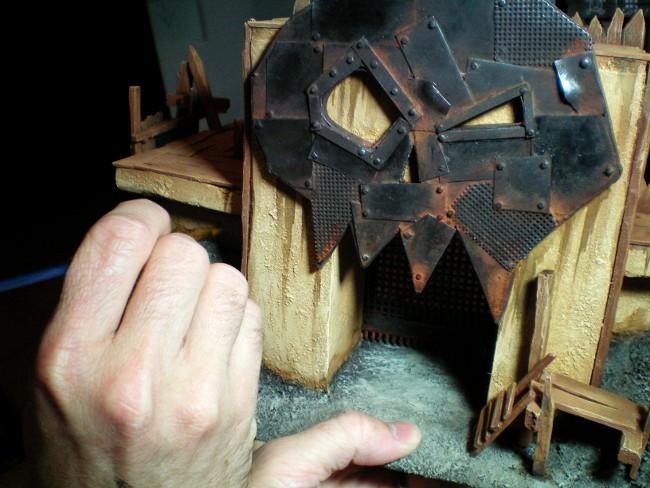
While glue and paint dried, we got to work on some of the larger, distinctive parts of this project. Remember the sketch of the skull I made on one gatehouse in part 1? That wasn’t going to be a painted-on detail. We don’t do anything halfway. Mismuse, our resident Orkish icon expert began to shape this massive glyph from foamcore.
It didn't need to be smooth, it’s mostly for shape, and rougher = Orkier.
The foamcore is just an under-structure, the next phase is to clad the whole skull to appear as if it were bolted together from spare parts and scrap metal plates. This starts with a pile of hacked up styrene of various shapes and textures, glued together in simulated randomness.
“Oops, glued the whole thing to my hand again.”
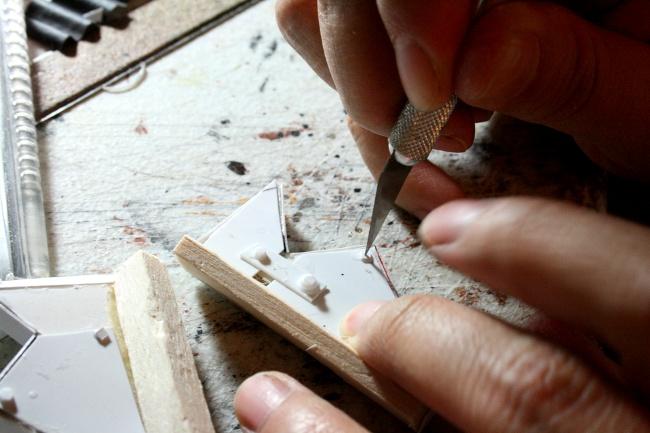
Then it’s rivets. We rivet the plates, gluing on each individual rivet, some with washers.
It’s exhausting. To watch. So I got to work on applying the ground texture to the built up soil around the structure.
Nothing magical here. Just watered-down PVA glue and garden variety sand. Of course we don’t like to just throw dirt on randomly, we actually sift riverbed sand into three different grades, making sure that the rougher grade sand and gravel (actually boulders at 28mm scale) accumulate around the rocky outcroppings to simulate crumbling, weathered geology.
Then while that dried, we primed the skull, and added texture for the rust I'll be adding later. We’ll cover the whole rusting process and our own different varieties and color schemes in an eventual tutorial, but you can read an excellent guide here. Seriously, whole books could probably be written on the varieties and techniques to make things look like rusty metal.
Notice wood planks on all the floors, bleachers beginning to take shape, boss-hut framework also being assembled. I temporarily attached the skull with masking tape to test its positioning. We use black nylon cord in a couple locations, wrapped around joins in the wood planks and posts to simulate the whole thing being lashed together when rivets were unavailable, because sometimes and Ork's gotta do what an Ork's gotta do.
I started to assemble the Nob shack on the watchtower structure, framing out the construction and adding boards and plates to make it look like a little shed.
And here is where we leave off for now.
10054
Post by: Death Gear
This looks awesome cant wait to see it all painted
26800
Post by: Commander Cain
Very nice ork scenery! Some of the best I have seen.
32099
Post by: wyrd boy of da naith
i want one of those! or two and make a gorkamorka game! yay! I need more free time
26894
Post by: Regnak
OUTSTANDING!
25700
Post by: Space_Potato
I think I just  my pants in amazement.
S_P
17244
Post by: The Good Green
AWESOME!
That is above and beyond, truly.
But where do you keep it all? I have been admiring your terrain since I first saw your posts. Have you a large garage with no car, or some humongous shelving system or a permanent gaming table?
29979
Post by: Anthony_D
The Good Green wrote:AWESOME!
That is above and beyond, truly.
But where do you keep it all? I have been admiring your terrain since I first saw your posts. Have you a large garage with no car, or some humongous shelving system or a permanent gaming table?
it's a commission piece, it's his job
23050
Post by: Terraformer
The next handful of updates will bring this project log current. There are a lot of pictures ahead, so if you're using dial up out in the wilderness, now would be a good time to go out and feed the chickens or complain about the government.
So far the working time on this project has been many months, working off and on with other projects. I honestly lost count of how many, but luckily our client is patient and knows the wait will be worthwhile.

In the previous chapter we were building the Nob shack on top of the observation platform. Well Mismuse walked by, picked up the balsa wood structure and while examining it, she  “accidentally” crushed it between her fingers, and ended up designing a whole new shack. Only a minor setback fortunately, and just a small example of the kind of changes these projects go through.
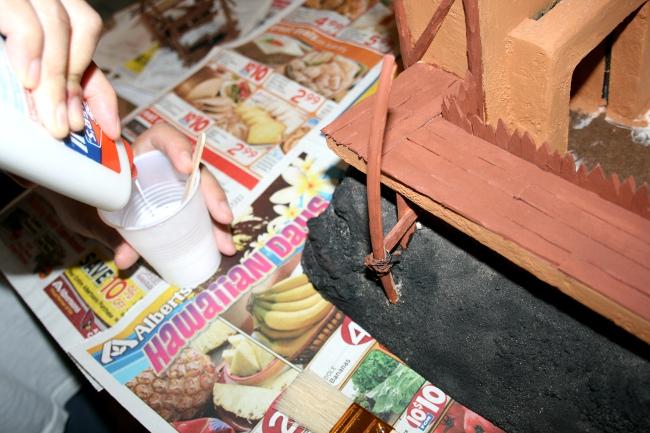
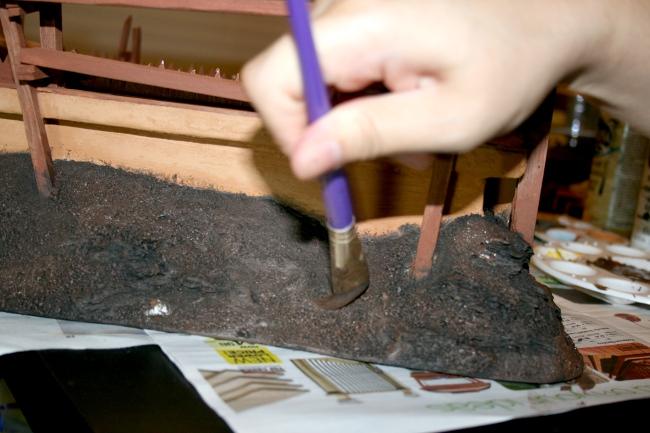
After the destruction of the Nob shack, Mismuse got to work on the ground cover. The outer ground was painted black, then painted again, then washed black to fill all the gaps that the first two coats missed, then touched up yet again where the previous three coats missed. The inner ground in the arena was to be a much finer grade, to represent the the mud and dust where the actual fighting takes place.
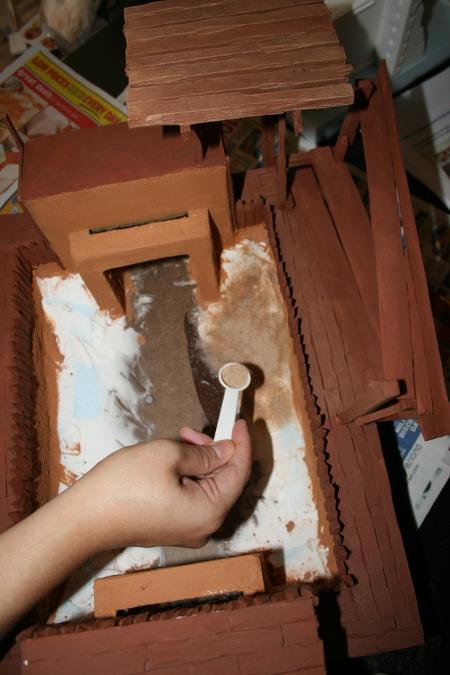
After painting on the diluted PVA glue with an old brush, she sprinkled finely sifted sand as the base cover for the inside.
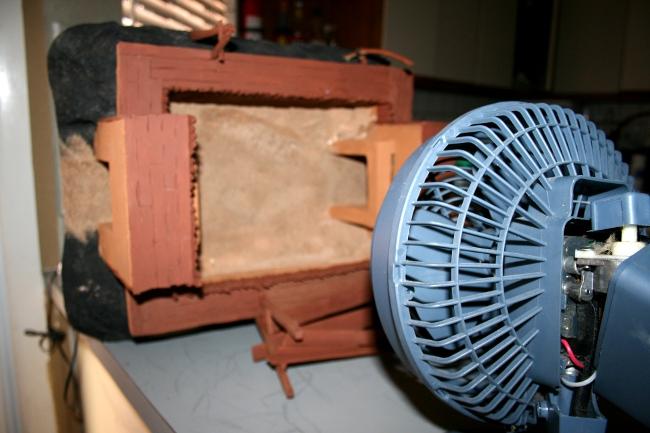
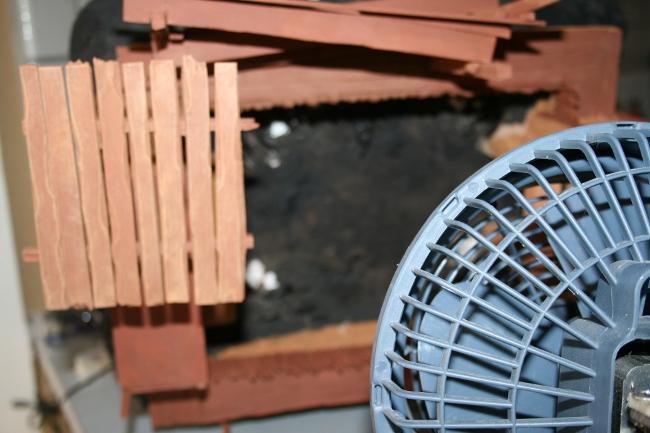
To speed drying time, the model was placed in front of a fan. (Or the battered remains of a fan.)
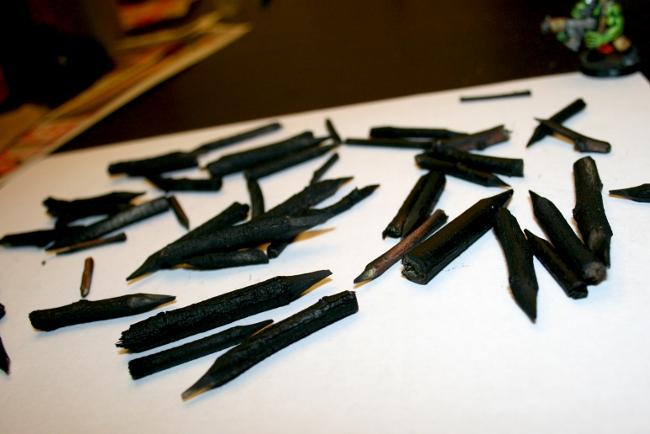
While that was drying, she then started carving small natural branches to points, which I primed black. Mesquite trees are her favorite because the bark has a very fine and rough skin that catches great detail when painted.
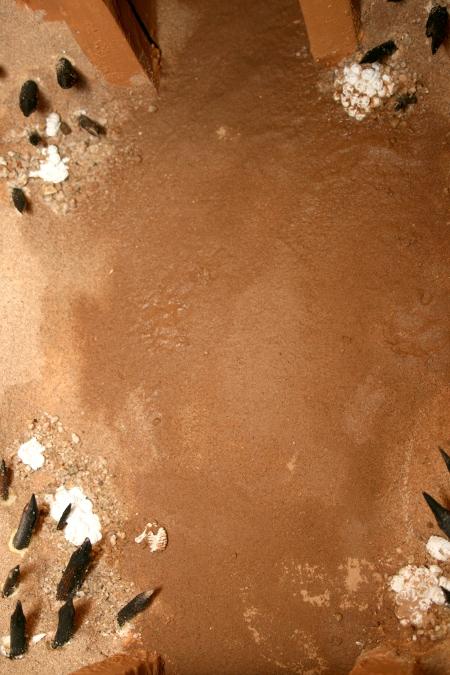
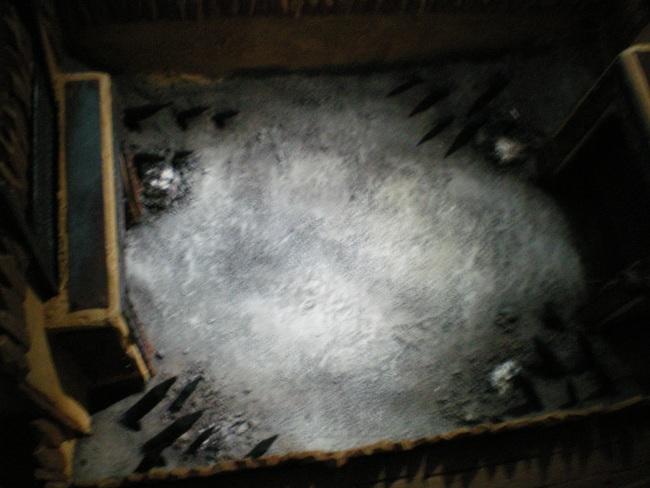
The pointy sticks were stuck into the sides and corners of the fighting pit, these were there to keep ravenous squigs and other desperate contenders from climbing the corners and attacking the cheering spectators. They also looked thoroughly nasty and orky. The spikes were accessorized with piles of skulls and bones from some of my resin castings, and everything was blended in with a little coarse gravel around the base of the spikes and bones. Finally, Mismuse poured diluted PVA into the pit, making a large, milky pool before tossing handfuls of our finest grade sand/dust into the pit, making a big, muddy mess. Yes, I was a little taken back at this technique, but she promised she knew what she was doing.
The glue had barely started to dry when Mismuse started painting it black. “This is madness!” I shouted, but she simply shrugged and put the whole thing in front of the fan again. I have ingrained values in my craft that state one should never use excessive materials or paint something onto a moist surface, which is why we have beat-up fans and hair-dryers everywhere. Since we work a certain number of hours on multiple projects each day, we often have to accelerate the drying process to make good progress and meet our deadlines. Sometimes the workshop is a roaring cacophony of fans and dryers and heaters, and of course the air conditioner to compensate for all the heat generated. The electric bill here is often astonishing.
While the inside finally started to dry out, Mismuse started painting the outside ground cover. She started with a coat of cinnamon brown mixed with a tiny amount of dark grey. She then applied this coat liberally, even watering it down to a wash in places, but careful to leave most of the deep texture of the rocks black. Progressive highlights were added using lighter tones of brown mixed with lighter grey. These highlights were done in mottled patterns, and in places had to be carefully brought back down with dark washes to keep the ground color naturally varied.
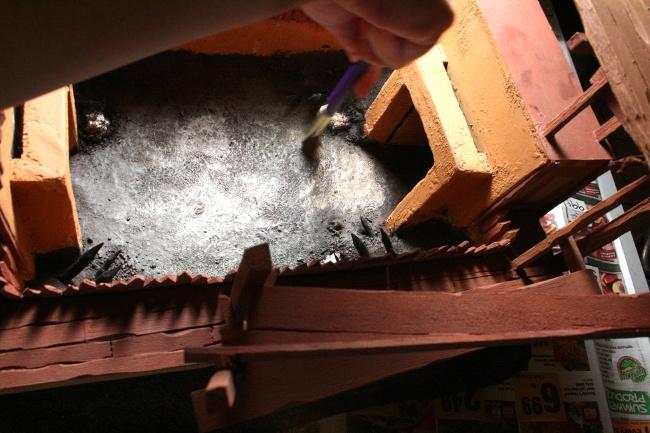
Mismuse then started working on the inside ground, using the same base color but working up to lighter tones of grey and sand colors.
This is where reason behind her wet-on-wet tactic began to reveal itself. The rapid drying of the mud and glue with paint on it caused the ground to take on the exact texture of compacted, dried mud, complete with tiny cracks everywhere. I couldn’t really capture the full effect in this picture but it’s there.
Next was my turn into the ring. The rocks were washed with good ol’ GW chestnut ink. (Do they even call it that anymore?) I wanted the rocks to have good contrast with the rest of the model so I decided to make them ruddy red/brown.
After washing, the rocks were semi-drybrushed in russet, a red/brown color, then highlighted with russet mixed with the ground cover highlights. The similar color pallet will help tie the rocks to the ground around them.
Next update we'll start to work on the metal parts and accessories, as well as begin highlighting!
19086
Post by: Tjyven
I can't wait!
26758
Post by: sc0ttfree
WOW
This is absolutly amazing!
Though right now the popsicle stick fence thing looks just like well a bunch of popsicle sticks with some mild cutting.
After seeing some of your other work i demand better!!!!
33345
Post by: lrak
looks mega, will follow this, keep up the good work
23050
Post by: Terraformer
sc0ttfree wrote:WOW
This is absolutly amazing!
Though right now the popsicle stick fence thing looks just like well a bunch of popsicle sticks with some mild cutting.
After seeing some of your other work i demand better!!!!
They're actually balsa stakes, they're well carved and when highlighted the textures pop out much better. It should also be noted that there are a couple of different styles of Orkish crenelations that we generally use. Most of the detail work on this piece isn't even in place yet, so the whole thing is still pretty plain. For this piece we're matching the style of building our client chose and has a half-dozen or pieces already. Here's a couple samples:
This style pays homage to the old-school GW theme.
23050
Post by: Terraformer
Moving on with the updates,
While I worked on the outside ground boulders, Mismuse started putting together the metal bits and the new Nob shack. The new design was to be stucco with heavy metal barriers around the platform. It was a fighting pit, yes, but it also needed to be defensible in case of an attack from inside our outside the pit. Her construction is based on my earlier drawing.
The rivet-laying process is tedious, painful and thankless. The rivets we normally use are sliced plastic rods with different shapes, either square, round or hexagonal, in different sizes. For Orkitechture, we use all those shapes and then some. Mismuse likes to use the point of a hobby knife to pick up the rivet and dip the back into a small dab of cyno glue before applying it, I prefer to use tweezers. I think she just likes to stab things.
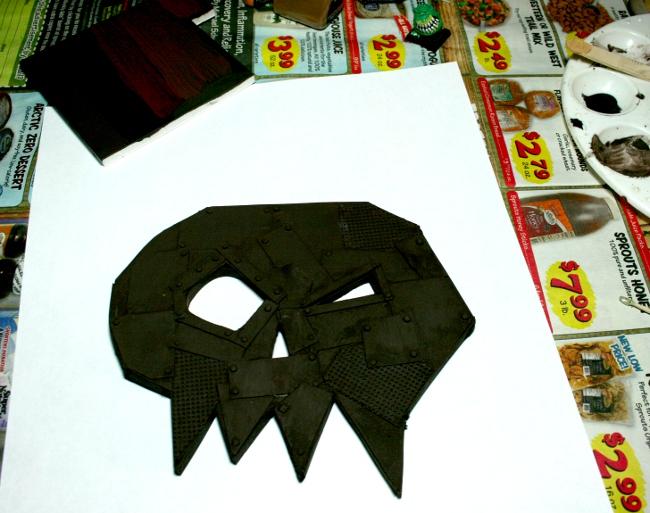
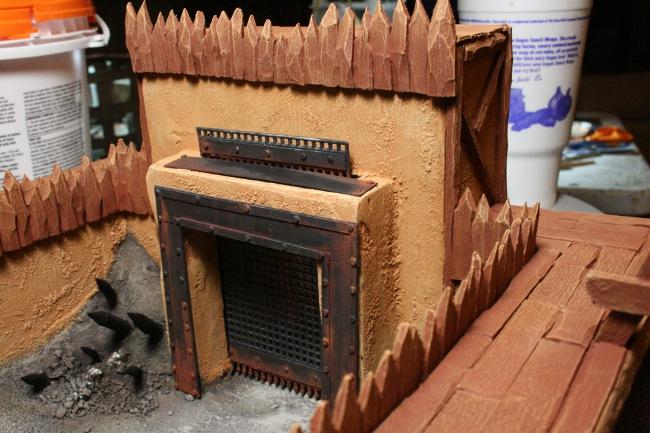
Next it was time to paint the skull. Like all good metal bits, I primed the whole thing black and prepared to paint it like bare, unpainted old rusty metal pulled from a junkyard.

Next I gave it a base-color. Most bare metal that's been left out in the elements has an oxidation over most of the surface, of different colors depending on weather and metal type. That square in the top left corner with the brown stripes on it is my test pallet for different shades of rust colors that I use, painted onto a black base color. This helps me decide how light or dark to start. In this case I chose the standard Vallejo dark rust, but most brands of burnt umber would be a good choice as well.
Now I used a graphite pencil onto the smooth metal surface and using my finger I smudged the graphite all over the skull. The raised edges and rivets caught the most graphite, making them shine more. I would further enhance the shine with a careful dry-brushing of pure silver around certain edges and rivets. I used a tiny bit of MIG pigments “Dark Mud” emulsified in turpentine and washed lightly around some of the rivets and textured areas. The effect would already be nearly perfect for some applications, and it already looked like old tarnished iron with some dust collected in the recesses. However this was no ordinary application, this was an ORKY icon, and needed to really show some serious neglect and carelessness.
Now we’re talking! I used the rest of the MIG range of rust colors in the same way, progressing to lighter and lighter rust shades in smaller patches until the skull looked like its been hanging out in the elements, exposed to grime, oxidizing fumes and rain. A few plates I washed with thin layers of black ink to make the whole thing look less uniform. I set the skull aside for now.
Next I got to work on the portcullises. I cut pieces of a knitting guide to size and inserted some plastic Evergreen H-channels into the grooves I left on the inside walls. I wanted these gates to be operable, or at least be able to slide up and down so it took a little fiddling and trimming, and I was pleased with the result even though I had to cut the mesh into a slightly funny shape to make it work. When I stepped out to run some errands, Mismuse threw my portcullises away and made new, better ones that worked better and had metal plates, spikes and rivets. Sigh.
Okay since we’re on the topic, lets talk about knitting guides. They’re square mesh sheets sold in hobby and craft stores, sometimes called “granny grating” by terrain builders. They’re cheap and are a perfect size for many 28mm miniature applications, but they have a couple of flaws. First of all, they’re made of Vinyl and most primer won’t stick to them very well. This is solved by giving the sheet a very thorough sanding with a medium grade sandpaper before priming, preferably with a high-grade auto primer. The other issue is these sheets sometimes have flash lines that are so bad they literally fill the inside of the squares with a thin film. The solution to this is equally simple- a cigarette lighter or other small flame waved briefly under the grating melts all the flash right off. (But you probably need to sand it again after.)
The end result after sanding and burning off flash. The dark area is where I held the flame too long and the vinyl started to burn. Which was perfect, because it actually looks more like crude metalwork with a little texture. < DANGER! Be careful using flames, especially in a hobby environment where there may be exposed, flammable solvents, paints and other hazards. Melted plastics give off toxic fumes, use with adequate ventilation, always wait 30 minutes after eating before taking candy from strangers. >
Now Mismuse started putting together another vital component, the squig cages. Using balsa, plastruct, toothpicks, cutting tools and a quiet, zen-like focus, broken only by sharp, blood-curdling expletives, she made an impressive variety of cages, as well as a large pile of “metal” parts and accessories for the fighting pit.
Automatically Appended Next Post: 
Here are some parts already on my desk for “metalizing” and rust treatment. I began to receive an endless stream of parts for painting. Some pieces I recognized as parts of my old Nob shack.
And here are pieces being finished. Each one has been rusted the same way as the skull, using MIG powders and graphite, and a little bit of silver drybrushing.
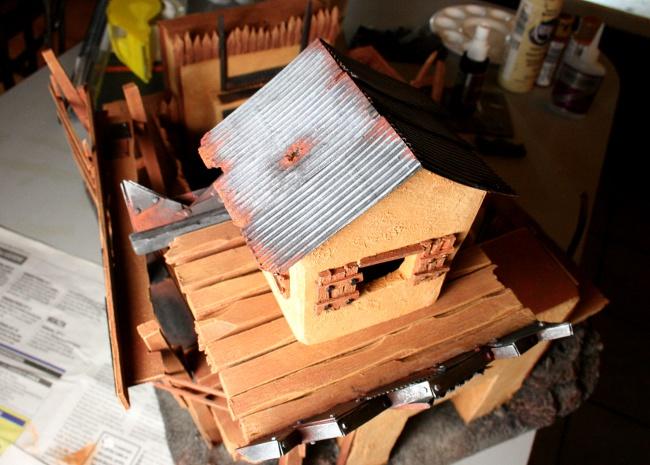
The new Nob shack on the top of the watchtower featured a much more solid appearance, and rusty corrugated metal roofing, and a generally Orky, slightly whimsical style that that we all love in Ork buildings, and which Mismuse has a innate eye for capturing perfectly, every damn time.
At various points in the process we tag-teamed the wood highlights, which was a daunting task in itself, to say the least. From light cinnamon we brought the tips and exposed areas of wood up through honey brown and sand color for the very edges. We did the same with the stucco building itself, highlighting up to the edges. Now I say we worked at various points, because there were three primary areas to paint- The wood, the walls and the ground. And each time you add a highlight to say, the stucco walls, you then have to go back to the wood and touch it back up because the stucco highlights tend to get everywhere. Then when working on the ground, the walls have to be touched up because the ground highlights need to be cleaned up, and so forth.

Here Mismuse is re-touching the wood after working on the stucco, probably at some unearthly hour of the night or morning. In order to keep the overall look of the project clean and sharp, this process of highlighting and re-touching had to be done over, and over and over, usually with a fine brush.
And here is the result so far. This thing is far from finished. Seriously, when I say we don’t know how to do anything half-way, I mean it, it’s something pathological. We need help.
Someone send help.
The voices, voices telling us to… to… make squigs, add ladders…. must…. wire lights!!!11sghfhfg
To be continued.
31040
Post by: Remos
Absolutely fantastic!
Are you God of Warhammer Scenarios or what??
25700
Post by: Space_Potato
Simply amazing. Can't wait to see the finished project.
Keep up the incredible work 
S_P
26790
Post by: Gitsplitta
You guys need medical assistance... but please... don't get it. You're work is wonderful and your blog is very, very interesting & entertaining!
17244
Post by: The Good Green
Fantastic work!!! That could go in Fantasy or 40K, at this point. I love it. The bleachers are looking very interesting, by the way. I can't wait to see more.
2776
Post by: Reecius
Damn son, you are very talented. Keep up the awesome and inspiring work!
14571
Post by: gretar
Wow.. just.. wow.. I'm speachless for the first time ina very long time
23589
Post by: Sageheart
this is awesome, can't see what else you make!
30775
Post by: sn0zcumb3r
visited your website imediately
you rock...
32540
Post by: Timonth
I really like it so far, maybe add a claw arm? For picking up shining stuff the dead left behind? 
33694
Post by: grotsrus
why dont you buil one huge mega squig with bionic parts like a bionic eye tha got a supa-dupa rokkit ont he side and some barrbed metal teeth for the ork gladiator champions to fight
32099
Post by: wyrd boy of da naith
And trow luke skywalker in the pit and then ... oh sorry i get carried away
28269
Post by: Red Corsair
These are sick, You should do a dark eldar arena in tribute to the upcoming release! I dont think I have seen a good piece of terrain for the dark pointies since they were released!!!! You sir would be the one to achieve this!
AWESOME WORK!!!!!!!
23050
Post by: Terraformer
grotsrus wrote:why dont you buil one huge mega squig with bionic parts like a bionic eye tha got a supa-dupa rokkit ont he side and some barrbed metal teeth for the ork gladiator champions to fight
The squigs are coming.... Automatically Appended Next Post: Red Corsair wrote:These are sick, You should do a dark eldar arena in tribute to the upcoming release! I dont think I have seen a good piece of terrain for the dark pointies since they were released!!!! You sir would be the one to achieve this!
AWESOME WORK!!!!!!!
Thank you so much There are so many races and styles and themes to choose from, and we love what we do so much that I sometimes get overwhelmed where to go next. I think we'll probably get to Dark Eldar after we pay regular Eldar a visit sometime in the future.
23635
Post by: Pennywise
This is some amazing terrain, I love it so much, it's making me want to make some new stuff.
33108
Post by: Spacebase
Great work. I love the old style ork buildings.
I'll definitely be following your blog. The work is really high quality.
17738
Post by: Briancj
How many slaves^H^H^H^H^H^Hemployees do you have, and are any doing it full-time (including yourself)?
--B.
33786
Post by: TTG BUNKER
Man, these are great! I'm going to stay tuned to this.
6135
Post by: HungryTaz
The temptations of commissioning you to build a trench system for my Cadians from a few Battle Board tiles is overwhelming after seeing your amazing Chaos Board.
What's the best way to begin this discussion?
31096
Post by: Tellis
I love your work Runt!!
25129
Post by: Trilobite
Jaw officially dropped.
17349
Post by: SilverMK2
This blog looks like it has potential for quite a lot of fun things
14152
Post by: CT GAMER
Inspiring.
24505
Post by: Ruzto
Absolutely lovely stuff from Terraformer, once again. Great work, keep it up. Can´t wait to see more.
23050
Post by: Terraformer
Briancj wrote:How many slaves^H^H^H^H^H^Hemployees do you have, and are any doing it full-time (including yourself)?
--B.
There's at least two of us going at it full time, myself included. Other helpers come and go as needed, or to replace those mangled horribly or devoured by our giant, evil cursed industrial machine press in the attic. Why do we have that thing anyway?
Automatically Appended Next Post: HungryTaz wrote:The temptations of commissioning you to build a trench system for my Cadians from a few Battle Board tiles is overwhelming after seeing your amazing Chaos Board.
What's the best way to begin this discussion?
Check our commission policy section on our website here, and drop us an E-mail at projects@3t-studios.com with the specifics of your project, including sizes of pieces(s), any other work to be included, budgetary considerations, Etc.
It may take a day or so for one of us to get back with a quote but we do respond to every E-mail. Look forward to hearing from you!
14571
Post by: gretar
I just went through your website and erh.. will you marry me?
23050
Post by: Terraformer
gretar wrote:I just went through your website and erh.. will you marry me?
I need to know the size of your dowry, your father's estate holdings and whether or not you have child-bearing hips before we can enter any kind of formal negotiations.
26790
Post by: Gitsplitta
LOL!
Too funny!
:-)
17738
Post by: Briancj
Terraformer wrote:There's at least two of us going at it full time, myself included. Other helpers come and go as needed, or to replace those mangled horribly or devoured by our giant, evil cursed industrial machine press in the attic. Why do we have that thing anyway?
Because the Dark Lord commands it.
Seriously, congratulations on being able to build terrain/paint for a living, AND spread the work around to some stringers.
--B.
23050
Post by: Terraformer
And on it goes, still no end in sight!
In our last chapter we had completed a bulk of the structural part of this project and it looked pretty good. But we couldn’t stop there, there’s just far too much potential for detail in a piece like this.

Mismuse continued to turn out piles of metal plate bits. We decided that there should be a lot of metalwork in a structure like this, plates and reinforcements on walls and around passages where large, angry beasts might be prodded through, flailing stucco-damaging appendages left and right. Also, see that bottle in the upper right corner? That's one of our shop bottles of cyno glue accelerator, more commonly known as "hurry, help quickening this while I hold these!!" I eventually glued all the bottles to heavy things or MDF bases to keep us from spilling them so damn much.
And as she made them, she passed them to me for priming, painting and rusting. Once in a while I would ask here which end was up on a plate, in order to make the rust pool in the right areas. Some plates I made with heavy rust, others only lightly rusted or just dusty.
Finished pieces were then handed back to Mismuse for attachment. The rest of the project was going to go like this, with sub-assemblies being built, painted and attached.
More pieces were being added to the outside and around walkways and seats, such as metal plates, defensible barriers and extra support beams under the bleachers, and the whole thing was really starting to come alive at this point, but this piece really needed a few more unique, eye-catching details.
Mismuse started working on a few of those details, as well as extra stairs and ladders to be attached around the structure. At this point everything is being painted and highlighted completely before being attached.
Some items, like the wooden planks in this picture were base coated black and painted in a darker, more aged looking grey/brown mix of tones to help provide contrast.
And what is this plank you ask? I asked too as Mismuse hung it from the underside of the Nob shack with a few jeweler’s eyelets. Round “nails” were pressed into the balsa as well before being highlighted. She promised it would be great and blew the dust off an old Ork codex.
She also began to work out placement for the various cages at this point.
“That cage is upside-down.” I pointed out.
She gave me one of her trademark looks and then explained to me that she was still working on the tops of the cages, and won’t close them up until they’re “occupied”. I backed away slowly lest something else “accidentally” get destroyed.
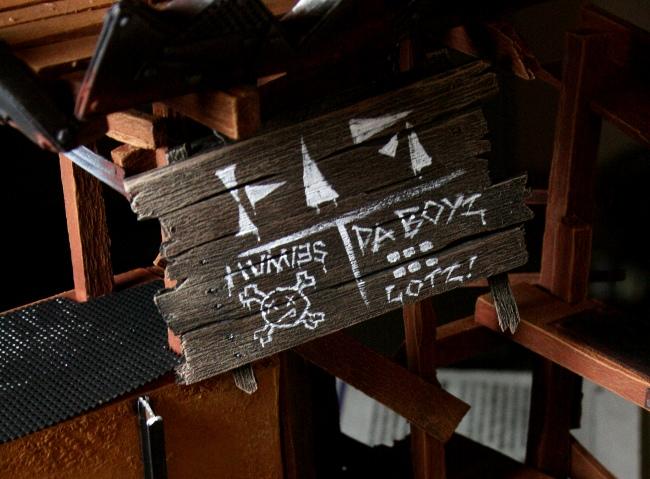
And then back to the planks. Aha! Her plan becomes clear now! The Orkish glyphs say “SKOR” I believe, and from the looks of things, the last game didn’t go so well for the humies.
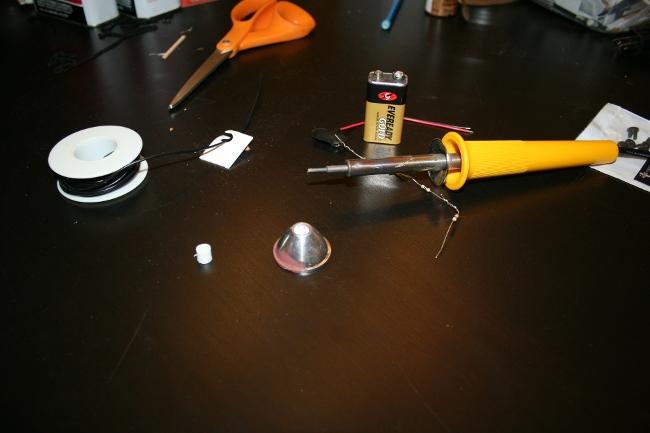
Next was my turn to make something special, and I chose to make a pole with a spotlight and megaphone speaker. Of course the spotlight was going to really work, do you really need to ask? I went out and purchased a bright white 5mm LED, then came back and started rummaging in our vast stores of bits. I found the reflector cap from the inside of a toy flashlight, it was already the right shape and size and had a reflective coating inside, perfect!
I made a cross-piece on a wooden dowel, then started jamming pieces together. The LED was glued to a small piece of plasticard with two holes for the wires out the back, then glued into the reflector after adding metal plate lines and rivets. A couple of chopped styrene tubes made a good looking piece of conduit out the back. I made sure to note and mark which wire was positive too, I would need to know later for when I wire the resistors.
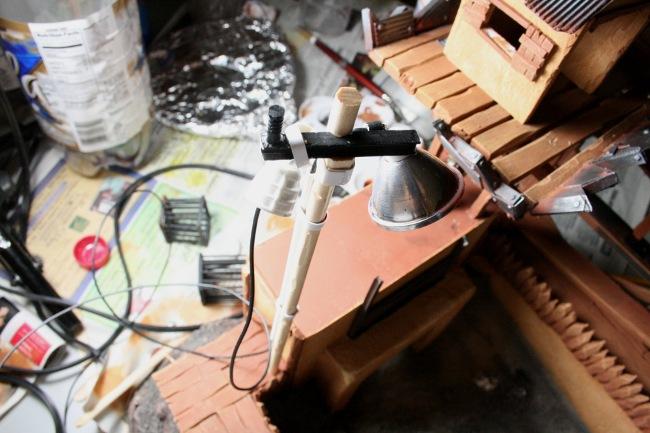
I fashioned the loudspeaker out of a resin bit I had, with the end of a zoid gun inside. Once assembled I tested the location and then satisifed that it would work out, I finished the rivets, primed and painted it.
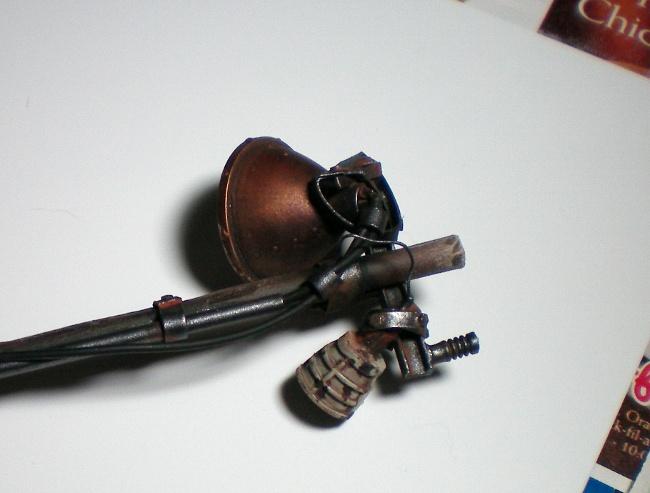
After it was painted, I weathered and rusted the whole thing. The megaphone was painted to look like chipped off-white paint using masking fluid. I made a wire coming out the back, but unlike the cables for the spotlight, the speaker wire was just decorative. I thought long and hard, and decided not to try to make it an actual working loudspeaker. (It would require making Ork figures with real working electronic voice boxes, and that was just a whole new can of worms I didn’t want to open.)
That’s where I leave off for this update, tune in next time to see yet more tedious detail work!
26790
Post by: Gitsplitta
Woof! Love all the little details Terra, that pole with the electronics on it is really sweet. It's amazing how you and Mismuse work so well together to make such masterful creations. Though I'm sure a healthy respect for/fear of her building/demolishing skills helps.
13611
Post by: Stump
Lovin this!!
will be following this for sure!
23050
Post by: Terraformer
Still going! It’s easy to start a large piece of scenery and think “It’ll be just as easy a smaller piece, just larger components.” But the reality is that to keep scale and detail level accurate, every inch needs to be given extra attention. We just keep looking at it and saying things like “needs more plating there.” and “Why not add a real spotlight and post?” making the amount of work time increase exponentially. Also we’re having fun.
And that’s where we are now, continuing the electronic part of this project from the last chapter.
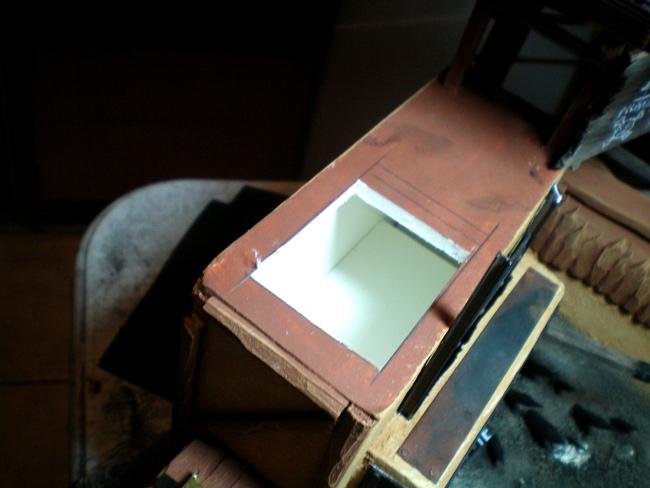
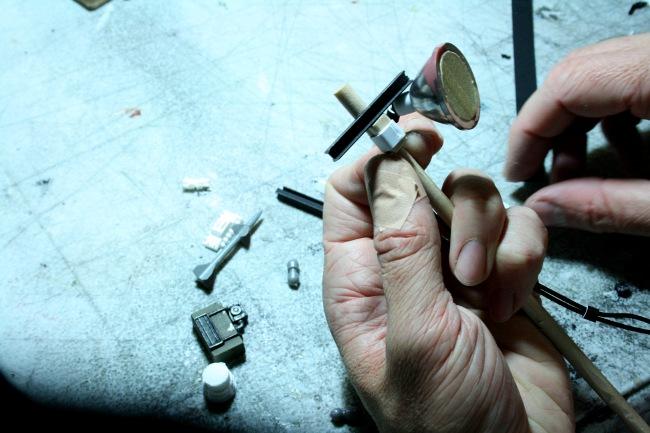
Since the lightpost was a bit of an afterthought, I had to find a place to hide the battery and wiring. I chose the gatehouse opposite the side with the metal skull icon and carved a square out of the foamcore structure.
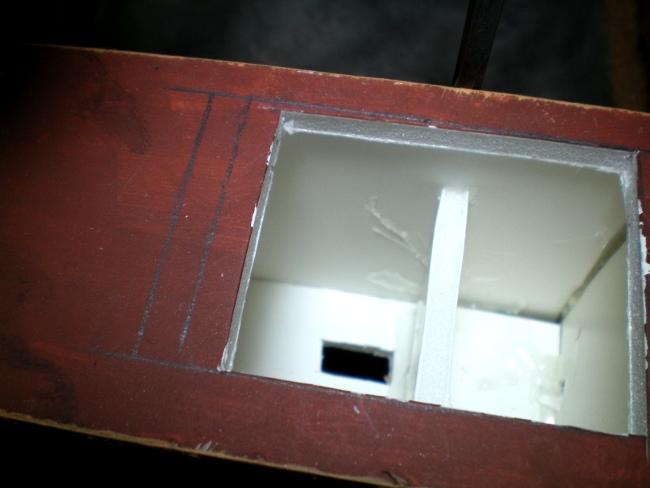
Since the gatehouse was tall, I couldn’t just drop a battery down the side, nobody would ever be able to reach it without forceps or something. I made a few foamcore walls inside, just to make a nest for the 9v battery. Before attaching the walls, I cut a small opening on the bottom for the switch.
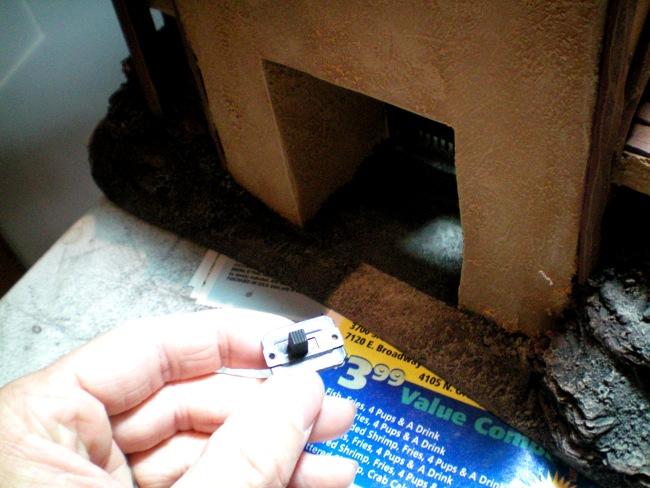
The switch is just a simple on/off slide switch. I made a plasticard flange around the edge and glued it to the switch so the whole thing would have more surface area for gluing it to the wall. I chose to mount the switch in a semi-hidden spot just under the doorway of the gatehouse.
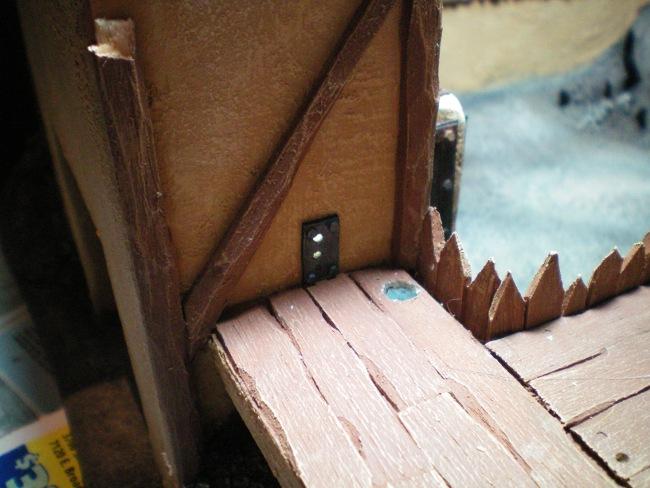
After the switch, I made a small plate cover with holes for the wires, and carved a round post hole into the floor of the structure, for inserting the post.
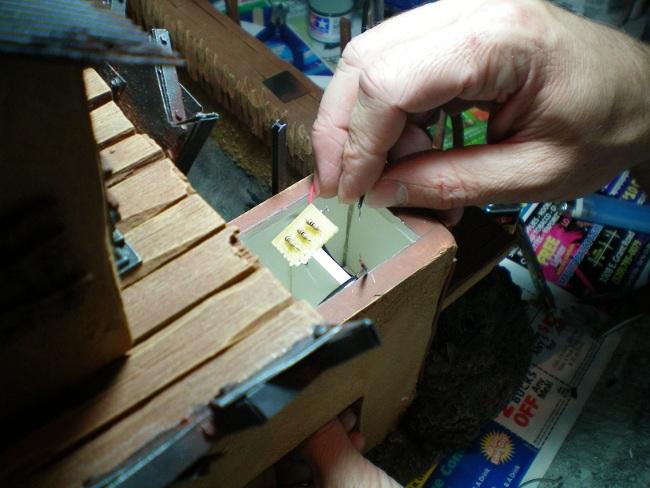
Now I wired the whole mess together at last. The single white LED called for 270 ohms of resistance against a 9v battery. There are a lot of websites that help you calculate this formula. In fact there’s websites for any bit of knowledge you need to know about anything imaginable. Someday we’ll all walk around plugged directly into google asking it everything about everything we see, too paralyzed to even move without first being directed a yahoo answers page with how-to-walk instructions.
On that day, the machines will have truly won.
The switch was in place, and firmly attached with fast-setting 2-part epoxy glue. I tried to test out the motion a few times and found that yes, I had indeed gotten epoxy into the operating channel of the switch, even as hard as I tried to avoid it, even though I was literally chanting “don’t glue the switch closed, don’t glue the switch closed..” Oh well, luckily I had a whole box of switches.
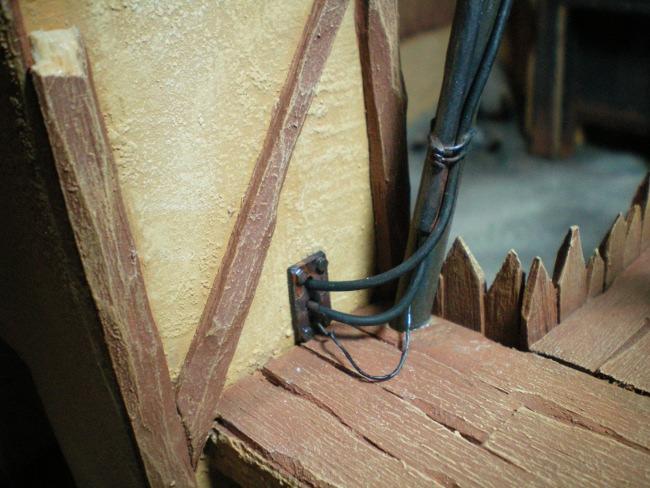
After replacing the switch, I fed the pole wires through the plate cover, and glued the post in place with carpenter’s wood glue. Basically a PVA glue designed specifically for wood. Yes, the pole is supposed to be at an angle, there's a reason Orks don't work at the telephone company. (I also wired the battery and resistors to the LED temporarily while I positioned the pole, to make sure the light beam would land where we needed it.)
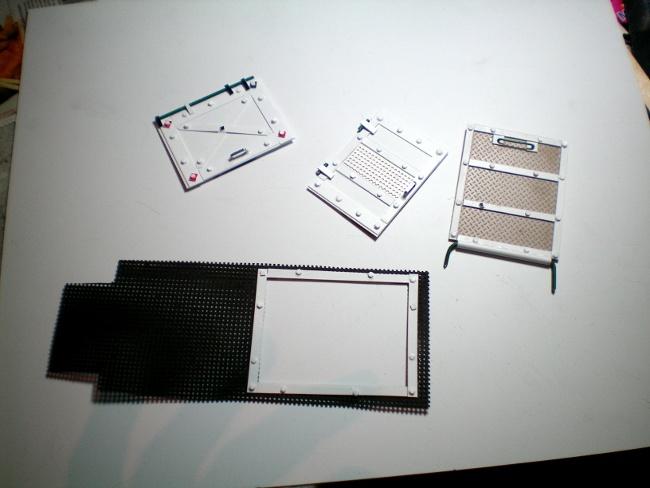
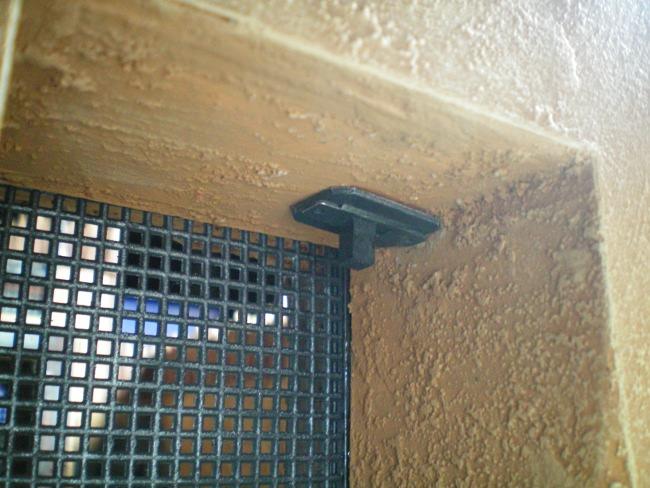
I didn’t want a gaping hole on the gatehouse, so I modified the perforated flooring with some plasticcard strips and rivets, then made a hatch with a working hinge by slipping a length of heavy-gauge florist wire into an evergreen styrene tube and bending the ends. I made a few more doors too so I could prime and paint them all at once.
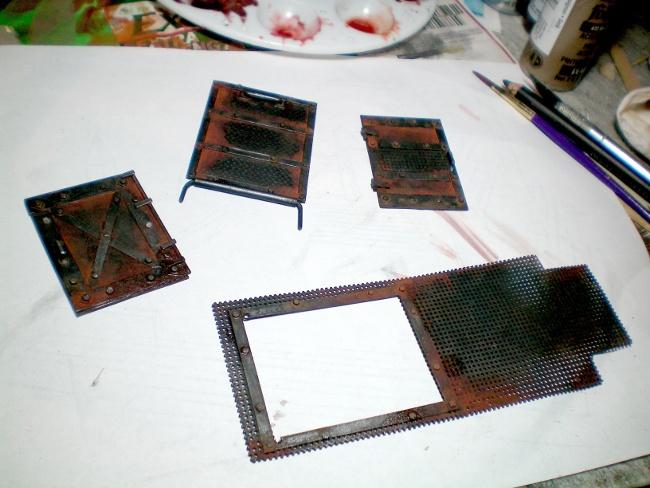
More burnt umber base coats, graphite rubbings, MIG pigments and turpentine. A final silver drybrush on the edges and I attached the doors inside the gatehouses.
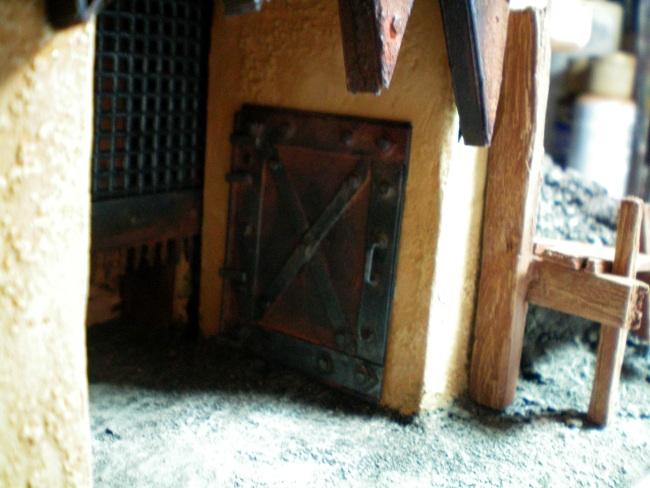
These doors would give the impression off access to interior space within the arena.
Here is the finished hatch and floor. I used my pin vice to drill holes in the flooring after gluing it in place and then pushed the ends of the hinge into the foamcore with the aid of a little expanding glue to make sure it doesn’t ever go anywhere.
And the guts inside. Easy to access for any battery changes or future modifications. Now the last step was to test it out.

Turned off, it looks like a really nice prop.
And turned on, we have magic!
Pardon the lousy quality of the shot, it’s low light with the pit illuminated strictly by the spotlight. Looks like a stage set for a grisly show, yes?
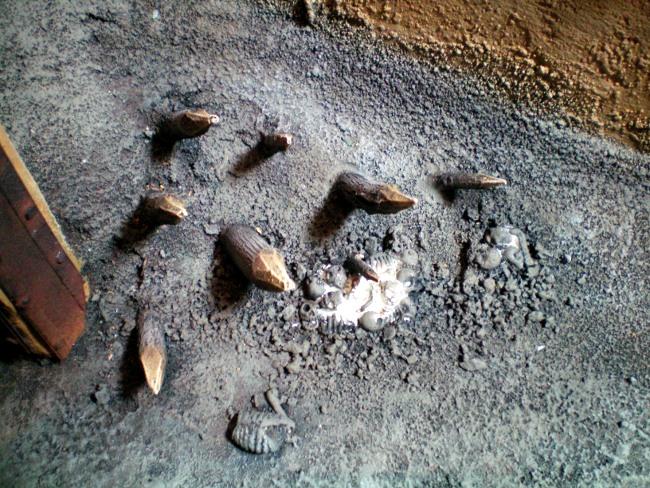
Taking advantage of the extra illumination, I began painting the details in the pit, starting with the spikes. A dark grey/burnt umber mix for the bark, highlighting up with a little sand color. The tips, which were to appear to be carved more recently, were painted the same tones as the wood trim of the pit for a splash of color.
Now at this point, there was a raging virus rampaging through the workshop, and unfortunately I was next in line to succumb to the pestilence. After a few rounds of chicken soup and reckless amounts of Nyquil, I’ll be posting the next update to this unending piece!
32969
Post by: redscorps
That last edition is freaking awesome!!!!
Top class work mate.
19398
Post by: Tim the Biovore
Holy gak. That is too awesome.
25700
Post by: Space_Potato
What is it that makes you so awesome Terraformer?
Is it sacrifice? It's sacrifice isn't it?
It's definately sacrifice.
S_P
26800
Post by: Commander Cain
Great work! the working flashlight really shows your dedication to this monster of a project. I can not find a single criticism, the metal plates really bring it to life.
17244
Post by: The Good Green
Incredible!
Have you thought about put some mushrooms in the darkest corner, a little boost for a lucky fighter.
23050
Post by: Terraformer
Space_Potato wrote:What is it that makes you so awesome Terraformer?
Is it sacrifice? It's sacrifice isn't it?
It's definately sacrifice.
S_P
Who told you about the offerings and sacrifices??
32358
Post by: Santobell
Wow just wow nice job mate
21738
Post by: superscenic
I reckon a few of those metal doors, grates, gates and hatches are screaming for molds. "Mold me! Cast me! Sell me!" Yep Yep.
32948
Post by: Whoopty
This is almost so good that I don't want to even bother trying my hand at scenery. Almost
25949
Post by: econtutor
You have amazing, jaw-dropping talent for terrain. Wow, just wow...
19452
Post by: Linked
I second that!
23050
Post by: Terraformer
In our last installment we wired the LED spotlight. Now, after a short break while we were all battling with a rampaging flu/nurgle virus, we’re going to make the final push to get this project finished. We had a ridiculous amount of little pieces, accessories and details to finish still and this was after making some concessions about what we could realistically finish and what we should leave out or save for other projects, which I’ll talk about later.
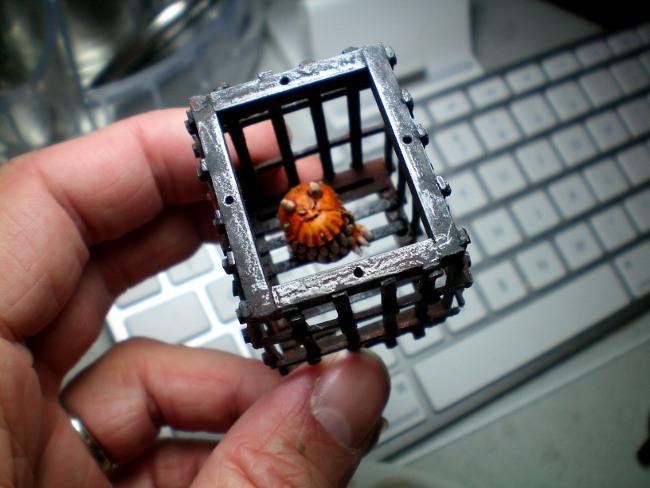
Next item of business was the squig cage, which I painted an occupant for and pinned his feet to the floor bars. An easy enough task in concept, especially if you’ve ever pinned parts or bases before, but I learned quickly that i couldn’t fit two fingers into the cage at once, which made guiding a tiny hole on the squig’s foot, over an equally tiny, glue-covered post on the bottom of the cage, an hour long ordeal.
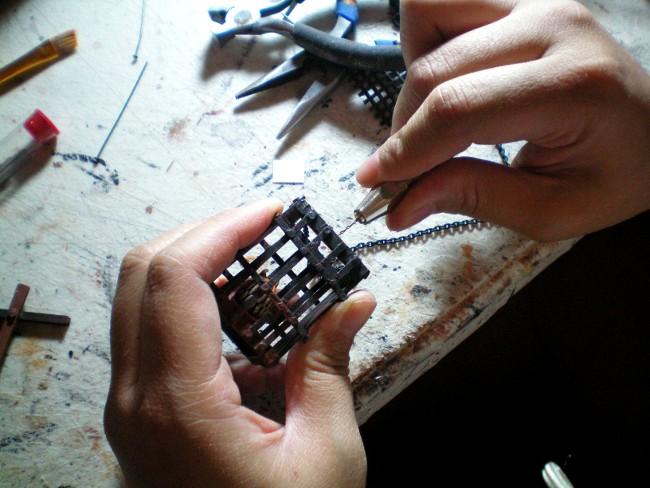
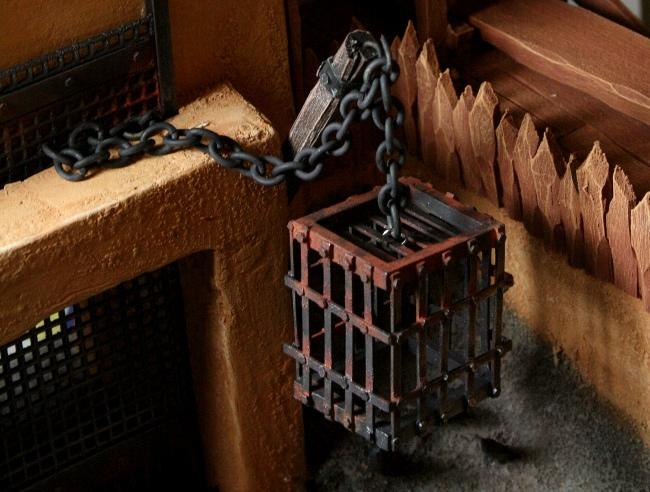
I handed the cage back to Mismuse, who drilled out the holes in the top of the cage and used chain, jewelry eyelets, and metal rings to fashion a 4-part suspension system before putting a lid on the cage, sealing the little guy in (until his turn to fight presumably.)
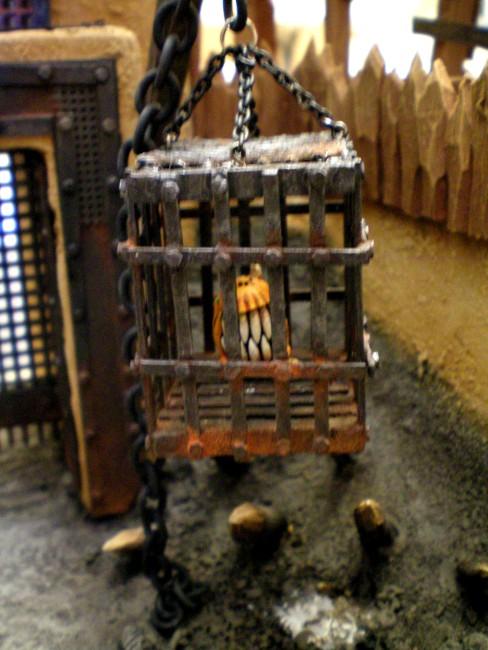
Here the cage is hung, but the chains still need painting and rusting.
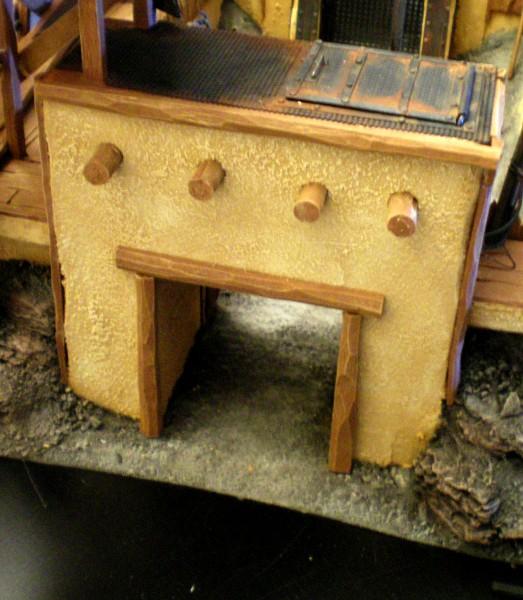
Mismuse finished the trimwork for the gatehouse opposite the metal skull, including the pieces of wooden dowel for the “pueblo” beams sticking out of the wall.
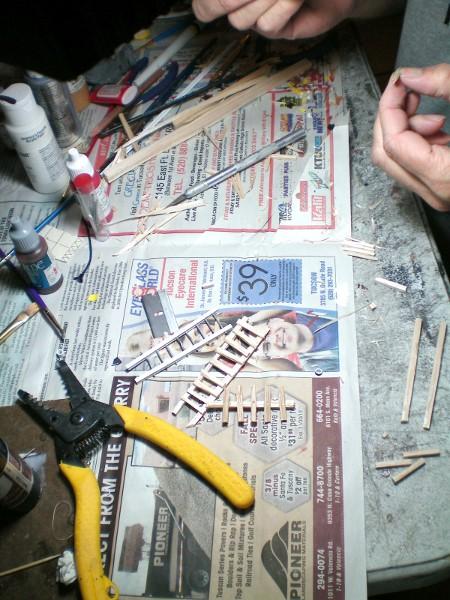
While she worked on final pieces of trimwork, I started on a stack of ladders, both wooden and metal to place all around the walls for access to bleachers and upper and lower areas. Wooden ladders were just carved balsa wood, the metal style ones were plastruct H-channels with 1″ pieces of heavy florist wire rungs glued into holes drilled through the channels with a pin vice. The rungs were dented and made deliberately uneven in places. Stupid Orks.
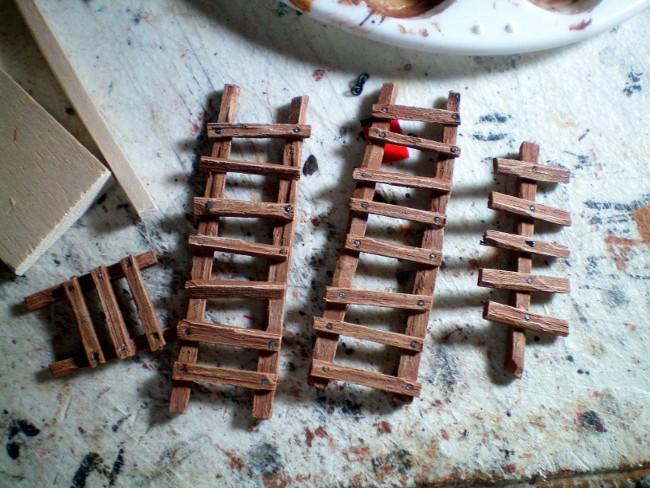
The wooden ladders were given “nail” indentations with our brush ferrule, then painted by Mismuse, leaving me to do the metalwork.
And still the metal plates kept coming! I really should try to count how many were used on this project. I painted and rusted the chains as well, and the metal ladders, and flooring pieces. This batch here is still wet with turpentine from the first, darkest washes of rust and grime.
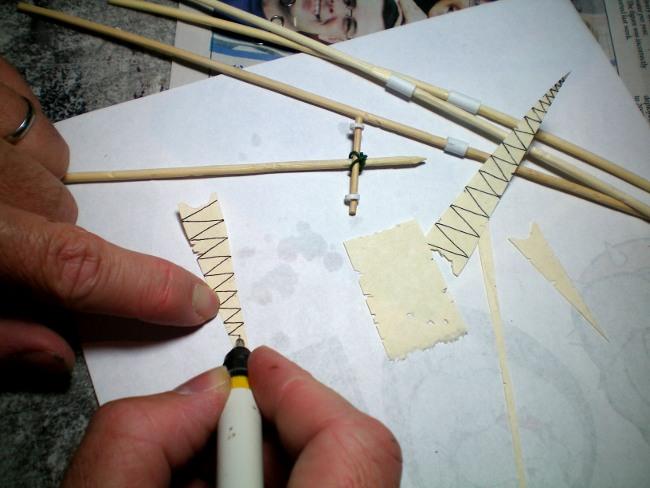
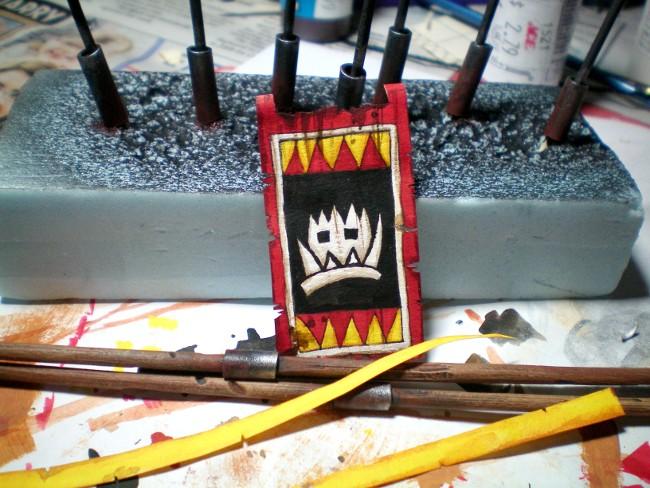
Then while the plates dried, I got to work on the banners, flags and streamers which we envisioned festooning this piece from early on to give this whole thing a festive feel. I used a hand-made paper with a smooth texture and fairly random grain directions. I figured this would simulate fine-scale, crude cloth the best. I cut the shapes out, notched the edges for wear and tear and then used a Rapidograph technical pen to outline the patterns on the banners. The poles were made from dowels and skewers, carved rough and given bits of plastic tube to simulate joins and brackets.

I painted the dags with Vallejo model colors. Why not print out the banners and save a lot of time and energy you ask? Because printed banners have no character! These were supposed to look like they were painted by cheerful grots happy to have the opportunity to do something other than get launched off in rockets or squished under stompa feet.
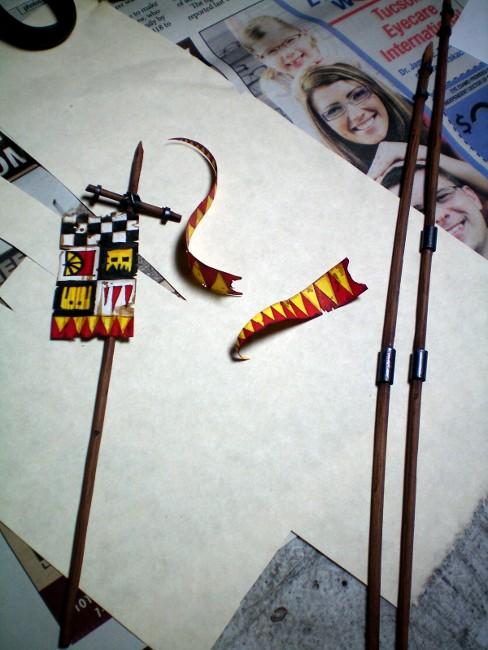
I painted flags, streamers and banners, then applied light shading and weathering to the edges, as well as stains. The flag on the left (which is upside-down in this picture) shows the glyphs for “funfair”, “squig”, “duel” and “gore/violence”. That should get the point across to what this place is all about.
More poles, yellow and red streamers, a big flag with a picture of a “dangerous squig” and those things in the background impaled on the partially melted block of styrofoam are small pieces of plastic tube to be used as the banner stands, being primed and painted while on toothpicks to keep them upright.
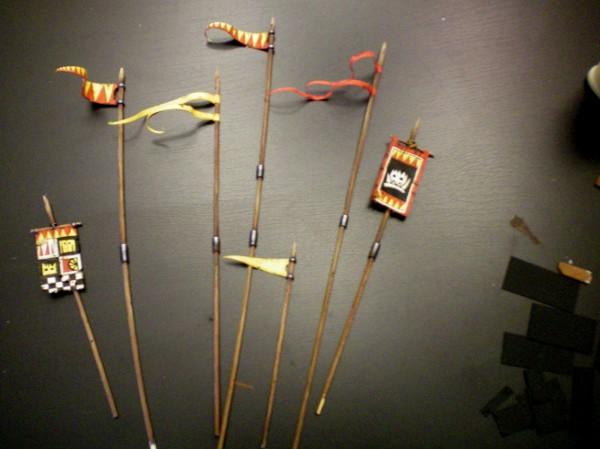
Here are the finished banners and poles, What is that to the right? Argh! it’s one last stack of metal plates waiting to be painted. I trudged back to the painting table and got out the metal-izing stuff again.

At this point I was done. I mean really, I had a couple more steps to finish this monster once and for all and I felt that if I added more to this project it would become the Winchester House of scenery projects. As it was we had a dozens planned items to keep reduce the amount of labor going into it. So when Mismuse asked me about making little triangle flag banners, I was naturally not very receptive to the idea, and pretended not to hear her at first. But she insisted that it would really, really help with the finished look, so I compromised and said that if she constructed them, I would paint them.
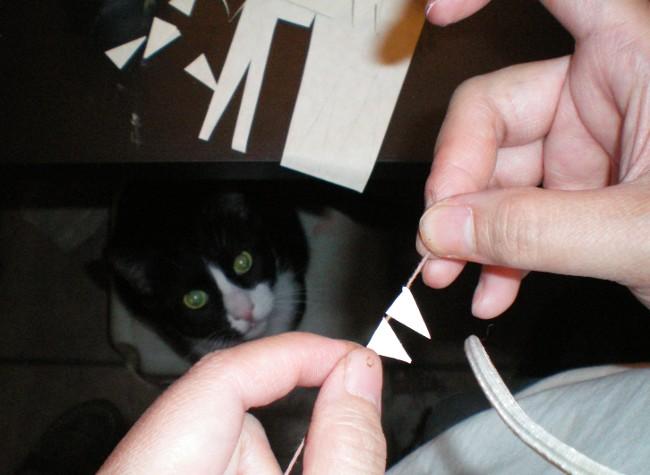
This is Mismuse’s asthmatic cat, Noodle, eying a most wonderous creation, obviously made just for him, little bits of paper, stuck to a string! Ohboy! Yes, I painted the damn things.
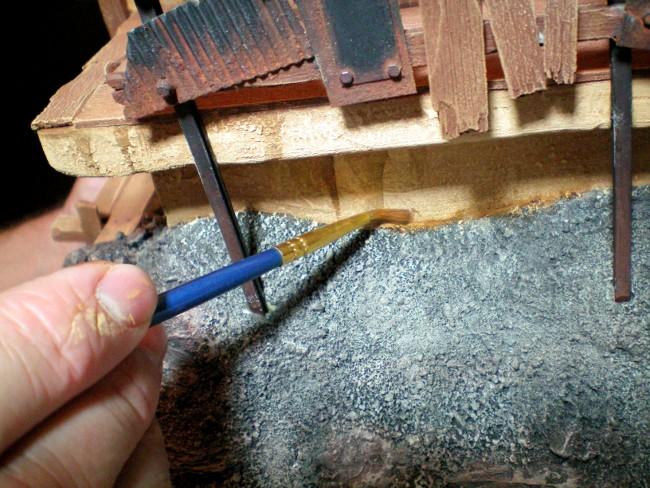
Now it was finally time to start weathering. This was the home-stretch, but it was a big one. Using chestnut ink and fleshwash mixed with black in different proportions, I went around the base of the structure, dirtying up the stucco, and adding streaks and water damage.
I paid extra attention to parts jutting from the walls, where rust and grime would wash down over time. For bright, light stucco walls like this, less is more, so I didn’t go overboard to make the thing look like a burned out ruin that’s been rained on.
Then moving to the inside of the pit, I added stains and splatters in rust colored and dark maroon red shades on the ground and walls. One can use their imagination to figure out what causes this sort of “weathering.”
Oh yes, the skulls and bones. I finally painted them too. Snakebite leather/bleached bone/white, with some skulls in shades of grey to show different states of age. Also note the wooden stakes are highlighted and shaded to final colors.
Last little bits of metal trim were added all around, and then the numerous rivets needed to be touched up with just a little gunmetal and silver so they would stand out.
And on into the night. Every time I think it’s finally over, I notice one more bit of bare plastic that needed to be touched up, one more rivet I missed, a piece of wood with a mistake, Etc.
Some of the things we ended up leaving on the cutting room floor, so to speak, were the multiple cages of the original drawing, the working winches to pull the portcullises up, a customized grot hanging off of the scoreboard with a paintbrush in hand, and many more skulls hanging off chains and on pikes around the pit, trash piles outside and under the bleachers, detailed and textured splatters of slime and gore using thick, dyed resin as well as a handful of custom sculpted squigs, and numerous little bits and pieces. Some of those items, like the custom squigs we will be including in another project, a smaller companion piece to this one which we’ll be finishing later. But adding all of these items would have pushed this project much further back beyond our lead time, and would not have been very cost effective for one piece, even one of this size. (Also, by popular demand, we are going to be working on a squig taco stand as a small separate piece. Please stop nagging me about it everyone.)
And that’s it, as I type this, we’re finally done. Pictures will be posted later tonight then we’re all taking a nap.
18894
Post by: tekk_45
Absolutely insane! You should upload some skill to the intarwebs and share it with us. You two obviously have plenty to spare :-)
32969
Post by: redscorps
Honestly, wow.
I saw your terrain on ebay and thought (I'm going to sound like a douche), 'Well photographed, but you have to be kidding! I could make that!'.
After following this thread, I could take the photograph, but I could not in a million years make scenery (Is it still scenery when it's this good?) to this standard. You guys have put an incredible level of detail into each of the pieces and I am gobsmacked! If only I could pony up and buy one for myself I would be a happy man.
Well done and thanks for taking us on the journey with this masterpiece.
23050
Post by: Terraformer
25129
Post by: Trilobite
Just brilliant, I can almost hear the orky cheering and the screams of the runty humies as I type.
21738
Post by: superscenic
Briliant. The little finishing details like the flags make it even better. I reckon there is one happy client.
29052
Post by: Xenon
Man this is just great..
You make the most awesome terrain in the world.. So much nice details everywhere and everything painted in high standard..
20079
Post by: Gorechild
Amazing
playing on one of your boards filled with your scenery would be the most epic battle of my ife 
29027
Post by: Heffling
Great work. Thank you for sharing your project with us, as it's incredible to see something like this come together.
30997
Post by: Sgt.Snail
Awesome stuff as per usual!
This is why there should be a terrain/scenery/building category in golden demon.
17101
Post by: TheChronoTrigger
This is really amazing! Haven't seen terrain like this in a while. Great stuff
19366
Post by: Grimm
Ow, my Jaw.
32358
Post by: Santobell
Incredible, Amazing the work you put into it shines through it's an awesome bit of Orky goodness
34119
Post by: neil101
I think we could be friends... not in a scary way though! jk
I like where your heads at very very obssevive , just how great art is created. love to know what your next project is!
keep up the inspirational work
18867
Post by: madmartykmf
You and your team are STELLAR! Another incredible creation, kudos!
Mike
9388
Post by: Stretch
Totally awesome! I wish I could scratch build stuff like this.
23400
Post by: Ma55ter_fett
Personally I don't think it looks right, and while I may get some grief here for saying so, there are a few points I think could have been improved upon.
I think it looks too clean, a lot of the ideas that you gave the axe (such as blood splatter, trash heaps, the pikes with skulls, the rusty chains) would have looked great. As it is there is very little that seems orkish about the piece other than the skull on the front and the score board.
In fact the skull above the front entrance (and small bits of iconography on a few flags) is the only bit that really screams that this is an ork structure; if you were to remove it (and the light) then this could easily be a mistaken for a human wfb piece.
It could have used some gots lurking around and some dead squigs in the pit. I know it would have taken you longer but they would have added more character to the piece, and more character is what this piece needed IMO.
I don't consider any ork building complete without at least one mounted gun somewhere on it. Orks are made for war and when you have lots of them in one place placing bets and getting into fights, the need for crowd control seems extremely necessary.
I also think more metal should have been used in the construction and a little less wood. Replacing a bit of that wooden scaffolding with an I-beam (or two) would have looked cooler and more orky IMO.
While it is an impressive piece of scenery I think that you could have done more with it.
32260
Post by: Tazay
Ma55ter_fett wrote:Personally I don't think it looks right, and while I may get some grief here for saying so, there are a few points I think could have been improved upon.
I think it looks too clean, a lot of the ideas that you gave the axe (such as blood splatter, trash heaps, the pikes with skulls, the rusty chains) would have looked great. As it is there is very little that seems orkish about the piece other than the skull on the front and the score board.
In fact the skull above the front entrance (and small bits of iconography on a few flags) is the only bit that really screams that this is an ork structure; if you were to remove it (and the light) then this could easily be a mistaken for a human wfb piece.
It could have used some gots lurking around and some dead squigs in the pit. I know it would have taken you longer but they would have added more character to the piece, and more character is what this piece needed IMO.
I don't consider any ork building complete without at least one mounted gun somewhere on it. Orks are made for war and when you have lots of them in one place placing bets and getting into fights, the need for crowd control seems extremely necessary.
I also think more metal should have been used in the construction and a little less wood. Replacing a bit of that wooden scaffolding with an I-beam (or two) would have looked cooler and more orky IMO.
While it is an impressive piece of scenery I think that you could have done more with it.
Ill plus 1 him. It looks awesome, but not Orky.
32969
Post by: redscorps
3rd edition Orks always had these style buildings though and I liked that a ton more than the ramshackle buildings they have now.
I guess this would be more 'Ork Planet' than 'Invading Ork Mek Hut'.
If you think about it, why would they build a Squig Fighting Pit on a planet they are at war with?
23050
Post by: Terraformer
Ma55ter_fett wrote:Personally I don't think it looks right, and while I may get some grief here for saying so, there are a few points I think could have been improved upon.
I think it looks too clean, a lot of the ideas that you gave the axe (such as blood splatter, trash heaps, the pikes with skulls, the rusty chains) would have looked great. As it is there is very little that seems orkish about the piece other than the skull on the front and the score board.
In fact the skull above the front entrance (and small bits of iconography on a few flags) is the only bit that really screams that this is an ork structure; if you were to remove it (and the light) then this could easily be a mistaken for a human wfb piece.
It could have used some gots lurking around and some dead squigs in the pit. I know it would have taken you longer but they would have added more character to the piece, and more character is what this piece needed IMO.
I don't consider any ork building complete without at least one mounted gun somewhere on it. Orks are made for war and when you have lots of them in one place placing bets and getting into fights, the need for crowd control seems extremely necessary.
I also think more metal should have been used in the construction and a little less wood. Replacing a bit of that wooden scaffolding with an I-beam (or two) would have looked cooler and more orky IMO.
While it is an impressive piece of scenery I think that you could have done more with it.
You are right that I could have added a lot more detail. Grots and squigs everywhere? Sure thing. Mounted guns? I actually considered it. In fact I could still be adding detail to this piece... If it was to be mine, or if I were making a diorama for contest entry, Etc. But in the end I had to be fair to my client, who wanted a specific look/style on a realistic budget.
As far as the look is concerned, I know you young'uns are so used to today's styles of Orkish mechanized and ramshackle scenery that many of you may not remember the old-school "pueblo" style that was a staple back in the day. This line I'm doing for my client's Ork city, is a shout-out to that slightly more whimsical and "light" look of yesteryear.
This style is meant to be fun, and not at all too serious (as will be seen in the upcoming companion pieces of taco stand and corral.) At the end of the day, it's the client's satisfaction that really matters most
26790
Post by: Gitsplitta
Outstanding work guys... congratulations!
|
|