24779
Post by: Eilif
This is an updated version of Kutzmon's amazing case tutorial seen here. It's a great article and I will refer to it, so go read it!
http://www.dakkadakka.com/dakkaforum/posts/list/241220.page However, there's enough difference that I felt this version deserved it's own thread.
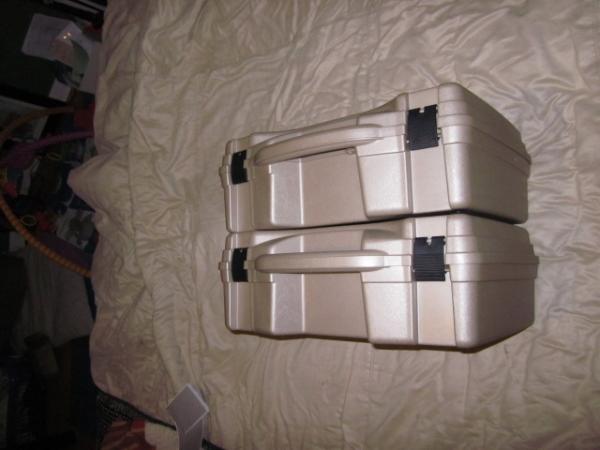
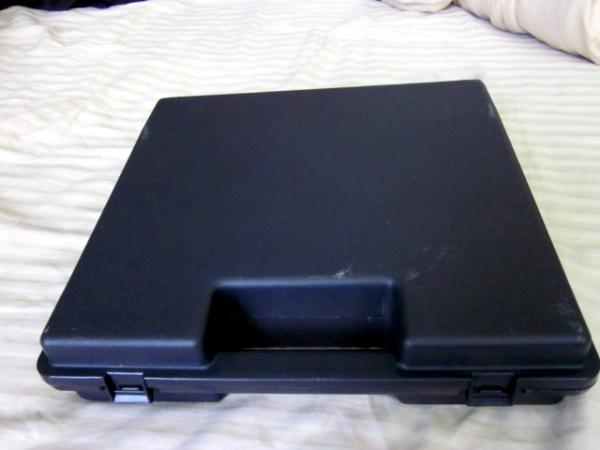
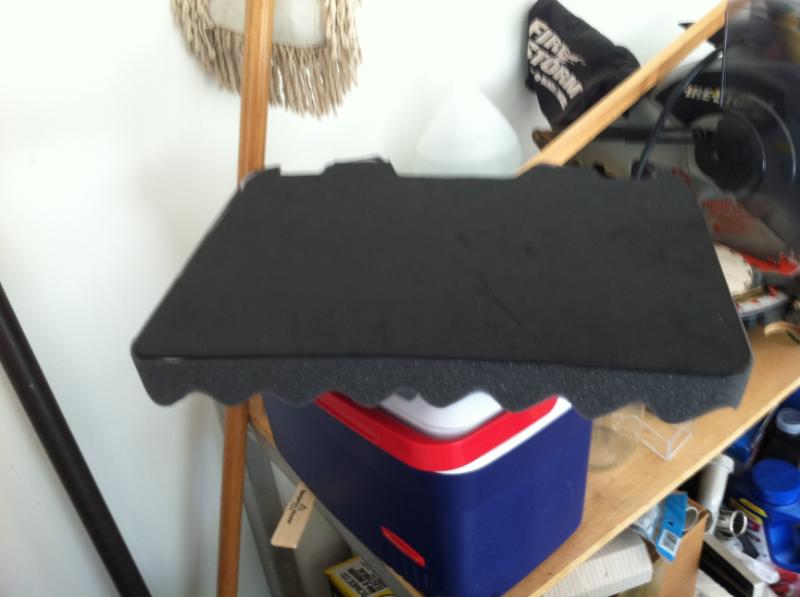
Both our articles use the Plano 1401. The largest difference in this case build is that I think I can take the Plano 1401 and turn it into a miniature storage and transportation solution without buying any additional figure foam! By eliminating either the cost of purchasing extra foam which usually costs more than the case itself, or having to hunt down bargain surplus options that not everyone will be able to find, this project comes much more within the reach of everyone who can acquire a case and get to a hardware store and a craft store.
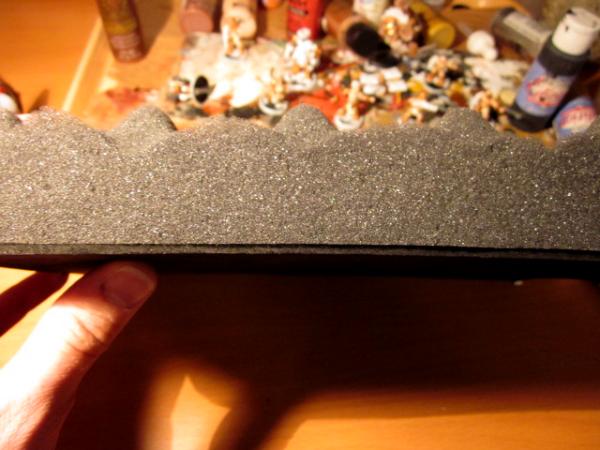
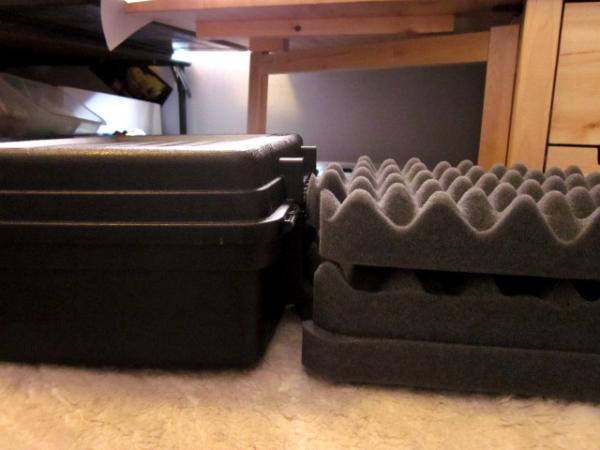
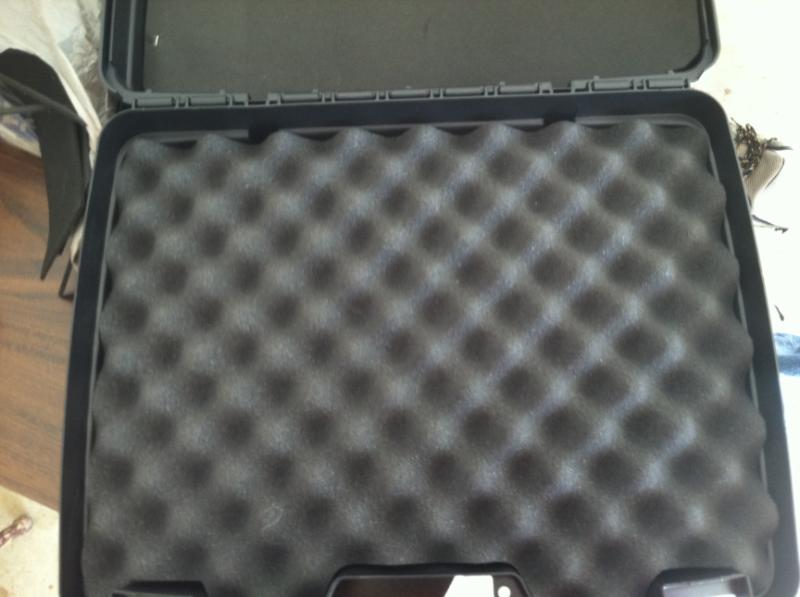
This project relies on the Plano 1404 case. The Plano 1404 is amazing in that it comes with 3 pieces of foam (two eggshell and one pluck and pull) that if purchased anywhere else would cost more than the case itself. It can be found from 10-20 dollars and depending where it is purchased, the sticker may call it any of the following:
Plano Protector series 4 pistol case
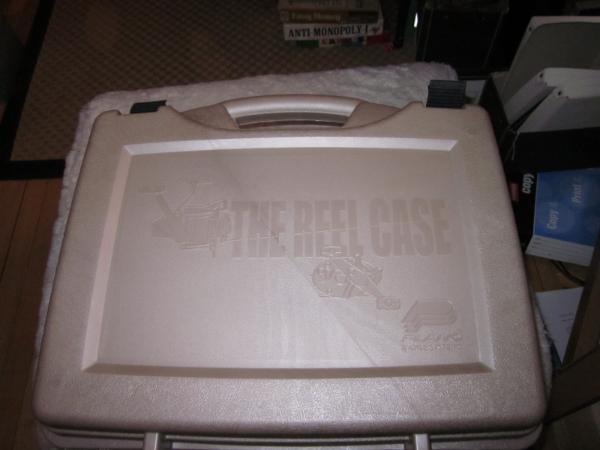
Plano Reel case
Plano XL Accessory case
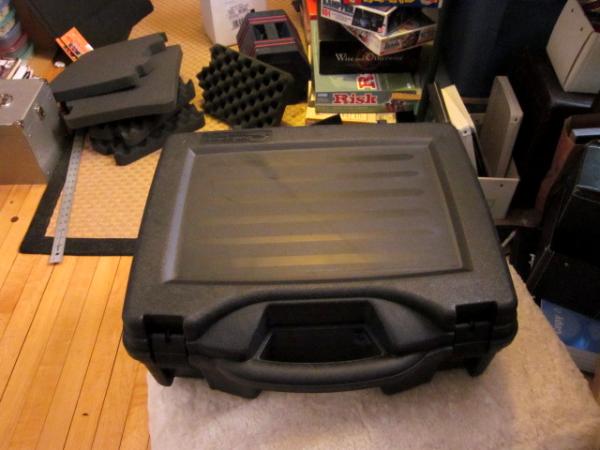
Regardless, they all seem to have the 1404 number (some times followed by a -02 or -05) on them and have the same foam inserts. I purchased mine for 15 dollars at Farm and Fleet.
http://www.farmandfleet.com/products/466298-protector_series_four_pistol_case.html?lref=%2foutdoor%2fhunting%2fstorage%2fgun%2f A google shopping search reveals some even cheaper.
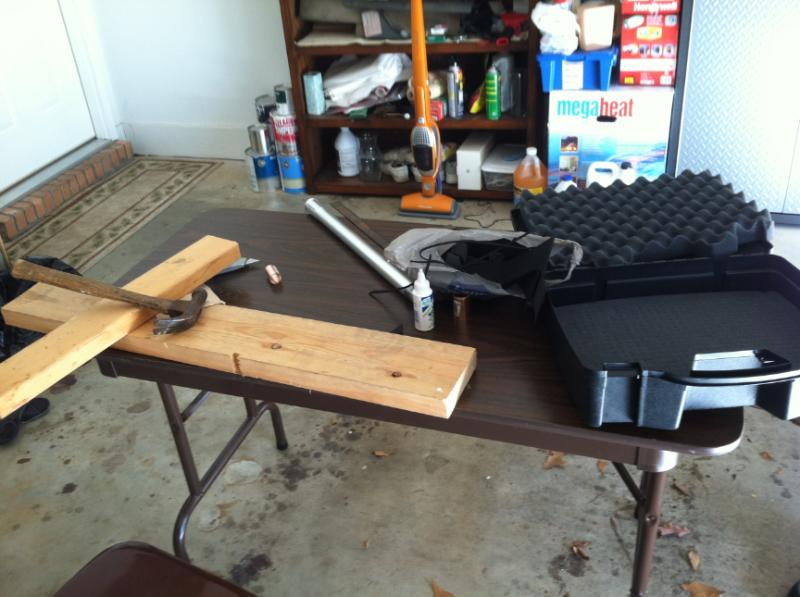
The other supplies you will need to buy.
At the craft store:
Adhesive spray: 7 dollars EDIT 5/7/2012: I no longer use Adhesive spray (it's weak) or Pliobond (it smells). I have switched to DAP Contact Cement (http://www.dap.com/product_details.aspx?product_id=35). See my post about it several posts down.
4 sheets of Funky foam: 99 cents each
At the Hardware store:
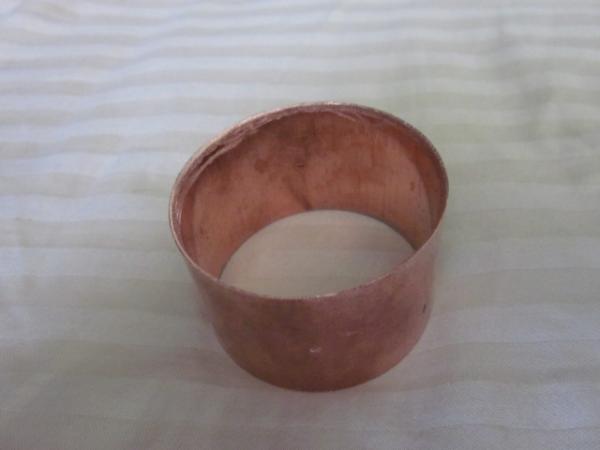
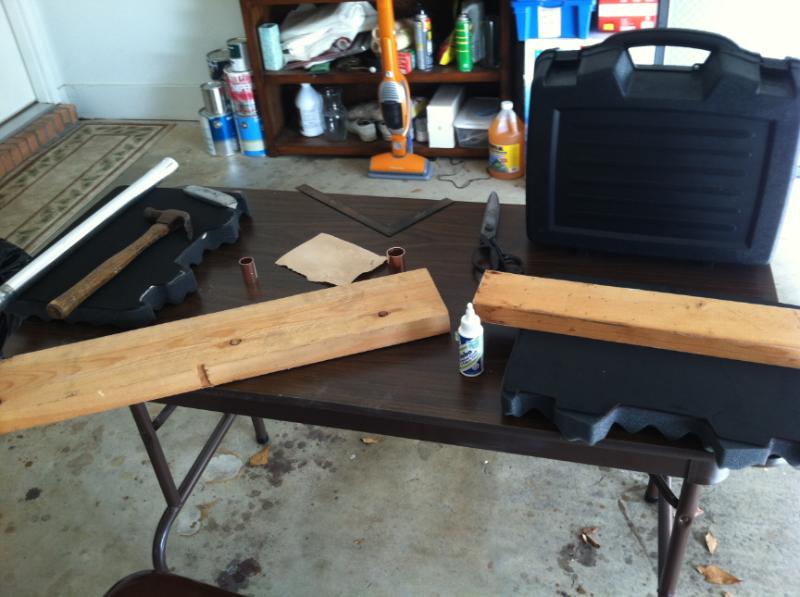
A 3/4" copper fitting and a 1" copper fitting : 1 dollar each
Tools you probably have but will need
-dremmel with grinding bit or Power drill with grinding bit for sharpening your copper fitting into a cutter Grinding bits are fairly inexpensive.
- Small slightly curved file for final sharpenign of the cutter
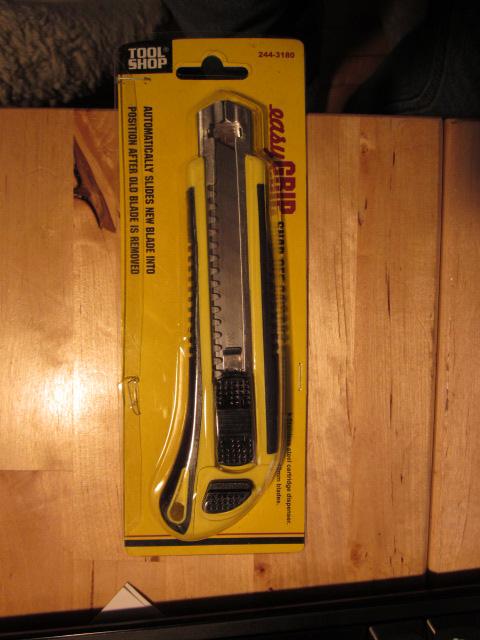
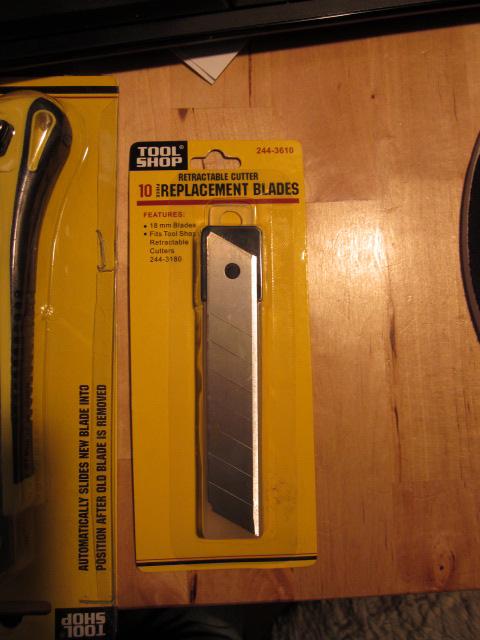
-Utility knife with lots of extra blades for foam cutting (I like the "break off blade" kind)
Addition 5/7/2012 If you have an electric carving knife, it will cut foam perfectly strait. For interior cuts, you will have to make a pilot how with a knife or foam cutter, but it slices though foam like butter and will make the sides of your trays very even!
Step one. Make your foam cutters.
I'm going to refer you to Kutmon's original thread for this one as there's nothing that I have to add to the process except the following:
-If you don't have a drum sander or a dremmel, but do have a power drill, you can get a griding bit for your drill.
-Kutzmon uses 1" and 1 1/2" fittings to cut into sold foam.
-Due the the fact that we are using eggshell foam for the trays which opens up a bit at the top, we can make smaller holes. Thus the smaller 3/4" and 1" fittings. You can use 1 ½ inch fittings to make holes for 40mm figs, but they don't evenly fit in between the rises in the eggshell foam.
-The sizes on the fittings do not exactly match the interior or exterior diameters of the fittings. Suffice to say that if you sharpen from the inside you will end up with cutters with the following dimensions:
3/4" fitting gives a hole 24mm in diameter which is just under 1” in diameter and snugly fits a 25mm standard slotta base.
1" fitting gives a hole 31mm in diameter which is approximately 1 1/4" in diameter and only 1mm larger than a privateer press 30mm base.
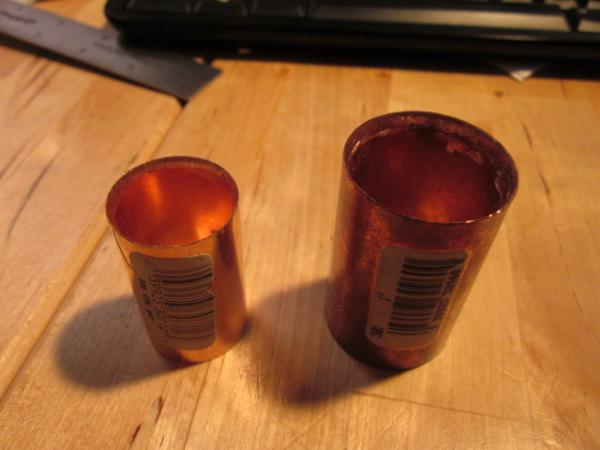
Hereafter, these will be referred to as the 24mm and 31mm cutters.
Step Two Tray division
Cut the trays in half. Don't just do one cut though. Measure out a strip ½ or ¼ wide down the middle and cut it out. This will give just a touch of space in between the foam sections which are very tightly fit to the case and become even more so when the stiff foam bottoms are applied.
The smaller size will make for manageable trays, especially if you have alot of metal miniatures. I can't stress enough the necessity of cutting with a very sharp blade. If your blade has any resistance at all, get a new blade. Otherwise you will end up with very rough cuts. Foam dulls blades very quickly.
I'm using the knife shown below. It includes 3 extra blades and costs about 3 bucks. A pack of 10 replacement blades is less than 2 bucks! This project is about cheapness, but don't be cheap when it comes to replacing the blades. All right, enough about that...
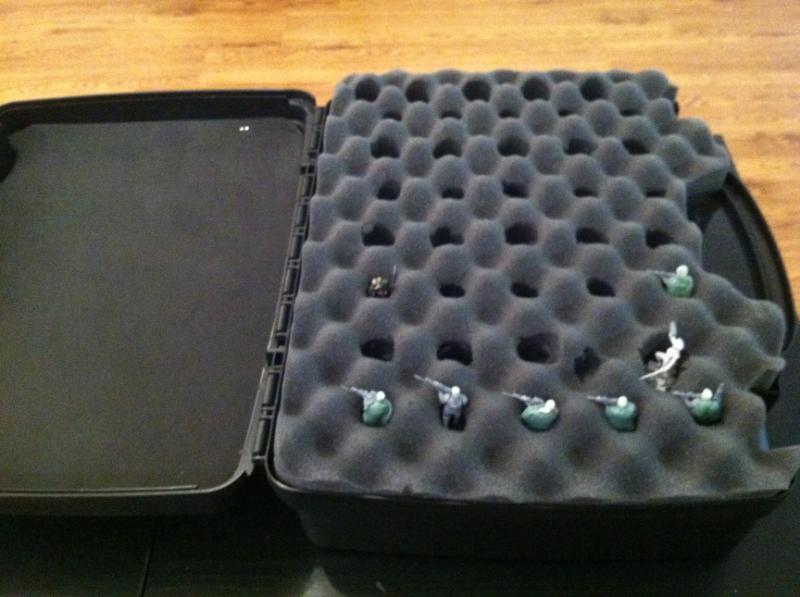
 Step 3 Make the figure cavities.
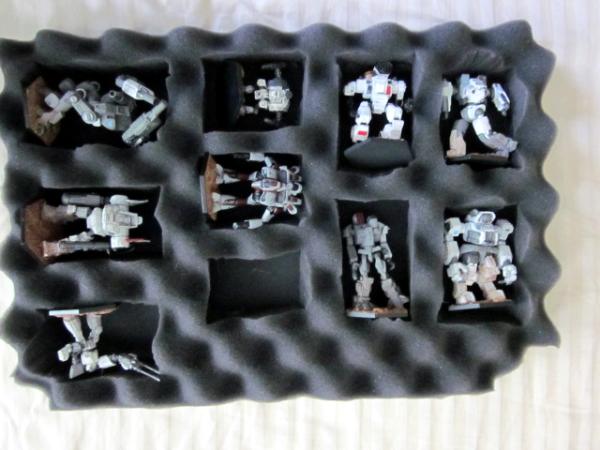
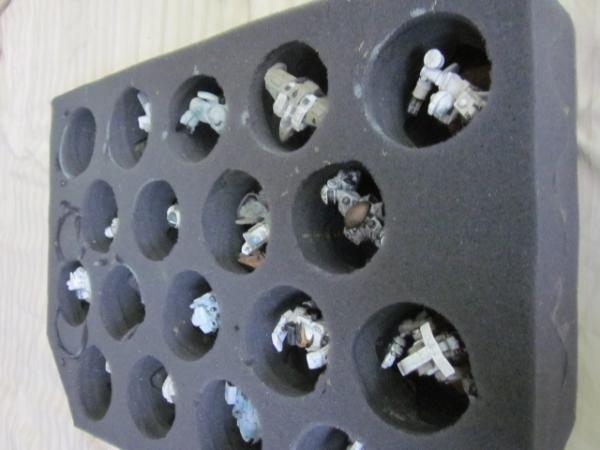
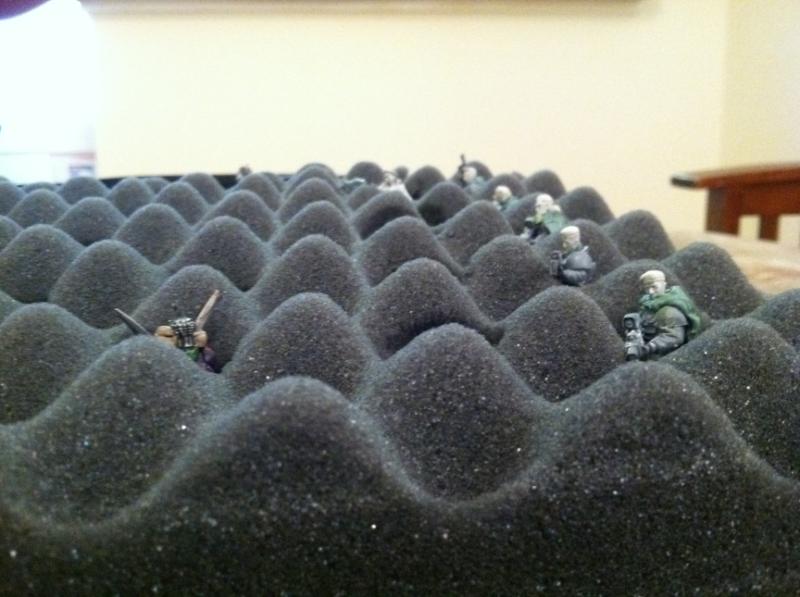
Use your foam cutters to cut out the indented sections of the eggshell foam tray. If you made them correctly, you just need to press gently and keep twisting to make the holes.
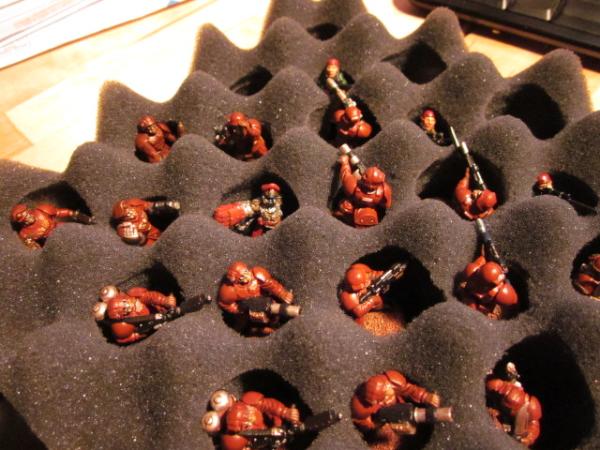
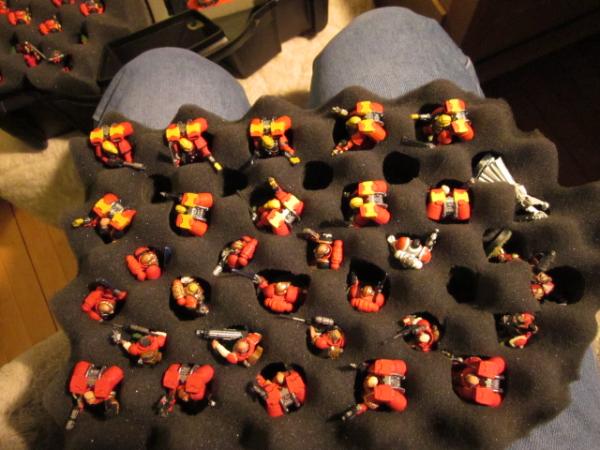
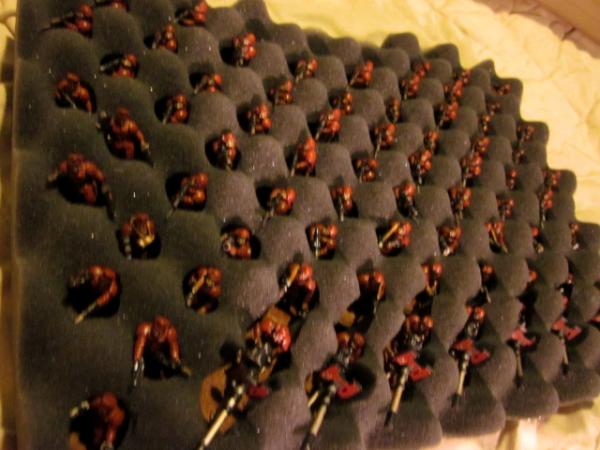
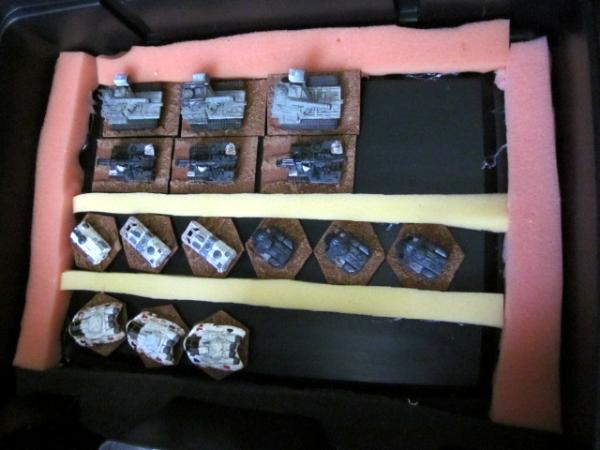
For the tray below I only used the 24mm cutter. The 24mm cutter may result in holes that are too small for larger models like terminators and such
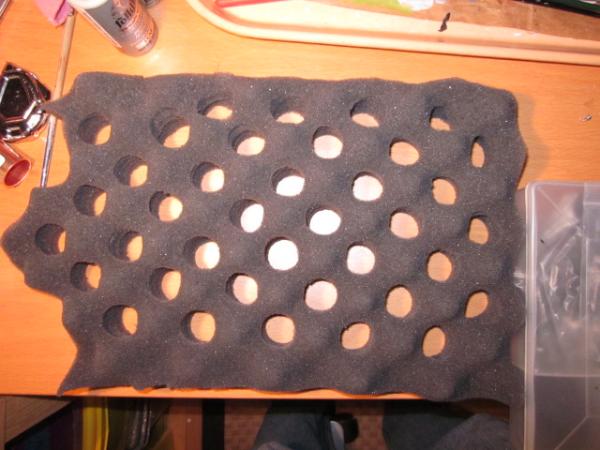
Using just the 31mm cutter may result in walls between cavities that are too small, so for the second tray, I used alternate rows of of 24mm and 31 mm with 24mm on the edges.
Use your own judgment about how close to the edge to cut. You will want to take a minute to sharpen your cutters a bit after every tray or every half a tray. Copper is a soft metal and foam dulls metal fast. Dull cutters will tear up the walls between the figure cavities.
After you've made the cavities, It's not a bad idea to trim off a bit of a corner or two to make it easier to lift the trays out.
 Step 4 Prepare the Funky foam Base.
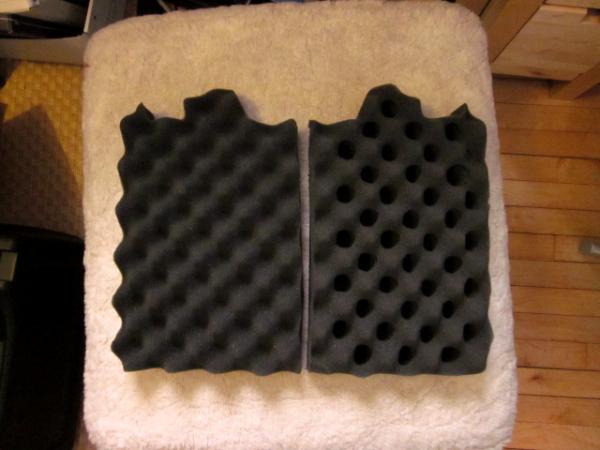
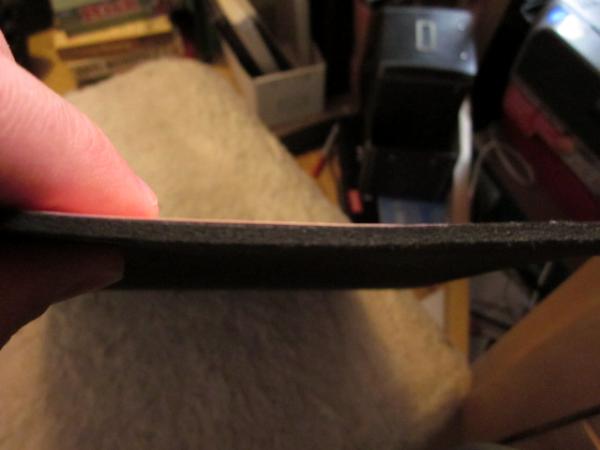
Funky Foam is what Hobby Lobby calls thin sheets of EVA foam. It is the very dense foam that many miniatures tray companies put as the base of their trays. It may also be the same foam that some companies with more rigid trays make their entire trays from.
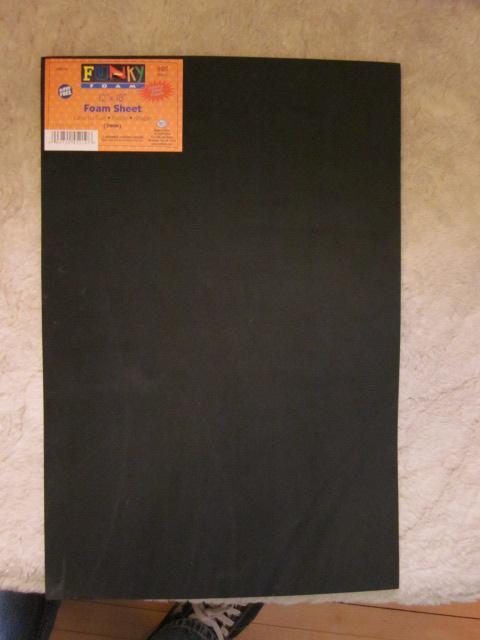
It can be bought at hobby lobby (and other craft stores I assume) in large 12x18" sheets that are 3mm thick and smaller sheets that are 2mm thick. We are using the larger 3mm thick sheets.
Miniatures trays with EVA bottoms tend to be 5mm thick. For now I'll go with one layer of 3mm. If it seems to flimsy I can always add another layer later.
One large piece of Funky Foam will provide the base for two trays. Cut The funky foam sheet in half
Step 5 Glue Funky Foam base to eggshell tray.
I use Elmers Spray adhesive because that is what Kutzmon recommends. I expect it will work just fine, but if it begins to separate, I can always supplement with my hot glue gun.
-Wipe dust off the Funky foam base. Funky foam is like a static dust collector.
-Spray the back of the eggshell section and the funky foam and press together well.
-Let it dry for a full hour. You want it to be as strong a bond as possible.
-Cut of the excess funky foam.
Your Tray is now done.
The dimensions are different, but it has roughly the same surface area and depth as a 2" Standard Sabol tray and holds almost exactly the same number of figures. Two more than Sabol in this case, but the number of figures depends on the arrangement of eggshell depressions.
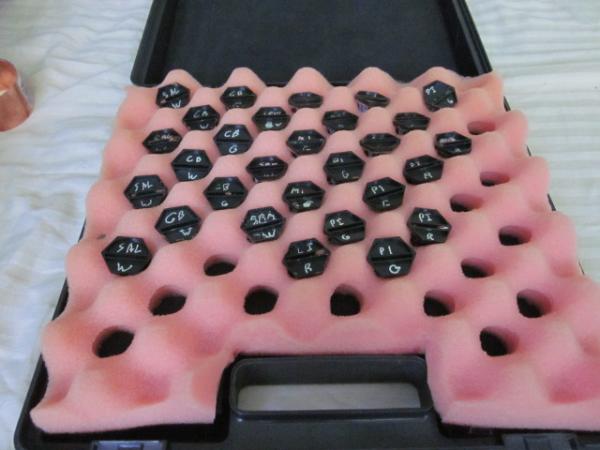
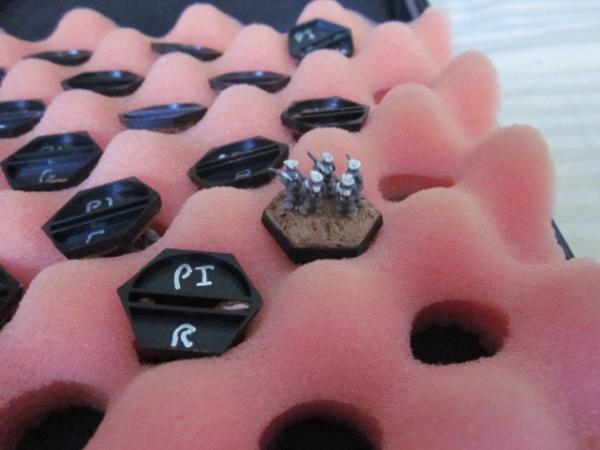
Step 6 Other Eggshell Trays.Repeat the process for the other 3 eggshell trays.
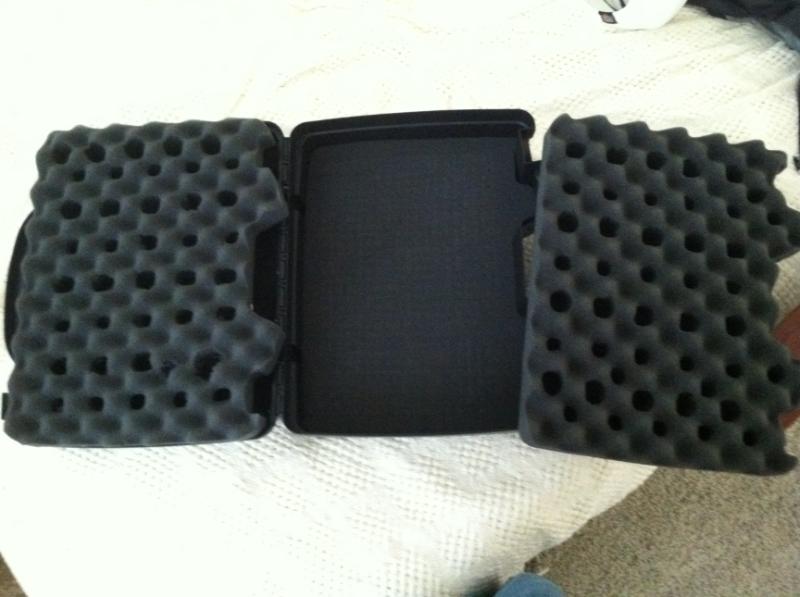
Step 7 the Pluck and pull tray.
3 options:
1. You may wish to make it the bottom tray. If you don't think you will be removing it often, leave it as one large tray and glue a full piece of funky foam. The Pluck and Pull layer is 1 1/4" thick and is great for oddly shaped models.
2. If you decide to split it in half you will end up with two trays that each have one side that is weak because it will be made of pluck pieces rather than a solid edge. I recommend either using elmers to glue all the pluck pieces on the cut side to each other, or cut piece of funky foam and glue it to the side for strength.
3.Lastly, if you have more than one case is to match two of the pluck and pull sections to make a vehicle tray. Two sections of pluck and pull end up being 2 ½ inches deep which is enough for most 40k vehicles without their turrets.
No pictures of this step as I haven't decided whether to do a vehicle tray or one or two figure trays yet.
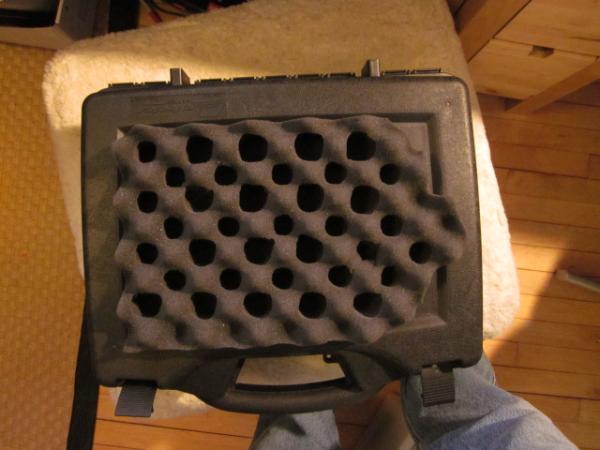
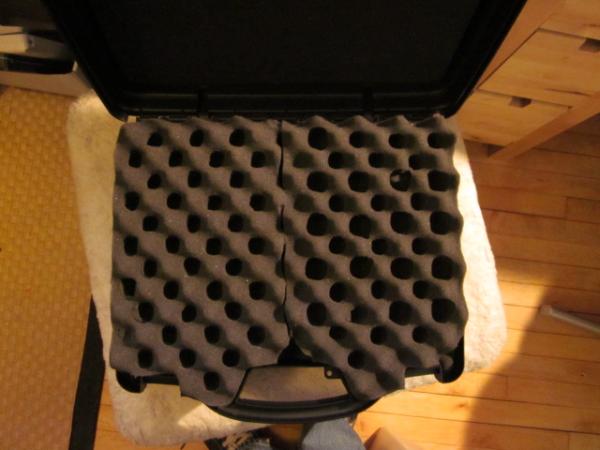
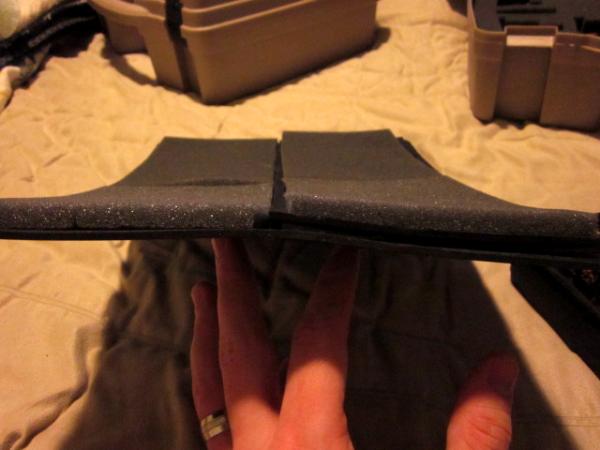
Step 8 Pad the top of the case.
Measure a piece of Funky foam the size of the top of the case and cut it. This will be the pad between your top tray and the top of the case. This may take a bit of fiddling as the top of the case is a touch smaller than the outline of the foam trays.
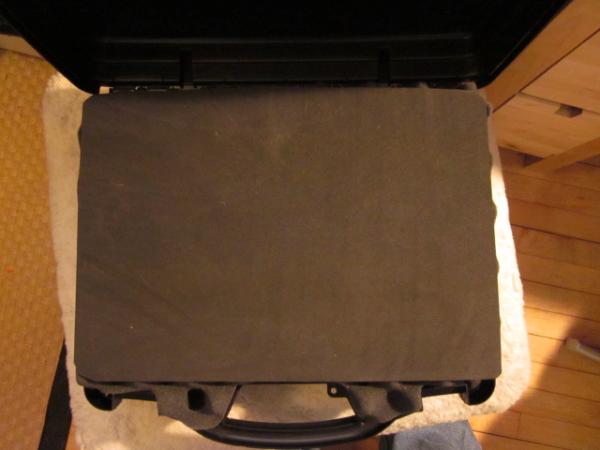
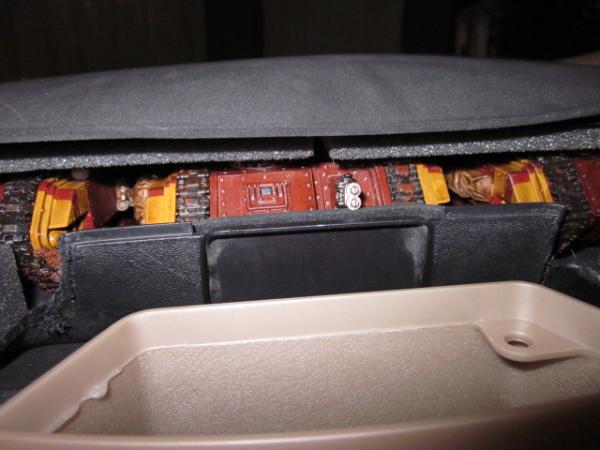
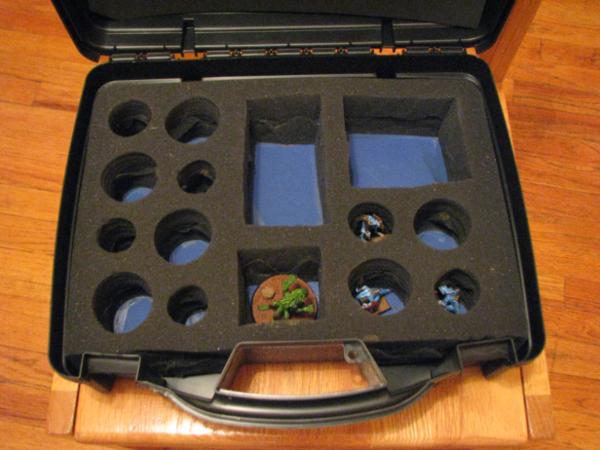
It just so happens that the two layers of Eggshell (not interlocking), the pluck and pull layer, and 4 layers (3 tray bottoms and a top cover) of 3mm funky foam fits nice and snugly in the Case with no room for shifting of models! Imagine the picture below plus 4 sheets of funky foam minus the indentions on the top and bottom of the case and you see what I mean.
 Final numbers.
The case can hold about 180 standard size figures in it's 3 levels.
Using Sabol as a comparison, you now have a hard case with the equivalent of 6 sabol trays, totaling a total of 11 inches (of equivalent sabol) of trays. This is about 2 inches less space than a standard "Army Transport". However you have a hardshell case and you just spent:
-$15 Plano 4104
-$4 4 sheets of Funky Foam
For a total of 19 bucks, as compared to $65 for an Army Transport
Even the cost of project specific supplies:
$2 Fittings
$8 Adhseive
$4 Grinding bit for dremmel or Drill
Brings the cost to 29 bucks. I don't count the cost of Dremel/drill, files and knives as every hobbyist should have or find a way to have access to these things. I will be making at least 3 of these, so divvying the cost of the adhesive and fittings over 3 cases, I'm looking at about 22 bucks a case.
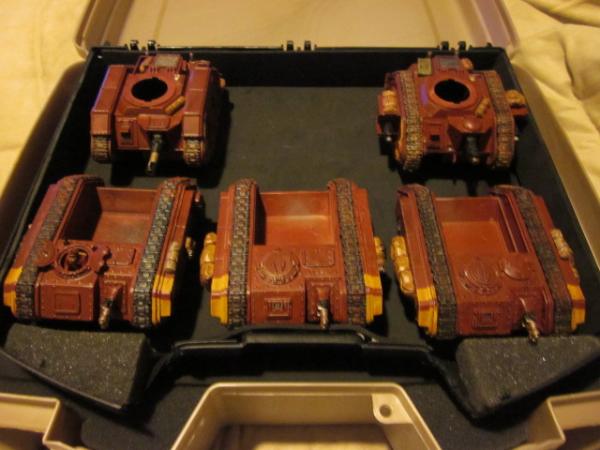
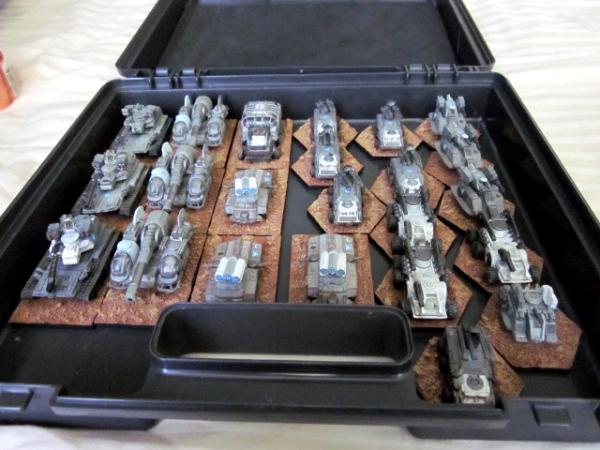
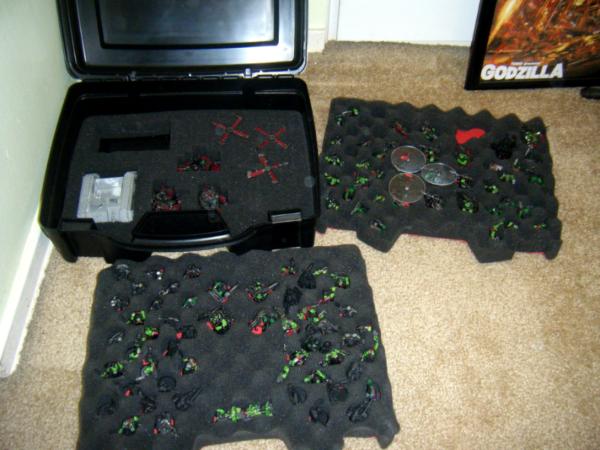
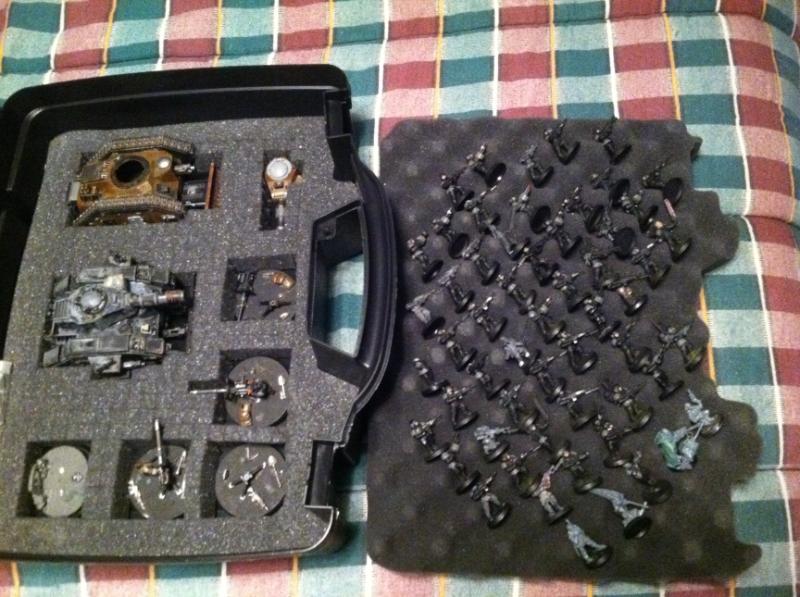
A few pics of my IG in the trays.
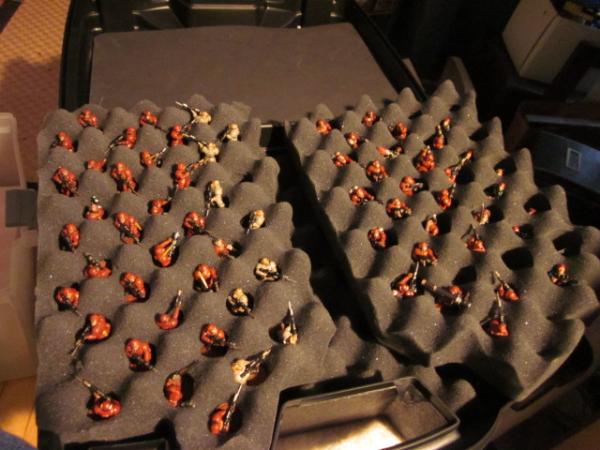
Note the difference between the 24mm and 31mm holes.
Now go make your own!
24779
Post by: Eilif
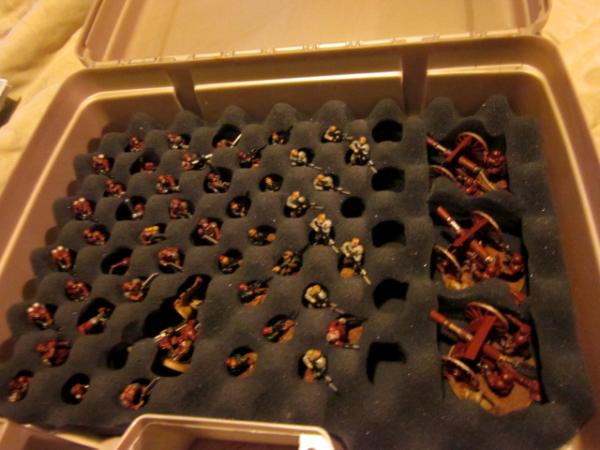
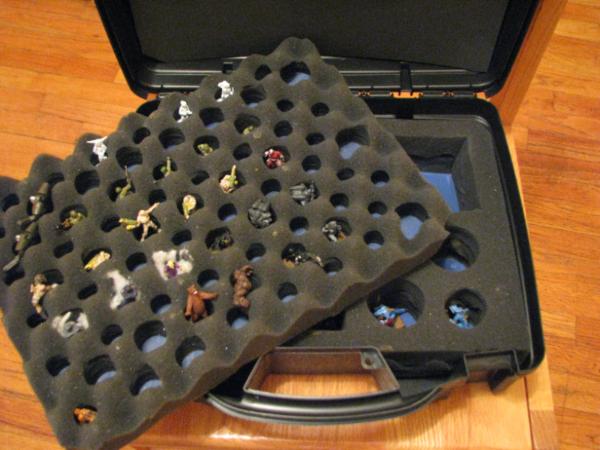
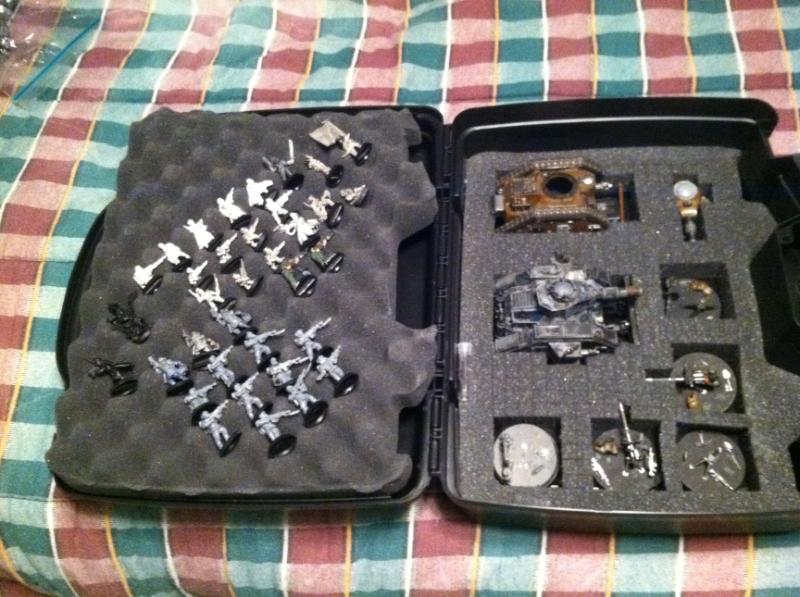
Here it is Finished and filled with Blood Angels.
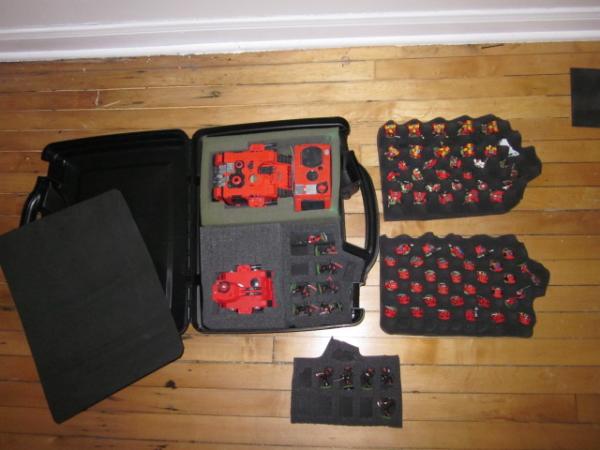
Currently is setup for about 90 figures and 3 vehicles with room for one more. For space marines with dynamic poses or weapons sticking out at odd angles put I them in the mini trays or joined two cavities in the eggshell foam.
Even though the figs appear to stick above the foam, all are below the level of the top of the eggshell trays.
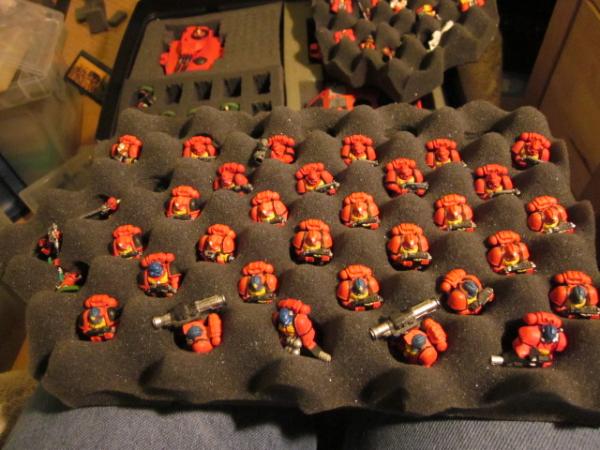
The grey tray is a premade miniature tray that I got second hand and cut down to fit the space. The Predator is in a slot made from cutting the pluck and pull sheet in half and glueing it together. The mini trays are sections of that same pluck and pull sheet.
I found two of these cases yesterday in tan being sold as reel cases at Fleet and Farm (not Farm and Fleet) for 10 bucks so I ordered them. They are sold out now, but just goes to show that these do show up at the 10 buck rate occasionally.
I've pretty much decided to move all my figs over to thse Plano cases even though I've got about four of these file cases cases already purchased and setup with bead trays and foam.
 http://www.dakkadakka.com/gallery/images-24779-13923_Ig%20Army%20Storage.html
I thought they were the bees knees, but the Plano's hold about as many figures more safely/securely, better looking and about 2 dollars left.
24779
Post by: Eilif
Another tiny update. My two "reel" cases from Fleet Farm came in. Same size and foam contents as the others I've bought and seen except that they are army tan (a nice color) and as seem below say "reel case" on the side and they were only 10 bucks each! (sorry, I bought the last 2).
Not sure if I'll leave it, put a sticker there, or try and sand it off. Nothing against fishermen, but for some reason I don't like it.
9804
Post by: Ultrafool
Great Tut! I have a plano gun case (got it at wallyworld for ten bucks) Mine came with two interlocking eggcrate foam that I glued together and use to hold two rhinos, two baal preds, a land raider, and a dreadnought. Then used the pluck n pick to make 50 slots for marines and still have enough space for another foam sheet.
42325
Post by: imperialguard12
looks great i was wonddering what that long veichle is that is beside your lr
24779
Post by: Eilif
(Update 4/23 Two more cases optimized for IG.)
Ultrafool,
Do you have a pic of yours, I'd love to see how you arranged the tanks.
Imperialgaurd12,
It's an M113 Tank that I made about 10 years ago as a Razorback. It has a double heavy bolter firing position that goes on top. I originaly had 3 US tanks in my army, but one by one they've been scraped or turned into post- apoc vehicles. Eventually this one also will be replaced with a Rhino/Razorback.
Quick note on glue. Spray adhesive sometimes has patches where it doesn't adhere all the way, I've found that superglue can work ok, for mending these, but proper application of rubber cement (apply to both sides, let dry then attach) works really well.
Now, what you've all been wating for....
Two more cases for my IG.
The Infantry box.
Since I've got nearly all plastic troops, I decided to not cut the trays in half, though I did trim the sides and front so they would be easier to remove
Tray 1 Line Infantry. All 24mm holes except for the lengthened slots for my autocannons.
Tray 2 Rest of the troops. Mostly 24mm holes with 3 lines of 31mm and some custom slots as well.
Tray 3 will be a third eggshell piece, it's uncut and waiting for how I may decide to expand this army.
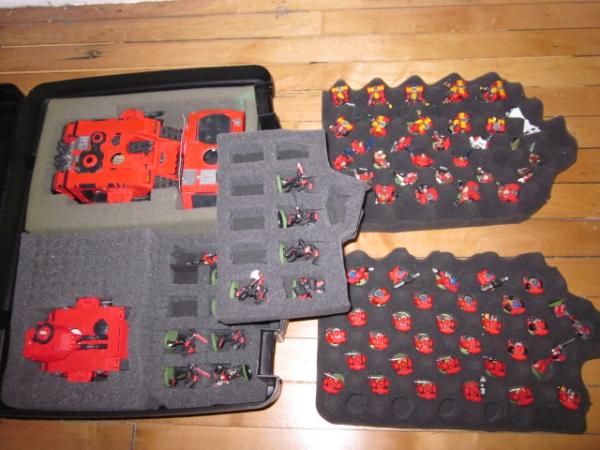
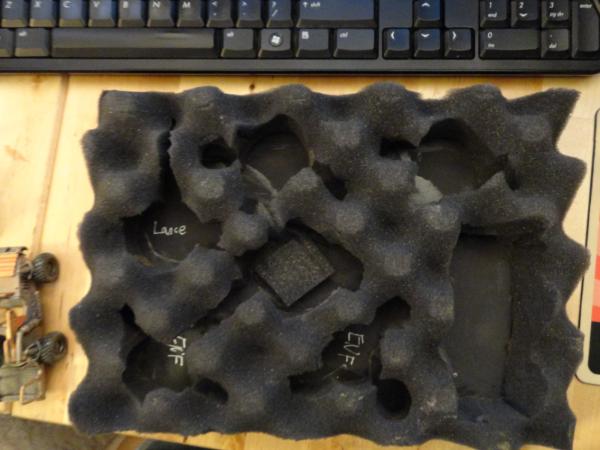
The Armor box.
Tray 1. Guns and Sentinels This base layer is two layers of pluck and pull (one from each box) glued to each other and to funky foam. I didn't trim the edges of the trays so this one would be really hard to remove, but it'll probably never be take out so it's no big deal.
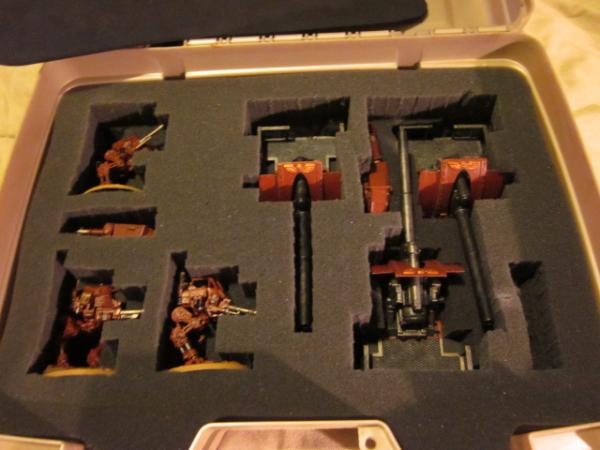
Tray 2. Tank hulls.
The 3 plastic casette suitcases I was using for vehicles before...
http://www.dakkadakka.com/gallery/182443-.html
http://www.dakkadakka.com/gallery/182442-.html
...were almost exactly the length and width of the Plano, so rather than using up foam, I:
1) Selected one of them and took case halves apart. (Saved the other for storage of post apoc vehicles.)
2) Cut off the handle
3) relined the case half with funky foam as it is thinner, of more uniform thickness and looks better than the random foam pieces I had in it
4) Cut a large piece of funky foam to go between the base tray and the plastic tank hull tray.
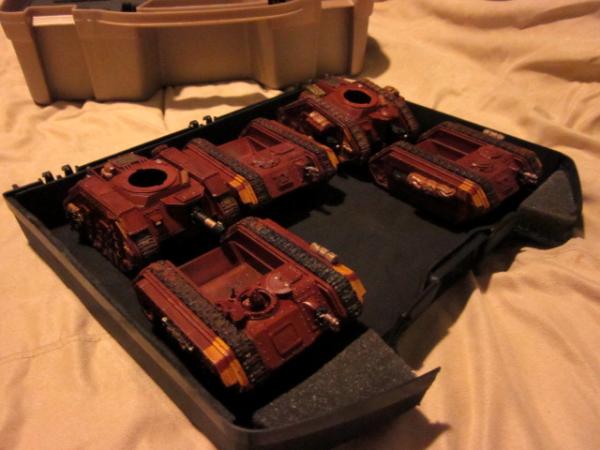
I also cut a piece of funky foam and layered some scrap foam and funky foam to match the different heights of Russ and Basilsik hulls.
It goes between the top of the hulls and the top of the case and I got it just the right tightness so it holds them firmly in place without any damage. I can pick up the case and shake it and the hulls remain in place and not touching each other!
 So how does it compare to my previous storage solution?
Previously, the collection took up one and a half of my previous storage boxes and two cassete briefcases. Now it all fits into 2 plano 1404's
As you can see, the Tan Plano case is a bit wider and taller than my previous File box filled with stacked bead cases.

However, it's considerably shallower and that's the measurement that counts, as I keep them on a shelf sideways. 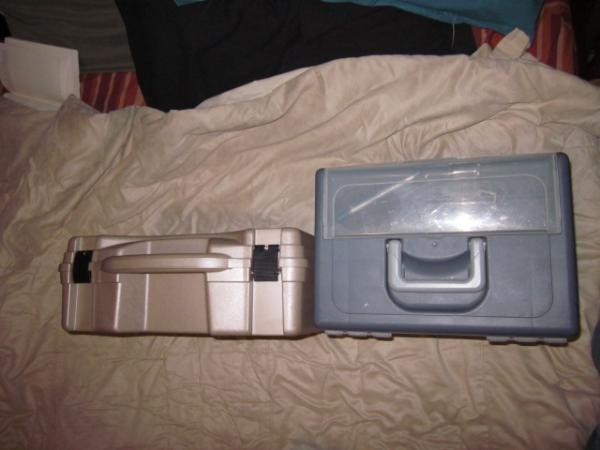
Between these two and my Blood Angel case, I've cut my required shelf space by around 40% and it also looks much better!
Lastly, As I have a Russ, Hellhound, two Chimeras, a Valk and an ogryn squad unassembled in boxes out on the porch, someday I'll need more space. However, I've no doubt that one more vehicle case like the above, plus utilizing the third as-yet-uncut infantry tray will cover all my case needs and still save space.
41040
Post by: wwwZugZugorc
You can get the plano cases for 10 bucks each at walmart, in the sporting goods section by the fishing and ammo stuff. usually 2 in stock with them being instantly restocked it seems.
24779
Post by: Eilif
Thanks,
Alot of folks seem to be able to find them at Walmart. Over here in the Chicago area, restrictive gun laws seem to have kept gun cases out of the local Wal-Marts.
I had to drive from Chicago to Montgomery (near Aurora) about 40 miles away to get mine for $15 from a Farm and Fleet.
Where are you located at?
38816
Post by: JBW
Well, I got my two Plano cases tonight; also at local Wallmart. I'll post pics when I start building. Thanks for the tut!
32828
Post by: Some_Call_Me_Tim?
Love the tutorial, nice and cheap, blah blah blah, but oh my gosh! I noticed your Lego pieces in one of your photos! So cool to find another Lego fanatic on here. Where can i find piccies of your Lego creations?
Cheers!
_Tim?
34234
Post by: Prophet40k
Great tutorial. I am adding another company of marines to my collection and this will solve the storage/transport problem thanks.
24779
Post by: Eilif
JBW wrote:Well, I got my two Plano cases tonight; also at local Wallmart. I'll post pics when I start building. Thanks for the tut!
Glad to be of help. I'd love to see pics of what you come up with.
Some_Call_Me_Tim? wrote:Love the tutorial, nice and cheap, blah blah blah, but oh my gosh! I noticed your Lego pieces in one of your photos! So cool to find another Lego fanatic on here. Where can i find piccies of your Lego creations?
Cheers!
_Tim?
Hey Tim, glad to find that you're a LEGO fan.
Links to threads and pics concerning the MOC's I've made for "Brickington" my module for the Northern Illinois LEGO Train Club is here:
http://www.eurobricks.com/forum/index.php?showtopic=43402&st=0&p=762584&hl=Brickington&fromsearch=1&#entry762584
You can find pics of most of my stuff here:
http://www.brickshelf.com/cgi-bin/gallery.cgi?m=eilif
Prophet40k wrote:Great tutorial. I am adding another company of marines to my collection and this will solve the storage/transport problem thanks.
Thanks! Glad to be of help.
A very important updates to this tutorial! UPDATED AGAIN 5/7/2012
1) I'm having mixed results with Elmers Spray adhesive. Some of the trays are very sturdy and some separate if pulled on. While visting my parents, I told my dad about this probalem and he gave me PlioBond, a rubbery contact adhesive. Pliobond worked well, but stinks to high heaven so I switched to regular DAP Contact Cement. http://www.dap.com/product_details.aspx?product_id=35 which is quite inexpensive and if used correctly (apply both sides, let dry a bit and then attach) it is absolutely bombproof . Also, when it dries it dries smooth and not at all tacky and the solvent smell goes away in a couple days. If you applying it liberally all over the base sheet there's no danger of it sticking to the bases of your minis.
Look for this product at your hardware store:

39783
Post by: theunicorn
For everyone new to foam cutting try this an electric carving or electric fillet knife. Like you would use to carve turkeys at thanksgiving or when cleaning fish. These are as cheap as 20$ us prolly even cheaper if you look around a bit. I have made 2 different cases out of standard size footlockers, so i have cut an enormous amount of foam. These knives are fantastic for straight line cuts.
38816
Post by: JBW
Eilif wrote:JBW wrote:Well, I got my two Plano cases tonight; also at local Wallmart. I'll post pics when I start building. Thanks for the tut!
Glad to be of help. I'd love to see pics of what you come up with.
It might be a month or so. I'm looking at fitting 3 Stormravens, 2 DC Dreads, and about 31 DC models. While I have purchased two cases, do you forsee me fitting all that into one? I haven't actually opened the SR kit yet. (thought they were between a LR and a Pred). Thanks for the insight!
8933
Post by: gardeth
Any advice for making spaces to fit space marine bikes?
24779
Post by: Eilif
gardeth wrote:Any advice for making spaces to fit space marine bikes?
I'd go with two large circles joined by cutting out the foam in between. Sort of a larger version of what I did with the rectangle based Autocannons in the blurry IG infantry tray above.
33990
Post by: cyrax777
Great tutorial. Plan to mod my case this weekend.
42709
Post by: bigbaboonass
Excellent tut! I've got three of these cases and wasn't sure how to make them work. This seems to be it though. Thanks.
43167
Post by: Sam__theRelentless
Great tutorial, thanks!
I'm just worried about several of my models, which are elaborately-positioned terminators etc. and I don't know whether the above approach will be better for this than the standard citadel case and its "lay models horizontally" approach, which wouldn't be difficult to DIY either...
I'm just wondering if anyone knows which approach will be less susceptible to miniature "break-off"...
33735
Post by: White Ninja
The only real problem I could see with this idea is someone thinking that you're carrying a gun.
24779
Post by: Eilif
I wouldn't worry too much about it. The Plano 1401 is a rectangular case similar to those used for cameras, microphones, and other fragile equipment. It's even sold by Plano in some areas with labels that make no mention of pistols and instead call it an accessory case or a Reel Case.
The real danger is that someone may steal it thinking somethign vaulable is in there. Don't ever leave it visible in your car and walk away.
Now if you choose a rifle case to store your minis, that's a whole different matter.
24779
Post by: Eilif
Sam__theRelentless wrote:Great tutorial, thanks!
I'm just worried about several of my models, which are elaborately-positioned terminators etc. and I don't know whether the above approach will be better for this than the standard citadel case and its "lay models horizontally" approach, which wouldn't be difficult to DIY either...
I'm just wondering if anyone knows which approach will be less susceptible to miniature "break-off"...
Either means of storage is fine if you can find a way to make the models sit so they are not leaning on the small parts that extend from them. If using my meathod above, the best way is to work with several size hole cutters and pick one that holds the model firmly, and doesn't allow too much jostling.
If lying them flat, I would advise taking little pieces of scrap or blister foam and gluing them in the compartments you use in such a way as to support the main sections of the model so the delicate parts won't be flailing about or supporting the weight of the model in transit.
Hope this helps.
43167
Post by: Sam__theRelentless
Yes it does, thanks. I have yet to think about which to use put at least now I know how to fix my potential problem. Thanks 
40523
Post by: lessthan1337
Congratulations, sir. You win the internet.

24779
Post by: Eilif
Thanks, I think. I can't see the pic though.
What did I do to deserve such an honor...
43218
Post by: Shasta Hawk
Ultrafool wrote:Great Tut! I have a plano gun case (got it at wallyworld for ten bucks) Mine came with two interlocking eggcrate foam that I glued together and use to hold two rhinos, two baal preds, a land raider, and a dreadnought. Then used the pluck n pick to make 50 slots for marines and still have enough space for another foam sheet.
Question? Is the bottom tray, the pluck foam one IIRC, removable? It would be great if it is. I saw these at my local Walmart as well but wifey was rushing me so I didnt really have time to look at them
24779
Post by: Eilif
Shasta Hawk wrote:Ultrafool wrote:Great Tut! I have a plano gun case (got it at wallyworld for ten bucks) Mine came with two interlocking eggcrate foam that I glued together and use to hold two rhinos, two baal preds, a land raider, and a dreadnought. Then used the pluck n pick to make 50 slots for marines and still have enough space for another foam sheet.
Question? Is the bottom tray, the pluck foam one IIRC, removable? It would be great if it is. I saw these at my local Walmart as well but wifey was rushing me so I didnt really have time to look at them
Yep. all the trays are removable. Just cut/pull your shapes, glue on a piece of funky foam for a base and you've got a tray.
Remember though it's a good idea to cut off the tabs of the tray that extend along the handle and trim the sides just a bit. Otherwise it is very hard to get the a tray stiffened with funky foam out, because the case tapers slightly toward the bottom. The bottom tray of my armor case (made from two bottom pluck sheets) is very difficult to get out because I didn't trim it down at all.
22129
Post by: Thortek
love it
24779
Post by: Eilif
Just finished 2 cases for my 10mm sci-fi. These cases hold my army of rebased mechwarrior figures. These are not battletech figs, they're the 10mm (N scale) clix game figs that have been removed from their bases and mounted on wargaming bases. A few of my club members have done the same thing and we use these figures for playing Mech Attack ( http://armorgridgames.blogspot.com/2010/03/armor-grid-mech-attack.html ) and Future War Commander ( http://www.blitzkrieg-commander.com/default.aspx?Area=FWC )
The first is made from the same Plano 1404 style as I used last time.
First tray for my largest mechs. One layer of eggshell with cutouts made with my hobby knife, glued to a layer of 3mm funky foam for a base. By a lucky coincidence,the eggshell foam is just a bit taller than the depth of the 45mm hex bases.
The second layer is two layers of eggshell. Interlocked. My largest cutter isn't very deep so I interlocked them and cut through the first layer and slightly into the second, then I pulled away the first layer and finished the cut. After all cuts were made, the two layers were glued together and a base of funky foam was attached to the botom.
This was the first time using my largest sharpened-copper-fitting-foam-cutter which is about 2.25 inches in diameter.
This left me just enough room to hot glue some foam scraps to the bottom of the case to make some trenches for storing the flattest of my ground vehicles.
A few notes.
1) This case uses 3 eggshell foam pieces. The plano 1401 comes with 2 eggshell pieces and a pluck piece. I've bought about 6 of these cases, so I've been able to mix the foam around a bit.
2)Pliobond brush on flexible adhesive has proved to be an amazing adhesive and much better than the Elmers spray adhesive used on my earlier cases, however, it gets used up fairly quickly. An 8 dollar 8 oz can has enough for about 2 cases. Before I attached the funky foam bases, I used chalk to trace the outline of the tray foam onto the funky foam. This saved me from alot of wasted Pliobond.
3)Both trays in this case were trimmed down slightly to facilitate easier removal from the case. Otherwise the fit is too tight.
Case 2.
This is a case I picked up at a game store auction for about 2 bucks. I was later told it was a D&D case, but it came with no foam.
The top layer holds all my infantry upside down. I have marked them on the bottom with type and color
For those unfamiliar with Mechwarrior, here's what the infantry look like when right side up.
The bottom of the case holds the rest of my vehicles. A piece of funky foam at the top of the case provides just enough pressure to hold everything in place without damaging any vehicles.
There you have it. A full storage solution for a 10mm sci-fi army!
44132
Post by: RavienCoromana
So I was wondering - for those of us who don't have or have access to a dremel, what would be the best possible way to sharpen the copper fittings? also, which dremel bit would be the best use for sharpening these fittings?
43218
Post by: Shasta Hawk
RavienCoromana wrote:So I was wondering - for those of us who don't have or have access to a dremel, what would be the best possible way to sharpen the copper fittings? also, which dremel bit would be the best use for sharpening these fittings?
A simple file would do if you don't have access to a dremel
24779
Post by: Eilif
Shasta Hawk wrote:RavienCoromana wrote:So I was wondering - for those of us who don't have or have access to a dremel, what would be the best possible way to sharpen the copper fittings? also, which dremel bit would be the best use for sharpening these fittings?
A simple file would do if you don't have access to a dremel
Yep.
Needle files would take a long time, but a set of diamond files (can be found for around 10 bucks or so) would be a good tool for the job. It would still take a while though.
However, I would recommend just buying a cheap Rotary tool (generic name for dremel-like tools). It's a really usefull tool to have for modeling/household. You can find them for super cheap online or at big box hardware stores. Here's one for arouind 25 bucks.
http://www.grizzly.com/products/Mini-Grinder-Kit/H3117
Googling for mini grinder or Rotary tool or Motor tool will show others
http://www.grizzly.com/products/category.aspx?key=300040
The bit you want is a grinding stone. Most Rotary tools come with one, but if yours doesn't, it looks like this
 http://www.grainger.com/Grainger/DREMEL-Grinding-Bit-1UH81
Lastly, it may be possible to find a similar bit for a power drill, but I haven't been able to find one.
30532
Post by: Zefig
I tried using hand files, and while I think it's certainly possible, it would take a very long time. I ended up using one of the brownish bullet-shaped grinding bits. There's probably a better one out there, but that certainly worked.
24779
Post by: Eilif
Yep, the bullet bit is just fine. I just used the one above because that's the one from my kit that looked the toughest, but I really don't know what the best kind of grinder is.
Folks making multiple cutters should be aware that the copper will wear down grinding bits. It hasn't ruined mine, but making 5 copper cutters has made a notable groove in my grinder bit.
On the other hand that's the only thing I use the grinder for, so it's no big deal.
Just wanted to add that there's now no reason to not have a rotary tool. Here's a cheapie for the same cost as a set of diamond files.
10 bucks!
http://www.harborfreight.com/power-tools/rotary-tools.html?hft_adv=10041&utm_source=google&utm_medium=cpc&utm_term=cheap%20rotary%20tool&utm_campaign=Power%20Tools%201%20-%20Exact&gclid=COeSn_e7kqkCFUa8Kgode109sw
It's single speed, and probably not the highest quality, but I'm sure it's fine for hobby work and comes with a set of grinding stones!
38816
Post by: JBW
JBW wrote:Eilif wrote:JBW wrote:Well, I got my two Plano cases tonight; also at local Wallmart. I'll post pics when I start building. Thanks for the tut!
Glad to be of help. I'd love to see pics of what you come up with.
It might be a month or so. I'm looking at fitting 3 Stormravens, 2 DC Dreads, and about 31 DC models. While I have purchased two cases, do you forsee me fitting all that into one? I haven't actually opened the SR kit yet. (thought they were between a LR and a Pred). Thanks for the insight!
I finally got the Stormraven built and placed it on the un-plucked bottom layer of the Plano Case. It appears there's enough room for a dread and a full squad per case, but I'll be checking that after I get the Dread built.

21966
Post by: col. krazy kenny
Nice cases,I own two,And a bunch of the small ones.Well worth the money.
24779
Post by: Eilif
Interesting shape to try and fit, you'll definitely be doing some custom cutting of the foam with a knife. If you go for stackable 1/3 size trays, you could fit quite alot of infantry on the right side of the case.
Also, you'd save alot of space by putting a layer of funky foam on the bottom of the case and letting the raven rest on that rather than wasting 1.25 inches of space just having it rest on the pluck foam.
Looking forward to seeing how this turns out!
38816
Post by: JBW
Eilif wrote:Interesting shape to try and fit, you'll definitely be doing some custom cutting of the foam with a knife. If you go for stackable 1/3 size trays, you could fit quite alot of infantry on the right side of the case.
Also, you'd save alot of space by putting a layer of funky foam on the bottom of the case and letting the raven rest on that rather than wasting 1.25 inches of space just having it rest on the pluck foam.
Looking forward to seeing how this turns out!
Yeah, I didn't mean to imply that I would be leaving the Raven sitting on the pluck foam. I was thinking of applying your method of mixing the foam types. Might try to use have egg-crate and half pluck on the bottom level. Just depends on the dread requirements, and space left over. With a three Storm Raven list, it'll like be three cases no matter what. That is, unless I magnetize the wings!!!! Which I likely could do and have been considering.
I was also thinking of including any gaming materials I use to fill up any extra space if three cases ends up being a requirement. An all in one carry case (with rivetted velcro of course).
43225
Post by: Nightfall
who the amount of money being saved heres is like wow...
I mean for me living in South African a large citadel army box cost me round about 1200 Rand... I could buy myself a battle forces, HQ and the codex and maybe a little more
33990
Post by: cyrax777
Walmart has a basic dremel for 20 bucks model 7300 only 2-speeds
(6500 / 13000 rpm. I used it to make my cutter cheap and works great.
24779
Post by: Eilif
Good find! Not everyone has a Harbor Freight nearby or wants to buy power tools online, but most everyone in the USA can get to a walmart.
I am starting on a miniatures case to hold a friend's collection. It should be a good example of variation within a case so I'll post pictures when I finish.
40960
Post by: Grendler7
Nice nice. Love the use of funky foam. 
I am looking forward to picking up some of these and experimenting. 
33990
Post by: cyrax777
What size coupler should I use for 40mm bases?
24779
Post by: Eilif
Unfortunately I just lent out my cutters to a friend and I didn't bother to write down the labeled sizes of the larger ones.
However, My two largest cutters make holes about 55mm and 44mm and they were both made with standard size pipe fittings. I would recommend the 44mm.
At the hardware store, they will be labeled in inches which don't necessarily translate to the size of the hole they will cut. Grab a ruler from the tool section and check the distance from outer edge to outer edge (when you sharpen the edge, grind from the inside of the tube) until you find the one that is closest to 44mm.
24779
Post by: Eilif
Just recieved these pics of a case I built a while back as a going away present for a friend of mine.
This one was designed to hold a fairly random assortment of figures that he had painted up for various generic skirmish games. He's fairly new to miniatures and doesn't own too many figs yet, so the idea was that whatever figs he decides to buy there will be a space in the case for them.
This was my first try at a different color funky foam for the backing.
The top section is setup with alternating rows of 24mm and 31 mm holes for standard size minis. The 31mm holes accomodate figures on 25mm square bases. 3 larger (44mm I think) holes are included as well on the right side.
The bottom section is made similarly to the Mechwarrior box shown earlier. Two interlocked sheets of eggshell foam. It's large cavities accomadate tall, bulky and even monstrous creatures. The largest rectangles were specifically made for two large monsters that he has. I also included a few 44mm diameter holes for regularly based figures that might have tall banners and such.
Exterior shot.
43167
Post by: Sam__theRelentless
That puts it into great perspective in another real-life application. Thanks! As soon as I get back home and gaming, I am making one of these.... After all, the old shoebox can't last forever 
6445
Post by: Spiku
Does anyone know a place that will ship these to the UK, or are bored enough to take theirs to find out what the shipping cost would be?
Just wondering if the shipping expense would make it worth getting some sent, given we don't have an equivilent really in the UK
24779
Post by: Eilif
Here's the dimesions.
Height: 6"
Width: 14-1/2"
Length: 16-3/4"
Estimate about 3 pounds just to be sure and you may be able to come up with a good estimate.
Alternatively, here's the item at Cabella's sold as a "reel case"
http://www.cabelas.com/product/Fishing/Rod-Reel-Storage/Fishing-Reel-Cases%7C/pc/104793480/c/104812380/sc/104527080/Plano174-Reel-Case/704776.uts?destination=%2Fcatalog%2Fbrowse.cmd%3FN%3D1102358%26WTz_l%3DSBC%253BBRprd704776&WTz_l=SBC%3BBRprd704776%3Bcat104527080
They ship internationally.
Best of Luck.
39783
Post by: theunicorn
My local Wal-mart in East TN carries these in the sporting goods section. I have been buying them for around $11.00 each. They are outstanding for large models. I currently have all my armorcast Tyranids and winged hive tyrants in them. I think I have around 12 of them now, keep up with places like bass pro shops, cabelas, and other large sporting goods stores and you can catch them at a great price. Assuming that you can't find them locally at your walmart, also remember walmarts have different stock depending on shopper habits. You might want to check all of your local walmarts for them.
6445
Post by: Spiku
Flat shipping rate of $20 dollars, or 25% of the cost of the cases if that's more from Cabelas; and those ones are $18 a pop =X
From what I understand they only have two foam sections compared to the non-embossed pistol case.
Other sites charge additional handeling rates and you end up with between 30-50 dollars added on, which is fairly surprising.
Almost looks like an ebay opportunity for someone here if the standard shipping was actually cheaper than $20 dollars flat, given there seems to be little international support~
24779
Post by: Eilif
Spiku,
The good news is that I've bought reel cases before and the case has all 3 pieces of foam. The bad news is that you're unlikley to find anyone who can ship more than one or two of them for 20$ or less. If you bought 5 of them, Cabellas would probably be taking a bit of a loss on shipping.
Still, compare the amount of storage from 5 of these for around $110 USD to whatever 70 GBP would buy you from another case company.
6445
Post by: Spiku
Good to hear the reel case has 3, I saw reviews saying just two!
I stand surprised, given I sent a metal toolbox three times the size abroad for $18
Clearly the best course of action is to see if there are fellow UK Dakkaites who are interested, and just do a bulk purchase between us all as just two people interested in a pair would be making a large saving on shipping.
24779
Post by: Eilif
A group deal sounds like a good idea. Maybe you'd get some interest in the Swap shop.
I've not seen any, but if you've seen reviews stating only 2 sheets of foam, it might be worthwhile to call cabellas just to be sure. I've never purchased any cases from Cabellas.
I've bought these cases under both "reel" and "accessory" labels and they have all had the three pieces of foam shown in the ads that call it the "Plano Protector 4 pistol case". This is the pic from Farm and Fleet where I bought a few. They are listed online as Pistol cases, but the sticker on the case at the store says "XL accessory case". You can see the two layers of eggshell and the layer of pluck under the pistols at the very bottom.

37016
Post by: More Dakka
Great tutorial Eilif.
Can you link a website to purchase the Reel Case?
I've only found one but not sure if they ship to Canada. I was hard pressed to find a supplier that ships the gun case to Canada, but a fishing box might be an easier buy.
24779
Post by: Eilif
More Dakka wrote:Great tutorial Eilif.
Can you link a website to purchase the Reel Case?
I've only found one but not sure if they ship to Canada. I was hard pressed to find a supplier that ships the gun case to Canada, but a fishing box might be an easier buy.
Glad you enjoyed it!
Not to pick on you too much, but 5 posts up.... 
Hope it works for you.
24779
Post by: Eilif
Made a few more trays, inlcuding a cavalry tray! All these are half size trays with the corners and edges trimmed so they are interchangeable for either side of the case.
The first three are pretty basic infantry trays.
Ventauran and Khiff infantry. These old school figures require no larger holes, so all holes are the small 24mm cutter. Even with the lost space due to half size trays, these small trays still hold 28-33 figures each depending on the eggshell arrangement.

Random Sci-Fi and Post apoc. Pretty much the same as the above tray.

Junker tray, for my growing Junker army.
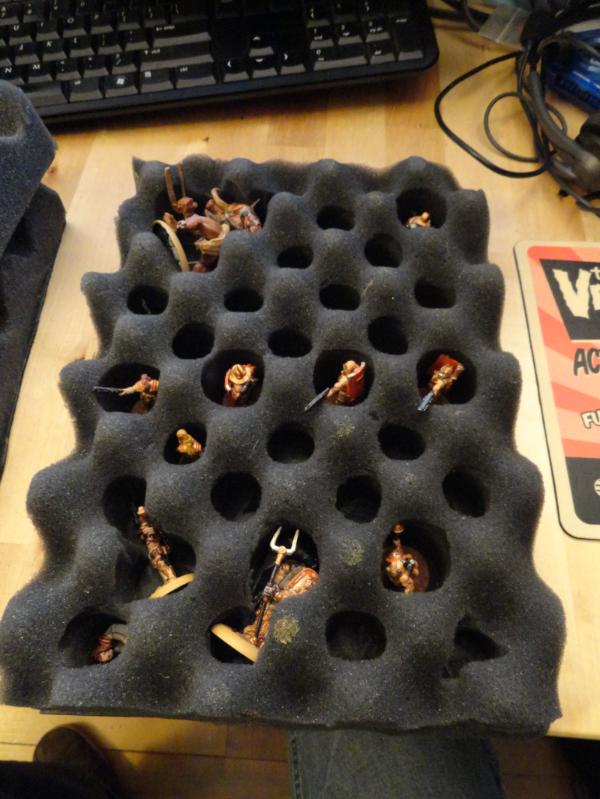
Here's the interisting one. made for my Junker buggy and cavalry. Rather than cutting out rectangles like some of my other custom trays, these are all circle cuts with additional side cuts made for bases, heads and lances. The leaders cavity has a piece of foam so that the weight of the figure doesn't rest on the fragile lance.
Cav case with figs.
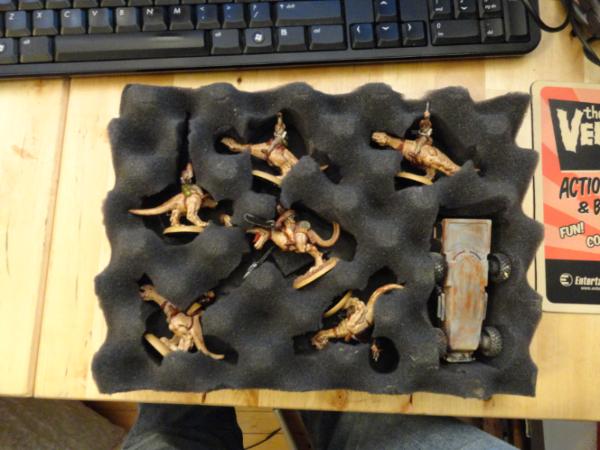
Enjoy!
44717
Post by: Steak
Have so say, thanks a lot for this!
I bought the case before seeing the tutorial because it was so cheap ($10) and after seeing this it blew my mind. Although you can just lay units in between the two layers without cutting holes, its 100% more effective to do so.
I'll upload pictures later when I get home
23737
Post by: Dannygee
Mechwarrior? NICE! i have TONS of that.....even though its in a big tub in the cloest for years...
24779
Post by: Eilif
Steak wrote:Have so say, thanks a lot for this!
I bought the case before seeing the tutorial because it was so cheap ($10) and after seeing this it blew my mind. Although you can just lay units in between the two layers without cutting holes, its 100% more effective to do so.
I'll upload pictures later when I get home
You're very welcome. Pics would be great as I'd love to see how yours is arranged!
Dannygee wrote:Mechwarrior? NICE! i have TONS of that.....even though its in a big tub in the cloest for years...
My club loves the mechwarrior stuff. We were looking for a cheap entre' into small scale sci-fi mass combat and they turned out to be just the thing. We rebase thm and use them to play Mech Attack and Future War Commander. If you decide to part with them let me know...
31303
Post by: swampyturtle
ive been looking for this thread for ages! Thankfully its here again. How would the case work with a all IG / Mech heavy tau lists? would i be able to carry a 2000+ army in it?
24779
Post by: Eilif
Hard to say swampyturtle,
You can shape the case to almost anything, but for mechanized lists, you're probably going to need 2 cases.
31303
Post by: swampyturtle
Eilif wrote:Hard to say swampyturtle,
You can shape the case to almost anything, but for mechanized lists, you're probably going to need 2 cases.
thanks for that
If you dont mind, id love to PM you and bounce some ideas around off you for extra tips on building one of these and pointers
30532
Post by: Zefig
You'll probably need two. I took the two pieces of egg-crate, glued them together, and cut out form-fit holes to fit 10 rhinos in that space, on their sides. There's enough room for a layer of infantry on top of that, along with maybe a few books, but that's about it.
24779
Post by: Eilif
swampyturtle wrote:Eilif wrote:Hard to say swampyturtle,
You can shape the case to almost anything, but for mechanized lists, you're probably going to need 2 cases.
thanks for that
If you dont mind, id love to PM you and bounce some ideas around off you for extra tips on building one of these and pointers
No problem, I'm happy to help. Feel free to PM me or if it's info that others might gain from feel free to post it here.
47236
Post by: chaoslooksgood
Question about your SM here: Could you tell me what you made the missile launchers longer with? They look very good
43167
Post by: Sam__theRelentless
Steak wrote:Have so say, thanks a lot for this!
I bought the case before seeing the tutorial because it was so cheap ($10) and after seeing this it blew my mind. Although you can just lay units in between the two layers without cutting holes, its 100% more effective to do so.
I'll upload pictures later when I get home
Yeah but then I'd think you'd get more movement potential... 
24779
Post by: Eilif
chaoslooksgood wrote:Question about your SM here: Could you tell me what you made the missile launchers longer with? They look very good
The missile launchers are just the stock missile launchers from the second edition box set. The arm and missile launcher are one piece that attaches to a one piece body with a separate backpack.
This fig here (not my pic)

People typically don't find these figs to be very desirable, so even if all you want is the missile launcher arm to put on a regular marine, with an ad here and in Bartertown you can probably get one (or several) for not too much $.
18131
Post by: Papaskittels
You could always Heat it with a lighter and melt through....
Do that in a ventalated area
THats what i did
44717
Post by: Steak
Heres mine:
I'm holding about 80 boyz, 15 lootas, a warboss, one Mek w/ KFF, a converted Mek w/ KFF, my 2 wip looted tanks and 3 deffkoptas.
Some notes: I tried making a slot in the eggshell to hold deffkoptas but its too shallow, so I use it for loose parts right now. Also, I'm not using any foam for the bottom of the pull and pluck because its sitting on the bottom of the case.
47606
Post by: haendas
Thanks for the tutorial. I'll be off to look for these at walmart next time I'm there!
48235
Post by: Ogryn
Thanks for posting this!
24779
Post by: Eilif
Papaskittels wrote: You could always Heat it with a lighter and melt through....
Do that in a ventalated area
THats what i did
That actually makes sense in a twisted kind of way. I agree that you should definitely do it outside though, burning foam gives off all kinds of bad bad fumes.
Steak wrote:Heres mine:
I'm holding about 80 boyz, 15 lootas, a warboss, one Mek w/KFF, a converted Mek w/KFF, my 2 wip looted tanks and 3 deffkoptas.
Some notes: I tried making a slot in the eggshell to hold deffkoptas but its too shallow, so I use it for loose parts right now. Also, I'm not using any foam for the bottom of the pull and pluck because its sitting on the bottom of the case.
Looks great! I like the contrast of the red funky foam.
One minor suggestion would be to cut a piece of funky foam the size of the top of the case and just lay it on top of the top layer so the figs won't scratch against the plastic. Plano plastic isn't very abrasive, but it's never a bad idea to not have plastic rubbing on plastic.
28295
Post by: TiB
This is so cheap and awesome. Makes me sad I don't live in a country with Wal-Marts and gun crazies.
We do have some fishing stores though, perhaps I need to have a stroll through there, although I doubt a reel case would be much cheaper than a real model case over here...
9922
Post by: The Grundel
Amazing!! I'm going to use battlefoam trays in mine for my grey knight infantry and use some of the foam it comes with for tanks.
24779
Post by: Eilif
Are you sure battlefoam trays will fit?
Not trying to be a downer, I'd just hate to think of someone spending good money on nice trays only to find they don't fit.
43167
Post by: Sam__theRelentless
Well, bring a spaceman and your case into the store, a quick check will make sure. If they're gonna make a sale, they won't mind
31303
Post by: swampyturtle
My first case Thank you for the tut!
I wanted my tanith to have a protective case because there my favorite army and i want to keep my hard work safe. The Tanith (as well as the Padrus and Phantine) are my special project right now. For the Tau, Ive decided that until im done with the tanith they can keep their tool case  The work station
 The trays Before:
 The trays after:
 Final pictures:
 Final Thoughts
Right, so my final thoughts on the matter.
1) The method of making the holes by the copper tubing and twisting till it popped out doesnt work well and takes HOURS! My grandpa (a engineer for 20+ years) suggested a new method. So what you do is Take the copper tubes and place them where you want the hole to go. Turn the foam upside down and take a hammer to the area around where the copper tube is. The foam will come out in a natural circle each time with very little effort. It literally took me a hour using the method in the post above and 30 mins for my second tray using my grandpa's method.
2) dispite the look of the holes seeming too small for your standard models , THEY DO INDEED FIT! It might not look that way but it is. Its a beautiful sight really 
3) Following the tutorial provides does a great deal of justice to making the case but alot of it is trial and error. It took me 2 hours to make my first one. I believe i could crank another out in an hour for my next one. The work does get repetivie so have some music, TV, ect going on to distract you.
4) Its a very easy project and i highly recommand it to anyone looking for a good case for your models that you want to protect
5) I got about 83 slots and have enough room still for many more should i choose to modify it. Once i get home im gonna add my tanks and other items into the bottom layers
24779
Post by: Eilif
Looks great!
I'm curious about your method of punching the holes. I may give it a try next time I'm making trays.
However, I've not had any trouble with the twist method which only takes about 15-20 minutes per tray for me. Even with split trays (eats up two rows of fig space) I was able to fit 70+ standard infantry figs per level!
What fitting did you use and how sharp did you file the edge to?
Regardless, the case it looks great and I'm glad to see some folks getting use out of my tutorial!
44717
Post by: Steak
swapyturtle, I'd be interested to know how sharp you filed them as well, if at all. It sounds like you may be able to skip that if you use the hammer method.
Also, what type of glue did you use on the foams? I used a industrial strength spray adhesive (although eilif advised against it) because I had it available, and haven't had any issues yet.
31303
Post by: swampyturtle
Steak wrote:swapyturtle, I'd be interested to know how sharp you filed them as well, if at all. It sounds like you may be able to skip that if you use the hammer method.
Also, what type of glue did you use on the foams? I used a industrial strength spray adhesive (although eilif advised against it) because I had it available, and haven't had any issues yet.
Before I began I ran the copper tube over sand paper for about 5 minutes per piece (that being the 3/4" and the 1"). I found it did very little except make it easier to hammer out the circle . If anyone is interested I could draw a diagram showing the method. Its really very easy. Take a plank of wood and lay it on the table. Lay the copper tubing of choice in the position of foam area that suits you on top of the wood. Then hammer it around the copper area outline on the direct top of the tube itself (not inside the circle, just the outline)
I found a all purpose glue at hobby lobby for 3 $ that works just as well as adhesive. I don't have it with me (at school) but I can post the name when I get home.
44717
Post by: Steak
swampyturtle wrote:If anyone is interested I could draw a diagram showing the method
I would like that, maybe even a video perhaps?
24779
Post by: Eilif
swampyturtle wrote:Before I began I ran the copper tube over sand paper for about 5 minutes per piece (that being the 3/4" and the 1"). I found it did very little except make it easier to hammer out the circle .
That's your problem then. You didn't actually make a cutter out of the tube. Sandpaper is of almost no use at all in making a copper fitting into a cutter.
It takes around 5-10 minutes with a dremmel to turn a copper fitting into a cutter followed by another few minutes with a file to really hone the edge. The resulting cutter will have an edge that can cut flesh and foam with ease.
swampyturtle wrote: Its really very easy. Take a plank of wood and lay it on the table. Lay the copper tubing of choice in the position of foam area that suits you on top of the wood. Then hammer it around the copper area outline on the direct top of the tube itself (not inside the circle, just the outline)
Is it possible to use the hammer method to make a tray where there are neat figure cavities in every indent in the eggshell foam? I would rather use a hammer than wear out my wrist twisting, but I have so many figs to store that a half capacity tray like the ones in your pictures are not an option for me.
swampyturtle wrote:I found a all purpose glue at hobby lobby for 3 $ that works just as well as adhesive. I don't have it with me (at school) but I can post the name when I get home.
I'd love to know the name. I like hobby lobby and the pliobond is bombproof but stinks for a very long time!
Sorry about all the questions, I'm quite curious to see if there's another method that would bring about results as good as mine with less time, effort and odor.
31303
Post by: swampyturtle
That's your problem then. You didn't actually make a cutter out of the tube. Sandpaper is of almost no use at all in making a copper fitting into a cutter.
It takes around 5-10 minutes with a dremmel to turn a copper fitting into a cutter followed by another few minutes with a file to really hone the edge. The resulting cutter will have an edge that can cut flesh and foam with ease.
That was my fault then, The orginal tut that i read didnt seem to indicate that method of making the copper into a better cut tool. Unless i missed it somewhere. 
Is it possible to use the hammer method to make a tray where there are neat figure cavities in every indent in the eggshell foam? I would rather use a hammer than wear out my wrist twisting, but I have so many figs to store that a half capacity tray like the ones in your pictures are not an option for me.
Yes it is, In tray number two, ( the one on the right here in the 3 trays picture) look at the bottom row and you can see that there are two small holes in between my rows about 3 rows up. I only made my case half capacity cause A) it was game time for college football on the TV B) i started doubting that the holes could fit the models (my mistake  ) However, the method is no differnt from what ive described above. the only forseeable instance is that you might have to postion the cells just alittle cleaner so that you dont run into any other holes. Again, those two holes are as far as i went with the extra's just to test the theory. Im not sure in practice how much stiffness you'll loose in the foam should you cut out more (though next time i have some free time from uni im gonna figure it out)
I'd love to know the name. I like hobby lobby and the pliobond is bombproof but stinks for a very long time!
Sorry about all the questions, I'm quite curious to see if there's another method that would bring about results as good as mine with less time, effort and odor.
Its called Sobo Premuim craft and fabric glue. You dont have to use alot i found but just enough to get the bond good. It is a weaker bond then pliobond i imagine but it also means should i choose to make more holes in my case (and i do!) then i can strip the bottom off easy. (yes i tested it)
24779
Post by: Eilif
swampyturtle wrote:[That was my fault then, The orginal tut that i read didnt seem to indicate that method of making the copper into a better cut tool. Unless i missed it somewhere.
That's at least partially my fault. In the first post I don't explain the process, I just refer you to Kutzmon's original article, (linked at the top of the page). It's not until a couple of pages later in this thread that we discuss files vs dremmel-type rotary tools. Rotary rools win by a landslide!
swampyturtle wrote: Yes it is, In tray number two, ( the one on the right here in the 3 trays picture) look at the bottom row and you can see that there are two small holes in between my rows about 3 rows up. I only made my case half capacity cause A) it was game time for college football on the TV B) i started doubting that the holes could fit the models (my mistake ) However, the method is no differnt from what ive described above. the only forseeable instance is that you might have to postion the cells just alittle cleaner so that you dont run into any other holes.
Oh, there it is. Hammering is seeming better and better. I have a wide head hammer, and an extra cutting mat that I could use to keep from ruining the sharpened edges my cutters have on them now. I may just give this a chance.
swampyturtle wrote: Again, those two holes are as far as i went with the extra's just to test the theory. Im not sure in practice how much stiffness you'll loose in the foam should you cut out more (though next time i have some free time from uni im gonna figure it out)
Putting a hole is every eggshell depression gives you a tray that is plenty sturdy though (see below) it is advisable to use a very strong adhesive.
swampyturtle wrote:
Its called Sobo Premuim craft and fabric glue. You dont have to use alot i found but just enough to get the bond good. It is a weaker bond then pliobond i imagine but it also means should i choose to make more holes in my case (and i do!) then i can strip the bottom off easy. (yes i tested it)
Hmm, being able to strip the bottom off is what made me decide to switch from elmers spray adhesive to Pliobond. It probably works ok for plastic figs, but for a tray of metal figs (or for just wanting trays as sturdy as the commercially made ones) I strongly suggest a stronger glue. I want a bond that's so permanent that pulling it apart will tear the foam.
31303
Post by: swampyturtle
Hmm, being able to strip the bottom off is what made me decide to switch from elmers spray adhesive to Pliobond. It probably works ok for plastic figs, but for a tray of metal figs (or for just wanting trays as sturdy as the commercially made ones) I strongly suggest a stronger glue. I want a bond that's so permanent that pulling it apart will tear the foam.
Yes, i agree with you on that. Again this case really was a learning experience. in all honesty if i did it again, i would make more indents and holes now that i know it works and have a method.
I also agree with you on the glue. Again, i was in a hurry to build this case before the game and so at the store choose the glue that seemed to fit my needs. No one knew what Pliobond was
It works just fine for plastic figures and i assume some metal ones too (havent tested it out yet). As for why im ok with the weaker bond for the moment, its because i know that my case truly isnt complete and i want to add those extra holes in for my IG (130 figures or so). once the case is complete i'll add the bond and hopefully make it 'so permanent that pulling it apart will tear the foam'
24779
Post by: Eilif
Minor update,
On a trip to Harbor freight today I found these:
 http://www.harborfreight.com/5-piece-1-4-quarter-inch-shank-mounted-stone-set-94992.html
These are grinding stone bits for a regular power drill. As most folks probably have, or have access to a power drill, this makes the issue of whether or not to buy a dremmel moot for this project and at 4 bucks a pack (2.50 on sale!) brings the investment in tools even lower.
I'll still probably use a needle file for the final bit of honing, but I'll be using my power drill from now on for making the cutters.
I'll update the first instructional post as well.
44717
Post by: Steak
Eilif wrote:Minor update,
On a trip to Harbor freight today I found these
I wouldn't get your hopes up. I bought their rotary tool with a million pieces and it came with a couple similar grinding bits. I started to file down the copper fitting with one of them, and I managed to file the bit itself, nothing happened to the fitting.
24779
Post by: Eilif
Thanks for the heads up. I'll give it a shot. The bits I was using before were Dremmel brand bits and while it did groove the bit, it did a good job on the fitting. I'll report back later with the results.
44717
Post by: Steak
Yeah, I ended up buying the Dremmel bits as well, they work great
1021
Post by: AesSedai
Hey Guys,
I'm planning on doing a tutorial on this same topic, but I have a question related to one of the techniques covered here: in this tutorial, people are sharpening a copper coupling with a dremel and grinding bit. In my case, I'm planning on a variation, but I'll be using a couple sharpened putty knives to do the "press cutting".
My question to you is: do you think a dremel and grinding bit can sharpen a putty knife to a sharp edge?

Thanks!
44717
Post by: Steak
AesSedai wrote:My question to you is: do you think a dremel and grinding bit can sharpen a putty knife to a sharp edge?
Yeah, it will definitely sharpen it.
But, you actually spin the fitting in a circle so that the sharp edge cuts the foam. Granted I have no idea what you plan to do, but it might be hard to cut that way.
24779
Post by: Eilif
AesSedai wrote: I'm planning on a variation, but I'll be using a couple sharpened putty knives to do the "press cutting".
My question to you is: do you think a dremel and grinding bit can sharpen a putty knife to a sharp edge?
A dremel can sharpen a putty knife to an edge (I'd recommend the "sharpener" attachment which includes a plastic guide) but the press cutting method (or "pound cutting method" ) as shown by swampy turtle requires a hammer. I don't think the putty knives would stand up very long to being hit with a hammer, and they wouldn't work well as a slicing knife either.
As Steak alluded to, cutting without pounding requires a slicing motion. Either laterally as with a razor knife (as seen in the first post), or in a circle as with my fitting cutters. You have to apply some downward pressure of course, but it's the slicing motion that cuts the foam.
Automatically Appended Next Post:
Steak wrote:Yeah, I ended up buying the Dremmel bits as well, they work great
One other thing to note, the Harbor freight 1/4 shank power drill griding bits are much, much bigger and more substatial than the dinky little ones that come with their motor tool.
1021
Post by: AesSedai
Elif, are you sure that a sharpened edge can't cut through 2" of foam through direct vertical sustained pressure, without any slicing involved?
I'm hoping that it can. My case plans are based on that idea.
24779
Post by: Eilif
The first few cuts might work. but the hammering might bend the putty knife. I'm almost sure it wouldn't work with just hand pressure.
Still, if you've already got a dremmel, a putty knife isn't very expensive. Give it a shot with some scrap foam and see what happens.
1021
Post by: AesSedai
Elif, you were right, hand pressure couldn't do it. I now have 3 razor sharp putty knives :( and nothing to use them for.
I'm just going to use a utility knife now. I think your tut is great, unfortunately I have too many unsuitable shapes (raiders, etc) to really take advantage of it.
24779
Post by: Eilif
Sorry it turned out that way. Utility knives are really the answer for unusualy shaped figs. I used them for quite a bit of my Mechwarrior and Void Junker's cases.
31303
Post by: swampyturtle
some images from christmas. Theses cases arent modfied yet but the look and layout of the bottom should be enough to show off how well the case works. Something i havent figure out yet is for my valks where to place them? it doesnt leave alot of room for them. This is my main armys case with the tanks and troopers. The one i made earlier is with me at uni and im still putting together the remaining 750+ points of the army. (all together around 2000+ points)
Bottom and Troops (many many many troops)
Bottom and elite + HQ units
1021
Post by: AesSedai
Hey Elif,
I made some trays last knife and I was quite surprised at how smoothly a utility knife can cut foam. Thanks for the encouragement.
24779
Post by: Eilif
Happy to be of help! The only thing I would mention is be willing to change blades often. Foam dulls blades really quickly and a dull blade can make a frustrating mess. Still, blades are cheap, so it shouldn't be much of an issue.
Glad it's working out for you.
Swampyturtle,
I'm not totally sure, but you may need a separate case for your Valks. I've got a valk and a couple of tanks left for my force and while I have room for the tanks and some infantry, I don't think the Valk is going to fit into my two existing IG cases.
53888
Post by: Emerett
That first case looks pro
53801
Post by: 1858remington
I got a Plano case and decided to give this a try, and it worked beautifully. I took a 2" copper coupler and ground its edge to a knife angle, then took a pocket knife sharpener around the opening till it was like a razor. When sharp the coupling cuts the foam with ease and makes clean holes for figs. I backed up the foam trays with 2mm high density foam I got at the craft store. My buddy likes it so much he's thinking of doing one for himself.
Thanks for the Tip!!!
24779
Post by: Eilif
Glad the tutorial worked out for you. Thanks for the tip about the pocket knife sharpener! Can you post a link to this device?
If it's not to expensive, it may be a better solution than a diamond file for doing the final sharpening.
55578
Post by: kcwm
Sorry to slightly necro this thread, but I've recently made two cases using this guide.
I tried one of the two trays using the hammer method and the copper method was much more effective for me. I've actually ordered a third from Amazon to make specifically for my vehicles.
The first two that I ordered from Amazon did not have the customizable bottom layer. Instead, it had the two egg crate foam layers and a small sheet of thin foam which isn't nearly as useful as the customizable foam of some of the posted pictures.
24779
Post by: Eilif
Thanks for the update! I'll make sure to check the next cases that I purchase to make sure I'm getting the right foam.
Can you link to the amazon item you purchased?
55578
Post by: kcwm
Eilif wrote:Thanks for the update! I'll make sure to check the next cases that I purchase to make sure I'm getting the right foam.
Can you link to the amazon item you purchased?
http://www.amazon.com/Plano-Protector-Four-Pistol-Case/dp/B000P3WPKK/ref=sr_1_1?ie=UTF8&qid=1333162091&sr=8-1
I just got my third, for my ghost arks and vehicles. It, like the other two before it, just had a thin, approximately 1/2" layer of foam. It works, just isn't as nice as the pick and pull stuff for things like Rhinos, Predators, etc.
Regardless of that, I have three cases for $60. Sure, I bought a dremel (3000 model), hobby knife, and other supplies mentioned in this thread, but I can use those for other things. For my situation, I do not include them in the costs of the cases. My biggest complaint is with myself. I held the foam while cutting the holes out so that I could watch TV, so the holes aren't straight enough to utilize as many holes as others in the thread have. My mistake.
43218
Post by: Shasta Hawk
kcwm wrote:Eilif wrote:Thanks for the update! I'll make sure to check the next cases that I purchase to make sure I'm getting the right foam.
Can you link to the amazon item you purchased?
http://www.amazon.com/Plano-Protector-Four-Pistol-Case/dp/B000P3WPKK/ref=sr_1_1?ie=UTF8&qid=1333162091&sr=8-1
I just got my third, for my ghost arks and vehicles. It, like the other two before it, just had a thin, approximately 1/2" layer of foam. It works, just isn't as nice as the pick and pull stuff for things like Rhinos, Predators, etc.
Regardless of that, I have three cases for $60. Sure, I bought a dremel (3000 model), hobby knife, and other supplies mentioned in this thread, but I can use those for other things. For my situation, I do not include them in the costs of the cases. My biggest complaint is with myself. I held the foam while cutting the holes out so that I could watch TV, so the holes aren't straight enough to utilize as many holes as others in the thread have. My mistake.
Does the case still have the pluck foam?
31303
Post by: swampyturtle
if you got a wal mart or acadamy sports nearby you could go in store and buy them. When i went to acadamy this past friday, i checked the cases and they still had the pluck foam. Sounds like you got a bad batch or the seller isnt selling the pluck foams like they should
27104
Post by: Madmax1
I ordered mine on Amazon, and it also did not have the pluck foam. I'll have to cut it. Not a big deal, but still a little disappointing.
24779
Post by: Eilif
Those of you who didn't get the pluck foam, was the foam dark-grey/black, or the light grey foam pictured in the Amazon ad?
All the cases I've bought in the past have had a pluck sheet and have been Dark-Grey/Black in color. However, the foam in the amazon stock pic is light grey and the flat sheet doesn't look like pluck foam. It could be that Plano is phasing out the pluck, in which case I may want to buy a couple of the old style cases quickly!
52540
Post by: Bluetau
Going to make myself one of these this weekend for all of my tyranid MCs, brilliant idea.
55578
Post by: kcwm
The foam has been dark gray. I doubt a company like Amazon is purposely holding out on the pluck foam. It's likely that Plano is phasing or has phased it out.
I used spray adhesive to combine two of the thin, flat sheets together. I then adhered some leftover strips of the EVA foam to the inside of the holes that I cut for my Rhinos, and this seems to be working just fine. If I used the third sheet, it'd likely cover them up completely.
I also glued together two of the egg foam for bigger things like my two Necron Ghost Arks, fragile figures like the Necron Wraiths. I'll be able to fit 8 rhino/predator sized vehicles in the double layer of foam and both ghost arks and other vehicles in the double layer of egg crate.
I checked my local Wal-Mart here in Lewisville, TX and they didn't have any of the these cases. Although this Wal-Mart had a small gun section, I haven't checked other Wal-Marts. I also haven't checked the local Acadamy stores because there's not one close to my apartment, but I'll have to check there.
If I can pick one up with the pick and pull layer, that'd be great. If I am unable to, I'm content with what I have and with the price I've paid for it. In fact, I might order a couple more.
Automatically Appended Next Post:
Reporting in:
Academy Sports and Outdoors has them for $15, but they also contain the single, thin layer of foam.
I decided to go to Bass Pro Shop. They sell them for $25, but all four at that store had the pick and pull layer, so I picked one up. I asked a sales clerk and he said that they do not price match.
The pick and pull layer appears to be as thick as two of the single, thin layers glued together, similar to what I've done for my vehicle container. I can take pictures later.
If you have an Academy, I'd say that getting two and gluing the two thin layers together is a better value than getting one with the pick and pull layer. If I didn't want a better way to secure sof of my bigger based models, like the Necron Wraiths, I wouldn't have bought the one I did from Bass Pro.
I could not find the item on bassproshop.com and academy.com said that they weren't available online.
26170
Post by: davethepak
I get them at walmart in the DFW area, and often they have the three layers are described (the bottom layer is about 1" of pluck
foam).
Several of my gaming friends use these cases and they are awesome.
Also, as a note, the GW trays fit nicely in them, with just a bit of room around the edges. I am out of town right now, but will try and post up some pics when I get home over the weekend.
55578
Post by: kcwm
davethepak wrote:I get them at walmart in the DFW area, and often they have the three layers are described (the bottom layer is about 1" of pluck
foam).
Several of my gaming friends use these cases and they are awesome.
Also, as a note, the GW trays fit nicely in them, with just a bit of room around the edges. I am out of town right now, but will try and post up some pics when I get home over the weekend.
Which Wal-Marts in the DFW area? I've checked Lewisville, one off of Beach in Fort Worth, and another off of Rufe Snow in NRH and none have had them. Maybe I need to check Azle or Lake Worth or something.
I'll be checking the Academy off of N. Tarrant in Watauga during a packing trip to the house we are moving to.
26170
Post by: davethepak
I had got them at the wal mart in plano near Coit and GB, and at academy off I75 near / plano and allen.
They are sometimes seasonal - meaning look in the fall when hunting season starts.
They show up now and then. Have about five of them between my best friend and I.
I will keep an eye out this weekend if I run by the store.
55578
Post by: kcwm
I am curious what causes some of the ones that are shipped to have the pick and pull foam layer and the others to not have them.
55578
Post by: kcwm
I went by the Academy off of N. Tarrant yesterday. They had one black case and 6 or 7 pink cases. The black case had the thin layer of foam and all of the pink cases had the pick n pull foam.
I bought one of the pink ones. Now, I just have to convince my wife to play my necron army..."Hey, look! Your army has a fresh, fancy case!". I doubt it will work.
54540
Post by: Langston128
Thank you
44717
Post by: Steak
Its been about 6 months since I made my case, and its working great. The only thing i've had a problem with is the spray adhesive is still tacky and sometimes get on the bottom of the bases of my models.
Any suggestions to avoid this in the future?
57210
Post by: DemetriDominov
I'm so doing this. I treat my army like crap even though I spent so much time painting it, only because I don't want to shell out a wad of money for a ridiculously overpriced case. Thank you for the advice.
24779
Post by: Eilif
Steak wrote:Its been about 6 months since I made my case, and its working great. The only thing i've had a problem with is the spray adhesive is still tacky and sometimes get on the bottom of the bases of my models.
Any suggestions to avoid this in the future?
I've switched entirely over to other adhesives, specifically pliobond. I'm still searching for a less stinky glue, but pliobond doesn't stay tacky. Spray adhesive just isn't reliable enough for me.
For the cases that are still tacky, 25mm rounds of paper stuck to the bottom of the model slots might be a workable solution.
DemetriDominov wrote:I'm so doing this. I treat my army like crap even though I spent so much time painting it, only because I don't want to shell out a wad of money for a ridiculously overpriced case. Thank you for the advice.
Happy to be of help.
55578
Post by: kcwm
I used the spray Elmer's adhesive and I'm running into some of the same issues the OP talked about. It looks like I'll be switching to Pliobond as well.
44717
Post by: Steak
Eilif, where did you buy Pliobond? I haven't looked to hard yet but the first hardware store I tried didn't have it.
24779
Post by: Eilif
Ace hardware has it in small containers. I had them order me the larger containers.
If you're willing to wait a few days...
I just bought a can of contractors Contact Cement today from Menards. It's cheaper, more common and less thick than Pliobond. I'll give it a go in a few days and report back on the results.
24779
Post by: Eilif
Update: Contact Cement and Electric Carving knife
I just finished making a tray with the Dap (original) Contact Cement. As far as I can tell it's holding really well.
http://www.dap.com/product_details.aspx?product_id=35
Pros
-Cheap 6 bucks for a quart!
-Still sticky, but goes on smoother than Pliobond.
-Less thick, so much less product needed than Pliobond
-Dries smooth so you don't have sticky residue if you apply to much or in an area that won't be joined
-Very common
Cons
-you have to coat both sides and wait 15 minutes before joining
-Still has the bad smell
-Bonds instantly when applied, so you better have your stuff lined up right.
I'm going to let it sit for a while, to see if the smell goes away, but 5 minutes after putting the two parts together it the bond is super strong. Not at all like spray adheseive which you can pull apart without much difficulty.
One note, there is a fast-drying version of this product, but it doesn't list foam or rubber as materials it will join, where as the "original" brand does.
More details about the product here:
http://www.dap.com/docs/tech/00030503.pdf
Secondly, I had the chance to try out an old GE electric carving knife that I bought at a resale shop. It oscilates back and forth rapidly. It cuts through foam like butter and makes it easy to cut long, perfectly strait lines in foam with no rough edges. One thing it can't do is dig into the foam so if you're cutting out cavities, you will have to make the first hole with a razor knife or one of your circular foam cutters.
I'm not sure how other carving knifes work, but mine has two blades side by side. It's too large to cut small cavities, but the copper foam cutters do that very well. I am never going back to using a razor knife for cutting foam trays to size again.
I'll post pics later.
24779
Post by: Eilif
2 Days later...
-The join is absolutely solid to the point where if you tried to pull the base off, the foam would probably rip rather than the join.
-The smell is gone to the extend that you have to get your nose right up to it and inhale to smell any of the chemical smell.
Looks like I've got a new adhesive!
Will update the first post momentarily.
47418
Post by: Adrian Fue Fue
Nice case, I actually bout two of these, with army included, off of eBay. I see maybe the got the idea off this page too.
27899
Post by: The Ravening Jaw
So i picked up two of these but for some reason they have apparently stopped including the pluck and pull foam in them and instead just include some regular old foam that appears to be a little bit thinner anyone else run across this? any ideas on how to make it work?
24779
Post by: Eilif
The Ravening Jaw wrote:So i picked up two of these but for some reason they have apparently stopped including the pluck and pull foam in them and instead just include some regular old foam that appears to be a little bit thinner anyone else run across this? any ideas on how to make it work?
How thick is the piece of non-pluck flat foam? There are several suggestions.
1) Use large cutters or razor knife to cut larger holes in which to lay miniatures flat.
2) Get a third sheet of thicker foam or Eggshell. Either bought, or scavenged from packaging. Ask your friends, you probably know someone who works somewhere where things are delivered in eggshell foam. I got a few sheets for other cases this way.
3) Buy a sheet of pluck foam. I recently split an order of pluck with a friend from this place. Here's a what used it for (pasted from another forum),
Thought you all might want to see the storage and transport system I've worked out for my post apoc vehicles. This was a somewhat heavily used (no hardware or strutural damage though) case I found at a resale shop for 5 bucks. It had a layer of pluck on the bottom and a piece of mattress foam that had been cut in the shape of microphones.
Open it up and you find a cardboard box/tray that I've added, and a layer of foam on top.
Under that my largest cars are in a foam the tray filled with 2.5 inch pluck foam that I purchased from the foam factory who has great prices on large pieces of pluck foam in different thicknesses. You can see where I plucked out cavities for some future cars but put the foam back for support until I have cars to put in there.
http://www.thefoamfactory.com/packagingfoam/picknpluckcr.html
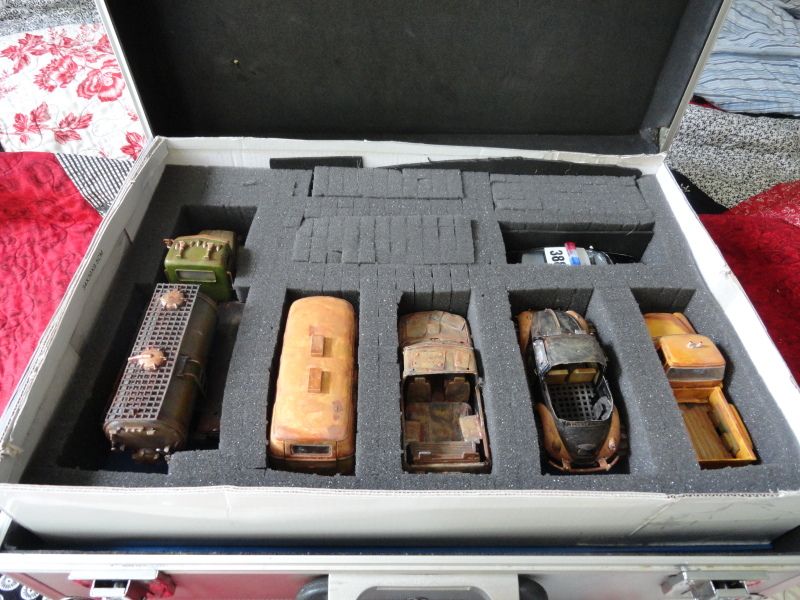
Below that I have a layer of 3mm EVA foam I use this for the bottom most of the custom figure trays I make. It's available at craft stores for a buck a sheet and is called "Funky foam". It's the same stuff (though slightly thinner) that sabol uses for the bottom of their trays. It's also the same material that this case came lined with.
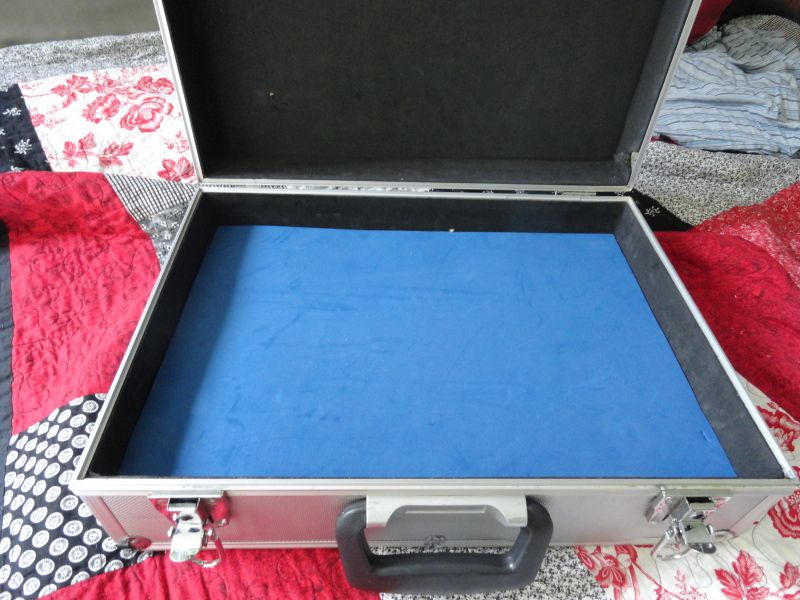
Below that the rest of my cars are seated in the layer of pluck that came with the case.
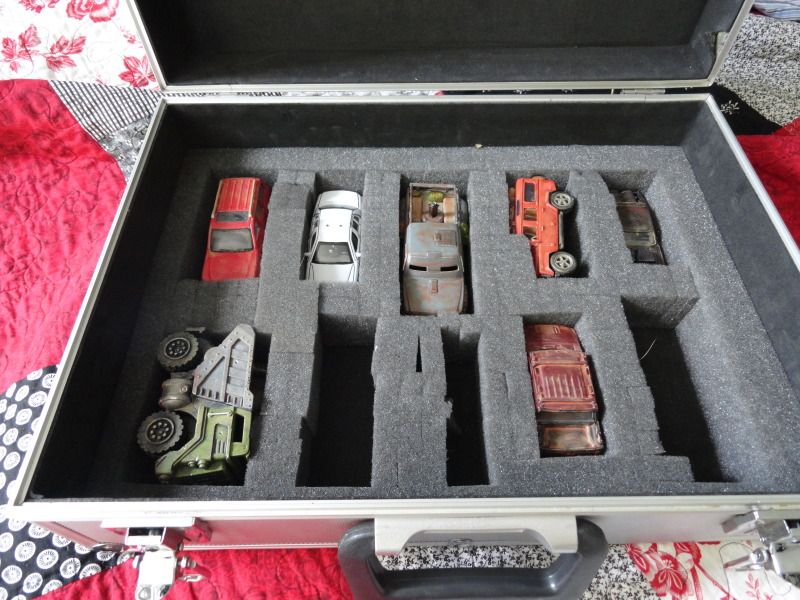
I'm really happy with the way this case came out. I was thinking that I was going to have to use one of the plano 1401 cases that had purchased for figure storage ( as I've done here: http://www.dakkadakka.com/dakkaforum/posts/list/362407.page ) but this box has worked out perfectly and including the foam used, I've probably got only 12 bucks invested in it. It worked great for taking my vehicles to the Little Wars convention, and as the club alternates between the FLGS and member's homes, it will likely prove useful in the future.
55578
Post by: kcwm
The Ravening Jaw wrote:So i picked up two of these but for some reason they have apparently stopped including the pluck and pull foam in them and instead just include some regular old foam that appears to be a little bit thinner anyone else run across this? any ideas on how to make it work?
This was the point that I tried to make before.
What I did was take two of those thinner sheets and adhere them together. From there, I cut rhino sized holes out and then reinforced it with some extra foam I had after adhering foam to the bottom to make a base. It works fine and the case that I took the second thin piece from isn't missing it.
47418
Post by: Adrian Fue Fue
I made one of these using 2 inch thick foam. I went through a couple razor blades but for $1 you can get those packs of 3 with 10 blades in them. 30 blades got the job done. I used the AoBR box as the case holder. But after a while I got tired of taking them in and out on their backs.
SO, I moved on to using magnets under the bases, and strong Tupperware with medal sealed to the lid. When it is time to play, I open the Tupperware, and flip the lid over. As my guys die I put them right back on the lid.
44717
Post by: Steak
So, I've been slowly drifing away from 40k and into Warmahordes. As I've been looking at different blogs and forums I came across this guide to magnetizing units and making a case.
Link
If you buy the box from the site he recommends it comes out to be pretty cost effective. Naturally, you can upgrade to a Sabol bag or something else more expensive and get similar results but I figured it would give us cheap bastards some more options
40960
Post by: Grendler7
For those of you who do not have access to a dremel or want to sit and grind out your edge, there is a very cheap tool called a Pencil Reamer. They are very cheap. And, it works quite quickly at making an internal edge. All you do is place the reamer on the inside edge of the copper fitting and turn the blade. The only trick is to continue in the direction that you started with. Trying to switch directions in the middle of reaming out the fitting is a pain.
1
69427
Post by: Demigod
This is great, I have quite a few old plastic case like that and will certainly put them to use. Thanks
24779
Post by: Eilif
rigeld2 wrote:http://sport.woot.com/plus/boyt-harness-gun-cases
More expensive but potentially higher quality
Interesting. Seems to be on par for quality and price with brands like UK and Pelican. Far more protection than most wargamers would need, but if you need a waterproof hardshell for you minis, it could be a good option.
42040
Post by: grayshadow87
For curiosity's sake, is there any way of adapting this method for use with Warmachine/Hordes? For that matter, exactly how effective would the Plano method be for PP models?
Automatically Appended Next Post:
Aside from 30mm models, that is. I mean, obviously it's not going to work for anything larger than 50mm models, but I'm concerned with its use for 40mm and 50mm models.
47462
Post by: rigeld2
It's the same method - just use a different size "bit"/cutter.
24779
Post by: Eilif
 grayshadow87 wrote: grayshadow87 wrote:For curiosity's sake, is there any way of adapting this method for use with Warmachine/Hordes? For that matter, exactly how effective would the Plano method be for PP models?
Automatically Appended Next Post:
Aside from 30mm models, that is. I mean, obviously it's not going to work for anything larger than 50mm models, but I'm concerned with its use for 40mm and 50mm models.
You can do larger dimensions, you just need to glue the foam layers together to form thicker trays. Check out the case I made for Mechwarrior figures a couple pages back and the one I made for my friend's fantasy figures. Both of them have a thick lower tray made by glueing two pieces of eggshell together interlocking, and a thinner top tray. It might require one more piece of foam.
43693
Post by: fenrir1997
I've seen this thread floating around before, but never paid it much thought. Finally clicked into it, as my green army transport case doesn't have enough space for my DE or Cryx.
I'm really liking this tutorial. Excellent stuff. I've seen that hardshell case around before, and never really thought of using it that way. Less than $30 for a protective case, large enough to hold an army? HELL YEAH.
Bring on the Walmart/Hobbylobby adventure...
2726
Post by: J'santai Khan
Great idea! Now if only I could find someplace local that sells the d@#med things!
24365
Post by: Arth-Rytis
I would like to apologize in advance to those of you who dislike reviving old threads, but I felt it necessary. This is still a very relevant topic.
I found it yesterday. along with the original Kutzmon post. It is absolutely amazing. Gaming cases are so absurdly overpriced, and most of the alternatives (tackle boxes, tool boxes...shoe boxes, etc) just do not provide the protection needed for miniatures.
Walmart now has the Plano case listed at $11.97 online. I plan to purchase two today, one for vehicles and one for troops.
I do have a couple of questions:
Has anyone attempted to use hole saws? They would increase the price of the project a little(maybe $10), but I'd imagine that you could cut the hole-cutting process down to 5 or 10 minutes, maybe even less. You also wouldn't have to worry about resharpening.
Also, I noticed that a few people mentioned that the Plano case either doesn't always come with the pluck foam, or that it no longer comes with it. Can anyone verify this? Is it something that differentiates alternate versions of the case? It was mentioned that the case may be listed as Plano Protector series 4 pistol case, Plano Reel case, or Plano XL Accessory case. are these names provided by the retailer or are they actually different cases? Perhaps this is what differentiates between those with pluck foam and those without. And for those cases that do not come with the pluck foam, what are the dimensions of the foam that is in its place? Is it identical in size to the pluck foam?
Thanks
24779
Post by: Eilif
No problem for the necro-thread. I'm happy to see folks getting use of it.
As for the hole saw, I've not tried it. It might work, but I tend to make some of the holes very close together to maximize capacity and I think the potential for tearing the walls between the cavities would be much greater with a hole saw. Still, if you've got bits of the right size, it's definitely worth a try.
Regarding the pluck-or-not, I've bought them with the same label (probably the same sku, but I don't know) and found some that have pluck and some without at different times. The solid foam piece I've found in it's place was similar in thickness to the pluck foam.
As for the different names, as near as I can tell this is the exact same case with different stickers on it. I haven't been able to track if differing labels correspond to the presence or lack of pluck. I haven't bought any in about a year however, and I don't recall if the last ones (from walmart) had pluck so I'm not sure what the case has now. I know that in the listings they seem to not specify. I would recommend taking the item numbers from different listings and calling the Plano corporation directly to find out.
http://www.planomolding.com
43693
Post by: fenrir1997
 Arth-Rytis wrote: Arth-Rytis wrote:
I do have a couple of questions:
Has anyone attempted to use hole saws? They would increase the price of the project a little(maybe $10), but I'd imagine that you could cut the hole-cutting process down to 5 or 10 minutes, maybe even less. You also wouldn't have to worry about resharpening.
Also, I noticed that a few people mentioned that the Plano case either doesn't always come with the pluck foam, or that it no longer comes with it. Can anyone verify this? Is it something that differentiates alternate versions of the case? It was mentioned that the case may be listed as Plano Protector series 4 pistol case, Plano Reel case, or Plano XL Accessory case. are these names provided by the retailer or are they actually different cases? Perhaps this is what differentiates between those with pluck foam and those without. And for those cases that do not come with the pluck foam, what are the dimensions of the foam that is in its place? Is it identical in size to the pluck foam?
Thanks
This is absolutely a relevant topic today, so your thread-necro is sound; these miniature cases are quite pricey; anything to help the gaming community is appreciated, and I bet there's quite a few new gamers that hadn't seen this will now be the wiser for transportation options.
1: I wouldn't suggest using a hole saw. IMO, they're too aggressive, as they're meant for wood. I can see you tearing a big ugly whole in your foam, and then that sheet is toast. If you do try it, please share the results, as I may be wrong.
2: My plano did NOT come with pluck, but I also purchased mine 2nd hand. Ymmv if you purchase it new. I might suggest going to your local outdoor sporting shop, and seeing how much pluck foam would be for a pistol case. They probably provide foam at reasonable rates, as people choose to keep different firearms and equipment in boxes as those belongings change hands and such.
I personally traced the piece of egg-crate foam that mine did have onto another piece, and cut that out with a good pair of utility shears. It's now the home of my Warmachine Colossal Galleon
3: The official Plano code is "Plano 1404", and you're in luck: of all the places I've looked, Walmart is indeed the cheapest (after 2nd hand, of course).
81303
Post by: Stormwall
Oh wow, cool that this came up. My friend suggested buying one of these so I did.
I am going to try to wrap a metal sheet and rivet it to the case, and embed small earth magnets into my miniature's bases to hold them in. Then cut the foam to fit, remove the miniatures and adhere it. (Not all that in that order but, you get the gist.)
Very great case, it's at Walmart for like 11$.
1611
Post by: Nuwisha
 Eilif wrote: Eilif wrote:2 Days later...
-The join is absolutely solid to the point where if you tried to pull the base off, the foam would probably rip rather than the join.
-The smell is gone to the extend that you have to get your nose right up to it and inhale to smell any of the chemical smell.
Looks like I've got a new adhesive!
Will update the first post momentarily.
Question about when you put the DAP on the foam, do you put it all over the foam, or just part of it? I'm wanting to recreate this and I'm not sure if I should just put a layer all over the foam or not.
Thanks!
24779
Post by: Eilif
Nuwisha wrote: Eilif wrote:2 Days later...
-The join is absolutely solid to the point where if you tried to pull the base off, the foam would probably rip rather than the join.
-The smell is gone to the extend that you have to get your nose right up to it and inhale to smell any of the chemical smell.
Looks like I've got a new adhesive!
Will update the first post momentarily.
Question about when you put the DAP on the foam, do you put it all over the foam, or just part of it? I'm wanting to recreate this and I'm not sure if I should just put a layer all over the foam or not.
Thanks!
Sorry about the late reply.
I just layer it over all of the bottom of the foam and the top of the base sheet. It dries non-tacky so you don't have to worry about getting the contact cement on the areas of the base sheet that will contact the bottom of your figures.
19204
Post by: Maddok_Death
Revives for days!
Still my favorite and most used Tutorial on Dakka!
I'm currently using this tutorial for my Malifaux and Infinity Minis, But since I'm need space for 20ish minis I'm using the Pistol Case (fits 2 pistols) It will fit a Large Based Mini (Dreadnaught in size) laying down.
I have 6 bigger Plano cases: 2 for X-wing, 2 For 40k Orks, 1 for Saga/ Malifaux, and 1 for my Space Wolves.
I use Hot Glue for the Kids foam to the Egg Crate its worked pretty well, probably takes more time but its what I've got on hand.
24779
Post by: Eilif
Thanks M_D,
Great to hear that folks are using this. The Hot glue solution is a good one. I think I used Hot glue to repair a couple of the early trays that I used the less-than-ideal spray adhesive on. It worked great. I've been thinking about doing a new version of this tutorial sometime and if I do I'll include that.
Since this article I've also made a couple cases using resale shop Video camera bags that have roughly the same dimensions as Sabol bags. I bought some used trays for a buck or two each and rearranged the pluck foam bits for my figs. I used hot glue for all those as well.
|
|
