5256
Post by: NAVARRO
Hi guys, my life is changing very fast and I needed a platform to update my stuffs faster and on the road since I'm migrating to another country this year.
So I have a couple sites but its structure is so heavy to update that its not a option so I opened a Blog on Blogger were I can upload all my new stuff and old projects that never finished as well as just wips etc. This way I can update things faster.
With all this said I will open this thread here so that you guys can follow the stuff I update there over here at dakkalands. 
Blog address http://mr-bugman.blogspot.com/
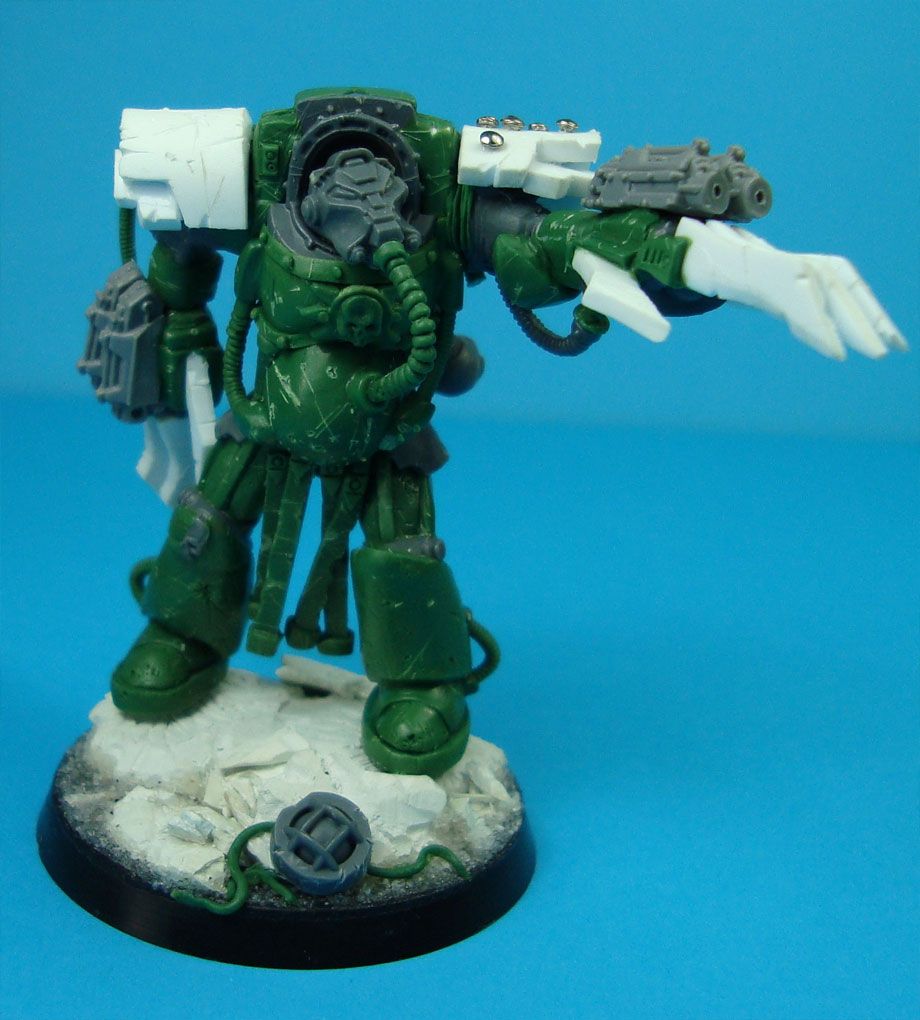
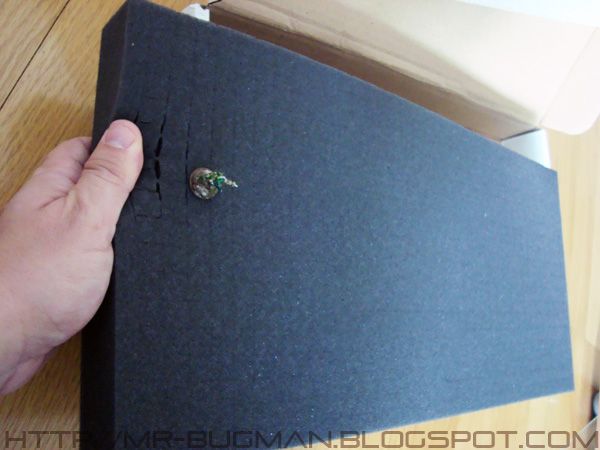
And for starters you have a Tutorial of how to make this 15mm scratchbuilted bunker

And one of my last commissions
43612
Post by: Rawson
Wow! Great sculpting on that termie. I'm assuming he is some sort of character, pre-heresy maybe?
Keep up the good work!
Cheers,
Rawson
32785
Post by: RaptorsTalon
I love that Terminator!
37206
Post by: Igandris
Great bunker and that termie looks amazing!
Can't wait to see more. 
5256
Post by: NAVARRO
The bunker is finished I just painted it full or rust so it can fit both scifi and post apocalyptic settings for my 15mm.

It was fun to paint and if you guys liked it and are curious about the color formulas I did a mini tutorial about it here http://mr-bugman.blogspot.com/
In the future I will do more detailed tuts just for little things, like how to do rust, how to apply masks etc.
39358
Post by: Paranoia_Agent
Looks great i love the way you painted the bunker!
I just realised i have all of those parts in my spare bits box and im just starting another terrain board i may use your bunker idea for my trenches/bunkers thanks for the tutorial.
5256
Post by: NAVARRO
Glad it inspired you, just checked your terrain blog and wow, thats a lot of terrain you have there, great table
5256
Post by: NAVARRO
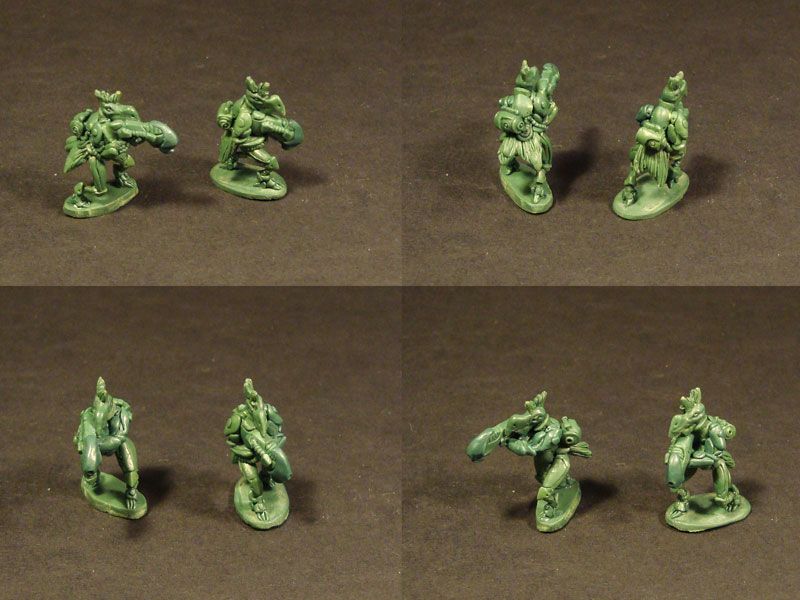
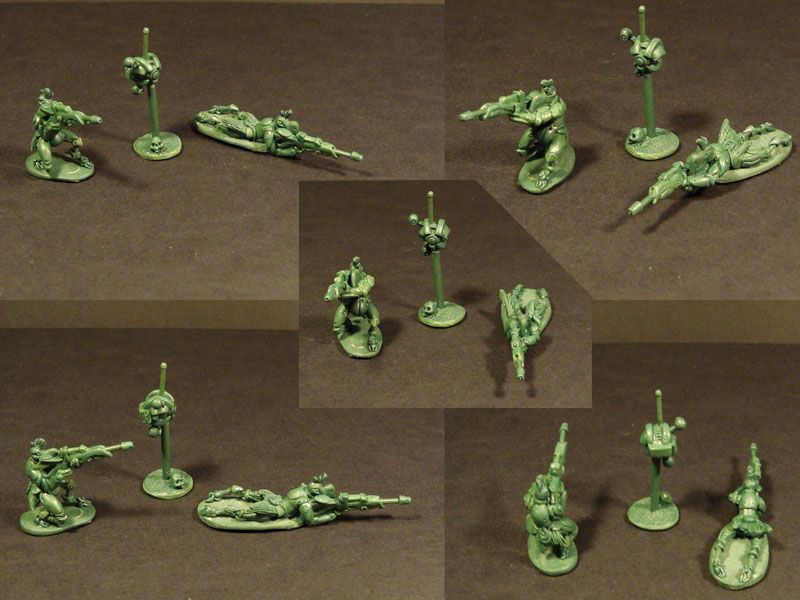
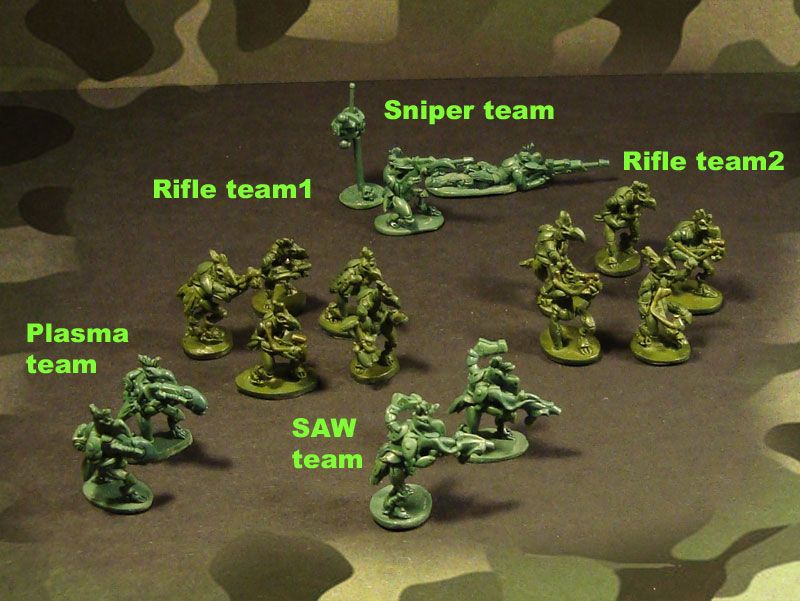
Little 15mm update, I just converted on rifle man to a RPG and finished 2nd rangers squad.
15mm is fun!
http://mr-bugman.blogspot.com/
5256
Post by: NAVARRO
One of my friends miniatures needed to go to the putty doc since she needed a new arm.
Man I love oldschool necromunda miniatures and it was a pleasure to fix this one...

Small convo but very enjoyable.
As usual more angles and comments at my blog.
5256
Post by: NAVARRO
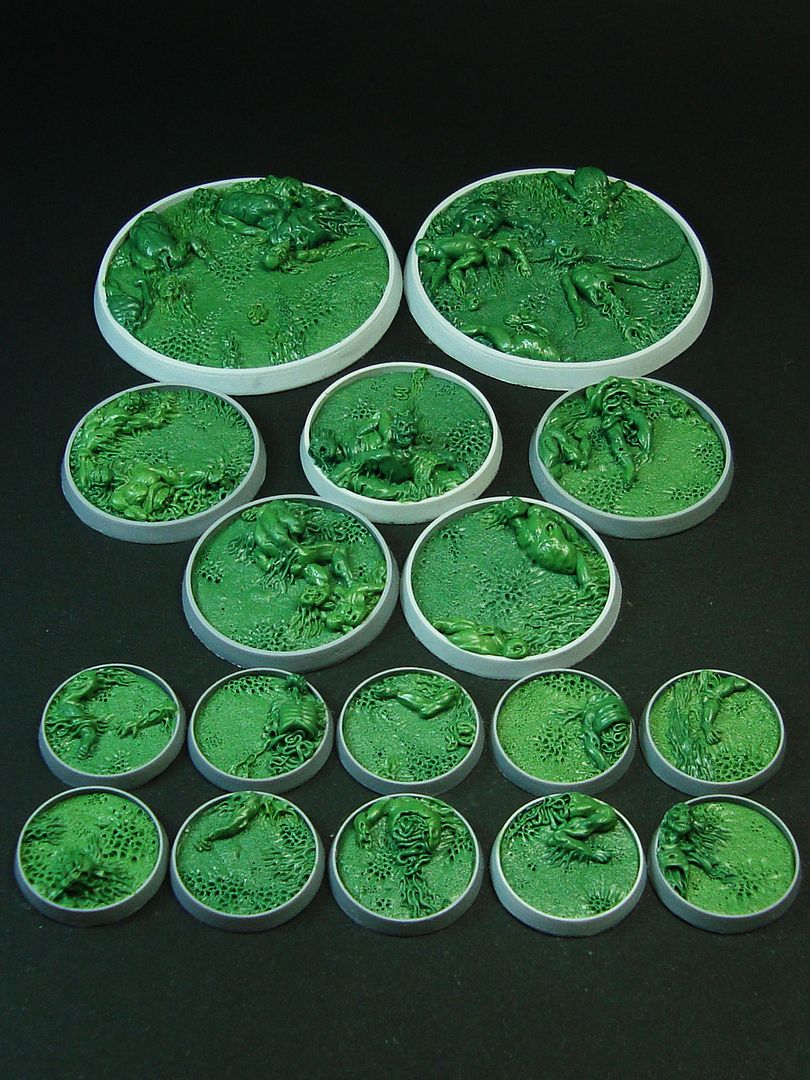
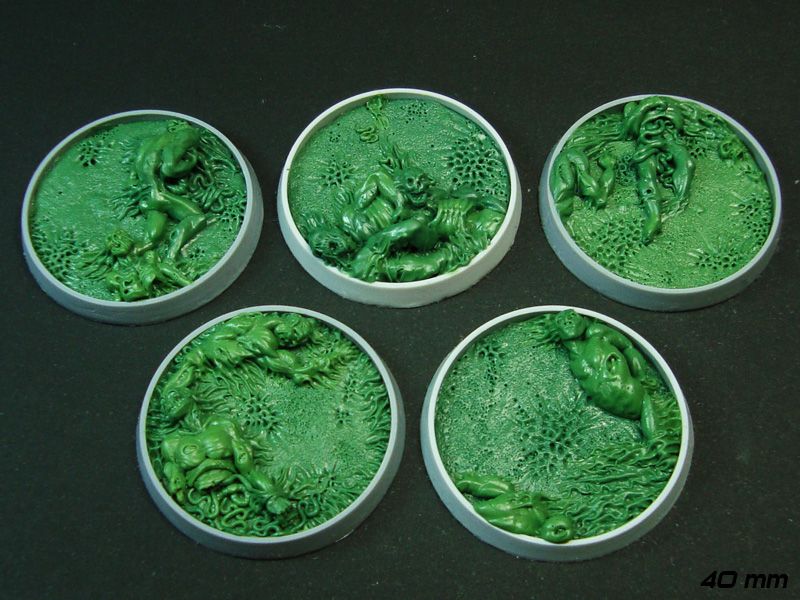
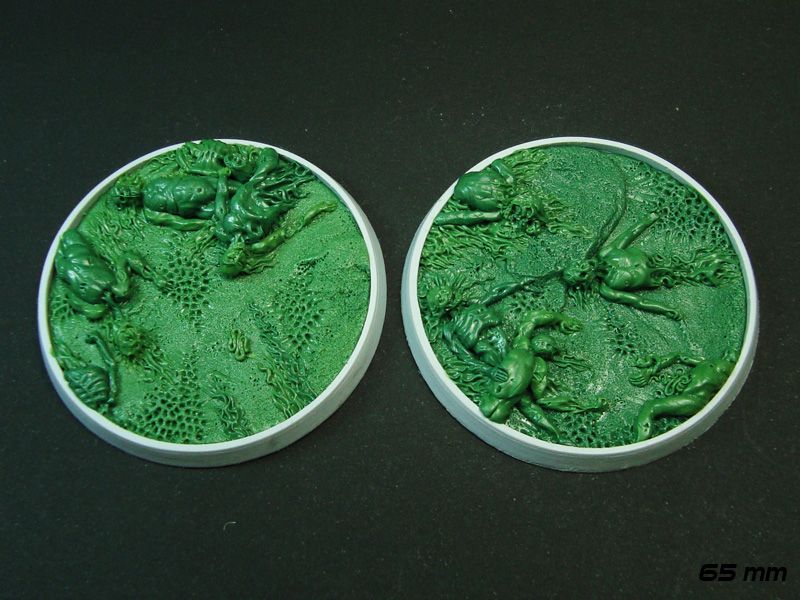
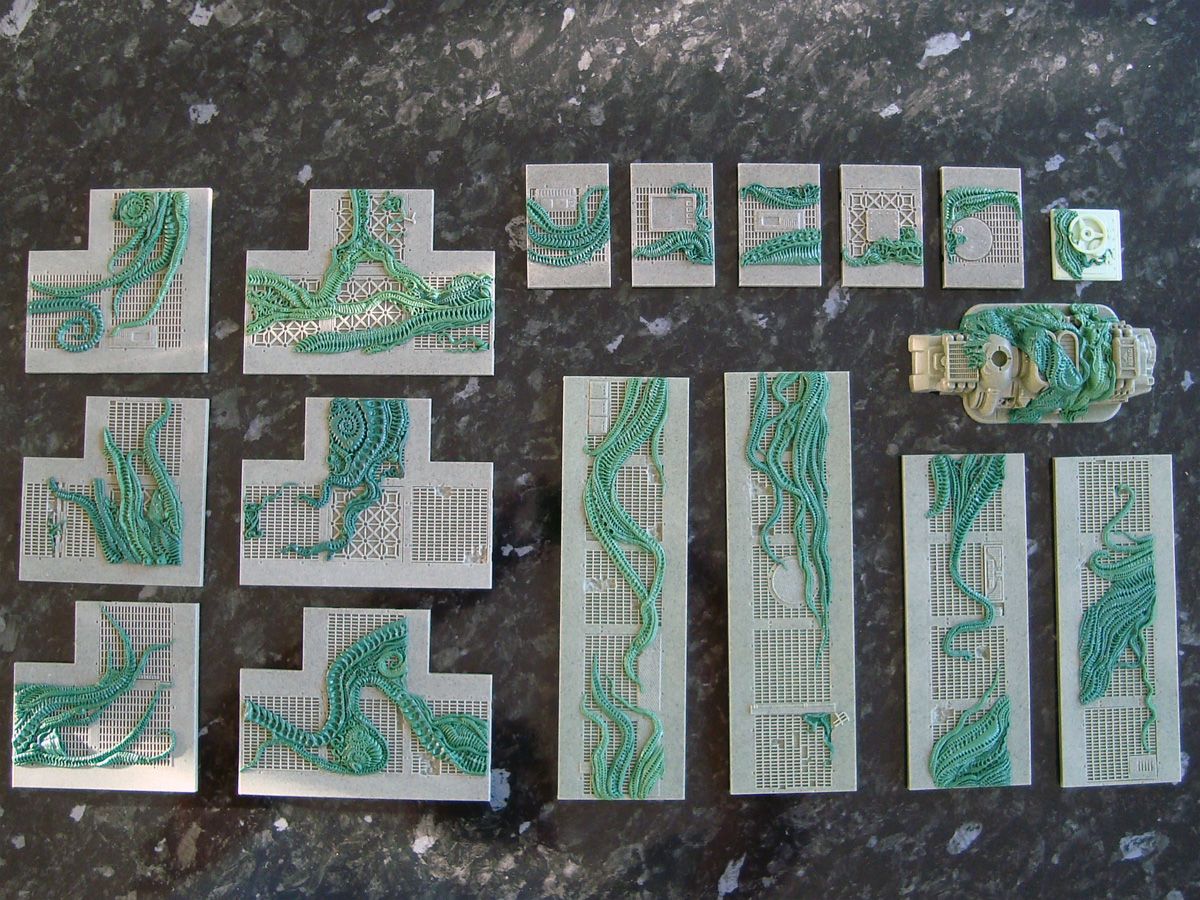
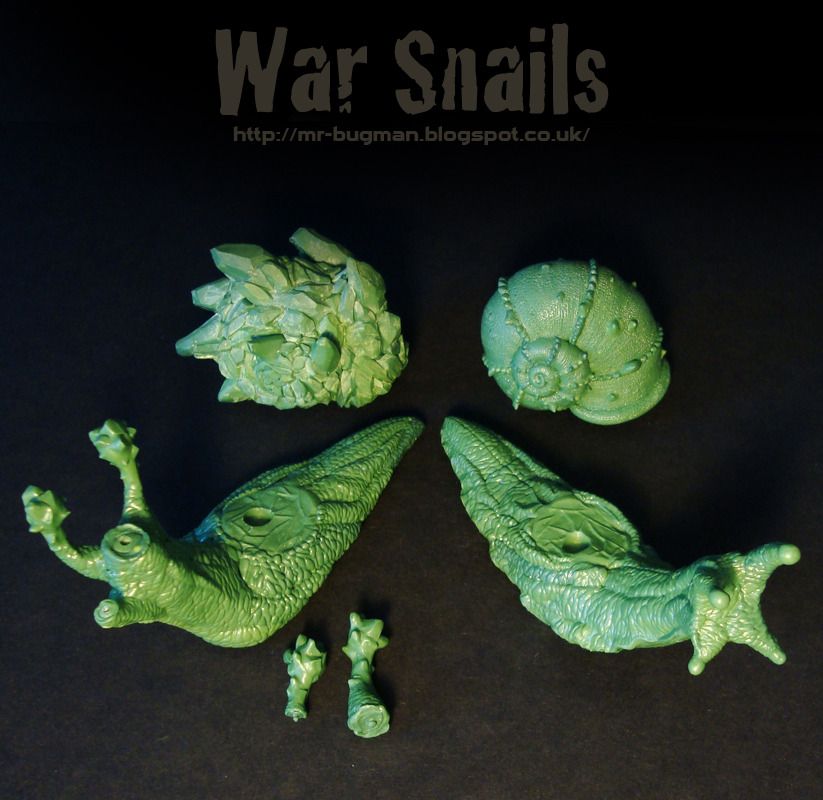
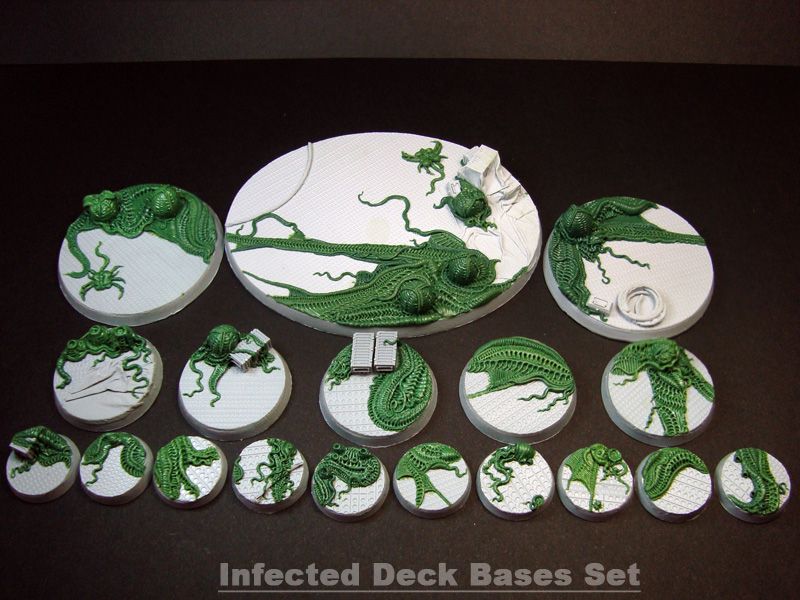
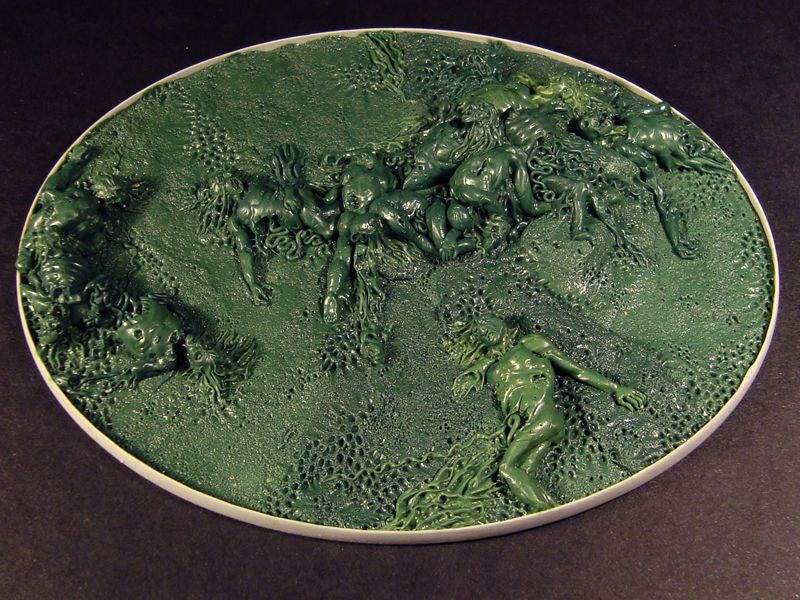
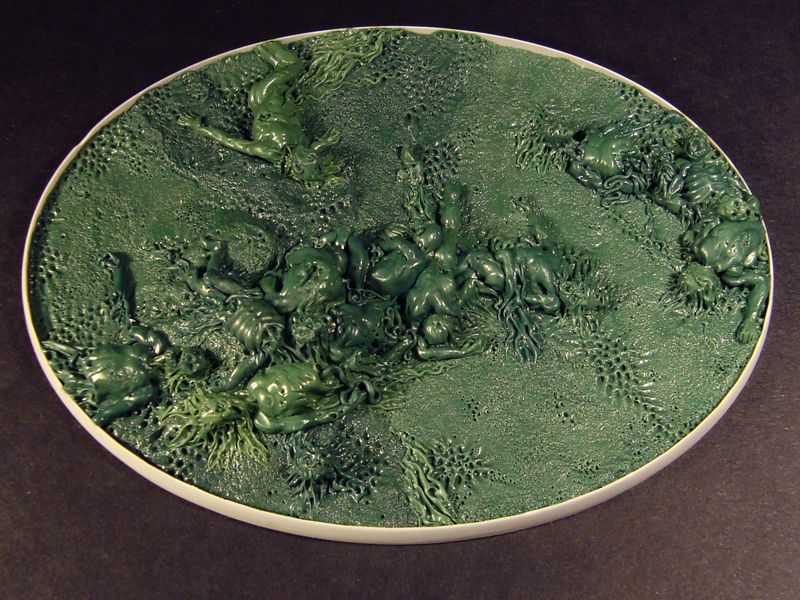
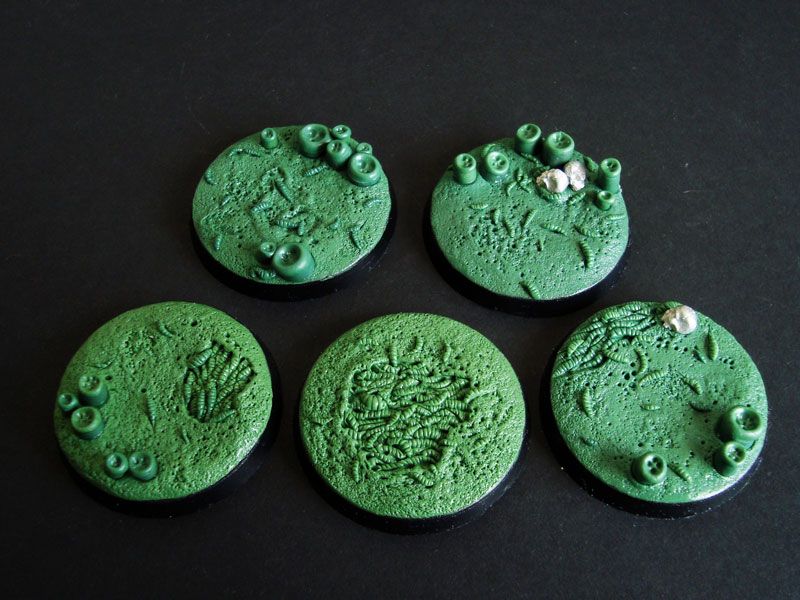
Hey folks just finished a bunch of new bases for Secret Weapon Miniatures and they are aproved and ready to be shipped.
This time the theme was close of what I have been developing for Justin but a bit more wild since its 100% gigerish alien bases with no city ruble or stones like previous sets, just total alien bases.
Here's a overall picture
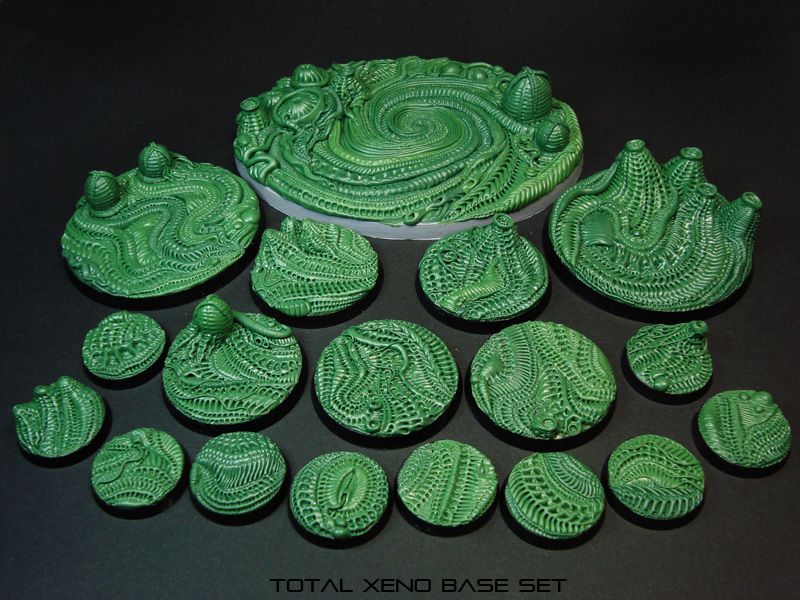
More pics with more detail and comments at
http://mr-bugman.blogspot.com/
Have fun bug lovers
24567
Post by: Kroothawk
Nice sculpts as always! Just when I need more Tervigon bases
BTW to which country do you move and when?
5256
Post by: NAVARRO
Kroothawk wrote:Nice sculpts as always! Just when I need more Tervigon bases
BTW to which country do you move and when?
Going to move to UK for at least the next decade as soon as I find a job there.
5256
Post by: NAVARRO
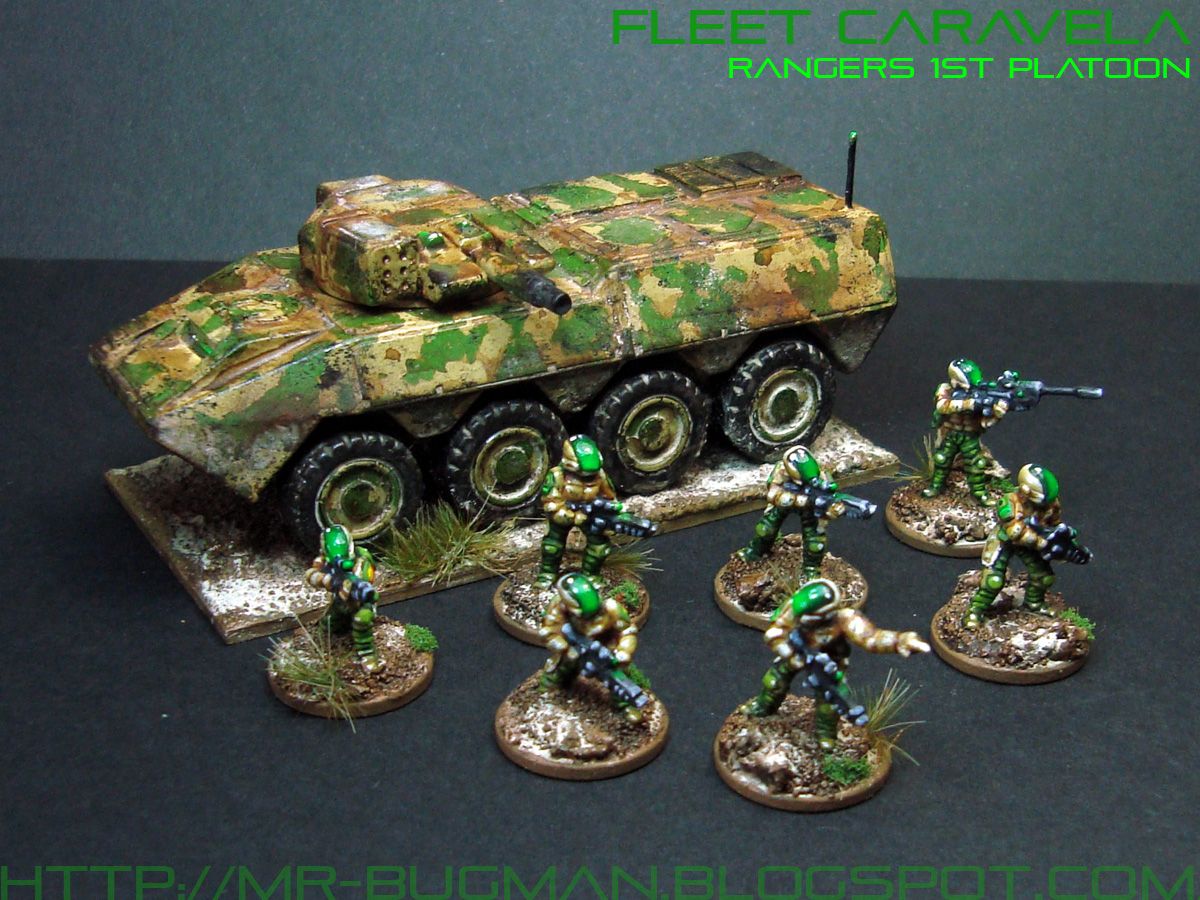
I just painted some APC's for my 15mm universe.
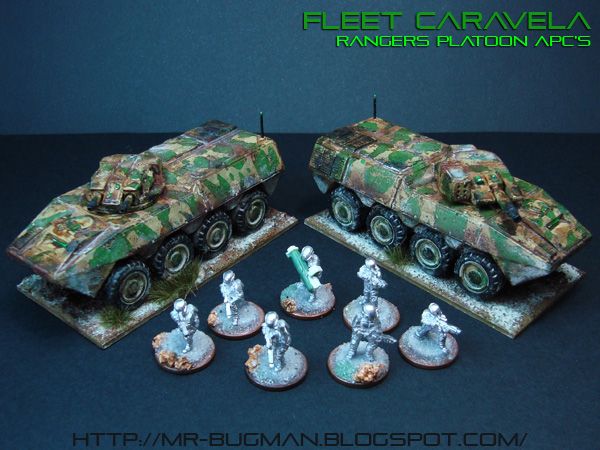
And I also made a small painting tutorial on my blog:
http://mr-bugman.blogspot.com/
I'm glad that painting 15mm is so fast and enjoyable, everything is simpler in 15mm and for what is essentially gaming pieces I'm happy with the final results.
For me 15mm has to be one of the most positive experiences to hit my modelling table and I'm very excited with the challenge these miniatures gives to any painter or sculptor. Fun times!
5256
Post by: NAVARRO
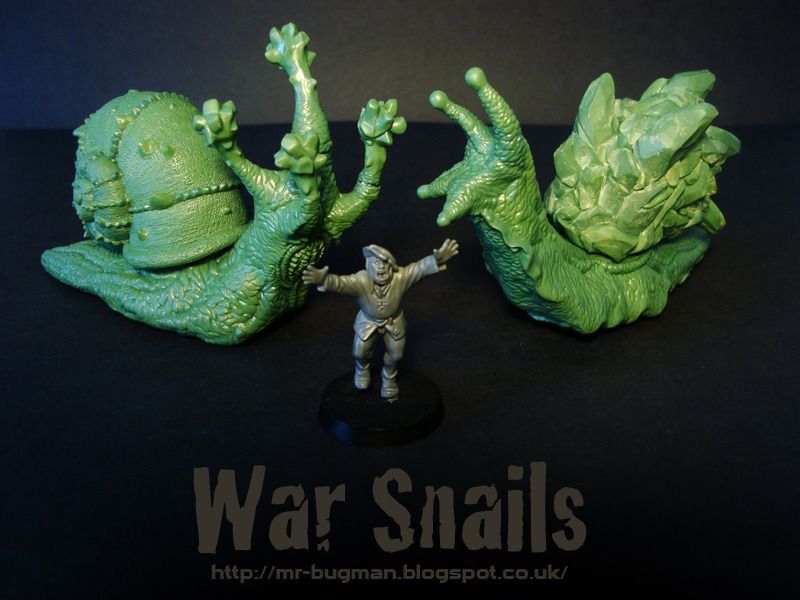
Well I just received a SUPERB gift painted by a friend AKA DEMI MORGANA...
HAPPY INVASION by Demi Morgana
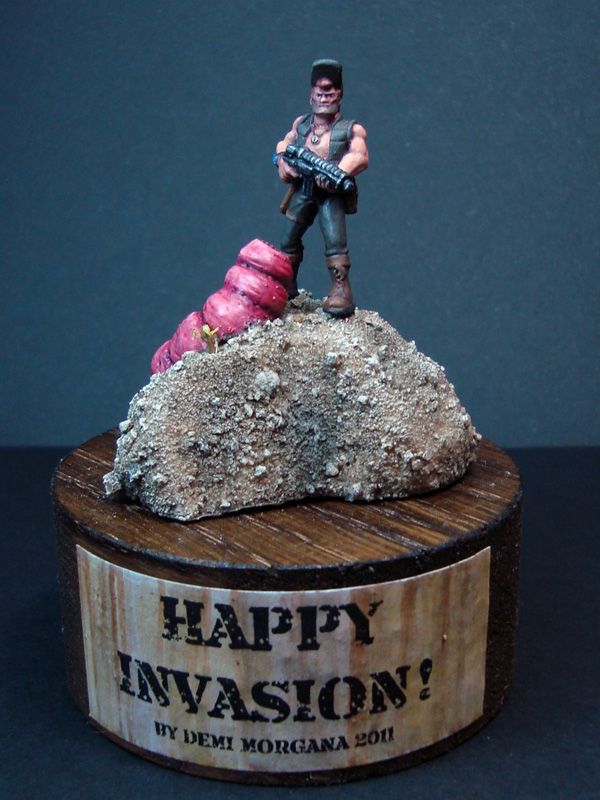
More pics as ussual: http://mr-bugman.blogspot.com/
It was a great surprise and Im so happy with this, there is nothing like cool painted bugs!
38415
Post by: tantan628
Hi, great work so far; amazing.
Do you know whereabouts in uk you're moving to yet?
5256
Post by: NAVARRO
Not yet it depends were I find the job
A small update:
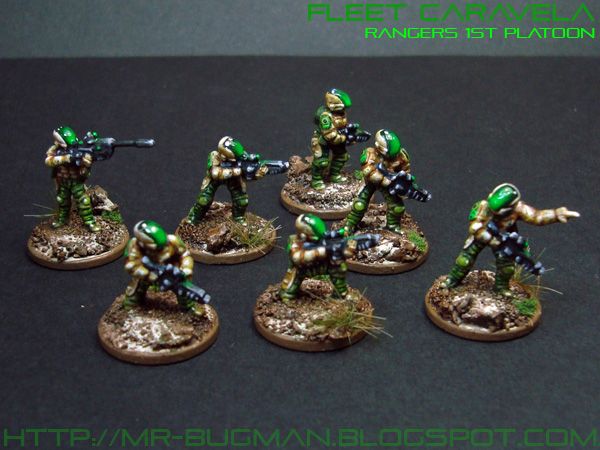
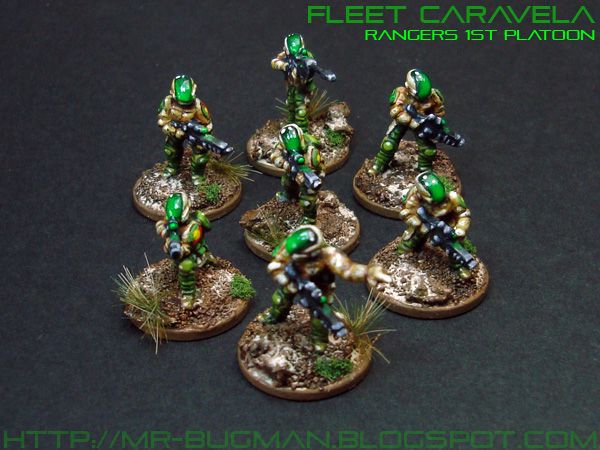
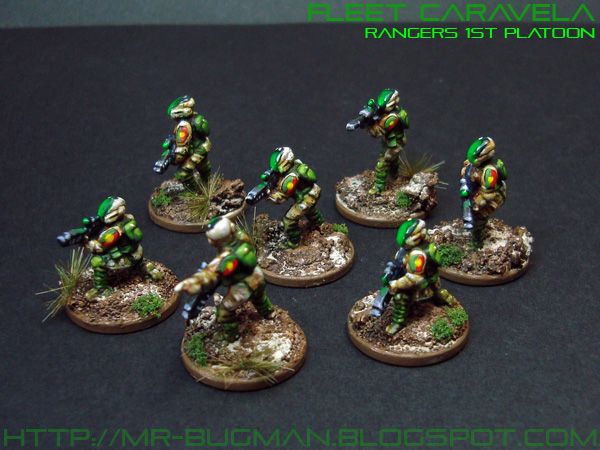
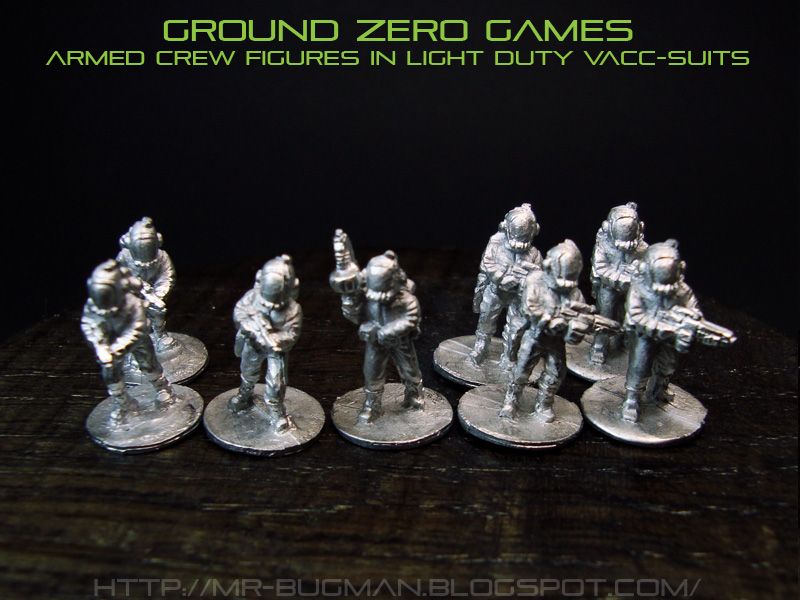
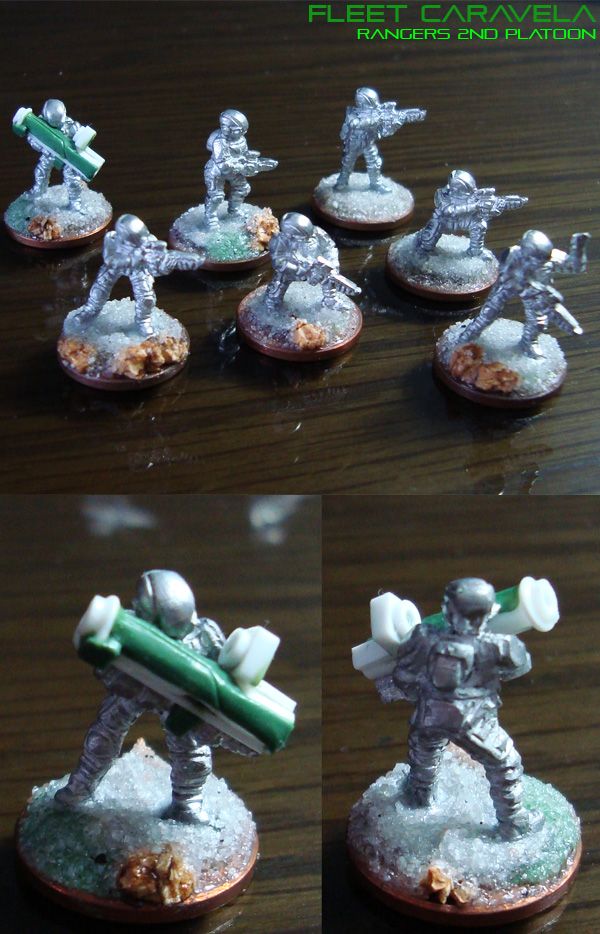
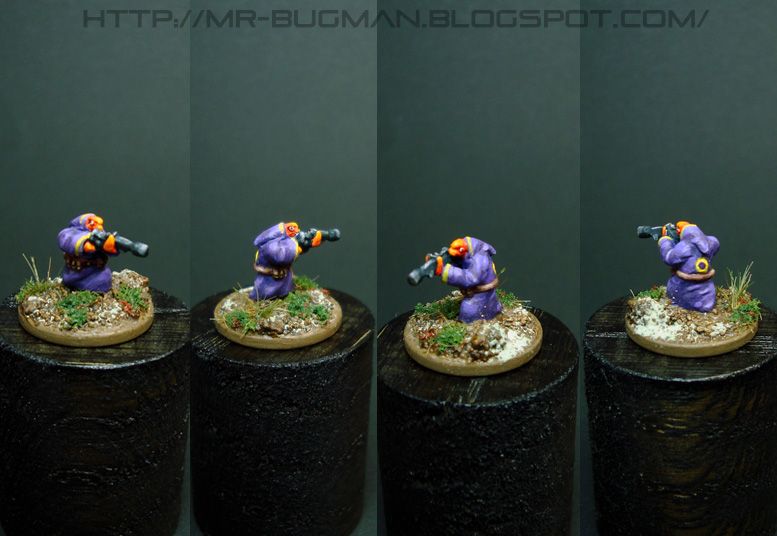
I managed to figure out the color combo for my 15mm UNSC rangers... I tried contrasting colors and even ventured myself in including battle damage on 15mm... a bit risky for my first painted 15mm but it looks good enough for a tabletop piece.
A big zoooomed image because real size pictures are way to tiny

Now to paint the rest of the platoon and if you are curious about color formulas and how I painted this little fella check the blog for extra infos.
5256
Post by: NAVARRO
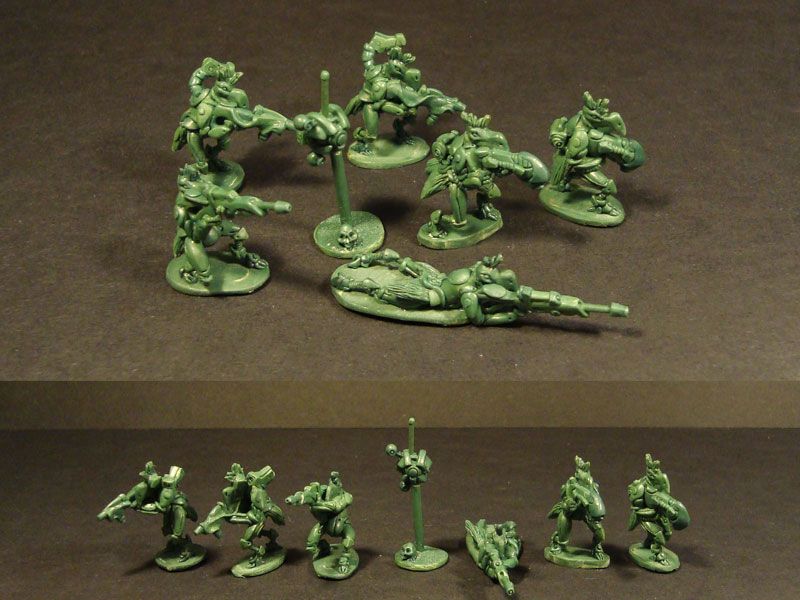
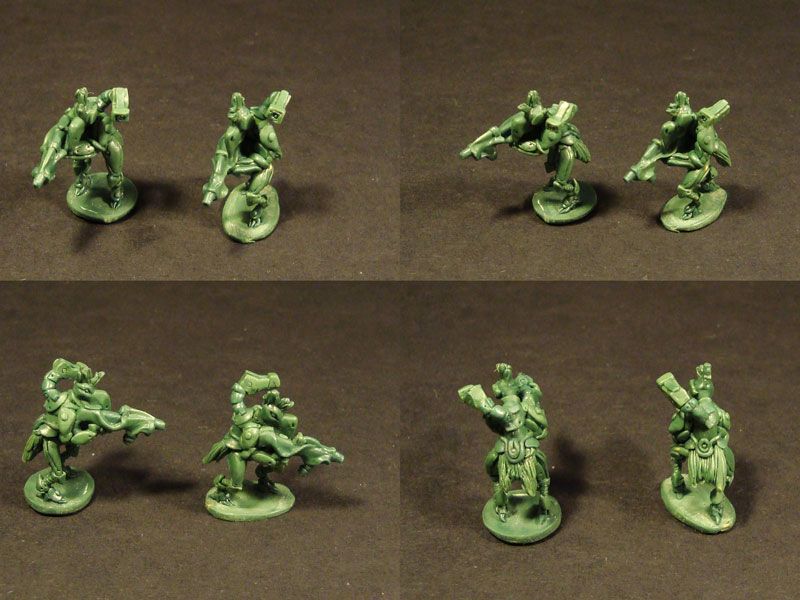
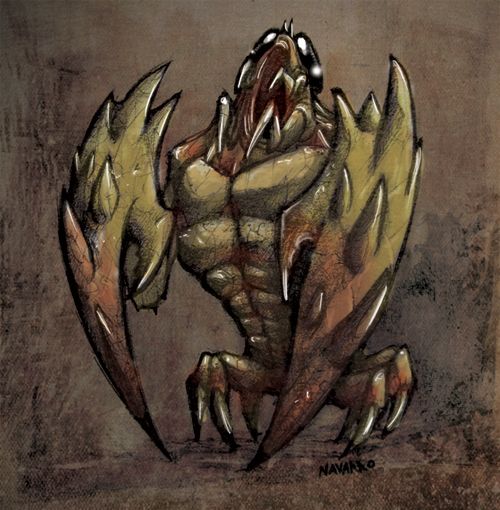
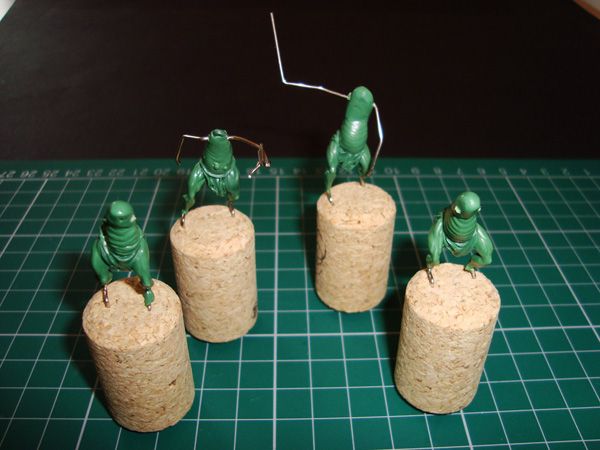
Well my 15mm adventure just got bigger, this time I was aproached by Mad Robot miniatures with a new concept for alien race... My objective is to sculpt a squad of these lovely Warbirds.
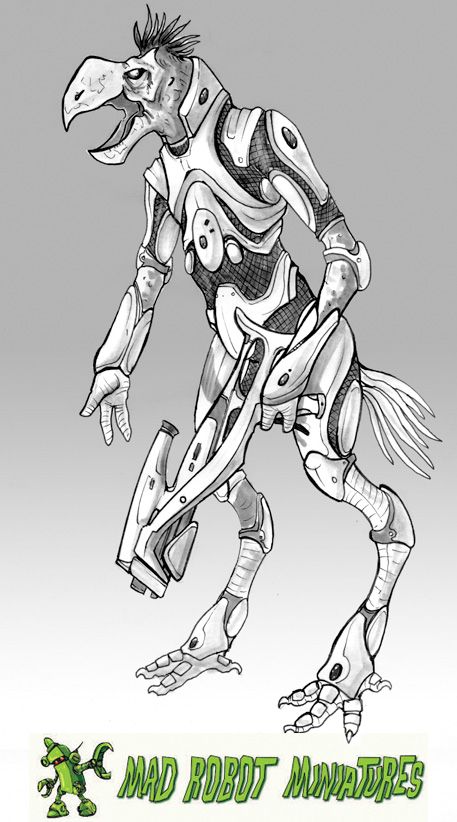
I liked the concept that Mad Robot created lets hope I can do justice to them in 15mm, wish me luck guys.
More details at http://mr-bugman.blogspot.com/
38415
Post by: tantan628
I love that concept. It's like kroot but in tau armour.
4670
Post by: Wehrkind
Those are pretty awesome! The birdman actually reminds me a lot of an alien species in "Old Man's War" by John Scalzi. If you are going to be sculpting some you might want to pick it up; great book in general, and in that one or the sequel the bird things play a big part.
When are you moving to the UK? I still intend to get those parts to you, as soon as I find out where they got packed for our move :(
32626
Post by: taffiarti
The birds actually remind me of the ones in the dark crystal, just more futuristic. I definitely look forward to seeing these sculpts. My fingers and toes are crossed as requested.
30139
Post by: 40k Ninja
Looks great. You have really good modeling skills. Nice work. 
5256
Post by: NAVARRO
Thank you guys I'm already sculpting some little warbirds, 15mm is so damned funny, I will keep you posted.
Soon I will post some paintjobs and some greens for Otherworld Miniatures.
5256
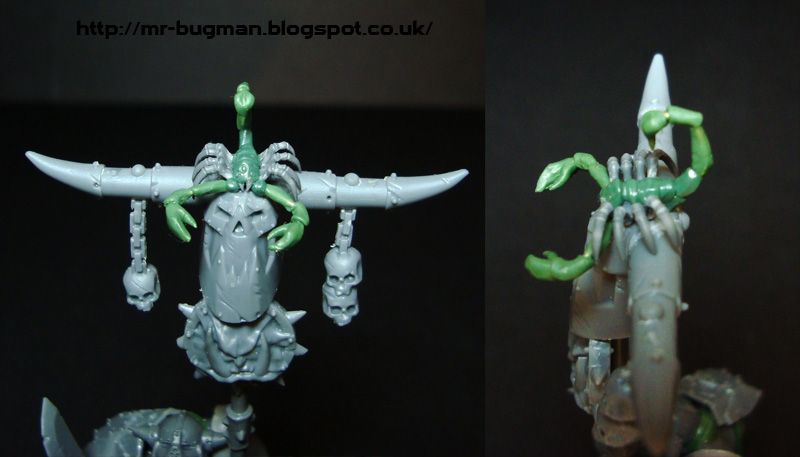
Post by: NAVARRO
Sculpted some more bugs for Otherworld miniatures, this time 3 scorpions that are multipart so you can change the pose if you like it.
I uploaded more pics of the parts and scale shot on the blog as usual.
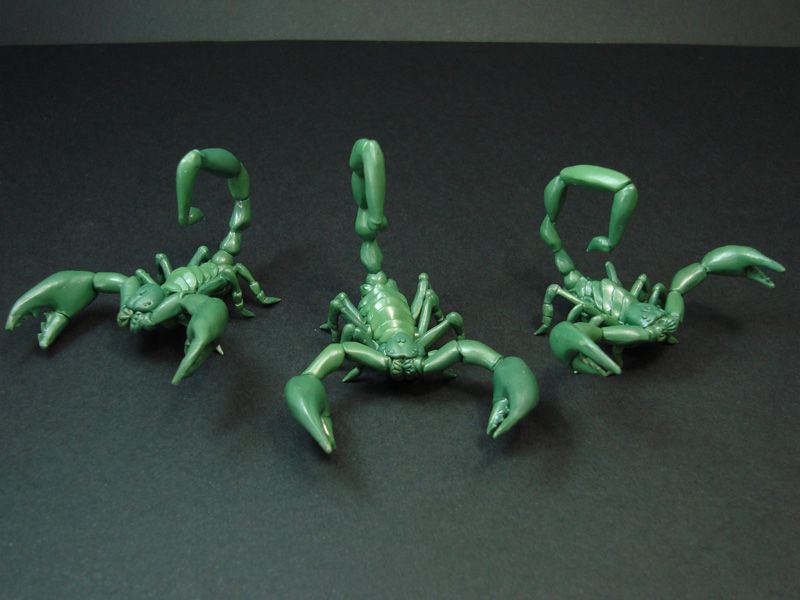
These were lots of fun to do but a bit time consuming since each has 8 legs and 2 pincer arms, at the end of this commission I had sculpted individually something like 24 legs just for 3 minis. Loved it!
5256
Post by: NAVARRO
Ok just finished sculpting a Harook in 15mm, fun fun fun to sculpt at these small scales.
http://mr-bugman.blogspot.com/


30617
Post by: Emperors_Champion
WOW! What a truly awesome blog! Glad I found it!
5256
Post by: NAVARRO
A friend of mine gifted me with this diorama!
Brothers in Battle painted by Pandadosmares

1/72 zvezda...
5256
Post by: NAVARRO
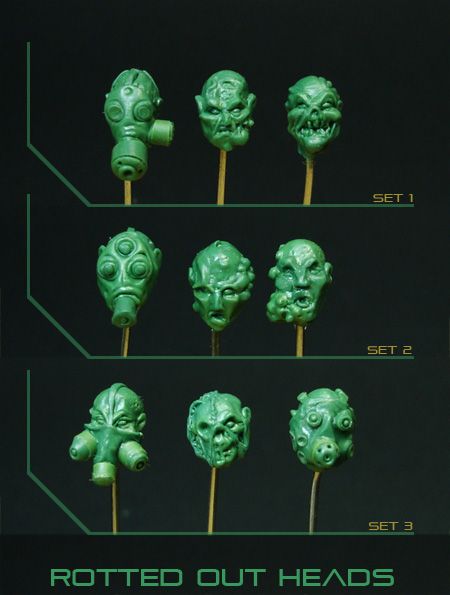
Some sets of rotted out heads for Battleroad Games... more to come.
5256
Post by: NAVARRO
Last weekend we had over here a nice wfb tournament, a painting comp and a sculpting workshop...
Check out the cool displays pics...
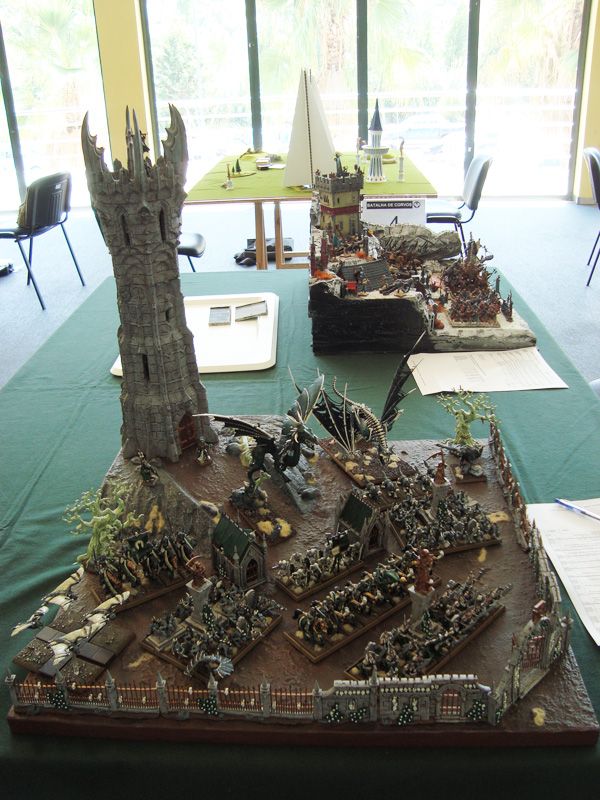
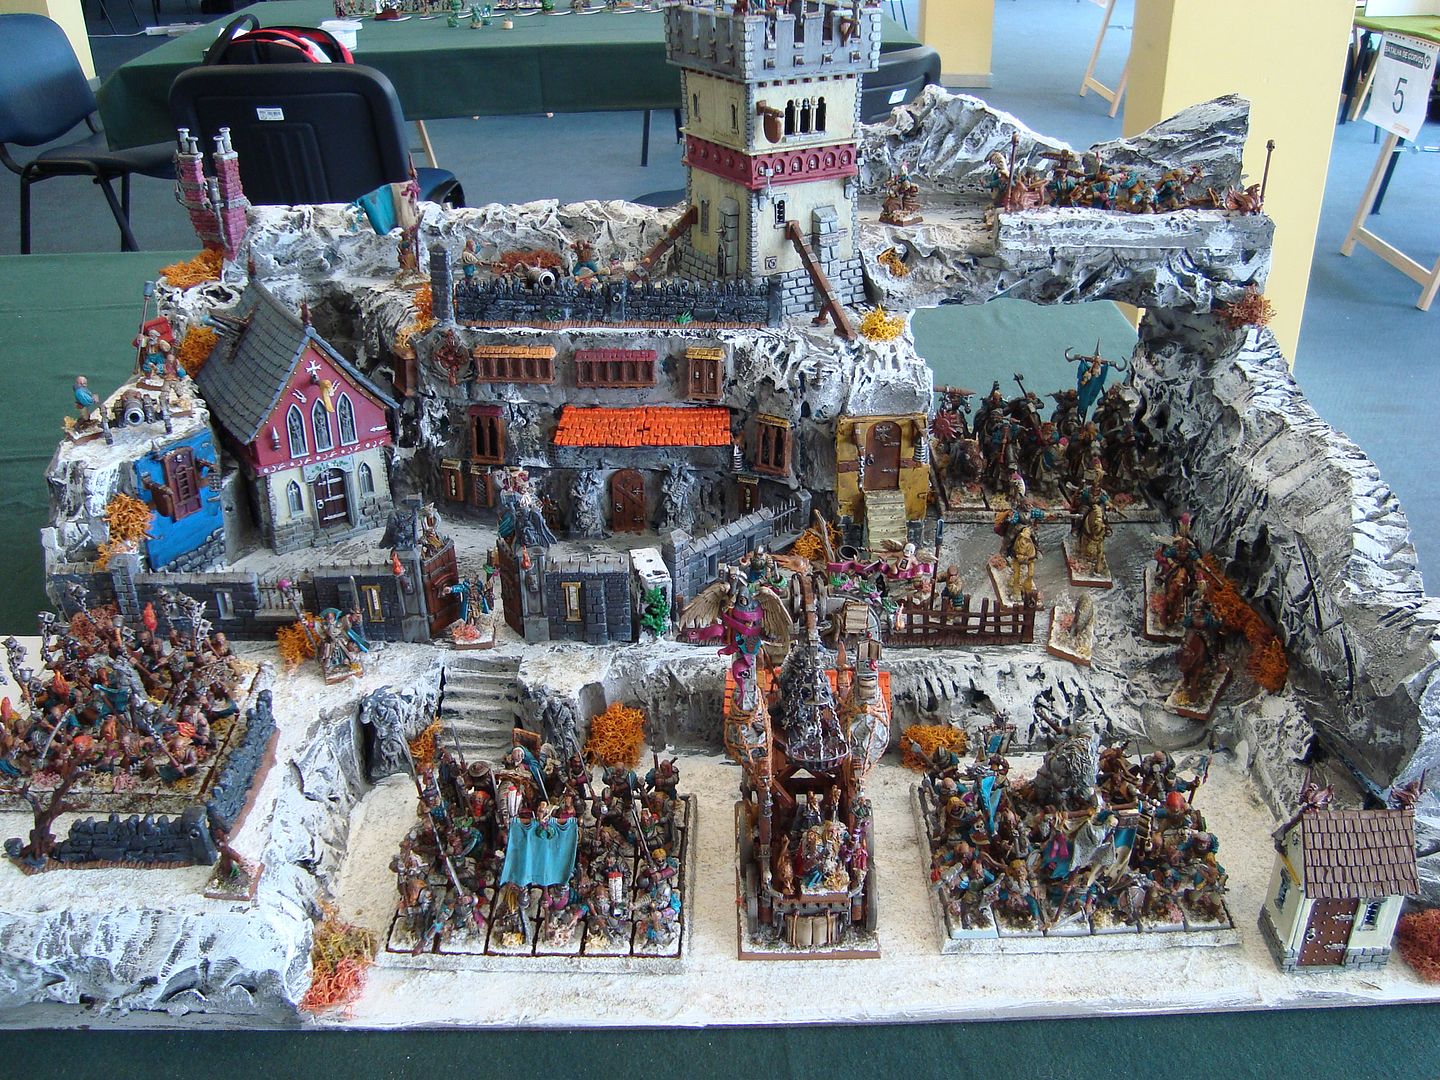

More pics of the event coverage at the blog.
http://mr-bugman.blogspot.com/
Cheers
5256
Post by: NAVARRO
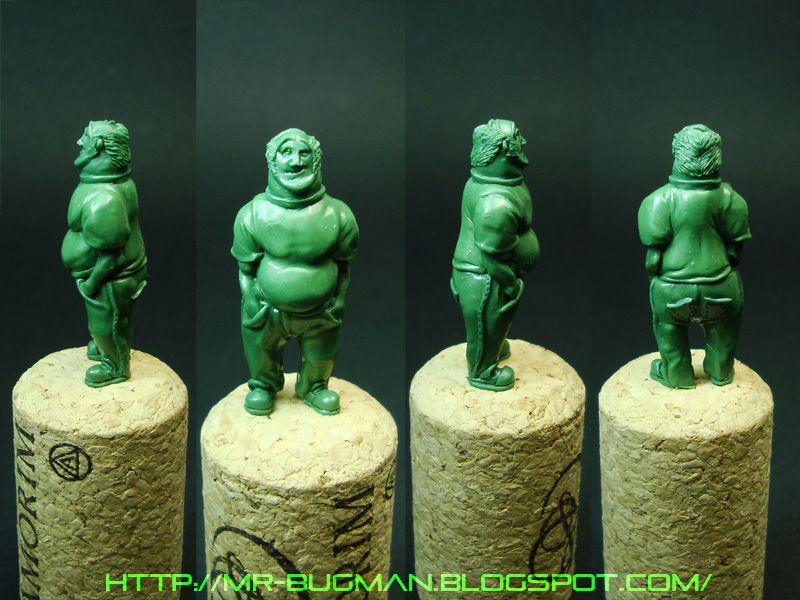
Sculpted a cartoon/ caricature of a friend (28mm)
4670
Post by: Wehrkind
Wow, those ARE great 15mm models! I was thinking they are much better than many 28mm myself!
Also, awesome displays 
5256
Post by: NAVARRO
Thanks mate
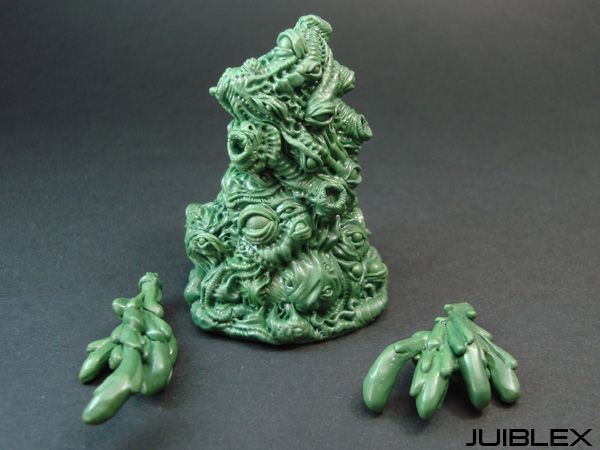
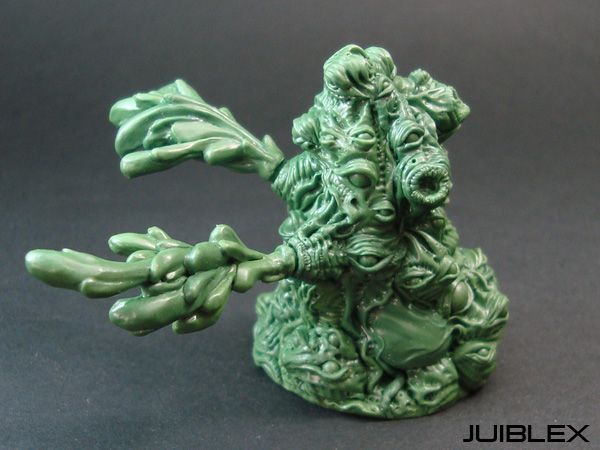
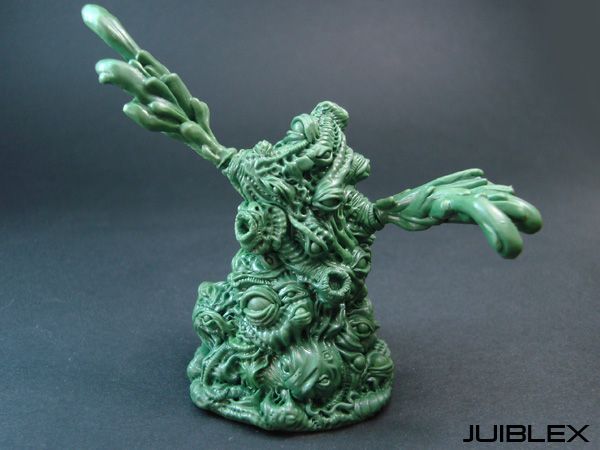
Just got commissioned from Fractured Dimensions to make lots and lots of old school monsters, here is the first one:
Juiblex the Slime Lord
The Juiblex is a mass of flesh, slime and many eyes and has several protrusions that expel slime, vomit, acid and all kind of nasty things...

More pics on blog
So 45mm tall 30mm wide for base, 2 vomit pieces that you can attach on any of the 6 different spots for variation.
I think it can fit a large number of purposes, from a role play monster for your dungeon crawlers, a chaotic or demonic objective for a fantasy/ 40k game, a spawn, Cthulhu creature, pulp monster to even a really huge alien manifestation or entity for smaller scales games... etc
5256
Post by: NAVARRO
Lol zero replies
More things:
review of portable warfare APC new box
Chewkanin convertion
original
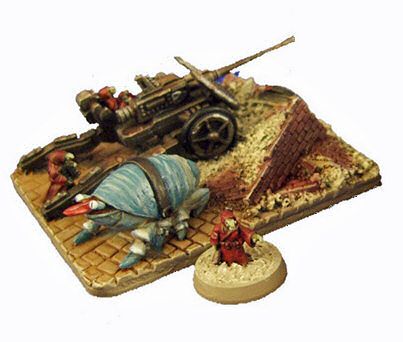
I converted into
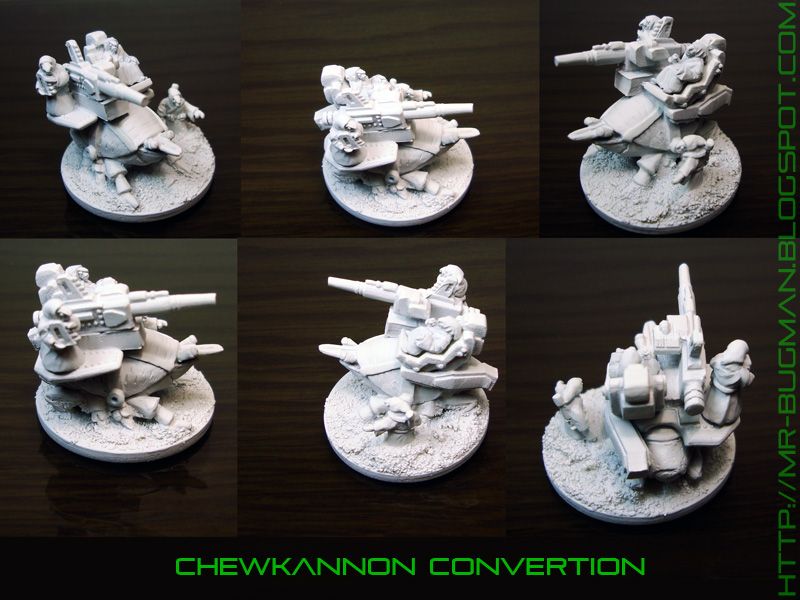
and a small painting guide of my first 10mm chewk
cheers...
37519
Post by: bigfish
10mm modesl wow, dont think i could ever muster the patiance to do that, still i am quite like the bird men and i think i saw them on beasts of war or some other website like that. very cool, keep up the awesome
4042
Post by: Da Boss
Dude, your blog is AWESOME. So much variety and awesome creativity. Exalted!
Can't believe how few replies are on here, I guess non-40K blogs get little love, right?
Anyway, this is amazing. What scale are your scorpions?
45653
Post by: MrTau
... how are such sculpting skills possible?
Have you sold your soul?
I can not compute.
48150
Post by: storag
Mate, your works agre great! I would love to learn to sculpt as you do!
5256
Post by: NAVARRO
Thanks guys, sculpting has always been a passion for me I really enjoy doing it and its very relaxing.
Da boss, the scorpions are on a 30mm base so they fit the role for a giant scorpion in a dungeon crawler or rpg.
I was also wondering why I had been posting here so many times in a row with no feedback whatsoever maybe has you say its not GW related stuff
I'm just finishing 5 new sculpts for 28mm market and I will post them soon, but before that there are some new bases next week.
5256
Post by: NAVARRO
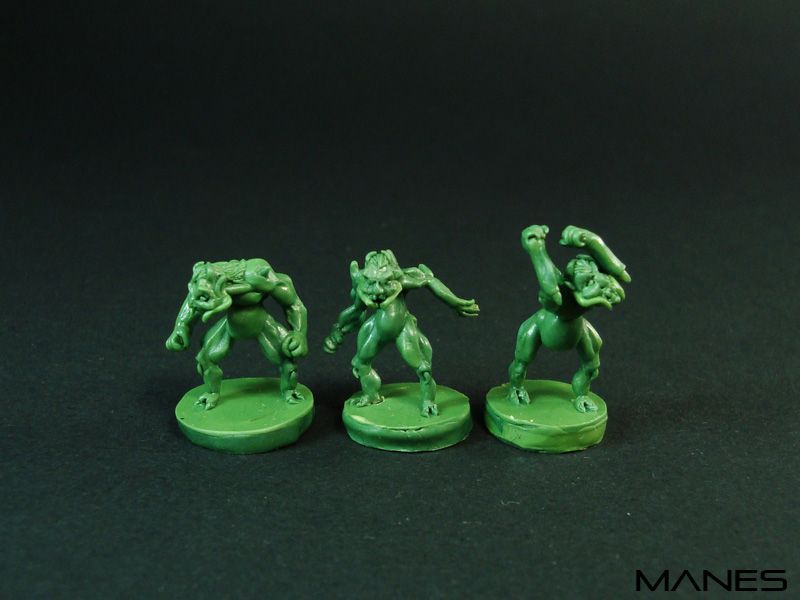
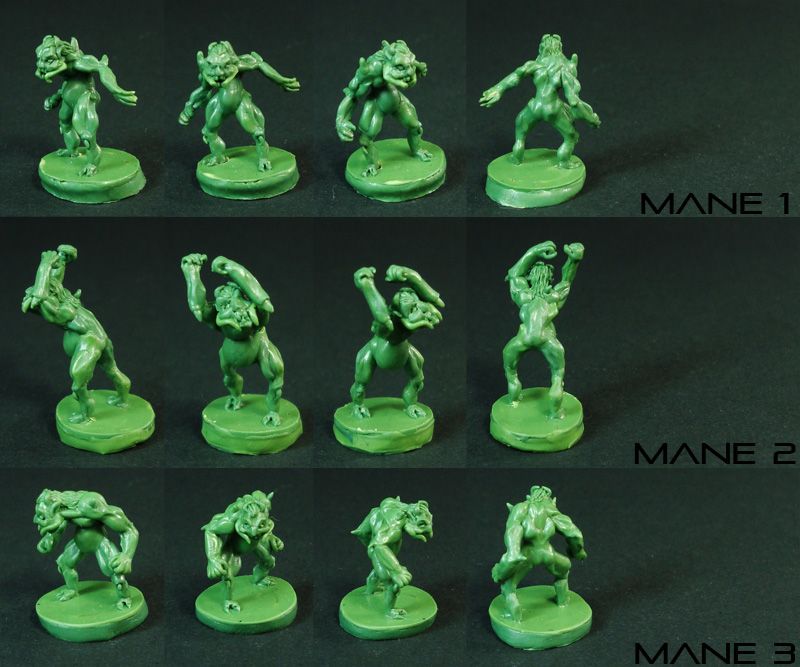
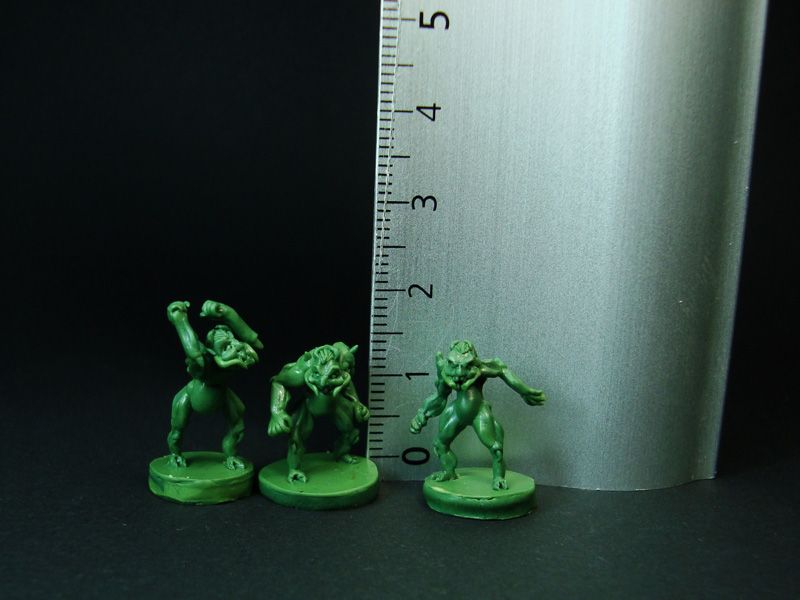
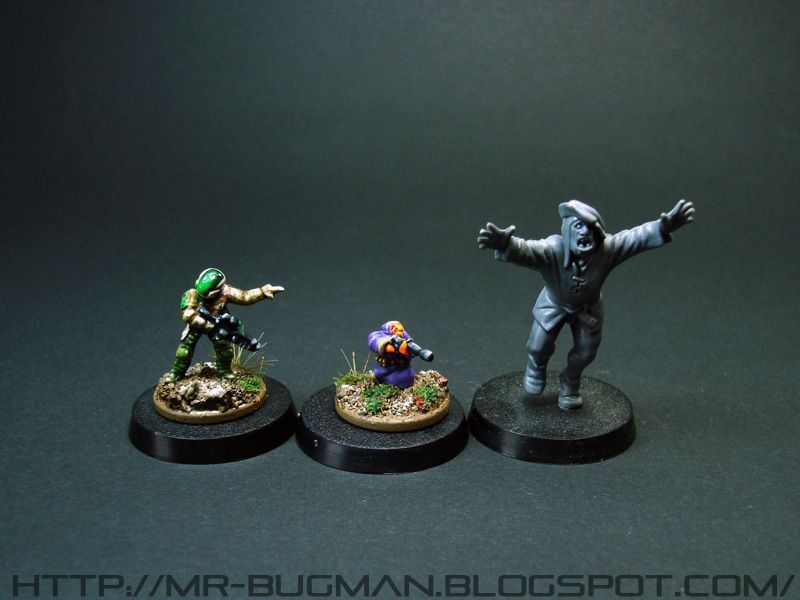
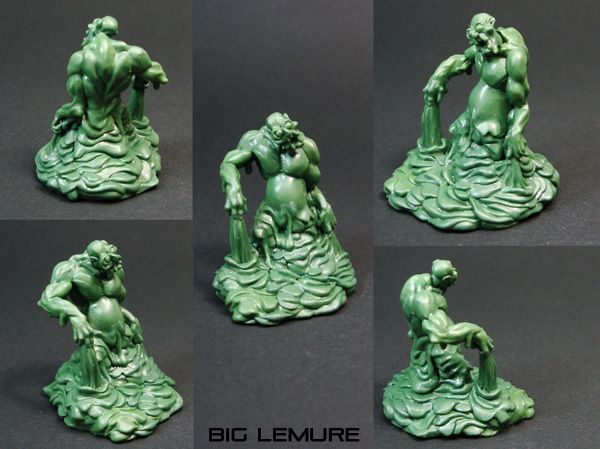
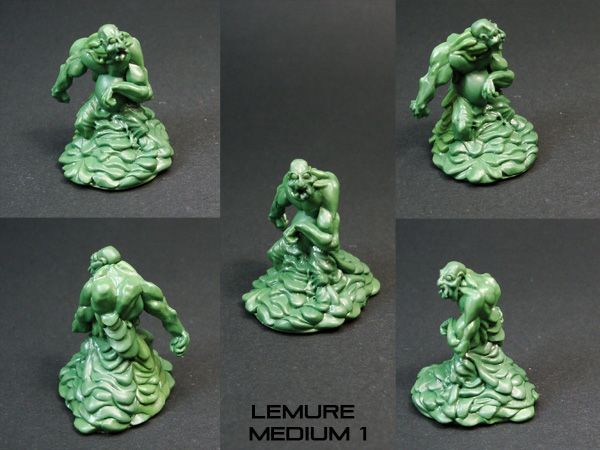
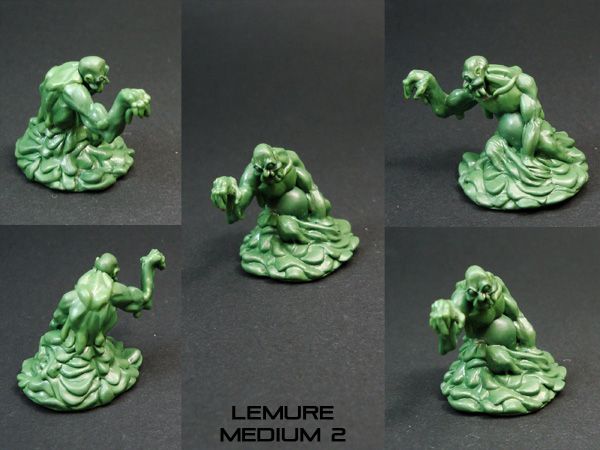
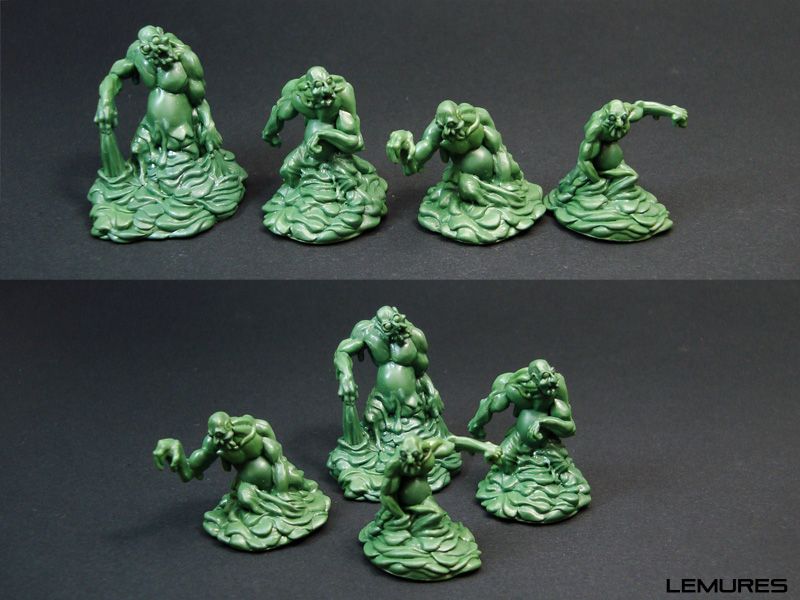
Back in the day I remember Lemures demons with large google eyes and melting body parts including the mouth etc in a pool of mud and here's my take on them...
Big 28mm to the eye
Medium1 24mm to the eye
Medium2 22mm to the eye
Small 21mm to the eye and a very small body in comparison with medium demon
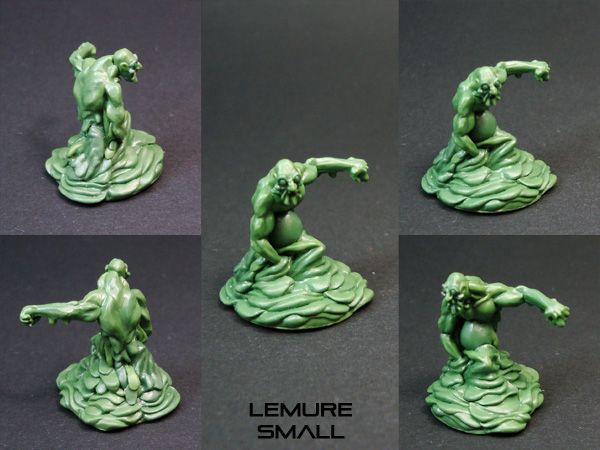
Lemures rave
46982
Post by: MrMerlin
NAVARRO wrote:Hey folks just finished a bunch of new bases for Secret Weapon Miniatures and they are aproved and ready to be shipped.
This time the theme was close of what I have been developing for Justin but a bit more wild since its 100% gigerish alien bases with no city ruble or stones like previous sets, just total alien bases.
Here's a overall picture
More pics with more detail and comments at
http://mr-bugman.blogspot.com/
Have fun bug lovers
WOW! They look great! How much green stuff did they eat up?
5256
Post by: NAVARRO
Half a tube of GS 
22687
Post by: MajorTom11
Navarro... Incredible...
I had gotten so used to nid sculpting style I never thought you would be as adept at other styles of sculpting... And by adept I mean absolutely masterful, from the characature of your friend to the slime monster, all incredible work....
You inspire me sir! Thanks!
44290
Post by: LoneLictor
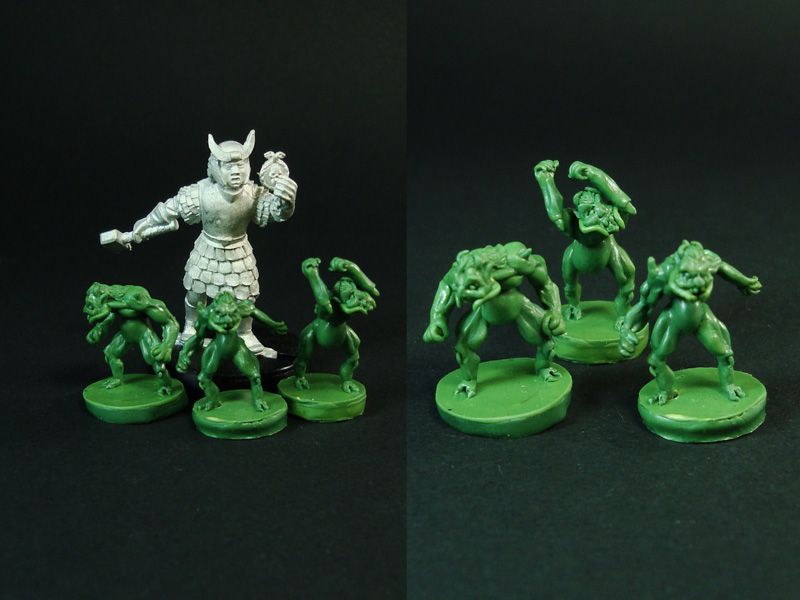
I love those Lemures. They look just like the illustrations in the D&D books (except in some instances where your sculpts are even better). Keep up the amazing work!
5256
Post by: NAVARRO
Wow thanks guys its appreciated.
MajorTom11 Inspiration goes both ways mate, I inspire you to sculpt something and then your sculpts inspire me back
LoneLictor If you like old dungeon and dragons monsters then look at my new sculpt The Mimic.
And here's the Mimic Kit 25mm to the top of the lid... 4 bits that you can play with to create different variants.
Bits are:
- The base with the chest
- The chest lid that you can glue more or less opened
- Optional tongue
- Optional Right arm
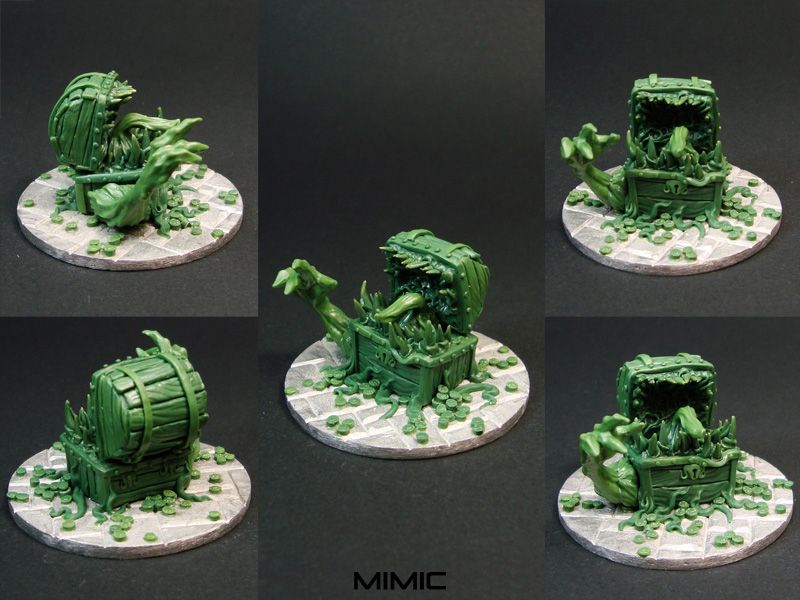
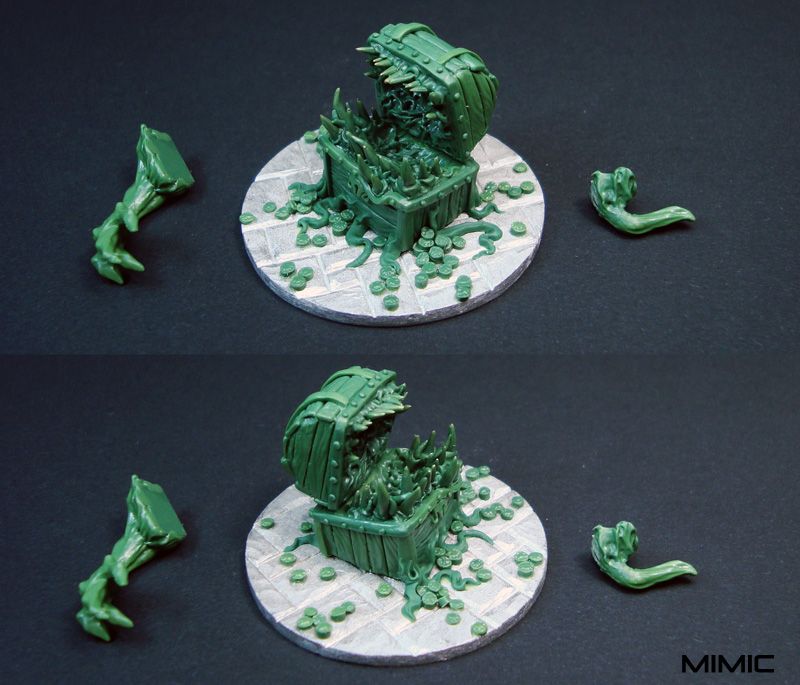
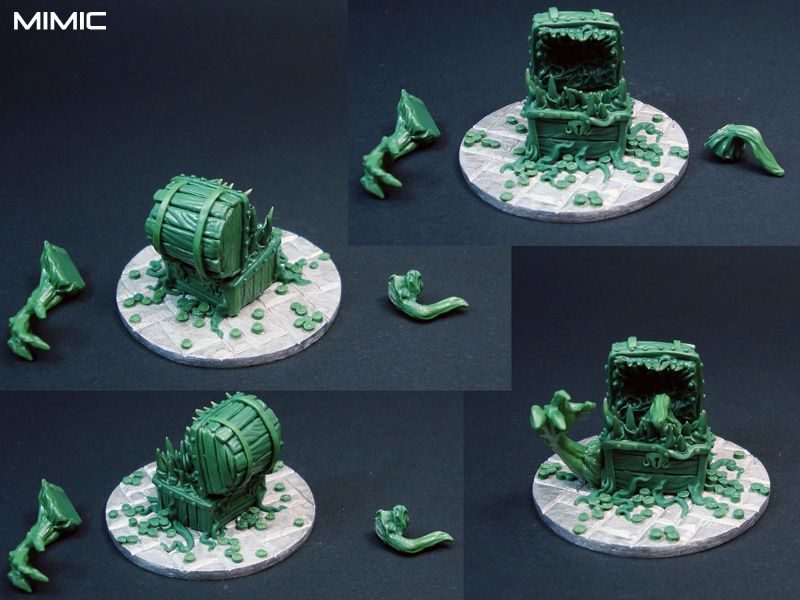
Forgot to mention the Lemures and also the Mimic will be produced by the chaps at Fractured Dimensions Miniatures.
4042
Post by: Da Boss
Right, I am going to get some of these beauties. I think I neeed the scorpion, and those lemures are awesomesauce.
I have no idea how you manage to be so productive dude.
44290
Post by: LoneLictor
Holy gak, that Mimic is amazing. The texture (for lack of a better term) is great. The wood looks like wood, the flesh looks like flesh, ect. Your greenstuff work is amazing.
5256
Post by: NAVARRO
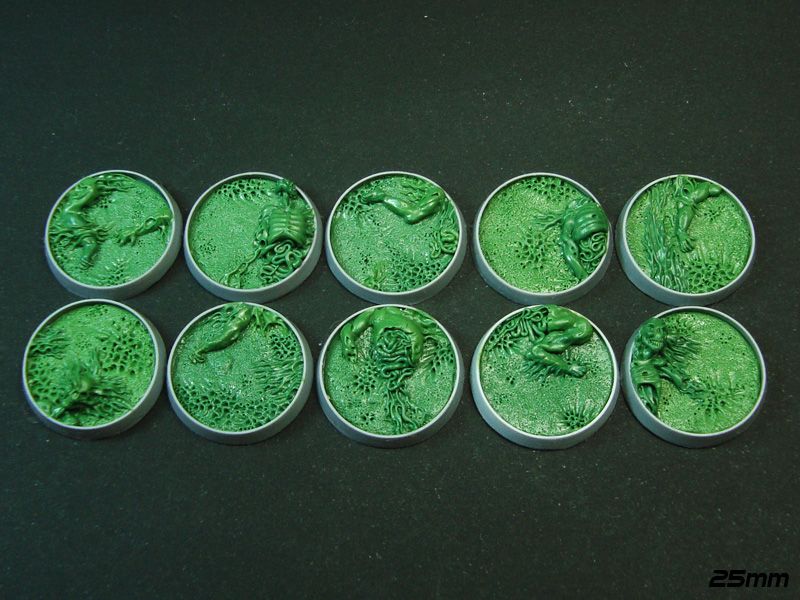
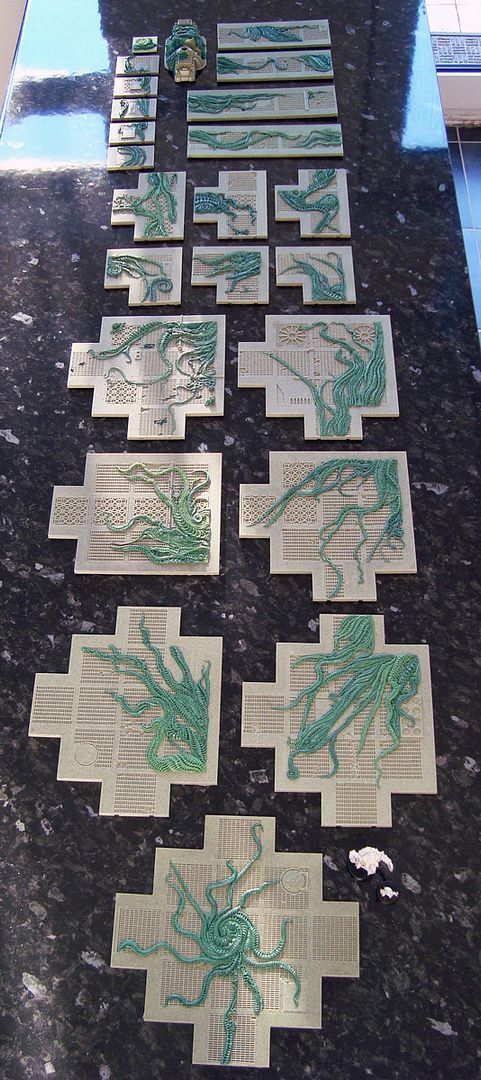
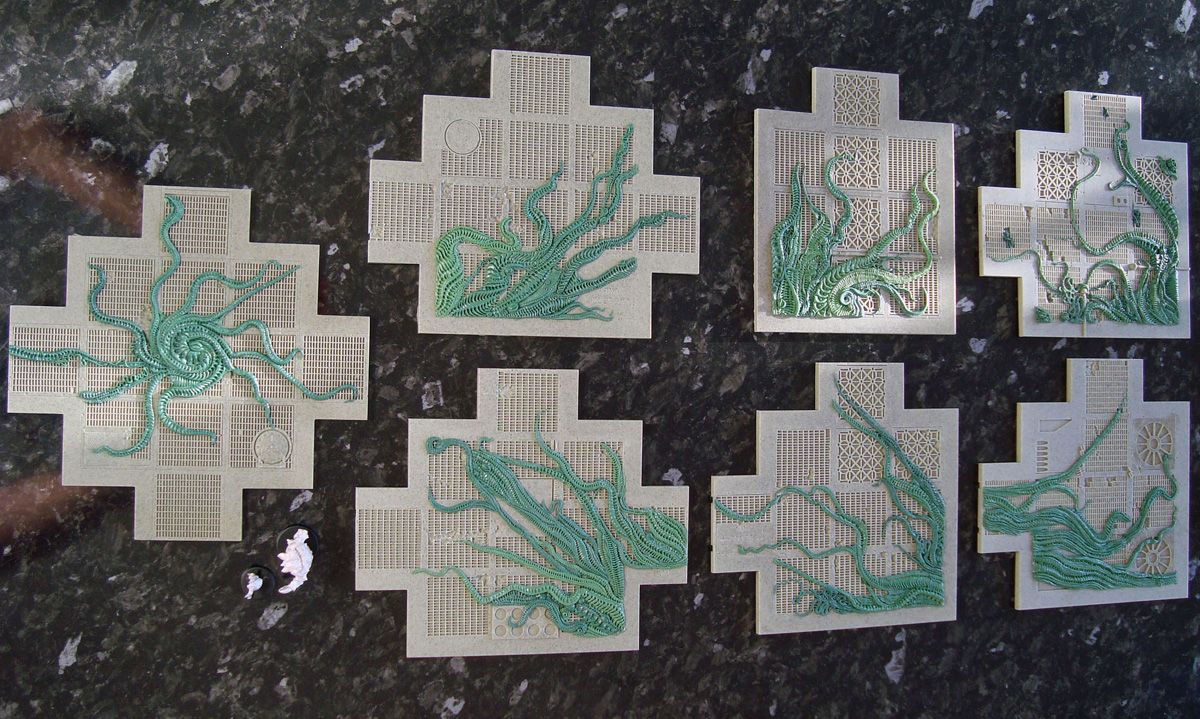
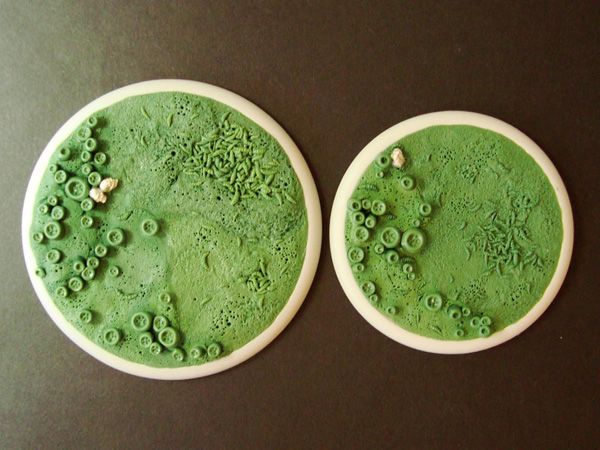
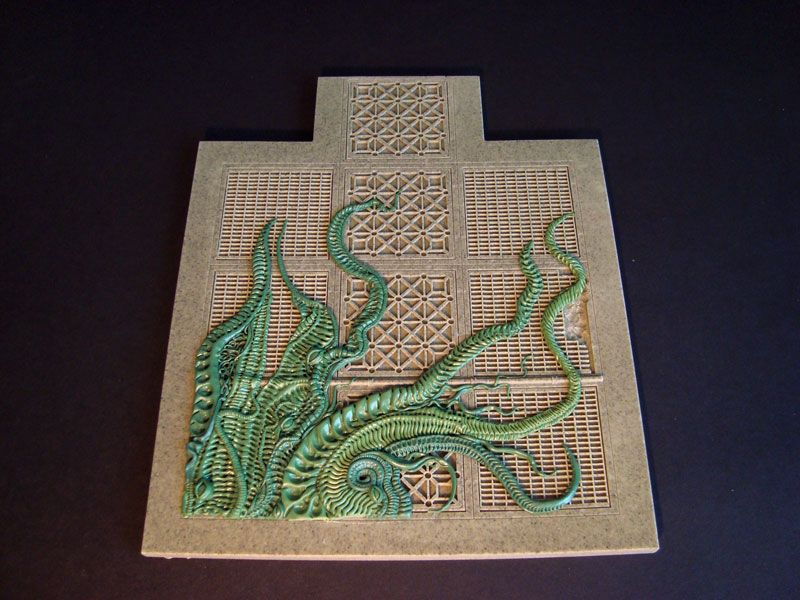
Thanks folks, I have some more stuff sculpted, this time for Secret Weapon Miniatures.
These bases will be probably the last with Alien theme and IMO they would be great for spacehulk fans since they have some textured decks beneath the alien features. They will only hit the store in the beginning of 2012 so this is just a early preview for you guys.
If you want individual pics of the bases go to the blog link.
Right now I'm working on a couple new themed bases, one of those I'm confident that will be very popular and probably the hardest bases I ever sculpted...
Next weekend I will attend a 40k Tournament and will give another sculpting Workshop and it will be my last hobby activity in Portugal.
47296
Post by: Biohazard
Well ive just found the bases id like for when I start my Scythes of the Emperor force. Was planning on having them on tech bases anyway but those ones fit the background of the chapter perfectly. I always love seeing your work mate. Good luck with the move over here.
44717
Post by: Steak
Wow, I'm in awe of your ability. You do truly masterful professional work.
I was just randomly clicking around blogs and am happy I found yours. I'm generally not too interested in other miniature games, but just looking at the sculpts you do is really cool. The range of things you sculpt is also impressive.
I look forward to seeing more!
26790
Post by: Gitsplitta
Those Alien bases are fantastic. Both sets... but the recent one is my favorite.
5256
Post by: NAVARRO
Thanks for the replies mates
Here's my latest sculpt, this time I sculpted a gift for a local miniature painter friend who's nicknamed Panda dos mares...
The panda is about 28mm to the top of the head.
52160
Post by: ArchaonSon
Good work mate keep it up.
37519
Post by: bigfish
wow, loving the panda, and those minis are tiny, very impressive you ca sculpt that small so well Keep it up
43836
Post by: Bacms
Excellent work I am subscribing this
4670
Post by: Wehrkind
Very impressive work on the tiny demon things!
32775
Post by: Tortured-Robot
Love your work, the minic is my favourite, its fantasic!
5256
Post by: NAVARRO
Thanks all for the comments
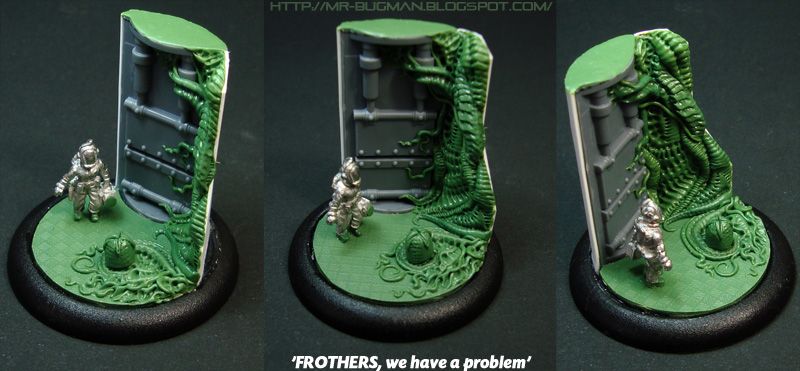
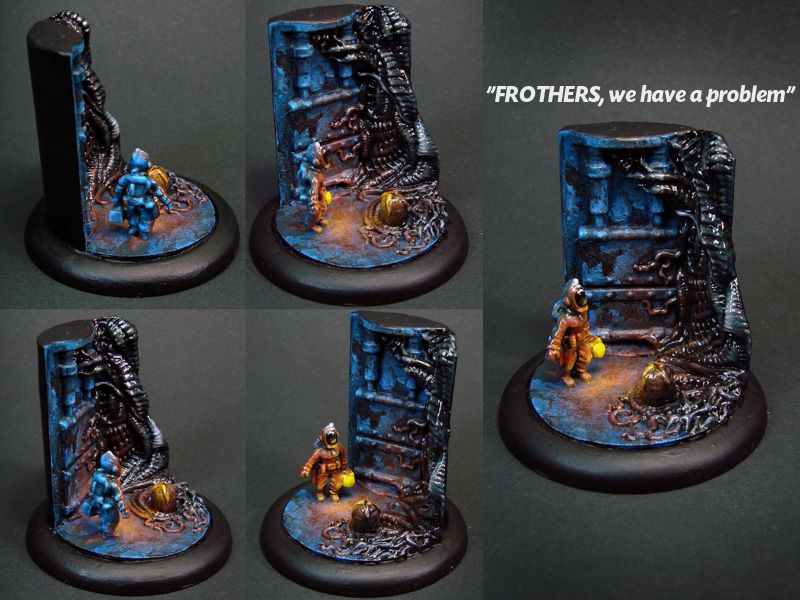
I'm currently painting one diorama I did for a 15mm miniature .
37519
Post by: bigfish
"frothers" ???
46982
Post by: MrMerlin
haha, that diorama looks somehow familiar to the "alien"-fan in me
44290
Post by: LoneLictor
That diorama is amazing. As soon as I saw it I remembered the scene when Kane gets "facehuggered". Keep up the amazing work.
5256
Post by: NAVARRO
bigfish wrote:"frothers" ???
Its a online community
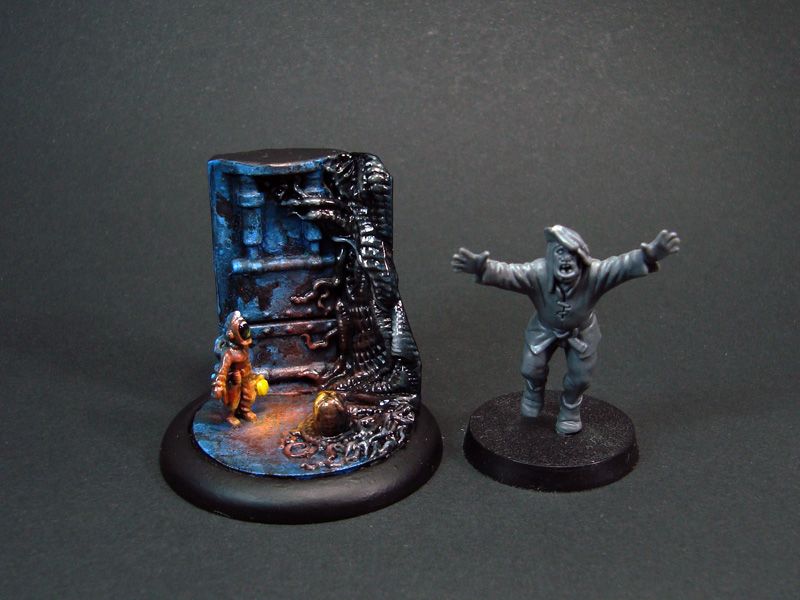
Diorama is finished
Scale pic
43836
Post by: Bacms
Wow that paint job is amazing specially at that scale. A true inspiration
33919
Post by: Moltar
I am so glad I stumbled across this blog. Navarro, your work is incredible and immensely motivating. Thanks for sharing. I'm looking forward to following this blog!
39666
Post by: GiraffeX
I was looking at your painted diorama thinking that is so cool, then I scrolled down and saw the scale shot and realised how small it was.
It didn't twig at first as I didn't take into account the base, I thought it was 28mm. Excellent work
5256
Post by: NAVARRO
Glad you guys enjoyed it and hope you all get motivated to paint and sculpt more, thanks.
The mini is really tiny and was so fun to do this diorama that I'm thinking on doing more in 2012.
26790
Post by: Gitsplitta
It's phenominal NAVARRO... not just the scale but the fact you've done the diorama-wide OSL perfectly just amazes me.
44717
Post by: Steak
I really enjoy seeing these NAVARRO, please keep up the updates!
Are you excited to see Prometheus?
5256
Post by: NAVARRO
Its fun to OSL everything a bit, I now want to try more ambitious colors or even go wild and try out something monochrome.
Prometheus? Its going to be so massive that I have to mentally prep myself for it Can't wait!!
24247
Post by: Ambull
Wonderful work in such a tiny scale with the diorama, I just discovered this thread (I've been under a rock) and the sculpting here is absolutely stunning, keep the updates coming, very awesome stuff!
37519
Post by: bigfish
fantastic tutorial there, really clever techniques
5256
Post by: NAVARRO
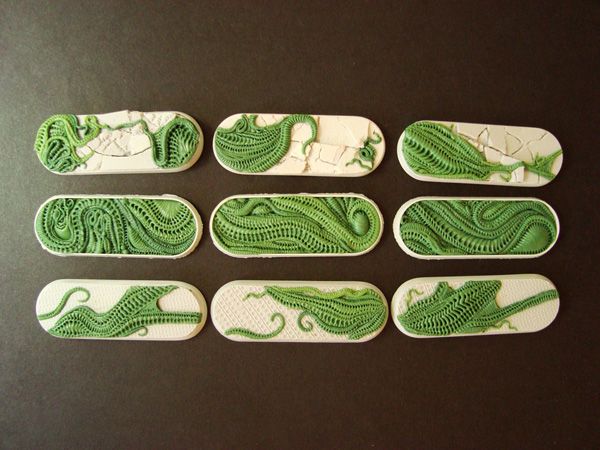
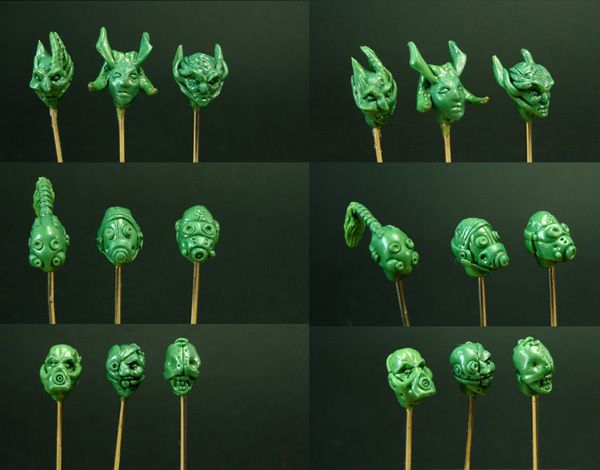
Another little update.
Just finished 9 "pleasure heads"
37519
Post by: bigfish
loving the middle ones and the bottom ones
33919
Post by: Moltar
Agree with Bigfish, those two sets of 3 (middle and bottom) are down-right awesome!
37908
Post by: D.Smith
Your sculpting skills are brilliant, i've been using some of your tutorials for one of my projects and its been brilliant help
5256
Post by: NAVARRO
Glad I could help with tuts, that makes a happy bugger! In Portugal in some rare events I did some sculpting workshops for people and since Im going to the UK maybe one day I will arrange some workshops for folks there.
37908
Post by: D.Smith
If you do run some workshops over here, consider me there lol
4670
Post by: Wehrkind
Great tutorial (love the mushrooms!) and I love the heads!
Great work as always!
26790
Post by: Gitsplitta
Nice... gruesome.
I have a question for you. Why do you mike the sculpting of your bases inset like that rather than coming right up to the top? I have some of what I believe are your bases from secret weapon and having the base deep set like that makes them very difficult to work with, especially if the mini has a wider stance. I and up either standing it on the lip, which kid of defeats the whole effect of the base, or putting one foot on and one foot off... which is neat looking but messes with game play.
5256
Post by: NAVARRO
Actually these are the first ones I did for the new range from secret weapons hollow bases... The plan for these hollow bases is that you can fill the bases with water effects or blood gory effects so that models are knee deep on a base full of nasty cadavers
26790
Post by: Gitsplitta
AH! That makes more sense. Guess I'll need to learn how to do water effects!
Thanks! You do great work. Love the bases you've been showing off here.
33919
Post by: Moltar
Navarro those new bases are insane! I love the gruesome-ness! When can we expect them for sale at Secret Weapon?
4670
Post by: Wehrkind
Wow, those are fantastic man! I am glad to see you are still as awesome as ever, even in the cold wilderness of Britannia!
5256
Post by: NAVARRO
Moltar wrote:Navarro those new bases are insane! I love the gruesome-ness! When can we expect them for sale at Secret Weapon?
Very soon they are already in the US for some time and being casted.
Wehrkind wrote:Wow, those are fantastic man! I am glad to see you are still as awesome as ever, even in the cold wilderness of Britannia!
Thanks! Loving it over here mate, really cool country!Awesome people etc.
So the cold makes me stay at home sculpting like a crazy in order to warm up my hands... In 5 days I sculpted these bases with the same theme but this time with warmachine style.


5256
Post by: NAVARRO
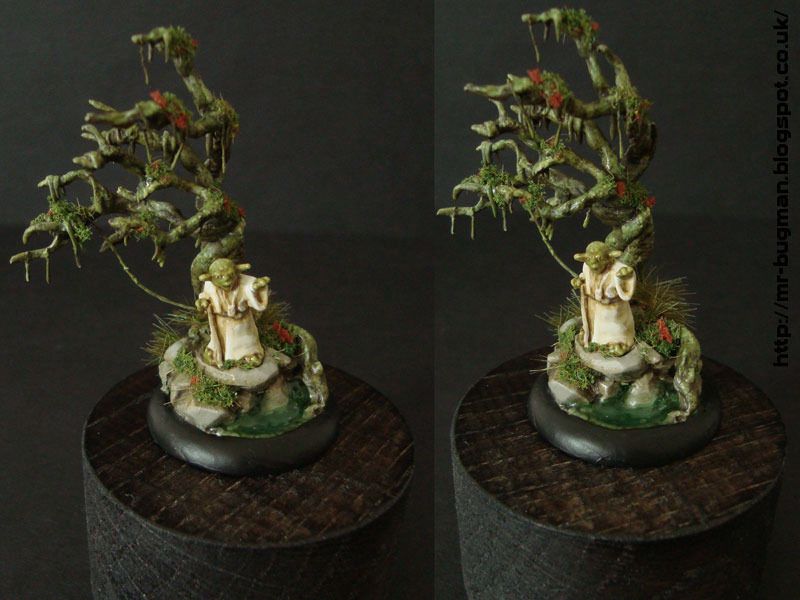
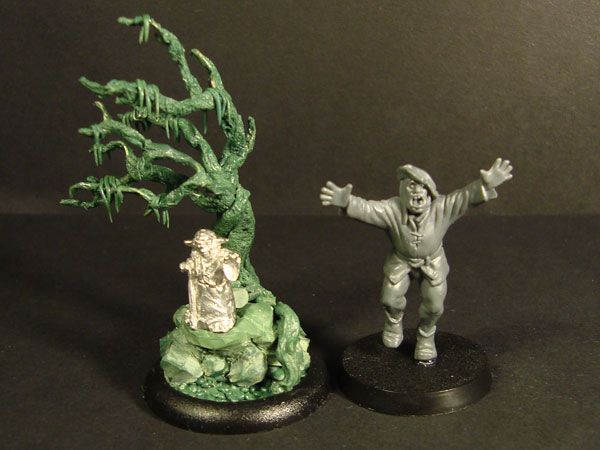
New painting project for one rare 15mm yoda... Just sculpted a base inspired in Dagobah
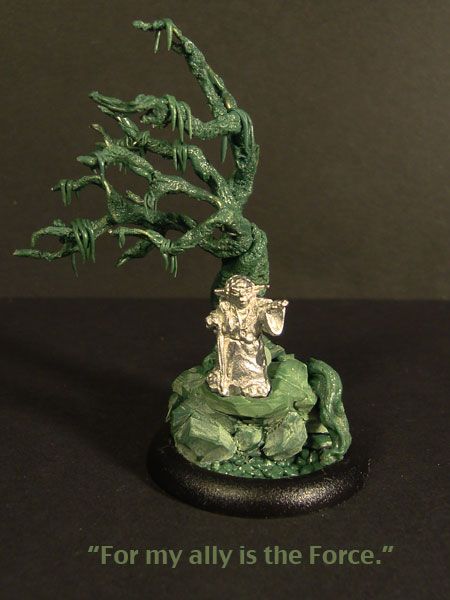
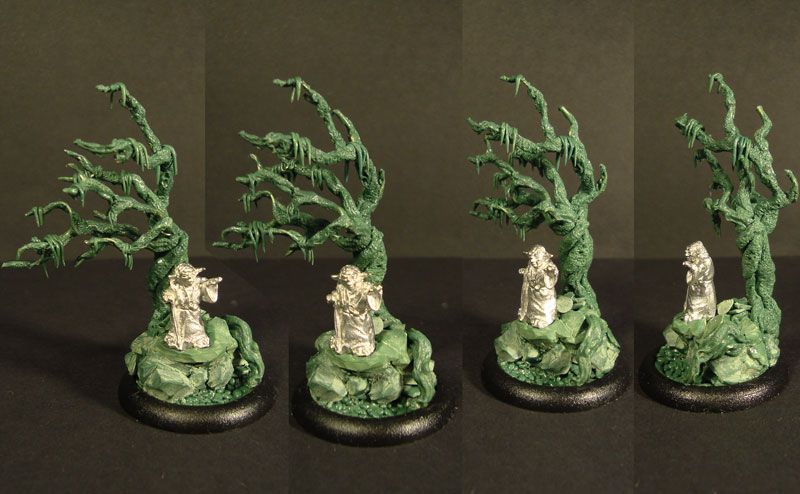
scale pic
46982
Post by: MrMerlin
really great new stuffs, Navarro! love the bodys on the bases!
38486
Post by: Far Seer
Man oh man, I am so glad I found this blog! I especially love all the sculpting!
46982
Post by: MrMerlin
an update! and an awesome one as well!
your stuff inspires me to try greenstuffing as well!
Merlin
26790
Post by: Gitsplitta
Very cool stuff!
37519
Post by: bigfish
very cool indeed want to see more
46536
Post by: ishkatar
That's a very impressive sculpting skill
26386
Post by: hungryp
I'm sure you get sick of hearing this, but seeing your greens is truly inspiring. The detail you can cram into a 15mm sculpt is simply ridiculous.
15358
Post by: Vitruvian XVII
Nice Navarro, i honestly thought they were 28mm. Fething awesome.
37519
Post by: bigfish
i love the way that is classed as a doodle
5256
Post by: NAVARRO
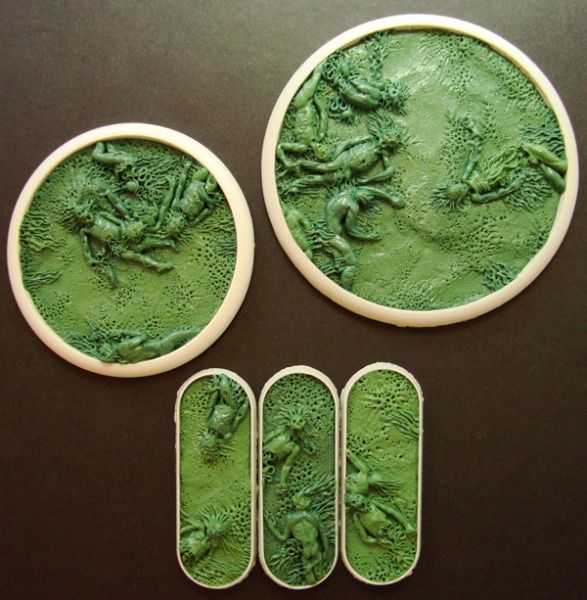
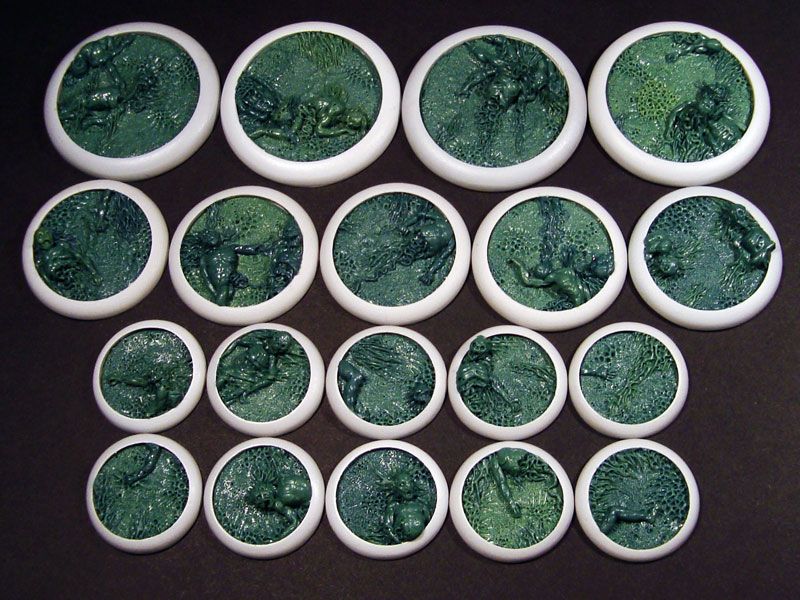
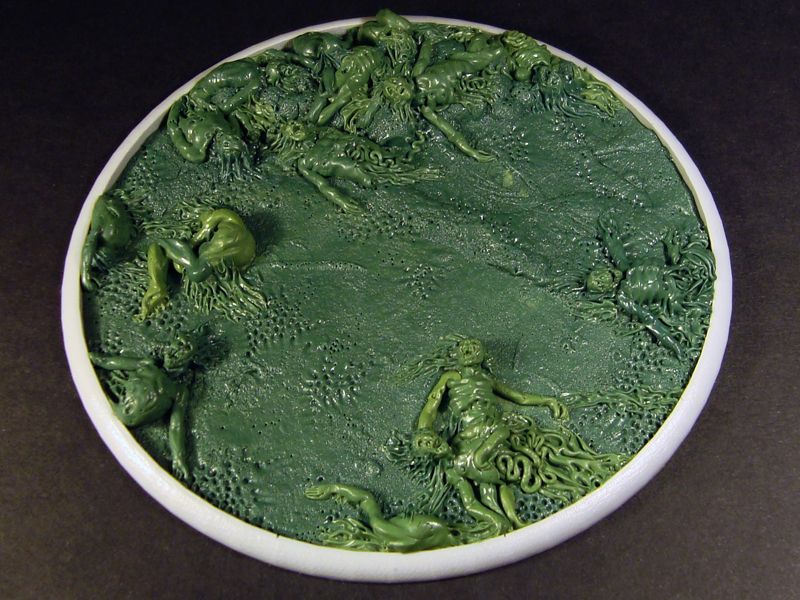
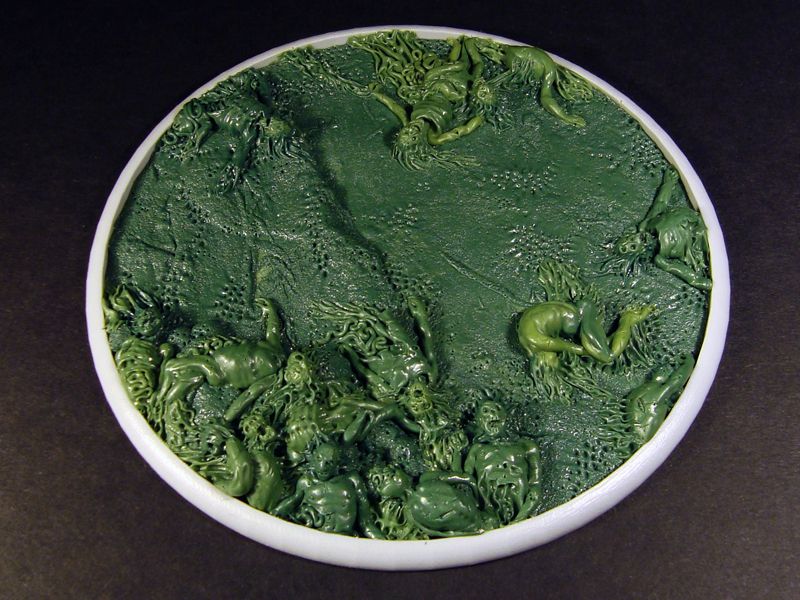
More minis for the corpses fields sets from Secret weapon minis. Big'uns
Big oval and a huge 120mm warmachine type of base
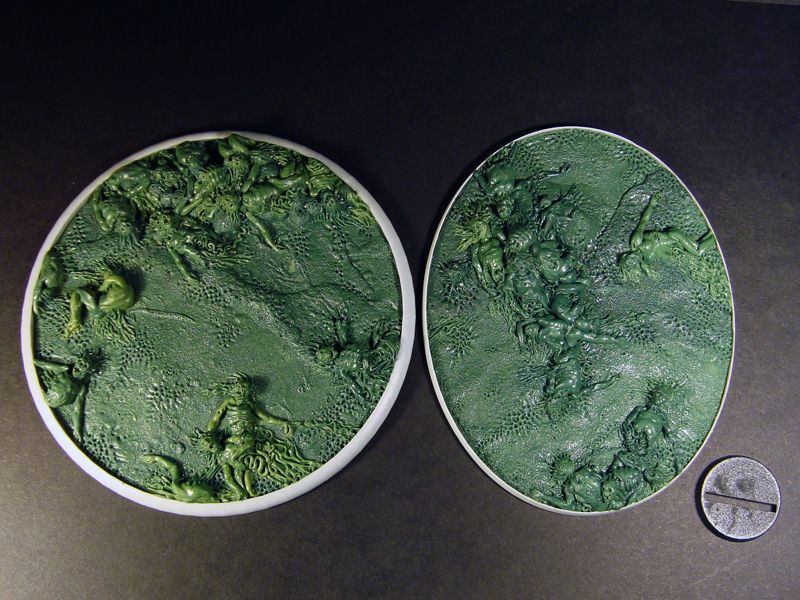
Big oval
120mm
46982
Post by: MrMerlin
Amazing grrenstuff work, as always. These corpses are just..... awesome!
327
Post by: tinfoil
I love those bases! Truly!
43067
Post by: S'jet
Your sculpting is pretty damn sexy. Checking out your blog now ^^
5256
Post by: NAVARRO
Happy that you guys liked them, these are going to be at Secret weapon's store really soon because Justin is aiming to sell them asap.
While doing these I was thinking on creating one small diorama for tv show the walking dead series, that would a interesting project.
5256
Post by: NAVARRO
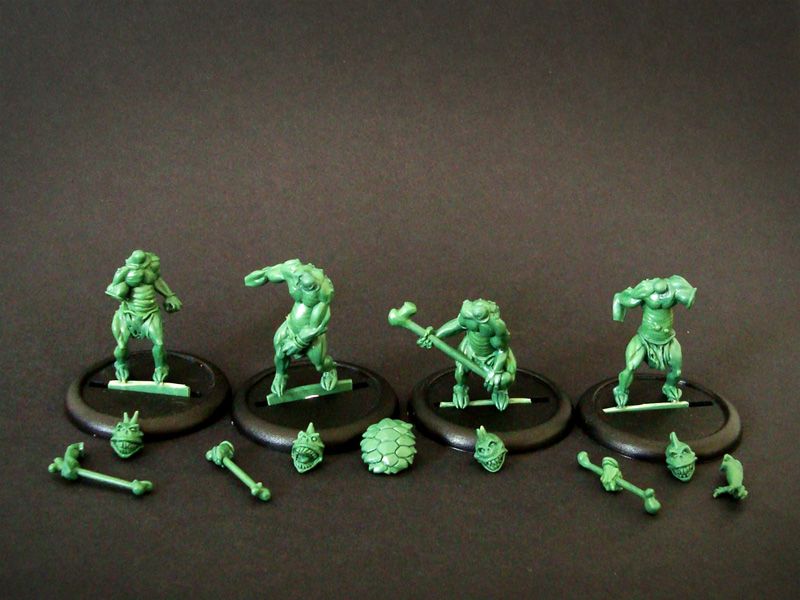
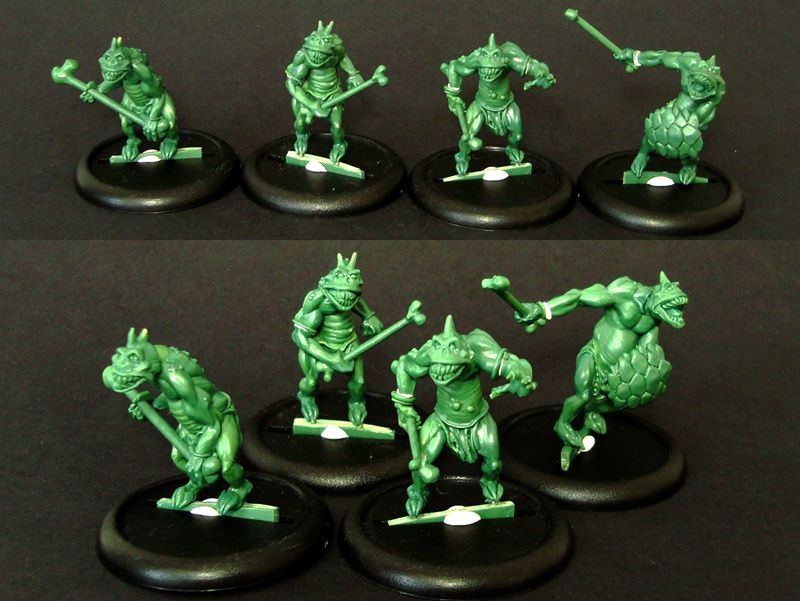
And just in time for the easter the first of 12 Space dinosaurs is done.

And one scale pic of the tiny fella, I think this one is the smallest mini I sculpted so far...

33919
Post by: Moltar
That is awesome. The future holds nothing, if not tiny laser gun-wielding dinos. Awesome sculpt, Navarro!
46982
Post by: MrMerlin
WOW! That lasergun dino is great, especially considering the size!
46536
Post by: ishkatar
Outstanding, indeed.
37519
Post by: bigfish
Very cool indeed
17349
Post by: SilverMK2
Love the bases and "space corridors" - excellent sculpting. And so much detail on the space dionos - I had no idea they were that small given how much detail they have on them.
13286
Post by: Mu
Nice little blog you've got here that's me kept away from the housework for another half hour...
48376
Post by: Capitansolstice
That stuff is so Impressive! Wow!~
32169
Post by: Rogue Wolves
Im glad I found you by some of your admiring fans *Gits* *cough* I'll have to go through any of your blogs now because you are infact amazing!
5256
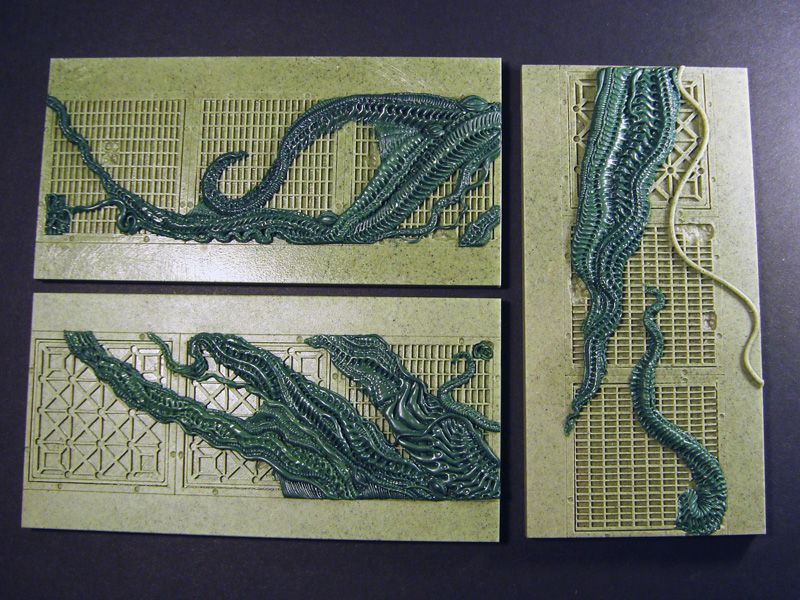
Post by: NAVARRO
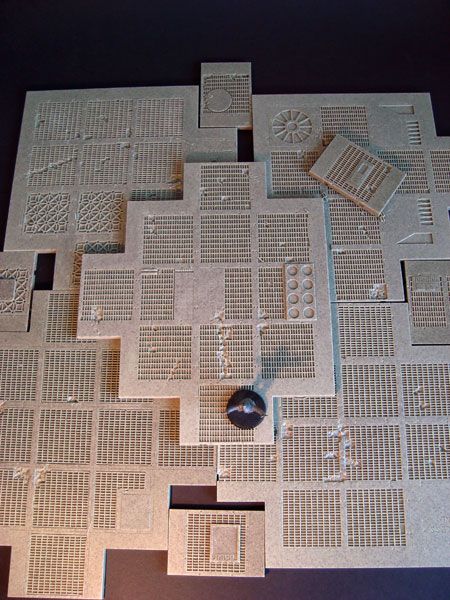
pics not great I only have one lamp atm...
Batch2
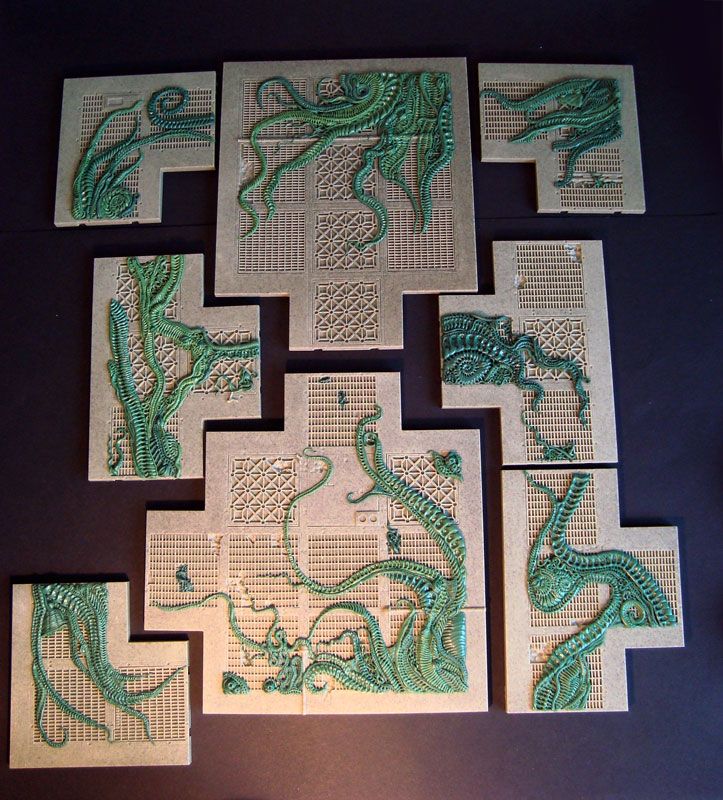
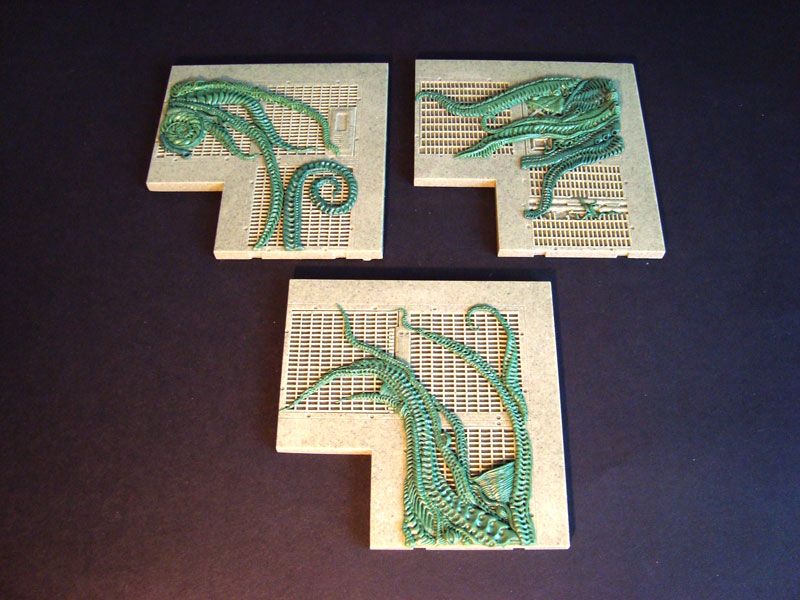
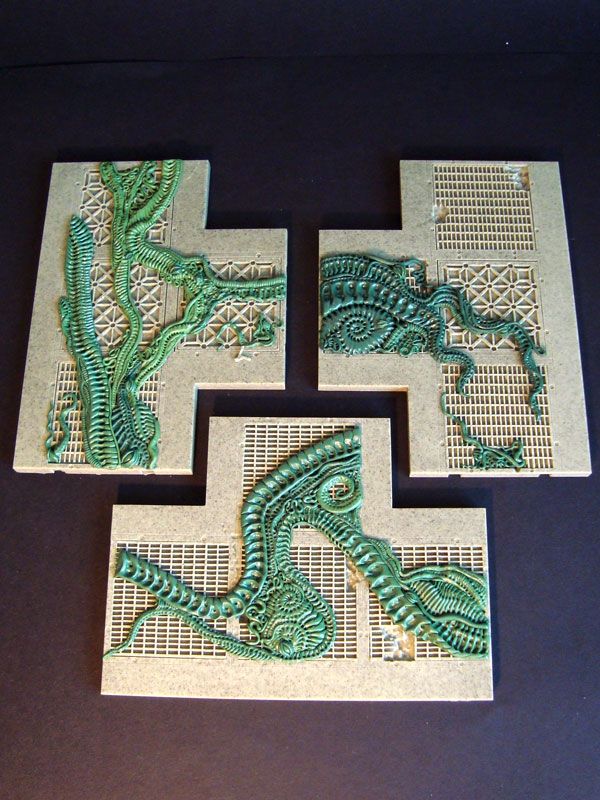
Scale pic to check flatness
Batch 3 :loopy:
46982
Post by: MrMerlin
Thats some really cool terrain!
26790
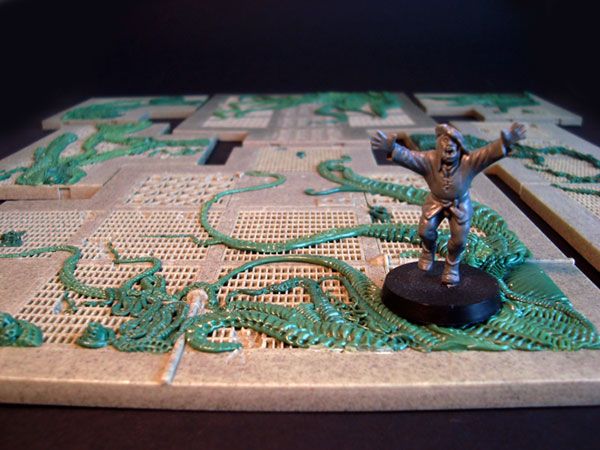
Post by: Gitsplitta
Very impressive Navarro. I was wondering how difficult it would be to stand a figure up on that. Looks OK. Guess the tendrils aren't as thick as they originally looked.
5256
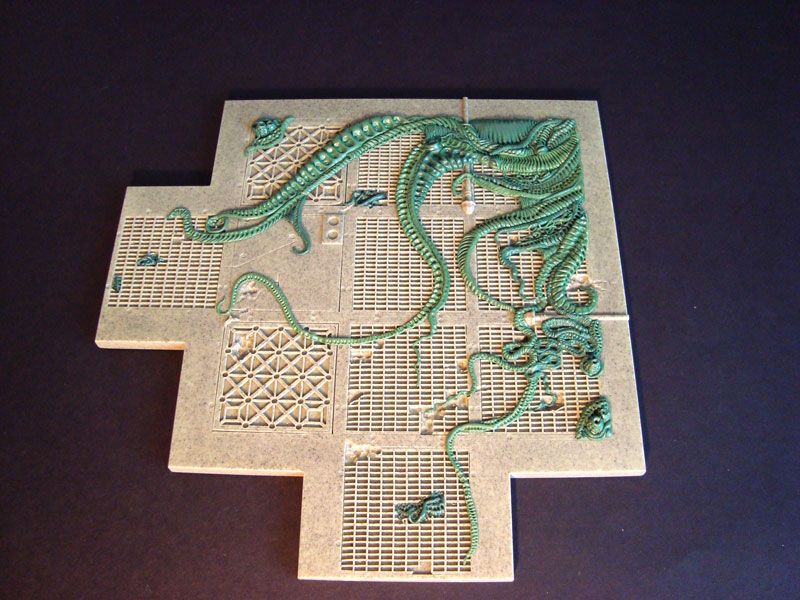
Post by: NAVARRO
Gitsplitta wrote:Very impressive Navarro. I was wondering how difficult it would be to stand a figure up on that. Looks OK. Guess the tendrils aren't as thick as they originally looked.
That was my main concern... simulating something 3d but that its in fact flat so that its practical for gaming. Illusion kind of thing
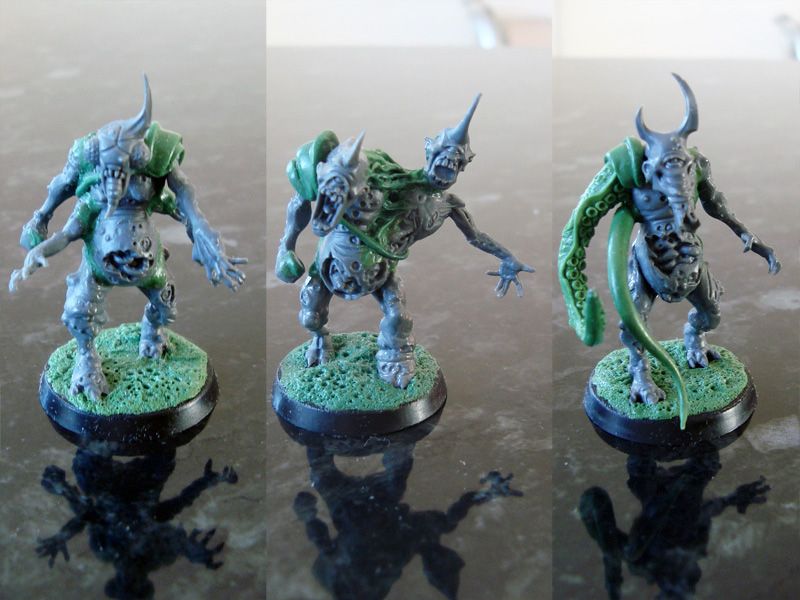
New mini
Bael 40mm
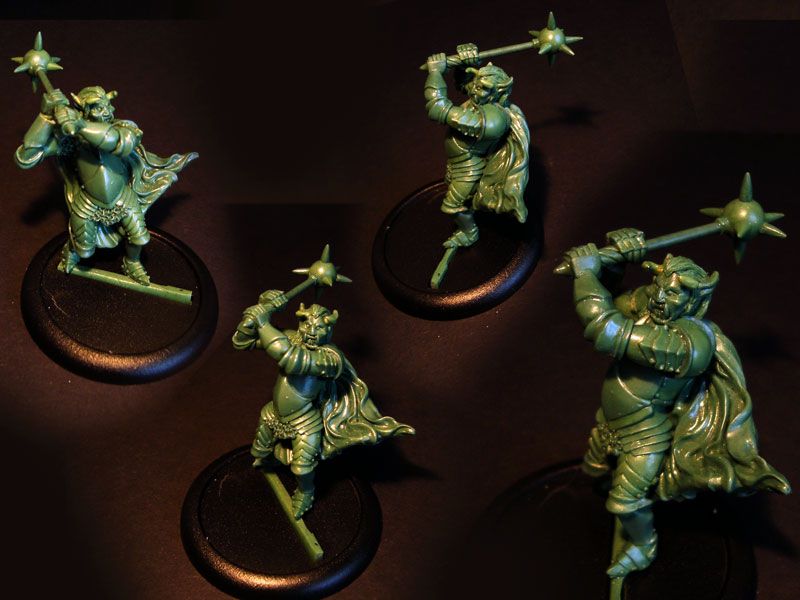
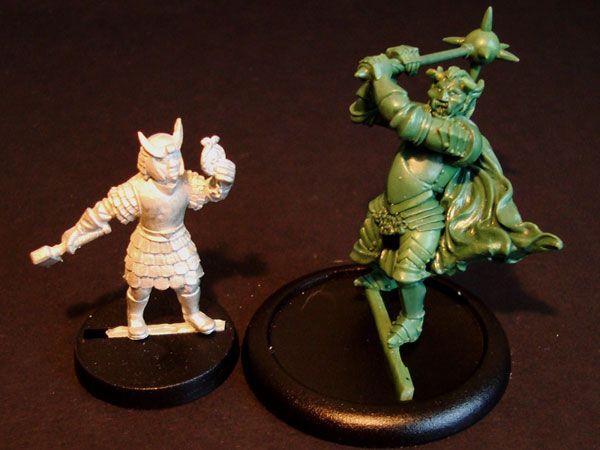
2 Bitz body and arms( wich are bluetac'ed)
26790
Post by: Gitsplitta
Ah, got it. The illusion is very visually convincing.
Love the new figure... great lines throughout the Gothic plate. Excellent job on the mask and morning start too.
44717
Post by: Steak
Wow. The new figure is flawless. I am continually impressed by your ability Navarro.
Thanks for sharing!
39666
Post by: GiraffeX
They look fantastic NAVARRO, cant wait to see them with a lick of paint.
15358
Post by: Vitruvian XVII
Brilliant! Seriously cool conversions
I cant help but feel the armour could do with a bit of rot/corrosion to fit with the plagubearers though.
37519
Post by: bigfish
They look awesome but i agree with Vitruvian on the corrosion point
5256
Post by: NAVARRO
Cool thanks, I'm planing to paint the armour with battle damage and rust effects so thats why I prefer a smooth surface for a canvas.
33919
Post by: Moltar
Those rotters look awesome, Navarro! Glad to see you back on Dakka and look forward to seeing those bloodbowl guys get some paint.
5256
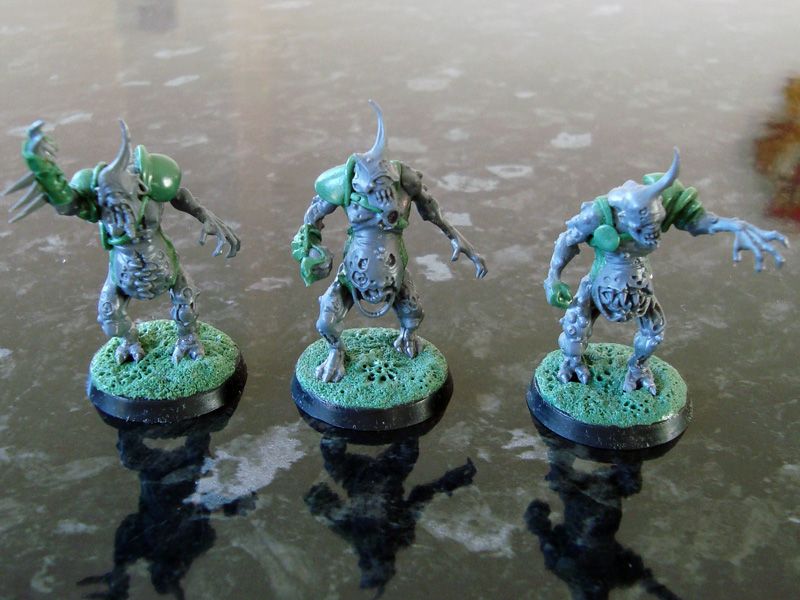
Post by: NAVARRO
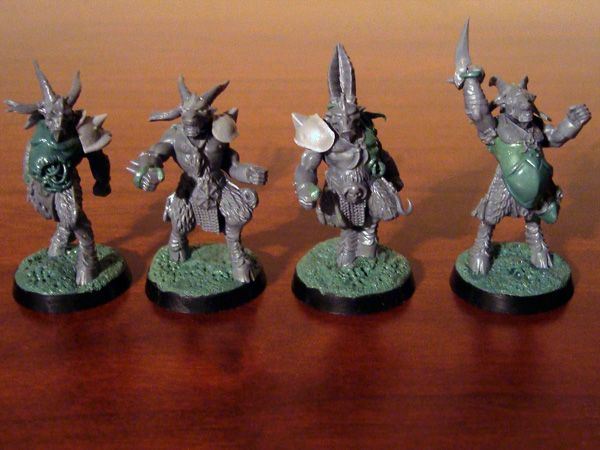
Finished 4 Beastmen for my Bloodbowl team.
5256
Post by: NAVARRO
To close this weekend here's one chaos warrior for my BB
And the team so far.
33919
Post by: Moltar
Awesome stuff, navarro! Your BB team looks fantastic and the space corridors turned out very nice! Sweet little weekend of updates from you!
15884
Post by: ghosty
The face on the Warrior looks a little goofy, but I'm well aware how difficult it is to sculpt at 28mm level! In addition I think some of the banding on the Nurgle Beastmans gutplate seems a bit rushed. I hope you don't get offended, but I'm trying to help out!
39666
Post by: GiraffeX
Your blood bowl team are looking fantastic so far, are there plans for a Minotaur?
5256
Post by: NAVARRO
Thanks for the tips and suggestions guys I appreciate it.
Minotaur maybe for the next team since this is a Nurgle team the big nasty thing will just be the Beast of nurgle.
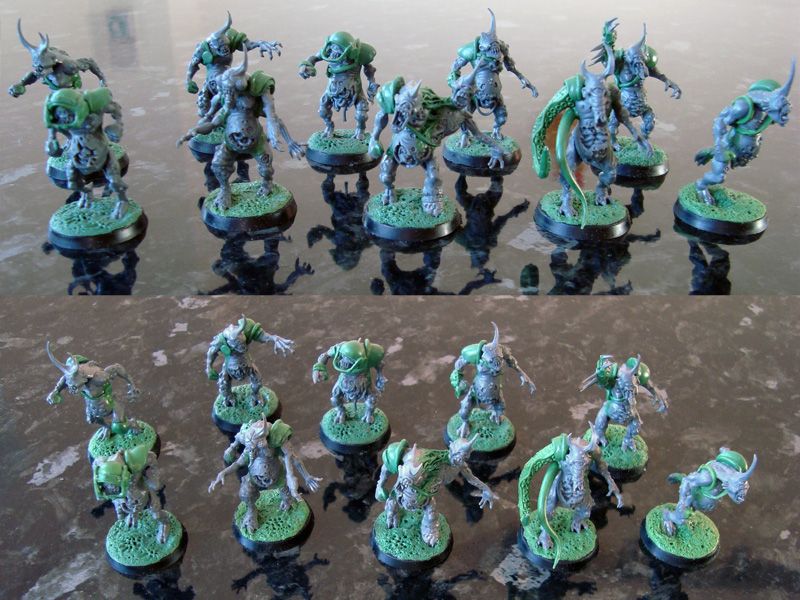
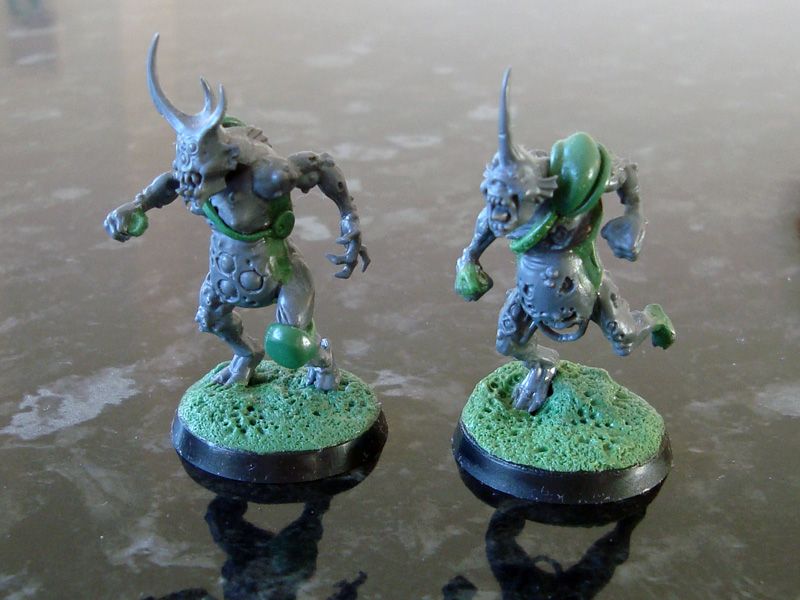
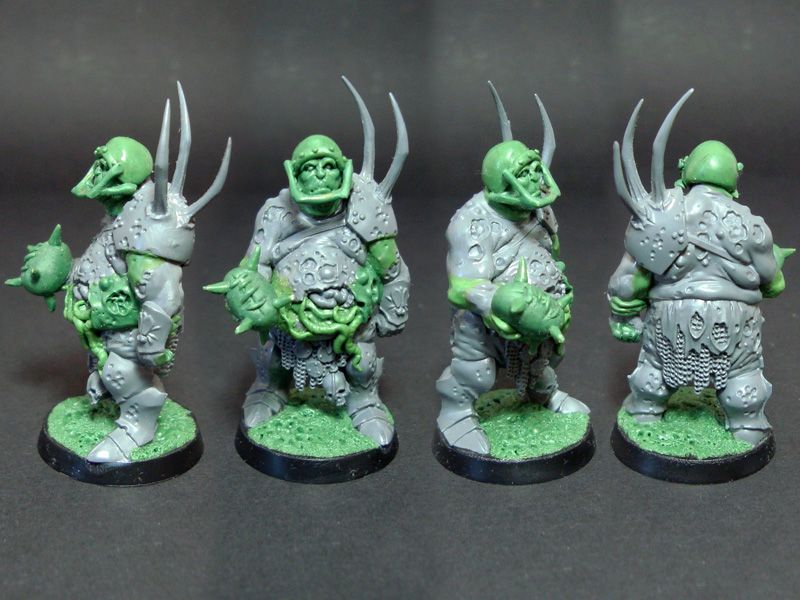
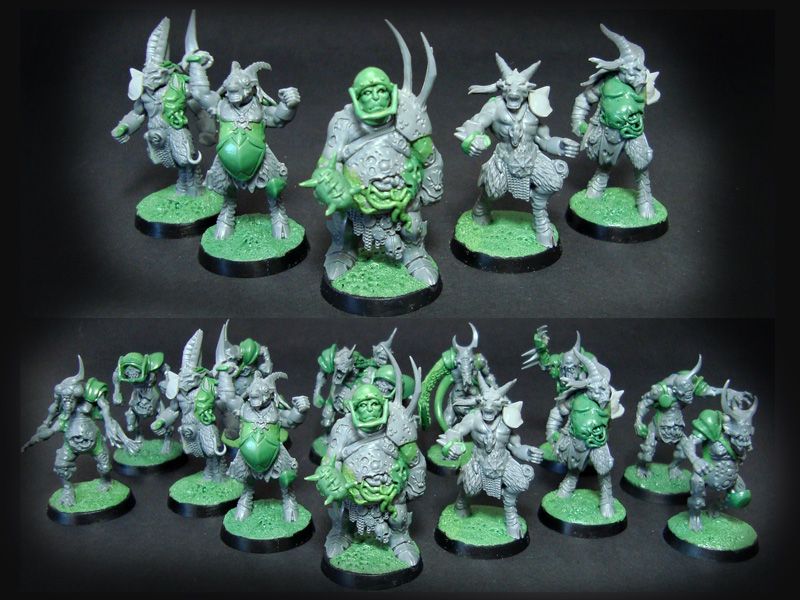
The team is all sculpted now.
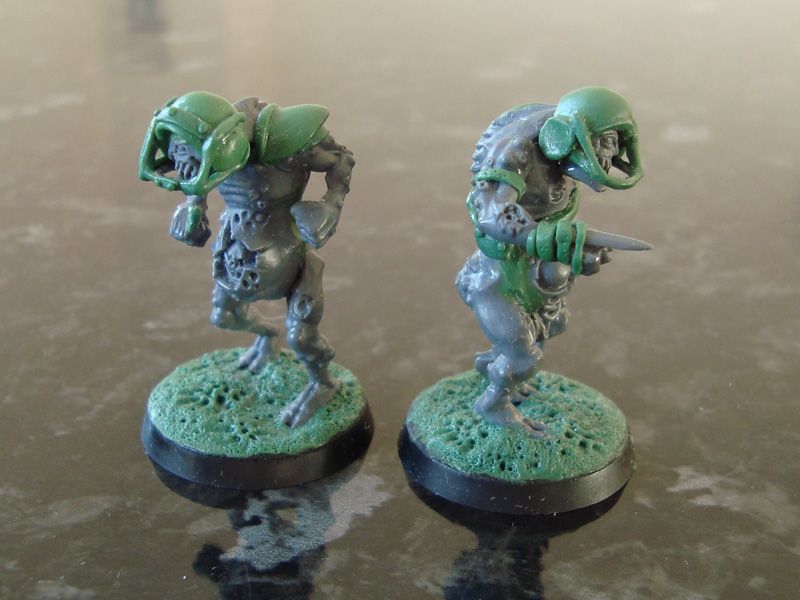
3 new warriors join the first one.
From left to right the Crabby, the Dumb, The French kisser and the Nurgling Thrower.
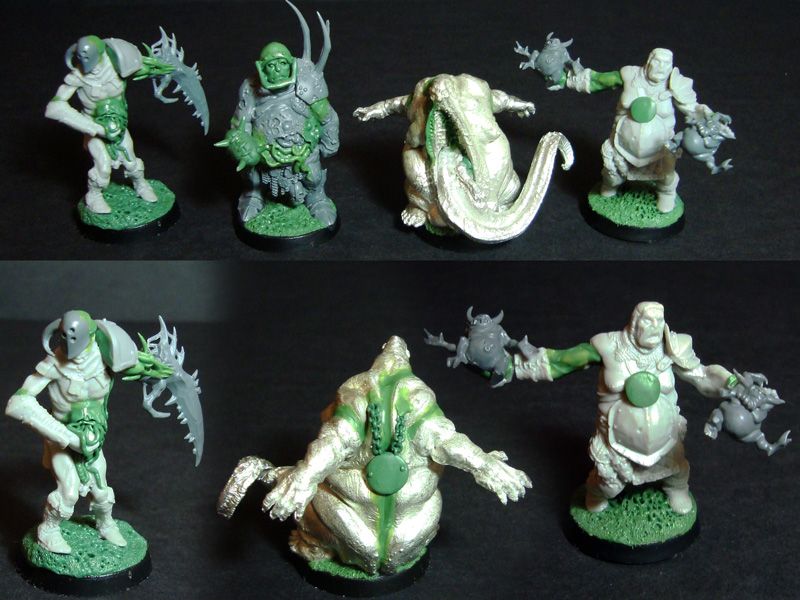
My beast of nurgle is obviously a cool damned big bug
Scale pic
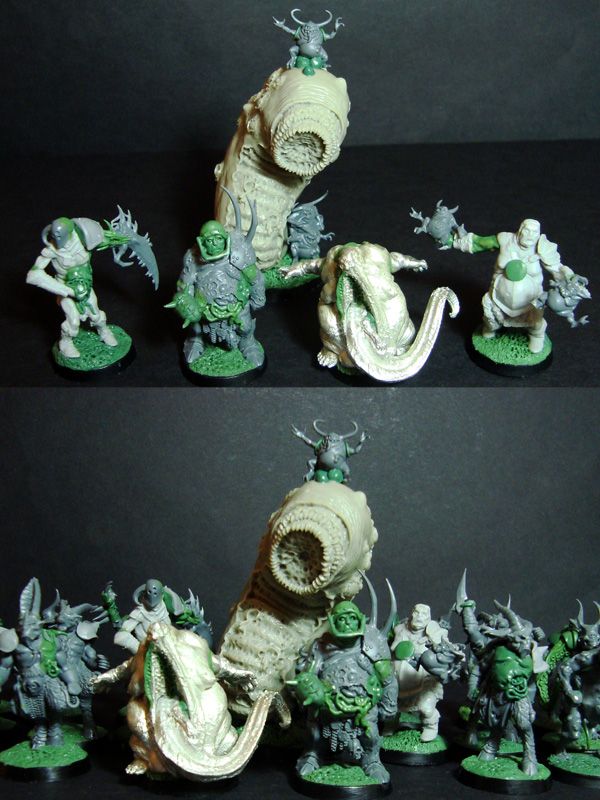
The bloodbowels are done and ready to hit the painting table.
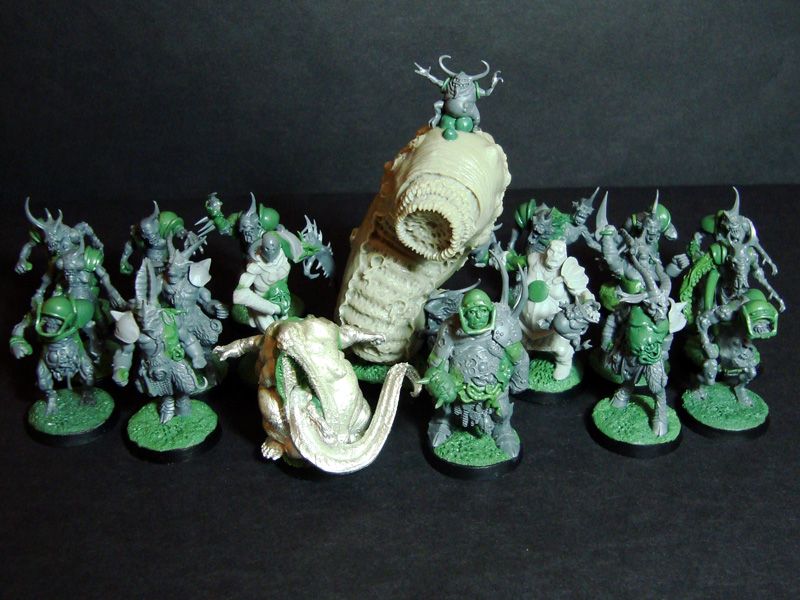
19 minis
10 rotters
4 Beastmen
4 Warriors
1 Beast of Nurgle
881
Post by: axiom
Beautiful sculpting! I love all the conversions and they look lovely together.
Trying to work out whether I like the dumb warrior or the nurgling thrower the best - both are very characterful. What's the base model for the nurgling thrower?
Looking forward to seeing these painted. Where do you intend to play with them - any tournaments coming up?
38259
Post by: Skumle Rafte
Fantastic work, makes me wanna play Bloodbowl right away
32169
Post by: Rogue Wolves
wow thats an amazing bloodbowl team
33919
Post by: Moltar
Tell Crabby to stop touching himself.
Team looks great and their name is great too.
56228
Post by: Leech
Hey Bug-man! You have some very cool stuff there, your work with the green stuff is superb and it's use imaginative as always. I really like the Plaguebearer who is converted to have another body fused to him, or growing out of him. That is a very simple idea but really good in the way you have pulled it off.
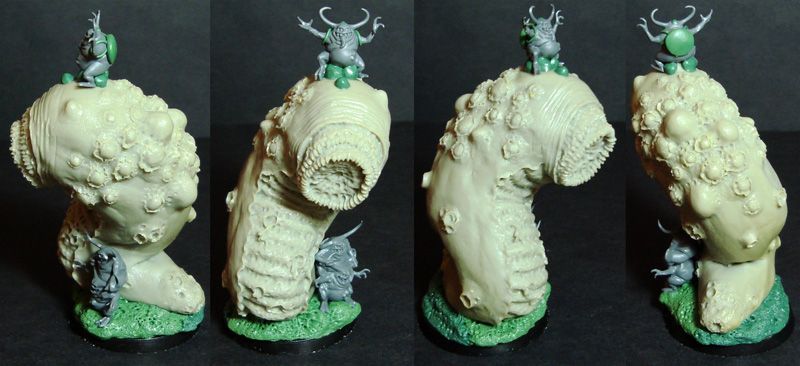
That huge buggy-grub-thing looks awesome. Where does it come from?
5256
Post by: NAVARRO
axiom wrote: What's the base model for the nurgling thrower?
Looking forward to seeing these painted. Where do you intend to play with them - any tournaments coming up?
Nurgling Thrower model is based on the old defunct game Alkemy from Kraken editions (its for the Kingdom of Avalon faction and its the Lotharious & Retiarii box set.)
I intend to play some games at Chelmsford bunker club... Bloodbowl is quite active there.
Leech wrote:Hey Bug-man! You have some very cool stuff there, your work with the green stuff is superb and it's use imaginative as always. I really like the Plaguebearer who is converted to have another body fused to him, or growing out of him. That is a very simple idea but really good in the way you have pulled it off.
That huge buggy-grub-thing looks awesome. Where does it come from?
Hey Leech, long time no see! Welcome to dakka. Glad you liked these and the big nasty worm is from Gribbly Miniatures.
Thanks all! I take this chance to post my yearly postcard wishing everyone.

26790
Post by: Gitsplitta
Same back at 'cha NAVARRO! Your team is looking pretty darn fantastic too. Nothing less than we've all come to expect.
67165
Post by: Novelist47
Those bases blow my mind
Keep it up
66047
Post by: Know No Pear
Glad to see that you're back.
And it's already been said, but those bases are fantastic! I especially like the details of the bodies decomposing!
37519
Post by: bigfish
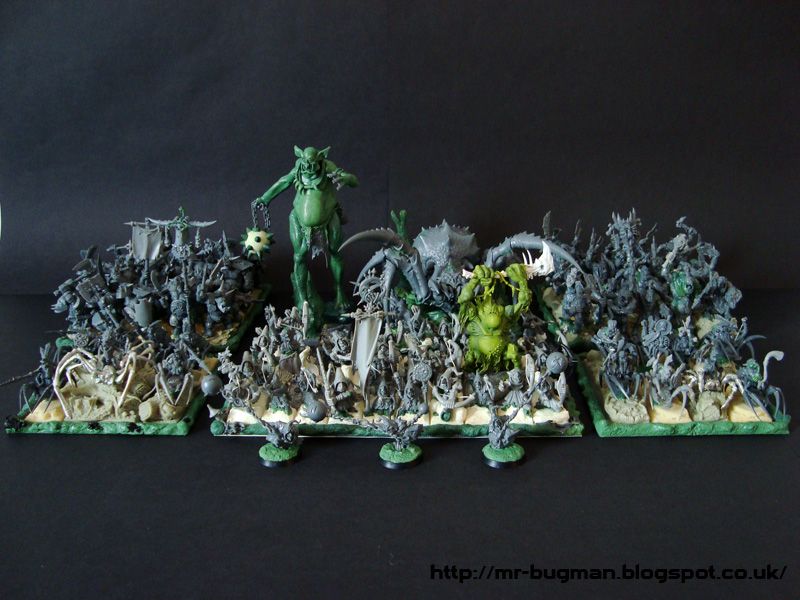
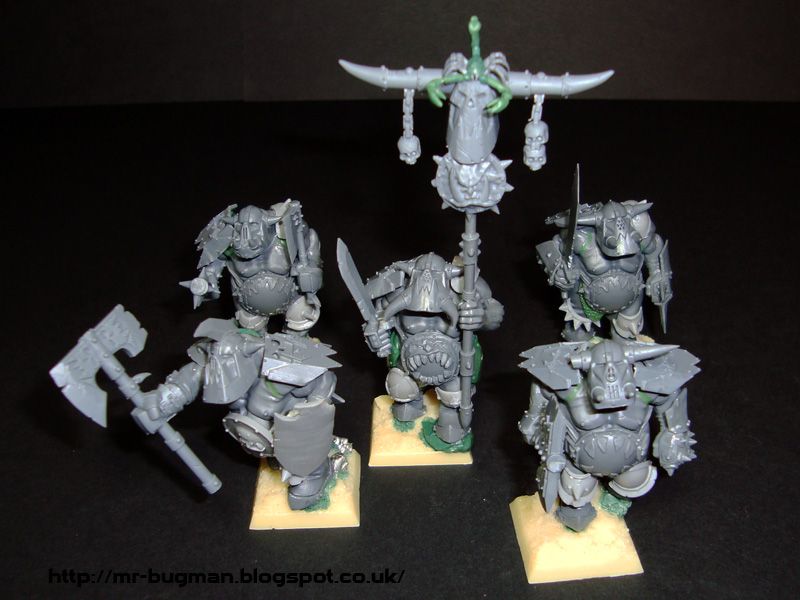
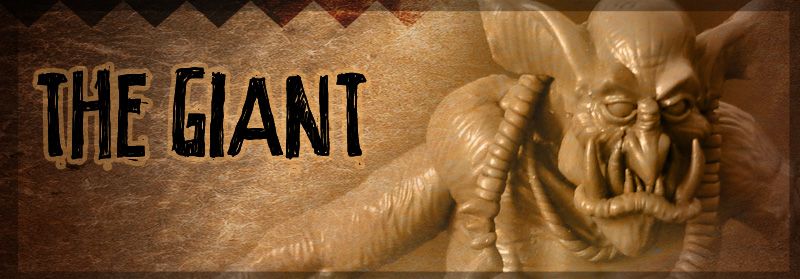
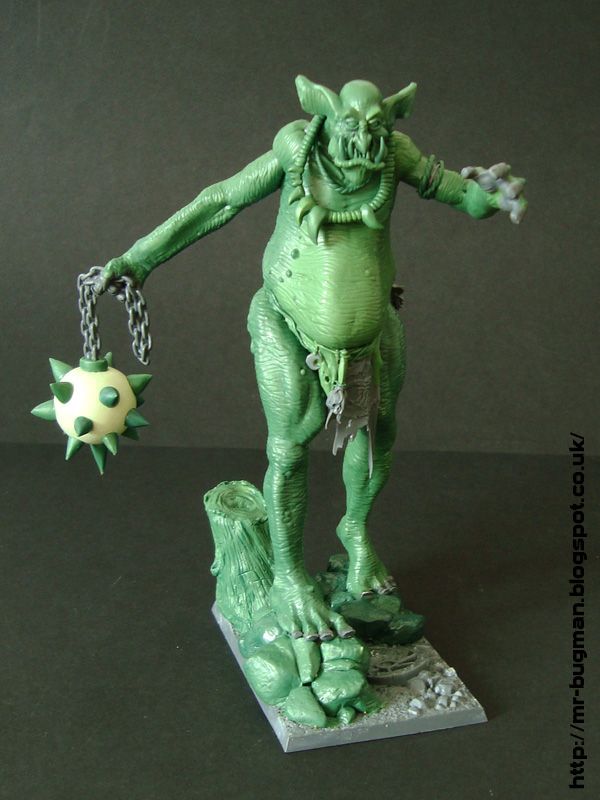
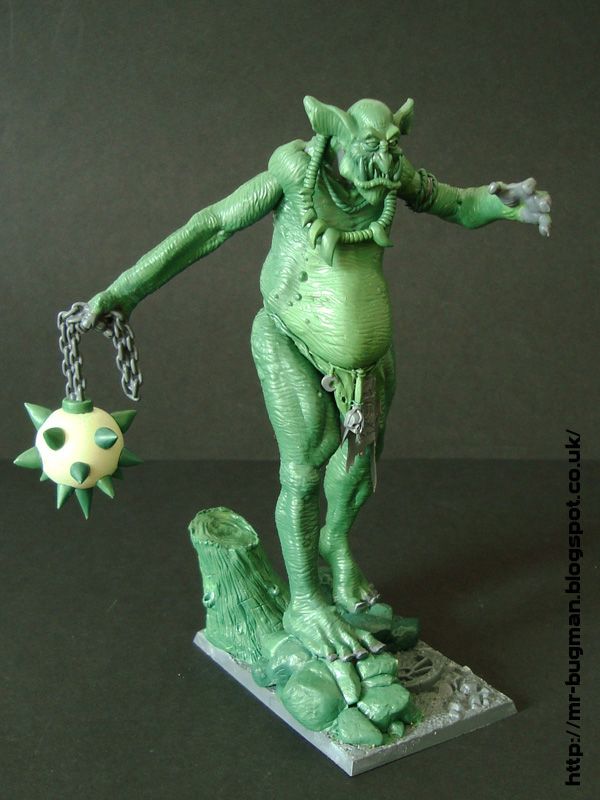
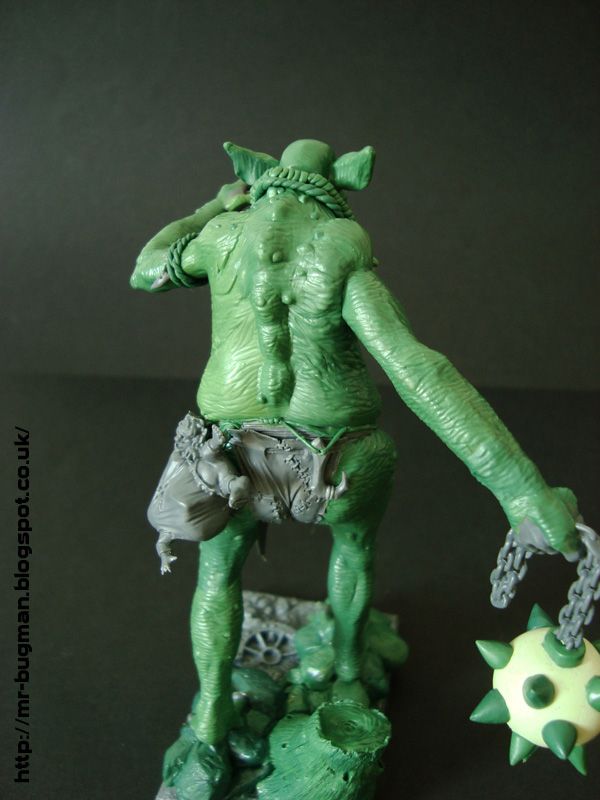
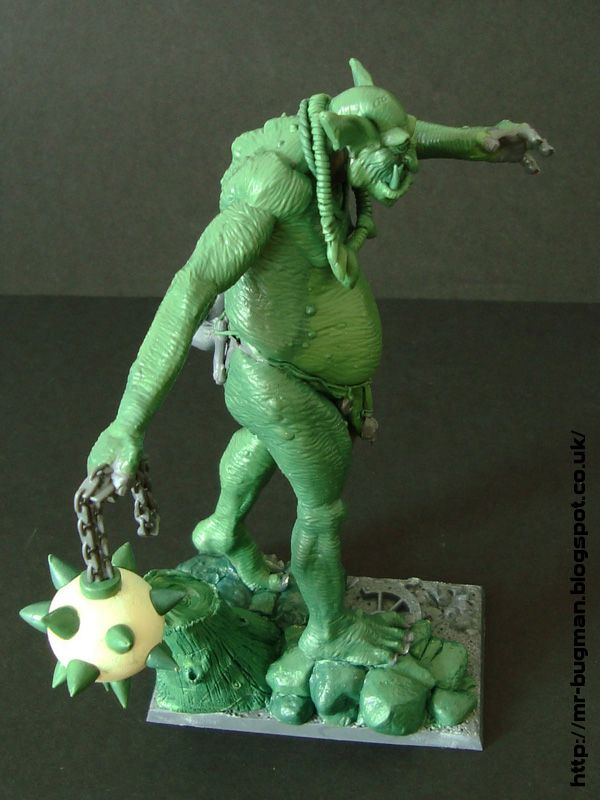
daaaam, the giant is particularly stand out for me but everything looks great
26386
Post by: hungryp
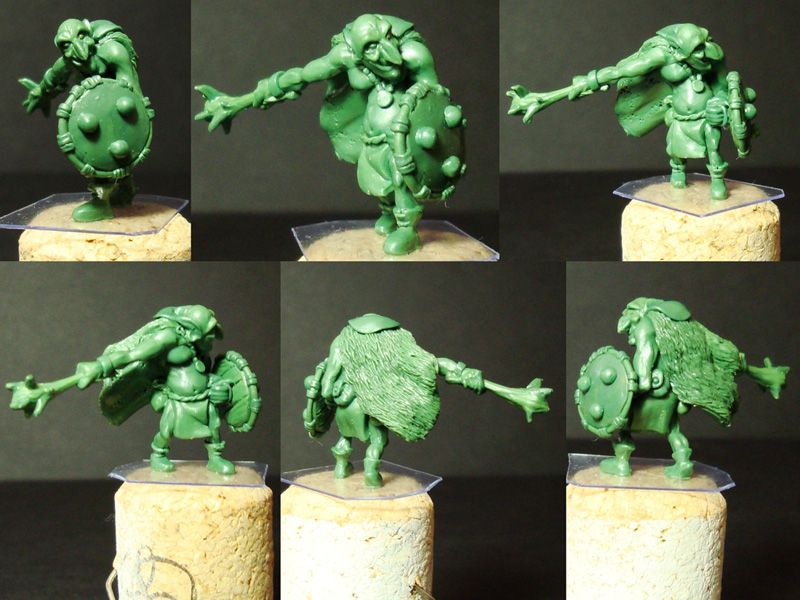
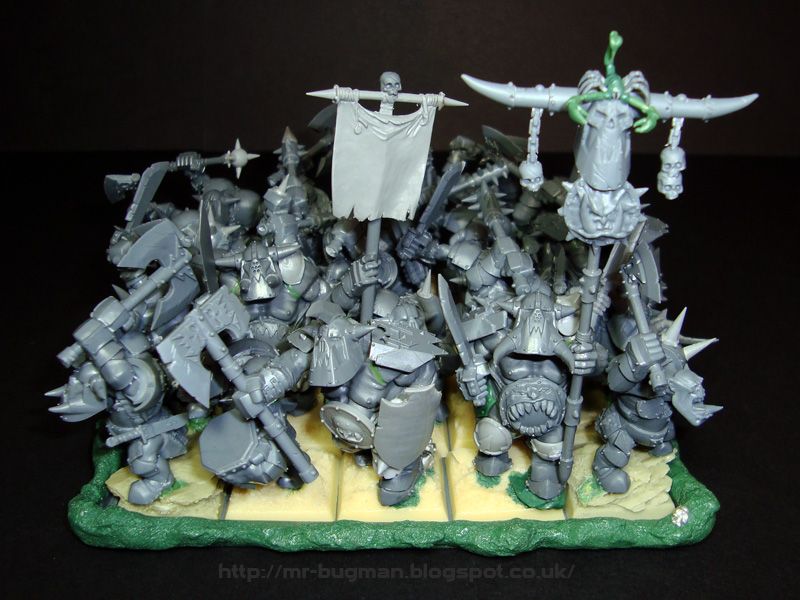
More incredible work. Those ogre-bodied Black Orks look huge, and the gobbo-looking giant is fantastic. To go way back, those 15mm sculpts pretty much blow my mind!
9594
Post by: RiTides
Awesome! Love the spider riders and giant especially 
5256
Post by: NAVARRO
Thanks all and I hope you have a wonderful Christmas with lots of new hobby shiny things.
26790
Post by: Gitsplitta
Truly remarkable work NAVARRO. Merry Christmas to you as well!
5256
Post by: NAVARRO
Time for a quick update.
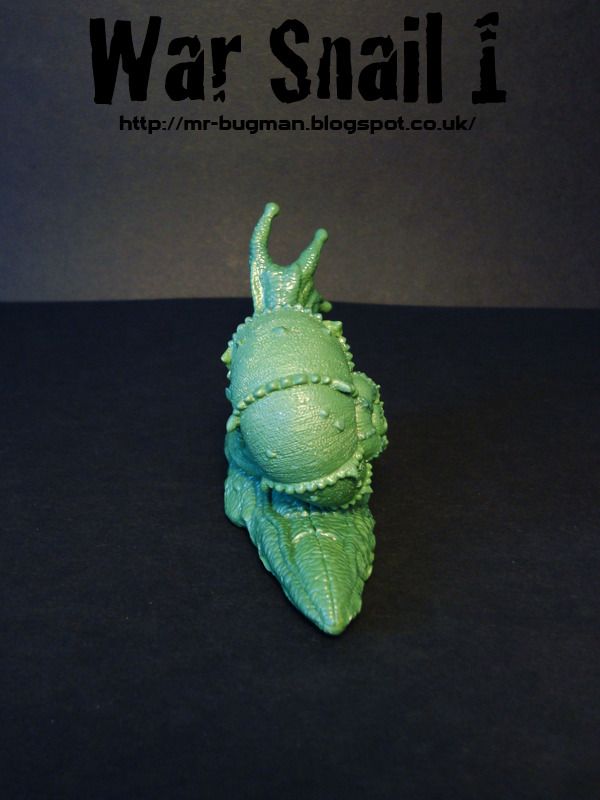
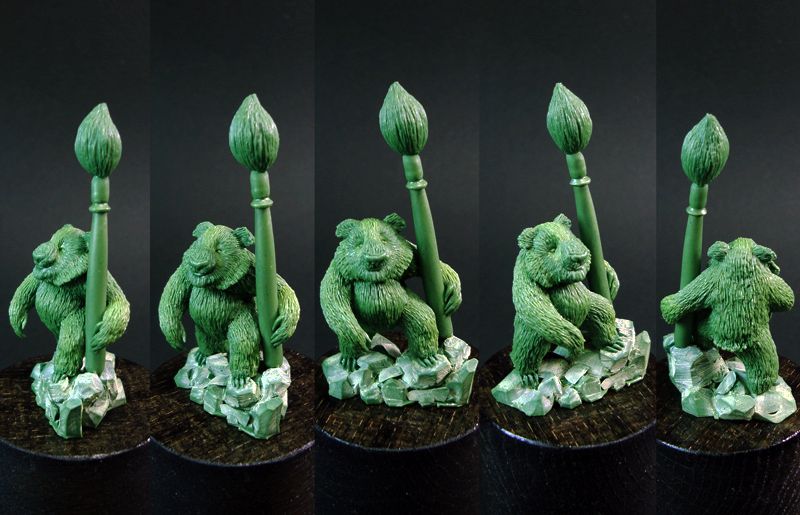
Last weekend I managed to sculpt and paint something a bit different as gift to a good friend.
So, he is crazy about League of Legends videogame and specially one cute creature there called PORO ( its like a snow yak chibi thing), perfect! I had 3 days to pull this off and dont ask me he how but I did it!
Poro Sculpt
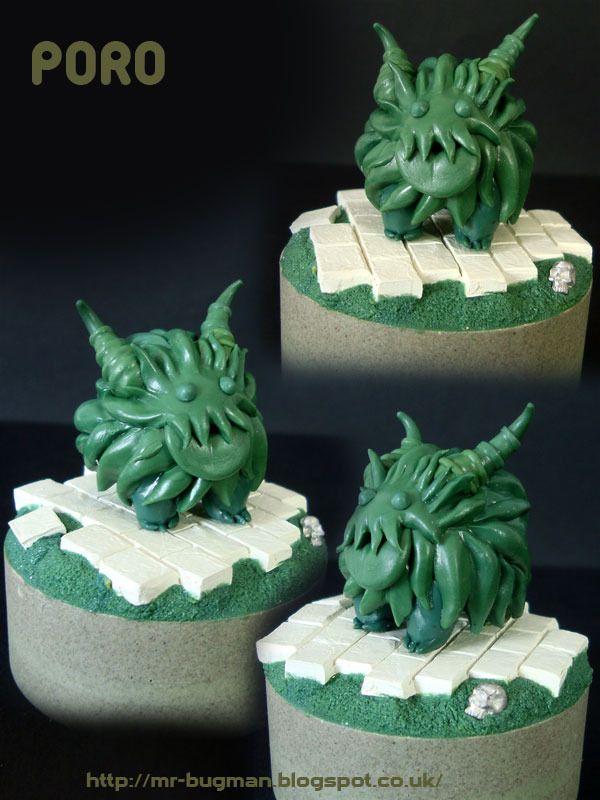
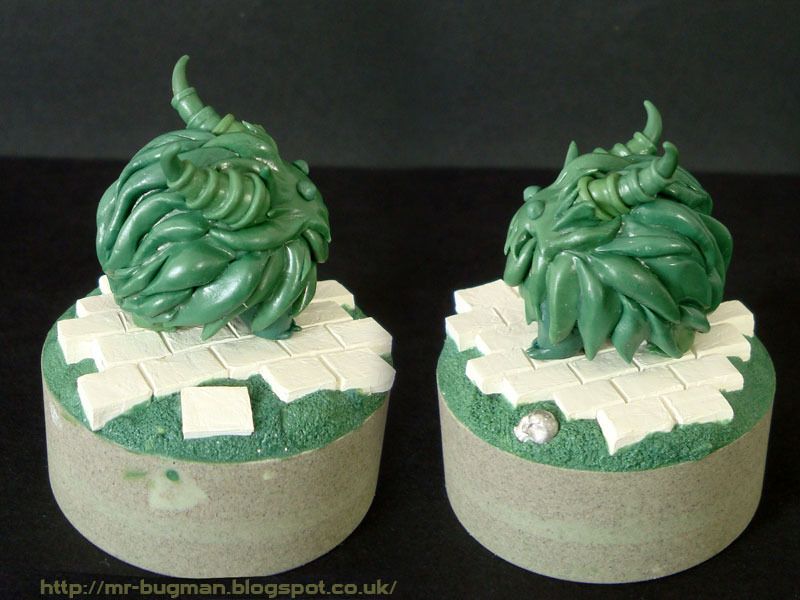
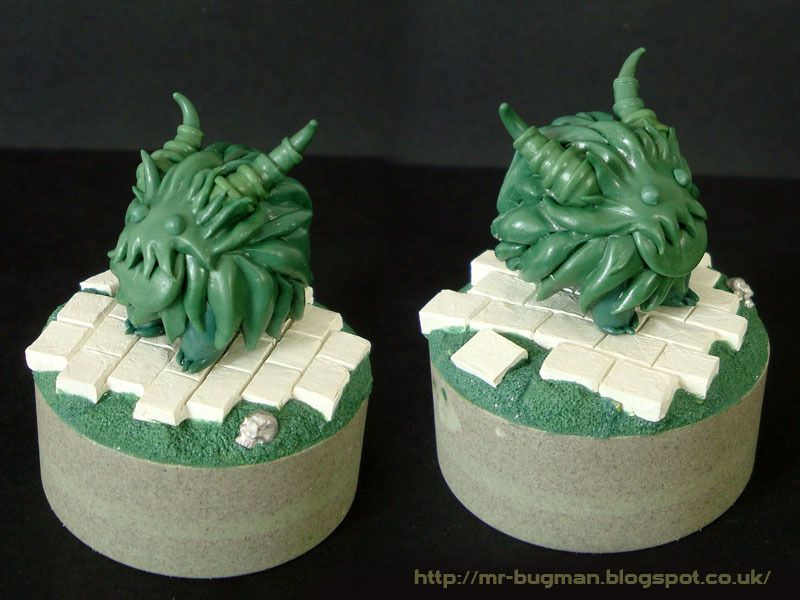
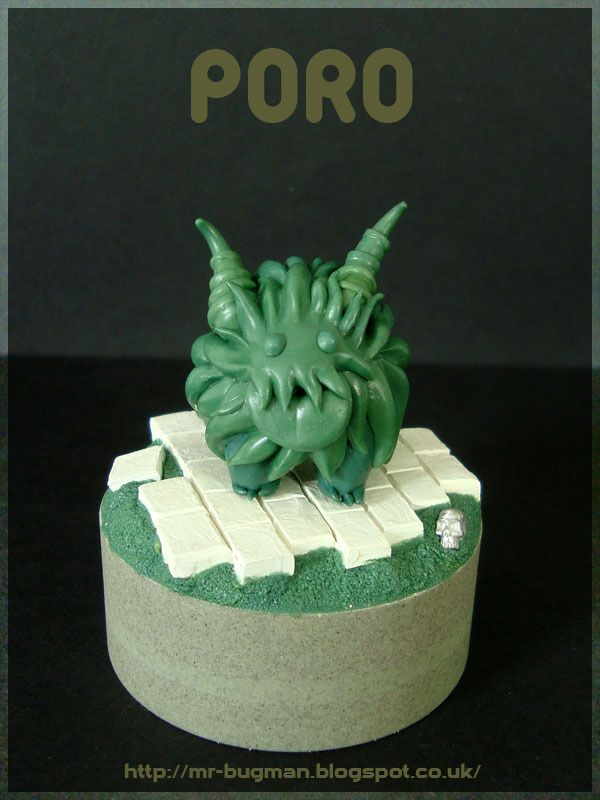
Paintjob
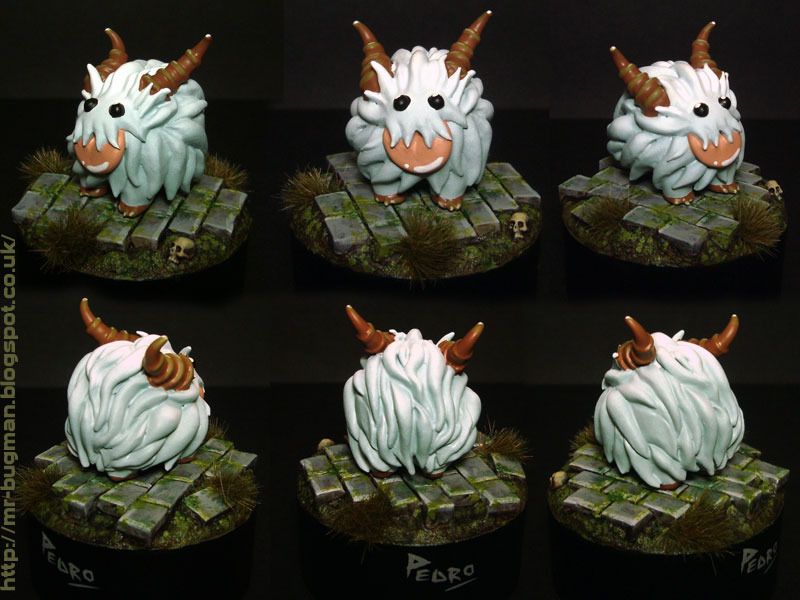
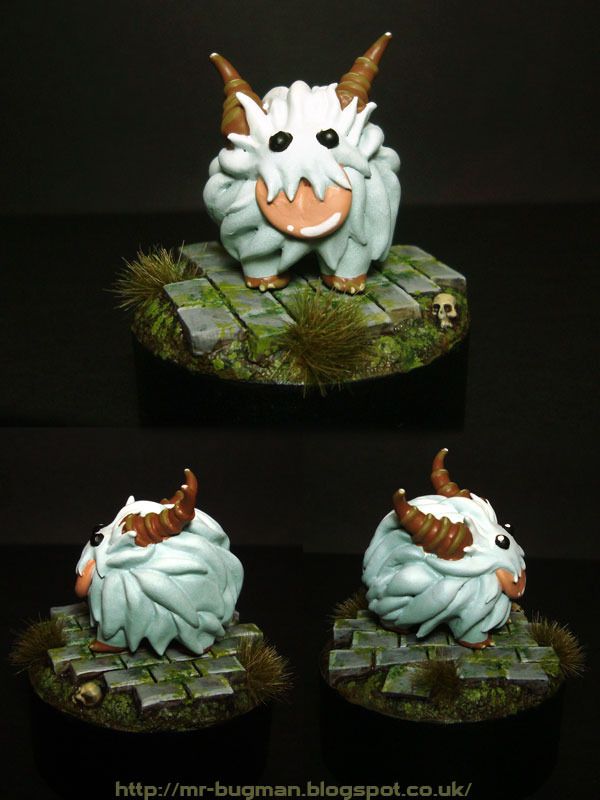
In the end he enjoyed this gift so I was happy with that.
4670
Post by: Wehrkind
Awesome! Glad to see some cute stuff, or any stuff really, from your blog man!
5256
Post by: NAVARRO
For the old vets here you probably remember my old site Buglands. This week I tried to recover it but unfortunately all files are missing so its really gone forever.
I had tutorials and all kind of bug things there, some of them useful for people curious about sculpting with Greenstuff.
With those bad news in mind I will slowly republish some of those tutorials on my Blog on Blogger. http://mr-bugman.blogspot.co.uk/2015/06/tutorial-sculpting-alien-skin.html
Here is the first one. Since its a small one I will also publish here on dakka.
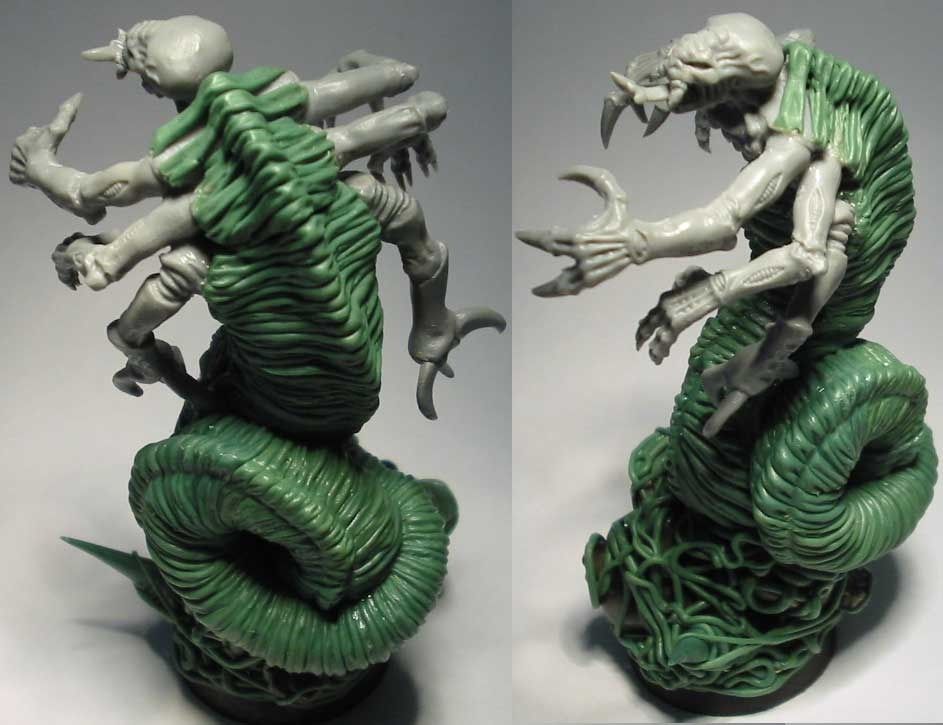
Sculpting Alien Skin ( Greenstuff Tutorial)
Introduction
This small sculpting tutorial will be showcasing some tips on how to create a very simple alien skin texture that can be used in various projects, from chaos creatures, lizardmen to Tyranids.
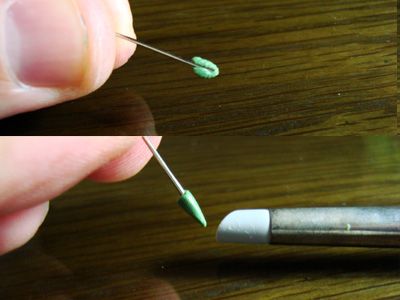
Step 1 ( things you will need) (pic1)
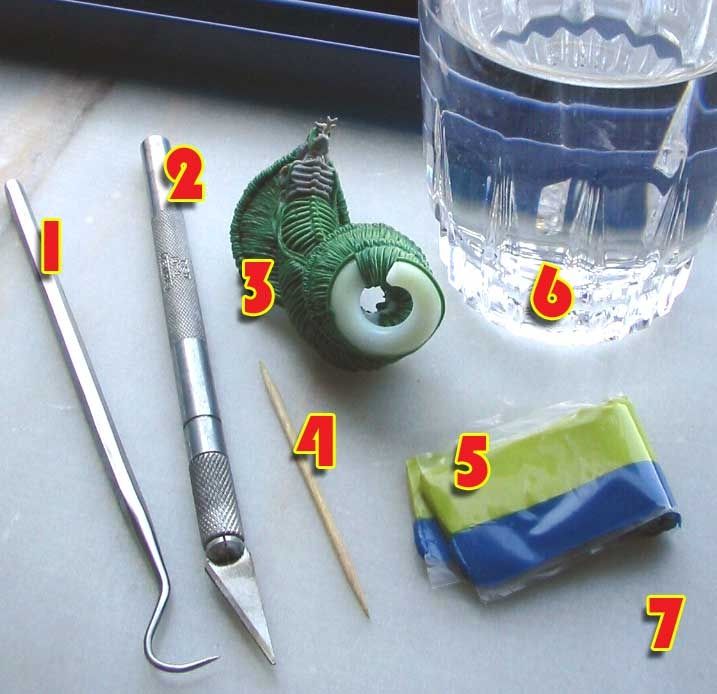
1- Sculpting tool
2- Hobby knife ( cutter)
3- Miniature or structure to apply textured skin
4- Toothpick
5- Modeling putty (green stuff)
6- Water
7- Flat surface
Patience
Step 2 (handling green stuff)
- Cut a bit of green stuff ( GS) and mix it, more yellow is better for detail work but it takes more time to cure and is also extremely sticky, more blue has the opposite effect.
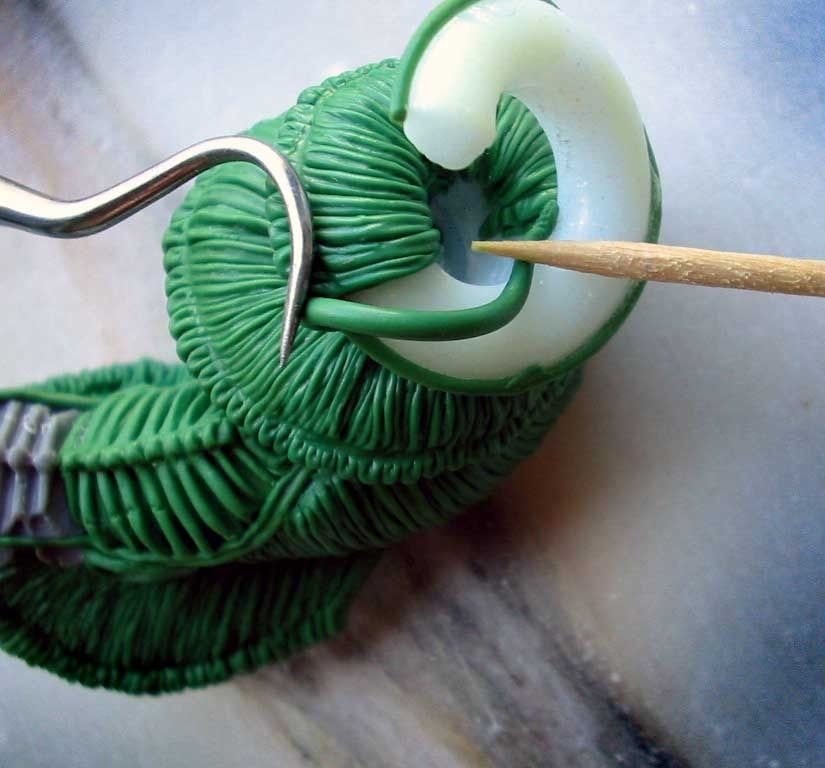
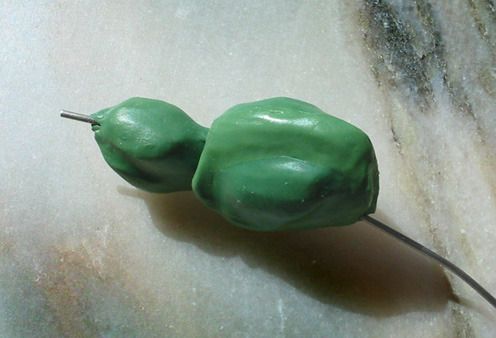
- In a flat area stretch, roll the GS until you reach the desired shape and size (pic2)
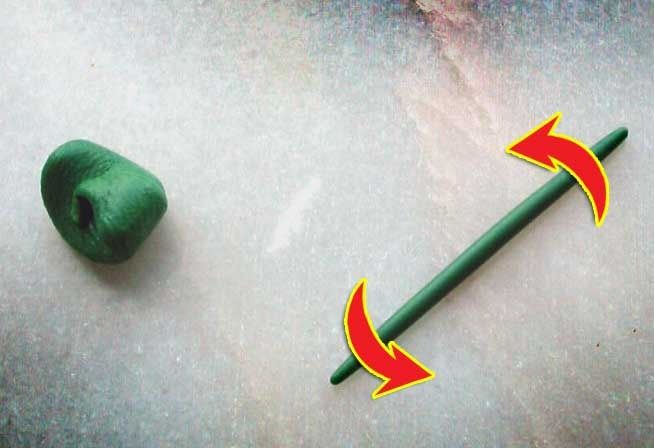
- Apply it directly on the miniature (I created a fimo swirly structure)
- Use the toothpick and sculpting tool to handle the GS, both should be dipped in water to avoid GS sticky properties (pic3)
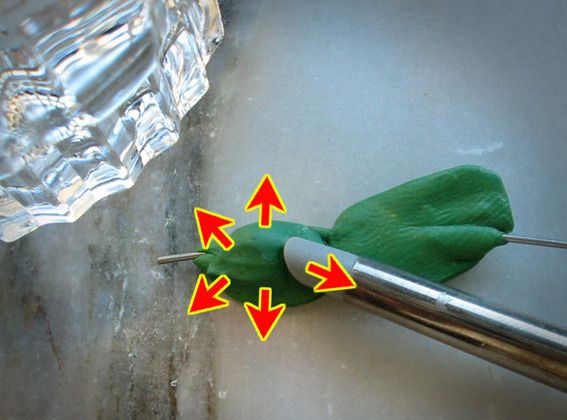
Step 3 ( Texturing)
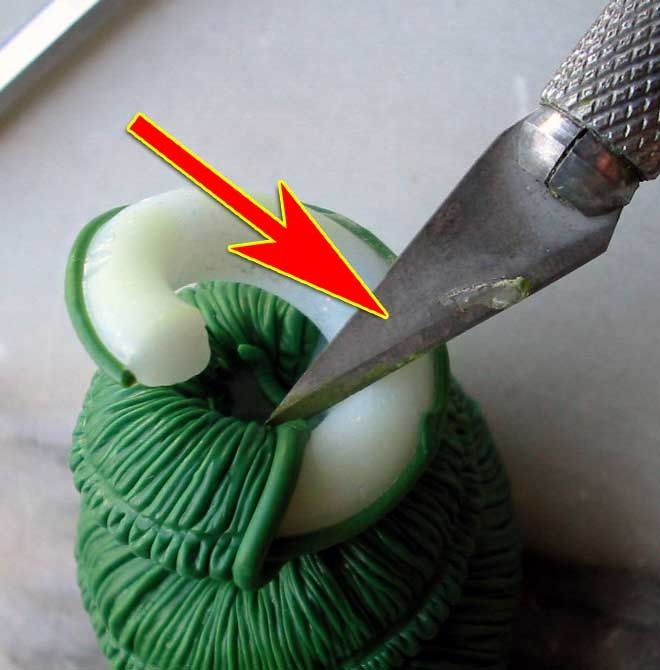
- Reshape the GS to fill the interior structure or miniature and cut the excess (pic4)
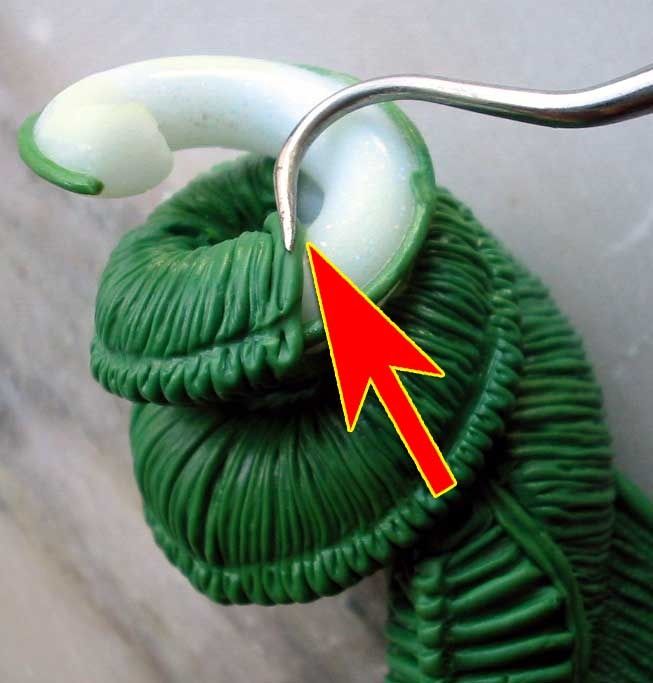
- With sculpting tool carve some parallel lines gently on GS (pic5)
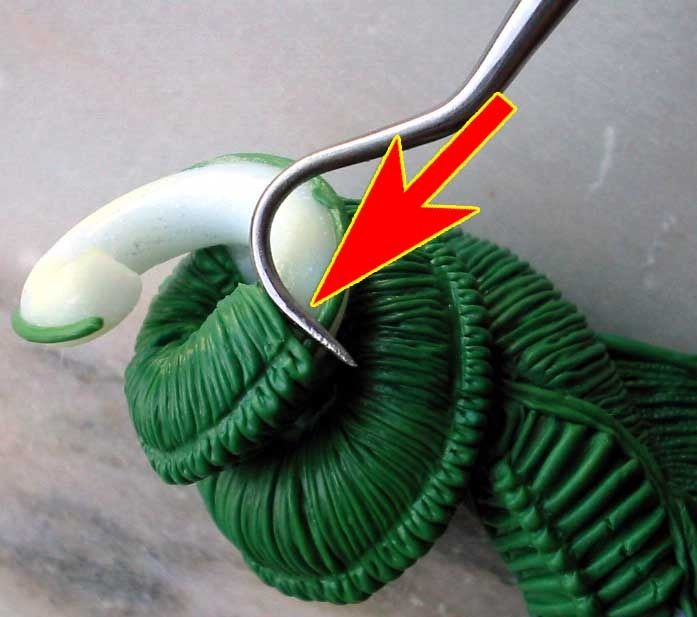
- Finally push it towards previous GS module in order to create space for next one (pic6)
Conclusion
Now that you have done the first module of the skin you just need to repeat the same steps several times in order to cover all the desired surface. The reason why I choose to make the skin in small modules and not all at once is due to the fact you will have more control over the skin sculpting and also makes the texture itself much more interesting. I hope these tips will help you all on your future sculpting projects.
Final result.
Have fun Greenstuffing.
4670
Post by: Wehrkind
Awesome! I remember the old Buglands, but hadn't realized it went down. Very sorry to hear it.
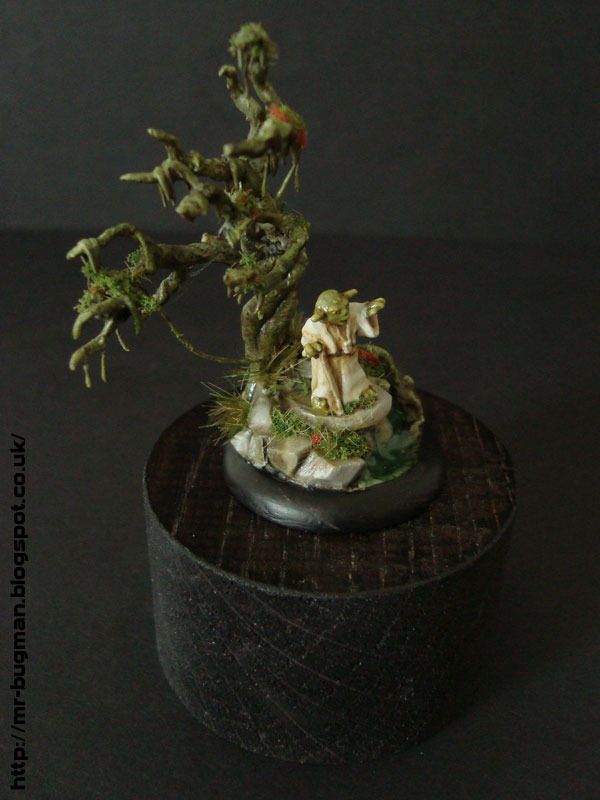
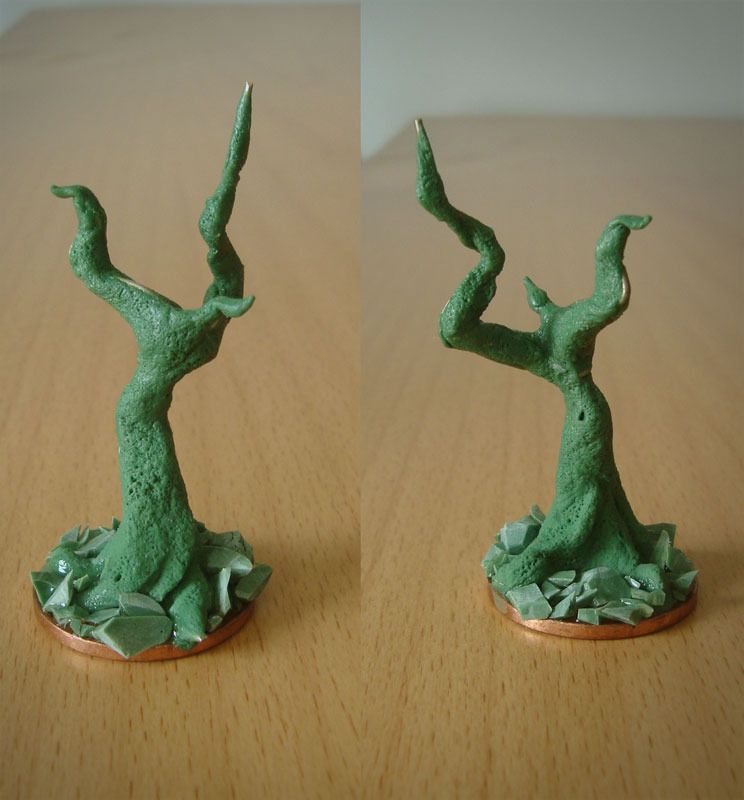
I like Yoda too, but honestly, I love the hell out of that tree How did you do the texture on it? Any particular trick?
87848
Post by: NobodyXY
You control over green stuff is inspiring! 
13225
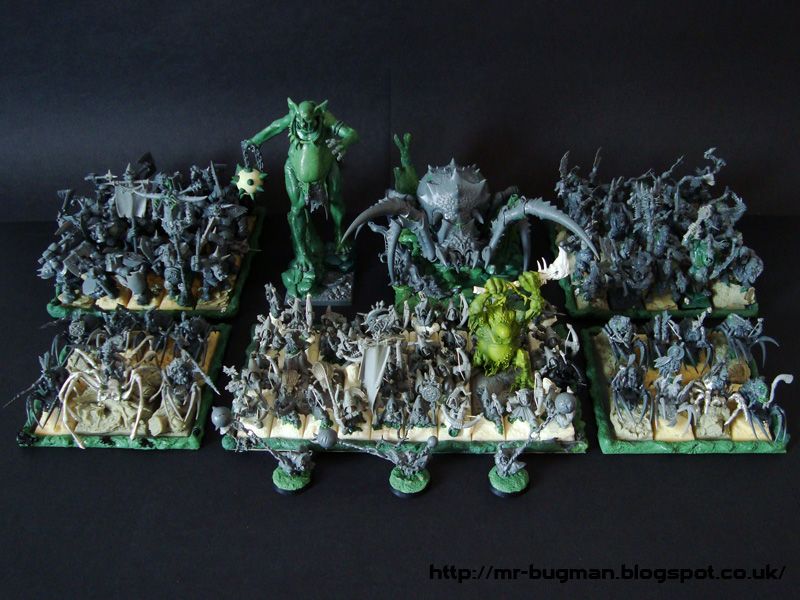
Post by: Bottle
Some amazing work on this blog.
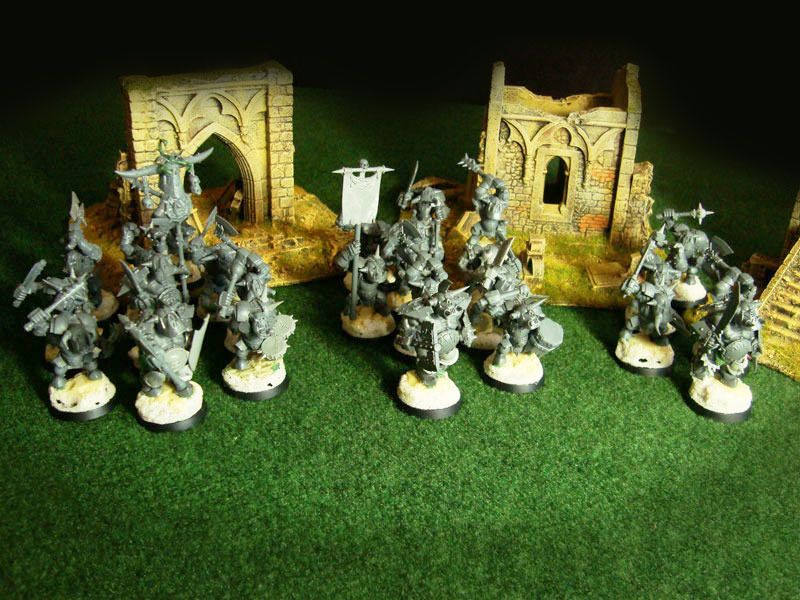
Did you ever get the Orc and Goblin army painted up?
76303
Post by: Warboss_Waaazag
Great tutorial! Awesome sauce.
5256
Post by: NAVARRO
Wehrkind wrote:Awesome! I remember the old Buglands, but hadn't realized it went down. Very sorry to hear it.
I like Yoda too, but honestly, I love the hell out of that tree How did you do the texture on it? Any particular trick?
The tree Texture Is a really simple process, you just gave me the theme for another sculpting tutorial right there.
Just in words if you want to try it now: the tree was made with the GS leftovers of my other sculpting projects and you only need a tree wire frame and a toothbrush. After you lay some GS on the tree wire you then poke it with an old tooth brush to create lots of little indentations. Simple and easy.
NobodyXY wrote:You control over green stuff is inspiring!
Thanks. glad I could inspire you, I hope that you try a bit of sculpting in the future. It can be a bit tricky in the beginning but with perseverance you will have lots of fun enhancing your minis.
Bottle wrote:Some amazing work on this blog.
Did you ever get the Orc and Goblin army painted up?
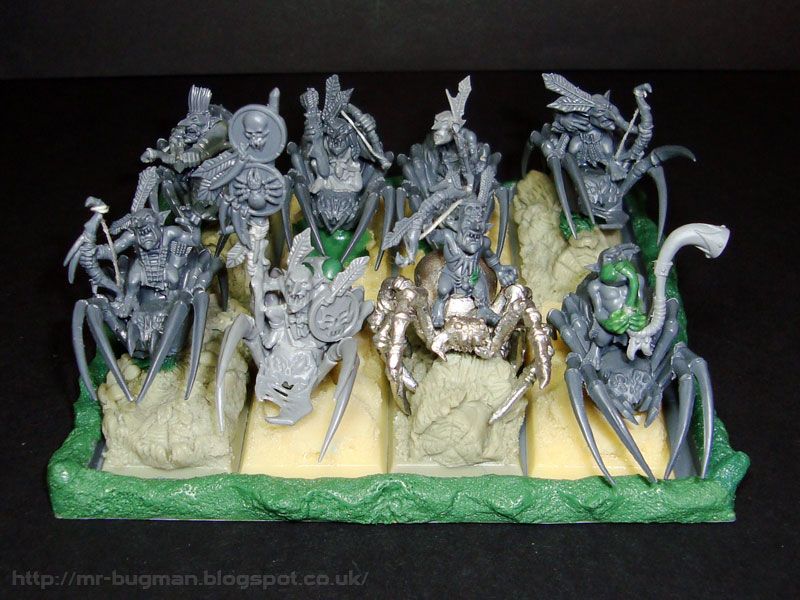
Yes good sir I have the 2 regiments of spiders ready just waiting to see what is going to be the outcome on the basing for Age of sigmar. Soon enough we will find out. I think my O&G as they stand will be the perfect number of models for a skirmish game.
Warboss_Waaazag wrote:Great tutorial! Awesome sauce.
More to come
4670
Post by: Wehrkind
 NAVARRO wrote: NAVARRO wrote:Wehrkind wrote:Awesome! I remember the old Buglands, but hadn't realized it went down. Very sorry to hear it.
I like Yoda too, but honestly, I love the hell out of that tree How did you do the texture on it? Any particular trick?
The tree Texture Is a really simple process, you just gave me the theme for another sculpting tutorial right there.
Just in words if you want to try it now: the tree was made with the GS leftovers of my other sculpting projects and you only need a tree wire frame and a toothbrush. After you lay some GS on the tree wire you then poke it with an old tooth brush to create lots of little indentations. Simple and easy.
Cool, I will have to give that a try! I had been messing around with GS trees for gallows groves etc, and just never really felt comfortable with their look. Then again I kind of hate everything I do ever, so there's that 
92505
Post by: youidiotkid
Thanks for posting this tutorial up. I've been looking for a way to sculpt alien skin like this for my alt 'Nids. I'm sorry to hear that your site went down. Is this the new hub for Bug Man stuff?
26790
Post by: Gitsplitta
Thank you so much for the tutorial! I'm a complete dunce when it comes to sculpting and even just this little tut contains all kinds of useful insights and techniques!
5256
Post by: NAVARRO
Wehrkind wrote:
Cool, I will have to give that a try! I had been messing around with GS trees for gallows groves etc, and just never really felt comfortable with their look. Then again I kind of hate everything I do ever, so there's that
I will try to do the tut about that texture ASAP mate. Good thing about it is that you can use it for more than just trees.
youidiotkid wrote:Thanks for posting this tutorial up. I've been looking for a way to sculpt alien skin like this for my alt 'Nids. I'm sorry to hear that your site went down. Is this the new hub for Bug Man stuff?
Glad I could help a Nid fan in need I will use my blogger site for all updates and upload as much as I can over here too.
Gitsplitta wrote:Thank you so much for the tutorial! I'm a complete dunce when it comes to sculpting and even just this little tut contains all kinds of useful insights and techniques!
Thanks. I think the small simple tutorial approach is a good way to introduce everyone to sculpting and converting. I will do a few more time permitting.
13225
Post by: Bottle
NAVARRO wrote:
Bottle wrote:Some amazing work on this blog.
Did you ever get the Orc and Goblin army painted up?
Yes good sir I have the 2 regiments of spiders ready just waiting to see what is going to be the outcome on the basing for Age of sigmar. Soon enough we will find out. I think my O&G as they stand will be the perfect number of models for a skirmish game.
I understand, my empire army is on hold too till I know if it'll be circles or squares they need to stand.
Hopefully we can get some pics once they are all done :-)
5256
Post by: NAVARRO
Wehrkind heres the tree tutorial as promised! On my blog http://mr-bugman.blogspot.co.uk/2015/06/tutorial-sculpting-texture.html
Or since its a small one here on dakka too...
- This tutorial will be about achieving some interesting textures that can be applied to many different subjects. Again it will be a really simple tutorial and easy to follow so that anyone can achieve the results fast with no hassle regardless of experience in sculpting.
The subject will be some kind of swamp tree with a very mossy and rough texture on the bark, so bring in your greenstuff and lets get this project done.
Sculpting rough textures
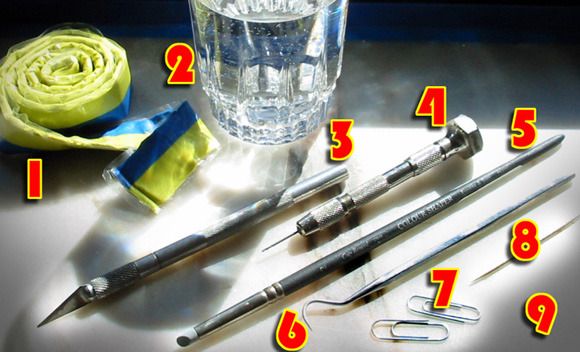
You will need the following.
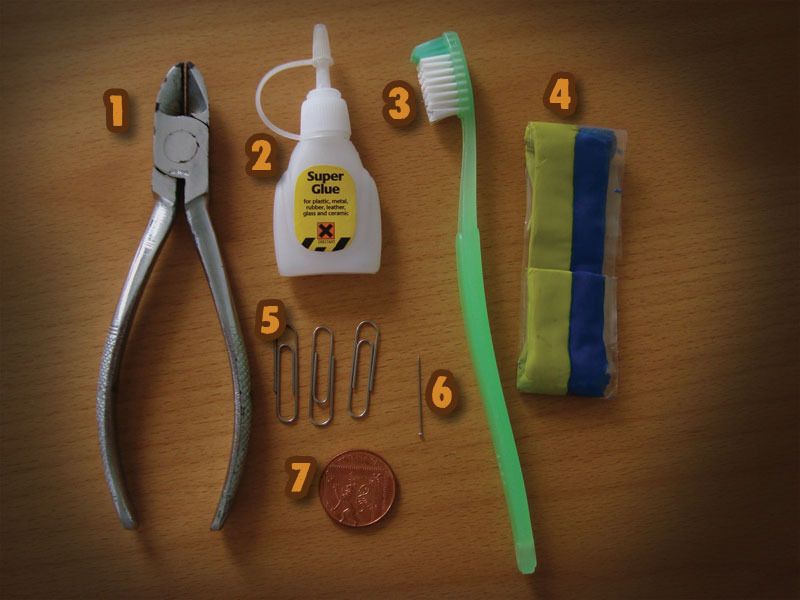
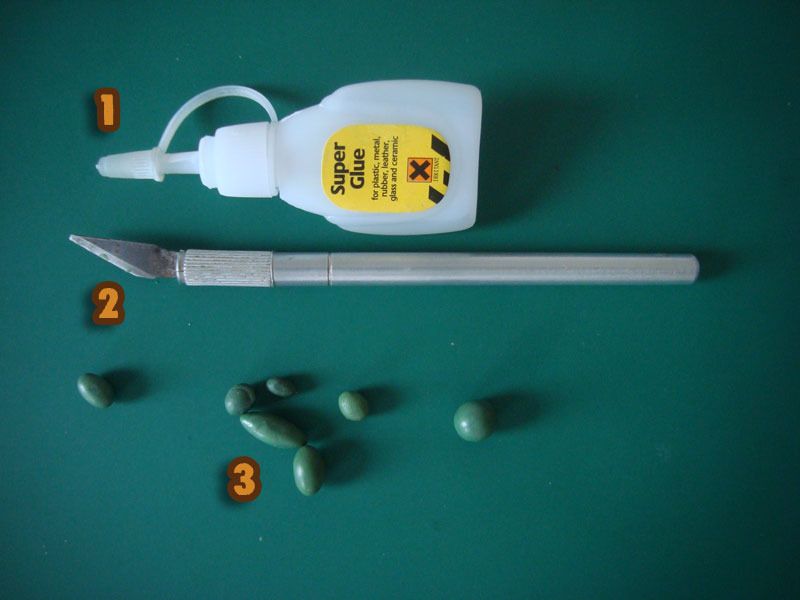
1- Wire cutter
2- Cheap super glue
3- Old toothbrush
4- Greenstuff
5- Paper clips
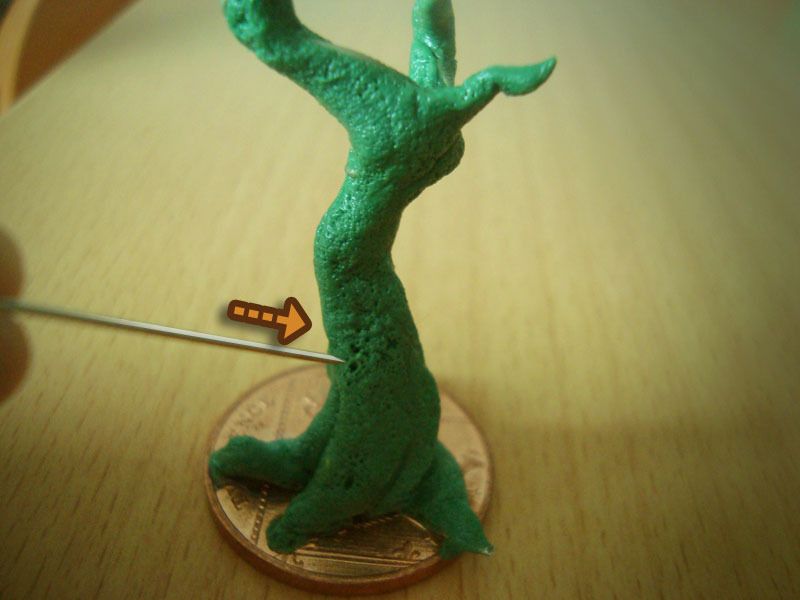
6- Needle
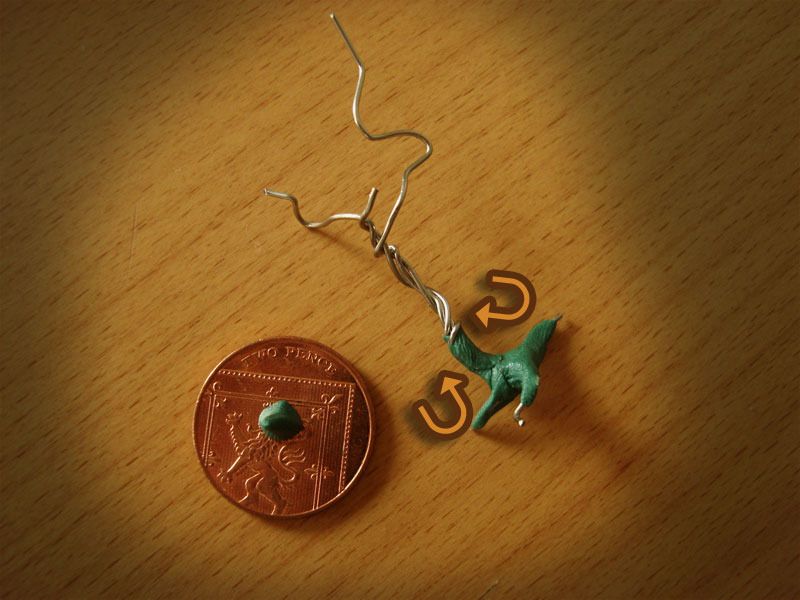
7- A base for your little tree branch, I used a coin
All sorted so lets play with some paperclips now.

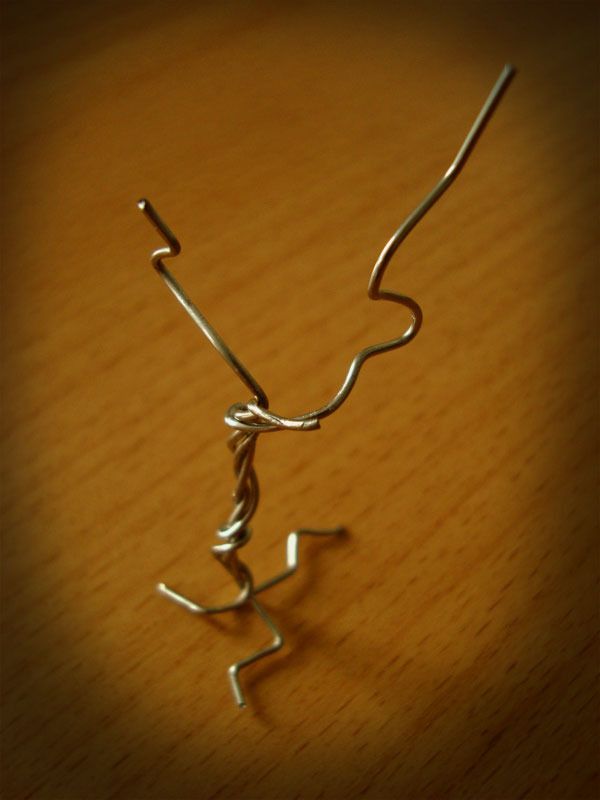
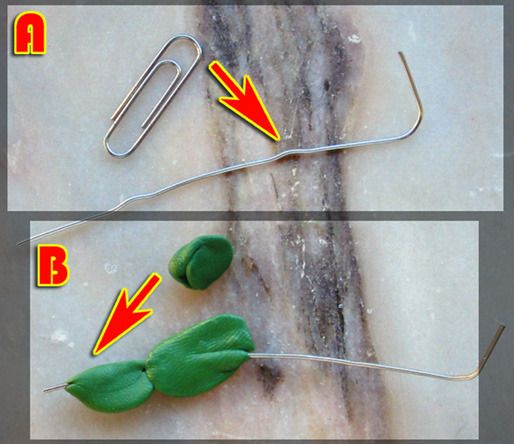
Bend and cut the clips to create the desired shape for our small tree, depending on how big and complex you want the tree you will need more or less paper clips\wires. Since my aim for this tutorial is to display the texture work I just made a really small young tree.
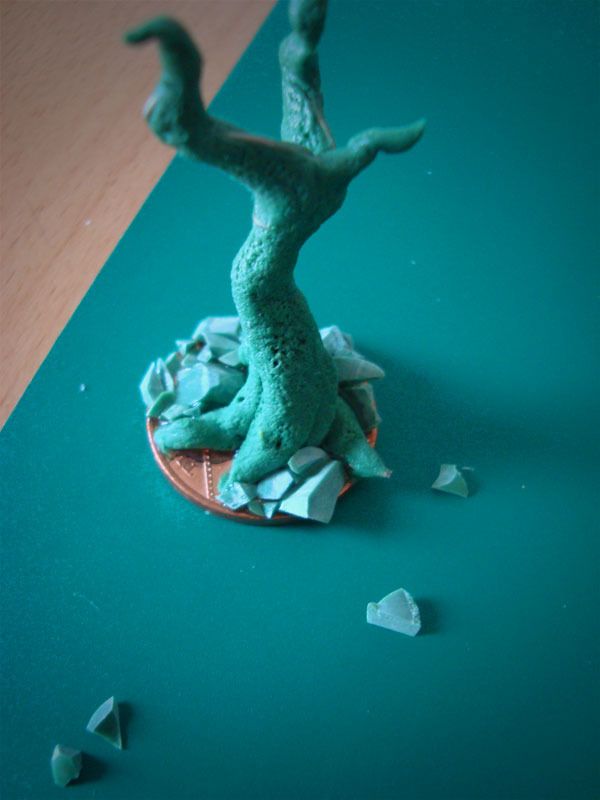
Lets base it now so we can have a good sturdy surface to work on.
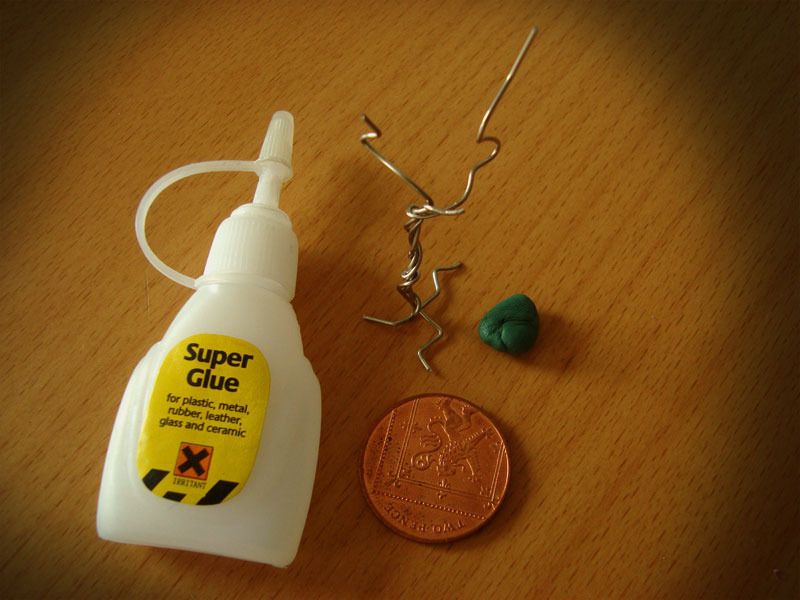
Mix just a little bit of Greenstuff...
Apply a little ball to the coin and use the rest to do some roots, this is really rough stuff so use your fingers and do not worry to much if your fingermarks are printed on the roots.
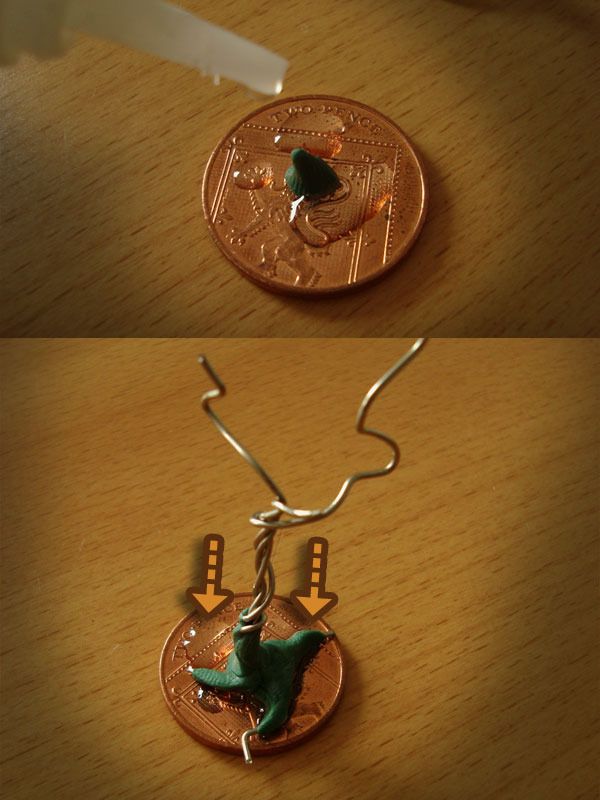
Once your happy with the roots and with the Greenstuff still fresh apply Superglue to join the tree to the base. The bound created by the mix of fresh Greenstuff and Superglue is VERY strong. Let the glue dry before going for the next step.

Mix more Greenstuff and break it in small manageable blobs, these will be your tree curves.

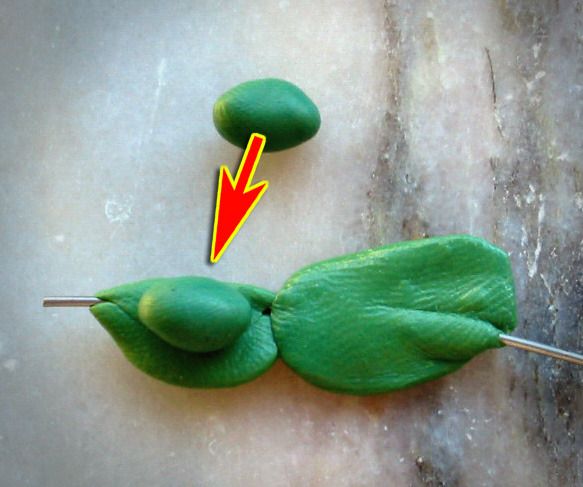
Bit by bit start bulking your tree, as you can notice if you just work one blob at the time you will have more control on the final shape. Note that all of this is just sculpted using your fingers so no need for other tools, we want a rough finish since its a tree after all.
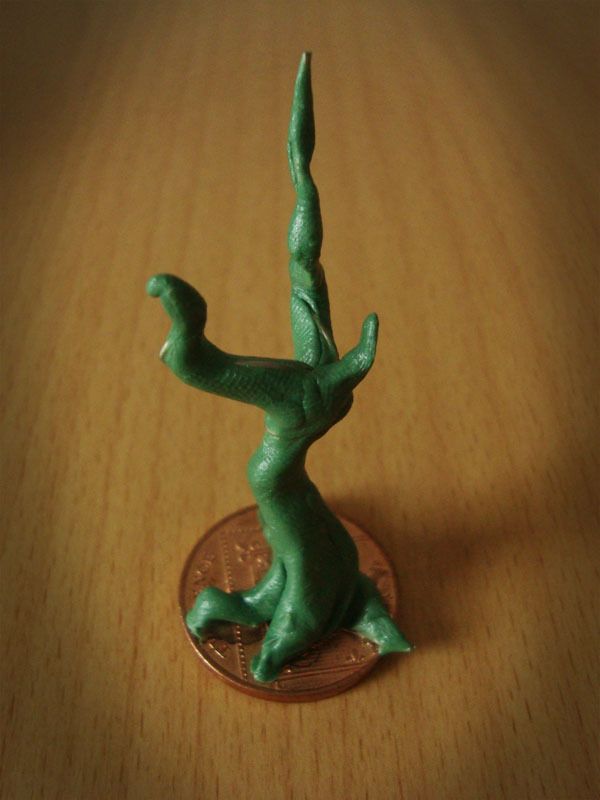
Horrible results so far, hey? Do not despair and lets have fun now.
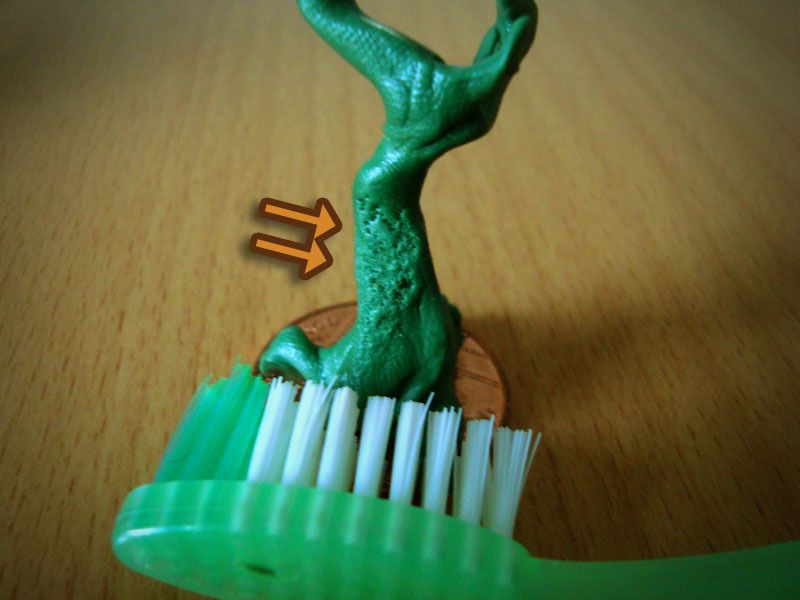
Bring in your secret weapon the mighty toothbrush and poke the Greenstuff! Experiment here, you will see that small jabs will create less deep indentations and vice versa. This picture displays just 2 pokes, one deep and a more subtle one.

Death by 100 pokes and your texture is almost done. Lets just add the final touch.
To make the final texture more eye catching use a fine needle and poke the putty again, this time some deep holes. Remember less is more so do not create to many holes.
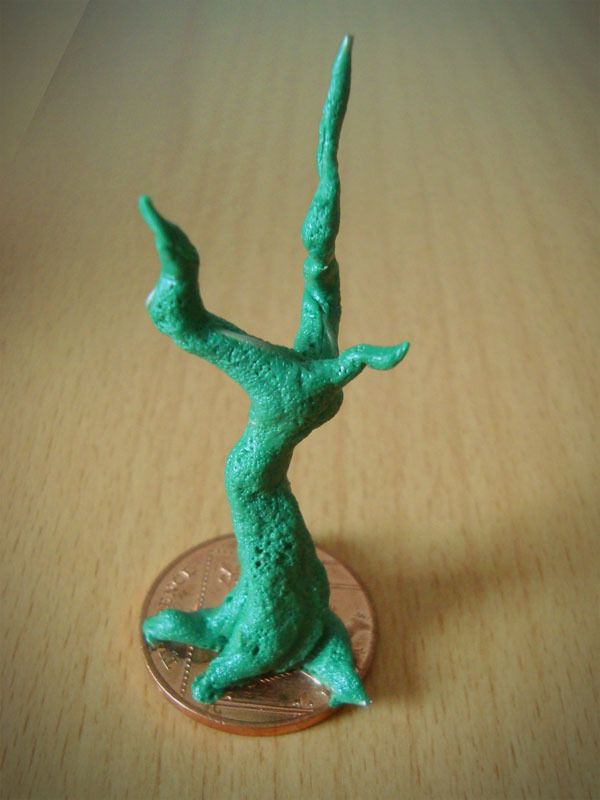
All done! Simple and easy! You can make a small tree like this in 1 hour. After that you can sculpt more stuff into it like mushrooms, lianas etc but thats for another day. Actually I did a small mushroom tut here Mushi tutorial http://mr-bugman.blogspot.co.uk/2012/01/tutorial-simple-bases-sculpting-mushi.html
So I hope you enjoyed this texture, it has many applications, you can use it to create soil, ugly tree bark or even a strange creature rough skin! Have fun and share your results and ideas.
Some examples of how I use this texture.
Yoda tree
Soil for bases
Movement trays
Cheers.
4670
Post by: Wehrkind
Woo! Thanks! This will be handy; my trees haven't gotten much past the "horrible" stage, as putting on a thin layer of GS and futzing with it from there didn't get me far.
Question for you, do you use predominantly GS or do you sometimes use other types like ProCreate? I have used mostly PC as I like that it is less sticky, but now that I have run out again I figure it is time to think about switching if it makes sense. Any preferences, and why?
83870
Post by: Xysis
NAVARRO, I just wanted to drop in to say that while it is unfortunate to hear that the original Buglands is gone, it is great to see you are still putting that greenstuff magic good use. I can't remember specifically how many years it was since I saw Buglands on the web (close to a decade I think), but your hybrid Genestealers inspired a much younger me to start converting and working with greenstuff. Keep up the awesome work.
5256
Post by: NAVARRO
Wehrkind wrote:Woo! Thanks! This will be handy; my trees haven't gotten much past the "horrible" stage, as putting on a thin layer of GS and futzing with it from there didn't get me far.
Question for you, do you use predominantly GS or do you sometimes use other types like ProCreate? I have used mostly PC as I like that it is less sticky, but now that I have run out again I figure it is time to think about switching if it makes sense. Any preferences, and why?
I got to the point that I find GS more reliable in therms of durability. I mean once dried its like flexible bendy plastic. I also find the stickiness one of the best features of the putty because you can get really cool effects if you explore the elasticity. Drawbacks of GS are the "memory" because unlike other putties you are always working against it, its like a little battle each sculpt and the other drawback is the blending between cured and non cured GS, its never really perfect.
I also used milliput and Fimo. Milli is perfect for blades and sharp pointy things and fimo is good for many things, like they say, but I literally hated the medium. I have seen amazing sculptors going procreate and even talked with some this salute... In general its very good for easy smooth work since it has little memory and blending is good too. ALthough not as sticky. I do not use though not because I have something against it ( by the contrary seems less problematic to work with) but more because Im at a point that I can explore the more complex nuances of GS and there is still lots to learn before shifting to other mediums.
So my goal at this point is learn more tricks with the GS and complement it with milliput.
Xysis wrote:NAVARRO, I just wanted to drop in to say that while it is unfortunate to hear that the original Buglands is gone, it is great to see you are still putting that greenstuff magic good use. I can't remember specifically how many years it was since I saw Buglands on the web (close to a decade I think), but your hybrid Genestealers inspired a much younger me to start converting and working with greenstuff. Keep up the awesome work.
Yes its about a decade if not more, it was such an old site. So glad that I could inspire you to sculpt a bit, specially our beloved Nids. Rest assured that I will do my best to keep on updating my blogs, I know its miles away from a fully fledged website but it will have to do for now. Thanks.
26790
Post by: Gitsplitta
Great tutorial NAVARRO. The toothbrush idea is a very neat one to be sure! Also very cool to see your explaining how to work with an armature.
5256
Post by: NAVARRO
 Gitsplitta wrote: Gitsplitta wrote:Great tutorial NAVARRO. The toothbrush idea is a very neat one to be sure! Also very cool to see your explaining how to work with an armature.
Much appreciated.
Any ideas of things you all would like to see covered in a future tutorial just let me know.
5256
Post by: NAVARRO
Small idea on what to do with dried blobs of Greenstuff.
When your sculpting a project most of the times there will be some Greenstuff leftovers. If its still fresh and you can sculpt something with it you can do plenty of things, little spikes, skulls, mushrooms, purity seals or scrolls etc.
But what to do when its not moldable anymore? Do you trash away the dried bits of Greenstuff?
I tend to use those for something else and again there are lots of things you can do with them, heres one.
Sharp rocks
Not much of a tutorial and more just an idea for you guys.
Greenstuff when dried is very easy to cut so bring in your sharp blades.
1- Super glue or PVA glue
2- Blade
3- Dried bits of Greenstuff
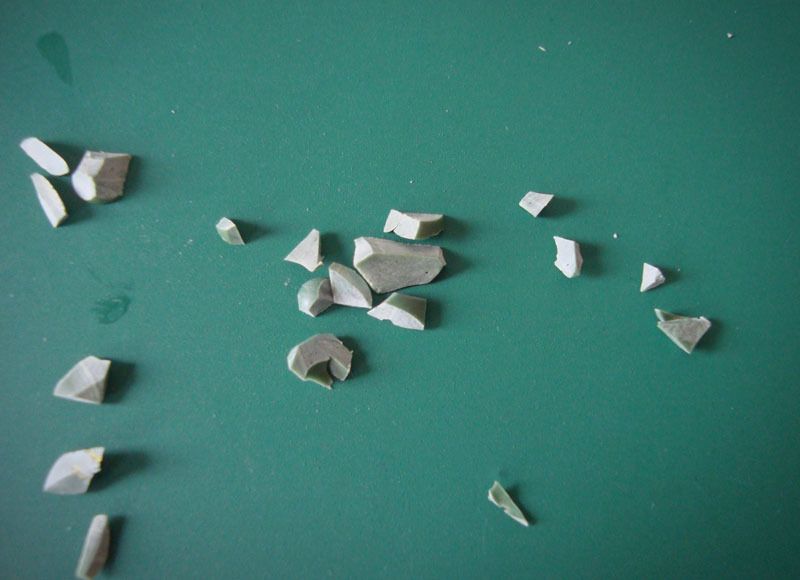
Cut random sizes and shapes, make sure they look very sharp.
Glue the bigger stones first and then fill the gaps with the smaller ones.
Job done.
So why not just use cork? Apart from being expensive and your using free bits of Greenstuff that you normally throw away, the look is very different since cork looks like a less sharp type of rock. You will also struggle to get the fine sharp tips on cork.
Also take this opportunity to experiment, instead of rocks you can cut spear heads, spiked armour and all sorts of sharp things for your models. Again have fun.
76303
Post by: Warboss_Waaazag
Excellent and informative. Great tutorial.
5256
Post by: NAVARRO
Thank you Sir
5256
Post by: NAVARRO
Introduction
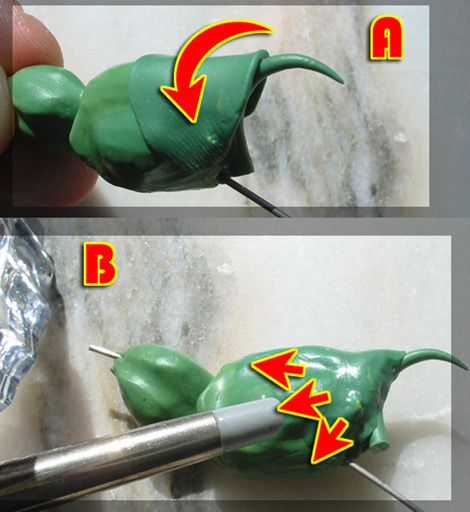
Another little tutorial for my bugs, this time we will concentrate on sculpting Crab legs that can be very valuable for different projects, from crustaceans to insect segmented legs or just a nasty chaos mutations.
Step 1 (things you need) Picture 1
Modeling putty (green stuff)
Water
Hobby knife (cutter)
Pin vice
Clay shaper brush
Sculpting tool
Paper clips
Toothpick
Flat surface
Step 2 (structure) Picture 2
Start with a strong internal structure, I used a paper clip and bended it to the desired shape. Picture 2a
Mixed a bit of green stuff and applied it directly to the clip, at this point no precautions with smooth or clean green stuff areas are needed. This is just a WIP shape of the final crab leg. Picture 2b
Step 3 (smooth shapes)
After the green stuff is cured its time to start building the final shape, so I mix a bit of the paste and apply it to the structure. It’s better to work on one side of the structure and let it dry before going for the other half, so I started with the left side of the crab leg. Picture 3
Used the clay shaper brush dipped in water and started smoothing the edges of the green stuff, take your time here and use always plenty of water. Picture 4
So, when left side is sculpted and smoothed just let it dry and only then, go for the right side. You can sculpt the shape you wish but avoid it looking too uniform, it’s a crustacean leg so irregular shapes work best. You should now have something like this. Picture 5
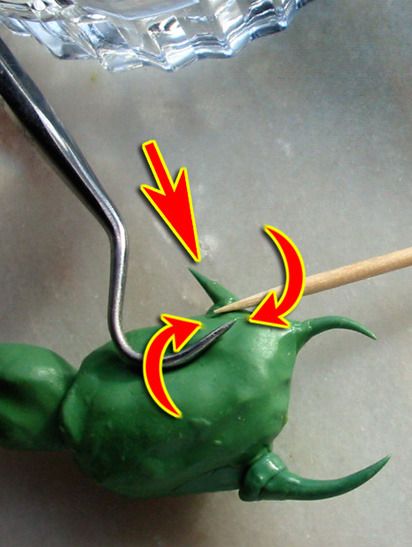
Step 4 (spikes and final contour) Picture 6
And the fun begins, while the stress of waiting for curing times is growing on you we can use one of those endless curing breaks to sculpt some little spikes, do some random sizes and shapes. And for those that say crabs don’t have spikes on legs I say… who cares it looks great. Picture 6a
I hope everyone knows how to sculpt spikes but for the newt sculptors here is how I do them. Do one little ball of green stuff and put it on a flat surface, then dip fingers on water and start pressing green stuff against surface with vertical movements, just let it dry. Piece of cake. Picture 6b
Now, with all stuff cured, choose one cool spike and mix a ball of green stuff... lets use its sticky properties, for “gluing” the spike to the leg. Picture 7
For better blending the spike to the crab leg lay a layer of green stuff over the junction Picture 8a
And for final smoothing use a clay shaper brush dipped in water. Picture 8b
Lets move to the final claw spike and this time we will use the paper clip extremity for a stronger structure. First with a cutter do a cut on another spike and then use a pin vice to do a small hole in it. Mix a bit of green stuff and squeeze the spike against it passing the hole on to the paper clip. This should make a stronger bond, but before you finish you need to smooth the greenstuff with a clay shaper dipped in water. Picture 9

Step 5 (Texture)
With all shapes finished its time for texturing those legs. I started by putting some spikes on the legs, since you already sculpted several spikes just cut them to the desired size and use green stuff for gluing them to the leg. In this process I use mainly sculpting tools and a toothpick dipped in water to sculpt the junction of the spike to the leg. You could also use pins but since the spikes are small there’s no need for that. Picture 10
Almost there, now simply cut several random sized balls of green stuff and again with the help of a toothpick and sculpting tool stick and smooth them randomly on the crab leg, also try to make the balls on the leg interesting and natural. Picture 11
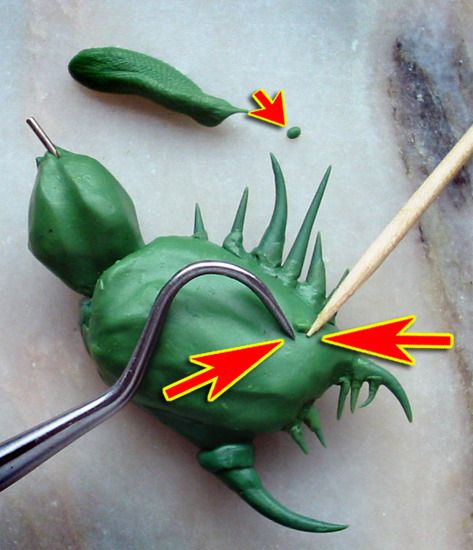
Conclusion Picture 12
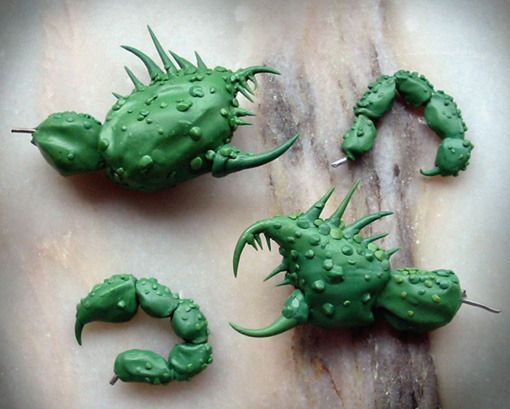
Well that’s it, you can now sculpt some crab legs for your projects, funny thing I noticed was that the smaller legs look like scorpions tails… hope you enjoyed it.
Result

96252
Post by: LeCacty
Your stuff is really good. All the respects!
26790
Post by: Gitsplitta
Exalted that tutorial. Fantastic work on both the model and the tutorial.
99
Post by: insaniak
I love these bases more than a man has ever loved icky-looking, maggot-ridden bases before...
87699
Post by: gloc
Loving these greenstuff tutorials here.
Also, I agree, those maggoty bases are amazing.
5256
Post by: NAVARRO
Thank you all
The worm bases are quite simple to do, yet I must confess that its a bit tedious to sculpt big ones
I will do a few more tutorials, its keeping me busy while I wait and see to what is going to happen to AOS.
Painting some Tau for a small kill team too.
4670
Post by: Wehrkind
Awesome, that crabby leg tutorial is really great. Thanks for posting that up!
Now where did those Hadross get too...
75552
Post by: MagosBiff90
Wow... what an awesome load of tutorials.. going to go back through them in depth! Thanks for these... really sweet work! The greenstuff gods smile upon you!
5256
Post by: NAVARRO
Thanks, I hope that these will help out you guys in some way.
I remember when I started that there was not much about greenstuff in form of tutorials so I learned most by trial and error. With dakka and other forums now things are easier for everyone to start sculpting some things.
I get the feeling that the traditional sculptors are a dying breed with the invasion of 3d sculpting on computers, so if this helps out to motivate someone to poke some putty Im happy!
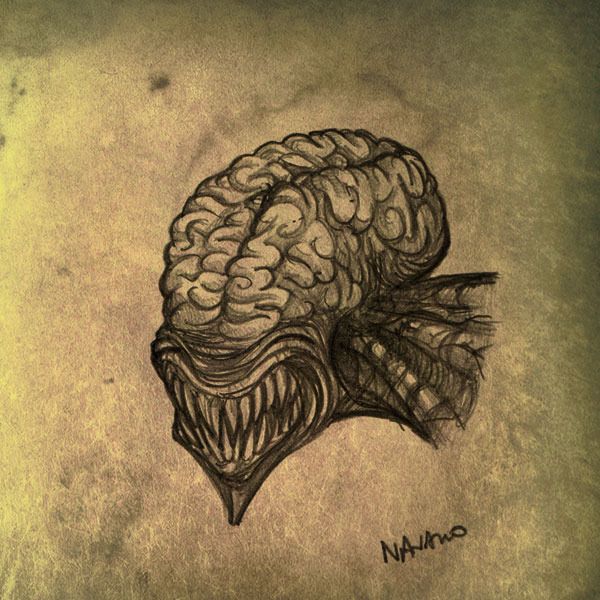
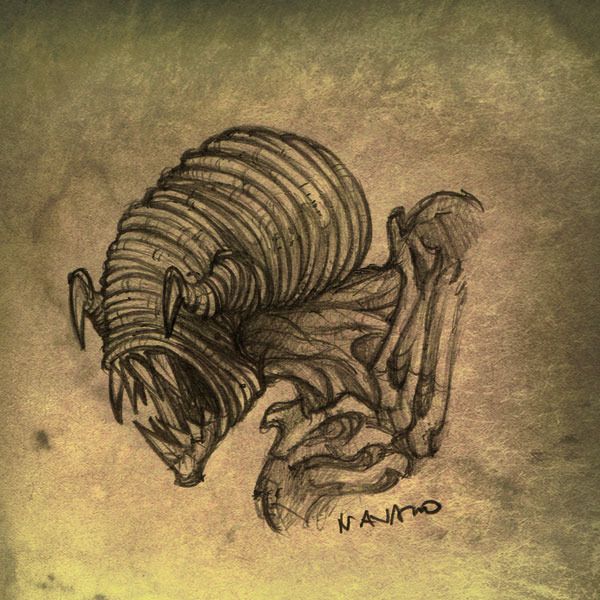
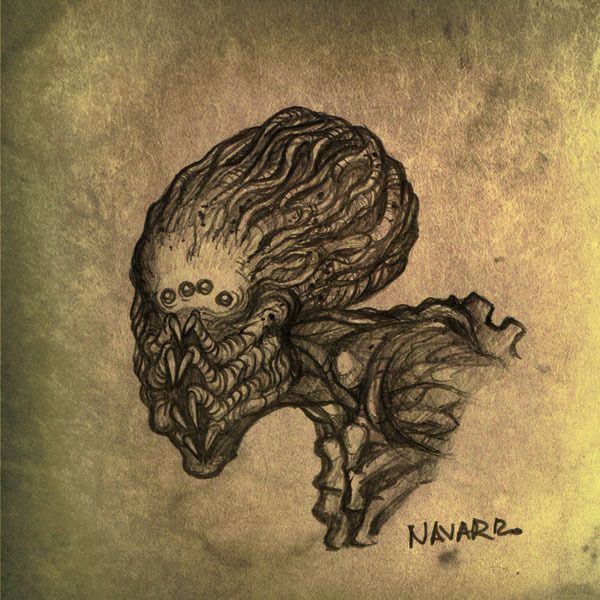
26790
Post by: Gitsplitta
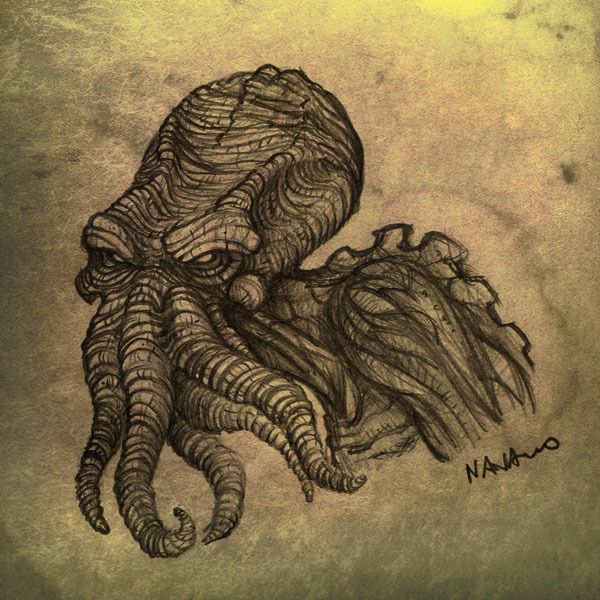
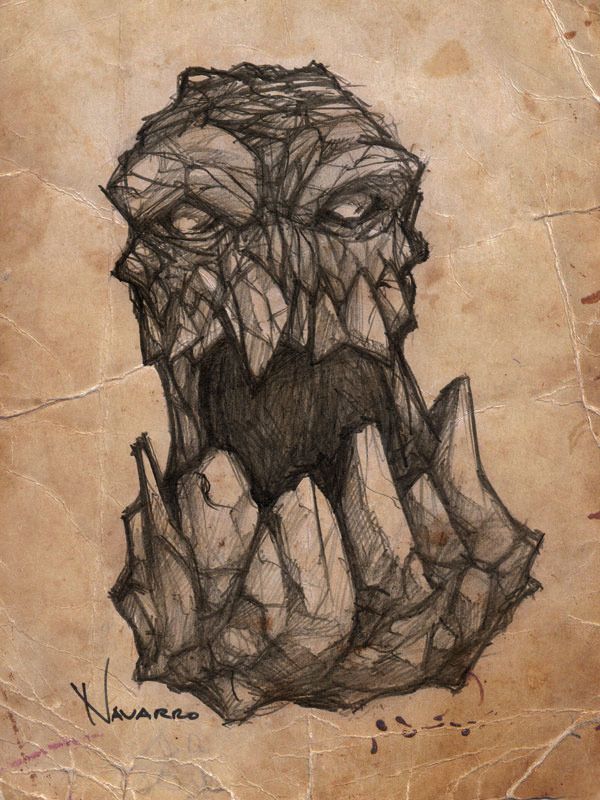
Very startling images NAVARRO... they should make fantastic sculpts.
99
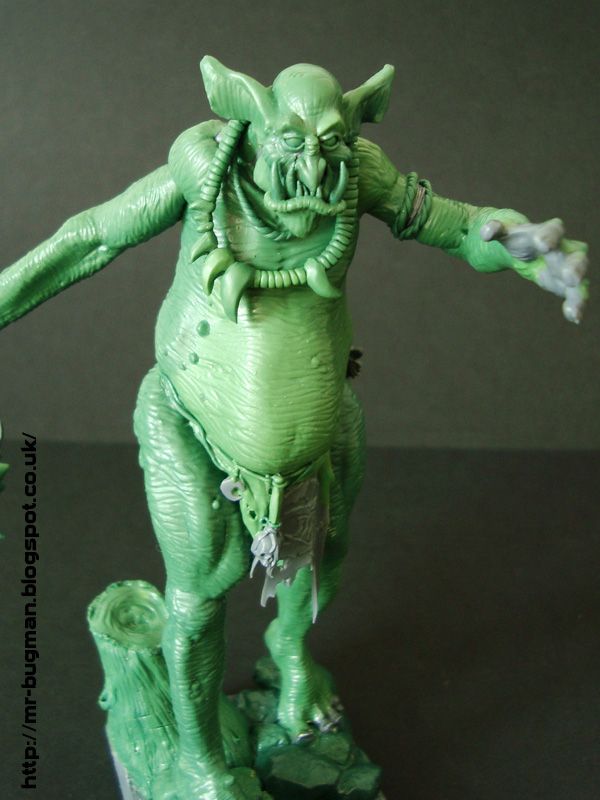
Post by: insaniak
Nice. I love the sense of age in the first one. He's old and cranky, and he will suck your brain out through your nostrils if you don't get off his damned lawn.
26386
Post by: hungryp
 insaniak wrote: insaniak wrote:Nice. I love the sense of age in the first one. He's old and cranky, and he will suck your brain out through your nostrils if you don't get off his damned lawn.
LMAO! I like the maggoty look of that third sketch, but I think a full set of upper and lower mandibles minus the traditional mouth would compliment the rest of the head a little better. Great ideas all around though, and a great big thank-you (probably not my first) for the great tutorials. It's always nice to see the method to the madness
5256
Post by: NAVARRO
My fav ones are the Octopus and the worm guy too, they should look nice once sculpted on my nids if I manage to capture a bit of the sketches on the Greenstuff.
5256
Post by: NAVARRO
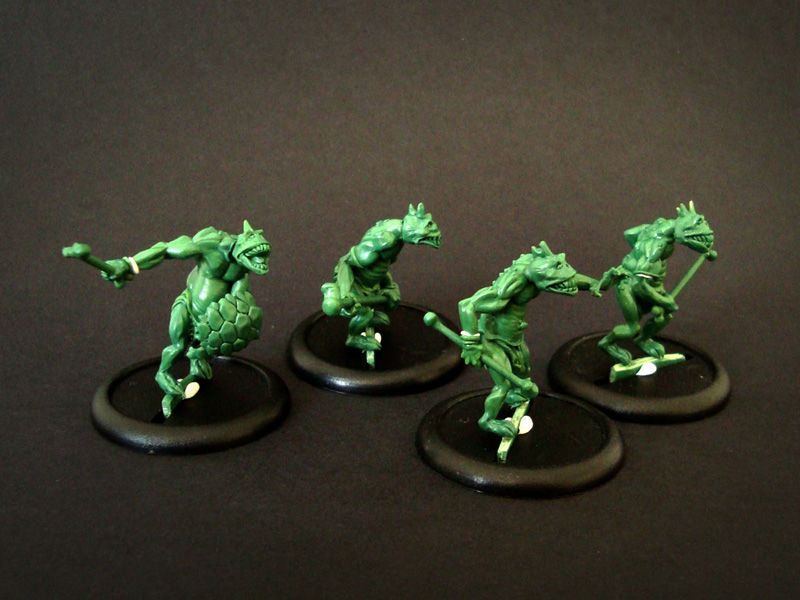
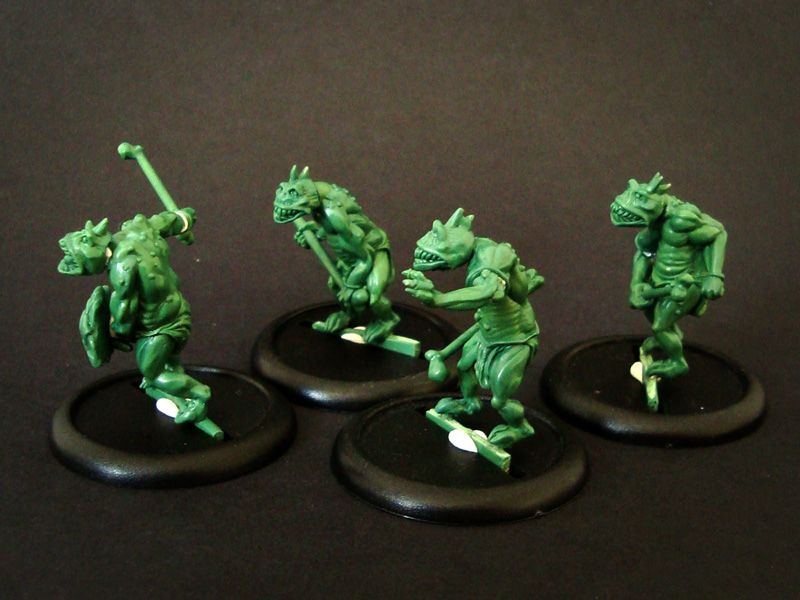
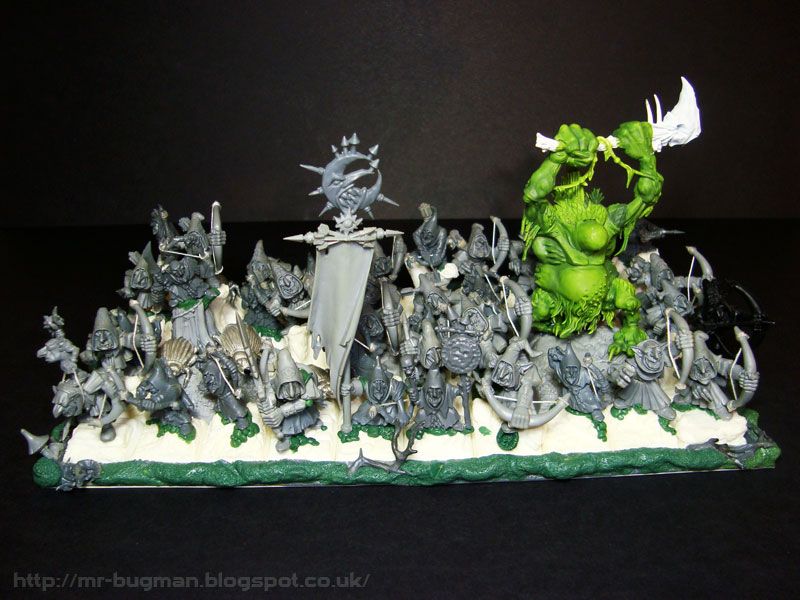
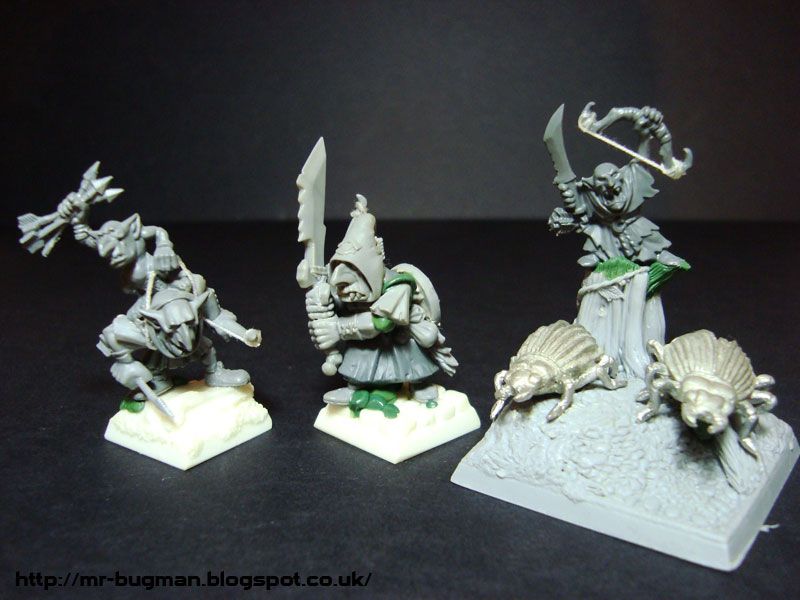
Been rebasing my WFB stuff to AoS.
My Age of Sigmar adventure starts here
The huge Ngobbos archer regiment that I had got split in 2 smaller detachments, all rebased in circular bases.
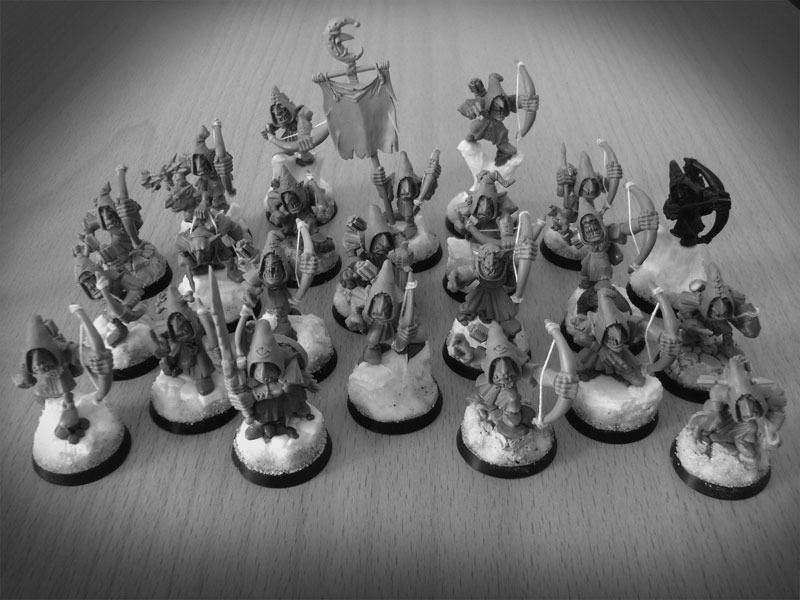

The skirmish look on my WFB miniatures is growing on me.
4670
Post by: Wehrkind
They look good! And hey, if you don't like AoS, they are ready for Frostgrave
306
Post by: Boss Salvage
RIP all those lovely unit fillers
Great to find your work again Navarro, I was a fan of Buglands and had lost track of your mad skills
- Salvage
5256
Post by: NAVARRO
If all fails I will use them for Songs of blades and heroes games instead. I think AOS even with all the bad things attached to it will prevail in the end.
I will miss those fillers too Salvage but unfortunately they have no use on this skirmish game since each miniature represents itself... on the bright side I can convert now my models without any rank&file constrains.
Thanks guys.
5256
Post by: NAVARRO
Got some terrain from Manorhouse workshop and its perfect for Age of sigmar.
review http://mr-bugman.blogspot.co.uk/2015/09/manorhouse-workshop-terrain-review.html
some pics.
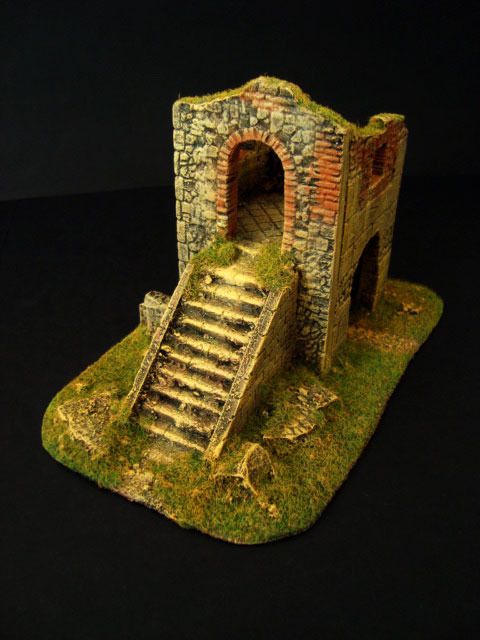
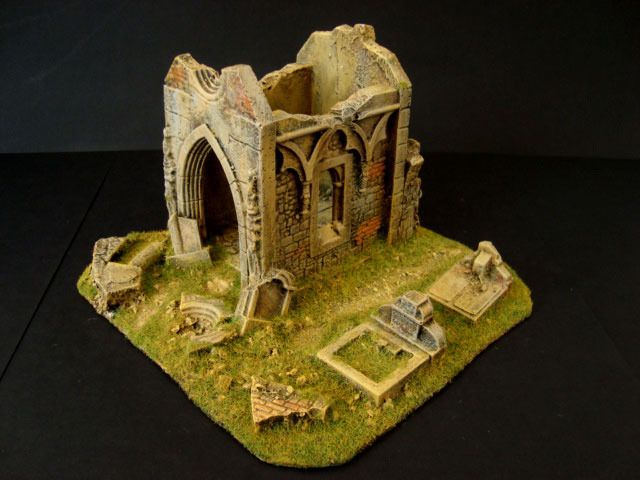

Im going to have fun with these on my homemade table.
9594
Post by: RiTides
The rebasing looks like a valiant effort! (and quite nice, too, just can't imagine doing so for so many gobbos )
Have you started sculpting on those awesome nid gribblies you showed art for above?
76303
Post by: Warboss_Waaazag
Neat tyranid sketches.
5256
Post by: NAVARRO
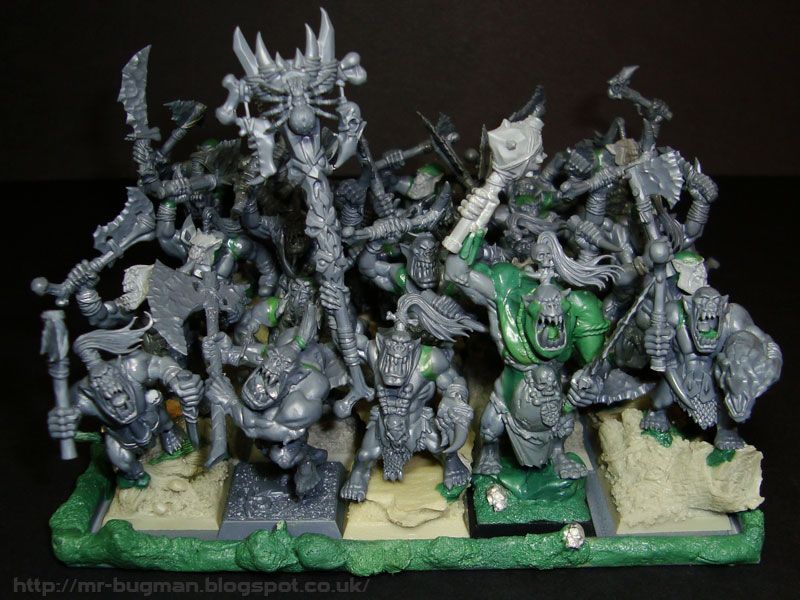
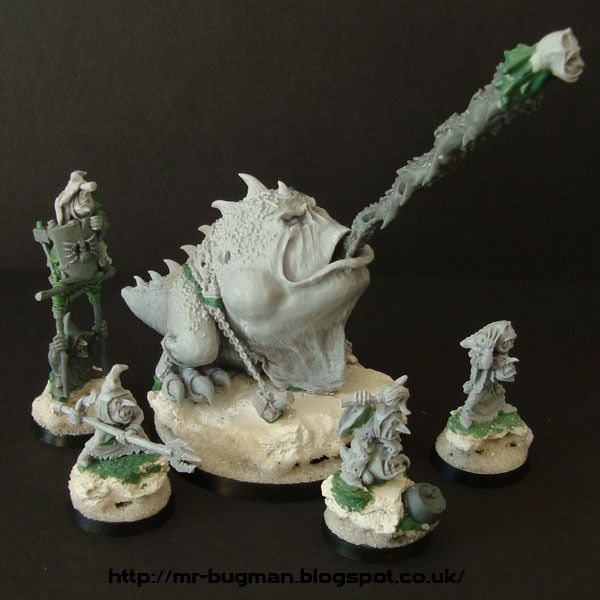
Not yet started on the nids, I'm doing a Nightgoblin Gobba and thinking on creating and sculpting a big stone creature first.
5256
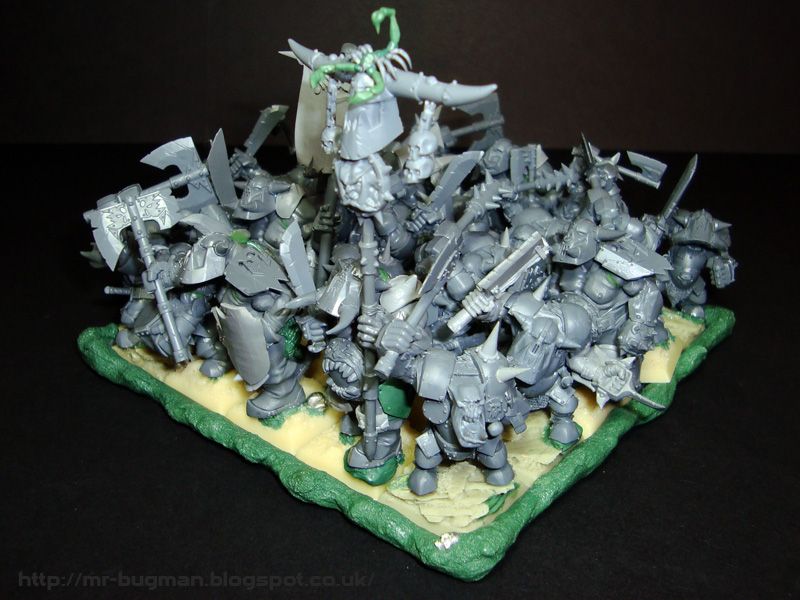
Post by: NAVARRO
The rebasing for AOS continues.
I had a unit of 25 Black orcs for WFB but for AOS I will split these in 3 units... so far I have 2 complete ones 10 strong Orcs units and one half incomplete unit that I need to bulk up to 10 with full command as the other ones.
Rebased to 32mm's and Only needing 1 giant and on Black orc big boss so the Ironjaws big mob is complete
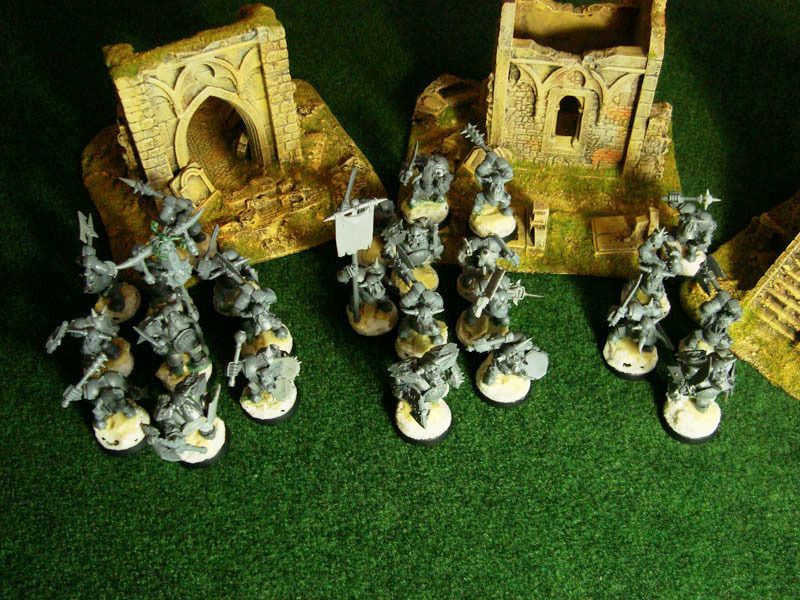

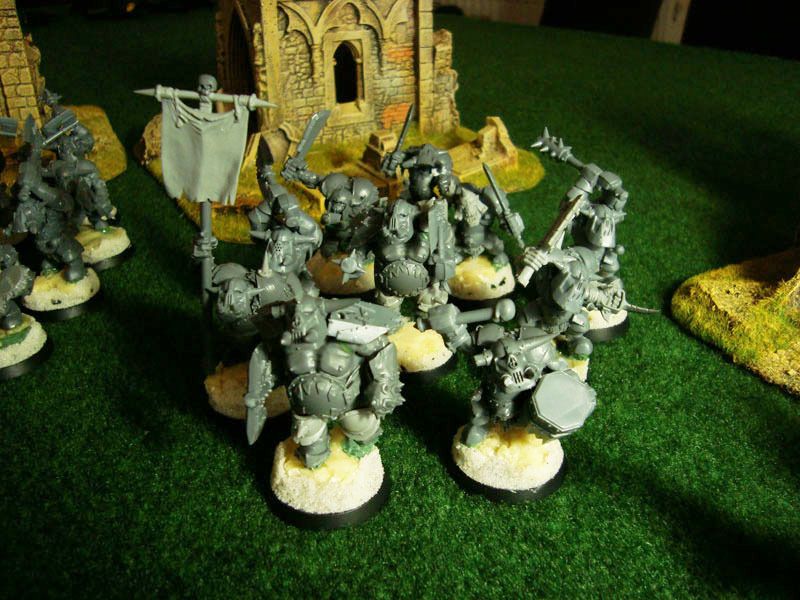
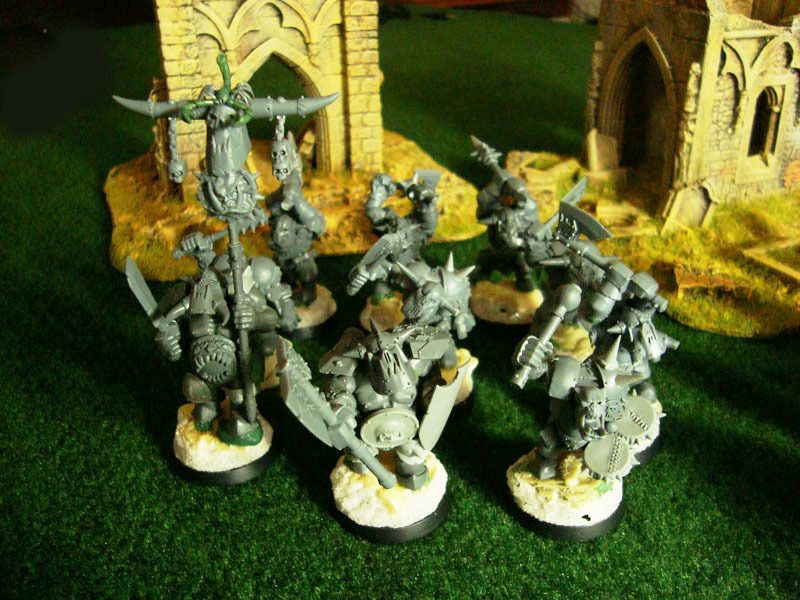
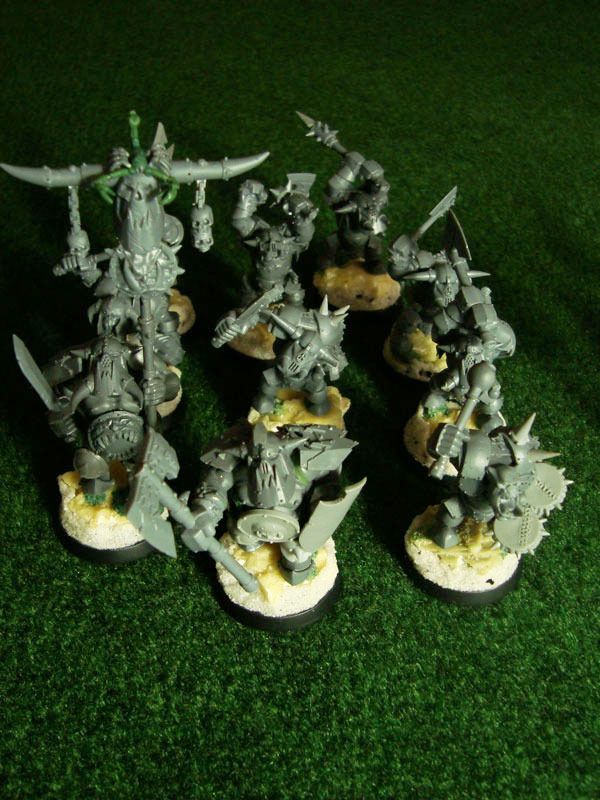
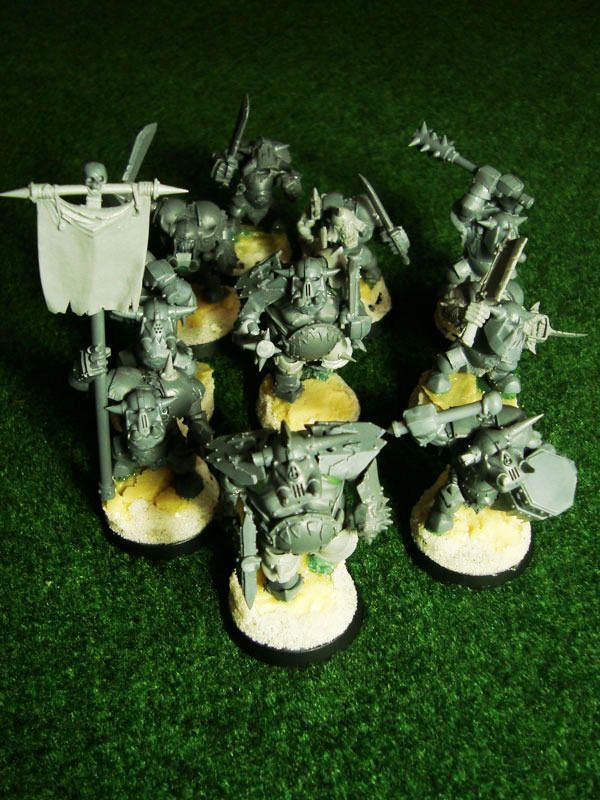
Any Ideas on how to differentiate these units on the battlefield?
39666
Post by: GiraffeX
You could use different coloured war paint.
5256
Post by: NAVARRO
I think I will paint some red while the others black and white small details to differentiate the units.
Time for another little tutorial.
How to make and assembly line for long grass tufts.
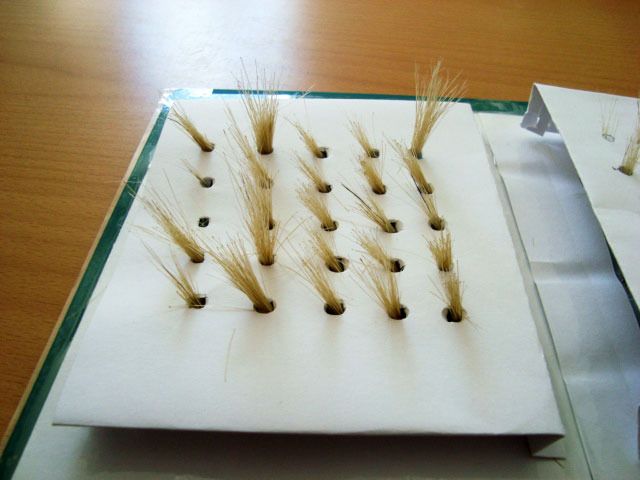
Long tufts can be challenging to do and time consuming if you need to do plenty of them. I have created a little assembly line for my tufts since I need lots of them for my upcoming terrain pieces. This process did speed up things and now I can do 100 or more a day, easy.
The main problem with long tufts is keeping them in place (standing up) while they dry... With a bit of paper you can do the following structure.
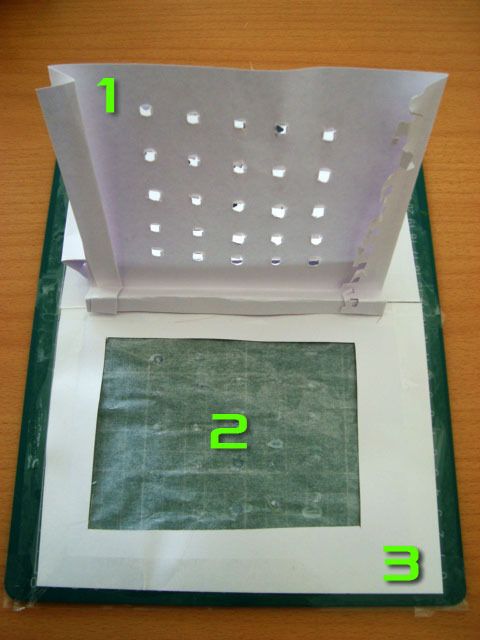
1 - Perforated paper with some folds so that the holes are away from the ground.
2 - Non adherent paper, this is where the glue goes
3 - Paper frame duck-taped to a movable surface since you want your little tuft factory mobile
I choose a big distance from the ground because I need big and medium tall tufts.
I created two assembly lines so that I can clear more units per day.

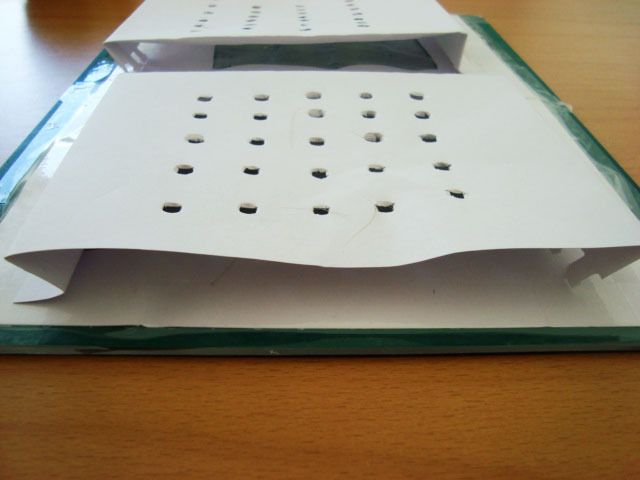
I use cheap PVA glue and some tall grass from any company really.
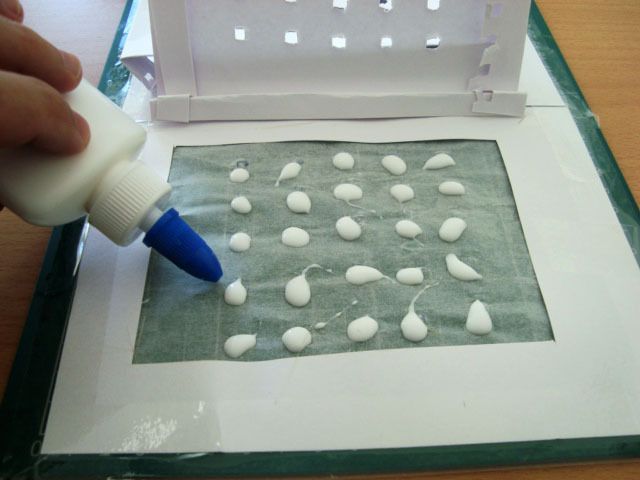
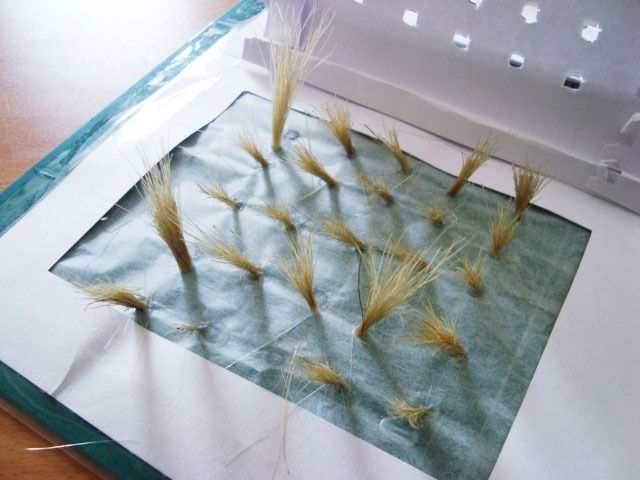
Lay down some glue blobs on the non adherent paper.
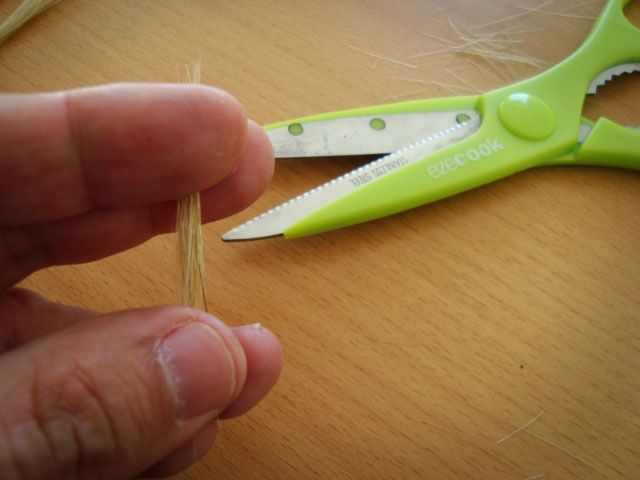
Grab the tall grass and make sure both extremities are secure. If you don't you will have loads of grass bits flying around everywhere.
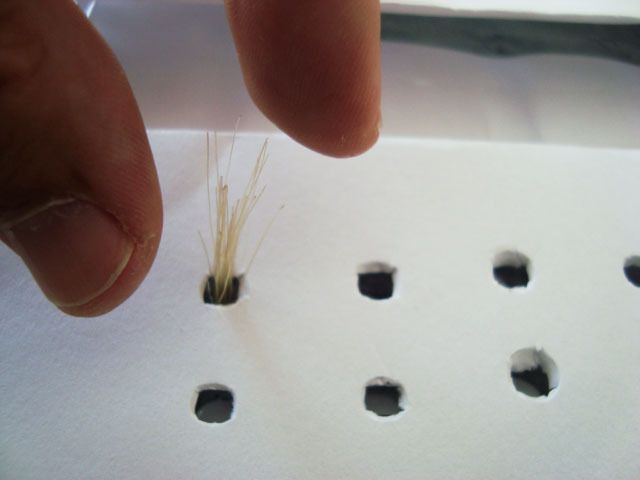
Insert tuft trough the hole and let it stick to the glue beneath it.
Make sure you do different lengths and volumes so that you can have more options when flocking your terrain.
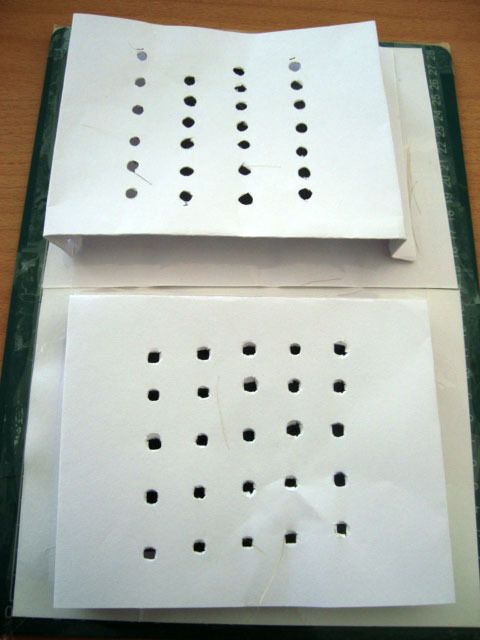
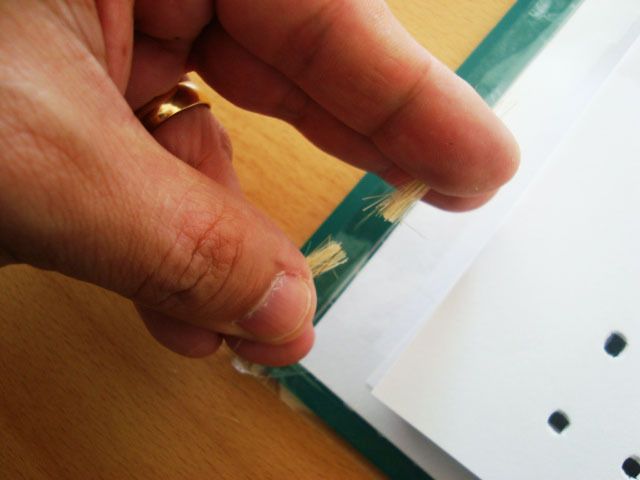
Once PVA is dried you lift the punched paper to reveal the results.
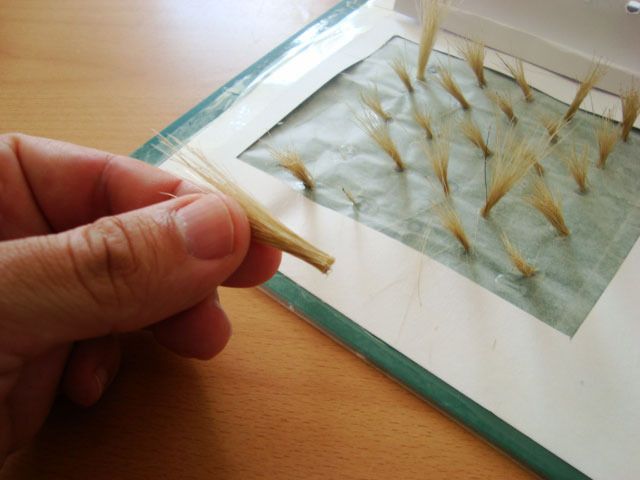
Thats it tuft done!
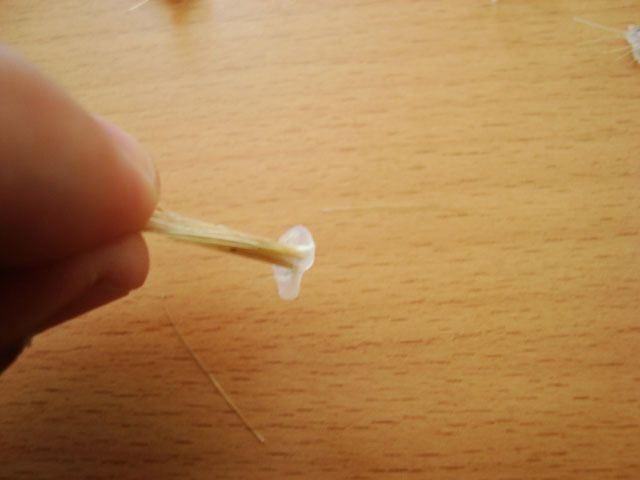
If some of them have to much glue on the base you make sure you cut off the extra.
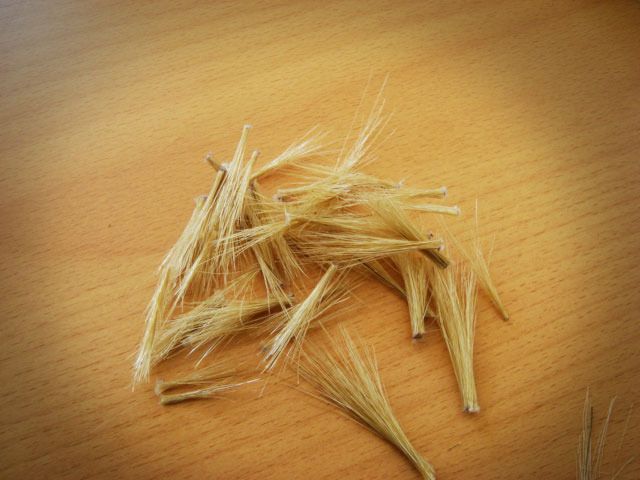
Lots of different sizes and shapes.
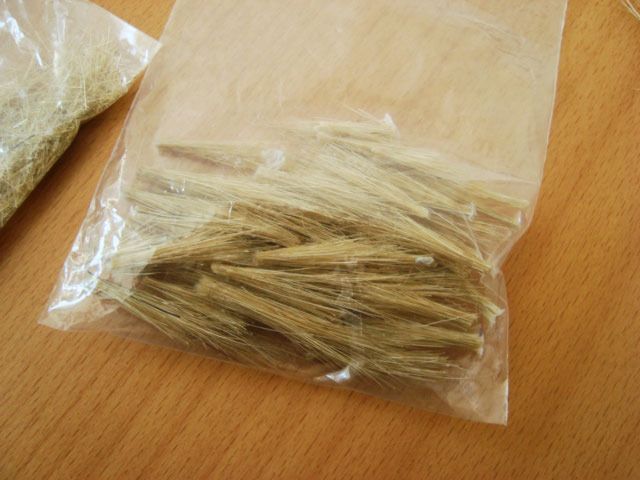
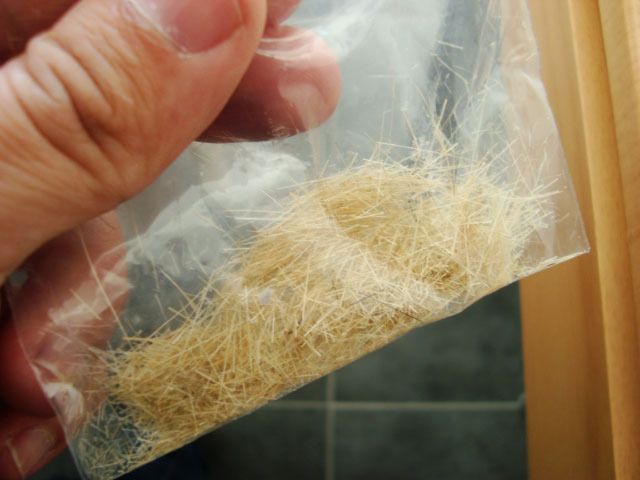
I keep them in a bag and the leftovers I also keep them in a bag so I can use them later on as scatter flock.
You can do plenty of tufts very fast this way.
tut link
http://mr-bugman.blogspot.co.uk/2015/10/tutorial-how-to-make-long-tufts.html
Hope its useful it made a difference in therms of speed for me.
26790
Post by: Gitsplitta
Another excellent tutorial. I've also made long tufts for many of my bases, but I like your way better than mine. Thanks!
76303
Post by: Warboss_Waaazag
That is an excellent tutorial! I will be using that.
13225
Post by: Bottle
The AoS rebasing is coming along nicely! I find gubbinz and unit fillers now make great counters to remember all the random buffs in game :-)
5256
Post by: NAVARRO
Thanks guys. I will try to find a way to do small tufts without the help of all the expensive machines we see these days, its proving quite difficult so far.
Bottle that is an excellent idea! Sculpt your own counters! I never thought of that and each army could really have their own little things! What are you using for your counters?
4670
Post by: Wehrkind
Very nice tutorial! I will have to put that to work on bases for KoW.
5256
Post by: NAVARRO
Cheers thanks mate.
I finished up my count as Doom DIver model. I used FW Gobba and some minor amends just to make sure the model was strong and durable enough for gaming tables rather than just displays...
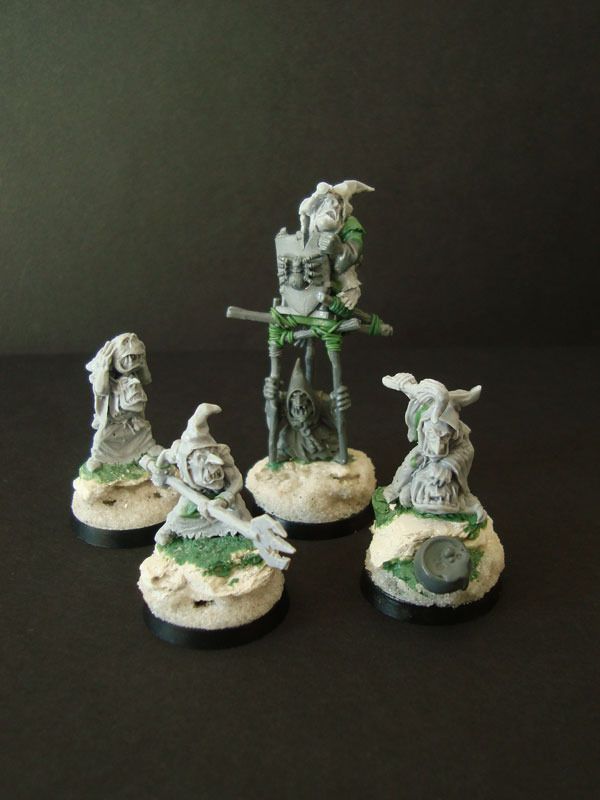
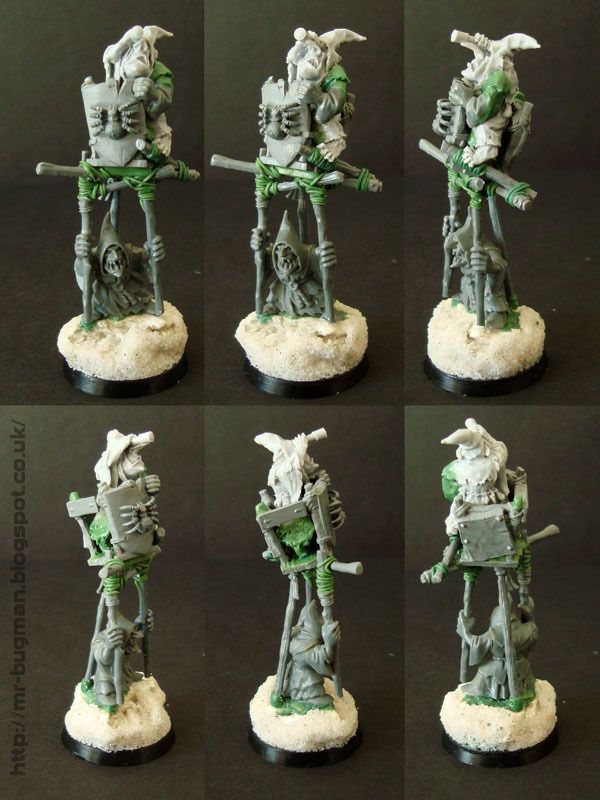
I do not like any of the current O&G artillery kits so I will do my own convos and models as I go.
39666
Post by: GiraffeX
That looks very cool, great idea.
54500
Post by: hk1x1
Very nice work on the doom diver , plus I love the grass tutorial, so simple, I wonder why I didn't think of it before .
15735
Post by: Bash the Bosh
Thank you so much for some brilliant tutorials. So simple yet so effective. You've dispelled a lot of myths for me.
13225
Post by: Bottle
NAVARRO wrote:Thanks guys. I will try to find a way to do small tufts without the help of all the expensive machines we see these days, its proving quite difficult so far.
Bottle that is an excellent idea! Sculpt your own counters! I never thought of that and each army could really have their own little things! What are you using for your counters?
OH, I am no sculptor so I am using random bitz. Baby Griffin from the Empire general kit to represent my General's command abilities etc. I usually place the counters by the unit to remind me that something extra is happening there rather than a dedicated role for each counter. For example my Monkey on a barrel or the troll skull from BFSP can mean anything and everything :-)
A propped up shield always makes a good "mystic shield" though.
The Doom Diver counts as looks incredible!! I love the goblins on stilts!
306
Post by: Boss Salvage
Gobba squig & co look smart on those round bases, and way cooler than a standard orcy catapult Funnily enough I almost picked up a slightly mangled one of these on eBay to do the same thing with, but backed down 
Those bases must be your own casts, right? Nice look to 'em, with the little height boost and all.
- Salvage
5256
Post by: NAVARRO
Thanks all. Time permitting I will keep doing some little tutorials
@Bottle, I like the idea of using bits for the counters. I can also see lots of potential funny ideas for the gobbos like little mushroom people or simply mini squigs etc. That would a be a nice sculpting project too.
@Boss Salvage You should have grabbed the fella its a really nice sculpt. the bases for the doomdiver are all individually home made and dead easy to do, I would spend more time casting stuff or learning how to do it because its something Im not really interested in, than just carving some putty.
306
Post by: Boss Salvage
Oh! Well nicely carved in that case. What white material are you using? And I do see some ballast in there, now that I look closer.
- Salvage
5256
Post by: NAVARRO
I used DAS clay, first do like a huge thin pancake and let it dry. Once its dried just cut chunks of it so you can make rocks for your base take the time to carve some scratches too. Dip it in diluted pva glue too seal the rocks. Once fried its ready to be added to your bases.
You can do this with plaster too but its more brittle.
306
Post by: Boss Salvage
You know, I think I remember Migs doing his bases with a similar process. Cheers for the rundown Nav
- Salvage
5256
Post by: NAVARRO
Random update, Im painting some Tau, Yay!
Going for very strong contrasts and colours, so far just reds.
WIP pic

5256
Post by: NAVARRO
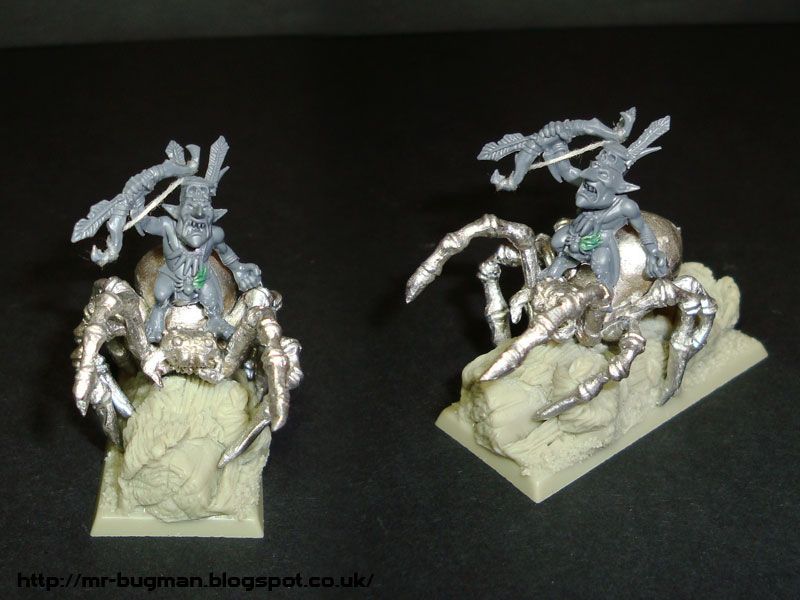
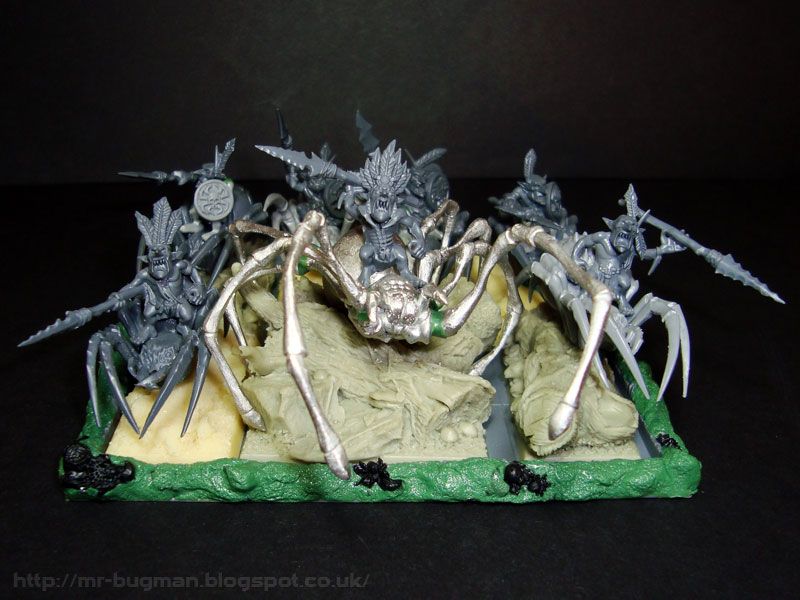
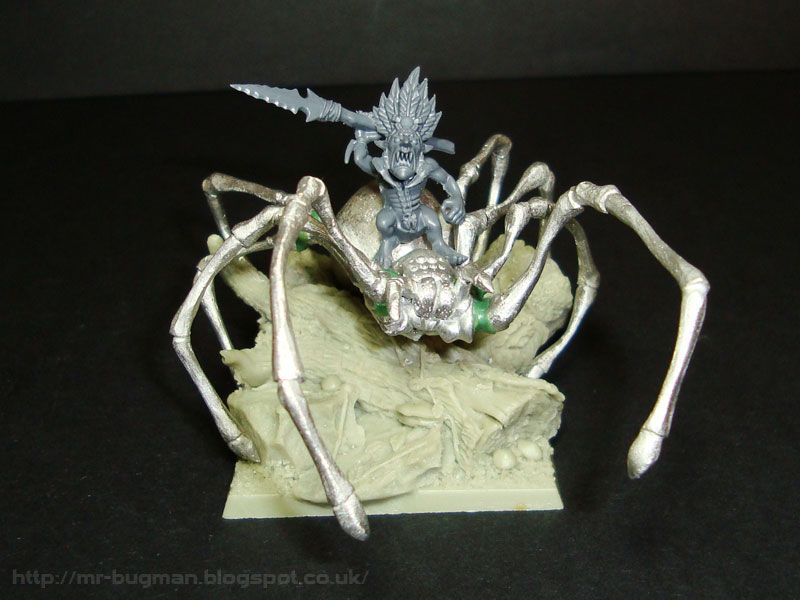
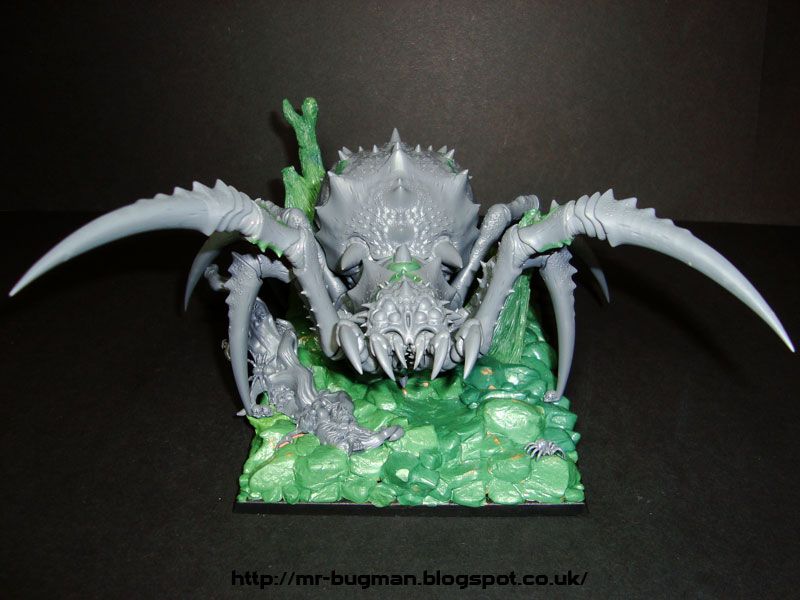
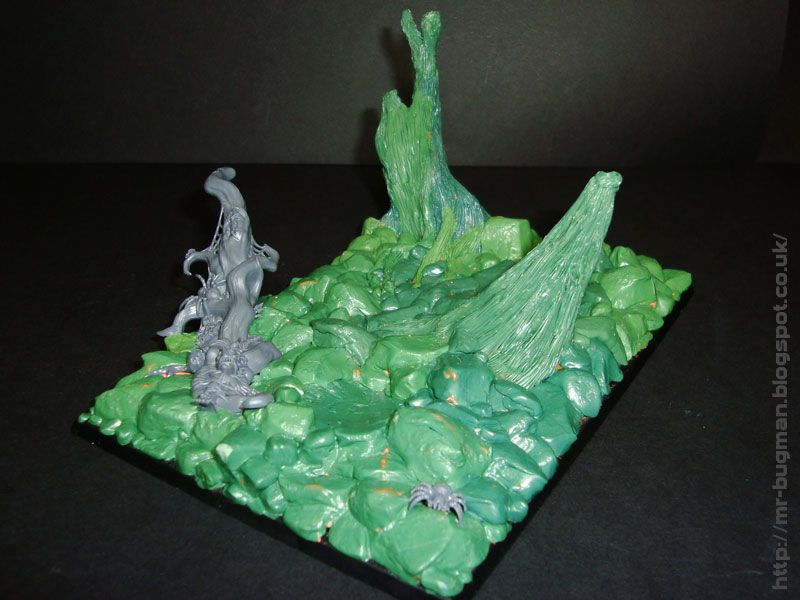
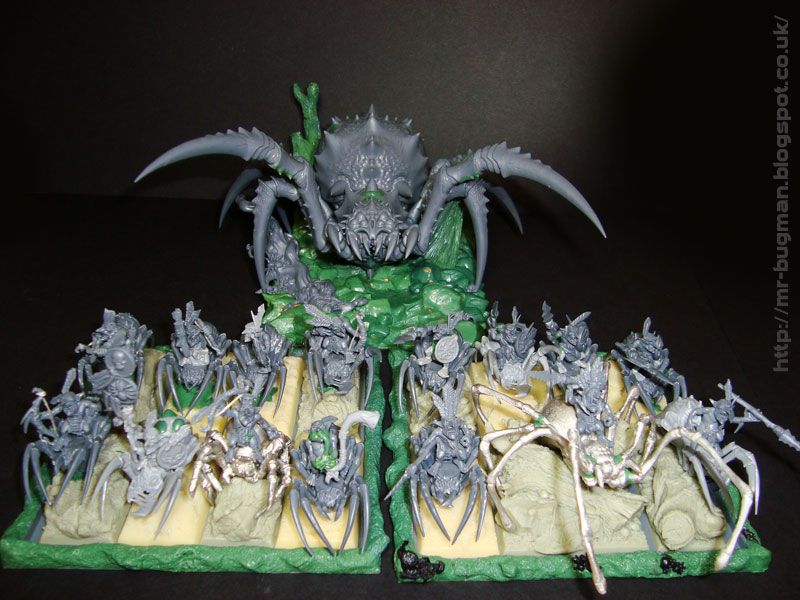
Spider time.
Years a go I sculpted a Huge tarantula for otherworld miniatures and I will use it for my 2nd Arachnarok for AOS.
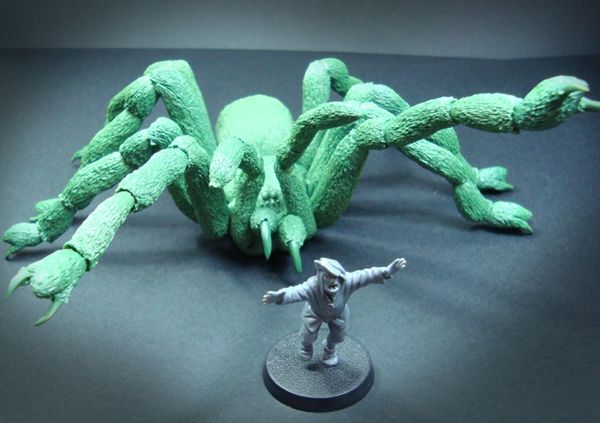
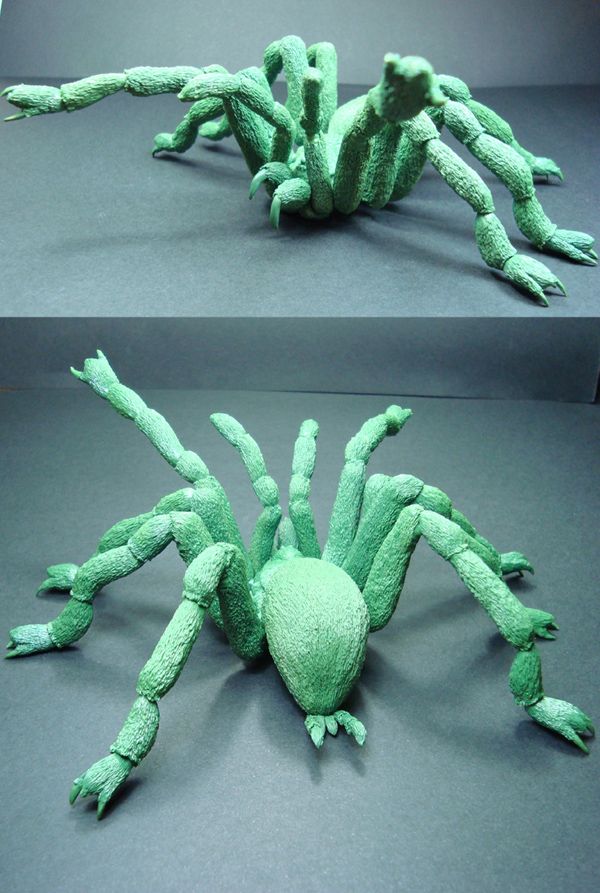
The bits
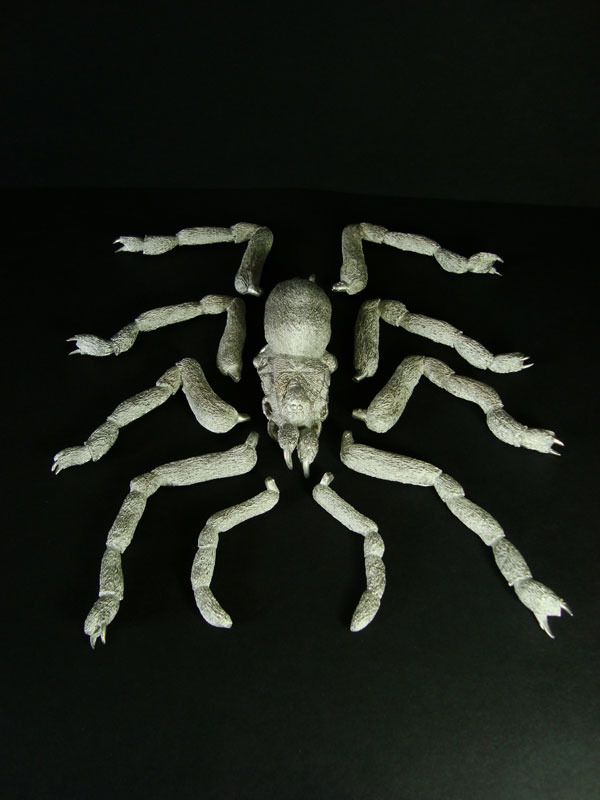
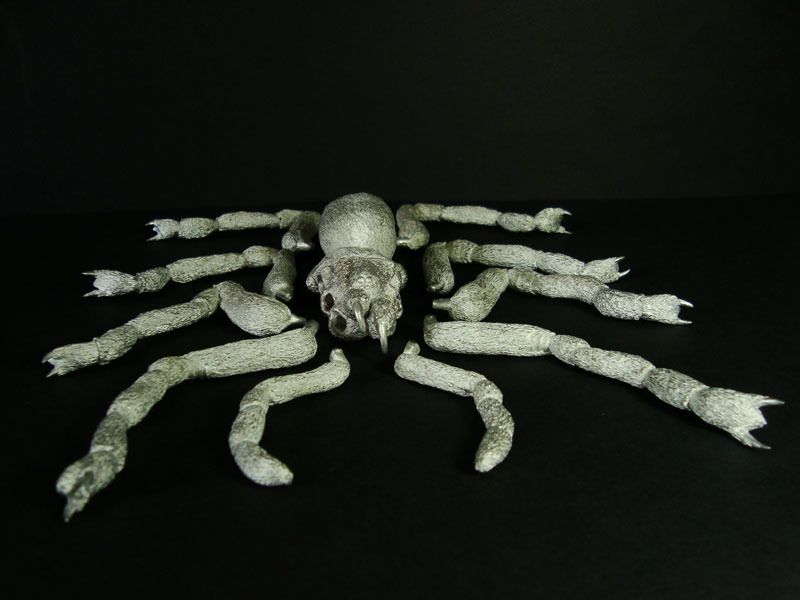
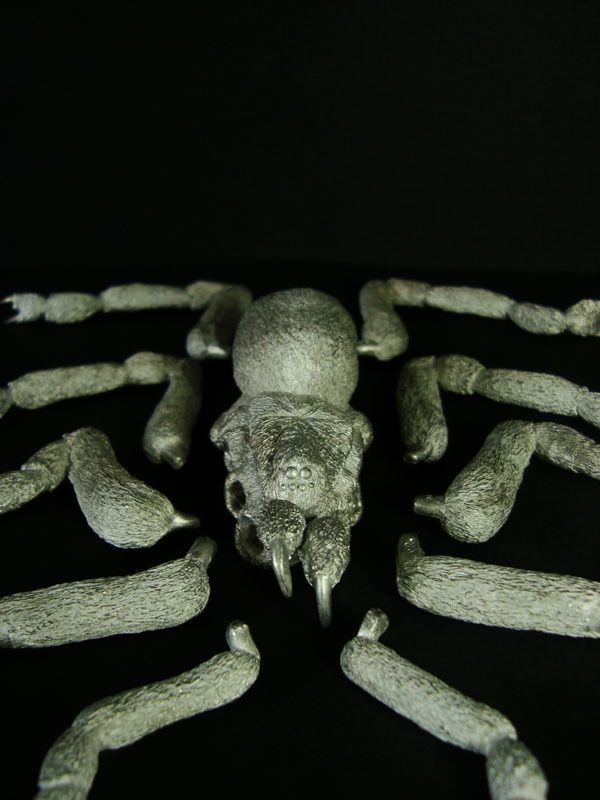
All metal goodness!
Comparison pics
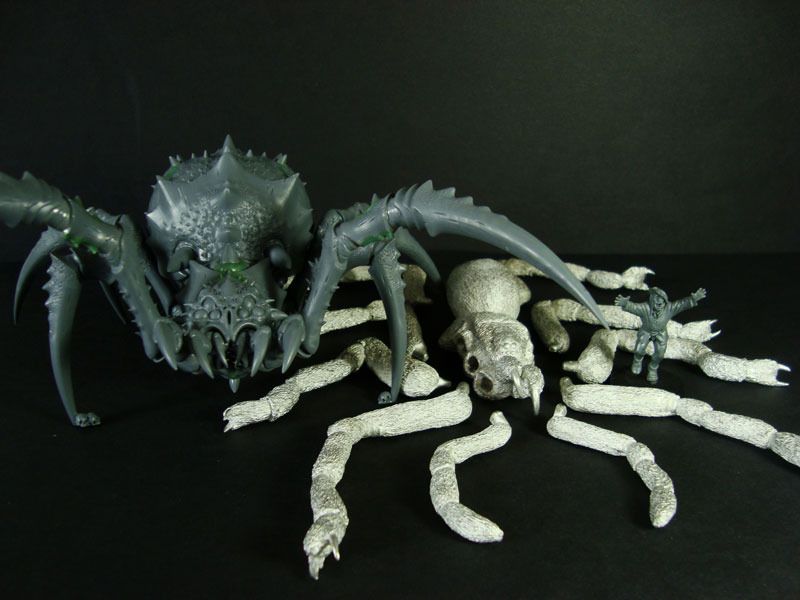
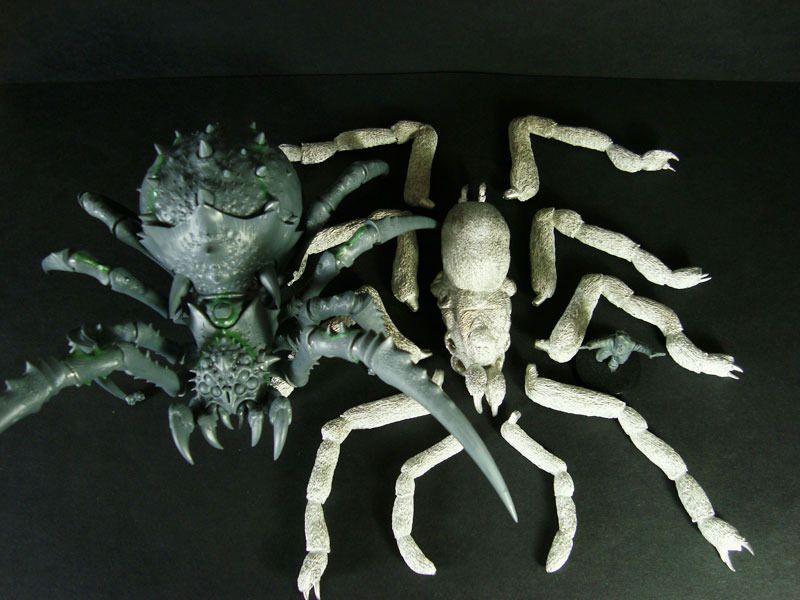
It has a oldschool feel it and it will look great with 4 gobbos with spears on its back.
9594
Post by: RiTides
The long grass tutorial is great, and that is one creepy looking spider!
29449
Post by: weetyskemian44
Amazing work! Your tips on using GS are highly valued.
37519
Post by: bigfish
Nice whip work, would be cool to see the rest of the army on here
5256
Post by: NAVARRO
Thank you all I will post a tutorial of the Whip very soon, hopefully will give you some ideas for your own sculpting projects.
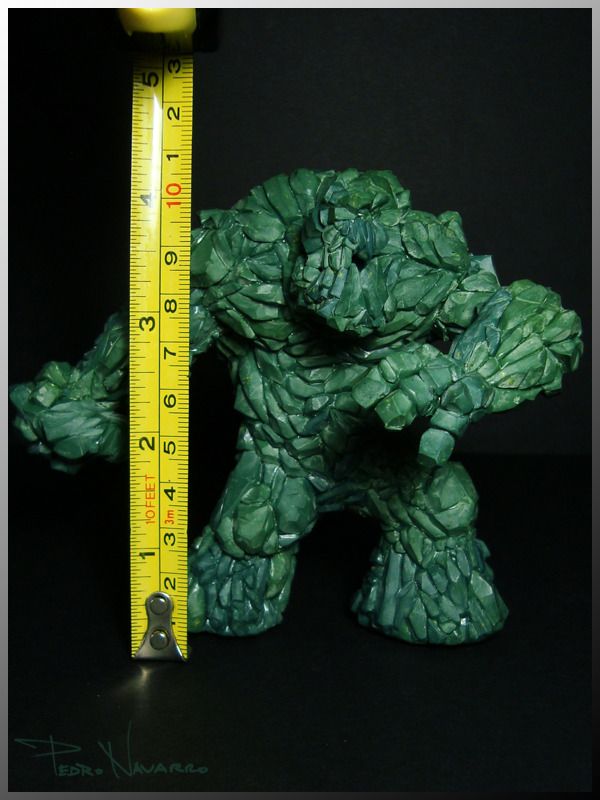
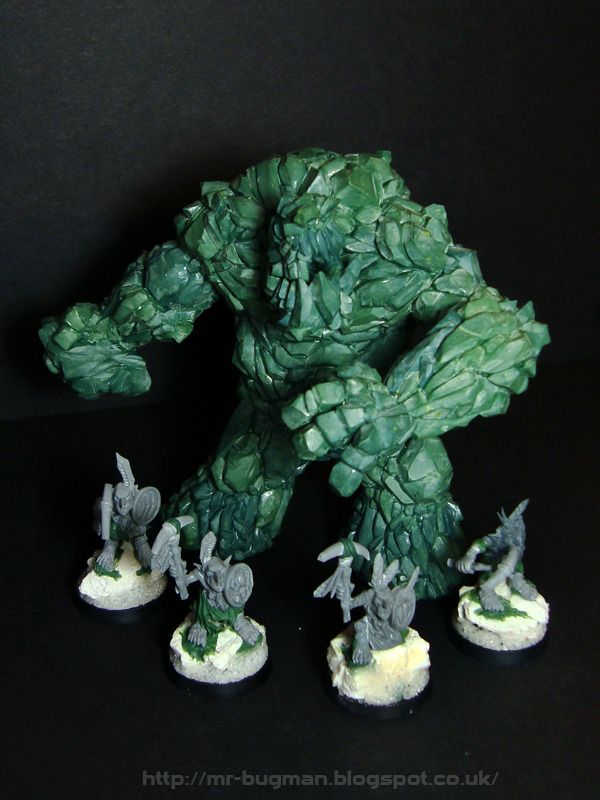
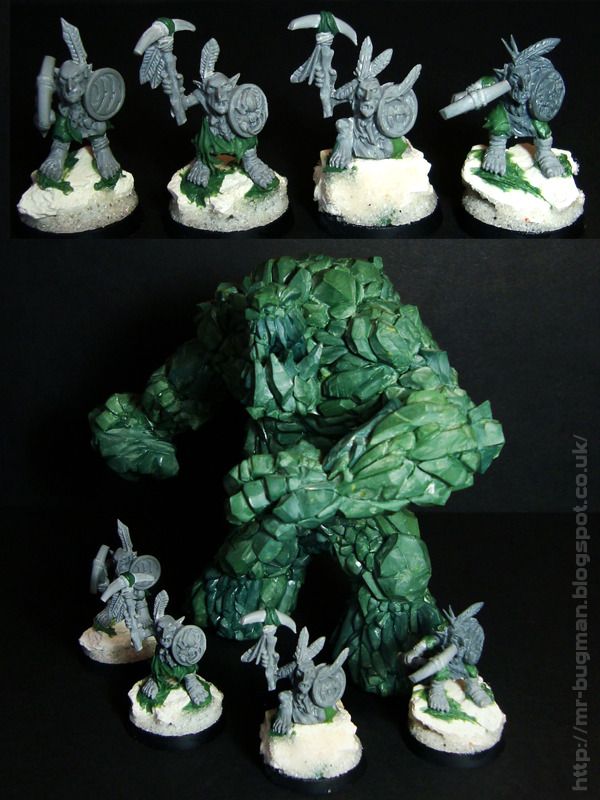
On the top of my sculpting projects Im now making a huge rock giant and this is my concept for it.
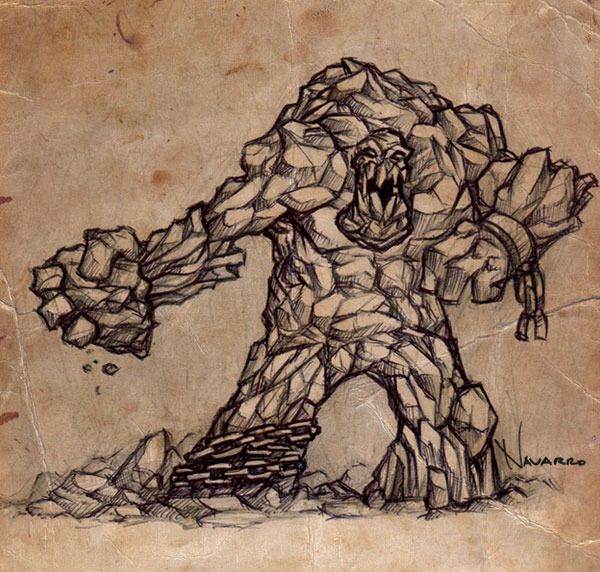
I will lose the chains idea, but apart from that its pretty close of what Im sculpting...
91816
Post by: Januine
Sweet! Lovely concept sketches - should look really fantastic sculpted up
9594
Post by: RiTides
That's a sweet concept, can't wait to see you start work on the sculpt!
5256
Post by: NAVARRO
Thanks folks.
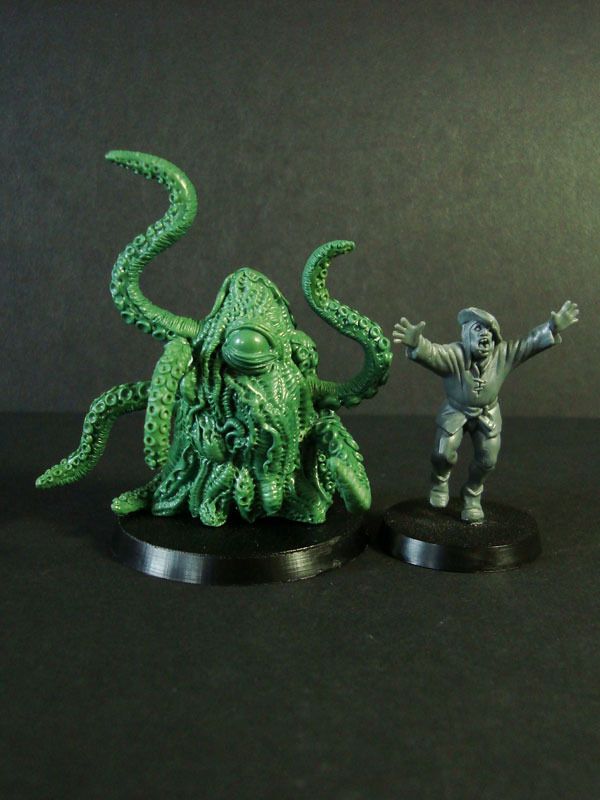
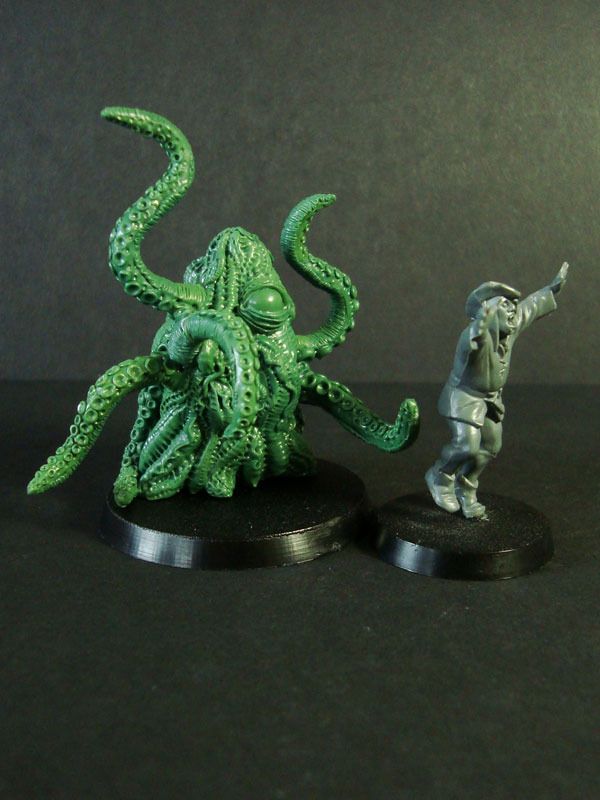
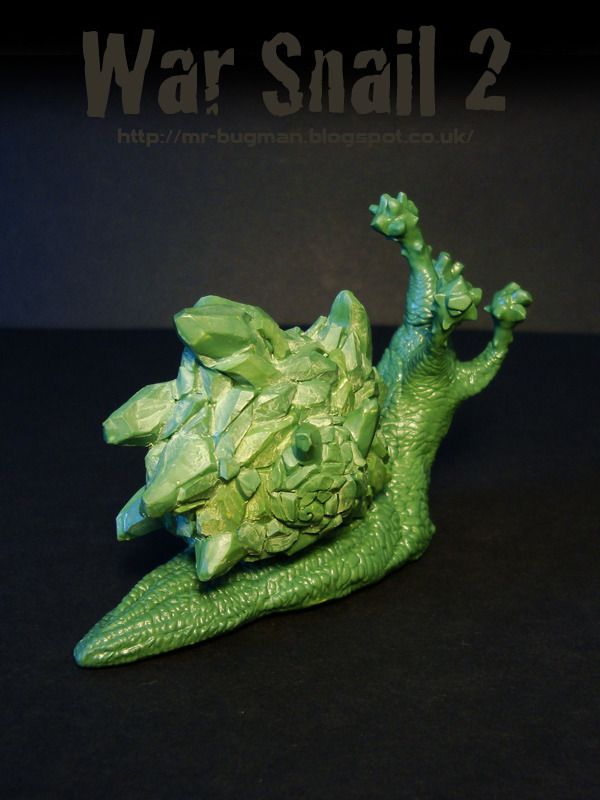
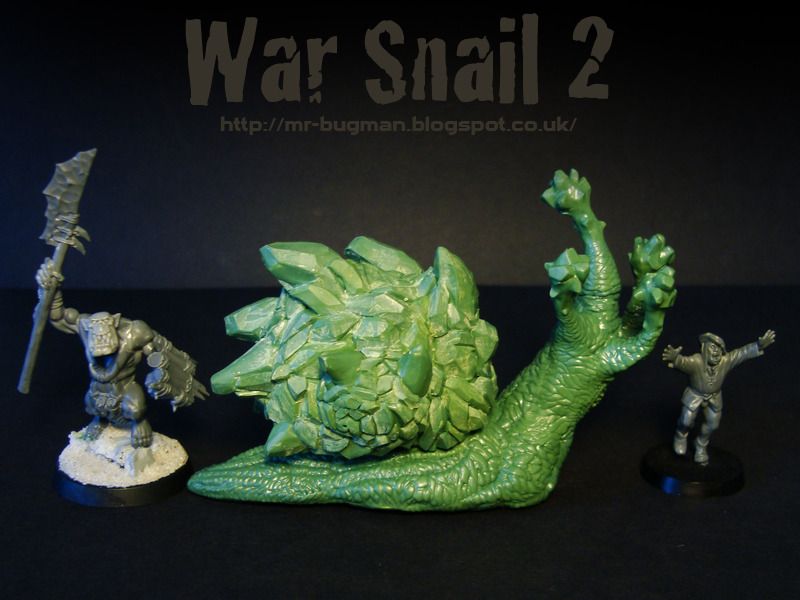
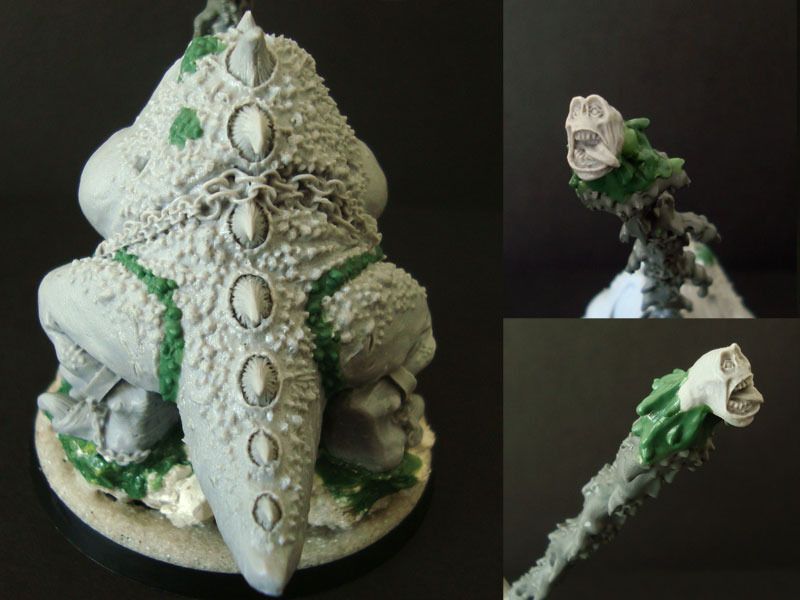
I leave you a teaser of my latest Commission sculpt...
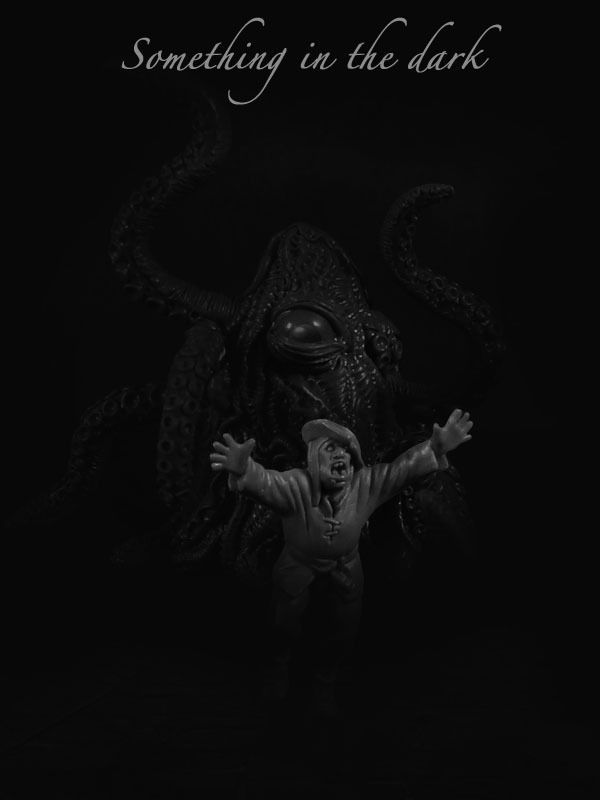
Happy Halloween DAKKA!
52201
Post by: evildrcheese
Cool spider. Looming forward to the reveal of the creature lurking in the dark.
EDC
39666
Post by: GiraffeX
That looks like an octopus.
5256
Post by: NAVARRO
Time for another tutorial.
_____
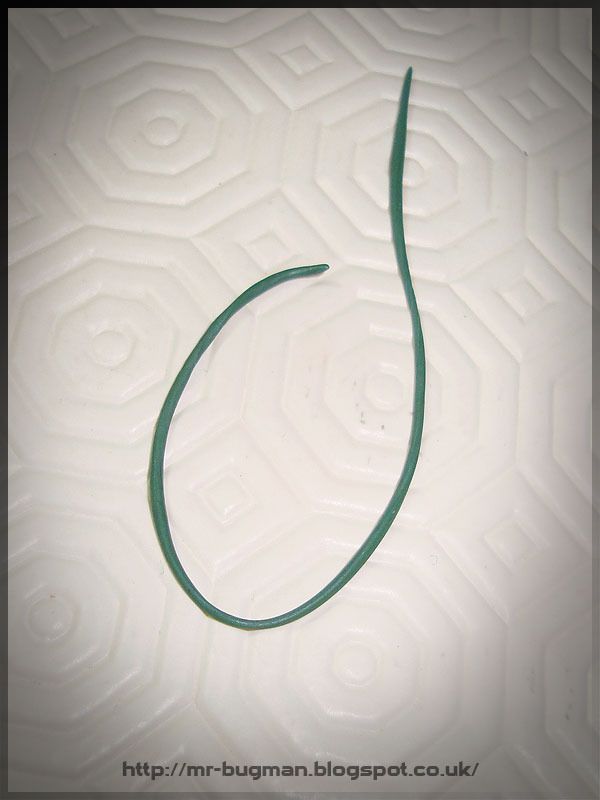
I have just finished another little greestuff tutorial and this time we will sculpt a Whip. These things are useful if your looking to add some spice to your chariot crew or just a beast handler, so lets pick up a paper clip and some greenstuff.

Just straighten the Clip and cover it with greenstuff, try to make it as thin as possible because this will get fatter on the next stage. The reason we do this is because the putty will stick better to putty rather than to the metal. You should end up with something like this.

Let it cure for 2.5 hours instead of the normal 4 so its still a bit sticky and ideal to take the next layer.
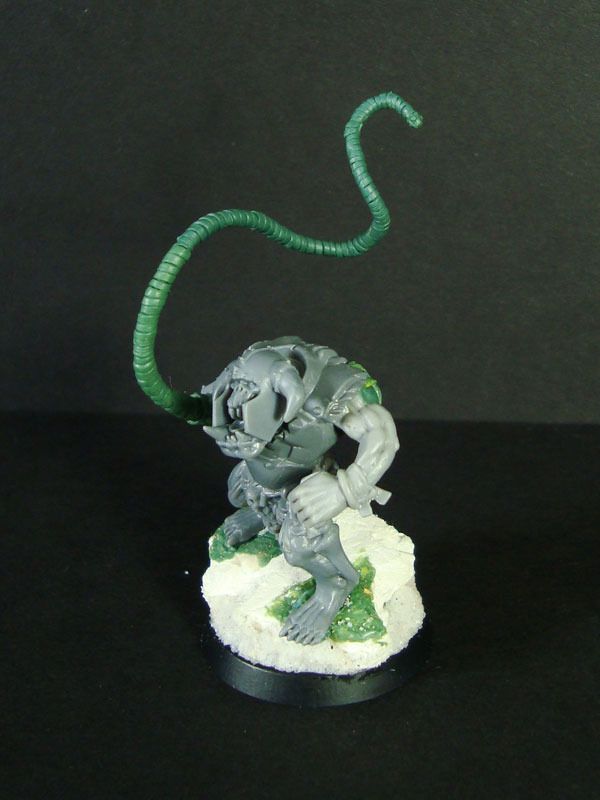
So now roll a really thin huge sausage of fresh putty.
Start with the bottom of the paper clip but leave that extremely free of putty because this will be the bit that you will stick to your mini.

The fun begins now. Pick your favorite flat sculpting tool and grab the other end of the paper clip.
With your fingers on the clip you slowly rotate the cured sausage and with your sculpting tool you tap, tap, tap the fresh greenstuff into place. Notice that the fresh sausage is now flat as you tap it into place. Keep on tapping!

As you approach the end of the Whip its good to make your fresh sausage thiner and thiner because it looks better. Grab the clip with a tool to help with the sculpting of the final tip of the Whip.

On the very end of the Whip I wanted some kind of metal thing so I added some miniscule rivets to it.
I will explain riveting with greenstuff later on in this tutorial. Remember do your riveting with fresh putty rivets on top of fresh greenstuff surface so that the bound is stronger and you have more control.

Let it fully dry overnight. Next day things should look like this unless you sculpted under the influence of a good whisky.

Now pick up your mini and drill a hole on the hand that will hold the Whip. My subject is a Orc Bully.

Now you can bend the, covered with greenstuff, paperclip at the angles you choose. I went with some dynamic Indiana Jones kind of angles. When your happy with it you can superglue the clip to the drilled hole but just leave a gap so you can sculpt some more details.

Almost there. Lets finish up the Whip hand grip.
Mix a small bit of putty and apply it to the gap.

Pick a sculpting tool and tap it into place so its stuck to the mini in a way that will not move.

Still looks very soft but because now the putty its stuck to the mini we will use a sharp flat tool to sharpen those edges. First pull it outside then push inside do it many times until you have something sharp.

Only some riveting left to do now, be quick because you want to set them while the surface is still sticky. So make some tiny balls of greenstuf (1), then push them into place(2) and that will make them flat and big. Finally with the fine tip of a sculpting tool reduce the size of the rivet by making circular movements on the edges of the rivet (3).

You can see how the rivets are now smaller and blended into the surface.
Job done.

Pick another bottle of Whisky and watch the putty dry...


____
I really need to create some articles pages here with all my tutorials but for now you can check them on this thread, or on my blog.
Cheers
91816
Post by: Januine
Great stuff man. Whip looks ...cracking
Really nice and helpful tut
52201
Post by: evildrcheese
Wow. Cool tutorial.
Thanks for sharing.
EDC
26790
Post by: Gitsplitta
Wonderful tutorial!- Thank you!
306
Post by: Boss Salvage
An excellent tutorial! Related: what tool is that in Step 3: Circular Movement? Is it just a clay shaper? Seems pretty big!
- Salvage
5256
Post by: NAVARRO
 Boss Salvage wrote: Boss Salvage wrote:An excellent tutorial! Related: what tool is that in Step 3: Circular Movement? Is it just a clay shaper? Seems pretty big!
- Salvage
Yeah its a HUGE clayshapper, I find them quite useful sometimes. THis one had a really sharp tip which is quite important when sculpting.
THanks all! The Huge rock monster is almost completed too.
306
Post by: Boss Salvage
NAVARRO wrote:Yeah its a HUGE clayshapper, I find them quite useful sometimes. THis one had a really sharp tip which is quite important when sculpting.
You happen to know what it's called / where I can get one? 
- Salvage
4670
Post by: Wehrkind
Great tutorial Nav! Always love seeing the tips on how to sculpt, even if I know my attempts will fall short
Here Salvage. I think the one he uses is the left most one, or the one in the middle there.
5256
Post by: NAVARRO
I have a collection of those shappers and I find different brands a bit everywhere… These big ones I got a deal at Lidl some years ago but any clayshapper with a fine tip will do just fine.
306
Post by: Boss Salvage
Great link Wehr! Nice set, quite cheap. I actually have a set of shapers that I've tried to get mileage out of, but they're not hard enough to do much with GS. From all I've seen, I should have gotten the white ones, not the black ones
*fixes that*
- Salvage
5256
Post by: NAVARRO
Boss Salvage wrote:Great link Wehr! Nice set, quite cheap. I actually have a set of shapers that I've tried to get mileage out of, but they're not hard enough to do much with GS. From all I've seen, I should have gotten the white ones, not the black ones
*fixes that*
- Salvage
Usually the black are the hard ones then grey for medium and white for soft. The thing with clayshappers is that they are good for fine tuning a form by making it smoother or sharper but to really make deep recesses on the GS you should use some metal tools.
306
Post by: Boss Salvage
NAVARRO wrote:Usually the black are the hard ones then grey for medium and white for soft. The thing with clayshappers is that they are good for fine tuning a form by making it smoother or sharper but to really make deep recesses on the GS you should use some metal tools.
Hmm. When I bought mine, I recall having the option of going one step harder, but didn't take it, and ever since I've felt like my rubber tools hardly budge the GS I'm trying to smooth out after ravaging them with metal tools. Not sure I want more, softer tools, though I still like that big pointy lad ...
- Salvage
4670
Post by: Wehrkind
Boss Salvage wrote: NAVARRO wrote:Usually the black are the hard ones then grey for medium and white for soft. The thing with clayshappers is that they are good for fine tuning a form by making it smoother or sharper but to really make deep recesses on the GS you should use some metal tools.
Hmm. When I bought mine, I recall having the option of going one step harder, but didn't take it, and ever since I've felt like my rubber tools hardly budge the GS I'm trying to smooth out after ravaging them with metal tools. Not sure I want more, softer tools, though I still like that big pointy lad ...
- Salvage
I am trying so hard to make some puerile joke based on this post, but I just can't do it. I wonder if I am coming down with something...
9594
Post by: RiTides
Wow, what a great tutorial, awesome pictures! Cheers Navarro
Side note: Salvage, what are you working on that requires clay shapers? Hope some of this is inspiring you to jump back into your minis projects a bit
5182
Post by: SlaveToDorkness
Man, you've come a long way since your "everything is buggy" days!
Very nice stuff!
10972
Post by: Ruglud
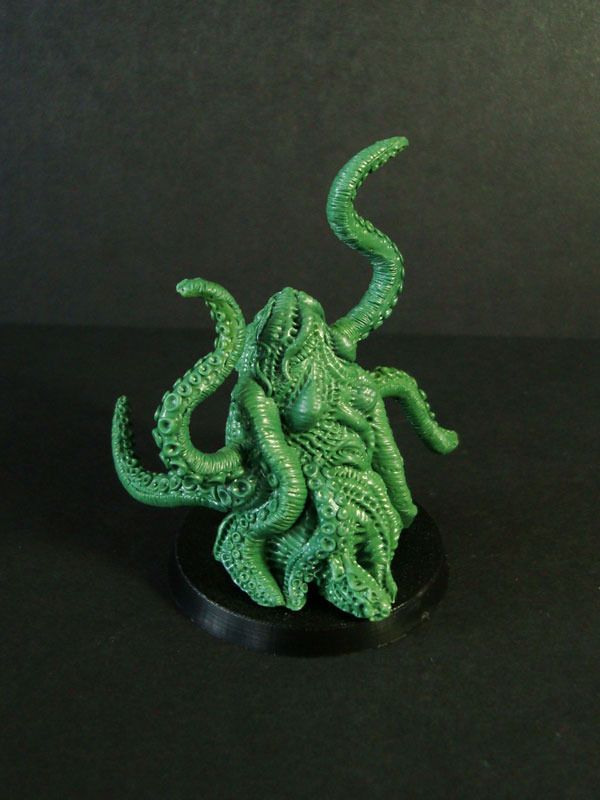
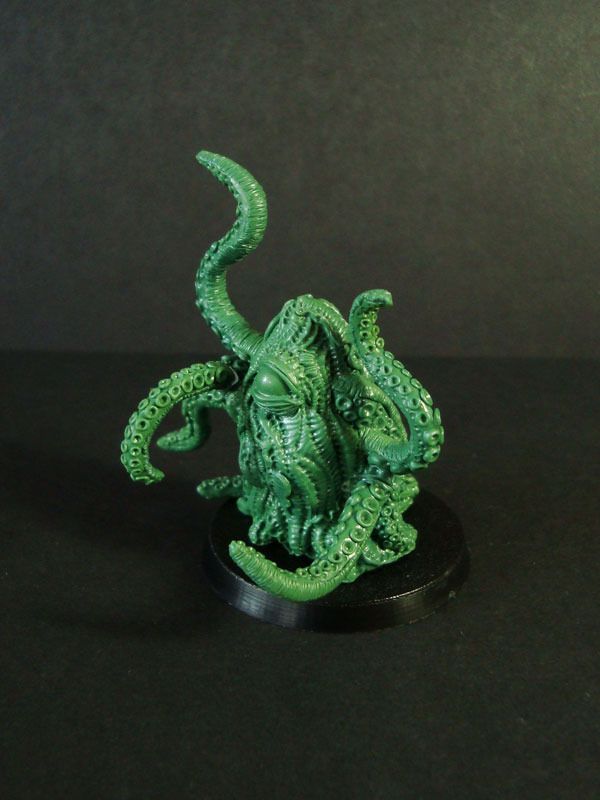
Just went through your blog page by page and truly impressed. This tentacle horror though, amazing, just amazing. It's like a crazy scary Dr Who creature, but realistic
52201
Post by: evildrcheese
Cool. The tentacle monster spawn beast is amazing. Great work.
EDC
5256
Post by: NAVARRO
Yeah I come a bit away from the tyranids thing for some time now, I think they look quite boring these days.
Which means I can carry on with my sculpting but just on different things.
Glad you liked the Blog Ruglud I have been checking yours too and your tree frame is crazy good.
Thanks Evildrcheese
65595
Post by: Camkierhi
You sir are inspiration personified.
That tentacle beasty is amazing.
I have credited (blamed) you for some of my latest. Not even close to you, but your fault I had a go.
Never stop.
76303
Post by: Warboss_Waaazag
Great tutorials. I'm late to the party, but the whip tutorial is fantastic.
5256
Post by: NAVARRO
 Camkierhi wrote: Camkierhi wrote:You sir are inspiration personified.
That tentacle beasty is amazing.
I have credited (blamed) you for some of my latest. Not even close to you, but your fault I had a go.
Never stop.
Wow much appreciated man. Glad you did give sculpting a go, the learning curve can be a bit hard when you start but hopefully past that its quite good to create your little miniatures.
@Warboss_Waaazag I will try to do some more tuts next year so the party is still going and hopefully will continue for a long time.
5256
Post by: NAVARRO
Hi guys I just finished up my illustration for the usual Xmas card for this festive season.
Have a good one!

26790
Post by: Gitsplitta
That's fantastic Navarro...
9594
Post by: RiTides
The sculpt is amazing, Navarro! How many commission sculpts do you do a year, out of curiosity? I'm impressed that you're able to balance it with your own army project, nice to mix it up
5256
Post by: NAVARRO
I went trough a period of doing lots of commission work but my life changed a lot and very quickly so I stopped it all for a couple years. Slowly when time permits I do a few just for the kicks. I will try to sell the rock giant and thats about it for this year. I have the feeling next year everything is going to change again so I may end up with just the time to do my personal things. In short all just happens to be an accident these days
43461
Post by: Lorax
Wonderful work Navarro! I am subbed now to both your blog and your dakka plog
4670
Post by: Wehrkind
Very nice! I can hear RiTides salivating as he draws out his wallet already!
92505
Post by: youidiotkid
Another excellent creation, Navarro. Why is it that you used Greenstuff instead of Milliput or Brownstuff (or a mix of the three) to sculpt the rock giant? It seems like a massive amount of effort to shape edges as cleanly as you did, considering the rubbery consistency of Greenstuff.
65595
Post by: Camkierhi
Same question.
Oh and where do I get one?
5256
Post by: NAVARRO
All of the interior is done in wire and Milliput and used GS for the exterior visible rocks only, the reason I choose to do so its because I want this model to be really strong and ready to be cast in anything. If I went for the milliput only approach I would be seriously concerned with its brittle nature. It only takes a fall to dent all the milliput sharp pointy bits. I also took this opportunity to train my skills at making sharp edges in GS.
Still not sure if this is going to be for sale at any store but Im working on it. Wish me luck.
13225
Post by: Bottle
Good luck mate. The rock giant is really cool!
All your stuff constantly blows me away!
9594
Post by: RiTides
Looks fantastic and much better than the former FW orc-rock creature. Can't wait to see it painted... but am willing to do so if it means you'll be having it cast
Since it's such a giant model I'm not sure it'd be that profitable in the end, but it's awesome! And even a bit dynamic in pose somehow despite being made of rock
5256
Post by: NAVARRO
Much appreciated both of you and happy 2016 all!
Some extras for my AoS Gobbos,
Going to use the giant as my rock lobber stand in, so I added some crew gobbos.
Full crew with bully
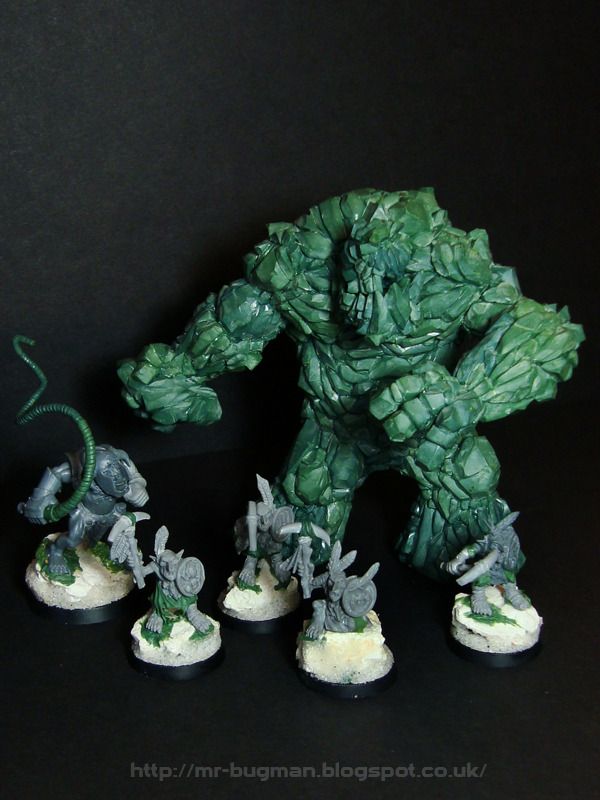
So with the rock lobber done and with the doom diver cleared I only need to convert a spear chukka.
4042
Post by: Da Boss
Amazing work. Just checked the last page, now need to go and read the entire thing - I think I last checked when you were doing the awesome 15mm stuff?
Looks like I'm in for a treat!
39666
Post by: GiraffeX
Wow thats very impressive, I hope someone decides to cast this up for you for retail.
91816
Post by: Januine
That Rock Giant is just stunning and furlongs ahead of a lot of the stuff I see being sold by some actual minitatures companies these days. Superb work. Deserves to be cast and painted.
5256
Post by: NAVARRO
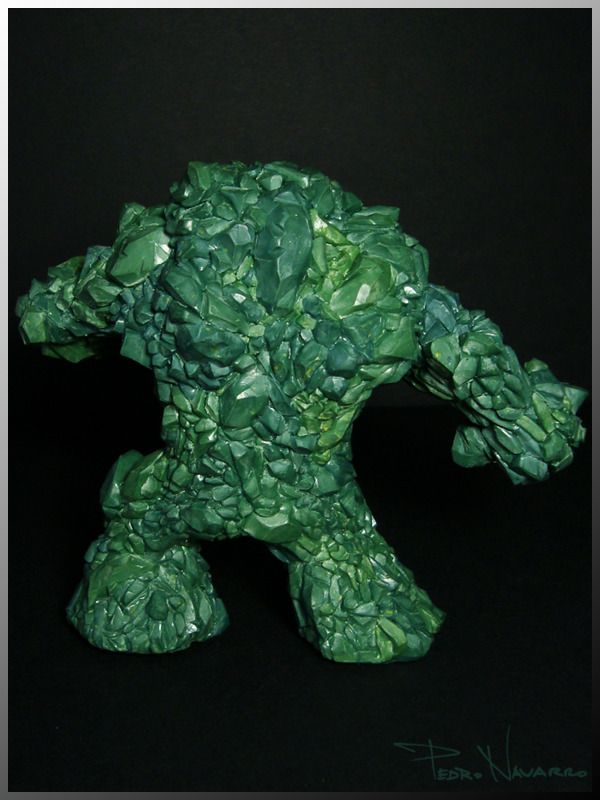
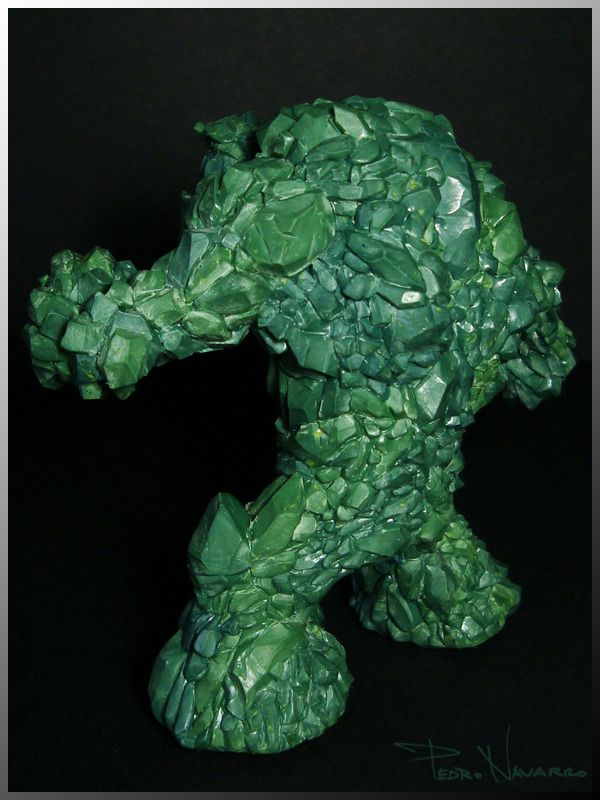
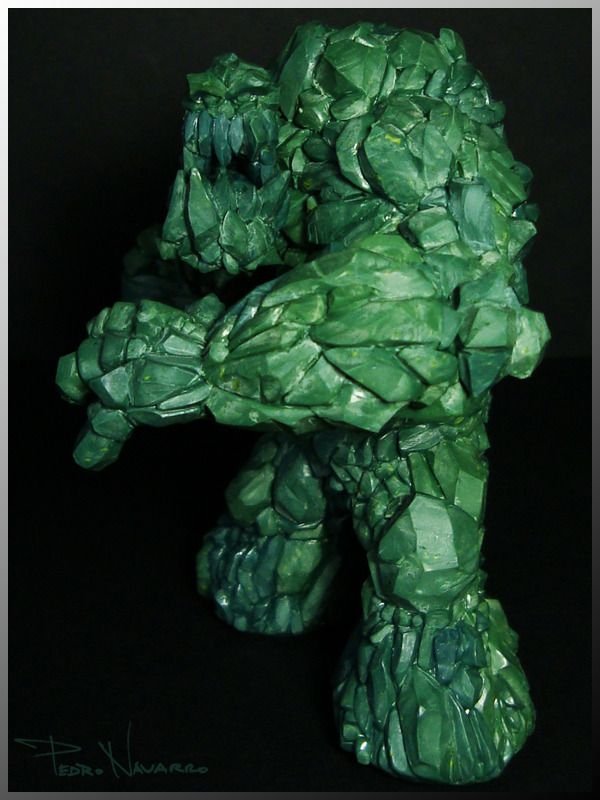
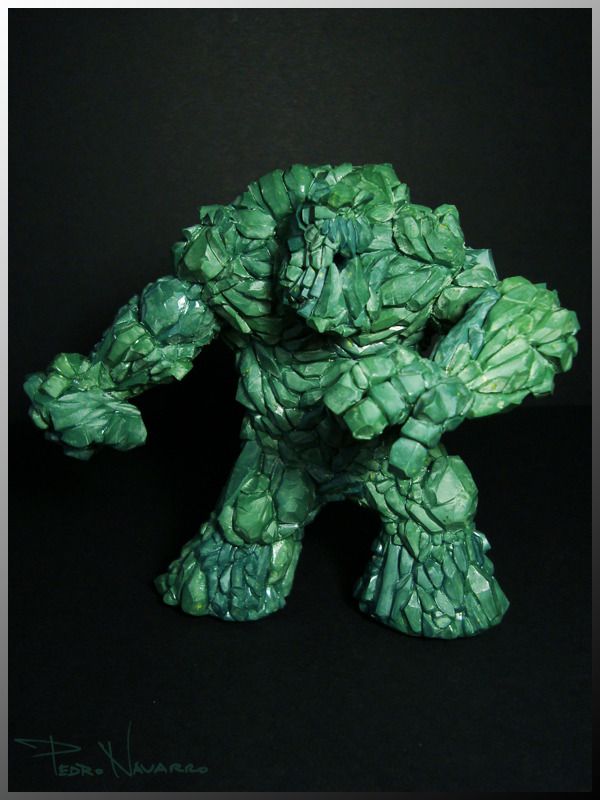
Good news!
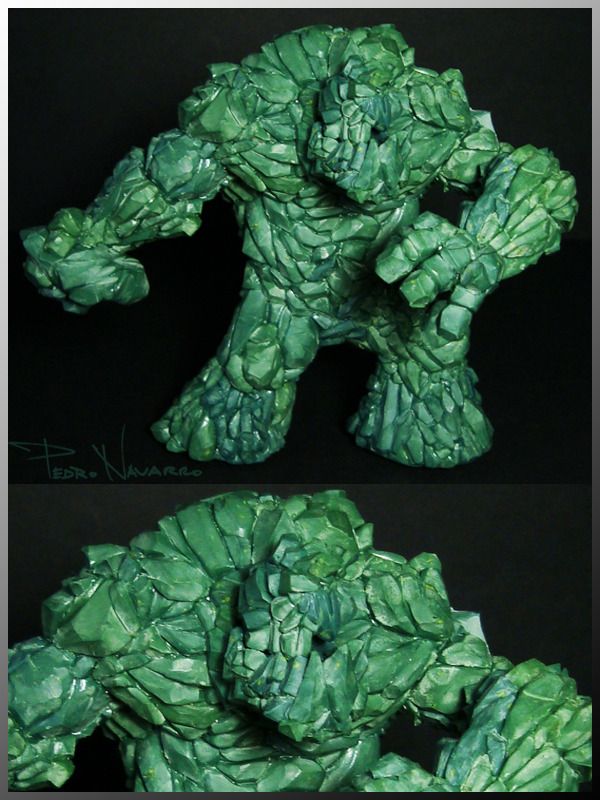
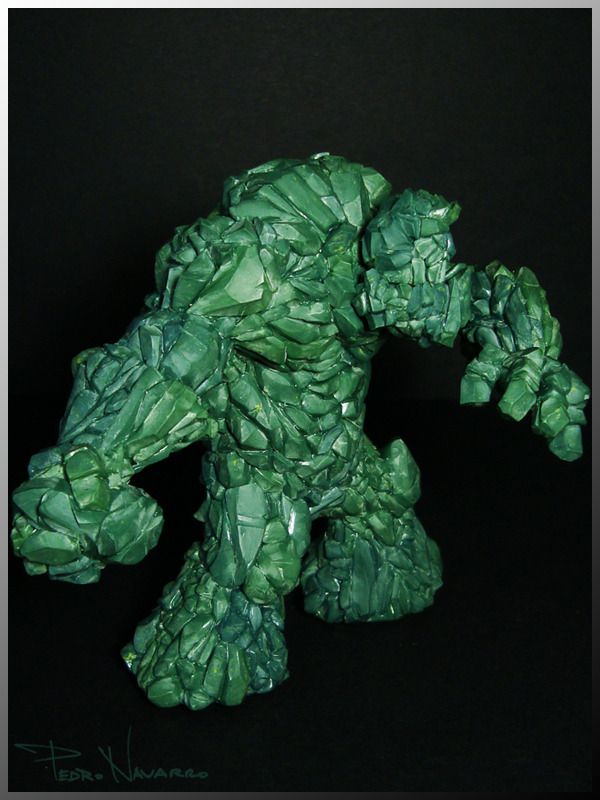
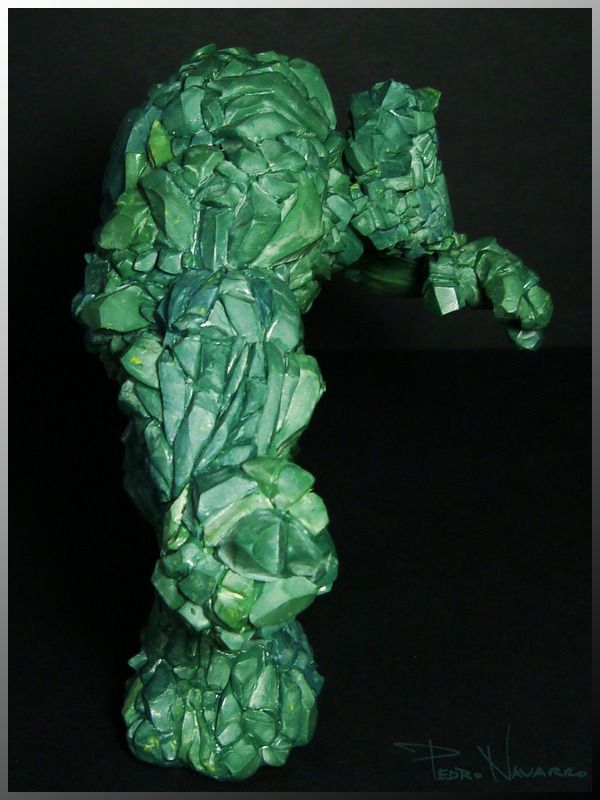
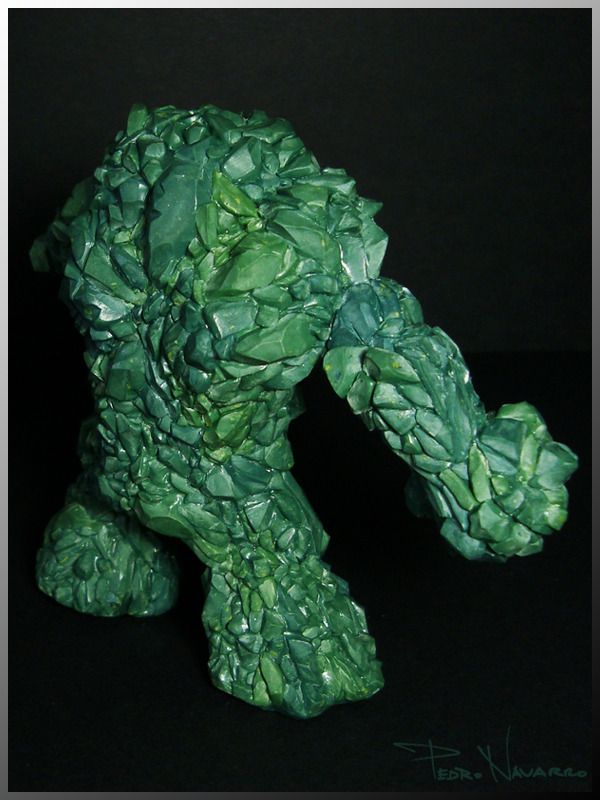
The Rock Giant got sold to Otherworld Miniatures, so soon enough it will be available to all.
To be honest this mini raised much more interest than I first anticipated and there were more companies on this run, at the end of the day I went for Otherworld just because Im such a fan of that range that its a pleasure to see the Giant among such great catalogue.
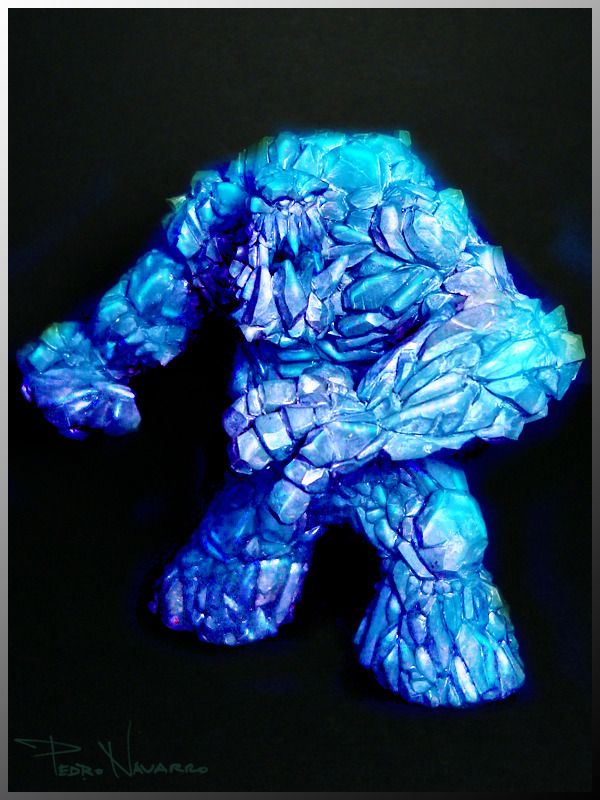
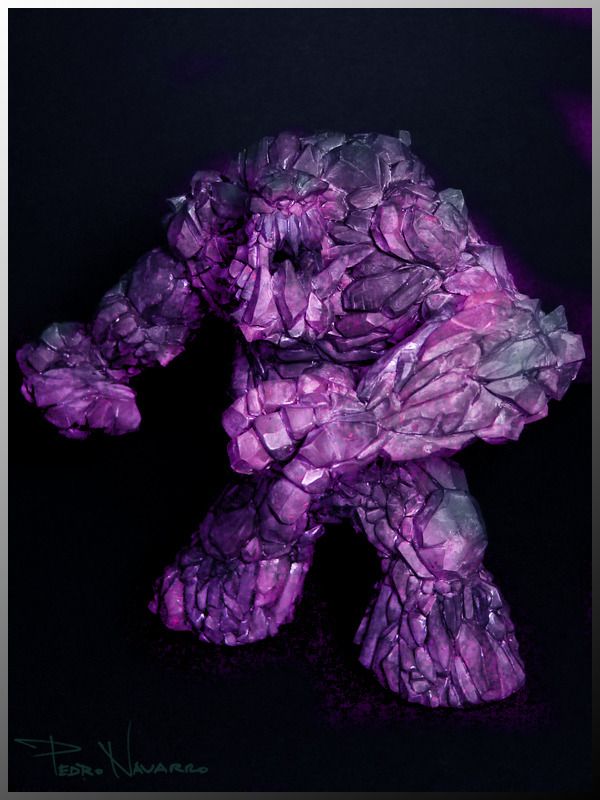
Its going to be called Ice giant and thats the cool thing about this mini, its really up to you to paint it and depending on the colours you go for you will end up with very different results.
Some quick photoshop for colours
Rock

Ice
Obsidian
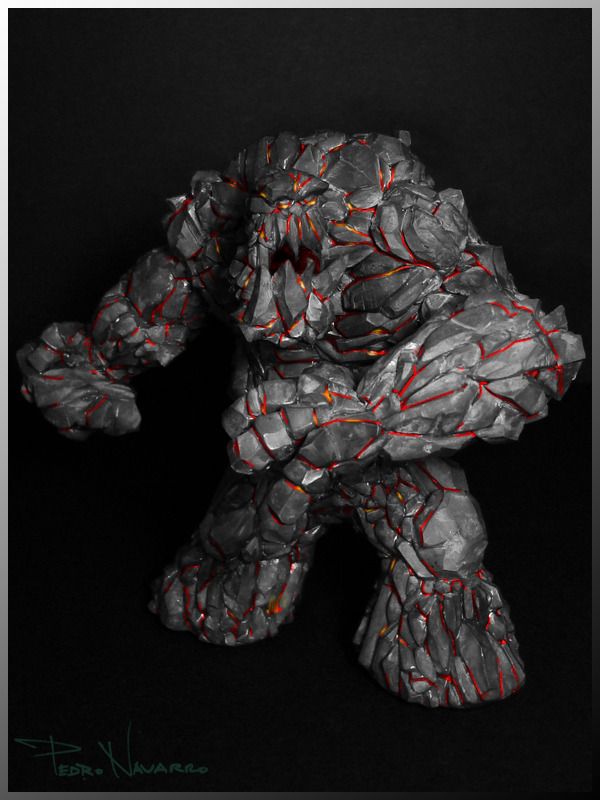
Crystal
Cheers
4670
Post by: Wehrkind
Very nice! Congrats on getting the model placed!
43461
Post by: Lorax
I love the color recommends for the rock monster. I especially like the looks of the obsidian and ice versions, I will be on the look out for this when it becomes available. As always, I am patiently waiting to see more of your amazing work.
26790
Post by: Gitsplitta
Congratulations sir!
91816
Post by: Januine
Congrats fella. A beautiful piece of work that really deserves to be made. well done
5256
Post by: NAVARRO
Thanks! Cant wait to have some casts myself, I will convert one of them with some extra spiky stones and different pose.
13225
Post by: Bottle
Great work, Nav. I would really like to see one of those painted in the obsidian scheme you showed. How are you going to paint yours?
52201
Post by: evildrcheese
Yeah the Rock monster in the Obsidian scheme is my fave. Really cool model, congrats on the sale.
EDC
5256
Post by: NAVARRO
I will go for the Rock dirt variant and maybe add some foliage on its back so its jungle themed.
Strange enough I find the crystal one quite cool too.
25983
Post by: Jackal
Hoping this pops up soon.
Gorgeous model and a ton of uses.
Shame you didn't make this a while back when every chaos dwarf player needed a destroyer in their army.
Still though, I want a few of them as they are stunning models with plenty of uses.
On the subject of bugs, any future plans of some 6mm scale large bugs?
As always though mate, stunning work!
5256
Post by: NAVARRO
Thank you for the feedback Jackal.
Funny you mention bugs because this year Im going to sculpt loads of them, some for myself while others for the commissions I just took.
Actually today I spent most of my time sculpting bugs.
5256
Post by: NAVARRO
Just got an official sneak peak of whats to come from Otherworld MIniatures.
I LOVE the paintjob they did on it.
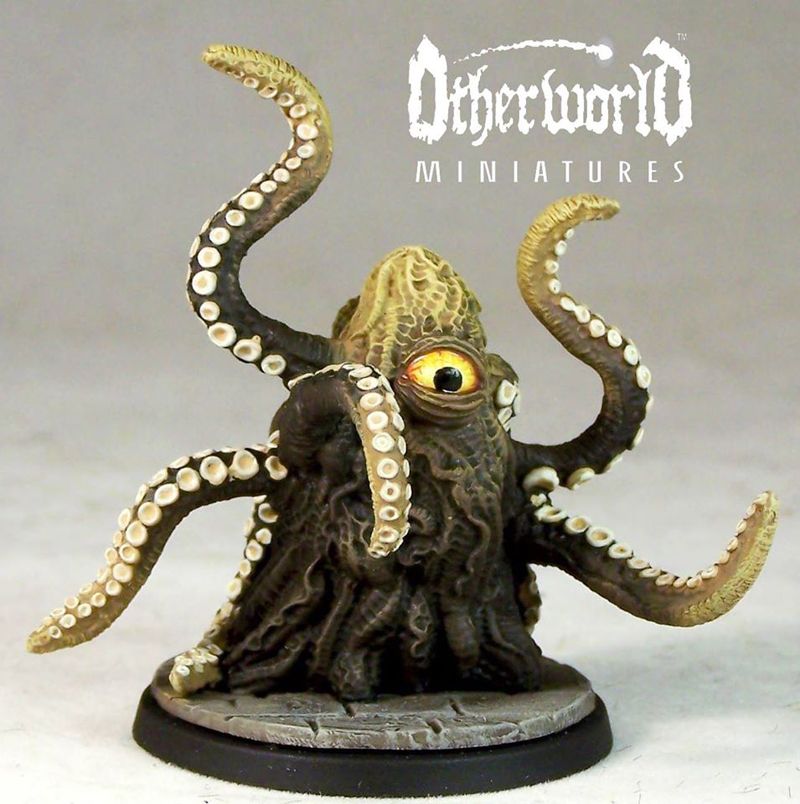
100678
Post by: Rootbeard
Oh wow, I remember your Genestealer Biodiversity project from so many years back, inspired me to make some of my own hybrids (nowhere near as well, though). Your GS skills have absolutely exploded since then. Love the Giger bases!
5256
Post by: NAVARRO
Tyranid Biodiversity Project was really fun back in the day, happy that you still remember that because it was so many years ago. I still have those minis stored in a big box.
These days with so many cool minis to represent xenomorphs I think I would do something different conversion wise.
5256
Post by: NAVARRO
Snails are on the move.
THis year I'm sculpting loads of bugs and started with some snails.
Here are some concept shells I made. Currently sculpting a couple of these.
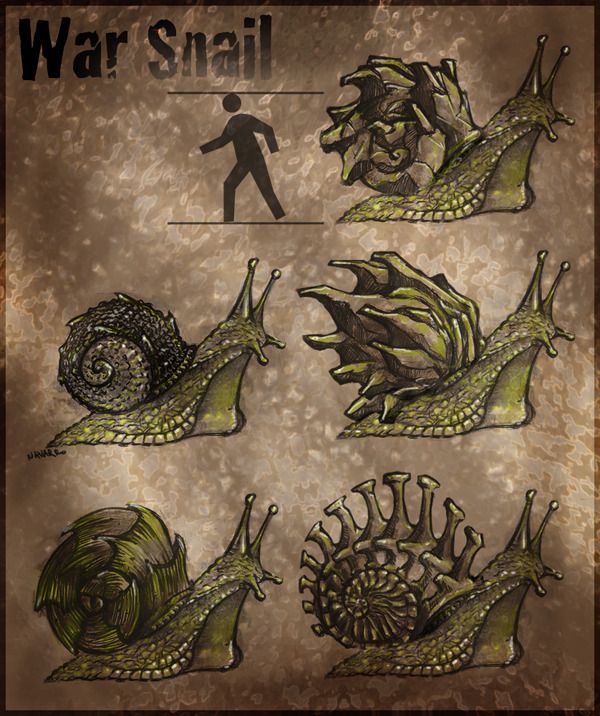
306
Post by: Boss Salvage
WAR SNAILS
I am weirdly excited by these Dig the concept art, look forward to the sculpts!
- Salvage
65595
Post by: Camkierhi
Love the idea. Cant wait to see you come up with some sculpts.
Will they all be straight out or will some be in defence mode ie tucking into their shells. And it might be cool to have one halfway attacking an enemy. Kind of absorbing him. Just a thought.
Will be watching intently.
36940
Post by: Anvildude
Just remember, snails have drill tongues.
DRILL TONGUES.
4670
Post by: Wehrkind
They also stab love darts into each other that are friggen huge relatively speaking. And yes, "love dart" is the proper term. It is pretty crazy, and hilarious. It would be a great once per game do a scary powerful attack in melee.
Snails are crazy cool.
5182
Post by: SlaveToDorkness
Wehrkind, that reminds me of the old Beast of Nurgle fluff that described them as giant affectionate puppies that bounded around the battlefield licking the enemy with toxic-venomed saliva. After their playthings died they'd bound away looking for something else to "love".
9594
Post by: RiTides
War snail concepts look awesome . I would certainly be after getting some if you decided to cast them!
306
Post by: Boss Salvage
 RiTides wrote: RiTides wrote:I would certainly be after getting some if you decided to cast them!
Of course you would
Minions just need some cav or a beast unit to sub them in for ...
- Salvage
5256
Post by: NAVARRO
Working ferociously on the snails and one is almost finished... again like always I will try to find someone to take them in and cast'em.
Snails are in reality some of the coolest things on earth, no need for aliens or little green men to spice up our imaginary because you can find them in your garden... and if you are a Portuguese they will also be on your plate Yummy stuff!
On my AoS front I got the time to rebase some of my savage orcs, they look soooooo much better now since you can see each individual convo much clearer. I also made the unit smaller with only 16 but added a stabba. Working on another 16 now but unlike these ones with 2 hand weapons they will have spar and shields.
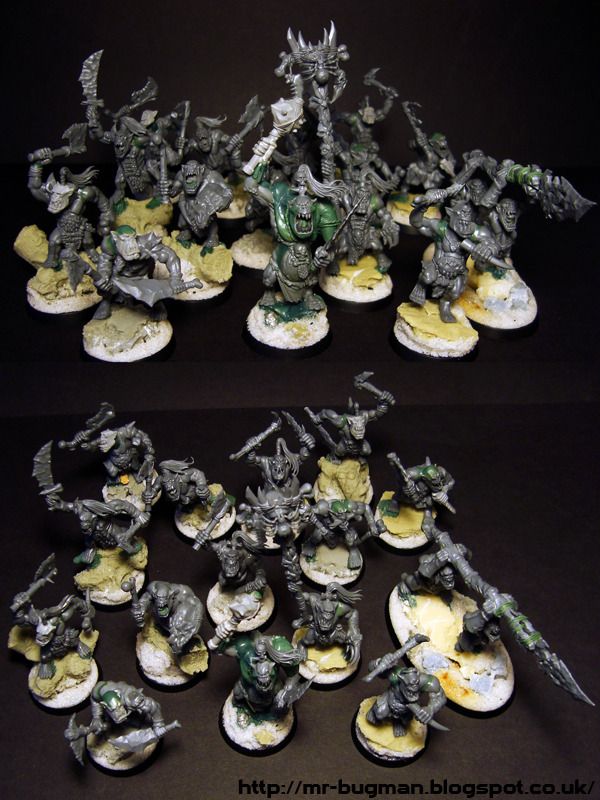
Next update will be Vinegar and Bugs, take a wild guess
Thanks all.
39666
Post by: GiraffeX
Your orks are looking really nice, the bigger bases really makes the models stand out better.
5256
Post by: NAVARRO
Thank you.
Its strange how the bases create such an impact on the minis. The 32mm are the best thing GW ever did
13225
Post by: Bottle
Wow! Now that is what a unit of savage Orcs should look like! Very impressive Nav!
Edit - we posted in eachother's blogs at the same time haha
99
Post by: insaniak
Some really nice posing there. Lovely Orcs.
Now bring on the snails!
4670
Post by: Wehrkind
I really love the look of your orks! The GW Ork/Orc aesthetic always really appealed to me. Your sculpting just takes that up a few dozen notches.
I also like the bigger bases, although mostly because it scales to the size of the model better. I would just as soon have smaller models that fit on a 25 mm base, so long as they are not hanging off all over. (Lookin at you, PP...)
65595
Post by: Camkierhi
Love the orks. They are not snails though! But you are forgiven for i love orks.
43461
Post by: Lorax
Those are some dead 'ard orcs! Cant wait to see the spear and shield versions sometime down the road!
13225
Post by: Bottle
Do you have pics of your AoS orcs and gobbos painted yet, Nav? Just realised we always see awesome sculpting from you, but not often painting. :-)
306
Post by: Boss Salvage
Just stumbled upon, thought of your WAR SNAILS:  Given the proper scaling (i.e. pretty big), I could be convinced to make a KOW army out of them. But I've got a problem. Also nice orcs, big fan of your AOS endeavors - Salvage
95173
Post by: ROTTEN_FACTORY
Great stuff! I love the bases.
Waiting for WIP's of War Snail
43461
Post by: Lorax
Boss Salvage wrote:Just stumbled upon, thought of your WAR SNAILS:
Given the proper scaling (i.e. pretty big), I could be convinced to make a KOW army out of them. But I've got a problem.
- Salvage
Perhaps we can convince Navarro to make a gargantuan war snail as well!
68152
Post by: JoeRugby
The snails are really cool.
|
|