Thought I would join this section now as I have to say I am gripped by the work you are doing, those moulds of yours are great and reminds me of being a kid and using LINKA moulds with my dad for the railway.
I have to say your dedication has to be admired and that is one hell of load of scenery must be a bitch to take with you
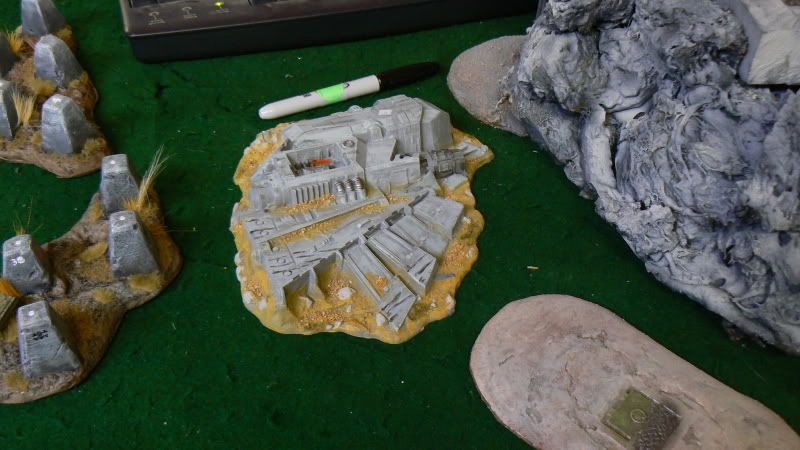
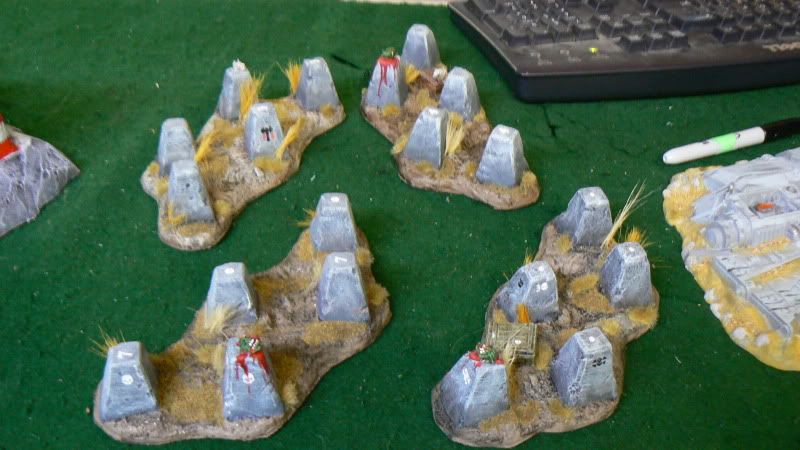
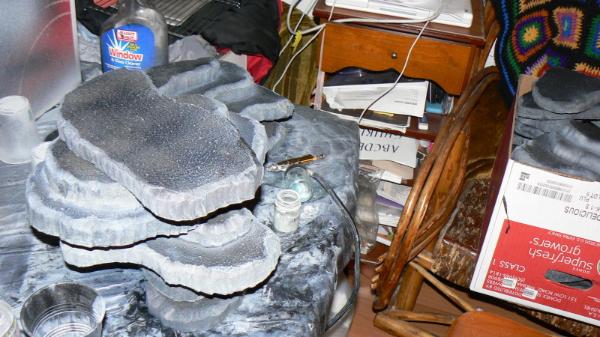
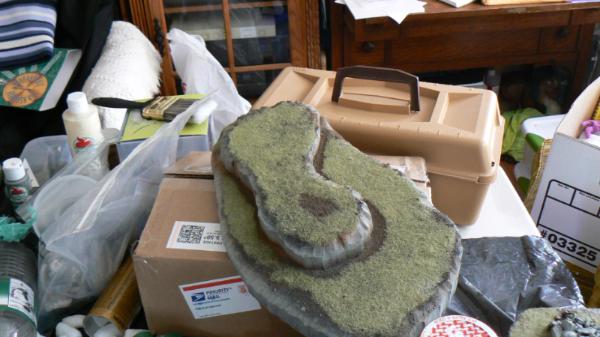
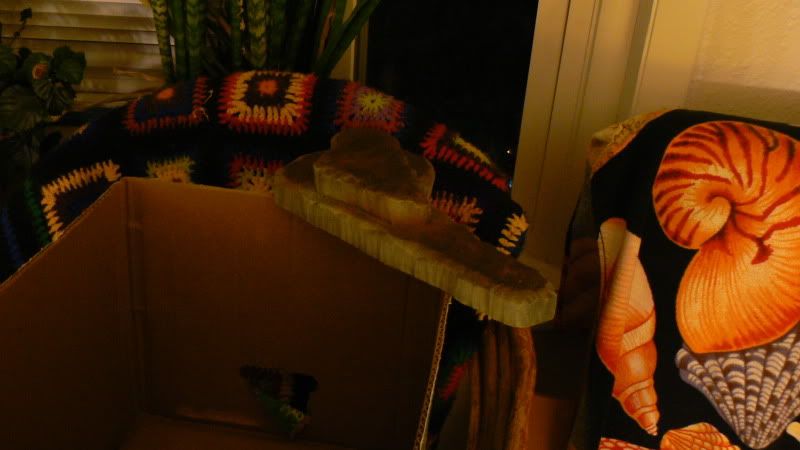
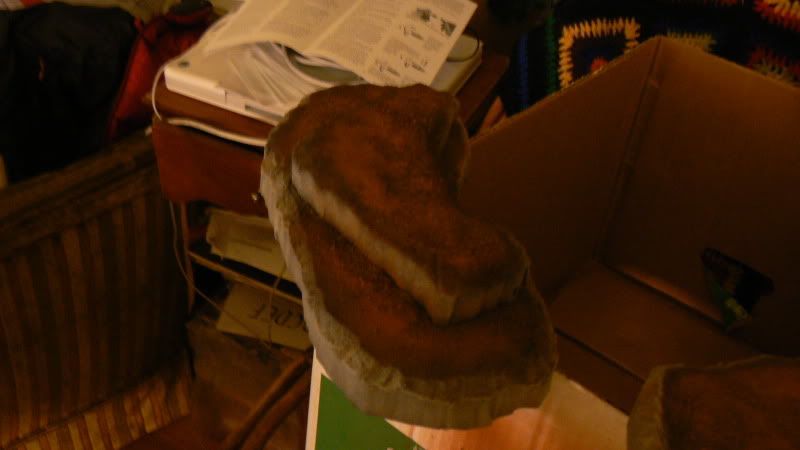
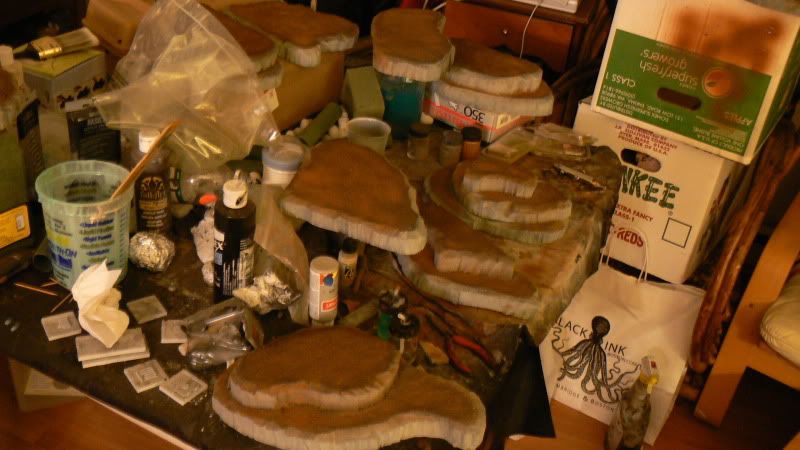
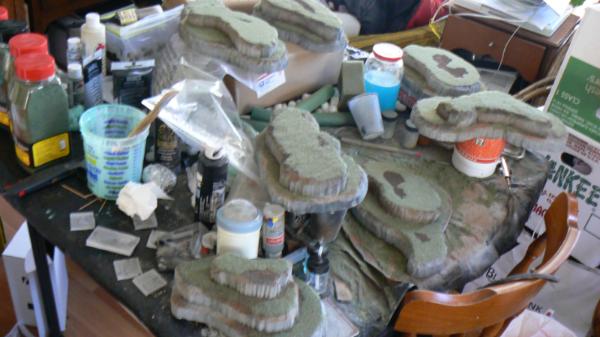
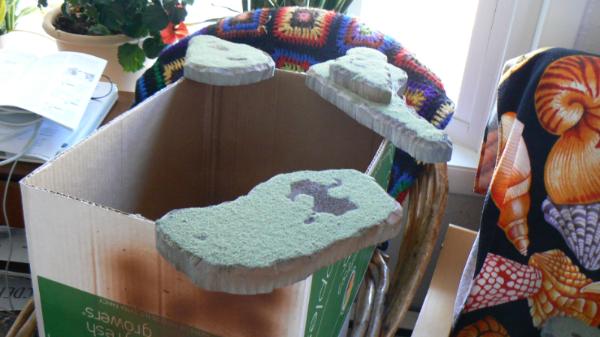
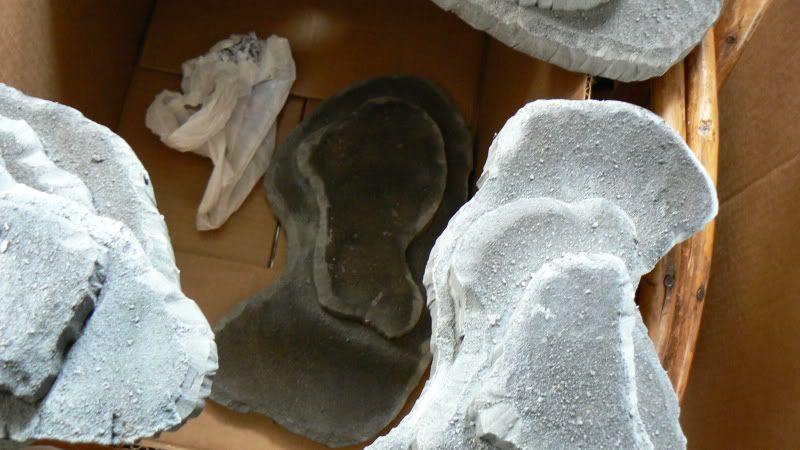
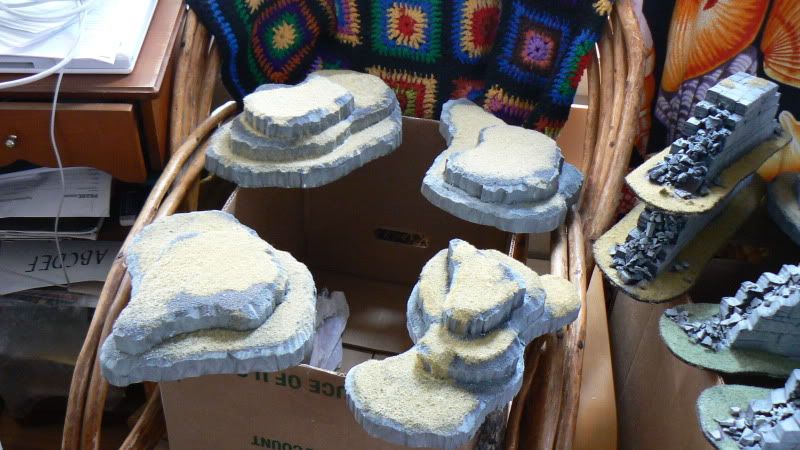
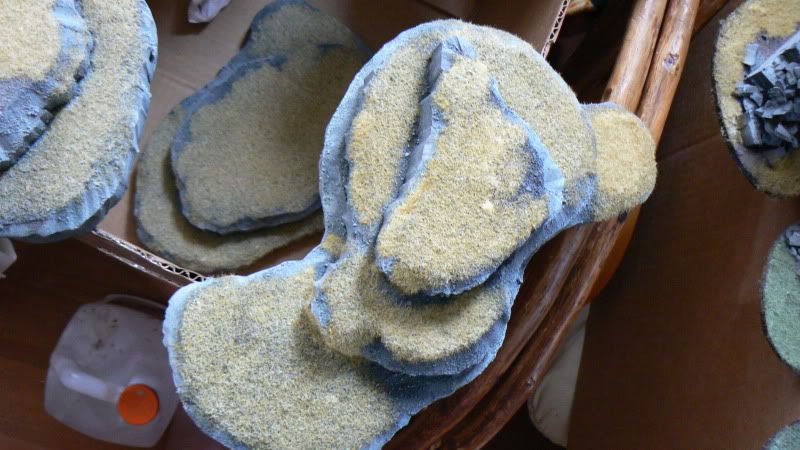
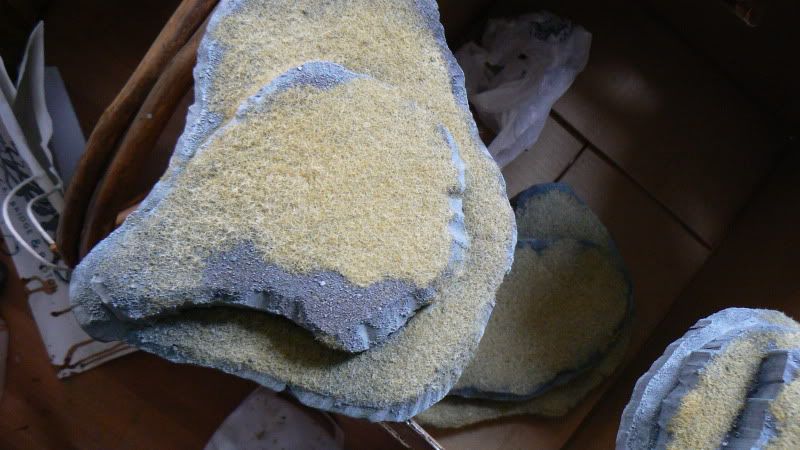
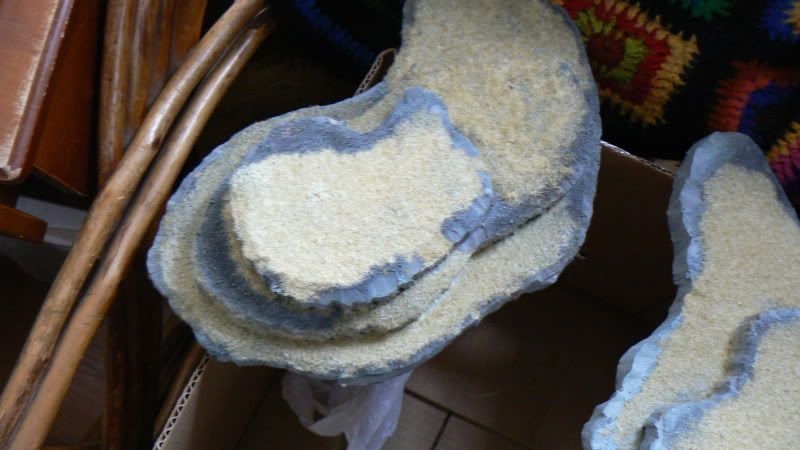
I think the hills are pink insulation foam, but could be wrong …..
Taking a quick brake to let my compressor cool off... It's bad if its actually hot to the touch right?
Viktor von Domm wrote:wow...this amount of work to be done without an airbrush would be simply undoable...but you do a decent work there mate and it looks very cool!
is that all cast stuff of yours or did you use other materials and methods as well?
and your crowded place does credit to your dedication to the cause!
i cross fingers for the forced insomnia to not cause any negative effects on you...well at least not on a larger scale^^
cheers, vik
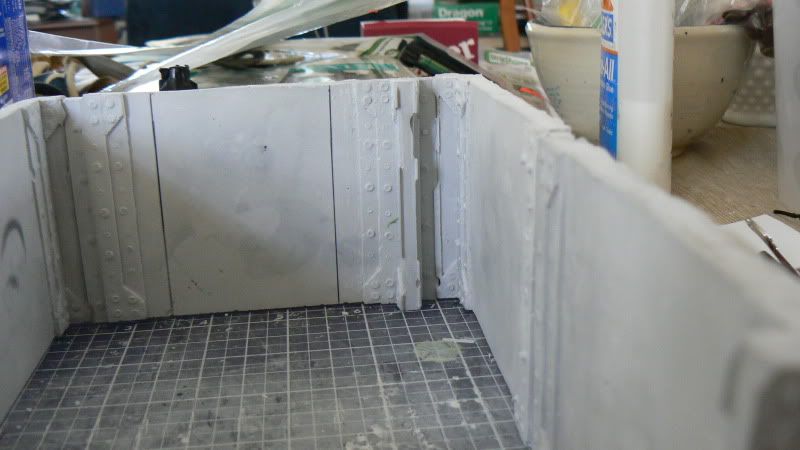
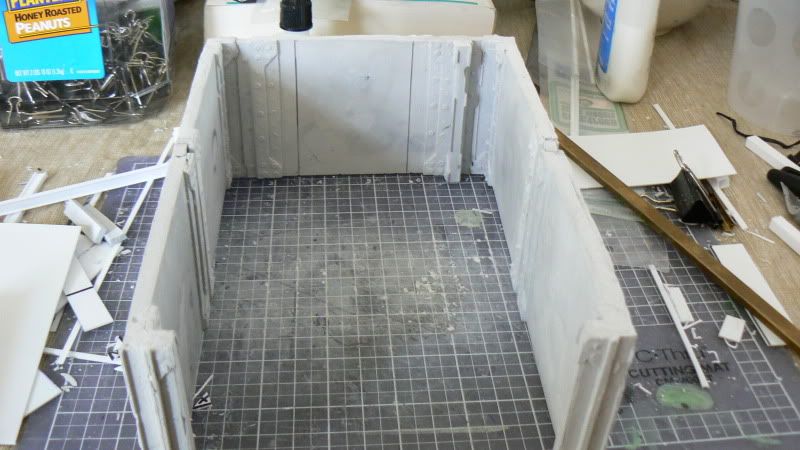
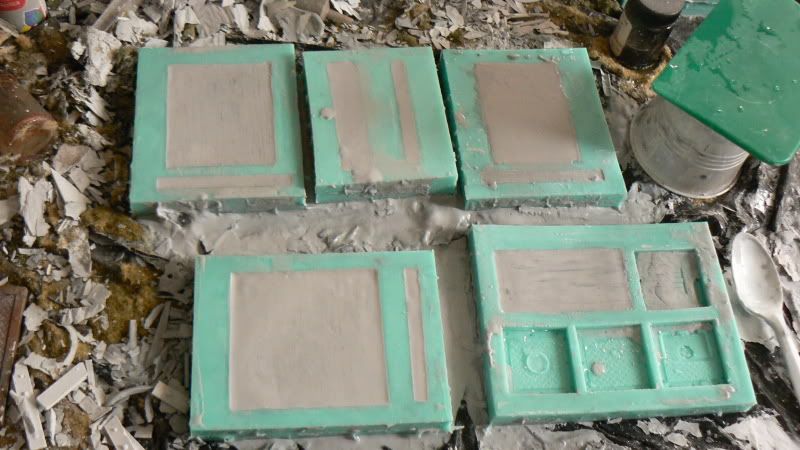
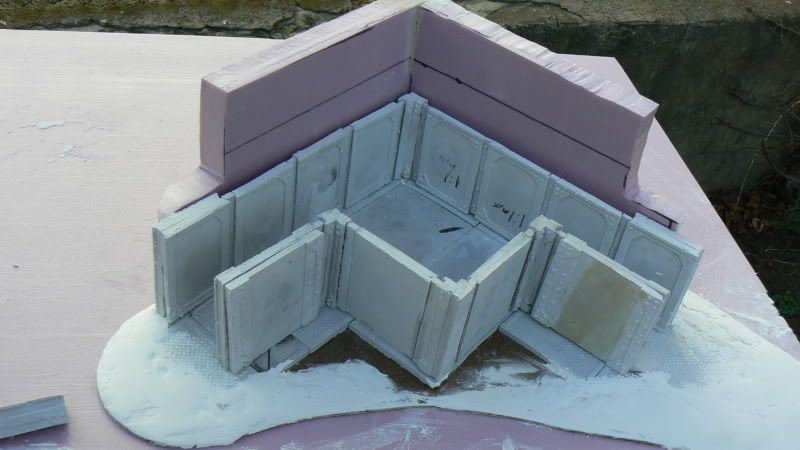
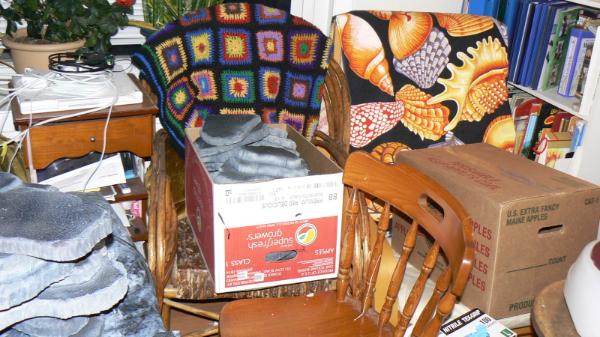
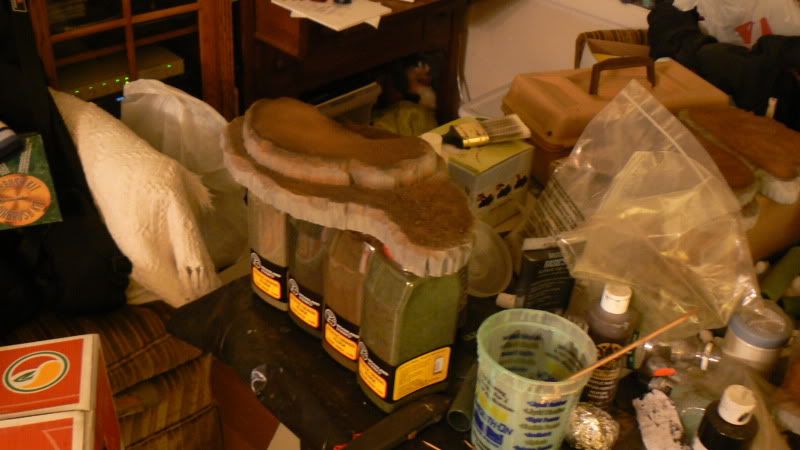
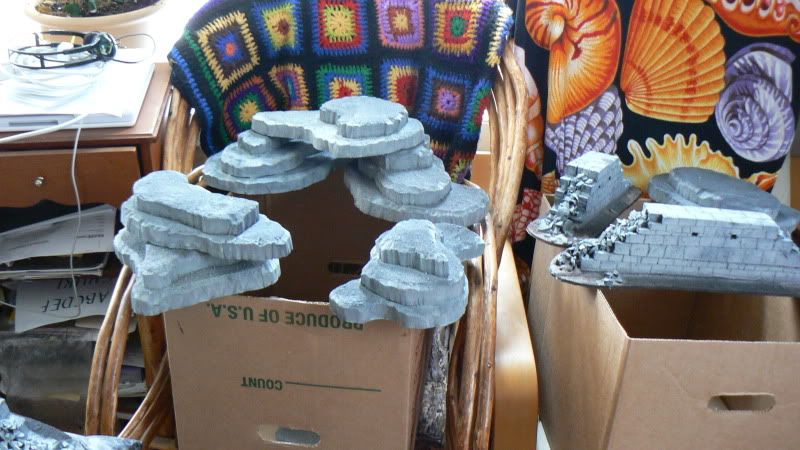
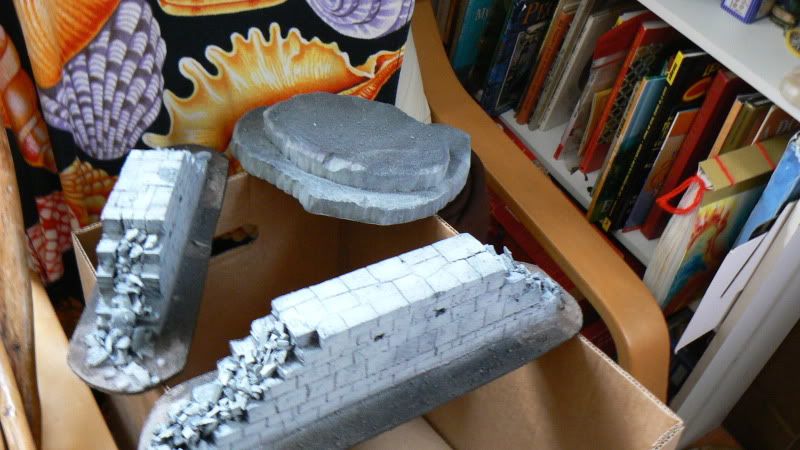
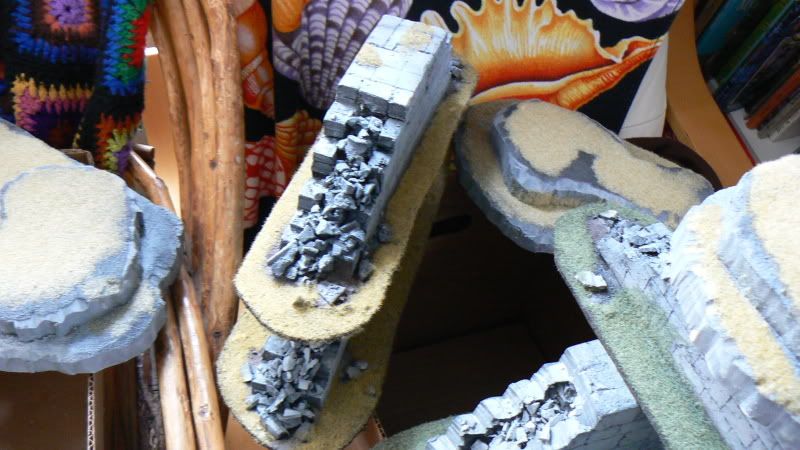
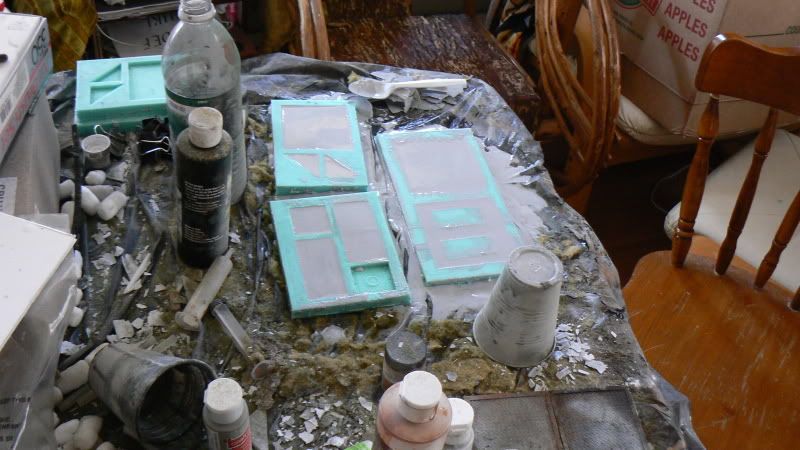
Nope The fill for the wall segments is crushed up excess dental stone, the bases are "hardboard" and everything else is Pink insulation foam. as for the sleep deprivation... I'm already cracked only thing left is rivets...
lone dirty dog wrote:Thought I would join this section now as I have to say I am gripped by the work you are doing, those molds of yours are great and reminds me of being a kid and using LINKA moulds with my dad for the railway.
I have to say your dedication has to be admired and that is one hell of load of scenery must be a bitch to take with you
I think the hills are pink insulation foam, but could be wrong …..
I see the drips in the bottom of your box..Are those splatter from the airbrush? If so, try lowering your air pressure slightly, might help. I made a huge mess until I figured that out.
"Bunch of coconuts" maybe you should lay off the red bull …. the advert saids it gives you wings not nuts there really is a thin line between madness and genius and this forum has found it …… LOL
Well I've gotten as much done as I could before time... The walls are done mostly (just missing static grass and flock, actually everything is missing that...)
Hey, Galorn, going back and rereadin' some posts (because everyone knows I am lazy about reading the words - MORE PICS - MORE PICS) and realized that I was at that Hanzel und Gretel show, maybe not that night but that month. Great live band.....
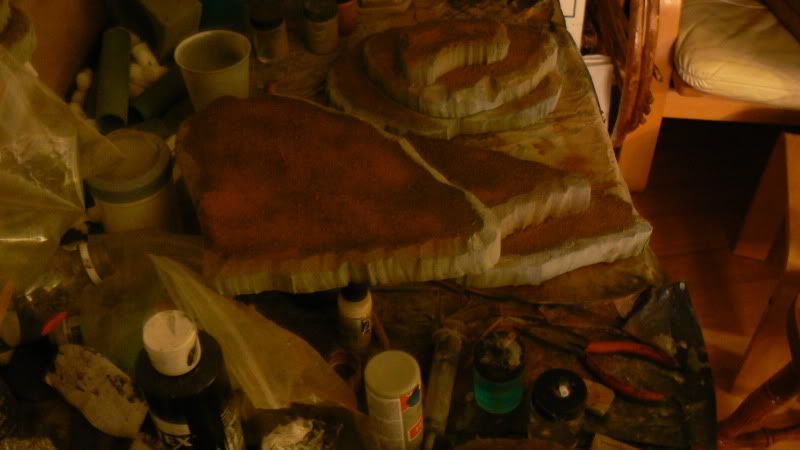
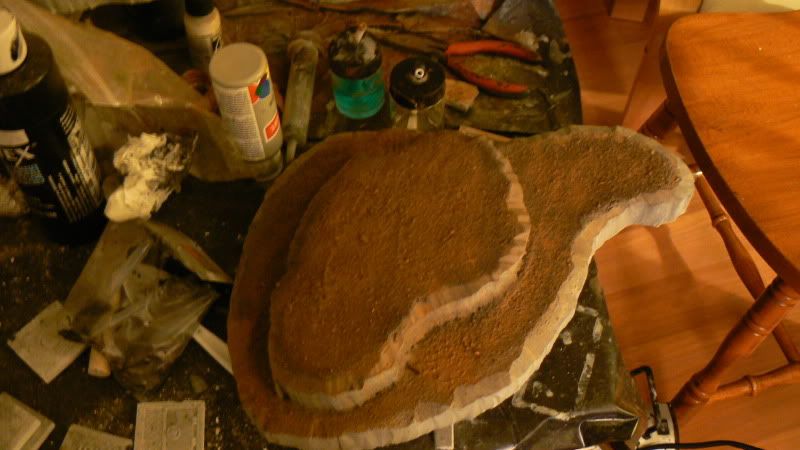
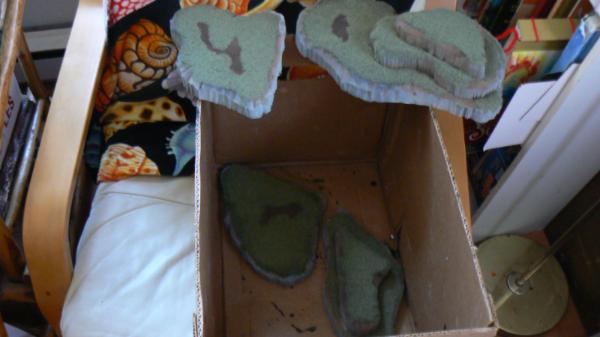
seeing now those pics a bit bigger than in the other gallery...i wonder...what did you use for the "brown" sections of the hills? is it some kind of flock or just sand and grain?
Viktor von Domm wrote:seeing now those pics a bit bigger than in the other gallery...i wonder...what did you use for the "brown" sections of the hills? is it some kind of flock or just sand and grain?
dsteingass wrote:I've got you're tooling right here
No, you're right, that needs to be exact.
Yep. If I had a Bandsaw I'd give it a crack (Print out paper templates, glue em onto hardboard/foamed PVC etc, then cut em out...) Interestingly a bandsaw is the one powertool I lack. (I have a drill press, and rotary/belt bench sander. and what I use to cut out bases from mdf (handheld jigsaw) just wouldn't do..
Shame your in the states, my granddad has one in his work shop that he never uses ……. actually he has a lot of stuff in their he does not use, think its time to go get my inheritance ……...
Automatically Appended Next Post: I used these moulds with my dad as a kid, still have all the moulds ……. but the scale is 1/72 scale so not much use really
Or for making a cladding to add detail to an otherwise flat structure (ala foamcore buildings),
Yes, guess but the detail is really …… I don't know how to describe it , I want to say flat but obviously it;s not, I suppose the best way to explain is that the detail is fine for 1/72 scale but to clean and none descriptive to be used for 28 mm or heroic …..
lone dirty dog wrote:Yes, guess but the detail is really …… I don't know how to describe it , I want to say flat but obviously it;s not, I suppose the best way to explain is that the detail is fine for 1/72 scale but to clean and none descriptive to be used for 28 mm or heroic …..
Shame really though
yep. I think they would work well for flames of war though.
That they would mate, the scale would be great for that, unfortunately I don't collect or play and the misses would love me to start collecting something else ………….
Viktor von Domm wrote:well...sometimes you feel lucky having one and sometimes not... it´s all in the mix...^^
but honestly...yeah get a grilfriend... there is one for everyone...i cross fingers for you...
Its like buying a car always test drive it first and make sure it is practical as well as looking good, the sports models look great but high maintenance and always breaking down and will end up costing you an arm and a leg. LOL …….. just don't tell my misses I said that
No like Vik saids you have ups and downs, like a fair ground ride its great fun but at times it just makes you sick hahah hahah ahah ha …...
Viktor von Domm wrote:well...you sauid fugly... so i was not expecting you like a tagteam session for both^^...
as for pain.... well...don´t knock it till you tried it^^
One thing about the fuglys they have a great personalty ……. No thats harsh I think all women have some kind of beauty to them, after all I aint no oil painting
After all look at me
Automatically Appended Next Post: No really that is not me No really
Automatically Appended Next Post: But I did lend him the outfit lol….
Refering to GF, if you have one. you can even use her as a Terrain for WH40K battles....try it out, I't very funny just lie her on a teble, and take off most of the clothes........there are areas to get a 4+ covers included
Galorn wrote:Got another box of stuff finished (static grass is drying) that makes 4 of 5 boxes of stuff "done"...
You little flocker you
At this rate you will be running out of boxes
Have you made any more moulds of late
And when will you be selling those moulds you made
As soon as I get em over to my friend to add to his store. (and his webguy takes pictures and adds em to the site...)
Zebra88 wrote:Refering to GF, if you have one. you can even use her as a Terrain for WH40K battles....try it out, I't very funny just lie her on a teble, and take off most of the clothes........there are areas to get a 4+ covers included
Zebra88 wrote:Refering to GF, if you have one. you can even use her as a Terrain for WH40K battles....try it out, I't very funny just lie her on a teble, and take off most of the clothes........there are areas to get a 4+ covers included
Surprised that it wasnt LDD who made this comment..
Zebra88 wrote:Refering to GF, if you have one. you can even use her as a Terrain for WH40K battles....try it out, I't very funny just lie her on a teble, and take off most of the clothes........there are areas to get a 4+ covers included
Surprised that it wasnt LDD who made this comment..
i think i detect a pattern here...whenever some good thread seems to lack new updates for too long (research for the timespan is still being in the datacollecting process phase...) peeps begin to get restless and sometimes either referr to use sexualy or gross flavored comments... i think this shows one piont tho... if you allow me to "jump" m gun here... the hobby still keeps us young and fresh...
hmm the more i look at this handsome sharkman, the more i think how nice it would be to build a moat around my house and throw a couple of em in here... of course i would have to shoot a couple rivets into them just to show good taste to the =][_,=
Rogue Wolves wrote:hmm the more i look at this handsome sharkman, the more i think how nice it would be to build a moat around my house and throw a couple of em in here... of course i would have to shoot a couple rivets into them just to show good taste to the =][_,=
I totally blame you RW you keep dangling the carrot
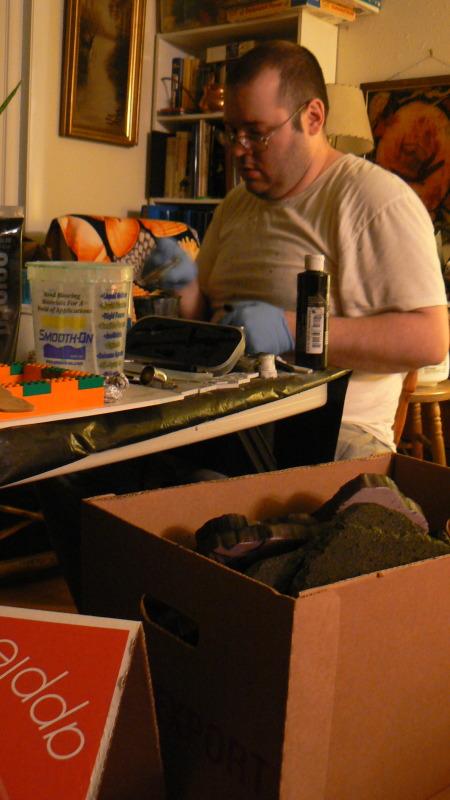
Well I shall chime in to say two things. I will be posting some more pics relating to my projects today, and Please for the love of god no more images requiring the use of brain bleach...
lone dirty dog wrote:Got to ask what is the new mould for and what have you used as a source of material for the wall sections Sorry nosey bugger
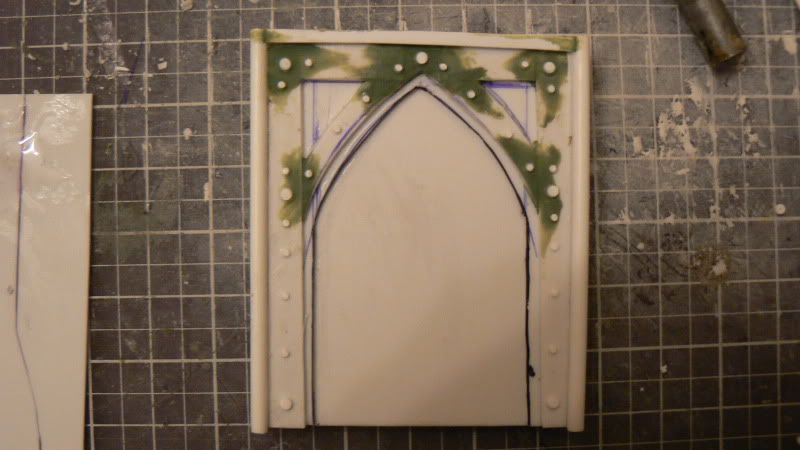
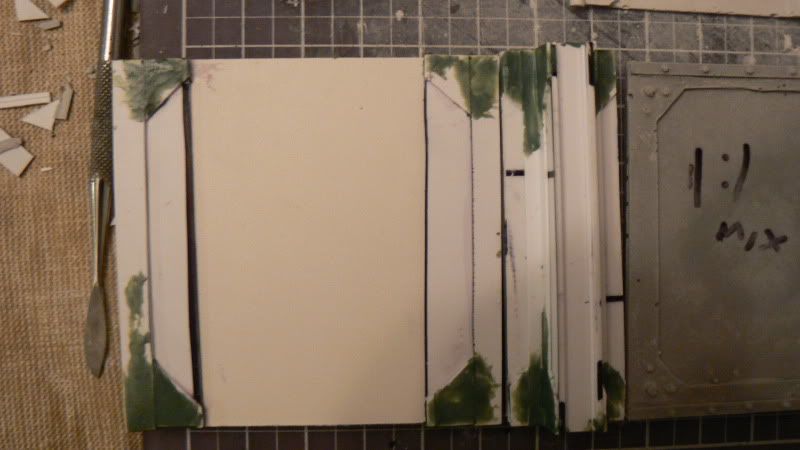
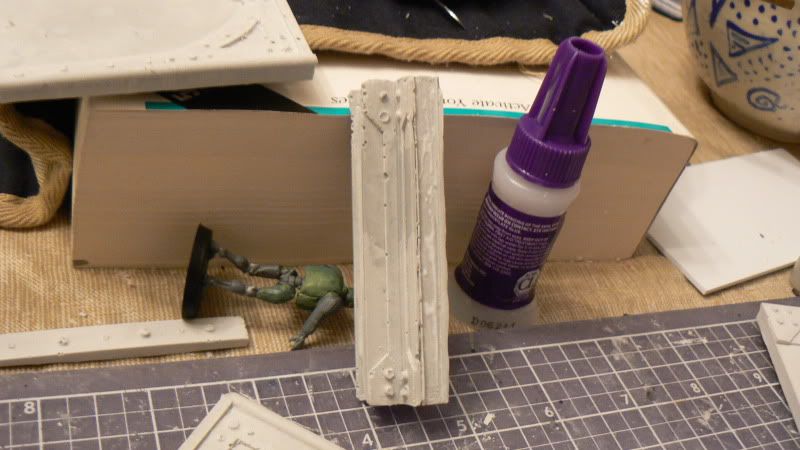
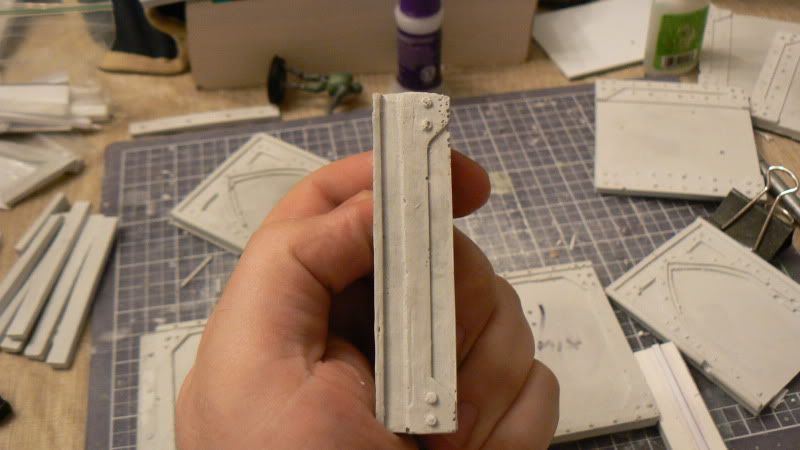
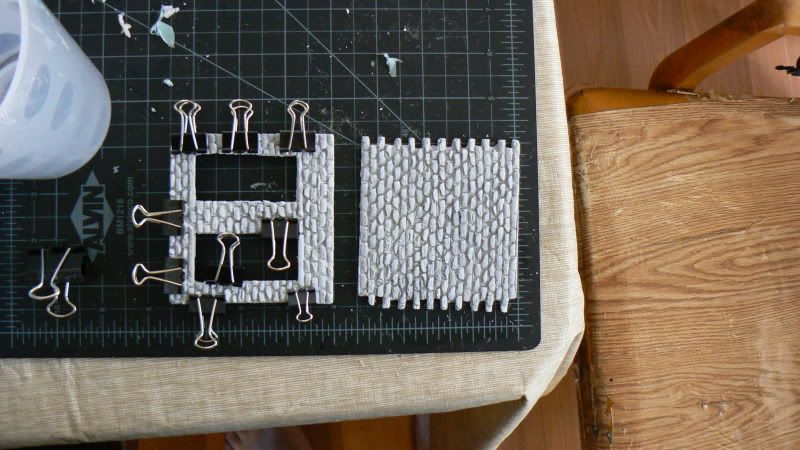
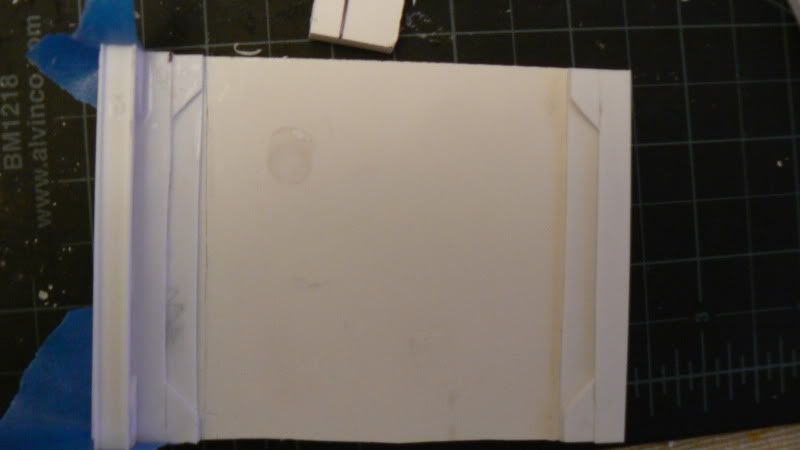
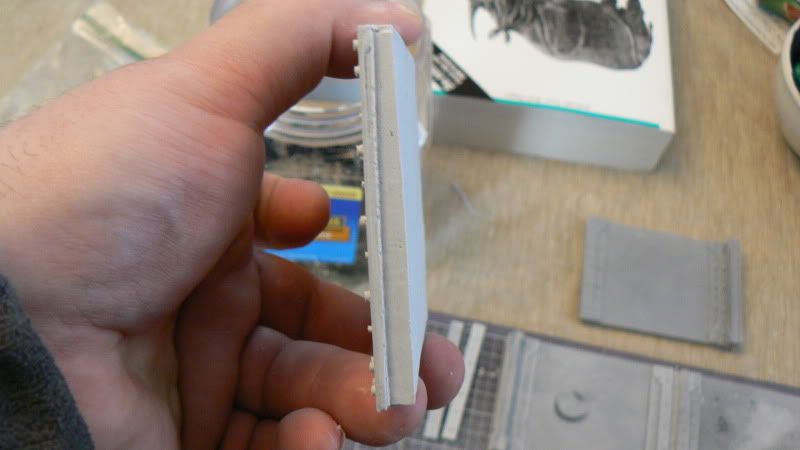
No worries. The mould is for a different wall option (that is slightly more detailed in certain ways.) Material for the master is Black foamboard (the stuff with the black foam in the middle, it's a little stiffer than the white foam board for some reason) saturated in dilute PVA glue (after carving in of detail) to stiffen it up.
Viktor von Domm wrote:i think he uses pink insulation foam... it is rather easy going stuff...
for the hills and free standing "ruined wall" segments mostly yep.
lone dirty dog wrote:YES I DO INDEED COME BACK RW PLEASEEEEEEEEEE…..
awww you know i couldnt stay mad at you!
I feel so much better now
Black foam card always wondered what the difference was
I have found the black foamcore to be SLIGHTLY more rigid. (also it's already black, for painting purposes...)
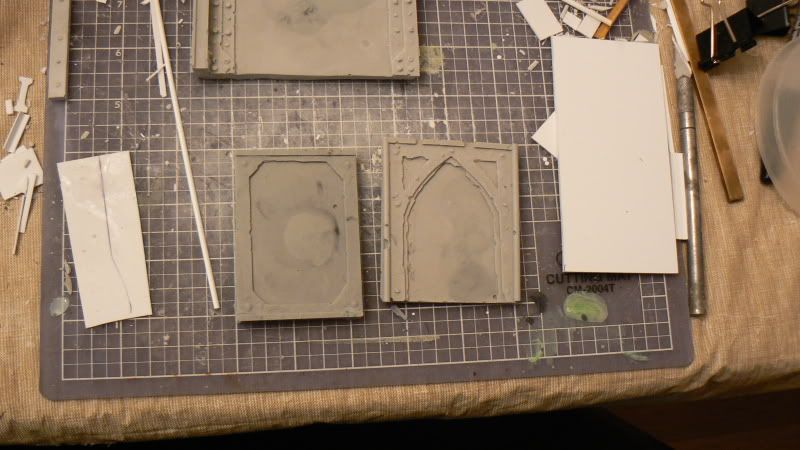
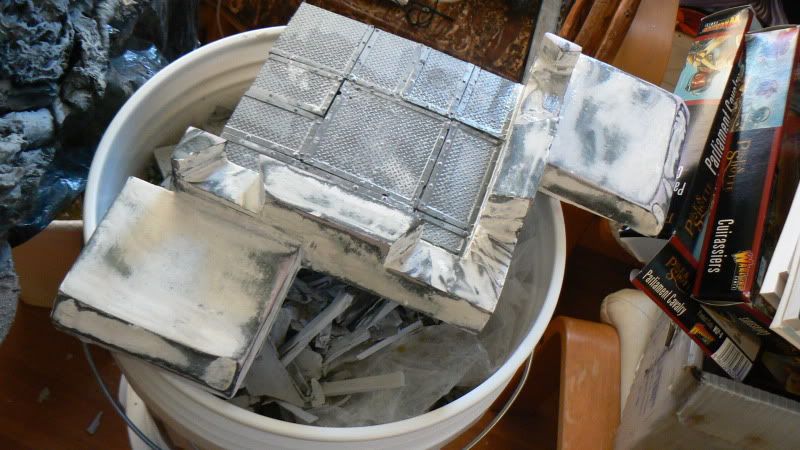
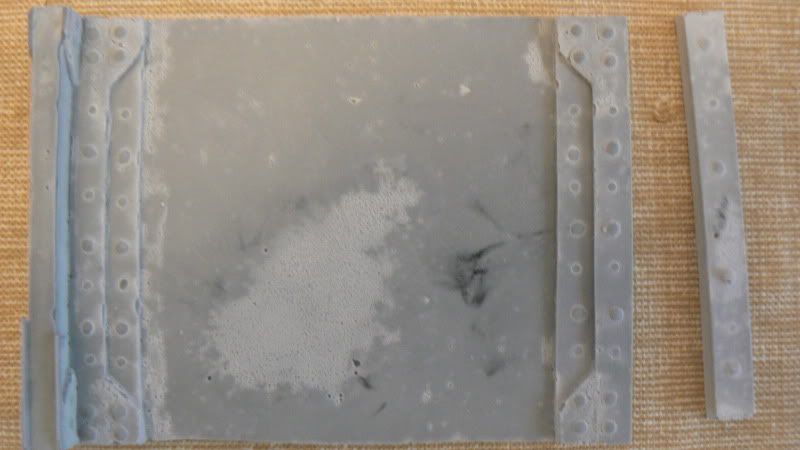
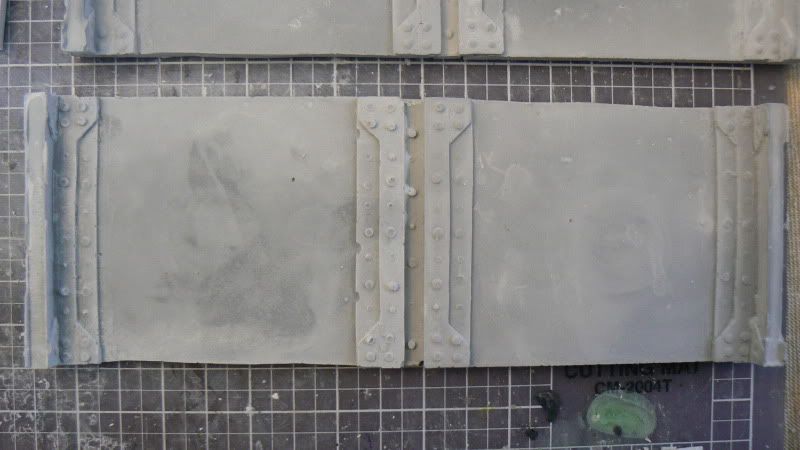
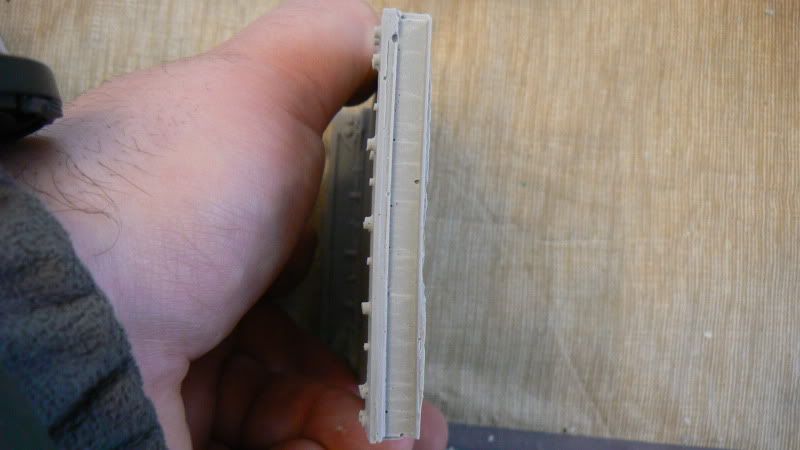
Well the mold is pulled... and has been filled We'll see what we get...
Automatically Appended Next Post: Pics of the First cast from the mold...
Cracked up a bit on extraction as I didn't wait quite long enough...
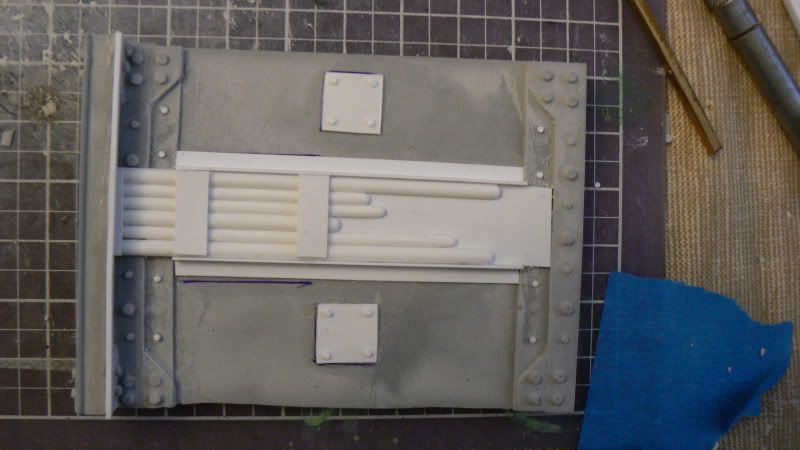
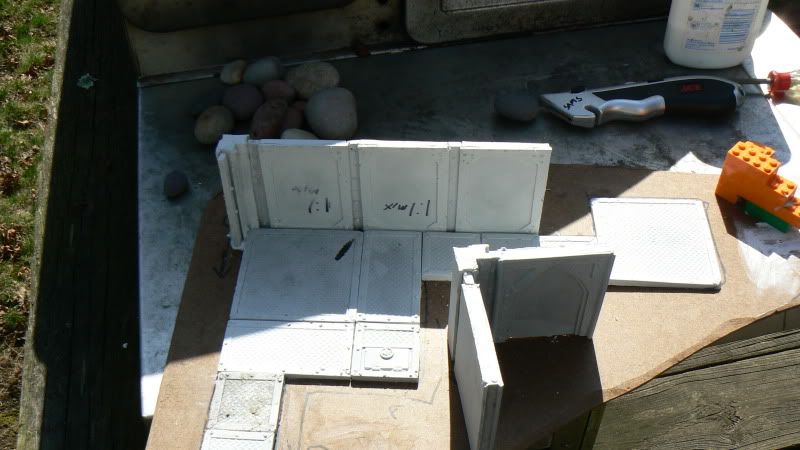
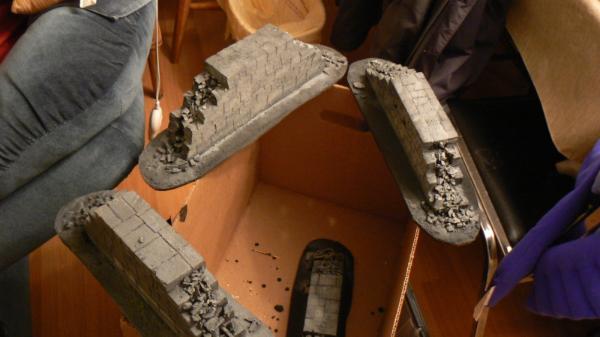
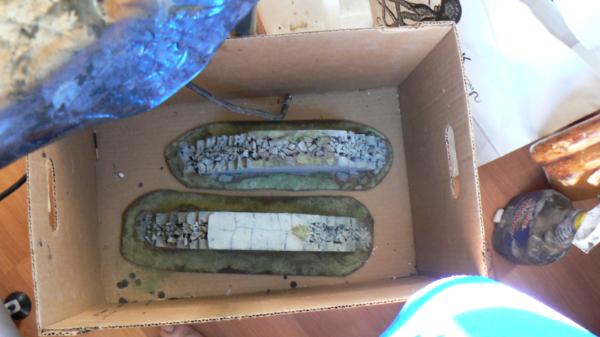
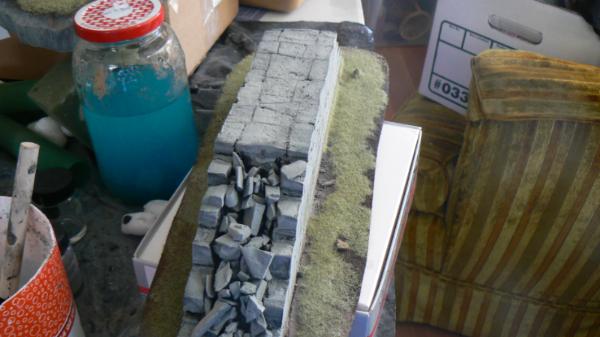
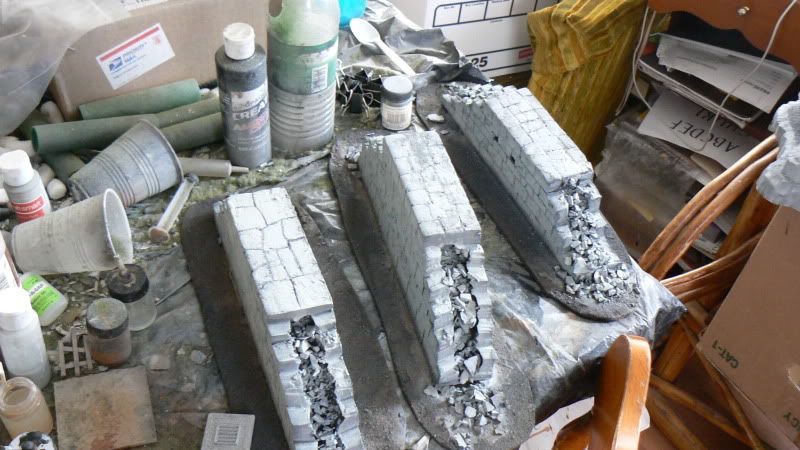
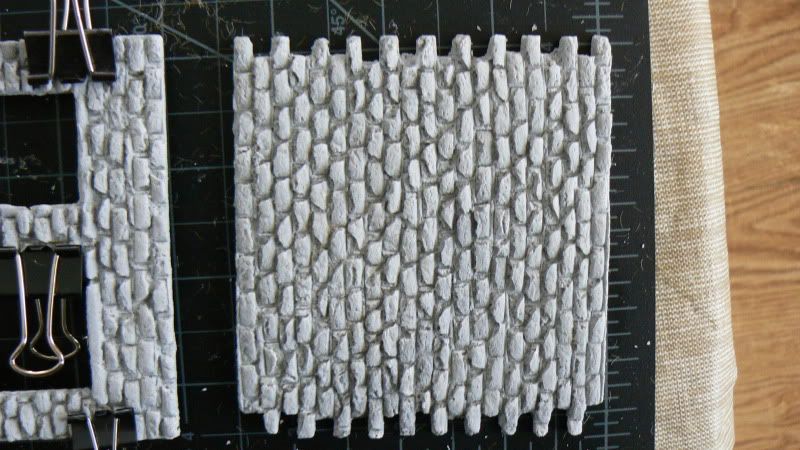
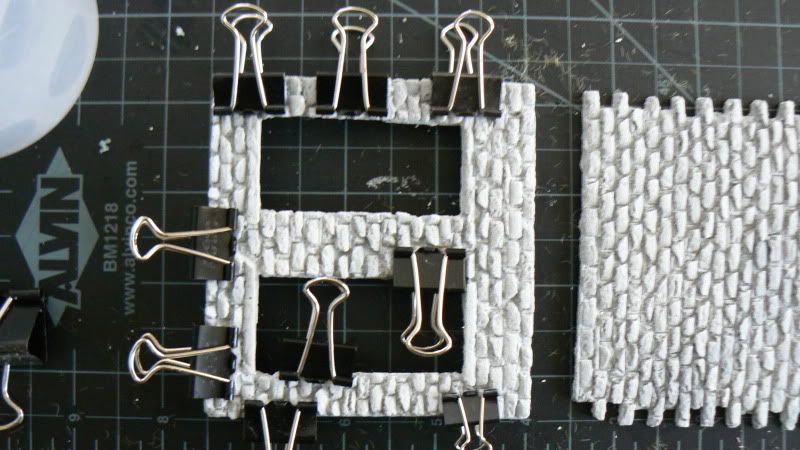
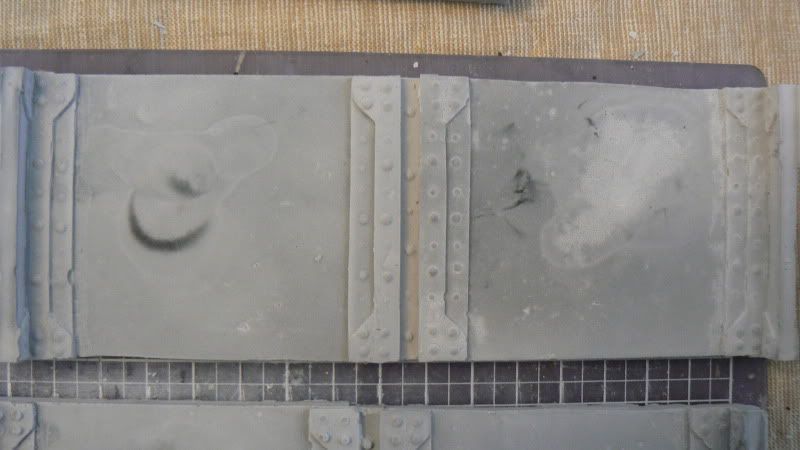
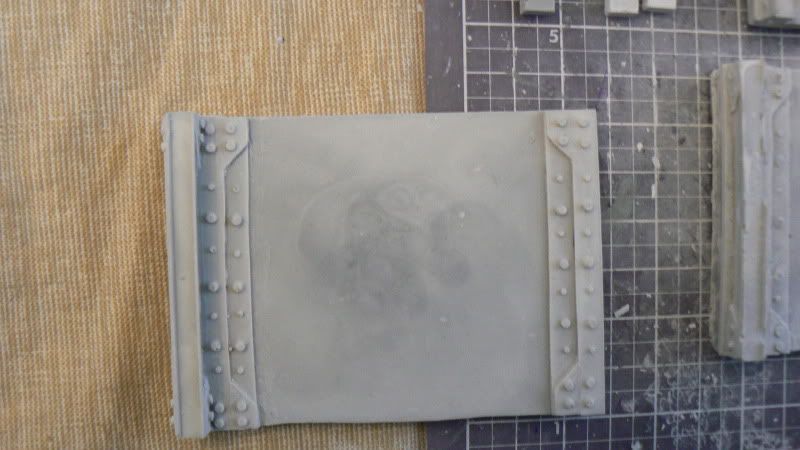
Automatically Appended Next Post: Well the "solid wall" brick panel is coming out... OK not great but OK. The "window" panels on the other hand... they are definitely a little thin for casting in Dental stone, Resin might be fine, but Meh. Off to design a MK 2 Brick wall stuff, and start working on some "Bunker/Spaceship" wall segments...
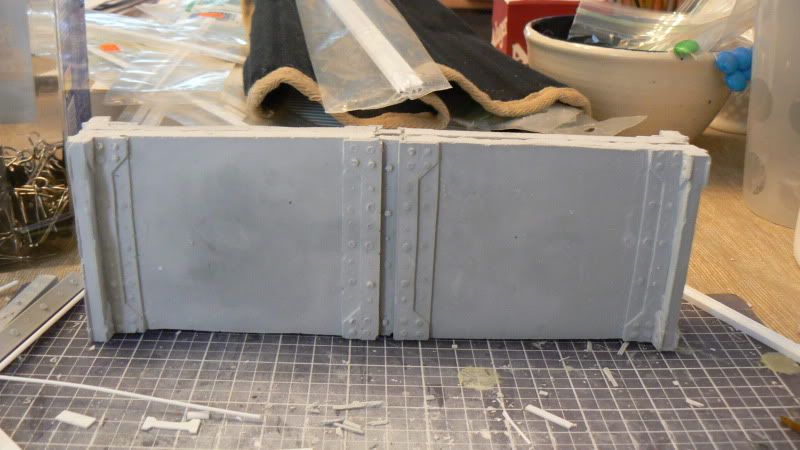
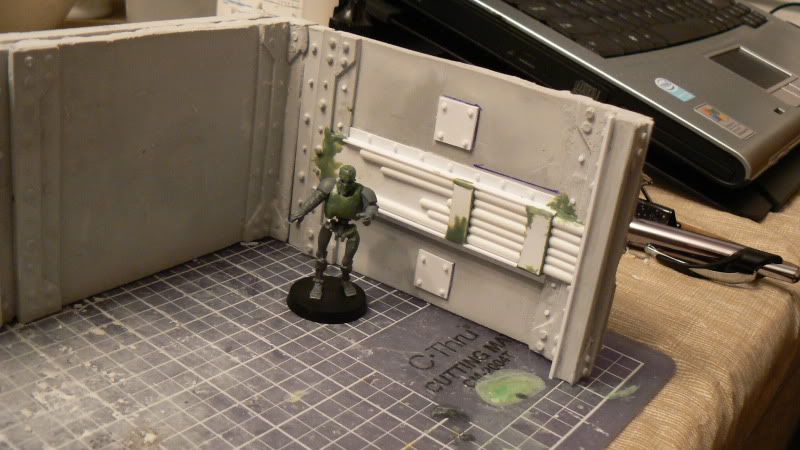
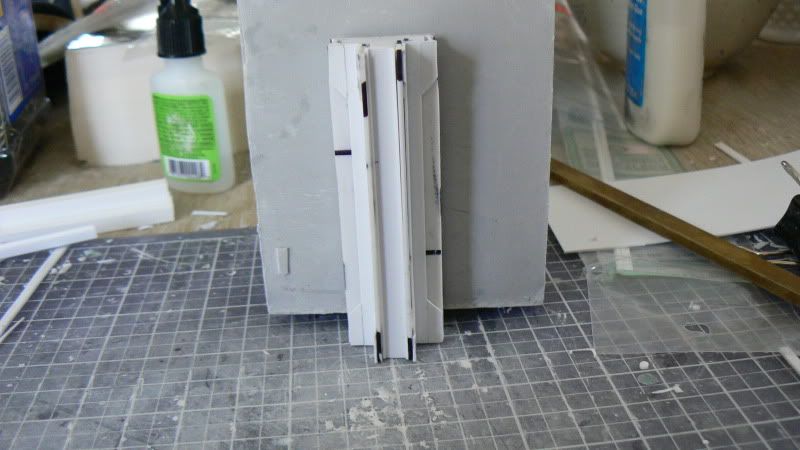
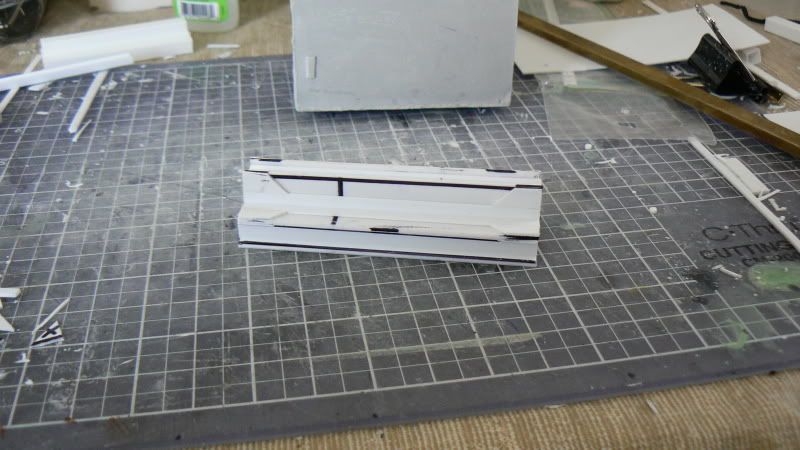
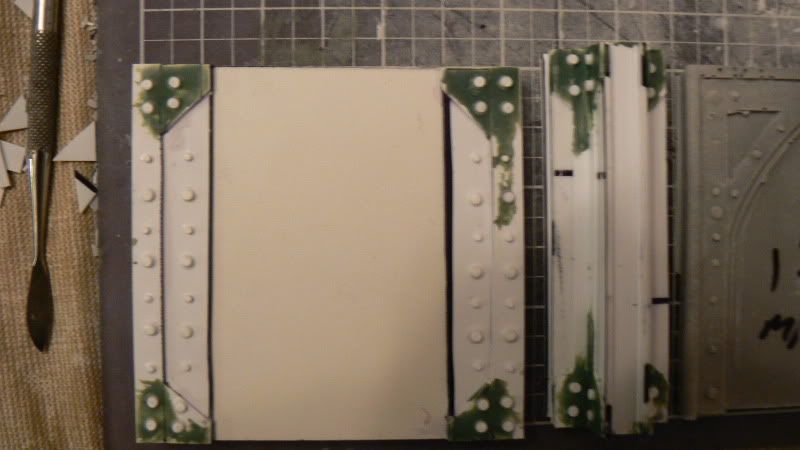
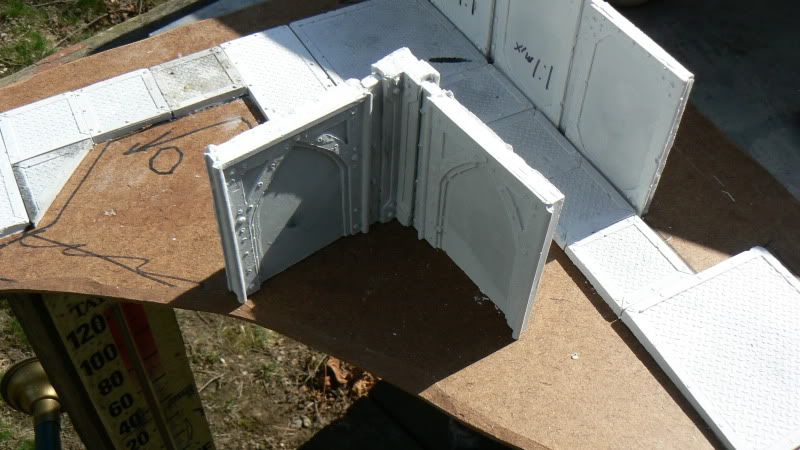
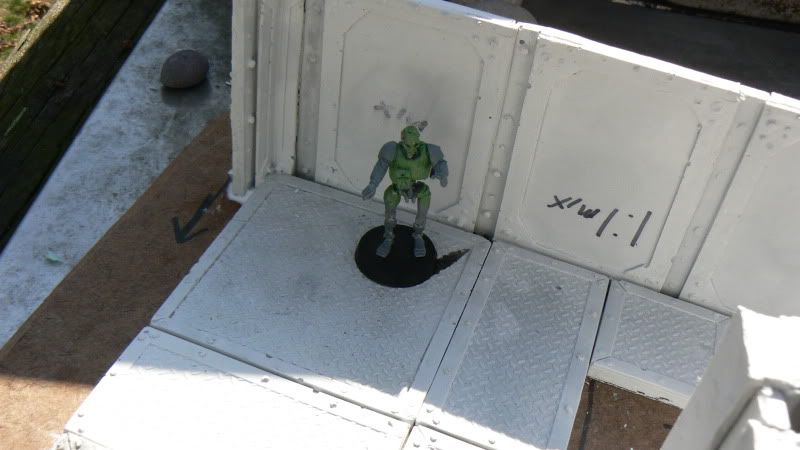
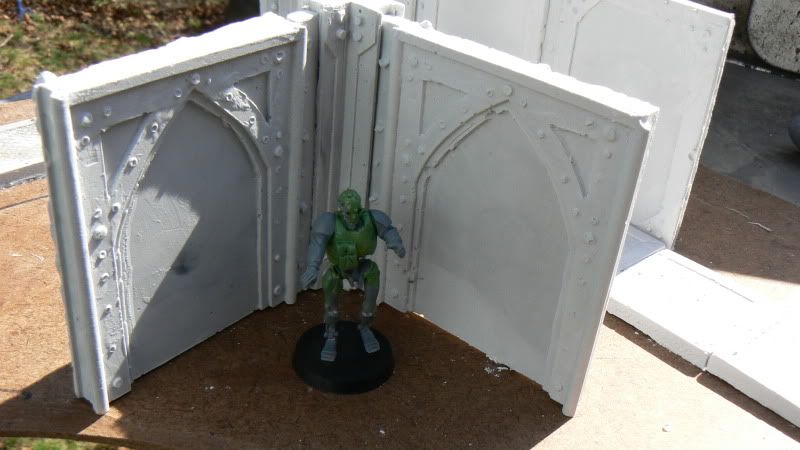
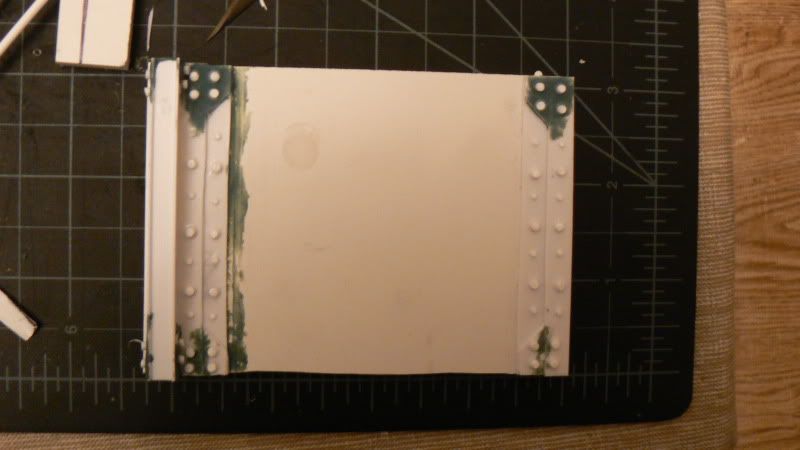
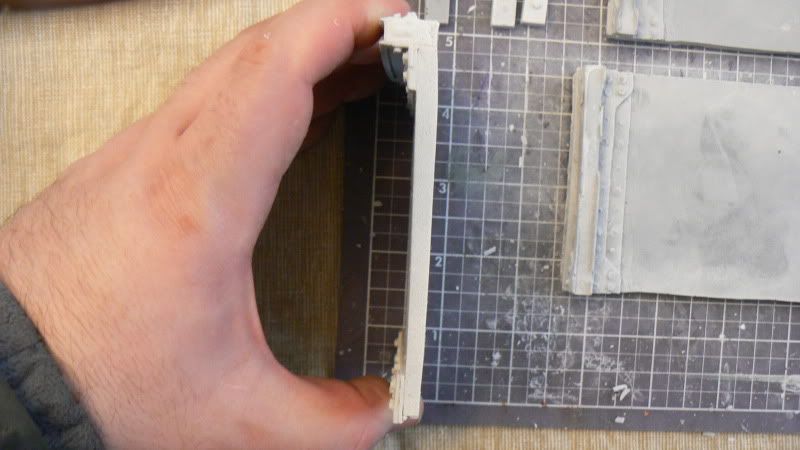
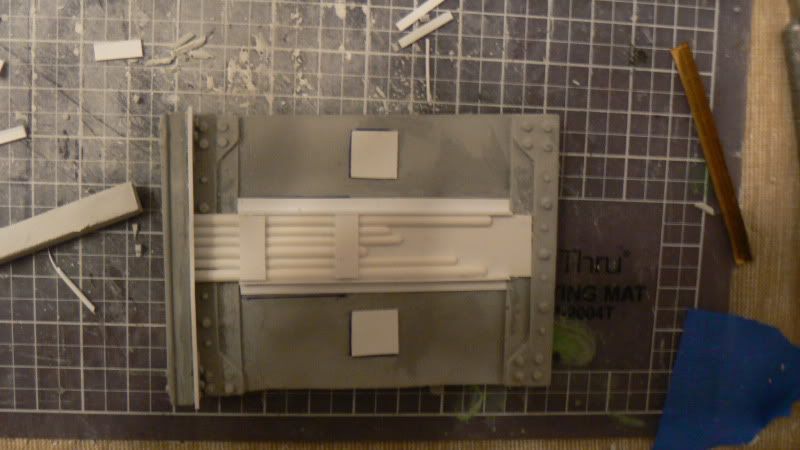
Automatically Appended Next Post: The Bunker/Spaceship wall WIP (need to fill cracks/gaps and add rivets to make the "base" wall blank, so I can reproduce it and add differing versions)
Viktor von Domm wrote:the brickwall is looking very good... linkable , eh? good idea!
and the wip wall i await with eagerness^^
Yeah it looks great... Its just too thin in Dental stone. as far as linkable goes... I need to be much more precise with the lines of bricks for the MK2 version.
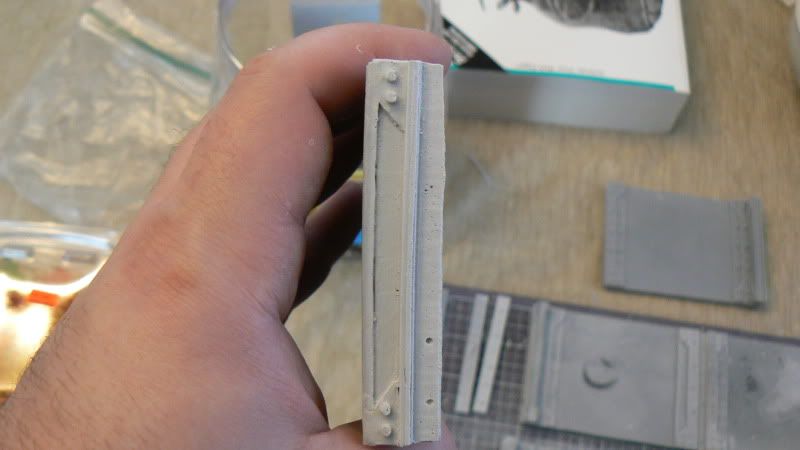
no offence... but there seem to be some rivets longer and some are shorter...also i have some difficulties with the pattern of the rivets... but that might be due to the different materials in different colors that you used for this... after an equalizing primer aplication this might solve itself tho...
Viktor von Domm wrote:no offence... but there seem to be some rivets longer and some are shorter...also i have some difficulties with the pattern of the rivets... but that might be due to the different materials in different colors that you used for this... after an equalizing primer aplication this might solve itself tho...
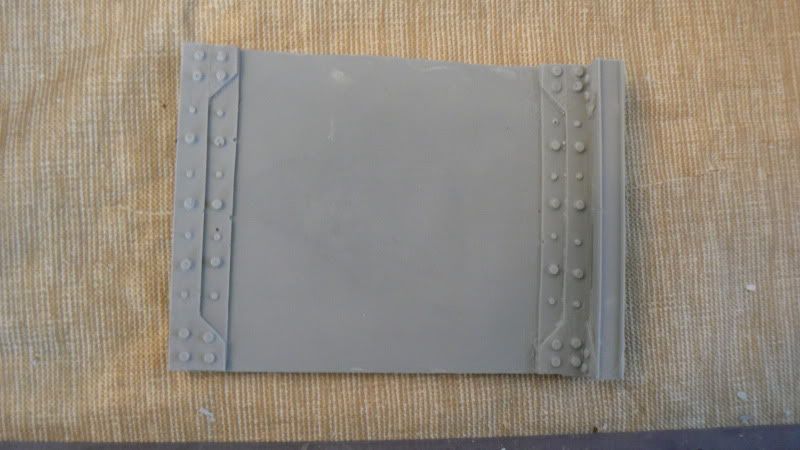
There is some variation in length of the rivets ( I lack a uniform rivet cutter and must needs cut each one individually, the variance is no wider than an xacto blade though) as to the pattern... It's almost certainly the lack of contrast that is throwing you off there. anyhoo the mold is made, pulled, and filled with dental stone (we'll see in the morning what it looks like.)
contrast when pic making is always possible of making difficult to discern what is what... well my favorite rivet making methode is still the holepunch way...but cutting them from rod is sometimes needed too^^
Viktor von Domm wrote:are you satisfied with that cast? it looks like the rivets not really came out that well...or is it the pic? they apear very flat?
the panel looks very good to me...and here i really like the decorative pattern of the rivtes... that is a very stylish piece!
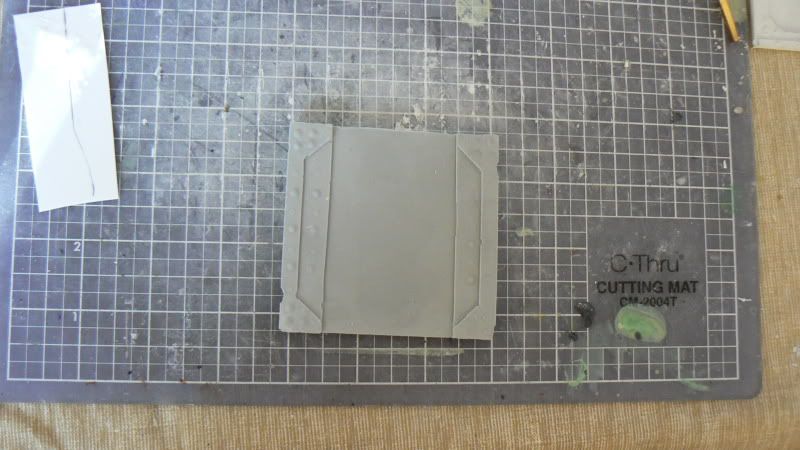
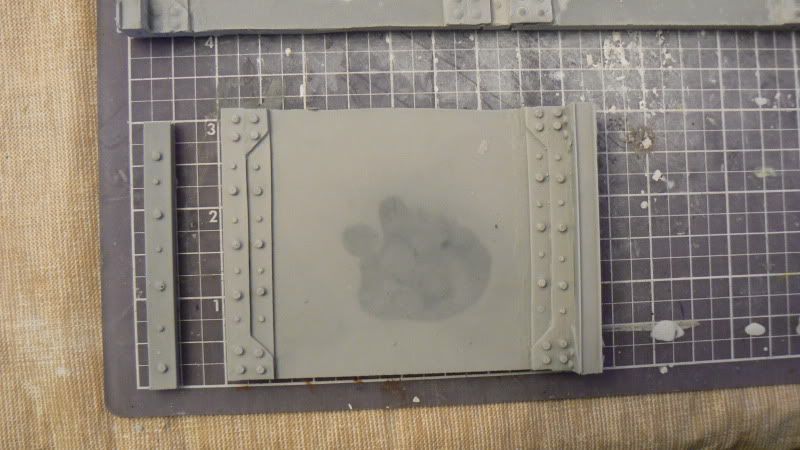
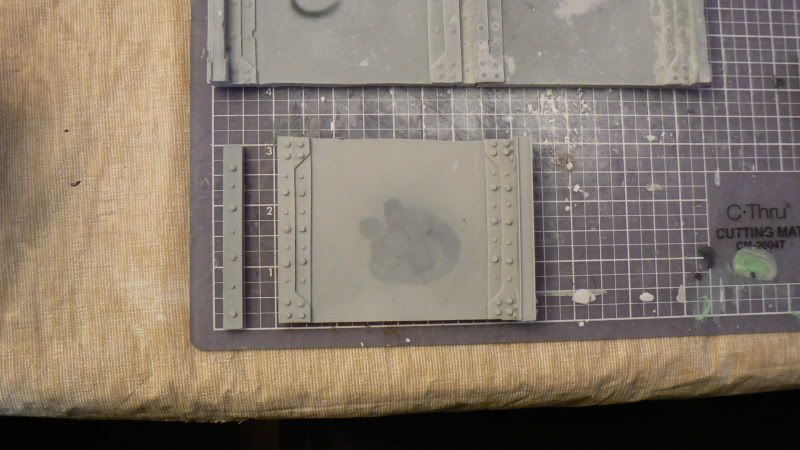
The first two casts came out... Meh. After I used a "wet water" to debubble (break the surface tension) the mold it cast perfectly.
I saw his "finished prototype" and demo pieces at Templecon. They are really quite good. Anyway I've begun assembly of the "meh" casts into a basic set of rooms to build.... you shall see... (Pics to follow in the AM.)
Also will be having an interesting time as My passenger window died tonight and I need to wrangle my car to the repair shop soonish...
dsteingass wrote: Beware mechanics who are in this League Those places are a wretched hive of scum and Villainy!
I can make you some new wall masters if you want Galorn.
60$ 1/2hr of work... and six new rivets fixed the issue... RIVETS FIX EVERYTHING!!!!
New/More wall masters would be awesome I'll send you one of my more "ideal" casts to give you a handle on the "large" dimensions I was thinking of (smaller works as well... specifically my first "good" pull (has 90% of the detail intact, thickness of the overall piece was off...)
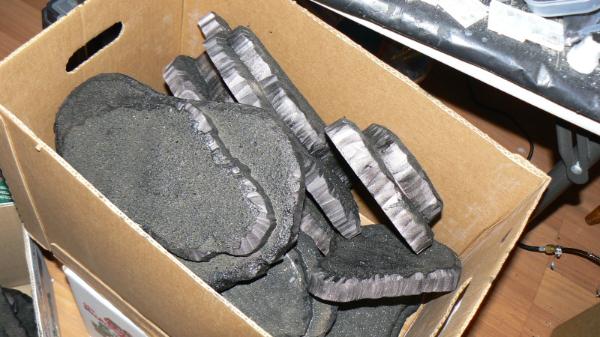
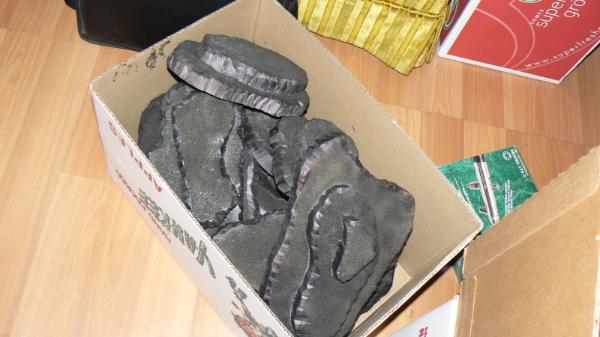
On to the Pics...
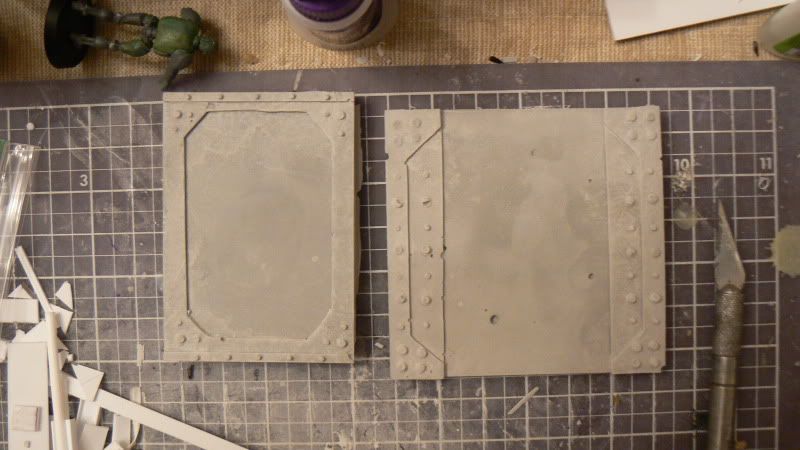
The Meh casts being assembled into "Basic" wall segments. I plan to go back and add on replacements for the "bad" cast rivets... the "bad" rivets give a handy reference point as to where to glue replacements...
My "perfect" cast (That I plan to use as a new master once I add some detailling on...)
the "near perfect" cast I'll be sending you dave...
Viktor von Domm wrote:ah...now i see where you are heading...didn´t thought of connecting them on both sides...!
That's for walls that need "interior" details. "exterior" walls dont need the other side since the extra detail would be hidden by "dirt" or what have you.
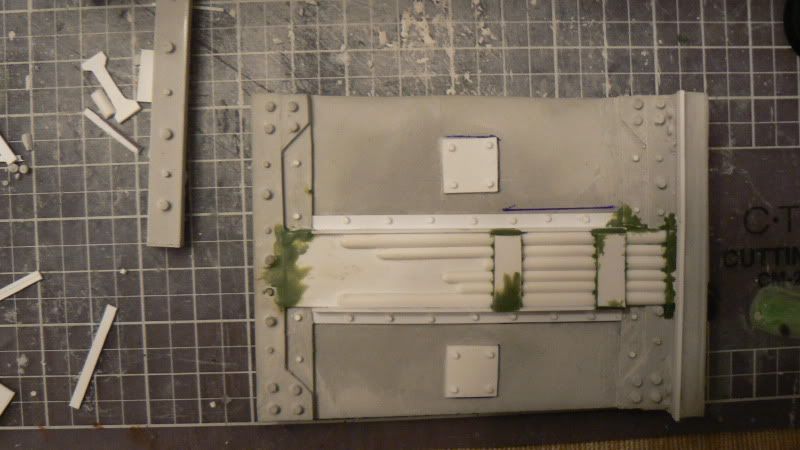
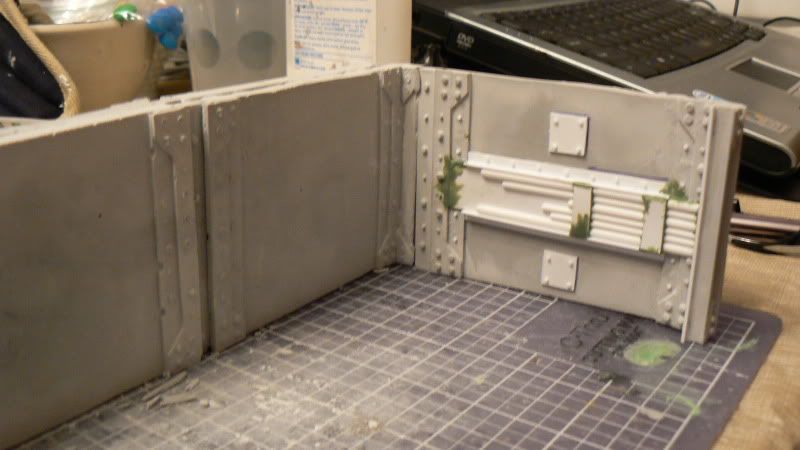
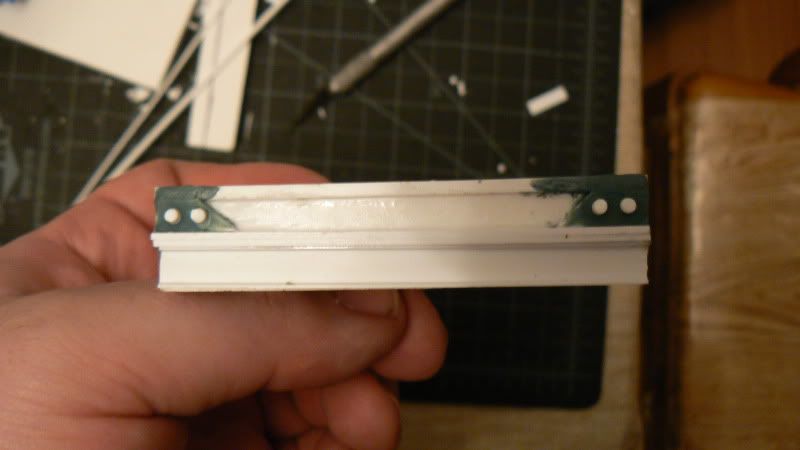
Now on to WIP pics. (I've finished GSing and re riveting)
i really like the ornamental rivet pattern! that is very cool looking!
also...good to see you up and about! hopefully you are restored to normal soon...had to go to bed early yesterday too... was feeling a bit depleted too...if the body asks for a pause...give it to him... he is on the longer lever anyway^^
Aaaaannd Now my car is dead... for now... The fuel pump STBd today half way into a 3hr drive to a meeting for potential biz involvement/Event planning...
Viktor von Domm wrote:oh bloody hell... now that is looking like a stroke of bad kharma...
Yep.
lone dirty dog wrote:Dude they come in threes watch out
Indeed.
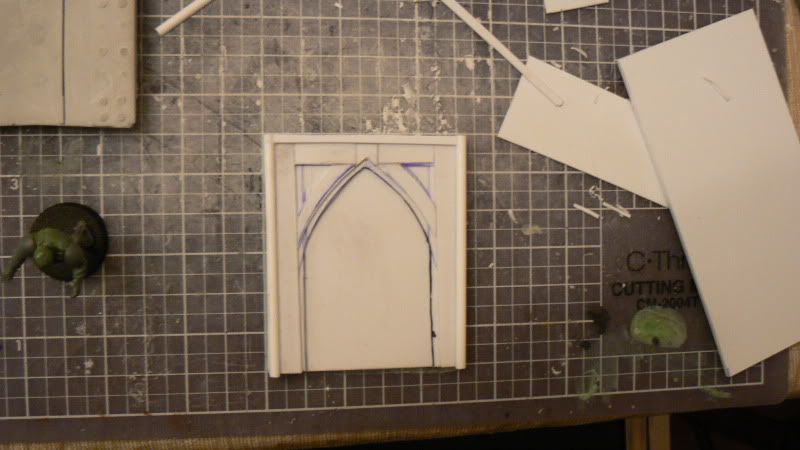
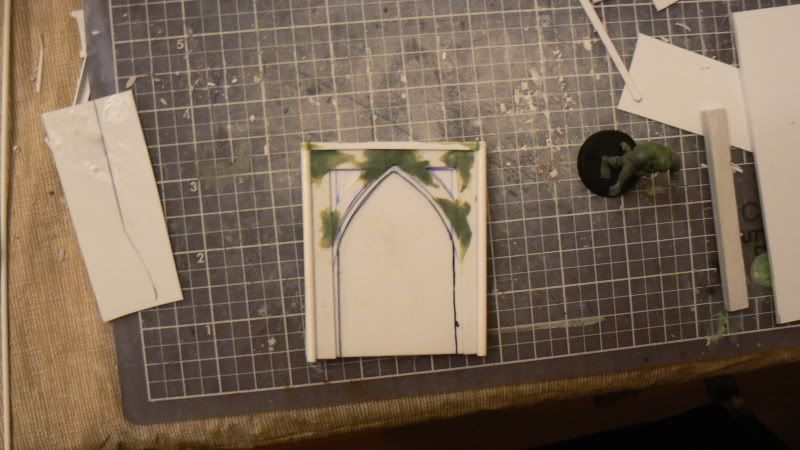
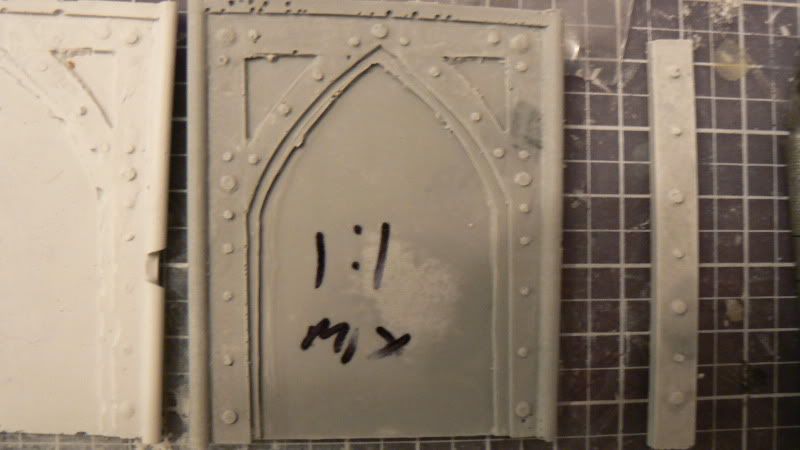
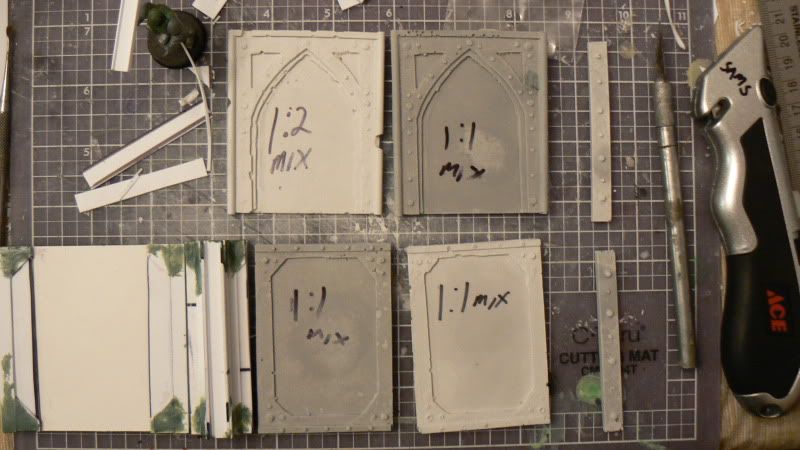
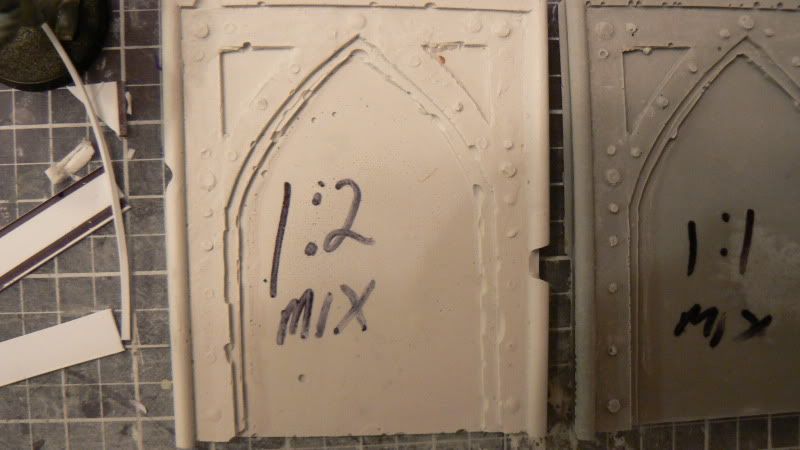
After taking a nap to De-brainfry, I pulled the first two molds for the two short bulkead masters. (Poured the RTV sillicone at around 11am, was fully cured by apx 6pm EST)
Filled them with a quick and dirty mix. The results... the "octagonal" bulkead came out... OK, the "arch" not so much... Not sure if it's a mold issue, or a result of my halfassing the mix.
Pics of the first cast.
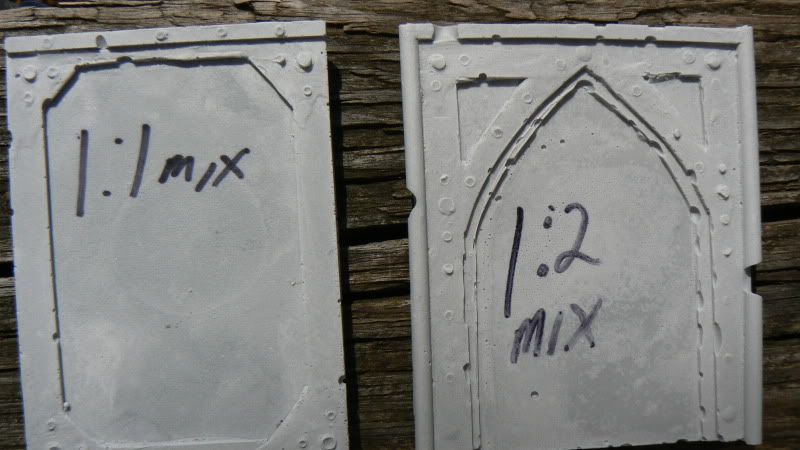
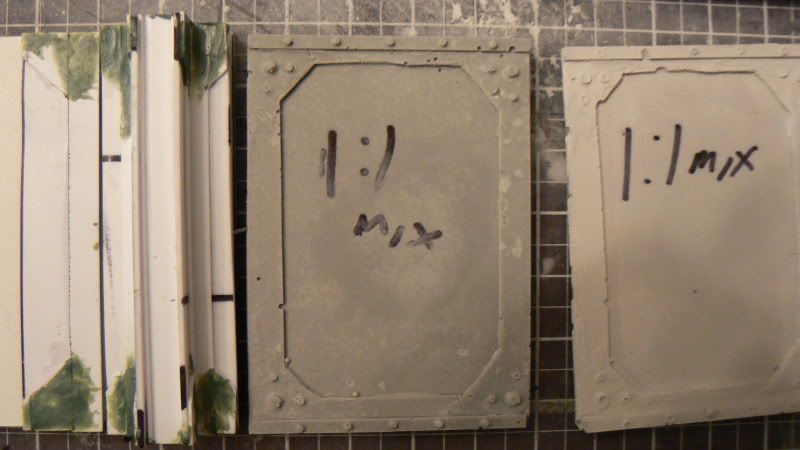
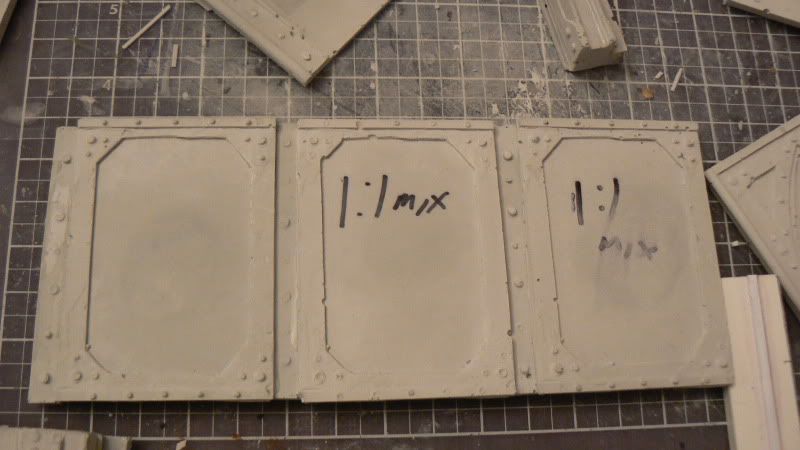
Now I've started to get all sciencey about my mix...
Running two test mixes at the moment both are probably too water heavy but if the Detail is OK I can easily backfill to pull from molds without really endangering detail...
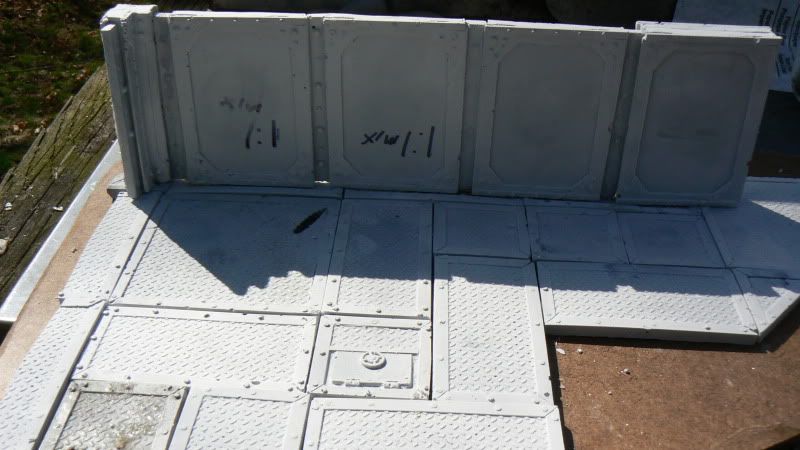
Formula is Ratio (Dental stone:water); Stone amount, water amount : Result
Mix 1 "1:1"
1:1 ; 51g Excalibur : 50g tapwater : (in progress)
also realized i'd made a minor design glitch with my Base wall design. (its not fully symetrical) so it makes for an odd "corner" I'll be redesigning that type of panel into a simple flat as I built a "T" type connector (need to GS gaps, and add rivets...) I'll get Pics of what I meant up when I get up... Also Pics of the Mix test results...
Oh man that sucks, nothing frustrates me more than car troubles. but no worries. I use 2:1 mix with the Permastone, with a couple of extra drops of water to help it flow.
well acording to science methods you should ahve presented equal models to test your methods... the 1:2 looks slightly more bubbly... but i can´t really say for sure... the formula has to be tweaked a bit still it seems?
Yeah, the wages of thinner mix is bubbles, (those little tiny bastards that don't seem to pop) sadly.
Automatically Appended Next Post: What do you think of a set of Fallout vault-ish walls along the same line as the floor panels?
And utilizing your ingenious little T-junction method?
dsteingass wrote:Yeah, the wages of thinner mix is bubbles, (those little tiny bastards that don't seem to pop) sadly.
What do you think of a set of Fallout vault-ish walls along the same line as the floor panels?
And utilizing your ingenious little T-junction method?
Those would be neat.
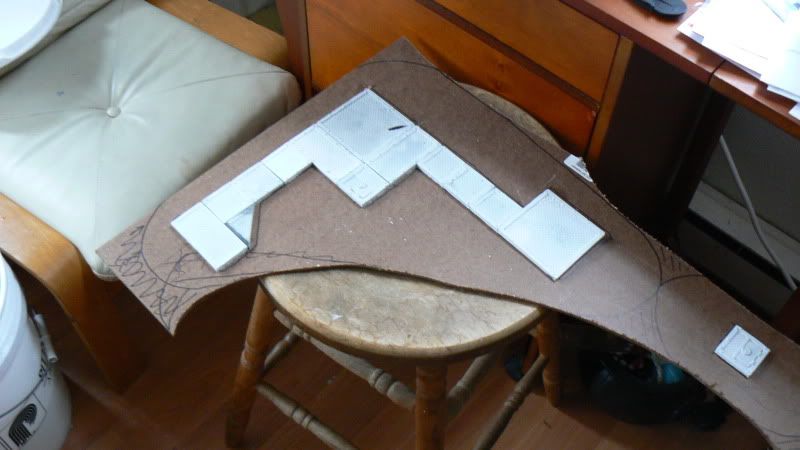
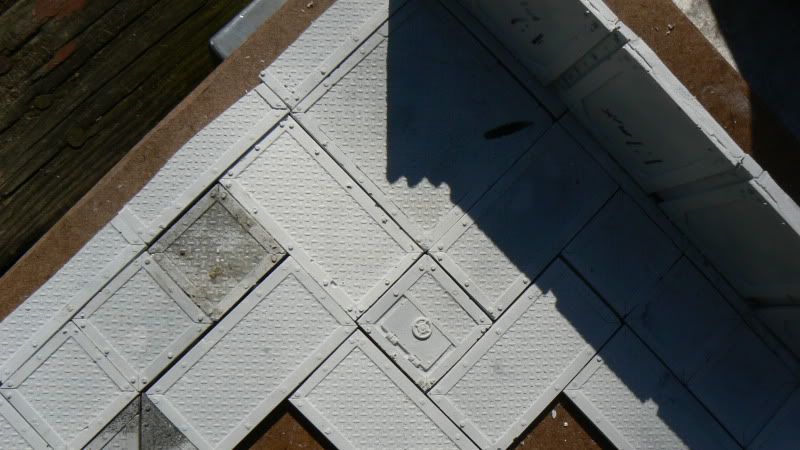
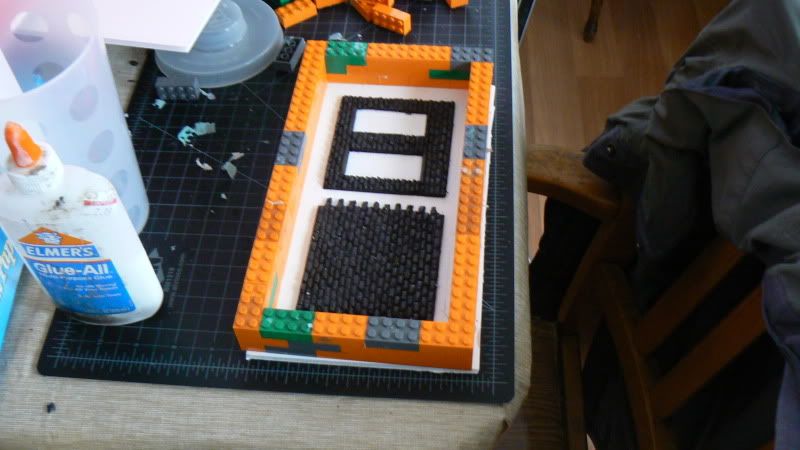
For compatibility reference for construction of "master" items. I'm using Evergreen 1/4" (6.4mm) I-Beams as the basis for the "connection channels, and Evergreen .187"x.312" (4.8mm x 7.9mm) rectangular tubes for the "connector" planks.
Viktor von Domm wrote:hey there is a thought... what about making that vault main door/gate? the one shaped as a giant cog?
Doable. Finicky but very Doable.
On to The Pics for the evening...
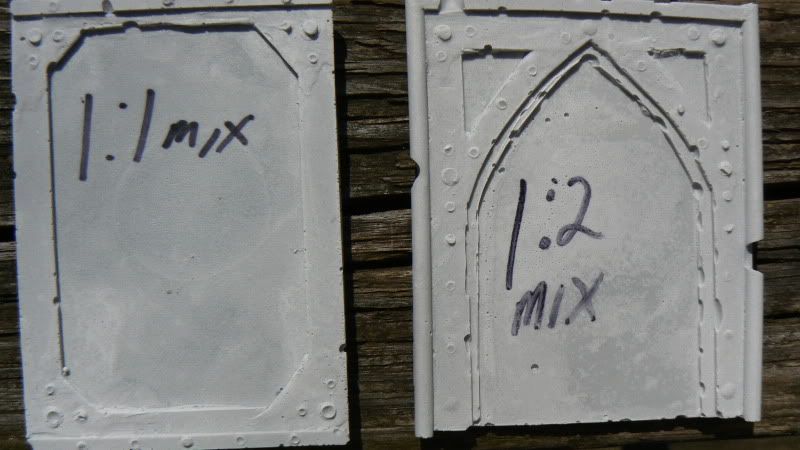
Second cast at ratio 1:1 (more finicky debubbling of the mold with "wet water")... Result.... SUCCESS!!!! First cast is on the Right, and is a lighter color (as it has cured further...)
Octagonal panel
Arch
Overview (with GS gap filling on the "T" connector and "Base" flat panel done)
Closeup of the first cast of the arch at Ratio 1:2
GS gap filling on the "T" connector and "Base" flat panel closeup
The "T" connector and "Base" flat panel closeup with rivets
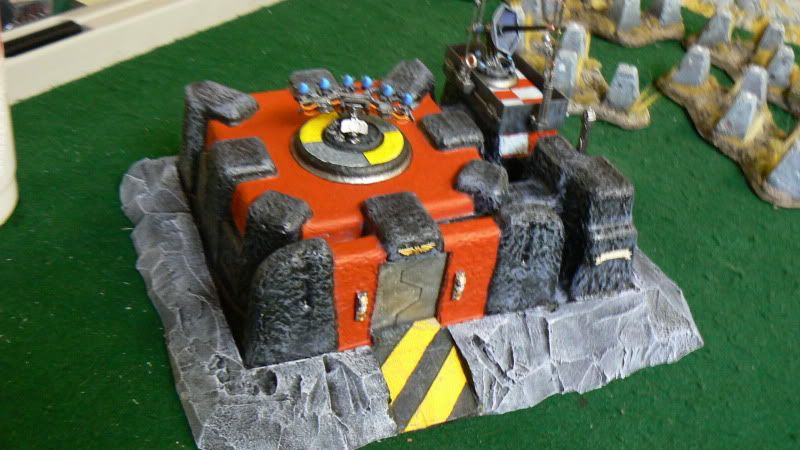
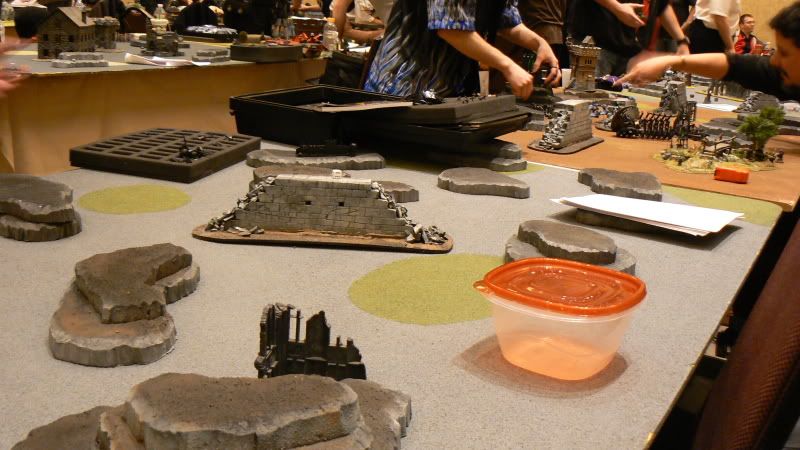
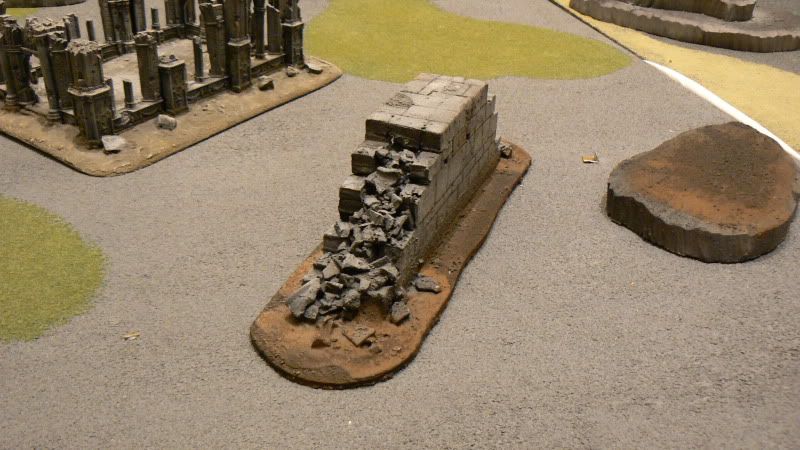
Build one terrain item (can be multiple pieces), and create a special rule for it (for either 40k or Warmachine). The only stipulation on the terrain is that it must be painted, can't be JUST a hill (hills are acceptable if they have something built on them or something else that makes them unique), and has to be at least 4"x4" in total coverage. The terrain will be donated to the club after the competition, so there is no fee to join the competition.
On 3/22 the club will vote on their favorite pieces of terrain, as well as their favorite special rules. I'll be talking with the store about running a small tournament on a Saturday following this competition to put these pieces to the test, but rules for that will follow later.
There will be prizes, which I will update once we've figured out what those are.
Sounds like they have it all figured out then, plus they get some free terrain thrown in LOL
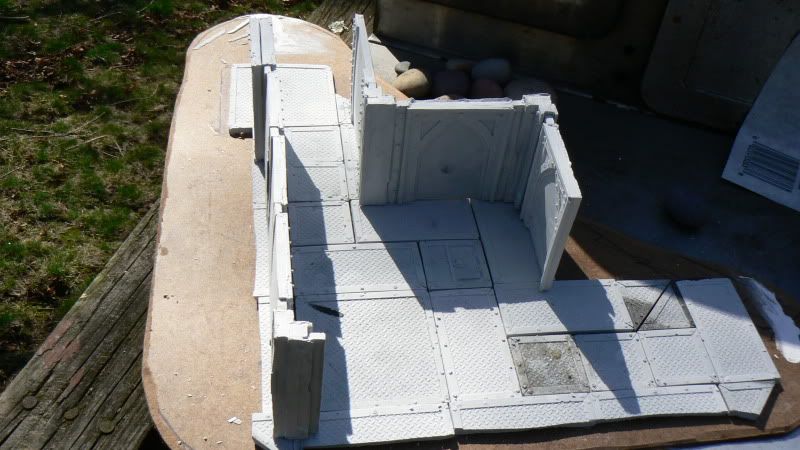
Beginning assembly of components and final walls (pending AB work to paint the interior) Only the Rear "L" of walls will be getting glued down initially to allow easier access for painting/detailling.
On to the Pics.
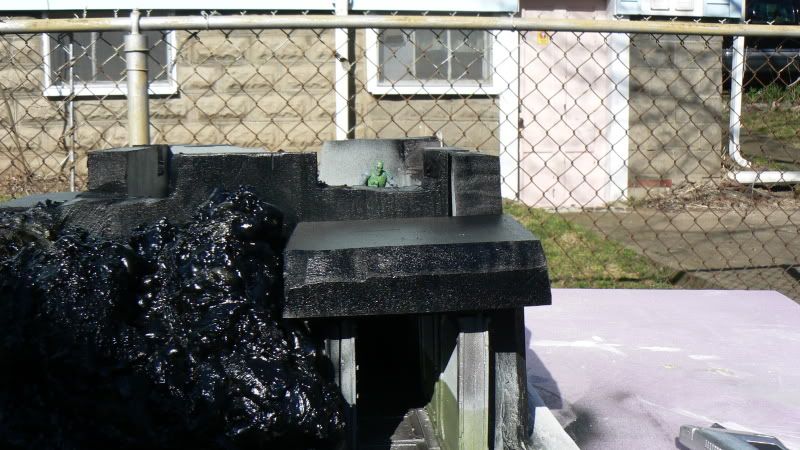
Overview of the "main" bunker entry section
center of the "W" inner walls
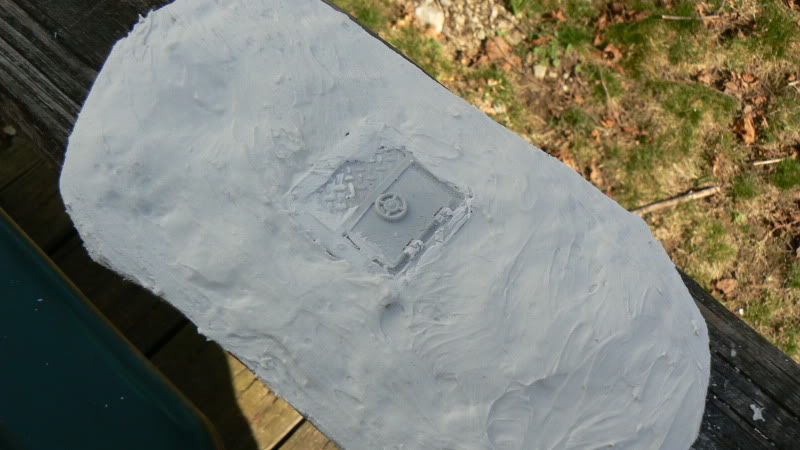
the Mystery Hatch... (spackle added to give ground contour... I intend to add some sandbag walls to this segment.
personally i would have raised your wlls a bit so that they would be level with the edge of the ground plates... so that the end is not lost to sight of your beautiful work...
Viktor von Domm wrote:personally i would have raised your wlls a bit so that they would be level with the edge of the ground plates... so that the end is not lost to sight of your beautiful work...
but the general look is awsome!^^
Hah. I actually went back and did exactly that...
Pics...
"back wall"
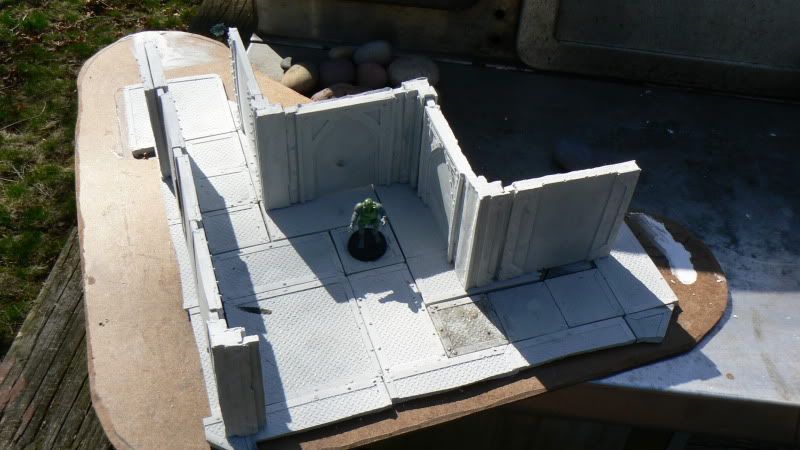
"main room" footprint overview
1/2 W placed (not glued) overview
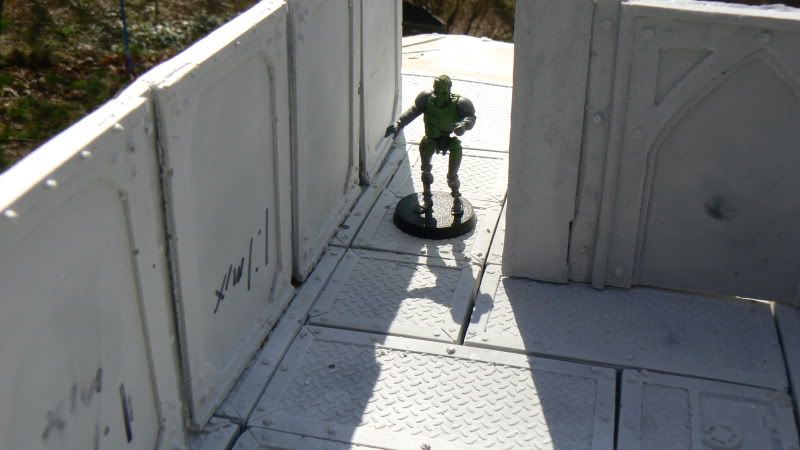
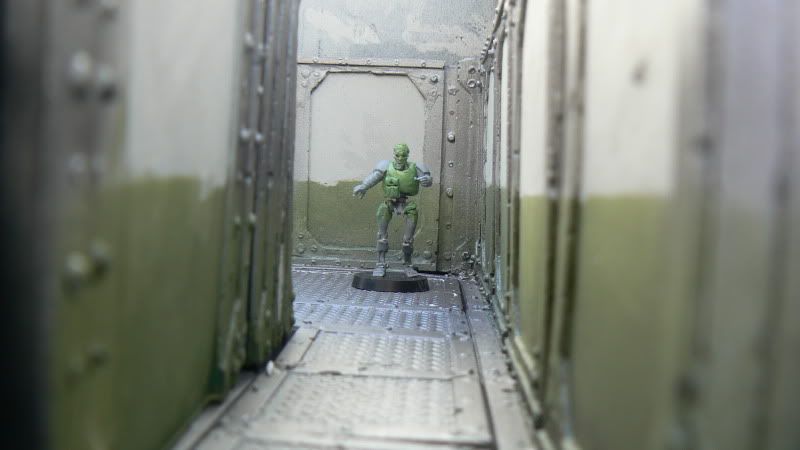
Termichron walking down the hallway...
Full "W" placed (one wing gluing together) not glued down
The following were taken at around 11am 03/21/2012 Since then I've gotten the interior walls painted, need to do the floors, and then glue the "W" in place.
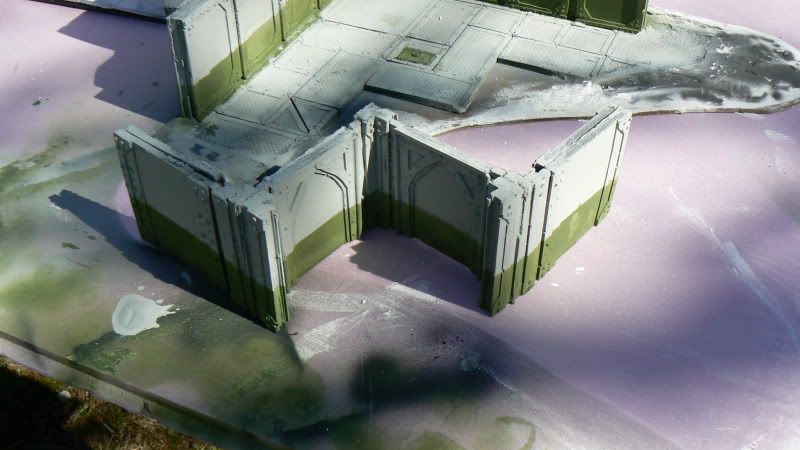
Complete Back "L" with "concrete" ablative walls added (need to trim the height and cut "firing arcs" out of the "concrete" Spackling for contour done as well.
with the Inner "W" wall in place (temporarily pending paint)
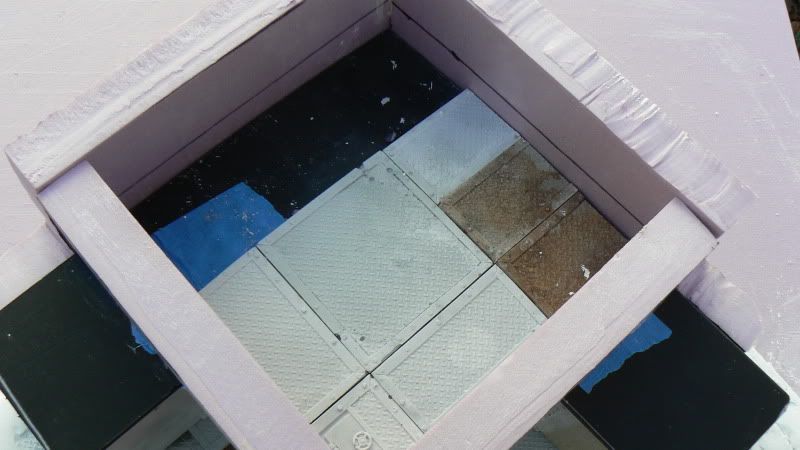
With the 2nd floor in place (tiling in progress) (the 2nd floor will be removable)
ok... i am a bit confused...what is the pink foam for? i thought your casted wllsections are outside and inside too? tho i have to say...the structure as is looks good!^^
Viktor von Domm wrote:ok... i am a bit confused...what is the pink foam for? i thought your casted wllsections are outside and inside too? tho i have to say...the structure as is looks good!^^
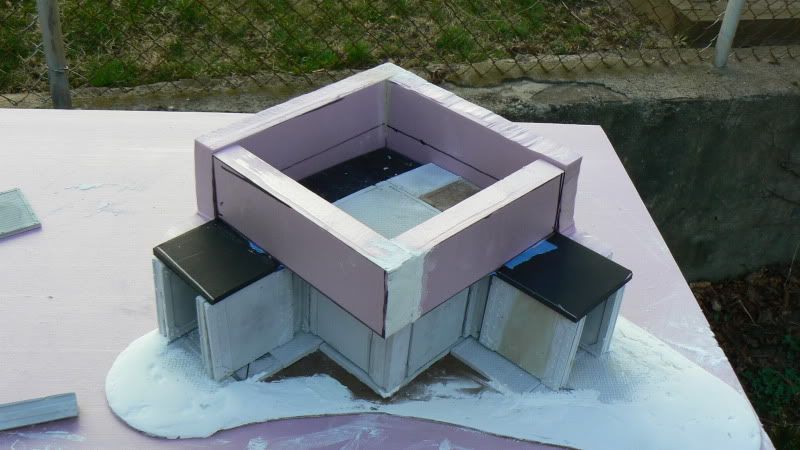
The pink foam is for the concrete ablative walls to further strengthen the "bunker" walls proper. (Also the pink foam will allow me to cut in "firing ports" for the second floor.
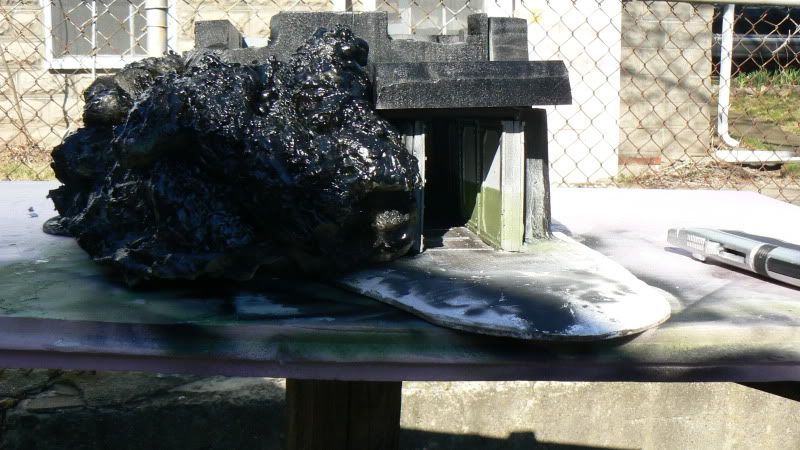
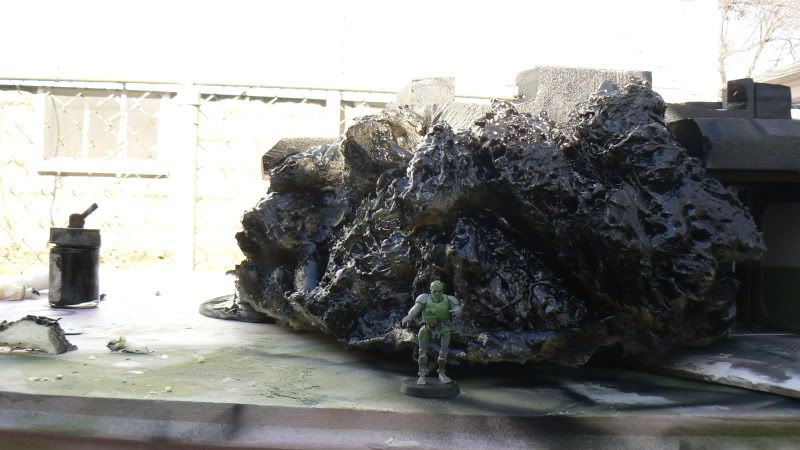
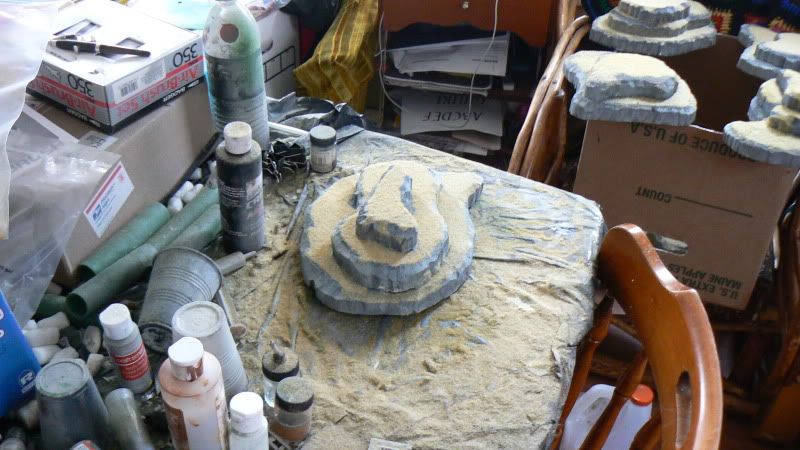
walls/interior of the bunker is now painted. I still need to texture and paint the exterior. I am currently waiting on the sprayfoam insulation "great stuff" to harden as that is how I am forming the rock outcropping the bunker entrance was built into. Also will need to weather things a bit as well.
On to the painted Pics. (no metallics painted yet...)
Thanks. I'll be taking pics at the club tonight of the other terrain entries. (and mine (it's at about 90% IMHO no weathering/ singage/ caution stripes etc, but good enough to enter since im now out of time.)
lone dirty dog wrote:Looking good so far their mate, like the 2 tone wall section as well gives it a more realistic feel.
Yep sure helps anyhoo.
On to the last set of WIP pics (before I "finished" the base colors for the rocks, and dirt. not done yet I'll be finishing it over the weekend, but still pretty good.)
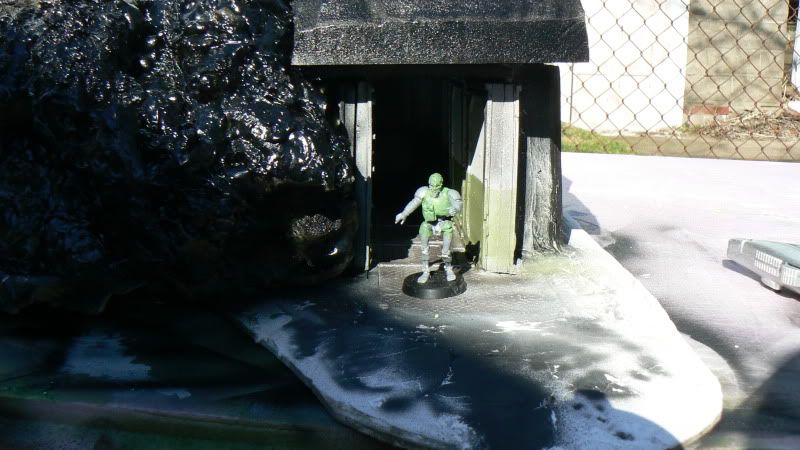
Rt entry hallway exterior overview
As above with Termichron for scale
Closer...
Termichron on the 2nd floor at a "firing port"
Termichron out front to show scale (height)
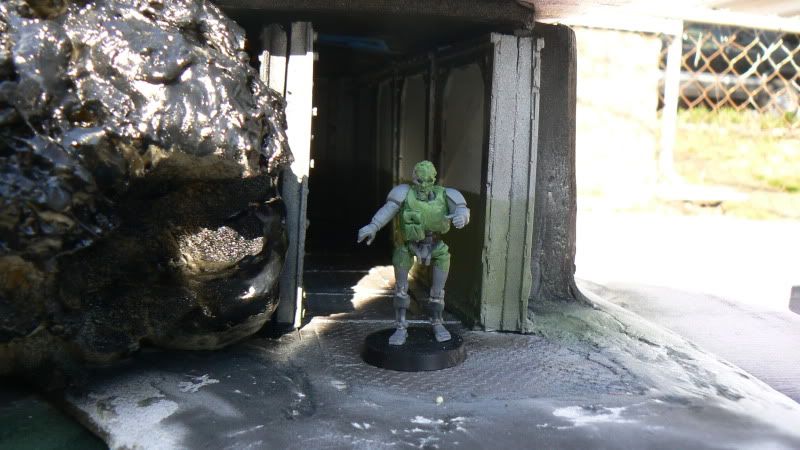
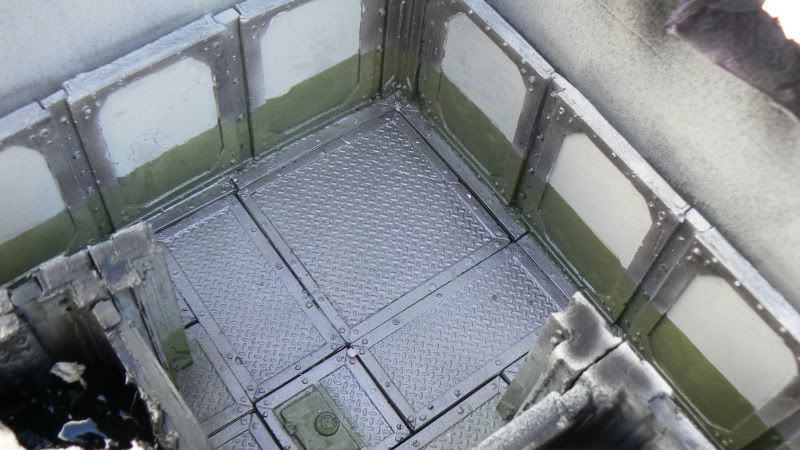
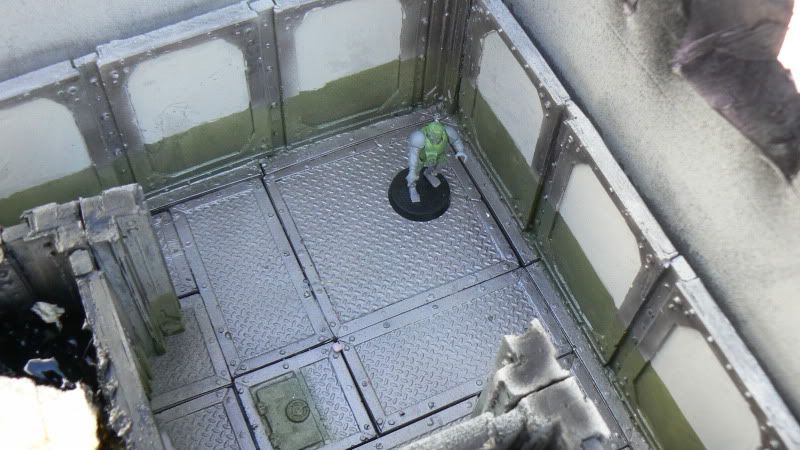
Assembled interior
With Termichron for scale
Looking down the RT entry hallway at a "defender" .... (2nd floor not placed to allow light in... (max you'd have just installed leds...)
i´ve used that spray foam for hobby jobs too... what i would have done ...cut it a bit... so not to make it look too bubbly... but that i can say because i don´t know of the finished look you are going for... will it get grass or sand on the structure or just a drybrush job? hmmm... i think i like it anyway^^
the green/gray walls give a "hospital" vibe... very good idea mate!
Viktor von Domm wrote:i´ve used that spray foam for hobby jobs too... what i would have done ...cut it a bit... so not to make it look too bubbly... but that i can say because i don´t know of the finished look you are going for... will it get grass or sand on the structure or just a drybrush job? hmmm... i think i like it anyway^^
the green/gray walls give a "hospital" vibe... very good idea mate!
Thanks. I figgure that various levels or sectors of bunker complex can be "color coded" as a subtle organizational touch... (Halflife 1, the PC game made me think of this...)
Rogue Wolves wrote:im really liking the half bone half green walls.. really look nice!
Thanks. The top is a light gray and the green is some sort of Olive Drab craft paint.
Well I got 2nd place in the Terrain comp (out of four entries) understandable as mine wasn't completely done (I still need to add sandbags, posters and weapon emplacements...)
On to a more "finished" (but not done) pic
Fourth place entry.
Third Place entry
Second Place Heh. Mine. Heh no need fr a Pic here....
funny decision they made... your stuff looks a lot better than the first place, has way more energy put into it...tho i have to say since your´s isn´t finished yet i probably would have voted first place for the thrid place... that is cool looking and reminds me a lot of the DOW games...and prooves again what you can do with some styropackaging...
gosh...halflife... that feels like...ages ago^^ but good call as an inspiration for your terrain... levels done in different colorcoding...yep...that sells the terrain even more!
I prefer larger pieces too, Rogue, All those above are nice but, like Galorn's Bunker, an interactive piece that isn't potentially destructive to the mini's is really cool....
Ever try to stand a Demon Prince on something like that fourth place entry?
What sorry this is bull gak yours was way better than the rest of the entries sorry harsh but true, plus yours had way more working use change club now they suck …………
Sorry for the out burst their but feeling a little emotional
Viktor von Domm wrote:funny decision they made... your stuff looks a lot better than the first place, has way more energy put into it...
^ this.. but then again i do perfer a large built peice over small (pre made i assume) peices
Rogue Wolves wrote:
Viktor von Domm wrote:funny decision they made... your stuff looks a lot better than the first place, has way more energy put into it...
^ this.. but then again i do perfer a large built peice over small (pre made i assume) peices
Viktor von Domm wrote:funny decision they made... your stuff looks a lot better than the first place, has way more energy put into it...tho i have to say since your´s isn´t finished yet i probably would have voted first place for the thrid place... that is cool looking and reminds me a lot of the DOW games...and prooves again what you can do with some styropackaging...
gosh...halflife... that feels like...ages ago^^ but good call as an inspiration for your terrain... levels done in different colorcoding...yep...that sells the terrain even more!
mxwllmdr wrote:I prefer larger pieces too, Rogue, All those above are nice but, like Galorn's Bunker, an interactive piece that isn't potentially destructive to the mini's is really cool....
Ever try to stand a Demon Prince on something like that fourth place entry?
Automatically Appended Next Post:
It doesn't work too well.....
I know.....
No no It does not...
Rogue Wolves wrote:plus, common anyone can buy terrain and flock it! it takes more skill to make a good scratch built piece!
Viktor von Domm wrote:
Rogue Wolves wrote:plus, common anyone can buy terrain and flock it! it takes more skill to make a good scratch built piece!
totally second that!
lone dirty dog wrote:What sorry this is bull gak yours was way better than the rest of the entries sorry harsh but true, plus yours had way more working use change club now they suck …………
Sorry for the out burst their but feeling a little emotional
Thanks guys. I'll get some more done on this bad boy on my next day off (I believe that's Monday but not sure)
Automatically Appended Next Post: I'll be adding the following things;
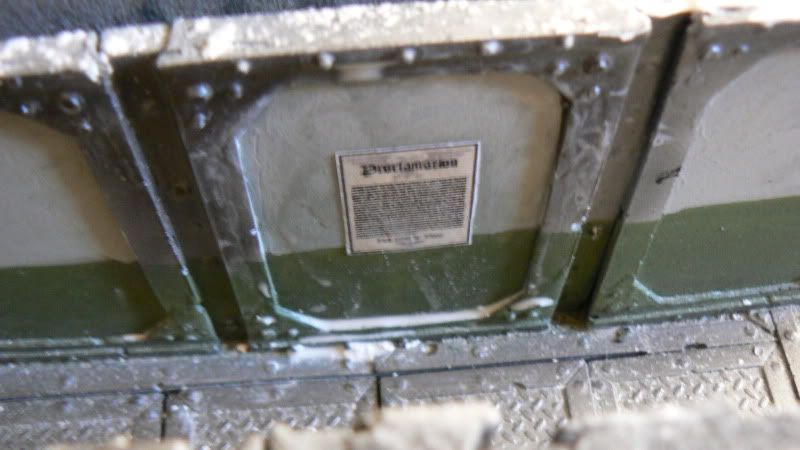
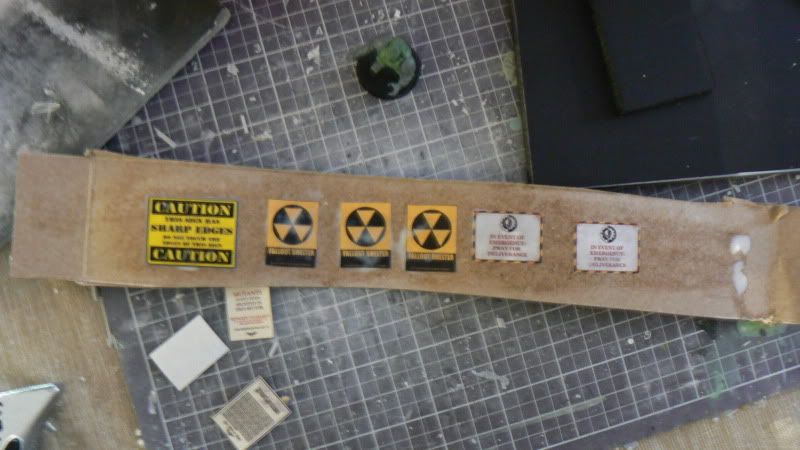
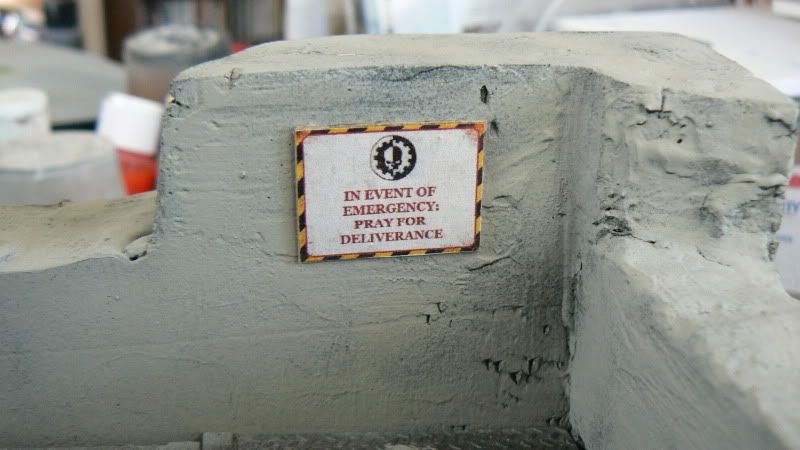
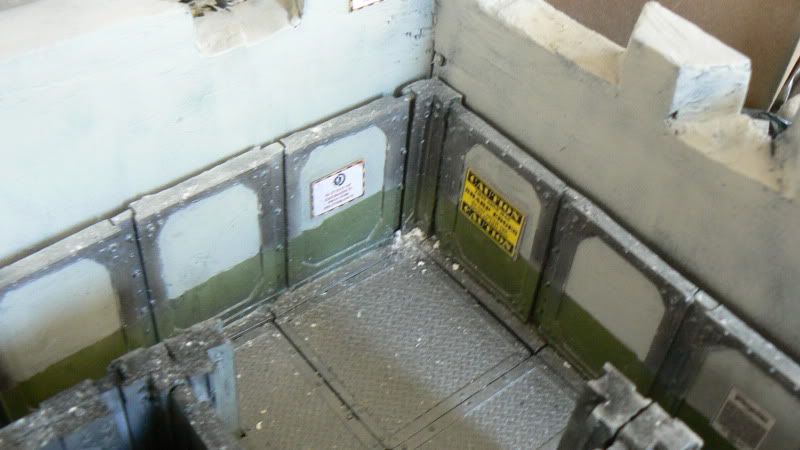
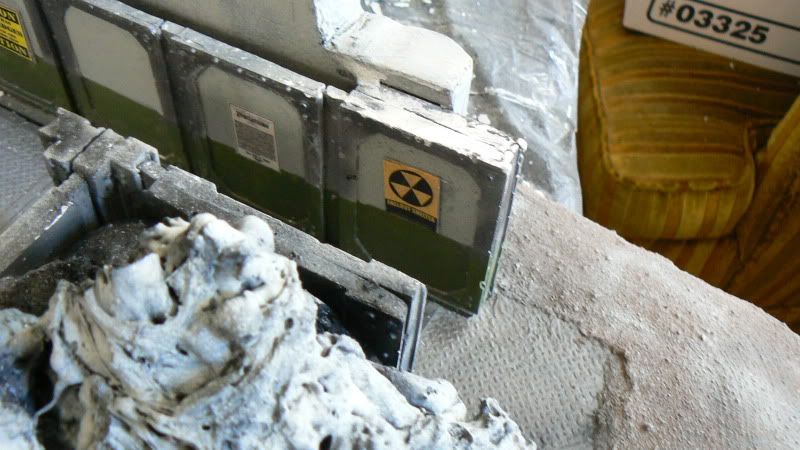
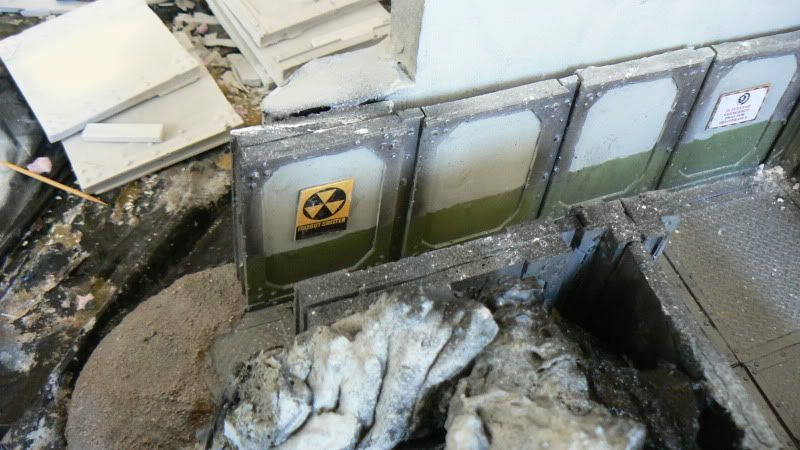
Signage Fallout Shelter signs "This Sign is Sharp" warning sign Bunker ID numbers Imperial propaganda posters...
Sandbag walls with weapon emplacements 2 Heavy Bolters 1 single shot Missile launcher
A ladder to the interior (to show how you get to the roof hatch.
Weathering
Some Impact craters to the exterior walls with exposed Rebar...
well... if i had said nice it would mean rather ot nice...as i don´t use that phrase...i think it is indecisive... but well he is only saving up for kharma^^
and i still think this contest deserves a nerdrage...
as a salesman (different life...don´t ask and i wont tell^^) i can say to you :
you don´t sell quality characteristics...no, you always sell the benefits /gains of a product...
tell her how good that specific bought of yours will be from her point of view... how relaxed you will behave now that your stock is filled with new suplies...how reaxed you now can feel in your role as a father and a husband...
see...?! instant win on her part... you have to slip into her point of view...
(never did work for me tho...if i buy to much plastic crack i get a trashing...oh and there is also the reason why i now will start with a new aperenticeship^^)
galron...
that is so cool looking... it looks very convincingly weathered and worn... the rebar is totally awsome looking... same for the now postered up wallsections!
darn... i always type his name wrong... this time it slipped me and i didn´t proove read his name... sorry galorn...i have it seems issues with your name^^
Viktor von Domm wrote:darn... i always type his name wrong... this time it slipped me and i didn´t proove read his name... sorry galorn...i have it seems issues with your name^^
No worries. Call me Sam if it helps (That being my actual first name.) I've just finished re graying the walls and attaching all the interior signage.
I still need to:
make and attach the sandbag walls,
Paint and place weapons emplacements
Add the Bunker ID numbers
Weather the thing.
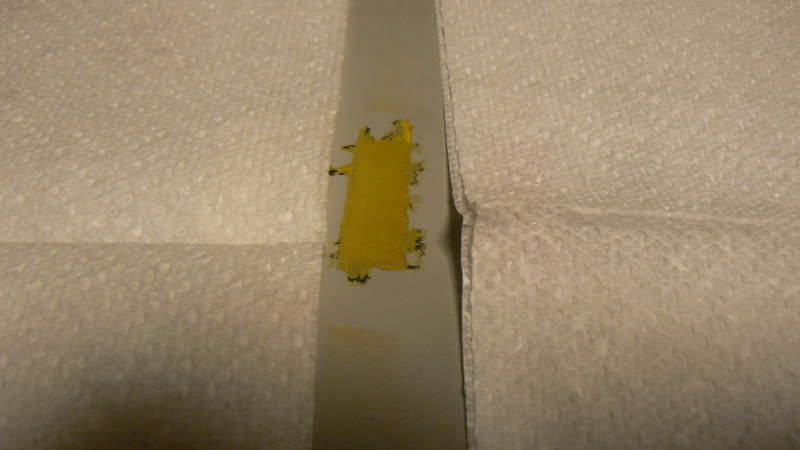
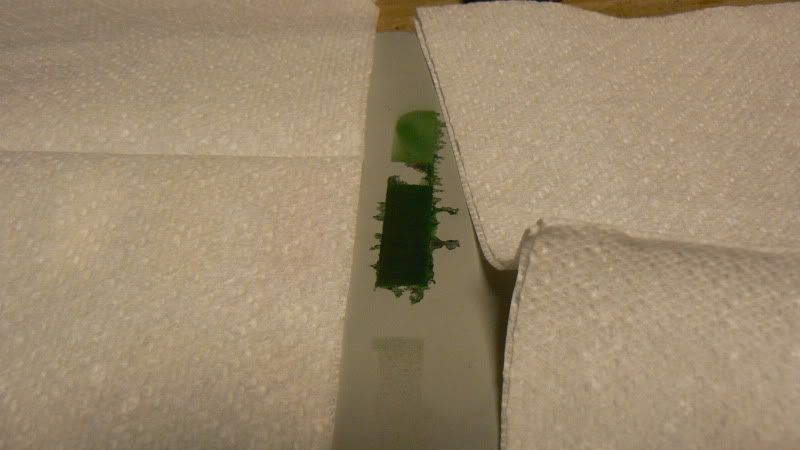
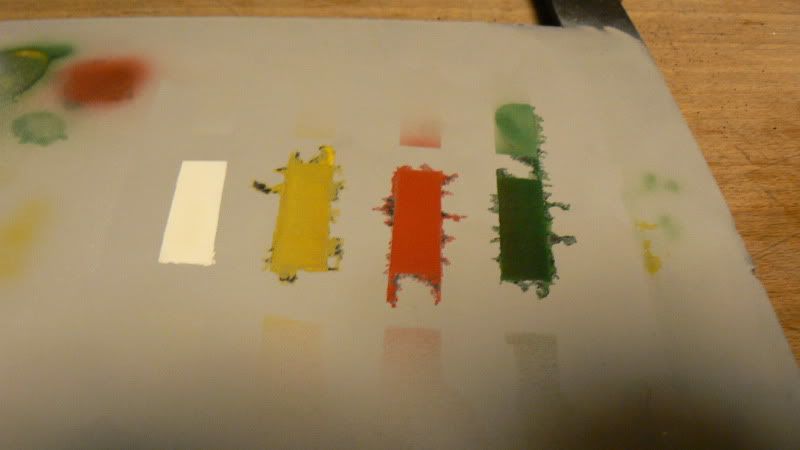
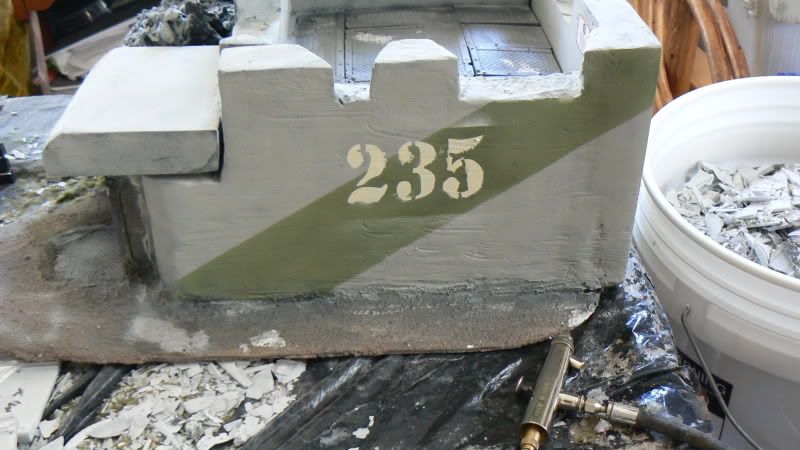
As for bunker ID numbers what color would look better?
WTF? Sheldon is cool. I have been on that set may times and that cast is great. Sheldon's character is awesome. That certain kind of mix between don't care and don't know.....
well after that color range you selected i have to put my vote out for either red or white...the yellow is atm downright oout and the green is the wrong hue for me...
er... one question... did you spray black first for all colors except white before?...could mean that this might have affected the other colors that way...by the way... that basecoat of the plate...is that the equal greeish color you used on your terrain piece?
Viktor von Domm wrote:er... one question... did you spray black first for all colors except white before?...could mean that this might have affected the other colors that way...by the way... that basecoat of the plate...is that the equal greeish color you used on your terrain piece?
Painted the grey onto a spare piece of Black foam core (as it was already black...)
The Green is a different green from the one I used in the bunker.
yep... that´s what happens if you get too close to certain cleaners...rather sad... his mind is dwindling away... not that there was much to begin with...
The Green is a different green from the one I used in the bunker.
that IS exactly what makes it not my color choice.....
yep... that´s what happens if you get too close to certain cleaners...rather sad... his mind is dwindling away... not that there was much to begin with...
The Green is a different green from the one I used in the bunker.
that IS exactly what makes it not my color choice.....
Viktor von Domm wrote:would make more sense to me...like you do the paintschemes for your minis... not too many colors and keep them in the same hue range...
well my case is prooven now... that looks better because it looks more together with the grey and i think i like the more subtile color... a more faded looking color than such strong ones as seen before...
Viktor von Domm wrote:well my case is prooven now... that looks better because it looks more together with the grey and i think i like the more subtile color... a more faded looking color than such strong ones as seen before...
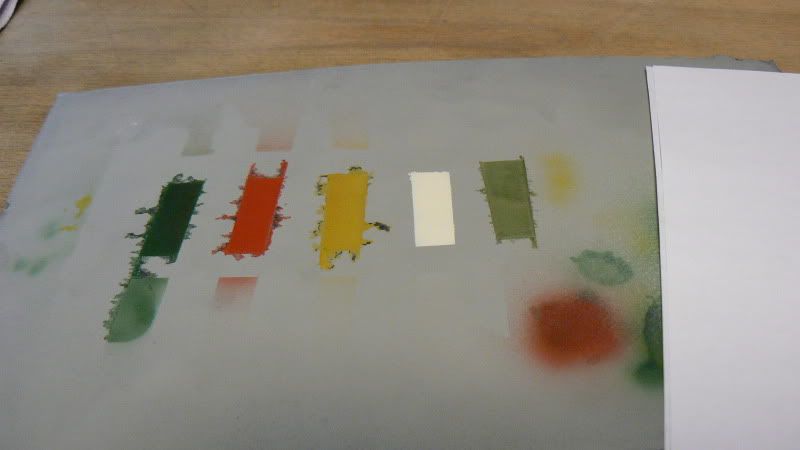
what do you think about that color?
Could work I think the off white works better though.
dsteingass wrote:Sorry Galorn, I must have missed "why" you are making the color test patches?
to see which color would look best for ID markings.
Galorn wrote:
Viktor von Domm wrote:darn... i always type his name wrong... this time it slipped me and i didn´t proove read his name... sorry galorn...i have it seems issues with your name^^
No worries. Call me Sam if it helps (That being my actual first name.) I've just finished re graying the walls and attaching all the interior signage.
I still need to: make and attach the sandbag walls, Paint and place weapons emplacements Add the Bunker ID numbers Weather the thing.
As for bunker ID numbers what color would look better?
mxwllmdr wrote:I liked the green in your original test swipe. But the original green would be good too.....
Thanks.
Signs are attached (to the interior) I need to do a little touch up of overspray, and add some "chips" to the painted signage then add exterior signs. Then add sandbags/weapon emplacements. Then weather everything.
Vik, that is what we call "didn't think I'd need to tape there" LOL -
Just brush-fix the area with the thin ab paint - TRUST ME- it works WONDERS! - If you buy the BIG full set of Vallejo Air paints, it comes with some really nice sable brushes
one day...one day i need to get my fingers on an airbrush as well.... but this might need a room only for me too...so you can imagine that might take some years...
yep... that´s what happens if you get too close to certain cleaners...rather sad... his mind is dwindling away... not that there was much to begin with...
lol that is too funny im really liking this building, only thing is, do you plan on dirtying up the posters a bit?
dsteingass wrote:Vik, that is what we call "didn't think I'd need to tape there" LOL -
Just brush-fix the area with the thin ab paint - TRUST ME- it works WONDERS! - If you buy the BIG full set of Vallejo Air paints, it comes with some really nice sable brushes
AB paints? Foo, I've been using Craft Acrylic thinned down to flow. Word... (soo white I know... Specifically Ceramcoat, and Delta Color. Decent ratio is 1-2parts water to 1 part paint.) ATM I don't have the spare cash for lots of AB specific acrylics.... Yet...
Rogue Wolves wrote:
Viktor von Domm wrote:
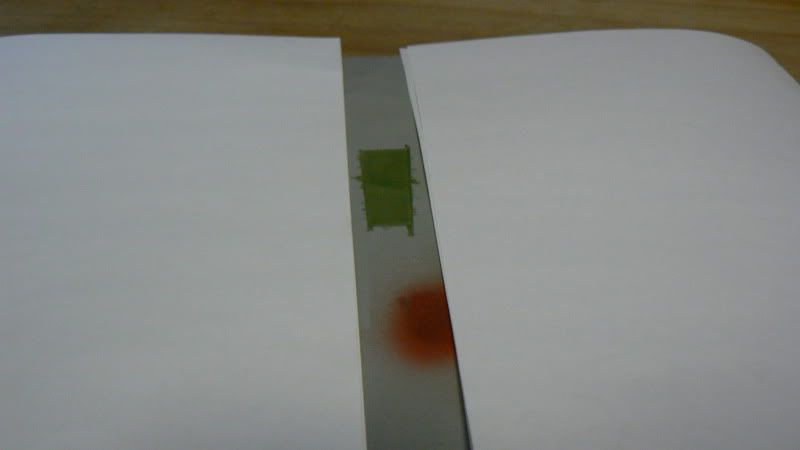
lone dirty dog wrote: I like the Blue ……..
Blue?
yep... that´s what happens if you get too close to certain cleaners...rather sad... his mind is dwindling away... not that there was much to begin with...
lol that is too funny im really liking this building, only thing is, do you plan on dirtying up the posters a bit?
Absolutely NOTHING has been "weathered" at all yet. I still need to make, paint , and attach the sandbag revetments, and paint and add weapons first.
yep... that´s what happens if you get too close to certain cleaners...rather sad... his mind is dwindling away... not that there was much to begin with...
The Green is a different green from the one I used in the bunker.
that IS exactly what makes it not my color choice.....
It was glue and pebbles ………..
I still like the blue
The bunker is looking great and the signs are a nice touch, the outside will look better with a but more detail added though, but overall love it.
I have found a cheap shop over here that stocks Vallejo paints, sells all kind of crap but when I saw the paints I was like wow and good price.
They stock sets of the AB paint are they worth the investments ? Or should I just continue to thin my normal acrylics ?
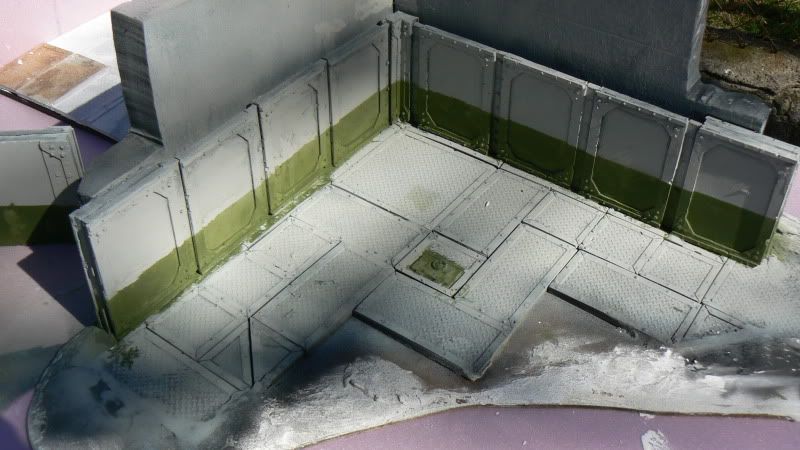
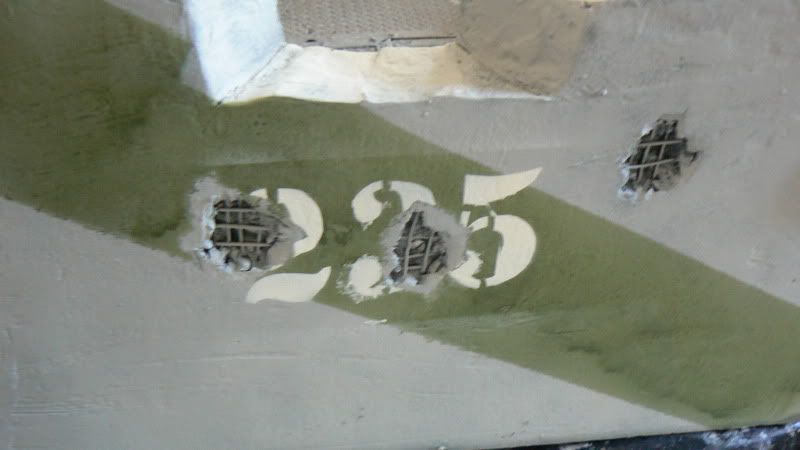
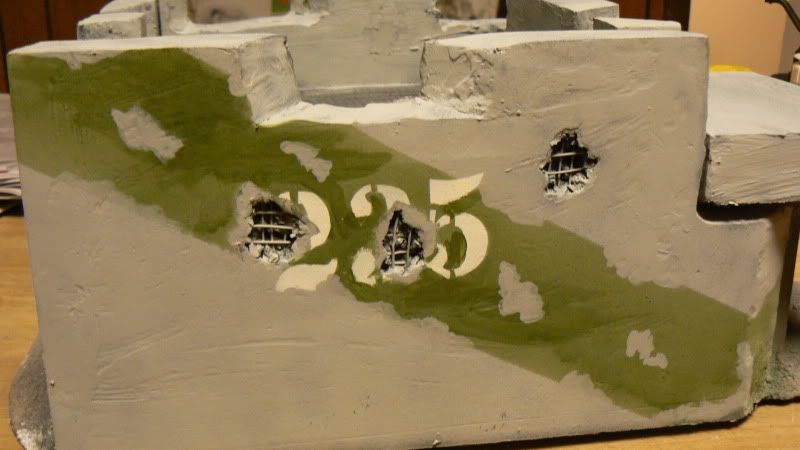
Well I've done a little "clean up" work. the numbers are looking good... but the green stripe looks a little odd due to the way the green pigment is layering on. at this point I have 3 options.
1 Re paint the wall to gray and restart (with multiple layers of Green to reduce the contrast for following clean up)
2 Mask off the Numbers and the non green portions of the wall and add layers of green to reduce contrast.
3 hand paint in green to a more consistent shading.


 yeah... of course^^


 just lie her on a teble, and take off most of the clothes........there are areas to get a 4+ covers included


 will you be adding any gauges or valves to these