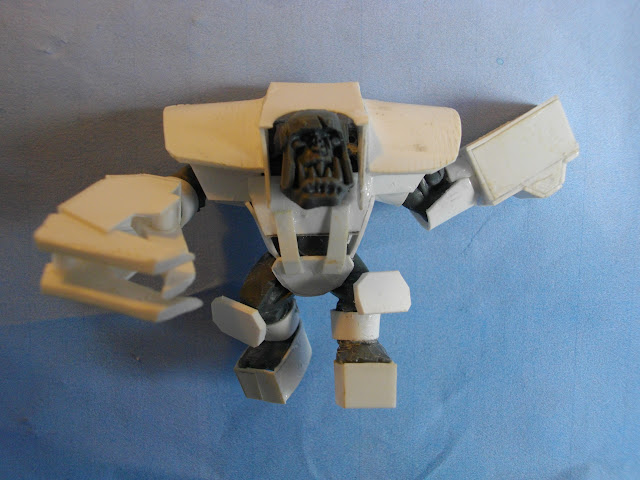
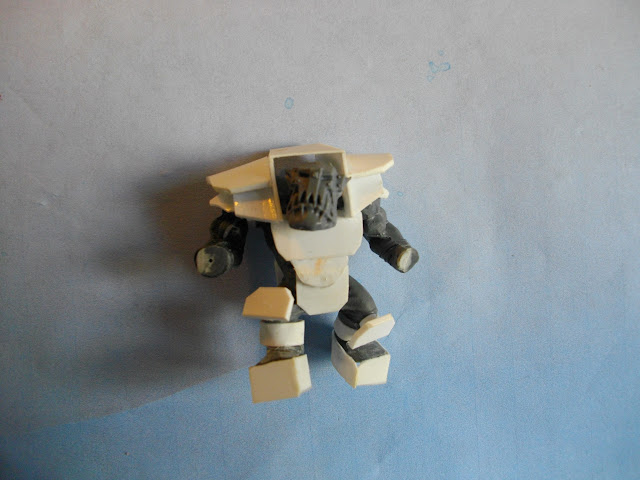
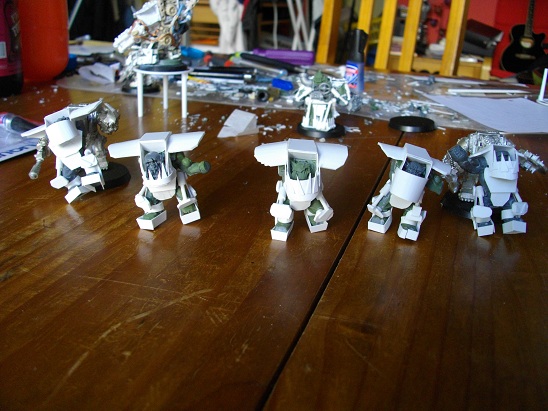
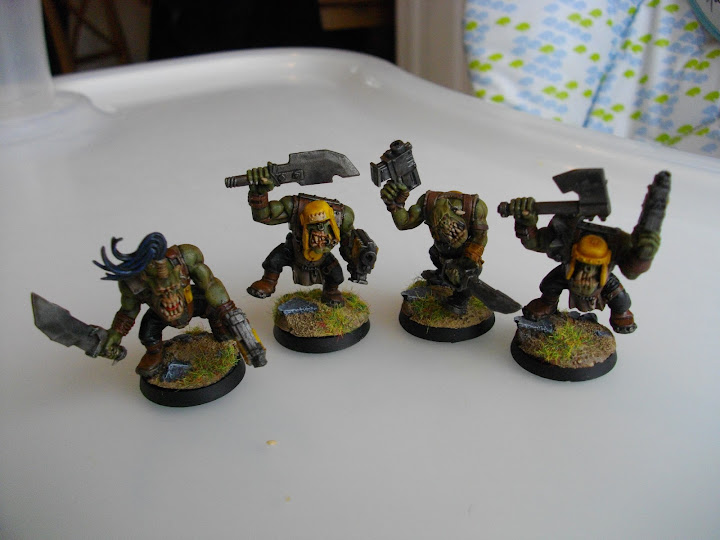
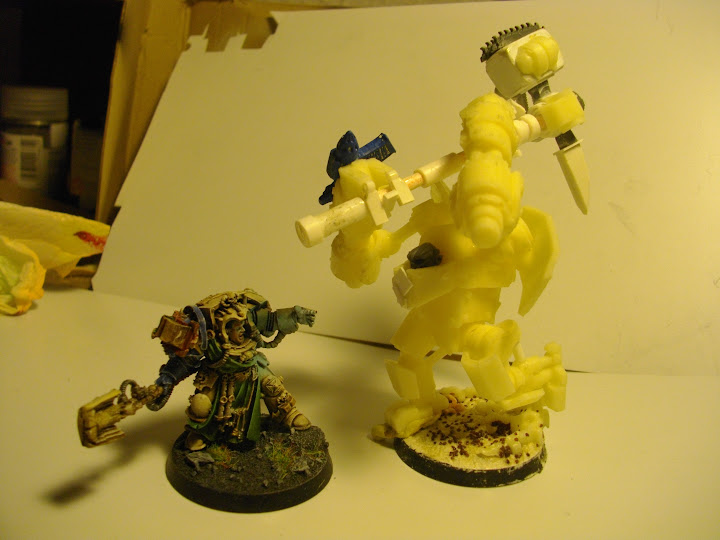
Here is my first MAN order by french moderator of huge warhammer forum. 9 MAN and a MegaWarBoss. The challenge is to build 9 MAN with specific stuff BUT I must built lots of pieces beforhands :
love your work. very inspirational. when I started my first one 2 days ago they were roughly based on your work and some other fellow's. His are very small in comparison and have shields.
Keep WIP shots coming! they do us newbies a lot of good!!
Loving the Thunderork! Making me want to get one for my Thousand Sons, but I'm not sure if I'd have the funding or space, or the time to scratch build one. Still, one can be hopeful the MANs are great too.
I just wanted to say you have inspired me to try and follow along with your tutorial and make my own MANZ. I'm having so, so much fun doing so.
Spoiler:
Thank you again for inspiring me on this.
Automatically Appended Next Post:
Mortalitas wrote: Please sir, may we have a tutorial/guide on how to make those lovely Nobz??
Awesome work!
He posted one, the link is here. Poke around on his blog, there are some more pictures of them painted. It's really terrific stuff. I wish there was a better translation but the pictures really are good enough.
Hey Ouze ! Terrific stuff too Maybe you should reshape pectoral plate, it seems a little too big.
Another tip : put p-card to grow up your nobz (I don't know how to say that :p : use a strip of p-card -0.5 or 0.25 mm- to make a shoes and that shoes makes your nobz taller than before)
Like that :
The strip of P-card is just rolled/coiled/wrapped (?) around the foot. Glue it. Then put a little and not rolled strip head on foot.
It gives a better looking in final. Whithout that, foot, knee and pectoral plate are too "close".
Sorry for my poor explanation and my poor english ^^
I wish there was a better translation but the pictures really are good enough.
Some friends of mine works on it. Professionnal translator ^^. My wife is an english teacher in France, she can help me ^^
Luciusletroll wrote: Some friends of mine works on it. Professionnal translator ^^. My wife is an english teacher in France, she can help me ^^
Thanks for the tips. I'm still working on mine, and yeah, maybe the chest plates are too big. So far as the translation, your English is better then my French, that's for sure.
Hey nice stuff. I think you should put more stuff in back and grow up the nob. I really like the weapon but it seems a little too big for twin linked gunz
The shield is awesome :p
Hi there !
Today my work for a local paint tournament. I win ! I'm happy because it's my fist vehicule paint, my first airbrush paint and my first paint tournament ^^ :
Those look amazing so far. Great work, you are very skilled with plasticard!
But I think some of the aobr heads look really ugly. Maybe its only me, but I try to avoid them as much as I can!
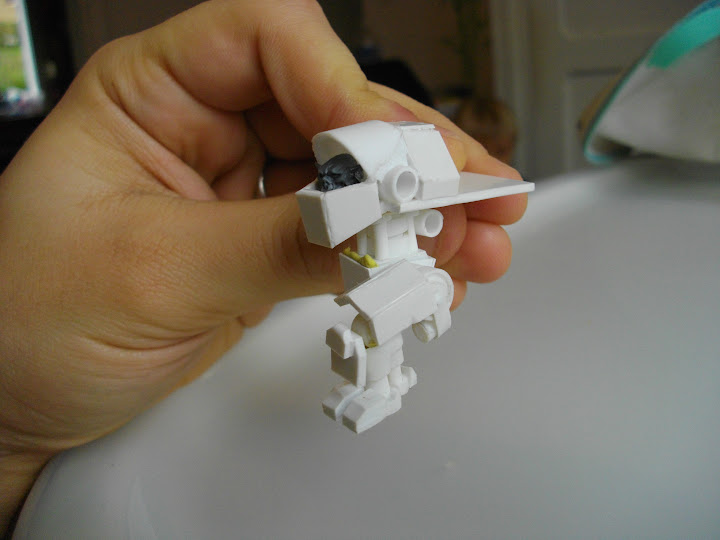
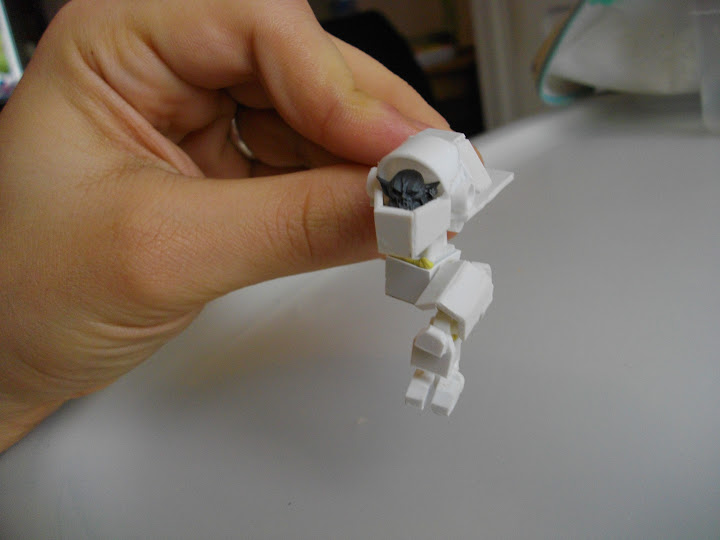
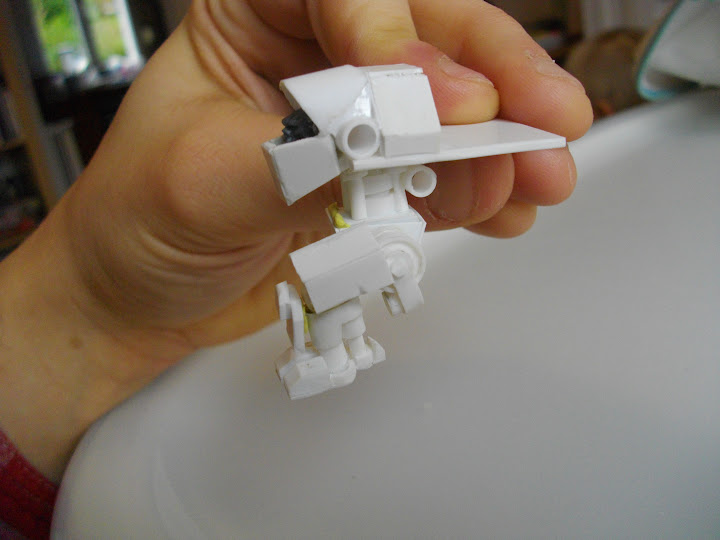
there is a mistake in the way the cockpit is integrated with the body, it must be pushed back more. I made the same mistake when building it and newobmij (author of the template) pointed it out. I fixed it in the second one (blood raven) that I built.
Good job and welcome in the paper craft world.
PS:
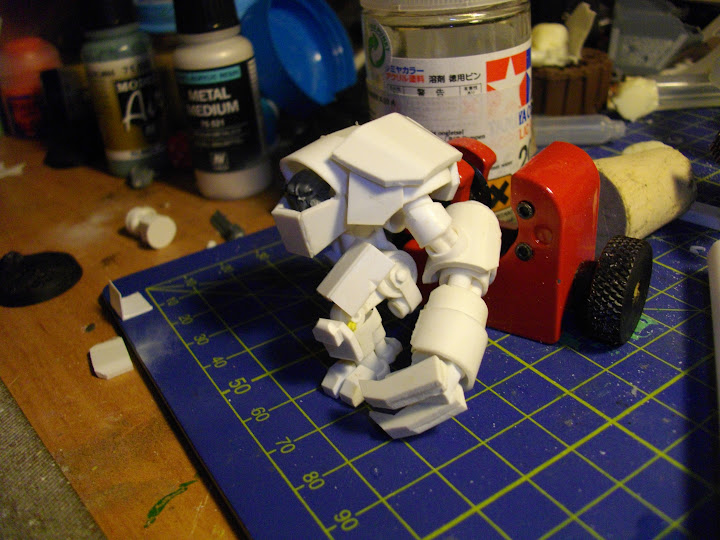
CANSON drawing paper is too expensive you can get similar weight of paper but meant for printing
yes I can because I did the exact same when I built it. Look at the reference (from GW) and at the pictures of the papercraft versions in newobmij blog (http://newobmij.tumblr.com), you'll see that the space between the opening of the cockpit and the body of the craft is much smaller (about 3mm or so). To do this when you attach the cockpit part to the body you have to push it further inside the body. The way you did it probably made building the underside more complicated.
Regarding paper, I work near an office depot in the southern suburb of Paris and I could find many grades of paper there. Otherwise you can probably order some on the internet, I use the Clairefontaine in 160gsm and 190gsm but there are other I am just a bit weary with the heavier grades as I bought some 250 once which would go in the office laser printer but not through my home printer.
Hope it helps, if you want more detais or advices don't hesitate to reply here or PM me.
PS: I love what you do with plasticard and I appreciate the article on your blog on where to find stuff in France, it is often not so easy
I took the liberty of adding small tips from my own experience building one of these.
You too can create your Meganobz!
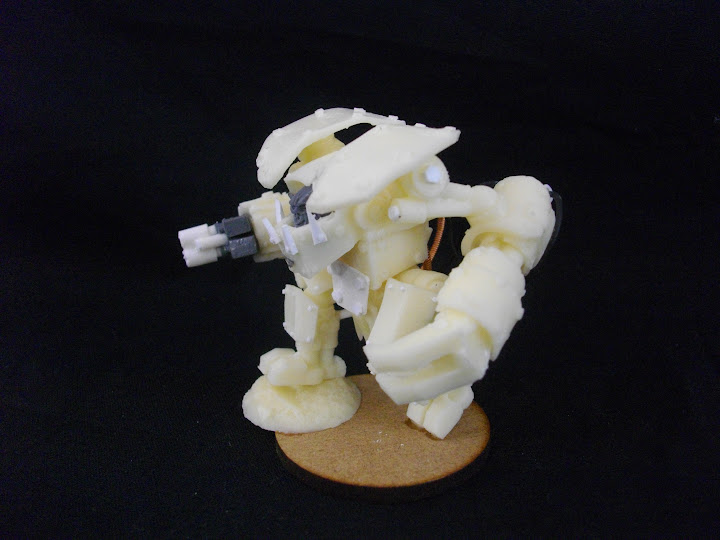
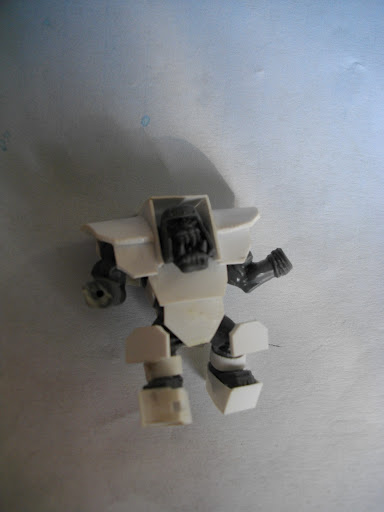
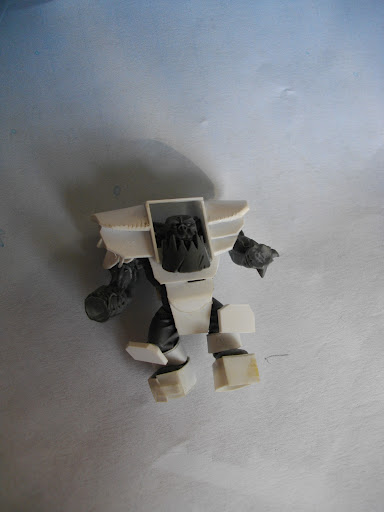
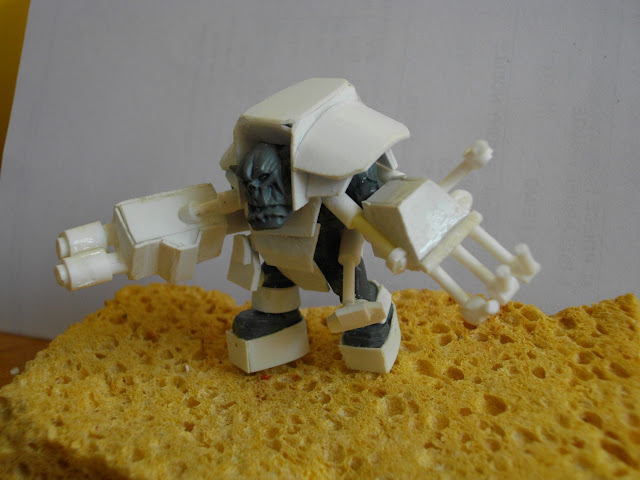
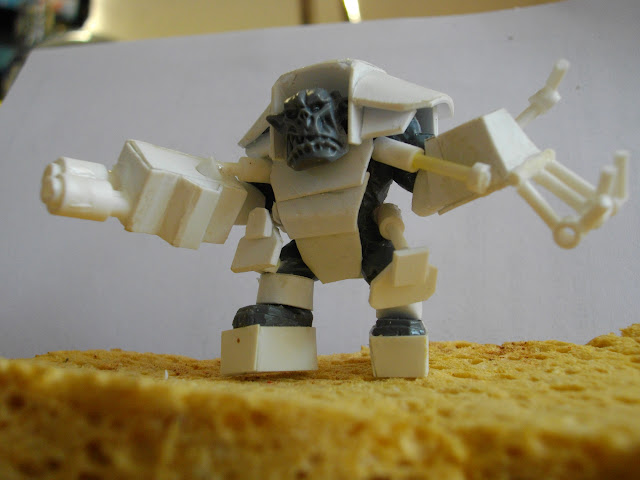
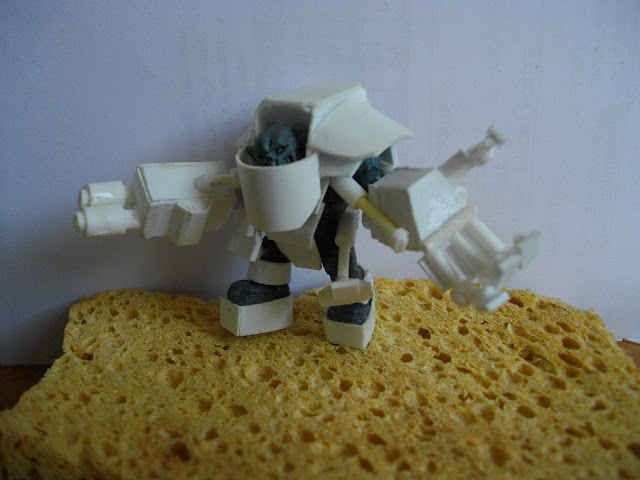
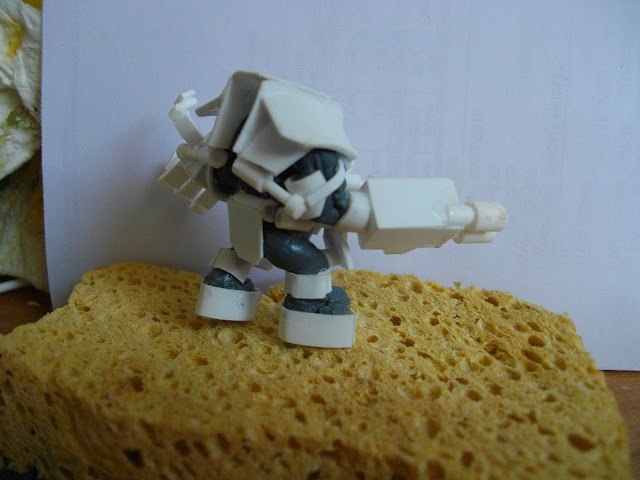
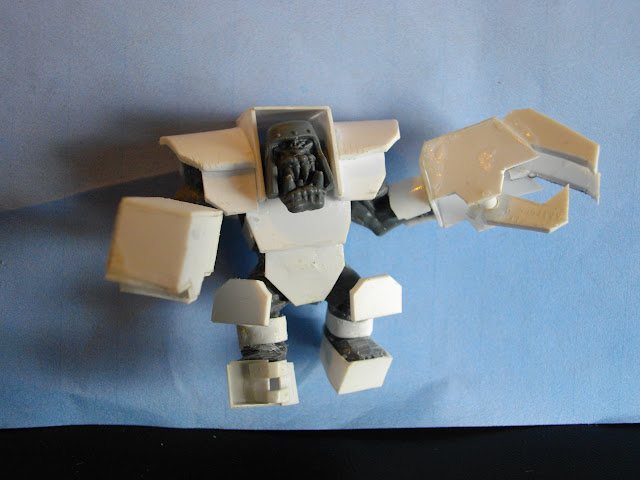
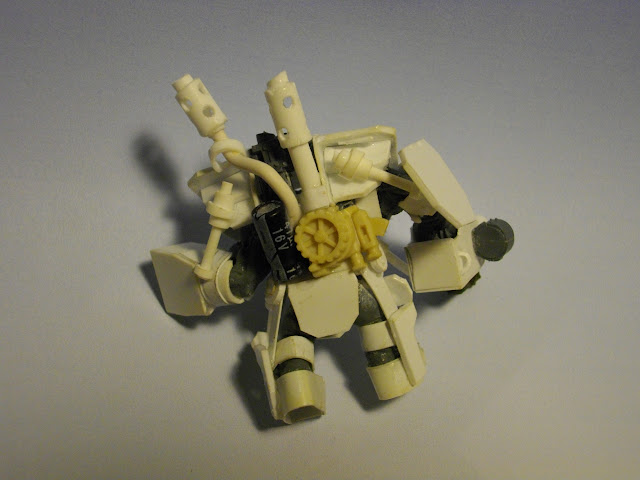
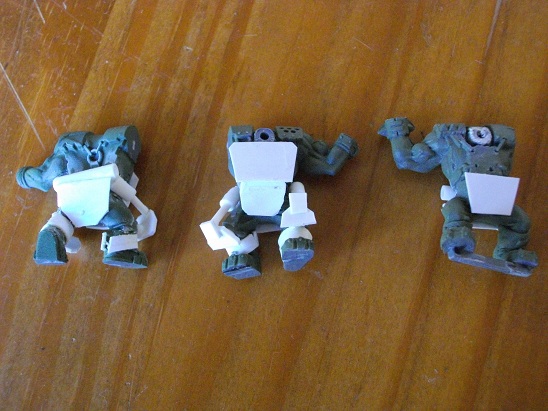
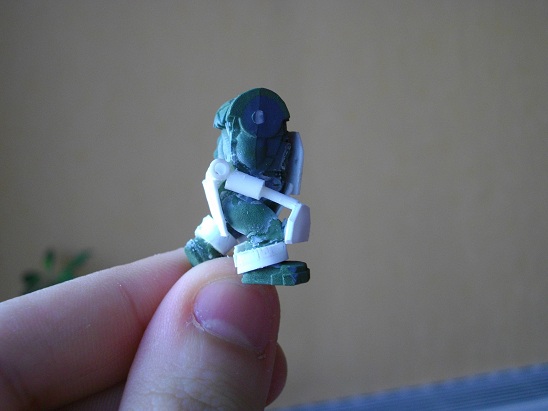
As planned, here is the tutorial to help and guide you in making your meganobz, to do so you will need a certain amount of tools and material. As always my goal is to save money, that is why I use Assault On Black Reach Nobs as a base. It is good to know that if you are motivated you can save the body and only use the arms and legs, but that is beyond the scope of this tutorial. For tools and plasticard, I am referring you to the tips on my blog. I myself do not use a precise plan, the tutorial is therefore more of a guide that will help you create your Meganobz, that is why I took lots of pictures, observing is often the best thing to do. Last advice before starting: Get yourself an official meganob, it will be useful inspiration.
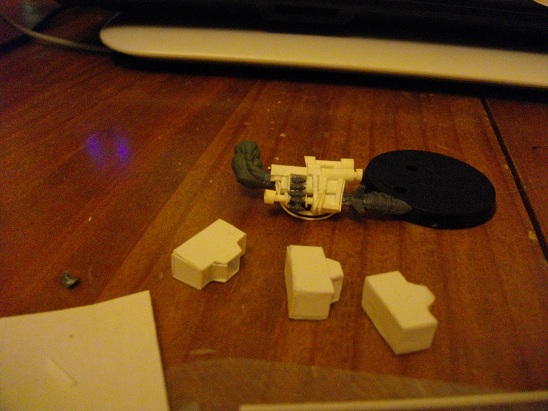
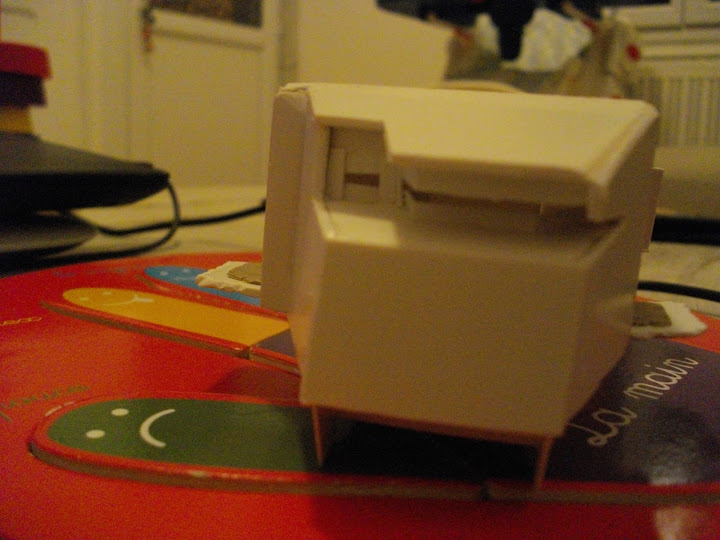
Step 1: "Prepare da nob, boss!"
Picture 1
First thing to do is to remove the plastic bar below the feet, generally speaking it is best to cut everything that pokes away from the model and might interfere with the armor we'll build: Objects tied to waists, bit of belt poking out, etc... Do know that your Meganobz will be different depending on the arm stance, those will guide the final look of the figurine. you can cut them off if you have spare nob arms. (Because regular boy arms will not do, too small). At this step, you should also shave plastic off the front of the torso and the knees to help place plastic how you like.
(Spacecat tip: Go ahead and cut the fixed arm at the shoulder with a hobby saw. It's easy to alter the pose and glue it back later, that also gives you more room to work on the body and shoulders.)
Picture 2
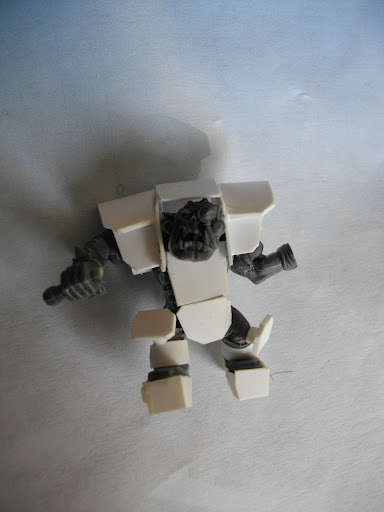
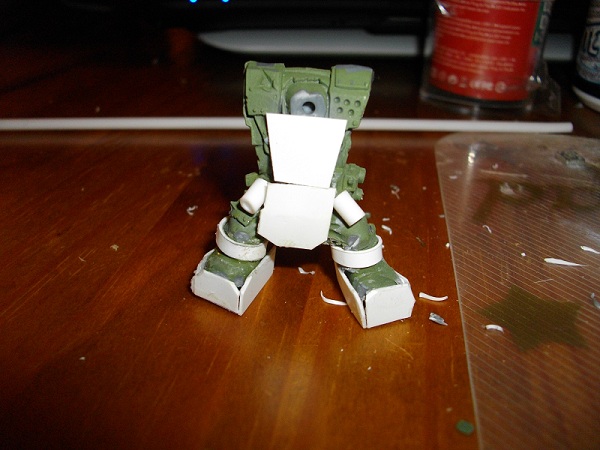
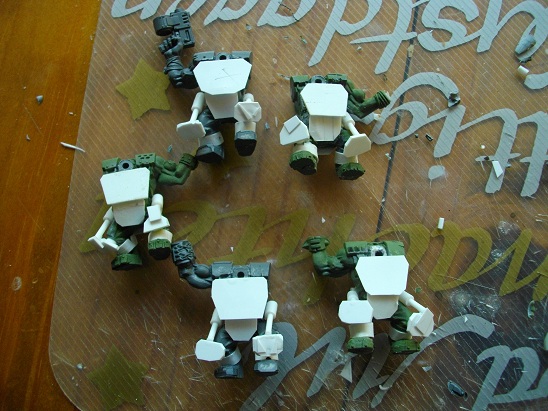
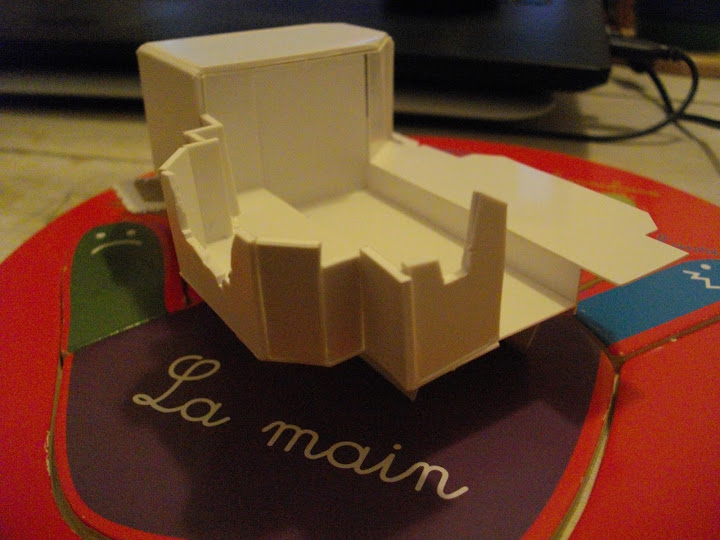
You must start to prepare the mega-armor structure:
-A chest piece (pic 1/2)
-A loin guard (pic 1/2)
-bands or tubing to surround the ankles (pic 1/2)
-Shoes: Careful! you must raise the nobz thanks to platform-style shoes, make it so the armored shoes are about twice the height of the original shoes, with the original shoes at the top.
-A small tube on each side of the hip, pointed along the thigh: They form the hydraulic cylinders that will link to the knee pads. Those are touchy to adjust, I recommend to set them against a horizontal tube in the back.
Do note that I often cut off loinguards and chestplates later, it's best to make things too big and take a cutter to it later, according to needs.
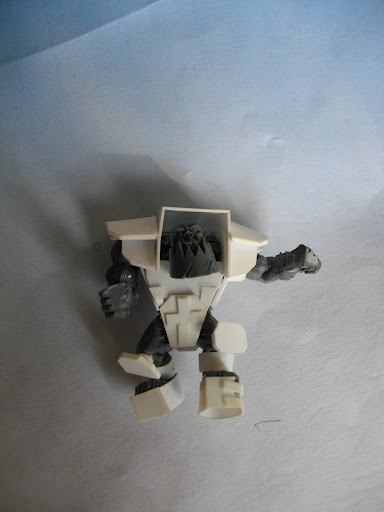
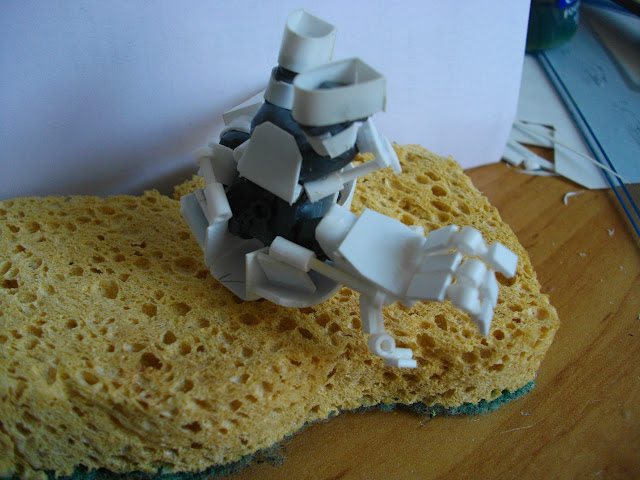
Picture 3
We then glue short tubes that will link to kneepads (pic 3). You need to cut them at angles so the kneepads don't bump against the shoes. The nobz have difficult poses around the legs, we must deal with it and plan to avoid bunching up the legs.
(Spacecat tip: The AOBR nobs have a really bent shoe, slicing off the top of the tip to change the angle of the boot can help.)
Picture 4
I make the kneepads in thicker plasticard (1mm thick I think). Make sure to insert the rods in the cylinders without gluing them (pic 4/5), it's easier. Those darn cylinders are a pain to set, don't hesitate to go light on glue at the start because you may have to adjust everything later. Sometimes I even 'dig' into the figurine to set the cylinders in a believable way (Thank you mini-tools!).
(Spacecat tip: You may find it simpler to build the kneepads first, then set the cylinders and finally the back tube. Instead of the other way around.)
Picture 5
Picture 6
You can see on pictures 4 and 5 the basis for the meganobz legs. If we stopped here he would be very bunched up (like the first I built), so we must raise the shoes. You can use plastic cuttings to add detailing on the kneepads (extra plates, teeth, glyphs: pic 6/7)
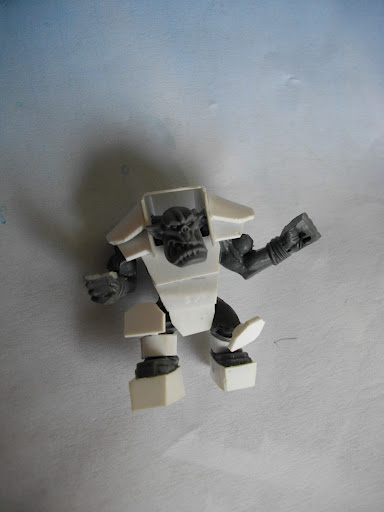
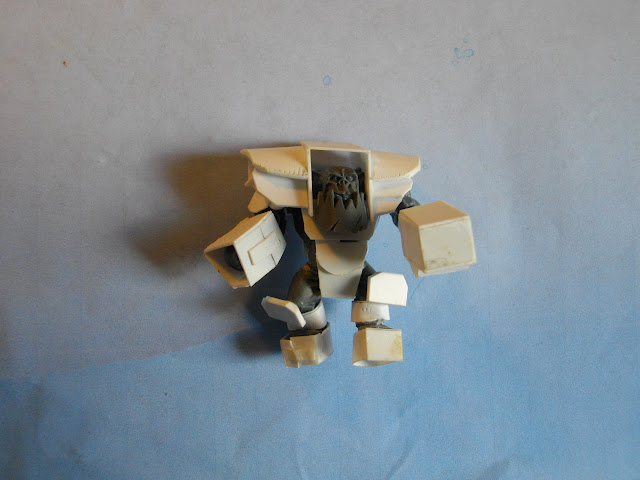
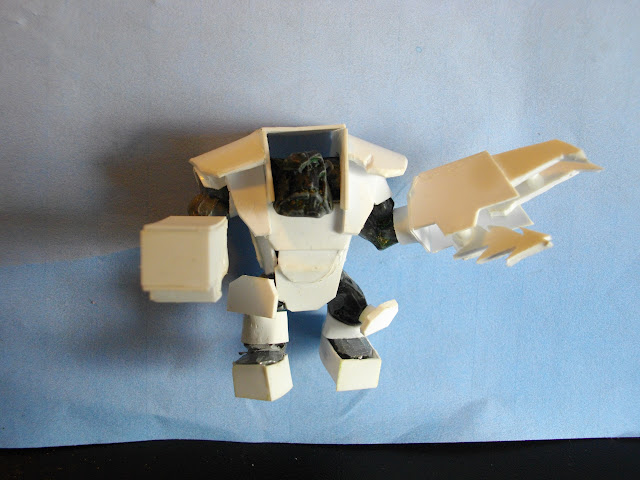
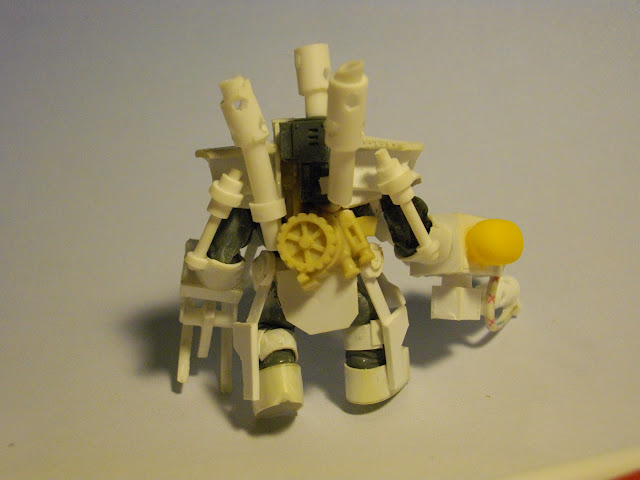
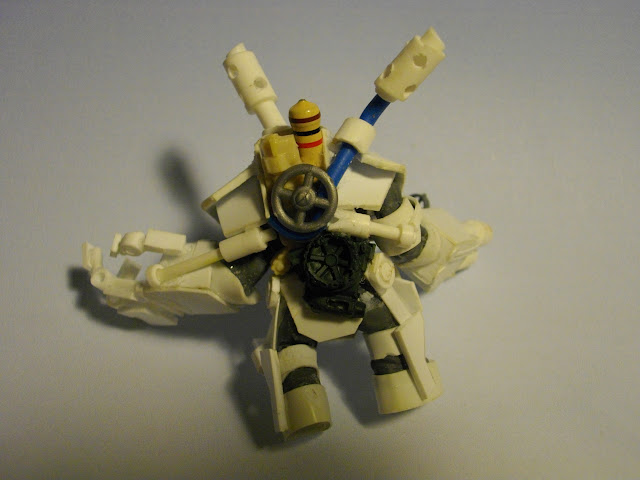
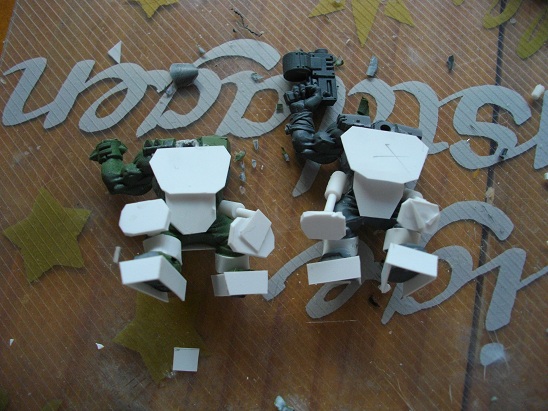
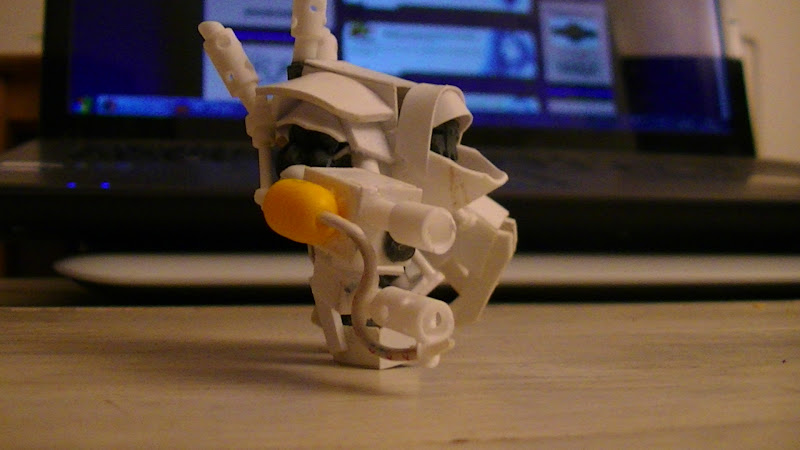
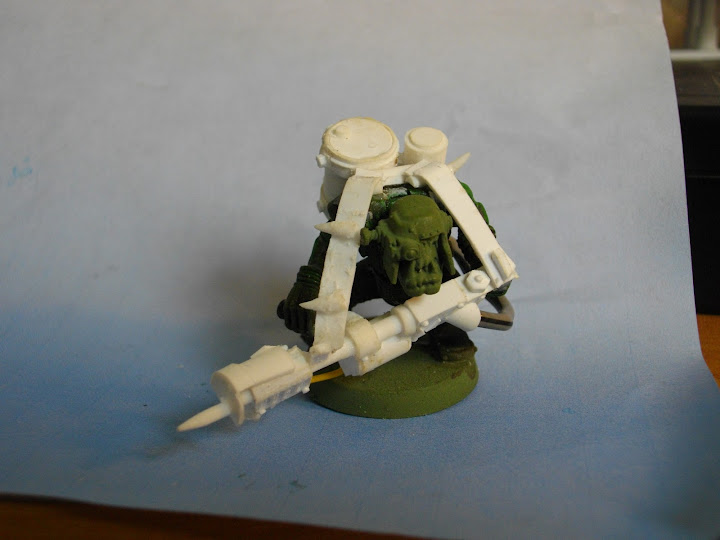
Step 2: "Add ded 'ard armor protekshun, boss!"
Picture 7
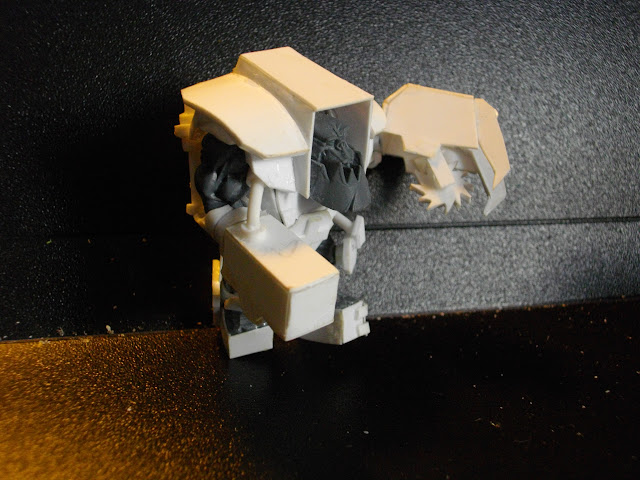
Now comes the painful moment to prepare the dorsal armor box. Between cutting into the figurine and trying to find an appropriate height (Too high: Giant Meganob. Too low: The head doesn't set right and the MN looks too flat), it can get frustrating. I begun this step by making vertical shoulder plates (pic 8)
Picture 8
This step will requirs tons of adjustments so the shoulder plates join against the model without too much empty space. Ideally those plates would set against the chestpiece to unify the whole thing. Once this is done, set a plate over the vertical shoulderplates (bigger than necessary, use cutter when the glue has set). Sometimes pieces will come apart when we rework a plate, do not give up!
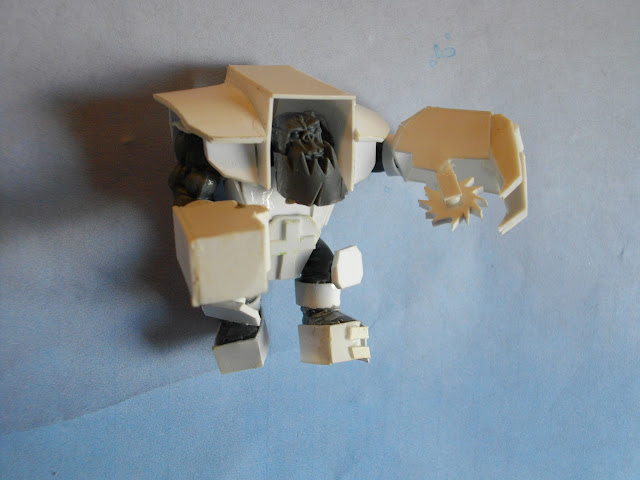
Picture 9
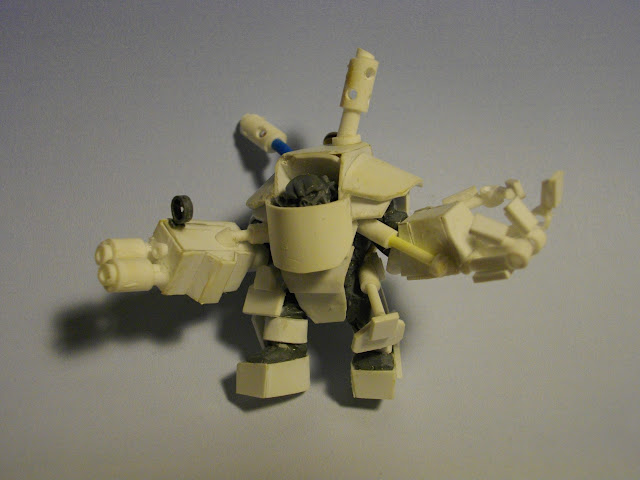
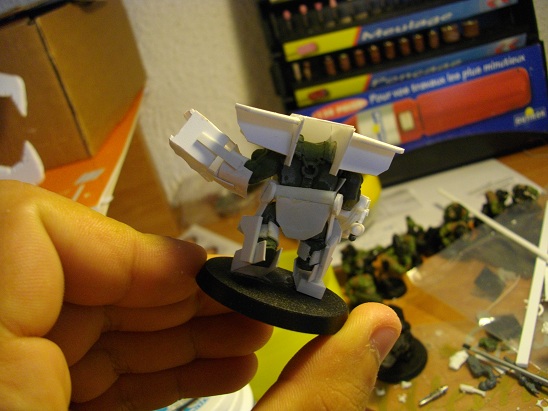
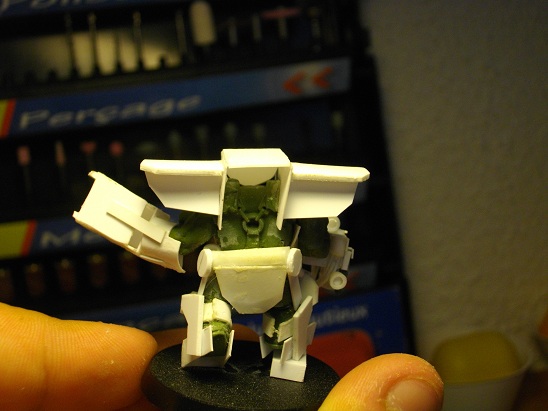
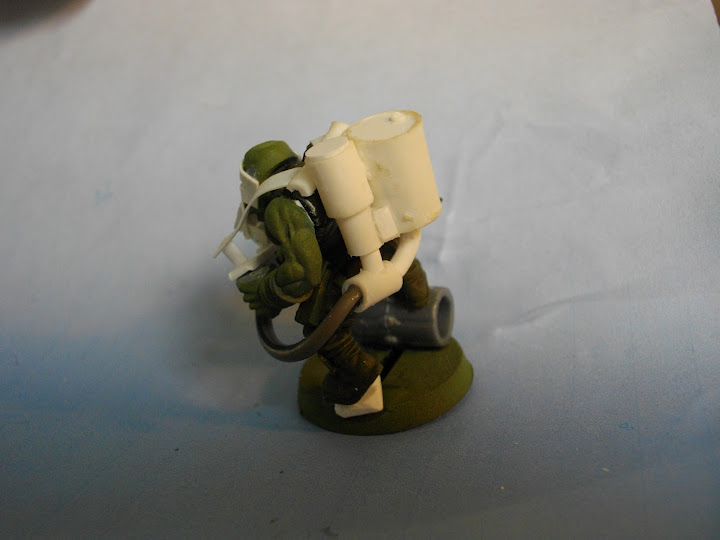
At this step it is advised to set a piece of plastic behind the head of each figurine, it hides the thinness of the plasticard and hides the depth (pic 9). Time to set the wings of our miniature airplanes! Some folks spoke out against these enormous shoulder-wings that they find ugly or not believable. For my part, I find it makes the charm of my meganobz, giving them a massive, 'knight of the scrapyard' look. You are free to not make these or make smaller ones, it's up to you. AT this step (pic 9) the meganobz look like planes on legs, don't worry, adding arms and big weapons will rebalance the model. Important tip: cut the shape in plasticard, give it a curve by giving multiple small bends with a pair of flat pliers, then file at an angle so the plate flues easily on the vertical shoulderplate. You will notice on pic 9 that I already, at this step, added the iron jaw. They can appear large, but once again we cut too large and use a cutter later on.
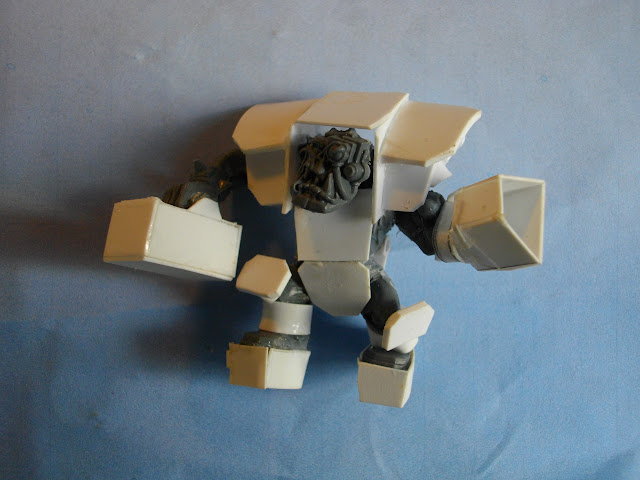
Picture 10
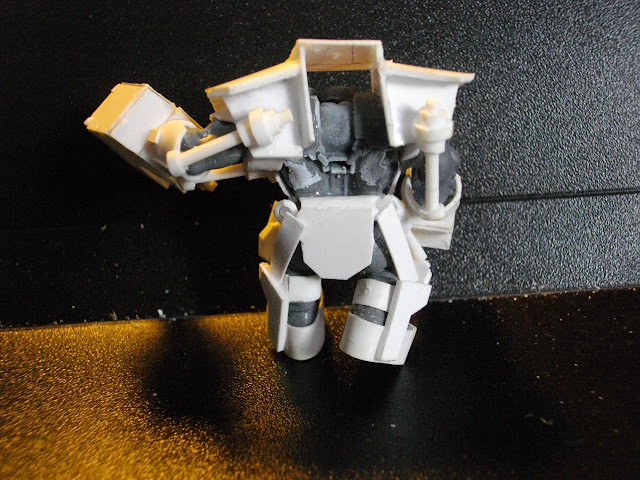
Now we start to give body and volume so our meganobz no longer look like airplanes. Glue the arms while considering the large size of the weapons that will go on them. You can cheat! Like adding a bit of tubing to set the arm further than the body, what matters is that we don't notice in the end. I even remember one arm cut over the elbow, glued to a tube that was glued directly under the shoulderguard! Also, besides the challenge of the tube holding on, it is a credible position as it'S easy to adjust the arm as we wish. However we need to improve the technique to have the arm hold on (small iron rod? I don't know). Glue extra armor plates under the shoulderguard, at an angle (pic 10). This has two uses: it gives volume to the model by hiding the relative thinness of the plastic, and it hides whatever mess we used to set the arm properly (if there is a mess).
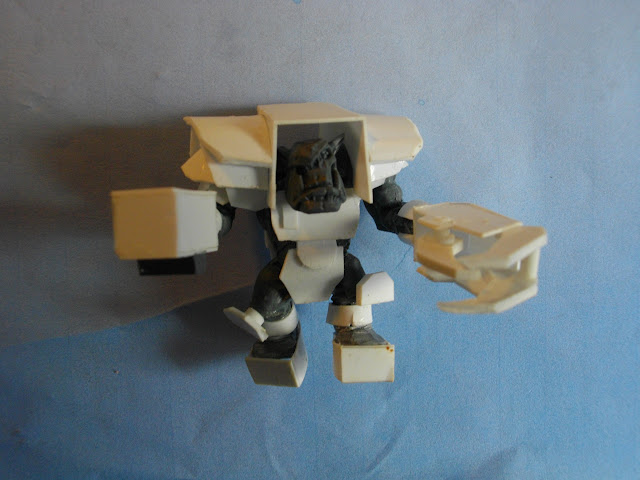
Picture 11
At least, attach the hips with the feet by creating these armor bits on the sides of the model. Keep in mind the higher part is like a thigh, the lower part follows the tibia. That will help you see how to set each part. Have a look at the official meganob, that will also help.
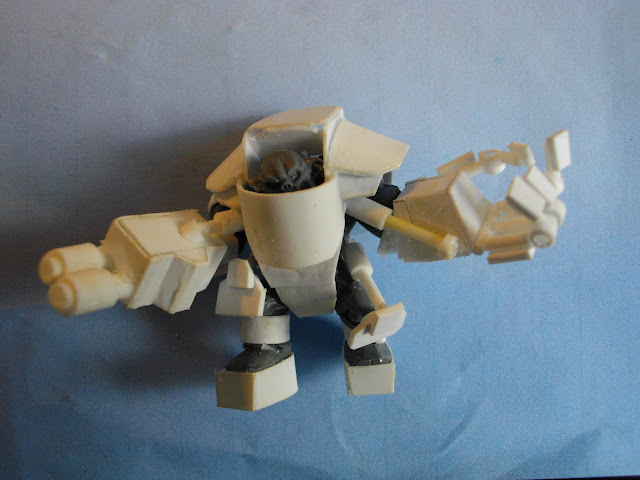
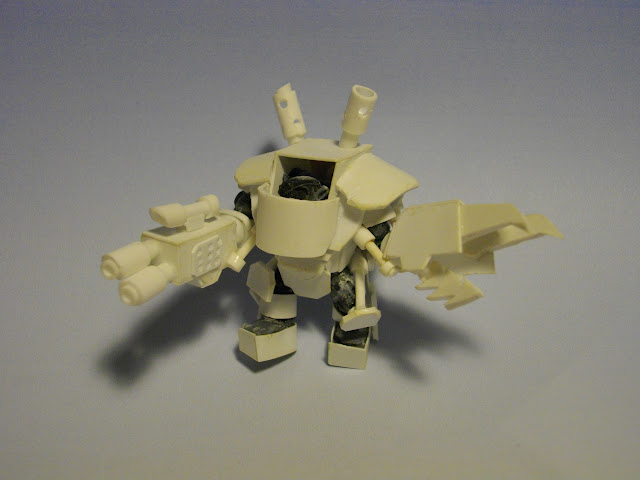
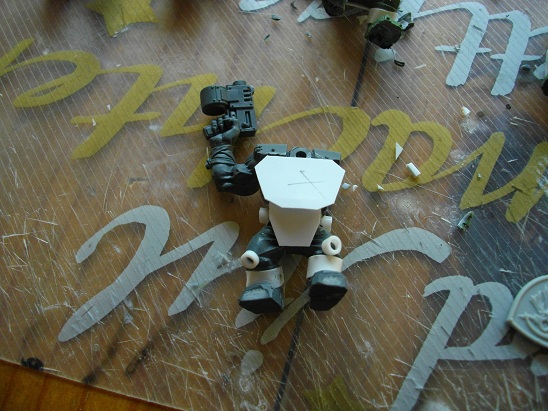
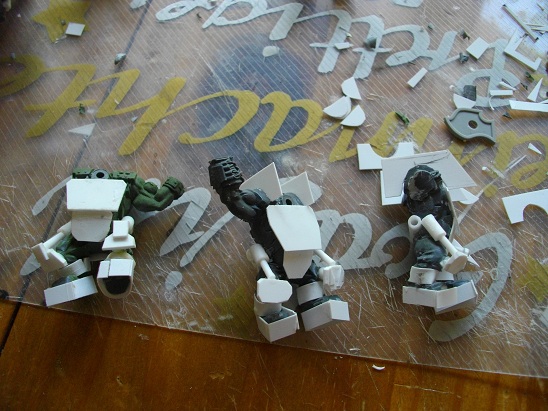
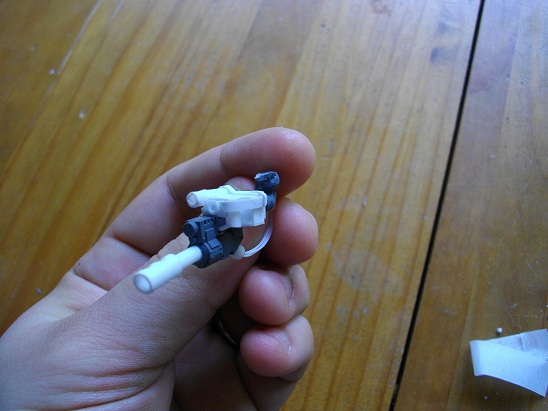
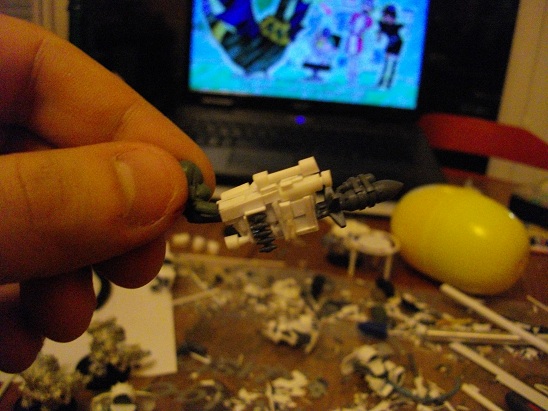
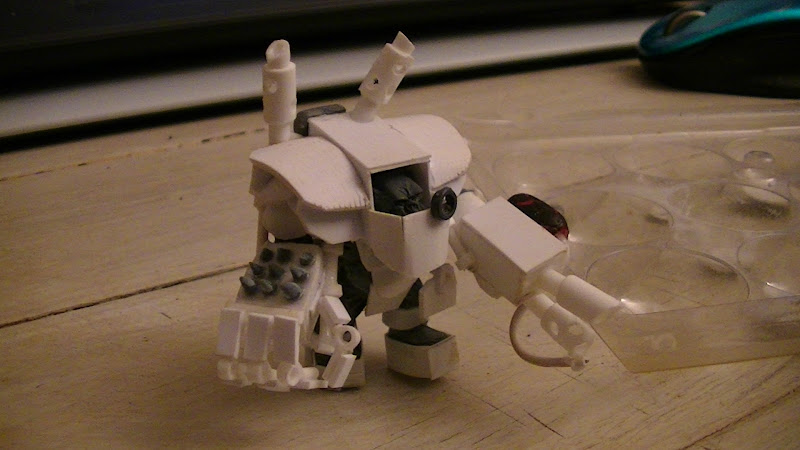
Step 3: "Dakka Dakka DAKKA Boss!"
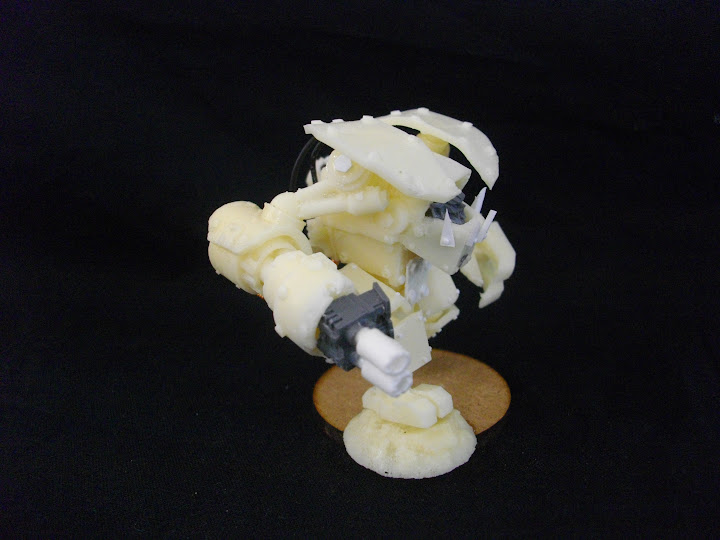
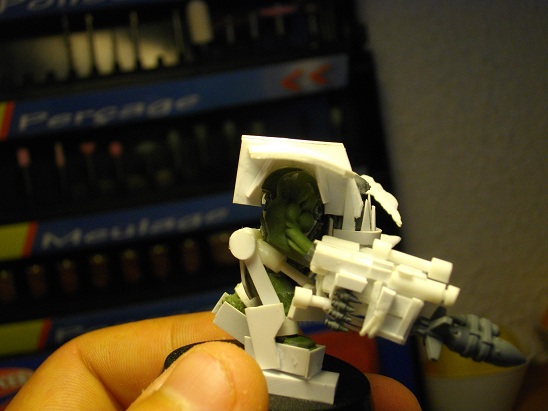
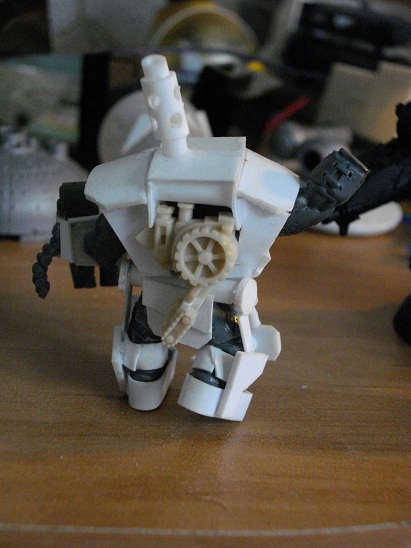
Now that we have a nicely protected meganob, we must arm it properly! Luckily (or not) the codex is a little thin on options, so we need power klaws and for the other arm a choice of twin-linked shootas, or kombi-weapons with rokkits or skorchas. The basis for each weapon or even klaws is similar: a box of plasticard (pic 12) on which we'll build the klaw or bits to make a gun (pic 13). I can't explain better than the pictures (pic 14/15). Keep in mind to look at the official meganob and check the net to make something believable. Don't forget also that we must 'appear' rather than 'be' in model-making, so even if in reality it couldn't work, as long as it looks believable when built, it's good.
Picture 12
Picture 13
Picture 14
Picture 15
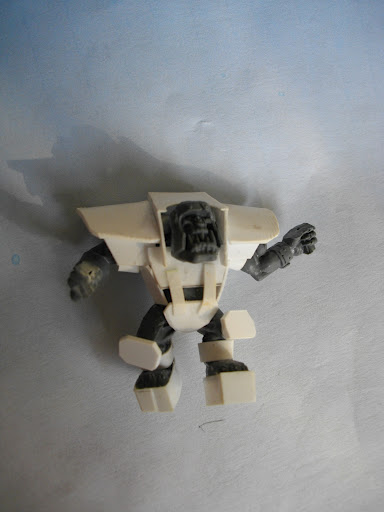
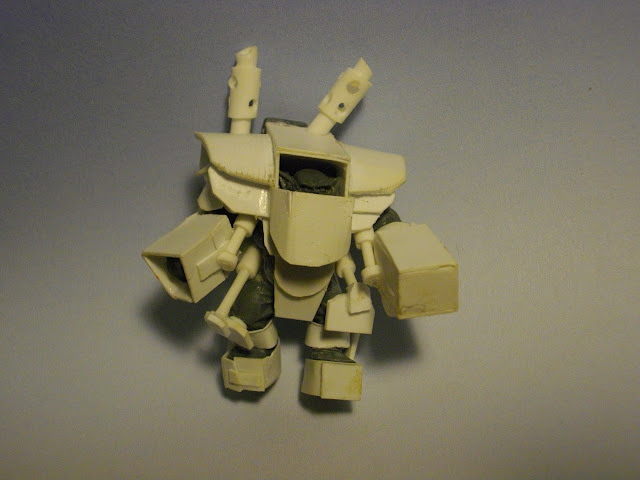
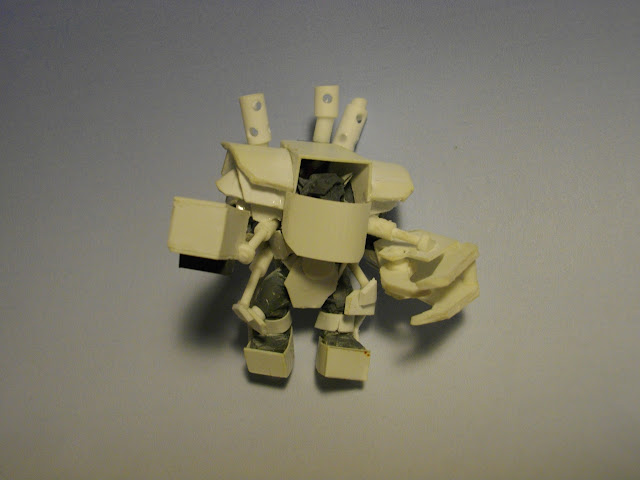
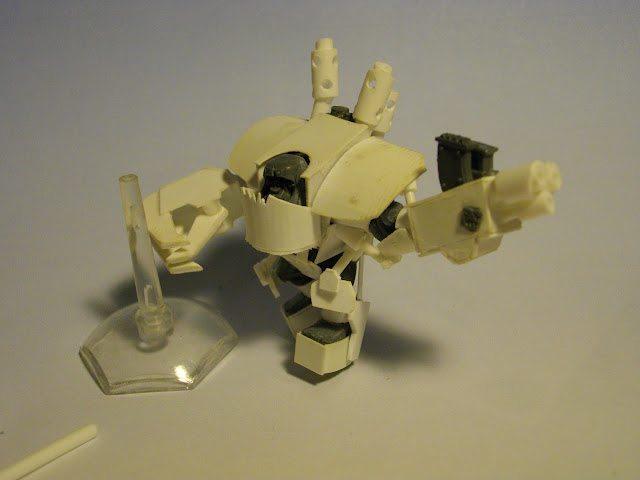
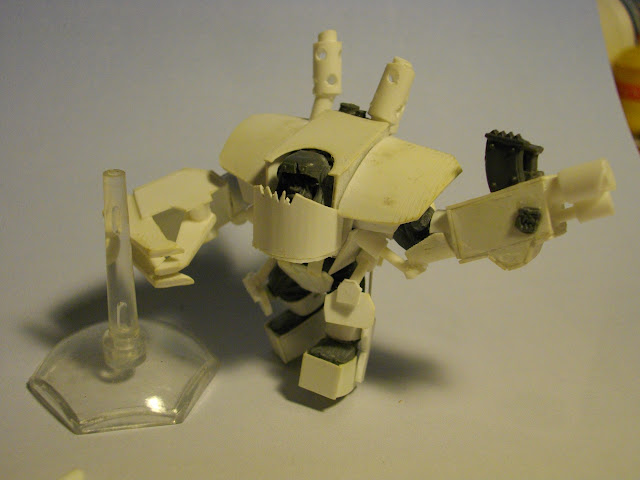
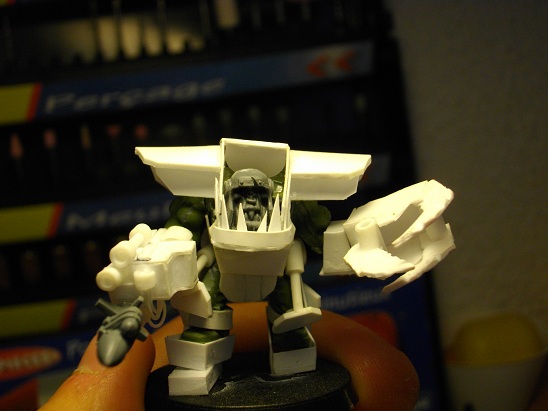
Once this is finished, you're done with most of the work! You should have something like pictures 16 and 17. We're still not finished! We will need to dress our model severely to give it its final volume and a unique charm.
Picture 16
Picture 17
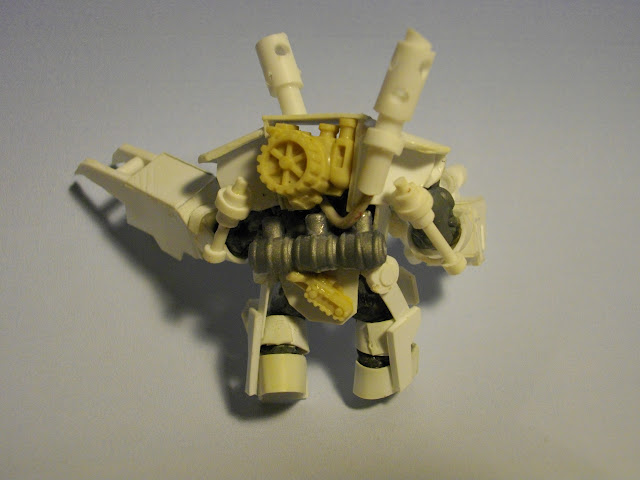
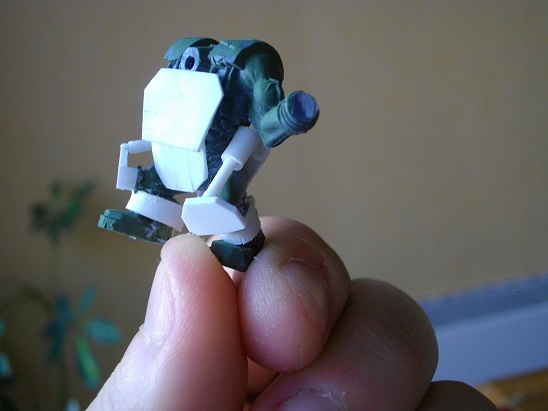
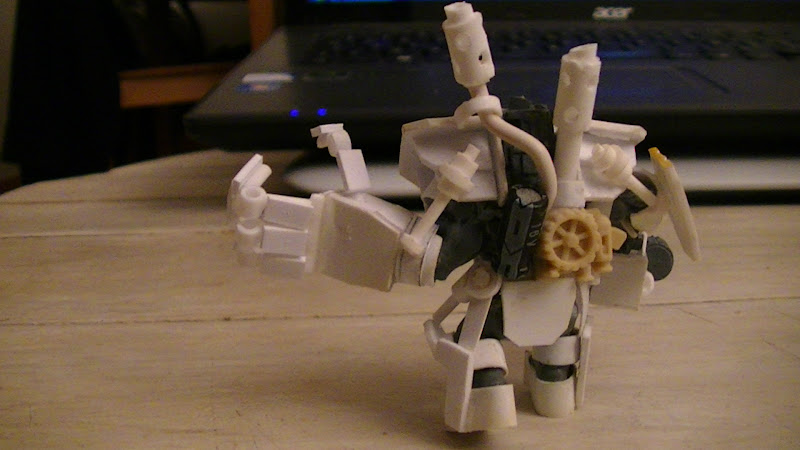
Step 4: "I'm da most proppa-lookin' boss, he he he!"
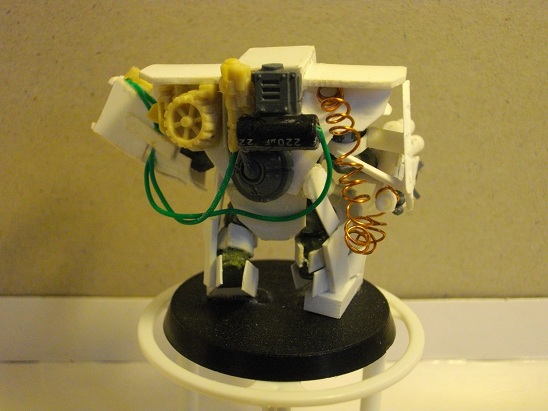
A meganob worth his teef is a meganob that leaves an impression, so the second objective (after killing and doing a lot of noise) is to make all boys around green(er) with envy. For that we need to hit the bits box and think a bit. Each builder can do what he wants, and there lies the advantage of playing ork: We can go wild and make almost anything! Though there are some important things, obviously:
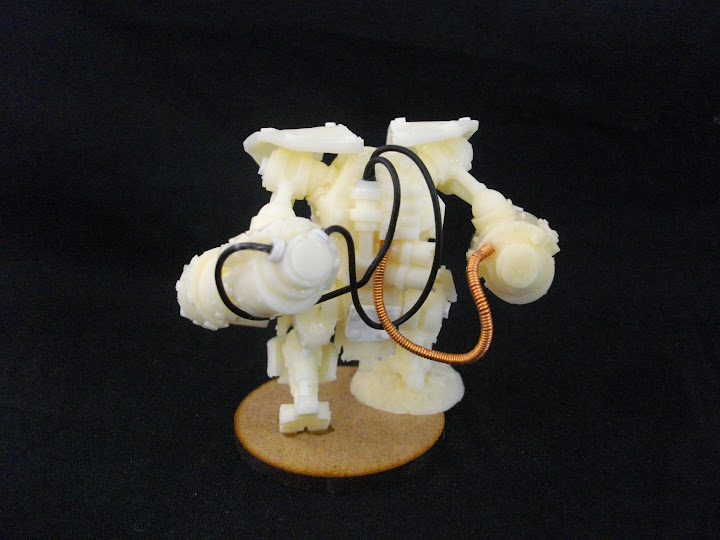
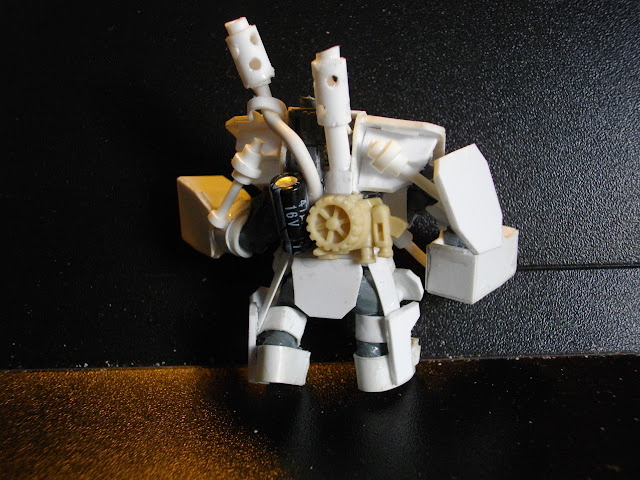
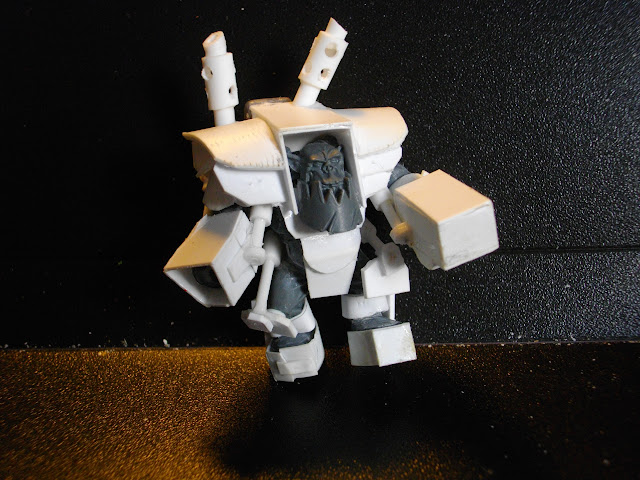
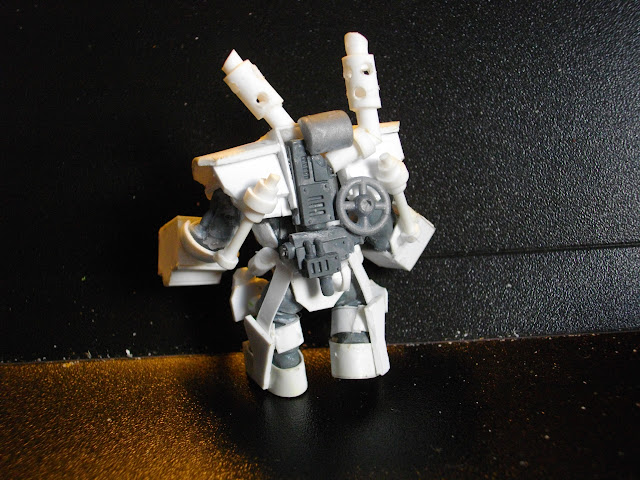
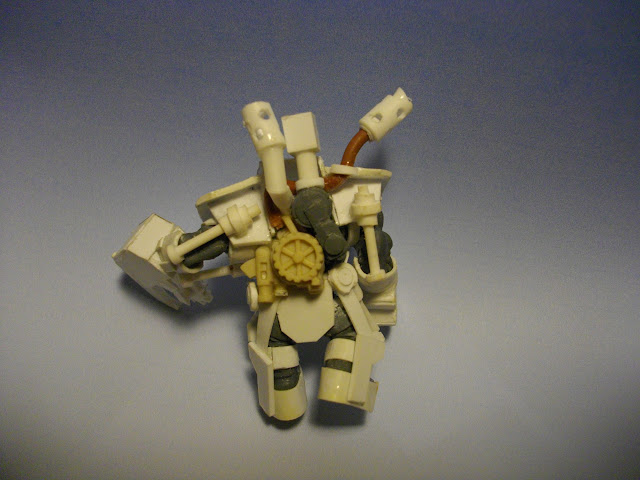
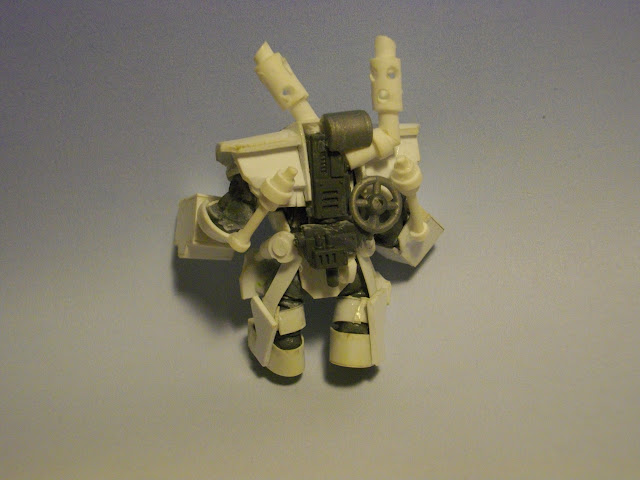
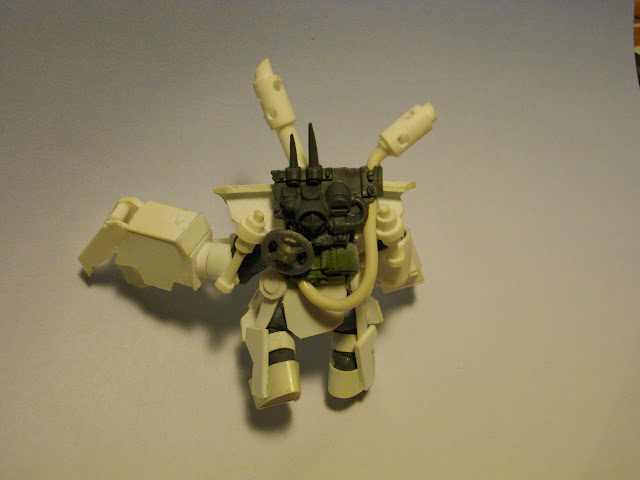
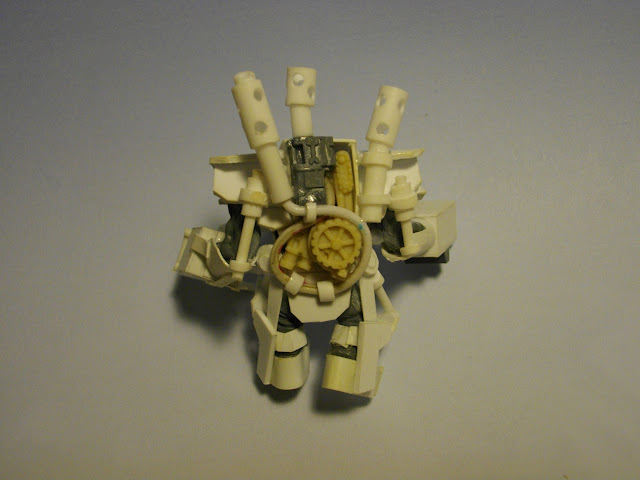
-Mechanical parts: Mega-armors are dubious-looking junkyard tech, but always flashy and noisy. Even on the 'softest' mega-armor I made (pic 18) I let some meganical bits visible. In this case half an epic Thud gun. You can see something more elaborate on pic 19: gubbins, something off a circuit board, electrical wiring, bailing wire... All these bits together, a bit messy, give a mechanical power source to the unit.
Picture 18
-Rivets: It is mandatory to add riveting. If I made the choice of larger rivets to make my meganobs more menacing, it is perfectly fine to use smaller ones. But in all cases we need them!
-Smokestacks and exhausts: As you can see on pic 20, it is easy to make believable exhausts with variously sized tubes. Again you can go wild, but if you want to stay tame, one well-set tube (pic 18) will do nicely.
Picture 19
Picture 20
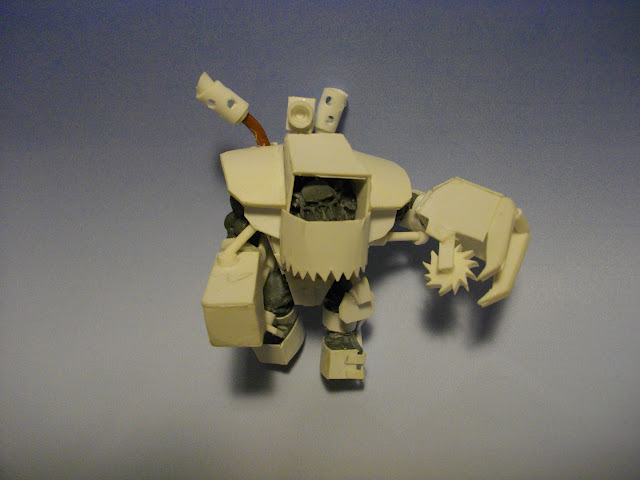
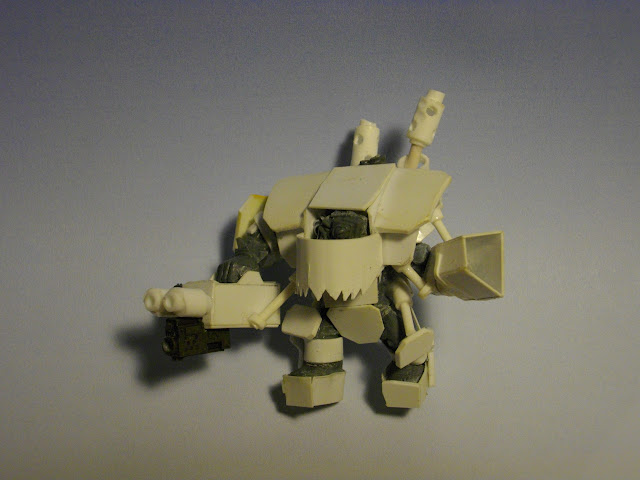
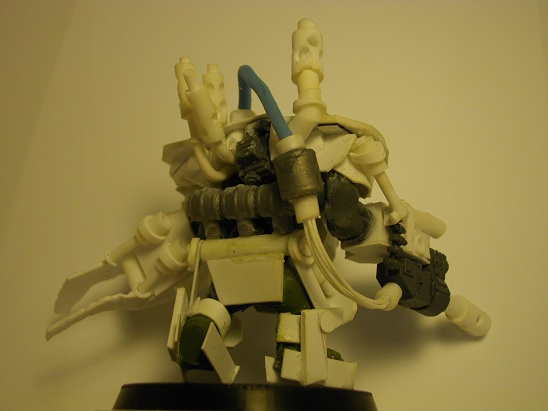
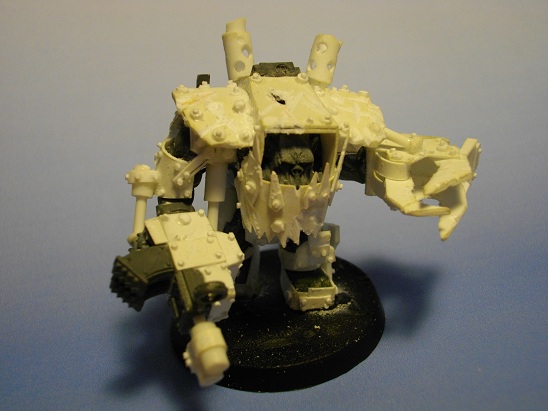
To conclude, here is a picture of a finished meganob, with battle damage:
final picture
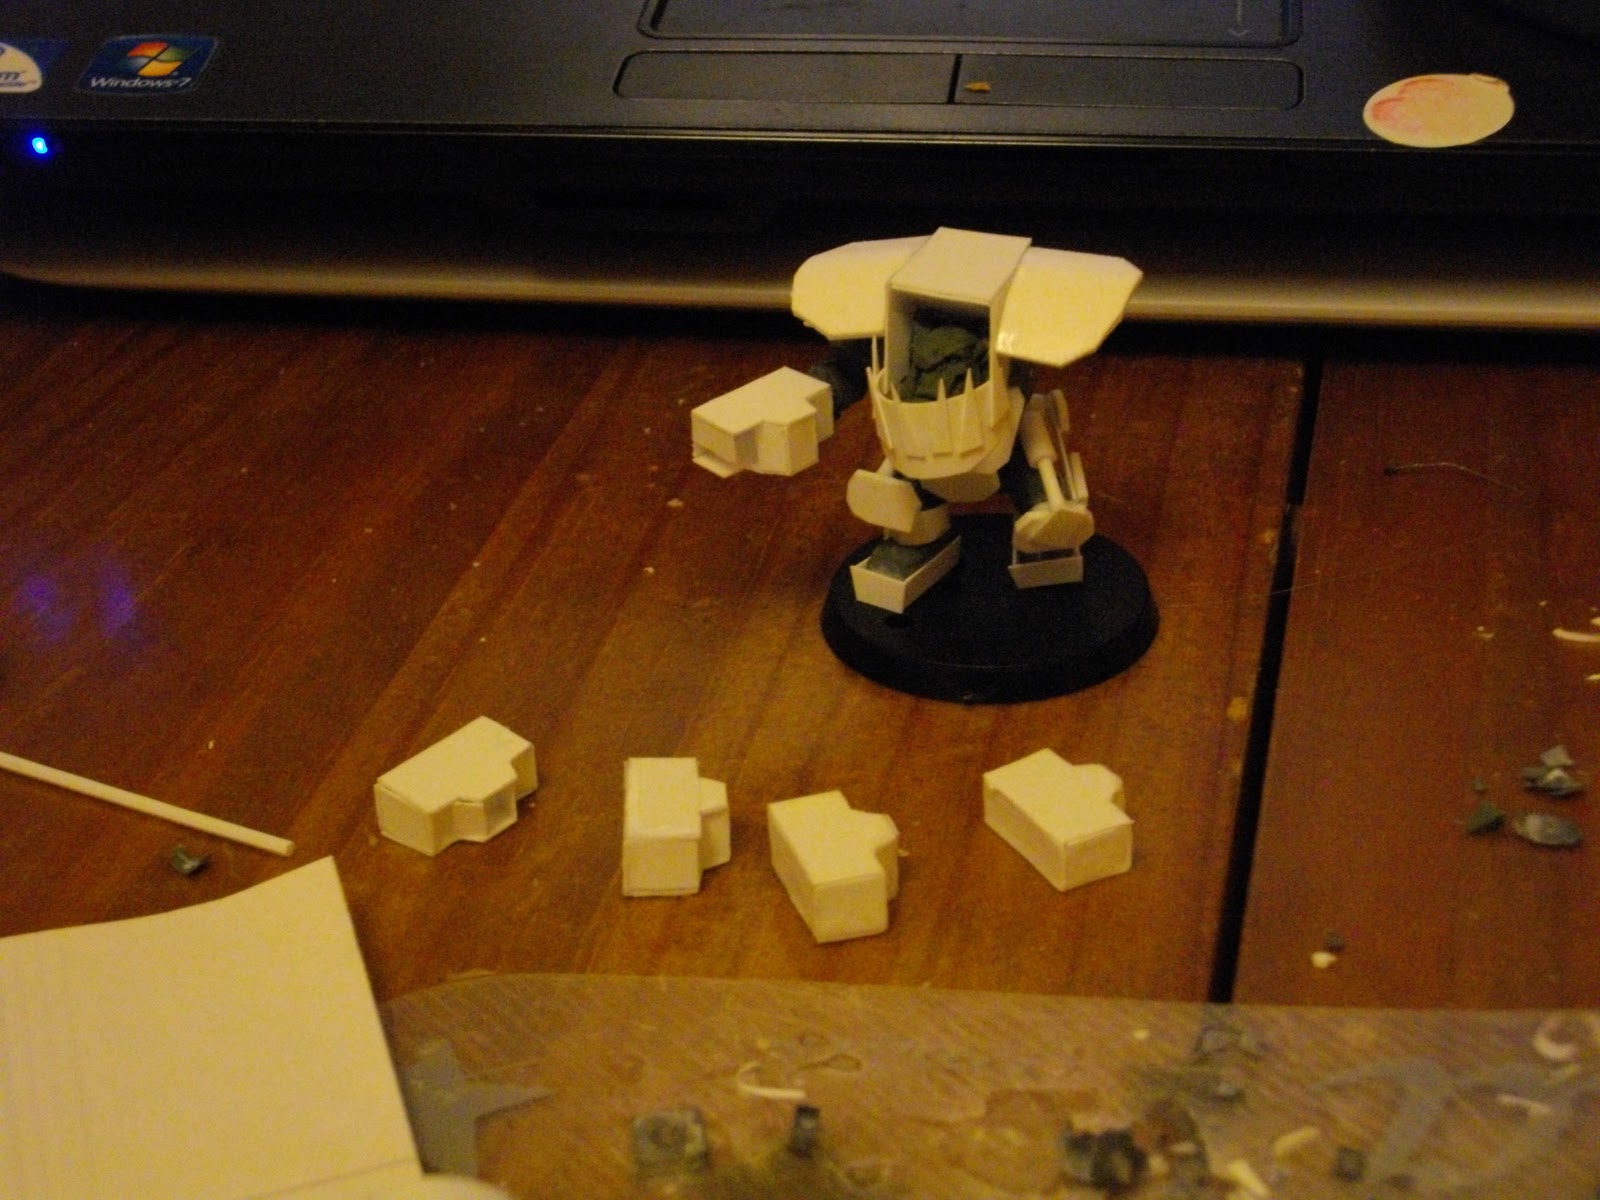
You will notice the addition of a plate on the top of the arm as well as some hydraulic cylinders going from the shoulderguard to the arm (really useful all over, those shoulderguards). They are additions that I made on each meganob, they take a while to make but add a real visual impact. I also added extra armor plates under the shouldesr to give more volume and hide the base of each cylinder (which were in fact glued directly to the arm... it's all about appearance). Still, the model is imposing, believable and that's our main goal! (Besides of course you liking the model.)
I hope this tutorial will be helpful, thanks in advance for all C&C, don't hesitate to ask me more information or show me what you built thanks to this file.
Très bon travail! (And that's about the limit of my French ) I always think that you can't be a proper Ork player unless you do some sort of scratchbuilds, so I guess that makes you the most proper Ork player ever!
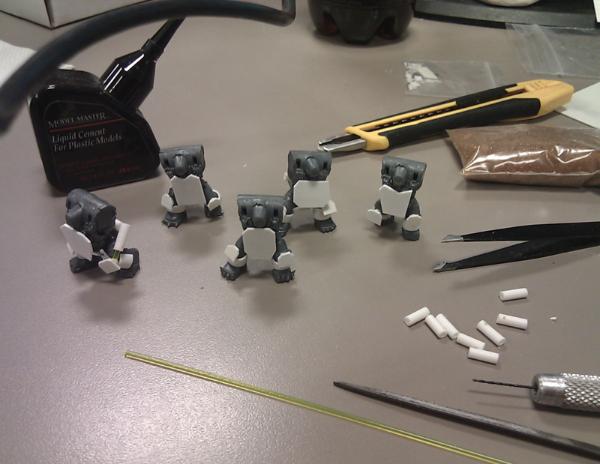
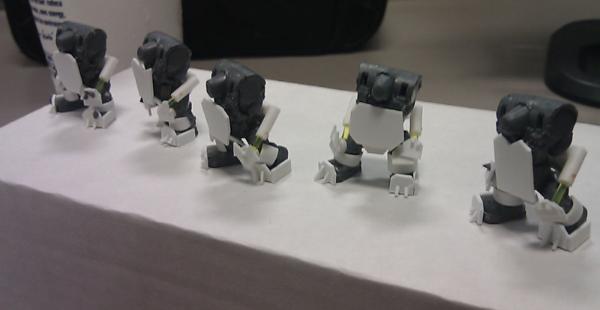
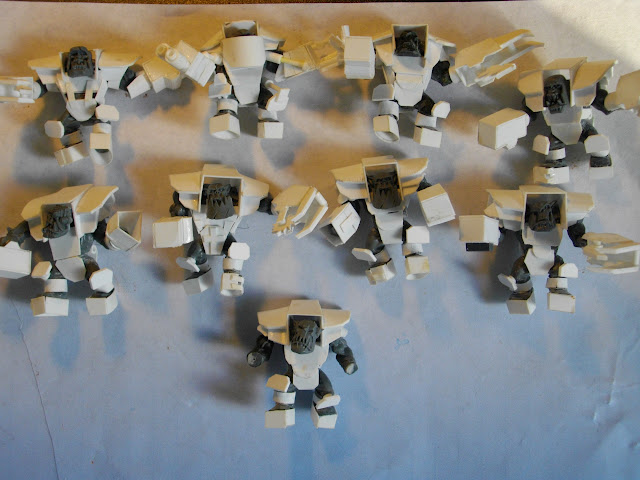
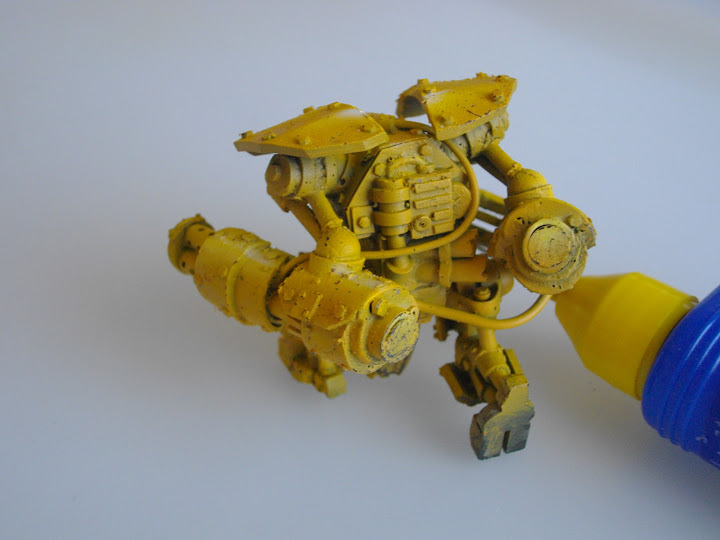
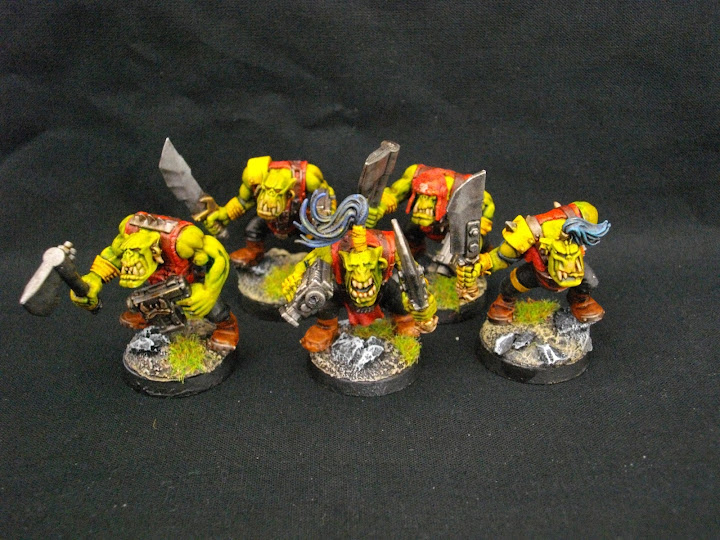
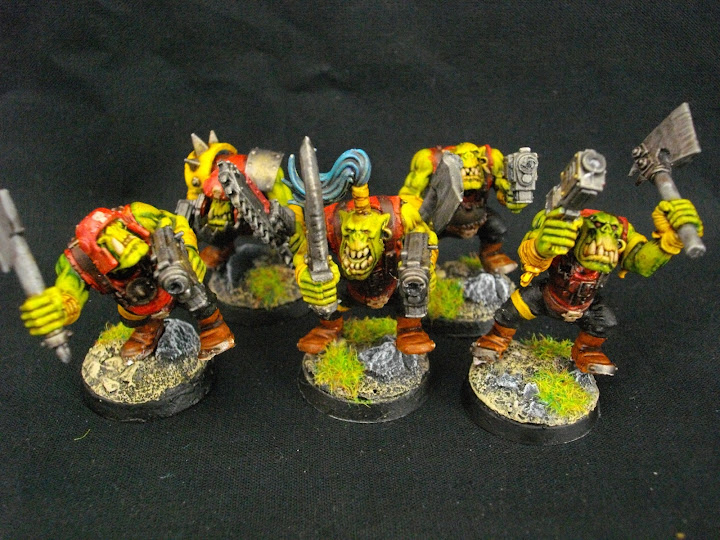
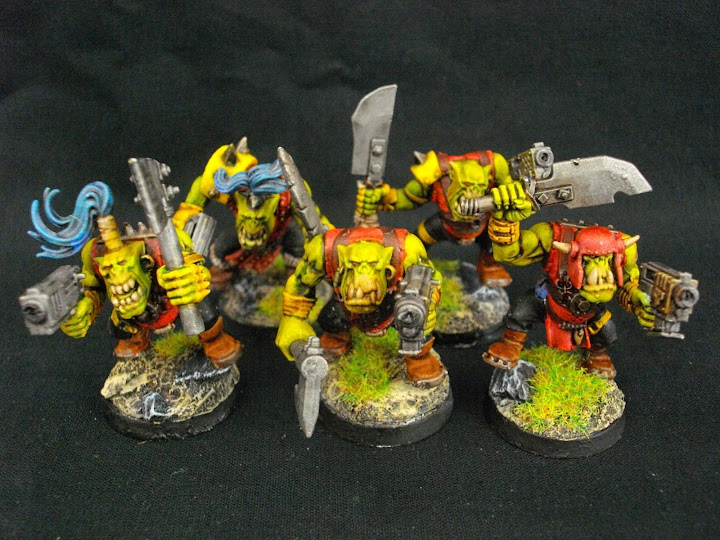
Finally finish ! Here it's 9 MeganobZ and a MegaWarboss full scratchbuilt by my little fingers ! I hope my customer will enjoy himself very much with them
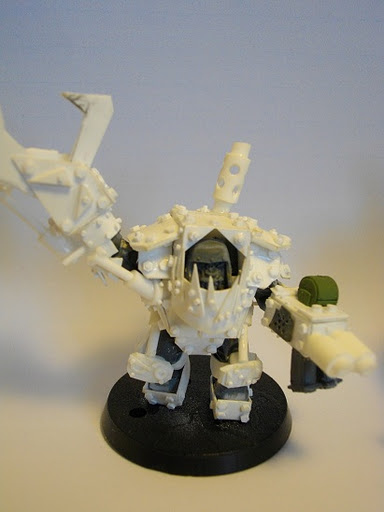
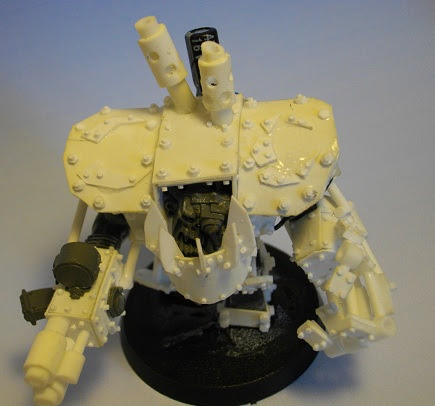
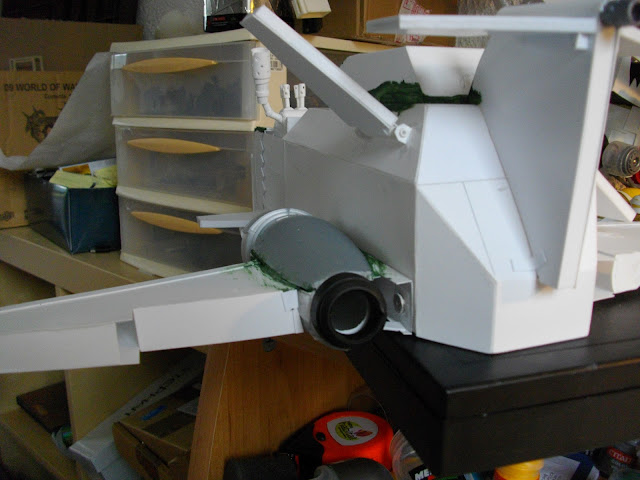
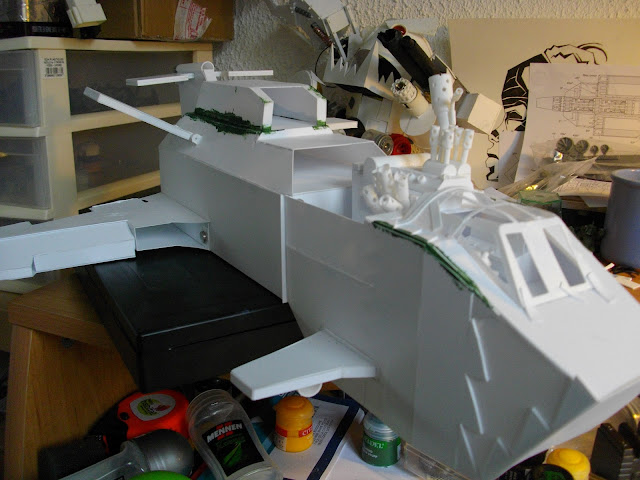
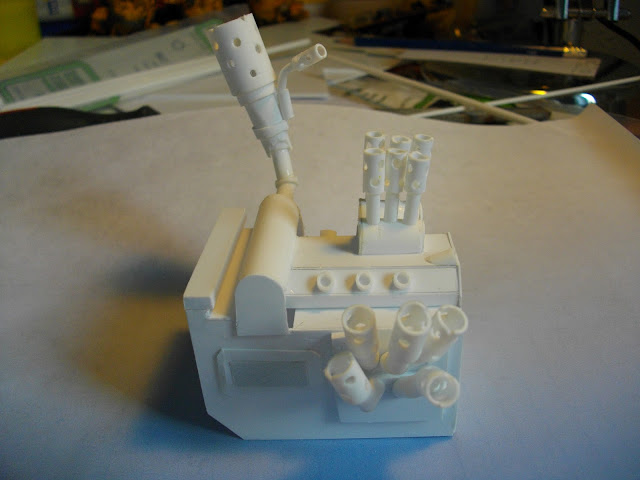
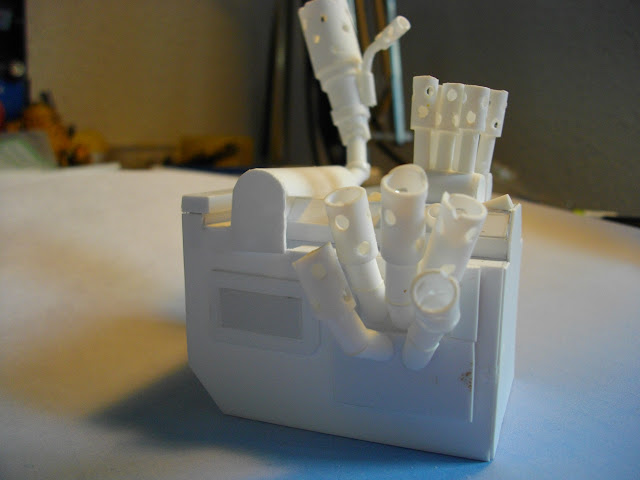
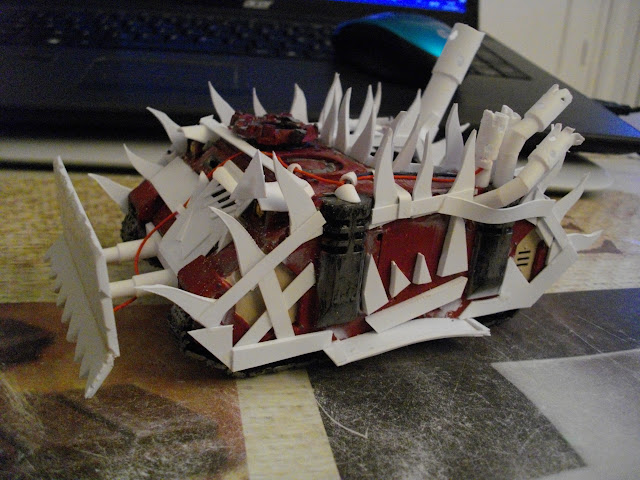
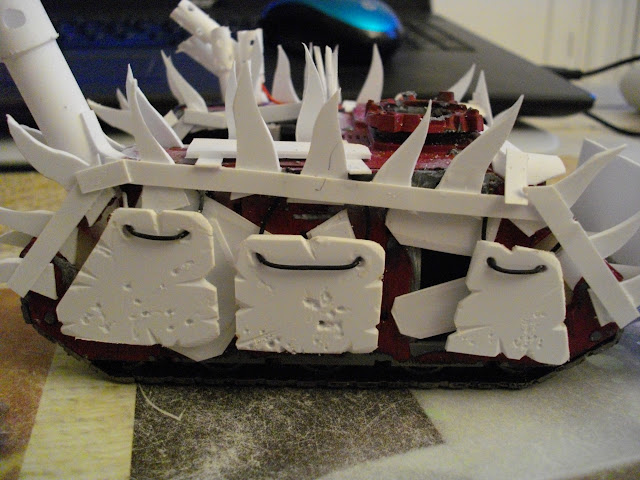
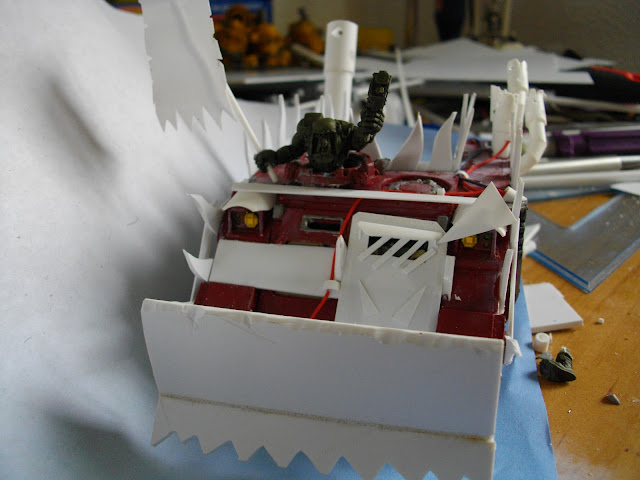
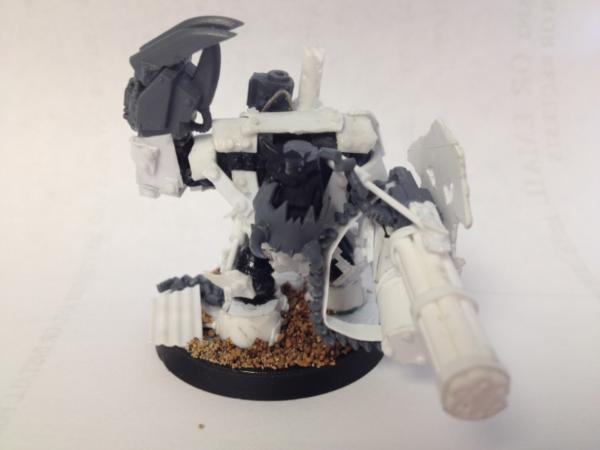
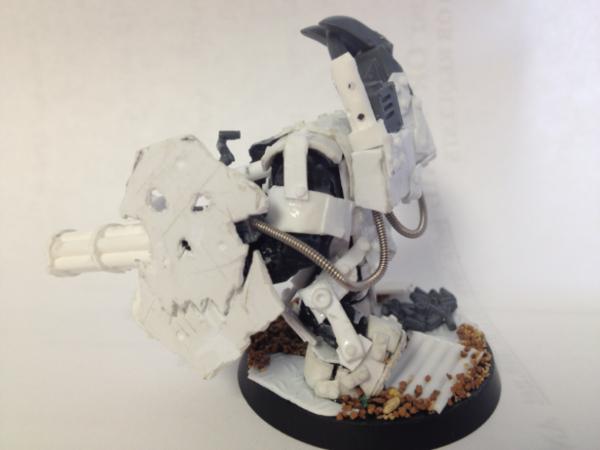
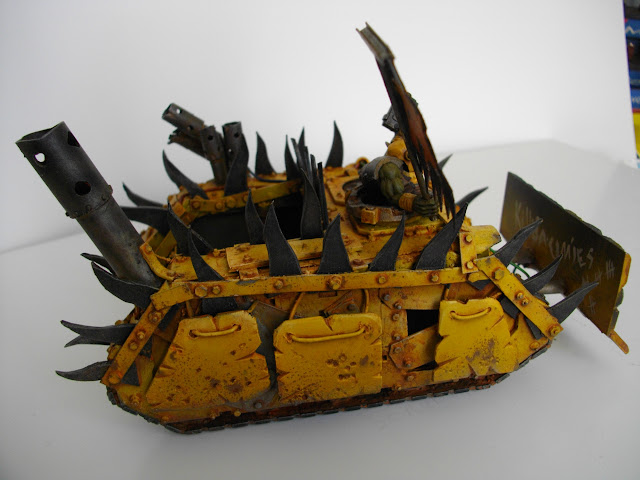
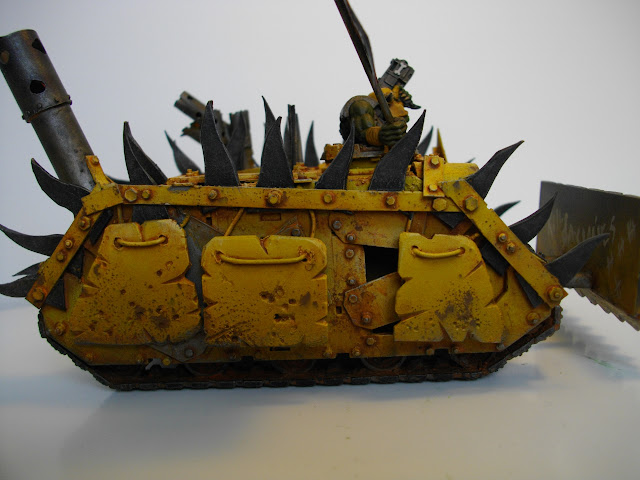
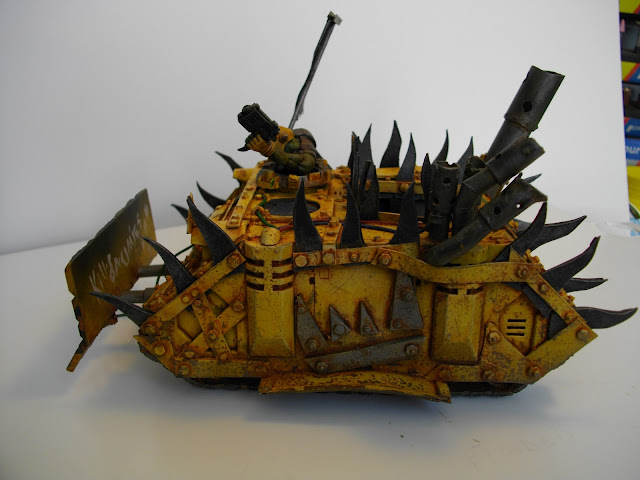
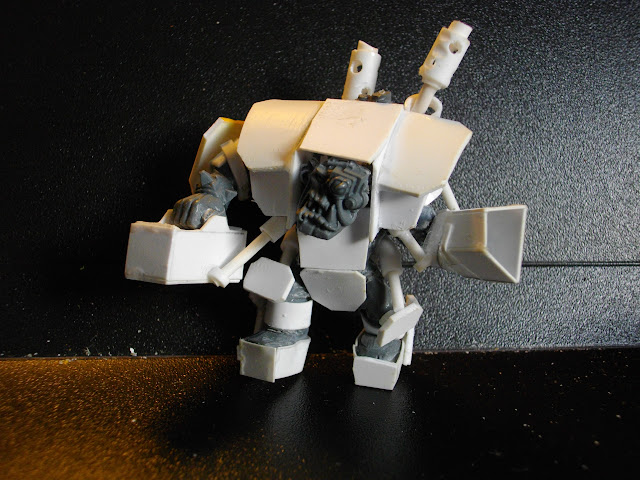
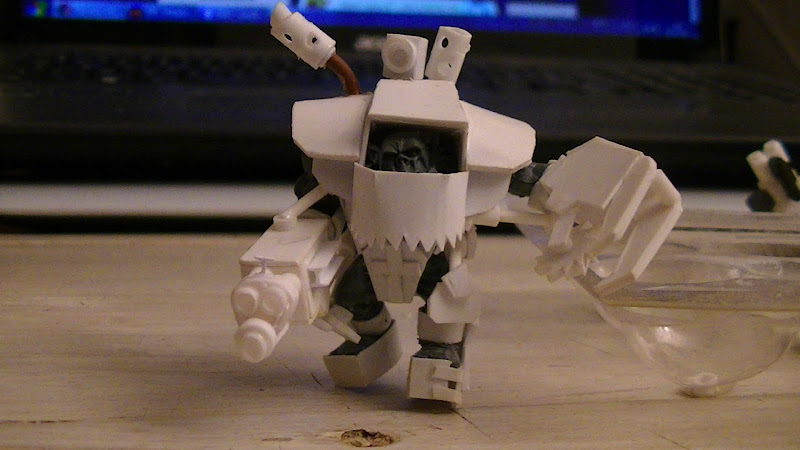
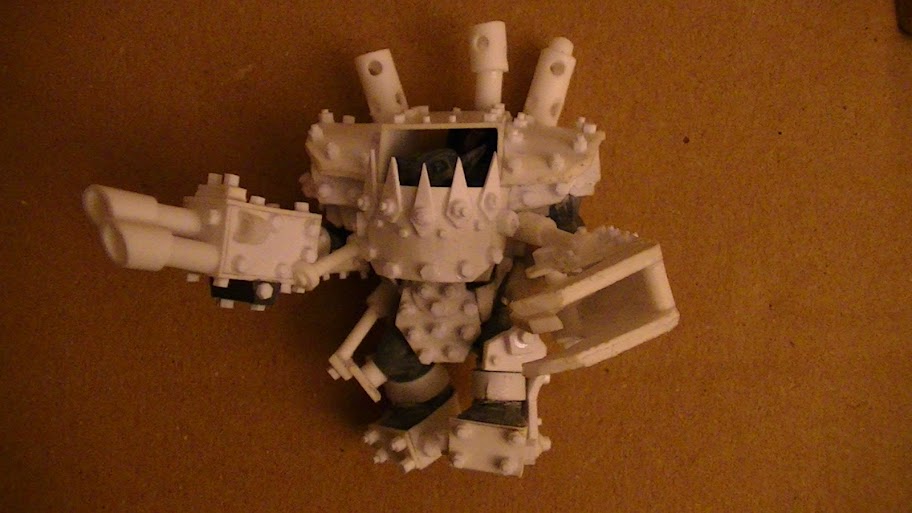
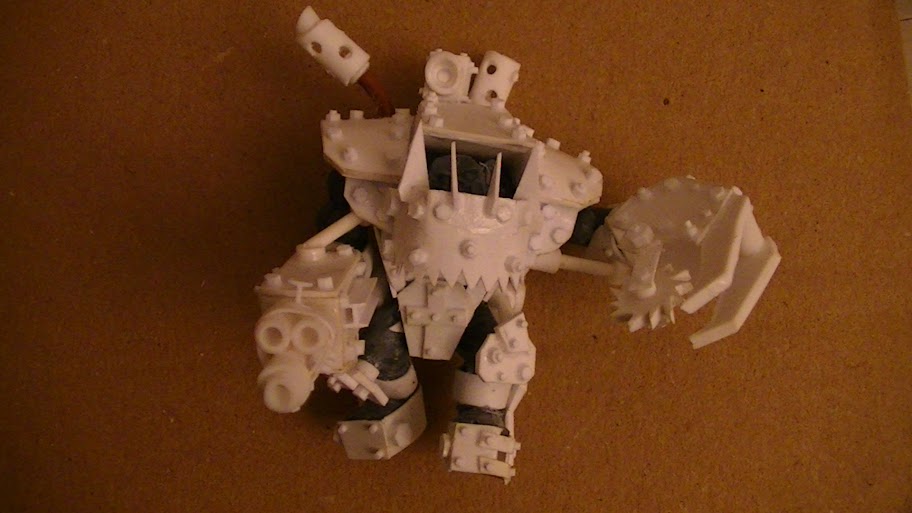
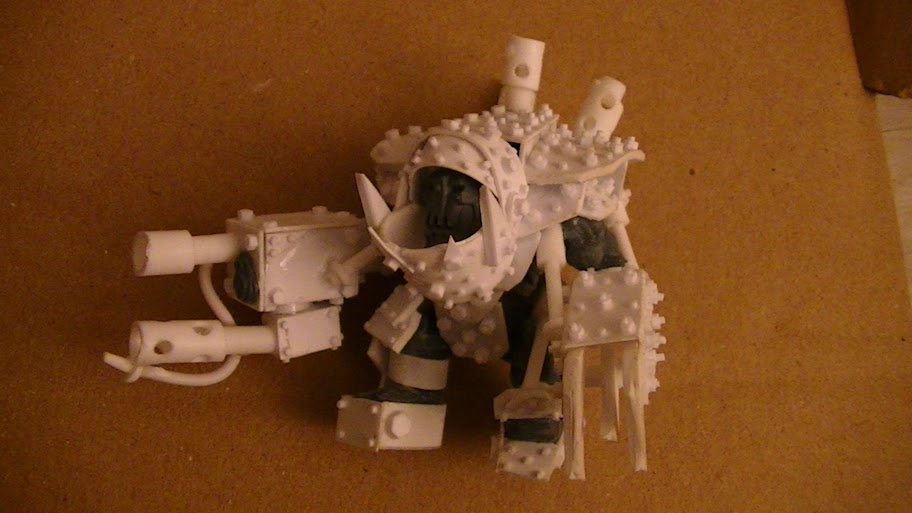
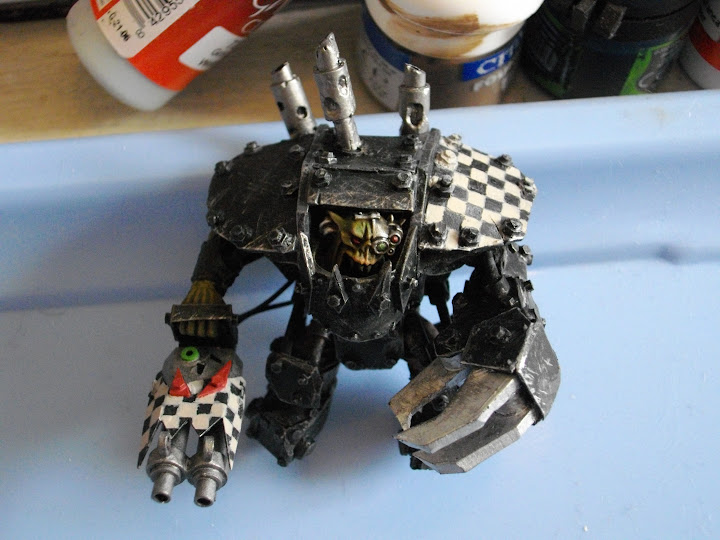
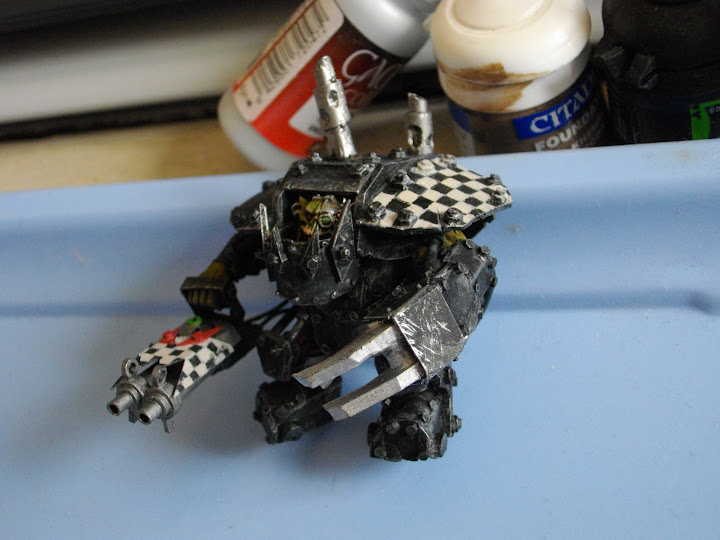
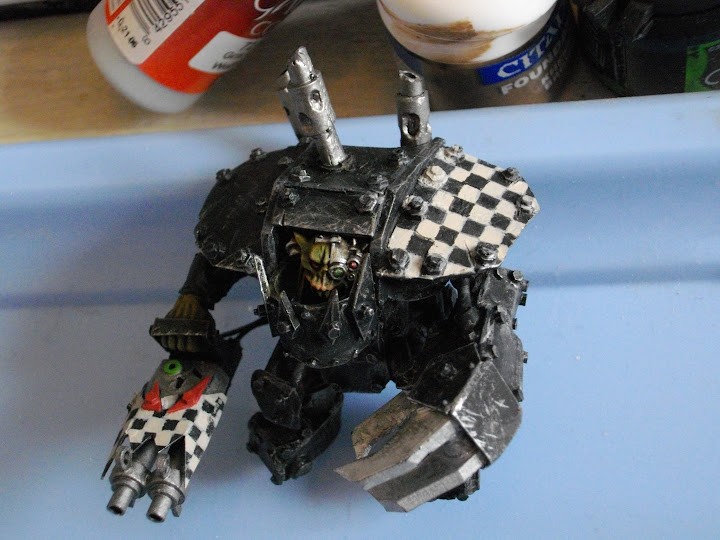
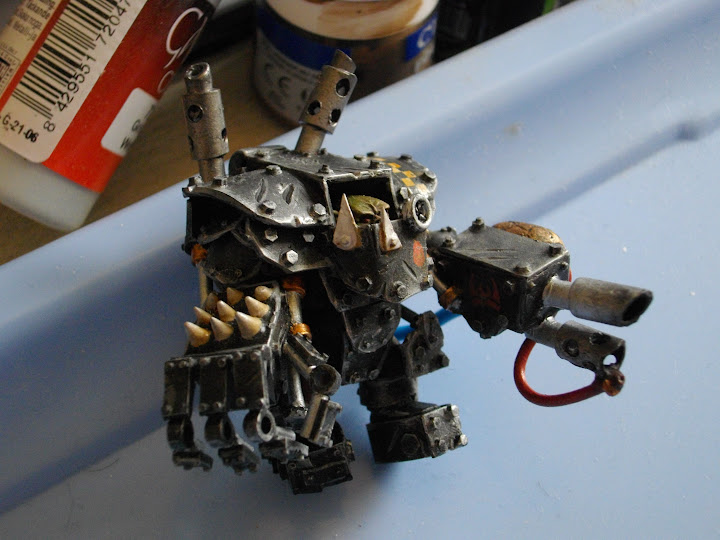
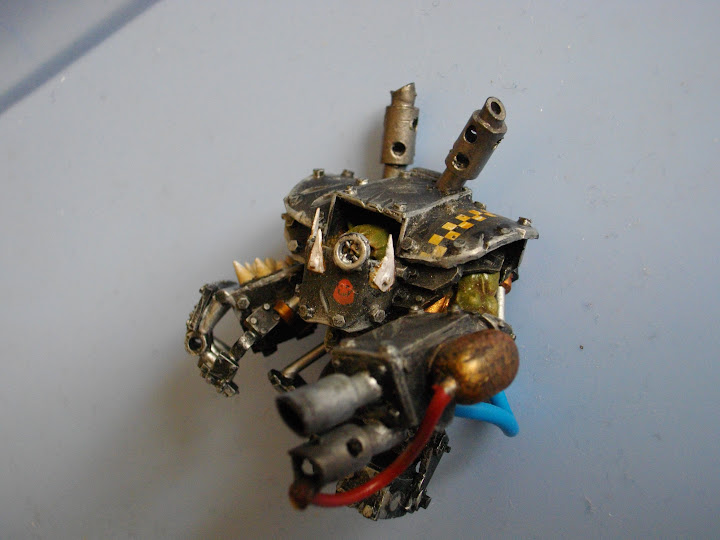
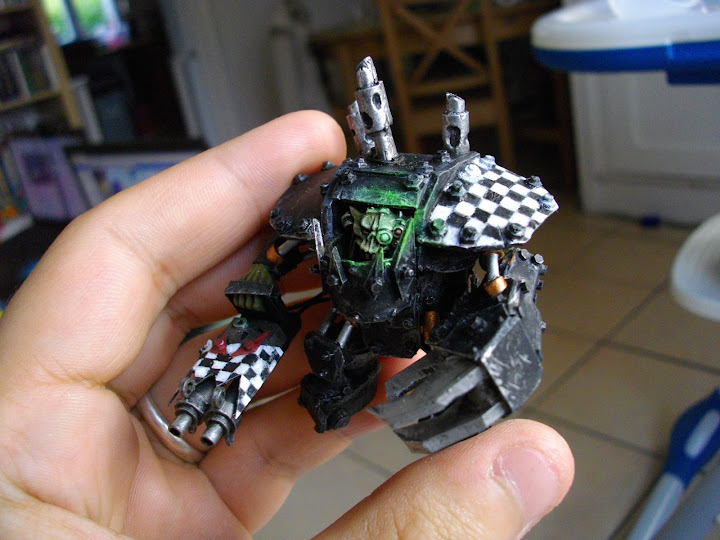
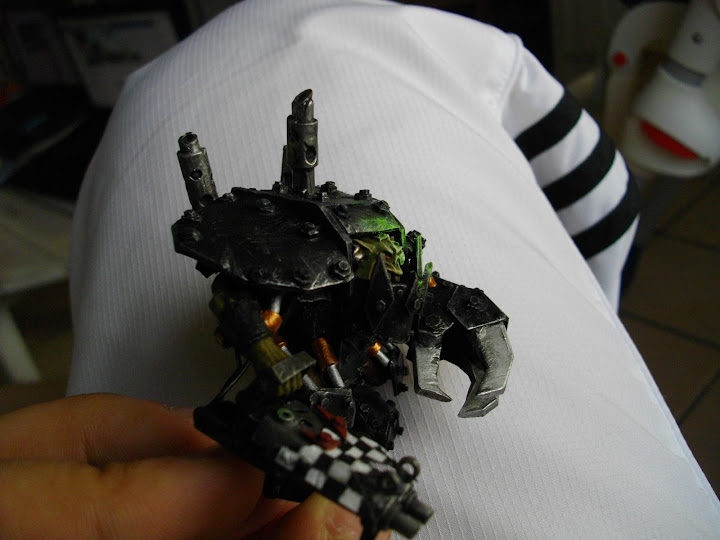
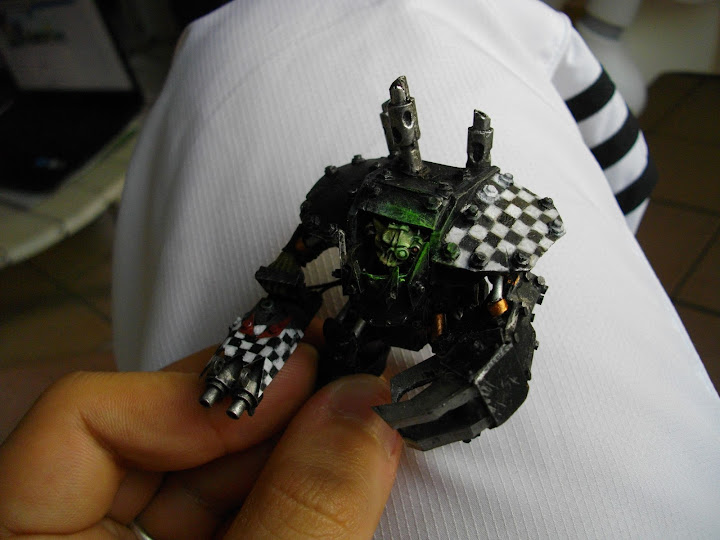
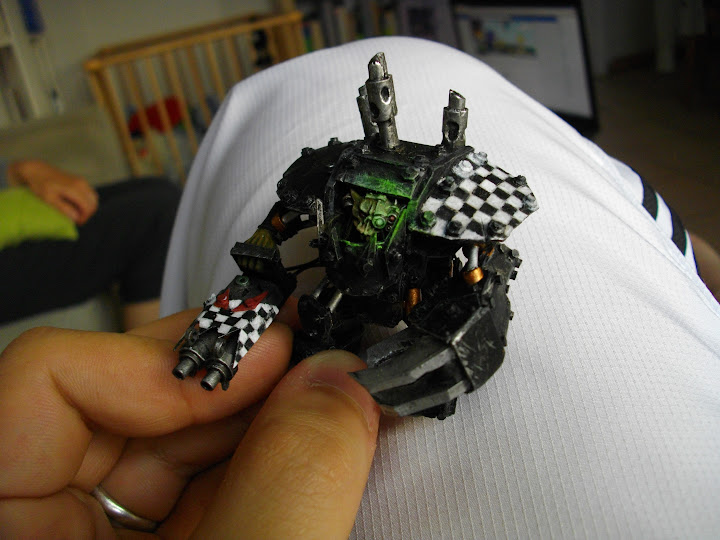
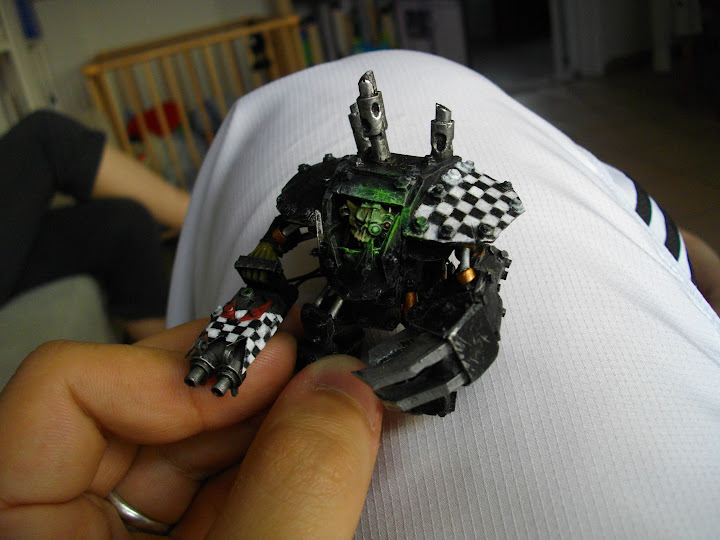
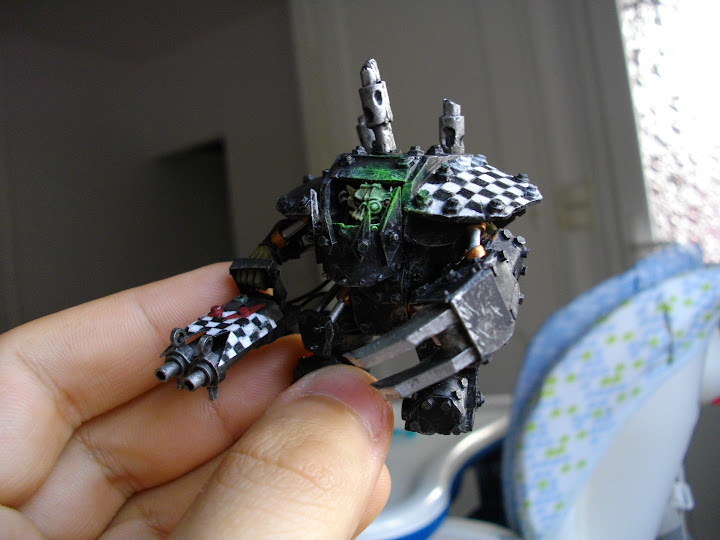
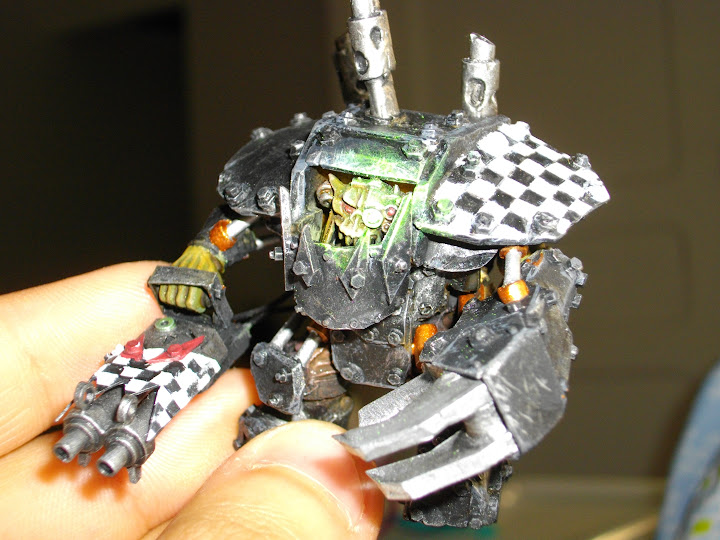
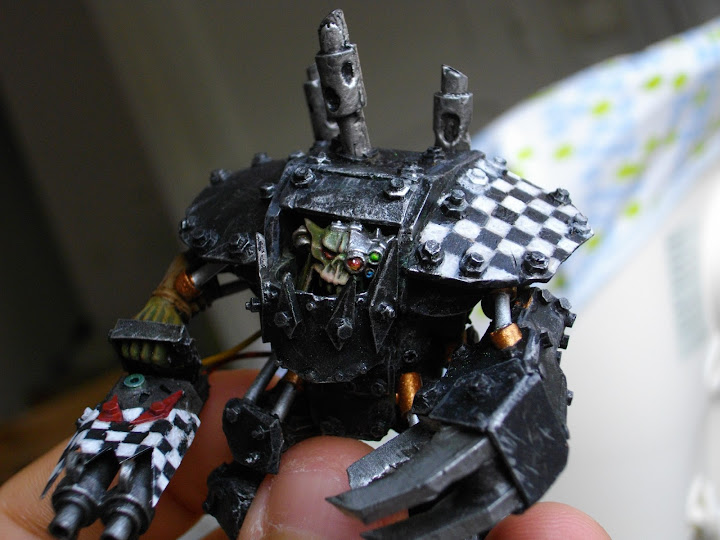
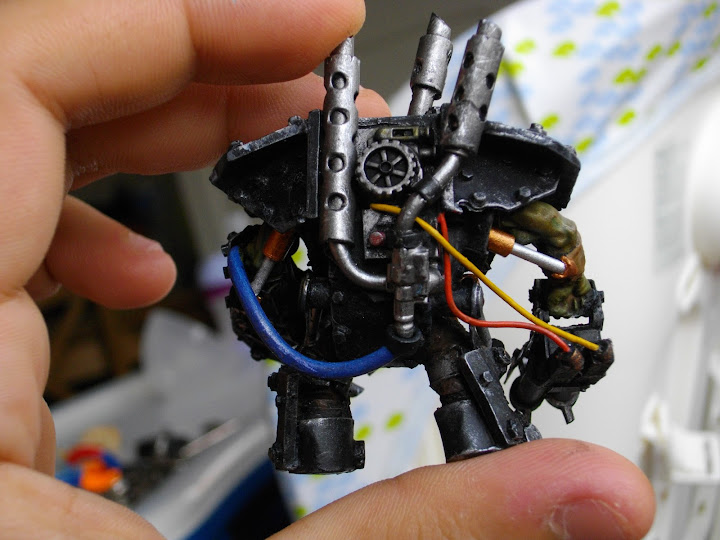
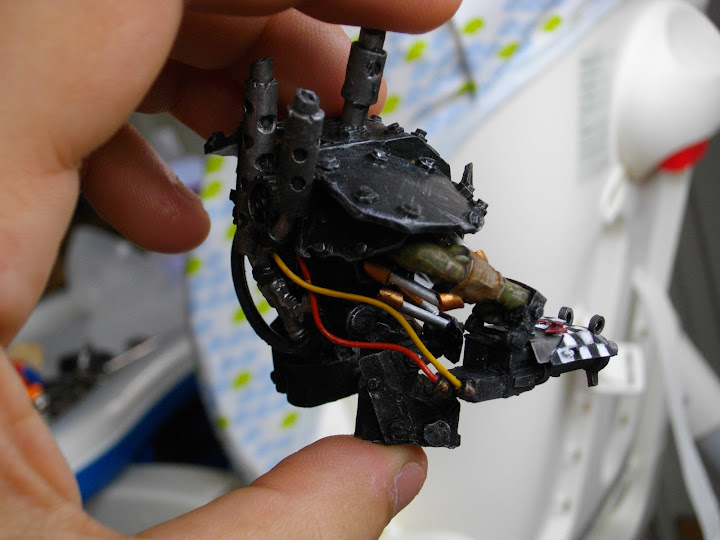
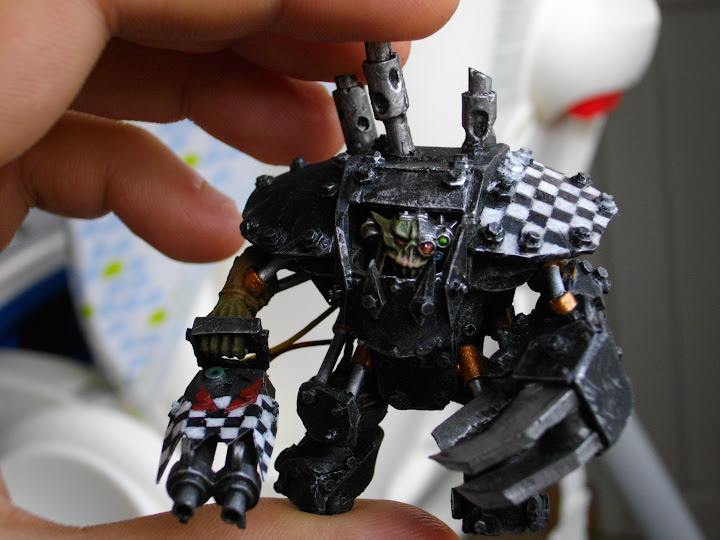
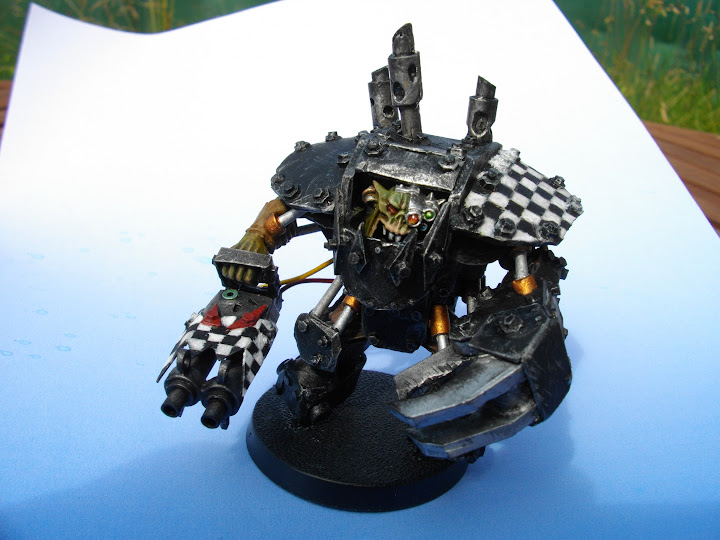
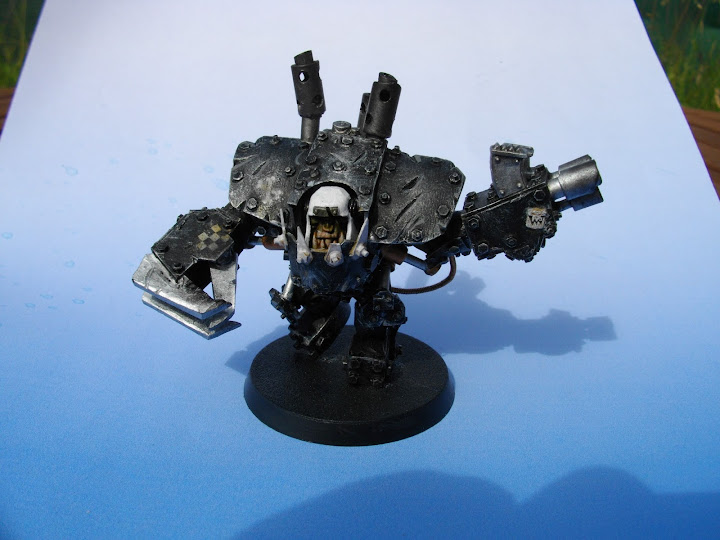
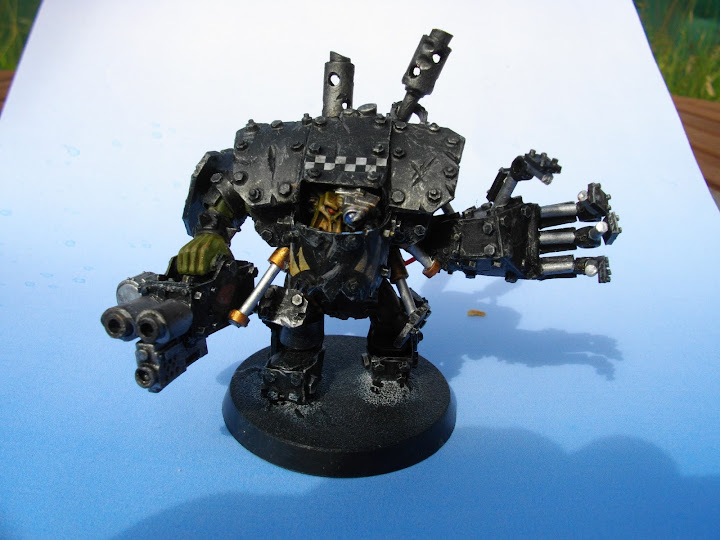
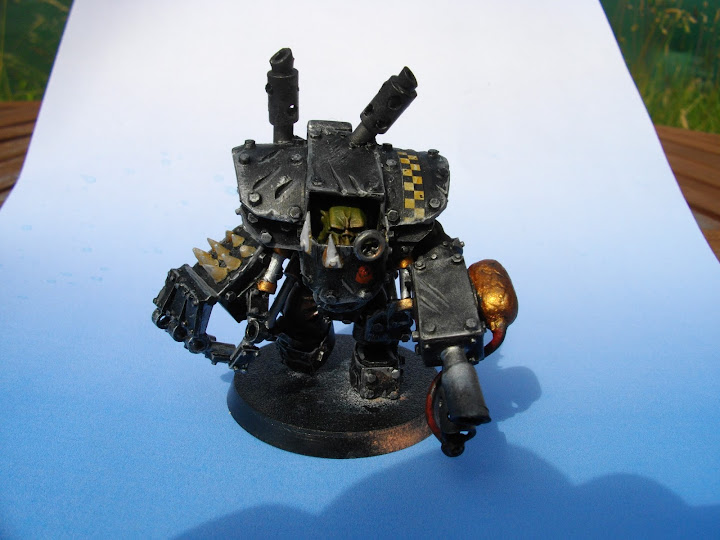
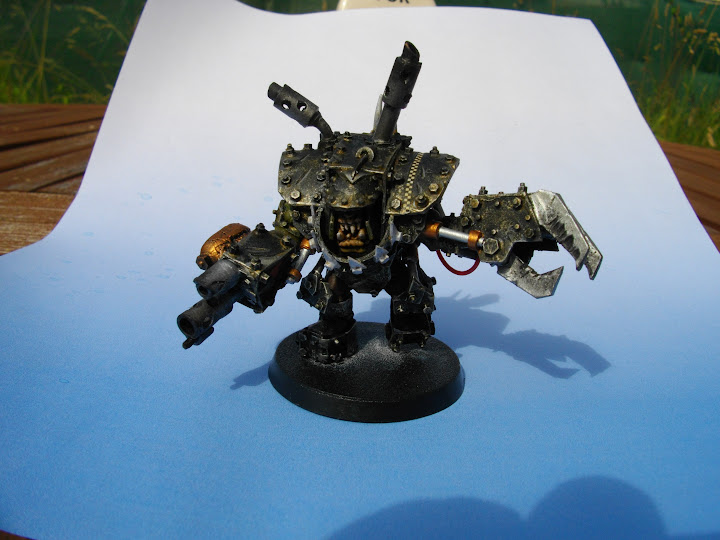
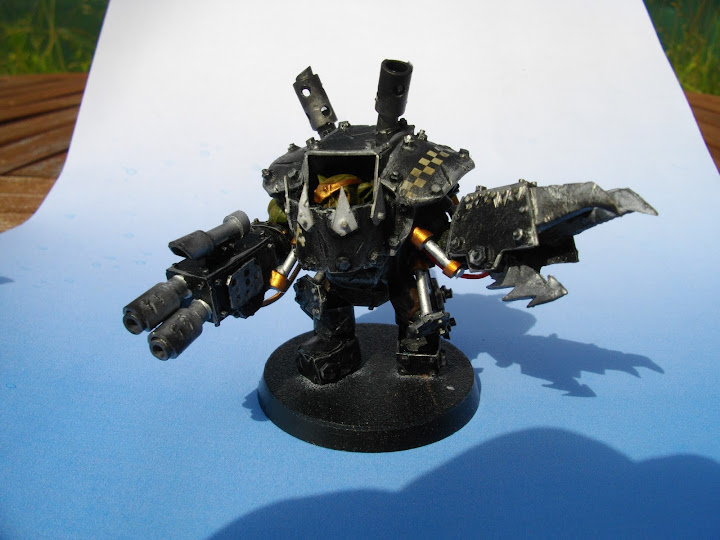
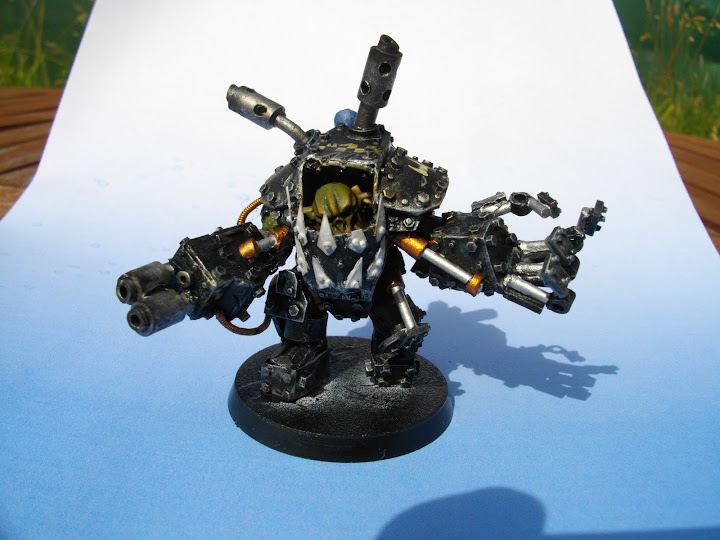
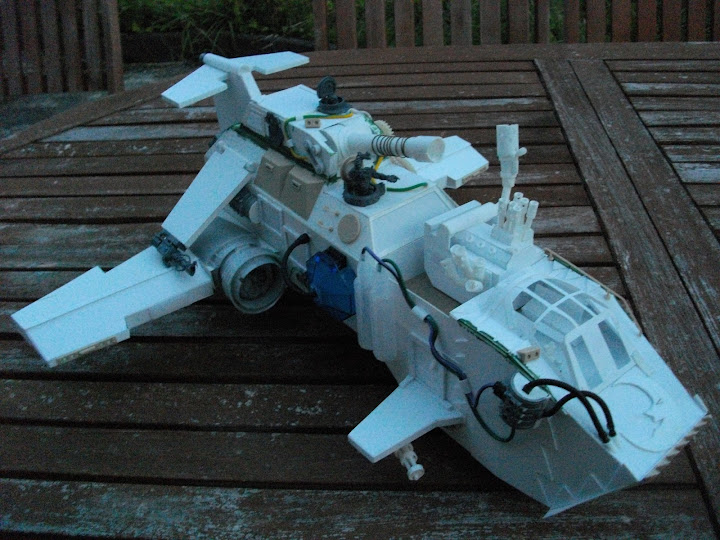
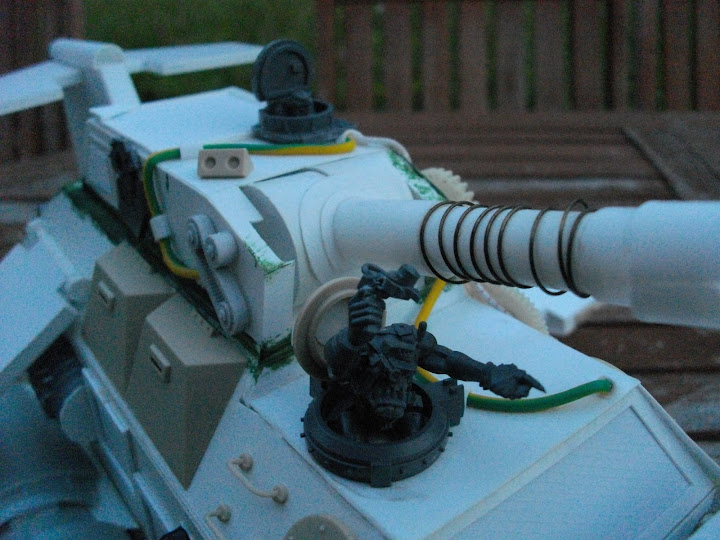
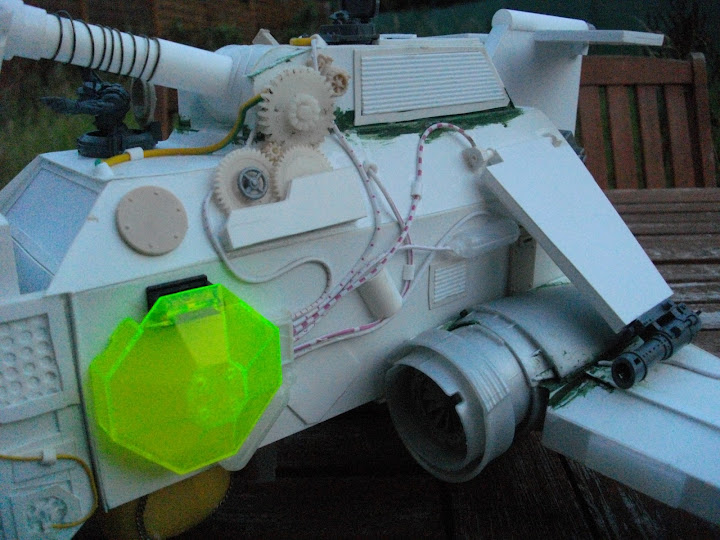
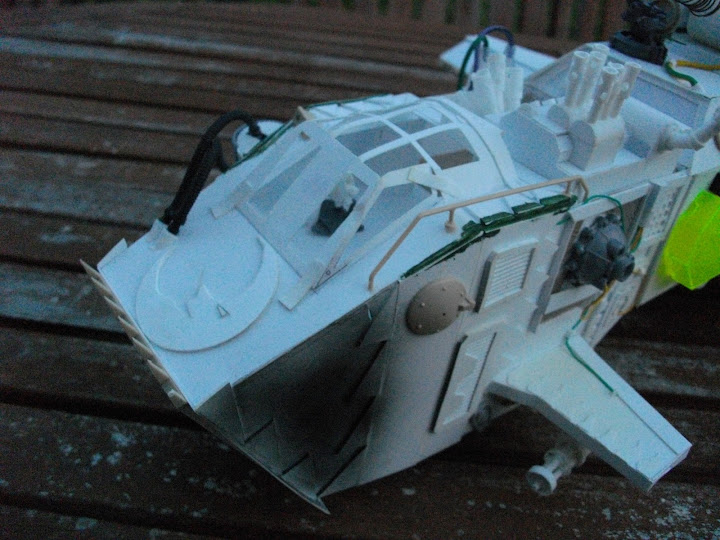
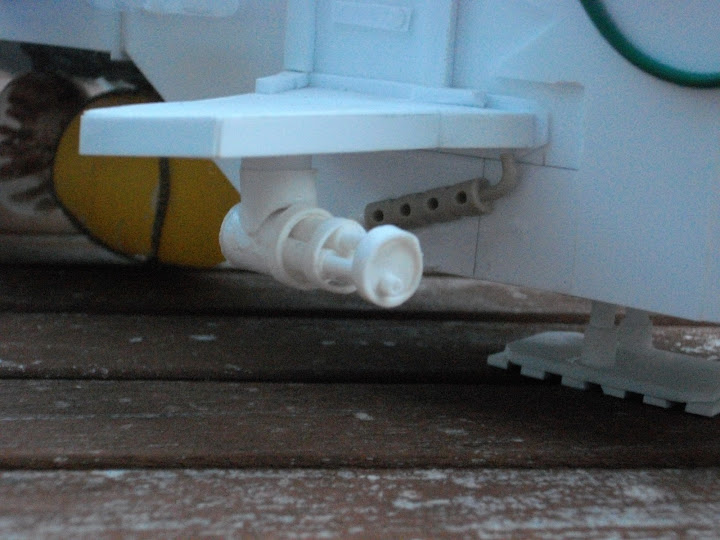
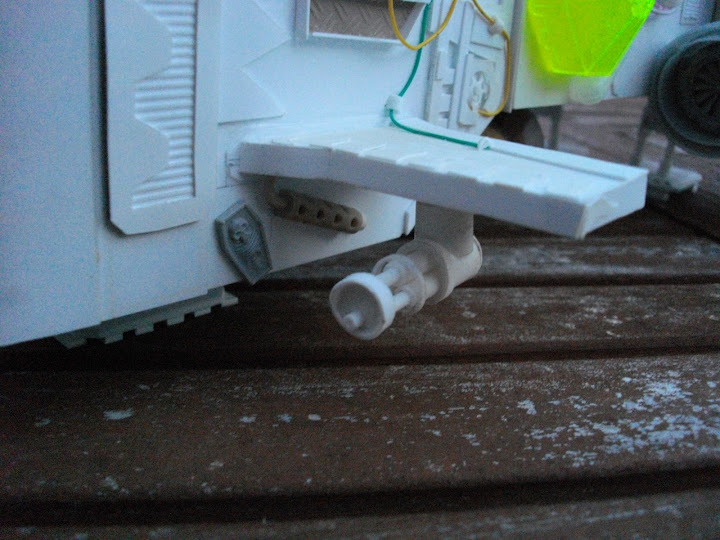
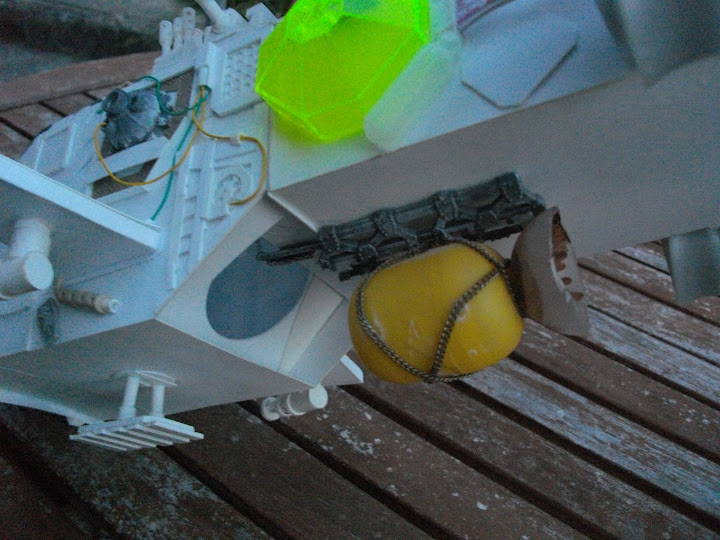
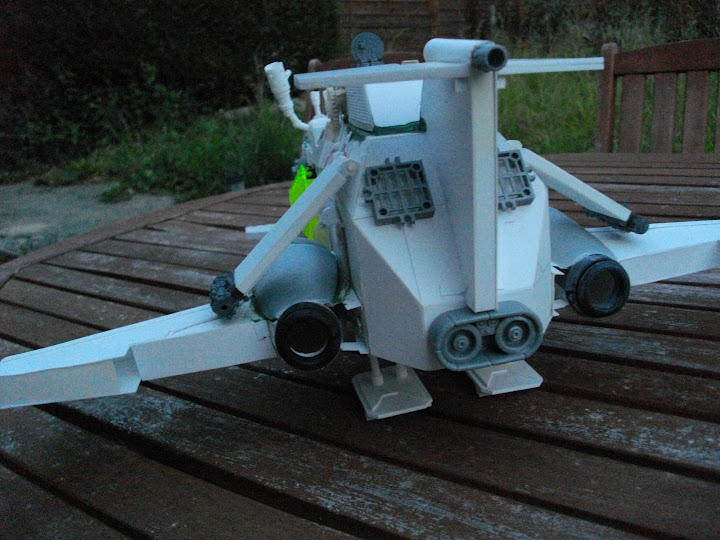
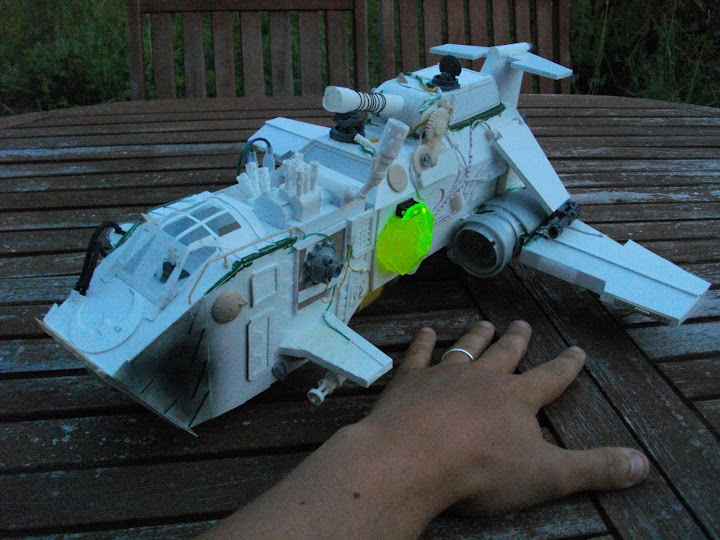
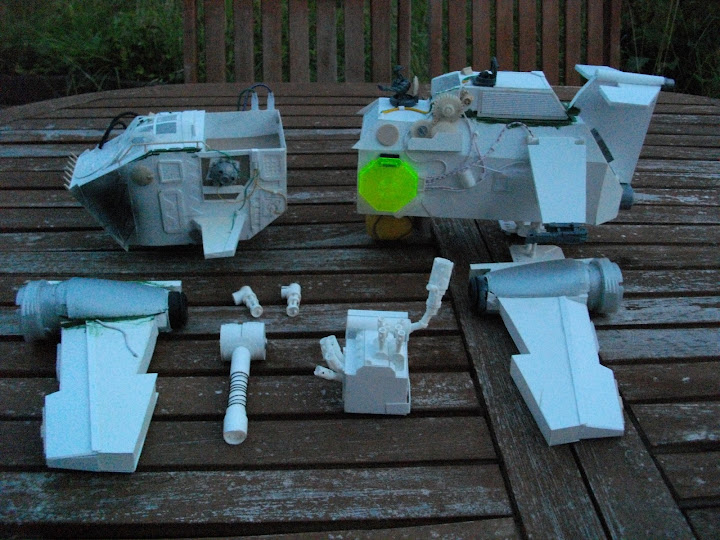
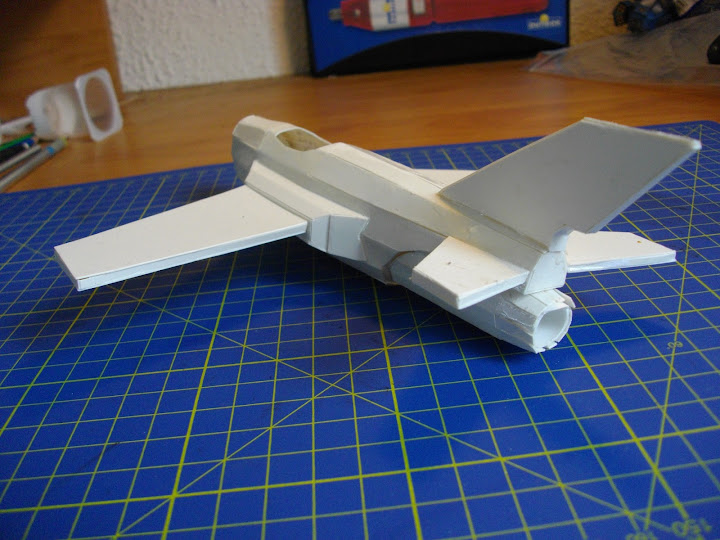
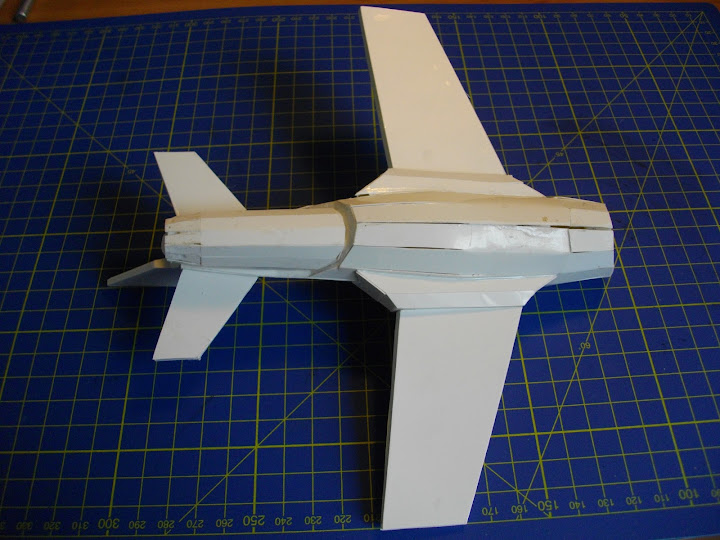
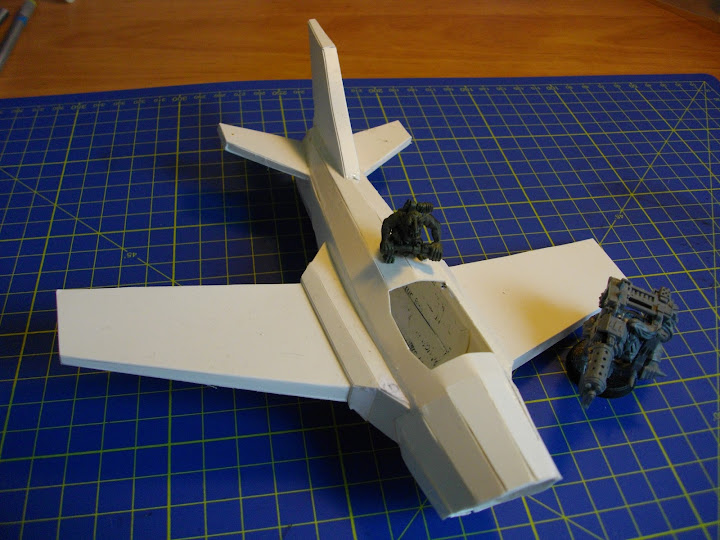
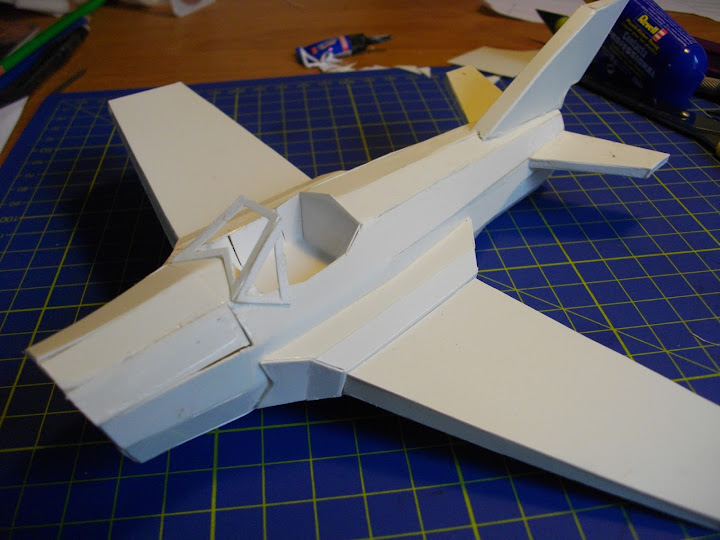
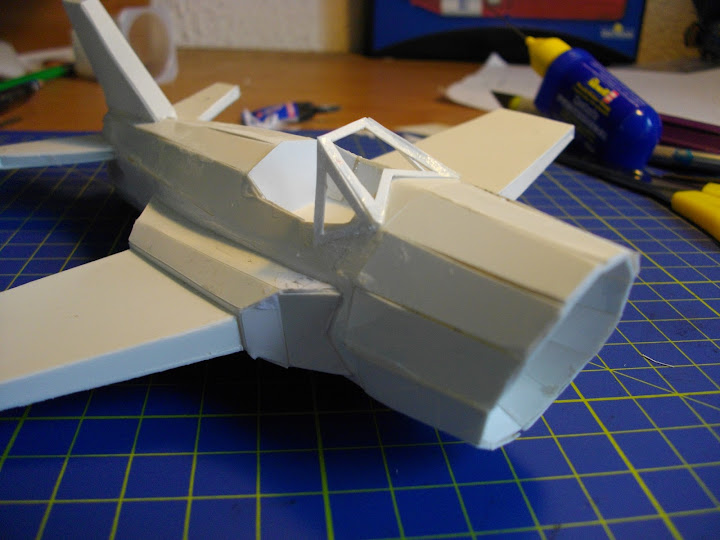
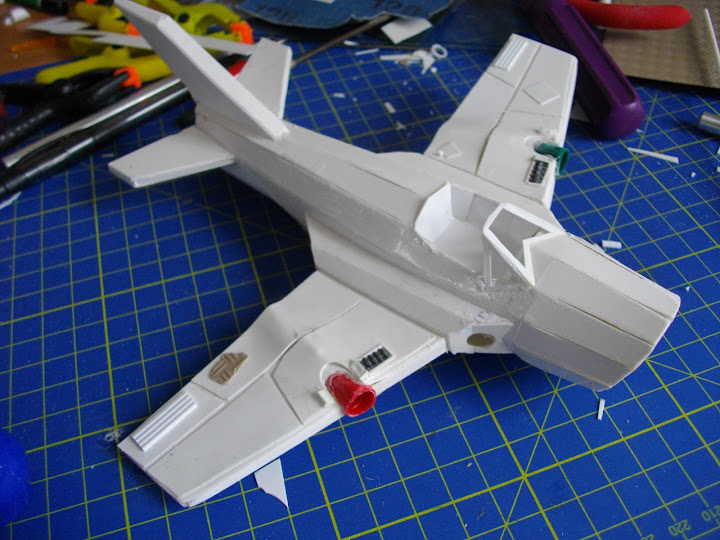
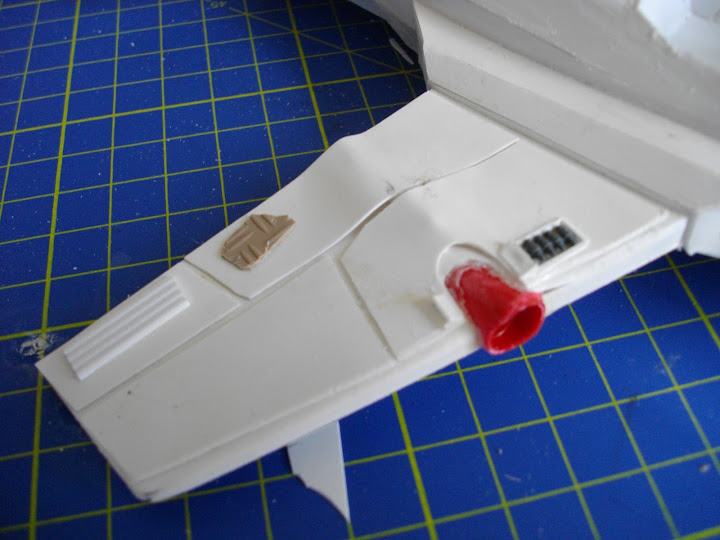
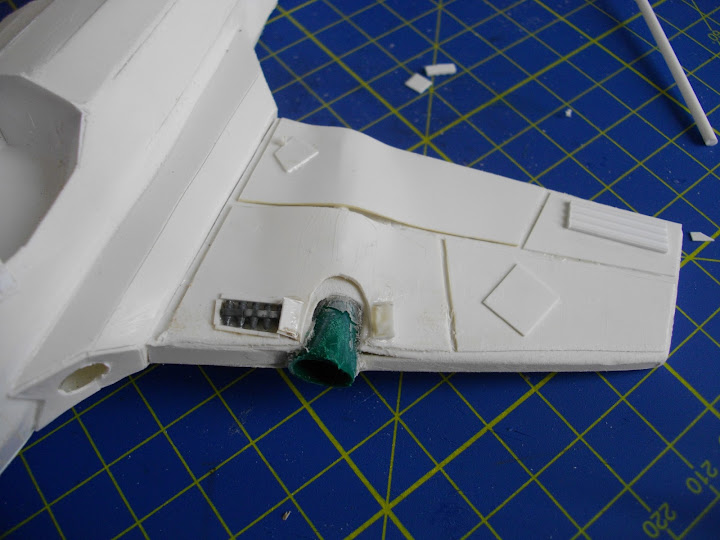
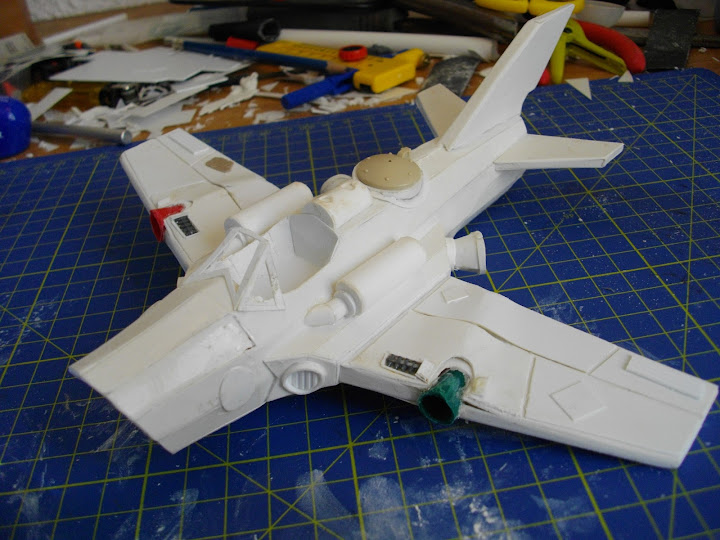
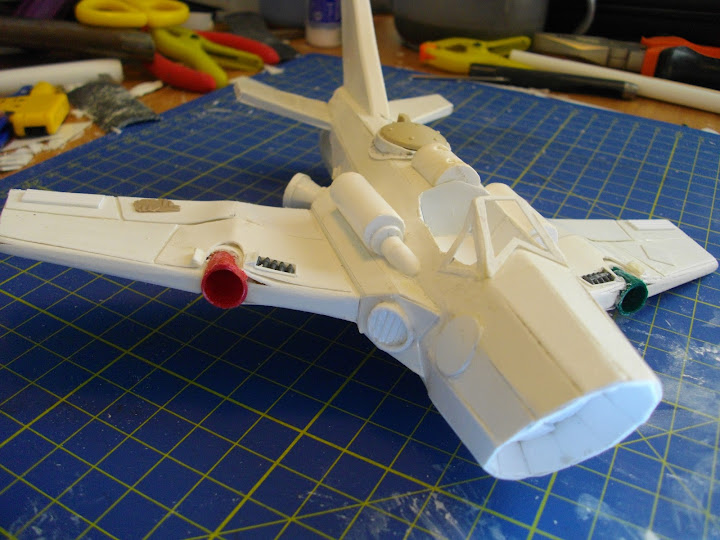
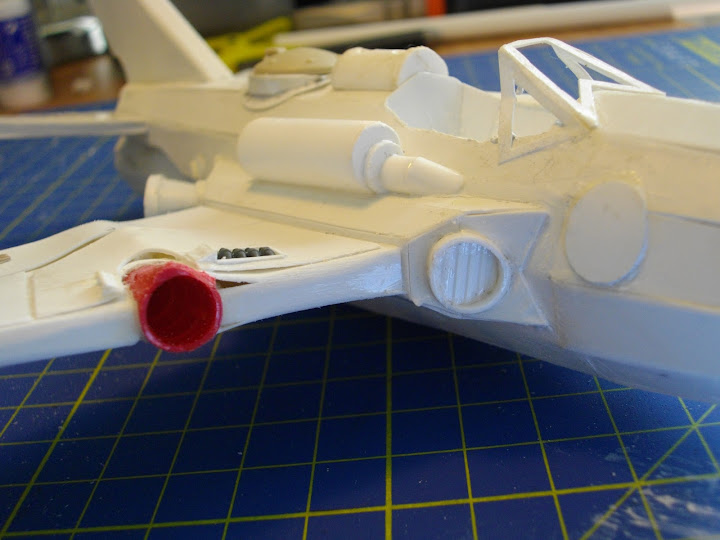
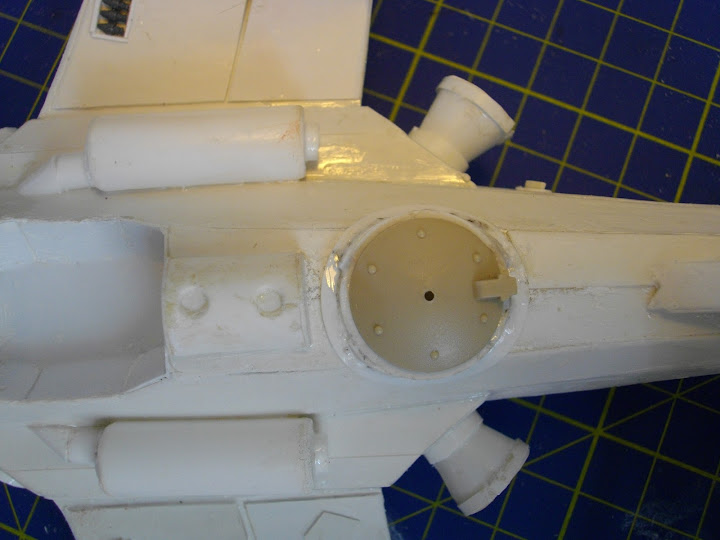
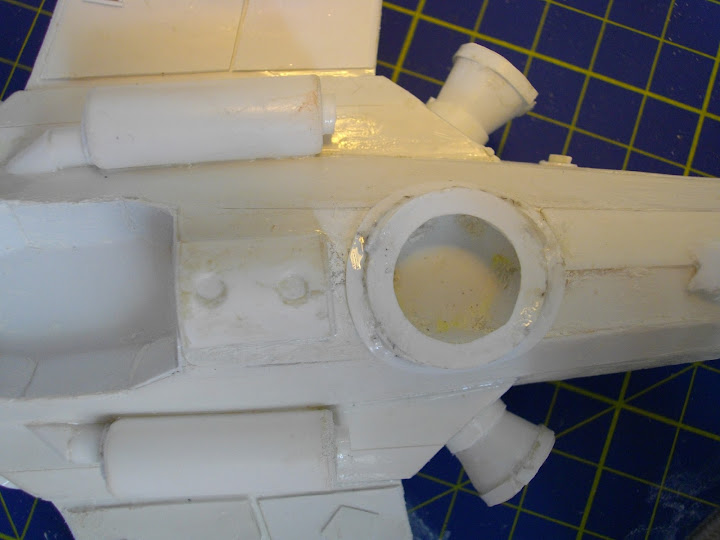
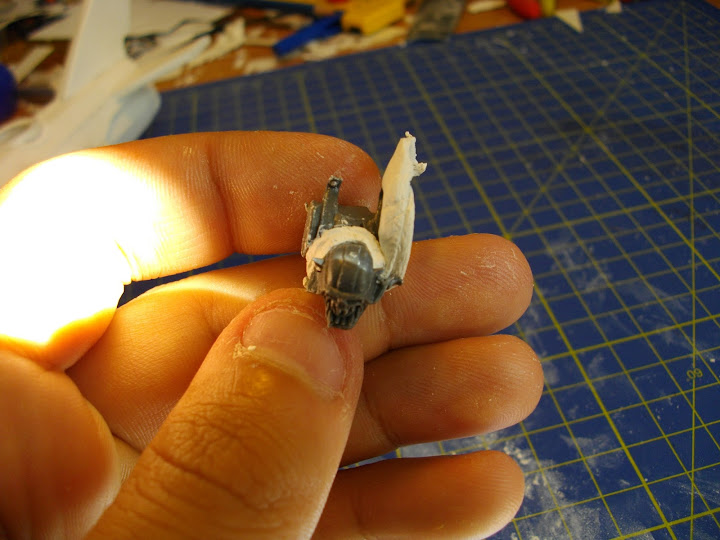
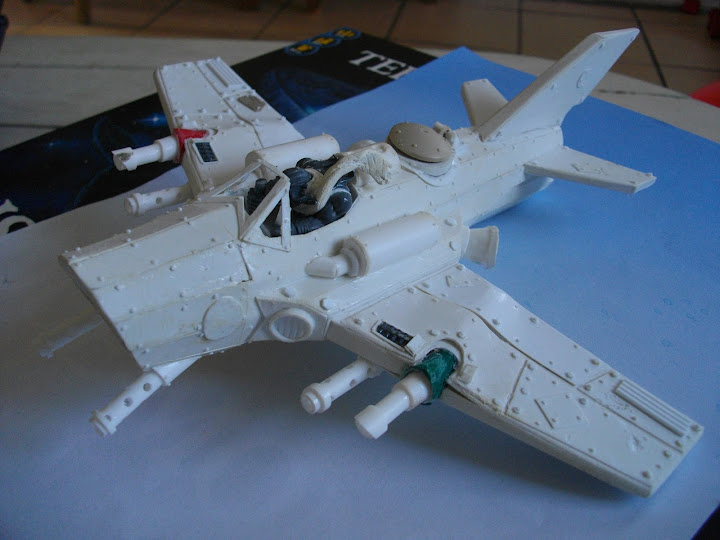
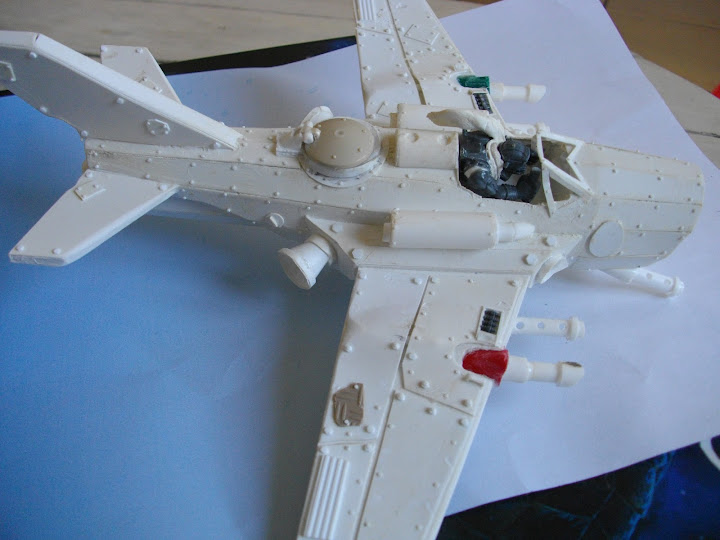
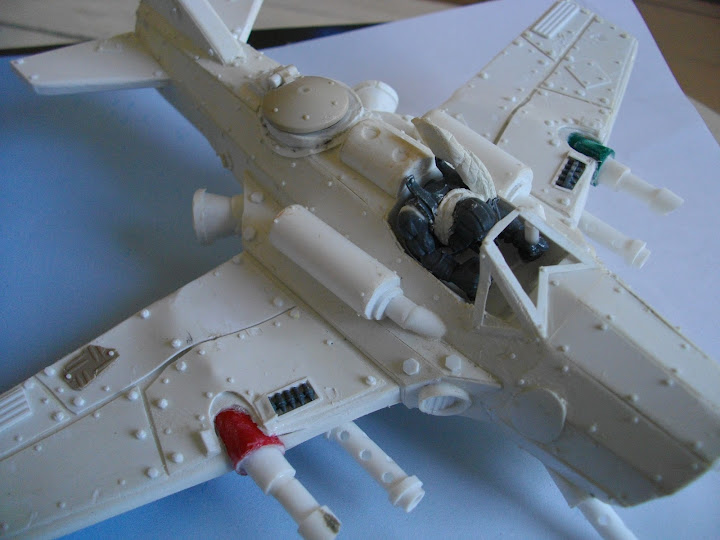
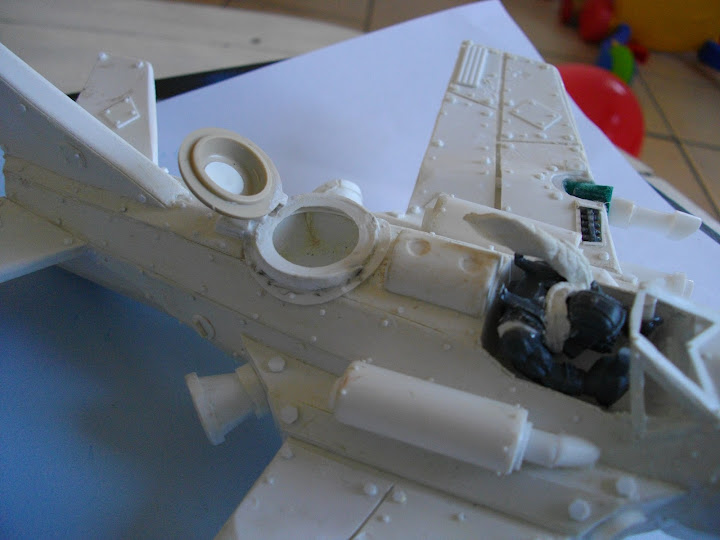
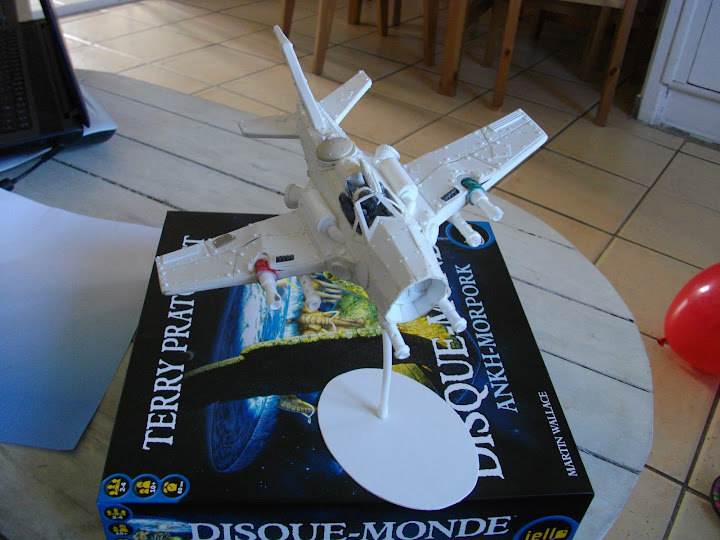
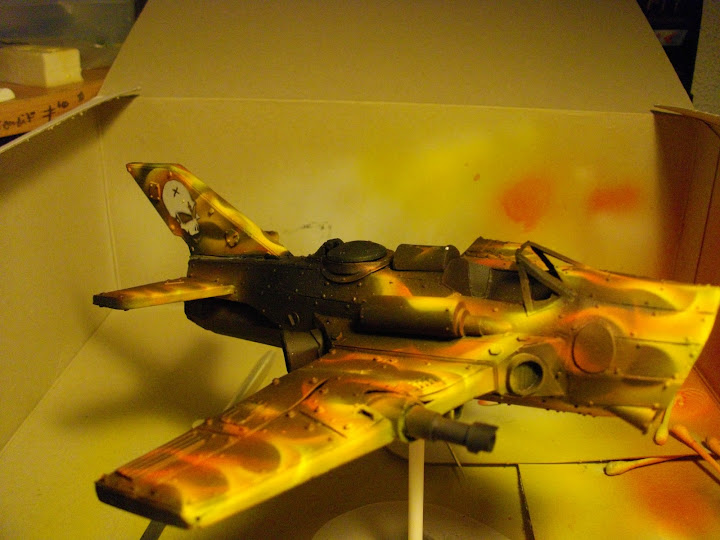
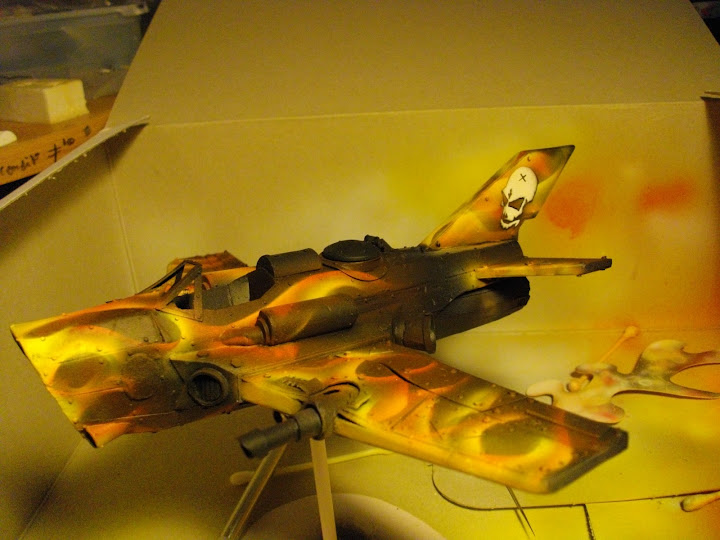
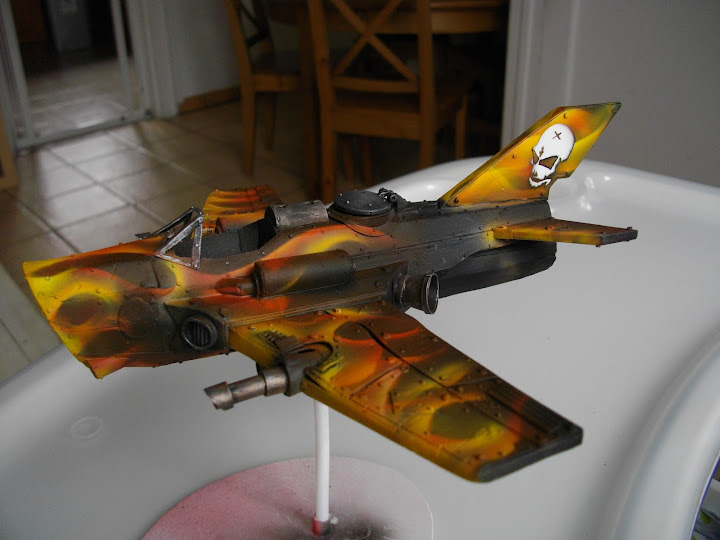
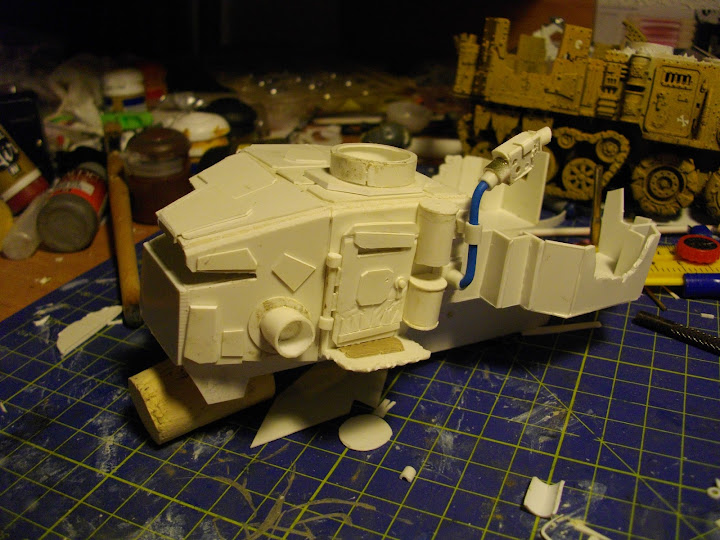
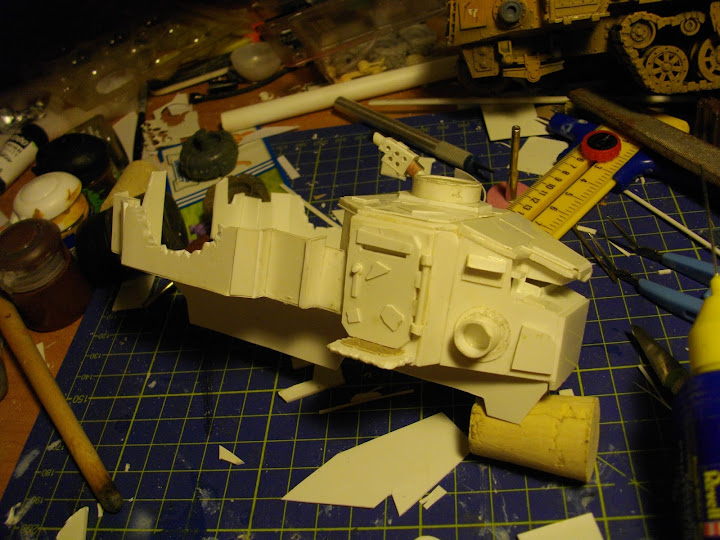
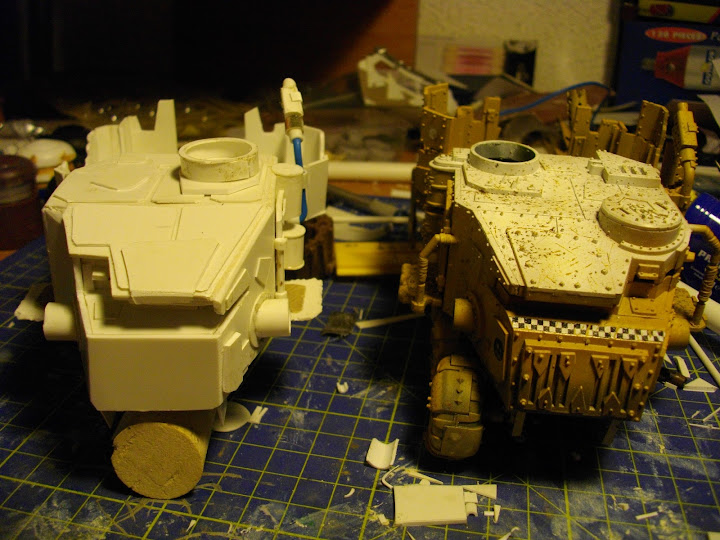
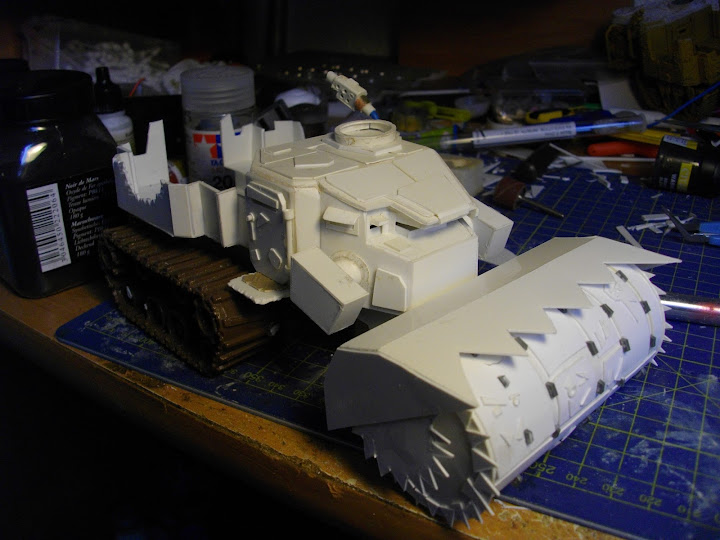
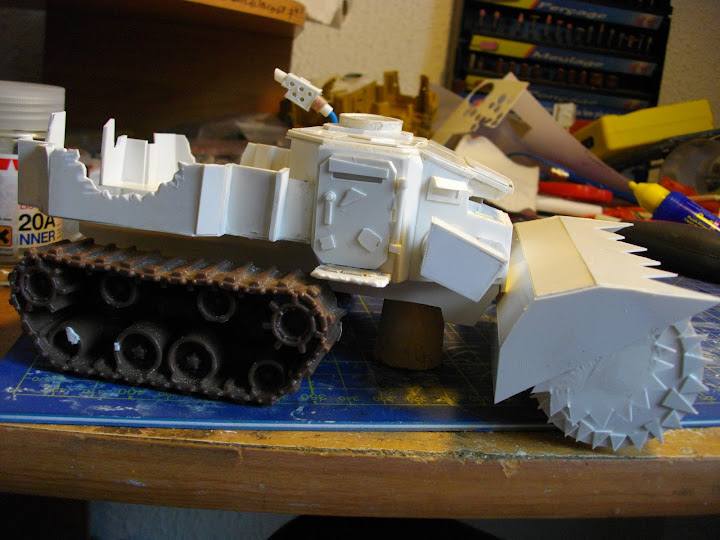
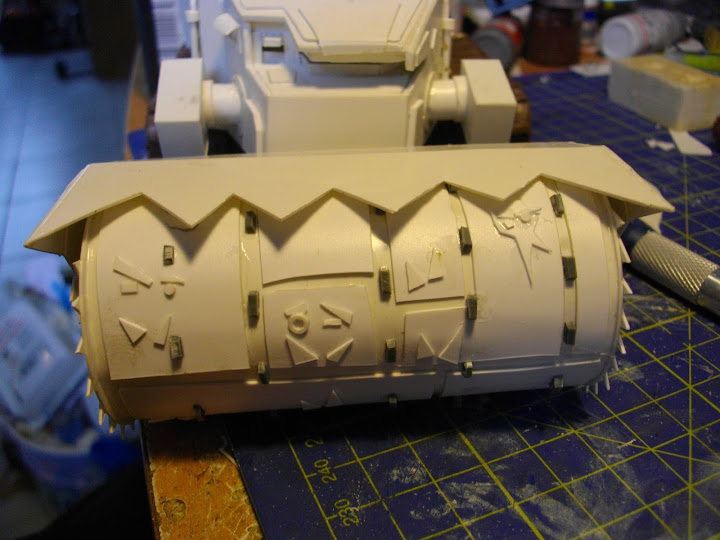
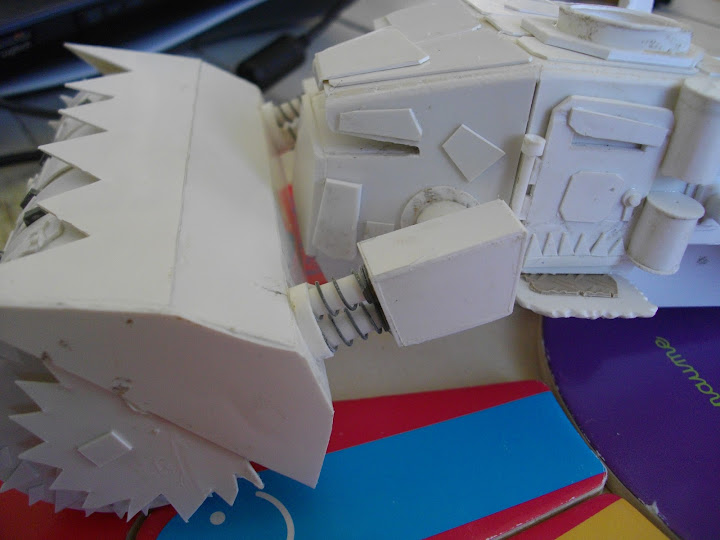
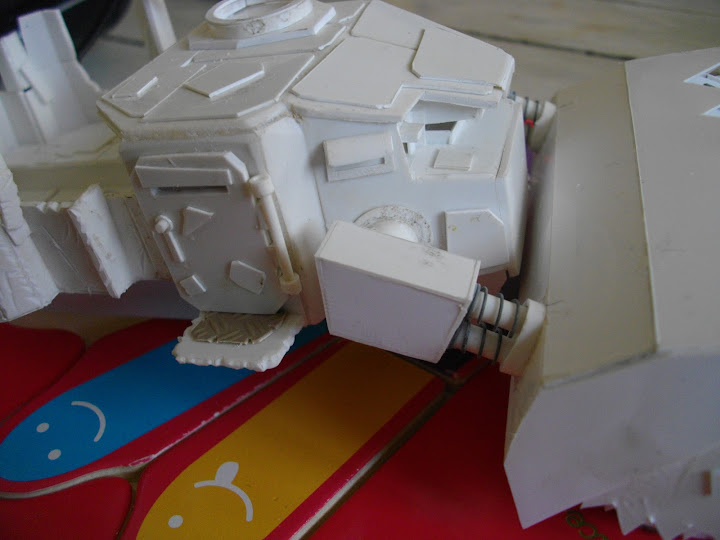
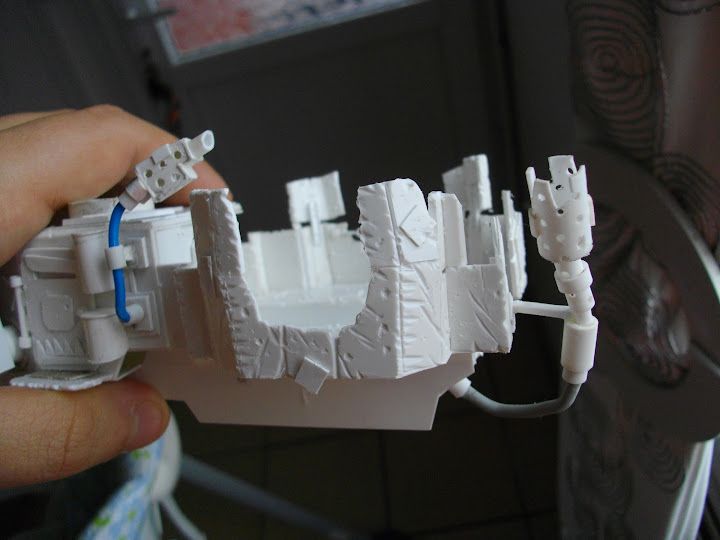
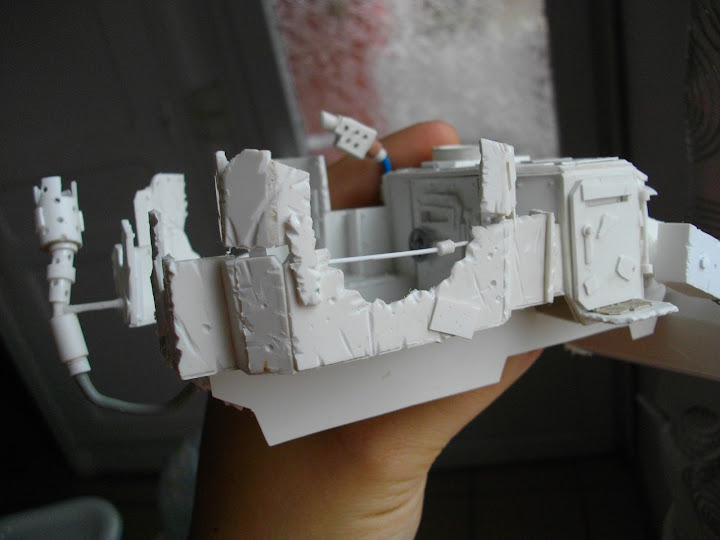
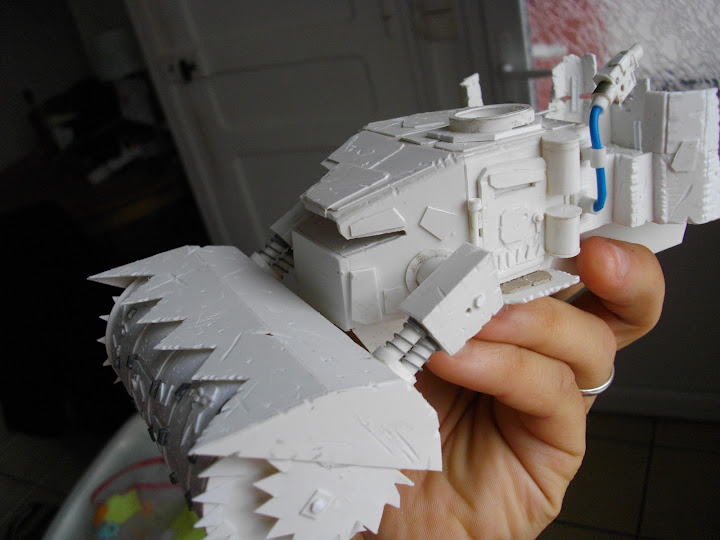
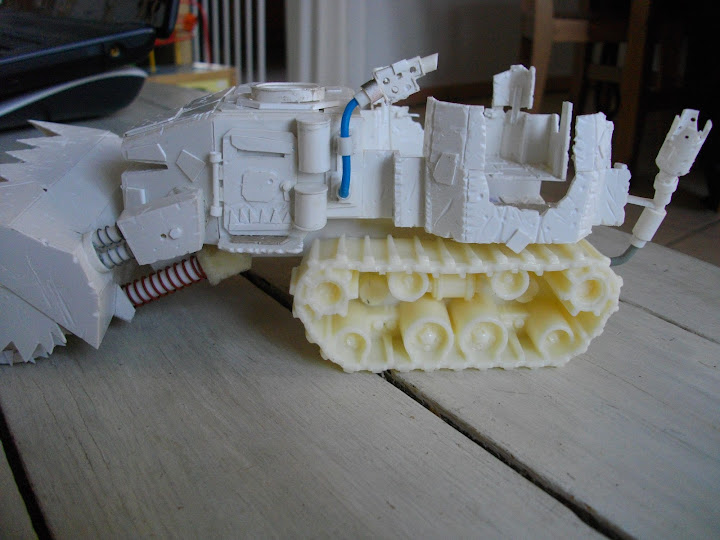
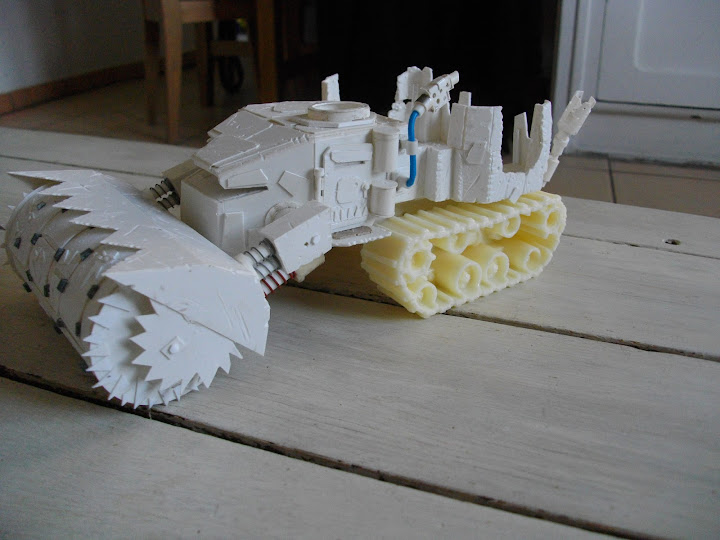
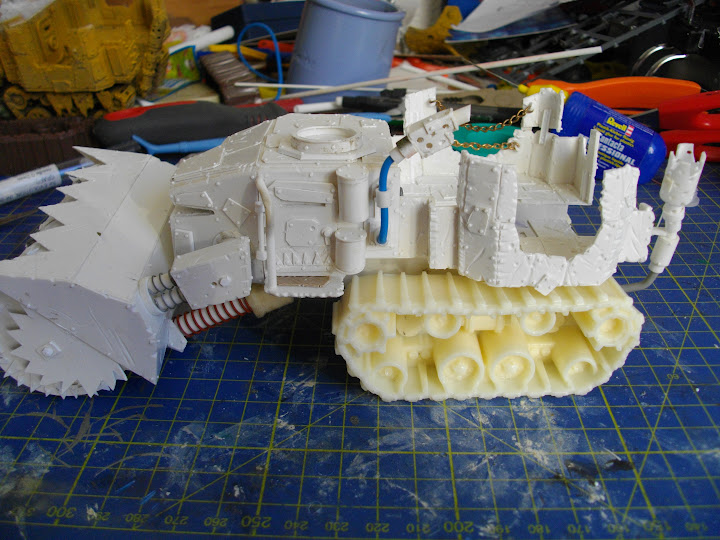
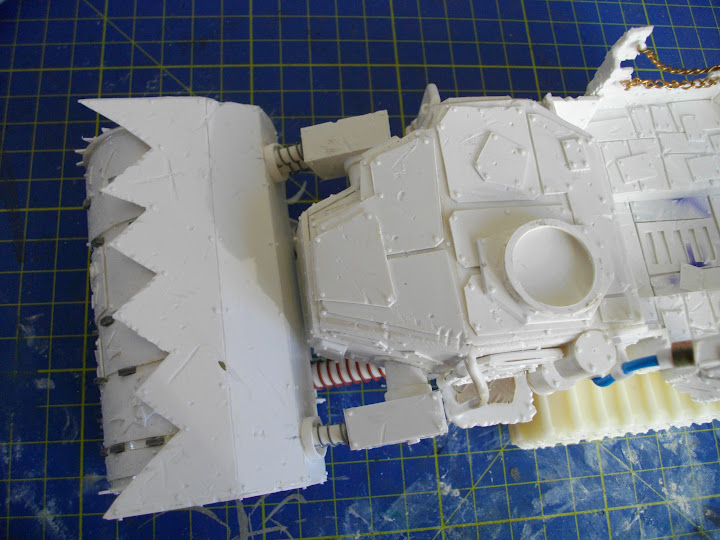
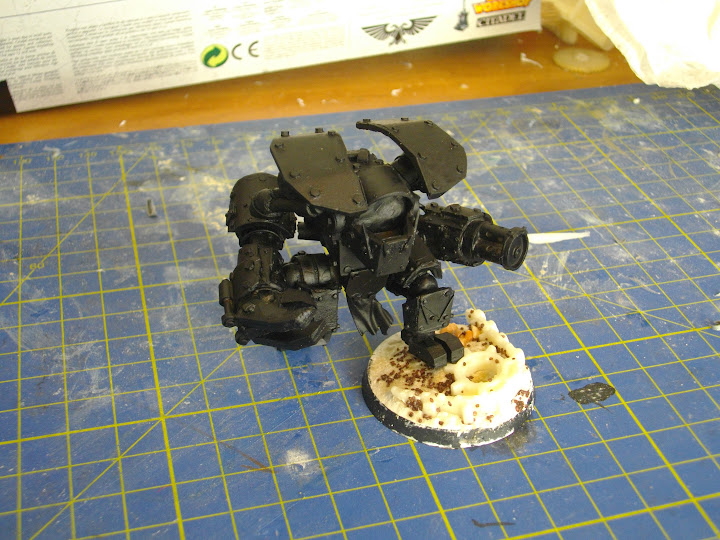
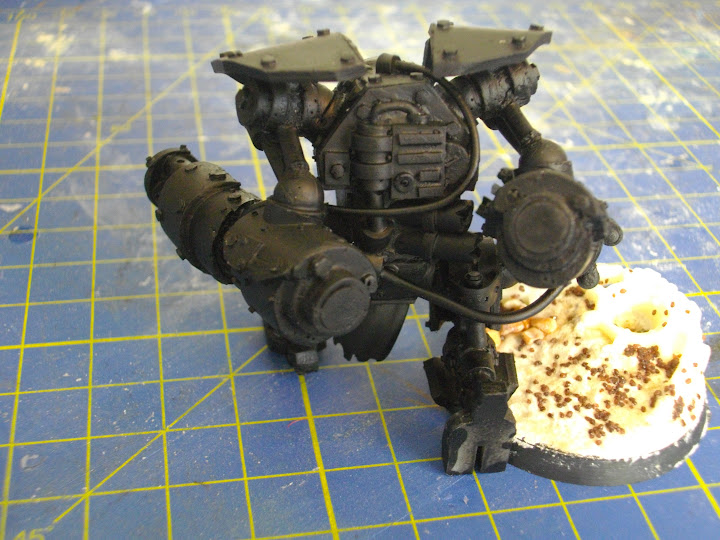
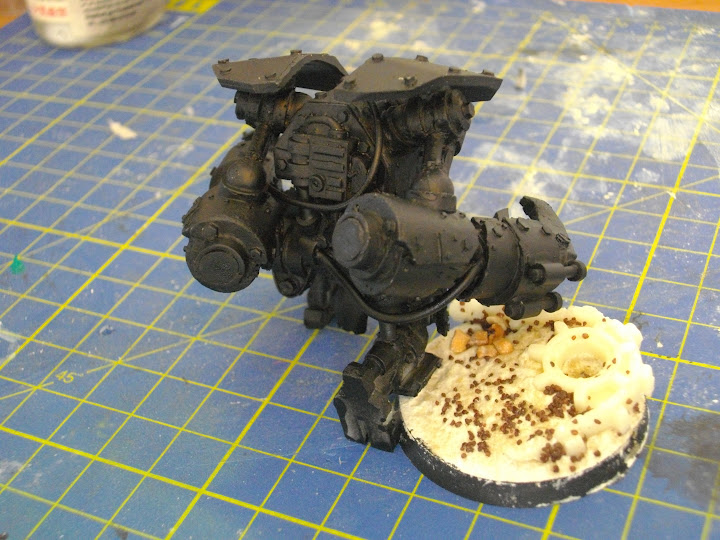
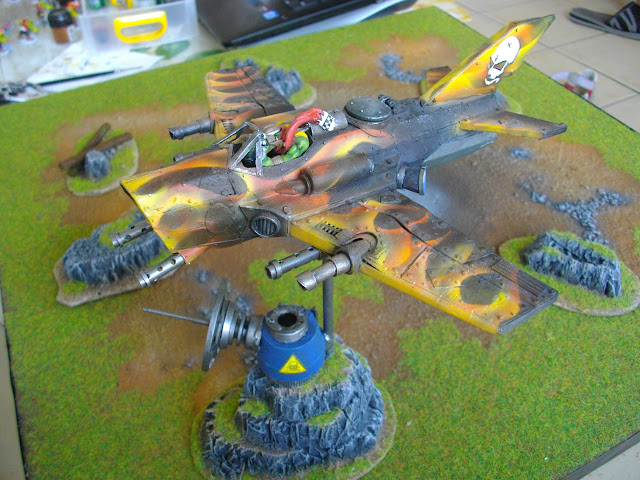
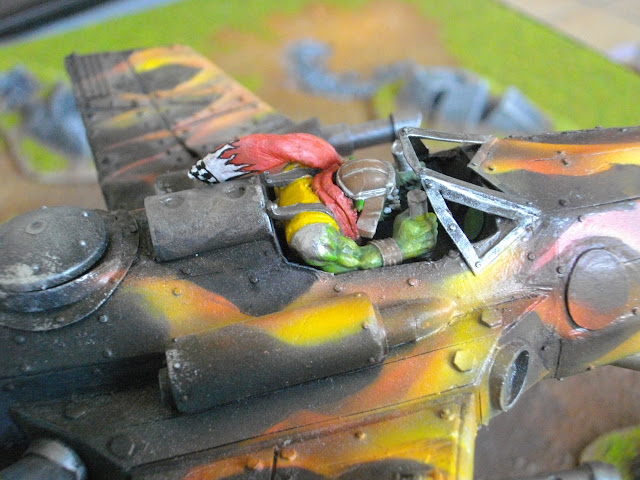
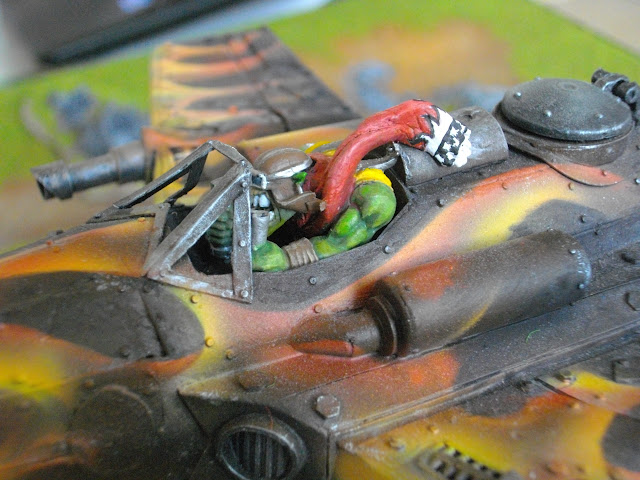
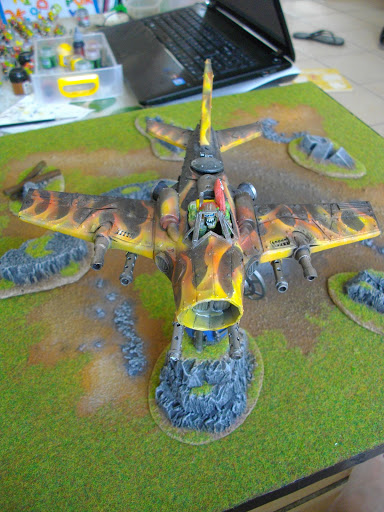
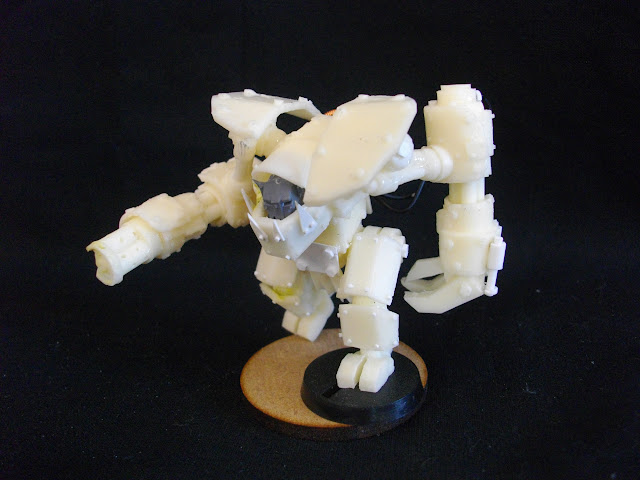
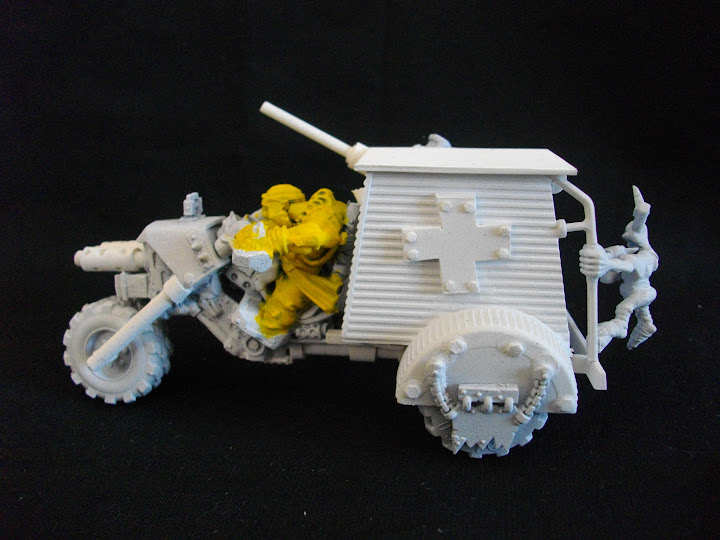
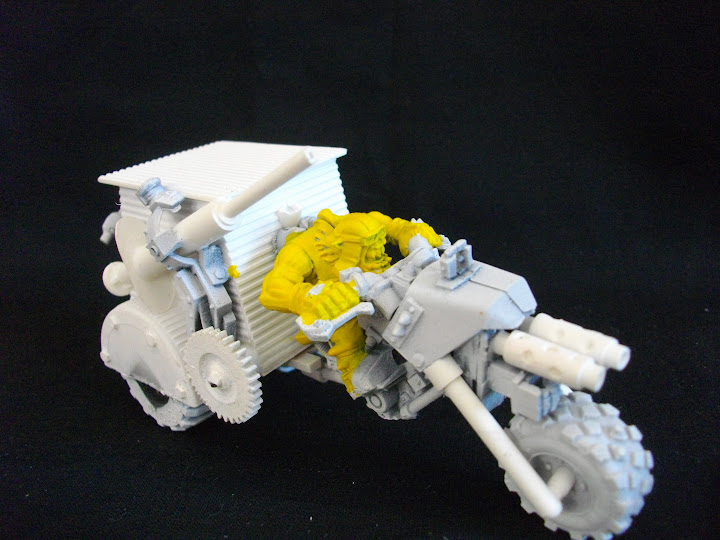
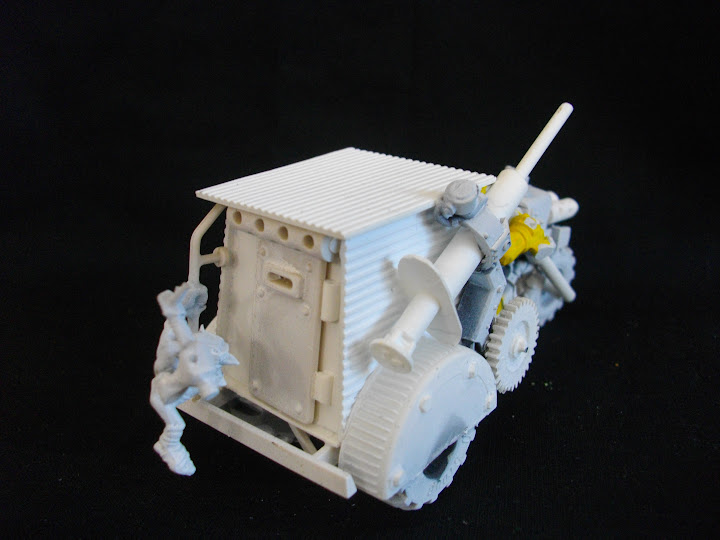
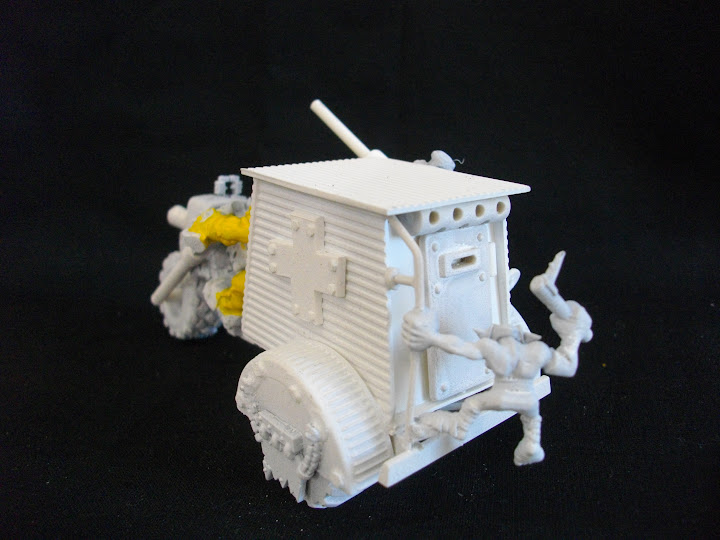
Here are the big advances in the ThunderOrk. Normally I'm almost finish, the rockets and all the rivetsare missing : '( I think I will start to paint after that (I'll do the cockpit crew at the end.).
I made a gatling on the front to model the "Heavy 3" (magnetic power to change in case) I think playing SuperFling '(like dakkajet). Instead of laser guns I put weapons carriage war reminiscent of fling'eud'la'mort. comments and critic welcome !
Today I want to do a spotlight on the blog of my brother Rhanarion: Blogurine Box. It was he who introduced me, when I was a child, in the world of wargame and it was he who, years later, made me relapse into the hobby.
But it is still active and is talented whether in sculpture, model, or his chosen field, painting. And here I must admit that I am still far from the quality of his productions. It's simple: Every time I think I succeed in bottoming learning a new technique, he released on his blog pictures of miniatures even more breathtaking and magical than ever.
Even now I think reaching a level similar to him, he puts me in my place with thunder Wolves Space Wolves which are simply sumptuous. If you find wolfes beautiful , lean a bit on the riders, you'll be surprised at the accuracy and technique deployed to give life to our favorite bearded. You have doubts, here are some photos:
From the base to the thunder hammer, everything is beautiful
Note the facial expression
As dangerous as a sumptuous unit
Feel free to browse the galleries of his blog, you'll find more Tyrannidae and Space wolves, dreadfleat, model making and many other things.
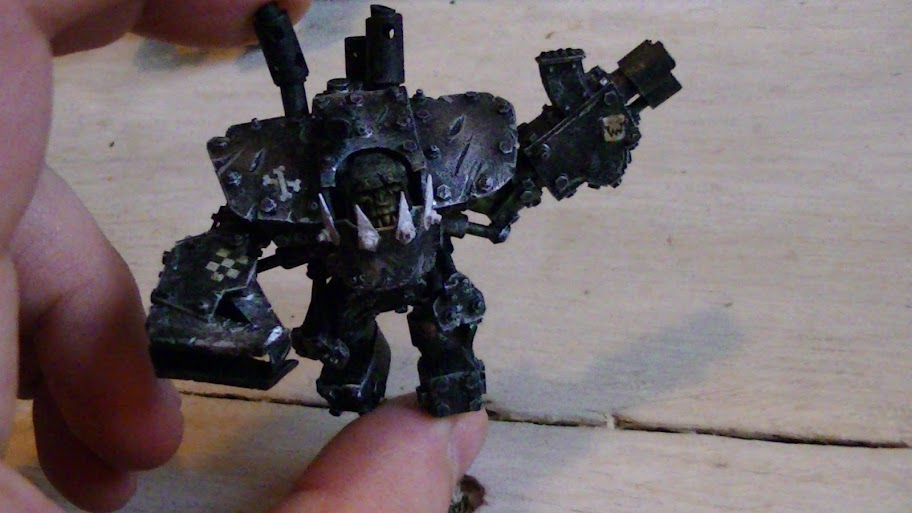
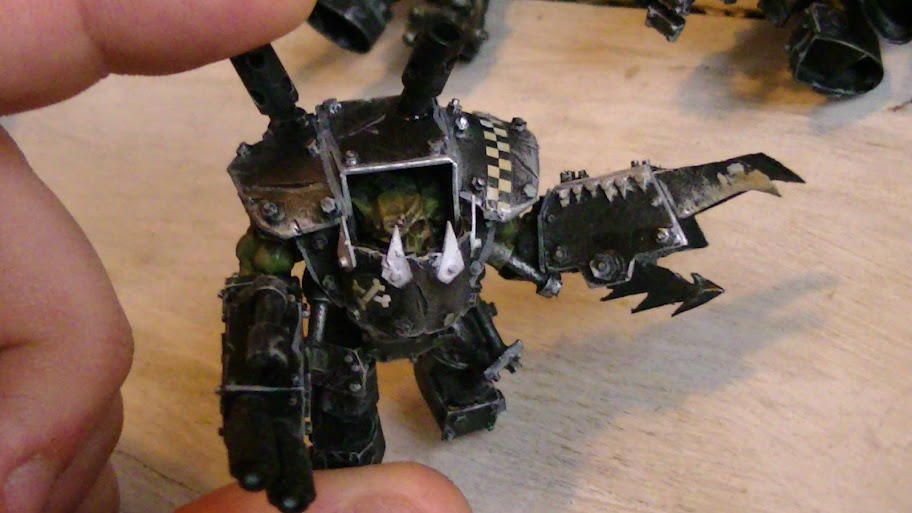
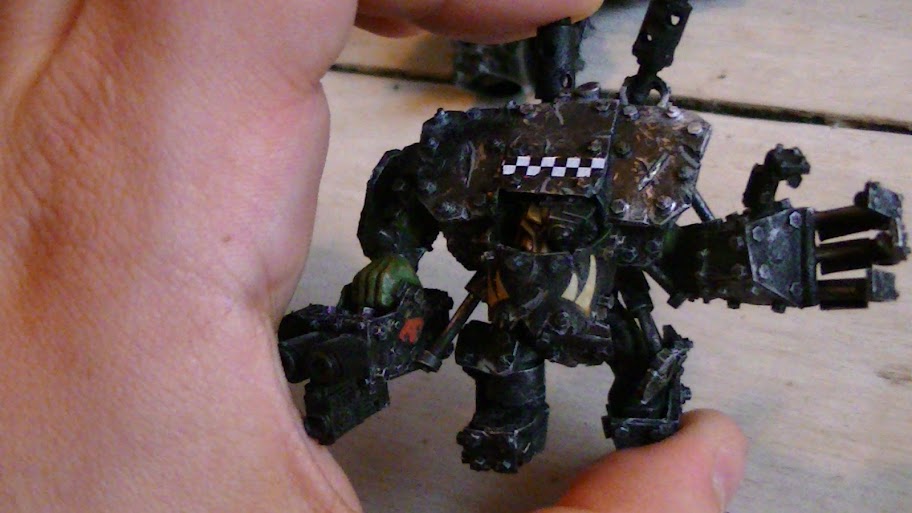
the thunderork was really cool lucius. sorry I haven't dropped in on your thread in a while. I really liked the use of the lego bits, lol
your scratchbuilt dakkajet makes me want to punch you in the face in hopes of stealing your powers.
but seriously, its a really good start, and inspiring. I have had my orks on backburner for a long time so that I could work on my squig cult but, between wazooo, you, and some other honorable mentions I kinda wanna build something!!
now to just figure out how to make a scratchbuild dakka-jet-pirate-ship-thing that will match "da land lubba"!
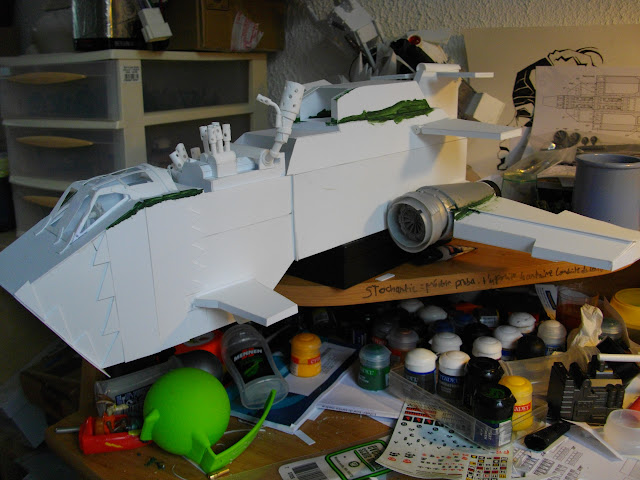
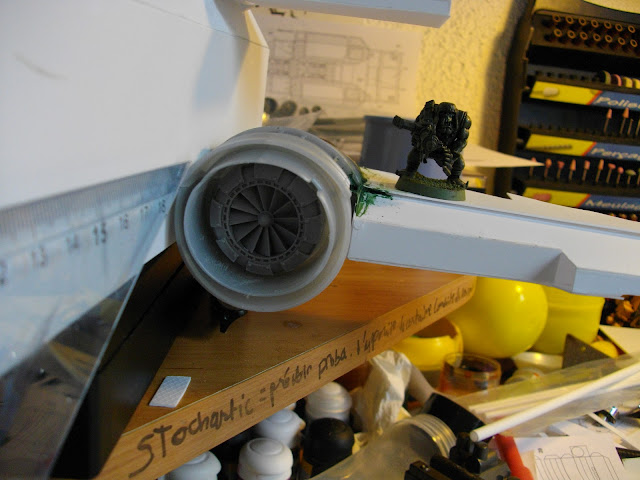
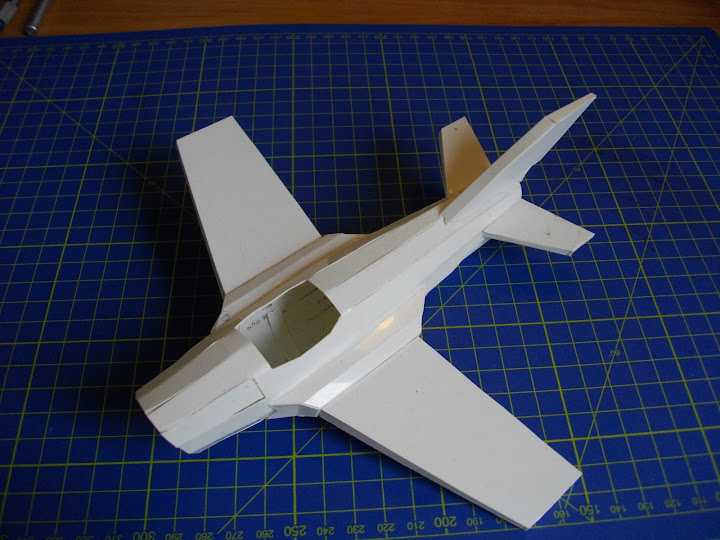
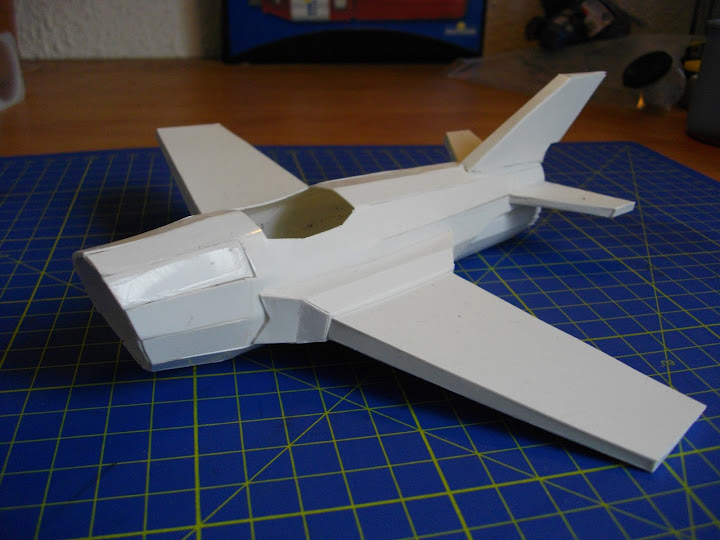
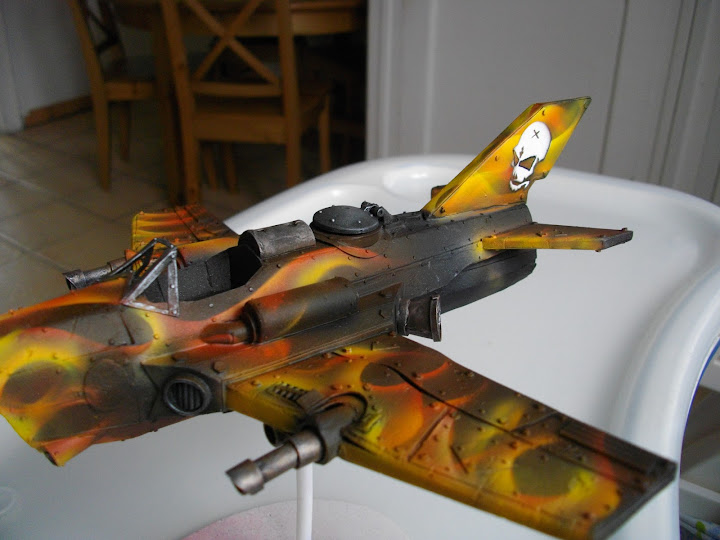
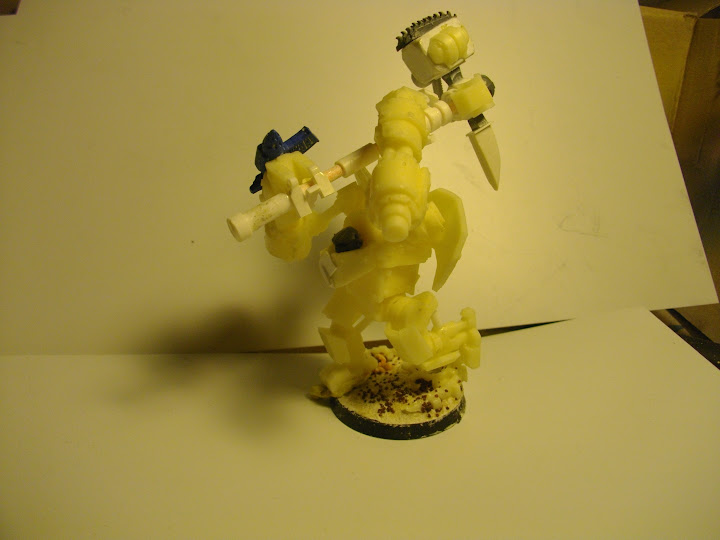
Here is my full scratchbuilt dakkajet. I build it to change stuff and play dakkajet or blitza bomba or krama bomba. All ammo is not built so be patient
C&C Welcome, look at my blog for more explanation (in french)
Though... I have to say, with the custom burna you made... you should have a burna-bomba that shoots your custom made burnas out as projectiles... I'm imagining burnaz strapped onto rokkits on bottom of wings with flames shooting out...
just one gits wish.. I know its totally within your abilities!
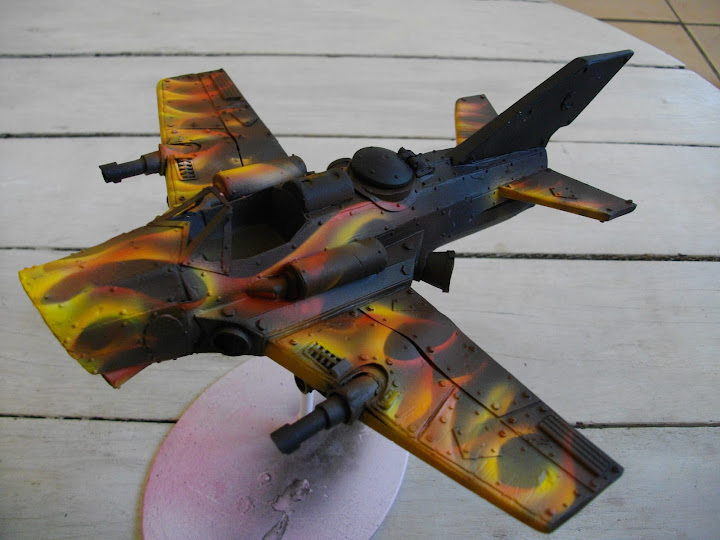
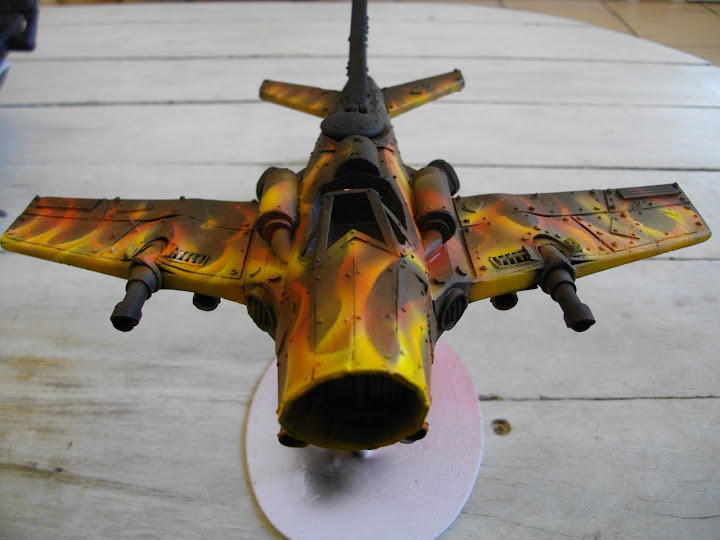
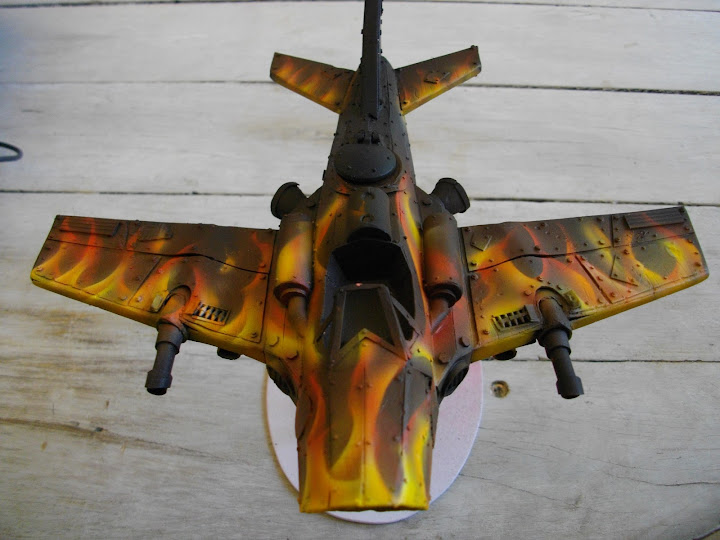
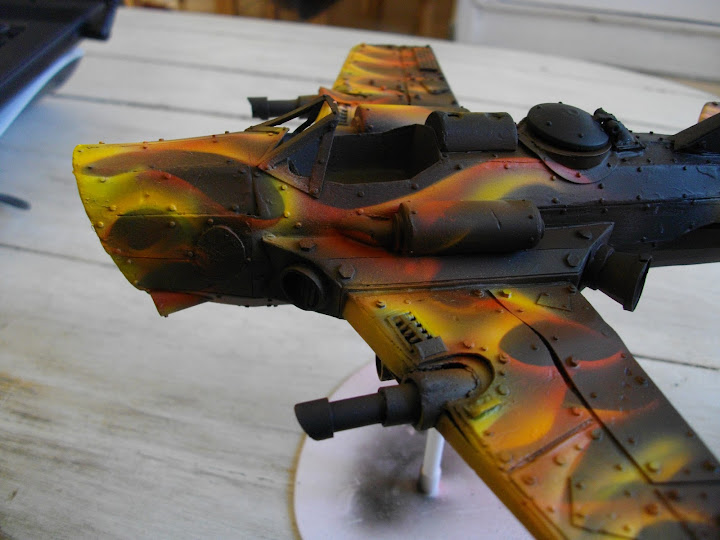
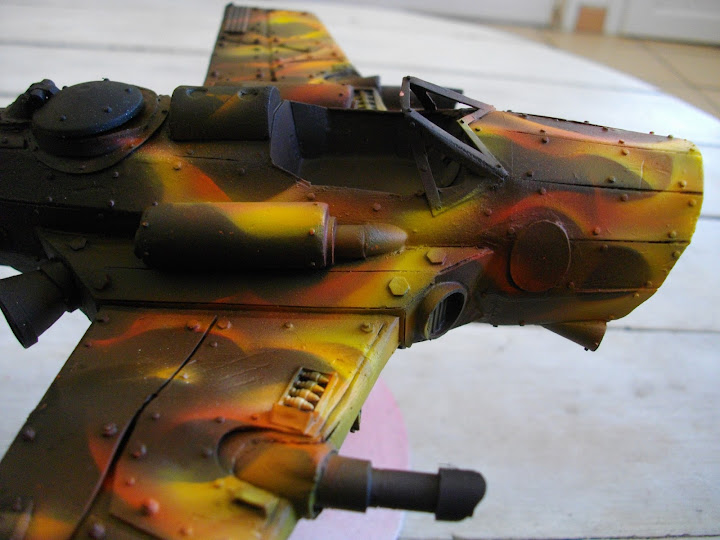
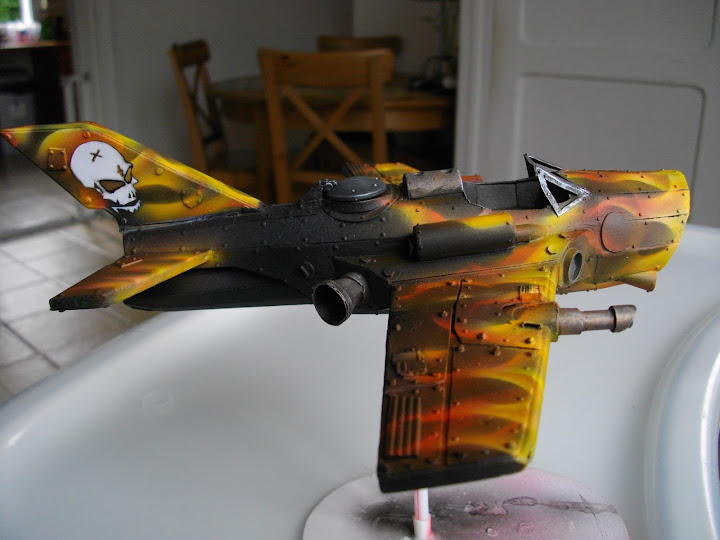
Today paint. After several attempts and several times to zero with black undercoats because "I can not do it but even if I yell like a pig I'm a fething stubborn," is the result of the main painting Dakkajet.
So I'm not a pro but I'm still proud of myself even if the model is full of little mistakes and various errors. If you have a solution to redo the black, let me know !
Here are pics :
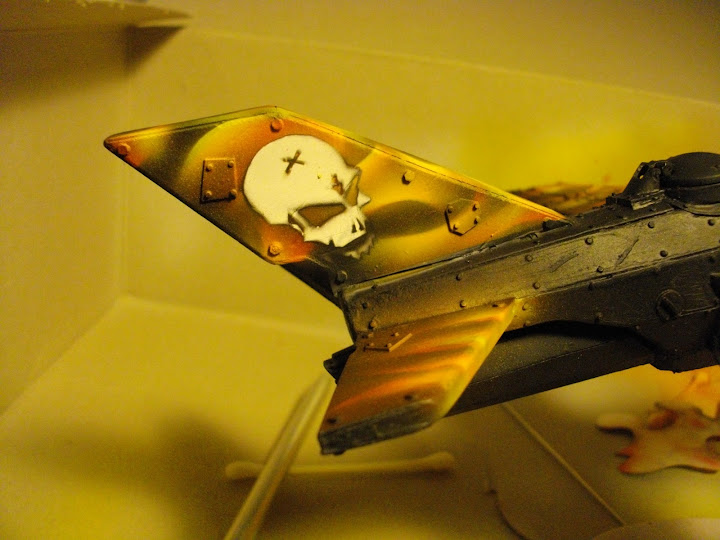
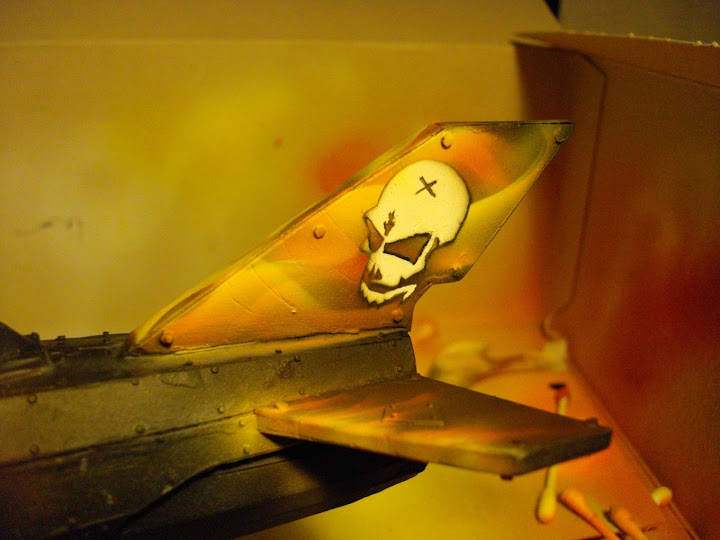
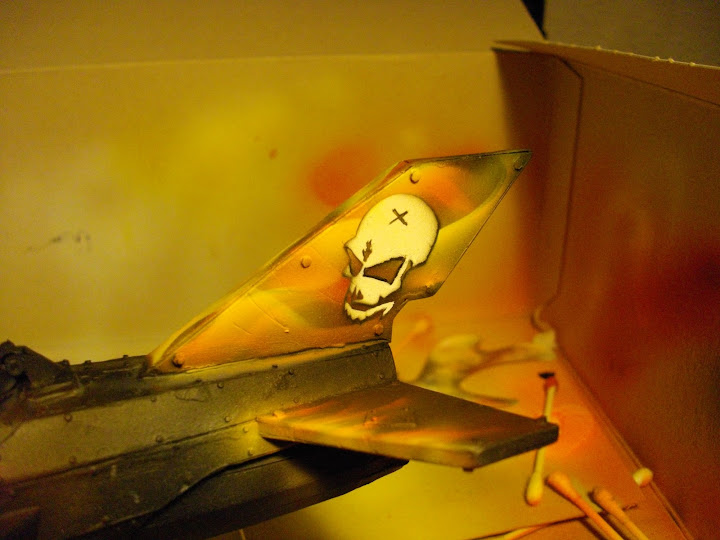
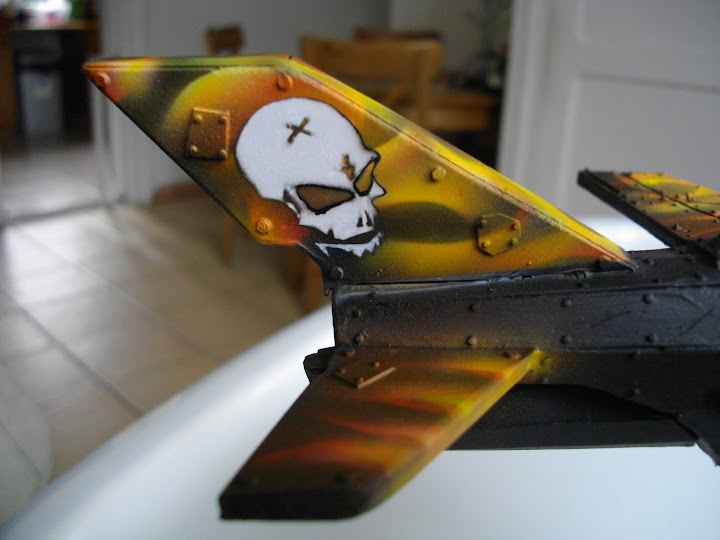
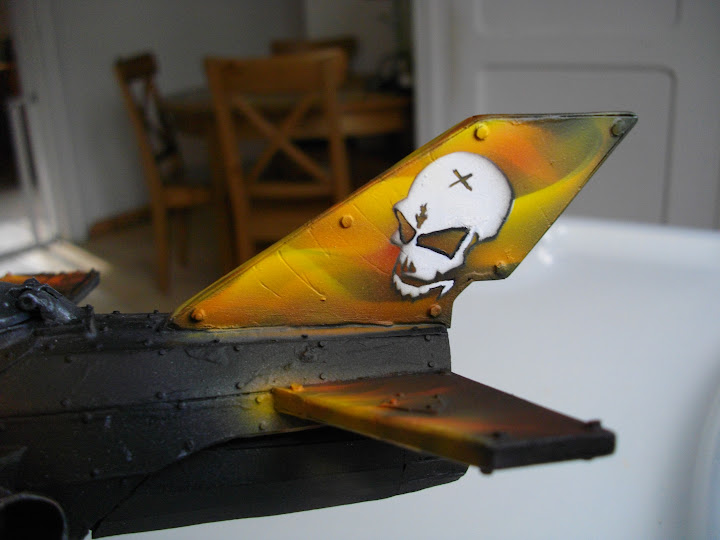
This is the pattern that I intend to apply to all my vehicles, not just flying. My wife made me notice that the vertical fin is not "burning". In my mind that was only visible from above or below should be "fired" but maybe I'm wrong , I want your opinion.
woah dude! you use a stencil and airbrush? Great job! looks amazing.
curious of your technique bud, looks great!
the vertical fin looks like a perfect spot for a clan marking, graffitti, personally.. loots like a little clean slate up there really! if you do somethign with it, i'll be excited to see it all finished up!
Could you give me your question with details and easy-understanding english, I'm french, so it's quite difficult to understand why do you mean by "How are you doing the cockpit"
Skyfi : Yep I use airbrush and a self-made stencil. I follow some tuto in youtube to know how to do.
Sure, sorry (your English is well-written enough that I forget). I was curious if you were scratchbuilding the cockpit or if you were going to use bits. I was looking forward to seeing what you did.
I would try it in french, but it's been years and I don't want to hurt your eyes.
For the black, the only thing I can think of is to go back by hand and re-paint the black where your yellow over-sprayed. In the future, it might be better to do ALL the flame layers while your stencil is in one place. Then move the stencil.
I had a more complicated idea... You can cover wax or parchment paper with a layer of masking tape, then draw your flames on the tape. Cut the tape along the shape you just drew and then you've got a mask to put down on your vehicles. The wax/parchment paper will allow you to pull up the tape easily so you can use it. With that I would also mask everything on the vehicle at once to make it easier.
I was curious if you were scratchbuilding the cockpit or if you were going to use bits.
Scratchbuild like 100% of this model (except the grot hatch/scuttle). I have plan if you want, I already said it in your thread Mail me.
JWMarines :
I can't paint it because black gets red and orange too : If I paint the black will be too dark for the other black (I don't know If I explain it good :p). That's why I think about nuln oil (not on flames, juste on black). But it seems to be a bad idea.
For the Idea I can't for 3 reasons :
- The stencil is always moving for each flame (look at this tuto : http://www.youtube.com/watch?v=CnrjYYB76TM )
- I haven't enought masterize of airbrush so I can't know where the flame gone before to peint them :p
- If you mask black, you can't mask all blacks, so some blacks are not really black (because get red and orange and yellow) and the masked-black was only black ... It's really hard for me to describe it ^^
I understand what you're saying with the blacks. The layering is complex and I'm not experienced with air brushes enough to offer any advice there. Wish I had a better idea to help.
looks great! ... about the only thing i would see changing in my mind is the forward most section of the rear fins ... maybe a bit more yellow or a touch of white along the edge.
looks like it would be a blast to build ... and since i play orks .. hah! ... looks like i need to get some other projects finished up so i can get started properly on my ork army ... have about 1300 points of them waiting for paint and customizing .. plus will need truks and jets.
Where do you get your supply of plasticard? I live in a rural area so i purchase most things online. Still trying to get a decent place for plasticard.
Back to your work - While everything is amazing, what floored me most were the burna conversions. They look just like the GW ones. Wow. Thanks for posting this stuff. Wonderful work. Makes me think I need to step up my game
Ruglud wrote:Amazing work Lucius, your dakkajet is superb. Sub'd
Thank you !
Gorgrimm wrote:Whoa. All of this is simply stunning.
Where do you get your supply of plasticard? I live in a rural area so i purchase most things online. Still trying to get a decent place for plasticard.
Back to your work - While everything is amazing, what floored me most were the burna conversions. They look just like the GW ones. Wow. Thanks for posting this stuff. Wonderful work. Makes me think I need to step up my game
Oh dude, you are american ! In France it's really hard to find plastic card because it must be import from USA, so you can find easily if you live in USA :p. Try to order at http://www.plastruct.com/ (you order a catalog and then you order product). I dream to order plastic card from USA it's cheaper and you have more choice of product (Try to search evergreen reference too : http://www.evergreenscalemodels.com/Sheets.htm. Know that : plastic card name is STYRENE, it could be help)
I've only ordered from Blick so far for styrene sheets. Pretty good prices and they do very manageable sizes of sheets. I spotted them and added into another order I was doing. I've ordered dropper bottles from usplastics.com before and they are great. Haven't ordered from estreetplastics.com yet, but their prices are pretty good.
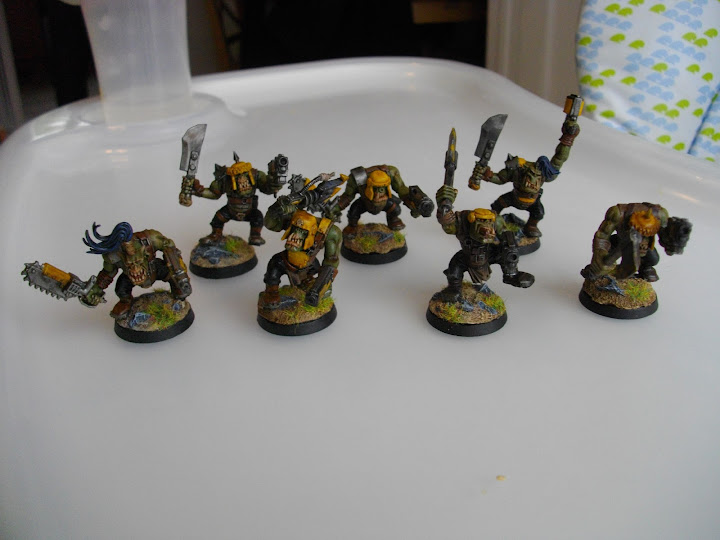
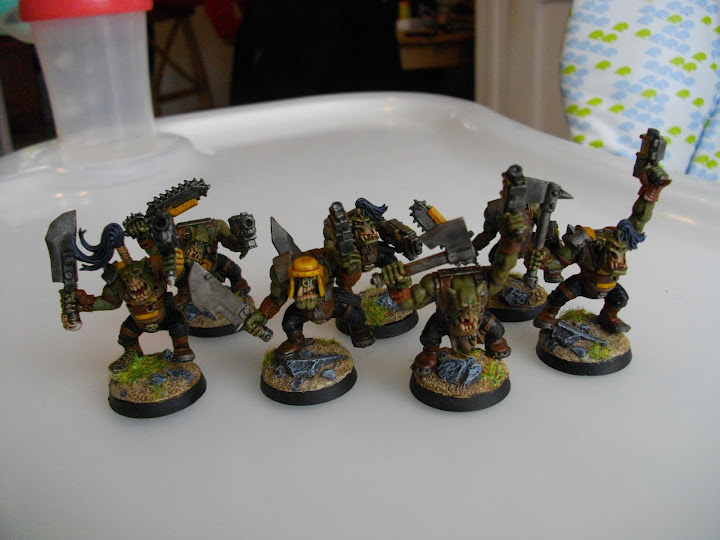
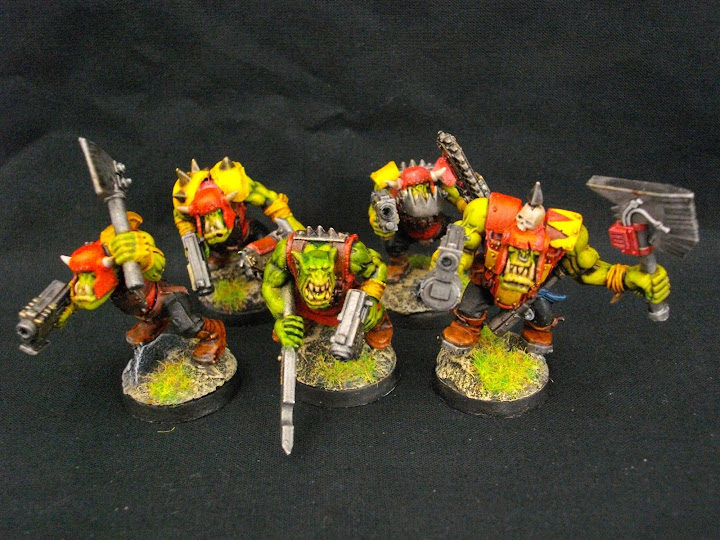
I like your skills, and your MANZ are simply awesome! The KillaKans are great aswell. Very impressed.
But why are you spending SO much time and effort on copying GWs burna, the dakkajet and the looted flyer? Its obvious that you have skills. If you are going to do a looted vehicle, or going for that look, then why not save time and money and buy the model, and loot it?
There are many unimpressive looted vehicles, but by the looks of it you could make it awesome.
JensDK : I like to scratchbuilt, so it's a complete part of hobby for me. So now, my dakkajet cost me lots of time but ... 2 dollars ? My ThunderOrks cost me 15 dollars ? For burnas, I juste need 2 more, I make them from AoBR boyz for ... nothing ? It's a very good way to save money AND enjoying modelism.
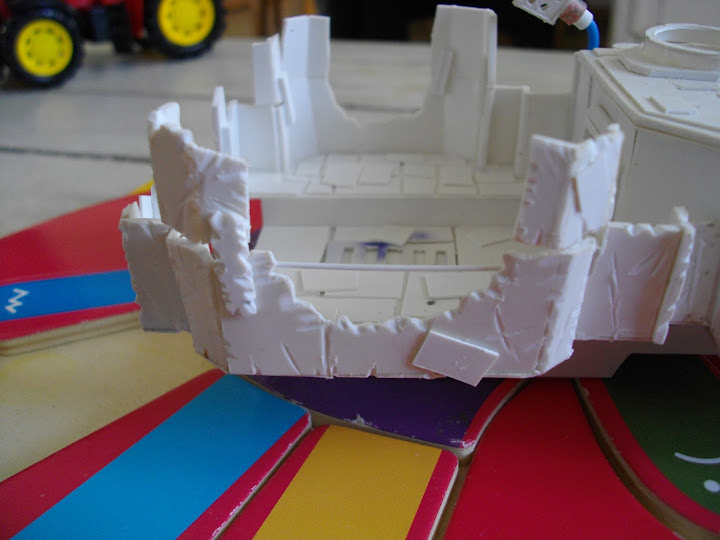
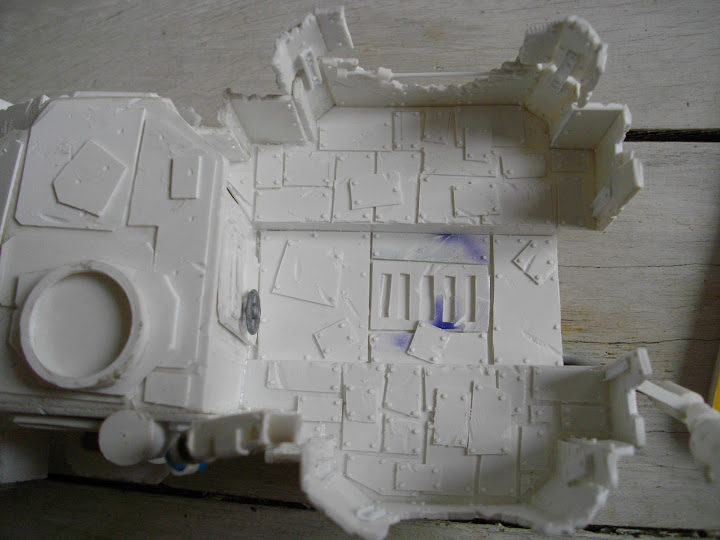
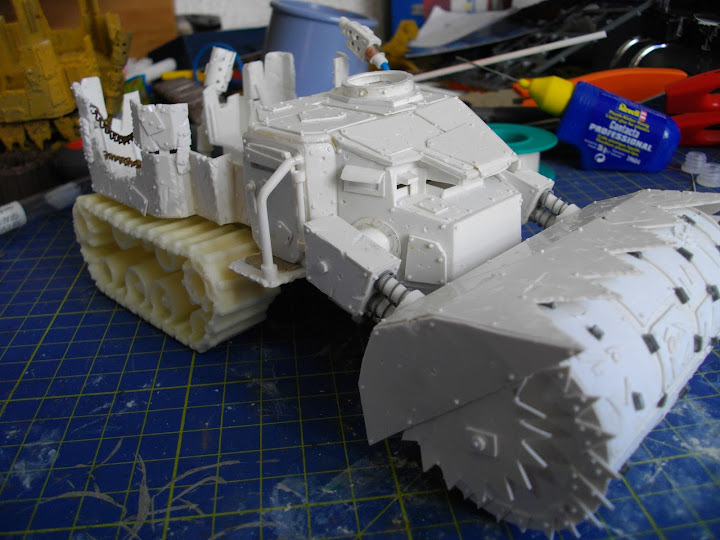
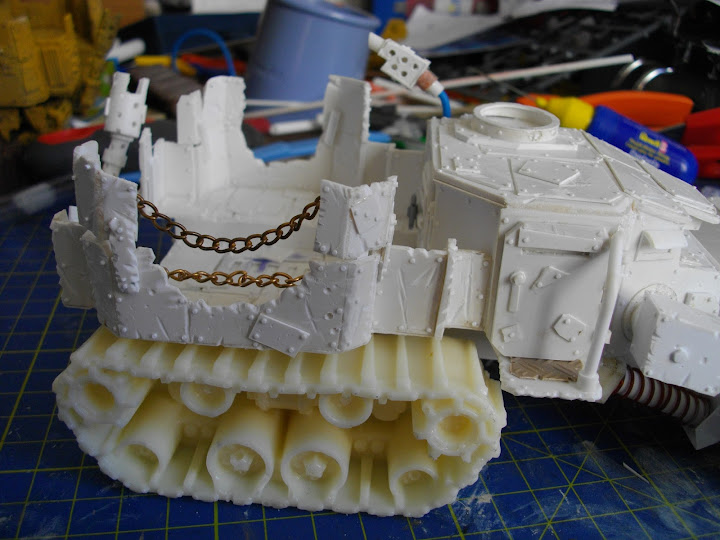
Raaaaaah after thousands of rivets I'm out! The vehicle will require two or three improvements before painting ( plate to hide between two caterpillars, straps for railings and a check for the hatch ), but I think I 've reached my goal was to create a vehicle in 11 days. I finally done it in six days, so I'm very happy!
Here are the final photos on my desk a mess . You will notice that most of the rivets I added chains to the rear and side doors Rails :
Thank you for following me during this week, it was challenging but very rewarding your many tips have been very useful to me .
again great work! ... i look through threads like yours and so many ideas pop into my head ... i write them down, and on occasion make a rough drawing ... but that is as far as they ever get ...
I can never figure out a good starting point to make something. i can picture the final look in my head but the smaller sections seem to confuse me.
Luciusletroll wrote: First rule in scratchbuilt : If you don't see it, you don't care XD
You must think about "How can I figure that" rather than "How can I do that". It's a good start ^^
Second rules : Think about volume. A good scratch is a 3D scratch. it seems fake if its flat.
Divine rules for everything : Try try try and try again. And when you meet succes : try again
i am going to shoot for trying to get something past paper by the first of the year ... i have enough random sketches that i just need to dive in ... have been pickin up styrene cards here and there to have enough to start cutting up ... but think i need something better then just an xacto knife blade.
translate.google.com works great and thank you .. somehow i overlooked that one while on your blog .... i already have a good amount of those tools ... other then the hole punches ... and needing to pick up some more blades for my xacto knife (or one of the economy packs like what you found)
Didn't understand sorry ^^ I use "polystyrene extrudé" in french, in english it's "extruded foam" it seems to me
i do apologize. yes that is what i was asking. I will be interested in seeing the durability and weight of those when you are done. i have been thinking about making some myself but the weight is a concern versus the durability with using a product like that.
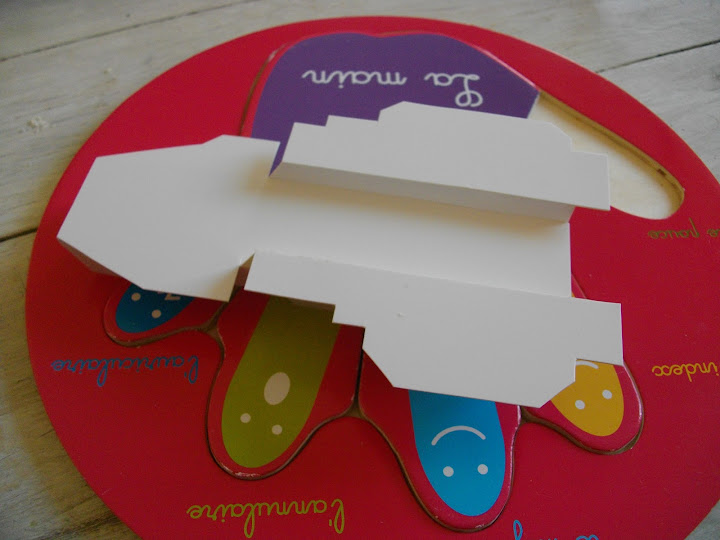
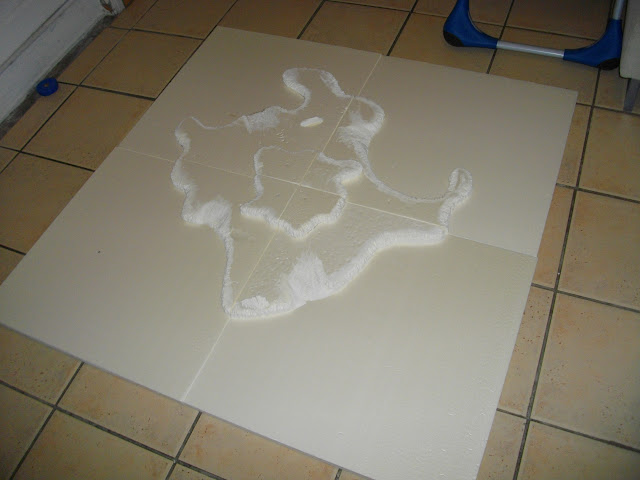
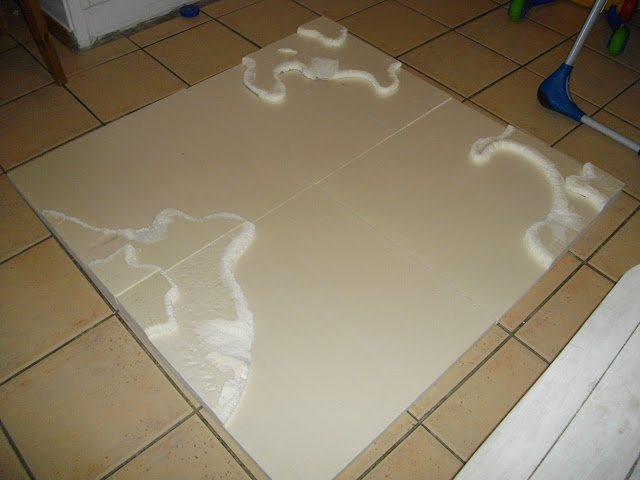
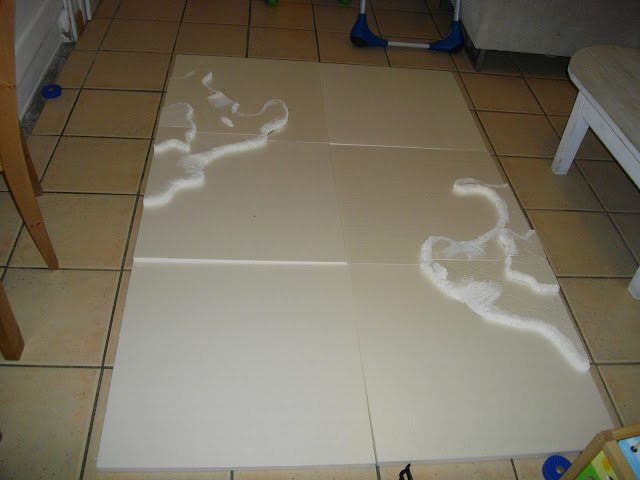
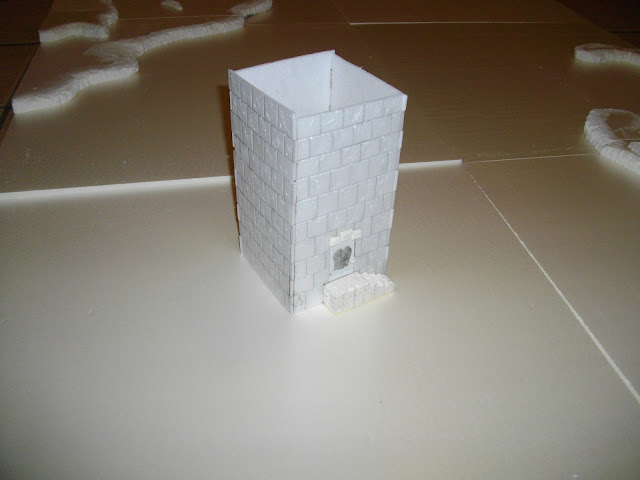
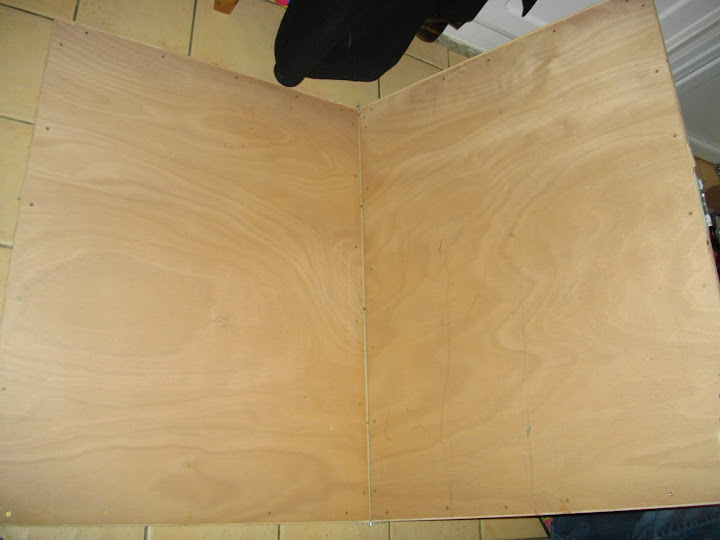
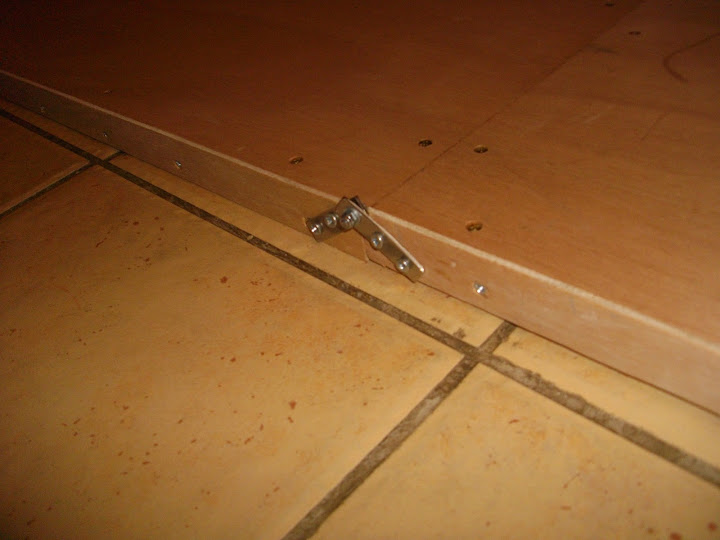
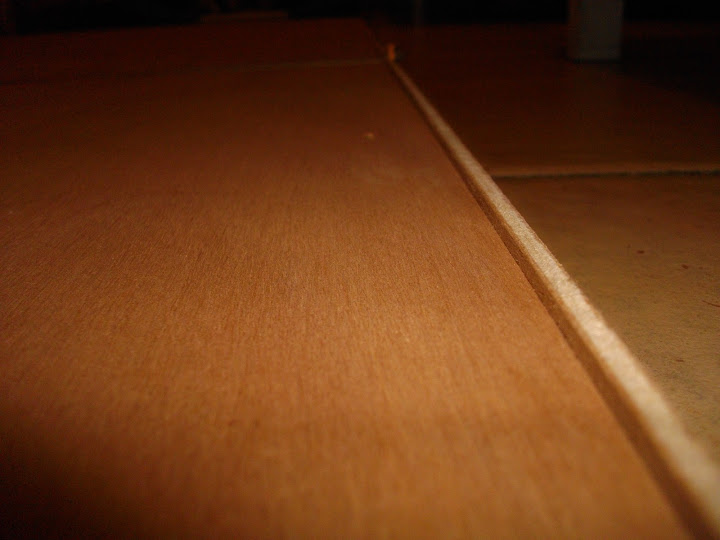
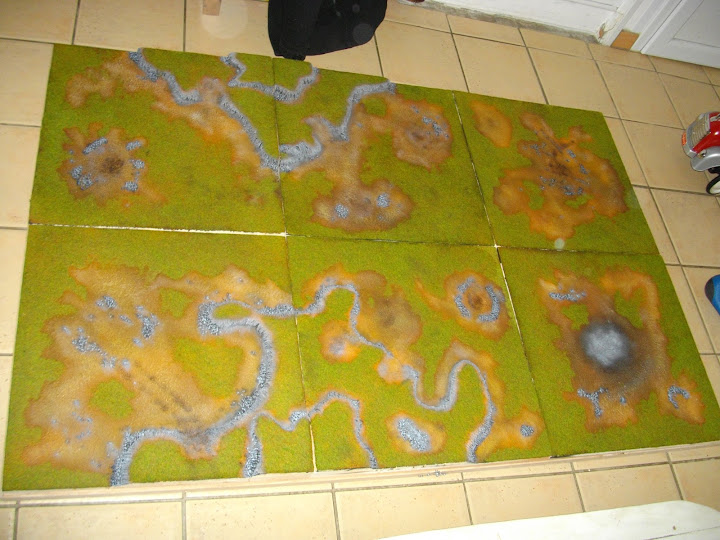
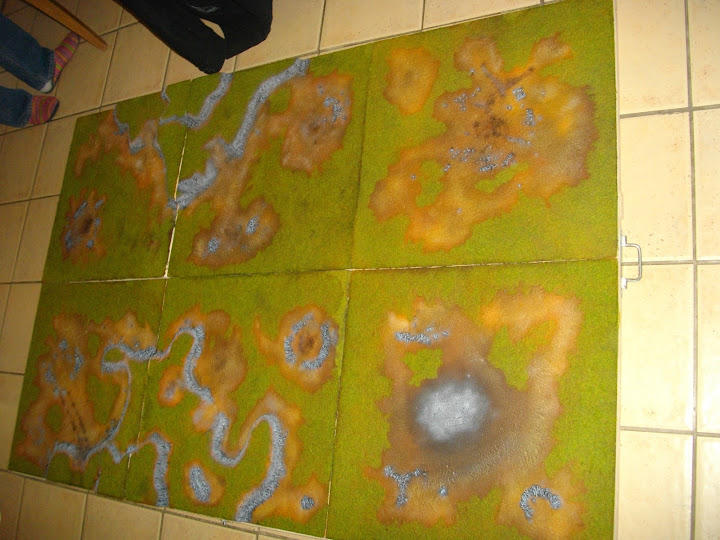
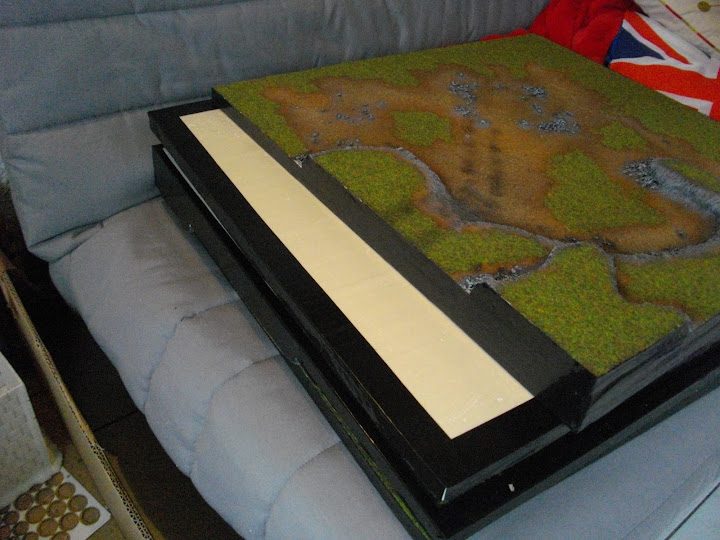
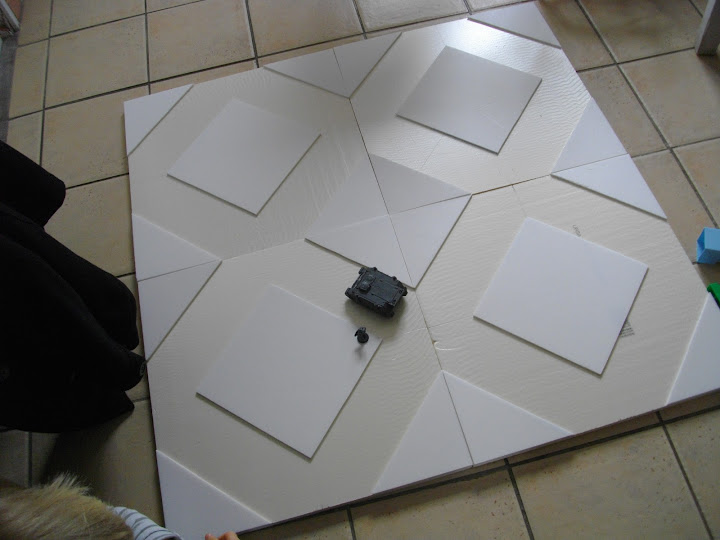
And here is the pliable board on which will insert the modular plate. It is a realization of my brother, carpenter status. I thank him very much because it will allow me to always have available a table to size with an ease transportation obvious!
The unfolded table :
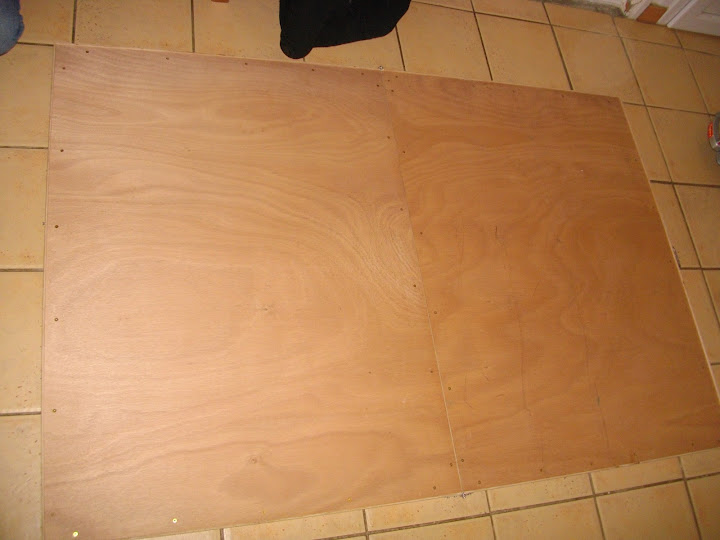
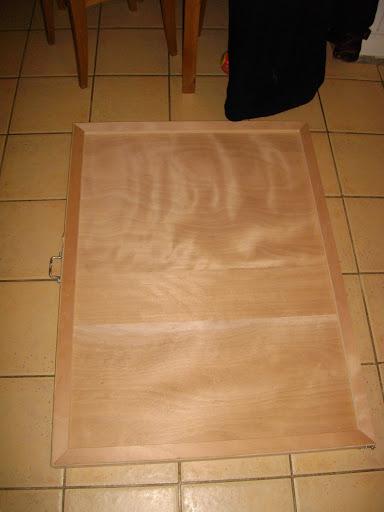
The folded table :
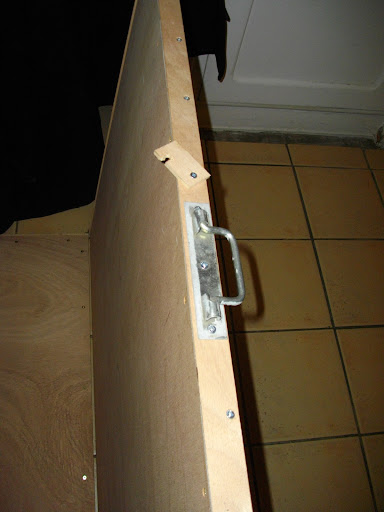
The carrying handle and the clip to keep the closed table, then the junction between the two parts of the table :
I asked him to achieved all around the edge of the table so that the polystyrene plates are calibrated and do not move at the slightest shock :
the constraints that this edge is relatively small (a few millimeters) and some of my plates were warped and I still have some file down on the edges to get everything right, but overall the system works rather not too bad :
Still work so that the plates fit perfectly into this table! Folding table is a real plus when I would play with Rhanarion or when people come home. Ultimately I think painting and decorating it but it is not the most urgent.
Another big thank you to my brother for making me this beautiful and very useful folding table !
Sorry for my english, again, I'm french (using google trad with some rectification)
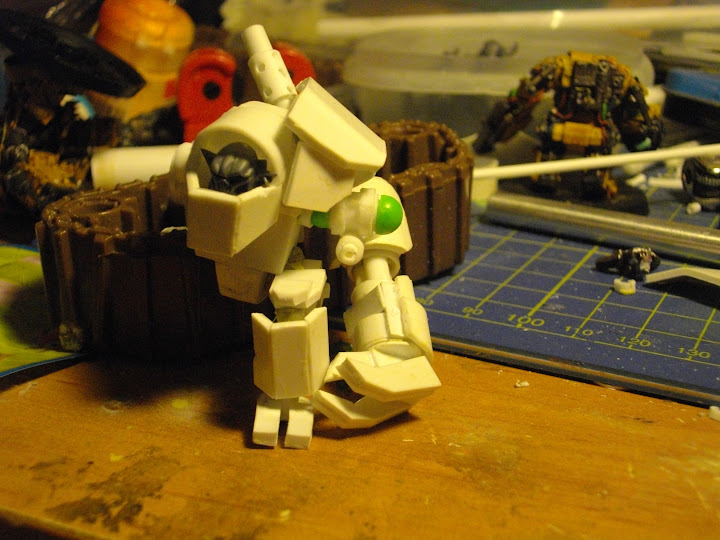
Here is the result of MegaNobz concept that will surprise many people I think. I am inspired by Khador Warjack from Warmachine and I wanted to give them a more simian appearance, with arms can rest on the ground, all in a very aggressive look.
Here is the result:
Note that all parts are modular, so I could change the weapons at the end of the arm : power claw, dakka, hand holding a hammer or anything else
Okay here is multiple pics of MegaNobz concept. some people made me notice that the articulation of the arm was pretty average and I must admit it was pretty lame. So I made a joint ( shoulder - elbow) allowing more various poses (cutting beads ball gun ) . The part to be consistent on each side of the body it shows a half ugly ball however once molded I could easily cut this half ball which is useless .
It was a job for this joint ^ ^ . I also did a back but I 'm not satisfied then for the moment I do not show you . I think I'll have to go through several before you find something that pleases me . The look of all I like, I do not know if you share my enthusiasm. I have to redo the shield thigh see the tibia , I also wonder about the opportunity to put something in place tailbone / hip. Finally I have to think about a method to bind the legs of the body.
I wonder if it should be more claw than arm? It's such a tiny claw (compared to other ones). I really like it, it's ~really~ different from the usual conversion/build. Keep on inspiring us!
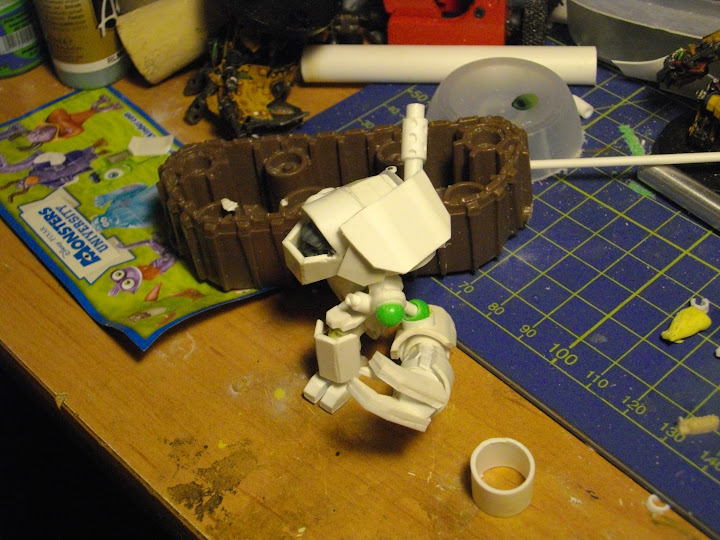
Following discussions with the internet users I decided to go up to 5 mm arm, rendering is much better. This forced me to change the shoulder but in the end it's better: the shoulder is attached directly to the arm allowing for more dynamic poses:
Except to show you that I was not idle here is the concept of spare parts: :
You will notice two different "hands", the brand that you have already seen and a minigun count-as paired fling, but I do not like it so I have to redo. You also have 2 alternative "back" that I realized but others should see the day. I revise the leg for him append a joint as the arm. This will require a bit of work to make it more beautiful, but it is mostly infinitely more practical.
Here is the first concept Meganobz fully assembled (except the head which will be painted separatly). I start the paint but this is some pics (black undercoat) while waiting the rest of minies.
I'll hope it please you !
I wonder the best clan I should paint ? Bad Moonz ? Deffskullz ? Evil Sunz ? Hmmm maybe it will be Bad Moonz !
Voici un teaser sur le 2eme MegaNobZ concept orienté "demandes particulières". C'est en gros ce que je suis capable de réaliser sur demandes particulières qui vont plus loin que le concept de base. Ça coûtera évidemment plus cher, ce sera selon la demande et la masse de travail à rajouter sur les moulages de base :
Here is the second MegaNobZ concept for "special request". It shows what I can do for special request which gone far than basic model; It will cost more obviously, it depends on request and the amount of work I must execute to made the request :
A huge fight ! :
I start paintjob for the first, and yes, it's Bad Moon !
Merci pour ce commentaire ! (thanks for this comment ;p)
Shades/Highlight are very basic : I start with black undercoat then I add more and more white and I drybrush ^^ (I don't use GW paint for sceneries, too expensive ^^)
Automatically Appended Next Post: The "test" meganobz is finished. I'm going to send it to Rhanarion (blogurine box) paint studio
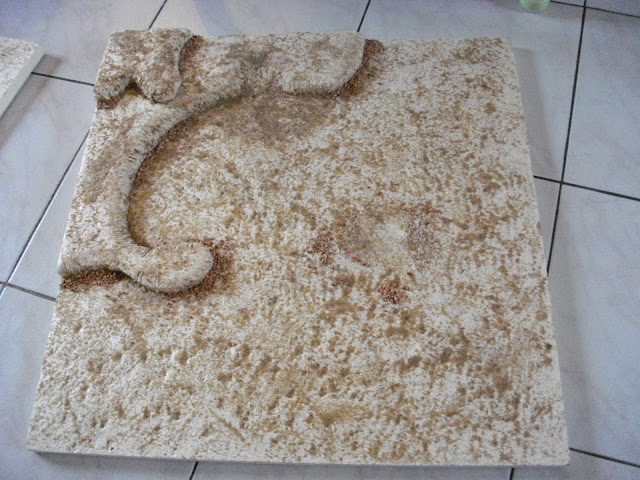
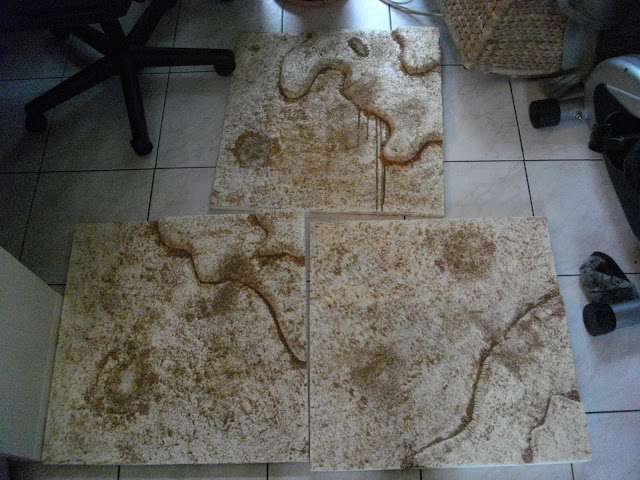
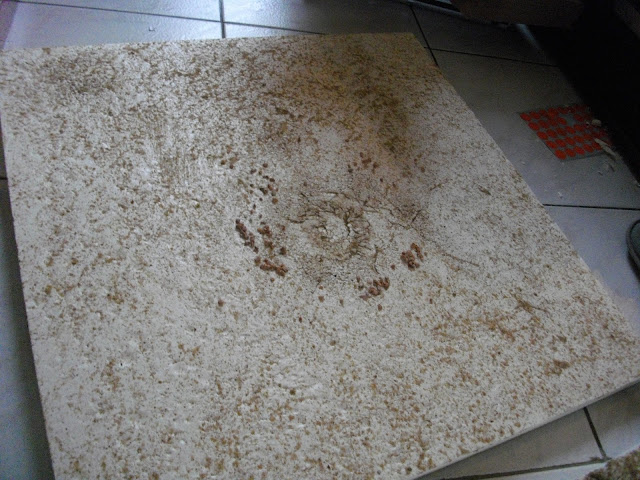
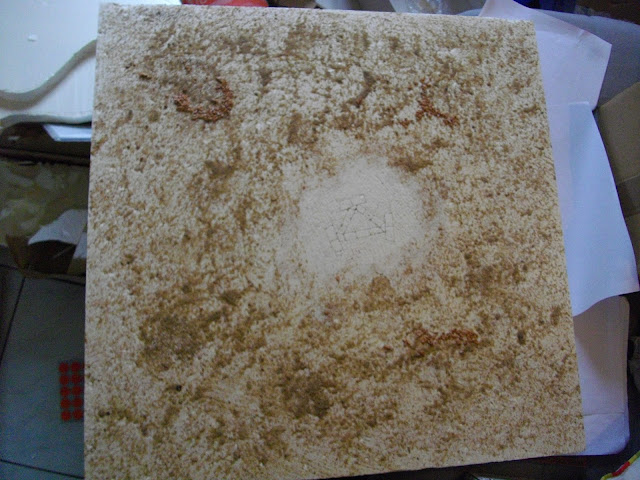
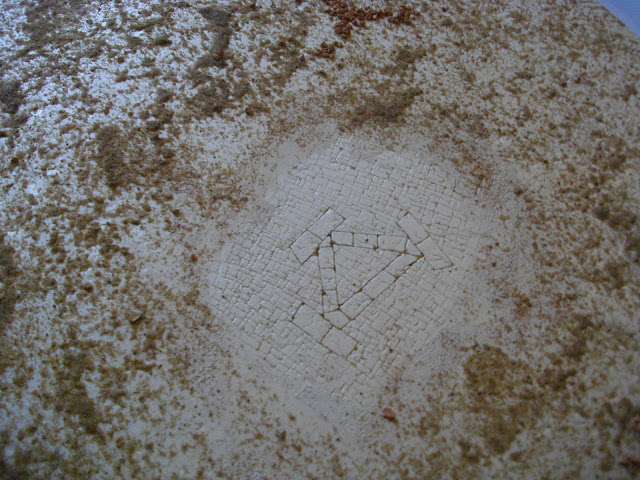
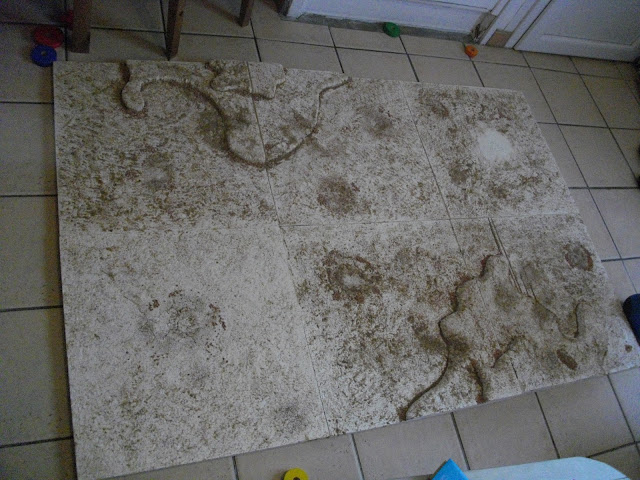
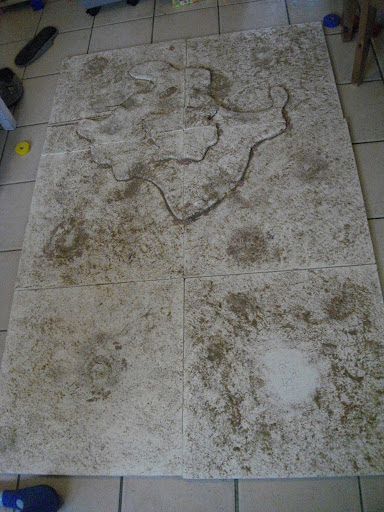
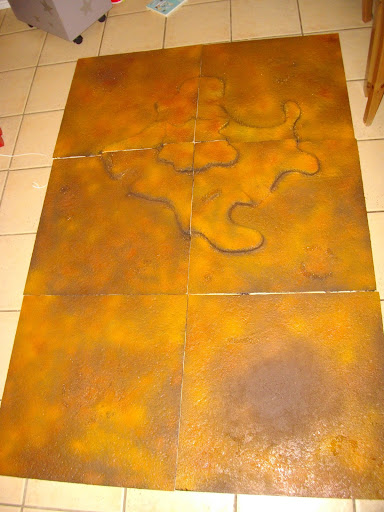
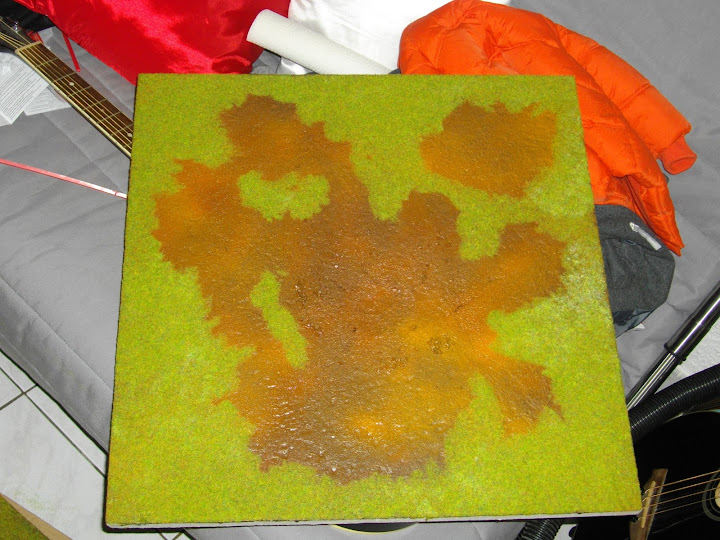
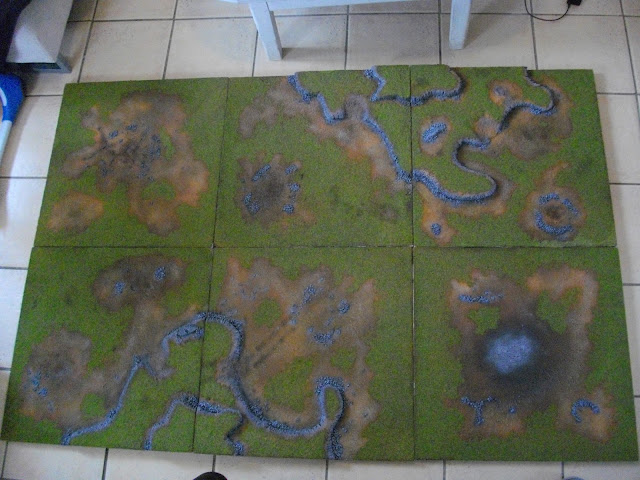
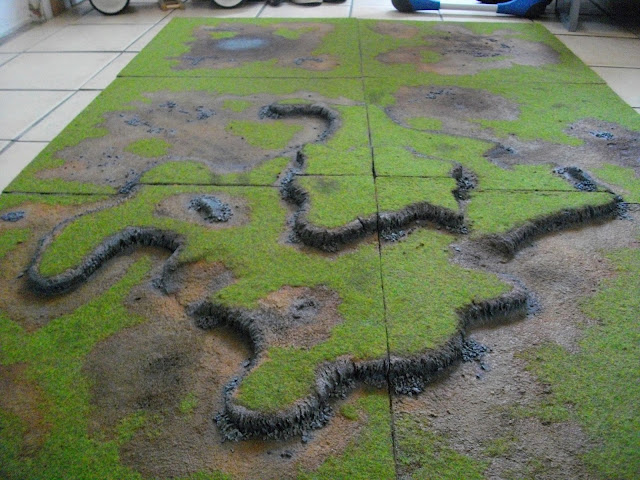
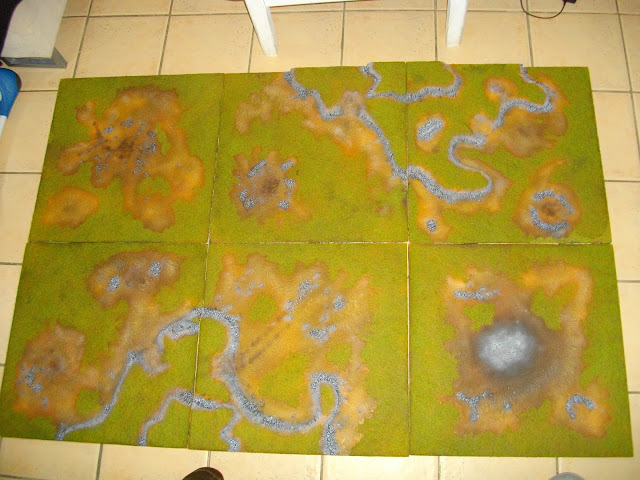
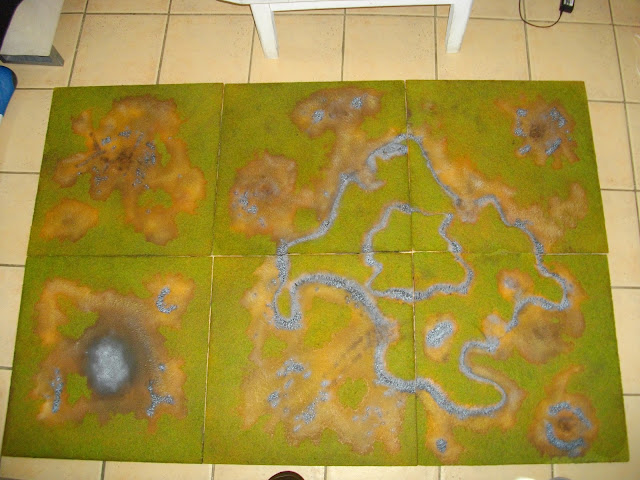
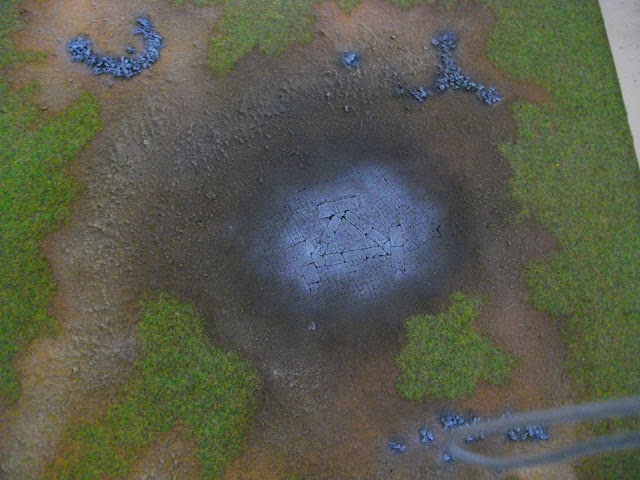
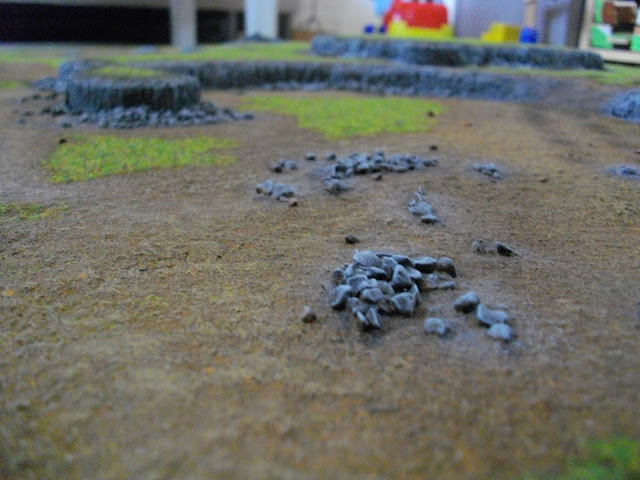
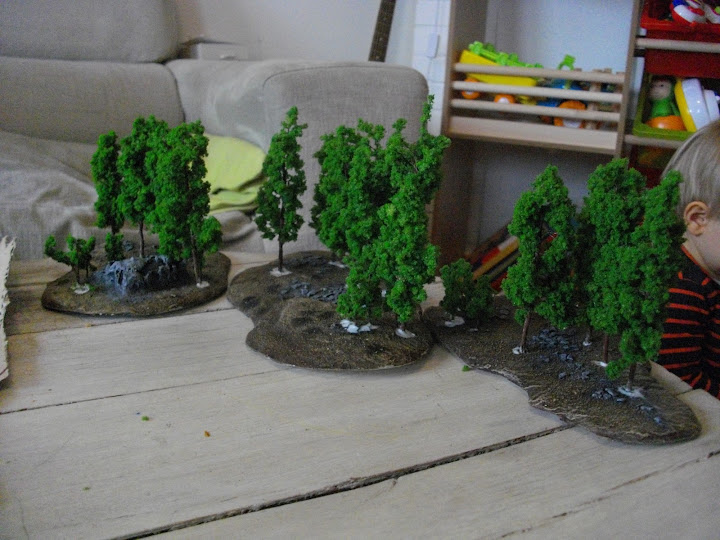
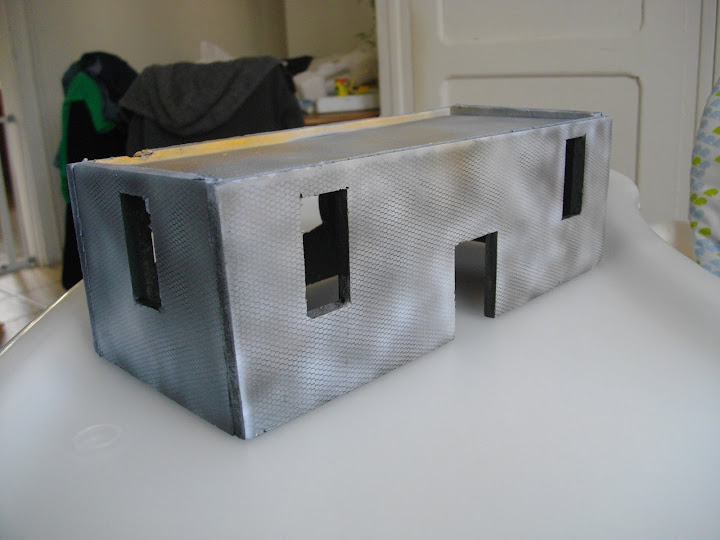
WIP for my urban table : one board is clearer than others, I didn't use the same grey. Others will be lighten with the same grey
Automatically Appended Next Post: WIP for my urban table : one board is clearer than others, I didn't use the same grey. Others will be lighten with the same grey
I can't love them, I must send them to my customer ;_; I always want to keep MegaNobZ I built
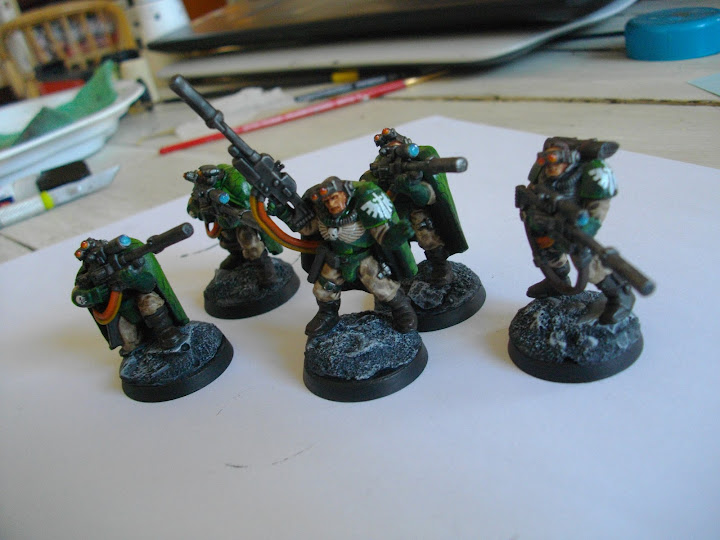
Hello everybody, some WiP for my order. I made the first paintjob (my customer wants one blue and one red) and I started metallic parts for the blue one.
The red :
I must improve my skill with the airbrush but I can see some improvement ^_^
Knarloc green
Camo green (drybrush)
Tallarn flesh with "glacis" (glaze ?) on lips
gryphone sepia wash for all
Quite simple, isn't it ? :p
I use tallarn flesh in "extremity" like eyebrow / elbow / cheekbone. When I started painting orks, I only base-paint the tallarn flesh, then a drybrush of tallarn flesh to pull pigment. I notice if I make a wet-drybrush it was better ... Yeah wet-drybrush, kind of non-sense. I just use tallarn flesh then I wipe my brush on towel (sopalin, don't know english word for that) but a slighty damp towel.
In fact I learn later that is more a glaze than other thing. So I train to make glaze. I use that to help me :
Hello everybody, some news in my order : I finish it. I paint the head ... before I notice it's pointless : we didn't see it ;_;
The same as the latter : no battle-damage, some transfer, more lining and basic coat with airbrush. I use green with vallejo metal medium and I'm proud of the result
The standing is less dynamic than the latter but it impress too
This is a serious start for my Youtube Channel : http://www.youtube.com/user/LuciusTroll I still need to work on video editing but I'm new in that so I'm proud of that work
Leave me a comment it's always a pleasure for me ; you can also ask me what video you would like to see !
Looks great. Never considered a diagonal layout. Should make the line of sight more interesting.
Out of curirosity, what are the general measurements ?
I'm guessing 2ftx2ft boards with 1ftx1ft center concrete tiles. Trying to wrap my head around how wide the streets would be, and how much terrain I could jam in each square.
Also, love that you worked the Imperial eagle in there.
Here is the first tuto on my Youtube channel : Make a simple volume with plastic card. It's in french but you can understand the tuto without my lucubration. (If SpaceCat throw an eye here, and want to traduce, it will be a pleasure )
Suscribe to my channel, give some green thumb and let me comment, I will respond to them (in english ).
Ha! That looks a bit like my to do list as well (scratch 3 Dakkajets, 15 MANZ, 20 Stormboyz, 20 Bikers, 10 Mek Gunz, Orky Aegis and Bastion, Stompa, etc).
Just make sure you keep on posting. We all love seeing what you come up with.
I love it. I really like the skull thingy on the front fender. I don't love the red handlebars so much. The detail on the rest of the bike is so good and the handlebars seem like they should have more detail than less.
Really fantastic painting though! Looks really good. I want to see some tabletop shots of them rippin it up!
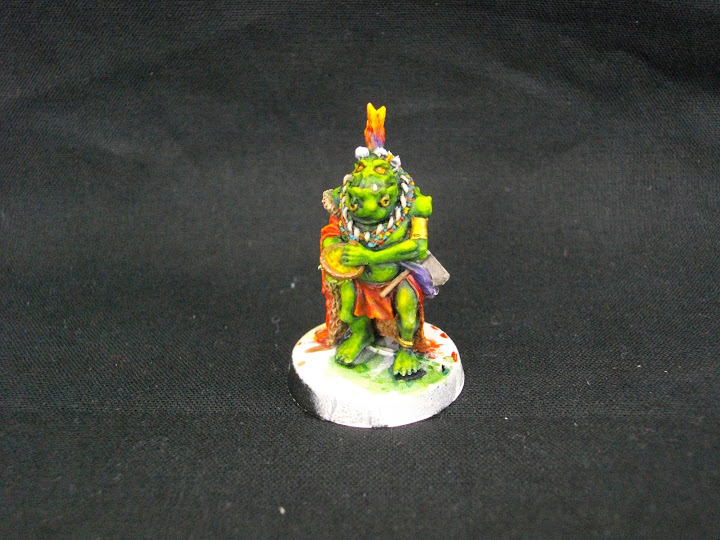
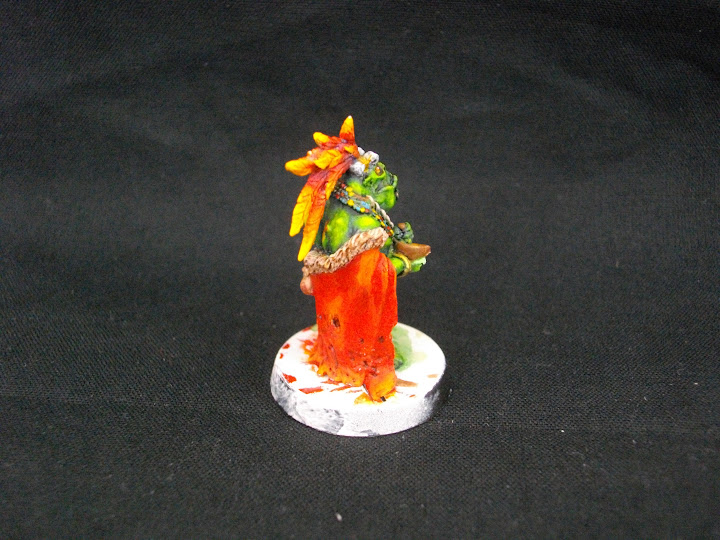
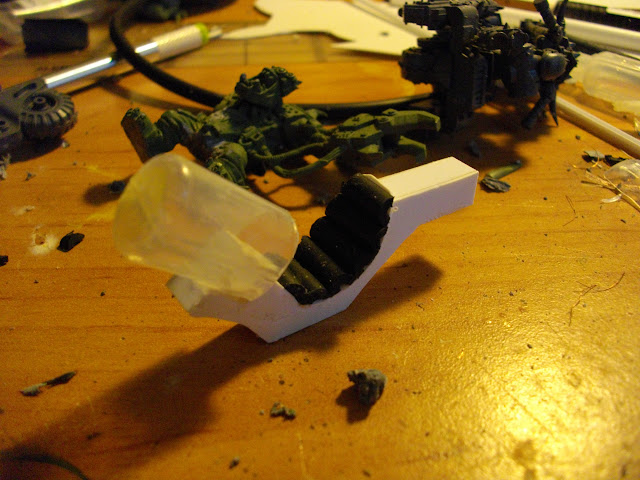
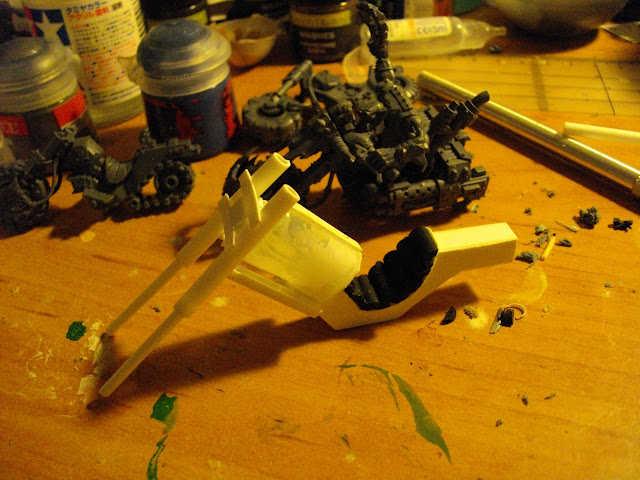
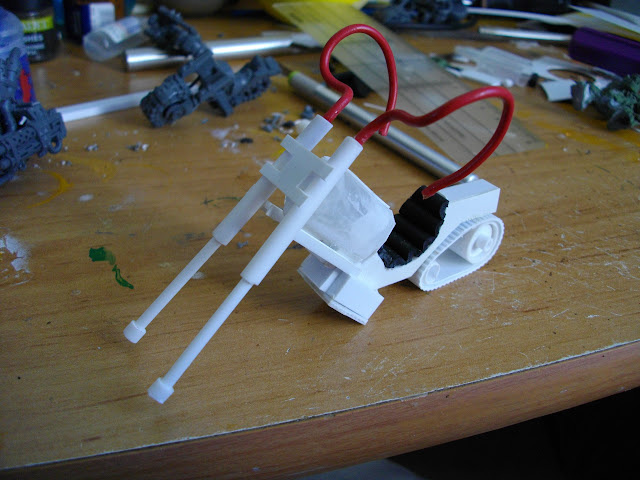
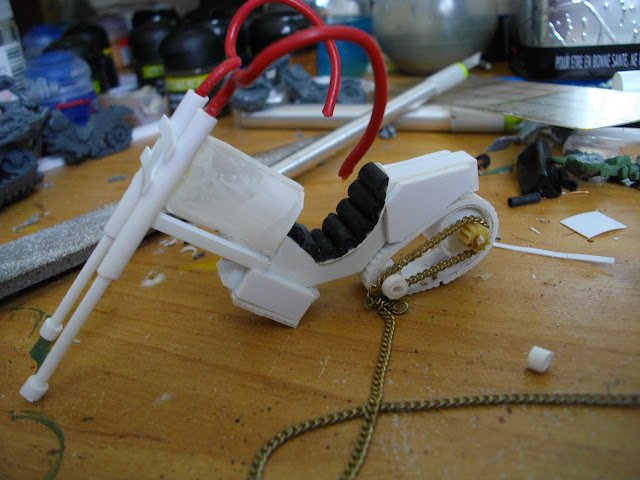
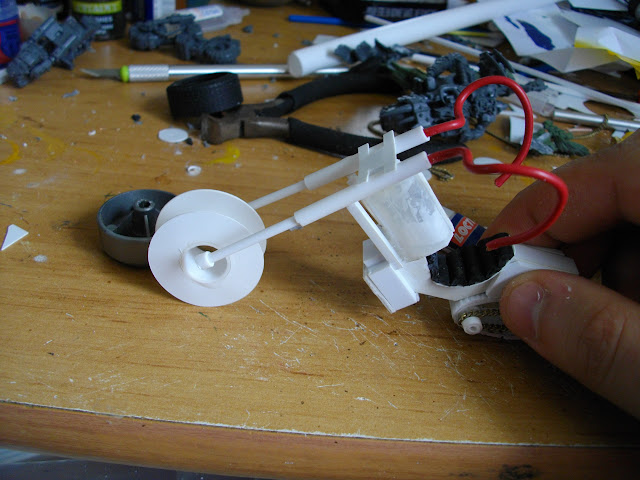
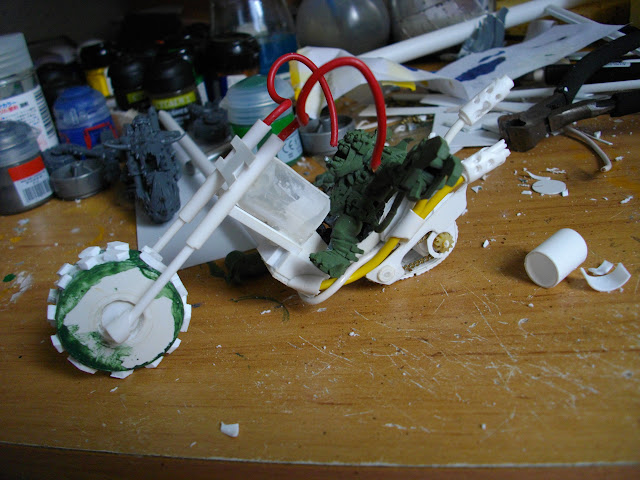
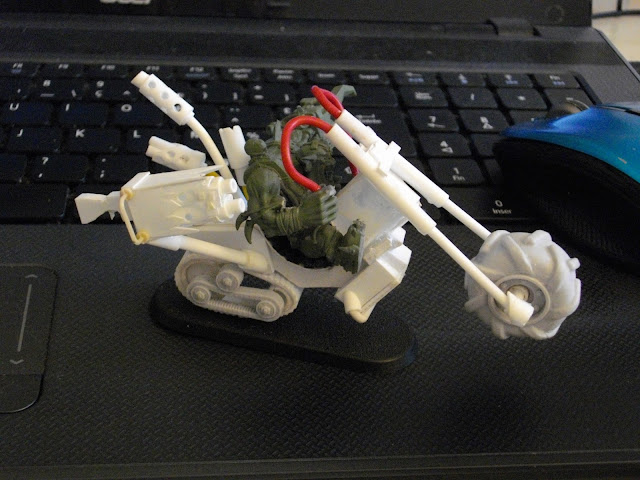
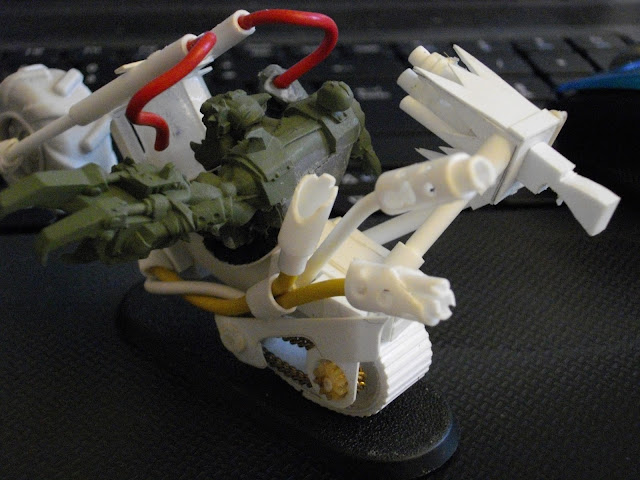
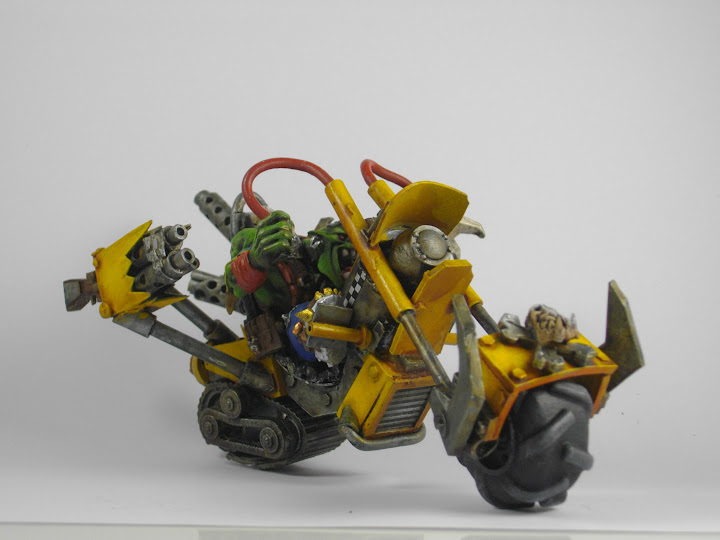
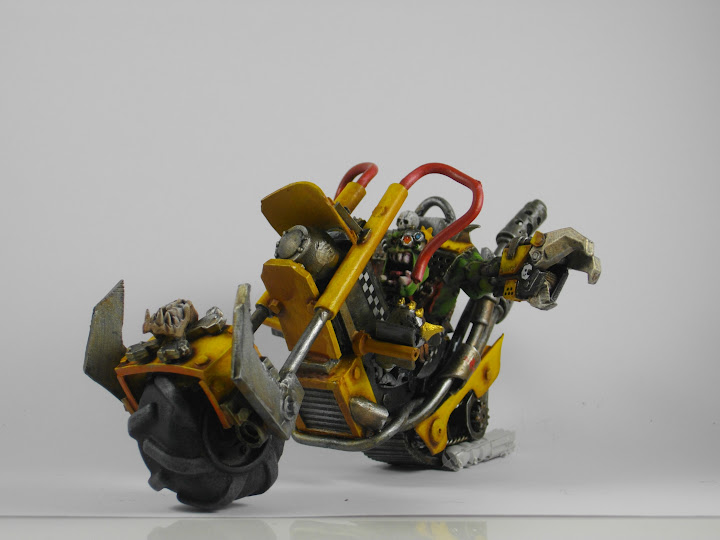
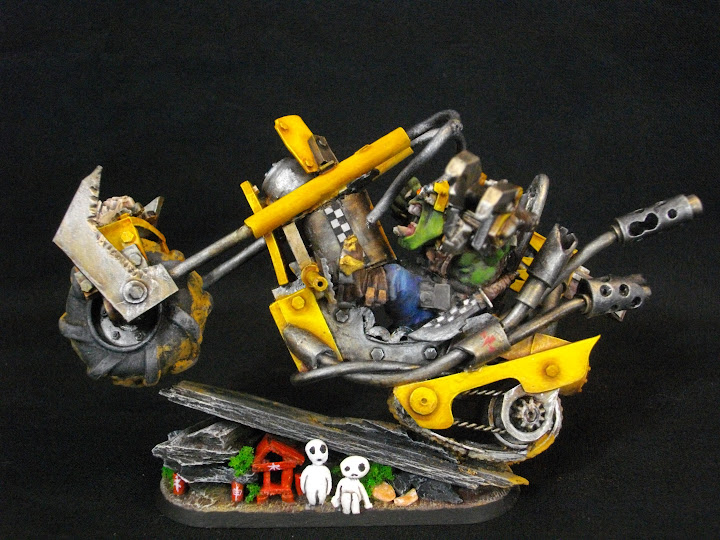
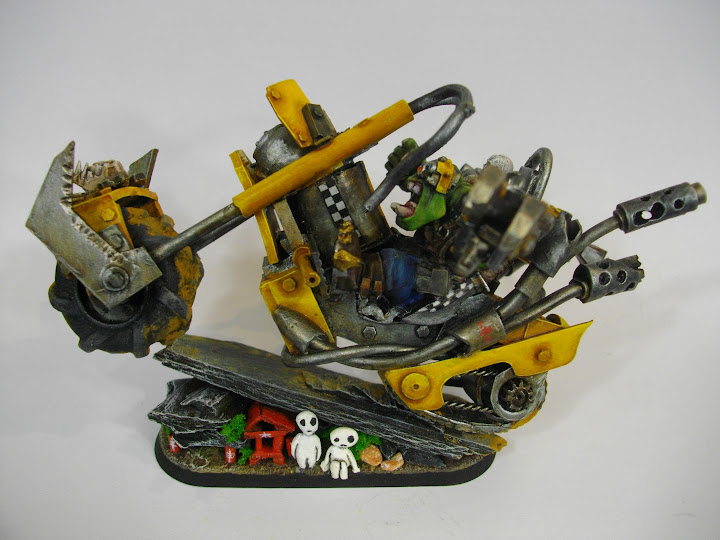
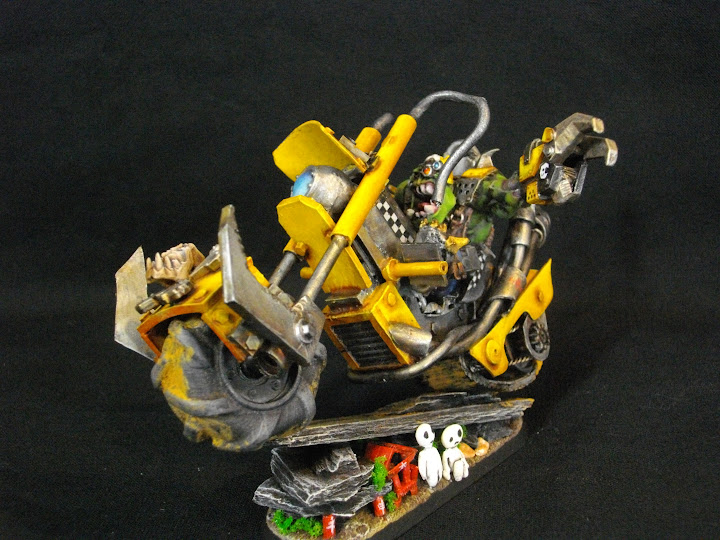
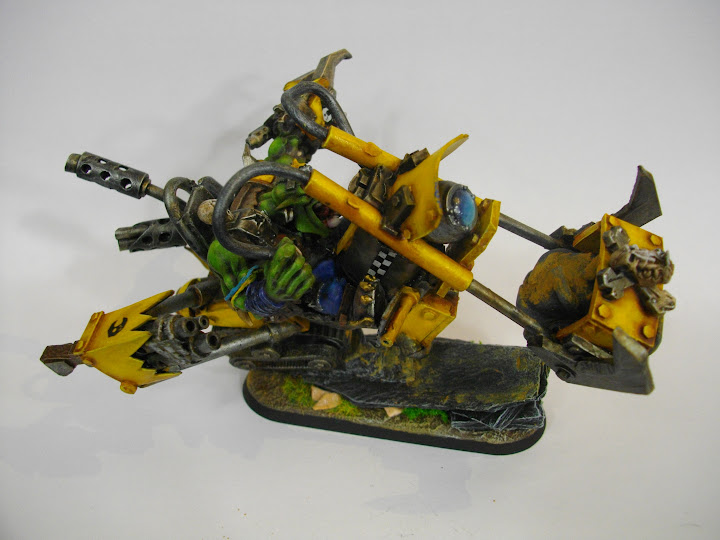
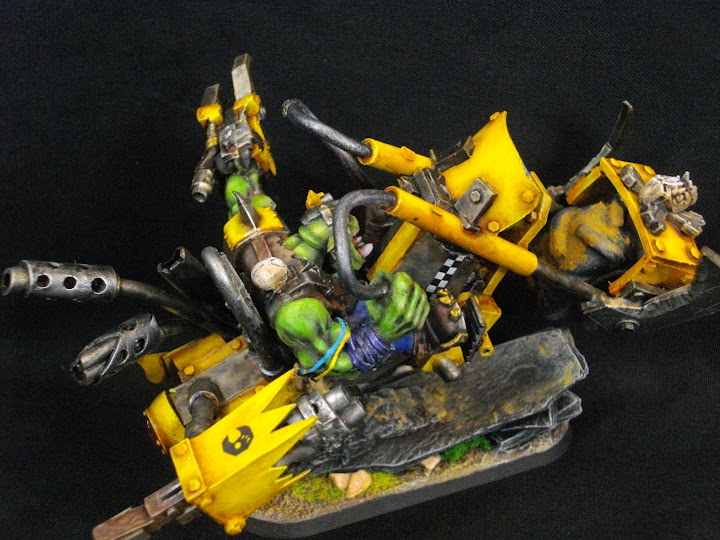
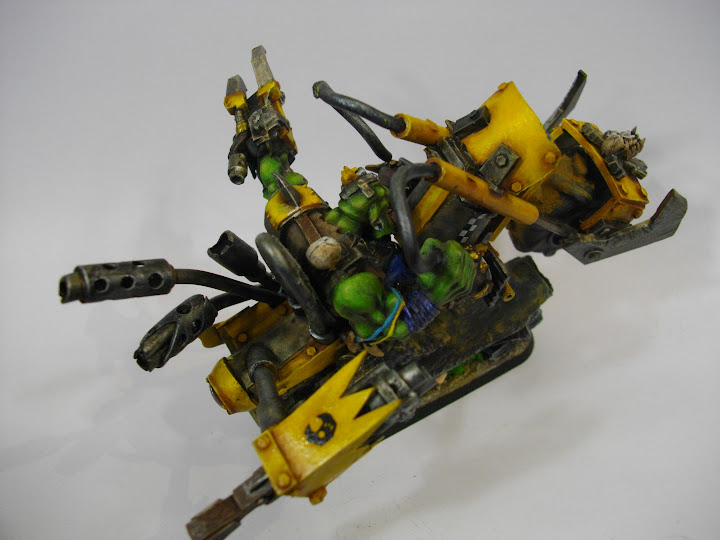
Here is Ukufa Mori (Death of Mori in zoulou langage), Warboss biker for my Bad Moon Waaaagh! It's a 100% scratchbuild except from the Warboss himself (from Black reach).
Ukufa was paint for the Challenge Championship of Crazy Peinturlureurs in a french forum (Warmania).
I challenged my friend Morikun, so he choosed the topic of this challenge. He choosed : Kami (japan spirit). I must paint a kami or put a kami or write kanjis for Kami : 神
I succeeded in both painting kami and kanji !
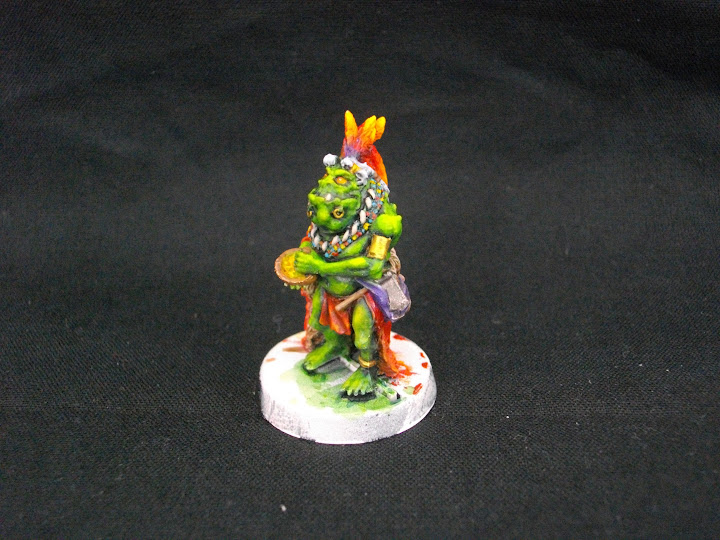
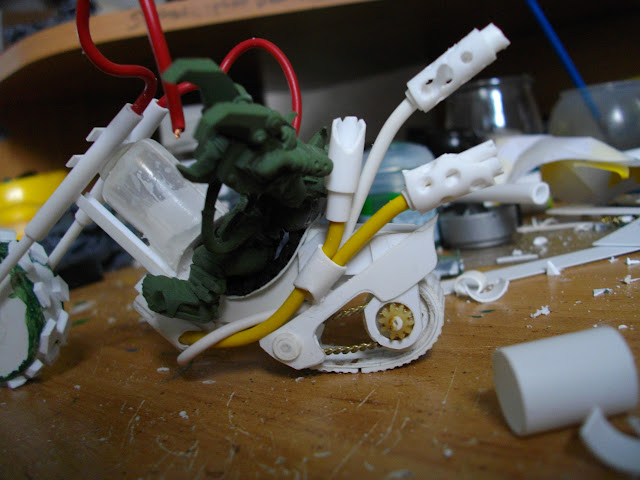
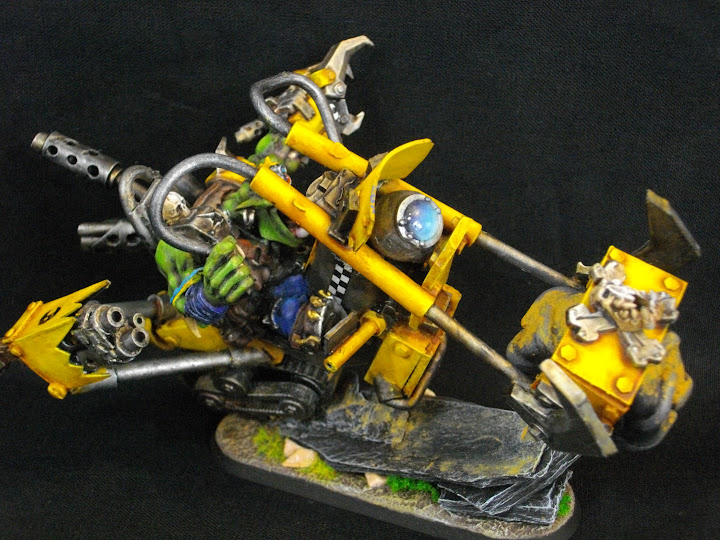
You can notice a little red temple with 2 red pilars with kanji. You can notice 2 Miyazaki's inspiration kami (kodama or forest's spirit). Morikun's blog is "Le Temple de Morikun" (Morikun's temple in english), so I represent it to let everybody know ... I RIDE ON HIM ! (in french there is an expression named "rouler sur" /roll on somebody/ to explain that you totally beat someone ... and "rouler" is the word for ride ... it's a calembourg).
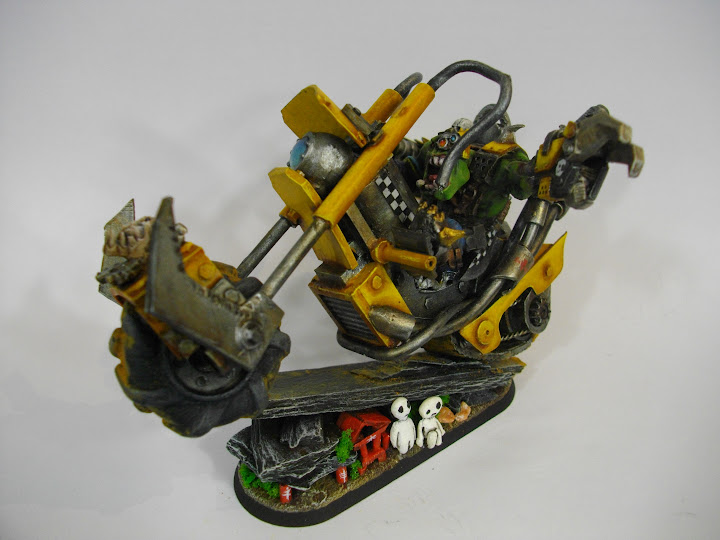
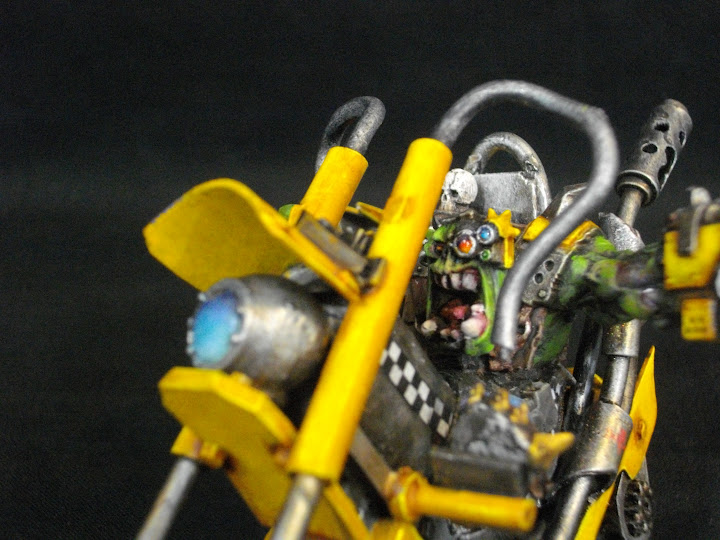
Pics here :
Some details :
The sculpt of so little object was so hard. The painting too !
I think it looks fantastic for a first sculpt! Very well executed pose and the face is characterful.
3 things to improve on (and actually all things you could still do if you wanted to): the texture (skin), the eyes (very difficult) and to slim down the beard sausages.
But it looks great already as it is, and you can definitely be proud of your accomplishment!
it looks awesome. the 'biceps' or upper arm is a bit too skinny for my taste. being that skinny, an ork's arm couldn't be in it, which mean the ork's whole upper body would be in the 'torso' section, which, in turn, also doesn't look big enough. but that's just nit-picking, really. nice work!
At first i was just bored and looking at random blogs and stuff, but i gotta say, this thread has blown me out of my chair, those meganobs! That Battlewagon! That Dakkajet!! Just wow!!
Hey I'm happy it pleases to you Do you like the ThunderOrk ? I should finish it ... one day ....
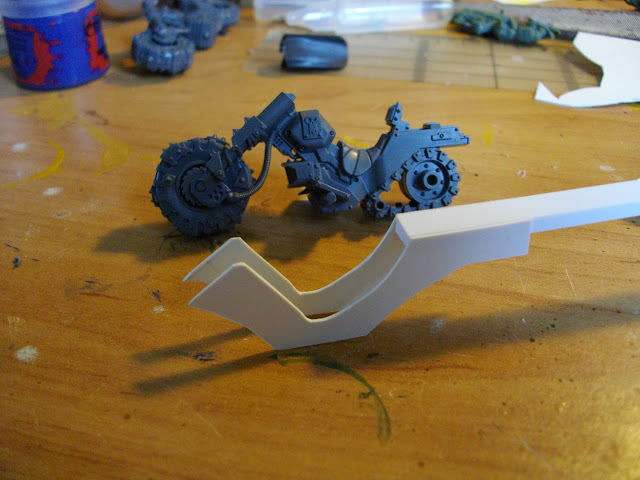
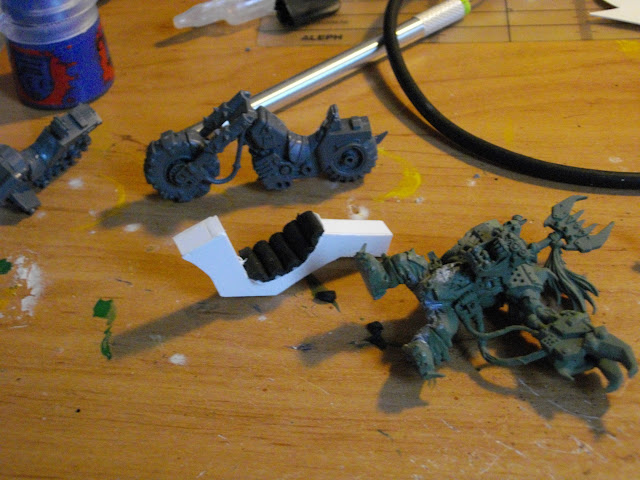
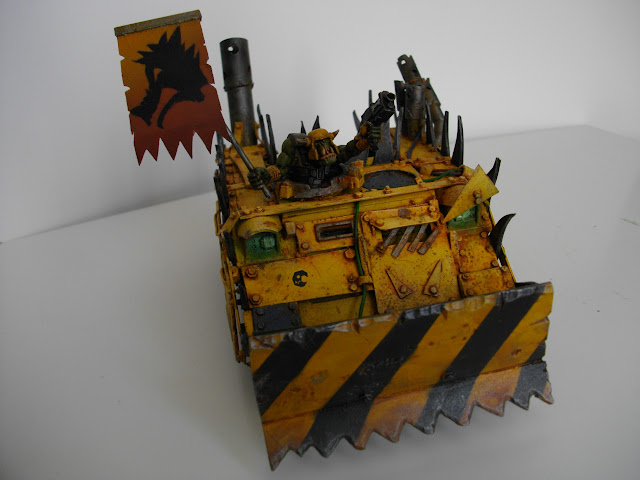
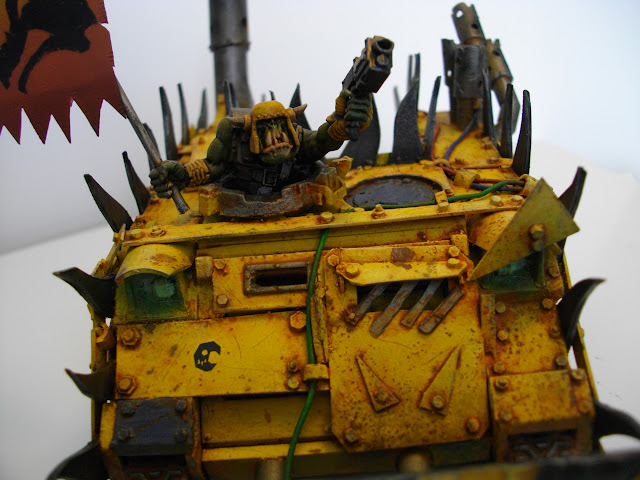
Actually I'm building a kit for build a Truks and sell them .... 15€ (half price in France :p). Because in V7, Truks spam is strong ^^ I need 9 of them.
Thunderwork is a work of art as well my good sir, if i wasn't working on my iron warriors like no tomorrow, i'd certainly get back into my blood axes! These orks are seriously inspiring! I've always loved meganobs and what you have made is tempting me to have a go at making my own green piston driven murderers!
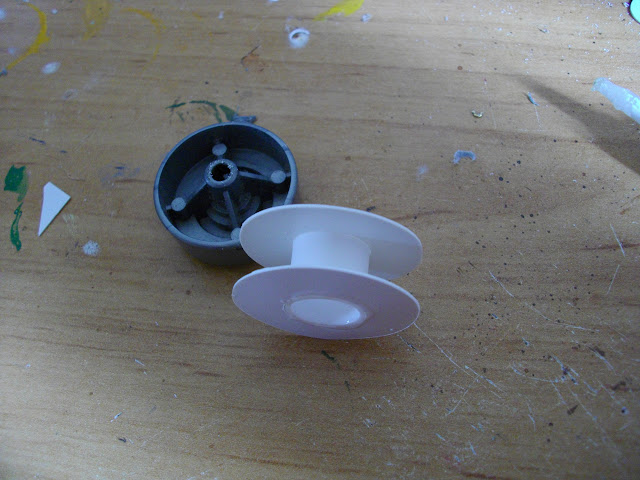
Lone : Yep it's a very quick and easy way to make wheel cover, I loot this idea from another Mekboyz :p There is a lot of type of lids to make various wheel cover.
do you sell the tracks already? also... the truck looks very good... and i see how it is developing...very promising... and for that pice...you´re coining money!
and... hat´s off to your madame....that looks very good.... where is that model from anyway? steampunk ork... that´s quite interesting!
do you sell the tracks already? also... the truck looks very good... and i see how it is developing...very promising... and for that pice...you´re coining money!
I sell a pair of tracks for 9€ without shipping costs ^^
It's promising work but it's hard work ! I'm alone and I must think about mold every time. No guarantee I succeed in this work ^^
and... hat´s off to your madame....that looks very good.... where is that model from anyway? steampunk ork... that´s quite interesting!
It's a solo mercenary from Warmachine (Reinholdt, Gobber Speculator). There is some other gobber in this game.
Thanks for your comment
Every time I look through the P&M blogs section, I find something new and awesome.
Your vehicles look great! I hope you keep giving us more and more.
Hey thank you ! You can look at the entire thread and my blog, you will find some crazy scratchbuilt (like ThunderOrk or looted tank and a ton of homemade meganobz). Suscribe to the thread
Hi to everybody ! I need your help. I am in paint contest and if I win I can donate my prize to a young friend who wants to start the game. Please help us to win, like this pics in FB :
Just stopping by to say I finally started building some MegaNobz using your MegaNob scratch-build technique. Thank you for such a great tutorial. All your stuff is fantastic. Keep building!


 )
)


 Salut!
 in comparison, having difficulty crafting first mega boot for


 ) I always think that you can't be a proper Ork player unless you do some sort of scratchbuilds, so I guess that makes you the most proper Ork player ever!
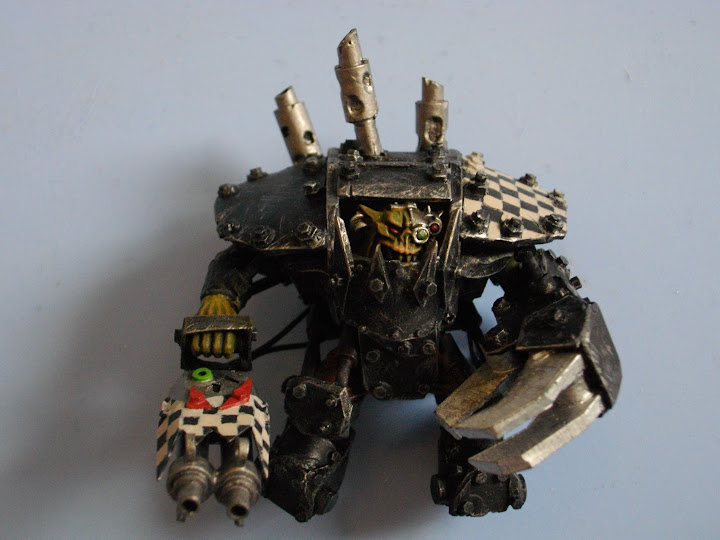


 .......


.jpg)