Hail to all and everyone that come to read this, and welcome. I have been a tourist around these threads for a long time, but just came around to my first post a couple weeks ago, drawn in by Briancj’s contest Discarded Treasure. After that, I jumped in the LoeR on-running competition too, and now I figured I might give a shot at my own P&M Blog, so here it goes.
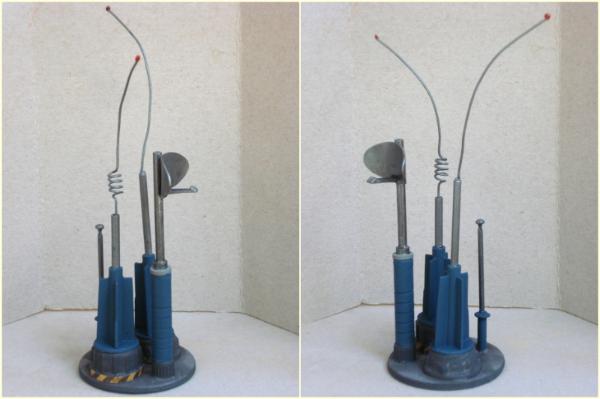
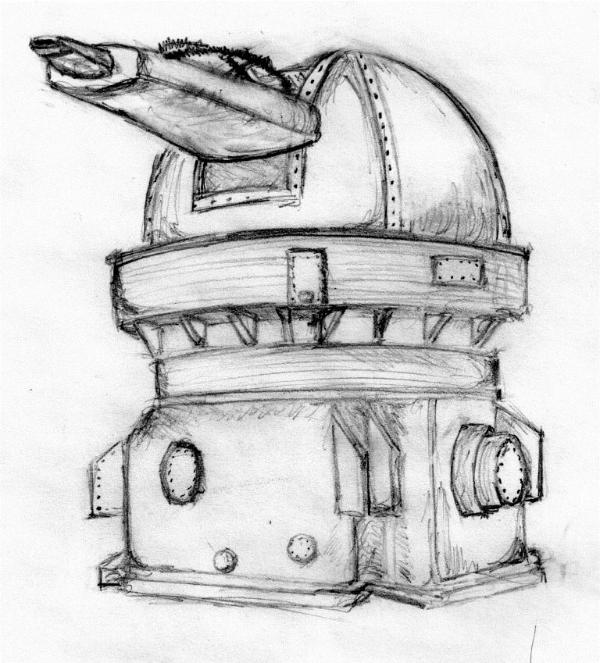
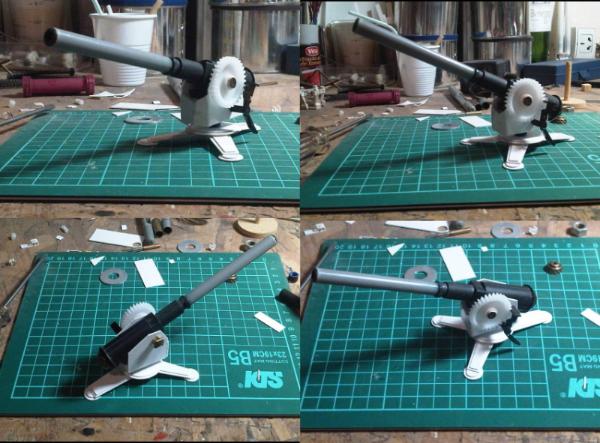
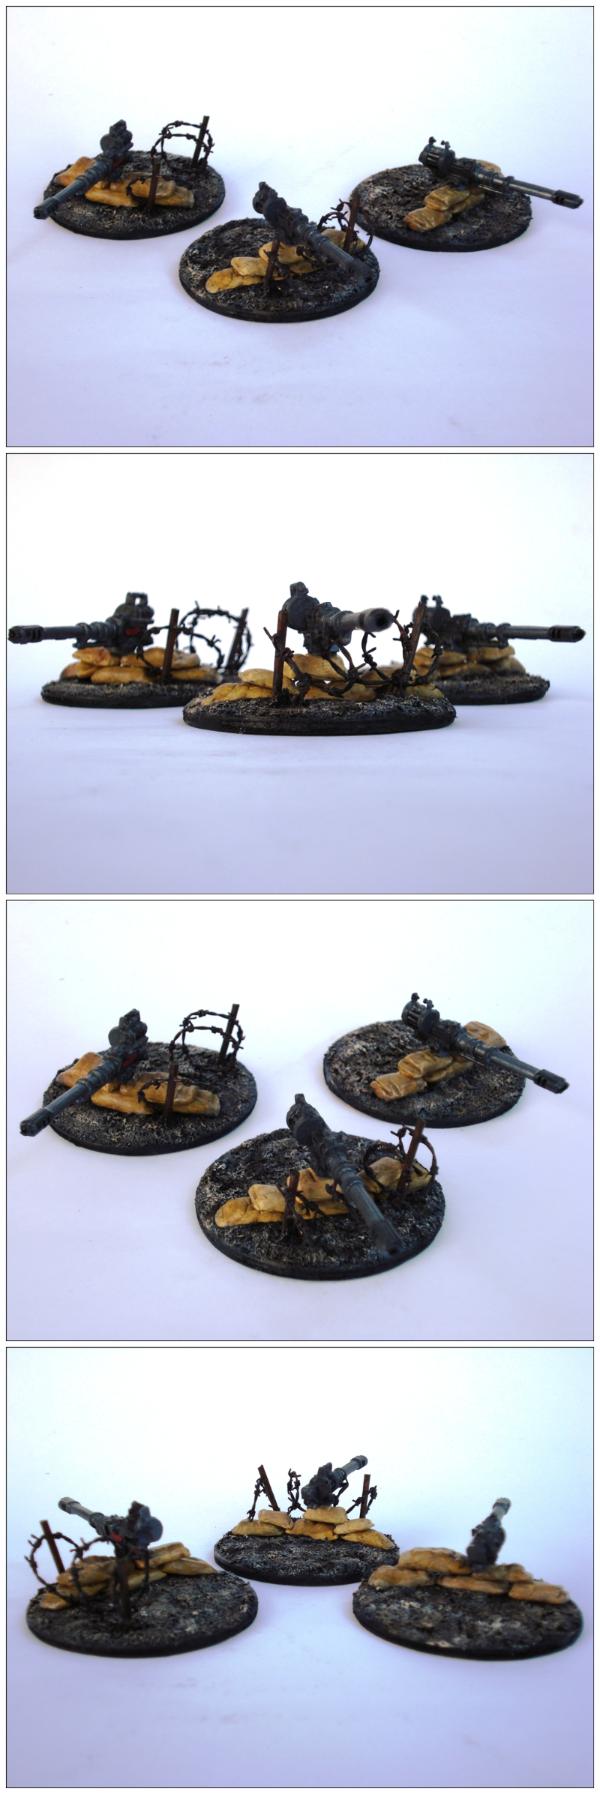
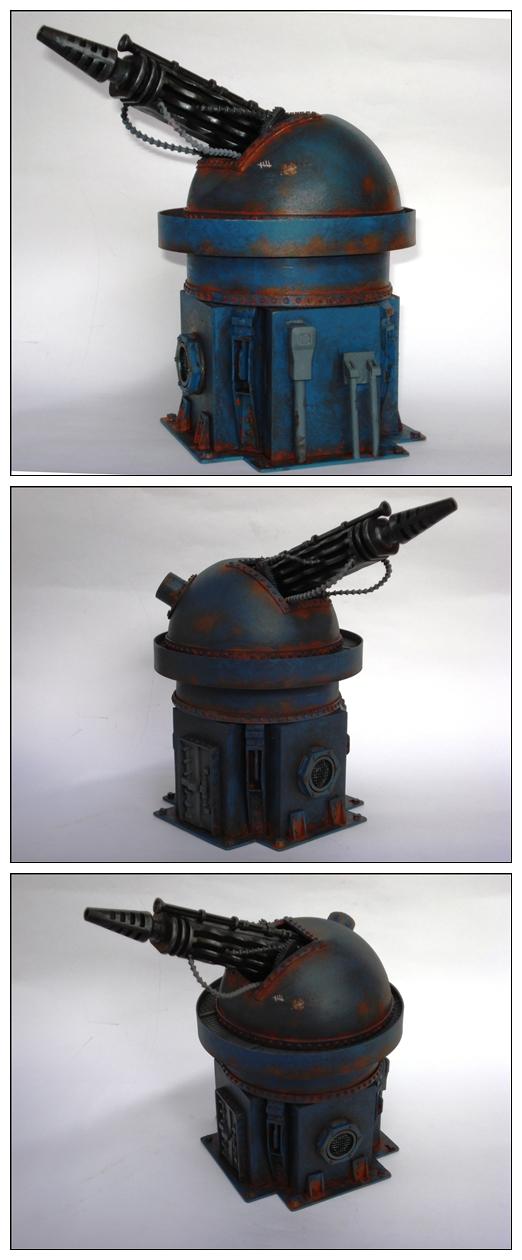
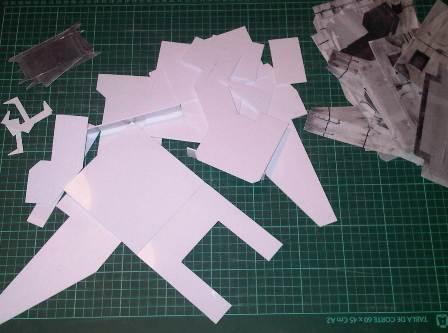
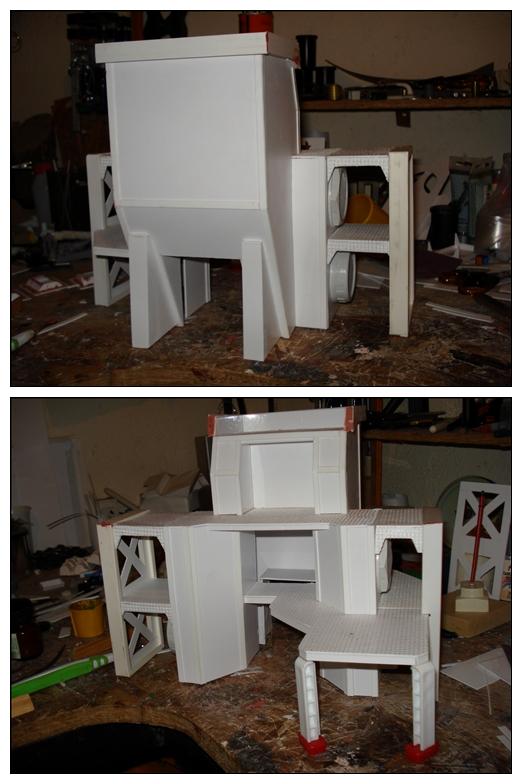
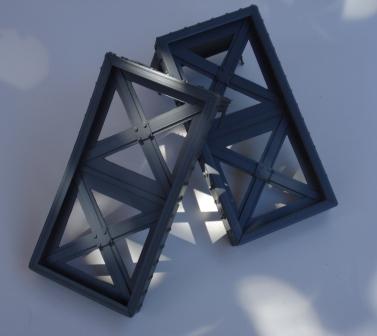
I was lured next by the LoeR terrain competition, themed on Big Guns, so I put aside another ongoing projects (Meaning unfinished, more than on the way) and, picking up a couple things I had put aside for a deeming idea, I sketched down mine:
@Camkierhi: Thank you, and welcome!
@Fango: Thanks, but I'll pass for now, one at a time is more than enough.
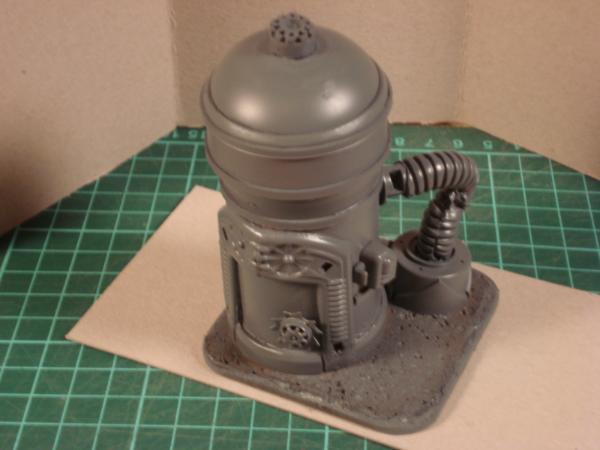
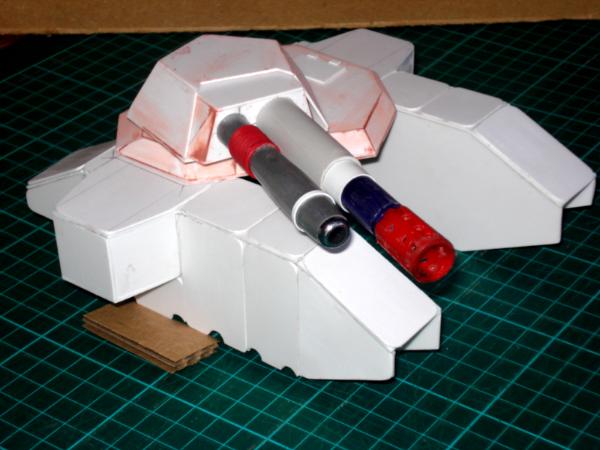
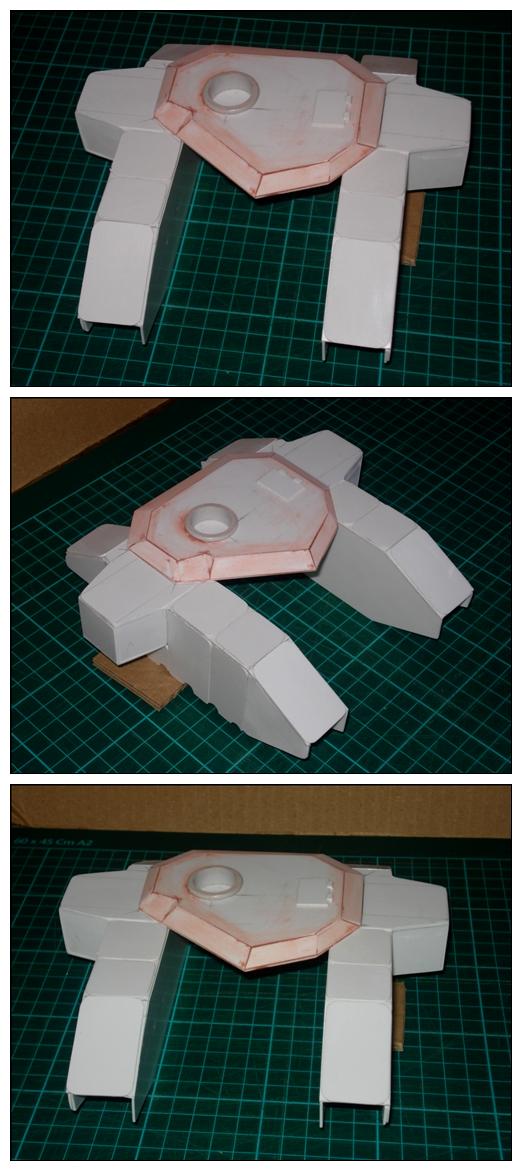
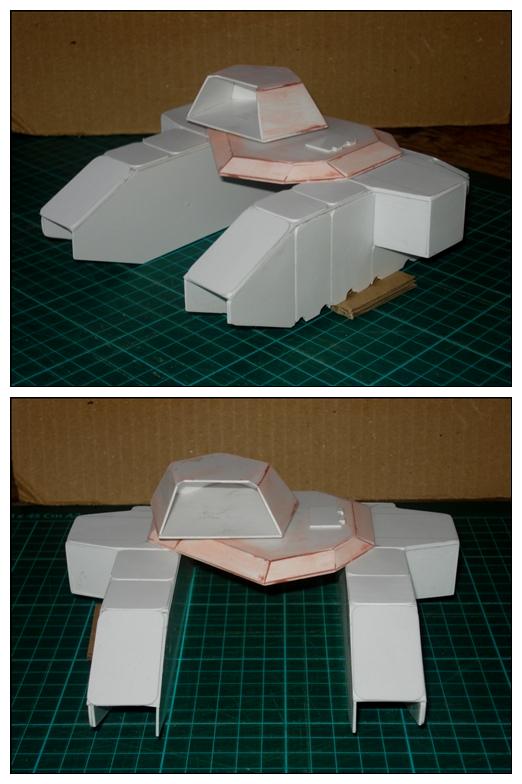
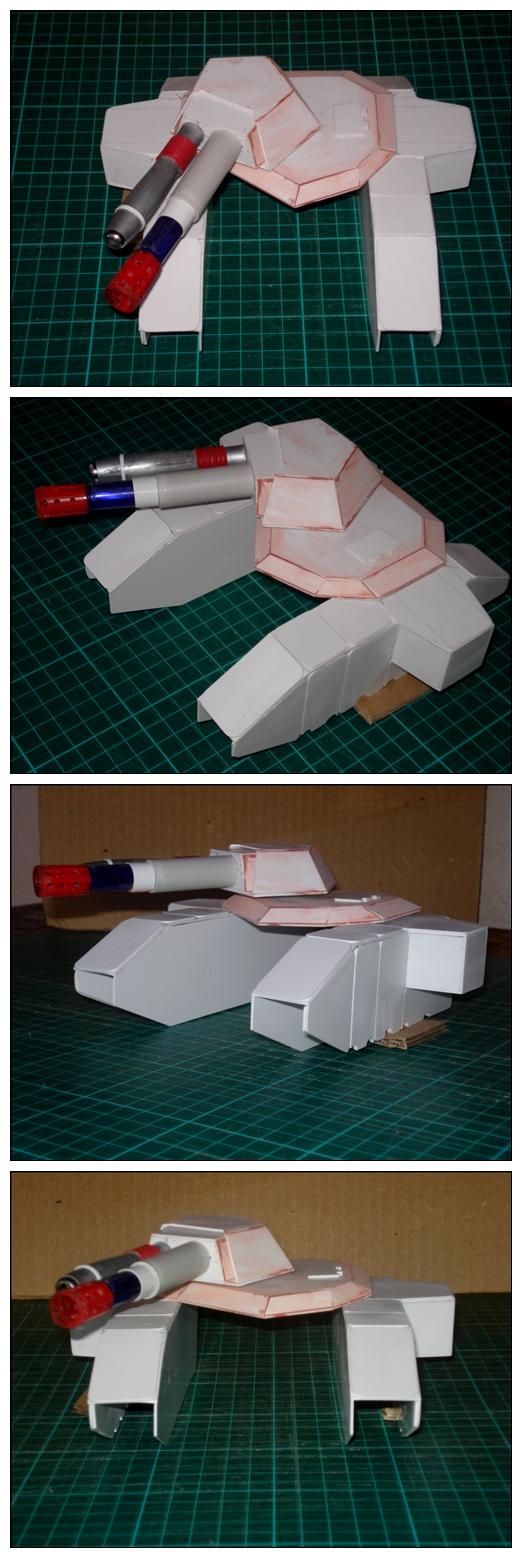
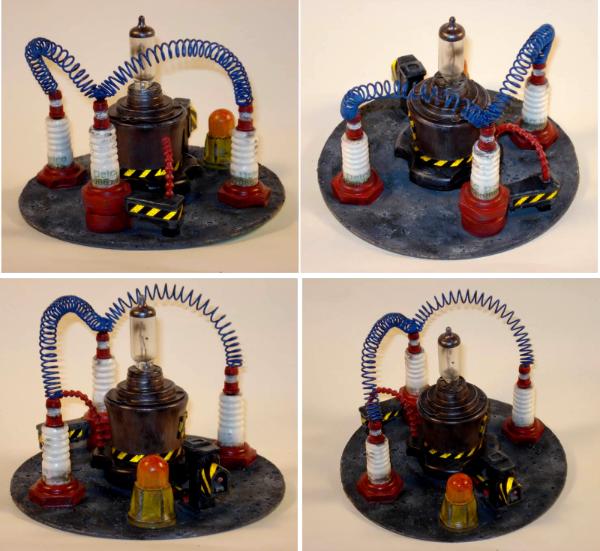
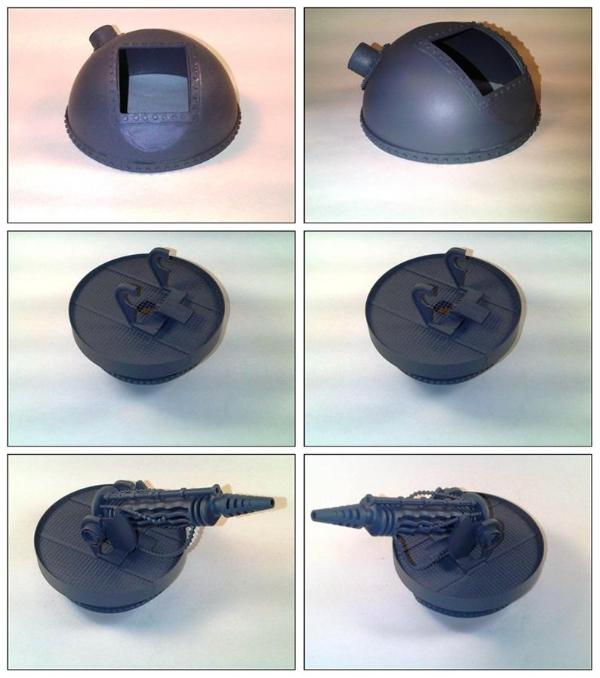
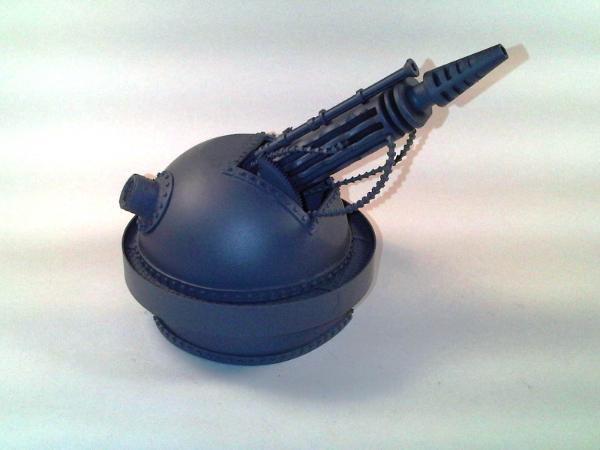
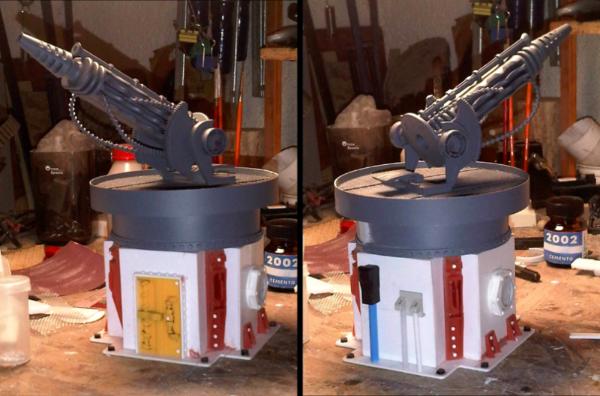
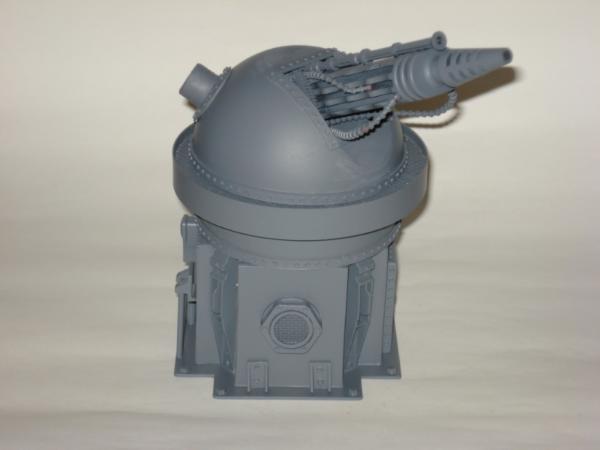
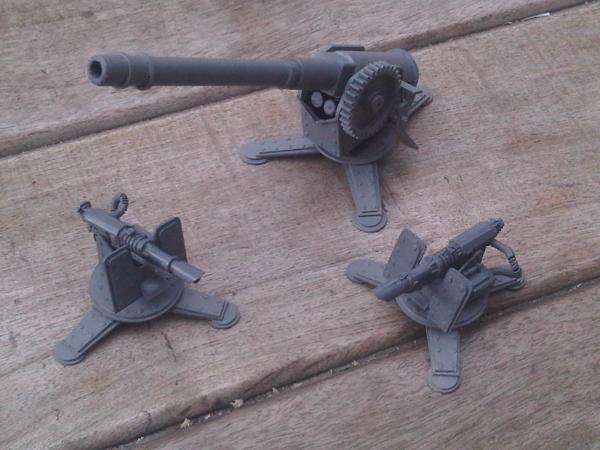
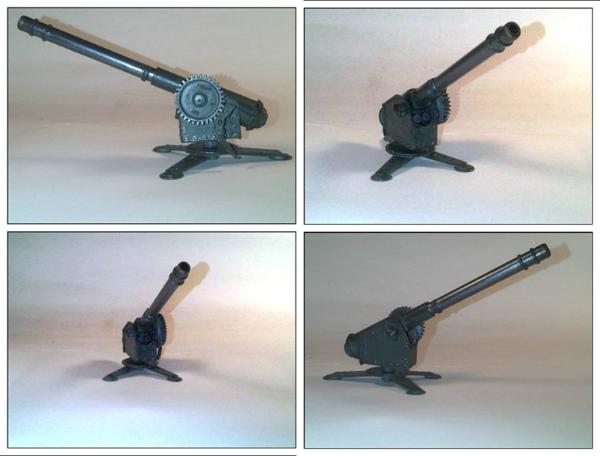
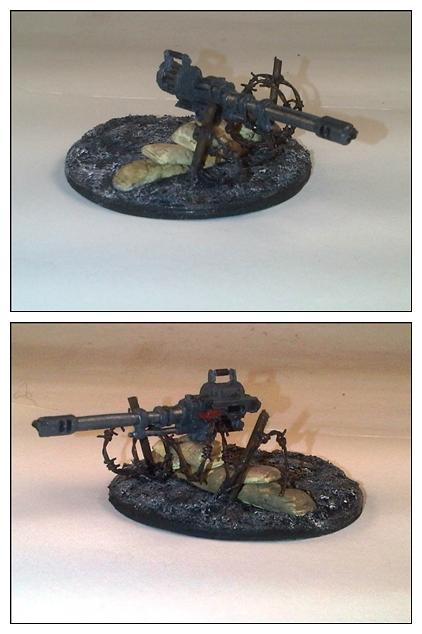
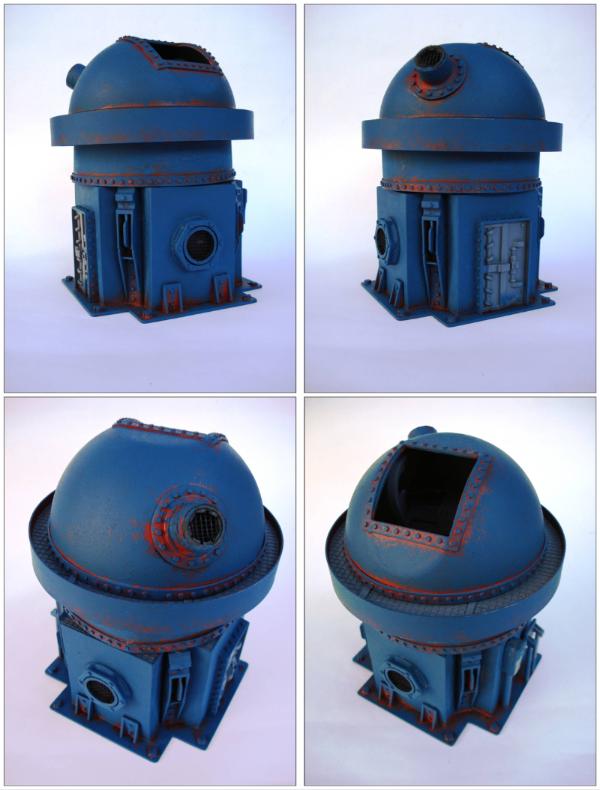
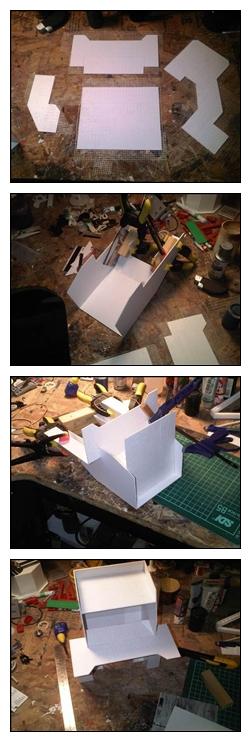
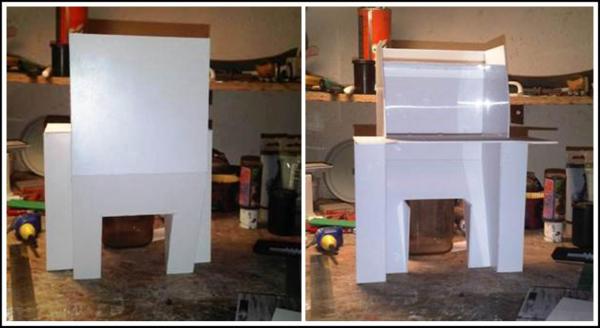
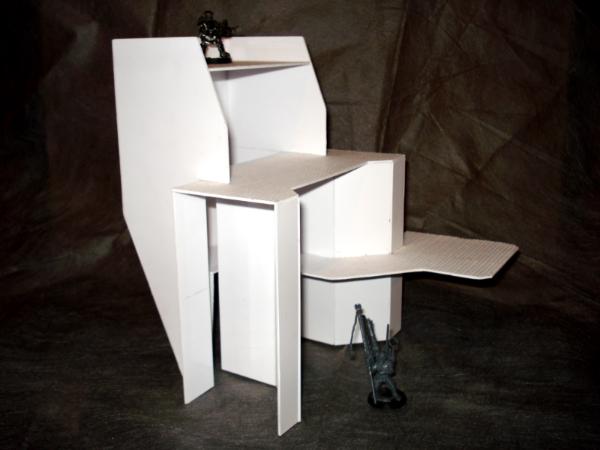
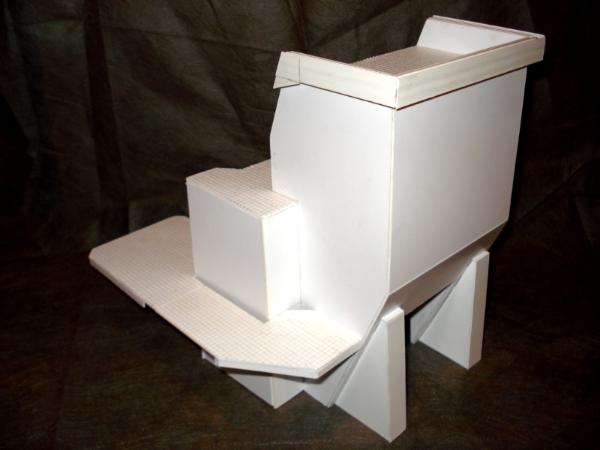
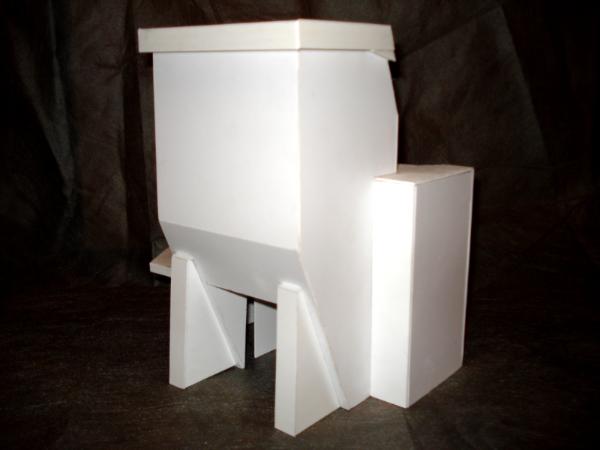
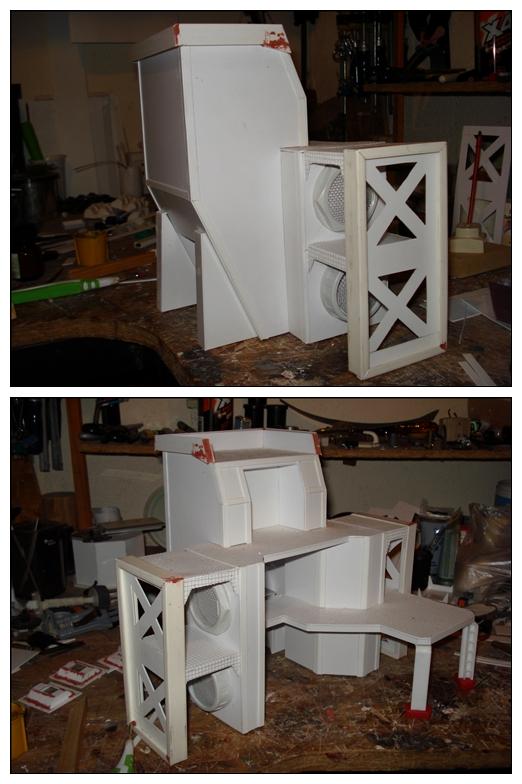
Not much of an update on the comp project, but, not being the only ongoing build around, and not totally unrelated either, a shot at a - although more modest - artillery piece:
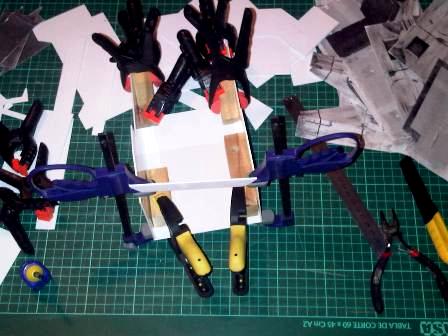
(I had come across a tutorial by Le Medico for a heavy weapon firing base some time ago and saved it for trying it out. After a couple "standard" builds, I scaled it up a bit)
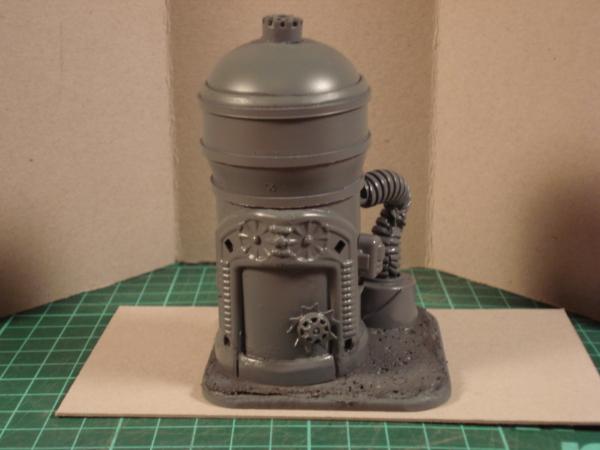
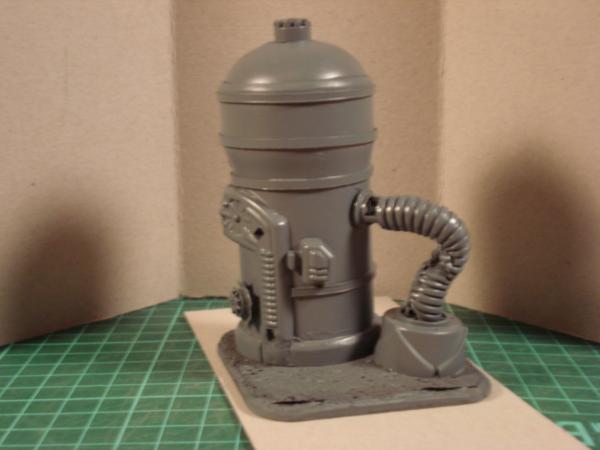
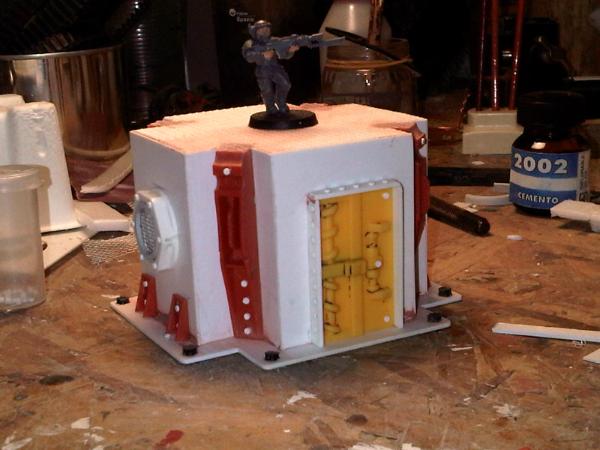
And after priming, besides its smaller predecessors:
Great work, going to have to have a go myself soon.
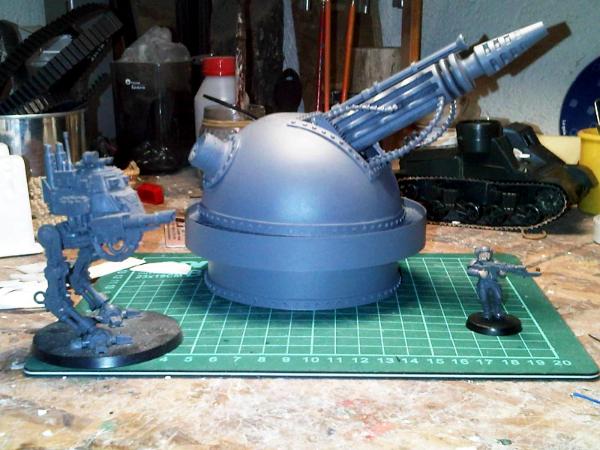
Only thing I am not 100 % on would be the size of the base/stand for the big gun. It looks brilliant, but it looks a little small. Not sure. I am probably wrong and its the perspective throwing me out.
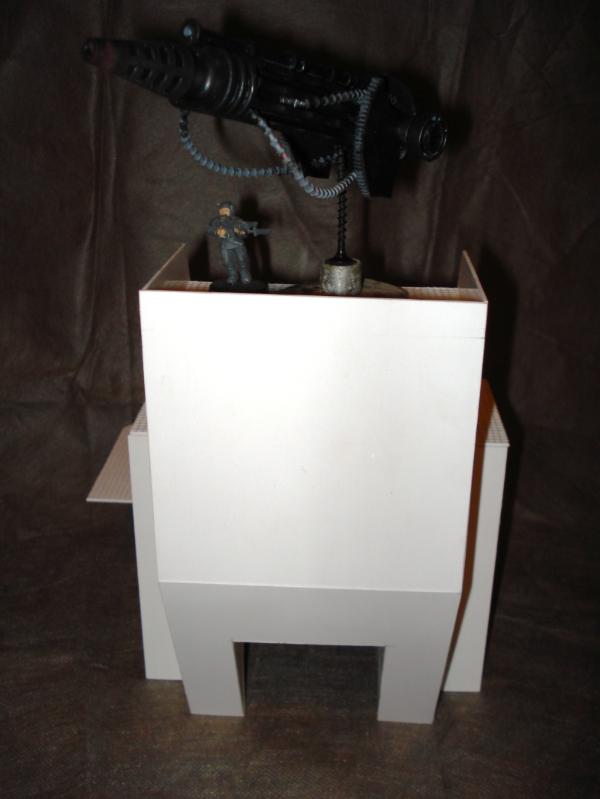
I hadn’t thought of it before, but now that you bring it up, I see your point. The hind leg is most likely too short – after a quick web search, the rear base seems to be as long as the barrel in most artillery pieces – so if fired, it would probably rollover backwards!
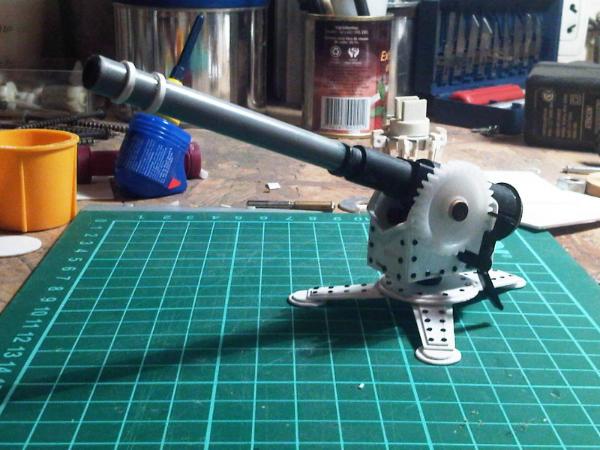
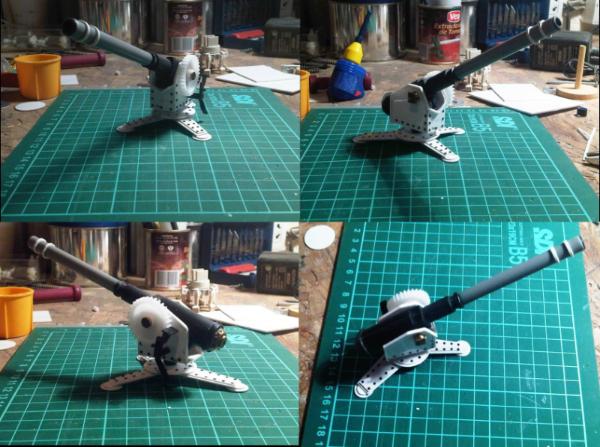
So this will probably be its only pics before it blows itself over:
(Base and armour are supposed to be dark green and lightly weathered, somewhat lost in the pics)
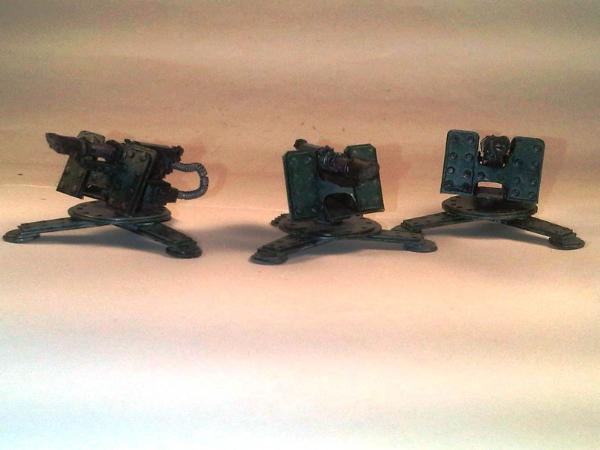
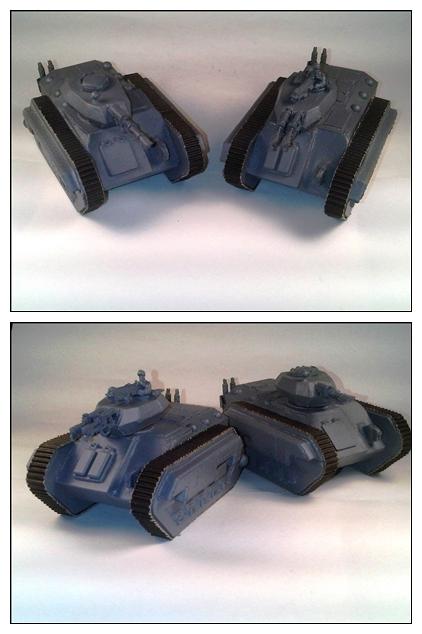
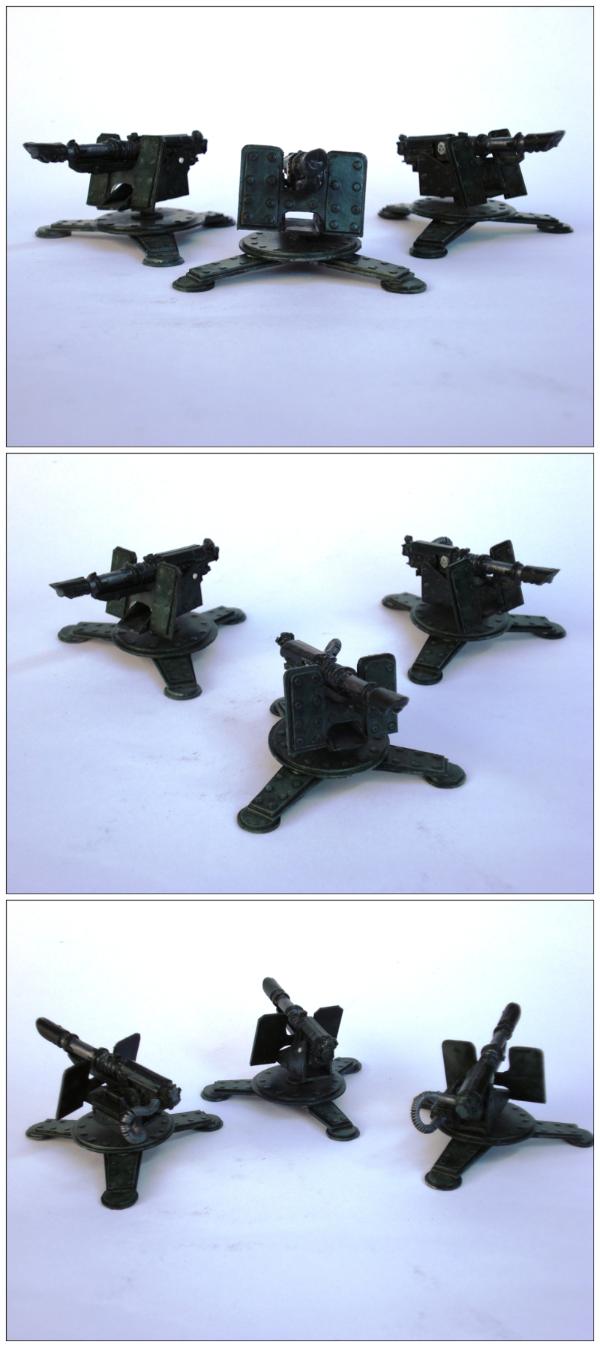
And the smaller lascannons:
While I was building those, I picked up some spare pieces and brought this one together too:
(No sure what it may actually be, but I sort of like how it turned out nevertheless)
Automatically Appended Next Post: Aiming (pun intended) at broadening the heavy weapons base after the lasscannons, I tried to put together a to-be-when-crewed autocannon squad.
ah... is it meant to be to just stumble over your thread? or just pure coincidence? either way...
brilliant work mate!
the big gun looks very good and your artillery looks very good too... and you built paper and cardboard tanks that totally look the part ! I will be a follower thus
@Sageheart: Thanks, and welcome any time.
@Viktor: Accident or predestination, you are welcomed any way, and thank you for your comments (I am at the time in the process of slowly catching up with your massive thread, hope to get to date soon!)
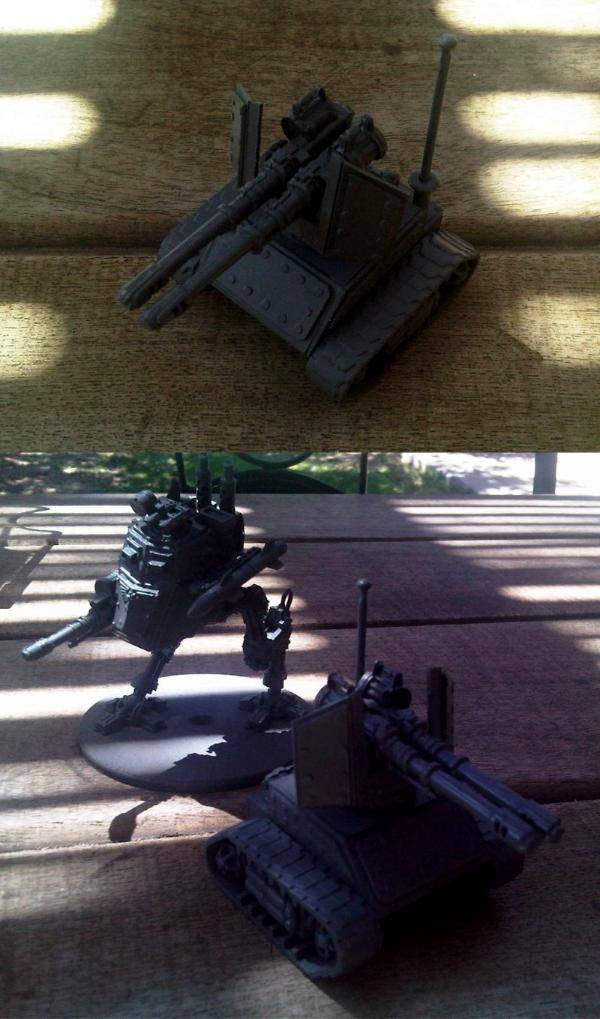
Those are now waiting for detailing and paint, along with this:
(Another bashing of parts and random pieces and in the process of being turned into terrain)
Great stuff littletower - your enty in Briancj's comp led me here and glad it did. Your LoER gun emplacement comp entry is also amazing, the scale shot is amazing and the base building looks like it was purpose built, not just scratchbuilt ! I will be checking back to your pages on a regular basis...
@Ruglud: Thanks, really appreciated. As I mentioned in the comp’s thread, I took me more than a couple attempts (Saved, of course, for an indefinite future use) to get to this shape, so having it found fitting is highly rewarding.
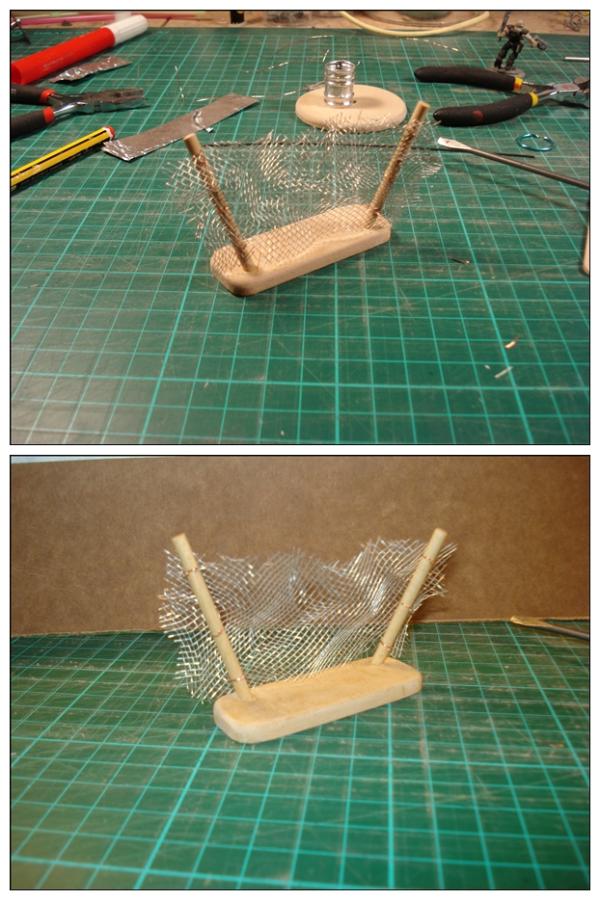
I’ve wanted to give the camo netting a shot for a long time, and found your entry in Briancj’s comp inspiring – liked the pallets too, been saving coffee stirrers since! – I’ll try it out as soon as I can.
@Viktor, Of course, but I’m afraid you might be disappointed, there’s not special secret ingredient involved…
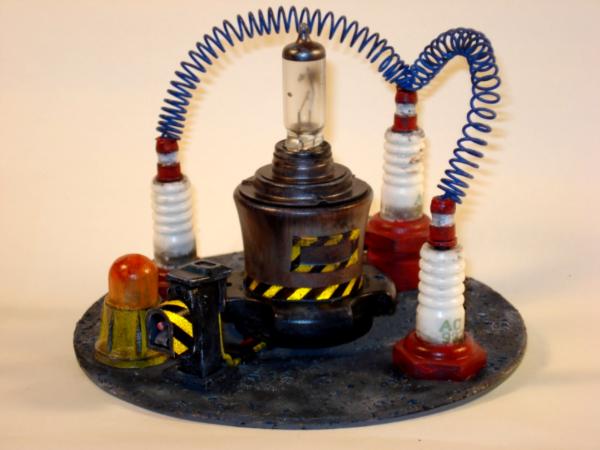
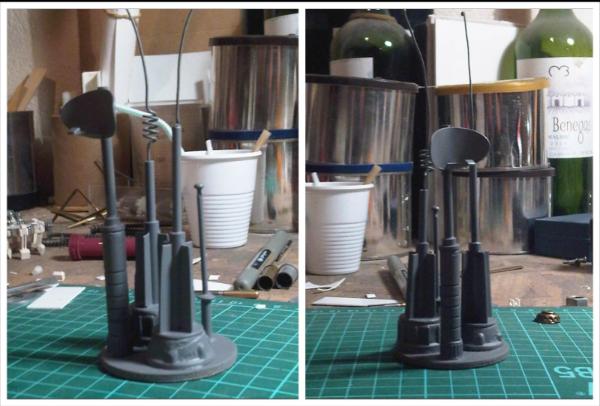
Spoiler:
It is just a thin, single stranded wire, around 15 cents long, flattened and rolled around a suitable size tube (A lollipop stick, in this case), from the middle, for 4/5 turns, (leaving a straight length on each side of the coil). The coil is lightly stretched to open up the turns, and the final twists, to re-shape/position both ends of the corkscrew section, were made with a long nose pliers.
(I used one of the thin, individual wires that make up an UPT –network- or telephone cable. Coms is preferable to networking cable, as the twisting is looser and thus, easier to stretch. Single stranded – only one copper strand -, makes it sturdier)
Glued to a short length of tubing in the lower end (Again, the lollipop stick), and with a small drop of PVA glue added to the upper end.
The other the parts are a bottle cap, an electrical piping nut, a plastic pen body, and some assorted bits from the throw- everything bin. The parabolic antenna is an oval shaped piece of plasticard, heated with a hot air gun and curve shaped, and the shorter pole in the back is an actual Pop rivet.
I’ll try to post a pic tomorrow to make myself clearer; surely it’d be better shown than told!
thanks littletower!
I was secretly imagine you have used some kind of plastic rod for this , but the single stranded wire is of course the much better and cheaper choice!... dave introduced me to this a long time ago... I should have known^^...
yeah that method will do nicely for my own sinister needs... and believe me, they will be sinister^^
There is some awesome stuff in this thread, I love the way you've taken a seemingly random collection of bits and bobs and turned them into something that looks absolutely seamless. The defence laser is especially awesome. Great stuff, and keep it coming!
Also, did you use a template for the Chimera/russ scratchbuilds, as I've been looking for something similar for a while?
if you´re looking for these... there is a community at yahoo groups... called BWC... they have lots of templates...join that group and you will have templates galore...
Viktor von Domm wrote: if you´re looking for these... there is a community at yahoo groups... called BWC... they have lots of templates...join that group and you will have templates galore...
@Paradigm: Thanks, and, yes, there should be more on the way, you are welcomed to drop by again anytime. As to templates, you can also check Armoman's thread in Zealot.com (http://www.zealot.com/forum/showthread.php?t=170912) there is a lifetime worth of work there.
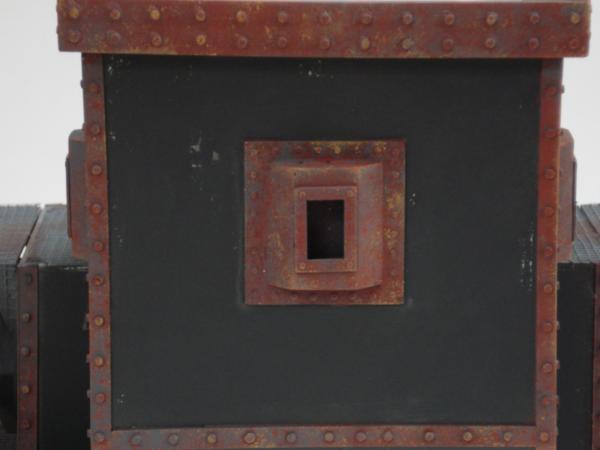
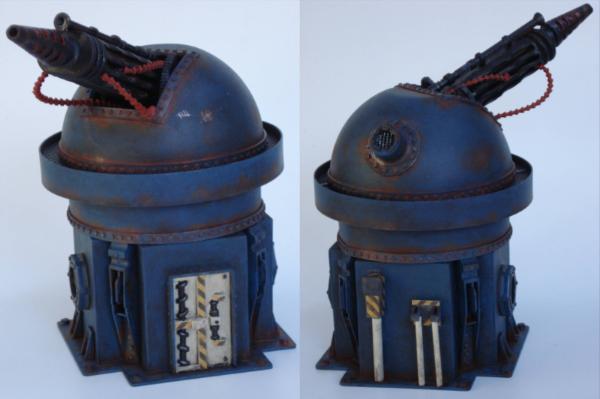
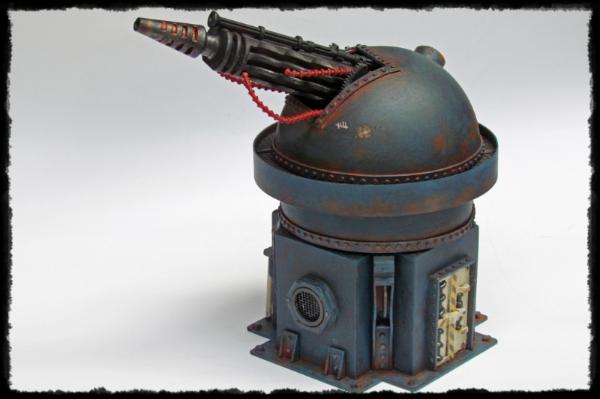
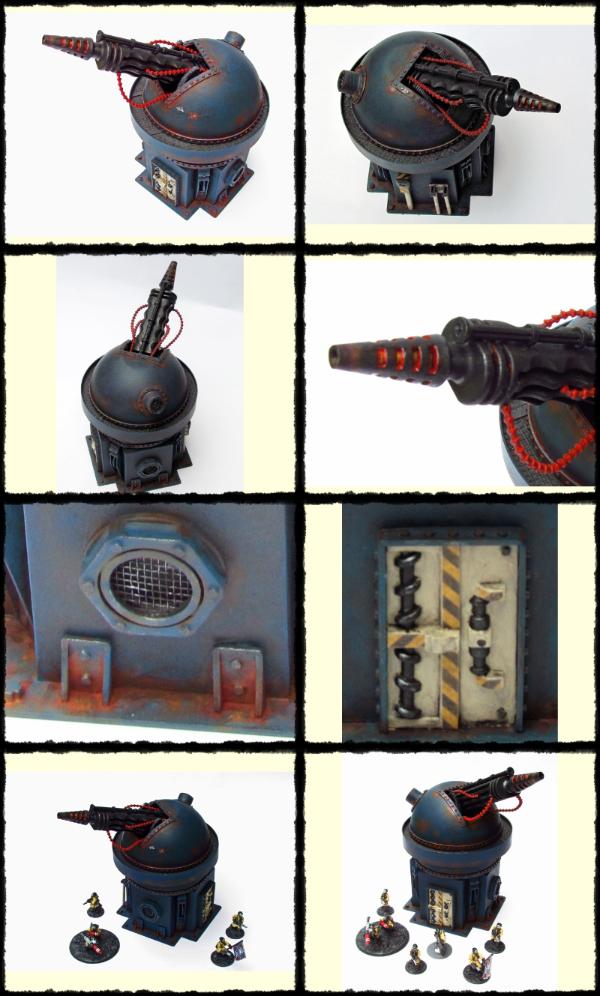
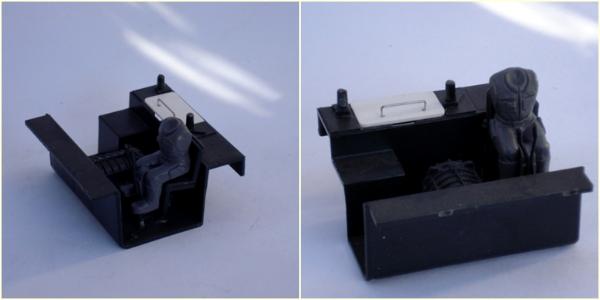
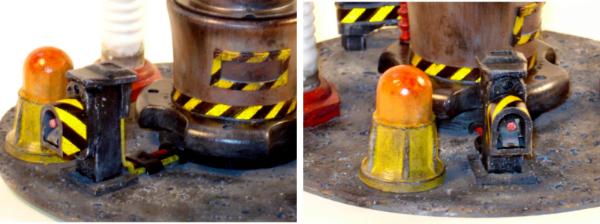
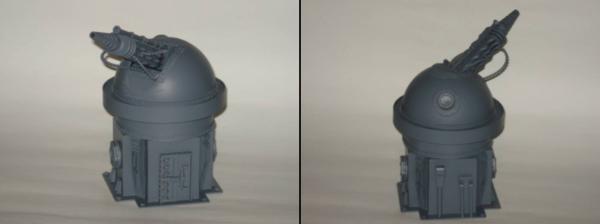
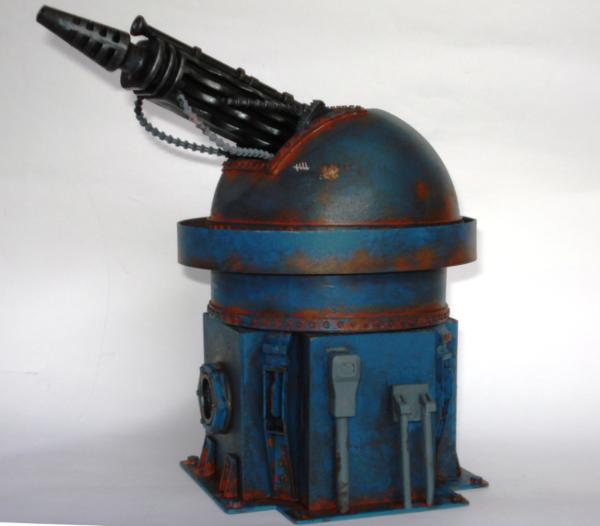
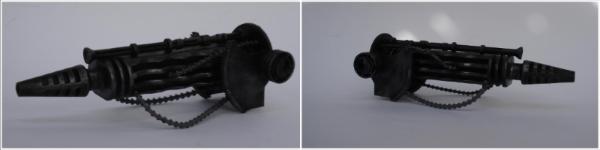
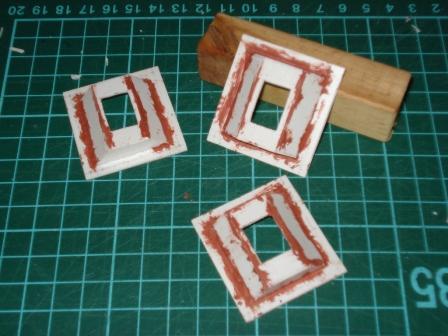
@Ilove40k: The gun cover is a spare for a minidome security camera, I closed part of the lens opening with plasticard and added the riveted reinforcement around it.
This is the one I originally planned to use, the actual one came from a different, slightly larger, model, as that one ended up being too small.
Littletower wrote: @Paradigm: Thanks, and, yes, there should be more on the way, you are welcomed to drop by again anytime. As to templates, you can also check Armoman's thread in Zealot.com (http://www.zealot.com/forum/showthread.php?t=170912) there is a lifetime worth of work there.
@Ilove40k: The gun cover is a spare for a minidome security camera, I closed part of the lens opening with plasticard and added the riveted reinforcement around it.
This is the one I originally planned to use, the actual one came from a different, slightly larger, model, as that one ended up being too small.
Thanks a lot I was looking to built a gun like yours for my campaign very nice idea and result !
Holy Gak!- We've got a gun-exert here! Some seriously amazing work man! I especially like the to-be-crewed weapons! Brilliant idea! And the tracked autocannon carriage is fantastic as well! And extra-killy little mobile emplacement!
@Ilove40k: You are welcome, and please, try it out and comment!
@dsteingass: Thanks a lot. No, no expert, but giving it a try... I'm quite fond of the little one myself, maybe even enough as to get back to it and paint it sometime!
@Victor: Indeed!
@Camkierhi: Thanks for the advice, I couldn't agree more. It's happened before: it looks as if there was plenty of time before a deadline, until the due date just pops up in the calendar and half the work has to get done overnight! Not this time... (Have I heard that before?) @Viktor: Thanks, glad you liked it.
Nice work, I would have gone with a little more weathering, i.e. some rusty streaks, here and there. But having said that, who is to say how long they have been stood around without a lick of paint. They look great as is, and I for one would be very happy with them. Nice work.
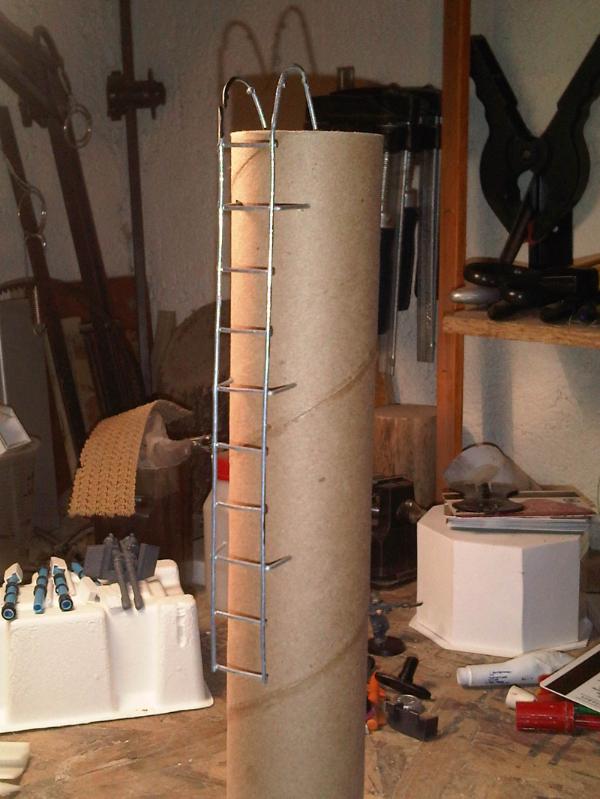
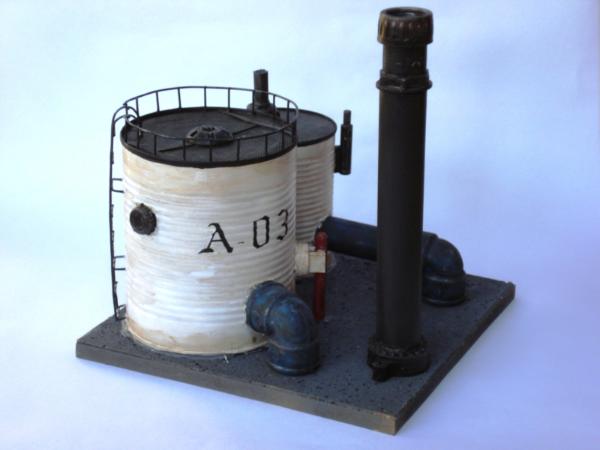
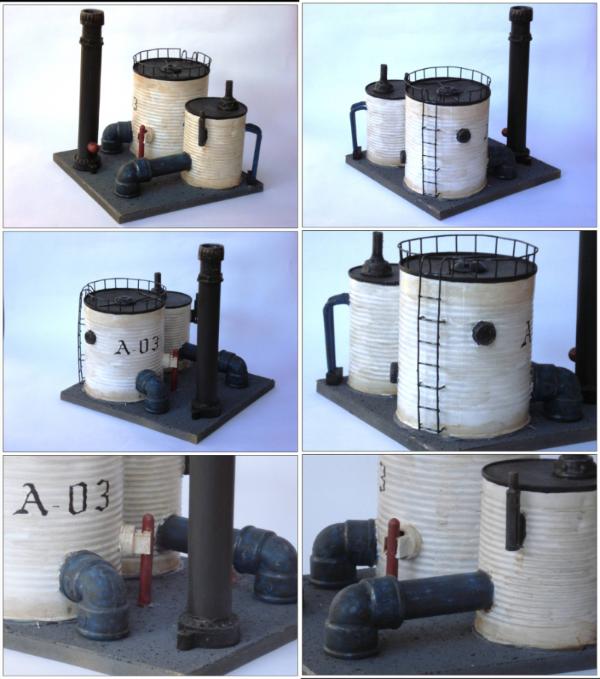
The finished tank terrain looks lovely! Specially the freehanded letters. Then ... Of course the wire mesh ladders I should have known.
As for the big gun I think paintscheme wise you'll have to obscure the cloth pegs better... Maybe hazard strips there? The rust and the blue main color look very good already.
@Camkierhi: Appreciated, thanks (And properly understood too, it does still have a long way to go before called done!)
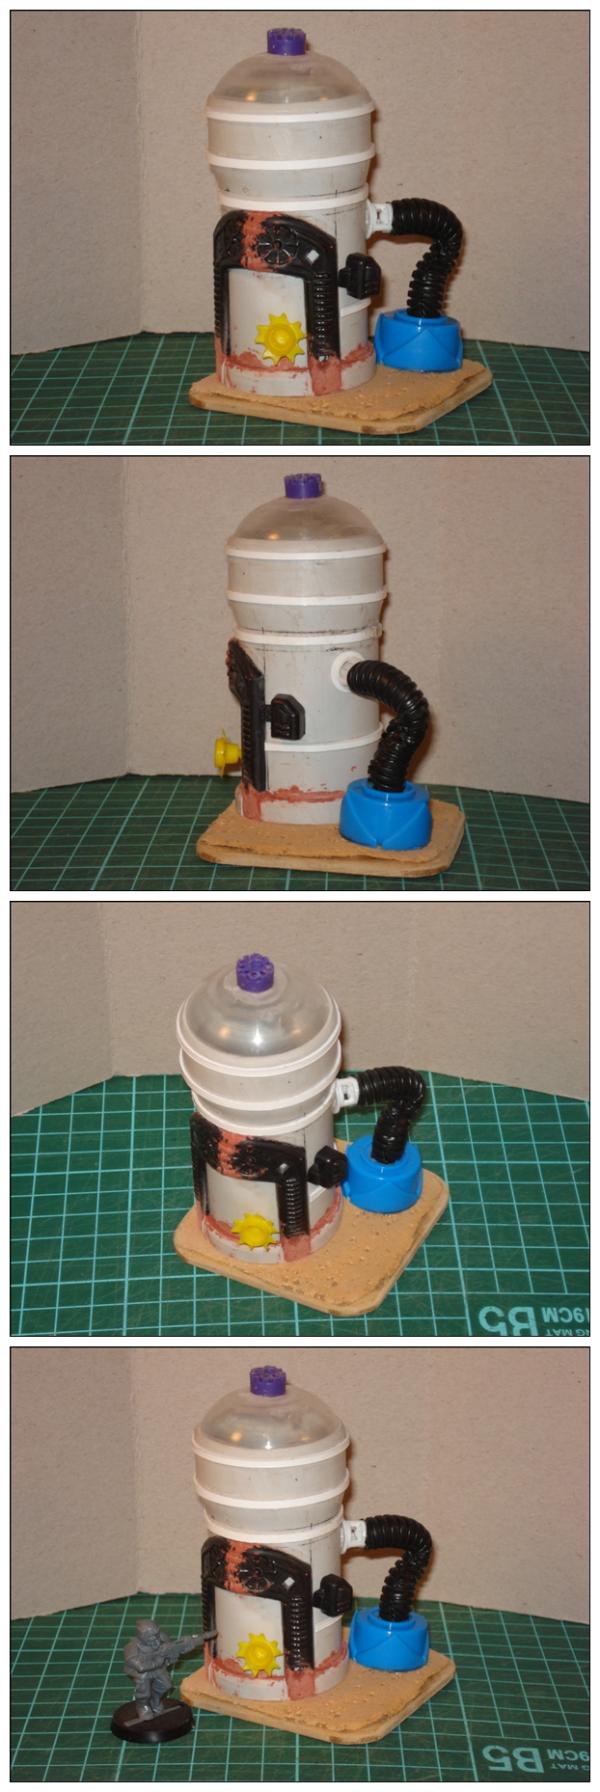
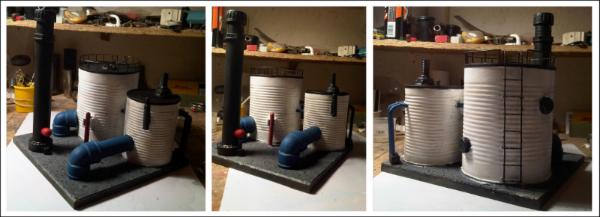
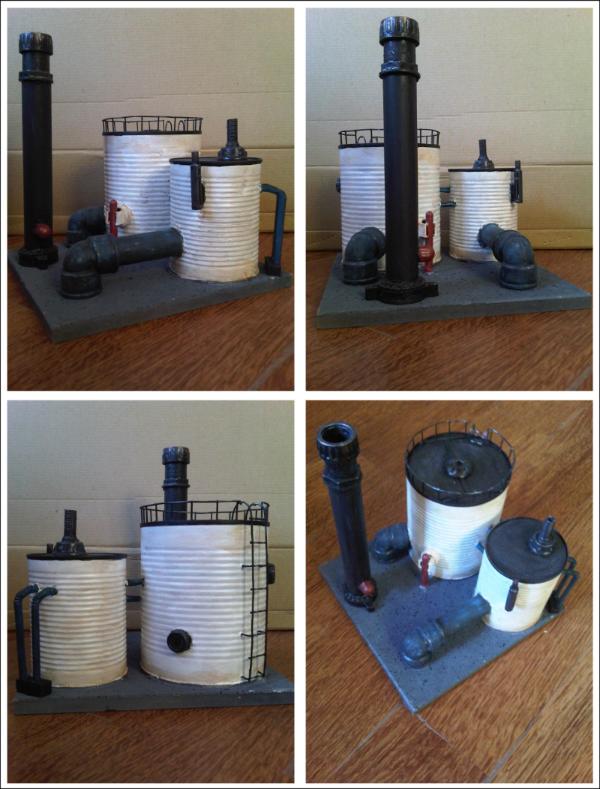
I’m now in the process of toning down the cannon itself; the metallic paint looks too shiny as of now:
Then, coming up with the colours for the door, pippings and power cables, and more weathering and detailing (And figuring out where the hazard stripes should go, of course!)
Pipping = white, power cables = red, door = imperial green. (see Dave's thread)
I am probably way off, but that's the colours I would choose. The white nice and rusty looking, would blend in a bit, the red would pop, and the door, just because Dave does his doors green. LOL.
White (Rusted and dirty, of course, following along the ongoing line), and red sound good. Will give the door some more thought, while checking Dave's thread for suggestions (Meaning, of course, a probable rip off!)
Thanks. Indeed, it would most certainly look good - and it'd be a great way to make use of the shapes and recesses on the cannon. On the other hand, I´m not sure of the way to go, if either a worn out, decommissioned look, or to try out something like OSL for a still operational appearance...
(And on a more realistic basis, I'm not actually sure I could pull off a decent lighting effect, either)
Details coming next, probably white, red and green (just because Dave does his doors green!)
Camkierhi wrote: Pipping = white, power cables = red, door = imperial green. (see Dave's thread)
I am probably way off, but that's the colours I would choose. The white nice and rusty looking, would blend in a bit, the red would pop, and the door, just because Dave does his doors green. LOL.
If one is going to copy, he'd better copy from the experts!
While slowly dabbling paint some more on the gun emplacement and browsing tutorials on OSD (It's too early yet to decide if thanks or something else are due to Viktor for that suggestion!), I gave in to hobbyist's ADD.
New supplies:
(For reference, the grey speckles in the middle are a Leman Russ tank and a cadian officer)
I received some designs from Hyenajoe a couple weeks back, hope I can do them justice.
ah.... that looks like a healthy suply drop of plasticcard!!!
the first time i got me that much fresh PC i was like a kid in a candy shop... i couldn´t decide what to do with it and instead i did nothing...then i build a giant tank...and didn´t finish it ever since
Littletower, I am liking all of this! is like Vik in some ways, but different. you two scrap recyclers are like two peas in a pod for the amazing use of stuff that would otherwise be seen as throw away materials by others.
@shasolenzabi: Thanks, and welcome. I enjoy the building or making of things, and using - as you put it - throw away materials gives it an extra twist. Problem is, you start seeing interesting or potentially useful shapes and pieces in everything, and stuff piles up much faster than it can be converted!
@Victor: Let's just say I was more in the mood (need almost!) for some cutting and chopping, so I took the afternoon off and got to this so far:
Littletower wrote: @shasolenzabi: Thanks, and welcome. I enjoy the building or making of things, and using - as you put it - throw away materials gives it an extra twist. Problem is, you start seeing interesting or potentially useful shapes and pieces in everything, and stuff piles up much faster than it can be converted!
Well, as long as it is all cleaned and made good for converting while sitting in the pens for the work it inspires.
@sennacherib: Thanks. I must say, I just gave a quick look at your thread (Bookmarked by the way to go through at leisure later, with more time) and there's nothing you should be jealous off!
I'm sorry, I didn't mean to tease on what the build is supposed to be - I guess I just figured that, as I knew what it is, it'd be obvious from the first blurry pic onwards for anybody else -. Obviously, it isn't (And it's happened before to me too, and apparently I still don't get it!).
But, as it came out like that, I might as well let it be then.
Updates to follow later on, hope those would clarify the issue...
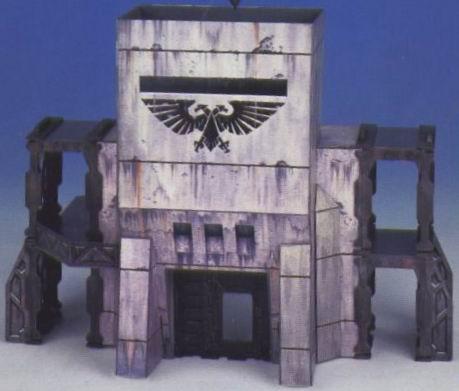
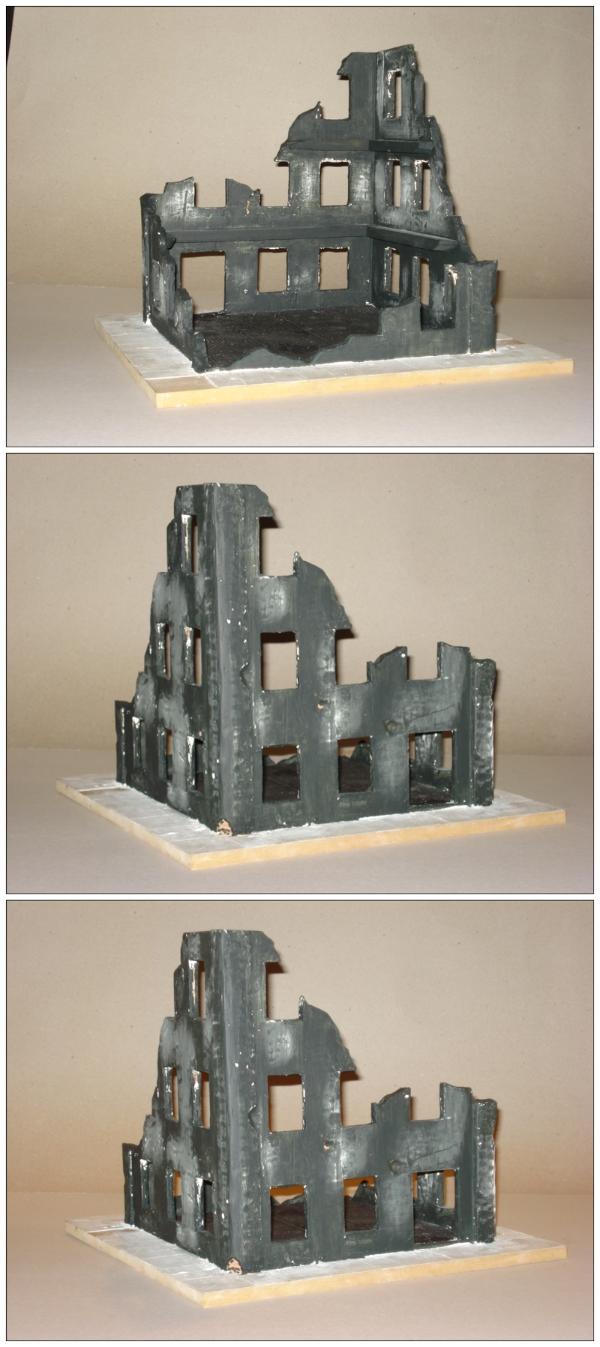
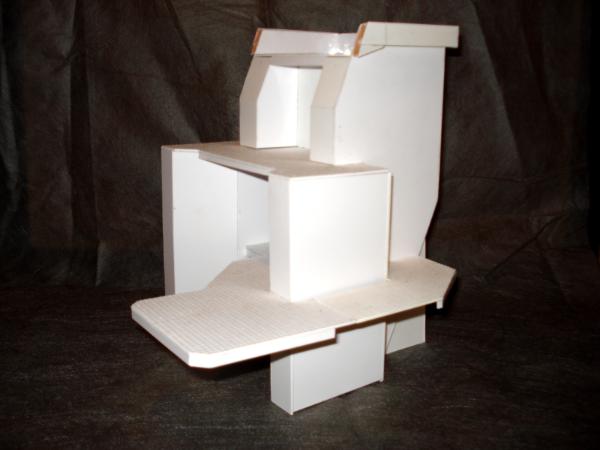
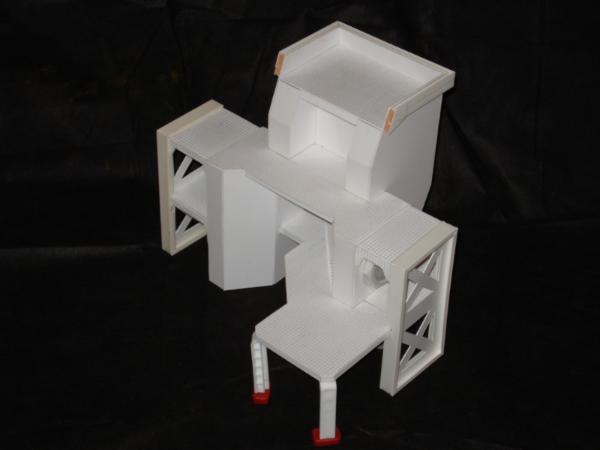
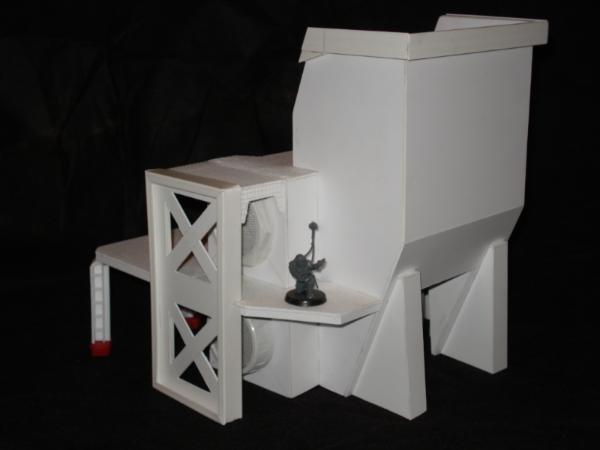
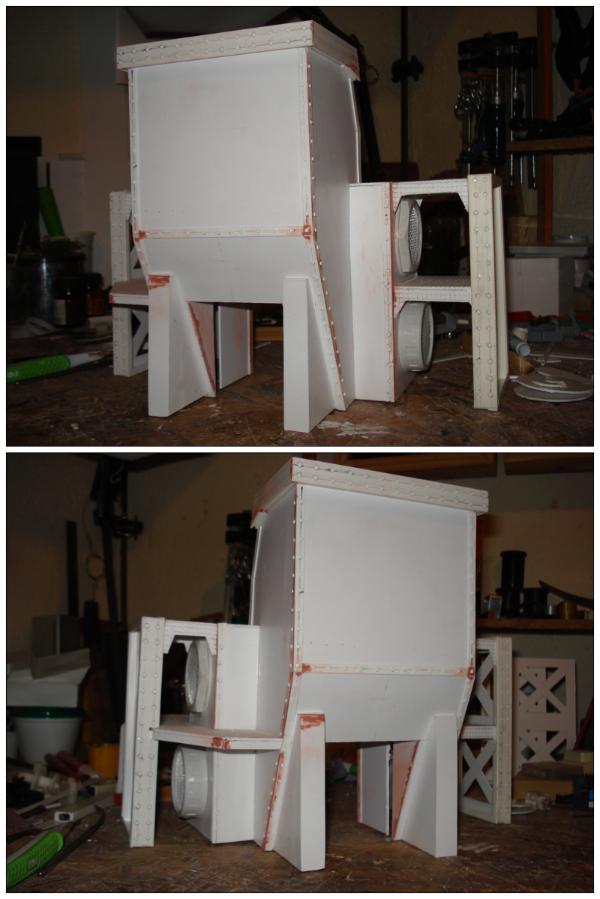
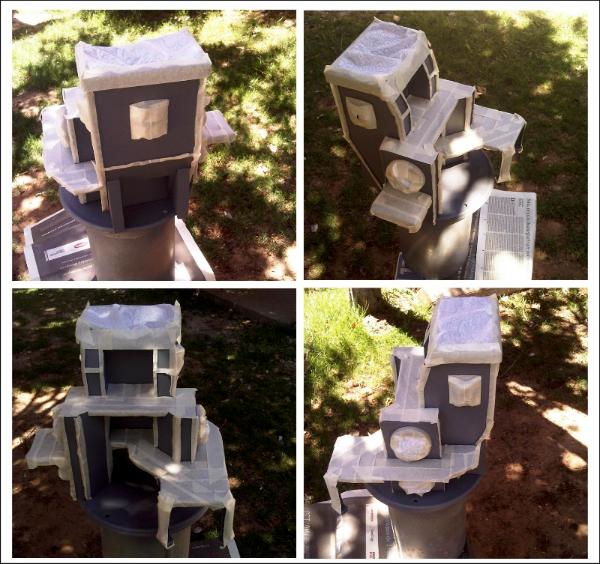
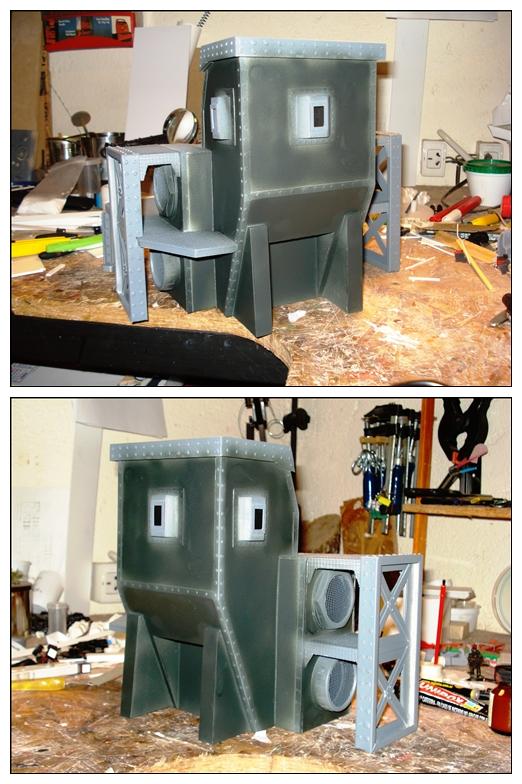
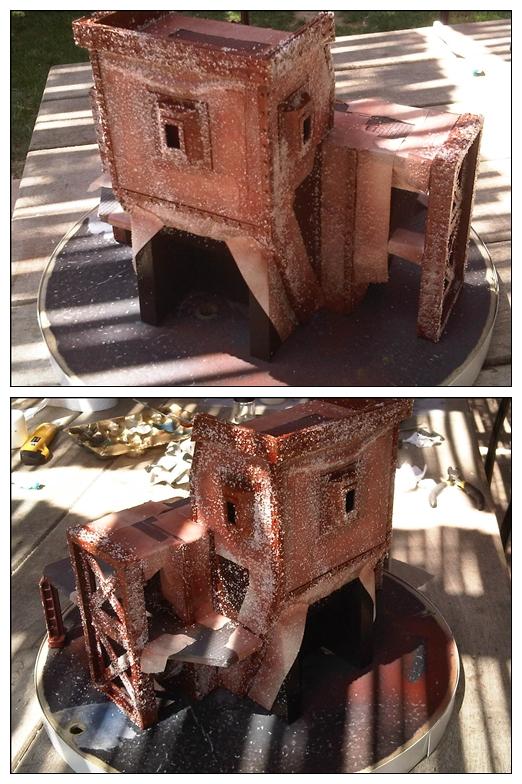
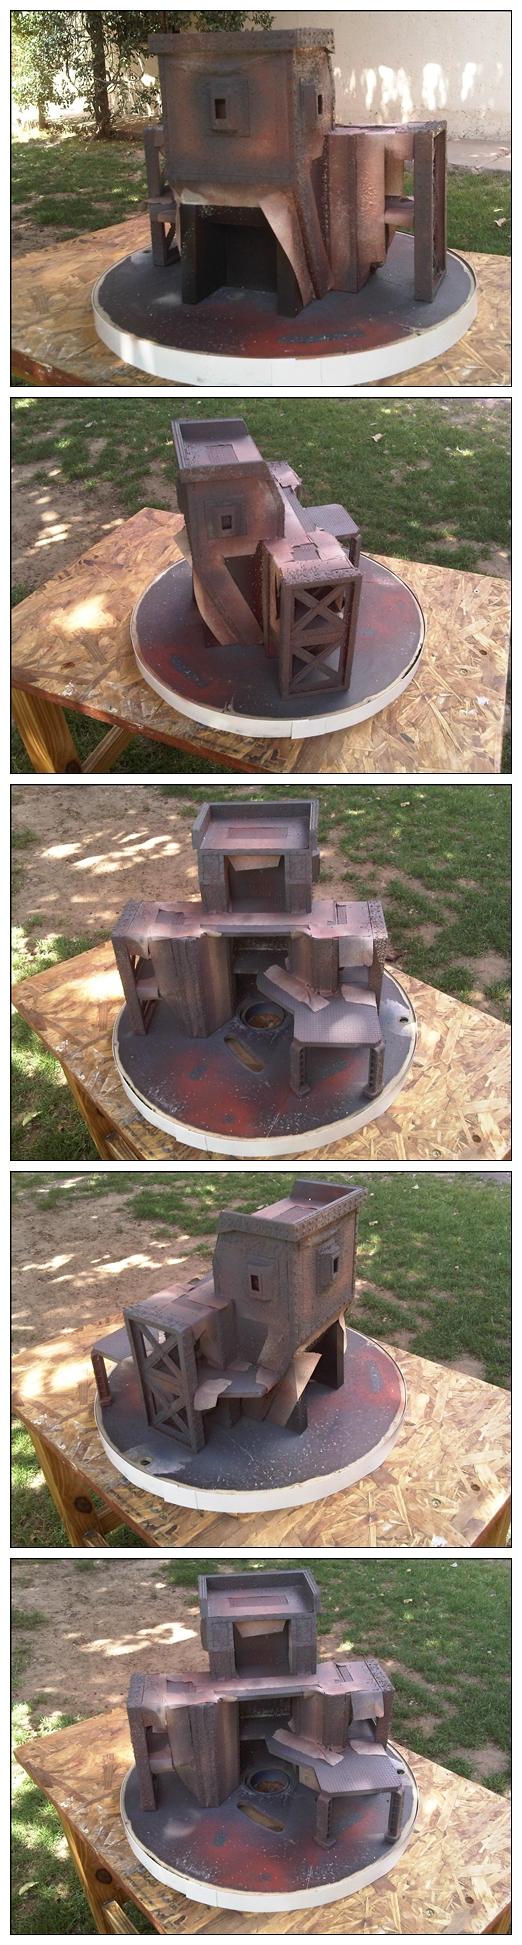
@Viktor: When you brought up the fortress idea, I paid some more attention to the projected dimensions, and it appears it will actually be sized more like a stronghold than like the current bastion kit.
As it is coming along – and so far I’m trying to keep as true to the original as I can, without actually having one at hand for direct comparison – just the main center build is as wide as the plastic bastion, so it will probably end up being rather big when I add the side structures and sidewalks.
@dsteingass: Sorry I skipped your post, it appears yours came in while I was typing mine! It does look like the gatehouse section of a city wall, doesn’t it? It will have to be more self-standing than that (No room for a full sized wall!), but attention will be paid to the door/gate of the build as it is.
@Camkierhi: I am, handsomely provided by Hyenajoe (Along with a great set of WIP pics of his).
On the workbench right now, update to follow soon.
@Viktor: I'm sorry, I guess it sounded a bit confusing, let me rephrase:
I'm (trying to) recreate the old cardboard & bulkhead Imperial Bastion, in it's actual dimensions, using the original cardboard parts as model for the plastic build.
What I meant is that the current plastic bastion kit is smaller than the old cardboard one (And thus, mine will be, of course, bigger then than the one sold today).
(As I said, just the central piece - the main tower, the highest reaching part - of the old model is almost as big as the complete new bastion, and the old one has, moreover, an outcropping coming out from each side, extending it further sideways).
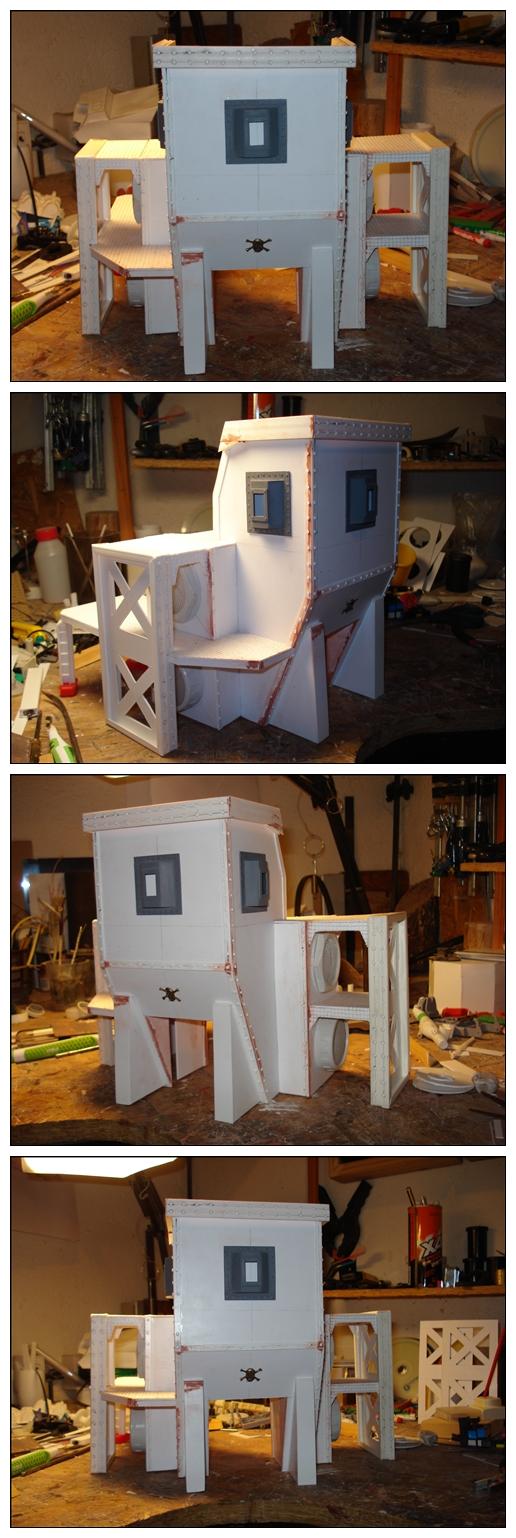
As for the weaponry question - which is actually the important point of all of this, isn't it? - I'll give the stats of the fortification rules (oe access point at floor level, one/two firepoints per facing in each level, four emplaced heavy weapons, one on each facing, and battlements for the roof level, plus the possibility of adding a comms relay or a gun emplacement), for the - wierdest of cases - event of it actually being used in game.
@Camkierhi: It is, but just because it was laying around on the workbench, it will go back to its own emplacement for the comp!
@Viktor: Come on, cut me some slack here, it's WH40K after all! Don't they look like one meter thick reinforced concrete to you?
Of course, you are right.
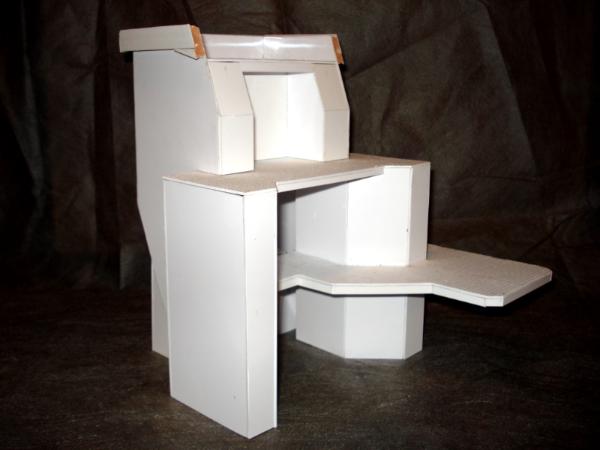
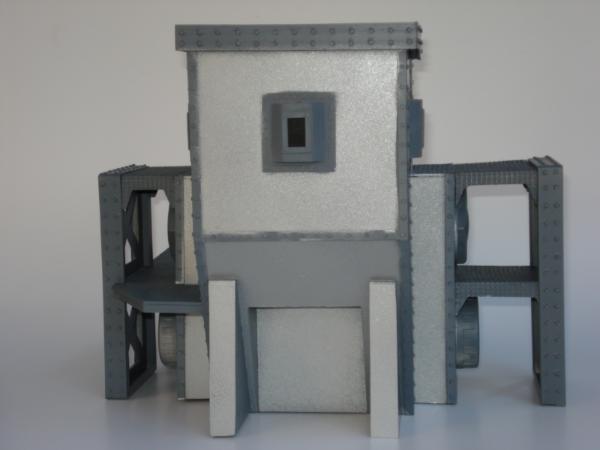
Bear in mind though that, when the rest of the walls and supports get added, only a few wall and platform's edges will remain visible - mainly the roof battlement and the side walkways -, and those will be strengthened/thickened to a more appropriated width.
@Viktor: I know, and I thank it. I go through other people's threads for learning, ideas and inspiration, and I post in mine for input and feedback, so ich danke Ihnen sehr für das, was Sie gesagt haben.
Even more, in this case I fully concur with your point of view and had planned to work into it as the build advanced.
@Ruglud: I couldn't agree more, the classic version layout is far more entertaining than the actual squared tower.
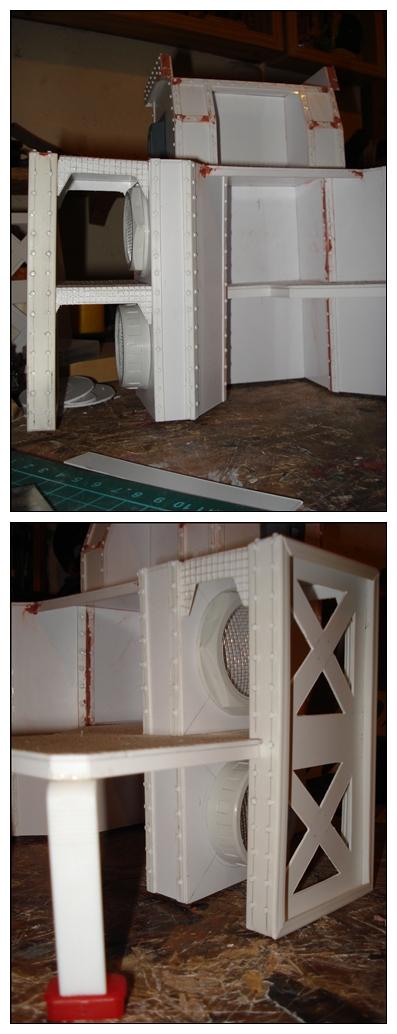
Glue is press-drying as I type, building up the edges as discussed above and adding more pieces.
Nicht doch so förmlich mein Freund^^.
How come you write such a flawless German?
The whole construction is steel based, right? So bound to have rivets,eh?
@Viktor: I appreciate the compliment, but I seriously doubt its flawless, and certainly not fluent! Just basics and bits I picked up from here and there; probably the lack of proper schooling might explain the excessive formality (Which might, if I'd tried to keep on, be followed by an equally inadvertent piece of street slang!)
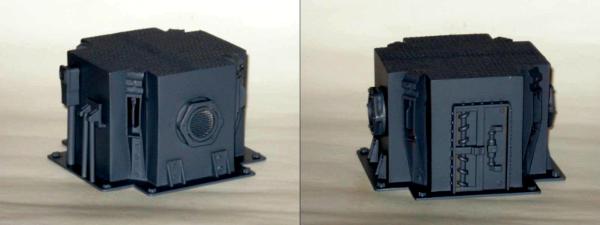
I guess it's supposed to be reinforced concrete and steel, yes, so at least the bulkheads, doors, battlements and walkways supports are going to need - a lot of - rivets.
Well, street slang is always a good way to get yourself the first foot in the door to any language. I say for my own needs that I want to be able to swear properly in a pub and then I think I am fluent enough in said language...
And the now strengthened walls and floors look superb! Add the odd rivet and some steelplating and some buttress and you have a proud building...
@shasolenzabi et al: Thank you all, and sorry for the delayed reply.
Without further comment (Everybody knows how it is when RL gets in the way), half update, half proof-of-life:
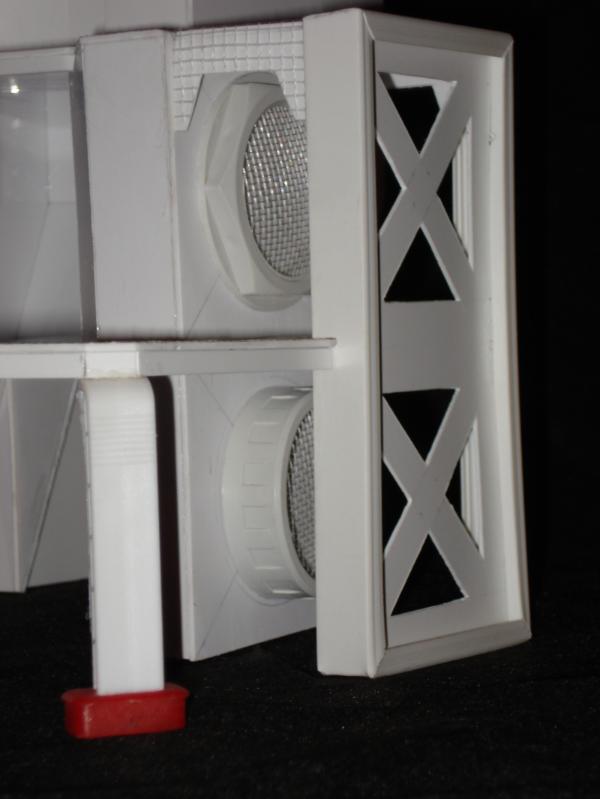
Added the side bulkhead-look-alikes and platforms.
Side detail:
And scale shot (Yes, it is bigger than I'd thought I'd be too):
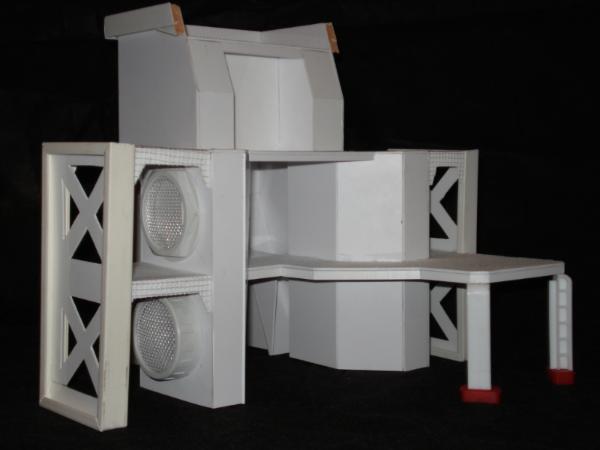
You'll notice there are no rivets on in yet, my rivet making tool of choice (revolving hole-punching tool) got seriously WIA after punching the third (Yes, actually the third) rivet the other night, so I'm sort of short of 1 mm roundlets right now, hope to fix it ASAP. But do no despair, rivets will be there.
And firing points. Lets not forget, there are two things you can never have too much of in the 41st M: Rivets, and dakka.
To make it count as the current bastion, it should have one on each side, featuring heavy bolters, but I don´t think one would fit on the rear facing, will see how to fix that.
On the other hand, as I said, it's significantly overgrown the present official version, so there wouldn't be much point in making it rule-compliant now.
And I reckon that fitting it with flamers instead (specially on the front, over or besides the main gate) would give it a nice, warm-welcome kind of feel...
the only downside atm mister is the skull on the front... it really drags your whole work down...better leave it out or even better... make an aquilla on your own!!!...
@Camkierhi: Thanks, and sorry for the late reply, it's been a busy real-life week.
@Hyenajoe: Thank you for dropping by, and glad you are liking it so far. You are sort of the creatures intellectual father, so to speak (Meaning, of course, I blatantly stole the idea from you), so your comment is doubly appreciated. If it is putting you to shame, be assured all work on it will be put on hold until your own catches up !
@dsteingass: Thanks again, it is slowly coming to shape.
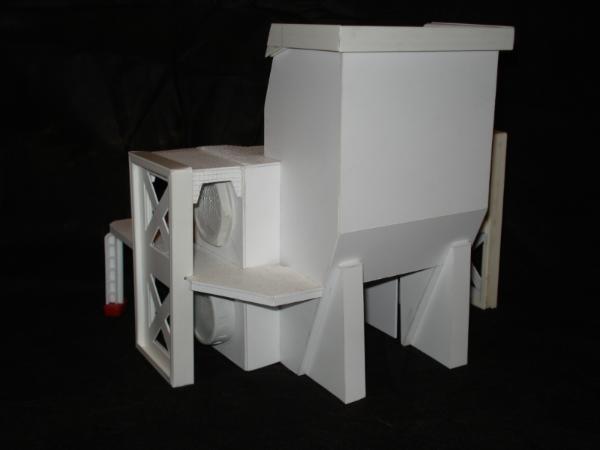
@Viktor: It's just temporarily tacked in (as well as the sides, firing points and vent grills, detachable for priming and painting), filling in the too large blank space over the entrance, but I didn't find it so bad anyway, I'm sorry you don't find it too appealing... I'll give it some more thought before putting it back nevertheless, or try to come up with other alternatives before calling it (Although I doubt a hand carved aquilla will be among the possibilities!)
I spent the evening laying out the riveting on the back (if I'd done the math beforehand, I would have gone with welding instead!), and fiddling with ideas for railings for the walkways, but nothing picture worthy yet.
Thanks for reading, hope to be back with a decent update soon.
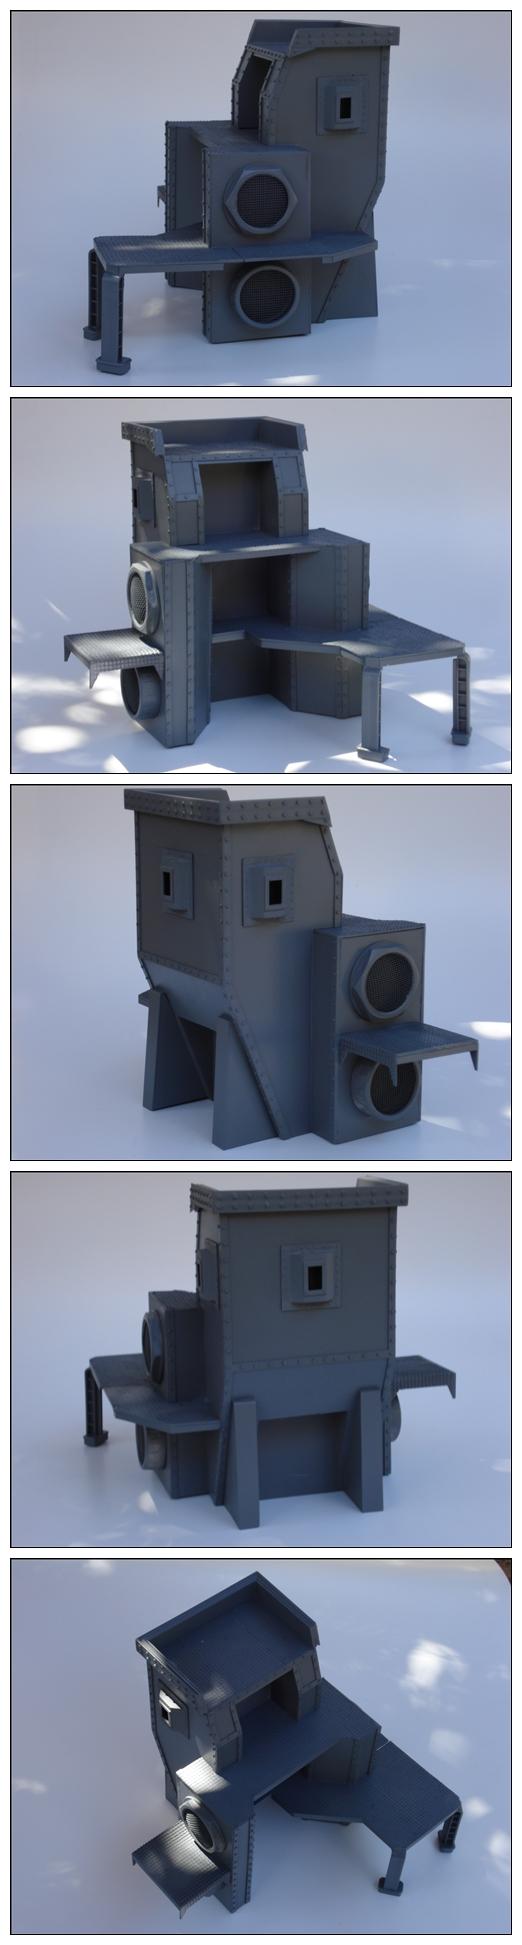
@Viktor: Thank you. See for yourself and let me know...
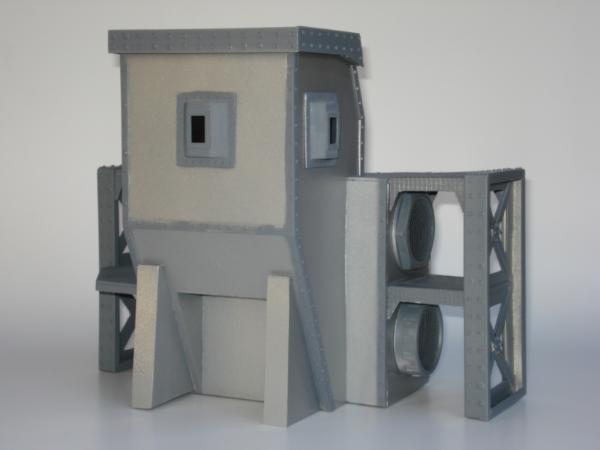
And close-ups:
Maybe not exactly what I was aiming for, but it'll do. It [b]is[/b] textured, just less than I expected. Further painting and weathering should add more depth and take care of the excess shine too.
aha....hmmm.... well it will later on obviously need a wash or two... what was the look yoou were aiming for? metal or concrete?...(just the look of the material...not to be missunderstood of the later on color you want it to look like...)
I'd planned for concrete walls with metallic reinforcements on the edges, and metal for the firing points, vent grills, walkways and side supports (Basically, the current darker grey parts).
A basic three-colored basecoat (Concrete, metal strips and bits, and flooring), with added rust, weathering and maybe battle damage.
The textured paint on the wall is not intended to be kept as is now, I was thinking cement greyish green. Will see, the paint suggests a 48 hours wait before recoating, so there is planty o f time to change plans!)
@Camkierhi: Thanks for stopping by, glad you are liking it so far.
While I wait for the base paint to properly dry, there are a couple other projects waiting for some attention, and tidying up the workshop is long overdue...
As thought, not much got done during the week. I just got to break out my new airbrush (Very cheap single action bought on sale in the supermarket, just to try out, never used one before) and give it shot.
Far from great, but a start it is...
Will try to fix it up and keep on painting in the upcoming weekend.
@Ruglug: Thank you, I couldn't agree more with the the more coatspart , will do ASAP.
Got to learn how to use the airbrush, and work on my patience on the way too, leaving the paint to dry between coats and using several thinner coats instead of trying to drown the thing in paint on the first attempt...
Some advice. I picked up a cheap bamboo lazy susan at Wal Mart. It helps for drying quickly between airbrush coats in front of a small fan. The Fan I have is maybe 8" in diameter and has 3 speed settings, and is LOUDER than my new airbrush-specific compressor (Badger TC910).
@Galorn: Welcome, and thank you. Experimenting with an airbrush with this one, hope it comes out well enough.
@Viktor: Sorry, got sidetracked (again), but will come back with more later.
@dsteingass: Thanks for the advice, always appreciated, I just hope I got right what a lazy susan was... (That building is looking great, BTW)
OT: Following what I (expected) was dsteingass's advicce, and taking the long road (Just trying for Wal Mart would have been too easy, I guess), I went 1/1 scale and scratch built a sort-of turntable jig:
(Just figured that if for lazy susan something else was meant, this might still be useful for painting!)
Drying times are quite short, actually (weather helps a lot, warm, and very low humidity), I just have to tone down on eagerness and go with several thin coats, might try a fan for extra speed.
@dsteingass: Not that much, if you have a router and don't mind the sawdust storm, but thanks anyway (And it did turn up to be quite helpful, so thanks again for the advice too!)
I couln't take pictures today, but have to say it, I'm really regretting not having tried an airbrush sooner
Great work so far with the build. It really looks spot on, especially with the hammered paint, that will give the extra flavor to it . I like the vents on the side, but hunk I will steal that idea and alter it slightly. I think making a doorway that looks like it would spiral open would be wicked .
Keep up the excellent work.
Edit: ninja'd.
I like the camo you choose, über cool.
@Theophony: Hello, and welcome. Please, take away - you can not steal it if it's freely given - will be glad if I get the chance to pay back at least a bit of the ideas I picked up from around here...
And mind you, I haven't done the doors for the bastion yet (Just couldn't wait to see how it would look when painted, and wanted to try out some ideas on it too, like the hammered paint, and got a little overeager!), and might steal your idea as well
Edit: Likewise!
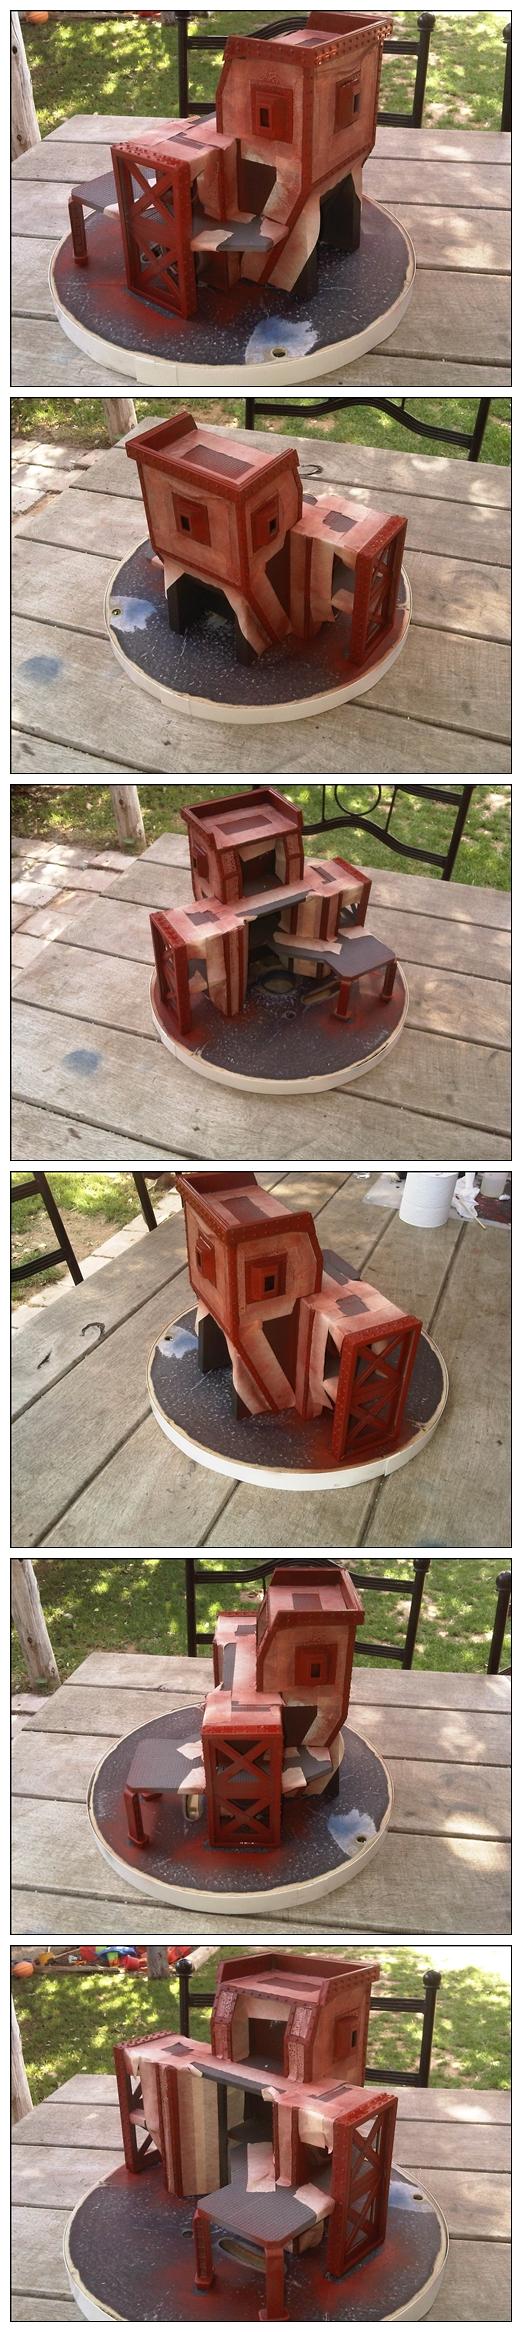
Navy blue turned out somewhat too bright, will be toned down with weathering...
@Camkierhi: Thanks for stopping by, there you go:
@Viktor: Lets see how it did...
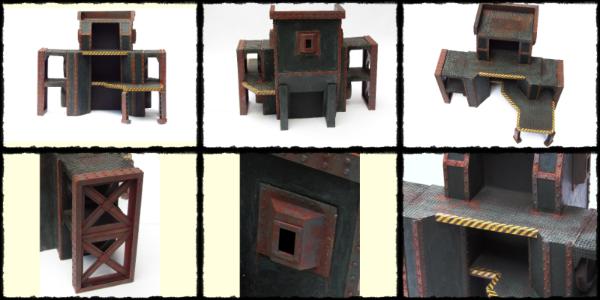
Current status:
Alternative views:
Firing point and top details:
The concrete walls need to be weathered to match the rusted metals, the rust will be toned down a bit (Too much corrosion came through the salt-painting, I’ll go back to it and “recover” some more of the chipped paint), and something will have to be done about the walkways, figuring out colors yet.
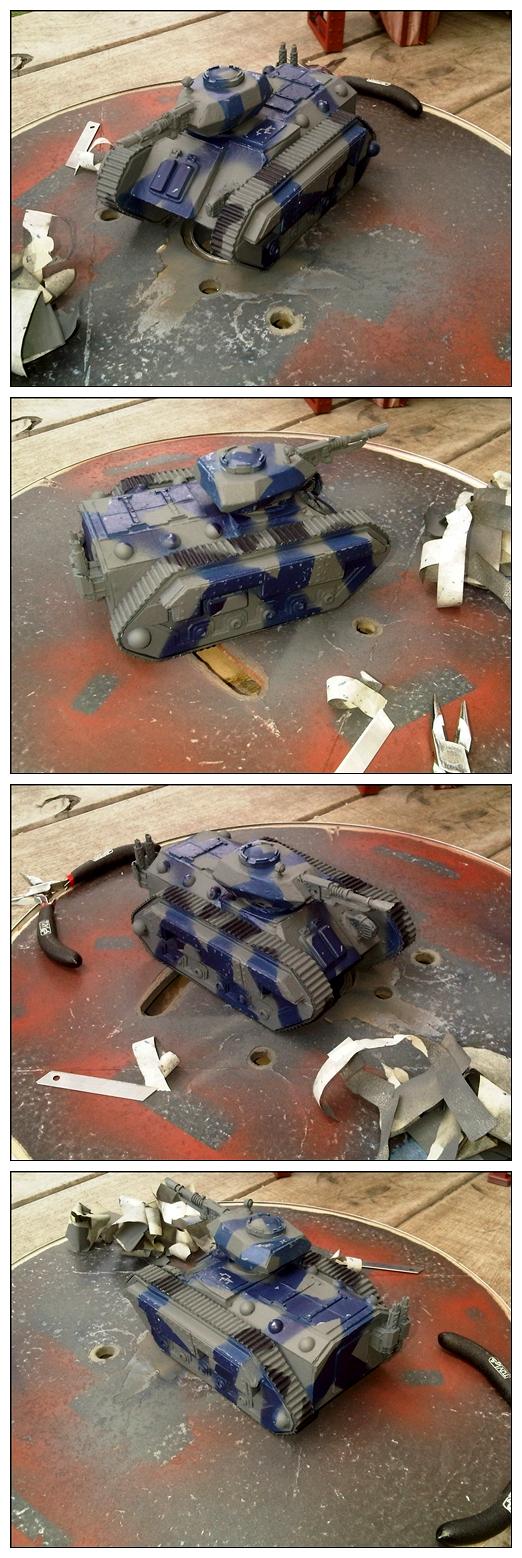
As for the tank, I basecoated the two I'd made in the same blue, and ran out of masking tape just before I could do the second one. Seeing the feedback it's got, I'll surely paint it to match.
Advice, comments and criticism more welcome than ever.
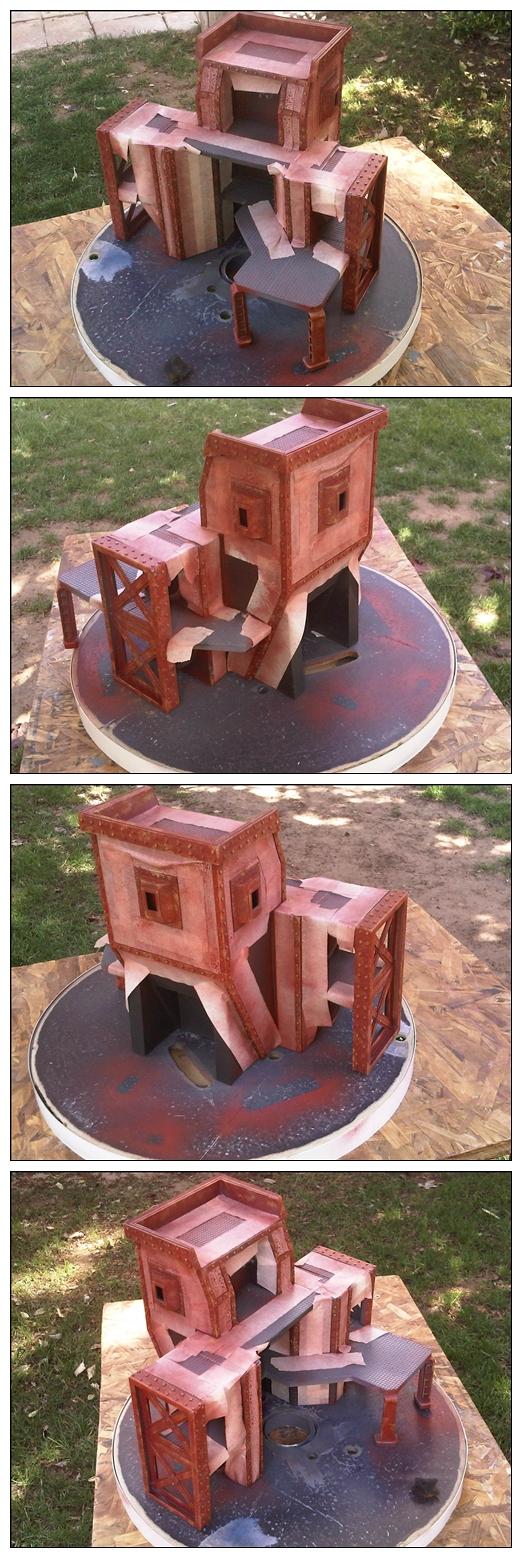
I think toning down the rust will really help this out, right now it's too big of a contrast to me, getting more of the metal back will help I think. I lo think the hammered gave it just the right amount of texture for the scale on the walls .
i too think the reddish look is too strong for the metal... specially in comparison with the still mint looking concrete parts...
a heavy dry brush of metal on the rusty parts and some grey (?) on the concrete will make this all look more suitable...
as for the walkways...you can never go far wrong with hazard stripes...(sorry for that lame pun...)
People: Thanks a lot for your input and feedback, truly appreciated.
I think the pics are not doing the paintjob a favour, the contrast is exaggerated and specially the red in the rust pops out quite more on the screen than it truly does. Nevertheless, it iscontrasting, maybe too much.
Couldn't get back in time for a daylight picture, to properly show the real colours, I will tomorrow.
@Theophony: Glad the texture shows, I thought it might get lost in the pics.
@Viktor: Haven't done much work on the concrete walls yet, indeed they look mint new yet, and that will not do. I'll weather the walls as the next step. And for the walkways, I was thinking railings, but hazard stripes along the edges sound quite good, will try them out .
@dsteingass: I still think it might be too much, too bright (Makes me think of a severe case of skin rash), but I'll wait until the walls catch up before making a call. I will work on them next, just not sure if AB them, I can not see me masking it all over again! Would some washes do?
Well, that looks way better!
Still a bit more red than I would do myself, but if you now get the concrete to look lighter, than I think this will work .
By the way, congrats for hitting the front page!!!
No masking, just a dusting from a distance. Remember, it would all weather the same, even if the walls didn't necessarily rust like the frame does. Washes ALWAYS work, and you never have to decide either or, you can always have both.
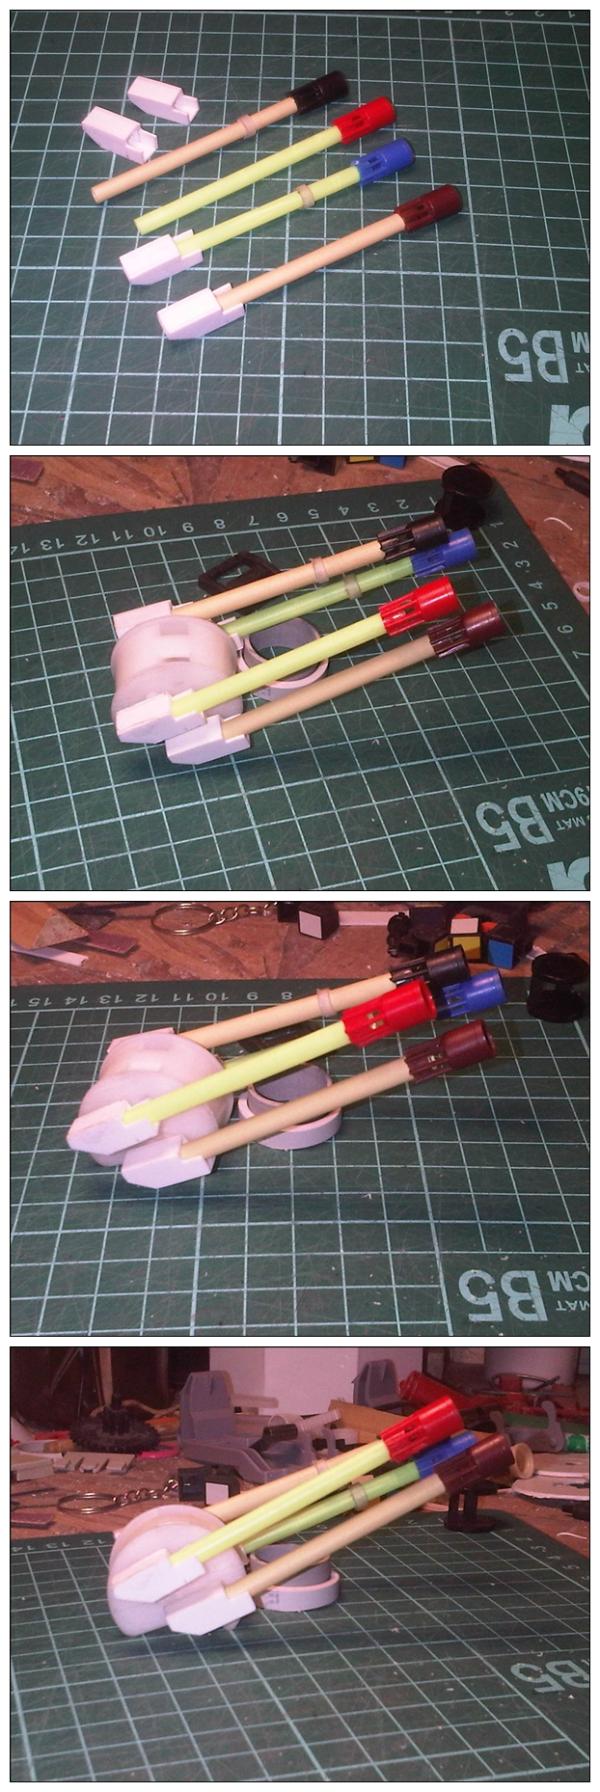
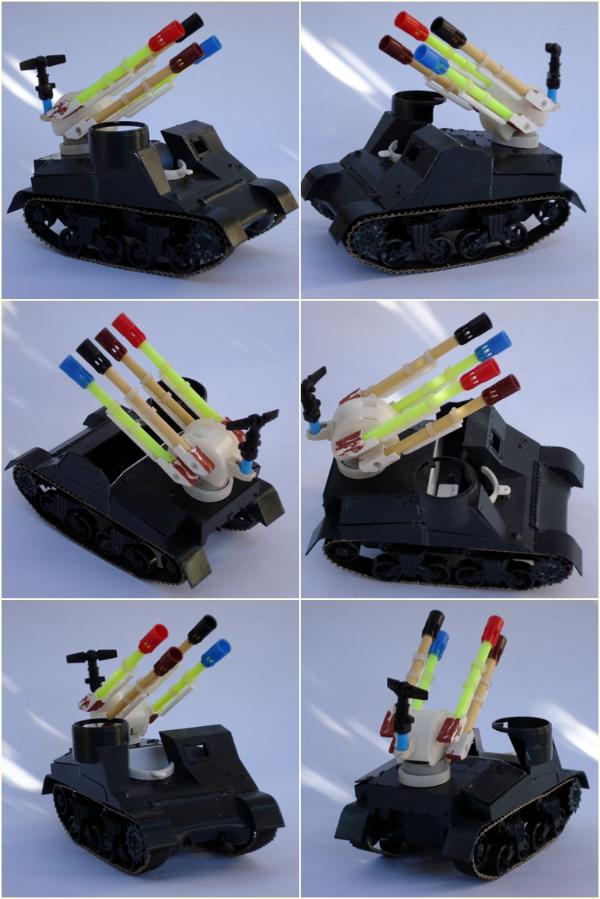
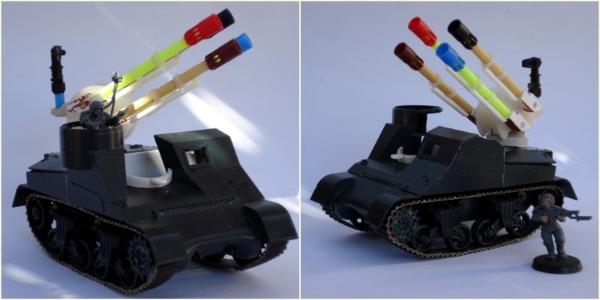
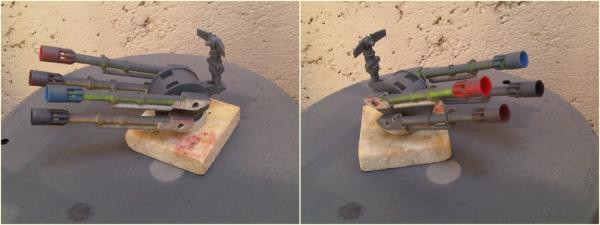
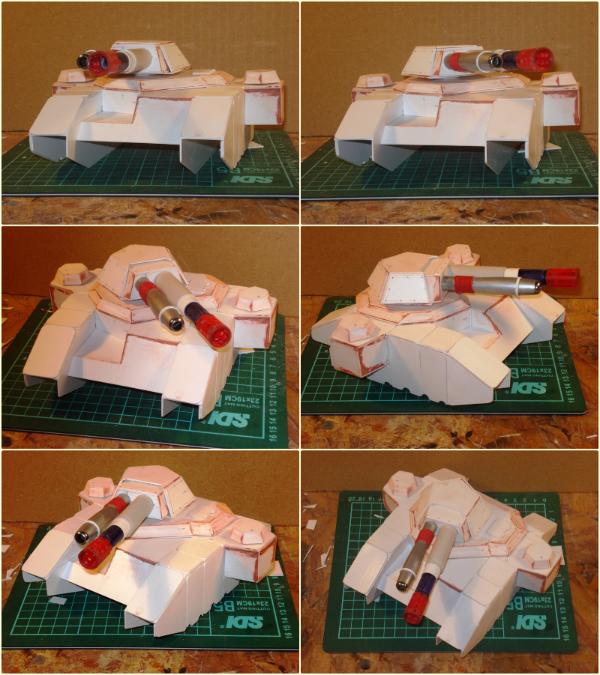
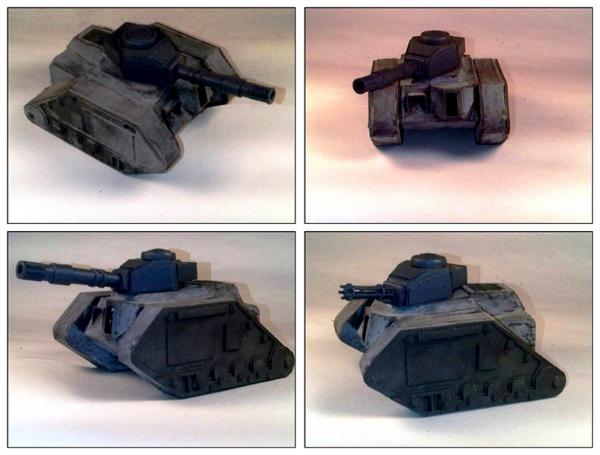
Awesome work LT, the gun emplacement is class, the Bastion is amazing and that tank is going be great - love the quad gun - what are the ends of the barrels? Look like bits you find inside spring loaded pens?
I have that same kit but then I went for the easy stuff and made a Basilisk out of it. Honestly for a Chimera it's too wide and shortening made it weird much better as a Hydra..
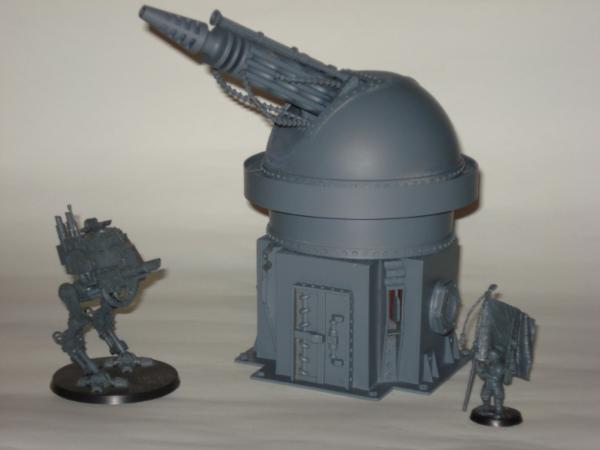
Littletower wrote: @Ruglud: Thanks, though sadly the gun emplacement got so badly dwarfed by monstrous Berfa!
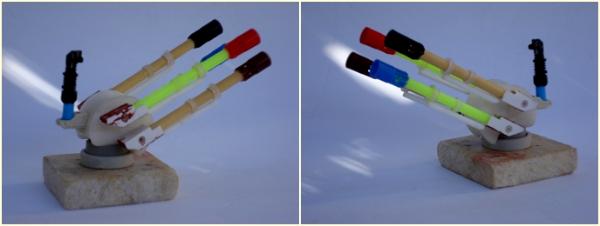
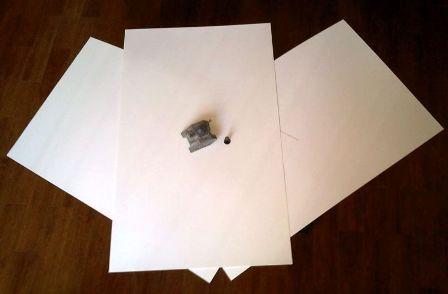
As for the end of the gun barrels, they are the caps of dried out felt tip markers, with the closed end cut off, and angled filed.
Ahh, what a great use of household stuff - now I look at them again I can see that they are in fact the felt tip pen lids - my kids have drawers full of these and I bet most have run or dried out... Time to go raiding for supplies
Your gun emplacement beats Berfa hands down as you've actually managed to finish it - the deadline is fast approaching and still a looooong way from applying paint - I may need another month to get her ready- takes a while to apply the foundatiuon before the make-up on this big old lady
Littletower wrote: @Ruglud: Glad to see you around, thanks for stopping by.
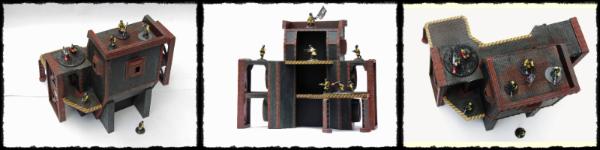
Having the brush out, I paid some care to the Bastion as well...
(Worked some more on the rust, dirtyed the walkways, and gave a first wash to the walls to weather and bring the contrast down a bit).
Cheers.
And so you saw 'Imperial bastion' as knockdown steel blockhouse rather than concrete bunker. so.. a lil bit historical referrence on the use of steel blockhouse please
@Miguelsan: Thanks for stopping by. I’ll tour around your thread for more conversion and count-as inspiration and ideas to steal.
I found Kilkrazy’s article on Scale Model Kits for 40K (Saw you commented there as well) as reference for vehicle sizes.
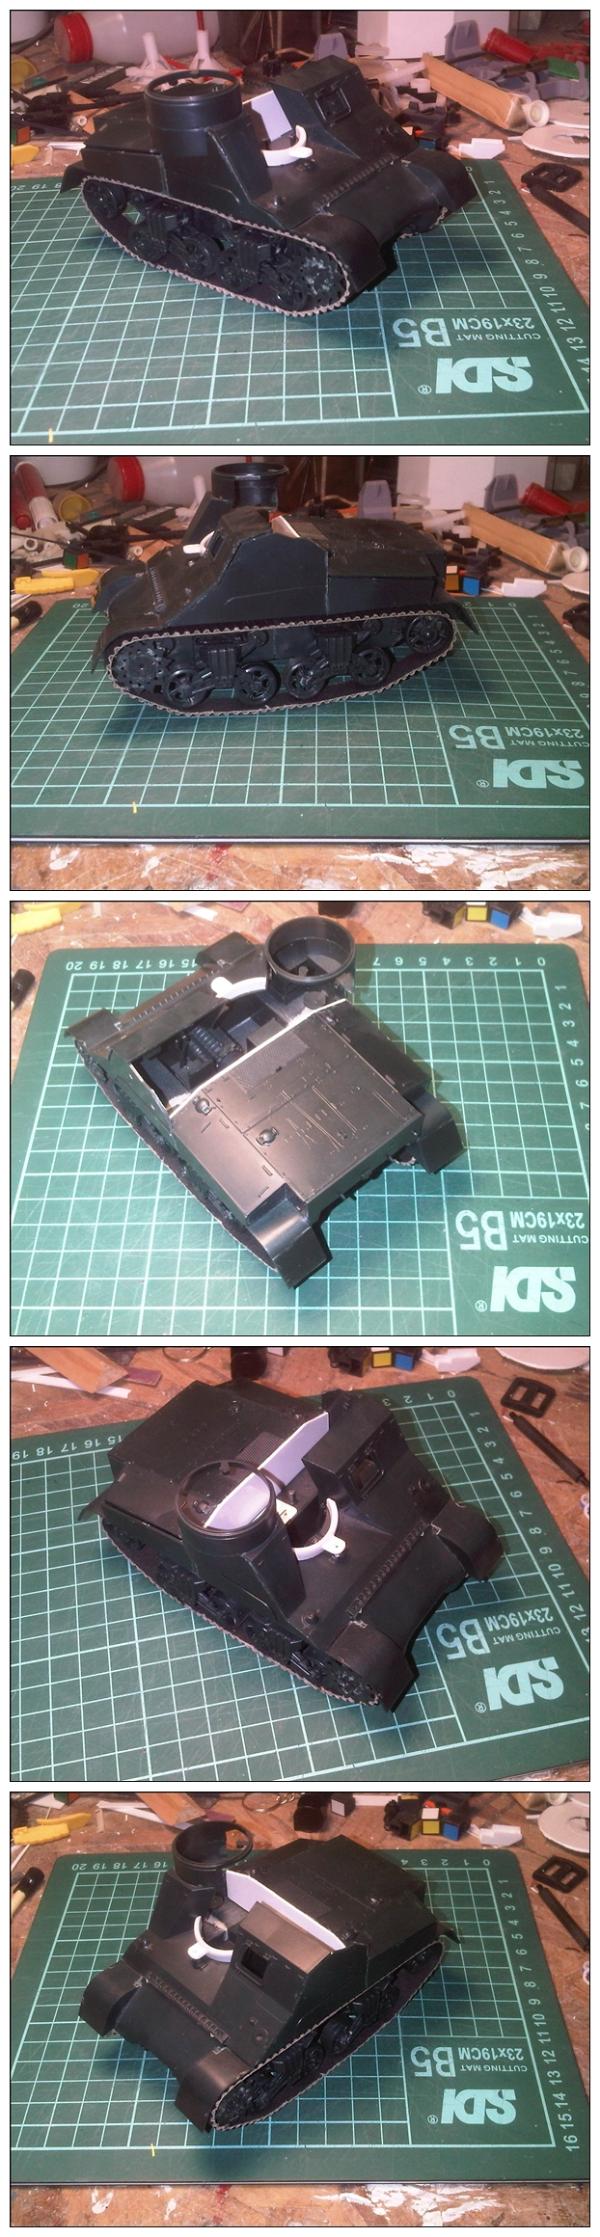
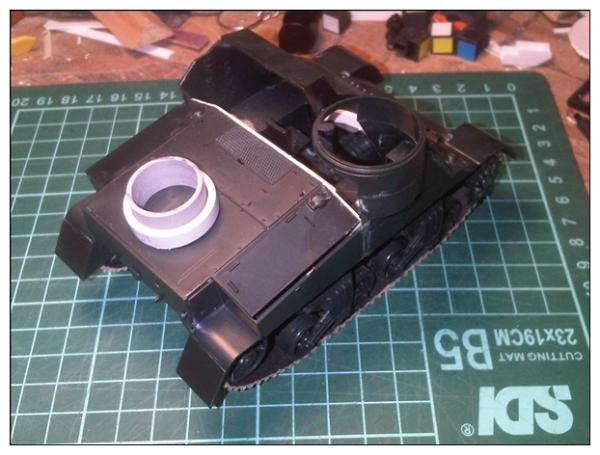
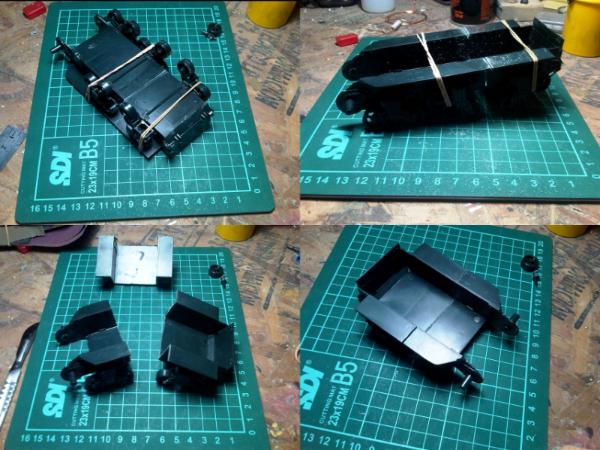
To bring the hull to length, I cut out the mid section and removed one of the track boogies, but it still is too slender - 7 cm wide, against the 9 quoted - And a bit too tall as well, but that is concealed by the oversized quad gun over it.
The shortened tracks might have ended up looking somewhat weird – with a too short footprint – but I think the overall result will do.
@Ruglud: I keep a bin full of reusables – toy pieces mostly, and any other potentially useful shaped thing I see around – Problem is, I save (hoard?) much faster than I use, and the pile grows, which will probably get me in trouble anytime now…
@Lone Cat: I’m sorry the paint does not do it for you, the building is supposed to be concrete, not steel made; the metallic parts being only the side supports and columns, firing points and edge reinforcements.
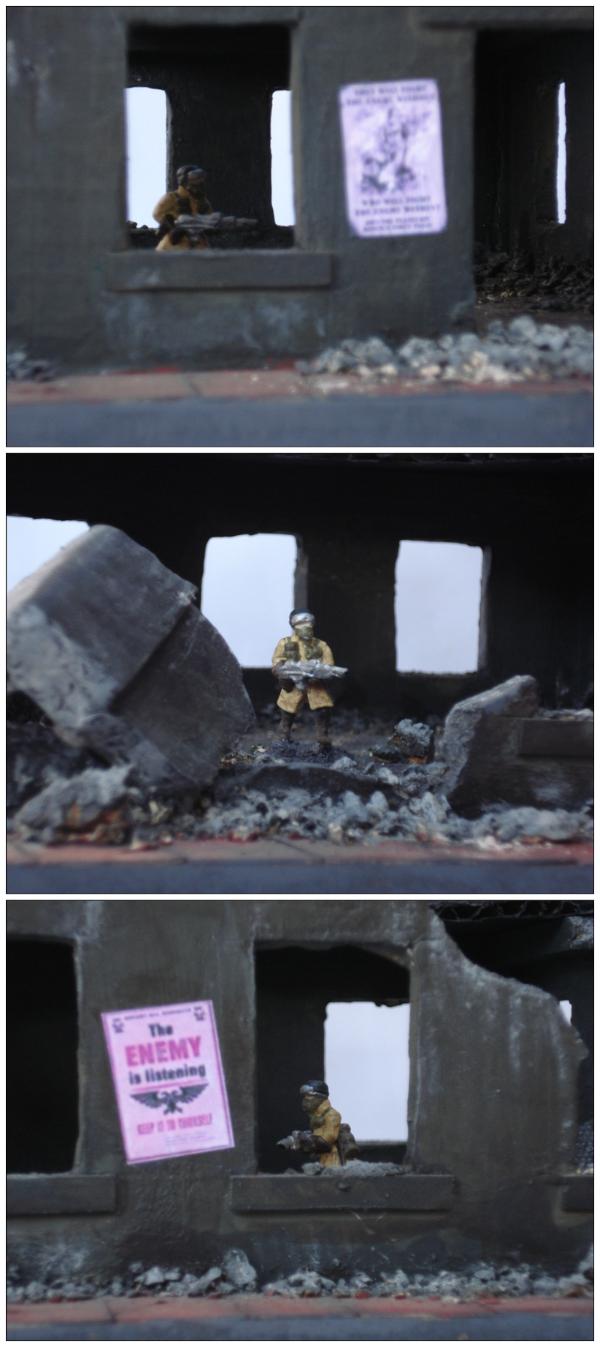
After yesterday’s primer fiasco, and while waiting until I can finish spraying – primer has a 24 hour waiting period between coats – I rescued another project to move along:
After replacing the offending spray can, I finally got to properly prime the Hydra:
(Please excuse the loose joints between planks, some parts were left unglued for painting, will be properly put together after that, whenever that might be)
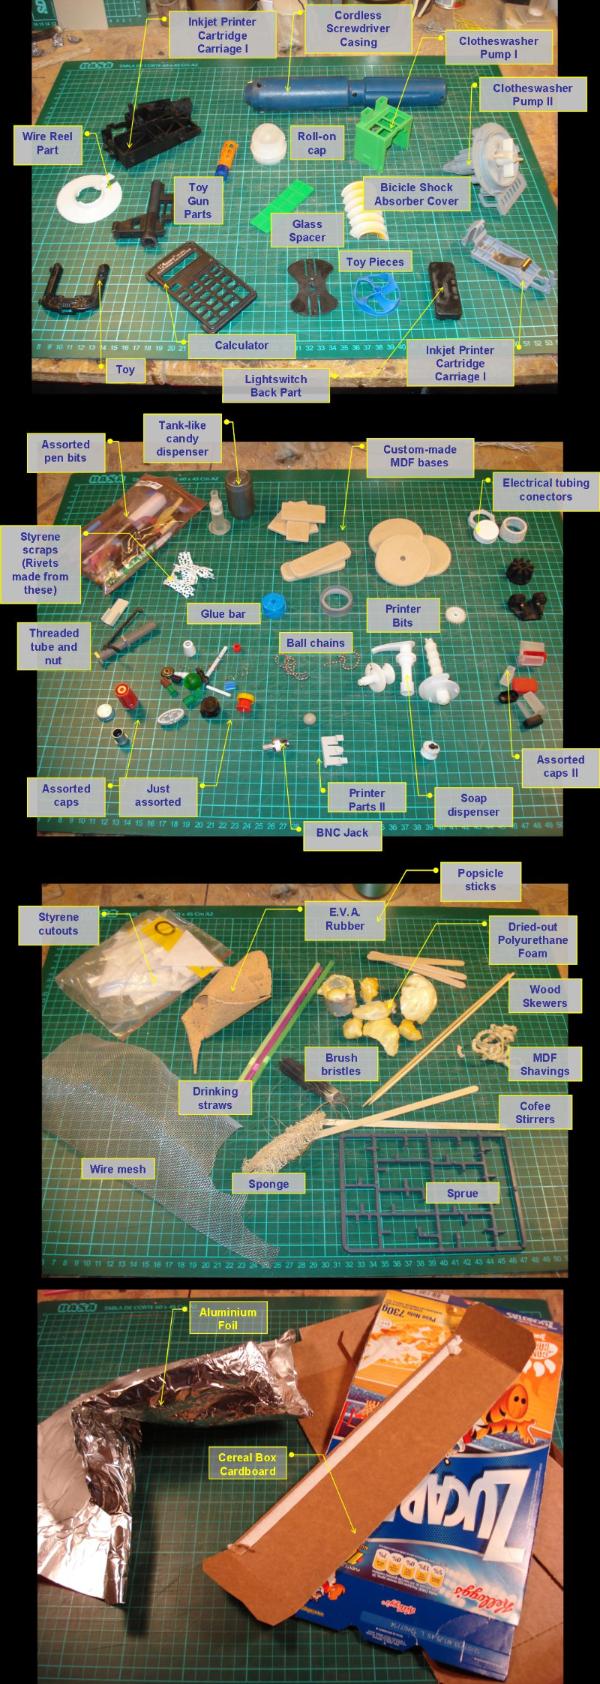
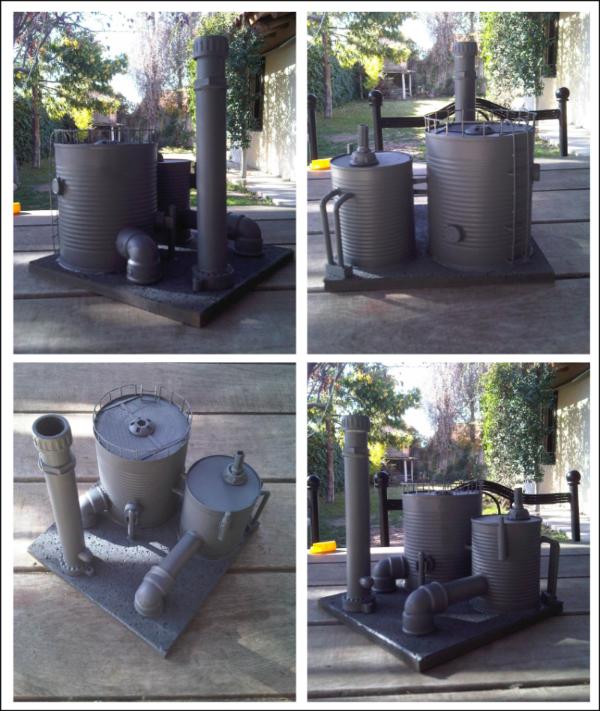
While planning (Read: trying to figure out) what to do, and following the picked-up-junk special rule, I collected these:
Dried out spray polyurethane foam bits, to (maybe) become some toxic spills from a scrapped tank among the forthcoming junk pile…
Actually, after I found those, I went after the guy sealing the boxes and got an almost empty can of the stuff for further experimenting as well.
(Didn't get a picture of that, it was awkward enough to ask for it, having him pose for a pic while he was giving me the used can as well would have probably been just too weird).
PS: @Camkierhi: Thanks, glad you like it so far. Paint is on hold pending a pressure regulator for the compressor (Too high pressure output for an airbrush), an airbrush specific compressor (Doubtful for the time being, though it be nice indeed), or the right mood for doing it the old fashioned way!
hey LT... i am feeling really bad for missing out on so many wonderful looking updates of yours...!!!the big gun looks so cool...the balldesign you really pulled of to the finest!
then the bastion looks amazing too...subtile amount of details... the whole thing works as a complete unit and no details fight for attention against each other... i like that very much!
then you started with a tank...and what a tank... nice choice for the chassis... and the flak gun is amazingly looking!the caps of the feltpens you used in a very unique way... the muzzles have actually the right cooling holes!...primed it looks like a comeplete bought kit!...what a talent!
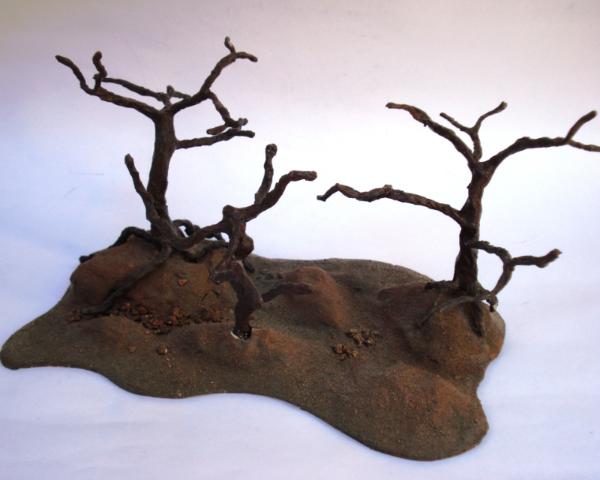
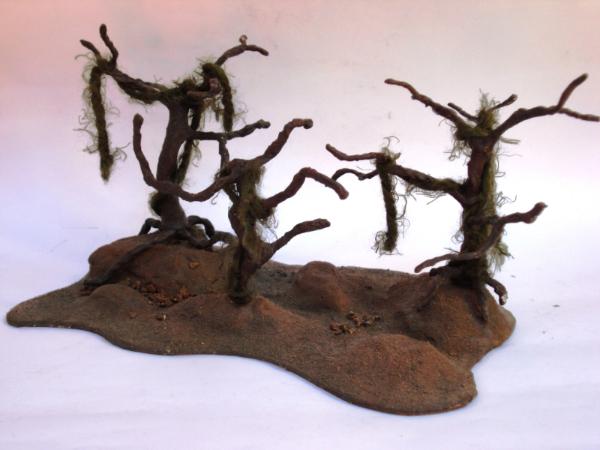
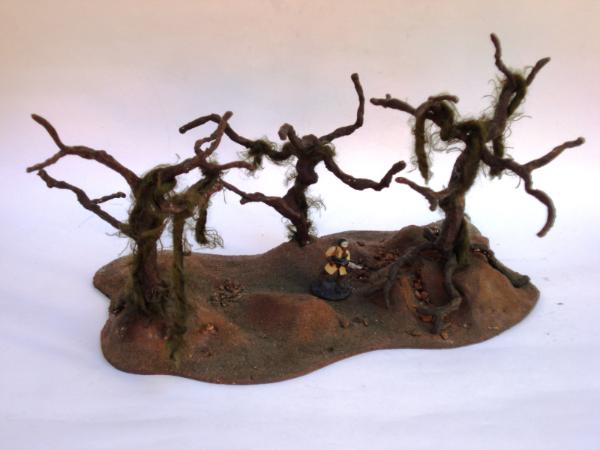
as i am getting older by the day...i can´t realy remember these trees... how did you make them? but what i can say is...they remind me of trench war sight i´ve seen... very convincing looking plantlife!
and i am eager to see what you come up with for skalks comp... the foam stuff is amazing... i have worked with that stuff for modeling puroses before too... just remember that foam doesn´t like spray and superglue!!! it melts it... i am having difficulties what to use for junk... i am thinking in totally different way atm, way more into structures than throw away junk... randomness of any kind really tests my creativity it seems^^
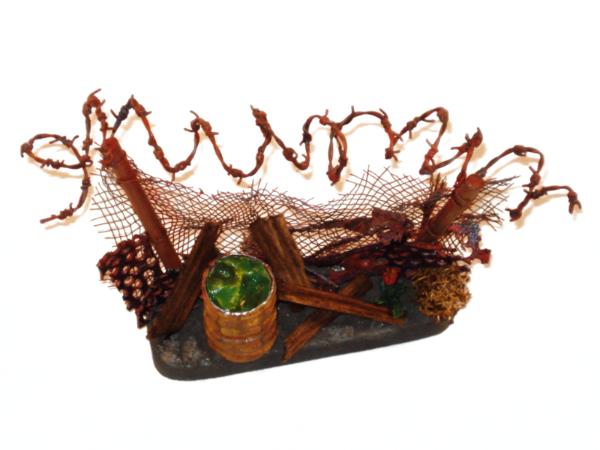
Delayed and distracted by RL, it took over two weeks just to get my junk together…
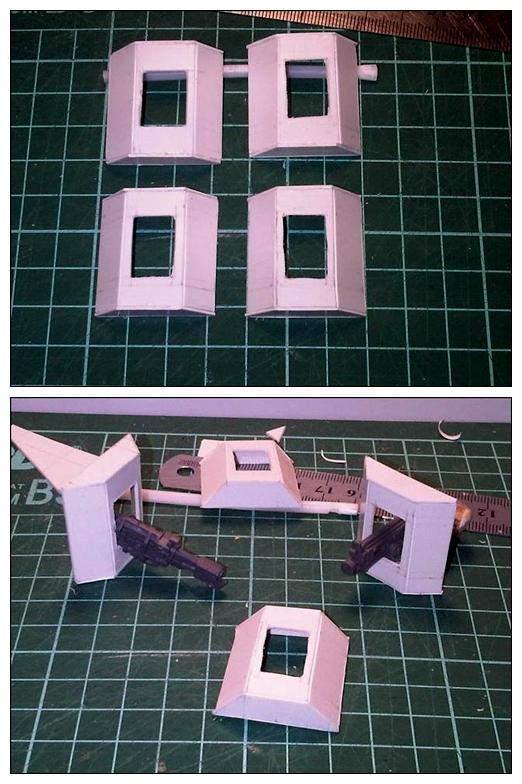
Step I, sorting through it all. This actually went quite well, put some order on the workbench and sorroundings, and several possibles started to come out as well:
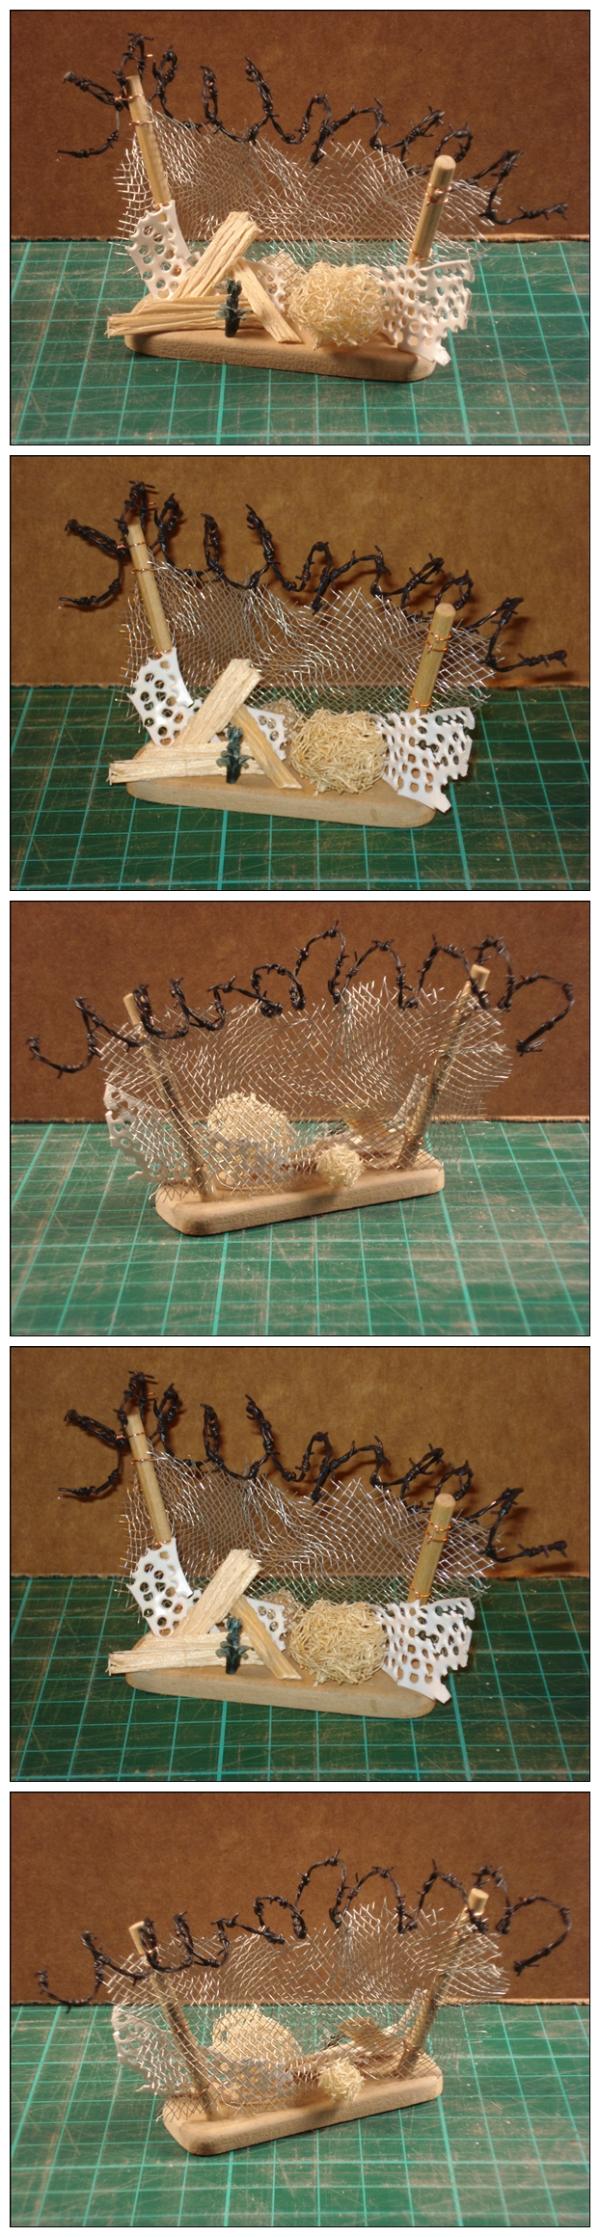
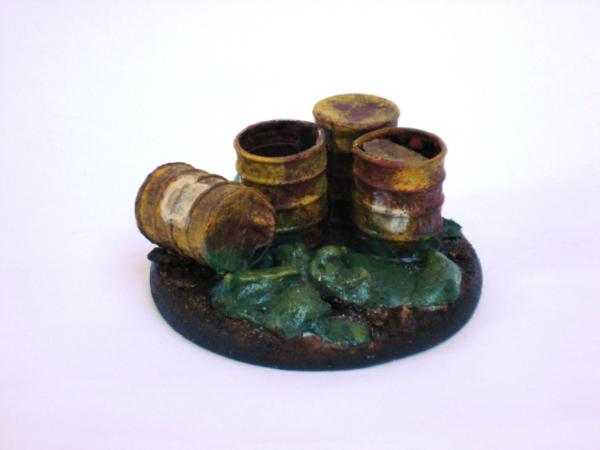
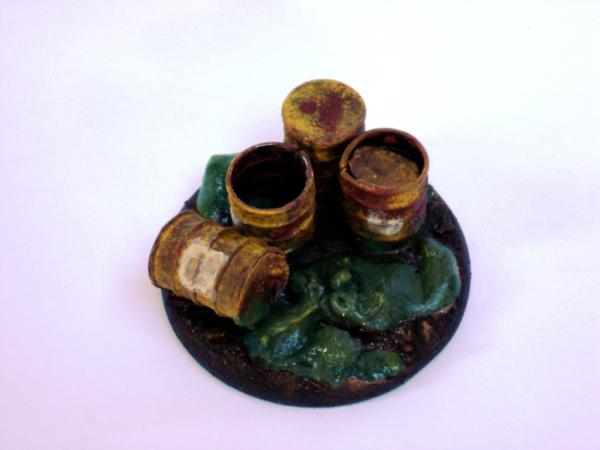
Plan A revolved around rusted and weathered drum/drums, with a toxic spillage. That had two advantages: First, I could aim for the extra credit points for the spontaneously found and picked up junk by using the polyurethane foam for the spillage, and second, I could even give a shot at OSL radiating from the waste.
Nothing suitable for drums though, I made a test run embossing an alumium foil strip and rolling it over to make the barrell:
Not discarded yet, but not sold on it either.
Meanwhile, an alternate plan sprung along, something else I’d wanted to try.
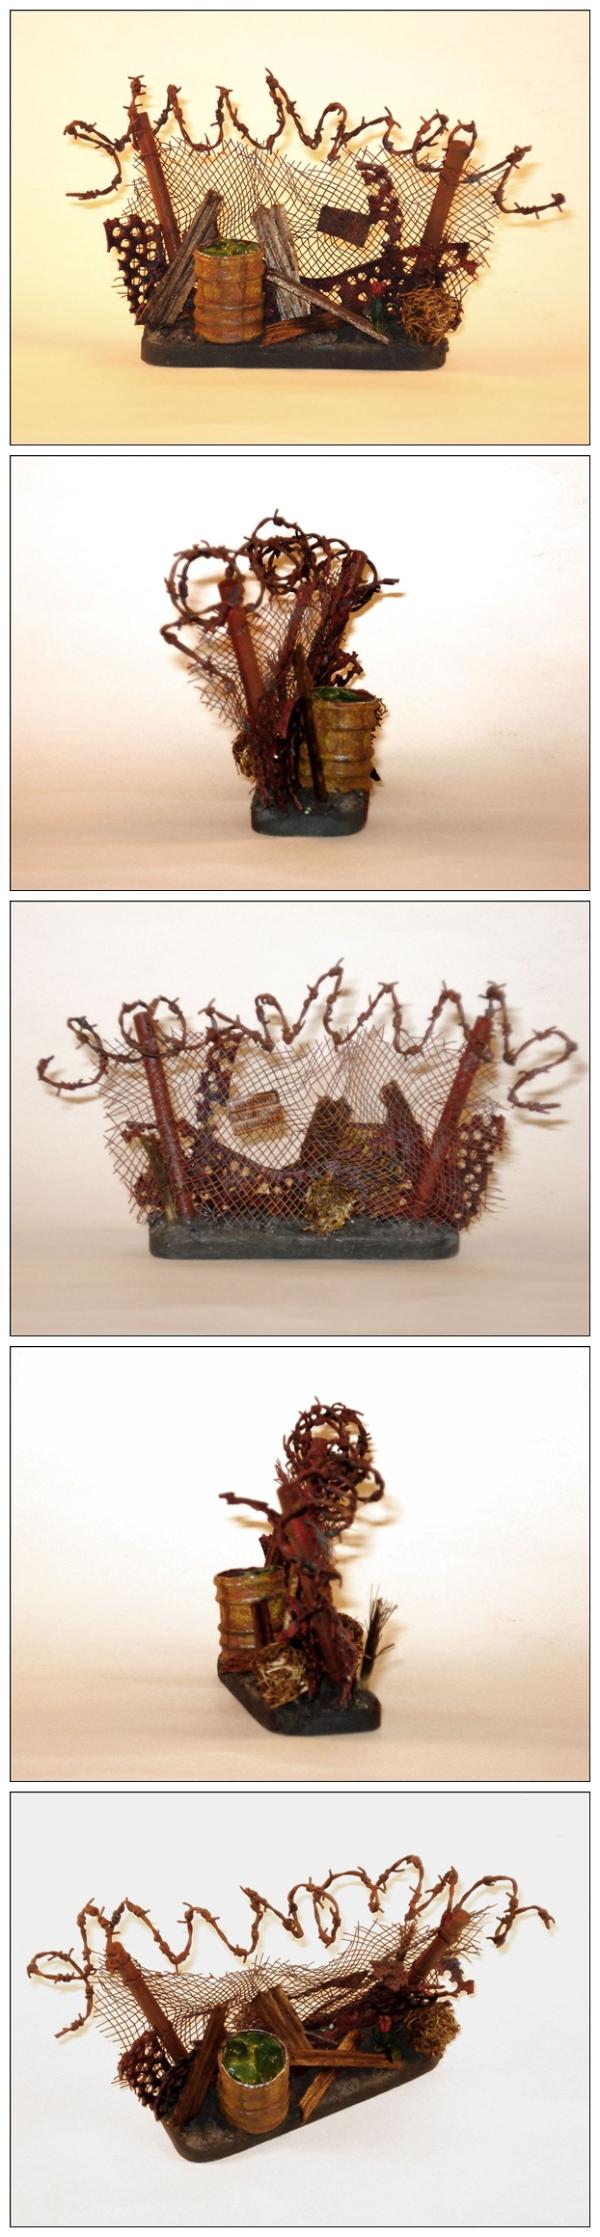
Not sure if it isn't more of a build than a junk pile, though it is indeed made of mostly junk.
Primmed and basecoated - red for rust effect for the mesh, poles and planks, green for the plant - and tinted the woodboards. Figuring out yet how to deal with the tumbleweeds.
If more junk is needed for it to actually be a [b]pile[/b], I could pack in the drum and the toxic waste in as well.
Thanks for stoping by.
PS @Viktor: Sorry for the delayed response! Nothing to feel bad about, and glad you liked those.
As for the trees, basic shape is made from twisted wire (1.5 mm aluminum wire) 6 strands making the trunk, branched in twos or threes at the botom for the roots and tops for the – surprise! – branches, and covered in pva-soaked tissue strips. I didn’t’ take any earlier WIP pics, might try a brief step by step later on if found of interest.
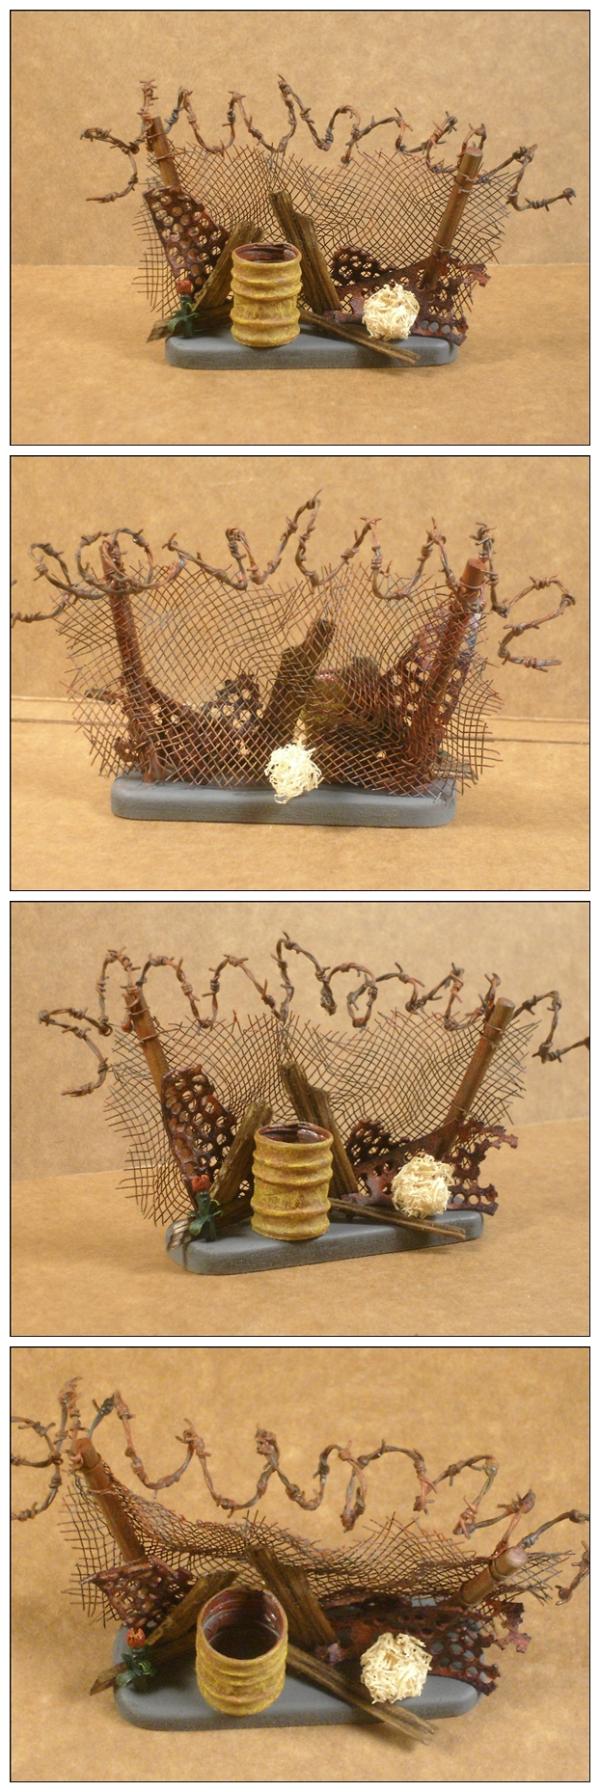
Oh yeah...that's good looking for sure! Can't tell if that barrel is filled, appears so....the mesh fence and that tripwire looks very convincing. The lil rose tho is the icing of the cake, a lil storytelling item...very good idea!
@Viktor: Empty yet, but will be filled with toxic waste (Polyurethane foam based, I'm still aiming for the +5 point bonus for picked up junk, don't think I can spare the extra credit!).
Maybe some spillage too, if it doesn't over do it.
Due credit was going to be given when finished, but you got ahead of me before I could! Please, excuse the omission, and let me state now that I got the inspiration for this from your sprue-work, and thanks for that!
@Ruglud: Indeed there are, toughest simple, fast & quick comp I'd ever figured.
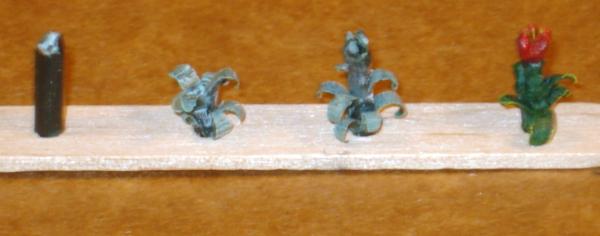
As for the sprue plants, you should. Excellent return on the effort they take, IMO (provided one does not chop off a slice from one's fingertips in the process!), providing, as Viktor mentioned, an extra twist to a scene by adding a different - and generally unexpected in usually grimdark builds - shape and/or colour.
@hdbbstephen: Thanks for stopping by and commenting
Realized I'd forgotten the scale shot:
Available space was indeed limited, a handful of ideas were left aside, I might give them a try later on (Mostly as "canvases" for effects and techniques I haven't done before, ice and snow, and OSL come to mind, as well as needed more practice with salt weathering).
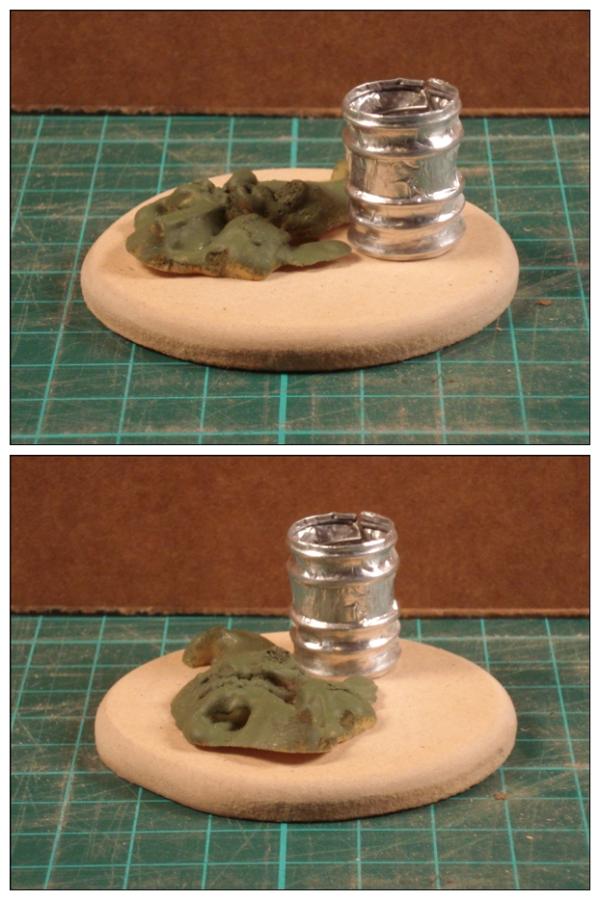
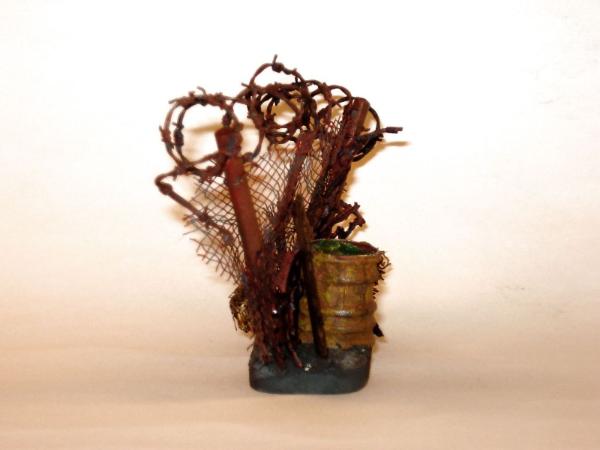
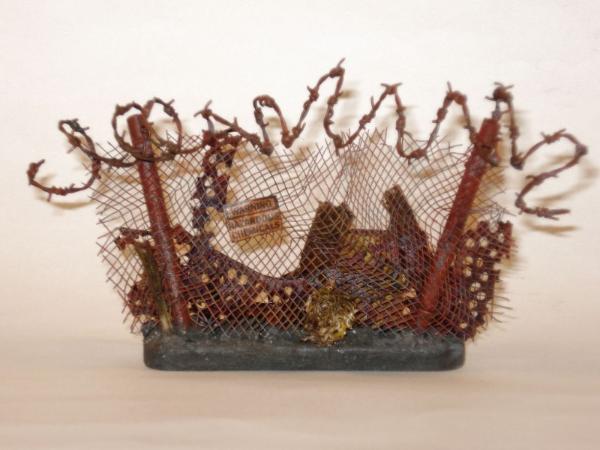
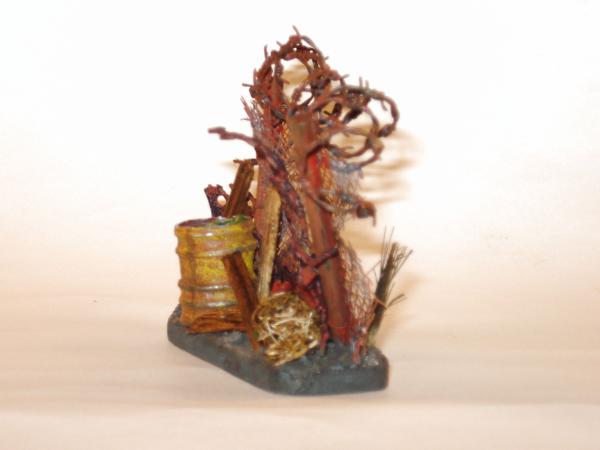
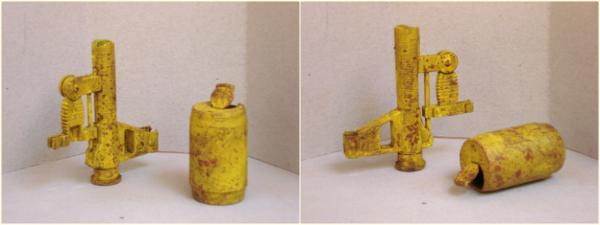
One of the possible - and discarded - plans for the Junk Pile contest required a few barrels. Scratch built one - used in the comp's entry, BTW -, but it did not seem the way to go if more were needed...
Having finished my scrap heap, and before moving on unto something else, I went back to the barrel, still thinking about building the terrain piece I'd thought of when I picked up some polyurethane foam leftovers.
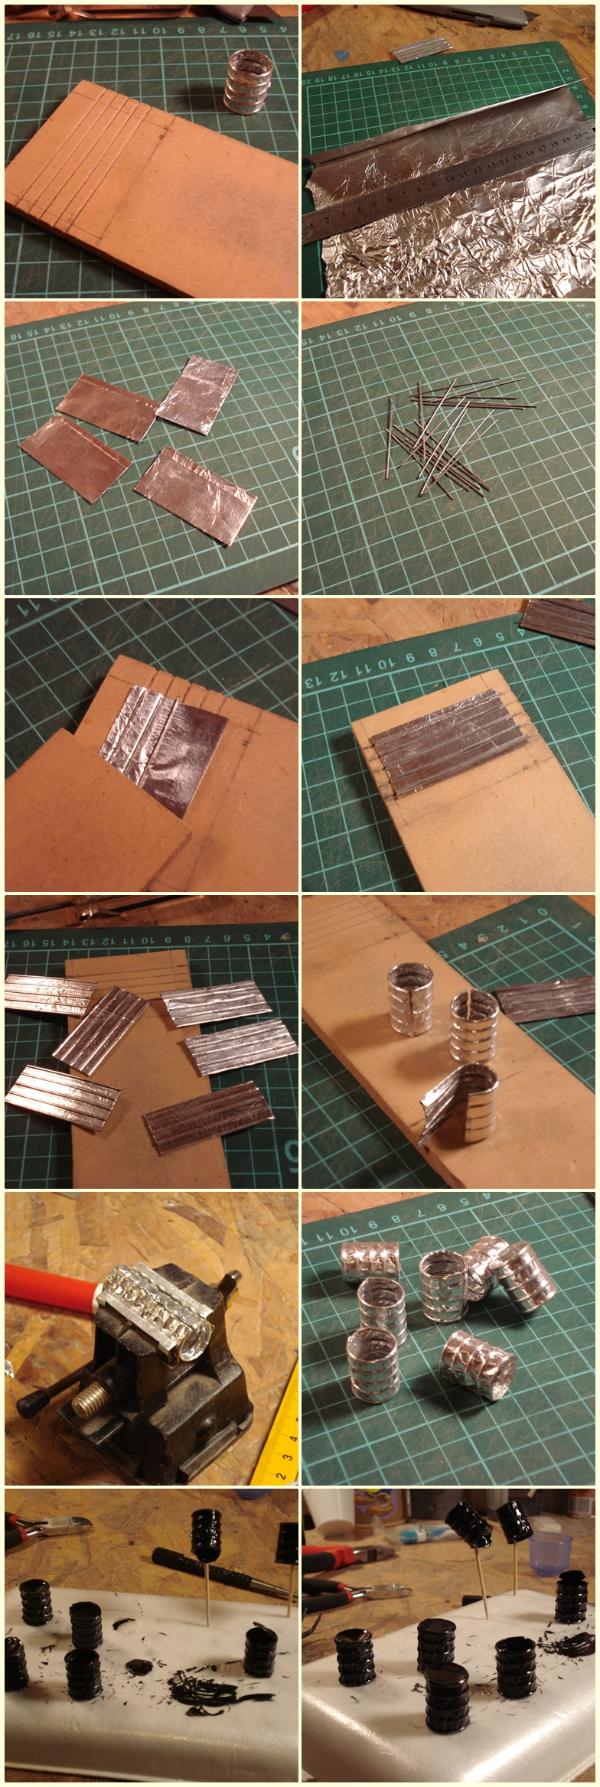
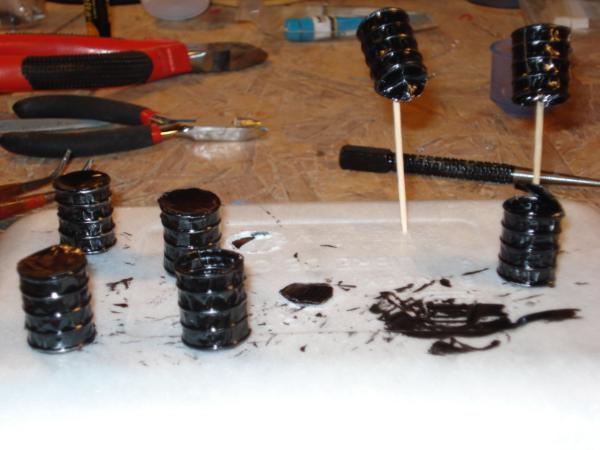
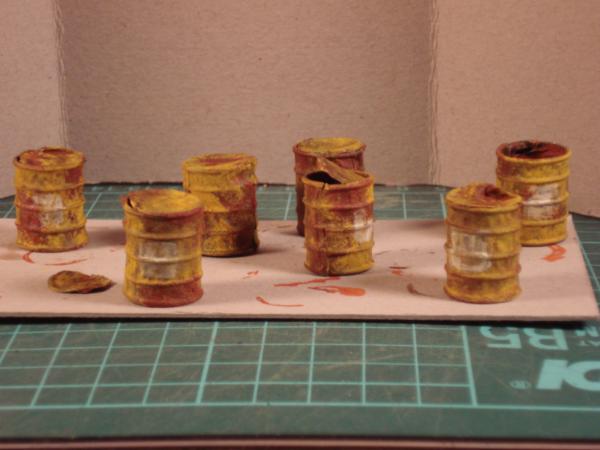
So, I rigged a simple jig for stamping and serial making drum barrels from kitchen aluminium foil:
1. Carved parallel grooves in a scrap piece of MDF (5 furrows, top and bottom rings and three ribs). 2. Folded over a strip of aluminium foil to make made a thicker, sturdier strip, of slightly over 25 mm wide). 3. Cut to length (For a 1.5 centimetre diameter drum, 4.7 cents long), to get the basic tin sheets for the barrels. 4. Wire, cut to same length, for reinforcing the ribs. 5. Embossed the drum ribs by placing the wire strips over the grooves in the MDF and pressing down with a second piece of wood. 6. Super-glued the wire strips and folded over the leftover foil on top and bottom to cover the wire. 7. Finished stamped sheets (Any protruding lenghts of wire cut off) 8. Rolled over the stamped sheets on appropriate diameter tube (Felt tip marker, in this case) to make the drum bodies. 9. Pressed to close the gap (Rounded nose pliers used before the vice) and prepped to weld (Well, glue) 10. Glued on the inside (Nothing fancy here, fast drying general purpose epoxy cement). 11 & 12. Added round aluminium cut outs for top and bottom to some. Primed black
Finished process, just over half a dozen drum barrels, ready for paint and weathering:
For the bodies, the aluminium foil is folded over four times, that, plus the embossed ribs - reinforced inside by the wire strips, make them robust enough. The top and bottom pieces, on the other hand, are single leafs, and thus less firm, but they are pressed in with a slight concave shape, so not too exposed.
Maybe thin styrene would have been better for those - and placed inside, slightly recessed from the rims and before gluing the bodies close - for added resistance, but I favoured the easy/quick build and the rugged look of the creased foil and the possibility of having some of them partially opened - can-opener wise - with outward turned tops.
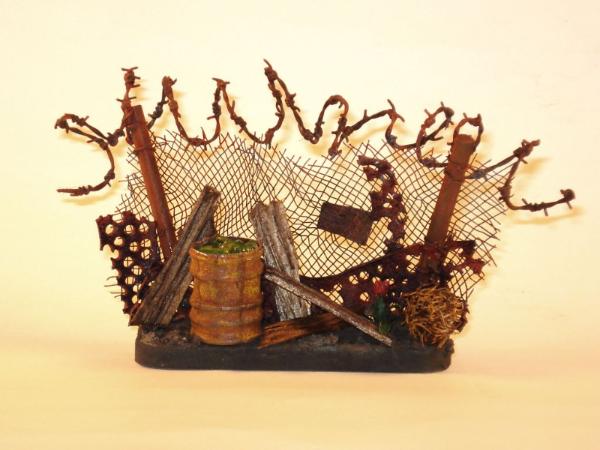
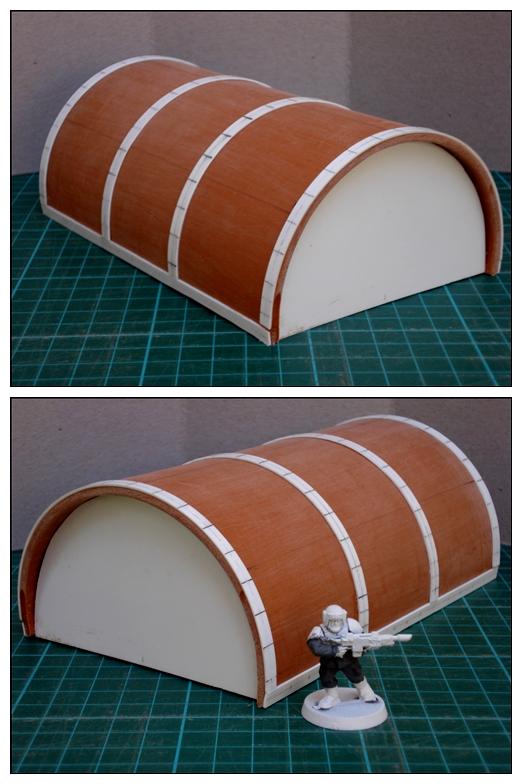
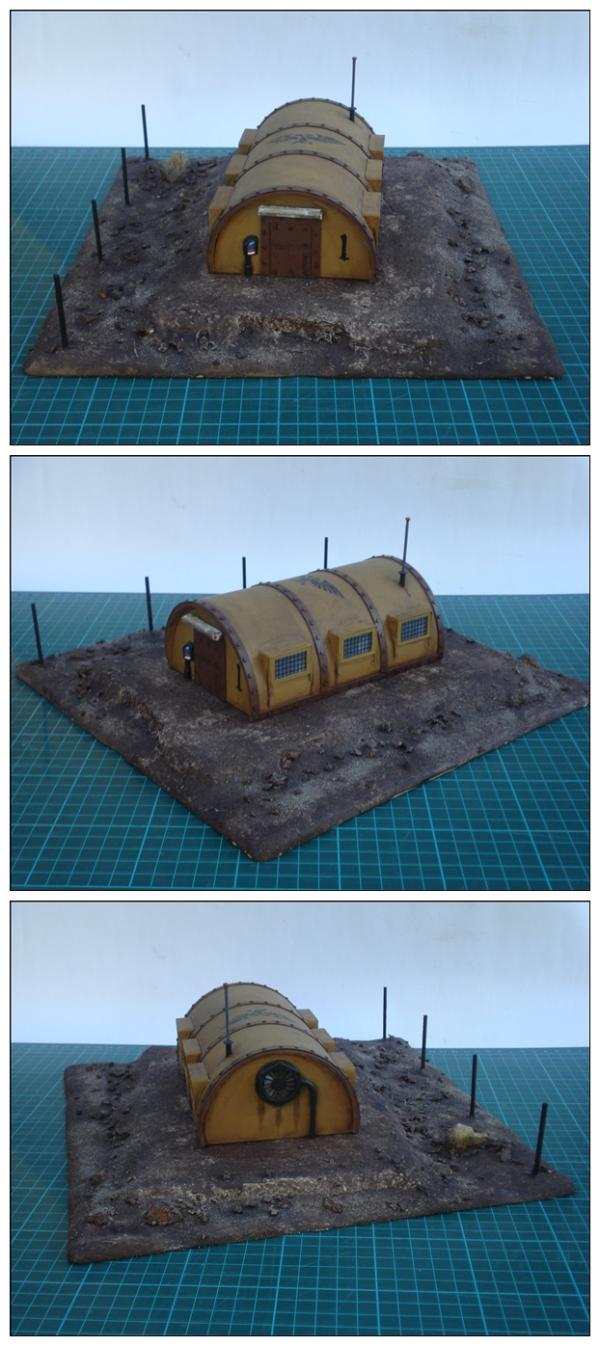
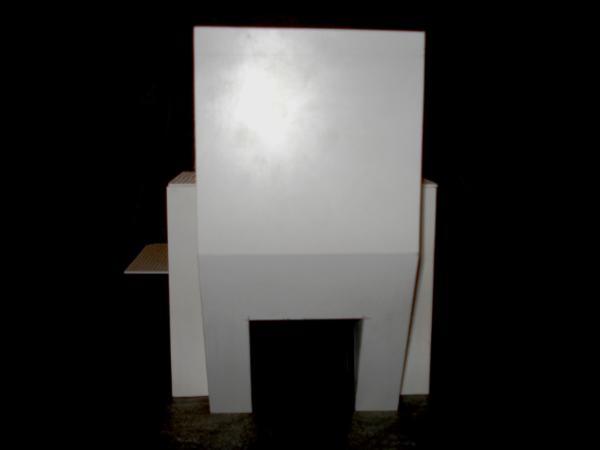
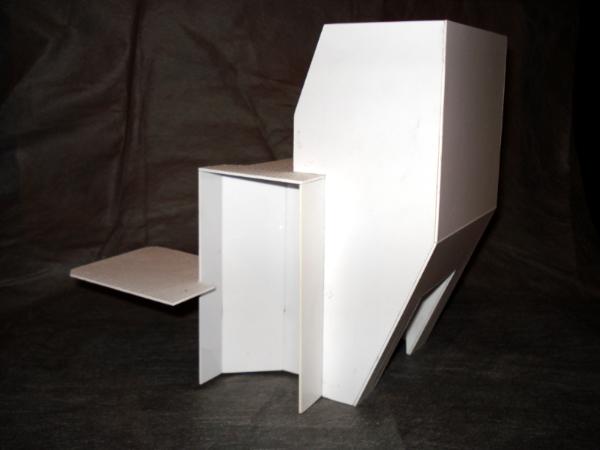
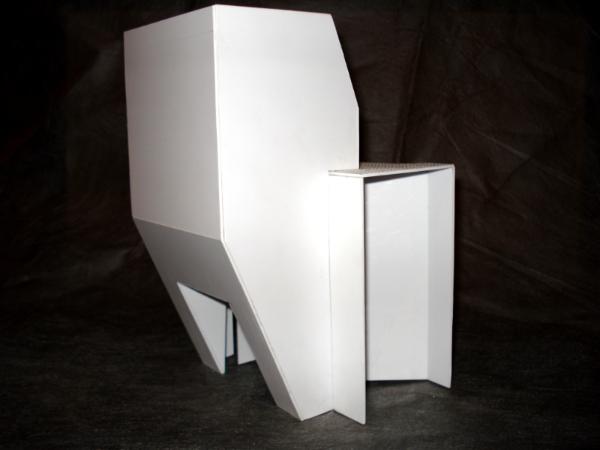
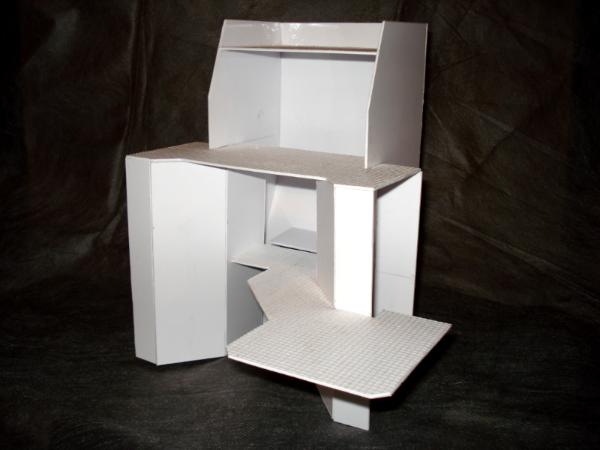
Following an old post in dsteingass thread and his Fallout terrain, I tried to give a shot at the theme as well.
(I don’t play, but I found the concept of the personal coin-operated shelters close to hilarious)
Ref pics:
Spoiler:
And a quick build, pulling together various bits and pieces from the random junk box:
Actually, resemblance departed way too far from the original – Ended up with a rather baroque look, instead of the industrial functional from the screen shots – so I’m guessing it’s more a free version-inspired by than an actual piece build.
Back on the junk pile again, competion is over and awaiting judgement. Finishid entries on display, and public voting open for the Daemon Prince award (PMSkalk Bloodaxe)
that barrel tut is amazing!...just showed it to my wife... (that is a very big praise by the way...)
and the shelter looks totally up my alley...very steampunky interpretation of the more dieselpunk original scheme...
gotta ask...what is the door frame made from? that is probably the important bit to really sell the concept!
cheers, vik...
oh...forgot...junk pile looks amazing too...and I love the other barrel terrain piece...the whole aluminium barrel concept makes it probably easy to make them dented and brusied...!!!
@dsteingass: More on both next, hope they keep up to expectations!
@Viktor: Flattered by the privilege
Paint frenzy.
Several projects on the shelf, some got some paint slapped on.
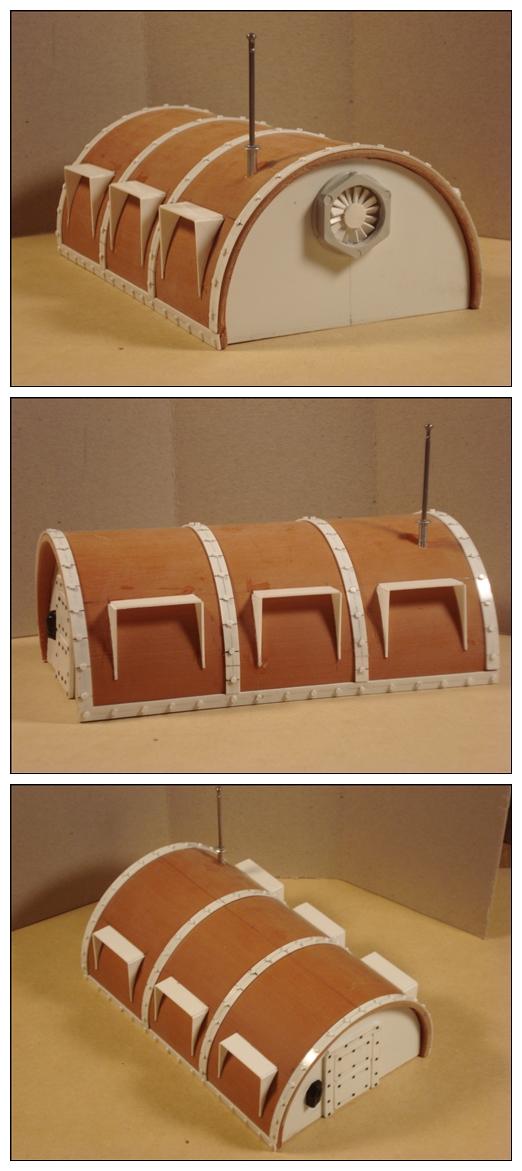
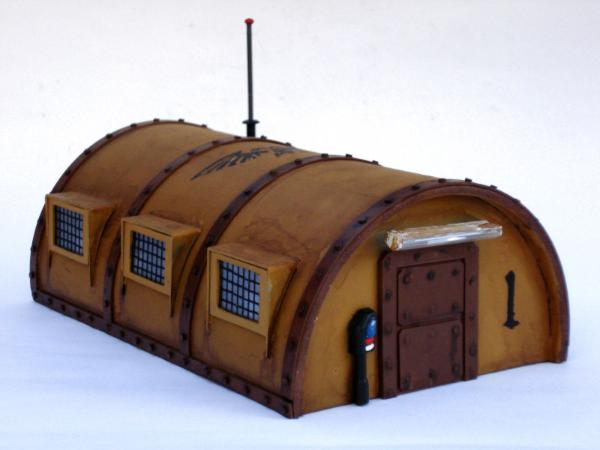
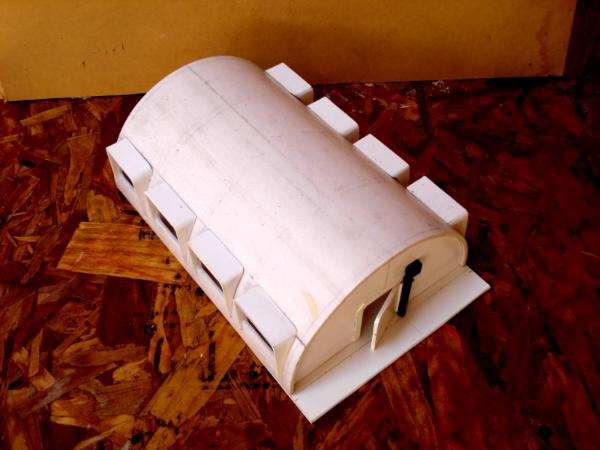
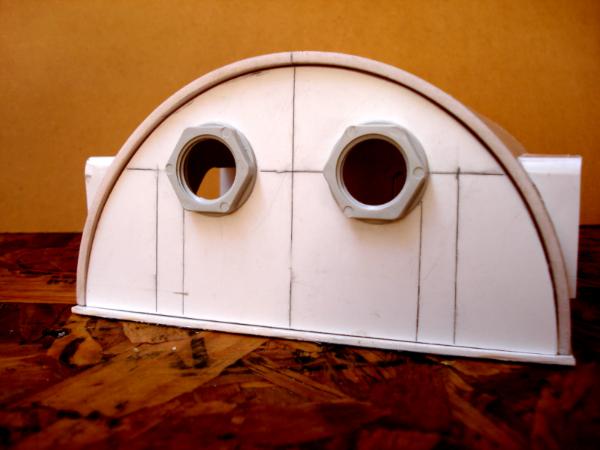
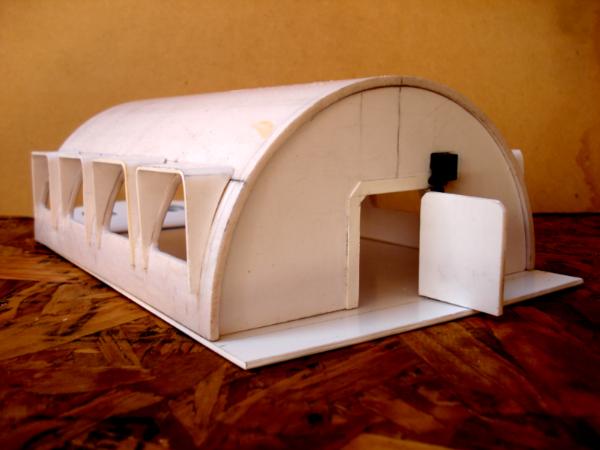
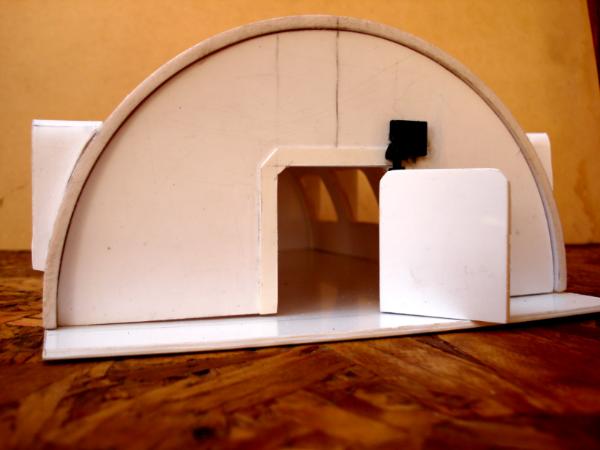
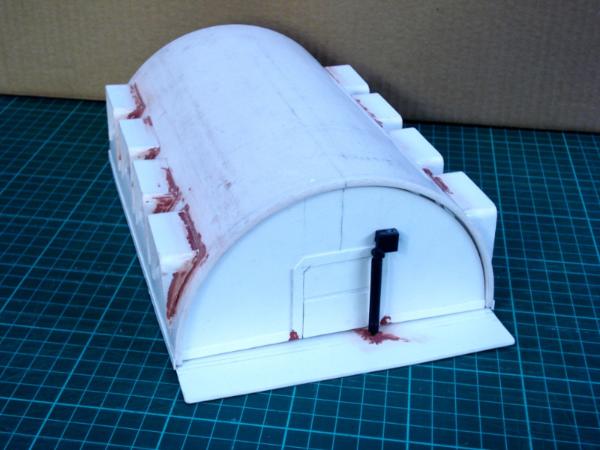
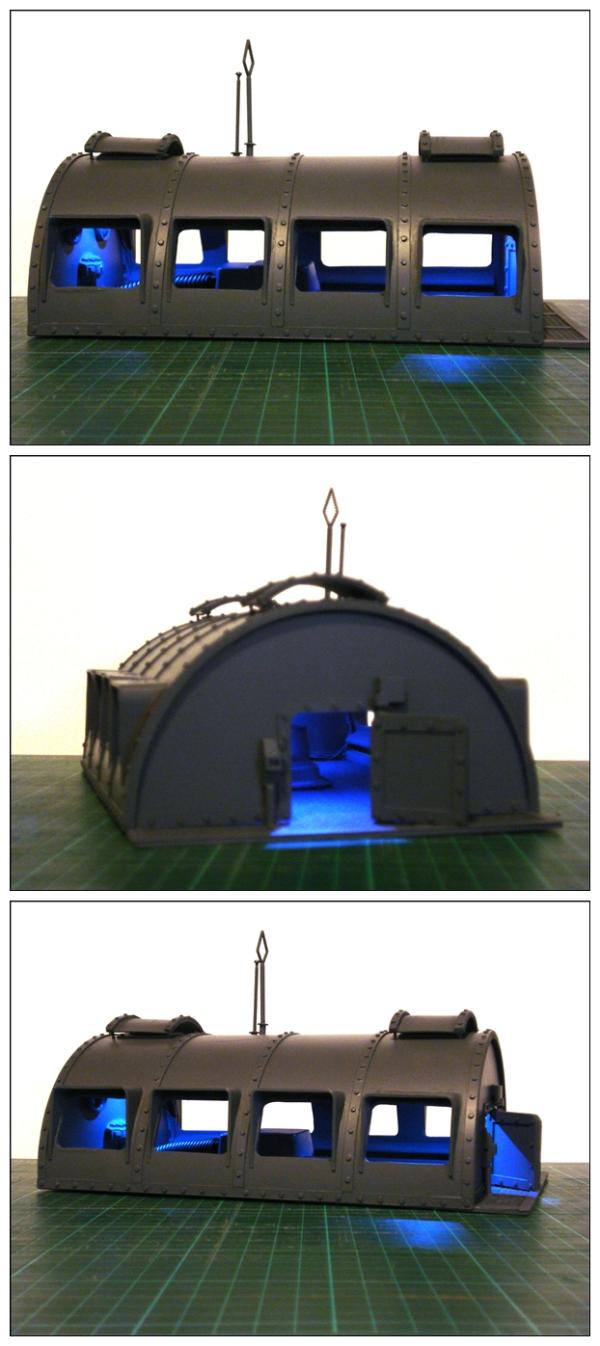
Preservation Shelter, sort of art-déco style:
Door frame is (was) part of a toy, a rubber-band car launcher of sorts (Had to check with the former owner for this), before it ended up in the recycle bin. Rediscovered when I sorted through the said bin in search for junk for Skalk Bloodaxe's Comp, it was - I fully agree with Viktor in this - a great doorway-to-be, and so got to be refitted for this project.
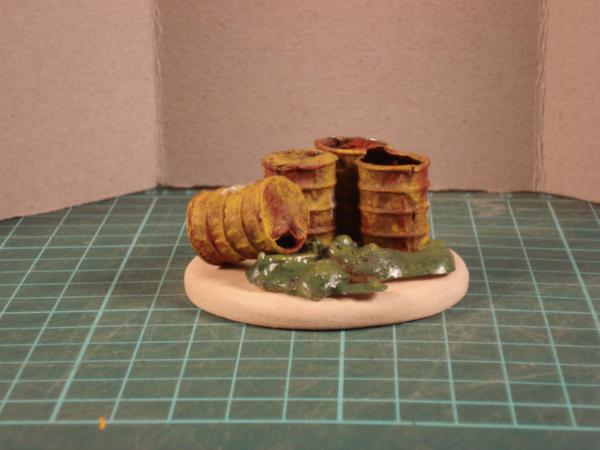
Drum barrels & Toxic Spill:
The whole point of this was to try OSL emanating from the spillage, green glow on the yellow and rust barrels. Now I grew fond of the build, and I'm less sure I want to use it as a test piece for painting experiments...
Speaking of experiments, salt weathering try out (From yet more junk set aside but not used for the contest):
And (just to use up the paint I'd already mixed), basecoating of an older standed -by project:
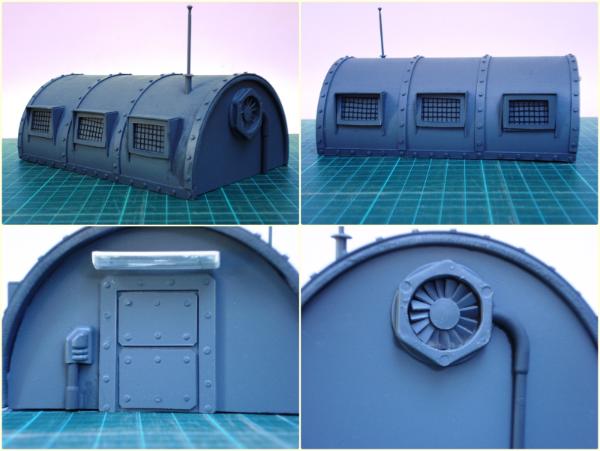
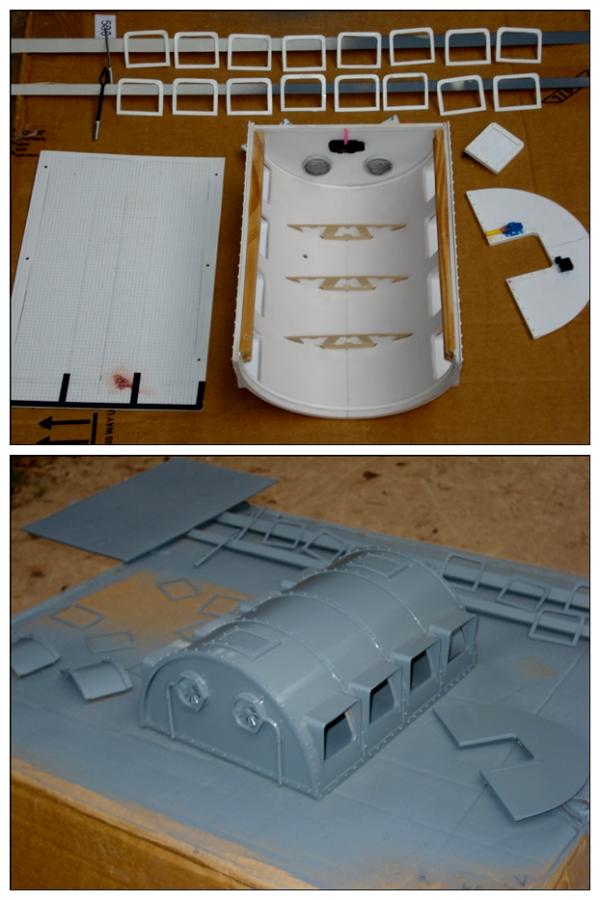
First - and basic - step on the the LoER's Contest entry:
I initially came up with a large sketch that might have proven too big to actually accomplish, or, even if built, unusable (and worse, un-storable), so I turned to a step-by-step modular plan, aiming at putting together some smaller pieces that could be grouped to form a larger piece, and thus, more manageable from both the building and use points of views.
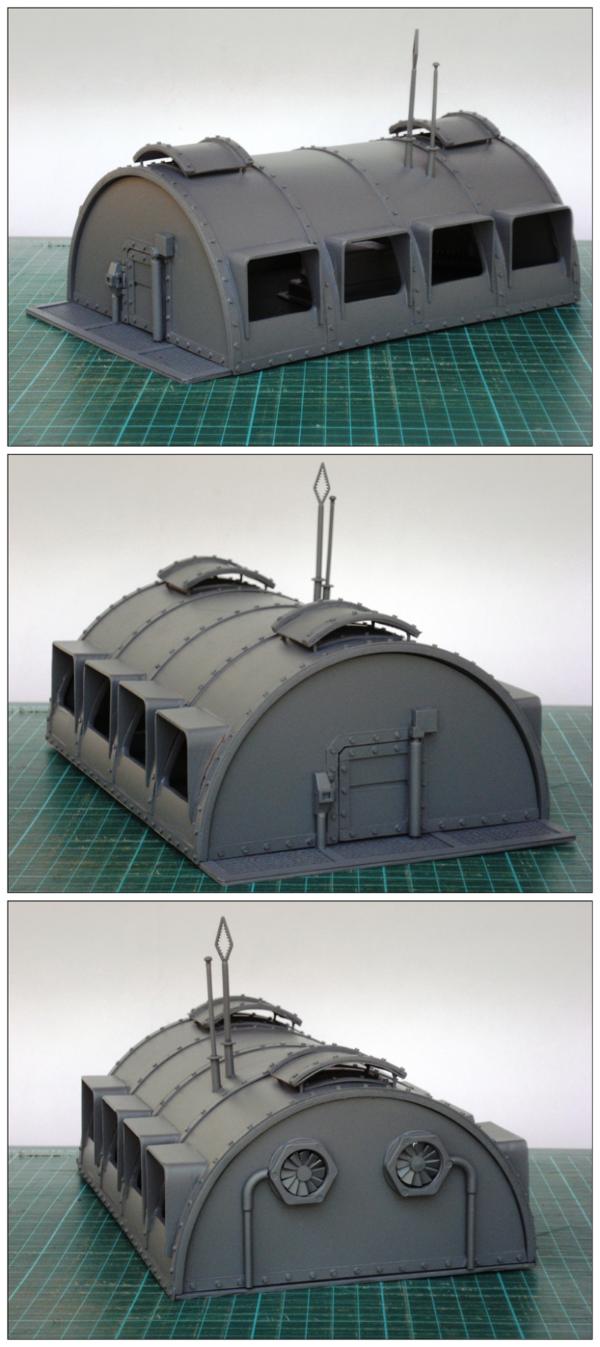
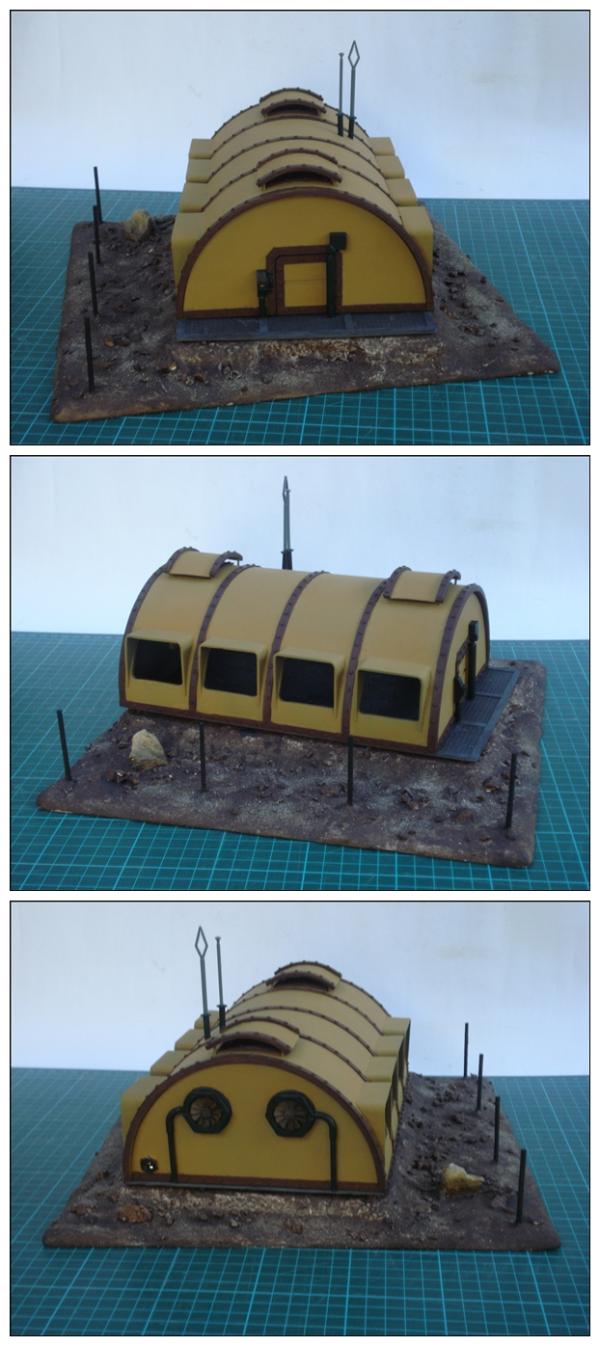
lil tower...this is turning out to be an amazing piece of terrain... as stated in the comps thread...the window frames currently really sell the piece... also...the fan is an amazing choice!...
one question tho... will this building be your entry or are you making a lil scene around it to go with it?
@Dr H: Thanks, though it's been so hot lately that adding a fan can hardly be called inspired!
@Viktor: Glad you are liking it thus far, thank you!
As for the finished piece, yes, I did come up a somewhat larger plan (Well, sketch at least), with a scenic base and a few other pieces to complete it as well (Light posts, perimeter fence, gangplanks and sentry gun emplacements come to mind), but decided to build and at least come close to finish the basic piece first - and have a "minimum" entry done at least - before plunging into a potentially too overreaching and uncompletable build.
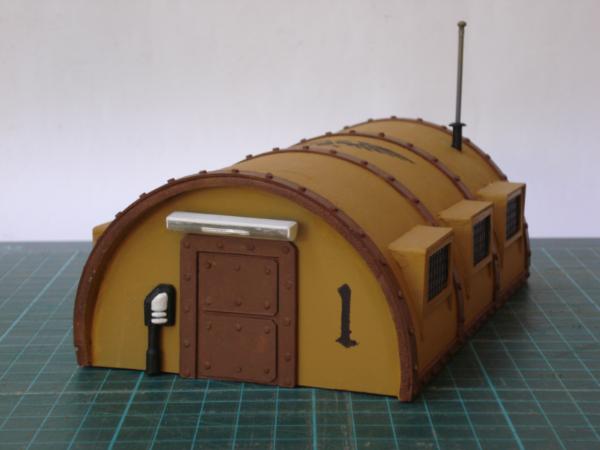
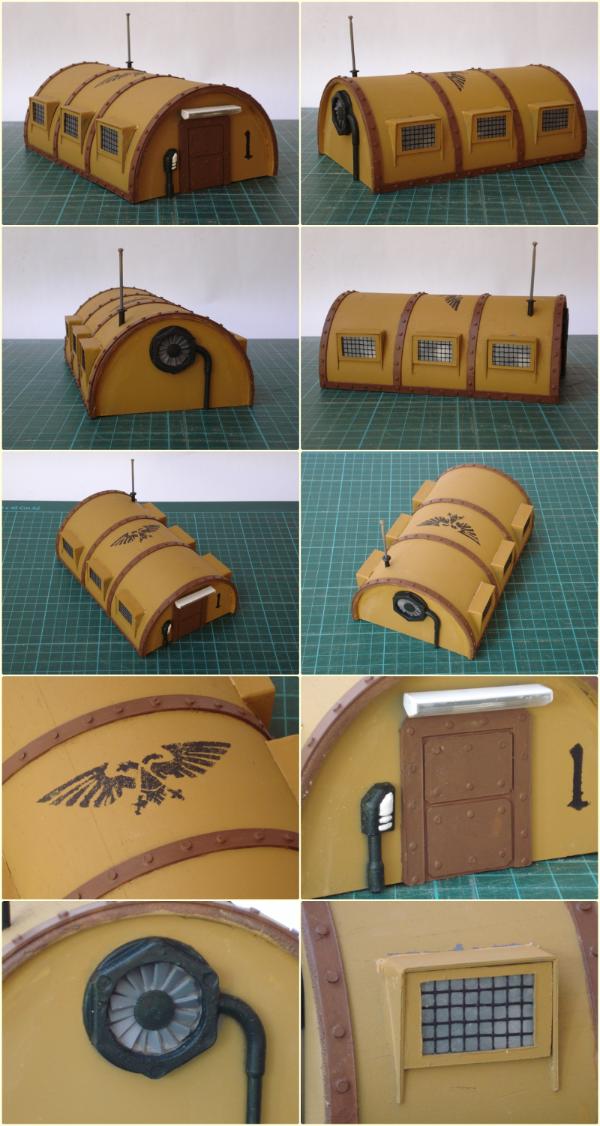
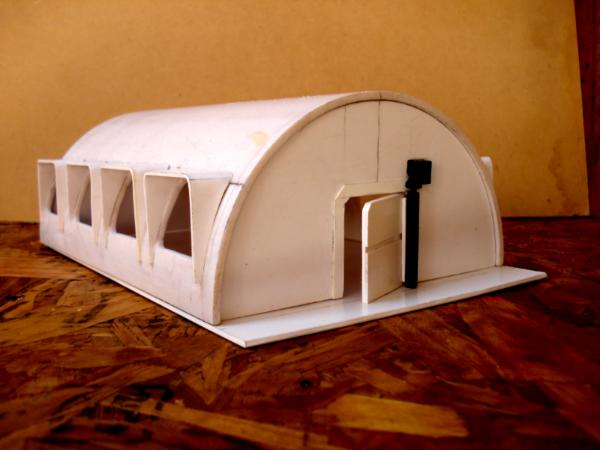
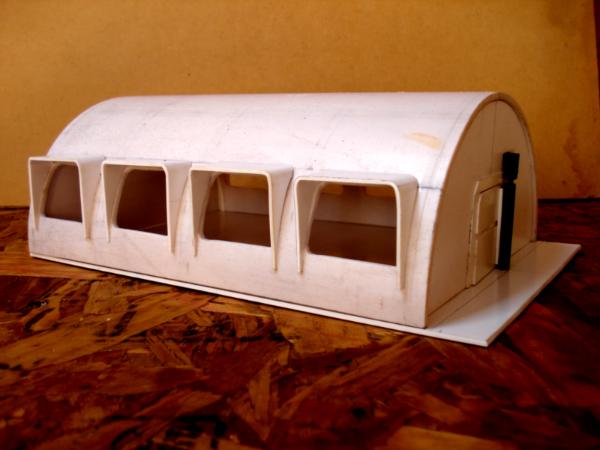
Some detail work and base colours, on an odd - unusual, for me - palette:
Fitted the windows a little better - yet not perfectly, but it'll have to do for now - and, after going over the Contest Rules, filled in some gaps (Avoiding silly gaps seems to be important for scoring, go figure).
Other angles and close ups:
Thanks for stopping by, your C&C are welcome.
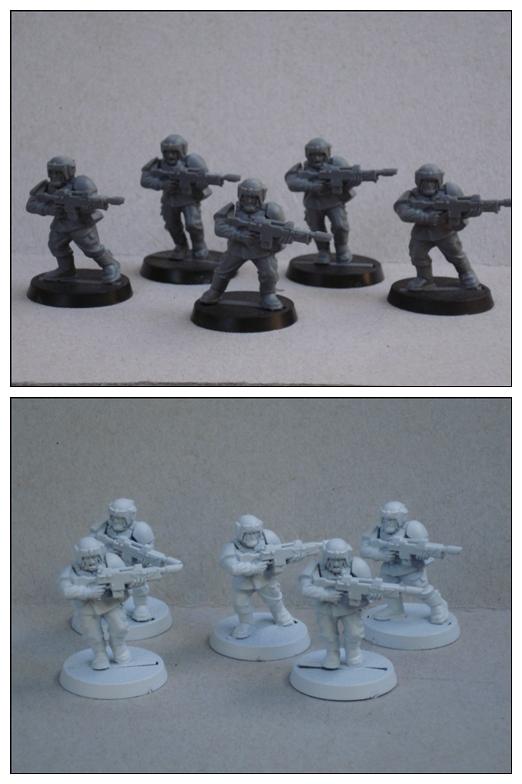
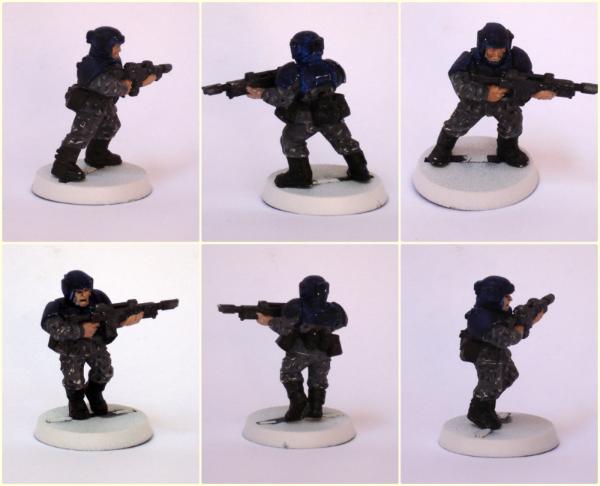
PS: On another front, still struggling with my guardsmen for Bebop's Comp, will update later on that. Cheers.
Looking outstanding to me buddy. Your building a solid body of work here for many people to get ideas and admire.
The neatness thing in the comp is to try and get people to push that bit further and to give us some way of distinguishing between the excellent work done by so many people.
I could not agree more with the no-gaps point, and in general how neatness and care put into a build help towards the finished look, comment was just meant as a joke on myself and a certain OCD tendency...
currently it looks like a barracks for noobs... all shiney and new ... tho the aquilla ontop looks vet enough^^...
will this glorious build see any weathering in the foreseeable future?
also...are the windows see through???...will this mean you will do some inside and maybe some cool effects? *nudge, nudge, nudge*
as for the guardsman...looks stunning...is that digi camo or a more subtle approach to stripe and patches?
Long week IRL-wise, and not much done until today...
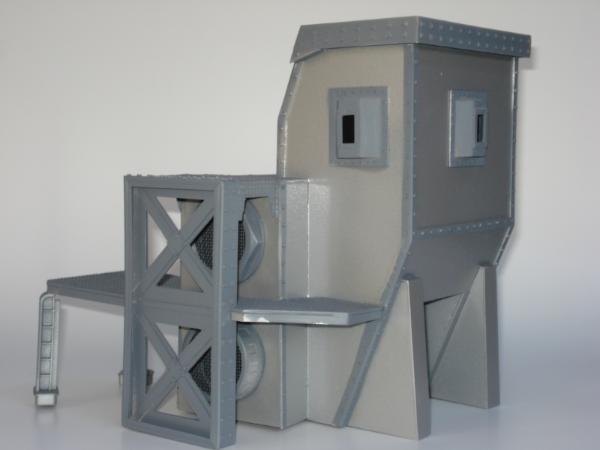
Since I couldn't settle between size does matter and what's inside is what is really important, I decided to give it a go at both, so projected entry 2.0 got under way:
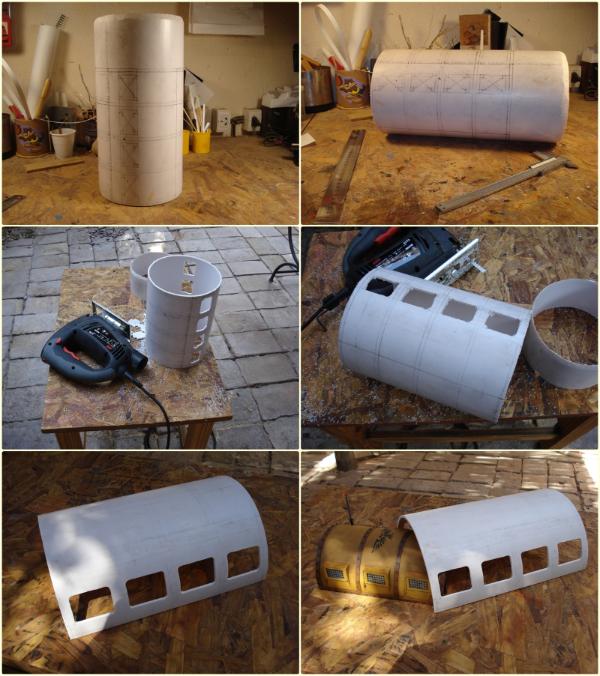
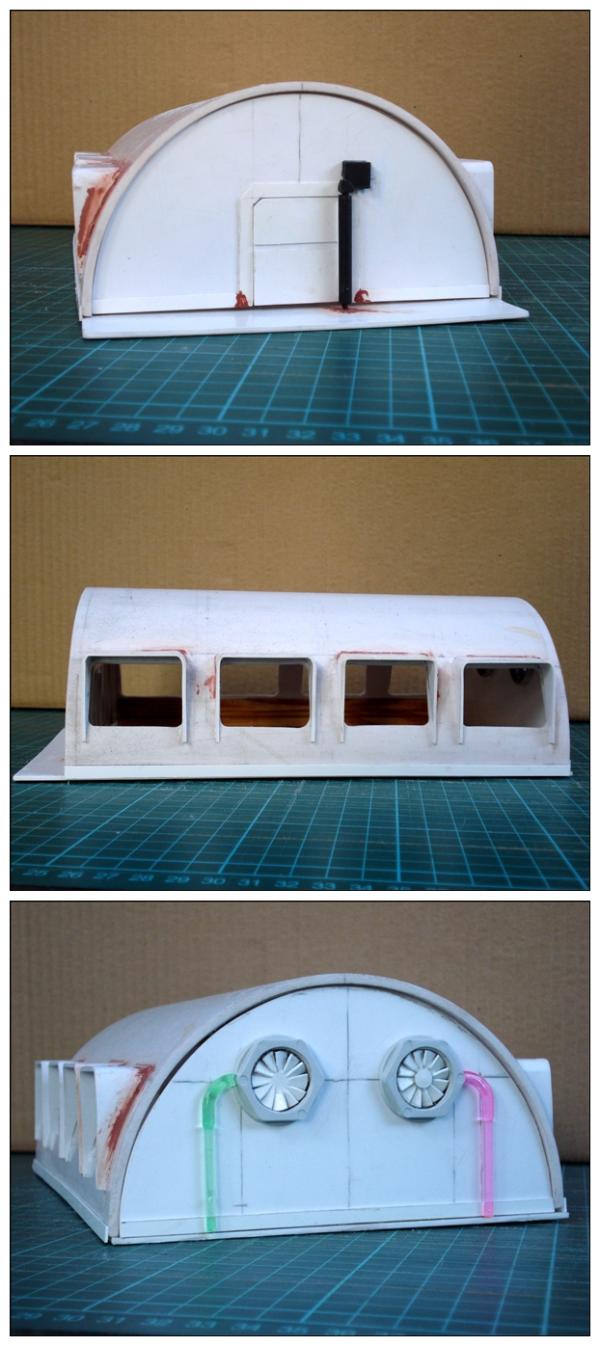
160 mm PVC sewer pipe (Repurposed leftover but not recycled), and cut out windows for making possible to see inside (which means the interior will have to worked on too) once done.
Still far from where I'd want to get, but on the way!
Not much to show for the effort yet, some cutting and lots of filing - curved geometry be , I should have stuck to straight edges - and an experiment at heat forming styrene for the windows eaves, to keep in line with the aforementioned curved shapes...
@Warboss: Welcome, and thank you for the reference. I'd looked for ref pics browsing for military camps and barracks, and never came across the proper name for the type of building.
Now, a new point arises: It seems corrugated steel sheet skin is an integral part of the definition... The previous version had a smooth cover instead... Wondering now if I should try the classic WWII look, or to stick to the initial plan...
Initial plan! Corrugated iron always look cheap to me. The only reason they used it was structurally it is stronger than flat steel...but we work for 40000years in the future...so the iom sure has other means. Beside, I like the flatter look way better...
Excellent work, looking forward to this. On the corrugated thing, yes it was more in keeping, however I am with Vik, in the future they will have better materials, flat looks brilliant on the other one.
I do have a suggestion. Roof vents. Just a modelled cover to show a means of air flow, I know you have the excellent fans, but look at these kinda buildings around the world and you will see simple vents on the roof. Give you something to add your brilliant detailling skills to!
@All: Thanks for your comments and input. Flat cover it is.
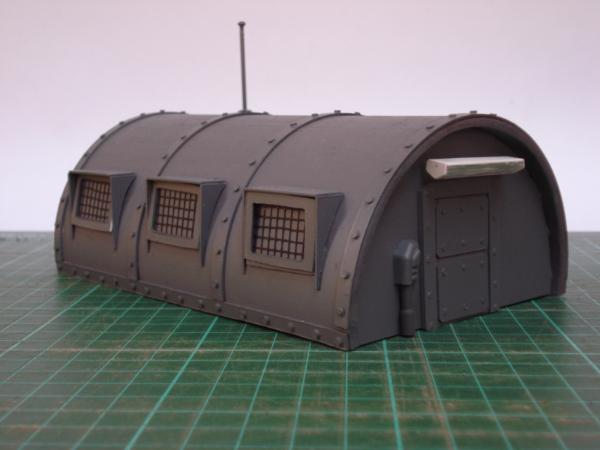
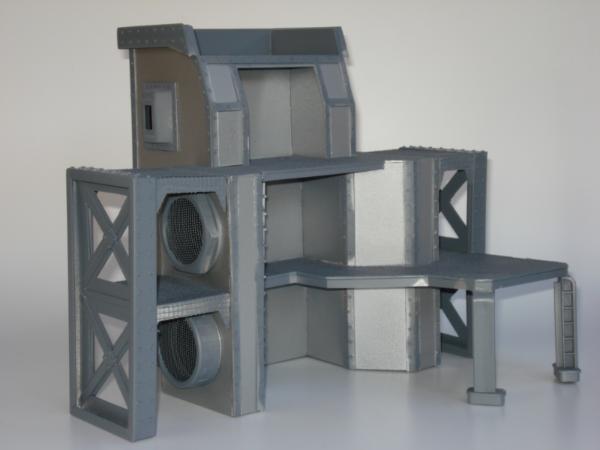
Recent development:
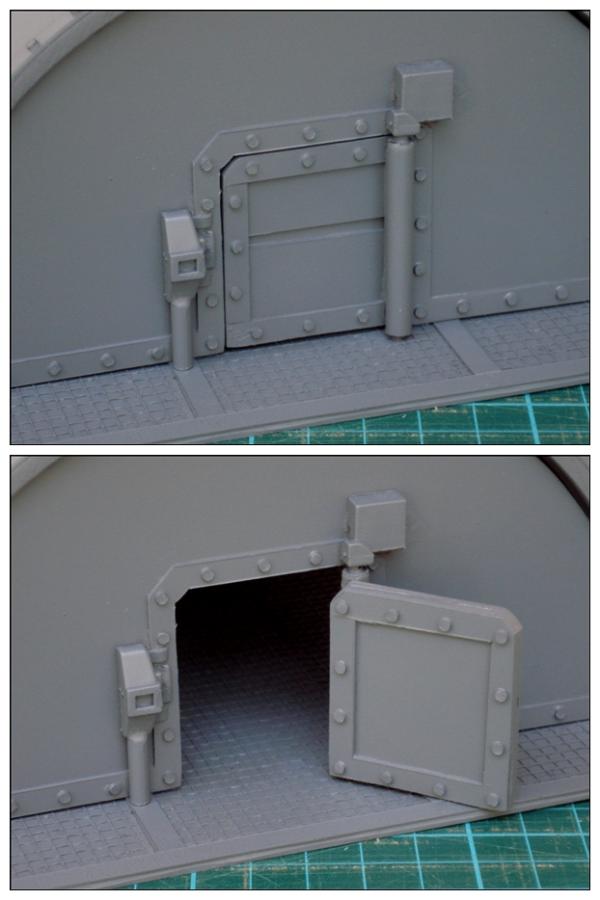
Renewed detail of the working door:
(Left fan is missing a piece!)
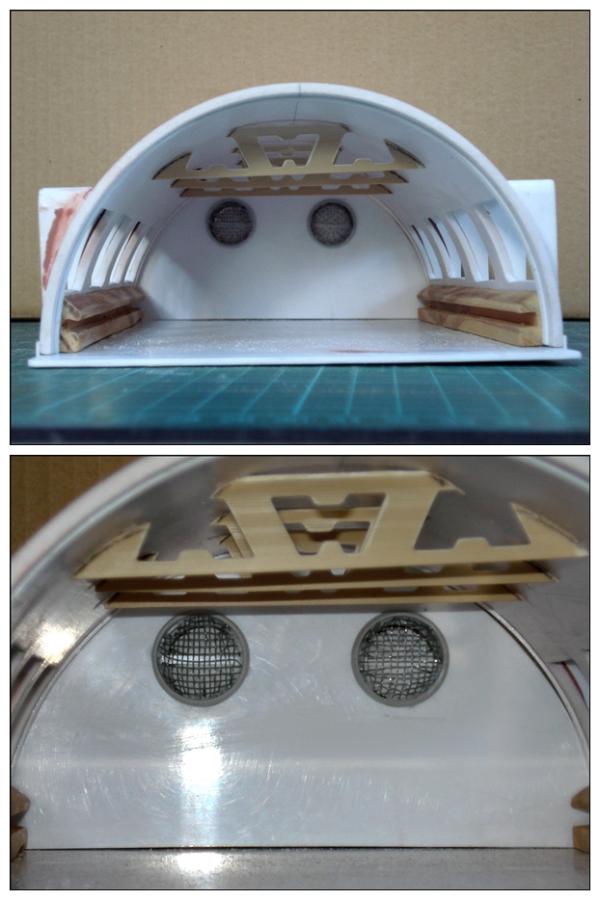
And interior detailing:
I had not noticed the first girder was crocked until I saw it in the the pic. Fixing that is on the to-do list already, as are the suggested roof vents.
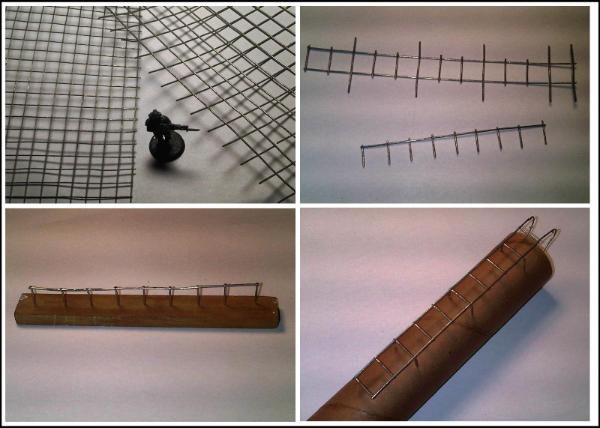
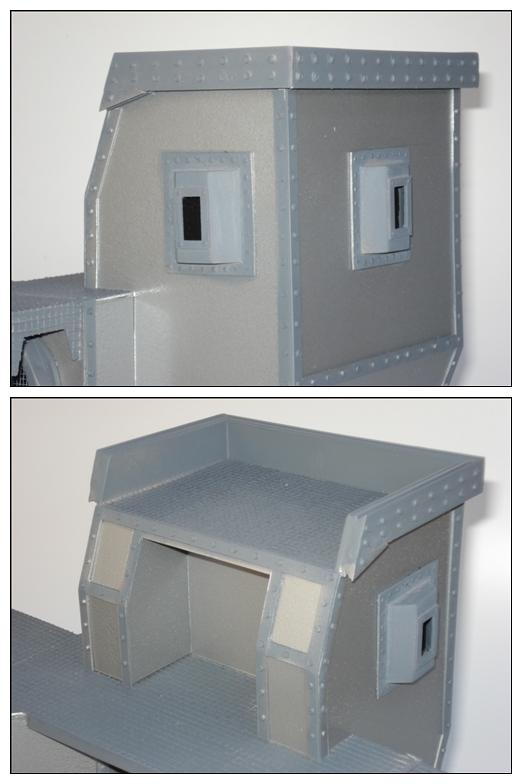
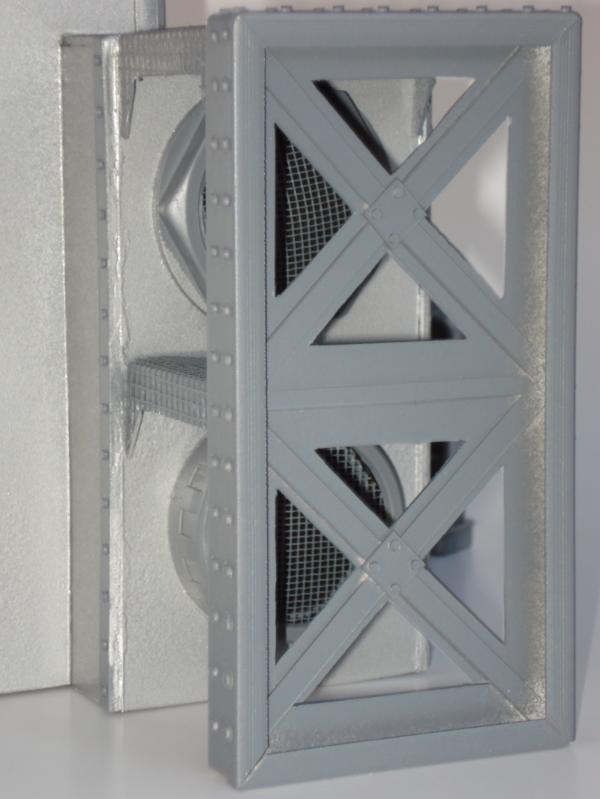
Added structure ribs, floor plating (Once again, using Skalk Bloodaxe's multi-purpose drywall mesh tape), door panel, and roof vents (After Camkierhi's suggestion, and following the actual look of this type of buildings) and aerials (One an a half POP rivets, I'll stick to my claim for the extra credit point for those!)
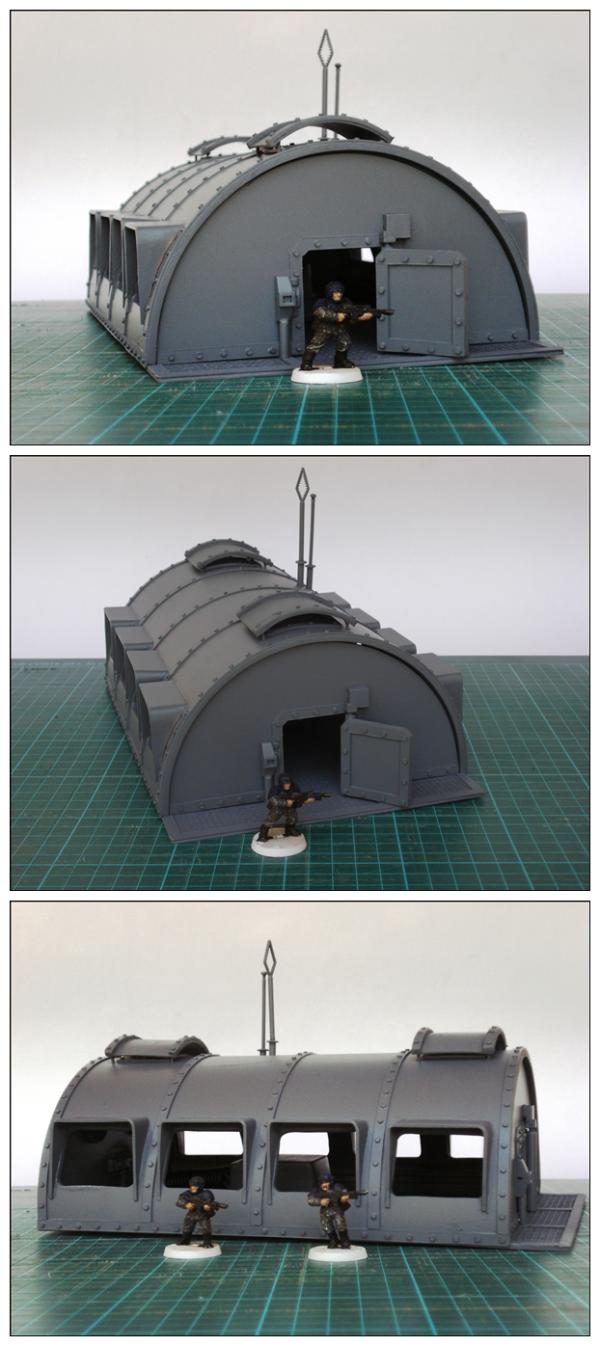
Views:
(Straightened the askew girder too).
Top vents close-up:
And door control panel:
Basically done, pending riveting and window panes.
@Dr H: Thanks. I agree on the furniture issue, would you happen to know where I could get some?
(I mean, somewhere the shipping would not tenfold the item value, not to mention the current exchange rate issue... )
Sorry about that, though the interweb knows not about distance, every once in a while I'm reminded location and purchasing power parity do matter in slow-time reality...
@Cleatus: Glad you like so far, thanks for stopping by! More will come, rivets mostly...
Talk about, running with an idea. Roof vents are brilliant. Overall is brilliant. And I am positive you can manage some furniture. As I said to Vik awhile back, you are doing military utilatarian, so pallet beds and simple tables. Does not have to be chipindale!!
@Dr H: Thought is being given to furniture, might give it a shot... Or something else I've been trying to try too, we'll see...
@Camkierhi: Pointing someone in the right direction is as important as actually getting something done, so the merit for those goes to you as well.
@pfibp: From what I see you do, I reckon you do have an appreciation for detailing, so I really value your comment, thanks!
Small update.
Of the process of scratch building, this is probably the single step I enjoy the most, it is the actual time something goes from an assorted collection of different pieces to a coherent build:
No advances today, some random ramblings on their place instead (And due warning to those who might be wondering around, in case there are any).
It’s been brought to my attention lately that my approach to the hobby might be slightly obsessive.
(Clarification: For lately, I mean I got an ultimatum, since the subject has come up more than once, and has a long-time standing. And slightly was added be me, there was nothing about it being faint on the comment!).
It seems I have been neglecting several personal and household issues while spending too much time at the workbench, among them:
Mowing the lawn: Ankle deep grass is too long, and feral is not the look we are after for the yard.
Shopping: Restocking is not scavenging through construction site dumpsters for useful bits when the fridge is empty.
Personal hygiene: Yes, even that came up. I emphasized I make a daily point of washing off eye boogers, it turned out it doesn’t count if I do it just to be able to properly see the current build I’m working on.
Housekeeping: Replacing burnt out light bulbs – other than those on the workbench lamps – and having running hot water in the bathroom seem to be important too. It doesn’t matter if we are in the middle of the summer and daylight runs from 6 am to past 9 pm, or if it is too warm to shower with hot water in the first place.
So I did what any self-respecting man who plays with toy soldiers and is mildly addicted to plastic crack would have done in my place: I manned up, rolled up my sleeves (Just a figure of speech, actually, as mentioned above, it’s been so hot lately that the sole idea of wearing long sleeves makes me sweat).
I nodded, conceded, and set about to solve the problem(s).
I called in sick (Not as bold or unethical, depending on your personal take on labour, as you might think, since I am an independent contractor, so I actually just didn’t work today), and threw myself to the tasks at hand.
So, no update today, unless I’d post pics of the trimmed grass, not-dripping taps, and shaved and tidied up self.
But I had time to think about the hobby – they can shackle my body to a lawnmower, but not my mind! –, and decided I’ll keep on nonetheless, OCD et all.
So stay tuned if you like, more to come later on.
Thanks sorry to those stopping by.
May your blades stay sharp and your brushes pointed.
Cheers.
PS 1: Come to think of it, I came around this in my head while I was actually mowing the grass. Maybe I am a bit obsessed after all...
PS 2: Truth be kept, not only has my better half never complained about the hobby, she encourages and accompanies over and above the craziest expectations; even bringing back home every now and then an odd bit she liberated somewhere for its interesting shape or possible use…
LOL...LT... i still think obsession is a good thing...if that wouldn´t be the case...i´d be lost too... loved your little(tower) rant...(sorry for the lame pun )
and i agree with you to the fullest...the strongest part of the hut is the upper vents.... these look simpy brilliant!
and you just had to ruin my day by adding lightshows to that awesome model...you had to, eh?....*shakes fists*
@Camkierhi: Thanks. I just knew I was going to be understood around here...
@Nerdfest: Jealous? Come on, I had to rig wires and lights and power it up to get at least close to what you do with a brush! Thanks for stopping by, BTW.
@silveroxide: Glad you do. I'd love to see your take at it (And let me know if you'd want to know/see anything else of this one if it might be of use).
@smithy: Flattered, thanks a lot!
@Dr H: Wanted to do some experimenting myself, an even got around to make it work, too.
@Viktor: Me? Ruin your day? You were the one poking people around with those pointed poles... (There, lame-joked back )
Hiya mate.... Love this! Top drawer stuff..... really cool!
One tiny comment from me... but its WWWAAAYYYY late..... is maybe to have a little vent unit / box coming down from the roof under the vents...?? Might add a little more interior texture and detail....... but hey..... hats off... its awesome!
Stupid thing to say... but i lovbe how a first base coat of colour can really bring a scratchbuild together.... and any model for that matter.......
Cheers,
ps...... i might be jumping the gun a bit..... but are those the components of a baneblade turret?! good times!
@MagosBiff: Thanks for the input. I agree, the barracks could use a frame or boxing on the inside to complete the roof vents, but it's also true those would collide a bit with the crossing girders and the wiring, had to make a call there, the lights won. Maybe in V.3.0, when the lights are part of the plan since the beginning instead of a late add-on...
And too true - as mentioned before - the priming/first coating of a scratch build is really the turning point from the random, uneven collection of bits and parts to an actual something.
On another topic, bullseye on that call, WD N° 132 vintage Baneblade it is!
@Viktor: Indeed!
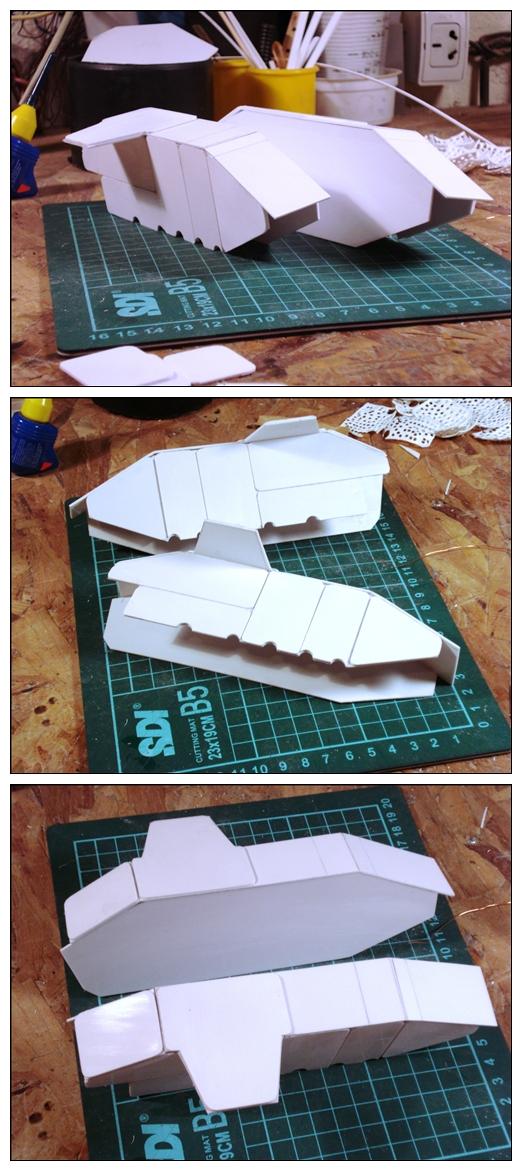
Inspired by Heliodore 's work, started on a scratch built Baneblade of my own, some more done today:
As mentioned elsewhere, it is probably quite smaller than the present version, and the templates will require more than a bit of trimming and adjusting, but on the way...
If it turns out too small or too dissimilar to the current models, it can always turn into an Australis pattern build, either previous or derivative from the actual one.
Looking good, glad to see Rogue Trader living on! Yes, the templates are funny like that, I really wonder how they were developed. It seems a safe bet to assume the example build shown in the original article was NOT built using the templates that were ultimately published in the White Dwarf.
So far it looks well on it's way to being a cool build! The main hull where the main turret mounts will get a bit tricky thanks to the wonky templates. In terms of weapons, the old BBs (this one and the two Biasi/ Armorcast ones) had a single heavy boler on the front hull mounted turret, as opposed to twin-linked heavy bolters. Also, they had 3 bolters on both side sponson instead of twin-linked heavy bolters. If you update that you'll be fine with regards to having a model you can use in a game of modern 40k. Of course, if you're playing against a stickler, they may not like the fact that this BB is only 2/3rds the size of GW's plastic kit!
Keep it up, I'll keep a watch!
Automatically Appended Next Post: Oh, and I really like your buildings/ terrain!
@Heliodore: Thank you on both accounts. Yes, I fully agree on the templates being either a draft or a guide more than actual blueprints, lots of room for builders criteria in there...
I'm now struggling with the main hull right now, just a bit tricky might be somewhat of an understatement!
Games wise, I do not play much (if at all) in an easy-going group, so I don't think the weapons config or WYSIWYG would be a problem (Undersize might draw a growl, but no more). I'll see what to do about the smaller guns considering mostly looks, and what I have laying around (no bits to speak about) or can came up with.
@Gitsplitta: Thanks for following, I expect to deliver a more solid update in the next instalment...
@Heliodore: Great call, and on a poor pic... No pressure on me at all onwards...
Yes, the unaligned plates were not an option, I would have sooner or later woke up in the middle of the night to fix that if I hadn't done it already...
Glue setting on said main hull, half of it redone for proper fitting.
@Heliodore: Hobby (and not only hobby, mind you) OCD? Indeed. And proud of it too!
@Camkierhi: You really should. It'd make a great addition to either display shelf or army, This particular version (WD 132) though, as said above, a) is sensibly smaller than the current version; and b) the templates themselves are far - far - from accurate. That can either be a pain, or a challenge and opportunity for putting down a persona imprint on the build.
Anything else, just ask away.
@MWHistorian: With your background, you were bound to get straight away!
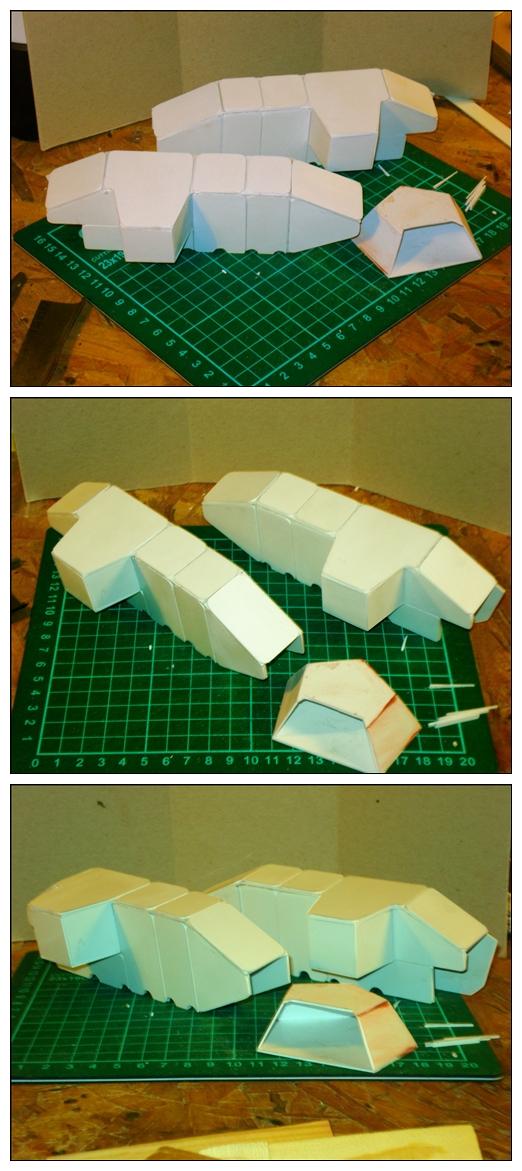
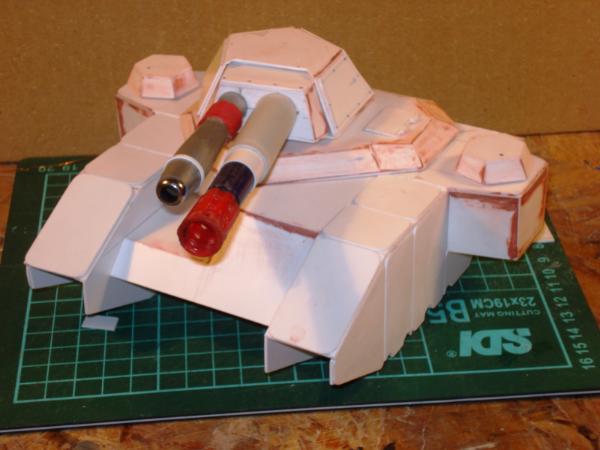
Taking shape:
Jumped the gun there. In proper order now:
The (dreaded) top hull:
Dry-fitted over the track housings:
With main (swivelling) turret:
And started to pile up some guns too:
I took some leeway with these, but, can they really be too big actually?
C&C are welcome as always.
Cheers.
PS I started painting the barracks as well, since it's the same colour scheme as the first version, at it is just basecoated at the time, I guessed pics would've been redundant, but it is coming along too.
Hehe, I agree, OCD can be a good friend in times like these. I actually went ahead and re-did the part of my top plate that was wonky, feel much better now!
Great, the top hull looks solid! "Dreaded" is a good way to describe the building experience here!
@Heliodore: Glad you approve. The hull and the gun mount in the turret have a couple more plates than those in the templates, but I guess it looks the part anyway.
@Briancj: Welcome! (And about time too, since it was you who got me started in this in the first place !)
Just painting on and off now, will try and get something to show later on.
The gun mount in the main turret was one place where I decided to only use the templates as a rough guideline, I think I was ripping my hair out by that point. No problem whith more plates, you got to do what you got to do!
Now, looking at the top hull again, it looks as if you may have flipped both the top and bottom parts of it when you put it together because the rectangular hatch is meant to be located on the area of the hull's surface where the sides come closer together, and the main turret is meant to sit on the wider part of the top hull's surface. This is only an issue if you want it to look very closely to the finished model in the article. It can certainly still work as is. I hope I'm explaining this well enough. I apologize if I'm back-seat driving.
@Heliodore: ! You are, of course, right. Utterly embarrassing
I do not know how long I've looked at it, I I yet hadn't noticed! So much for MY observation skills!
Your point was absolutely clear, and there's nothing to apologize for, if anything, thank you for taking the time both for watching and bringing it up.
Now, its decision time. I can either leave it as is, as long as the change doesn't interfere much with the lower hull layout, or do it over - it's just one part, though a little troublesome to put together -, hoping to get it right this time. Or just switch over the turret mount and the hatch and built it completely sidewards (A left-handed version? Being in - from? - New Zealand, I think you might even appreciate that!)
What I do know, is that it will be solved one way or another!
@Briancj: Ja! Not slow, you just have your own pace. So does good wine. You are welcome any time.
No need to feel embarassed, I had to constantly look at the pic of the completed model, back and forth, in order to get this guy done, it is not an easy project and the instructions aren't as helpful as they could be. I'm glad I could help then.
Yes, you could just switch the hatch with the turret mount and make a left-handed BB, it wouldn't effect playability and it would be less of a headache, but will your "OCD" allow for it?
I'm actually from the US, but I go to school in New Zealand!
PS: I've been reworking on the Baneblade hull to fix the reversed layout, not much to show on that front, as I'm just getting to where I had already gotten, but on the right side this time.
@Heliodore: I couldn't! Just had to redo it as it was supposed to be. Go figure...
@dsteingass: That's why I always leave mine outside the workshop!
More angles. Lots of them. Everywhere. (I think I should start closing the glue lid while working)
Starting to come together:
T
Mounted the rebuilt top hull, started on the lower body, and alongside, built and mount the side turrets.
Other views:
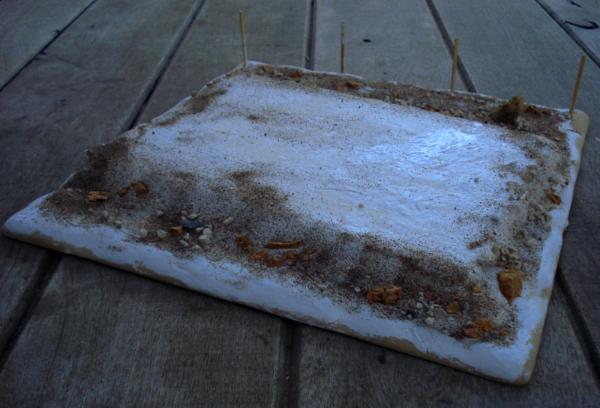
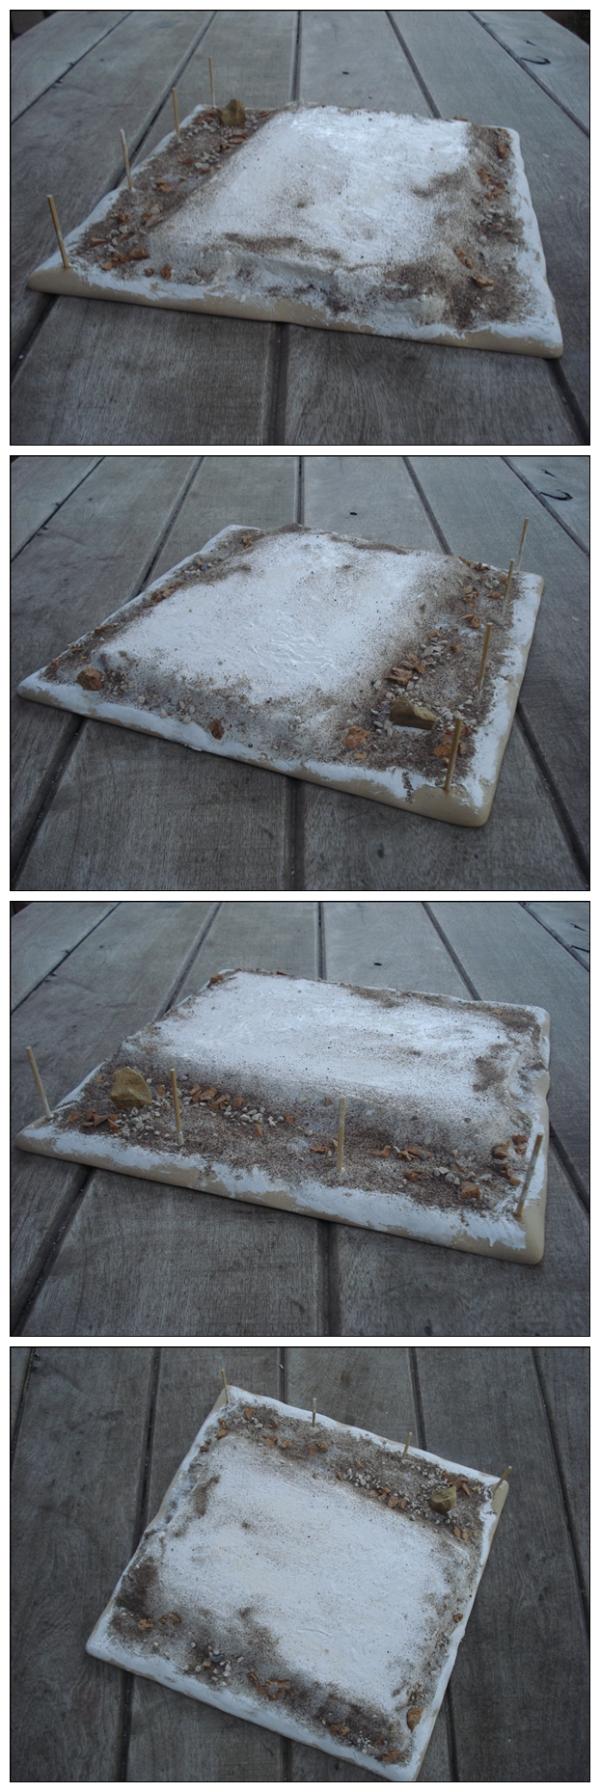
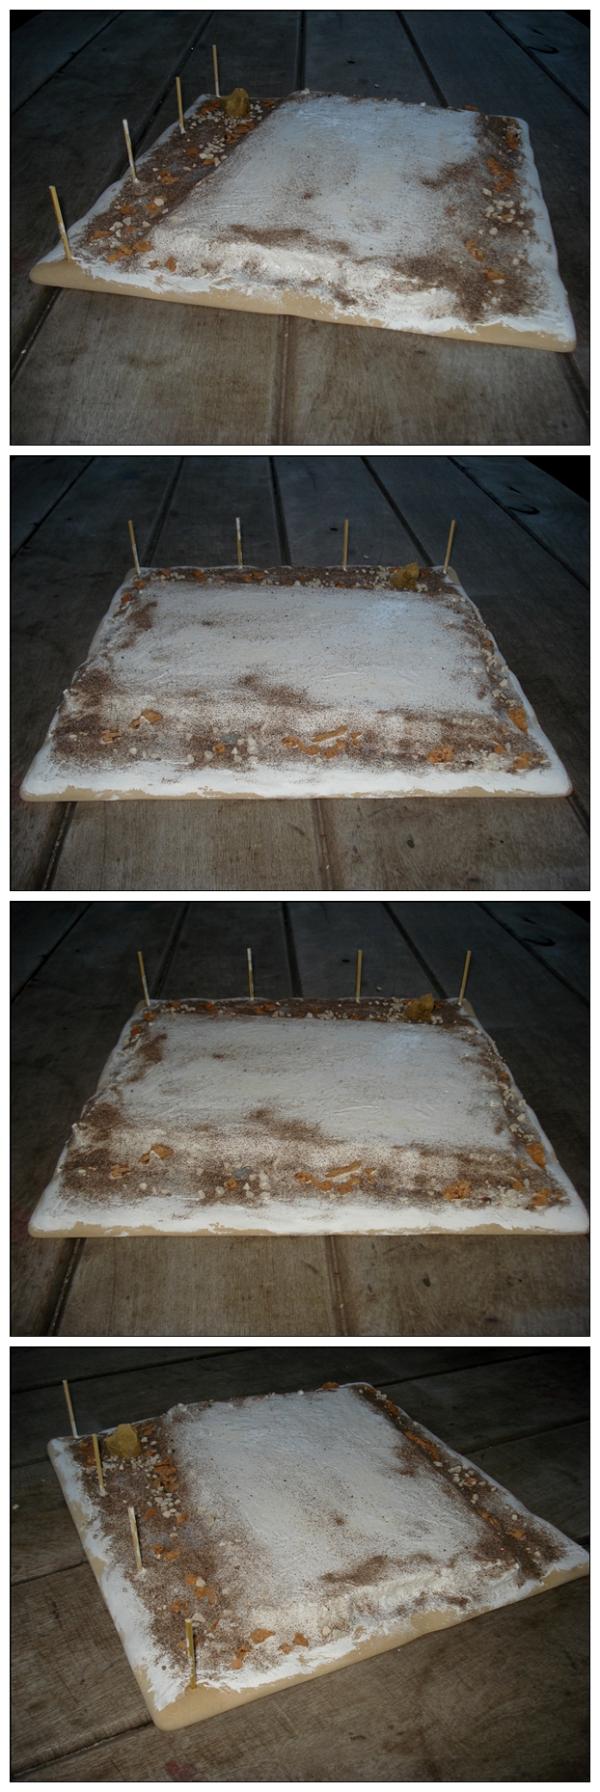
@Camkierhi: The base is 30x30 cm (Rather large, actually, especially when thinking of transportation and storage). It will accommodate the building, and have some spare space on the sides for "landscaping".
As for the colour, the white was just dry-wall filler - Though I really like the idea of a winter/snow scene, it does not fit with the scheme I'd already started on this one - turning to scorched earth along with PVA sealing:
@Dr H: I just figured out which part IS the inside! Hardly any openings on it to have a viewable interior, though. (But the turrets do turn; does that help instead? )
As for the raised base, two ideas behind (or is it beneath?) the mound: From a realism point of view, it would be to ease rain water drainage and prevent humidity and even an eventual flooding.
Model wise, I just liked the idea of adding weathered wood steps in the front
Littletower wrote: @Dr H: I just figured out which part IS the inside! Hardly any openings on it to have a viewable interior, though. (But the turrets do turn; does that help instead? )
I'll let you off.
As for the raised base, two ideas behind (or is it beneath?) the mound: From a realism point of view, it would be to ease rain water drainage and prevent humidity and even an eventual flooding.
That makes sense.
Model wise, I just liked the idea of adding weathered wood steps in the front

 ).
).


 I should have known^^...


 , I was bluffing, and my bluff got called! (I was talking about the real door, but it is just wood, not plated or bolted!


 !
!


 .
.