what i love now the most is your thirst for knowledge... testing new ideas... wether they work out or not... you are going boldly where no one has gone before...
the chimera for "drybrushing" trackmarks... unbelievable...
the wooden sticks for push and torn marks... brilliant!
and so much rust and other yucky effects...*bows* thanks for sharing!
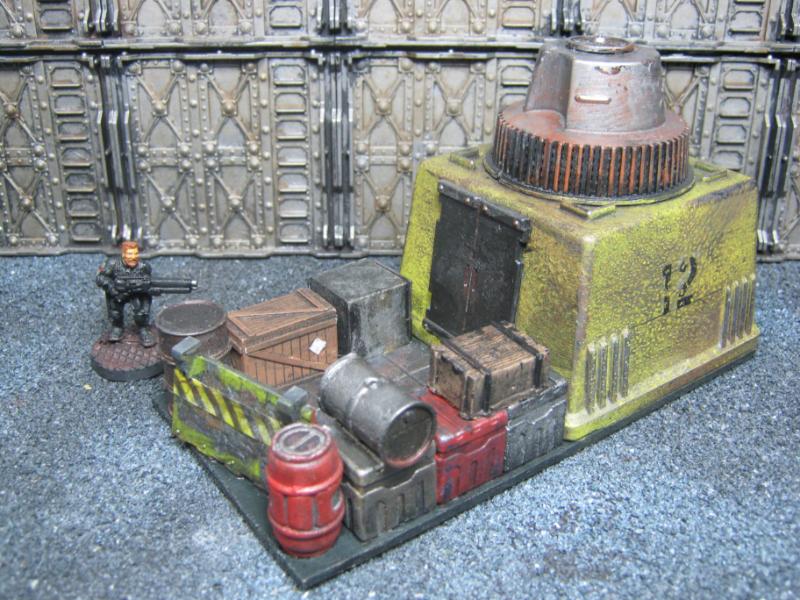
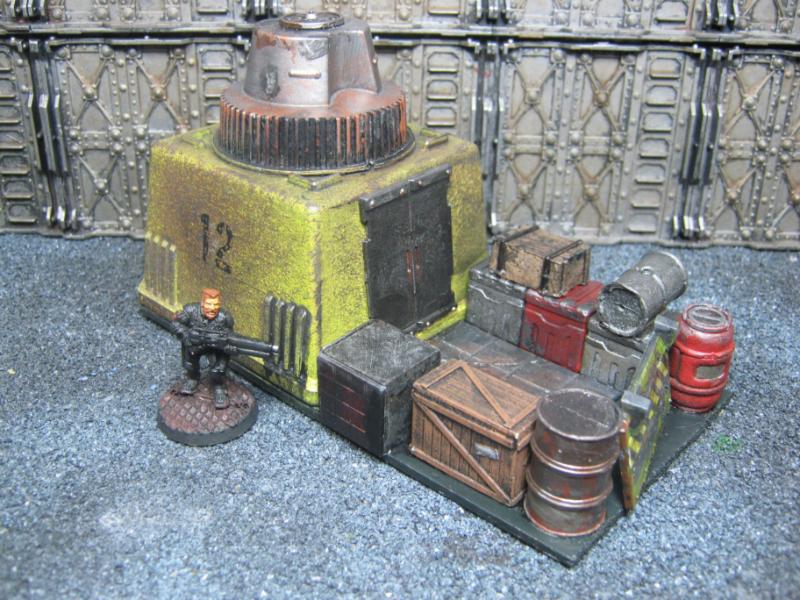
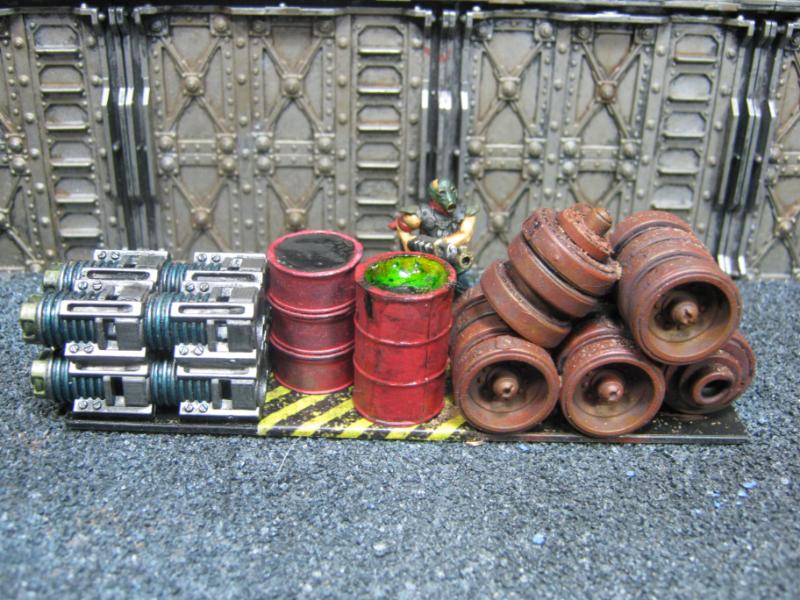
Wow! Loving where this has come! The electrical panel was an excellent addition, but I'm really diggin' the trashcan, toolbox, and other shambles in the corner. This thing just gets better and better and is a true testament piece of how this community comes together to make something unique and awesome through helpful, constructive criticism and encouragement.
Terrific work as usual Skalk!! The scuffing on the tile by the Chimera worked out great! Love the trash barrel and piled up bits against the ramp. How about some oil or fuel splashes/drip spots around the drain where the Chimera was placed? Fuel streaks down the platform wall maybe?
Wow, this is brilliant! Thanks for sharing the pics and tutorial, I think that I can apply this right away. The trash is my favorite detail. I have to say that I was wondering about the hose too...
@ Gits- I'm really trying to make this the most it can be. My only worry at this point is the paint. I still feel it's my weakest point. Not fishing for compliments, I know I don't suck. In fact I know I'm slightly above average and climbing. I'm just not where I want to be, or where I need to be to give this piece the paintjob it needs in order to be truly complete.
@ Vik- Wow. Coming from the LoER Chapter Master that is a high compliment and I appreciate it. Eventually I'll simply know what works or not from experience and my projects will take a lot less time w/ the same excellent results.
@ graven- That seems to be the 'big hit' of my recent update. I'm still trying to figure out how to show damage to the tiles (like cracks, etc) as I sure a Leman Russ would be heavy enough to crush them down quite a bit (think of any major US road w/ a lot of semis going over it day after day). I have an idea but not so sure how to make it work. I'll figure it out.
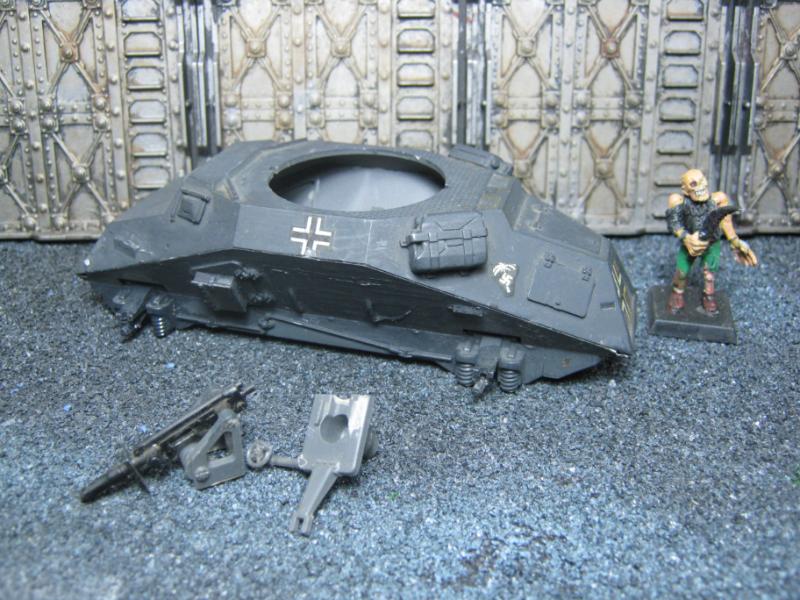
@ Brian / hdbbstephen- I had a hose, but some old guy drove off with it still in the filler neck. I have a replacement one on order with the Adeptus Mechanicus. They gave me tracking number 968-273-76-382533 but would not give me an estimated date of arrival. If worse come to worse I'll just cobble one together.
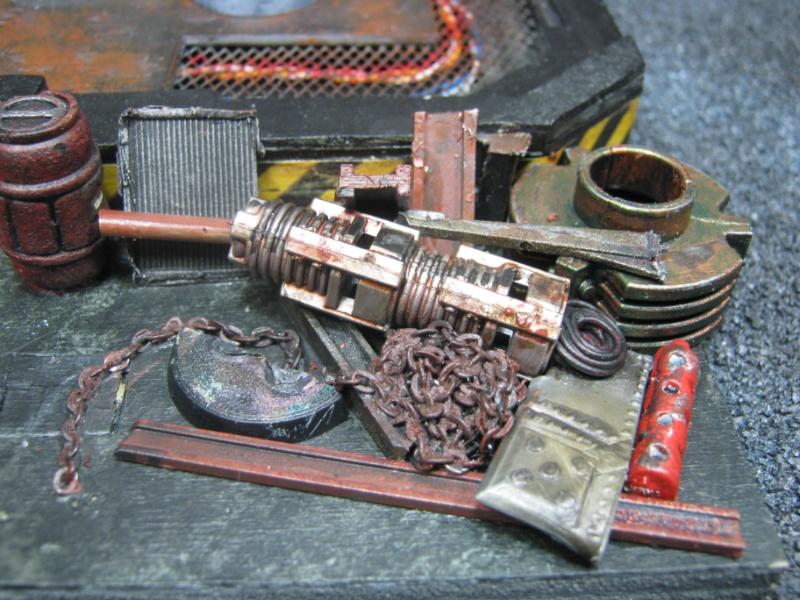
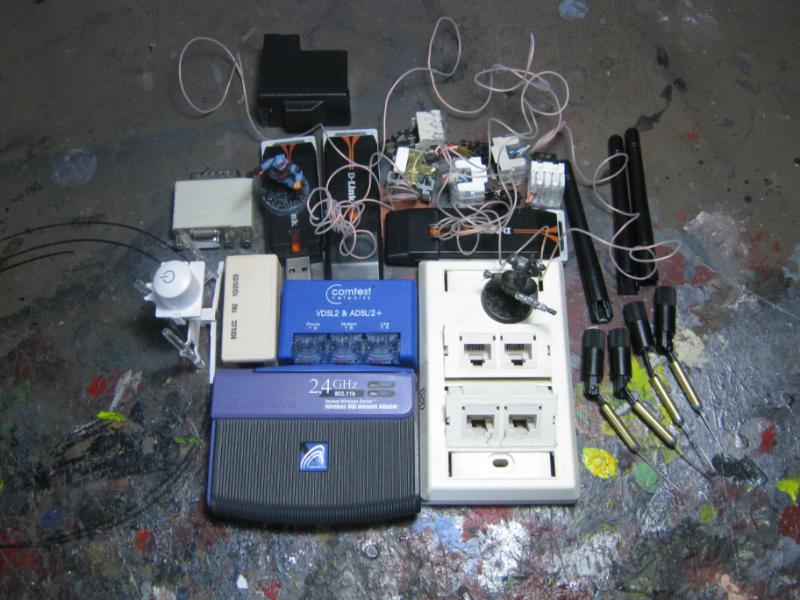
@ Moltar- This project is why I am glad I'm a bitz hoarder. I've had that tool chest since somewhere between '96 and '99. All the other stuff I have no idea really. There's a gas mask from a 1/32 scale M113 kit I built when I was in the Army. The cables are from a 2nd Ed Servitor that I cut up for my Pit Slave gang in '98. There's other stuff in there that I've had for a ridiculously long time, like when I was 12. But I knew someday I'd use it.
@ rust- Thanks! Fuel splashes / etc will be last on the list before I do the final matte spray. I'm also going to have rusty gross seepage from the trash can, grit and nastiness around the grate, etc.
@ hdbbstephen- I hope my failures lead to your successes. And the hose... well, you saw what happened.
I still have a lot of work to do. By the time I am done with this I'm likely going to seal it in a glass display case.
Naw, just kidding. I want to use it in every game. I won't obviously, bit it's going to look mighty awesome on the table. Now that I've kicked up the ante I'm going to have to look at my past projects w/ a more critical eye, which is dangerous because that's how this Frankenstein projects started out.
I'll have more to share in a few days, work is getting nutty again and the OT is available. May as well ride the $$$ train to the very end.
Skalk Bloodaxe wrote: I'll have more to share in a few days, work is getting nutty again and the OT is available. May as well ride the $$$ train to the very end.
Wish I had that Over Time problem I don't get any... The rest of the engineering dept where I work all have a crazy amount of time off on the books but me, so I am the engineering support for the holidays. On a positive note though, I can sit at my desk and clean flashing off mini's for 8hrs a day without being interupted by folks
Back in the day when I had a cube instead of open floor plan I would paint at my desk during break and lunch (and when I had the 10:30am to 7:30pm shift I'd paint straight through from 5 onward). Sadly I can barely get away w/ jusr Dakka posts these days.
Where the heck you get all that building material, cool.
As broken tiles just cut one out dig out under it a little, then cut it up an put it back in. Also as someone mentioned earlier, take an odd tile out and concrete the hole up, like some half ass repair man would IRL.
This is another inspirational thread I have found on Dakka, just awesome.
GiraffeX wrote: This keeps getting better and better Skalk, looking forward to the next update, imagine a whole table with this amount of detail
Oh, I can imagine that, but I'd only be inclined to let my opponent join in if all of his models were painted... but with a bunch of pics and a third person to take turn-by-turn notes one could make a killah bat-rep!
Amazing work Skalk! The Toolbox takes the scene to "EPIC" level! It looks like you also learned the most important lesson "If you don't make "vroom vroom" engine sounds- it doesn't work "
This is absolutely outstanding work! I love all the litte details on the updated Fuel Depo, for the hose the Ork Stompa has some prtty good hose bits that would probably fit well on this piece.
Skalk, i read you wanted to show the weight of say a leman russ on the tiles, like in old roads...
I'd try it with a wooden ruler. Put it on the track with the thin length down, and smack it a couple times with a rubber hammer. It will be just enough pressure to form a vague gutter. Using something a bit wider will make the track wider. Not sure if it will work since I have no idea what you used as the base. Wood? If so it might not work.
Foamboard? Then don't smack it too hard...
Impressive body of work here Skalk. Really like the way you're not afraid to change your finished pieces and improve them further... Some of your techniques are truly inspired
@ Camkierhi- Thanks for taking the time to post! I get that that stuff at yard sales, eBay lots, friends, 'going out of business' sales, picking random things up off the ground, etc. It's a lifelong practice I started a really long time ago. The tile idea was a good one and I had been thinking about it for a while and finally figured it out. See below.
@ GiraffeX- I tried to imagine doing an entire table at this level of detail, and I suddenly had a vision of finding myself with no friends or family left because I had taken the last 10 years doing just thing. And my table looked great!
@ hdbbstephen- Luckily my game group has painted armies.
@ HAZZER- Good to see you back around Dakka. I've had a lot of fun on this project and have learned a lot.
@ Dave- Oh dude trust me, I did more than 'vroom vroom'. It's a TANK.. I scraped it back and forth making "BRRRRAAWWWW!! CLANKCLANKCLANK BRRRAAWWWWWW...GRRRAAAAHHHHH!!!!!" noises. And thank you for the compliment, nice to know you are digging this.
@ Biohazard- I appreciate the feedback, it means a lot. I figured out the hose issue, it's below.
@ MauS- I tried the whole "weight' thing, except with a much more intense weight and method, but the base is made out of plywood. It took a while but I figured it out. See below.
@ Gorgrimm- Thank you, appreciate you taking the time to post. And feel free to snake away. If I have an idea that inspires someone, I'm glad that it is passing along. A lot of what I am showing here are ideas given or shown to me from others. This is my take on those ideas. The stuff I've come up with on my own is usually done the really hard way as I'm still going through a learning process.
@ Ruglud- Thanks for stopping by, and thank you for the compliment. Tearing apart a 'finished' project is a bit stressful at first, but seeing what I have done with this will make the next 'tear down' easier.
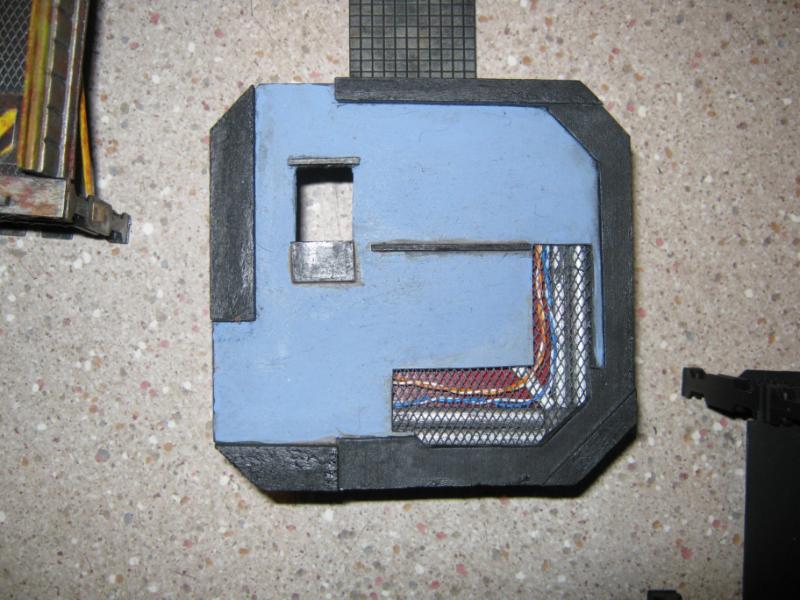
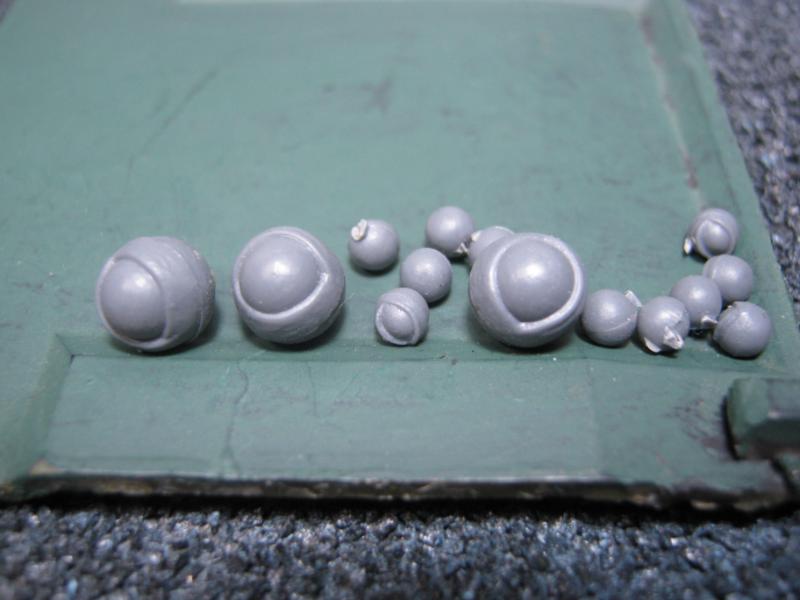
I have a lot to share with this update. Tried to post last night but things didn't work out that way, so you get a whole bunch all at once. My first step getting back to this project was to make the tiles look more 'crushed' so I dug out some tiles:
depth:
Took this pic in case anyone thought I was taking the 'easy way out' by simply pulling up tiles along the score lines instead of where the tracks would be. Another fortunate circumstance that works in my favor for sure, but it wasn't just because it was 'easy'.
However, it became obvious very quickly that doing a single strip WAS lame, so I wound up tearing a lot more stuff off and ground a huge channel out of the base w/ my Dremel tool.
Skipping ahead, this is where I would up w/ the build. I put each individual tile back 1 at a time, and while I like how it came out I see something that would have made it look even better but it would take hours to do and honestly I really do not want to do that right now. It's going to remain an idea for next time. And this does look pretty cool 'as is'. I think this is more what Bruticus had in mind when he gave me advice on this, doing something w/ the open space to make it an active part of the piece instead of just a huge open area.
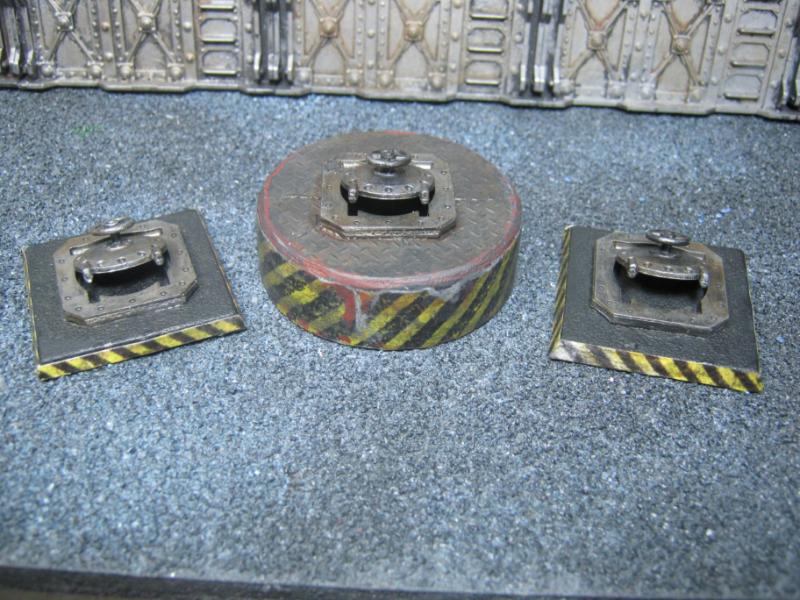
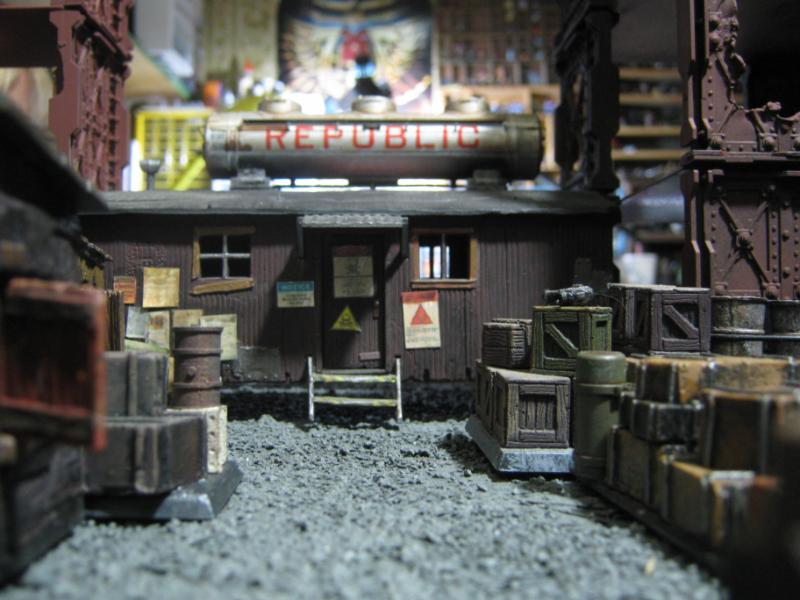
Another reference shot:
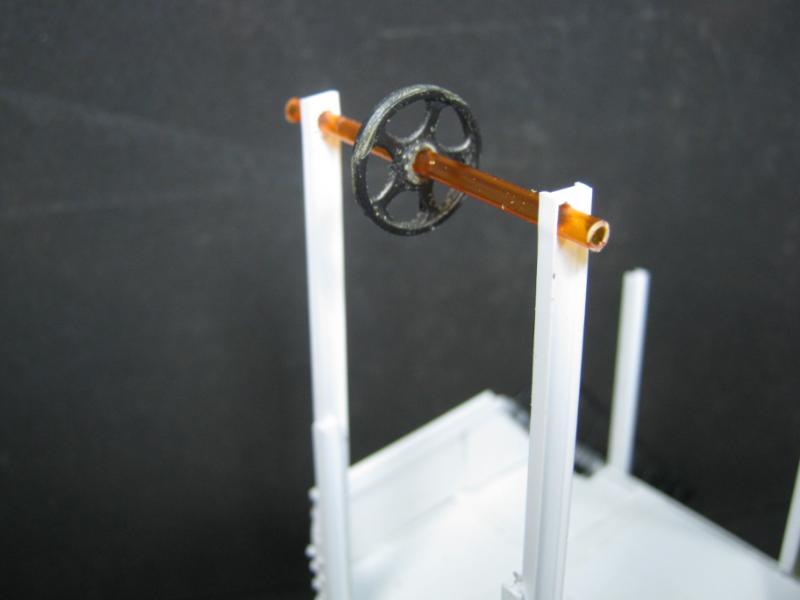
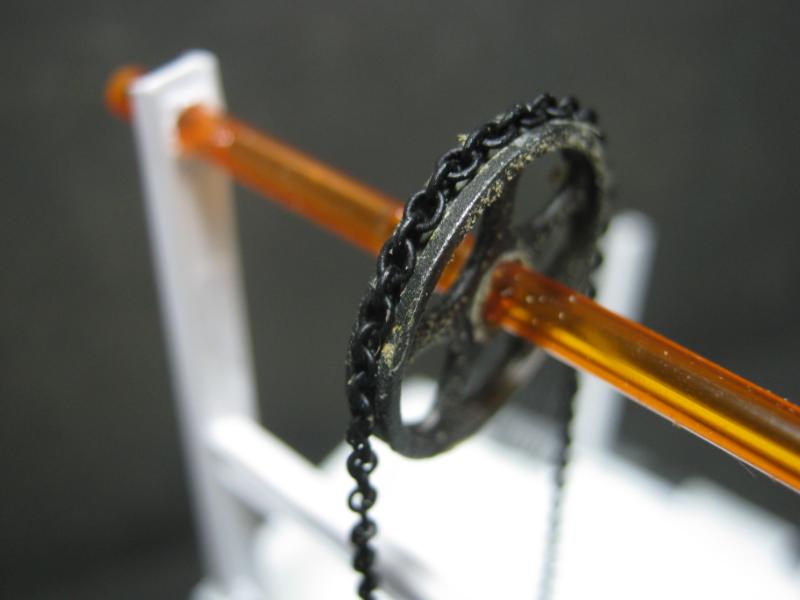
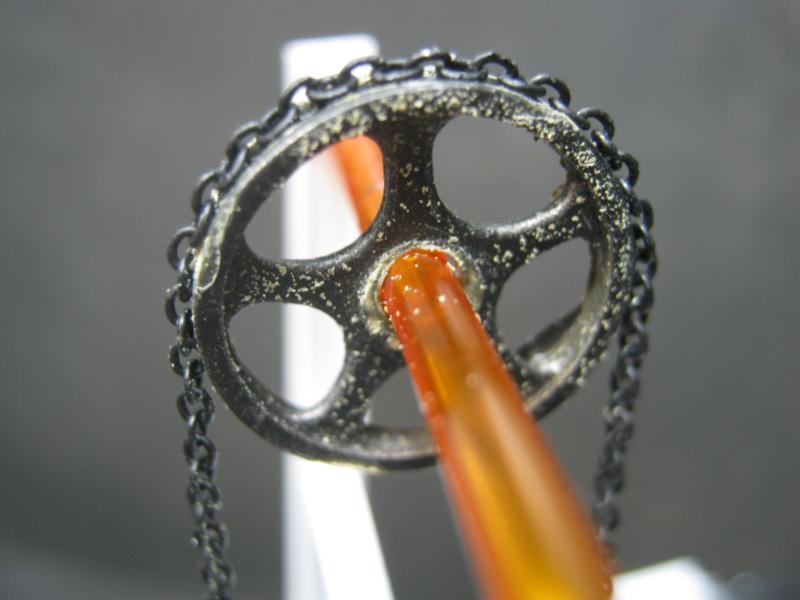
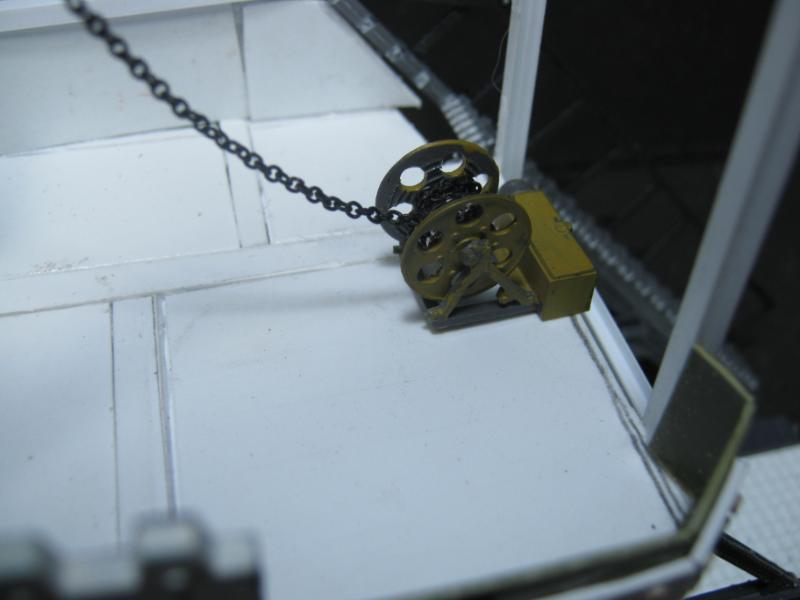
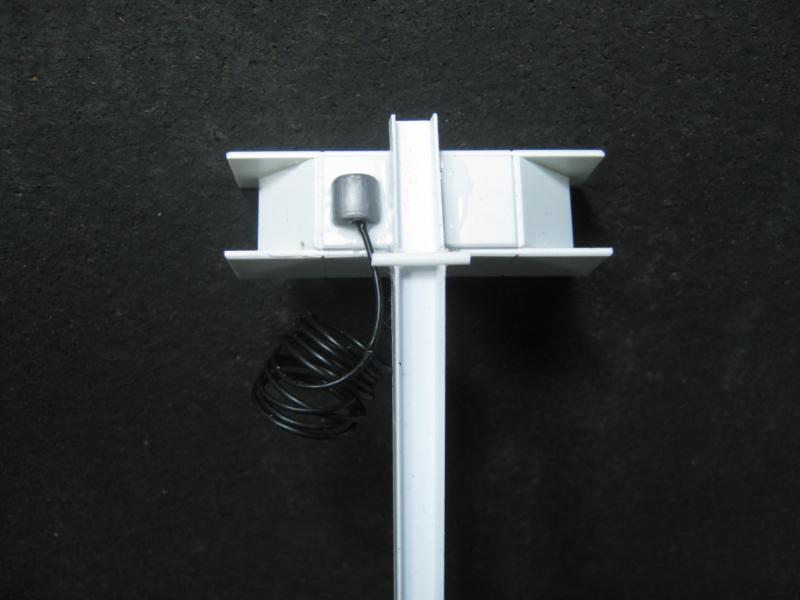
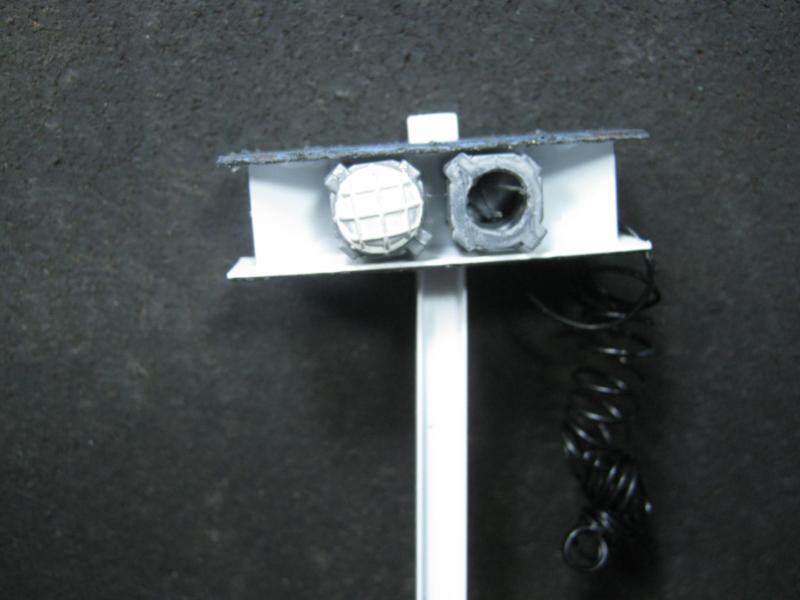
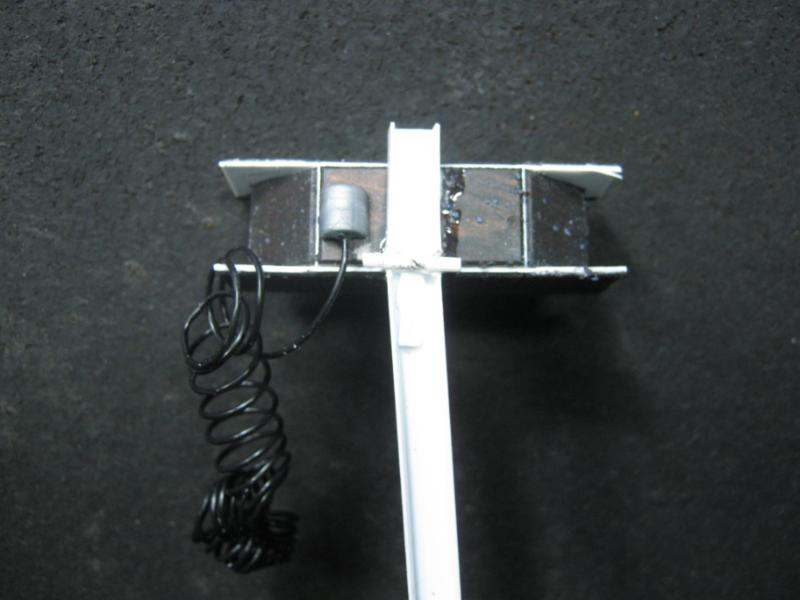
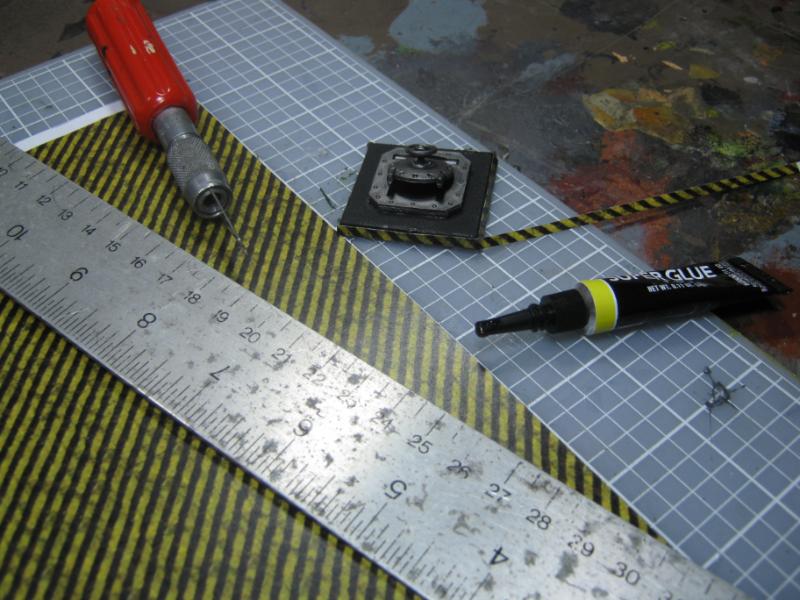
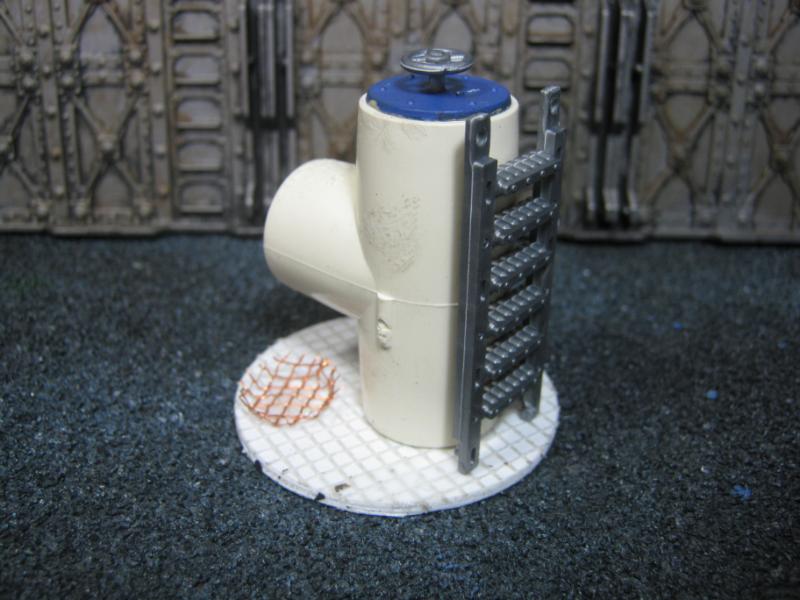
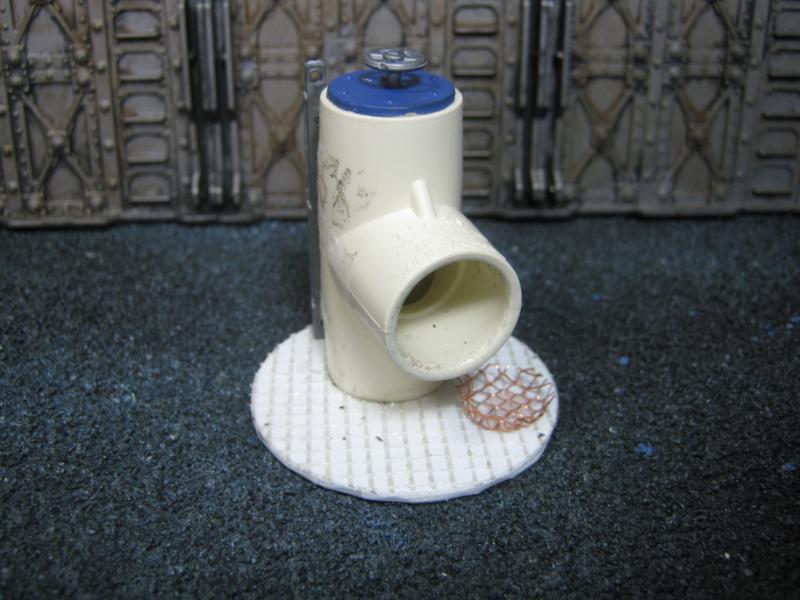
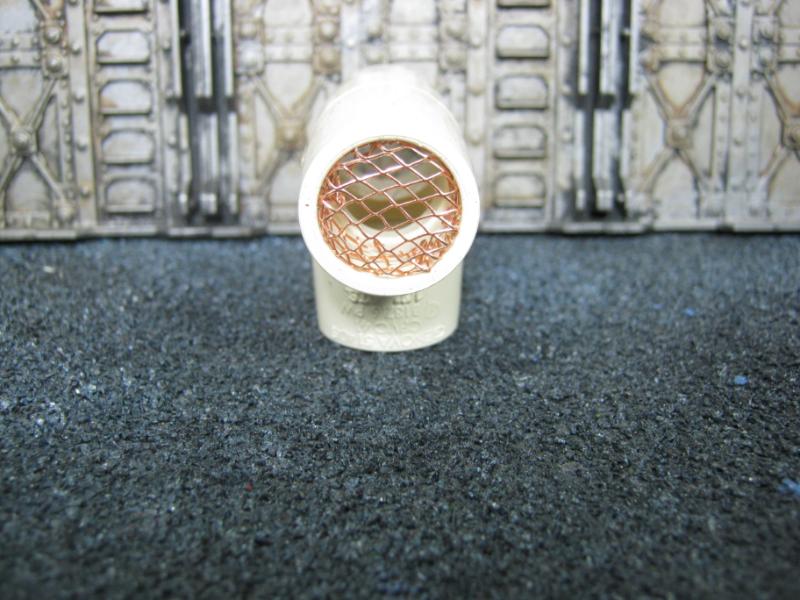
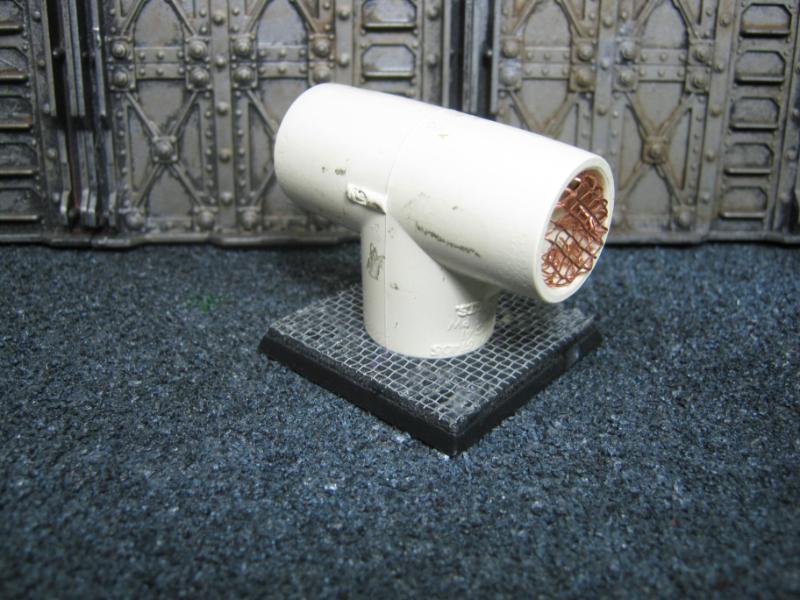
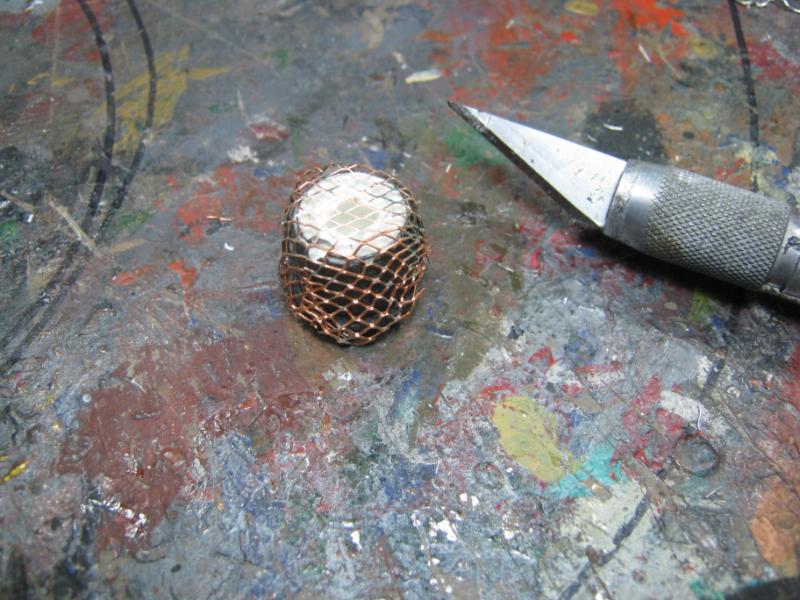
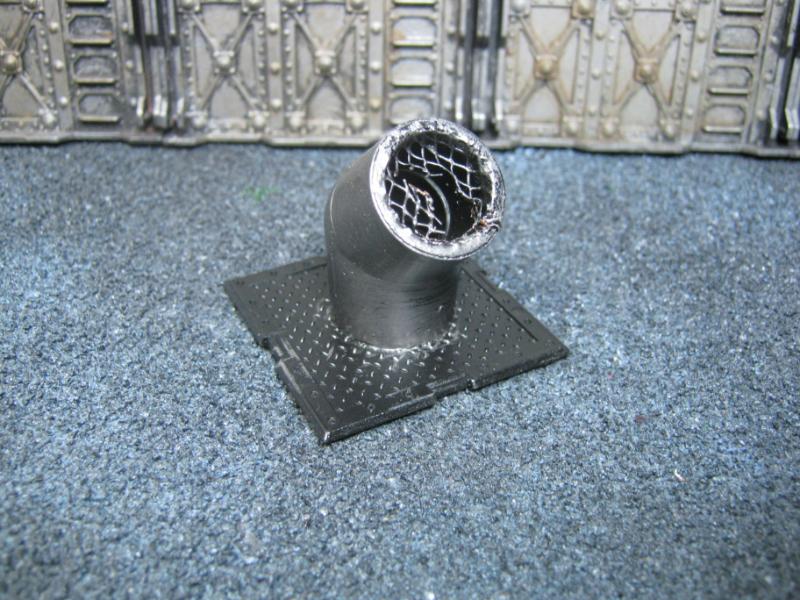
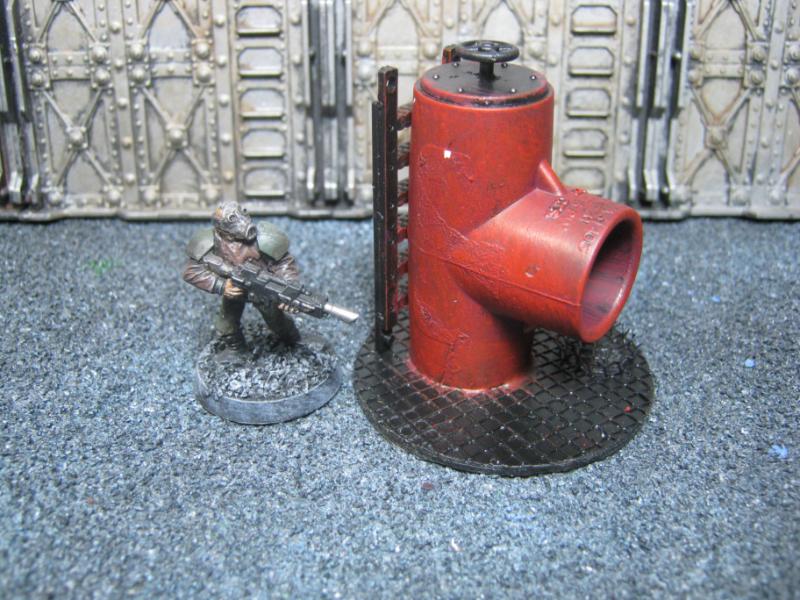
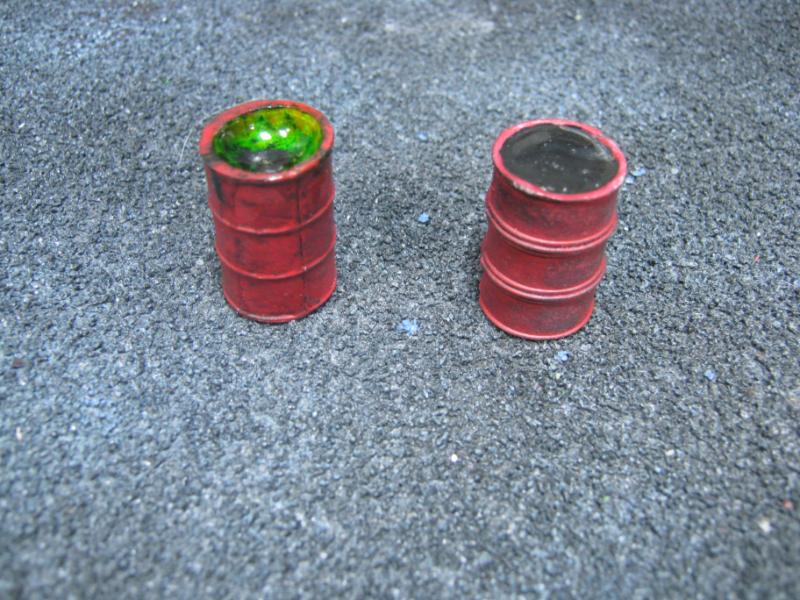
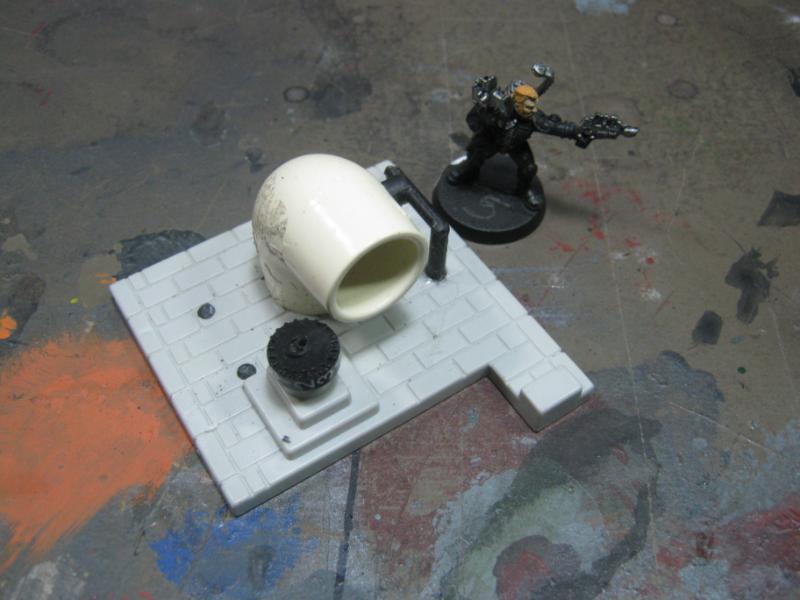
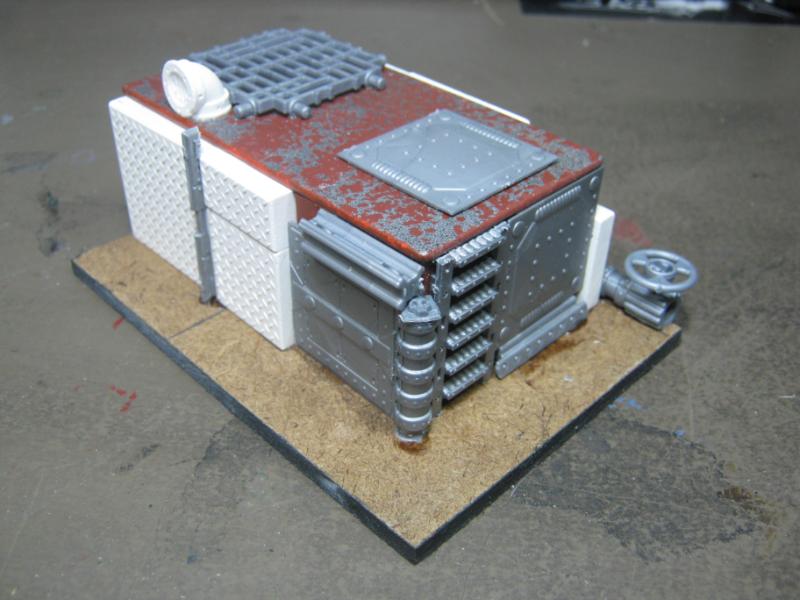
Moving on to another bit on this project, here's my rough idea for the gas pump:
And some final shots from last night:
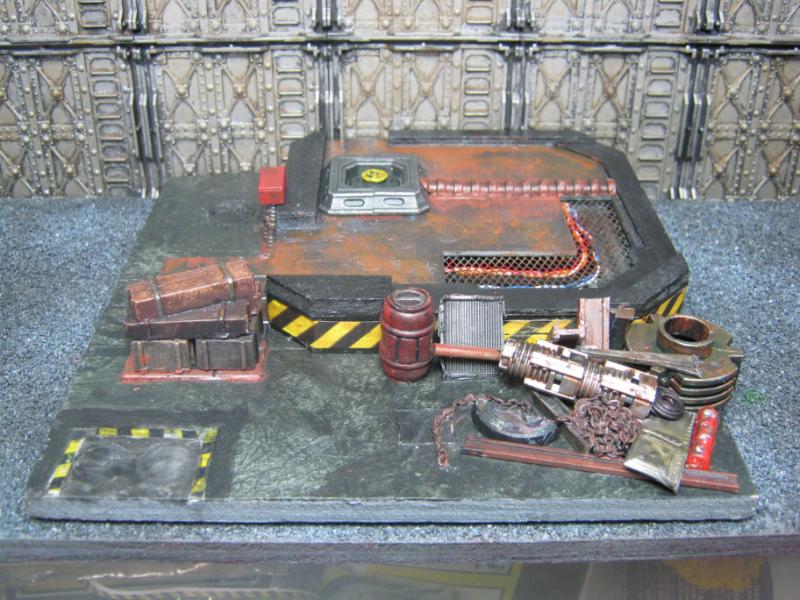
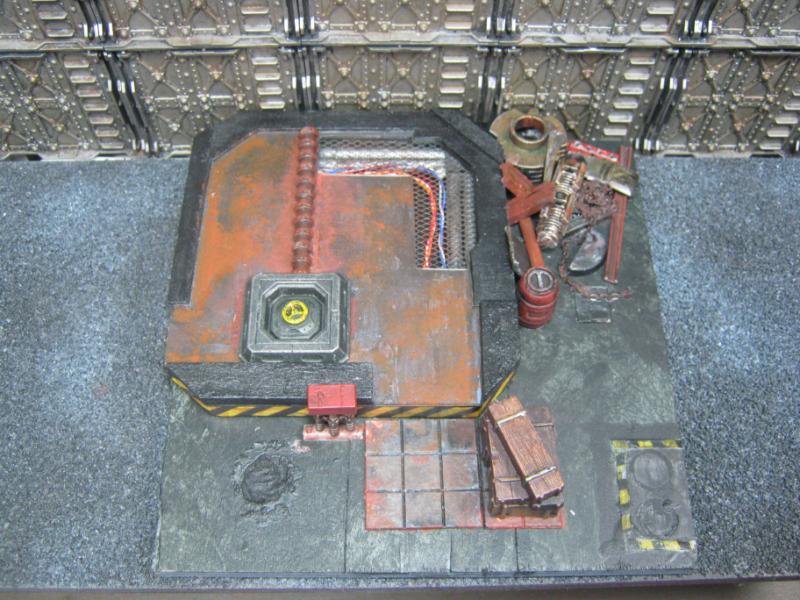
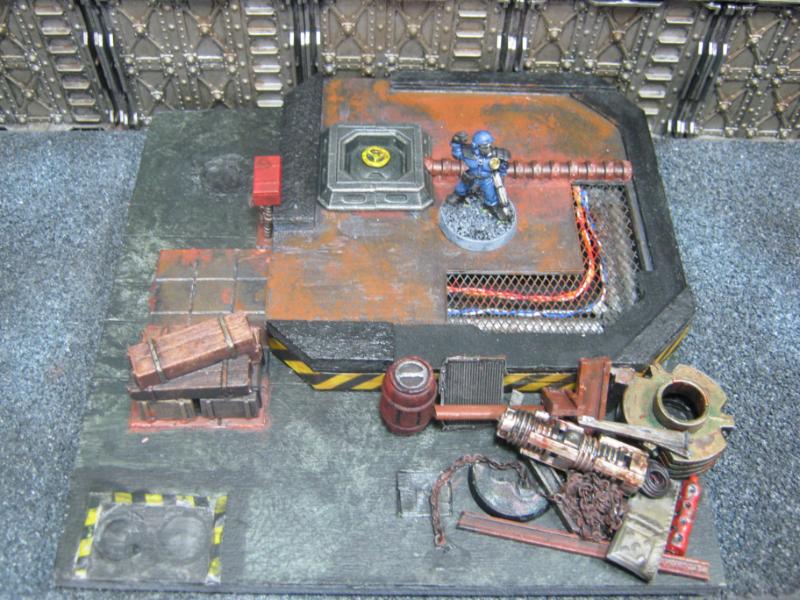
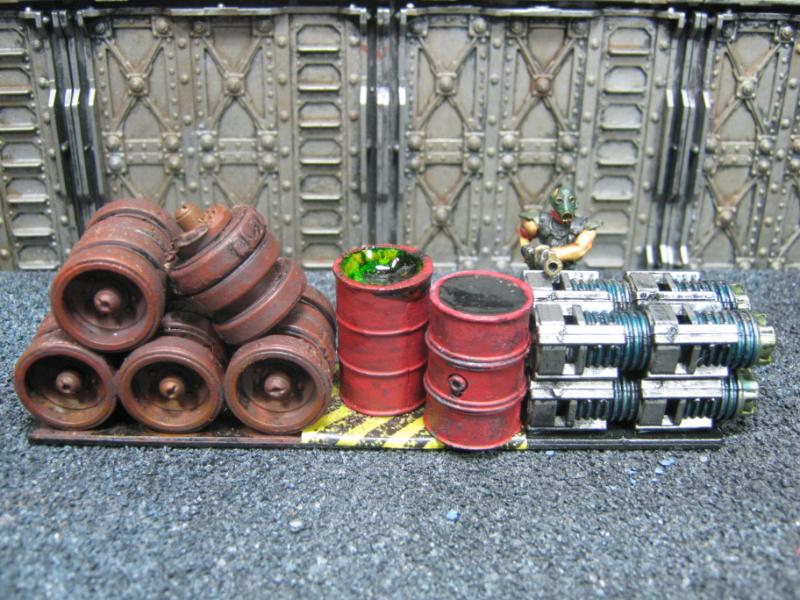
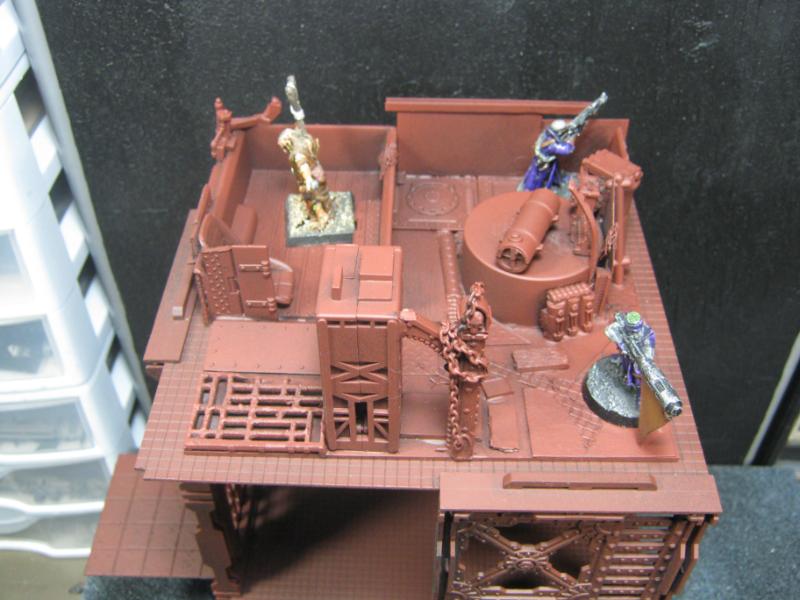
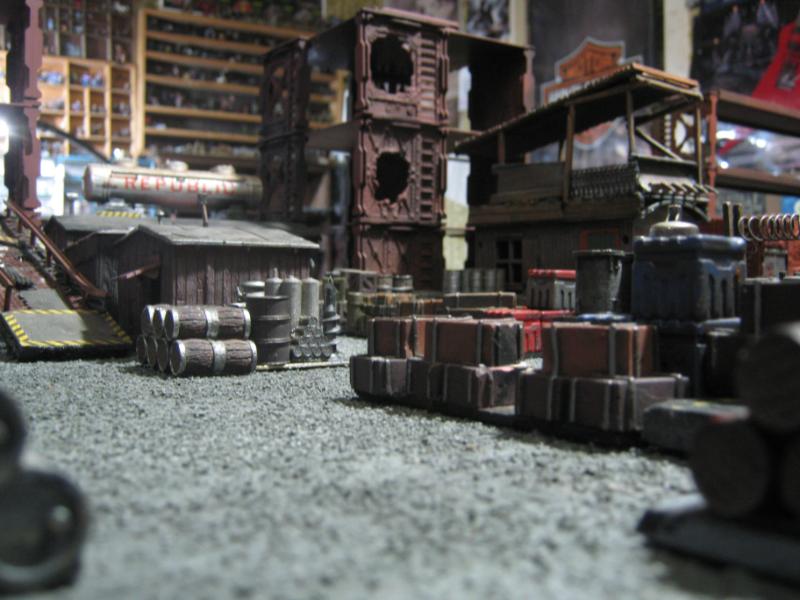
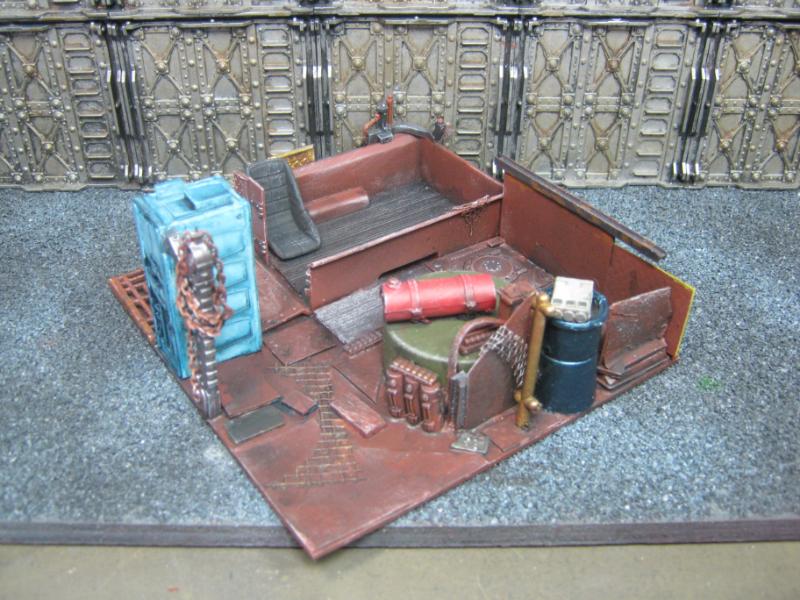
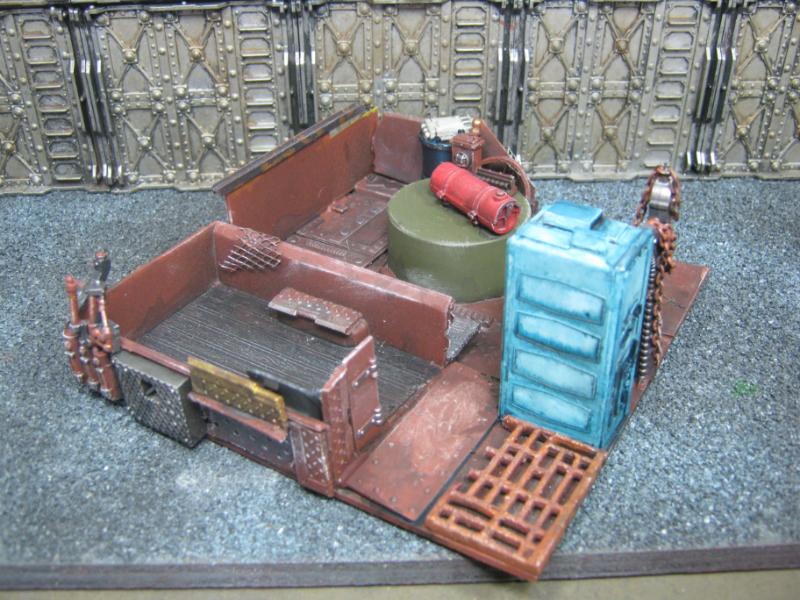
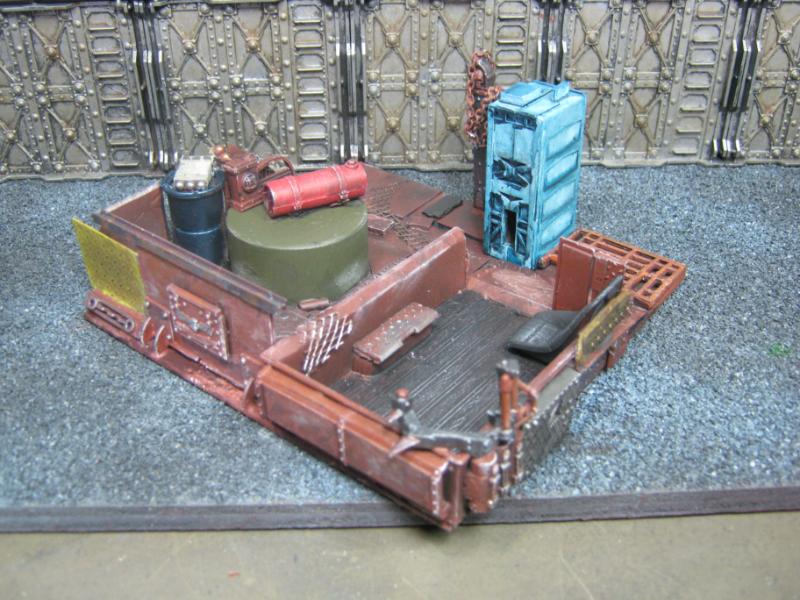
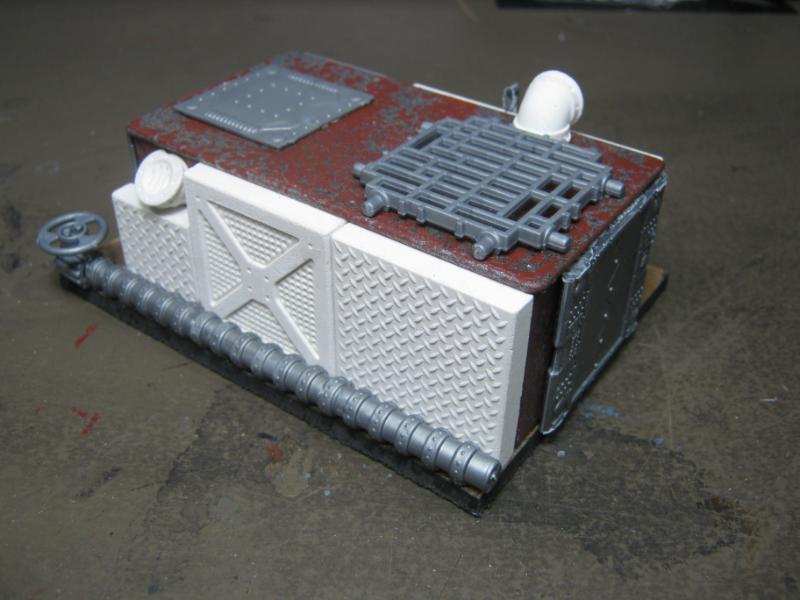
I got working on the project again this morning as soon as I got up at the crack of 10, and I was still pretty blurry from the night before so I forgot to take any WIP shots. Here's where I am at right now. Took a bunch of random pics from different angles to show things I may not have shown before now:
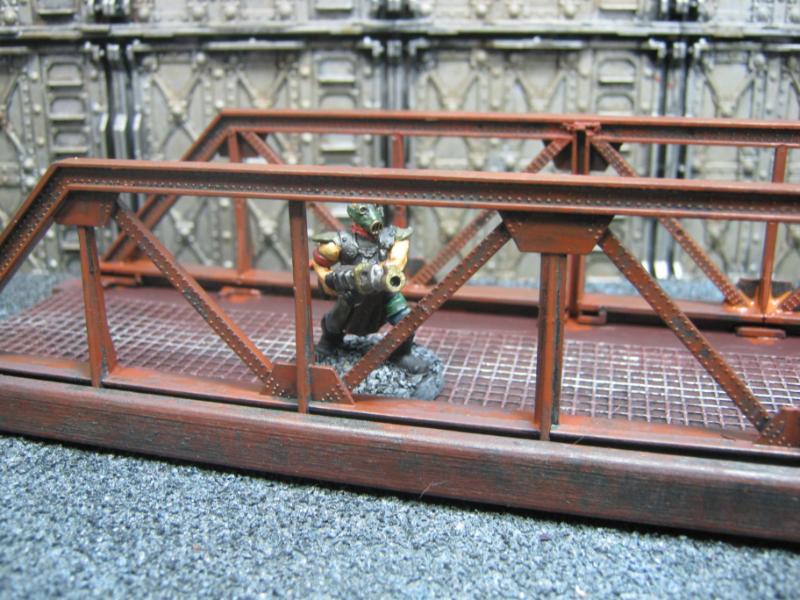
And a couple action shots:
The idea behind the oil stains is that there have been spills (multiple spills) over time and if anyone has ever worked in / been to a mechanic's shop you're familiar w/ the kitty litter they spread on the spill. A lot of shops just throw it down and leave it. Same idea here.
I'd describe things in more detail (like the bits I used to make the gas tank, etc) but I'm heading out and really should not be here right now but I wanted to post. So here you go, hope you still like where this is going, and I'll be back later to answer any questions.
As always, thanks for looking, thanks for the C&C, and thanks for making this a lot more fun than if I were sitting in the back room doing this all by myself w/ no one that share it with.
I've been watching this project from the tank on a micromachine thing and kept thinking "that looks good, I'll wait until you do the next bit" and each time you revisit it, it gets bits ripped off and then gains a whole load more awesome... and you are still saying there is more you could do to it, and I think "what else could be done to make it better"... and you do.
And so, again you have taken it to a whole new level and I have had to break my silence to say that it looks awesome.
I really like the thought process that goes into the extra details, don't just add more detail, think about why that detail is there. It makes it all the more real.
And I agree with you and others about showing the trial and error stages that most (if not all) models go through, as it helps everyone.
The broken, weighted tiles look fab. I mean the vehicle damage, the oil, the rust - it's just... So ... DIRTY! Parts of me miss it pristine but boy does it work well. Filth monger.
@ Gits- Tearing things apart and rebuilding them is the price to pay for being a slacker to begin with. That said, this piece was supposed to be a quick upgrade to an old project while I was waiting for something else to dry. I had no idea at all what I was getting myself into. . Ugh. I am still enjoying this but it's becoming a Frankenstein of a project.
@ Moltar- Thanks, I appreciate the continued support! I don't know if you remember, but you were an integral part of why I started this project, and that was over a year ago. I'm glad you're still checking in on this because in a way it's partially yours.
@ Dr H- Thank you posting and for the compliments. It's always good to see people are inspired by my work and the process I share. If nothing else you can learn from my myriad of mistakes.
@ Ruglud-
Skalk Bloodaxe wrote: I put each individual tile back 1 at a time, and while I like how it came out I see something that would have made it look even better but it would take hours to do and honestly I really do not want to do that right now.
YOU BROKE THE CODE! Outed once again! Yes,I thought of it after I was about 3/4 done and had no interest in going back as I used polystyrene glue and that needs dynamite to remove when it's styrene into porous wood. I will try my hobby knife w/ a #16 scoring blade and see if I can make some cracks. Man I was so hoping to get away with that. Guess not. And really, I knew I should have just done it. My bad. Look for new update later.
@ Graven- It was hard to tear up the 'new' Fuel Depot, but I have to admit I like this a lot better. And good thing, too. If I put this much work into somehting and hated it, I'd have a Fuel Depot sized hole in the wall.
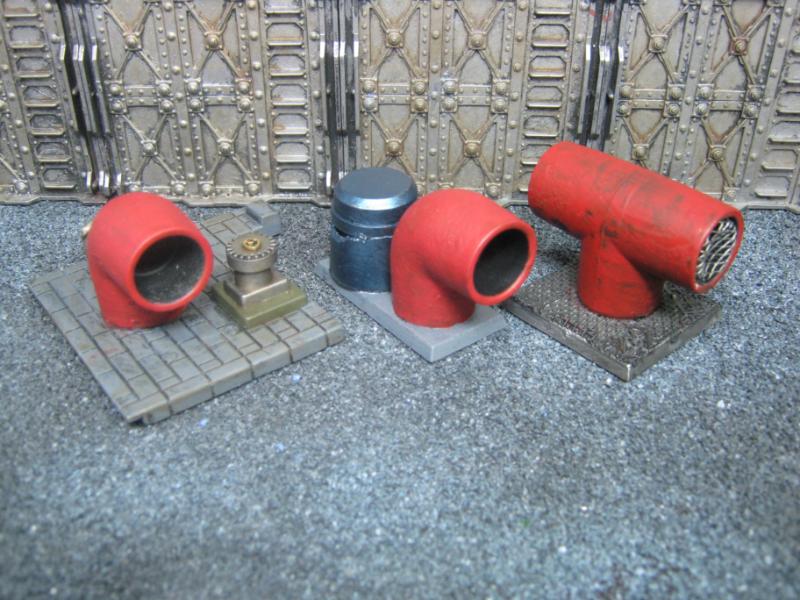
Just a bit of description of what I did w/ the gas pump. The pump is from an old airplane model kit, no idea from what or where, it's a bit that I've had kicking around for a long time. The 'hose' is actually a retaining cable off an old tank kit that was given to me in pieces by a friend of mine back in '96-'99, can't remember when. The nozzle is a bit from a model truck kit I've had (again for years) and glad to see all this stuff finally find a use.
I threw the 'kitty litter' on top of the 'oil' for a more realistic effect. The 'litter' is the dust from the bottom of a bag of ballast I've had a couple years, and the 'oil' is a mix of Badab Black and Tamiya Smoke. I also used the Smoke and Baal Red for older spills that had been mostly dried out.
I'll have more to share later. Thanks for looking!
@ Gits / Galorn- Thank you for the support on the idea. I think I have found the solution.
@ Camkierhi- I said the same thing when I first got to Dakka. My best advice is to find threads where someone is building things you like, as questions how they did it, and then have a go at it yourself. Each failure brings you another step closer to success (so long as you learn from your mistakes).
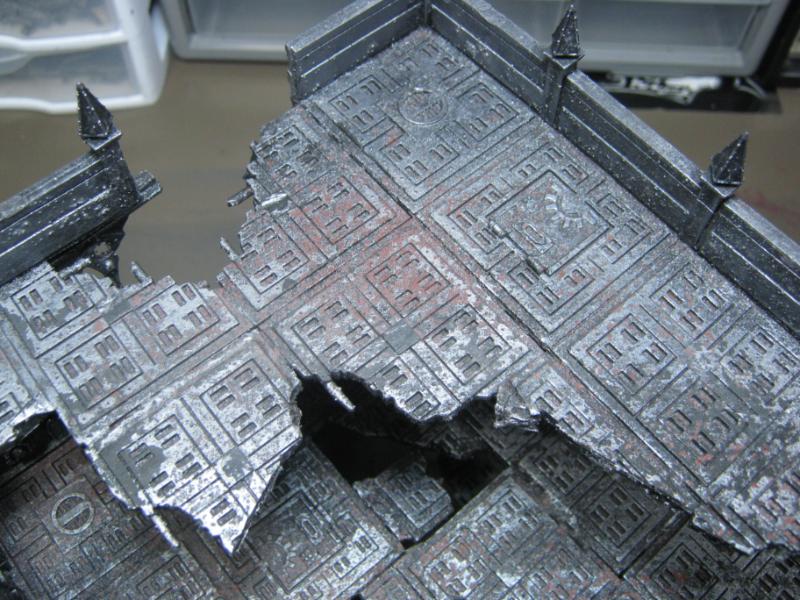
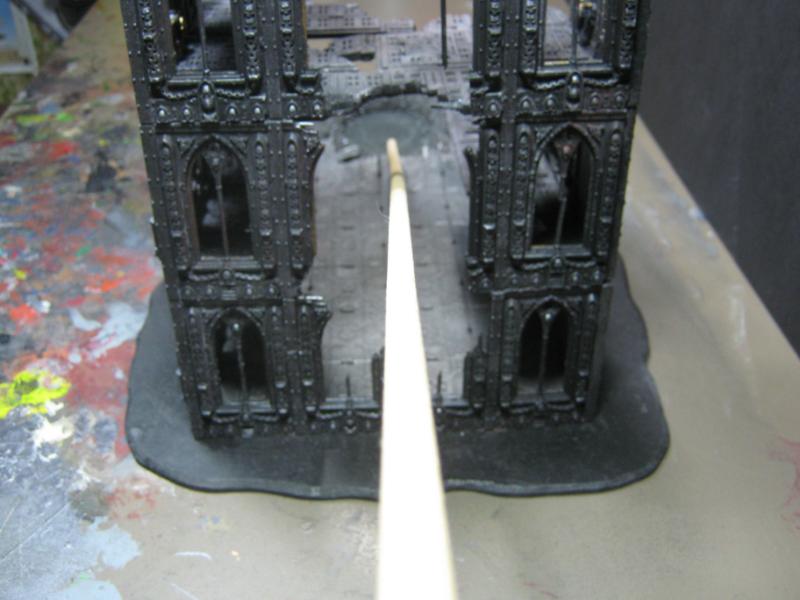
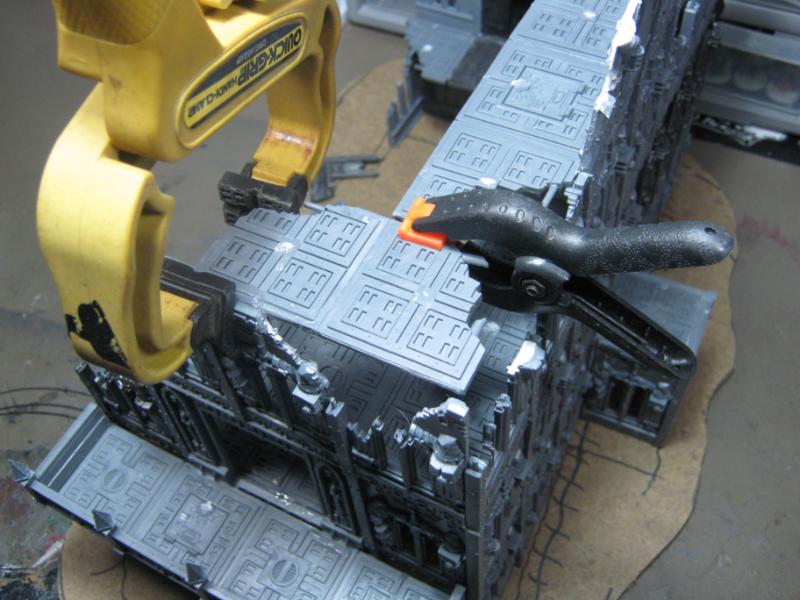
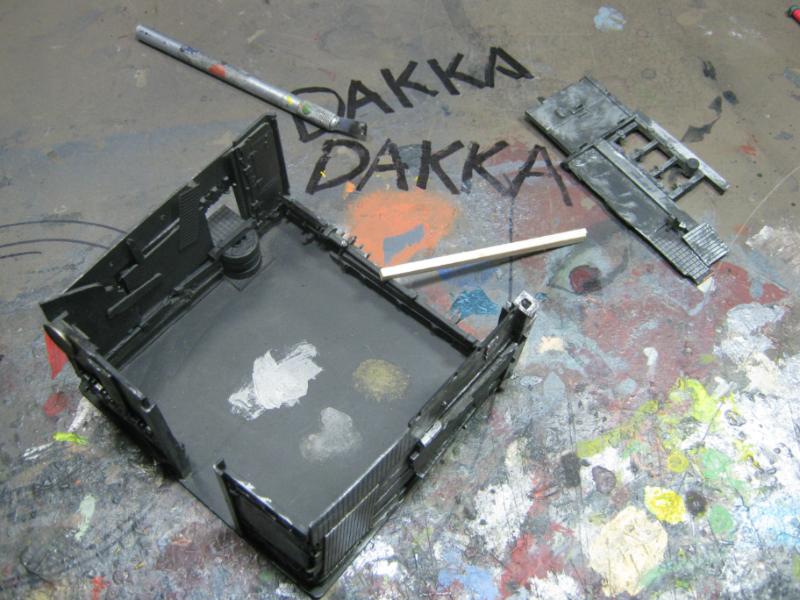
I said I'd be back today, and I am. Here's what I did to solve the issue I had w/ the tiles.
First instinct was "RRRAAAGGGHHH DESTROY!!!" and replace w/ more tiles:
But after I thought about it for a moment I decided to be a bit more selective and dug out each tile 1 at a time and replaced it with another tiles I chopped into bitz:
Remember last post where I said the glue turned the plastic squishy? Here's a great example of that:
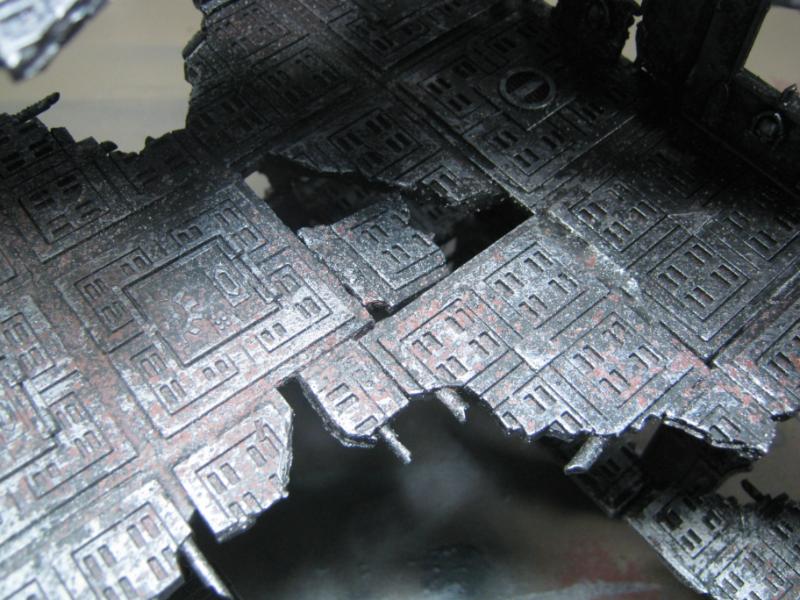
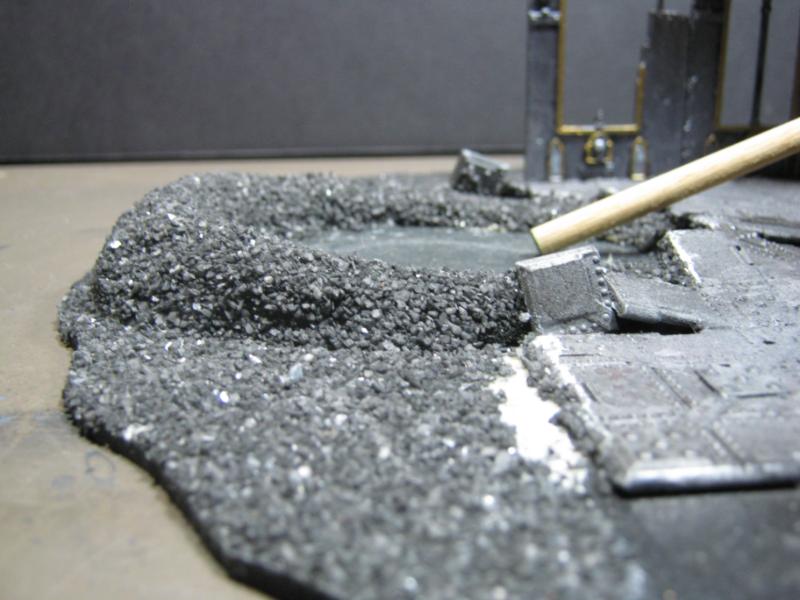
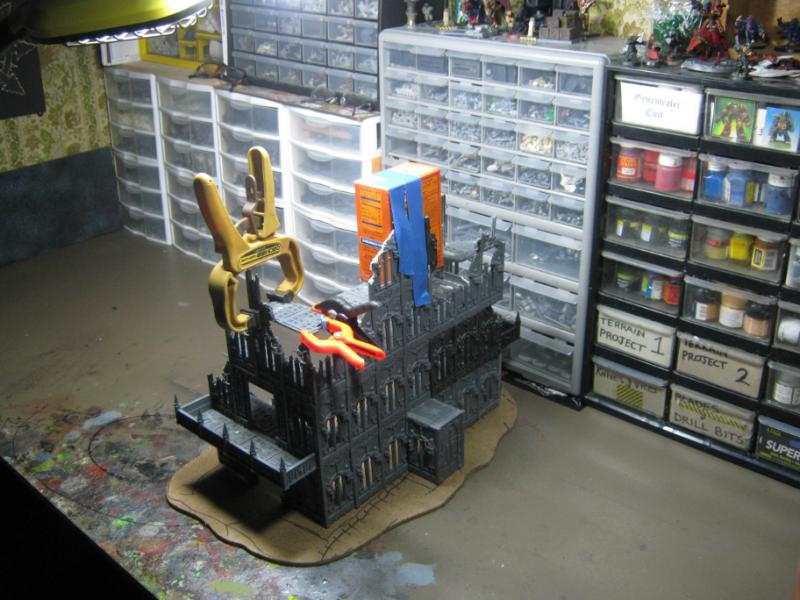
I dug more out until I had the trench I wanted. I also learned from a mistake I made last time- base the trench black and then glue pieces. This isn't glossy paint, it was just wet when I took the pic.
Fast forward a bit and this is what happened in the trench:
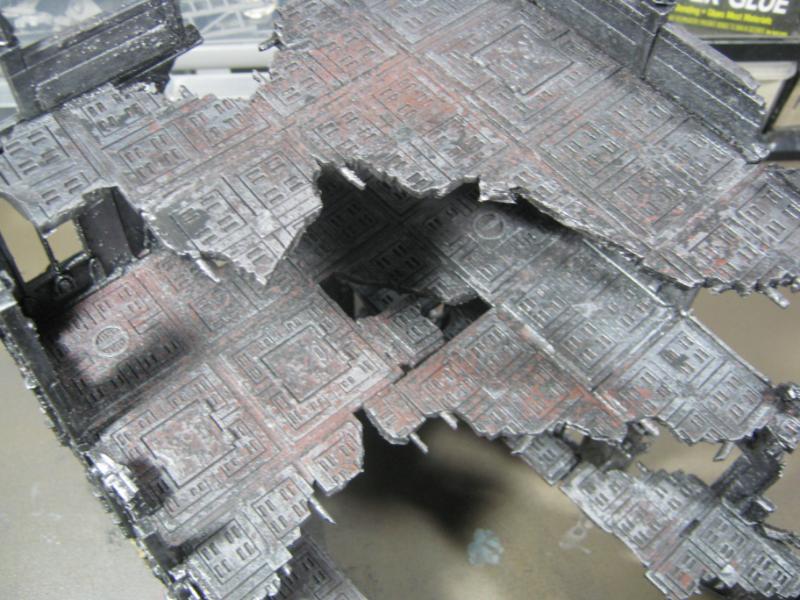
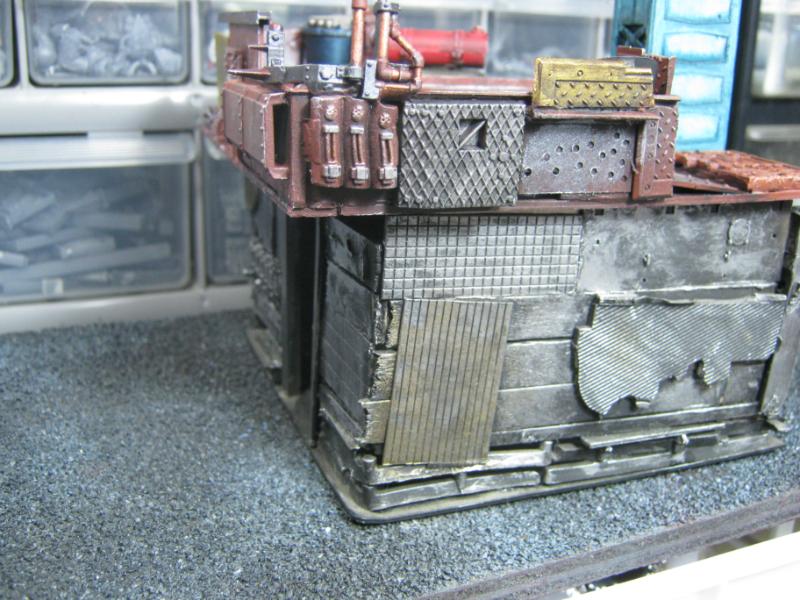
Here's a concrete
patch that got driven over while it was juts a bit soft. Used GS for the patch:
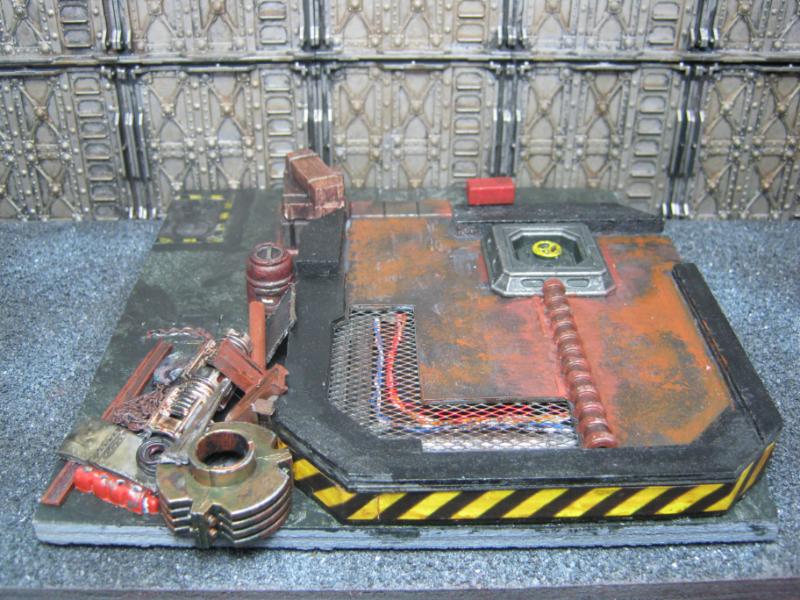
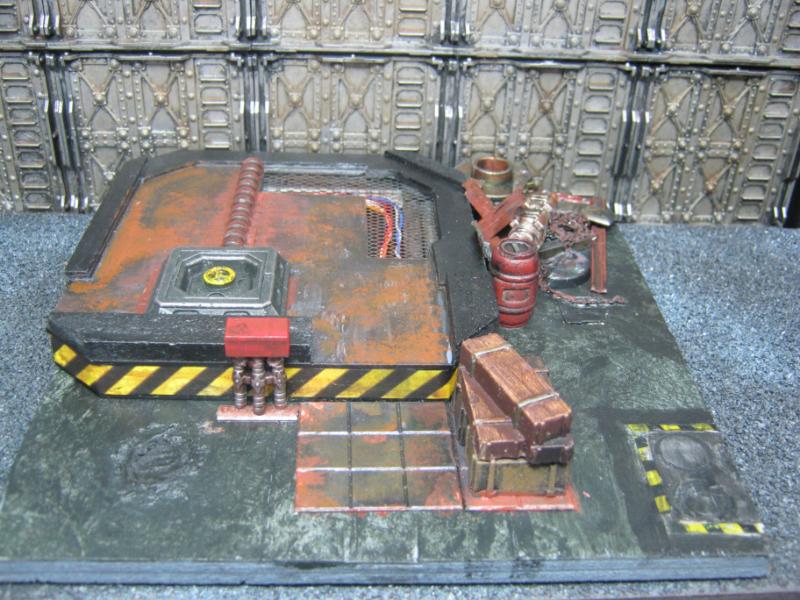
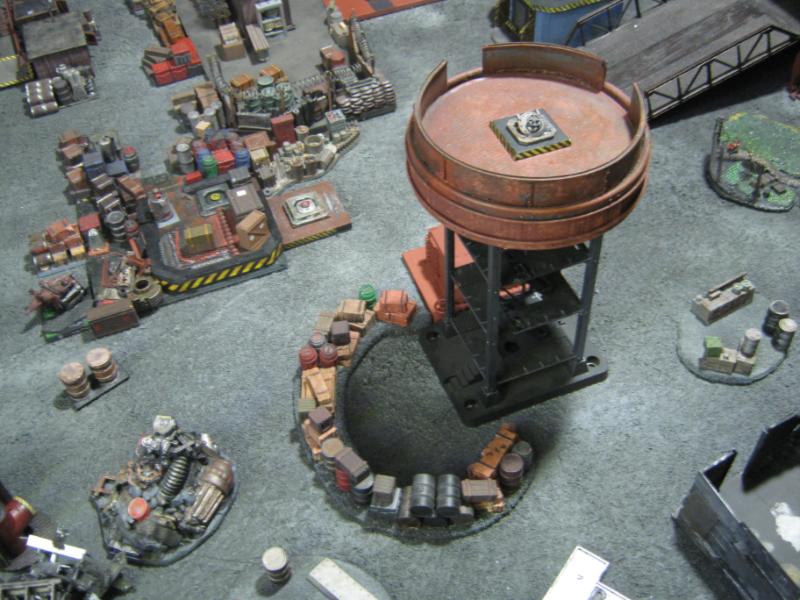
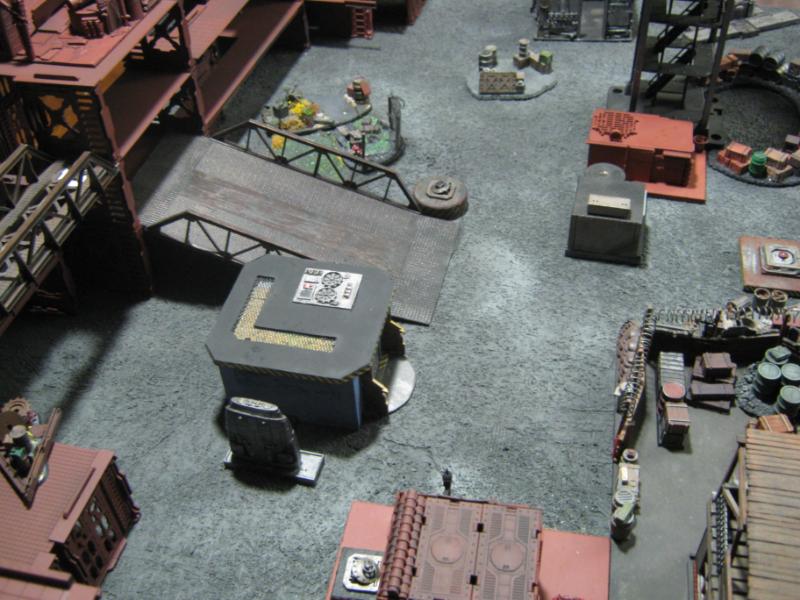
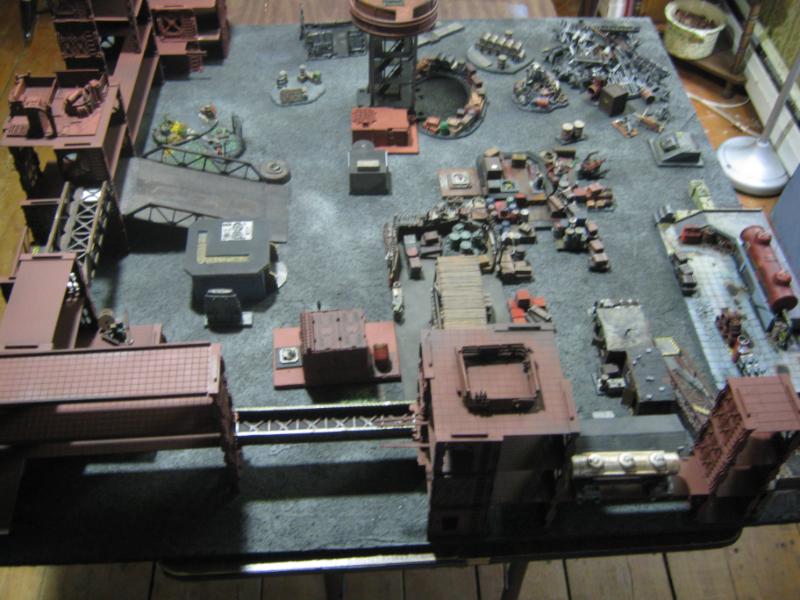
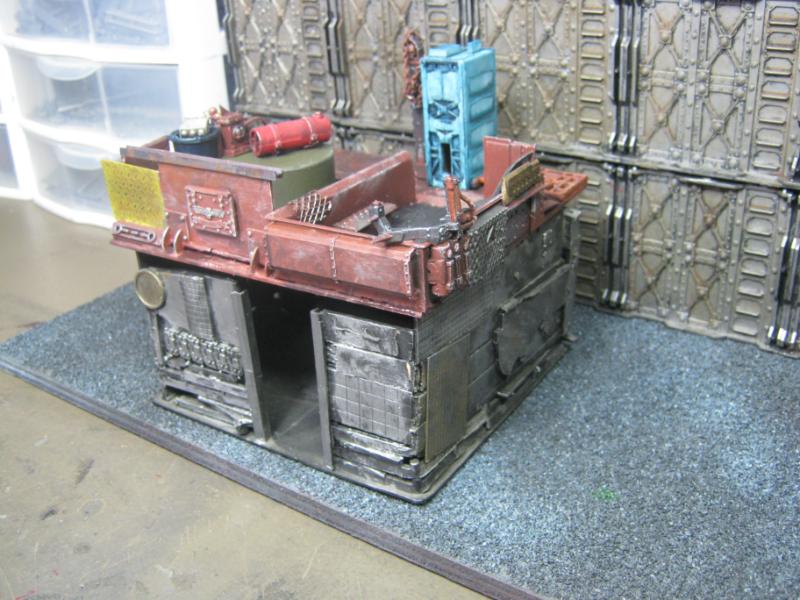
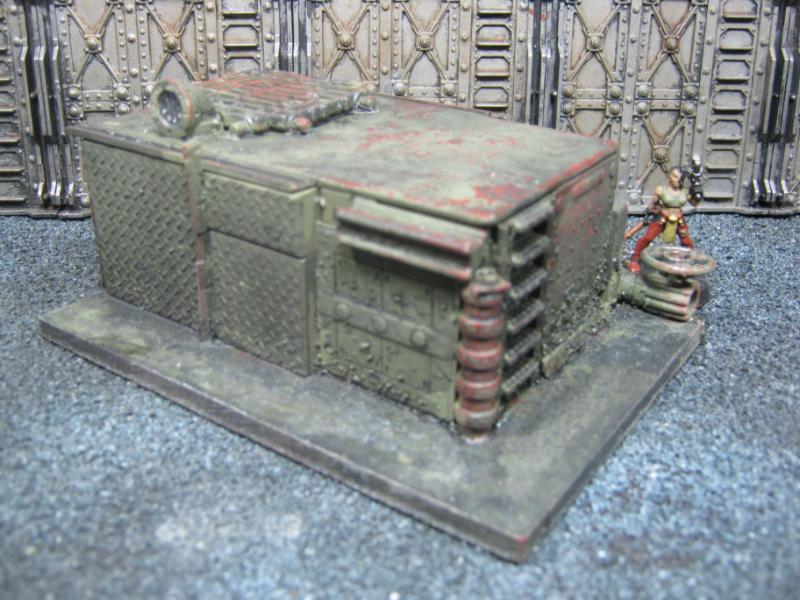
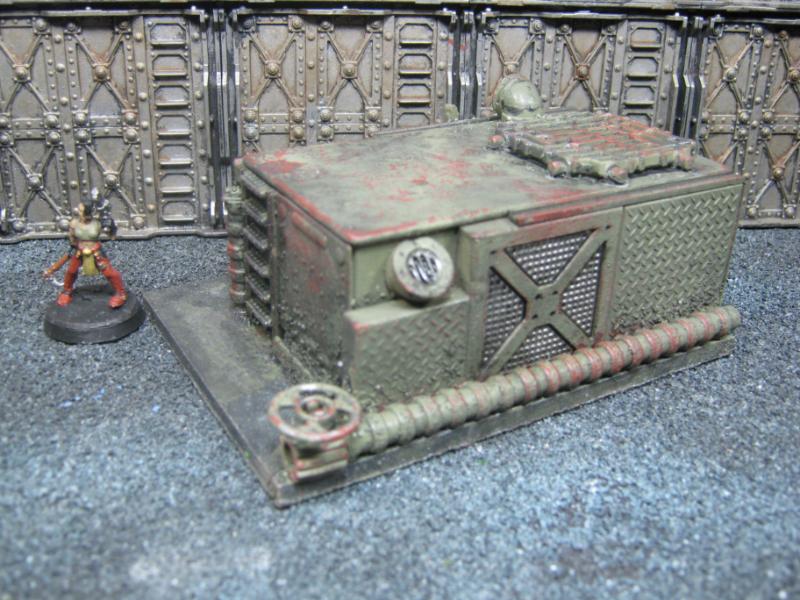
Overall views:
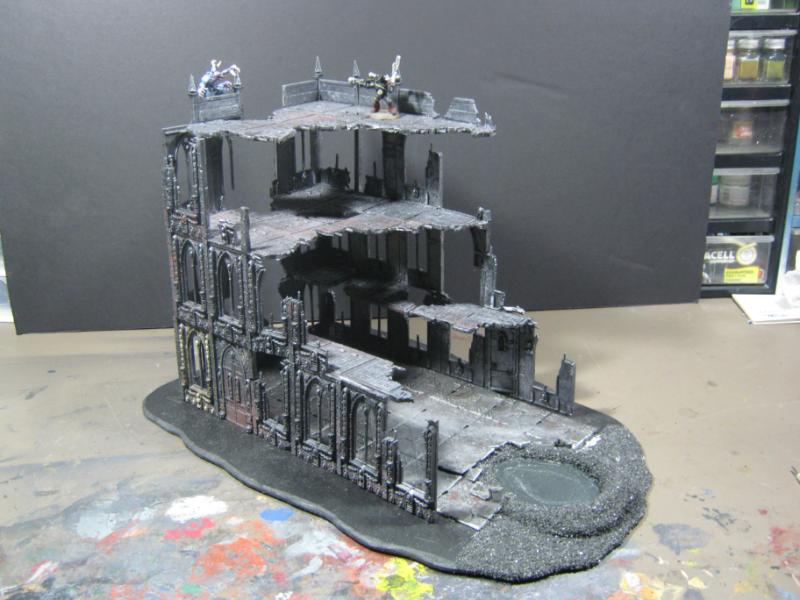
Scale perspective shot:
Shot of the entire model:
Is it finished? Maybe. Still subject to change? Depending on the advice / suggestion, absolutely.
I've taken the recommendations and ideas people have offered and made them come to life. I can't properly explain how much this project has been for me and how very much I have learned. This was a crash course in getting a *lot* better at this craft. Thanks one and all for participating and if anyone has a 'last minute' great idea, speak soon as I'm about ready to give this a blast of flat sealer and call it done.
Thanks for looking! I'll be back soon, and will probably be on a new project to share.
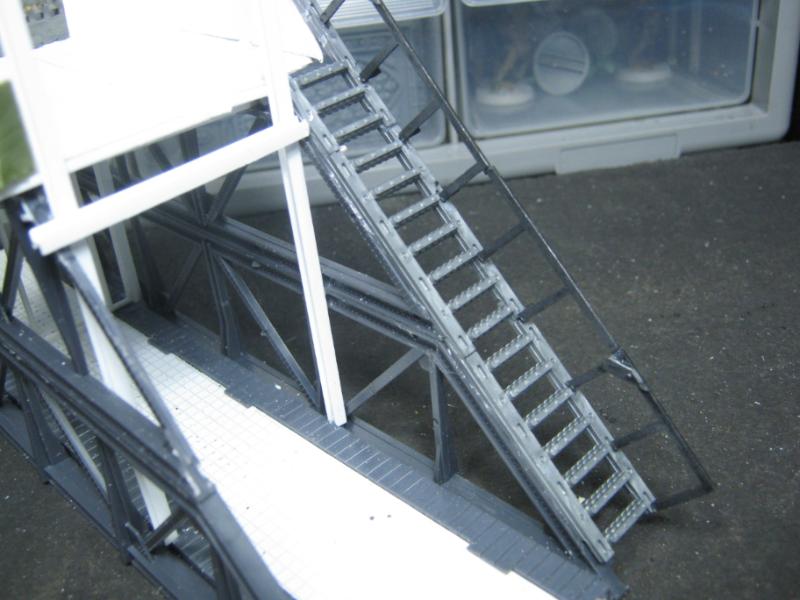
That piece is amazing! I love the attention to detail, and the wear and tear effects help make the piece even better. I especially like the /
3D aspect of the piece, with the cabling and ramp to the next level. i notice you never replaced the stairs though, did you decide they didn't fit?
I can't wait to see your next project, I'll be following keenly.
When I was in college, many of my instructors told us to avoid "sprinkling", just adding more and more stuff without any real rhyme or reason for it.
If it feels finished, or you are at that "I don't know what else to do with it" moment, its time to move on. Anything more and you risk ruining the piece altogether by overdoing it.
Absolutely incredible, Skalk! Haven't had much time to comment (same old, same old ), but watching this progress from its first iteration to this final piece has been wonderful. So much thought has gone into it, and it's clear that you're really trying more and more techniques - it really shows.
Kudos on being adventurous enough to try things I've never seen anywhere else too - that peeling paint on the tank is a great technique, and I might have to try it out myself, if you don't mind.
Love that you kept going, too. Lots of points where you could have said 'good enough' and stopped with a kickass piece, but you took it further anyway, even if it meant risking things you'd already finished.
This is one of my favourite blogs on Dakka - you're always doing something interesting and new, and it never fails to inspire.
Apologies for that embarrassing gush, but it's been building up for a while when I check your page out on my phone on the bus in to work
p.s. Do you mind if I pm you a few questions about your airbrush? There's a badger one that's been making eyes at me from the shelf of my local hobbyshop, and now that I'm actually getting paid, it might be time to make the leap!
What can I say... I'm truly impressed and humbled by your mastery of the scratchbuilding art and the dedication and patience you put into each element. The tiles are amazingly done. After I posted the picture I fretted that it could be too much, but you've done just enough to make it look spot on... My hat is off to you good sir...
Looks awesome. One niggle - the damaged tiles seem to shift slightly to the right with each tile, resulting in a very noticeable misalignment with the undamaged tiles by the time you get to the far right. At first I thought the undamaged tiles were too perfect, but I think it is this uniform shift to the right of the damaged tiles that is the problem. I'd completely understand it being too much effort to fix at this stage though...
Echoing all the others, that looks awesome, bud. It turned out sweet as hell. All the little details are what bring terrain to life and this little piece is packed full of them.
@ Mr Wolfie- Stairs are an oversight that may be added in the far future if I find a bit that will satisfy the design there, but for now I've had enough scratch build for now and in game terms it's less than 3" tall so models will hop up / down w/o issue. Thank you for the compliment, this is w/o question the best piece I've ever done and the standard I've set here won't be revisited for a while. I won't be 'slacking' on my Imperial Sector ruins, but those will rely on paint and a few converted bits to achieve a quality look.
@ Gits- Consider it completely and utterly forked. Thank you again for the idea you offered, it really made a difference.
@ Camkierhi- It's a day. I agree that if I keep going it will a descent into madness and there's already enough detail to put it on most tables with a degree of pride. I know I did a great job on this one.
@ bigfish- Thanks. It was a lot more fun once I figured it out and got going on it. I'll be doing this again on my Imperial Sector floors, but a different design.
@ Graven- Yes, it does. And I'm very happy for that.
@ rust- if you can make your way up here, you're invited. 1,750 pts, standard rules.
@ magless- I really tried to avoid the 'sprinkle' effect and made sure there was a reason and place for everything. I could have added more trash around the base but decided against it. I could have drilled rivet holes in the diamond plate on top of the platform, but again decided against it. No doubt I could have been lost in minutia. There's still a lot of room for my skill to improve, but I think this is an excellent display of where I am. My real challenge is paint, and I'll figure that out before long. I have an airbrush to start using.
@ Scarper- No worries. I know it's absolutely genuine, and I've done the same about your work. Your words honor my work and it is appreciated. As far as the airbrush goes, I haven't firred it up yet because I had to finish the project I was working on first or it wouldn't have been finished for a long, long time, if ever. Now that it is done I can focus on the airbrush. I'll be firing it up Friday night. Expect to see all sorts of pictures here. Once again, thanks to dsteingass for his advice and recommendations. I am hoping to avoid some n00b mistakes thanks to his excellent tutelage.
@ Ruglud- It turned out much better than I expected. Thank you for calling me on task, it looks much better now because of your recommendation.
@ Arakasi- another critical eye catching an error. This one is not getting fixed, bit I'll keep it in mind for next time. It's likely becasue I worked from left to right laying the tiles and did it from only one side as the tank limited access to apply on both sides.
@ hdbbstephen- It's a day, and the sealer is on the list! I'm finding the sealer I have right now is a bit too shiny for what I want. I'm going to look through my FLCS to see if they have a FLAT (like FLAT flat) sealer.
@ Dave- Thank you. You've been a huge inspiration for me, and your advice has been incredibly helpful. This weekend I'll be starting up the Badger. I'm pretty excited all around!
@ Galorn- That would be awesome. Father Nurgle vs. everyone else!
@ Moltar- Thanks man, you know I appreciate the compliments. I had a lot of fun with this, which is different than other projects. Usually I got sick of them 1/2 way through and call them 'done' when I hit 80%ish truly finished. I'm looking forward to cranking up the airbrush this weekend and embrace the next level of terrain modeling! Whoo!
Wow. I really appreciate the feedback. This is w/o doubt the best piece I have ever done and I'm looking forward to somehting similar in the future but for now I'm going to slip back to the more comfortable / less insanely detailed Imperial Sector pieces. Mind you, I am NOT slacking, I'm just not going to spread empty bottles and trash all over the place. I will make craters though, and have bits of IG equipment scattered around randomly, may even call some up of my WFB Skeletons to active duty in the Imperial Guard... as dead Guardsmen. Ha.
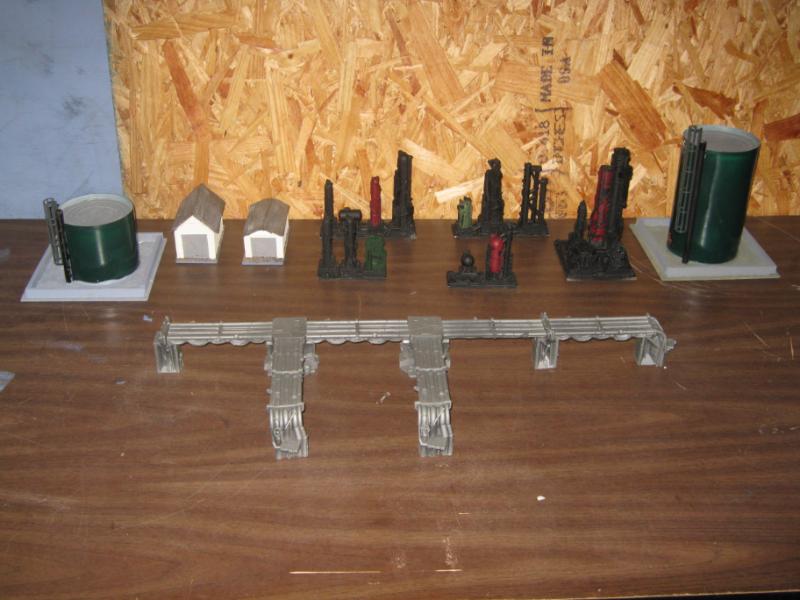
MUCH more coming. Here are my pending projects (may have missed something as I am at work and doing this from memory)
1 large Shrine of The Aquila (2 sets combined)
1 large (2 sets combined) and 1 small (one set) Manufactorum
1 small (1 set) and one large (2 sets combined) Basilica Administratum
1 large Sanctum Imperialis (2 sets combined)
1 Aegis Defense Line w/ Quad Gun
2 Pegasus Hobbies buildings
2 Pegasus Hobbies ruins
1 Pegasus Hobbies Chemical Plant
1 Pegasus Hobbies Large Platformer
Scratch build recreations of the old Necromunda cardboard terrain (aka the original project I was working on when I first started this thread)
Other misc Necromunda stuff
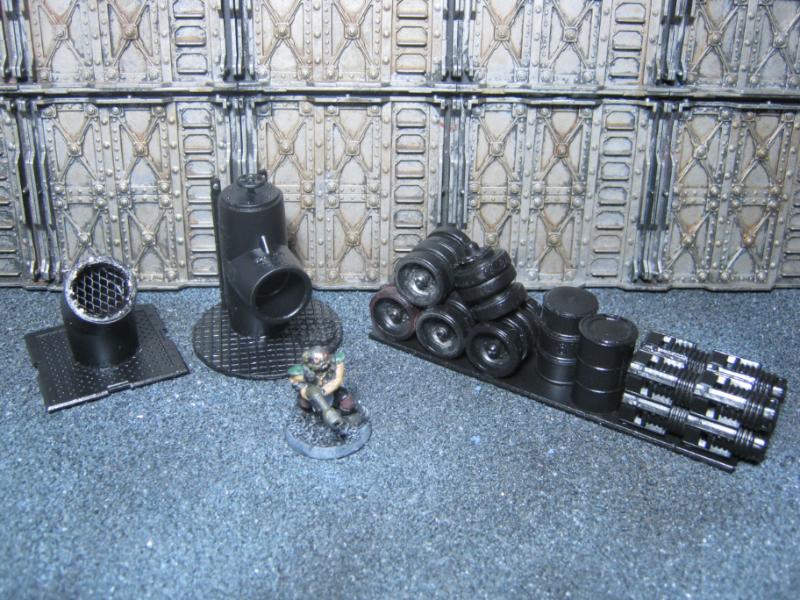
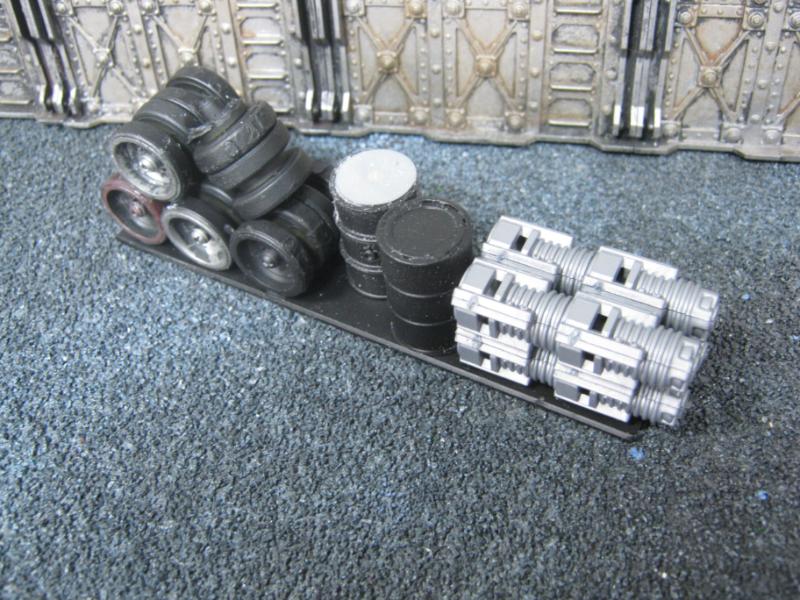
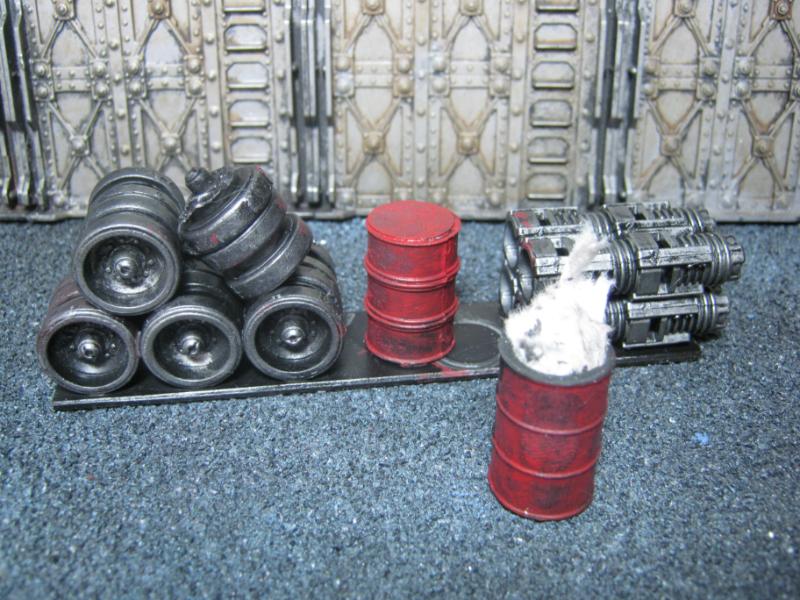
Many smaller 40K / Necromunda things like crate piles, fuel drums, etc.
And of course, a few random surprises here and there to keep you guessing.
The guys at my FLGS were commenting on how nice my scratch-built cardboard ADL looked on the table yesterday, and all I could think of was that I needed to go back to them and bump'em up a level in detail...
@ madmartykmf- You know how I feel about your work / skill and I take the compliment as high praise. Thank you.
@ Rogue- It was a lot of fun to do. I probably won't throw this much detail onto my next piece, but at least I know I could pull it off it I did.
@ hdbbstephen- Glad I could be an inspiration. I have to credit most of the other guys on Dakka for where I am now, and where I'm going next. Dare to experiment. if nothing else you can always put it back the way it was. Sort of.
@ Styrofoam04- Man, you're killing me. No. Just no. I'm done. That's it. Thank you for the compliment though.
@ HAZZER- So far? Dude it's done. Like really. Done.
@ Dave- A few days ago I was on vacation and (of course) was wearing a Harley t-shirt as we walked around the outlet stores (had to take the women shopping... ugh... ) and eventually my shirt attracted the attention of an old graybeard (yay!) that came up to me and we started talking about bikes and the lifestyle that surrounds riding, and of course we asked each other what we rode. He told me he had a Wide Glide (I forget what year) and I told him I had a 2010 Sportster 48 with a few extra tricks on it. He told me he really liked the look of that model and if he was still into the 'stretched out' riding style he'd be seriously thinking about one. As we talked more he told me that he started riding when he got back from 'Nam and had hardly missed a day since. I told him I rode from age 9 to 21 (Basic Training) and as soon as I got my my first duty station I started riding again, but then gave it up in '91 and didn't get back on until '11. He understood the whole family / house / responsibility thing, but when I told him I waited 3 months to ride it after I bought it he was a bit more perplexed. I told him the truth- I was afraid to ride it. it was brand new, it was awesome, it was expensive, I had no skill, and it was too intimidating. But I finally did get on, and in my first year riding I logged over 6500 miles and I have 10's of thousands more miles ahead of me.
That's what is happening w/ the airbrush right now. I've been looking for excuses to not use it. Everyone here is asking me why I'm avoiding it, especially since I was *so* excited to get it. I am going to get to it, but it's not going to be for a while more. I haven't even read the manual yet. Once I get going I'll probably airbrush anything that is nailed down in the house. Until then... I'm getting ready to go. I promise.
@ eldartau1987- Glad you like it! The tile is what really 'sold' this I think. Really brought it to life and put a perspective on it I could not have achieved w/o it.
@ GiraffeX- PM sent
Taking a SHORT break from terrain for a couple reasons-
2- I have no idea how to follow my last piece of work so I'm putting some distance between what I just did and what I'm doing next. I'll post a couple pics of the upcoming project in a few days.
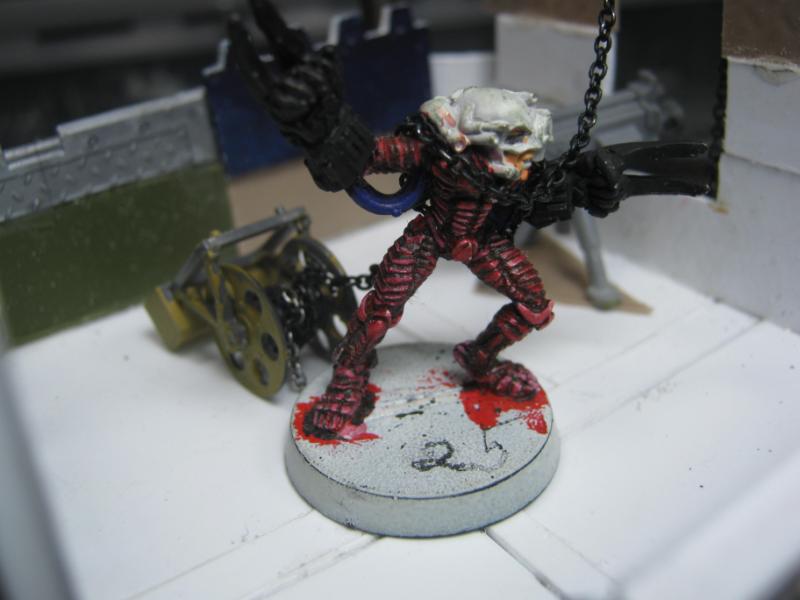
Thanks one and all for checking this out and staying interested. I'll be back soon with actual progress on a new piece soon! I'm taking a minor break but the Terrain Thread rules all and will be back into full swing as soon as I finish this Chaos Lord.
All you have to do is hook it up and start spraying, it's not like a motorcycle at all. You're just afraid of it, but you are the only one that can do anything about that.
@ Gits- It's been fun so far. Need to step it up a bit though, just rec'd a request to play Friday night so I have tonight and tomorrow night to p... hmm... going to skip this game w/ him and just hide it instead. I played a Daemon Prince of Khorne last time so he's probably geared up to defend against a fast-moving death dealer. I'll play something else instead. Muahha.
@ Dave- Just offered that as an example. I know I'm the only one that can change it, and want to, I just can't get past the 'block' right now. Once I do I'll feel as stupid for waiting as I did w/ my bike.
@ Dave- I believe you. And I know that soon I'll be -SQUIRREL- UPDATE!
I started this November 19th 2012. I haven't posted it yet because I was trying to post projects 'in order' as I completed them, but I won't be doing that again for quite a while. I have at least 8-10 different projects going right now, all in various stages of completion. This is the next one I want to finish so it's what I'll be focusing on.
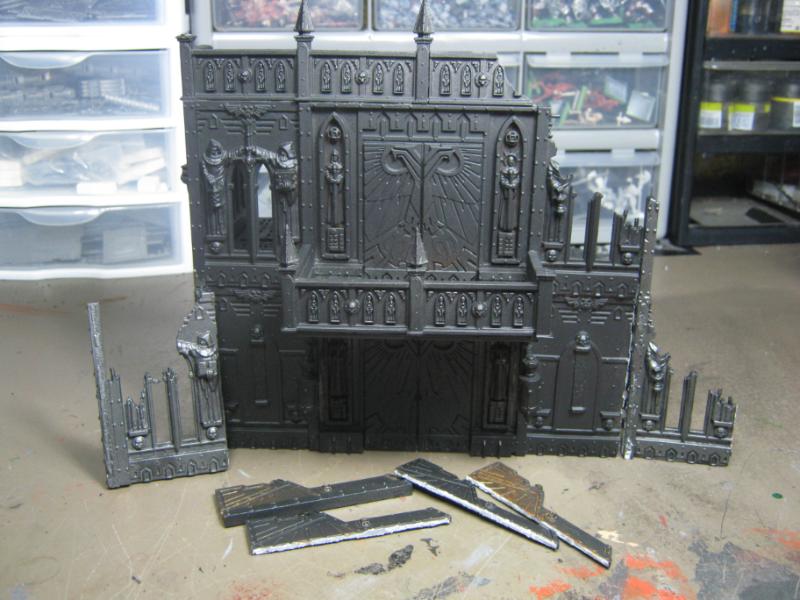
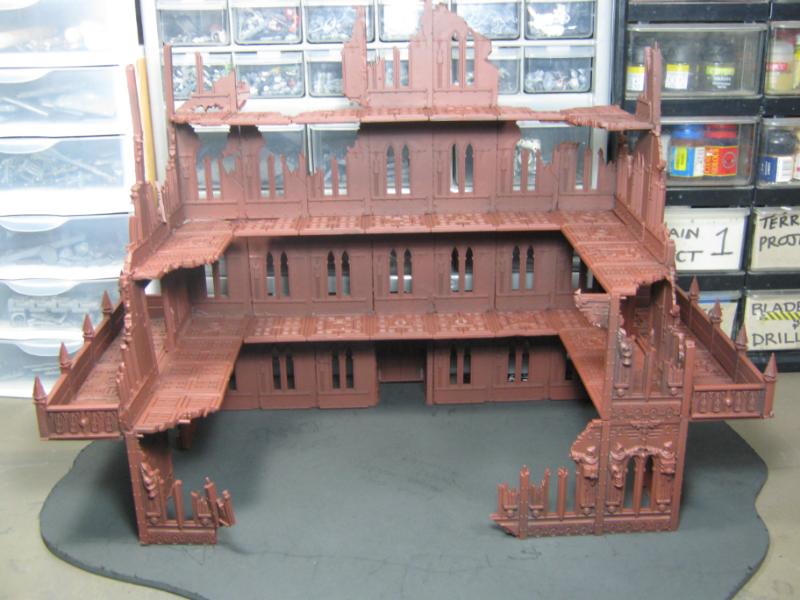
This is the original Basilica model I had been using. It was an eBay rescue. I painted it up decent enough for game play but it was bland, basic, and didn't have a base:
Here it is after it was torn down so I could start rebuilding it:
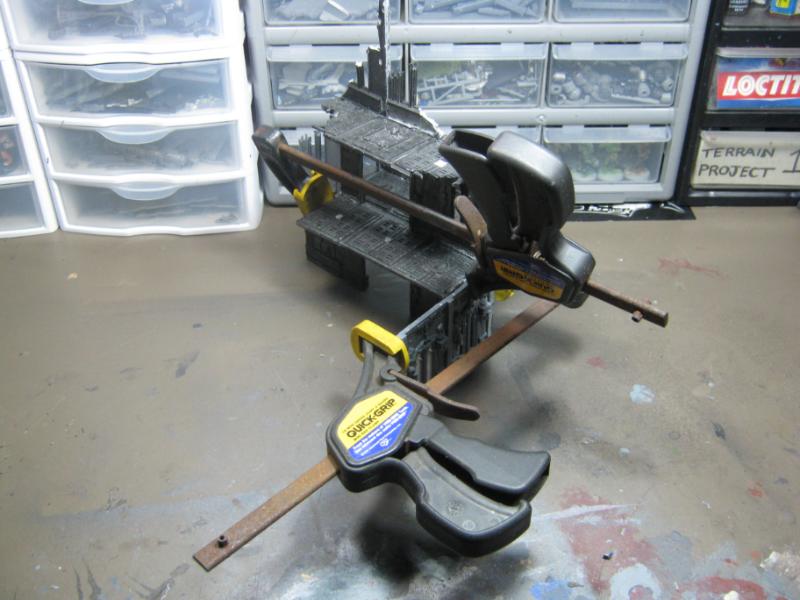
Starting the rebuild w/ pieces from HoB. I use superglue mostly, really try to avoid plastic cement unless absolutely necessary:
Progress is moving right along:
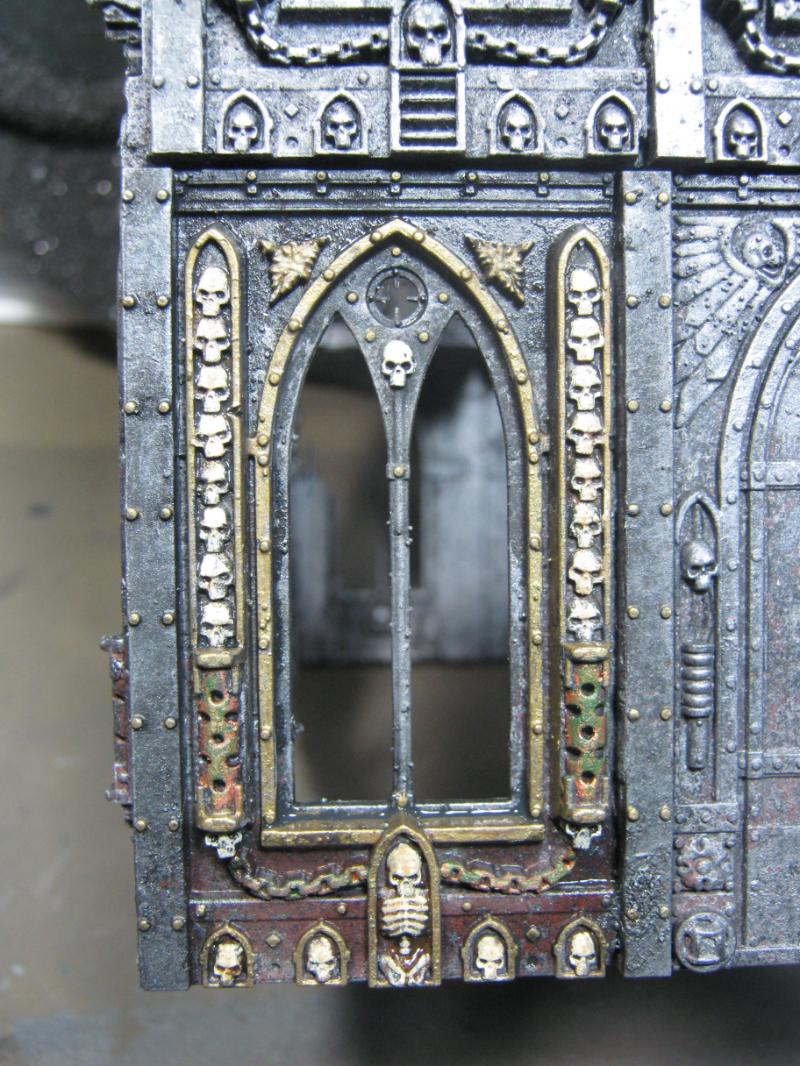
Taking a moment for a short rant about GW models again, this time as a vignette:
Whoever came up w/ the idea of putting skulls on the floors / platforms of the Imperial Sector buildings should be forced to reply personally to every complaint of a model broken / chipped / etc due to falling over because of those stupid knobby skulls. I've been a victim of them more than once. This is how I've been managing that on this project:
Idiots.
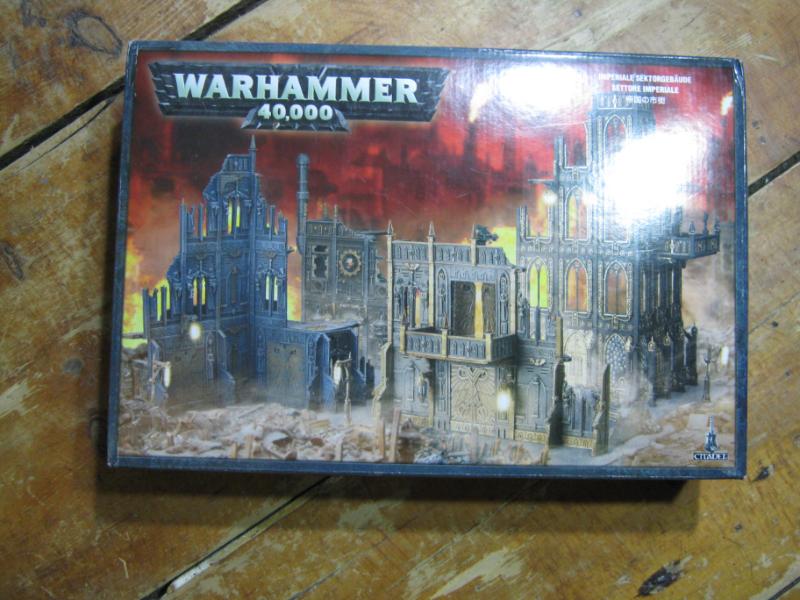
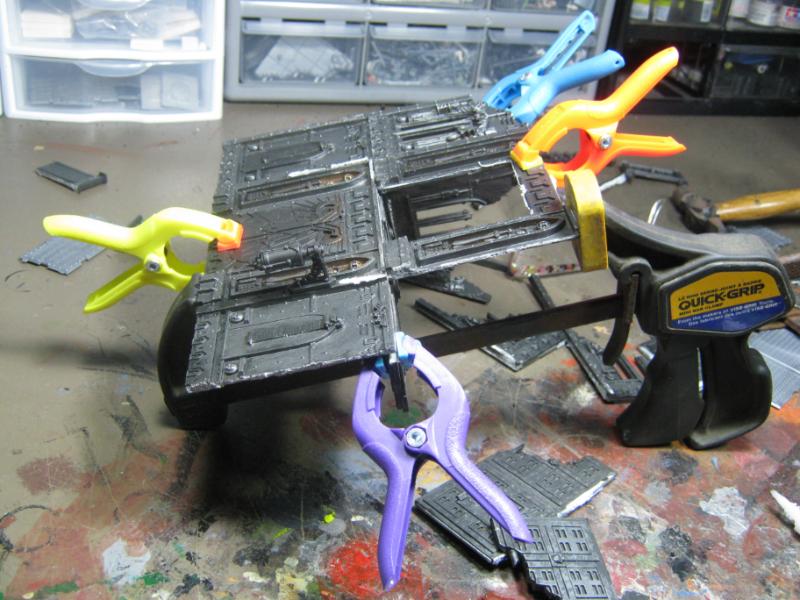
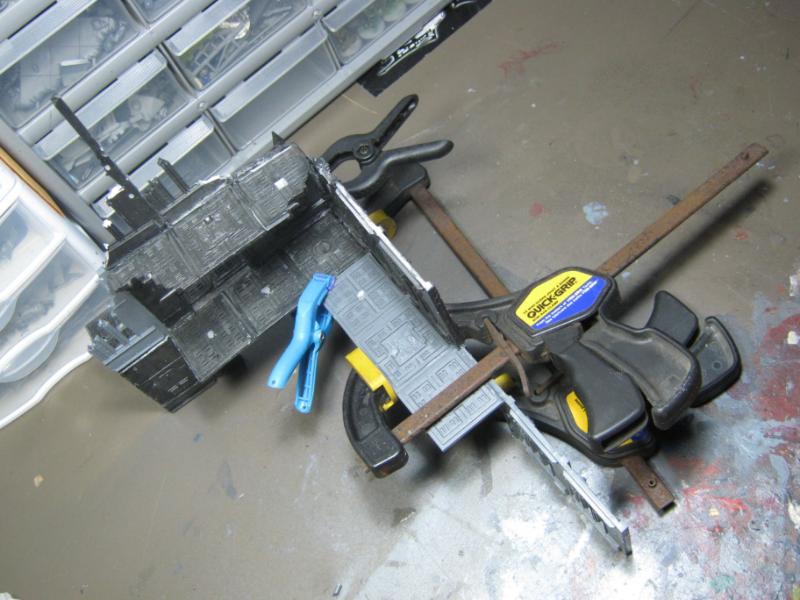
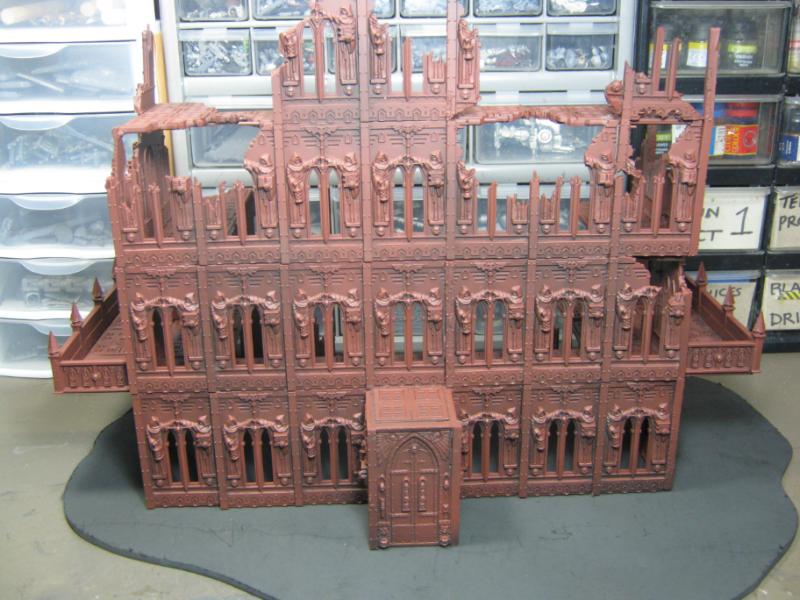
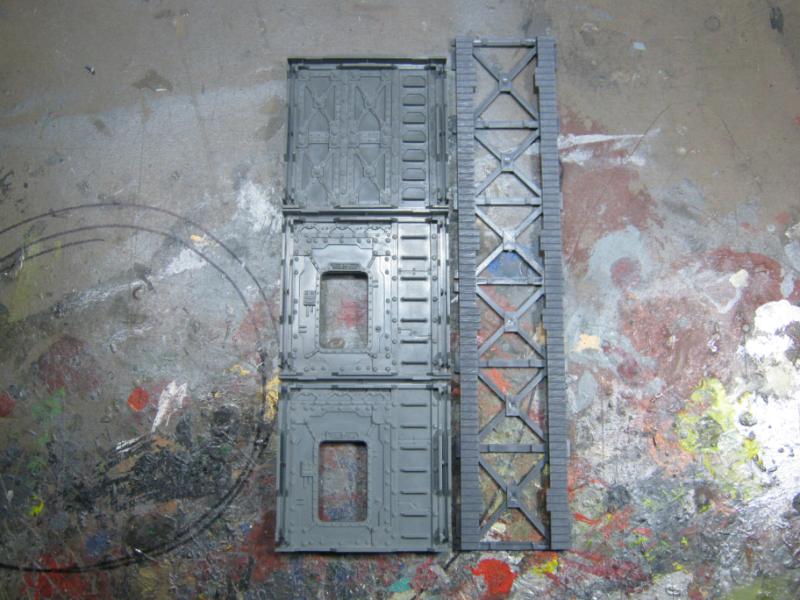
Anyway, moving on. Here I've finally opened my Imperial Sector box and cutting out all the Basilica plates:
Skipping ahead a bit (because for some reason I didn't take any pics) here's what I would up doing w/ them all:
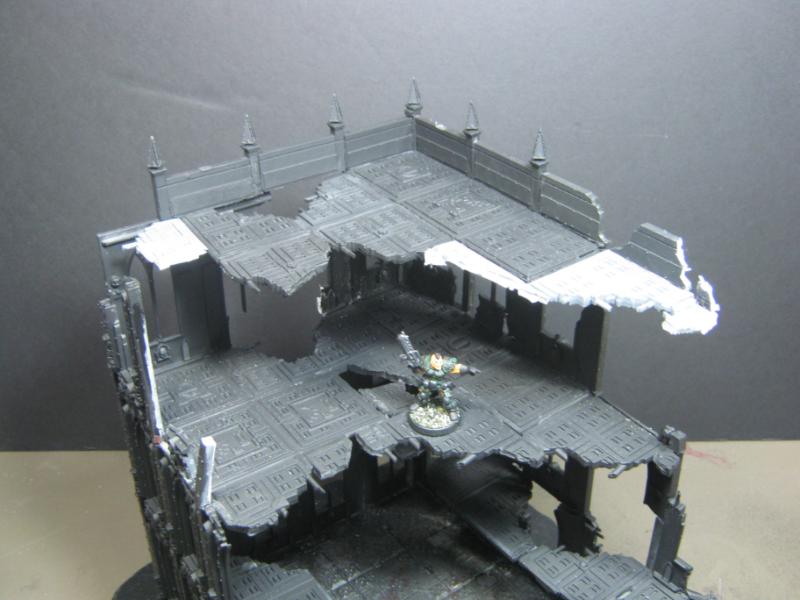
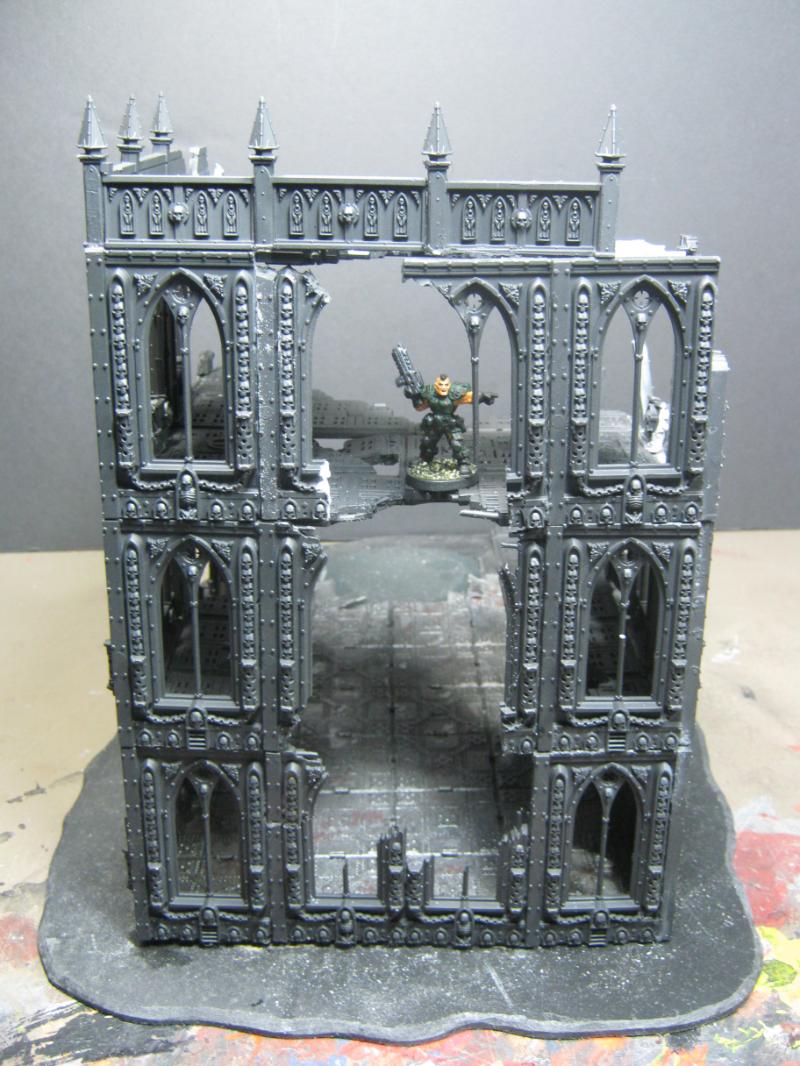
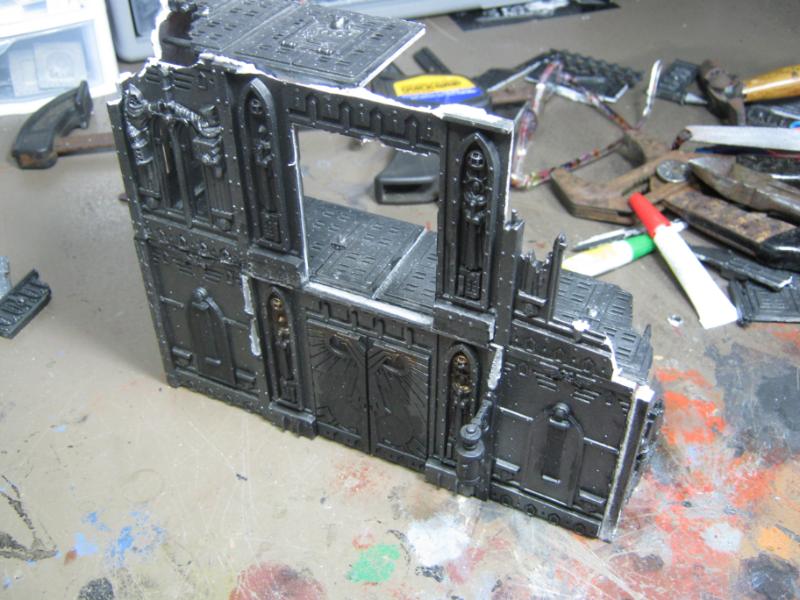
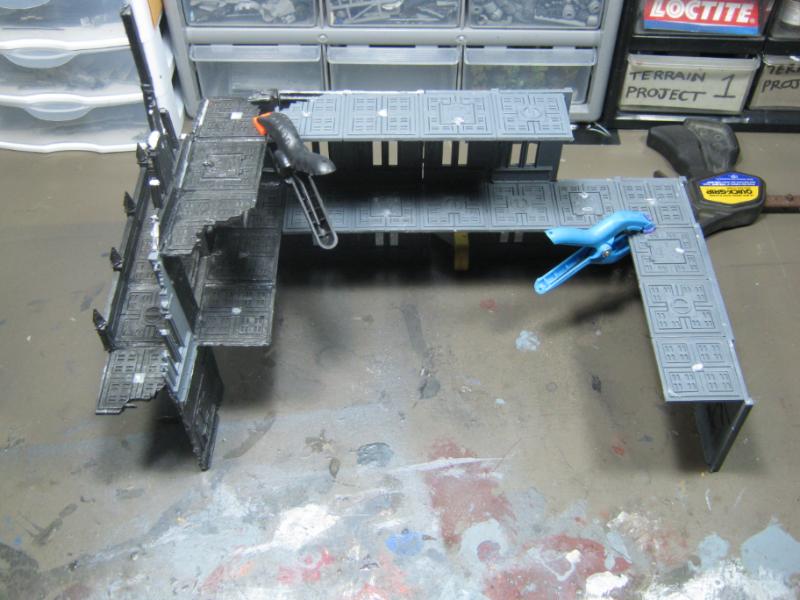
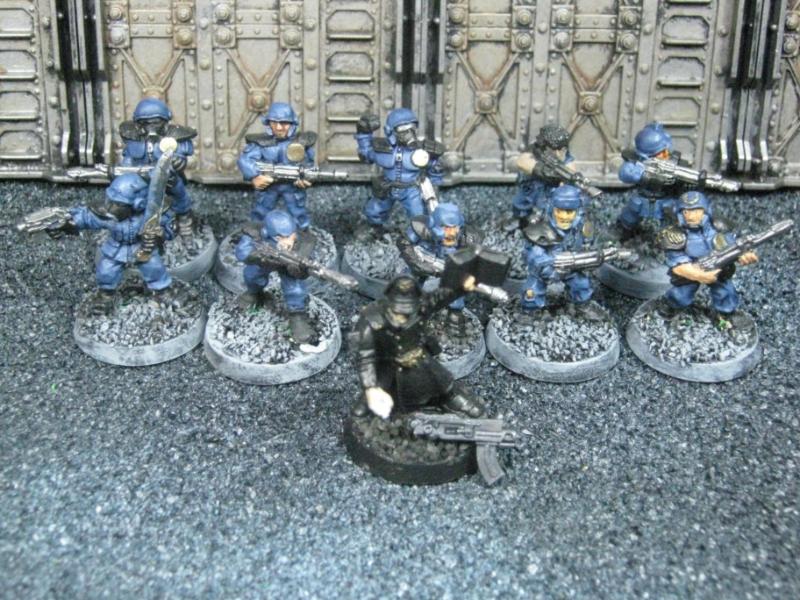
For reference and scale, you can see my original Basilica and also a Space Marine in Mk VI armor here:
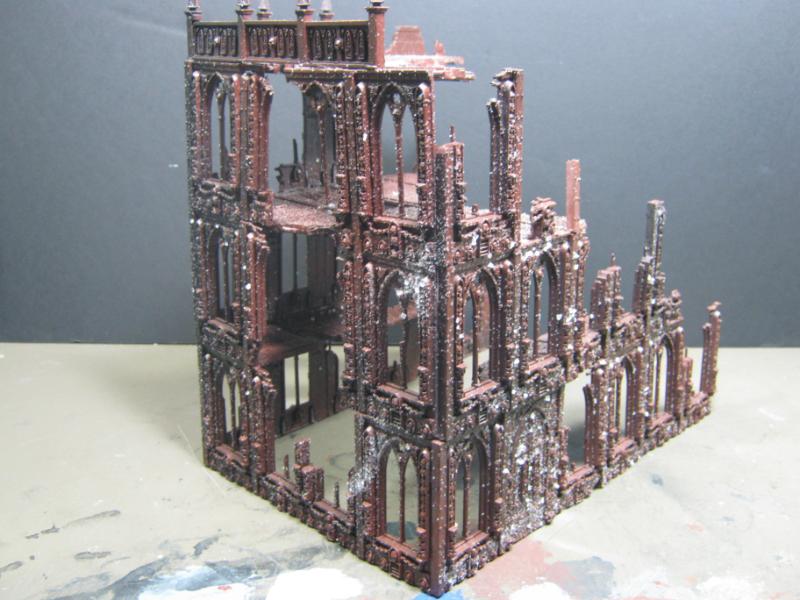
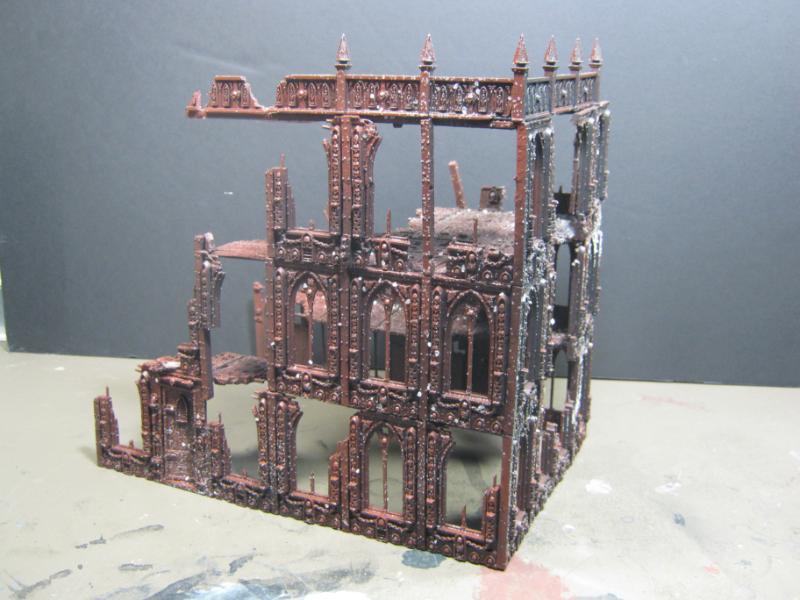
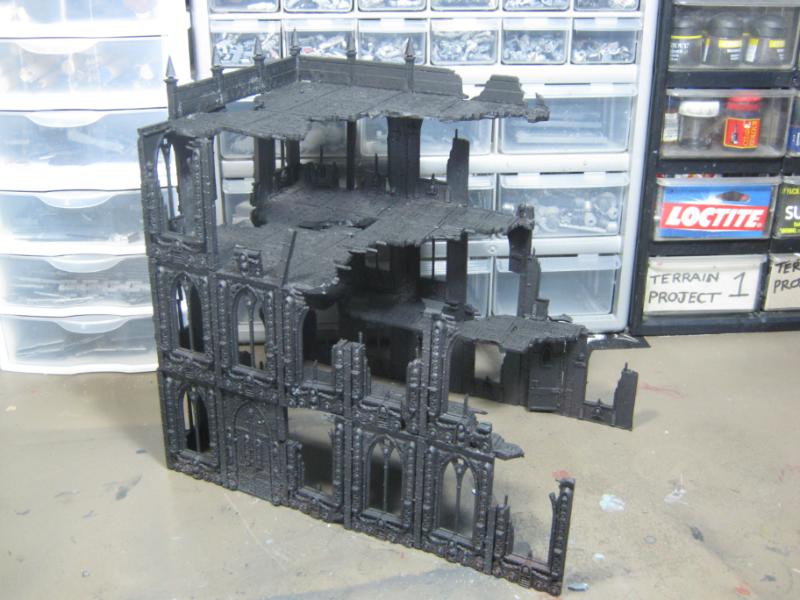
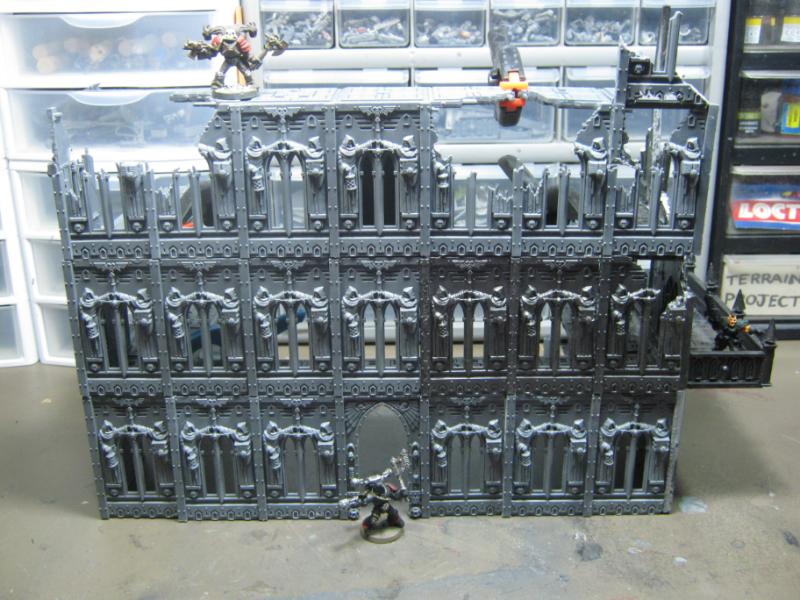
Primed and ready to start painting:
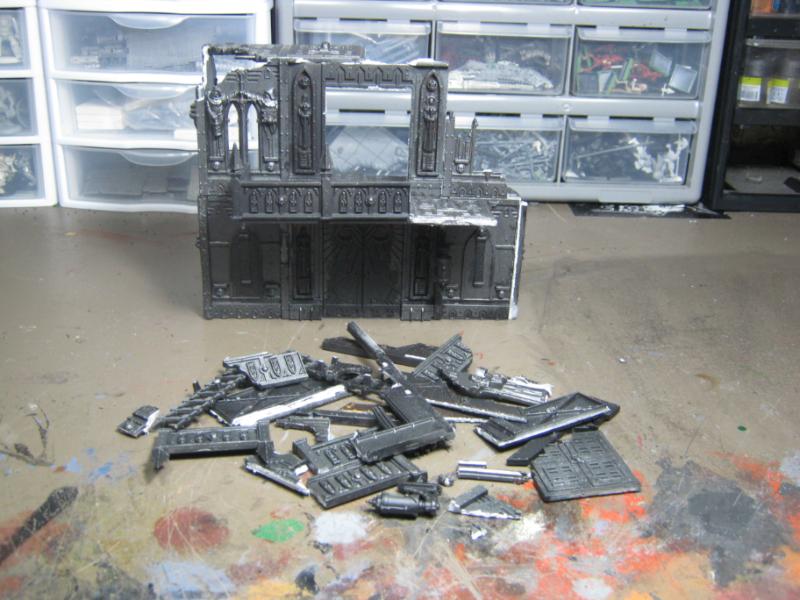
...and then, I realized how completely ridiculous this was in size and illogical for game play it was, so I (literally) took a hammer to it:
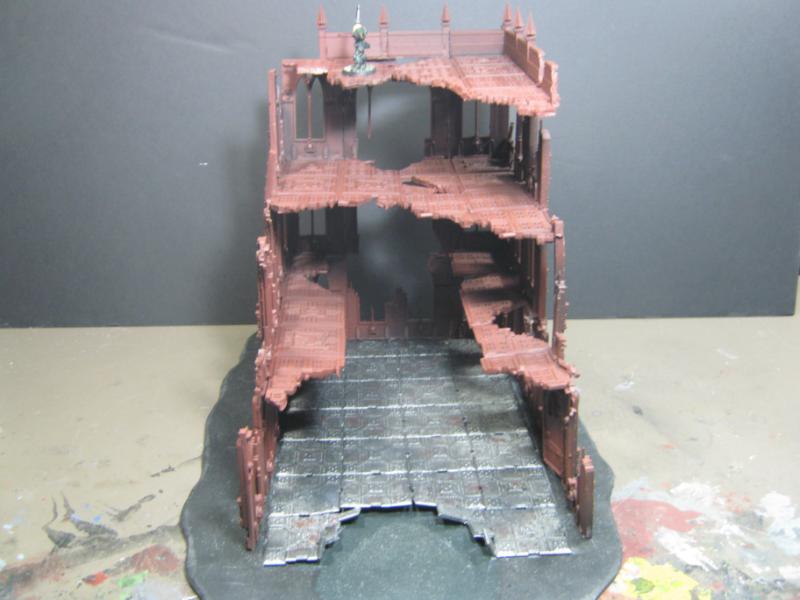
I started the rebuild w/ the floor / base of the Manfactorum project I haven't shared yet:
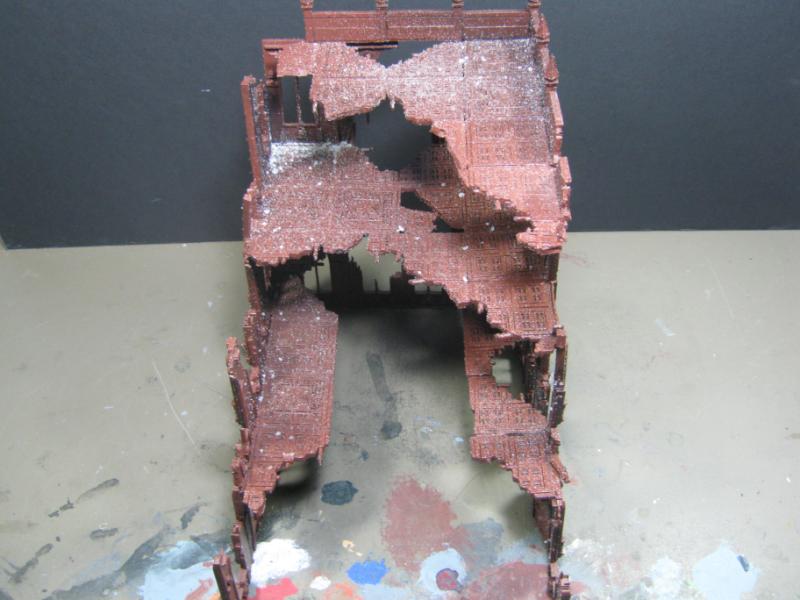
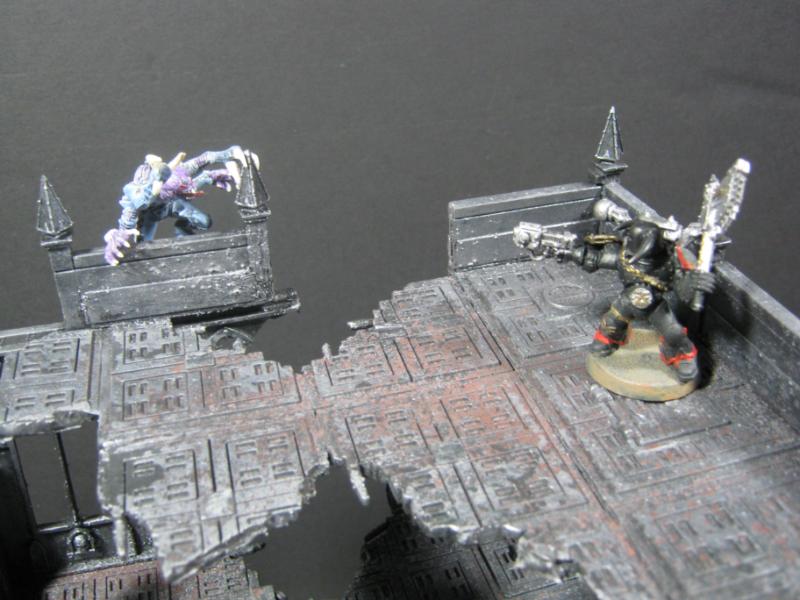
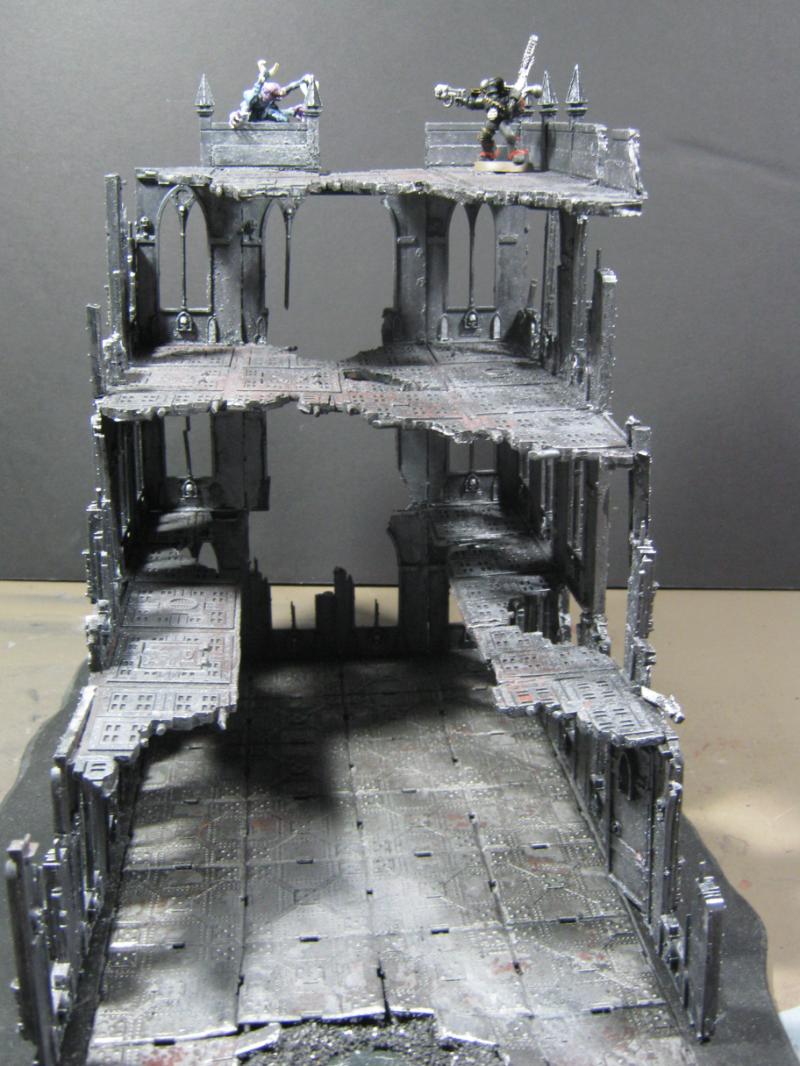
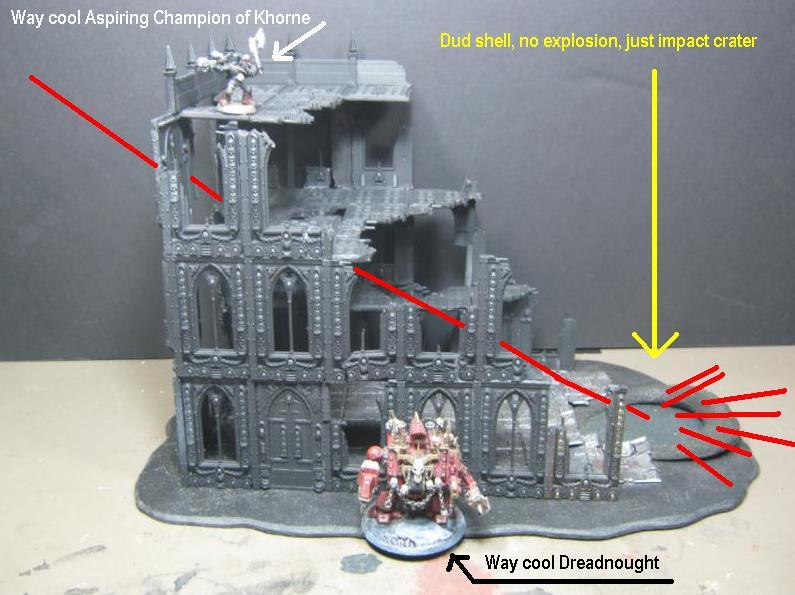
Yup, another crater. Story behind this one is that the round was a dud but still did considerable damage, and of course since that time the building has taken even more hits as the long war rages on:
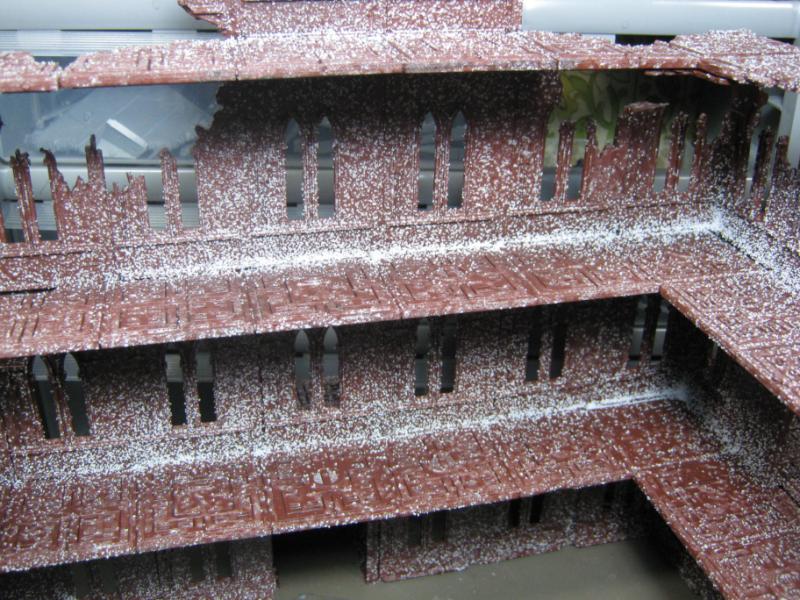
View of where the shell passed through the building on it's way to the impact point:
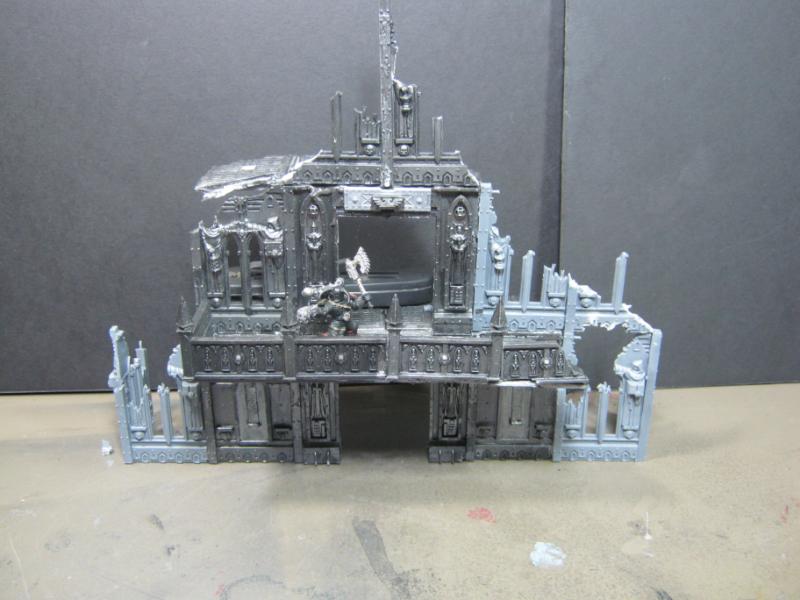
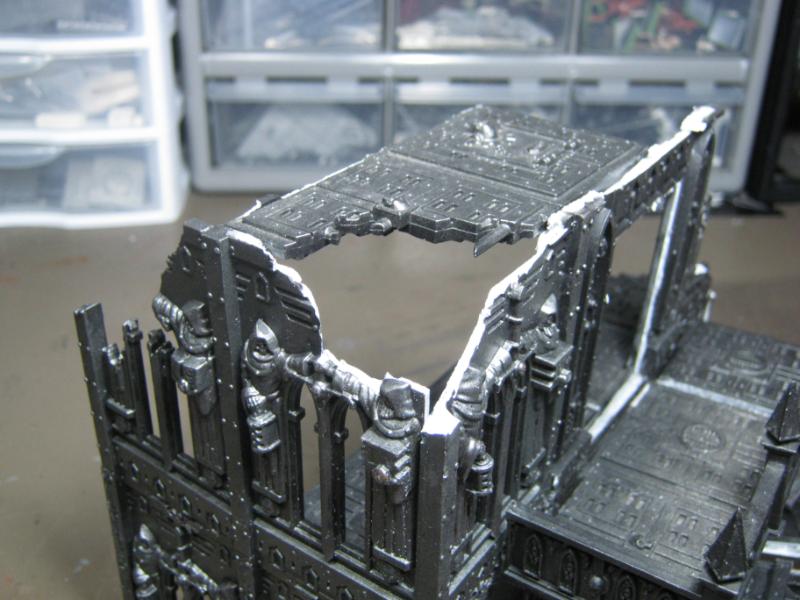
Heavily converted to show damage. Many bits were in need of reinforcement do I used plastic cement and straps of plasticard to make sure they were strong enough to hold together. All straps are under the platform so the model looks cool. Fashion and function!
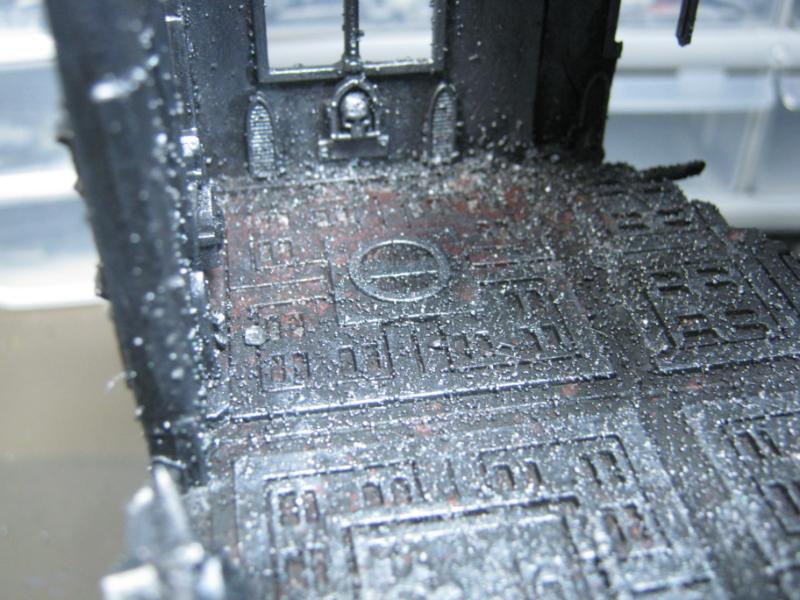
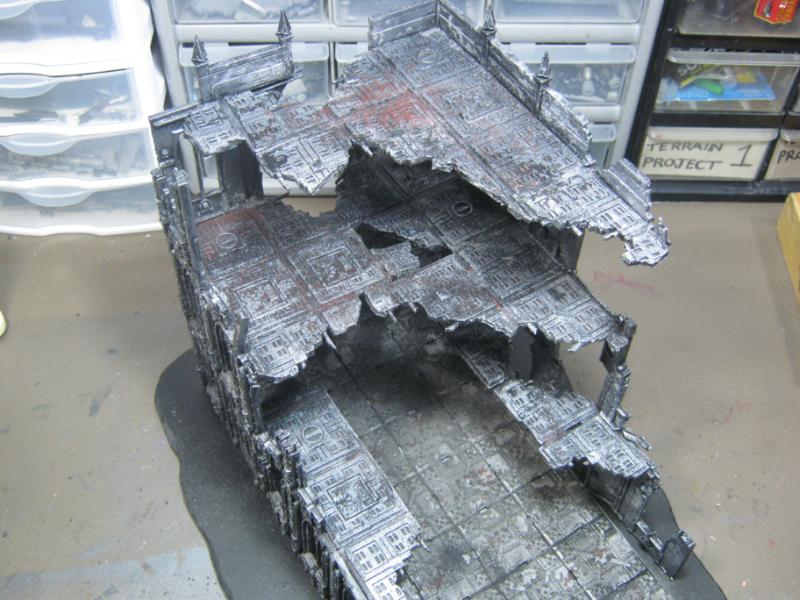
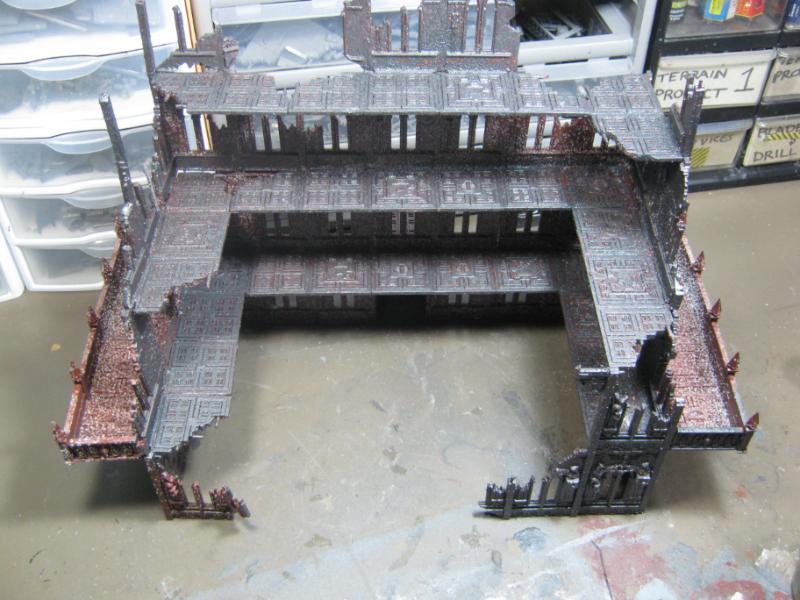
This is where things become 'current', took these pics tonight after I primed it. Build is done, now it just needs paint and random debris for detail. I'll be using a salt and airbrush method on this one. It's not as huge as the original build but it's still large (see ref pics w/ CSM and Dreadnought below) and completely playable.
I like where this project is going and it's going to be my primary focus until completed. I am still going to finish the Chaos Lord I am working on for the contest, but I assure my #1 interest and desire is in Terrain.
That's it for this one. More coming soon, including airbrush updates.
GW model designer #1- Skulls skulls skulls! Skulls are awesome!
GW model designer #2- Yes they are! Skulls! lets put them on... lasguns!
GW model designer #1- And helmets!
GW model designer #2- And canteens!
GW model designer #1- And kneepads!
GW model designer #2- And ... and skulls!
GW model designer #1- YES! Skulls on skulls!
GW model designer #2- Ok, we've put skulls on everything... except...
(designer #1 and #2 synchronically) ON FLOORS!
Lol
Latest piece looking good so far. I like the idea of the shell passing through the building, you could maybe add a few intervening pipes etc bent in the direction of the crater to really sell that idea, maybe...
That is a labor of love, but, seriously, don't smash it again. It looks pretty awesome. I like the size of it and the functionality. Excited to see it develop from here on out.
@ Gits- Building is my favorite part of any project and always receives the most attention. I don 't enjoy the painting so much as it never feels 'finished' or 'right'. My critical eye goes back to old projects and see things I don't like but were the apex of my skill at the time. The recent Fuel Depot was a great example of that. It was functional and looked ok, but now it's a mini-diorama. I would enjoy doing that to all my previous projects, but where does it stop? Eventually I'd loop back around and start the process all over again. I'm going to leave what is done 'as is' unless it is a completely obvious need (like what the Fuel Depot was before the rebuild).
@ Galorn- PM sent
@ Meade-
How could you???
It's easy! I just take my razor saw and zip right through them! All kidding aside, if you ever have a 2nd Ed (meaning metal) Havoc w/ an Autocannon fall of the 4th level platform and break into 4 pieces because of 'wobbly model syndrome' you'll understand my reasoning better.
@ inmygravenimage- The hammer was the best thing I could have done. It changed so many things for the better. I'm looking forward to finishing this one, it's going to look great on the table.
@ Dave- PM your address (for the 3rd of 4th time... ) and I'll send you whatever I have that came out decent.
@ Dr H- I didn't show a pic of the completed 'impact side' of the model. I'll do that soon and let ,e know what you think.
@ Moltar- Believe it or not, this time it wasn't a flash of modeling rage RRAAGGHHHH SKALK SMASH!!!! I took a long and discerning look at what I had built and decided that I could get more use out of the model and stay more true to the overall intent of the board if I downsized it by appx 1/2 half and use the pieces in a more intentional fashion. To that end, I dismantled the model instead of smash, even though I did wind up resorting to a hammer. Look at the clean lines. Also, the piece left over is completely intact and ready to be used in a different project.
I really enjoy this project and I'm looking forward to completing the 40K Imperial Sector portion so that I may move on to the next phase, which is likely going to be the Pegasus Hobbies buildings.
@ Dave- Been there, done that, and was scolded for it.
@ shas- Yup, we have. Somehow we all manage to keep going and make some great stuff though.
As has happened dozens of times on this thread I have once again found an error and need to address it. The build is in fact NOT done. Ugh.
Flat edges do not belong on my ruined models. Thinking back I'm remembering how this happened- I am out of ruined walkway bitz and need to get some more. HoB here I come. Later.
I've already spoken to the people in my life that would be directly impacted by an idea I had and the unanimous decision was green light GO so I'm going to pull an Iron Man modeling weekend w/ hopes of completing the Basilica. I do have to take some time out for a few things but overall I'm going to crank on this until I start nodding off at my workbench. I'll be investing in a few 5 Hour Energies and drinking quite a few coffees. I expect to start sometime after 9-10pm tonight and go from there. I'll be using my regular rattlecan for the rust base / salting but I'm going to use airbrush to lay down the primary steel base. I'll skip detail work w/ it though. May as well jump straight into the deep end wearing heavy boots without a life jacket. I can't 'break' it per se, and I have some awesome instructions from an old airbrush veteran. I'll be fine.
I need to pick up few more supplies before the next project starts, specifically another sheet of hardboard for the base of each building. I'm going to try the Pegasus Hobbies tiles for the walkways on the next building I put together. I have a lot of them so I want to try something new just to see how it works out.
Cool, will do.
It's a good thing you don't use plastic cement when you start a building with the number of times you end up pulling it apart
But seriously it good to see this kind of modelling going on in the open as (take it from a scientist) experimenting is good
It's a good idea to use the airbrush for undercoating/basecoating first, as it'll let you get used to handling it and will give you confidence with it, detail work can come later.
Dude!..Pulling an all-night (or all-weekend) hobby binge is fething cool!! -Just make sure you give yourself plenty of rest before going back to work...I was worthless as tits on a boar all this week @ work- My binge last weekend probably directly related to my panic or BP or whatever it was last night. Rock on brother!
btw...make a damn mess will ya? A clean bench is a sign of a sick mind p.s. just save them in a baggie or something and send them along with the next inevitable trade
@ Dr H- I don't use plastic cement very often. I change my mind so frequently (as you've seen already) that I barely keep up with myself. A great idea today is horrible tomorrow. I tend to rip things up frequently, but in the end the result is always superior to the initial idea.
I have a lot of respect for scientific minds. A long time ago I wanted to become a Geologist specializing in Geochronology but my family was a bunch of working class white trash redneck felon losers who thought getting a job driving a truck for the local concrete company was the apex of success in life and didn't support (or even have a cursory understanding of) my aspirations. After an extended lack of assistance / support and a series of poor decisions I wound up taking a different path in life. The field still fascinates me and I enjoy it as a layman, and knowing that my current employment (IT / Support) gains no respect from my family at all is totally worth it.
@ Dave- Man I cracked up at that. I operate on 4-6 hrs of sleep on average anyway, my BP has been raging and I'm using my powers for 'good'.
@ Dave again- WHOOOO!!! I've switched up to vodka though, more alcohol w/ less consumed volume. But taking a pic of a mason jar full of purple fluid doesn't convey the same msg as a beer label. Know that I'm feeling decent and I'm amped up to keep going for many hrs. And man, you had better believe the house is shaking w/ Metal. If someone got shot in the other room I wouldn't know it unless it was between songs. Bolt Thrower and Cannibal Corpse (and Nile and Obituary and Six Feet Under and Gorefest and Malevolent Creation and Bloodsoaked and Hypocrisy and Entombed and Kataklysm and dozens more) are shaking the house off the foundation. Tonight is 100% PURE DEATH METAL AND GRIMDARK MODELING!!! RRRAAAGGHHHH!!!!!
(hard to believe I'm 45 sometimes, isn't it? Ha! And no, I'm not messing up my work space. I lose / break things when it's a mess, and I have PTSD from the way it used to be. Never again.)
Ok, quick update while stuff is drying. First up is a pic for Moltar. This it the remaining 1/2 of the huge Basilica I took apart. I didn't smash it.
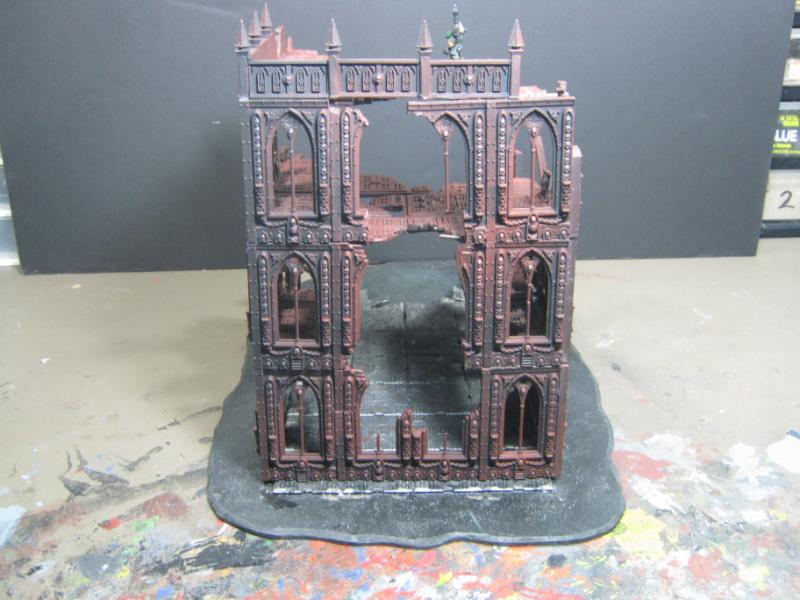
On to the project. Took care of the flat edges as much as I could. Had to open / steal from my Sanctum but it's cool, I'll replace those bits before I get cranking on that piece. Also, 5 Internet points for anyone that identifies the model I've chosen to represent scale tonight. Hint- it's nothing GW did.
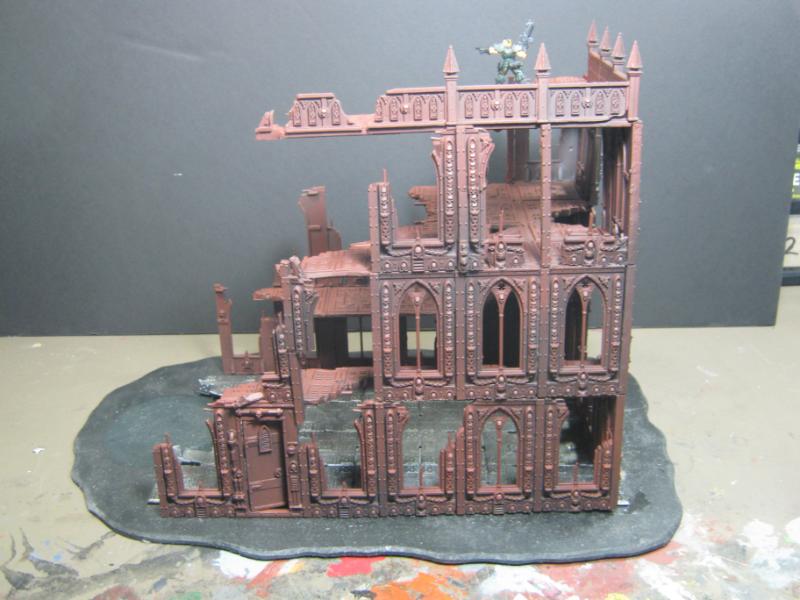
@ Dr H again- here's a pic of the 'impact' fron of the building. I know there's too much space but I'm working w/ limited resources and the idea is that it didn't explode, it just smashed though and there will be debris strewn on the floor / exterior of the building later to show the collapsed walls.
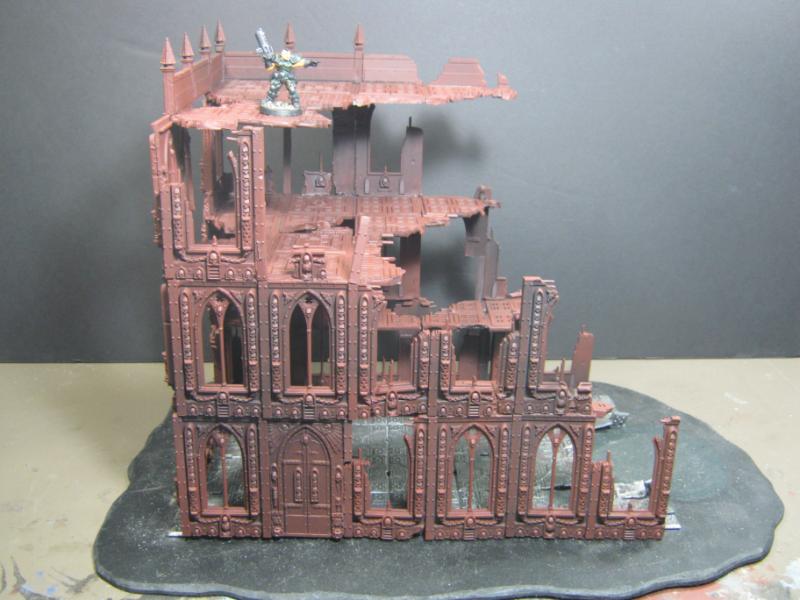
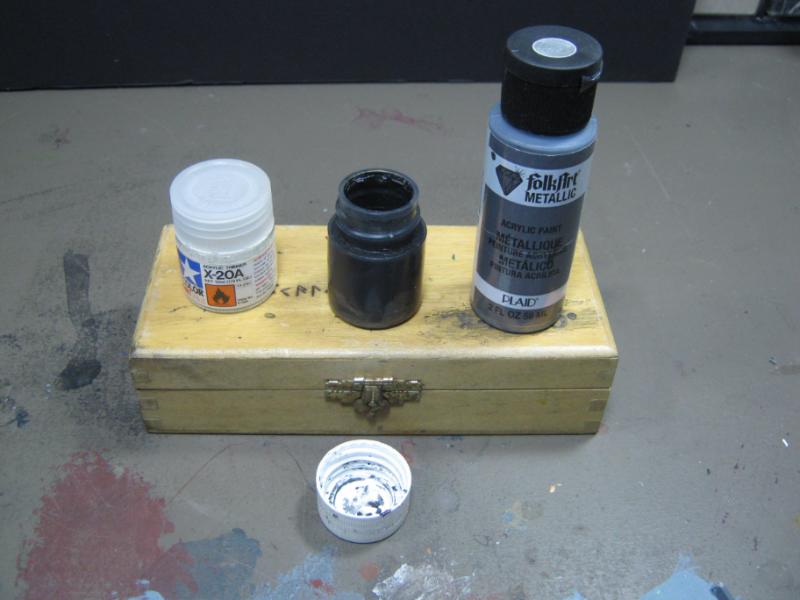
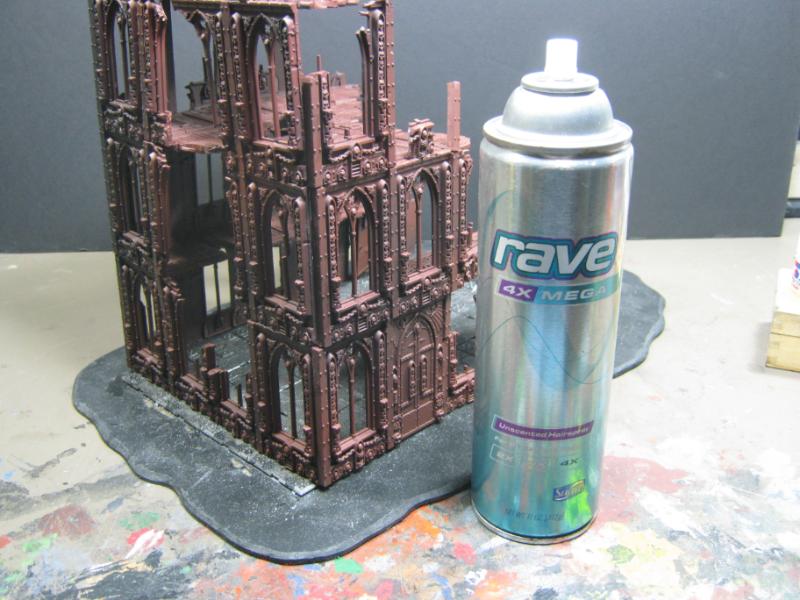
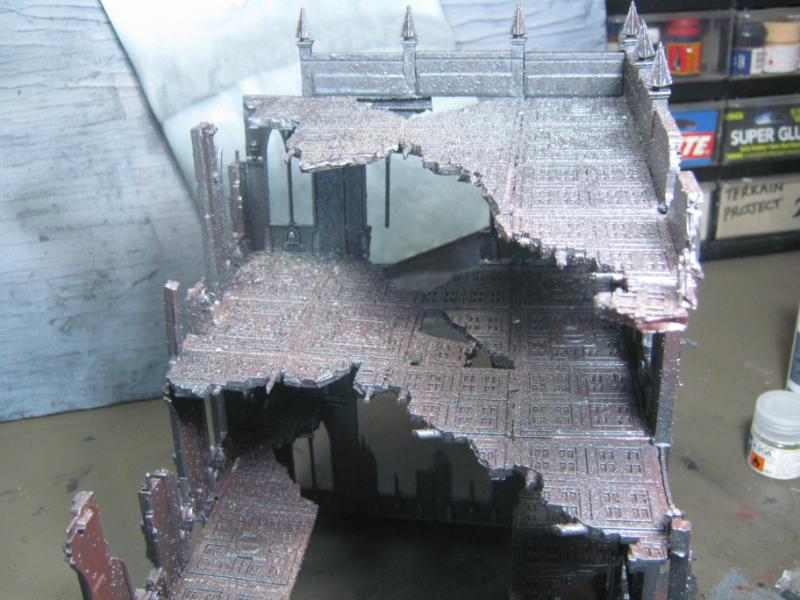
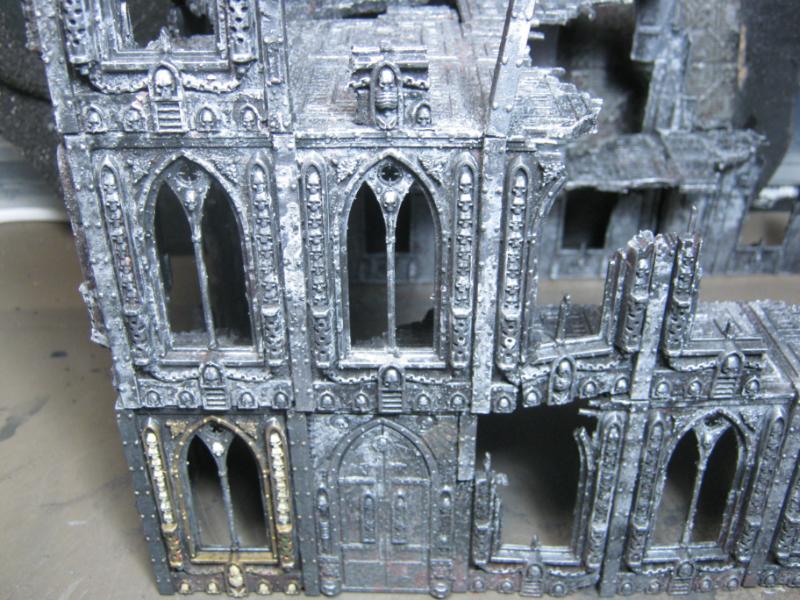
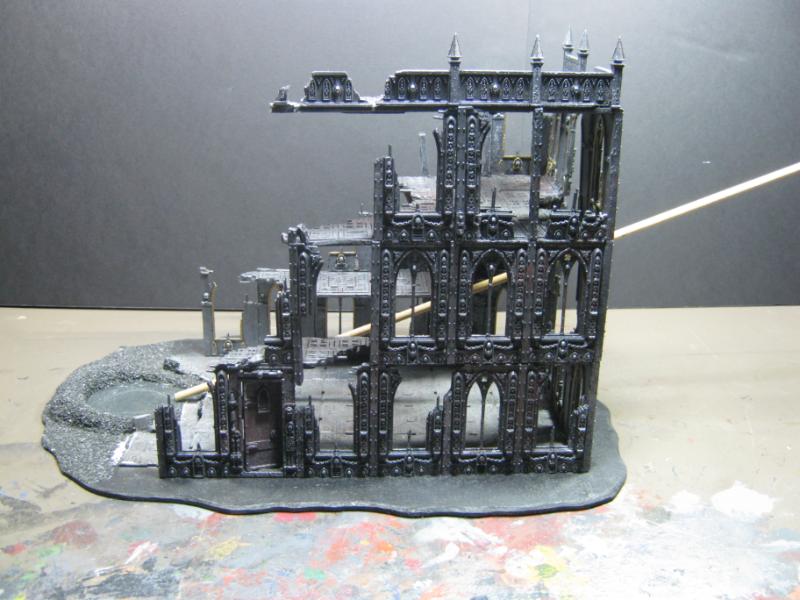
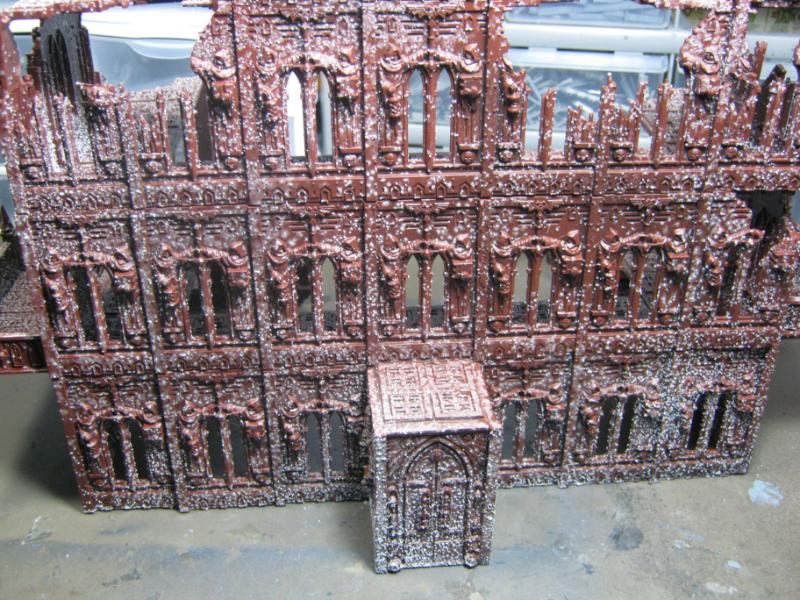
Rust undercoat. I was thinking about saying I was stopping here but I didn't want people to think i was serious. Because I kinda could have been.
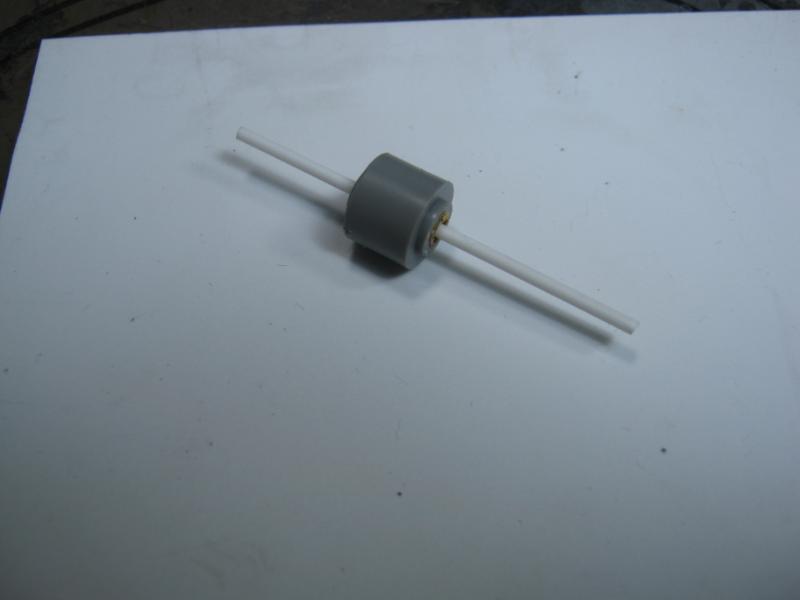
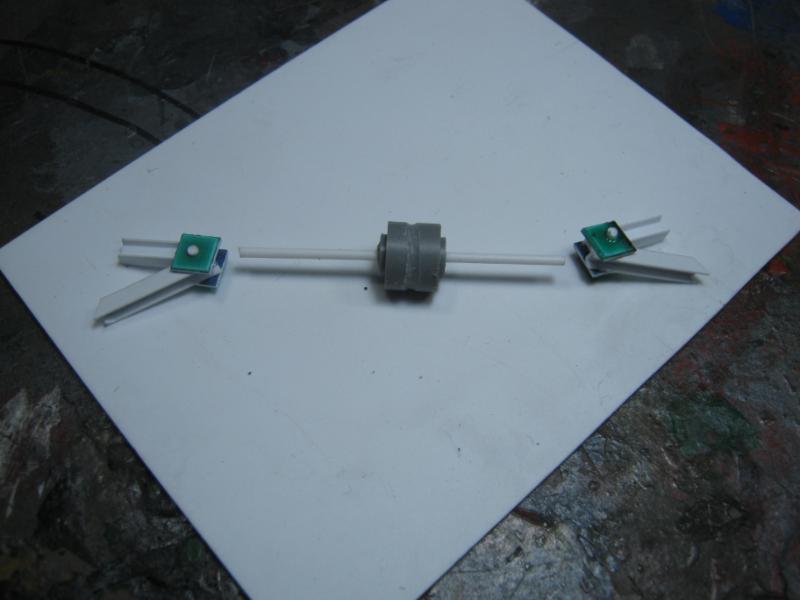
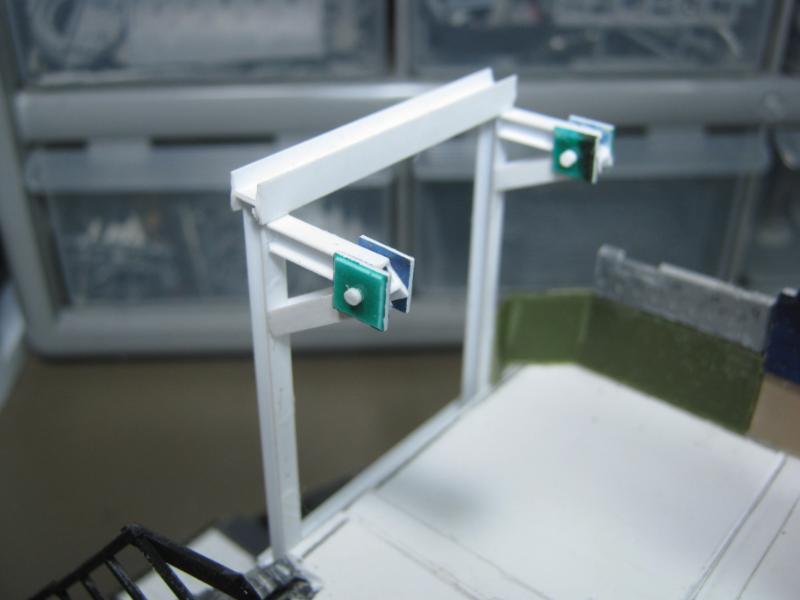
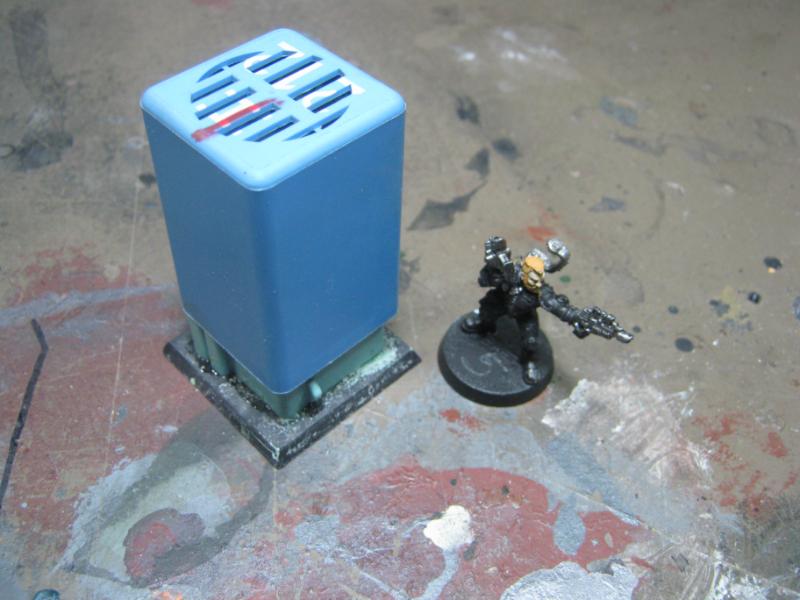
While I was waiting fore that to dry, I started putting this together...
I'm going to experiment w/ the thinner mix. I don't expect awesome but bottom line is I can't 'ruin' anything so I'm looking at this as a crash course in airbrush awesomeness.
And the reason I'm posting right now- time to salt!
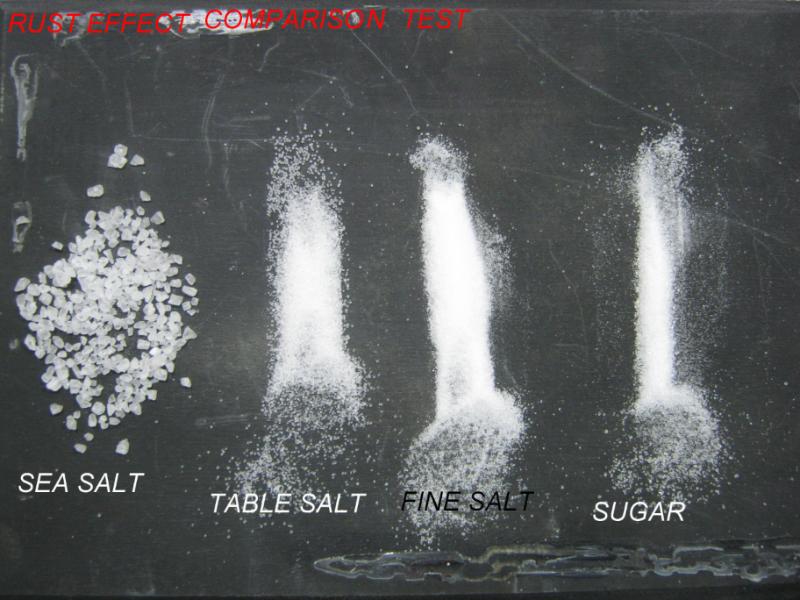
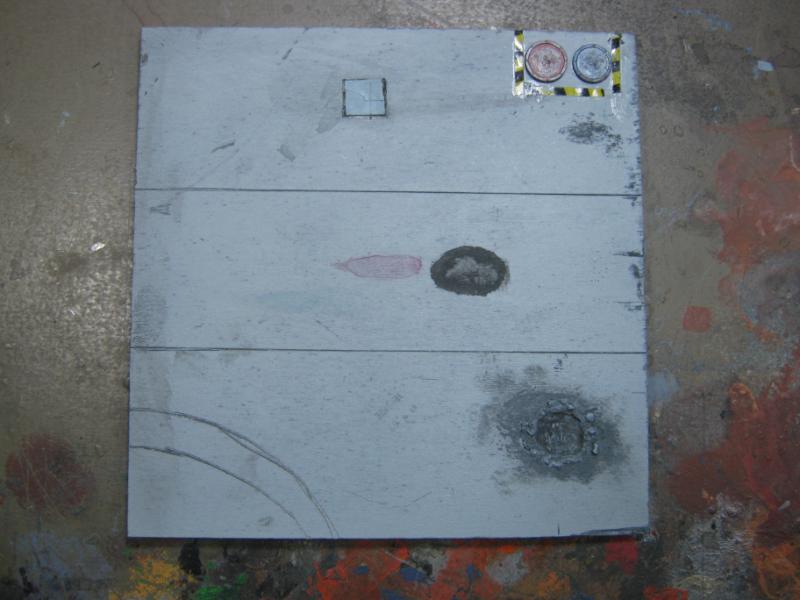
Before I sprayed I decided to do a salt comparison / test to see what I liked best:
I decided I liked it all and mixed it together. It climped in a few places more than i intended but it was applied by hand. I need to find a shaker that allows more even application.
I'm off to get back to work! I have a buddy coming over for a while but I'm going to run his ass out of here and get back to work ASAP.
oh skalk... do you realize that you are the one guy that makes me flich and then a second after that i drop my jaw?
that hammering on that huge building sure made me almost lose my lunch... but then i saw where you are heading... all back in good humors...
one question tho... the salt... i understand and i like how you mix different grades together to get a nice random effect... and although sugar has a nice grain size too... isn´t there the odd possibility to mess it up because to sweet glueing everything? just asking... if you get away with it, then this is highly educational... as always^^
I can see the scientific mind at work in what you do.
The front of the building looks good so far. It certainly looks more like something has passed (read smashed) through the wall rather than exploded and the combination of bits and pieces strewn between that and the crater and a pile of rubble at the base of the hole should work.
My idea, to add to that, was that if you were to add some floor support beams or underfloor pipes that would have been there before the hole and are still attached to the rest of the standing building, then have them bent in towards the crater as this will give a greater impression that something has punched through the wall. But it's only an idea, will looks fine as is.
As for the salt, I think the clumping of the salt mix is better than an even spread as you want it to appear random. Rust doesn't occur nice an evenly. So what you have should be good.
If the sugar does give you issues as Vik says, you could always try to wash it away with water, it'll dissolve but your paint and glue and plastic won't. May even give a nice affect...
well... i saw a thread here where they masked and weathered with marmite... just the same methode really... let it dry...then hit it with paint... then rinse off...
Wow...I had to google Marmite...WTF..more weird British food?
It looks great so far Skalk. Glad you're gonna spray the color over top with the airbrush, trust me..with a single color, you'll most likely abandon rattle cans for good
Sugar is soluable and will dissolve in the water/thinner and mix..probably not a good idea. Salt will dissolve too, but recrystalize once the water evaporates.
I know EXACTLY what you mean about family not even having a cursory understanding of what you do. As a result of that and other things, I really don't give much of my valuable time for things like visiting or giving a gak about my family either
"Tonight is 100% PURE DEATH METAL AND GRIMDARK MODELING!!! RRRAAAGGHHHH!!!!!"
Remember when GW wanted these things to go hand in hand? When we had metal bands advertising their albums in our mostly black and white White Dwarfs? I'm old enough that I can't separate 40k from metal. I miss old school Slaanesh Noise Marines with mohawks and guitars.
errr... excuse my derailed train of thought....
On topic, the basilica is looking nice. I'm curious to see what color you apply over the salt and rust effect and eagerly anticipate a meaty update.
I managed the Yorktown, Fort Sumter, the the Hunley, as well as the downtown open air market, and a few other touristy things with my local guide. Had a good time! Even visited the game store by the Citadel mall.
Brian, glad you had a good time. You managed to visit most the stuff I try to avoid
That game store is okay, certainly not the best in town. They always have a very limited selection of miniature merch and over priced, used, retro video games, but at least you got out and about.
@ Vik- I imagine a few people have that reaction reading my blog, but I'll admit you're the first to say it and it cracked me up. For what it is worth, sometimes I feel the same way while I'm doing it. As far as the sugar, I have no idea how it came out, I'll have to test it completely individually before I can offer any results.
@ Dr H- I'm not discounting your idea at all and I think it would certainly sell the idea even more, but I'm at a place in the project build where I don't want to tear apart / rebuild again, and that is what it would take for this as I'd be drilling holes through each floor. And on that note I'll admit that I'm disappointed w/ myself on this one, I could have gone for a lot more detail such as pipes, wires, etc. I have quite a few projects left and perhaps the next 'ground up' build I start will have some more advanced features. As it stands right now I'm going to be lucky if I pull a decent 'save' on this one. You'll see why I said that as you read through.
@ Dave- Adventures in Airbrushing were a complete fail, but only because the paint I tried to use was completely inadequate and the small bit of 'success' I achieved actually made things worse. You'll see what happened as you read down.
@ Moltar- I do remember, which is awesome because I discovered Bolt Thrower AND Games Workshop right around the same time but completely independent of each other, and when I found the tie-in I was pretty psyched. And regarding the OLD metal models... I wouldn't expect anything less from a Thrash Metal Noise Marine.
@ Briancj- We had a decent chat about Metal the last time you were here. I remember when Titan Legions came out and I imagined MASSIVE speakers all over the Imperator Titan blasting Bolt Thrower (or Benediction / Entombed / Unleashed / etc) to motivate the IG troops as they rushed headlong into oblivion.
@ hdbbstephen / Brian- and Spotify.
Sorry about the late update. My 'Iron Man' weekend got screwed by a series of events that I won't go into but I wasn't happy. However, I did get a few more hours in, and here's what got done.
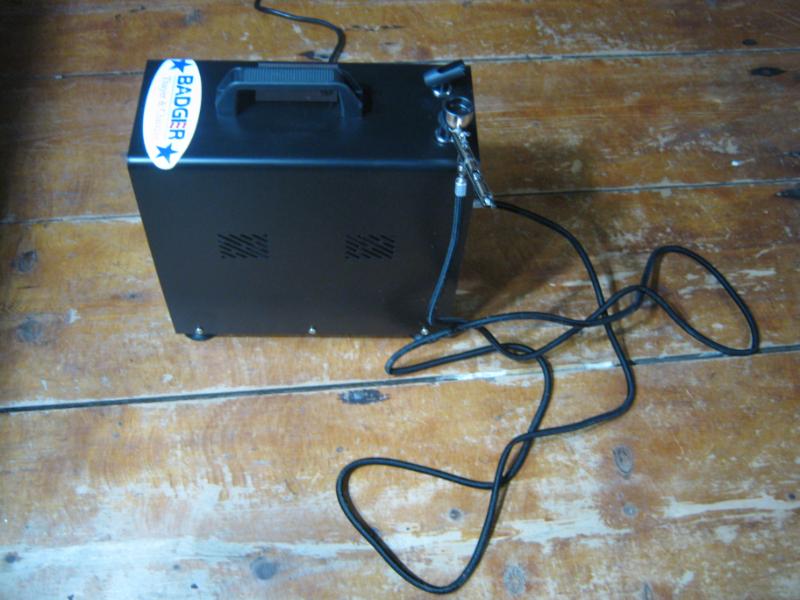
First , a msg for Dave- the compressor is very quiet. The airbrush is louder than the compressor. It hits max pressure quickly and keeps it in that range very well. I'm looking forward to using it more.
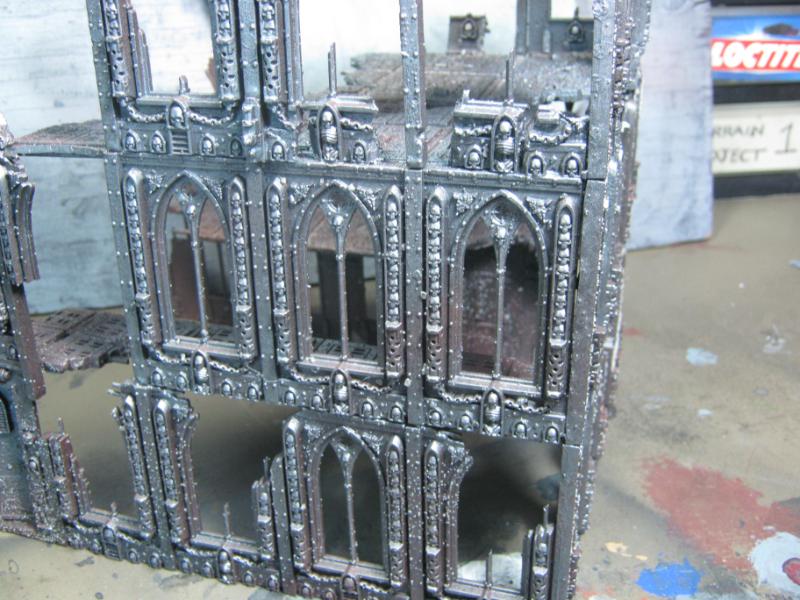
That said, 1st airbrush adventure ended better than the average 1800's era North Pole expedition but wasn't very much fun. I need a lot of practice w/ the trigger and I really need different paint. Maybe some n00b mistakes, maybe inexperience, but this was th ebest result I could get:
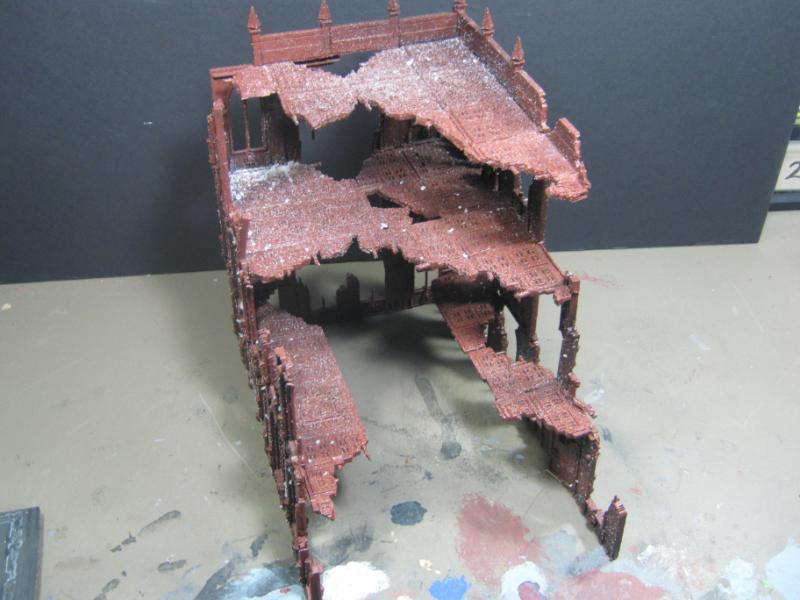
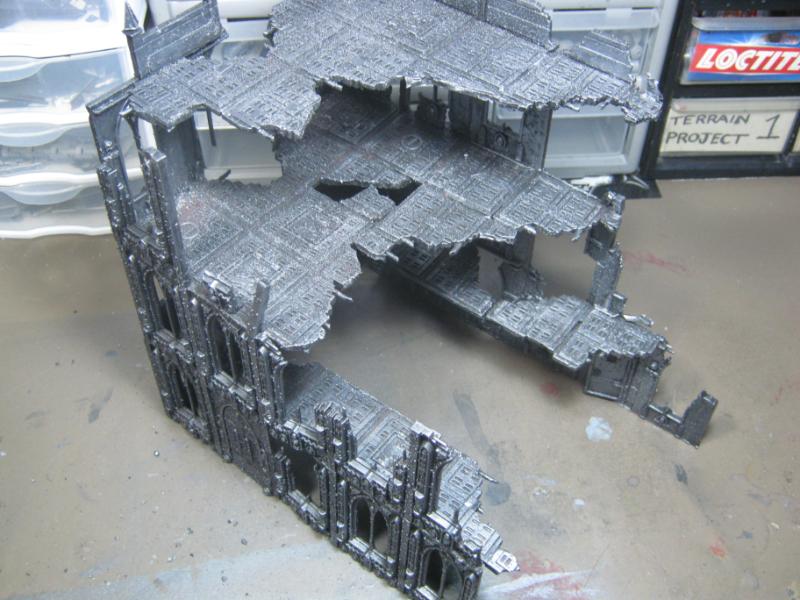
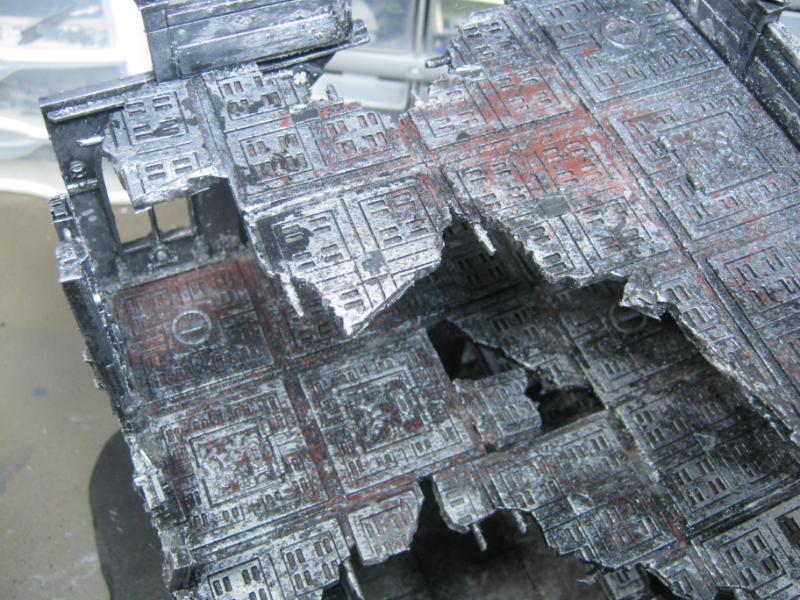
Solution? Rattlecan respray flat black and repaint metallic. This was not a random decision, I've been down this path before and I know how to get decent results from it. The salt stayed on really well this time, too.
After several washes and rubdowns I still was not getting the effect I was looking for. Problem #1 was I was trying a new kind of paint, a decision I regretted not testing on a test piece after realizing how tough it was to wash and how shiny it was when it dried. Oops. Won't be using this paint for base color anymore. But I did paint up a single tile to get an idea of how I wanted to do this one. It came out ok and looks like all the other stuff I've done.
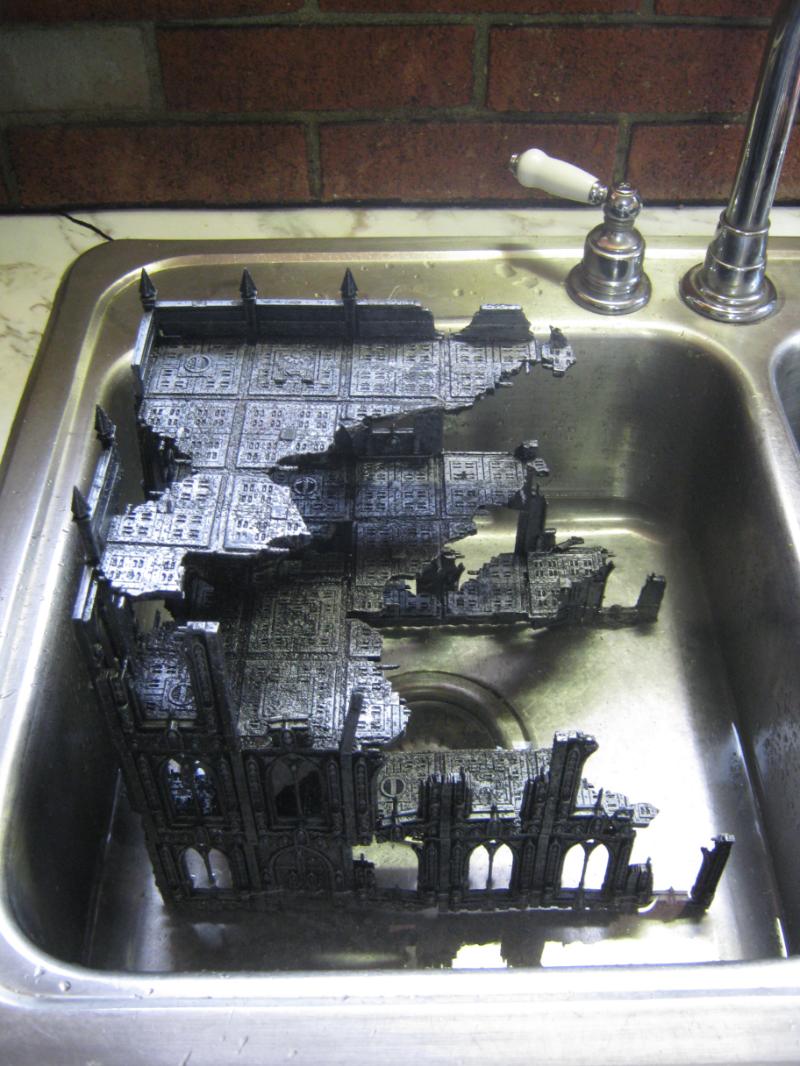
After getting sick of trying to figure out the 'save' for this project I decided to soak it and do something else for a while.
The 'something else' was the base of the Basilica. I hadn't done much w/ it since I stole it from the Manufactorum, and pretty soon I'm going to glue the Basilica to the base (after I finish painting the inside as the entire thing is a rickety disaster in waiting). Decided to get the final steps for the crater started.
Final placing and gluing down. This won't move ever again.
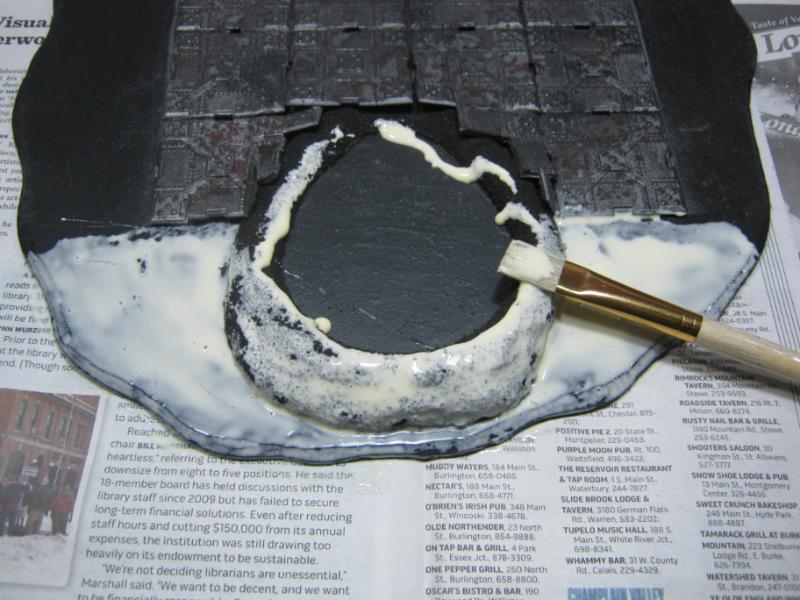
I always use Elmer's glue to keep my rock basing in place. I really like this stuff. Inexpensive, no nasty fumes, and works every time. Also easy cleanup if you I make a mistake.
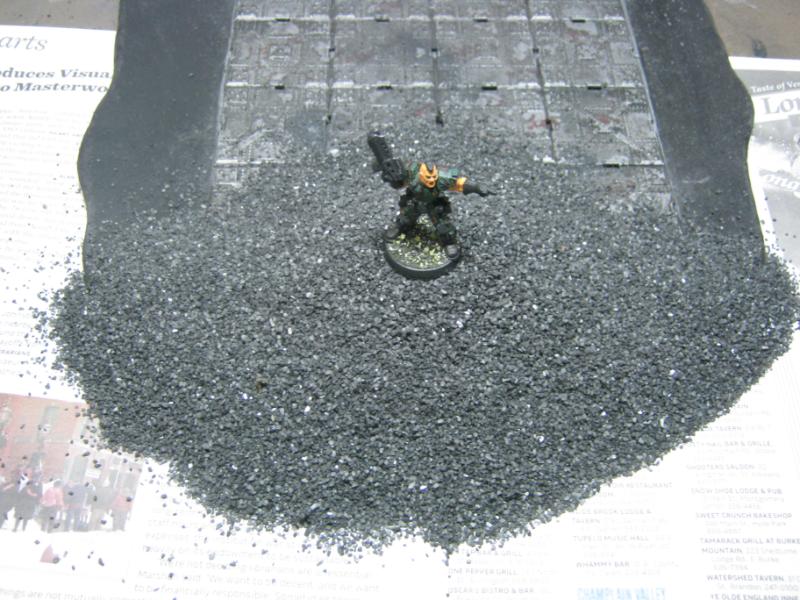
Here I'm flocking the crater. I always use WAY more than I need, it ensure complete coverage, and the stuff that doesn't stick just falls off. The newspaper is so I can recover the unused rock. It's easy to roll up and pour back into the jar I store it in. In case you are wondering, I only did this much instead of covering the entire base becasue I need to glue the building to the actual base instead of onto the flock in order for it to have a solid connection.
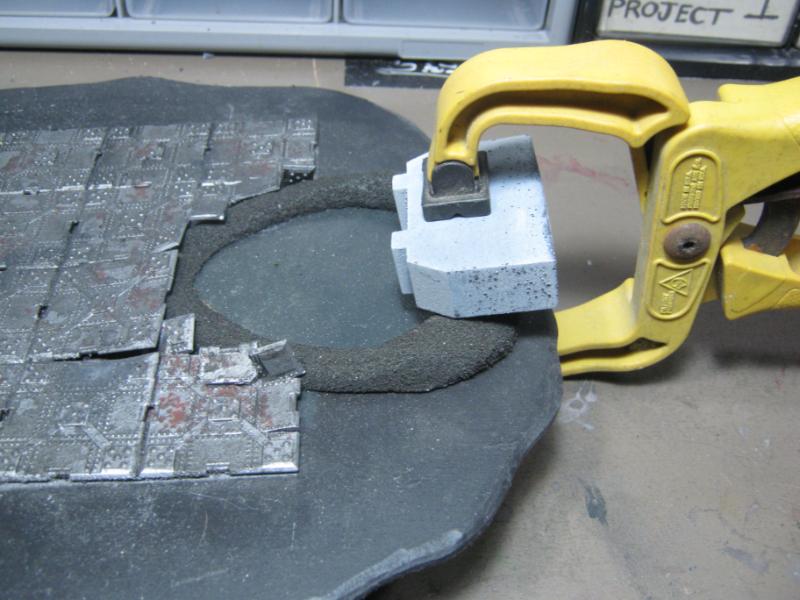
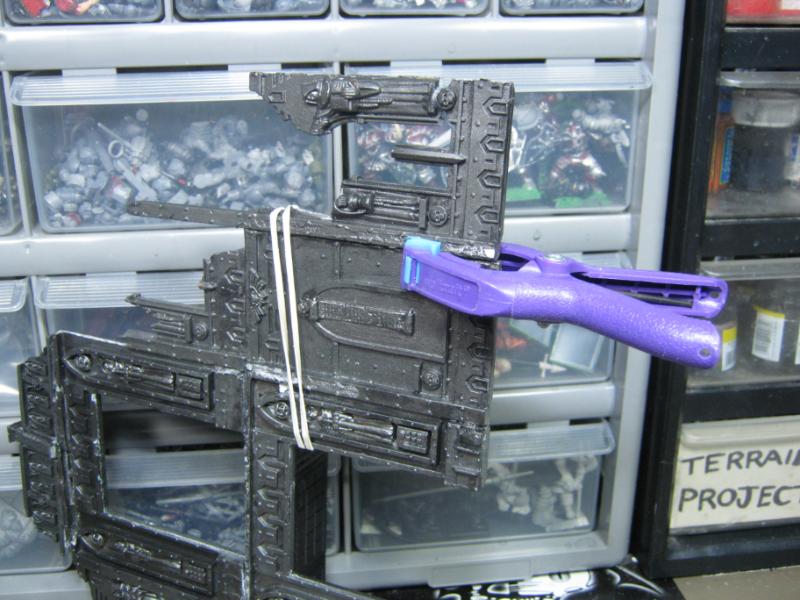
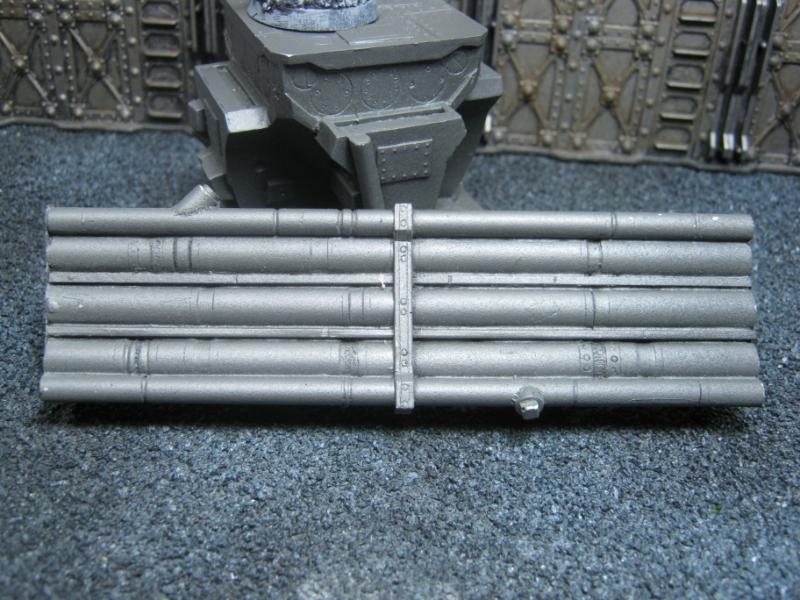
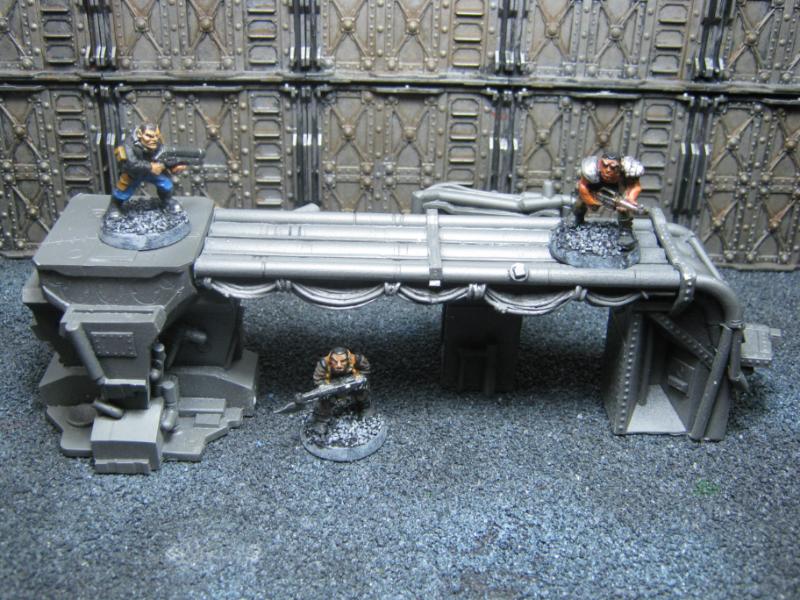
While the glue on on the base was setting I took the Basilica out of the soak and put it in front of a fan to dry. Since I was waiting on both parts of my primary project I decided to fix something I've been meaning to do since I adopted the "difficult terrain identification' for my table. I didn't want this to be difficult terrain so I marked it out and cut it w/ a coping saw:
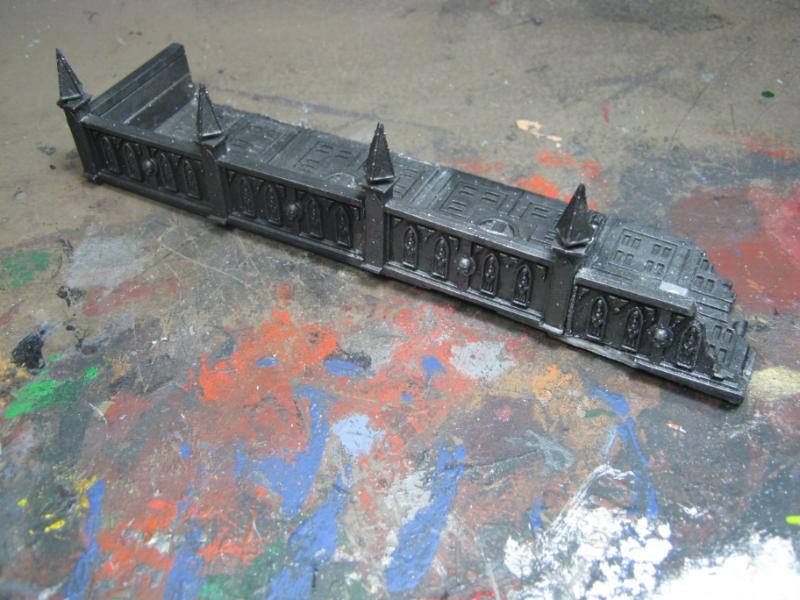
And here it is finished w/ standard awesome display shots:
The detail is a bit lame as I built it in April 2011 and hadn't stepped up the skill level. I really should go back and bring it up to standard but for now I'm happy that I can at least put it on the table again.
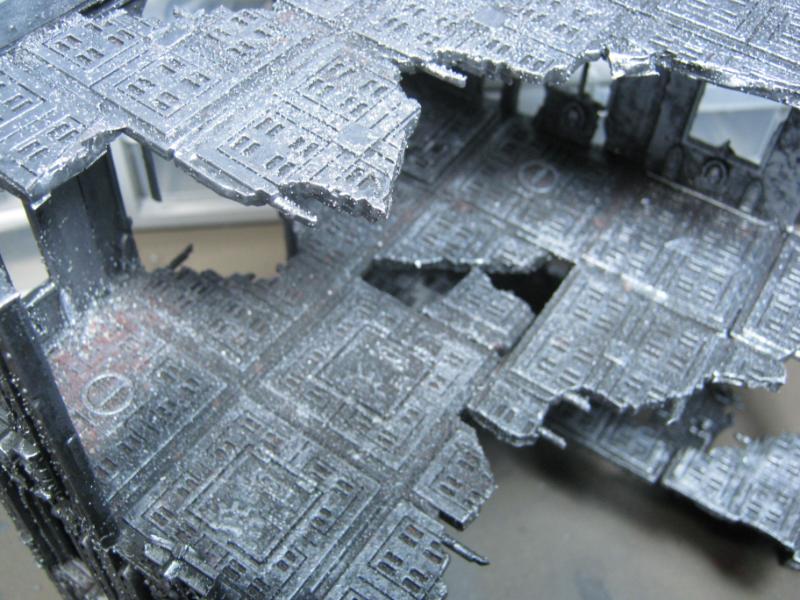
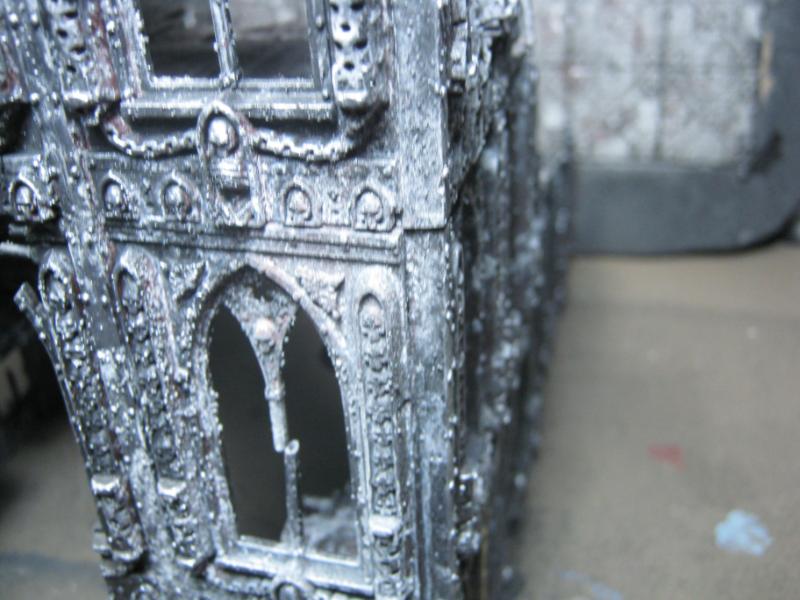
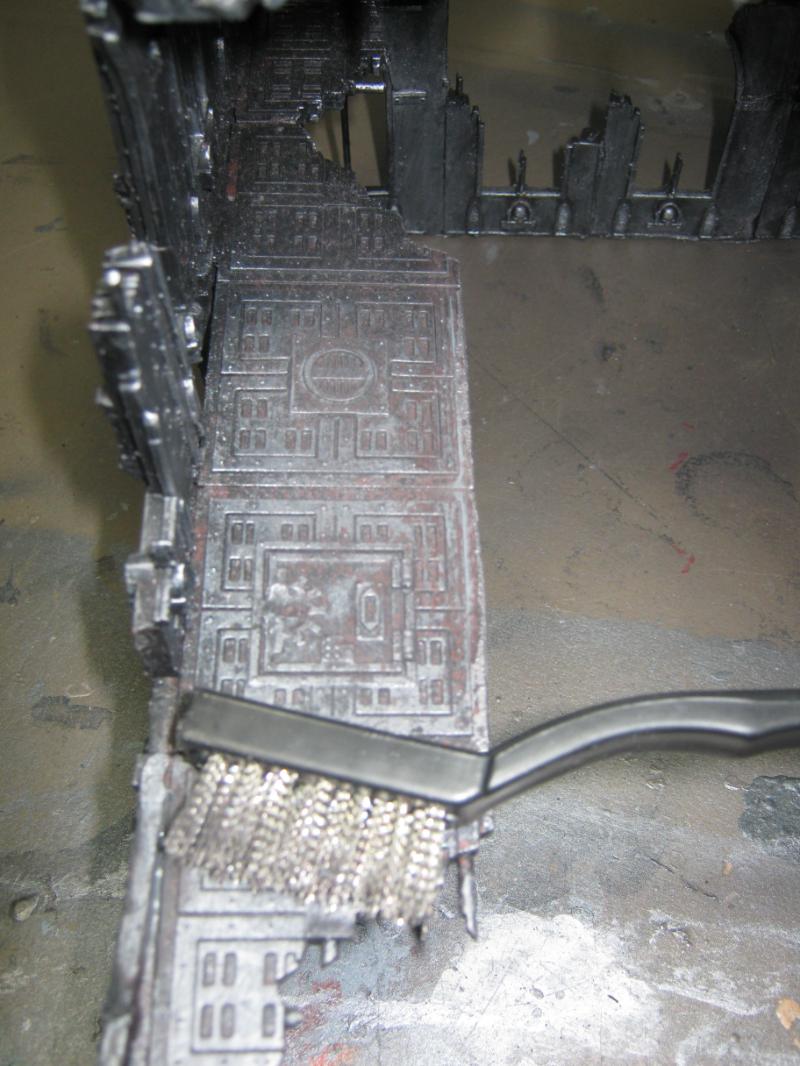
After finished the barricade I went back the Basilica and found this:
The model was saltier than Pegleg the pirate. Solution (and admittedly I should have thought of this sooner... ) steel brush! And not only did it solve the salt issue, it solved the 'way too shiney problem! See pic #2 for comparison. L = brushed / R = not brushed. Not all pics are 'finished product' but I took them to show progress.
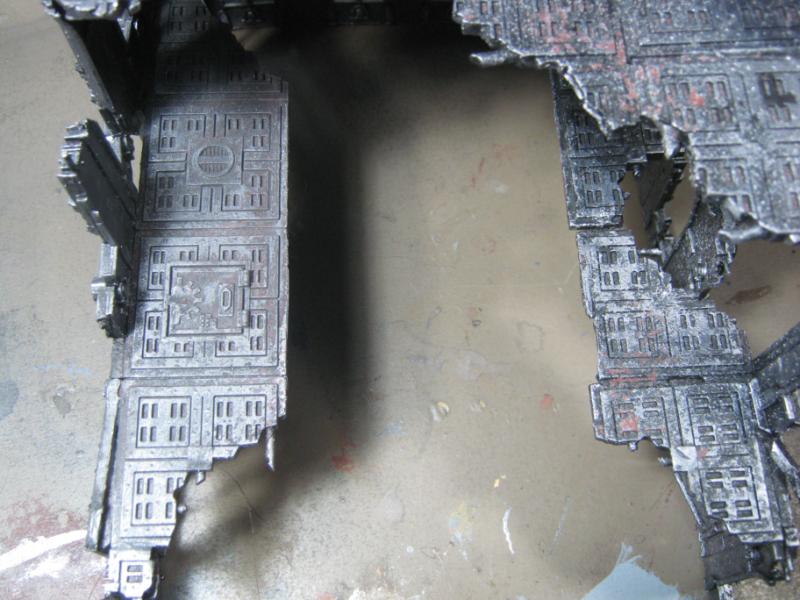
And some action shots. I really like where this is going.
Still a LOT of work to be done, but I'm at least 3/4 there. Last night I was able to paint the entire inside (I really need to get this thing on a base, I've broken it 4 or 5 times so far since it is so 'ruined' and doesn't have a solid connection anywhere) and once it is on the base (tonight if I can) I'll start painting the outside walls and then get to work on the rust. This time I'm going w/ WISIWIP (what I see is what I paint). I've put unnecessary detail (meaning completely covered after the fact) on my last few models, going to skip that this time and put my efforts into what you'll actually see.
Thanks for looking, I'll be back w/ more as soon as I can!
Skalk, somehow the crater's sides seem off to me... maybe it needs more smoothing out into the ground, i'm not sure. Otherwise brilliant build, and good experiment with the salt... did ya seal the salt with hair spray before painting?
It prevents the salt from actually absorbing the paint, allowing it to come of waaay more easy...
What pressure were you using? I use 10-15PSI for most, I never dial it above 25 (for primer)- look under the nozzle- there will be an F stamped for fine or M for medium- the finer the needle/nozzle, the lower pressure you can generally get away with. Ignore anything you read re: 30PSI- that's bullgak, and only relevant for bottom feed airbrushes.
Ooo no, don't pull it apart on my account. I just wasn't sure if you knew what I was getting at.
I totally understand wanting to do a (relatively) easier build after going for it like you did on the filling station.
Don't be disappointed with yourself, as it will be awesome when you are "finished", as usual.
Shame the painting turned into one of those "5 minute" jobs (This is what experimenting is all about. ) but I think it's looking good now, grubby, worn and just a little rusty here and there = perfect.
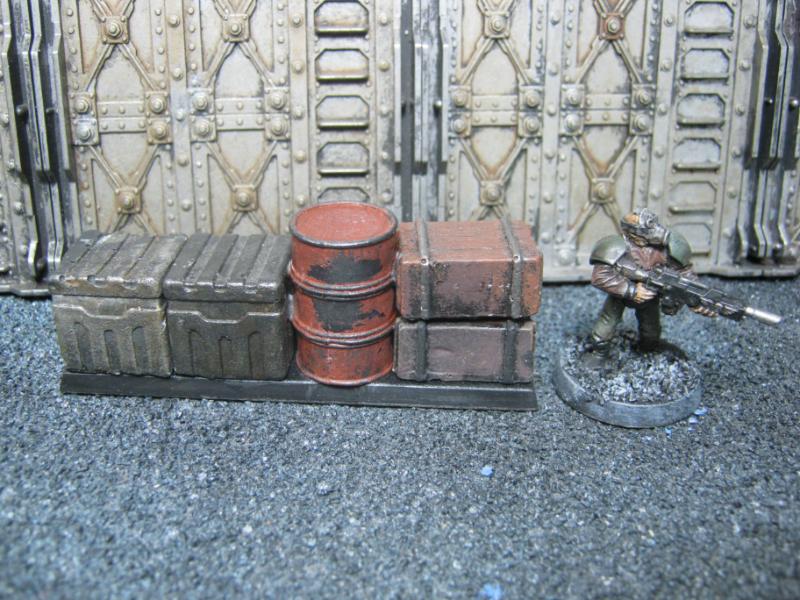
The barricade looks good and can fit in anywhere now with the new minimal base. You bought all the boxes and barrels for that if I remember right?
@ Maus- The crater looks that way on purpose. See below:
@ Dave- was using 15-25lbs. Will turn it down a bit. But the paint I was using was not good, even w/ thinner.
@ Dr H- My only disappoint w/ myself is I know I could do 'more', but I could also lose my mind in minutia. Better that I let a bit go and finish a project that looks good and is functional. In the end it is terrain intended to be played on, not a diorama display. My fuel station was an experiment in how far I could go. I'll do another on in a year or so. Thanks for the compliment on the barricade. I picked all that stuff a couple years ago now, probably 2010?
Also, I got to be the 1,000th post on my own thread! Yay!
Hey Skalk, the one thing I do with salt is due to hand brushing the "mud" onto my tanks, so the salt is in the paint but has not broken down like it would in water, I realize that the stuff would knacker a airbrush, so good work doing what you have done so far with the salt/painting
@ Galorn- Thanks on both. Looking forward to you seeing them in person so you can tell people that my pictures do not do them justice
@ Dave- Ok, will turn down the pressure and try the GW paint again. What ratio do your recc' for the thinner to paint? Also, do you mind if I compile the info you shared w/ me and posted here? I'm horrible w/ keeping track of PMs.
Shas- I spray hairspray twice, once to throw the salt on, and once to seal it in before I lay paint on it. I think my main problem this time was some of the salt I used was very fine, almost like powder. I'll try it again om some test pieces and see what the results are. On that same line of thought, I'll try again w/ sugar on a test piece. I'm sure that I'm re-inventing a wheel someone else already tried, but sometimes you just have to make mistakes for yourself.
You can always share whatever you want anywhere bro- Dakka's PM system isn't very friendly I know.
I dunno, Ratios are too much like math It all depends on the paint really. GW Foundation (or base i.e. dense pigment) paints will take more thinner than translucent colors, just because of their consistency differences.
If it splatters or runs:
1. Pressure too high
or
2. Paint too thin (rarely the case, but then you'll notice it watery and see-through)
Ideally, you'll thin the paint, and dial the pressure down to the point where it atomizes nicely without running or splattering. I'd just focus on basecoats to begin with..get that down with a bit of practice, then your balls will unfurl for detail work later
If you want, I can shoot some tut pics for you. Tell me what paint you're using, and I'll try to use the same brand/color for ease of understanding.
Skalk, I love how you not just cobbled some stuff together but thought about how the ruin was damaged. IMO that is the key to good modelling: thinking about how things work / became what they are.
Your thread is one of those I have followed for a long time as a lurker. If you ever felt a cold chill and wondered if there was a movement in the shadows in the corner of your eye while updating it was probably me. I just don't think its very creative to be the umphteenth reader to post things like "awesome" and "OMG". Although you deserve that definitely...
Having said that, I believe I understand what Maus feltt when he meant the crater looks off. The wall needs to be even more broader and higher on the opposite side than on the inner side. Think how it looked like when throwing hammer in P.E., most of the sand was pushed forward. Mind, I think what you do is awesome (HAH now I said that...!) . But as you are one of those who don't calm down until they have achieved maximum perfection I feel you might want to fix that.
@ Dave- I'll get those posted up here, they may assist others as well. I'll take pics of my paint and pressure. Have to figure out what to use as thinner though, I know that water doesn't work and the Tamiya stuff I had is gone now.
@ Hruotland- thanks for coming out of the lurker closet . I always wonder who is stopping by. I notice my views go up by a hundred or so when I do an update but my replies are 5-8.
@ Both- I guess I really need to take better pics to clarify the trajectory of the shell, how it impacted, and why the crater looks the way it does. The bent plates might be throwing it off since they are dislodged by the back pressure of the impact. I may have been too much. The other part of it is that I can't go much larger w/ the crater or I'm going to wind up on a completely different base. Or..... OR I could just turn the crater around so it is facing into the ruin instead of away, but then I have a huge missing wall on the back side to explain.
Gah.
I'll figure this out. It's what I do.
@ hdbbstephen- I just caught your posted before I did this update. I'll check that link later because I'm out the door from work heading to Home Depot for a supply drop, but from what I saw it's about a line of airbrush paints?
Yeah Skalk! Before Christmas, Ken Badger e-mailed me for my address, he was going to send me samples of the new Minitaire line.
http://minitaire.com/ I think he may have forgotten though
Skalk, i understood the idea of the crater instantly... but to me it seems so... i dunno... placed on top of it... Don't know how to explain exactly, but it misses some coherency with the groundwork... It looks like the outer wall of the crater collapses in on itself before touching the ground. Never ever seen a crater do that...
my point about the crater wall is futile now that I see that picture from near - ground level, the outward rim IS much bigger than the inward rim. Because of perspective I did not catch that before. The backwards tilted floor plates are good with me, too. Maybe scatter some pieces of broken plates into the wall debris, or let some stick out of the water, in order to tie floor and crater together more? Also, as I said, radial cracks in the debris would help to make it look more like crater and less like heap of sand. I found a pic of a crater from a sideways impact on mars, and you can see there are some cracks imediatly making clear something came from left and hammered into the ground.
have you ever thought about making the buildigns safe? in the 41 memen (cant spell ok?) theres only hazzards! Just call around building crontorl or the 40k equlavant is anyway!
That buildings looking most excellent Skalk, If the missile type shell was a dud would there still not be a rusty shell where it landed half in the ground?
Back for a moment, was checking PM notices from my email. Taking a Dakka break due to IRL stuff. No worries though. It's not brutal or unmanageable, everyone will be ok, etc. I'll keep working on stuff as I can and taking lots of WIP pics as always. Will post everything upon my triumphant return.
Back. I'll have stuff to share in the next few days. Progress has been slow so don't get too excited. I'll show where I am w/ everything and the complete WIP as I focus on a single piece.
Some cool news- I finally talked ktbb22 into playing Necromunda w/ me, and I joined a decent 40K campaign that Feldenglas is running, so I've got a few games in recently. 40K will be a LOT easier for me since I picked up the BRB from the DV set.
Funny note on Necromunda- I played a Delaque gang and kt played an Escher gang. She managed to first take out my Leader by hitting him w/ a shotgun while he was within 1" of the edge of a platform (granted, my fault for poor gameplay), he failed his Initiative test, fell 6", went down and on the end phase she rolled a 16 and killed and he became a deleted Delaque. She also took out my two remaining Gangers, one suffering a Chest Wound (-1 Toughness forever) and the other survived but could not collect income. My options at that point were (1) let the guy w/ the sucking chest wound become my new Gang Leader (he has the most XP), buy a new Gang Leader, or retire the entire gang after one game.
I chose option #3. Back to the Sourcebook sometime this week.
For the 40K campaign I'm playing an Undivided CSM force that is a bit like Iron Warriors. No psychic anything, no Daemonic anything, just a solid belief that technology will rule the known universe. I'm running a Warpsmith instead of a Lord, and I have the force maxed out w/ firepower. Here's my list:
HQ- Warpsmith - w/ Aura of Dark Glory and Ichor Blood
Aura of Dark Glory = 5+ INV save, and Ichor Blood does a D-something SR whatever hit to anyone that hurts him in Close Combat.
TROOPS 1 – 10 CSM. Has 1 Missile Launcher w/ Flakk Missiles in Rhino w/ Havoc Missile Launcher
TROOPS 2 – 10 CSM. Has 1 Missile Launcher w/ Flakk Missiles in Rhino w/ Havoc Missile Launcher
HEAVY SUPPORT 1 - Land Raider w/ Havoc Missile Launcher
HEAVY SUPPORT 2 – 6 Havocs. Has 4 Missile Launchers, each w/ Flakk Missiles
I feel that I'm roleplaying my army. I didn't min / max w/ the most brutal brutality the CSM Codex has to offer, I went with what I would imagine a Mobile Light Infantry w/ some Heavy Support would look like in the 41st Grimdark and this was the result. And for those who would accuse me of being spammy... In it to win it! Go big or go home! Victory needs no explanation! Trample the weak, hurdle the dead! RRRrrraaagghhhhh!!!!
I haven't got a game in w/ the finished list yet but I did play the beta version against Feldenglas' Tyranids and I killed every Monstrous Creature he had. I imagine I'll be giving 'hard targets' and Flyers a lot of trouble w/ my Missile Launchers, and I'll be dropping quite a few small blast markers on Infantry . I may have a difficult time with taking / keeping Objectives but I'll try to mitigate that by crushing my enemies, see them driven before me, and to hearing the lamentation of their women.
Anyway, that's where things are at the moment. I'll take the next few days to catch up on sub'd threads and coming up to speed.
Falling in Necromunda is brutal! We house rule that you don't fall if there are solid barriers on the edge. If there are only partial barriers or only barriers on one side we do the test as normal.
But you rolled 16 in the end phase? You mean 16 on the serious injury table? You do those after the game. In the end phase you get recovery rolls (1=flesh wound, 2-5=stay down, 6=OOA). Also I think 16 is multiple wounds not dead.
Yeah it sucks to have to retire a gang, sometimes it is worth just sticking it out and playing on regardless. Necromunda always balances out eventually due to the underdog rules. A weak gang can raid and try for quick victories until they have made the points back up. Although losing your leader right away is pretty terrible. You aren't allowed to buy new leaders.
@ Dave- Mileage varies, but it was shorter than expected and I'll be around again w/ some frequency.
@ Bruticus- I said it wrong, it was all 'end of game after-action' stuff. House rule from a long time ago is opponent rolls on the Serious Injury chart becasue they are the ones that caused it, added a bit more 'stick the knife in and twist it' aspect when something bad happened. Other than that the process was by the original rulebook.
I'm scrapping the Delaque gang and going to try Van Saars instead. If this turns into a campaign I'll start a new thread.
Just a heads up for those of you who follow my cooler threads- I'll be working on my new Necromunda project for a while, but when I do some terrain I'll post it here as well.
I will show terrain work I did during my absence soon though, hopefully this weekend.
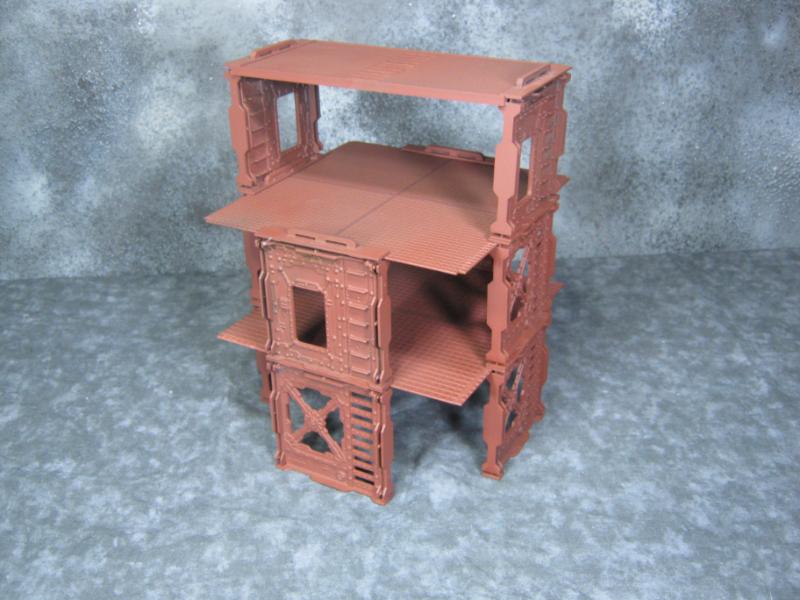
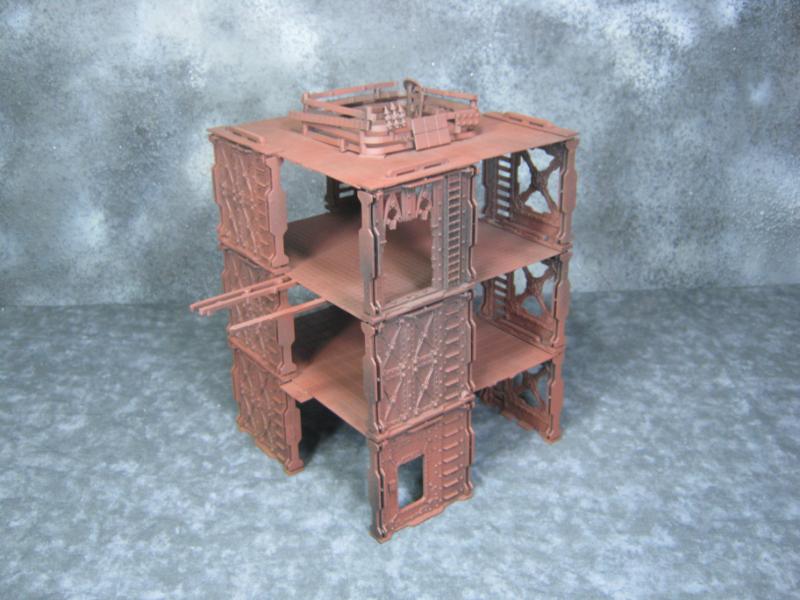
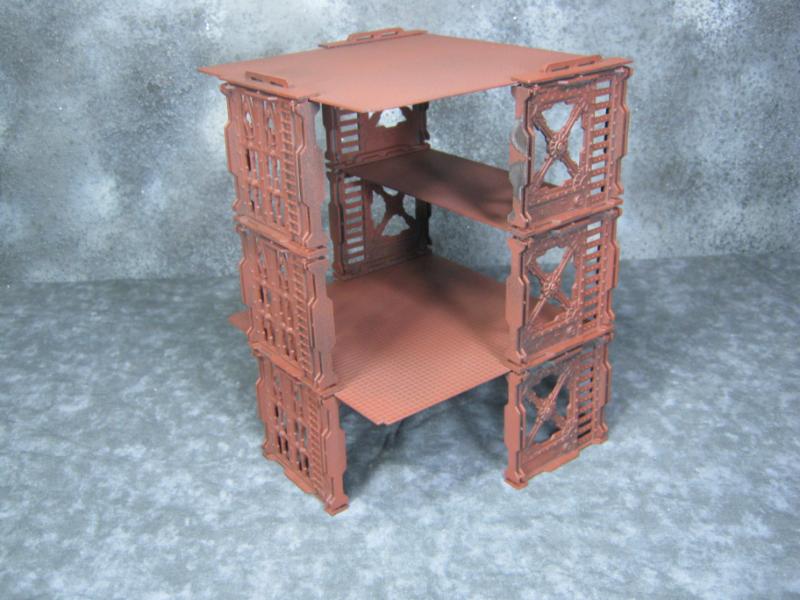
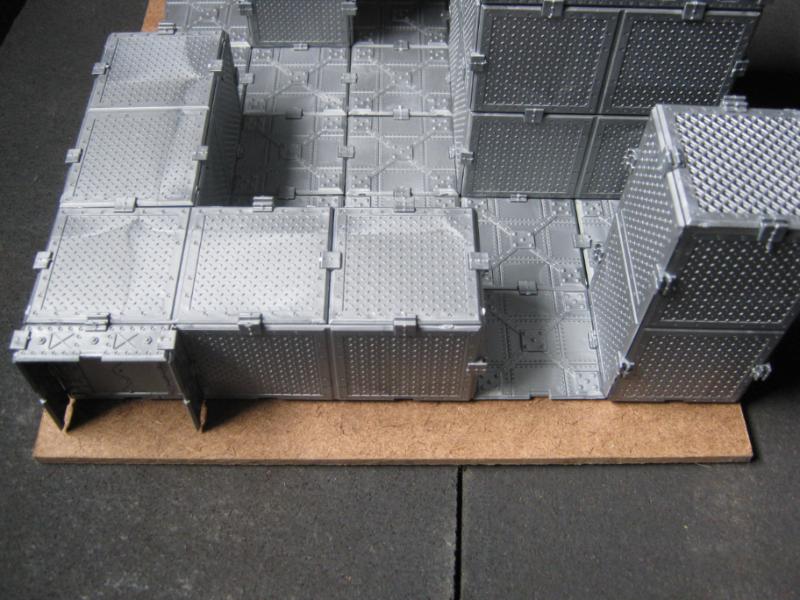
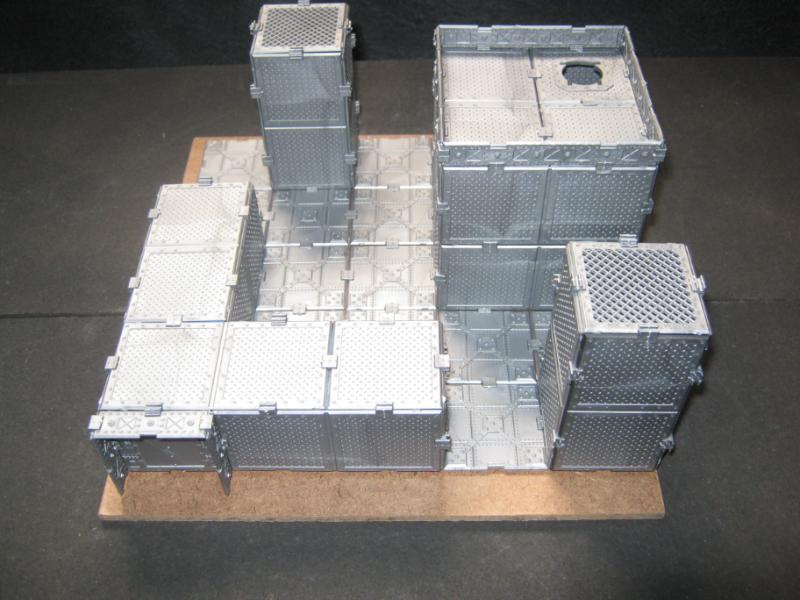
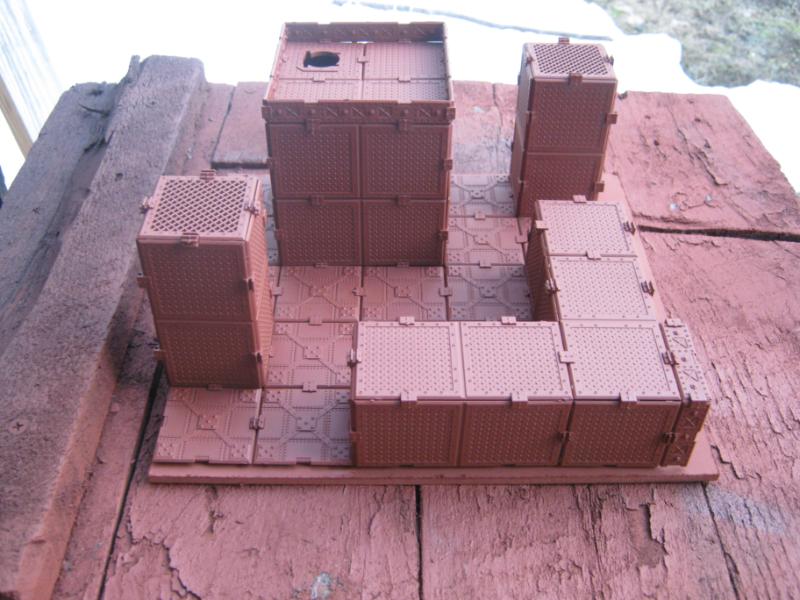
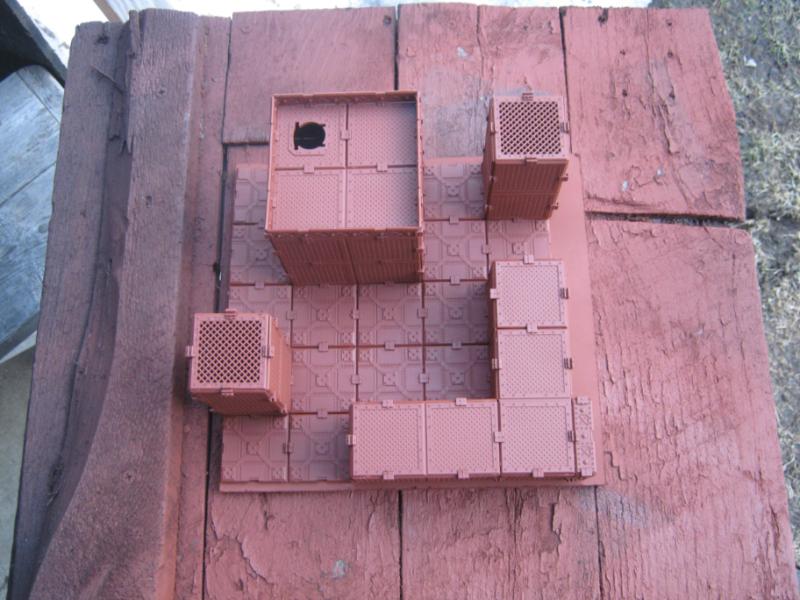
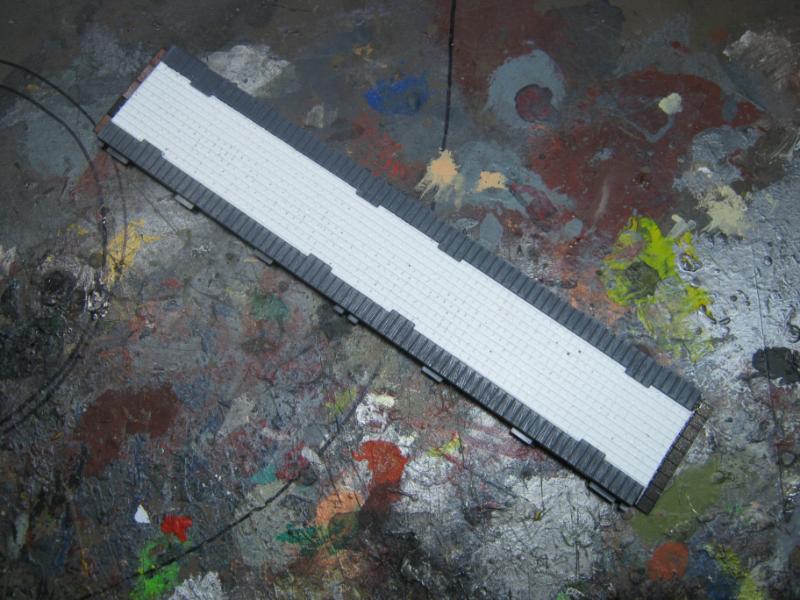
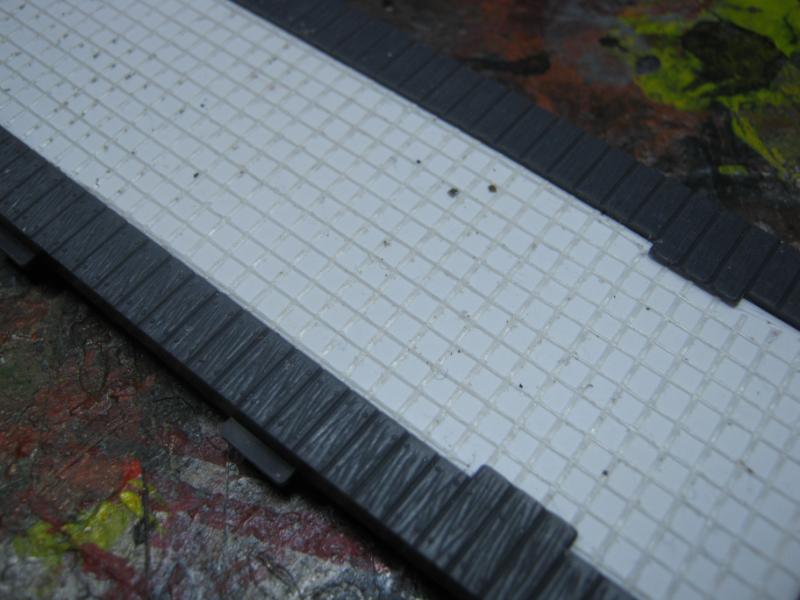
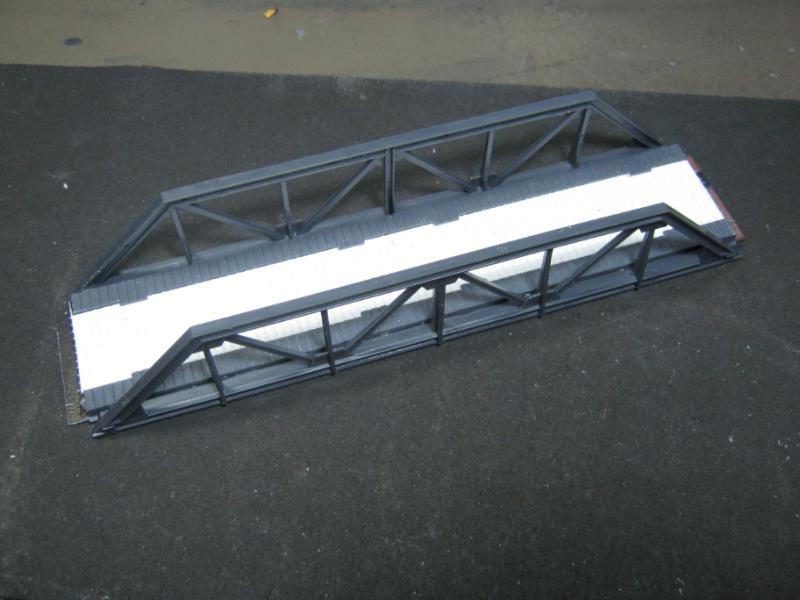
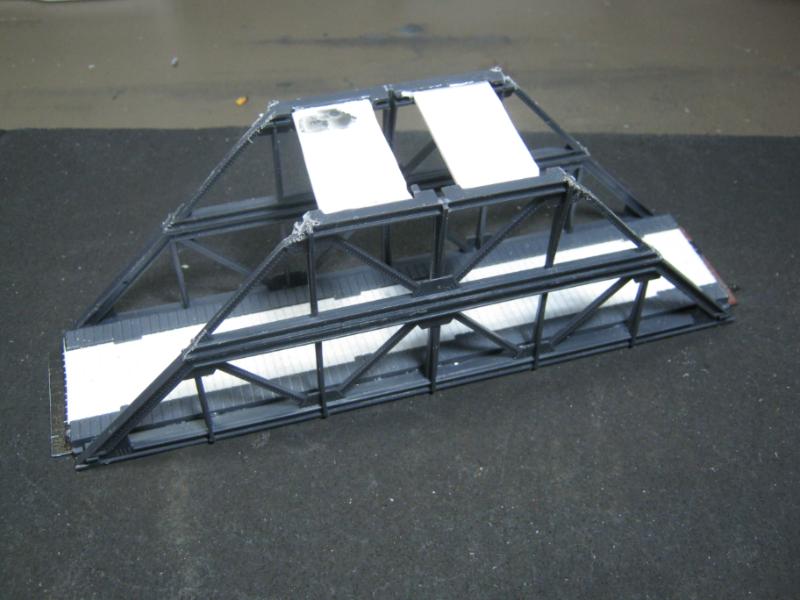
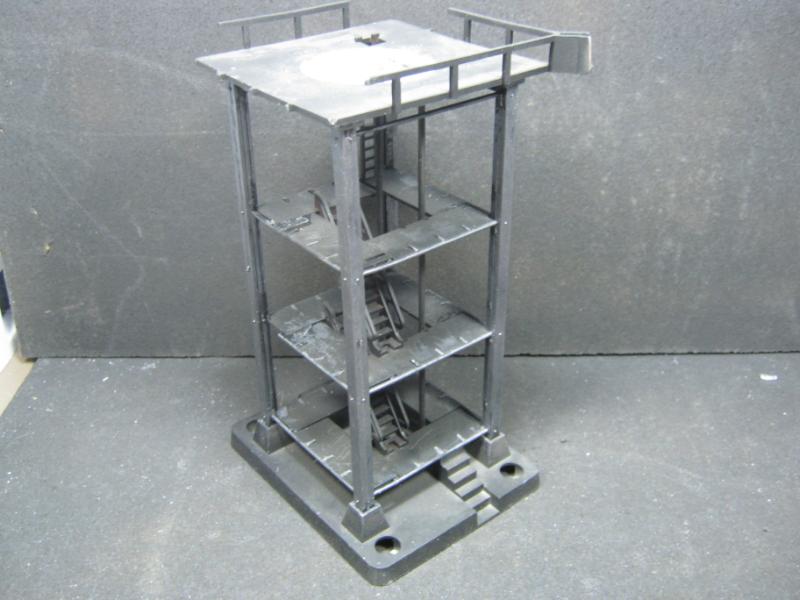
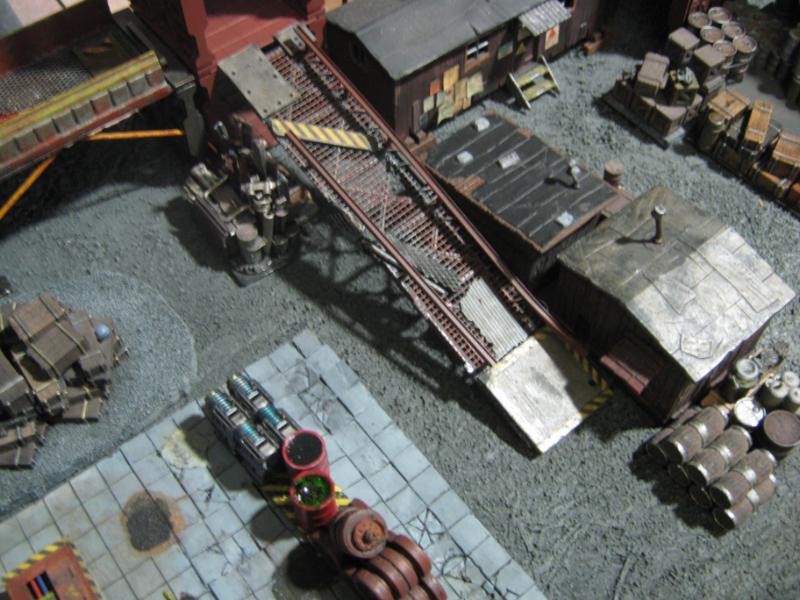
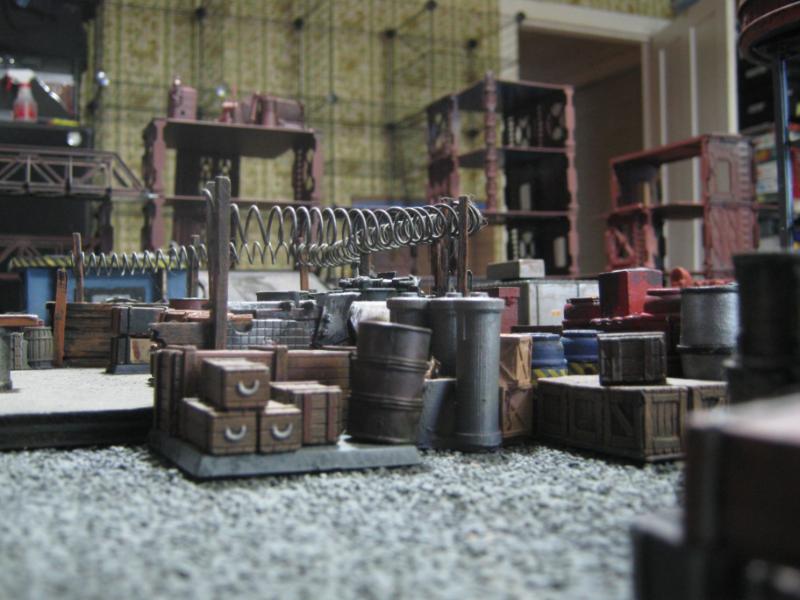
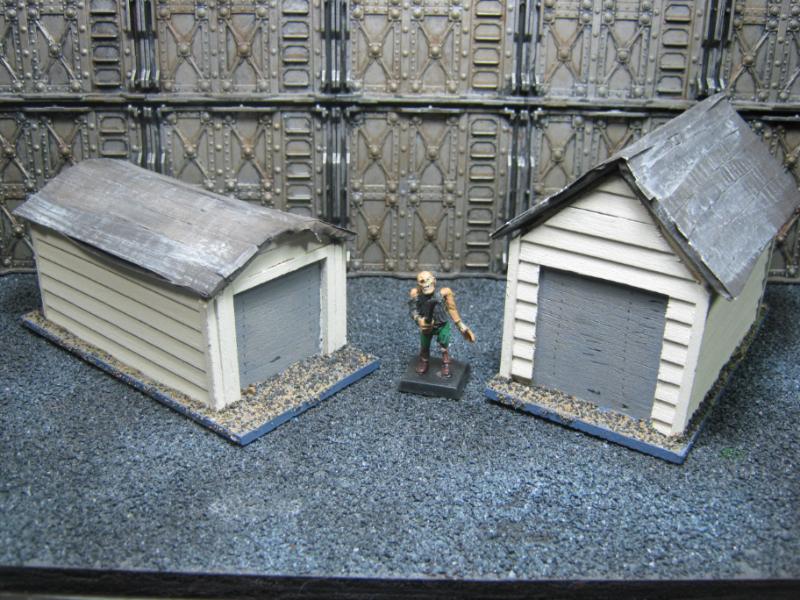
When I first started this thread, it was w/ the intent of rebuilding my original Necromunda terrain. Not the box set stuff per se, but the terrain I used during my League. Tonight I'm happy to share something I've been looking forward to for a long time. If you've followed this thread for any amount of time you've seen how it has gone back and forth between different terrain projects, and after almost a year and a half I'm getting back to the project idea that got this thread started.
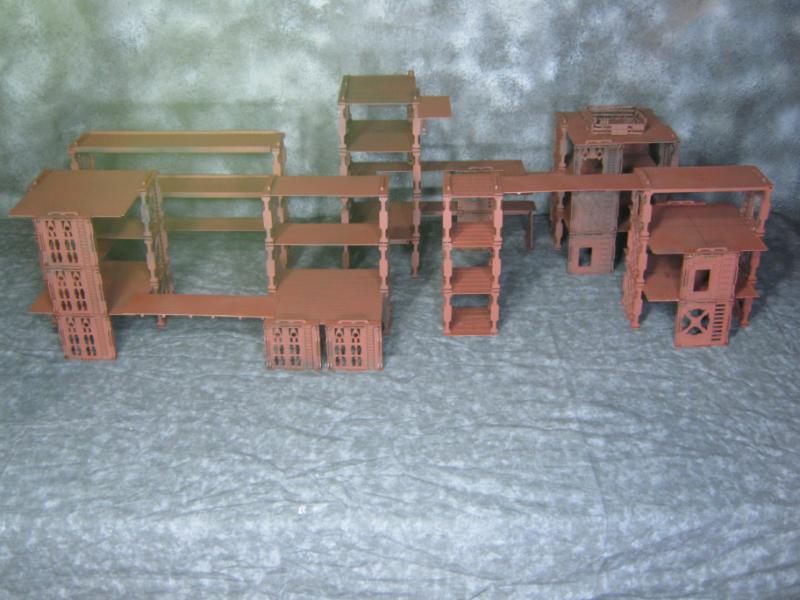
I've finally found the motivation to rebuild my original Necromunda League terrain. Only one is the original shape, but the rest are built from the same card from years past. I did use additional bulkheads, but I have a LOT of them so it's actually cool to see them going to good use. Regardles sof original or new design, they are all excellent additions to my terrain collection and I'm looking forward to subjecting it to the Skalk Bloodaxe treatment very soon. For now, it is functional for the new Necromunda games I'm playing. A bit bland, but all models start somewhere. These are further along than bare plastic and for that I am happy enough for now.
For those of you that may have an interest, I've started a new thread (Return to the Underhive- a Necromunda project). The main focus there is miniatures, and this thread will remain my primary terrain. Tonight I am posting the same pics on both threads because there are people there that do not follow this thread and what I am posting is pertinent to both threads. I won't be doing that very much from here on out, most likely just finished work.
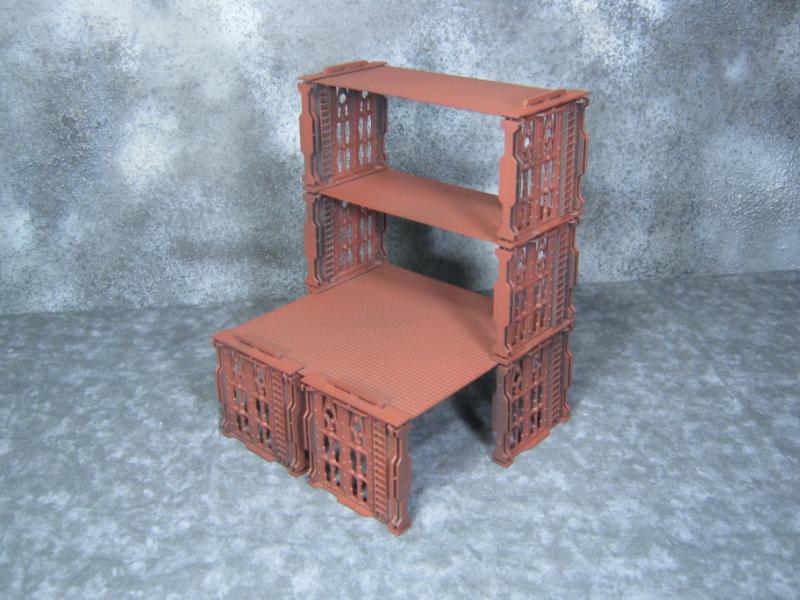
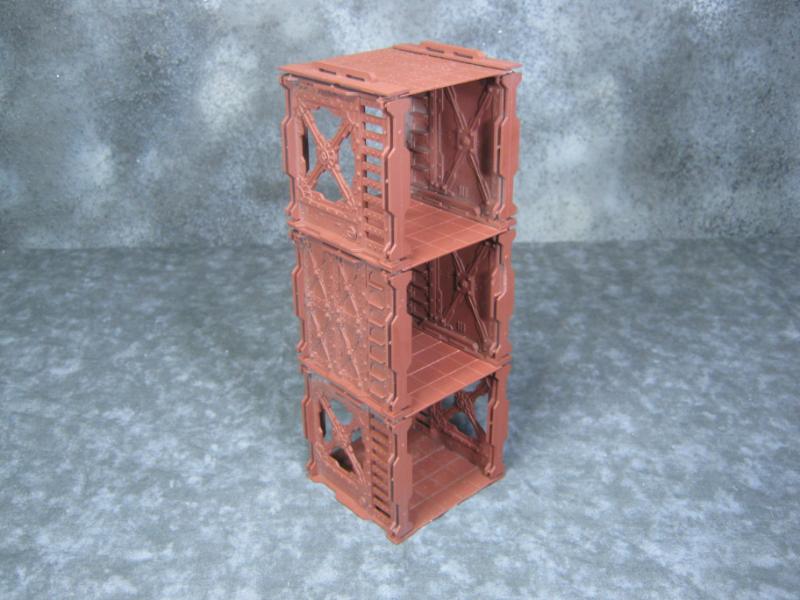
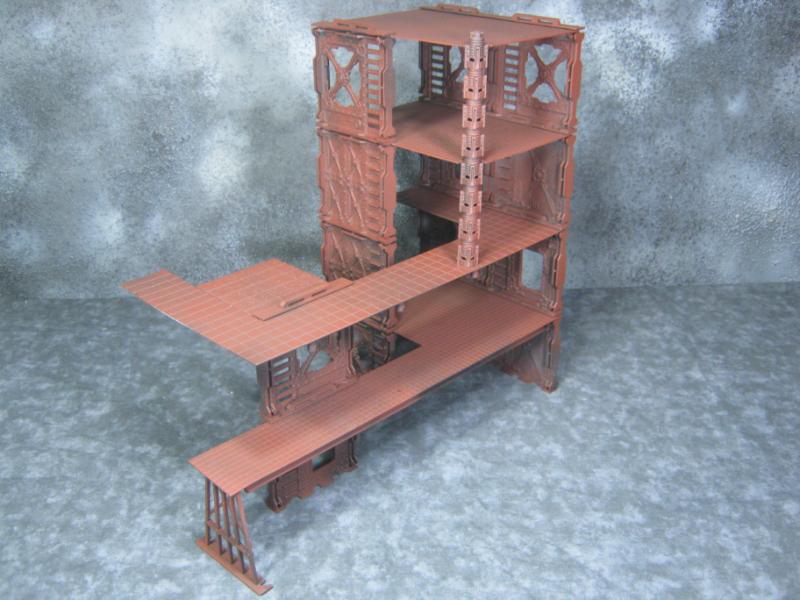
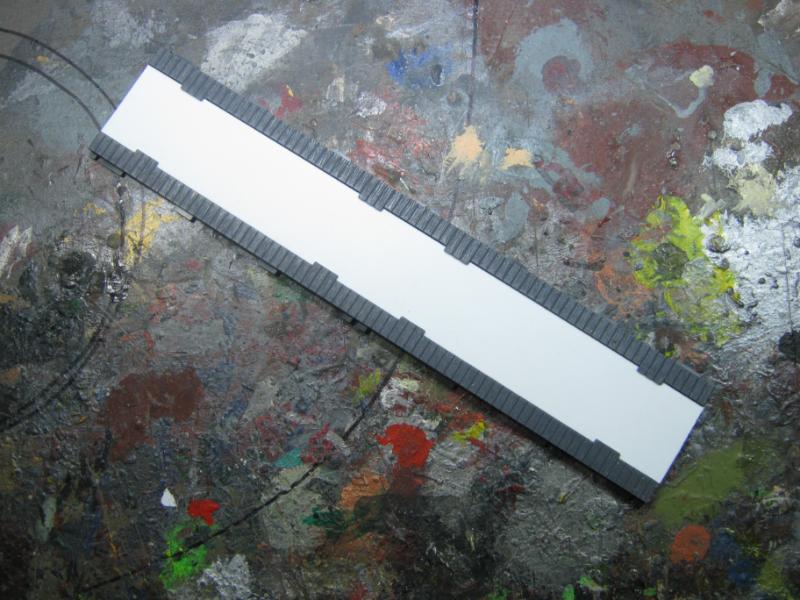
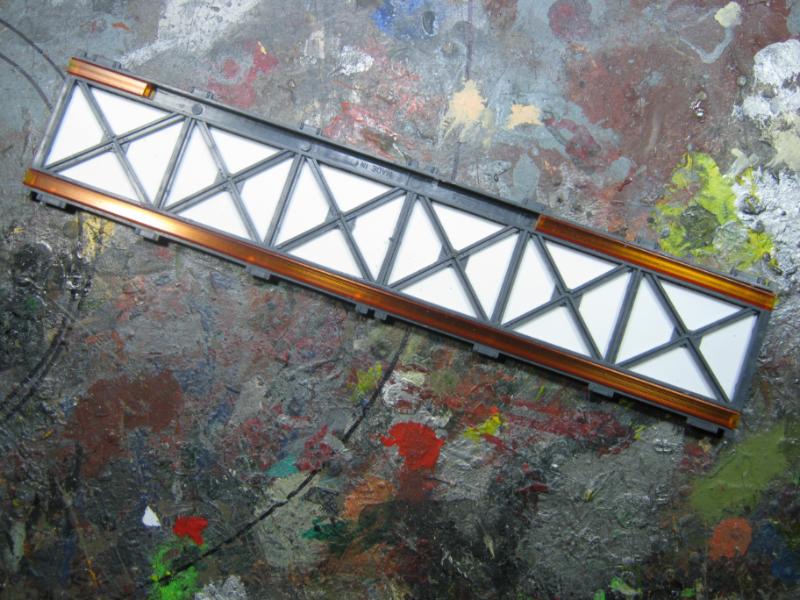
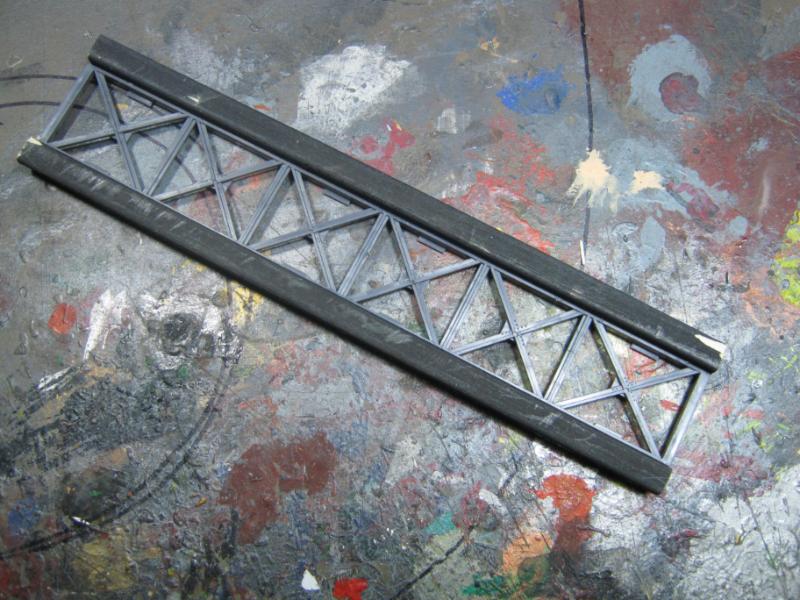
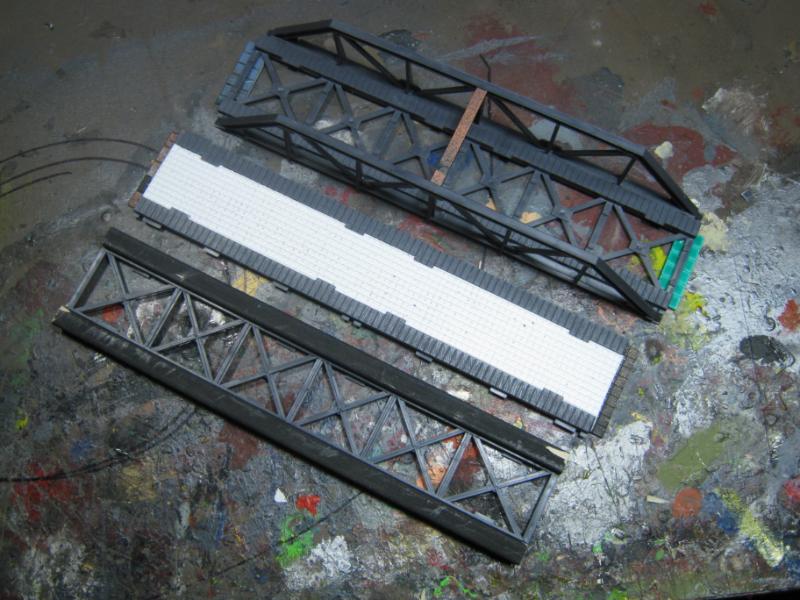
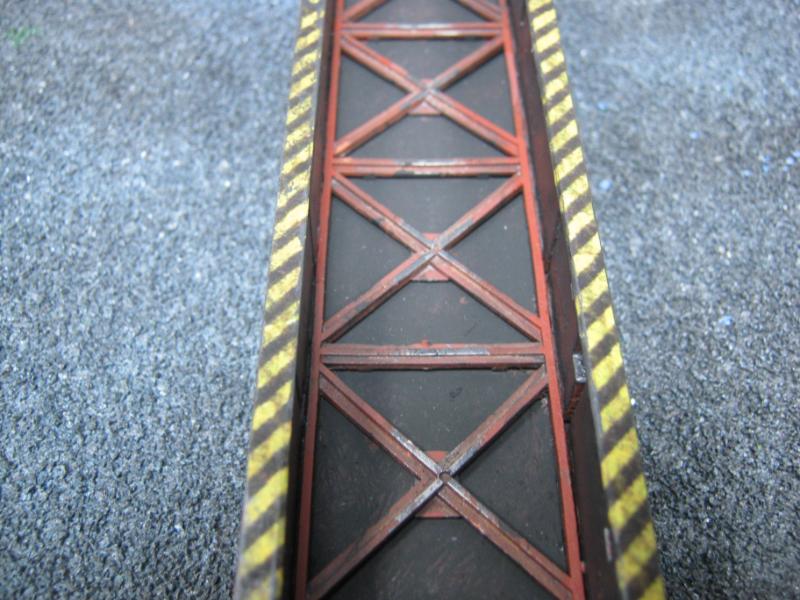
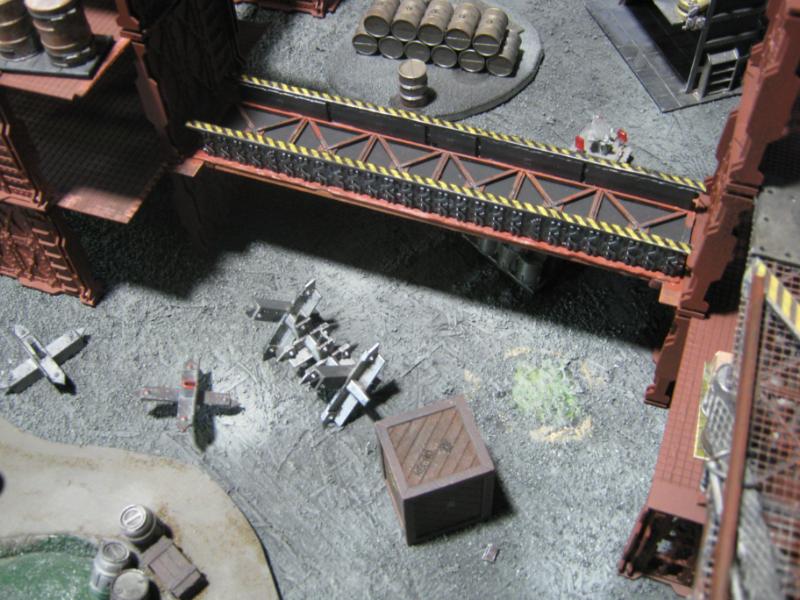
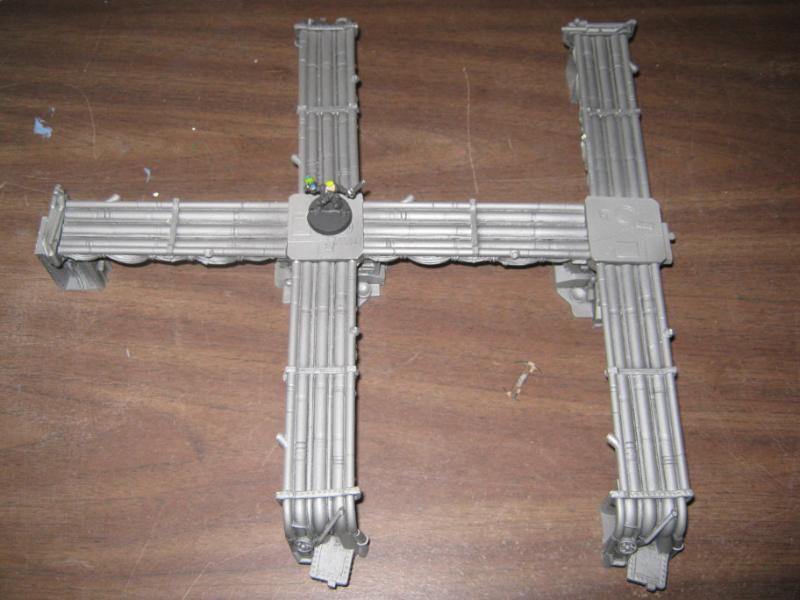
Here are my main platform pieces for Necromunda. I do not expect I'll be adding any more until I get back to plasticard scratchbuild, and at this rate I expect that will be sometime in 2017.
To the terrain.
(2 images because it is a large piece)
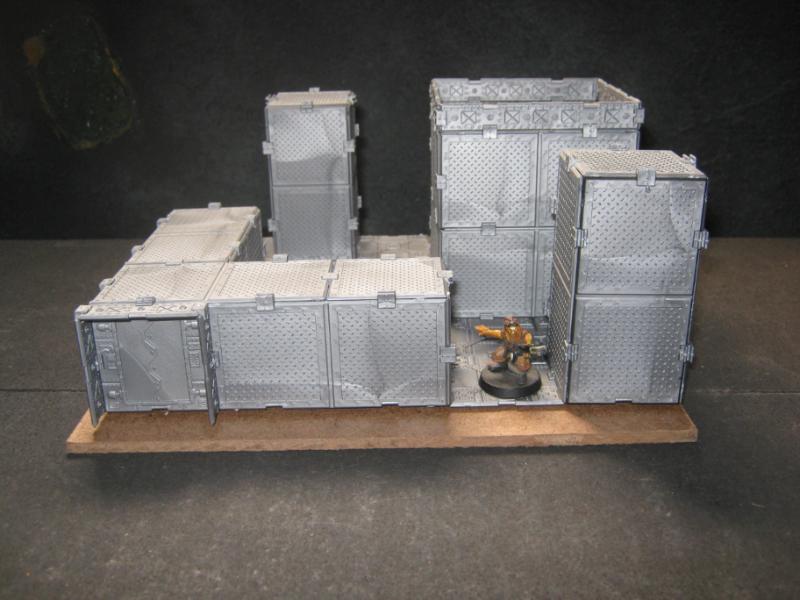
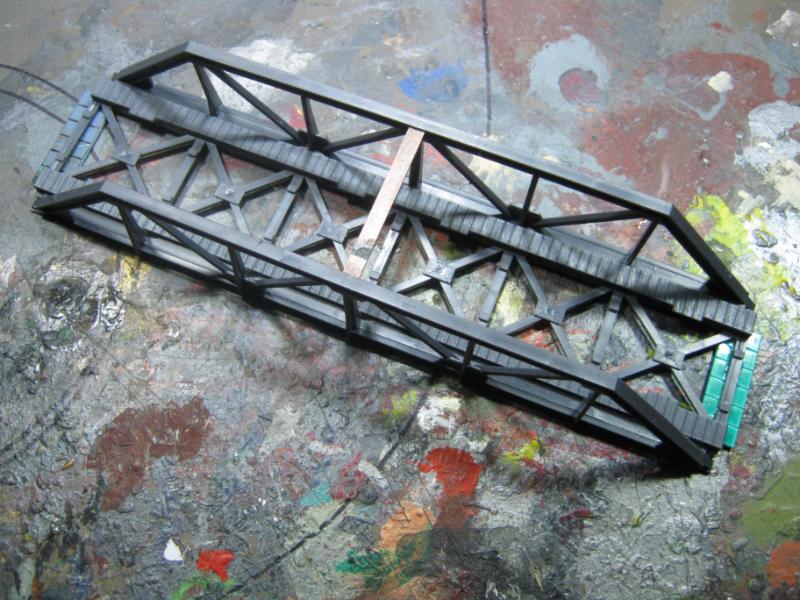
(original piece exactly as it was originally built in '96)
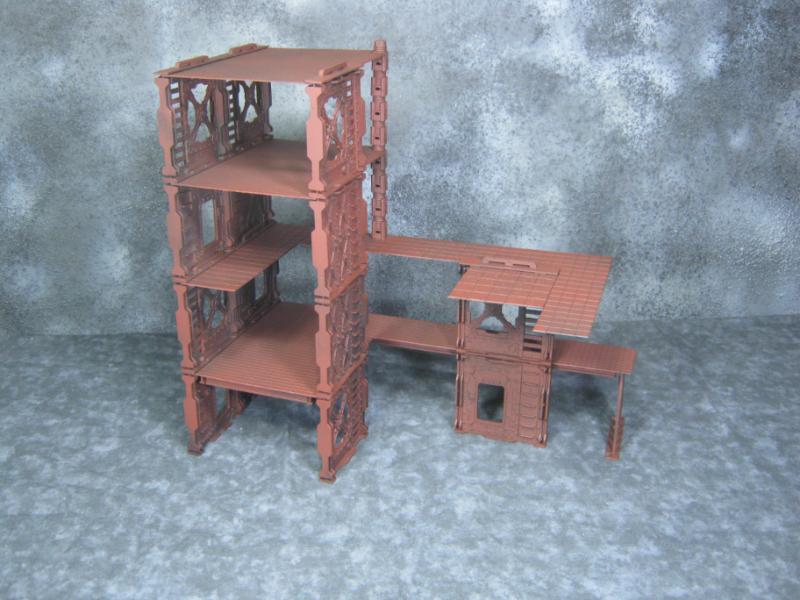
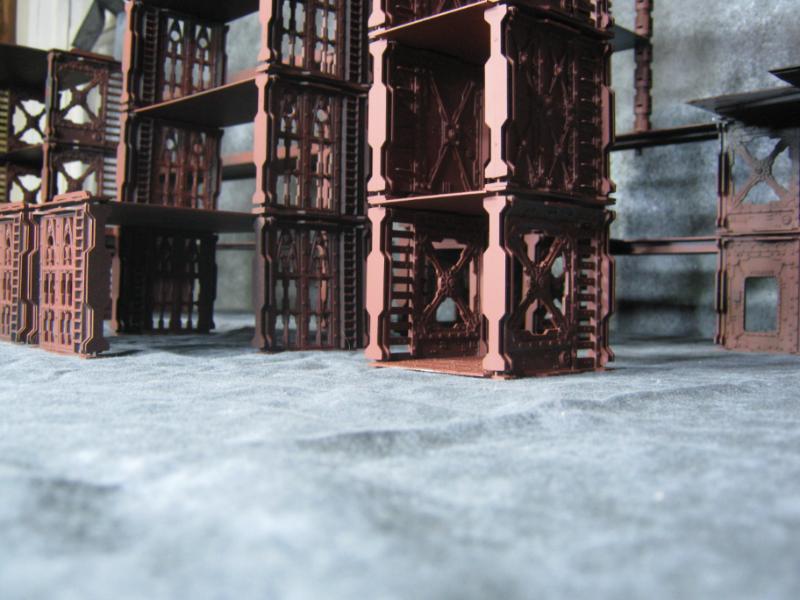
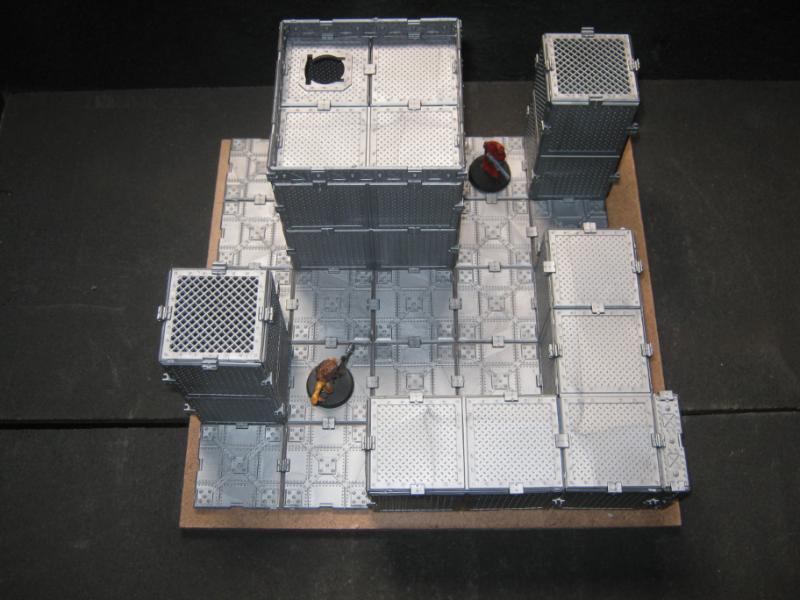
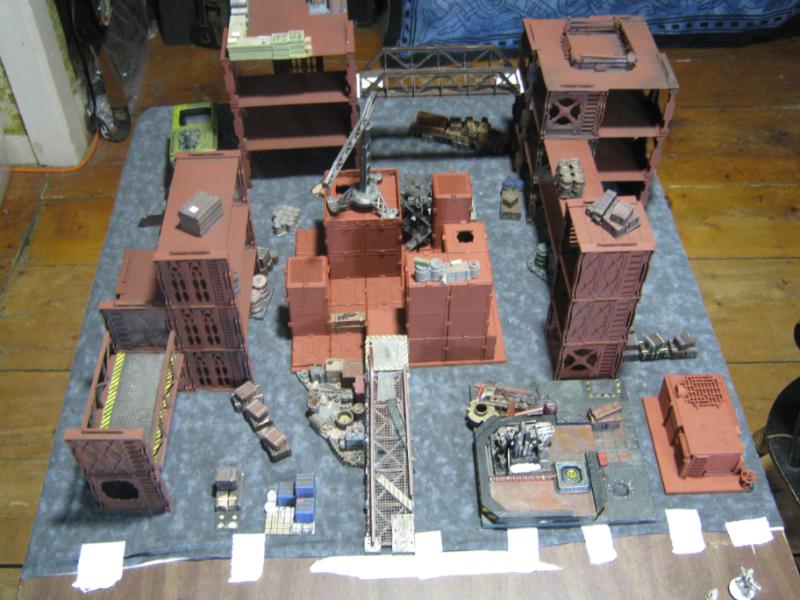
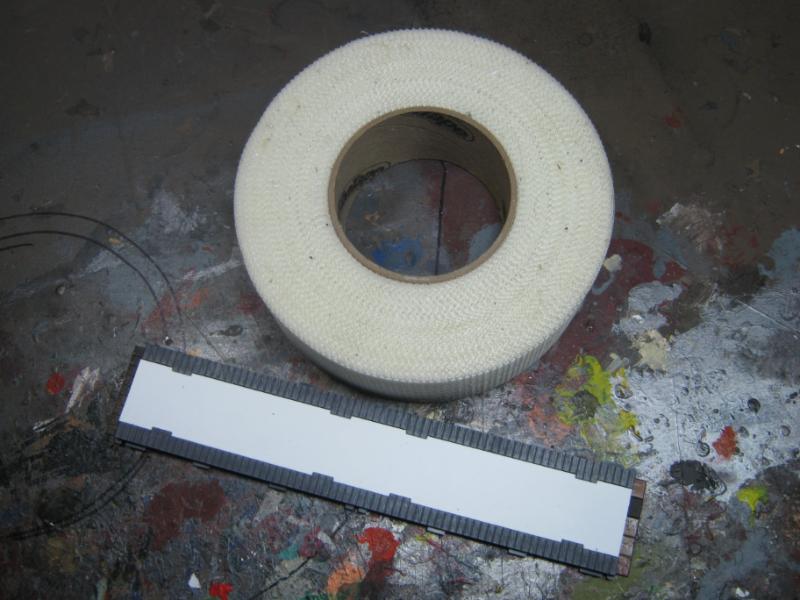
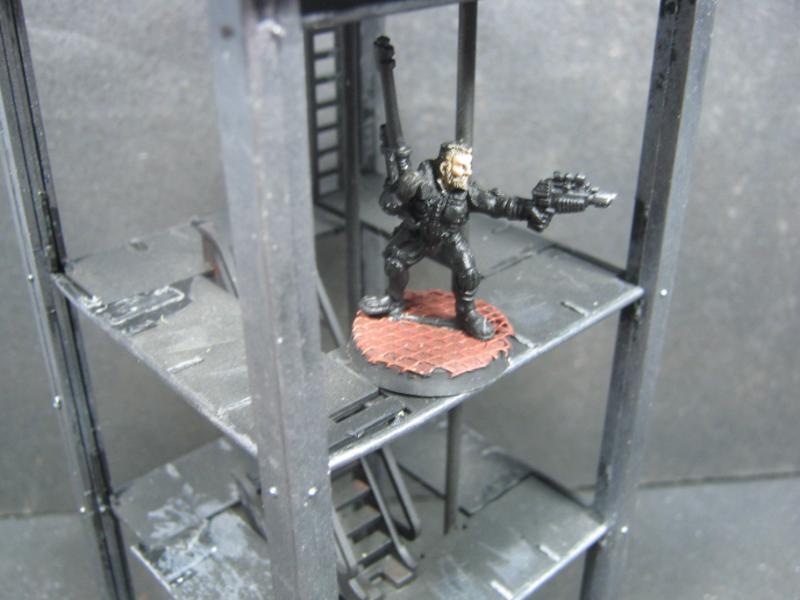
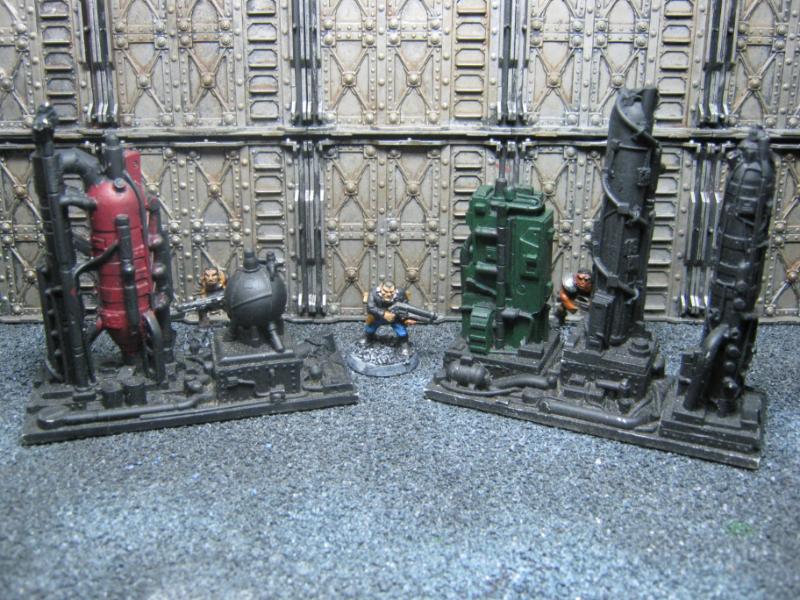
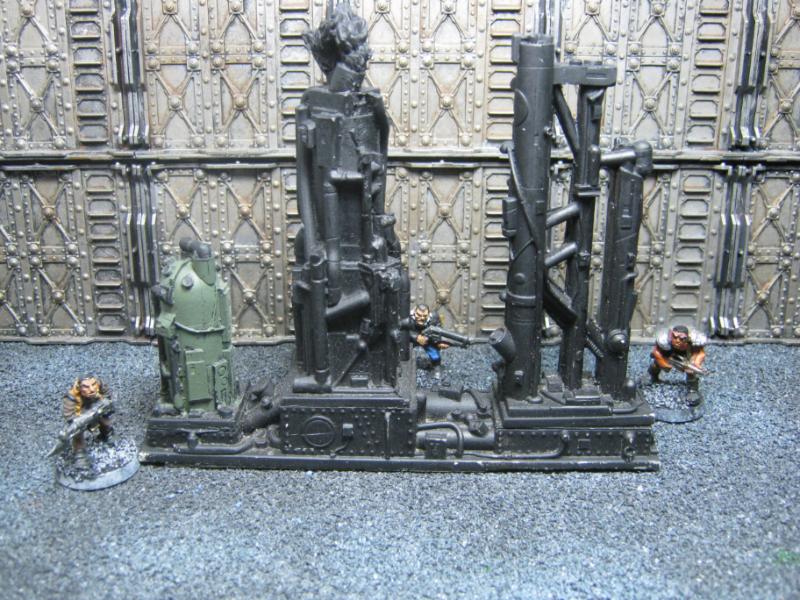
I'll end with a couple of my favorite perspective shots. Welcome to the Underhive.
And Camkierhi, to make your links links you want a (url) at the start, the link inbetween and a (/url) at the end. But use square brackets e.g. http://www.dakkadakka.com/dakkaforum/posts/list/486262.page Also, if you use (url=http://www.dakkadakka.com/dakkaforum/posts/list/486262.page)Name(/url) the link will be called "Name" in this example. As is in my sig.
@ Gitsplitta- That's cool, and I hope the work I do on them will be up to standard. There are a lot of them to do.
@ Camkierhi- Thanks for stopping by and posting, always enjoy seeing new folks. As for bulkheads, aside from the ones I rec'd in the original box set all of my bulkheads have come from eBay. Sometimes there are huge auctions and no one is bidding. My last haul was enough to last a lifetime of modeling and I paid very little for them. It's hit or miss, but it would be a good idea to check every week or so. You can also check the Dakka Swap Shop and Bartertown. I've never used either of them but both have good reviews from a couple of my friends.
@ Dr H- Welcome back. I'm glad to be up and running again. IRL was kicking my ass, but I've started to kick back.
@ monkeytroll- Glad you are liking them. They are already so much further along than they ever were even when I was using them in League play and they are great to play on. One reason is because I intentionally left open areas so people can actually reach in instead of push the model along w/ the end of the tape measure (anyone that has played Necromunda knows what I mean ) and the other reason is because they are dead solid. All the plasticard is reinforced w/ sprue strips or straps of scrap platicard, it's glued together, and each tower is always connected to at least one other w/ at least 1 walkway so the overall stability is excellent. The only 'wobbly' places are when there are planks ( as in yarrr, walk the plank matey!) but even those are reinforced and I try to keep them short. I put them up to encourage Jumping since I think it quite funny when they fall.
Nothing to share as far as an update, just wanted to stay up to date w/ folks. I expect I'll have a decent amount of time this weekend to get some things done, trying to decide if I want to do a little on each or a lot on one.
As far as crates / barrels / misc junk I'm already completely good to go. I've been thinking about uneven terrain like foam board made into slight rises and ash piles, etc. Not there yet but it's an idea. I've also been thinking about making a dedicated 2 X 2, 2 X 3 or 3 X3 board to tighten games up a bit. Not getting to shooting range by turn 2 and CC by turn 3 at earliest is slowing things down a lot for a weeknight (i.e. work night) game that starts around 7-8pm. If I go that route I'll make a rust / dust based board.
Thanks for the interest and replies. More coming sometime this weekend.
@ Vik- Thank you. Those bulkheads are still one of the coolest things GW ever produced. I'm betting if they released them again people would buy them.
@ HAZZER- Oh buddy you had better believe it. Necromunda is back and I'm really into it.
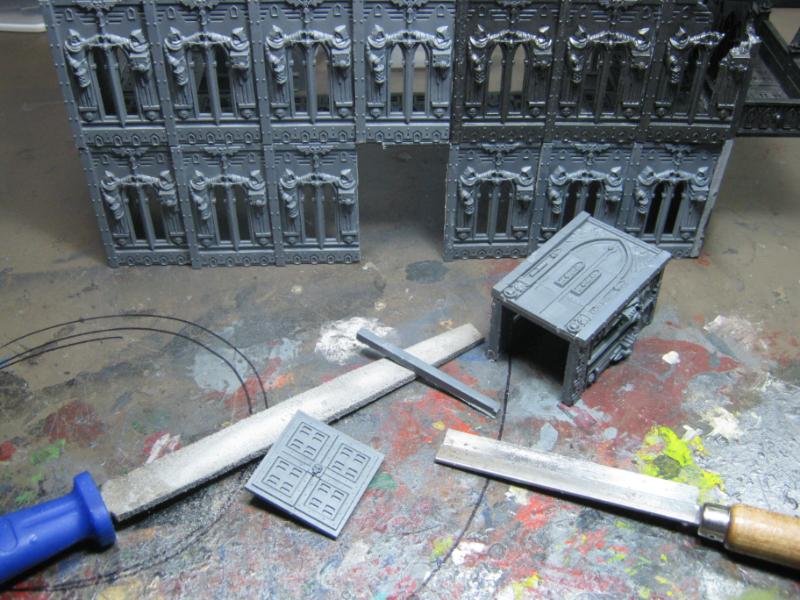
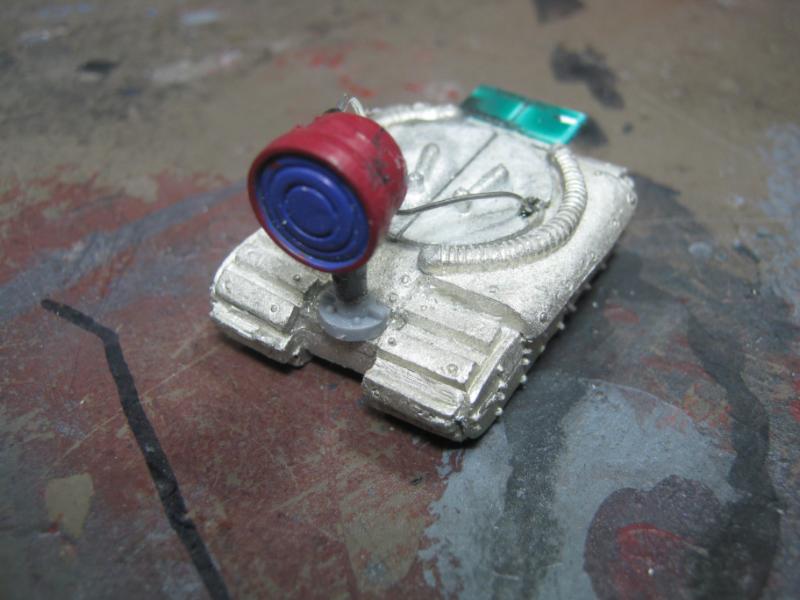
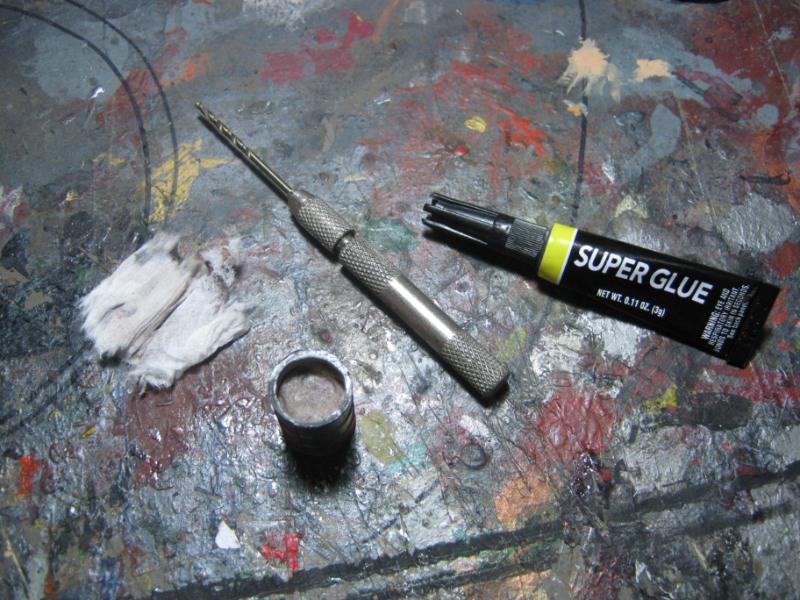
Today I'm going to share a project that got started in November '12. I had the model for maybe 2 years prior (was an eBay score and I had been playing it on my table w/ a Boltgun Metal dry brush) bit when i bought all the Imperial Sector stuff I decided to start w/ this as the base and build it out from there.
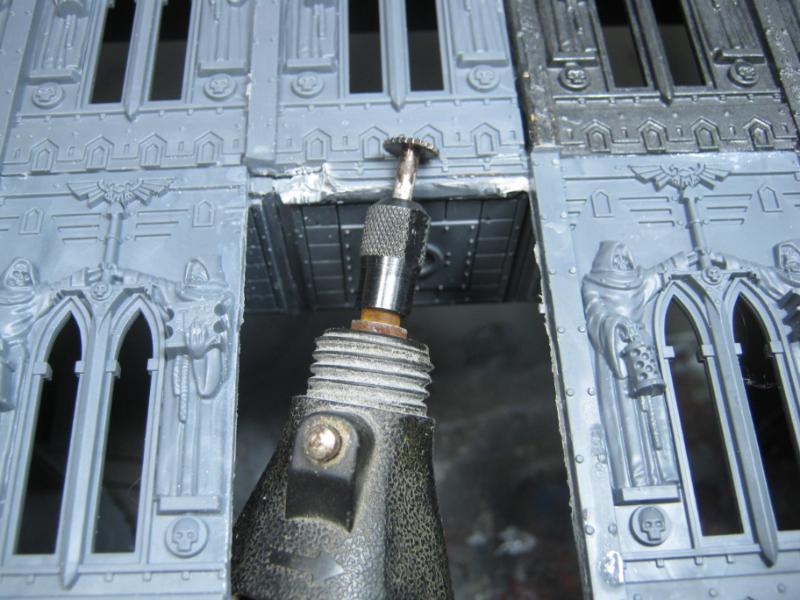
Here I'm using my favorite conversion tool:
After I destroyed everything I took a cue from US foreign policy and started to rebuild it bigger and better than it was before (at considerable expense to the US taxpayers... meaning me).
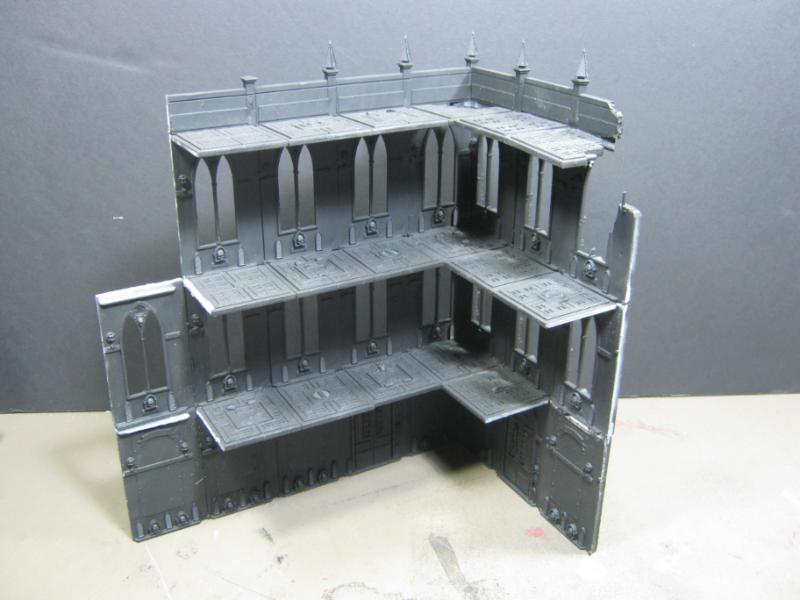
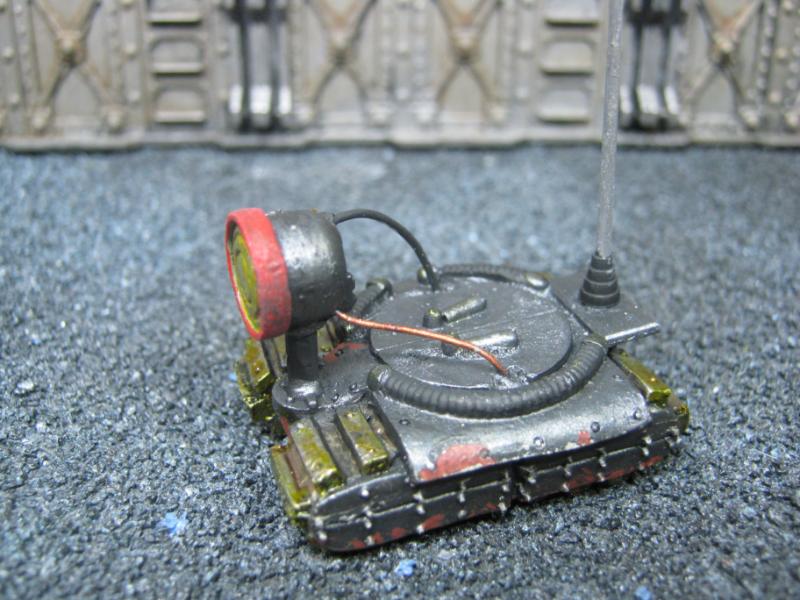
Doesn't look like much but a lot of work went into just getting to this point:
Going to do a series of progress shots, I'm not going to explain every step. If there's anything in this that piques your interest, ask and I'll explain
New damage to get the look I am going for:
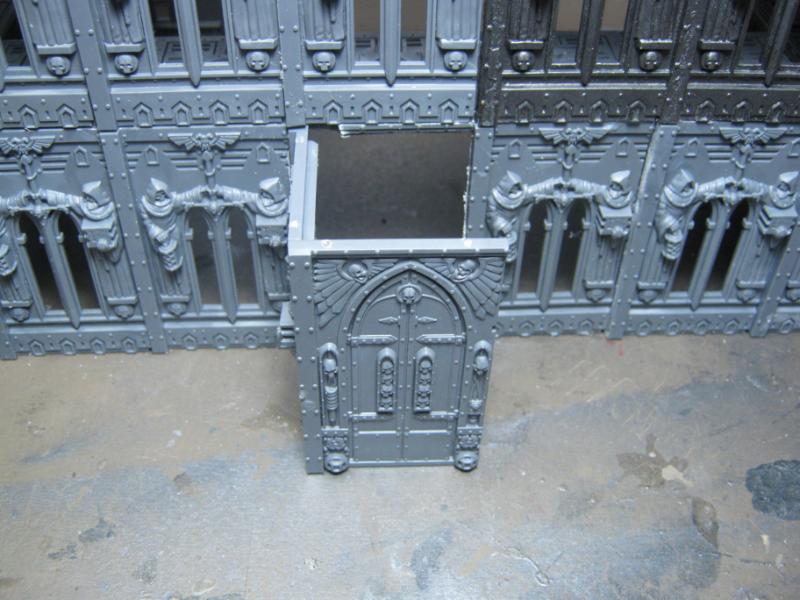
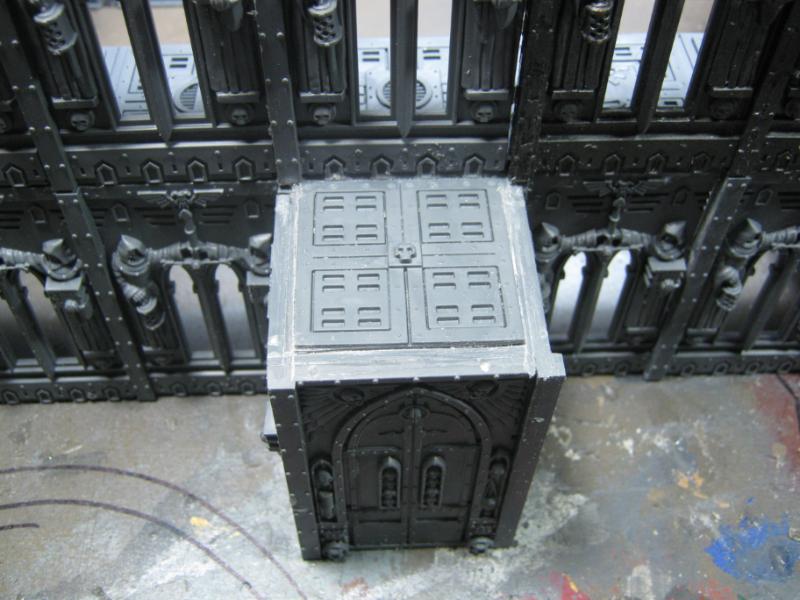
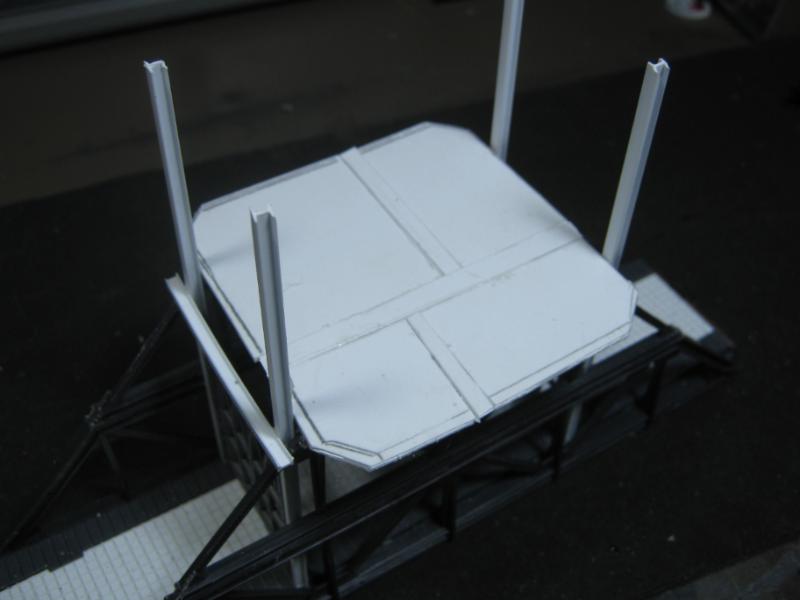
This next bit I want to detail out a bit because it's a genuine step outside the box. I decided the front was way too flat so I thought about how to fix that and came up with a simple doorway. First bit was to remove the existing door and build this:
It was not as easy to take apart and shape as I had hoped:
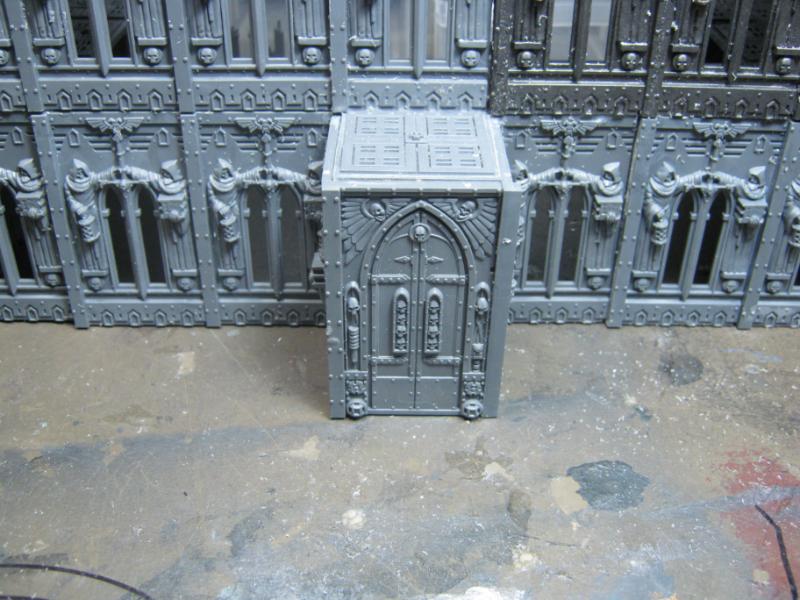
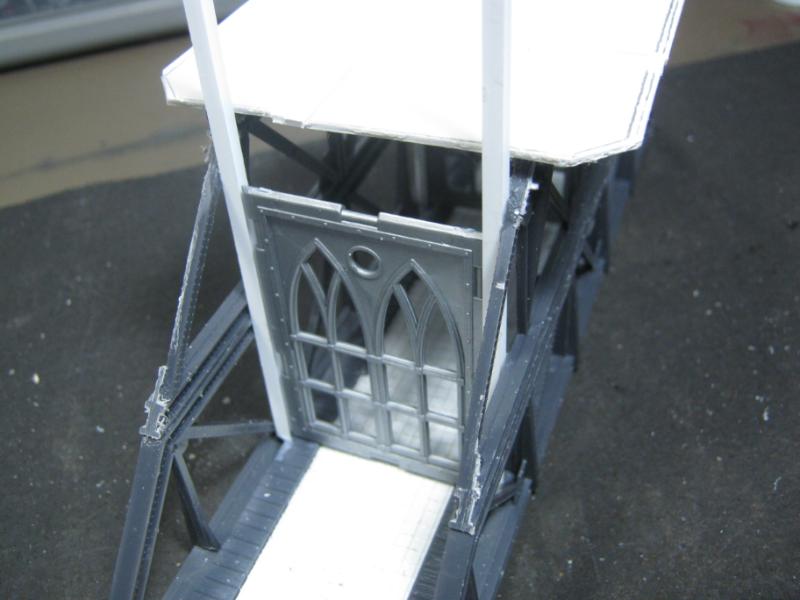
Eventually I got it fixed up, but it looked really bland:
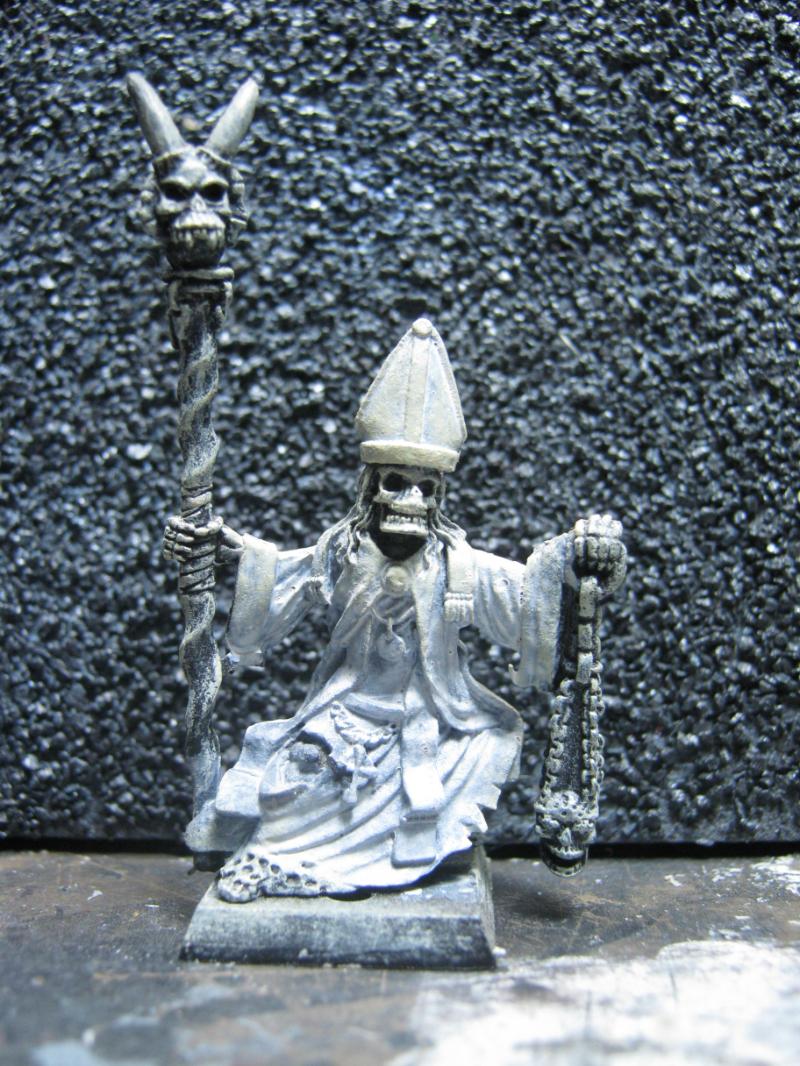
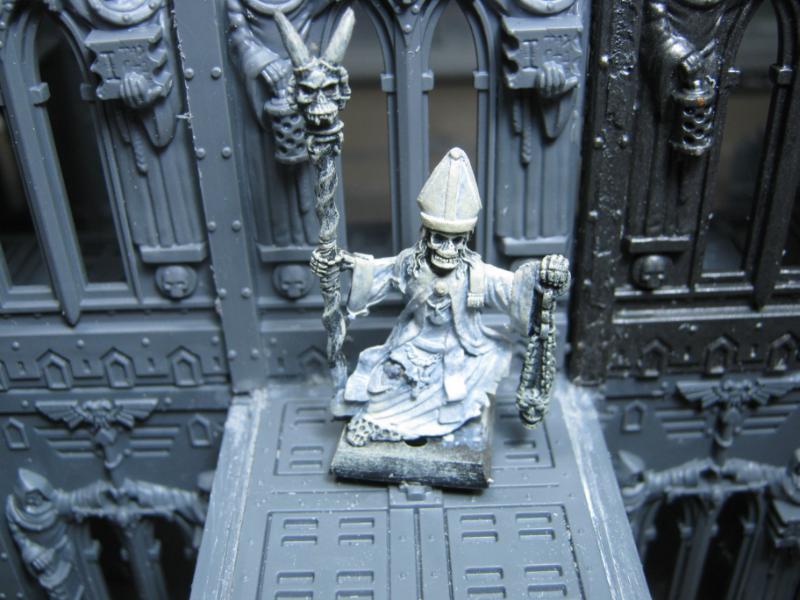
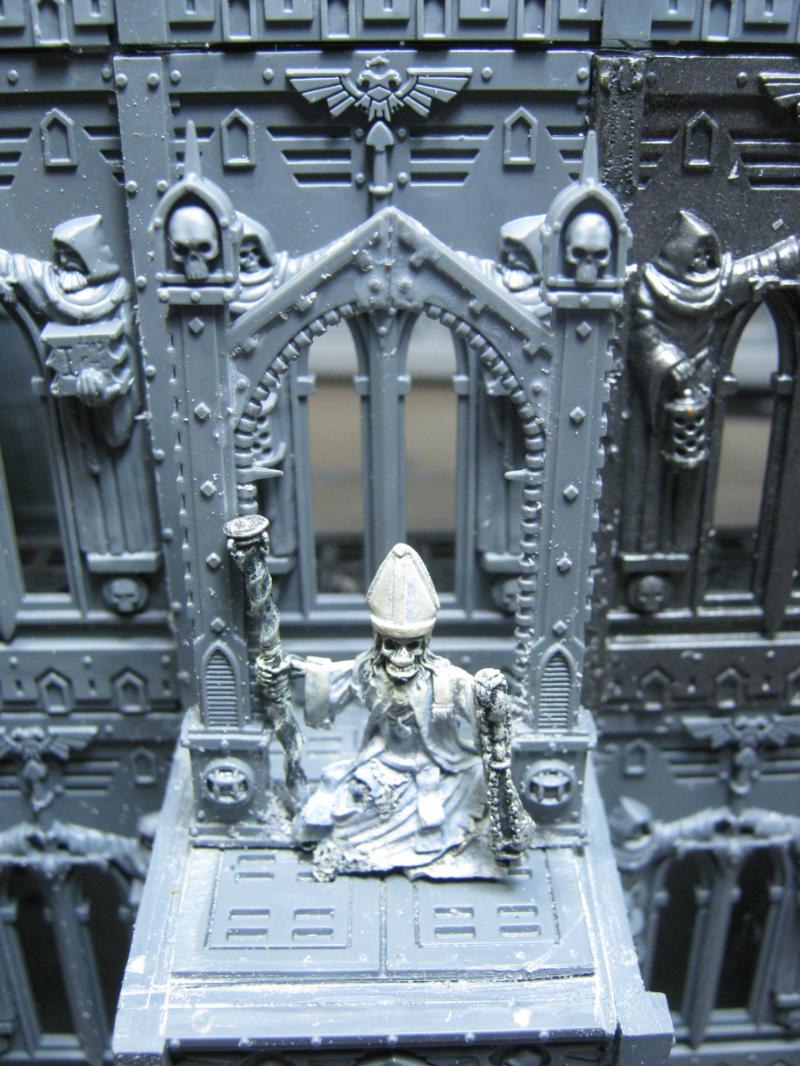
A tiny bit of inspiration hit me and I went looking for this miniature. Amazingly, I founbd it. I can't remember the manufacturer of this miniature (Reaper maybe?) but it was a prefect representation of some martyred missionary or high-office mucky-muck guy. Whatever. He's dead and his corpse is going to be propped up in a shrine on the building built in his memory.
That part of the project is on hold until I get to the finishing touches. On to more construction!
Time for paint!
And that's it. Nothing further has happened w/ it since February 20th. No real plans for it to improve anytime soon, but it is the most recent project I had up to now. I will finish this eventually, but honestly I'm thinking it is going to look a lot different the next time you see it. Mr. Smashy Hammer has been whispering in my mind and telling me to do horrible things. Once I have a good start on my Necromunda stuff I might revisit the structural integrity of plastic and super glue....
Thanks for looking. I'll be back in a while w/ some Necromunda scenery updates.
That's quite a sizeable structure there. Looks good.
Although, as you said, the door/porch needs something doing to it. I think the porch is just a little too square, which is why it looks a bit odd. Needs something to make it seem more part of the building. The statue/altar thing on top is a good idea. Ooo, idea just came to me, flying buttresses...maybe.
I have learnt not to worry when Mr. Smashy Hammer whispers to you as Awesome always results whatever the sequence of events.
Oh yeah, No problem Camkierhi. I'm still learning how bits work on here. Share the wealth or ask and ye shall receive.
As someone who's tentatively trying to build a cathedral of sorts, I salute you. That's most impressive, and that reaper dude is a new quest objective for me!
Plenty of space to move around on, and big enough to add something in the middle sometimes, for where some new structure has been built up in the ruins of the old.....
For the shrine thingummy on the porch are you thinking of having a back or the open archway around the ancient martyr?
@ Camkierhi- Thank you! More of the same to come eventually.
@ Dr H- I'm going to use the small flying buttresses that came w/ the set to break things up a bit. Lame, but I don't want to delved into scratch build on the Imperial Sector buildings. The difference stands out way too much.
@ graven- always glad to know I can provide inspiration, especially when I enjoy your work so much.
@ monkey- Even 1/3 done it has seen the tabletop 4 times now (I've been getting in a lot more games) and every time it lands in (or close to) the middle. it's an awesome LoS blocker, it's terrifying when Scouts infiltrate it, it's a massive area of difficult terrain... it really does affect the game and strategic decisions.
@ Vik- I doubt GW would ever release them again as it would encourage scratch build instead of buying their much more expensive kits.
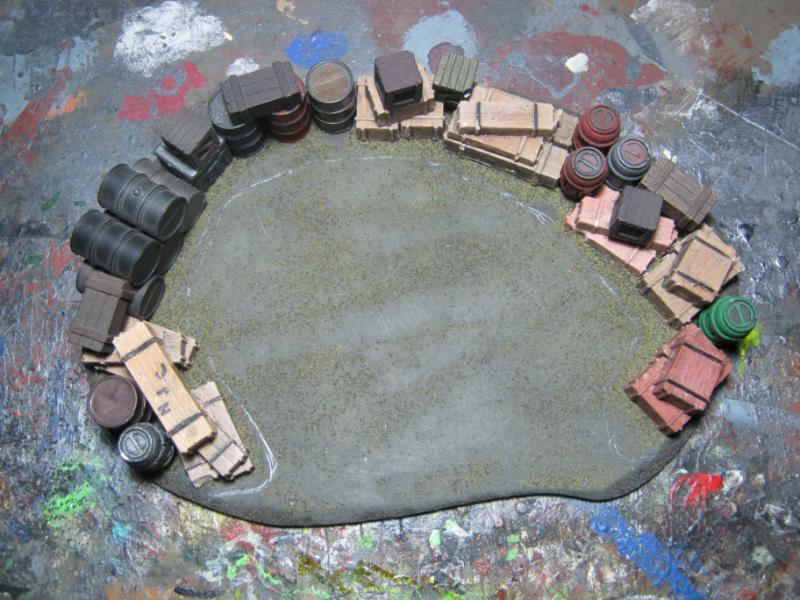
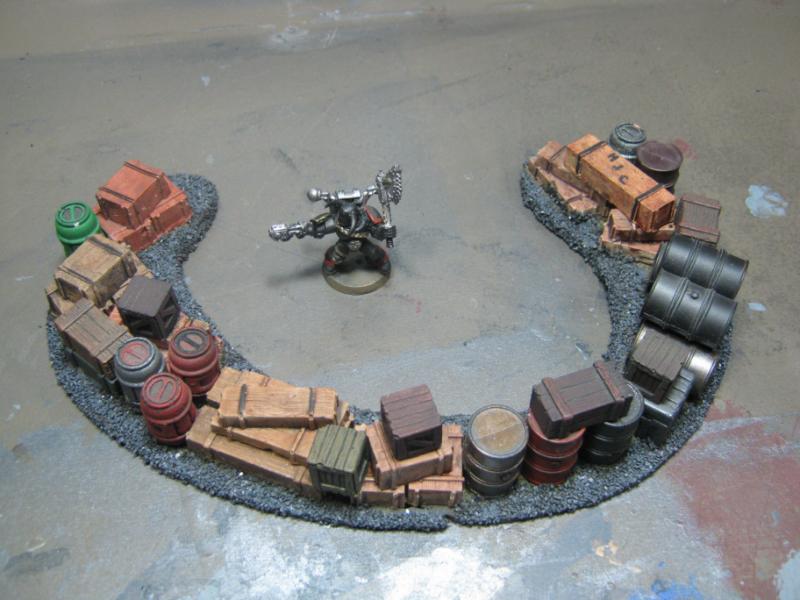
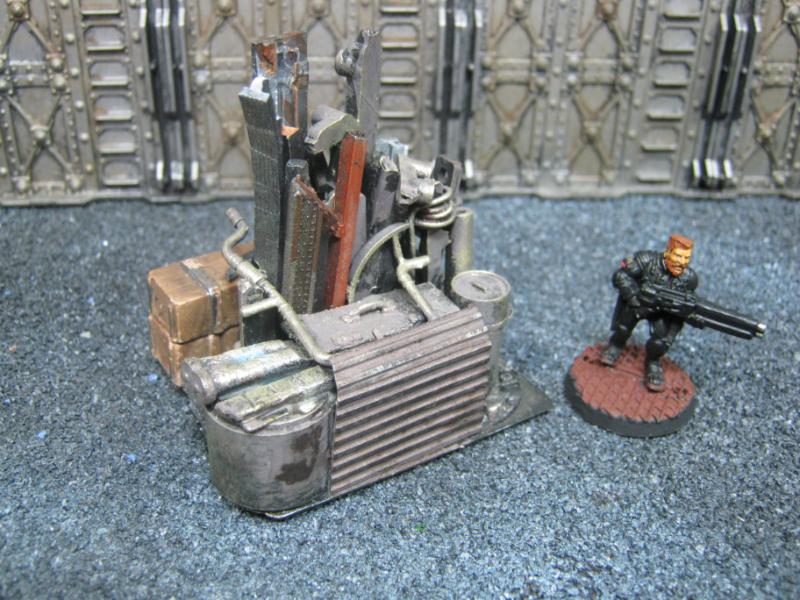
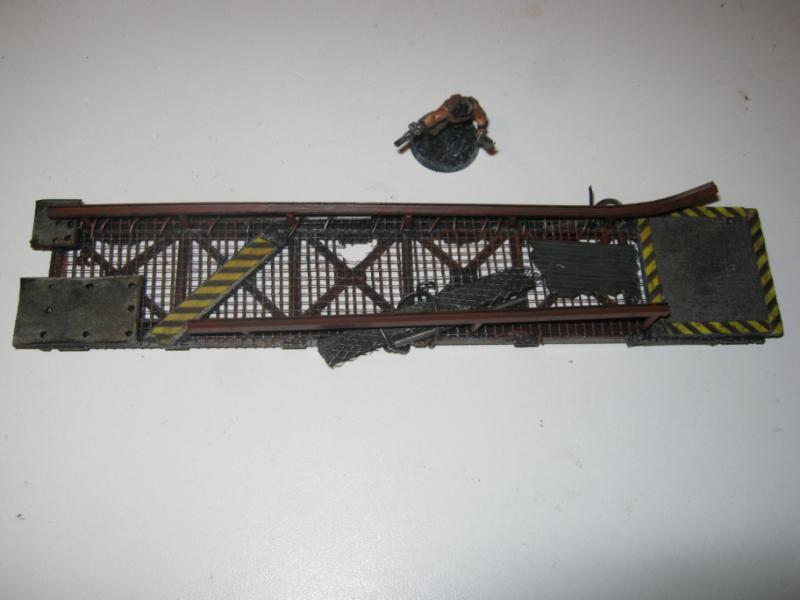
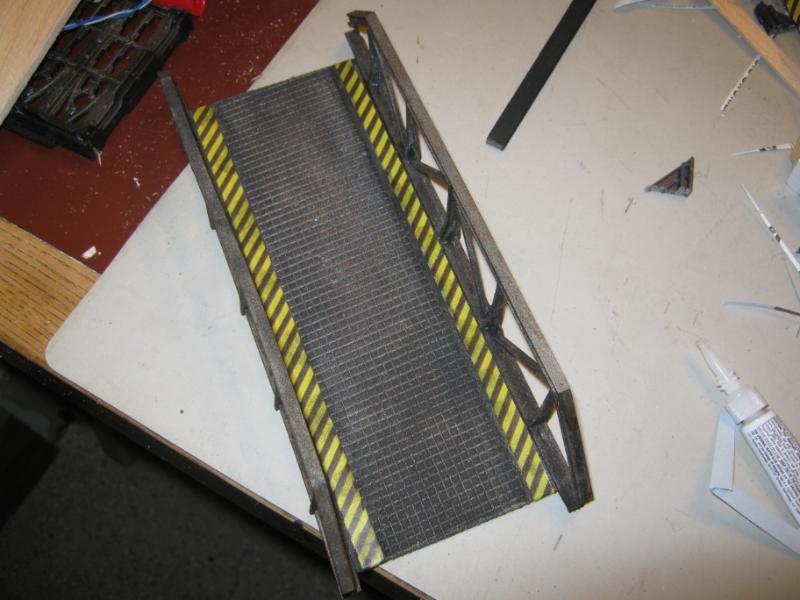
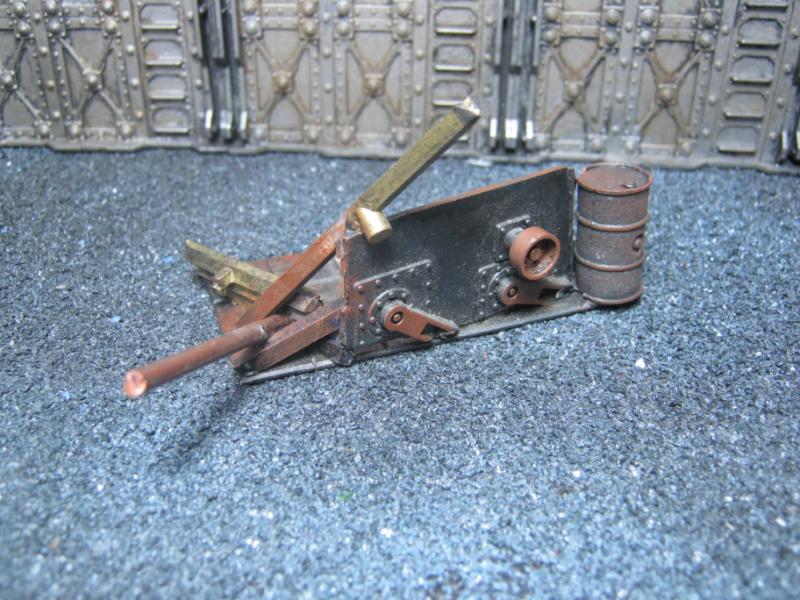
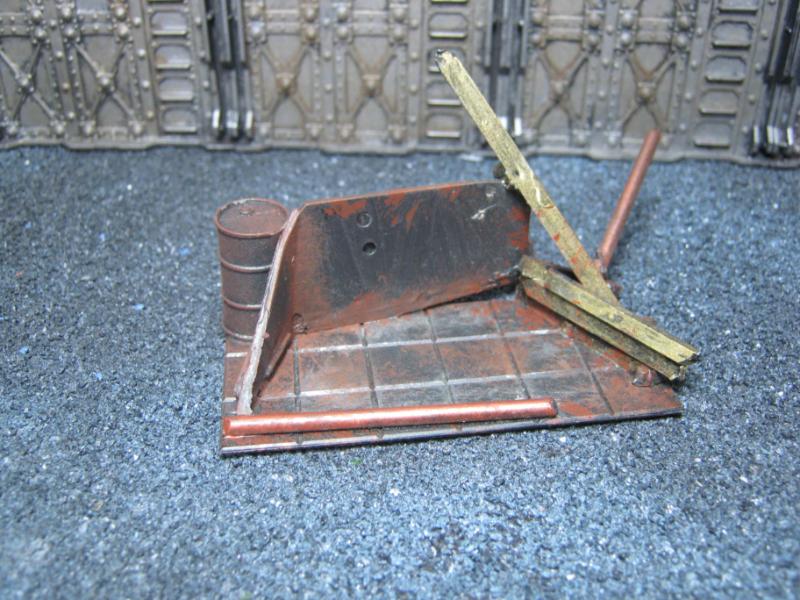
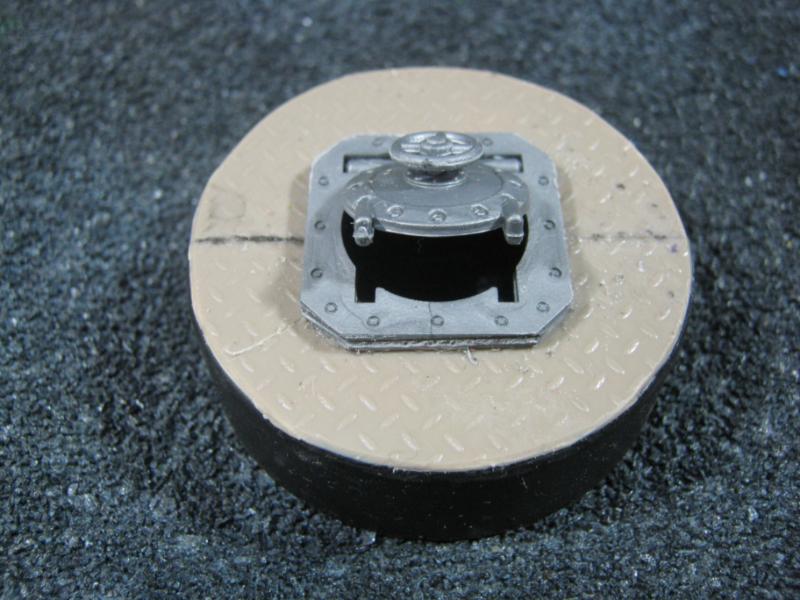
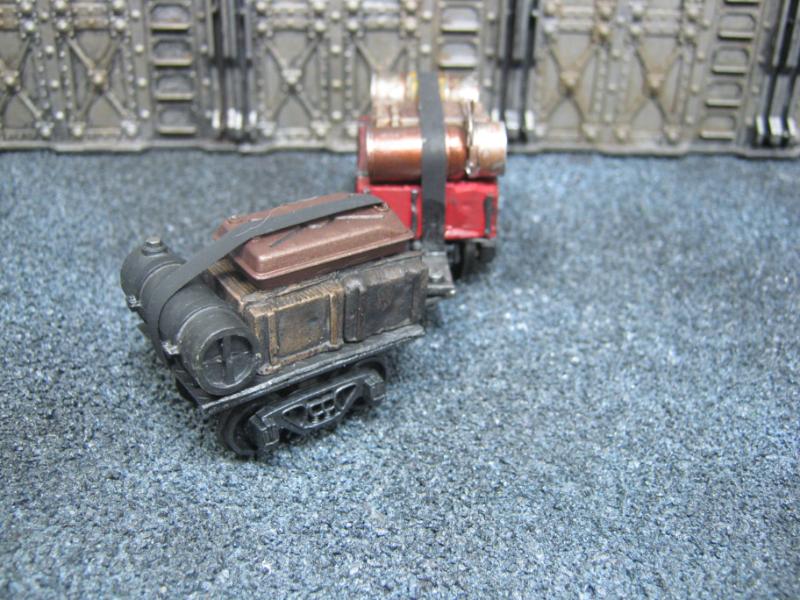
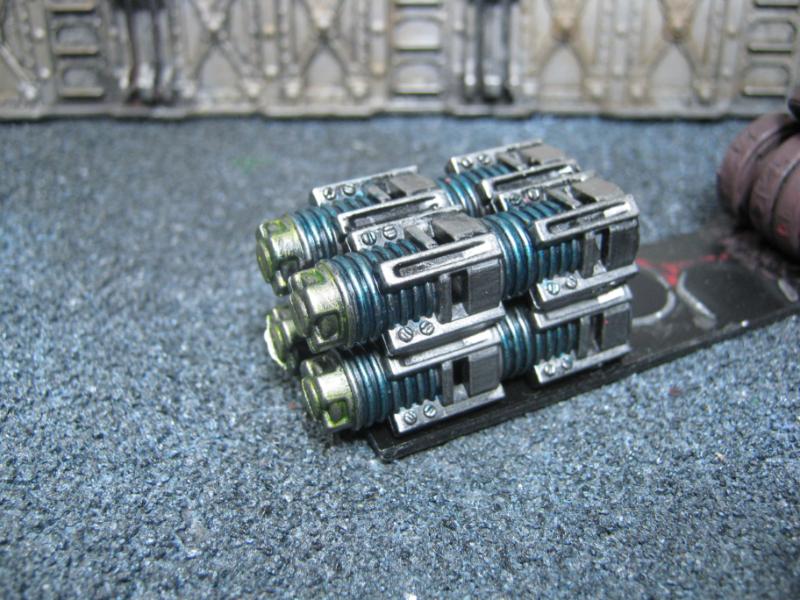
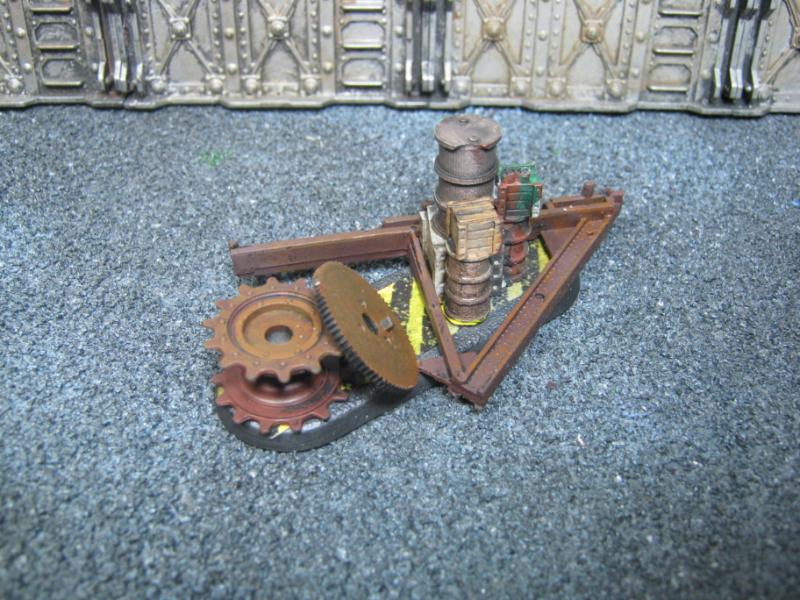
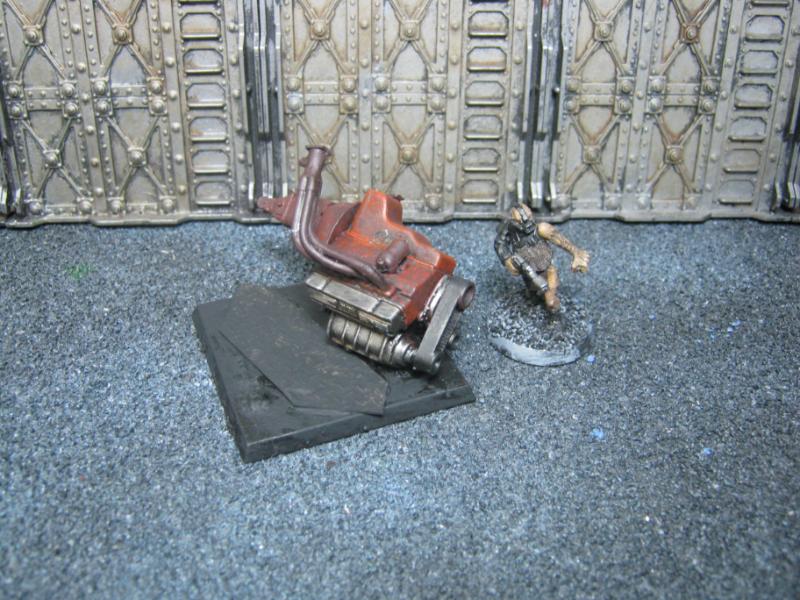
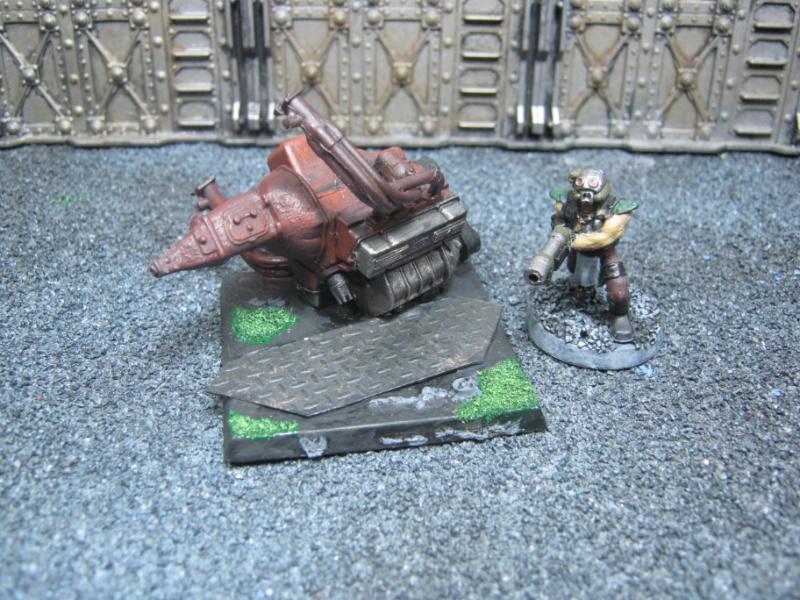
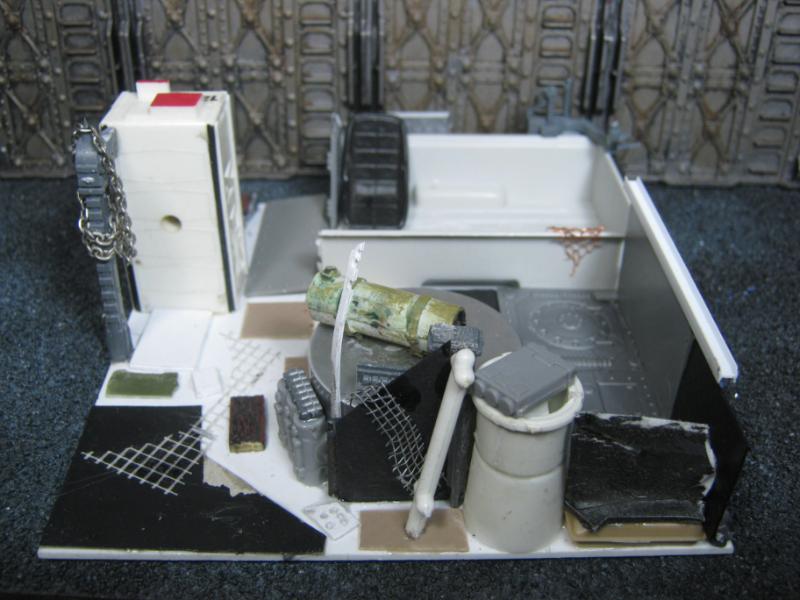
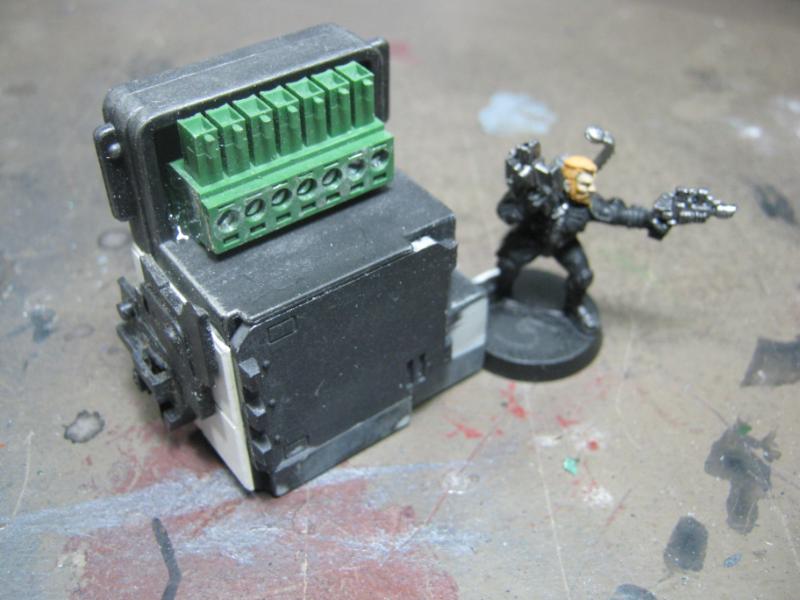
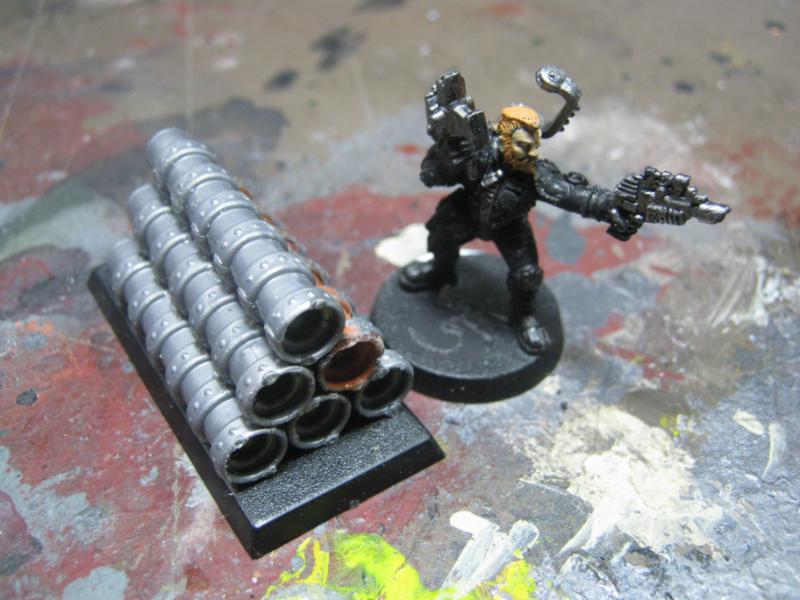
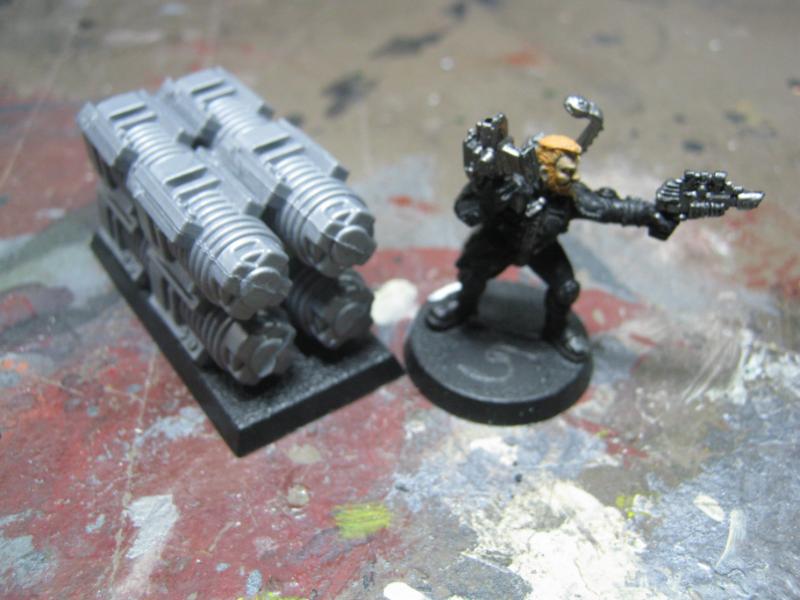
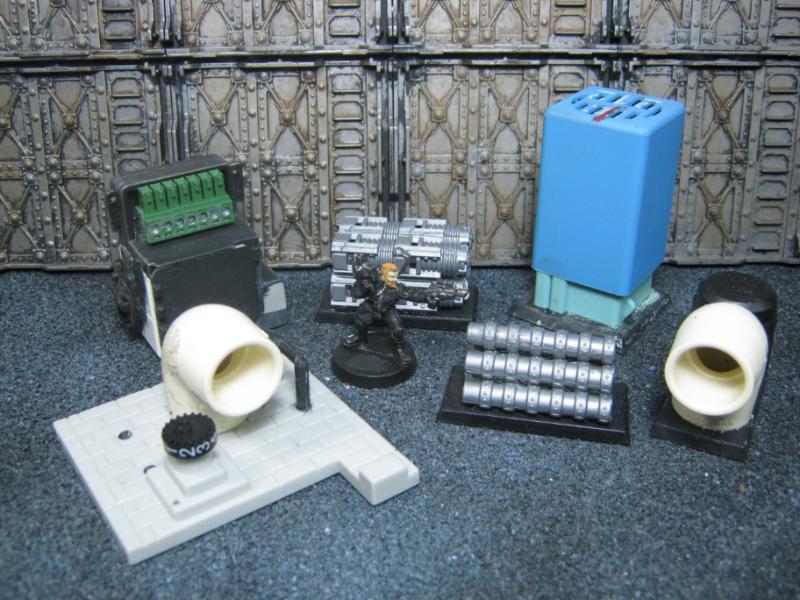
And once again shifting gears without a clutch I have a finished piece that I'm adding to my Necromunda terrain. It's largely a recycle project, everything on this came out of my bitz bin and I didn't spend even 1 new cent on it. Notice I said 'new'. Ha.
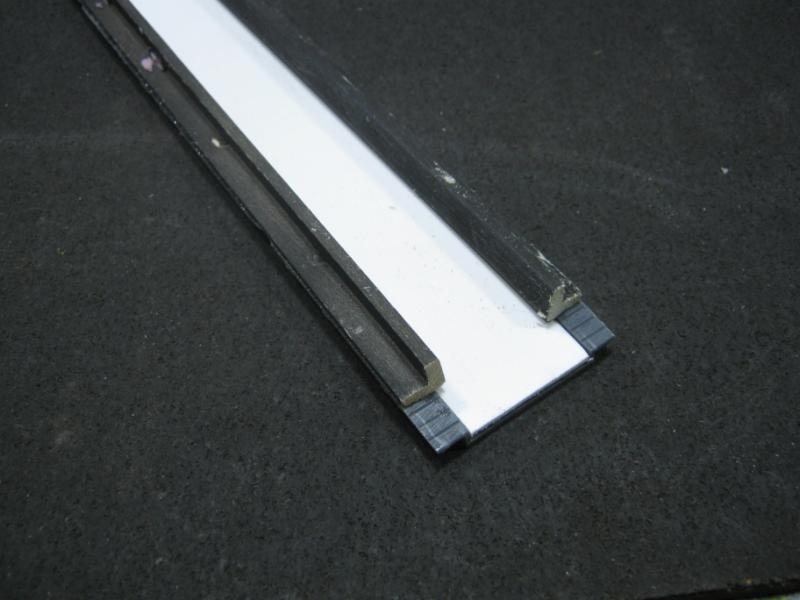
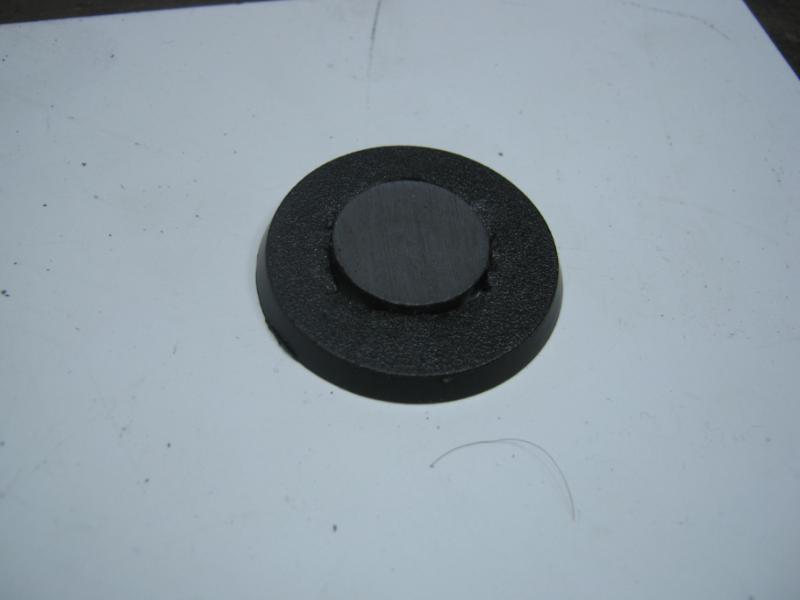
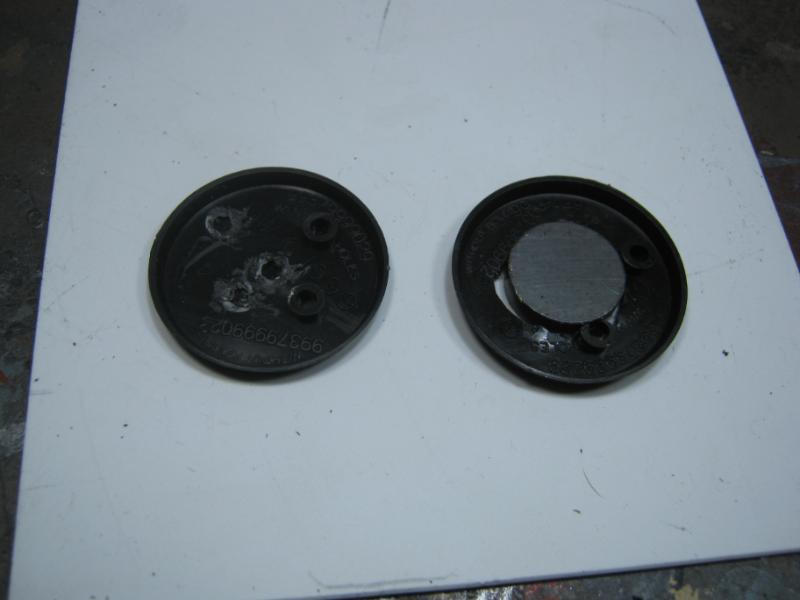
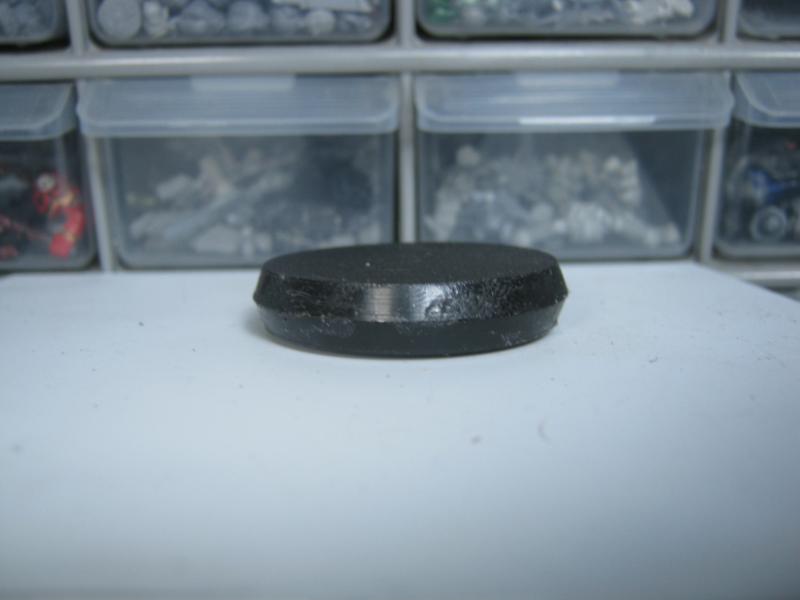
Before I share the finished piece I want to show where is came from. The base of the piece came from a test block I was trying when I was doing the Fuel Depot:
And the platform came from a piece I did a long time back when I first started this thread. I never liked the piece anyway and this was the perfect opportunity to smash it up and use it for something I would enjoy playing on:
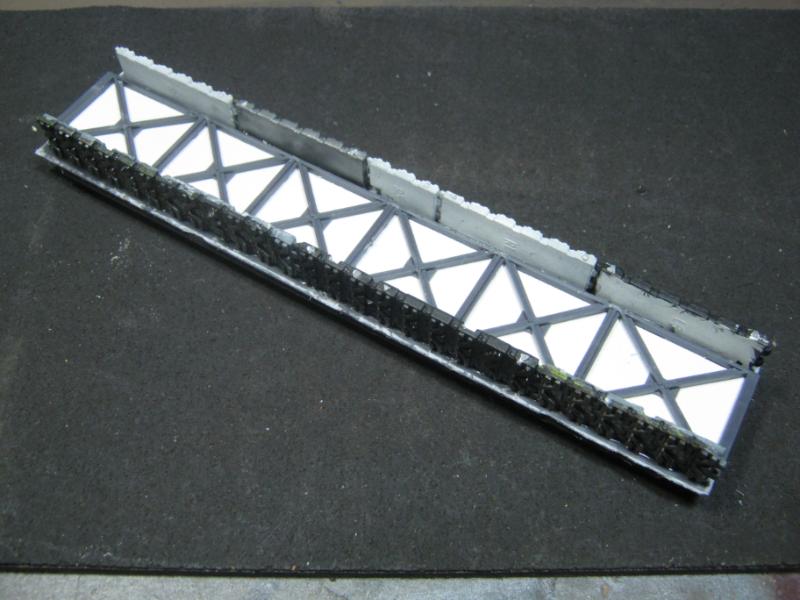
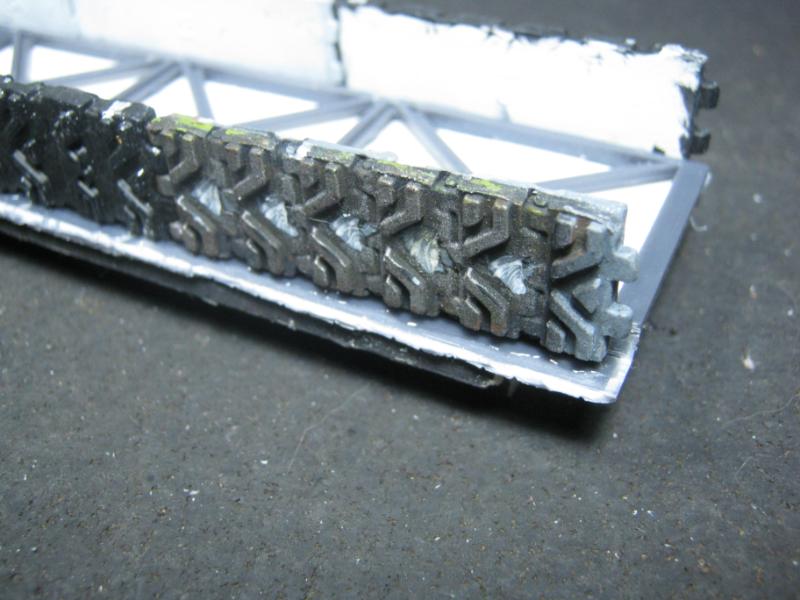
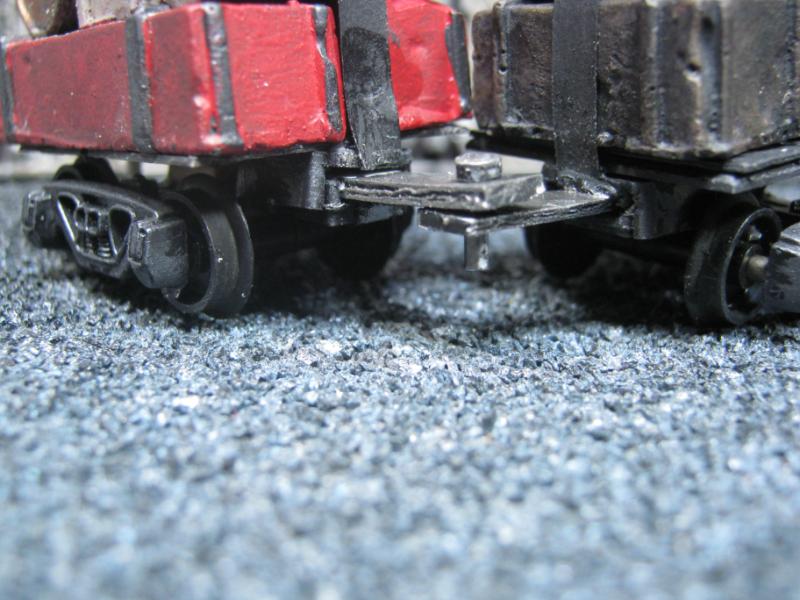
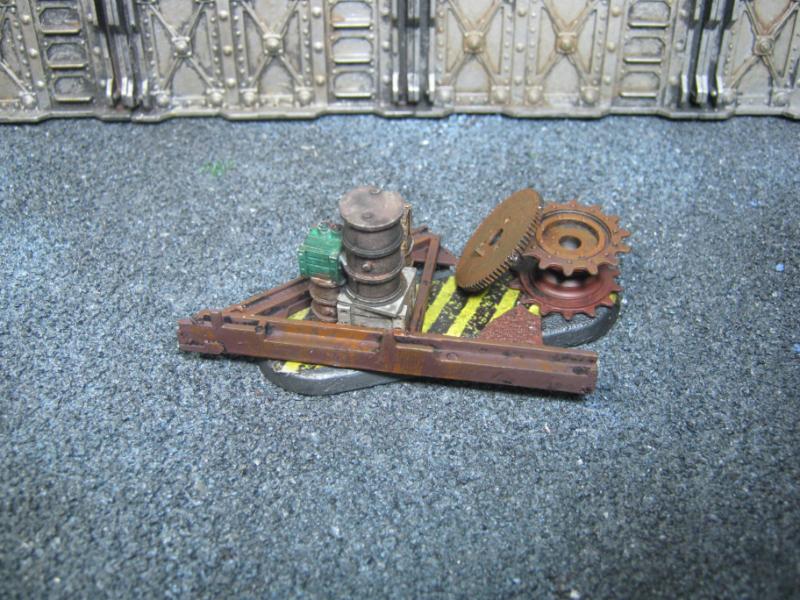
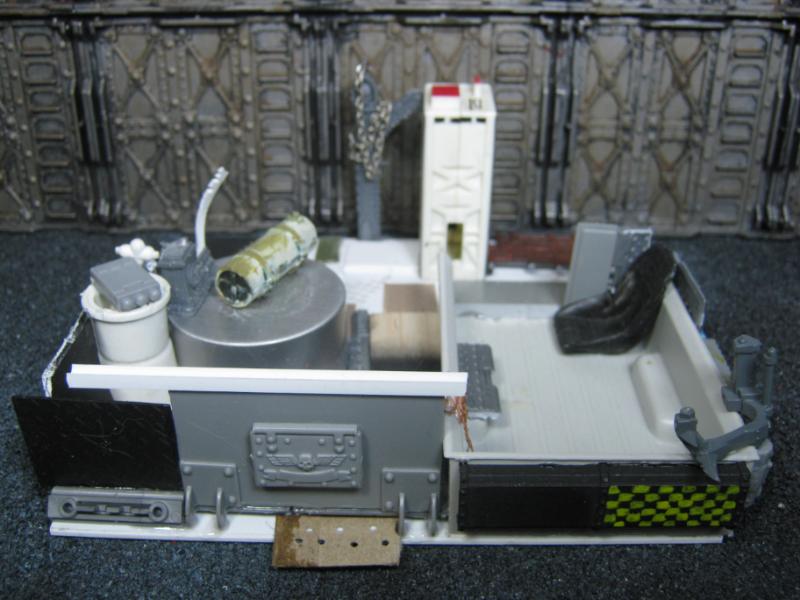
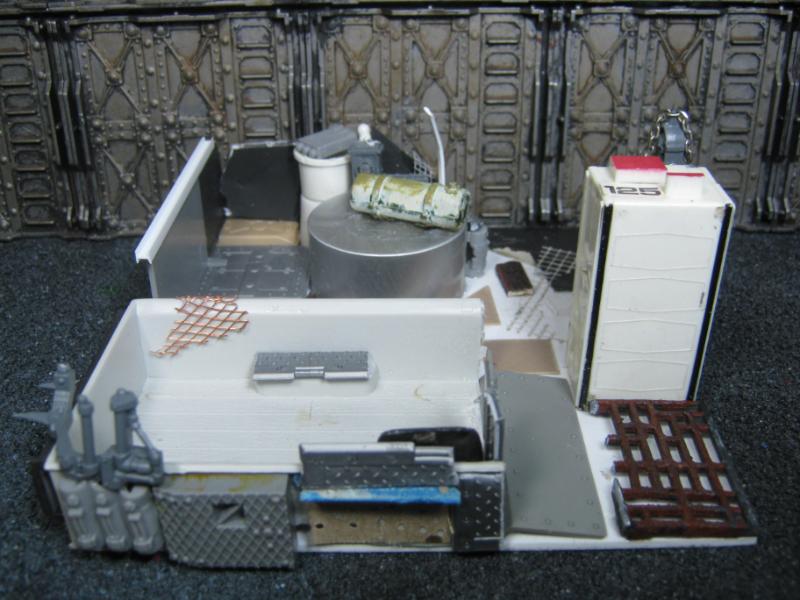
Here's what I did with those pieces:
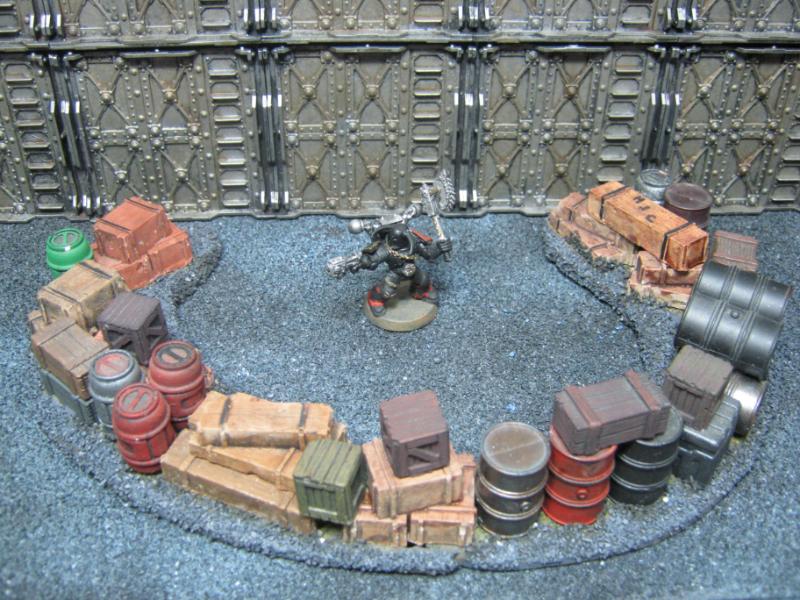
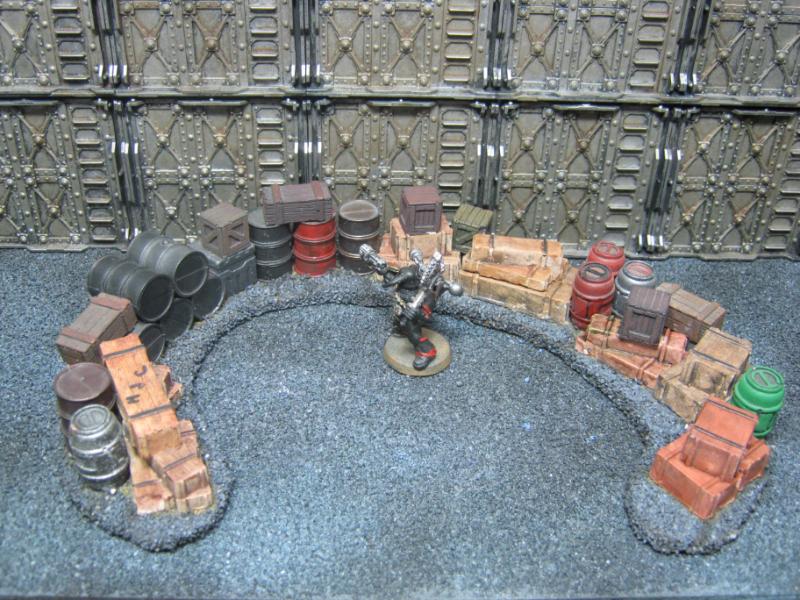
It only took me a couple days to finish this once I got started. It's not a 100% effort project but it's way better than the stuff I used to crank out in the same amount of time (I am taking into account that the platform was mostly done) and I'm very happy with it. It is going to look great on my Necromunda table and will be fine to put on my 40K table as well. I prefer scratch build for Necromunda more than 40K because I have so much prefab on my 40K table and Necromunda is a complete mess. The Underhive is centuries of decay, randomness, and (for me) lends itself to more ingenuity for using random junk like switches, ethernet ports, broken electrical stuff, etc.
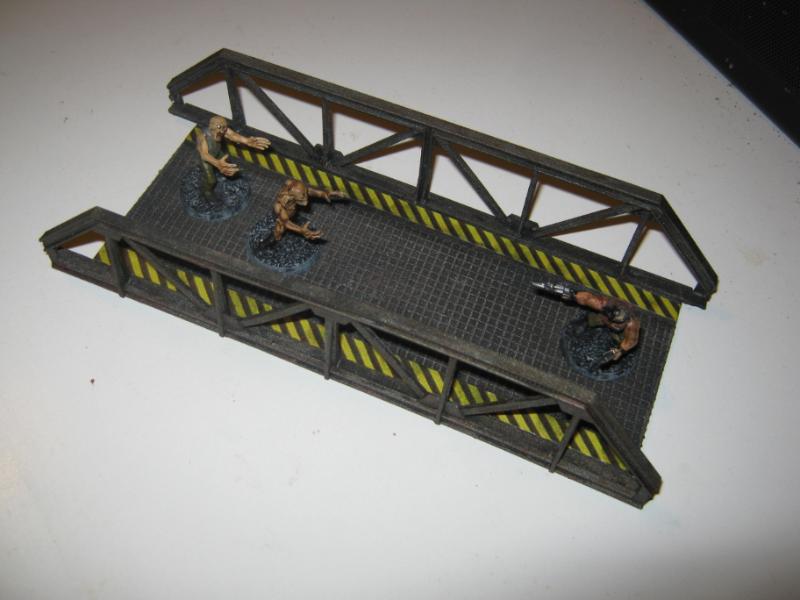
Good job. The weathering is excellent.
The tarmac could probably do with a little more contrast. Like a light grey drybrush around the pot-hole for example, just to bring out the texture a little more.
That's all I've got.
Vik- I doubt GW would ever release them again as it would encourage scratch build instead of buying their much more expensive kits.
you and your reasoning!!!
thank the lords of choas you are a scratchbuilder of the finest...
that terrain piece looks really nice... i really should invest time in smaller terrain pieces myself than get sucked in in way too large projects...argh^^
@ Dave- Thanks! No chance this return to Necromunda here would inspire you to... naw, nevermind. Anyway, I have two more things below you'll recognize and hopefully be happy w/ the new direction. Nothing major. Well, one is. But it wasn't on purpose. And I promise 'mean old Mr. Hammer' had nothing to do w/ it.
Two genuine updates in as many days. If you are wondering where all this hobby time is coming from, I'm home with some sort of wretched disease. I haven't been this sick in a few years. It hit me like a train 3 days ago and each day it has become exceptionally worse. Right now I'm awake because I feel like my lungs are full of water, the pressure in my sinuses is going to rip my face in half, and someone punched a plated gauntlet down my throat.
Lovely.
Luckily I have a dr appt tomorrow morning so I (probably?) won't wind up dying from this. And if by some chance I do, I want you all to know that I always thought you were a bunch of right bastards and I'm glad to be done with the lot of you.
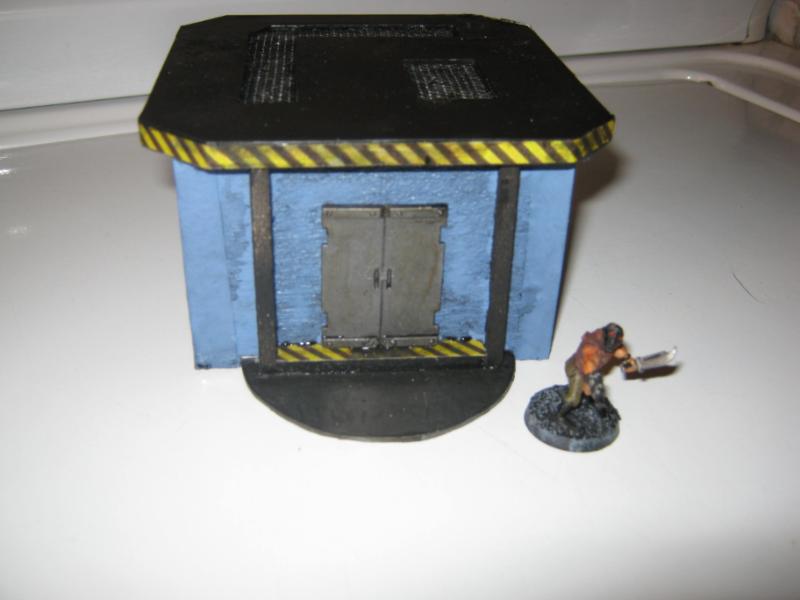
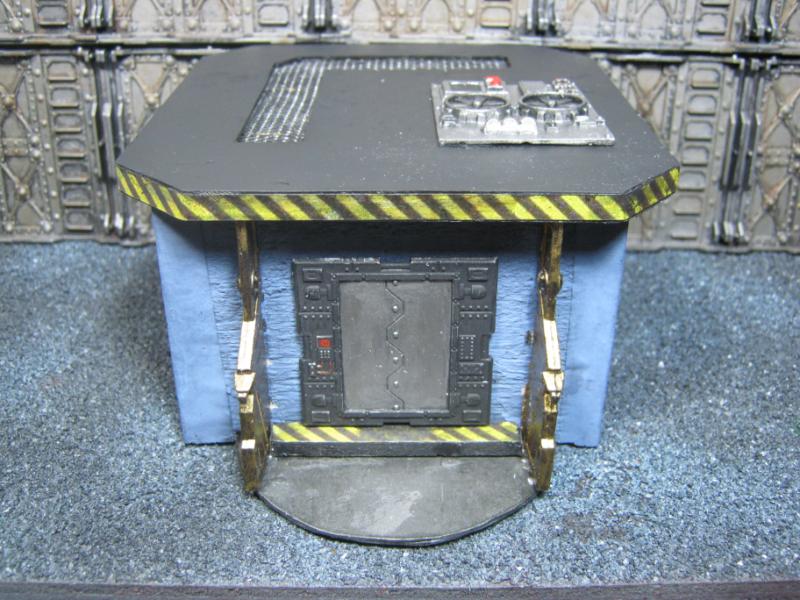
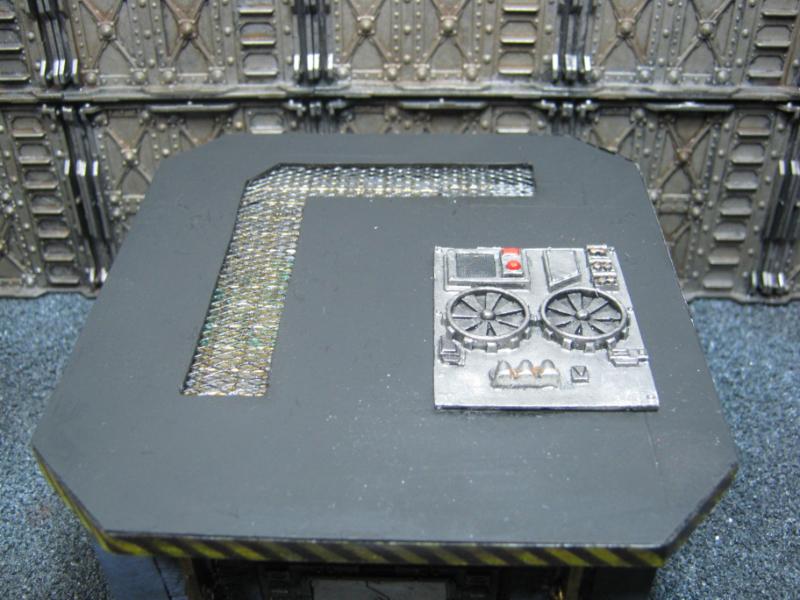
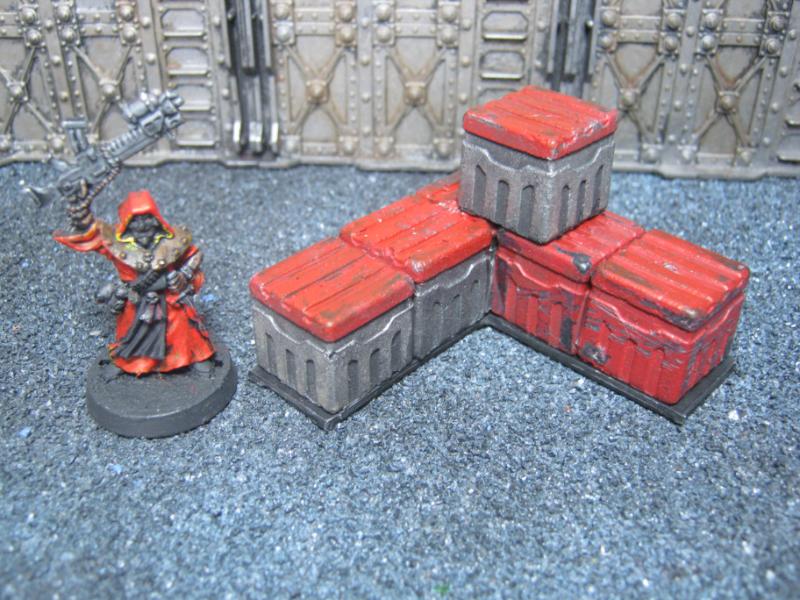
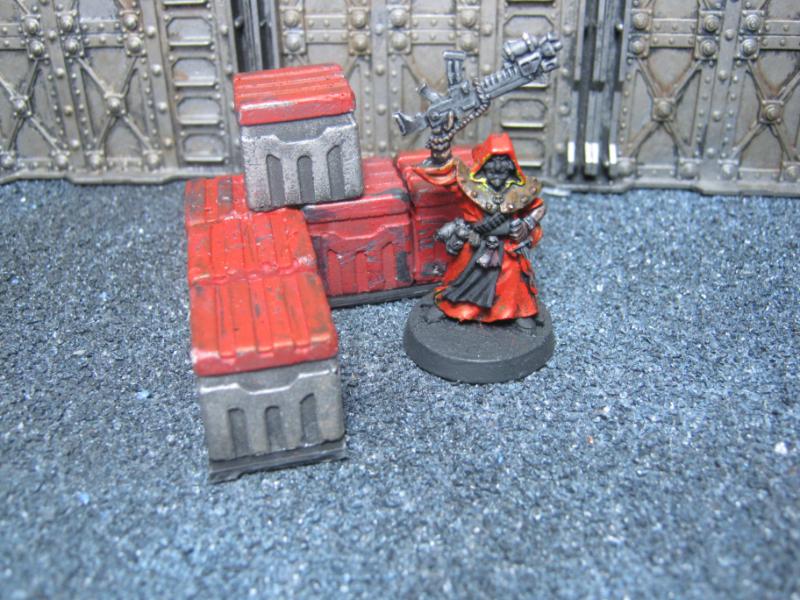
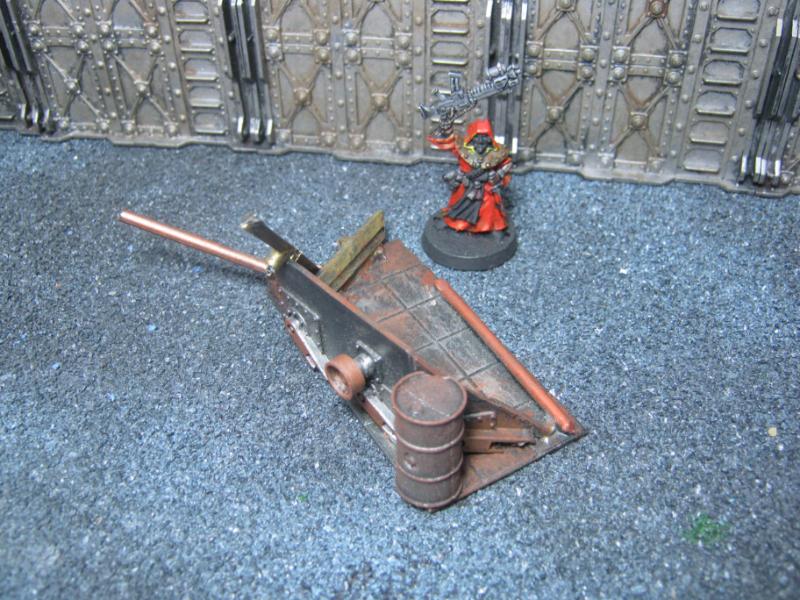
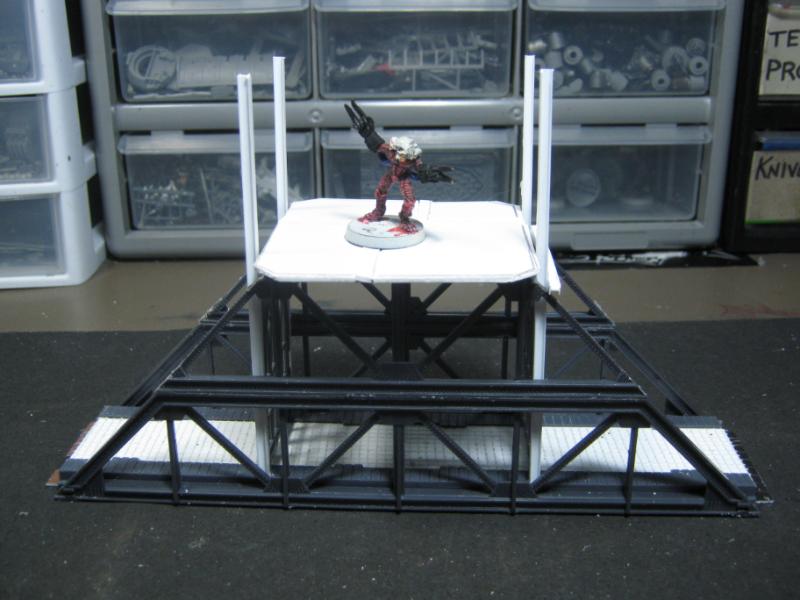
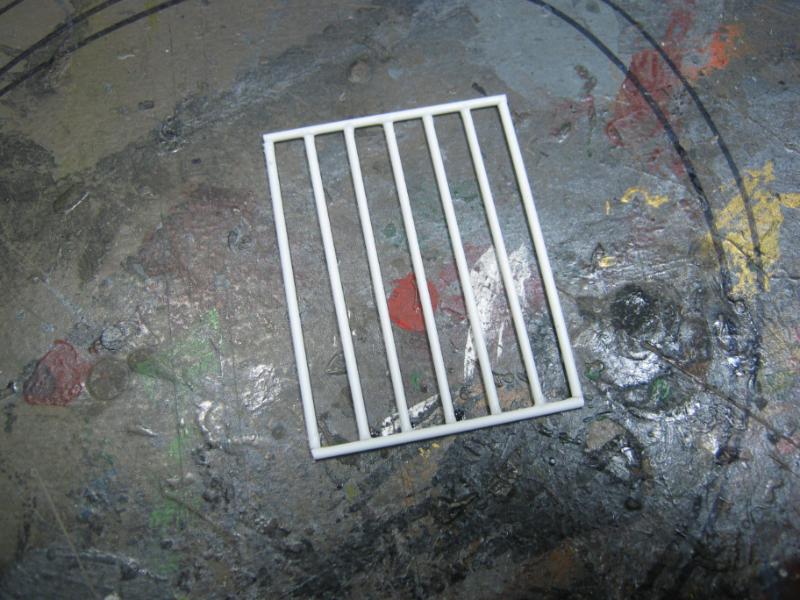
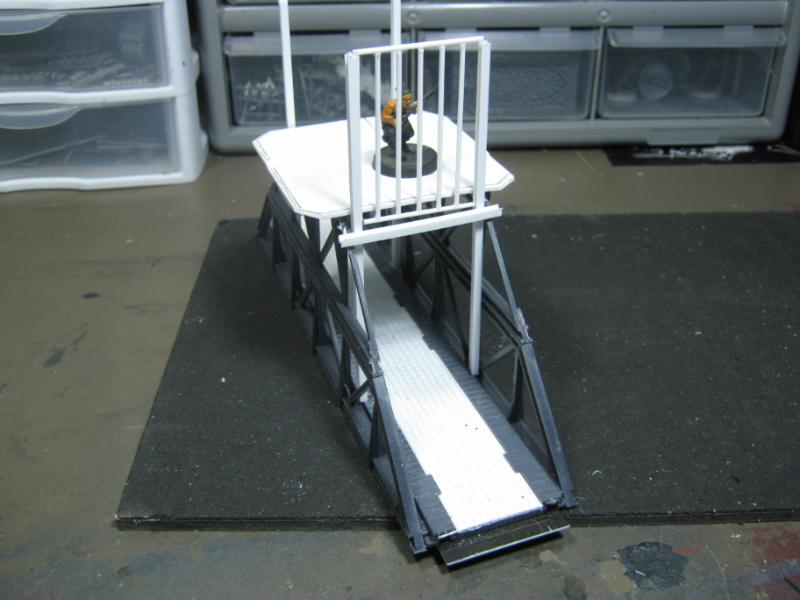
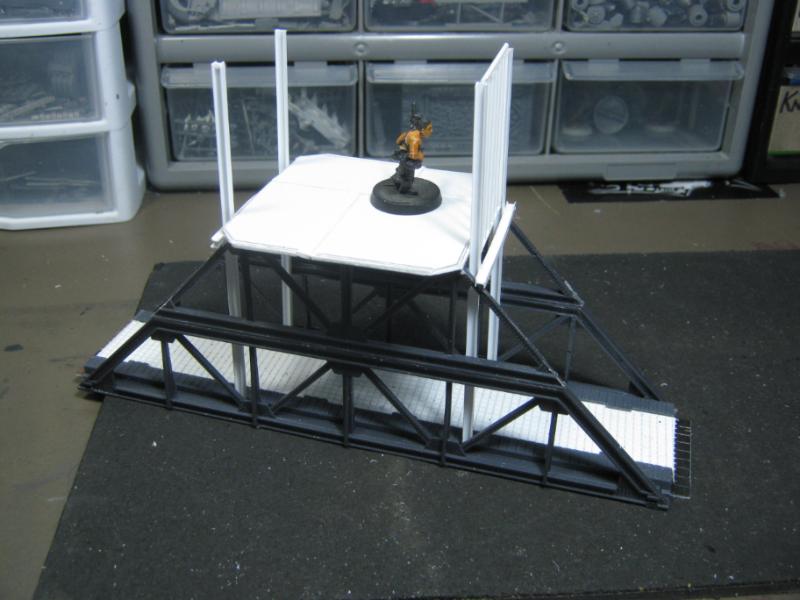
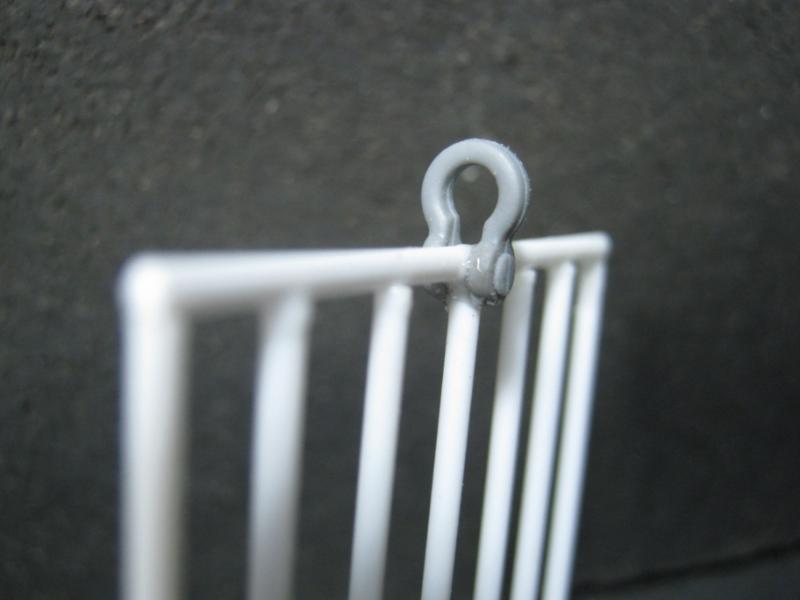
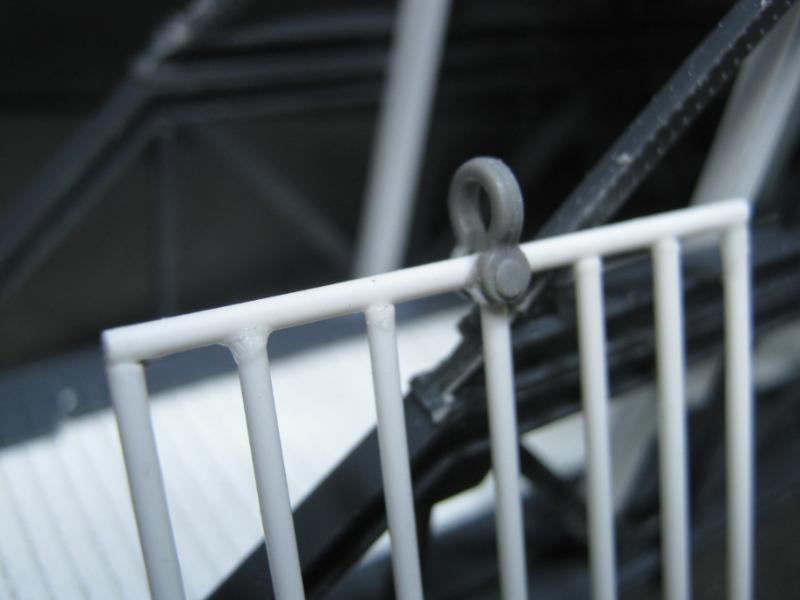
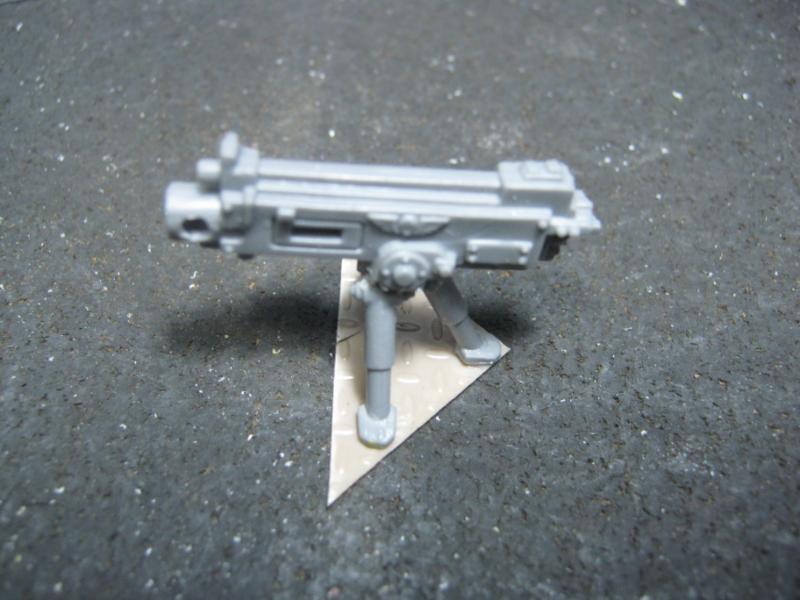
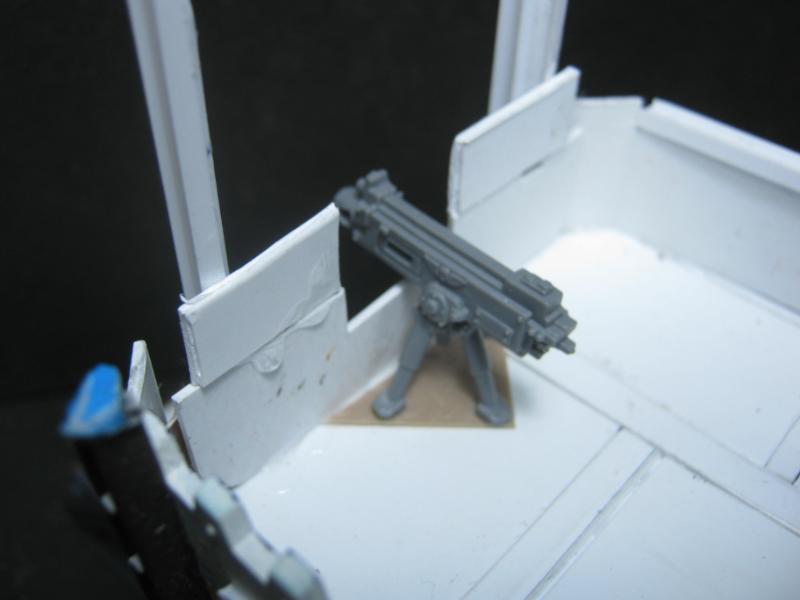
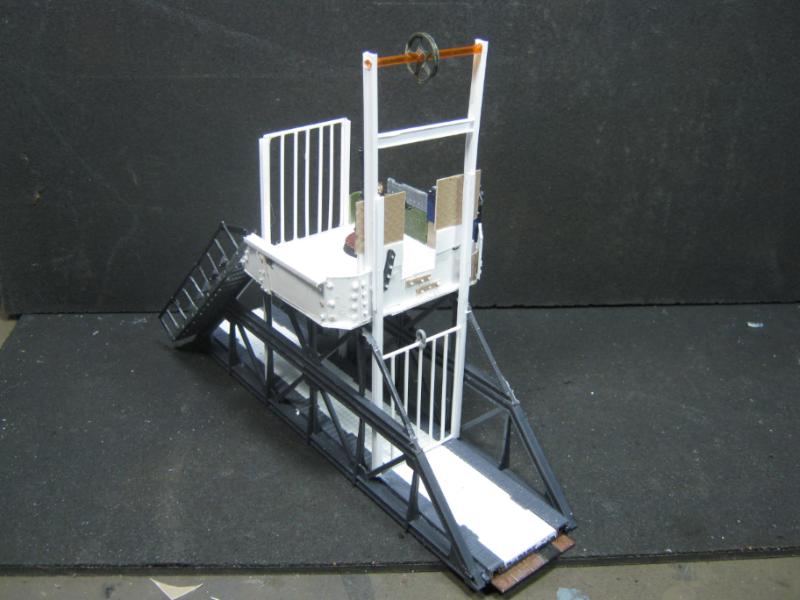
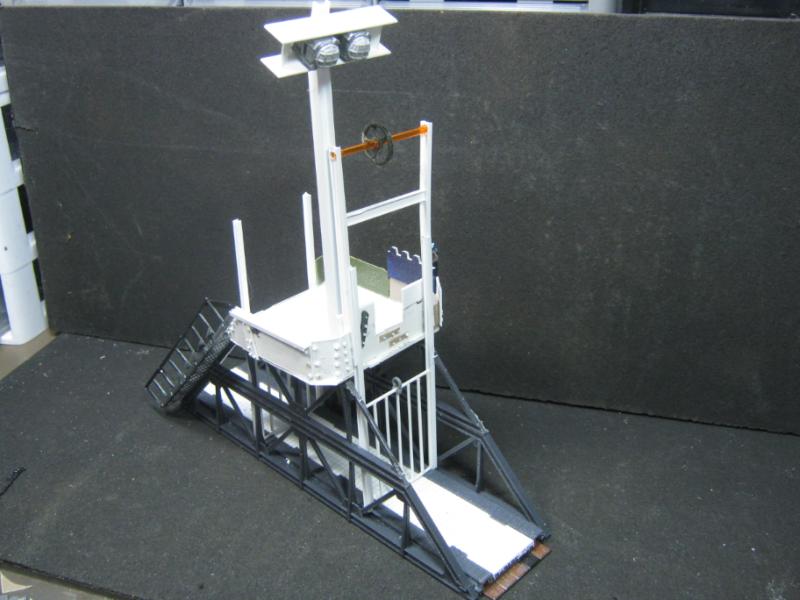
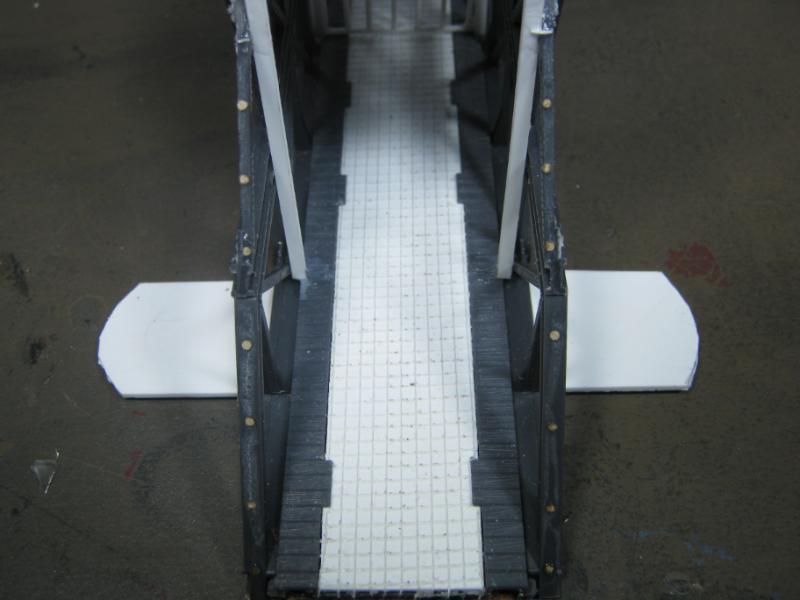
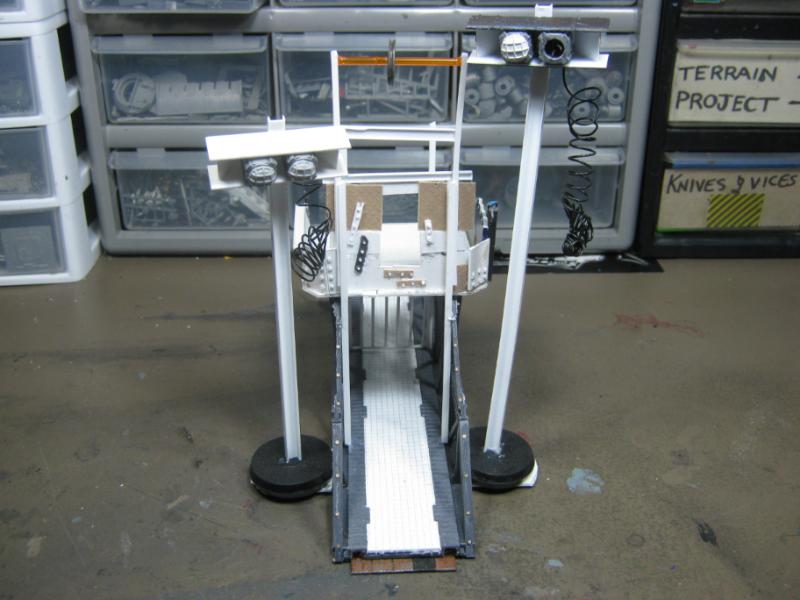
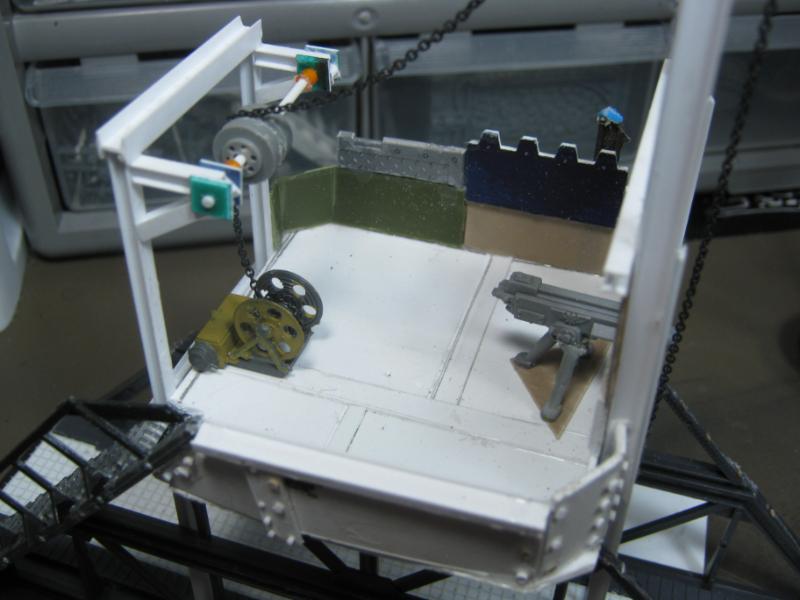
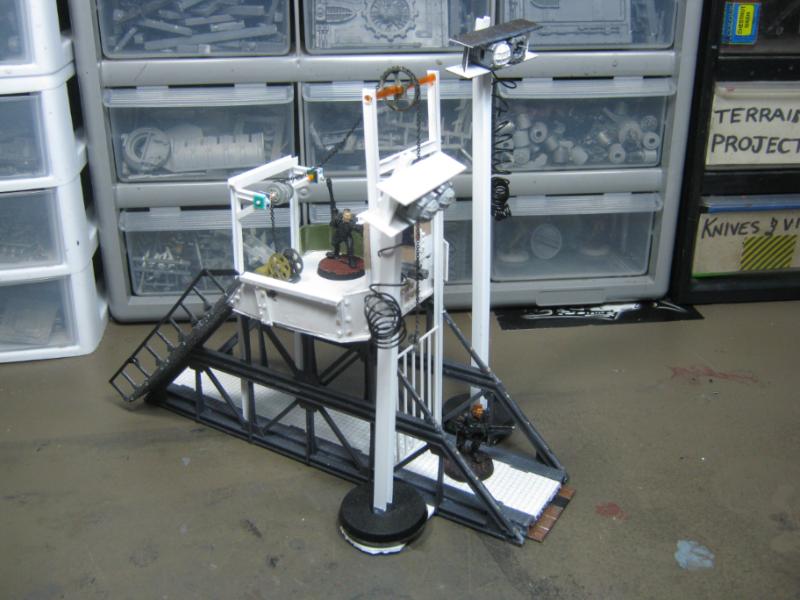
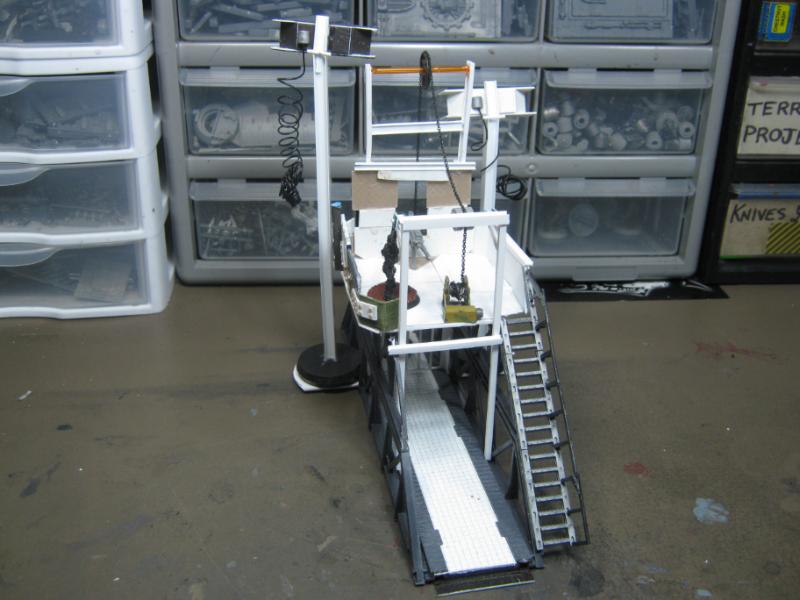
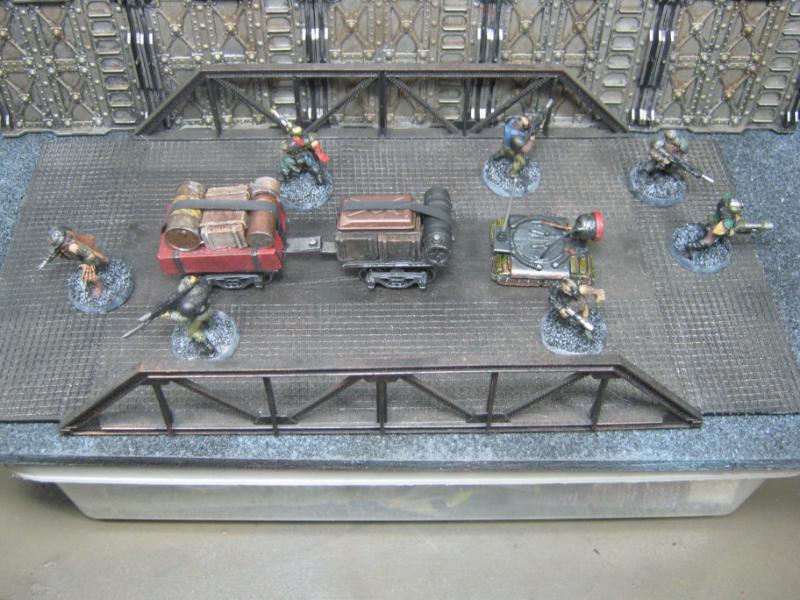
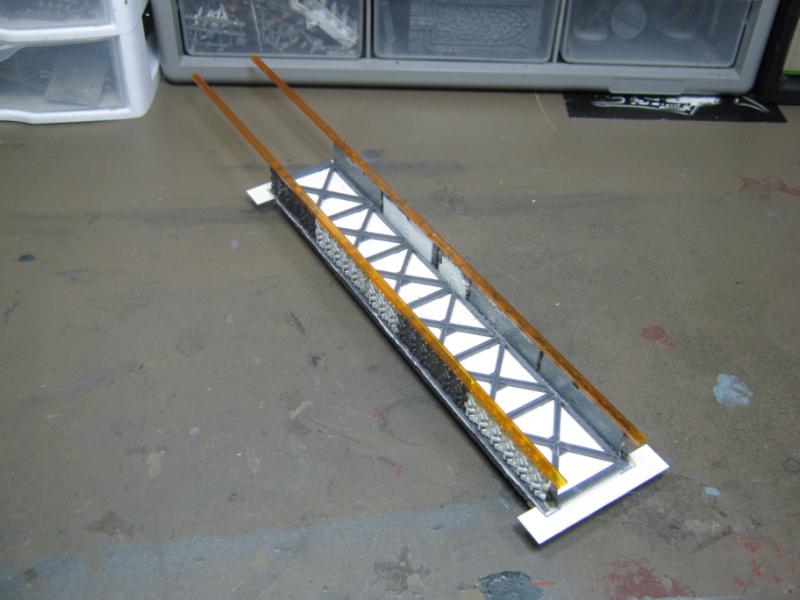
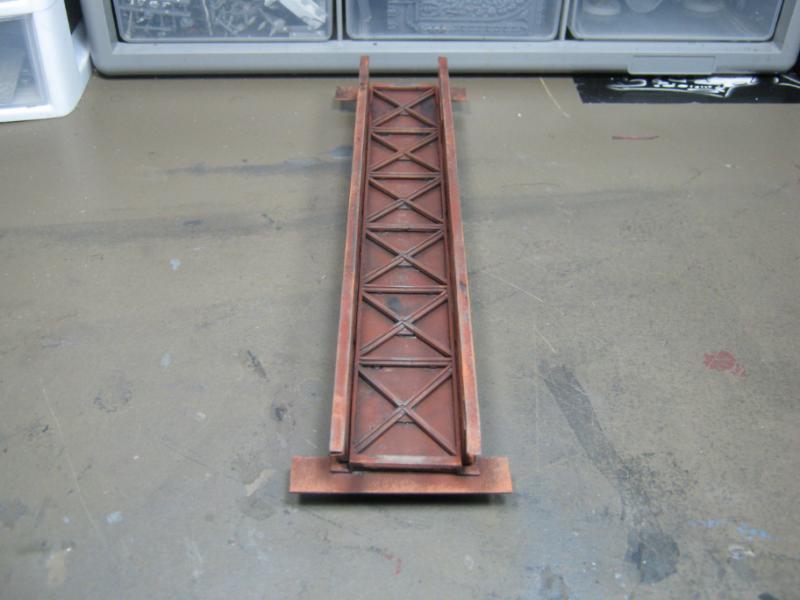
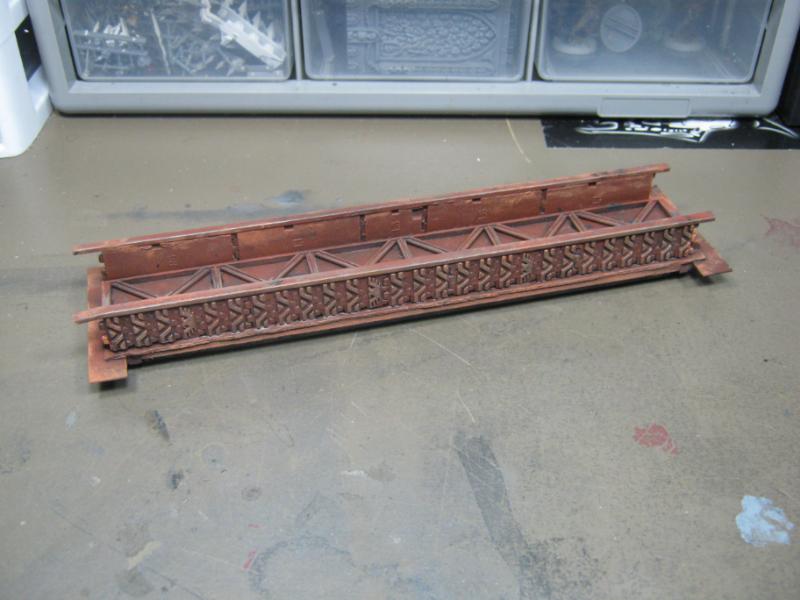
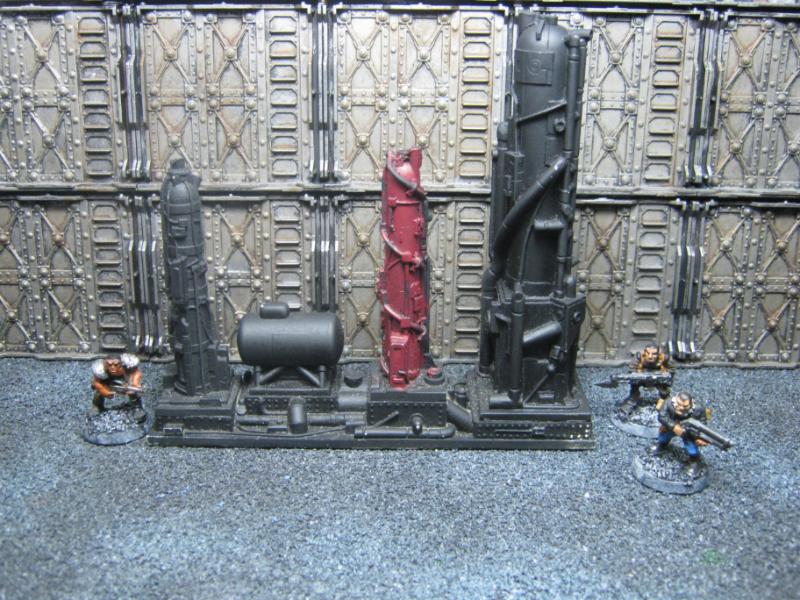
On to the modeling. Tonight I reworked a piece I liked enough to keep, but not enough to use. I've meaning to fix it up a bit for a long, long time. I built it in Nov 2011, and it finally got the attention it should have received back then. I like it a lot and I'm looking forward to putting it on the table. Maybe even an Arbites / Watchmen scenario. There is one I ran back in the day called "Jailbreak" where a random player lost a random member of their gang (arrested while in town for whatever reason), and the options were to let them rot in jail (w/ all of their weapons & equipment confiscated), pay the ganger's total rating X2 for bail and bribe to have all the gangers weapons / equipment returned, or simply storm the precinct and rescue the ganger (w/ me playing the Watchmen / Arbites).
We'll see how it goes. back to the model, here's what it used to look like:
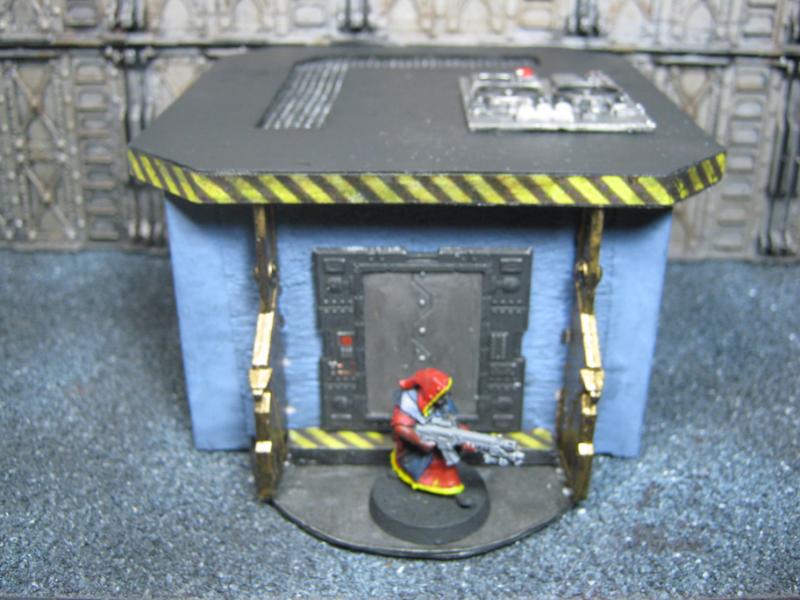
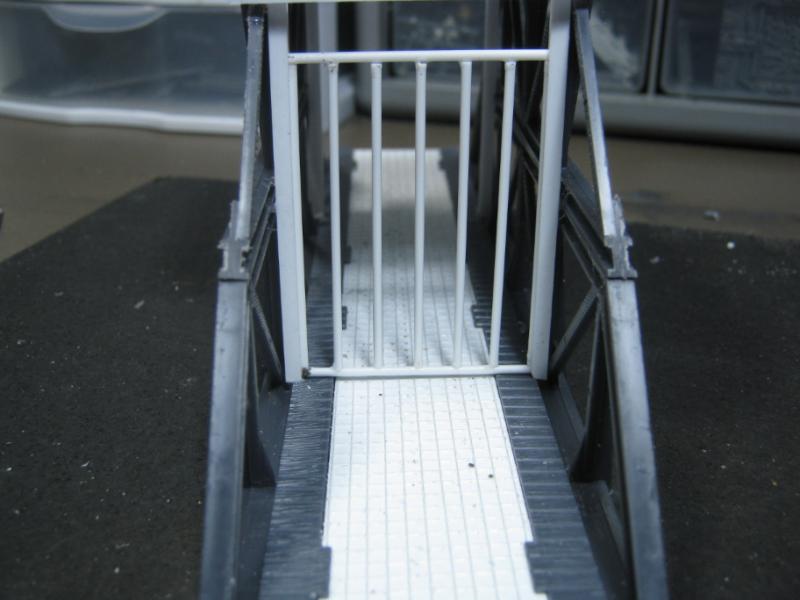
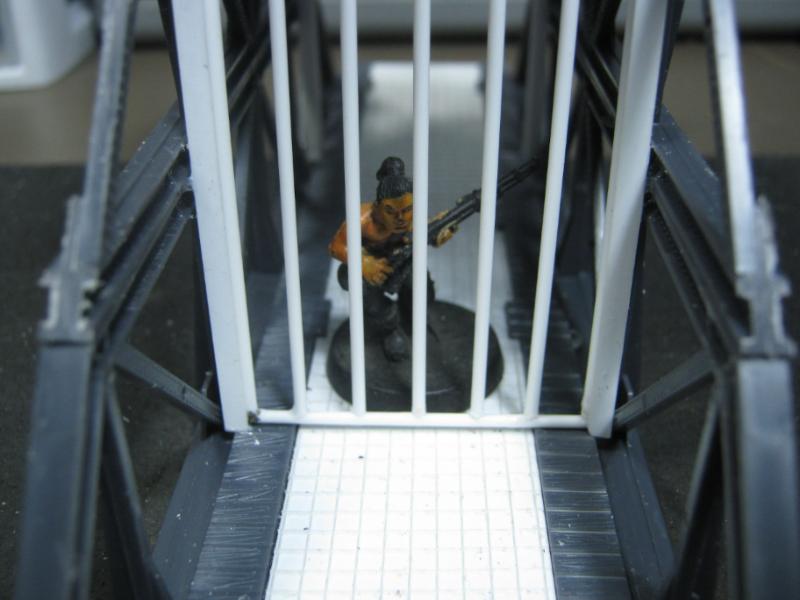
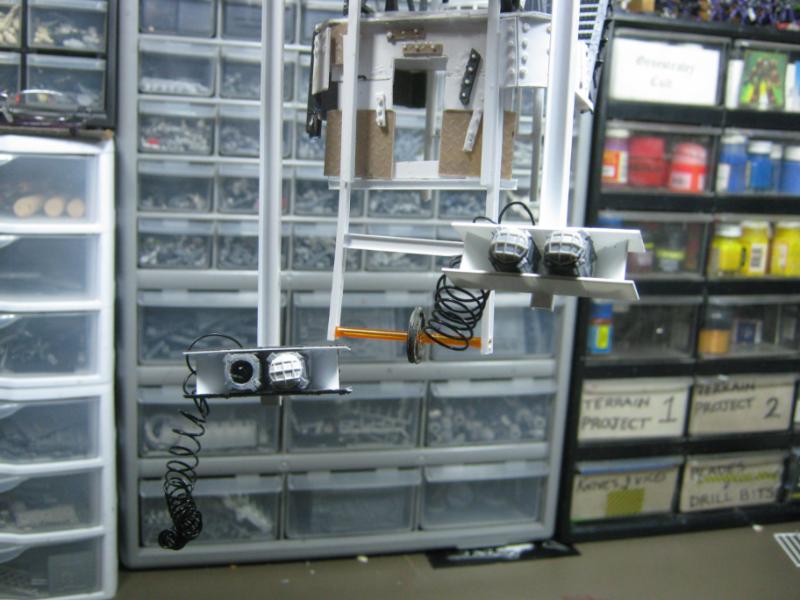
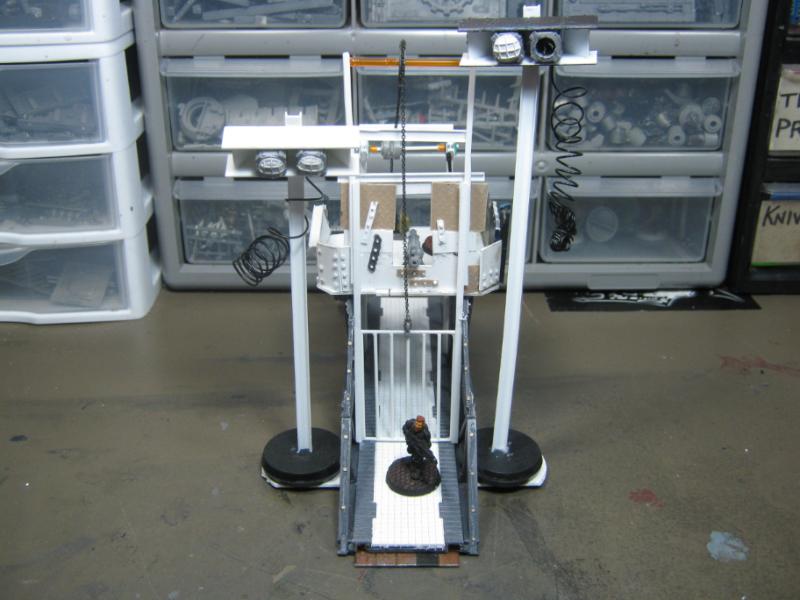
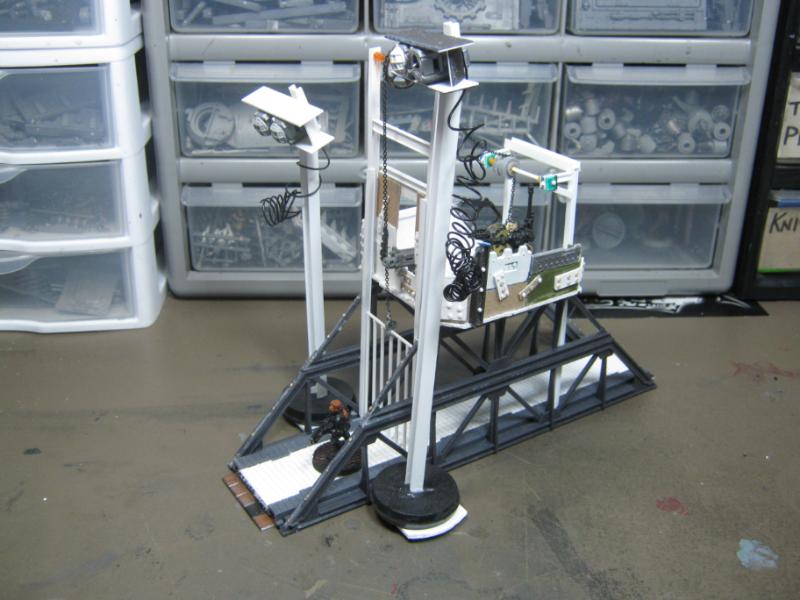
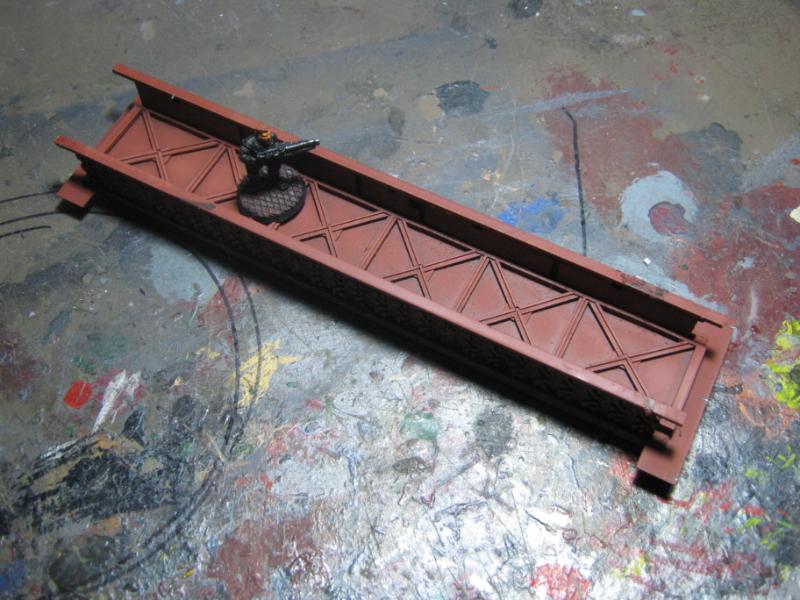
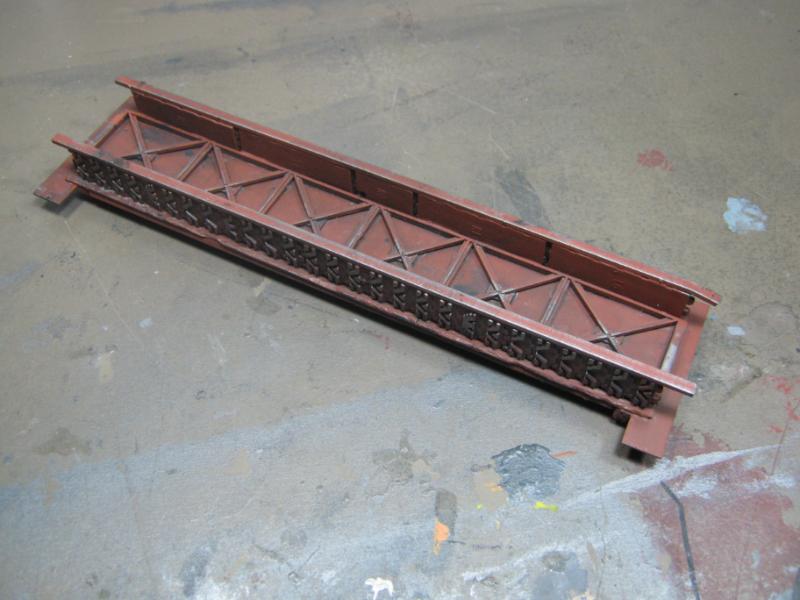
...and here is the upgrade:
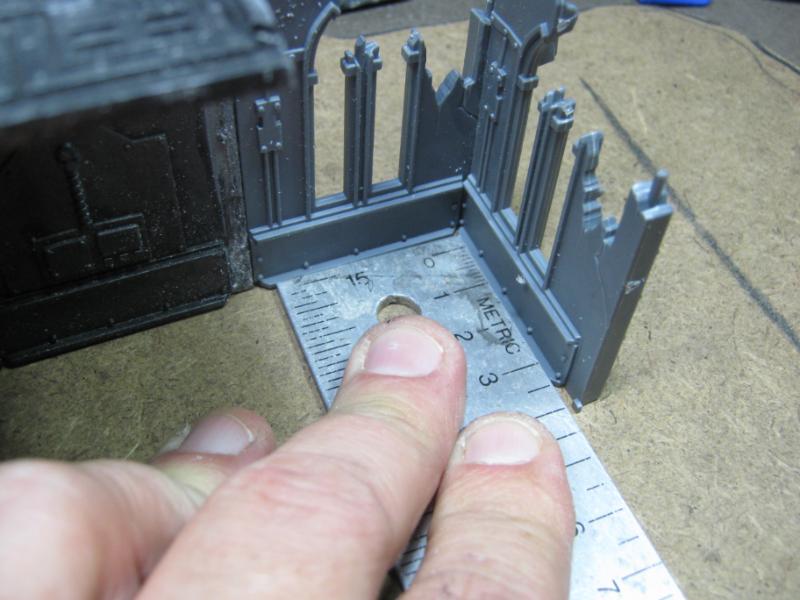
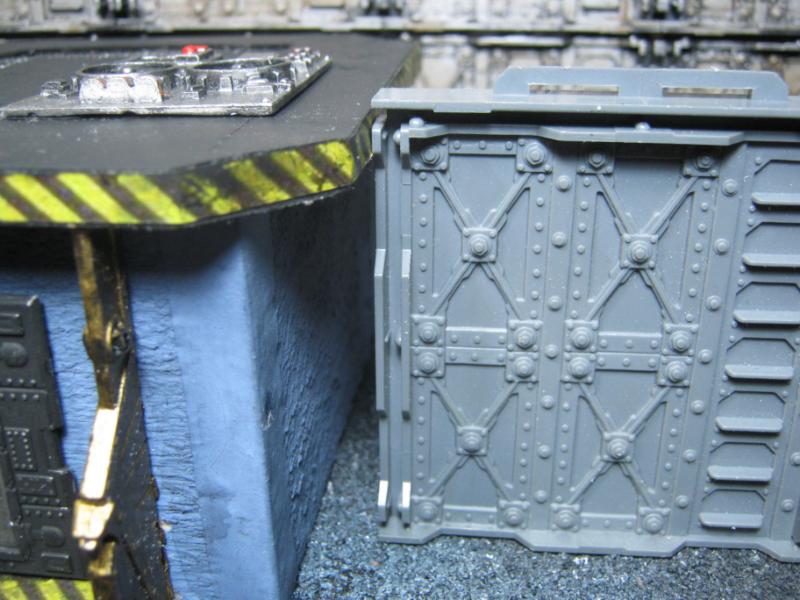
And for reference, I built it so the height exactly matched a bulkhead (for ease of measurement)
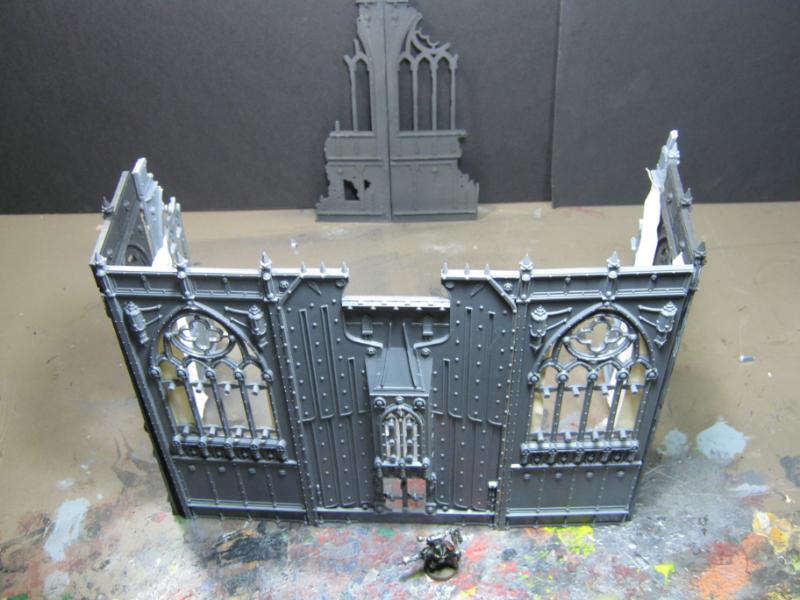
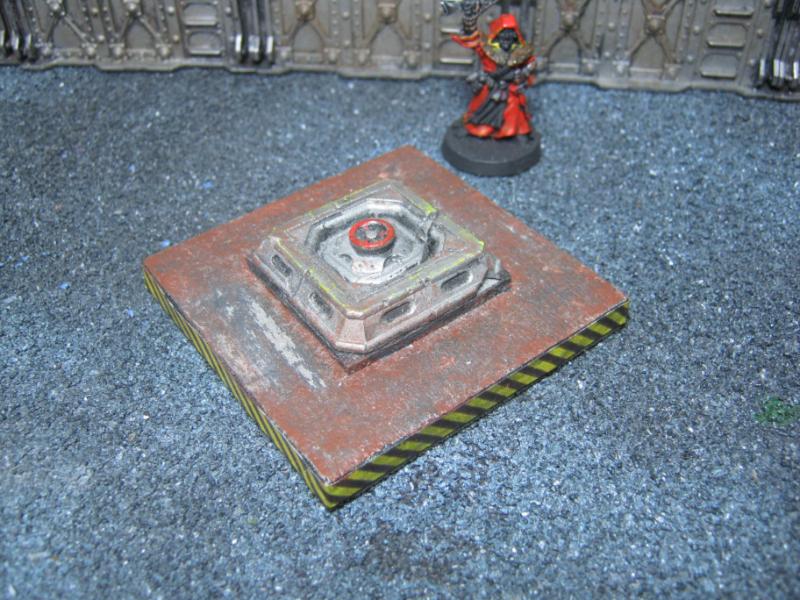
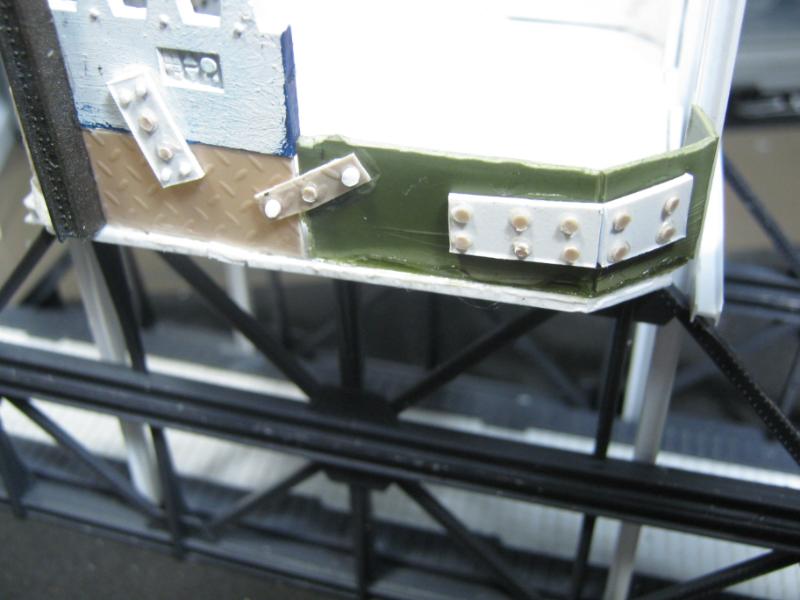
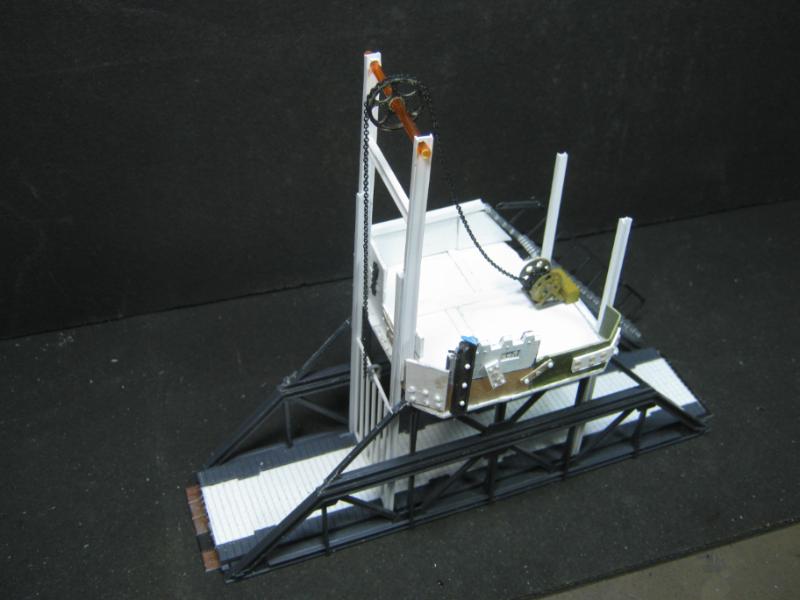
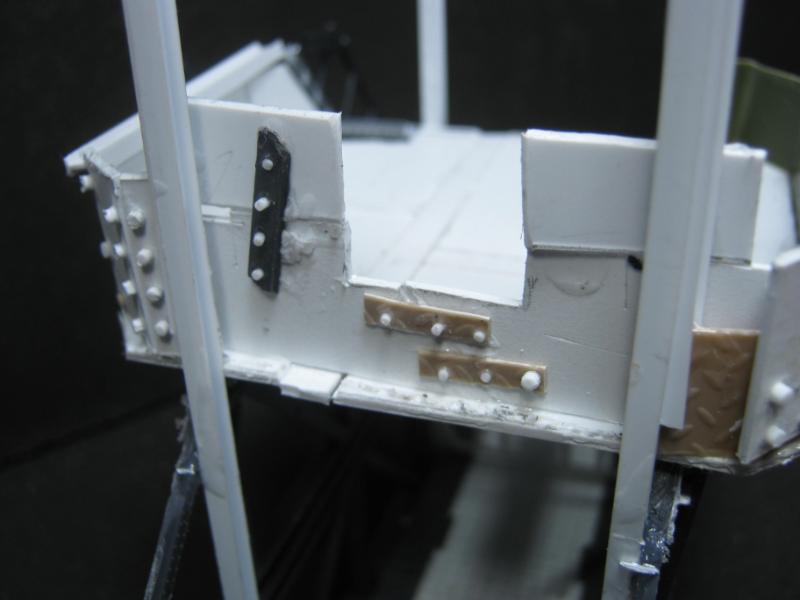
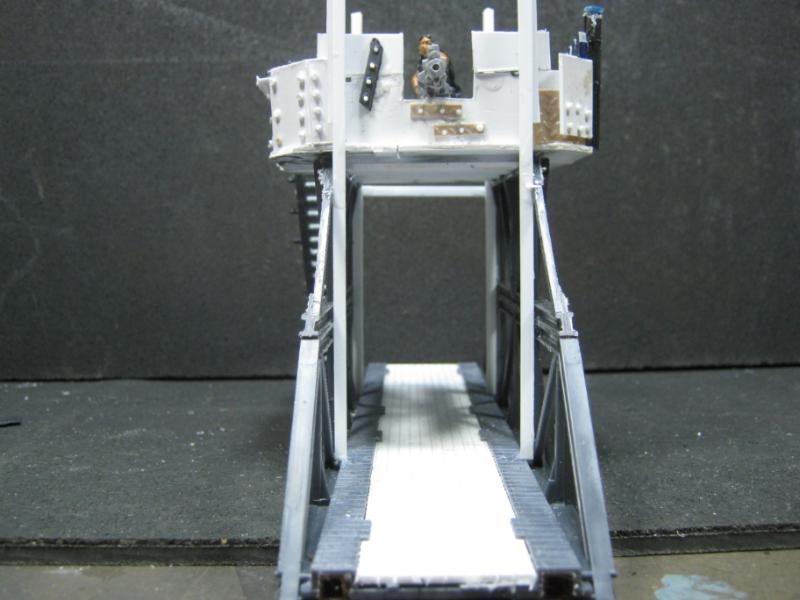
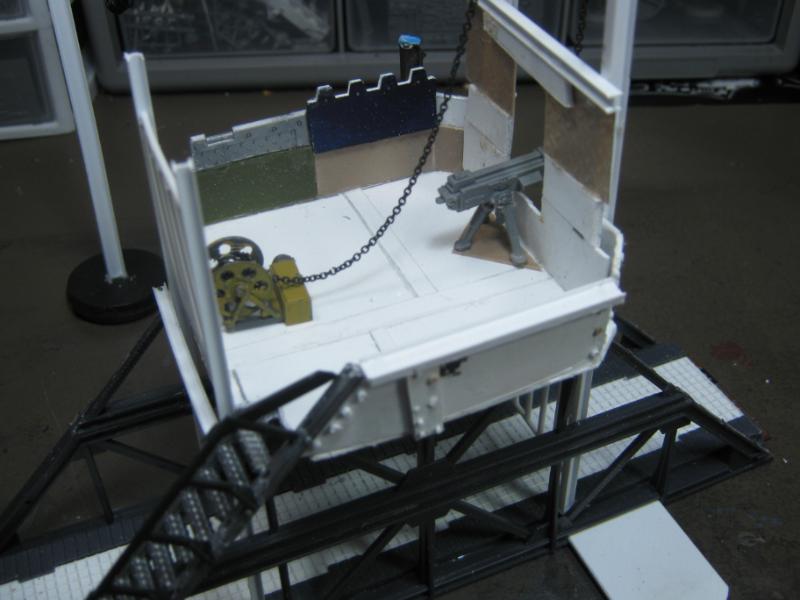
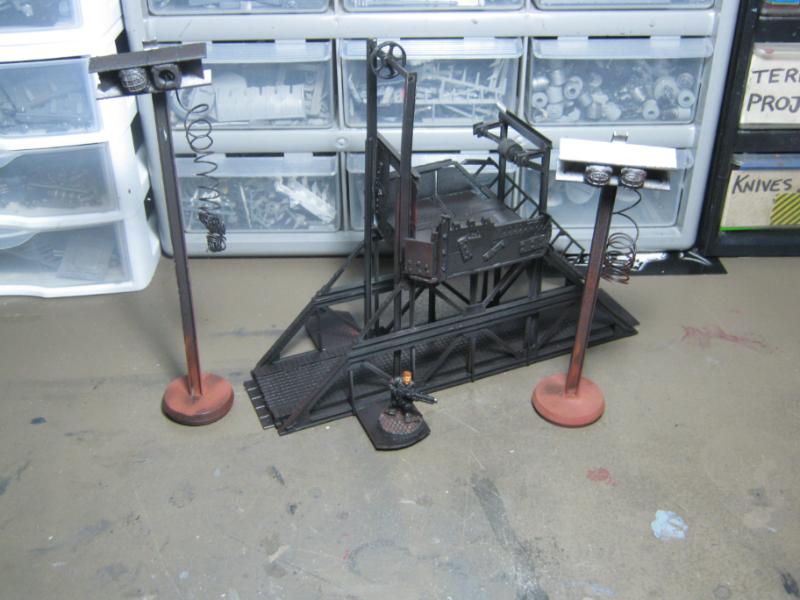
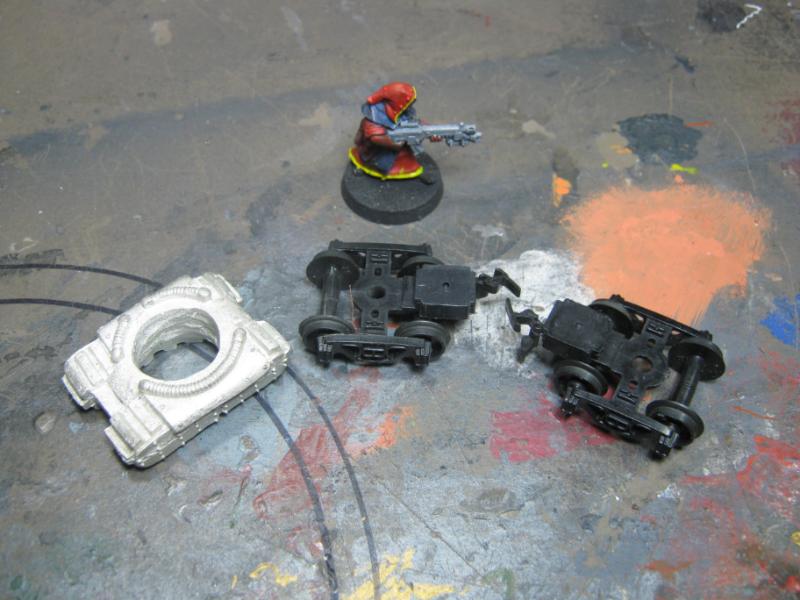
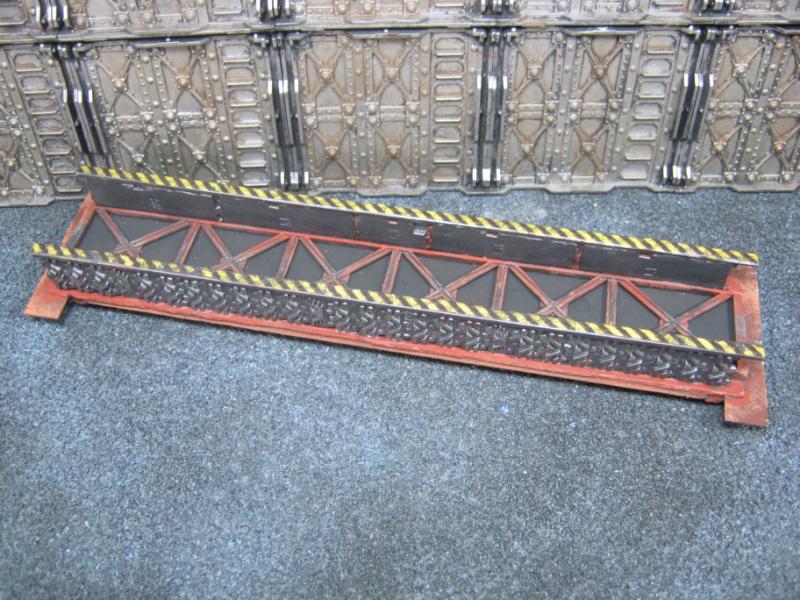
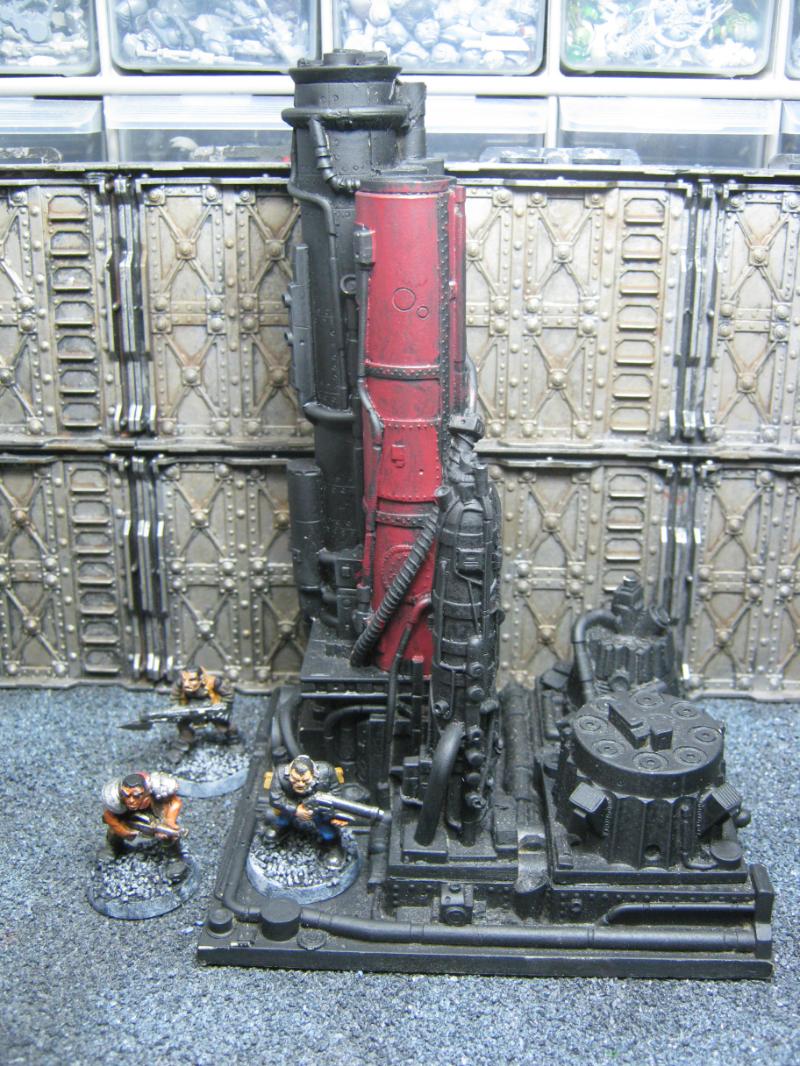
The next piece was not my fault. Well, maybe a bit, but overall it wasn't. Here is what it used to look like.
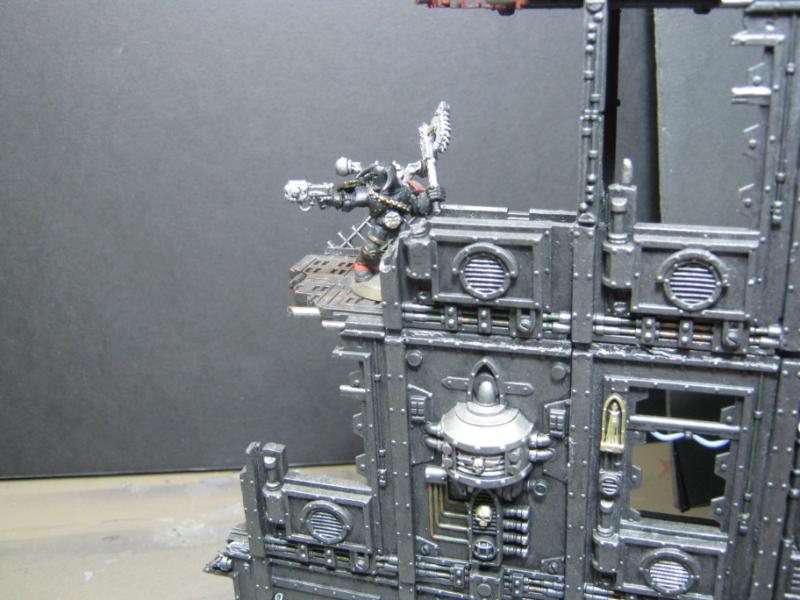
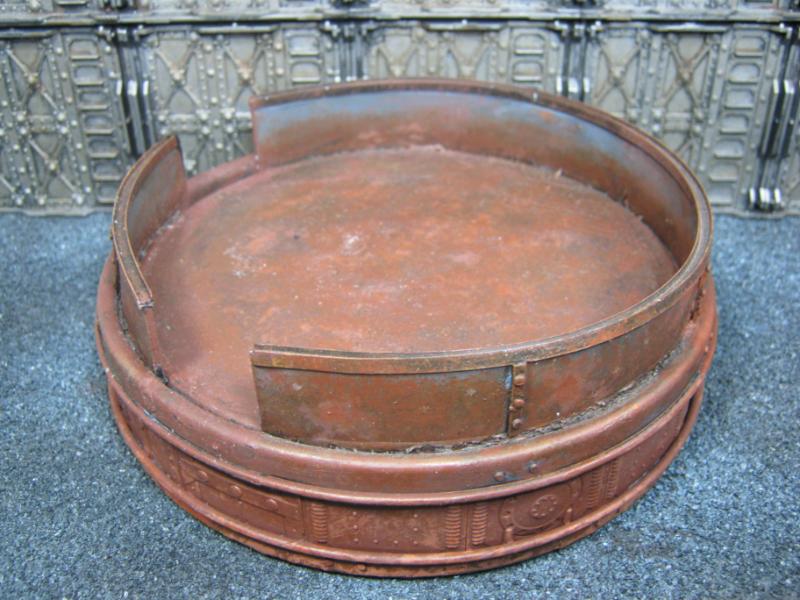
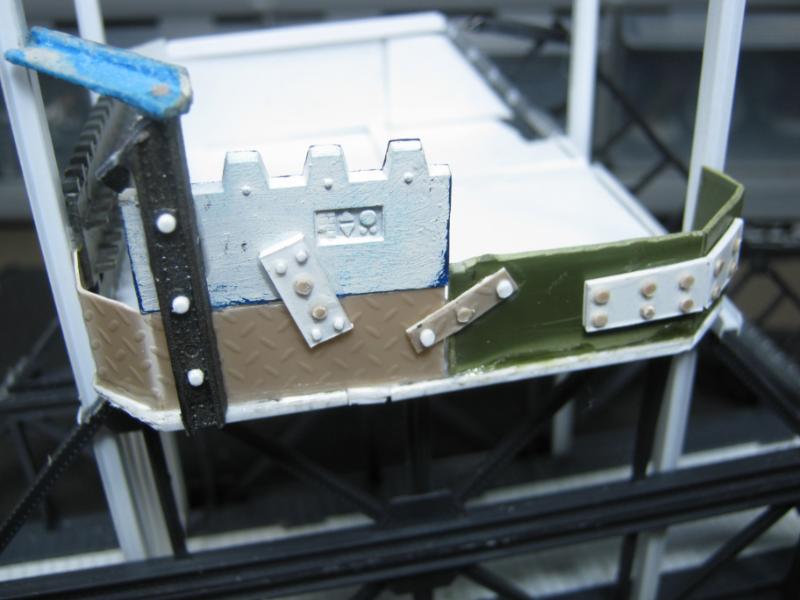
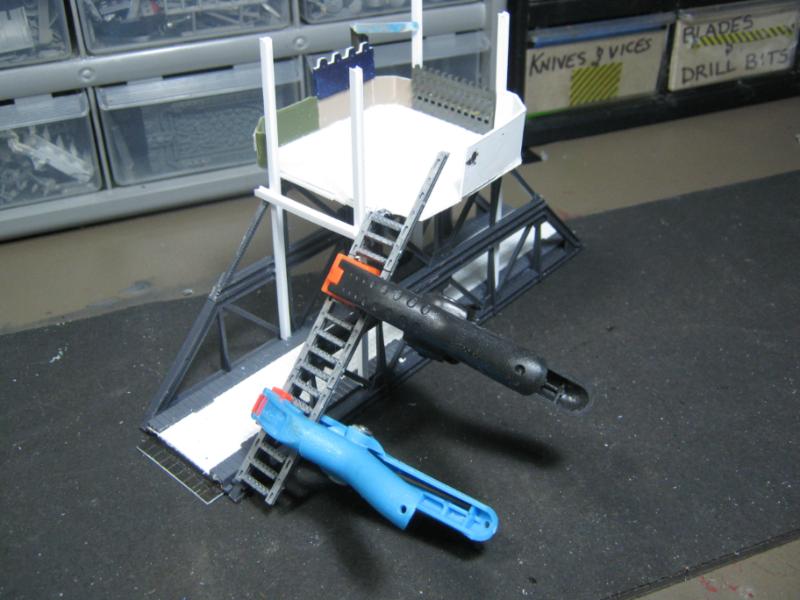
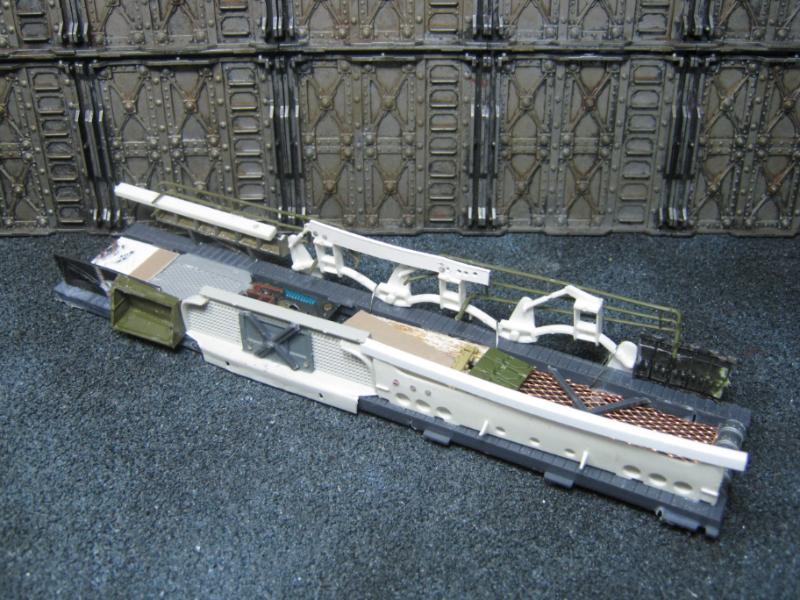
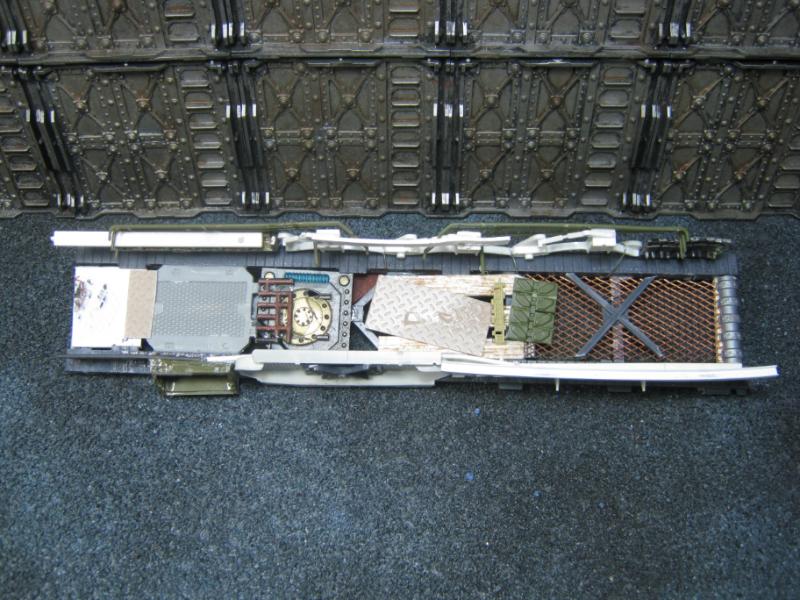
When I built this for the 1st LoER Terrain comp I built it with an asymmetrical base. Once I started playing 6th Ed it had to change as the house rules for terrain changed on my table (asymmetrical base = difficult / dangerous terrain) and I didn't want such an awesome piece to get mothballed. I very carefully removed it from it's base and then (due to other projects) I set it aside for a while. During that while a series of unfortunate events occurred and skipping over details this piece was shattered. I threw the assorted bits into my "I'll get to it later' bin and life went on. Recently I was digging through that bin looking for bitz I could use on a different project and decided that this would have an excellent new home as part of my Necromunda terrain.
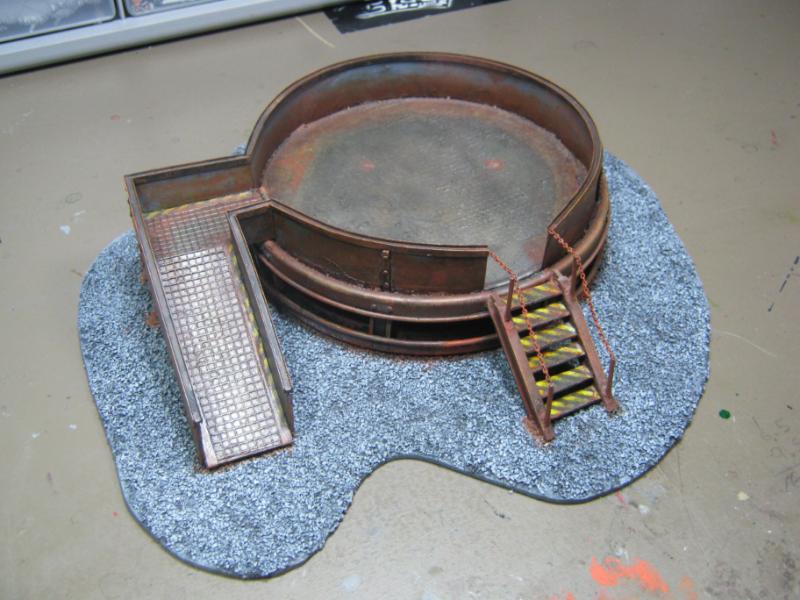
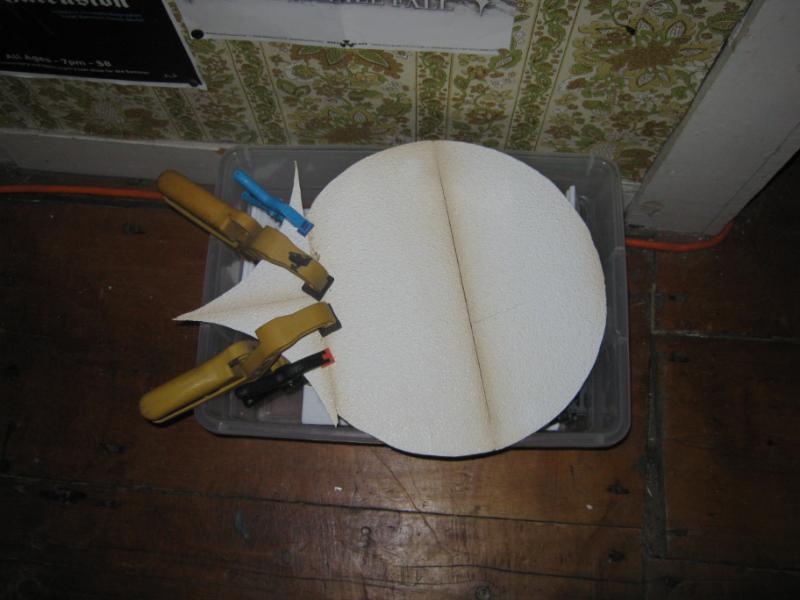
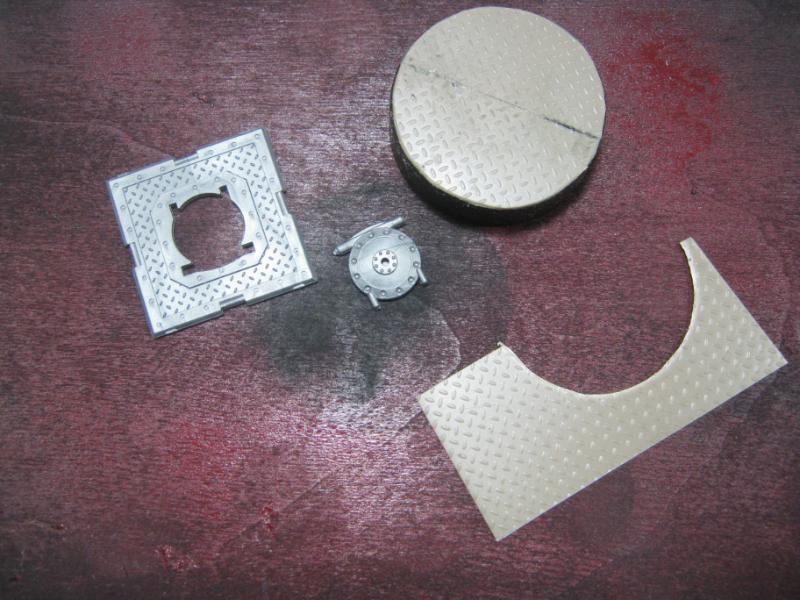
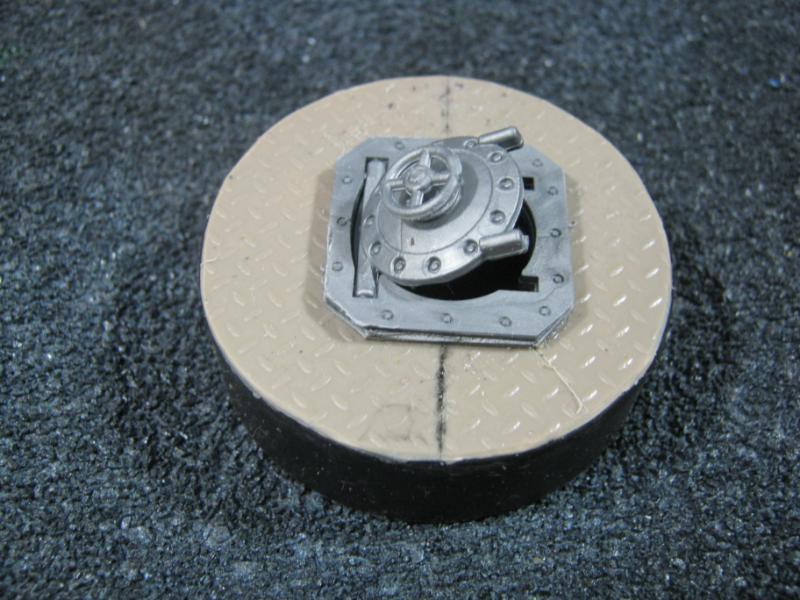
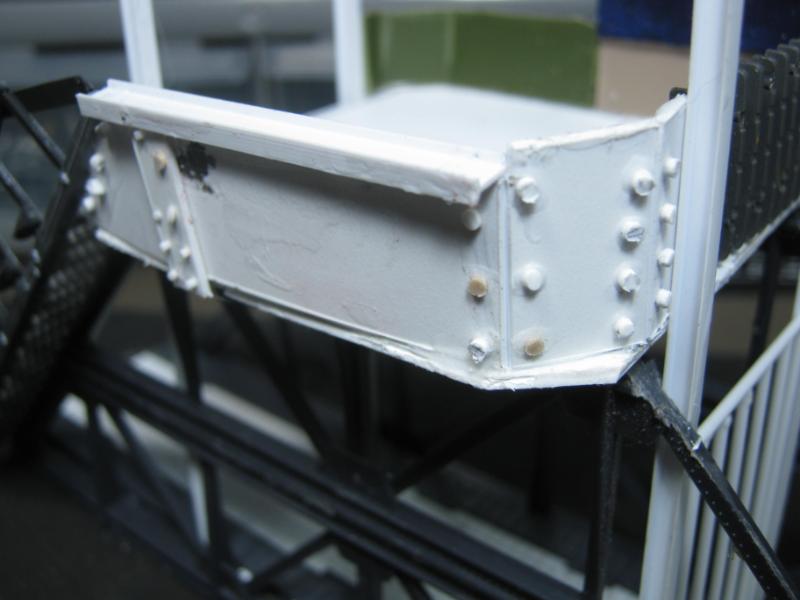
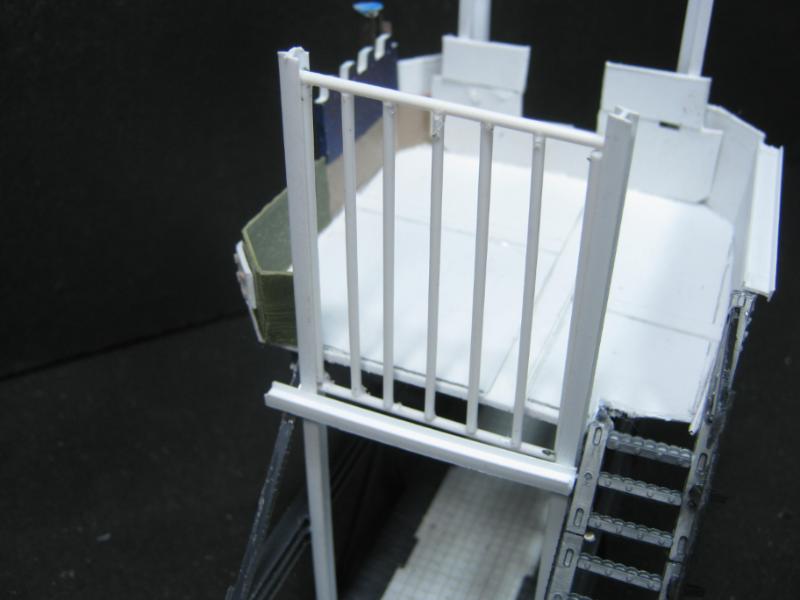
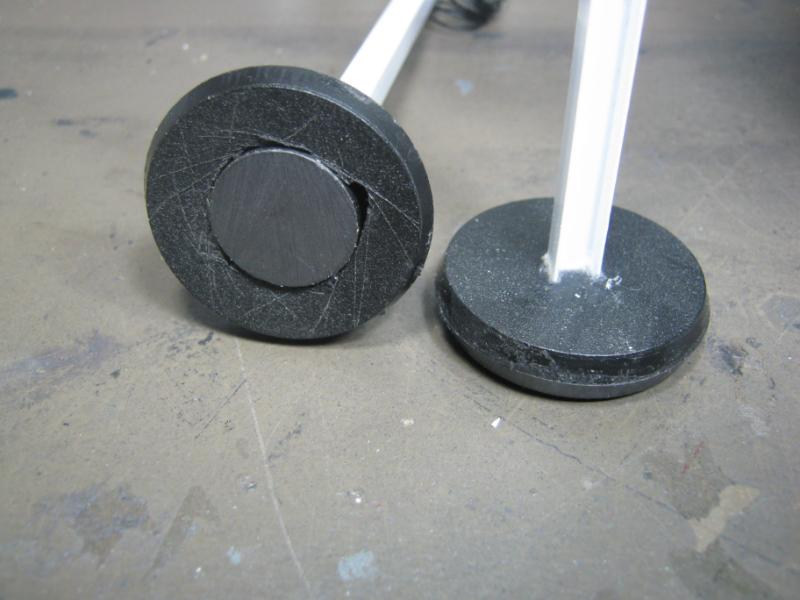
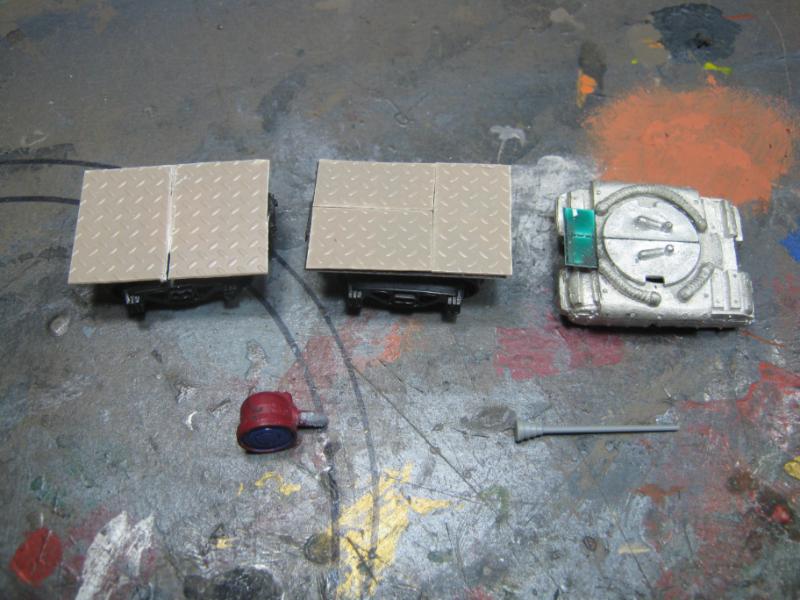
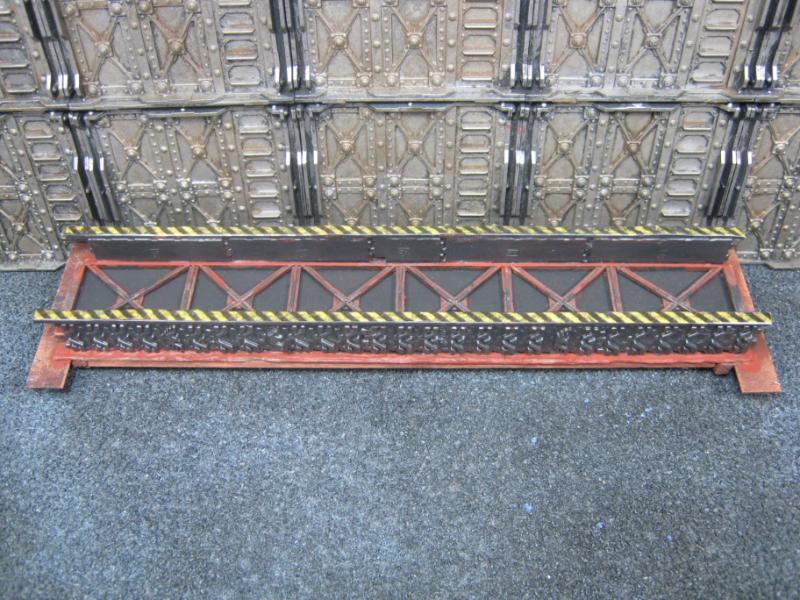
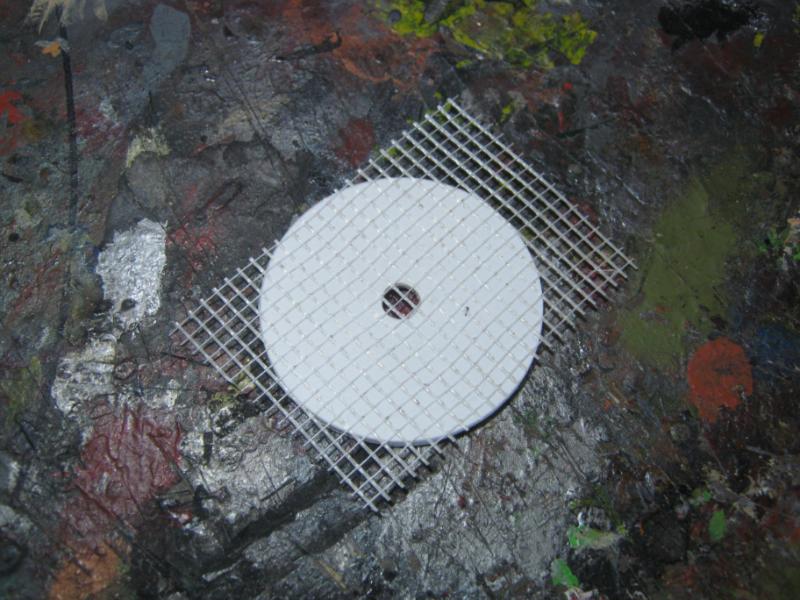
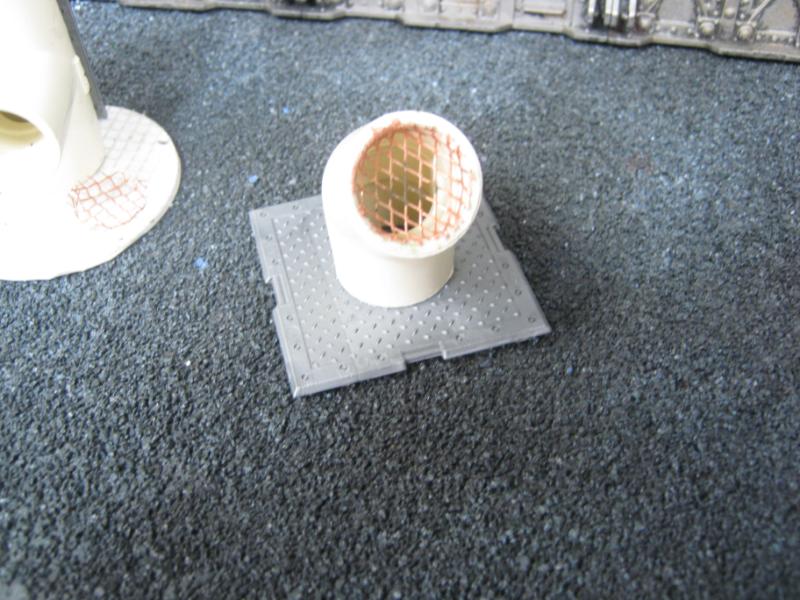
I've recycled a few pieces for this project as well. The round base is from a scrapped idea to build a Daemonic Summoning Circle (a 'counts as' Skyshied Landing Pad) and the plasticard is from dsteingass as part of my prize package from the LoER contest. Here's where it all is right now:
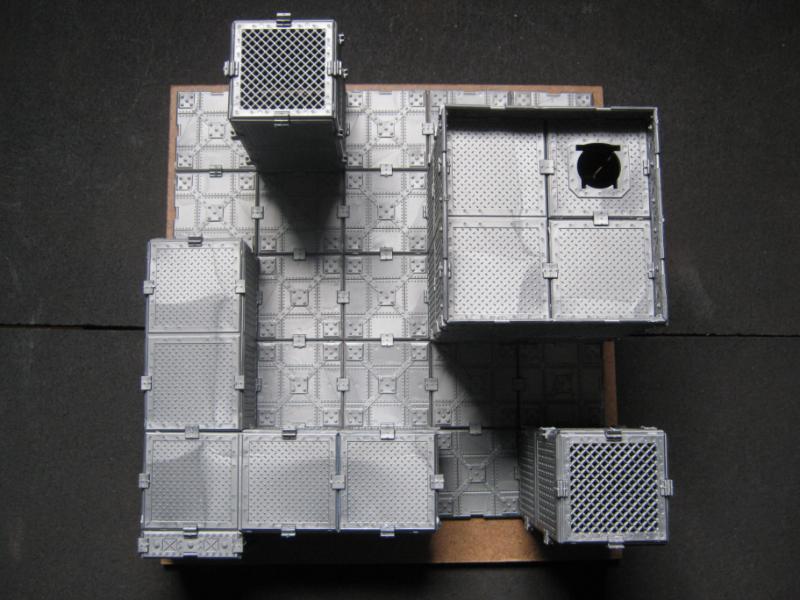
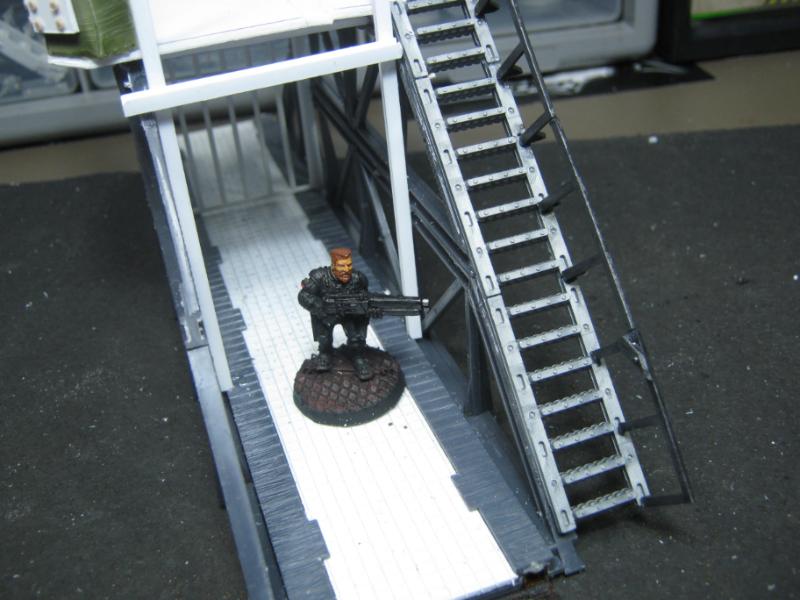
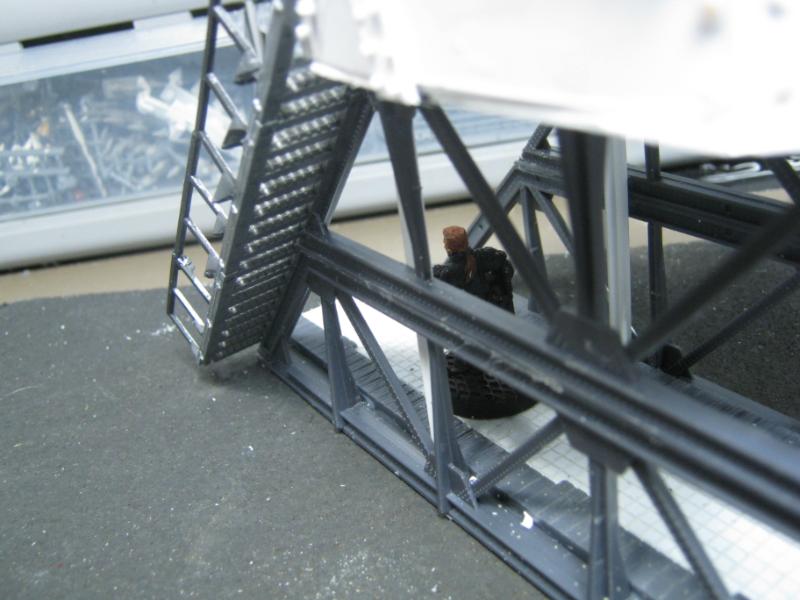
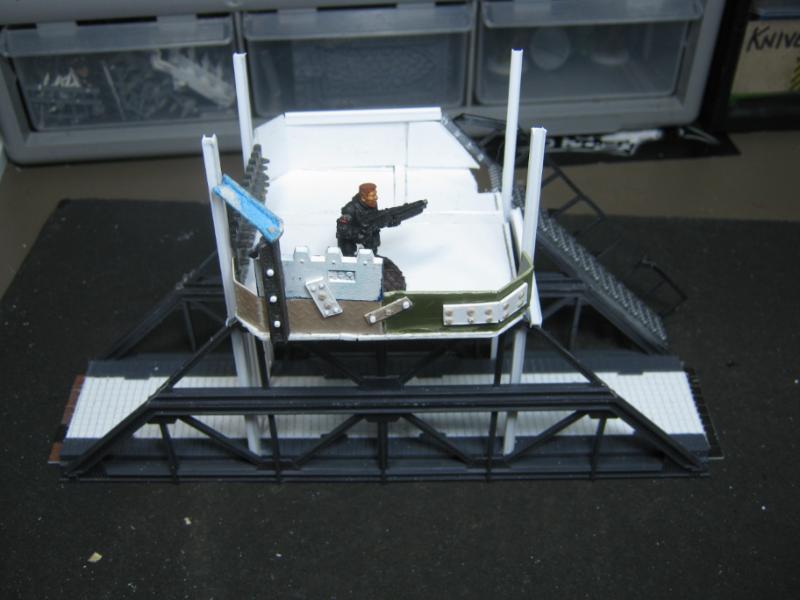
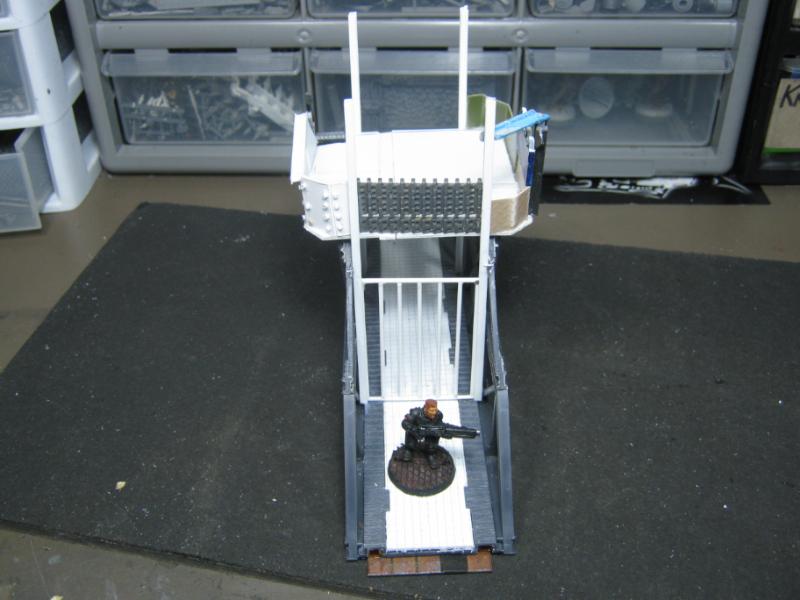
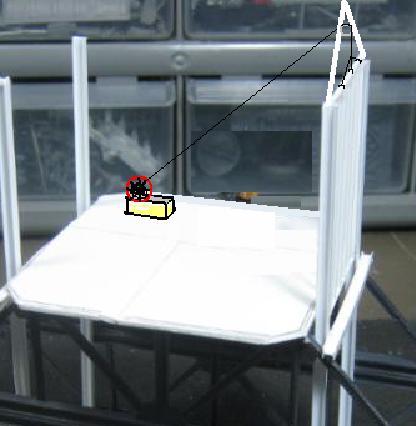
Notice I added plates from the Pegasus Hobbies range to make the platform taller and look more like a bunker. The stairs and the ramp survived, but only the stairs are being used on the new incarnation. The ramp will find a higher purpose on another piece at some point. I expect to have this done in the near future, though I am thinking about another change that would be really cool if I could find the one bit of materiel I need to make it happen. I don't know if I'll follow through with it, but I'll keep the idea on the back burner.
I expect there will be more terrain like this in the near future. The main platforms won't be seeing much love from me for quite a while because I barely have the attention span to stay focused on the smaller (re: less overwhelming) pieces.
That's it for now. I'm off to drink a 1/2 bottle Nyquil and hope that I don't drown in my sleep. Ugh.
he destroys badass looking terrain.... you better make it even better...mister... "oder ich versohle dir den hintern!"
Luckily I have a dr appt tomorrow morning so I (probably?) won't wind up dying from this. And if by some chance I do, I want you all to know that I always thought you were a bunch of right bastards and I'm glad to be done with the lot of you.
LOL... yeah... leaving this plane of existince with a clean slate is always up my alley
Cool! That crumbly vinyl stuff is soo old and brittle, but it works great for peices like this. Glad to see you working Skalk!
I hope you feel better soon!
@ Vik- Have faith. You've seen me tear down and rebuild before. It won't be in the immediate future, but I assure you that it will come back better than it was. I've learned a lot since I originally built that.
@ Dave- Dude it is a pain to work with. it won't stay glued down, it breaks into tiny crumbly bits if you as much as THINK about it, and overall I am regretting my decision to use it BUT I absolutely am going to and it will be awesome. I'm making a point of using as much of the stuff you sent me as possible to show my appreciation and to show that it went to a good home where it got used (in hopes that maybe someday you'll send me another haul of the stuff you won't ever use )
It appears that Papa Nurgle spared me once again. I lost 3 days of PTO (paid time off) that I could have used for stuff like riding my bike this summer... but I did sneak in some modeling between episodes of coughing convulsions.
All of this is from Pegasus Hobbies. And let me tell you, it's AWESOME!!! Let me say that again- it's AWESOME!!! It's like having a Lego set you can build incredible wargame terrain from. That said, it's MADDENING to work with because the possibilities are boundless and if you use just a bit too much pressure while pressing a panel into a connector can result in an explosive cascade of plastic panels where your almost completed structure had been only moments before. This happened to me many times. I finally figured out how to do it w/o error but the learning curve sucked.
I have a couple more things that I didn't take pic of. I have no idea why. but this piece is the jewel of my efforts and I am so very much looking forward to putting this on the table.
No narrative. I'd write more but I'm beat tired but wanted to post this tonight. I can follow up w/ an explanation or fluff later if anyone wants one. Because the fluff is pretty cool. Really.
That is some great stuff, and it will fit into my 40K as well. I am so happy I finally decided to try it out.
Hope you get better soon mate, forced time off work sucks. The boxy towers look wonderful though, and are going to be awesome for necro! Are you going to whack a ladder on the side of the taller one? Look like they could be shipping containers, right? It's great to see you producing stuff again!
@ graven- I really like the all the stuff from Pegasus.
@ Scarp- Ladders and other bitz of detail will be added on once the main paint job is complete.
@ hk1x1- Thanks for checking this out. Terrain is my main modeling focus and I expect that will continue for a long time.
@ Theophony- I do not know how many sets it was because I bought a lot of bitz months ago to use as floors for my Imperial Sector buildings and I used most of that. I imagine it was at least 2 sets worth. I can give you a total count of the squares and the connectors if you'd like.
@ Styro- Hmm. I may have to think about that. A ball pit would be really easy to make and ridiculous enough to work, kind of like an easter egg on a bitter grimdark table. Ha.
@ dsteingass- Thanks, glad you are enjoying the Necro terrain.
Played two games of Necromunda last Wednesday. I didn't take pics of the 2nd game (which had more terrain) but here's a shot of the first setup. Pics came out too fuzzy to share, this was the best of the lot:
Recently my box of smaller terrain pieces was knock off a shelf and many things broke apart. I noticed the majority of the things that broke were plaster casts made from Hirst molds, etc. I am done with anything made of plaster. From here on out if it isn't plastic or resin I'm not wasting my time on it. Some things were not rebuilt since they were mostly made from barrels or crates of plaster. Some things will be reused (such as container boxes and the dental stone crates) but the majority of the broken plaster was thrown away.
Here's a pic of one of the things I put back together. It's just a pile of junk and bitz but I really like it and I will probably make a few more like this. Also, just to be clear, I will be keeping the undamaged plaster pieces I still have and will replace them in the future with plastic / resin as needed. This is rebuilt but not repainted yet.
I also took a re-worked piece and gave it more detail (an example of re-using the container boxes and crates, plus 1 plaster barrel that wasn't terribly damaged). I feel that it is a truly finished piece now.
Notice some of your bridges were model train tresses, I picked up seven used ones from a model train shop within walking distance of my house. I don't like calling any place a dump (being a gamer I've seen plenty of stores and players houses that could qualify), but the shop is tiny and stuff is all piled on top of each other with hand made signs saying "don't touch" every two feet. The four old men in the shop kept giving me dirty looks (I'm late thirties) like I was a young punk. I dug through th piles and got th trestles for a couple bucks each, saw a new in box was like $16.00, so seven old ones for th price of one new one was worth it to me. I'll be raiding his shop for some goodies.
No need to count up the platformer stuff. Thanks for the offer though. When the funds become available I'll be ordering a few sets to see what they can do.
Sorry to hear of the damages. Would the stuff have survived better if it was made from harder material than plaster? I've thought about getting a few moulds and trying them out.
@ Theophony- Funny you should mention train trestles. My next update is all about them. Did some work last night building 3 new walkways as the last couple games showed me I do not have enough.
As far as the damage to my plaster items, I want to make sure I'm being clear about my decision to not use plaster again. I've been unhappy w/ my plaster pieces for a long time. A major issue is that even w/ normal use and storage they chip and show white plaster underneath the paint. I have used different kids of sealers and sprayed them multiple times w/ no noticeable difference in durability. Also, the pieces that broke were not just plaster, some were hydrocal. The only non-resin / plastics pieces that survived the crash were made of dental stone, even though a lot of them popped off the bases as the bottom part (super glued) separated from itself but nothing actually broke like the other items (broke meaning in half or into many smaller bits).
That said, if you are casting your own stuff my recommendation is dental stone if you are not using resin. There are a lot of other guys on Dakka that cast and opinions vary, but IMO if you have to opportunity to cast resin that's the way to go. It does eat your molds a bit more quickly but you'll still get a lot of casts out of it and you'll be much happier with the items you've cast over the years. I've cast resin only a few times but I've been happy w/ the results.
Last night after I posted my update I started working on some walkways I need for my Necromunda terrain. A long time back you may remember that I picked up quite a haul of them on eBay. So far I’ve only used 2 of them in different projects. I decided to use some more for this project. Originally I thought I’d work w/ 1 and go from there, but as you’ll see I made some quick progress between stages of gluing.
Here I’m starting with the stock bottom piece of a train trestle:
Cleaned out all the studs for a clean channel:
Here I’ve cut a strip of plasticard that I’ll be using for my walkway:
…and here it is put together:
It was a bit flimsy so I reinforced it w/ some plastic rod dsteingass sent me. And other example of putting someone else’s obsolete material to good use. I didn’t have enough to do both channels so I used the end bits as close to the end as possible as that is where the ‘action’ will be happening.
While I was waiting for the glue to dry I started another walkway, this time going w/ the stock bride ‘as is’ except for a support beak in the middle. You’ll notice the plasticard bits at each end of the bridge- those are used to connect into the Necromunda bulkheads. I’ll have pics of the connection later.
Back to the first walkway. The plasticard is plain and boring so I decided to use some self-adhesive drywall tape. I’ve used this on some other projects before and I’ve always been happy w/ the results. First I applied the tape, being careful to keep it as symmetrical and square as possible, and then I used a hobby knife to cut to contour. Also adding a closeup so you can get a good idea what this looks like:
I took a third trestle, flipped it upside down, added some side supports, and suddenly I have another walkway.
Here’s a pic of the lot of them.
Not a bad start for 1 hour of work. More coming as soon as I have something to share.
Good job on the various bits and pieces.
With the walkways, could you put the plasticard sheet under the crossbeams of the trestle for a different look (or are you even going to leave them with holes?) or even fill the holes with card or putty/resin/something to keep the criss-cross pattern (although it's a lot more work)?
Or (there appears to be alot of "or"s in this) would models not like the crossbeams?
That drywall tape, does it have holes in it, between the fibres or is that filled with sticky-tape? Just curious.
@ Dr H- The upside down trestle will have a strip of plasticard under the cross brace so they show on top but the walkway doesn't look like a plummet to certain death. The other walkway will have wire mesh under it to break up the look of things. To show the possibilities of variety, this is a trestle base from the same set:
As far as the drywall mesh, it is made of individual strands so the squares are holes. Here's a finished model using mesh tape to show how it looks when it is done:
it's really neat stuff and has a lot of application possibilities. Plus one roll of it will most likely last a lifetime of hobby projects.
Cool. Sounds and looks really useful. I shall have to keep an eye out for it when I'm in a suitable shop.
I remember seeing those other ones now you show them again. Good o, carry on.
Never thought about using the mesh, I've been using the cross stitch plastic. Will have to dig out my home improvement toolbox. Also on that same tresel you might not have noticed but if you stand them on end they are the EXACT same height as three bulkheads. I've taken two of them and connected with plastic card to create tall piers. Also working on making them gantry elevators. Will keep my eye out for more of them.
@ Dr H- It's really great stuff but I'm not sure if they have it on your side of the pond. I did some research for another Dakka bud a long time back and couldn't find it on any UK site.
@ Theophony- "Also working on making them gantry elevators". Man that is the coolest idea anyone has offered since Gits thought of the service panel on my fuel depot. I am *so* doing that really soon. I'll make a solid connection bracket for the lift so it is solid, I know how to make the 'safety rail', and I've already figured out how to make it so I can use it on any 3-bulkhead platform (as I also did not know it's exactly 3 bulkheads tall). Talk about inspiration. Now I want to ditch work and go build this!
@ dsteingass- I think Scarper just upped that ante.
Took a bit of time to model this weekend. First I checked out what Theophony said about the trestle being the same height as 3 bulkheads. My trestles are a bit taller but I have an idea how to make that work for me so it's perfect.
I had an idea how to make the elevator compatable with any 3-level building, but the method I used was completely stupid and the ned result was three ruined bulkheads and one ruined trestle w/ a small bit of wasted plasticard. The idea is still good, but the application has to be WAY different next time. I won't go into detail, I'll just mention that Tenax 7R and gravity can provide undesired results. I'll revisit this and do it right next time.
Also repaired some crates that broke off bases during The Great Terrain Crash of '13. They are dental stone so not so worthless, and I tried a technique here where everything is glued together in one bulk mass. No gap went unglued, and the base is solid .060 plasticard. This bit should last a long time so long as it is stored with consideration and doesn't suffer another '6 high header.
Next bit is from my original Necromunda scenery collection when I lived in VA. I have more of them, and they all need a bit of a paint facelift to join the collection I use nowadays. I didn't think to take 'before' pics, but whatever. The build is original, the paint is reworked. Here's one of them w/ the new look:
I also reworked this a bit, gave it a more dulled look and added light rust w/ a yellowish highlight around the hatch. Looks weird up close, looks great on the table:
Here's another 'after the fact' project, and the original project I was working on that prompted THIS piece didn't get any pics at all. I'll take some later and share becasue it's pretty cool. Anyway, I took a top piece off a tower and was going to toss it because I had no immediate use for it and I'm trying to keep my junk collection limited to a single bin. I still have hobby PTSD from the way my game / hobby room used to look. Gah. Anyway, just before I tossed it I had this small voice in the back of my head issued a challenge- take this useless random thing and make something from it... RIGHT NOW! I looked at it again and the inspiration hit me. I started building it and then decided to take some pics:
I'm going to keep the hatch unglued so it can be moved. Why? No idea. Just seems neat. More work coming on it before it sees paint. I'll likely renew my LoER membership w/ this one, I haven't given anything rivets in quite a while.
Thanks for looking, more coming as I have something and time to post it.
The hatch is magnificent. The reworked piece doesn't look weird; and I love the lift. Keep on the general goodness I think the barricades could do with a sandbag or two, but that's just me.
Skalk, sorry, all but one of mine were perfect size, but everything lose on it matched the other sets. Great looking hatch, is that from the Pegasus kit?
Skalk..look up the "vents and tunnels" rules, and see what a badass thing you've created! Now you just need several more. They can seriously change a game, and the portable nature means that you can move them around as needed.
@ graven- Thank you for the compliments. I really like the hatch. It's the 2nd one I have (the reworked piece is a hatch as well). The 'barricade' is simply a stack of crates. It can be used as cover but it's happenstance instead of intentional. I have a couple 'intentional' barricades ideas that I'll share once I have them started. Completely OT, but I've always wondered how the abbreviation 'graven' was chosen out of 'inmygravenimage'.
@ Theophony- No worries. Everything is different and it worked out anyway. I know what I did wrong and it'll be better next time. I'm really looking forward to this. I have the lift car ready and I think it'll look decent enough.
@ dstein- My Van Saar's have Vents as a territory and I know how they work on the game table in general, but I also know I need more of them.
No update right now. I spent a LOT of time doing hobby stuff last night and have some really cool stuff to share but didn't have time to get on Dakka so no pics uploaded. Will make that happen late tonight so be sure to check in tomorrow.
@ Bruticus- Thanks for the compliment, it's appreciated.
@ inmygravenimage- Ha.
Ok, decent update this time. First up is my 'show the cross braces' walkway. I cut down the unwanted flex of the bridge by adding some support beams:
Quite a long time ago when I bought the Land Raider for my Plague Marines I tore off the treads and was going to throw them away becasue there was no way I'd ever use them. But then said to myself "Self, keep these treads. You will use them for something someday". Someday has arrived.
Still WIP of course, but wanted to share the progress.
Next up is a blatant ripoff of a project Scarper has on his blog. Link to his is here at the bottom of the page.
Here's my version. I had a bridge started and I was going to make hand rails for it (this one from a few days ago):
But after seeing what Scarp had started I decided I had to have one so I started this:
Pretty basic, but then I added another tier:
Support braces:
Starting the platform and the gate frame:
Pegasus panel fits perfectly. This was on purpose, but I changed my mind about using a Pegasus panel (as you'll see later)
Full shots of what' has been built so far.
Here's what I'll be using for my gate.
In place, but it is functional so I can move it up and down:
Side shot:
Renewing my LoER membership:
Starting the platform access:
Rails that I cut off another model. Nice and quick repurpose here:
And leaving you for now with some scale shots:
More coming soon. I've already done more work since the last pic. Not sure why I didn't take any (that been happening a lot lately) but I'll have more to offer tonight or tomorrow.
Nice! Liking that gate-bridge. So much so, I can't think of anything to add.
The first bridge though, I do have a suggestion. The inside (underside) of the treads needs something... I know you said it's still WIP, that's fine, I Just thought I'd get in early. Maybe something just as simple as make it look concrete or go as far as to make it look like the back of the treads (but that would be tricky).
@ Theophony- You didn't miss anything, I just haven't got the work done yet. Guess I should have, See below fort an explanation.
@ Dr H- Hmm. Well... yeah. I'm going to have to rig something becasue I've already glued everything. I have an idea. Cool. I'll get on it tonight.
@ graven- I can't take a lot of credit for the initial idea, but I'll accept the compliment since the the execution is all mine.
The gate- it will have a winch (I haven't decided motorized or hand crank yet) that will raise and lower the gate. Something like this:
The fluff for this piece is that it is the only way in or out of a well-stocked and heavily guarded Trading Post. All of this will be on a 3rd level risers and I have huge plans for the Trading Post compound.
@ Viktor- Glad you are liking this. I know it's the rivets.
I got some work done last night. I'm going to preset things out of order so I can keep some cohesiveness in the individual aspects of the overall model. That said, please ignore the changes I'm not profiling from pic to pic as it could cause some confusion. Ok?
Ha.
Anyway, here's a series of photos for the gate system and how I managed it. First I took a cog wheel from a 1/35 Soviet T-72 and drilled a hole in the support beams and the pulley so I could run a piece of plastic rod through, and I'll point out that once again I'm making use of the windfall supply drop dsteingass sent my way.
Next I took a file and I routed out the wheel to make a channel and put my chain in place.
Here's a pic of the winch. it's not glued in place yet, this is just a visual mock-up to illustrate what the final product will look like:
For the gate I used a shackle and I think it worked out really well. I'll be adding a rigging clamp to finish it.
An overall shot w/ everything loosely connected:
Here's a mix of things that all come together. I put some more work into the platform structure. The fluff for this bridge is that it is the security checkpoint for the only entrance in and out of a Trading Post. For security reasons the gate is closed by default and the only time is is raised is when traffic is moving in and out. As an extra precaution there is a secondary gate that is lowered in the rear of the walkway when the main gate is opened.
Here's the front-facing wall as a 'heavy cover' firing point.
I decided to have the option of this being a gun emplacement as well, so I make this:
And put it here. It is completely removable.
Dakka Dakka, indeed. No doubt this sight would deter your average Hiver from rushing the gate. Note that in this pic neither of the gates are closed. You can almost hear the guard taunting someone, "No, really dude, go for it! I fraggin' dare ya! Come on! Do it! Whoooo!"
Here's the rear security gate I mentioned:
A shot of the checkpoint as it will (mostly) look when fully functional (missing a few things but it gives you an idea).
I also decided the checkpoint needed super-heavy floodlights to make sure they could see into the darkness of the Underhive. I started w/ the lights from a (Land Raider? not sure) and put them on some cut-down Pegasus Hobbies power plant columns.
I made a frame for the lights that (to me) look a bit like stadium lights:
Added the power cable and swivel. It doesn't actually swivel and NO I AM NOT GOING TO ADD LED so please please please do not mention it. And just to be clear, I'm not going to do it with 'light bulbs' strung on the ceiling of the checkpoint walkway. Yes I did think about it. I'm not doing it.
I couldn't find a 4th bulb so I decided to make a damaged socket instead. It doesn't show well in this picture but I do have a ruined filament in the socket:
Intentionally wonky. I'm also going to add bullet holes or some other visible damage. I didn't do it before these pics as the glue is still drying:
What it may look like when done (but only one showing, will be 2)
And last shot for the day, everything coming along nicely. I'm almost done with the initial build. Next comes paint, and then finally all sorts of bitz like trash, etc. It'll be on par with this:
More coming as soon as I have something to offer, which will be soon.
Your right I like this update. The coolness is the shear magnitude of it. You went for all the extra details. I especially lik the blown out lightbulb.
I think the only possible thing missing is a guy in a cage dangling from the side. Perhaps he forgot the password (his favorite color), or he was caught trying to shortchange the toll bridge fee.
If you do do lights in the future check out poweredplay.net
That looks great, I think your skills are really improving. Perhaps you could keep the security lights separate on their own little bases, then you could position them around depending on your layout
Looks great buddy! Clever work with the chain and pully system. I'm not official back to painting and modeling yet but your newest pieces are giving me the itch!
@ Theophony- I did think about a guy in a gibbet because it would look scary and possibly deter those of weaker constitution, but the stench would be overwhelming and make life suck for the guards. Those guys have it hard enough already as it is.
@ Bruticus- That is an outstanding idea! So much so that I did it. See later in the post.
@ Styrofoam04- Hey, decent seeing you around again. Thank you for the compliment, and more is coming soon.
@ Gitsplitta- Yes, I know, I know . Thankfully I use my powers for 'good'.
@ Dr H- The pulley and winch system are what will really sell this idea (especially now, see below), and it forces 'scale perspective' quite well.
@ Vik- It's all about the rivets. I'm offering this piece as my LoER membership renewal.
@ Llamahead- Thank you. I have a feeling I'm going to regret this piece about 3/4 through, but I'll be very happy with it upon completion.
@ dstein- You'll see more and more of your old stuff now that I'm doing Necromunda terrain. I'm not a huge fan of 40K scratch build because I can't match the Imperial Sector stuff, but Necromunda has always been scratch build for me, so I'm feeling right at home with it and the only limitation is my imagination and skill level.
@ Camkierhi- Thank you. I checked your gallery, nice work on those Plague Marines.
@ madmartykmf- If there is anything that I can do to pull you back into modeling you know I'll do it. Looks like I'm going to ramp up my efforts and keep poking at you.
Huge update this time, in four different sections. I've been way more focused on modeling than I have been posting, and I've been modeling projects in between projects on top of projects. Go go go go go go!!! There's a lot of stuff going on and it might be too much for one post but I'm doing it anyway. You might want to go get a snack or something before you settle into this update. Go on, I'll wait for you to get back.
*waiting patiently*
Ok, all set? Good. On to the update.
First up is the platform that donated the railings for the Checkpoint and the cap that used on one of the hatches. Here's the stuff I took from it:
Railings:
Hatch:
Here's what they both came from:
I had to cut the railings off so I could get models on the platforms on each level since the 20mm bases would not fit with railings on:
And I had to take the cap off for this:
That's a project that is coming on the not-so-distant future, but I have a lot of other stuff to get done first.
Moving on to stuff I'm working on, here's an update on the checkpoint:
So back to the awesome idea Bruticus had, I set out to make it happen. First step was grab a couple 40mm bases. I had considered 60mm but decined for two reasons- (1) the lights would have less flexibility for use in smaller spaces, and (2) I don't have any 60mm bases.
This the bottom piece. Cut to size and insert magnet.
Next is to scrape out the top base so the magnet would fit. Please excuse the sloppy chop job I did on the bottom base. I was more 'results' orientated than precision work. I really should play an Ork army again.
And a completed base w/ magnet hidden inside:
These are the platforms I added to the checkpoint so the lights had somewhere to go:
Here they are in place:
And here they are magnetized. They are rugged and do not come off w/o intentional effort. I used powerful magnets (the checkpoint is upside down):
After putting things together in a mock-up again I realized there was a problem w/ the pulley system- it hung down way too much:
...and would make it annoying to move models around in:
So I did some more work to the pulley system. Here I've built a new pulley and two a brackets that will support the pulley:
This is how the new system looks. Notice the greatly improved head space. Also notice the orange couplers. They are cut from plastic rod that dsteingass sent to me.
Build complete! Here's a 360 series of how the model is looking overall:
Time for paint. Basic black undercoat awaiting an insane amount of detail work:
And then hobby ADD strikes! Seeing the bridge made me think (once again) how materials were distrubited through the Underhive and remembered that model that I've had since I was in VA. The original top piece was sacrified to my daughter, and I kept the bottom. I think it went to Warzome / Martian Chronicles but I can't remember and I couldn't fine it online.
I also had some wheels left over from that train tanker I bought a few years ago. The idea came together so fast that it also made my head hurt:
I'm thinking of it as a remote controlled crawler with a headlight and two carts of supplies:
I put a lot of work into the design. Check out the functional cart coupling!
It's not finished but it's come along quickly and will make for a really cool scenario. Guilders are moving important supplies to a settlement...
Yup. Lots of possibilities.
I'll finish up with my most recent walkway. I stated this a couple posts ago. I've completed it now and it looks perfect within the collection I have. Upon seeing the pics right now I realized I need to run a sepia wash over the railings, but the rest is solid.
Here I'm using plastic rod from... wait for it... dsteingass! I'm hoping to use up everything he sent in this project..
Paint followed shortly after the glue dried:
And here it is done. Looking pretty awesome if I do say so myself. Yep, that one is right up to par with everything else, simply perfect!
...then my son walked into the room, looked at my bridge, and said "what's it going to look like when it is finished?" I told him that it was finished, and he looked at me with such genuine disappointment. He handed it back to me and said in a very serious and flat voice 'no, it's not'. Ashamed, I set back to work on it. What was really cool is that he hung out w/ me the entire time, and was talking to me about the game and the setting. He pointed out some things he did not like, such as rust being the majority of the model. Then said that from what he understands, the Underhive is that it is a multilayer civilization and that newer stuff could be mixed in with older stuff, and that different metals decay at different rates so not everything has to look completely rusted.
Such an astute lad.
..and here it is in our most recent game of Necromunda. It fits in perfectly:
That's it for now. I'll have more work done to share soon.
You just negated these comments with this metric asston of amazing updates!
1. imagination has no limit, it is infinite. -Didn't you watch Mr. Rogers as a kid?
2. skills are always continually improving, every time you cut plastic, or glue a rivet, your skills improve!
3. Your son is a smart kid!
Epic update skalk! Your son gets bonus points for reminding you to paint he hazard stripes.
Th extra pulley on the chain is a great call. I didn't even think about it, but he again it is just another hazard in the underhive.
Gibbet idea was to be a warning to others. H doesn't have to b dead, he could just be unhappy. Could also be a hazing ritual for new juves. Hang them out over the sump to attract a spider, then make him grab I and eat it.
The toll bridge looks great. New winch system is perfect, just the sort of thing that would be done after someone saying "I'm getting fed up of walking into this chain...". Good job on the lights as well.
and wow, that's a big crane on the top of that tower.
The little robotic crawler and it's trailers are brilliant. Good work on the coupling.
and the bridge, lol that boy of your's has a bright future. Good work on the hazard stripes.
Another amazing piece! I've been lurking about, watching this come together... I was going to do Tank-a-Palooza in May after I finish my new IGCCS (shameless plug link), but now I'm thinking that we need some more cool buildings/ruins at the FLGS...
@ dsteingass - Ok, so my imagination isn't limited. I would never have imagined that. My skill is 'limited' in that I can see in my mind (imagination again) what I want but fail to translate into physical form. While I do get better each time, it's a little better. I'm hitting a plateau. And yes, he's a smart kid. Every class is Honors or AP, and he's already looking into Engineering. He can't decide if he want to study electronic, mechanical, or structural, but he's got his sights set on using his mind and his hands.
@ Theophony - Actually, those hazard stripes aren't painted. I took some tut pics for you but of course have not uploaded them yet. I'll have them uploaded by tomorrow night at the latest. The pulley chain modification was more for my benefit than theirs. Ha. And thanks for the clarification on the gibblet. I'm giving it more consideration now.
@ Briancj - If I could only get that kid into wargaming! Gah! BUT... at the beginning of this season I told him that i'd been thinking about for a couple years- if there is one wish I have in this world, one thing I want to do above all others, is to go riding with him. The smile on his face was brilliant and the moment could have been a Hallmark commercial. He's going to the BRC (Basic Riding Course) right after he gets his driver's license in '14. Looks like I'd better start saving up for a bike.
@ Dr H - I think the pulley system really adds to the model, forces perspective, and to me makes it look like a model for a railroad set more than a model for wargaming. That is a *very* good thing to me. Pics of 'how to' on the hazards stripes coming soon.
@ hdbbstephen - Thanks! I always appreciate your feedback, decent to see you here again. More terrain is like more money or more beer or more (insert something cool and awesome here). There's never too much and you can always use more.
@ inmygravenimage- I was going to go with a Servitor / Pit Slave upper torso and wire him in to the crawler, but I couldn't find a decent model so I just capped the top with a hatch. I think it's a bit lame that I cut such a huge corner but I'll go back to it if I ever pick up the models I'd use for that.
I did a LOT of work on terrain last night but didn't load a single picture! But I did get a lot of work done. Pics and a full update by Sunday night. Thanks for reading and staying subbed. A lot more is to coming soon!
@ Vik- it was a humorous jab at myself since I haven't riveted anything since the first LoER contest. I'm going to be doing a lot more riveting now that I'm (FINALLY!!!) back to Necromunda terrain.
@ graven- You mean this guy?
Yeah, that would be cool... just add that to my tab.
Skalk Bloodaxe wrote: @ Vik- it was a humorous jab at myself since I haven't riveted anything since the first LoER contest. I'm going to be doing a lot more riveting now that I'm (FINALLY!!!) back to Necromunda terrain.
@ graven- You mean this guy?
Yeah, that would be cool... just add that to my tab.
you making me rummage through the boxes again.. I have three storm ravens, two still on sprues, and hated the top turret, so it was never assembled. If the model has a flat bottom to the chest they may make great plastic servitors when put on scout legs. My chapter was to be made entirely out of plastic and resin, no metals. It made finding good solutions like this a must. Thanks, challenge accepted.
Amazing work Skalk, The details and work in the checkpoint are absolutely inspiring and inspired. Once again I doff my cap to you and your enviable skills good sir
Thanks for the idea skalk , has some fun building these two and have a third guy waiting in the cue now. I've toto get me more of the servitor bits.
Roger the riveter and Ted the torch will be deployed in my underhive as former gangers put to good use after lobotimization for their crimes.
Oh come on, how the hell am I supposed to comment on all this? So much fantastic stuff since I last visited, I'm going to sound like a massive fanboy if this is all in one post...
The toll bridge is mind blowing. The functionality of it is what really strikes me - you're problem solving for ergonomic functionality at a frigging 28mm scale. It looks like it would work, it looks like it could be a movie set, and it looks like it would be an absolute blast as a centrepiece for a themed campaign. The spotlights are a wonderful touch.
Have you seen this kickstarter, by the way? There's a cute little 5cm cargo crawler for a fairly reasonable price which would make a great addition to your wagon train!
Your board in general is starting to look stunning - so rare to see so much painted up gear with such obvious care and attention on such a large scale. Wish you'd head over to Scotland with a small freighter to carry it for a day or two!
@ Maxim C. Gatling- Sorry, not mine, just a random pic from Dakka, but thanks for posting. It's kind of funny that with hundreds of pictures spread out over 38 pages of absolute AWESOME, I get complimented on someone elses model.
@ Vik- You'll get back to it. Every scratch-build bit of terrain we do has at least a few extra rivets.
@ Theophony x2- Oh come now, good sir! 'Making' you rummage through boxes full of wondrous wargaming treasures *again*? ? Methinks thou dost protest too much. Especially since you have some awesome looking Pit Slaves there (if you turned them into Pit Slaves).
@ Ruglud- Thank you. It just occurred to me that I've seen your work before. Well done. The rust effect you produce is excellent and I especially appreciate how you weather paint. Those are skills I must discover for myself.
@ inmygravenimage- Happy hunting.
@ GiraffeX- It's amazing what a hobby knife and a few bits of plastic can do. I'm having a lot of fun with the Necromunda terrain. It has reminded me that there is a feeling of freedom in scratch build that I don't get w/ my 40K kits. I can do anything I want and it still looks like it fits into the centuries-old expanse of an underground city from the 41st Millennium.
@ Scarper- The toll bridge was your idea. I liked it and copied the idea, just took the basic concept in a different direction. So please just take the credit because you are genuinely the inspiration. As soon as I saw your model I knew I had to make my own because it is so wicked cool. As I kept working the model created a story, and before long the story was building the model. This is one of the most intentional models I've built in a long time. Once I knew what it was going to be, it went together quickly. What I really liked about building this project is not only did I know what I wanted it to be, I knew what I didn't want and therefore knew when to stop. That's a new thing for me.
@ Briancj - Hi.
@ HAZZER- Hey man, decent to see you again. Thanks for the compliment.
Ok, specifically for Dr H and Theophony- Here's the method I use for my hazard striping.
First I print out a hazard stripe pattern onto color printing paper. Measure width of stripe, cut to size, apply, done.
And that's it. The rest of the effect comes from weathering. I use Gryphon Sepia the most, but I also like to use diluted black. You'll see examples of both later in this post. I had the opportunity to do a lot of modeling this weekend, so of course I took it.
Here's a good example of a finished product. Hatches are done. Will make more at some point. These were from a moment of inspiration while I was waiting for glue or paint on my primary project to dry.
I had some time to model this weekend and I wanted to make the most of it. My first thought was to get the paint started on the checkpoint, but the idea was soon abandoned. I just could not get into doing it, and without the flow of inspiration I decided to figure out where I wanted to go, and my mind went straight to Vents and Tunnels. I didn't have any vents and decided to change that. I've been wanting a hole saw set for a while, and now I have one, Plus I saw these plumbing fittings and had to give them a try.
supply drop:
I tried one of my new hole saws on some plastic scrap. Looks like it will create excellent circular bases if used properly. This base came out ok, though a bit ragged on one side because I did this one by hand. I'll use a power drill next time.
A bit of sheet rock mesh tape and another terrain piece is under way. I also used a T connector that I bought. The ladder and hatch wheel bitz are from Pegasus Hobbies, and the hatch itself is from a MK I Rhino.
More PVC vents:
Here's how I make the mesh grate- wrap it around the end of a plug (which is very close to the same size as the pipe connector), crush it into shape, cut away the excess, inset, glue into place.
Vent paint jobs started:
And a segue to my next profiled project- from vents to random junk.
Here's where old meets new. The cog wheels from a broken 1/35 M1 Abrahams that I built when iw as in the Army, so I've had it for maybe 20 years. Finally getting used on a project that will see action for many years to come. The barrels are a mix of stuff I picked up in Virginia in the late 90's, and the tube things are Pegasus Hobbies that a few months old.
I was going the 'everything has to look rusted' route and then stopped. I decided the barrels were too bland and wanted to step them up a bit. First barrel was going to be full of toxix goo. Here's I'm filling the barrel w/ tissue. It occurs to me that if I painted flames on that tissue I'd have a burn barrel. Might try that at some point.
Really packed in now, and made solid with liquid super glue. Next step is color and fill with water effect stuff
Barrel of toxic goo. I've done more work on it since, and the 2nd barrel is brimming with oil. I'll share those in the next update.
More work on same piece, decided the tube things are power cells. I'm gong to keep them clean intentionally. Will muss them up a bit to show dust / dirt, but overall the cells will look almost the same as they day they came off the factory floor. I'll also be using this same idea when I finish my 40K Manufactorium. This is Bolt Gun metal, Turquoise glaze, and Yellow Glaze. There's more to be done but this should give an idea where I'm going w/ this.
Here's a project that I banged out in about 30 minutes and it looks great. I really like this one. Base is a bike base from 40K. I think the hazard stripe really sells the piece overall. The triangle girder is scrap from the checkpoint bridge, small crates / barrels from an HO train set I scored a long while back, the 'flywheel' thing is from a tape deck I destroyed in 1996 ( I remember the incident VERY well) and the cog is from the same M1 Abrahams kit.
This next bit is the engine from a 1/24 kit that I started building when I was maybe 12 or 13. I've had it for a very long time. I've mentioned before how all the way back then I kept bitz from models I worked on. I had no idea why I was doing it, I just did. Now I know why, and I'm glad I did.
I can't remember if I posted this or not. Random stack of crates and barrels. It is on a 20mm WFB base. I also just realized it does not have any hazard striped. Looks like I'll be going back over that one.
Lastly, another bridge. Base is the same (railroad trestle bridge) but the rest is such a cobbled mass of random stuff that I'm going to do each side individually.
Right to left, top- track from the M1 Abrahams, white plastic is the suspension system from the 18-wheeler kit, green rods are from Abrahams kit, Mk1 Rhino blade w/ a random truck part on top. Notice the truck suspension is tired down w/ wire to greatly improve durability.
Right to left, bottom- I-beam, 18-wheeler body frame, front grill from a 1/24 1950's truck, brace from a bridge, random plastic part from a 40K set, green box is from the Abrahams, and a piece of plasticard.
Another view, rotated:
Top view, right to left: Pipe from Pegasus Hobbies set, copper mesh, brace from the bridge, Abrahams track, single track link from a 1/24 German tank that I only have a few pieces from and I do not remember what it was, balsa wood bottom and tread plate from dsteingass on top, hatch plate from Pegasus Hobbies set (recycled from my fuel depot), grate from Pegasus Hobbies kit (also recycled from fuel depot) A hatch door from one of those newfangled Rhino kits, more dstein tread plate, and finishes w/ some .060 plasticard.
Please notice all the rivets! There are over 40 of them. Also, there's an 'easter egg' on the bridge. Whoever spots it first gets a few Internet pat on the back from your 'ol buddy Skalk.
That's it for this one. It took me 4 days to get this posted and I've got work done since then so the next update is all ready to go, I just need to upload pics and write it out. I expect that I'll have a bit more hobby time soon so I'm hoping to finish up some 1/2 finished projects before building new stuff.
Oh wow. You have been a busy wossname haven't you.
Ha, the hazard stripes are brutally simple. Nice.
I like the vent/pipe things. Good use of parts.
Like the torn/broken grill on one of them.
Toxic goo by tissue paper and water effects is a really good idea. I shall have to remember that.
and the power cells are looking the part.
Yeah, keeping spare parts from past models is brilliant. I have a small collection myself, mostly of aircraft pieces, nothing really as big as an engine though. The odd piece here and there can make a model really unique.
Is it the eye of chaos? Cos that's a nice touch great bridge amigo, you continue to set the bar. BTW did you see this Look what I found on google quick rivet technique? amazing, Ouze posted it in his blog.
Been watching their ks, but not interested in the esthetics of mantic. Local flgs says that dreadball hasn't gone over well, and have heard complaints about the figs. The ones I've seen at the store don't do it for me. The price is good, and I'll kick myself later for not getting the earlybird, but can alway but it when out for retail.
Yeah, I dunno..they are supposed to be at about $5 a sprue, I'm not sure I want $100 worth, not until I've seen the other sprues at least. If I had that kind of pocket change to throw around maybe, but I have plenty of unused sprues lying around already.
Same feeling here. I'd rather keep the $100, or put it towards tools and necromunda, then something that might not work. Besides I can scratch build more for that price.
@ anyone that wants them- links to download the patterns. None are my IP, I just put the sheet together via copy / paste (and paste and paste and paste)
Remember that different paper will yield different results, so experiment to find the look you want. You'll make hazard stripes that look in-scale symmetrically perfect every time.
@ Theopony- Maybe I should become a spin man for BP.
@ Dr H- If you use the tissue method I would recommend filling it mostly to the top before pouring water effect mix. I left mine a little too deep, should have filled it more. Now my 'goo' has a concave finish because it cured at different times. Doesn't show badly because of the high shine, but I know it is there. As for bitz... never ever get rid of them. Not even a broken steering wheel from a 1/24 Snap-Tite '74 Pinto. Keep that. You'll use it some day. And thanks for the compliment on the bridge.
@ inmygravenimage - YES! And here's your prize! *pat pat* The Eye is pervasive in the Underhive, it is just overlooked. There are more than a few models w/ the Eye. It's my only 'nod' to Chaos so far. But it is there, in the deepest shadows, in the blackest of places where even vermin fear to go... it's there.
@ Gits- Sure.
@ dstein- Thank you! I'm having a of fun w/ this project and the best thing is that I make it this week and it can affect next week's game. Fast turnaround on the effort. As for the kickstarter, the CGI looks cool but 'hands on' I already have Pegasus and the concepts seem very similar. Very.
@ hk1x1- Thank you. Go back a page or check out my Necromunda thread. I have pics of it set up for games.
Quick update tonight.
Completed barrels. I made a couple mistakes that I'll remember for next time. I like the effect a lot (slime / oil) so it will be showing up again.
Complete piece:
Just realized I took these pics before I made the hazard stripes look dirtier / grittier. It's not as bright, more weathered.
Hard at work on the bridge:
Finished two vents:
And the engine bit is done except for two mushrooms I'll be applying:
That's all I have pics of. Will share more this weekend probably.
Sorry I have not been here before and what the hell I have missed I don't know where to start so much creativity and the toll bridge is amazing especially the pulley system which you have improved on dramatically.
So much to go back through on this thread and so many ideas to steal
dunno what you have been eating as of late... but your creativity has gone to new horizons... that last walkaway looks amazing...and I love the vents done with pipes!
Ha I used to use the same thing Vik a few years back, it was my mums foot sander for getting rid of hard skin same thing as that practically, worked a charm
Ha I used to use the same thing Vik a few years back, it was my mums foot sander for getting rid of hard skin same thing as that practically, worked a charm
Ha I used to use the same thing Vik a few years back, it was my mums foot sander for getting rid of hard skin same thing as that practically, worked a charm
Hmm. I just finished mowing and all my yard work for the first time this year. 6 hours. Taking the rest of the day off to model. I'll some new stuff to share later tonight.
Technically yes, but not the 'later' you're asking about. I'll have some stuff posted around 2am your time, Vik. But it'll be here waiting for you tomorrow.
I'm working on another vent and starting to paint the bridge. Plus I have a really cool project to show you all, but it's a secret right now. Oh the suspense!
Ill be up early tomorrow anyway so should catch the update before you shut down then hope its worth the build up now Skalk "just pilling on some pressure
Hope it all goes well tomorrow Vik the first school trip still remember mine visited a farm, all the kids me included spent most of the day playing with the electric fence
The worst thing was the farmer and teachers let us
I thought I had more to share but these are the only pics I took. I'll have more to offer next time I post.
This project was really cool. I found a mostly square chunk of .060 plasticard and decided to use it as a base for something. Then another idea hit me- how fast could I make somehting that would be relevant and look awesome? I set a time limit of 10 minutes and got to work. Bitz bins opened, glue poured, clamps locked, and the creative mind was in overdrive. 10 minutes later (verified by kitchen timer) I had this:
Everything is glued and the piece is surprisingly durable as I was using plastic cement with a shot of liquid super glue. The super glue held it in place and the plastic cement made it solid. I could list everything on it but it would take me too long. If anyone has a question about a bit I'll answer.
Extra bonus, I found that it is the perfect size for the top level of 2 of my towers:
That's it for this one since I didn't upload anything else to share. I'll be back as soon as I can with more to share. I think I need to get painting though. I have too many 'on deck' projects.
Skalk, did you win the ebay deal? Also what is the white tower made from? Lastly what is the base color your using for all your projects, is it ruddy brown primer?
Everything looks awesome by the way, just needs. Sign saying beware of dog, but with the dog crossed out and rat written next to it. My first mpression was it was a junkyard, an actual one not a bad one .
Your scenery all together looks awesome dude, some of those shots could be straight out of a movie or a video game. Couple there got me thinking of Crisis. Just awesome.
@ Gitsplitta X2- Thank you. It was an episode of inspiration, and a labor of love overall. I've always tried to offer the best table I can, and I'm finally starting to reach my expectations. Huge pieces are majestic and impressive, but it's the tiny bitz like a pile of crates and an overturned barrel spilling toxic goo that really sells the overall scene makes the big pieces look good.
@ Theophony X2- did not win, and glad of it. Was still a good deal per piece, but went for $305. The tower is from a Micro Machine set that was pre-broken, got it at a yard sale. The primer I am using is ruddy brown and another lighter color that I ran out of and forgot the name of but it's a common stock at Aubuchon's (local DYI hardware for those not familiar w/ it) and I'll pick some more up later. And thanks for the 'beware of' sign idea. I'm thinking of using it, though it'll be a 'ground level' piece later on. Also, not really 'back', just visiting and offering what I can.
@ dsteingass X2- Thank you. Trying to use what I have before I start hoarding again. Summer = yard sale free piles. And the 'death match' idea would be a great game to play. Too bad only 2 people I know are playing Necromunda right now. I need more gaming friends.
@ Camkierhi X2- I've long admired the work you do. Thank you for the compliment. Terrain Competition- I'm not doing them for a few reasons. First and foremost is I am tired of 'failing'. I get excited and have great ideas, then I stumble a bit, slow down, and eventually add another failed project to my Shelf of Shame for a while before I tear it apart and recycle the bits. Part of that is because I haven't been able to 'connect' with any of the contest projects I've paid attention to over the last (... year?) and overall it is a rare moment where I actually focus on one project from start to finish. So far I've offered one piece for judging. I'm not sure if that will ever change, but the possibility is always there. As for the photos, I enjoy taking dynamic POV shots that really 'take you there'. I'm glad you enjoyed them and I really appreciate the compliments.
@ Viktor- Painting will be a challenge for sure.
@ alabamaheritic- Thank you. I need to catch up on your thread soon.
@ hdbbstephen- Send me a PM.
@ inmygravenimage- Thank you. I intend to keep going. Someday I imagine I will not have any ‘table’ left to play on.
@ Styrofoam04- Thank you. You already know I'm a certified Styrofoam fanboy, your work has impressed and inspired since the first time I saw it. I especially like your faded paint to rust to paint effect, and it is on the list of many rust effects others have offered on Dakka that I want to replicate.
Short update, but at least it is a real update. Took some time last night to do some modeling and I'm blowing off a chunk of work today to write this up.
First order of business- supply drop:
.040 plain plasticard. It's not much, but it gives me more options for platforms. I have a couple ideas and when I have the chance to get to them I'll have the material already on hand.
I am staggered. I posted it on my Necromunda thread the other day by accident, meant to post here. $54 w/ S&H. I still can't believe I won it, and I won't until it arrives. I've played on the ‘pipe’ set before and it is excellent. It is a great walkway and adds a distinct ‘industrial’ look to the board. Very cool stuff.
Next- 2013 Gameroom Re-org:
This is just the same display case I've been using that I moved to a different location. It has been repaired, cleaned up, and is dedicated to terrain (obvious exception is my MTG cards). It was never a properly utilized space as it was tucked into a corner and was not immediately accessible due to chairs / etc always in front of it. The empty spaces on it became a catch-all magnet for things I did not have a home for.
Other improvements so far- I've re-purposed another set of plastic bins from another part of the house that make sorting and using finding materials even easier than before which helps me keep an accurate mental inventory. I've also properly stored models that were taking up space as 'display by default' (which means they didn't have a real place to go so they wound up 'on display' collecting dust) and the shelf they were on is going to be replaced w/ the new plastic bins. The shelf will likely leave this room and be used as (gasp!) a bookcase. Last item on the list (but likely not the last) is I'm planning on building another set of shelves for more terrain storage. My goal is to have a game / hobby room that is as accessible and organized as possible.
And finally, genuine hobby stuff. I found no motivation to paint but I did want to do something hobby-related so I started building more stuff. Small pieces are easy and paint up fast and I'd like to have that 'I finished something' feeling again. I'm guessing that I'll be building for a while though. The idea of picking up a paint brush makes me want to just play a video game instead. Not sure where that is coming from, but as you can imagine it's frustrating. I really need to paint. I gained experience from many of my recent past projects and I know I can streamline some of the processes with an end result that is almost as detailed as spending the extra 5 hours for a similar effect, but even if I stopped building right now and did nothing but paint I feel I still would not be finished with my current projects by the end of the year. I’m also frustrated that I have a top of the line airbrush sitting under my desk because I don’t know how to use it and the few times I’ve tried to learn it has yielded discouraging results that are completely my fault. I need to take the time and make the mistakes and read the book and listen to the advice, I just can’t right now. Once I practice with it enough I know my entire painting experience will change and my terrain will reach new levels unattainable with a sable brush or spray can. But until then… yeah. Anyway, on to other stuff.
I'm still trying to use the really old bitz that I have been hauling around for years. These next pieces all have old stuff, even if it is just an old WFB base.
New tunnel / vent piece. pipe is new from recent haul. base is from a Polly Pocket set, wheel w/ numbers is from a cassette player I smashed into tiny bits in the late 90's, and black 'pipes' are sprue from a 1/25 Chevy Pickup model I built in the mid 80's:
Volvo door alarm from my 1996 Volvo (that I still drive daily). I was working on the car one day, door had to stay open and keys had to be in ignition. After about 5 minutes of 'ding...ding...ding' I suddenly found this interesting-looking item in my hand and the ding had stopped. Hmm. I kept it around for quite a few years w/ the intent of putting it back, but I know I'm not going to. Base is a 40mm WFB base that used to have a Rogue Trader Ork Dreadnought on it.
This should have pics of each side, but whatever. It's a collection of many different things. Main piece (which would show better from the back) is from 1980's GI Joe vehicle, green bit is from a Enhanceable ADSL panel, the black plastic on left side is more of that broken tape deck, and hatch is from the recent Rhino kit (I think).
This vent / tunnel is made from one of the parts I picked up recently, but the black bit on it is a shower faucet coupler with a 1/25 Mac Semi wheel well capping it. Base is another WFB cavalry base.
Pegasus Hobbies pipes on a WFB cav base. Simple and effective. I need to make more of these.
Group shot of an evening's work:
This didn't take a lot of time to do, and the majority was spend digging through bitz. It was a decent time and relatively easy. I'm hoping to do this again soon.
That's it for this one. I really appreciate the feedback.
Those shelves look like a selection of random (partially ruined and very cool) city skylines.
Good to see Polly pocket has a worthwhile use then.
Good use of parts throughout like the cassette deck pieces and volvo alarm (maybe when it comes to painting that, you could sneak on a small volvo symbol somewhere).
@ Gitsplitta & inmygravenimage- Thank you both very much. I will take credit for the 'vision' and the skill this time (I'm usually humble to the point of self-effacing). I know am good at taking random junk and turning it into interesting and convincing tabletop terrain, though I'm always open to suggestion (like when you both helped me improve my Fuel Depot).
@ alabamaheritic- Yeah, and I don't need loud pipes on my Harley either, but I have them. When I play my guitar it registers with the USGS station in New Hampshire.
@ Dakka_Dok- The wallpaper is an excellent example of cheap 1970's redecorating that I had no part in. I have considered replacing it with somehting else but it has received so many comments since I started posting on Dakka that I can't change it now. It's like the backdrop for most of my photos. It's a defining factor now. And thank you for the compliment.
@ Dr H- Yeah, I've noticed that as well. It looks pretty cool in low-light pictures. Also, this is not the first time that Polly has donated to a terrain project. She's a real sport about the whole thing. The cassette player and Volvo were not so willing to donate.
@ madmartykmf- Thanks! And it's good to see you around.
@ Theophony- I'm going to be in and out for a while but my intent is to be here more regularity. The new pieces really are excellent. See below. Also, nice quote from dstein. The truth hurts.
@ Camkierhi- I hope you found a trove of treasures in that shed. I would prefer to be around Dakka more as well. I do not expect things to change for a while but promise to offer quality work when I am able.
@ LDD- You and I have spoke before about -hoarding collecting more stuff than we could use our natural lifetime. I have no doubt you'll find some amazing things in your bits bin. As for what I'm doing, there won't be many more Pegasus items in a while. Believe it or not I'm out of the pipes and connectors. Thankfully eBay is only a click away. HoB here I come (next month)!
@ dsteingass- Yes I do. It's the left one.
Spoiler:
@ Briancj- I know, sorry. Luckily I have a few from the 90's plastic set. I'll paint those up sometime in 2013 I am hoping. Or 14. Hard tellin' these days. As for the game weekend, I totally agree. hdbbstephen is in NH and has also expressed interest in playing. I foresee a massive gathering of armies and an epic battle that will be recorded by the Adeptus Administratium for the ages.
@ Bruticus- Thank you. Your terrain and scenery remain a major influence for me, and it's good to know I'm on the right track. As for the MTG cars, I stated in The Dark and ended up during Ice Age. I've bought some random collections since then but with the realization that I do not need 158 Llanowar Elves I've been slowly working my way through the boxes and limiting each common to 8 cards since both of my kids play. I'm covering bases in case they find a combination that makes Durkwood Boars the coolest card ever released.
@ Jeffar- Actually I keep them in my Chaos Mutation bitz bin.
Ok. Lame update since I'm only showing off new toys and have no actual work to offer. Hobby time has been limited.
Here are the newest items I have added to my collection. The first photo is of a German armored car that I picked up at a flea market. Not bad for $1.
My plan is to turn it into a vehicle for my PDF (counts as Adeptus Arbites) Color scheme will match the uniforms.
which means I probably should have posted this on my Cultists of Random Projects threads, but this is the only truly 'active' thread I have currently and wanted to share it with more than 3 people. Not that it really matters though. I want to do this project, but I also want to do all the other projects I have going as well, so I would advise against holding your breath on this one. Don't be surprised if it winds up at another flea market 30 years from now as part of my estate sale.
Ugh.
On to the main attraction of this update. It is without doubt the most incredible score I've ever made on eBay, but it is tainted because I feel really bad for the seller. . I scored this for $55 ($44 for item, $10 for shipping) sinc ethe shipping cost him $41!!! After he pays the eBay and Paypal fees he'll make what, $10? Less? He knew the fickle ebb and flow of eBay, but man that really sucks for him.
That said, here's what I scored:
It just occurred to me that I did n ot take any close up pics of the two fuel tanks. I'll pass on it for now and show them once I've made some changes. Nice construction but the paintjob is terrible. The clapboard buildings will be converted to fit in w/ my Fantasy collection. Everything else will hopefully be on the table tonight, I have Necromunda game scheduled (finally).
'm really excited to have this set. It's an old school blast from my past and I'm going to do my best to make it look as awesome as possible.
That's it for this one. Thanks for looking, and I'll be back as soon as I can.
Skalk if you feel really bad you could send the guy some more money nice lot though well worth the money
Yes, hoarding stuff is great fun just trying to figure out what to do with it is the pain in the arse Love the old IG I have some of those myself some where
I admit to, on one occasion, feeling so badly about winning an auction, i sent more money. There was a typo, the auction went for, like, $5. It should have gone for 100+. I sent $40, because that's what I was going to max my bid at.
Wow, this is some really awesome stuff. I'm going to have to go through and catch up, this being a fairly lengthy affair. Just had to say wow though, I like to cobble bits together but--good lord-- you've got some killer stuff.
Briancj wrote: I admit to, on one occasion, feeling so badly about winning an auction, i sent more money. There was a typo, the auction went for, like, $5. It should have gone for 100+. I sent $40, because that's what I was going to max my bid at.
Well I have to say you are better than most then, I would have thought what a deal
@ Gitsplitta- I haven't touched it yet. Been working on some small projects. Just haven't had time or felt motivated enough to dive into one of those projects yet. The detail is intense. I'll get to them this year though. At least start them.
@ LDD- Yeah, I could. But I didn't, at least not yet. And if you ever get sick of those old IG, I know a PDF that is recruiting new members.
@ Briancj- Hi.
@ Theophony- You are going to wind up with enough bulkheads to rebuild the entire Hive Primus Underhive.
@ dsteingass- Oh man, I know it. I remeber this stuff being expensive (and hard to find) NIB back in the day. I can't imagine what they are worth to a collector. And yes, you send some Armorcast walls / etc. I'm already digging those back out. I finished one but may have to rebuild it a bit. On that though- thanks again for the stuff you sent. I've been putting it to good use on almost every project I've done since.
@ GrimDork- Thank you for the compliments. If you have any questions feel free to ask. I know this thread has grown to a lot of pages but hopefully it has quality work / useful ideas throughout. If nothing else it can server as an example of what not to do- I'm not one to hide my mistakes and failures. If someone can learn from one of my monumental mistakes then it was not a complete fail.
Too long once again. Here's what I have to offer today:
First up, this is a 'terrain challenge' for myself- random junk from work. Now before anyone asks about workplace ethics etc I assure you that every one of these items came from a recycle bin.
Have also been putting a bit more paint on my tunnels / vents. I've decided to make them all red:
Here's a bit of paint on the random junk bit I put together a while ago. The drybrush is NOT permanent, it was to help me figure out shape / shadow / depth. And I absolutely hate the blue so it's going to change.
A while back I posted a pic of this building that I started back in 90-something. Originally it was going to be a Trading Post for Necromunda, and after finding all the pieces I decided to keep that idea going.
After it was together I was looking for something to use as a roof, and then inspiration hit me:
Had to build it up a bit inside to make it fit all around:
And here's how it will fit when done:
Also got a lot of work done on this piece that I built last December:
it's a lot more finished than this now, but I don't have more pics to share yet and I'm sorry for the bad quality, next pics I take will be a lot better:
That's for this one. Thanks for looking and I already have more to share, just need to take pics and post.


 I don't get any... The rest of the engineering dept where I work all have a crazy amount of time off on the books but me, so I am the engineering support for the holidays. On a positive note though, I can sit at my desk and clean flashing off mini's for 8hrs a day without being interupted by folks

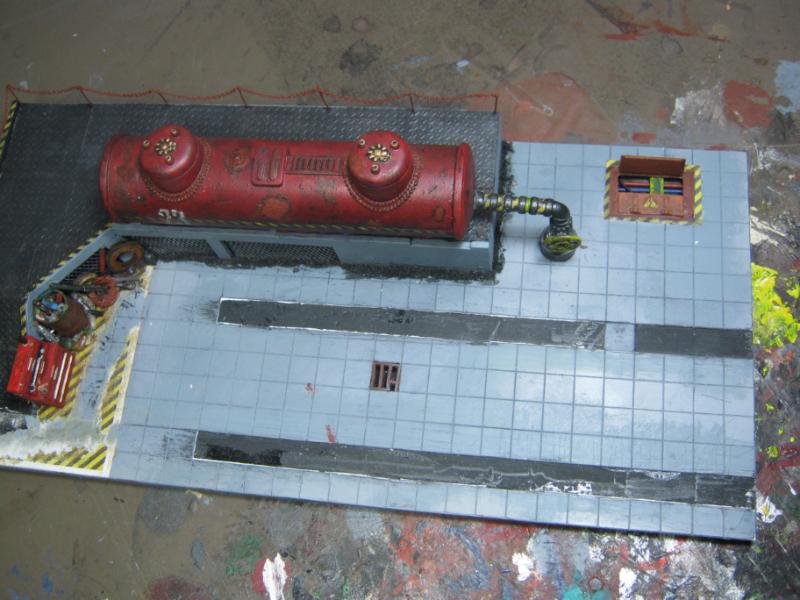
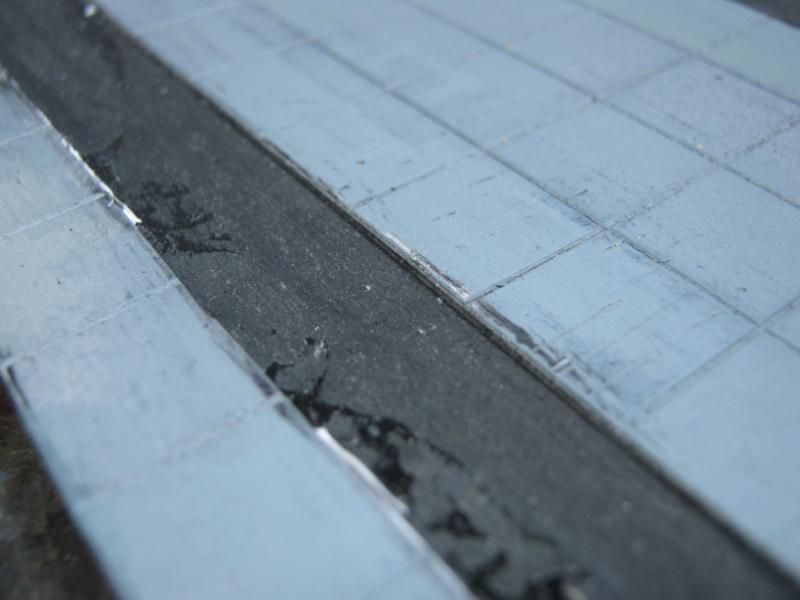
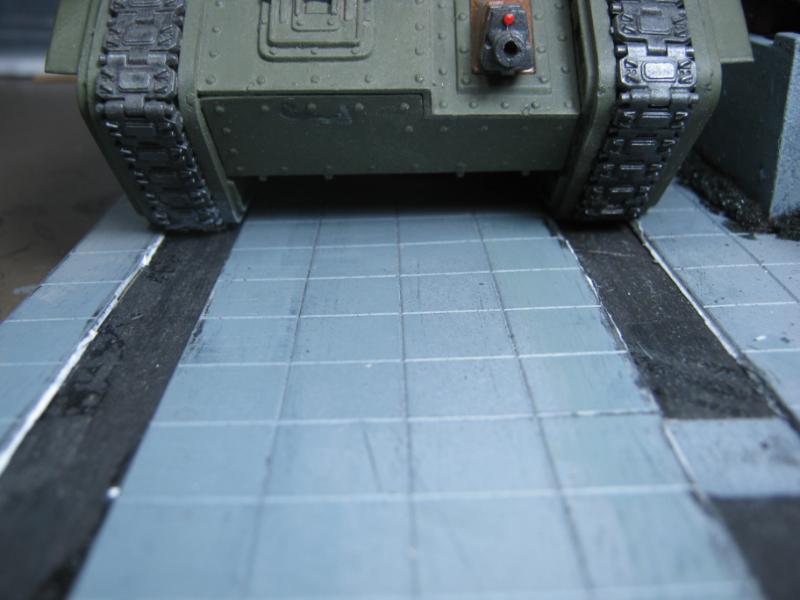
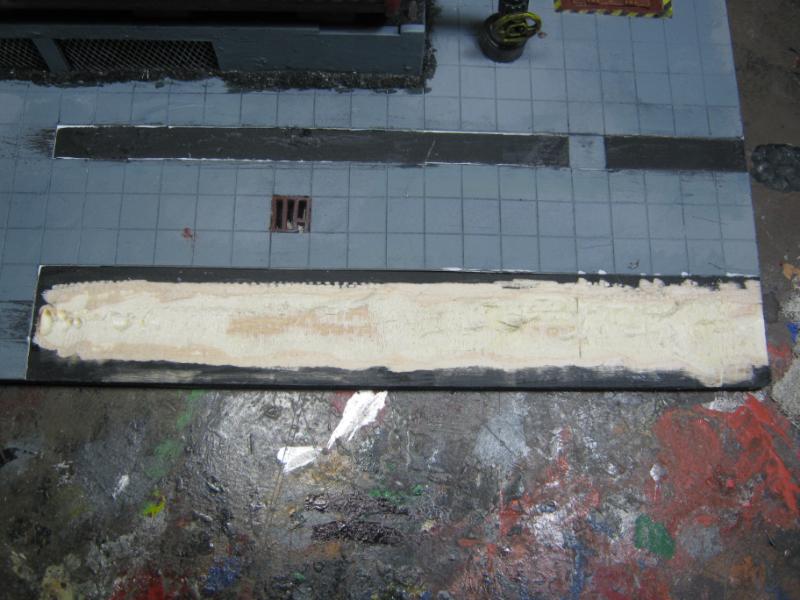
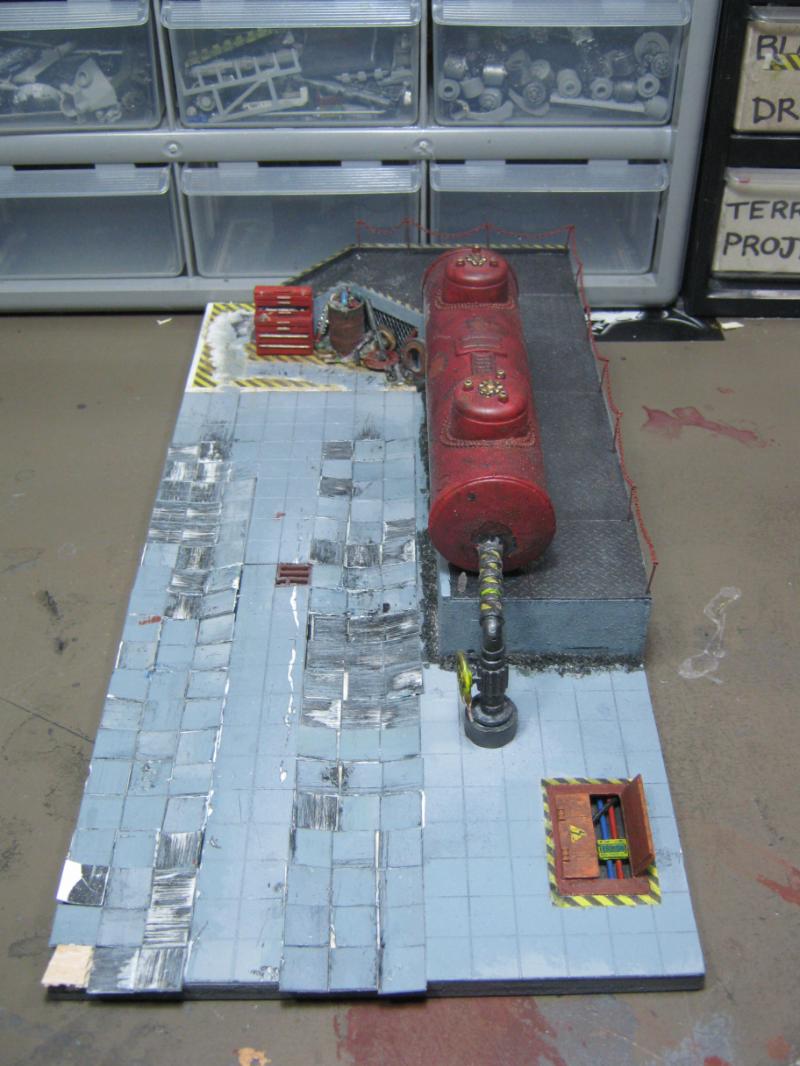

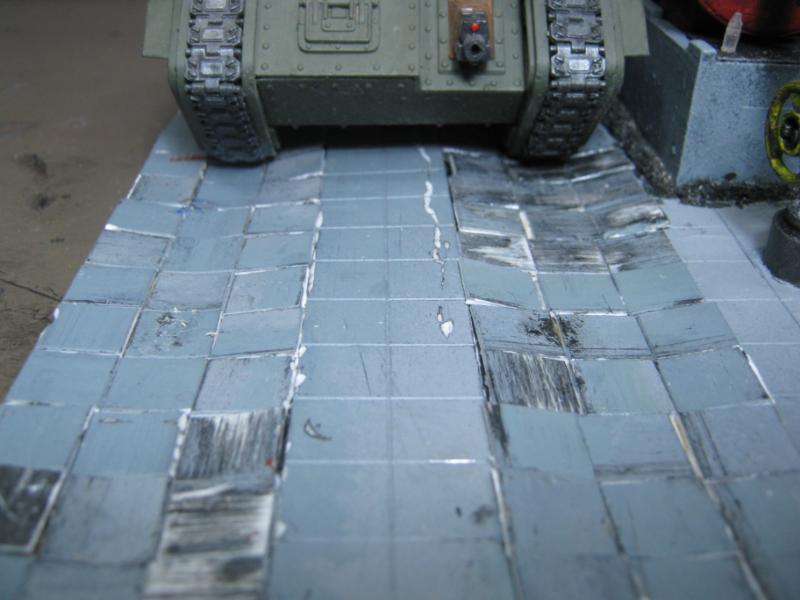
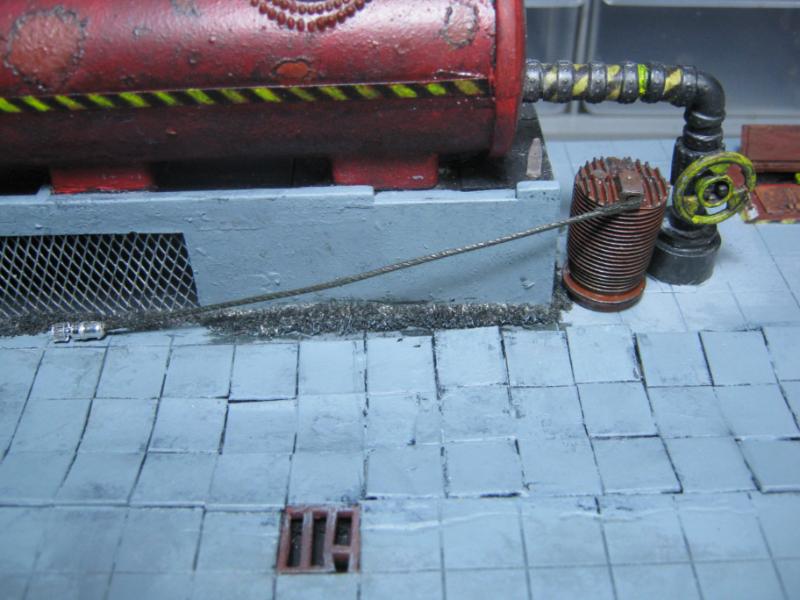
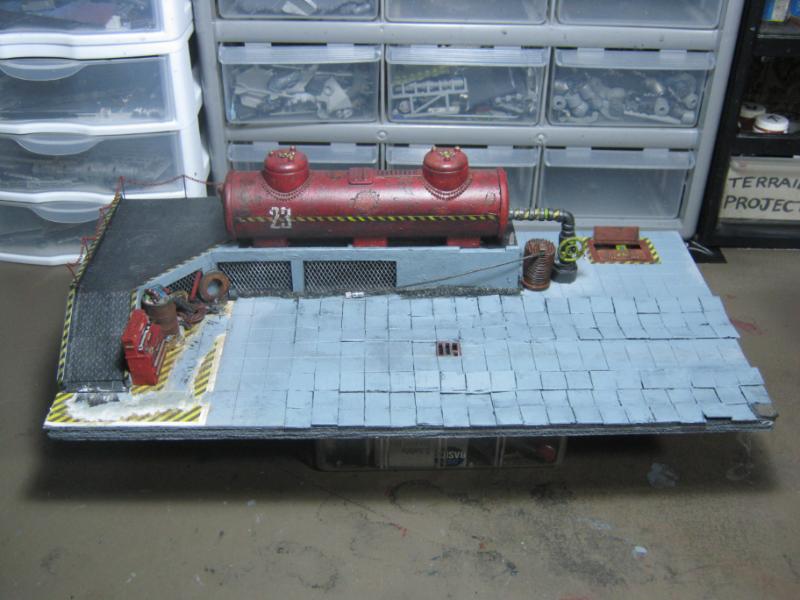
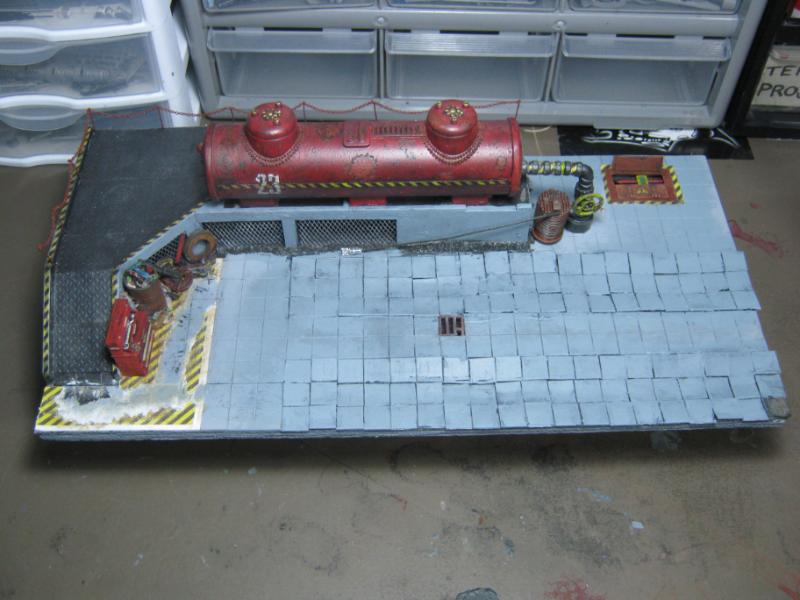
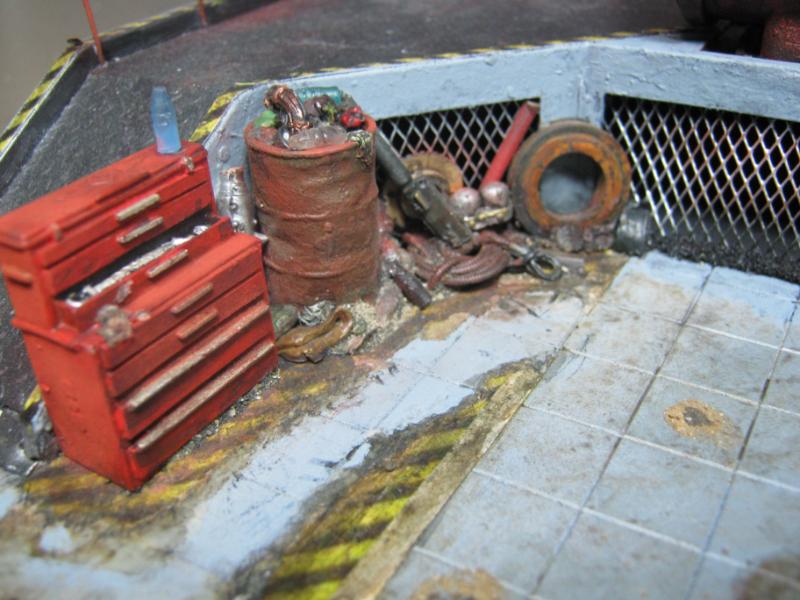
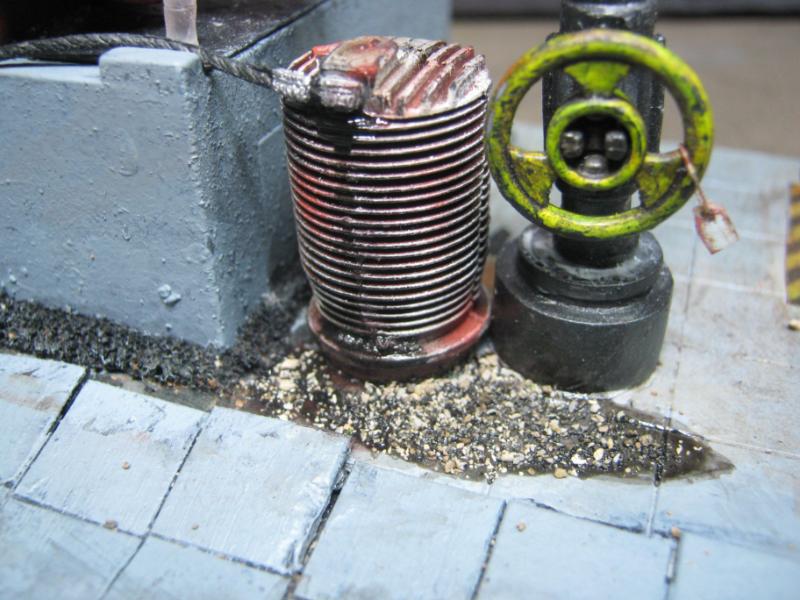
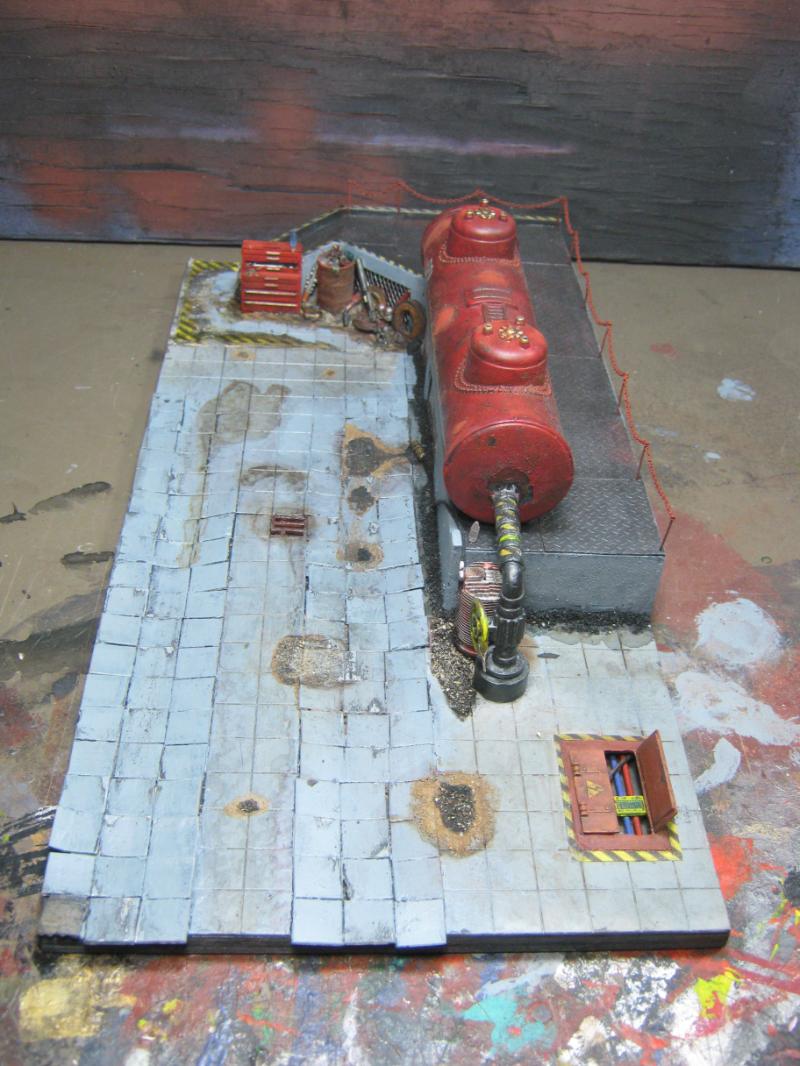
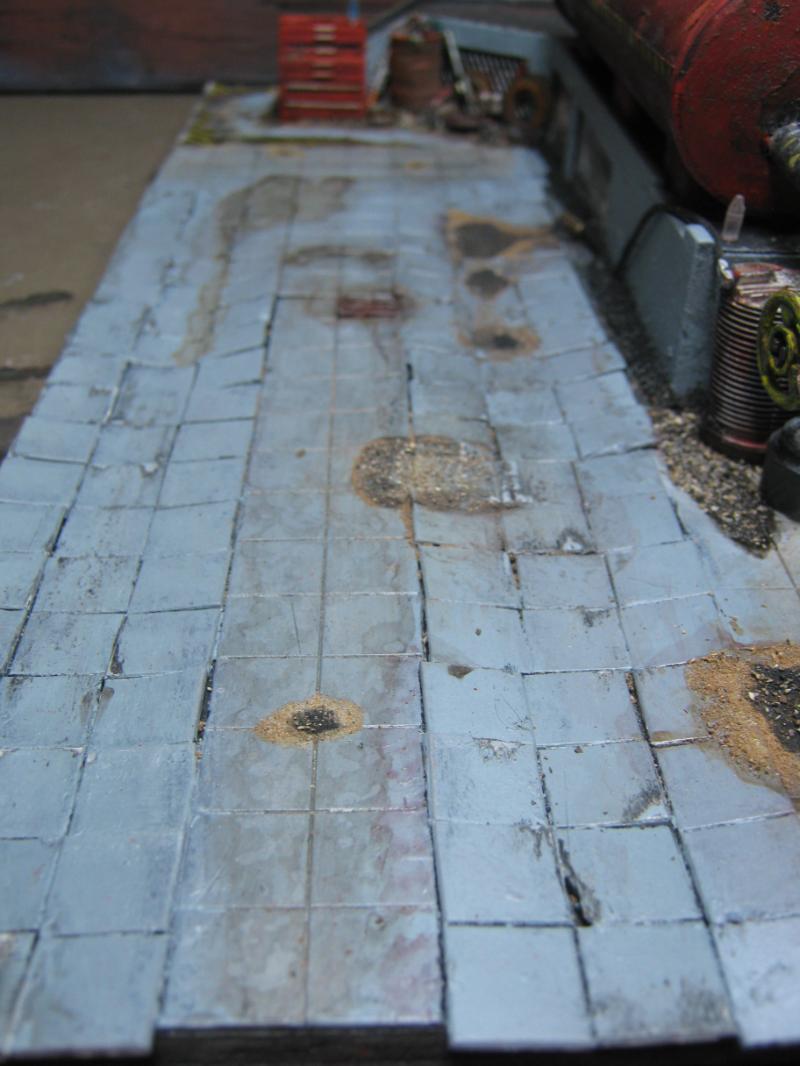

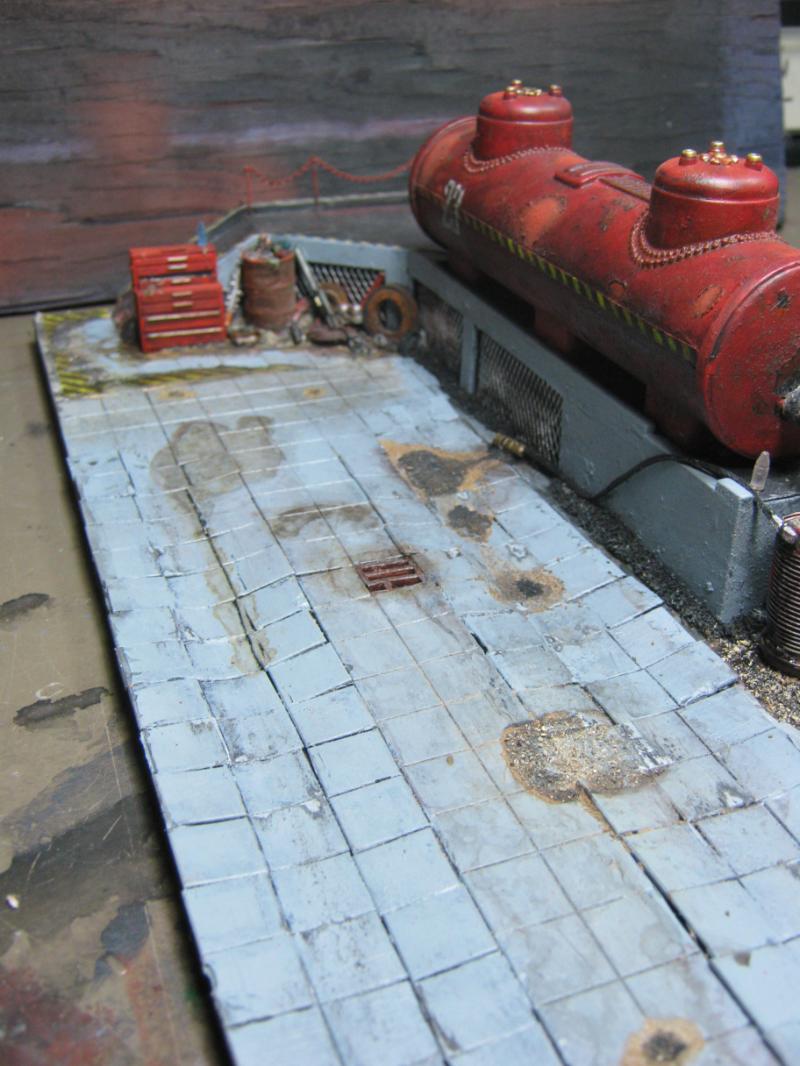
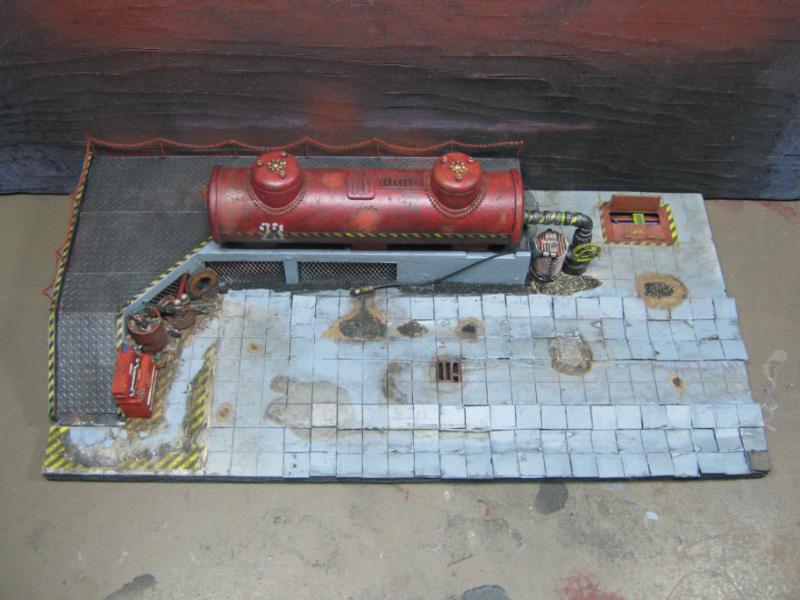
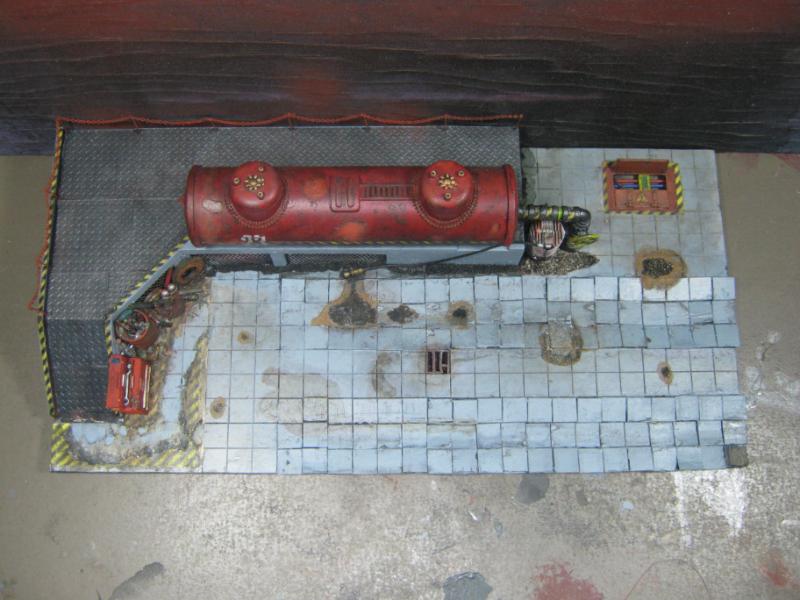
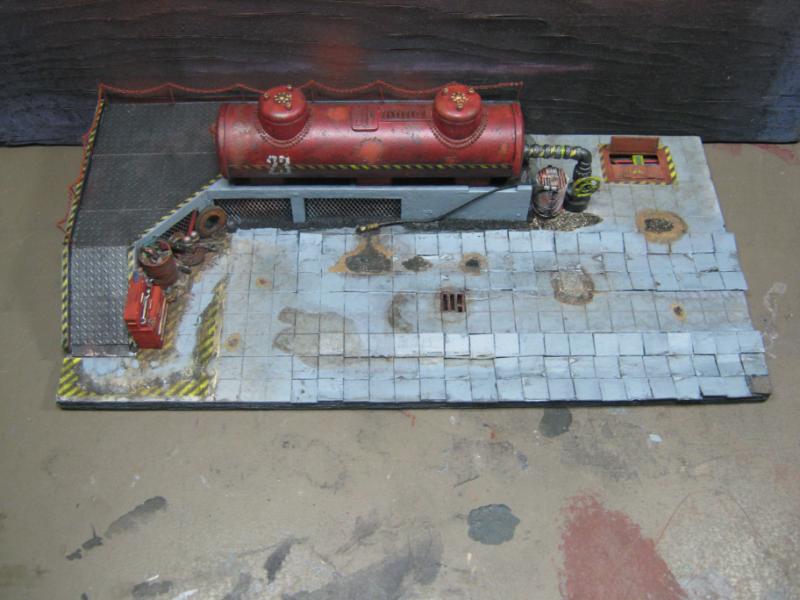
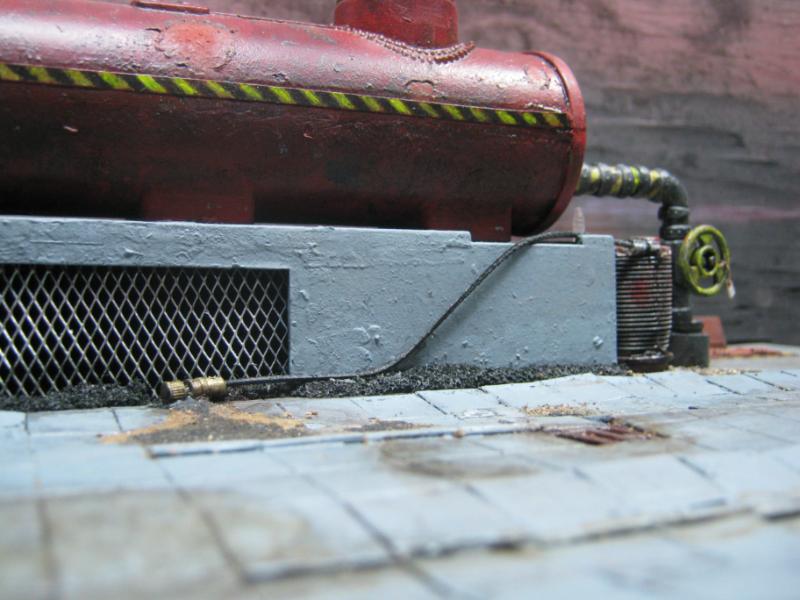
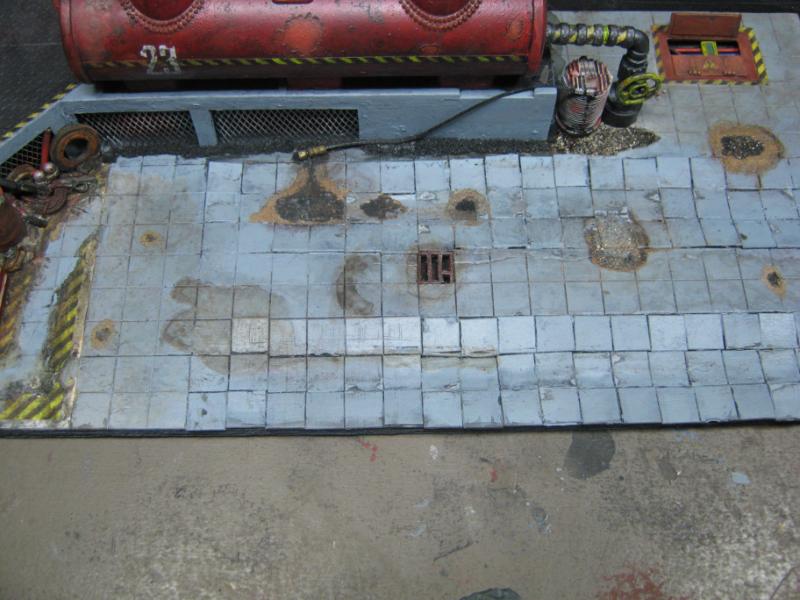
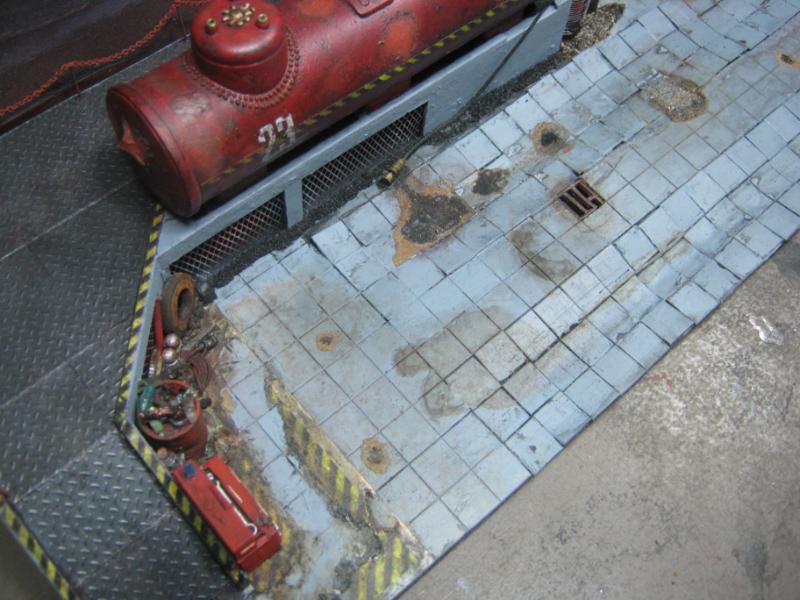
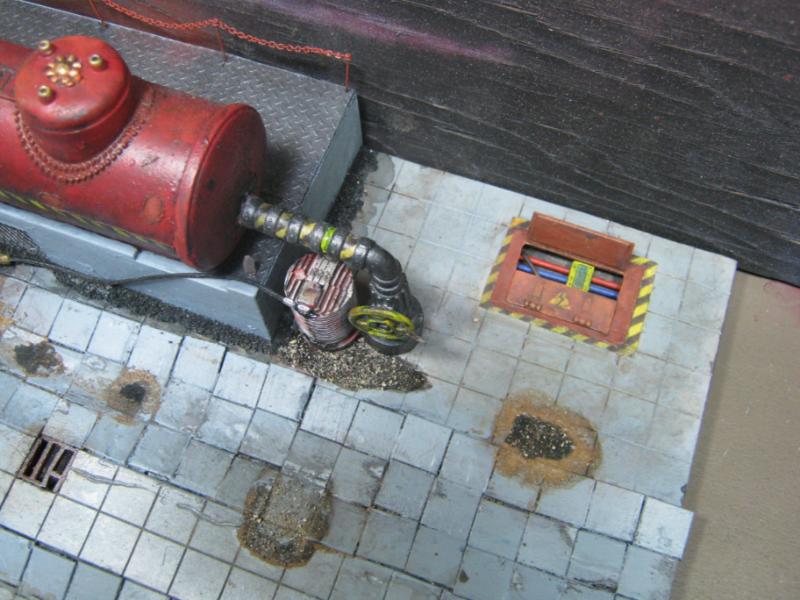
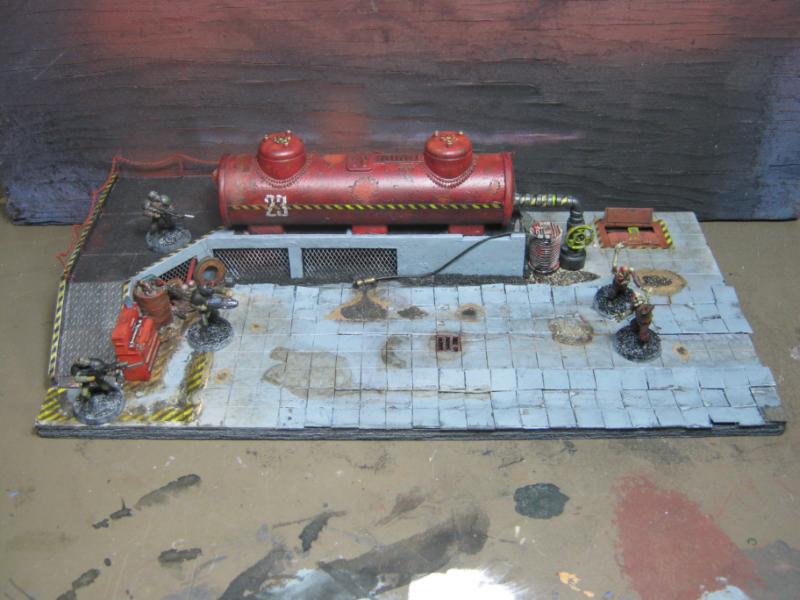

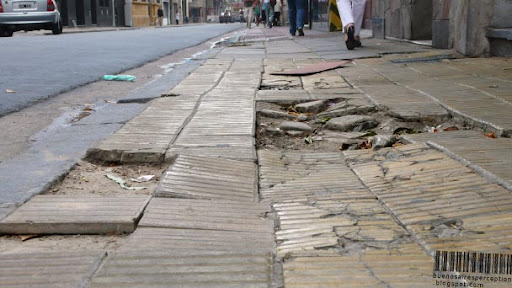


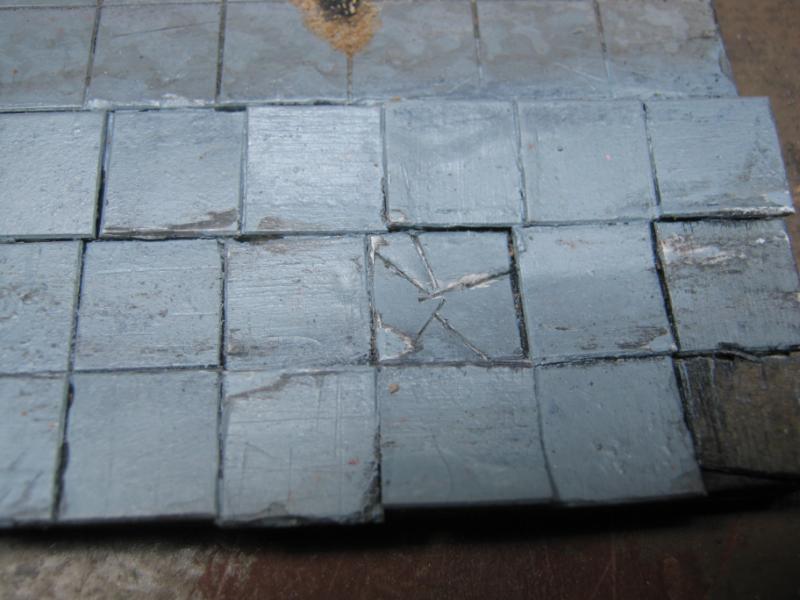
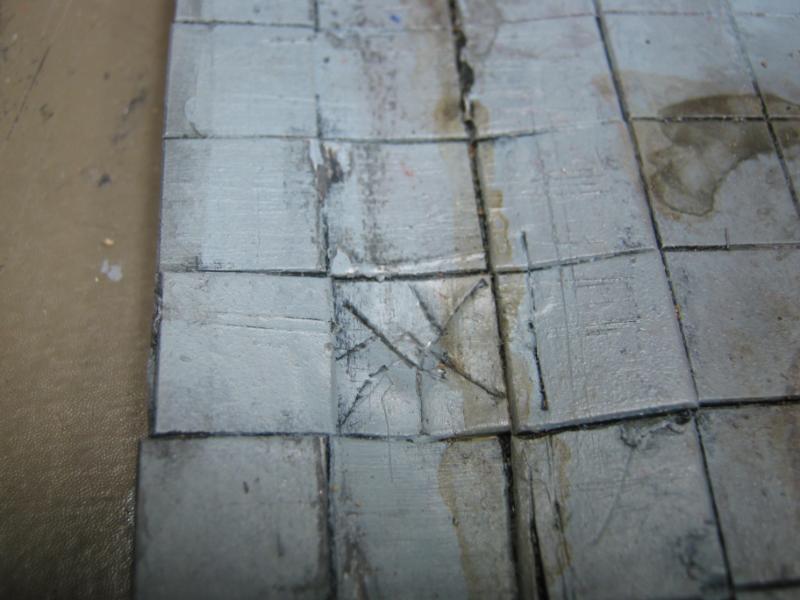
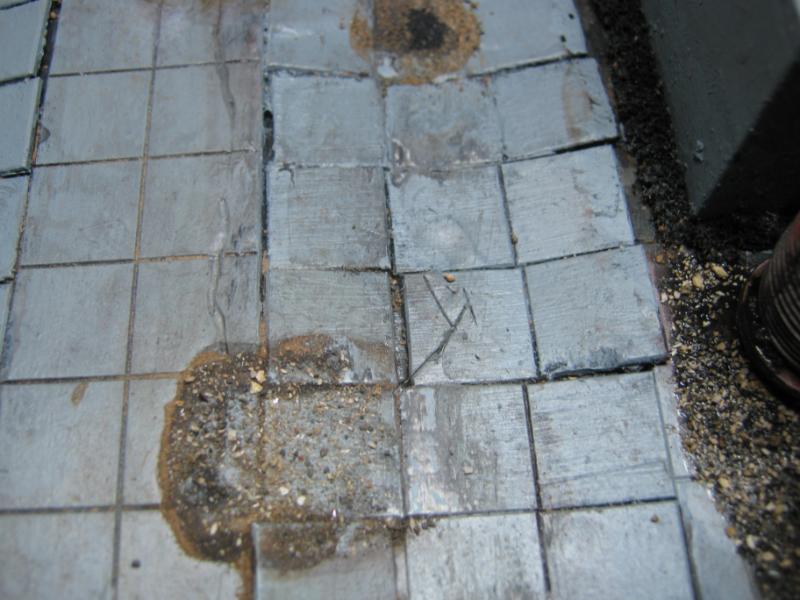
 It messes w/ your hobby time.
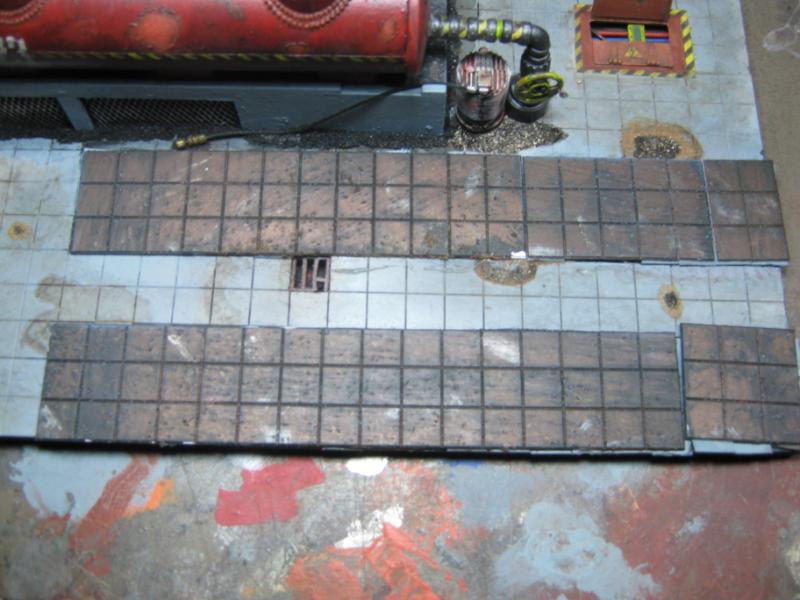
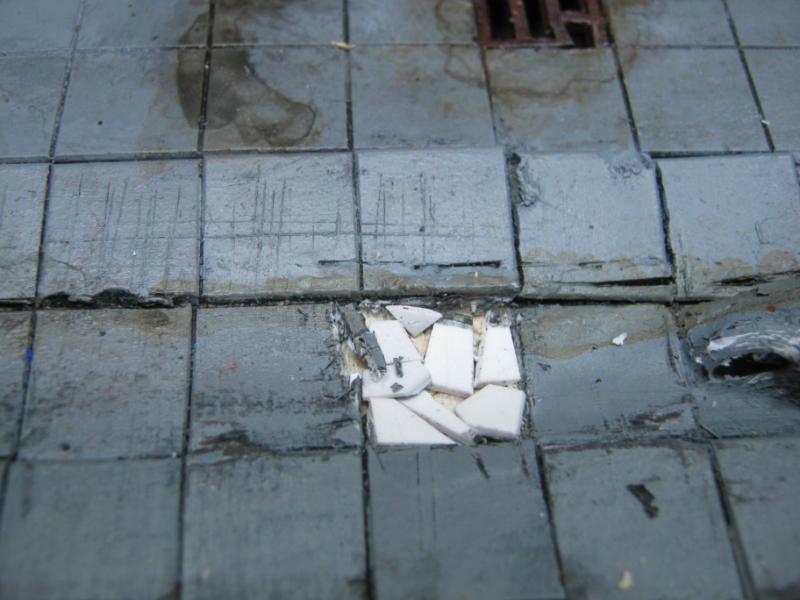
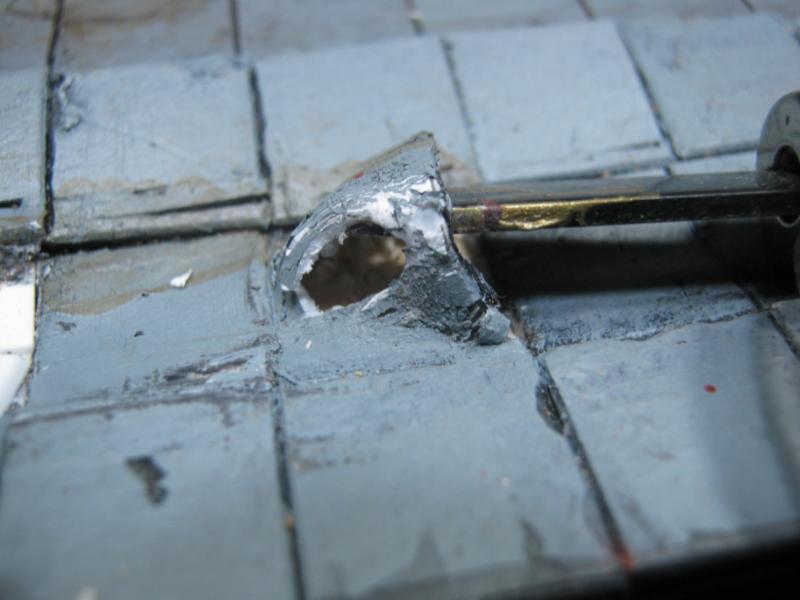
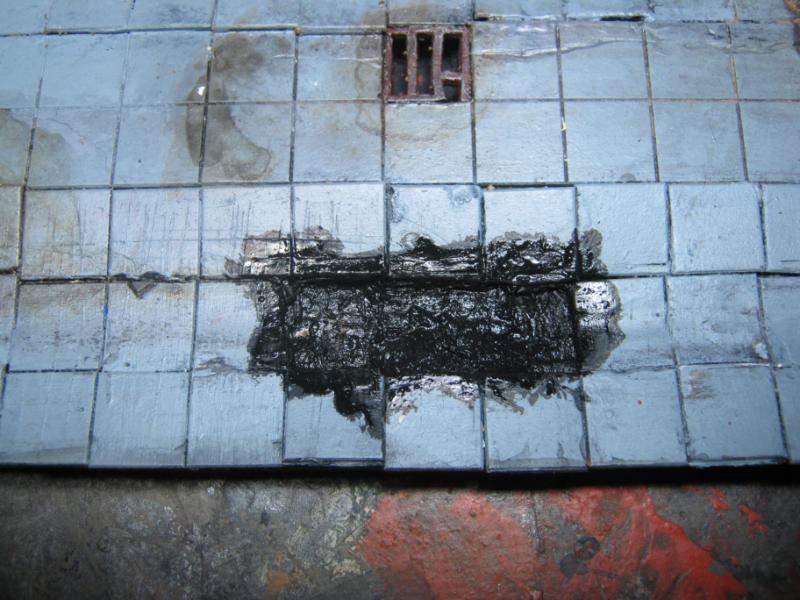
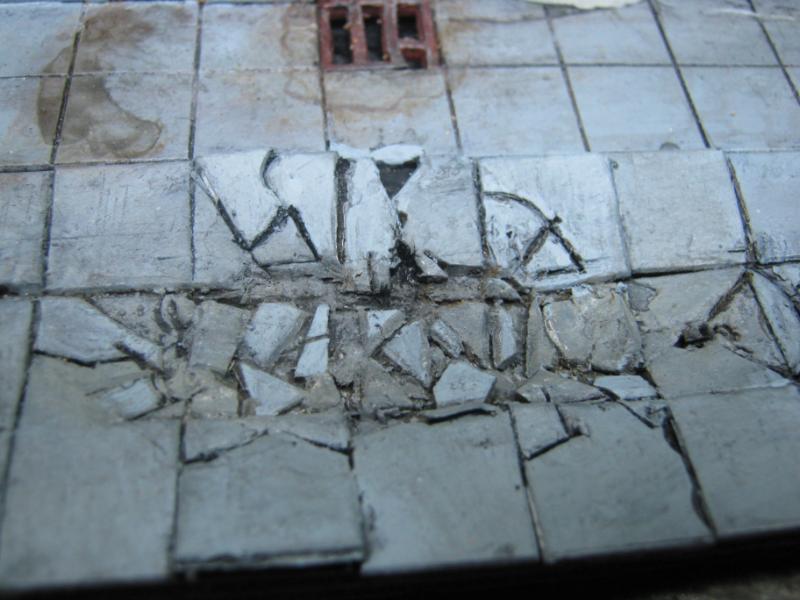
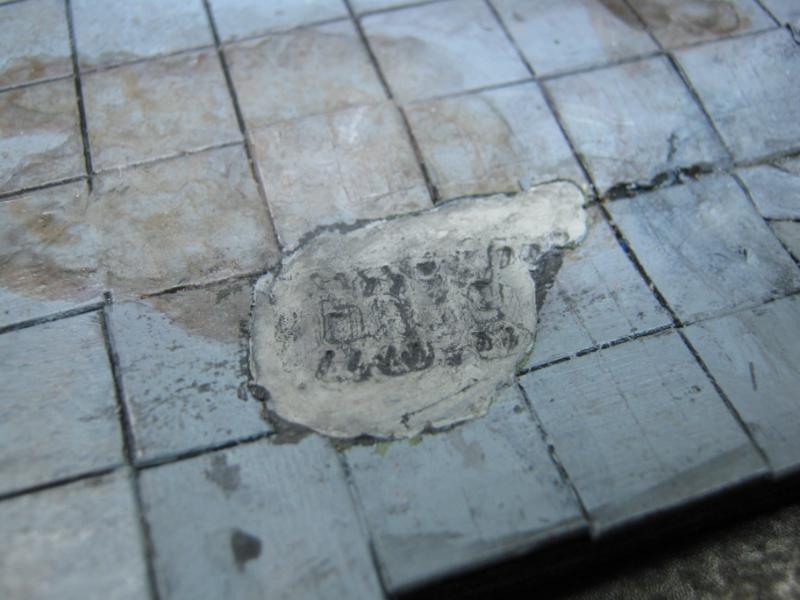
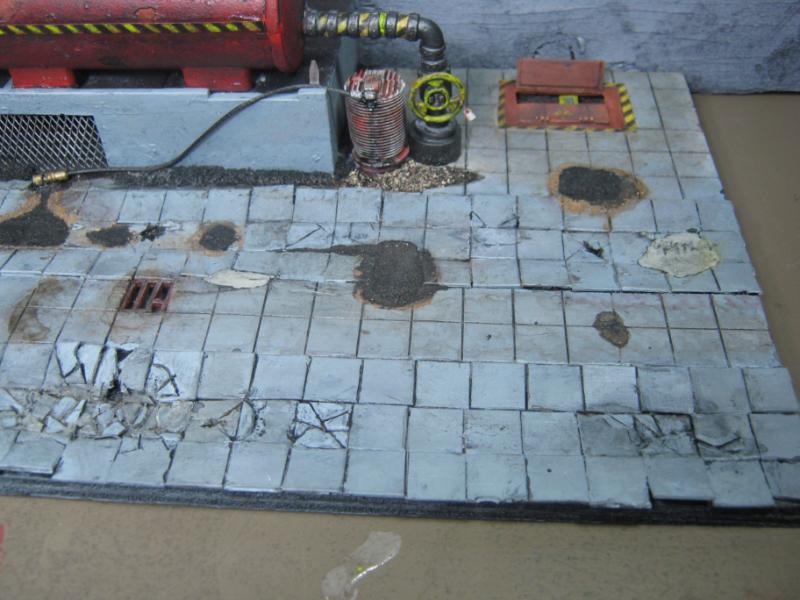
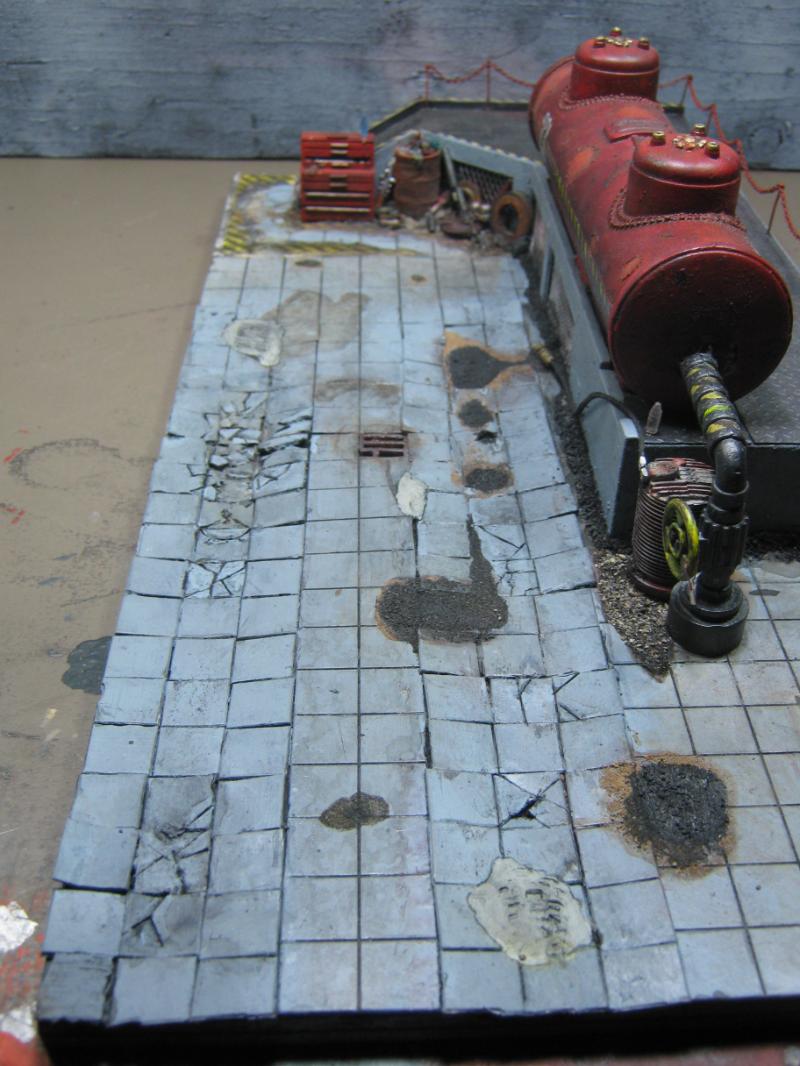
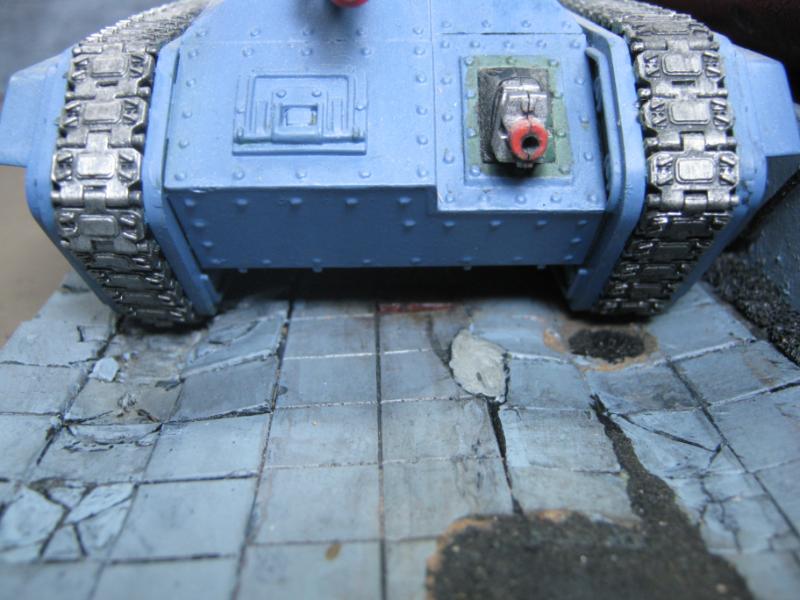
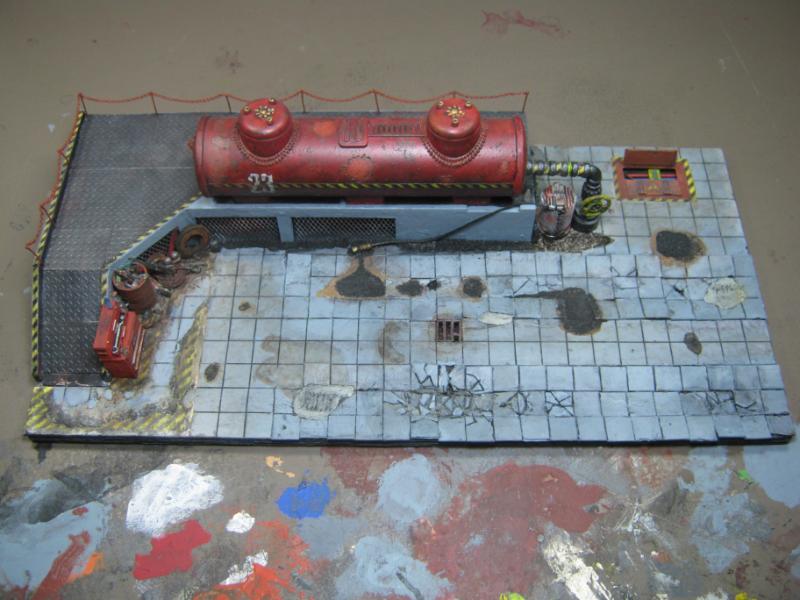
 ), but watching this progress from its first iteration to this final piece has been wonderful. So much thought has gone into it, and it's clear that you're really trying more and more techniques - it really shows.
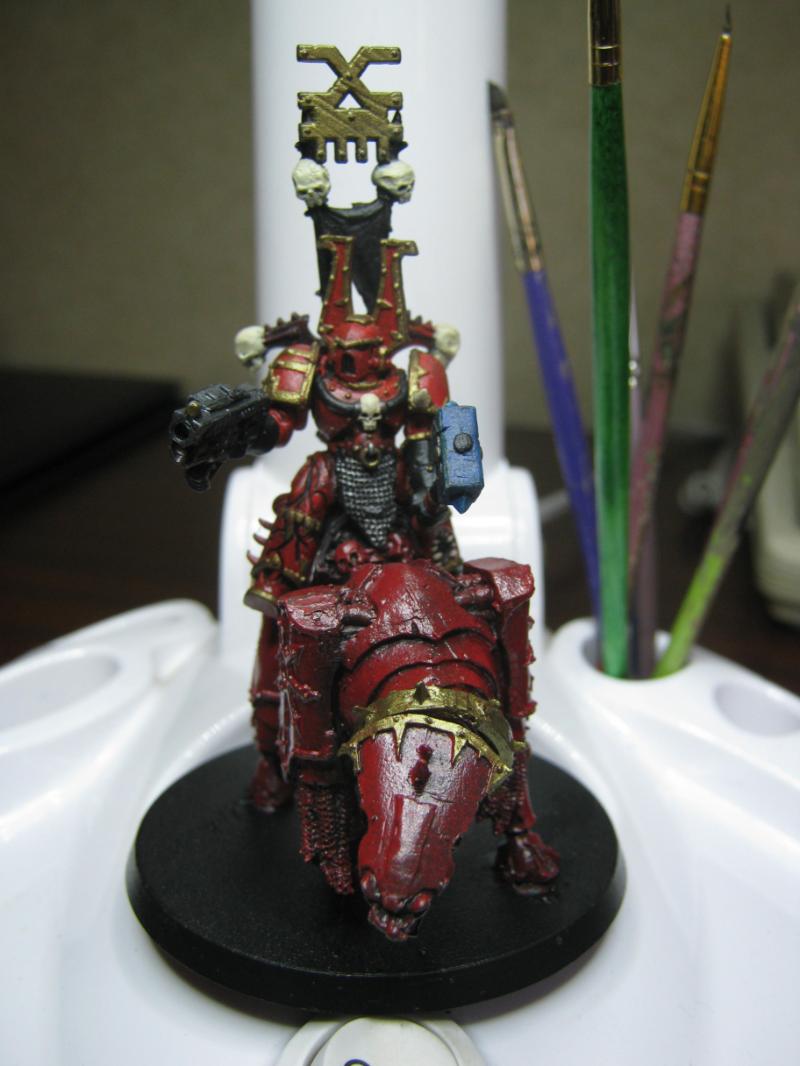
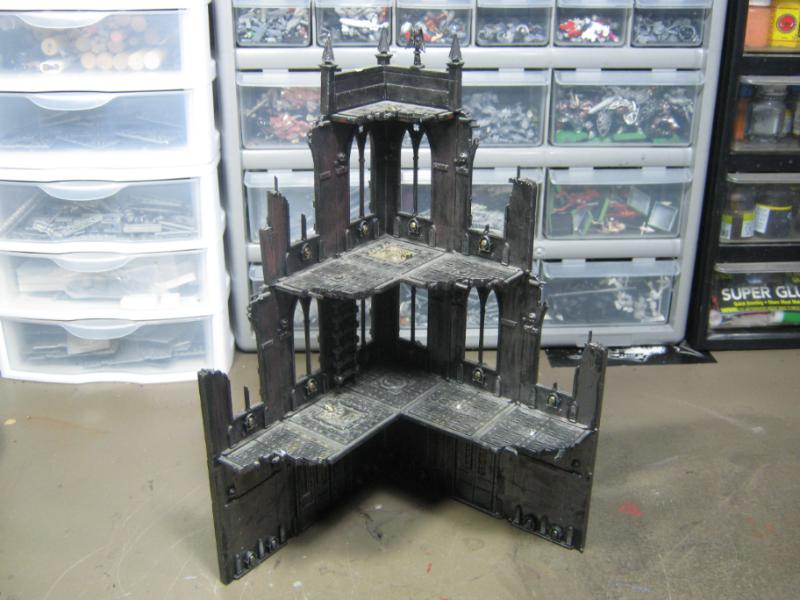
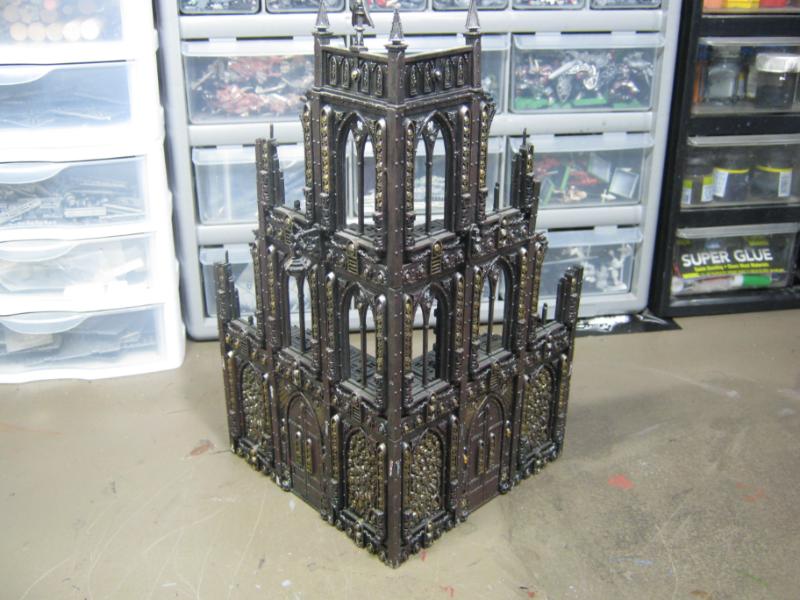
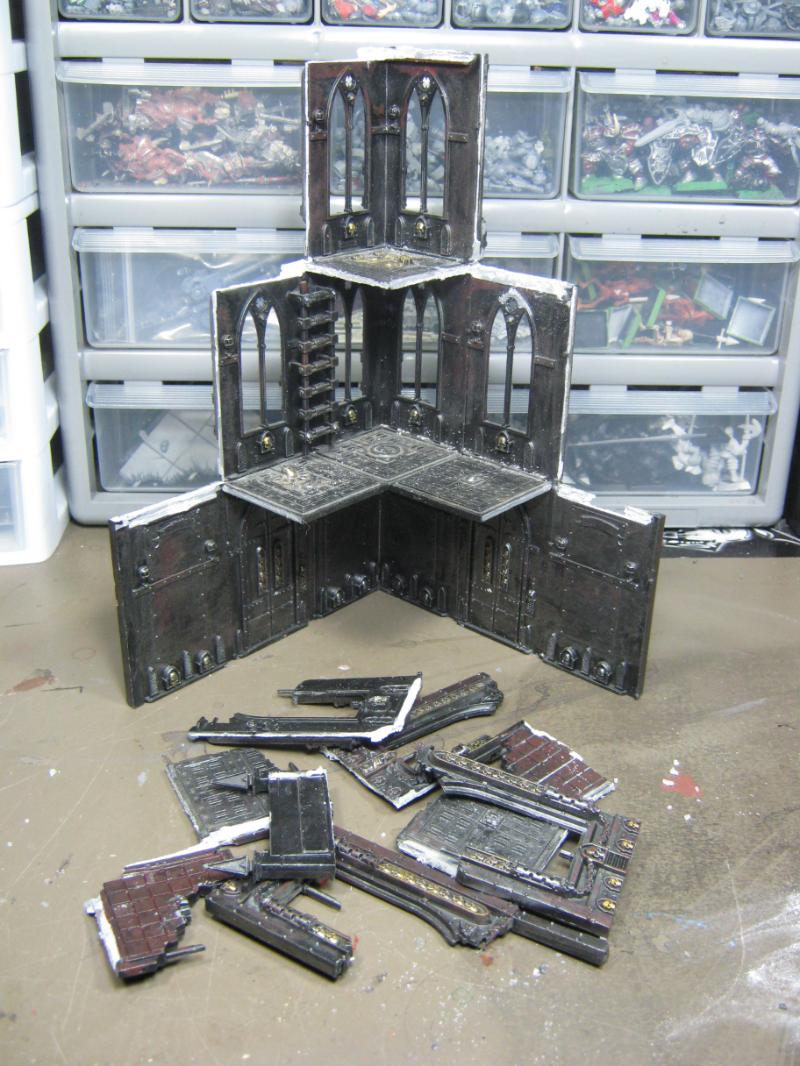
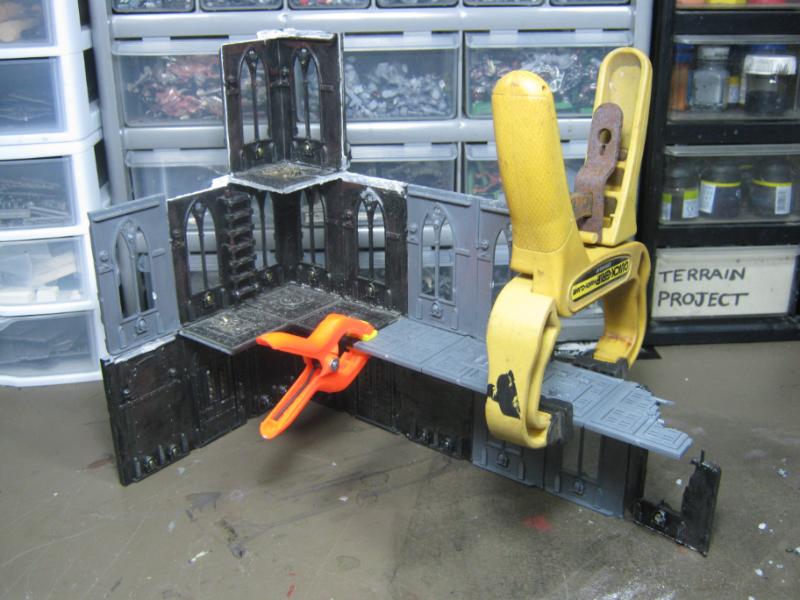
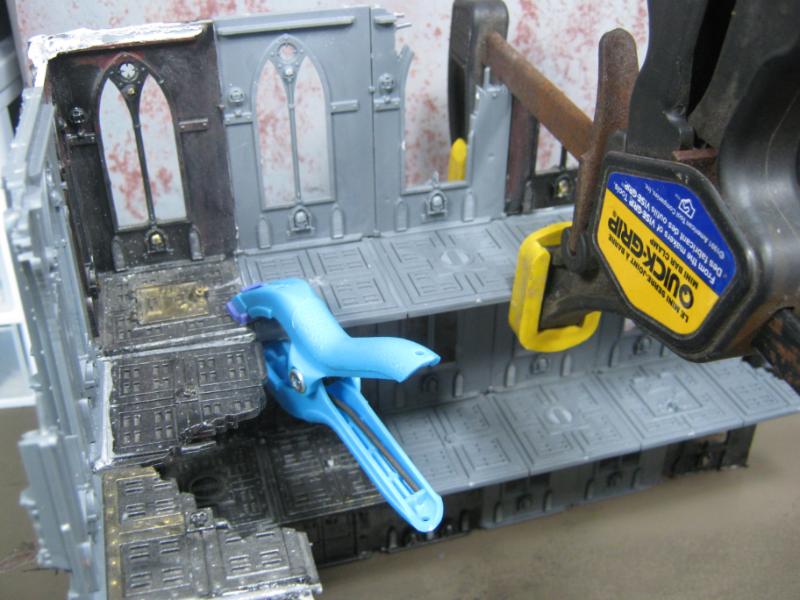
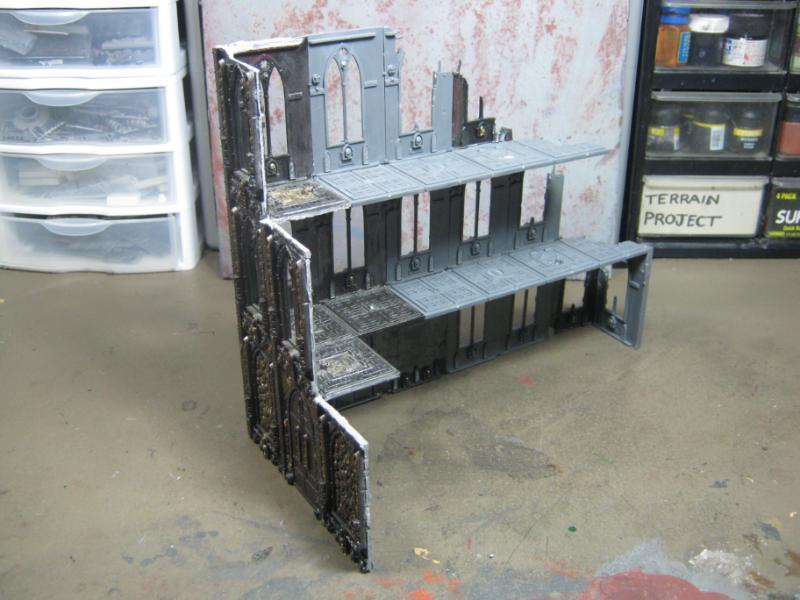
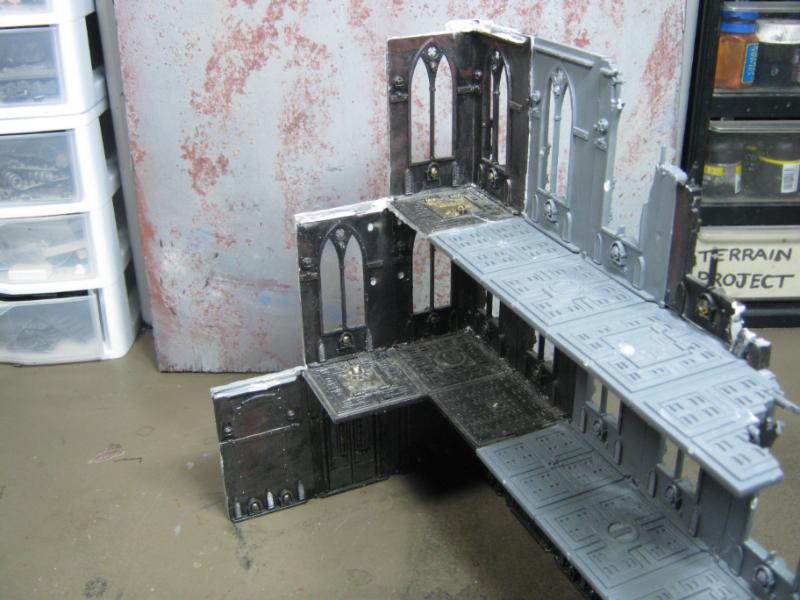
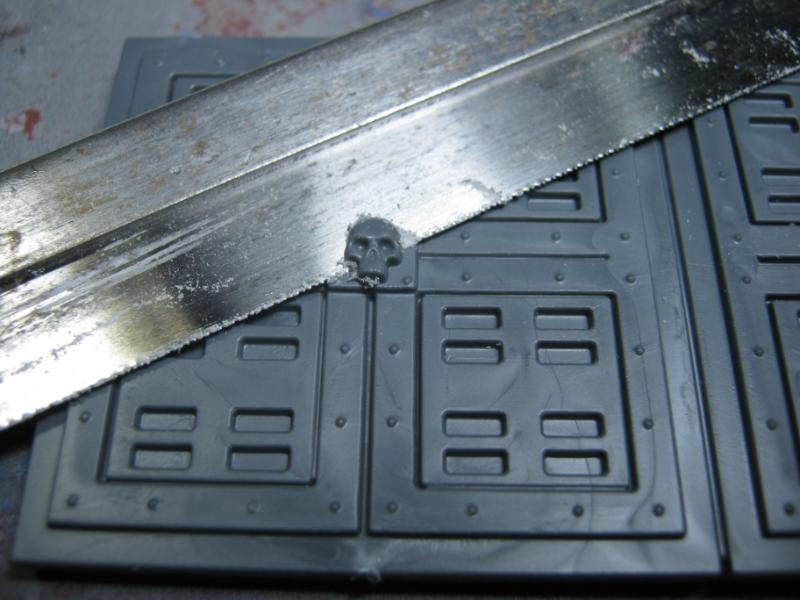
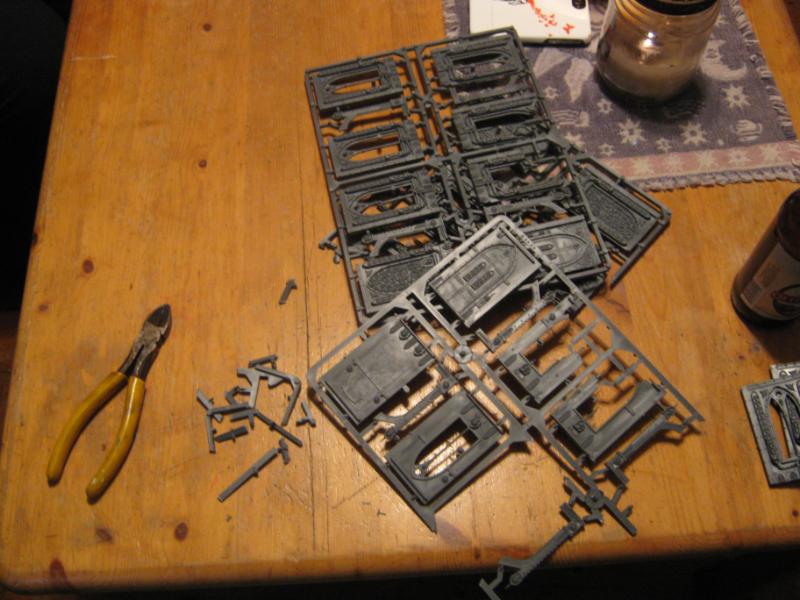
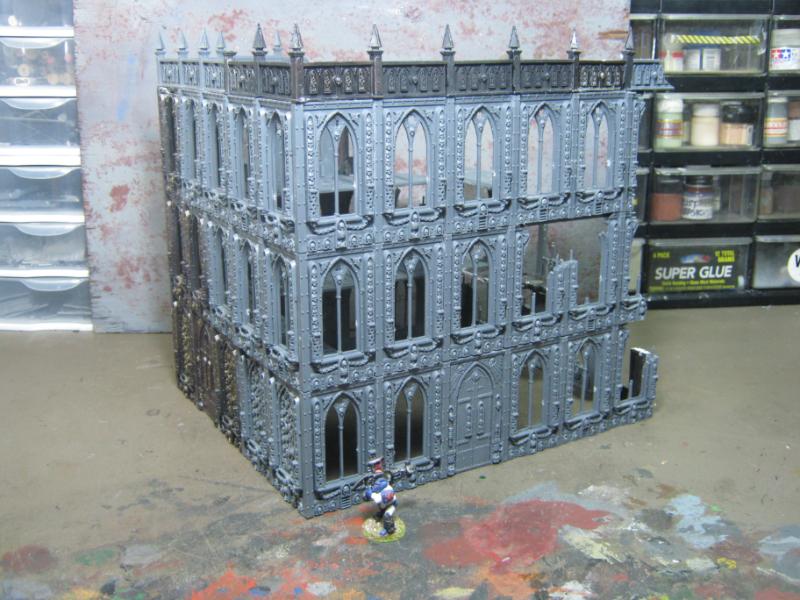
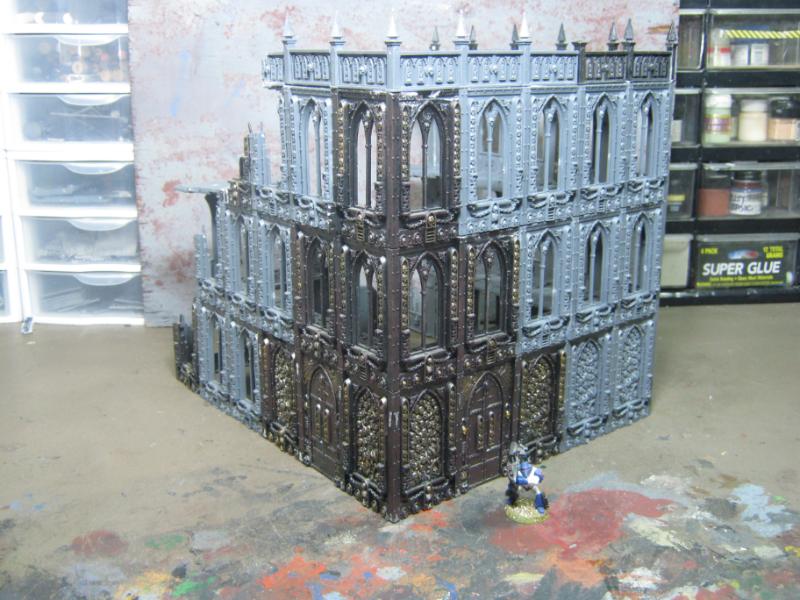
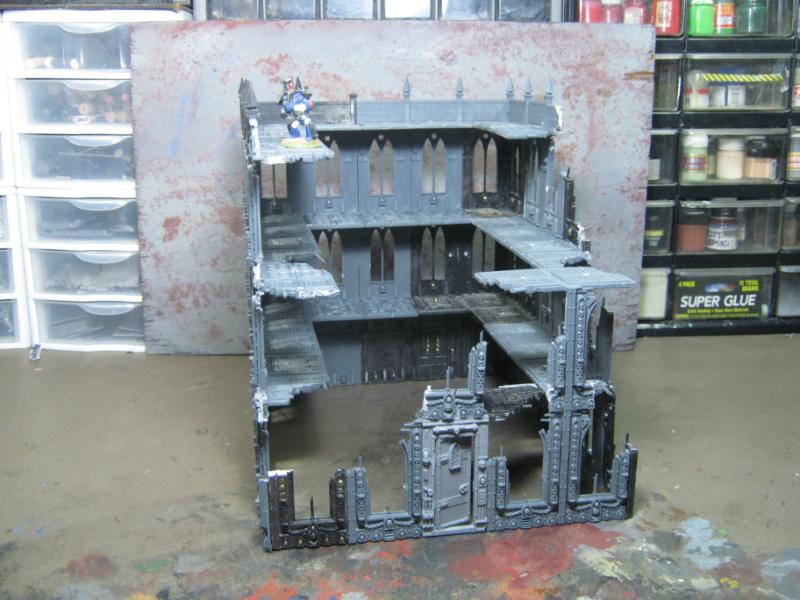

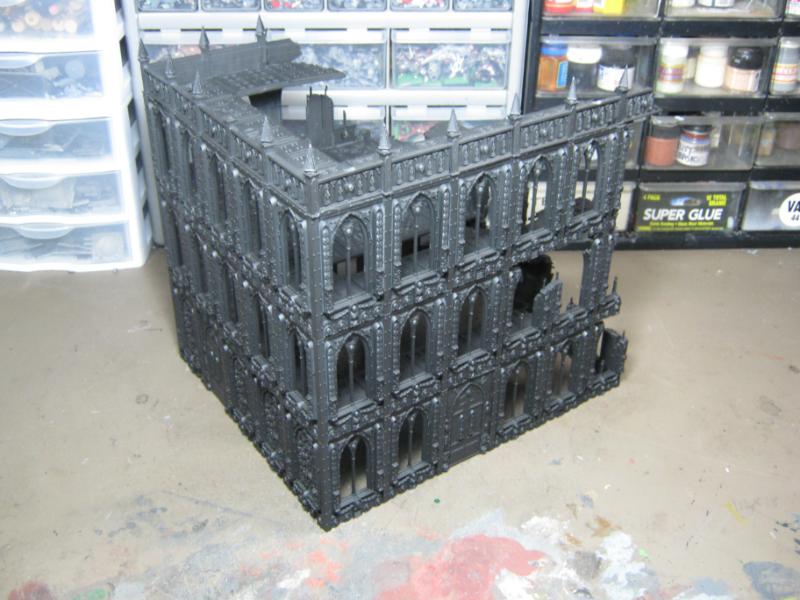
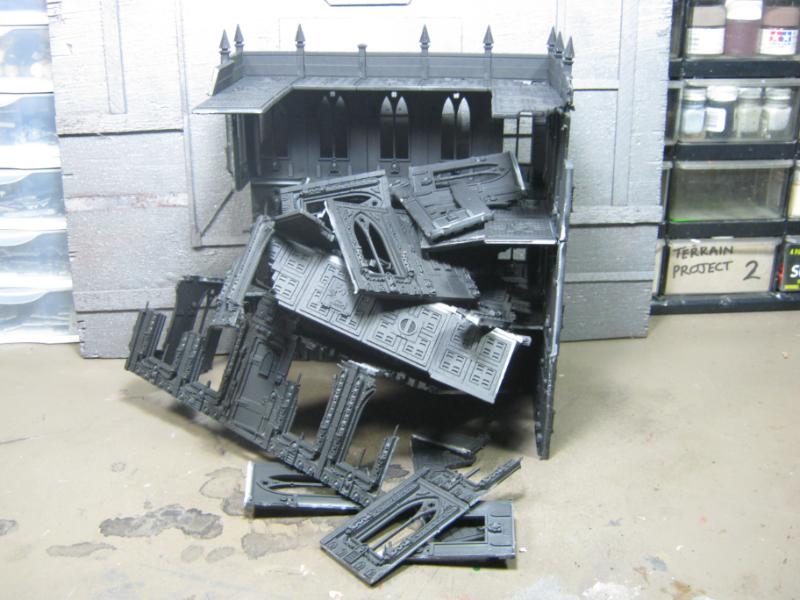
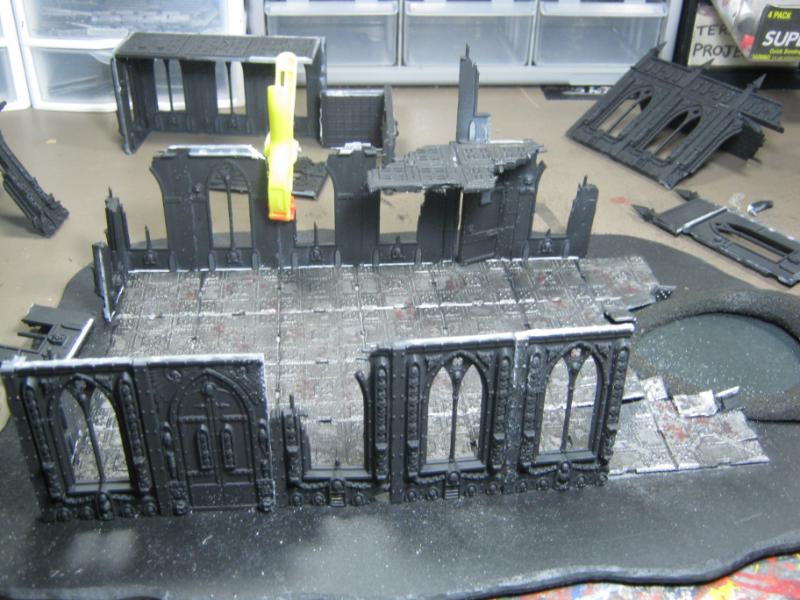
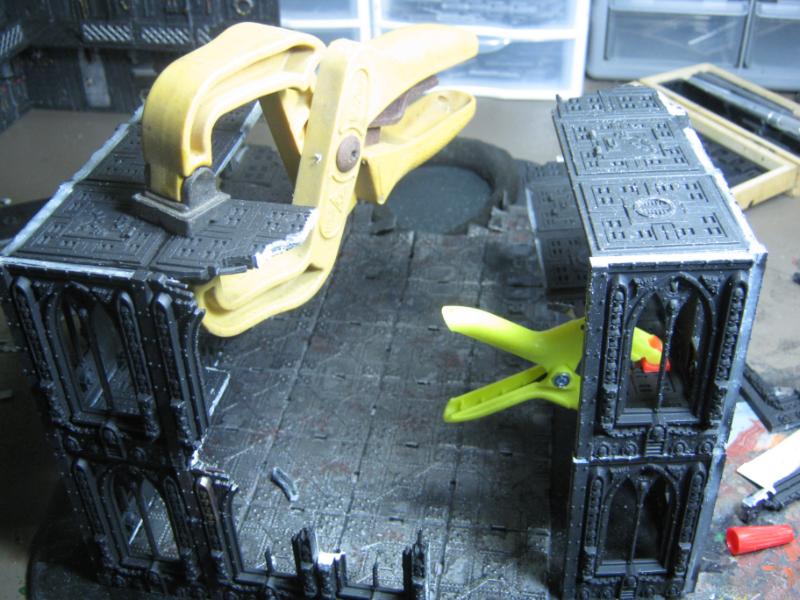
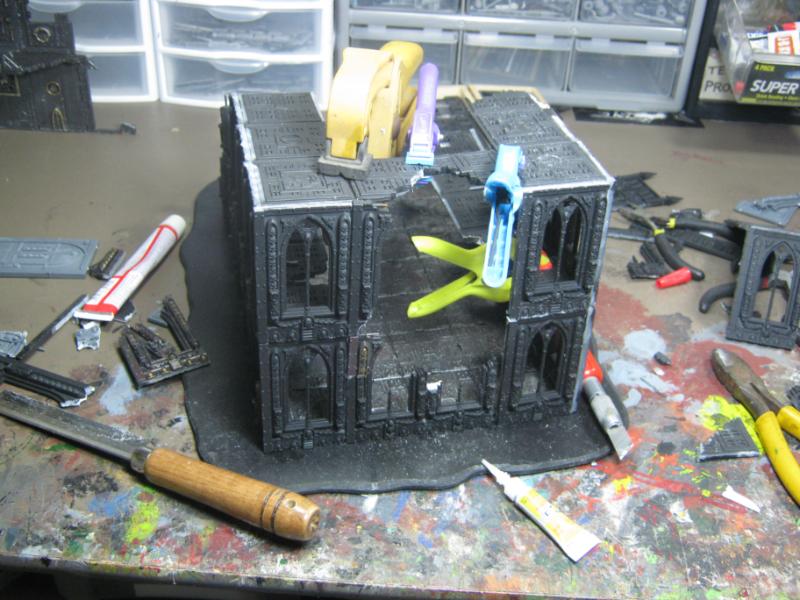
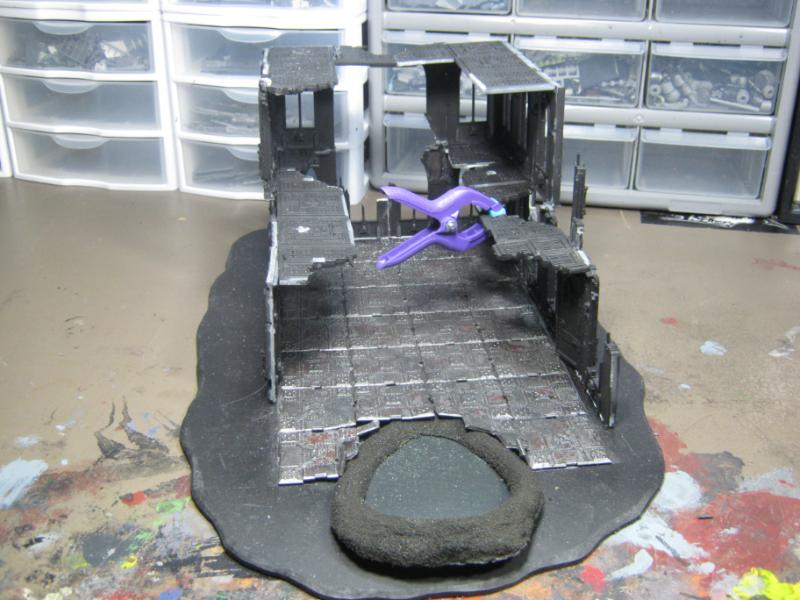
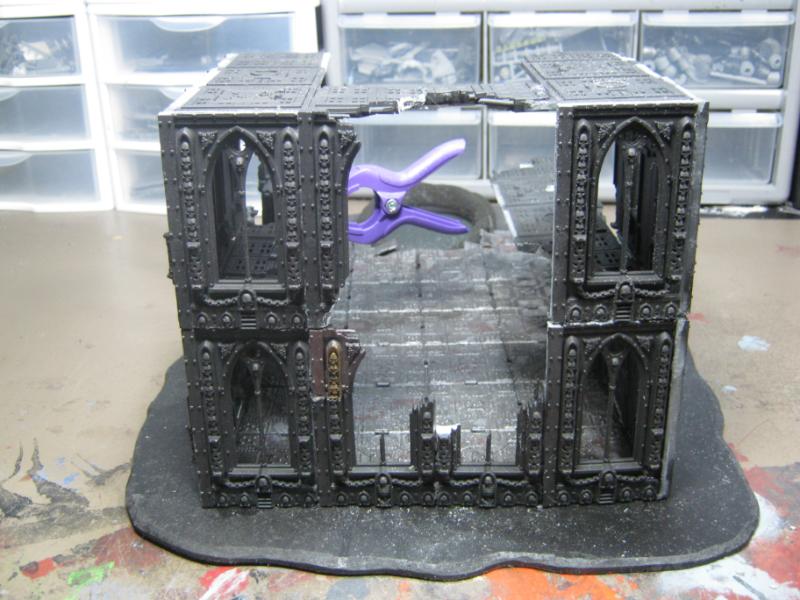
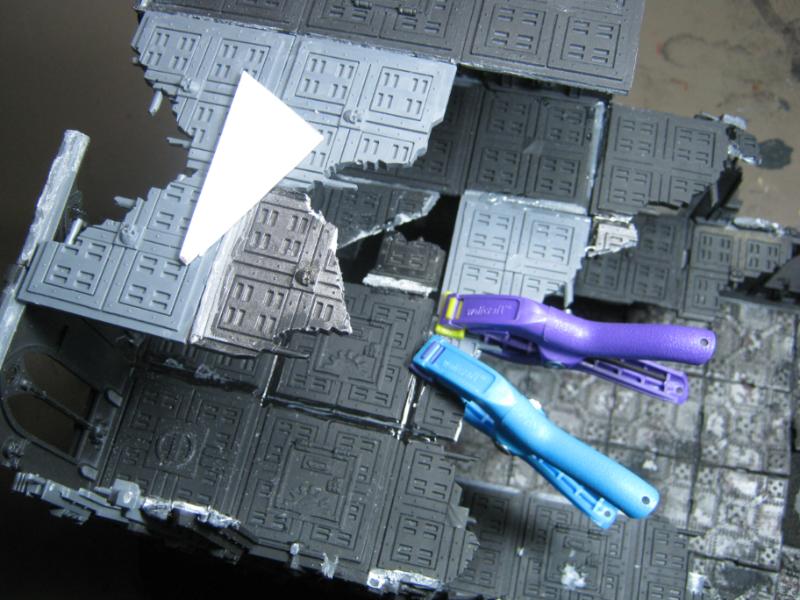
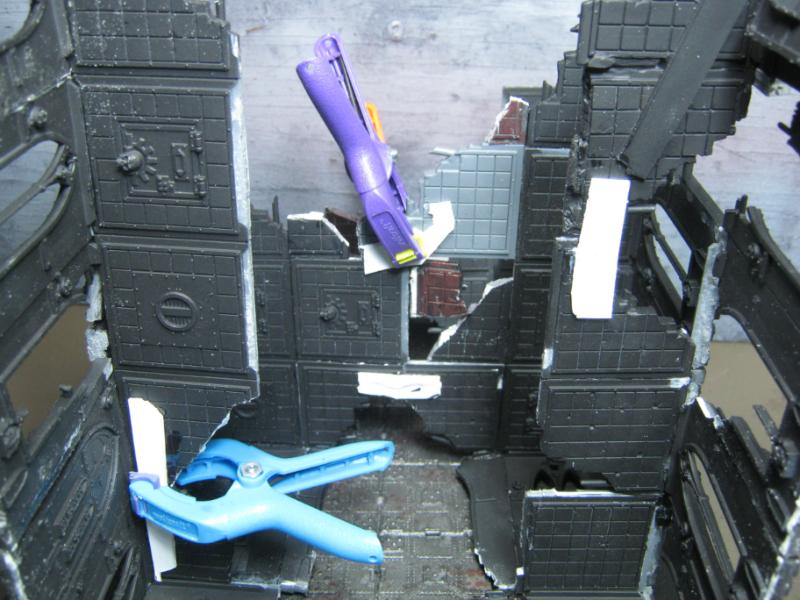
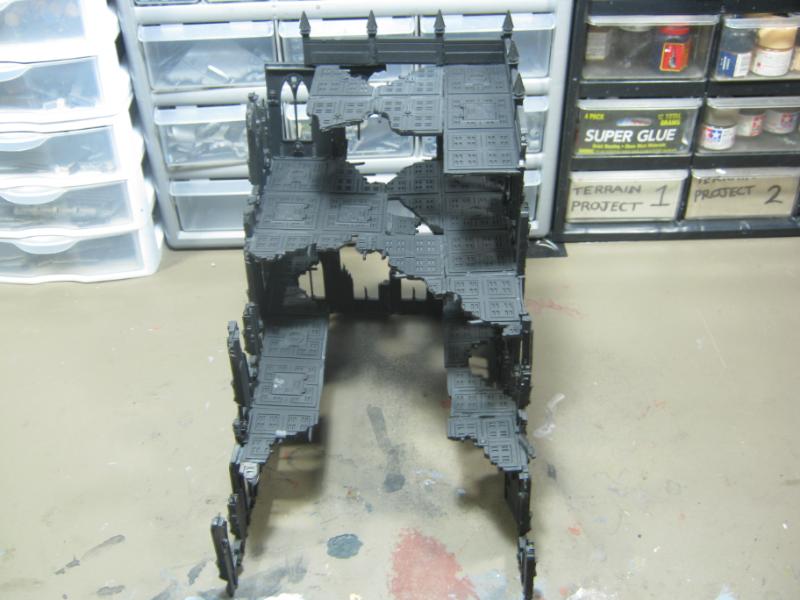
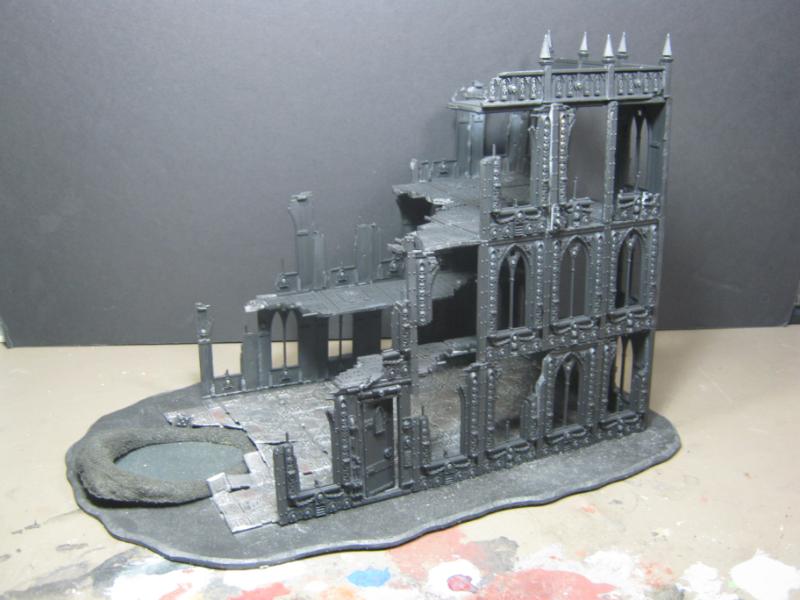
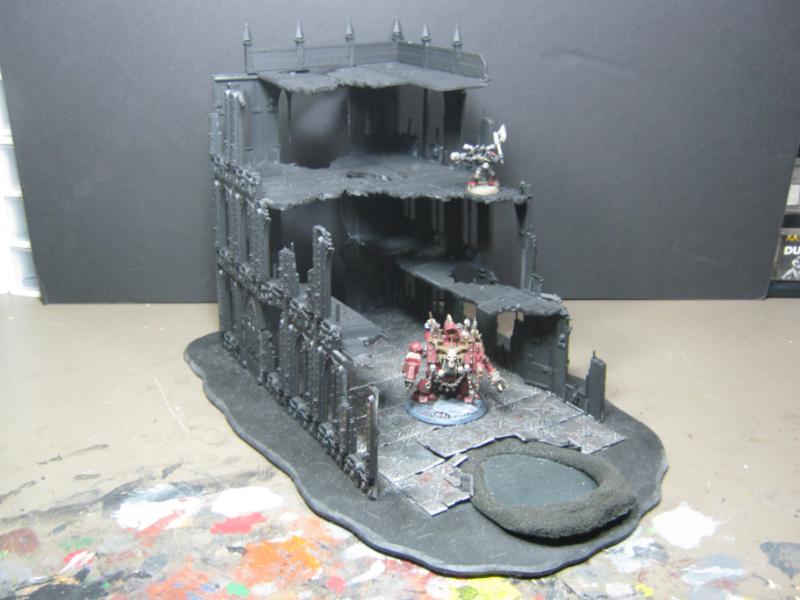
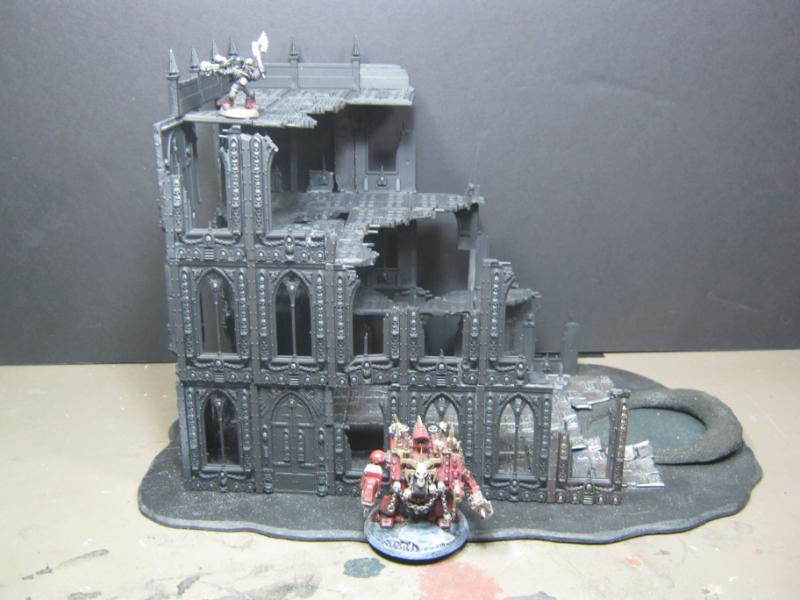


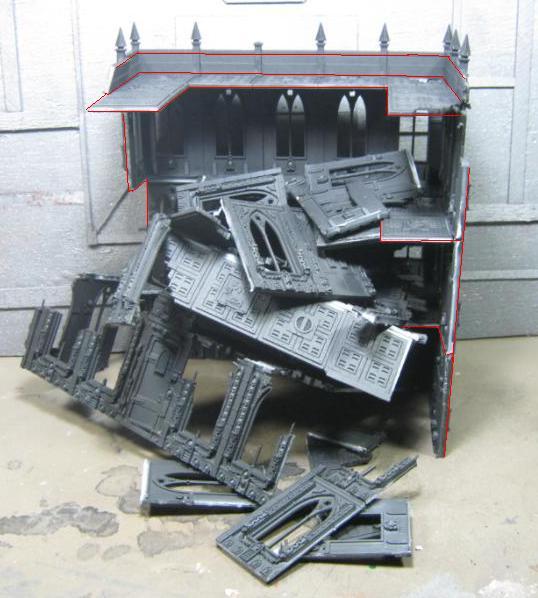
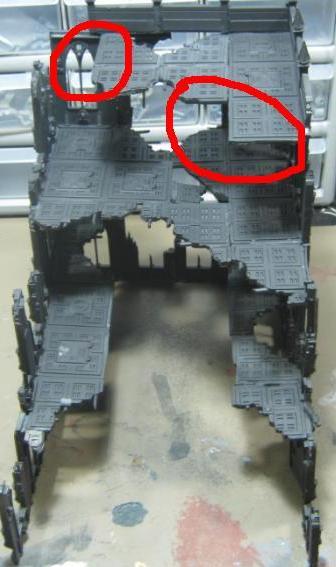
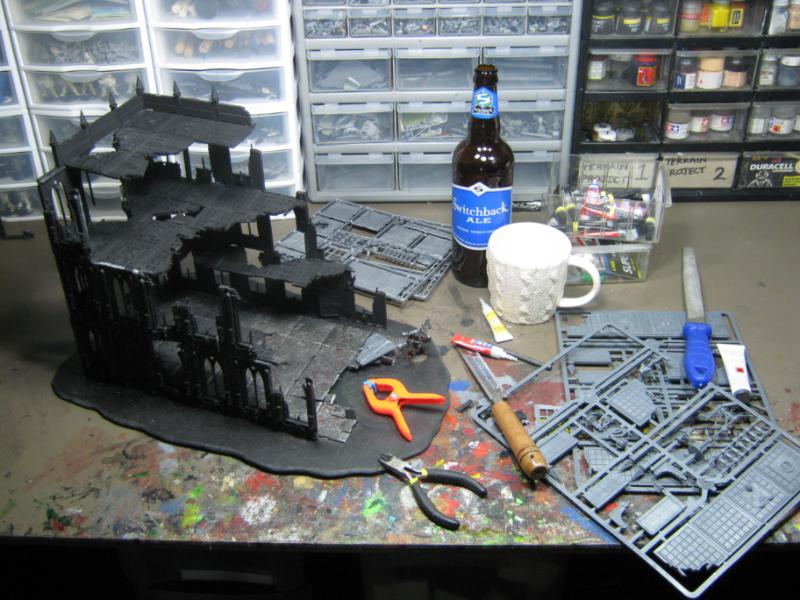

 DEATH METAL AND GRIMDARK MODELING!!! RRRAAAGGHHHH!!!!!