Got to try out a list idea last night, courtesy of Sazzlefrats. I thought I'd be playing 'mech Eldar; I got Tau, instead. With the 'stealers painfully inadequate 5+ armor save, this could be interesting....
My list:
Prime w/pair of Boneswords & Toxin Sacs
2x Zoanthropes in a Pod
3x Hive Guard
8x Ymgarl
9x Genestealers w/Toxin Sacs
9x Genestealers w/Toxin Sacs
9x Genestealers w/Toxin Sacs
9x Genestealers w/Toxin Sacs
14x Hormagaunts w/Adrenal Glands
Tyrannofex w/Rupture Cannon, Cluster Spines, and beetles
Tyrannofex w/Rupture Cannon, Cluster Spines, and beetles
The Tau:
Shas'
el w/2x Gun Drones, Missile Pod, Burst Cannon, Fusion Blaster, and necessary toys
Shas'
el w/2x Gun Drones, Missile Pod, Burst Cannon, Fusion Blaster, and necessary toys
3x Suits w/Missile Pod, Burst Cannon, and necessary toys
3x Suits w/Missile Pod, Burst Cannon, and necessary toys
12x Firewarriors in Devilfish w/
SMS & toys
12x Firewarriors
12x Kroot
12x Kroot
9x Pathfinders in Devilfish w/
SMS & toys
Ion Hammerhead w/
SMS & toys
Ion Hammerhead w/
SMS & toys
3x Broadsides w/
SMS, 2 shield drones, & toys
We randomly selected from the 2010 Adepticon Championship Primer missions, and got mission 3.
Spearhead deployment
One player place 3 objectives at least 15" apart; the other selects one of them as the primary.
Primary: Primary objective is 11 pts; the other 2 are 5 pts each.
Secondary: Have one unit fully in every quarter of the board (doesn't have to be scoring)
Tertiary: Win by 750
VPs.
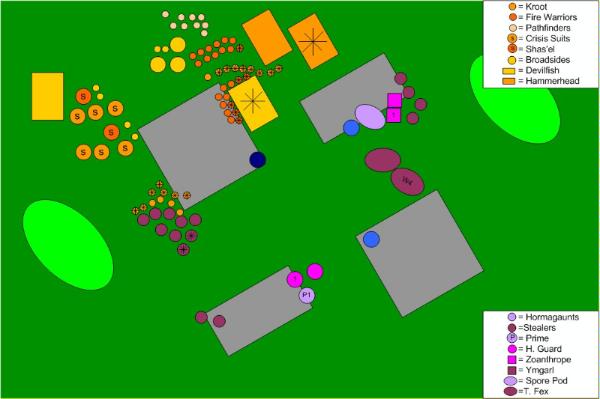
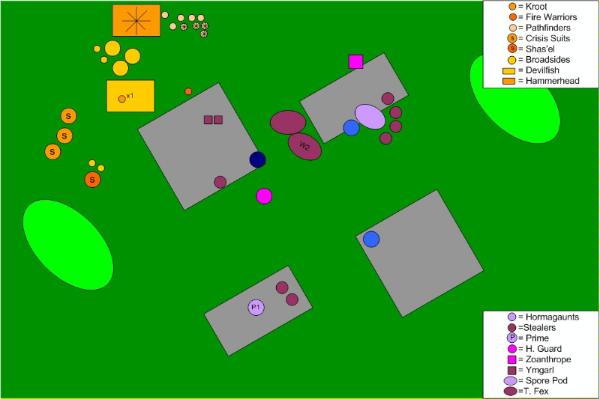
I placed the objectives in a triangle; he selected the center-most as the primary. I lost the "who goes first" roll, and he chose his deployment zone and deployed, saving the Kroot out to infiltrate. I chose to infiltrate all of my genestealers; the Ymgarl were dormant (hiding in the big ruins near the primary objective); and the Zoanthropes were in their pod.
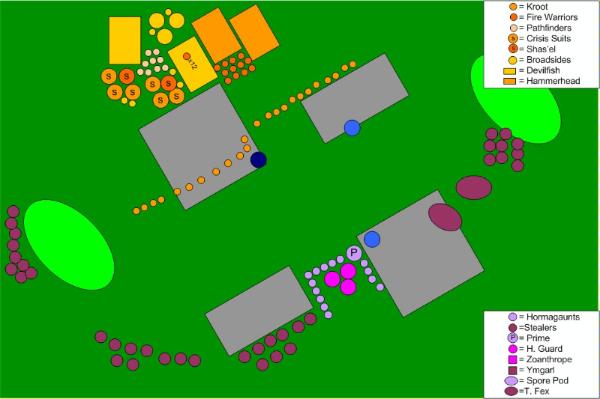
(Blue circles are objectives, with the dark blue circle as the primary. Green ovals are forest. Grey rectangles are ruins; these are lovely pieces of gothic multi-story wreckage, with windows in many spots, but some intact walls in spots, as well. As a bonus, they are plenty large enough to give a Tyrannofex cover, if he's in there.)
I attempted to seize the initiative, and failed.
Thoughts on Deployment:
First, it was fairly obvious that Sazzlefrats was a little concerned about outflanking stealers - he deployed everything at least 17-18" from the short edge, leaving him fairly compressed in his deployment zone. Once he did that, I no longer needed to outflank - the threat had been sufficient to affect his deployment.
Second, I'm not quite sure how to handle infiltrating genestealers - I just felt like I had too many to place! He used his kroot to further limit my options, while keeping them close enough for mutual support. I made some mistake here; I think I should have dropped all four squads on a single side (probably the NE corner), and pushed.
Third, I put the Ymgarl in the obvious location, mostly because I figured I could keep enough of it clear for 8 models to arrive.
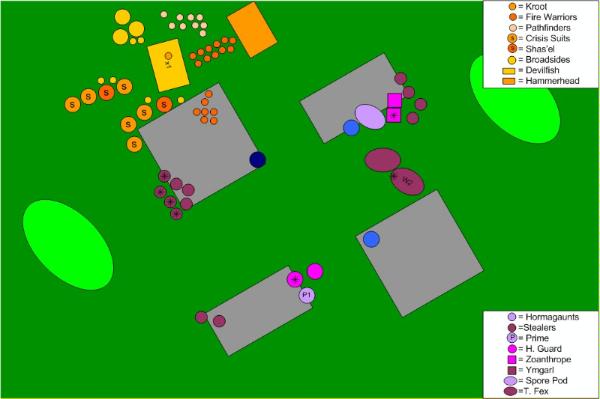
Tau, turn 1
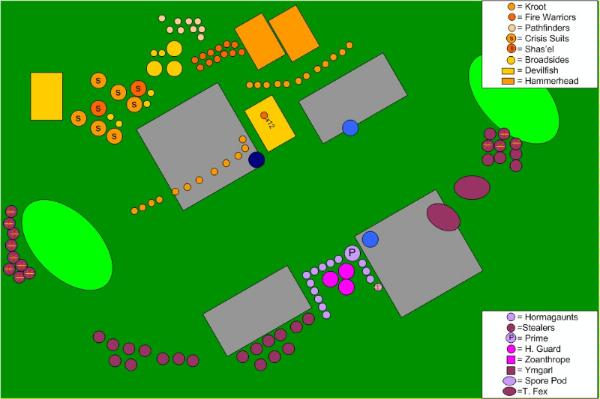
A little rearranging of the Kroot to the NE, and some movement in the suits & Devilfish. Pathfinders lit up the 'stealers hiding behind the western forest, and they get wiped in a hail of fire from the Devilfish, suits, and Kroot, in spite of Going to Ground. On the east side of the board, 4 Stealers die to
SMS from the Hammerheads, while Ion cannons kill off a Hive Guard. A single hormagaunt dies to the central 'fish. Railgun fire from the broadsides bounces off the building sheltering a Tyrannofex.
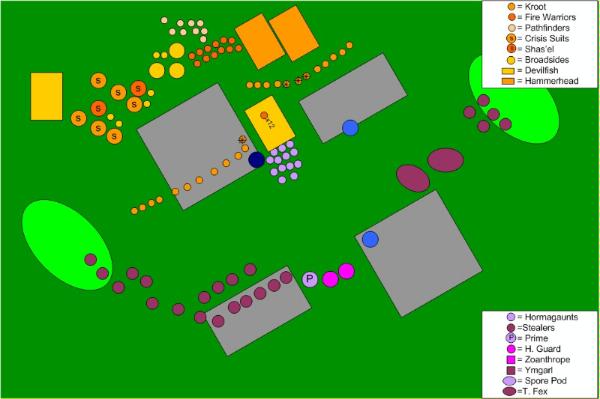
Tyranids, turn 1
Ouch. Tau and their markerlights/
SMS, and massed S5 guns can definitely hurt me!
The central devilfish had poked it's nose out a little far. The Prime moved to the Hive Guard (which prevented them from moving), while the Hormagaunts bounded forward to try and capitalize. Genestealers & tyrannofexes generally moved up; the western-most stealers got some poor Run movement, and couldn't quite get half the unit inside area terrain.
Shooting saw Cluster Spines from the Tyrannofexes knock down some Kroot in the eastern squad, and the Hive Guard killed a single Kroot in the central unit. The eastern kroot failed their morale test, and ran a little. Hormagaunts charged w/33 attacks, hit 4 times, and did no damage to the fish. Ooops.
Tau, turn 2
First, the broken Kroot rally. A little more shuffling of the suits occurs, and the embarked Firewarriors get out of their transport, after it backs up a little.
Then, it's time for Fish of Fury! In a hail of pulse fire, the Hormagaunts all die. Ion cannons put 2 wounds on the Prime and 1 onto a Hive Guard, while Railgun fire puts 2 wounds on a Tyrannofex. Pathfinders light up the western 'stealer squad, and massed suit, kroot, & devilfish fire kills off 7 of the 9 stealers after they go to ground. I think an odd
SMS shot kills a stealer in the NE corner as well.
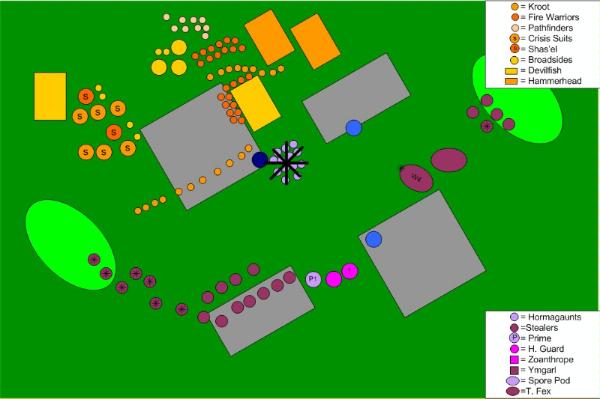
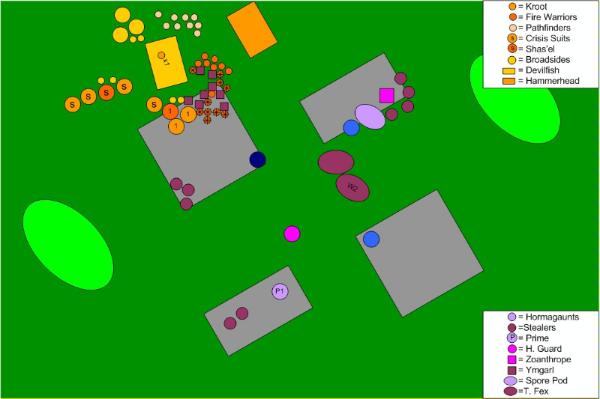
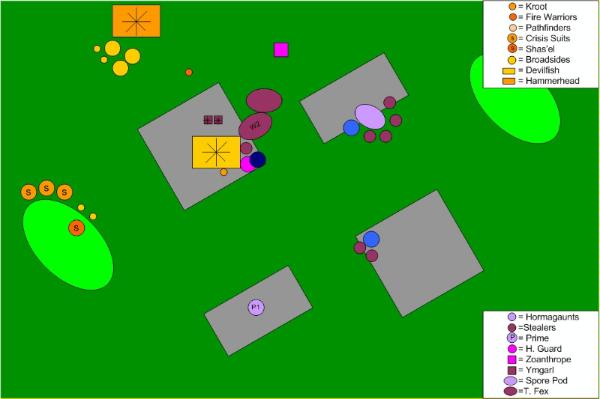
Tyranids, turn 2
I'm starting to get concerned about keeping scoring units alive.
Reserves time: the zoanthropes decide to come in, but the Ymgarl hit "Snooze" on their alarm clock. (Too bad - they could have caught both suit units if they arrived this turn.) I aimed the pod for the pocket formed by the two Hammerheads, the Kroot, and the Devilfish...and preceded to scatter 9" in the only direction I could scatter, right back into the ruins. The Zoanthrope get out, and peek through a window at a Hammerhead. The intact 'stealer squad in the middle moves out of their runis, and heads up to charge some Kroot. The Hive Guard + Prime get into cover. The wounded Tyrannofex slows down, and lets his buddy get in front.
Shooting time. One Zoanthrope promptly rolls box-cars and gives itself a nasty headache, but the other a) passes the test; b) hits the hammerhead; c) penetrates it; d) gets past the cover save; and e) blows it apart. Good boy. The first Tyrannofex fires into the Devilfish, and hits 5 Fire Warriors w/the Cluster Spine marker while doing it. Then he penetrates the Devilfish with the Rupture cannon (inside 12", so no Disruption Pod save) and blows it apart in a 4" radius. Ends up doing 14 wounds to the
FW (5 die), a few to the Kroot, and one to the rear
FW squad. The other Tyrannofex then tosses it's shots at the Kroot, and kills a bunch more with the Cluster Spines; one lives, but doesn't break. The Hive Guard shoot at the
FW in the ruins, but do nothing.
In assault, the 'stealers kill 7 kroot on the charge, and lose a couple to return attacks. They win, run the survivors down, and try to look inoffensive in the ruins.
Tau, turn 3
The surviving Devilfish drives over, and the last kroot on the board jumps inside, hiding like the chicken he evolved from. The 7
FW in the ruins move up, to ensure rapid-fire range on the 'stealers, and the suits rearrange themselves. Shooting is relatively ineffective for him - he markerlights the wounded T-fex and puts a couple more wounds on, kills off the wounded Hive Guard, and kill 4 of the 7 stealers after they go to ground. And the positioning of those units around the ruins is interesting....
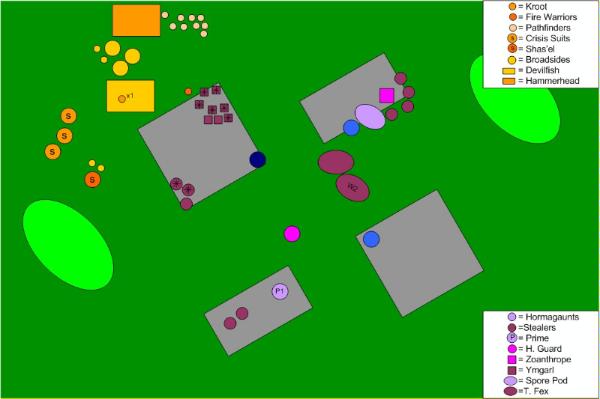
Tyranids, turn 3
The Ymgarl wake up, look around, and get very excited. I deploy them along the NE edge of the ruins, and between movement and running, set them up for a triple-charge, catching a unit of suits and both units of
FW. It will be a charge through terrain, of course. The Prime parts company with the last Hive Guard, and the last two genestealers along the southern border hide behind a solid wall in the ruins. The Zoanthrope rolls snake eyes for movement, but just barely has range to fire on the Hammerhead; it promptly misses.
In the uber-assault, the Ymgarl morph for T5, and make all 3 of the saves they are called upon to make. Then then do about 11 wounds spread across all three units, and break them all. I choose to run down the suits; the large
FW squad flees 11" (and off the board), and the last living
FW flees about 4"; he is incapable of regrouping.
Sazzlefrats' face, as this was happening, looked pretty shocked. 8 models popped up, and proceeded to alter the outcome of the game, all by themselves, and without taking a single casualty.
Tau, turn 4
The Tau mill about a bit, and dump fire into the Ymgarl. The pathfinders light them up...but only get 3 hits for their 9 shots. When the smoke clears, 2 Ymgarl live, after going to ground, and a single genestealer is still alive near the primary objective.
Tyranids, turn 4
That last living 'stealer moves to hide behind a piece of solid wall, and hopes he's forgotten. The Hive Guard can't quite make it into cover. The Zoanthrope drifts through the ruins, and the other living stealers move a bit, to get closer for turn 5 rushes to the minor objectives.
Shooting sees the Zoanthrope miss the pathfinders, but one of the Tyrannofexes hits them with Cluster spines, while firing on the Hammerhead. The hammerhead is wrecked, and the pathfinders lose a few models, fail their morale test, and call it a day. The devilfish shrugs off 3 penetrating hits from the Hive Guard and other T-fex, courtesy of Disruption Pods.
Turn 5
The Tau move a bit more, and park the devilfish w/single kroot near the objective, while killing the last two ymgarl. All the rest of his fire either misses, or bounces off.
The Tyranids try hard to shoot down the Devilfish, but fail; a Tyrannofex ends up wrecking it in close combat. Stealers are on all three objectives, but that last living kroot manages to get out of the devilfish wreck, and pinned or not, he's within 3" of the objective when the game ends on a "2."
Post mortem:
Tyranid Prime: He's an
HQ, and I have to have one. I misplaced him initially - he should have been with the Hive Guard all along, and never with the 'gaunts. He definitely benefits from the T6 majority toughness in that unit. Otherwise, he serves some purpose as an ablative wound sink for the Hive Guard, and he may be useful as a little counter-assault punch.
Genestealers: I need to give more thought to what to do with my units of 'stealers when not outflanking. Here, they were relatively useless - I killed one unit of kroot in hand-to-hand, and finished the game with 7 models living, out of 36. As it happens, they were all in good spots, but they need to be more effective. Against
HtH opponents, I'm not worried about their utility, but against shooting armies, I think I need to aim for local-area target saturation, rather than spreading out and letting every gun in the enemy army have a target.
Ymgarl: Hands-down, the best unit of the game. 8 models show up, destroy 3 crucial enemy units (yes, they were Tau, but still!), and don't lose a model in the process. I'm keeping them, even at the cost of another unit of Zoanthropes.
Zoanthropes: They're fine. Initial landing was way off, which kept them from having a huge impact on the game, but they blew apart a Hammerhead when no one else was going to get close to it, and that's a "win" in my book.
Hive Guard: I may need them for dealing with rhinos/razorbacks/vendettas, but they're not thrilling me so far. They get a couple more chances, if only because I bought the models already.
Hormagaunts: Useless. I would have been happier with the 2 units of 10 'gants I had originally scripted. They're probably useful in huge numbers, but a little investment like this is wasteful.
Tyrannofexes: Very solid performers here. Strangely enough, the Cluster Spines were at least as important as the Rupture Cannons, particularly when dealing with units that were clustered near vehicles - it was like being able to split fire.
For the future:
First thing to try is dumping the Hormagaunts, and just grabbing some termagants instead. Alternatively, I could drop the Prime and squeeze a Tervigon in, either to take cover behind the T-fexes or to provide it, as seems necessary. I also wouldn't mind trying to fit Regeneration in, but not at the cost of a scoring unit, as seems required.


 No madam, 40,000 is the year that this game is set in. Not how much it costs. Though you may have a point. - GW Fulchester
  The Gatling Guns have flamethrowers on them because this is 40k