| Author |
Message |
 |
|
|
|
|
Advert
|
Forum adverts like this one are shown to any user who is not logged in. Join us by filling out a tiny 3 field form and you will get your own, free, dakka user account which gives a good range of benefits to you:
- No adverts like this in the forums anymore.
- Times and dates in your local timezone.
- Full tracking of what you have read so you can skip to your first unread post, easily see what has changed since you last logged in, and easily see what is new at a glance.
- Email notifications for threads you want to watch closely.
- Being a part of the oldest wargaming community on the net.
If you are already a member then feel free to login now. |
|
 |
2016/07/03 10:46:08
Subject: DakkaDakka Society of Fine Painters
|
|

Is 'Eavy Metal Calling?
|
Cheers for that tutorial, Jan, I'm always aiming to get my metallics somewhere between yours and Nerdy's, so having that for reference is a great help!
|
|
|
|
 |
|
2016/07/03 21:19:04
Subject: DakkaDakka Society of Fine Painters
|
|
Mastering Non-Metallic Metal
|
bebopdrums2424 wrote:... This by no means is the fastest way, it's not, it's slow as hell. But I enjoy the process and I feel like it's getting me results I'm happy with and the more I practice it the faster I get and I feel stronger as a painter for it. But yeah, it's not efficient, it's not fast, and not really meant as an army painting strategy. AS far as the streaking, if your paint is super thin, this is a non issue as long as you are careful to feather each stage.
I can't say that my way is any faster. Adding multiple layers will take time whatever order you do them in. 
@ Red, could you give some examples where using thick paint is useful in your endeavors? I'd love your input here! The only time I use thick paint, and I use the word thick pretty liberally, is when I need something incredibly small and it has to be stark in contrast and can't run, like perhaps an edge highlight, and even then the danger is that it dries on the brush before you apply it. The other times are of course, drybrushing, or other technical applications.
I've just come up with one; painting about masking tape. A thicker paint will be less likely to bleed under the tape. But don't go too thick or you'll end up with a noticeable step between the paints.
Red Harvest wrote:... What are the preferred brush sizes you guys use? I'll use #0 for pretty much every finer detail, but for crazy small I drop down to a 3/0.
I use a range of sizes from #4 down to 3/0 depending on the size of the area I'm painting: Large flat areas get the large brush (they are also good for all-over washes) usually only priming...
...really large areas get the airbrush,
Small or tricky areas get the smallest brush.
But for details I have a pair of Rosemary&Co brushes at #1 (as the quality of brush and it's point is important for details).
I also have a set of cheap hog-bristle (if I remember right, stiffer than sable) brushes for dry-brushing and similar techniques.
tatt2014 wrote: tatt2014 wrote: tatt2014 wrote:I would love to join DakkaDakka Society of Fine Painters. I have read all your post, and found my self extremely impress with all your work. I feel I could be an asset to your group. I am self taught and been painting mines sins 1984.I am a retired US soldier and try to put some off my experiences out in my mines. I don't have any pics of my old stuff, but here are a fue pics of mhttp://images.dakkadakka.com/gallery/2016/7/1/809893_sm-banner.jpgy more involved peace's. I have tried to go on the blog page but its still under construction. Thanks Tatt .
We're not ignoring you, tatt'. This thread has really moved fast and it's tricky to keep up with every post. Join in the conversations and once it all settles down and everyone's introduced themselves we'll all get to know each other better (in a friendly and not creepy way ).
|
     Mastodon: @DrH@warhammer.social Mastodon: @DrH@warhammer.social
The army-                   ~2295 points (built). ~2295 points (built).
 
* -=]_,=-eague Spruemeister General. * A (sprue) Hut tutorial *
Dsteingass - Dr. H..You are a role model for Internet Morality! // inmygravenimage - Dr H is a model to us all 
Theophony - Sprue for the spruemeister, plastic for his plastic throne! // Shasolenzabi - Toilets, more complex than folks take time to think about! |
|
|
|
|
2016/07/03 22:36:49
Subject: DakkaDakka Society of Fine Painters
|
|

Utilizing Careful Highlighting
|
 Red Harvest wrote: Red Harvest wrote:Learn to paint with thick paint too. It is a valuable skill as well. A decent painter should be able to do both, paint thin or thick. IMHO.
Brush sizes. I've been experimenting with larger, #3 and #4 rounds and liking them for pretty much everything but really fine detail. What are the preferred brush sizes you guys use? I'll use #0 for pretty much every finer detail, but for crazy small I drop down to a 3/0.
I use a 6 for vehicles, round and filbert (not an airbrush), for the overall base coats for instance, then switch to smaller to do the rest. Also use them a lot for my terrain as coverage is easier.
For most miniatures I use a 2 for basecoating, a 1 for most all the details except eyes, which I break out my tiny-I-dunno-the-insane-number brush.
@Jaunuine - I love your metals, and TMM is really my favorite. I appreciate a lot of people who can do NMM but honestly I don't see the point when the real metals are right there and they look so shiny 
@Bebop - that's a great tutorial, simply holding the model the same way to keep the light source the same, such a simple great idea!
one of the things I struggle with a lot is light source, where would it hit, where would the highlight be? I try to use the light at my desk to see where it actually hits the model and then I try to remember. This does not always work. Especially the remembering part. And especially when thinking of small items, or weapons etc.
|
|
|
|
|
|
2016/07/04 05:03:29
Subject: DakkaDakka Society of Fine Painters
|
|
Gargantuan Great Squiggoth
|
So much good!
Take a picture Guildenstern doesn't have to go public but take pics and use them on screen for reference. And though I am not good at it, I just use a stiff brush and brush away from the light, kinda dry brushing. Only hit the surfaces that need hit. Hopefully no bendy light.
I personally use lots of brushes, but have been heading towards bigger no. 2 etc. for a lot of the work. Alsop using flat brushes , used to have loads for oil painting. I do have a cheap and nasty airbrush.
Hi Tatt, sorry did not reply sooner. Indeed hi to you all. Wow do we have some amazing people here.
And lastly thanks to those posting tuts. I have some I would share, but amongst such giants I am embarrassed to suggest it.
|
|
|
|
|
|
2016/07/04 05:15:30
Subject: Re:DakkaDakka Society of Fine Painters
|
|
Utilizing Careful Highlighting
|
you should make a dakka dakka society of eminent converters, Cam ^_^
give us all loads o tips and tricks!
|
|
|
|
|
|
2016/07/04 06:08:19
Subject: DakkaDakka Society of Fine Painters
|
|

Chaplain with Hate to Spare
|
Thanks Bebop, seeing the way you do it is very helpful! especially so because I can see it's similar to how I do my Imperial Fists except I use the coloured primer and wash as a mid/dark tone and I use light coverings of the yellow to build it up, I tend to add a pretty strong final highlight though at the end whereas you leave the beautiful subtle blends. I would like to paint an Infinity mini one day too i'll keep my eyes peeled for a cheap one ;-)
|
Flesh Eaters 4,500 points

" I will constantly have those in my head telling me how lazy and ugly and whorish I am. You sir, are a true friend " - KingCracker
"Nah, I'm just way too lazy to stand up so I keep sitting and paint" - Sigur
"I think the NMM technique with metals is just MNMM. Same sound I make while eating a good pizza" - Whalemusic360 |
|
|
|
|
2016/07/04 06:20:02
Subject: DakkaDakka Society of Fine Painters
|
|
Dakka Veteran
|
 Camkierhi wrote: Camkierhi wrote: And lastly thanks to those posting tuts. I have some I would share, but amongst such giants I am embarrassed to suggest it.
Post them anyway! As a beginner, I don't have much to offer but I still posted my burnt muzzle attempt. I didn't win any accolades, but they haven't laughed me off the forum either
Seeing your techniques may inspire a conversation we can all learn something from.
|
|
|
|
|
|
2016/07/04 14:24:13
Subject: DakkaDakka Society of Fine Painters
|
|
Mounted Kroot Tracker
|
You're welcom guys for the tut. I'll post more as well, and I hope you guys do too, there's always something to learn!
@Dr. H: You are so right, and actually, the more I was thinking, your way might be even longer. Starting from the darkest, which I have done a lot in the past, I think I stopped doing as much when I started using thinner paint as it wasn't viable with certain colors to do that. Too many coats needed to get a good red for example if I'm painting up from a shade tone. I'm sure you've got it figured to where it works for you though
@ Jan: great tut. Clear and easy to use with great results. I was thinking the same thing about step two, looks great!, gotta find some minis to use that on
@Tom: Also a good tut, thank you for sharing it! Please continue to do so. If I might suggest, that muzzle burn is a perfect place to try thinning paint. If you were to do it again but just use much thinner coats, and each time you add a coat it's closer to the muzzle, you'll get a much softer and smoother transition into the muzzle burn. You can even start with brown or blue or whatever then move into black the closer you get to the nozzle...try it out and let us know how it goes!
@Cam stop being silly and show us the dang tuts, but this is the painting blog remember, no rivets hehehe!!!!
@Guildenstern: man, I had, have, the same problem. It's lessened because I'm vigilant about the angles now. If I'm painting NMM I have to do that or the effect is wrong, lost, and failed. (More on that in a sec)
@Tatt: you're in bro, no worries. Just go to the first entry on the plot and scroll a bit you'll find the link to the banner so you can put it in your sig. Welcome dude!
@ Damo: Yeah I figured we'd be close in terms of that, I guess I sometimes do a stark highlight?, I'm not really sure actually lol, but I have started to get away from GW styles, and actually, black lining, instead of edge highlighting everything, has been a thing that I've been focusing on too, that I didn't use to, black lining....frustrating though because it's fiddly. Oh and respond to my darn pm, or was it something I said? EDIT: in fact, i know its time consuming, but could you post a little pic tut as well of how you are doing those bikers? Id like to see it, an dsure everyone in here feels the same about that
now...::grabs soapbox:: ... Guys, and girls...a note about NMM, because I'm seeing a lot of comments about why, and nah, and no point etc etc. I get that dakka dakka has a general asthetic that it leans towards in terms of painting styles and what not, but the fact is, there's a lot of minis out there and a lot of different styles. Both NMM and TMM can be done in absolutely breathtaking ways, and to discount one over the other is really silly to me. Lately I've been painting NMM on my minis because I'm painting Infinity, and while it could of course be done, TMM seems to not fit the style. But for me there is a deeper reason why I personally am painting NMM right now. Because it's hard. It's a challenge. It forces me to understand light, how it reflects against different angles and surfaces, and its requires me to have a strong understanding of how to literally apply that to make it look convincingly like metal. That simple fact is making me a better painter because Im not in my comfort zone so my brain and hands have to work overtime, and, those concepts work all over the miniature, not just on metal bits. And honestly, I'm not anywhere close to where I wanna be with that skill, so until I am, I'm gonna keep doing it. As for TMM, I love it equally, and gladly use it when the asthetic asks for it, but ultimately i think there are things that you cannot do with TMM, and really vice versa with NMM too. This may be the jazz musician in me, but the slowest way to progress at your art is to practice things you're already good at. All this to say, in the end paint the way you want, but both styles are extremely viable and it's worth, i think, to strive for new things, the worst case is that you'll find a way to make it fit into your own style and you'll just have more tools at the end of the day.
|
|
This message was edited 2 times. Last update was at 2016/07/04 15:07:00
|
|
|
|
|
2016/07/04 20:18:57
Subject: DakkaDakka Society of Fine Painters
|
|
Dakka Veteran
|
Thanks Bebop, I'm getting ready to do a marine with a flamer, I'll definitely be trying to implement your advice.
|
|
|
|
|
|
2016/07/04 21:00:33
Subject: DakkaDakka Society of Fine Painters
|
|
Mastering Non-Metallic Metal
|
 bebopdrums2424 wrote: bebopdrums2424 wrote:@Dr. H: You are so right, and actually, the more I was thinking, your way might be even longer. Starting from the darkest, which I have done a lot in the past, I think I stopped doing as much when I started using thinner paint as it wasn't viable with certain colors to do that. Too many coats needed to get a good red for example if I'm painting up from a shade tone. I'm sure you've got it figured to where it works for you though
Yarp. As I mentioned, with Enamels I get good coverage of one paint over another, so it's no harder to get up to white (with appropriate layers of shading) over a black basecoat, without the paint needing to be so thick that it obscures any detail.
I still "water" down my paint to probably the same consistency (although different surface tension properties) as you do for most applications.
Some colours are better for this than others. Some of them (metallics in particular) don't like being diluted. Some work really well when applied in transparent layers, others are perfectly good as a "one coat" paint (although not actually/usually in one coat, but you get the idea).
...a note about NMM...
Absolutely. Each to their own. And it's definitely good to push yourself to improve.
I just like the way metallic paint looks and I hope I didn't come across as dismissive of nmm.
|
Mastodon: @DrH@warhammer.social
The army- ~2295 points (built).
* -=]_,=-eague Spruemeister General. * A (sprue) Hut tutorial *
Dsteingass - Dr. H..You are a role model for Internet Morality! // inmygravenimage - Dr H is a model to us all
Theophony - Sprue for the spruemeister, plastic for his plastic throne! // Shasolenzabi - Toilets, more complex than folks take time to think about! |
|
|
|
|
2016/07/04 21:23:29
Subject: Re:DakkaDakka Society of Fine Painters
|
|

Strategizing Grey Knight Chapter Master
|
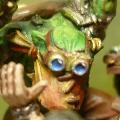
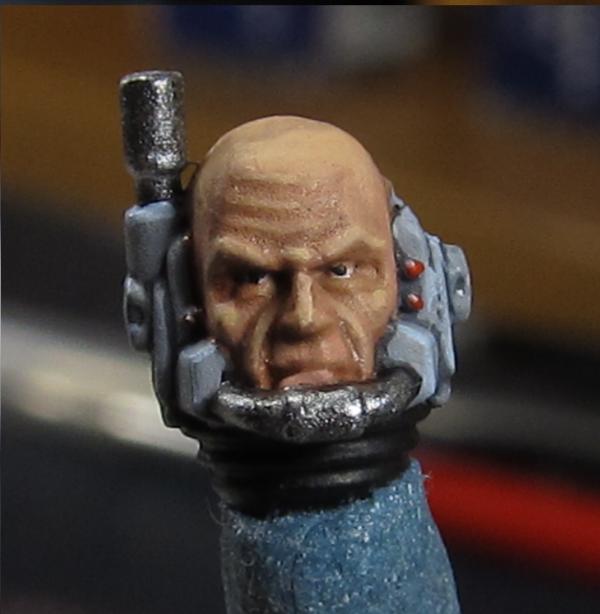
I've had some comments that I seem to do faces to a decent standard.
I figured I'd share my little how to guide on how I paint faces.
First Stage, base face with Tallarn Flesh and give the face a good bath of Ogryn Flesh wash. The aim here is to have the wash pool in the sunken sections
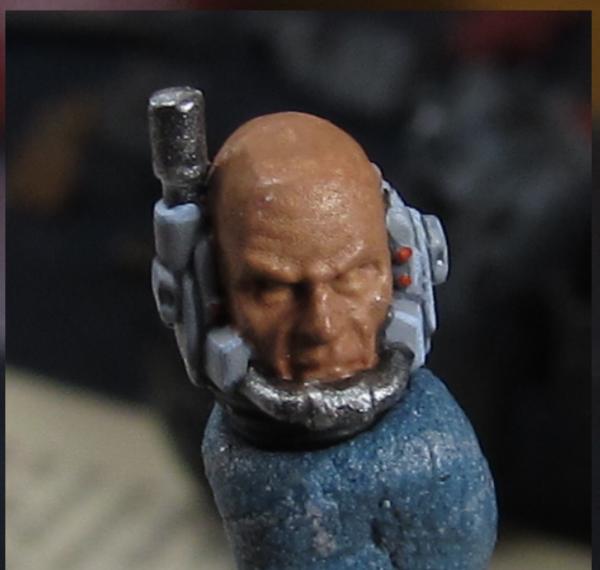
Second Stage: this is just a strait dwarf flesh layer (plenty of water) focusing on leaving recess with the Ogryn wash showing, areas such as around the eyes, around the forehead area, bits beside the mouth and little bits on the nose.

Third Stage: this is a 50/50 mix of Dwarf Flesh and Elf Flesh, this stage is aimed at raising the lightness of areas where the sun would hit, so cheek bones, top of the head, bridge of the nose, eye brow region , lips, chin, the aim here is to have the first layer not totally covered up by the new mix.
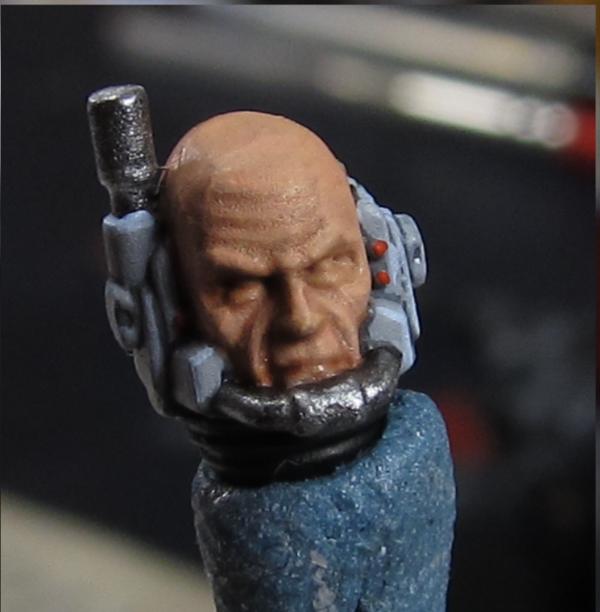
Fourth Stage: This stage is just pure elf flesh, The aim here is to paint raised edges where the sun would hit it the most. This includes areas such as top of the head, bridge of the nose, eye brows and cheeks.
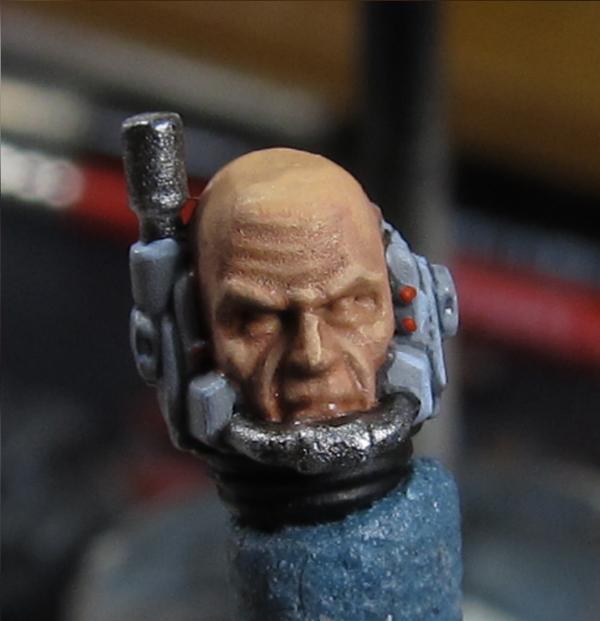
Fifth Stage: Eyes were done at this point, using a 000 brush I did the white of the eyes. Then with the same 000 brush for the pupil of the eye. Here you can also do scars, stubble hair etc
|
IceAngel wrote:I must say Knightley, I am very envious of your squiggle ability. I mean, if squiggles were a tactical squad, you'd be the sergeant. If squiggles were an HQ, you'd be the special character. If squiggles were a way of life, you'd be Doctor Phil...
The Cleanest Painting blog ever!
Gitsplitta wrote:I am but a pretender... you are... the father of all squiggles. .
|
|
|
|
|
2016/07/05 01:31:48
Subject: DakkaDakka Society of Fine Painters
|
|
Dakka Veteran
|
Excellent! Thanks for the tutorial knightley.
|
|
|
|
|
|
2016/07/05 02:48:02
Subject: DakkaDakka Society of Fine Painters
|
|
Combat Jumping Ragik
|
bebopdrums2424 wrote:@ Red, could you give some examples where using thick paint is useful in your endeavors? I'd love your input here! The only time I use thick paint, and I use the word thick pretty liberally, is when I need something incredibly small and it has to be stark in contrast and can't run, like perhaps an edge highlight, and even then the danger is that it dries on the brush before you apply it. The other times are of course, drybrushing, or other technical applications.
It's just another technique. I made my comment just to say that there is no One True Way™ when it comes to paint viscosity. I use thick pretty much for everything except really shallow details on things like faces. I have no problems with paint drying on my brush; I keep the brush fairly wet. I use thick paint ( well, more or less straight from the bottle thick) quite a bit. There is a difference between using thick paint and thickly applied paint. Thick paint is a nice way to get really good 'flow' control of the paint in small areas.
What I've noticed is that many people apply way too much primer to their minis. If you use a white primer, it should actually look very light gray on the mini ( assuming a metal mini) and not solid white. Take a thick primer coat and thickly applied paint and you get a mess. A proper primer coat and a base coat of thick paint and you get a very nice looking mini ready for the final stages.
I did a lot of oil painting back in the day. I suspect that that is part of my willingness to use thicker paints, and my habit of blocking in colors/base coating, then going back to finish things off sometime later. With oils, the paint stays 'wet' enough to do that. With acrylics, it gives an usual effect, essentially a 2nd canvas for the highlights and shading, and if you mess up you can 'erase' it (carefully) without harming the underlying base coat. Might be why my painted minis look a bit unusual.
I also prime with Gesso-- another oil painting habit (works great for metal, not so great for HIPS) and Gesso will suck up thin paints like a sponge.
RE: TMM or NMM. Paint with what you like. I dislike using the metallic paints, so I paint something like NMM. ( but true NMM is not even possible in a 3D work. Ah, here is a nice discussion of it... or not. THe blog has now gone private. Ah well.)
Thanks for the answers about brush sizes everyone. I think I'll get a nice sable #2 for now. Maybe I'll be able to paint faster... Good luck with that, eh?
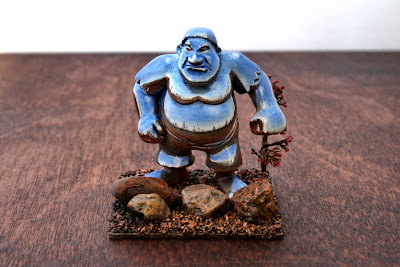
Oh, side by side of a goblin ( grenadier miniatures) I *painted* when I was a little kid, and a goblin I painted more or less recently. Now, I will note that the paints used on the first goblin were the aforementioned Duncan Bisq-stain ceramic paints. Well, at least the paint didn't chip. I think I've improved a smidge or so. Not much for elaborate bases though.
|
|
This message was edited 1 time. Last update was at 2016/07/05 23:41:29
|
|
|
|
|
2016/07/05 07:15:05
Subject: DakkaDakka Society of Fine Painters
|
|
The Hammer of Witches
|
I think learning to paint NMM has improved my TMM technique. I sort of combine the two now, so start with metallic but then highlights and washes with nmm paints.
|
|
|
|
|
|
2016/07/05 10:13:46
Subject: DakkaDakka Society of Fine Painters
|
|
Is 'Eavy Metal Calling?
|
Just come across this, thanks to the Dakka banner ads, and figured most of the folks in this thread might find it handy. Tons of inspiration to stare at for hours, a handful of tutorials and loads of high-end WIPs, and a nicely down-to-earth approach to top notch painting and high-end techniques.
https://www.althaipaints.net/
Regarding the TMM vs NMM thing, I always make that choice on a case by case basis, but a bit part of it is the type/range of mini. I'll default to TMM for 40k, moderns/historicals, LotR, anything that I want to look nice and 'realistic', as I find weathering techniques and such look far better on metallic work than NMM. On the other hand, for things that I want to look a little more fantastical or different, NMM all the way. This goes for Infinity and AoS in equal part, and also for Batman where I'm aiming to evoke a comic booky look. There is some crossover, like NMM banners for 40k, but those are the lines I tend to stick to. Neither is more useful than the other, I reckon, but I can understand a preference for one or the other; when I only painted 40k, NMM never crossed my mind, although that's in part because I couldn't even contemplate doing it with my skills (or lack thereof) at that time.
|
|
|
|
|
|
2016/07/05 10:51:17
Subject: Re:DakkaDakka Society of Fine Painters
|
|
Mekboy Hammerin' Somethin'
|
I don't really have any strong opinions either way regarding TMM/ NMM...both can look great if done well, both can look rubbish if done poorly...I haven't had any real desire to attempt NMM yet, just doesn't really fit the look of the stuff I've been painting so far...might have a go at it one day though, nothing at all wrong with trying new things every now and then 
what blows my mind though, is SENMM...essentially NMM taken to the extreme, painting something to look like super-shiny reflective chrome/mirror finish...granted I don't see much practical application for it, but for a display piece, wow...
in case you don't know what I'm on about, here's some examples courtesy of google image search 
any of you guys tried that before?...kinda curious about how difficult it is...I can get a vague idea of what's required, by looking at pics, but I don't feel up to actually trying it myself yet
|
   ...it's good to be green! ...it's good to be green! |
|
|
|
|
2016/07/05 10:53:35
Subject: DakkaDakka Society of Fine Painters
|
|

Arch Magos w/ 4 Meg of RAM
|
Saw a SM done in SENMM a while back......WOW didnt even come close. The thing look like it was made of pure chrome. Absolutely incredible work
|
|
|
|
|
|
2016/07/05 14:38:04
Subject: DakkaDakka Society of Fine Painters
|
|
Mounted Kroot Tracker
|
 weetyskemian44 wrote: weetyskemian44 wrote:I think learning to paint NMM has improved my TMM technique. I sort of combine the two now, so start with metallic but then highlights and washes with nmm paints.
totally, thats the same way i do my TMM too when im painting something small and detailed like an equila ...i love that look, almost a brushed metal look can happen...
@ Paradigm: awesome tut thanks for the share i bookmarked that one.
@ Knightly: thanks mate! another good tut, this is really becoming a good place for great informatioN!
|
|
|
|
|
|
2016/07/05 14:39:07
Subject: DakkaDakka Society of Fine Painters
|
|
Yu Jing Martial Arts Ninja
|
Never heard of SENMM before but that looks amazing. Would like to try that sometime.
Also great link there Para, some good hints and tips there.
|
|
|
|
|
|
2016/07/06 15:21:03
Subject: DakkaDakka Society of Fine Painters
|
|

Buttons Should Be Brass, Not Gold!
|
bebopdrums2424 wrote:@Dr. H: You are so right, and actually, the more I was thinking, your way might be even longer. Starting from the darkest, which I have done a lot in the past, I think I stopped doing as much when I started using thinner paint as it wasn't viable with certain colors to do that. Too many coats needed to get a good red for example if I'm painting up from a shade tone. I'm sure you've got it figured to where it works for you though
For certain bright colors with poor coverage, I paint the entire thing with neutral paints that cover better and then tint it to what I want.
|
|
|
|
|
2016/07/08 01:42:37
Subject: DakkaDakka Society of Fine Painters
|
|
Stern Iron Priest with Thrall Bodyguard
|
The Tao of Sable:
mold lines are the enemy!!!
nothing kills a nice paint job like a stray mold line...
once i see it, my eye keeps coming back to it...
taking the time to properly scrape and file mold lines can really save a lot of disappointment...
looks like i have a lot of catching up to do here...
nice to see so many people joining in
@Gits: i like that you used the Iron Warriors mini for your EC Centurion...
the weight on the front foot really changes him up to "action pose"...
@ZoBo: you are a natural...
your first Boyz were already really good!!!
@Camkierhi: wow, what an improvement!!!
your dioramas are awesome
@LDP: i can't believe how far you've come along...
i love your painting style
@weetys: it is so awesome that you have found such a personal painting style...
your minis are instantly recognizable, for sure...
@Nodri: seriously, i thought you came from nowhere as an instant amazing painter...
your PHR were the first minis i saw from you, and couldn't find any previous work...
being blown away by them, i thought, "Where the hell did this guy come from, and how is he so good!?!"
@Guildenstern: keep on pushing those skills...
you are doing great...
@Knightley: your clean style is definitely on the right track...
@Minus: love your intro!!!
clearly, you were a prodigious talent from day one...
i am a huge fan of your current style...
you really make the minis stand out from the crowd
@Mym: nice progress in 3 short years...
i like the color selection you've got going on these days...
the Blue Horrors are coming along nicely...
@nerdfest: love ya, Damo!!!
Tazzy is so full of amazingly talented people
@keezus: always a pleasure to see your progress, mate...
you Lord Carver turned out awesome last month!!!
@Buttery: it is amazing that you can paint with such vivid colors, and be color blind...
keep up the good work...
sorry to anyone i missed, but this has gotten way too long...
it is great to see everyone's progress...
kudos for not giving up once you discovered how hard it is to paint minis well...
since i hate to post without pics, here is a little thought about progress...
i don't think anything is ever really perfected in painting...
just when you think you've got something perfected, an idea pops up to add a new twist into the mix...
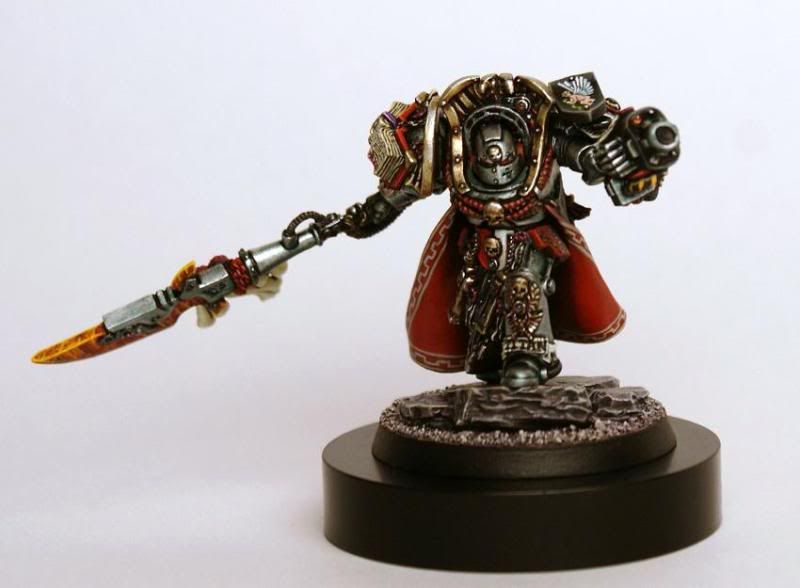
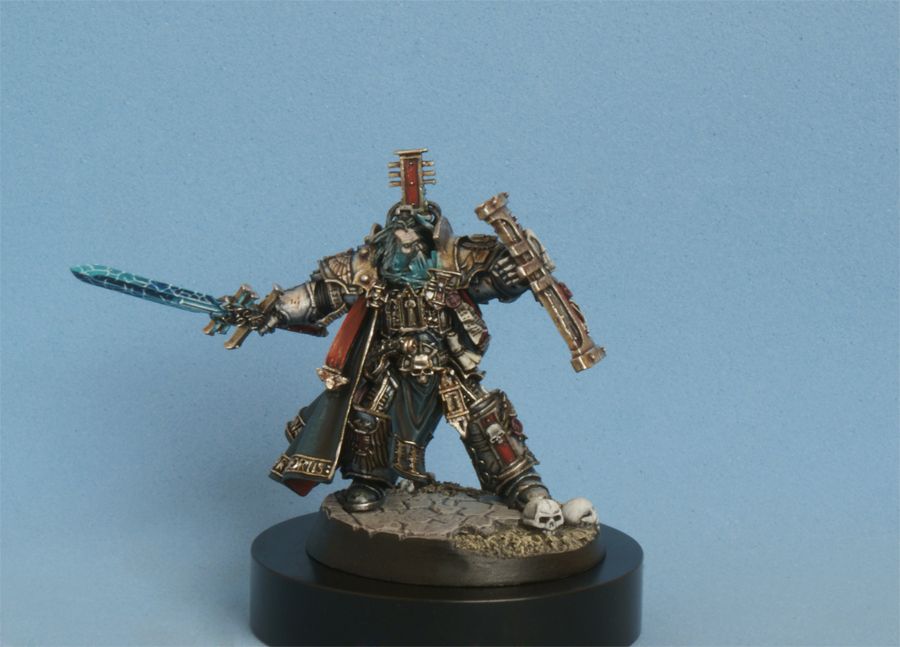
for example, i got a lot of compliments on my first Grey Knights Grand Master...
honestly, all i saw was how turquoise, rather than blue, the armor tint turned out...
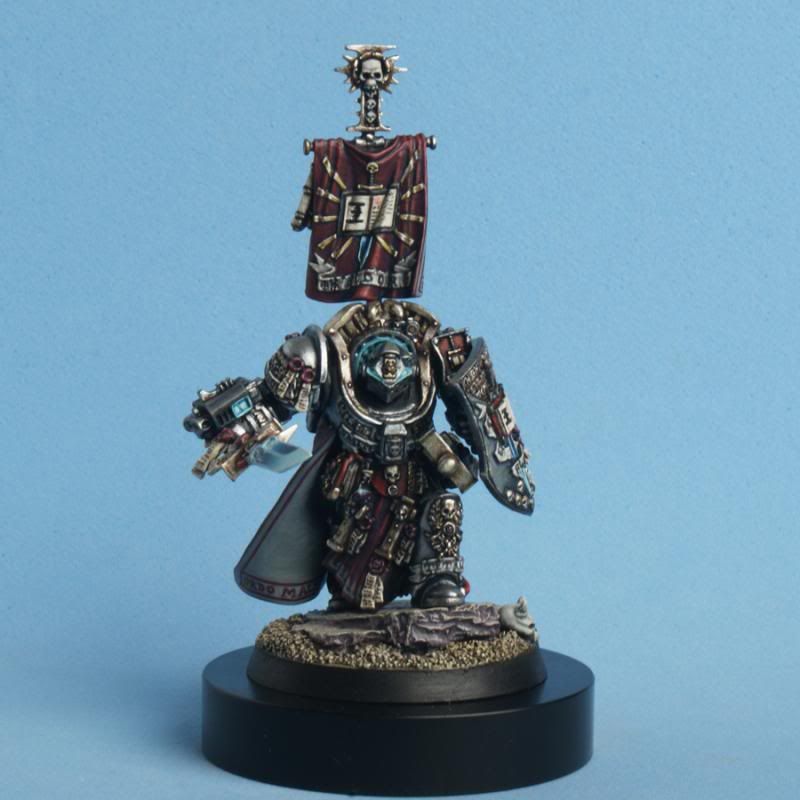
i was also sad that i didn't change the original Calgar mini enough with the conversion:
thankfully, i got a second chance at the conversion a couple of years later...
this time i swapped the turquoise ink for blue ink on the armor, and was much happier...
i also did a lot more sculpting to make the base mini look more like a proper Grey Knights Terminator:
my next commission allowed me to try my hand at weathering the GK metal scheme:
after that, i made a custom Mordrak, and tried to bring together my first three experiments with the metalics into a pleasing whole:
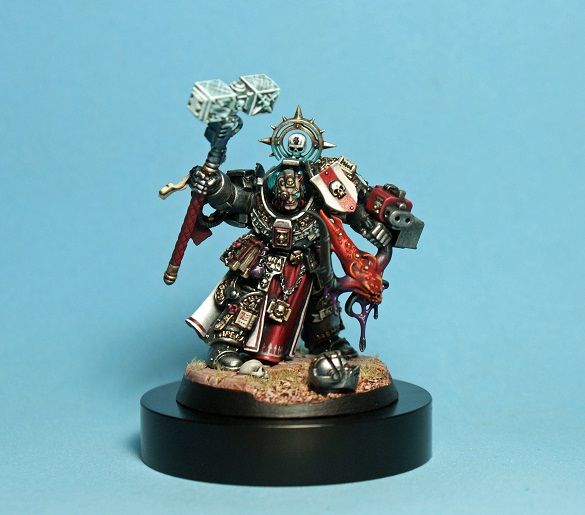
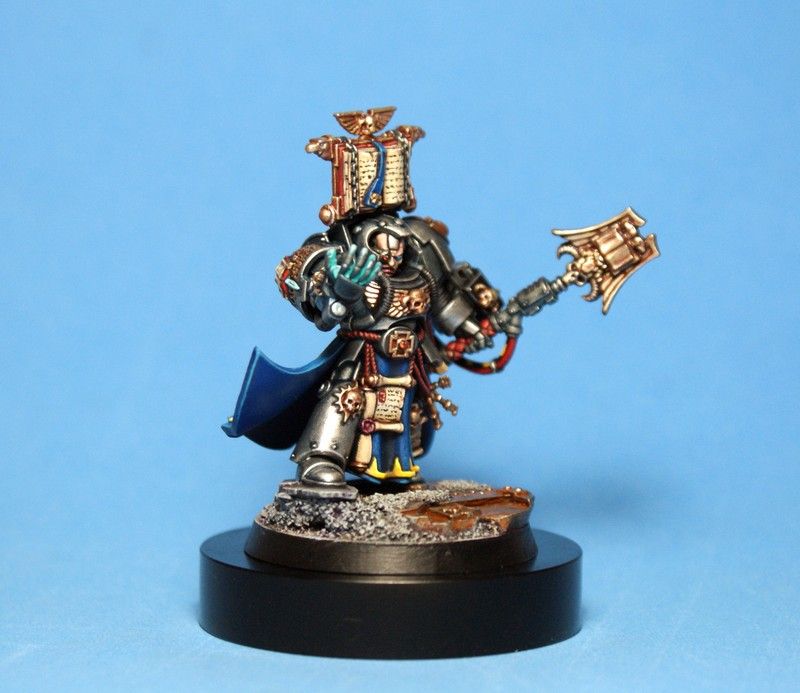
sadly, he was too "busy" to actually show off the progress i had made with my metals, so i was stoked to get a chance at painting the new plastic Libby in a GK's scheme...
i think i hit the right note for blue-steel, finally:
now i want to push contrast and weathering even further, like i did with my Iron Warriors Marine a couple of months ago...
like i said, nothing is ever perfected, but each experiment just leads to more experimentation...
that's the motivation, to keep pushing your successes further, and learning from your failures...
cheers
jah
|
Paint like ya got a pair!
Available for commissions.
|
|
|
|
|
2016/07/08 01:49:49
Subject: DakkaDakka Society of Fine Painters
|
|
Dakka Veteran
|
Inspired (and inspiring) work jah!
I tried a blood spatter effect on the CSM I'm working on, though I don't have any BFBG I think I still got a pretty nice effect by utilizing Paradigm's suggested splatter technique.
|
|
This message was edited 1 time. Last update was at 2016/07/08 02:46:34
|
|
|
|
|
2016/07/08 02:48:10
Subject: DakkaDakka Society of Fine Painters
|
|
Dakka Veteran
|
This is all very inspiring! I'm too ashamed of my terrible freehand work on small models (my hands only stop shaking if I take drugs to prevent it), but I've got a project involving some rhinos. Maybe I'll get the guts up to post if they come out like I plan. Also, Heretic Tom, if you have a bit of a brush on gloss varnish, you can make that blood look a little better, less dry.Might also want to try a bit of a darker red in the center of the splat to look more gory. Back when I started, we didn't have special effects paints
|
|
This message was edited 1 time. Last update was at 2016/07/08 02:50:17
|
|
|
|
|
2016/07/08 03:01:41
Subject: DakkaDakka Society of Fine Painters
|
|
Dakka Veteran
|
Munga wrote:if you have a bit of a brush on gloss varnish, you can make that blood look a little better, less dry.Might also want to try a bit of a darker red in the center of the splat to look more gory. Back when I started, we didn't have special effects paints
Thanks for the tips and good luck with your rhinos! I will add gloss varnish to my supply wish list, in the mean time I'll see about mixing up a darker red, anything that makes it more gory is worth a try
|
|
This message was edited 1 time. Last update was at 2016/07/08 03:02:16
|
|
|
|
|
2016/07/08 22:58:24
Subject: DakkaDakka Society of Fine Painters
|
|
Decrepit Dakkanaut
|
@jah: Excellent work. Thanks for posting your progression of minis with comments. It's really helpful to see someone's painting progress as well as reading your thoughts on each as you go along. You have a really interesting way of shading colors with different colors that gives an excellent and unique effect. Lots to learn from. Thank you!
|
|
|
|
|
|
2016/07/09 23:25:53
Subject: Re:DakkaDakka Society of Fine Painters
|
|
Mastering Non-Metallic Metal
|
What Gits' just said ^ 
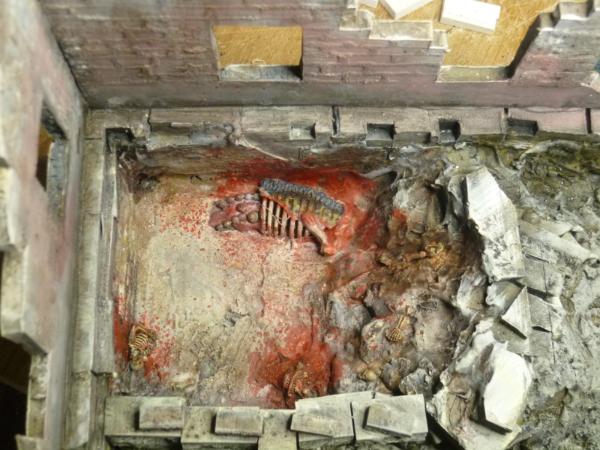
On blood effects:
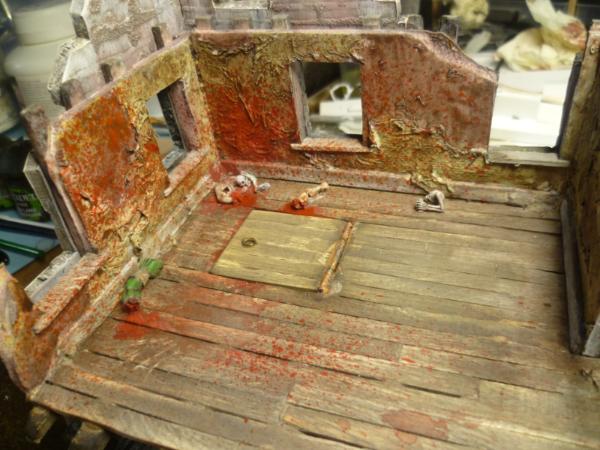
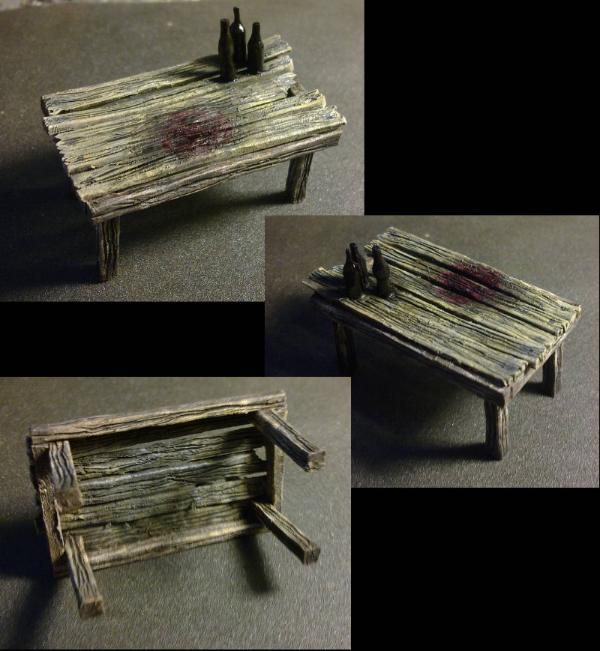
I have a nice example in my Sprue Hut. I wanted a bloodstain on the wooden table to give it a little backstory.
One thing to note is that (like many painting effects) there is no "one right way" for all examples: A different material will "react" differently to a covering of blood, for example.
Wood and other absorbent materials (such as cloth) will absorb some of the blood and cause the surrounding area to darken. The blood will also be slightly less glossy (even when fresh) than on non-absorbent surfaces (such as metal or plastic).
For this I painted the wood as normal (see my hut tutorial for more information, although I could cut-and-paste my wood painting section from that in here if people want), and then I darkened the area with a black wash.
After that, I used a clear gloss red paint (Humbrol equivalent to the Tamiya one) to cover the central part of that area, leaving some black around the edge.
I then darkened the centre of the red area with more black wash (this is a matt black which knocks back the glossiness of the red paint).
And done:
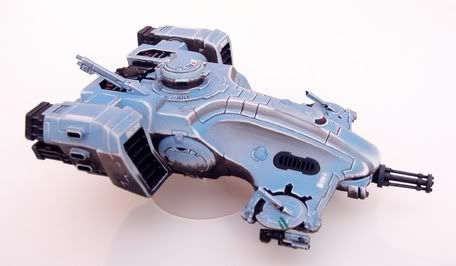
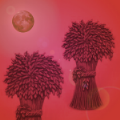
For SENMM:
I've actually been doing a similar thing on a my current model, but much simpler due to a flatter surface and much smaller scale:
This is supposed to represent a glass skyscraper reflecting the surrounding buildings, distant land and the sky above.
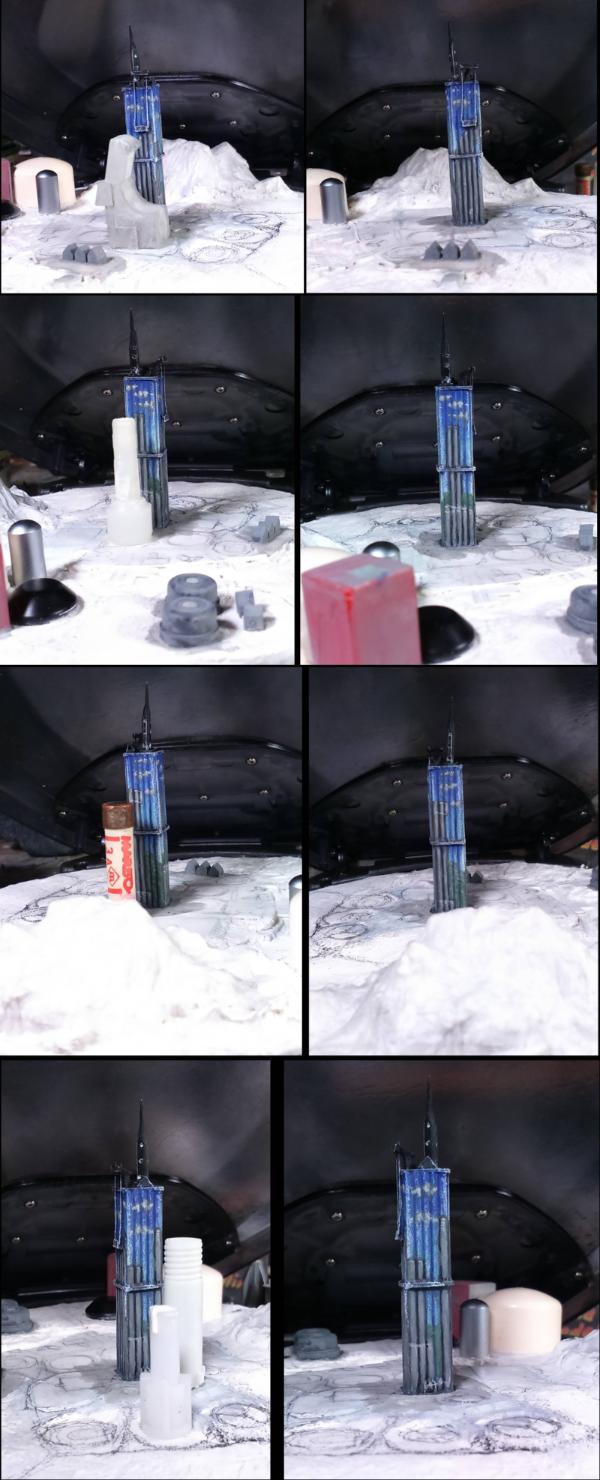
It probably worth practising with simpler circumstances, like this, to get your eye in for reflections before trying it on complex shapes.
You have to think of it as painting the reflected environment, rather than painting a shiny surface.
|
Mastodon: @DrH@warhammer.social
The army- ~2295 points (built).
* -=]_,=-eague Spruemeister General. * A (sprue) Hut tutorial *
Dsteingass - Dr. H..You are a role model for Internet Morality! // inmygravenimage - Dr H is a model to us all
Theophony - Sprue for the spruemeister, plastic for his plastic throne! // Shasolenzabi - Toilets, more complex than folks take time to think about! |
|
|
|
|
2016/07/10 04:16:16
Subject: Re:DakkaDakka Society of Fine Painters
|
|
Chaplain with Hate to Spare
|
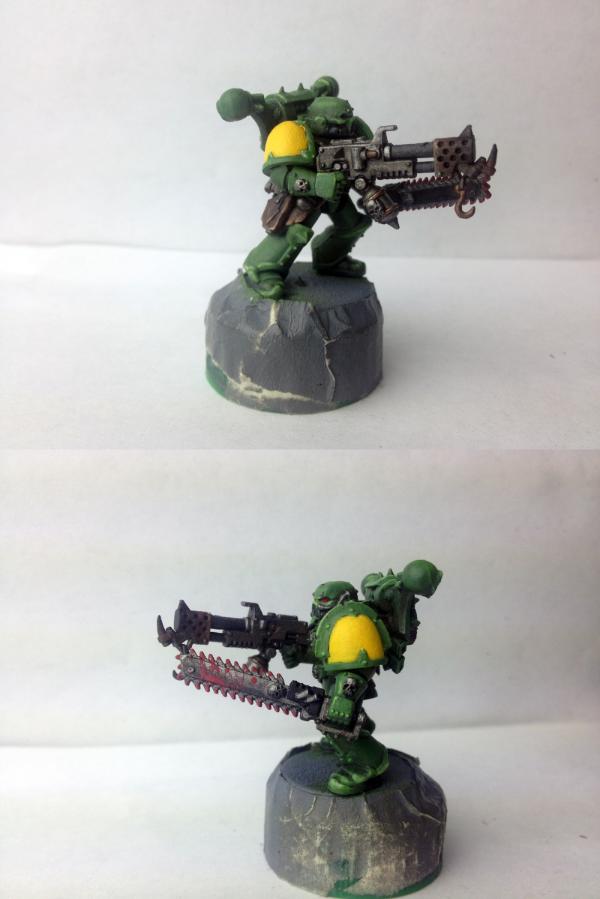
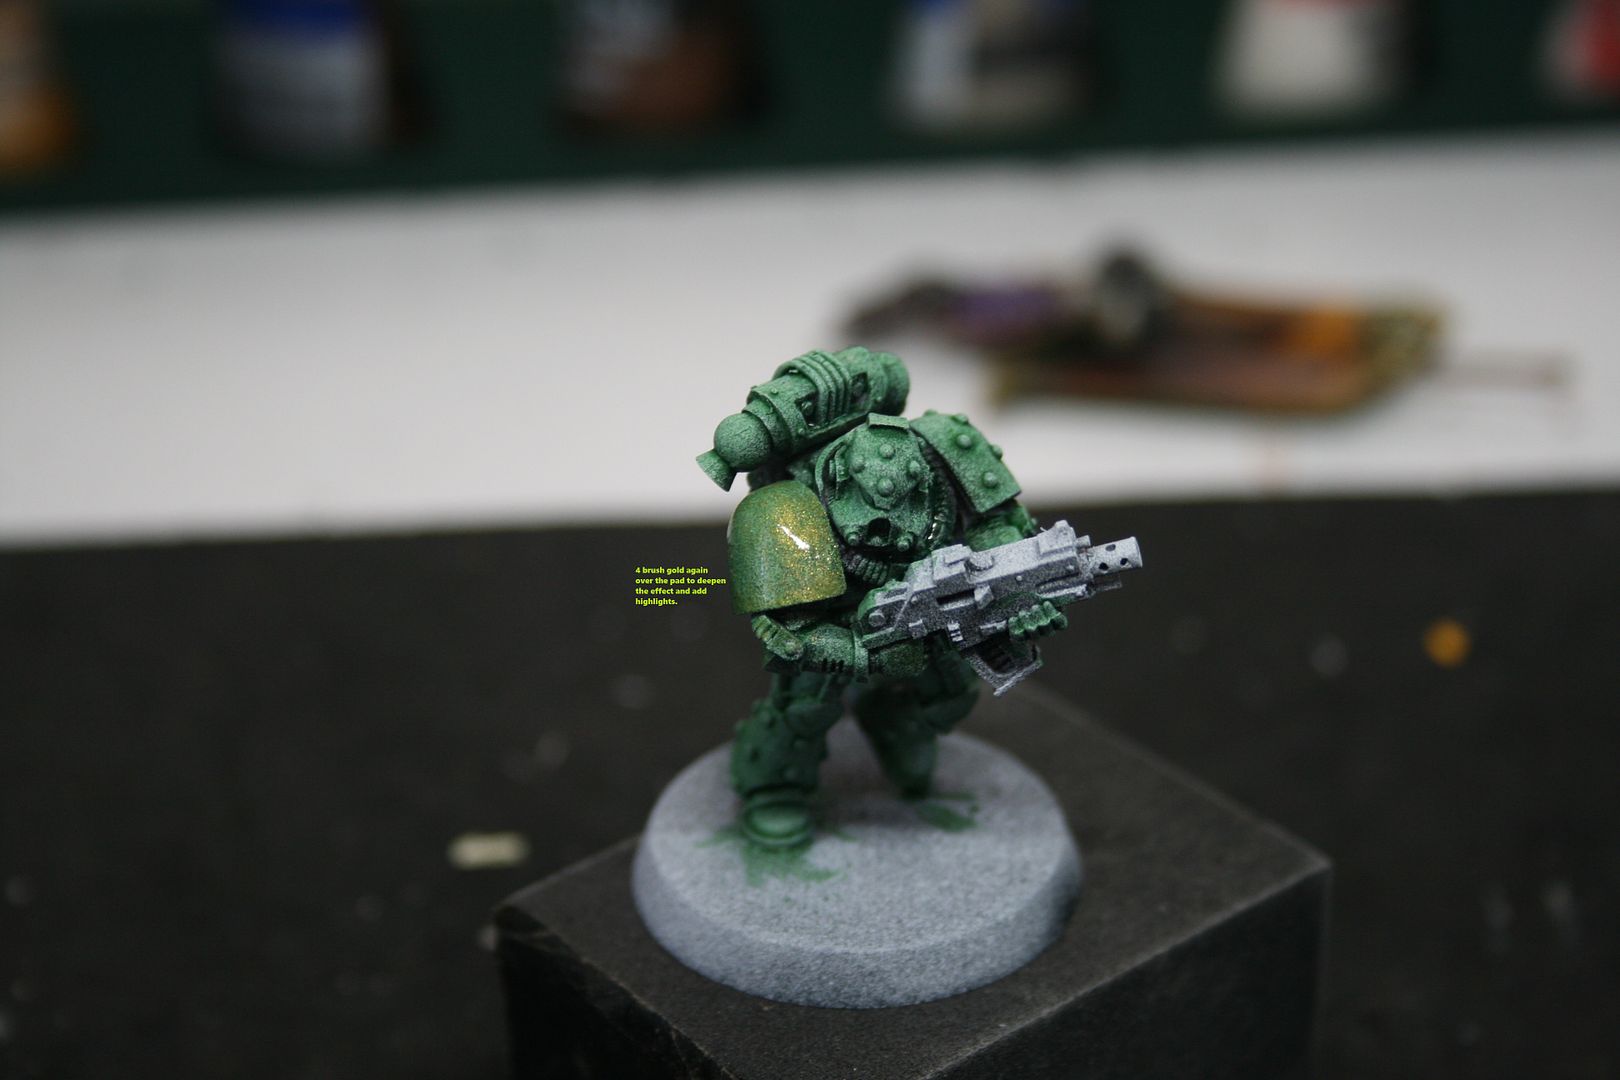
Hey guys I've started a rundown of my yellow here's part #1
Prime with Army Painter desert brown
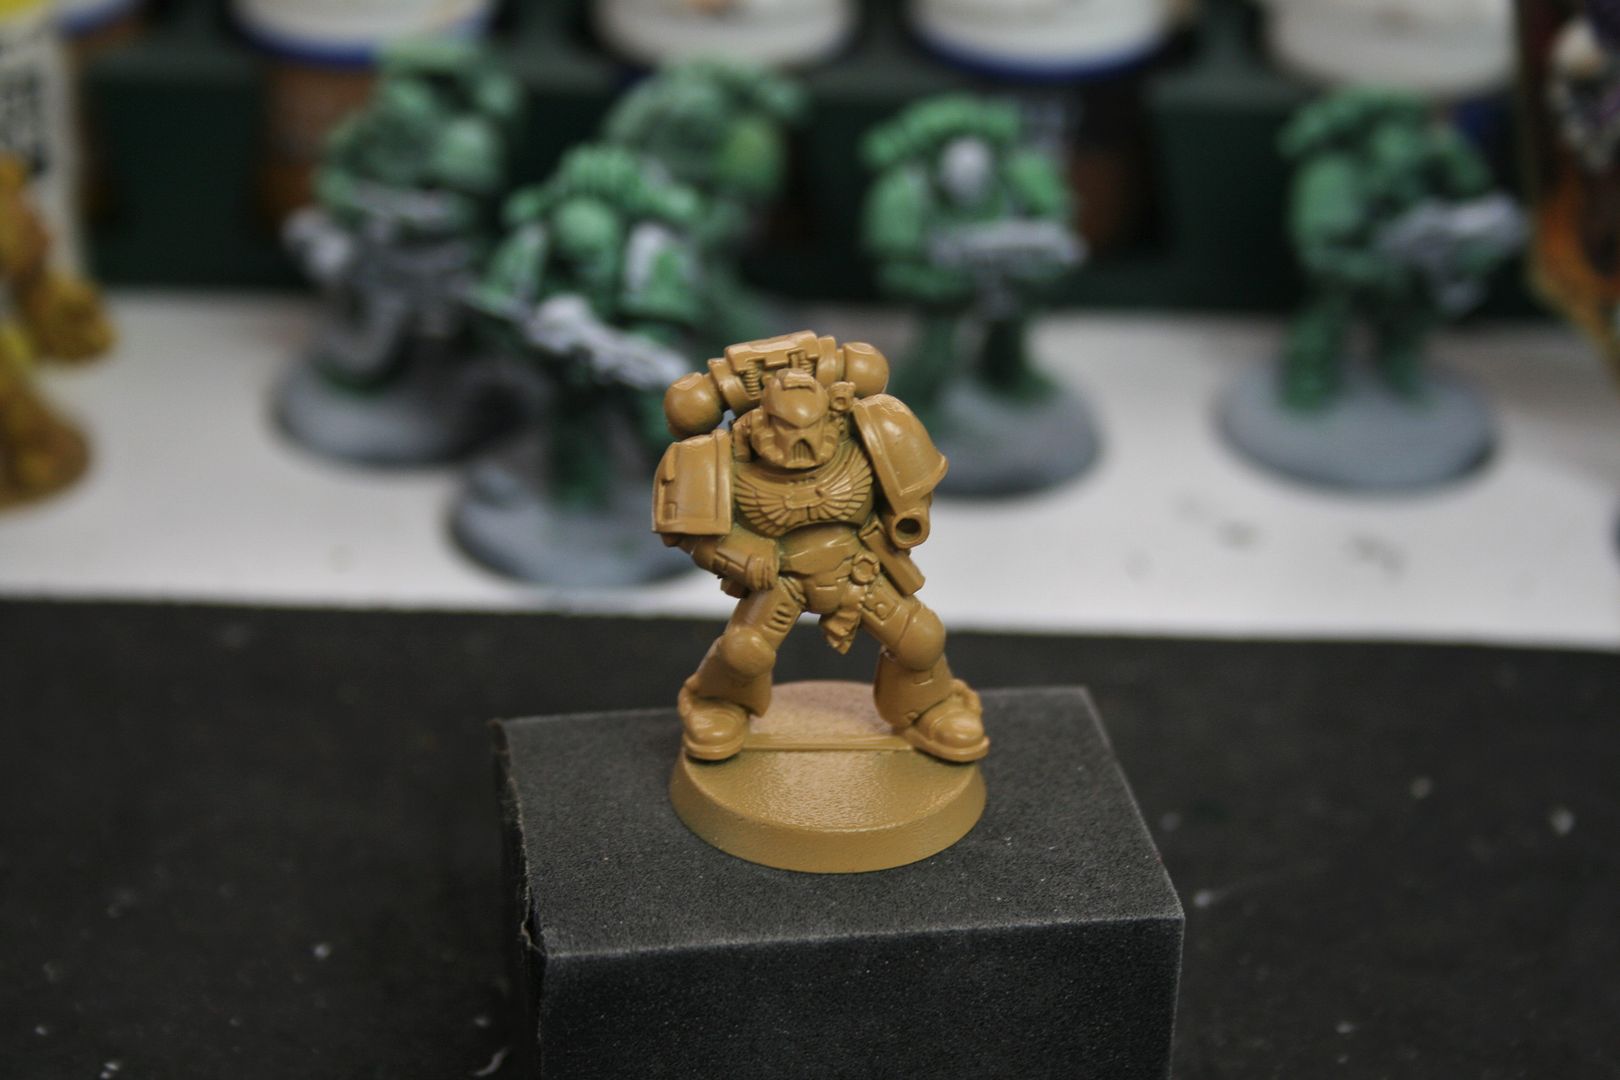
wash with sepia.
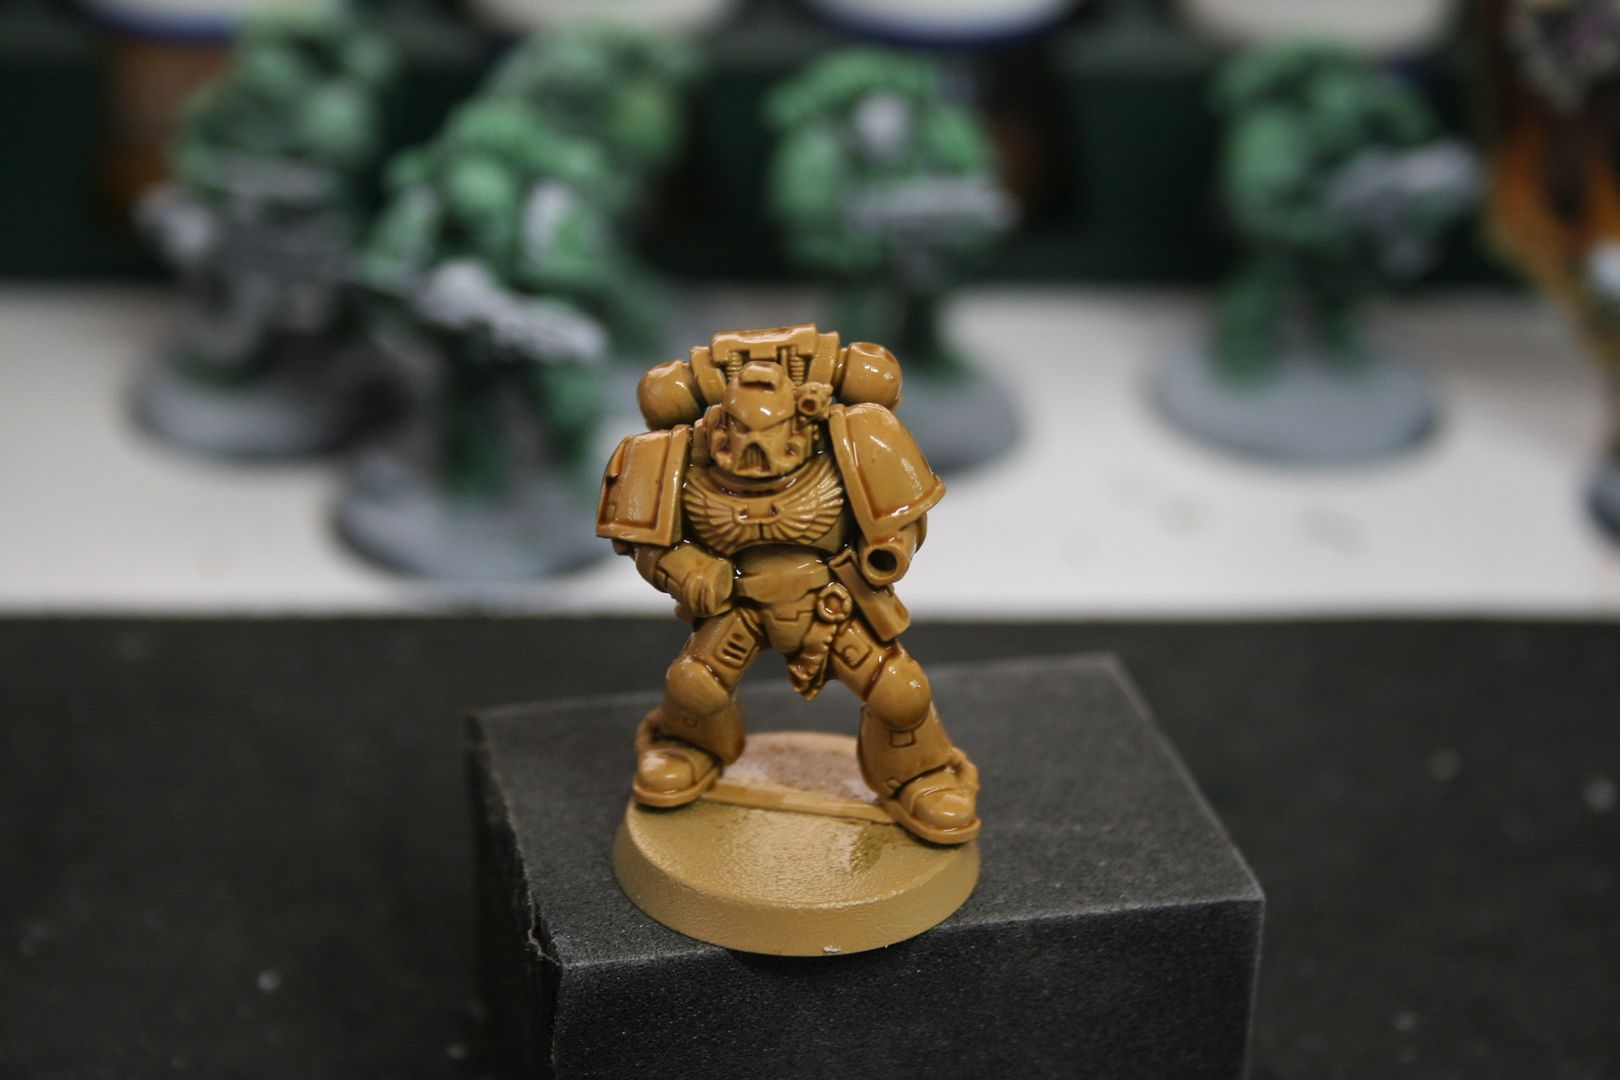
when dry use very diluted yellow to start highlights.
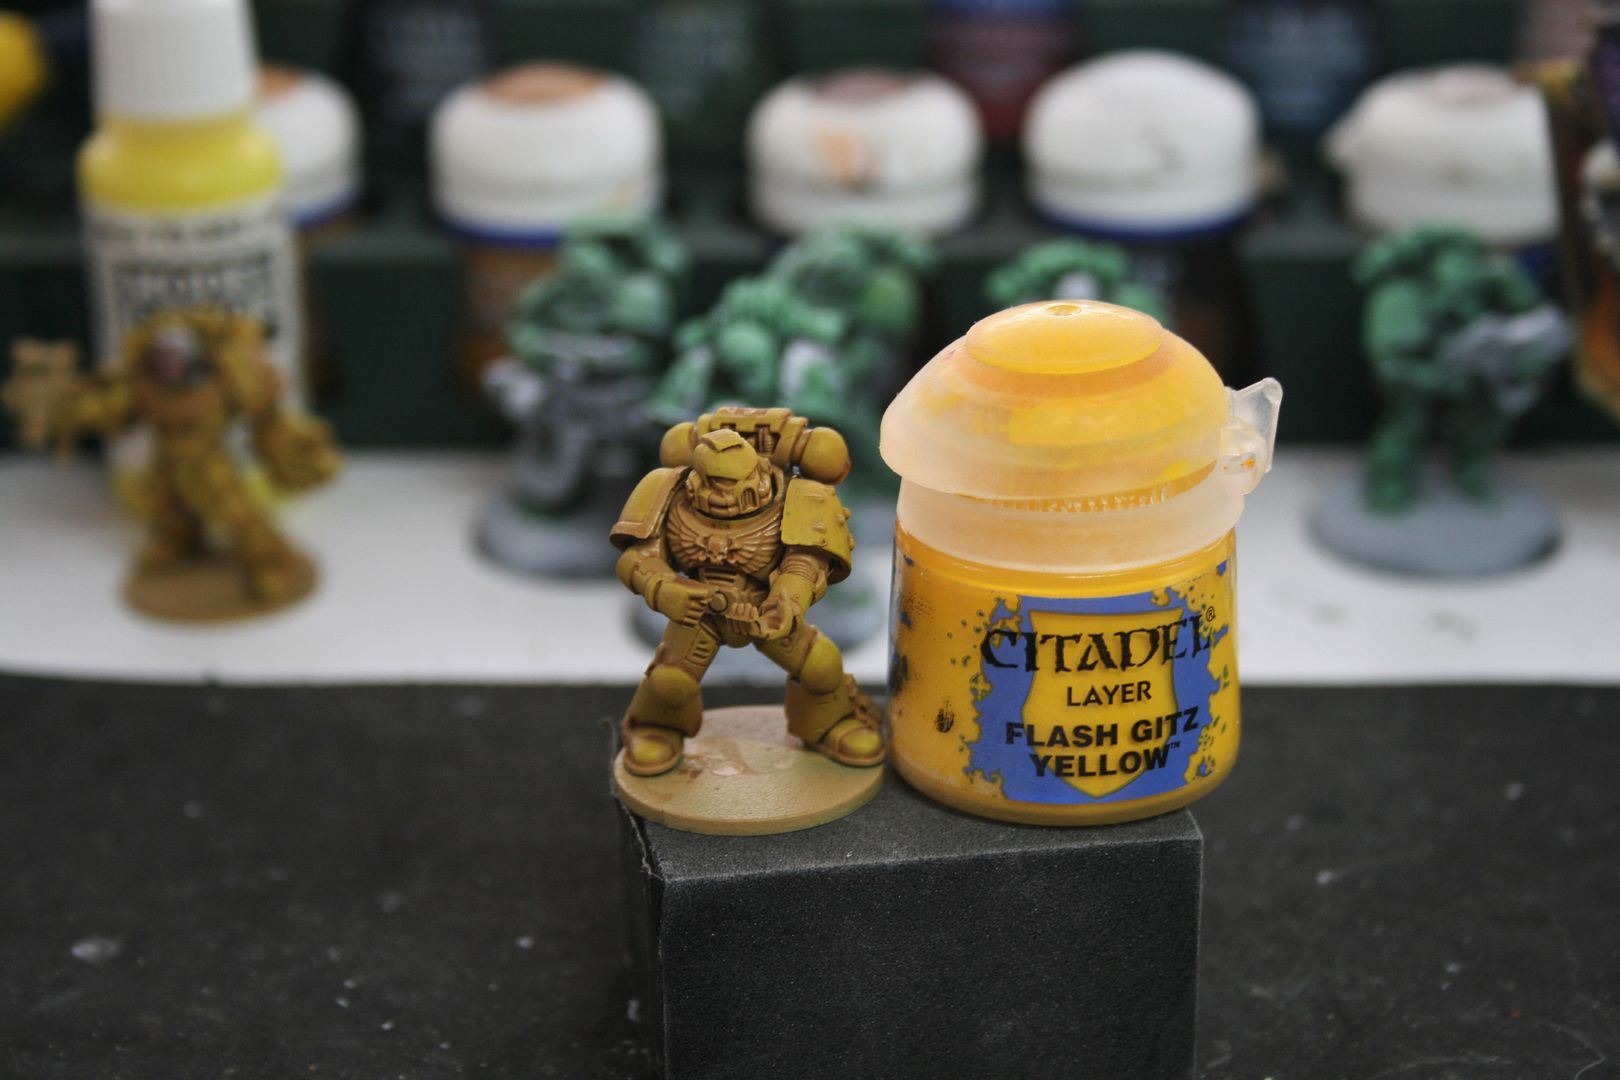
then vallejo lemon yellow to strengthen the highlights
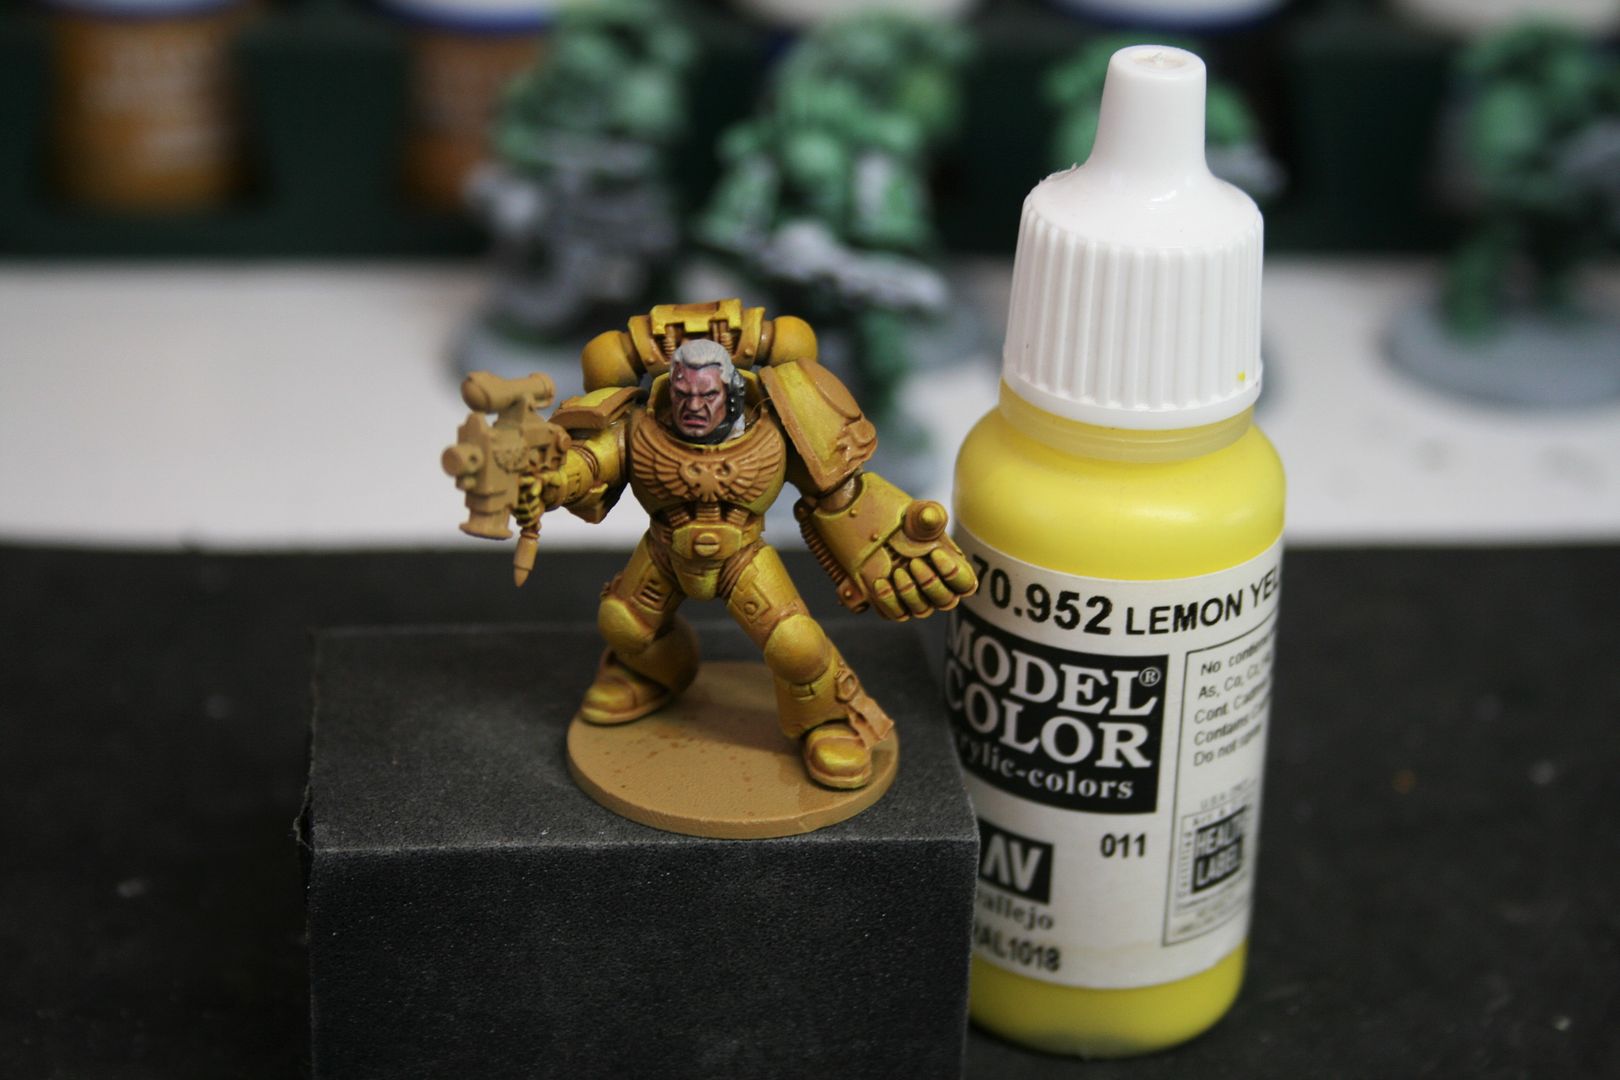
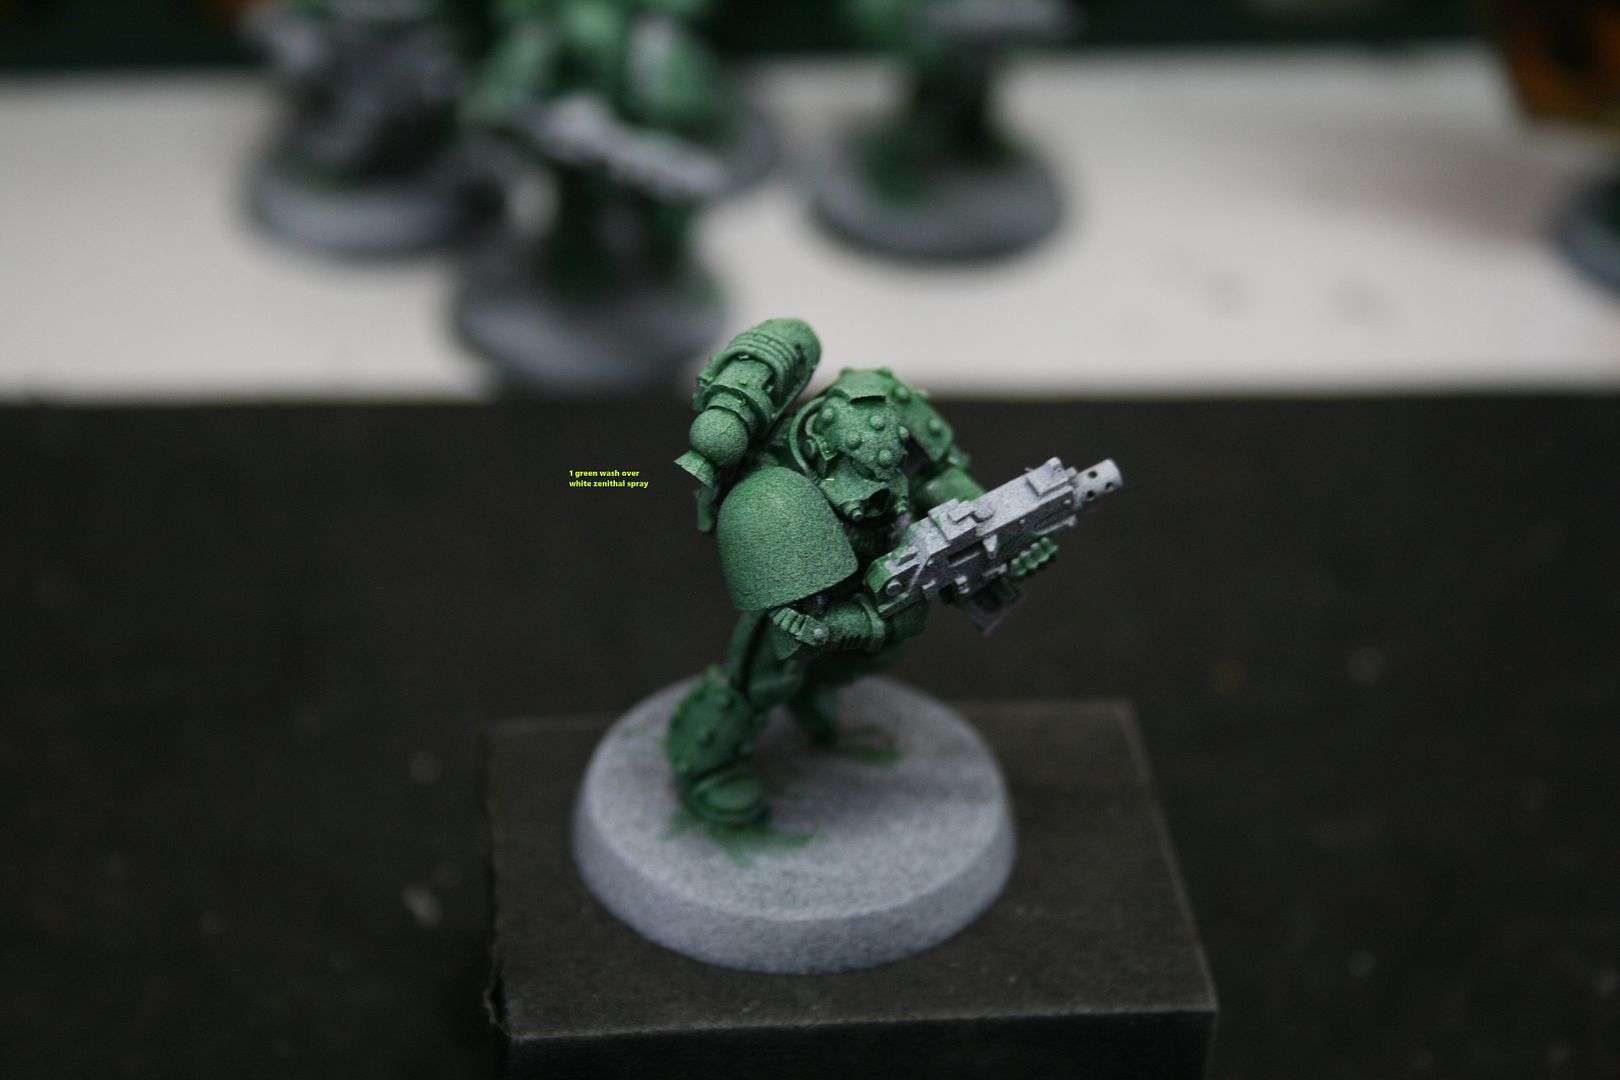
and a basic of my greens with a candy effect. lol writing was smaller than I expected
green wash over white zenithal style spray
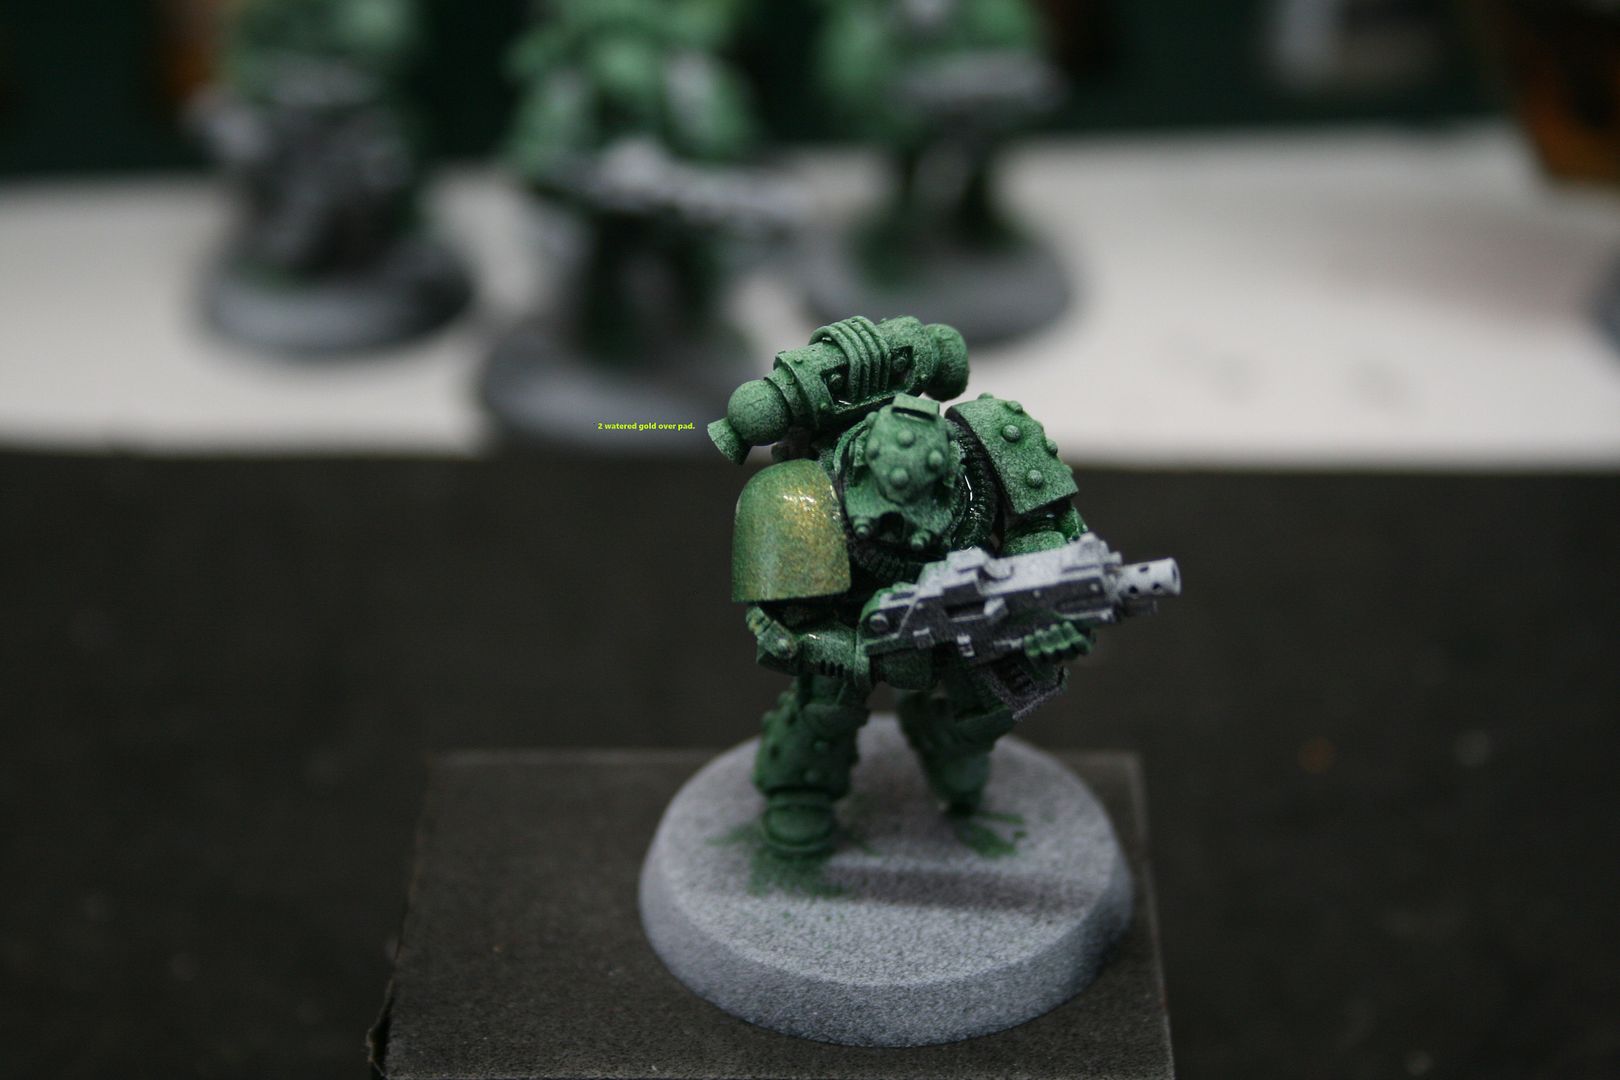
watered gold over pad
green wash over gold
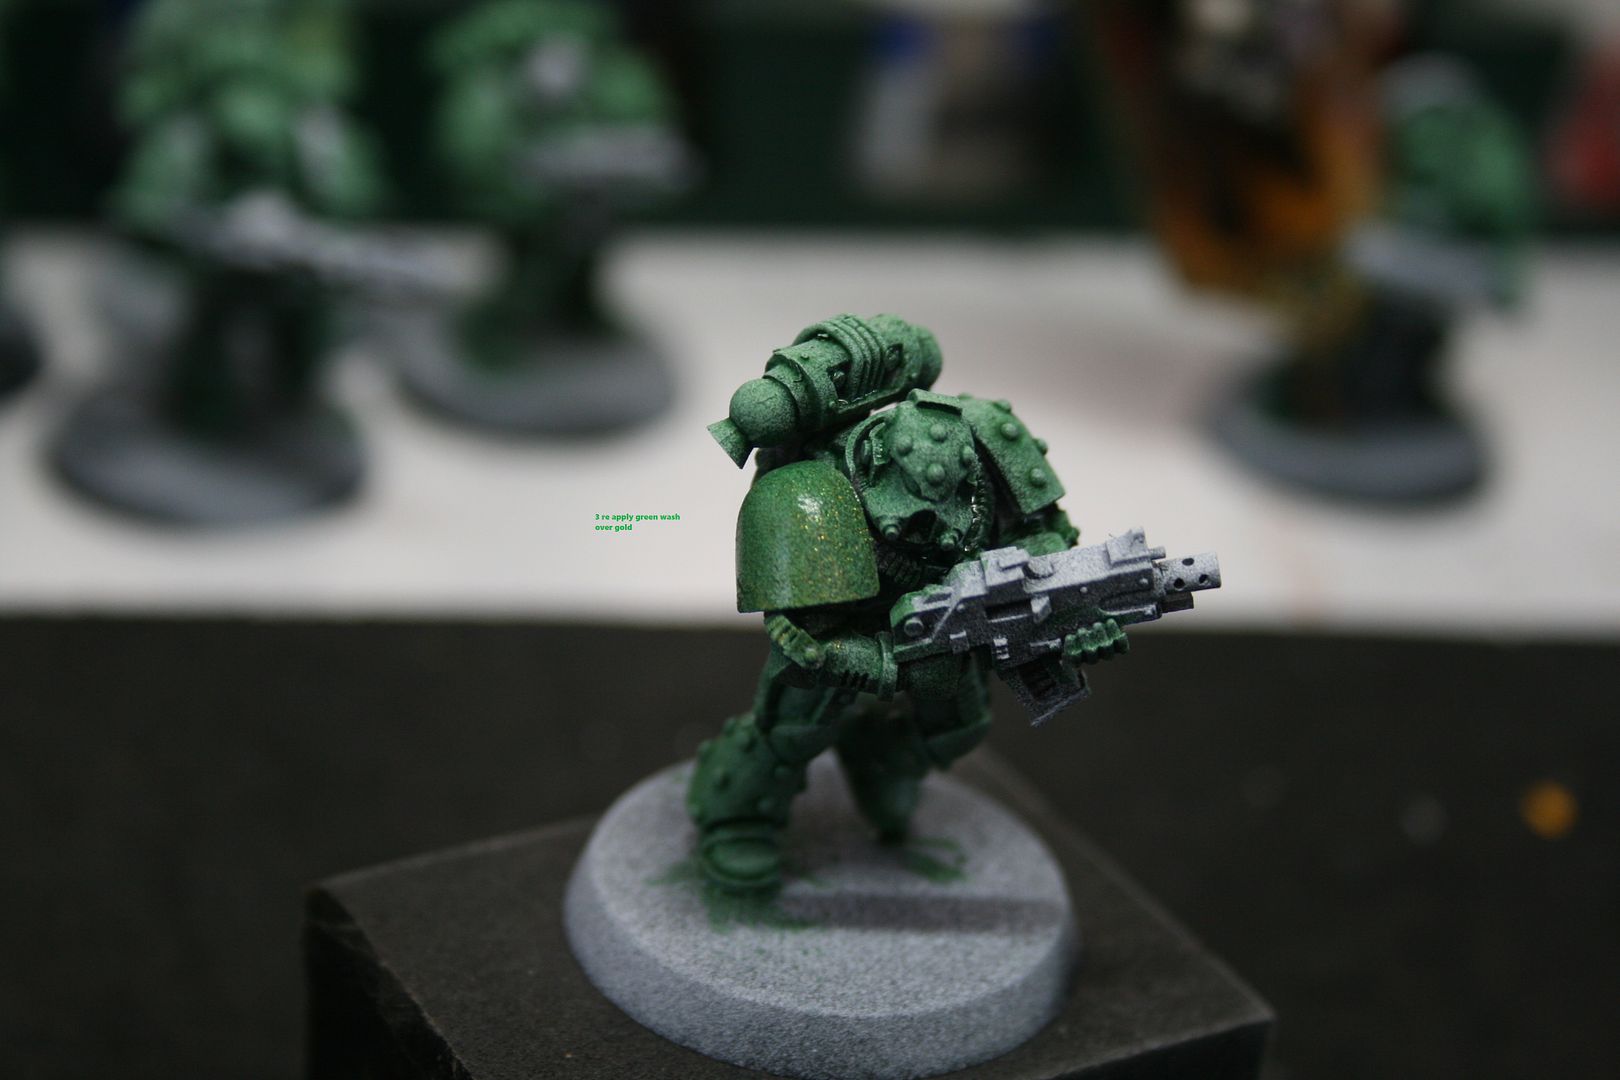
deepen the effect by gold over the pad again
|
Flesh Eaters 4,500 points
" I will constantly have those in my head telling me how lazy and ugly and whorish I am. You sir, are a true friend " - KingCracker
"Nah, I'm just way too lazy to stand up so I keep sitting and paint" - Sigur
"I think the NMM technique with metals is just MNMM. Same sound I make while eating a good pizza" - Whalemusic360 |
|
|
|
|
2016/07/10 05:54:21
Subject: Re:DakkaDakka Society of Fine Painters
|
|
Gargantuan Great Squiggoth
|
Agree with DrH, alot of these effects are best practiced on simple pieces/flat surfaces, gets a bit mind bending after that.(looks amazing Dr)
I wondered if that was the method on the candy, really effective.Thanks Nerdy.
Blood spatter....on this I used swamp brown watered down then blood red. Tooth brush applicator! (held at distance and run finger along it.Mask where you do not want blood.)
On this I used again Swamp brown very thin wash, but then discovered BFTBG liberally applied....
Hope that helps.
|
|
|
|
|
|
2016/07/10 16:35:22
Subject: DakkaDakka Society of Fine Painters
|
|
Mounted Kroot Tracker
|
@ Jah: Superb minis dude as usual. Yeah that one fellow is rather busy but the metal effects are still well done, and I blame the mini more than the paint And those damn mold lines, i always miss at least one. You can count on it....
@Dr H: Great pics and tuts...love SENMM tower, reminds me of home! And yes please do post your wood painting tut here, it would be massively appreciated and at this point I think this thread has enough visibility that it's worth it to rehash some tuts that's are posted in the tut forums.
@Damo: awesome tuts. Actually, that candy green is extremely close to how I painted the mother of pearl effect. Except i used silver over a menagerie of pink turq and blue wash stippling. But besides that, exactly the same. Great minds....me thinks
@Cam: fantastic blood effects. Has everyone basically gone towards using BFTBG as opposed to any other method these days? Or is that the quick and easy? I'm wondering about more cartoonish blood and gore as well...just literally painting it all on. Hmmm....and the toothbrush, I love that idea, tiny splatters and blood spray! I'll be using that whenever I start painting bloody things
Cheers all. Keep up the momentum and great posts! This is so great! <3
Bebop
|
|
|
|
|
|
2016/07/11 00:10:54
Subject: Re:DakkaDakka Society of Fine Painters
|
|
Gargantuan Great Squiggoth
|
Going to try an experiment, since we have the creme dela creme here, please pick this to bits...
Zoom in in the Gallery to see it properly.
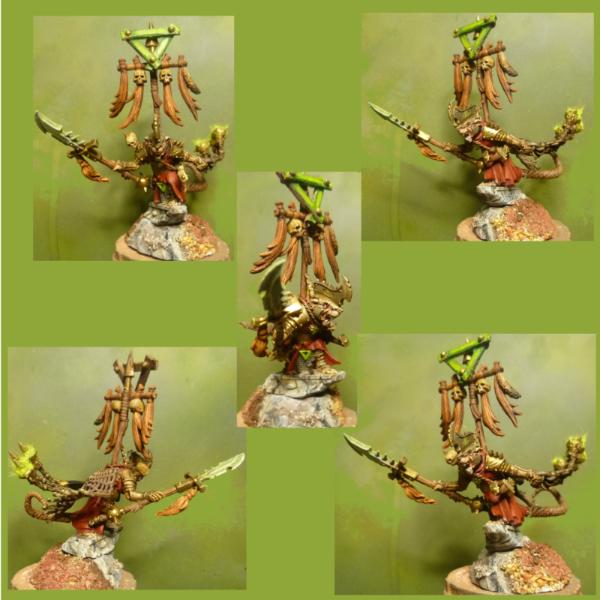
I am close to calling it done, though I have spotted a couple niggles I will sort out, however, all advice and suggestions accepted.
I figure public dismemberment will help many others as well as me.
|
|
|
|
|
|
|
|


 Chaos Warband & Inquisition