| Author |
Message |
 |
|
|
|
|
Advert
|
Forum adverts like this one are shown to any user who is not logged in. Join us by filling out a tiny 3 field form and you will get your own, free, dakka user account which gives a good range of benefits to you:
- No adverts like this in the forums anymore.
- Times and dates in your local timezone.
- Full tracking of what you have read so you can skip to your first unread post, easily see what has changed since you last logged in, and easily see what is new at a glance.
- Email notifications for threads you want to watch closely.
- Being a part of the oldest wargaming community on the net.
If you are already a member then feel free to login now. |
|
 |
2016/08/20 21:35:58
Subject: Re:My adventure into (making money with) modelling: Now Building: CD City.
|
|

Mastering Non-Metallic Metal
|
Thanks Red'. That's pretty much what I've ended up doing.
Proof of life post.
I know I said I'd update in a couple of days, but the method i've settled on takes a long time to dry and you can't do anything with it until each layer has dried.
I have been taking photos at each stage so that I can give you all a full breakdown of the method, but there is still a few finishing touches to do.
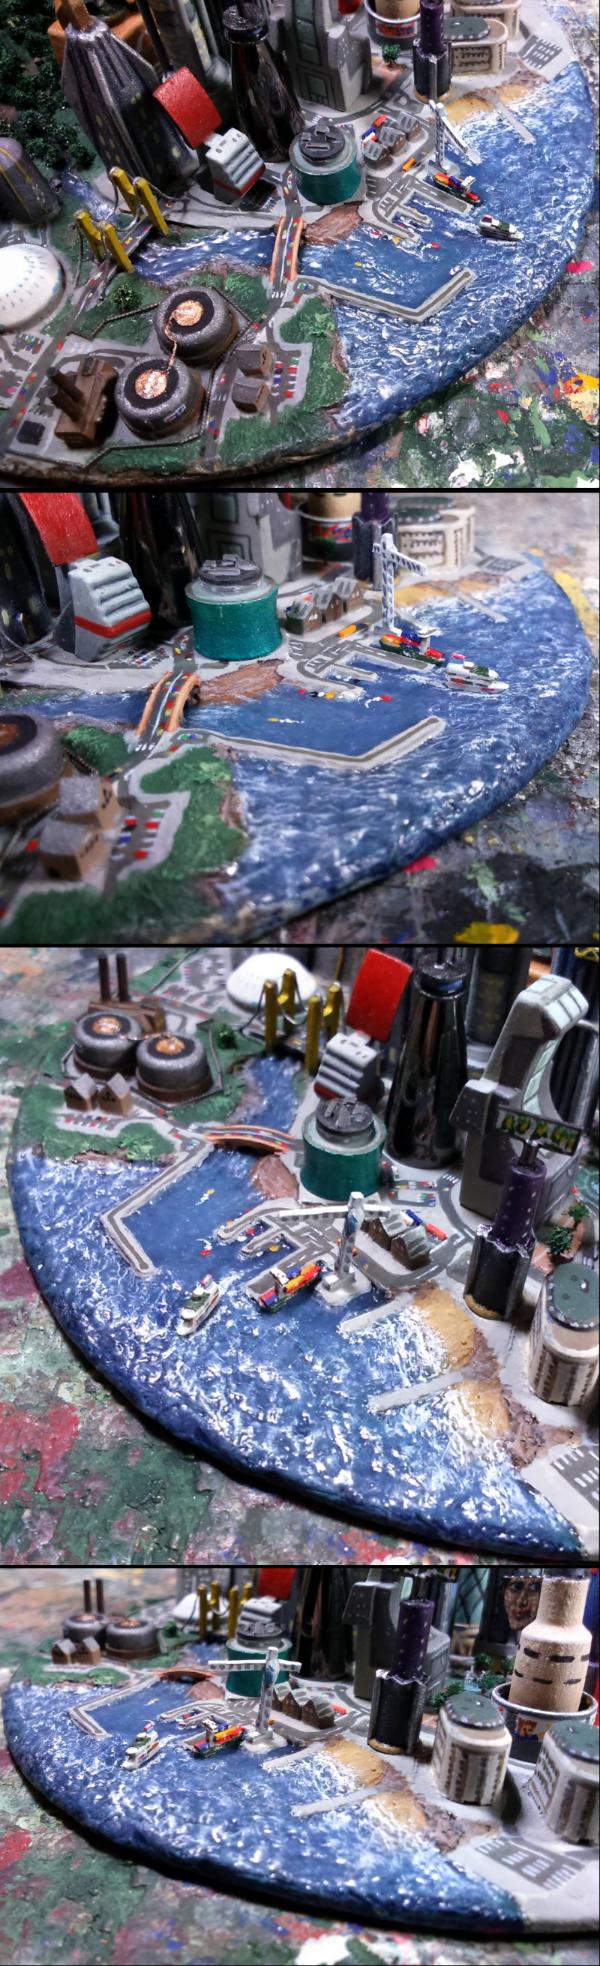
So, to tide you over until it's done and I can post a full tutorial (of sorts), here's a photo of the river as it stands:
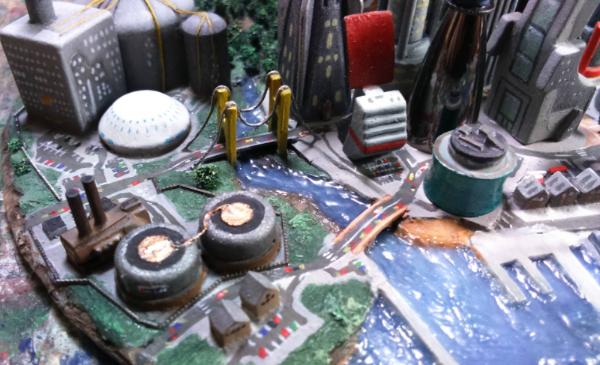
The quick version of my method is using an acrylic glaze medium with tiny amounts of blue mixed in.
The medium I had available (without buying one) was a matt finish, but as it turns out a final coat of gloss varnish is just as good.
It's a thick, artists medium, so it doesn't shrink like paint or varnish; allowing volume to be built up.
Stay tuned for the full reveal... once this stuff has fully cured (notice that it's cloudy in the bottom right of the above photo), and I've added white details, more gloss varnish and a boat or two.
|
     Mastodon: @DrH@warhammer.social Mastodon: @DrH@warhammer.social
The army-                   ~2295 points (built). ~2295 points (built).
 
* -=]_,=-eague Spruemeister General. * A (sprue) Hut tutorial *
Dsteingass - Dr. H..You are a role model for Internet Morality!  // inmygravenimage - Dr H is a model to us all // inmygravenimage - Dr H is a model to us all 
Theophony - Sprue for the spruemeister, plastic for his plastic throne! // Shasolenzabi - Toilets, more complex than folks take time to think about! |
|
|
 |
|
2016/08/21 06:50:05
Subject: My adventure into (making money with) modelling: Now Building: CD City.
|
|
Decrepit Dakkanaut
|
Looks stunning mate. I think the loer will be breathing a collective sigh of relief that you're not in the current contest!
|
Theophony"... and there's strippers in terminator armor and lovecraftian shenanigans afoot."
Solar_Lion: "Man this sums up your blog nicely."
Anpu-adom: "being Geek is about Love. Some love broadly. Some love deeply. And then there are people like Graven. |
|
|
|
|
2016/08/21 20:57:21
Subject: My adventure into (making money with) modelling: Now Building: CD City.
|
|

Combat Jumping Ragik
|
It certainly has flow now. He could enter it though, since he started it after the start point. 'Twould be legal.
|
|
|
|
|
|
2016/08/21 22:54:14
Subject: Re:My adventure into (making money with) modelling: Now Building: CD City.
|
|
Mastering Non-Metallic Metal
|
 Ha Ha, yeah I did consider making this my entry when this round started. But didn't think that I'd get it done in time to compete... and now with the deadline looming, I know I won't get it finished in time.
True, I could finish the harbour, add a boat or two and call this done as it is. But there are many more things I want to do all over the place, and mount it in it's proper place; inside the CD player.
Anyway, I see it as qualifying me to judge a contest on water features, by showing that I can do water.
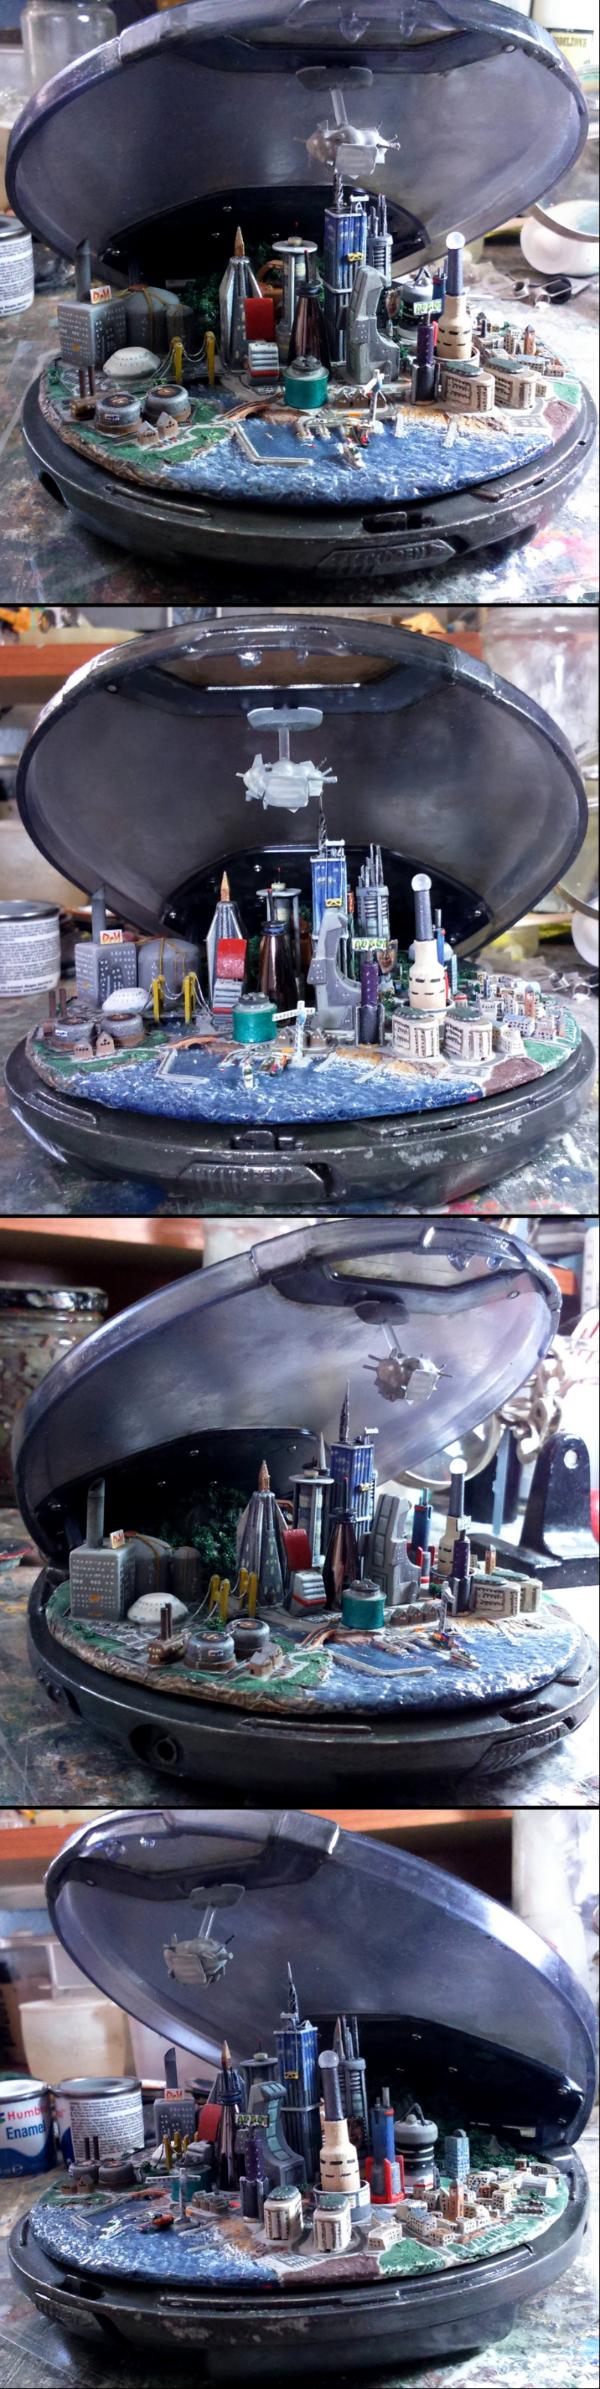
And so, minus the boats and a painted harbour, this is how it was done:
This is for small scale water, really small, you may think that your miniature gaming pieces are small, but that's just peanuts to this...
The scale you are working at is important for the colour of the water.
At very small scales, such as this*, the water will appear quite blue.
At smaller and smaller scales (that is 1:a smaller number, e.g. 1:56, 1:48, 1:12...), the water will be more and more colourless.
*I've not yet worked out the scale of this model, but when a car is only just over a millimetre you know it's small.
1. The base area, modelled with tissue/PVA, was painted with a dark blue then highlighted with a light blue.
This is just a base coat which lends it's colour to the finished water (as it will be transparent), and the highlighting is just to give a little variation in tone.
2. This is all that I used to create the water:
A glaze medium, this is the bulk of what will become the water. A gloss finish would be ideal, but I only had a matt variety to hand. Therefore the finished water needed a gloss varnish.
You want something that will cure with very little shrinkage (unlike paint) and will be transparent. Look for mediums rather than varnishes.
Acrylic paint, as the medium was acrylic these needed to match so that they could be mixed. Both green and blue (see later).
Something to mix in, and my universal poking device (a blunt scalpel).
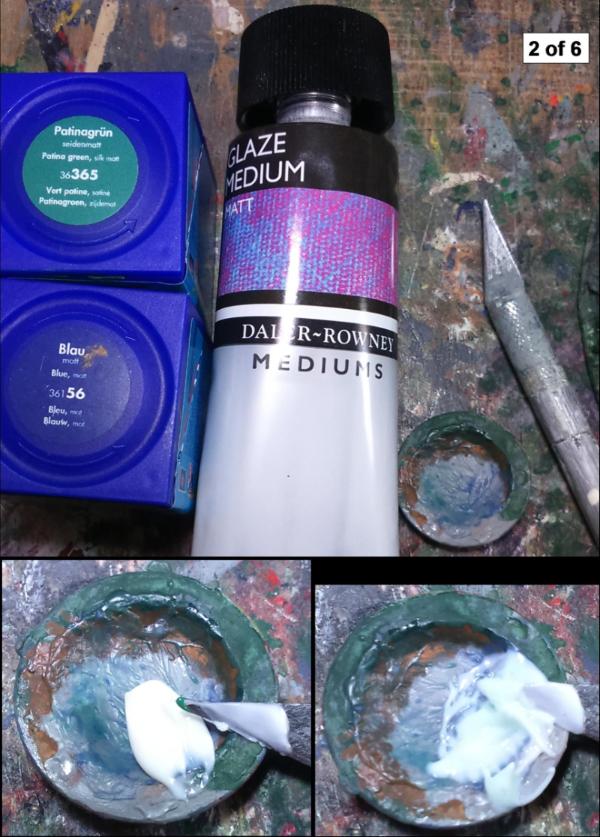
These last photos show the relative quantities of medium to paint (see the tiny dot on the tip of the blade), and the final colour of the mixture; a very slight tint to an otherwise white medium.
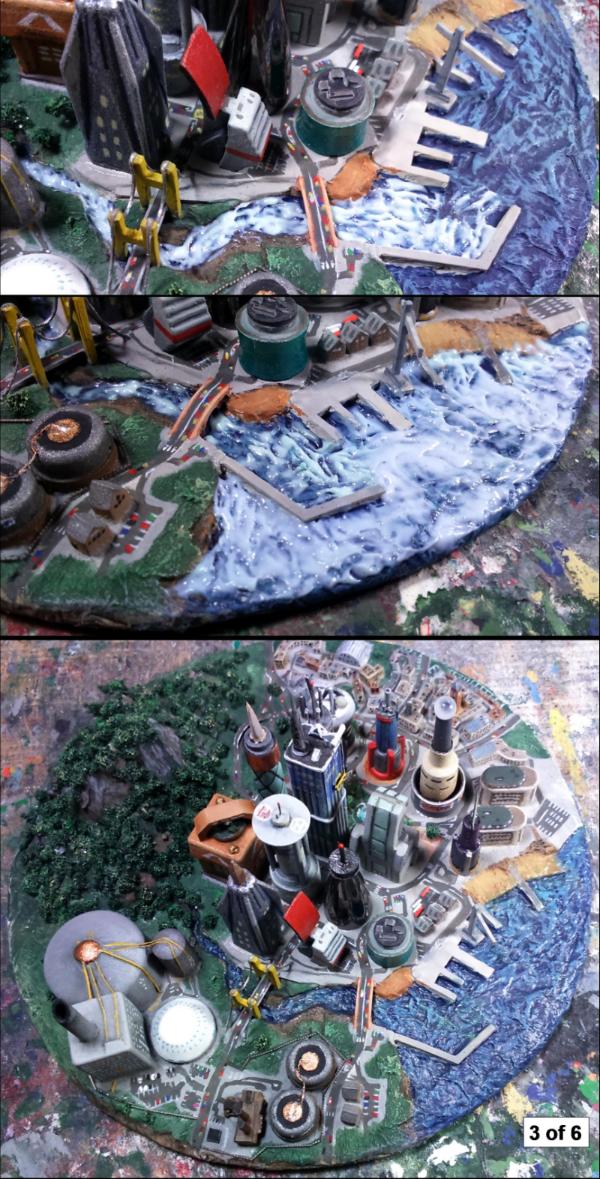
3. The mixture was spread over the water area.
The first pass was with a green mixture to give the final water a slight greenness; adding to the variety in tone.
You will also notice that it’s applied unevenly, this helps to give swirls in the finished water.
Once dry you have a slightly green, transparent coat over the blue base.
It’s important to make each layer reasonably thin as they will dry quicker.
And it’s important to let each layer fully cure before adding the next, or you may end up with a cloudy lower layer.
4. Three progressively smoother coats of blue-tinted medium were then spread over the water area.
Each time I made sure to keep the edges where the “water” met the land, neat.
Removing excess “water” after it has cured leads to unsightly differences in the surface of the water.
I continued to tidy the edges as the medium cured, as it was often too “wet” at first.
A wet brush did help initially to smooth out the parts that didn't behave when poked with my poking device.
Areas that were further out to “sea” were modelled with waves, while inside the harbour it was kept relatively smooth.
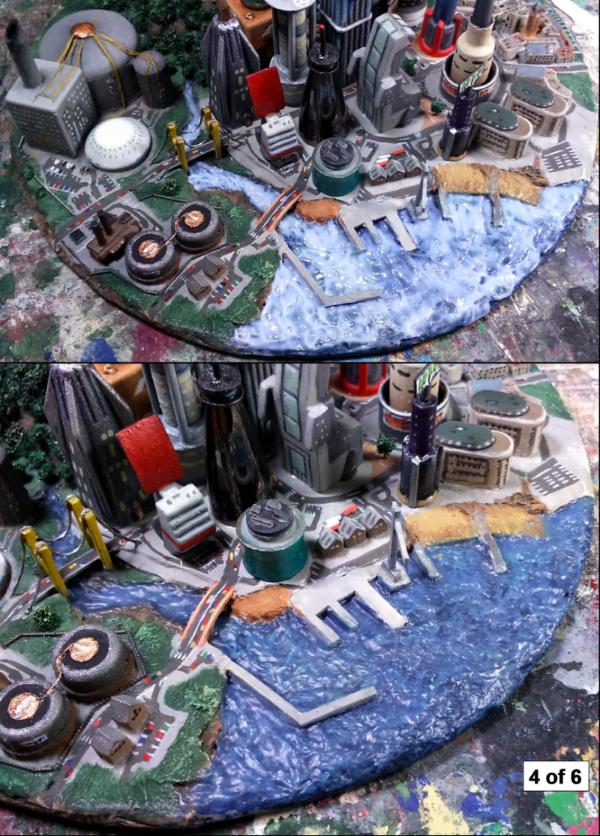
5. The final touches was to add patches of larger waves outside the harbour and at the beach.
The ripples and waves stand out much more once coated with a gloss varnish (as seen here).
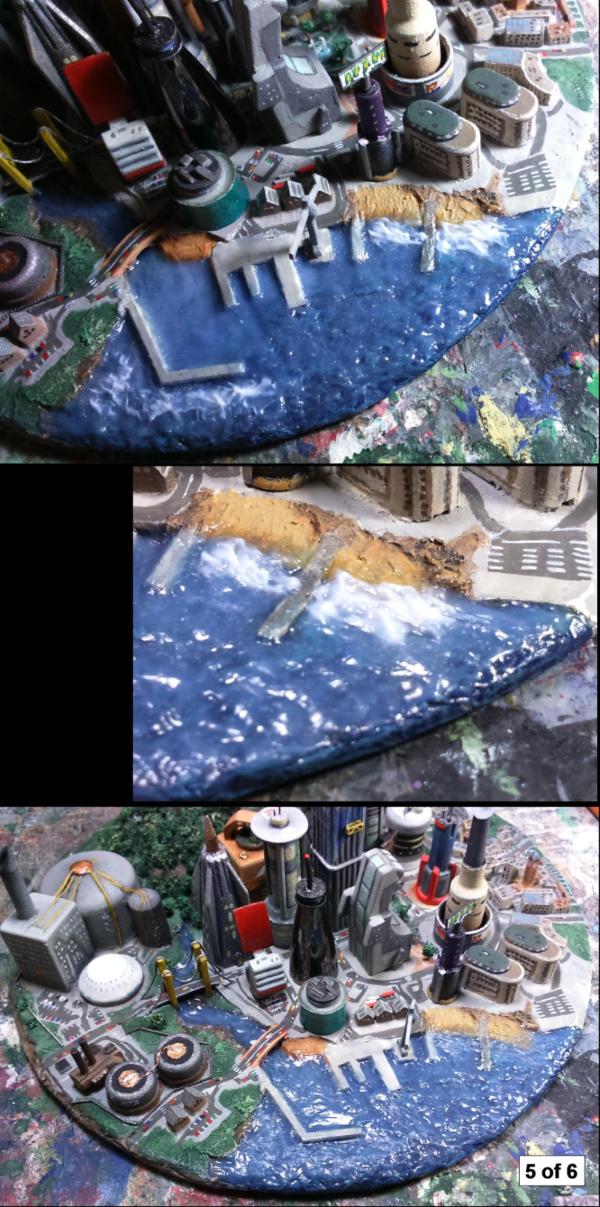
6. The last thing to do was add some white highlights, via dry-brushing, to the peaks of the largest waves, and one last gloss varnish.

Getting the translucency to show up in photos is tricky, and I've not found a particularly good way to do this yet.
Hope that proves interesting and/or useful to someone.
|
Mastodon: @DrH@warhammer.social
The army- ~2295 points (built).
* -=]_,=-eague Spruemeister General. * A (sprue) Hut tutorial *
Dsteingass - Dr. H..You are a role model for Internet Morality! // inmygravenimage - Dr H is a model to us all
Theophony - Sprue for the spruemeister, plastic for his plastic throne! // Shasolenzabi - Toilets, more complex than folks take time to think about! |
|
|
|
|
2016/08/22 06:10:45
Subject: My adventure into (making money with) modelling: Now Building: CD City.
|
|
Rogue Inquisitor with Xenos Bodyguards
|
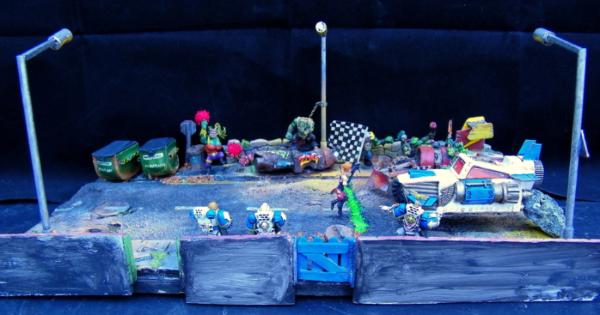
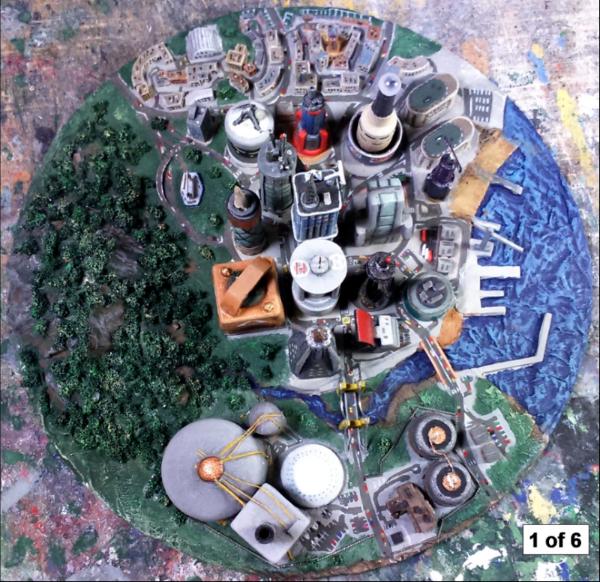
The city has come to life!
|
"Your mumblings are awakening the sleeping Dragon, be wary when meddling the affairs of Dragons, for thou art tasty and go good with either ketchup or chocolate. "
Dragons fear nothing, if it acts up, we breath magic fire that turns them into marshmallow peeps. We leaguers only cry rivets!


|
|
|
|
|
2016/08/22 17:11:10
Subject: My adventure into (making money with) modelling: Now Building: CD City.
|
|
The Hammer of Witches
|
Looks very aesthetically pleasing now the blue of the sea is in.
|
|
|
|
|
|
2016/08/22 22:06:39
Subject: My adventure into (making money with) modelling: Now Building: CD City.
|
|
Mastering Non-Metallic Metal
|
Thanks Shas'.
Thanks Weety. Yeah, this is the reason I've been avoiding blue on the buildings.
Harbour is getting there, but I've mostly been building ships...
One container ship (just a small one), and one cruise ship.
And then I added a few smaller boats in the same way I've been doing cars (dots of paint).
|
Mastodon: @DrH@warhammer.social
The army- ~2295 points (built).
* -=]_,=-eague Spruemeister General. * A (sprue) Hut tutorial *
Dsteingass - Dr. H..You are a role model for Internet Morality! // inmygravenimage - Dr H is a model to us all
Theophony - Sprue for the spruemeister, plastic for his plastic throne! // Shasolenzabi - Toilets, more complex than folks take time to think about! |
|
|
|
|
2016/08/23 21:12:39
Subject: My adventure into (making money with) modelling: Now Building: CD City.
|
|
Decrepit Dakkanaut
|
Glorious. Your white horses are just perfect.
|
Theophony"... and there's strippers in terminator armor and lovecraftian shenanigans afoot."
Solar_Lion: "Man this sums up your blog nicely."
Anpu-adom: "being Geek is about Love. Some love broadly. Some love deeply. And then there are people like Graven. |
|
|
|
|
2016/08/23 22:38:40
Subject: My adventure into (making money with) modelling: Now Building: CD City.
|
|
Rogue Inquisitor with Xenos Bodyguards
|
Just when I think he can't add more details, he goes and out does himself!
|
"Your mumblings are awakening the sleeping Dragon, be wary when meddling the affairs of Dragons, for thou art tasty and go good with either ketchup or chocolate. "
Dragons fear nothing, if it acts up, we breath magic fire that turns them into marshmallow peeps. We leaguers only cry rivets!
|
|
|
|
|
2016/08/24 16:36:49
Subject: My adventure into (making money with) modelling: Now Building: CD City.
|
|
The Hammer of Witches
|
I love tiny worlds.
|
|
|
|
|
|
2016/08/25 15:30:43
Subject: My adventure into (making money with) modelling: Now Building: CD City.
|
|
Mastering Non-Metallic Metal
|
Thanks Graven. Came out quite well, I think, and hides the rather too abrupt end to the beach under the water.
Thanks Shas'. I'm always trying to out do myself.
Thanks Weety. That is why we build models.
Apart from sweating profusely ...

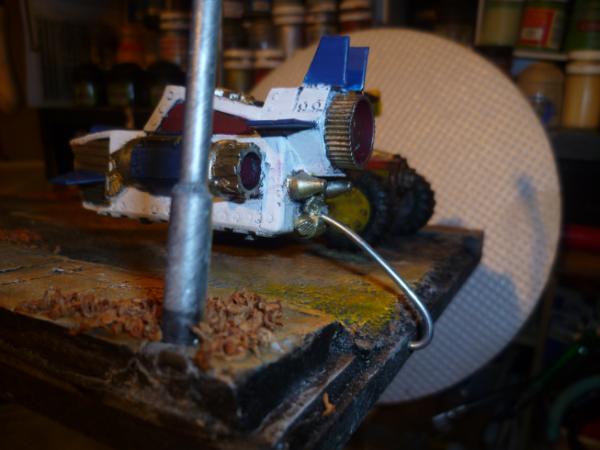
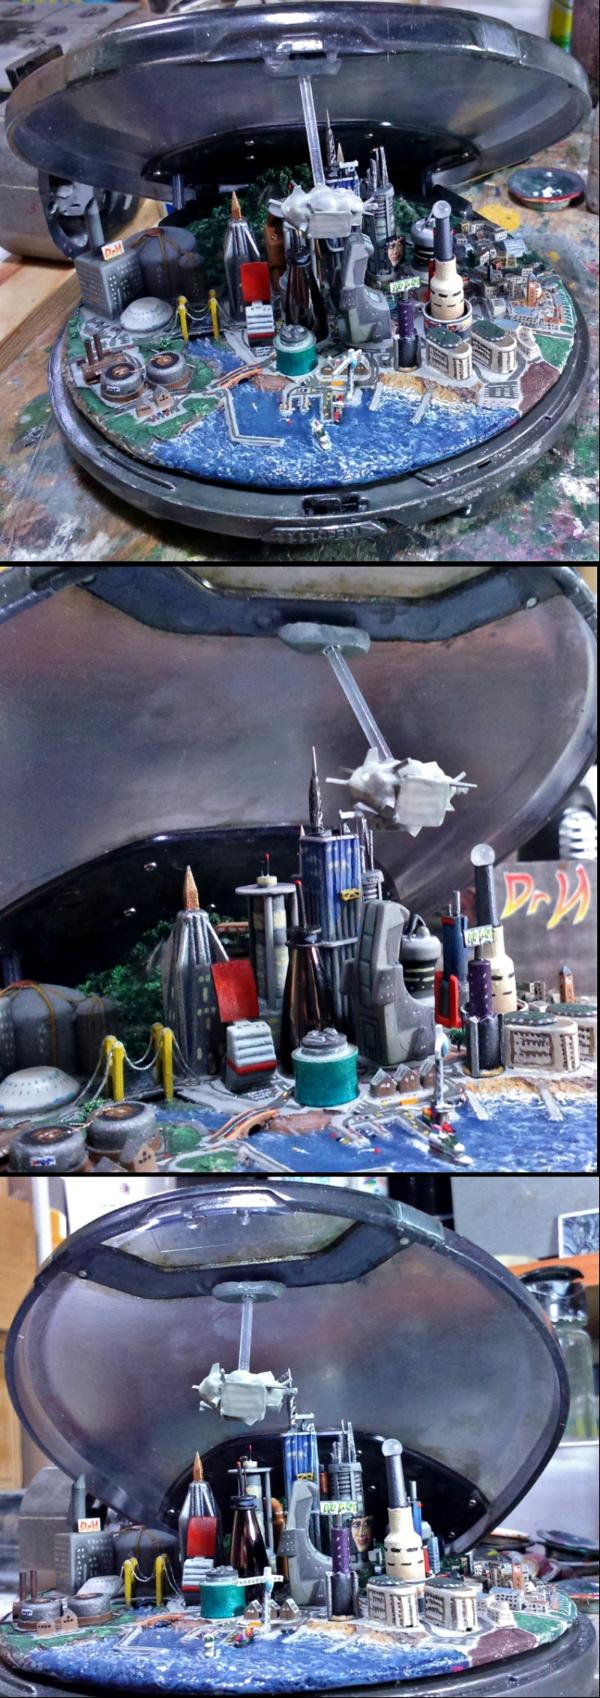
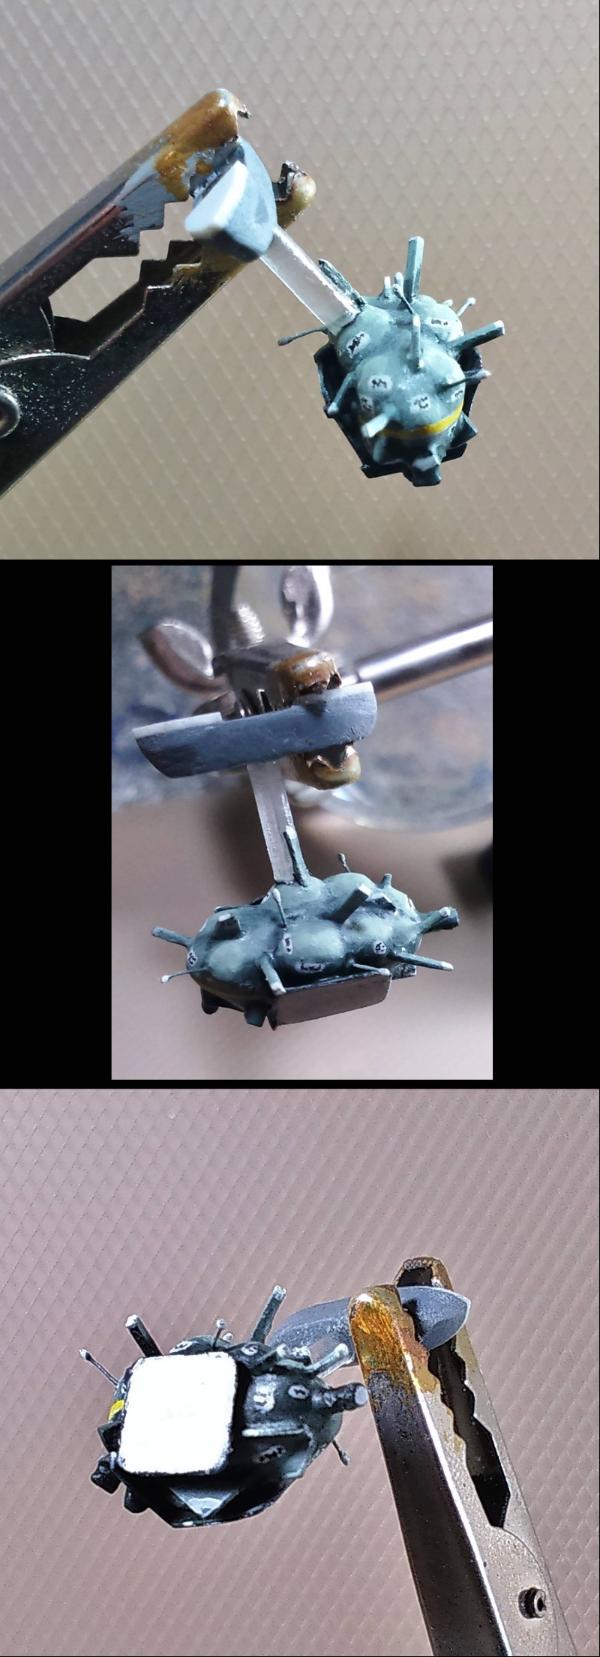
... I've been building an airship.
It started as a "normal" zeppelin-alike airship. But I wanted advertising on it, as seen in Bladerunner, and one thing led to another, the zeppelin was too big, etc... and it ended up pretty heavily based on the Bladerunner airships.
Then came the main problem, how to attach, suspend, and keep safe the airship.
Thread/wire was the first thought, but I decided that that was going to be too fragile as it would have to be really thin wire to not spoil the scale of the model.
I considered using a section of clear plastic (acetate or the stuff blisters are made of), but I couldn't come up with a satisfactory way to attach it as I already had sculpted the airship; the best way would be to incorporate it within the putty with pegs and pins to lock it in.
So I ended up with the method of suspending models that I personally don't really like, a piece of clear plastic rod.
Why go with something I don't like?
I wanted this to be removable and so required a good way to hold the model airship without needing to touch the airship; hence the worries about wire etc. not being strong enough.
The rod is attached to a piece of sprue (carved into a "nice" shape) that is magnetised to the bottom of the lid.
Looks like I've snapped off one of the spiky bits, I may reconsider how those are attached.
Then... paint.
|
Mastodon: @DrH@warhammer.social
The army- ~2295 points (built).
* -=]_,=-eague Spruemeister General. * A (sprue) Hut tutorial *
Dsteingass - Dr. H..You are a role model for Internet Morality! // inmygravenimage - Dr H is a model to us all
Theophony - Sprue for the spruemeister, plastic for his plastic throne! // Shasolenzabi - Toilets, more complex than folks take time to think about! |
|
|
|
|
2016/08/25 19:47:20
Subject: My adventure into (making money with) modelling: Now Building: CD City.
|
|
Rogue Inquisitor with Xenos Bodyguards
|
Ah the Ad/News blimp! awesome!
|
"Your mumblings are awakening the sleeping Dragon, be wary when meddling the affairs of Dragons, for thou art tasty and go good with either ketchup or chocolate. "
Dragons fear nothing, if it acts up, we breath magic fire that turns them into marshmallow peeps. We leaguers only cry rivets!
|
|
|
|
|
2016/08/25 20:21:28
Subject: My adventure into (making money with) modelling: Now Building: CD City.
|
|
Decrepit Dakkanaut
|
OK Dr H, I'm going to stick my neck out here. I absolutely love the Blade Runner references & want you to keep them, but the mounting rod really distracts from the piece and the blimp blocks the view of the amazing detail you've spent so much time putting in. Mount the blimp to the lid directly by a very short rod and move it towards the back so it's more behind and over the city rather than in front and over. Make it a little smaller if you need to in order to keep the size perspective you want.
|
|
|
|
|
|
2016/08/25 22:00:55
Subject: My adventure into (making money with) modelling: Now Building: CD City.
|
|
Mastering Non-Metallic Metal
|
Thanks Shas'.
 Gitsplitta wrote: Gitsplitta wrote:OK Dr H, I'm going to stick my neck out here. I absolutely love the Blade Runner references & want you to keep them, but the mounting rod really distracts from the piece and the blimp blocks the view of the amazing detail you've spent so much time putting in. Mount the blimp to the lid directly by a very short rod and move it towards the back so it's more behind and over the city rather than in front and over. Make it a little smaller if you need to in order to keep the size perspective you want.
Thanks Gits', good feedback.
I do agree with the rod (did I mention that I don't like these... ) being distracting.
Making the rod shorter will happen. It catches the light when not in the shadow of the lid.
Moving the ship further back is more tricky; the reason it is attached where it is is that the non-clear piece on the lid hides the magnet attachment point. Mounting it anywhere on the clear area will show from outside, which leaves it right at the back; I'll look into this and see how it might work or leaving it mounted where it is with the rod ~half as long (which would put it above the height of the spike of the main skyscraper).
Looking back over the photos, they don't show it spatially as well as it does IRL, it's currently hanging right above the water (about where the tip of the crane is). This puts it in the empty space above and in front of the city. The photos seem to show it much nearer the buildings than it actually is.
I'll have a look at what can be changed (it might fit in between the rear of the city and the mountain at the back, it might be too busy), and do some blu-tack photos tomorrow.
|
Mastodon: @DrH@warhammer.social
The army- ~2295 points (built).
* -=]_,=-eague Spruemeister General. * A (sprue) Hut tutorial *
Dsteingass - Dr. H..You are a role model for Internet Morality! // inmygravenimage - Dr H is a model to us all
Theophony - Sprue for the spruemeister, plastic for his plastic throne! // Shasolenzabi - Toilets, more complex than folks take time to think about! |
|
|
|
|
2016/08/26 13:24:37
Subject: My adventure into (making money with) modelling: Now Building: CD City.
|
|
Decrepit Dakkanaut
|
How about using a stiff piece of wire instead of the plastic rod? The rod, even though "clear", still effectively is a solid visual object.. and a big one. You could get away with a lot thinner piece of wire which would have less visual impact I'd think.
|
|
|
|
|
|
2016/08/26 15:10:34
Subject: Re:My adventure into (making money with) modelling: Now Building: CD City.
|
|
Mastering Non-Metallic Metal
|
I was just about to post some tests when I saw your above comment (thanks again, Gits'), and I wouldn't be a scientist if I didn't fully test all the possibilities, so I just added some more tests.
All shown here:
As these are quick tests I have used a lump of blu-tack, rather than sculpt another blimp that may or may not be used. However, the blu-tack is a similar tone/lightness to the primed ship and of the same size, so that's all fair.
The first photo here shows the original attachment from the side, so that you can see what I was talking about in it's position in space.
Below that is testing with some clear acetate, positioned at the front and rear of the city.
My thoughts after the photo so that you can draw you own conclusions before seeing mine:
The acetate, while very good for "invisibility", doesn't quite behave how I'd like it to.
To get a good attachment to the lid it would be easiest to have it flat against the surface (larger surface area). The alternative would be sandwiching it inside a block (like that used for the magnet previously.
With it attached flat to the surface the idea was that the weight of the airship would bend it down to where it should be.
This helps to hide the acetate better by keeping it out of sight for "longer", and avoids light reflections off it spoiling the effect (one of the main issues with the rod).
However, it has a couple of problems:
1. It's very bouncy and moving the whole model around (and I'm also thinking about posting this thing as a consideration) is potentially risky with the ship colliding with the lid and/or city.
Magnetising it, as shown with the rod previously, would therefore require a good connection with both the ship and lid so that they don't break, for example, when someone wants to remove it. Getting a good connection is tricky, compared to the polystyrene rod, due to glue chemistry; a good bond to acetate is difficult.
2. In order to get it to bend to the desired amount it needs to be quite thin (and therefore more difficult to get a good connection), and/or quite long.
This means that where you attach it becomes increasingly rare. You'll see in the photos that I have it attached right at the front of the lid, not at the position of the magnet (where the attachment is hidden), and it's still a bit too close to the city. You can't shorten the length of the acetate, as that raises the ship too close to the lid (and getting the angle of attaching it to the ship compared to where it'll hang in the sky becomes increasingly difficult).
If you attach it the other way around, curve outwards, you'll need to be gluing it right in the middle of the lid (the clear bit, therefore not hidden) or it sticks outside the bounds of the CD player, and I want everything contained within (for aesthetics and safety).
Also shown is the airship positioned at the rear of the city.
Even if I made the ship smaller, it'd need to be at least half the size, it's just too cluttered back there for it to be visible as something separate from the buildings of the city.
Seeing into the back area of the model is tricky enough (which is why it's mainly trees and hills), I don't think hanging the ship anywhere around the sides of the city would help this either.
So it "needs" to be hanging at the front.
Which leads to...
Wires (after Gits' mentioned it above).
I had a rummage through my pot of "wires" and found 2 that were stiff enough to do the job.
Anything I have thinner is too bendy, because they a mainly copper wires, or just too thin to support the weight of the ship.
Hanging the ship as you would with a thread leads to the same issues as the acetate I mentioned above; movement = damage, too fragile to remove reliably.
The colours of these two wires don't help their cause, but that is what paint is for.
Again, my comments after the photos.

There's not a lot to separate the two wires, really. But the green one helps to give an idea of what a non-shiny, painted, wire would look like and how it reacts to light.
The copper-coloured wire (it's much stiffer than any other "copper" wire I have, so might not actually be copper in this case) is thinner though.
While in shadow the green wire doesn't show up much at all (a good thing), but when the light catches it, it's no better than the clear rod it might replace. But the wire would have to be painted; that shiny copper really jumps out.
Being stiff wire there's no issue with the ship moving about, and the mould-ability of the wire opens the thoughts to permanently attach it, rather than magnetise, and to curve it in such a way to lessen the affect of light on it (as mentioned about the acetate). But could still be magnetised (as I've already glued in the magnet to the lid...).
However, making it magnetised leads to people handling the wire and rubbing off the paint, which would lead to destroying the effect of the "hidden" wire (shiny copper, remember).
Whether they are better than the clear rod, in this situation, I'm not sure. Thoughts?
And finally, the clear rod again, but shorter...
It does what it needed to do; the ship is higher up, above the city from pretty much any viewing angle, and is now all in shadow, meaning you don't have half of it shining out where the light catches it...
It's better than it was in all respects, but is it better than the wires?
Answers on a postcard to: I'm still reading after all this and don't have my brain leaking out my ears.
Thanks.
|
Mastodon: @DrH@warhammer.social
The army- ~2295 points (built).
* -=]_,=-eague Spruemeister General. * A (sprue) Hut tutorial *
Dsteingass - Dr. H..You are a role model for Internet Morality! // inmygravenimage - Dr H is a model to us all
Theophony - Sprue for the spruemeister, plastic for his plastic throne! // Shasolenzabi - Toilets, more complex than folks take time to think about! |
|
|
|
|
2016/08/26 16:11:20
Subject: My adventure into (making money with) modelling: Now Building: CD City.
|
|
Decrepit Dakkanaut
|
Much as I'm surprised to say it... I think the short clear rod is the best.
|
|
|
|
|
|
2016/08/26 16:40:04
Subject: My adventure into (making money with) modelling: Now Building: CD City.
|
|
Mastering Non-Metallic Metal
|
lol
Well that was still your idea anyway.
You don't know if you don't try.
Create the hypothesis,
Test the hypothesis,
Draw conclusions.
Thanks for the input, Gits'. I'm always happy to get feedback, "good" or "bad" (as I'm sure to dish out my own feedback from time to time).
Anyone else have any thoughts?
In the mean time I'm going to think about that attachment point, as shortening the rod has brought the airship nearer to it and it's become more visible.
Might shrink it a bit, and consider camouflage options (probably just paint it to match a "conveniently" placed cloud).
|
Mastodon: @DrH@warhammer.social
The army- ~2295 points (built).
* -=]_,=-eague Spruemeister General. * A (sprue) Hut tutorial *
Dsteingass - Dr. H..You are a role model for Internet Morality! // inmygravenimage - Dr H is a model to us all
Theophony - Sprue for the spruemeister, plastic for his plastic throne! // Shasolenzabi - Toilets, more complex than folks take time to think about! |
|
|
|
|
2016/08/26 18:27:50
Subject: My adventure into (making money with) modelling: Now Building: CD City.
|
|
Gargantuan Great Squiggoth
|
you could cover the rod with steam !
|
|
|
|
|
|
2016/08/26 19:20:00
Subject: My adventure into (making money with) modelling: Now Building: CD City.
|
|
Mastering Non-Metallic Metal
|
Ah, you mean coming from the airship... I had thought about using cotton wool to make the magnet "base" a cloud, but I'm worried about handling it affecting the wool.
I have also thought about using the excuse of the various spiky bits to camouflage the clear rod too; stick one up alongside the rod.
Will have a play with things...
|
Mastodon: @DrH@warhammer.social
The army- ~2295 points (built).
* -=]_,=-eague Spruemeister General. * A (sprue) Hut tutorial *
Dsteingass - Dr. H..You are a role model for Internet Morality! // inmygravenimage - Dr H is a model to us all
Theophony - Sprue for the spruemeister, plastic for his plastic throne! // Shasolenzabi - Toilets, more complex than folks take time to think about! |
|
|
|
|
2016/08/27 09:33:04
Subject: My adventure into (making money with) modelling: Now Building: CD City.
|
|
Decrepit Dakkanaut
|
I like, it's very cool, and I'm not just saying that because I'm teaching Blade Runner this week I suggest making the pylons / wires a bit longer and have one of them running all the way to the lid. You could indeed take out and through the lid with your detach mechanism on the exterior of the lid.
|
Theophony"... and there's strippers in terminator armor and lovecraftian shenanigans afoot."
Solar_Lion: "Man this sums up your blog nicely."
Anpu-adom: "being Geek is about Love. Some love broadly. Some love deeply. And then there are people like Graven. |
|
|
|
|
2016/08/27 17:43:09
Subject: My adventure into (making money with) modelling: Now Building: CD City.
|
|
Mastering Non-Metallic Metal
|
 inmygravenimage wrote: inmygravenimage wrote:I like, it's very cool, and I'm not just saying that because I'm teaching Blade Runner this week I suggest making the pylons / wires a bit longer and have one of them running all the way to the lid.
Thanks Graven.
Lucky little kiddies you have there, I was never taught about anything as cool... or at least remember being taught, which amounts to the same thing.
It's a thought, but it may look a bit too comically large if I extended the spines enough to space the ship far enough away from the lid.
You could indeed take out and through the lid with your detach mechanism on the exterior of the lid.
I feel that auto-correct may have had a say in this sentence and I don't really follow what you mean?
I don't want anything on the outside of the lid as I want that to retain the look of the CD player (although it's going to be "distressed").
No pic' update.
Been having a look at the spines with an aim of pinning them to prevent/minimise snapping them off if the ship is handled.
Many of them are too thin to drill into with my smallest bit (0.3mm), so that's not possible.
I did add some thin wires as extra spines while I was there.
With that meaning that the airship has fragile parts, I think I'm going to do away with the "base" and magnet and attach the rod directly to the lid permanently, thus doing away with issues of:
hiding the base,
fragile spines,
grubby fingers on the rod and/or cotton wool clouds,
falling off in transit,
having to add instructions for handling,
and pretty much any other problems that may have been mentioned.
Sometimes, the simplest solution is the best.
|
Mastodon: @DrH@warhammer.social
The army- ~2295 points (built).
* -=]_,=-eague Spruemeister General. * A (sprue) Hut tutorial *
Dsteingass - Dr. H..You are a role model for Internet Morality! // inmygravenimage - Dr H is a model to us all
Theophony - Sprue for the spruemeister, plastic for his plastic throne! // Shasolenzabi - Toilets, more complex than folks take time to think about! |
|
|
|
|
2016/08/27 21:31:37
Subject: My adventure into (making money with) modelling: Now Building: CD City.
|
|
Decrepit Dakkanaut
|
Magnet is good  I just meant in one side and out the other.
|
Theophony"... and there's strippers in terminator armor and lovecraftian shenanigans afoot."
Solar_Lion: "Man this sums up your blog nicely."
Anpu-adom: "being Geek is about Love. Some love broadly. Some love deeply. And then there are people like Graven. |
|
|
|
|
2016/08/27 23:51:17
Subject: Re:My adventure into (making money with) modelling: Now Building: CD City.
|
|
Utilizing Careful Highlighting
|
If I missed it, apologies! but what are you doing with the lid?
Because I totally am seeing the black disk part as the sun, setting, and the interior part as the atmosphere surrounding the city.
Also, re: airship I keep thinking about two magnets repelling but I can't think of a way to keep them in line, with the airship hanging down from the top ><
|
|
|
|
|
|
2016/08/28 08:31:47
Subject: Re:My adventure into (making money with) modelling: Now Building: CD City.
|
|
Gargantuan Great Squiggoth
|
I was thinking making it less obviously a straight rod, so something similar to what I did here..
You could do a thin wire circling away from the back indicating movement, with a little bit of whispy stuff indicating "steam" of exhaust.
What you have shown so far looks good to go though.
|
|
|
|
|
|
2016/08/28 22:18:34
Subject: My adventure into (making money with) modelling: Now Building: CD City.
|
|
Mastering Non-Metallic Metal
|
Fair enough, Graven. I've removed the magnet now anyway, so we'll see how it looks without.
Guildenstern wrote:If I missed it, apologies! but what are you doing with the lid?
Because I totally am seeing the black disk part as the sun, setting, and the interior part as the atmosphere surrounding the city.
Also, re: airship I keep thinking about two magnets repelling but I can't think of a way to keep them in line, with the airship hanging down from the top ><
Lo Guilden'.
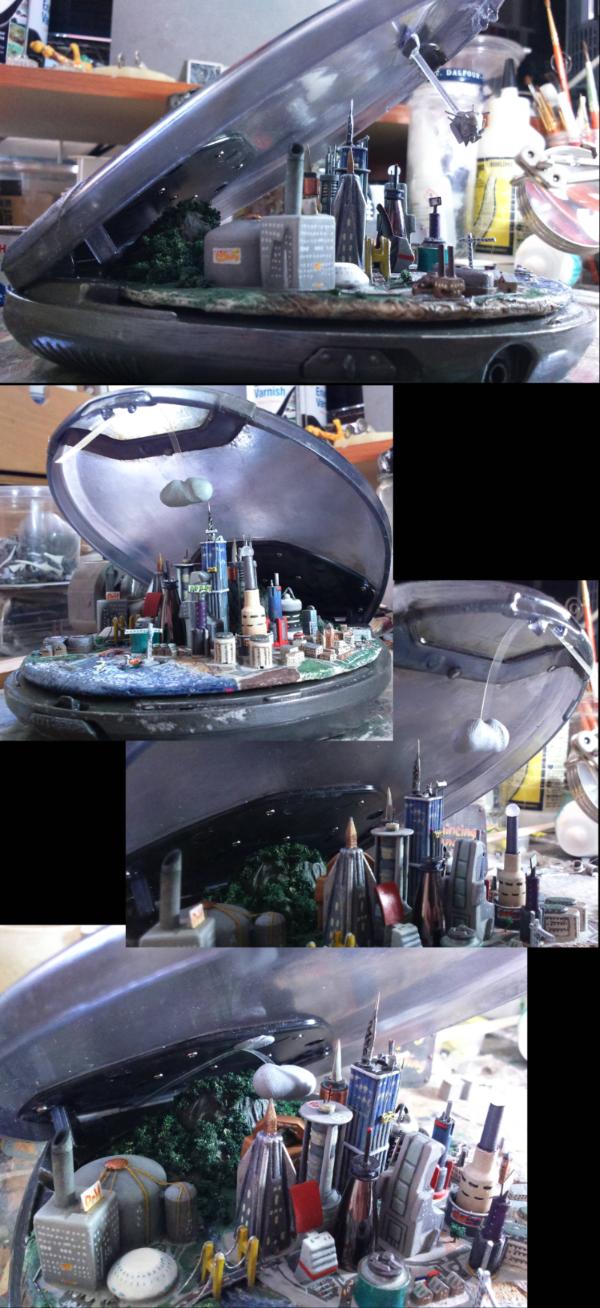
A sunset at the back would have been good. But to add that now, I'd have to paint it on the central skyscraper, which is not possible now.
I do have plans though.
The opaque part at the rear is going to have hills, etc. painted on to match the modelled one. I'm putting this off as it involves painting a 3D perspective on an angled 2D surface (and not angled in a helpful way either).
The clearer (and clearly not getting any clearer) part of the lid is representing the sky and will have some clouds painted on to hopefully cast some shadows onto the city and look cool in photos.
I know what you mean; magnetic levitation. 
I've seen it done in models. The one that springs to mind is an Eldar jetbike (or similar vehicle) suspended over some ruins/flagstones.
I believe that it involves a quite powerful magnet inside the model, and an electromagnet in the "base". I don't think I have the space for either in this case.
There's also flux pinning, that would do the same job. But I don't think I could sell a model that requires a plug and liquid nitrogen. Not to mention getting hold of a suitable superconductor (I have synthesised some during my undergraduate days, didn't keep hold of it though).
Thanks Cam'. Yeah, I did think about curving the wire if I used it. Hiding it in the exhaust is a good idea. Plan B for now.
I've been painting the airship (slowly) and thought I'd take a photo or two to liven this post up:
Notice the added spiky bits, and the one along the rod to (hopefully) camouflage it a bit.
It's also plastered in small adverts and I'll eventually come up with an idea of what to put on the main displays.
|
Mastodon: @DrH@warhammer.social
The army- ~2295 points (built).
* -=]_,=-eague Spruemeister General. * A (sprue) Hut tutorial *
Dsteingass - Dr. H..You are a role model for Internet Morality! // inmygravenimage - Dr H is a model to us all
Theophony - Sprue for the spruemeister, plastic for his plastic throne! // Shasolenzabi - Toilets, more complex than folks take time to think about! |
|
|
|
|
2016/08/29 21:29:14
Subject: Re:My adventure into (making money with) modelling: Now Building: CD City.
|
|
Mastering Non-Metallic Metal
|
And now with 100% more advertising...
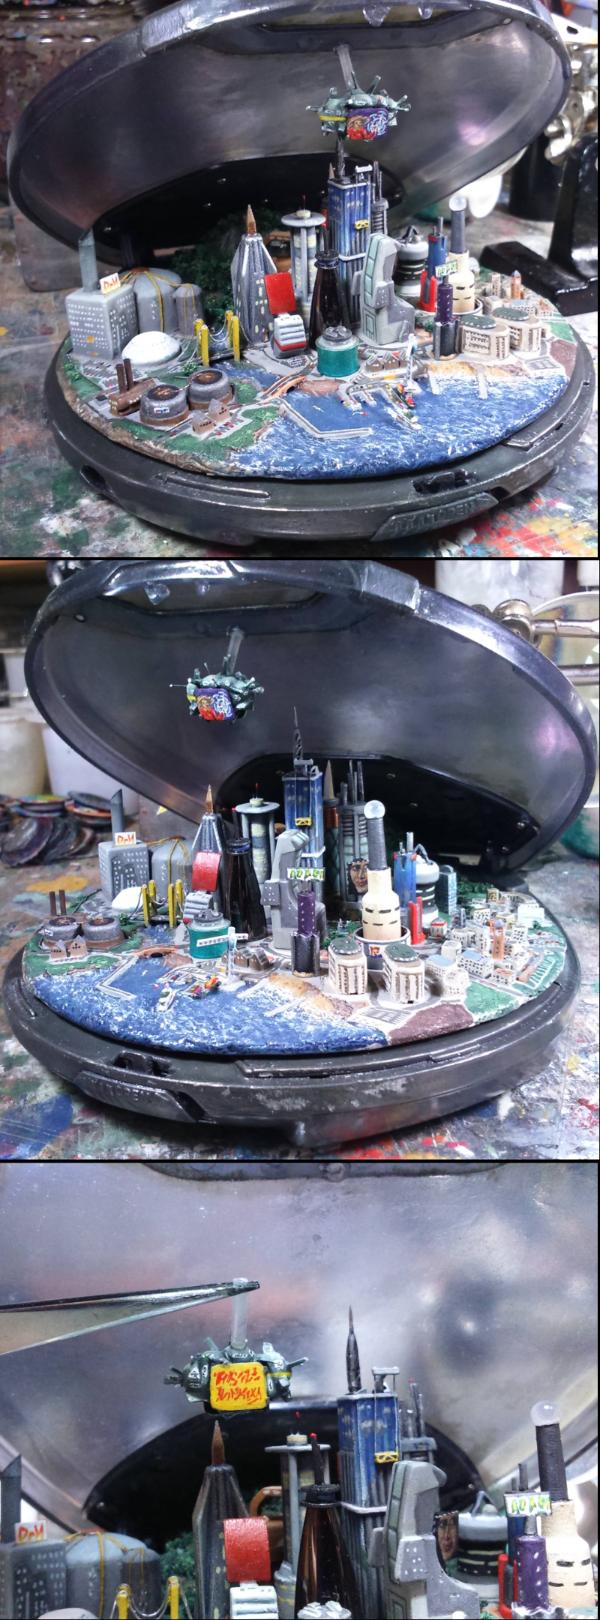
That's just held in with friction at the moment.
Now, I suppose, it's time to start on the landscape painting for the background.
And clouds.
|
Mastodon: @DrH@warhammer.social
The army- ~2295 points (built).
* -=]_,=-eague Spruemeister General. * A (sprue) Hut tutorial *
Dsteingass - Dr. H..You are a role model for Internet Morality! // inmygravenimage - Dr H is a model to us all
Theophony - Sprue for the spruemeister, plastic for his plastic throne! // Shasolenzabi - Toilets, more complex than folks take time to think about! |
|
|
|
|
2016/08/30 13:00:10
Subject: My adventure into (making money with) modelling: Now Building: CD City.
|
|
Decrepit Dakkanaut
|
Been waiting for this next part. I think it'll make a big difference!
|
|
|
|
|
|
2016/08/30 20:09:53
Subject: My adventure into (making money with) modelling: Now Building: CD City.
|
|
Decrepit Dakkanaut
|
A new life awaits you in the off world colonies! Very nice.
|
Theophony"... and there's strippers in terminator armor and lovecraftian shenanigans afoot."
Solar_Lion: "Man this sums up your blog nicely."
Anpu-adom: "being Geek is about Love. Some love broadly. Some love deeply. And then there are people like Graven. |
|
|
|
|
2016/08/30 20:10:49
Subject: My adventure into (making money with) modelling: Now Building: CD City.
|
|
Rogue Inquisitor with Xenos Bodyguards
|
Love the touch of the message/ad blimp!
|
"Your mumblings are awakening the sleeping Dragon, be wary when meddling the affairs of Dragons, for thou art tasty and go good with either ketchup or chocolate. "
Dragons fear nothing, if it acts up, we breath magic fire that turns them into marshmallow peeps. We leaguers only cry rivets!
|
|
|
|
|
|
|