| Author |
Message |
 |
|
|
|
|
Advert
|
Forum adverts like this one are shown to any user who is not logged in. Join us by filling out a tiny 3 field form and you will get your own, free, dakka user account which gives a good range of benefits to you:
- No adverts like this in the forums anymore.
- Times and dates in your local timezone.
- Full tracking of what you have read so you can skip to your first unread post, easily see what has changed since you last logged in, and easily see what is new at a glance.
- Email notifications for threads you want to watch closely.
- Being a part of the oldest wargaming community on the net.
If you are already a member then feel free to login now. |
|
 |
2015/11/12 17:29:49
Subject: Adamantine Mantle made of Green Stuff
|
|

Focused Dark Angels Land Raider Pilot
|
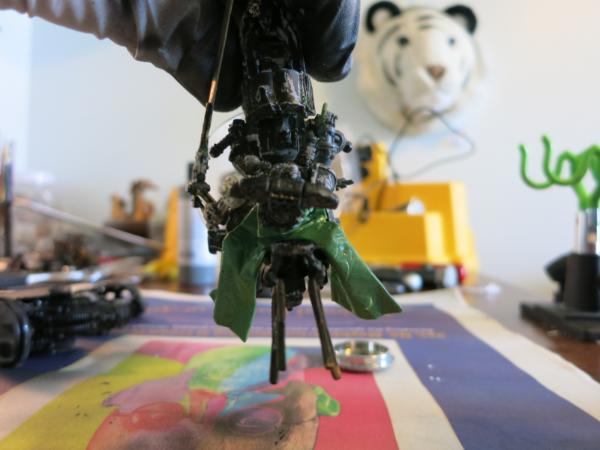
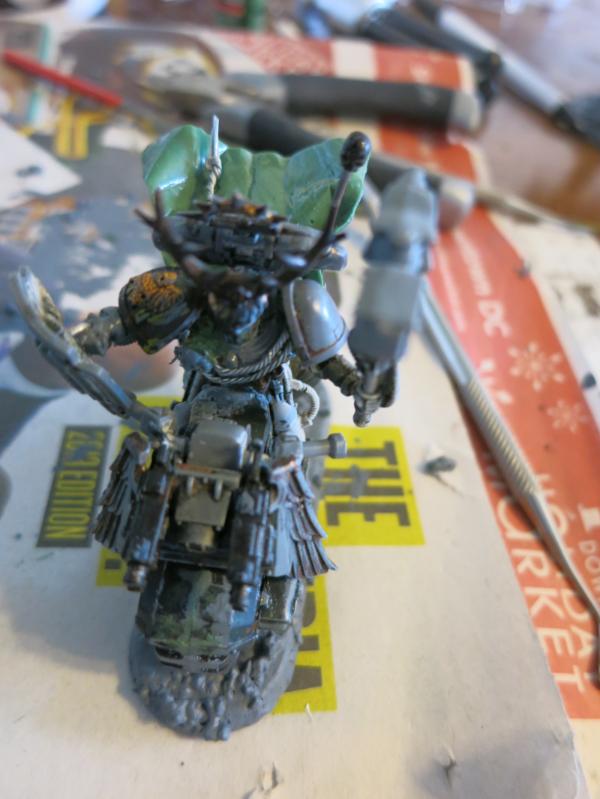
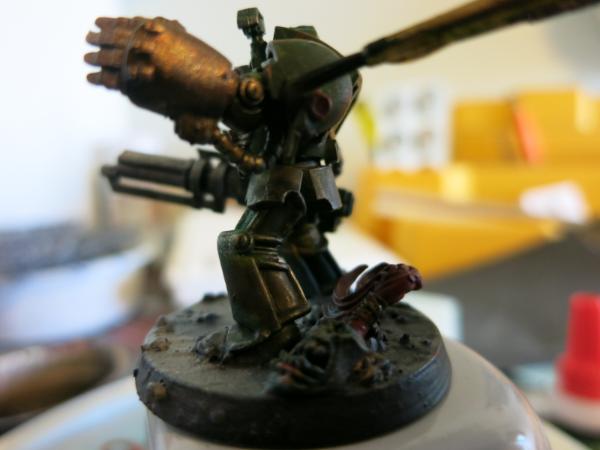
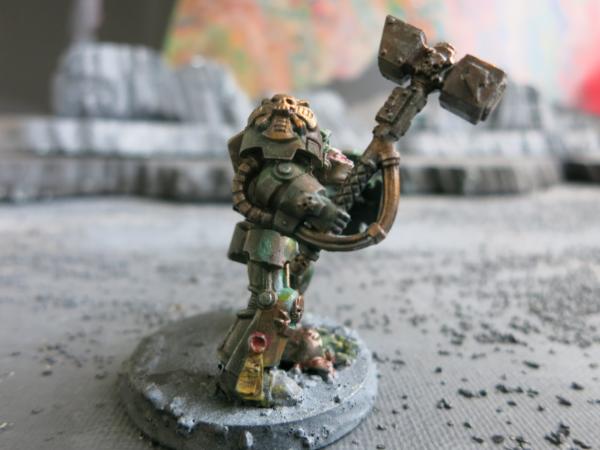
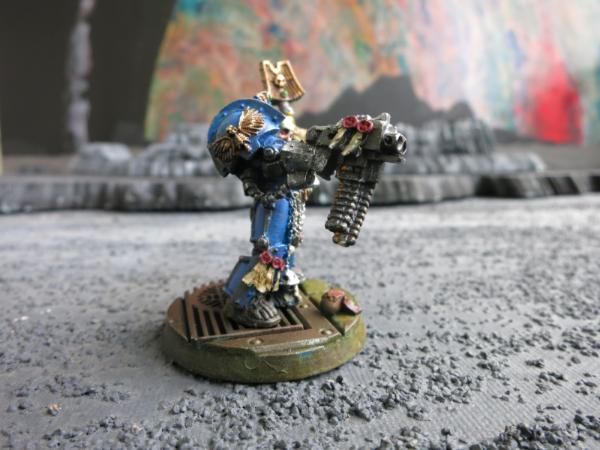
Green Stuff Mantel
Enjoyed your comments, Spacewolverine. The Bret heads are fun but they do take a little bit of carving to get it to fit the space marine torso. Still, with a touch of green stuff and a little pinning, they look natural.
Speaking of green stuff, I stripped and am rebuilding Sammael. I never did like the Adamantine Mantle cloak that is part of the official kit so I had tried to cut it up and attach it with green stuff but it never looked right. In this last rebuilding, I stumbled over a method of making a green stuff cape that is fairly easy. I plan to make a tutorial on how to make it but I want to take pictures of the steps to do it while I build a cape for another model.
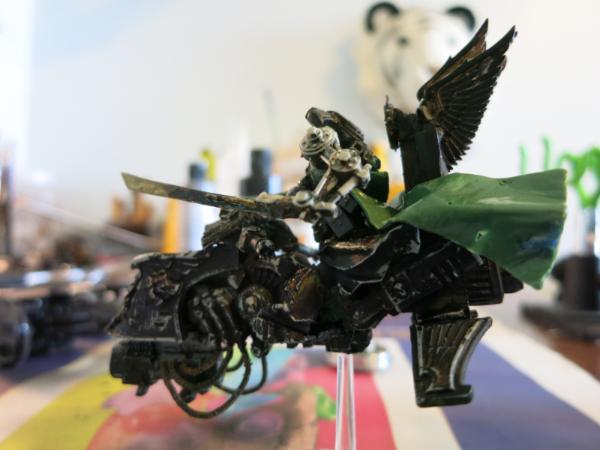
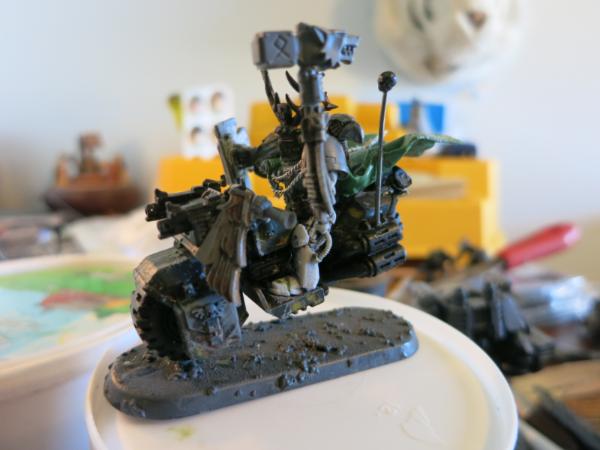
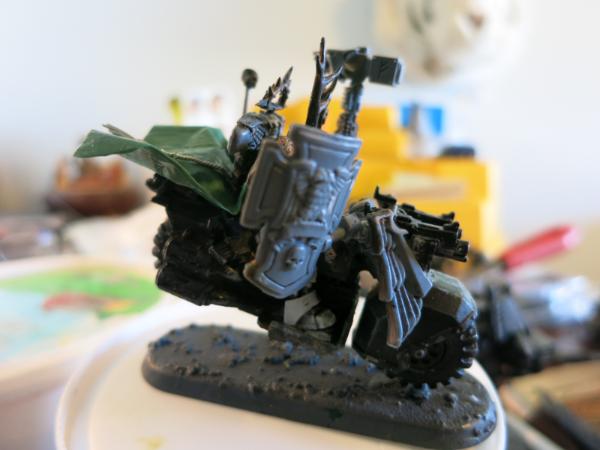
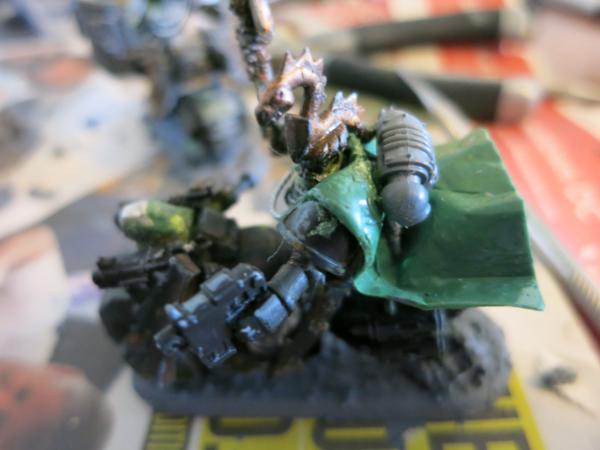
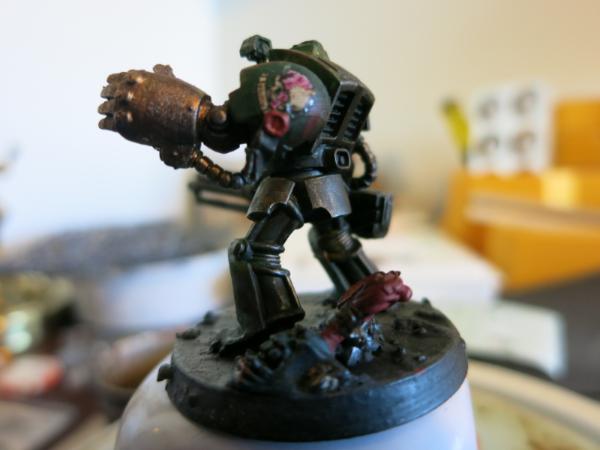
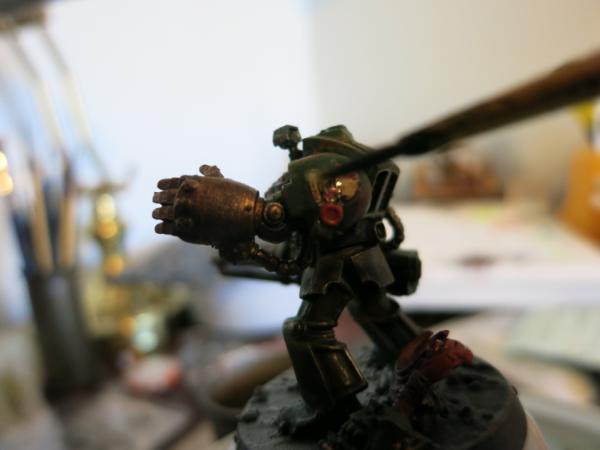
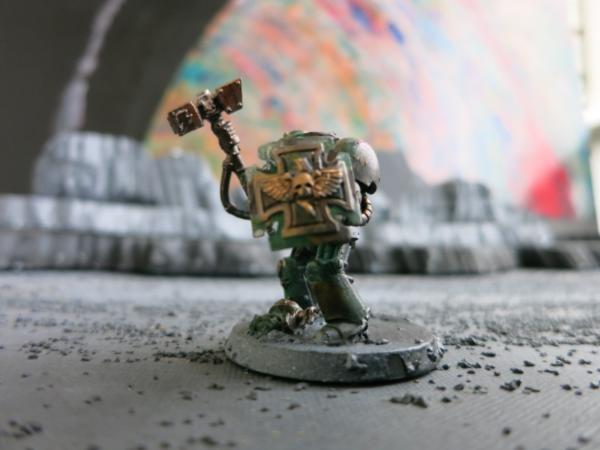
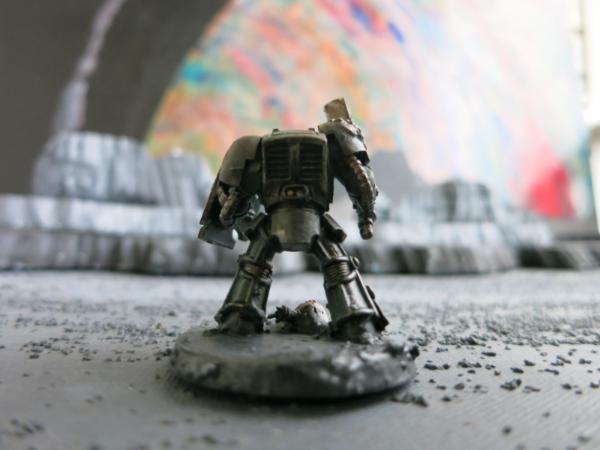
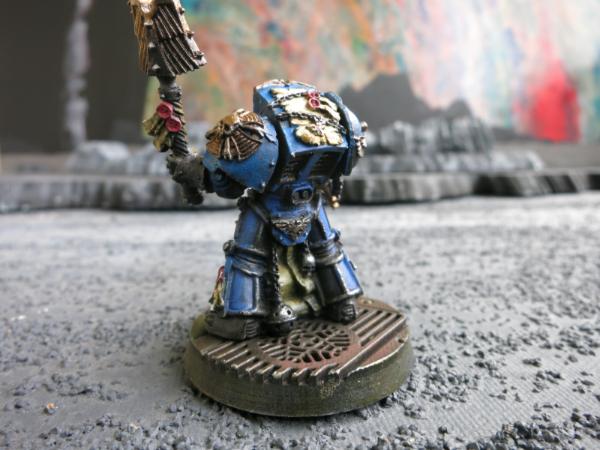
Left Side View of Rebuilt Sammael showing the Green Stuff Mantel
The mantel is completely made of green stuff.
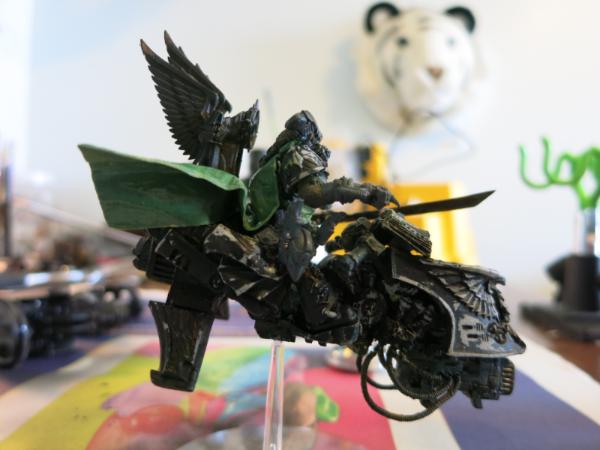
Right View of Rebuilt Sammael showing Green Stuff Mantel
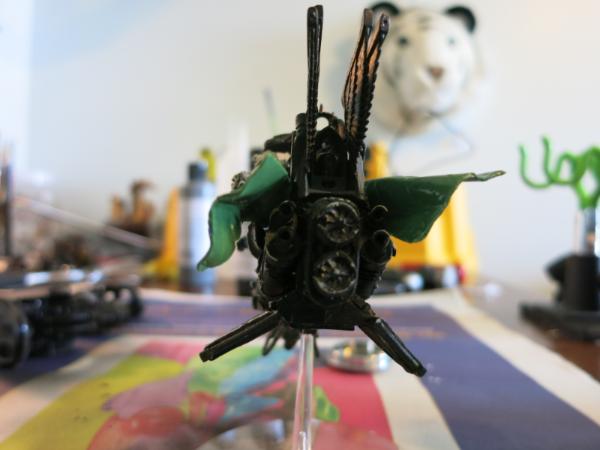
Rear View of Rebuilt Sammael showing Green Stuff Mantel
Top View of Rebuilt Sammael showing Green Stuff Mantel
|
|
|
 |
|
2015/11/13 15:13:28
Subject: Astrorath the Well-Adjusted
|
|
Focused Dark Angels Land Raider Pilot
|
Astorath the Well-Adjusted
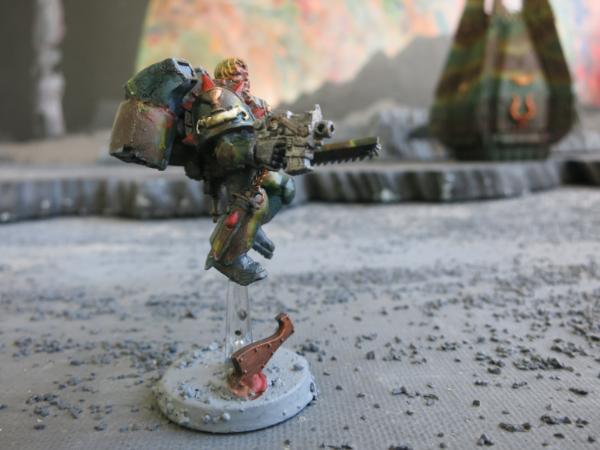
Jump Marines look great. I have been building a formation centered around a blood angels death company squad of jump marines led by Astorath the Grim. The Games Workshop model for Astorath the Grim is pretty ugly, even for a model labeled “the Grim.” Below is a scratch built replacement for him.
Pseudo-Astorath the Grim
I must admit, however, that although I really like this model, he isn’t really grim. In fact, he looks a little too warm and friendly for someone leading a death company squad doomed by the black rage.
Astorath the Well-Adjusted
Whether this model looks too well-adjusted to be a replacement for Astorath the Grim may be mute. I have misplaced this model so I might have to break down and build the Games Workshop model after all. With normal colored flesh, this Games Workshop model might actually look decent, grim but not so ugly. We shall see.
|
|
This message was edited 1 time. Last update was at 2015/11/13 19:37:27
|
|
|
|
|
2015/11/16 20:21:01
Subject: Re:6th Biker Troop - “Schrödinger's Apocalyptic Raiders”
|
|
Focused Dark Angels Land Raider Pilot
|
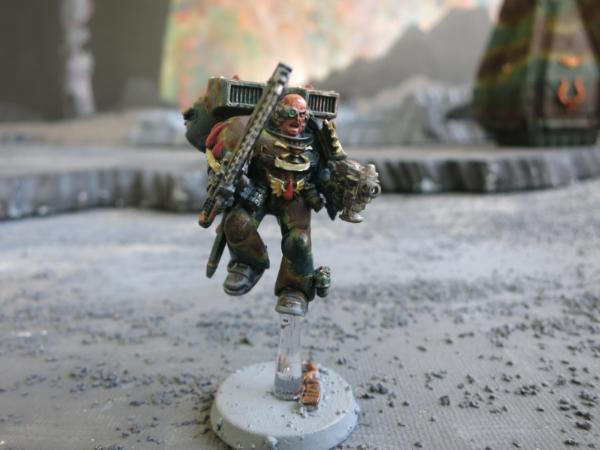
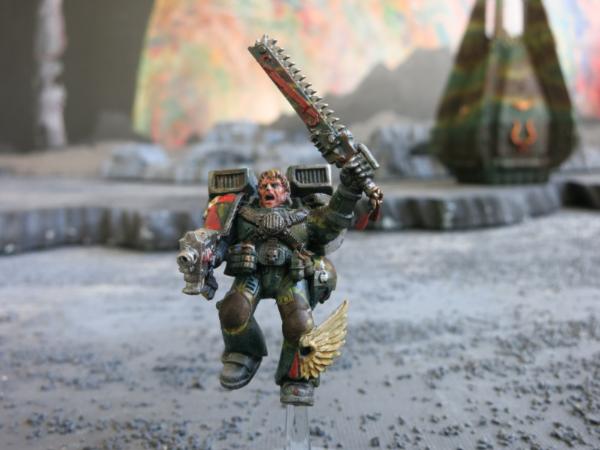
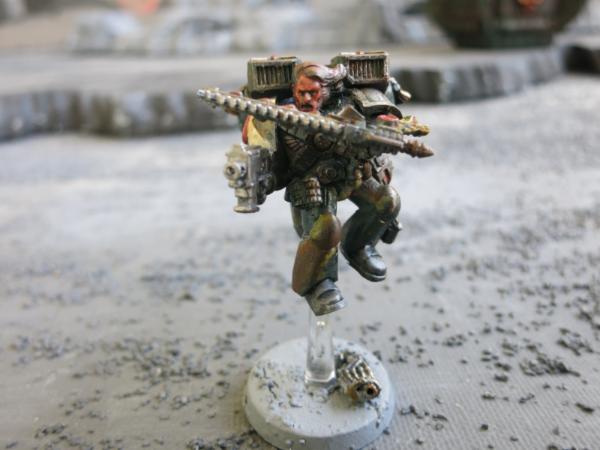
Death Company Squad Jump Marines – The Old Man
Since Jump Marines look great, I have been building a formation centered around a blood angels death company squad of jump marines. One of my favorites is the old man.
The Old Man
Although these are death company squad members, I still use my basic camouflage pattern both to keep the theme of my army and because black is a difficult color to paint.
Close Up of the Old man.
The Old Man looks grumpy rather than affected with the black rage but he still one of my favorite jump marines.
|
|
|
|
|
2015/11/18 12:59:10
Subject: Another Jump Marine
|
|
Focused Dark Angels Land Raider Pilot
|
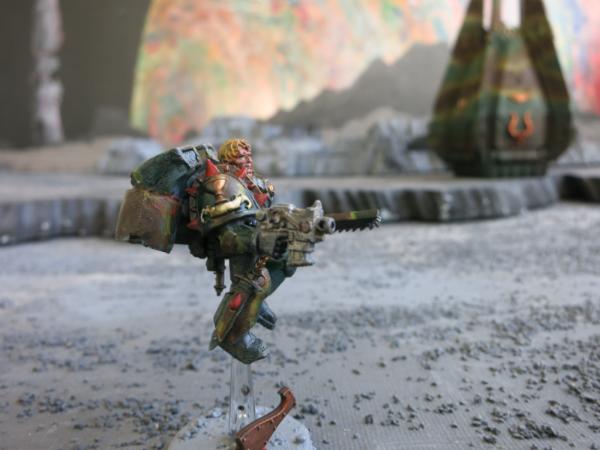
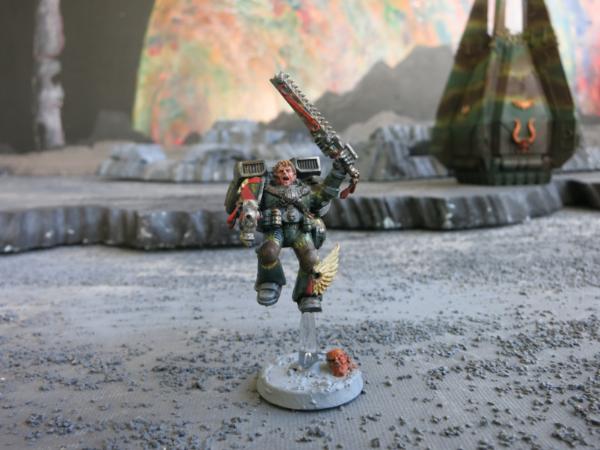
Another Jump Marine
Since Jump Marines look great, I have been building a formation centered on a blood angels death company squad of jump marines. Here is one
Jump Marine
Close Up of the Jump Marine
He looks a little crazier than the old man. Of course, you don’t have to look weird to have the black rage. You only have to act weird.
|
|
|
|
|
2015/11/18 23:26:17
Subject: Re:6th Biker Troop - “Schrödinger's Apocalyptic Raiders”
|
|
Land Raider Pilot on Cruise Control
|
Facial hair looks very realistic. I bet those Jump Packs are very fragile being in the air like that. Always hated the clear plastic as they break to easy. Excited to see them all done!
|
|
|
|
|
2015/11/19 11:58:26
Subject: 6th Biker Troop - “Schrödinger's Apocalyptic Raiders”
|
|

Pious Palatine
|
Looking good.
In answer to the question about the alt heads I use, I've used a number of different FW heads, mostly different marks of armour and different heads from the legion specific termie models, but I suspect the ones tour referring to are FW Elysian heads which I've used on my scouts. I found the GW scout kit heads too weird looking to use and I like all models other than DC and librarians to have a helmet .
EDC
|
|
|
|
|
2015/11/19 23:03:40
Subject: Plastic Stems
|
|
Focused Dark Angels Land Raider Pilot
|
 Spacewolverine wrote: Spacewolverine wrote:Facial hair looks very realistic. I bet those Jump Packs are very fragile being in the air like that. Always hated the clear plastic as they break to easy. Excited to see them all done!
Unfortunately you are right about the plastic stems. I already have broken several. I may replace them with piano wire, not as attractive but unbreakable, at least in comparison to the rest of the model. I also weighted down the bases with a washer. Automatically Appended Next Post:  evildrcheese wrote: evildrcheese wrote:Looking good.
In answer to the question about the alt heads I use, I've used a number of different FW heads, mostly different marks of armour and different heads from the legion specific termie models, but I suspect the ones tour referring to are FW Elysian heads which I've used on my scouts. I found the GW scout kit heads too weird looking to use and I like all models other than DC and librarians to have a helmet .
EDC
I like the helmets you are using. I started out by having almost all my models with helmets because well-disciplined troops, especially in non-earth environments will be wearing helmets. But the models are more interesting with faces. As humans, we love faces and love looking at faces. Also, faces are fun and challenging to paint. I now have bare head on most of my models with a helmet in easy reach, either hanging on their belt if they are infantry models or on the back of the motorcycle if a biker. Automatically Appended Next Post: Jump Marine with Power Fist
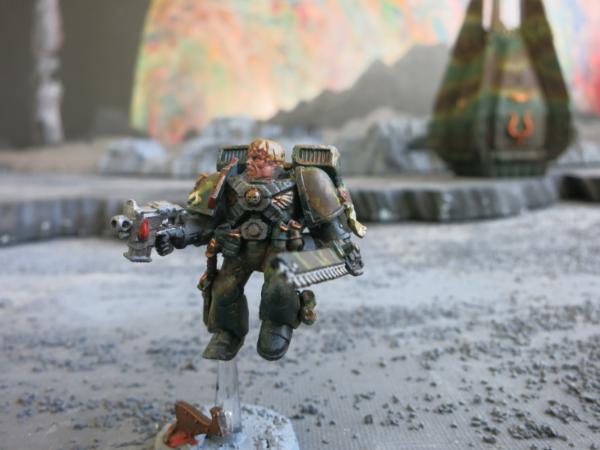
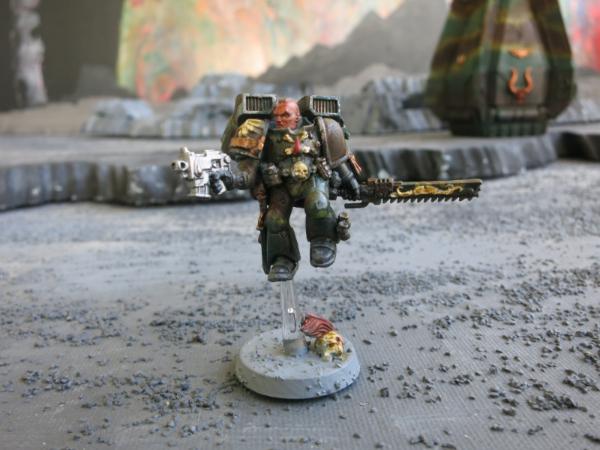
Since Jump Marines look great, I have been building a formation centered around a blood angels death company squad of jump marines. Here is one with a Power Fist.

Jump Marine with Power Fist
I don’t know where this Power Fist is from but it is one of my favorite Power Fists. This Power Fist looks perfect for ripping rip out the entrails of some monstrous creature, sort of like gutting a fish, only better.
|
|
This message was edited 2 times. Last update was at 2015/11/19 23:17:40
|
|
|
|
|
2015/11/20 21:02:09
Subject: Jump Marine
|
|
Focused Dark Angels Land Raider Pilot
|
Jump Marine
Since Jump Marines look great, I have been building a formation centered on a blood angels death company squad of jump marines.
Jump Marine
Jump Marine
Close Up Jump Marine
|
|
|
|
|
2015/11/23 13:12:33
Subject: Re:6th Biker Troop - “Schrödinger's Apocalyptic Raiders”
|
|
Focused Dark Angels Land Raider Pilot
|
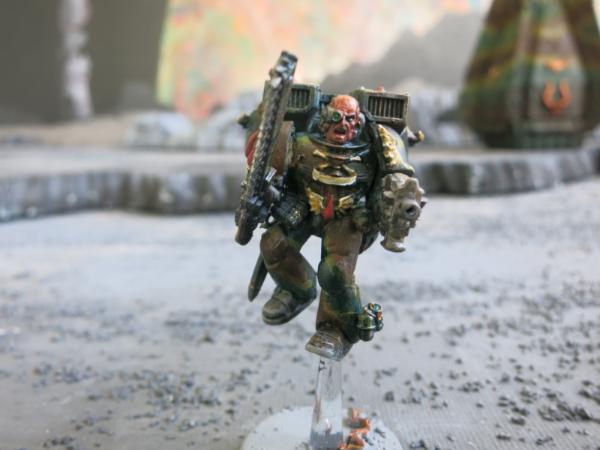
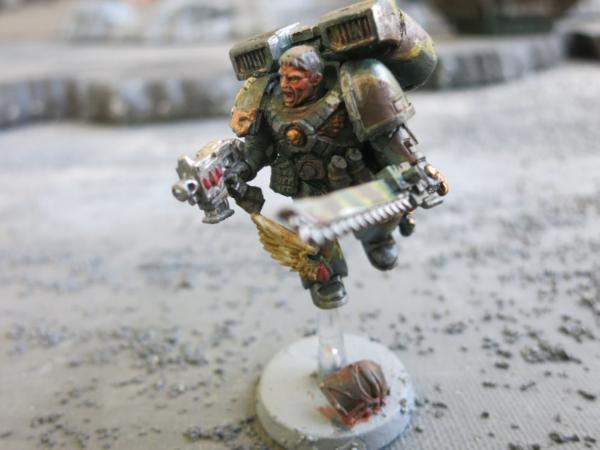
Black Rage
Since Jump Marines look great, I have been building a formation centered around a blood angels death company squad of jump marines.
Jump Marine showing the Black Rage
He looks a little more deranged than the others.
Jump Pack Marine
|
|
|
|
|
2015/11/24 12:56:50
Subject: Re:6th Biker Troop - “Schrödinger's Apocalyptic Raiders”
|
|
Focused Dark Angels Land Raider Pilot
|
The Mohawk
Since Jump Marines look great, I have been building a formation centered on a blood angels death company squad of jump marines.
Jump Marine with Mohawk
|
|
This message was edited 1 time. Last update was at 2015/11/24 12:57:42
|
|
|
|
|
2015/11/25 16:23:17
Subject: Re:6th Biker Troop - “Schrödinger's Apocalyptic Raiders”
|
|
Focused Dark Angels Land Raider Pilot
|
Jump Pack Marine
Since Jump Marines look great, I have been building a formation centered on a blood angels death company squad of jump marines.
Jump Pack Marine
I think each soldier should have a slightly different personality.
|
|
This message was edited 1 time. Last update was at 2015/11/27 14:11:09
|
|
|
|
|
2015/11/27 14:16:44
Subject: Re:6th Biker Troop - “Schrödinger's Apocalyptic Raiders”
|
|
Focused Dark Angels Land Raider Pilot
|
Bad Hair Day – Jump Pack Marine
Since Jump Marines look great, I have been building a formation centered on a blood angels death company squad of jump marines. The head below is an elf head or something I picked up when I ordered some bits off the internet.
Jump Pack Marine having a Bad Hair Day.
No wonder he is suffering from the back rage. He just can’t get his hair under control.
The clear plastic stem that used to hold them up may be too breakable for game play. I have several that have already broken.
|
|
|
|
|
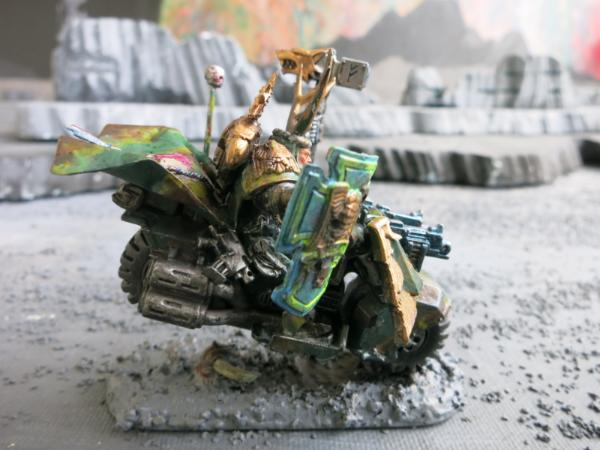
2015/11/30 14:01:13
Subject: Re:6th Biker Troop - “Schrödinger's Apocalyptic Raiders”
|
|
Focused Dark Angels Land Raider Pilot
|
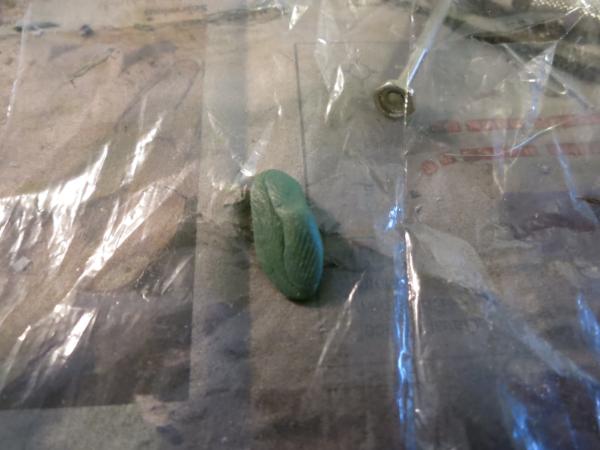
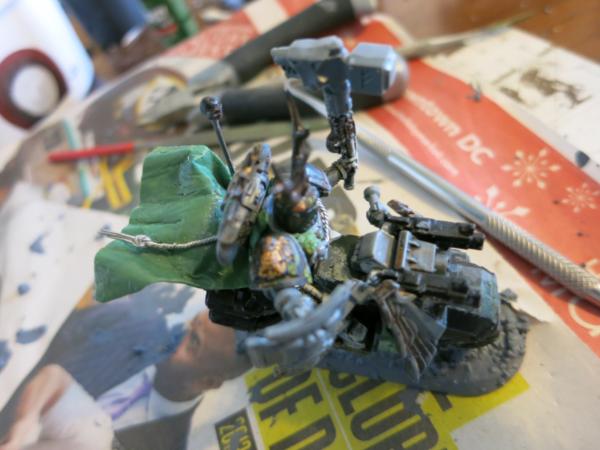
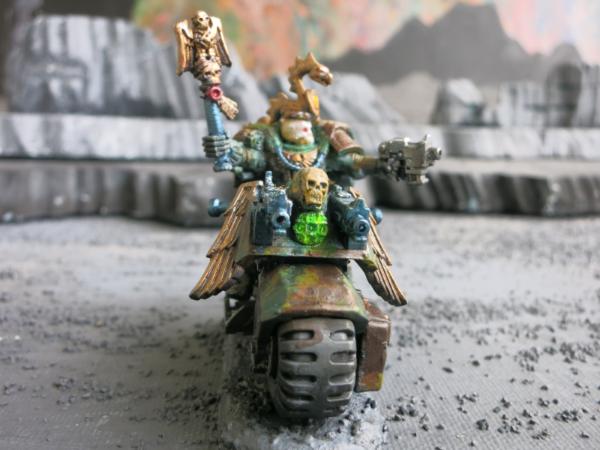
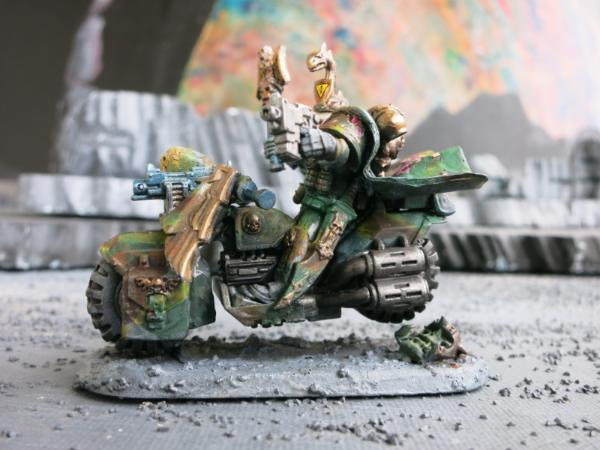
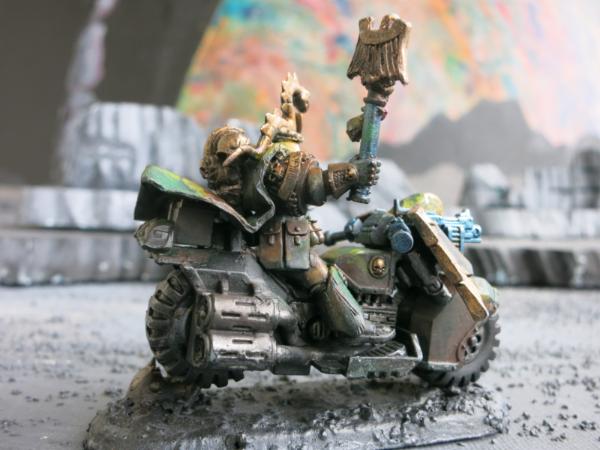
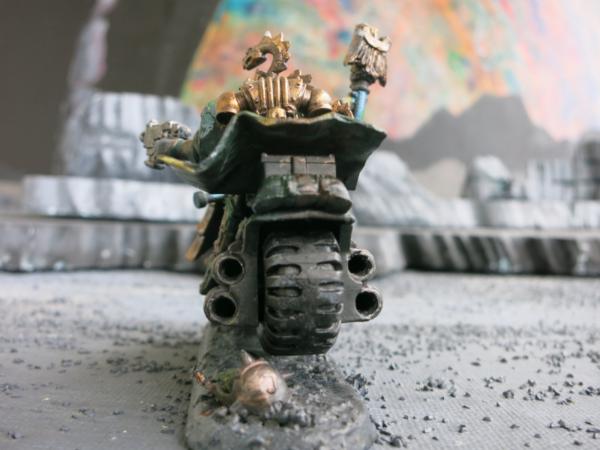
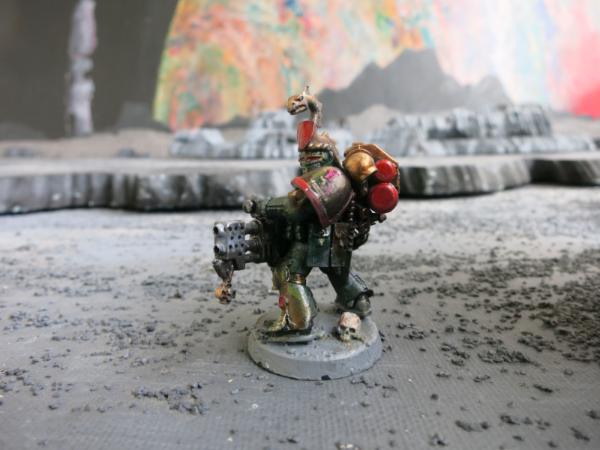
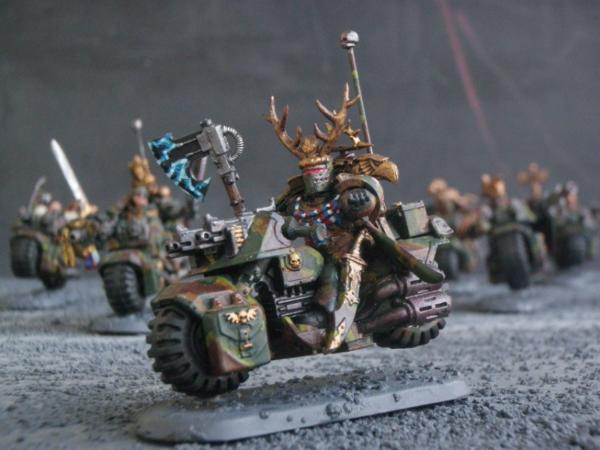
How to Make a Cape Out of Green Stuff
Modelers fall into three groups. 1) Those that never use green stuff. This group pretty much builds the model as it come out of the box. They may do a little customizing but without some type of sculpting media such as green stuff, they are really limited in customizing the model. 2) Those who are true artists with green stuff. They build intricate parts with green stuff and are true masters at sculpting miniature figures. They often display their work on sites such as this and I am impressed. I know how difficult it is as I have attempted such sculpture but I find that I cannot perform the delicate manipulation that is needed. The third group, of which I am a member, consists of those who use green stuff as filler. Typically, I use green stuff between a limb and the torso, smoothing it as good as I can but covering it up with shoulder pads and other bits so that the green stuff patch disappears into the shadows.
Nevertheless, with the right technique, making a cape out of green stuff is ridiculously easy, well within the skill of any modeler. I will demonstrate with two models that I am rebuilding: Victor Staghorn, the senior sergeant and second in command of the 6th Biker troop (although I equip and play him as an iron hands chapter master with the shield eternal and a thunderhammer; and Jambalaya "Dry" Bones, the chaplain assigned to the 6th Biker troop although I am tempted to play him as a librarian in an concave. Both are fun models and each really needs a cape. Although I had already built and painted these models, I decided to rebuild them. I soaked them about a week in a degreaser, Purple Power, to remove the paint. It will also weaken some of the glue and weakened and dissolved the green stuff but that allowed me to make some changes in both models.
Tools: Assembled Model, Green Stuff, Plastic sandwich bag (sheet of thin polyethylene plastic resin), rolling pin, and scissors.
Step 1: Assemble the model. The model should be substantially assembled before making the cape. The model needs to be fairly complete because the cape will flow around the model. Here the models are finished except for their backpacks and some minor bits.
Victor Staghorn
Step 2: Obtain a sheet of polyethylene plastic resin which is a fancy way of saying, find a clear plastic sandwich bag. I have a pile of sandwich bags that I store bits in and from my lunch bags. You need enough plastic to cover both sides of the cape but the smallest sandwich bag is plenty big. I cut up the bag but kept intact a seam so that I could lay the plastic over the green stuff.

Cutting Sandwich Bags
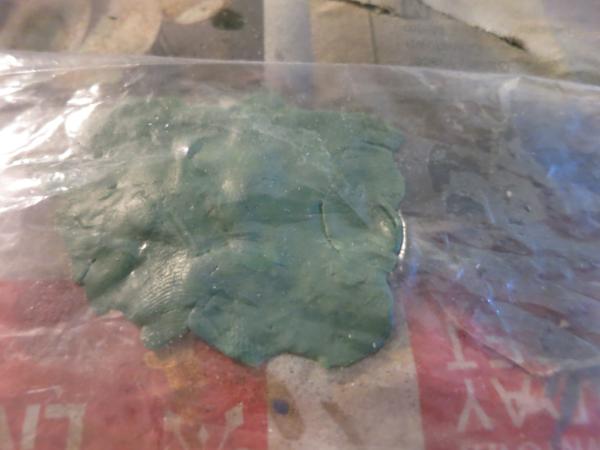
Step 3: Make the green stuff. Green stuff is regularly available on line and at hobby shops. Just search green stuff. Green stuff includes yellow 'filler' and blue 'hardener.’ Use one part blue stuff to one part yellow stuff; mix until green. Avoid leaving yellow or blue lumps. Don’t make up too much. Make up more later if needed.
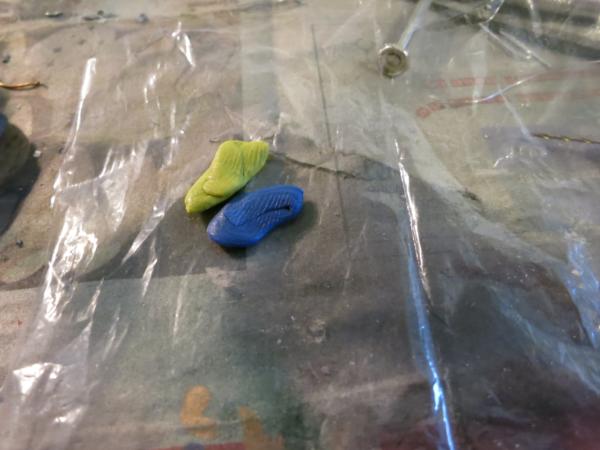
Lumps of Yellow Filler and Blue Hardener
Lump of Green Stuff
Step 4: Flatten the green stuff over the surface of the clear plastic so that it roughly is in the shape of the flattened cape. Don’t worry much about getting the edges smooth. The edges will be trimmed in a later step. I find it best to use small dots of green stuff and smug them out. Then add another dot and smug them out until they mix together. The goal is to have a thin sheet of green stuff over the plastic sheet. Avoid holes or wrinkles as much as possible. Make the size of the area covered slightly bigger than the cape will be at the end.

Green Stuff Flattened the Clear Plastic
Step 5: Cover the exposed side of the green stuff with a second piece of plastic. I just fold the plastic bag over the green stuff. So now you have a green stuff sandwich with clear plastic as the bread and the green stuff like peanut butter spread in between.
Green Stuff between Two Sheets of Plastic like a Sandwich
Step 6: Take a rolling pin and flatten out the green stuff sandwich. This is primarily to even out the green stuff rather than make it thinner. Green stuff is too stiff to really thin out even with the pressure from the rolling pin.
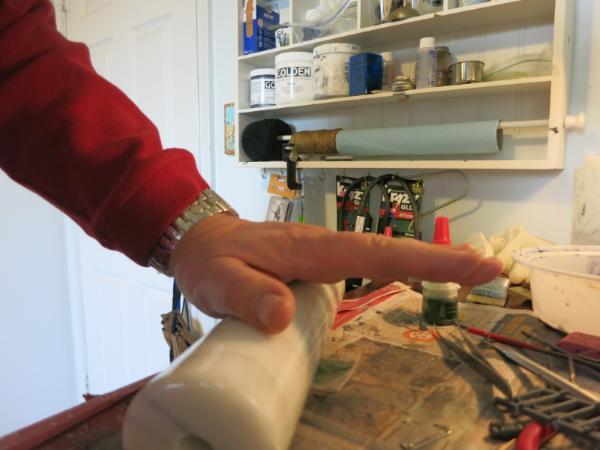
Rolling Pin over the Green Stuff Sandwich
Step 7: With scissors, cut out the cape. This is almost as easy as cutting a piece of paper or fabric. Do not remove the clear plastic until the last step.
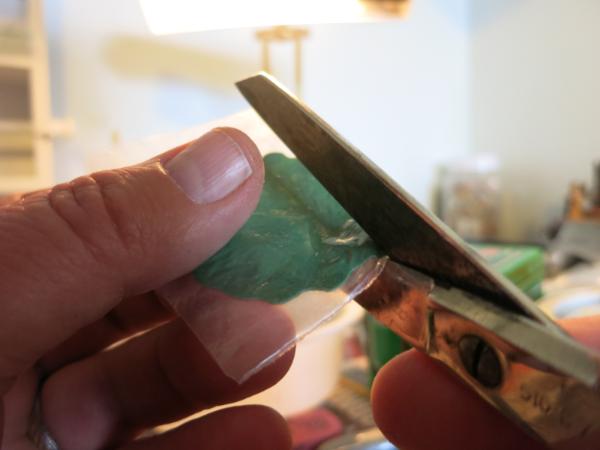
Cutting out the Cape
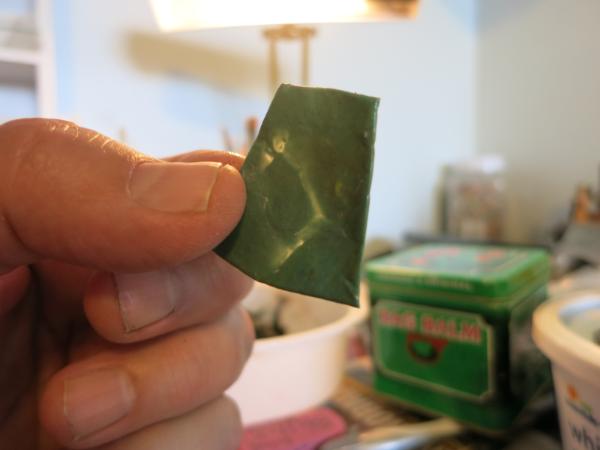
The Cape – Green Stuff between two sheets of plastic
Step 8: Mold the green stuff sandwich cape over the model in a pleasing shape. Have it swirl around any obstacles such as antennas and fenders. Put in some dramatic folds. With the plastic covering, the green stuff is easy and fun to handle. If it needs additional trimming with the scissors, do so now.
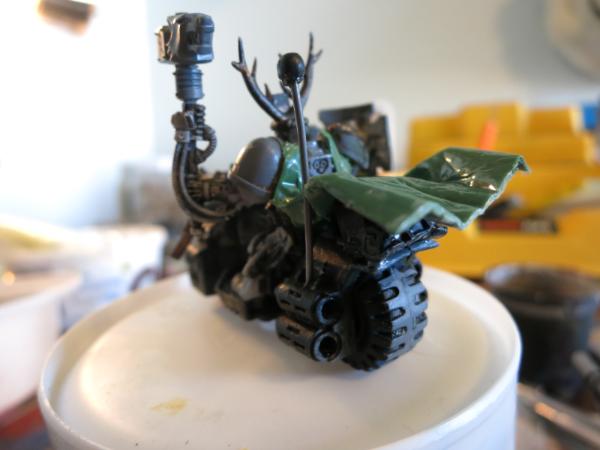
Green Stuff Cape over Victor Staghorn
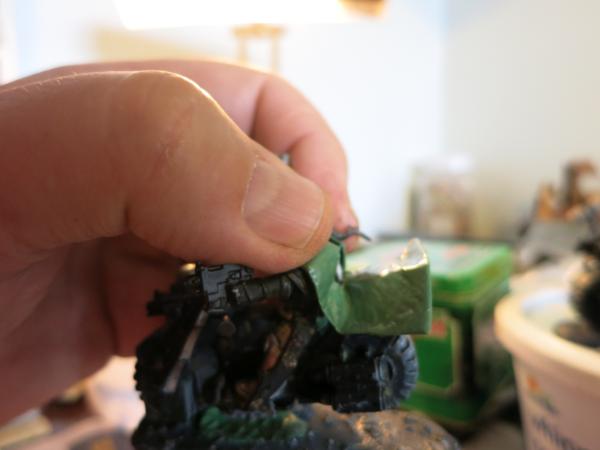
Molding Green Stuff Cape over Jambalaya Bones

Green Stuff Cape over Jambalaya Bones
Step 9: Leave the model alone for 24 hours to let the green stuff cure. I am not sure how fast it cures but I usually let it cure for a day.
Step 10: Gently Remove the Cured Cape from the Model and Peel the Away the Clear Plastic Sheet.
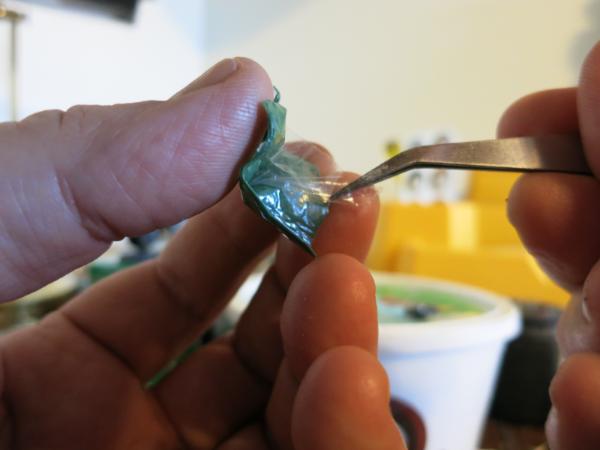
Removing the Plastic Covering
Step 11: Replace and Glue back the Green Stuff Cape and any remaining bits. Here I put on the backpacks and some braids. Where did the braids come from? I guess I need to make another tutorial on making braids. Making braids is much easier than making capes but that is a tutorial for another day.
Top View of Victor Staghorn
Left View of Cape on Victor Staghorn
Right View of Cape on Victor Staghorn
Cape Glued on Jambalaya Bones.
Here I finished up the top part of the cape with some additional green stuff
Top View of Jambalaya Bones
This picture has a long piece of lint. I easily removed it but it is in the picture.
Step 12: Finish and Paint the Model
I will include some pictures when I finish painting the models.
|
|
This message was edited 1 time. Last update was at 2015/11/30 14:05:26
|
|
|
|
|
2015/12/01 13:19:00
Subject: Making a Braid From Floral Wire
|
|
Focused Dark Angels Land Raider Pilot
|
Making a Braid From Floral Wire
I did a tutorial on making a cape. Now I am going to add a length of braid on the cape. The cape was fairly easy to make. The braid is even easier. The braid is made from 30 gauge floral wire, usually available in arts and crafts stores like Michaels. Floral wire is extremely flexible. I already have posted about creating hoses and cables with floral wire.
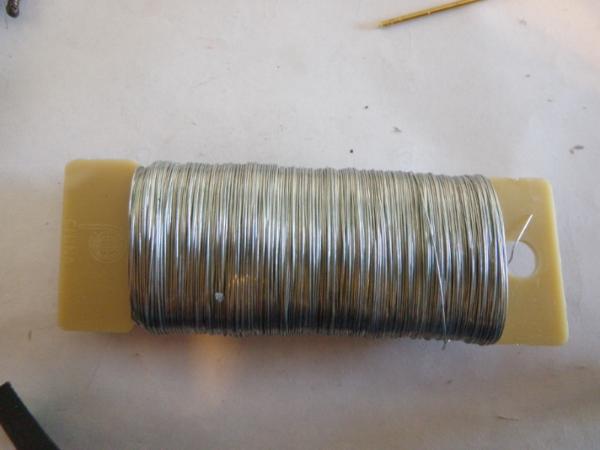
30 Gauge Floral Wire
Step 1: Cut three strands of floral wire and hold them side by side with each other.
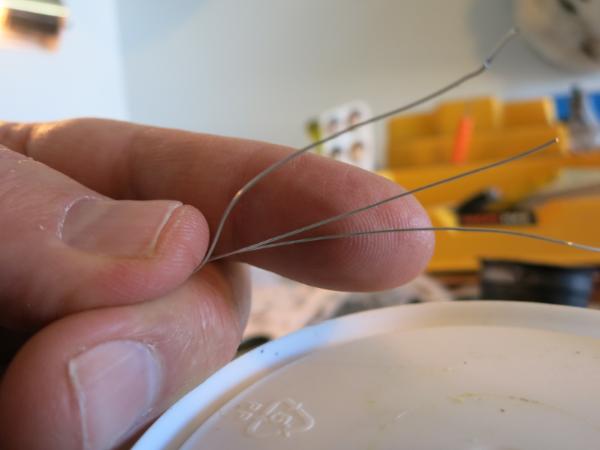
Three Strands of Wire
Step 2: Tie an overhand knot on one ends of the wires. Pull each strand to tighten the knot. If the knot is real tight, it may be part of the braid. If loose, it a least forms a handle for gripping one end of the wires while twisting. Oddly enough, without the knot, it is difficult to twist the wire.
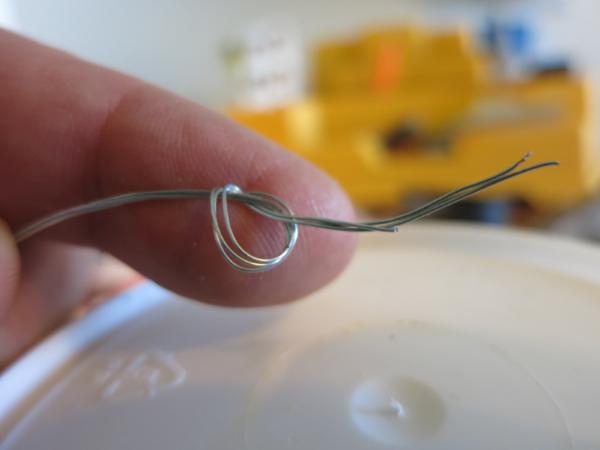
Knot in Wires
Step 3: Hold the knot and start twisting the three strands of wire together. Keep twisting. The more twists, the tighter the braid and the tighter the braid, the better it looks.
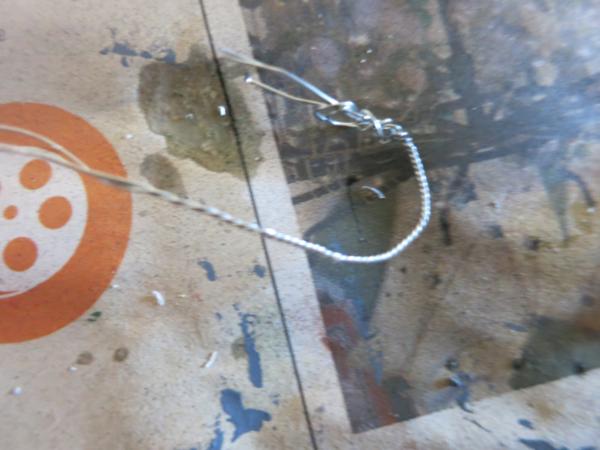
Twisted Wire
Step 4: After finishing the desire twisting, cut and glue the braid to the model. Shape as needed.
Braid on Victor Staghorn’s Cape
The braid is the silver colored wire over his cape.
Braid on Front and on Cape of Victor Staghorn
Braid on Jambalaya Bones
This picture shows a sting of lint over his face. I easily removed it but this is still the best picture of the braid.
|
|
|
|
|
2015/12/26 15:11:38
Subject: My 1000th Picture in the Dakka Dakka Gallery
|
|
Focused Dark Angels Land Raider Pilot
|
The 1000th Picture in the Dakka Dakka Gallery
I just posted my last batch of pictures in the Dakka Dakka Gallery and this batch broke the 1000 mark. I have now posted over 1000 pictures in the Gallery. What does this mean? Probably nothing except that I spend too much time taking and posting pictures of my models. I am not richer, or famous, or better looking. I rarely play Warhammer 40K so I am at best a mediocre player. I guess I can list this accomplishment in my obituary.
Below is the 1000th picture that I have posted in the Dakka Dakka Gallery.
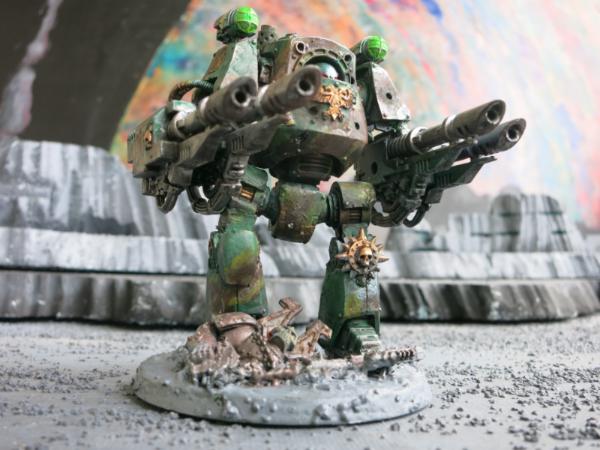
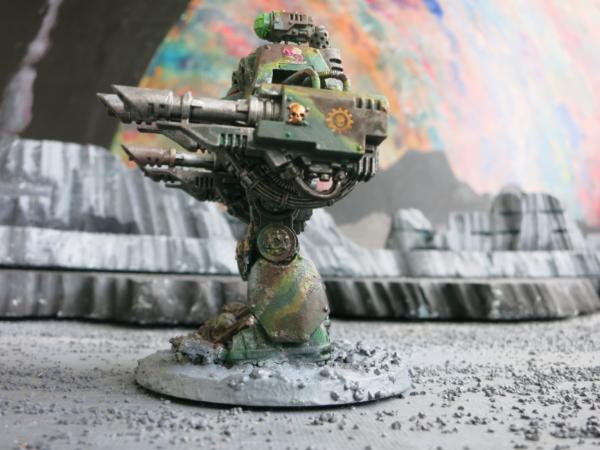
Mortis Contemptor Dreadnought with Twin-Linked LasCannons
|
|
|
|
|
2015/12/28 15:07:50
Subject: Re:6th Biker Troop - “Schrödinger's Apocalyptic Raiders”
|
|
Focused Dark Angels Land Raider Pilot
|
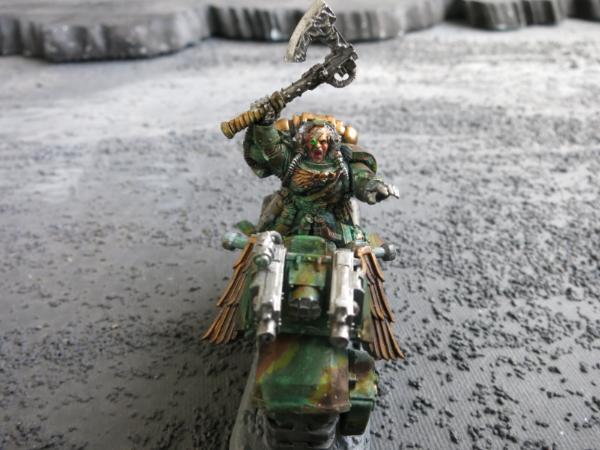
Biker Chaplain
 Jambalaya “Dry” Bones
Jambalaya “Dry” Bones is the chaplain assigned to the 6th Biker troop. He was originally a Dark Angel Chaplain who found himself reassigned after an unfortunate sermon where he said “yesterday is but a memory; let it go, for today is the day to perform our duties.” For those whose spiritual sensitivity is dull, such a statement may seem to be a mere pious homily, a harmless exhortation to perform the task at hand. But alas, for those who label themselves as the unforgiven, who still brood over the unspeakable acts of processors during a dark and ancient millennium, such talk smacked of blasphemy or at least a woeful ignorance of the theological understanding expected of one who had taken upon himself the covenants and obligations of a Dark Angel chaplain.
Biker Chaplain
When confronted by the Interrogator-Chaplain, Jambalaya quickly confessed his error. When given the choice between 1) entering an extensive period of penitence and confession (e.g., torture and interrogation) necessary to reeducate himself in the pure theology of Dark Angels or 2) of using his admittedly meager pastoral talents to minister to an unruly congregation of those less enlightened souls of the 157th security detachment, Jambalaya reluctantly choose to the leave the Dark Angels forever.
Left View of Biker Chaplain Jambalaya “Dry” Bones
Right View of Biker Chaplain Jambalaya “Dry” Bones
Even then, misfortune seemed to mark his sermons. Legend has it that Jambalaya’s maudlin sermon on the “dying servitor” was the origin of that bitter nickname that the members of the unnamed chapter apply to themselves, namely, the Servitors. Still, in spite (or perhaps because) of his mangled theology, Jambalaya inspires the troopers of the 6th Bike troop who are zealous in their attack when Jambalaya is with them. Even for the most pious of these troopers, true religion is this, steadiness in the gun-line, aggressiveness in the attack, fearlessness in the defense. Orthodoxy is a chainsword; worship is a boltgun; redemption a flamethrower. In these doctrines, Jambalaya’s theology is excellent.
Rear View of the Biker Chaplain
|
|
|
|
|
2015/12/29 15:45:01
Subject: First Biker Librarian
|
|
Focused Dark Angels Land Raider Pilot
|
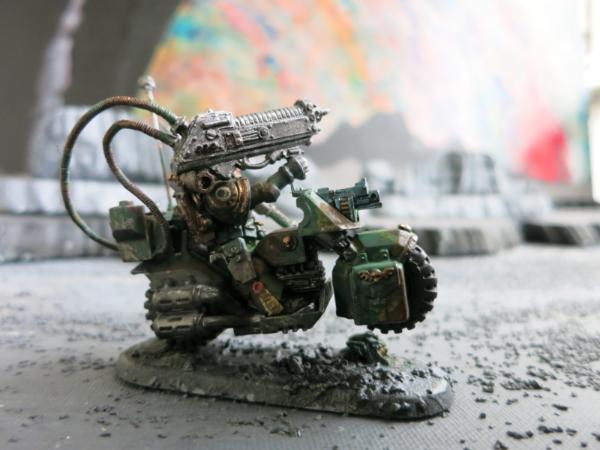
First Biker Librarian

First Biker Librarian
This is the first librarian for a Space Marine Librarius Conclave composed of three biker librarians. This model is the first that was finished. I already have a second librarian that I had built in the past but I just stripped him and need to rebuild and paint him. I plan to have three distinctive models.
Lower Rear View of Librarian Showing Robes and Tread Marks
The model has the robed legs for the Dark Angels biker sergeant with the top being the latest space marine librarian, the one with the ugly little cherub on his shoulder. I cut off the top and didn’t use the cherub but put it away for some other project where I could use an ugly little cherub, maybe as battle debris. Since I couldn’t use the librarian legs, I did cut off the horned skull on it and use it as a clasp for the braid on Victor Staghorn, the next model I will be posting.
Side View Showing Robes and Dark Lower Section and Bright Top
This librarian is one of the first biker models I have painted using a new painting technique. I started with a base paint of black sprayed on the lower parts of the model and on the undersides with a gray base sprayed from the front and top to give the model shadows. Then I sprayed a quick white base coat directly at the face to highlight the face. Then I used dark dull paints in the black shadowed areas and increasingly bright colorful paints in the gray and white areas with Vallejo liquid gold and Vallejo fluorescent paints for the highlights. I tried to get the face as bright as possible while keeping it realist.

Back of the Librarian Showing the Dull Underside and Tread Marks
Note how dark and dull the back and lower parts of the bike are. Notice how bright the upper part of the model is. This is designed to have the view focus on the face and give depth to the model.
Close Up of the Biker Librarian’s Face
He turned out okay with only one problem. I built the bike and body and then mounted him so that the bike is coming down on the front wheel. This places the librarian’s face looking down rather than out towards the front. For my next librarian, I will experiment with mounting the biker on the bike so that his body is leaning back so that when he is mounted on the base, his face is looking forward.

Upper View Showing Keys and Staff
The keys were part of the original model’s lower legs that I had to cut off. I cut out the keys and put them on the bike.
|
|
|
|
|
2015/12/30 22:06:19
Subject: Terminator with Assault Cannon
|
|
Focused Dark Angels Land Raider Pilot
|
Terminator with Assault Cannon
 Terminator with Assault Cannon and Power Fist
I stripped a couple of terminators and repainted them. Mostly it is an experiment since I don’t really have a need for terminators in my present army list. Still, it was fun to paint them up in the new style.
Terminator with Assault Cannon – Side View
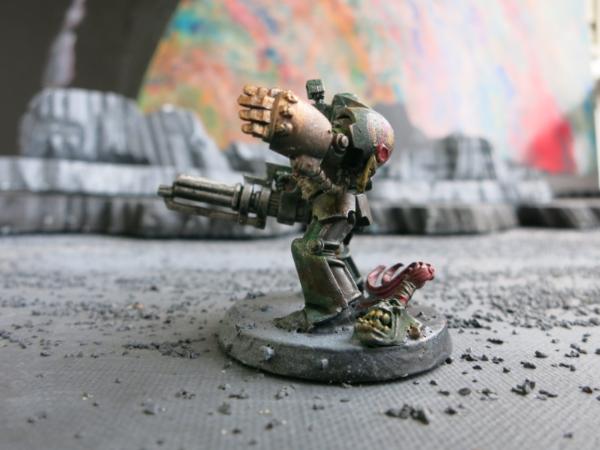
Terminator with Power Fist and Assault Cannon – Other Side
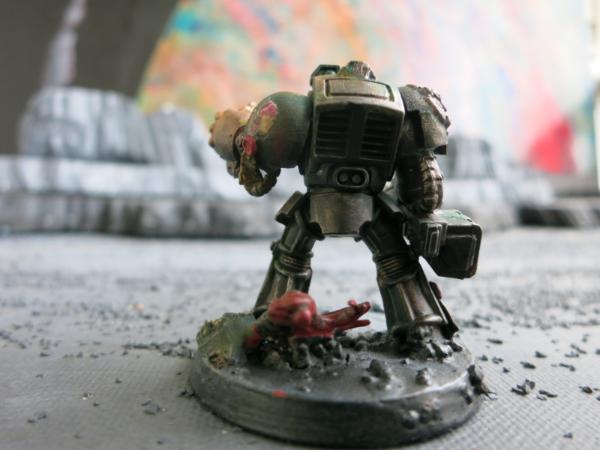
Terminator with Assault Cannon – Back View
|
|
|
|
|
2015/12/31 16:48:11
Subject: Fun with Decals
|
|
Focused Dark Angels Land Raider Pilot
|
Fun with Decals
Before the last Nova Open, I never used decals on my 40K models. I thought they would look too artificial or too generic. But I was having trouble painting an acceptable shoulder insignia for my army and decided to order some custom stickers from Fallout Hobbies www.FalloutHobbies.com. I drew up a sketch with cherry blossoms over a skull and send them the sketch. They send back a finished drawing and I ordered several sheets. I also went on the internet and learned how to set decals.
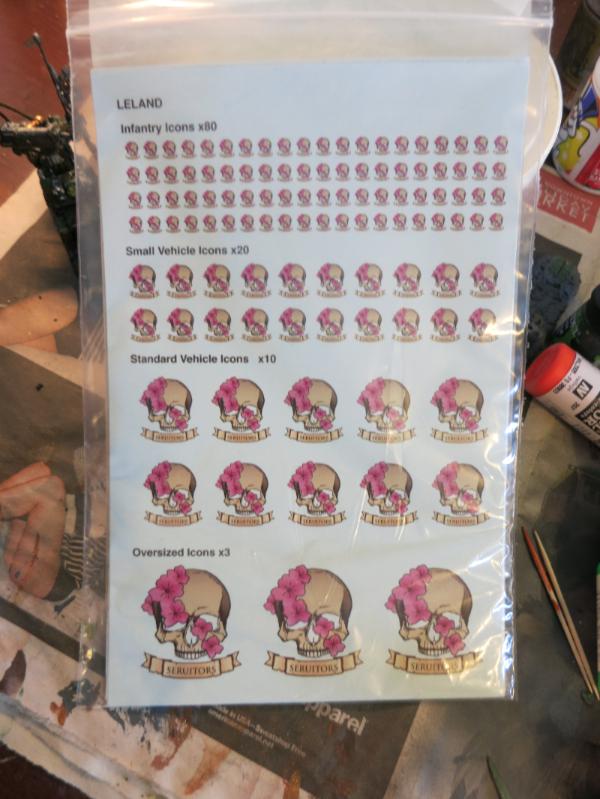
Custom Decal Sheet from Fallout Hobbies
A problem with decals is that decals are flat and shoulder pads are round. This is a problem that is solved with modern chemistry. The products needed are Micro Set and Micro Sol.
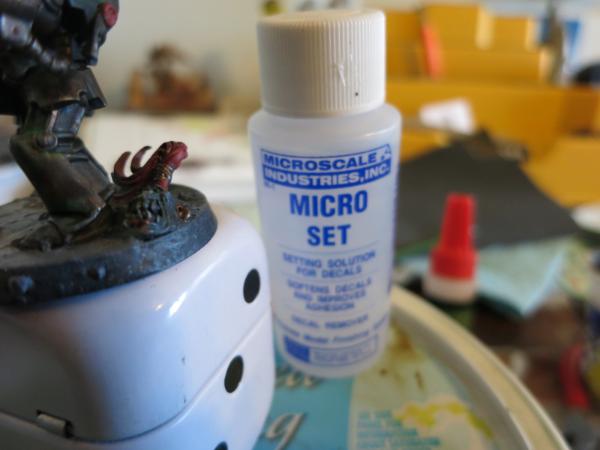
Micro Set
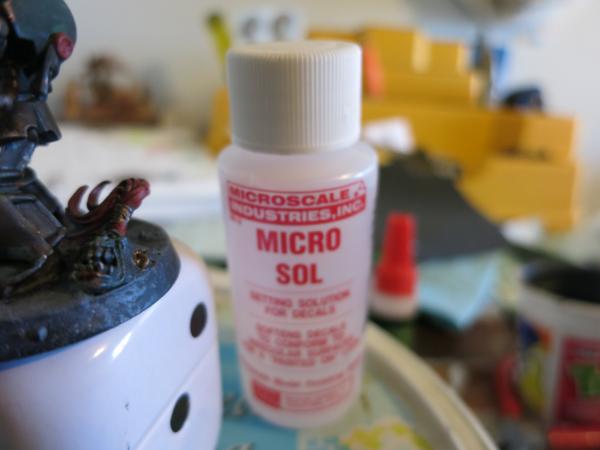
Micro Sol
Make sure the model is substantially painted, at least the part that will have the decal.
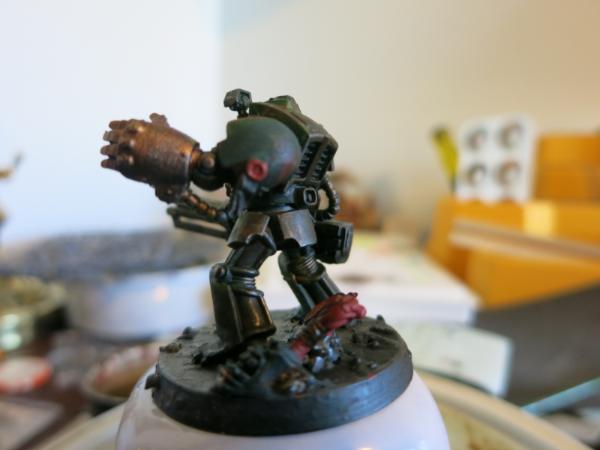
Painted Terminator with Naked Shoulder Pad
Step 1: Cut out the decal. The less excess around the sides of the decal, the better although don’t get too concerned about a little excess. For example, with the skull with blossoms, cut as close to the skull and the jawline as possible but don’t worry about a little edge around the blossoms at the side.

Close Up of the Decal
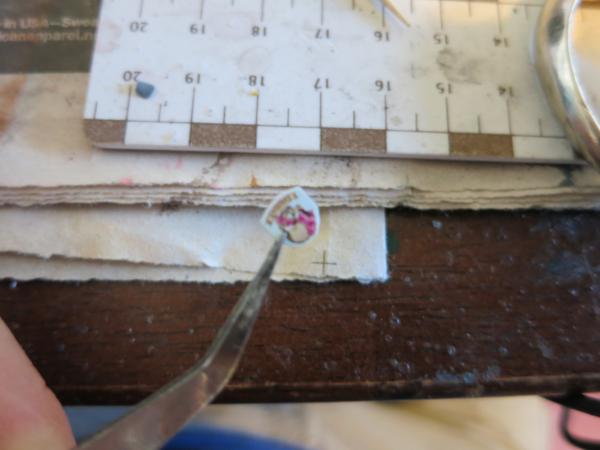
The Trimmed Decal
Step 2: Soak the decal in water. Don’t use too much water, just enough to cover the decal. I put my water on a small plate to form a little puddle. It is enough water although sometimes I have to sink the decal since the surface tension will hold the decal up so that it doesn’t get thoroughly soaked. Soak the decal until it slides off the paper backing.
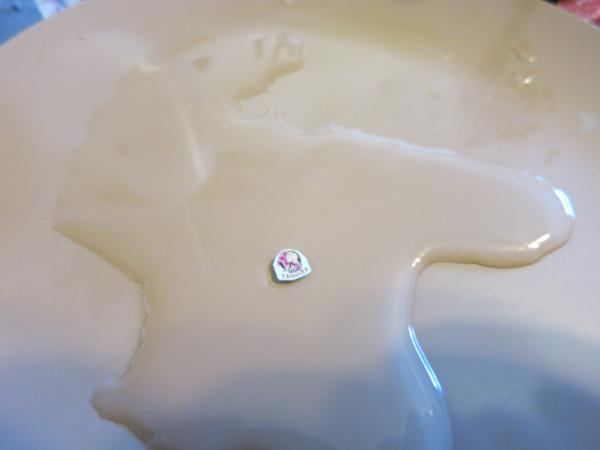
Soaking Decal
Step 3: With an old modeling paint brush, dap Micro Set on the shoulder pad where the decal will go.
Dapping on the Micro Set
Step 4: Remove the paper backing from the decal and place it on the wetted shoulder pad. I use a toothpick or two to pick up the decal rather than directly with my fingers. If the decal folds over on itself, place the decal back into the water until it naturally unfolds.

Placing the Decal on the Shoulder Pad
Step 5: Center the decal on the shoulder pad. Use the tooth pick and the brush that you added the Micro set with. Make sure the bottom of the decal is flatten out but don’t worry so much about the top which will not really be flush with the shoulder pad. Expect a few wrinkles. They will straighten out later.
Decal with Wrinkles on the Upper Edge
Step 6: Dap on the Micro Sol. This will really soften the decal so, as it dries, surface tensions will pull the decal towards the shoulder pad, removing the wrinkles on the upper portion so that the decal is now fitted to the should pad.
Dapping the Decal with Micro Sol
Step 7: Let the decal dry.

The Drying Decal
Step 8: If the decal is not flush when it is dried, dap on some more Micro Set and then some Micro Sol and let it dry again.
Now comes the fun part. Use washes to shade portions of the decal. I use a brownish (Seraphim Sepia) wash or a black wash (nuln oil). This allows control over the intensity of the decal. This is especially useful for light intense or white decals in shaded areas. When done properly, the decals really look like they are part of the model.
For even more contract, use a fluorescent paint to highlight portions of the decals. In the sunny areas, I have highlighted the blossoms with magenta fluorescent paint. Notice how natural the highlights and the shades look in the photographs.
Shoulder Pad with Decal on a Biker Librarian
The lower portion of the decal is shaded and portions of the upper blossoms on the decal are highlighted in fluorescent magenta on this biker librarian to give depth to the decal.
Shoulder Pad with Decal on Sanguinary Priest
These shoulder pads on the Sanguinary Priest above and the Heavy Flamer below show the shaded portion on the right with the blossoms highlighted on the upper left.
Shoulder Pad with Decal on the Heavy Flamer
The Mechanic Skull Decal on the Rifleman Dreadnought
A heavy wash toned down the white of the Mechanic Skull Decal so it is more brownish yellow.
Two very subtle decals are used on the two models below. The first is the banner on the shoulder pad on the Biker Chaplain.
Decal on Banner on Shoulder Pad on Biker Chaplain
Mechanic Decal and Writing on Shoulder Pad on Biker Techmarine with Conversion Beamer
There are actually two decals on his shoulder. The first is the mechanic patch which is black and white but has been so shaded that the white is dulled out. The second is the writing on the banner. Both have been shaded to blend them into the model. To see the decals in detail, click on the picture to go to the picture in the gallery. Use the size bar on to enlarge the picture..
|
|
|
|
|
2016/01/04 21:10:51
Subject: Terminator with Thunderhammer and Shield
|
|
Focused Dark Angels Land Raider Pilot
|
Terminator with Thunderhammer and Shield
I stripped some terminators and repainted them.
Assault Terminator with Thunderhammer and Shield
Terminator – Thunderhammer Side
Terminator – Shield Side
Terminator – Rear View
|
|
|
|
|
2016/01/07 16:25:18
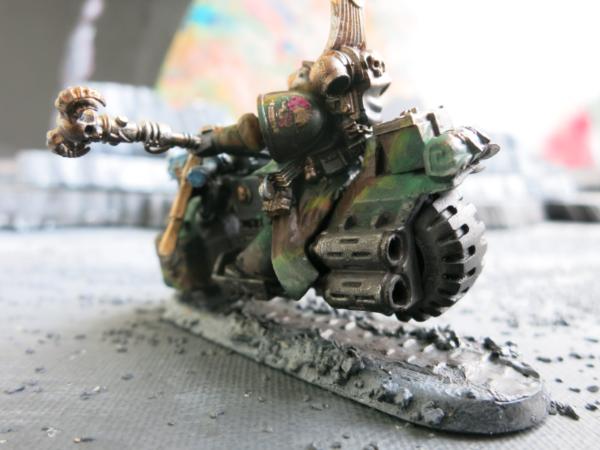
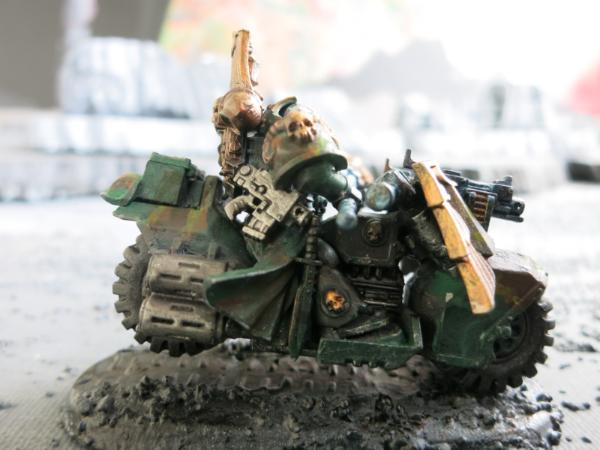
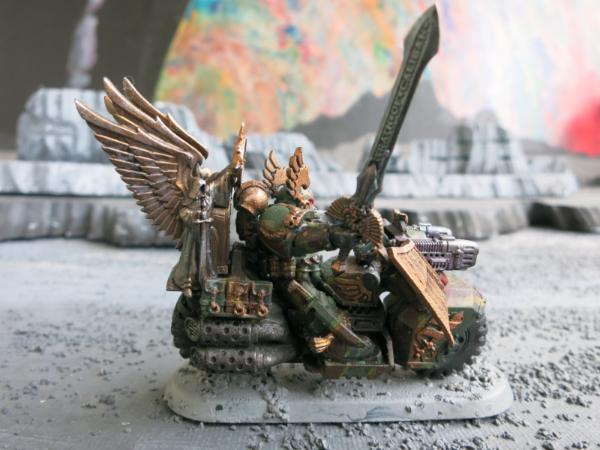
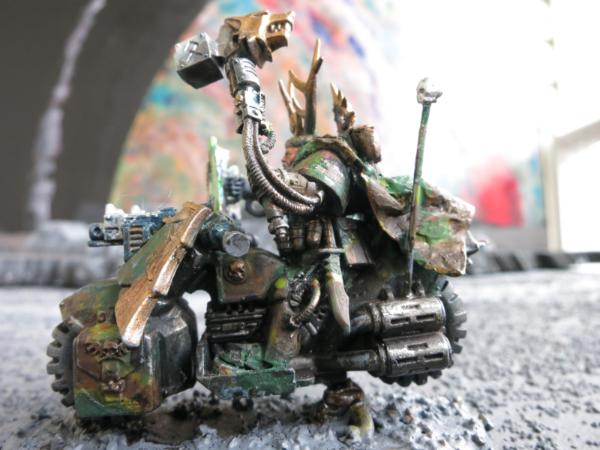
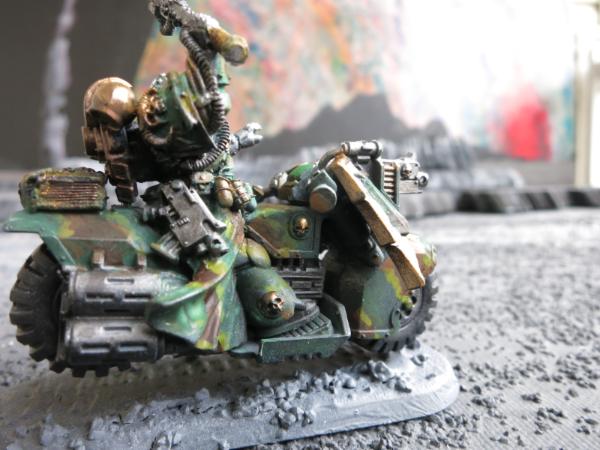
Subject: Victor Staghorn
|
|
Focused Dark Angels Land Raider Pilot
|
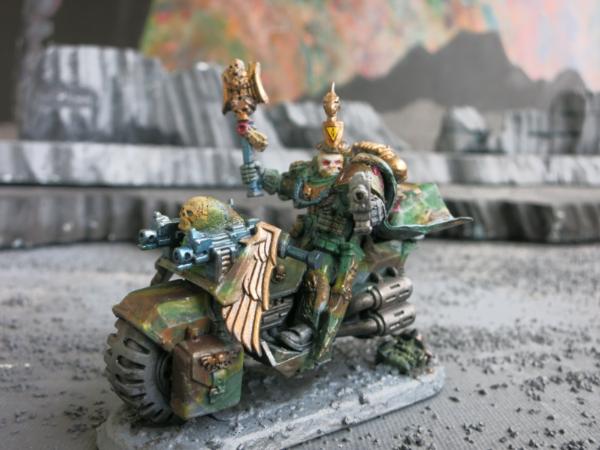
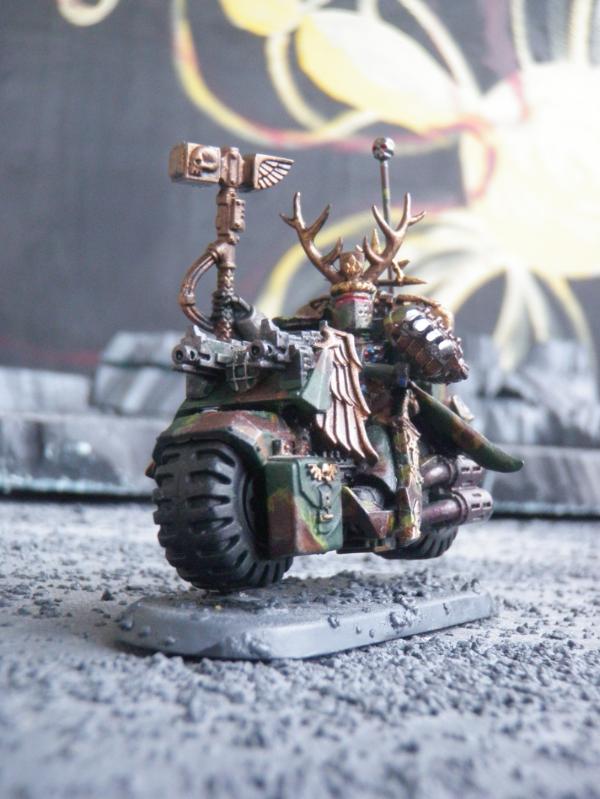
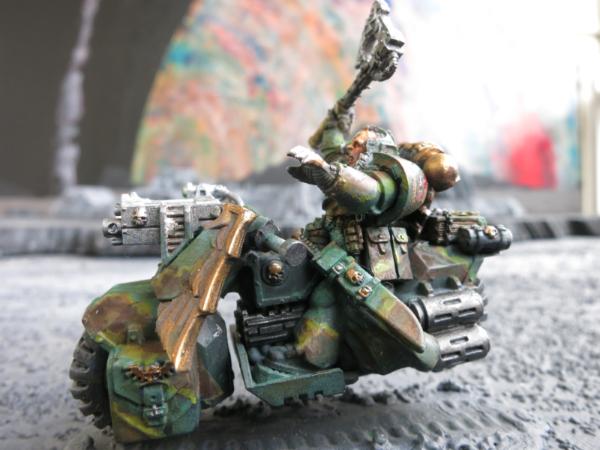
Victor Staghorn
This may be one of my most rebuilt models. He started out as a experimental Biker Sergeant. I added the antler helmet from a Bretonnian Knight. With the axe, this became one of my favorite models.
Sergeant Victor Staghorn
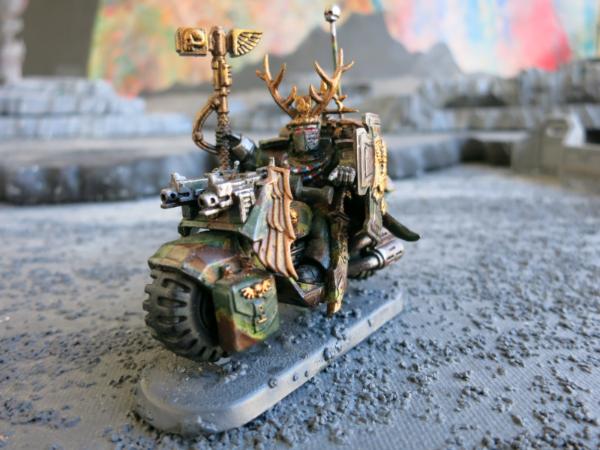
I then rebuilt him as a biker captain.
Captain Victor Staghorn
I then remade him to add a thunderhammer and power claws.
Captain Victor Staghorn with Thunderhammer and Power Claws
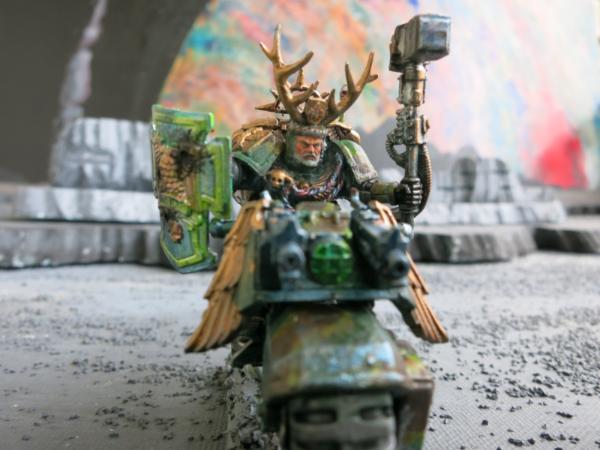
With each of the above rebuilding, he remained one of my favorite models. So I rebuilt him one more to be a chapter master with the Shield Eternal.
Chapter Master Victor Staghorn with Shield Eternal
I should have stopped there but I decided to rebuild him one more but this time I stripped him down and changed his arms. I didn’t like the result so I kept the antlers and but cut out the front of the helmet and added a face. I also brightened up the shield eternal but it was too bright so I dulled it by placing blast impact marks on it. I still don’t like this as well as the earlier versions of the model. I am stuck on why this version is not as satisfying as the earlier models. I like all the individual parts better, the face, the shield, the braid, even the hammer but the model as a whole is lacking. Something is wrong.
Chapter Master Victor Staghorn with Glowing Shield Eternal with Impact Scars
The problem may be the angle of his body. Notice that I put him on a slant but this puts the face leaning forward rather than upright and heroic.
Side View of Chapter Master Victor Staghorn
Since I took this last picture I cut off his body and remounted it so it is taller and more upright. I will post the results after I finish repainting the rebuilt parts.
|
|
|
|
|
2016/01/14 18:26:23
Subject: The Ravenwing Champion
|
|
Focused Dark Angels Land Raider Pilot
|
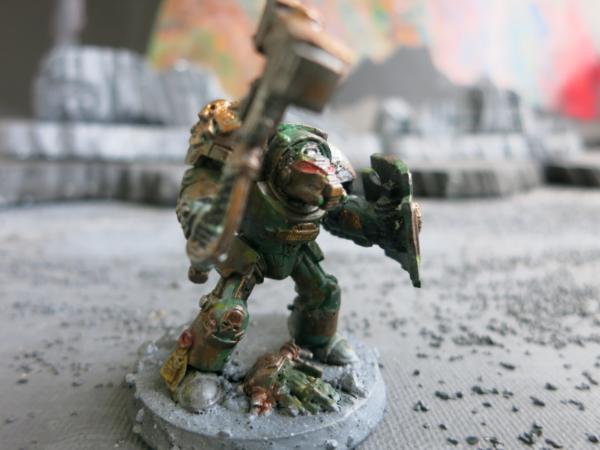
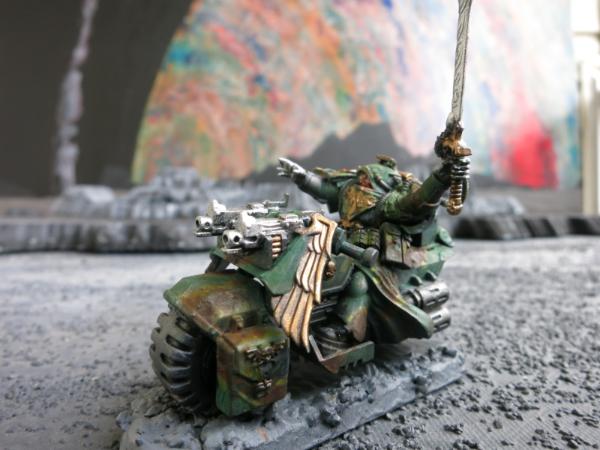
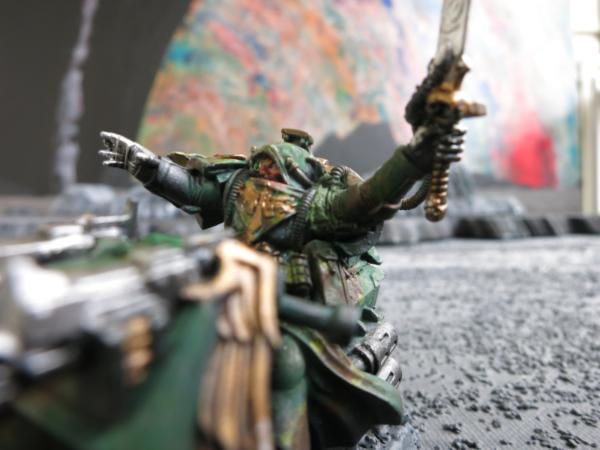
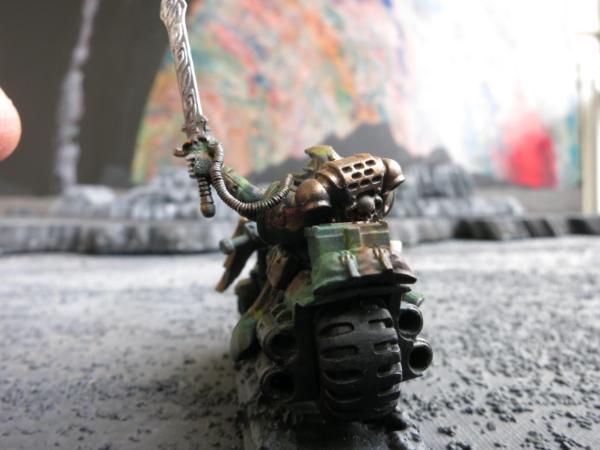
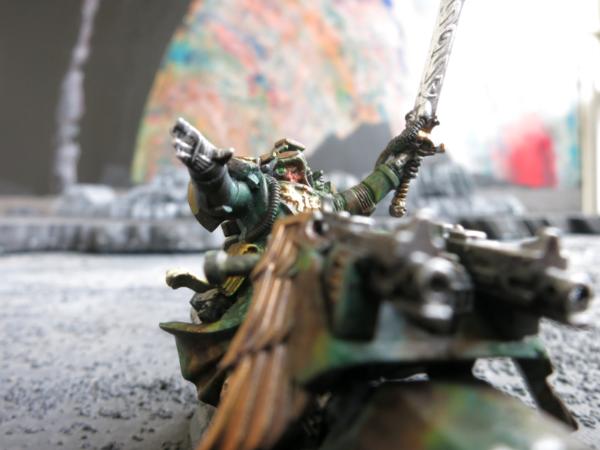
The Ravenwing Champion
The Ravenwing Champion is a strange character. He is measly 5 point upgrade from a standard Black Knight with a 1 point addition for WS. Instead of a Corvus hammer, he carries the Blade of Caliban which is a Power Sword with a plus 1 strength and the standard AP3 so it is a good SME killing tool. In the prior Dark Angels codex, however, the blade was unwieldy. This seemed like an insult. In the entire 40K universe, the Blade of Caliban was the only sword made that was as clumsy as a Power axe. Because of this, I couldn’t bring myself to field a Ravenwing Champion.
In the newest Dark Angels codex, the Blade of Caliban has been refined so that it is no longer unwieldy. So I took one of my Dark Angels and updated him to be a Ravenwing Champion.
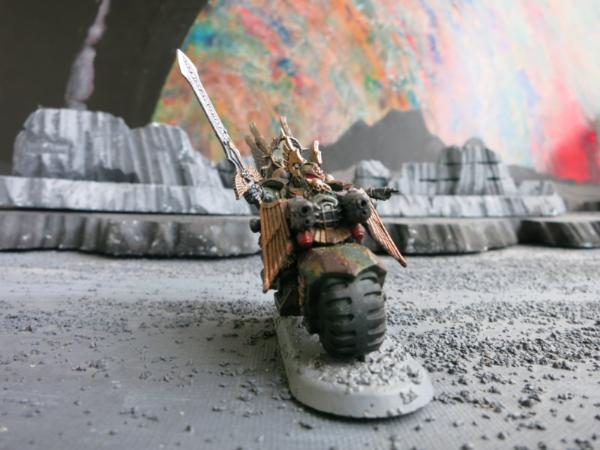
Ravenwing Champion Wielding the Blade of Caliban
This is the fluff. In the great furnaces of Caliban, a young but promising techmarine tooled the Blade of Caliban creating one of the most beautiful and deadly power swords in the known Universe. When he showed it to his master, his master praised its beauty and power. But when the master tested the sword, he found that it was unbalanced and clumsy. The young techmarine was distraught and wanted to destroy the sword but the master forbade it because of its power and beauty.
Instead, the Master presented it to the Ravenwing champion who the master knew to be both arrogant and stupid. He told the champion that only the most pure and righteous of the Dark Angels could wield the sword. The Champion took it refusing to admit that it was clumsy in his hands. In battle the sword was slow and the Champion took a several hits but even then refused to admit that he could not handle the weapon properly.
After watching the champion in battle, both the young techmarine and his master were filled with remorse over the trick they had played on the champion. They secretly took the blade back to the furnaces and reworked it and added spells so that when the new codex came out, the blade was no longer unwieldy. They secretly returned it to the Champion who then bragged about how he had mastered the sword due to his pure and righteous nature.
The Blade of Caliban Wielded by the Pure and Righteous Ravenwing Champion
The sword is big.
|
|
|
|
|
2016/03/07 16:16:10
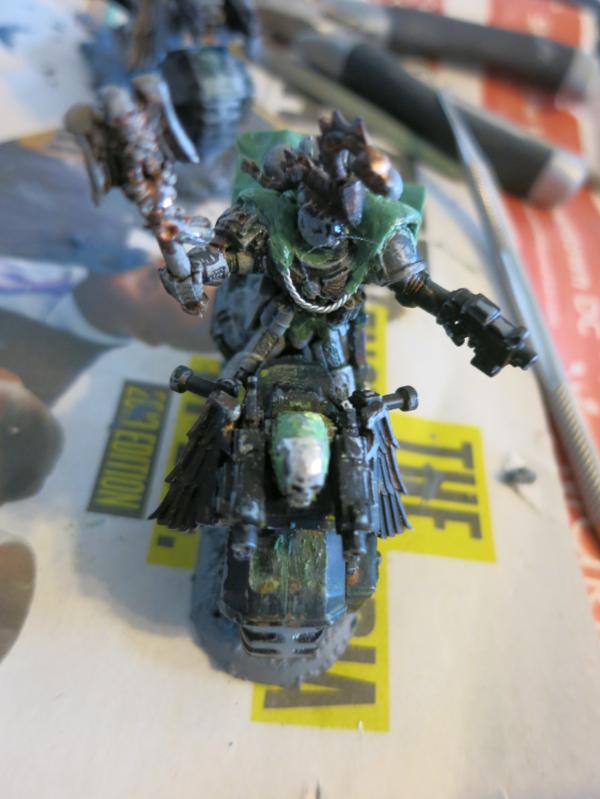
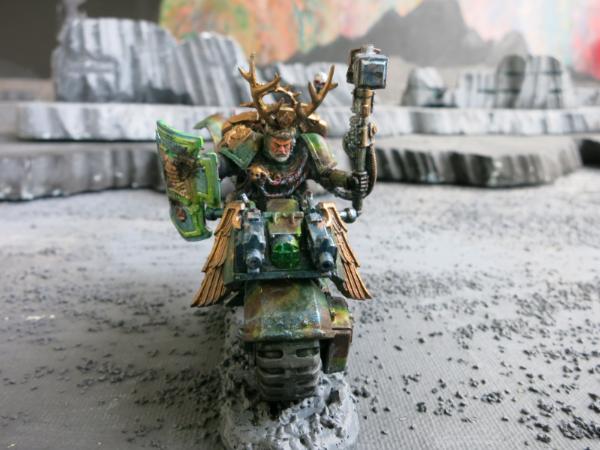
Subject: Victor Staghorn Redone
|
|
Focused Dark Angels Land Raider Pilot
|
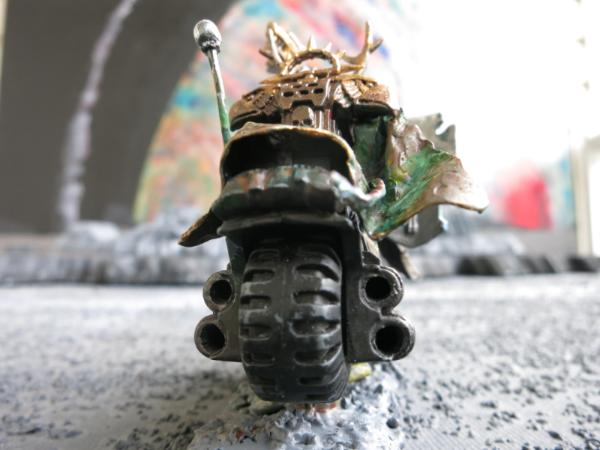
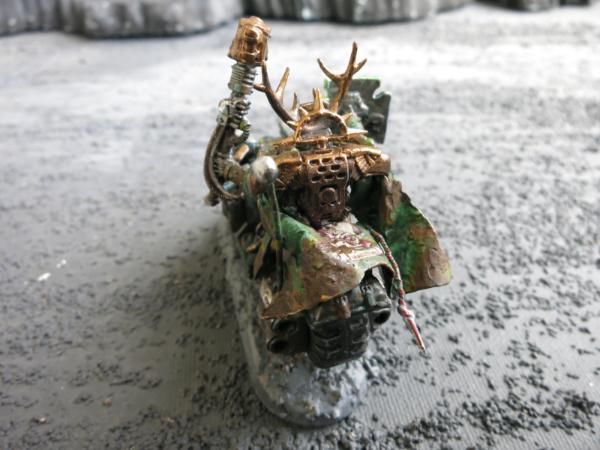
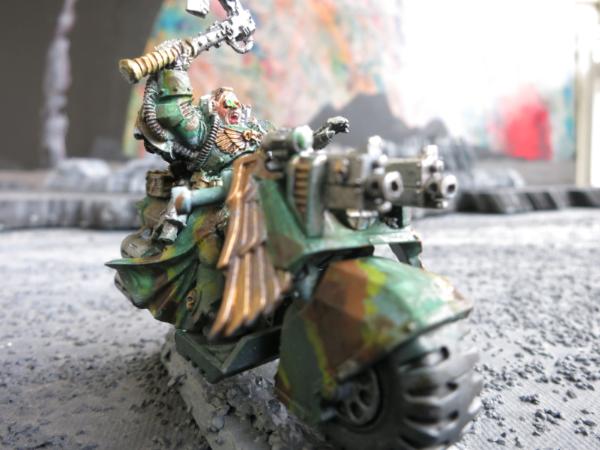
Victor Staghorn – Another Try
In an earlier post, I stated I had rebuild Staghorn by cutting off his body and remounted it in a more upright position. Actually, I did a lot more, including remounting his shield, repositioning the thunderhammer, and remaking his cape so that I could lower the eagle backpack. I also cut off the top of the seat on the bike so that the model could be mounted upright because the upper portion of the seat was blocking the backpack from sitting properly. The two pictures below show the difference.
Side View of Chapter Master Victor Staghorn – Before
Side View of Chapter Master Victor Staghorn – After
Notice in the After view, more of his body is exposed. Overall, these changes seemed to improve the model although few details were changed. The only detail added was a new shoulder pad with the mini-skulls which is cut off from a model of Astorah.
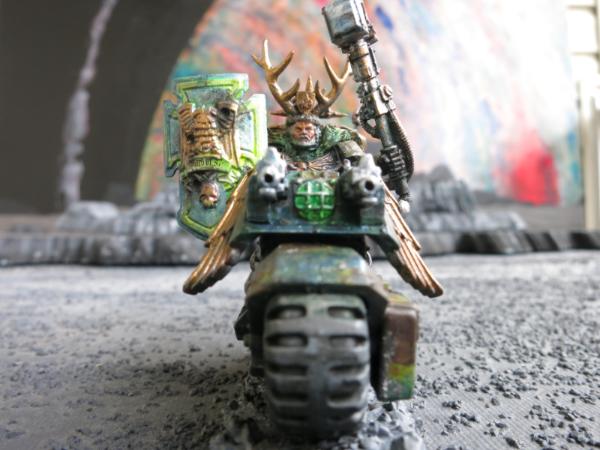
Front View of Victor Staghorn – After
Note how upright his head is compared to a before picture.
Front View of Victor Staghorn – Before
Rear View of Victor Staghorn showing New Cape
Upper Rear View of Victor Staghorn showing Details of New Cape
Left Side View of Victor Staghorn
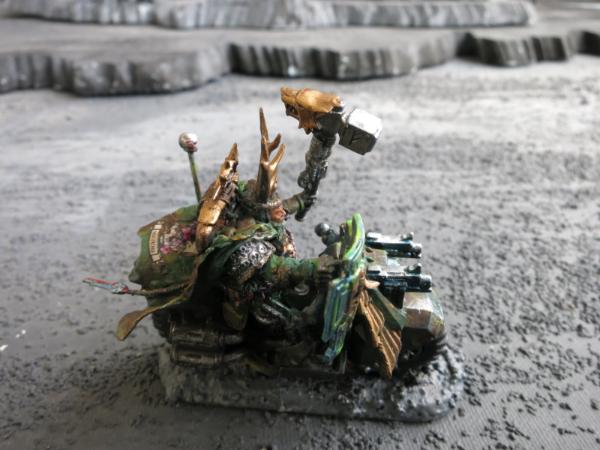
Upper Right View of Victor Staghorn
|
|
This message was edited 2 times. Last update was at 2016/03/07 18:05:41
|
|
|
|
|
2016/03/09 01:42:39
Subject: The Three Weird Sisters
|
|
Focused Dark Angels Land Raider Pilot
|
The Three Weird Sisters
The Three Weird Sisters compose a Librarius Concave. These were fun models to make since all required extensive conversion. Each one is converted from a different librarian model.
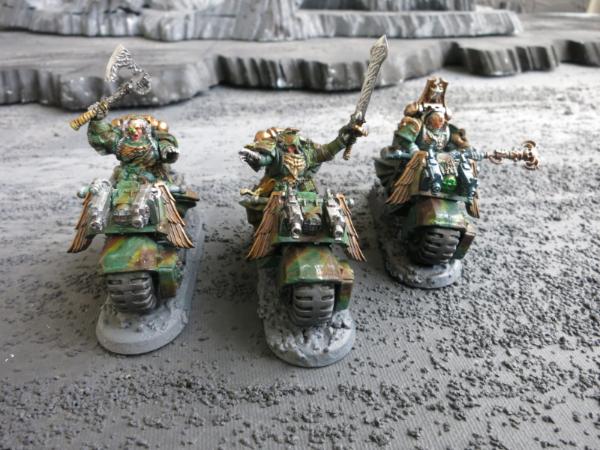
The Three Weird Sisters
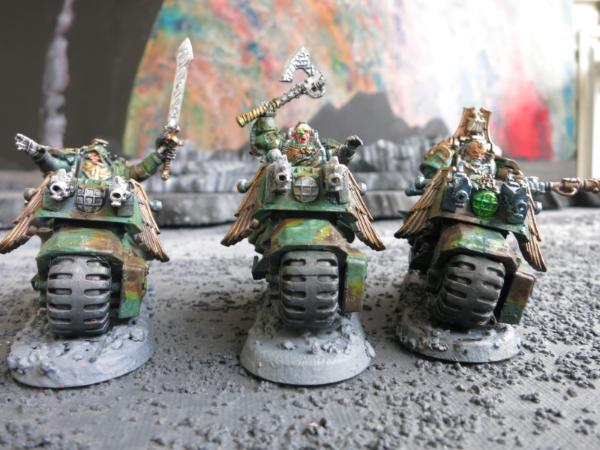
A Librarius Concave
|
|
|
|
|
2016/03/09 12:07:32
Subject: 6th Biker Troop - “Schrödinger's Apocalyptic Raiders”
|
|
Pious Palatine
|
Awesome update. The Chapter Master is especially awesome.
EDC
|
|
|
|
|
2016/03/09 14:42:26
Subject: Re:6th Biker Troop - “Schrödinger's Apocalyptic Raiders”
|
|
Land Raider Pilot on Cruise Control
|
I agree with EDC, the Chapter master is a work of art, he looks intimidating but very artistic with the details. You did a really good job on him. The Chaplain looks equally as awesome.
Not sure how I've missed so many of your updates. Love the Contemptor, looks great. Keep up the amazing work.
|
|
|
|
|
2016/03/09 22:12:12
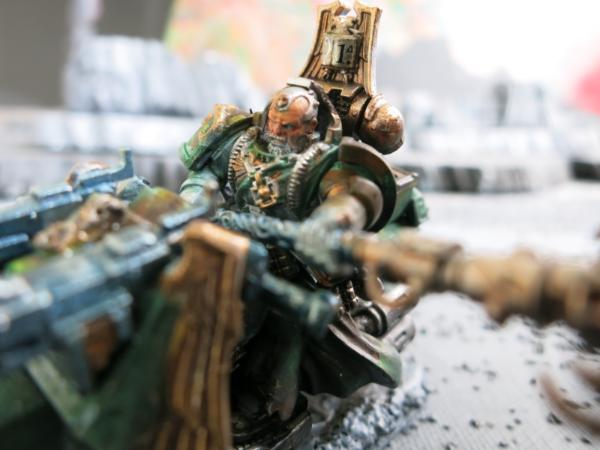
Subject: ]Old Style Metal Terminator Chaplain
|
|
Focused Dark Angels Land Raider Pilot
|
Thank you for the encouraging remarks, Evildrcheese and SpaceWolverine.
Old Style Metal Terminator Chaplain
Back in the day when Games Workshop had full stores, I signed up my then young teenaged son for a weekly class on playing 40K and painting models. After a few weeks he went to a birthday party and managed to hurt himself ending up with crutches and a cast. During the next class, as a get well present, the red shirt gave my son an old metal Chaplain in terminator armor.
Recently, I came across the model. I stripped off the old paint with Purple Power and rebuilt and repainted it. For sentimental reasons, I repainted it in the traditional ultramarine blue. I mounted it on a base that I had received as a promotion for a suppier. I really like the look and in some ways I wish that I had started painting all my models with a traditional color like ultramarine blue rather than the camouflage. The metal model also feels nice in my hand, heavy and substantial.
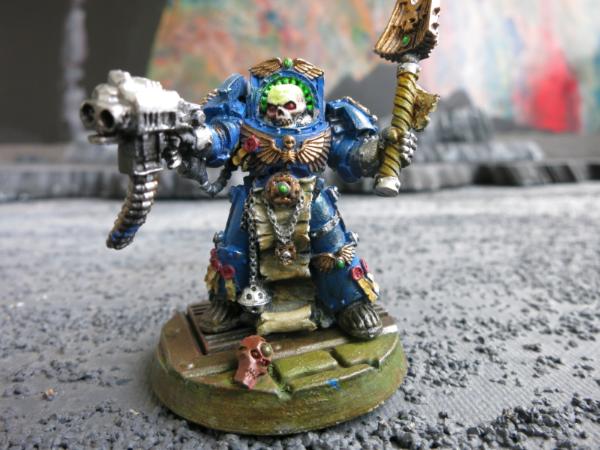
Terminator Chaplain
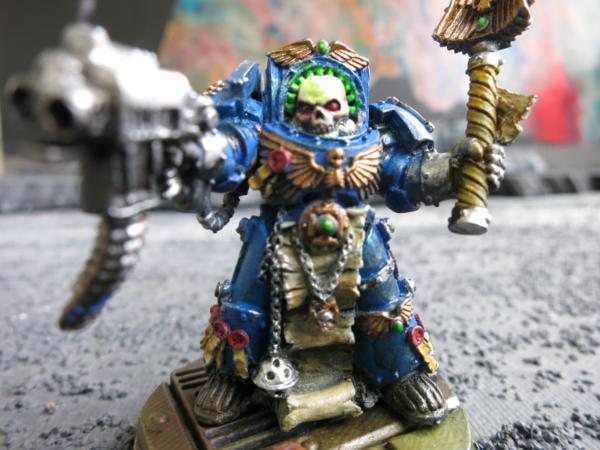
Terminator Chaplain – Close-Up
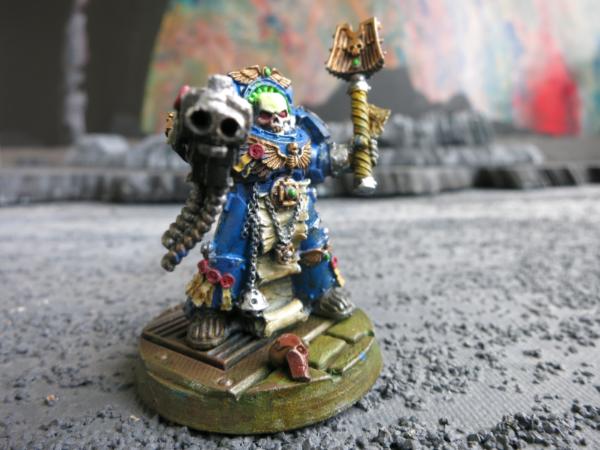
Terminator Chaplain – Front View
Terminator Chaplain – Left Side View
These side views show the base. I have been experimenting with using washes and pigments over a monochromic, black, gray, and white base coat. This gives the base a more weathered or natural look that does not distract from and contrasts with those areas painted with standard opaque paints.
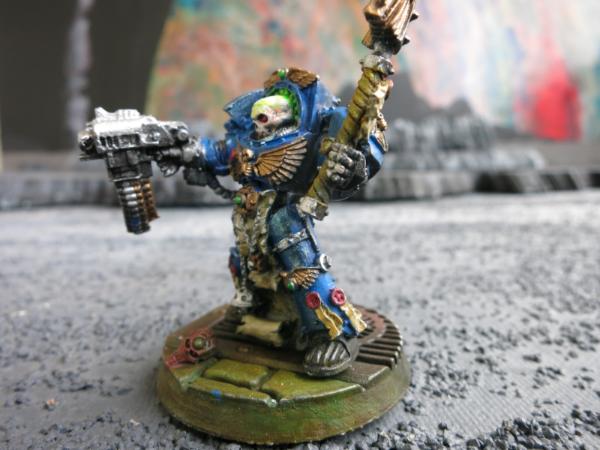
Terminator Chaplain – Right Side View
Notice that the colors and textures move from the dull washes and pigments in the base and handle of his Crozius Arcanum to the standard opaques in his armor and the scrolls and then to the metallic of his weapons, chains, insignia, and highlights on his armor, and finally to the whites and fluorescents on his helmet and jewels. I have been experimenting with this technique on all my most recent models but because the other models are painted with camouflage rather than blue the effect is more subtle.
Terminator Chaplain – Back
|
|
This message was edited 4 times. Last update was at 2016/03/17 20:01:43
|
|
|
|
|
2016/03/10 20:51:51
Subject: ]Librarian with Power Axe – Second of the Three Weird Sisters
|
|
Focused Dark Angels Land Raider Pilot
|
Librarian with Power Axe – Second of the Three Weird Sisters
Librarian with Power Axe
Librarian with Power Axe – Right View
Librarian with Power Axe – Left View
Librarian with Power Axe
|
|
|
|
|
2016/03/17 19:59:02
Subject: Librarian with Power Sword – The Third of the Three Weird Sisters
|
|
Focused Dark Angels Land Raider Pilot
|
Librarian with Power Sword – The Third of the Three Weird Sisters
Librarian with Power Sword.
The Three Weird Sisters are the three librarians who are in a Librarius Concave. The Third Sister is a rebuilt of a librarian that I made earlier.
Librarian with Power Sword – Close-up
Librarian with Power Sword – Rear View
Librarian with Power Sword – Another View
|
|
|
|
|
2016/03/21 19:32:48
Subject: Objective Markers
|
|
Focused Dark Angels Land Raider Pilot
|
Objective Markers
Justin McCoy, who taught a pigment painting class at Nova-Open, gave us class members some bases that he created for practicing using pigments. I added the Ork heads and am using them as objective markers. These are painted over a black and gray base coat using washes and pigments. This gives a natural weathered look to these surfaces.
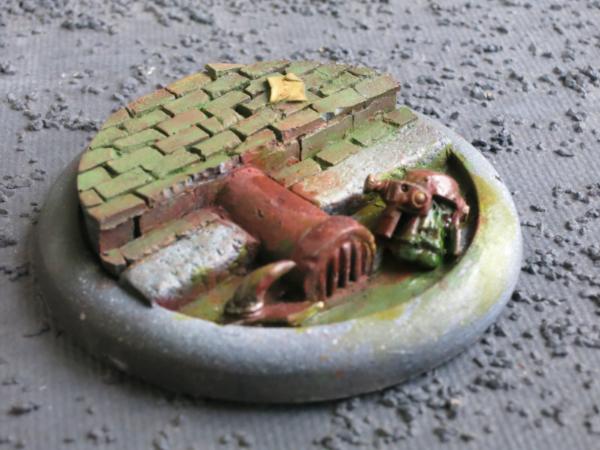
Gutter with Two Ork Heads
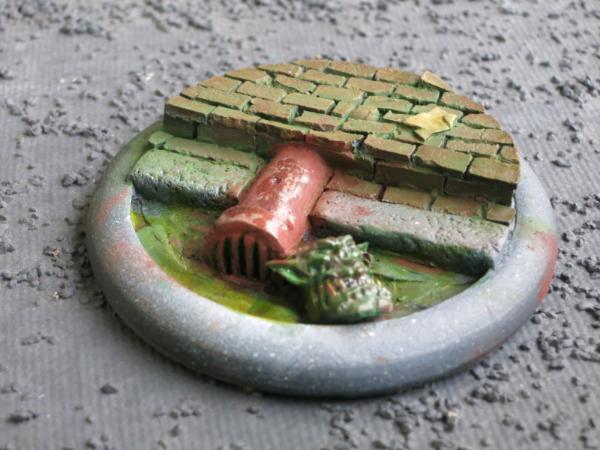
Gutter with One Ork Head
|
|
|
|
|
|
|