Forum adverts like this one are shown to any user who is not logged in. Join us by filling out a tiny 3 field form and you will get your own, free, dakka user account which gives a good range of benefits to you:
No adverts like this in the forums anymore.
Times and dates in your local timezone.
Full tracking of what you have read so you can skip to your first unread post, easily see what has changed since you last logged in, and easily see what is new at a glance.
Email notifications for threads you want to watch closely.
Being a part of the oldest wargaming community on the net.
If you are already a member then feel free to login now.
Guess what nerdy bought? I bought a digital Camcorder and a stand so I can learn to do video tutorials when they arrive I'll see if I can work out how to film and edit etc then pop them in here for perusal! i'm happy to receive any help or hints regarding making these videos too, don't be shy!
Flesh Eaters 4,500 points
" I will constantly have those in my head telling me how lazy and ugly and whorish I am. You sir, are a true friend " - KingCracker
"Nah, I'm just way too lazy to stand up so I keep sitting and paint" - Sigur
"I think the NMM technique with metals is just MNMM. Same sound I make while eating a good pizza" - Whalemusic360
dunno about Nerdwisdom! but i'll do my best, should be a much better way to show how I do faces and reds and yellows! and metals.......and skin........and gross Nurgle guys.........
Flesh Eaters 4,500 points
" I will constantly have those in my head telling me how lazy and ugly and whorish I am. You sir, are a true friend " - KingCracker
"Nah, I'm just way too lazy to stand up so I keep sitting and paint" - Sigur
"I think the NMM technique with metals is just MNMM. Same sound I make while eating a good pizza" - Whalemusic360
Definitely looking forward to that! I've been meaning to put together some tutorials myself, but it'll probably have to wait until I'm back at uni in September where I'm not reliant on natural light (my lamp here is fine for painting, but crap for pics).
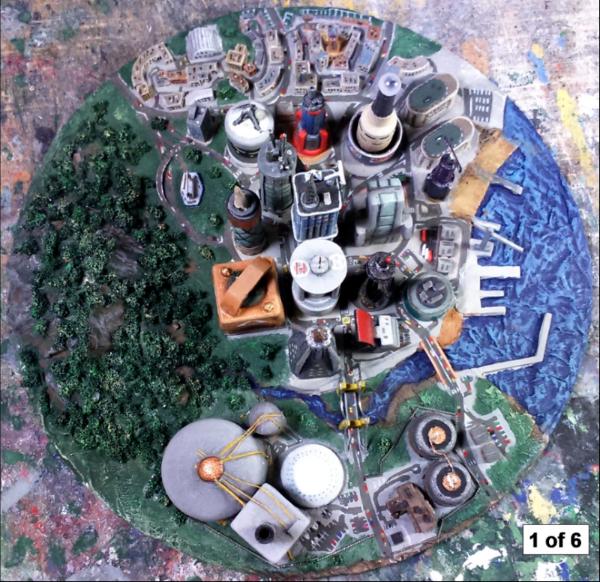
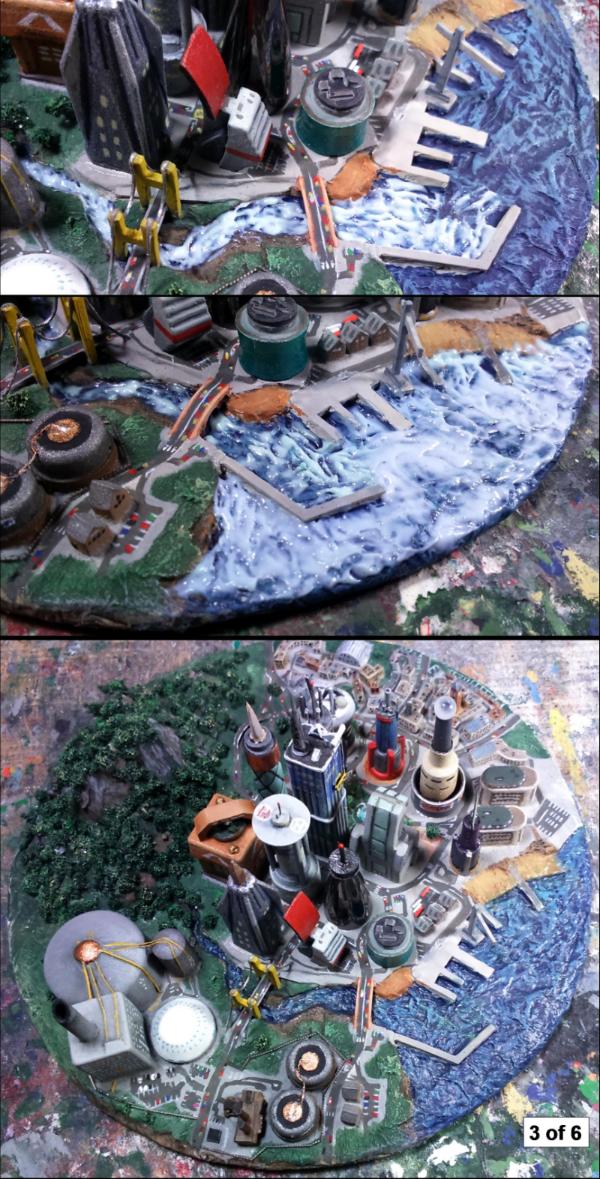
OK then, slightly more than a day or two later, and only slightly painting related... Water, at small scale.
I did say I was going to post something to keep this going.
Copied over from my blog.
The scale you are working at is important for the colour of the water.
At very small scales, such as this*, the water will appear quite blue.
At smaller and smaller scales (that is 1:a smaller number, e.g. 1:56, 1:48, 1:12...), the water will be more and more colourless.
*I've not yet worked out the scale of this model, but when a car is only just over a millimetre you know it's small.
1. The base area, modelled with tissue/PVA, was painted with a dark blue then highlighted with a light blue.
This is just a base coat which lends it's colour to the finished water (as it will be transparent), and the highlighting is just to give a little variation in tone.
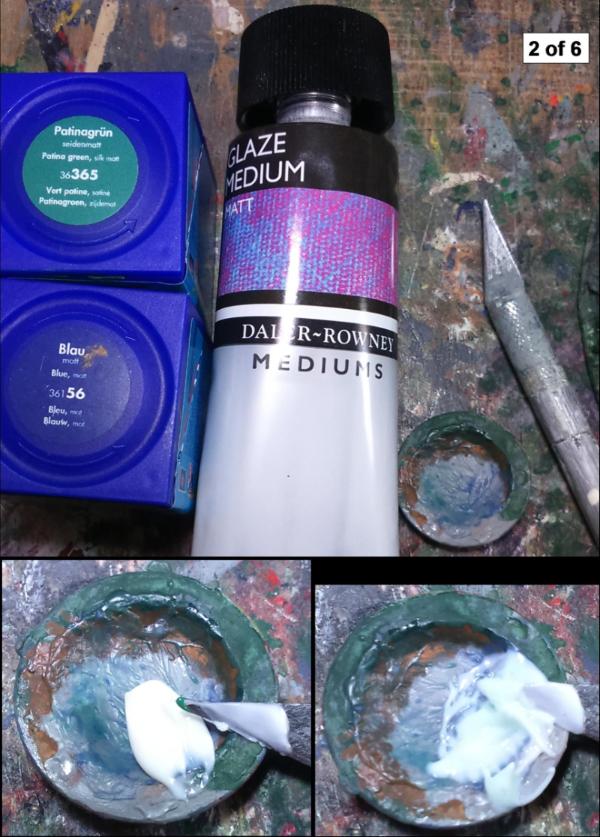
2. This is all that I used to create the water:
A glaze medium, this is the bulk of what will become the water. A gloss finish would be ideal, but I only had a matt variety to hand. Therefore the finished water needed a gloss varnish.
You want something that will cure with very little shrinkage (unlike paint) and will be transparent. Look for mediums rather than varnishes.
Acrylic paint, as the medium was acrylic these needed to match so that they could be mixed. Both green and blue (see later).
Something to mix in, and my universal poking device (a blunt scalpel).
These last photos show the relative quantities of medium to paint (see the tiny dot on the tip of the blade), and the final colour of the mixture; a very slight tint to an otherwise white medium.
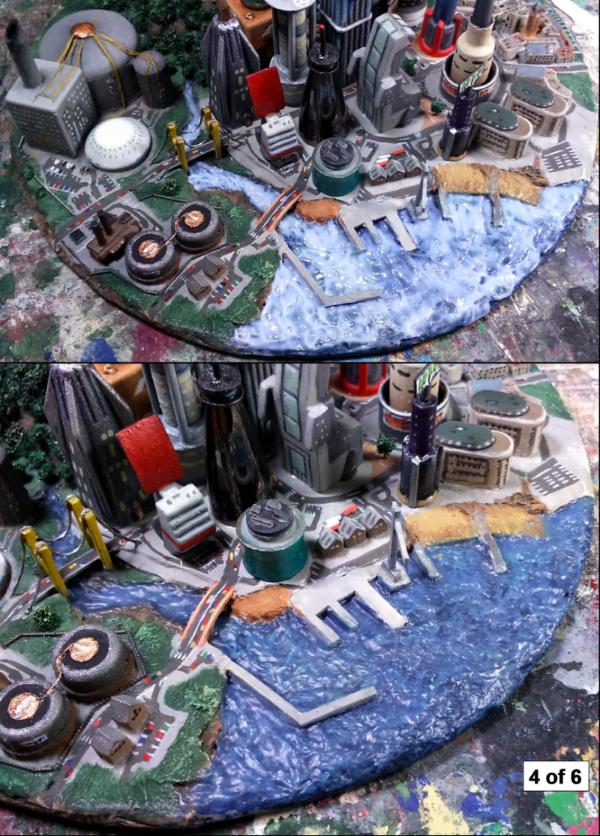
3. The mixture was spread over the water area.
The first pass was with a green mixture to give the final water a slight greenness; adding to the variety in tone.
You will also notice that it’s applied unevenly, this helps to give swirls in the finished water.
Once dry you have a slightly green, transparent coat over the blue base.
It’s important to make each layer reasonably thin as they will dry quicker.
And it’s important to let each layer fully cure before adding the next, or you may end up with a cloudy lower layer.
4. Three progressively smoother coats of blue-tinted medium were then spread over the water area.
Each time I made sure to keep the edges where the “water” met the land, neat.
Removing excess “water” after it has cured leads to unsightly differences in the surface of the water.
I continued to tidy the edges as the medium cured, as it was often too “wet” at first.
A wet brush did help initially to smooth out the parts that didn't behave when poked with my poking device.
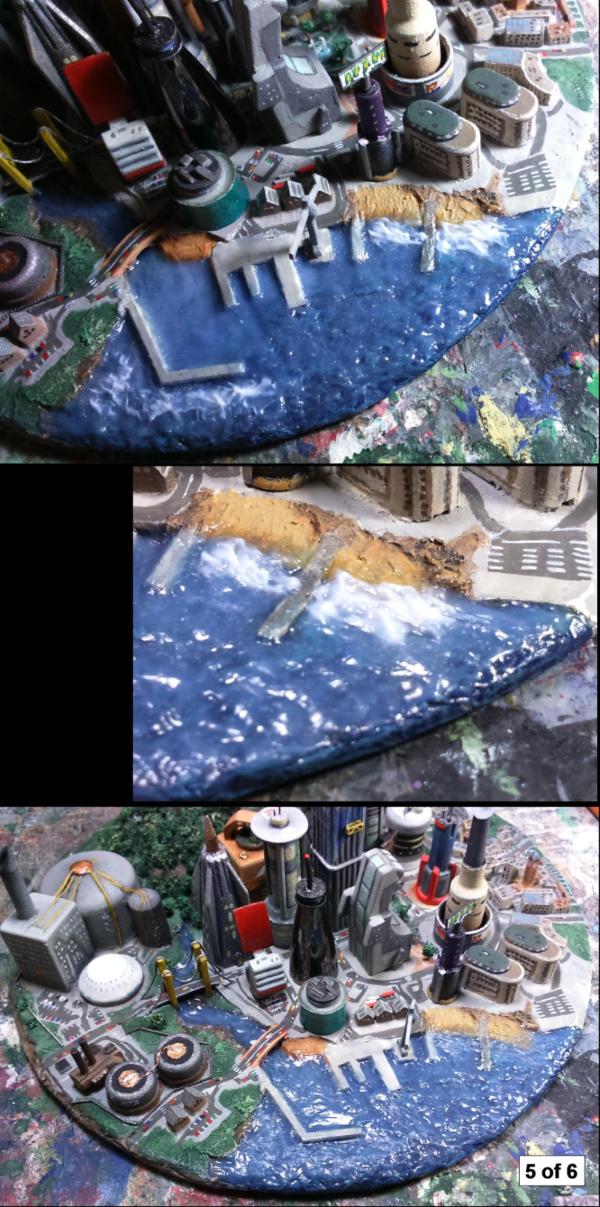
Areas that were further out to “sea” were modelled with waves, while inside the harbour it was kept relatively smooth.
5. The final touches was to add patches of larger waves outside the harbour and at the beach.
The ripples and waves stand out much more once coated with a gloss varnish (as seen here).
6. The last thing to do was add some white highlights, via dry-brushing, to the peaks of the largest waves, and one last gloss varnish.
Getting the translucency to show up in photos is tricky, and I've not found a particularly good way to do this yet.
Hope that proves interesting and/or useful to someone.
Mastodon: @DrH@warhammer.social
The army- ~2295 points (built).
* -=]_,=-eague Spruemeister General. * A (sprue) Hut tutorial * Dsteingass - Dr. H..You are a role model for Internet Morality! // inmygravenimage - Dr H is a model to us all Theophony - Sprue for the spruemeister, plastic for his plastic throne! // Shasolenzabi - Toilets, more complex than folks take time to think about!
Thanks Nerdy. It was actually more forgiving than I expected.
Mastodon: @DrH@warhammer.social
The army- ~2295 points (built).
* -=]_,=-eague Spruemeister General. * A (sprue) Hut tutorial * Dsteingass - Dr. H..You are a role model for Internet Morality! // inmygravenimage - Dr H is a model to us all Theophony - Sprue for the spruemeister, plastic for his plastic throne! // Shasolenzabi - Toilets, more complex than folks take time to think about!
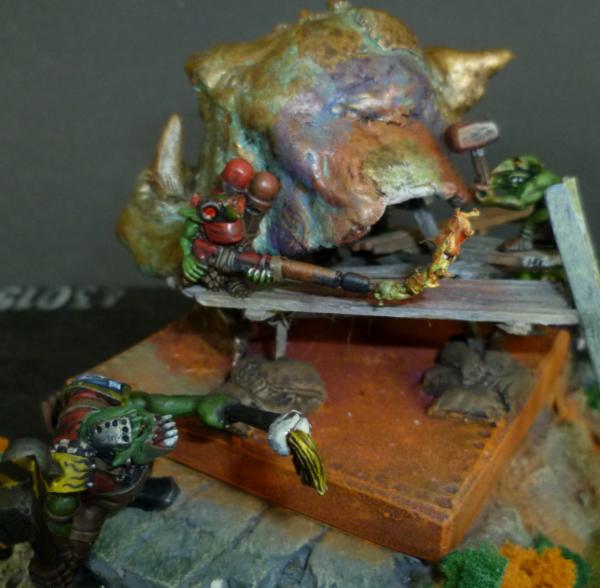
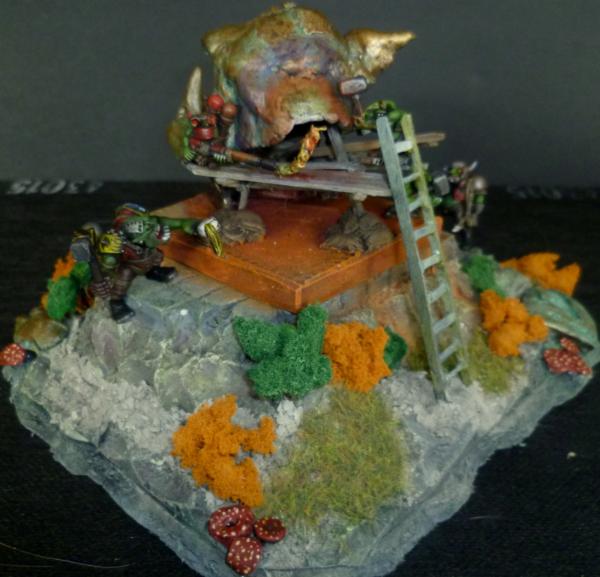
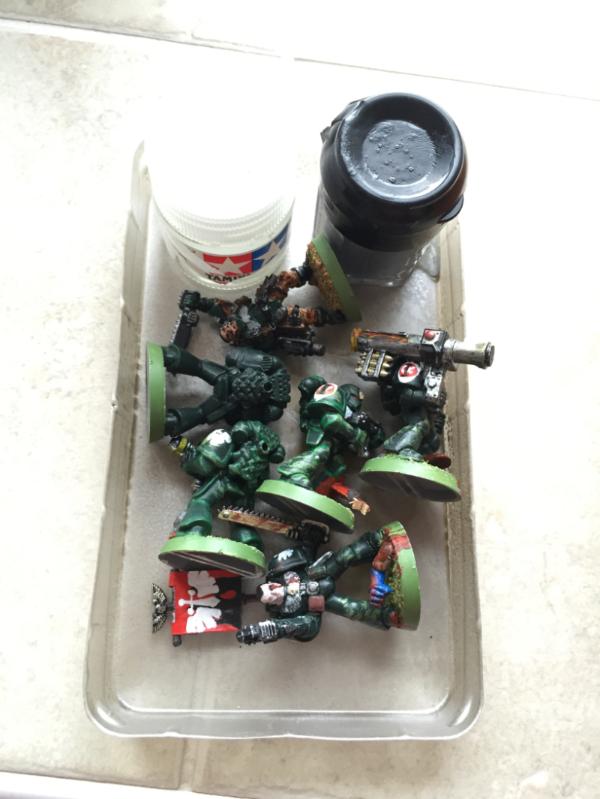
While I was looking into methods on how to do a burnt muzzle effect on weapons I stumbled upon this, it's a heat stain effect that I haven't actually tried but I think certainly looks superior to just a bit of soot on the tip of heat weapons. Check it out and share your thoughts as well as your own methods for adding a used look to your guns.
that does seem to work quite well, might have to try that...
I've done heat-stressed metal a few times, for ork big shootas, dakkajet jet engine/exhausts/big shootas, etc...but never tried using washes though...I mess about with blending and colour-mixes, mixing metallic silver with a little gold, silver/dark blue, silver/blue/black, silver/black...and then just straight black at the end.
my method turned out a fair bit more subdued than on the assault cannon in that tutorial, I think I needed the purple layer between the blue and gold.
...unfortunately I haven't got any pics of anything I've done that on at the moment, I didn't have a camera when I painted them...I'll try to remember to take a couple in the morning...
Yeah, that's the method I generally use (still need more practice on is though), as seen here:
Mastodon: @DrH@warhammer.social
The army- ~2295 points (built).
* -=]_,=-eague Spruemeister General. * A (sprue) Hut tutorial * Dsteingass - Dr. H..You are a role model for Internet Morality! // inmygravenimage - Dr H is a model to us all Theophony - Sprue for the spruemeister, plastic for his plastic throne! // Shasolenzabi - Toilets, more complex than folks take time to think about!
@Dr H - that little water city is awesome! I will definitely be stealing some of your ideas for my Discworld thing.
@Januine et al - I'm looking into doing a different metal colour, but more in the way you do your admech stuff. That is, I'd like to come up with a better recipe for old steel. Not necessarily corroded, but more like maybe a weathered aluminium. I'm trying to figure out how to replicate the pitting and such, since it's more of a white(?) than silver colour. Sponging on a white paint (like you'd do for a rust kind of idea) just doesn't really seem to achieve the same effect.
Anyway wondered if anyone here had any thoughts about how to go about this?
sponging could work very well. I'd do up a bright silver base first - stormhost silver. then do some patches of corrosion with thinned skrag brown in the recesses. stippling for that. I wouldnt use pure white mind. Make a mix of white ans silver so you'll still get some metallic flakes in it adn then a very light sponging. use plenty of reference photos though
Ahh cool! that sounds like a plan - I was likely going to quickly into the end colour without really building it up. I'd post a trail pic but I already stripped it to paint again.
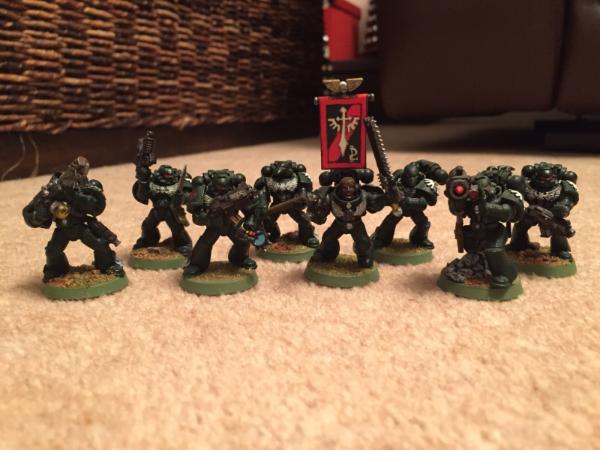
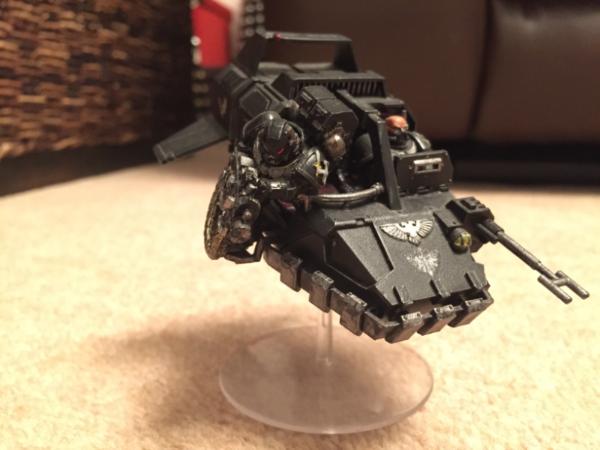
First off let me apologies for not chiming in for so long, I have an up date on my 1/6th scale Death Angel Space Marine. I had to clean all the resin parts sand, sculpted and primed it.
Awesome tatt! The details on the armor are incredible, please don't hesitate to post some wip shots and share techniques.
This also brings to mind something I've wondered about, as I've only ever painted plastic models, how do you guys feel about working with resin models? Any special techniques or tips for those of us new to resin? Preferences in terms of metal, plastic, or resin minis?
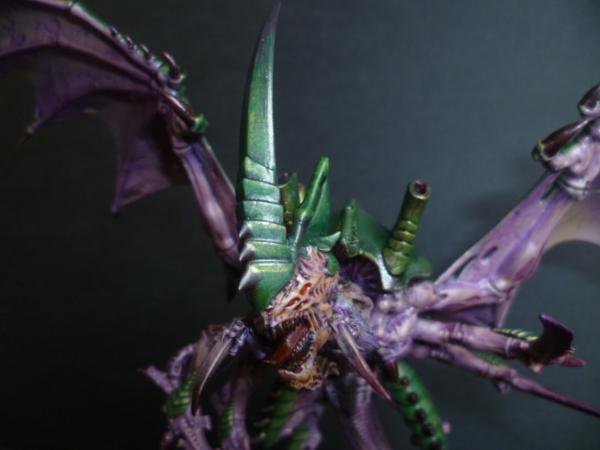
Thanks guys, I have some wip I will post. As for Heretic Tom clean reins repeat then dry fit and shape. Hot water fixes bent or warped parts I nuke water for a minute. Auto primer for stronger paint adhesion. Camkierhi , well the colors work but try going with maybe lighter highlights or I would stick with the purple and make the face more lavender tone. Hope that helps. More Pics soon
Camkierhi, looks good. I think tatt's right about the highlights as a little more contrast is the only way I could think to improve on your already great work. Maybe some highlights in the eyes?
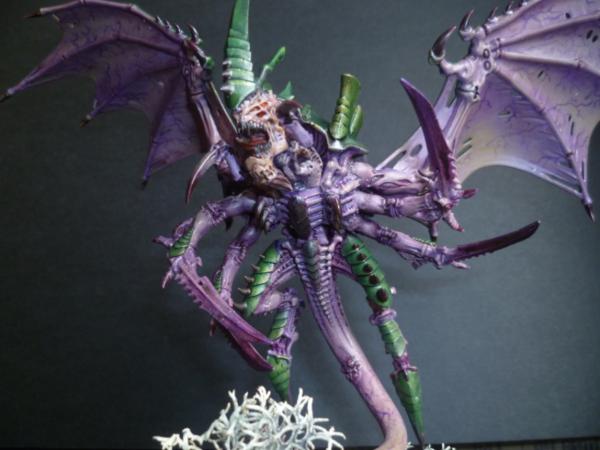
Looking good cam! A really great way to use that technique and it fits perfectly with the tyrants bugs! If you want the face to pop I'd use the tongue and teeth as a focus to draw the eye, maybe a different bright color
Flesh Eaters 4,500 points
" I will constantly have those in my head telling me how lazy and ugly and whorish I am. You sir, are a true friend " - KingCracker
"Nah, I'm just way too lazy to stand up so I keep sitting and paint" - Sigur
"I think the NMM technique with metals is just MNMM. Same sound I make while eating a good pizza" - Whalemusic360
'Tom: I don't treat plastic, resin, or even metal any different when it comes to painting.
They still get a layer of primer (although metals can require more coats), and once that's on they're all the same.
The main reason I prefer working with plastic is for gluing rather than painting.
Cam': I'm with Nerdy on the 'Nid's face.
Good sculpting Tatt'. We need more painting in this thread though.
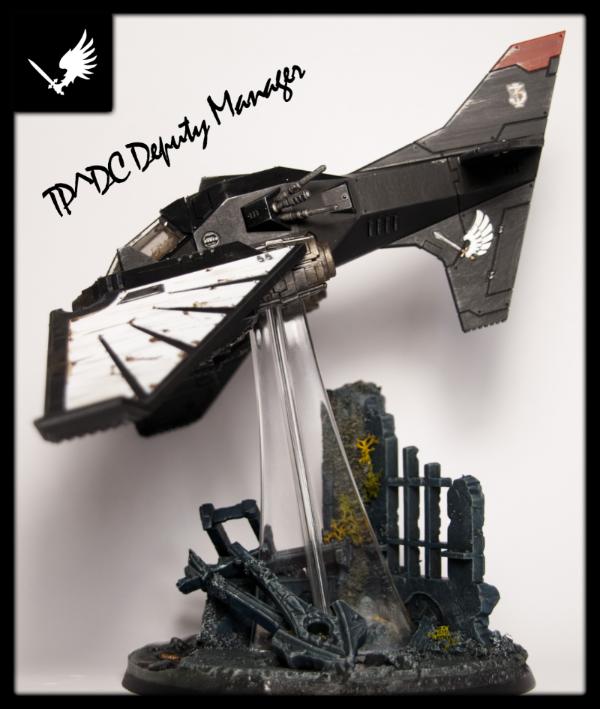
Speaking of painting, I had to learn a new technique recently; reverse painting.
This is a technique for painting something on a transparent surface that will be viewed from the other side.
To achieve this you have to paint the things that you would normally paint last, first. e.g. highlights and/or shading.
And then finish with the basecoat.
When I first had to think about this it took a while for me to wrap my head around it as, how do you know where to put the details before you've painted the basic shape?!
Still, I was only painting clouds, and they are very forgiving in their painting; they're only a collection of blobs anyway...
As I was painting on something that would be viewed from both sides I had to reverse paint the clouds so they could be viewed from the far side, and then paint them "normally" over the same basecoat, so they could be viewed from the near side.
Starting with the darkest parts for the lowest parts of the clouds,
Then a lighter grey for the shading of the clouds,
and then the bulk of the white...
Then more light grey to shade them,
and lastly the dark grey.
To end up with this:
Not to mention the perspective painting on the opaque part of the lid either... that was also tricky (not least because I had to paint most of it upside-down).
Mastodon: @DrH@warhammer.social
The army- ~2295 points (built).
* -=]_,=-eague Spruemeister General. * A (sprue) Hut tutorial * Dsteingass - Dr. H..You are a role model for Internet Morality! // inmygravenimage - Dr H is a model to us all Theophony - Sprue for the spruemeister, plastic for his plastic throne! // Shasolenzabi - Toilets, more complex than folks take time to think about!
Hi there everyone, I'm not going to be so presumptuous as to post any "how to" tutorials because I am learning as I go and have little to teach as of yet (the Padawan is not yet a Master ).
Very briefly. I started painting airfix planes with my Dad when I was about 7. I progressed on to tanks, spaceships (Star Trek) and Tamiya remote control cars. 40K was a natural progression as I further developed my interest in science fiction. Life happened and I took a huge break from A-Levels onwards but had a resurgence when I was in university for a year or so, but had to let it go again as coursework and exams took over. Life continued to be crazy and then I happened to be in Nottingham last March on a course and realised where I was and what a once-in-a-lifetime opportunity I had so blew off the last hour of the course and practically ran across town to GW headquarters and bought the Dark Angels booster for Dark Vengeance.
My painting was stagnant for years and I have only improved since last March. Prior to then I would say that the biggest revelation for me was inks/washes. When I first used GW's Green Ink on my Dark Angels it was like a revelation. I had no friends who painted so had no way of learning new skills. It was DakkaDakka.com that taught me what I now know. This thread (and even more so if there were a way to link directly to advice posts) will be an invaluable resource for those wanting to develop.
I don't think my stuff is that worthy of showing, but have included some photos to give an idea of how I have developed:
Spoiler:
Circa 1997(ish):
2001:
2002 (Proudest model at that time and first conversion):
August 2016 (Finally finished the model that spurred me to buy the expansion set 17 months earlier):
I learnt all I know now from a few key members of Dakka and quite a bit of Google searching. Biggest things that made a difference are thinning paints, layering and highlighting, basing properly (clear resin is NOT scary, I promise) and letting the stories you think of for your models permeate through in the planning phase. Oh and GW technical paints will skyrocket your results.
Thanks for listening to me babble, and in an effort to keep learning.....
Heretic Tom wrote: While I was looking into methods on how to do a burnt muzzle effect on weapons I stumbled upon this, it's a heat stain effect that I haven't actually tried but I think certainly looks superior to just a bit of soot on the tip of heat weapons. Check it out and share your thoughts as well as your own methods for adding a used look to your guns.
I was about to try this on flamer/melta/plasma weapons. Would the consensus suggest this should be used on projectile weapons? I didn't perceive that it would make sense on those weapons. Happy to be corrected.
GW - 670 pts || - 354 pts || - 46 pts || - 106 pts || LoTR - 400 pts (Evil) vs 0 pts (Good) || Space Hulk - 1/35 || Deathwatch Overkill - 0/50
OtherMEdge: Karists - 23 points || Epirians - 0 points Shattered Earth: Awaiting delivery "Awakening" Terrain: Awaiting delivery DWMG2: 4/54
My Miniatures blog || My Terrain blog || My MEdge blog || Paradigm's Painting Challenge League Tables: 2015/16, 2016/17 The Hobby Mission: 25/713 minis complete, 98/406 terrain complete. 46 more minis in 2016 to complete my goal for this year
jreilly89: "In the far future, there are only drive-bys."
Lovely to see a healthy blog in my absence. Sorry guys, cross country move and all has slowed my painting load.
Dr H : it came out fantastic!! Wonderful work.
Tatt: Awesome stuff man. And thanks to Dr H, this is a painting blog so we prefer painting pics to modelling ones Thank you!!
TPDC: Welcome and wonderful showcasings Thanks for sharing and looking forward to more.
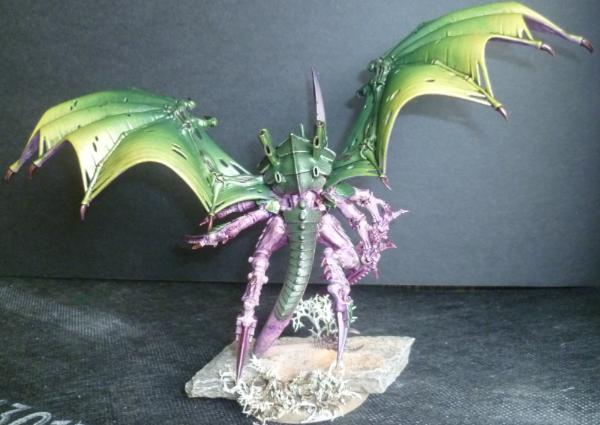
Cam: The tyranid looks like a lot of progression!! The orc piece, however, ive some critiques. Again, it comes down to palette. I really think your works would benefit from narrowing down your color choices. in the above youve got red yellow orange green etc etc....) Also, really try to think outside of the box when choosing your tones. Orange and green...what kind of orange and green...The content is good as always but i think one of the main things you could focus on is the in your mind seeing the finished product before you finish it and stick to a more specific palette. Onward!!!
As for myself sadly, ive nothing new to show. Soon
This message was edited 1 time. Last update was at 2016/09/06 18:49:32


 I bought a digital Camcorder and a stand so I can learn to do video tutorials
  when they arrive I'll see if I can work out how to film and edit etc then pop them in here for perusal!
  i'm happy to receive any help or hints regarding making these videos too, don't be shy!
 Flesh Eaters 4,500 points


 dunno about Nerdwisdom! but i'll do my best, should be a much better way to show how I do faces and reds and yellows! and metals.......and skin........and gross Nurgle guys.........


 // inmygravenimage - Dr H is a model to us all
  Chaos Warband & Inquisition


 ...it's good to be green!
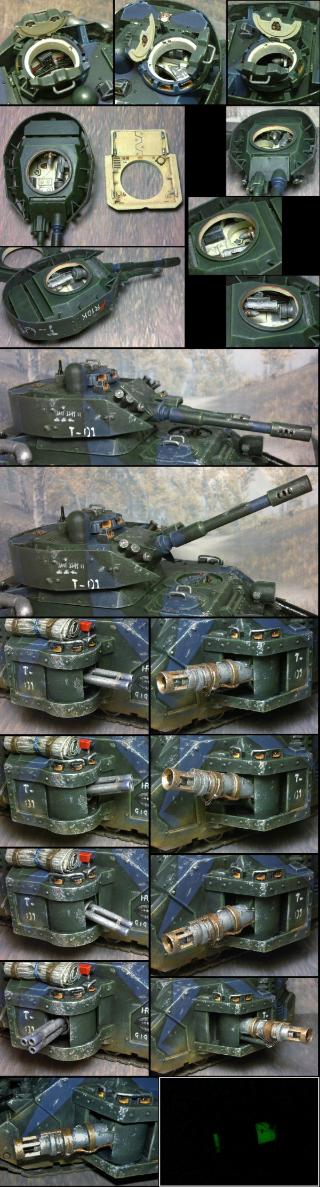


 - 670 pts ||