| Author |
Message |
 |
|
|
|
|
Advert
|
Forum adverts like this one are shown to any user who is not logged in. Join us by filling out a tiny 3 field form and you will get your own, free, dakka user account which gives a good range of benefits to you:
- No adverts like this in the forums anymore.
- Times and dates in your local timezone.
- Full tracking of what you have read so you can skip to your first unread post, easily see what has changed since you last logged in, and easily see what is new at a glance.
- Email notifications for threads you want to watch closely.
- Being a part of the oldest wargaming community on the net.
If you are already a member then feel free to login now. |
|
 |
2010/12/07 11:43:56
Subject: Land Raider Mk1...or Mk1.5
|
|

Stalwart Tribune
|
shasolenzabi wrote:Hi, as for your title, I have an old Mk-I hull, and so this beauty that you have made I would class as the Mk-I.5 as it is still lower, and longer than the old Mk-I Landraider. This in my mind makes a great "Missing link" between that old plastic kit and the FW made Mk-II Landraider. It is excellent, and I would love to know how you made the casts for the older pattern treads that go all the way around like the Mk-I treads.
I shall not name the rival site but I have a whole thread there on how I made these treads and more.
http://www.warseer.com/forums/showthread.php?t=227319
|
|
|
|
 |
|
2010/12/07 12:05:36
Subject: Land Raider Mk1...or Mk1.5
|
|
Rogue Inquisitor with Xenos Bodyguards
|
Very nice! I may just like to discuss these more via PM.
|
"Your mumblings are awakening the sleeping Dragon, be wary when meddling the affairs of Dragons, for thou art tasty and go good with either ketchup or chocolate. "
Dragons fear nothing, if it acts up, we breath magic fire that turns them into marshmallow peeps. We leaguers only cry rivets!


|
|
|
|
|
2010/12/07 13:50:06
Subject: Land Raider Mk1...or Mk1.5
|
|
Stalwart Tribune
|
shasolenzabi wrote:Very nice! I may just like to discuss these more via PM.
Sure! This was actually a relatively simple project so if any of you would like a Land Raider modified this way just let me know. The next time around I would like to make the tread units taller like the original.
|
|
|
|
|
|
2010/12/07 14:17:08
Subject: Land Raider Mk1...or Mk1.5
|
|
The New Miss Macross!
|
Machinator wrote:shasolenzabi wrote:Hi, as for your title, I have an old Mk-I hull, and so this beauty that you have made I would class as the Mk-I.5 as it is still lower, and longer than the old Mk-I Landraider. This in my mind makes a great "Missing link" between that old plastic kit and the FW made Mk-II Landraider. It is excellent, and I would love to know how you made the casts for the older pattern treads that go all the way around like the Mk-I treads.
I shall not name the rival site but I have a whole thread there on how I made these treads and more.
http://www.warseer.com/forums/showthread.php?t=227319
not really rivals as how they're listed on the forum "friends" on the front page.  feel free to link away.
did you just add the treads to the top of the land raider hull or did you have to fashion new pieces for the top?
|
|
|
|
|
2010/12/07 15:11:10
Subject: Land Raider Mk1...or Mk1.5
|
|
Stalwart Tribune
|
warboss wrote:Machinator wrote:shasolenzabi wrote:Hi, as for your title, I have an old Mk-I hull, and so this beauty that you have made I would class as the Mk-I.5 as it is still lower, and longer than the old Mk-I Landraider. This in my mind makes a great "Missing link" between that old plastic kit and the FW made Mk-II Landraider. It is excellent, and I would love to know how you made the casts for the older pattern treads that go all the way around like the Mk-I treads.
I shall not name the rival site but I have a whole thread there on how I made these treads and more.
http://www.warseer.com/forums/showthread.php?t=227319
not really rivals as how they're listed on the forum "friends" on the front page. feel free to link away.
did you just add the treads to the top of the land raider hull or did you have to fashion new pieces for the top?
It required a little work. First I had to add a couple of 0.060 plastic strips to the front of the track unit to widen the radius for these longer tracks. Next I added a 0.25 plastic strip along the top to give it some extra height. The only other modifcation I needed to do to the kit was to cut off the track guards on the top piece of the Land Raider. Then I glued the tracks on top of that.
The next time around I think I will raise up the top by 0.5 inches just to get some more clearance on the top and make it look more like the Mk1.
|
|
|
|
|
|
2010/12/07 15:26:45
Subject: Land Raider Mk1...or Mk1.5
|
|
The New Miss Macross!
|
Machinator wrote:It required a little work. First I had to add a couple of 0.060 plastic strips to the front of the track unit to widen the radius for these longer tracks. Next I added a 0.25 plastic strip along the top to give it some extra height. The only other modifcation I needed to do to the kit was to cut off the track guards on the top piece of the Land Raider. Then I glued the tracks on top of that.
The next time around I think I will raise up the top by 0.5 inches just to get some more clearance on the top and make it look more like the Mk1.
i was just curious. i've got a FW MkIIb and wouldn't mind acquiring some treads if you sold them and i could fit them on an already finished MkIIb without messing with the model too much (might have to take off the old tracks but i'm ok with that part). keep that in mind if you're redesigning the kit for a possible future webshop offering.
|
|
|
|
|
2010/12/07 16:05:49
Subject: Land Raider Mk1...or Mk1.5
|
|
Stalwart Tribune
|
warboss wrote:Machinator wrote:It required a little work. First I had to add a couple of 0.060 plastic strips to the front of the track unit to widen the radius for these longer tracks. Next I added a 0.25 plastic strip along the top to give it some extra height. The only other modifcation I needed to do to the kit was to cut off the track guards on the top piece of the Land Raider. Then I glued the tracks on top of that.
The next time around I think I will raise up the top by 0.5 inches just to get some more clearance on the top and make it look more like the Mk1.
i was just curious. i've got a FW MkIIb and wouldn't mind acquiring some treads if you sold them and i could fit them on an already finished MkIIb without messing with the model too much (might have to take off the old tracks but i'm ok with that part). keep that in mind if you're redesigning the kit for a possible future webshop offering.
Treads are available here: http://mail.aol.com/32992-111/aol-6/en-us/Suite.aspx
A kit would be tricky, another route would be for me to sell the Land Raider body or just the track units already modified.
|
|
|
|
|
|
2010/12/07 16:34:46
Subject: Re:Land Raider Mk1...or Mk1.5
|
|
Fresh-Faced New User
|
tmac wrote:thats amazing !
you make it look way easy
|
|
|
|
|
|
2010/12/07 23:28:04
Subject: Land Raider Mk1...or Mk1.5
|
|
Rogue Inquisitor with Xenos Bodyguards
|
I would love a tutorial sheet and the treads to do it myself as I am a model converter myself. I have scratch built a gun tractor for one of my Thudd guns.
|
"Your mumblings are awakening the sleeping Dragon, be wary when meddling the affairs of Dragons, for thou art tasty and go good with either ketchup or chocolate. "
Dragons fear nothing, if it acts up, we breath magic fire that turns them into marshmallow peeps. We leaguers only cry rivets!
|
|
|
|
|
2010/12/08 09:22:40
Subject: Re:Land Raider Mk1...or Mk1.5
|
|

Fresh-Faced New User
|
If you are a model converter you dont need a tutorial 
By the way i love your conversion. Im working on a 100% scratchbuild raider and i want to make mine look like this one.
|
|
|
|
|
|
2010/12/08 23:43:52
Subject: Re:Land Raider Mk1...or Mk1.5
|
|
Rogue Inquisitor with Xenos Bodyguards
|
Rekrom wrote:If you are a model converter you dont need a tutorial
That does not mean I can't appreciate learning a new way for working on a model now, after all, stop learning and you stagnate. I do not know all of the possible methods, and I would likely be able to do it on my own, but if there is a better way to do it than something i may do, then well, I may as well find out.
|
"Your mumblings are awakening the sleeping Dragon, be wary when meddling the affairs of Dragons, for thou art tasty and go good with either ketchup or chocolate. "
Dragons fear nothing, if it acts up, we breath magic fire that turns them into marshmallow peeps. We leaguers only cry rivets!
|
|
|
|
|
2010/12/09 23:51:47
Subject: Land Raider Mk1...or Mk1.5
|
|
Jovial Plaguebearer of Nurgle
|
I miss the Mk. 1. Its nice to see one like it out in the wild. Very cool modeling.
|
|
|
|
|
|
2010/12/10 00:58:13
Subject: Re:Land Raider Mk1...or Mk1.5
|
|
Crazed Spirit of the Defiler
|
So I just ordered the materials to scratch build tracks I saw on another thread, then I saw your tracks. Very nice I just ordered two packs of the oppressors for my chaos chimera project! If you ever consider expanding your track line im sure you could improve on this guys design. http://www.dakkadakka.com/dakkaforum/posts/list/60/301059.page#2183666
|
|
|
|
|
|
2011/06/05 06:16:18
Subject: Land Raider Mk1...or Mk1.5
|
|
Stalwart Tribune
|
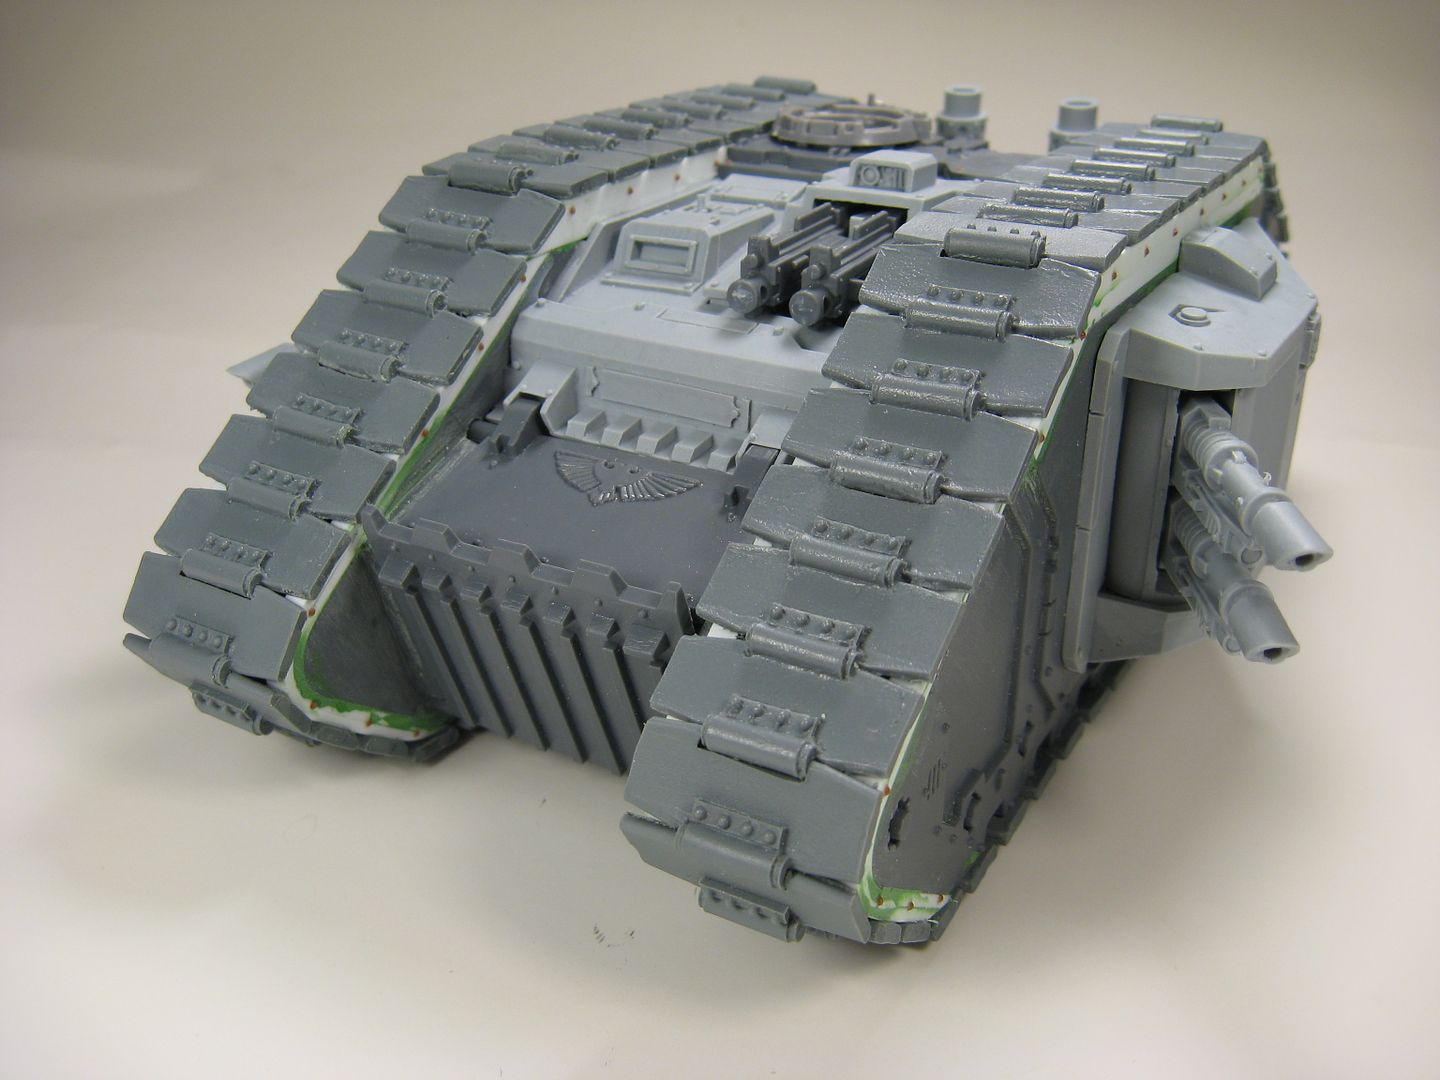
Since doing this project I was asked a number of times to do a tutorial on how to replace the standard treads with my Liberator Pattern 1.0s (you can also use the same process with the Oppressor or Krusher Pattern 1.0s). Well I finally got around to building another one (for the same customer no less) and I documented the whole process as best as I could. So here we go.
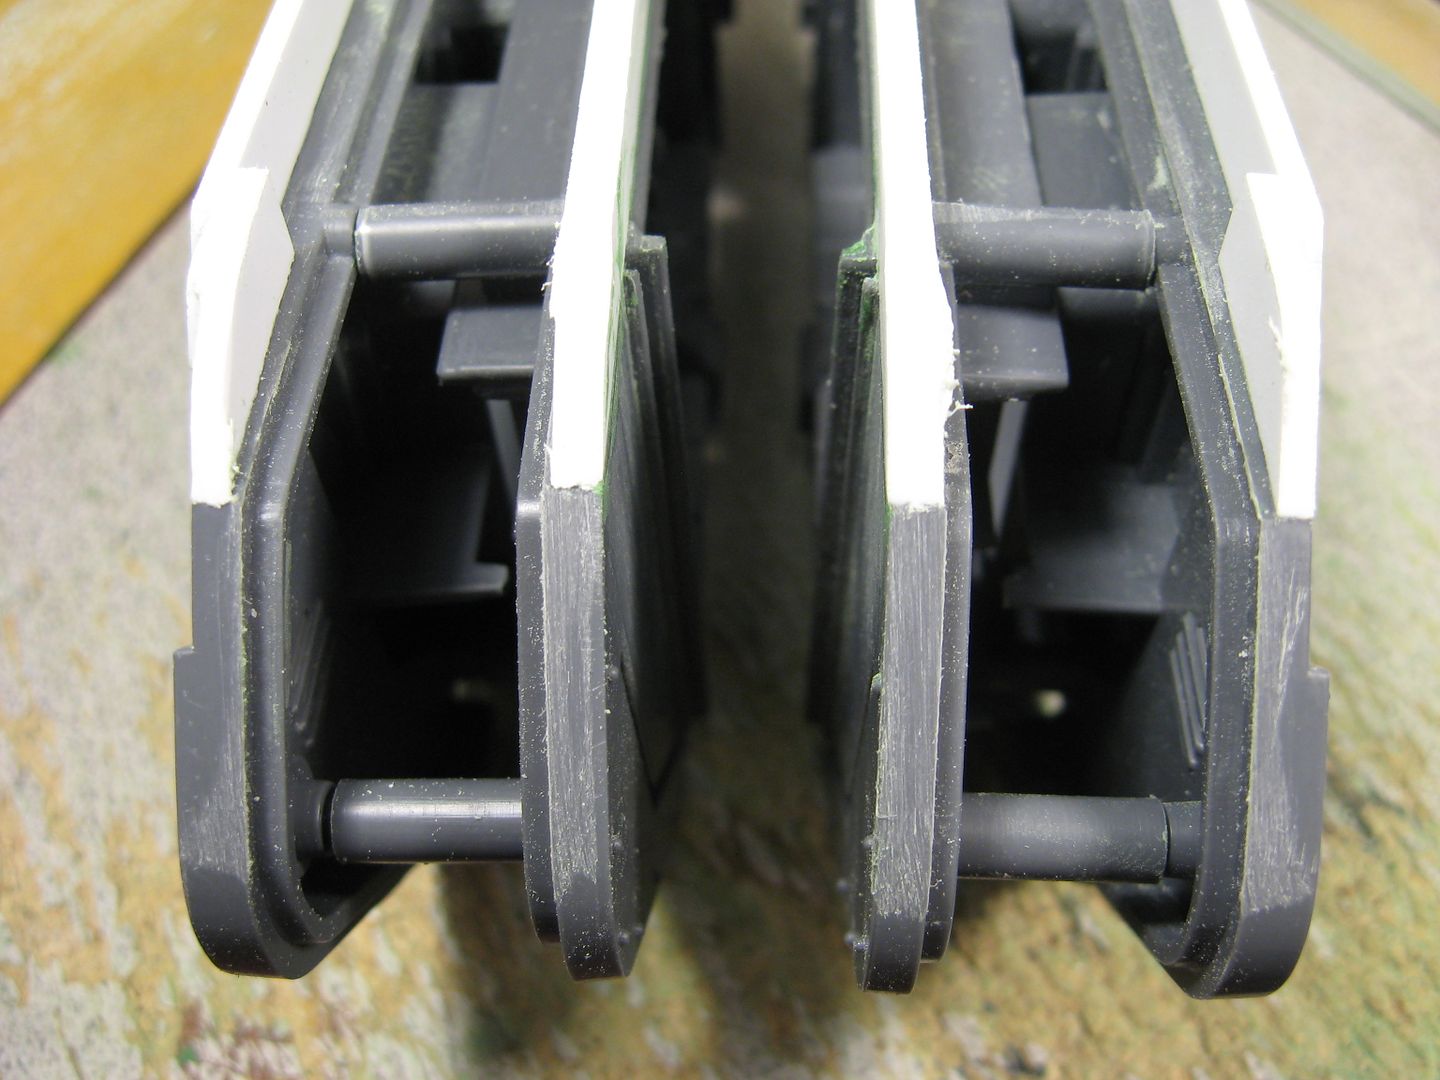
First up you want to remove the ridge that runs along the top of the outer track plates of the Land Raider so that you have a flat surface going all the way across.
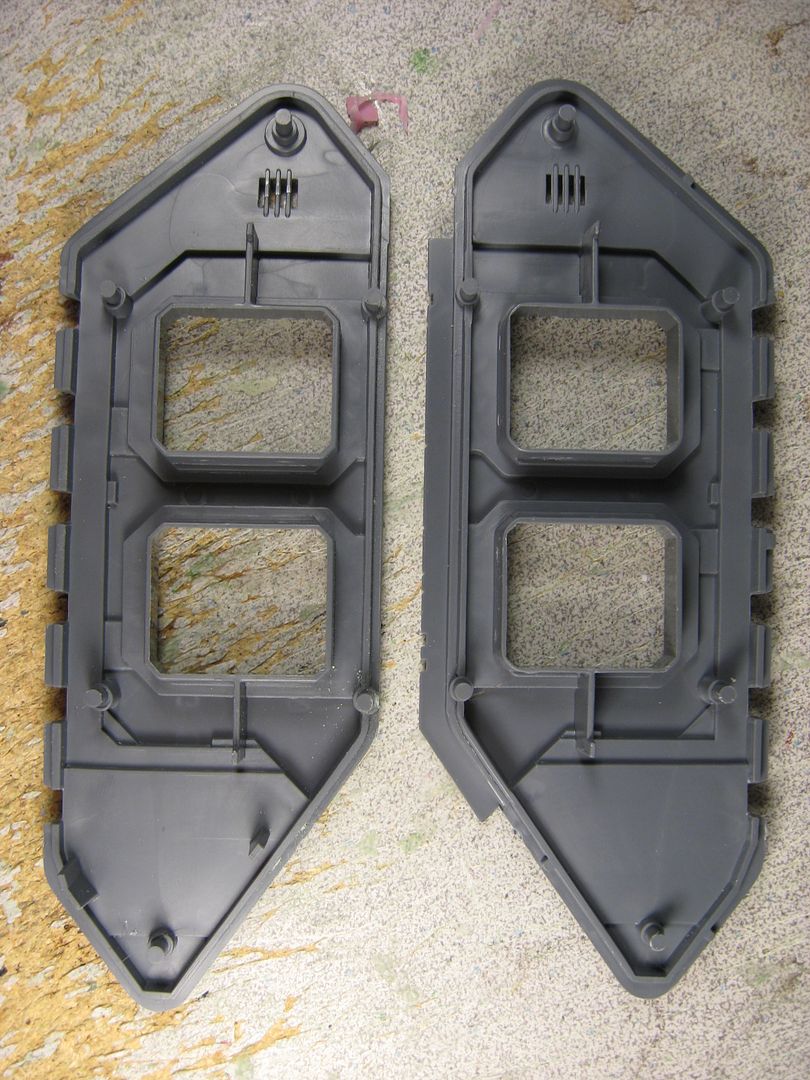
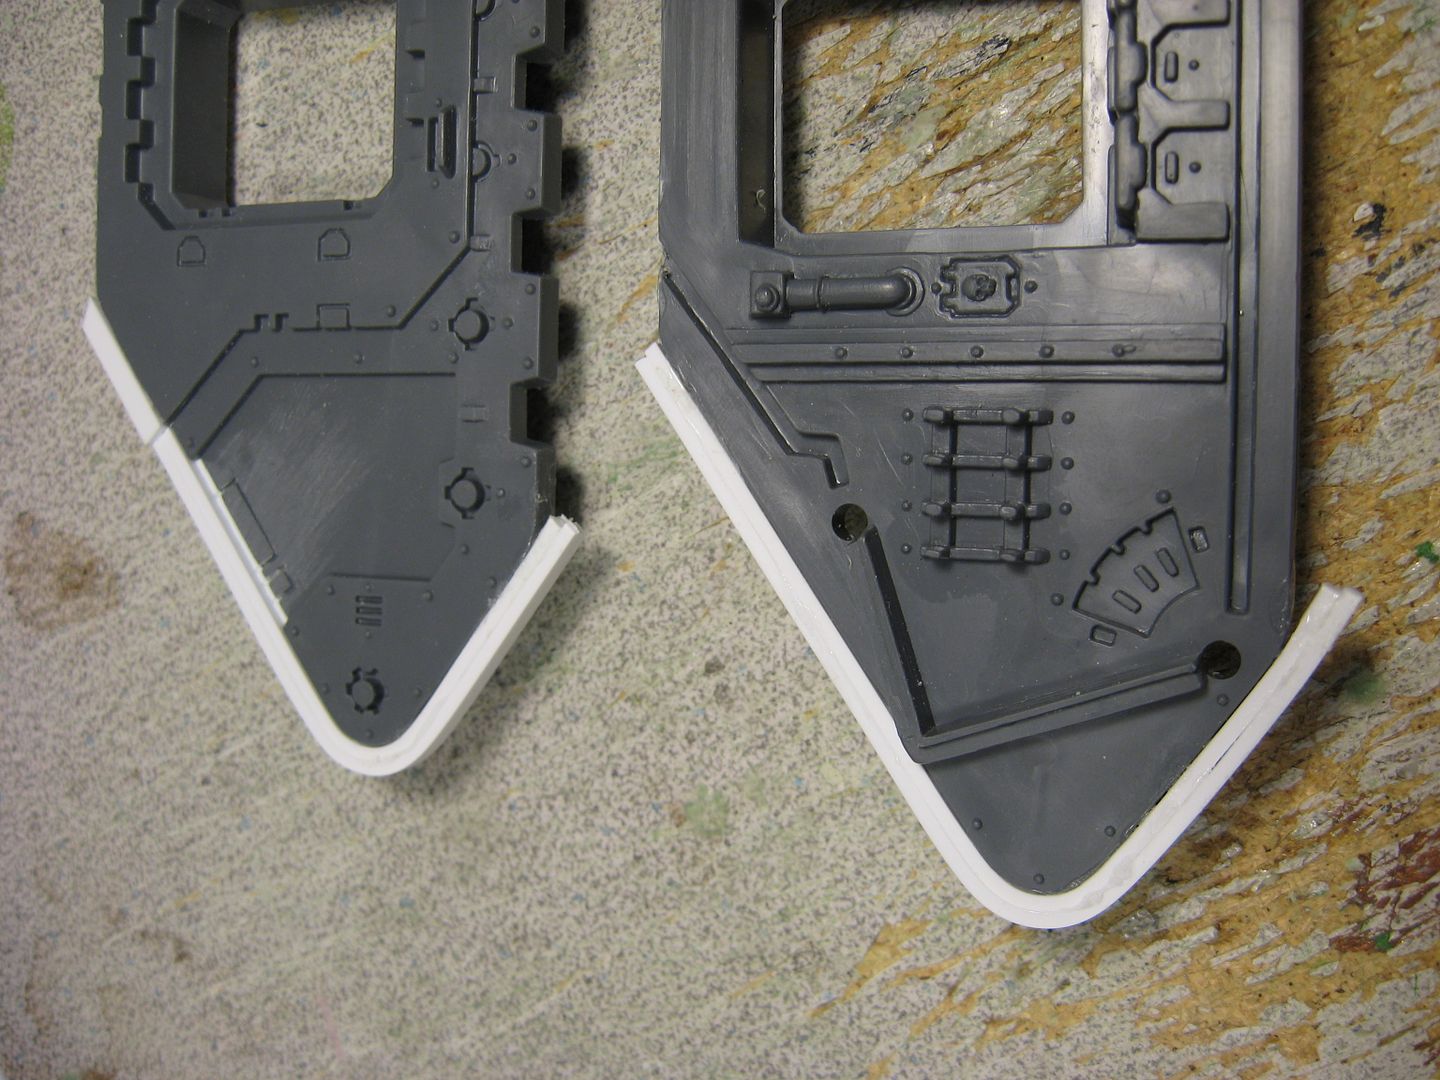
Also on the outer track plates there is a recessed portion on the angled front portion that needs to be raised up so that it is flush with the rest of the edge. I did this by gluing a 0.03x0.06 inch strip of plasticard. I them patched it and cut the grooves in it so that it matched.

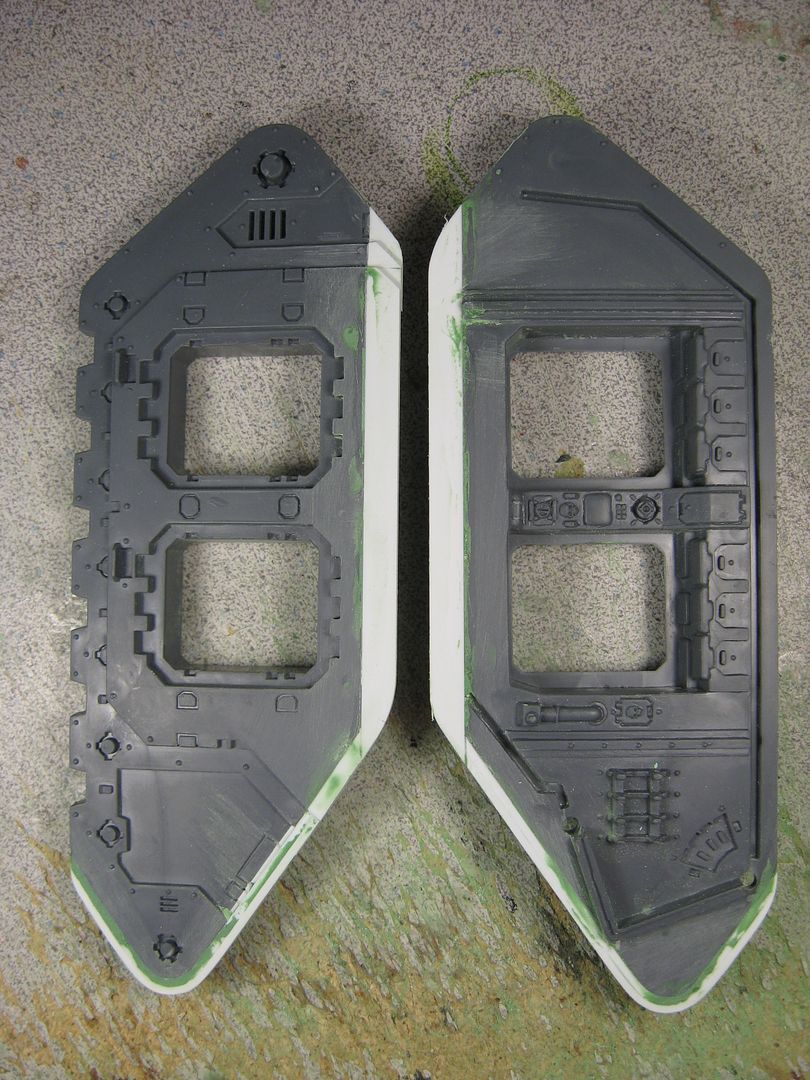
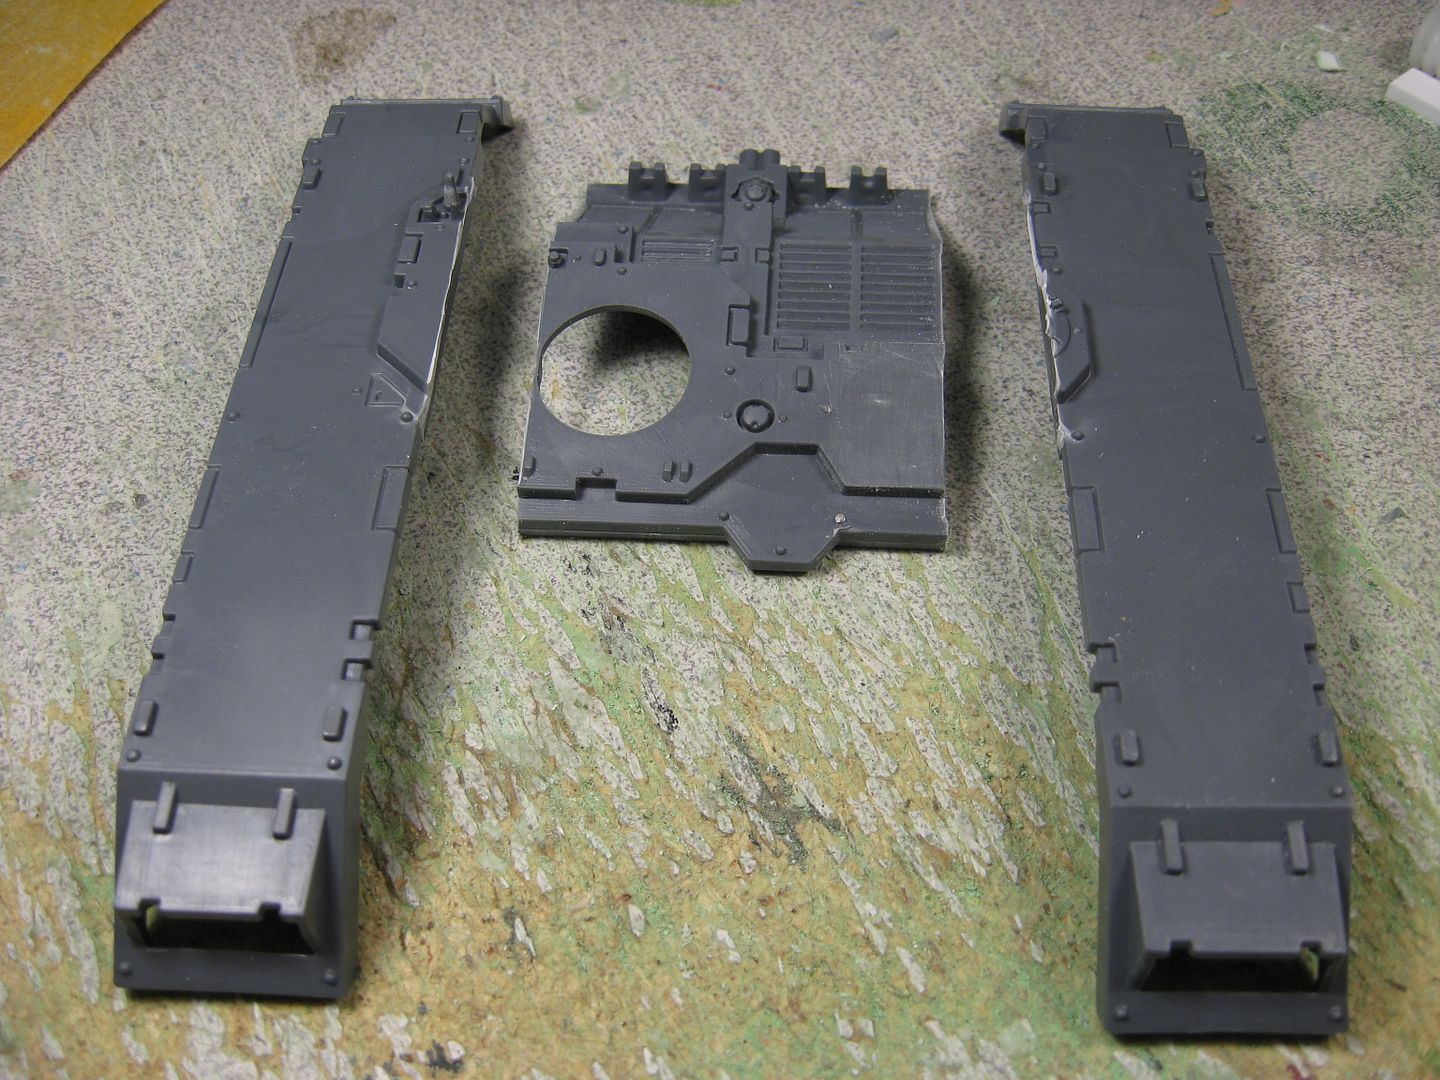
Next you need to increase the radius at the front of the track section so that the larger treads can smoothly go around. I did this by gluing two strips of 0.060x0.125 inch plasticard (or you can use one strip of 0.125x0.125) along the entire front section. You want to do this on all four track plates.
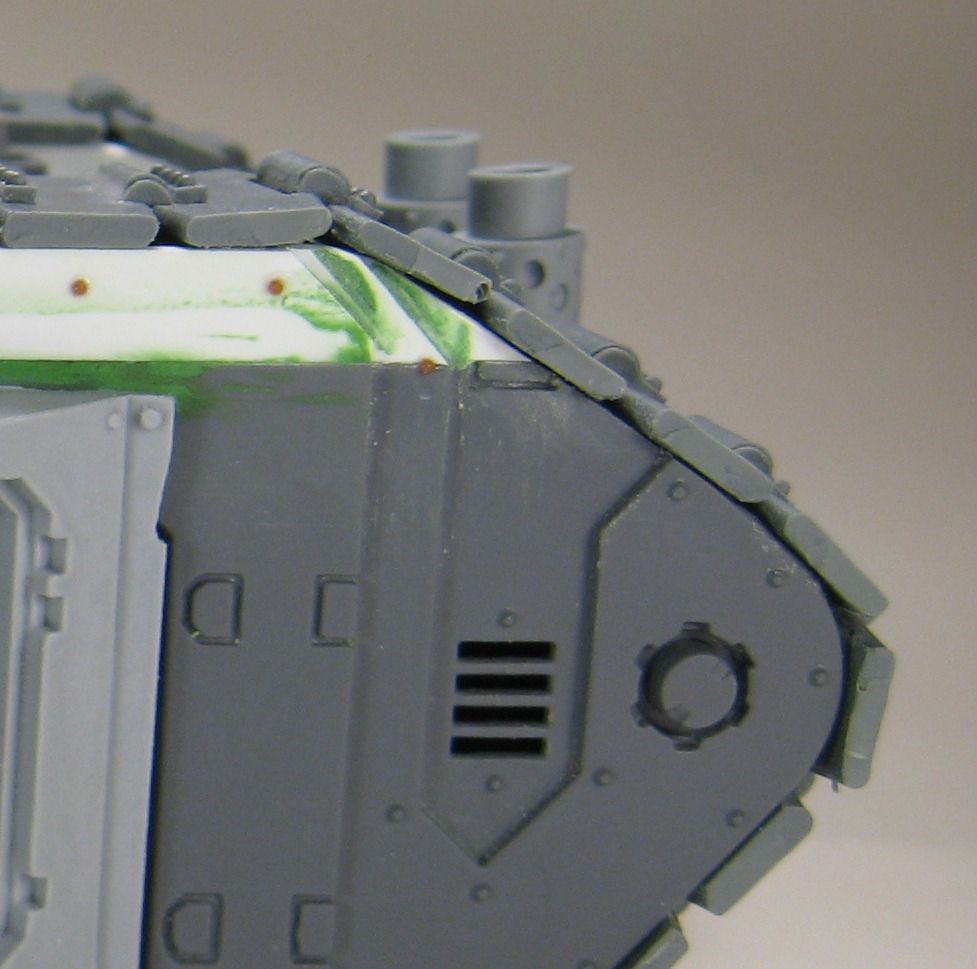
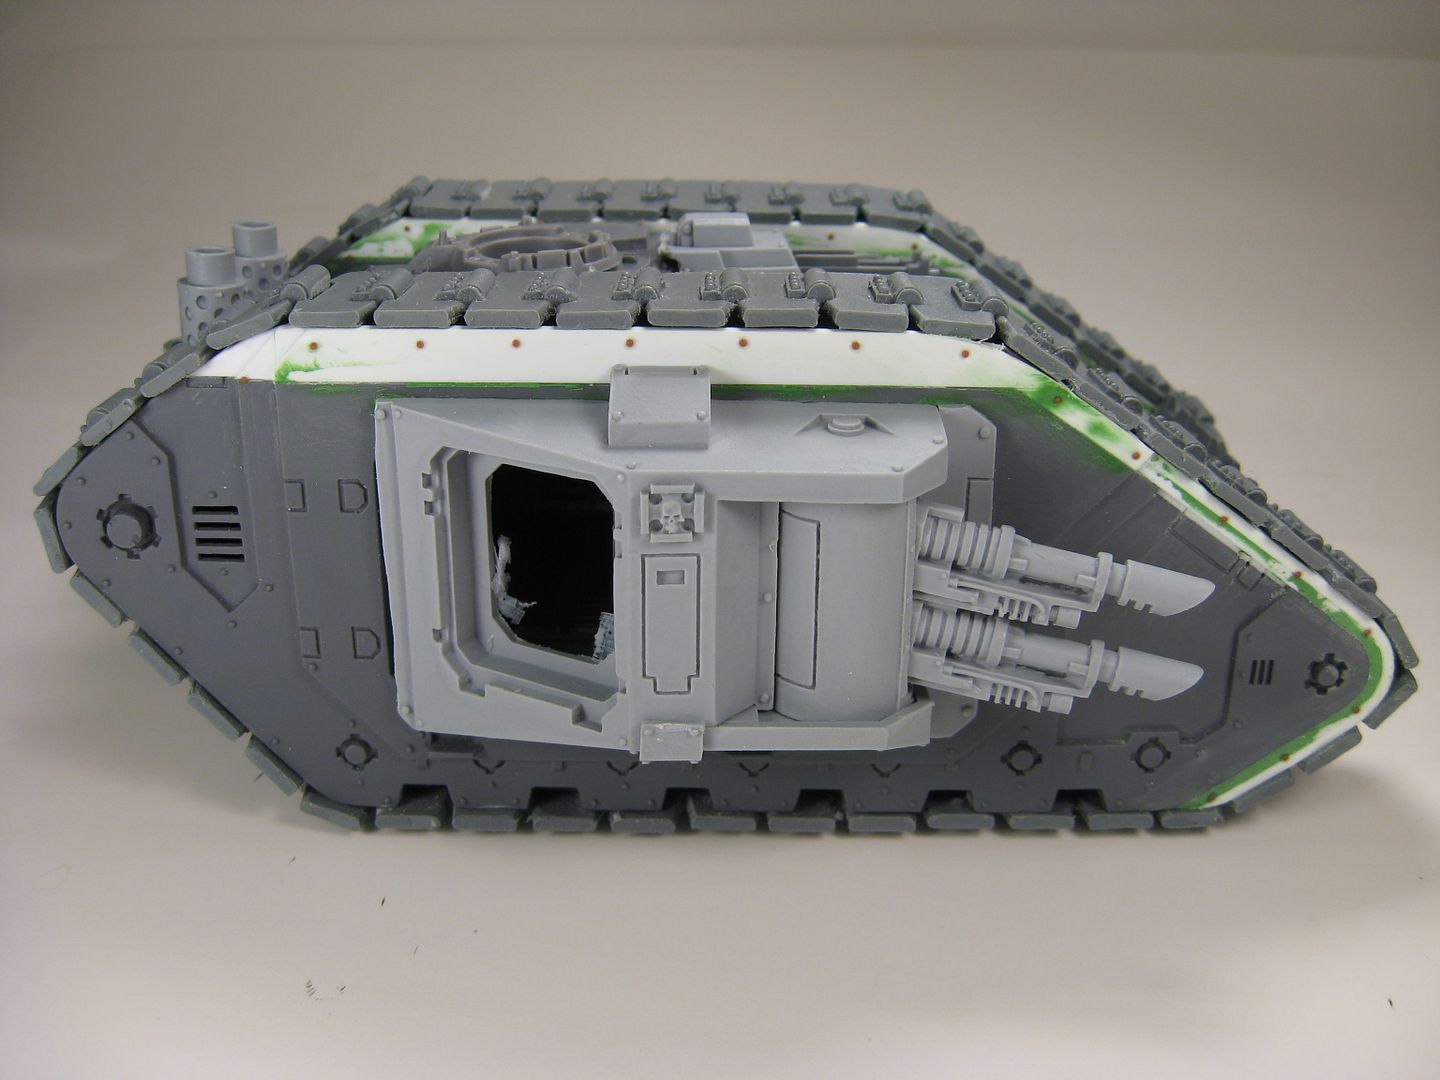
In order for the wrap around treads to clear along the top of the tank they need to be raised up about a 0.25 inches. In this case I glued a 0.25x0.10 inch strip of plasticard along the top of all four plates and made it flush with the outer edge of each plate. I them patched and sanded the joint smooth. You can then assemble the two track sections (don't forget to install the front access ramp and its opening mechanisms. The other thing you will want to do is smooth over the sharp edges where the new plasticard meets the model to that the track has a smooth transition.
As there are some different armor layers on the outer track panels along the back I added a few extra piece of plastic to get them to match. It's not necessary but it a nice touch to get everything to blend together.
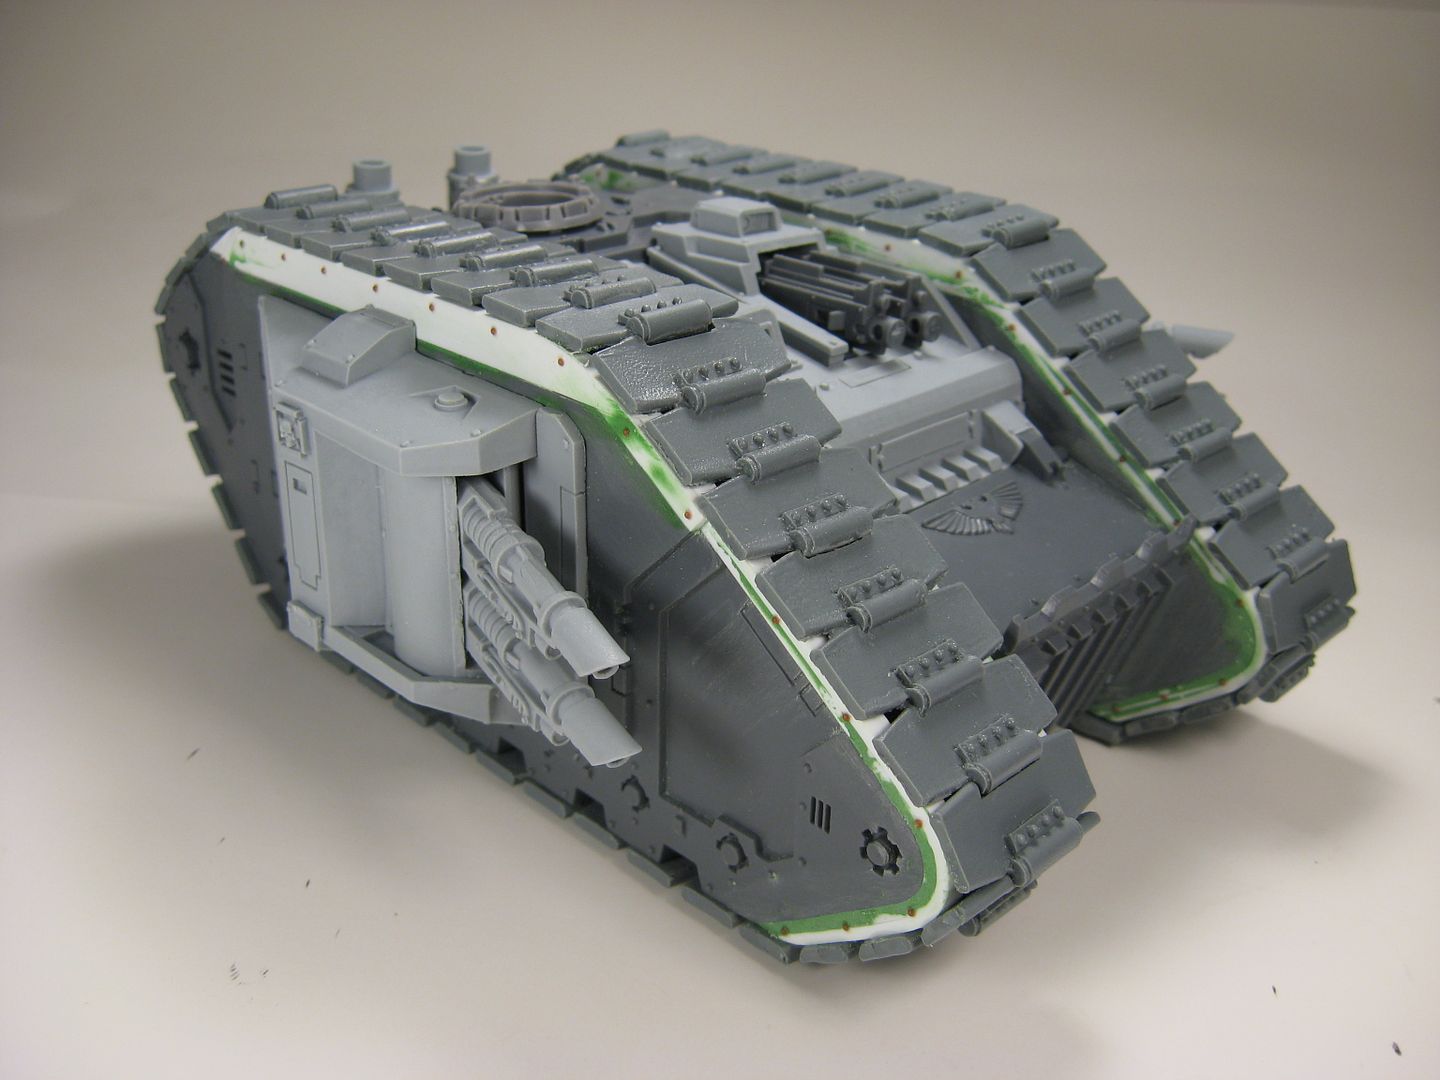
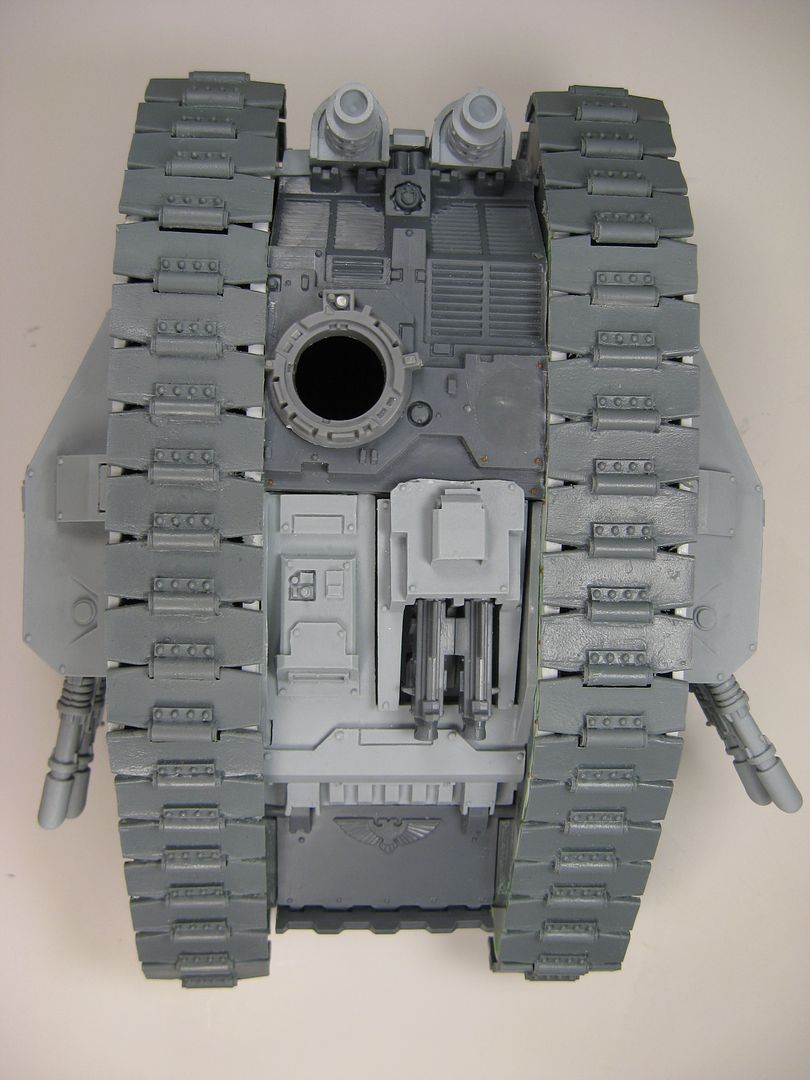
At this point you can begin wrapping the treads all the way around the track sections. I like to start in the very front with a couple of treads and continue along the top and bottom. In all you will need 39 treads per side. The Liberator Pattern 1.0 pack comes with 40 treads so you will need two packs all together (if you decide to use the Oppressor or Krusher Pattern 1.0s you will need a 3rd pack as the treads are shorter). The section I leave to last is the angled area on the rear top of the treads section. As the treads are a little short you will need to sand this area down until you get the two ends to meet. Then the tracks are done!
Lastly you assemble the rest of the model. There will be some tripping to do on the front top plate to remove the part of the tab where there is no longer a slot (if you’re also using the Forgeworld Mk2 kit prepare for a lot of swearing as nothing fits together right). The last modification is to the top plate. As the armored plates above the track sections are no longer needed you just need to trim off the two sides and finish the assembly.
Finally you can add new rivets and the like to finish the look. Then it’s ready for paint!

Hope this all helps
|
|
|
|
|
|
2011/06/05 11:34:22
Subject: Re:Land Raider Mk1...or Mk1.5
|
|

Longtime Dakkanaut
|
That's lovely! 
|
|
|
|
|
|
2011/06/05 14:28:31
Subject: Land Raider Mk1...or Mk1.5
|
|
Esteemed Veteran Space Marine
Sheppey, England
|
Thanks for putting the time in to make such a detailed guide. Any chance of the owner putting up some painted shots? I'd love to see them finished.
|
|
|
|
|
|
2011/06/05 14:51:21
Subject: Land Raider Mk1...or Mk1.5
|
|
Stalwart Tribune
|
Necroagogo wrote:Thanks for putting the time in to make such a detailed guide. Any chance of the owner putting up some painted shots? I'd love to see them finished.
Yeah, so would I When I get some pics I'll make sure to post them.
|
|
|
|
|
|
2011/06/07 02:14:52
Subject: Land Raider Mk1...or Mk1.5
|
|
Mekboy Hammerin' Somethin'
|
Looks fantastic yet slimmer than the standard LR. My only source of disapointment is the visible gaps into the outer hull/tread sections it would have been so much nicer if these gaps were filled in somehow.
|
|
|
|
|
|
2011/06/07 07:51:03
Subject: Land Raider Mk1...or Mk1.5
|
|
Blood Angel Terminator with Lightning Claws
|
I am so tempted to do this to all my upcoming Raiders. How long would you say it takes to reconfigure one at a time?
|
|
|
|
|
|
2011/06/07 11:19:12
Subject: Land Raider Mk1...or Mk1.5
|
|
Stalwart Tribune
|
jabbakahut wrote:I am so tempted to do this to all my upcoming Raiders. How long would you say it takes to reconfigure one at a time?
It depends on the level of detail you want but it takes me about five hours to fully assembly a model like this one.
|
|
|
|
|
|
2011/07/31 21:35:56
Subject: Land Raider Mk1...or Mk1.5
|
|
Stalwart Tribune
|
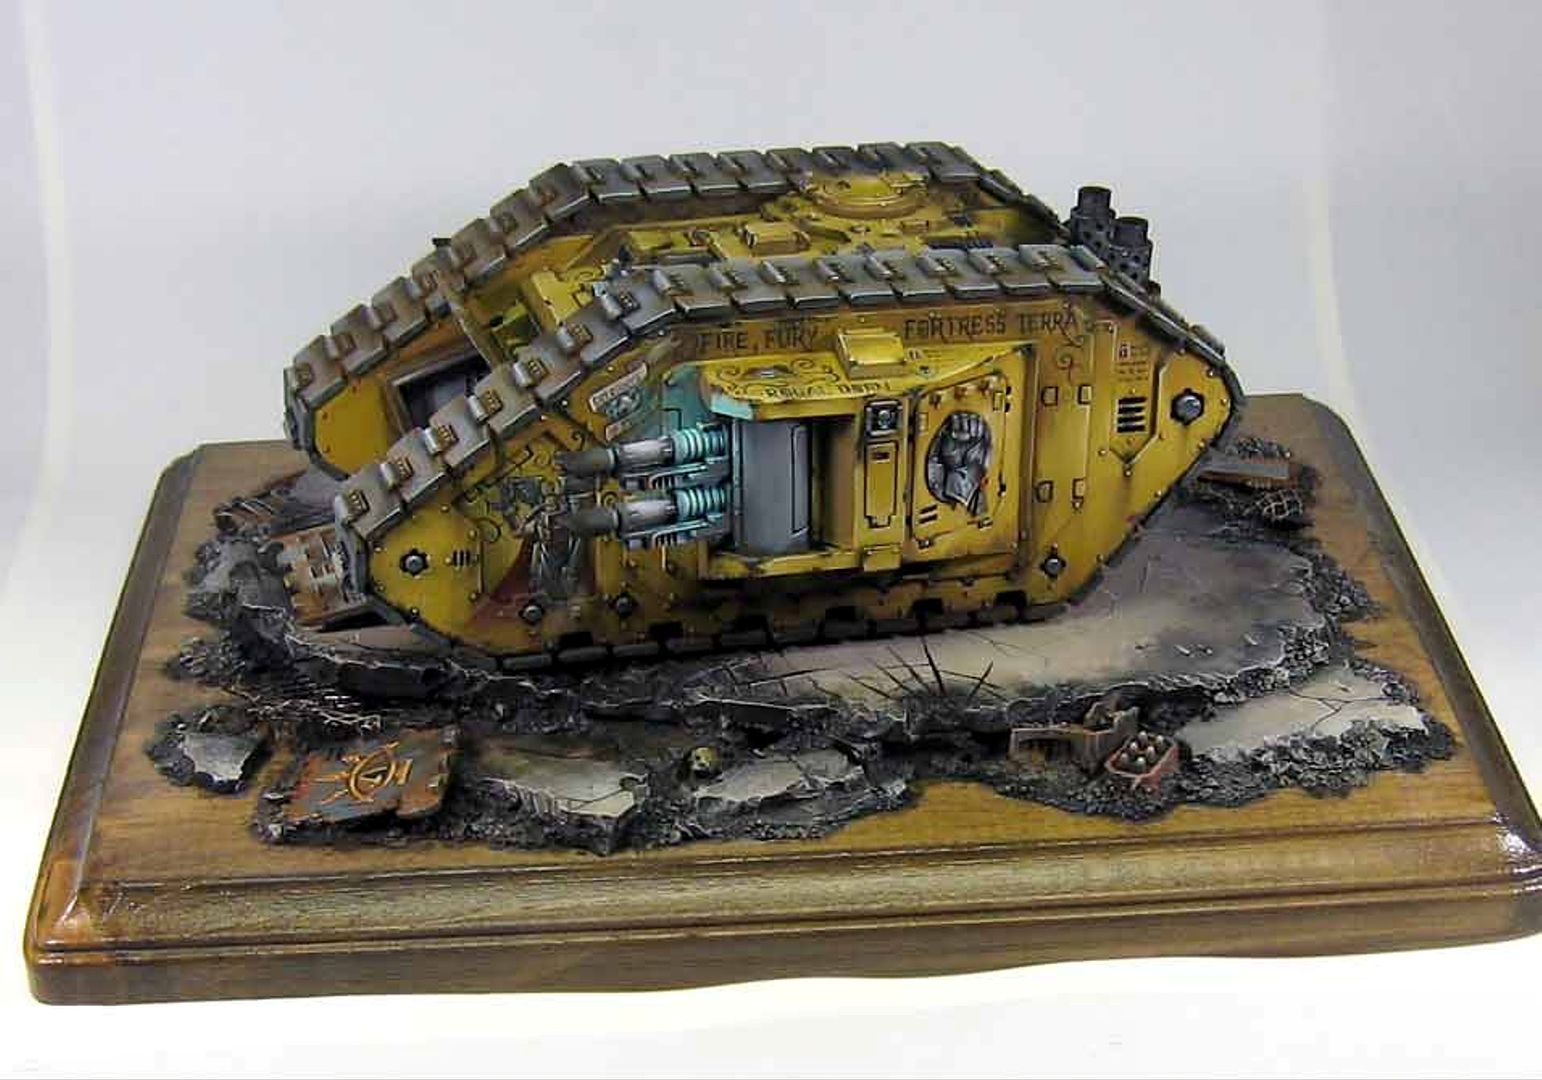
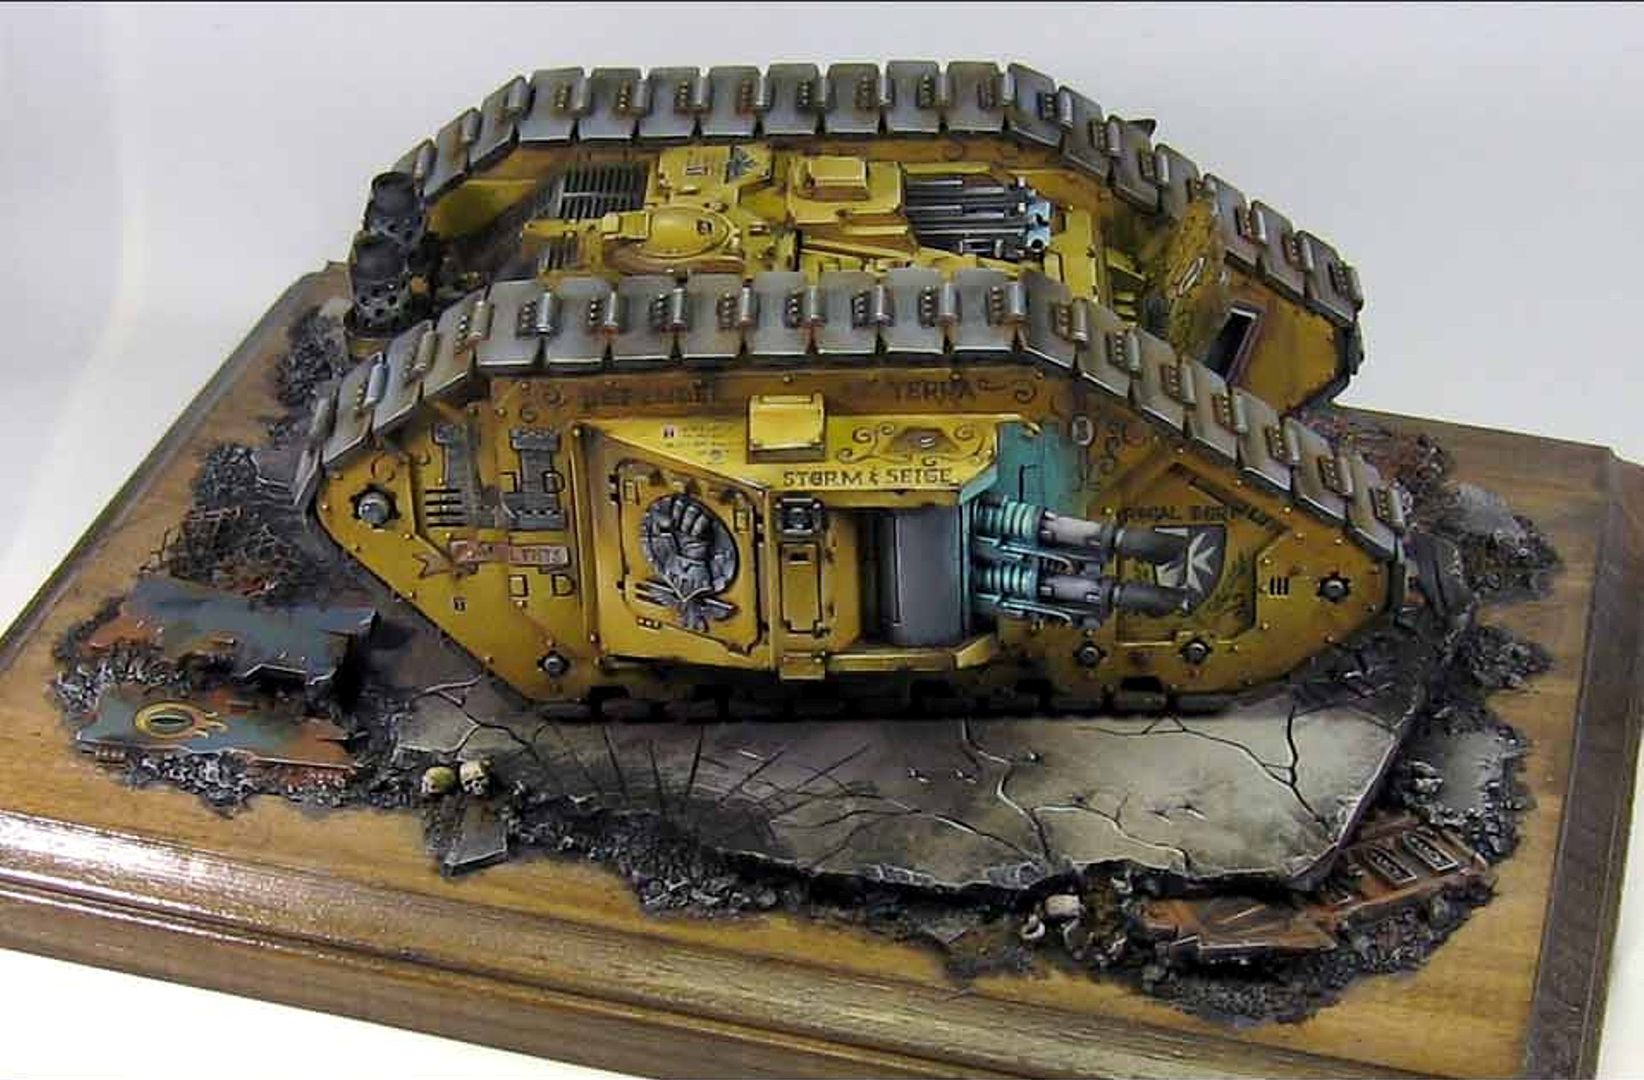
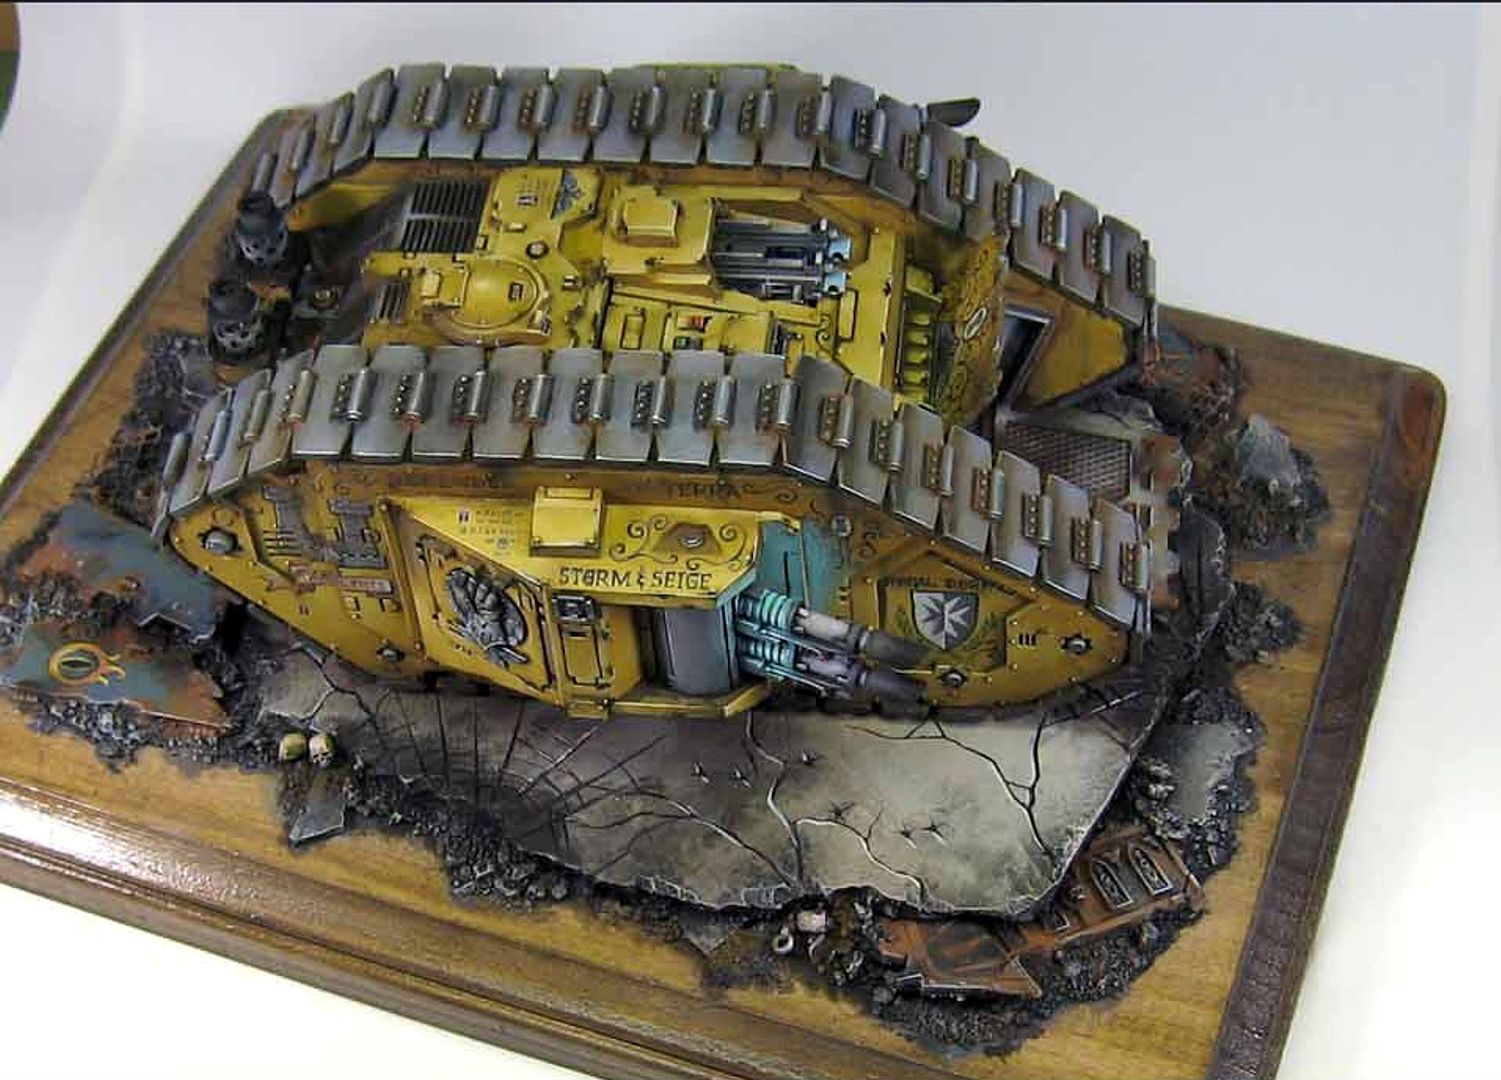
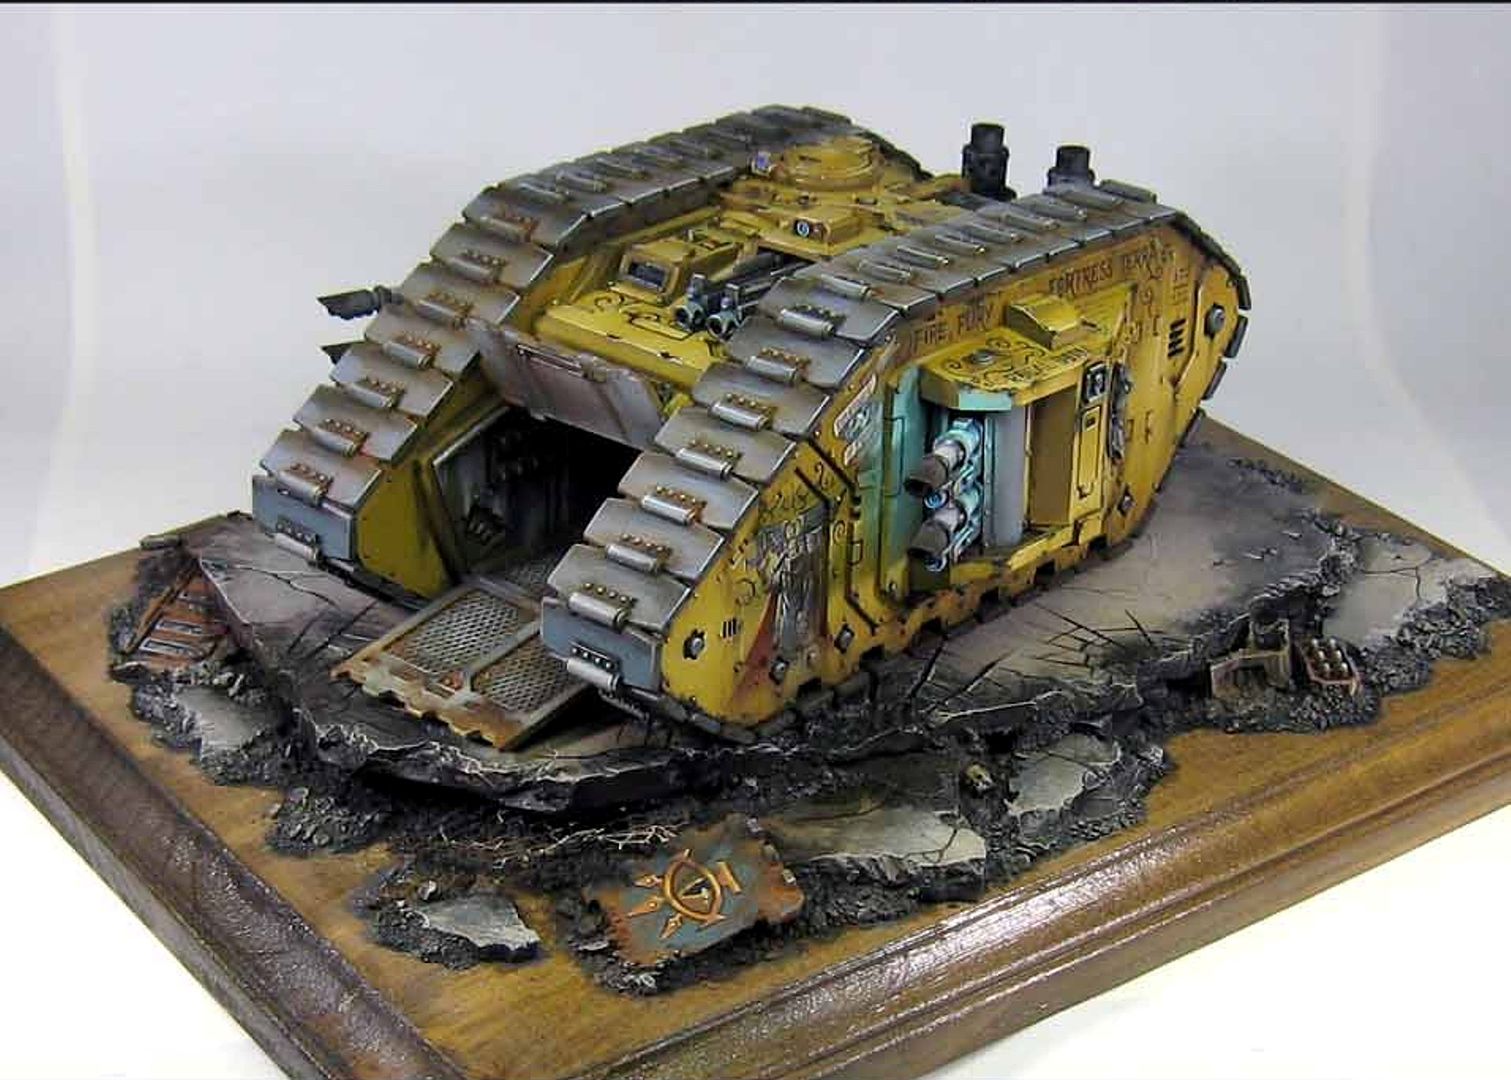
Well it took a while but the original Mk1.5 Land Raider was finally painted and WOW what a paint job it is! Courtesy of Jim Wappel: 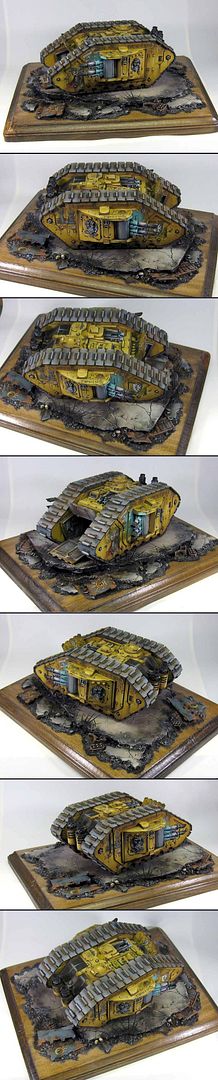
|
|
This message was edited 2 times. Last update was at 2011/08/01 14:20:14
|
|
|
|
|
2011/08/01 01:22:16
Subject: Land Raider Mk1...or Mk1.5
|
|
Blood Angel Terminator with Lightning Claws
|
Looks great, can we get better images?
|
|
|
|
|
|
2011/08/01 02:35:52
Subject: Land Raider Mk1...or Mk1.5
|
|

Blood Angel Chapter Master with Wings
|
Bigger pics mach cmon those are tiny lol!
|
|
|
|
|
|
2011/08/01 15:13:52
Subject: Re:Land Raider Mk1...or Mk1.5
|
|
Stalwart Tribune
|
|
|
|
|
|
|
2011/08/01 15:24:20
Subject: Land Raider Mk1...or Mk1.5
|
|
The New Miss Macross!
|
Muuuuch better! If only my preheresy LR hadn't come assembled... :(
|
|
|
|
|
2011/08/01 15:27:31
Subject: Land Raider Mk1...or Mk1.5
|
|
Blood Angel Neophyte Undergoing Surgeries
|
Absolutely beautiful. I think I may have just had a nerdgasm. Great job on the weathered yellow, the mural work is excellent, but oddly enough what I like the most is the glow off of the Lascannon coils. The base just sets it off even more. I am part of the minority that really likes the mk1, and I say well done sir.
Cheers,
Effendi
|
A DAGGER IN THE DARK IS WORTH A THOUSAND SWORDS AT DAWN |
|
|
|
|
2011/08/01 22:02:51
Subject: Re:Land Raider Mk1...or Mk1.5
|
|
Fresh-Faced New User
|
I love it! Are the doors rhinosize? Im working on an scratchbuild LR which looks similar.
|
|
|
|
|
|
|
|