| Author |
Message |
 |
|
|
|
|
Advert
|
Forum adverts like this one are shown to any user who is not logged in. Join us by filling out a tiny 3 field form and you will get your own, free, dakka user account which gives a good range of benefits to you:
- No adverts like this in the forums anymore.
- Times and dates in your local timezone.
- Full tracking of what you have read so you can skip to your first unread post, easily see what has changed since you last logged in, and easily see what is new at a glance.
- Email notifications for threads you want to watch closely.
- Being a part of the oldest wargaming community on the net.
If you are already a member then feel free to login now. |
|
 |
2010/08/11 15:04:04
Subject: Share your Yellow Recipes!
|
|

Khorne Chosen Marine Riding a Juggernaut
|
Hi, Dakkaites,
I'm looking for Painters out there to 'Share their Yellow Recipes', as I'm looking for the best way to achieve the Yellow Armour for some Marines Malevolent I plan to take up, come Christmas. Posts with Pictures prefered. 
Right now, the Test Recipe that I'm experimenting with is, Quickly and Simply, Iyanden Darksun and Gryphonne Sepia. However, I'm looking for something a little more Full-Bodied, although not compromising on the Shading. For this, I considered mixing the Sepia with a little Wate,r and giving it 2 Washes. This would, hopefully, leave a Smoother Finish, whilst ensuring the Wash reached all the Recesses.
If anybody has a Yellow Recipe, or thoughts to further my Test Recipe, then your Post would be much appreciated!
Thanks,
Martin
Aka. Popsicle
|
|
|
 |
|
2010/08/11 17:51:32
Subject: Share your Yellow Recipes!
|
|
Longtime Dakkanaut
|
|
|
|
|
|
|
2010/08/11 17:58:19
Subject: Share your Yellow Recipes!
|
|

Lone Wolf Sentinel Pilot
|
My mix for yellow:
Black prime
Scorched brown layer. Make sure you have good coverage. I recommend using vallejo game colour scorched for this step otherwise you'll be doing it forever.
Khemri brown over the top but leave the scorched brown in the recesses. One medium coat.
Iyanden darksun - 2 coats of this at least.
Iyanden + white. Approx 50% mix for the a single highlight. You can do more if you want but for troops I just do one.
Gryphon Sepia - 50% water mix. This is very important, it makes the iyanden a medium yellow, from a banana yellow and it works very well on the highlights. I'll post a picture when I get home later.
That's it!
|
The USS Orinoco was a Federation Danube-class runabout that was in service with Starfleet in the late 24th century, attached to Deep Space 9. It was outfitted with a sensor pod.
http://orinoco.imgur.com/ |
|
|
|
|
2010/08/11 17:59:45
Subject: Share your Yellow Recipes!
|
|
Longtime Dakkanaut
|
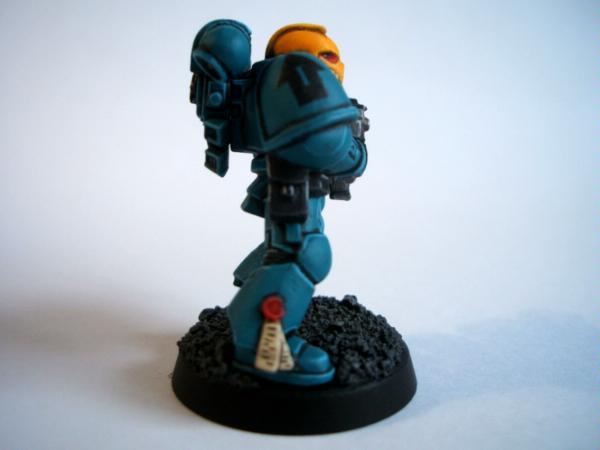
I painted this Marine's helmet like:
1. Undercoat Skul White.
2. Basecoat Iyanden Darksun.
3. Wash Gryphonne Sepia.
4. Layer Golden Yellow. (Three thin coats.)
5. Highlight Sunburst Yellow.
6. Extreme Highlight 1:1 Sunburst Yellow:Skull White.
If I was to do it again, I'd instead just add Skull White to the Golden Yellow, as a suppose to the Sunburst Yellow for highlighting, like:
5. Highlight 1:1 Golden Yellow:Skull White.
6. Extreme 1:3 Highlight Golden:Skull White.
But personally I'd just stick with the dipping method - much more fun! Automatically Appended Next Post: A tad out of focus, I knows, but here's another picture:
|
|
This message was edited 1 time. Last update was at 2010/08/11 18:02:36
|
|
|
|
|
2010/08/11 18:12:04
Subject: Share your Yellow Recipes!
|
|
Guardsman with Flashlight
|
I start with simple whit under coat
Watered down Sunburst yellow ( gw) atleast two coats
Then a simple wash like Badab black or devlan mud
http://lh3.ggpht.com/_kLO346LLgN0/S_F5nfGQf_I/AAAAAAAAAQg/5EO3GvG86e8/s1024/P6080162.JPG
|
|
This message was edited 1 time. Last update was at 2010/08/11 18:13:47
|
|
|
|
|
2010/08/11 19:32:12
Subject: Share your Yellow Recipes!
|
|
Lone Wolf Sentinel Pilot
|
Cosmic wrote:
I painted this Marine's helmet like:
1. Undercoat Skul White.
2. Basecoat Iyanden Darksun.
3. Wash Gryphonne Sepia.
4. Layer Golden Yellow. (Three thin coats.)
5. Highlight Sunburst Yellow.
6. Extreme Highlight 1:1 Sunburst Yellow:Skull White.
If I was to do it again, I'd instead just add Skull White to the Golden Yellow, as a suppose to the Sunburst Yellow for highlighting, like:
5. Highlight 1:1 Golden Yellow:Skull White.
6. Extreme 1:3 Highlight Golden:Skull White.
But personally I'd just stick with the dipping method - much more fun!
Automatically Appended Next Post:
A tad out of focus, I knows, but here's another picture:
A bit OT, but the blue is excellent  . Could you be so good as to tell us how you do that as well, please?
|
The USS Orinoco was a Federation Danube-class runabout that was in service with Starfleet in the late 24th century, attached to Deep Space 9. It was outfitted with a sensor pod.
http://orinoco.imgur.com/ |
|
|
|
|
2010/08/11 21:11:56
Subject: Share your Yellow Recipes!
|
|
Longtime Dakkanaut
|
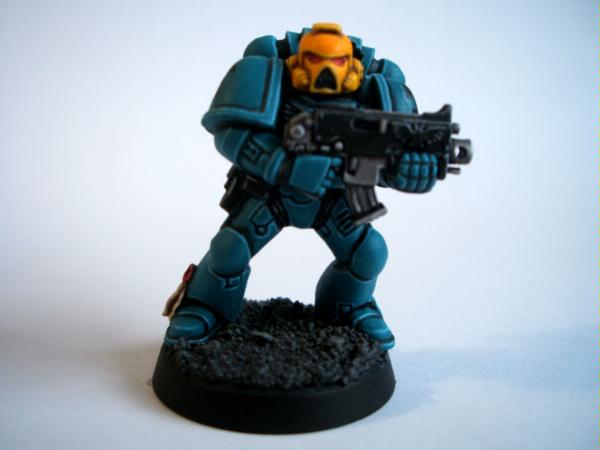
Orinoco wrote:A bit OT, but the blue is excellent . Could you be so good as to tell us how you do that as well, please?
Why thank you...  Actually, it is in fact turquoise, not blue!
Here's how I did it:
1. Undercoat Skull White.
2. Basecoat 1:1 Mordian Blue:Knarloc Green.
3. Wash 1:1 Asurmen Blue:Thraka Green
4. Layer Hawk Turquoise (should take one good, slightly thinned-own, coat).
5. Highlight 1:1 Hawk Turquoise:Ice Blue.
6. Extreme Highlight Ice Blue.
Here's how I'd do it again:
1. Undercoat Skull White.
2. Basecoat Hawk Turquoise (probably with a spray gun/airbrush).
3. Apply a watered-down wash of 1:1 Asurmen Blue:Thraka Green - or possibly even Devlan Mud - into the recesses.
4. Touch up Hawk Turquoise again.
5. Highlight 1:1 Hawk Turquoise:Ice Blue.
6. Highlight 1:3 Hawk Turquoise:Ice Blue.
7. Extreme Highlight Ice Blue.
Now I know that this would look far more better, and save allot of time from not faffing around with layering the Hawk Turquoise. The highlights would be much less severe and more gradual, and step number 5 could be applied slightly more liberally, and therefore more noticable, than the original one that I did.
Hope this helps!
|
|
|
|
|
|
2010/08/11 21:13:44
Subject: Share your Yellow Recipes!
|
|
Lone Wolf Sentinel Pilot
|
Cosmic wrote:Orinoco wrote:A bit OT, but the blue is excellent . Could you be so good as to tell us how you do that as well, please?
Why thank you... Actually, it is in fact turquoise, not blue!
Here's how I did it:
1. Undercoat Skull White.
2. Basecoat 1:1 Mordian Blue:Knarloc Green.
3. Wash 1:1 Asurmen Blue:Thraka Green
4. Layer Hawk Turquoise (should take one good, slightly thinned-own, coat).
5. Highlight 1:1 Hawk Turquoise:Ice Blue.
6. Extreme Highlight Ice Blue.
Here's how I'd do it again:
1. Undercoat Skull White.
2. Basecoat Hawk Turquoise (probably with a spray gun/airbrush).
3. Apply a watered-down wash of 1:1 Asurmen Blue:Thraka Green - or possibly even Devlan Mud - into the recesses.
4. Touch up Hawk Turquoise again.
5. Highlight 1:1 Hawk Turquoise:Ice Blue.
6. Highlight 1:3 Hawk Turquoise:Ice Blue.
7. Extreme Highlight Ice Blue.
Now I know that this would look far more better, and save allot of time from not faffing around with layering the Hawk Turquoise. The highlights would be much less severe and more gradual, and step number 5 could be applied slightly more liberally, and therefore more noticable, than the original one that I did.
Hope this helps!
That's quite helpful, thank you 
|
The USS Orinoco was a Federation Danube-class runabout that was in service with Starfleet in the late 24th century, attached to Deep Space 9. It was outfitted with a sensor pod.
http://orinoco.imgur.com/ |
|
|
|
|
2010/08/12 01:21:43
Subject: Re:Share your Yellow Recipes!
|
|

Yellin' Yoof on a Scooter
|
Lately I have been mixing Bleached Bone and Sunburst yellow into a nice butter colour and using that as a basecoat. I then wash it with Gryphonei sp? Sepia. This gives you I nice golden yellow colour. More sepia is used to for the shading in strategic areas, then the highlights are done with sunburst yellow and then finally skull white.
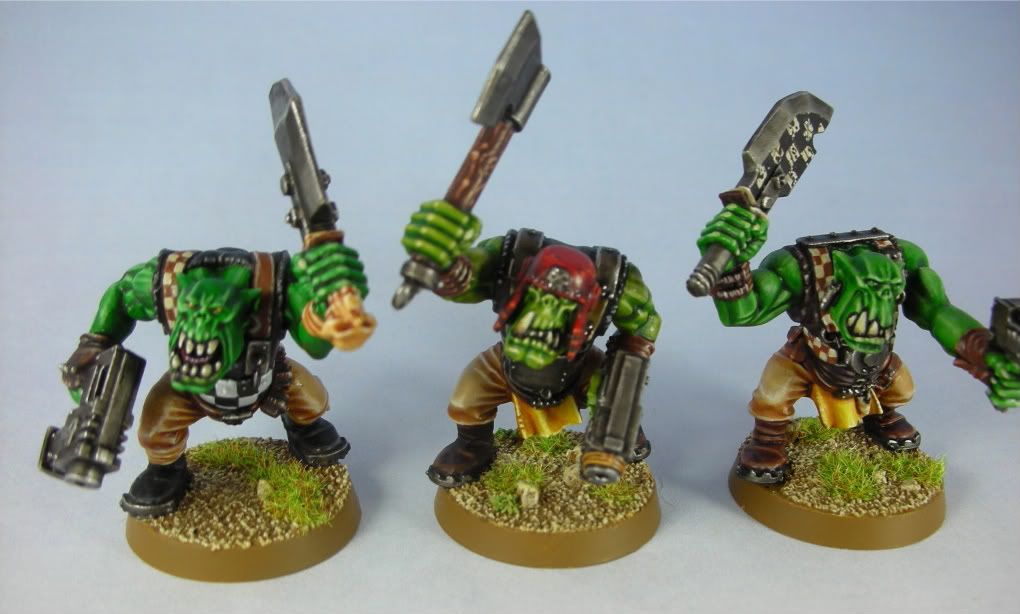
edited to add pics for you hard asses. Even CMON doesn't demand pics. Makes for a good thread though. I have learned my lesson.
|
|
This message was edited 4 times. Last update was at 2010/08/17 03:44:09
Fully Painted Points Total since 01/01/10
Orks: 369
Trollbloods: 34
|
|
|
|
|
2010/08/12 08:48:51
Subject: Re:Share your Yellow Recipes!
|
|
Khorne Chosen Marine Riding a Juggernaut
|
Pictures, or it didn't happen! 
|
|
|
|
|
2010/08/13 09:12:24
Subject: Share your Yellow Recipes!
|
|
Jovial Plaguebearer of Nurgle
|
Don't have a piccy to hand but here's how my Fists are yellowed:
Black primer.
Iyanden basecoat.
first highlight in 2:1 Iyanden/Golden Yellow.
Then blend up to Golden Yellow.
Further highlights; Sunburst/Golden Yellow mix.
|
|
|
|
|
2010/08/13 09:46:12
Subject: Share your Yellow Recipes!
|
|

Societal Outcast
St. Louis/MO
|
Hi Guys,
I know that this would not work for everybody but here goes what I'm doing anyway.
Recently I did a marathon to paint 2500 pts of BAs in 2 months. Considering I have a family, social life and a job...this is quite challenging. So searched and found a easy painting scheme, specially for painting 40 Assault Marines with Yellow helmets (which matters in this case)
So my scheme is pretty much....for thw whole miniature do the following steps:
- White Primer
- Blood Red
- Flesh ink wash
- Orange highlight
- Baal Red wash
now...here is were I differentiate the helmet...since I gave a decent darker color as a shadow...I simply added here the Bad Moon yellow...or whatever yellow is now for GW...then I add a bit of white to this yellow as a highlight...if I want to go more detailed...but already in the 2 or 3 layers of yelow after this whole red prep is working pretty ok for me. I will add some picture as soon as I can.
Again, is not Golden demon quality and might not work for everybody...but I really like the result.
|
|
|
|
|
2010/08/13 10:01:42
Subject: Re:Share your Yellow Recipes!
|
|

Squishy Oil Squig
|
there was a nice article in some not so old WD... I dont remember excactly but I think it was this one
http://www.feenwald.net/images/product_images/thumbnail_images/6784_0.jpg
since I have the german version (#146) I dont know the english number of that WD.
It could also have been in this one (German #157) http://www.feenwald.net/images/product_images/thumbnail_images/8366_0.jpg
anyway the article is about painting an converted ork nob from the nob box, he is painted bad moons style and the guy there uses a brilliant yellow. I dont remember the correct colors he uses but I use a slightly different style for my orks, I could look it up if you would like to know.
best
|
I am now convinced that theoretical physics is actually philosophy.
Max Born
Me Orkz |
|
|
|
|
2010/08/13 10:16:01
Subject: Re:Share your Yellow Recipes!
|
|
Khorne Chosen Marine Riding a Juggernaut
|
Any additional Recipes or References you can find will surely be useful, not only to me, but for anyone else who comes across this Topic, looking for similar answers, as a 'Collbaoration Topic' of sorts, where they can find a bank of Yellow Recipes!
So, yes, if you wish, and have the spare time, look it up; every little helps, as Tesco say. 
|
|
|
|
|
2010/08/13 22:40:33
Subject: Share your Yellow Recipes!
|
|
Been Around the Block
Nashua, NH
|
I rather like the look of CB Studios yellow painting technique:
http://cbstudios.co.uk/#/tutorialimperial/4525393843
You can see more of his work on CoolMiniOrNot: http://www.coolminiornot.com/artist/Wiltrichs

|
|
|
|
|
2010/08/14 09:26:16
Subject: Re:Share your Yellow Recipes!
|
|
Squishy Oil Squig
|
awesome!! absolutely awesome.
so but here now about the WD yellow recipe. I was wrong with both WD I mentioned, it was the WD from March 2009 , I think 351 in UK and 159 in Germany, this one http://www.games-workshop.com/MEDIA_CustomProductCatalog/m2230070_March_Cover.jpg.
anyway, here is the recipe which can be modified very easily and it is also shows how to do the corresponding battle damage:
0) The model is primed black
1) Tausept Ochre is applied
2) Highligt 1:1 Iyaden Darksun, Golden Yellow
3) define some shadows and depth with thinned Dark Flesh
4) do some highlights with the mixture in 2) with an equal amount of white
5) final highlights with the mixture of 4) with some more white.
personally I add golden yellow or bad moon yellow at both steps 4) and 5) and don't use white but VGC Off white
for battle damage:
1*) paint the edges and some small spots/scratches with the mixture of step 4) from above. you can use the well known sponge technique here.
2*) apply dark flesh inside the areas created in 1*) but keep a thin outline/contour visible
3*) apply bolt gun metal in some of the spots, again leaving the contours visible, you dont need to do it with every spot/scratch
4*) apply a little bit mithril silver in the spots, do this just at some of the scratches to simulate fresh damages
I highly recommend a wet palette for this work, since you can use the mixtures from the first recipe if you do the battle damage...
best
|
I am now convinced that theoretical physics is actually philosophy.
Max Born
Me Orkz |
|
|
|
|
|
|
 1500
1500  1500
1500  3500
3500