| Author |
Message |
 |
|
|
|
|
Advert
|
Forum adverts like this one are shown to any user who is not logged in. Join us by filling out a tiny 3 field form and you will get your own, free, dakka user account which gives a good range of benefits to you:
- No adverts like this in the forums anymore.
- Times and dates in your local timezone.
- Full tracking of what you have read so you can skip to your first unread post, easily see what has changed since you last logged in, and easily see what is new at a glance.
- Email notifications for threads you want to watch closely.
- Being a part of the oldest wargaming community on the net.
If you are already a member then feel free to login now. |
|
 |
2014/01/07 20:50:27
Subject: Tonio's journey into Brushfire, and excursion into Endless
|
|

Scribe of Dhunia
|
 miskatonicalum wrote: miskatonicalum wrote:Thats great to hear that the flat slants worked so well. For some future proofing, maybe test both the flats and curves with texture/basing on them, see if that makes a difference? Possibly scruffing up the bottom of the bases with some sandpaper could help too.
I did some tests with sand, but I couldn't find those pieces when picture time came. The sand makes it even slippier, so I'll need to make sure to add some elements between the squares to help prevent models slipping. I haven't tried to rough up the bases, but I think the problem has more to do with their flat, full bottom, then the exact texture. A base with an hollow bottom (like the regular 25mm square GW bases) could fit over some small curve in the terrain, but the flat one can't.
If possible, I'd love to see a detailed walkthrough when you get to the water. I've never had luck with that aspect.
No problem, I'll take more notes and pictures this time around.
The Spanish Colonial tiling is also really cool. Where did you find it?
Those come from Wills, a UK line making OO/HO scale train stuff. I had a picture of the package, but erased it by error instead of the one I put in the thread... 
|
|
|
|
 |
|
2014/01/14 21:45:10
Subject: Re:Tonio's journey into Brushfire, and excursion into Endless
|
|
Scribe of Dhunia
|
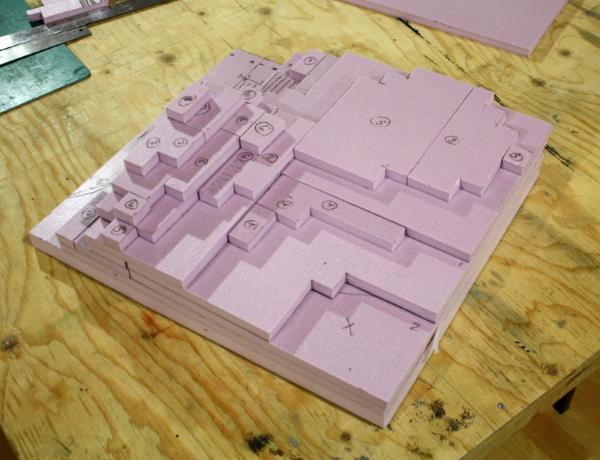
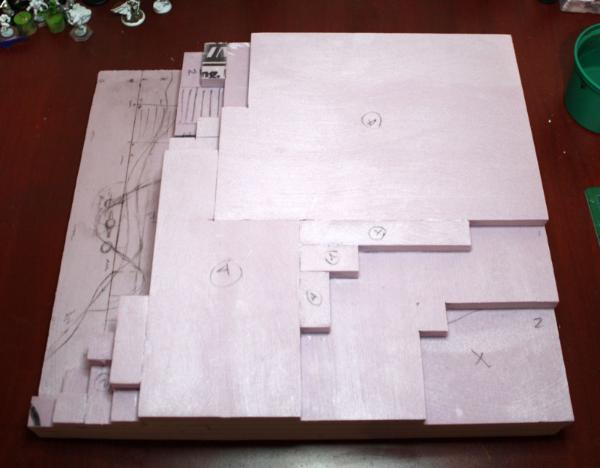
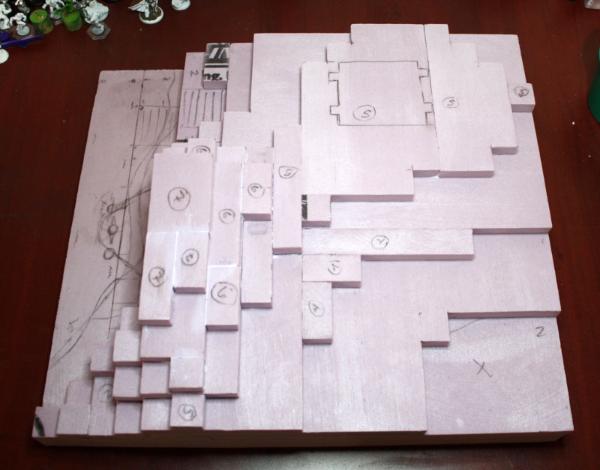
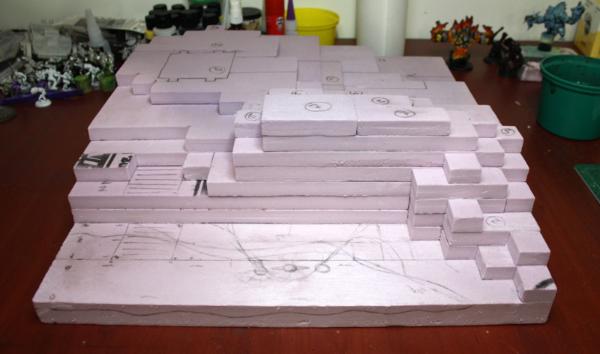
Here are a couple more constructions pics. Taking pictures is not the problem, it's finding time to edit them and post them here.  The work on the cliff, which is fully texture, not blocky, is well under way. You can also see that I didn't glue the final 8th level, as it's worked in the cliff texture work.
WiP - Dry fit test of all the levels
 WiP
WiP - Gluing of the base elevations, midway
 WiP
WiP - Gluing of the base elevations, completed
 WiP
WiP - "Before" view of the cliff
|
|
|
|
|
|
2014/01/14 22:05:15
Subject: Tonio's journey into Brushfire, and excursion into Endless
|
|

Fixture of Dakka
|
Looks great!
|
|
|
|
|
|
2014/01/15 20:21:40
Subject: Tonio's journey into Brushfire, and excursion into Endless
|
|
[DCM]
Dankhold Troggoth
|
Your first EFT board absolutely blew me away, and I really like the layout of this one so far. Not much time left  you'll have to power through!
|
|
|
|
|
2014/01/21 14:16:41
Subject: Tonio's journey into Brushfire, and excursion into Endless
|
|
Scribe of Dhunia
|
 RiTides wrote: RiTides wrote:Your first EFT board absolutely blew me away, and I really like the layout of this one so far. Not much time left you'll have to power through!
You don't tell me! On top of that, I've been sick most of the weekend, with cut down my freetime, but the whole timing still looks good. I'll just not have time to paint a small EFT party like I wanted before the convention. It's going to be grey resin or proxies for me, sadly, but I will still want to play!
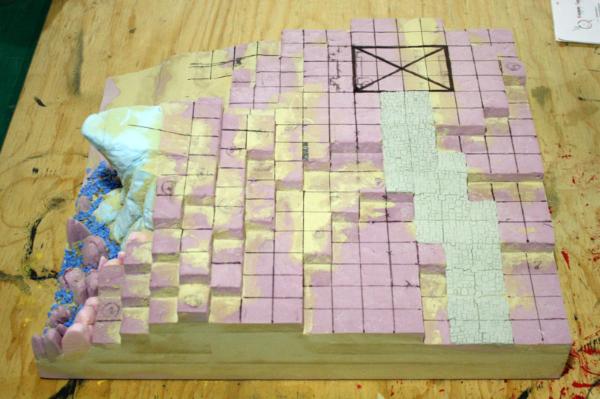
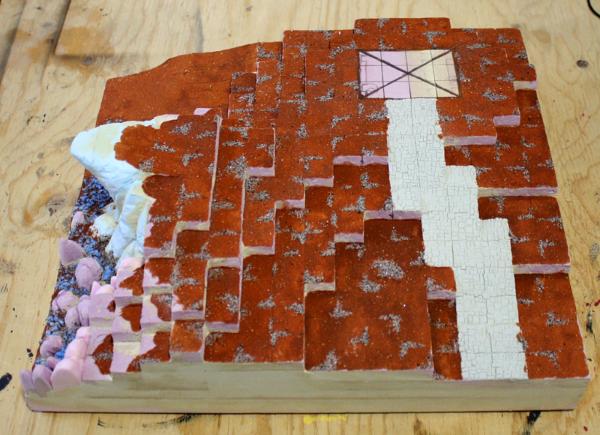
Here is the next batch of update pictures. The pic titles are pretty self explanatory, so I won't go in detail for each step. I just want to mention how I did the flagstone road. For that, I used my newly received Happy Seppuku Texture Stamps. I applied putty in the correct squares, then pressed the stamp everywhere it was needed. As the stamp doesn't come "tiled", I just had to adjust the putty to help define each squares.
Wip - Rough shaping of the cliff
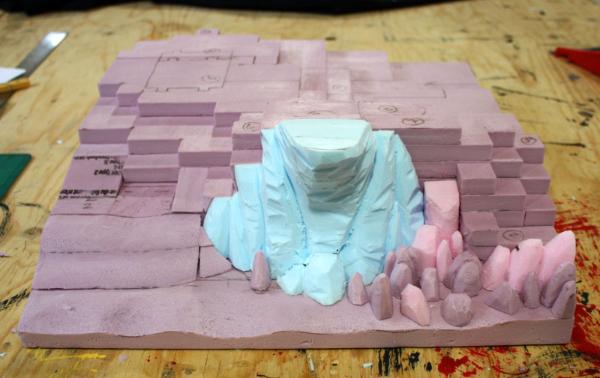 WiP - Foam of the cliff and board textured
 WiP - Putty applied to fill gaps and smooth slopes
 WiP - Flagstone road
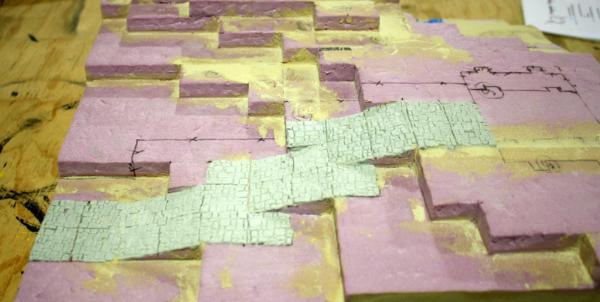 WiP - Tiles marked for texturing
|
|
|
|
|
|
2014/01/21 14:51:29
Subject: Tonio's journey into Brushfire, and excursion into Endless
|
|
Dakka Veteran
|
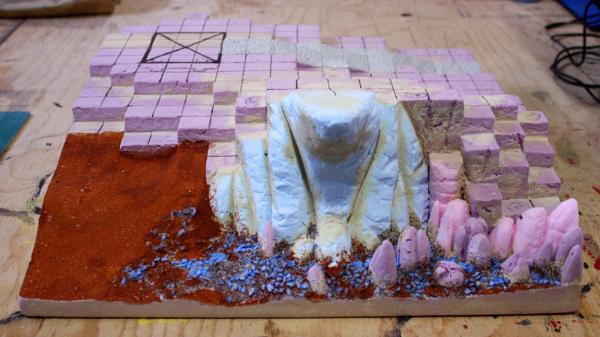
In the final picture, what is the blue stuff over by the rocks?
The texture on the road is amazing. Tell me you used a template or resin tiles and didn't do that by hand again.
|

Lockark wrote:If you stat it, they will kill it.
|
|
|
|
|
2014/01/21 14:59:59
Subject: Tonio's journey into Brushfire, and excursion into Endless
|
|
Scribe of Dhunia
|
miskatonicalum wrote:The texture on the road is amazing. Tell me you used a template or resin tiles and didn't do that by hand again.
Tonio wrote:(...) I just want to mention how I did the flagstone road. For that, I used my newly received Happy Seppuku Texture Stamps. I applied putty in the correct squares, then pressed the stamp everywhere it was needed. As the stamp doesn't come "tiled", I just had to adjust the putty to help define each squares.
miskatonicalum wrote:In the final picture, what is the blue stuff over by the rocks?
Those are simply aquarium rocks. I'm in the middle of texturing the base of the cliff, and was waiting for the whole section to be done before doing another picture.
|
|
|
|
|
|
2014/01/21 15:06:49
Subject: Tonio's journey into Brushfire, and excursion into Endless
|
|
Dakka Veteran
|
 Tonio wrote: Tonio wrote:(...) I just want to mention how I did the flagstone road. For that, I used my newly received Happy Seppuku Texture Stamps. I applied putty in the correct squares, then pressed the stamp everywhere it was needed. As the stamp doesn't come "tiled", I just had to adjust the putty to help define each squares.
D'oh, I just saw pretty pictures. Nothing else entered my mind.
|
Lockark wrote:If you stat it, they will kill it.
|
|
|
|
|
2014/01/21 18:43:56
Subject: Tonio's journey into Brushfire, and excursion into Endless
|
|
Dakar
|
That looks great! The cliff and rocks below look so good.
What tool do you use to cut the slopes into the foam for the road?
|
|
|
|
|
2014/01/21 18:52:58
Subject: Tonio's journey into Brushfire, and excursion into Endless
|
|
Scribe of Dhunia
|
 Galen wrote: Galen wrote:That looks great! The cliff and rocks below look so good.
Thanks. 
Galen wrote:What tool do you use to cut the slopes into the foam for the road?
Patience and an x-acto knife.
I cut a 2x2" piece of foam, put it on its short side, mark two opposite corners, then slowly cut through it. The result is not perfect, but after a light sanding and some putty, it's nice and flat like the rest.
|
|
|
|
|
|
2014/01/22 18:08:05
Subject: Re:Tonio's journey into Brushfire, and excursion into Endless
|
|
Scribe of Dhunia
|
Here is some more work.
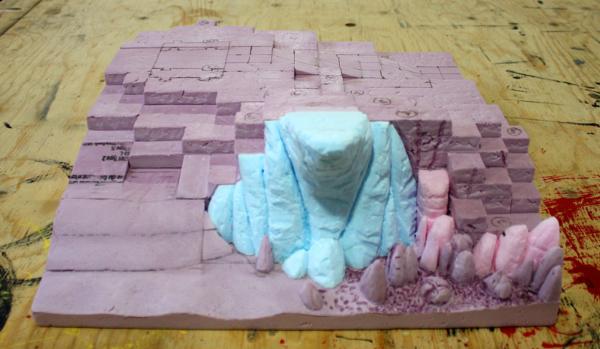
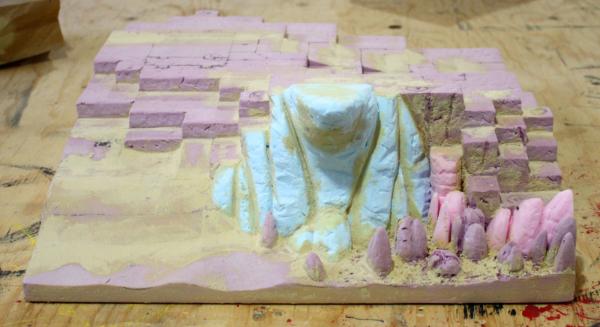
For the reef and beach, I started by roughing up the foam with a Hot Foam Knife, applied some wood putty and then added bigger rocks (blue aquarium rocks). Those three steps were already done in my last post, but not mentioned. Next step was adding rough sand (grey), and finally some really fine one (rust).
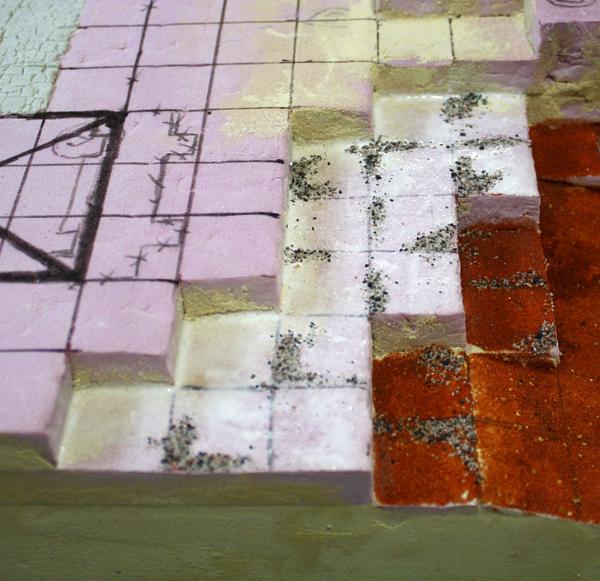
For the playable tiles, I decided to do them in a different way then the ones on my Mine board. Instead of making grooves in the foam to physically mark the squares, I am doing it with basing material and paint this time around. As I had already drawn all the tiles on the board, I had nice guides to start applying the texture. The idea was to have some rough patches to help identifying lines and corners, while the rest would be filled with fine sand. This will be reinforced with the painting and the flocking of the board, to make sure it's easy to use. It all works out in my head, I promise.
For this, the first step was applying watered down glue on a section of the board, then using a small spoon, I dropped small quantities of rough sand on random lines and corners of tiles. Before the glue dried, I then filled the space with the finer sand. Repeat and rinse, until all the board is textured. I still have to do some touch-ups, and add some sand patches on the road, but that's about done.
Next up are two important steps I need to do before I can start painting. First step will be to make the stand for the wayside calvary. The calvary itself can wait a bit, but not the stand. Same thing for the base of the chapel. I need to have my exact shape done before I start painting, as it probably won't be squared like the zone reserved for it on thr last picture, and some texture will get in there too, that will need to be painted too.
|
|
|
|
|
|
2014/01/22 22:27:14
Subject: Tonio's journey into Brushfire, and excursion into Endless
|
|
Dakka Veteran
|
Looking great! It's amazing to see it come together.
|
Lockark wrote:If you stat it, they will kill it.
|
|
|
|
|
2014/01/23 20:50:14
Subject: Tonio's journey into Brushfire, and excursion into Endless
|
|
[DCM]
Dankhold Troggoth
|
So cool  . That texture stamp is the bomb, although I'm sure it's harder than you make it sound. Tempting me to get one, though... I just modelled and 3d printed a cobblestone part as a gift for someone, and man, it took me forever!
|
|
|
|
|
2014/01/23 21:18:42
Subject: Re:Tonio's journey into Brushfire, and excursion into Endless
|
|
Scribe of Dhunia
|
They really are that easy to use. Sure, they are mostly made for bases, and I had to slightly modified my flagstone stamp to make it print up to edges, but that was nothing complicated. The most time consuming part was making/enlarging the lines that separate the tiles. That required some basic sculpting, but again, nothing big.
Here is the youtube channel for Happy Seppuku, where they show how to use their stamps. You'll see that it is really easy.
http://www.youtube.com/channel/UCXZhLR4FQkgejjMYCDqZK2A
|
|
|
|
|
|
2014/01/23 22:59:33
Subject: Tonio's journey into Brushfire, and excursion into Endless
|
|
[DCM]
Dankhold Troggoth
|
Basic sculpting to you
But thanks for the link, I will check it out
|
|
|
|
|
2014/01/24 07:45:34
Subject: Tonio's journey into Brushfire, and excursion into Endless
|
|
Fixture of Dakka
|
Wow, I hadn't peaked back here in a bit. That board is fantastic looking so far! I am really glad you are posting the step by step on how to do it. Great reading, even if it does softly whisper "you should totally take on another project like this!"
If I do, I will post pictures of my subsequent seppuku here. Or at least I will try and do a live stream or something. (Clearly I haven't thought this through.)
|
|
|
|
|
|
2014/01/25 07:07:16
Subject: Re:Tonio's journey into Brushfire, and excursion into Endless
|
|
Lit By the Flames of Prospero
|
aw man this is what i get for negletceing to look in this thread for abit! top notch stuff on the new board!
O____O
|
|
|
|
|
2014/01/27 16:51:33
Subject: Re:Tonio's journey into Brushfire, and excursion into Endless
|
|
Scribe of Dhunia
|
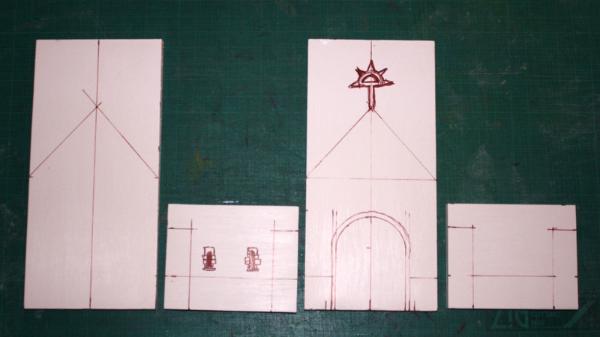
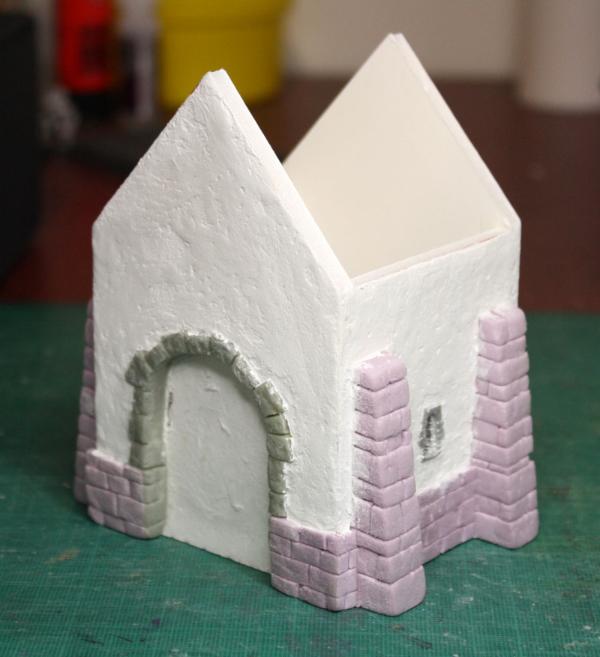
The board is now all primed and ready for painting. I've also started work on the chapel, with only the roof, the door and some accessories to add.
Just for you RiTides, I've done a mini step by step of the stone work, to show how easy it is.
Step 1 - Spread the putty
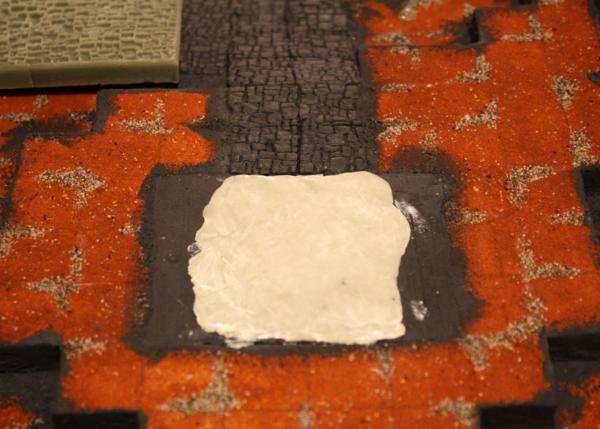 Step 2 - Press the mold
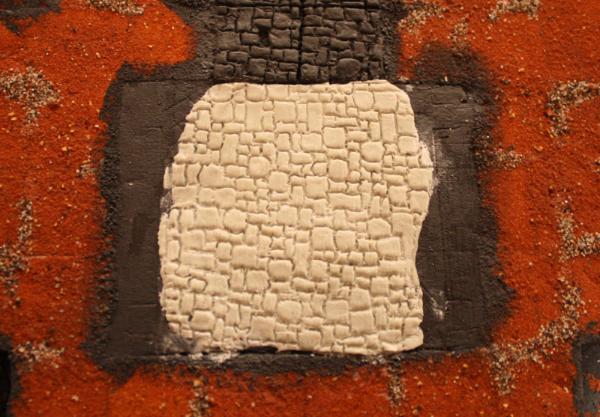
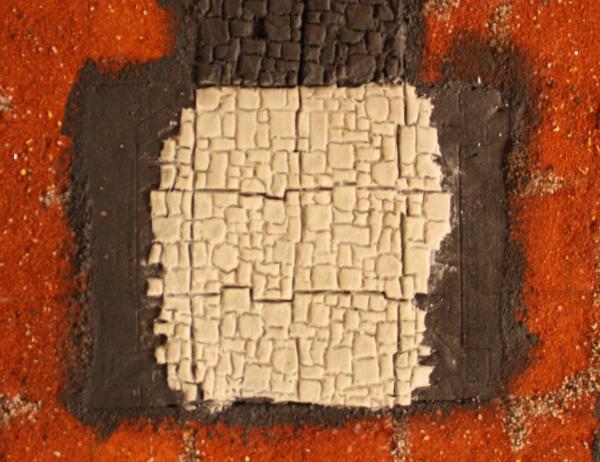
If you are going for an "untiled" look, you are done. Super easy. As I'm doing it for EFT, I just had to "magnify" some of the lines, to give an idea of tiles. This isn't hard, just a bit time consuming.
Step 3 - Tiling
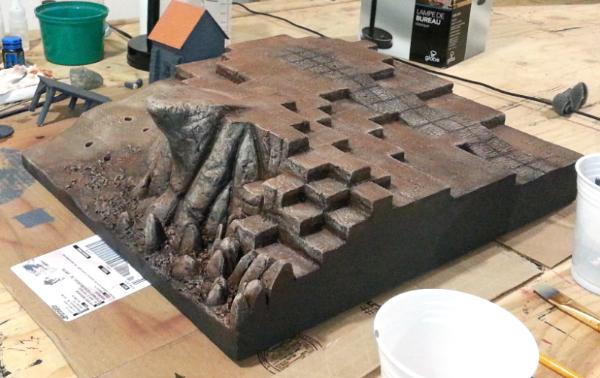
Here is a shot of the cliff and beach, all primed. With an unified colour, it ties in everything and gives a better idea of the look I'm going with.
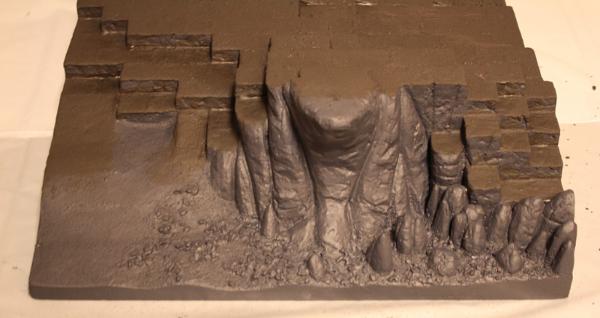
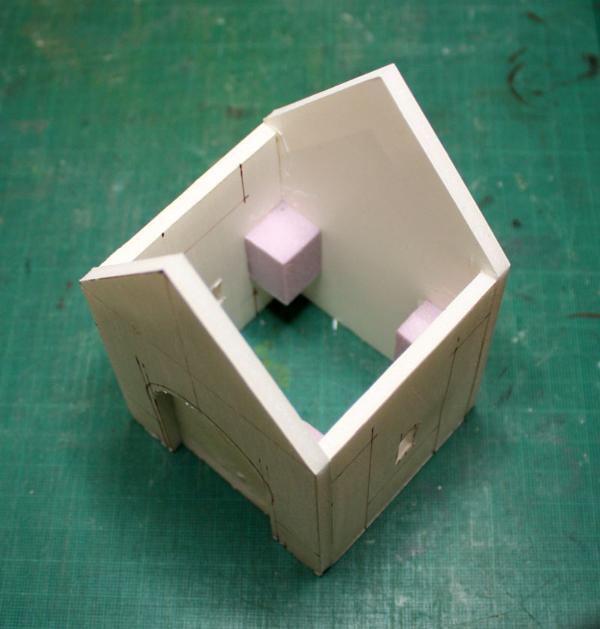
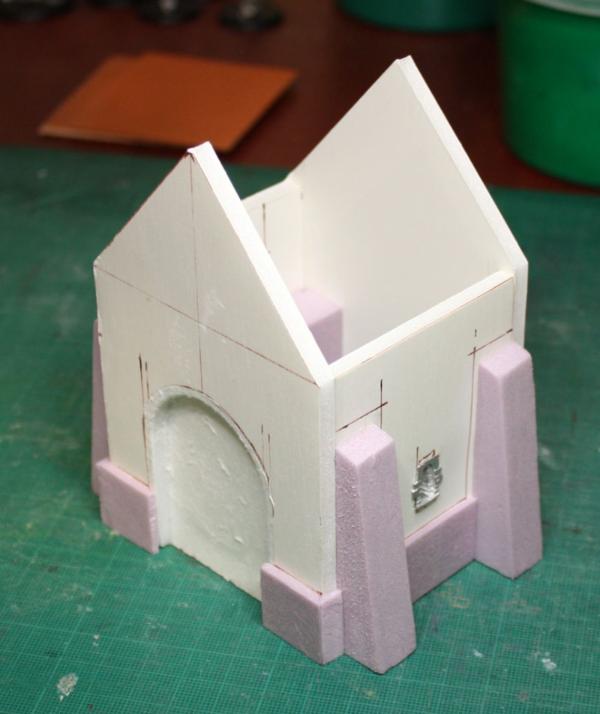
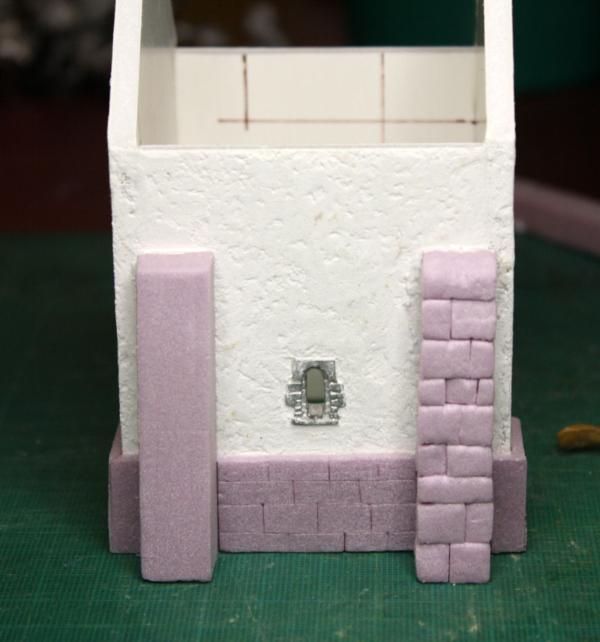
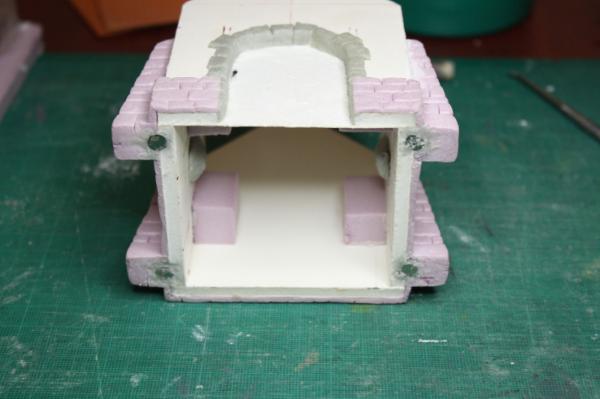
Now here are a bunch of shot of the work on the chapel. The white plaster is actually... white plaster, left over from the work on my basement this summer. It was applied with a plaster tool, and using a small cloth piece, I sponged it. Once a bit dryer, I simply smoothed it a bit with a flat wooden tool. The chapel is magnetized so to stay on the board, but still be easy to transport.
|
|
|
|
|
|
2014/01/28 01:05:11
Subject: Tonio's journey into Brushfire, and excursion into Endless
|
|
[DCM]
Dankhold Troggoth
|
Thank you very much for the step by step on the tiling
I thought it would be hard to use so close to the edge of the prior tiles, but it seems to work right up to the edge. Looks awesome
|
|
|
|
|
2014/01/28 01:19:59
Subject: Tonio's journey into Brushfire, and excursion into Endless
|
|
Fixture of Dakka
|
Are those little metal window frames?
Awesome work as always!
|
|
|
|
|
|
2014/01/28 01:58:32
Subject: Tonio's journey into Brushfire, and excursion into Endless
|
|
Scribe of Dhunia
|
Yes, the window frames are metal pieces from Antenocitis Workshop.
|
|
|
|
|
|
2014/01/28 03:28:38
Subject: Tonio's journey into Brushfire, and excursion into Endless
|
|
Incorporating Wet-Blending
|
Im just speechless!
You've way too much talent, Tonio- I would love to play on a board like that! Looks really good with a coat of primer on it.
What do you think the durability on the plaster will be like as far as travel and play?
|
|
|
|
|
|
2014/01/28 04:05:49
Subject: Tonio's journey into Brushfire, and excursion into Endless
|
|
Scribe of Dhunia
|
 Ramos Asura wrote: Ramos Asura wrote:Im just speechless!
You've way too much talent, Tonio- I would love to play on a board like that! Looks really good with a coat of primer on it.
What do you think the durability on the plaster will be like as far as travel and play?
Are you attending Templecon? The board will be there.
The plaster is just a thin coat on foam core, that will be further hardened with watered down glue. It should do fine, I think. @Cyp, did the other boards got any damage during the transportation?
|
|
This message was edited 1 time. Last update was at 2014/01/28 04:06:20
|
|
|
|
|
2014/01/28 04:08:38
Subject: Tonio's journey into Brushfire, and excursion into Endless
|
|
Fixture of Dakka
|
Tonio wrote:@Cyp, did the other boards got any damage during the transportation?
Previously we've had boards last us around a year, but I'm planning on getting some hard plastic containers to store the boards you've made in; that should hopefully keep them around longer.
I think the only wear and tear on the two boards we've got from you now is some minor rubbing around the corners/edges.
|
|
|
|
|
|
2014/01/31 16:56:43
Subject: Re:Tonio's journey into Brushfire, and excursion into Endless
|
|
Scribe of Dhunia
|
Here is a quick pic I took with my phone earlier this week, to at least show some of the ongoing progress.
|
|
|
|
|
|
2014/01/31 17:34:12
Subject: Tonio's journey into Brushfire, and excursion into Endless
|
|
[DCM]
Dankhold Troggoth
|
Wow, that's already shaping up really nicely Tonio! And you're saying you're further along than it shows?
I guess there's not much time left, though . At least take a break to watch the Super Bowl!
|
|
|
|
|
2014/01/31 18:19:01
Subject: Re:Tonio's journey into Brushfire, and excursion into Endless
|
|
Scribe of Dhunia
|
The painting itself hasn't progressed that much: it's mostly the accessories that got worked on since that picture. However, I'm looking forward to that freetime weekend to get the board all ready for the first resin pour on sunday night.
|
|
|
|
|
|
2014/01/31 18:24:30
Subject: Tonio's journey into Brushfire, and excursion into Endless
|
|
Fixture of Dakka
|
The board looks great! Just needs some more grid lines
|
|
|
|
|
|
2014/01/31 18:29:49
Subject: Tonio's journey into Brushfire, and excursion into Endless
|
|
Scribe of Dhunia
|
Yes... My plan to have them show up during painting with the use of a coarser grain of sand has been mostly cancelled by the magnetic primer I applied on the board to have movable elements. I didn't expect that much thickness and texture in the primer, and it flattened/hid most of those texture lines. I'll know for next time. 
The grid will still be painted on, and the flock and turf will help to strengthen the visual cue. I just won't have the sand texture to help also.
|
|
|
|
|
|
2014/02/01 03:57:34
Subject: Re:Tonio's journey into Brushfire, and excursion into Endless
|
|
[DCM]
Dankhold Troggoth
|
Tonio wrote:The painting itself hasn't progressed that much: it's mostly the accessories that got worked on since that picture. However, I'm looking forward to that freetime weekend to get the board all ready for the first resin pour on sunday night.
What is the resin pour for? Water at the base of the cliffs / edge of the beach?
|
|
|
|
|
|
|


