| Author |
Message |
 |
|
|
|
|
Advert
|
Forum adverts like this one are shown to any user who is not logged in. Join us by filling out a tiny 3 field form and you will get your own, free, dakka user account which gives a good range of benefits to you:
- No adverts like this in the forums anymore.
- Times and dates in your local timezone.
- Full tracking of what you have read so you can skip to your first unread post, easily see what has changed since you last logged in, and easily see what is new at a glance.
- Email notifications for threads you want to watch closely.
- Being a part of the oldest wargaming community on the net.
If you are already a member then feel free to login now. |
|
 |
2012/07/07 23:44:30
Subject: Chipping Tutorial (How to ruin a perfectly good paint job in 4 easy steps.)
|
|

Decrepit Dakkanaut
|
Please note that there are a lot of good chipping and weathering tutorials already out there. I don't claim that this method is unique or the best... but it's just a description of how I go about it.
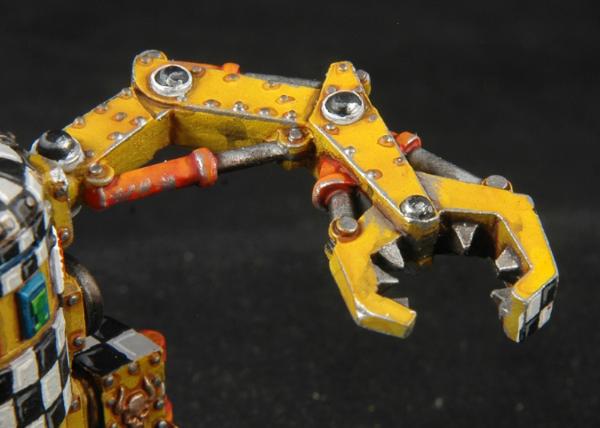
So... conceptually, you want to take a look at the figure and try and map out in your mind where the ware and tear is going to be. Will the edges be worn? Has paint been rubbed off from mechanical movements? Will there be areas where the metal has actually been chipped off at the edge from impacts or cuts? Is there gun fire damage? Is it rusty or muddy? If so, where do all these varying effects go? Where, and how... is the damage occurring? For this Kan arm, I;ve decided that most of the damage will be on the forward part of the arm and inside the CCW.
Now, the entire "distressing" process from start to finish can be rather involved and lengthy... so rather than tackling the whole thing in one go, I thought I'd approach it in sizable bits. While the Kan is a good subject for the tutorial... it's not the best as there's not much mud involved... but it'll have to do. Perhaps some day I'll do a grot tank version of the tutorial which will be a no-holes-barred assault on a decent paint job.
Which brings me to another point. Distressing is NOT for the faint of heart. Your going to take a perfectly decently painted figure and really screw it up. If you can't handle that emotionally... don't start. I don't distress my marine vehicles very much at all. Just won't risk it. Gretchin on the other hand don't look right without a lot of abuse, so it's easier for me to throw myself into it.
With that in mind... let's begin.
Step #1: Take a lighter color of your base metal (in this case I'm choosing chainmail for boltgun metal) and edge the plates that you thing might have had the paint scraped off. Forward edges, near ground edges, "action" edges for things like the CCW. I leave occasional blank spaces so that not every ege is uniformly done. This "planned randomness" is very important in delivering a result that is more realistic, at least in my opinion. If you don't know how to edge... now is a good time to learn. Take a fine brush, dilute your paint a bit so it flows smoothly. Put the paint on your brush and *very briefly* tap it on a paper towel to remove the excess that is like to blob on your figure. Then take the *side* of the brush and run it lightly along the edge that you're trying to paint. That's it. No boggle.
 Step #2:
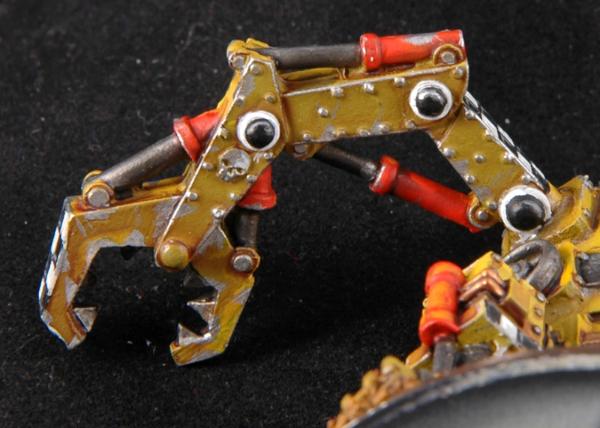
 At irregular intervals, take that same light metallic paint and make little V and irregular shaped inclusions into the paint job from the edge. I nearly always limit these to areas that have already been edged. Again, focus on those areas that would take the heaviest wear, or (conversely) areas that need a little visual interest on your figure. Or areas where you didn't quite paint it up to snuff, had an unsightly collection of wash, etc. In other words, you can use this opportunity to cover your mistakes! Don't go overboard unless you really what things to look beaten up badly. I see the V-shapes as actual chunks taken out of the metal... other areas (like next to an arm joint) are where the paint has just been rubbed away by the action of the arm moving. You can also draw little dings here and there, circular areas to represent bullet impacts or streaks to represent scrapes. Remember that the dings on the edges are three dimensional and may be represented in both planes that make up the corner!
 Step #3:
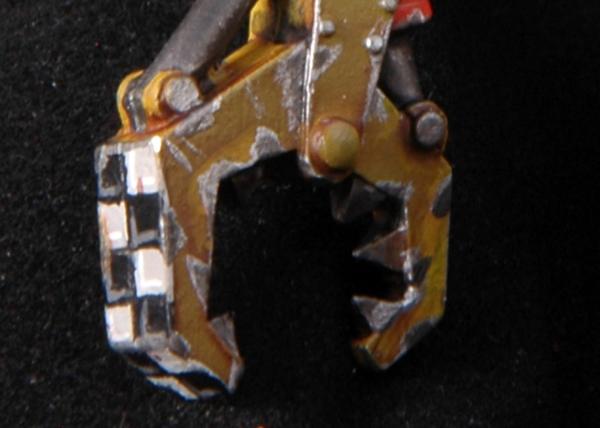
 Mix some of your metal highlight color with normal black paint until you get a dark metallic. Pretty dark is OK here, you want significant contrast between the dark and the light. Then on your biggest scrapes, but some of the dark mix inside of the area to represent shadow or depth in the ding.
 Step #4:
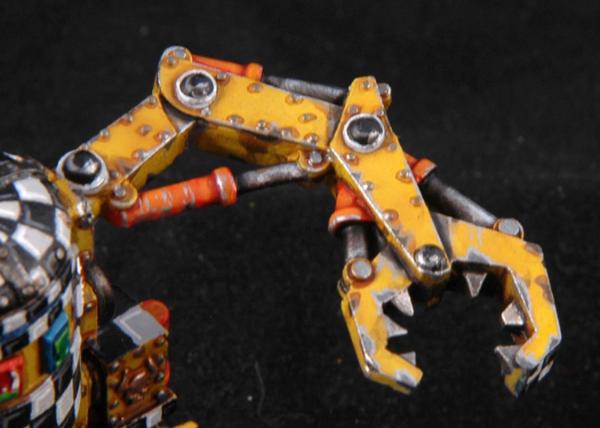
 Finally, take a look at the piece and see if there are areas you'd like to add a bit of rusty or oily patina to. I just use a bit of black or sepia wash to accomplish this. Be very careful as you do this as even the sepia will greatly de-emphasize the dings and will muddle the difference between the light and dark shades. Just look at the older dings that may have been made once but generally are in areas that don't see much action. I put the black wash in the areas around the arm joints and at the base of the hydrolics to represent oil left on the metal rods.
 Alternate Example:
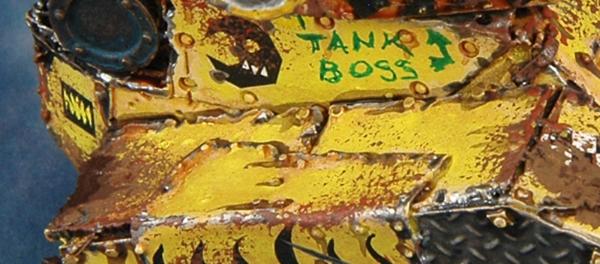
 This is a slice from one of my grot tanks. Because grot tanks are supposedly made completely from scrap, I decided to chip around the edges of nearly every individual plate. This is an extreme example of course but still... quite effective.
 The next phase in my weathering process is to add rust and soot. To see that tutorial, go here: Sponge Rust & Soot Tutorial
|
|
This message was edited 6 times. Last update was at 2012/07/08 00:11:04
|
|
|
 |
|
2012/07/09 02:08:04
Subject: Re:Chipping Tutorial (How to ruin a perfectly good paint job in 4 easy steps.)
|
|

Fixture of Dakka
|
When i first saw the title for this i thought it was going to be an explanation on the finer points of dropping a painted metal model from a great height and watching it get ruined as it hits the floor. As it turns out its really an excellent tutorial on how to do wear n' tear/battle damage to vehicles.
I unfortunately may never give this a shot. For as you mentioned in your op im one of those people who just cant handle seeing a good paintjob befouled. Maybe one day if i buff out my AoBR Ork army then i will come back to this tutorial.
|
|
|
|
|
|
2012/07/09 02:17:29
Subject: Chipping Tutorial (How to ruin a perfectly good paint job in 4 easy steps.)
|
|
Decrepit Dakkanaut
|
I'm there with ya Snrub... my marines are immaculate and will probably stay that way. 
|
|
|
|
|
|
2012/07/09 03:44:07
Subject: Re:Chipping Tutorial (How to ruin a perfectly good paint job in 4 easy steps.)
|
|

Dour Wolf Priest with Iron Wolf Amulet
|
Snrub wrote:When i first saw the title for this i thought it was going to be an explanation on the finer points of dropping a painted metal model from a great height and watching it get ruined as it hits the floor.
Same here... I'm actually kind of disappointed. 
|
|
|
|
|
|
2012/07/09 09:35:33
Subject: Chipping Tutorial (How to ruin a perfectly good paint job in 4 easy steps.)
|
|

Kinebrach-Knobbling Xeno Interrogator
|
Another excellent tutorial on Orking things up Gitsplitta!
I've actually now found a wayward Ork and I'll be trying out this and your checkerboards 
|
DA:90S+G++M---B-I+Pw40k09#+D+++++A++/eWD358R++T(M)DM+ |
|
|
|
|
2012/07/09 11:25:28
Subject: Chipping Tutorial (How to ruin a perfectly good paint job in 4 easy steps.)
|
|
Decrepit Dakkanaut
|
Sorry to disappoint guys! I have dropped and ruined minis before... but I didn't need a tutorial for that!
Glad you like it Nerbil, hope it works for you.
|
|
|
|
|
|
2012/07/09 12:13:11
Subject: Chipping Tutorial (How to ruin a perfectly good paint job in 4 easy steps.)
|
|
Gefreiter
|
Gitsplitta wrote:I'm there with ya Snrub... my marines are immaculate and will probably stay that way.
Sounds about right... Space Marines keep their armour shiny while the Guard do the real leg work.......
It's also worth looking at the effects you can get without paint. Metallic pencils and graphite can do a nice job too.
Frenchie
|
|
|
|
|
|
2012/07/09 13:06:19
Subject: Chipping Tutorial (How to ruin a perfectly good paint job in 4 easy steps.)
|
|
Decrepit Dakkanaut
|
Good point Frenchie... but I'll leave that tutorial to someone who knows what they're doing with those media!
|
|
|
|
|
|
2012/07/16 13:15:21
Subject: Re:Chipping Tutorial (How to ruin a perfectly good paint job in 4 easy steps.)
|
|
Decrepit Dakkanaut
|
I think later today Im going to attempt your technique on my Biker Boss, as currently his bike is a bit to bright and clean. Heres hoping it works, because I can never seem to get chips to look right
|
|
|
|
|
2012/07/16 14:09:49
Subject: Chipping Tutorial (How to ruin a perfectly good paint job in 4 easy steps.)
|
|
Decrepit Dakkanaut
|
Best of luck KC. It's a risk... but if it comes off well it's a good risk. You might start by chipping an out-of-the-way area to see if you like the effect, then move to the more highly visible areas.
|
|
|
|
|
|
2012/07/18 13:04:00
Subject: Chipping Tutorial (How to ruin a perfectly good paint job in 4 easy steps.)
|
|
Bloodthirsty Bloodletter
|
Well I have seen a couple videos on this. I also live and have lived in a combat zone for 4 years now. Each artist has their own point of view on wear and tear. They also have their own point of view on the fluff.
Me... I don't like Hero Names, and thousand year old units. If 80-90% of all soldiers die in battle, how can they be fighting as heroes? I use the Name, as a rank, like a Artillery Platoon Sergeant is always called "Smoke," a Company First Sergeant is always called "Top," a Coronal is called "Full Bird" and a 2nd Lt is called "Butter Bar."
Back on subject, fast rust over silver is impossible. over aluminum maybe, steel sure, and so on, the medal looks different. Also primer is the first color applied to a model, and a real piece of equipment. When paint chips off, primer will be visible, when primer chips off metal, and soon rust will accrue....
Push comes to shove, your tutorial is great for you. If your whole army is done like that then I guess your army equipment is made of the same material, in the same environment, and aged about the same on the battlefield.
Good job.
|
The Good: 8,000
Ultramarine, Scouts, Blood Angels, Dark Angels
The Bad: 8,000
Chaos, Daemons, Dark Eldar, Orks
      VS VS    |
|
|
|
|
2012/07/18 14:49:39
Subject: Chipping Tutorial (How to ruin a perfectly good paint job in 4 easy steps.)
|
|
Longtime Dakkanaut
|
Adrian Fue Fue wrote:Back on subject, fast rust over silver is impossible. over aluminum maybe, steel sure, and so on, the medal looks different. Also primer is the first color applied to a model, and a real piece of equipment. When paint chips off, primer will be visible, when primer chips off metal, and soon rust will accrue....
To be fair, these are orks - I don't think that they have a technical manual which governs a chromate primer coat to be applied prior to the finished paint colors.
|
|
|
|
|
2012/07/18 21:13:54
Subject: Chipping Tutorial (How to ruin a perfectly good paint job in 4 easy steps.)
|
|
Decrepit Dakkanaut
|
@Adrian: I appreciate the comments Adrian. I must admit, I have no experience with seeing weathered vehicles aside from railroad cars, I just kind of made up what seems to look good & convey the idea of wear. I think I did specifically mention somewhere along the line that I don't believe grots would bother with primer, which is why I didn't include a primer color in my weathering.
If you come up with a better system that's more realistic, please feel free to post a link here. I'm sure everyone would appreciate it.
|
|
|
|
|
|
2012/08/01 13:37:48
Subject: Chipping Tutorial (How to ruin a perfectly good paint job in 4 easy steps.)
|
|

Thrall Wizard of Tzeentch
|
Haha I just attacked my vechies with silver paint before this. I've never been great at painting be vehicles (ok I only have 1 vehicle which I went overboard with wear and tear, or mostly just tear but whatever) (ok I also only have 1 vehicle that's non cron, so I don't really know how to pait vehicles but thanks again gits for another great thread
|
|
|
|
|
2012/08/01 13:45:49
Subject: Re:Chipping Tutorial (How to ruin a perfectly good paint job in 4 easy steps.)
|
|
Decrepit Dakkanaut
|
I've never really enjoyed painting vehicles either... but getting an airbrush helped... as does getting more comfortable with some weathering tricks. So far the ork and necron stuff is turning out pretty good... but I still haven't gotten the stones to try and weather my marine vehicles. I think I'll need more practice first.
|
|
|
|
|
|
2012/08/01 17:51:08
Subject: Re:Chipping Tutorial (How to ruin a perfectly good paint job in 4 easy steps.)
|
|
[DCM]
GW Public Relations Manager (Privateer Press Mole)
|
Excellent tut Gitsplitta
|
|
This message was edited 1 time. Last update was at 2012/08/02 00:30:40
Adepticon TT 2009---Best Heretical Force
Adepticon 2010---Best Appearance Warhammer Fantasy Warbands
Adepticon 2011---Best Team Display
|
|
|
|
|
2012/08/02 00:10:52
Subject: Chipping Tutorial (How to ruin a perfectly good paint job in 4 easy steps.)
|
|
Decrepit Dakkanaut
|
G-i-t splitta. Gutsplitta is another bloke entirely!
|
|
|
|
|
|
2012/10/03 13:45:24
Subject: Chipping Tutorial (How to ruin a perfectly good paint job in 4 easy steps.)
|
|
Perturbed Blood Angel Tactical Marine
|
Great tutorial. I will be using this technique on my own orks. Thanks.
|
All your prayers will go unanswered -
Why do you think this is?!
\m/ ( > < ) \m/
- - |
|
|
|
|
2012/10/03 14:37:52
Subject: Chipping Tutorial (How to ruin a perfectly good paint job in 4 easy steps.)
|
|
Decrepit Dakkanaut
|
Thanks! Hope it works for you.
|
|
|
|
|
|
2012/10/04 20:38:14
Subject: Re:Chipping Tutorial (How to ruin a perfectly good paint job in 4 easy steps.)
|
|
Perturbed Blood Angel Tactical Marine
|
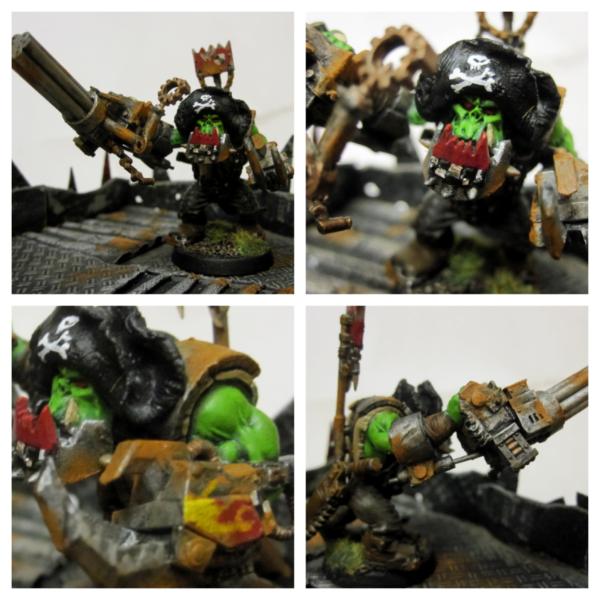
This is my first rusty ork attempt. i wanted them to pretty much be completly rusted. Im not sure if i pulled it off. Do you think it looks ok or is this too much rust? The lighting i have is pretty terrible so it does look a little less orange in person.
|
All your prayers will go unanswered -
Why do you think this is?!
\m/ ( > < ) \m/
- - |
|
|
|
|
2012/10/04 20:45:51
Subject: Re:Chipping Tutorial (How to ruin a perfectly good paint job in 4 easy steps.)
|
|
Decrepit Dakkanaut
|
Thats as rusty as I go on mine, unless the metal is painted a solid color. Looks good to me 
|
|
|
|
|
2012/10/04 22:53:30
Subject: Re:Chipping Tutorial (How to ruin a perfectly good paint job in 4 easy steps.)
|
|
Decrepit Dakkanaut
|
Rust looks good. You really need to either drill out the barrels or put a black dot in the center of each to indicate a hole there. They look odd without it.
|
|
|
|
|
|
2012/10/05 05:11:52
Subject: Chipping Tutorial (How to ruin a perfectly good paint job in 4 easy steps.)
|
|
Perturbed Blood Angel Tactical Marine
|
Yeah Ive been meaning to do that. And I'm definitely going to make the blood on my power klaws darker.
|
All your prayers will go unanswered -
Why do you think this is?!
\m/ ( > < ) \m/
- - |
|
|
|
|
2012/10/19 15:11:35
Subject: Re:Chipping Tutorial (How to ruin a perfectly good paint job in 4 easy steps.)
|
|
Longtime Dakkanaut
|
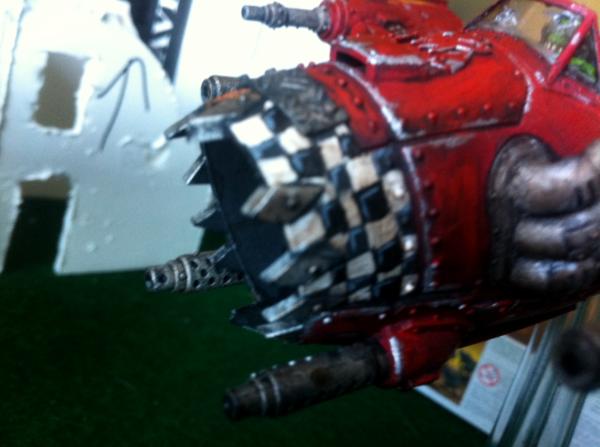
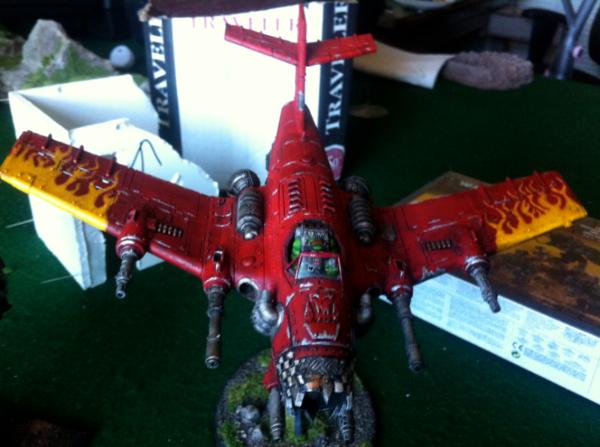
Git I wanted to say thanks for the TUT on this and highlighting checkers (i think it was you right?)
in any case wanted to share my work that you helped. thanks again
-skyfi
|
|
This message was edited 1 time. Last update was at 2012/10/19 15:12:15
|
|
|
|
|
2012/10/19 15:33:30
Subject: Chipping Tutorial (How to ruin a perfectly good paint job in 4 easy steps.)
|
|
Decrepit Dakkanaut
|
Excellent work! Thanks for sharing and I'm glad the tut helped! Those are fantastic looking models skyfi, love the checkers and flames on the jet... very cool.
|
|
|
|
|
|
2012/10/19 15:45:41
Subject: Chipping Tutorial (How to ruin a perfectly good paint job in 4 easy steps.)
|
|
Longtime Dakkanaut
|
 Gitsplitta wrote: Gitsplitta wrote:Excellent work! Thanks for sharing and I'm glad the tut helped! Those are fantastic looking models skyfi, love the checkers and flames on the jet... very cool.
Thank you thank you! [edited because i saw the checker tut in your sig]
Thanks again for the tutorial!
exalted!
|
|
This message was edited 1 time. Last update was at 2012/10/19 15:46:31
|
|
|
|
|
2012/10/19 18:36:00
Subject: Chipping Tutorial (How to ruin a perfectly good paint job in 4 easy steps.)
|
|
Just the Bare Metal
brooklyn,new york,usa
|
hey what about taking a bit of a sponge and tip into black paint and simply hit the figure or vehicle lightly with the sponge then use a little white paint around the edge to give it a 3d look by the way this comes from GirlPainting .
|
marc yablon  |
|
|
|
|
2012/10/19 18:40:05
Subject: Chipping Tutorial (How to ruin a perfectly good paint job in 4 easy steps.)
|
|
Decrepit Dakkanaut
|
I've seen that used quite effectively as well. I see that more as physical chipping where chunks of metal are blown out... this is more like paint chipping where areas are exposed to rust and such.
|
|
|
|
|
|
2012/10/27 10:56:20
Subject: Re:Chipping Tutorial (How to ruin a perfectly good paint job in 4 easy steps.)
|
|
Decrepit Dakkanaut
|
Yup, I used your method one my scratchbuilt DAKKAjet as well. Worked a charm!
|
|
|
|
|
2012/10/27 13:36:41
Subject: Chipping Tutorial (How to ruin a perfectly good paint job in 4 easy steps.)
|
|
Decrepit Dakkanaut
|
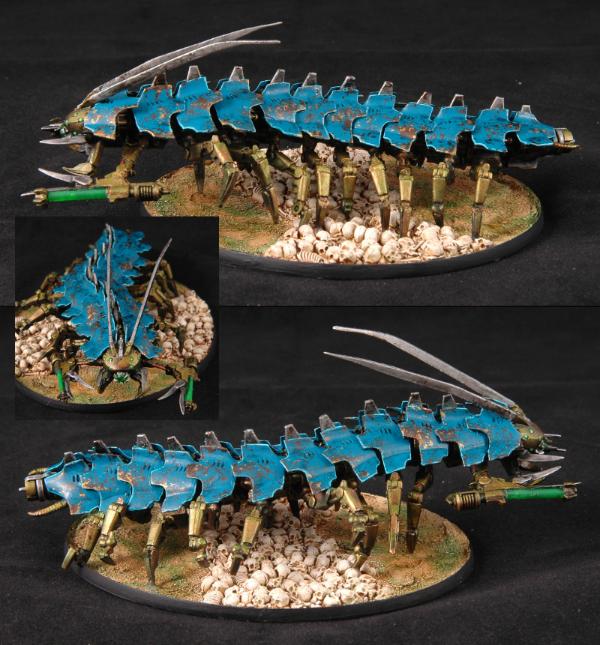
Glad to hear it KC! I've been using a modified version of this to put metallic inclusions into the blue stone of my necron army. They started as chips, but then my idea of what they were started to change & now I view them as bits of metal scattered throughout the stone (the way gold can be found in pockets and veins in quartz for example).
You can see it here on this Tomb Stalker. At this point, I was still thinking chipping.
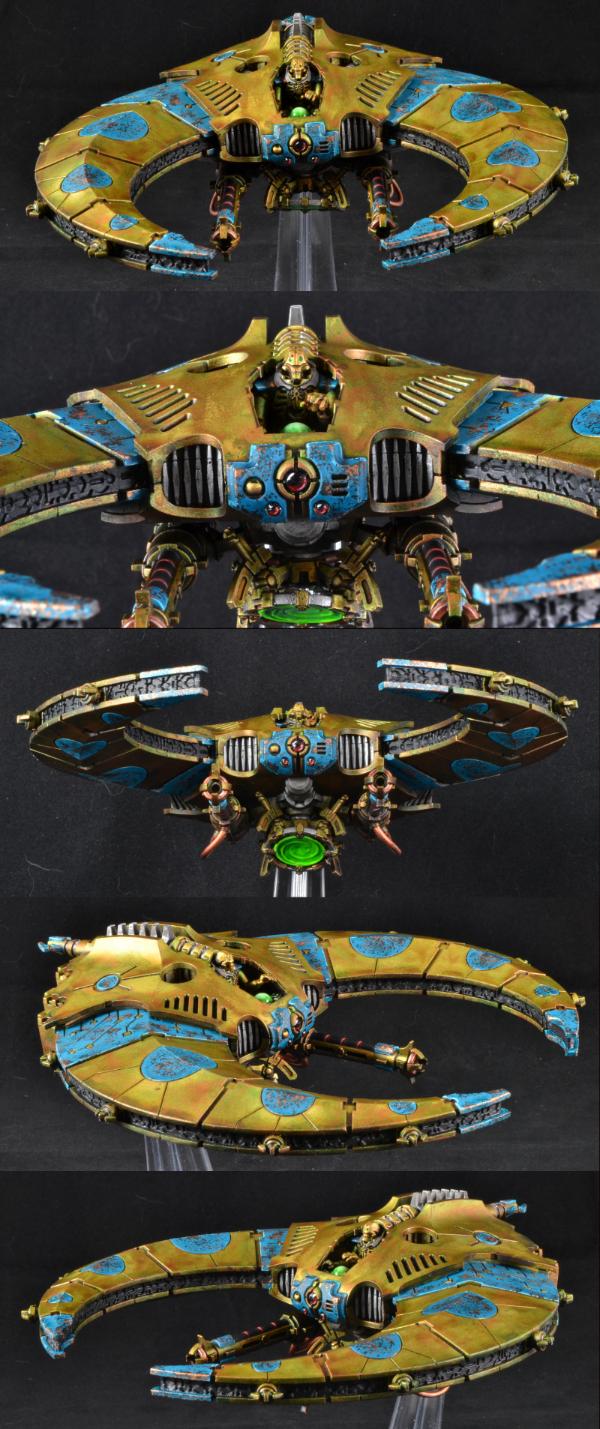
Then I moved towards inclusions rather than the chips... slightly different technique & result.
|
|
|
|
|
|
|
|