| Author |
Message |
 |
|
|
|
|
Advert
|
Forum adverts like this one are shown to any user who is not logged in. Join us by filling out a tiny 3 field form and you will get your own, free, dakka user account which gives a good range of benefits to you:
- No adverts like this in the forums anymore.
- Times and dates in your local timezone.
- Full tracking of what you have read so you can skip to your first unread post, easily see what has changed since you last logged in, and easily see what is new at a glance.
- Email notifications for threads you want to watch closely.
- Being a part of the oldest wargaming community on the net.
If you are already a member then feel free to login now. |
|
 |
2014/01/03 04:37:12
Subject: Commision Terrain builder work log
|
|

Regular Dakkanaut
|
Hi guy i wanted to do this for a while but could not find the right time. So the first couple of post will be about some of my previous work. the first work doesn't have lot of wip photo but now i take more of them. if you have any question feel free to ask.
It took me a year into terrain building, before making any work i can qualifies good for commission work and selling.
Here a example of my early work. it's in fact my first piece of terrain. this was made of foam core and Styrofoam hand painted with layer of paint so thick that it practically hold the model together more than the glue itself.(still look ok on the picture because it was taken far you cannot see the detail that much)
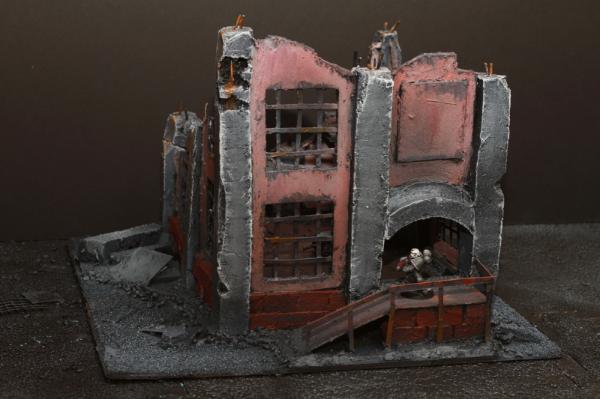
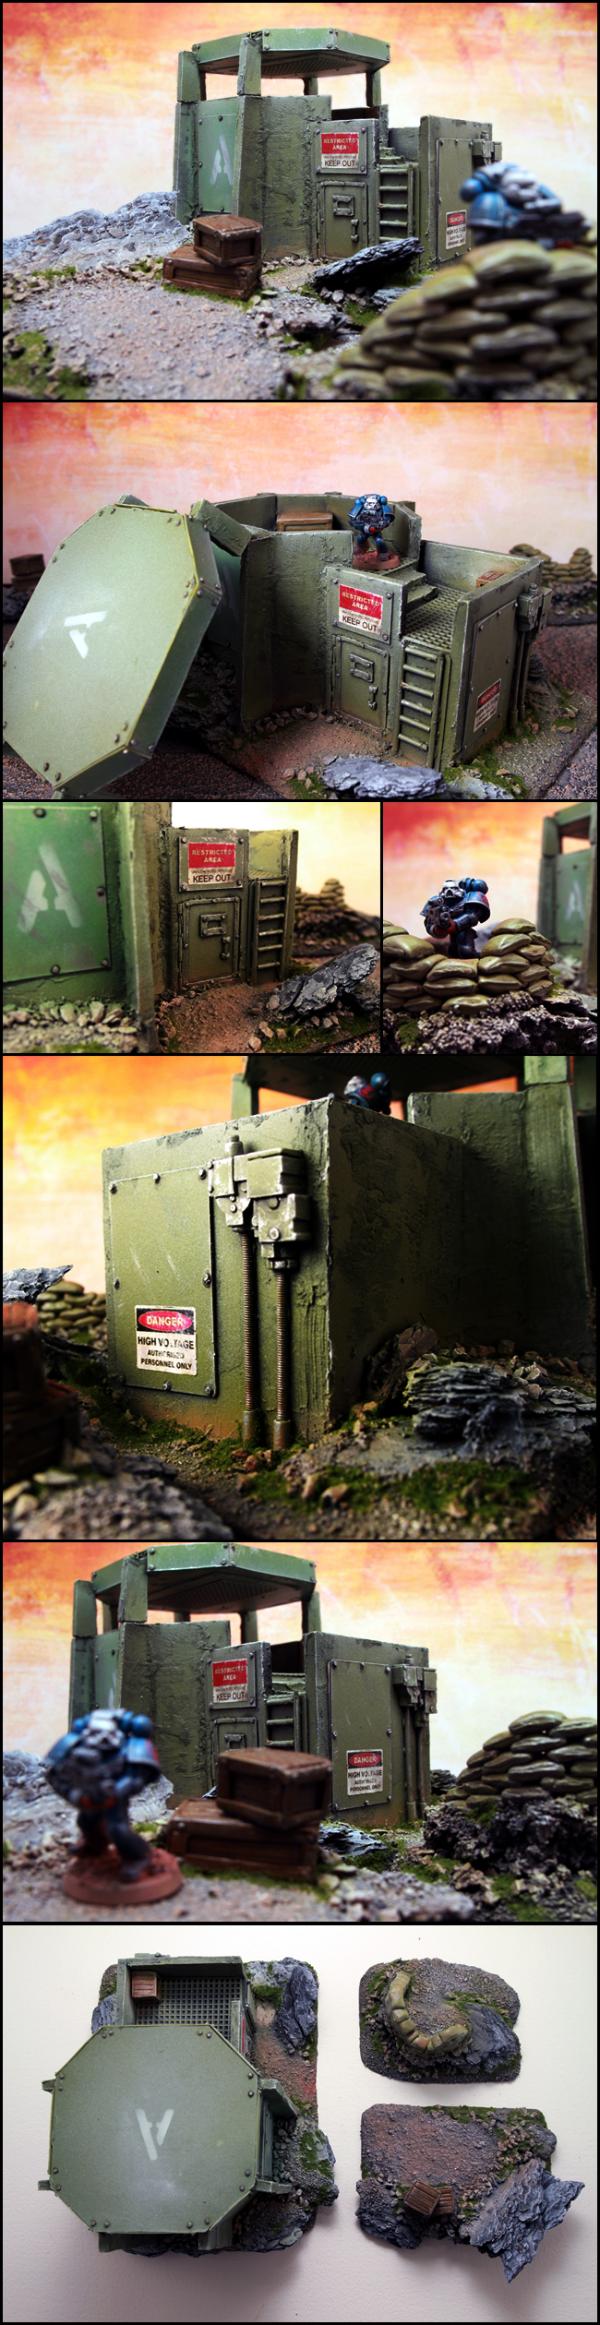
lot's terrain and a airbrush later I decide that i needed to start working to a higher quality, put more time into detail so I could sell them and do commission work. I made this bunker which is in my opinion my first good piece of terrain.
its made of mdf for the base, foam core for the structure, pine bark to make the rock,the sand bacg where sculpt in super sculpey and some piece where mold and cast in resin (like the door and the crates whiche where sculpted in green stuff.)I aslo begin to magnetize part of the terrain for playability.
After I made this. the brick wall where sculpted in super sculpey then mold and cast in resin.my technique consist of doing a flat one face tiling wall and glue it in place on a foam core structure (not the best way to do in my opinion but it save on the weigh of a piece and I had this in mind since i wanted to sell it) i change my way of doing brick wall since then.

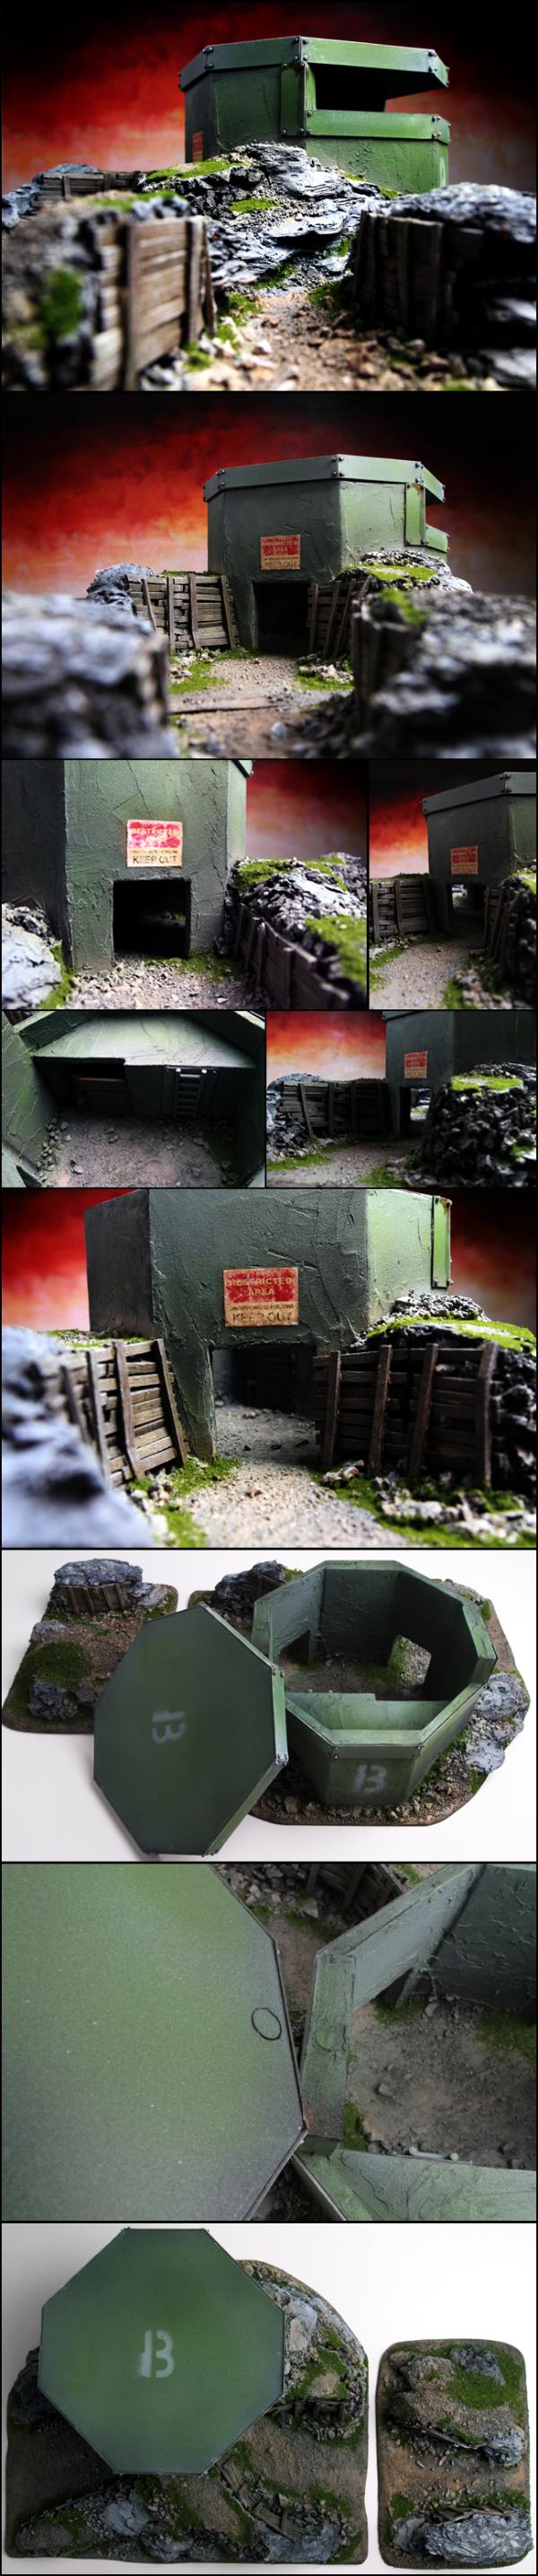
the bunker was a quick sellers contrarily to the temple which took me a long time to sell. son i decide to do more bunker they all sold pretty fast.I use balsa wood to make trenches which is a charm to work with, but i change it to Popsicle stick, it give the same quality result but is a little more hard to cut.I made the change because it was a lot cheaper and I wasn't able to find large quantity of basla wood.
they are show in chronological order:
This one was a commission work ,I improve my weathering a great deal on this one i think .I bought a lot of game workshop terrain part at this time got a great deal from a friend.so you can see some of GW part on my next work.


 Automatically Appended Next Post:
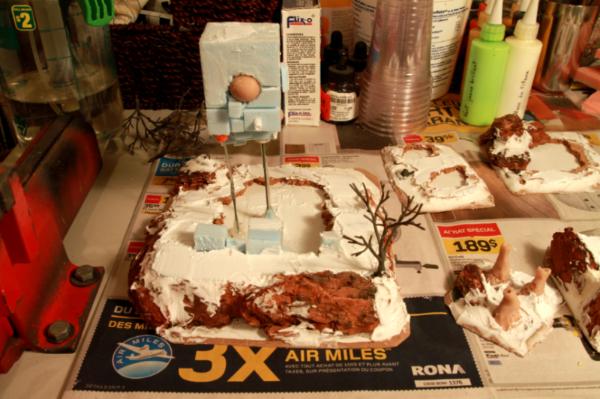
after all these Bunker i wanted to change a little and since i was just starting my nurgle traitor army. I decided why not make a terrain to go with the army.
i wanted to be gross an gooey but also mysterious. my idea was to put some kink of weird cubic monolith with giant eye on it that float in the air over a pool of goo. at first i wanted to make the monolith to hold with chain glued to be solid but it doesn't work that well.so instead why not make to monolith drip goo and hide some metal rod in the goo fall.
here yo can see the stage before i put the sand over the piece as you can see i completely cover the metal rod that old the monolith in place with hot glue.
The white stuff by the way is call modeling past its the product i use the most its pretty great to make all part blend together and fill hole between 2 piece.
after putting the sand in place i painted these pieces. the next thing was to make the goo . I used liquitex acrylic gloss medium mixed with green paint.and i just pour it in the pool. it take a day or two to dry completely.
here's the final result:
this piece too sold pretty fast.
 Automatically Appended Next Post:
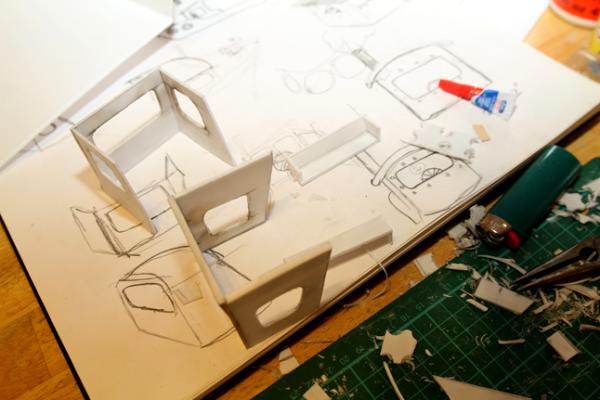
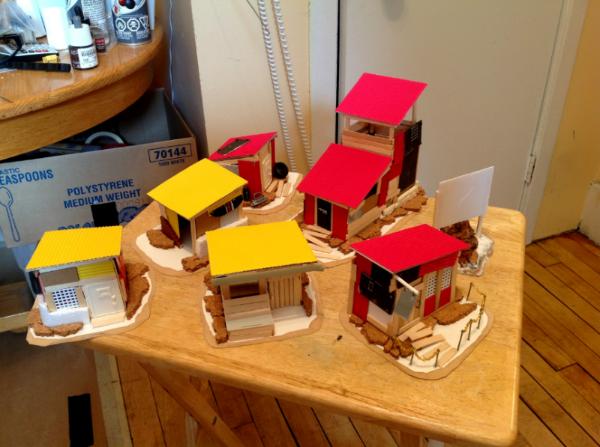
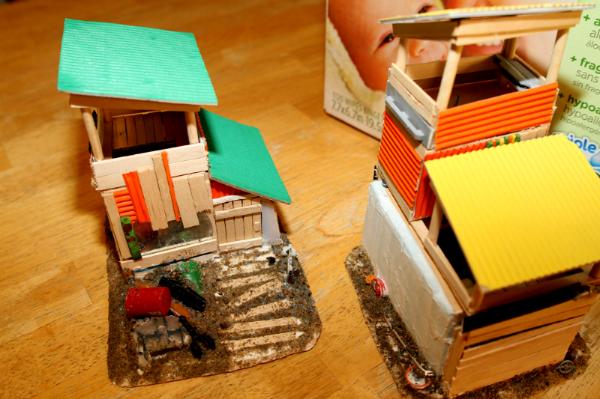
One of my regular client ask me to do a shanty town for him. It was a great idea and a great fun to do .At first i think i would be done quick since building doesn't need to be straight and clean but the time i save not measuring thing, i lose it adding detail and texture.
To look like a dump you need a lot of stuff so i bought a box of old model kit and toy to use as debris laying around. i used baking soda to make rust texture now i use talc powder (work better)
this is the first kit i made for him:

I think he like it because soon after he commission me to do another kit. This one:
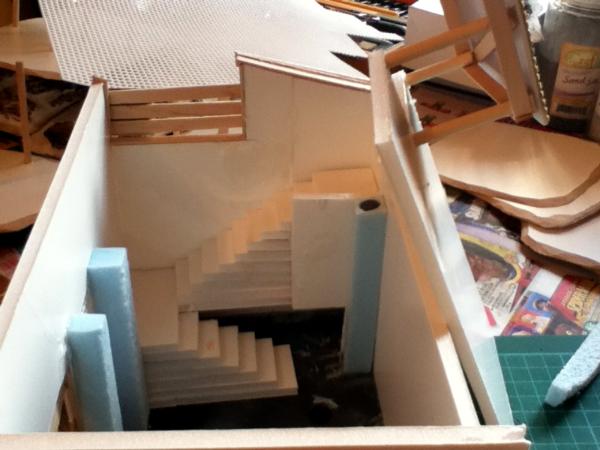
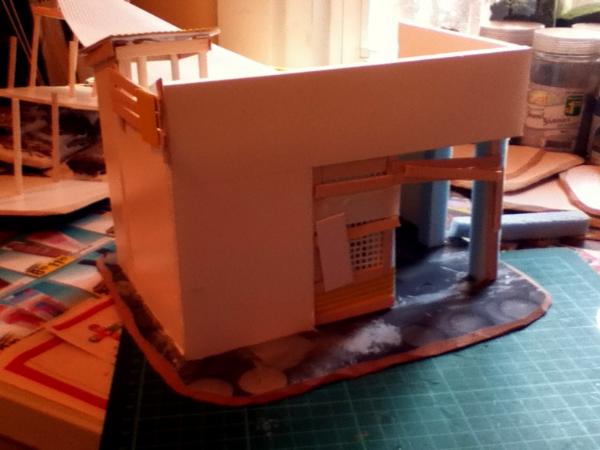

Right now i'm working on another batch that i intend to sell to see if people like them .this time i take some wip pic.as you can see Popsicle stick are the main material on these.
I would recommend doing a shanty town for any beginner. its great to make test ,material doesn't cost much and it's easy to do.
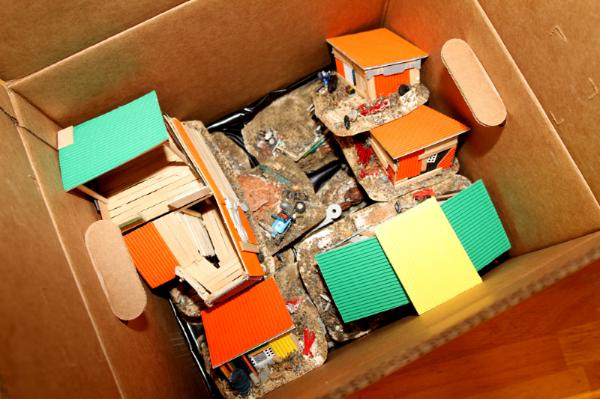
I have a lot of them ready to paint i will show them to you a soon:
|
|
This message was edited 4 times. Last update was at 2014/02/04 23:51:53
|
|
|
 |
|
2014/01/03 11:27:08
Subject: Commision Terrain builder work log
|
|

Hardened Veteran Guardsman
|
Wow, these pieces look brilliant!
|
 Iron Lords Iron Lords
 For The Emperor! For The Emperor!
 Tau Tau
 Blood Angels Blood Angels
 Dark Angels Dark Angels
 Dark Eldar Dark Eldar |
|
|
|
|
2014/01/11 00:43:48
Subject: Re:Commision Terrain builder work log
|
|
Regular Dakkanaut
|
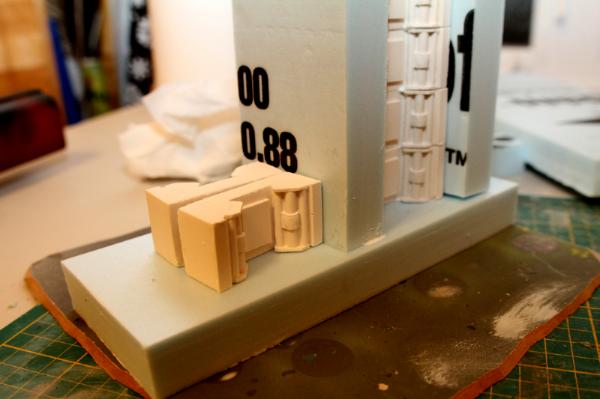
the next thing is my biggest project up to dates, I wanted to make a modular medieval dungeon for rpg but i wanted all my piece to be custom made i didn't want to use part from another companies like Hirst arts. so i started the long process of sculpting and molding.the goal of this project was to be able to have a product i can duplicate at will.so I always have something to sell on my Ebayshop
the first mold i made was a texture-less slab and brick from which i could sculpt every other piece.
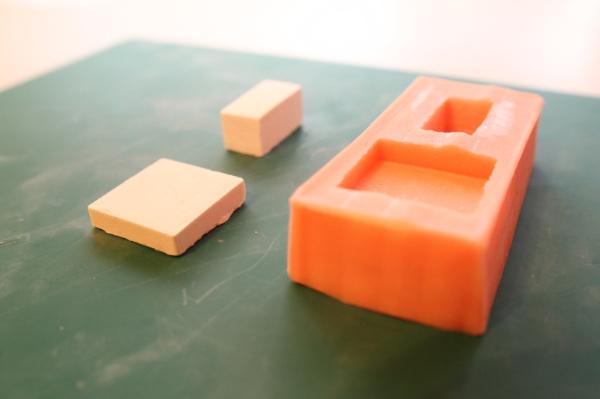
i cast them in plaster of Paris a because it is cheap and easy to sculpt. i sculpt a lot of medieval slab and brick:
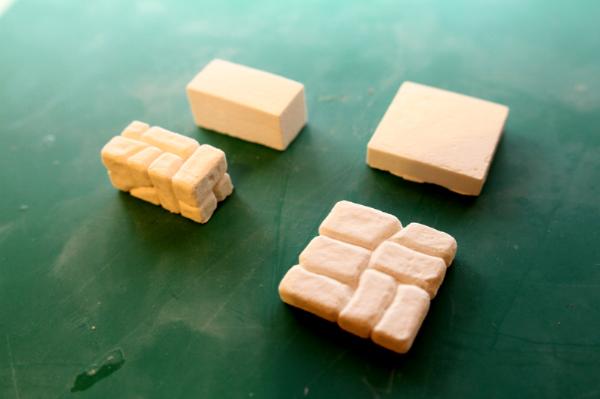
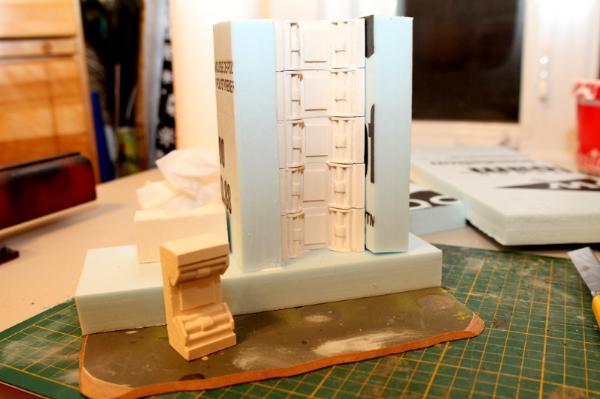
then i made another mold to be able to cast a lot of piece :

i used these piece to build dungeon part.I clean them and use modeling paste to fill all the gap between the piece i want to make sure you cannot see where the block end and another start.
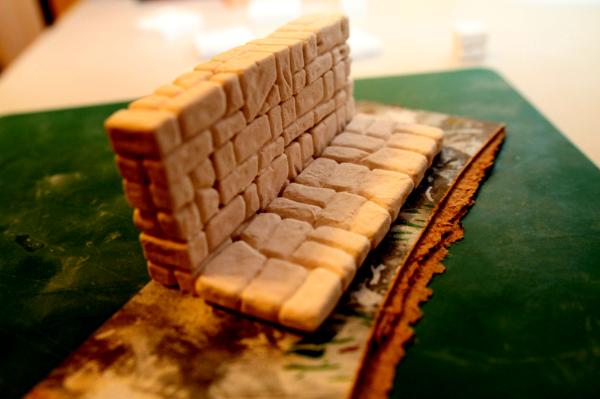
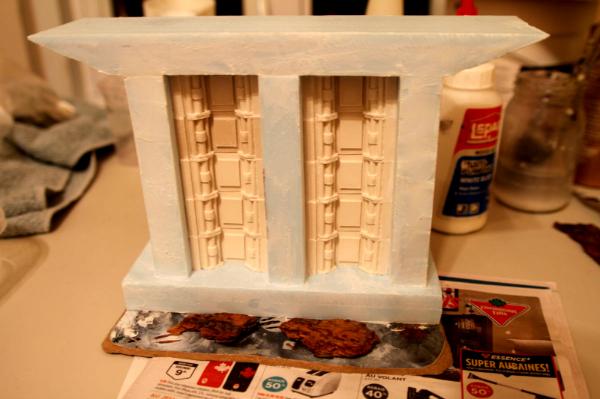
then once again i create a mold.
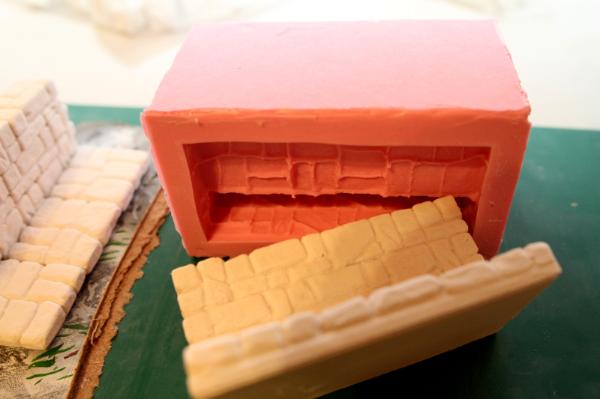
i repeat this process a couple of time until i had all the piece necessary to build a complete dungeon and this is the final result:

This is my most expensive and time consuming project so far. I would not recommend to do it yourself unless you want a product you can sell or a 1000 piece dungeon. If you just want a fun little dungeon to play your favorite rpg i would recommend buying mine or a similar one... but more mine 
(send me a pm if you want one)
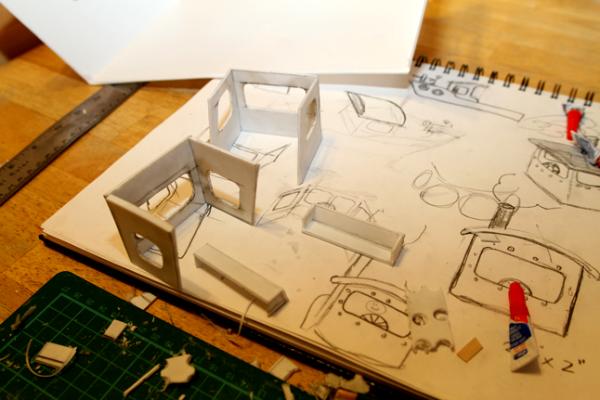
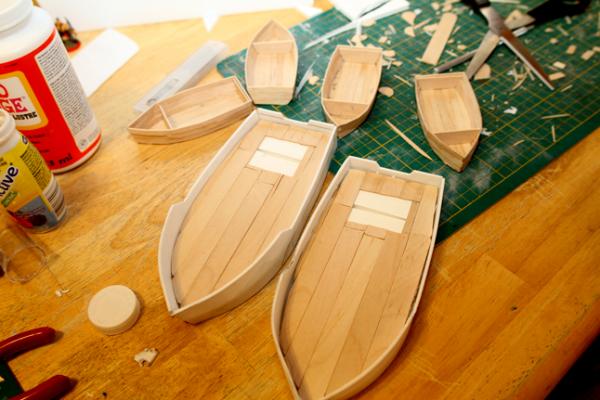
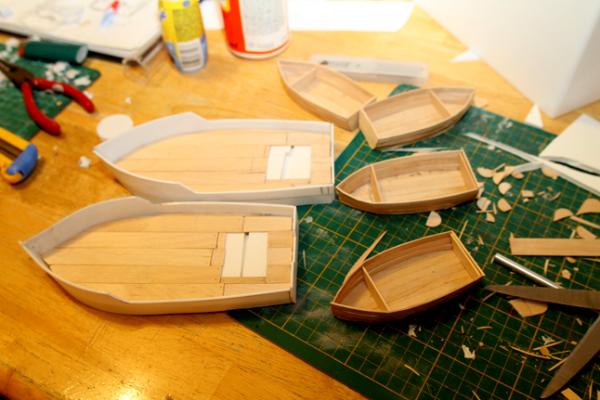
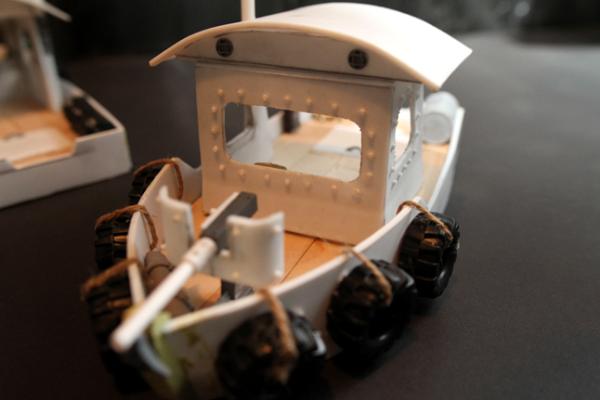
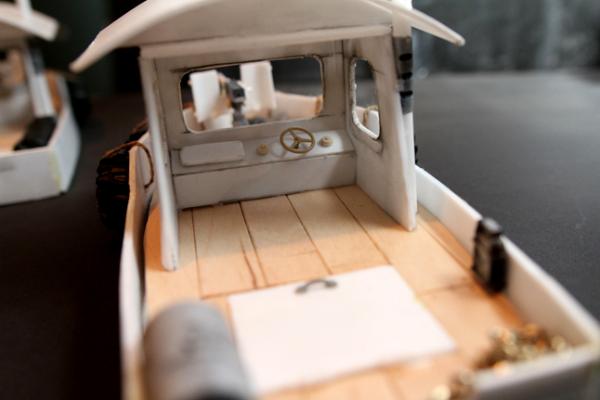
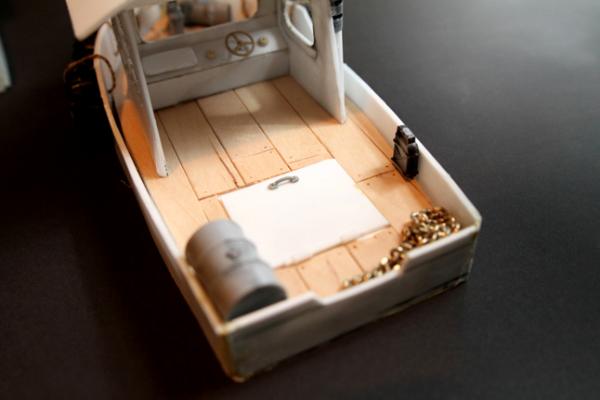
coming next post: custom project for a client 2 patrol boat and 4 jolly boat. for Necromunda,
|
|
|
|
|
|
2014/01/11 01:04:15
Subject: Commision Terrain builder work log
|
|
Omnious Orc Shaman
A long time ago in a galaxy far, far, away...
|
Dude, your work is awesome. I've seen the bunkers on the front page before but to see all this work in your blog, Wow...
Please post more WIPs, that's my only request at this time

|
|
|
|
|
|
2014/01/11 08:26:08
Subject: Commision Terrain builder work log
|
|
Regular Dakkanaut
|
 Ruglud wrote: Ruglud wrote:Dude, your work is awesome. I've seen the bunkers on the front page before but to see all this work in your blog, Wow...
Please post more WIPs, that's my only request at this time
Thanks a lot!
don't worry as i said in my first post i don't have a lot of wip pic of my older work, but nowadays i take more wip picture.
|
|
|
|
|
|
2014/01/12 00:41:43
Subject: Re:Commision Terrain builder work log
|
|
Regular Dakkanaut
|
|
|
|
|
|
|
2014/01/15 15:19:33
Subject: Re:Commision Terrain builder work log
|
|

Basecoated Black
Chicago
|
Most of those bunkers and the shanty town are mine!
He does great work, and the prices are very reasonable.
|
|
|
|
|
|
2014/01/31 00:25:23
Subject: Re:Commision Terrain builder work log
|
|
Regular Dakkanaut
|
 jlopatin wrote: jlopatin wrote:Most of those bunkers and the shanty town are mine!
He does great work, and the prices are very reasonable.
Thanks a lot!
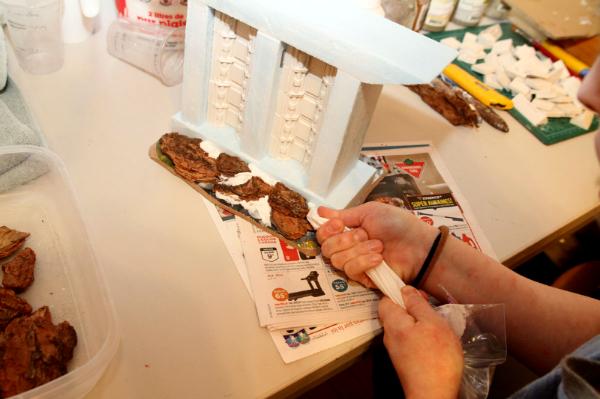
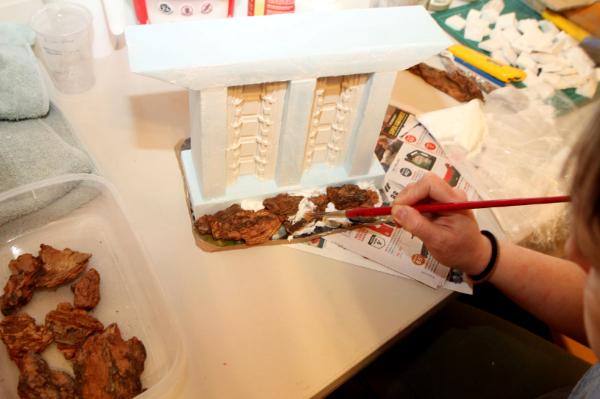
I start another project for a client of mine. he ask for a bridge large enough for 4 rhino and 4foot long. that a pretty impressive piece of terrain.
here i start the first pillar i use foam and piece I cast in hydrostone.
|
|
|
|
|
|
2014/01/31 04:56:25
Subject: Commision Terrain builder work log
|
|
Ragin' Ork Dreadnought
|
Holy moly! Your stuff is great! Really impressive stuff!
|
|
|
|
|
|
2014/01/31 05:04:06
Subject: Re:Commision Terrain builder work log
|
|
Wicked Ghast
|
GOOD GOLLY MISS MOLLY You have a ebay store right ??? haha all those are great i love the temple stuff most of all would love to play a game of fantasy with that
|
|
|
|
|
2014/01/31 13:43:52
Subject: Commision Terrain builder work log
|
|
Mastering Non-Metallic Metal
|
Impressive terrain work.
Looks like I've got a lot of catching up to do...
|
     Mastodon: @DrH@warhammer.social Mastodon: @DrH@warhammer.social
The army-                ~2295 points (built). ~2295 points (built).
 
* -=]_,=-eague Spruemeister General. * A (sprue) Hut tutorial *
Dsteingass - Dr. H..You are a role model for Internet Morality! // inmygravenimage - Dr H is a model to us all 
Theophony - Sprue for the spruemeister, plastic for his plastic throne! // Shasolenzabi - Toilets, more complex than folks take time to think about! |
|
|
|
|
2014/01/31 15:35:40
Subject: Re:Commision Terrain builder work log
|
|
Regular Dakkanaut
|
 Field Marshal Wiley wrote: Field Marshal Wiley wrote:GOOD GOLLY MISS MOLLY You have a ebay store right ??? haha all those are great i love the temple stuff most of all would love to play a game of fantasy with that
yes i do there not much on it at this time but i update it frequently:
http://www.ebay.com/sch/warmongercreation/m.html?item=251416820384&ssPageName=STRK%3AMESELX%3AIT&rt=nc&_trksid=p2047675.l2562
I also take commission work
|
|
|
|
|
|
2014/01/31 15:48:36
Subject: Commision Terrain builder work log
|
|

Regular Dakkanaut
|
Really nice Work!! I allways enjoy detailed and beautiful terrain. I'm looking forward to see more.
|
|
|
|
|
2014/02/04 01:46:12
Subject: Commision Terrain builder work log
|
|
Enginseer with a Wrench
|
Love your works on the patrol boats. For the decking, I would recommend using wood coffee stirrers. The stirrers are thinner and not as thick as the Popsicle sticks. Great work on the dungeon and the habitat buildings. All of the work is impressive.
|
Strength and Honor
Silveroxide |
|
|
|
|
2014/02/04 03:25:54
Subject: Commision Terrain builder work log
|
|
Wraith
|
.......and subscribed. This stuff is unreal!
|
|
|
|
|
|
2014/02/04 11:24:12
Subject: Commision Terrain builder work log
|
|

Hurr! Ogryn Bone 'Ead!
|
Very inspirational and awesome terrain!
|
|
|
|
|
|
2014/02/04 23:49:10
Subject: Re:Commision Terrain builder work log
|
|
Regular Dakkanaut
|
Thanks for your comment everyone !
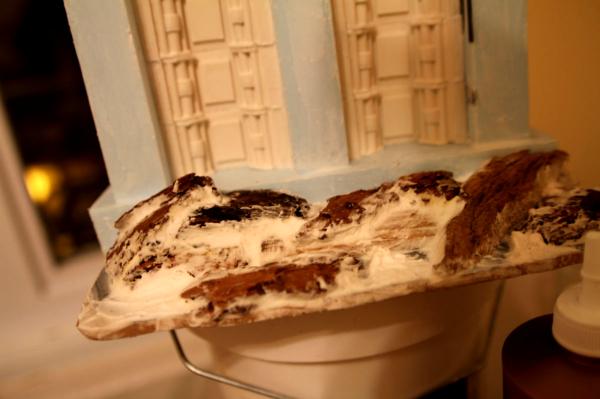
some other work on the bridge:
once the pillar are finish i put some pine bark at the base then use modeling past to merge it all together

Once this is done, I start working on the road itself. the terrain is so large 1 foot by 4 foot i had to cut it in half and magnetize the 2 piece together otherwise the center of the road would be too fragile.
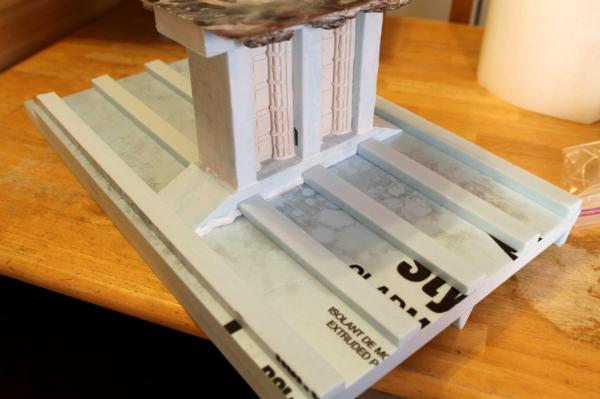

finish now i only have to paint this monster.
This is a large piece honestly i don't think i will make another piece that large soon, it's kind of hard to work on it. Automatically Appended Next Post: Update the first post with shanty town wip i just found on my computer.
|
|
This message was edited 1 time. Last update was at 2014/02/04 23:52:36
|
|
|
|
|
2014/02/05 07:54:45
Subject: Commision Terrain builder work log
|
|

Fresh-Faced Inquisitorial Acolyte
|
Wow! Your stuff absolutly great! I'm totally speechless and flashed!
|
|
|
|
|
|
2014/02/06 12:53:26
Subject: Commision Terrain builder work log
|
|

Arch Magos w/ 4 Meg of RAM
|
I love your necromunda Shanty Town! I'm definitely going to try my hand at that! Thanks for the inspiring work! Looking forward to more 
|
Bye bye Dakkadakka, happy hobbying! I really enjoyed my time on here. Opinions were always my own :-) |
|
|
|
|
2014/02/07 02:35:53
Subject: Re:Commision Terrain builder work log
|
|
Regular Dakkanaut
|
lot of new stuff finish right now. 2 new set of shanty town i was working on(there is wip on previous post)is finish and for sales:


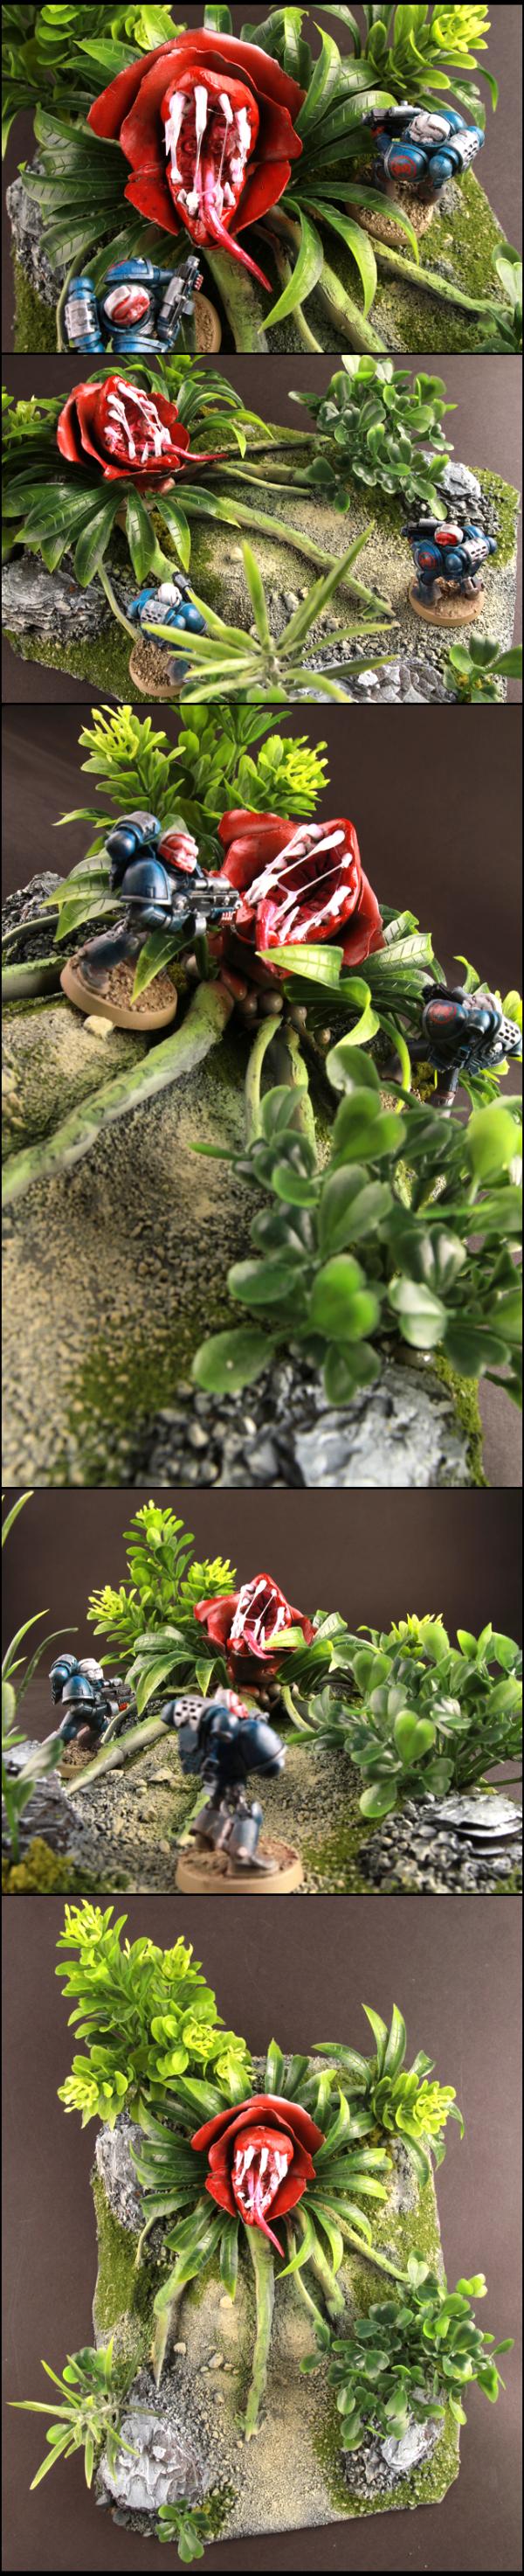
also a commission i just finish a carnivorous plant.
the plant itself is sculpted in super sculpey.
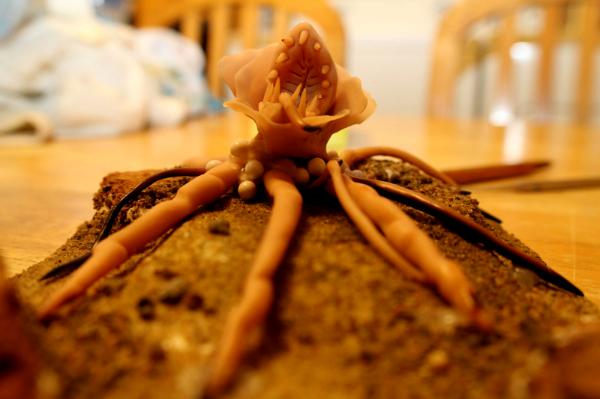
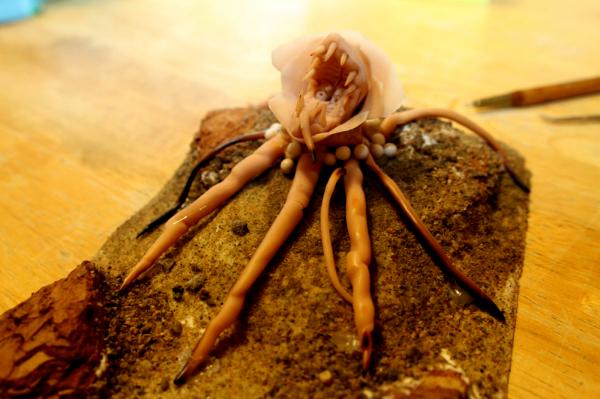
paint +some vegetation later:
|
|
|
|
|
|
2014/02/07 02:59:47
Subject: Commision Terrain builder work log
|
|
Dakka Veteran
|
Really love your work. Looking forward to seeing much, much more of it.
|
|
This message was edited 1 time. Last update was at 2014/02/07 03:00:02
|
|
|
|
|
2014/02/07 16:35:06
Subject: Commision Terrain builder work log
|
|
Hangin' with Gork & Mork
The Ruins of the Boston Commonwealth
|
Well... This is incredible... this is truly magnificent! Great work on everything! I love building terrain and your stuff now gives inspiration to even greater works!
|
|
|
|
|
|
2014/02/18 00:51:43
Subject: Re:Commision Terrain builder work log
|
|
Regular Dakkanaut
|
the bridge is finally over. Its such a large piece that i could not take a picture with my black background i usually use. hope you guys like it.

|
|
|
|
|
|
2014/02/18 01:06:31
Subject: Commision Terrain builder work log
|
|
Mauleed
|
Wow, this is all really impressive work. I particularly like the boats! You recommended shanty towns are good pieces of terrain for beginners to make, any chance of a basic tutorial? Showing what bits you use and the general process. Your shanty buildings are great pieces if terrain, but the removable levels and roofs give them such a playability factor. Subbed.
|
|
|
|
|
2014/02/19 00:56:11
Subject: Commision Terrain builder work log
|
|
Regular Dakkanaut
|
Mr Sighs wrote:Wow, this is all really impressive work. I particularly like the boats! You recommended shanty towns are good pieces of terrain for beginners to make, any chance of a basic tutorial? Showing what bits you use and the general process. Your shanty buildings are great pieces if terrain, but the removable levels and roofs give them such a playability factor. Subbed.
I will try to make a more detailed tutorial next time i do a batch. but the general idea is pretty easy just take Popsicle stick, ripple cardboard,old toy, sprue ,bits ,etc and bash them together. and use magnet to fix the roof.
|
|
|
|
|
|
2014/02/20 23:09:57
Subject: Commision Terrain builder work log
|
|
Regular Dakkanaut
|
New product i made for my shop not lot to say on these. Sand bags are made from super sculpey the rest is sand little rock and popsicle stick.
there a lot of bubble in the casting of these on because i was trying a new mixt (hydrostone +woodglue). it made a lot of bubble and its not as great as i think it would be. Lot less bubble when cast in pure hydrostone.

|
|
This message was edited 1 time. Last update was at 2014/02/20 23:13:02
|
|
|
|
|
2014/04/24 20:46:07
Subject: Re:Commision Terrain builder work log
|
|
Regular Dakkanaut
|
It,s been a while since my last updates i was quite busy. I just finished some new shanty town for a client. I think these will be my last bunch of shanty town for long time.

|
|
|
|
|
|
2014/06/28 17:39:39
Subject: Re:Commision Terrain builder work log
|
|
Regular Dakkanaut
|
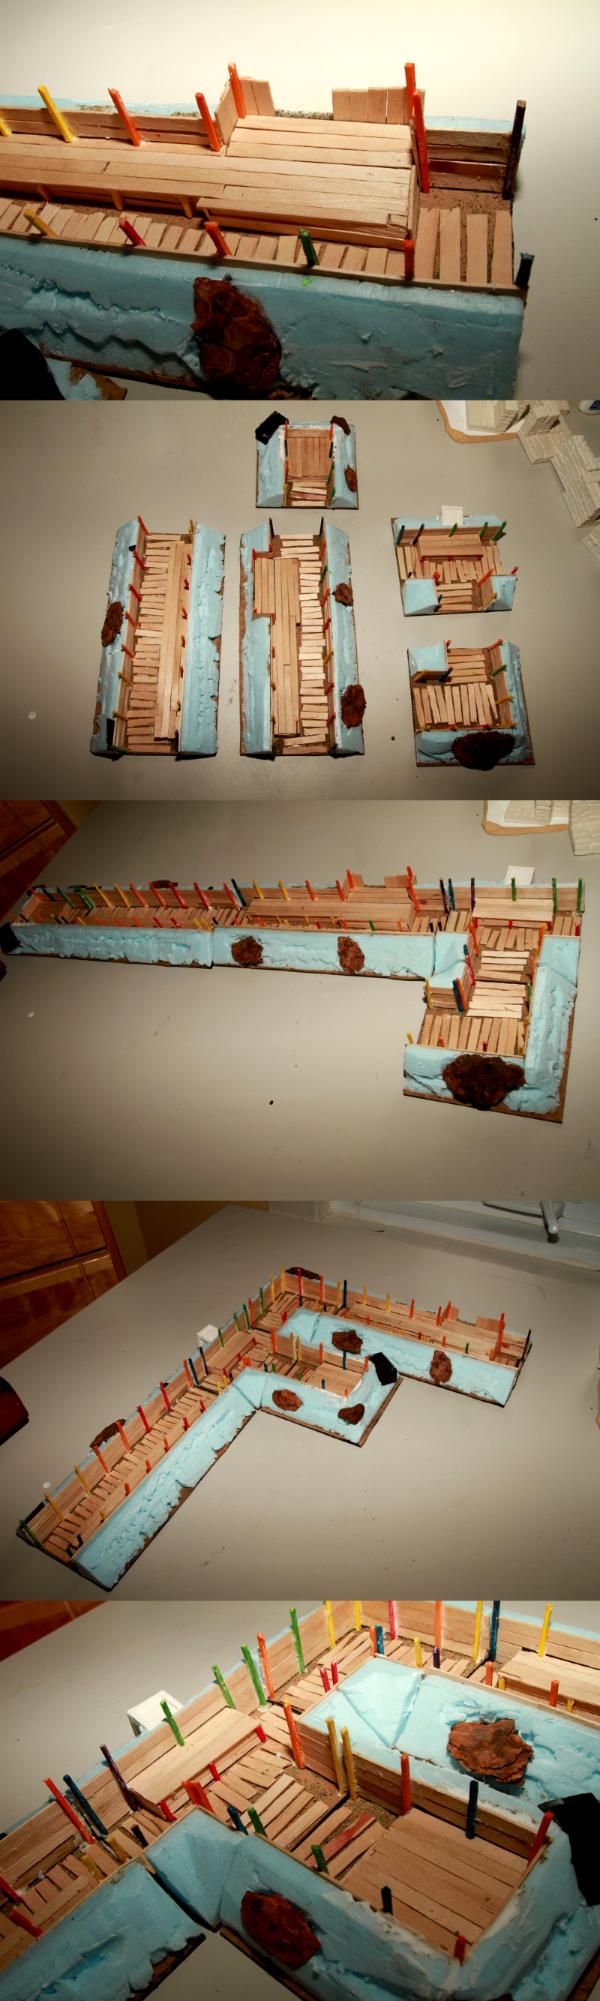
Hi guys ,its been a while since i post here!
I'm currently working on a modular trench set up, that i intent to mold and cast. This is the work in progress i hope you like it. Comment and suggestion are welcomed.
|
|
|
|
|
|
2014/06/28 22:54:43
Subject: Commision Terrain builder work log
|
|
Implacable Skitarii
|
this is hands down one of the best terrain threads on dakka. Immediately struck with both inspiration, and jealousy.
Well done, can't wait to see more.
|
|
|
|
|
|
2014/12/05 18:31:07
Subject: Re:Commision Terrain builder work log
|
|
Regular Dakkanaut
|
I'ts been a long time since i posted. I'm still working on terrain. I would like your opinion on my set of trench right now i made them with 2 sides, I wonder if one side would be better.
2side pros:
look cool
offer more cover
1side pros:
easy to cast
offer more versatility
need less different pieces to make a complete set
I really want to hear your opinion I not sure what to do!
|
|
|
|
|
|
|
|