| Author |
Message |
 |
|
|
|
|
Advert
|
Forum adverts like this one are shown to any user who is not logged in. Join us by filling out a tiny 3 field form and you will get your own, free, dakka user account which gives a good range of benefits to you:
- No adverts like this in the forums anymore.
- Times and dates in your local timezone.
- Full tracking of what you have read so you can skip to your first unread post, easily see what has changed since you last logged in, and easily see what is new at a glance.
- Email notifications for threads you want to watch closely.
- Being a part of the oldest wargaming community on the net.
If you are already a member then feel free to login now. |
|
 |
2013/04/30 04:17:49
Subject: Re:A Detailed Quality build of the Forge World Storm Eagle
|
|

Fresh-Faced New User
Memphis TN
|
Hey everybody!
Here is a new post showing more progress. As I said just previously, the COLOR thing is slowly coming to front and center. ACK!
Before that though here are some more build details, tricks and tidbits! So enjoy!

 As I promised Primarchz I will be putting together a post on my tool jig with some drawings. Most of those parts were just done somewhat spur of the moment and while there was some rhyme and reason to how and why they are shaped as such, I never really documented it. I will get around to it, but will have to create all the docs from scratch. Bear with me, they are coming!
Now, time for a beer!
|
|
|
|
 |
|
2013/04/30 04:25:32
Subject: A Detailed Quality build of the Forge World Storm Eagle
|
|
Fresh-Faced New User
|
Thanks!
Very creative stuff
|
|
|
|
|
|
2013/05/10 10:45:53
Subject: A Detailed Quality build of the Forge World Storm Eagle
|
|

Splattered With Acrylic Paint
Uk, South
|
Still amazed by your attention to detail. I cant wait to see it finished.
|
|
|
|
|
2013/05/16 05:44:38
Subject: Re:A Detailed Quality build of the Forge World Storm Eagle
|
|
Fresh-Faced New User
Memphis TN
|
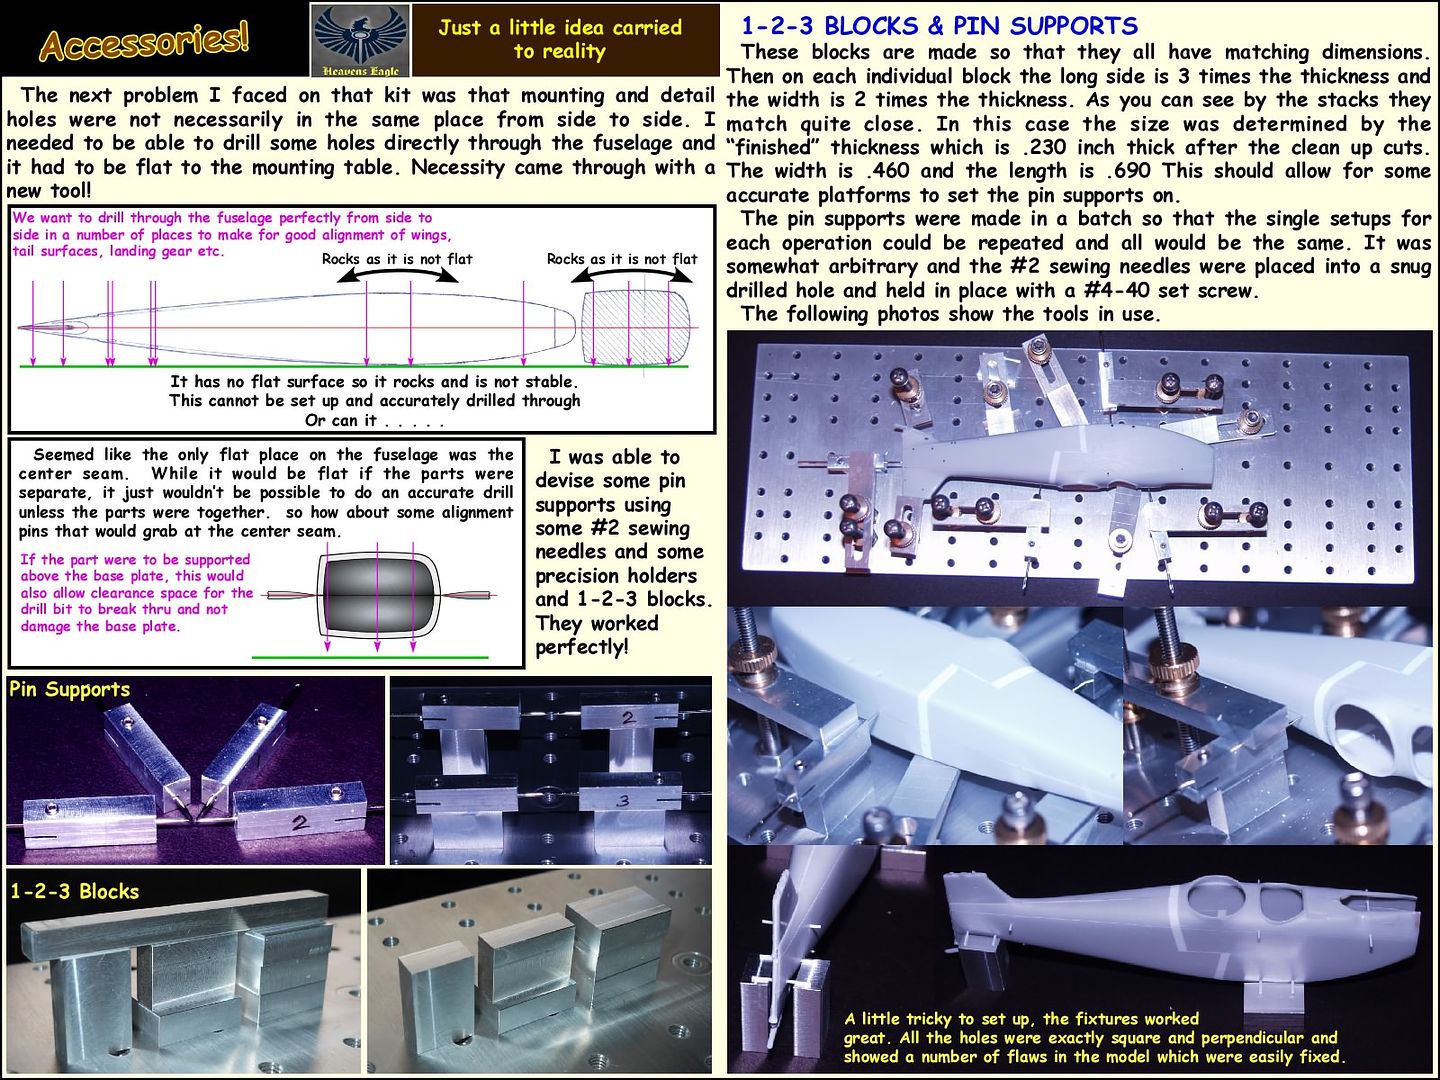
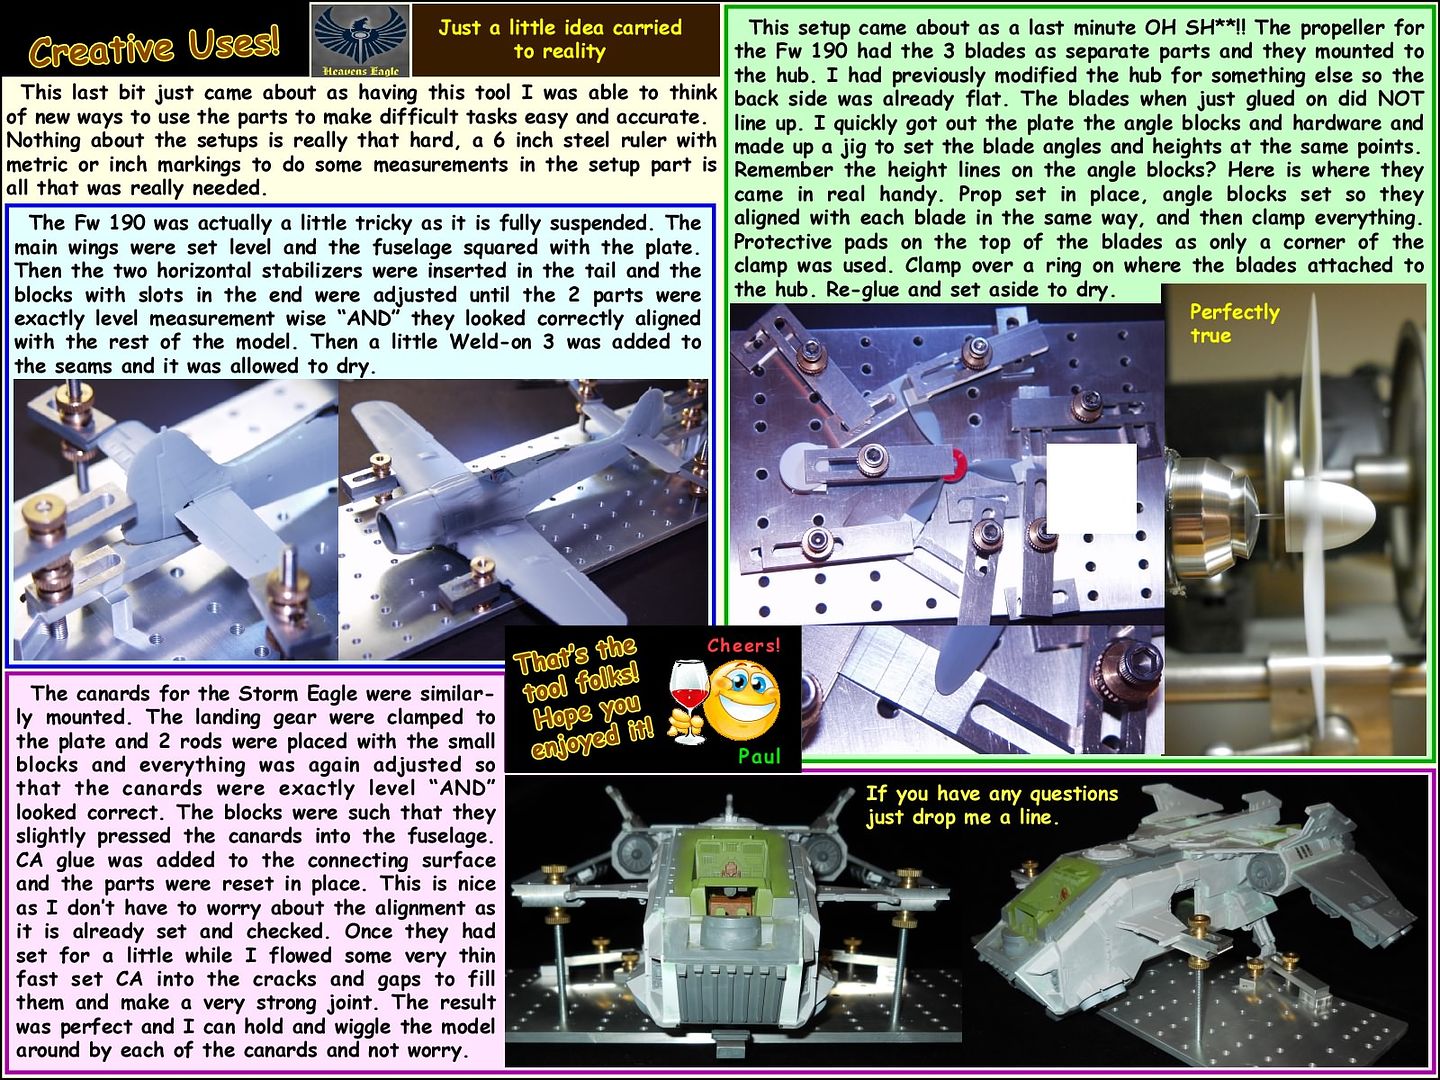
I was asked a little while back if I could post some information on the tool I use to do the various things when building my models. Here is some information for all of you, it is a starting place if you desire to build your own. Some of the parts can be built to acceptable tolerances with simple tools and some time. Others (The pin mounts and 1-2-3 Blocks) have to be extremely accurate or they won't do the job. If you have any questions, feel free to ask, I will be glad to help.
 Enjoy! Next time I will have some more work on the Storm Eagle. I scratch built from plastic card a 3D logo for my SM Chapter. It is a slightly simplified version of my forum avatar with some small additions. It really turned out much better than I had expected. Now to make a rubber mold and make some resin duplicates to mount on the model. More on that next time!
|
|
|
|
|
|
2013/05/20 21:12:28
Subject: A Detailed Quality build of the Forge World Storm Eagle
|
|
Black Templar Recruit Undergoing Surgeries
UK (England)
|
Oh wow great. Mine is still in its box.
|
|
|
|
|
|
2013/05/21 02:25:05
Subject: Re:A Detailed Quality build of the Forge World Storm Eagle
|
|
Fresh-Faced New User
Memphis TN
|
Heck mine showed up in a big baggie! So now you have many of the secrets and problem areas are known why aren't you building it?
|
|
|
|
|
|
2013/05/21 04:11:46
Subject: Re:A Detailed Quality build of the Forge World Storm Eagle
|
|
Blood Angel Terminator with Lightning Claws
|
This thread, while amazing in its depth has probably made me too afraid to ever purchase a kit like this from FW. I eventually wanted a warhoud but I don't even want to think about the issues you could have wih that model.
|
|
|
|
|
|
2013/05/21 06:52:42
Subject: Re:A Detailed Quality build of the Forge World Storm Eagle
|
|
Fresh-Faced New User
Memphis TN
|
 TheLionOfTheForest wrote: TheLionOfTheForest wrote:This thread, while amazing in its depth has probably made me too afraid to ever purchase a kit like this from FW. I eventually wanted a warhoud but I don't even want to think about the issues you could have wih that model.
I understand where you are coming from. However, think of it this way. Rather than building the whole thing at once, could you say build a foot or a leg? Yes it would be a bit more challenging than say slapping a Rhino or Eldar Falcon together in an hour or so, but that is where the difference is. This kit "can" be thrown together in a weekend, or you can spend a lot of time working on details.
I have spent the better part of the last 2 weeks making my avatar into a new logo for mounting on the side of the SE. It was a little intimidating before I started the process as I have not done much scratch building of that type of stuff. It turned out WAY far better than I had thought it would. The actual part was easy once I started making it. The challenge was making a rubber mold, ( a GOOD CRISP one) and then getting some good crisp bubble free casts. I have 3 different rubber molds of the 2 logo parts. The last was the best. (3rd time is the charm?) Getting the fast setting resin to cooperate and not generate bubbles was another chore that took many tries. I did finally figure it out and now can make professional type casts that are bubble free. (Woo Hoo!) It took practice though to get there and I have about a half dozen fails that came first. Luckily the parts are fairly small and don't use much resin. However because they are small it caused some other problems that I had to solve. Trial and error and now I should have an easier time making small resin parts. Say mini logos for shoulder pads.  If you are used to looking at a model assembly as "One Big Step" and then you are done, a kit like this will scare the poo out of ya. However, if instead, you back up and go OK here is step 1, lets just get all the pour gates cut off. Then you carefully cut them off and BOOM! Step 1 is done! Next step, clean up some of the parts, and so forth. I did not start out on this kit to build it all at once. I would have become overwhelmed as you seem to be. I just stepped back and took things one bit at a time. Right now I am a little burned out and need to work on something else for a little while. It might be the WW1 plane I have started and am working on the engine for it, or I might start building the custom base for the Storm Eagle. I might even pull out an armor kit, say a WW2 German half track Hanomag Kfz 251 variant. Just to build and look at something different with different problems that need to be solved. Heck one of the things that has me overwhelmed is what color scheme am I going to paint this monster!
If you really want a Warhound, then go for it! The kit does not have to be built in an afternoon, or even a weekend. Heck spend an afternoon just smoothing out parts and fixing little problems with them. Then once you are satisfied with a part, set it aside and grab another one. So what if it takes a couple of hours tweaking and shaving till 2 or 3 parts fit perfectly. That is part of the build. Have a beer and put a movie on the TV while you are working. I don't sit and concentrate on just the building, it is recreation for me. Kind of like doing a 3D puzzle but the puzzle part is solving the problems. Building this has made me so much of a better modeler, that I can't even begin to imagine what I might be working on this time next year.
Heck, I have spent several hours in the last few weeks just putting filler on problem spots and sanding off. Not in a big hurry, just working on it and every little step gets it closer to being done. One step was putting the front wings on. Took a couple of hours all said as I was being picky, but was enjoyable and once I had the wings glued on, the step was finished. That was my entire goal for the evening.
Years ago (when I was about 9 or 10) I got a model helicopter kit that was motorized. I was in such a rush to get it together and see it run that I totally messed it up. It didn't run, the tail booms sagged, and it was a disaster. If I had just been a little more patient at the time (and let my dad help me) it would have looked better and would have definitely run. This is no different. I just set attainable goals for each session and then if I don't quite make the goal, no big deal, it will get there next time.
|
|
|
|
|
|
2013/05/21 13:26:14
Subject: Re:A Detailed Quality build of the Forge World Storm Eagle
|
|
Blood Angel Terminator with Lightning Claws
|
It's not the multiple steps and quantity of parts. It's the issues with bent resin. I would have to do it right. And it would probably take me 6 months to gettogether. Maybe once my IG and BA armies are finished being painted.
|
|
|
|
|
|
2013/05/22 01:28:41
Subject: A Detailed Quality build of the Forge World Storm Eagle
|
|
Fresh-Faced New User
Memphis TN
|
LOL! I started this on Jan 3rd. I hope to have it finished before July 27.
The warpage problems were really about the least of the difficulties. The poor fit on things that had to fit or look like poo were the main problem. De-warping resin is actually fairly easy unless you have to get things to fit in a very precise way. The larger and heavier parts don't tend to warp or if they do it isn't much. The biggest problem is poorly designed masters and the bad fit problems that result from that. The larger titan kits don't have that just because of the way they fit together. It doesn't matter as much if a part is slightly shorter or longer as it only attaches at the ends, say an arm or leg.
The worst problems on the Storm Eagle were getting the box fuselage assembled and the engine covers/rudders mounted well. Everything else was just patience and adjusting things around the resin.
|
|
|
|
|
|
2013/05/28 16:03:15
Subject: Re:A Detailed Quality build of the Forge World Storm Eagle
|
|
Dakka Veteran
|
 Heavens Eagle wrote:Actually this is the first Forge World resin kit I have built. I do have a fair amount of scratch building and modification experience from scale model kits. There are a lot of techniques I learned over the years and one of them is how to think my way through solutions. Heavens Eagle wrote:Actually this is the first Forge World resin kit I have built. I do have a fair amount of scratch building and modification experience from scale model kits. There are a lot of techniques I learned over the years and one of them is how to think my way through solutions.
What this means to the layman is that Heavens Eagle is a scratchbuilding monster.
The very best modelers all come from the Fine Scale Community.
I have seen Fine Scale work you cannot even wrap your head around.They regularly have to convert and scratchbuild and upgrade to make it as realistic as possible.
I have been studying the fine scale side of modeling for a few years now and it has propelled my work light years.
@Heavens Eagle this is a great tutorial for the Stormchicken but what is is in reality is one of the best how to build all model tutes I have read in a while.
I picked up some great tips,from this.
Quick question Do you prefer squadron green to squadron white?
If so,why.
|
|
|
|
|
|
2013/06/01 01:26:40
Subject: Re:A Detailed Quality build of the Forge World Storm Eagle
|
|
Fresh-Faced New User
Memphis TN
|
 Eisenhorn wrote: Eisenhorn wrote:
Heavens Eagle this is a great tutorial for the Stormchicken but what is is in reality is one of the best how to build all model tutes I have read in a while.
I picked up some great tips,from this.
Quick question Do you prefer squadron green to squadron white?
If so,why.
Hey ya Eisenhorn! I have been meaning to get to this all week, but being single sometimes means that all my time is spent doing the needed stuff.
As to the Squadron Green and White, I have never used the white. In many ways I am still building like I did 20 years ago. (playing catch up on the new ways of doing things still) The green was the most prevalent available at the time. I learned that putting it in a bottle and adding a thinner to it made it work better. Being thinner it tends to flow out as you spread it and will bond a little better. Also if you use the right thinner it still dries fast, but it doesn't seem to "flash" dry. I use Xylene for a thinner. Yes, you can use acetone, lacquer thinner, MEK, and Toluene, but those tend to dry faster.
I based this on information I got off of the internet [1].
Solvent ------------ Boiling point
===============================
Acetone ----------- 56-57 °C --- 133-134 °F
MEK ---------------- 79.64 °C --- 175 °F
Water -------------- 100 °C ------ 212 °F
Toluene ----------- 111 °C ------- 232 °F
Xylene p ----------- 138.35 °C -- 281 °F
Xylene m ---------- 139 °C ------ 282 °F
As you can see the boiling point of water is lower than Toluene and Xylene. What this does in a putty is give you more working time and allows you to spread it thinner. Also as they are solvents, they will tend to bond better than water based stuff like the GW liquid green stuff. Whlie acetone, MEK and lacquer thinner work well for thinner for Squadron Green, they evaporate so fast that the putty will tend to cake up and not spread nicely. Once it is applied, I will tend to set it aside overnite unless it is a small touch up spot and is fairly thin. Thicker applications might need several layers done over time. It will stick and bond much better than any water based putties though.
I have also used an auto body putty called blue acrylic that is a solvent based putty and is light blue. It tends to dry too fast and I had problems with it splitting when put in a thin layer over a flat surface. I ended up just putting it aside and using the modified Squadron green exclusively. I believe that there is some info in one of my previous posts on how I mix the Squadron Green.
A nice variety of dental probes and spatulas is almost a must for applying the filler where and how you want it. Shaping and flowing it around while applying it makes the final sanding and smoothing go much faster.
--->MEK is short for Methyl Ethyl Ketone and is found in Testors liquid solvent cement
--->Acetone, Toluene, and Xylene can be found at hardware stores that carry paint. They are almost always available in 1 gallon cans though some places will carry 1 Quart sized cans as well.
--->[1] Reference is from Wikipedia for the solvent temperatures.
|
|
|
|
|
|
2013/06/04 03:57:10
Subject: A Detailed Quality build of the Forge World Storm Eagle
|
|
Regular Dakkanaut
|
This is a very nice resource. While I don't have the patience or drive to do a lot of the things you've done, it's nice to see a good document for this thing get put together.
I'm not looking forward to the magnets in the front mounted weapon - that's going to be a bear. Want to let me borrow your jig? ^_^
Bending the resin hasn't been bad so far - nothing fancy for me - I just use CA glue to hold it together, then heat it up so it stops pulling - once three sides are glued and I can fit the bottom in, I heat up both ends and straightened it out - right as rain.
Looking forward to seeing you finish this one - it's going to be epic.
Best,
Paul
|
|
|
|
|
2013/06/04 04:04:50
Subject: Re:A Detailed Quality build of the Forge World Storm Eagle
|
|
Regular Dakkanaut
|
TheLionOfTheForest wrote:This thread, while amazing in its depth has probably made me too afraid to ever purchase a kit like this from FW. I eventually wanted a warhoud but I don't even want to think about the issues you could have wih that model.
FWIW, I had the same thought. It i took the plunge and got it anyways. I had it sitting around for a few weeks before I finally got the nerve to pull It out. I expected to spend weeks on it, at night and on weekends. Nope. Took a day and its basically done. I want to do a little green stuff in some seams here and there, but honestly - depending on the level of perfection you want - its that that bad of a model. Mine looks great, especially at table view. You have to know where to look to find the flaws, and they're not egregious (my first drop pod is way worse). Before this I had only assembled a few large resin models, and nothing on this scale.
|
|
|
|
|
2013/06/06 03:09:51
Subject: A Detailed Quality build of the Forge World Storm Eagle
|
|
Fresh-Faced New User
Memphis TN
|
jason2250 wrote:This is a very nice resource. While I don't have the patience or drive to do a lot of the things you've done, it's nice to see a good document for this thing get put together.
I'm not looking forward to the magnets in the front mounted weapon - that's going to be a bear. Want to let me borrow your jig? ^_^
Bending the resin hasn't been bad so far - nothing fancy for me - I just use CA glue to hold it together, then heat it up so it stops pulling - once three sides are glued and I can fit the bottom in, I heat up both ends and straightened it out - right as rain.
Looking forward to seeing you finish this one - it's going to be epic.
Best,
Paul
I could have sworn I replied to this already, but for some reason I don't find the post I thought I did. D'OH!!
Oh well, let's try again, my main comment is that you should be careful using heat to align your model "after" gluing the parts together with CA. While CA joints can be very strong if done right, it also has one thing that can be a problem, HEAT can weaken and break down the joints somewhat. I use CA a lot for tacking metal parts together. Then once done some heat and the parts almost fall apart. So you might want to do a tack together, de-warp, then flow thin CA into the joints until they are filled after the straightening process is done. That way you could avoid any weak glue problems.
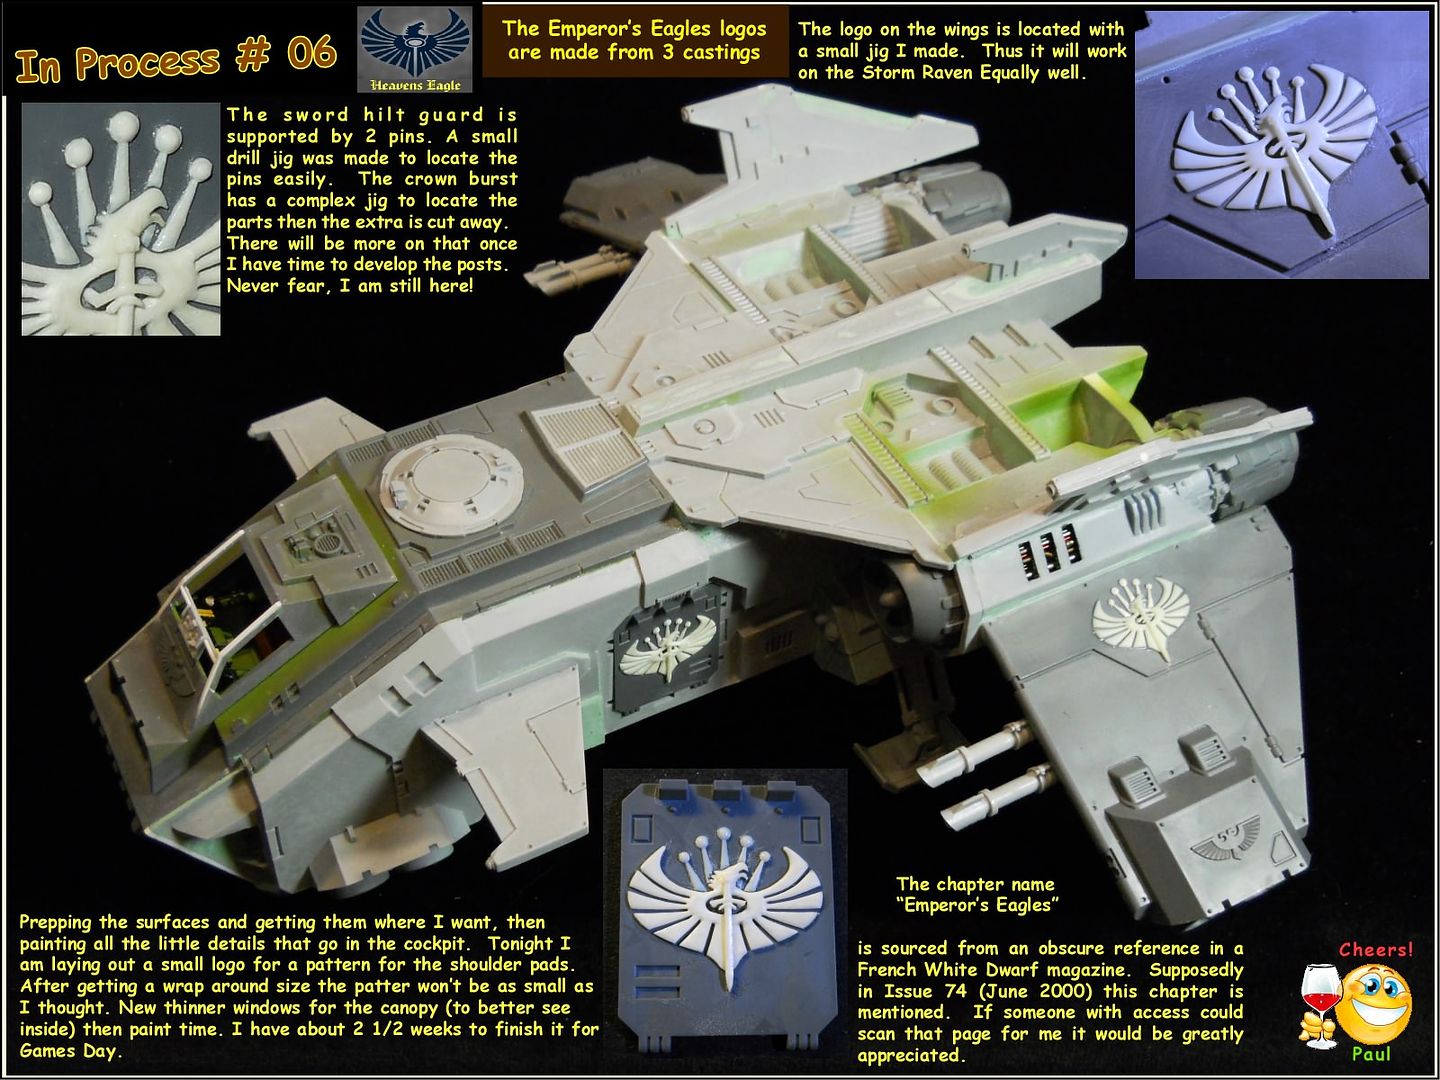
As I have been mostly busy with "have to do's" lately, the progress has been a little slower than usual on the Storm Eagle. I have added 2 lazguns to some spots that "suddenly" looked vacant and needed something added. Then I have been working on my Chapter Logo to mount on the side doors. I was going to do a Heavens Eagles chapter, but got a slight inspiration a couple days ago where I can make a small addition to the logo and convert it to The Emperor's Eagles. According to 1000 Space Marine Chapter Index, Under the Cannon lists, there is a "Obscure Chapters" page. The listing refers to a French White Dwarf #74 (June 2000) page 45 for this chapter name. If anyone has this particular issue, a quick photo of the page would be HUGELY appreciated. Otherwise I am just flying by the seat of my pants on this.
Anyway, here are the tease photos. First the resin castings I made, attached to the Rhino sized doors that go on the sides of the Storm Eagle.
 Yes, those are resin castings I made. The master was carved out of sheet styrene and the sword is a separate piece that is mounted with some reinforcements. Then I had an epiphany and thought "Hmmm I wonder if part of a famous watch brand logo, adjusted slightly and placed behind the current parts would look good and do what I want, Hmmmm.
Using my favorite technical illustration program I worked up these concepts. I like it! The separate 5 tines just floating free really shouldn't be too much of a problem, I just have to make a small jig to align them before gluing. Here are the concepts:
 Well what do you all think? I like it myself, but am open to hearing any suggestions. Sometimes multiple suggestions can present a whole new "Outside of the Box" idea not remotely related to any of them. Comments and ideas are welcome.
I will be doing a couple more sizes of the logos, so with those I will make a detailed step by step on how I do it and why it works well. I am getting into crunch time to get this completed though. July 26th is coming up fast!
|
|
|
|
|
|
2013/06/27 13:48:43
Subject: Re:A Detailed Quality build of the Forge World Storm Eagle
|
|
Torture Victim in the Bowels of the Rock
Boston MA
|
This is an incredible review of the entire process. While you have a number of tools not available to me, I'm hoping to at least manage a poor imitation of the work that you have done I have received a Storm Eagle just last week and I plan on making it my summer project to assemble and paint. I am sure this will be a great resource, and I'm using it as an opportunity to experiment with some customization as well - I've never been comfortable or proficient in using plasticard or styrene to build out models, but it looks like both those skills will be necessary before I am done.
A couple questions which I could not find answers to:
What kind of CA are you using? Zap Thin CA? The strength you have achieved in the model without pinning all the pieces together is pretty amazing.
If I do not have a fancy model straightening device, do you have any suggestions on how to get the walls of the Eagle straighter than they come shipped? I was looking at them, trying to find a way to flatten them against a solid surface such as my hobby desk, but I may have to resort to simply eyeballing it and bending them with my hands.
I've seen the green filler you are using throughout the process, and you have explained that you thin it a little bit. Is it something like this that you are using? http://www.amazon.com/gp/product/B000JCE6BI/ref=oh_details_o05_s00_i00?ie=UTF8&psc=1
Thanks, and I can't wait to see more progress! I'm sure I'll have more questions as I start building!
|
|
|
|
|
2013/06/28 01:03:21
Subject: Re:A Detailed Quality build of the Forge World Storm Eagle
|
|
Fresh-Faced New User
Memphis TN
|
Hey Zhent!
Thanks for the questions. I have been working on my beast, just been busy with other things though I am now into crunch time and really need to get with the program. July 26 is a month away.
While the clamp and jig I have are custom built, you could use a 1/8th inch thick plate for a basis if you wanted something to clamp the parts to. The most important parts are:
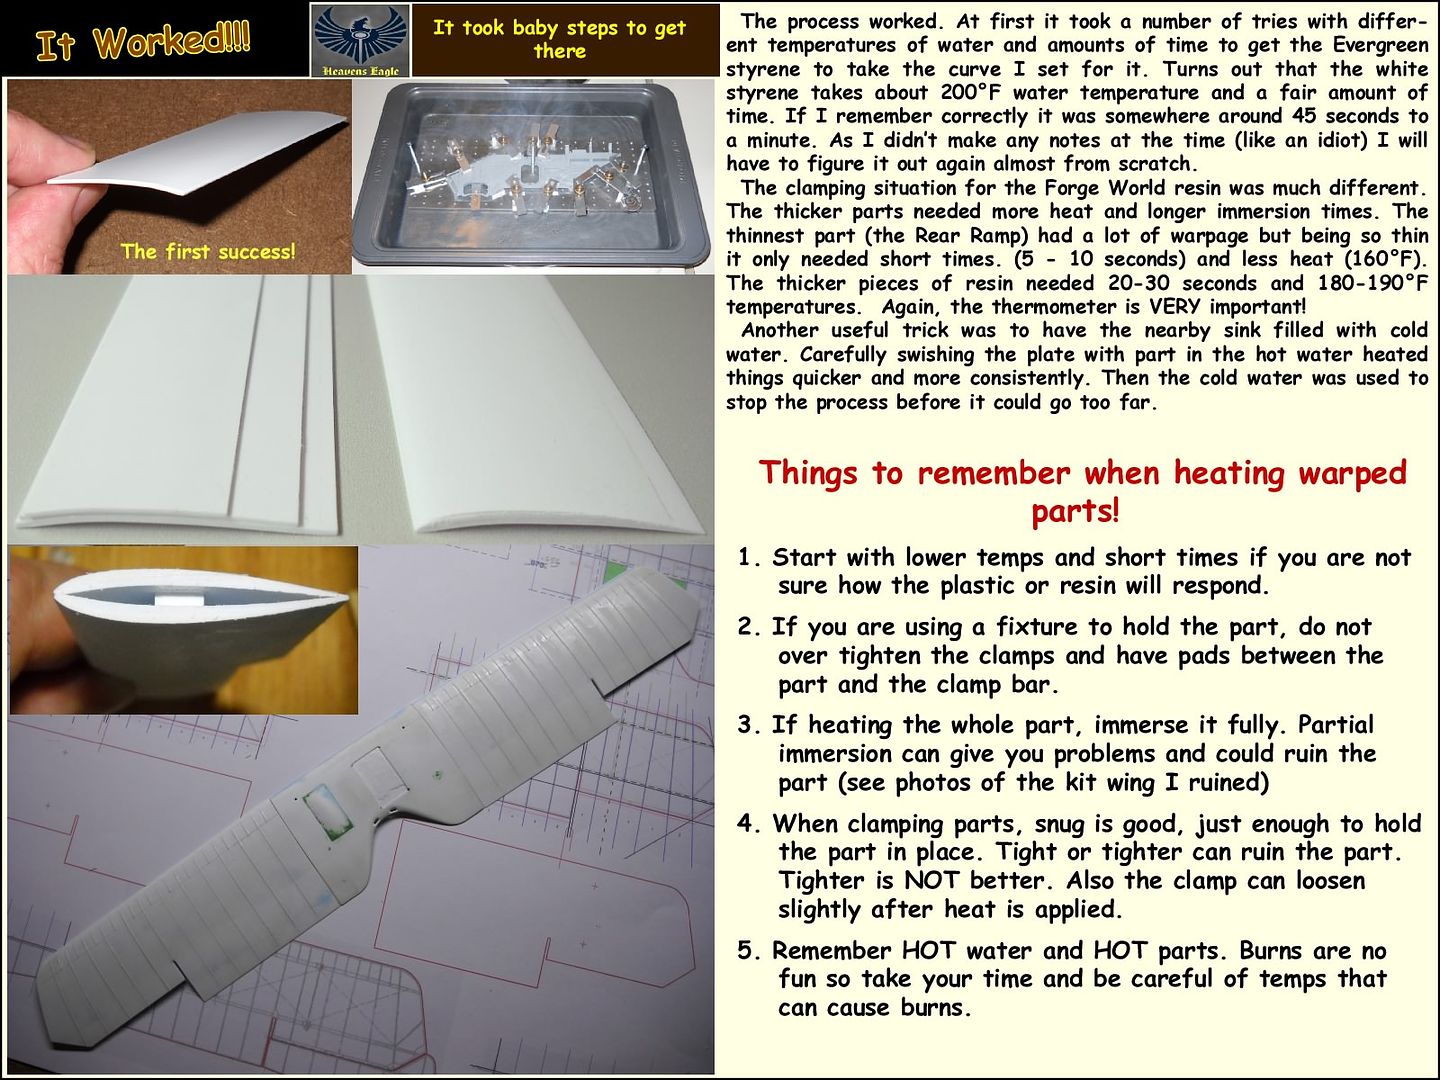
1. Use a thermometer to observe the water temperature. Thus you can regulate what you are doing take as much guesswork out of the process.
2. If you decide to clamp the parts to a plate, DO NOT OVER TIGHTEN!!!!!!!!! Reread the parts where I go over
_ this. A pad plate between the part and the clamp and just snug enough to hold the part where you want it, no more.
3. I found that I had to do hand adjustments to the parts even after the clamp process. A good eye that can judge how straight a part is helps. For the large
_ flat sides dip only a section or area at a time and straighten until you are satisfied, then adjust another area. Another trick I used was a gravy ladle to
_ pour hot water over a particular area (both sides alternating) so as to not undo or cause problems with areas I didn't want heated.
4. Thin parts, like the rear ramp, heat and soften quickly, use cooler temps (150 - 160F) and SHORT immersion times on these parts. Add heat and or time in small increments as needed.
There are usually no really stupid questions, but the mistakes can be a bear!
As to the CA glues I use, they are available at Hobby Lobby or most decent hobby shops here in the USA. Here are some links to the types I use.
 For basic assembly, tacking parts in place and large parts I will use Insta-Cure + (plus) Gap filling (5-15 second) CA. It is a little thicker and slower setting and will give a little wiggle on alignment. As with any CA glue, the better the parts fit, the better the joint. Insta-Cure + Gap Filling
 To fill the thin little gaps I use the Insta-Cure Super Thin (1-3second) CA. Careful with this stuff as it can bond you and your fingers together before you even realize it. I apply it with an applicator made from a sewing needle. Apply until the thin gap is filled in, makes a super strong joint. Insta-Cure Super Thin
 The final part to using CA is the accelerator. I personally hate the spritz application as it goes everywhere except where you want it to go. I ended up with a large bottle of this type accelerator after my dad passed away. Unlike the older type I have this doesn't evaporate as fast, doesn't smell as bad, and doesn't seem to make the CA boil into white foam when applied. I apply it with a small dental probe with a 1/8 inch dia flat round end and let it flow over the CA to set it. It will prevent the white powder out gassing that can occur when liquid CA sets. Accelerator
 The Green putty I use is put out by Squadron and I have usually purchased it at my local hobby shop. There is a white variety also available and I have used blue acrylic auto body putty thinned as well. The Squadron Green though just works for me and is reliable. I found the blue acrylic was shrinking as it dried and gave some problems. A little experimentation here will help you find what works best for you and your skills. Here is a link for the Squadron Green Putty
Also, one last note, I buy the smaller bottles of CA. It usually goes bad before I use it up. The bottle types shown in the photos always work best as you can clear the drops of glue that are setting in the applicator tube. This keeps the tip clear and when it does plug a small drill will suffice to open it up. Also I never apply CA to small parts from the bottle. I take a piece of glass or old defunct watch crystal and put a drop or 2 on the crystal and use the CA from that for small applications. Then I have a place to put the bottles that hold them upright so that the tips stay relatively clear.
The Green putty I use is put out by Squadron and I have usually purchased it at my local hobby shop. There is a white variety also available and I have used blue acrylic auto body putty thinned as well. The Squadron Green though just works for me and is reliable. I found the blue acrylic was shrinking as it dried and gave some problems. A little experimentation here will help you find what works best for you and your skills. Here is a link for the Squadron Green Putty
Also, one last note, I buy the smaller bottles of CA. It usually goes bad before I use it up. The bottle types shown in the photos always work best as you can clear the drops of glue that are setting in the applicator tube. This keeps the tip clear and when it does plug a small drill will suffice to open it up. Also I never apply CA to small parts from the bottle. I take a piece of glass or old defunct watch crystal and put a drop or 2 on the crystal and use the CA from that for small applications. Then I have a place to put the bottles that hold them upright so that the tips stay relatively clear.
|
|
|
|
|
|
2013/06/28 02:06:25
Subject: A Detailed Quality build of the Forge World Storm Eagle
|
|
Martial Arts Fiday
|
Damn, this is EPIC!
|
"Holy Sh*&, you've opened my eyes and changed my mind about this topic, thanks Dakka OT!"
-Nobody Ever
Proverbs 18:2
"CHEESE!" is the battlecry of the ill-prepared.
 warboss wrote: warboss wrote:
GW didn't mean to hit your wallet and I know they love you, baby. I'm sure they won't do it again so it's ok to purchase and make up.
Albatross wrote:I think SlaveToDorkness just became my new hero.
EmilCrane wrote:Finecast is the new Matt Ward.
Don't mess with the Blade and Bolter! |
|
|
|
|
2013/06/28 05:53:21
Subject: A Detailed Quality build of the Forge World Storm Eagle
|
|
Innocent SDF-1 Bridge Bunny
|
 sandant wrote: sandant wrote:Cue the classical music as you continue building with this precision.
I'll be tuning in.
How funny I'm listening to some now just I clicked into this thread. Gotta a lot of love for "Two Steps From Hell". For those that don't know this duo they wrote the music that was featured in the first and I think second trailer for the last trek film.
|
|
|
|
|
2013/06/28 13:37:08
Subject: A Detailed Quality build of the Forge World Storm Eagle
|
|
Screaming Shining Spear
|
Amazing modeling, sir! I wish I had the patience and skill...but alas...I slap stuff together, add some paint, so it can destroy things quickly!! A wife and kid doesn't help with 'gaming time' either. :-P
Again, amazing job. I love the Storm Eagle model, and it is worth tuning in just to see the attention you are giving it.
|
 Farseer Faenyin Farseer Faenyin
 7,100 pts Yme-Loc Eldar(Apoc Included) / 5,700 pts (Non-Apoc) 7,100 pts Yme-Loc Eldar(Apoc Included) / 5,700 pts (Non-Apoc)
Record for 6th Edition- Eldar: 25-4-2
Record for 7th Edition -
Eldar: 0-0-0 (Yes, I feel it is that bad)
Battlefleet Gothic: 2,750 pts of Craftworld Eldar
X-wing(Focusing on Imperials): CR90, 6 TIE Fighters, 4 TIE Interceptors, TIE Bomber, TIE Advanced, 4 X-wings, 3 A-wings, 3 B-wings, Y-wing, Z-95
Battletech: Battlion and Command Lance of 3025 Mechs(painted as 21st Rim Worlds) |
|
|
|
|
2013/07/01 15:25:12
Subject: Re:A Detailed Quality build of the Forge World Storm Eagle
|
|
Torture Victim in the Bowels of the Rock
Boston MA
|
Heavens Eagle wrote:Hey Zhent!
Thanks for the questions. I have been working on my beast, just been busy with other things though I am now into crunch time and really need to get with the program. July 26 is a month away.
Great, thank you. As I'm living in an apartment without a lot of space to spread out or leave things set-up between hobby times, I'm currently straightening pieces using a flat piece of tile as a straight-edge; I simply heat the resin, then press it against the tile and hold it until it cools. After 2 or 3 heatings, most pieces end up straight enough that I can resolve any lingering issues with some Green-Stuff. I have never dealt with a model in quite this condition before, however, so I may need to expand my process a little bit.
Does drilling out the engines as you have significantly reduce the weight in the model? I don't have a mill, but I can bring the engines home at some point and use a hand drill if it is a significant improvement. Did you go all the way through the engine?
I have to ask another question - unless you specifically call out a change to the order you followed the instructions, did you do pretty much everything else 'by the book'? This past weekend I took all the pieces off the gates, so I'm going to start un-bending tonight and with the [US] holiday week this week, I hope to get a fair amount of progress done
|
|
This message was edited 1 time. Last update was at 2013/07/01 15:25:39
|
|
|
|
|
2013/07/02 03:46:36
Subject: Re:A Detailed Quality build of the Forge World Storm Eagle
|
|
Fresh-Faced New User
Memphis TN
|
Zhent wrote:
Great, thank you. As I'm living in an apartment without a lot of space to spread out or leave things set-up between hobby times, I'm currently straightening pieces using a flat piece of tile as a straight-edge; I simply heat the resin, then press it against the tile and hold it until it cools. After 2 or 3 heatings, most pieces end up straight enough that I can resolve any lingering issues with some Green-Stuff. I have never dealt with a model in quite this condition before, however, so I may need to expand my process a little bit.
Does drilling out the engines as you have significantly reduce the weight in the model? I don't have a mill, but I can bring the engines home at some point and use a hand drill if it is a significant improvement. Did you go all the way through the engine?
I have to ask another question - unless you specifically call out a change to the order you followed the instructions, did you do pretty much everything else 'by the book'? This past weekend I took all the pieces off the gates, so I'm going to start un-bending tonight and with the [US] holiday week this week, I hope to get a fair amount of progress done
As to straightening, a nice straight edge is a big help. Also dry fit the parts together. If it only needs to "flex" a little to have a tight joint, you are good to go, if there is a large gap, it will need more adjustment. (I am mainly talking about the 2 sides, the bottom and the forward top there) Also, the bulkhead can help square up the box of the fuselage. The more time and effort you put into the prep, the less work it will take to tweak the seams. Also if the parts fit together fairly well the joins will be stronger.
Does drilling out the engines as you have significantly reduce the weight in the model? I don't have a mill, but I can bring the engines home at some point and use a hand drill if it is a significant improvement. Did you go all the way through the engine?
I drilled them out just mostly as a lark. It did lighten those 2 parts a little, but overall it probably didn't affect the weight much. I did drill all the way through, but it was with a "VERY" slow drill speed on a tight set up. If I were to use a hand drill, I would start with the smallest diameter drill that had just enough length to go all the way through. That way if your pilot hole is a little off, you can correct for it, and it is easier to step up to just the next size to enlarge the hole. You just need SHARP drill bits, and SLOW speed.
I have to ask another question - unless you specifically call out a change to the order you followed the instructions, did you do pretty much everything else 'by the book'?
I examined the "book" and got a feel for how the parts had to go together. Of course there are some parts that just "have" to go together before others and most of those are pretty obvious. I decided to mount the engines later so as to better handle the box fuselage parts and not have those large heavy things in the way. The upper front piece had some alignment problems and it is "out there" where it can be seen. Getting it to fit is a compromise at best then go back and fix the problems that couldn't be dealt with during basic assembly. I know that some big problems or at least hassle factors were avoided by doing the build in the order that I have shown.
Here is a list (off the top of my head) of the various problems I dealt with In order:
<*>Warpage , I can't stress how important it is to straighten and dry fit. REPEAT REPEAT REPEAT It will take multiple times. If you decide to paint the interior, do so only just before gluing the fuselage parts together.
< >Assemble front hover engines and retaining parts in place once you are reasonably sure the sides are straight. The retaining parts can help with the floor alignment.
< >Be sure glue areas are clean down to resin. Paint in these areas will cause the model to fall apart.
<*>Large rubber bands are a necessary item! I Managed to dry fit the fuselage together without glue using the rubber bands. They will also help on closing slight gaps.
<->Enlarge the hinge pin holes (in the sides) for the front ramp just enough so that the pins are slightly snug but will still rotate. Tight is not good. If the ramp flexes before the pin rotates it will be too tight. Each side should stay put but a slight nudge can move it.
<*>The front ramp opening is not large enough. Fit this carefully. Some material needs to be removed from the sides of the opening, more at the bottom, less at the top.
<*>You can see how much by inserting the front ramp between the loose sides and then setting the floor in place. If I remember right it was about 1/16th of an inch too narrow and made gaps at the sides of the floor. I took the same amount off of each side bottom to top and ended up with too much off at the top. The opening was too narrow at the bottom but only slightly at the top.
<*>Glue the bottom to the sides first, Use blue tack, or play-dough or some thing sticky to hold the bulkhead in place and use rubber bands to hold the front top piece in place.
<*>Once the sides and bottom are set, remove the rubber bands, bulkhead and front upper part (cockpit) It might twist a little and the top of the sides might lean in slightly, no problem, that is where fitting the bulkhead in place and as square as you can make it does the trick. Remove tabs from bulkhead and add shim to the sides until it just fits squarely between the sides. If one side leans a little more than the other you will have to force the bulkhead to the floor and side to make it square. Refer to the photo section on that. I also added CA to the lower seams from the inside before attaching the top.
<*>Once the bulkhead is in place now fit the upper front. Rubber band it in place and flow thin CA into every little crack little by little. Add CA until the seams are filled.
<*>Fit and place the upper rear portion now. Refer to my photo sections for points that have to align. If you have gaps, this is where adding plastic card to build up the mounting areas is a plus. I found the GW Green Stuff putty to be still pliable to some extent several weeks later. That was fine for a fig, but this model is one big mis-alignment stress monster. The 2 part GW Green Stuff in my opinion won't hold the box frame together well.
< >Now fit the engines to the sides. You will probably need some plastic card for spacer, trim on the mounts (the curved back ones had problems) and also to make sure the engines are level with each other.
*+*The most difficult part is now behind you. (WOO HOO!!) It isn't an easy kit, but if you work on it in small steps or sections, it comes along and builds up well. The hardest part is sometimes having the patience to let the glues set up fully or fit, adjust, fit, adjust, and fit some more.
Here now is a quick In Process to show where it stands at this point. I have some work to do yet before I am ready to paint then out comes the airbrush and it is full tilt boogie!
 Well it is off to it then, I will do a big update with all the details after Games Day.
|
|
|
|
|
|
2013/07/13 16:03:52
Subject: A Detailed Quality build of the Forge World Storm Eagle
|
|
Torture Victim in the Bowels of the Rock
Boston MA
|
This is great, and thank you for all the information.
I have a couple of quetsions about your use of plasticard. I've purchased a couple of thicknesses of plasticard that came in 12" square sheets off Amazon. How do you go about keeping your cuts so clean and straight? Is it as simple as using scissors?
What thicknesses do you typically use? Are there other types you find regularly useful besides standard flat, white plasticard? I know Evergreen provides options with patterns pre-imprinted on some sizes.
Edit:
For anyone who is considering this model, or has been put off in part by the extreme detail that Heavens Eagle has put into his build, take heart! He is showing you a combination of a particularly poor cast and a particularly experienced model builder. I received mine just a few weeks ago, and after asking Forgeworld for replacements on a few pieces that were un-salvageable, I have been able to build the entire model with a minimum of difficulty, although not to the standard that HE has achieved. While it is an expensive model to use as practice, it's a great challenge if you are accustomed to some of the newer sculpts that Forgeworld has put out and want some experience really working with resin.
|
|
This message was edited 1 time. Last update was at 2013/07/13 16:06:30
|
|
|
|
|
2013/07/14 01:52:56
Subject: A Detailed Quality build of the Forge World Storm Eagle
|
|
Fresh-Faced New User
Memphis TN
|
Zhent wrote:This is great, and thank you for all the information.
I have a couple of quetsions about your use of plasticard. I've purchased a couple of thicknesses of plasticard that came in 12" square sheets off Amazon. How do you go about keeping your cuts so clean and straight? Is it as simple as using scissors?
What thicknesses do you typically use? Are there other types you find regularly useful besides standard flat, white plasticard? I know Evergreen provides options with patterns pre-imprinted on some sizes.
Edit:
For anyone who is considering this model, or has been put off in part by the extreme detail that Heavens Eagle has put into his build, take heart! He is showing you a combination of a particularly poor cast and a particularly experienced model builder. I received mine just a few weeks ago, and after asking Forgeworld for replacements on a few pieces that were un-salvageable, I have been able to build the entire model with a minimum of difficulty, although not to the standard that HE has achieved. While it is an expensive model to use as practice, it's a great challenge if you are accustomed to some of the newer sculpts that Forgeworld has put out and want some experience really working with resin.
Well said Zhent! To be honest this has been a practice/ learning/ remembering how to do it, model for me. After many years off from building models I worked on some others and have them partially built before I jumped on this one. A lot of the nit picky stuff I do is just "my thing" and is not required to have a nice model for the table top.
As to your questions about plasticard, I have a fair amount of the Evergreen card. I found that plain jane sheet is the best for building and assembly. The textured stuff is there if I need a particular surfacing, but usually that is for some external detail or some basing detail.
As to the thicknesses I have everything from .005 inch thick to .080 thick. I finally measured each sheet with some calipers and noted the actual thickness up on a corner. This helps if you just happen to "NEED" a particular thickness, and helps to keep track of what the thickness is on a sheet.
As to cutting plastic card, I measure for where I want to cut the card and then use a small (usually 6" 15cm) steel ruler and a sharp knife to score the card. Thin card will usually cut, but thicker card I just score it. Then bend at the line and it will make a clean break. The raised burr along the sides of the cut can be then cleaned down and it is good. Thicker card needs several cuts so the score will be deep enough, but it just takes a little practice. Sometimes if it is a complex shape I will use my jewelers saw and just cut it out. It depends on what I am doing. Practice and some experimentation will show you more what you can do than my explanations. Different plastics will cut, bend, and break in different ways. The white Evergreen sheet is fairly soft but will cut and break with little problem. Other types or brands will work slightly different.
The thicknesses I use the most are .020 and .015 Then I will use .010 and .030 or other thicknesses as needed. Also Evergreen is available in narrow sheets, strips, squares, round rod, and some other shapes as well as the textured surfaces. I have acquired a fair amount of shapes and thicknesses over the years. The hard part is keeping is sorted so I can find what I want.
|
|
|
|
|
|
2013/07/18 05:56:00
Subject: Re:A Detailed Quality build of the Forge World Storm Eagle
|
|
Fresh-Faced New User
Memphis TN
|
Well folks, I came to a conclusion/decision about trying to enter this guy in Games Day this year, "It aint happenin"! I could have tried to crash finish this, but would not have been happy with the results. I am still plugging away and in the process learning and relearning a number of things. While it is at a point where I could just "finish it" it would not do things justice and I would rather continue with the high grade work and be happy with what I finish with.
As this is the first 40k model I am building for my space marine chapter (actually it is the first 40k vehicle I have built) I am also designing other things that will be used on a couple of Storm Ravens, various tanks and what not. At the moment I am downsizing the Chapter logo to a size that will fit on a shoulder armor. I discovered that the resin once basically all set has a period of time where it can be curved and formed to about any shape. As I will be needing those for the marines in the cargo holds, it becomes part of the model. I also took some .015 thick clear lexan and made the glass in the cockpit from it. Lots thinner and less distortion. Fits snug, just have to trim the lower edges so everything will set down tight. Have even considered having the cockpit hatch where it will open in a similar way to a jet fighter. Just would have to add some more detail for the front gun/ missile assembly in front of the 'pit.
I will try and do a nice update in the next few days before Games Day. If you are coming to Games Day, drop me a line!
Toodles 
|
|
|
|
|
|
2013/07/18 20:56:53
Subject: A Detailed Quality build of the Forge World Storm Eagle
|
|
Hard-Wired Sentinel Pilot
|
You are a surgeon of precision... good lord man.
|
|
|
|
|
|
2013/07/22 23:05:44
Subject: A Detailed Quality build of the Forge World Storm Eagle
|
|
Aspirant Tech-Adept
|
This is looking great, excellent work so far.
|
|
|
|
|
2013/07/28 08:47:47
Subject: Re:A Detailed Quality build of the Forge World Storm Eagle
|
|
Fresh-Faced New User
Memphis TN
|
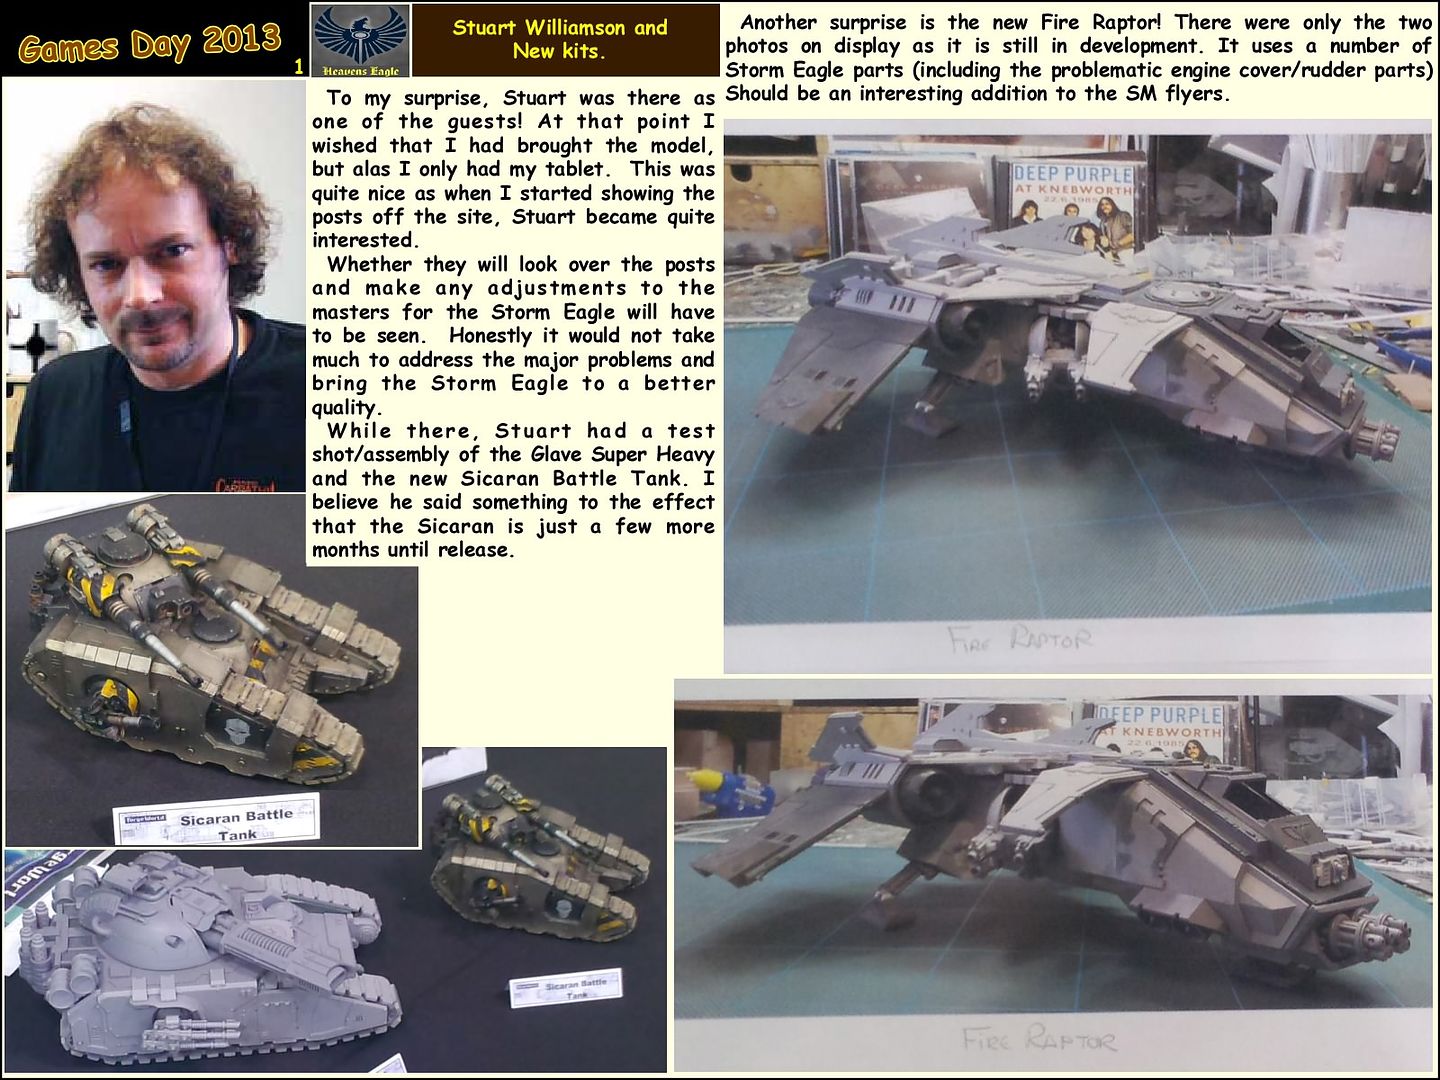
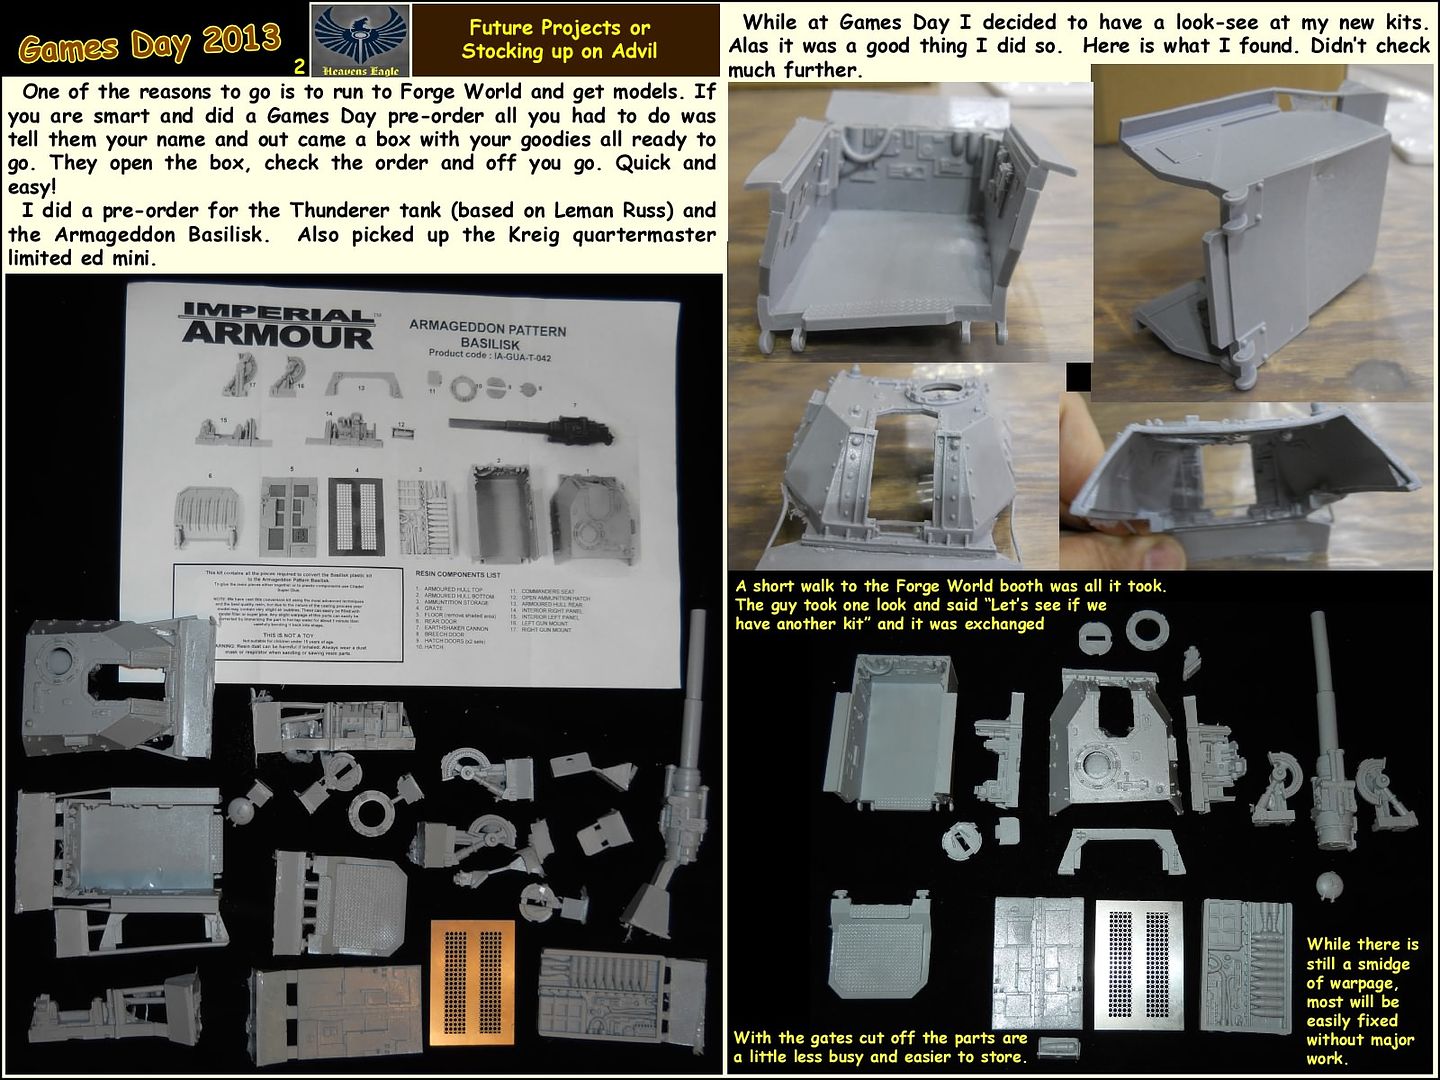
Yesterday was Games Day here in Memphis. My first Games Day! Was interesting to say the least, met people from Mexico, Canada, Spain, Germany, and of course England and the US. There were some really nice armies and minis to be seen as well as plenty of merchandise to purchase. Here is a quick update on all that and some news that some of you may not know.
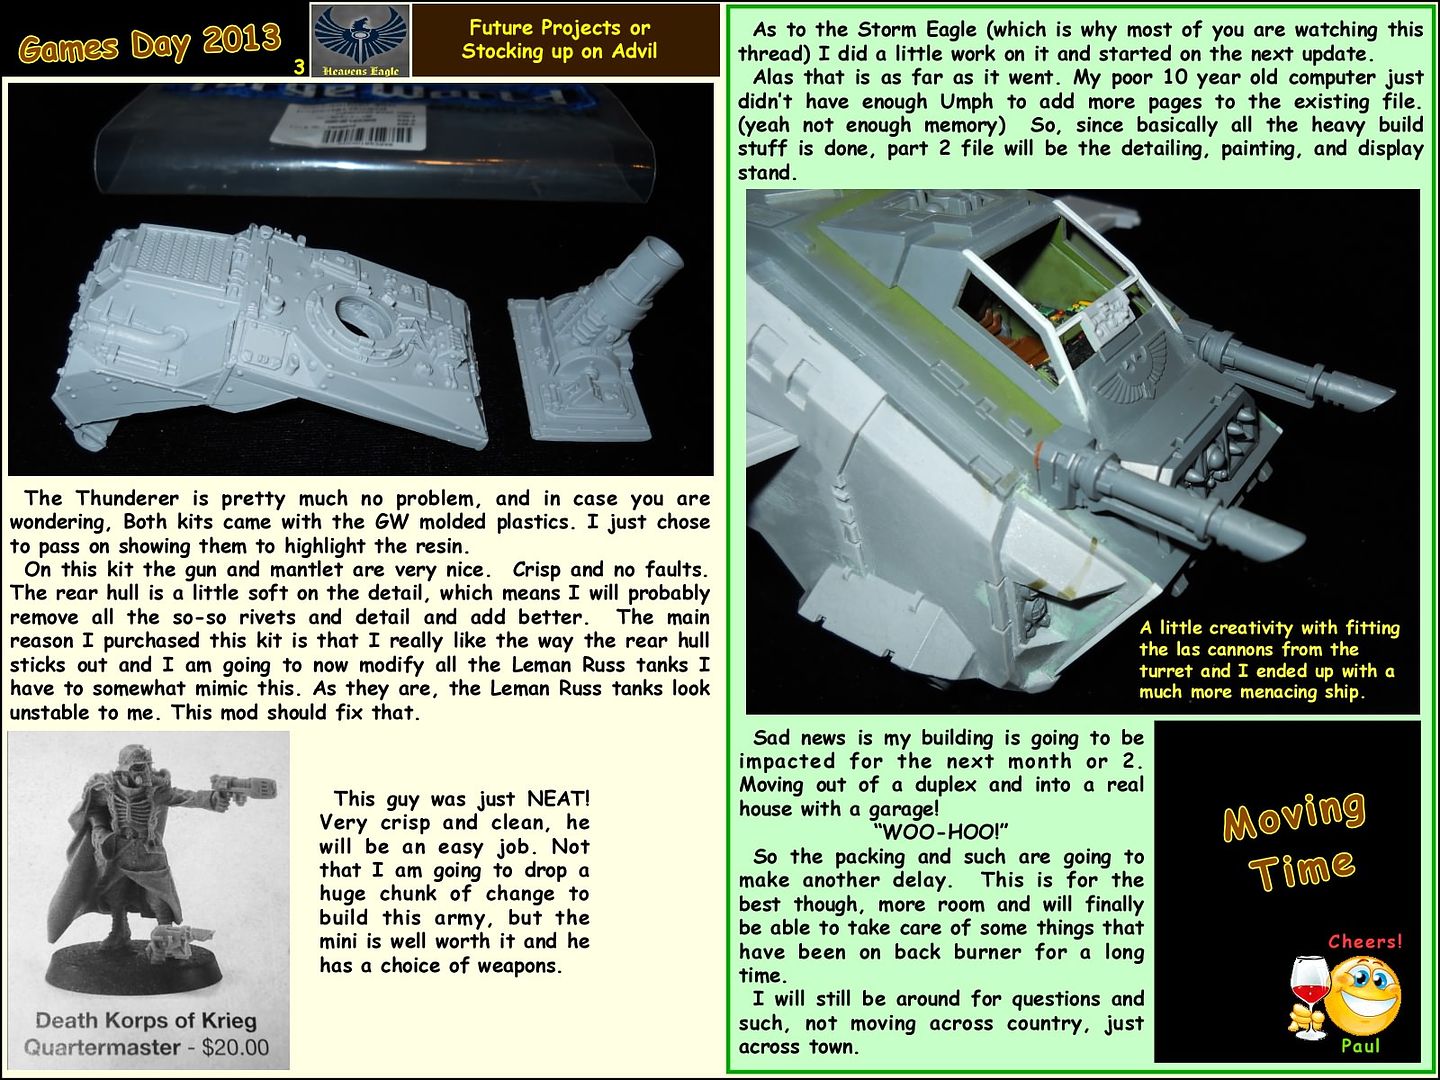 As I stated I will still be able to keep up with questions and such, just won't be able to generate new posts until I get the new place set up. (Shouldn't take too long as I will go through some 'puter withdrawal)
Those of you that I met at Games Day, I really enjoyed visiting and getting to know you! If you came here to have a look at this thread, send me a message so we can keep in touch.
|
|
|
|
|
|
2013/07/28 10:30:49
Subject: A Detailed Quality build of the Forge World Storm Eagle
|
|

Annoyed Blood Angel Devastator
|
Very detailed :O
|
"Treat them with honour, my Brothers. Not because they will bring us victory this day, but because their fate will one day be ours." |
|
|
|
|
2013/07/29 00:40:33
Subject: A Detailed Quality build of the Forge World Storm Eagle
|
|
Land Raider Pilot on Cruise Control
|
You have to be in the top percentile of hobbyists in terms of getting value for money. Massive kudos.
I myself struggled with the Armoured Proteus Land Raider. Doors didn't fit, tracks were a nightmare and the hull took forever to reshape.
Huge respect to you on getting that build together - FW should make it clear just how much it takes to actually build the bigger kits beyond "advanced users"!
|
"If you don't have Funzo, you're nothin'!"
"I'm cancelling you out of shame, like my subscription to white dwarf"
Never use a long word where a short one will do. |
|
|
|
|
|
|

 P&M Blog -
 Knights of Titan 500 points Primary
  Warp Angels 750 points Primary
  The Eternal Crusade XXXX points Primary