| Author |
Message |
 |
|
|
|
|
Advert
|
Forum adverts like this one are shown to any user who is not logged in. Join us by filling out a tiny 3 field form and you will get your own, free, dakka user account which gives a good range of benefits to you:
- No adverts like this in the forums anymore.
- Times and dates in your local timezone.
- Full tracking of what you have read so you can skip to your first unread post, easily see what has changed since you last logged in, and easily see what is new at a glance.
- Email notifications for threads you want to watch closely.
- Being a part of the oldest wargaming community on the net.
If you are already a member then feel free to login now. |
|
 |
2015/05/17 02:06:31
Subject: One Box Conversion Challenge : Storm Talon
|
|

Been Around the Block
|
I have set myself a challenge of converting a single model using only what comes in the box.
No bitz, no plasticard, and putty only for seam filling (no sculpting or parts making).
I don't have a lot of spare time, so a disclaimer upfront that progress will be slow.
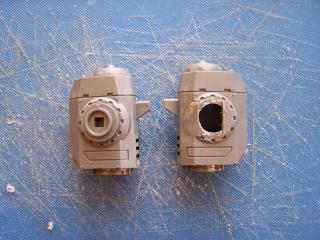
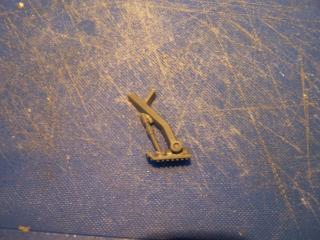
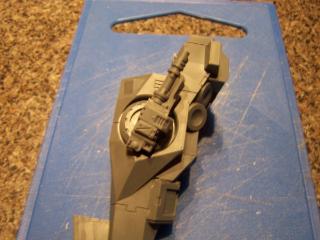
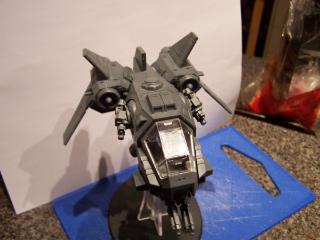
First up - everyone's favourite design failure... the assault cannon turret.
I removed the original turret mount and replaced it with the inverted turret socket.
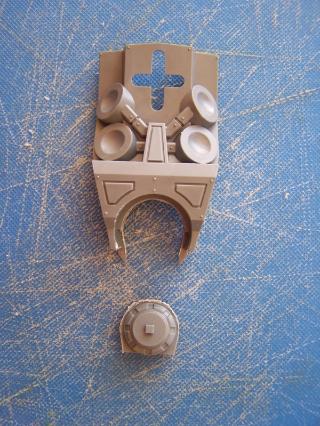
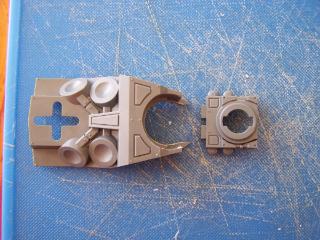
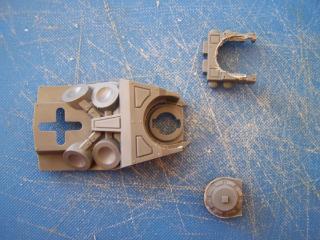
The flush mounted socket is perfectly sized to allow the turret to turn unhindered over the raised ridge at the back of the housing.
Next, the under plate from the Assault cannon assembly had its raise features removed, shortened in length, and a 4.5mm hole drilled into it.
It is attached perpendicular to the inverted turret.
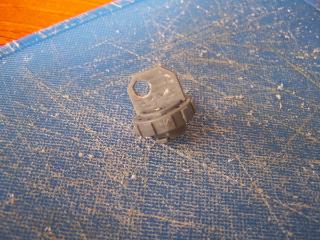
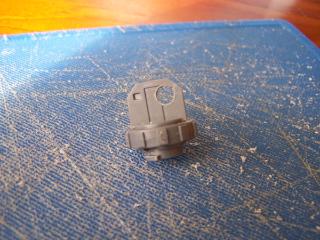
Removed the joining plug from an assault cannon, and shortened the pivot lugs. The assault cannons are installed with the pivot lugs to the centre.
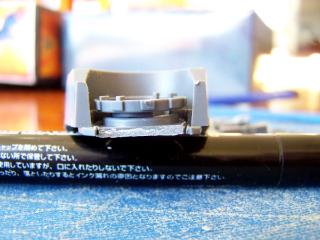
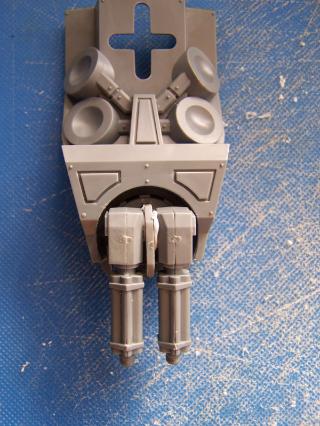
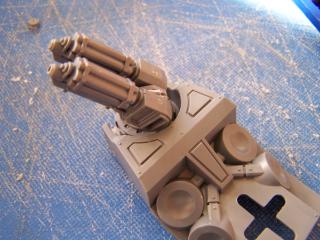
The turret has free range of movement a full 360 degrees around, and close to 180 degrees front to back.
I will install the guns upside down to the usual way for assault cannons (with the rotating barrels under slung) for aesthetics, but they will still retain the same movement arc if place the right way up.

More to come, but I have no idea when that will be... 
|
|
|
 |
|
2015/05/20 01:29:40
Subject: Re:One Box Conversion Challenge : Storm Talon
|
|
Been Around the Block
|
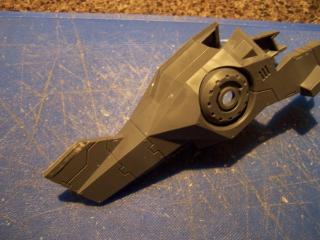
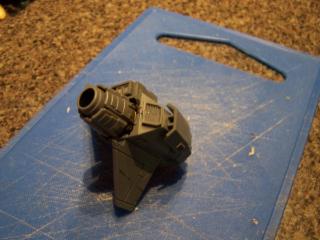
A quick update - mounting the missile launcher on the engine housing.
The engines were made up as per the instructions.
I removed a section of the engine mount where it usually attaches to the fuselage.
I shaved down the missile launcher body to create a flush fit with the engine housing.
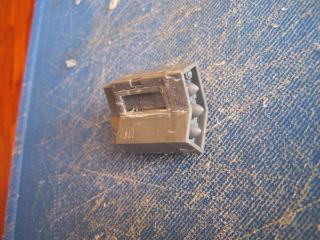
The missile launcher attached to the engine housing.
The individual missile heads (skyhammer/typhoon) should sit in there quite nicely without magnetic help. After all, I'm not supposed to use anything that doesnt come in the box... 
That's all for now, more to come.
As always, I don't know when that will be!
|
|
|
|
|
2015/05/20 02:55:35
Subject: Re:One Box Conversion Challenge : Storm Talon
|
|

Warwick Kinrade
|
Looking good, interesting to see where it goes as I have one still sat in a box waiting to be built but in need of conversion inspiration to get going .
Are you planning on doing anything to the tail fins? I have always hated the oversized downward pointing fin, and have considered chopping it off entirely (and 'modeled for advantage' be damned!).
|
|
|
|
|
|
2015/05/20 07:56:09
Subject: One Box Conversion Challenge : Storm Talon
|
|
Been Around the Block
|
Thanks lapedus.
The downward tail fin has already been chopped off, and is awaiting its turn to be retasked.
I have seen many great conversions of the Storm Talon, but they always seem to incorporate bits from other kits (like droppod fins, or landspeeder assault cannons) - this conversion is something I have been thinking about for a while and is a challenge to myself to come up with something as good with only what comes in the box.
And to hopefully provide a little inspiration to people in need like yourself
|
|
|
|
|
2015/05/21 02:14:05
Subject: Re:One Box Conversion Challenge : Storm Talon
|
|
Warwick Kinrade
|
Yean, I agree - the storm talon is a model in desperate need of being 'stripped down', so adding bits from other kits seems a bit counter-intuitive.
Anyway good luck - more photos please!
|
|
|
|
|
|
2015/05/22 13:38:25
Subject: Re:One Box Conversion Challenge : Storm Talon
|
|
Been Around the Block
|
Another quick update of progress squeezed in amongst everything else going on...
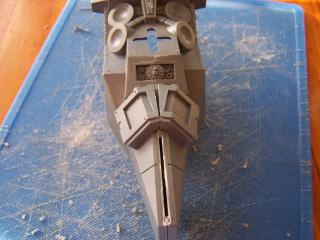
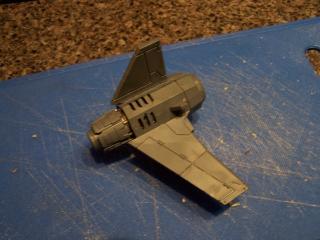
I attached the other missile launcher to the other engine housing
As requested, the lower tail fin has been removed
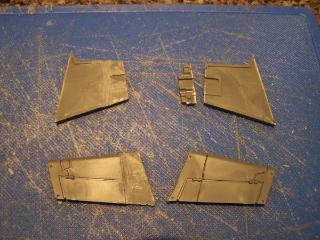
I also separated the upper tail fins,

And attached the central piece to the main fuselage that was constructed as per the instructions.
lapedus wrote:Yean, I agree - the storm talon is a model in desperate need of being 'stripped down', so adding bits from other kits seems a bit counter-intuitive.
I think my conversion might actually have a larger footprint that the original Talon! I doubt anyone will be complaining about "modelling for advantage"...
|
|
|
|
|
2015/05/24 09:58:26
Subject: Re:One Box Conversion Challenge : Storm Talon
|
|
Been Around the Block
|
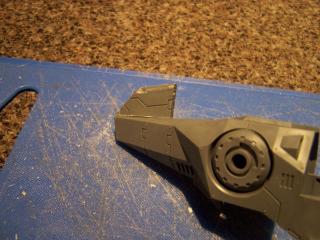
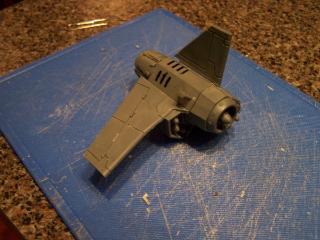
Yet another small update.
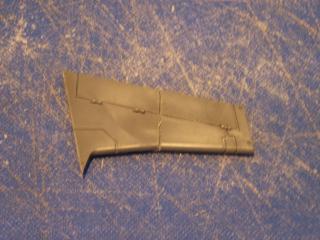
After closer inspection of my inspiration folder, I decided to reverse the remaining tail fin.
It doesn't look that great now, but it should pull the whole thing together later.
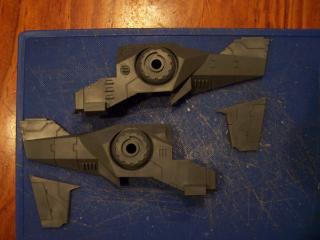
I then set to work on the main wing structure.
We have all seen by now the conversions using drop pod fins as wings, and this is an attempt at something similar.
On the right is the 'before', showing where I cut one half of the downward tail fin and the fillet line for the upper tail fin piece.
On the left is the matching pieces after removal of the unwanted layers of plastic.
And this is how the wing will fit together.
The underside of the downward tail fin half will need a piece to fill it in but I am not willing to cut up anything just yet until all the other parts are allocated.
It's slowly coming together, and you might have noticed I am not giving much away about the final design... thats because its a surprise! 
... and I am making it up as I go along.
|
|
|
|
|
2015/05/24 11:51:20
Subject: One Box Conversion Challenge : Storm Talon
|
|

The Marine Standing Behind Marneus Calgar
|
The talon started to look a lot better to me when I stopped thinking of it as a flyer, and more as a gunship helicopter. But I like what you are doing here, looking forward to seeing how it turns out.
Doing it all in-kit is an interesting idea. One of my ideas for reducing the giant chin gun was just to find smaller AsCs, like the ones on the ravenwing accessory sprue. I just ended up building mine as-is (didn’t have the parts at the time).
|
|
|
|
|
|
2015/05/27 01:14:33
Subject: One Box Conversion Challenge : Storm Talon
|
|
Been Around the Block
|
 Nevelon wrote: Nevelon wrote:The talon started to look a lot better to me when I stopped thinking of it as a flyer, and more as a gunship helicopter.
Thanks for the comment Nevelon.
Keep that word "gunship" in mind...
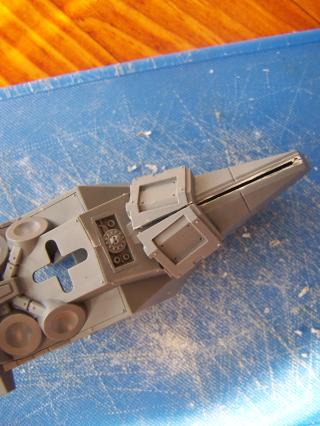
Another quick update.
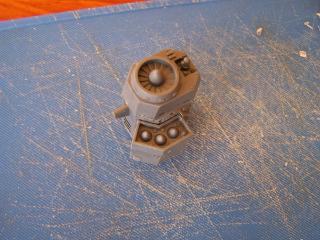
I have taken off the top aerial housing from the fuselage, and replaced it with the left over assault cannon turret piece.
It is supposed to resemble an access hatch, but I need to shave down the top to make it a bit more aerodynamic (not a word commonly associated with SM flyers!)
I am not sure whether to have this bird sitting on the ground or up in the air, but I have pieces for the landing gear so I decided to make some anyway.
However, I did bend the rules slightly here as I used a portion of the sprue... technically it does come in the box so I think its ok.
I am planning on using a few more pieces of sprue for the other landing gear so if anyone cries foul I can just not attach them and have it on the flying stand 
The stock landing gear from the tail looked a bit thin and wobbly, so I used the aerial housing insert as a sort of "heel" to add some stabilization and volume.
Here is the positioning for the front landing gear if it does get attached.
It is a long weekend here this weekend so I hope to get a bit more done soon.
Thanks for watching.
|
|
|
|
|
2015/05/27 02:02:55
Subject: One Box Conversion Challenge : Storm Talon
|
|
Warwick Kinrade
|
Great! That is my second most hated part of the storm talon design after the large tail fin - I am really excited to see where this is going now. Might even dig my sprues out of long term storage in anticipation.....
|
|
|
|
|
|
2015/05/31 11:30:16
Subject: Re:One Box Conversion Challenge : Storm Talon
|
|
Been Around the Block
|
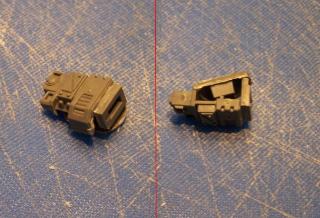
I have not had as much time as hoped this weekend.
I took the bolter/las half of the weapon pods and cut them down to create rear landing gear housings.

And positioned them under the tail boom just behind the mechanicus skull. A few gaps to putty up later but its not a bad fit.
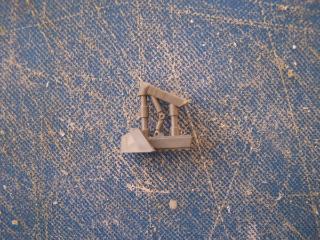
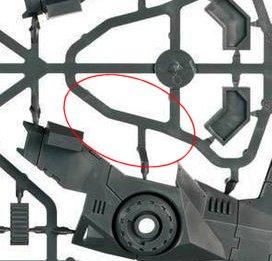
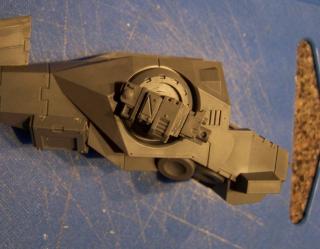
For the rear landing gear I am using the original skid, one of the two larger topside aerials, two side knobs from the cut up chin turret piece, and a piece of sprue from the position circled in red.
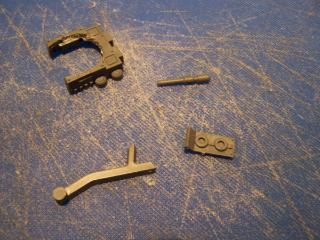
I carefully shaved off the back round socket on the skid and used it as an accent piece on the sprue part.
The knobs from the chin turret piece form a pivot bracket on the skid for the leg, and the aerial sits in the remaining socket to make a hydraulic piston.
These are proving to be quite fiddly, and will require tweaking to get to the right angle before gluing in place... hence the blu- tac.
And finally for this update, the positioning of the landing gear on the fuselage. Obviously there will be a second one on the other side.
They are going to get a more solid structure on the top end but I don't know what parts will be available for that just yet.

As for the dilemma over having/not having the landing gear attached I think I have come up with a solution:
Once this challenge is over I am considering having two bases - one with the flying stand for games, and another that has the landing gear attached. The Talon will just sit down on top of the landing gear as a display piece.
Best of both worlds!
Thanks for watching.
|
|
This message was edited 1 time. Last update was at 2015/05/31 11:42:53
|
|
|
|
|
2015/05/31 18:18:28
Subject: One Box Conversion Challenge : Storm Talon
|
|

Regular Dakkanaut
|
looking good. Still have two of these in the box, as I was not sure about how to mod them.... I might now.. Great work...
|
Duct tape is like the force. It has a light side, a dark side, and it holds the universe together.
"A man has to believe in something. I believe I'll have another drink" |
|
|
|
|
2015/06/03 13:22:36
Subject: Re:One Box Conversion Challenge : Storm Talon
|
|
Been Around the Block
|
Thanks for the comments.
I managed to get a bit more done today and yesterday.
First up - adjusting the stubby wings on the engines.
On the right is the standard angle (although the wings are mounted on the opposite engine and would normally be angled down)
On the left is the new angle. It will need a bit of putty to reinforce and strengthen the join.

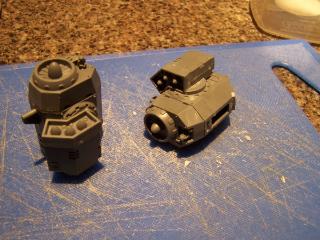
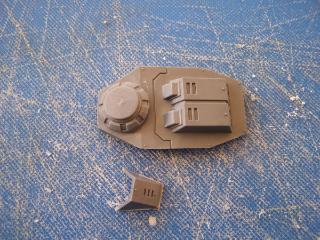
Second - the bolter/lascannon sponsons.
I used the following parts to make the basic sponson body. The round piece with the square hole on the right is what was cut off of the engine housing to make room for the missile pods.
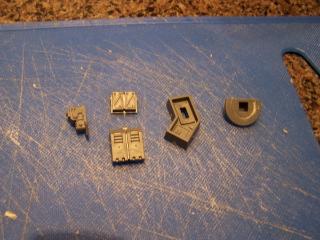
As I want to use the same sponson for both weapon options, I decided to use both an ammo mag and a power cell so neither option looks out of place.
After some careful cutting and placement I arrived at this. Side view/top view to show placement of the parts.
The sponsons will be fitted to the engine mounts of the fuselage like this (sorry for the blurry pictures)

The sponsons can rotate 360 degrees around but are set at the outward angle shown.
Obviously the Talon doesn't normally have side turrets, so the sponsons are just for coolness factor.
Since taking these pictures I have added some plating to the open top of the sponson that was made from the main tail fin offcuts pictured previously.
The underside of the sponson still needs work to plug up some holes and consolidate the shape. I would like to use putty for that but I can't!
I will post pictures of that in my next update, which will be at some point in the future at a time to be determined later.
|
|
|
|
|
2015/06/06 10:50:58
Subject: Re:One Box Conversion Challenge : Storm Talon
|
|
Been Around the Block
|
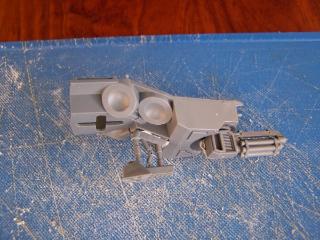
A little bit more work to show, and then the "big reveal".
I used some pieces of sprue to make the engine reverse thrust flap stay open
Next I attached the wing I showed earlier in the thread. It attaches directly on to the missile pod.
My inspiration for this conversion came from the Forgeworld Fire Raptor

Let me introduce my version of the Storm Talon, which I like to call Fire Talon... or Storm Raptor, or Talon Raptor Fire Storm. Whatever.
 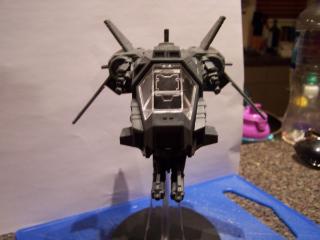
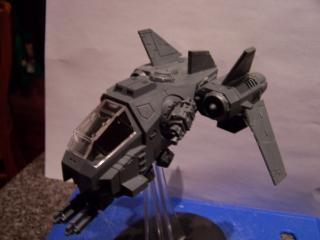 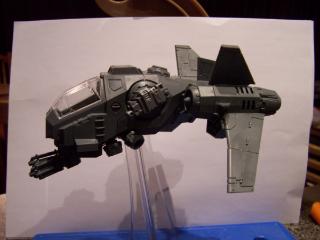
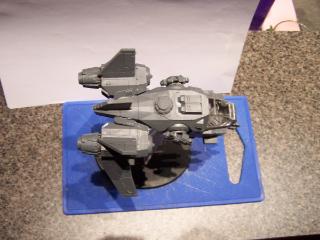 
It is currently held together with blu- tac. There are still a lot of little details to complete, gaps to putty, and paint to slap on.
Hopefully this little exercise has inspired some people to dust off a kit and challenge themselves to try a one box conversion.
I will continue to update this thread as I progress towards a finished model.
Thanks for watching.
|
|
|
|
|
2015/06/06 12:03:53
Subject: One Box Conversion Challenge : Storm Talon
|
|
Did Fulgrim Just Behead Ferrus?
|
Man, that looks a whole lot better than the original model!
|
|
|
|
|
|
2015/06/06 12:50:14
Subject: One Box Conversion Challenge : Storm Talon
|
|
The Marine Standing Behind Marneus Calgar
|
Nice looking mod you have there. I do get a bit of a fire raptor vibe from it. It’s still not using anything resembling physics to keep in the air, but looks a not more comfortable in the sky then the stock version. Well done!
|
|
|
|
|
|
2015/06/06 12:53:27
Subject: One Box Conversion Challenge : Storm Talon
|
|

Longtime Dakkanaut
|
 Malika2 wrote: Malika2 wrote:Man, that looks a whole lot better than the original model!
Seconded - Top notch work!
|
|
|
|
|
|
2015/06/06 17:20:59
Subject: One Box Conversion Challenge : Storm Talon
|
|
Implacable Skitarii
|
Looks more like a space fighter rather then something the space marine scouts stole from GI's joe.
Well done
|
|
|
|
|
|
2015/06/08 02:44:02
Subject: Re:One Box Conversion Challenge : Storm Talon
|
|

Veteran Knight Baron in a Crusader
|
I personally don't really like the extreme downward inclination on the main wings, but it is looking a hell of a lot better than the original,
|
3000pts Blood Angels (4th Company) - 2000pts Skitarii (Voss Prime) - 2500pts Imperial Knights (Unnamed House) - 1000pts Imperial Guard (Household Retainers)
2000pts Free Peoples (Edlynd Fusiliers) - 2000pts Kharadron Overlords (Barak Zilfin) - 500pts Ironweld Arsenal (Edlynd Ironwork Federation) - 1000pts Duardin (Grongrok Powderheads)
Wargaming's no fun when you have a plan! |
|
|
|
|
|
|
 Ultramarines, 3rd Co. and friends, 16k+
  4k
4k  2k Points
 Competition Index
