Switch Theme:

Sculpting fancy trim on Space Marine pauldrons  [RSS] Share on facebook Share on Twitter Submit to Reddit
»
Author Message
Advert


Forum adverts like this one are shown to any user who is not logged in. Join us by filling out a tiny 3 field form and you will get your own, free, dakka user account which gives a good range of benefits to you:
  • No adverts like this in the forums anymore.
  • Times and dates in your local timezone.
  • Full tracking of what you have read so you can skip to your first unread post, easily see what has changed since you last logged in, and easily see what is new at a glance.
  • Email notifications for threads you want to watch closely.
  • Being a part of the oldest wargaming community on the net.
If you are already a member then feel free to login now.


Made in au
Dipping With Wood Stain


Brisbane, Australia


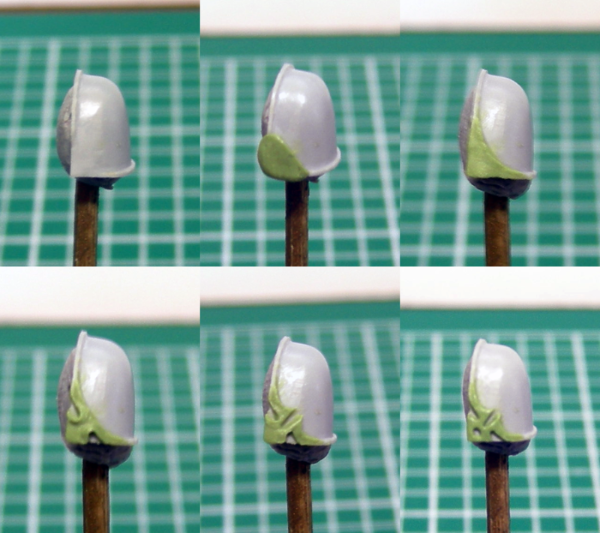
Here's a quick and dirty tutorial on adding fancy trim to space marine pauldrons! This should work with just about any type of plain pauldron.

1. Scrape off the existing trim on the corners.

2. Whack on a small blob of greenstuff and/or milliput, whatever you’re most comfortable working with.

3. Shape the blob, removing excess greenstuff.

4. Use a sculpting tool or something (personally I just used an old crochet needle for this) to push in the greenstuff from the side and bottom to create the indents.

5. Press the tool into the middle and pull it out towards the center of the pauldron to create the middle indent.

6. Add the little hole in the corner (if so desired!) and tidy up the edges. Don’t worry about raised areas of greenstuff, they can always be sanded off later once it dries. As long as you get the edges of the actual trim neat and tidy, any bumps and uneven bits can be sanded off with fine-grit sandpaper afterwards!

And a tip - only do one side of a pauldron at a time! Let that dry before you try to do the other side. No matter WHAT you have the pauldron attached to, if you try to do the second side while the first is still soft, you WILL inevitably end up squishing your previous work accidentally. Be patient! Let it dry!

   
Made in gb
Secret Inquisitorial Eldar Xenexecutor


Leeds, UK

That's awesome

   
Made in au
Dipping With Wood Stain


Brisbane, Australia

Thank you!

   
Made in us
Legendary Master of the Chapter


Oh cool idea

 Unit1126PLL wrote:
 Scott-S6 wrote:
And yet another thread is hijacked for Unit to ask for the same advice, receive the same answers and make the same excuses.

Oh my god I'm becoming martel.
Send help!


Made in my
Regular Dakkanaut


Definitely would try this!
   
Made in au
Dipping With Wood Stain


Brisbane, Australia

@Bluedorian: Awesome! Good luck man, let me know how it goes! And if you've got any questions feel free to ask!

   
Made in ca
Fresh-Faced New User


Looks good and easy enough, I'll have to give it a try.
   
 
Forum Index » Painting & Modeling Tutorials
Go to: