| Author |
Message |
 |
|
|
|
|
Advert
|
Forum adverts like this one are shown to any user who is not logged in. Join us by filling out a tiny 3 field form and you will get your own, free, dakka user account which gives a good range of benefits to you:
- No adverts like this in the forums anymore.
- Times and dates in your local timezone.
- Full tracking of what you have read so you can skip to your first unread post, easily see what has changed since you last logged in, and easily see what is new at a glance.
- Email notifications for threads you want to watch closely.
- Being a part of the oldest wargaming community on the net.
If you are already a member then feel free to login now. |
|
 |
2014/11/26 04:05:43
Subject: An Assorted Blog of Varying Degrees of Awesome
|
|

Giggling Nurgling
|
The following is intended to showcase the various projects I've currently got in the works, as well as those to come.
I've been into the hobby for a number of years, the height of my involvement being the three years that I managed a local Games Workshop store. My main interest has been 40k, and thus many of the projects I'll be talking about here are set in that universe.
C&C is welcomed and greatly appreciated.
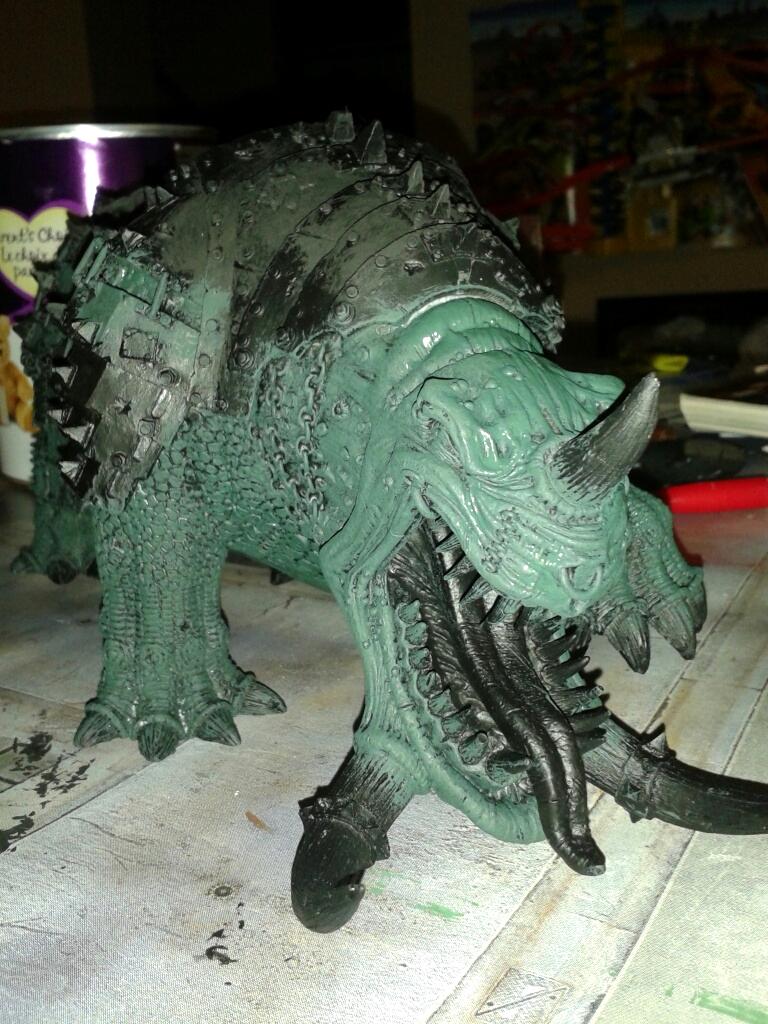
Let's kick things off with the current project...The Squiggoth!!
This is a commission for a local game store, and it's tons of fun to work on.
Automatically Appended Next Post:
And this is where we start.
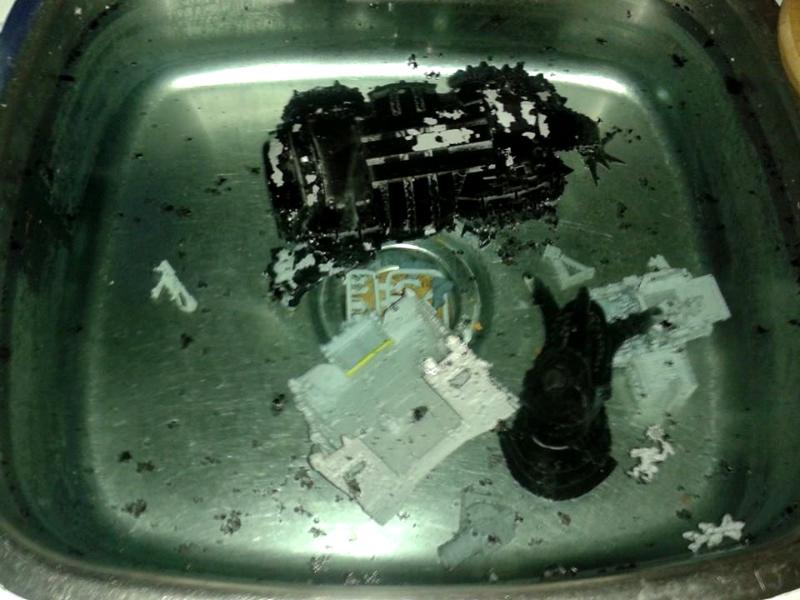
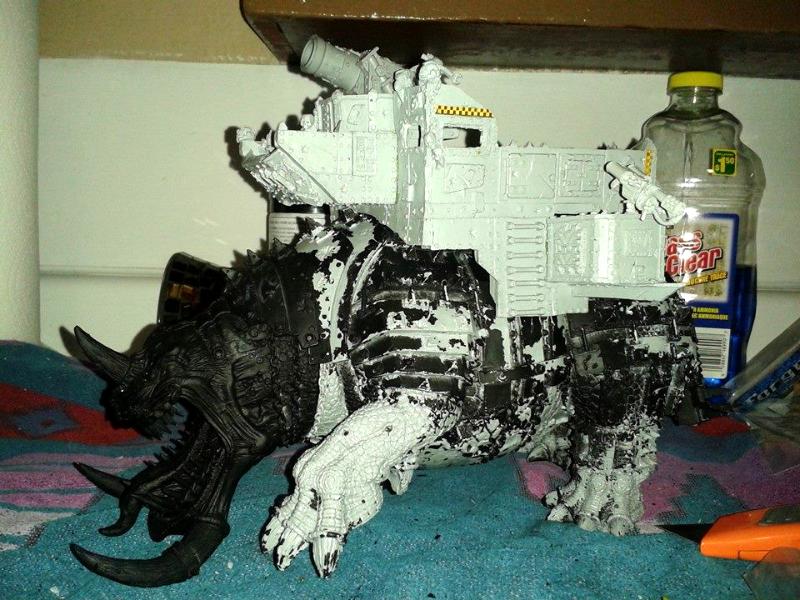
I took on this project after someone else had found it to be too much work. The first thing I found was that most of the primer was flaking off of the model, a clear sign that it had not been cleaned properly to begin with. Thus starts the fun task of soaking and scrubbing all the parts; big and small!
I soaked the model in hot water with windex, then scrubbed it down with an old toothbrush.
I soaked again in hot water and dish soap, then scrubbed again with an old toothbrush.
The residue left on the model from the mold makes it near impossible to paint on top of, so it's very important to get it nice and clean in the beginning.
|
|
This message was edited 2 times. Last update was at 2015/01/30 16:41:58
|
|
|
 |
|
2014/11/26 18:47:56
Subject: Re:Peculiar Paul's Project Logs
|
|
Giggling Nurgling
|
Next came some cleaning.
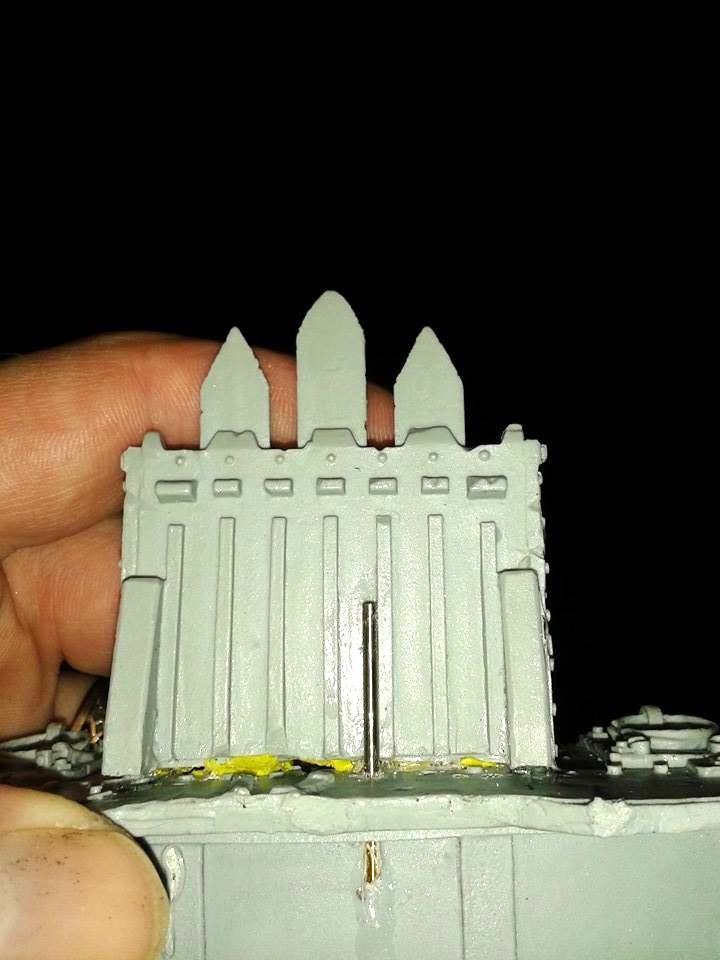
I found a fair amount of 'yellow stuff' at the rear of the howda. This would need to be cleaned off as the paint won't set properly to it. This is one part of GW's two part sculpting putty. The blue hardening agent hadn't been mixed in, so the 'stuff' won't actually set.
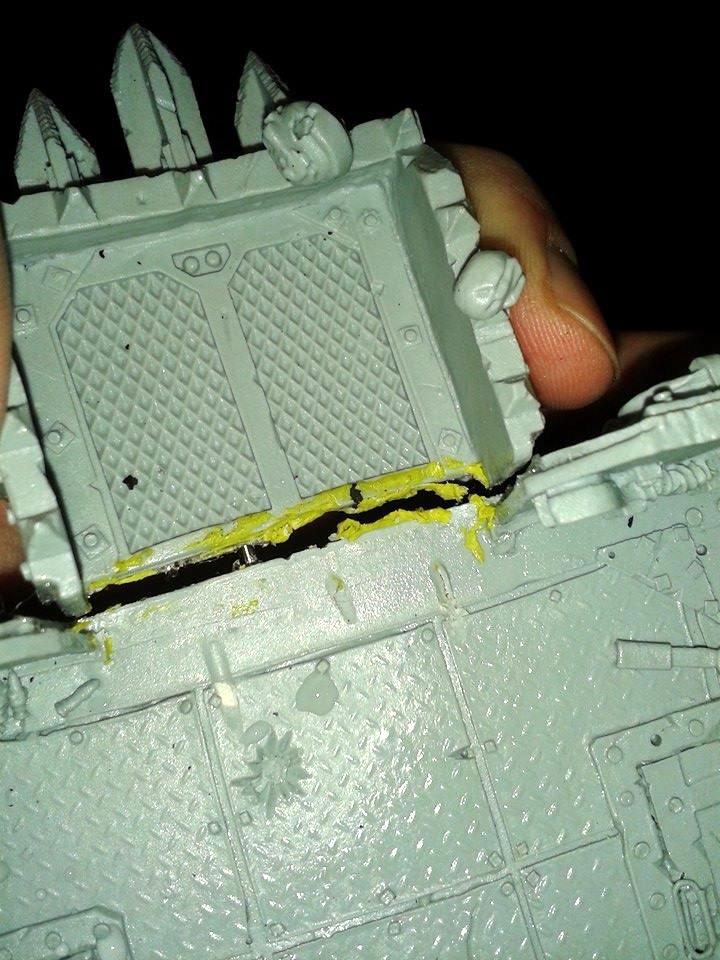
After removing much of the yellow stuff however, the whole piece came right off!
In essence, this was being held on by stick tac, supported by a single (very visible) pin.
With the piece removed, I was able to thoroughly clean the area. I removed the pin, and reattached the piece with a little bit of green stuff and NO pin.
Pinning large resin models like this always makes me nervous as I would hate to hit an air bubble and crack the thing!
With that set and out of the way, I can move on to attaching the head!
|
|
|
|
|
|
2014/11/26 19:59:30
Subject: Re:Peculiar Paul's Project Logs
|
|

Strategizing Grey Knight Chapter Master
|
I've always been a fan of seeing peoples work renewing old used models, this is no exception.
I've been on the receiving end of the mould release agent before and how frustrating it is when you accidentally miss a bit.
I hope for good things from you 
|
IceAngel wrote:I must say Knightley, I am very envious of your squiggle ability. I mean, if squiggles were a tactical squad, you'd be the sergeant. If squiggles were an HQ, you'd be the special character. If squiggles were a way of life, you'd be Doctor Phil...
The Cleanest Painting blog ever!
Gitsplitta wrote:I am but a pretender... you are... the father of all squiggles. .
|
|
|
|
|
2014/11/27 14:34:37
Subject: Re:Peculiar Paul's Project Logs
|
|
Giggling Nurgling
|
I've been on the receiving end of the mould release agent before and how frustrating it is when you accidentally miss a bit.
Thanks Knightley!
Ya, I know I missed a couple little spots on this guy, even with two baths! Thankfully will a little bit of patience, and a q-tip, I could remedy the problem.
Admittedly, at this point the Squiggoth itself is almost completely painted. I'm just organizing my thoughts on the process I've taken to his completion. More photos and thoughts to come shortly.
Automatically Appended Next Post: Well, it's time to attach the head!
My first thought was drilling into the model, and using a small wooden dowel to provide the support necessary for such a large model.
As I've stated previously, drilling into resin models makes me nervous. While I'm sure I could fix any damage with some sculpting putty, I really didn't want to put that theory to the test while working on this guy's head. Not to mention that it's not even MY model to be experimenting with.
Thankfully a lightbulb clicked on, as I remembered something that someone had mentioned to me back in my GW days. They had suggested the use of cotton with superglue. For whatever reason the combination would dry rock solid, and provide ample support.
So that's the method I ran with here.
Let me tell you, it's worked like a charm! As I've been painting the model, I've been grabbing him, and moving him by the head without realizing what I was doing. There's been no strain at the joint, and with the painting almost complete I think it's safe to call the method a success.
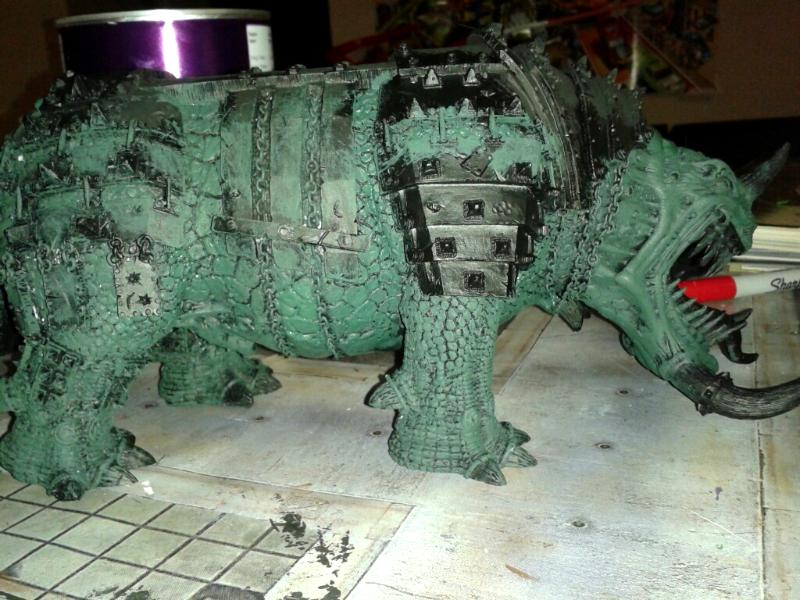
Kudos to the sculptors on this fine piece, as there was very little green stuff needed for gaps.
With the howda assembled (not much to talk about there), here's a look at the complete model ready for painting.
|
|
This message was edited 1 time. Last update was at 2014/11/27 19:46:43
|
|
|
|
|
2014/11/27 20:37:21
Subject: Re:Peculiar Paul's Project Logs
|
|
Strategizing Grey Knight Chapter Master
|
Cotton wool and superglue, what is this sorcery!? I had never even considered that so chalk that one up as something I learned today, thank you!
Also the reassemble looks good, as you going to paint it as well?
|
IceAngel wrote:I must say Knightley, I am very envious of your squiggle ability. I mean, if squiggles were a tactical squad, you'd be the sergeant. If squiggles were an HQ, you'd be the special character. If squiggles were a way of life, you'd be Doctor Phil...
The Cleanest Painting blog ever!
Gitsplitta wrote:I am but a pretender... you are... the father of all squiggles. .
|
|
|
|
|
2014/11/27 21:06:53
Subject: Re:Peculiar Paul's Project Logs
|
|
Giggling Nurgling
|
Cotton wool and superglue, what is this sorcery!? I had never even considered that so chalk that one up as something I learned today, thank you!
You're welcome, Knightley! Hopefully it comes in handy for you one day as well. I wish I could remember who told me about originally.
Also the reassemble looks good, as you going to paint it as well?
Yuppers! I'm painting it now, almost done actually. I'm just spreading out my posts so I can talk about the process and maintain some regular updates here.
|
|
|
|
|
|
2014/11/28 20:04:23
Subject: Re:Peculiar Paul's Project Logs
|
|
Strategizing Grey Knight Chapter Master
|
Awesome, any particular Ork Klan he belongs to?
Also are you planning on putting it on a base, or just having it run free?
|
IceAngel wrote:I must say Knightley, I am very envious of your squiggle ability. I mean, if squiggles were a tactical squad, you'd be the sergeant. If squiggles were an HQ, you'd be the special character. If squiggles were a way of life, you'd be Doctor Phil...
The Cleanest Painting blog ever!
Gitsplitta wrote:I am but a pretender... you are... the father of all squiggles. .
|
|
|
|
|
2014/11/29 03:07:16
Subject: Re:Peculiar Paul's Project Logs
|
|
Giggling Nurgling
|
A local store owner has commissioned me to work on it for him, and it's meant to fit in with his existing 'Freebooter Army'. So not dedicated to any particular clan.
I will be building a base for him as well. The Squiggoth doesn't really stand level on the table. He's got a wobble to him, so I"m going to cut a base and do some sculpting work on it. Automatically Appended Next Post: And here comes the painting! 
I started with a base coat of Leaf Green. Don't panic, I know it looks messy right now. I believe that most models have a 'messy' step, and I always like to figure out what that step is and get it out of the way first. That way I don't have to worry about slopping paint onto areas that are already painted. At this stage I really just want to provide a strong base tone to build everything else out of.
As you can see there are lots of little areas to get that green into, which is why I didn't want to try to do it later in the process.
Next came a brown wash followed by a dry brush of the original Leaf green. This is helping me create a nice deep shade, without resorting to black, and also maintain a nice transition into my base tone.
My background before this hobby was traditional artwork, my father being a very talented and realistic painter. He would always warn me against using so much black in my artwork as a 'true black very rarely occurs in real life'. I"ve carried as many of his lessons as possible into painting miniatures. You'll find that I avoid the very strong black shade, and stark final highlights. NOT that there's anything wrong with that look, it's just not my style.
Next up I"ll be going through the model and discerning those areas that need an extra punch of the brown wash to create some deeper shadows.
|
|
This message was edited 1 time. Last update was at 2014/11/29 14:34:43
|
|
|
|
|
2014/11/30 20:26:55
Subject: Re:Peculiar Paul's Project Logs
|
|
Giggling Nurgling
|
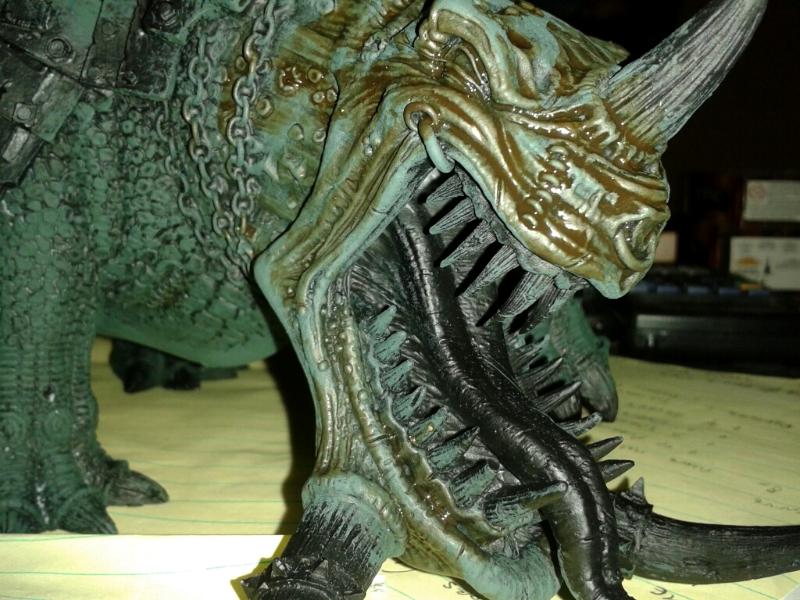
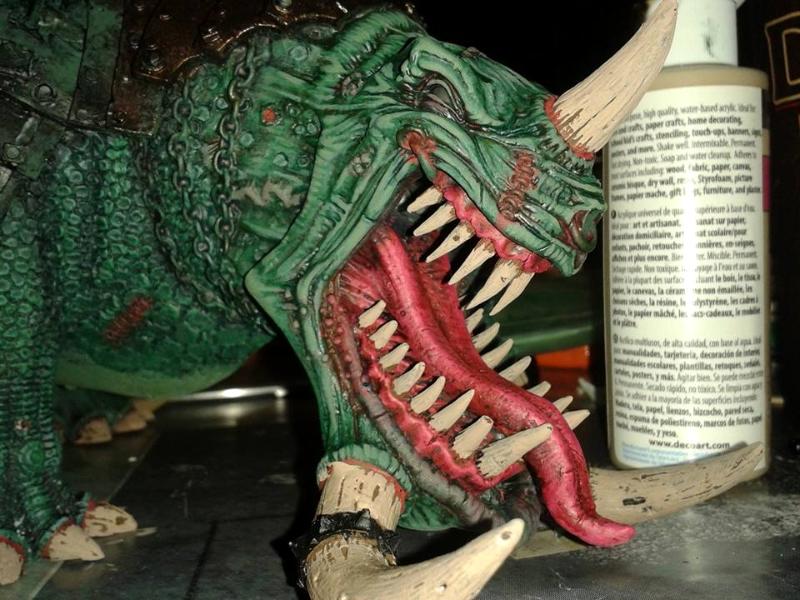
I went back over the model and applied a sepia wash to the deeper recesses. I really like this shade because it adds some warmth to the cool green. Still looks pretty messy right now, as the priority is providing a really strong base for the coming highlights, as well as to make sure all the deepest recesses have been hit.
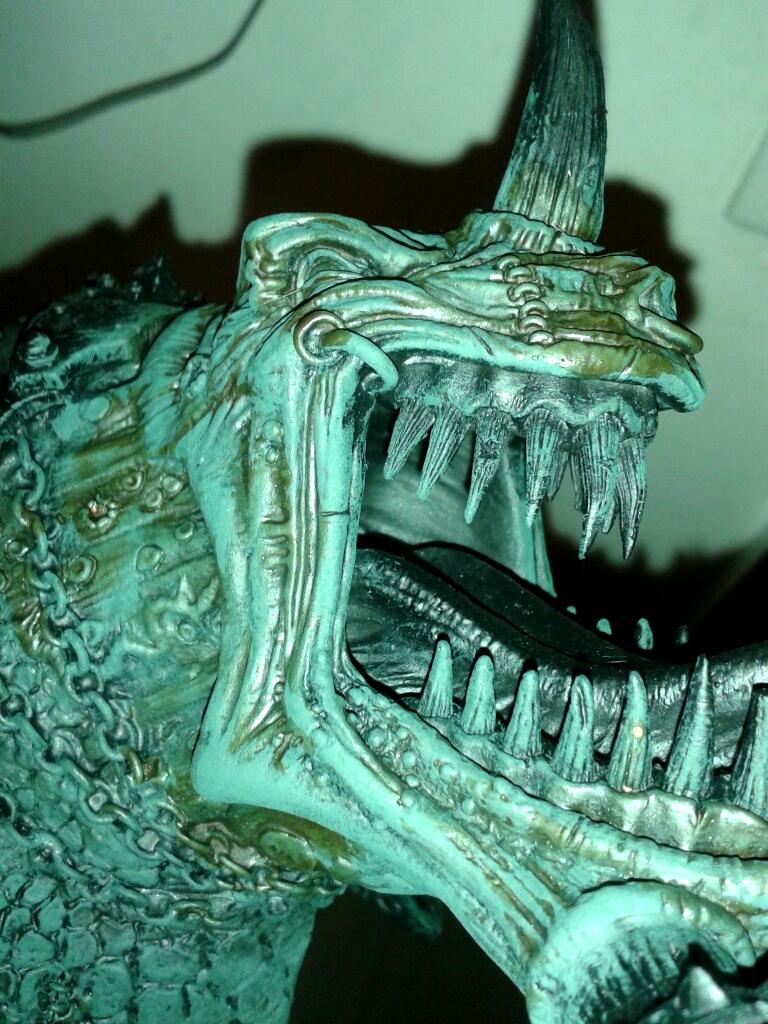
Just a quick snapshot to show how I'm smoothing things out. From here on in, I'll be going back and forth between highlights, and washes. For the highlights, I'll be progressive amounts of tan to my green mixture. I'll be leaving out all of the scale areas in these steps as I'd like to build them up seperately. For the washes, I used a couple more Sepia washes in the deeper recesses. Then moved on to a dark green ink wash. For the final few highlights I switched to a yellow in order to warm the skin tone up again. Finally I went around to the eyes, lips, veins, and....sensitive areas, with a magenta ink wash.
So at this point I'm pretty happy with the skintone, and I can turn my attention to the scales.
|
|
This message was edited 1 time. Last update was at 2014/11/30 20:28:14
|
|
|
|
|
2014/12/01 03:53:24
Subject: Re:Peculiar Paul's Project Logs
|
|
Strategizing Grey Knight Chapter Master
|
Very cool skin tones, had you pre-planned the colours or was it just go with the a random selection? I've done the latter on a couple of models and been quite happy with the results.
|
IceAngel wrote:I must say Knightley, I am very envious of your squiggle ability. I mean, if squiggles were a tactical squad, you'd be the sergeant. If squiggles were an HQ, you'd be the special character. If squiggles were a way of life, you'd be Doctor Phil...
The Cleanest Painting blog ever!
Gitsplitta wrote:I am but a pretender... you are... the father of all squiggles. .
|
|
|
|
|
2014/12/01 17:54:05
Subject: Re:Peculiar Paul's Project Logs
|
|
Giggling Nurgling
|
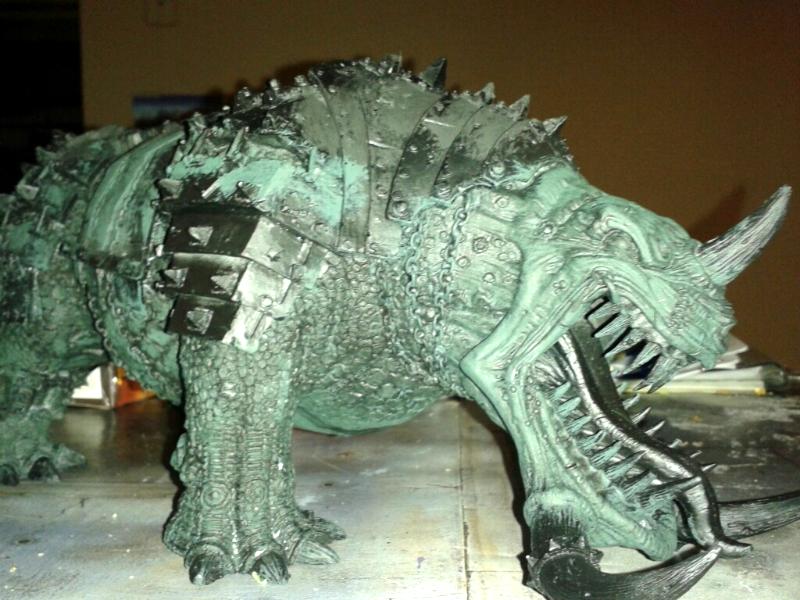
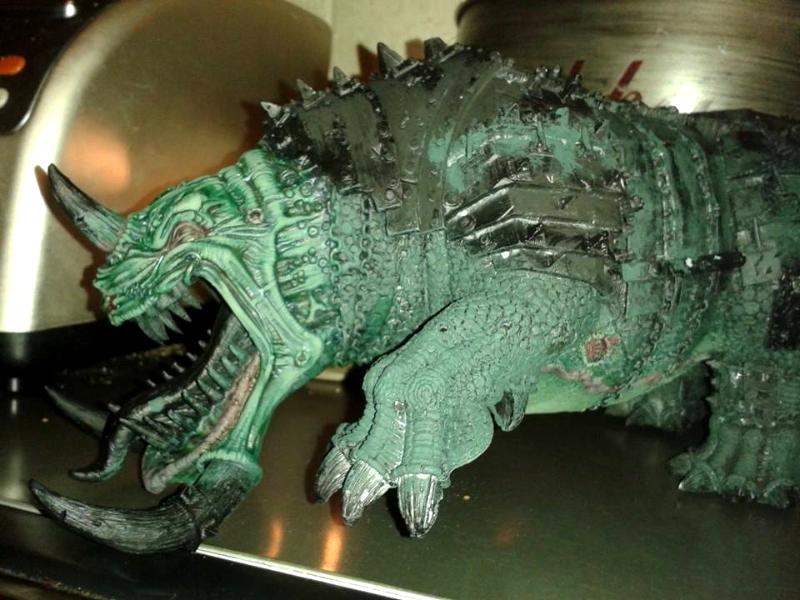
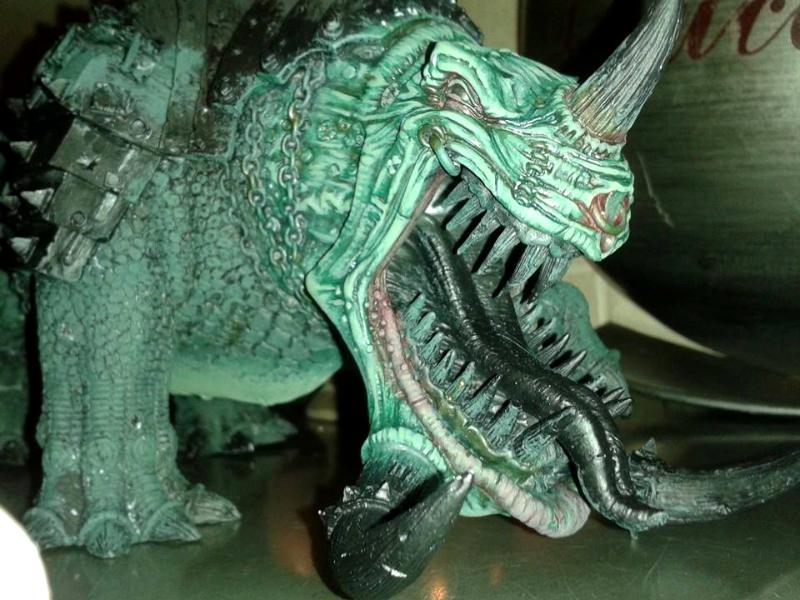
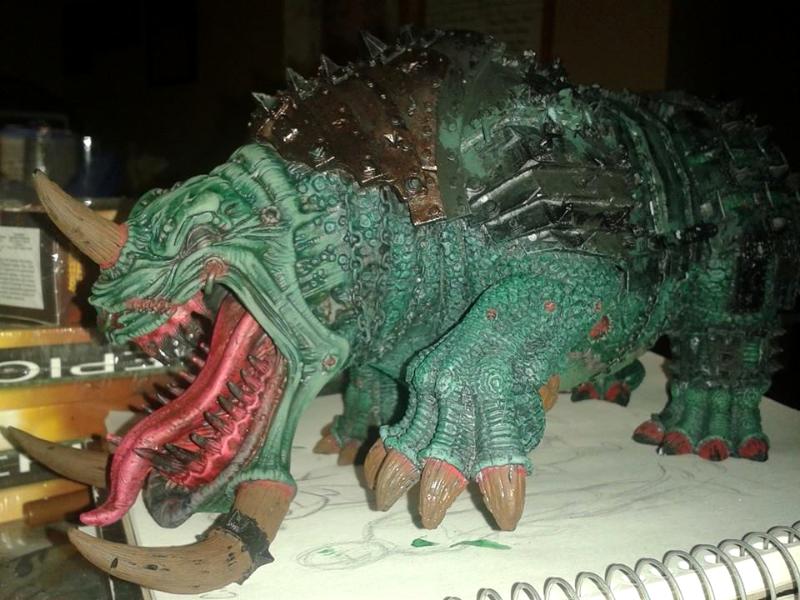
I decided after looking at the model that I wanted the armour to be an assortment of bronze and rust-tones. After that, I figured I wanted the skin to contrast nicely with cooler tones (green). Which green tones to use, and what highlights to introduce kind of developed as the model progressed.
Here's a shot after some more work went into the scales...
And one more with the red areas picked out.

|
|
|
|
|
|
2014/12/13 14:50:33
Subject: Re:Peculiar Paul's Project Logs
|
|
Giggling Nurgling
|
Sorry everyone, I"ve been so busy I haven't had a chance to post any updates here.
So brace yourself, here comes a doozy.
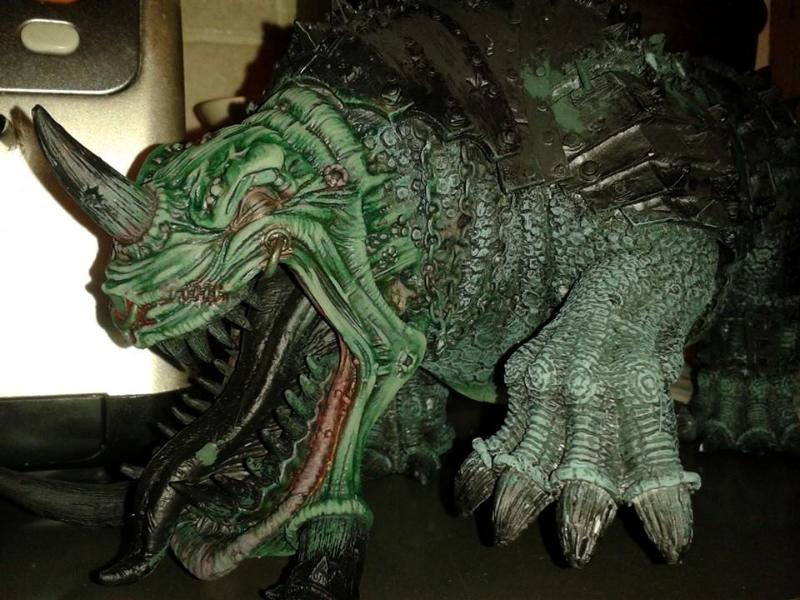
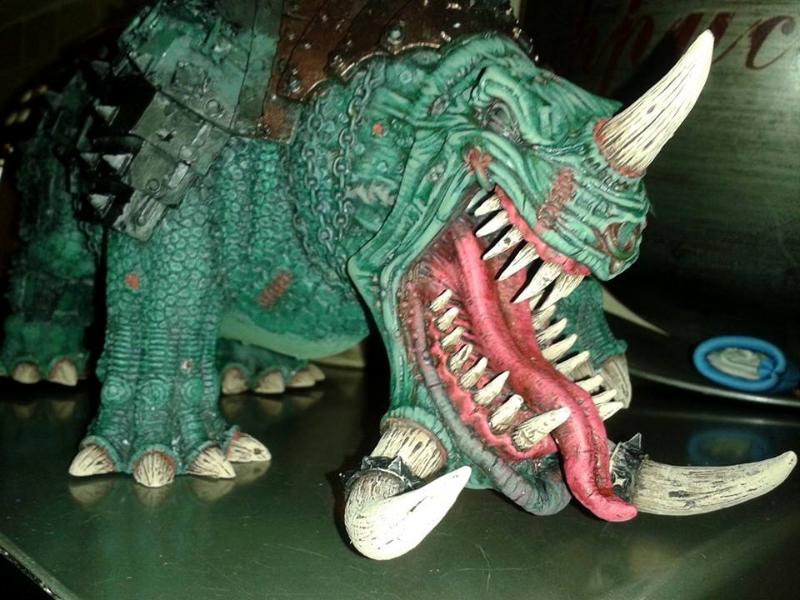
After picking out all of the red areas on the squiggoth, I gave them a pretty generous blue wash. Afterwards, I drybrushed the original red back onto those areas, and continued adding pink for successive highlights. Pretty happy with how that turned out. After the model was finished, and sealed I applied a glossy varnish to these areas to keep them looking wet.
Then came the bone! I picked out all the bone areas with a 'Burnt Umber', which I found to be pretty equivalent to a Bestial Brown from the GW paints of olde! From there I added a light tan into the brown for a few layers. Then I added a wash of...Asgrax Earthshade? I'm pretty sure that's the one. I'm away from my paint table right now, so I'm relying on my coffee fueled memory. Love love lovel that wash. I can see myself using it quite regularly.
I can see the light at the end of the tunnel at this point, with the last big effort being put into all the metal areas. I wanted this to look ramshackle, but still represent some level of consistency. So I decided on three-four types of metal, which you'll see come together on the following images. First shade; Warplock Bronze, followed by a Nuln Oil wash, then I mixed the Bronze with a touch of chainmail for a lightly dusted highlight. Second metal was really rusted. I picked out these areas with that Burnt Umber, then mixed some orange into it to create that rusted look. I followed this up with a chainmail drybrush. The last metal shade was straight chainmail. This one I used a little more sparingly than the last two shades. I picked out rivets, sharp edges, chain, and things like that. Which brings us to this...
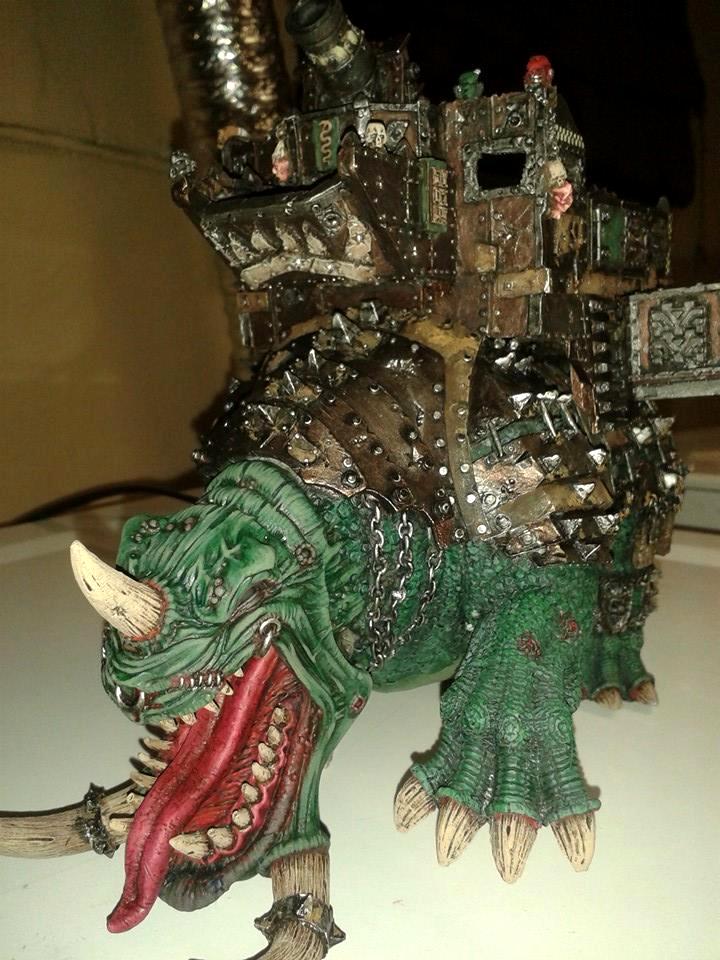
And that's pretty much it. After this picture was taken, I added in the crew, and varnish. There are more pics in the gallery: http://www.dakkadakka.com/gallery/images-70150-44257_The%20Squiggoth.html
I hope you enjoyed watching this one unfold.
Next project up is a quick paintjob on an Imperial Fist Vindicator...
|
|
This message was edited 1 time. Last update was at 2014/12/13 14:51:32
|
|
|
|
|
2014/12/14 19:09:34
Subject: Re:Peculiar Paul's Project Logs
|
|
Giggling Nurgling
|
Here's a quick project post!
Local store owner was running a Tank Battle, and wanted a new tank for the store. We agreed that it should be something useful but not over the top. Presentable, but not award winning. His specific request was to go with something "obnoxious...how about yellow?".
We settled on an Imperial Fist Vindicator.
My personal goal was to have the piece painted in less than three hours.
I built up the yellow by drybrushing some Burnt Umber as a basecoat, followed by highlights with increasing amounts of yellow. When I had a few layers of highlight done, I gave the tank a healthy wash with Lamenter's Yellow. Here is where it brought me.
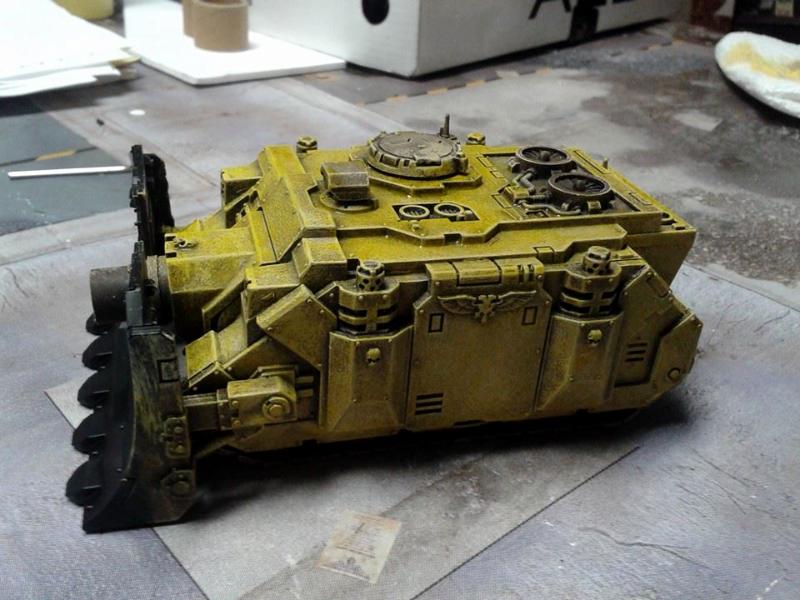
Not quite obnoxious enough, and still more gritty than I feel comfortable with, I went at it with one more yellow highlight and Lamenter's wash. Turned up bright enough now. With that done, I picked out some sections of the tank with red. Gave those a Nuln Oil wash, and then touched up with the base red again. Once the metal accents were done, I could put this baby to bed!
Total paint time: 2.5 hours.
It's not my favourite piece, I would have loved to have spent more time really working on the yellow, and adding some weathering, and iconography. In the end, this project was about getting something done to a playable standard, so I had to really keep myself in check.
|
|
|
|
|
|
2014/12/16 02:31:21
Subject: Re:Peculiar Paul's Project Logs
|
|
Giggling Nurgling
|
Here's the latest finished piece. I didn't take any progress shots of this guy. He's for a friend of mine. I didn't even think to stop and take pictures as I was working on him.
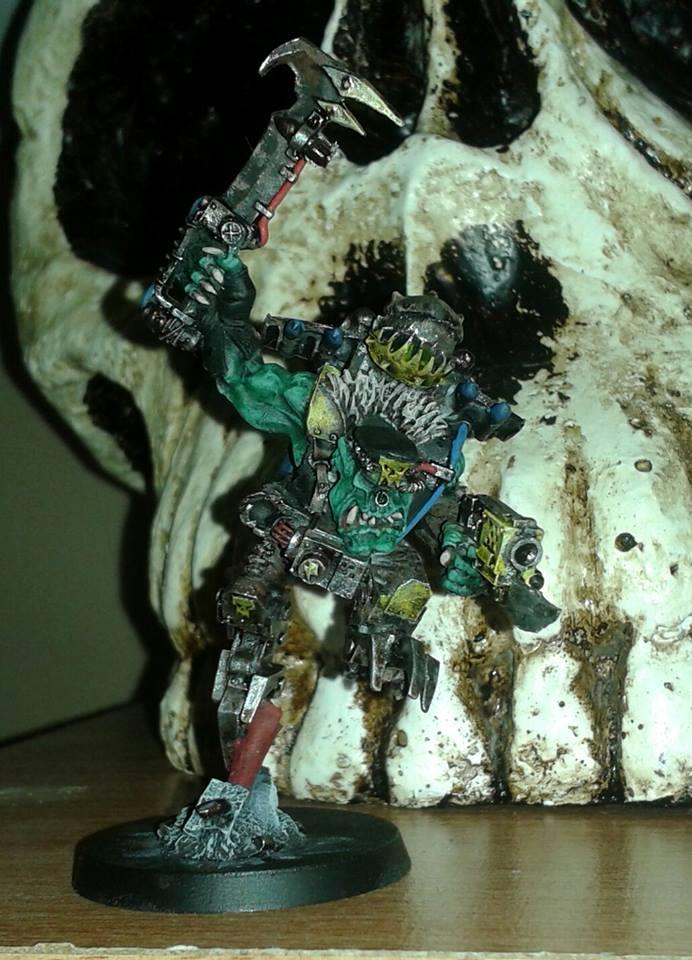
I'm working on a Truk right now for the same friend. Just bulking up the old metal model right now. Pics to follow soon!
Comments, thoughts, and criticism always welcome.
|
|
This message was edited 1 time. Last update was at 2014/12/16 02:32:35
|
|
|
|
|
2014/12/16 02:36:33
Subject: Re:Peculiar Paul's Project Logs
|
|

Never Forget Isstvan!
|
I actually like the Imperial Fist vindicator a lot, same with the squiggoth.
|
|
|
|
|
|
2014/12/17 01:12:23
Subject: Re:Peculiar Paul's Project Logs
|
|
Giggling Nurgling
|
Many thanks Ustrello. I was pretty happy with how the vindicator turned out. It's a model that I've always really liked. In the past, I've used flesh tones and a yellow ink wash to get a nice vibrant colour for the Imperial Fists. This is a bit darker.
|
|
|
|
|
|
2014/12/17 01:20:35
Subject: Peculiar Paul's Project Logs
|
|
Gargantuan Gargant
|
What, no Hellblade ?
|
|
|
|
|
|
2014/12/17 03:34:58
Subject: Re:Peculiar Paul's Project Logs
|
|
Giggling Nurgling
|
adamsouza 2014/12/17 01:20:35 Subject: Peculiar Paul's Project Logs
--------------------------------------------------------------------------------
What, no Hellblade ?
Sorry! I haven't taken any pics of it yet. I'll get some up right away. Automatically Appended Next Post: 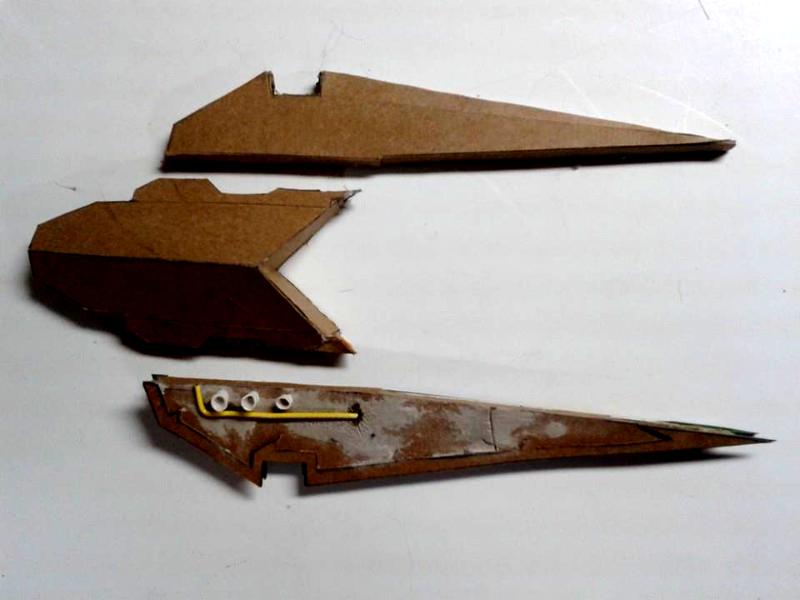
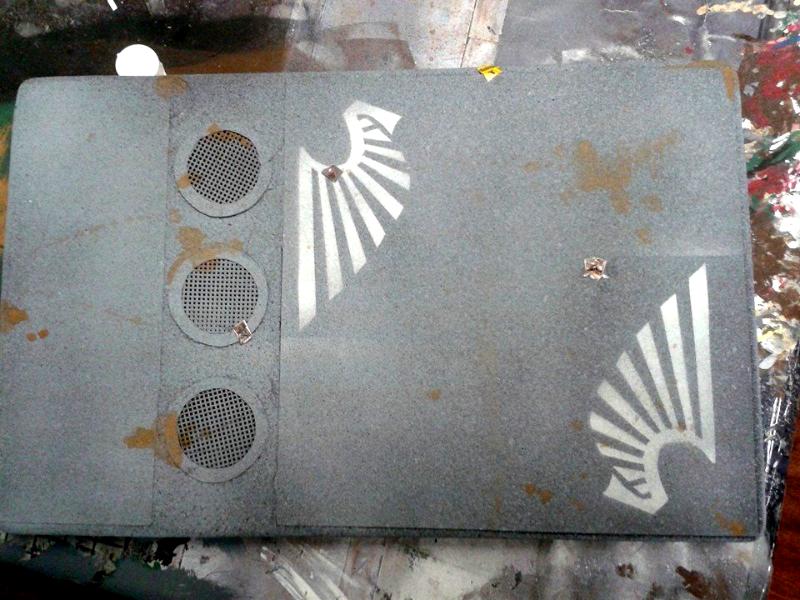
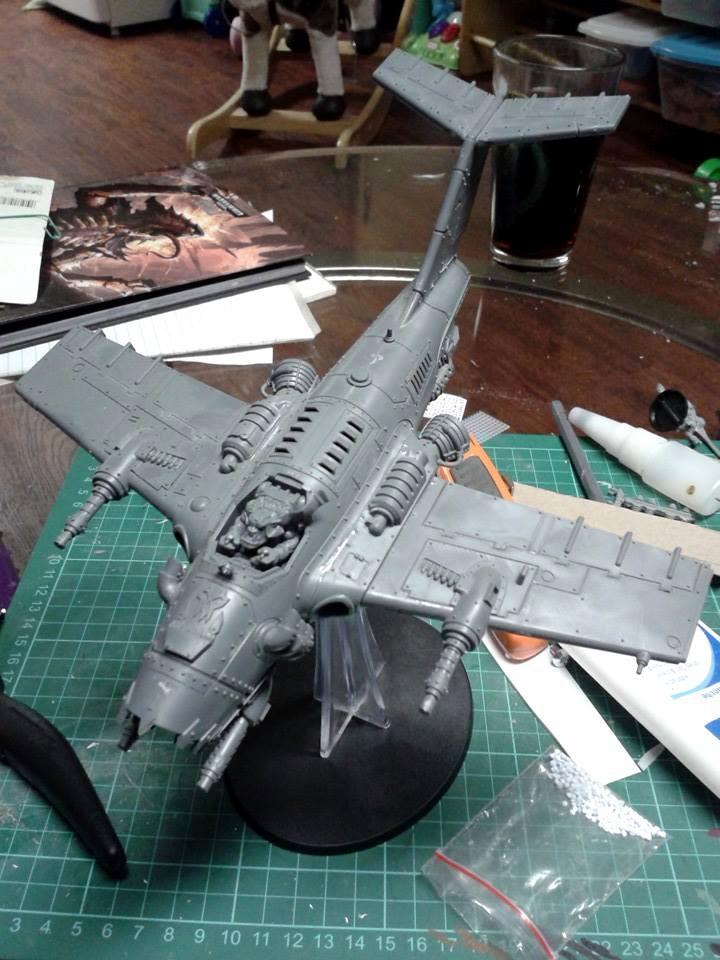
Here's what I have constructed so far for the Hellblade. Everything's been built with thin card (cereal box type), though I think with future models I'll base the wings on foamboard.
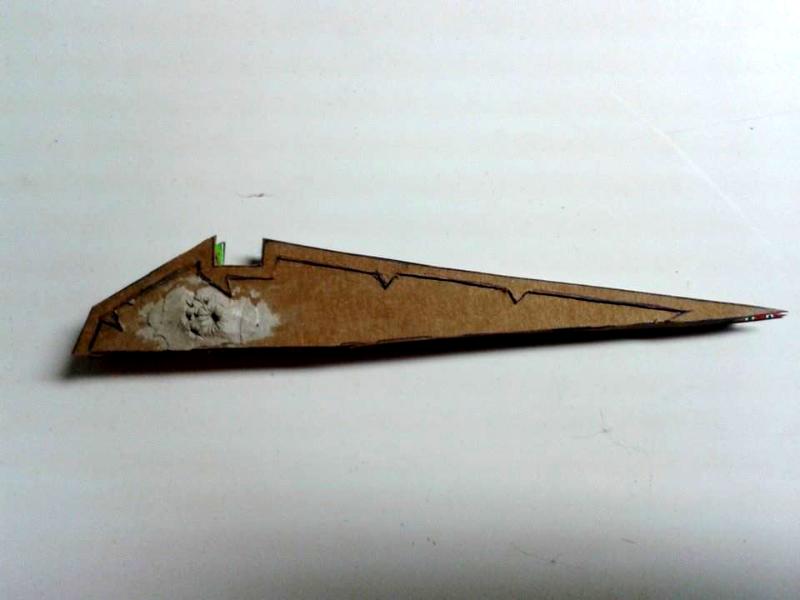
This is the underside of one of the wings. I want to find a way of applying a nice Nurgly texture to the armour plates so they stand out from the other metal sections. Any thoughts or suggestions are greatly appreciated.
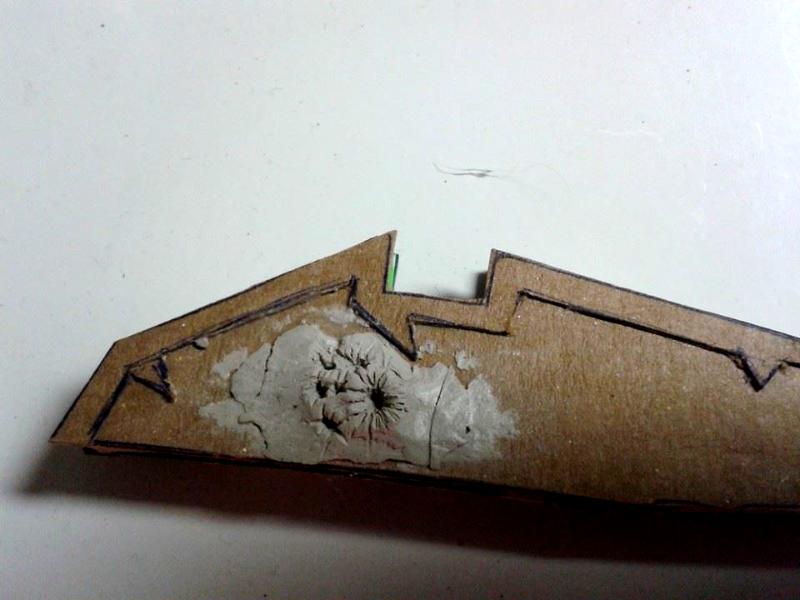
Here's a close-up of the exhaust vents.
|
|
This message was edited 1 time. Last update was at 2014/12/17 04:08:10
|
|
|
|
|
2014/12/20 04:53:29
Subject: Re:Peculiar Paul's Project Logs
|
|
Giggling Nurgling
|
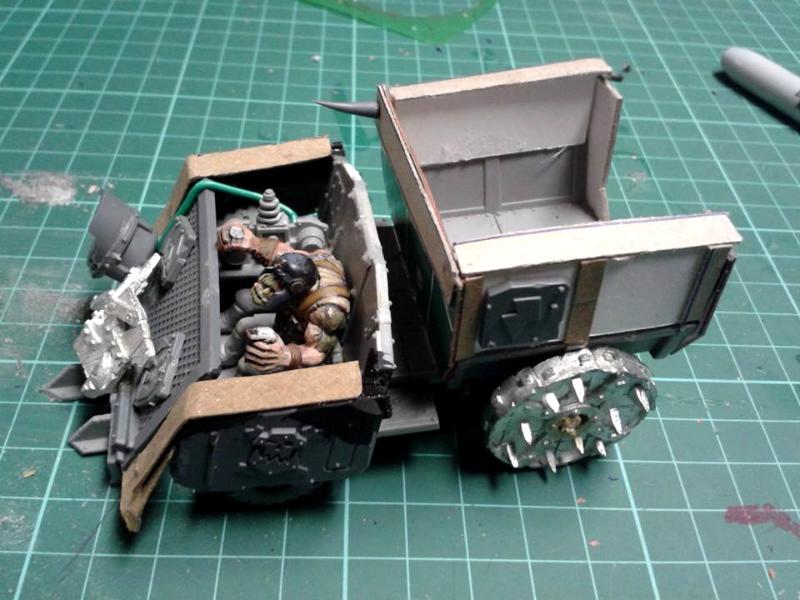
Here's the trukk I've been working on for a friend. I kept it pretty simple with this one. Looking forward, on any future trukks I'd like to build the back end up much more. These models seem to be much smaller than what they should be. Even the drivers for the trukk were tiny. I used the torso from a regular Ork boy to replace the original driver model. This took up so much space though that I could use the second rider. I covered up his tiny legs with the battery for the searchlight.
I'd love to go over the whole thing with rivets, but sadly I know not the right method/materials required. I remember hearing (reading) mention of some Advanced Rivet Technology (A.R.T.) somewhere on Dakka. If anyone could offer some insight, or point me in the right direction it would be greatly appreciated.
|
|
|
|
|
|
2014/12/20 12:59:20
Subject: Re:Peculiar Paul's Project Logs
|
|

Lone Wolf Sentinel Pilot
|
Looking good, all of it 
Rivets? Ah, that's something some people around here have a soft spot for...
As briefly as I can (being one of the former, I could ramble quite a lot about the subject at hand  ):
Flat rivets: Either thin slices cut of a proper round styrene rod (.5 to 1 mm diam. in my case), or roundlets hole-punched from an equally suitable plastic or cardboard sheet (.5 to 1mm thick, .5 to 1mm diameter hole punch. Revolving hole punch pliers might came in handy for these).
Round/Half-round rivets: Available from various suppliers - Zinge Industries comes to mind -. Also, small spheres and half-spheres are available, can be found under nail art/nail decoration supplies. Sewing pins (drill a hole in the rivet's place, insert pin, head becomes rivet) work well, might need trimming of the pin on the inside if in sight. Back to scratch building and recycling, the insides of a water filter would make for a life time supply (Both these and the spheres will require a pilot hole).
Embossed and recessed rivets: Camkierhi has developed the heat-engraving of embossed rivets (obviously, works on plastic and not on cardboard) into an art form, might want to look into his thread for that. He uses a mini blow torch for pre-heating, I prefer a soldering iron with a custom drilled and filed tip (I think my way is on the safer side )
Lastly, a properly placed small drop of PVA glue or relief paint can do the trick as well.
Just take your pick!
|
|
|
|
|
|
2014/12/20 16:04:42
Subject: Re:Peculiar Paul's Project Logs
|
|
Giggling Nurgling
|
Wow Littletower that's a fair amount of useful information! Thanks so much.
The hunt begins for this hole punch.
|
|
|
|
|
|
2014/12/20 19:17:55
Subject: Re:Peculiar Paul's Project Logs
|
|
Gargantuan Gargant
|
I like the truck.
MCGill makes hole punches all the way down to 1/16"
I use a few sizez of mcgill punches and thin plastic sheet and punch a few hundred out at a time. Then I just stab them with the tip of a scalpel and apply them to a thiny dot of glue I applied with a pencil tip.
|
|
|
|
|
|
2014/12/28 04:21:08
Subject: Re:Peculiar Paul's Project Logs
|
|
Giggling Nurgling
|
With the holiday craze dying down, I can finally sit down at the computer and update some project info!
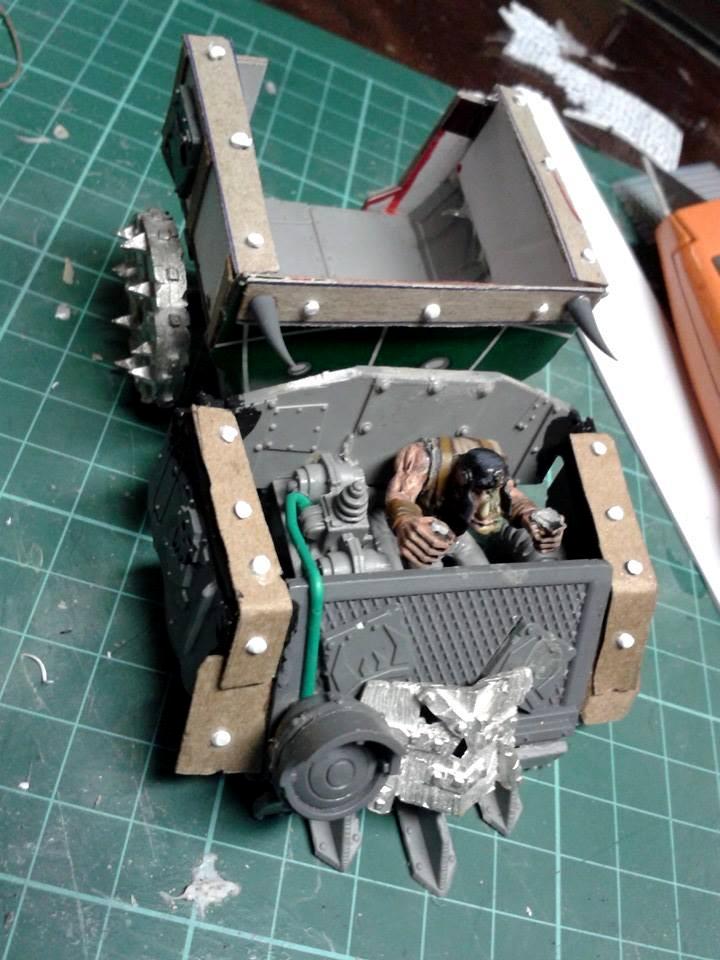
First off. Thanks to everyone who offered insight on applying rivets to models. I must have behaved well this year, because Santa brought me a great hole punch perfect for this task. On top of that, my uncle owns a sign business and operates it with his sons. They were kind enough to bring me a box of their cast off sheet styrene! I've got more than enough to keep me busy for quite some time. Needless to say, I spent some time punching out some rivets. My initial target was the Ork Truk I was most recently working on.
 \
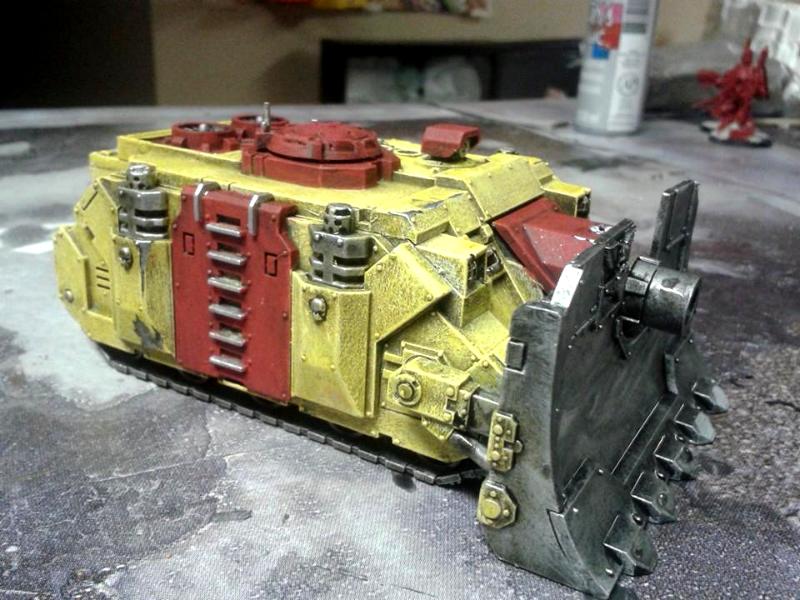
Next I dusted off an old conversion I had done for my Chaos - Nurgle force.
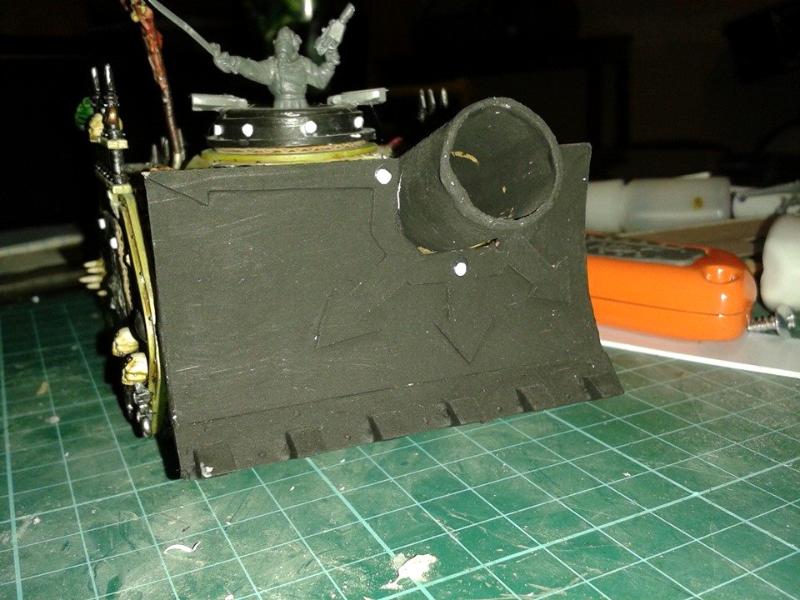
This was originally a Lemus Russ, suitably Nurgled up for the Eye of Terror campaign. That's when I jumped into the Chaos side of things with my Lost and the Damned army. After the campaign, the army rules were no longer legal so the tank got shelved. Years would pass before I would decide to change it into something useful. And thus was born...The Leman Vindicator.
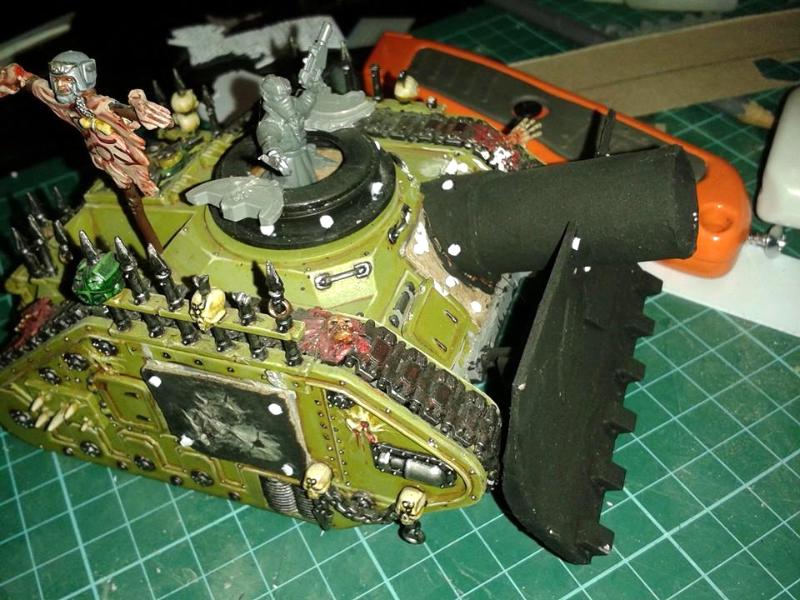
The black sections are the pieces that were added onto the original model. I have yet to finish painting the updates. Now that I've given it the rivet treatment I'm feeling the motivation to finish it off once and for all.
Finally, I stopped by the local game store and picked up my next project...
|
|
|
|
|
|
2015/01/02 04:28:38
Subject: Re:Peculiar Paul's Project Logs
|
|
Giggling Nurgling
|
Well I've been hard at work here between the Dakka Jet, and getting the workshop/studio cleaned and reorganized.
The holidays were awesome, I had some great times with the family, and made out with some exciting new tools that I can't wait to use (hence the cleaning and reorganizing of the workshop!)
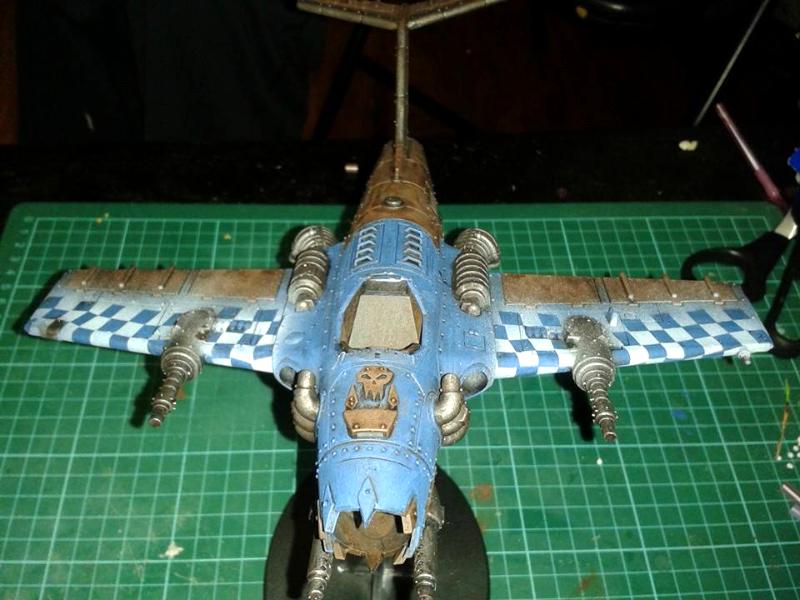
First up; The Dakka Jet.
I gave the whole jet a basecoat of Burnt Umber, and then picked out much of the front half with Copenhagen Blue. I gave the blue areas a healthy dose of Agrax Earthshade, which brought me to this point...
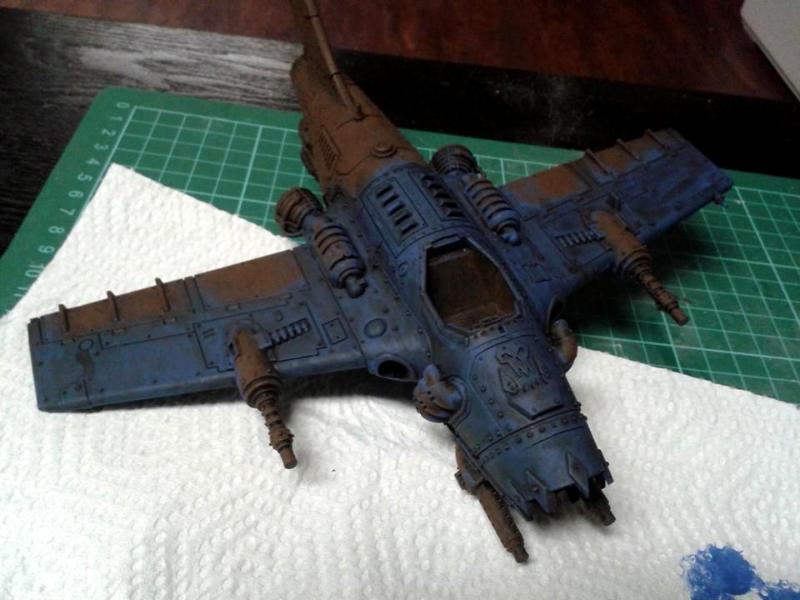
I went over the blue areas again with the same Blue just to clean it up a little...but not too much. Then I cleaned up the all the surrounding edges, lightened the Burnt Umber with a touch of Antique White, then gave all of these areas the same Agrax treatment. I picked out the remaining metal sections with some dark chainmail, then gave these sections a wash of Nuln Oil. Which brings us here...

And here...
I`m pretty happy with where it`s going so far. The next step is adding a checker pattern onto the fronts of the wings. I want it to fade away as it continues back down the wings, so an airbrush would be perfect for this.
Which brings me to one of my great new tools!

Got me a new airbrush for Christmas! So I dusted off the compressor, and it`s time to get my airbrush station set up here in the workshop. It`s been about four years since I`ve airbrushed anything, and I`ve never airbrushed on miniatures. I`m really exciting at the possibilities here.
|
|
|
|
|
|
2015/01/05 23:48:37
Subject: Re:Peculiar Paul's Project Logs
|
|
Giggling Nurgling
|
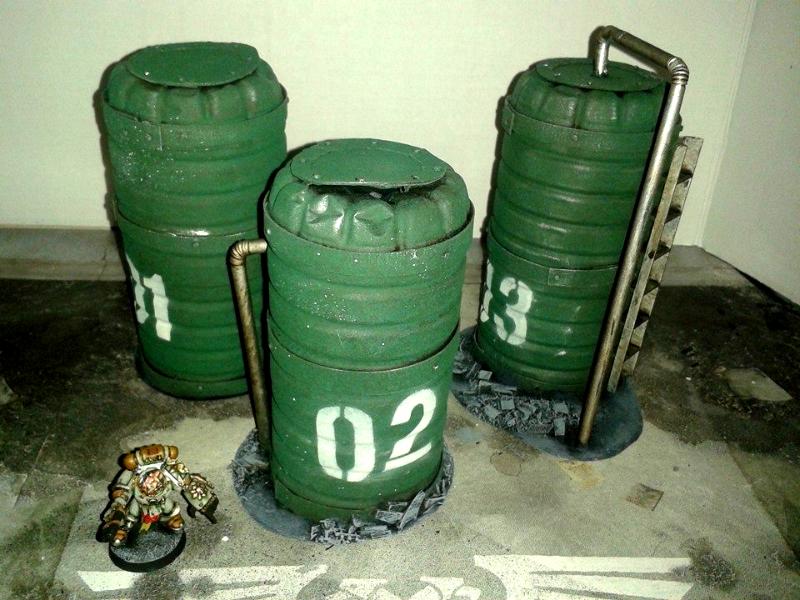
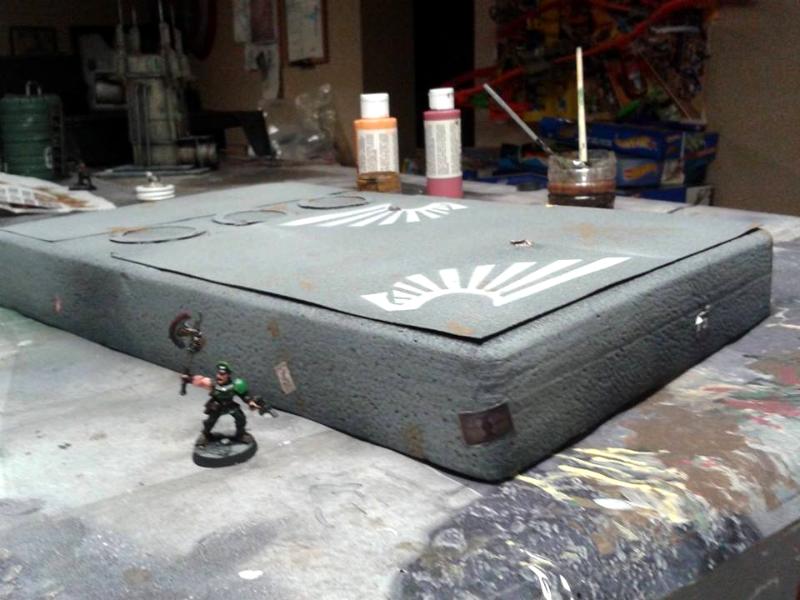
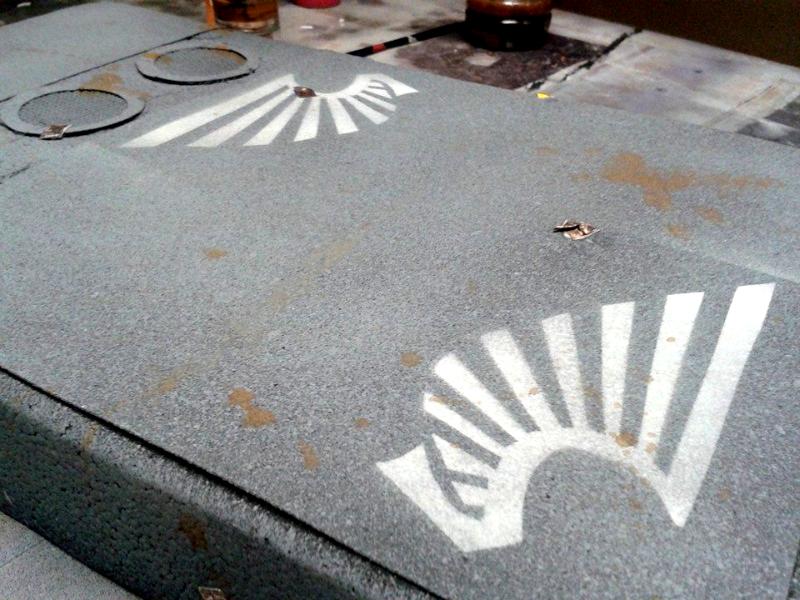
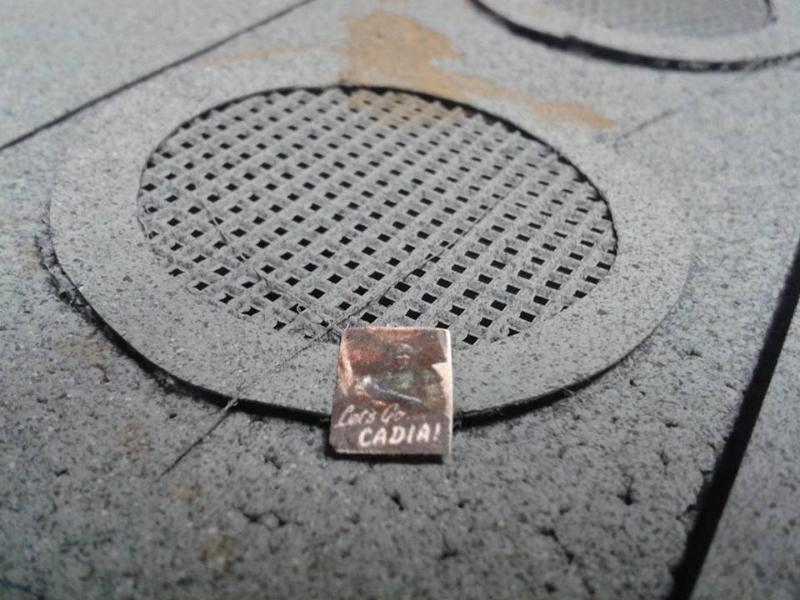
Today was certainly a productive one. I set aside the day to hammer out some scenery piece sets; for use at home, and for sale.
The sets I had in mind were Oil tanks with three different variations. A friend came over and we pumped out four sets.
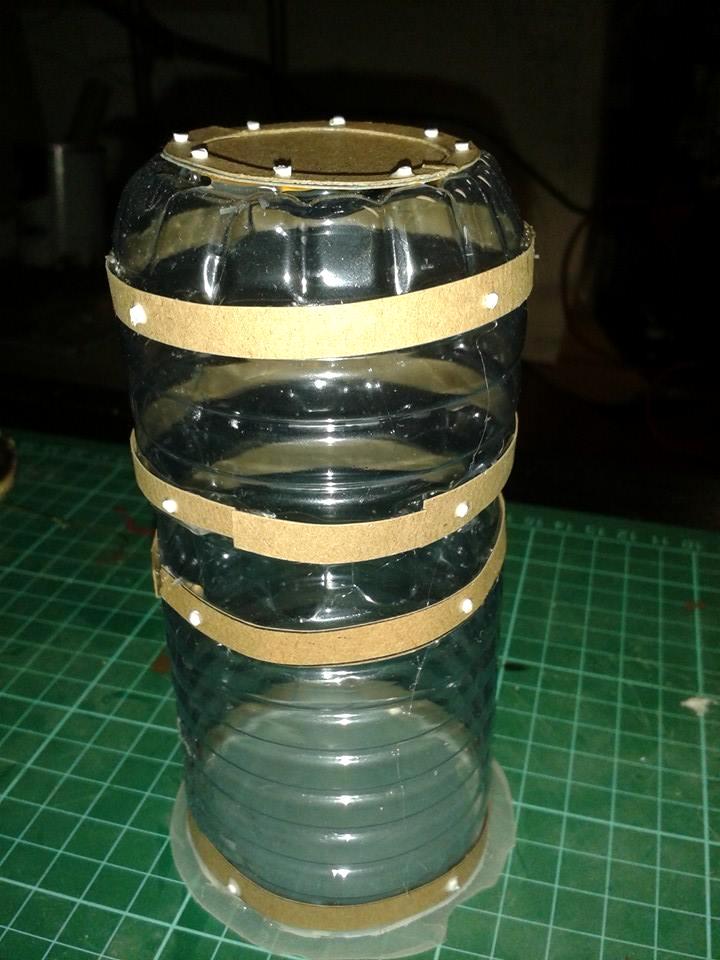
This is the first or 'core' design for the oil tanks.
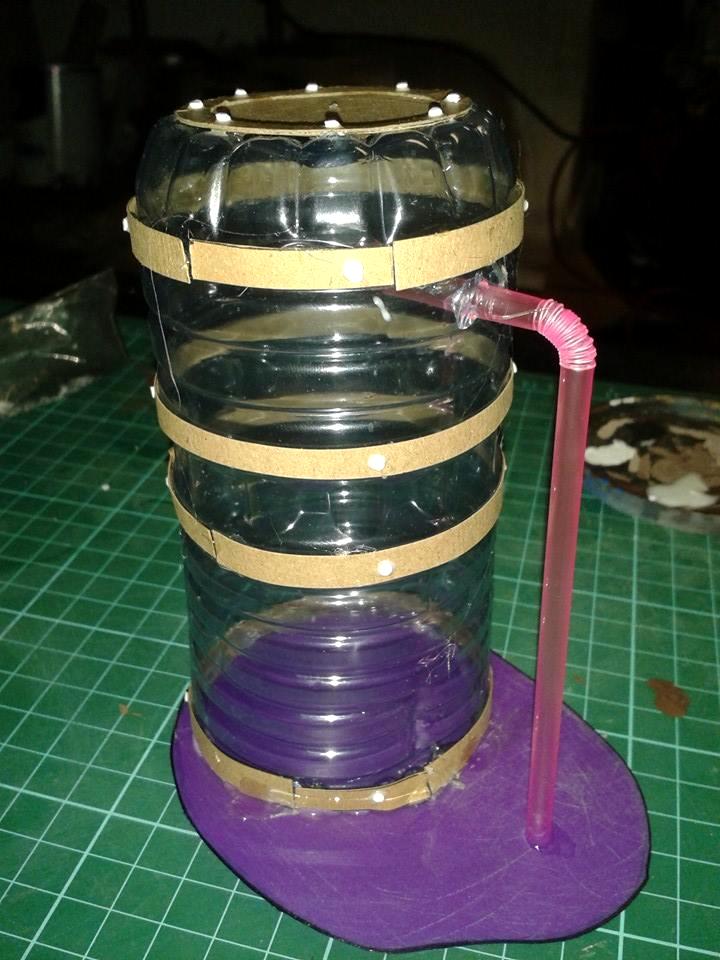
The second design has a pipe added.
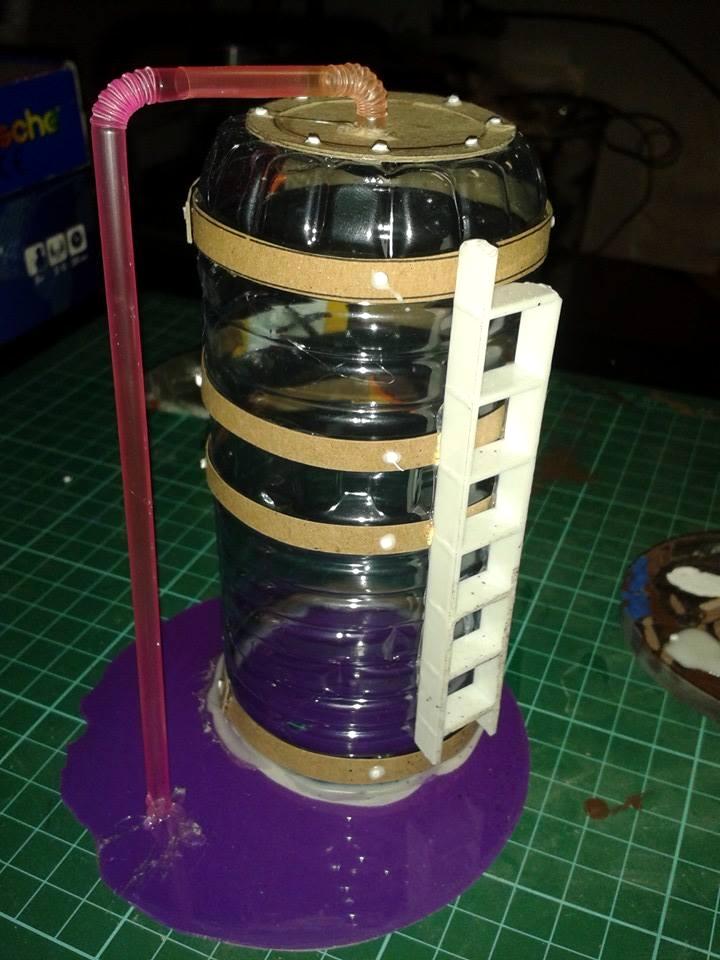
For the third design, we moved the pipe to the top of the tank and added a ladder.
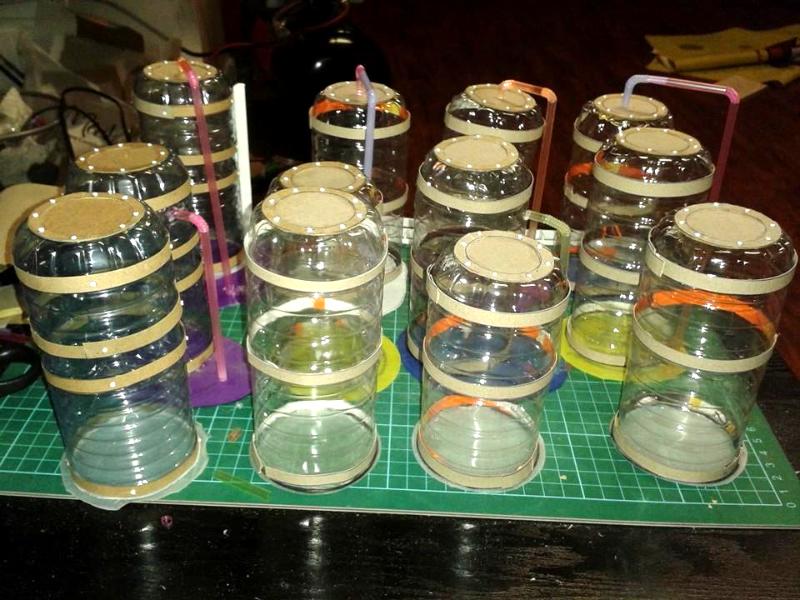
And here's our four sets, almost finished.
|
|
|
|
|
|
2015/01/07 19:04:23
Subject: Re:Peculiar Paul's Project Logs
|
|
Giggling Nurgling
|
So I got the airbrush unpacked and hooked up today! And the first target in my sights was the Dakka Jet.
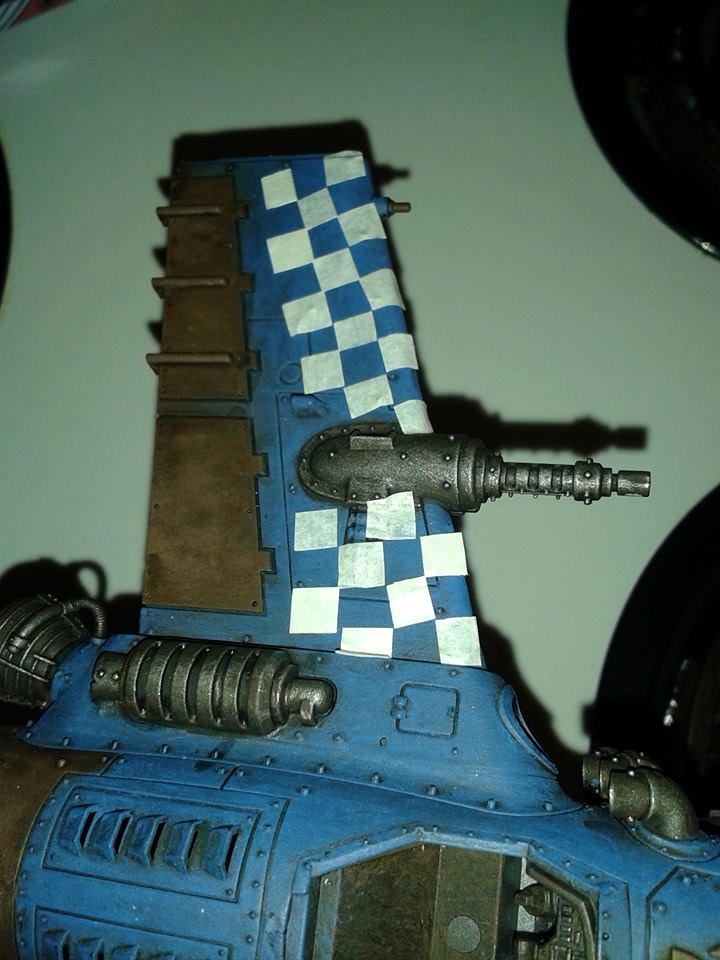
I started by making up a checkered stencil with tiny squares of masking tape. Took maybe half an hour to lay out both the wings. This will be my first attempt at airbrushing a model, so I'm kind of flying by the seat of my pants here.
A super fast spray with white, and I'm really happy with how the fade worked out. I need to do a little clean up on the overspray, but all in all it turned out how I had envisioned it.
With the clean-up, damage, and rust complete, I'm ready to turn my attention towards the pilot and the finer details.
Thoughts?
|
|
|
|
|
|
2015/01/20 22:05:16
Subject: Re:Peculiar Paul's Project Logs
|
|
Giggling Nurgling
|
Holy Smokes! I've been working on so many things, I didn't realize how behind I've gotten with my posting here! 
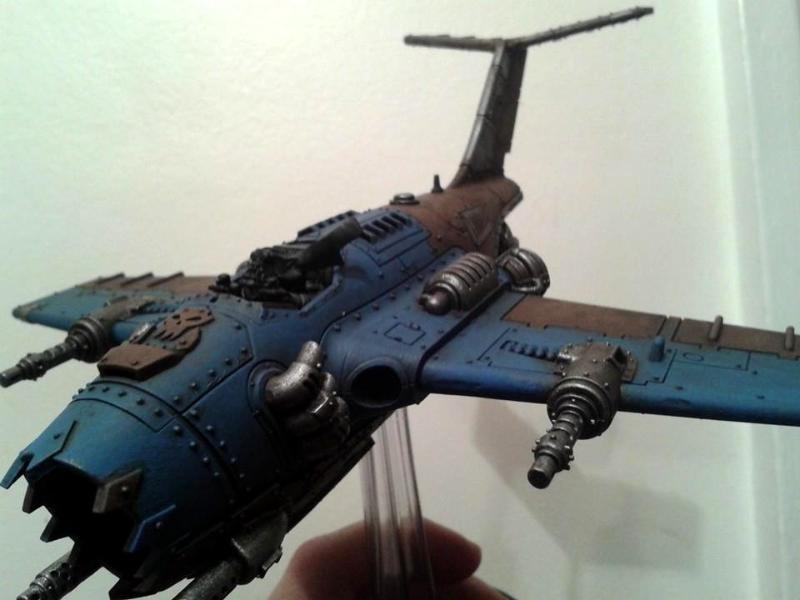
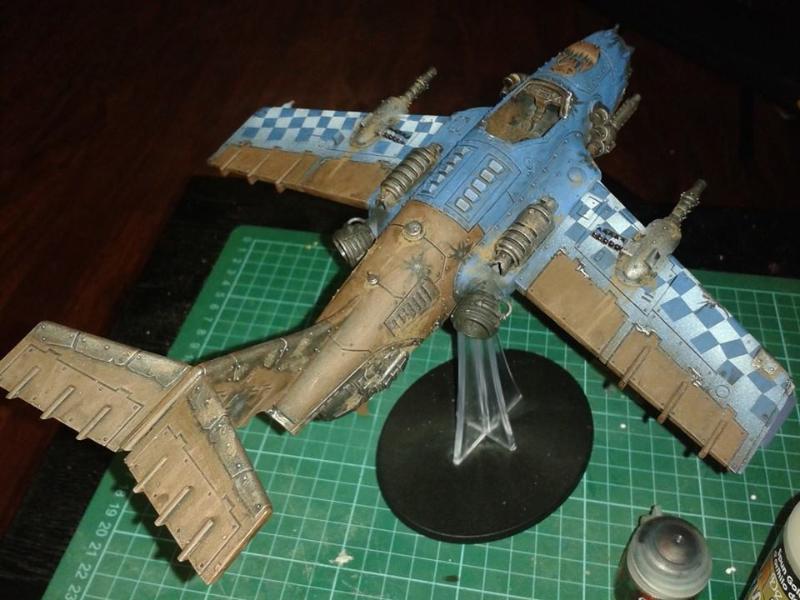
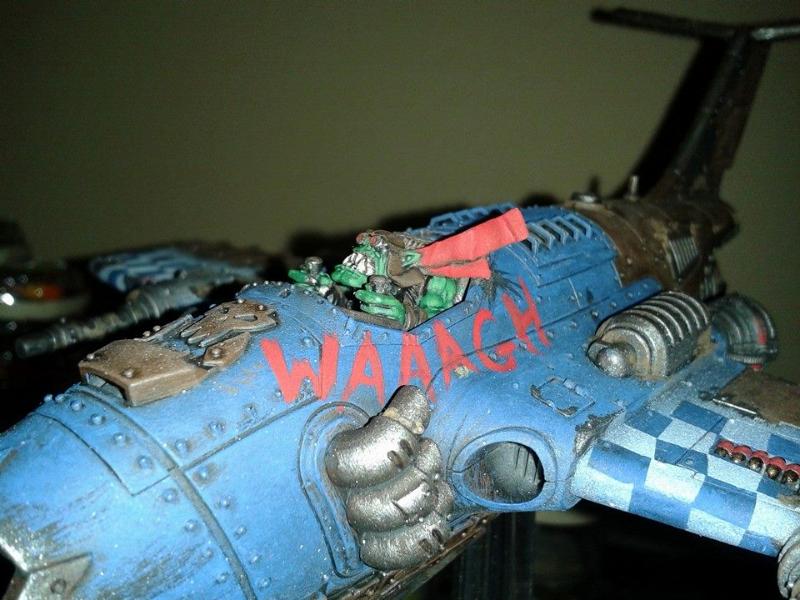
Here are some pics from the finished Dakka Jet
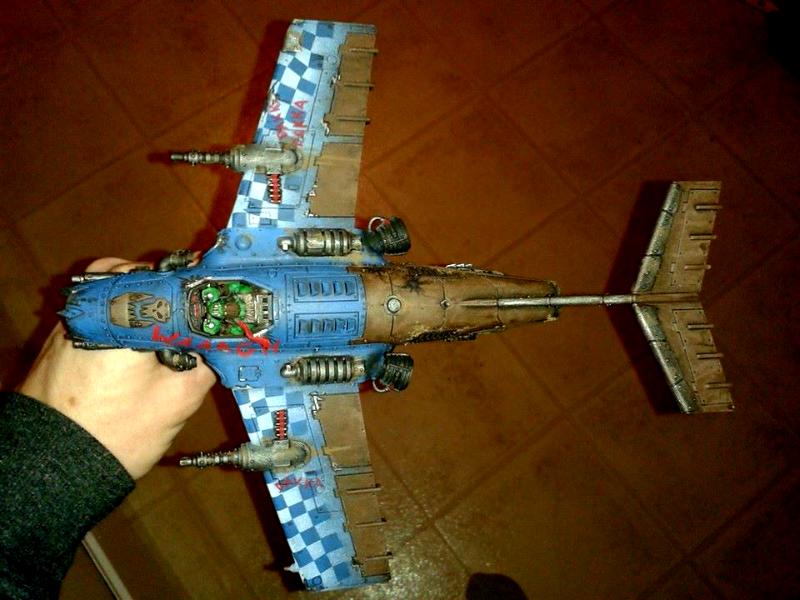
I'm really happy with the checkered pattern! Now I'm just looking for excuses to airbrush things!
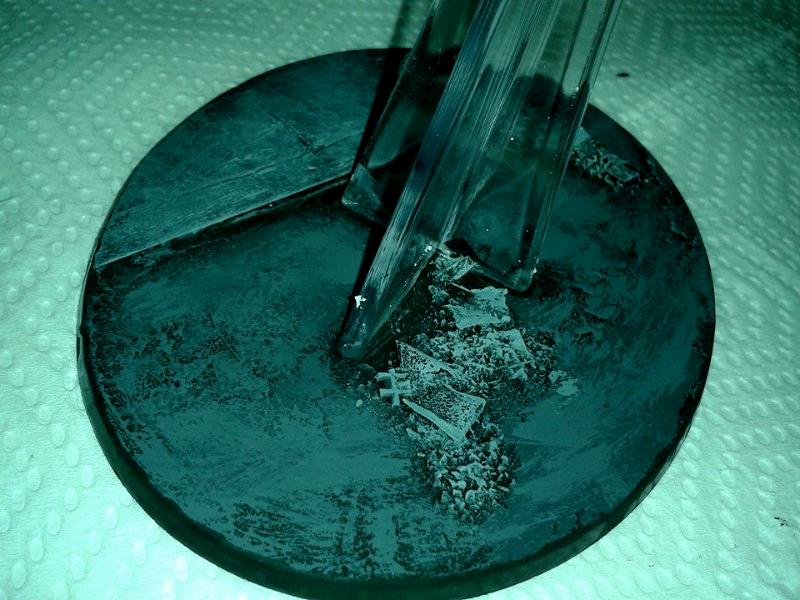
A little plasticard and rubble to finish up the base.
WAAAAGH!!!
I've got some scenery updates to follow shortly...
|
|
|
|
|
|
2015/01/27 04:32:39
Subject: Re:Peculiar Paul's Project Logs
|
|
Giggling Nurgling
|
|
|
|
|
|
|
|
|