Conversion of plastic Baneblade
After some Tanks done for Space Marines and mesin cuci dempoo Imperial Guard armies, Apoc came out and the fine Baneblade plastic kit.
Always wanted this big super heavy but never had an easy grasp at Forgeworld products.
Imperial Guard armies, Apoc came out and the fine Baneblade plastic kit.
Always wanted this big super heavy but never had an easy grasp at Forgeworld products.
Now we got a not cheap, but affordable Baneblade.
Started with 2 baneblades and a hellhammer. Built my own stormblade since I disliked the FW model.
Had some spare time tv led sharp between spring 08 and the 5thED/codex SM. Was caught by the idea of a super-heavy-company.
The poll to give me kulkas toshiba some impressions where to begin was successful (thanks to our dakkaites).
Result of this:
Part one:
Converting the chassis and the turret/s
Stormhammer.
Every Tank needs some background and the stormhammer was known to me only by Epic Armageddon.
My research gave me a first take on this Tank. It is a really contradictory built model. Seems like no two of
the existing scratchbuilt ones are close to the old Epic model.
Here is my try on it.
Rules = taken either from epic or epic armageddon.
Sure is 4x heavy bolter (sponsons), 2x turret with twin linked cannon. Old rules had battlecannon, newer had demolisher.
May get around problems with exchangeable main guns.
Base for the tank
Used the plastic kit for the chassis. Tracks and lower hull completed and painted once.

Next on my list was to position the guns and get the upper hull to support them.
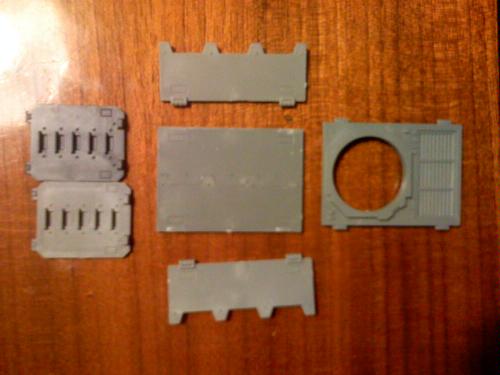
Built 2x turrets from spare predator parts. Most of them hatches and doors.


Parts used to form the basic turret (gets additional design):
Built turrets positioned to get a feeling for the looks:


Built the engine section.
Changed the upper hull with a saw. Needed space for the lower main turret and a part of the hull piece was planned to be
repositioned. Had some inspiration from the old epic model, but the Baneblade is different in his front.
Parts to be used for the upper hull:

Space for free movement of turrets tested:

Front hull newly defined to be more like a stormhammer:

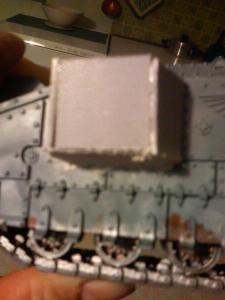
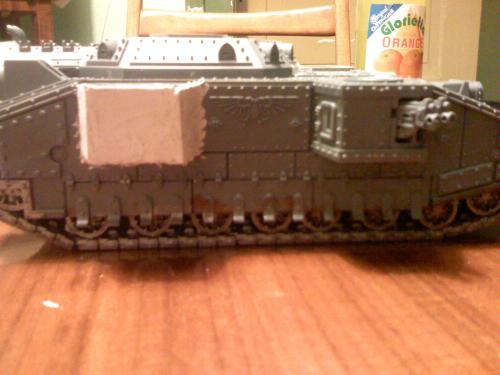
Used a piece of plasticard and a rhinohatch to rebuild front.
Front completed and gaps closed with plastic putty:

Cut out a predators/razorbacks turret-emplacement for 1st and 2nd guns.
Used one at the main hull and the other at the upper part of the hull.
First recut baneblades turret-emplacement:

Inserted predator-turret-emplacement and closed the hole with spare plastic from the sprues.
Strengthened the parts with additional plastic. Closed the gaps with plastic putty.


Both turret-emplacements at the hull:

Added the armor plates at both sides. Fitted unused armor plates and some rhino doors as "surface" on the hull.

Combined the gun emplacement and the main hull. Filled holes with plastic from sprues / plasticard.
Filled the gaps with plastic putty.


Main hull is ready to fix the sponsons and extra bitz.
Next step will be to build the sponsons, after them the two turrets get their form and function.
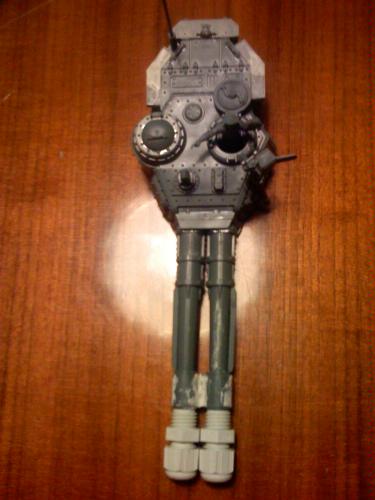
The Main guns
First to start with the turrets to see where conflicts in movement will occur.
Used a plastic pipe to add some space to the side of the turret. Sawed the pipe into 3 pieces.Took 2 of them to form the flanks
of the turrets. Filled the gaps first with spare plastic from the sprues and then with plastic putty.
Polished the surface and got a second layer of plastic putty. Polished again to achieve a smooth surface.


Tested the guns to swivell undisturbed. Got a metal pipe for the guns and a spare piece of the plastic pipe for the "gun-shield".

Glued a base as "turret-mount" under the turrets. Positioned the Guns.


The turrets will get a few "pimp-mybaneblade-parts" to look imperial.
Guns upgraded to TL-Demoliser:
To counter the additional weight of the Guns ( metal pipes) the turrets got spare metal parts inside.
I have used old GW-parts from my bitz-box,but usual any heavy piece does the trick.
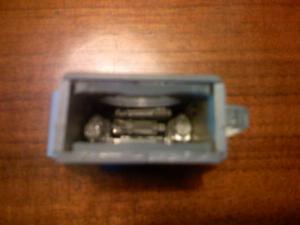

The Demolisher consists of 2 metal pipes, one smaller 10 mm and a slightly bigger 11 mm (diameter).

Guns and turret from side and above:


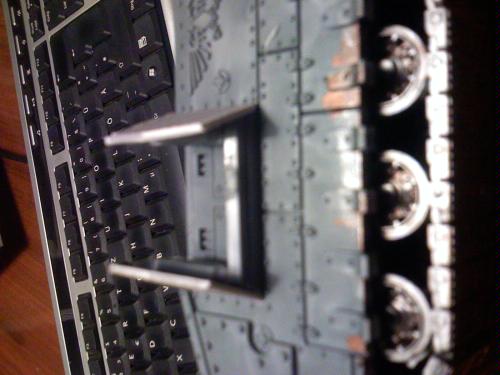
Complete turret front view:

Turrets need their hatches and some work on teir gunshields.
Exchangable main guns:
The Stormhammer has no 40k rules now, so I thought to add the option to 3 different patterns.
Epic style stormhammer with TL-battlecannon => long barrels.
Epic armageddon style with TL demolisher => short thick barrels.
own datasheet type with TL stormhammer cannon => midsized barrels

Any of those 3 barrels can be used with this turret:

Standard barrels are 2 metal pipes. Epic:A barrels are moved onto the basic metal barrel.
Demolisher Cannon consists of a plastic pipe with 16 mm diameter.
Was built of those components:

One pipe is the "outer" gun-barrel. A second pipe gets cut into a spiral and is used as inner barrel to reduce diameter.
Small plastic part added to fit the 16mm gun-barrel over the 11mm metal basic-barrel.


The complete demolisher shown in reference to the basic gun-barrel:

Next job are the secondary guns and the sponsons. Could either do with more "towering" sponsons or go for auto-targeters.
The secondary Guns
Old epic stormhammer had his secondary Guns at the top of the "sponsons" (maybe more turret mounts than sponsons).
Decided to combine the new plastic Baneblade kit with some ideas from the Old metal model.
So this super-heavy will field 4 sponsons,but only the forward left/right sponsons come from the plastic kit.
The sponsons accompanying turret 2 will be higher,they may shoot over the first pair of sponsons.
For those second pair,I try to make them from plasticcard and spare plastic.
Made the original Baneblade sponsons,but without the gun turrets. Will add targeters as replacement for the turrets.
Started with the second sponson-pair.
First build up with plastic from the sprue to get the side of the sponsons in an angle like those original sponsons.

Got the plastic in layers to "enlarge" the space where the sides will be mounted.

Had both sides glued to.
Got all 3 sides closed.

Placed the rear sponsons as seen on the old epic model.
Had to work with this model at a lower profile than the old one. So my sponsons couldn't be exactly and I had to change from
4 turrets to 2 turrets plus 2 typical sponson mounts.
To compare the size of the sponsons:
From above:

Parts used to build those sponsons:

The baneblade turrets would be useful for the rear sponsons.
Can take only 4 secondary guns in epic/epic armageddon. But now I have a position at the front where a gun may be handy.
Maybe a exchangable turret / hatch combo will solve this.
First set of guns will be the four heavy bolters.
The forward sponsons should use auto-targeters (like shadowswords do) and I had to find some.
Existing range was only for space marine vehicles and I wanted them for IG. Decided to take an"upgrade" from the
"command-tank-upgrade-sprue". Combined this with a piece of wire.:

Could have tried in plastic,but metal is tougher if used as moving part.
Made a hole in the top of the sponson and fixed the end of the wire with the weapon mount of the Heavy bolters.
Now this targeter will always follow the direction of the guns.


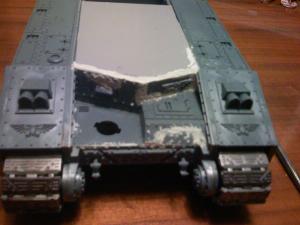
Completed Heavy bolter sponson with targeters at the stormhammer:

The guns for the rear sponsons needed turrets and those small baneblade-turrets seemed viable.

To move the weapons those turrets have to be mounted at the scratchbuild sponsons.
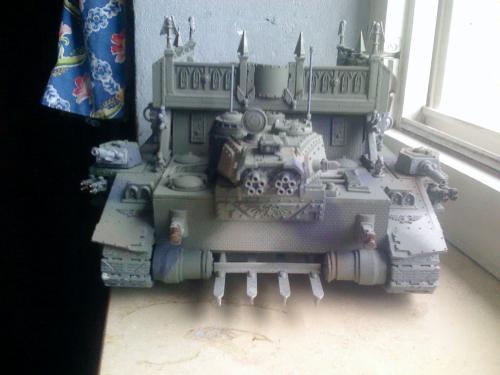
Had another look at the Tank. Seems this will be the weapon config:


Main guns are free to move and those secondary have also good fire lines.
- Front main gun is 200°
- Rear main gun is 360°
- Front heavy bolter and sponson HB are 45°
- Rear HB turrets are 360°
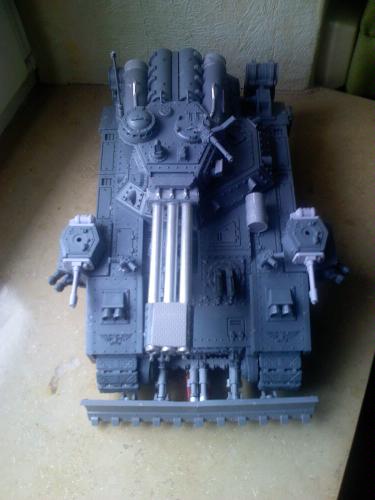
Main and secondary Guns placed at the Hull:
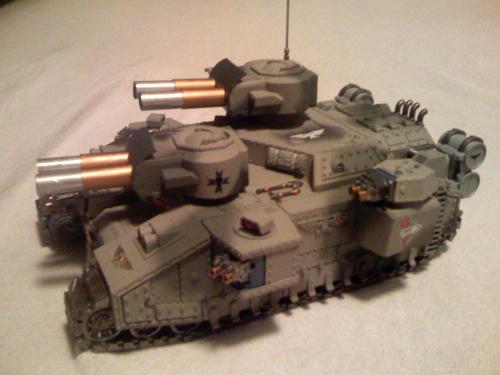
The stormhammer in the "epic armageddon" variant:
-2x TL Demolisher with 4x heavy Bolter.


Main guns in identical place as old epic mini. Secondary guns in turret and sponsons.
Looks like this if facing a stormhammer:

Completion of the Modelling:
Final stages:
Add some unneeded but nice things like tools (shovel, pick) and other parts from vehicle upgrade sprues.
The included baneblade parts provide some basic stuff (antenna, decoration, a toolbox) but it is no problem to
recruit a few pieces from imperial tanks or space marine vehicles. Especially the personal gear (IG) and a searchlight
or hatches may give the tank more individuality.

I have decided to use parts from the baneblade and leman russ. Decoration and antenna from the baneblade-kit and
hatches,tools and personal-gear from the russ. Filled the last gaps with plastic putty.
This tank has now 2 configurations:
-a epic compatible
-a homebrew datasheet
Achieved is this option by the use of pipes as main gun. I can change with those "pipe-in-pipe" guns from demolisher to
battlecannon. Just use a long inner pipe or none.
Option epic compatible:

Option datasheet ( 5x HB):

Next step will be the paintjob.
Painting (camo-scheme):
First layer and additional layers done with airbrush set. (compressor).
Starting with "dust grey" to cover the plastic with a basic paint and also reducing the difference between used materials.
I'll add a second, a third and a fourth color to achieve a "greyish" camo-scheme.
used colors:
-tank grey
-dust grey
-earth
-greenish grey

SHT with turrets ( weapons only partial installed ):


Stormhammer with 2nd layer:

Stormhammer camo consists of "dust-grey" + "green-grey" + "earth" + "tank-grey" .


Added 3rd and 4th color to the camo-scheme.
Painted the details:
- weapons and movable parts in metal colors.
- fuels drums and additional wargear in greyish colors to fit with the camo.
- markings = ad mech in black&white, eagles in gold, scrolls in bleached bone.
- used decals for markings.
From above:

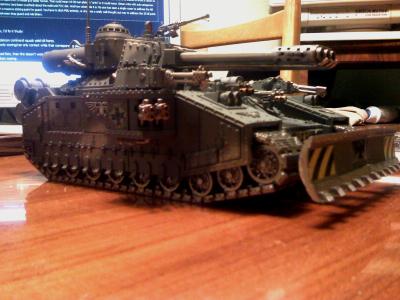
Left side:
The back of the tank:

Right side:
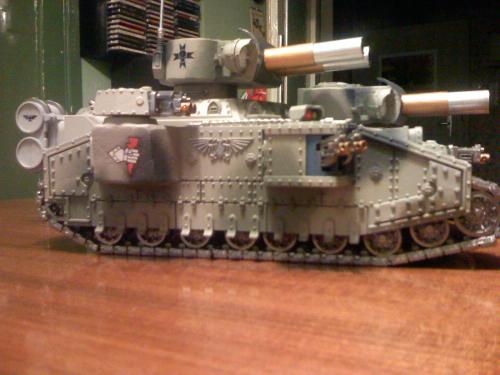
stormhammer is completed!
Part II
Turret Conversions to change the main weapon
Since we have now a complete Tank done,there is time to look at conversions of the main weapon.
Chassis and superstructure stay as "out-of-the-box" build then. Sponsons could be changed but I think sometimes its a
serial production of vehicles that defines a type and most Tanks share some parts to be easier built and serviced.
Lightblade:
The Lightblade fields a double barreled TurboLaser.
I'll do this with 2 leftover baneblade cannons + some spare ammomags from Predator-tanks + 2 fine pieces from my job.
(The focussable end of the barrel is done with a piece we use to put cables watertight into any device.)

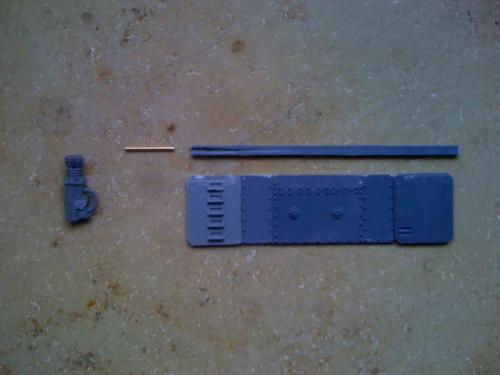
The set of parts to build it:

Glued the original turret together and added some sprue pieces to strenthen the weapon mount.
Added 2x2 ammo-mags to the side of the turret-magazine.

completed turret with additional ammo-mag to the rear,commander and heavy stubber,antenna.
Test-mount on existant baneblade chassis:

Rebuilt the sponsons to fit autocannons where heavy bolters were before.
Spare autocannons (from coax, sentinel or heavy team) shortened and cut the HB at the ammo-fed.
Glued the autocannon to the HB.


Mounted the turret and the sponsons on the chassis:


Main gun "upgraded with tubes and muzzles shortened:

Added details (smoke launchers, ladders, cables, exhaust vents,.....) and closed any gaps with plastic putty.
Any cables or other tubes were done with metal wire or alu-tubes.
Camo-scheme applied and first basic colors (metal parts) done.


Painted:

Firesword:
A Firesword is more work than a standard weapon change, since this tank has a different front if compared to a baneblade.
So I start with the hull and replace the demolisher with TL-heavy bolters (spare original baneblade ones).
To fill the big weapon mount of the cannon i'll use plastic putty and emulate the design of the chimera hull mount.


First test of the front weapons and sponsons:

Main gun and turret:
Began with a set of 3 aluminium tubes for the barrel of the inferno cannon. Used the old H-K missile pod as base for the
weapon mount. 3 holes later and with added plastic tube halves the cannon may look a little "common" but this will
change to a specific "flamer" design (warhound style).


Inserted smaller alu-tubes into the barrels to reduce the muzzle's diameter. Plasticcard fixed to the barrels to ensure
it has a flamer design. ( needs some holes to be typical imperial).
3 underslung small alutubes represent the usual "injection" device of any imperial flamer.


Built standard turret and added spare fuel drums (baneblade rear) as Promethium tanks.
Cut some flamers and parts from the plastic sprue for connections between the turret and tanks.
Plastic tube and a halved fuel drum taken to model additional storage for chemicals (maybe also promethium?).


completed turret with hatches and stubber, exhausts and insignia. Had to change it a bit after I realized it could look
better and evade "bugs bunny" comments.

Additional "goodies" came from lascannons (cables), flamers (pipes) and old tank sprues (exhausts, underslung tanks).
New front-shield made from 2 IG-tank shields and lascannon-barrels for longer hydraulics.
Firesword has now most parts, but could get a second sponson.

Painting:
Given a 3 color camo-scheme: dust grey, tank grey and stone grey.
Firesword right side:
Firesword left side:

Shadowhammer
The first tank without a turret, the shadowhammer fields a missile pod as main armament.
Decided to use a platform (360° move) and the front heavy bolter also 2 sponsons to complete secondary gunnery.
Chassis:
Standard chassis (baneblade) changed to replace the demolisher with enhanced sensors.
Cutted the demolisher mount from the upper hull.

Added a plastic "stick" made from sprue to support the sensor mount. Base for the sensor is a halved predator/razorback turret mount, followed by a sisters lower hatch and a redeemed chaos sensor array of the squad leader sprue for apoc.
Used a sensor and light from the space marine vehicle sprue to pimp the sensor array a bit.
Basic sensor mount:

Filled the place of the cut off parts on the upper hull with plastic of the turret-mag and a piece of CoD low-walls.
Fixed the gaps with plastic putty.

"Married" the upper hull with the lower hull and added the sensors, front heavy bolter and sponsons.

Sponsons only change is the swap of the lascannon barrel for autocannon barrel.
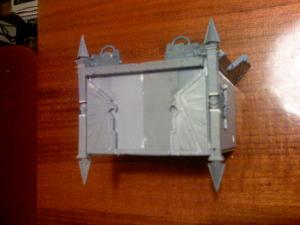
Platform:
Consists of CoD (citys of death) parts. Useful platforms, ladder and low walls taken as base to build a "U" and strengthen it
underside with sprue parts. Cut 2 platform-pieces in half (diagonal) and added a piece of plasticcard at the front to close
the "U". Added 2 spare rear "fuel drum mounts" of the baneblade sprue as rest for the missile pod to come.


Lower walls and ladder used as railing for the platform. Spare plastic piece from a baneblades upper hull added as "frontshield" to the platform.

Added some skulls (whfb skeletons) and imperial iconograpy (IG tank upgrade) to the platform.
Shortened the engine exhausts about 3mm to keep the platform full turnable.
Vehicles Antennae were fixed at both sides of the platform.
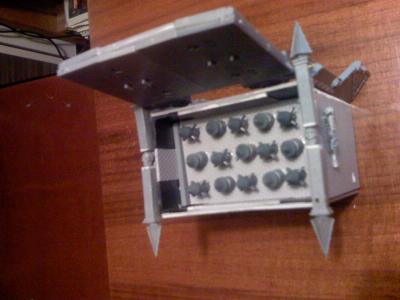
Missile pod:
Found a nice plastic piece in form of a "L", fine support of any conversion work.
Is sold in metres,so took 2m of it. 4x plastic "L" and 4x pieces of plasticcard used to form a rectangular box.


With a few sprue parts as support and another piece of plasticard closed both ends of the box.
Several HK missiles (IG tank upgrade) and baneblade ammo cut ( 50-60% length) to use as rockets.
Placed them in 3 rows,achieved 15 missile heads.

Used 4x halved predator/razorbacks turret mounts,need only the exhausts to build the rear of the missile pod.
Added a piece of sprue and closed any gaps with plastic putty.

Created a "vehicle icon" from: Dark angels winged skull and sword, empire white wolves hammer, skeleton spear handle.

The hatch for the missile pod is built with those parts:
heavy flamer (baneblade), CoD pieces,rhino hatches, 1,5mm wire, skulls (skeletons).
Glued 2 sets of rhino hatches together. Added plastic to reinforce it. Made a hole in 2 plastic pale and the 2 heavy flamers.
Cut the flamers into shape and glued them to the door. Took the 2x pale and fixed them on the pod.
Put the wire through the holes.Used 2x pale and 2 skulls(decoration) as outer border.
2 building-pieces (aquilas) added to the doors surface.


Used the spare turret sides to build the "hinges" for the missile pod.First half used to make a triangle.
Took a piece of wood (recruted from kitchen and used for shashlik) as axis.
Made 2 holes into the pod and out the "axis" through, fixed both ends in the plastic "triangles".
Mounted the missile pod on the platform.

Built a "hydraulic cylinder" from 2 tubes (alu, 10mm + 11mm), wire 1,5mm, plastic sprue and heavy flamers(baneblade).
Bigger "outer" tube and smaller "inner" tube got holes at their ends. Put a wire through those holes at each end.
Took the flamers and some spare plastic sprue and made holes into them (4x).
Put the wires (added to the tube) through the 4 plastic parts. Glued the former flamers to the bottom of the platform and
the plastic sprue parts to the missile pod in a position where the tube is at maximum lentgh.
Strenghtened the plastic base at the platform with additional plastic pieces (CoD).

Weapon now movable (platform 360°, heigth +70°).
Painting:
Used 3 color camo-scheme: greenish grey,dust grey and tank grey.
Shadowhammer with Missile pod turned to look at rear:

Shadowhammer left side:

Add upcoming SHT here:
Part III
Conversions of the shadowsword/stormlord kit.
Stormlord:
First kit to be changed is the stormlord. Out-of-the-box model isn't so bad, but I think it can be upgraded to a real fine model.
So heres my try:
- 1) enlarge the stormlord, since the original model seems to be to small.
- 2) use a turret mounted VMB, since this "gatling" style weapon needs to move for effectivness.
- 3) add a ramp, since SHV can transport more than infantry.
Enlarge the chassis:
Halved the bottom plates, added 5cm plasticard and strengtened it ith spare parts of the plastic sprues.


Built some sprues-parts in to fix the second level plate as new floor.
Test with guardsmen achieved as result enough space for 40 of them, course of action seems to be right.
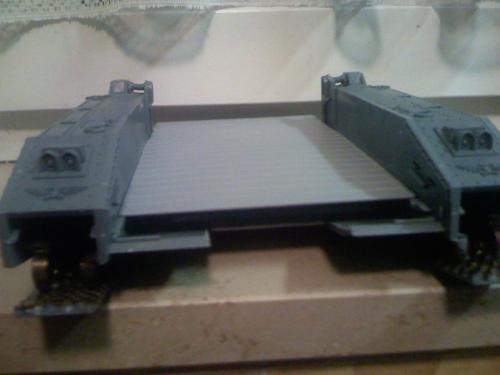
Compared the size of the "pimped" stormlord-chassis with a shadowsword:

Mounted stormlords VMB into a baneblade turret, added some plastic on the sides and filled any gaps wit plastic putty.

Build a new front from spare plastic sprue.
Used some additional parts of model railways ( 1 bridge, platform ).
Filled the gap between the tracks-housings and the new front with plastic and plastic putty.
Added plasticard to the front. Will be enhanced for more structure when basic chassis is ready for details.
New front:


Glued the sides of the bridge as support T-steel (cut the unnneded parts off) to hold the 3rd level on the left and right.
Existant fuel-pipes cut to get the needed space.

Test of the new plasticard main weapon mount (with 3rd level placed, not glued yet):

Main weapon mount done. Centered hole for standard baneblade turret.

Enlarged the tank also in length. Added 4cm with spare parts from the sprues, plated it with plasticard.

Put some track-guard enhances ( ie former rhino hatches) as mounting plate to both sides.
Cut the drums diagonal in, to fix them on their old "connection", additionally made a seperate "fuel-pipe" from alu-pipe ( 5mm ).

Moved on with the gun-ports. Would not look right if the passengers did not have some protection, so i thought about gun-ports.
Armor-plates to swivell up to get free sight, but also swivell down when the usual side armor value shall protect.
Took 2 rhino doors and 2 parts of the baneblades/shadowswords side-armorplates, plus 2 h.flamers and 2x 1cm wire ( 1mm diameter).
Cut the plastic sprue at length, sawed 1mm out and fit the wire in.
Glued the "plates" together. Made a hole in each h.flamer and combined the "flamers" ( as hinges) and the plates and the plastic sprue to this:

Mounted the hatches to the stormlord:


Build the rear loading ramp.
One piece of plasticard outfitted with an hinge, same design as the hatches.
Strengthened the ramp with parts of the plastic sprue and also a few snippets of the plasticard sheet.
2 halved lascannons glued on ( predator turret ) to get it more "technological".
Ramp mounted on the rear:


Set 2 alu-pipes as exhausts on the ramp-mount. Put the first half of 2 old Battlecannons on top of them.

The vehicle as it is now:

Made 2 firing platforms for infantry to stand on and have a chance to actually look over the sides of the Tank.
Possible to remove them when embarking non-infantry units in the lower level.
2 strips of plastic in L - shape and plasticard used to form a C - shape. Sawed out where it met with side or front details like hatches or cables/pipes of the interieur.
Put some details into the flat surfaces inside the Tank. Used the engine-hatch and tech-shrine of the kit, added some spare hatches from other imperial tanks and
completed it with plasticard and pieces from the plastic sprues. Filled any gaps with plastic putty then.
Inner details with mounted firing platform:

Inner details with removed firing platform:

Building 2nd level platform:
Base is plasticard, strengthened with additional plastic on its edges and a crossing bar of plastic to prevent it from twisting when heavier models are placed on.
Raising some "walls" at midsized heigth around it for cover ( using spare parts from the COD buildings ). As battlement on top of the "walls" i have used those
heavy stubber emplacements from the shadowsword box. Put some lasguns and ammo-crates ( old IG metal parts ) and a heavy bolter ( sammaels speeder )
with the heavy stubbers on the battlements.
Borrowed some dread-sarcophagi-plates and a few bretonnian knights helmets figurines as decoration for the tank.
The stormlord unpainted but near completion:


Added some pipes, wires, IG tank hatches and skulls (whfb skeletons)/(SM cpt) to upgrade the details a bit.
Raised the main guns emplacement with plasticard. Closed all the gaps i found with plastic putty.
Near complete stormlord:

Painting the stormlord
Using an airbrush set with those colors:
- revell 75 dust grey
- revell 78 tank grey
- revell 67 green grey
- revell 87 earth brown


Painted the interieur in grey and "weathered " it a little with black wash and earth brown.
Metal parts in the usual boltgun metal + tin bitz combo done.
Inside the Tank ( with mounted fireplatforms ) and rear ramp closed:


The stormlord with decals from side and front:

