Ed at Trollforged was kind enough to send me enough models to push through my AdeptiCon army, and I mean to make the most of the opportunity by getting them all painted between now and the first week of April- just over 2 months!
Update March 31: I am finished with the AdeptiCon army! More pics in the update here.
Update March 10: All 150 Grubs are fully painted! More pics in the update here
Update March 3: One set of 25 grubs is painted to completion, now to finish the other 5 sets! More pics are in the this update.
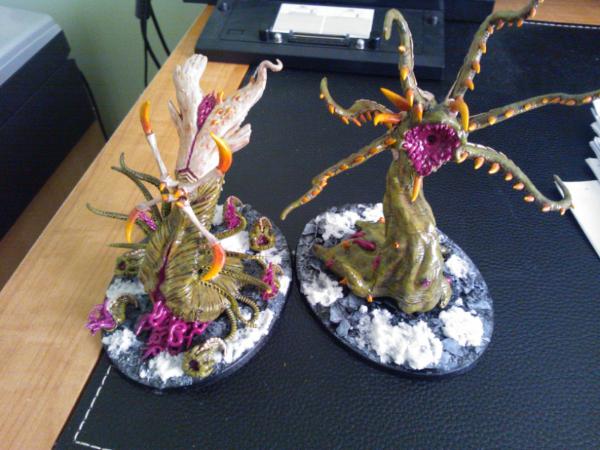
Update February 19: Here is a sample model painted and based. Now to mow through 150 like it . More pics are in the this update.
Update February 3: Here is the lineup assembled and primed! From back to front / left to right in the below pic it is: Tervigon, Dakkafex (converted with Devourers), Flyrant (converted with Devourers), Prime (converted with Devourer), Zoanthrope, Venomthrope, Termagaunts, AOBR Marine. More pics are in my the update further down the page here.
And these are the finalized lists that I'll be putting together for the Team Tournament:
Steve's List: (uses fortification) Tyrant w/ Wings, 2 x TL Brainleech Devourers - 230
Tervigon w/ Cluster Spines - 200
30 Gaunts - 120
Venomthrope - 45
Bastion - 75
2 Carnifexes, each w/ 2 x TL Brainleech Devourers and Adrenal Glands - 330
Total - 1000
John's List: (uses 2 heavy slots) Prime w/ Norn Crown - 165
29 Gaunts - 116
29 Gaunts - 116
28 Gaunts - 112
3 Zoanthropes - 150
Mawloc w/ Adrenal Glands and Toxin Spike - 170
Mawloc w/ Adrenal Glands and Toxin Spike - 170
Total - 999
Remaining tasks:
Week 1 of March - Finish first wave of models (150 grubs)
Weeks 2, 3, and 4 of March - Finish second wave of models (3 Zoanthropes, 1 Venomthrope, 2 Carnifexes, 2 Mawlocs, Tyrant, Tervigon, Tyranid Prime)
Week 4.5 - Base and seal models, pack it all to fly to AdeptiCon!
Edit: Here is the original post spoilered, which laid out some of my plans. This is more for my benefit to keep it here so I don't lose track of things
Spoiler:
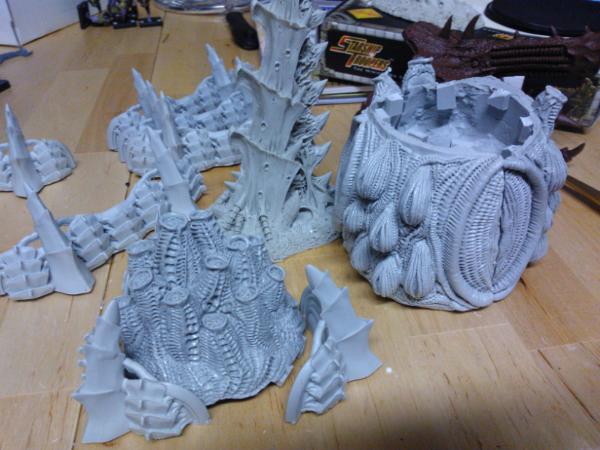
First, I had to clean out my hobby space yesterday, before the models arrived that night. Here is the result:
Second, I had to have a plan of what to use the models as in an all-wyrm-themed Tyranids army.
Carnifex: Wyrm from Trollforged..... Tervigon: Fiend from Trollforged
Termagaunt: Grubs from Trollforged....... Zoanthrope / Venomthrope:LE Grub from Trollforged
Hive Tyrant: Brood Mother from Gribbly Miniatures...... Biovore: Burrower Bug from Mongoose, now also called Sand Wurm by Rebel Minis
Mawloc: Dread Maw from Forgeworld........... Exocrine: Exocrine from ArmorCast......... Gargoyles: Finecast Rippers from GW (just the cyclops ones) with Gargoyle wings
There are some other models that may get added in the future (Ed at Trollforged is still planning to sculpt more grub based variants) but these are what I am going to be using for this army push.
Third and finally, I had to come up with a few lists, to figure out which models to build and paint! They all overlap with the exception of the Heavy Support selections and some Gargoyles... trying to save effort, after all!
Carnifexes with Biovores: Hive Tyrant, Wings, 2 x TL Brainleech Devourers - 230
Hive Tyrant, Wings, 2 x TL Brainleech Devourers - 230
3 Carnifexes, each with 2 x TL Brainleech Devourers - 450
Mawloc - 140
Mawloc - 140
Bastion - 75
Total - 1850
And that's it! My next update will show my assembly of the first miniatures, as I push to try to build and paint the following models by the first week of April . Wish me luck!
I really like the trollforged stuff but I think all this proxying might be a pain in the arse to keep track of. I do think those rippers will be too small for gargoyles.
Did you go for more of the humanoid aliens? Was their not a wider range than this like the Queen or the Adult Swarm?
I think once you start getting things built it will help the whole idea come together.
Guys, thanks very much for the comments! I have already spoken to muwhe about the army, and will be sending an official list of the models I plan to use complete with pictures as soon as their model policy is up (right now it leads to a page not found).
I attended this same event in 2012 with a Count-As army. I make sure to make every model extremely clear- I use GW weaponry, and paint to make everything very obvious. If there is any confusion at all, I don't use it, so don't worry about that!
Here is a link to my gallery showing the army I made in 2012, which was part of the team winning "Best Heretical" for theme and appearance (mostly theme I'm afraid but I did my best on them). So, believe me that I will make sure that everything is 100% clear, and get full approval from AdeptiCon, just like I did previously:
Medium of Death wrote: Did you go for more of the humanoid aliens? Was their not a wider range than this like the Queen or the Adult Swarm?
I'm going for an "all wyrm" theme, so those models wouldn't fit in for this army. I look forward to seeing what other people do with them, particularly with the Queen, though . Ed also mentioned that he made the Queen such that it's upper torso could be put onto the Wyrm's lower half, for a grub-like Queen, which would totally awesome but isn't something I'm using here.
Awesome! I remember you talking about your Tyranid plans during the Kickstarter, really looking forward to seeing where you end up with this. I'll be watching!
Here are pics of the assembled lineup of models! The only model not represented is the Mawloc (Dread Maw from Forge World) as I'm still waiting on it. From left to right in the first pic below it is: Tervigon, Dakkafex, Prime, Flyrant, Zoanthrope, Venomthrope, Termagaunts, AOBR Marine.
I also posted the finalized lists that I will be building towards in the OP for myself and my teammate's team tournament armies. It turns out, my teammate wants to run a swarm army so less big bugs, but a lot of small ones! I can't decide if this is good or bad for me, but I'm actually looking forward to trying to mow through 120 - 150 gaunts! (120 if I don't do any extra for my Tervigon to spawn, and just try to tack those on at the end... 150 if I do enough for the Tervie, which is my plan).
That means that I will have the following painting groups, and tasks for the next 8 weeks until the event! I'll be marking off this list in the OP as I progress through it.
Gits, yes it does. Here is a great thread in the tactics section on Tyranids... I've filtered it just for jy2's posts, as his bat reps and ideas are the main inspiration behind my list / how I plan to use it. Basically, my hope is to give my 2 Carnifexes a 3+ cover save, and maybe get them in range to shoot something before they get blown to bits
On the lists in general, my teammate is a much more experienced Tyranids player, and he is going with a Tyranid Prime for an untargettable synapse source, instead of the Flyrant that I am using. Hulksmash also mentioned to me this is the route he was leaning towards with Nids. But as a complete tyranid noob, I am following jy2's tips and I also like the idea of the Bastion. I plan to put the Venomthrope inside and hide my Tervigon behind it for this event, or as much of the Tervigon as I can, since with the team tournament restrictions I have no Zoanthrope in the list.
My other motivation for running the list I am, is that I have these great models to use as a Tervigon and Carnifexes from Trollforged... and darn it, I'm going to use them!
So... if I'm understanding you correctly... you're suggesting that jy2 is "a complete tyranid noob" as HIS is the advice you will be following as opposed to your "experienced" tyranid team-mate??
Gitsplitta wrote: So... if I'm understanding you correctly... you're suggesting that jy2 is "a complete tyranid noob" as HIS is the advice you will be following as opposed to your "experienced" tyranid team-mate??
I'll have to point that out to him.
Lol, I guess it could be taken that way, couldn't it
@Ketara- Me too, let's hope my speed method works out! I will be testing it this weekend after all the assembly is complete.
For some reason I've found that worm monsters seem faster to paint than humanoids. It's one giant unbroken block of skin, so you can do 1-2 colors and wash away. Chitin's all about dry brushing, so it's just the things with a bunch of tentacles or limbs flailing about that would take the longest.
@gunslinger- Wow, I just checked out your plog, I hope you make it by this weekend! I am a project painter so it looks like we have that in common
@Badablack- That is encouraging, and I hope you're right! That fact, combined with my basecoating with an airbrush and likely just going a wash and drybrush on the main skin of the gaunts is my best chance at getting through the horde.
25 are complete, 50 just need heads. I attach everything with green stuff and super glue... it seems excessive sometimes but it is the only way I've found to make sure things never come apart.
@Ketara- Nice! I had a snow day yesterday that helped me get this lot going. Hoping to finish it tonight.
I find it very similar to "Wehrcast", the material that Wehrkind has cast figures in in the past for companies like On The Lamb. I believe Wehrkind uses a type of Smooth On, or similar material... a bit of it is his secret sauce . Similarly, Trollcast seems much more similar to "resin" than "plastic" to me. It's fairly brittle, can have some really good detail, but can also be prone to breakage, have bubbles, etc. Basically, all things resin is prone to, too but has the same benefits (high detail, able to get away with things not possible in injection mold tooling) and an even bigger benefit- it is Really cheap
What has kept me from projects like this in the past is, where else than GW can you buy an infantry model that you'll need a few hundred of without going absolutely broke? And also, that is not limited to just a few poses?
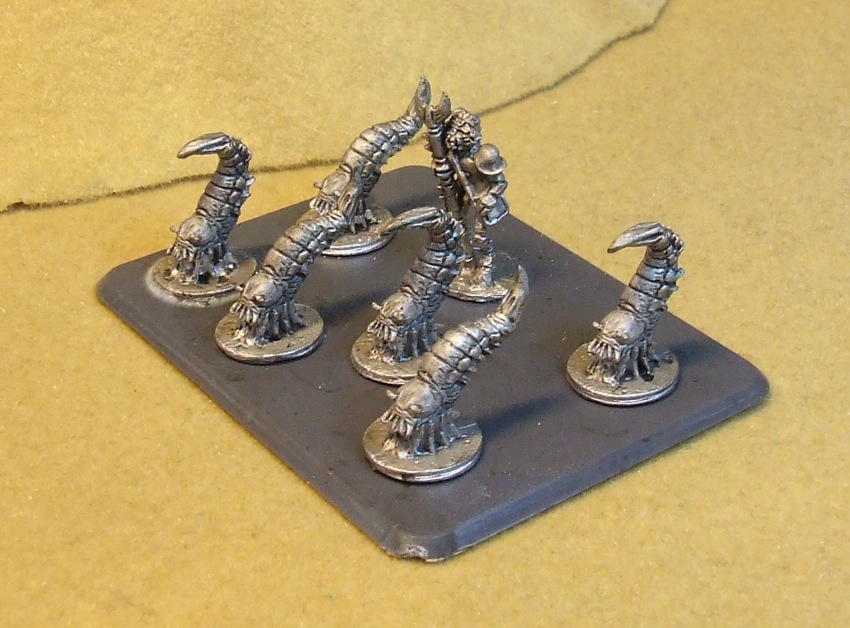
These grubs are great because there are 6 bodies and 6 heads, making for a lot of variety in the horde. The only frustration I have so far is I wish the sprue gate were on the back of the head- having it on the top means on some of them I damage the head when clipping it off. Not a huge deal for these models, but I just wish it were in a different place. That is my only gripe so far . I am growing to highly prefer resin over metal, because I can chop it up, and it is much less prone to chip once painted. So I would put these models right in there along with other resins- the quality may not be quite as good, but the price more than makes up for it, for me
One other note is that, I used a lot of greenstuff on the joints. However, I do this with all my models, so I'm not sure it's required... but particularly the joint between the upper and lower body of the Wyrm and Fiend required greenstuff. For the grubs, some heads fit perfectly on some bodies (the ones they were sculpted with) but not as well on other bodies, and so some GS is required there.
Finally, just like with Wehrkind's models, I see that they chop some parts off of the sprue before giving it to you, making a surface that may not be perfect. I believe the joint between the upper and lower body on the Fiend was like this- used as a gate since it did not need to show detail, but it makes the fit a bit harder to maintain. But, I'm used to digging into those parts to make them flat, or the like, if a sprue gate was not totally removed, as I did this with Wehrkind's models, too. It just means that some greenstuff is very helpful in certain joints if the fit doesn't match quite right due to those factors... same with the tentacles- some are designed for certain sockets and not others. If you want to mix and match, you'll likely want to add some greenstuff into the joint.
That is a great suggestion, though, and I'll keep it in mind for when my FW Dread Maws (counts as Mawlocs) come in, hopefully next week... as I'd like to be very careful about those.
I thought it would have been a bit confusing but you've proved me wrong. It's coming nicely together.
What are you planning with the bases? I notice there is a small lip on there, perhaps some kind of swamp or slime oozing off of these wriggling nightmares?
Thanks MoD, that means a lot actually! Your comment earlier worried me so I tried really hard to make the big bugs clear... I think the lineup shows that things will be pretty clear, and even moreso once painted
For the bases, I am planning to use slate and snow this time, as I actually thought of exactly what you said last time I used these bases, and already used up the "oozing slime" trick . Spoilered below:
Spoiler:
I plan to do a test base along with the test paint scheme, so should be able to show that within a week.
75 gaunts (half the total I need ) assembled! I've also decided that I will keep powering through gaunts and do them all in a month, instead of splitting them into two separate 2-week efforts. Once I'm doing them I think it will be most effective to keep at it until they're all complete... And I probably couldn't bear moving onto something else, then having to go back to them!
MoD - I'm not sure about colors, I have six grubs primed which I will test schemes with.
Man I tried to find a clip from he A-team last night to post, but no joy. Episode where they take on the mob and Howling Mad Murdock delivers a funeral arrangement to the other side. He sings a little ditty.
"The worms crawl in
The worms crawl out
They do the tango on your snout"
They put you in a little box
and cover you over
With dirt and rocks"
I can't remember the rest, but I thought that would be hilarious to have even as a song you sing at the beginning of a game to get your opponent relaxed .
Right on, Theophony . I will have to look it up! And no problem, bbb, now I can direct others to that post when they ask the same question as I know there was a lot of interest in the material (and is / will be more once he's caught up on his queue).
Cool stuff in this thread. I'm not generally a fan of Nid blogs, but this one is so unique that it really does stand out. Can't wait to see these painted.
Wow, Armorcast exocrine! I had one of those, once upon a time, though I can't really remember why- I never really collected Tyranids (at least not that I can recall).
The alternative models are pretty sweet.
Looking forward to being shamed by the pace of the army building/painting on display here...
Red_Zeke- Cheers for checking in here! Yes, I've actually procured the Armorcast Exocrines now... or at least, they're in the mail although I won't be getting them ready for AdeptiCon (likely just after). The Dread Maws from FW I do need for AdeptiCon, though... and tracking says those should be arriving today! So hopefully I can finish assembly tomorrow.
You're right Gitsplitta, my airbrush is hiding in the corner right now . It's time is coming shortly.
Orlando, my very first foray back into wargaming was with 100 hormagaunts... I removed the mold lines on each and every part separately, and got so frustrated I ended up selling the whole thing! Since then, I've learned that I can do assembly line quite well, but that I can't be a perfectionist about it.
Thus, my plan for painting is the following:
Airbrush base color
Brush on two detail colors (one for heads and back spines, one for fangs / tentacles / eyes). Maybe three, at most!
Wash entire model
Highlight (or more of a "selective drybrush" really) base color and detail colors (so 3 - 4 colors to highlight)
The only thing I'm unsure about, is whether I should paint another color onto the skin before washing. This wouldn't be too hard and the wash may tie it in together so I don't have to be as careful with it. Will experiment with this on my 6 test grubs that I've already primed.
have you considered a belly color like on snakes? I know your more wanting a worm theme, but you could do a slightly lighter/darker belly color as that's what would still be slightly covered by mucus/slime.
I hadn't considered that- what I was thinking with the second skin color would be just a lighter shade of the same color for raised areas / bulges, that would be applied pre-wash. So it would just emphasize the shading. However, this isn't something I have experience and I'm afraid I'll mess it up... so I may skip that altogether and just go with the base color, wash, highlight for the skin.
The other option was to paint some sort of pattern, such as a belly color as you suggest, but I do think it would make them more snake-looking than I would want so I'm not currently planning to do that.
Have you considered 'dipping' these? It might make the washing process a bit easier. I've never used it myself, but there are plenty of examples around.
I haven't just because of the stigma attached to it, although I think it's a perfectly viable method! However, I've been hoarding Devlan Mud for a reason... going to put it to use now
Used my snow day yesterday to Almost finish assembly. Just part of one Carnifex left to do today. So it is on to painting!
The Dread Maw was much shorter than I expected given the cost so I took a long time trying to figure out how to raise it up. Tricky because of the ground pieces it comes with. Here's what I came up with- going to paint those parts as if they're the roof of the container bursting open. I am doing snow basing so I hope some added snow will blend the two together, as well.
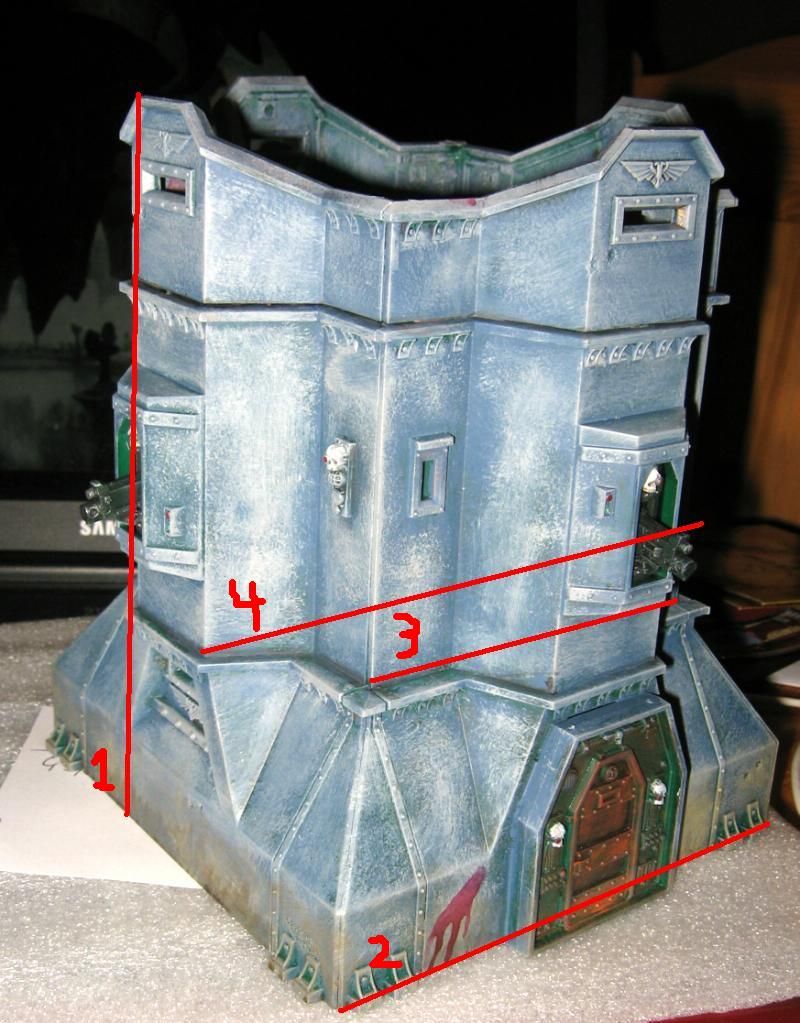
I also decided, as I'm a little behind schedule already, to punt on the Bastion. Just ordered this to use for it, which comes painted. May add a few alien bits to it when it arrives, will see how it looks. It is 5" x 5" x 9", so just a little tall, but as I have nothing anywhere near that tall to benefit it should not be much of an issue.
Have you thought about putting one of the maws busting through a rhino or some such? I like the idea of the crate, but two of the same makes it seem strange.
WM- Yeah, that was my exact thought, too. Unfortunately that's what I have to work with. They're attacking the 41st millenium's equivalent of a trailer park, I guess
I was just coming back on here to post that I may add just a small amount of industrial debris to the other big bug bases to help tie those industrial containers in. Hopefully I can finish a week early to have more time for the bases- the slate and snow should be fast, but any extra details would need more time.
Thanks for the unanimous, honest feedback guys! Already taken it onboard since I'm on snow day number two, and had chopped up bastion bits from my attempting this yesterday ready to go.
Behold!
Not as tall, but I can swap the other one over if someone takes issue with it being an inch short. Hope this works better for the pair
Have you considered standing the base up? You'd have to attach it to a heavy block to keep from tipping over, but them model the block to look like a fortification wall this thing just burst through. The mouth would be angled down towards the ground, but if set up high enough it could look like its about to burrow down or just swallow a defender.
Well, that'd be sweet but a lot of work! The bastion base looks pretty sweet here now that I've cleaned it up (filed the gaps visible in the quick pic above), and avoids the "clone wars" look. It is V-Day so I'm going to finish the Carnifex I was supposed to do this morning, and probably call assembly done... gotta get started painting
I think those'll do fine Ri Tides. Get the tops camouflaged with snow and maybe some extra plasticard pieces to represent torn roof sections and you'll be fine.
Quick pic of everything assembled! I may add a little debris to bases here and there to tie in the Mawloc bases (already did to the Tervigon base) although ground will be slate and snow.
Gits- Thanks, I think it will work! Not something I'd planned, but improv time
Orlando- Thanks!
Polonius- Looking forward to seeing you at AdeptiCon as well
Salvage- Thought the gribblies would be to your liking . Happy Vday indeed!
Thanks for the comments guys, it is motivation for me for sure . Now off to the Vday activities my wife patiently delayed while I finished this. Next update will be the test paint schemes on the grubs early next week (as I'm visiting my parents this weekend).
I am also going to use the Dredmaw as a Mawloc instead of the standard model. The Dread looks like it can absolutely swallow a large blast template worth of models!
Can you let me know, does the Maw come attached to the base? or is it possible to remove the base from the model? Just thinking of alternate modelling possibilities for the height difference.
Test model is painted! I actually painted several, but this is the one that I took to completion for the scheme I'm going to do. Pics, and then a few thoughts / questions afterwards:
Questions:
-I had trouble finding a "place to go" for the bone color. I'm using Vallejo Game Colors, so will just name approximations, but I started with Bone, applied a Devlan Mud wash to the whole model, then highlighted with Bone and a very light drybrush of a pale Flesh color. I guess I could paint a darker color before the Devlan Mud wash, but the wash is so dark that I don't think I should. I'm reasonably happy with it, but the head was the hardest- I had to drybrush back on the Bone color, followed by a bit of the Flesh... seemed like there would be another way to do it.
-For the snow, Future Floor Polish can't be used as the actual adhesive, right? You use it to get wetter looking snow, but still need PVA or Water Effects to use as the adhesive?
Hope you guys like it, I'm pretty thrilled with it... the question is if I can get them all to that standard. And, of course, the bone question, which seemed like more trouble than it was worth / harder than it should have been to get the right look.
I dig the scheme, as well as the execution I am disturbingly reminded of gyoza though, which probably has more to do with needing to go make some breakfast than anything
Luck with powering through the rest of the gribbles!
If anyone has thoughts on the bone color process they prefer to use, let me know... I'm guessing most folks start with a darker color than I did, but the Devlan Mud kind of does that so I may just keep the process.
Also, I think I answered my own snow question from above- these are my two snow resources, and in the second Redfinger says he actually uses the Future Floor Polish as the adhesive. I may use a mix of Water Effects and Future Floor Polish, since the Water Effects is a lot thicker.
Well, I actually painted the lip black so I could paint it another color. Would you suggest something else, like brown?
My process on the base is:
-Paint entire base (black in the above)
-Apply PVA and slate, with more PVA on top
-Drybrush slate grey and then wash with Badab Black
-Apply snow
I would definitely be open to another color if black didn't look good on the base, however I guess I thought the black and the snow were striking together. Brown might make the snow look kind of ugly... or maybe not. I'll have to think about it.
No, I just think there's too much contrast between the white snow and the black base. It looks unnatural to me. I think the slate is too dark. Try painting one with the slate painted a lighter grey, highlighted in a lighter grey yet, then washed in Badab Black. You can still ring the base in black, that's not what I'm getting at.
Ah, I get it now. You're right, thanks for the tip Gits! I will try to go a bit heavier with the grey, and a bit lighter with the Badab black and see if I can get the slate to "pop" a bit more. It is really hard to make out in the pics; it's actually not quite so hard to make out in-person. But I agree that a lighter grey for the slate would be better
I've tried using future as an adhesive for 'ash' rather than snow and while it works ok for display pieces I wouldn't trust it for gaming minis, I'd go with water effects or PVA glue with a bit of future over the top for the shine
and I think the contrast between the snow and the black looks great
Thanks for the tip on the Future Floor Polish, Orlando... I'll stick to using it for a bit of an effect but not as the adhesive.
Also, I forgot to snap this pic this morning, so did so just now really quick... not usable for the AdeptiCon army, but I'm planning to run 2 Exocrines instead of 2 Mawlocs sometimes so these will be completed after the event
This was an unseasonably warm weekend, which allowed me to go outside and prime everything . I will be painting the army in two "waves", in full assembly line mode.
Wave 1:
Wave 2:
The steps I need to complete for Wave 1, and a projected shcedule, are below. Each day's task includes doing half in the evening and half the following morning (i.e. 75 gaunts at a time):
Sunday - Prime, Airbrush green basecoat (done)
Monday - Paint bone
Tuesday - Paint orange
Wednesday - Paint purple
Thursday - Wash
Friday - Drybrush skin step 1
Saturday - Drybrush skin step 2
Sunday - Highlight bone
Monday - Drybrush bone on head
Tuesday - Drybrush (very lightly) mauve
Wednesday - Drybrush orange 1, highlight orange 2
Thursday - Highlight purple, paint bases black
Friday - Glue rocks to base with PVA
Saturday - Drybrush and wash rocks
Sunday - Apply snow and seal
If I can do the above, I'd have the gaunts painted in exactly 2 weeks, leaving me 3 solid weeks for the big bugs... wish me luck!
Finally, here is a quick shot of the paints I'm using (more for myself than anything) and of the basecoated gaunts.
I do need to still figure out what colors to paint the details on the other heads (i.e. what is orange and what is purple). I think the tentacles must be purple (i.e. they can't be orange like the horns) which means the eyes, I think, need to be orange... or what about black??? I will try to quickly test this tomorrow evening before painting the orange.
The colour scheme you've gone for is great, really suits the gribblies. Seeing these get some colour is getting me excited/anxious about the KS shipping now
Step 2: Pinstripe is done on half of the grubs. Some of these steps I will likely combine so that I have to cycle through the whole lot less, and some will take a bit longer than others. This step is taking longer than painting the orange and purple will, I believe, because it's a much larger area.
After painting the rest of the pinstripes, I need to just double check that I know which features should be purple and which should be orange on the various head variants, so will likely check that late tonight or early tomorrow morning, then move on to painting the purple and orange.
Assembly line, go! Such an ambitious schedule, best of luck powering through it all And props for taking advantage of the break in winter's grip, I did the same, busting out the ol' primer can
Thanks for all the encouraging posts, guys . They are a real boost!! Finishing up the pinstripes tonight and early tomorrow morning, then it's on to the interesting stuff. Amazing how boring a color can get as you paint it on 150 models I find myself craving the orange and purple now. It's the carrot I'm holding in front of my nose to finish the bone color tonight.
Don't worry my friend... you'll get there, no problem! It's not like if you blow it you'll completely ruin a once-a-year, very expensive event for 3 other guys or something....
Okay, step 3 is complete, painting the base coat of orange:
Next step is to paint the purple, then wash, today and tomorrow!
However, I have a little bit of a dilemma... last night before tackling the orange, I had a rather frustrating session of trying to make sure I knew how to paint each grub's face. The eyes are giving me the most trouble... I decided purple would just be the best, but I need feedback on this, as I'll be starting them tonight.
I also need feedback on the order to paint the colors on the faces- I'm going to basecoat the purple tonight/tomorrow and then wash the whole model, so that's no issue. But what order to do things after washing? I'm going to spoiler this section out, but if you're interested in reading it and giving me some feedback, I would appreciate it!
Spoiler:
The order I tried painting last night:
1. Highlight purple and orange
2. Highlight bone color
3. Drybrush head
I did the this order, because I thought it would help clean up any mess around the orange and purple... but it also gets drybrush on top of the purple and orange . So, I'm thinking to do it in this order instead...
1. Drybrush head
2. Highlight purple and orange
3. Highlight bone color (to cover up any mess around purple eyes in particular)
Does that last order make sense, or should I consider something else entirely?
Here's what I had when drybrushing last, note the spillover of the drybrush onto the purple/orange. Ignore the body, this is a test grub:
As a reminder, this is what I'm aiming for:
So, hopefully doing my drybrush before highlighting the purple and orange will get rid of this issue, with the selective highlight of the bone color helping clean up the purple and orange as one of the very last steps. Does that sound right?
Other progress, I received the Bastion! I didn't paint this, but I think for this event I'll just add some snow onto it and call it good to go. I tried putting various tentacles and things coming out of it but it just looks too cheesy if I do
Also, I received my Alpine mat from the Frontline Gaming kickstarter. It started off as a 6'x4', but I took it to FedEx Kinko's and they cut it for free! This is a 26" x 48" section (so just over 2' x 4') which I think we can cram our team onto for "display board mat" purposes. I neglected to check that the tube I cut down to store it in would fit in my suitcase before having it done, but it fits! Just barely
And that's it! Hoping to have an absolute paint-a-thon this weekend, starting with drybrushing the skin and head on Saturday, if I can power through the purple and the wash today and tomorrow.
Thanks for the tips guys, I actually didn't even think of that alternate process until trying to type up this update... I think describing things helps me organize my thoughts
Gits, that won't be too late because I'll just be painting the purple base color tonight- the steps/order I was stumped on won't happen until after the wash (so likely happening on Saturday).
I was pretty stoked about receiving the the mat and tower, so I'm glad you guys like them
1. Highlight purple and orange
2. Highlight bone color
3. Drybrush head
I did the this order, because I thought it would help clean up any mess around the orange and purple... but it also gets drybrush on top of the purple and orange . So, I'm thinking to do it in this order instead...
1. Drybrush head
2. Highlight purple and orange
3. Highlight bone color (to cover up any mess around purple eyes in particular)
Does that last order make sense, or should I consider something else entirely?
As a reminder, this is what I'm aiming for:
Finally have a chance to look at this...
So, if I have this right... you're proposed order allows you to
A) drybrush/highlight the head/bone, then
B) highlight the purple & orange, (in essence, allowing you to clean-up spill-over from the drybrushing), then
C) re-highlight the the head/bone... allowing you to clean up after the orange/purple highlighting???
I'm not sure I have the details right... as such, it seems a bit of wasted effort as your constantly cleaning up after yourself. Can you skip the drybrush stage and just quickly highlight the head/bone area? That would save you a step and the need to clean up. You could do that last, after the orange and purple... that way you'd really only have ONE clean-up step (i.e. the head/bone highlight) rather than two.
That's a good question, Gits... I actually just picked up some extra fine point sharpie paint pens at Michaels (in black, blue, red, green, and yellow... wasn't sure which would be best so I'm trying them all!). The plan is to try them out on the eyes of my test grubs and see if they make the eyes easier, as that's my real sticking point (and where the drybrush spillover was a real problem, causing me the angst above!). The stripes I can more easily avoid with the drybrush, it's the eyes that are tough to get right and that I felt were too sloppy.
I'm going to put down the base color of purple on the head stripes tonight / in the morning (I did the purple tentacles last night, but not the head stripes) possibly along with the dark purple in the center of the stripes, then do the wash on the whole models and drybrush the skin, which isn't near anything important... then evaluate where I'm at.
I do think the method I proposed is too many steps- but without the drybrush, my feeling was the heads were too dark. But maybe a selective highlight would actually yield better results, and both are not needed... I will think about it. At least my next three steps (which should be done by the end of my paint-a-thon tomorrow) are very clear! Purple stripes, possibly along with the dark purple center, then wash (as this helps blend in the edge of the purple stripe), then drybrush the skin (which has no spillover / cleanup issues).
How about a purple wash for the eyes after you do the head? it should pull away from the pupils leaving them a lighter color than the rest and the sockets would be dark (purple). And you're done... no muss, no fuss. Worth a shot anyway.
I have spoilered the process I have taken the grubs through since the last update below... no need to view this unless you're interested in the step-by-step
Spoiler:
Paint last base coat color (purple on faces)
Wash with Gryphonne Sepia
Wash bodies (not heads) with Devlan Mud
------------All grubs have been taken through the steps above------------------
With a smaller set of grubs, I finished them out:
Re-paint back stripe with bone color
Drybrush skin with light green and light yellow
Wash back spine with gryphonne sepia, then lightly drybrush head and back spine with bone and mauve color
Highlight orange and paint dark purple in recess of face
Obviously, I decided just to paint the purple in the eyes, but I think it came out well . I have now taken all the grubs through the wash steps shown above, and then took one set of grubs of a single head type through to completion:
So, now I just need to take the other 5 sets of grubs with the other head types from the post-wash phase where they are at now, to where these are. Should still be on track to be finished this coming weekend! However, I am considering trying to blend the back stripes into the bodies a little better, and will discuss that in the spoilered section below (and may go back to tweak these if that works).
So that discussion is spoilered below . No need to read this unless you've got time to weigh in on the paint scheme / process.
Spoiler:
Here is a pic of the back stripes, which I am thinking of modifying my method for slightly (and going back and adjusting these).
In the pic above, the three grubs on the front right are ones that I took through to completion before the others as a test. The back stripe "blends in" to the body slightly better on these, which I think is a positive... but I can't figure out what I did differently on them. Here is a pic of just those three compared to my original test model:
I think I'll just be careful to paint the back stripe a little thinner from now on, as it stands out more on the larger group than it does on these... I also am going to try replacing the brown drybrush with a thin brown wash, which I didn't think of before completing this set.
My wife thinks the back stripe looks fine as-is on the larger group, and at this point I'm somewhat inclined to agree with her . It may be as simple as, I had more time to spend on those 3 models, and thus could kind of "feather" the backstripe over the protruding sections, rather than painting it as a solid line... which I probably can't do for the majority of the models.
I think I'm going to press on as-is with the more stark back stripe as seen in the larger group picture above, but just be careful to paint it a bit thinner, as I think that is the biggest factor in how it looks visually (and also try the thin brown wash). Obviously, I will more carefully blend the back stripe up from the body on my larger bugs to come. Thoughts on this appreciated!
Remaining schedule for the rest of the grubs:
Tuesday: Paint back stripe (thin!)
Wednesday: Drybrush bone on head
Thursday: Drybrush light brown on spine
Friday: Drybrush mauve on head and spine
Saturday: Drybrush green and yellow on skin
Sunday: Highlight orange, paint purple (dark in recesses, light on tentacles), paint bases black
great work RITides . They really are coming together nicely. They also look even more evil all painted as opposed to that wall of resin you started with.
You could run a brown glaze or liner between the stripe and the skin to help blend them. Might not be the exact look but I agree that a softer transition looks better.
Thanks guys, and that's exactly what I'm thinking Polonius. I was able to try it real quick before heading out the door this morning, although note that the skin isn't finished on this model and is a lot lighter on the final models.
This process was: paint thin line of bone, wash with gryphonne sepia, quick drybrush with bone and mauve. So, same amount of work, but a slightly better result, I think!
Although rather unforgiving when blown up so big just remember there will be 150 of these buggers on the table.
I'm going to go back and put this wash / drybrush on the spines of the ones I already finished, then power through the rest!
And especially from the table view, those are going to look phenomenal. Its easy to look at the camera blow-up and think "oh man", but I think they're looking really solid.
Thanks for the tips guys, particularly Gits via PM. I took another pass at the spines of the "finished" 25 grubs last night and am quite happy with them now. You'll have to wait to see them until I take more pics this weekend, though... hopefully of everything finished all together!
I'm changing my order up to paint the base color of the spine, but then move on to the skin drybrush and Then the light brown wash and spine highlight. This helps blend it in a little bit better. It doesn't make a huge difference, but it's enough to make me very happy with it
The plan is to finish painting the spine base color tonight, then do the drybrush of the skin tomorrow/Friday (may spill over into Saturday morning for some), then all the finishing steps this weekend.
The finishing steps are: the light wash on the spine and tentacles, drybrush on the spine and head, highlight of the orange, and dark purple in the recesses with a light purple touchup.
You'll make it just fine RiTides. Just keep plugging away and refining your process as you go. Each "round" will get easier than the last as you get more and more practiced.
I made it... 150 grubs fully painted in 15 days! Technically, I finished at 1 a.m. last night, but as we "sprung forward" on Sunday I was due that hour anyway
Obviously, I didn't do the basing yet (other than painting them back to black) as I'm planning to do it for the whole army together at the end. I have 2 questions for folks, related to that:
1. I should spray Dullcote on these models before applying the snow, right? So that the snow does not lose its sheen?
2. Should I apply a gloss coat to the green part of the grubs after spraying the Dullcote, to make them look slimey? I will try this on my test grub to see what it looks like
So now, it's on to the big bugs! I've spoilered a pic of the remaining models that I'll be moving on to now below. But today, I'm resting
Okay, I'll try it on the test model in the meantime to be sure that I like the gloss effect but yes, any gloss steps will be saved to the end to complete on the entire army at once, just like with the basing. Good suggestion, Gits!
Monkey, I'll be trying to complete the big bugs in 2.5 weeks, so that I can have a full week (or at least, a full weekend plus a few days) to do the clearcoat / gloss and basing on the army at the end.
After everything is done you should totally paint that marine in similar colors to the gribblys, then field him in random games. If anyone asks just say Brother worm food is on an extended hiatus from his chapter after making a comment about the chapter master. He has been assigned to infiltrate the hive and learn what he can about their mating rituals. His armor was decorated in the color of the host and he pretends to be one of them hoping that he will soon be extracted. Unfortunately the chapter master has forgotten about him, but when the insult happened he made sure the techmarine painted him up to be a female of the species . marines don't have a sense of humor.
Thanks for the comments guys, they really motivate me! I'll be basecoating the big bugs tonight, with one exception- I'm going to hold off on painting the Forgeworld Dread Maws until the last possible moment (the last weekend).
This is because it's possible Ed at Trollforged will be able to get me 2 casts of this model in time:
I've got my fingers crossed for that because it would fit in with the army so much better than the Dread Maws!! I hadn't thought it'd be possible before and so had gotten the substitute models ready, but I'm really not happy with them for my theme in the end and am hoping the Goliath Wyrm will be ready in time, instead.
So, before having to make that decision I will get all the other models painted: the Tyrant, Tervigon, 2 Carnifexes, 3 Zoanthropes, Prime and Venomthrope.
After a few days of self-reflection (AKA burnout? ), I've got my plan of action laid out
I'm going to tackle the remaining big bugs in 4 separate groups, although I'll be airbrushing most of them together tonight.
Group 1: 3 Zoanthropes, Venomthrope, Prime (by Sat)
Group 2: 2 Carnifexes, 4 Objective Markers (by next Sat)
Group 3: Tyrant, Tervigon, and little bugs for Tervigon base (by the last Fri)
Group 4: 2 Mawlocs (the last weekend)
Basing: The last 2 days
So, the first 3 groups:
For the Mawlocs, I am actually at peace with my plan now. Ed is going to try really hard to get 2 Goliath Wyrms to me in time, but if he can't make it I think I've found a way that I'm happier with the Dread Maws. I.e. no elaborate bases to make them tall, and adding tentacles coming up from the ground along with them to tie them in to the gribblyness better.
Please forgive the horrible mock-up pic below, but just to give you an idea of what it'd look like. The whole base will be covered in shale and so it will look like he's bursting up from the whole base, not just a rectangle in the middle with 4 tentacles going out at various angles to imply a larger body below.
Spoiler:
I think that's the best I can do with this model! And would actually look pretty decent and possibly be useful for something else after I get the Goliath Wyrms from Ed. But either way, whatever I use for the Mawlocs will be last, and I'll power through the rest in the interim . Oh, and Theophony, Ed mentioned the Goliath Wyrm is 3" wide at the base... I'm thinking that's the diagonal across the base portion, but still- the Goliath Wyrm is big!
One question:
Should the wing membranes on the Tyrant's wings be green like the body... or should they be dark grey / almost black? The "bones" in the wings will be bone-colored, I believe... although they could be green if the wing membranes were dark grey / almost black. There's a better pic of the Tyrant in the spoilered image above. Thoughts appreciated here!
Gits, well, that's the question! Here's a pic of them airbrushed green:
I want to stick to my pallet if possible- bone colored armor plates / back spines, purple on the small tentacles, orange on the horns. But the real questions are...
1. What color should the wing membranes be? Thinking about introducing a new color (black / dark grey) for this, because the arm leading to the wing will be green, the bones white... so the membranes need to be something else. I could risk it and go purple??? Perhaps a darker shade than the tentacles.
2. What color should the large "limb-like" tentacles be? Purple, like in the pre-painted Monsterpocalypse model shown in the front right of the pic above? If so, how should I transition the purple into the green of the bodies? I'm thinking most importantly on the models that are on the right half of the image above... on the Wyrms, Fiend, and Grub C with the added tentacles, I think purple might be a little abrupt going into the body. So should they just stay green, or go with purple?
Thoughts greatly appreciated on the above two quandries, since I'm starting those colors tonight!
For the wings, stay within your palette, but go in a different direction. Consider doing a pale green (half skin green, half bone plate white), or a variation on the orange used for the fangs. You definitaly want them to stand out, but huge blocks of a new, non-neutral color will probably stand out too much.
Why not keep the limb tentacles green? Again, I'd alter the hue a bit, but make color choices based on composition, not on the function of the part. Big Tentacls are a base color part, not a trim color part.
How about doing a brown, similar to the shaded areas of the worms backs. I think that could look good for both the wings and the tentacles. I'd stay away frompurple or pink as that would start looking more Slaaneshi than anything.
Okay, I think green for the "limb" tentacles is a good idea, but perhaps altering the hue a bit, so thanks guys . I'll still do purple for the face tentacles and the like, of course.
That's the much more urgent concern since the wings will come a bit later... still not sure about the wings but it may be that the same trick color as the tentacles will work, since that model has no limb tentacles.
So I'll experiment with the shading on the green of the tentacles, then decide if that same color is suitable for the wings, or if I need to branch out more for the wings (to more of a brown, as Theophony suggests, or more of a purple).
RiTides wrote: So I'll experiment with the shading on the green of the tentacles, then decide if that same color is suitable for the wings, or if I need to branch out more for the wings (to more of a brown, as Theophony suggests, or more of a purple).
Another way to think of it is that wing membranes and limb tentacles are still just skin. Keeping them all based on the same basic color helps tie them together.
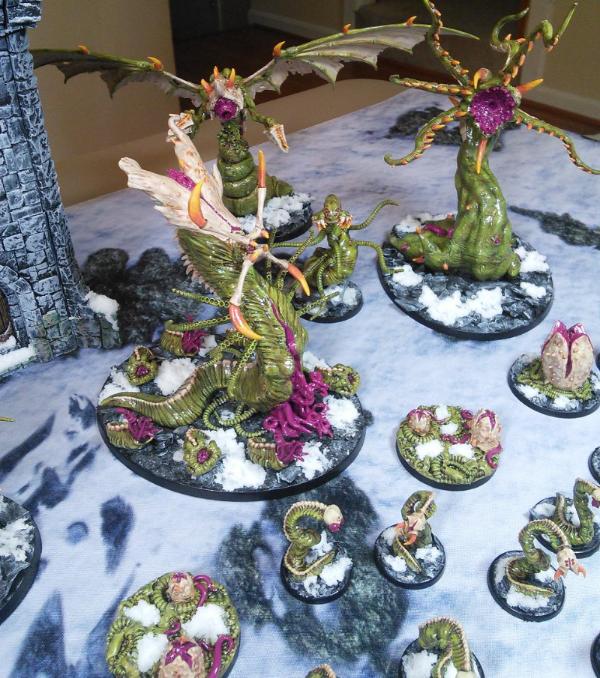
Here's my progress on the first wave of big bugs! This wave includes the 3 Zoanthropes, 2 Carnifexes, Venomthrope, Prime, 4 objective markers, and 7 little bugs to put on the base of the Tervigon. (The next and final wave before AdeptiCon will be the Tervigon, Tyrant, and 2 Mawlocs)
Base colors:
Washed:
Drybrushed skin:
Now I just need to drybrush / highlight the colors other than the skin- the bone, orange, and purple. I still haven't figured out how to highlight the purple, as I don't have a "ready made" highlight color that works for it... might try just adding white to the purple mix on the palette.
There is a lot of green, but anything else I try doesn't make it look better, so I think I'm going to go with it. Also, I tend to have only one "standard" that I paint to... I'll try to do well with the highlighting on the bone / orange / purple to make these pop, but they're not going to be that far above my grubs in standard.
I could look at this two ways... I'm going to try to see it as my grubs are just done well . The skin is basically "done", but the bone, purple, and orange will be getting highlighted today
Yeah, that's what I'm struggling through right this second, Gits. (It's a snow day which means it's a painting day)
I am just going through and highlighting the other colors and the purple is the one where I really have nowhere to go... may try a leviathan purple wash on the purple.
Also just tested out my sealing process- so, I don't think I'm going to spray on Dullcote after all. It seems to, well, dull my green shades... instead, I'll paint on a gloss varnish onto the whole model, then paint on a matt varnish (I have the Vallejo one) onto the non-skin areas (which are few in comparison).
Will get up a pic of the model I tested this on later, but I think it will work
They did turn out rather green, didn't they? Not that that's an issue really, they look grand Also, I really like those three medium-sized sculpts with the boney crests, and would be lying if I said I wasn't scheming up uses of my own
I just tried deepening the recesses of the purple with Leviathan purple... but didn't realize that I have to use wayyyyy less of it than the other washes... but not until I'd used it on quite a few models, of course
I'm undoing the damage and then using it much more judiciously from now on.
And the first wave of big bugs is complete! Pics below
I did try to deepen the recesses on the purple a bit- it might not look like much in the pics but it does help it quite a bit in-person from feeling too flat compared to the other colors. Let me know what you guys think
Also, 2 questions! I am ahead of schedule, just waiting on the two big bugs (Mawlocs) to arrive in the mail, which I will do alongside the Tyrant and Tervigon. So, I think I will be moving onto either sealing or basing this week. Questions regarding those:
1. Sealing: Do I even have to seal these models, since they're all plastic / resin? I tried dullcote on my test model, and it makes the green look really flat. Afterwards I tried various paint on sealants- I tried GW gloss, Vallejo Satin, and Vallejo Matte. The gloss is just too much, I think... so I was considering satin.
Has anyone used a satin spray sealant, and do you have one to recommend? How would I get the heads and such not to be glossy afterwards? I tried painting on the Vallejo Matte to those parts after applying a glossier finish to the test model, but it seems to dull things quite a bit still. I would just be careful to only paint the Matte on the bone, but I think it makes the purple on the heads look worse, and it's likely to get on those areas. Thoughts / tips / help here greatly appreciated!!
2. Objective Markers: In the last pic above, my 4 objective markers for AdeptiCon are visible on the 40mm bases. Two of my teammates are Imperial Guard and Space Marines. How could I add something to these to represent them? I'm thinking of how Gitsplitta added things to his Necron formations... but I don't want it to look like the nids on the base are eating the IG / Marine symbols. Any ideas?
Big gribblies look great, glad to hear you're ahead of schedule
I'd recommend sealing anything used for gaming rather than display, as I've always felt handling even plastics can show up some wear and tear...although you may be able to get away with not sealing till after adepticon - have to decide if you can accept the slight risk of having a chipped model at the con.
Personally I've not had any issues with GW's purity seal as a satiin finish - but I know several people who have. Matte varnish is always going to dull down the final piece, how about applying the matte to the bone using a drybrush technique? May not dull it down quite so much, but I'm just putting the idea out there, haven't tried it myself.
Objective markers is a tough one, can't immediately think of something that isn't going to look like the nids are eating the imps....
Satin varnish should do the trick. The only satin I've used is the Vallejo satin that is in their airbrush line. Works fine. Though in my recent attempts at making gems, the GW varnish is a lot more like satin than gloss.
Do you mean this picture?
Spoiler:
Assuming you're referring to the four pod-like things on the black bases, I have an idea. You should go with the whole Alien/Promethius thing and model a guardsman and marine leaning over one of the pods on the bases without the giant pod on it. Like they're looking into it trying to figure out what it is, right before the face-grabber thing leaps out to get them!
Gits / Theophony- Regarding the objective markers, yes that is the pic I was referring to. The problem with something more elaborate like an actual figure is that that will be out of my hands- one of my teammates would need to bring a painted model, as I'm not sure what their schemes are exactly still and wouldn't be able to match them.
That's why I was trying to come up with something generic that would signify "Imperium" that I could paint up and put on the base, that would indicate our alliance but not clash with their scheme.
I actually think I just came up with it- I have 5 of these gun tractors from Anvil Industries' kickstarter... I'm wondering about putting two of them on the bases with the smaller eggs. Here's a pic of them without guns, and I could put a sensor array of some kind there instead:
I'd like to go for a "Wall-E" feel, a sensory robot rather than an armed one. Hoping a few bits I have from the Bastion will work for the sensors. These would only go on 2 of the bases, since we have 2 nid players and 2 imperial ones.
Amazing work Never really seen anything like it.
Kudos alone for assembling 150 small nids, even more so though for painting them all up that bloody quickly!
Also, if you ever dislike or want to remove those exocrines from your army, let me know Keep seeing them spring up but never had the chance to snag one.
Assembled my two "Wall-E" models last night so these will be the 4 objectives for our team:
I likely won't even glue the Wall-Es on... any idea how to attach them temporarily so I can remove them later? I could try a magnet on the bottom of them and the bottom of the base, or bluetac... but I feel like any kind of putty may be hard to get off the painted base.
I've also decided that the basing is too intimidating to start in the middle of the week when I have limited time. So, I'm just going to start in on the Tervigon and Tyrant:
My wife is not a fan of the idea of the wings being purple, and doesn't think I should introduce a new, paler shade here either (I've been using a pretty limited palette). She thinks they should just be green... Any new thoughts (now that you guys have seen some other big bugs painted) on the wings?
Jackal- Thanks, but I think I'll be hanging onto them
Personally I think purple on the wings would be really cool and stand out, but maybe to subdue it you could use the bone colour to fade it out on the edges etc.
But that would mean that the "struts" of the wing would need to be green, rather than bone colored. So that's okay with you?
I had been using the bone color for... well, bone up until now . But if you guys are sure, I will go with it on the wings, with green "struts"... and then blame you all if it looks horrible
For attaching the Wall_E's, maybe you could just pin them on? With a long paperclip pin t'd be pretty stable for gameplay and not too obvious on either piece. Also fast to do!
I had been using the bone color for... well, bone up until now . But if you guys are sure, I will go with it on the wings, with green "struts"... and then blame you all if it looks horrible
Make sure you paint what you like. Listen to too many voices, even well meaning ones, and you can end up with a camle. You know, the horse as designed by committee?
It sounds like you have an idea for what you like, you're just being swayed. Try what you want, and see how it looks.
Haha, its funny to see how tight a grip people keep on those old exocrine models There are however 2 on ebay at the moment for £70 or so, which is tempting.
My suggestion is to stick with the bone struts, then use whatever fleshy color you want for the membrane. Use a dark color to start with, then hand paint on bright streaks of blue and/or green and/or red to establish veins. Then use thin layers of brighter shade of membrane color airbrushed over to blend the veins in and get an awesome veiny look.
And again - LOVE THE WORK!!!
ps - thanks for looking at my blog bud! appreciate the comments!
Pics with the base colors applied to the Tyrant and Tervigon are below (sorry they're a bit blurry, had to nab these with my cell phone):
Thanks for the input from everyone about the wing colors! Obviously, I ended up risking trying bone based on the initial advice here, but I think it looks good . Polonius, on that one I actually wanted to be swayed, since many of you are excellent painters... and also aren't staring at this model until you're blue in the face like I am
On that note, I have a question about the Tyrant above... I tried various colors around the purple "face", in the space between it and the carapace... green, bone, etc, but none of it looked right. I went back to all purple, and am thinking to just wash the "neck" purple to be darker than the "face" purple. Does that sound right?
Also, do the purple boils / gashes in the skin make sense? Without them, the purple face just stands out too much as the only purple on the model, I think. Next steps, washes tonight, then drybrushing the skin tomorrow!
---------------
On attaching the Wall-Es to the bases, a pin is a good idea, RZ! Unfortunately I am a pinning rookie... so I am going to give the magnets a try first, I think, before resorting to that.
I think they turned out really good RiTides (though I still think pruple would have been better on the wing membranes). Still, your instincts are serving you well, pulling the purple down into the gashes in the body is an excellent way to keep continuity in the figure.
I had a long discussion with my artist friend in-person about it... and I totally agree that purple would be best there "on paper". But, given that it's the color I have the least "range" with (and tends to look the flattest) I think with my methods I would have fallen on my face had I tried purple there .
It has ended up that green is the obvious primary color, with bone as the clear secondary color and purple/orange as detail ones. So, I am happy with it, and think it will look really good once I shade it (and I have a Lot of range with the bone color, so can darken it towards the edges of the spurs and lighten it in the center of the wings).
Thanks again for the tips guys, and yours in particular Gits, they have been very helpful! Your telling me to go ahead with the bone color was actually what helped me pull the trigger on it and not just leave them plain old green . This preserves my use of the purple for what I had originally intended it as- "internals" (internal tentacles, mouths, the Tervigon's birthing parts, etc). So, in the end there wasn't a perfect color for the wings, but I'm happy with my choice now that I finally pulled the trigger . Now to make it look good!
I think you did a great job on it RiTides. And it was really fun to watch you go through your processes of trial and error to come up with a good solution. Honored to be able to help out a little bit.
More progress, washes are now done, and I will then be drybrushing / highlighting all of the colors back up:
I will likely keep these at this state until I get the last 2 models to the same point (which will hopefully arrive today!) then drybrush / highlight them all together.
However, before I do any of that, the weather looks to be turning cold again (it might snow Tuesday!) so tomorrow is my best chance to seal the rest of the army!
I have been unhappy with the satin sealant, and had a revelation this morning: why not seal this exactly how I sealed an army I painted using a "wash only method" a few years ago? It had the same issue with needing subtle variations in color to not get dulled down. The way I got around this was by brushing on a coat of GW gloss, then hitting it with Dullcote.
So, the egg bases have volunteered to be test subjects for that method again... here they are with just the GW gloss:
I have a tiny bit of Dullcote left in a can, and am going to try hitting them lightly with that today to knock off the shine. If they remain shiney in crevices, that's actually good / no problem... but in-person they look too "candy-like" with just the gloss coat.
So, if that goes well, I'll be brushing on gloss to allllllll of the bugs that are done tonight then hitting them with Dullcote tomorrow! This also assumes my Dullcote arrives today, which it's supposed to... come on postman
One question: Do any of you use brush-on gloss? I thought I had extra pots of it, but only seem to have one, so I'll be buying more locally at lunch today... planning to just buy the current version of the GW gloss, since I really liked the old version. If there are any known issues with the new version of it, please let me know!
Thanks SavageRobby... it looks to me like GW discontinued their gloss, anyway (although may just be calling it a "technical paint" now, and charging more for it...). So, I will likely go buy the Vallejo gloss and just fill my old GW gloss paint pot with it (I like the paint pot for painting on gloss, as it's faster than using the eye dropper, and I don't need gloss on a palette).
Glad you like the wing choice, Polonius
Edit: Well, scratch that, the hobby store only had GW's gloss ("Ardcoat"). I loved the oop version, will have to see how this one compares. People seem to have good things to say about both this and Vallejo's gloss, which I have one bottle of, so if I have to use different ones to get through everything it should be OK.
The only thing that has me worried a little bit is people posting about thinning the GW Ardcoat- I never did that with the old GW gloss (but maybe I should have?) so if it's the same, I won't worry... but if it's thicker I may have to do that. Thinking to just add a bit of water directly to the paint pot and mix it well (the reviews I'm seeing says water works fine) as to get through all of these I don't want to be thinning it as I go.
The big bugs arrived (Ed is still tweaking the mold, but spun it a few times to get me these in time to paint up!). I am so excited . Here's my progress so far, first basecoated then with the main colors blocked in:
I'm going to block in the main colors on the second model tonight, then touch them up (especially the edges of the bone, although the wash kind of obliterates this ) then do the wash tomorrow. That will get them to the same point as the Tervigon and Tyrant, but will likely be it before my test game Wednesday, so I'll have to finish the 4 big bugs in the latter part of this week (drybrushing / highlights, and sealing). Then, with my wife's help, I'll do the basing for the whole army on the weekend
This past weekend, I actually spent more than half of it doing the gloss step on the whole army. I did it the hard way- brushed on high gloss, then brushed on satin on the bone and orange . Don't ask me why... but I am very happy with how it looks, the matte was just too flat to go with for these slimy bugs!! I did have to go back over the recesses of the orange with a light wash, since the satin kind of lightened the recesses of it, but with that small tweak I'm very happy with the results . Pics to come when I photograph the entire army together this weekend!
Oh, and the Wall-Es are now magnetized to the bases, it worked like a charm
Edit due to page rollover: Yes, I agree the Goliath Wyrms fit the army aesthetic much better! Will take a pic once I have them to the washed stage where the Tyrant and Tervigon are currently
So, the next step is to drybrush the skin back up, then do the drybrush / highlight on the bone, orange and purple, and finally seal them.
I've got a practice game which will take up my evening today, but then I'll be pushing to finish the 4 big bugs by Saturday, then have Sunday - Tuesday to base everything! Oh, and to paint those 2 little robot scouts, too
Got 2 test games in yesterday, and I have a question below! First, a pic of one of them (my Tyrant and Tervigon are still WIP):
You can see him lining up a shot with his Wraithknight... it actually didn't do much, but his war walker grounded my Flyrant with it's first shots, and the Wave Serpent then obliterated it . My first game was against nids with a lot of gaunts, a Flyrant and 2 Crones... I threw away my Flyrant killing his Venomthrope, then kind of got picked apart.
Both games I pushed my Carnifexes forward after I got behind- I think this is a bad idea as they just died really fast. In the team games, I plan to hang back and let my teammate be the aggressor... but I'm so short-ranged that on my own my opponent can just wait for me to come to him. I may have to look into building some Crones myself, as I already have a model for them... I've been waiting to reveal that later, but I think it's going to look sweet
But anyway, my question is:
How should I differentiate my gaunt squads? One easy way that was suggested was to have different head types be different units... but that's kind of a bummer as then they'll all look so uniform, like in this pic where they are all of one single head type, rather than mixed:
Spoiler:
I may not do anything before AdeptiCon, and just struggle through while I'm there, but I do need to figure out a solution to this. My opponent apparently paints the rims of his bases differently, but that's going to detract from the models, I think. Small lines on the back of the bases, basically hash marks designating what squad they're in? But then I have to keep track and not put them all mixed together in a box... I could really use some help / ideas about that!
What about doing the whole base rim in different colours to differentiate between squads, you could use fairly neutral colours, green, brown, grey/black, however this might blend into he scenery too much... or use the 4 army colours, purple, orange, green and flesh/white...
Automatically Appended Next Post: Or maybe something else, like a skull on the base for squad 1, a rock or ruble for squad 2, some scrap metal for squad 3, a little puddle/ water effects for squad 4 and so on... Not something big which is time consuming to paint or detracts from the model, but noticeable enough for you to think, thats the skull munchers on the right, theres the dirt wrigglers on the left and down the centre go the rust bunnies!!
Interesting, for some reason I hadn't thought of using the army colors on the base rims to differentiate them (I had just thought of random colors on the base rims, which is unappealing).
What do you guys think about that? That would give me 4, or really 5 different base rim colors: Purple, Bone, Orange, Green, and just plain Black.
The rest of the army would have black base rims, of course. Thoughts greatly appreciated, as this is the kind of thing I would actually do this weekend if folks thought it would look good enough / not detract from the army. If it would detract, though, I just might do nothing to differentiate them for this event...
Actually, what about just a vertical stripe on the back rim of each base? Less noticeable than painting the whole base, but would let me quickly differentiate squads depending on the color of the stripe? I like that idea best, I think rather than doing the entire rim.
Yeah, I'm liking the stripe idea, as it'd also be a lot faster to paint than the whole base rims, and less obtrusive. Thanks for suggesting the color idea, dantay_xv, as that will be an easy and quick way to tell which is which, even with just a stripe
Or at least I hope so . Will give it a shot this weekend!
I think the Tervigon is my favorite model of the bunch! The little bugs on his base are magnetized, so I can run him as a Tyrannofex without them, as I realized a Tyrannofex does not have to have a rupture cannon! For one with just 2 x scything talons and a thorax weapon, I think the model is perfect
I actually went back and touched the orange with a highlight on everything, because the satin coat just dulled it down too much. Very happy having it back bright again . I have 2 optional things left to paint, which I'll probably do tomorrow, as I'm taking my wife out to a movie tonight to thank her for helping me base the army . Those are, to paint the stripe on the back of the different units' bases to tell them apart, and to paint the 2 bots for the objective markers. I also need to make army lists with pictures, which I'll likely do tonight or in the morning
After the event, I have plans to build and paint another medium-sized wave of models: Flyrant, Exocrine, Crone, Carnifex, 6 Warriors, 3 Biovores, Venomthrope, 18 Spore Mines, 20 Gargoyles. So that's 4 big models, 10 medium, and 38 small... but I will take my time on it compared to how I pushed through these
I'll be taking pics at AdeptiCon, and also handing out small samples of the Trollcast material, so if you will be there come by, see the army, and get a free gift
But your going to give people worms at the convention? I thought you were one of the few "clean" gamers out there. I know hygiene is sorrowfully lacking in the gaming community, but contagious worms.....oh my!
Gits- It's actually just 2000 points . I painted exactly what my teammate and I needed for our two 1000 point armies for the event... there are 32 extra gaunts in case my Tervigon is incredible spawning them, but I've realized now that that's usually more than I'll need.
This is why I want to build one more wave of models after the event, to give myself options, since as it is I'll be pretty locked down to a gaunt-heavy 1850 point list with what I've done so far, and I'd like to do a monstrous-creature-heavy list using either the Living Artillery Node formation (Exocrine, 3 Biovores, 3 Warriors) or the Bioblast Node formation (Tyrannofex, 3 Carnifexes, 3 Warriors).
Here's the list I'm thinking for each of those
Living Artillery Node (formation models shown in red)
Spoiler:
Hive Tyrant, Wings, 2 x TL Brainleech Devourers - 230
Hive Tyrant, Wings, 2 x TL Brainleech Devourers - 230
The army looks fantastic now it's finished, and although I like the bigger models my favorite is still the swarm of small wyrm's at the front,
For the only thing scarier than one big alien, is hundred's of smaller ones .
The display mat is a cut down Alpine mat from Frontline Gaming's "MegaMat" Kickstarter. I believe they'll have them up for normal sale in May
hk1x1, I think many people would agree with you!
Also, I made a collage image, would love to get some votes on this one
Last night I brushed on a little bit of extra Future Floor Polish to the snow to make it look a bit wetter. I think it might have made the snow just a tad looser on the bases, but it is still adhered pretty well. If I ever needed to make it stronger, could I just brush PVA on top, or would that change the look of the snow?
Tonight I'll be doing the 2 bots and stripes on the back of the bases to distinguish units. Then packing tomorrow!
Thanks again guys, the comments here really motivated me to finish!
I ended up putting little purple dot stickers on the back of bases to determine units. It may not be obvious enough, but it should work for the event and best of all it is temporary and I can remove them if I want . They are quite unobtrusive, I think... maybe too much so, but painting a line on the back looked jarring to me.
I also have only halfway painted the robots, hopefully I can finish them tonight before packing! They're not totally required, but they would be very nice to include.
I think I'm finally mostly recovered from AdeptiCon! We did well I thought, placing 57th overall, just barely in the upper half of the field (Dakka Detachment 3 in the pic below)
We got a 38 for appearance despite having almost no display (just the Frontline Gaming alpine mat). I hope to attend again next year and bring a much better display made from the Dwarven Forge modular caverns pieces!
Here is a pic of our army setup and team. Thanks to Alpharius for snagging the picture of our armies in the brief period that we had them set up!
Quick summary of the rounds:
Round 1- We faced a beautiful Eldar army which was selected for the army showcase that evening. It also had tons of Wave Serpents. Despite only killing one Wave Serpent and a handful of Dire Avengers, we won the secondary objective thanks to a Mawloc coming back up on turn 5 and contesting, netting us around 10 points. Here are the Mawlocs the first time they came up, when one was obliterated, with the rest of our army hiding off-camera
Round 2- Ketara and I had the privelege of playing against Carl Tuttle and another member of the Independent Characters podcast! We got a major win as my bugs filled our backfield to keep out the deep-striking Grey Knights, and Ketara's IG outshot them at range. Their dice were the worst I've ever seen, though, and Ketara's were on fire!
Round 3- We played against the 40k Wrecking Crew. This game was just okay, and was the only game I put "good" for instead of "fantastic". They were very skilled players and we only managed to draw on the primary objective, getting around 10 points again. I also apparently forgot to take a picture this game, but they had some beautiful yellow hazard stripe tanks.
Round 4- Another game with Ketara, this time against the winner of Best Xenos appearance / theme. We really did get to play against some amazing armies! It was the Relic, so I moved forward my waves of bugs to touch it every turn with a good cover save from shrouded and terrain while Ketara blasted the Tau. But to no avail, they blew me away and we drew on the primary Relic objective while they got the secondary kill points objective, so this was another game where we got around 10 points. But everyone looked good while doing it and they gave out Mr. Goodbars before the game, to boot!
Round 5- Ketara and I again! And again, with no picture . This time we went against IG and chaos marines, and got another major win- apparently marines were a very good matchup for us. Both sides held their back objectives but we got the center one, giving us over 20 points. Very nice guys and I gave all my extra Trollforged samples to them at the end
This convention was my favorite experience at a Con ever, between a fantastic game of space hulk on 3d terrain, to the amazing team tournament, to hanging out with Dakka mods and other awesome folks. Hulksmash' friend Phil, who filled in for AgeOfEgos in the final month, was literally the nicest guy I've ever played 40k with! And krootman, our other teammate, was a very skilled player who I learned a ton from.
I hope to attend again next year . For shorter term goals, I plan to build and paint the following over the next 2 - 3 months:
Looks like you held up your end of the donkey quite well there RiTides! Good battles with good opponents are always a sign of a successful day. Nice shot of your team and armies. Too bad I didn't get to see them all set up.
Congrats on the placing, I know here was some good opponents there, it is a Mecca o gaming after all. Looking or ward to more people's pics showing up.
Fantastic, and your phone camera is much better than mine! Ketara's boat Vendetta even made it into the pic, excellent
I've put a larger version below if anyone would like to see a bit more detail . You can also click on it to view the full-sized one in the gallery and zoom in on stuff, including Ketara's awesome steampunk guard!
Thanks again to Alpharius for snagging this pic in the brief period we had the whole thing set up!
Awesome photo, like the idea of the skyboat as well. What was the concept behind the force, guard and marines mind controlled by the worms , or they protect the worms and the spice trade .
Here is the background that I wrote up for our team for the event, which does it's best to explain the alliance . We got a 37 for theme and a 38 for appearance, so given the limitations we were working with I was really happy with both! I do hope to improve on both for next year if I'm able attend . Sorry for the delayed reply, I've had a busy week catching up on things.
Spoiler:
First Contact
It isn't known exactly when the Knights of Blood marines first encountered the splinter fleet of xenomorphs now known as "Tyranids". It is only known that it was sometime after Inquisitor Kryptman had ordered the Exterminatus protocol carried out on thousands of worlds to block the advance of HiveFleet Leviathan.
Somehow, these creatures are able to communicate with one another across the vastness of space, and every subsequent incursion into our galaxy has been with more and more advanced tactics.
Still, until this record was recovered, they all had something in common- the complete assimilation of all biomass on a planet's surface... stripping it bare and moving onto the next. There has never been a more destructive force, and it has seemed to be completely unsustainable... leading to speculation that these organisms consumed all life in their previous galaxy, forcing them to abandon it in search of more prey.
But what if something else is at work... some deeper motivation other than hunger, and this is all just a diversion? A clearing of the way for something even more sinister to come?
All that is known about this event is as follows: a small detachment of marines from the Knights of Blood chapter came upon a world surrounded by an unknown Hive Fleet. They descended to the surface, planning an all-out assault to extract any survivors... and found, instead, that the local Imperial Guard regiment was being largely ignored.
Certainly, an unarmored human standing in the way of the creatures was consumed instantly. But those who hid in their barracks, tanks, or even the power armor of the marines, were strangely ignored...
Scans from the marine battle barge indicated that the creatures were all intent on digging. The larger ones were burrowing miles and miles under the planet's crust, with the smaller ones removing material to the surface in great mountains of refuse that were beginning to become visible even to the naked eye in outer space.
Great swaths of land seemed to be undulating from some pressure beneath... but in these areas, the creatures had dug under leaden deposits, and no scans could penetrate to reveal what lay below.
This fragmented record shows that the marines, upon extraction of the local imperial guard regiment and surviving civilians, called in for Exterminatus... but it can only be assumed their astropath's communication was swallowed by the Shadow in the warp.
Most strange of all, upon rescuing the survivors, none of the marines or humans onboard the ship seem to have shown any memory of this event taking place... upon later interviews, all swear that they were rescued from a planet whose sun went dark and forced an evacuation before they all froze to death. Even the official records of the ship were later altered to reflect this... perhaps by a well meaning astropath looking to align the records with what all swore took place. A partial, hand-written record is all that remains…
All that is now known is the following: the record shows that a previously unencountered splinter fleet of Tyranids, almost all taking the shape of wyrms, was active on the edge of Imperial space. What were they doing on that planet that was so important, to the abandonment of all other priorities, even the assimilation of biomass? What was under the surface of that world... and what can be done to prepare for such an unknown?
What the is that? it looks awesome, but not sure what it is. I looks like an evil cross between an octopus, my little pony and ......I'm not sure, but it is scary. It will definitely fit your army look, except maybe the hooves.
Well shoot, I got it from Blackball Games directly, but now it's listed as sold out. I'm always paranoid about things like that happening, and tend to overbuy... so, I already have 3 . But if I'd known they were low stock I'd have picked up two more... keep an eye out for me guys, as I may want to run a Skyblight formation one day! Or at least to have the option of doing so.
I'm going to cut off the legs / hooves, and maybe the lower mouth if I can't figure out how to keep it, and mount it up on a flying stand. Currently planning to use the standard GW cross shaped flyer stand which I have, and dremmel a cross into the bottom of the model. If there is a better alternative, let me know!
Ah, lego fixed the thread now (my and Gits' last two posts weren't showing up). He mentioned that if you hit the mod alert button on a thread having a similar issue and include the message 'please click the clear thread cache link', that is a work around while he tracks it down
Yes, if anyone sees two more of those anywhere please let me know! I've pinged Blackball Games about getting two more, as well.
Theophony wrote: What the is that? it looks awesome, but not sure what it is. I looks like an evil cross between an octopus, my little pony and ......I'm not sure, but it is scary. It will definitely fit your army look, except maybe the hooves.
Multi-tongues with mouths reminds me of Tremors, the graboids (Worms) had at least 3 of them in their mouths.
Losing the legs and hooves is definitely the right thing to do, but I'd keep the lower mouth in place, maybe with the addition of a couple of smaller tentacles coming from where it melds into the main body. (I know what I mean anyway ).
Checked a couple of sites directly after seeing it was out of stock, and they were also out, but I'll be looking for some of the other Book of fragments figures now I've seen them, I'll let you know if I see any of these babies.
RiTides wrote: Well shoot, I got it from Blackball Games directly, but now it's listed as sold out. I'm always paranoid about things like that happening, and tend to overbuy... so, I already have 3 . But if I'd known they were low stock I'd have picked up two more... keep an eye out for me guys, as I may want to run a Skyblight formation one day! Or at least to have the option of doing so.
I'm going to cut off the legs / hooves, and maybe the lower mouth if I can't figure out how to keep it, and mount it up on a flying stand. Currently planning to use the standard GW cross shaped flyer stand which I have, and dremmel a cross into the bottom of the model. If there is a better alternative, let me know!
You could also flip it over upside down and put the cross on there. If you alternate them you could have more variety to your flyers.
Okay, so I think I'm just about done with my "month off" (or really, month spent reading scholarship applications ) and wanting to make my second wave so that I can run either of these lists (and try swapping a Crone in for the Carnifex in the first list).
However, I think I'm only going to build one Crone, and add a Tyrannofex. My question is, how should I convert the "birthing section" of the Tervigon for when I build it as a Tyrannofex? This TFex will not have the big cannon, just "electroshock grubs" and 2 sets of scything talons (well represented by this model, imo). All of those pink tentacles on the front are separate bits, so I can just leave them off... but will that look weird? Is there anything I can add (rather than just remove) to make that part look awesome?
This will allow me to run both the Tyrannofex and Tervigon in one list, like this:
Spoiler:
BioBlast Node (formation models shown in green)
Hive Tyrant, Wings, 2 x TL Brainleech Devourers - 230
Also, I ordered the defense line and alien spore pod from Chapterhouse. I plan to convert up my own "tyranid bastion" using the spore pod, and some capillary towards if I can get a hold of them. Anyone know of a place that sells anything like a tyranid capillary tower? (Meaning a conversion, not a recast) I have been looking around and found some possibilities, but nothing I'm sure about.
I'd plan to put the 4 capillary towers at the corners of the spore pod to make my bastion, to give it the right height and bulk:
Thoughts on the Bastion conversion (adding capillary towers at the corners of the above spore pod) and Tyrannofex conversion (leaving off the birthing tentacle bits from a second version of my Tervigon model, and replacing them with...?) would be appreciated!!
Capillary towers usually go at a premium when I've seen them. I bet there are some decent nid tower manufacturing how-to articles out there if you gave it a good look.
For the electroshock grubs... could you place the grubs you have currently around the base... shooting out (say on thin wires) from the split in the body. Maybe with blue/white mouths/tentacles rather than pink?
Oooh... shooting out grubs from the gap in the body! I like it. I think the "grubs" I have are a bit too big, but I also have a fair number of the finecast wyrm-like rippers:
So, that may work... but I think I'd like even smaller. I don't want it to look like anything is being birthed, but like a weapon.
Edit: I'm also considering taking the small mouths bit coming from this model which I showed above to use for my Crone (which I'll have at least one extra bit of) and putting it there. The small mouths are a separate piece from the rest:
Spoiler:
However, that bit still suffers from being too big, so hopefully I can find something that looks more like "lots of tiny beetles" sized.
I really like the idea of a converted nid baston. I never use fortifications, as it just doesn't seem very nid-like to me, and I prefer more fluff-driven armies. But if you can pull this conversion off, I might have to try my hand at it too. Good luck!
I'll do my best to make it convincing, Freytag! Azazel, I had considered an overrun Imperial one, but if you look at my efforts earlier in this thread with the cargo containers, I just don't think I have the ability to make that look good. I think a full-on gribbly edifice will work better given what's worked for me so far.
I'm also trying to decide on how to build one more of my Mawloc models as a Trygon. Ed at Trollforged said they look pretty cool with "all horns" and no tentacles. What do you think about that for a Trygon conversion, assuming I'd also model it to be bursting up out of the ground on the base?
I also am still trying to figure out how to model "Electroshock Grubs" on a new version of the left model above, to run a Tyrannofex. Similar to GW's model, I plan to leave off the "birthing bits", but I'll need something to put there to represent the electroshock grubs, instead (or else it may look like I just left off a piece!).
So I have settled (finally) on building the following, which I may break into two painting waves:
Could you sculpt a 'chest-piece' in the space with boreholes akin to a devourer, to represent the grubs? Possibly with a visible grub head or two, or one on a wire having been fired?
That is a great suggestion, monkeytroll, and is what I'm thinking but I'm not totally sure if I'm up to the task!
What's driving me crazy is I feel like I saw a model like this somewhere, with a bunch of little things flying / shooting out of it, but I can't seem to think of what it was. Maybe my imagination
I do think if I could find something "beetle sized" I could add them on myself, and perhaps put some on a wire as if they're shooting out, as you say. I'd love to fill that space with "beetle sized" things... or even a more solid surface that looks like it is perforated and can have beetles coming out of it, as you say.
I'll post here with what I come up with . The Chapterhouse spore pod (to become part of the Bastion) and space bug line came in, and I'm thrilled with both! Now I just have to find some capillary towers and that idea will be ready to implement
Automatically Appended Next Post: Okay, here's what I found. I ordered some of each and I think one of them should work!
1. Khurasan Parasachnid bugs, which I would leave the legs off of. (Edit: I received these and they're not going to work, unfortunately, so hopefully the second option below will)
2. Ground Zero Games "Crusties" Scuttler bugs (from their 15mm Stargrunt line):
Between the two of those I should have one that will work! Also, for the Trygon conversion I'm thinking of using the extra mouths bit from the Dark Young model posted on the last page. Will experiment with it and see what looks good.
I have now acquired the parts I need to build the bastion with sufficient bulk, here's a teaser pic:
Parts will be:
Chapterhouse Spore Pod
Chapterhouse Space Bug Defense Line
2 sets of Tyranid Capillary Towers (from ebay)
I'm hopeful that my capillary towers are genuine but with items this OOP it's almost impossible to know. The casts certainly look fantastic to me, but obviously that's no indication. If I could've bought them directly from Forgeworld, I would have, but I got these from a seller in the U.S. so I at least hope they're legit
What I need now, are detailed Bastion dimensions. I actually have a GW Bastion, but I cut up many parts of it when trying my Mawloc conversion earlier in this thread. Would anyone be willing to make a detailed drawing of the base level of the Bastion, and then the top level?
What I really need is a top down view showing the width of the various sections. I believe the previous building I used was around 5" x 5" x 7", but having better numbers would be a lifesaver.
If no one can get me these, I'll try to piece together the parts of my own cut up Bastion to get a measurement or see if one of the local game stores has one built.
Ooh, those crusties look like they'll be a good fit.
Not entirely sure where my bastion bits are....if I come across enough of them before anyone else I'll have a stab at figuring sizes for you.....but I'd be willing to bet a fair bit that someone will have a much faster answer
I think so too, Gits! Can't wait to get them, they're coming from the UK though so still waiting.
Monkeytroll, thanks for checking. I may be able to cobble together enough of mine to get a measurement, will give it a go at least . Although if someone could measure theirs I would be in their debt! I can send some grubs as compensation for detailed top-down measurements / drawings, just PM me
Whalemusic is my hero and has given me the dimensions that I need . I have a day off on Monday and plan to clean out my workspace from the big AdeptiCon push and start making some good progress on this then!
Hey lads, so with 7th edition about to hit I am thinking it makes sense to wait on working on this until I can make sure everything will still be legal / what I want to take / etc.
I have some other projects I'm working on... would it make sense for me to update the title / OP and show those, or do people generally start a new thread for each separate project?
Think it's best to go with whatever you feel more comfortable with - I try to maintain separate blogs for my orks and chaos, with whatever else I'm working on going into whichever one is more active at the time, so peeeps who like orks but not chaos don't get put off and vice versa - but seen plenty of mixed blogs too. And to be fair, it generally seems that people who like what you do in one will at least take a look at what else you're doing - I probably would never have thought of looking at Gits MW's if I hadn't been interested in his orks. Which obviously would have been my loss.
Thanks for the thoughts, guys . I think if it doesn't bother folks too much, I'll use this same thread and just adjust the title and OP (i.e. put some of the prior stuff in spoiler tags).
And whalemusic, yeah I'll still be working on the Bastion simultaneously with other things, as soon as I verify that I can still take it in the new edition lol.
I prefer the single blog for multiple projects. If its a project I'm less interested in, its easy enough to take a quick glance and move on. If it's something I feel like commenting on, even if its a quick thumbs up.
Edit: I've decided just to keep this blog for my nids, after all
I want to update my tyranids to 7th edition, but I'm glad I waited as the lists I'm seeing are very different from what I would have made if I had just dived in. Things I'm currently considering: whether to try to gear towards a swarm list, using my massive number of gaunts, or more of a nidzilla. Also wondering if a Malanthrope model will blend in well with my army, or not, as the rules seem to be amazing and could open up more viable army lists. In that case, perhaps I would eventually update my venomthrope to be the GW model, but converted like this? I think it might help the Malanthrope blend in. Although with the Malanthrope around, the Venomthrope probably won't make it into my lists
7 1/8" tall at the highest point (#1 in the diagram below), 5 5/8" wide on each side (#2 and #4 in the diagram), with some protrusions that are 3 7/8" wide on the upper portion (#3 in the diagram). Sorry for the archaic "english" measurements hopefully the pic helps:
Spoiler:
Also, my discouragement about not having a list to run I think has been solved! Jy2, my tyranids hero, has given me some ideas, and here is a list that I think I would like to try (using self-allying)
Malanthrope gives synapse AND shrouded from inside the box which before I was hiding a Tervigon behind the Bastion to provide. It's also a lot more durable even inside the Bastion (I've had the Venomthrope die in there before) and of course if the Bastion is destroyed.
But basically, I think synapse is the key- it will allow me to move away from the Tervigon and not rely on easy-to-snipe zoanthropes in the open to have synapse in my backfield.
Ed at Trollforged says he should have the larva swarms (which I'll use as counts-as rippers) ready in the next batch of molds shortly, so I just need to buy the Malanthrope and Imperial Armor Volume 4. Off to the DCM group forgeworld order thread!
Also, I edited the above spoilered list, and also posted it in the 40k army lists section. Hopefully I can get some good advice and know exactly what to build towards! But I think I have a good idea here, maximizing the use of the big bugs I've already painted. I'll still want to one day go back and paint up a Living Artillery Node and some devourers to convert some gaunts with, but I think this would be a sweet list to run now, and maybe even more effective.
I also think I'm going to convert up some of my massive stockpile of painted grubs to be gargoyles, by mounting them up on tall piled slate bases and converting them with gargoyle wings. This means I'll only need to paint up the wings! Which would also be a huge timesaver, of course.
I'm getting more and more motivated so updates will be forthcoming
Quick question- I had been planning to cut off this model's legs and use it as a Crone. But now I'm thinking, it actually works perfectly as a Dimachaeron! I can model it as if it is leaping:
Actually looks a lot sweeter than the official model! What do you guys think?
I really liked the idea of the crone, and was eager to see what you did with it......but, you're right, that does seem to fit the Dimachaeron for your gribblies
Clearly, my reply broke Dakka this morning... trying again
Just a quick update to say I ordered these:
I wasn't totally happy with the idea for my gargoyle conversions, and think these would be a better fit. I might swap the wings for the GW plague drone wings- or maybe just the small ones. I ordered a set of 3 off ebay, and am considering the larger set (or perhaps both) for my winged hive tyrants instead of the large wings I'm currently using. Spoilered pic for reference of what I'm talking about:
Spoiler:
Bugs should have bug wings, right!?
I'm also just about to place the DCM group forgeworld order this week, to get my two malanthropes and the book with their rules. Then it will just be waiting for those to come in, although I've got work to do in the meantime. I've laid out all bits for the Bastion but need to lasercut a base for everything to mount onto.
Finally, two other updates on my plans: despite how sweet the OOP Armorcast Exocrine is, I've decided it's just too big and doesn't fit with the rest of my models. So, I sold it, and am eagerly awaiting the Trollforged version- I'm hoping Ed will have it cast up very soon! It has legs, but to tie it in I'll be converting my Biovores from his carnage hounds. So, it's the larvae swarm, cannon drone, and carnage hounds I'm waiting on from Trollforged, all sculpted by Ed and just needing to be cast:
Larvae Swarm:
Cannon Drone:
Carnage Hound (will convert into a Biovore, thoughts appreciated on that!):
I would also be designating the crazy tentacled model that I'd originally planned as a Crone/Harpy back to that role, as Ed is making one more big drone which I could use for a big FW bug with some converting. So, those are all the plans, will update when I have more actual progress to show in September
What is that you're using for the gargoyles? I'm sure I should know what it is, but can't place it. I'd agree that a wing swap is probably a good idea.
Pleased to hear the crone idea is back on the table.
How does the carnage hound compare size-wise with a biovore? Never had one, but I always think of them as fairly chunky beasts.
What's the plan for the conversion- adding a 'cannon mouth', or re-arranging the head to suit, or something else entirely?

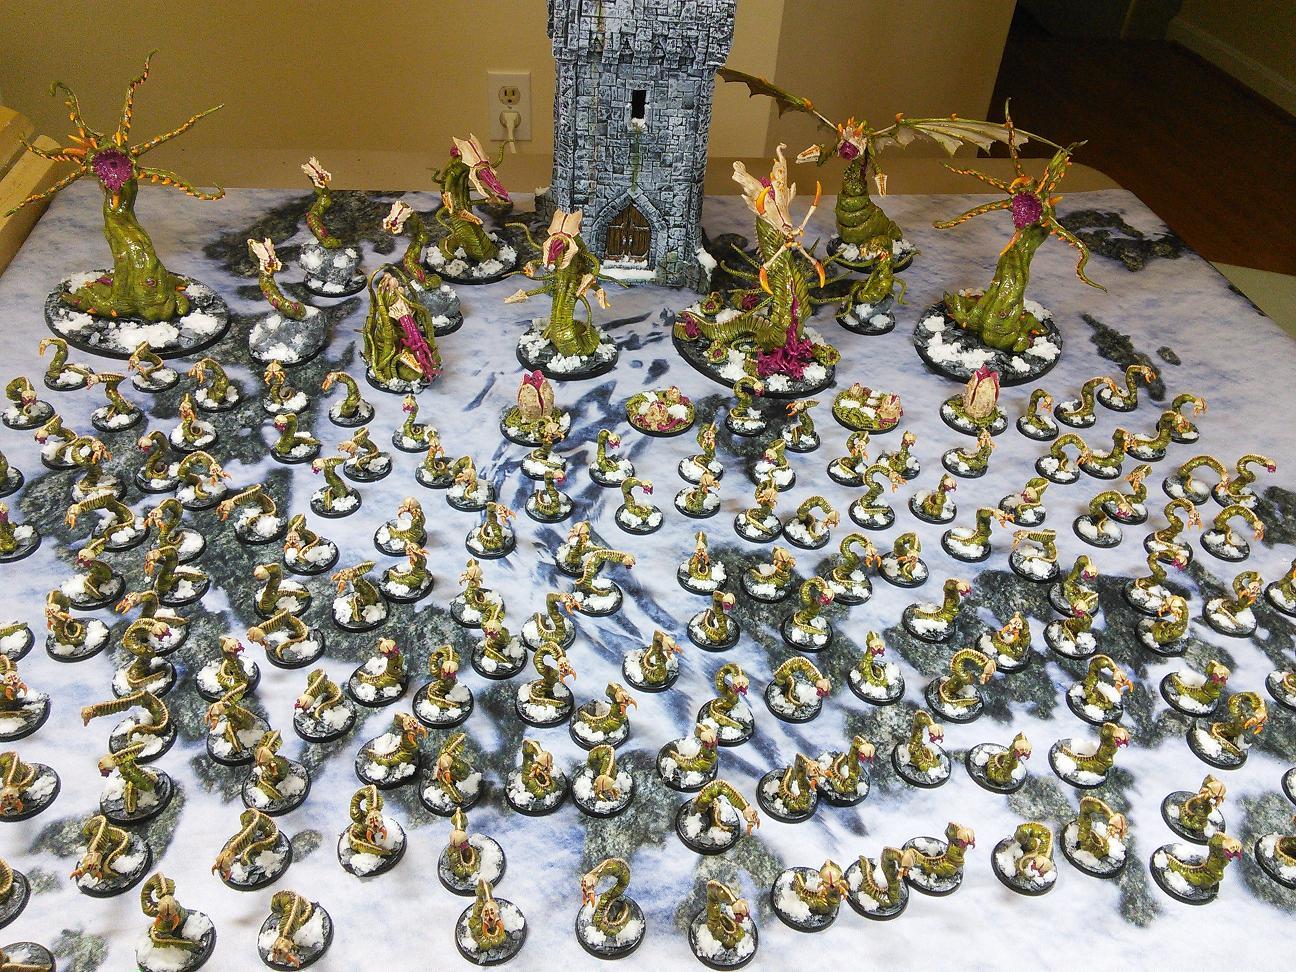
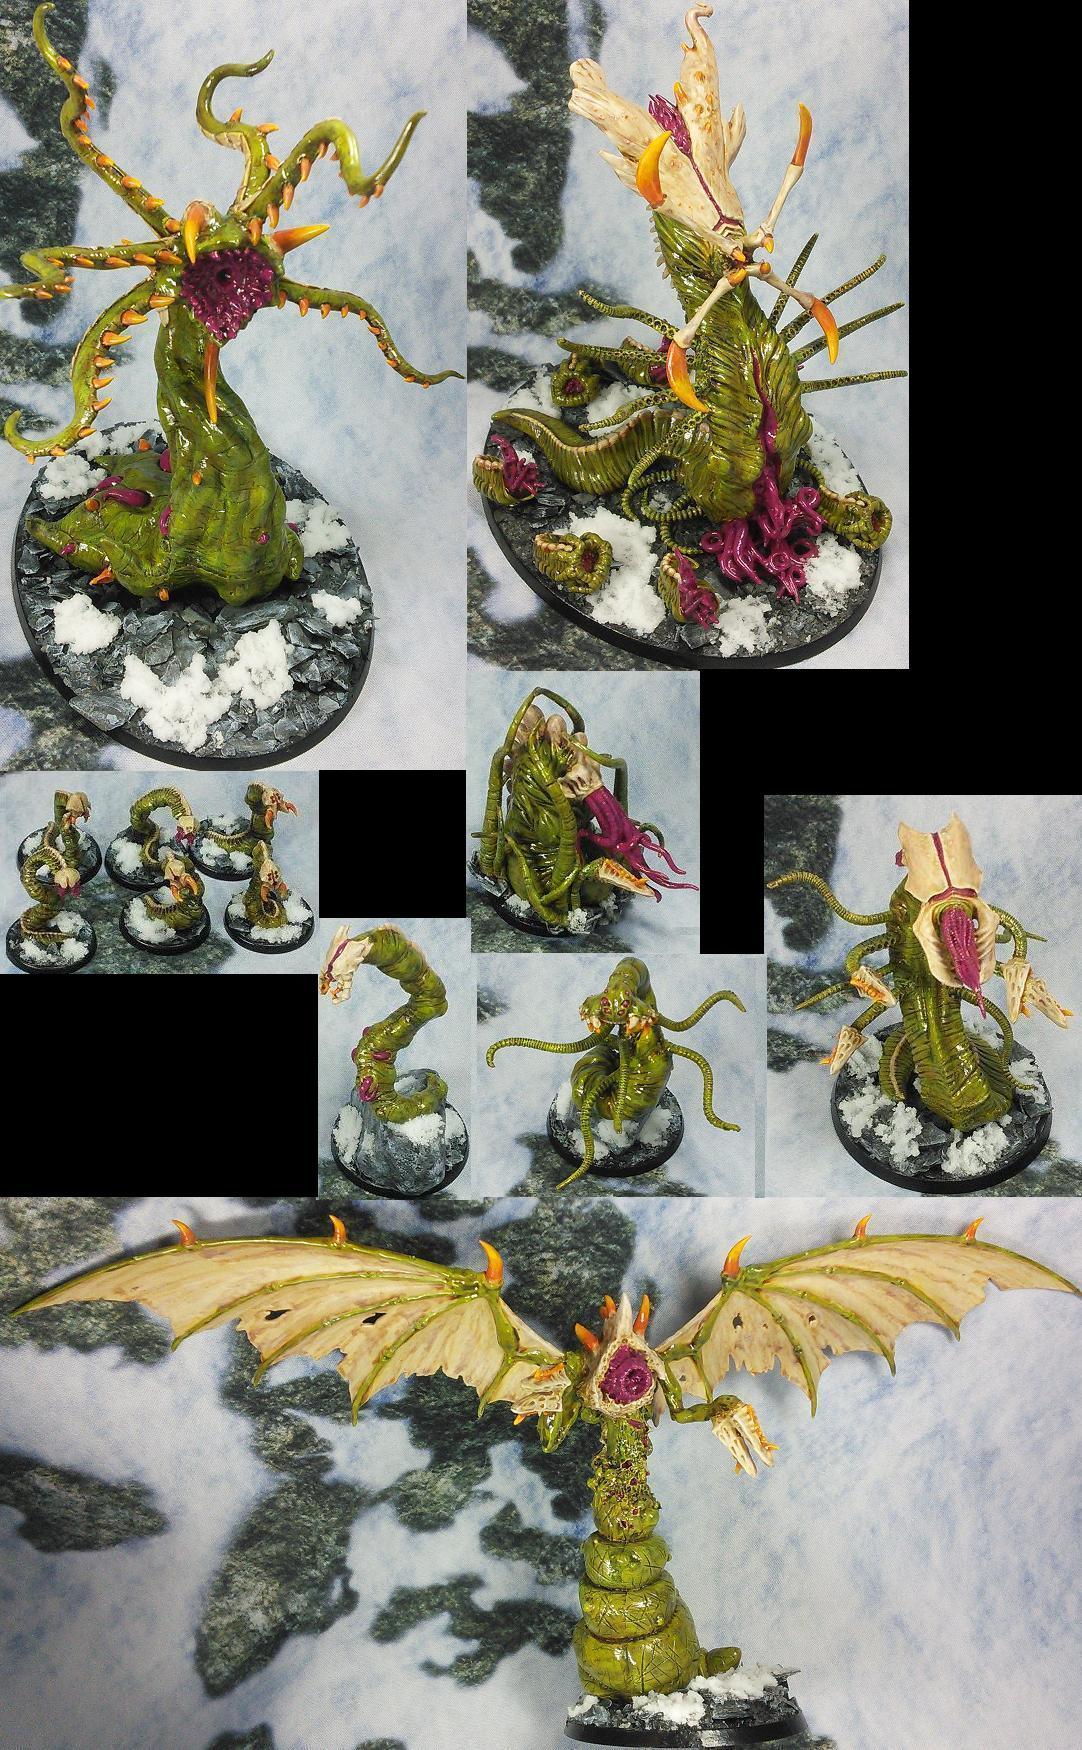


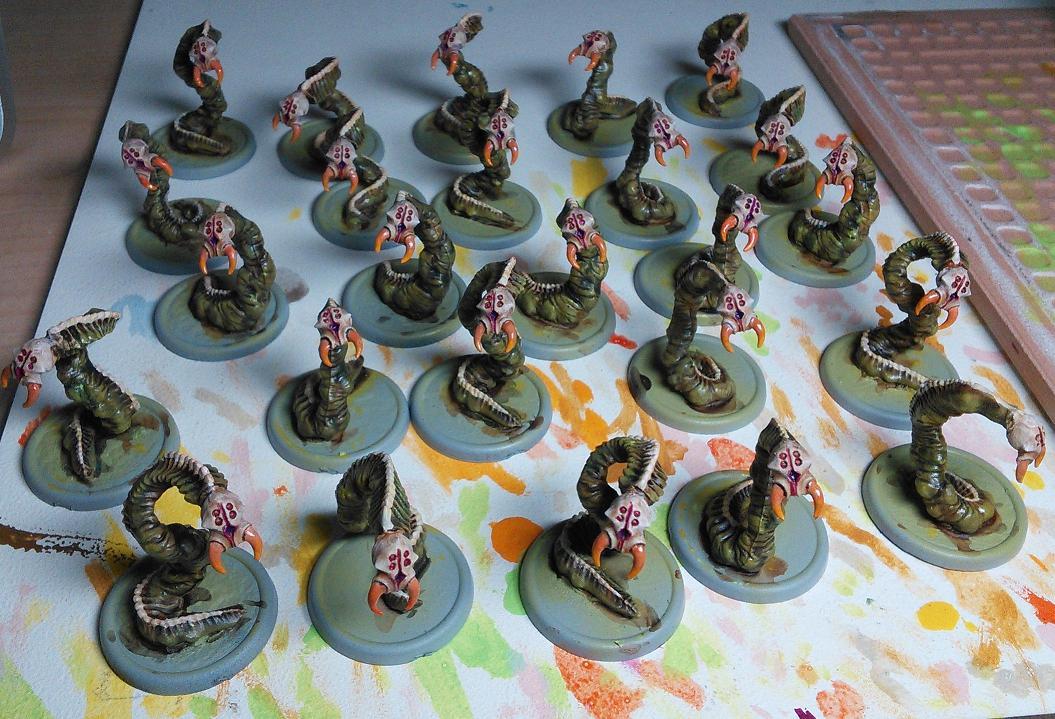
 . More pics are in the
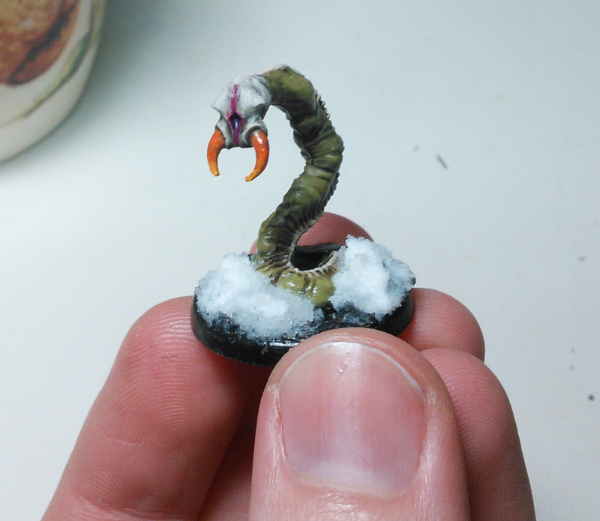
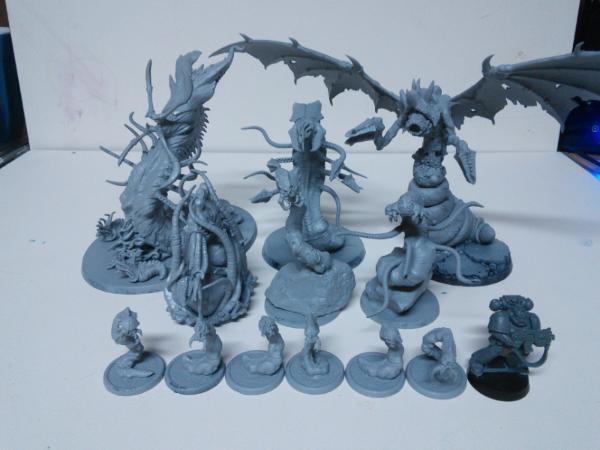

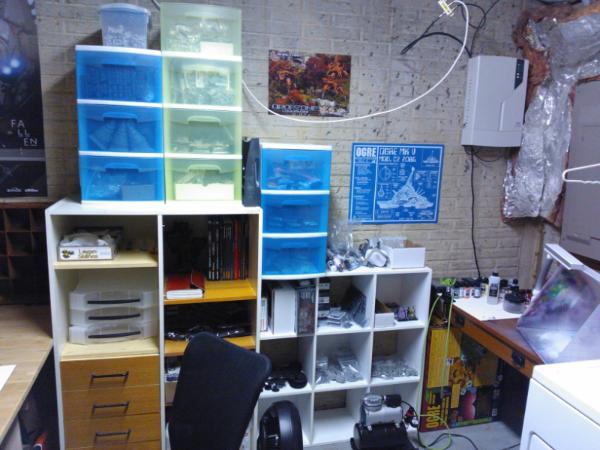


 . Wish me luck!
  . Ed also mentioned that he made the Queen such that it's upper torso could be put onto the Wyrm's lower half, for a grub-like Queen, which would totally awesome
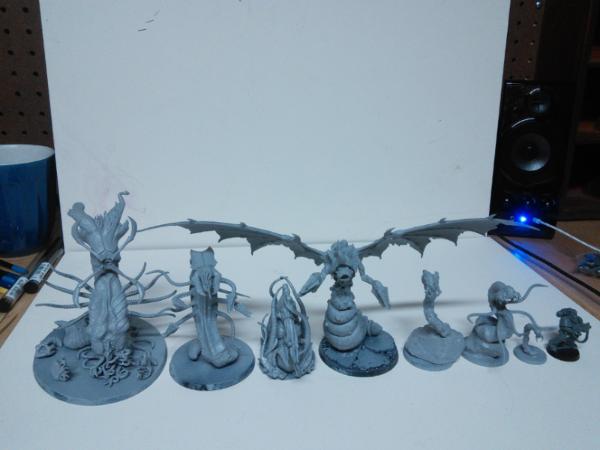
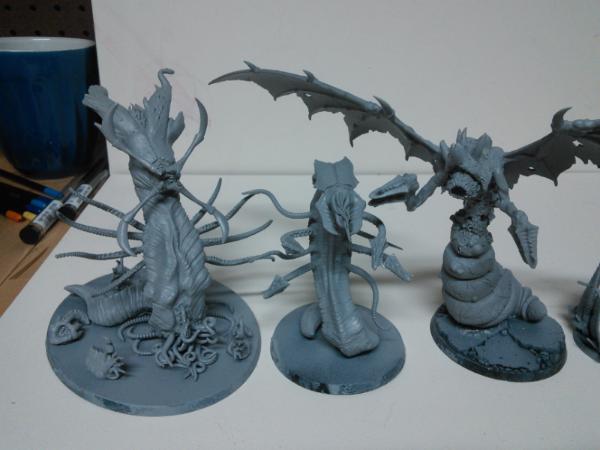
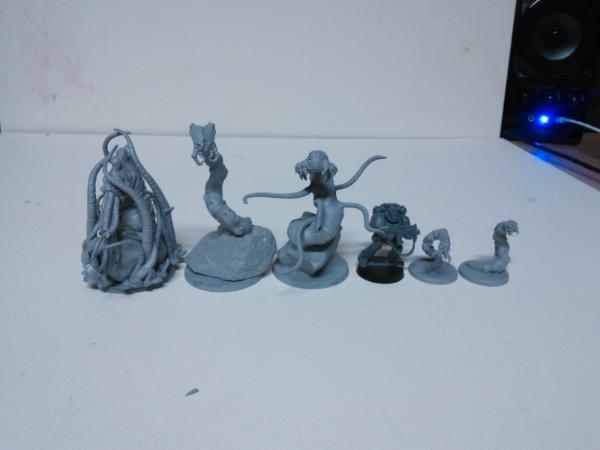
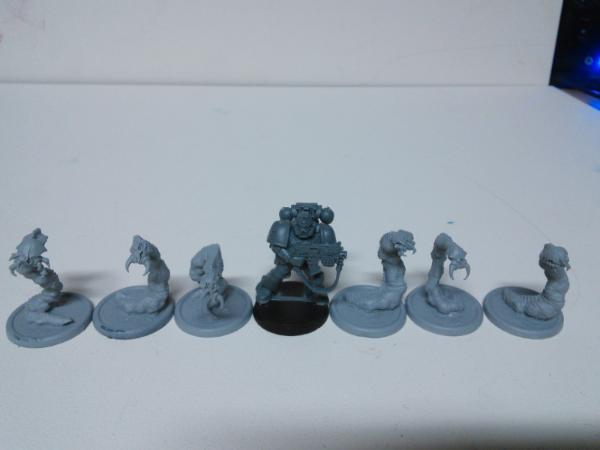
 and I also like the idea of the Bastion. I plan to put the Venomthrope inside and hide my Tervigon behind it for this event, or as much of the Tervigon as I can, since with the team tournament restrictions I have no Zoanthrope in the list.

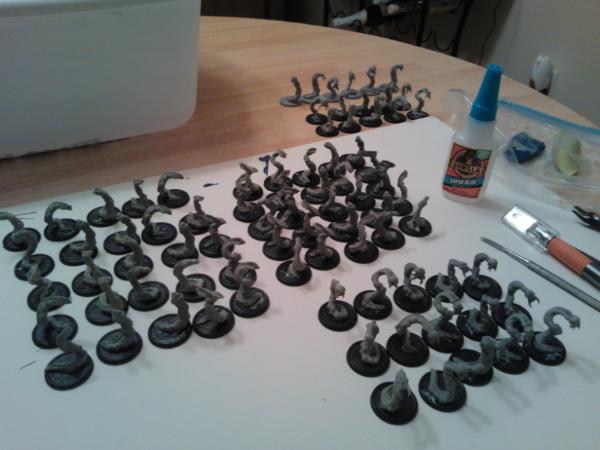
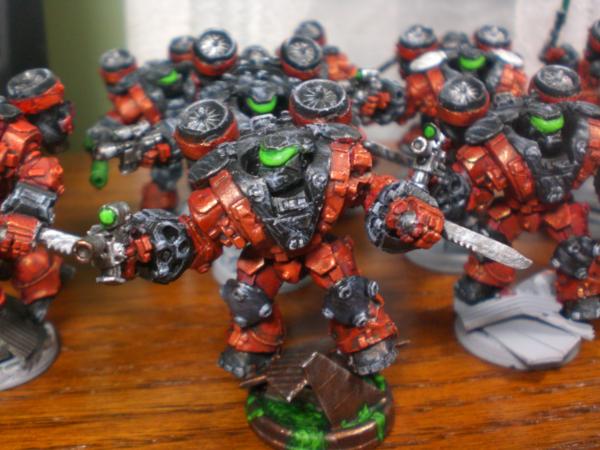
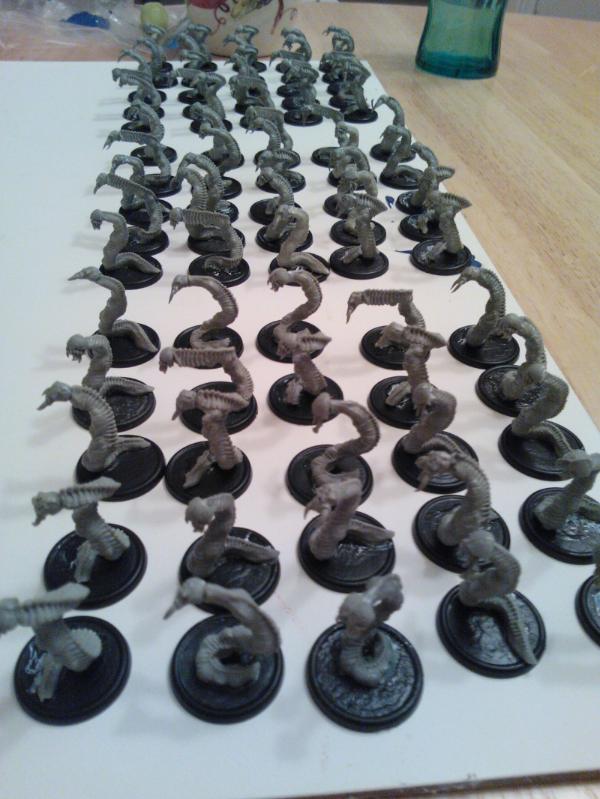
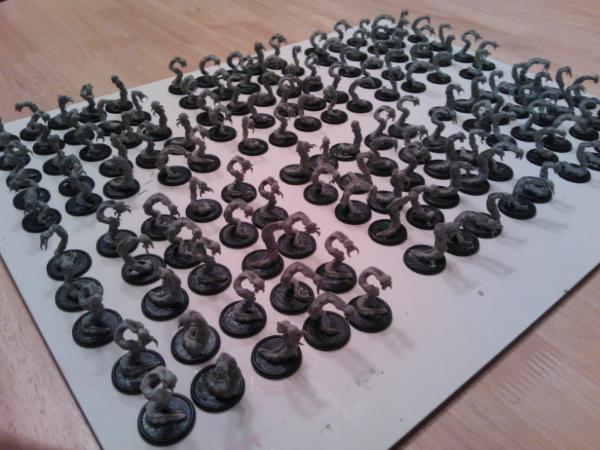


7tHP,OJBMhqJ5Ul1Q~~_3.JPG)

 I'm not an artist
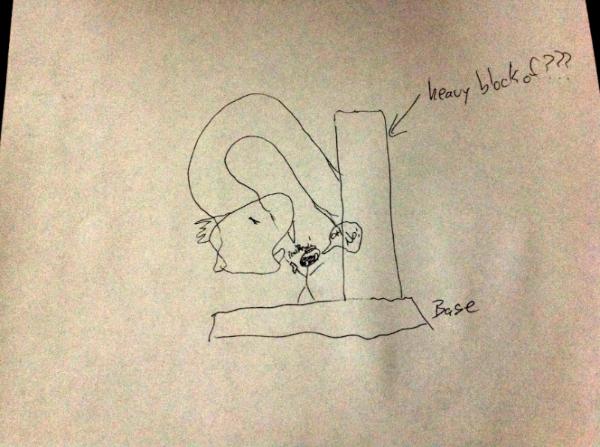

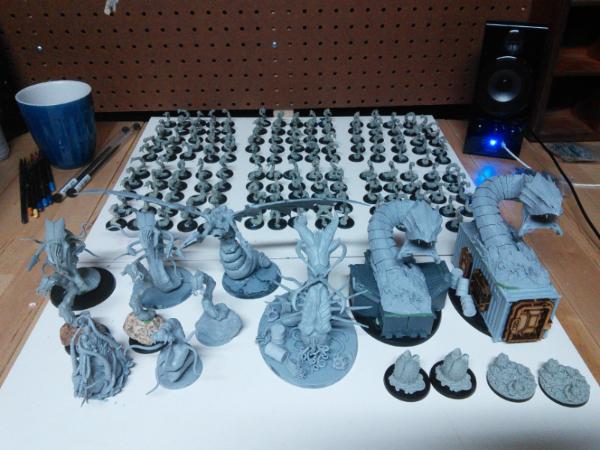
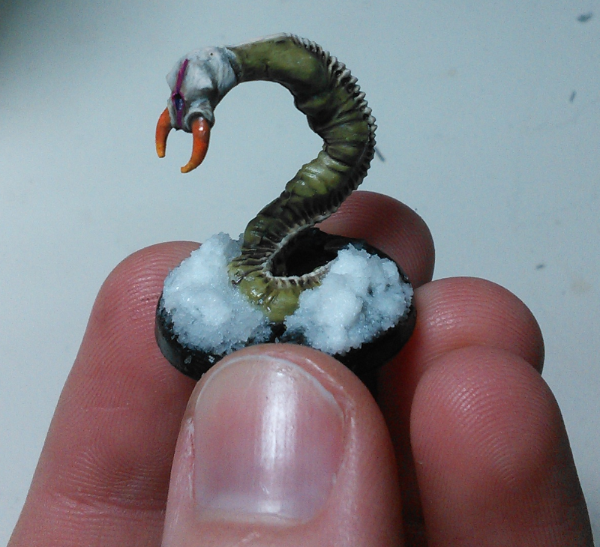
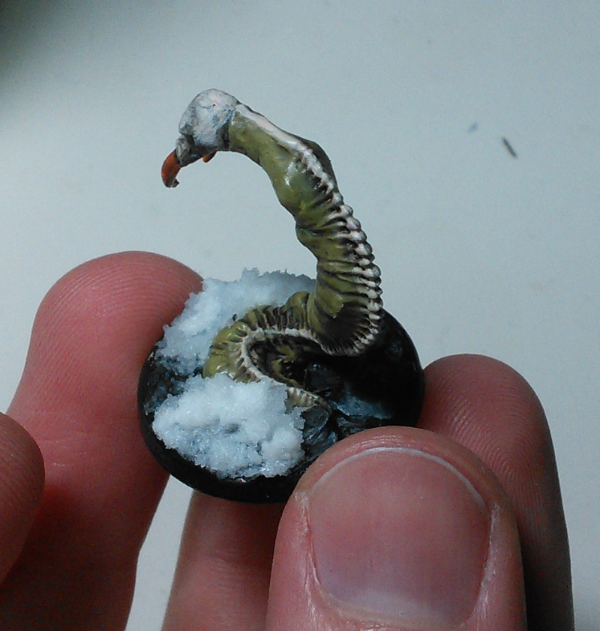

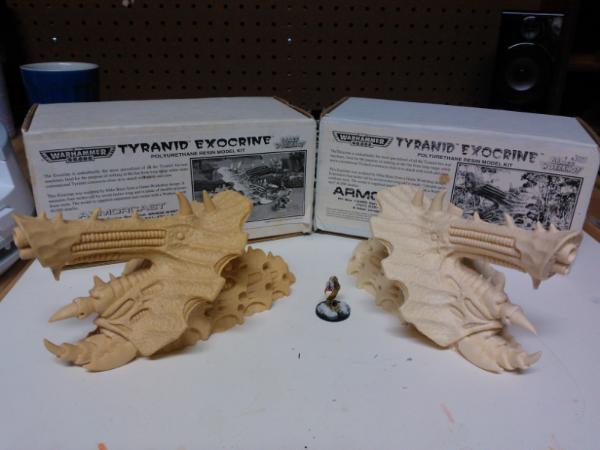

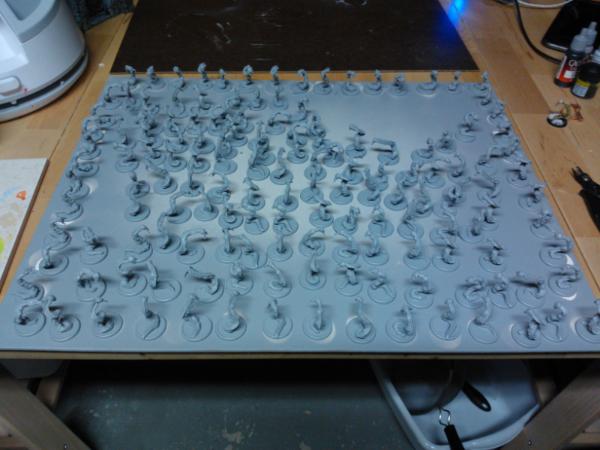
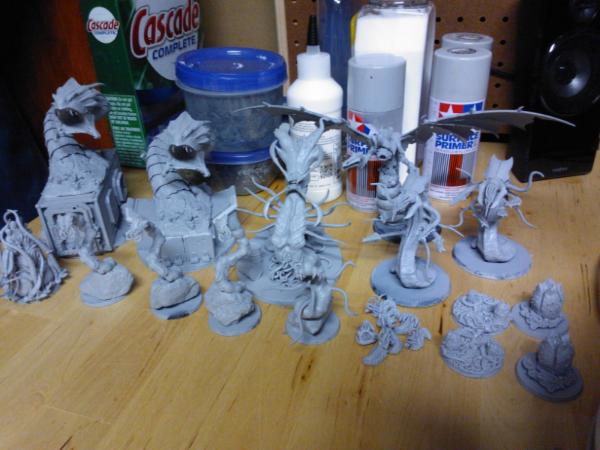
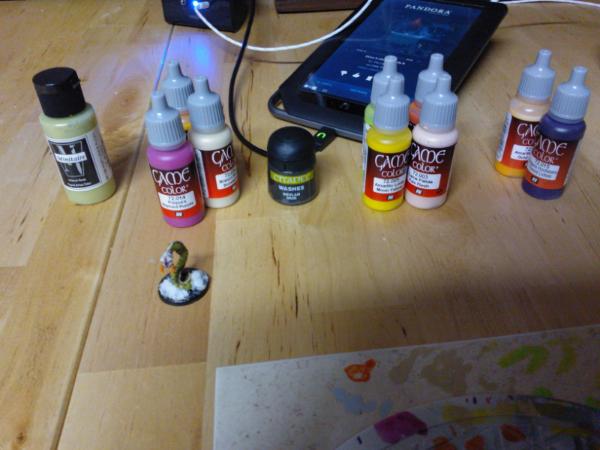
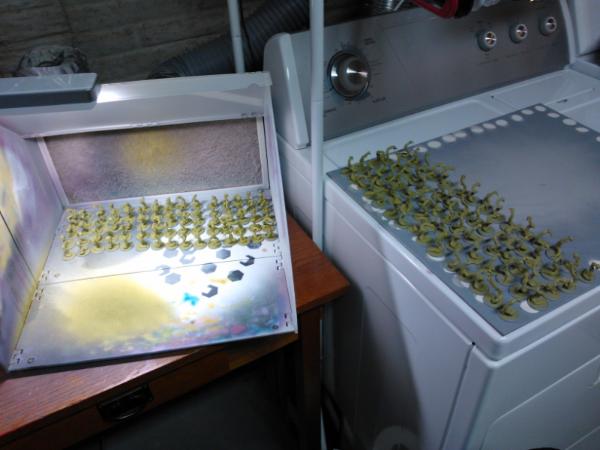
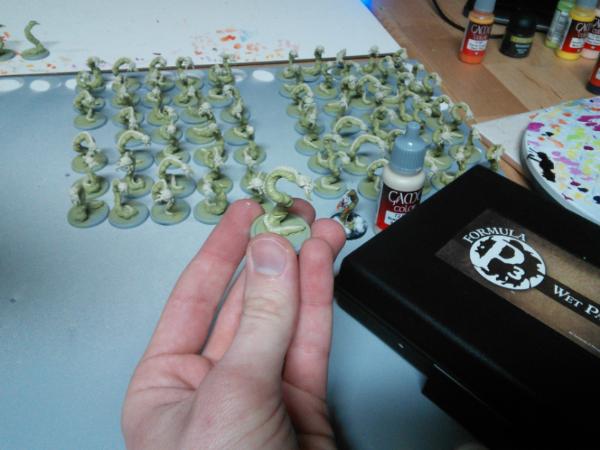

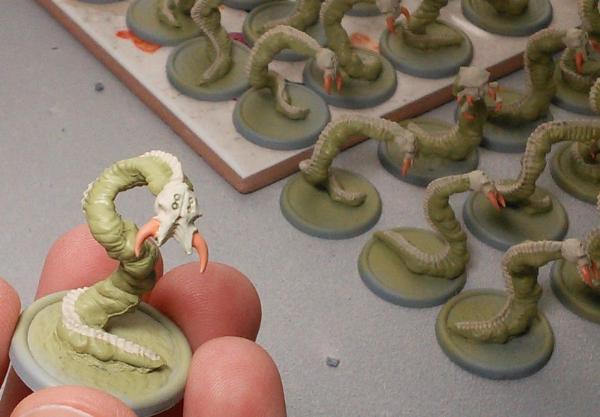
 . So, I'm thinking to do it in this order instead...

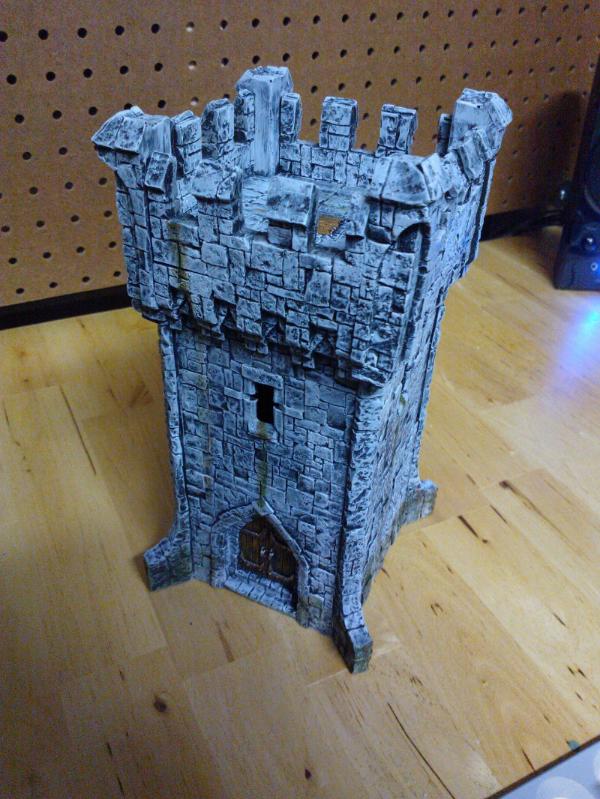
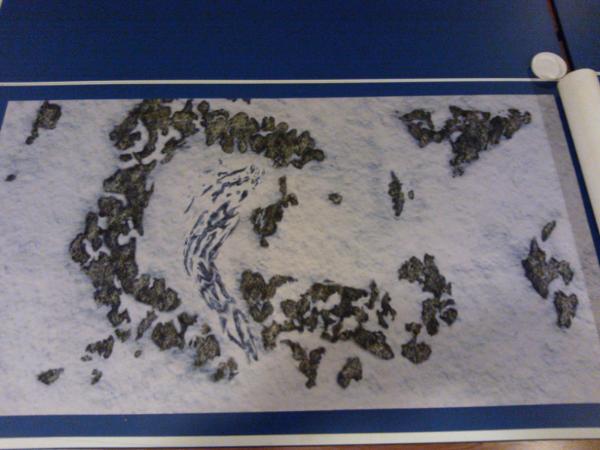
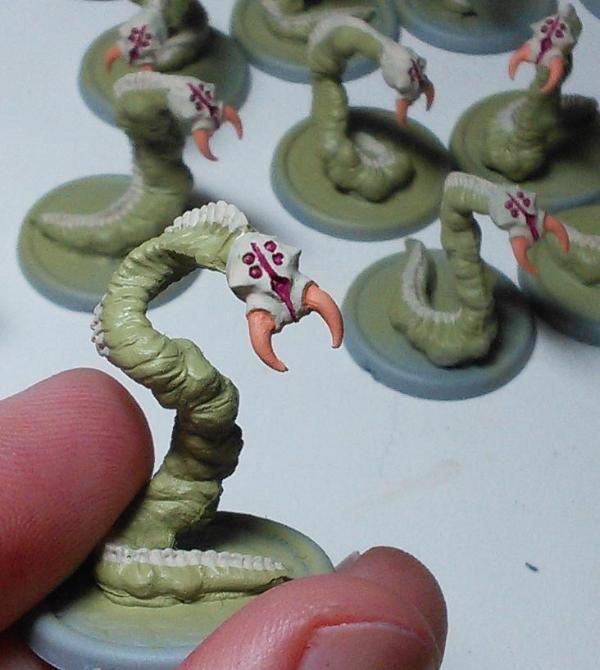
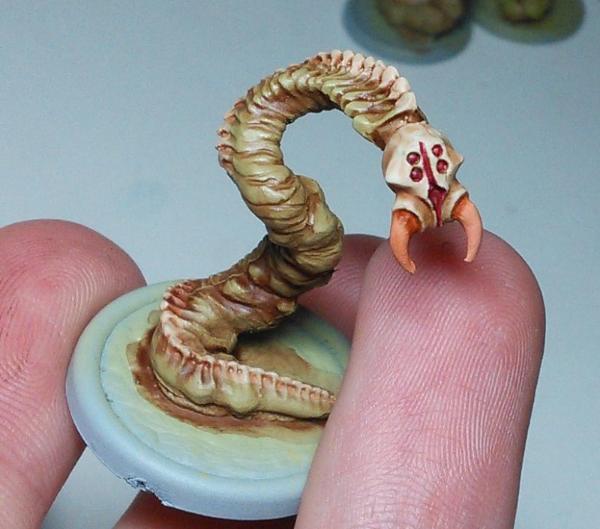


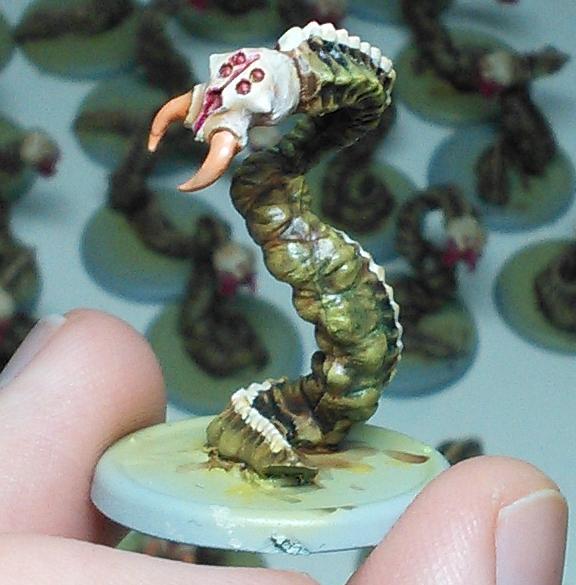
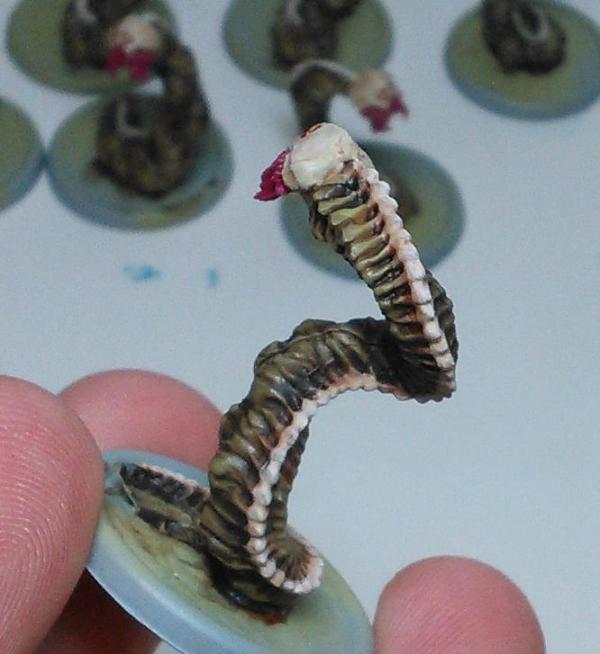

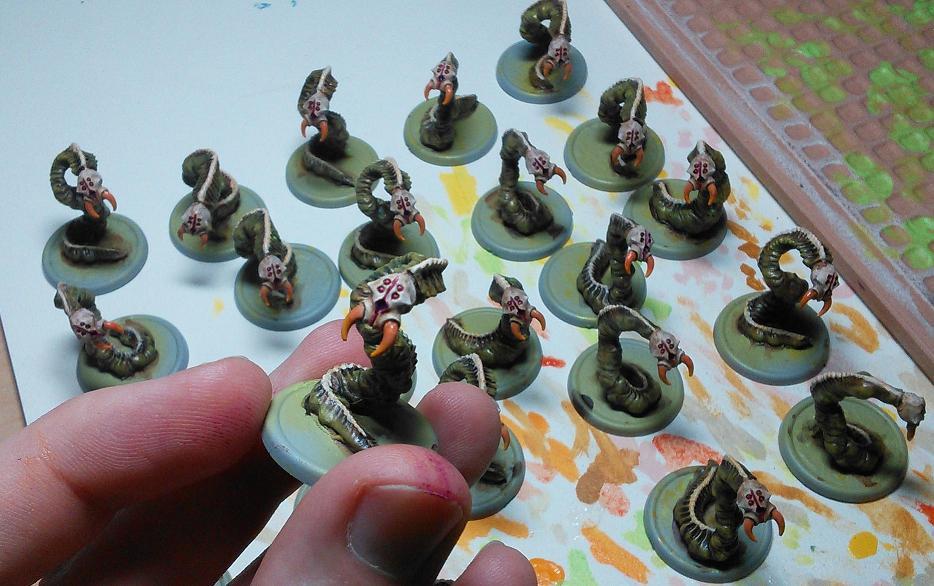
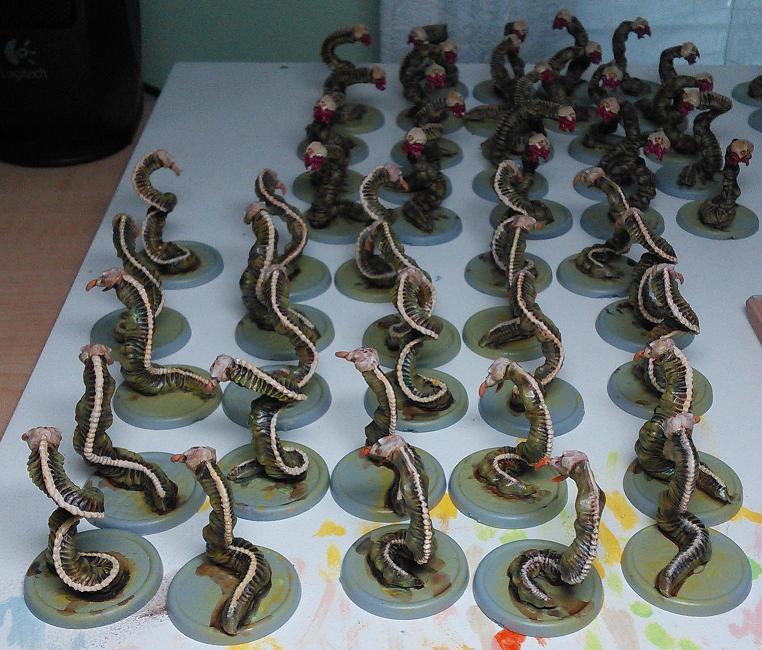
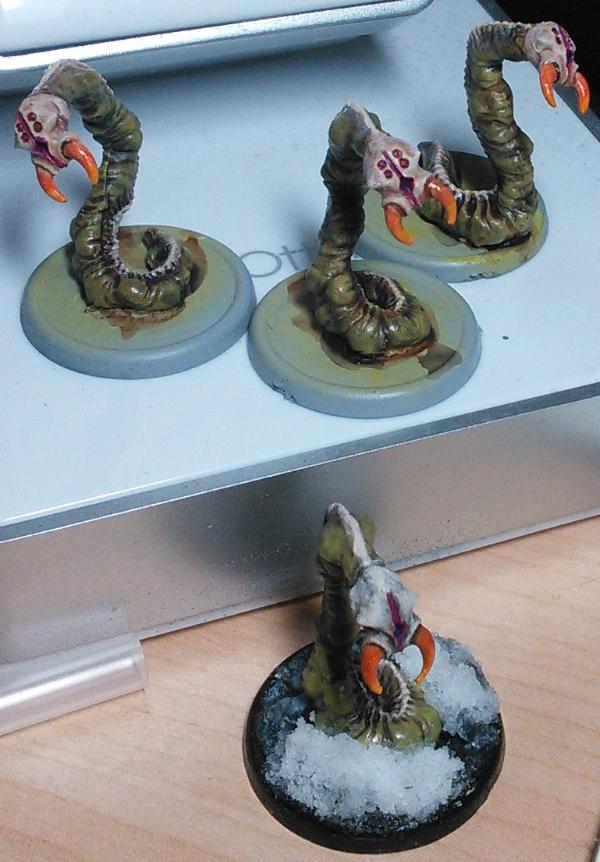
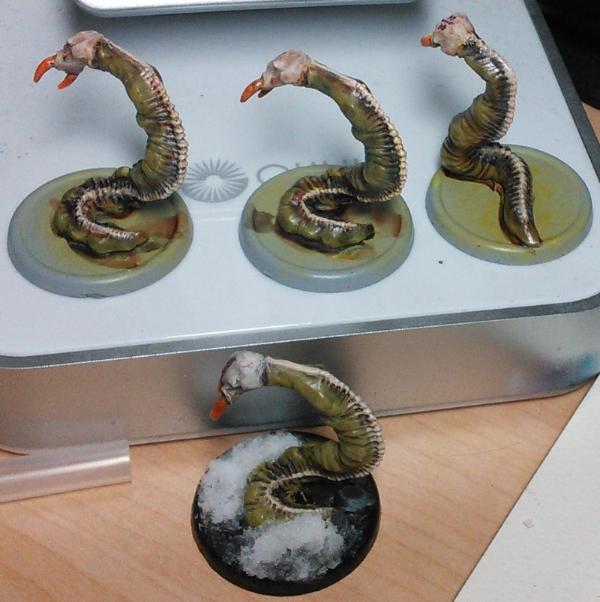
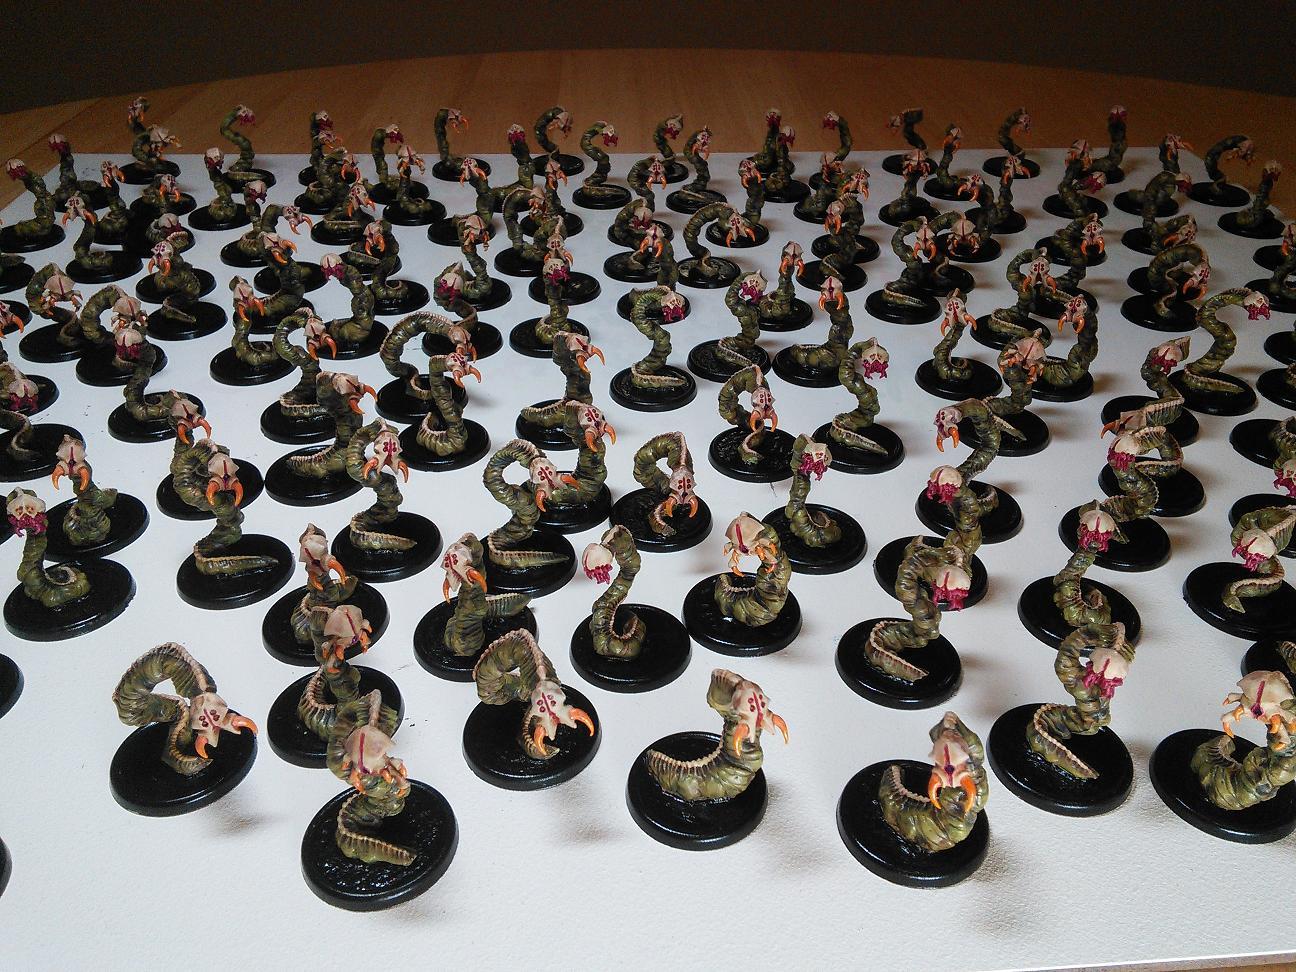
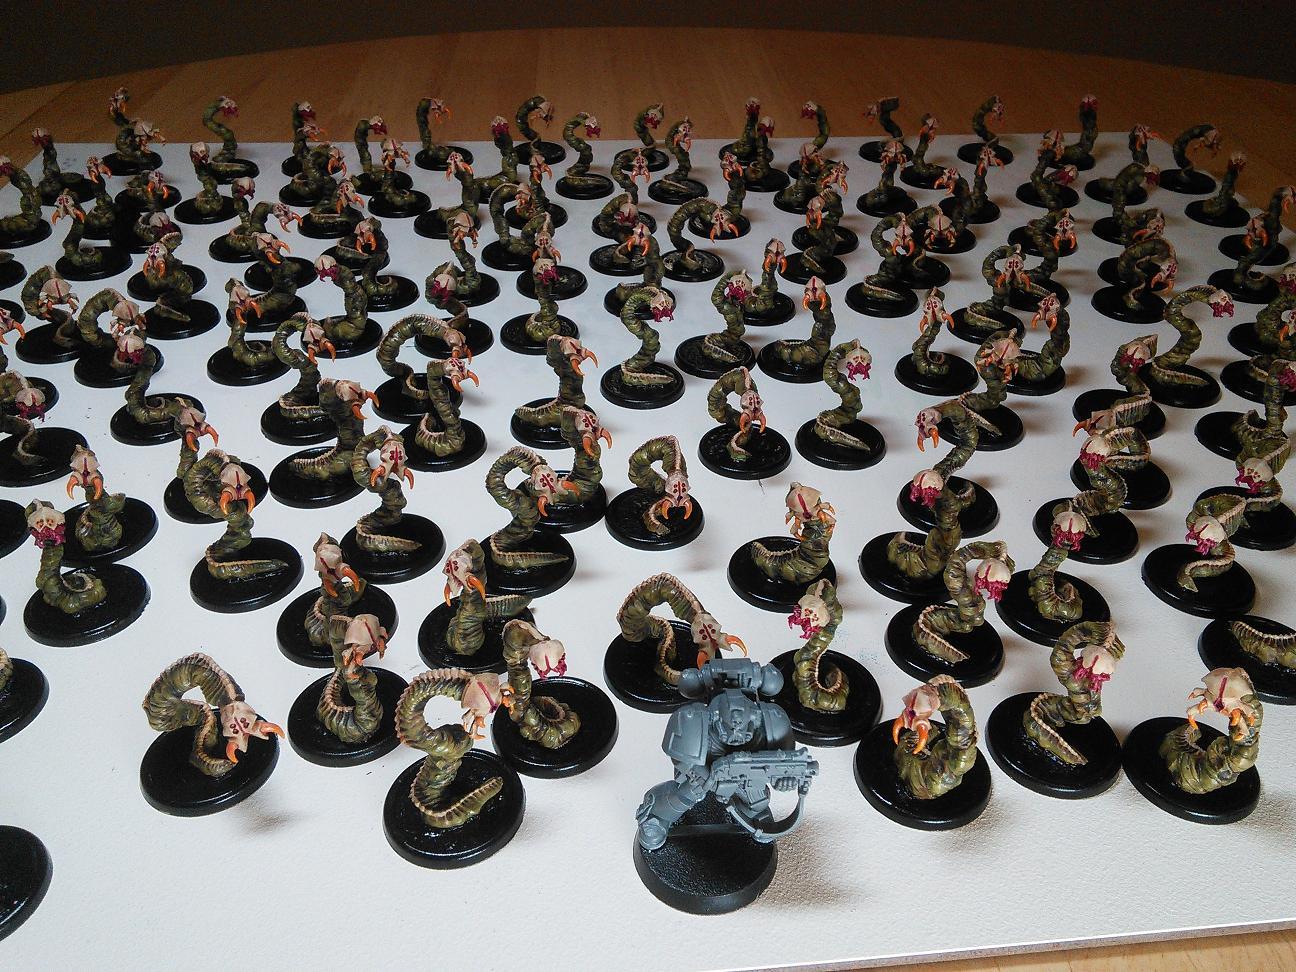

 worst where's Waldo EVER!!!


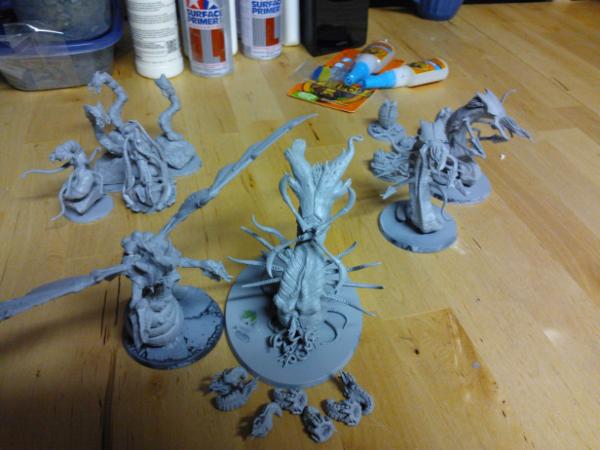
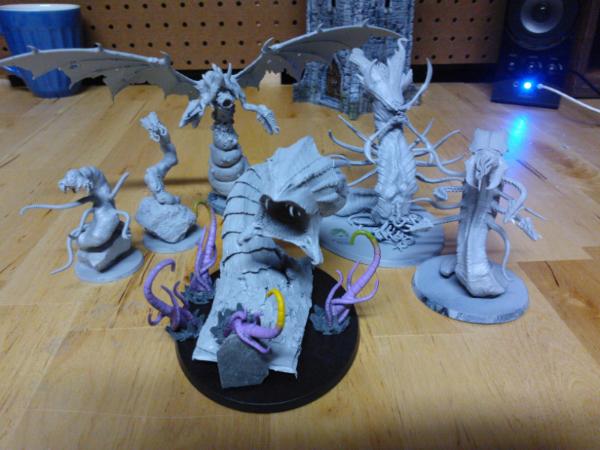
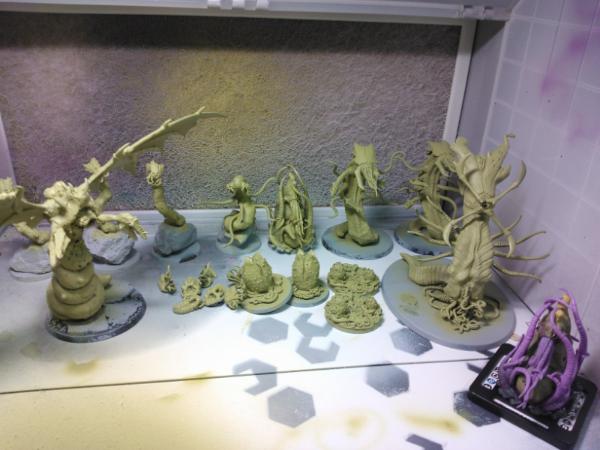
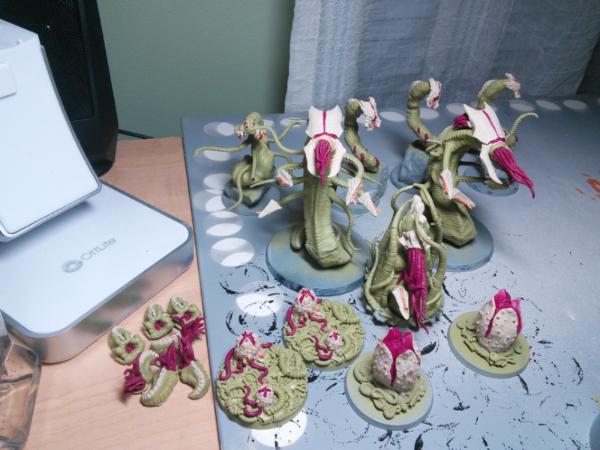
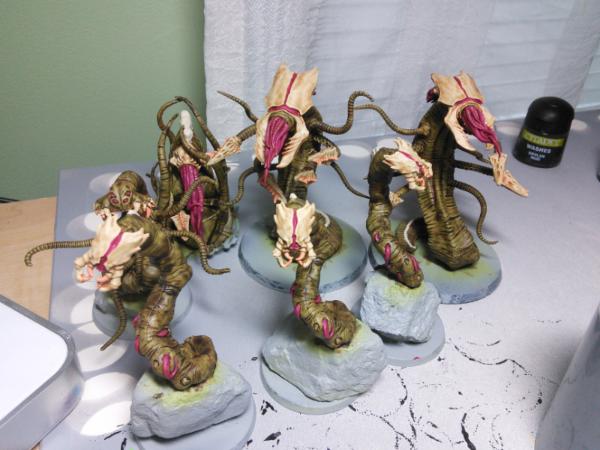
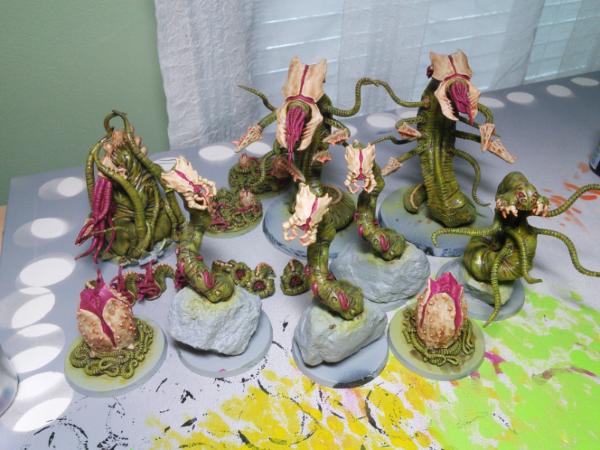

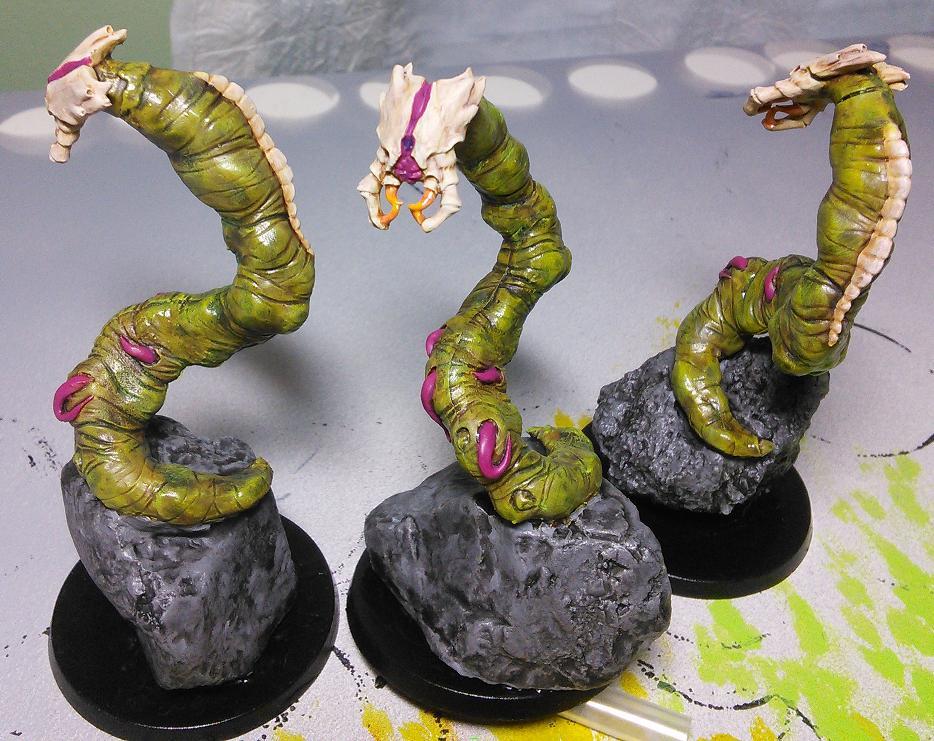

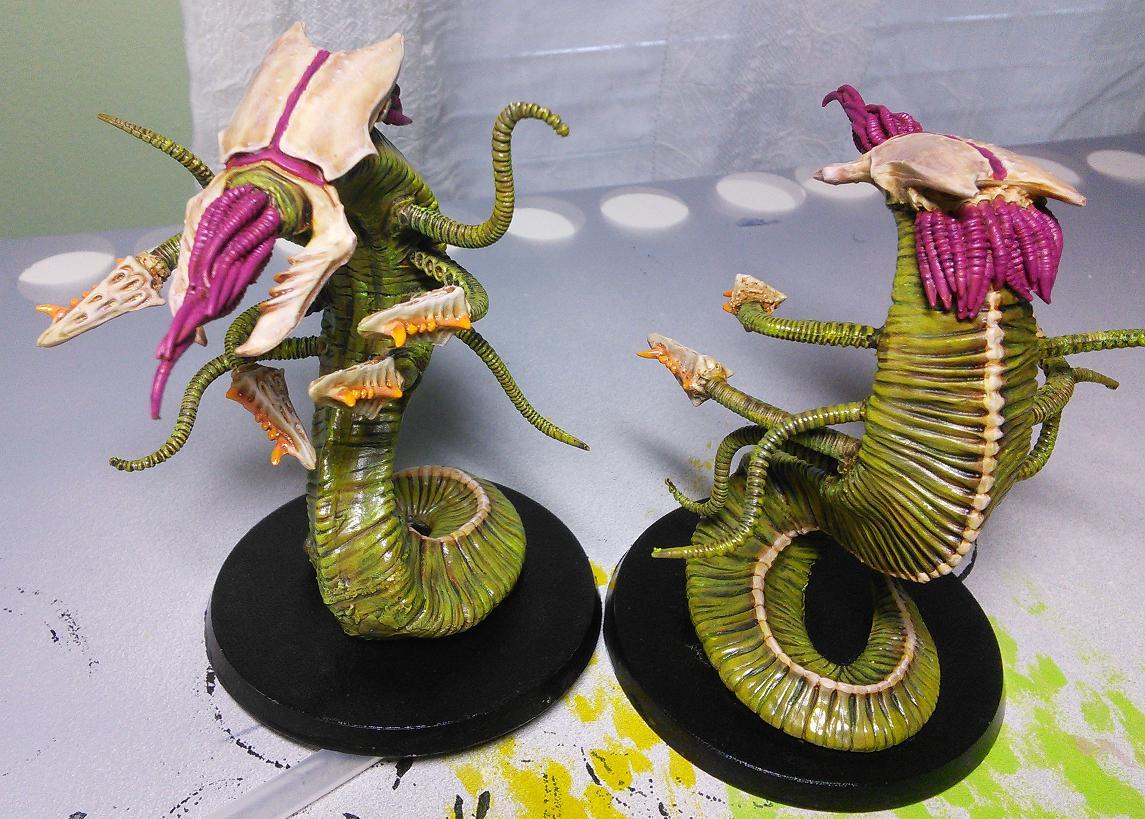
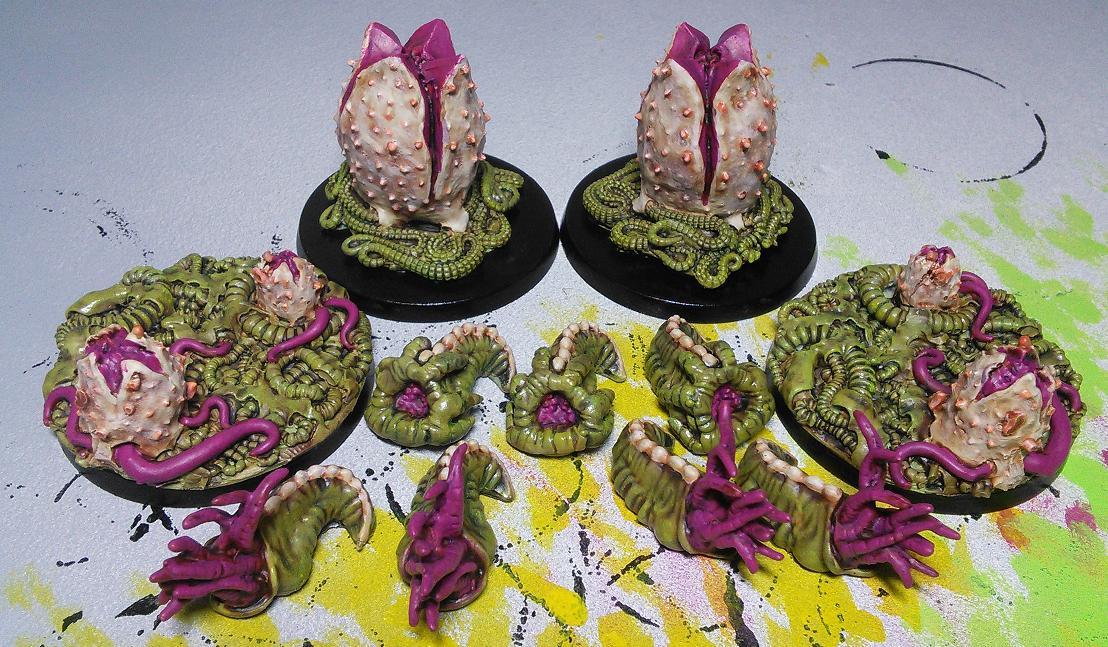
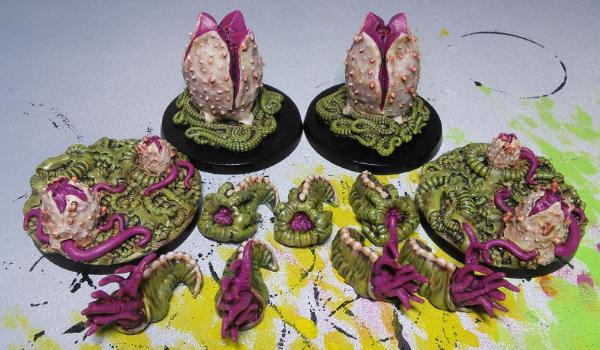


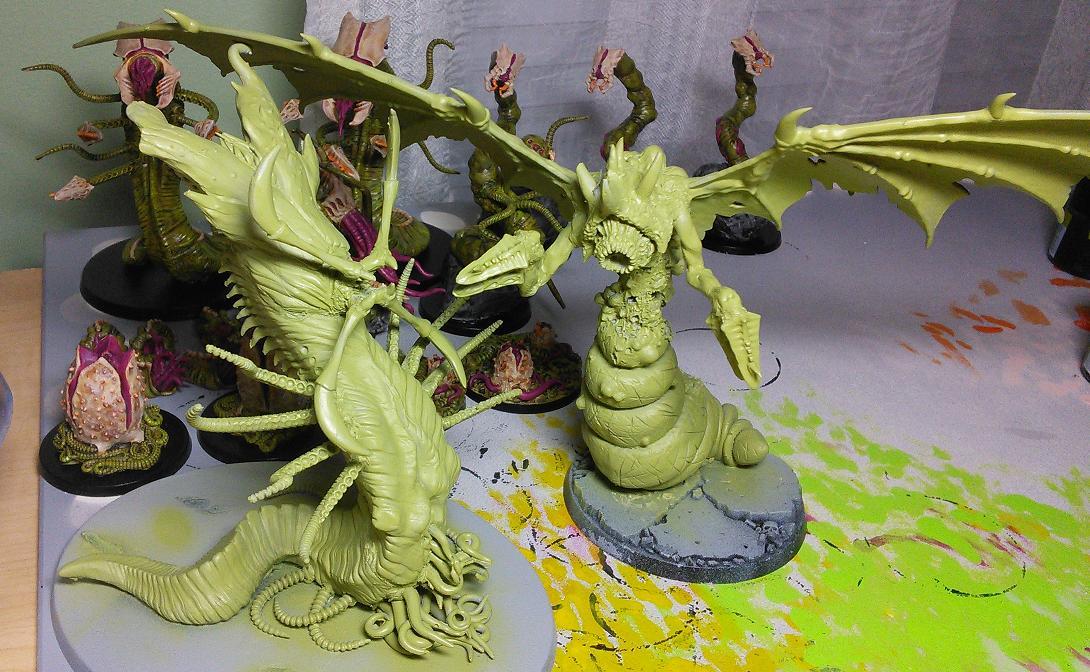
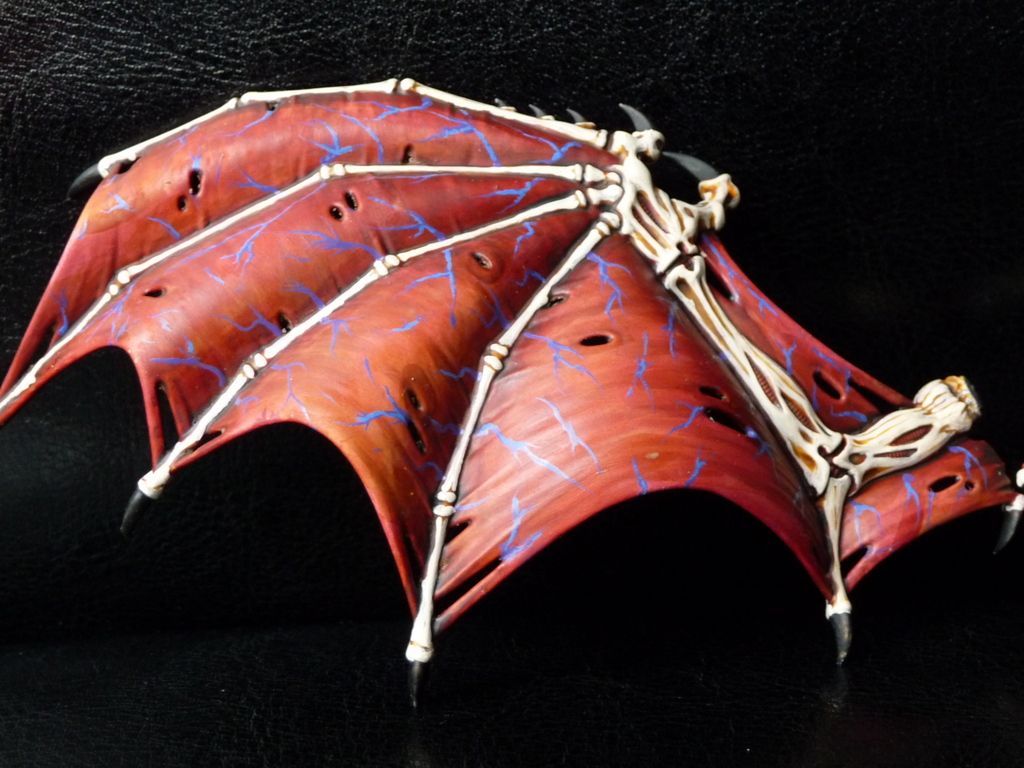
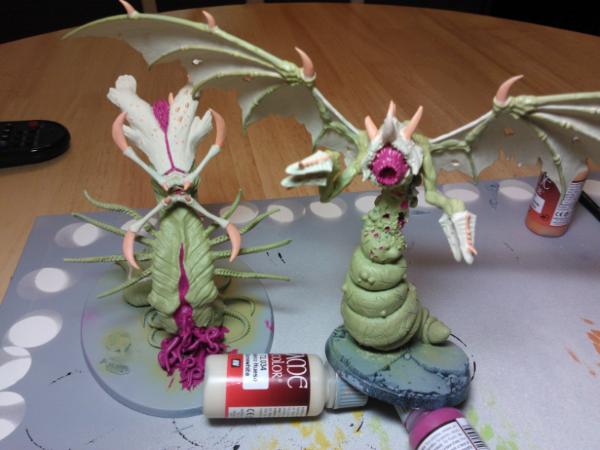
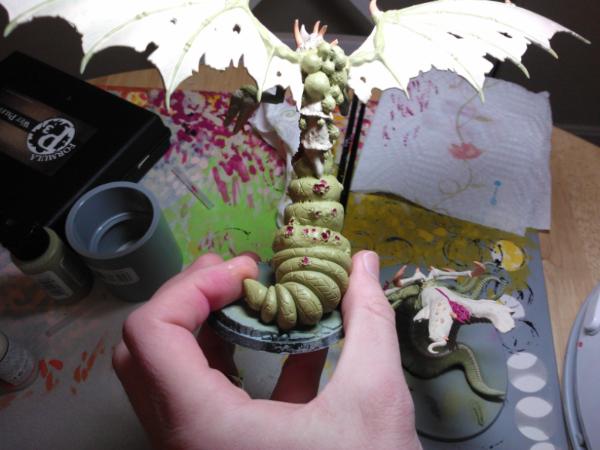
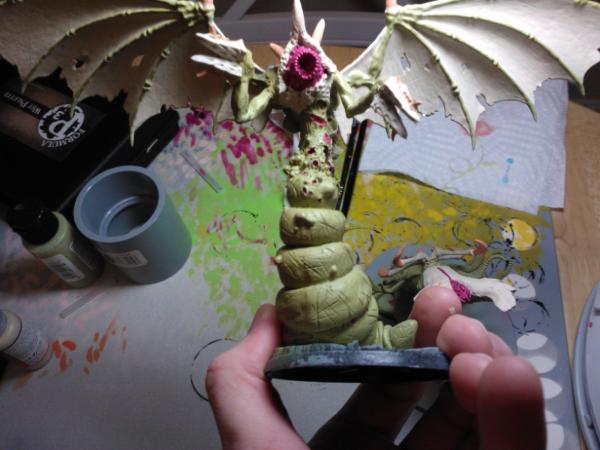
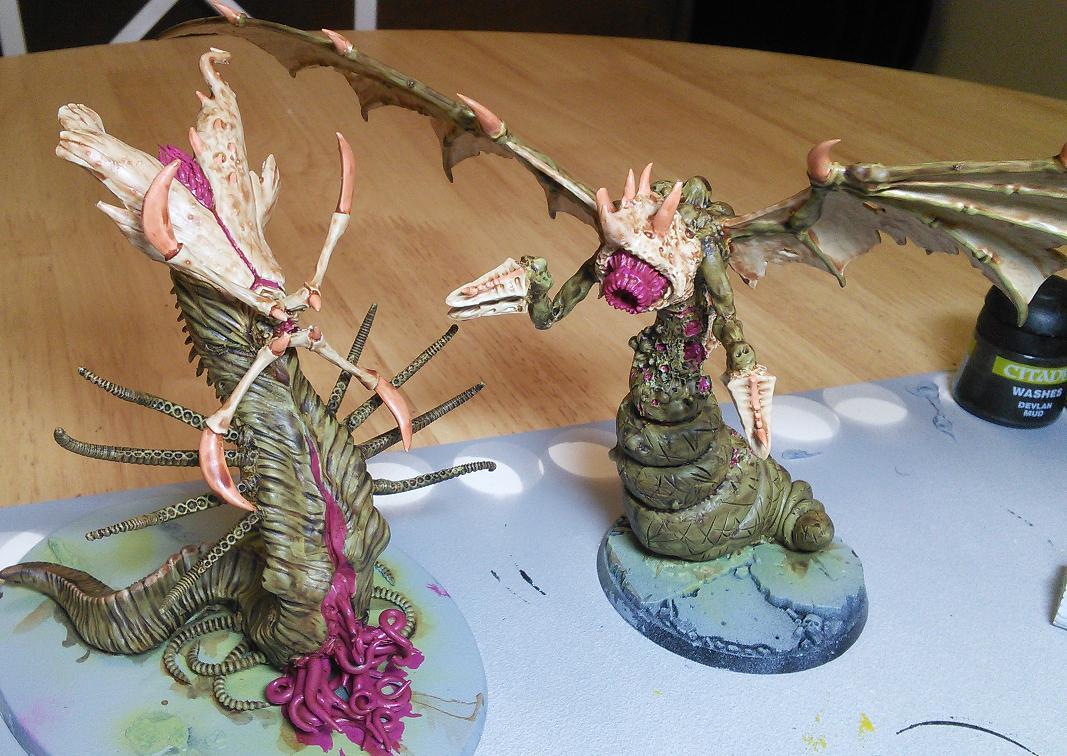
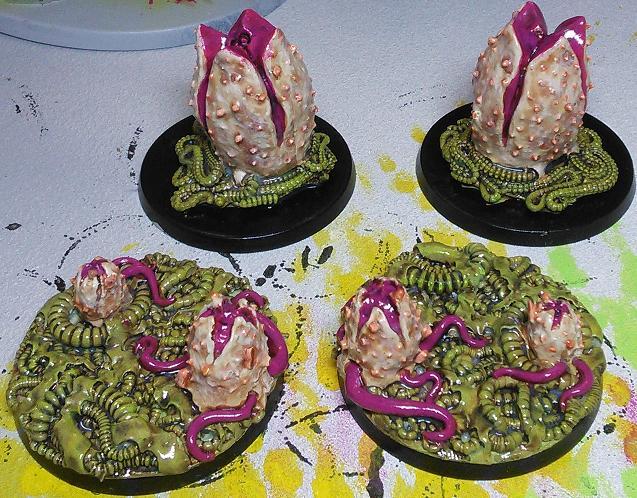
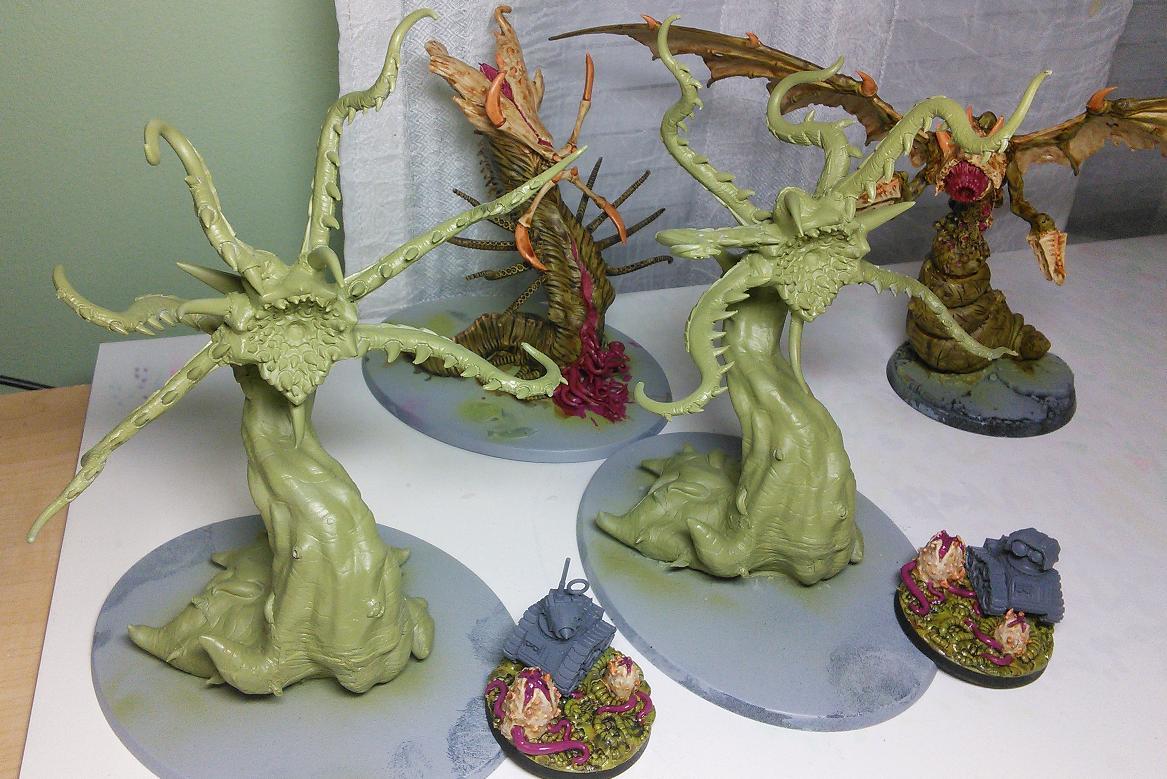

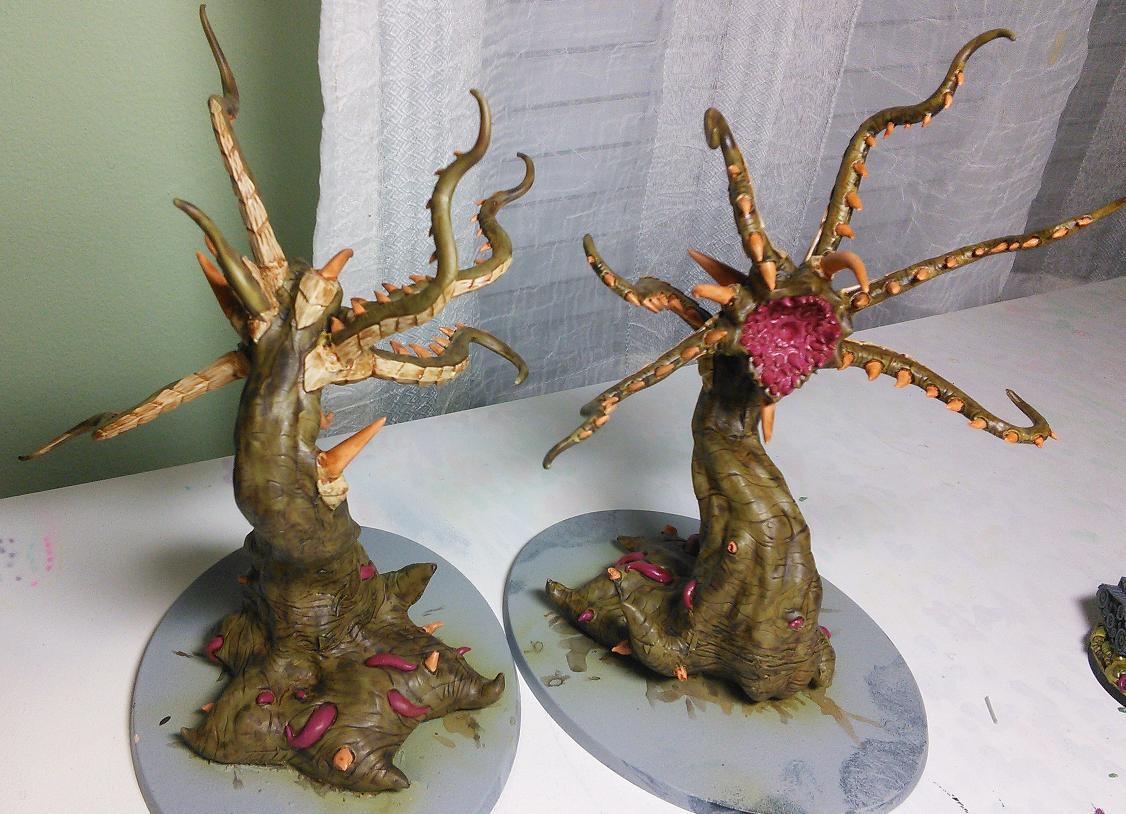
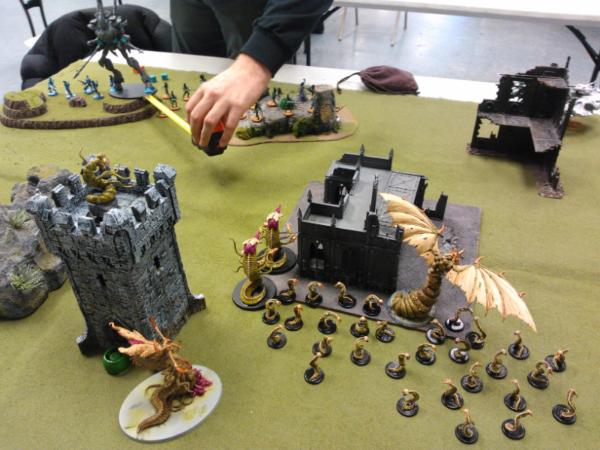
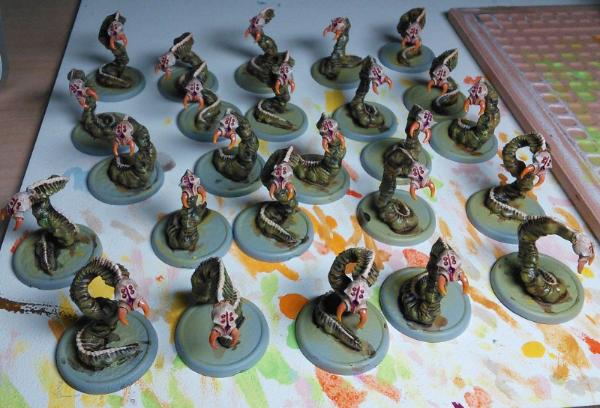
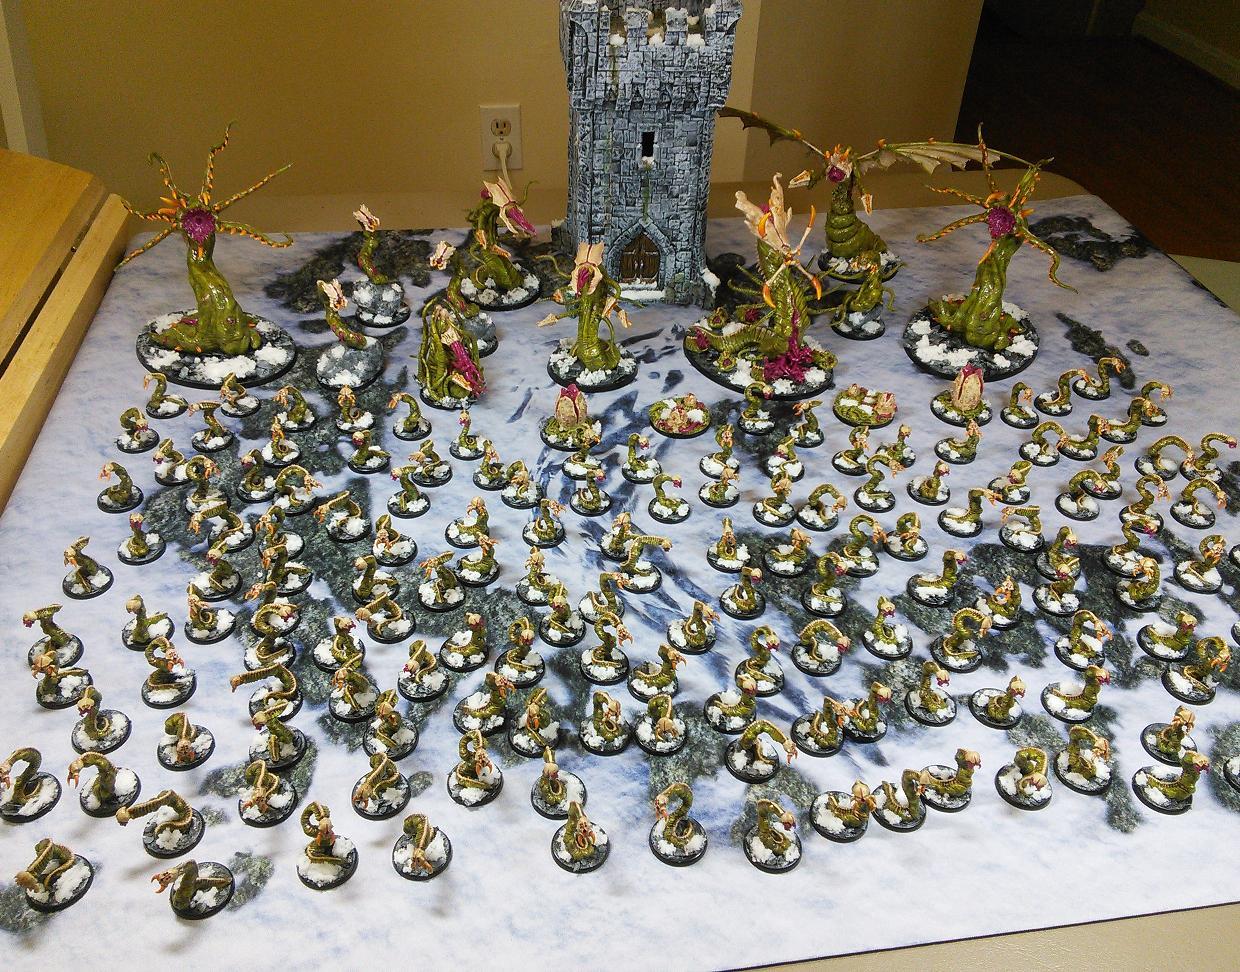

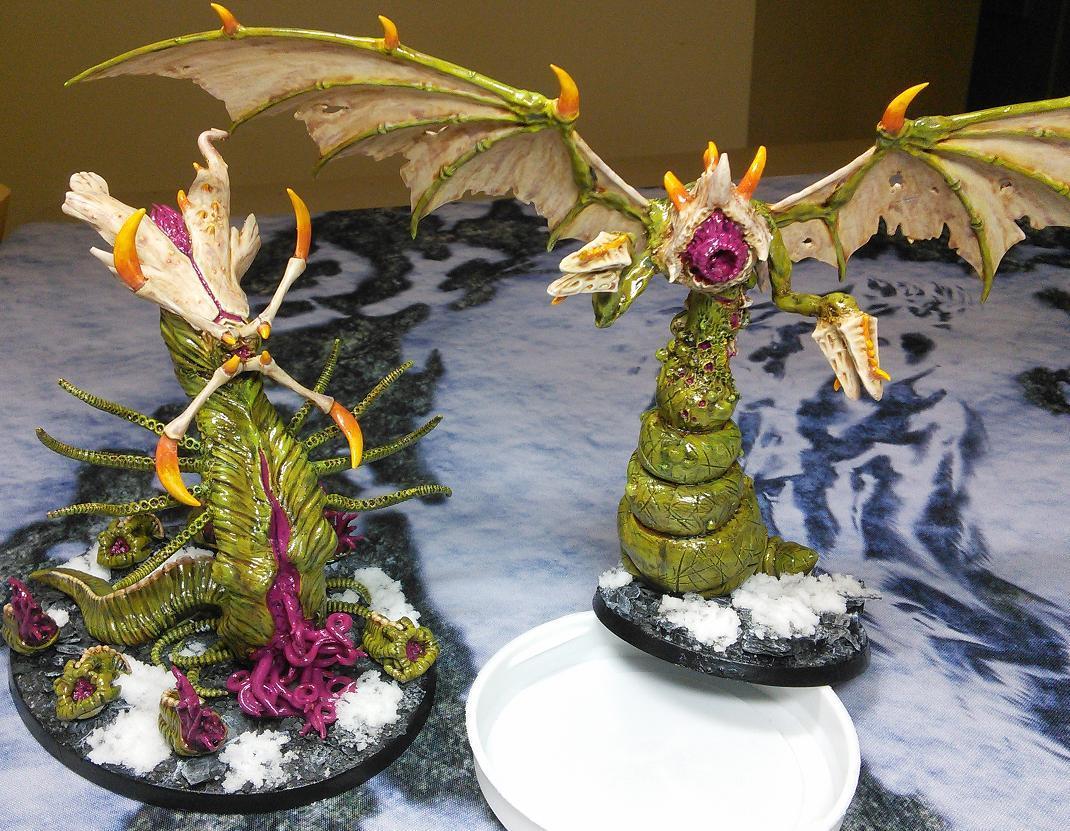
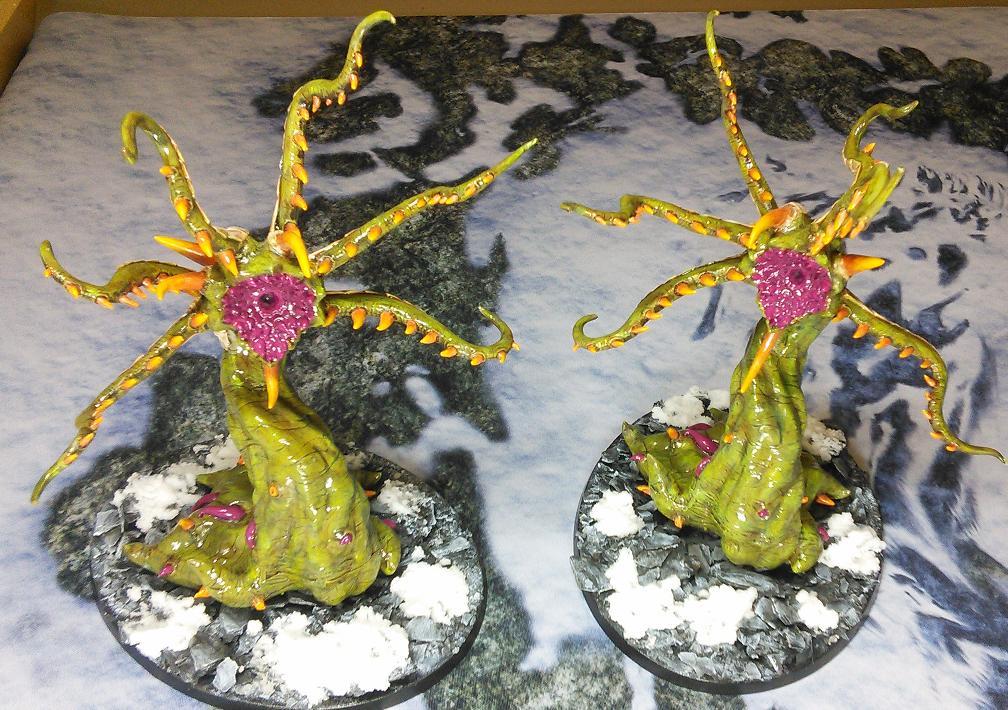
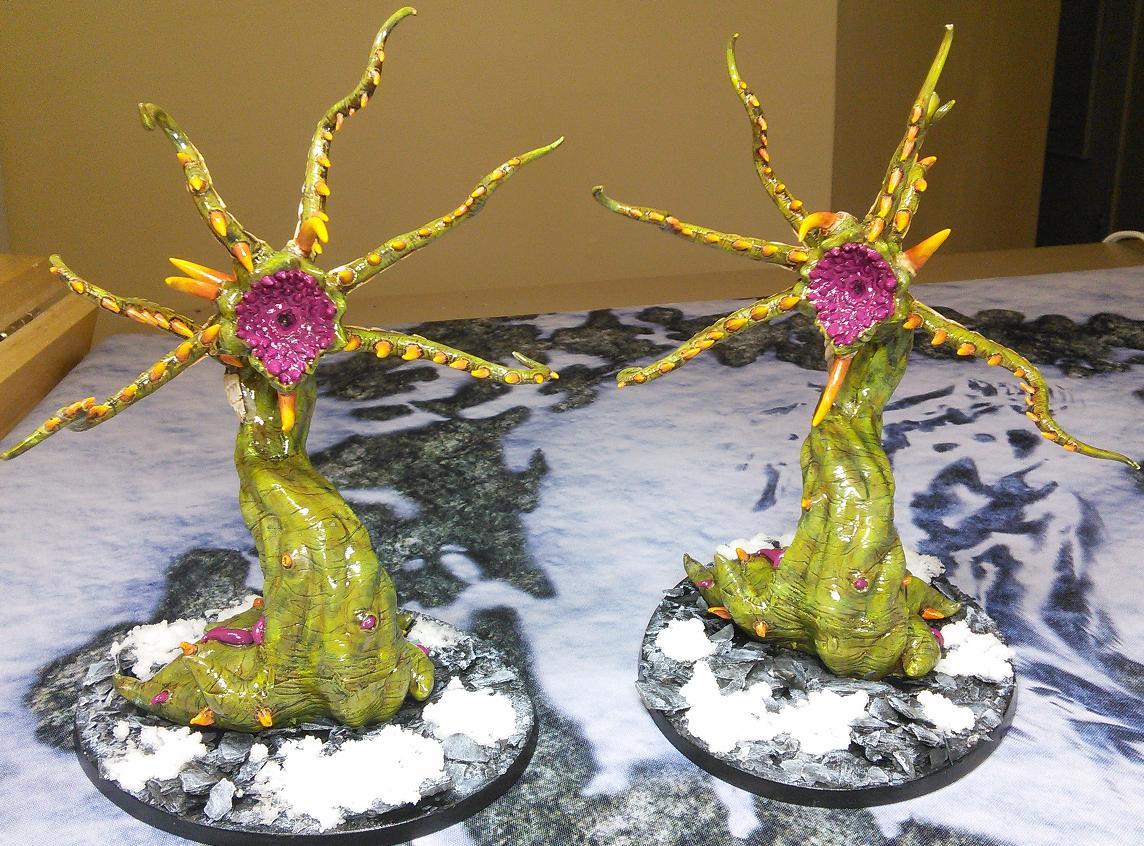
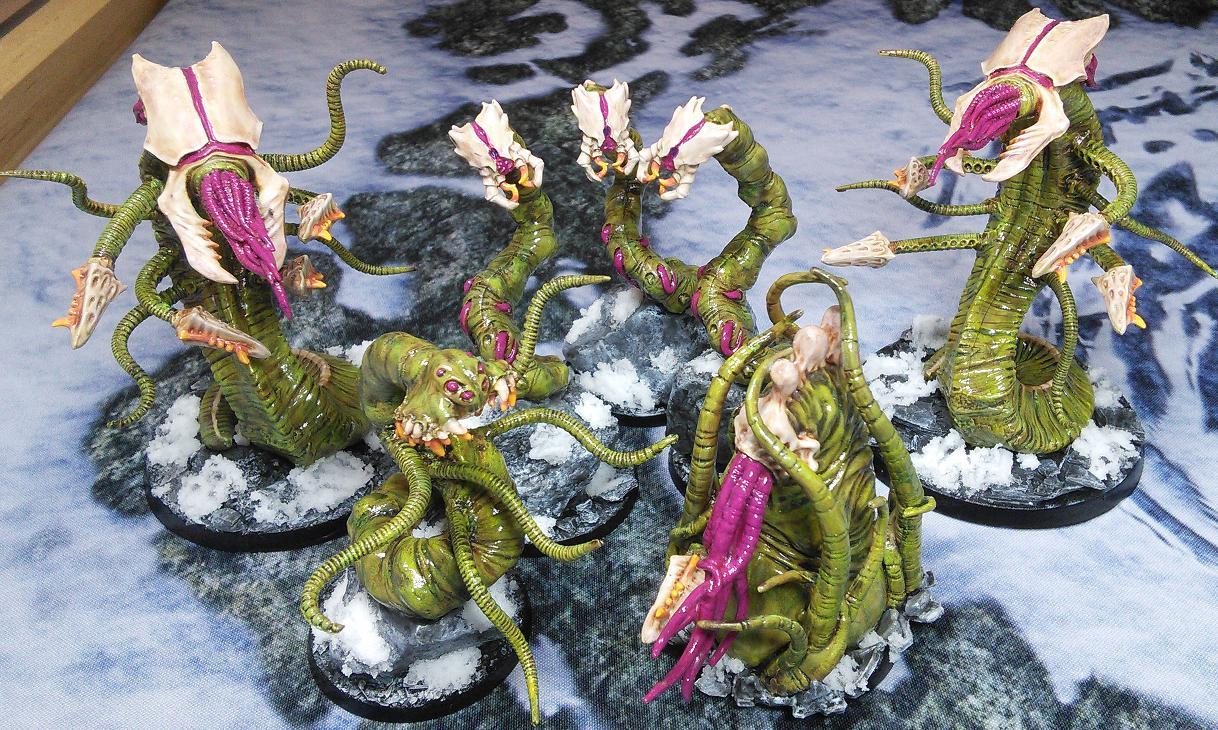
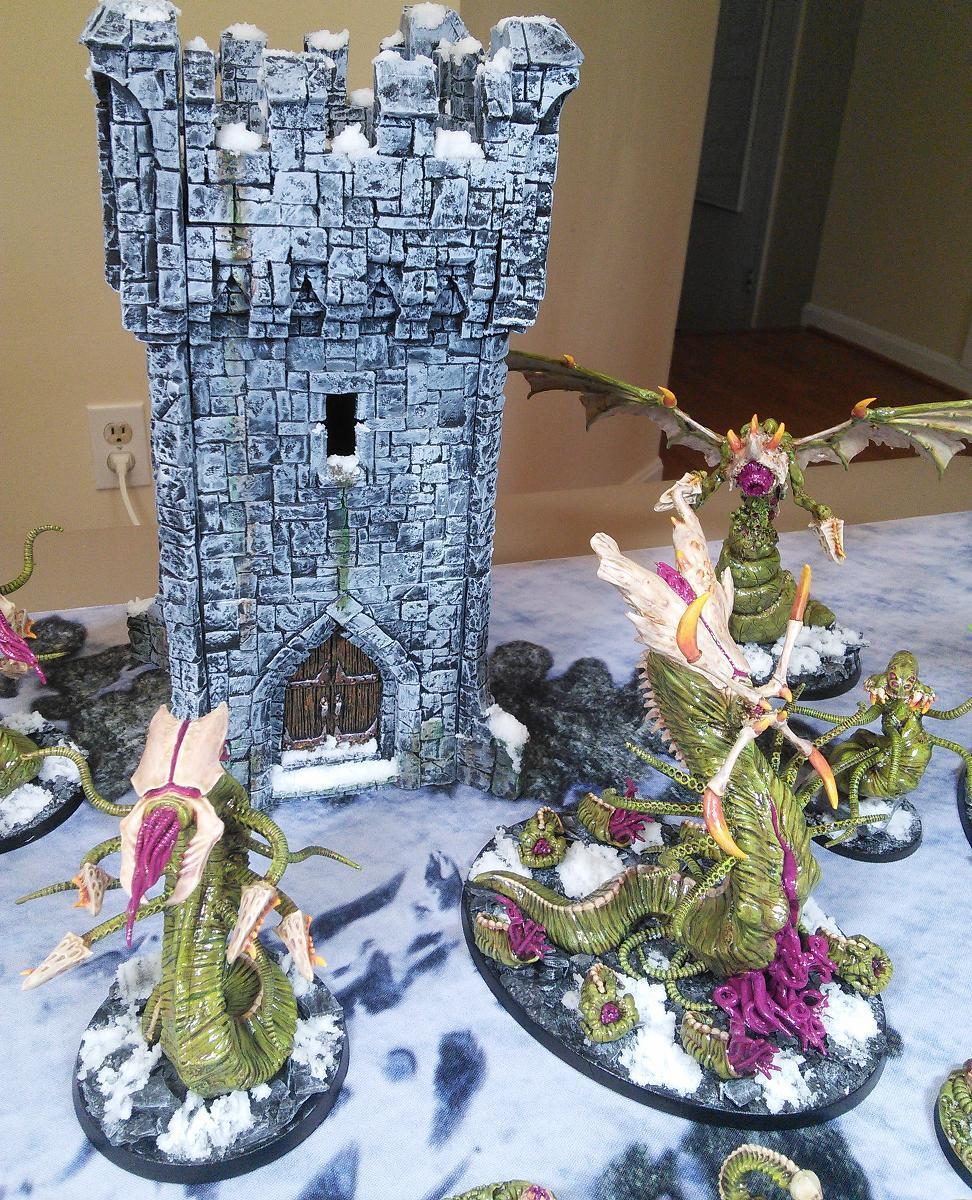

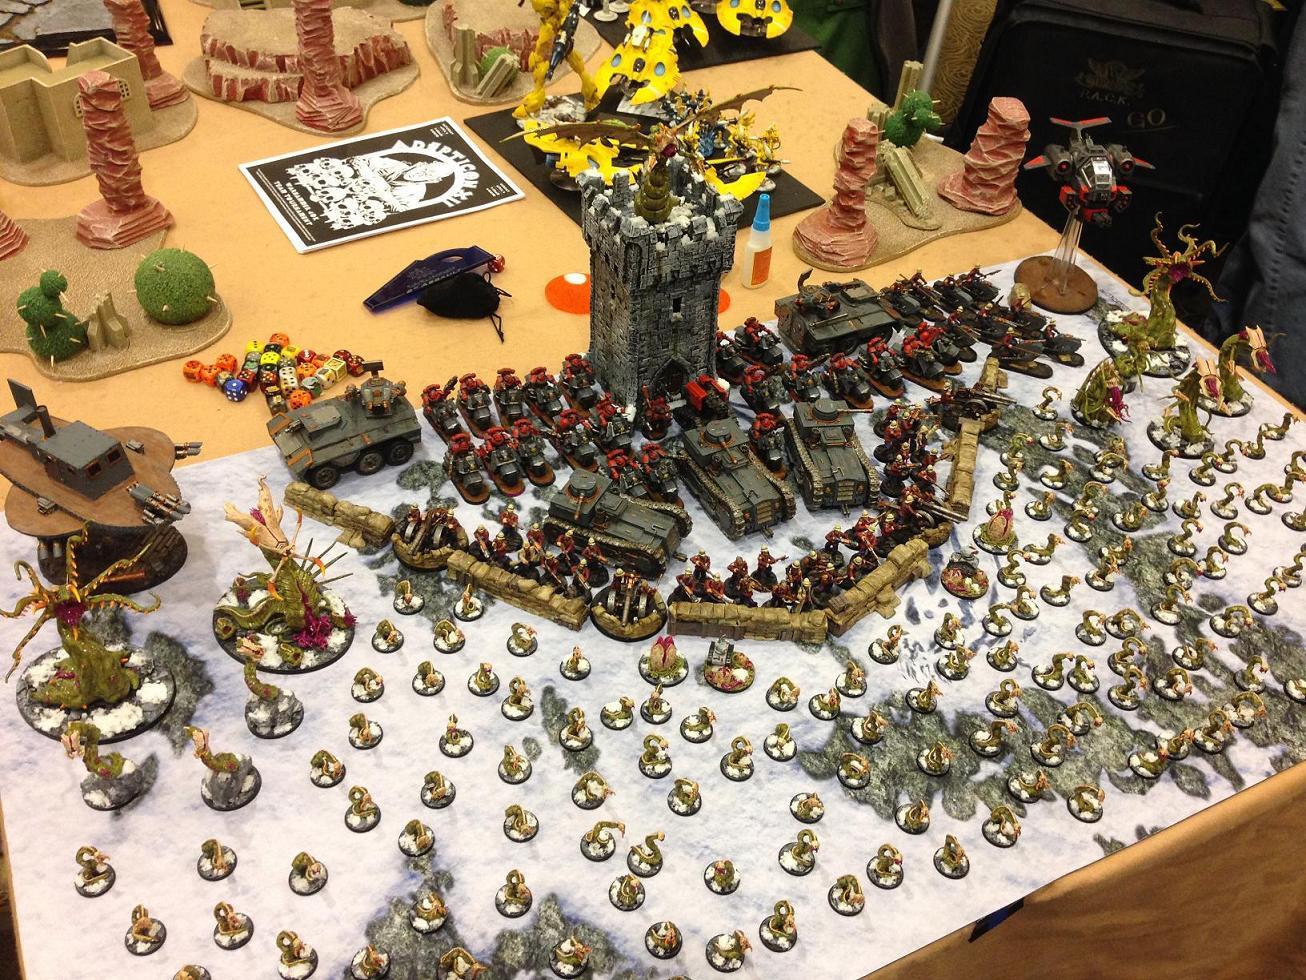
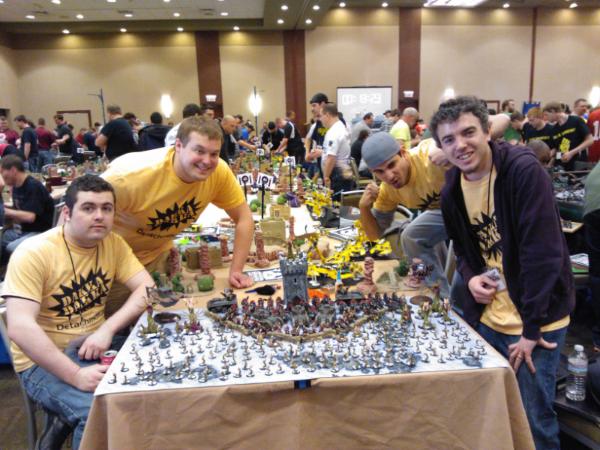
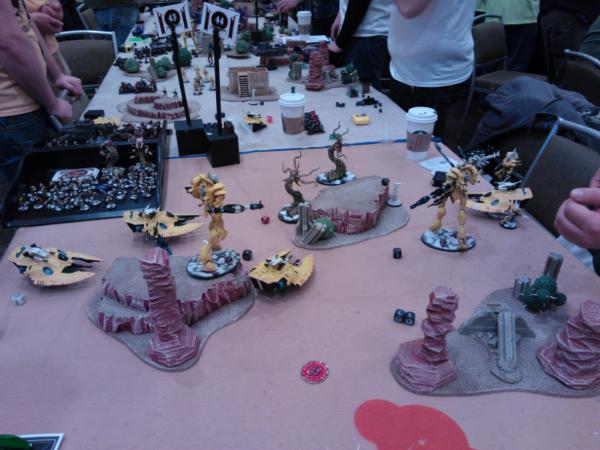

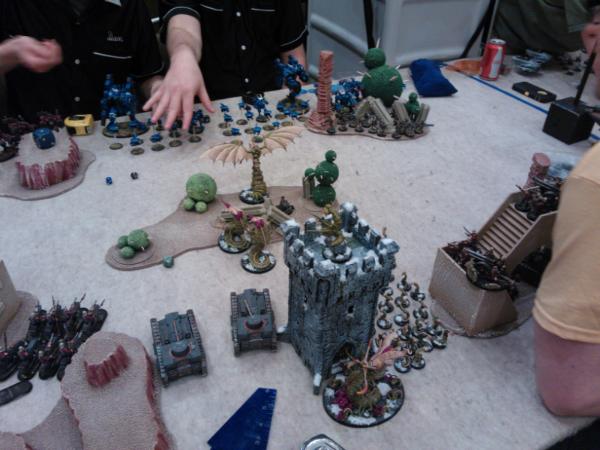


 is that?