Solar_lion wrote: Looking at getting one this year... Maybe I should have Ramos paint it in matching colors!
This legion does have history with the Lamenters. Killing them, mostly, but history none the less.
Pick a responce:...
1. Take a number bub!
2. We Lamenters get that alot.
3. Why you have to be hateing
4. Imperial Fists... You got us yellow colored marines mixed up again!
5. Just you wait till our chapter master hears about this.. if we can find him.
6. Graven made me do it! Not my fault!
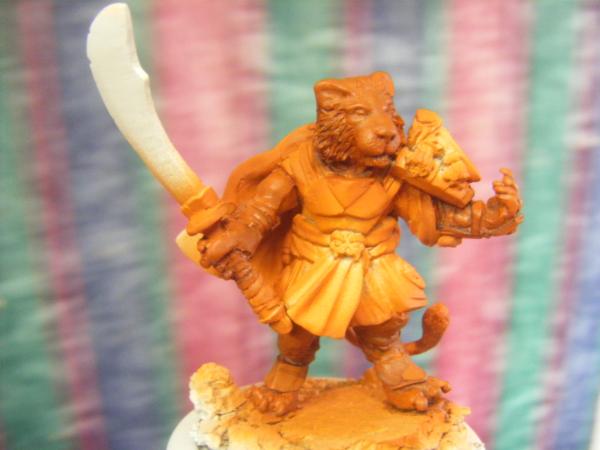
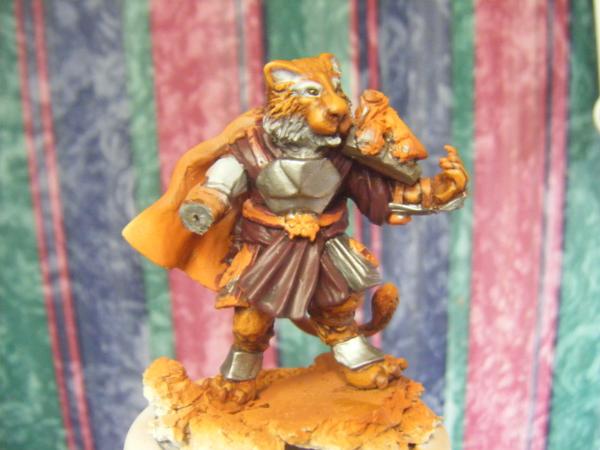
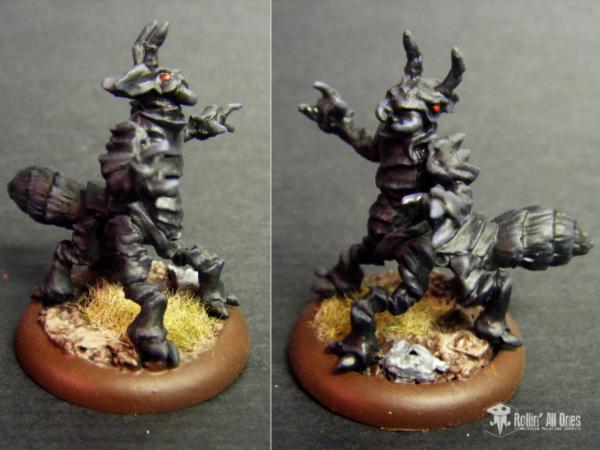
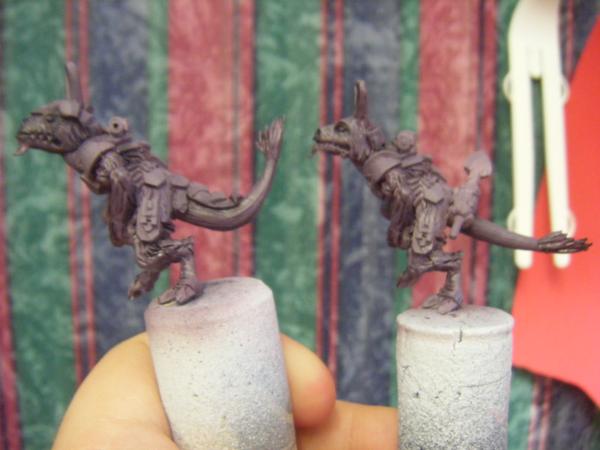
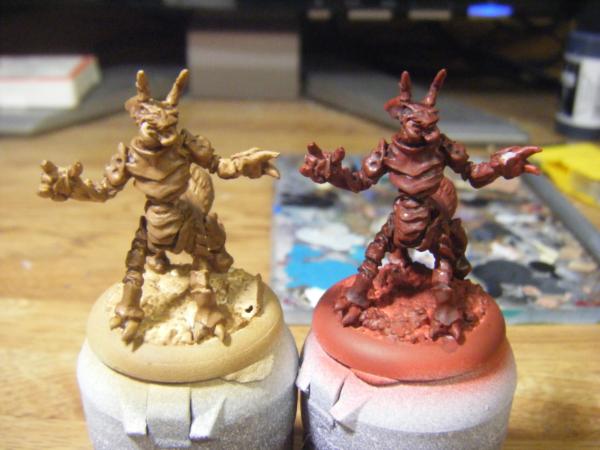
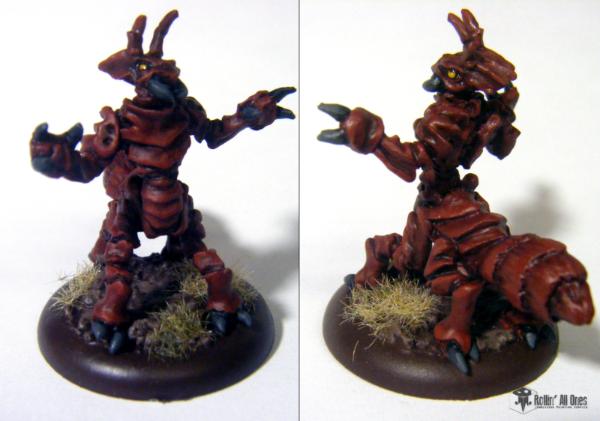
Wu Xian is at his base and washed fur color. Still a lot to play with as far as the blending is concerned. Mixing a nice orange is difficult- Way too easy to make it an unnaturally bright color or have too much red in it. I should be able to make the color fade a good bit in subsequent layers!
@SL: My doors are always open, especially for projects of this magnitude! Thus far its been super fun building and painting it. Its such a nice model! Just lemme know
@Dr. H:
@WM: Now now, we gotta learn to play nice with the other kids. He's gotten so used to us beating him I think hes developed a bit of Stockholm Syndrome- A Titan in our colors would certainly ease some of the separation anxieties.
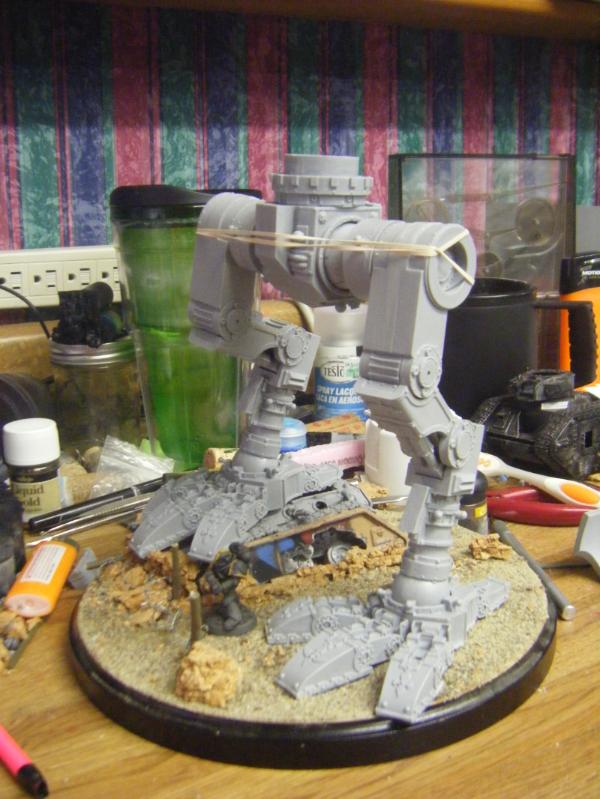
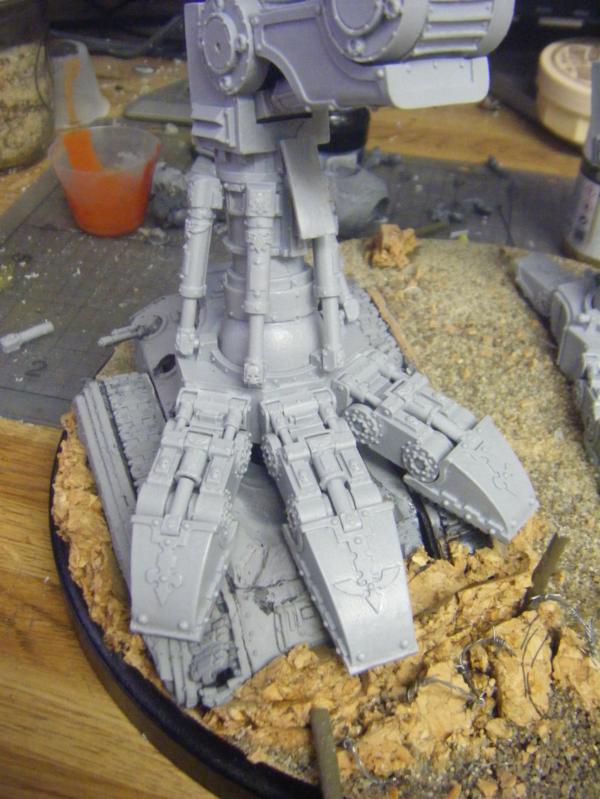
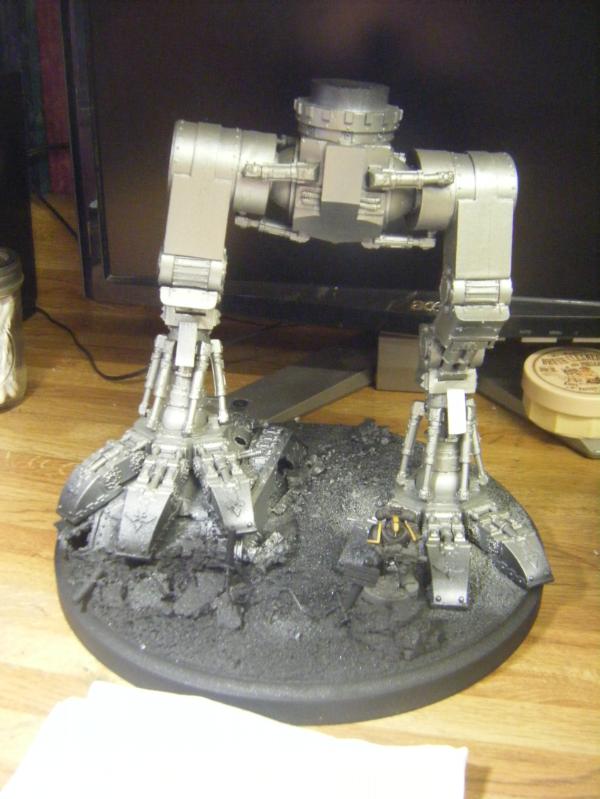
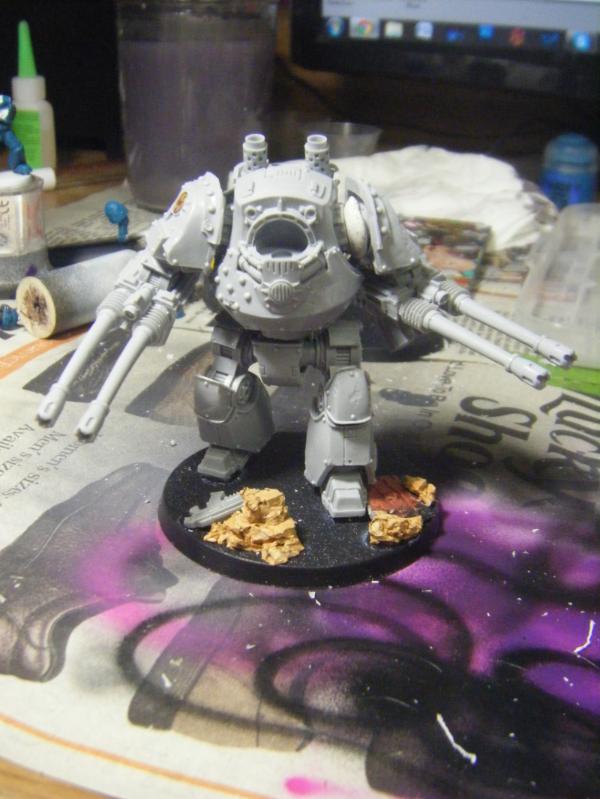
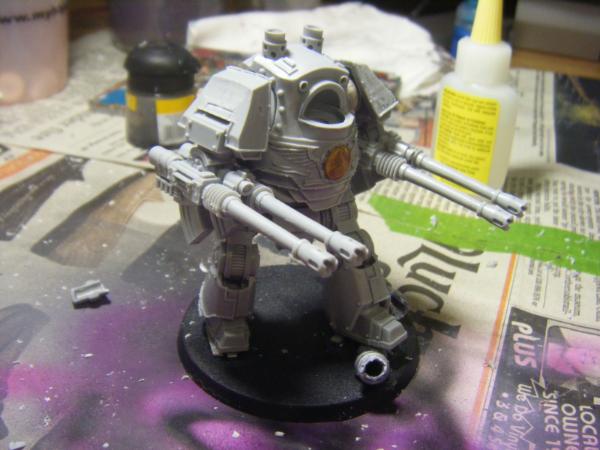
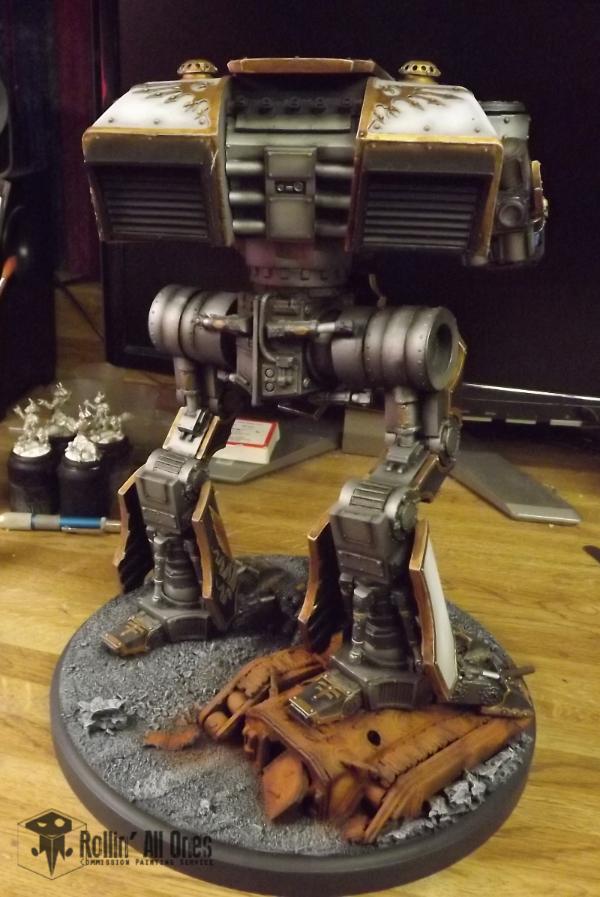
The titan is able to stand on its own, albeit to a limited extent. Right now Ive got two nice pins in the ankles that should provide a good foundation once all the bits are glued together! Biggest thing that prevented me from gluing it all together was access to the base, as well as the many pistons that need to be glued in before the legs are secured.
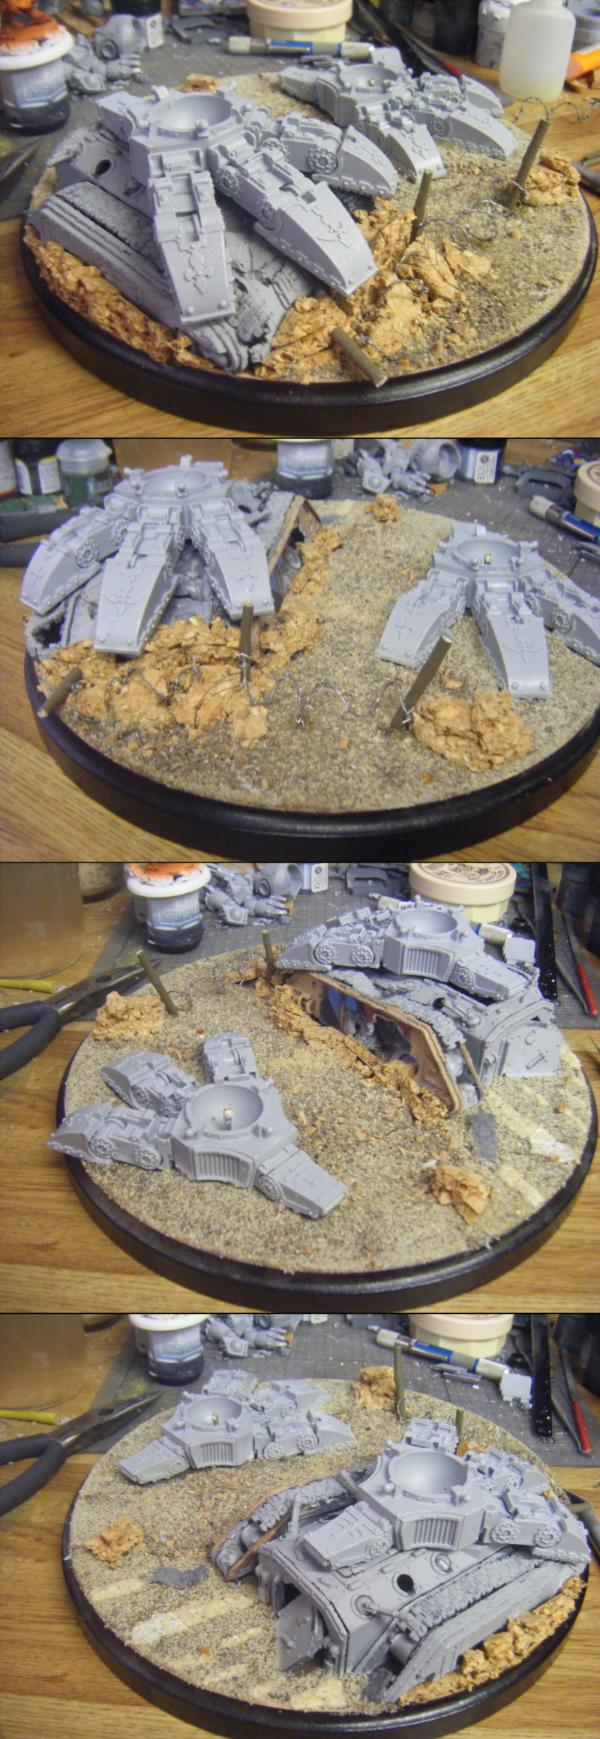
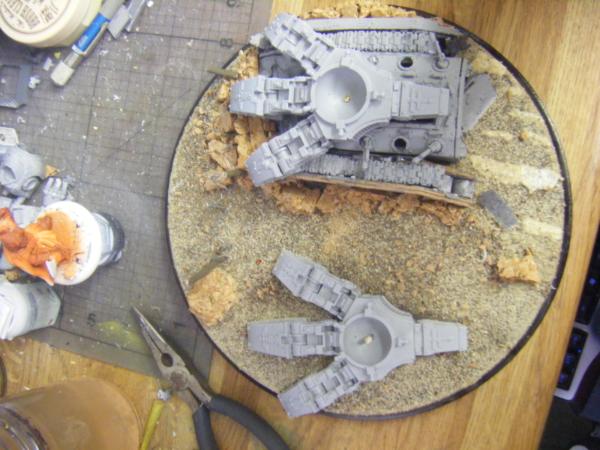
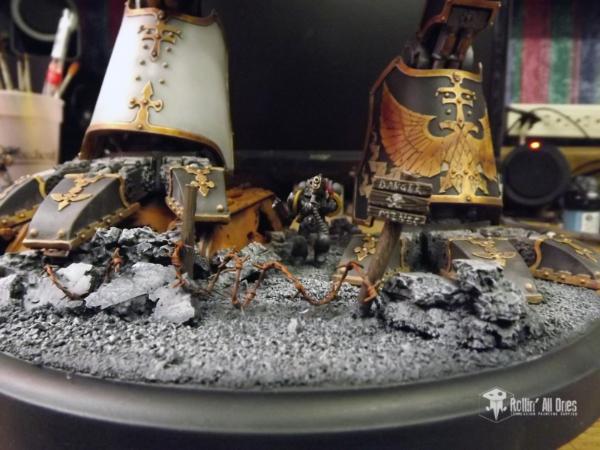
I added to the smooshed chimera, and I attempted to make it look like the wreck was pushed forward and into the ground by the God-Machine. Visible on the left side is a gaping hole, showcasing the gears and wheels of the suspension/track system- Likely the wound that felled the tank in a battle long since passed.
I attempted some drag marks behind it, as well as piling cork rocks in front to make it look like the rock underneath has been compressed and fractured, folding it forward.
*NOTE* the toes on the Chimera are not yet glued, just in case I need/want to make any corrections to it.
Still to add (later) a marine or two charging into battle! Plus various battlefield debris.
Your thoughts are appreciated! Definitely wanna make this thing shine.
That is an awesome base, the Titans really let modellers go wild on detailing. The crushed Chimera is wonderful. Be careful though on the toes - the pistons sit on top and don't really allow for the toes to curl down - having said that, the rule of cool applies so if it looks good then go with it...
Awesome. You pulled that off perfectly. Now put a IG body out the back hatch.. paint him in orange with black tiger stripes.. too obvious?
Ramos Asura wrote: @SL: My doors are always open, especially for projects of this magnitude! Thus far its been super fun building and painting it. Its such a nice model! Just lemme know
Deal.... I'll contact you when I get it! Most likely at AC
I'll think I'll call it " Ferrum Pythonissam" .... Iron Witch. hummm ..or...
Solar_lion wrote: Awesome. You pulled that off perfectly. Now put a IG body out the back hatch.. paint him in orange with black tiger stripes.. too obvious?
Ramos Asura wrote: @SL: My doors are always open, especially for projects of this magnitude! Thus far its been super fun building and painting it. Its such a nice model! Just lemme know
Deal.... I'll contact you when I get it! Most likely at AC
I'll think I'll call it " Ferrum Pythonissam" .... Iron Witch. hummm ..or...
As it comes with free shipping anyways, I would highly recommend against doing that. You will get hit with the already elevated show price (they dont do an actual conversion of GBP to USD, it's a higher, rounded up number) as well as Chicago's hefty sales tax.
We'll have to let them hang out at AC once it's done. Which guns are you planning?
@Ruglud: Thanks for the advice. I think Im just at that limit, maybe -just- exceeding in on one of the toes. Should be able to make it work, nonetheless! Im getting very good at getting kits to do something they weren't designed for
@SL: Well i was thinking some yellow and checkers would look nice..... We shall see what happens when i start adding more figures to the base!
A quick poking about with Google Translate gives me a few suggestions for the Iron Witch. (note: these names are pretty much just "rule of what sounds interesting"
Ferrea Strigam
Ferrum Vanefica (actually closer to "Iron Poisoner")
Ferrum Maleficus (Iron wizard xD sounds cool though!)
Could swap the names around pretty easily, too (ie, Vanefica Ferrum). No need to entirely match the true latin syntax.
As to WMs titan...
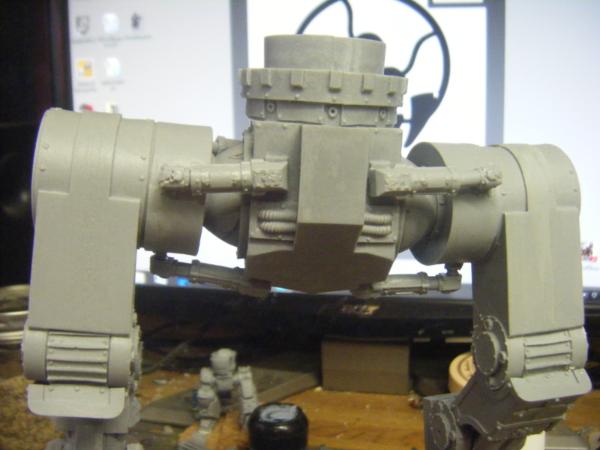
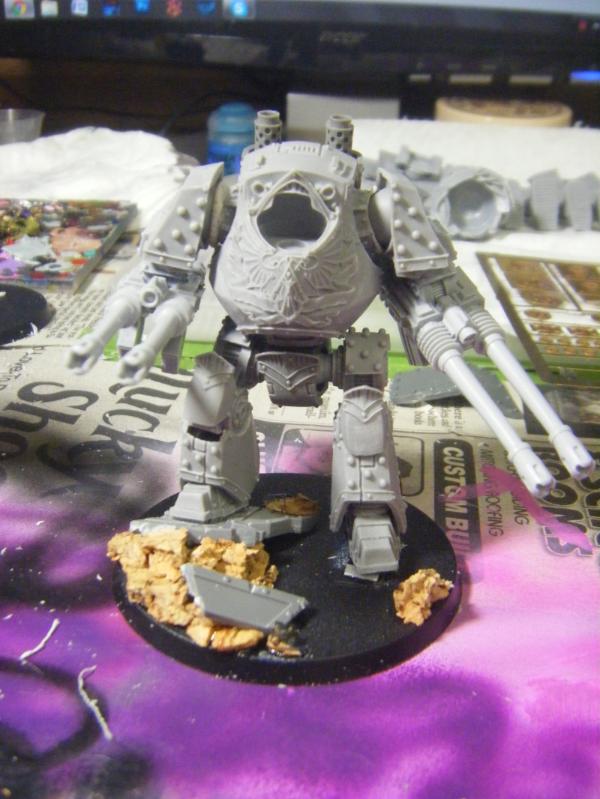
SHE STANDS!
Surprisingly sturdy, even at this stage. I still need to go back and reinforce the joints with a bit more glue, and then fill in the holes where the pins were inserted. Pistons are the next step, however I seem to have used all of my superglue basing the titan and building it to this stage, so further assembly is on hold!
@Dee: May I recommend a copious amount of pistons and/or epoxy?
I find they are quite supportive
@moonpie: Thanks! And shoot, dude. Assembly is sometimes my favorite part xD Definitely breaks up the endless hours of painting!
@SL: I use a combination of both. Epoxy -is- the primary, as I did find it gives a more robust bond, however superglue is much better for the smaller non-load bearing parts like the pistons. In these cases, epoxy is just too thick and gooey. Superglue I can just flow into the cracks and let capillary action do the rest!
I will be injecting more epoxy into the knees, as I notice mine are a little wobbly yet.
Yeah, im gonna be painting three main sections- Legs/base, Body/Carapace, and head. Then whatever little armor plates that are separate.
Should make painting real easy (rather, easier)
So no superglue run today- Unfortunately plans changed rather at the last minute
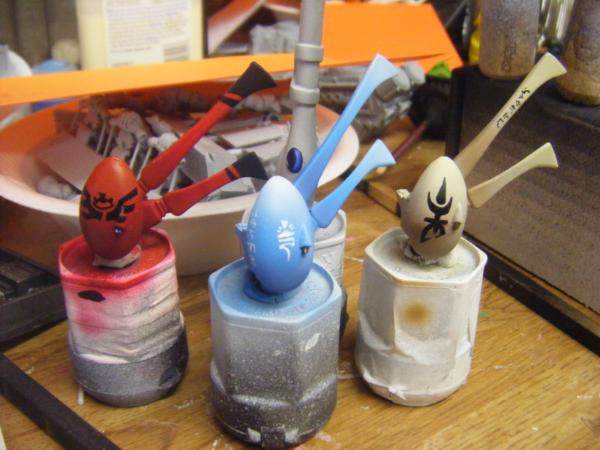
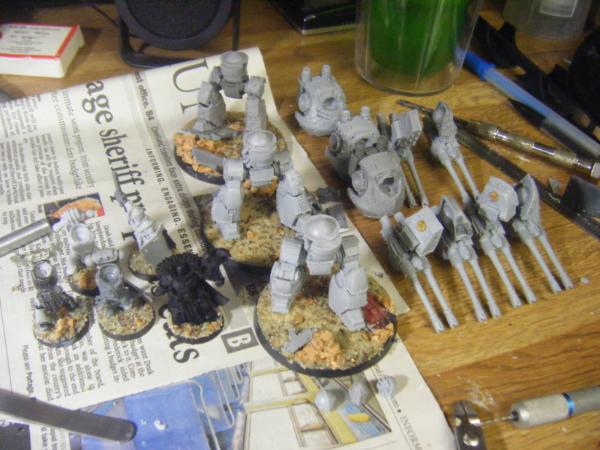
Anyways, heres a bit of what I was working on:
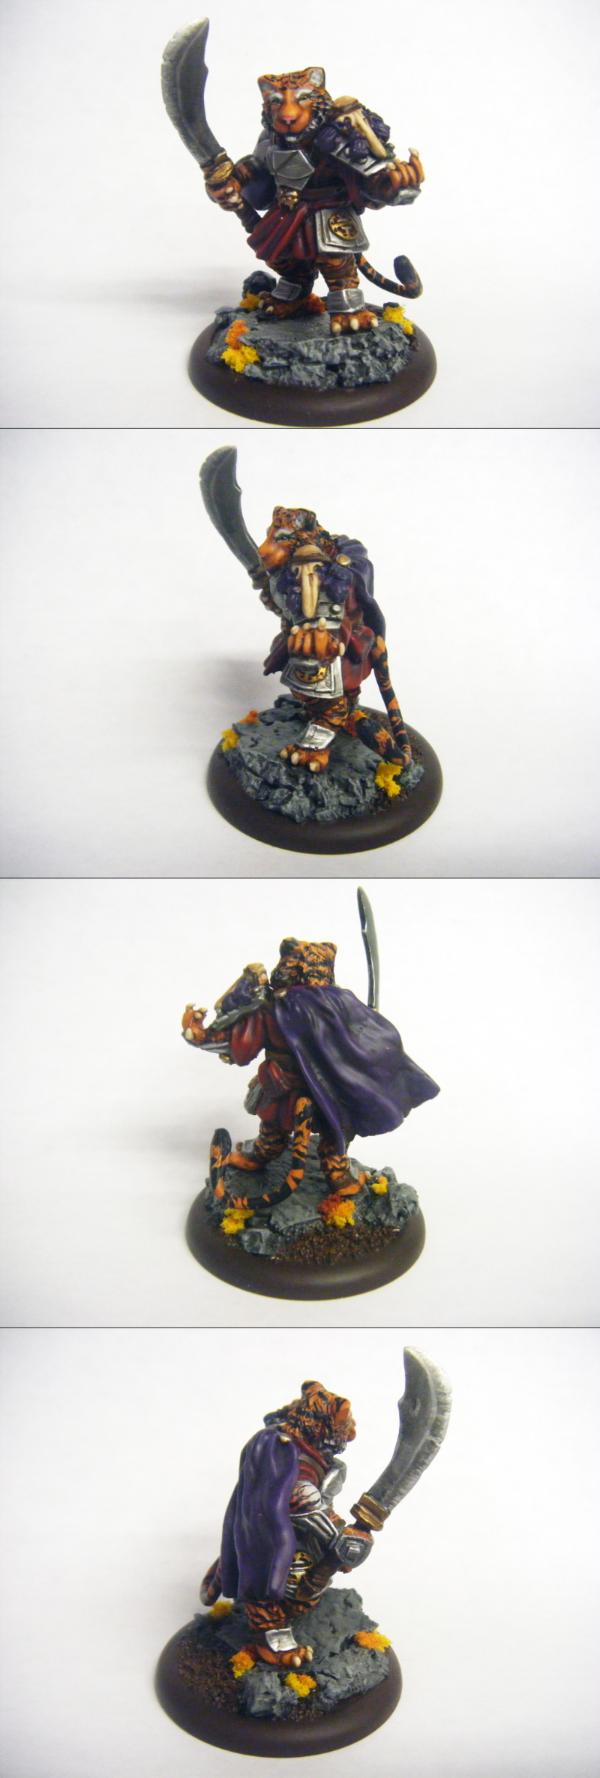
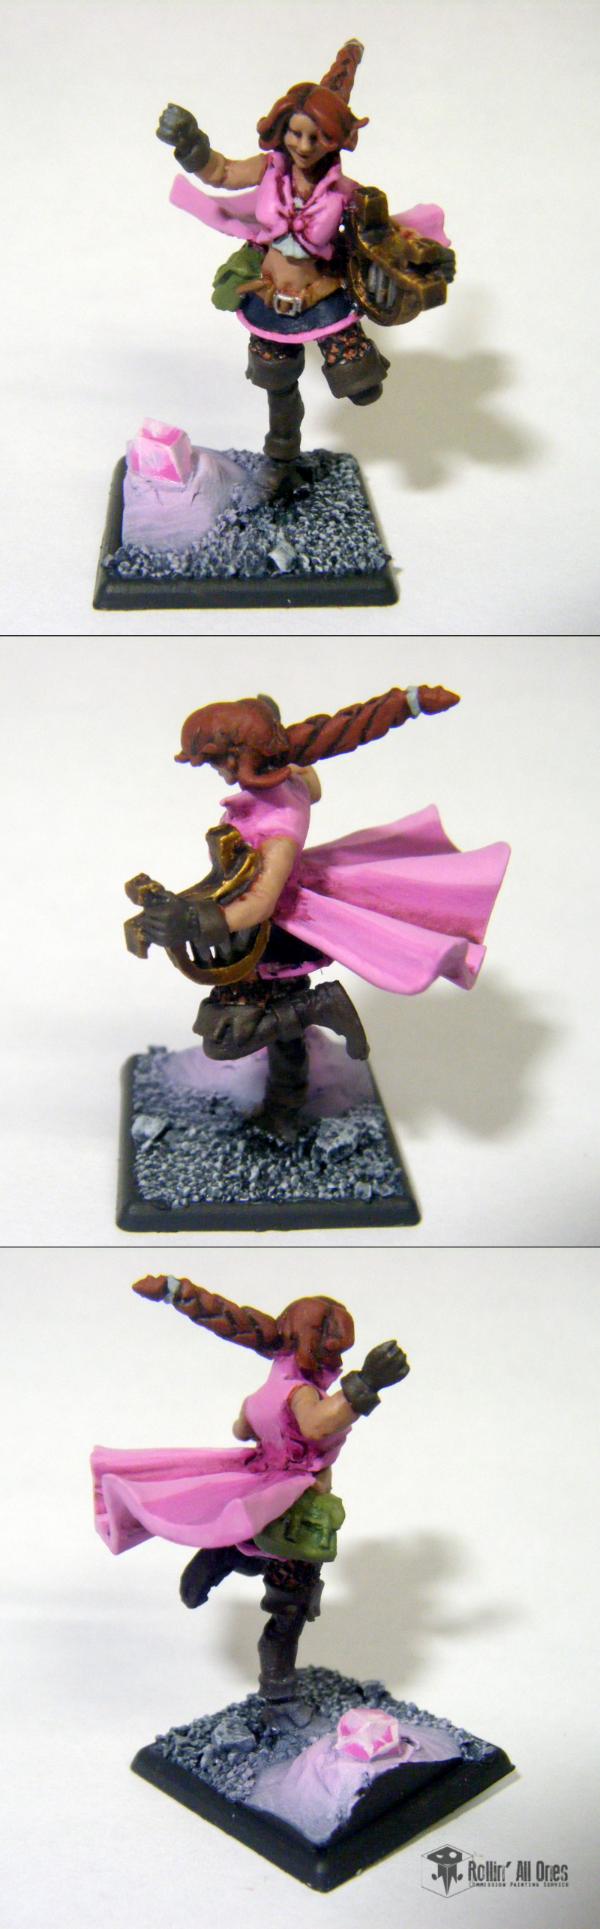
Wu Xian:
Fur is probably at its brightest (maybe a few final extreme highlights), and needs only stripes to mark him as a full tiger!
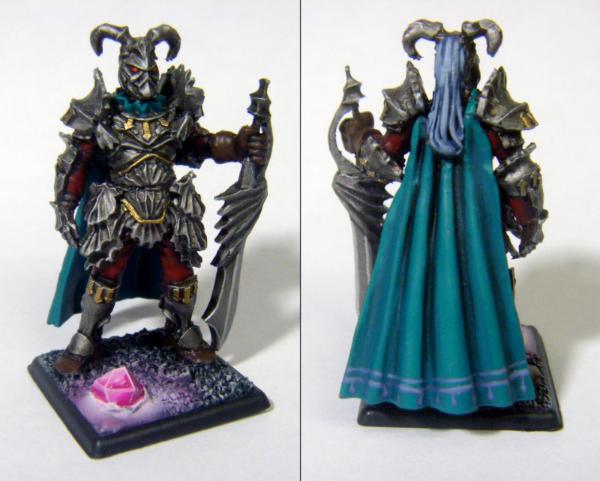
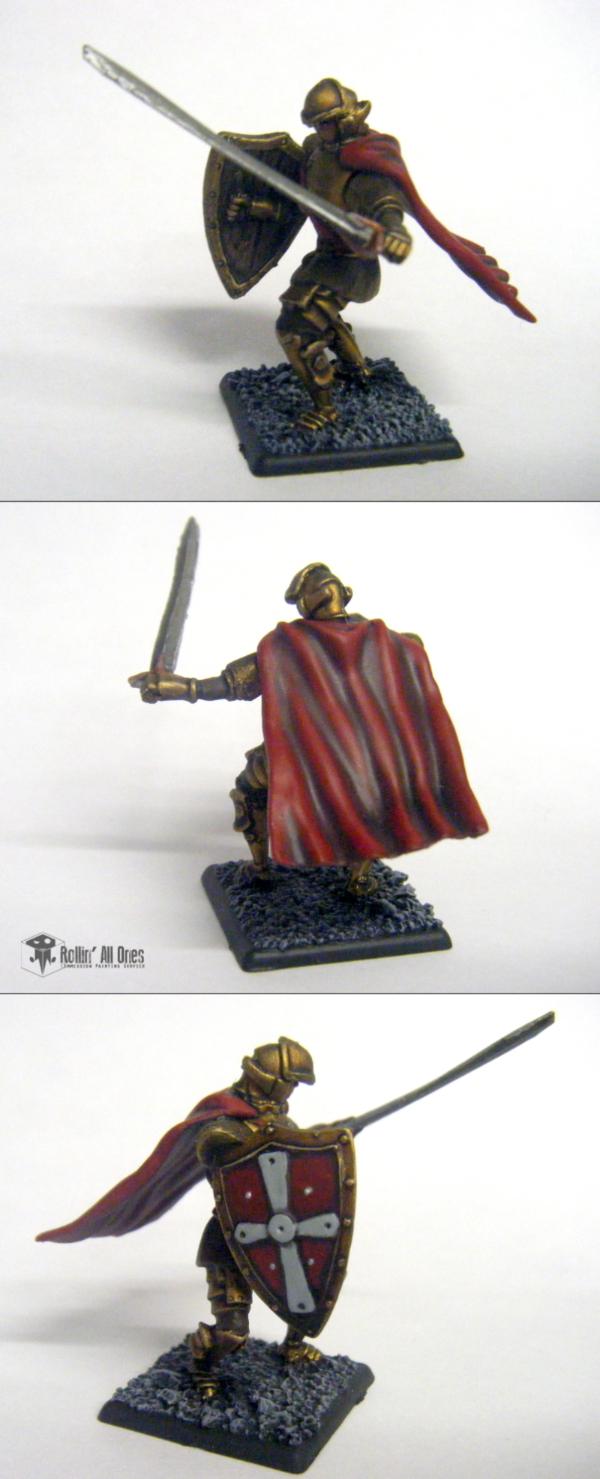
His robes and metal armor ar at various levels of basing- Im aiming for a deeper cherry red for the cloth, and a deep purple for his cape.
You may notice that he now has his hand cut off- This was necessary because Im an idiot and completely failed at building him right! Naturally it wasn't until I had already glued it all together and painted him before I realized my error.
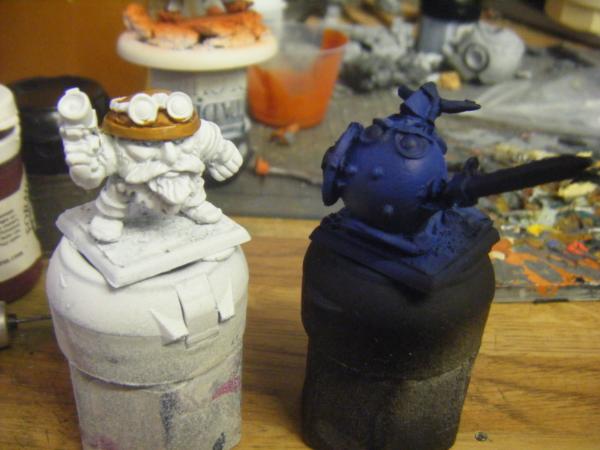
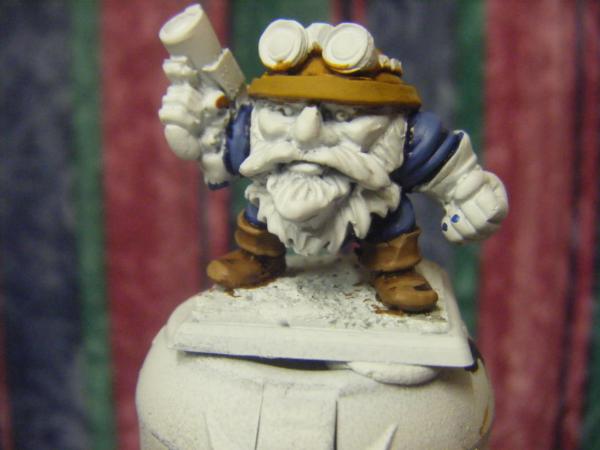
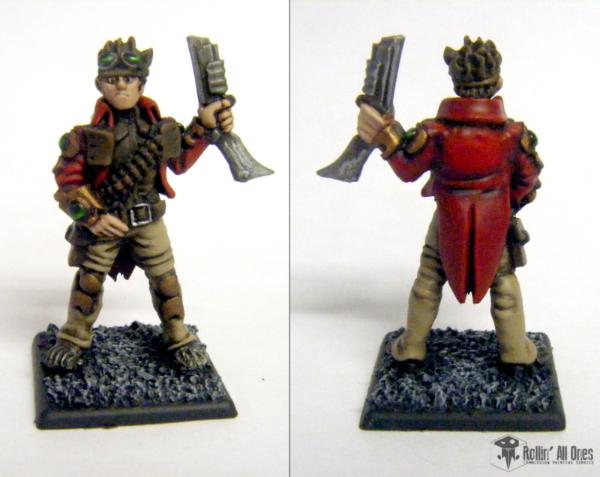
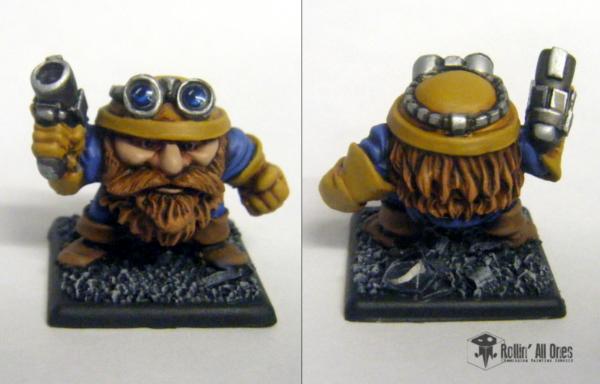
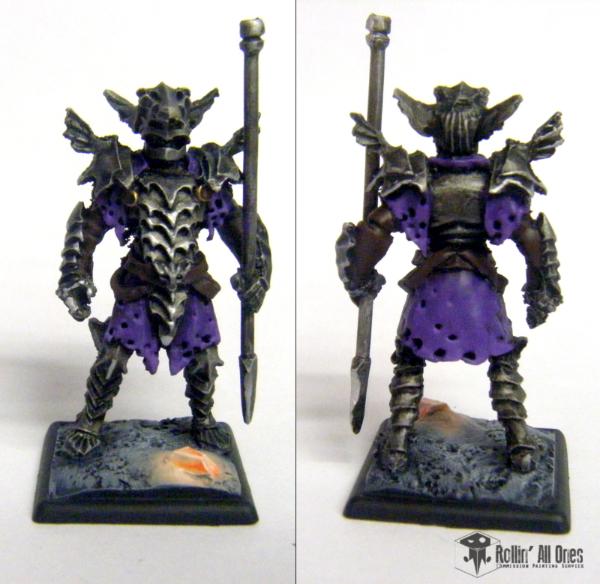
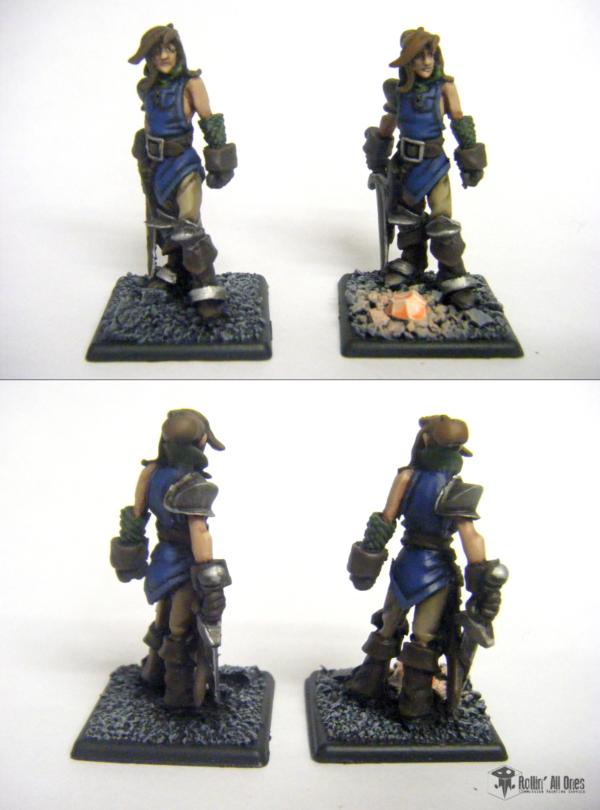
And secondly, the Dwarf Gunsmith and Gel Warrior from EFT: Just a few random colors on these guys!
Dont think Im gonna get any more work on these guys done tonight- My youngest brother just turned 18 (I still cant believe it- making me feel old xD) so I think we're gonna be doing stuff later.
Nice work Ramos, that Tiger guy is very nice and your painting is spot on so far! it's great to see different models being bought to the fore by skilled artisans, goes a long way to convince people to add them to their own collection!
Yeah Im liking a lot of the BF minis, thus far. The dogs were ok, but not my cup of tea, though the lizard (Tajir) and Wu Xian here I could actually see myself getting for my collection As to the Endless figs- well.... I LOVE the idea for the game, and the figs are awesome. Definitely on the list for the future!
I can certainly recommend getting a few of these models!
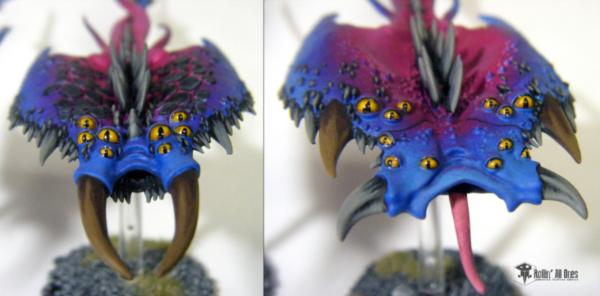
Nearly finished with Wu Xian, with really only the base and leather to go. I haven't taken the plunge on the stripes quite yet- giving it a good think before putting brush to paint!
Should actually be able to finish him tonight.
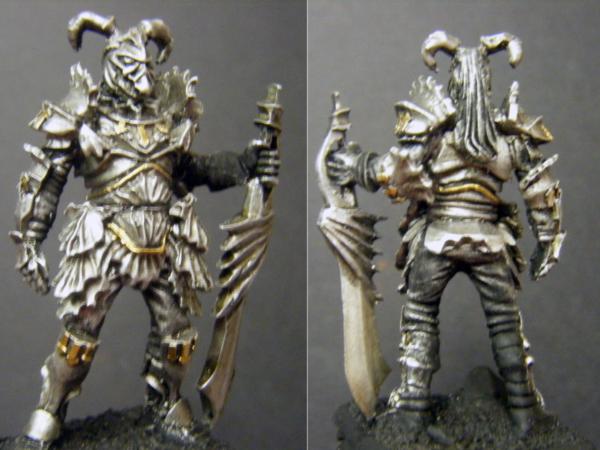
And the metal progress on the Dark Knight. Hes actually a good bit duller than it appears here. The metal just really catches the lights in my room!
@WM: Quiet you! Or I might just forget a hand on your titan!
@Cyp: I might very well take you up on that. I've definitely a few minis in mind... Ill have a think on it and letcha know As to a hook hand- do it! Yarrr!
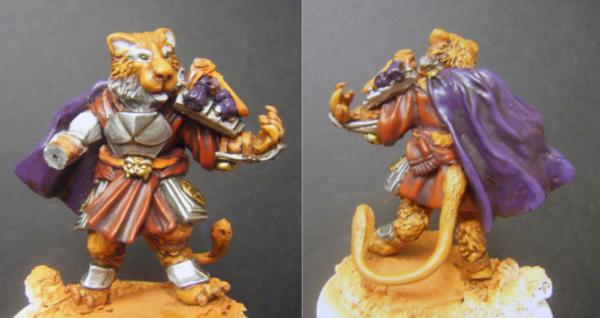
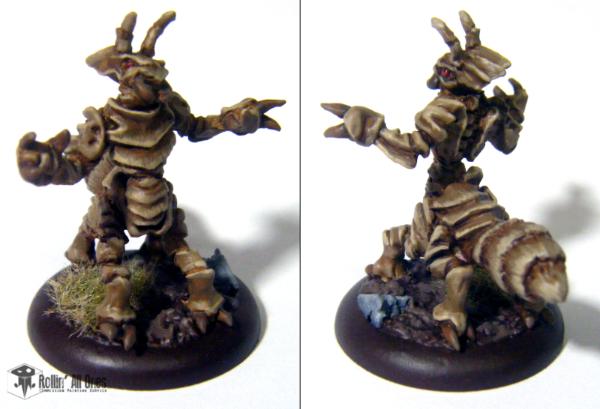
On that note, Wu Xian has been completed!
The stripes were a bit of a harrowing experience at first, but after the first few passes, I took to it quite quickly. I think the trick is not to think too hard on which way the stripes go. You just have to let the brush do the work for you.
There were two particular sets of markings that I really wanted to include on him. The first was a marking common to tigers, and that is a cluster of stripes on the forehead that happen to resemble the Chinese symbol for "King". This is one reason why Tigers are so prevalent in Chinese mythology- they are king of animals.
The second was a bit from the art I was given, in which he is portrayed with a tail that is mostly black.
Now it may just be a case of being in shadow (and likely is, given the art style), however I kinda liked the image of the black tail. Stripes on tigers are like fingerprints, and I wanted to give Wu Xian a mark unique from all the other tigers in BF.
Also, the Warhond's legs are all assembled! The pistons went in rather quick and easy, if I do say so myself.
Perhaps this may temporarily sate your hunger for titan painting?
This was my entry into Nerdfest's most recent painting comp, the Nerdcademy awards. I'm disappointed that I was unable to build something more elaborate, or even finish the whole cockpit, as was my secondary plan. However, somehow I managed to think that the deadline was several days away, and I had more time than I actually did However, I did paint this in record time- several hours, compared to days!
Next up are the two Moderatii and the interior of the head.
@Cyp: Excellent! Glad ya like him! Dark Knight will hopefully be along very shortly as well!
@Gits: Thank you! I agree with ya on the dramatic change- It all came together so quickly after blocking out the colors fully. The stripes really broke up the huge orange areas.
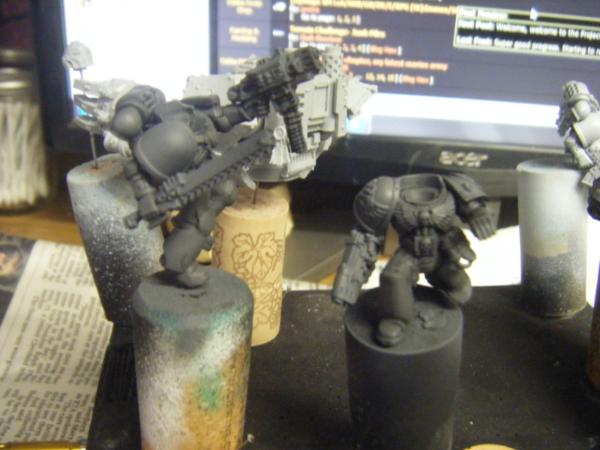
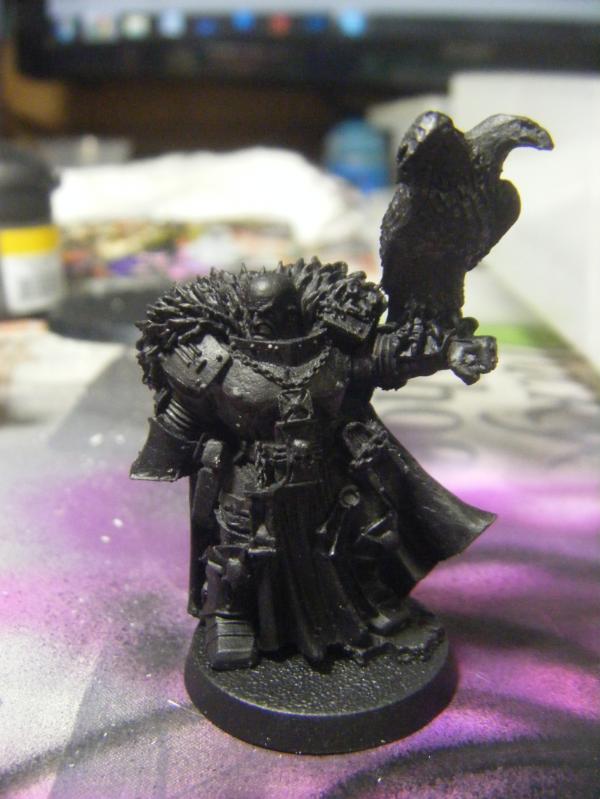
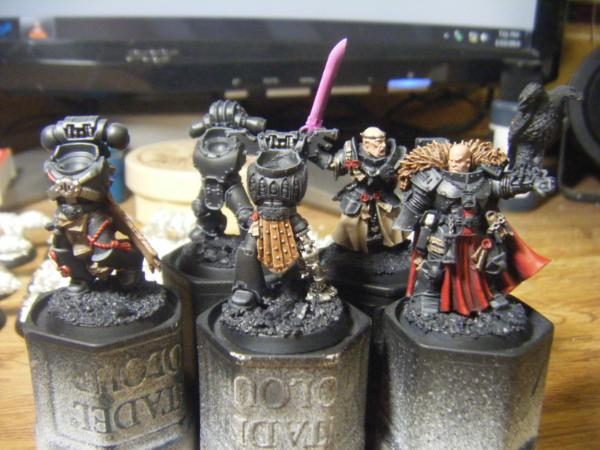
@WM: Thanks, dude. Hehe I hadnt even noticed the dread back there xD Here's a comparison shot, for those interested:
@SL: WM got it right- That's an Emperor's Children Contemptor I picked up last year for myself. Gonna be my Daemon Prince, should the need for it arise.
And no, the titan comes with no base. It's sturdy enough to stand on its own, though it limits the posing you can do with it. Personally, i like having the base, as it ensures no mishaps (this thing will easily kill whatever it lands on) and allows me to go crazy on basing.
If I recall correctly, the base I used here was from an old sword display WM had. Just a simple round wooden plaque.
Im sure you can find (or even build!) something similar without too much difficulty. Id recommend going a little bigger than this one, as that would give you more room for posing.
As it stands, this one was -just- big enough for the final pose, and one of the toes ended up hanging just ever so slightly over the edge of the base. A slightly larger base would allow the legs to be in a more dynamic pose, as the legs could be spaced further apart.
This base measures a little over 9 inches in diameter (including the bevel around the edge), so use that as a frame of reference. A 10 inch base would probably be ideal- not too big, not too small.
Unless you wanted to build it in a full on walking pose, in which case you'd want a more oval base. (rough estimates maybe 9x13? )
I definitely want to do this on a titan in the future.
Anyways, Finished pic time!
Got a pair of models from Endless Fantasy Tactics completed.
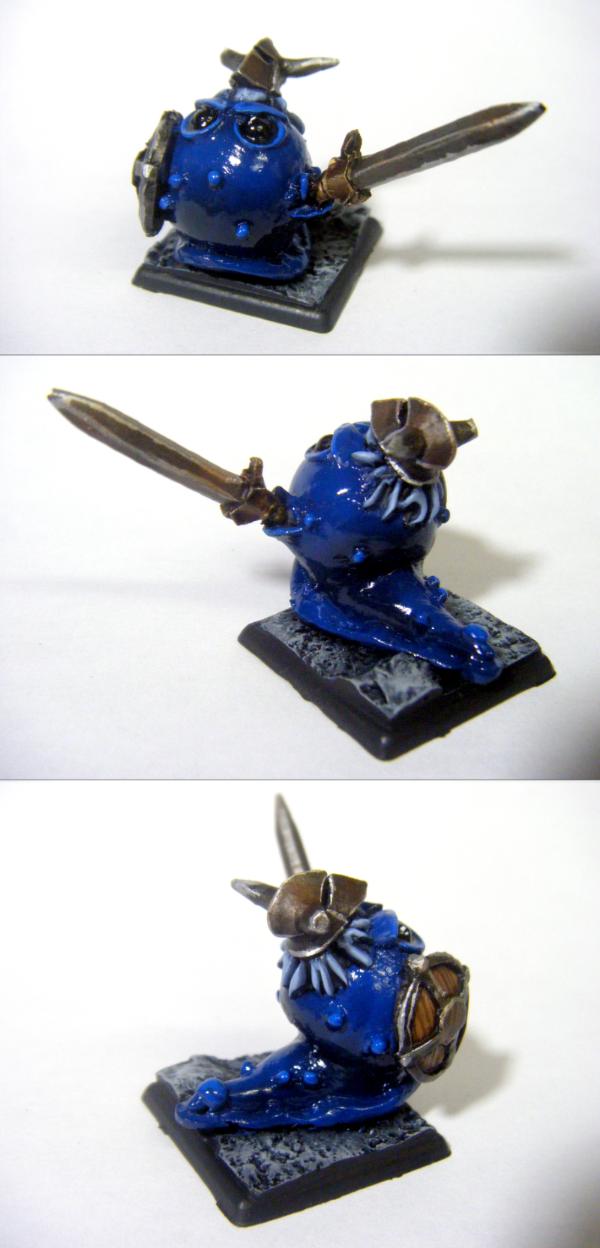
The slime trail is something I was considering.... Might very well add it in. if I could find a pearlescent paint (like an oil slick!) I think thatd look amazing.
As to the eyes, I wanted to keep them kinda beady and unusual. Black eyes... A doll's eyes... [/Jaws]
The eyes arent actually all black- theres the traditional glimmer in the top corner, where the light catches them. The art seems to give them just kinda jelly-like eyes.
There are many more of these little guys on the table... 3 of the Warriors, 3 Mages, and one real biggun!
EDIT:
@Cyp: Eeeeexcellent! That sounds great! Its super exciting to be this close to the miniature-making process! ^^
Of course now I'll have to echo the sentiment on moar titan! Doubly so thanks to the decadent looking base, though it sounds like the vehicle may already have been a wreck it always helps to make it look extra fancy.
Also is that a tub of the masters brush cleaner I see, does it actually do it's job as I saw some in an art shop in town this weekend but passed it up.
I just got a tub of that brush cleaner. It works pretty darn well. It has helped quite a bit since I started doing white undercoat. I also like it, cause I can't always tell if I have a little paint left over on the brush that is slightly changing my color. Plus, it's easy to use and given our brush scale, I imagine a tub would last you your entire life.
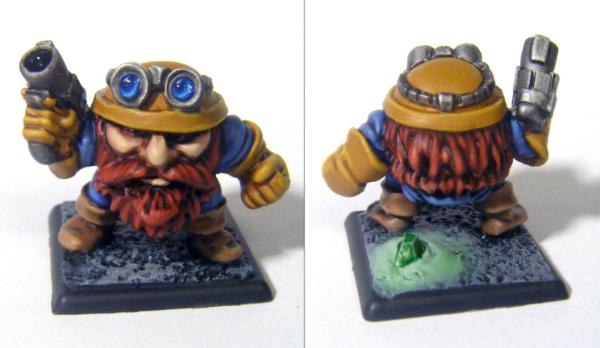
@Dr. H: One big tip i can think of is to leave a sliver of the lens non-highlighted on the bottom right (or opposite of wherever your light source is). This gives the illusion of depth, which is what we're looking for when painting not only lenses, but gems as well.
@SS: Thanks!!
@IG: ABSOLUTELY!!! Oh man, I love this stuff!
Like moonpie said, it really helps get that little hidden blob of color hiding in your bristles (blue is particularly nasty at this). Plus it really helps your brushes keep their points. Happy brushes make your life easier!
You can even bring some brushes back from the dead!
Incidentally, I'm writing an article concerning brush maintenance for a gaming blog a few guys I know started recently. I'll shoot up a link as soon as all the bugs are worked out of the site. Right now its a bit chaotic and disorganized @_@
*fingers crossed that it wont just be a whole bunch of card gamers*
Bit of progress on the models but nothing picture worthy xD
Damn kids. i leave you alone for a few days and it turns into Nerdfest's blog!
Anywho, Things have been all over the place here. I keep oversleeping, getting hard to get into the swing of doing anything.... bleh. I'll not cloud the blog with my personal problems. You came here for models, after all!!
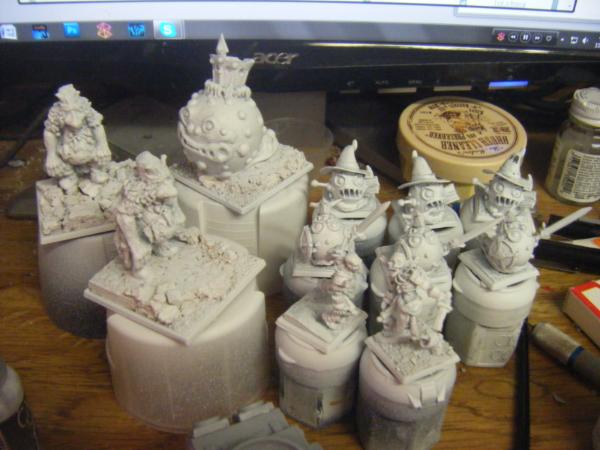
I did get a number of models finished, though I am running a few days behind according to my plan. The final parts of this group of EFT guys should be finished tomorrow, and the titan is primarily waiting on a good day outside to prime. Lately its been all cold, drizzly, windy garbage weather, and I dont have my indoor spraying rig prepared yet. (Gotta get on that, actually..... Winter is coming...)
First up, three more EFT guys:
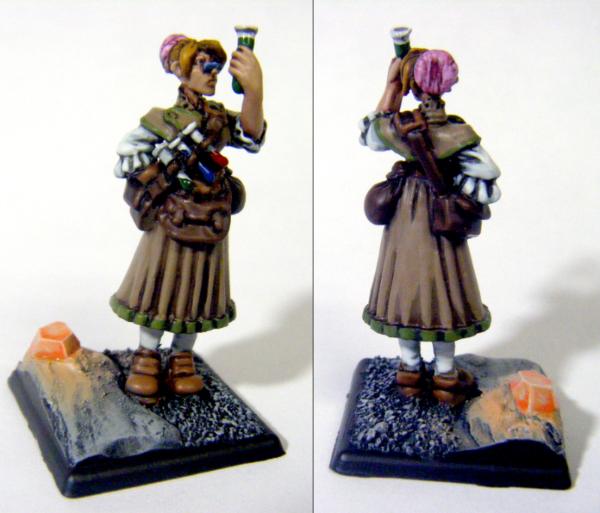
A familiar face: The Chemist
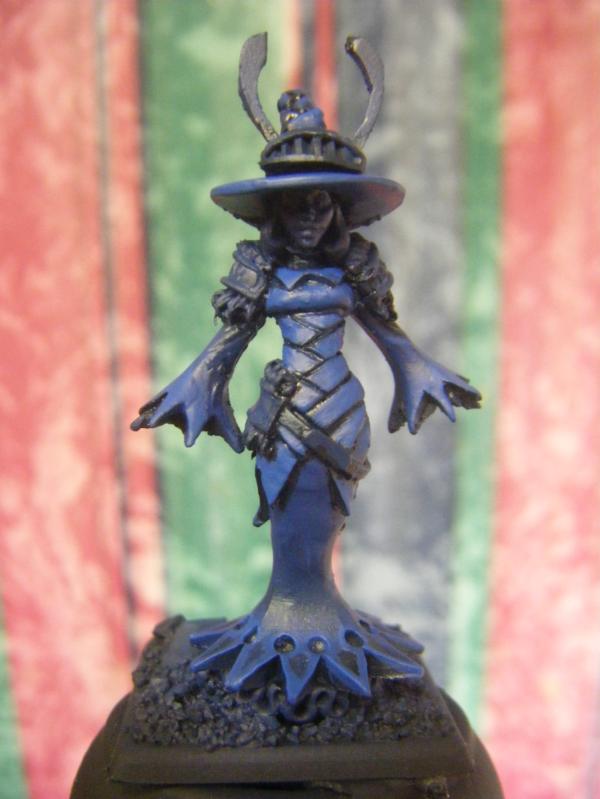
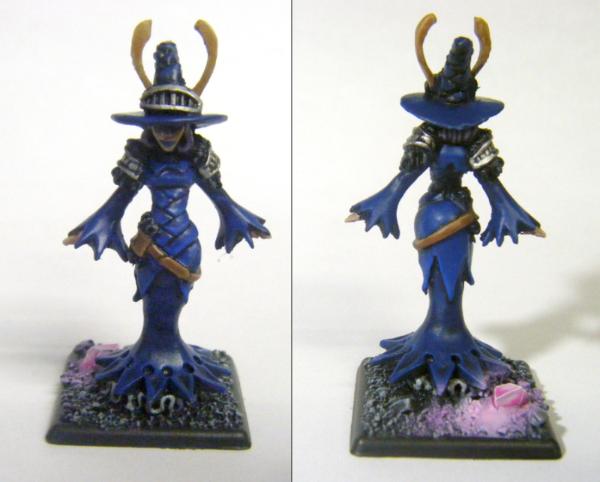
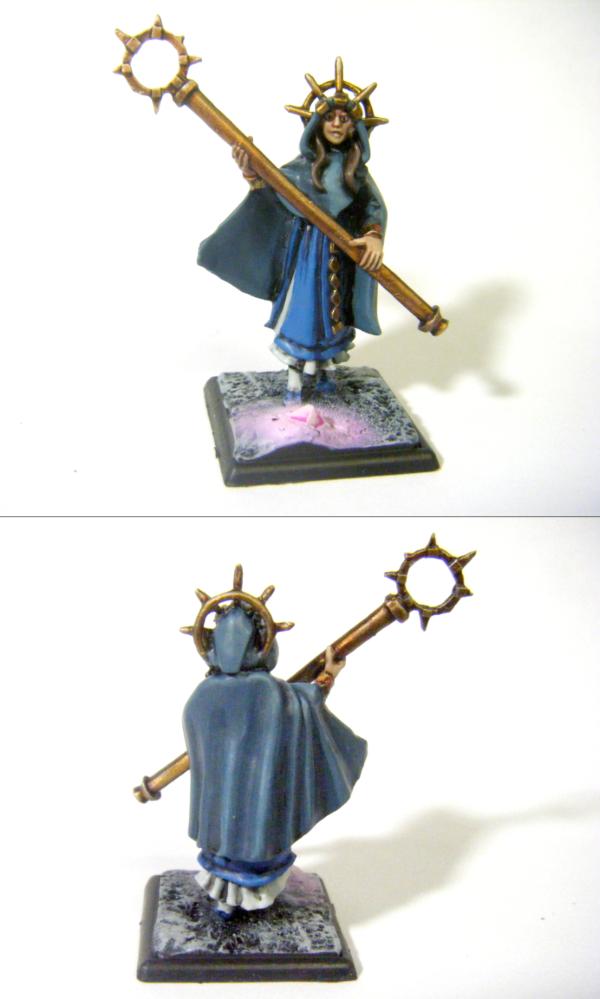
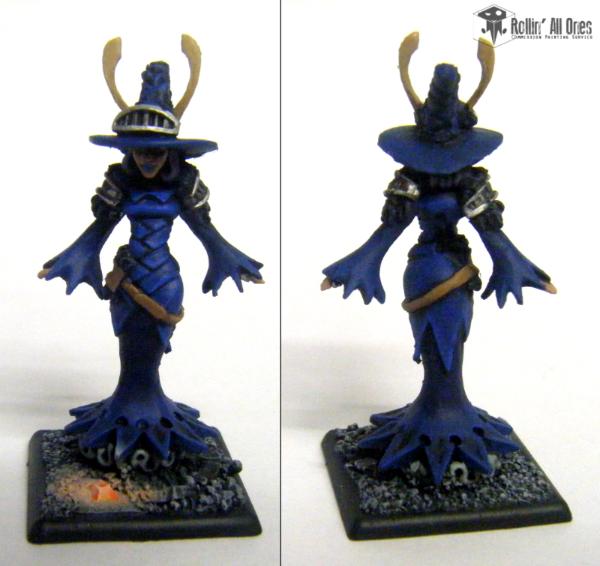
Cleric: It was requested that I add more blue, so this is the result. Normally she has a red and white dress, with a muted rose colored cloak. I decided on Blue and white for the dress, and a sort of grayish blue-green for the cloak.
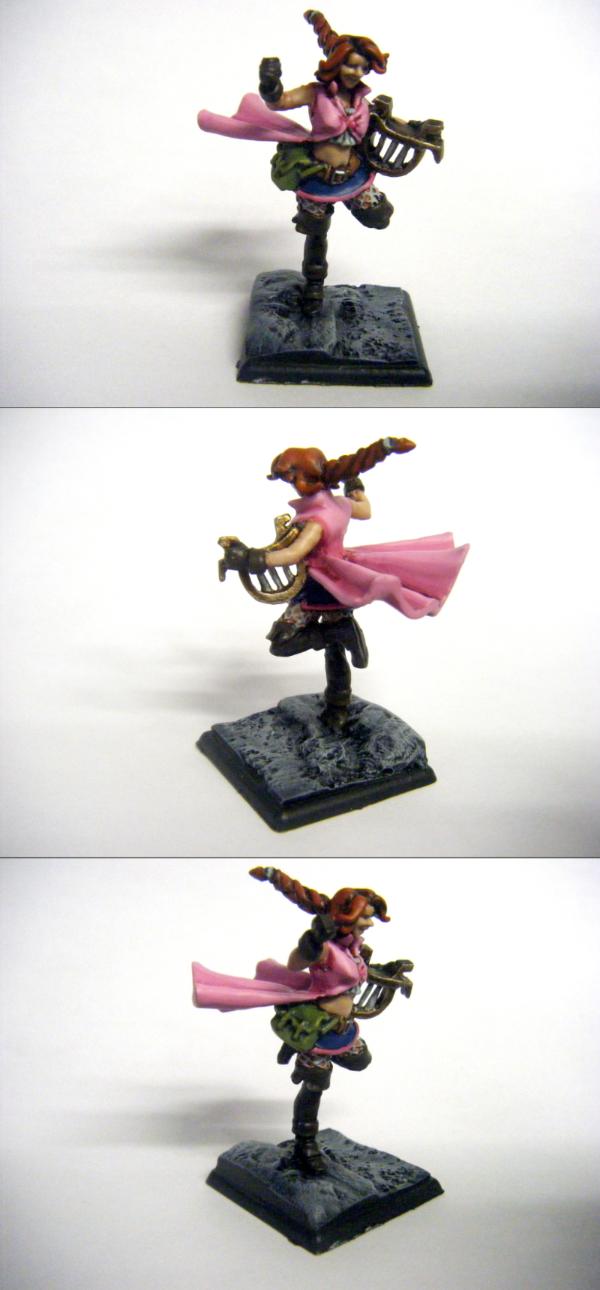
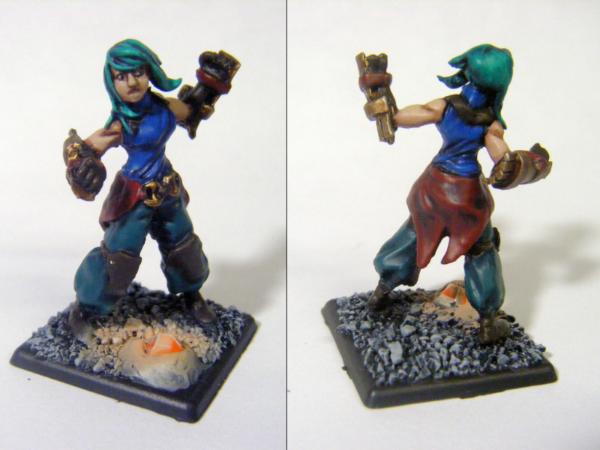
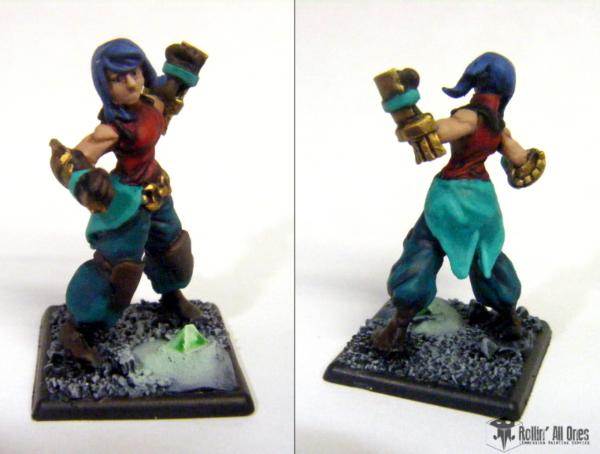
And finally the pugilist. The color pallette is swapped a bit, as a "blue top and dark pants" were requested. I think it worked out surprisingly well. The teal hair was chosen because in the art she is depicted with teal as a spot color (where I happened to use red on this figure). Definitely one of the more bizarre colors Ive painted hair!
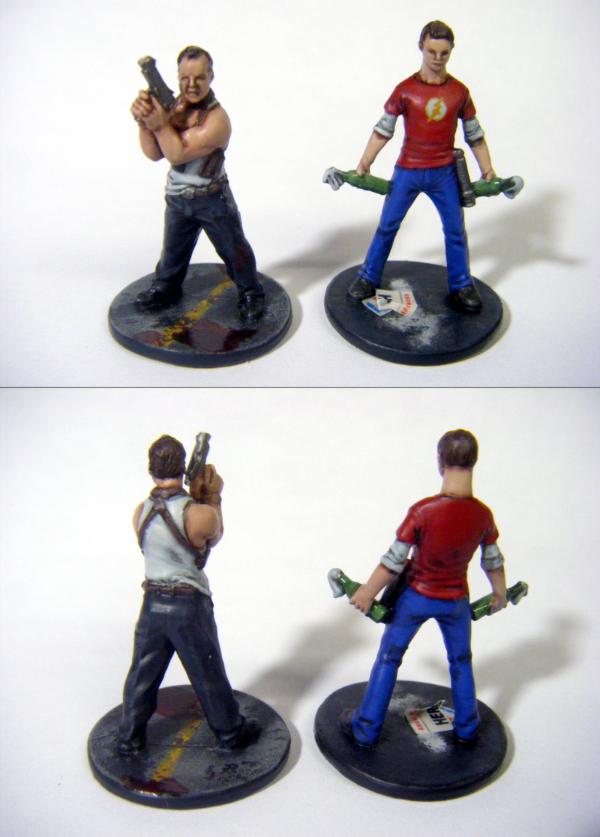
I also painted up two Zombicide survivors that have been on my desk for a while now. Trying to mix up my projects so I dont get burned out.
Here we have the Bruce Willis character, and "Dave" , who is a clear Big Bang Theory tribute
Bruce's right eye had a weird bit of mold line going through it, and I've done a bit to try and fix it. Still looks a little funny to me.
Finally, a bit on the Titan:
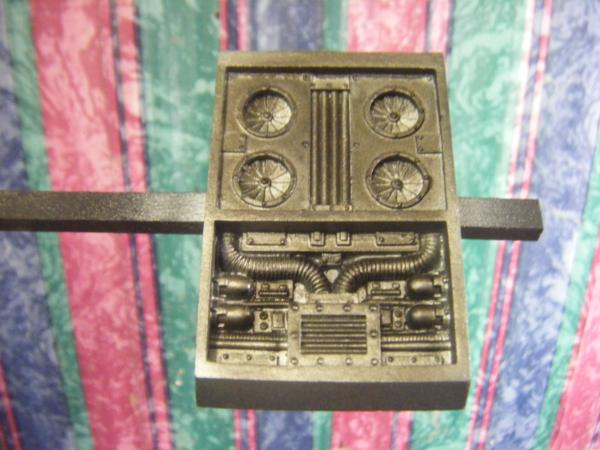
Unable to prime the larger sections, I made some headway on color choices for the metallic components (ie, most of the lower section)
I want to utilize my airbrush for as much of the base coat as I can, as there's a TON of area to cover with a regular brush. So I experimented with some Testors Model master Acrylic, specifically "Steel"
Here we have the interior engine component, which will sadly be obscured under a steel mesh screen!
And washed with SW Soft Body Black we get this:
I will be hitting this with "Armor Wash", another secret weapons wash that looks a bit more green tinted than GW Devlan Mud, and that should give me a nice grimy dark metal. Then its some highlights with various other silvers and we should see where we stand!
Im hoping weather gets nicer (a small bit of rain started up just tonight as I was flat coating these minis *grumble*), and hopefully the Titan will get some metallics on it soon!
Now I had a bit of a question about the format of this blog. Do you guys like it better when i make more substantive posts like this? Or do you prefer seeing smaller, more frequent updates? So this, versus the past week or two.
The Earth Troll and Gunsmith from Endless are about done- should have them flat coated tonight.
In the mean time, the weather continues to be crap. Im going to see If I cant get some primer on the titan's legs. At least that way it'll be a step forward!
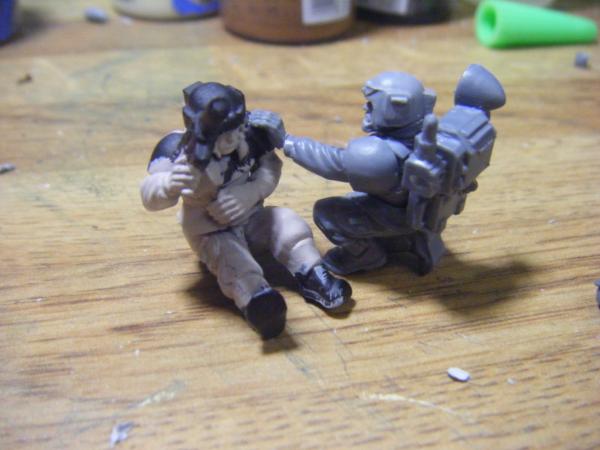
In lieu of Marines on the base (Im still trying to figure out a model to use- my bitz are disappointingly slim in this regard), I rigged up this little scene with two guardsmen, one of which has been sitting around for ages. I think I made it for one of the ork flyers I never finished building.
In any case, here we go. I dont think his buddy's gonna make it...
And on the base.
Lemme know what you think (especially you, WM!) I can always put marines on the base instead, I just dont have any suitable parts The wounded guardsman just seemed to fit so perfectly in that spot. If you dont like him ill just pop him on one of my flyers for next Adepticon.
I like the look of the guardsman, but I think the marines would make it more Badab War titan then generic titan, ya know? I have literally hundreds of space marines in bits, just lmk what you are looking for.
I'd go with the marines if that's what Whaley wants dude :-) if he's happy to send you the bits and you can make another little conversion that is along the same lines as the Guardsman then you're onto a winner! I love how the two guardsman look on the base, it really does add that special feel to it but two marines in Badab era! well now, that's just gonna be even better !!
I definitely hear ya on that, WM. Cyp's Idea could very well work, though i guess since you want this to drip with Badab flavor, we should get marines all around (I'll just save the mixed group for one of my flyers ) Have an RS Apoth tending to the wounded guy, then another loyalist marine lining up a shot or something. I put a minefield running between the Titan's legs, so he'll probably be next to that rock in back.
I figure I'll need a set of kneeling legs (from Devs, i think), the apoth backpack and right arm w/ the drill thingy, and three sets of legs, heads, and torsos. Weapon arms I think i've got, especially with assembling mostly heavy weapon devastators last year. If I could get a couple additional apoth bits for my own future basing purposes, thatd be cool too. I can trade ya something for em.
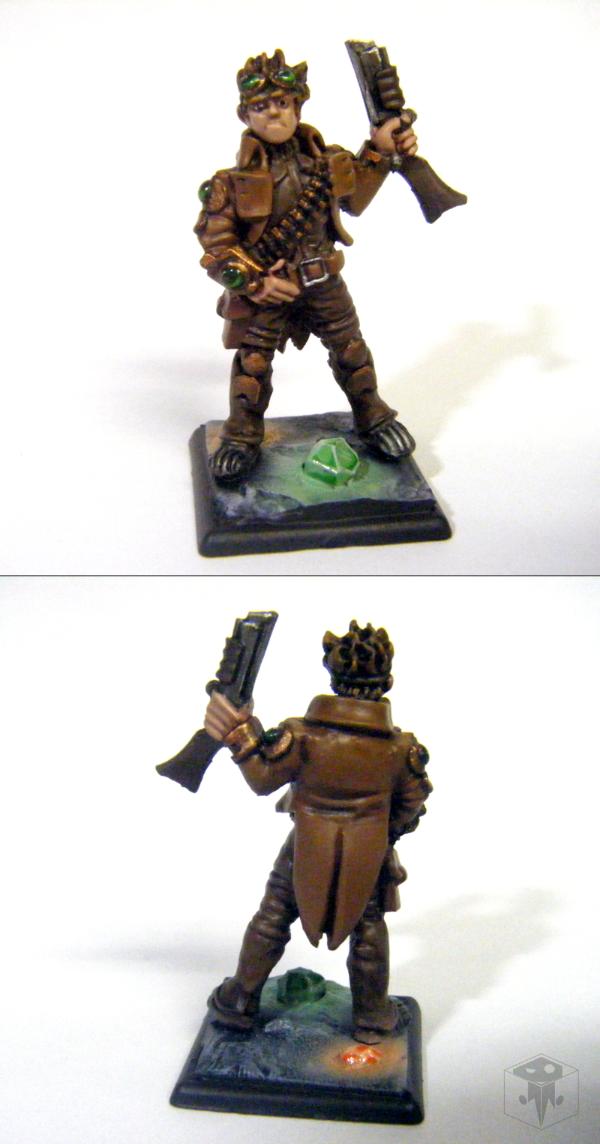
Anywho, the first group of endless figs are complete! Including the human Gunsmith: (That eye isnt nearly as messy as it looks.... odd bit of glare from the camera there... :/ )
@Gits: Thanks! All credit for the idea goes to Tonio, who built an awesome crystal mines board for the game. Im just glad it turned out as well as it did ^^
@Dr. H: He'll keep going and going and going.... I wasn't a huge fan of the model at first, but seeing it painted up made me warm to it... looking at the stat card this guys got a ton of HP too, so.... Keeps going and going......
@WM: Top notch! No super rush on em- best part about em is that I can add them at any time!
Now on to the next update! (two in one day! Madness!)
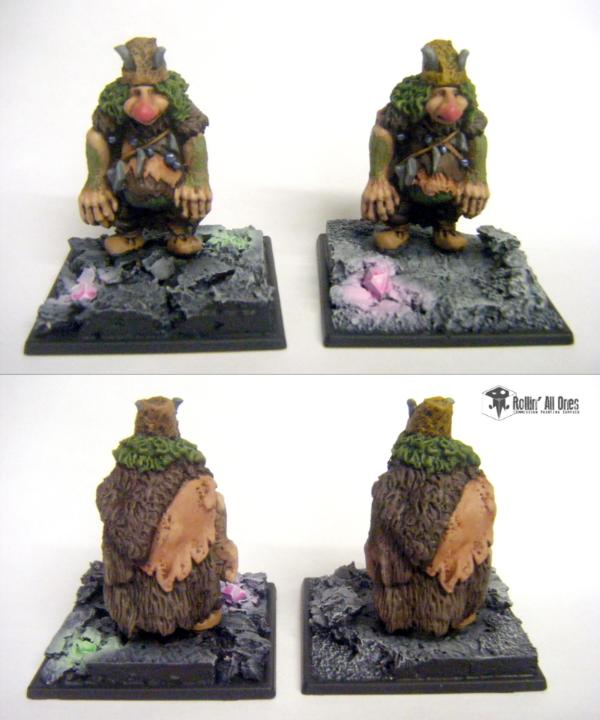
I neglected to picture the Earth counters that go with the Troll, markers for one of his abilities, i believe. Since there are two other trolls in the next group, there are a total of six tokens. I just painted em all up at once, since it let me keep my brush going!
Then the Titan's legs saw primer! *celebrates*
Getting chilly outside, so its not going to be long before I'm forced to prime indoors.... time to get my rig set up again!
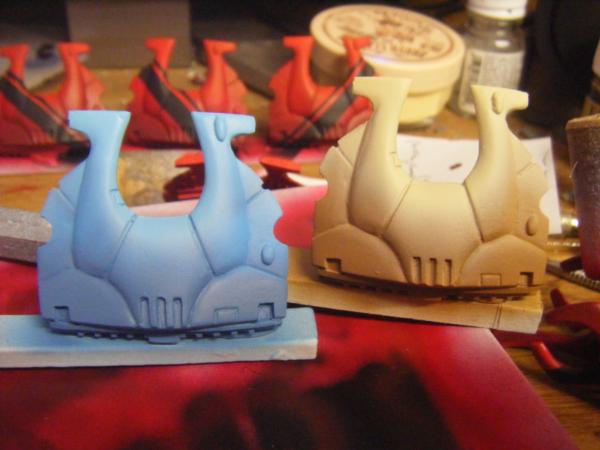
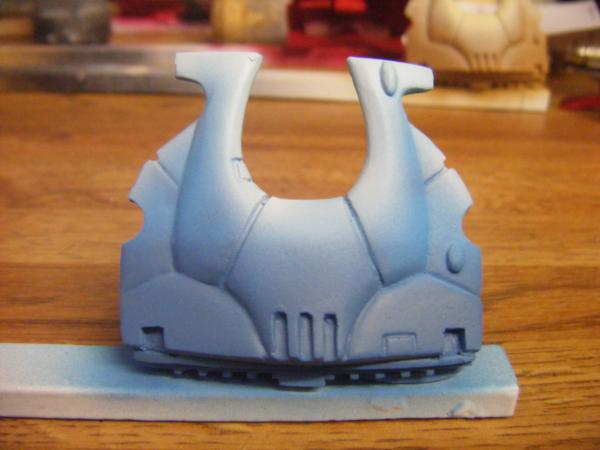
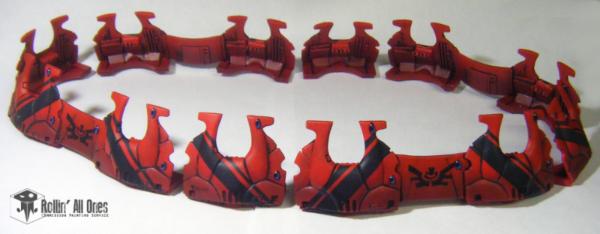
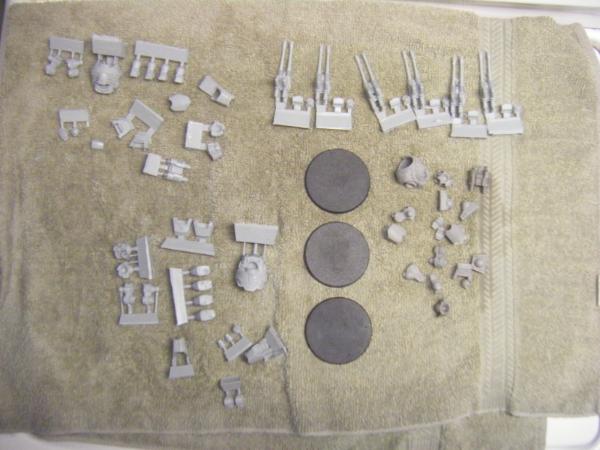
And then we come to the last part of this update: I was recently approached by the designer of the Eldar Aegis Defence Line I worked on a while back for WM.
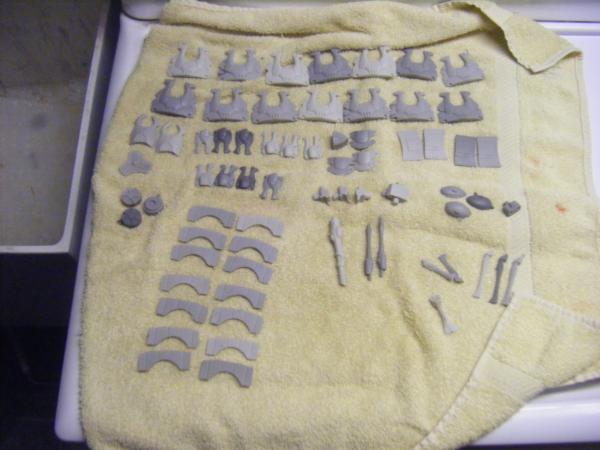
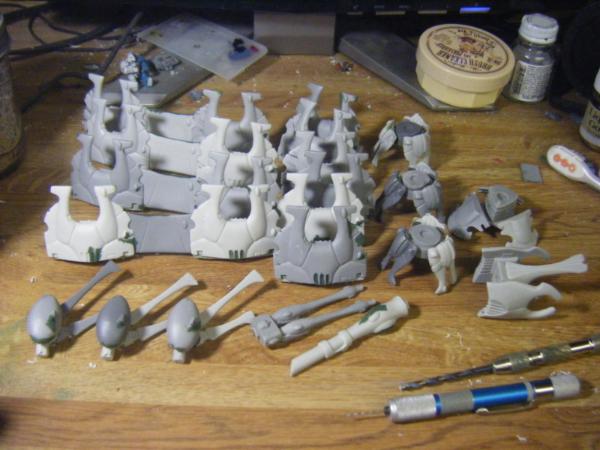
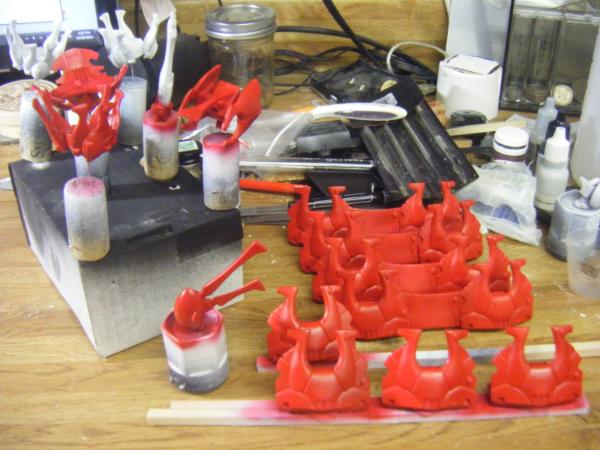
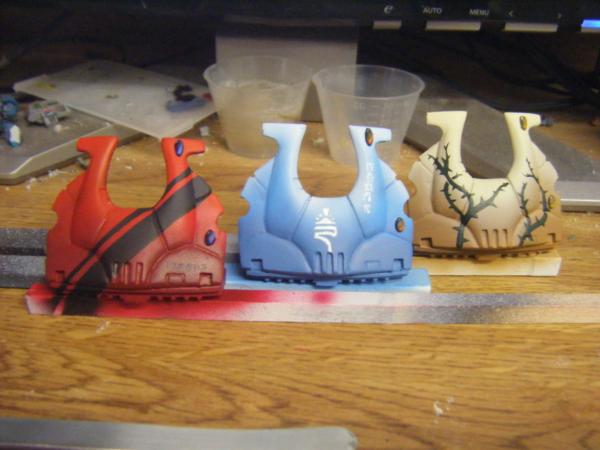
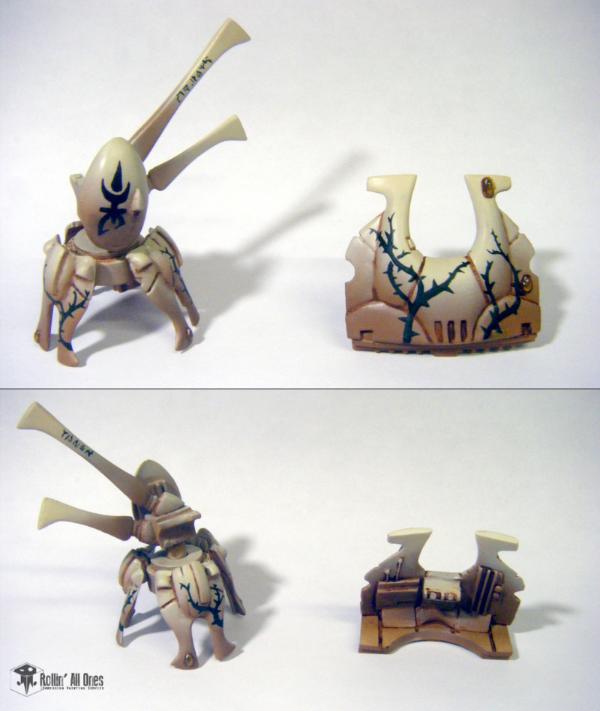
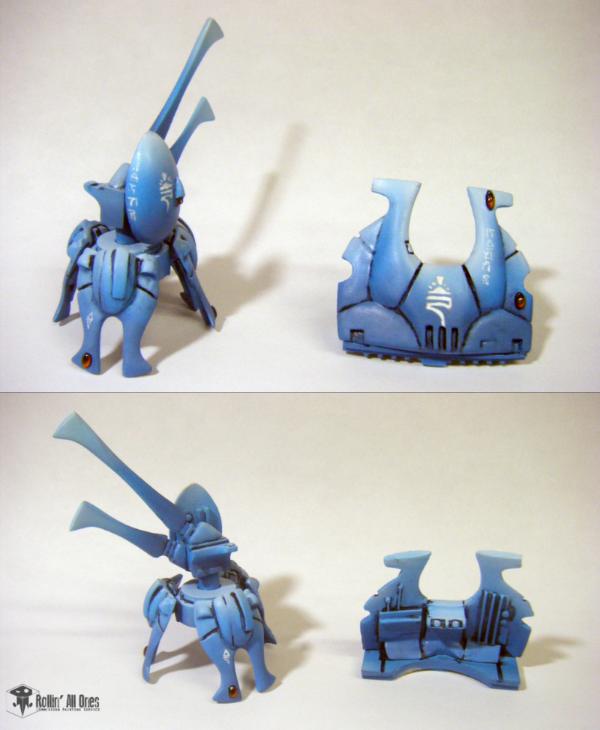
He liked my work, and so commissioned me to paint up a batch for him. One full set plus guns and comm relay, then two other single segments plus relay in two other schemes. Currently we are discussing colors, and Im liking where its going so far. Though the details are still being hammered out, it looks like the colors are going to be black and red (very Saim-Han), an icy blue and white, and a bone colored wall with dark green thorny vines.
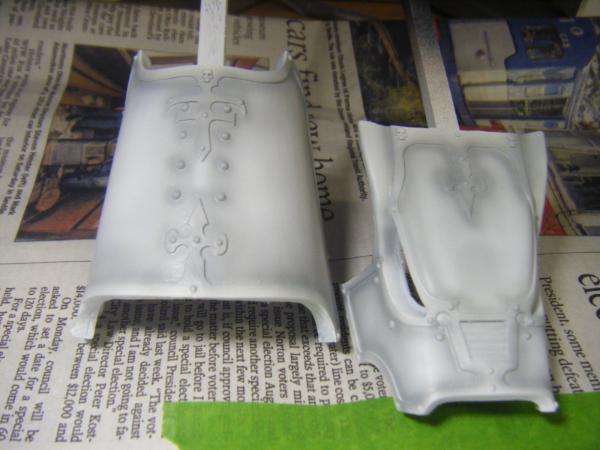
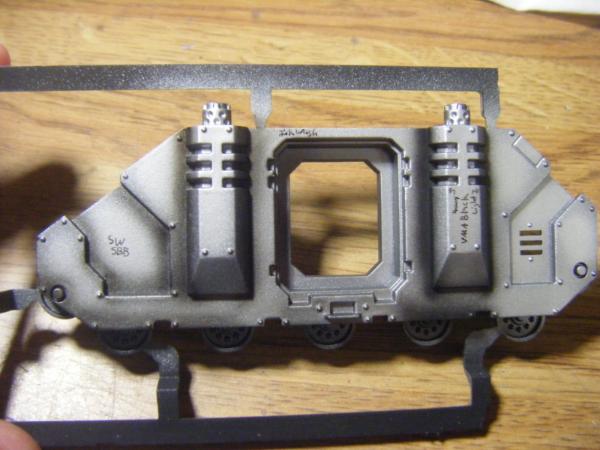
So I spent a bit of this afternoon washing the bits:
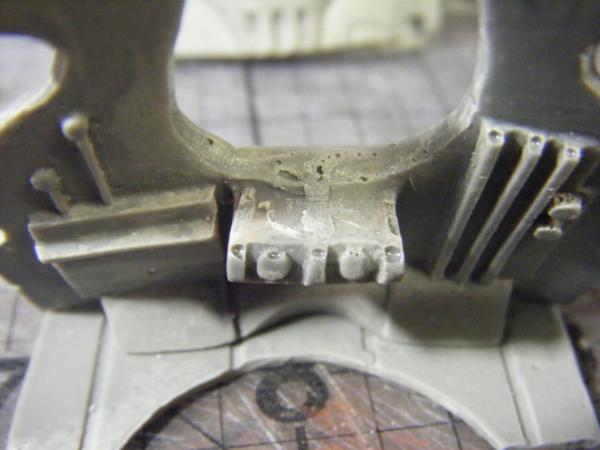
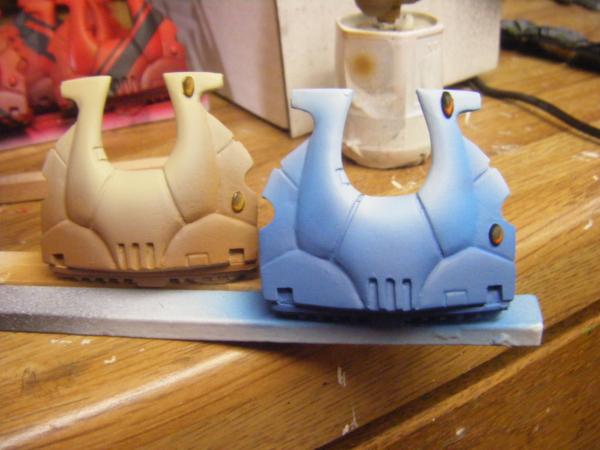
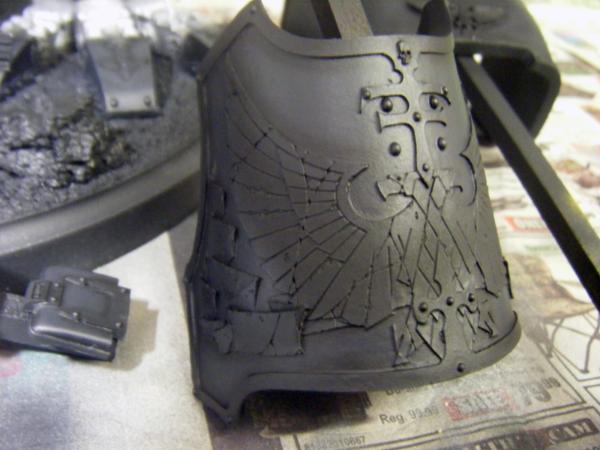
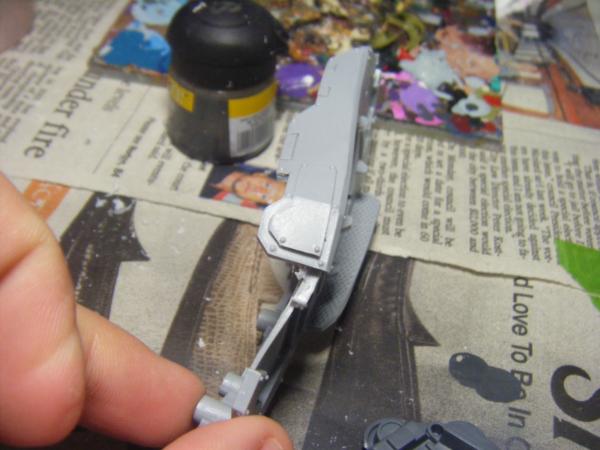
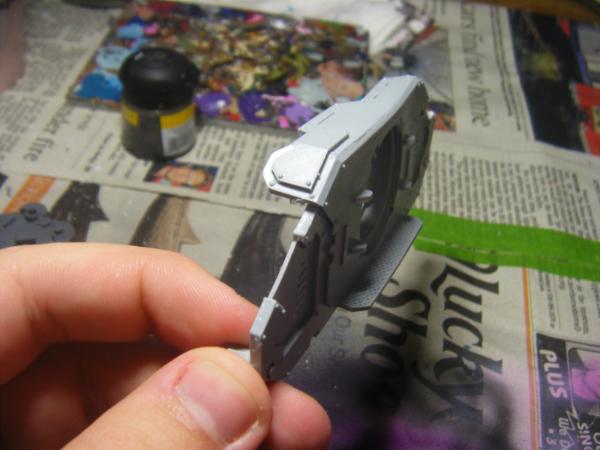
Now as you may remember, this particular kit gave me a few problems, namely bubbles and annoying parts. For example, the hard to remove bit of sprue in the middle of the control panel.
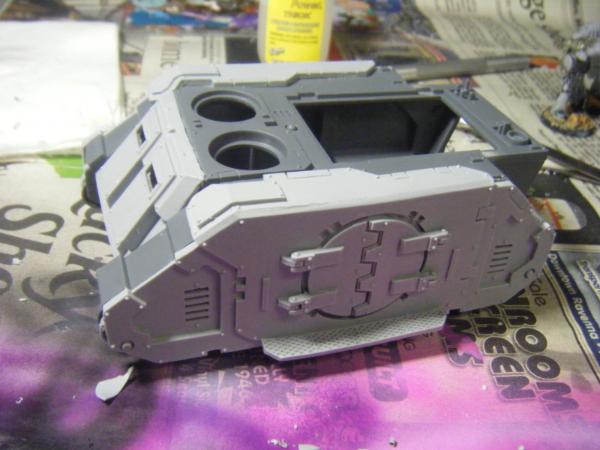
The Old:
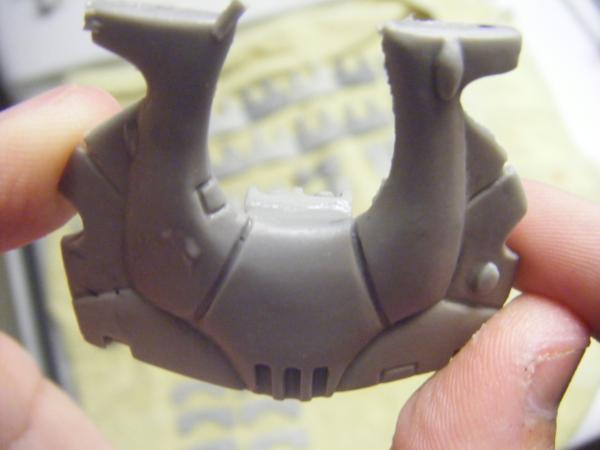
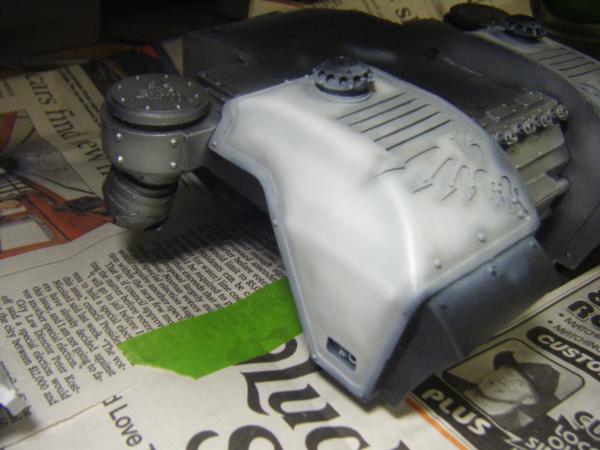
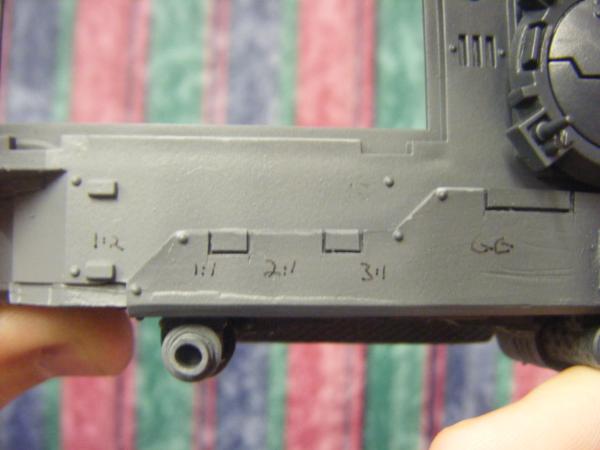
Now lets compare it to the new kit.
The New:
All I can say is "damn". The improvement in quality is astounding! Every piece is crisp, and whatever minor defects present are a cinch to fix. Gone are nearly all of the bubbles, and the accursed sprue is nowhere to be found! In addition, the two part sandwich bases I complained about in my previous build have been cleanly consolidated into a single base piece. I said last time that I could recommend the kit if the bubbles became a non-issue, and I stand by it. Definitely some gorgeous work! He apparently has also built a Tau and Daemon ADL. Something to look forward to, for sure!
@Dr. H: Thanks! Really these dont take much time. Its actually only a few shades of gray (starting with Adeptus Battlegray) progressively layered to a slightly gray-white. A rather quick method, but very effective!
@WM: No worries, dude. Yours still looks killer (if I do say so myself). I don't think you'll be able to tell the difference after its all said and done. I worked hard to make your wall look nice Only thing that's gonna be different is that I spent a lot less time gap-filling on this model!
Wall is now clean and assembled. Just gotta let the GS cure, then its a bit of smoothing it out and its all ready for paint!
@Moltar: Iiiinteresting. Not sure how I feel about that version- It's definitely nice (and gorgeously painted), nut it just doesnt "do it" for me. Not a fan of the overall aesthetic, particularly the "wall connector" pieces. The back of the walls looks rather nice, though- I like the energy conduit glow.
From a gaming standpoint it seems like more of a hassle to place, seeing as you not only have the 8 wall segments, but the 9 additional connector bits.
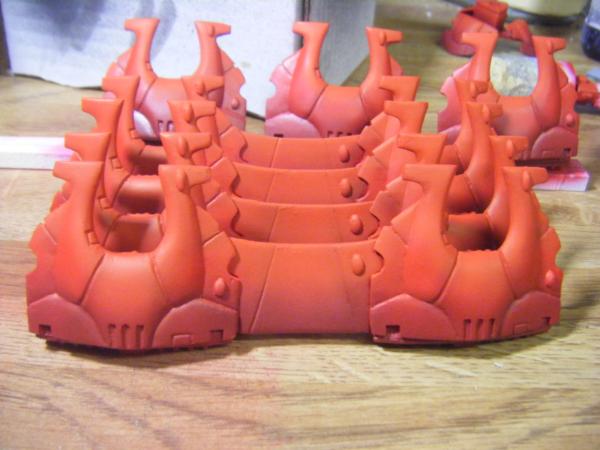
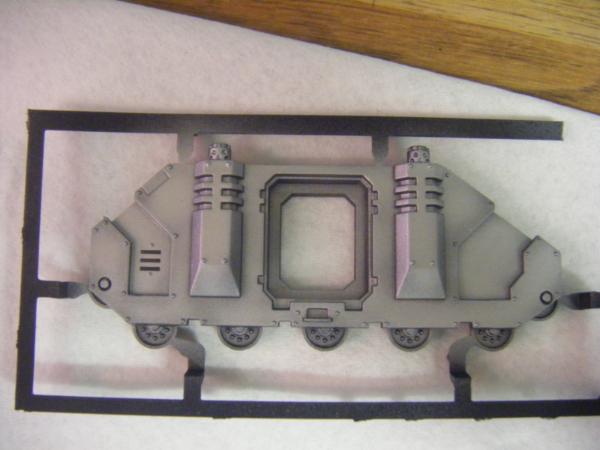
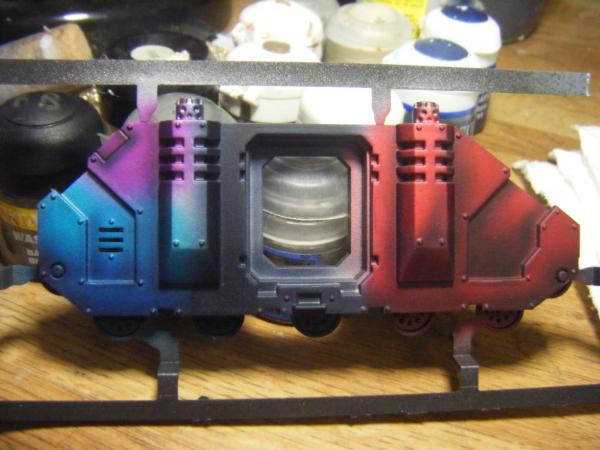
So I decided to try something new while painting the first layer of red. Back at Adepticon, one of the things in the swag bag were a pair of sample pots of Badger's Minitaire paints. Minitaire is a line of airbrush ready paints designed for the miniatures market, and from what I've seen the color range is pretty nice. I was given a pot of red and a pot of blue, which though a bit of deductive reasoning Im guessing are the colors Scorching Red and Lagoon Blue.
And so I sprayed....
Rather happy with the result. The paint went on smooth and the color is awesome. Its a little more red than GW Blood Red.
It seemed to be a bit thick, so my airbrush had a bit of a hard time with it, but that might just be a case of the paint being a bit old and drying a bit. Even then, it went on great. More of these paints are definitely in my future.
As it stands, I need to wait for my compressor to cool a bit, then its on to highlights and shades. Then the black stripes!
Automatically Appended Next Post: Aaaand Shade!
Compressor cooling again... At least I've gotten rid of the issue of water in the line!
I've got a bunch of their paints after Ronnie from Mantic gave them to me (someone must have given it to him, and I was the only one from OTL that has an airbrush). They're awesome paints. And their tints are cool
Lucky bugger! I've been reading more and more about them, especially the Ghost Tints... They seem like really neat tools. Very interested in trying em out.
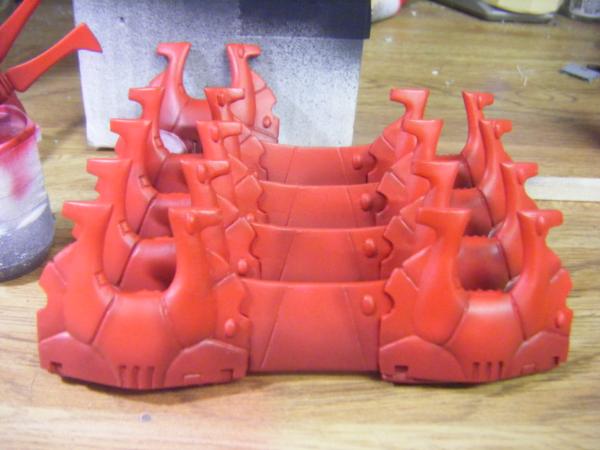
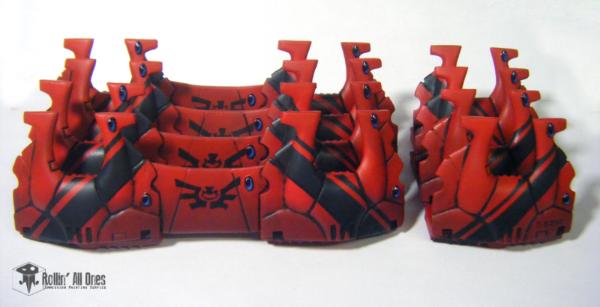
Probably last little bit of progress tonight on the walls- the main color is complete, I think.
Now its some black stripes and a bit of detailing. Then gloss coating and a Paynes Gray Oil wash.
Then theres the two other single segments and relays. Icy blue and bone!
Thanks Gits. Im finally starting to understand how to use my airbrush, so gradients are getting easier and easier. I definitely have you to thank for a good part of it- I've been studying a lot of your work and various tutorials to try and gain some insight.
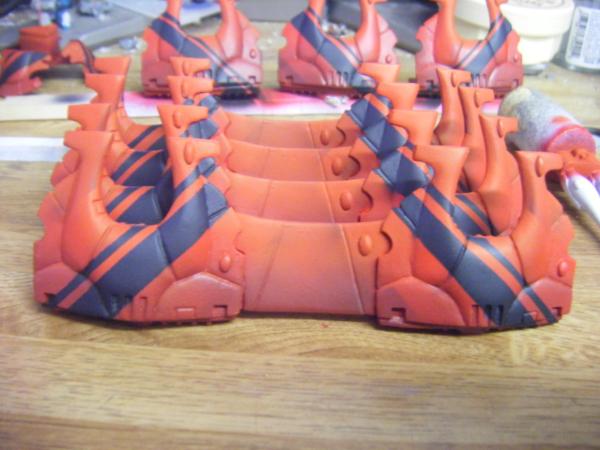
Got the stripes sprayed and shaded this morning.
Unfortunately I got a bit of overspray on a few areas, so I have to go back and retouch the gradients. A minor setback, but really, theyre just about complete!
Thanks guys! Definitely more to come- actually just finished touch up work as well as the other two color schemes: Ice and Bone.
I think I'm gonna hit the Ice one with a bit more white, as its more sky than ice at the moment. I got to use a color I never opened before, too. The aptly named "Ice Blue"
@Ruglud: Hehe thanks- I actually hadnt heard of Wombles before- Fortunately I was educated by the all mighty Google, and you're right... they do have a striking resemblance!
@Gits: Oh pish- you still have me beat on spraying vehicles. I still am a bit confused on that process.
Though once thats done, I must slay you in true Sith fashion, ensuring you never rise to overthrow my tyrannical rule! Bwahahaha!
Ice Ice Baby! looking good dude! actually everything is looking good! :-) love the red defense line it's superbly painted and I'm eagerly awaiting your exeptional-ness on the others!
Ramos Asura wrote: ...Got the stripes sprayed and shaded this morning.
Unfortunately I got a bit of overspray on a few areas, so I have to go back and retouch the gradients. A minor setback, but really, theyre just about complete!
Love the stripes on the Eldar wall. I assume that they are still a WIP as the gems and such are not complete. The panel recesses washed?
@SL: Oh absolutely still a WiP. Gems aren't done, panel lines aren't washed, symbols aren't added... I figure about a day and a half left on these guys (mostly drying time for varnishes!). Panel lines will get an oil wash after I clear coat the models.
Walls are on a bit of a pause, as I am awaiting feedback on a couple of designs for insignia and stuff. Honestly its one of the harder things I've needed to do. I'm admittedly a better mimic than a creator- give me a reference image and boom. I can knock it out. But soon as I need to generate original stuff, thats when my progress slows down a bit.
Actually, if you guys have any ideas, Id love to hear em! This is what I've come up with so far.
Past two days have been unproductive, mostly because I needed to help my grandparents to the doctor. Nothing too terrible- grandpa recently had a hip replacement, so they needed to check on him.
I did continue cleaning most of the minis for the second EFT backer, so they should be ready to paint soon.
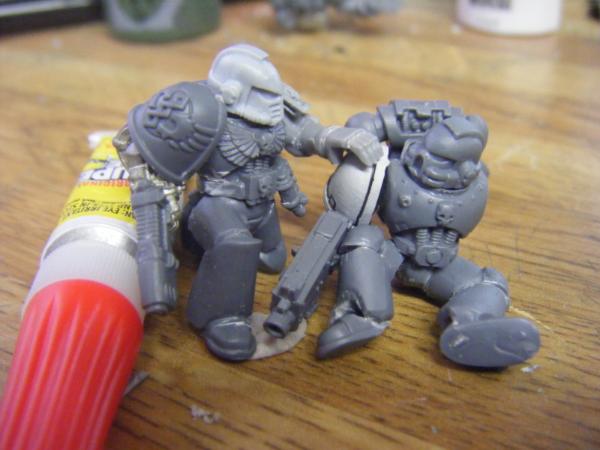
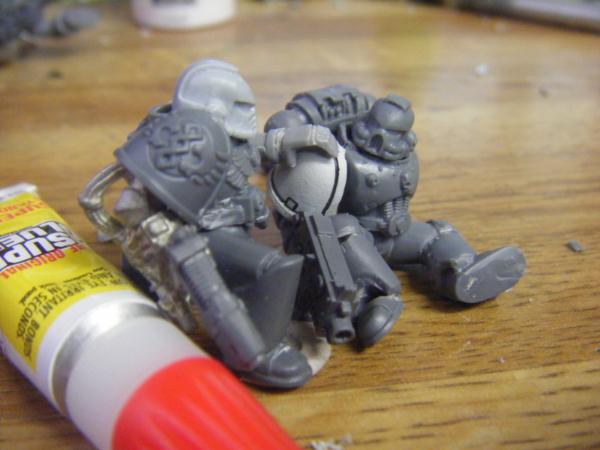
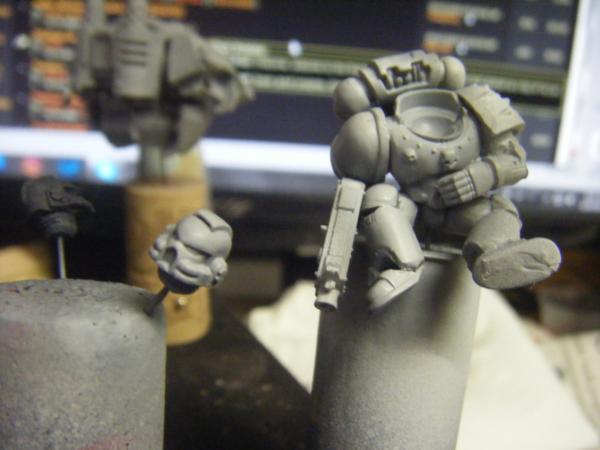
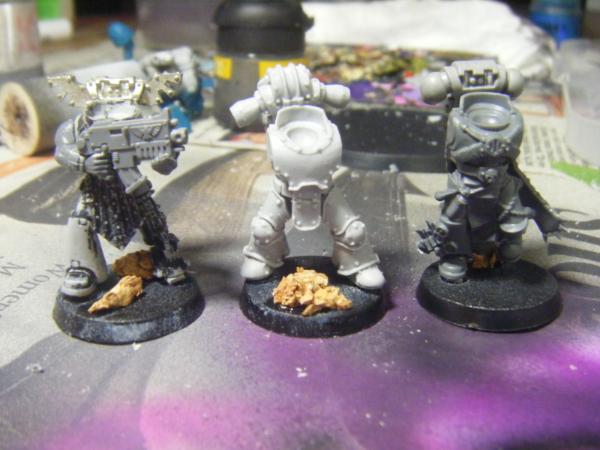
On a more photo-worthy note, I rigged up a new and improved medic scene with some new marine bitz sent to me by WM.
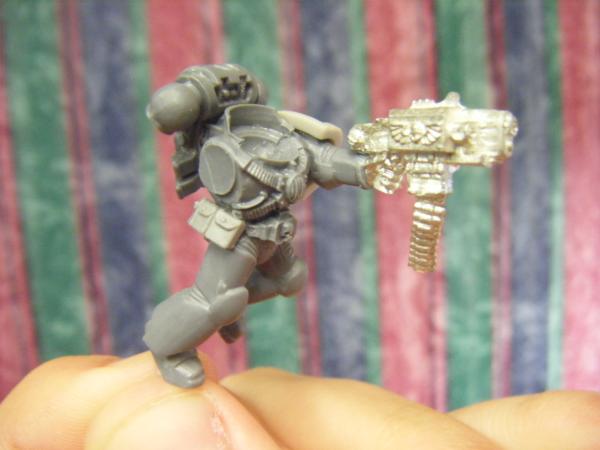
And the third marine for the base, charging recklessly towards his enemies.
Still a lot of gap filling left to go on all of these, as well as rigging up the other arms, but progress will be progress!
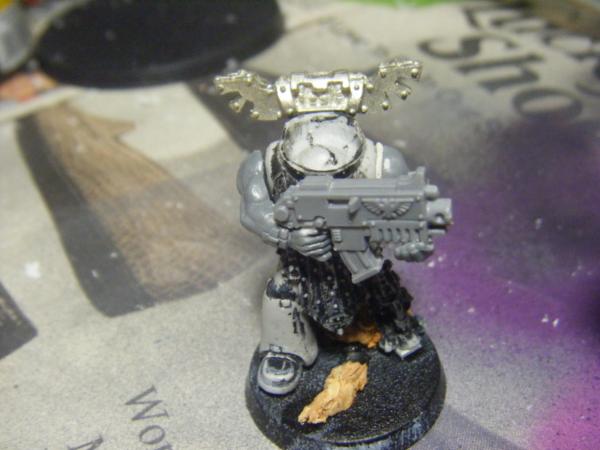
I don't know what you shoot it for. I guess it helps the healing process. If it ain't better tomorrow, I'm gonna shoot it again, I'll tell you that right now.
The plasma pistol is "incentive" to get better!
Get better now! *pew pew*
That and I never ever get to use plasmas. In game they tend to be a pointless waste, so ive billions of the damn things!
So Happy Halloween everyone!!
Nothing special going on around here tonight, just business as usual.
Titan is still waiting for me to go to the store and pick up supplies. I only just realized Im out of Windex (for AB cleaning and thinning), paper towels (cleaning), and this bottle of superglue I got is crap too!
So hopefully Ill be able to go shopping tomorrow...
In the mean time, I'm greenstuffing a ton of EFT figs!
A bit of cleanup now and they'll be ready to prime and paint!
Btw- Definitely still looking for ideas for symbols to put on the Eldar walls. Any suggestions?
Ramos Asura wrote: Btw- Definitely still looking for ideas for symbols to put on the Eldar walls. Any suggestions?
Not a direct suggestion, but have you tried google-ing something like "tribal tattoos" and having a look for symbols within them. It may at least spark some inspiration or give you something to tweak.
We play it 2-3 times a month (usually more than 1 game a session). I can bring it up some time. Basic game with new players takes 2ish hours, especially with the new zombie types in there.
@Alf: Alas, as usual I was without a vehicle, and would have been unable to join ya. One of these days xD
Definitely need to hang out sometime- Maybe WM can bring up Zombicide
So this family baffles me... even when someone goes to the store, they are unable or unwilling to pick up things for other people.... Or even let said person come with them to literally go right across the street from where they're shopping -___-* (Sadly it makes sense in context, if you know my family...)
So Im -STILL- unable to use my airbrush, as I've nothing to clean it with, so a majority of my projects are in a holding pattern.
Anyways, progress shots!
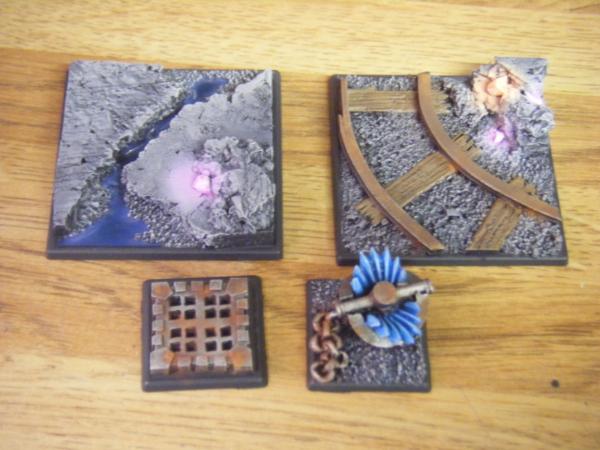
The walls have gems!
I decided to go a more amber-esque gem for the desert one. Should pop out more after the oil wash. Then "blackstone" gems with a bright orange color to them.
EFT stuff is primed, and mostly is awaiting the airbrush.
Today i started on the twin Adepts, though.
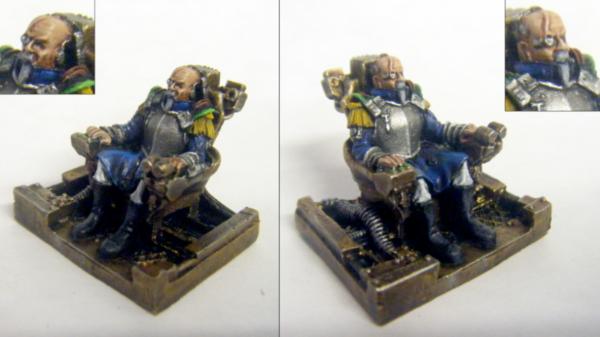
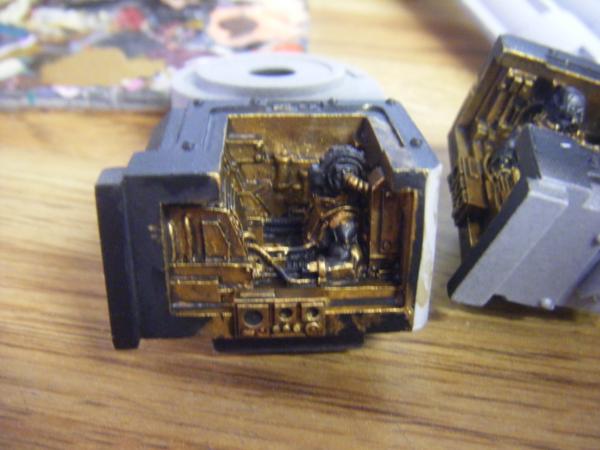
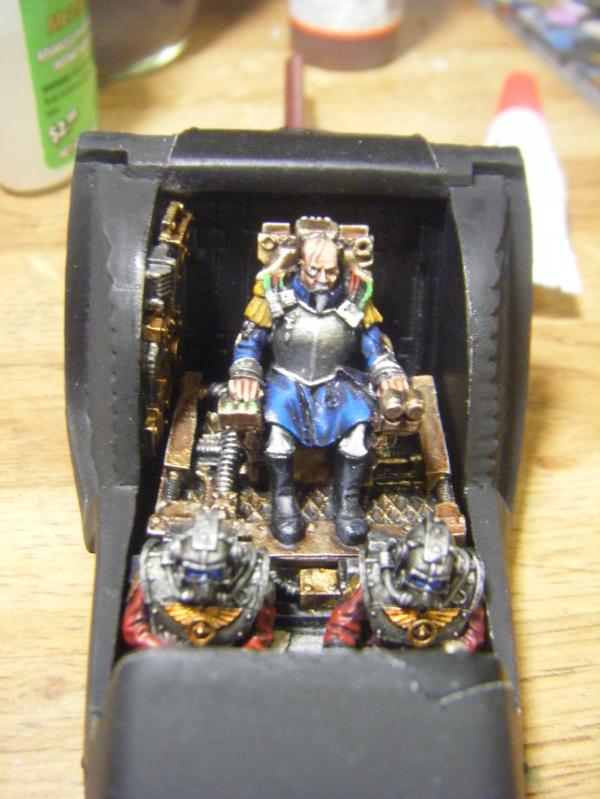
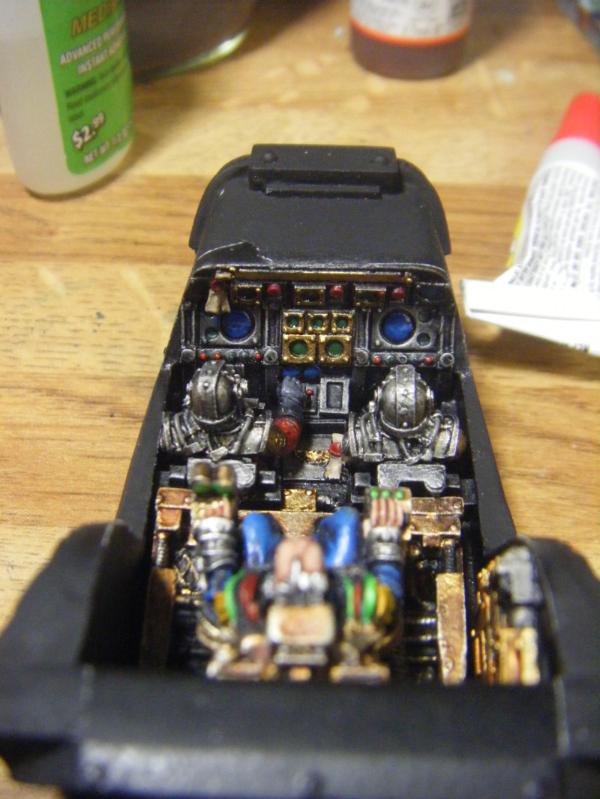
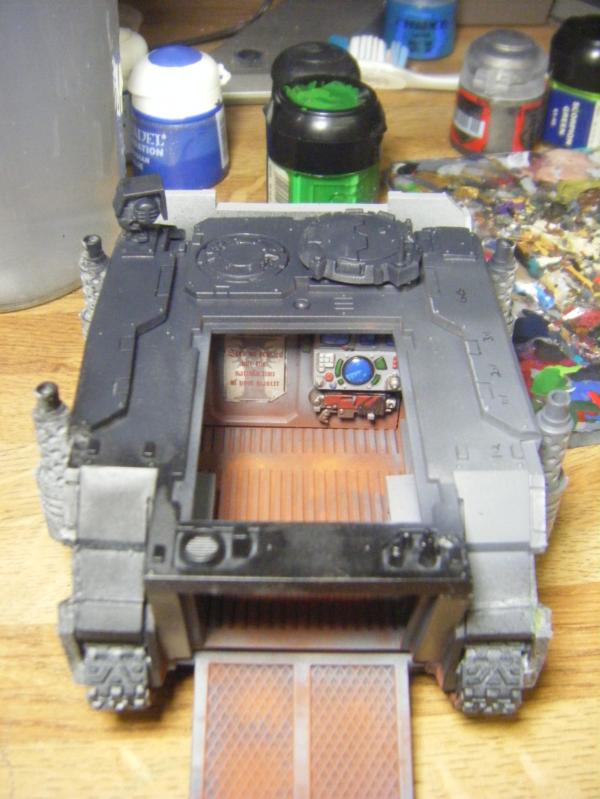
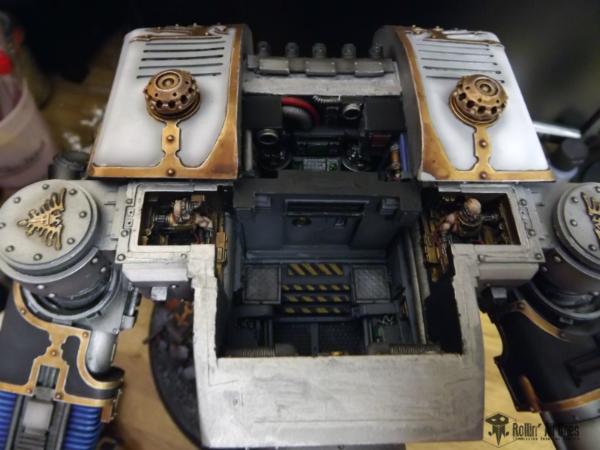
And finally, a bit more Titan work. Painting the Moderatii, as well as the servitor arms (which I had somehow neglected to paint with the interior)
I liked how the FW model had dark, weathered gold in their servitor compartments. It sort of makes sense with the Titan being something of a moving monument to the Machine God. It also adds an interesting spot color to the interior.
My biggest gripe at this point is that the screens and gauges are damn near impossible to access with a paintbrush! Even the servitor itself is hard to reach. Its all built into this 1 inch cube. I may need to leave some of the harder to get areas as shades of gold and brown.
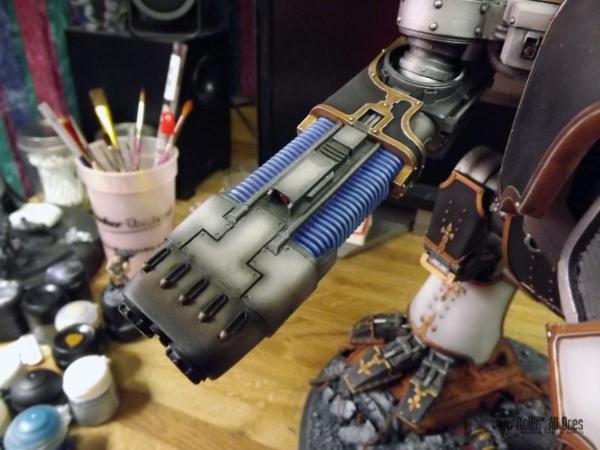
I'm noticing something else, as well... Somehow it seems Im missing the cables that run to the head... (only have the 2 bundled and 2 ribbed tubes for the weapons) I sent a message to FW wondering if you're supposed to cut the other lengths of tubing, but that doesn't make any sense... only alternative is that I never got the other cables.
Giving another look to the box to see if somehow I missed it, but Im not liking the prospect of waiting for more cables to come in :/
I like the gold dude, it's a good shade and I agree the walking monument to the machine god would be kind of lavish in detail! how difficult is the screen etc to reach? and when assembled how visible are the compartments going to be? should give you some idea of how much to invest in painting them? I know the artist in you will not want to leave any detail but sadly sometimes they're just not designed for that level of paint in mind!
It just pains me to under-paint or leave out details... Its very clear this model was designed to look good, not necessarily to be painted.
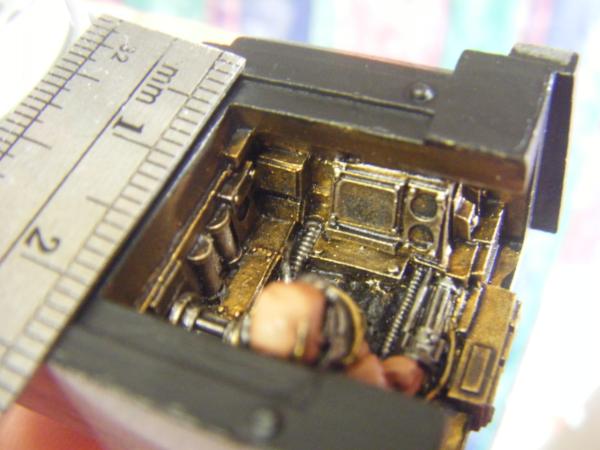
And this is what we're looking at- less than 2cm cubed, with an overhang covering the screens!
It's an interior area that will usually be covered by a hatch (and top carapace), so will only be visible when the top is off. Today Ill see how much I start to hate this model as I paint them in!
Oooh o.k yep, you're gonna have difficulty with blending the screens like you usually do it with the way it's set up, might be a chance to think a little outside what you normally do? when i went from marines to painting DE the eye lenses are different shaped so I couldn't do my usual approach, I tweaked it by bringing the highlights up to a point in the middle of the lense instead, maybe you could adjust how dark the screens are and where you highlight them? are you imagining overhead lights in the cabin areas? or is it dark purely lit from the screen in front of them? this could really control what you do with it! :-) whatever you do I'm looking forward to seeing it happen!
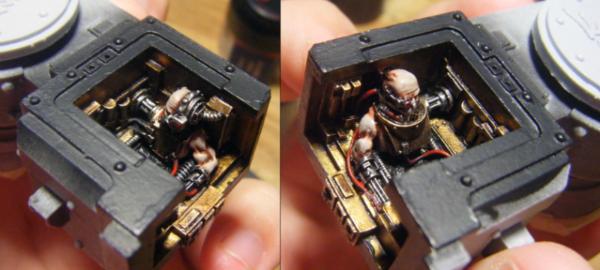
@nerd: Aye, though I may have come up with something passable.
They're not as vivid as normal (mostly cause I couldn't get the brush in there), but they do have a bit of a glow to them... Overall it seems to have resulted in a "dimmer" screen, so maybe its being washed out by the compartment lights?
I may yet go back and add a bit more brightness to the corners. It'll get a bit brighter once I gloss the screens (funny thing, gloss varnish). Those little circular gauges are damn near impossible to get to :/
Servitors are pretty much finished, save for varnish, glossing of the screens, and assembly. I took your advice, Cyp, and put in a little easter egg
That left servitor has to have a bit of fun, too.... I mean... THIS IS A SPECIAL COMBAT PROGRAM!
I kinda like the bleached/pale gray skin tone I got on the servitors. Really unhealthy looking, and red when it interfaces with a machine.
Titan now has its torso completely assembled, and tomorrow (weather permitting) it will get primer!
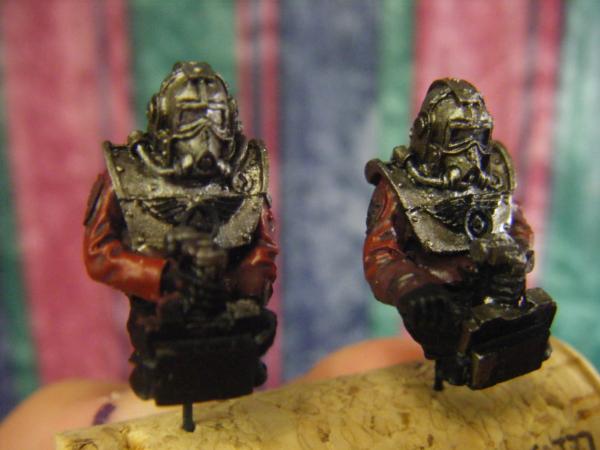
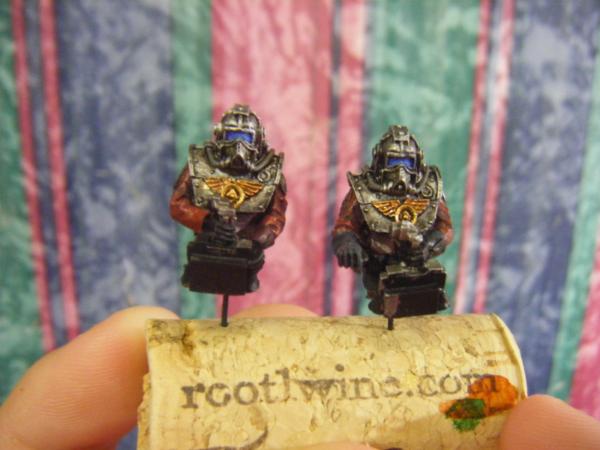
No pics of it in its current state (nothing interesting to see!), but here is one of the in-progress Moderati: A nice rich red for their uniforms, and I've based and washed the silver areas to give em some age and wear.
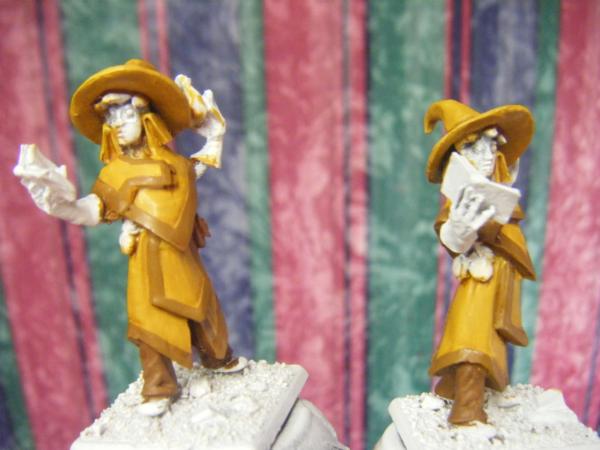
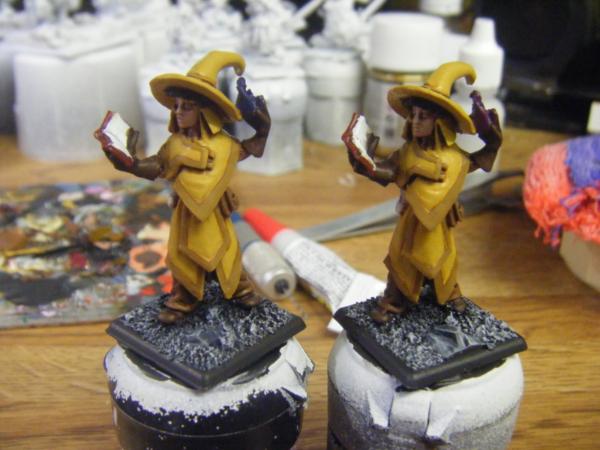
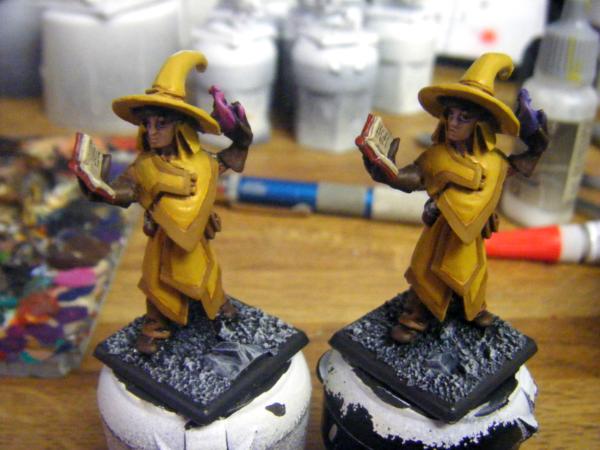
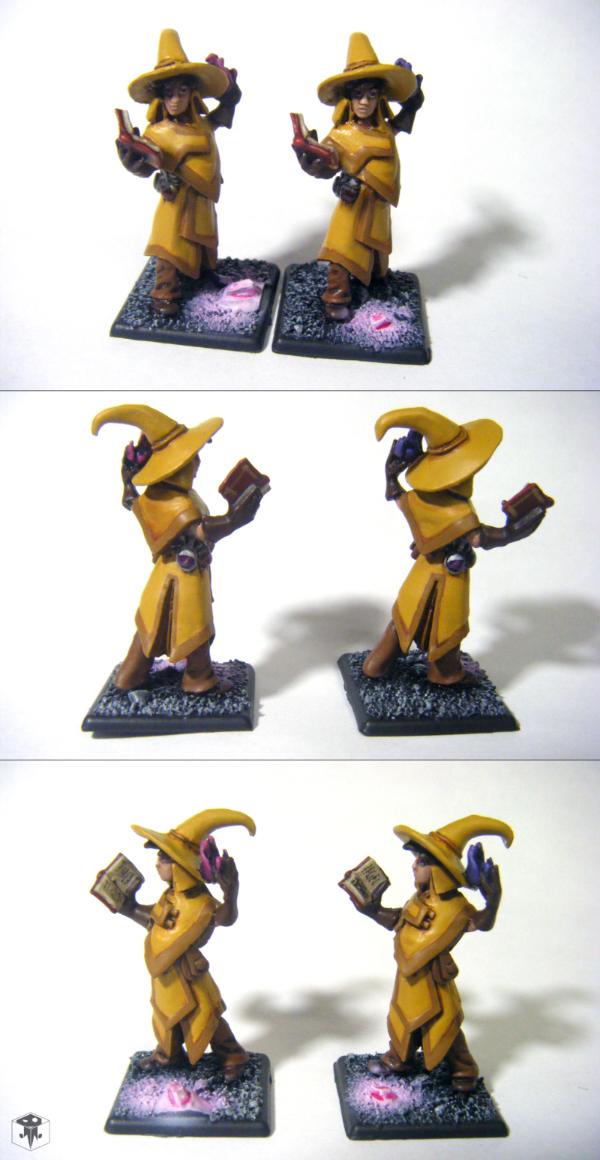
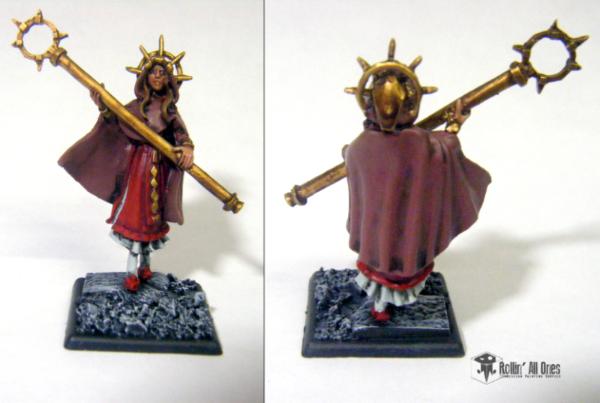
And the Twin Adepts are finished apart from one or two minor details. The fireballs will be different colors, giving them a bit of an individual identity. Designs on the book will be different as well. I've also gone with a darker trim, learning from the previous model.
So, I know I'm slipping, progress-wise, and it bothers me immensely- The past few days have been less productive than I'd anticipated. But I've deadlines to meet, and I'll be damned before I fail to meet em! I have to figure out a better system... especially for getting me motivated lately.
"Ramos, Ramos, Ramos, Ramos, Ramos, Ramos" The chant was clear and rhythmic. Never falling in volume or clarity. He waited just out of sight, eyes closed feeling the sound resonate through his body! The smell of freshly churned dirt mixed with blood rose up like a mist across the crater filled no man’s land saturating his lungs. "Ramos, Ramos, Ramos, Ramos, Ramos, Ramos". He walked to the top of the blast crater each footstep timely, measured and then he stopped. As one the chanting stopped. An eerie silence descended; the only sound was the wind and the crackling of burning wreakage.
Thrusting his sword into the air he screamed " Forward". As on cue a million voices screamed " Ramos" as the tide of bodies launched themselves out of the defensive earth creating a drum beat as thousands and thousands of boots hit the ground all at the same time. The War has begun!
Dude... Solar, that gave me chills. Totally intense!
Heh, Here's to hoping I remembered to pack my power armor!
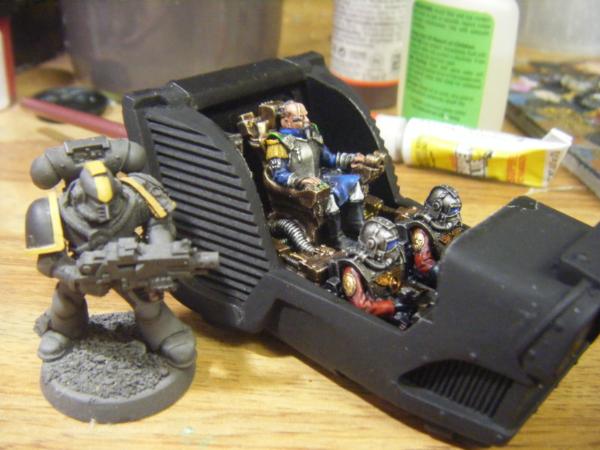
Wizards and Moderati complete (save for the crystals that need airbrushed) Not "final" pics of either (no backdrop, ya see!), as those'll come later when the last tiny bits are finished.
Im going to work on the cockpit today and see if I cant get it done too! Its a bunch of lenses and gauges, so shouldnt be super hard, right? [/famous last words]
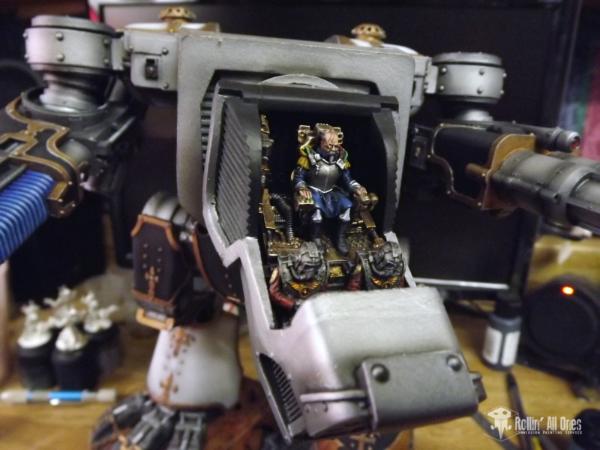
Automatically Appended Next Post: Well hey! The inner head is completed!
The Philosophy professor got a new office... and a pair of interns!
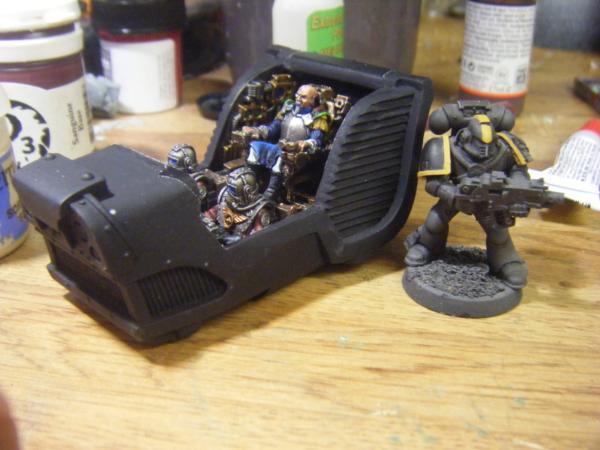
I think that Im missing a piece, now that I look at this thing compared to the FW pics... Looks like I need that grille looking thing that goes on the left side of the Princeps ><
looking good Ramos. It does look like ya got somthing missing...best find it or it'll all fall to ruin.... or if it truly isn't there, you can call and say gimmi a new one, then wait fer it to arive
whalemusic360 wrote: I don't see whats missing, can you point it out in the fw pics?
Looking at the picture directly into the cockpit from the front. There is no detail on the right wall next to the princeps ( His left side ) There should be something to fill that space ( unless thats where he put his pictures of cats in doing cute things?)
Has to be missing.... I dont think I saw the piece when I was washing the parts... And its not in the bowl I have all the small bits in. Weird... :/
In other news, I have the stuff to make my airbrush go! So I set to work on a bunch of the EFT figs!
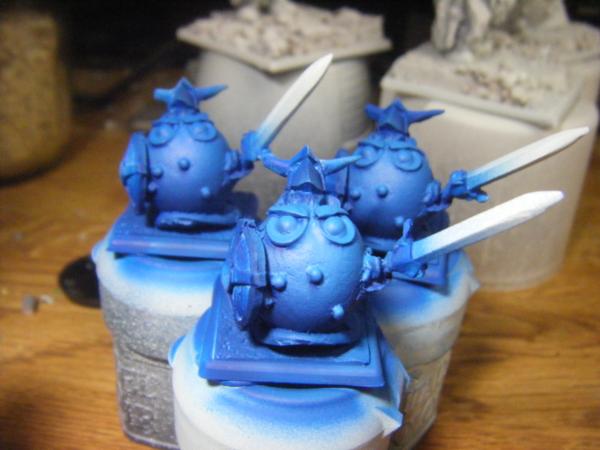
Gel Wizards:
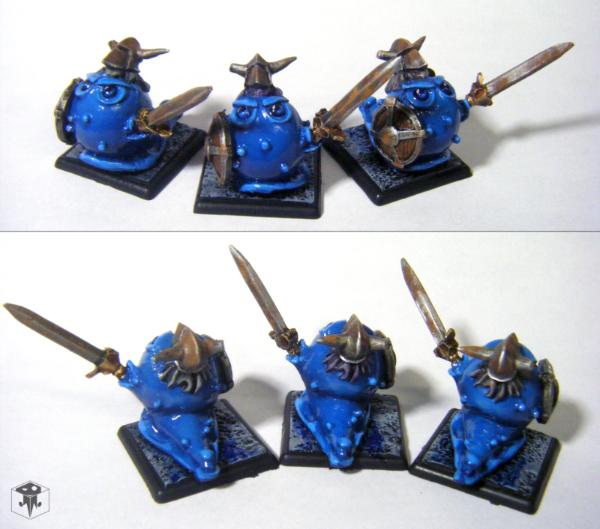
Gel Warriors:
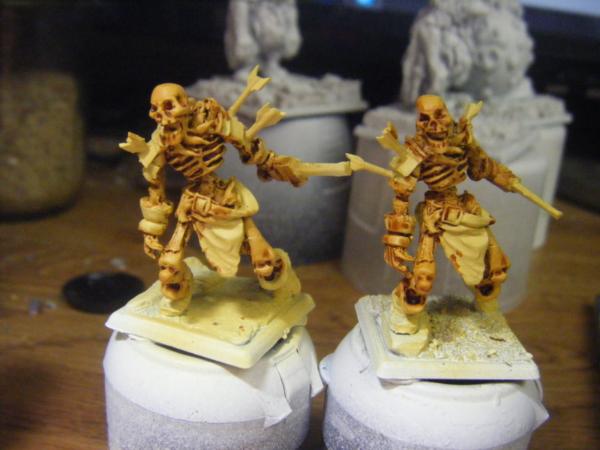
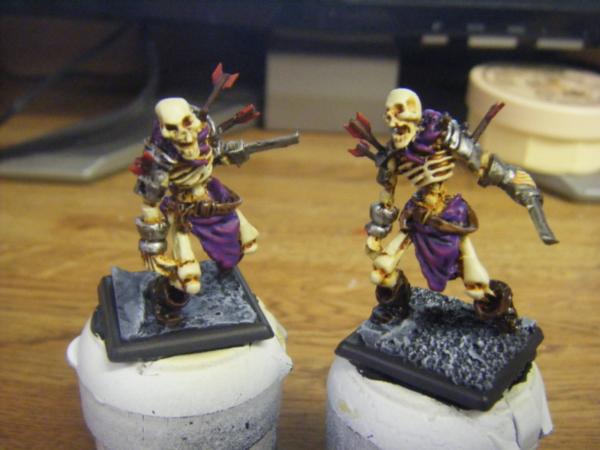
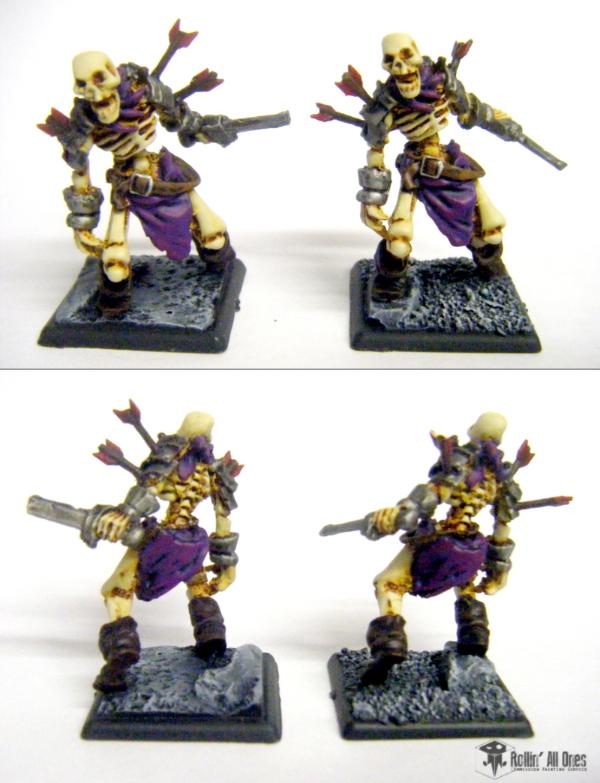
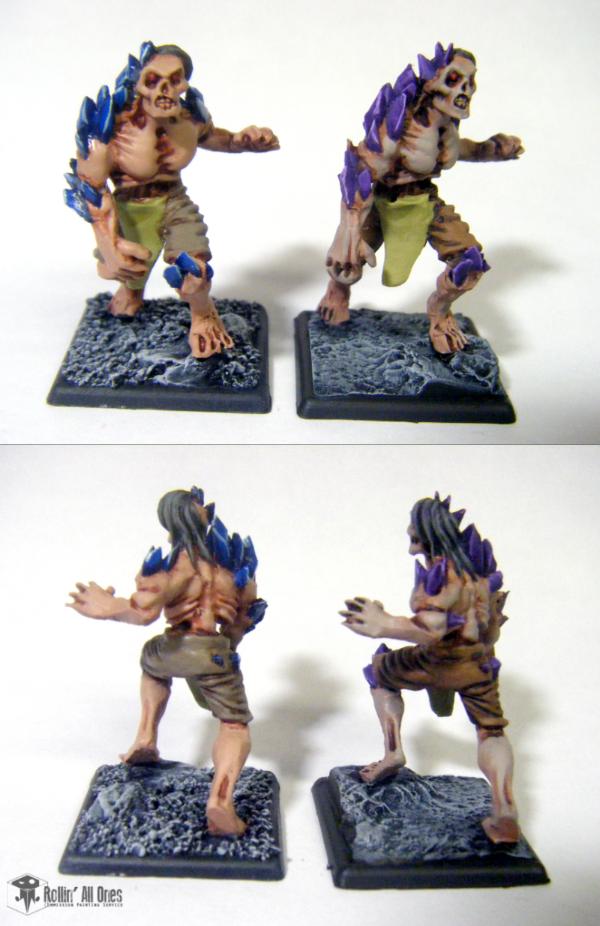
Risen Warriors:
As far as the color differences in the gels, my reasoning is thus: When asked what color Gels are, Cyp replied "blue to bluish purple kinda octarine color". Now octarine, for those of you who haven't read any Discworld books, is the color of magic- described as a greenish yellow-purple. A physical impossibility, sure, but thats MAGIC! Anyways, I figured the next best thing is to have them on a spectrum of colors, particularly, the more magical the Gel, the closer to purple it becomes. Thus, being non-magical, the warrior Gels will hold a bright Blue hue, whilst the more arcane Wizards have a brighter purple color. No clue what Im gonna do with the King Gel... Its a biggun!
Gels have their skin color finished (save for a bit of highlighting on the Warriors) and the Risen are based and washed. i think Im going to paint them similar to my Meka Tyrant, where the bone is yellowed and worn. The eyes on the Gels I think Im going to paint with a gemstone/lens effect, probably of a similar cool color so as not to stand out -too- much on the minis. Maybe brighter shades of their skin color.
I dont know what to do with the teeth on the Wizards, though... They're Gels, so I dont think Bone colored would work (color wise, it would, though!), and in the art they look like strands of goo (which I don't think would stand out on the model as its sculpted)
@Denua: After some playing around with that idea, I think I've got it! Thanks ^^
The Gel Wizards, with gooey teeth:
The Gel Warriors, with rusty swords:
And the Adepts, with... erm... Robes and fireballs?
(looks like I missed a bit of gloss varnish on the one guy... fixin now xD )
For the slimes, I added some gloss varnish mixed with ink to the base, giving it that slime trail look some of you were mentioning. The eyes I think worked alright. Used most of the same colors as the slime itself, so it looks like its all made of the same stuff.
I finally heard back from Garage Models, getting the final runes for the ADL walls sorted out. Im hoping that I can oil wash them tomorrow, and flatcoat them tomorrow night! Right now Im working on the assorted blue gems (which I love to do xD) then its the bits of writing!
Thanks GiraffeX! It was something I experimented with on the previous Gel Warrior, and I really liked the effect of the orange rust and the blue gel.
Todays update is the Eldar ADL, which currently has its gloss coat drying. It needs to set up fully before washing with the oil paints, so work is paused on it till sometime later tonight.
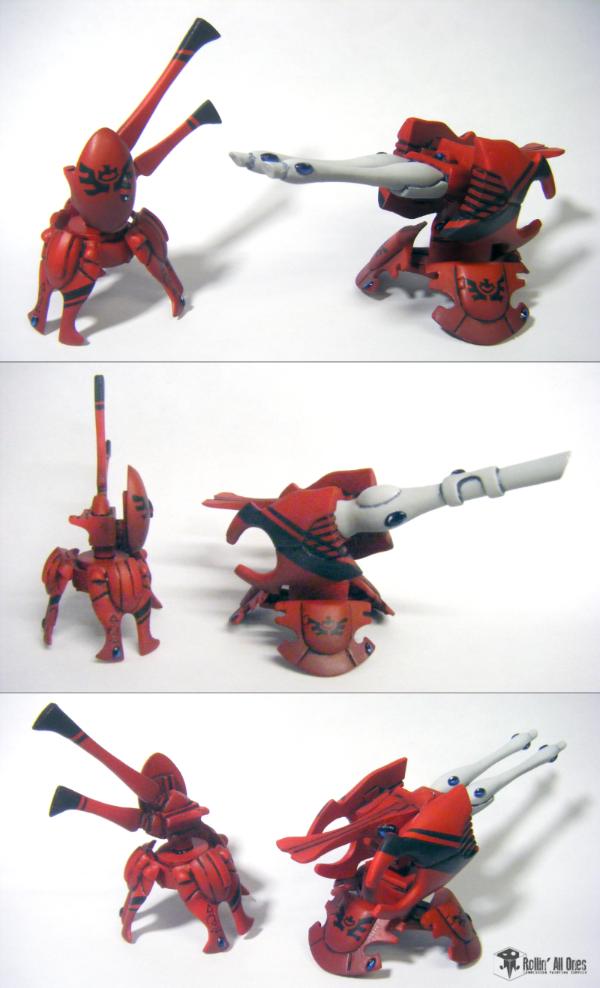
Should have final pictures of them tomorrow, but in the mean time heres a couple shots of the details.
Thanks guys! (And don't worry, WM- Im plan on playing with the Titan a bit today )
And the ADL is complete!!
Had a minor accident while spraying one of the double segments- Its been a bit stormy/windy/all-over-the-place-blargh-cleveland-weather, The damn wind caught it, -just- at the perfect angle to knock it off the board I was carrying it on. It proceeded to explode into pieces when it met my concrete patio
Fortunately, it seems that I was able to patch it up, even though it turned out to be a real pain in the ass to glue again.
What bits did you use for the ADL though? Looks like something off the Guardian/Vulcan's Wrath Platform to me, and then just card for the connecting bits?
What bits did you use for the ADL though? Looks like something off the Guardian/Vulcan's Wrath Platform to me, and then just card for the connecting bits?
The Eldar ADL is from a third party company, (shoosh don't tell GW), that Ramos painted originally for Whalemusic (you can see it earlier in the thread).
@Shadow: Alf got it right! These are from Garage Models, a UK based company that makes a lot of these third party models. They're recently released a Tau and Daemon set, too, and can be found at their ebay store Here:
http://www.ebay.co.uk/usr/garage_models
@Gits: Its all for one guy- The same guy who created them, in fact. He wanted some painted models for his auctions/website/etc. so contacted me to do em up!
He wanted one full set, plus a Comm Relay and gun emplacement in one scheme, then two single segments in two other schemes with matching Relays.
@nerd: I rather like that one myself. I'm curious as to what i could do with that scheme on a double segment- Lots more curly thorn vines!
Been working on the titan mostly today (no pics, sorry WM!) but in between colors I pretty much finished up a pair of Risen Warriors from Endless.
At this stage, theyre just waiting on flat coat so I can super rust up the metal areas. The plan is to have very little of the metal still visible- these guys were dead for a looooong time!
That will have to wait, however, as I need to swing out to grab a furnace filter before I can spray indoors. We got hit by a snow storm last night, with more this morning!
Part of me says "Yay snow" while most of me goes "damn it! I cant spray in snowy weather!"
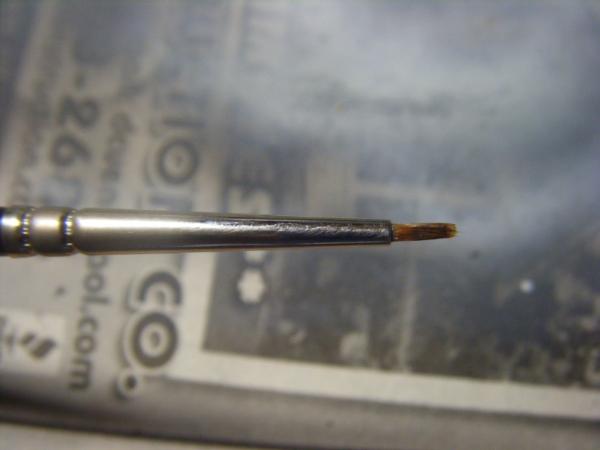
Finally, today has seen tragedy:
After nearly 6 years of use (from the blue handled ones, at least) these brushes have given up the ghost and shed all of their bristles.
It sucks, but fortunately I prepared for this, and bought some new brushes specifically to replace these as base coat brushes. Theyre cheap, but they work. I'll save the Series 7's for detail work!
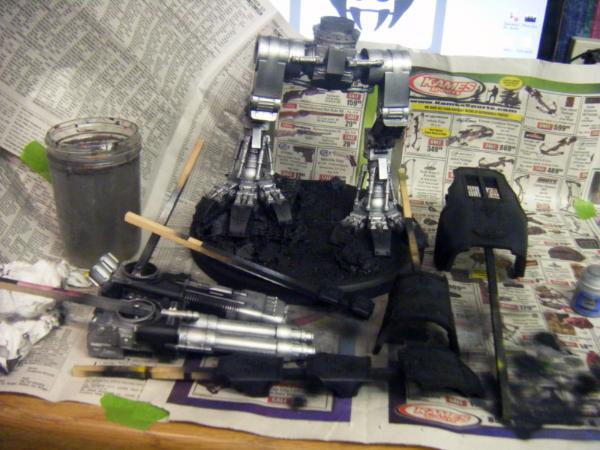
A couple progress pics before the family heads out:
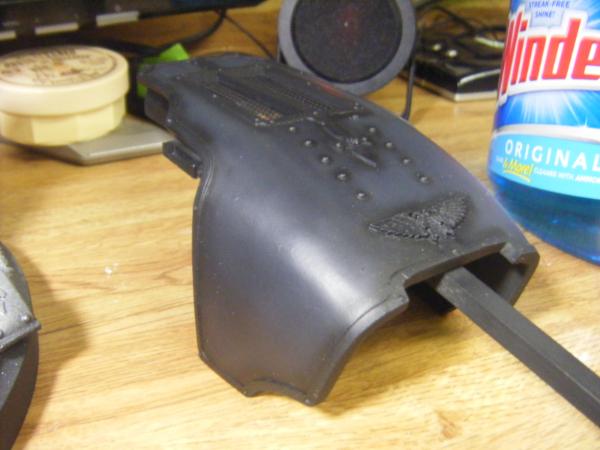
The carapace and first black test:
I dont know how much I can highlight it up without it going blue. The base black turned out to be a very cold black xD
And the base metal on the legs. i really gotta watch it with this stuff.... spraying it shot metal flakes EVERYWHERE. I'll need some kinda spraybooth for it before I tackle the other metal bits- deeeefinitely dont want to breathe this stuff.
The color's pretty nice though- a slightly warm silver:
So a good chunk of progress to report, however due to once again running out of Dullcoat, much of it will remain undocumented!!
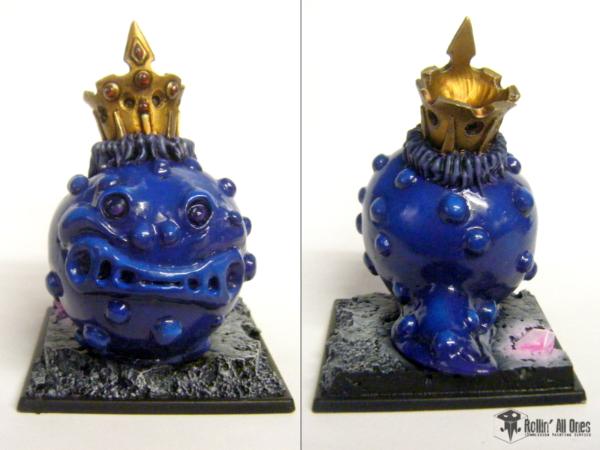
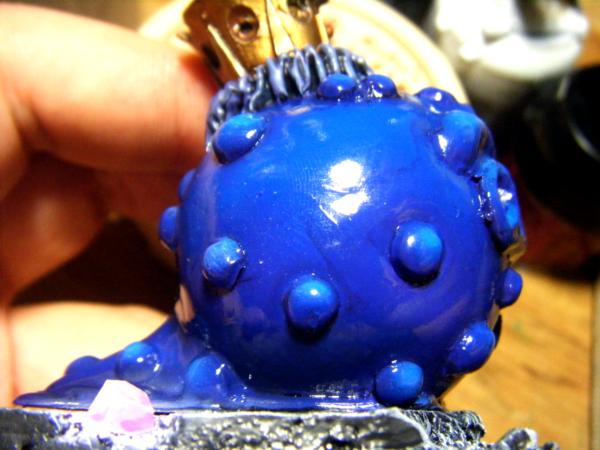
One thing I do have a picture of though is the King Gel!
The gradient s hard to photograph, but this pic is closer:
For the King Gel, I felt he should encompass the full spectrum of the Gel colors, so I gave him a gradient effect that ranged from a deep purple to a bright blue. The effect ended up looking something like those pearlescent paints that shift color depending how you look at them.
Also completed were the two Earth Trolls, two Risen Warriors, a Dark Dragoon, and a Knight. However, no pics till they're dullcoated!
In titan related news, Im stuck on how to do the metallics. Its a large area, but with lots of complex edges. My initial plan was to airbrush the metal (as seen above) then airbrush the Secret Weapons washes at a very low pressure on top of it. Im just really not happy with how it turned out, and so I need your advice: Any thoughts on painting large chunks of metal?
Perhaps airbrush the metallic paint, hit it with the tint of the shade you want, take a light airbrushing of the same metallic paint so some of the tinted layer still shows through, and then hit the crevices with the wash?
I've never had any issues airbrushing washes myself, but you can also just use thinners with black paint in it as you're doing such a large area.
test the depth of colour first on something so you can see how dark it will come out, then liberally spray it on, more than you think you'll need i've discovered, too little and it beads on the surface, more then it saturates the surface well and runs down if you've enough thinners in it. it's how i do my insides of drop pods etc.
whalemusic360 wrote: Well he's supposed to be coming with Alf to play a few games on Saturday, so I'm hoping he is working feverishly trying to get it done.
As long as he doesn't like shoot me when I show up I should be bringing him
As long as he doesn't like shoot me when I show up I should be bringing him
We dun take kindly ta yer sort 'round here... *ominous banjo*
Definitely hoping to get some good playtesting in, as well as other such madness this saturday.
Okay! So!
Regarding the Titan: I've tried two different techniques for the metal, but ended up really hating how they turned out (though on smaller scales they arent too bad., so I needed to re-prime the legs entirely, as well as the weapons :( However, I think i've found a solution... though the only way to know for sure is to proceed with testing! I would -LOVE- to have it done by Saturday, but I dont know if thats feasible at the moment... Especially with all the lost effort in the first metal tests. definitely going to be powering on with as much of it as I can, though...
Its a major pain in the ass making this much metal look nice while at the same time preserving my sanity (theres just too much of it to reasonably attack it with a small brush!)
My sanity seems to find other ways of escaping though, particularly with the Endless parade! Another group is complete, with only a handful left to go!
Pugilist
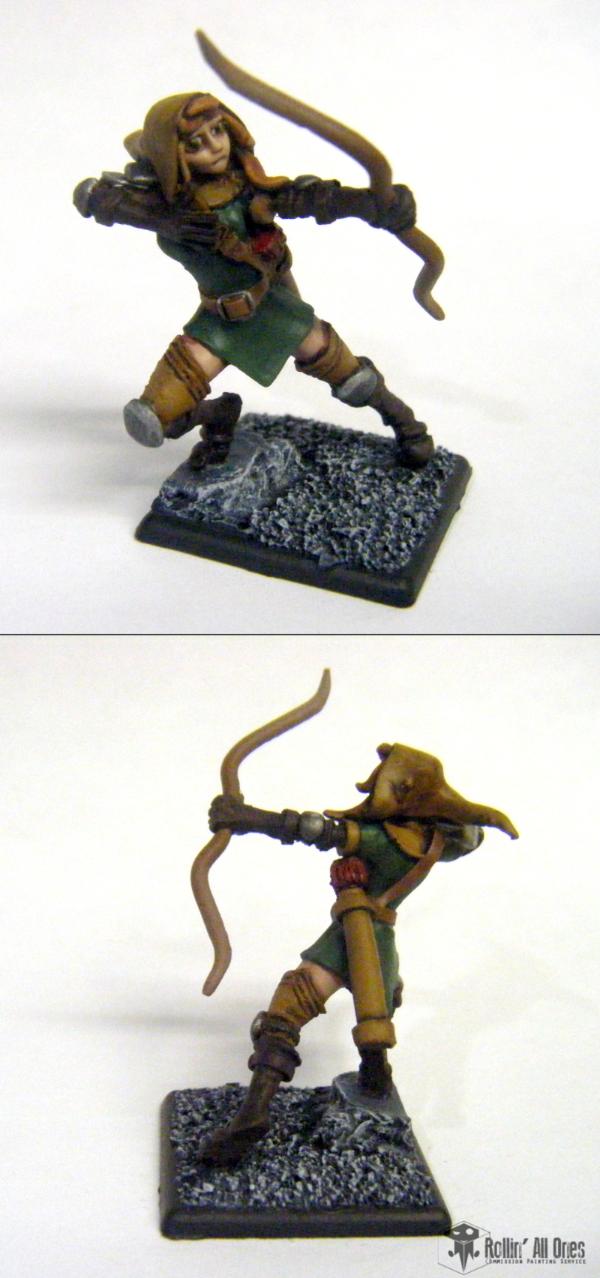
Archer (with some crazy huge anime eyes... Not sure how I feel about them, but thats what the sculp ended up getting me to do xD
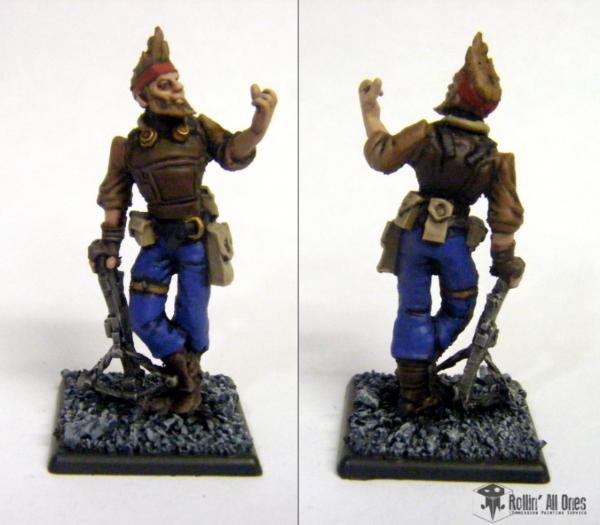
Bandit
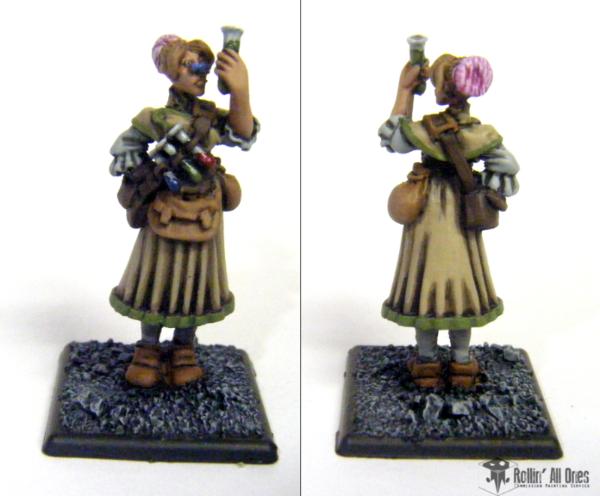
Chemist
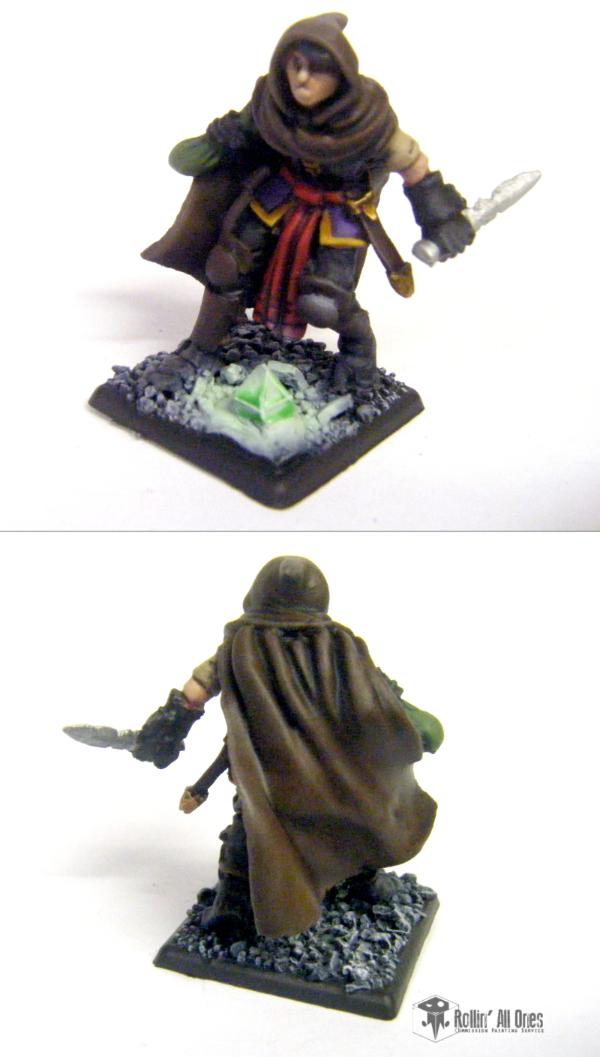
And finally a Thief (clearly planning to swipe that big ol crystal in front of him)
Thanks for reading... And thanks for the motivation
As long as he doesn't like shoot me when I show up I should be bringing him
We dun take kindly ta yer sort 'round here... *ominous banjo*
You're just playing into obvious Brunstucky stereotypes
If you guys want to playtest your AdeptiCon lists, I can throw something together, I can't promise you how competitive it'd be, but I can try to build 2 AC lists using what I've got.
Correct, with split Foc. 1 hq, 1-3 troop, 0-1 of others, 0-1 extra for three others, or fortification. Don't get to hung up on that part, practice is practice.
@Gits: Very much appreciated! Heh... this batch has been in the works for the better part of a month or so, so I needed to be rather efficient/quick with painting. I failed miserably, but I guess thats what happens
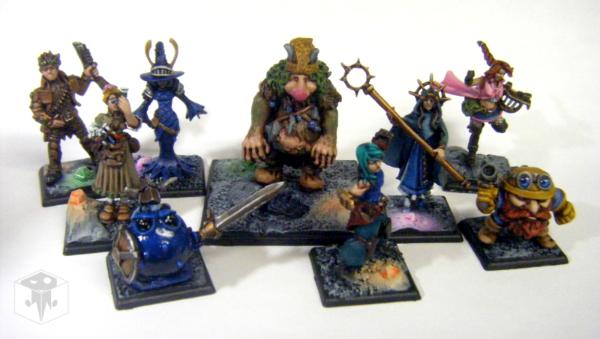
So. At long last, the Endless tides have receded, the armies beaten back and brought to heel.
In other words, IM DONE WITH THE HUGE BATCH OF ENDLESS!
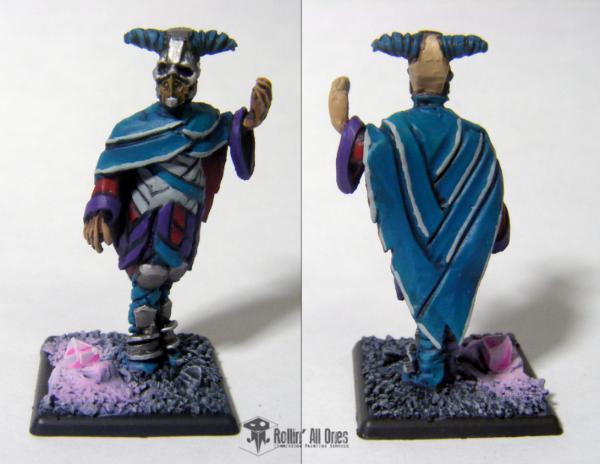
Miasma Thralls
Dark Priest
Cleric (I was messing with my skin technique and ended up with a kinda Hispanic skintone. Wierd how it happened, but its neat)
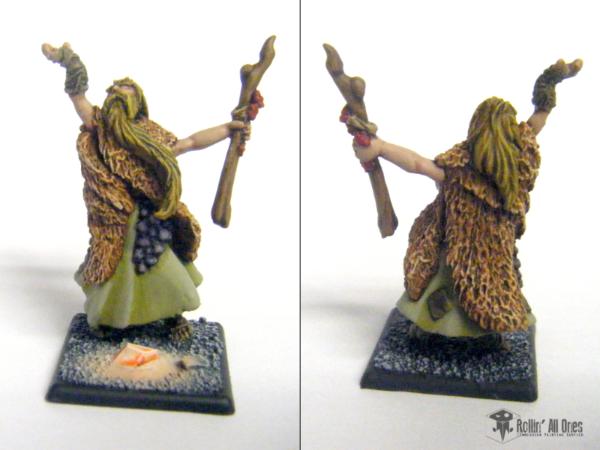
And a Rhapsodist!
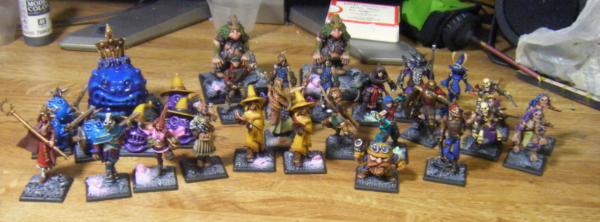
Finally, a group shot: Seriously theres like a billion models here....
WHEW!
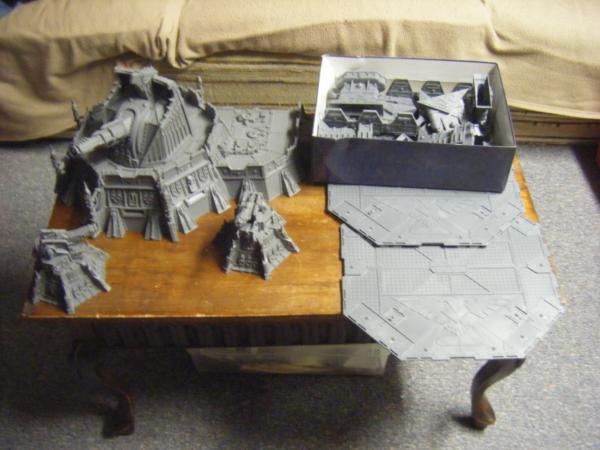
So the endless stream of Endless minis has ceased (even though OTL just sent me another box... Nothing nearly as massive, though!), and after gaming with WM and Alf Saturday, I got nearly every single miniature and terrain piece for WM's army and our display... You guys seriously wont believe the amount of stuff...
I would pop a picture up, but its late and I cant be arsed Expect some tomorrow (or later, depending what happens with the current project) Also, no pictures for a battle report from Saturday's game, and Im not exactly the most elaborate bat-rep writer, so it'll prolly just be a cliffs notes version.
Anywho, this big group is done, so you know what that means.....
Solar_lion wrote: Glad you guys got a game in. Hopefully you took some pictures.
oh.. and excited to see more Titan action.
I believe he took a few pictures of the board as it was being set up, but we didn't get much/any of the actual game. I will say this, I facerolled them back and forth all over the table*
* - This may be a lie, in fact I was thoroughly stomped by turn 3, my dying words are, "Feth Heldrakes and Feth Psifleman Dreads". Also might I add that losing a unit of terminators in a single mishap really puts the kibosh on any chances of winning
Alas, no pics of the battle. None of us really thought to do it until we were knee deep in marine corpses xD
A very abridged version of a battle report follows (mostly just highlights and the setup).
Setup was Dawn of War, with WM's GK Red Scorpions and my CSM Marines Errant on one side, and Alf playing 1k of his Ultras and WM's BA Red Scorpions from last year. Mission was the one with random-valued objectives.
Knights take first turn, and deploy first. The trio of Psyflemen Dreads take a position on top of a Skyshield, with the Terminators and Coteaz marching across the center of the board. ME Havoks with Autocannons set up to move into a building nearby (as it was JUST out of the deployment zone). Mark of Nurgle marines in Rhino drive up next to the GK Termis, and the blob of cultists march forward, bubblewrapping the Lord. Twin Drakes are in reserve.
Alf holds the BA termis in reserve, deploying the twin AC Razors in the corner of the board across from the blob of cultists. A trio of Ultra Rhinos deploy in the other corner. A lone Venerable Dread deploys in a fortification in the middle of the board.
Two of the ultra rhinos were dead in that first turn, thanks to Psyflemen. Cultists march on and rush through the ruins, managing to hide from the Assault Cannons. Pretty sure this is where my rhino blew up too.
Turn two, and both Drakes scream onto the board. They roast a metric ton of Marines, and even pop a razorback with a lucky baleflamer strike.
The razors fire at the cultists, picking off a few as they march forward. BA Librarian decides to stay at home, leaving the Termis to come in via deepstrike. They scatter into terrain, and mishap when they ended up too close to one of the Drakes. As would be expected from a Murphy's Law scenario, they are lost to the warp.
By turn 3, Alf was well and fully toast, the drakes and Psyflemen being the allstars of the game. Khorne Lord gets into combat with the second Razorback assault squad and annihilates the sergeant in a challenge. the rest of the cultists pile in and continue to muck about.
By then we called it, moving on to play zombicide, whereupon Chuck Norris proceeded to accumulate more kills than every other survivor -COMBINED-
We lost after too many zombies appeared and mobbed everyone (I had the last survivor, but she was useless xD )
Closing thoughts, Even though Alf's lists werent optimized, they helped to fine tune the list and showed me how stupid powerful the Drakes are!
Anyways, on to painting!
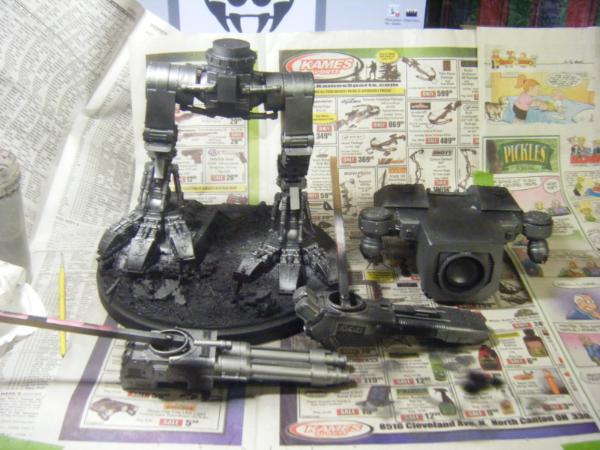
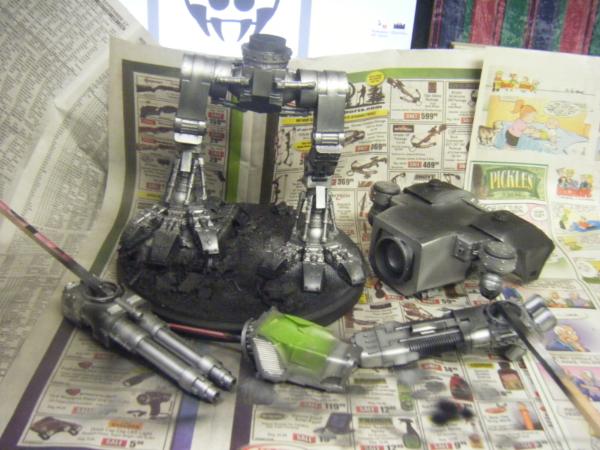
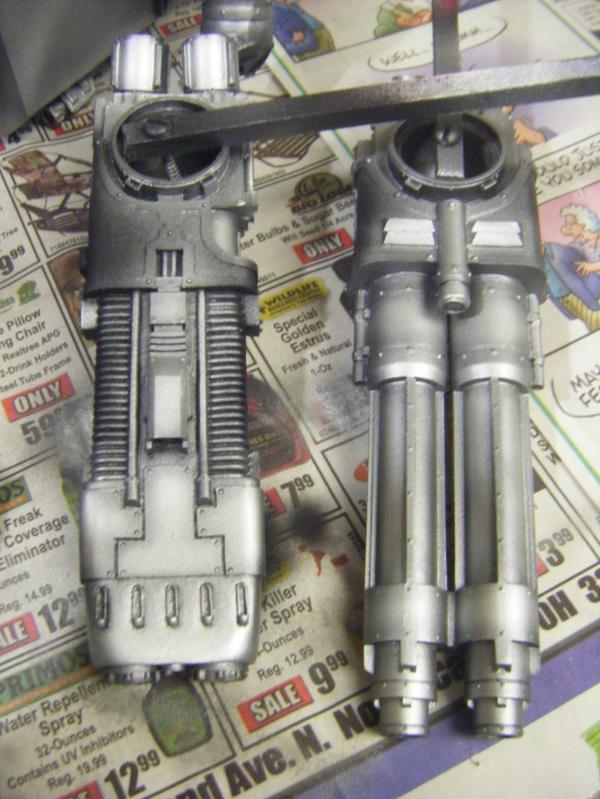
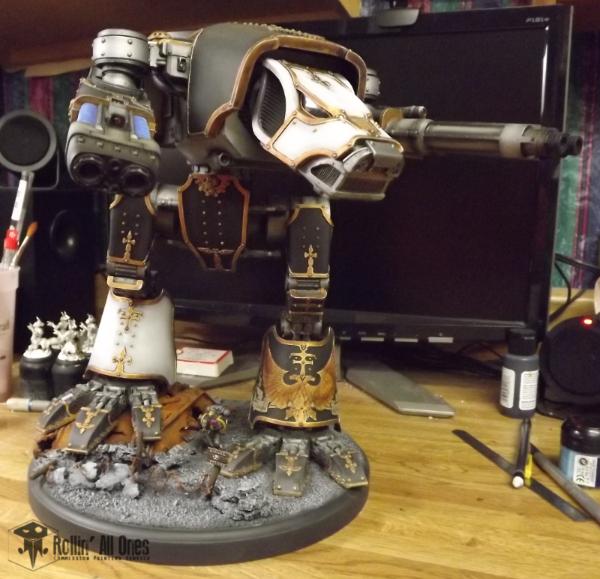
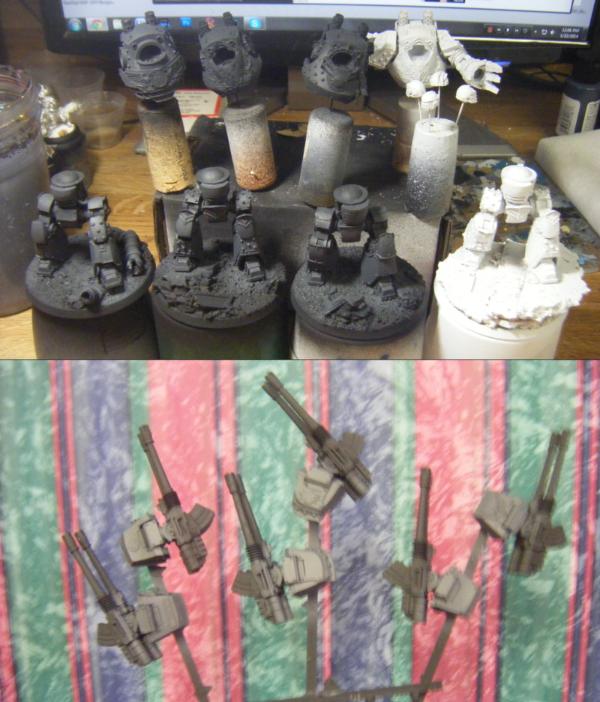
Today was a very shiny day as I started on the Titan's metal parts (for the third time)
First, I primed black, and sprayed VMC Gun Metal on all the parts. The natural masking provided by the many greeblies and other details created areas of shade and highlight, even from a single color!
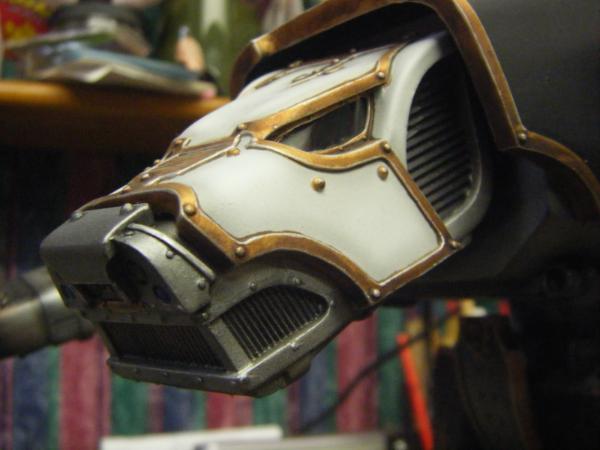
Then I proceeded to highlight the metal areas with GW Ironbreaker, followed by a very sparse highlight of Mythril Silver. This was meant to amplify and accentuate the shadows and highlights from the base coat.
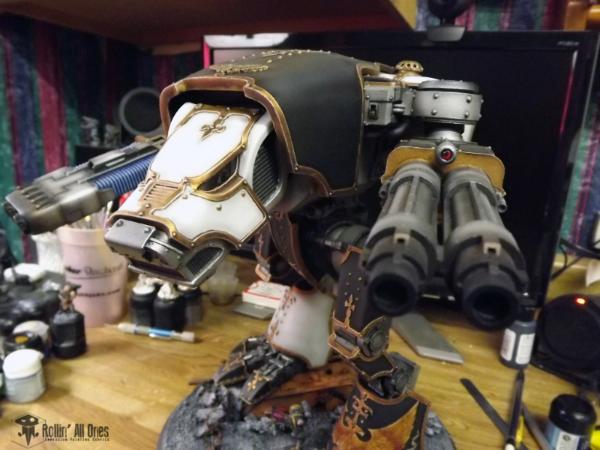
Finally, close ups of the head:
And guns.
Now at this stage, Im conflicted. In the many reference pictures I've been using, two schools of thought seem to exist.
The first is to leave the metals mostly unweathered, shaded simply with black/dark metal.
The second is to weather it, similar to this Titan by Next Level Painting
In particular he says he uses Reaper Harvest Brown (from what I can tell it looks like GW Vermin Brown) and black to shade.
I've seen it done both ways, so either is manageable (I think). As it stands, I can progress along the non-weathered route with the model as-is. I would of course add shading in the recesses, most likely an oil wash once the model gets some gloss varnish on it. My primary worry about weathering it is screwing up the metals I've got so far. I'd really hate to mess it up and have to respray this sucker -again-
That said, there is something to be gained from being bold... Though, I don't know what colors or kind of technique to use if I decide this route.
So what do you guys think? Weathered or no? And if I weather it, how should I go about it?
I would recommend that you try weathering that baby with oils. They look much better and the nice part is that you can wipe them off with mineral spirits and try again if you don't like the look of them. That's not so easy with water based ink washes that tend to run everywhere you don't want them and pool.
I like the cleaner look of the 1st one. Some chipping on the armor is cool, but the second ones metals look straight up neglected. It's also got a very airbrushed look, which is kinda meh too.
Both are great examples. The first is very clean, I suspect it is so because the body and major plating is blued. Very in sync.
The other is using brown to transition the metal from the yellow. also very in syn to the colors they are using.
I'd try weathering a small amount and leaving the brightness of what you have already done. Adding a wash of blue tint/wash to the metal parts. Maybe not a total surfac wash; just in all the cracks or edges between the metal and plates. This might provide a good transition between the metal and the black and white color scheme.It also should allow more contrast between the shinyist metal of the "working" parts
Hopefully this make sense. Either way I look forward to seeing where you go.
Very interesting indeed... Definitely seeing more support for the "clean" version, so I'll be going with that line, then. A number of options are available to weather it, so Im going to ponder it. Oil washes. acrylic washes, ink washes, airbrushed shades... I may look into the Oil Discharge Ghost tint by Minitare. Coincidentally, Alf and me were talking about it during our drive to New Philly. Its supposedly a black tint, but has a bluish hue when it pools. Ponder ponder....
@SL: Makes perfect sense to me. Its a good idea to have one shared color or tint across the model, especially with the size of this thing. REally makes the piece look cohesive.
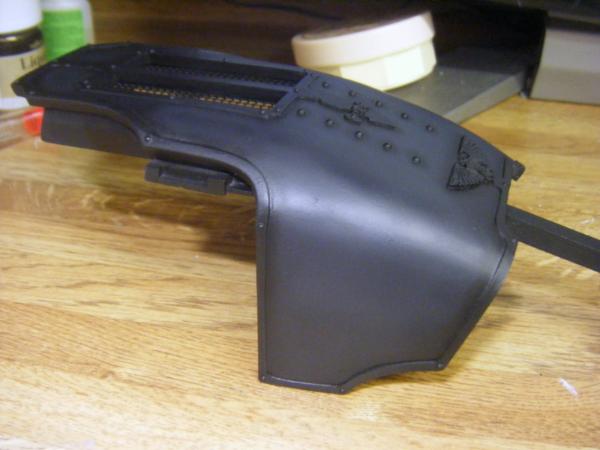
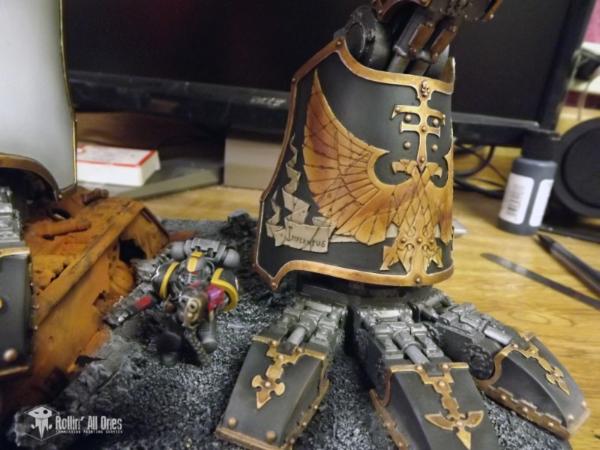
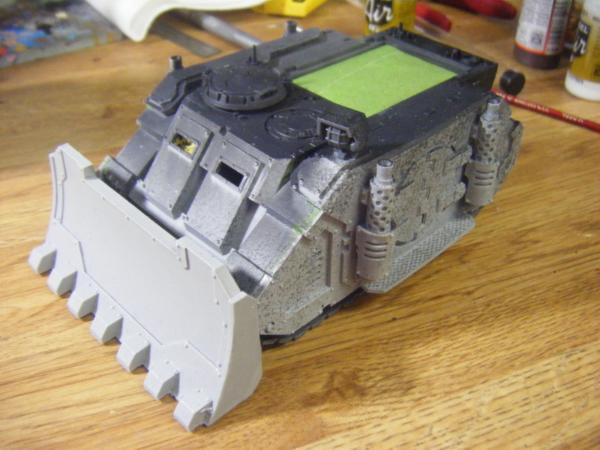
So while mulling over the weathering aspect, I went ahead and worked on the black armor.
The carapace (not really this blue. The lighting and Photoshop brightened it a bit xD)
And a shin pad, giving a much better idea of the color.
Annoyingly enough, it would seem that the black paint Im using is a very very cold black, so by throwing white into it (or even a warm gray), it turns navy blue! This limits me on how "bright" I can make the black areas, but I think i may have got something workable. As it stands now, the color is a very fine gradient from pure black at the edges to a bluish black at the highlights. It doesn't stand out very much at a distance (looks like a smooth black coat, simply due to the way light plays on it), but when you get close to it, the color starts to come out (as seen above). Im going to take a fine edge highlight of Adeptus Battlegrey to any sharp edges on the plates (really it looks like its just the toes) to make them pop out a bit more.
The plates will really start to shine when I put the gold trim on them.
Ramos, too bad you couldn't make it up to North Olmsted tonight I'm going to be hanging out at a store near there, I could bring my extra bottle of tint for you to have/try out
Ramos Asura wrote: Closing thoughts, Even though Alf's lists werent optimized, they helped to fine tune the list and showed me how stupid powerful the Drakes are!
I'd like to point out that I've never had an optimized list in 40k because I'd rather have wins with models I find fun instead of models that everyone says are good. With that being said, my Chaos army is the closest thing to an optimized list I have, and that's missing its 2nd Heldrake
I will say this, I had fun, but I didn't stand a chance against your guys' armies, optimized or not. Flyers fething suck and vehicles are useless in 6th edition
Also I might have survived if we had remembered night fighting
Automatically Appended Next Post:
Ramos Asura wrote: Bah! That'd of been great! Alas, Little bro had school today, so no car! Another time, maybe? Might have to get another game in soon
You did use my adepticon list from last year, which did pretty well. Razorbacks scored 4 air kills over the 5 games, plus your own rifleman, so its not like you had nothing.
*note: Our lists are much tougher this year than last year.
whalemusic360 wrote: You did use my adepticon list from last year, which did pretty well. Razorbacks scored 4 air kills over the 5 games, plus your own rifleman, so its not like you had nothing.
*note: Our lists are much tougher this year than last year.
True, but like all my experiences in 40k, someone else has better x than I do. My 1 dread was considerably weaker than your 3 dreads not only in the shots that they could put out, but the strength of each shot, and I chalk my bad generalship with the Red Scorps to not knowing the list. Like I completely forgot that I had a librarian until I saw him back in the foam and asked who he normally runs with (because I didn't give him Psychic powers either ). The Razers did what I wanted them too, just not for as long as I wanted them to. My plan with them was to weaken the marines and cultists and charge the lord with the two squads and the terminators. I thought that they would have been fine on that side of the board because I thought we would have night fighting (but forgot to bring it up >_< ). I mean there were lots of little mistakes I made. Like not rolling for that objective to get Skyfire until after I shot at Ramos's drake, which probably would have shredded it, not remembering night fighting, like not combat squadding my marines so the missile launchers could have hid in that Imperial line, like not putting Tigurius where he'd be effective, not putting my dread where I did (I should have put him in the shrine of the aquila in that back right corner). I should have hidden the rhinos behind that imperial strongpoint to get a cover save turn 1 and rushed the Grey Knights.
Lots of little things that cost me the game, but the lists you guys had were good, I knew going in I was probably going to lose.
whalemusic360 wrote: As long as you dont make all the same mistakes next time you play, it was worth it.
I always make the same mistakes, I don't play 40k enough. Though if it was my Chaos army, I'd have given you a better run for your money, I might have actually killed something Even though I lost, it was still a fun game, which is rare for me with 40k.
It was definitely worth the trip down there, few hours of good gaming, damn good Mexican food, forge world goodies. We just need to get Ramos a car so he can start driving to game stores and play more.
We'll definitely have to figure something out then.... Maybe Ill actually play some Endless (too bad I dont have KD:Monster yet, or that'd be totally on the table!)
Anyways, yeah. Night fighting would have definitely given you some wiggle room, and forgetting that Skyfire Nexus -was- a really big mistake.
Live and learn, yeah? Next time, you'll be better prepared!
On the painting side of things, More progress: this time the White armor!
You know, for being one of my least favorite colors, it was surprisingly painless to get these parts to this stage. I never would have thought that black would be the biggest pain in the ass!
Im even more surprised that I was able to paint all the plates with my airbrush without masking anything- the soon to be gold trim acted as a great barrier from overspray. Really made the process quicker!
The colors I went with are from the Vallejo Model Air line, specifically White and Barley Gray. It behaved a bit differently than I anticipated.
20 drops of white and 4 of gray got me a slightly warm off white (surprising because the Barley Gray looks very cold), then a near 1:1 ratio got me the shade color, which looks similar to a blend of Codex and Fortress Grays.
So untill I figure out the metallics on the Warhound, that bit of the project is up in the air.
Also, I am now pondering the Gold. I will be doing my usual gold technique with Vallejo Alcohol metallics, however I am not sure if I want to use the bottle I have (which is simply "gold") or order in what I think is a better color "Old Gold." The latter has a nicer overall tone when you first pop it down, as its not blindingly cold gold, it has a bit of warmth to it. I can compensate slightly for this if I use the bottle I have, but I really do like the tone of the Old Gold better.
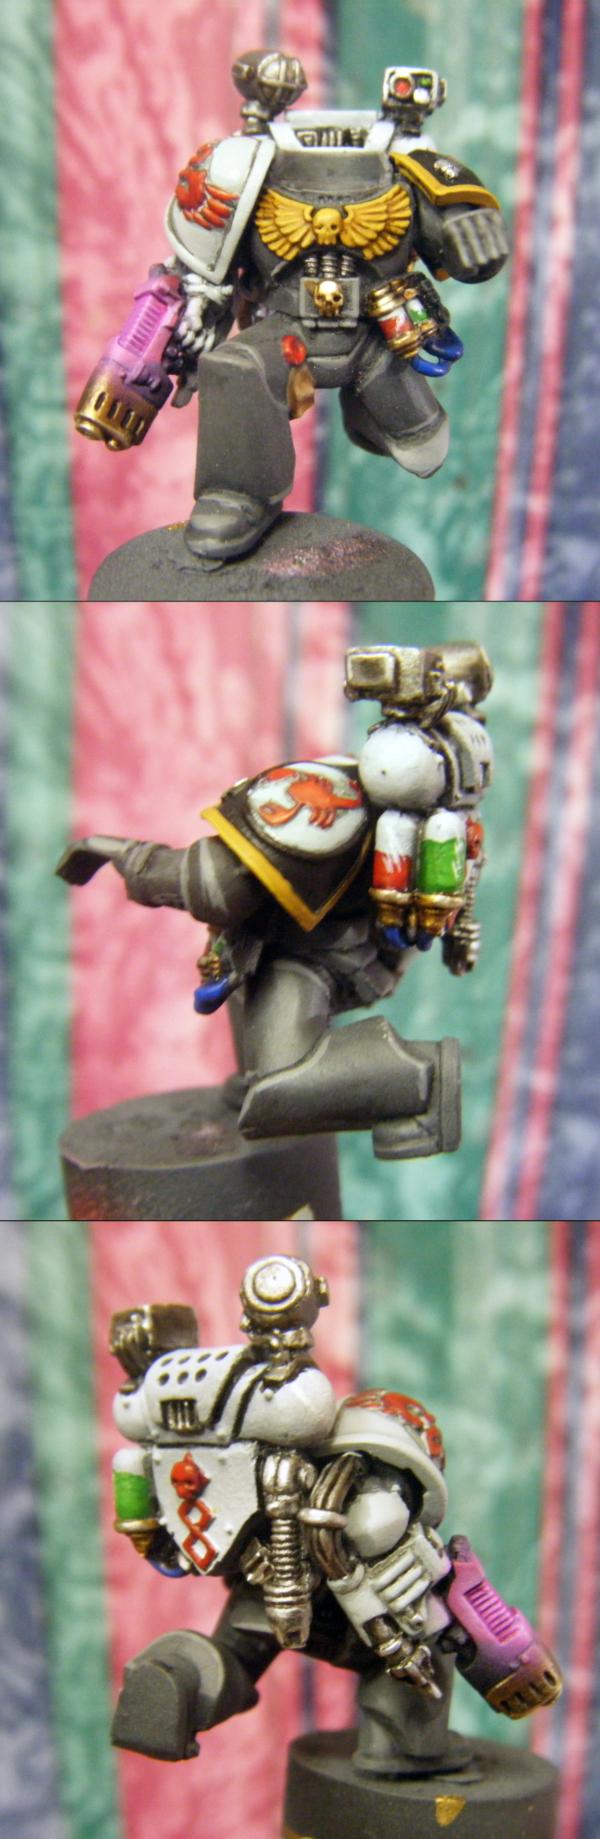
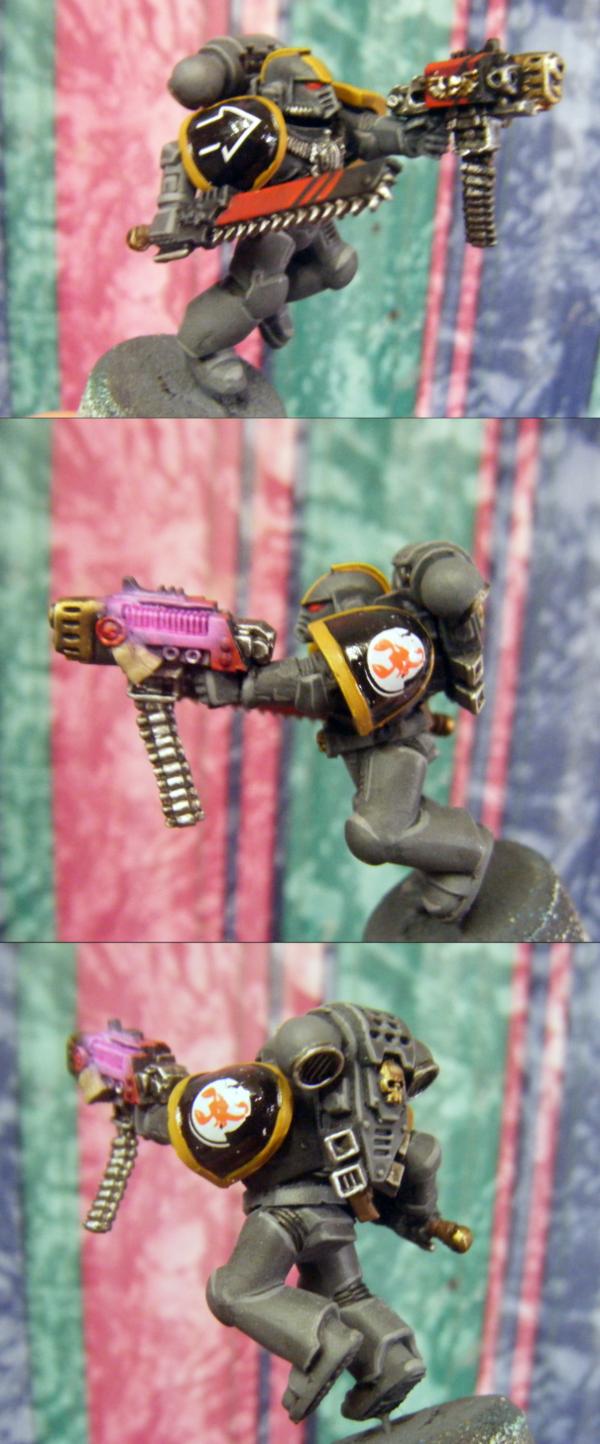
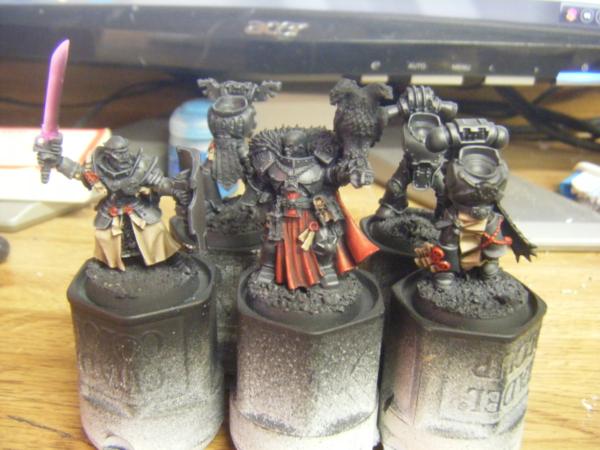
So I spent a bit of today painting up the marines to go on the Titan's base. It really has been a long time since I've painted Red Scorpions!
Currently, they have all their grays, and are drying after the oil tint.
And the wounded Marine Errant (actually much brighter than he appears in the pic)
I had to mix up a new batch of the gray (well, enough to last these few models), and so Ive been giving consideration to preparing ne paints for them using Vallejo model Air paints. They mix and spray great, and from the looks of things should have the colors I need. Especially with the airbrush I want to move away from GW paints, as theyre more expensive than Vallejo equivalents, and thinning them consistently can be a pain.
The challenge now is figuring out what colors to use, as Ive little more than the color swatches on the Warstore to guide my choice.
Even in Death, I still Paint. Got a lot to do and not much time to do it!
Heh. For whatever reason, the internets here went down for a couple days. Odd, but its come to be routine around this house.
Its been a while since I painted a marine, and it feels nice to get back to familiar territory. These guys went up quick! just have the downed Marine Errant, and the figures for the Titan base will be done!
Apothecary (head is separate till I figure out where hes gonna be looking. also, his light will be done in a bit.)
And the crazy RS dude charging forward: The decals suck.... Im remembering why i dont use them :/ Kept breaking, wouldnt stick, the colors in the print were offset... Im gonna battle scar the edges to make it blend in
Finally, alas poor S7 brush, i knew ye well.
And I think i need to retire this brush... After the millions of miles Ive put on it over the past month or two, it no longer holds anything close to a coherent point (or even tip!)
Anywho, its back to painting for me. Thanks for reading!
So I went on a bit of an assembly kick these past few days (waiting on a few supplies before continuing the Titan), and so have started on WM's Adepticon army!
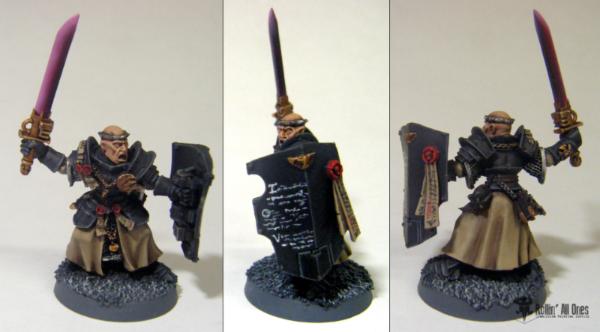
While the Trio of Contemptors was soaking, I started with Inquisitor Coteaz and his retinue: a bunch of Acolytes in Power armor, plus a crusader.
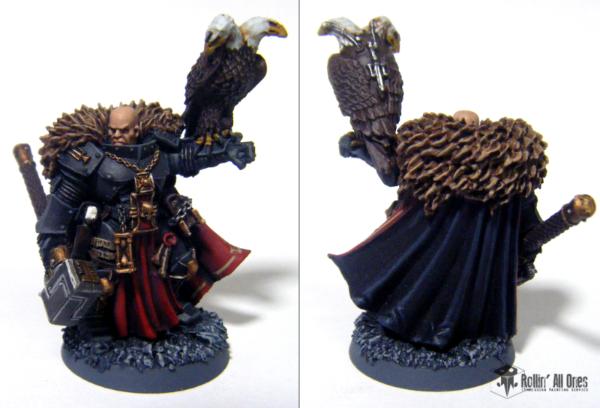
Coteaz:
Crusader:
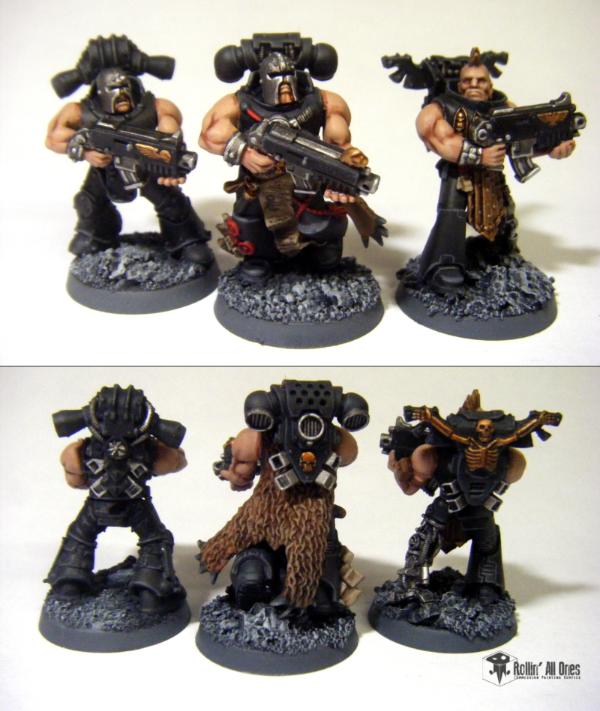
And the three Acolytes:
Now WM wanted to make them stand out and to not look like space marines, so we used Catachan bare arms. They work well enough, and need only a bit of gap filling after assembly.
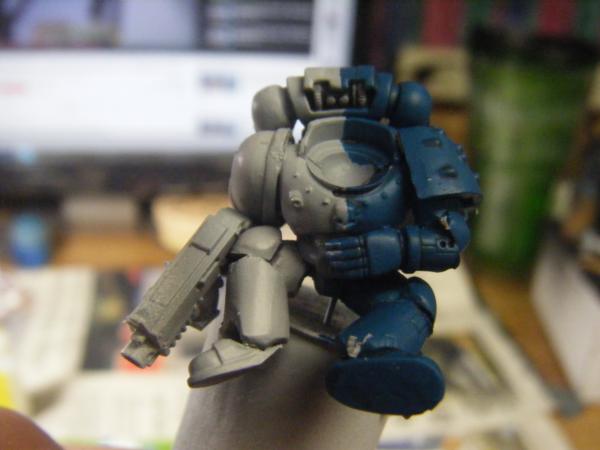
By the time these were assembled, the Dreads were done, and it was time to assemble those! What we ended up going with was a selection of three different HH Dreads, each with some of the more notable iconography shaved off.
Fresh out of the wash:
A Death Guard dread (I love the banded armor on this one):
An Emperor's Children dread:
The third dread, an Iron Hands one, is still being assembled.
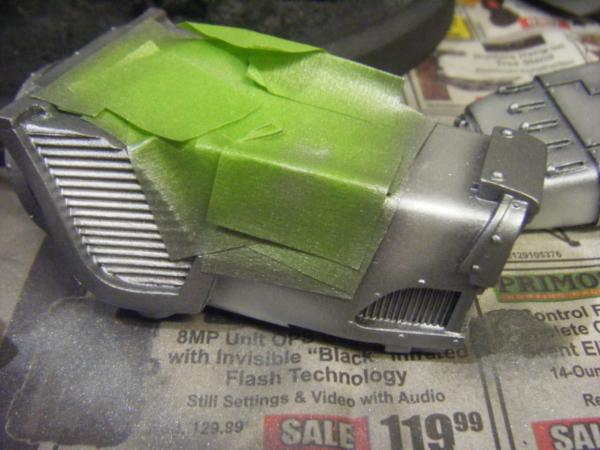
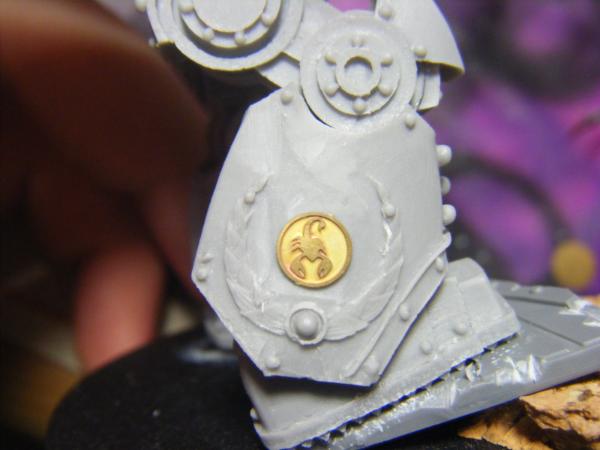
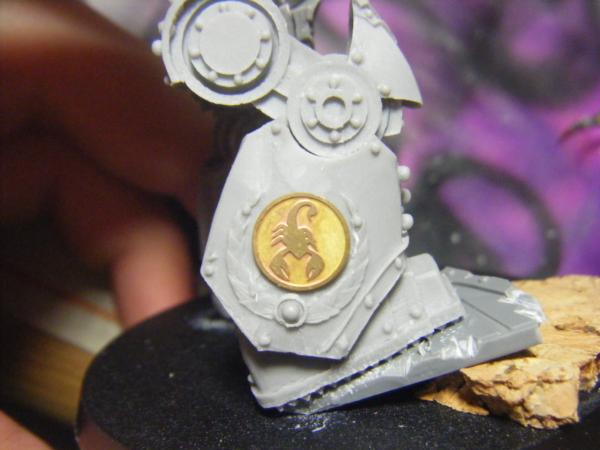
Now I encountered a bit of a conundrum with the EC dread, specifically what details to add back in on the legs.
Normally, there is a laurel with a roman numeral 'III' in the middle. I've since shaved the numeral down, and I am thinking of replacing it with a piece of etched brass:
So here is the smaller RS emblem:
And the medium sized one.
I kinda like the medium one, as it fills out the blank space rather well, but I'd like to hear your thoughts on the matter.
And medium icons it is!
I now have officially exhausted the medium icons on this brass sheet (pity, as theyre a perfect size for vehicles and stuff without being too overwhelming )
And yeah- all three are running as Psyflemen Dreads. Devastating from what I've seen on the table. Plus the contemptors look damn cool!
Speaking of, heres the last of the trio:
I also got in a bit of painting done on the MArine Errant for the Titan's base.
Next stage of this assembly party is a Mk 1 rhino for the Henchmen squad. However, it will be a bit more of a challenge than normal, for this particular kit has a massively warped side panel.
Time to have some fun with hot water
It was pretty nasty, but I think I may have banged out something usable!
For those interested, Here is the before:
Overall it was twisted from the doors to the front segment, as well as having the step bent in an odd way. Also the top panel was warped inwards.
A bit of hot (and cold) water later, I got most of the kinks worked out. There is still some minor warpage, but I think that will either be corrected during assembly (as it has other parts to butt up against) or are so small they can be ignored in the final project.
What was interesting was that some areas had a bit of memory to them and ended up fixing themselves, most notably the step. Dipped it in hot water and poof! back to normal!
Same here. Plus, it gives a really neat aesthetic to your overall army!
Should work well enough. The remaining warpage should be pretty easy to correct or hide.
Oh yeah more great stuff dude! I really love seeing all the random projects you're working on (thanks Whaley lol) all the ideas are stellar and the plethora of different FW parts make it even better! :-)
Hehehe definitely a big thanks to WM for the random projects xD Otherwise, all you'd see would probably be the random half-finished ork model!
Instead, we have THIS:
All subassemblies ready for primer, then paint!
This actually is about 75% of the Adepticon army right here, with only a batch of termis and the razorback remainting.
Speaking of, I've been working on the previously warped parts, and have managed to get it nearly all built up.
You might still notice a slight bow in the armor on this side, but it should only be noticeable if you really look close (I hope!). Due to the unique way the armor parts go on, I've left the bottom panel off in order to get at the interior (which will of course be detailed )
So long story made very short- Im without internet until further notice. So no pictures or anything (no real progress either as I couldnt order supplies until not too long ago)
Been working on screamers, and a very vivid color scheme for them. Other than that, now Im just waiting on supplies from the warstore!
Hopefully the net will be back before too long. its terribly boring around the house without it Till next time!
And so, after a month and a half of famine, all in the household are gorging themselves of internets. Returned is the great age of prosperity!
So in other words, Im back!
Actually have a good bit of stuff to show off, both completed stuff and WiP shots... So i think Ill be spreading them out over the next few days (till whenever I run out ), making this the second Great Catchup Week!
And IG, you might notice that the screamers look.... familiar xD
FIRST A BIT OF BACKSTORY!
After having been internet-less for a few days, I decided to take a break from the Titan and my many hours of mulling over the mammoth machine's many metallic machinations.Whoo gratuitous alliteration!
and so I looked over the many projects on my table, and noticed I still had a half dozen Screamers all assembled and ready to paint. Pushed aside by the Titan and other assorted projects, it had been gathering dust for weeks. And so I set forth on my Daemonic journey.
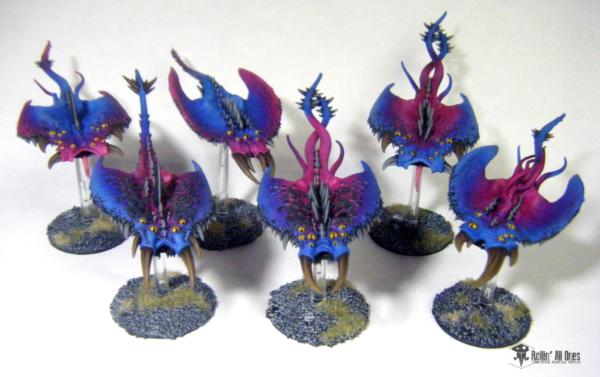
From previous conversations, I remembered that WM wanted the regular GW schemes on the Daemons. Without any connection to the internet, I relied on memory of the "stock" paint jobs. A vivid magenta and electric blue sprung to mind. I was pleased with this development, as I seldom had the chance to use such bold colors, plus this would give me some practice with the airbrush!
Cut to a week later, and Im putting the final touches on the base colors when i find the box buried in my crate of projects... with the official art on them. As it turns out, the colors I had -thought- were stock ended up being far brighter than they were supposed to. The very reason the colors stuck out as much as they did was because I had remembered IG's work on his screamers, and had subconsciously linked them with the standard color scheme xD
Sooooooo.... I ran with it, giving me this suspiciously familiar color pattern:
And MAN did I have fun with the eyes!
In retrospect, and perhaps if I were to do more of them later, I would do different colors, perhaps even some kind of different pattern overall on the different models. Still though, Im happy with the final colors... big and bright, just how I like painting!
Ohmigosh get the cease and desists ready! They do look lovely in blue and pink though, much better than the current official black and blue. Dunno if I'll ever progress beyond the nine I've already got but I imagine I'd keep extra squads in those colours too. Shame the old ones don't have the eyes to play with, just lots of scales.
@GX: Excellent! The eyes were my favorite part to paint as well, so Im glad they turned out so well.
And dont worry, you'll get your Titan pictures soon enough
@SL: Thanks! No ME progress to show in pictures, but a bit of RS stuff... Gonna be another fun year of blitz painting!
@Cyp: Thanks! Hopefully should have some decent pics for your stuff soon. Lotsa bugs need lotsa little highlights! Having fun with the models though.
@cormade & Gits: Thank you!
@IG: I REGRET NOTHIIIING! I definitely think its worth getting some of the new ones though, if not purely for the eyes xD Then again, I love painting gems and lenses and stuff, soooooo.... xD
@WM: Duuuude Reboot. Back in the day, man. Good stuff! (at least what I remember!) Really liked painting these guys, and glad they meet your expectations!
And now to Super Catch-Up Week Day II!
Another project I worked on was the Mk I Rhino kit for WM. In a previous update, I had already shown how bent the side panels were as well as my progress bending them back to normal.
I proceeded to build it up to paint the interior, albeit somewhat awkwardly, due to the way the kit is designed. Rather than leaving one side off and putting on the top panel last, I needed to instead leave the bottom panel off while assembling the rest of the chassis. A bit of fighting with it and I primed and painted it up!
I decided to really weather the floor down, like its seen a lot of activity and whatnot. (the Techmarine must be getting lazy- if hes not careful the floor'll rust through!)
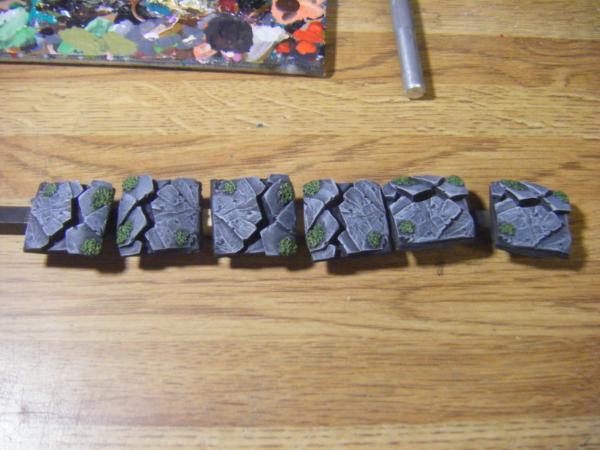
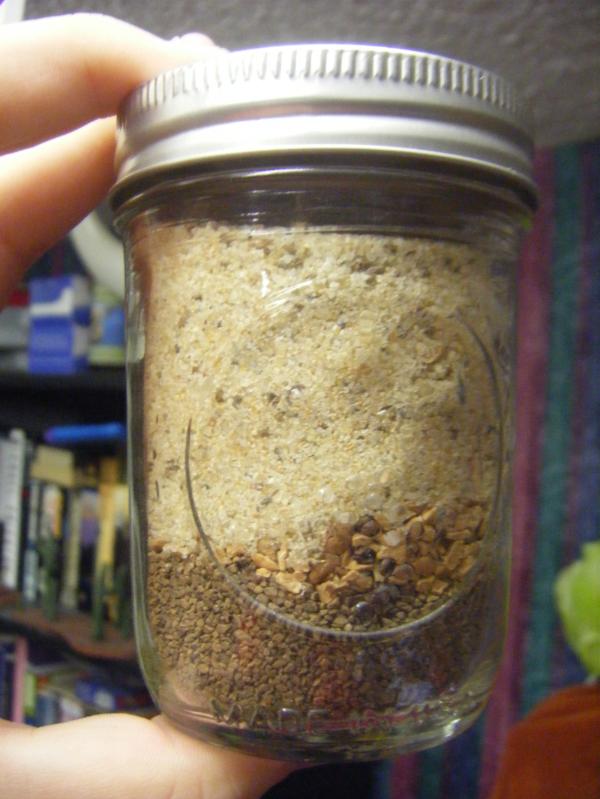
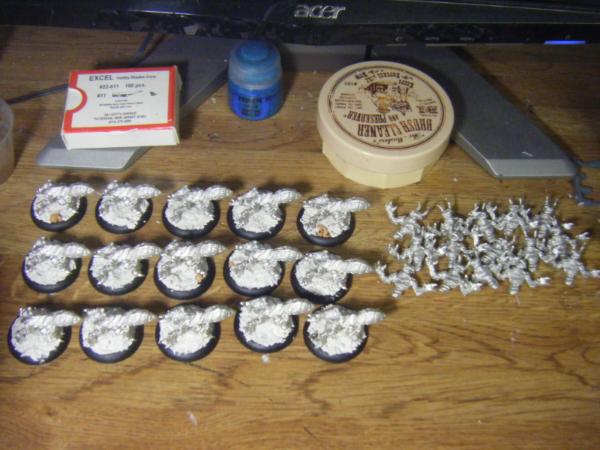
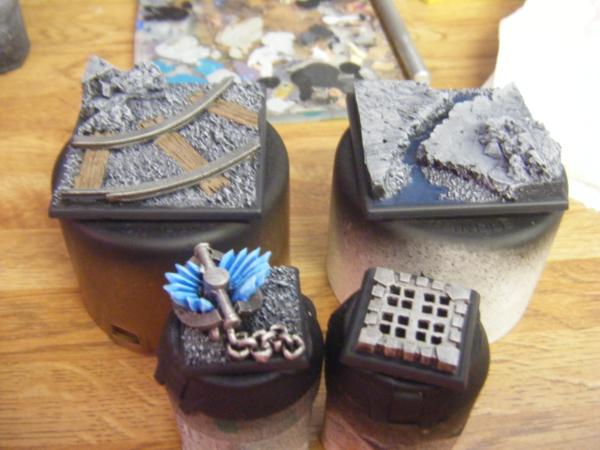
As I assembled and based more models, it dawned on me that I'd need to mix up more of my basing grit. So I figured, why not do a mini tutorial? Its quick, easy, and gets great results (and is cheap to boot!)
All it takes is:
> Concrete sand (avoid the sands with rounded pebbles in them- really breaks the scale! The sand I use has a nice jagged grain to it.)
> GF9 coarse basing grit
> Woodland Scenics Medium ballast
In a pint-sized mason jar, I mix together roughly 1 cup of Concrete sand, 1/2 to 3/4 cup of the medium ballast, and about 2 tbsp of the coarse basing grit, leaving me with something that looks like this:
Shake to combine and you're all set to base your minis!
I use this stuff straight for 40k and other applications where I want a rougher terrain. For filler bases, like those for Warmahordes and Brushfire, I mix a bit in with spackle or plaster to get a stucco-like putty. Simply glob this mixture onto the base and let cure. Once it sets up, I clean the edges with a hobby knife and whipe it down with a damp cloth, both clearing the plaster dust and exposing some of the grit's sharp edges. When painted, this looks more like rocky soil or hard desert terrain.
@Cyp: Heyyy any time!
My brother and I had a blast doing it, and its given us a good story (though as Alf can tell ya, we tend to give every game an absurd narrative ) In this case it was the tale of "Team 'Cheap Date'" (my mob of single crystal-cost models) and the Dread King Bloop (a lone Gel Warrior who stole the Boss kill)!
@WM: Shhhhhh! Maybe he wont notice!
Super Catch-Up Week Day III
In addition to painting models while the internet was out, I also experimented with a number of techniques and new products.
The biggest issue at the time was figuring out how to shade the huge metal areas on the Titan's legs. I didnt want to purely use a wash, as that would not only take a long time, but would also leave rather inconsistent results (unless I took even longer!). And so I began to experiment.
First off, I took the unused sides of WM's Rhino and sprayed them similar to the metal areas on the Titan. A boltgun basecoat, highlighted with chainmail and then just a slight touch of mythril silver.
I then turned to a handful of paints that I thought might do the trick (these are listed in order from left to right).
First I tried Secret Weapons' Soft Body Black, then an ink wash I had mixed up a few months ago (1 part black ink to 11 parts thinned matte varnish), and finally VMA Black.
From my results, I figured that the custom ink wash was too thin and didnt want to spray well at all, while the VMA paint gave me too opaque of a finish. The Secret Weapon wash on the other hand got me exactly the effect I wanted, and this would be what I eventually chose for the project.
I also had the chance to play with some Minitare ghost tints borrowed from Alf. These are similar to candy paints in that they are translucent, even when sprayed thickly. Through further experimentation I also determined they can be washed off with water unless you seal them. Very similar to spraying an ink shade.
I sprayed them over the same metallic base as above. Colors from left to right are: Purple, Plasma Fluid (blue), Midnight Blue, and Fresh Blood (red). The Midnight blue is very near black, and I actually went back and shaded the other colors with it. The final effect is rather nice, as the translucent nature of the paint gives it real depth when applied over metals. Painted up pretty quickly too.
Finally, I tested a few new paints in order to determine VMA blends to use for Red Scorpions. This would let me premix large batches without needing to play with the various mixes and thinning the paints.
I started with VMA Grey-Green, and mixed in various amounts of VMA Light Gray.
Gray Green is pretty close to Charadon Granite, for those interested.... It sprays much better too!
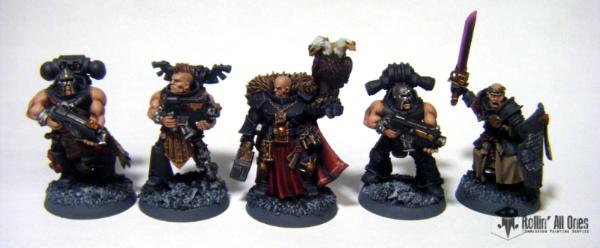
In between playing Minecraft, Terraria, and GTA V, Painting progressed without internet. Included in the mass of painting was the Inquisitor and his retinue.
After getting the black armor down though various sprays and washes, I set to work on the parchment and cloth.
Then the reds:
The browns, including the furs and pelts
And further along I knocked out the metals, skin, and other various spot colors.
Very nearly done with these guys. Just a few minor areas to paint, like the eagle and the one acolyte's mohawk. They were just pushed aside briefly as I worked to get other projects a bit further along. shouldn't be long till theyre finished!
So December/the first weeks of January seem to have been very black armor-centric. Not only did I have the Inquisitor and his retinue, but also a group of models from On The Lamb!
Specifically, Legion from the Cult of Exomorphism:
As these guys are ants, I decided that I would paint a large portion of them black, particularly modeled after a group of giant carpenter ants I find around my house. Some seem to get into my room every year (Mostly the big winged males... Almost look like wasps!)
They're big, black, and mean, So i set out to capture this in these minis.
I decided to attempt what Ifalna (wonder where she ran off to...?) managed to do on "Delilah", a massive black widow spider she painted a few months ago. She seems to have gone with a pure black base, then only a faint edge highlight of a dark blue in order to keep it as dark as possible. A bit of experimenting later, and I came up with my take on it, albeit a bit lighter, due to my tendency to brighten paint schemes more than normal.
And a close up:
From here, there are 4 others which will be painted in different schemes, including red and brown ants.
Well I've gotta confess I was expecting nids when he said bugs
Inquisitor band is looking good, arms are indeed spot on. Would love to see some more work with ghost tints as I was thinking about grabbing some for myself.
@WM: Never! My streak shall continue! Just took a bit longer to get photos of such a large subject
@Cyp: Oh come oooooon! You gonna take that? Dont let Decepticon ties stop you! After all, everyone needs to do a little Starscreaming now and again
@IG: Hehehe aye, a bit of a bait and switch, though I think I have a bit of nid stuff on the bench (way pushed off, mind, but its there!)- MechaFex 2 has been sitting half painted for ages xD
As to the ghost tints, They probably have their uses, though its a method/technique all itself when using them. They seem to be best used to cover a large area with a tint... Could be used to very quickly paint a SM army after preshading a white or gray primed model with shadows, although to me it would take too much control out of my hands. The paints are in a very specific set of colors, and though they mix easily enough, they just cant match as many colors as traditional paints.
If I can think up some experiments for them, I'm definitely up to it. That'll have to wait till after Adepticon, though... Im already starting to run out of time!
And now, to Day 6 of Catch-Up week.
I was originally going to fluff up today with another project, however it seems that I planned the seventh day of Catchup week to coincide perfectly with my birthday. Though I probably will do nothing (things are increasingly and painfully mundane around here, birthdays included), I didnt want to take that chance and break my combo... SO! Its the moment everyone has been waiting for.
Ladies and Gentlemen, at long last May I present... THE TITAN!
Do forgive the lack of a backdrop. nothing I had could fit this monster! Also, I had to use my little brother's DSLR, so the color balance and overall quality of the photos may be a bit less than normal. That said, however, the photos are huge and VERY zoomable!
The weapons.... First the Plasma:
And then the Big ass laser! aka, the Dirty harry pose
"Feelin' Lucky, punk?"
The now attached interior spaces:
A close up of the crushed tank:
And a close-up of the shin eagle- Really pleased how the marble effect came out!
Now it is important to note- this is Mark One of the Titan. To be added later are the various cables (which are a pain in the ass to bend) and a few decals (for which I need to order/acquire clear decal sheets!
After those are finished, I will be able to call this guy done and done, and I will take better photos... with backdrops, even!
Really good job Ramos! that Titan is beautiful :-) I love the detail on the base with the rusted tank as it's done very well. the shin eagle loks good too with the marble! you're making me want a Titan now you bad bad evil Nerd! :-)
@Gits: Thanks a ton! Glad to hear it was worth the wait!
@Cyp: Yuuuuup! Those 4 are gonna be the tests for other colors, like fire ants and brown ants (and will get primed later today!)
@Dr.H: Thanks! Took a while, but Im definitely pleased with it!
@Theo: Ahhhh the Rust Monster... I love it. No better way to make your PCs crap themselves than by suddenly having their gear poof into rust!
@Nerd: Thank you! And you should totally do it! Though.... youd put me to shame with your stupid skills- So on second thought.....
@WM: Expect nothing less of the Astartes! Not only is he running through the legs of a Titan, but through the legs of a Titan WHILE its walking through a minefield! I figure I'll do the cable bending after I get all the parts from you- better to do em all at once than some now and some later!
On the seventh day of Catch-Up week, He looked upon his project log.... And found out he still had a lot of work to do!
More EFT! Including the Dragoon-
And a pair of Beastmen!
A bunch of Contemptors:
The Inquisitor's ride:
And last but certainly not least, A metric ton of terrain @_@ Not to mention my -own- army for adepticon!
And so closes Catch-Up week, perfectly timed to land on my birthday xD Time to keep painting. And painting.... and paintiiiiiiiing~
@WM: Expect nothing less of the Astartes! Not only is he running through the legs of a Titan, but through the legs of a Titan WHILE its walking through a minefield! I figure I'll do the cable bending after I get all the parts from you- better to do em all at once than some now and some later!
Thanks for all the birthday wishes, guys! Super quiet (as is normal around here, really) but I got a nice cake. Although the thing had almost as much frosting on it as cake! (At least it was tasty frosting )
In addition to some work on the remaining Legion and EFT stuff, I knocked out the tiny details on the Inquisitor and his retinue and finished em up!
Coteaz
Crusader
And the PA Acolytes:
And a close up of the one Acolyte's parchment (I really like this bit!)
Yes I just noticed that I didnt paint the gem and vial he has.... Ima take care of that now
@WM: Bah! If they didnt want to be bothered, they shoulda put all the parts in the box!
@GX: Thank you!! I had fun painting it, and it was truly a thrill to paint something so massive! I never would have thought i'd of ever gotten the chance to paint one of these beasts, but there ya go xD I definitely agree with you on the white head. The simple black and white really add a sense of refinement to the model. looks sharp and makes your eye go to the bright colored areas!
Happy Birthday ramos! :-) sorry I'm late on the party! you didn't happen to get any pics of this cake with a cake amount of icing did you? I'm feeling a bit peckish!
I really like how those came out. Funny part is my favorite bits made my least favorite dude, and the super kit bashed one made the best. Who'da thunk?
Still baffles me how much frosting there is. Good for breakfast, though!
So today I painted various pieces and parts for Endless guys- specifically the bases and Trap markers for the beastmen. Metals will be getting some rust and wear after varnishing. Also, I havent picked out the crystals yet, so that should brighten the bases a bit.
And the remaining Legion got their colors today. There will be 2 of each.
Currently these guys are finished, save for basing and varnish, but I'm gonna be taking off here in a bit for game night, so dont have time to finish em yet xD
LOL Thanks Ramos :-) duuuuuude that is some frosting on that cake man! although it does look pretty damn tasty! perhaps you can save me some? it'll only take two weeks to get to me so it shouldn't be too stale ;-)
The bases are great, and with more weathering they will be phenomenal. I also agree on the hivefleet brushfire name , bu did you mean to have two "i" in it?
The bases are great, and with more weathering they will be phenomenal. I also agree on the hivefleet brushfire name , bu did you mean to have two "i" in it?
Brushfire is a badass Hive Fleet name. Time to get on that!
@Alf: Bring what? The unfinished guys? Cuz they're unfinished.... And not mine xD
@Nerd: hahaha! Alas, nerd, my family is like a group of buzzards- I had to wrench the last piece from their claws just to get a piece for myself! (And its my cake, even! D: ) The thing vaporized while I was out at game night!
@Theo: Liiiiike THIS weathering? *dramatic reveal*
Knocked them all out while the airbrush was out spraying the Contemptors (who are now one more shade of gray brighter, huzzah!)
Also finished the remaining Legion.
Of the Brown,
And fire varieties:
I also put a considerable bit of effort into the Dragoon today.
Its proving to be a challenge simply because of the colors. The primary blue is exceptionally delicate and pastel, so I cant shade it with anything too strong. This also applies to the metals and the wings. I really watered down the soft Body Black to get a lighter shade. I decided on kind of a Dove grey for the wings. Will shade it up to white, in keeping with the light color pallette. Even the skin tone is fighting me, as I cant shade it too extremely.
In addition, there was a super inconvenient mold line right across the left side of her face. I did the best I could to patch her up, but she still has a little bit of scarring. Hopefully it wont show too much. Its a very pretty model, after all. Currently the light blues and skin are complete. everything else is in various stages.
And finally, a last little bit of random tragedy news: My G15 Keyboard has finally bitten the dust. It was having connection problems all this week, then today my computer suddenly blue screened and crashed due to a USB error.... Never again would the G15 connect. Ive had the thing for 6 or more years (and really did put it through its paces), so I guess I got my use out of it. I gave it a bit of an inspection, and seems that the years of bending the cable at the point where it entered the keyboard made it crack and fray. Unfixable, sadly Now im on some ancient backup keyboard for a computer long since dead xD Wouldnt be so bad if it werent for the fact that the space bar is really picky on where you need to push it.
Guess I know whats on my list of computer stuff to buy next!