I wanted some practice at putty work and this should be the ideal thing to do that.
I've coated and strengthened the card of the cloak and the tissue of the hood with superglue and I'll putty later. If I work in small pieces and build up the hood/cloak slowly it should all work out fine...hopefully...
lol Nerd. I've not tried knitting really, done some stitching of various sorts when I was younger and was competant but not had cause to knit anything.
In other news; The Dark Vengeance Tactical squad I painted on commission was sold in 5 minutes!
congrats on the sell i just started folling your blog recently. read it and enjoyed what i saw.
it was quite entertaining.
again grats are in order for the sprue hut that looks like loads of awesome work. at any rate glad to have watched and learned something between you and giraffex i feel the need to up my game even more than i been trying.
I've got catching up to do since this last week has been busy, but liking the auspex. Even though every time I see one it reminds me of one of those bopit toys niece had.
alabamaheretic wrote: congrats on the sell i just started folling your blog recently. read it and enjoyed what i saw.
it was quite entertaining.
again grats are in order for the sprue hut that looks like loads of awesome work. at any rate glad to have watched and learned something between you and giraffex i feel the need to up my game even more than i been trying.
Thanks alabama and welcome.
Glad you like the blog, it's been fun making it and it's always nice to know that others are enjoying it too.
The hut was fun and the techniques involved can be used for all kinds of model building.
It's definitely more than the sum of it's parts. The individual elements that make the hut are relatively simple and it's the combination that makes it what it is.
Yeah, there are many bloggers here on DDakka that have pushed me to raise my game time and again, there's always something new being posted that just blows everything before it away.
I've got catching up to do since this last week has been busy, but liking the auspex. Even though every time I see one it reminds me of one of those bopit toys niece had.
Thanks Theo. It really surprised us at how quick it sold
Ta. Yeah, I see that now.
In actual modelling news, I have coated the hood in putty, but it needs some sanding and a few additional creases carved in. I'll hopefully have something to show later.
yea i know what you mean man. i just wish some times i could raise the bar not too sure on how to though i think if i start trying to highlight that would push the envelope a little for me...
just got some eldar in a trade gonna try and push those guys to the limit...(more of a painter than a modeler)
but it should be a good test...any way would love to here your thoughts on my painted chuckle heads if you get around to it.
i just aprreciate folks that think outside of the box and it makes me strive to be better in the hobby and that to me is worth it when i find a new blog or find something interesting to look at.
your take on the cloak is wonderful it is really well done looking for more of that in the future and if you need a guardsman or two i can help you out as i have a few extra floating about.
any way keep up the awesome and let the modeling/paint flow.
alabamaheretic wrote: yea i know what you mean man. i just wish some times i could raise the bar not too sure on how to though i think if i start trying to highlight that would push the envelope a little for me...
For me, it was trying something new on each model. I'm always on the look out for new painting and modelling tips/techniques (and I've asked many people questions about their models and how it was done). Then when the opportunity arises (such as the current hood and cloak) I give it a go and try to solve any problems I encounter before moving on.
So you can see through my blog that early on I was just painting each model a different colour scheme. I then started adding a few more complex painting techniques and then started some putty work and now I'm onto carving sprue...
But little steps (don't try to do everything all at once) and build up your skill base slowly. Dry-brushing and highlighting are a good step to take.
just got some eldar in a trade gonna try and push those guys to the limit...(more of a painter than a modeler)
but it should be a good test...any way would love to here your thoughts on my painted chuckle heads if you get around to it.
Eldar are fun to paint. Many people seem to think that they are difficult to paint, but I found them easier than the Tyranids I did before.
I'll give your blog a look when I get a chance. (although the link in your sig' appears to be kaput somehow)
i just aprreciate folks that think outside of the box and it makes me strive to be better in the hobby and that to me is worth it when i find a new blog or find something interesting to look at.
Indeed. There is much we can all learn from each other.
your take on the cloak is wonderful it is really well done looking for more of that in the future and if you need a guardsman or two i can help you out as i have a few extra floating about.
any way keep up the awesome and let the modeling/paint flow.
Ta. I have a few more Eldar to play with, some Tyranids I haven't touched yet and a whole box of Tau to tinker with yet, so much to do and so little time... *sigh*
Just fixed the link in my sig...i guess i did something wonky to make it not work >.<
yea i liked the eldar range and they seemed fun to paint its a lot different than painting power armor. Lots of little details.
I really enjoyed painting my guardsmen but i kinda cheated. I did the basic three color thing and called it good with a wash on top as well there is a million (more like 60 or 70 infantry men) but it was a challenge to paint that many dudes. took me more than six months to get them all painted minus my commissar lord...to finish all my IG i just have to start the commisssar lord then ill be done with them.
the tau in my opinion are just fun to paint the sculpts just have a lot of things going on..
yea man have a lookie loo when you get the chance tomorrow (your time) ill have a proper update to show. I am updating it today just waiting on my box to get here before my update cuase its gonna be a huge picture fest.
I'm in no rush to finish models, so I really take my time to get each one done to as high a standard as possible before moving on.
Yeah, all the little armour plates on the Eldar really look good when they are picked out and individually highlighted (there's a few that I've even added blending to each plate).
The more effort you put into each model the better they will look and pay attention to all the little details, that's what lifts a model to a whole new level.
Not a huge amount of progress here, I've been busy going to town on a librarian...
But I said I had thrown some putty at the hood and I've just been over it to tidy up the details.
I gave it a quick coat of grey to tone down the WHITE of the putty.
It's still a little rough in places and it's really hard to get in an smooth them, but will see when I do a bit more to it.
I tried to do some "stretch creases" around the point, but couldn't get them to look right, are they missed?
Looking much more convincing now H, great job. I don't think creases at the top is actually a natural place for them to occur, hoods are designed to fit that shape so you don't need to add them.
Casey's Law wrote: Looking much more convincing now H, great job. I don't think creases at the top is actually a natural place for them to occur, hoods are designed to fit that shape so you don't need to add them.
Cool. I saw something like them on a picture somewhere. But I like that reasoning Job's a good'un.
I have actually done something! and it's something for this blog!
Having finished the Librarian (that I have been working very hard all week on) for commission earlier today I had some time to start on the cloak of Guardian #9.
and wow, this is difficult. I spent ages *correction* AGES poking and prodding and smoothing and poking some more and smoothing over again and ... you get the idea...
and I then realised that I was doing the creases in the wrong direction and I should really LOOK at the reference tutorial I had open in front of me then try to replicate what I SEE and not what I think should be there...
After that, I am reasonably happy with how it looks, but it will need more attention once I've finished adding all the putty...as always...
What do we think?
Am I heading in the right direction?
Do they look like creases in a cloak?
Anything that needs more work?
dsteingass wrote: They look creasey to me. The question is..do you want the robe flowing dramatically? If so, then more swoop, otherwise this looks great!
Thanks Dave. There will be bigger and more swoop-y cloak-ness further down the cloak.
This is just the top "hanging" third of the cloak.
The indent on the left (as you look at it here) will have some cloak curling back towards the camera, then a few big ripples in the middle and then it smooths out towards the point on the right. That's how I am thinking of it at the moment...
Casey's Law wrote: Yep I think your creases look solid, hard to say more until you've added more putty but I'm sure you'll nail it bud.
Thanks Casey. Have a look below for more putty.
So the next session of putty work has added the middle of the cloak.
It's looking a little dodgy at the moment, but if you place your hand over the unfinished bottom it looks better (maybe).
I'll leave this to set properly before attempting the last part, which I think will be the make or break moment...
Casey's Law wrote:Yep, looks promising for sure. You've got this in the bag.
Camkierhi wrote:Looks great, and you have inspired me to have a go, using card as former, for putty work. Yours looks so good. It seems to flow very naturally.
Thanks Guys. It's been really difficult to get it looking like this and it's good to know that it is looking natural.
Cam, that's cool. Remember to "set" the card in shape with superglue (thin, runny stuff is best) first.
The first section I did was just one lump of putty that I spread on and poked at.
This second section was added in sausages of putty (starting from the left side) which were each smoothed on before adding the next sausage.
Good luck.
Viktor von Domm wrote:gotta agree..the cloak looks very good! the creases certainly sell the cloak!
Cool, Thanks.
Theophony wrote:The creases look great little disappointed that its putty and not carved from sprue, but at least you are branching out .
Thanks Theo.
Well as "they" say, specialising breeds weakness...
Or, I need to improve my putty-fu as it will help with some of the things I have planned for the future.
I've finished off the bottom of the cloak.
Didn't change the shape of the creases by much (but that may change when it comes to the inevitable tidying stage).
Next thing to do is the inside of the cloak (of course, with my ocd/attention to detail I can't leave it plain) and to make it "match" the outside as closely as possible. But have to leave the outside to set again before that.
Automatically Appended Next Post: Oh yeah, and Woo Hoo page 42. Somewhere around here must be the answer...
Just tried to do the inside of the cloak but the putty was trying my patience by refusing to stick to the surface (even when I tried to use superglue to stick it on with) and so I had to just plaster it on and smooth it out and I'll just carve it out later (assuming it stays stuck on now).
Casey's Law wrote:Looks good. In my experience carving dried putty isn't as easy as sculpting it in the first place so that'll be interesting to see.
Milliput is quite good for carving.
However a combination of a thin layer of putty that probably isn't as attached to the surface as it should be (bits were chipping off), the fact that the chap's legs are slightly (read; quite a lot) in the way and that I seemed to be doing more damage than good has meant that the inside of the cloak will stay minimally detailed. I'll emphasize the folds that aren't really there with paint later.
I also snapped his gun arm off in the process, so I've re-glued that (hopefully in the correct place) and ... well... these seem to be nearing the point that they are ready to paint. Once the glue is dry I shall give both 9 and 10 a look over for any missing details (I always think that I've missed something) and then it may be time to think about painting...
Wow. You've been really busy. Way too much to catch up on, but the sculpting looks really good and the vision you have for your projects is still evident.
Skalk Bloodaxe wrote: Wow. You've been really busy. Way too much to catch up on, but the sculpting looks really good and the vision you have for your projects is still evident.
Looking forward to seeing more of the same.
Thanks Skalk. Hope RL eases off for you soon. Yeah, Brian's competition led to quite a burst of creativity.
On the guardian front, paint has been thrown about, but nothing worth showing yet. But soon... maybe...
In other news, I have been doing little bits of carving in-between recent stuff that I have been showing here and there with the aim of making things for terrain and bases that people may want to part with cash for. There's not really anything to show yet, but there has been much thinking and inspiration-hunting.
With that in mind I would like to know what people out there would like to see me making?
More furniture?
Boxes, crates, etc...?
Bases (with what on?)?
Anything specific that you have (or haven't) seen available, that you want to see me make?
Simple things or complicated things?
I have a long list of things, but some direction would be nice.
LBM: Indeed, those Terminators are next on the commission line-up. Boxes are a good start, I wonder what that pile of sprue pieces in the picture below will become...
Also a teaser of something I've been carving... To give you and idea of scale, find a piece of sprue that is the thicker size that usually goes around the edge of the GW sprues...
...found one? Good. She is carved from a single piece of one of them that was about as long as most troop models are tall... This was only as a carving exercise and can only really find a use as a statue of some kind.
She's not finished yet. Arms will be added, not sure if I'll add hair , but the details (such as her face) probably won't become much sharper as they are tiny...
Painting has only progressed as far as base coat and wash, so not very exciting to look at yet.
shasolenzabi wrote:Good bit of whittling there Doc!
Thanks shas.
dsteingass wrote:Toilets and sinks!
Of course, toilets and sinks How did I not have those on my list? How else are people supposed to get a refreshing drink and heal their wounds... Thanks Dave.
Not all necessarily made as separate entities (possible base decorations) and if something can be made from different materials (wood or metal...), it will be. Edit: I realise that many of these things are available elsewhere already... how/if that makes a difference.
I am currently searching for inspiration for the bathroom things and thinking about how I can make them, I suspect a largely putty job for them.
Plans are afoot anyway.
Casey's Law wrote:Awesome work there H. Especially impressive at that scale.
Viktor von Domm wrote:That last damsel carved from sprue looks like you're about to make a pyre? Amazing
Thanks, I should give her arms at some point... I'm thinking more like a large oscar or one of those "very tasteful" (often gloss white) statues that some people like. But didn't really have any plans for her, it was just to see if it was possible.
and to show you that something is happening...
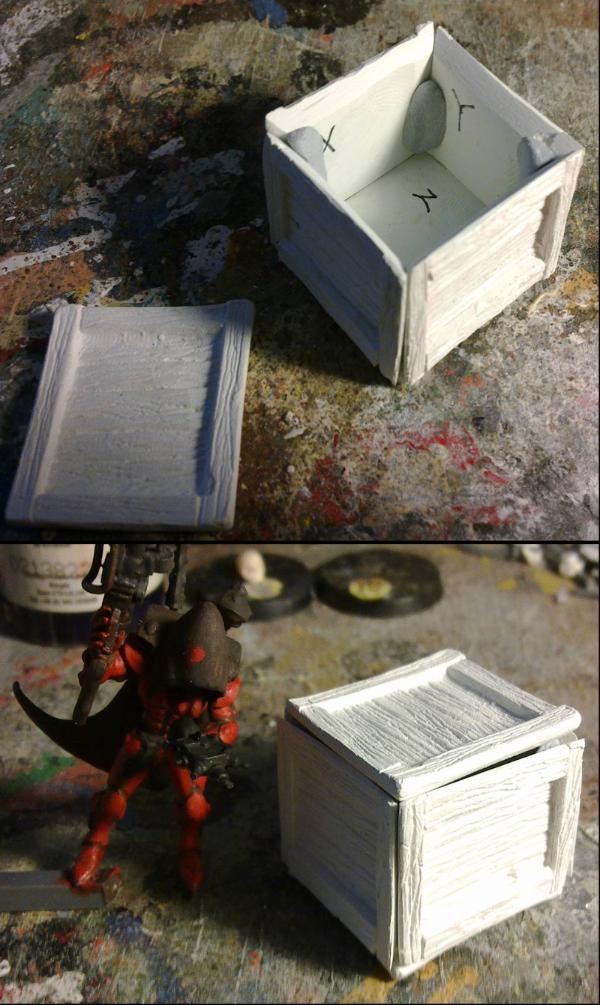
Some, but not all, of what will become a box.
Even with a little cheating it's still a fair amount of work (there's a surprising number of elements that go into a simple box).
I need to build the 4 "walls" of the box first before I can cut the top and bottom for this particular design, so those are missing from the picture.
On the bogs, have you thought of looking through the screwfix catalogue, I now it's probably obvious and a bit late, but thinking future world not necessarily what we all now and love, (and hug on occasion after a few pints.) Some of the more commercial designs are sleeker and would be easier to carve/mould. Just a thought.
Thanks Cam Glad you like her. Maybe I'll make more one day.
That's not a bad idea, I'm not short of designs for bogs, it's now more how to go about making them... I'll try next, after the box.
As for the box, it now has structure. Not done the bottom/top yet, but it will be similar to the top/bottom you see here.
I tried to tone down the wood texture from what I used on the hut to be more realistic (less exaggerated), but will still allow similar painting techniques to be used (washes and dry-brushing).
Which corner design do we prefer for the edges, square or angled?
The angled corners are very difficult to get right when you're just doing it by eye and not using and angled cutter thing (as seen on Dave's blog)...
The final boxes will have one or the other type all over.
Also, is this big enough to count as cover in-game? Remember to add the millimetre in height for the bottom that isn't added yet.
Viktor von Domm wrote: the box looks awesome! love the lid of the box especially... once again you own the floor with your woodgrain!!!
Thanks Vik.
You'll be happy to know that I've done some work on the lid to make it squarer (as the angles on it weren't quite right due to making it fit the box...). It's still a little off but it's not so noticeable now.
I've also worked out why the box wasn't as "square" as it should have been; One side is 1mm shorter than the other 3 (25mm to 26mm, that's nearly 4% out not good enough). Probably should have spent more time measuring it "before" rather than afterwards... Oh well, works as a concept.
I have a plan on how to make near perfect boxes that will have to wait until I get some casting up and running.
a bit of uneveness with wooden boxes is totally acceptable...in fact it makes them more characterful to me...
and it seems you soon need yourself a chop-it to get that evenness quicker...
Great Job Doc surgery was a success, and trust me the angles look fine I made furniture that was more out of square than that.
The wood grain looks spot on although the wood effect you used before was good, you could do a box in the same grain finish as the hut so it looks aged.
Viktor von Domm wrote:a bit of uneveness with wooden boxes is totally acceptable...in fact it makes them more characterful to me... and it seems you soon need yourself a chop-it to get that evenness quicker...
Yeah, I'm hoping the commission stuff will at least pay for nice and useful things like that.
lone dirty dog wrote:Great Job Doc surgery was a success, and trust me the angles look fine I made furniture that was more out of square than that. The wood grain looks spot on although the wood effect you used before was good, you could do a box in the same grain finish as the hut so it looks aged.
Thanks LDD and welcome to the show.
It's the little ocd/perfectionist devil that sits on my shoulder that wants it to be nearer to square, that's just the way I do things.
The wood-grain on the boxes is pretty much the same as on the hut, done in the same way, it's just not as deep as the grooves on the wood of the hut.
I know what you mean as to the OCD aspect how many times have I scrapped or pulled a project apart (probably why I never finish anything ) but those boxes look great and even if you do notice these things the rest of us don't.
I never received my party invite hence the lateness to the party
Thanks. It's only noticeable if you look down on to the box (whereas I gave you all nice angled shots to look at) and probably if you stacked the boxes next to each other.
Worry-ye-not, it's not something that drives me mad (more mad) or away from the project, I actually enjoy the perfectionism...
...and have always been like it, such as in the lab I would weigh out a chemical for a reaction and I wouldn't be happy unless I got the mass correct to at least 3 decimal places, and this is with milligrams of stuff (so that's + or - 1 microgram). That's the difference between a large and a small grain of salt...
Better boxes will happen soon.
I may try a toilet tomorrow evening...
Your personal invitation must have been lost in the post LDD, I shall hang, draw and quarter the person responsible. Please accept my most humblest apologies.
I started A level chemistry Dr H and I know what you mean about grains of salt. Titration exercises where the worst. I transferred to biology after about a month.
If you are anything like my university teachers... you are beyond a special breed, your freaking endangered.
I wouldn't say that I'm entirely like a teacher/lecturer... I can teach, I'm reasonably good at teaching, but I don't enjoy it. However I can get a little carried away when talking about science, so that may be similar... Anyone that goes through a PhD comes out a little weird in the end though.
weetyskemian44 wrote:I started A level chemistry Dr H and I know what you mean about grains of salt. Titration exercises where the worst. I transferred to biology after about a month.
That's a fine box. Craftsmanship.
Yeah, titrations are a major part with chemistry, although at PhD level you do get to play with more interesting equipment to do titrations with... Ah, I looked at Biology for A-level, but there was more writing essays involved and as a dyslexic that kinda put me off.
Thanks Weety.
Largeblastmarker wrote:WOODEN BAWKSES
(please do some ebay sprue box commisions)
Glad to have made you happy.
The bad news is that I won't be selling sprue boxes made of sprue (it's far too much work to make lots). The good news is that sprue boxes will be available for sale as casts of the ones I make of sprue, once I have a few varieties and other things good to go (and find out what is the best stuff to use for moulding and casting).
Unfortunately there isn't a toilet to show you all today as I got sidetracked "looking for inspiration" (read; running about the capital wasteland now it appears to be mostly working). But I will do something model toilet related tomorrow, barring any natural disasters or alien abductions.
Serious question, what happens in chemistry if you see a chemical backwards? Could that not have some bad results i mixed with the wrong thing? Or have you learned to compensate for it?
LBM: Not sure yet. Need to balance the quality and cost of what's available. Thanks for the link, I'll give it a look.
Shas: Not sure what you mean by backwards?
When planning a reaction/experiment in a lab it's unlikely that you will use the wrong chemicals in a bad way (e.g. explosion-like bad).
You know what reaction you want to take place (e.g. what molecules you want to attach together and where to attach them) and you then have to read a lot of literature on that reaction to find what chemicals and conditions are required.
Then you plan the reaction, equipment needed, calculate the quantities of the chemicals and what solvent is best. All the time thinking of the hazards and costs Vs the production of the desired product.
You then need to fill in a CoSHH form (Control of Substances Hazardous to Health) where you look at the hazards of the chemicals involved and risks involved in the reaction.
And after all that work, you usually make sure that you pick up the right chemicals in the lab because that's a lot of time to waste.
Most reactions need quite a bit of persuasion to take place even in the best case.
So if you accidentally use the wrong chemical, if it's similar to what you actually wanted you may just end up with the wrong product or nothing happens. If it's completely different from what you wanted then very little will usually happen.
That said there are some things that you really don't want to mix and there are a few reactions/chemicals that do react very quickly and violently if not handled appropriately (but that's covered when you're filling in the CoSHH form). The dangerous chemicals are usually kept separate from most of the safer chemicals so it's not like you could accidentally pick up the bottle next to it.
The worst I've seen in the lab have either been the wrong solvent or wrong salt (like a nitrate instead of a chloride) and they either lead to no reaction or the wrong product.
The only time we had to evacuate the building was when someone had a cannister of HCl gas (that's hydrochloric acid) that had a faulty valve and started leaking...
He taught at our school, she was a principle at a local private school and she was built like a tank. If her knees bent it wasn't going to be good for him
Doc, good thing, I know how HCL vapor can irritate and good that they keep the nasty away from the simple chemicals.
I know you add to water, not water to chemicals for dilutions, and it is not usually good to mix things as has been bad for schools and others when ammonia and Chlorine or other bleaches mix. As a Janitor, I learned decades ago about HCL in a pink solution used as toilet cleaner, I had noted before that how after having to clean a toilet covered by me when my stomach emptied how clean the surface was and thought how good a cleaner that would be? then saw someone else had already beaten me to it!
Dave and Theo: lol. Who actually names their child Barbie? Please say it's a nickname.
Solar_lion: Lo. It is an interesting tutorial in many ways.
Shas: Yeah, sometimes it can be just enough to have 2 certain chemicals in the same cupboard and they would react...
Adding to water is because solvation is an exothermic (that means is gets hot) process and water is a very good at absorbing heat (has a high heat capacity) so the heat produced is quickly spread through the water without raising it's temperature by much. The other way round, for example adding water to sulphuric acid (H2SO4 for Theo), will lead to the acid boiling; and you don't want that.
HCl is such a useful acid. It's good for changing the pH of a solution without adding complex or unwanted ions etc...
On a side note, I've had the pleasure of using an acid that makes HCl look like water, Trifluoromethanesulfonic Acid for those of you who want to look it up.
In other news, I have started looking at toilets...
As you can see, I have started on two concepts:
The one that is more upright is based on what I have here (and is a nice simple design) and those of you familiar with a certain computer game should recognise the pieces laid out in front...
I've started with simple card to get the measurements right and to use as a possible skeleton for the putty.
There's a few things though before I continue:
Is this big enough / in scale? It comes up to just below the knee which is where you want a toilet.
However, I needed to put it on a base in order to compare it to my Eldar chap here. If it's not on a base, it looks ridiculously small... Do I leave it small (as it is), build it up to this height without the base, or somewhere in between?
I would build it to me rightly scaled without the additional height of the base...
I assume you soon fill the shape of said skelton with Sculpy? You are on your way to greatness!
The resin is probably the most accessible thing for an amatuer caster. what you could do is take the pieces of the box (flat sides) and just lay em out with sprue in between to make the mould. Anyway, if all goes well, I will one day be clipping Dr.H brand boxes for some scenery.
And the molds take like no time to create and reuse. And tbh, they are wooden boxes in a warzone. I would expect them to be low quality XD.
Viktor von Domm wrote:I would build it to me rightly scaled without the additional height of the base...
I assume you soon fill the shape of said skelton with Sculpy? You are on your way to greatness!
Cool ta.
Ja, well with milliput as that's what I have to hand. I'll add a little more skeleton first though.
Largeblastmarker wrote:The resin is probably the most accessible thing for an amatuer caster. what you could do is take the pieces of the box (flat sides) and just lay em out with sprue in between to make the mould. Anyway, if all goes well, I will one day be clipping Dr.H brand boxes for some scenery.
And the molds take like no time to create and reuse. And tbh, they are wooden boxes in a warzone. I would expect them to be low quality XD.
Ahh, you have discovered my cunning plan for making near "square" boxes.
Good to have a potential future customer involved. Nice to know that I am doing something that someone wants. Thanks.
In all the years I have been playing and modeling, of all the pics I have scrolled by online, I will say that I've never seen anyone else create such functional and impressive art from GW sprues.
That box staggered me. Wow.
Incredible work. Your craftsmanship has my respect.
Lo people. A little update on the bogs for you below.
I didn't see your edit LBM. No, they will not be 40squids a box. I'll have to see how much resin goes into each box before I can calculate a price, but I could probably make a 1:1 scale box with £40 of resin...
this next project is coming straight from and to the crap-er. Neat.
I'll measure them especially carefully just for you Comrade. Thanks, more crap-ers below.
On a side note, you are definitely like my professors... its a chemist thing i am sure.
Probably, but every subject has it's nerds and weirdos...
Skalk Bloodaxe wrote:In all the years I have been playing and modeling, of all the pics I have scrolled by online, I will say that I've never seen anyone else create such functional and impressive art from GW sprues.
That box staggered me. Wow.
Incredible work. Your craftsmanship has my respect.
Hey wow, thanks Skalk. The number of times I've been staggered by things in your blogs that means a lot.
So, toilets. The basic skeleton has been constructed for the two initial concepts. The bog on the left is one of those "up against the wall" types ( ) and so won't initially have a cistern (although I may build a large box-like one later). My time wandering the wasteland hasn't been wasted either as I found a toilet that I could get to the side of and get a picture to show what goes on behind it.
I still need to make the cistern for the FO bog and that is the next job. The gap at the back of that one and the big hole inside the first will be filled (probably with sprue) before I start putty-ing them.
In other news I have been buying things for casting. So there is some silicone, some resin AND some Oyumaru (that name is a nightmare for a dyslexic) winging their various ways towards me. I just want to give a shout out and thanks to Galorn for his advice in casting materials.
I need to have a look at what equipment that I have laying about that will be useful for casting and I will be shopping at the weekend for anything I don't have, then some vaguely exciting casting like things will happen once the stuff arrives... I also need to decide upon what I want for my birthday on Monday. It will likely be something plastic...
And as it turns out the cistern was reasonably quick to make. I had a piece of sprue that was the perfect length (just slightly wider than the seat). Into which I carved out the shape in the front of the cistern. The flush handle I couldn't make any smaller I'm afraid. And I used a little putty rivet for the round thing that's on the side of the cistern. Then I had to find a suitable pipe and the best fit I found was a length of paperclip.
You'll have to imagine the bowl filled in with putty and I think it's a pretty close match. What do you think?
And behind it you can see the first wall of my taller (about shoulder height) simple box.
Looks like you got the toilet skeleton. Nice to see what you sculpt in it.. maybe a floater!
Anyways, enough of the feces. I must get ready to go apply to internships. So hard to talk about hobby related information on the job when the most recent project you have seen is a toilet.
cormadepanda wrote: . I must get ready to go apply to internships. So hard to talk about hobby related information on the job when the most recent project you have seen is a toilet.
Viktor von Domm wrote:Yes, that is a post apocalyptic throne! I think the dimensions are very good!
shasolenzabi wrote:The right thing for a wastelander to use in a pinch
dsteingass wrote:AMAZING!!! I never realized how complex of a shape a toilet is!!
Thank you gents (see what I did there?). Yeah, it's amazing how something that you consider so simple and everyday is actually very complex in it's design when you look close enough.
cormadepanda wrote:Looks like you got the toilet skeleton. Nice to see what you sculpt in it.. maybe a floater!
Anyways, enough of the feces. I must get ready to go apply to internships. So hard to talk about hobby related information on the job when the most recent project you have seen is a toilet.
A well done and pleasant looking one to be added.
Thanks and lol, I see what you did there. I'm thinking of leaving the bowl as empty as possible to give people room to add water effects and their own floaters (or empty if they so choose).
Good luck with your applications and...
Solar_lion wrote:LOL.. Yeah I probably pass on that subject.
...Yeah, probably best not to get into explaining about why someone is sculpting a toilet...
Casey's Law wrote:Nice progress mate! Interested to see how the bowl takes shape.
Thanks Casey. See below...
So the first wave of putty has been performed; I stopped before completion for a couple of reasons, One being that I used up the putty that I had mixed. I could have easily mixed up some more immediately and carried on, but one of the toilets seats had apparently not been fully sealed with pva and became quite soft with all the water I was splashing about and I bent the skeleton support for the other seat. So I straightened them both, added putty in places that would strengthen them and I'll let that set and finish them off next time.
In other news, the silicone and resin turned up today. So that was nice and fast. Still waiting on the ..."not-instant mold" (edit: Oyumaru), but then that is coming from Hong Kong so can't expect that to be quick...
I vote for empty toilet as well, but make it look like the water (and other various substances) evaporated over a long period time and the grunge / grime has bonded w/ the ceramic on a molecular level. Yuk.
Ruglud: lol. Maybe I will in certain circumstances.
Galorn wrote:as an FYI Birch coffee stirrers make for easy scale wooden planking. also the actual wood grain is indeed picked up by RTV sillicon.
Ta. Good to know that texture like that can be picked up.
No worries Theo, variety is the key. I may use things like that for alternatives.
dsteingass wrote:Awesome shape! YES, please leave the bowl empty
Skalk Bloodaxe wrote:I vote for empty toilet as well, but make it look like the water (and other various substances) evaporated over a long period time and the grunge / grime has bonded w/ the ceramic on a molecular level. Yuk.
dsteingass wrote:Well, you can do that with paint. You don't want texture in the bowl for casting....
Yarp. Have to leave options for the customer.
Toilet progress.
The colour balance is a bit off on a couple of the pictures but as these are just plain putty I didn't bother changing them.
There is still more work that needs doing on these, they will look better once I've finished with them.
Turns out the cylinder of card I used for the FO bog was not really central to the bowl and so I had to fill it in and will carve a hole later. The hole in the other bog will also receive some attention.
Also need to add some more putty for the top of the rim on the FO bog as the putty was going off by the time I got to it and it wasn't sticking.
A little more putty may be needed here and there to alter the shape a little and some carving and sanding will be required as well.
But progress has happened. I also added a piece of card on the top of the cistern to look like a lid as trying to carve out the inside and adding a float didn't look possible in such a small piece of sprue. I may however make a hollow cistern in the future.
It does raise the question of where all the lids have gone in the capital wasteland? or do toilets in America not have them anyway
I'm pretty sure a turd would break down after 200 years, but the cast ceramic would not. It'll break or crumble, but the enameled surface would still be smooth.
Thanks Comrade. Still quite rough and wonky at the moment, but that will be solved.
It doesn't have to be a 200 year old present that someone has left in there though, could have been a raider... or a supermutant (you wouldn't want to follow one of them into the bathroom)...
Yeah those gore bags. I just went through a load of them in the Chryslus Building, you know the one that's full of supermutants... I actually haven't played FO3 for long enough that I don't remember where things are or what they are when I find them. So it was a surprise when I walked in there at level 4...
Anyway, I haven't touched the toilets today. Done a little commission painting and went shopping.
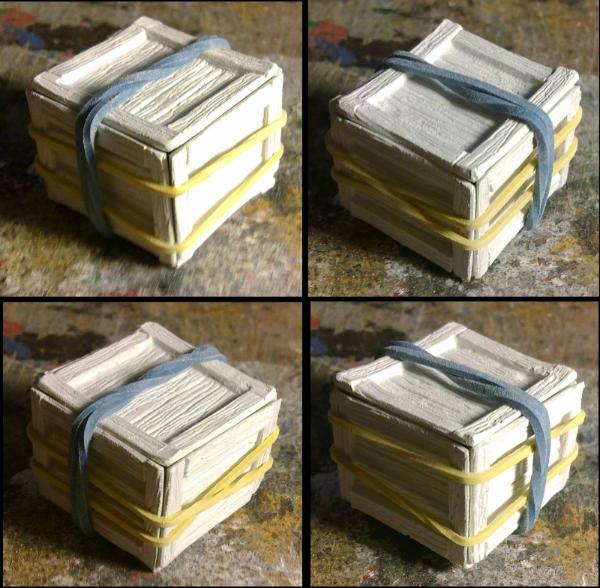
But I can show you some boxes... well some walls of boxes that will eventually join up with other walls to make boxes... The open box at the top is the box I've already shown you and is there for scale. The lid that was on it is on the right.
The little side below that is new-ish (and needs a little tidying looking at that picture). It was actually a side that was too small for the original box and has a friend that just needs the edges added.
The tall side in the middle was what I showed behind the toilet earlier, but the other one with the cross bar is new. Both of those need a second side built to match (may do the cross the other way for variety) and these will be ready to begin box casting... once I'm up a running.
Viktor von Domm wrote:those boxes look as if they are straight from a WHFB kit sprue... awesome looking detail!
as for the toilets... looking very good... tho i have to say the classic one is my favorite... the left one pales out compared to the right one...
Thanks Vik. That's what I'm going for; to have everything I make (not just the boxes) look like a bought model.
The main reasons that I'm making the other one is that I have a real one to hand to measure and study closely and as practice for the FO bog and for a bit of variety (other types may appear in time as well, I have taken reference pictures of the Vault toilets too). There may be a piece of terrain that someone builds that the more simple looking toilet fits better.
Camkierhi wrote:Fantastic work on both the bogs, and the boxes. I for one want those boxes by the dozen. Don't know why because I don't play, but I still want them.
Viktor von Domm wrote:i know what you mean...on both issues
Thanks Cam.
Do not worry, that'll be the subliminal messages getting through...
But really, I'm happy that you do like them, and enough to actually want some. Looks like I'll have to make a large mould of many boxes when I come to it...
Dam they do look like actual kit boxes who would have thought we could get this giddy over Boxes, either way put me down for some when you release them
P.S. I used some cast of sprue on my badass base, kind of a montage
cormadepanda wrote:Neat boxes, hurry up and castem, so I can buy em.
Thanks Comrade. I'm still waiting for the Oyumaru (I seriously need to look that name up every time I write it...) to arrive.
Once it does, I'll be able to create the casting masters that will fit together neatly (part of my cunning plan), and make lids that actually fit well on those boxes. Although I can start on the lids, it just requires measuring things.
Then they can be cast up, which may or may not require some trial and error tests as that is new to me...
lone dirty dog wrote:Dam they do look like actual kit boxes who would have thought we could get this giddy over Boxes, either way put me down for some when you release them
Thanks LDD. I should put some thought into making my sprues look as professional as my products then... *cogs start whirring*
I'm really quite pleased that you all want a box or two. Gives me a lot of motivation (relatively, I am very laid back in reality) to get things made.
P.S. I used some cast of sprue on my badass base, kind of a montage
Good to hear. More people should use more sprue, more often.
I've been working on a couple of second sides for a couple of the boxes (if you haven't noticed, making only 2 unique sides per box is also part of my cunning plan for a few reasons; quicker, kinder to my fingers, you're only ever going to see 2 sides of a box at any one time and it will help create square boxes) and doing a little bit of painting and shooting Mirelurks with my favourite gun; the railway rifle...
Shas: Yeah, you just have to hope that some sneaky person who can speak "dragon" doesn't kill all your guards and run off with the contents...
Comrade: Sounds like a good idea.
Skalk: Thanks. Do not worry, I will likely be shouting it from the rooftops (or at least plugging it in my blogs).
I have done a few little bits, but nothing worth showing yet.
However, in other news; I can reveal what plastic I have acquired...
This may excite quite a few of you, so make sure you are sitting down and try to remain calm.
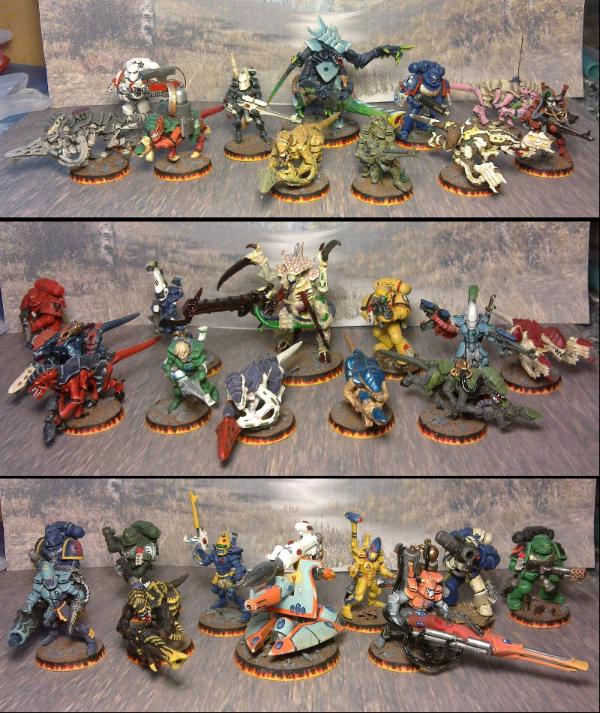
Continuing with my collection of battleforces I have:
Spoiler:
picked up the Ork Battleforce
So they will appear eventually (I still have to Tau box to start on).
I also picked up the new SM tactical box. I'm quite impressed in the improvement of the kit as a whole: The instructions are useful ("more" would imply the previous instructions were of any use), not that I need or will use them, but it's nice they've made an effort. AND there is lots of nice useful bits in the box too and they will be useful.
This is England, and here we wait in line politely and don't make a fuss...
But seriously, I'll need to do my research before starting the greenskins or even the blueskins.
However, with them now available to me, something green is that little bit closer for all of you.
shasolenzabi wrote:Ah, the British and their qeues for everything
Well it's the polite thing to do
BTW, I run a Argonian Dragon born in dragonscale armor, LOL!
Ha. My Argonian is my mage character and is pretty much at the point and click stage in battles. and doesn't even need to wear armour (mage armour perk)
and is my best archer (conjures a bow and arrows, so don't carry them either).
Well when I get round to casting them, I won't need so much sprue. It's only being used for the concepts/masters.
How about, you buy my boxes and build your very own warehouse of artefacts and I promise to keep producing new and unique boxes for you to extend your warehouse, yes?
So do the ones with your blood on them come cheaper? If so I'm all over it, I'll just clone you a dozen times and put the mini Dr. hinternets to work in my basement with my piles of sprue. I'll finish my sprue habitat before the rest of you .
Theophony wrote: So do the ones with your blood on them come cheaper? If so I'm all over it, I'll just clone you a dozen times and put the mini Dr. hinternets to work in my basement with my piles of sprue. I'll finish my sprue habitat before the rest of you .
Viktor von Domm wrote: You all are in the wrong... the bloody ones are of course relics and charge a hefty double fee...tstststs...some peeps and their lack of thinking....
I pay half for blood not double. Take your highway robbery else where.
Theo, for someone that goes to church willingly and regularly, I'm surprised by some of the things you come out with... May I prescribe more bible study and less NF study. But then again, does painting your local church give you a free pass into heaven? If so, it's a shame that my local is made of stone...
I'm afraid however, that I've not cut myself deep enough (while modelling) to really distribute my blood over a wide area.
And it's only while I'm working on the sprue concepts that I have been cutting myself, and only twice during the making of these box pieces have I drawn blood. But it only flows with pressure on my thumb, not freely as you may hope...
If for some reason I do get my blood on some of my casts for distribution, I'll let you know and you can fight/bid to acquire them...
In actual news, I've been painting for my commission blog and I am working on the tops / bottoms of the boxes.
I've actually heard about the Wordbearers, that makes a change.
Comrade: Only when I've been lazy and not wrapped up my thumb, so it's my own fault. Just the usual very sharp scalpel blade meets thumb. Most of the time I just create a pattern of fine lines on my thumb, occasionally it goes a little deeper... *shrugs* occupational hazard.
Dr H wrote: I've actually heard about the Wordbearers, that makes a change.
Comrade: Only when I've been lazy and not wrapped up my thumb, so it's my own fault. Just the usual very sharp scalpel blade meets thumb. Most of the time I just create a pattern of fine lines on my thumb, occasionally it goes a little deeper... *shrugs* occupational hazard.
No where in the Bible does it say we can't have humor . God loves humor, not as much love for sarcasm though. All tickets to heaven are free by the way, Jesus paid the price for them, you just have to accept it. Most of my humor is a release of tension, or just to see if people read my posts, i do a similar thing with my kids. When I'm correcting them and they seam to not be paying attention I'll slip a totally different conversation in there to see if they react. Sometimes they surprise me and are paying attention, other times....well at least I humor myself with the tangent story .
Theophony wrote: No where in the Bible does it say we can't have humor . God loves humor, not as much love for sarcasm though. All tickets to heaven are free by the way, Jesus paid the price for them, you just have to accept it. Most of my humor is a release of tension, or just to see if people read my posts, i do a similar thing with my kids. When I'm correcting them and they seam to not be paying attention I'll slip a totally different conversation in there to see if they react. Sometimes they surprise me and are paying attention, other times....well at least I humor myself with the tangent story .
I do this as well I would be explaining or saying something and feel like the person is not listing, so I begin talking total crap about alien invasions or throwing in random words, it's amazing how quickly someone turns around and goes "WHAT !!!!!"
Although the misses has got used to it now she just lets me jibber on for a few mins then goes your just talking crap again …………. mind you she said that a lot before
The thing I worry about with tossing random stuff out there is that I might be training my brain to do it on its own. Then later in life my brain might override what I really want to say, then I'll just be that crazy old coot everyone points at and crosses the busy street to avoid .
Theophony wrote: The thing I worry about with tossing random stuff out there is that I might be training my brain to do it on its own. Then later in life my brain might override what I really want to say, then I'll just be that crazy old coot everyone points at and crosses the busy street to avoid .
I know what you mean. I've always had quite a random mind and have had to suppress my crazy-talk on occasion, usually when meeting new people if you know what I mean... I would be a perfect rich eccentric, I just need to be rich...
cormadepanda wrote: Haha... dr.. a dr needs to be rich, that is rich! good old jokes, never feel poor when they happen because happiness is worth a fortune.
This Dr doesn't have a job and the Masters degree and PhD haven't helped me get one so far...
and there's a difference between being rich and being rich enough to be eccentric.
The boxes now have lids...well the concept boxes now have concept lids. The next stage (once this stuff arrives from china) will hopefully make them all fit together better.
With that done, I will return to the toilets tomorrow.
cormadepanda wrote: Haha... dr.. a dr needs to be rich, that is rich! good old jokes, never feel poor when they happen because happiness is worth a fortune.
This Dr doesn't have a job and the Masters degree and PhD haven't helped me get one so far...
and there's a difference between being rich and being rich enough to be eccentric.
Dang, come to America, you would get all the jobs.. of course currency change and medical changes,but eh you could play with miniatures with me.
nice boxes. You have me wanting to throw much money your way.
Yeah, the dollar to pound may seem a let down, and they are still hammering over the healthcare issues, but well, it is hard to make changes here, but you might find a job, many a PhD are flipping burgers to survive. But a chemist is likely to get a job with some company, just avoid Monsanto, please.
shasolenzabi wrote: Yeah, the dollar to pound may seem a let down, and they are still hammering over the healthcare issues, but well, it is hard to make changes here, but you might find a job, many a PhD are flipping burgers to survive. But a chemist is likely to get a job with some company, just avoid Monsanto, please.
No he should work for Monsanto at their corporate HQ here in saint Louis. It would be fun, then I wouldn't have to clone him. I could just chain him up in the basement. Really, it saves me a whole lot of steps in my plans for sprue domination .
Someone... quickly.. find a way to get theo locked up. Or Theo invite me over for second in command.
shasolenzabi wrote: Monsanto would suck his soul out, his tasty, so tasty soul!
But soulless minions work extra hard. They think that their bosses will be pleased, and will give them raises. Me I'll just give him an extra ration and maybe if he's extra good a new knife blade to carve sprue.
Second in command must be a ruthless, cunning and for my own safety not have any desire to advance in the ranks . Applications for #2 (hehe I said #2) are taken daily between 8:15 a.m. And 3:15p.m. Central standard time. I am not an equal opportunity employer. But membership to the league of extraordinary riveters is a plus .
lol. er...thanks guys I'll probably just start by looking harder for a job here to start with. But I'll keep your offers in mind if I continue to struggle to get a job...
Nothing to show here yet, I'm afraid.
But I have nearly finished the Terminator commission and then I'll blitz the Eldar pair for here. So pretties, soon
Dr H wrote: lol. er...thanks guys I'll probably just start by looking harder for a job here to start with. But I'll keep your offers in mind if I continue to struggle to get a job...
Nothing to show here yet, I'm afraid.
But I have nearly finished the Terminator commission and then I'll blitz the Eldar pair for here. So pretties, soon
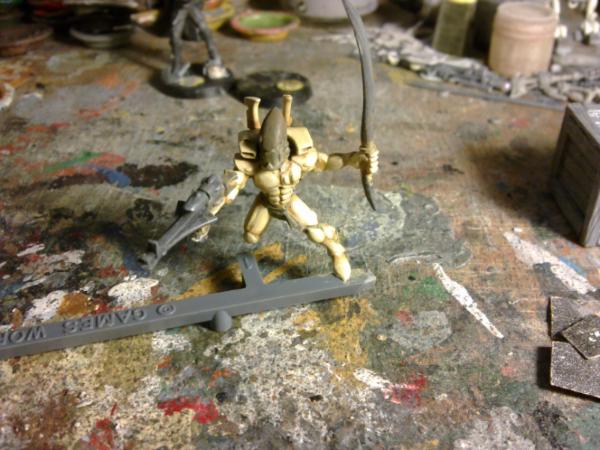
Ha, yeah I don't often attach models to sprue to paint (blu-tacked to the base usually suffices for me) but this chap kept falling over so I stuck him down to a random piece I had laying about and with the side piece it stands up by itself. Which was nice.
He's only partly done and will be lighter when I've finished with him.
Looks brilliant, I am seeing a little Panda-influence, but looking nice.
You just can't help yourself with the sprue can you. "Just a metre or two I had lying around" Do you buy kits and throw away the models and just keep the sprue??
Camkierhi wrote: Looks brilliant, I am seeing a little Panda-influence, but looking nice.
Thanks Cam.
Yeah, I had actually planned this colour scheme (a reversal of the Ulthwé scheme) before Panda showed his Eldar, but I have little to no proof of this.
It's fine though, as I do tend to collect other people's colour schemes to add to my army, to look like The Scientist has brainwashed one of their fallen.
This is most apparent with my Tyranids, where when I have borrowed someone's scheme, I'll post a link to the model that inspired mine.
You just can't help yourself with the sprue can you. "Just a metre or two I had lying around" Do you buy kits and throw away the models and just keep the sprue??
lol. I have a reasonably sized collection of sprue from just the models I have shown here in this blog so far, as well as much sprue from my past in model aircraft (that until recently was only kept with an unconscious feeling that it would be useful one day)...
If you get a dreamforge Eisenkern troop set, paint one in my scheme or so as that will then give you brainwashed Kruegerians, oh they would be so upset to think of such a sullying of fine Kruegerian elites doing the mindless minion thing.
Theophony wrote:An eldar that keeps falling down guess he's a guardian cause he couldn't make it passed the physical fitness tests to join a specialist group .
That, or the brainwashing didn't work out as well as it should...
dsteingass wrote:I picked up some very small plasticard tile sheets, suitable for a FO bathroom tile job
I get the feeling that you're hinting at something but I can't quite put my finger on it...
Don't worry, I haven't forgotten the toilets and they will get some love soon.
cormadepanda wrote:Hmm.. that paint scheme. I like it.
He He. Thanks Comrade.
shasolenzabi wrote:If you get a dreamforge Eisenkern troop set, paint one in my scheme or so as that will then give you brainwashed Kruegerians, oh they would be so upset to think of such a sullying of fine Kruegerian elites doing the mindless minion thing.
With such a recognisable paint scheme such as your's, I have already thought of that (but now I know what models they are). May be a while though, as I appear to have quite a queue of bare plastic building up...
No problems, and the color scheme would be base: castellan Green or similar shade of green, then the desert color splinter patches with the earthy/brown inner splinter patch like the old Bauhaus 1st ed Hussars I did. fabric in a dark adeptus gray shade.
shasolenzabi wrote: No problems, and the color scheme would be base: castellan Green or similar shade of green, then the desert color splinter patches with the earthy/brown inner splinter patch like the old Bauhaus 1st ed Hussars I did. fabric in a dark adeptus gray shade.
Ooo, colour scheme as well. I usually do it all by eye, but that will help. Ta.
While we're on the subject, how do your dreamforge Eisenkern troops differ from GW Cadians? Not that I'm adverse to buying from other companies, just that if I were for get the battleforce (as I seem to be collecting all the battleforces) would it be a huge jump to modify one and get the look?
I suppose I could just go and look at one of your pictures really, but call me lazy...
Well, if using Cadians, then the Khadrovian central theme is the uniform is battle gray with shadow gray and fortress grey patterns added, the lower troops wear plain castellan green flak armor and helms, the veterans get the splinter patches.
Automatically Appended Next Post: Eisenkern are a bit taller than cadians but their hands are normal sized, not 1/35 scale hands for the over sized weapons, but they make for good IG platooners which I am making with the 40minis and the 3 teams of support heavy weapons. I need the FW book with the sabre platforms in it for the rules of a quad heavy stubber is needed, and the skyfire rules would also be used for it.
Dr H wrote: Right-y o. We'll see when I get there.
or we can see that Eldar's paint job.
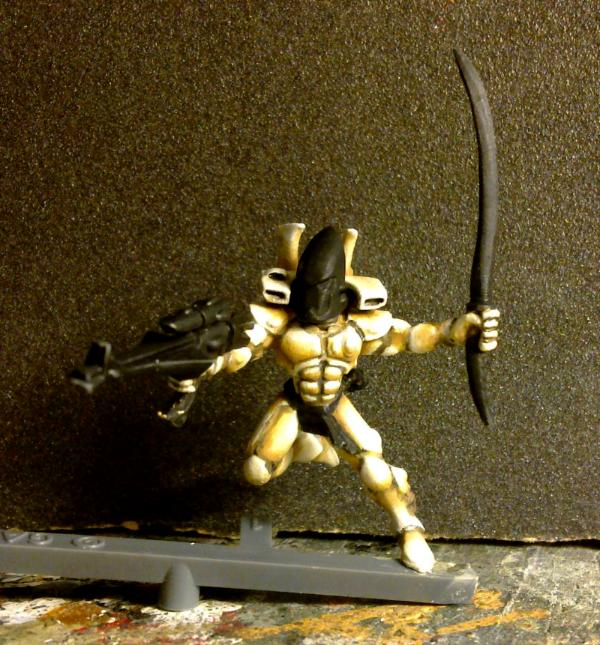
OK OK, here's another picture... Haven't properly started on the black yet and the "bone" may still require the odd touch up yet. He's a tricky one to photograph and I've had to fiddle a bit with the picture so you can actually see what I've been doing.
looks atm probably brighter in spots than in RL...i expect you autoadjusted the pic parameters a bit...
but i do like the shading of the bone colorerd parts!
also...the black looks promising... what will the blade be painted in? NMM? or an energy effect?
Yeah, the auto-adjust actually made the picture darker and I had already darkened it a bit before posting... He's blended up to white so he does "glow" quite a bit under harsh lighting, so I'll have to do something ingenious for the final pictures to look ok. Maybe I should have used a light background... I'll do that next time...
Thanks. The black is literally just black at the moment, but I think I may blend that up to a lighter grey to (kind of) match the bone.
Not thought about the sword yet. I'm not seeing it as a power weapon and I'm not really feeling the nmm thing (especially as I have plenty of nice metallic paints). I have got a paint that you buff up to a shine once it's dry, but it does look kind of flat in photos...
Thanks, although looking at the pictures below it could still be better...
Solar_lion wrote:Agreed the bone colors you used worked really well
Thank SL. I used a brown, a little black in the brown for the darkest recesses, then blended from that, through a sand-y colour, a "bone"/Oak colour to white.
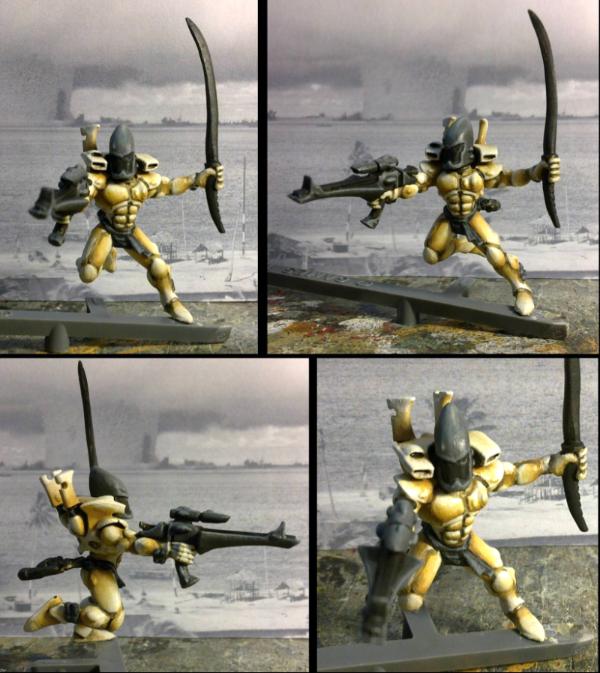
So, using a lighter background does help the clarity of the pictures. This however, shows the rough patches in my painting...
The black has now had some work, not sure what else I will do to it, but will see when I start adding other colours...
and ignore the light patch above his left eye, that's not painting, it's just the paint isn't quite dry yet...
The sword, "face" and dangly bits haven't been touched yet, only the helmet, belt and gun.
I don't normally do this kind of shading on black things, so what do we think?
Next I'll do a few of the other pieces and see how they sit with the bone and black.
I like the attempt at lighting it, but I think you went a touch to much shading on the helmet. That balance of dark black that people like, and light is hard to get. It looks good as it is, I am just being picky. He wants to jump on a ship across the bond and meet some friends I think
Viktor von Domm wrote:very good looking, doc!
what color will the face be then?...i bet that will be a tough decision...
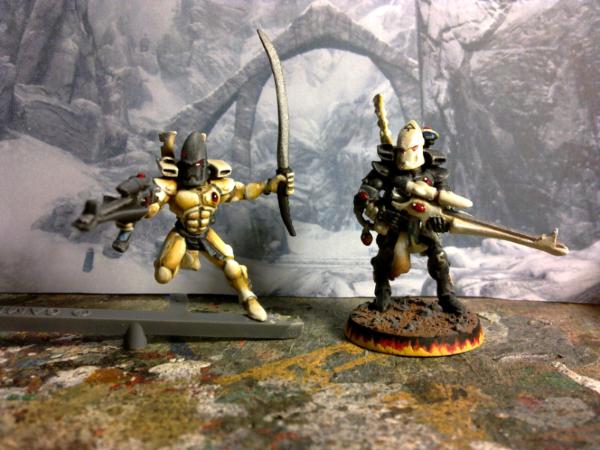
Thanks. Well actually, as I've always planned him as a reversal of #5 (see below), it will be black and is now I've added some shading.
cormadepanda wrote:I like the attempt at lighting it, but I think you went a touch to much shading on the helmet. That balance of dark black that people like, and light is hard to get. It looks good as it is, I am just being picky.
Thanks Comrade.
Yeah, I did think it looked a bit too grey from the front. That came about as when I was looking at the helmet for the shading I noticed that there is a "corner" and the sides and front of the helmet are "relatively" flat and so the sides would be much darker than the front with light from above. This meant that there is a reasonably sharp change from the sides to the front.
And the flat black "face" made it look all the more grey...
However, now that the "face" is painted with a slight gradient (I still want it to look darker than the rest of the helmet), I don't think it's as bad.
And, I made the area just above the face slightly darker so the front isn't as flat grey any more.
Here he is, next to #5 so you can see the reversed scheme. Better?
He wants to jump on a ship across the bond and meet some friends I think
The brainwashing and the little chip in his brain means he wants for nothing and wouldn't recognise his former friends...
Really looking great. Please don't get me wrong here, but helmet looks definitely grey. I am by no means any expert at all, but I think maybe you graduated it to much, On No.5 the black has a very slight edging going on and looks fantasticly black, where the new kid you have "blended" the toning in on the black and it looks very dark grey.
Please feel free to tell me to shut up and go away.
It absolutely rocks btw, he looks brilliant and way better than my efforts. And your toning on the body is just spectacular.
the reversed schemes explain a lot... after just reading and seeing the painted helmet i was a bit lost... somehow i expected something else for the face part... but now i am calm and understanding ...yeah... looks very good!
the blade however looks a bit bland still... maybe...maybe you could make it look a bit more like an elven sword from lord f the rigs with some golden embellishments?
i tried to find a good referrence pic but no such luck
Not to worry, I have this one already in my "sword" folder.
Spoiler:
I don't think I'll be able to paint as finely as required to copy that, but I can at least give the impression of it...
and that picture decides the colour of the handle as well.
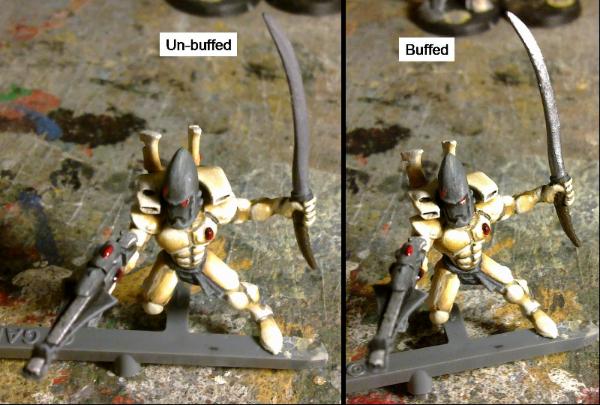
Before I attempt the gold work here's what the polished metal paint looks like (Humbrol Metalcote): On the left is what it looks like after you have painted it on and let it dry, just a matt grey. On the right is after a bit of elbow grease and held at the right angle to catch the light. Polished steel it says and polished steel it looks like.
That looks brilliant. And I guess it also kinda automatically adds shading as there are recesses you won't get into to buff and they will stay matt. That's awesome.
Just a thought about the very fine gold filigree, have a go at carving in a fine groove for your gold paint to sit in. You have shown us you have amazing carving skills and the point of the scalpel is finer than you will manage with a brush. I have had some success with this on hair, but I am not as good a carver as you.
Camkierhi wrote:That looks brilliant. And I guess it also kinda automatically adds shading as there are recesses you won't get into to buff and they will stay matt. That's awesome.
Yeah it's a very cool paint. I've only used it on swords so far, but I can imagine it working nicely on a large metal sheet with rivets as it would do exactly what you said. There are other flavours of that paint type but I only have the polished steel one.
Just a thought about the very fine gold filigree, have a go at carving in a fine groove for your gold paint to sit in. You have shown us you have amazing carving skills and the point of the scalpel is finer than you will manage with a brush. I have had some success with this on hair, but I am not as good a carver as you.
That's not a bad idea, but I won't try it on this one as it can be tricky to get the scalpel to do what you want and one slip and it's screwed and it being painted will complicate matters. However I will remember that for future swords and give it a go.
cormadepanda wrote:looks sweet well done
Thanks Comrade.
nerdfest09 wrote:Dude that is ALL looking great! the scheme is really nice and unusual, I like what your rather 'out of the box' thinking does to models :-)
Theophony wrote: Day late and more than a dollar short , but well done mate. The sword is looking excellent.
Thanks Theo.
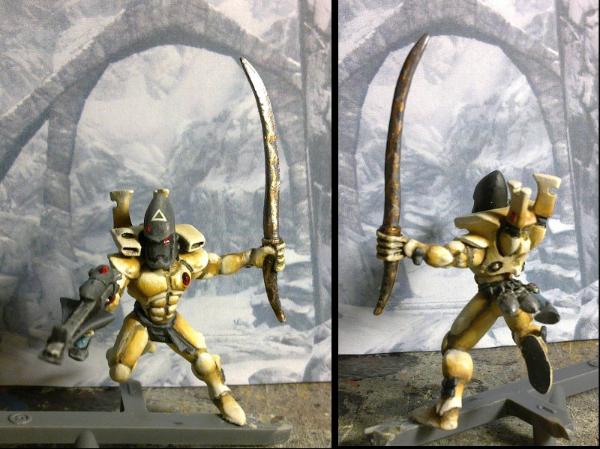
So I've done the golden squiggles.
They're not as sharp or thin as I'd like, but it's really difficult to paint a metallic paint over a very shiny metallic paint (as you can see in the picture below).
I will get better pictures of him when he's on his base, and I'll do that when I've painted Number 9.
Guess what's next on the "to do" list...
...no, it's toilets.
I've given them a little sanding today and assessed where they need more putty to properly fill out the shape, so they are next.
you had to buff up the paint?...how? did you do it with a Q-Tip?...but it looks amazing...and while the golden squigles are bigger than expected i think they still sell the elven look very good!...
Viktor von Domm wrote: you had to buff up the paint?...how? did you do it with a Q-Tip?...but it looks amazing...and while the golden squigles are bigger than expected i think they still sell the elven look very good!...
Yeah, you can do in hard to reach areas. I just used a bit of tissue. Basically anything soft will do (it does leave a grey patch on it so don't use your t-shirt).
Also, of note on the paint in particular.
It's still enamel, so you still need white spirit to clean up.
It dries really quickly (compared to the other enamels).
Best results are on surfaces that are very smooth as any roughness is shown up (and I should really have given the sword a rub down with fine sandpaper first, but it's not that bad).
It uses a different solvent to the other enamels and smells nicer (in my opinion), more like ether than "paint".
And it requires VERY thorough mixing/stirring before use. (if you don't get the matt finish when dry, it wasn't mixed enough and won't look right when buffed).
i smell a troyan horse here...if paint starts to smell nice... be careful not to sniff your paints
And it requires VERY thorough mixing/stirring before use. (if you don't get the matt finish when dry, it wasn't mixed enough and won't look right when buffed).
and this is why acrylic painters really are way too pampered just shaking wont do...
I avoided any such virus' as I didn't like the idea of paying to play a game I had already paid for... I'm funny like that...
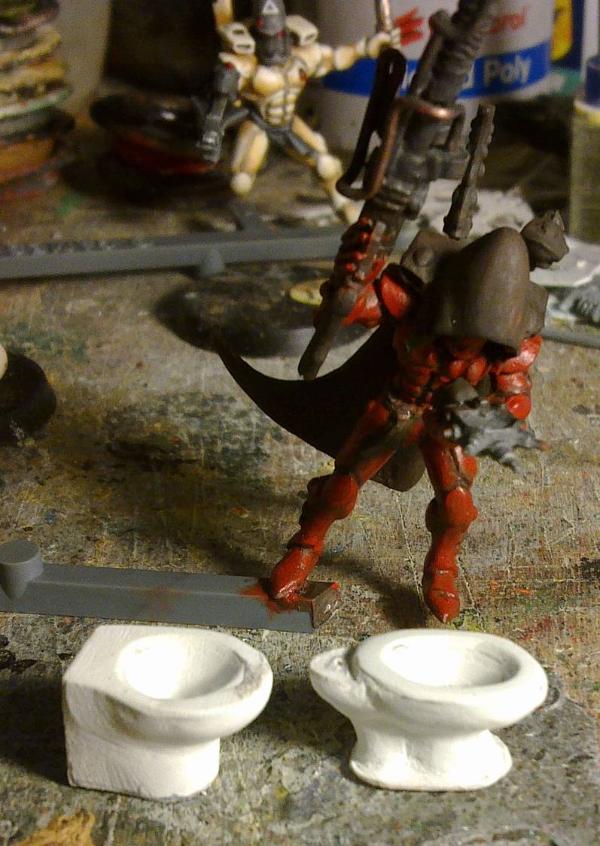
And I have a dual update. I have started painting guardian number 9 and as he is a sneaky sniper type I though he should be bright red... (the cloak will be camo-alike )
And the toilets have had (quite possibly) the last putty session.
The seat of the FO toilet now sits parallel with the ground (it was leaning forward) and the outsides of the bowls have been rounded and filled out more (although a little too much on the front of the FO bog, that'll be sanded back).
They have had some sanding work and just need a little more to smooth them further and some carving to define some of the shape better.
That red sniper standing by is checking readings from the toilets? Uhoh...what's lurking there Thrown shapes look very good,brie white currently helps a lot too to carry the message....
The red sniper is a bit new...red being not a usually known color for stealth... But wip is wip
Viktor von Domm wrote:That red sniper standing by is checking readings from the toilets? Uhoh...what's lurking there Thrown shapes look very good,brie white currently helps a lot too to carry the message....
The red sniper is a bit new...red being not a usually known color for stealth... But wip is wip
Thanks Vik.
Yeah, the one occasion where the white milliput actually helps. The main reason he's red is that I have pretty much run out of main colours to use on the guardians and I don't have a bright red one (for the Saim-Hann craftword), so he completes the collection. The cloak will make up for any non-stealthiness of the red (think of the elven cloaks from TLOTR ).
dsteingass wrote:@Vik either Sugar Bombs or scrap metal I'd assume
Or Cherry bombs. I've lost count of the number of them I've found in bathrooms (although usually in broken toilets)...
Lovely toilet bowl! like I said, I have some tile ready to house such a throne!
Thanks Dave. I am excited to see what you do with them.
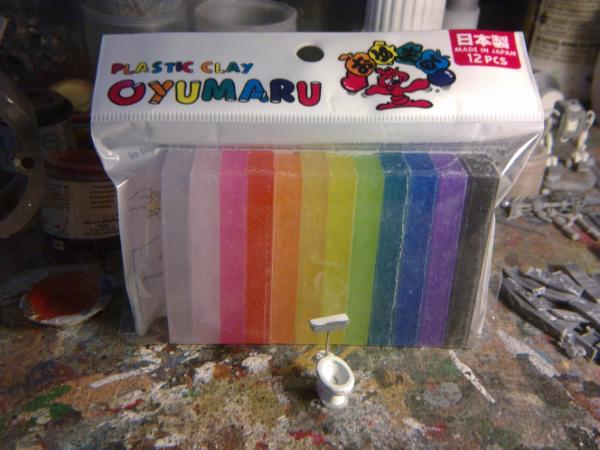
Good News!
The Oyumaru has arrived I can now have a play about with it and start making masters for casting.
And the FO toilet is as far as I can take it here.
It's not exact, but maybe I will be able to alter things at a later date as the card skeleton is preventing me from carving too much away in places (and I don't want to accidentally damage this one).
The cistern is not glued in place as I think it will be much easier to cast them separate... (this is as far as I have got with thoughts about how this will be cast, more thinking is needed but the Oyumaru will help in the testing stages).
Oyumaru, is that reuse-able molding material for mini copying?
Yeah. Reusable press-moulds basically. Just add hot water.
I don't know how it behaves yet, but from what I gather it gets soft enough to mould it into any shape and you can cut it up and stick it back together and maybe (hopefully) make 2-part moulds.
I shall report back on my adventures with it as I attempt to make copies of my creations , but I will definitely not be using it for recasting any miniatures or their bits...
Speaking of orders, Galorn ought to be casting my soda machines today. If you do make enough for orders, consider me another one to order the toilets Doc
dsteingass wrote:Toilet is PERFECT! I'd like to place my advance order for 2 dozen please!
shasolenzabi wrote:Speaking of orders, Galorn ought to be casting my soda machines today. If you do make enough for orders, consider me another one to order the toilets Doc
Your tiny toilet is very convincing Dr H. I think you're onto a winner here. I can't think of a reason to buy these right now, but if I ever need a tiny toilet I will think of you.
weetyskemian44 wrote:Your tiny toilet is very convincing Dr H. I think you're onto a winner here. I can't think of a reason to buy these right now, but if I ever need a tiny toilet I will think of you.
Thanks Weety. Yeah, toilets are kind of a niche within the modelling market, but someone has to fill them...
I will be making more objects in the future, so if there is something you think you may need and can't find, let me know. Although you have proven to be perfectly capable of creating such things yourself.
cormadepanda wrote:Yay dr has instant mold. Things can only get better now.
cool toilet... the water tank is a very good addition... while i see the differences to the original... i see that this throne has the right character...and everything is fixable once you have casted the first one...
Viktor von Domm wrote:cool toilet... the water tank is a very good addition... while i see the differences to the original... i see that this throne has the right character...and everything is fixable once you have casted the first one...
Thanks. Yeah, my thoughts exactly.
dsteingass wrote:
weetyskemian44 wrote: I'm sure some will deliberately make dioramas involving toilets now they are available!
I've been specifically waiting for these toilets to build Fallout bathrooms!
Sooooo looking forward to those...
I should start thinking about sinks now shouldn't I?
Theophony wrote:Well at least my league of extraordinary servo skull janitors will have more work to do now I can now have one getting a swirllie
Yeah, I'll keep 'em busy. That's a very nice name for something that at our school was only known as a bog-wash.
shasolenzabi wrote:In the grim darkness of the future, there is only TOILETS!!!
and boxes, don't forget the boxes...
Thanks Ruglud. Very wise.
Galorn wrote:Actually using the good doctors sprue carving techniques simple block faucets would be easy. They would need to be vac then pressure cast though.
Thanks Galorn. I'll cross the bridges when I get there...
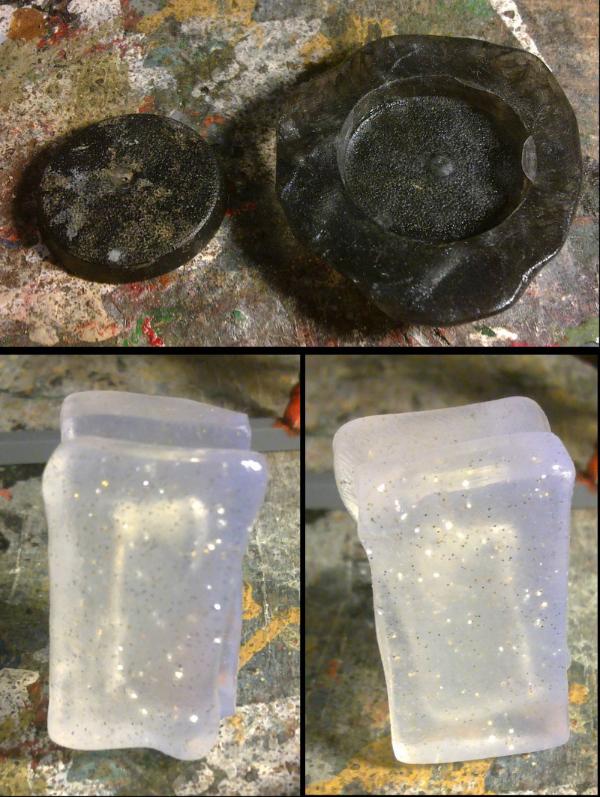
Well I couldn't help myself and had to have a play with the Oyumaru.
My first impression was that this stuff FLOATS in water. For something that you are told to put in water I was surprised that it wasn't at least neutrally buoyant. But it's not a problem as it still seems to heat up evenly and is easy to fish out of your chosen container.
Second impression is that it gets really soft. kind of like blu-tack that you have really well kneaded or softer than mixed milliput. When cold, it's like a hard, but flexible plastic.
So for my first test I wanted something that only has one side with both a simple shape and fine detail.
The nearest thing I had of that description was a base.
Together with a flat surface it's very easy to get the whole shape of the base and it picks up all the little rough detail on the top of the base.
Second test was to see if two-part moulds are possible. So I pressed a mystery object into one piece of Oyumaru, let that cool and then pressed a second piece on top of that. They only lightly stuck together and were easily peeled apart thanks to the flexible nature. The final mould looks perfectly good although I should have added registration points so will probably need to redo it to get a proper mould. But works well. The second piece even picked up the fingerprints from the first piece, so this stuff is really good for details.
My sister used to work at one time as a chambermaid. Well , that one day she had to clean a toilet (room) ceiling to floor from a "grime" similar to that look...but it was all fresh...she mentioned to me it had to be a pair of perverts the other night....
I've seen some pretty horrific sights in toilets when I was working in pubs. I won't give you details.
Dave and Theo: You need to give this stuff a try. It's reusable, so you can test it on anything and if it doesn't work just chuck it back in the hot water and try again.
On the hot water thing; Once your water is below the ideal temperature you will need more fresh hot water. If it's not hot enough you'll only make the mould rubbery and not soft enough to do the job.
I've pulled out a thermos flask so I can boil a load of water and then take that to my desk and pour out enough for each mould stick, and then dispose of the cooled water and pour out more hot water for the next mould. Saves running down to the kettle (or even boiling a kettle) for each mould. A mug of hot water won't stay hot enough for more that a couple of moulds even if you work quickly.
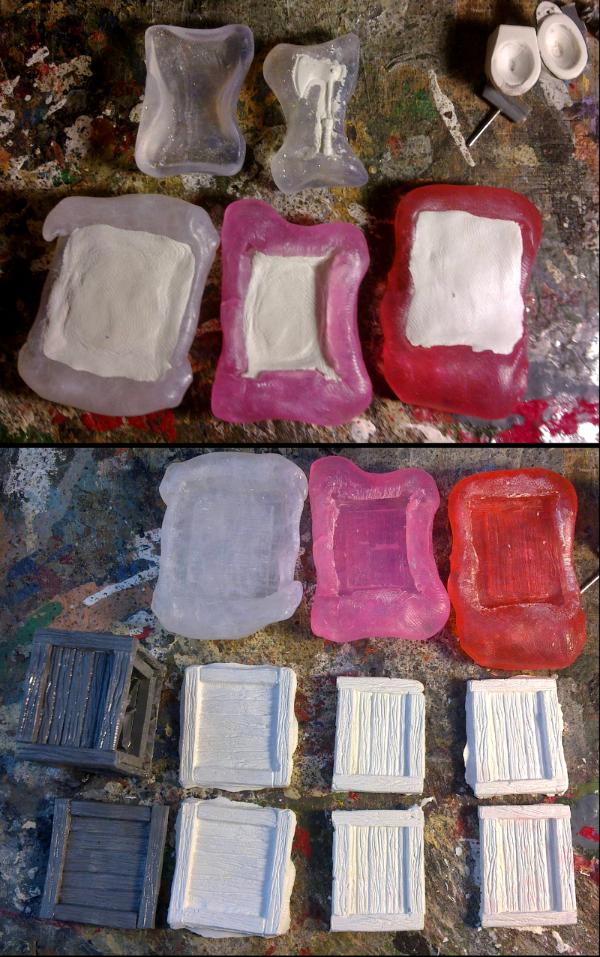
And further to the registration key thing I mentioned last time: I gave it a go with a couple of beads but found a much better way in the process.
The problem with the key making is that for it to work you need to get the second mould to go right into the holes that you made in the first. But this is difficult as the Oyumaru is not being poured into the mould like you would with RTV silicone and so you don't end up with reliable, perfect keys.
However, I found that when I made the first half of the mould I ended up with it in quite a unique shape (see below) and just pressing the second half around the first led to a much better registration key that locks the two halfs together perfectly.
As you can see, I've been casting the masters for box number 1.
I kind of pushed the Oyumaru too far around the box original really and I've ended up using more putty than necessary and leaving me with a fair amount of clean-up work to do (not to mention being a little tricky to extract the casts from the moulds, but the flexibility helps).
There is a few little bits of "damage" to the casts, but nothing a little tidying won't solve and anything that isn't solved just adds to the uniqueness of the parts.
Solar_lion wrote:Very nice for small unique bits you want to cast. What material are you using to do your casts .. Milliput ?
Yeah and apparently you can join many of the sticks together to make larger moulds. Ja. I used milliput for these as I want to be able to clean up, carve and sand them before casting them properly... that's the plan anyway, good idea or not...
Viktor von Domm wrote:The amount of details it picks up us amazing!
Yeah, as I said even fingerprints are picked up.
and it keeps the detail for at least a second casting (I've only used them twice so far) and should be usable for many more in theory.
and if not, just re-heat and mould again.
If you can't tell, I'm really quite impressed by this stuff.
Soon you won't be even think about saving money anymore...instead how you can spend it...
Oh, I wish.
Automatically Appended Next Post: Oh yeah, I keep forgetting to say...
PAGE 50! I have plans for a mini celebration-like thing to mark this occasion, but will take a little time to compose it.
Darn, now the fear of pageturner spreads... Happy 50! Congratz...coming this far doesn't happen by chance...er... of course with that thread, choas implies everything...
Been out for a while, but back in the game now.
The Hut turned out better than any possible idea I had, fantastic.
Following the casting process with load of interest.
Viktor von Domm wrote:Darn, now the fear of pageturner spreads... Happy 50! Congratz...coming this far doesn't happen by chance...er... of course with that thread, choas implies everything...
No need to worry, I got my act together. Thanks, I'm surprised that I made it this far and this quickly really and I'm very pleased that people have shown interest in my madness.
dsteingass wrote:Anyone know what the US equivalent product to Milliput is?
I don't I'm afraid and I didn't realise you didn't get it over there. You will probably get a quicker answer if you ask on your blog though...
SelvaggioSaky wrote:Been out for a while, but back in the game now. The Hut turned out better than any possible idea I had, fantastic. Following the casting process with load of interest.
Keep It up Mate and congrats for the 50th Page
Welcome back Sel. Good to see you are still kicking. I await progress on your blog. Good luck with the job hunt. Thanks.
So, 50 pages ago, I set out to show what I can do in the modelling world of warhammer 40k after becoming bored of buying an endless stream of expensive plastic kit models of mostly planes and helicopters. I wanted to challenge myself and to learn more and new techniques that would improve my modelling and maybe give a little back to the community.
I was concerned that my approach to painting the models in my collection would not be received all that well by (what appeared to be) the masses of warhammerers with their uniformly painted armies, but I had an idea. To show the true nature of chaos and just how chaotic it can be... This idea led to the creation of what is known as The Army of the Second Law. Referring, of course, to the second law of thermodynamics where the concept of entropy is found.
Following from chaos theory, which states (in many more words) that from small initial differences, drastically different results can occur and these will continue to diverge from one another, my initial army concept has brought me further and further from the "normality" of 40k armies. Below, I present the extent of how far this idea has come and (if you look closely) how far my painting and modelling has come.
Ladies and Gents, The Army of the Second Law as compiled by The (Mad) Scientist as it stands at the present moment: First up is the ranged combat specialists
The close combat specialists
The support group...
and the transport solution
I hope to continue to diverge from what is considered normal...
...there are so many more ideas yet to be realised and I hope you stick around to see them.
Ok just properly read what your doing...... on the hot water front. A chaffing dish....with a small burner under it will maintain hot water for a long time. Or if you only need a minimal amount of water I have seen usb powered mug warmers that keep your coffee warm while at computer?
Automatically Appended Next Post: That is a beautiful army dude. love everything about it, concept and result.
Camkierhi wrote: Ok just properly read what your doing...... on the hot water front. A chaffing dish....with a small burner under it will maintain hot water for a long time. Or if you only need a minimal amount of water I have seen usb powered mug warmers that keep your coffee warm while at computer?
Thanks Cam. They need to maintain about 80degC, but are worth a thought.
Automatically Appended Next Post:
Camkierhi wrote: That is a beautiful army dude. love everything about it, concept and result.
dsteingass wrote: So, what is it, a two-part mix like GS that you just jam into the mold and let harden?
Yeah, a two part epoxy putty. From what I can tell (I still haven't used GS or and equivalent) milliput is not as elastic as GS or as sticky. But it dries harder, so can be drilled, sawn and sanded once dry.
Yep, just mix some up and press it into the mould. Helpfully the Oyumaru is largely transparent so you can see if you have filled all the corners. Then I had to wait about 4 hours before I could pull them out and the milliput was still a little flexible then (although I don't think one of them was properly mixed as it really clogged my sandpaper just now). The second lot I left overnight as it was late when I filled them.
I had that problem when playing with the clear resin you can get from Michael's, the parts stayed a bit flexible. THankfully, it was just floor tiles, so they would be glued flat anyways.
Milliput is used a lot in modelling, but also in other area's including for instance, I know a diver who uses it deep sea to seal up pipes because it sets underwater. It has a cure time of about 24 hours which is not great for us, but once set it is very solid. I often mix it and GS together and this gives me a nice somewhere in the middle. The one big disadvantage is it is difficult to get it as smooth as GS, but using water after a period of curing helps.
All information is good information Cam. Bubble all you want.
It's usually workable after a few hours though.
I have read somewhere than Meths is good for smoothing milliput (as it dissolves it), but I haven't tried it as water followed by a little sanding works fine for me.
so long since we actually saw what this whole blog is all about...a brilliant and crazy army (crazy as a bag full of cats on crack...)
the more I see of your army, the more it is growing on me...but I do detect a serious lack of green skin...hmmm?
and the average man is also missing from the roll call of lunacy...
Dr H wrote: All information is good information Cam. Bubble all you want.
It's usually workable after a few hours though.
I have read somewhere than Meths is good for smoothing milliput (as it dissolves it), but I haven't tried it as water followed by a little sanding works fine for me.
Methamphetamine is good for what??? Sorry, I better go back and read some more than just the last post. I might be misreading, I did just move out of the methamphetamine Capitol of he world last year (Jefferson county, MO).
Viktor von Domm wrote:so long since we actually saw what this whole blog is all about...a brilliant and crazy army (crazy as a bag full of cats on crack...)
the more I see of your army, the more it is growing on me...but I do detect a serious lack of green skin...hmmm?
and the average man is also missing from the roll call of lunacy...
Thanks Vik. Glad you like it.
Yes yes, there are many flavours of being missing at the moment. All in good time, good sir.
I've only been working on this for just over a year and at the ever decreasing speed I am cranking out models some will inevitably have to wait.
Blue and Green skins are available and so will be seen (relatively) soon.
More terrestrial coloured skins will arrive eventually.
Theophony wrote:Methamphetamine is good for what??? Sorry, I better go back and read some more than just the last post. I might be misreading, I did just move out of the methamphetamine Capitol of he world last year (Jefferson county, MO).
Meths darling, I said meths not meth. Methylated spirits to be exact.
And with that, an update on the box.
You can see here the angled edges I've been sanding so it all fits together nicely.
The letters will help with construction as you have 2 of each side and to make a square box you just have to put the matching letters opposite each other.
And as blu-tack wasn't holding it very firmly for me to test the fit of the pieces...
Minimal gaps all round, if you get all the pieces the right way round... it's kind of a jig-saw at the moment...
And the side that I said was not mixed properly... it wasn't.
Once I moved on to cleaning up the fine detail I found patches on it that were really soft and crumbly (much like the individual sticks are) and some of the details were becoming rounded...
So I've mixed some more milliput and stuck it in the mould again. The rest of the pieces are fine though and this was a top/bottom so that's the best case problem.
shasolenzabi wrote: Too much exposure w/o the right safety equipment like Methyl Ethyl Keytone and Toluene liquid for me to mess with such.
Ah yes. I'll let you off. With all the chemical and solvent exposure chemists get just while at uni I'm surprised I've not heard of more that are sensitised to things. Only one I can think of was my old boss that was sensitised to Thiol containing compounds.
Probably says something about the effectiveness of fume-cupboards.


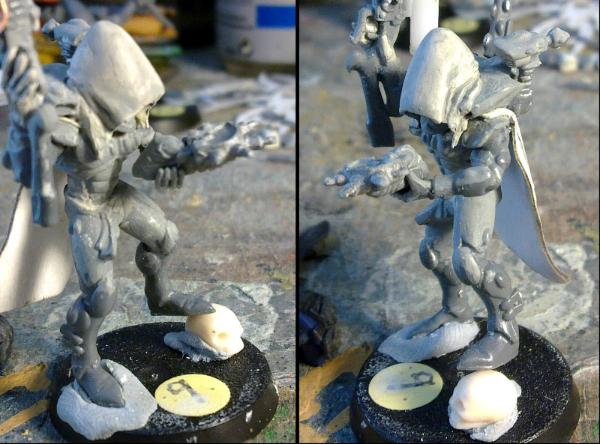
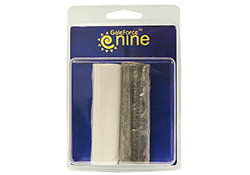

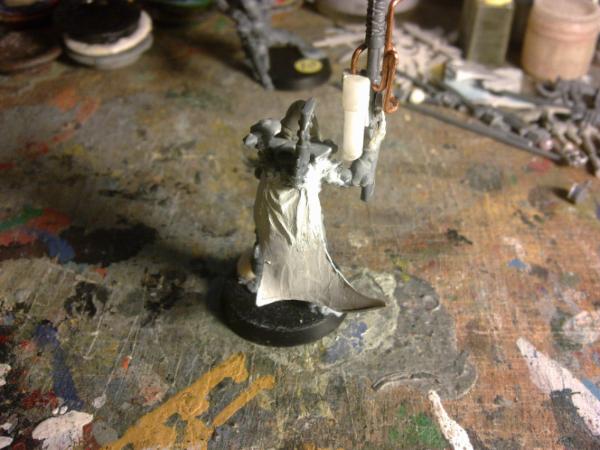
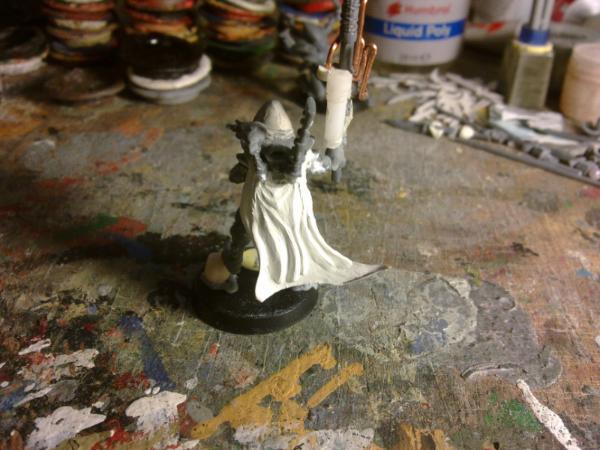

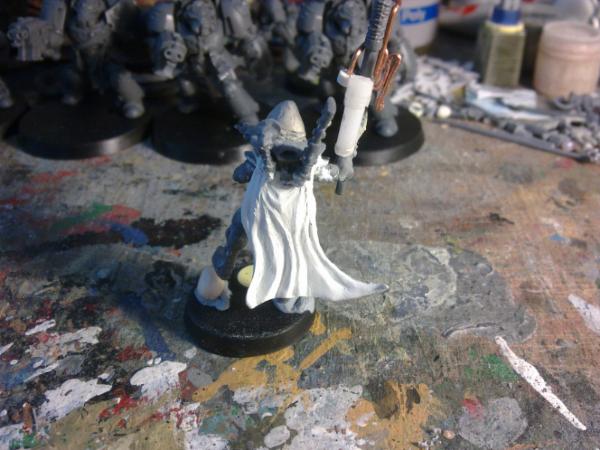


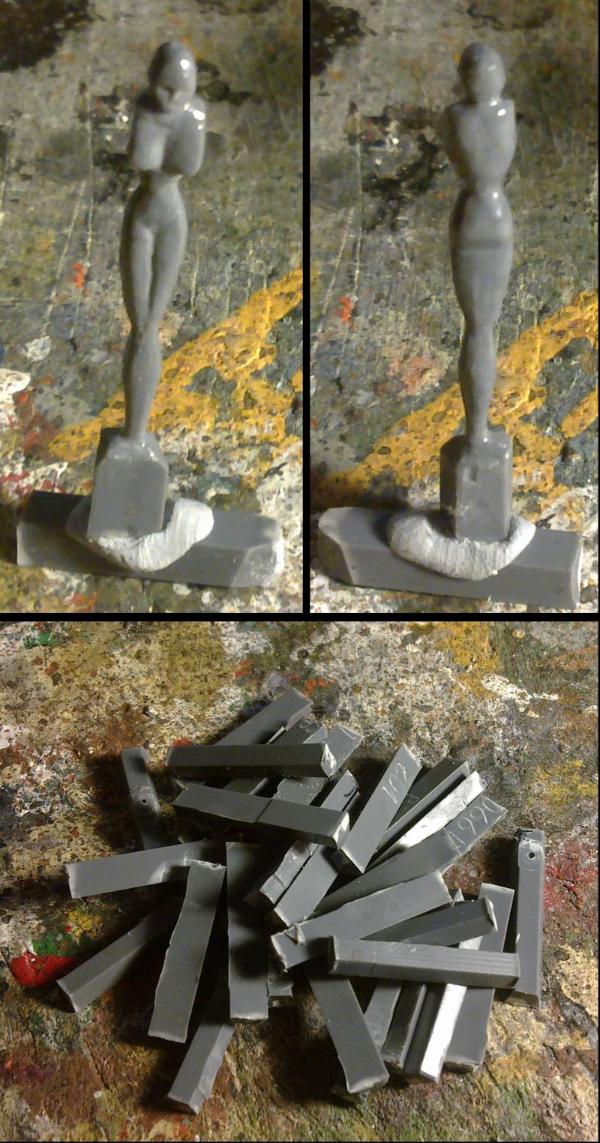
 , but the details (such as her face) probably won't become much sharper as they are tiny...
 How did I not have those on my list?


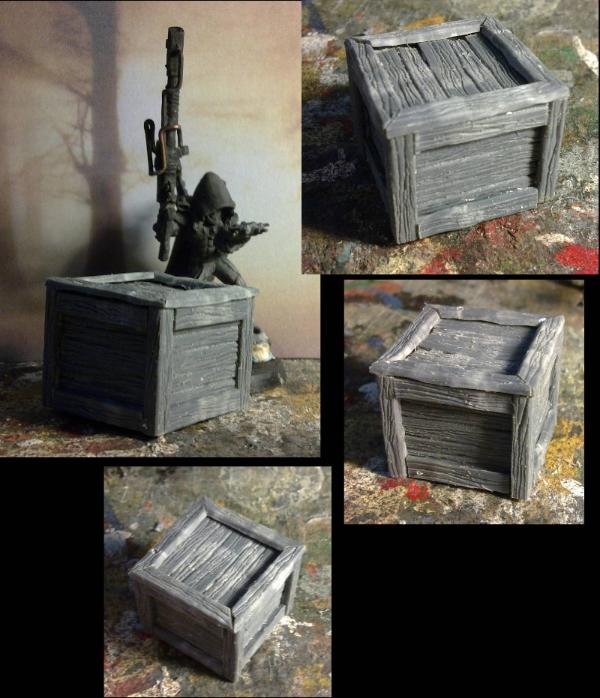
 not good enough). Probably should have spent more time measuring it "before" rather than afterwards... Oh well, works as a concept.


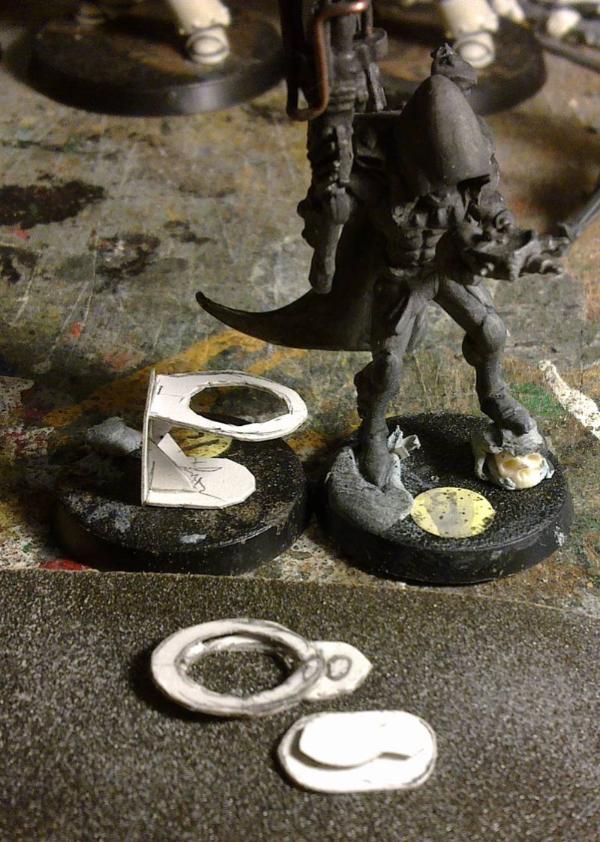
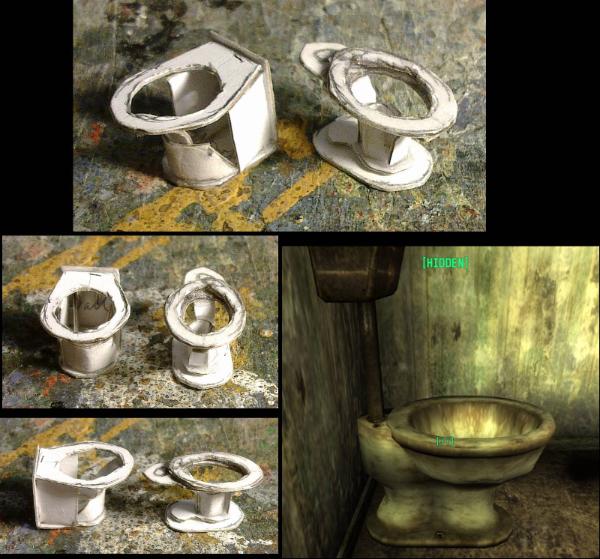
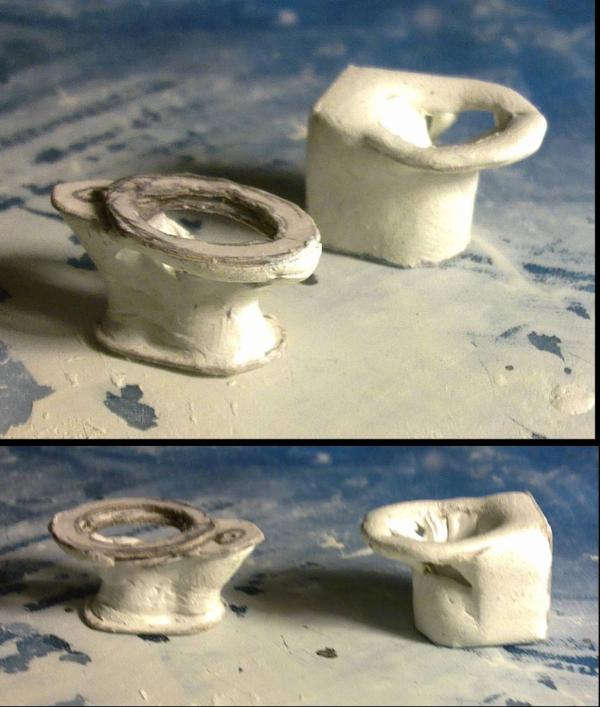
 blood for the blood dog woof!
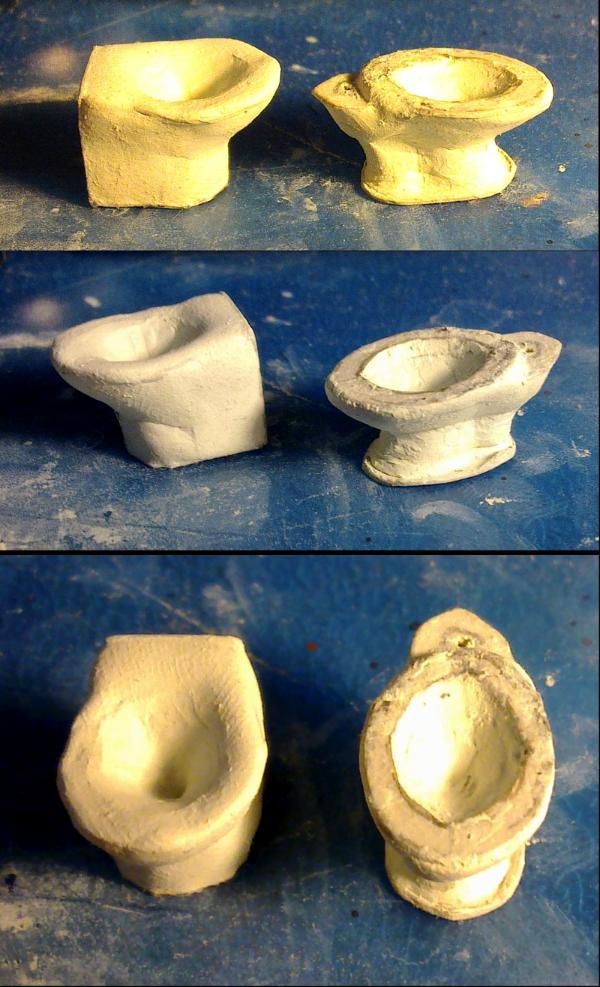
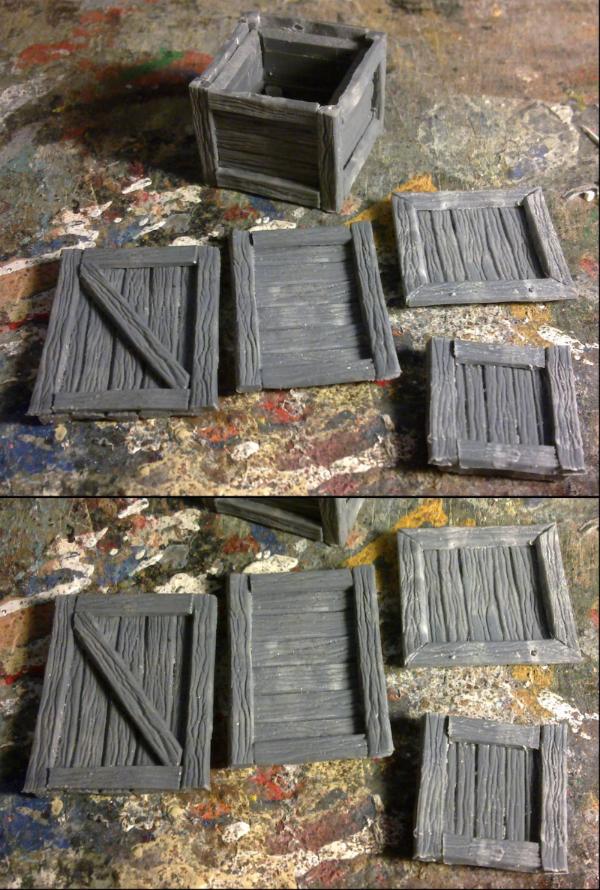


 now get them out of the way before there's a special on sushi.