Well the second attempt at a top/bottom worked out fine and fits the rest of the box. Not had much time to do a lot today as I did some 1:1 shelf building, but I have a question.
I've been marking up the inside of the pieces to help with building. At the moment you're only getting X, Y and Z (as described earlier), but on my copy and to make my life easier I wrote on each piece where they match up with the other pieces (the 1, 2, 3 and 4 in the picture). Would you want this on the final pieces or is that a bit too much of an idiot's guide?
I can also mark up the top/bottom pieces as they really do make a difference which way round they are.
Also, how neat would you want the inside? They are quite rough in places, but you won't be seeing it in the built boxes, so does it really matter?
Letter keying or even a scratch that only lines up on relevant sides would work. And would be helpful.
As to the insides, I would not be worried, but it does give me an idea for you. You could make "fillers" so it looks like the crate is nearly full of grenades, or maybe contains a toilet! Just an idea.
Fit should be as well as you can get it really. Anyone who buys it and can't be bothered to sand a little bit is just lazy IMHO. No one expects the exacting standards of a Japanese plastic kit after all
Camkierhi wrote:Sorry, love the box, where do I order?
Letter keying or even a scratch that only lines up on relevant sides would work. And would be helpful.
As to the insides, I would not be worried, but it does give me an idea for you. You could make "fillers" so it looks like the crate is nearly full of grenades, or maybe contains a toilet! Just an idea.
Just need to be a little bit more patient. This is all new to me at the moment and I want it to be right, right from the start.
I had future plans for "open" boxes, but actually making a "full" box of stuff it not a bad idea... Just a flat piece that sits just inside and I would "have" to texture the underside of the lid... or at least make a "both side" lid available... Cogs are whirring... Thanks Cam.
dsteingass wrote:Fit should be as well as you can get it really. Anyone who buys it and can't be bothered to sand a little bit is just lazy IMHO. No one expects the exacting standards of a Japanese plastic kit after all
It would be nice to achieve as close to that standard as I can though. I agree though, these do fit together reasonably well and people can leave them rough as they are or fill/sand them to get perfect boxes...
Letters for better matching is a workers must, I use letters or crosses and such signs all the time. Teached by my grandpa there is no way around it anymore for me! Also...I wouldnt be too averse for a box that is empty but with woodgraine inside too...
dsteingass wrote:Your masters may be exact, but with gravity pouring, you are always going to have some variations in thicknesses. It's unavoidable.
Good point Dave. I'll dial down my perfectionism to 10 and consider them nearly ready.
Viktor von Domm wrote:Letters for better matching is a workers must, I use letters or crosses and such signs all the time. Teached by my grandpa there is no way around it anymore for me! Also...I wouldnt be too averse for a box that is empty but with woodgraine inside too...
Cool, I'll add some markings. Yeah, an empty box will happen in the future. It's just a lot more work, but maybe there'll be a shortcut when I get to casting the closed boxes, will have to see.
Thanks Ruglud. Yeah, it's not the cheapest option, but it's only for the single individual masters and I had it on hand to use. That's a good idea, I might pick some of that up. Thanks.
BTW, I always thought your Army of the Second Law was something to do with the 3 laws in I Robot !! DOH!
Ha ha, well that's something to keep in mind for when I come to add some Necrons...
If you would like to know more about The (Mad) Scientist and his army and don't want to trawl through this blog to find all the fluff pieces I have it all in my "Compiled Army Fluff" article. Where you can learn about his decent into madness and how he plans to achieve his aims (and what those aims are)...
I'll also have to find a way to include that club that we can't talk about in the army somewhere...
I'll update later... when I have something to update about...
Well I said I would post and update today, so here it is.
The red on Guardian #9 is mostly done (I think I may touch up some of the highlights that are a little thick).
The black needs highlights and the white faceplate needs to be made white.
The brown bits are just the start of the painting of the cloak and gun, much more work to be done there.
The box here is the original sprue box (the one that isn't quite square) with the dodgy putty top/bottom added.
This will just be like a showcase example of what you can do with your boxes.
Not finished yet.
But a shout out to Weety for the "adding grey to a bright colour" to make it more muted, top tip.
I'm going to try out some more two-part moulds with the Oyumaru tomorrow and see if I can take the toilets to the next stage. Dental plaster should be arriving Tuesday, Thanks Ruglud.
Heh! stormtroopers are still IG but with some better stats and armor than 5+ they get the 4+ armor. Hellguns, and both K and F grenades and 2 special weapons per 10 man squad.
That comes in the bundle deal. Order a toilet and it comes shipped in a container . I think any imperfection with he box has more o do with the carpenter who assembled it than your carving ability.
Thanks Cam. I am simultaneously excited to get this all going and scared...
I'll look into them shas. Ta.
Ruglud wrote: All looking good... LOL moment though is seeing a toilet in the background
Thanks Ruglud.
Yeah, that picture pretty much covers all of my current unfinished pieces; the two Guardians, the boxes, the toilets, the swords and axes, my next commission piece and a mystery object at the very top right... The only thing missing is what's next to that mystery object that I have shown before by itself and will get used very soon (which is to say the lower body replacement solution...).
Ha Ha. Thanks Theo.
That may have to wait until I have boxes with an inside...
Just to show you that I have tried out a two-part mould of a toilet, can't quite tell how well it's turned out yet as the putty is still a little soft to attempt to remove it from the mould.
and the box with a rough marking added (although this one is better than the one on the other side...).
Camkierhi wrote: Sorry but the sign on the side of the box totally puts in mind.......has that got the Ark in there?
Looking good.
That's not entirely unintentional... Although I planned to do a proper one when I've got a box of the correct dimensions (I believe the "rectangular" box I'm planning of casting tomorrow will be nearer).
Thanks.
I've extracted the test cast of the Tainted Toilet.
Not a brilliant turn out. Obviously the rough edges can be smoothed out, but there is a strange bulge on one side (I assume I didn't get the mould onto the original properly) and I broke one side of the base (that's been fixed with glue).
Not bad for a first attempt at a complex shape though.
I've now made a (hopefully) better mould now as well as moulds for the next box. I'll give them a go tomorrow.
Time for a bit of painting...
It was a "special payload" - there is a story behind it that I didn't read, but it was dropped over VietNam Probably some General got to take a dook in it first.
Theophony wrote: wow , I don't think I looked at the labels on the bottles before
Thanks Theo.
Yeah, the bottle of wine is just some squiggles and splodges but the other two bottles there (although you can only see one in this picture) should both be recognisable around the world.
the idea about adaptive camo sounds interesting... maybe with a kinda electricity field effect? as if the cloak just has brought the eldar ranger out into the open again... graven did such an effect for his mantis warrior...
Viktor von Domm wrote: the idea about adaptive camo sounds interesting... maybe with a kinda electricity field effect? as if the cloak just has brought the eldar ranger out into the open again... graven did such an effect for his mantis warrior...
I remember Graven's MW. This chap doesn't have a set background to work with though.
I am open to ideas of what adaptive camo' affect to use.
I wasn't thinking so much of the Predator "light bending" type of camo', but more of a "produce a camo' pattern that works well with the environment" type camo'. So the cloak here would look like it was "switching" from off to on, but probably not using the bright lightning cut off that is often seen on the Tau stealth team (as I do have some of them, and one will likely get that effect).
But I was also thinking of the effect that you see with the elven cloaks in the LoTR films, where when he covers himself, he looks like a boulder/piece of ground.
Still throwing ideas about at the mo, so feel free to throw ideas in the pot.
In other news, I have been playing with the plaster that arrived today. Will see later how those turn out.
Depends on your setting really. I set things in a desert environment. Thus beige. I think maybe grey or grey dappled effect. Kind of blends in anywhere colour.
The spitfire is an example of organic camo, the lines are not straight, and have a rough look, organic, one can add in other colors, but pick the colors if desert, sand/brown and reddish or black maybe mustard color
woodlands uses loam green, forest green, brown and the black squiggles
My own camo is an example of "organic" style camo.
Camkierhi wrote:Depends on your setting really. I set things in a desert environment. Thus beige. I think maybe grey or grey dappled effect. Kind of blends in anywhere colour.
I tend to use good ol' mud and rocks for my bases with the occasional piece of greenery. Ta.
The spitfire is an example of organic camo, the lines are not straight, and have a rough look, organic, one can add in other colors, but pick the colors if desert, sand/brown and reddish or black maybe mustard color
woodlands uses loam green, forest green, brown and the black squiggles
My own camo is an example of "organic" style camo.
Oh I see. I thought it was a technical term for a style of camo' I hadn't heard of... That's a hurricane actually, but it's really not easy to tell the difference from above, so I'll let you off.
Cool, ta. I do like that style of camo', which is why a lot of my model aircraft have it (if it was an official option).
shasolenzabi wrote: Too many variations to have a single name, but 2, 3, 4 and 5 color camo in any pattern exists
Yeah, I suppose.
But what does the man in charge of ordering a new tank say to the paint-shop when he wants it to look like that? He can't say, "Y'know the wibbly wobbly one in green and brown"... It's probably just some alpha-numeric code from the What Camo! catalogue. *shrugs*
As I said, I had a go with casting with the dental plaster...
...It wasn't a total success...
So I'm about to have a look at changing the moulds.
To remove the lip around the edge, which will make it easier to get the casts out the mould.
To not be so ambitious with how thin I can make the casts.
And I'll use more plaster in my plaster, to see what difference that makes.
The toilet turned out ok, except for the broken base. But that was because the mould leaked a little and the level dropped, making it too thin to hold together.
I can at least experiment on it and see how it handles some gentle tidying...
And again as with all my suggestions, I am probably wrong.
When I am mixing up cement to patch in an awkward spot or even using Polyfilla, I sometimes use a diluted PVA mix instead of just water. This seems to add almost plastic qualities to the mix. I have used this several times in modelling. It adds rigidity to the few things I have tried to mould. It maybe worth a shot to get the thickness you are after and maintain a less fragile piece. The only slight word of warning would be, I generally use this mix to give better adhesive qualities. So it may cause probs for mould release.
Anyone please chip in here if I am wrong. I have personally had some success, but don't want to give bad advice here.
Yeah, there's no problem with sticking to the Oyumaru. The internet tells me it's a silicone based plastic and I've not found anything that it's stuck to permanently yet. It only sticks to itself when both bits are hot as well. So shouldn't be a problem.
I'll give that a go with the next pour, thanks Cam.
Galorn wrote:Dental stone is very fragile until its apx 1/8 in thick.
Ta. Yeah, that first go ended up at probably 1/32in in places... I didn't intend to do it that thin, just how it turned out.
Second batch turned out better as they were thicker. One still broke, but into nice larger pieces (that I'm testing glue on).
I also discovered that the second batch were not quite set in the middle when I took them out the moulds, which might explain why one broke.
I've noticed that the first batch are whiter than the second batch, that may be a function of dryness and a way to check on their progress. This is currently under test.
A third batch is in the moulds, but I'll leave them much longer in the hope that they will be set (and stronger) when I do remove them.
I also have a test with some pva added to see how that differs.
I've also noticed that the first batch is very soft to sanding/carving, will have to see how the later batches (with more plaster and pva in) compare.
Viktor von Domm wrote:i´ve read that adding PVA helps to make the plaster less brittle too...
well we live, we learn, eh?...
and learning is fun.
and a rock painted camo claok...that would probably be an easier way....but risky to get right nevertheless...
Yeah, not sure how that could be done yet and still look like a cloak.
I haven't touched the cloak yet, so ideas are still welcome.
I've been painting the other bits of him (mostly the gun) today, so progress is still happening.
I should ask the internet for more camo' ideas too...
On the camo, just a thought but Grey, brown and dark green triangles of different sizes maybe. Be a bugger to paint, but would kinda look like the elven LOTR cloaks as worn by Frodo etc in movie.
Okay, when I was in Germany, we painted the trucks we had in 4 color woodland pattern camo. That was Green+Brown+Loam+Black
Used to have the old 4 color desert pattern in sand+brown+Mustard yellow+black Now they use a sand all over color, maybe the "Chips of black over white and some light brown.
Camkierhi wrote:On the camo, just a thought but Grey, brown and dark green triangles of different sizes maybe. Be a bugger to paint, but would kinda look like the elven LOTR cloaks as worn by Frodo etc in movie.
I think I know what you mean, I'll show something tomorrow.
shasolenzabi wrote:Okay, when I was in Germany, we painted the trucks we had in 4 color woodland pattern camo. That was Green+Brown+Loam+Black
Used to have the old 4 color desert pattern in sand+brown+Mustard yellow+black Now they use a sand all over color, maybe the "Chips of black over white and some light brown.
Woodland/Desert/Urban/Arctic are old basics.
Good good. I have a reasonable list of schemes to try so I'll do some tests tomorrow and show you lot then.
With a combination of:
More plaster in the mixture,
The addition of PVA into the water,
Thicker casts,
Better shaped moulds,
Leaving them longer to set before de-moulding,
AND a better and more gentle method of extracting the casts from the moulds...
I have some whole casts. They still need a little more time to fully dry before I'll attack them with scalpel and sandpaper...
However the previous test piece with the added plaster and PVA appears to be much stronger than those without. So good call Cam.
On the other side of the coin, I've not managed a good cast of the toilet yet, but I will modify the mould and try again with the PVA.
I am however producing some "nice" broken toilets...
In other news, I am currently painting the camo' tests, paint drying time is slowing progress though. This does mean that there is still time to add further ideas to the camo' cloak discussion.
No pictures today. Camo' concepts are ongoing... Today, I have mostly been poking plaster with mixed results.
They are indeed stronger than previous casts. It is possible to carve them to shape I did however break one while carving and some of the detail appears to be being worn down with handling The thicker ones didn't break, but quite a few corners did
Also had a thought about the thickness. In order for the plaster to be strong enough to not break they are at least twice as thick as the milliput ones I did for the previous box. This means that when I come to cast these I'm going to end up using more resin per box, and as I'm hoping to cast many boxes that's going to add up quicker than using some milliput for a single original.
So, I've got some milliput casts of this box and a toilet (in a newly made mould) in the moulds. I'll have them to show tomorrow.
I will save the plaster for when I want to test moulds and for larger, less flimsy, applications in the future.
nerdfest09 wrote: That's some good looking box right there DrH! job well done dude! the casts look excellent :-)
Thanks NF. Good to know you like my Box...
And while I continue to play with my box, here's an update on the toilet situation...
On the right is the original sculpt.
P1, 2 and 3 are the plaster casts (all broken in one way or another).
M1 and 2 are the milliput casts.
These plaster toilets (made before the improvements with my plaster casting) are all very fragile, to the point that I could crush them between my fingers.
M1 needs some tidying of mould lines, etc...
M2 is strangely not quite the same shape as the original so I think I either didn't get the mould right when I made it or squeezed it in the wrong way when I made the cast.
Maybe next time I'll get the perfect cast...
Notice that I also made a milliput cast of the cistern. Not perfect either, but a little cleaning up and should be fine.
And and update on Guardian #9.
No camo' yet, but face and rifle.
So far, the red is done, the black is done and the white face is done.
There's still a few bits to finish on the gun, but you get the idea from this.
No worries Dave. I thought of you as each one broke... (there's another one for Dave) They actually look very close to the broken toilets you see in FO3.
I have an idea of how to strengthen these to a certain extent, I'll report back later.
dsteingass wrote:Experiment away! You'll have no waste!
I noticed before when experimenting with gluing plaster back together that the glue was partly absorbed by the plaster and the glued line was much stronger than the surrounding plaster.
So today's experiment was to see if absorbing glue into a plaster cast would strengthen it compared to it's bare self.
Superglue; does strengthen the plaster, but only a very thin layer at the surface. This makes it easier to sand rough edges, but does not make the whole thing less breakable.
Water and PVA mix; Doesn't.
shasolenzabi wrote:Resin powder in the plaster?
Sounds interesting. Expand? I don't have any resin power, but I'm intrigued.
So, here's an example of what I was talking about with the difference in thickness between plaster and putty.
Bare in mind the outside dimensions of the boxes are the same, you can see how much thinner the putty can be made.
Also note the multitude of chips in the plaster casts.
And with that, the casting master of box 3 is complete.
I would say that's big enough for an ark...
I personally am not to worried about the thickness of the plaster. I know it would be good for you to get it just right though. Only other product i think maybe worth a go, other than resins, would be air drying clay maybe. But setting times are a real issue with that. I have used it before and it is great except it takes forever to cure, (or what ever it is) not sure.
Would something like the fibreglass filler (isopon) used for car repairs work, or is it to expensive/ sticky.
If it was just for myself, I wouldn't be bothered by the thickness (I'd cast a solid box out of plaster if it made it solid).
But as I'm making these with the intention of selling the final boxes (which will be casts of these masters), the saving in thickness at this stage means I'll be able to make twice as many boxes for the amount of resin I have. That means, I can sell more boxes and the customer gets a cheaper box, everybody wins.
Hey dr. H, how about making the box minus one side and then cast it up. You could use Lego to plug the empty hole and save on casting material. This would also allow you to hide loot underneath the boxes in game and then gangers could "loot" the boxes. Might cost more to shi like that instead of flat boxes, but could turn out better and easier to mold otherwise.
Thank you Theo. It's not a bad Idea, I'll save it for later when I have a spare cast of a box to play with to do more complex things with.
You could just leave one side off of you own box and use the spare end as a trapdoor or something...
Dave; No, probably not. But as a chemist I am both curious and qualified to mess about with mixtures and chemical reactions.
Today's word is "Camouflage".
Bare in mind that these are VERY roughly painted. It's just to give an idea of the colour combinations and patterns.
Also, I tried to paint in boxes of a similar size to the cloak to encourage me to paint to scale. This however, didn't really work. You will have to imagine these patterns scaled down a little to match the miniature.
Also also, some of the patterns have a little shading added to give the range of shades that will be used on the cloak's folds.
Pattern 1: Green and Brown "stripes" with (but can be done without) black chips.
Pattern 2: Stippled markings, to give a rough or feathered edge to the colours.
Pattern 3: "Tiger" stripes in 3 flavours of green and a black. Two of the greens are a bit too close though.
Pattern 4: Brown and White "permafrost" scheme. With perhaps too many black chips...
Pattern 5: Desert scheme. Although maybe too much brown on show, the sand and mustard colours are too close and black.
Pattern 6: "Probably not what you were thinking, Cam" - Triangles. Probably should be much smaller. Or as an alternative, the triangles should interlock rather than overlap.
Pattern 7: 4 colour jungle.
Pattern 8: 2 colour jungle.
Pattern 9: The idea I had just before I uploaded the camo' earlier and decided to paint first and show you all together.
This is an attempt at the switching camo' effect. The bottom third is in camouflage with the surroundings (looking like my usual basing), then the middle third (which I ended up painting all the way up here) made up of still camo'd diamonds with switching coloured diamonds and plain cloak brown diamonds. The top third is just the cloak brown (not actually shown here).
The final version of 9:
Probably shouldn't show the lines.
Each diamond would receive shading like I have started doing to the individual armour plates of my guardians.
The colours will be planned out better than here.
Could always be used to switch between the other camo' schemes (I quite like this idea).
The diamonds should probably be slightly smaller...
I was thinking that as they made concrete more durable with water reacting resin powder in the mix, the same may be applicable to plaster, as that may act in similar fashion to the concrete?>
shasolenzabi wrote: I was thinking that as they made concrete more durable with water reacting resin powder in the mix, the same may be applicable to plaster, as that may act in similar fashion to the concrete?>
I see. That's probably similar to what I've tried with the PVA. I'll look into the reactions when I have a moment.
Just remember, this is advice or suggestions from a person who at a younger age of 13-14 was handed a chemistry set for teens and made something that burned a nearly invisible flame by mixing all sorts of chems w/o a guide at random. LOL!
shasolenzabi wrote:Just remember, this is advice or suggestions from a person who at a younger age of 13-14 was handed a chemistry set for teens and made something that burned a nearly invisible flame by mixing all sorts of chems w/o a guide at random. LOL!
Yeah, the things that can be achieved with seemingly safe ingredients...the chemists secret...
A quick internet search has given me a few interesting options for strengthening plaster;
Adding paper (or some other fabric/fibres).
Adding lime (Calcium hydroxide) to the water.
Adding Gum Arabic to the water.
Adding wood glue to the water (like the PVA).
Brushing the finished plaster with an aqueous solution of Bicarbonate of Soda.
As to the triangles, I dont know what I mean either.
On the plaster front. Honestly I think I would follow Dave's advice. Dont mess too much. I would maybe try different dilution levels of the PVA mix. Upto actually no water. The alternatives are simply resin Or place around with the putty.
This stuff, is my (EXPENSIVE) go to for very fast setting, very strong putty, and it can be mixed with Milliput amd GS for different effects. It sets solid in 20-30 mins, and I mean solid. It may be worth a go.
Theophony wrote:I like the bottom part o number 9, then number 3is my alternate choice.
Camkierhi wrote:I really like the bottom bit on No.9. myself.
When you both say the bottom part of 9, I take it that that is without the diamonds?
As to the triangles, I dont know what I mean either.
That's ok then, you must have meant what I did then...
bebopdrums2424 wrote:I like the number 3 camo Dr H. Is this going on the cloak of the eldar scout?
Ta. Yep, this is for his cloak. Just the outside, the inside will remain bare because it doesn't make sense for the inside to be camouflaged (and it's really difficult to paint it).
dsteingass wrote:Yeah, just remember that at this scale, real camo patterns may make it all look too busy in photos and from table-height.
Indeed. It needs to be exaggerated like bits of the models are. It can also merge into one colour and no camo' effect is noticeable.
And thanks for the putty advice Cam. I'll stick with milliput for these for now as I'm most of the way through them and am eager to start on the resin casting.
Master casting of the third box (number 4... don't look at me that way... I haven't done number 2 yet...) and another toilet are underway. On the toilets, I have had a go at some of the previous putty toilet casts and I think they are now OK. I'll show them later when I've taken the current cast out.
Bottom of the ninth appears to be winning. Thanks guys.
and here's the toilets I mentioned earlier. On the right is the original sculpt. On the left is the latest, fresh from the mould. A bit of the rim appears to not have moulded properly, but the rest of it seems ok. The middle two are the previously shown casts, but after much sanding and carving and filling of minor gaps. Although one of them looks a little wonky, so I'll sand the rim a little more to straighten it out a bit. You'll also notice that I've drilled the holes to give you room to add a little water. The cisterns are also visible behind the toilets. They've been really tricky to get a good cast of, but I think I'll be able to make these work.
I may try casting the other toilet tomorrow. Box 4 master is also nearing completion, just need to fit the sides together neatly. Then I can start on box 2... Once that and tiny toilet are done up the the same level as these it will be very near to proper casting time...
Great work they look great to me. IRL the ceramics are never perfect.
BTW just had a thought. Could you add a little to the top lip in moulding so you have a bit to sand off to make it level, rather than trying for level with the mould!
dsteingass wrote:My bathroom is proof that doesn't work IRL
From what you've said before, what's in your bathroom is not made of paper and isn't 200 years old...
Camkierhi wrote:And we shall name you Mr Potts.....
Great work they look great to me. IRL the ceramics are never perfect.
BTW just had a thought. Could you add a little to the top lip in moulding so you have a bit to sand off to make it level, rather than trying for level with the mould!
Thanks Cam. The others have come out level, it's just that one is a little wonky. I've actually tracked it down to the base not being straight, so that's not as bad as the top being off.
Dr H. You can use resign in insta mold instead of a putty or a plaster. You may get more desirable results, of course you will have to add air channels and more.
cormadepanda wrote: Dr H. You can use resign in insta mold instead of a putty or a plaster. You may get more desirable results, of course you will have to add air channels and more.
There's a couple of reasons I've not used to resin with the Oyumaru; I didn't want to waste it on test casts as it wasn't cheap. I know that the resin is supposed to get warm/hot while it sets and wasn't sure whether that would cause issues with the heat-softened Oyumaru. I also wanted to keep the resin sealed until I needed it and if these tests took a long time it may not be at it's best when I came to do the final casts.
Great crappers! I like em
Thanks Comrade.
and that reminds me, I was going to update before I was distracted...
Box 4 is good to go
This is the biggest box I'm working on (although only slightly larger than box 3).
The top/bottoms are actually made to fit into the ends of the box and not sit on top as the others are. (just for a change and not because they somehow ended up too small ).
The first half of the final, smallest, box number 2 is in the moulds.
As is the first attempt at the Tiny Toilet.
Also, I painted the cloak.
There's a few little bits left to do on the model and he's done. I've even started on the bases for these two.
100 meters long, 15 meters high, 10,000 toilets took two months to build.
where do you find this?
Parent teacher conferences at the kids school tonight and they had the scholastic book fair. I saw this pic in the Ridleys believe it or not book that was for sale. It's a crazy outdoor display somewhere in china. All the toilets were recycled, the big picture has some questionable things with it .
Thanks guys. I'm glad you like him. I've just got the bases to finish and I can reveal them in all their glory.
I'll add tentacles in a box to the list of open box options.
That's a lot of toilets... Not sure if I'll ever have that many to hand but the pictures do give me an easy to find example of many toilet types.
In other news; Just posted off the commission Terminators and together with the Librarian and the Tactical squad, they have paid for the Dark Vengeance box and I've not even finished the Dark Angels let alone started the Chaos army... Still not a good hourly wage (didn't really expect one), but it's good news anyway.
Awesome work Dr H. The eldar ranger looks fantastic, and the final choice of camo is spot on. Glad it worked out so well and you made the right choice by disregarding my opinion lol!! Cheers mate
BB
bebopdrums2424 wrote: Awesome work Dr H. The eldar ranger looks fantastic, and the final choice of camo is spot on. Glad it worked out so well and you made the right choice by disregarding my opinion lol!! Cheers mate
BB
Ha, thanks BB. To be fair, I did actually quite like the one you chose as well. It will be used in the future.
Thanks Vik. I tried to keep the shaded folds dark with the grey and green patches as well, by only using the lightest highlight colours on the raised areas.
the scheme of the camo reminds me a bit of a tabletob game we have...
The Settlers of Catan
...where the landsacpe a bit resembles your camo scheme... and also of old WWII german camo schemes...
Oh yeah, we have that game, I see what you mean.
It should also match my basing, which you will be able to judge for yourselves tomorrow. They are finished, they are glued to their bases and I only have to paint the flame pattern around the bases before I'll take pictures.
the box nevertheless still looks so exiting...and the toilets too...wich is still feels a hell lot disturbing
Thanks again. I've even finished the master for box 2 (I'll show that tomorrow as well). So I just need to poke a couple of the toilet casts and I'll be ready to start thinking about silicone...
There will be pretty pictures with lots of detail shots. It's going to be quite tricky to get a good picture of some of the details due to angles though...
There will be pretty pictures with lots of detail shots. It's going to be quite tricky to get a good picture of some of the details due to angles though...
I'll start with the box. Here's box 2, the small one.
That's all the boxes complete and ready for casting.
A couple of the toilets still need some tidying and that's next on the agenda.
And, as I said, the guardians are complete. May I present...
Guardian Number 9.
The screen on his living Auspex didn't come out well in the photos, so you may need to zoom in to see that I did actually paint it.
and Guardian Number 10.
Spoiler:
Consciousness came to him like a craftworld gliding through the cosmos; smoothly, serenely and slowly. As feeling returned to his body, his mind wandered the foggy remains of his memory. He remembered growing up of the craftworld of Ctho not long after the birth of "she-who-thirsts" and he remembered the training he and a small group of his brothers undertook with the storm guardians of Ulthwé, but little of the time between these moments. The training and the skills he learnt were crystal clear in his mind but other moments from his life were clouded and indistinct.
He could now feel that he was wearing mesh armour and this reminded him of the colouration of the armour and the alterations that were made for his squad of Ctho Storm guardians. In respect for their Ulthwé teachers and to remain true to their own craftworld of Ctho their armour was predominantly a "bone" colour with black trim, although there was a fragment of a memory of dark greys and orange he could not recall the reason why.
His mind then settled on the last thing that he could remember from his life. There was an emergency on the craftworld, an attack? He was unsure. He remembers the craftworld hitting something, or something hitting the craftworld, a crash or a collision, again he was unsure. The last fading memory was of laying on his back with the warmth of a sun on his face, the smell of burning flora and of bodies in his nose. The sky was a brilliant blue with a few fluffy white clouds here and there and he was aware of many plants and trees surrounding him in the way that only a jungle can. Everything then began to darken and he sank into a deep sleep, but then, blackness and waking up here... where was here? Now, wide awake, he sat up and surveyed the surroundings; he was no longer in a jungle, he was in a metal-walled room with one door.
A voice came to him then, from a speaker in the corner, and said "Ah, you're awake, good. Welcome guardian number 10, Ha Ha. Now chop chop, get your equipment together and then you will meet your new family that you will be fighting with...forever." A slot opened in the wall and a Shuriken pistol and sword were pushed through from the other side, the sword was of a familiar yet strange design and had a red ribbon around it, and on that ribbon was written "chop chop".
Not a lot more to say about them really, I've covered all the various changes to them as I've gone along.
Any and all comments, questions and critique welcome. Hope you like them.
No.9 Awesome. (Voted) Only question, (Totally nothing wrong) why did you decide to camo the um not sure what you call it, breather pipe maybe, from his backpack. Looks awesome as is. Can't fault it, just wondered. Crossed my mind you would paint the gems, and it would be red is all. Again not criticism, just asking why you went this way.
No.9 Awesome. (Voted) Only question, (Totally nothing wrong) why did you decide to camo the um not sure what you call it, breather pipe maybe, from his backpack. Looks awesome as is. Can't fault it, just wondered. Crossed my mind you would paint the gems, and it would be red is all. Again not criticism, just asking why you went this way.
N0.10 Flawless. Absolutely brilliant.
Thanks Cam.
You mean the lumpy Eldar sticking up fin thing from his back? I thought about doing that and the targetter in red (or even as another colour altogether) but as they are sticking up out of the cloak and if he is to hide properly with the cloak, they have to be camouflaged as well or they'll give him away.
"where'd that shot come from"
"probably over by that bright red eldar thing there..."
KABOOM
I see it (as with the little fins on most guardians) as an aerial of some kind and as he had the targetter, he could only have one, and being a sniper would likely be working on his own, he got a big one to make up for that.
I also gave it a different pattern to the cloak as it sticks up and so won't look like a natural mound in the environment (like him under the cloak) and so just needs a "breaking up" style camo'.
The only gems I painted were the one on his chest (soul gem) and one on his armband thing. Again, I thought any others would give his position away.
Just bloody awesome! I really honestly love the shade of bone you did on the Girldar.... Eldar, it's perfect and I am a little curious to see how it would look on a Deathwing Terminator? and you know what else is bloody awesome? the red on the OTHER Eldar! so good!
nerdfest09 wrote:Just bloody awesome! I really honestly love the shade of bone you did on the Girldar.... Eldar, it's perfect and I am a little curious to see how it would look on a Deathwing Terminator? and you know what else is bloody awesome? the red on the OTHER Eldar! so good!
they are 2 very impressive paintjobs mate!
Thanks NF Yeah it would look good on a Terminator. Maybe one day, for commission (as I've already got a Deathwing Terminator in my army) I'll do a squad like that.
Thanks on the red as well, there's a much more subtle shading on that then the bone.
cormadepanda wrote:love the back story dr.
I thought I may as well make it an official rip-off of your army . Glad you like it.
dsteingass wrote: The flame painting on the base is quite impressive as well!
Thanks Dave. It really is ridiculously quick and simple as far as painting goes. I use an old, worn down, paintbrush and paint large triangles with the side of it, in red, all round. let that dry, then do slightly smaller triangles in orange, then dry and then smaller yellow ones. Job done.
dsteingass wrote: It's quite impressive! I'd like to see that same effect with really hot blue source flames too!
Yeah, it's simple but effective, just what I wanted for the bases.
I use it as the only thing that ties the whole army together (so everyone knows which are mine on the tabletop, for example).
It was decided as fire due to how I did the first squad leader banner (a dragon breathing fire) and as fire is a perfect example of entropy (the basis of the army) in action.
[the science bit]Fire takes large, complex, compounds and structures (e.g. wood) and converts them into smaller, simpler things (e.g. CO2 and IR radiation) that can have a larger number of permutations in their arrangement and therefore a higher entropy, and entropy always increases in nature.[/the science bit]
All future banners will also get fire on them as well, as I did on the only other banner I've done so far (on the Dire Avenger Exarch).
Yeah, blue flames are cool. I'll find somewhere to do some (probably not on a base, but maybe for an HQ... will have to see when I get round to that).
I did do some stylised blue/green flames on the chap below;
So that'll have to do you for now.
Ha, yeah. Thanks Cam. That also means that they are all the way back on page 4... The vast majority of my army is in the first 4 pages so far... again, that's the Wave Serpent's fault.
There are useful links in the very first post for those that want to (re)discover the rest of the army.
Dr H wrote: Ha, yeah. Thanks Cam. That also means that they are all the way back on page 4... The vast majority of my army is in the first 4 pages so far... again, that's the Wave Serpent's fault.
There are useful links in the very first post for those that want to (re)discover the rest of the army.
I'll think about how to achieve that for the next blog milestone Comrade...
In related news; I am currently planning future army members and will soon decide upon what will be next to build
In other news; I am currently painting a model for commission and planning how best to start casting things (I've pulled out some lego and given it a clean), so soon, my preciousssssess.
Well well well, what's all this then... I thought that the toilets would be the ideal test subjects for mould-making and casting practice.
Simultaneously testing the use of top-fill casting (on the left),
bottom-fill sprue casting (yes, I do need to cut some of the air release channels later),
and how best to cast the cisterns.
Much head-scratching has led to this point and much effort went into the layout and plasticine placement.
The silicone is poured and we will all have to see how it turns out tomorrow as I want to give it as much chance of being fully cured before poking it, that and I would have to stay up 'til 2am at the very minimum to check it.
If I didn't already bite my nails out of habit, I would be too.
A couple of observations:
The two components of the silicone are more viscous than I expected. This means than I probably should have stirred for longer (it has a 45 min pot life after all). And probably could have left it to sit for longer to let bubbles out...
I should have also used a larger mixing pot, as it was very full and meant I couldn't stir it as easily as I could have.
A pouring spout probably works against you, as I ended up with a thin stream of fluid rather than a sheet (which would remove more bubbles).
My initial plan for measuring the volumes of the two components could have been better and I need to remember to use 10% more of each as there is quite a bit of wastage left in the pots.
So if this pour works out well, it'll be a miracle. Fingers crossed.
Thanks Ruglud. I do have some syringes (I "borrowed" from the lab) that I've placed with my casting stuff, so I'm nearly there...
It appears that all the "if"s came out my way and the first half of my first mould looks good on first inspection. This is the moment that you don't often see in moulding tutorials...the plasticine that needs cleaning off...
Assuming that there isn't any hidden bubbles (which I'll have a look for while removing the plasticine) this is the perfect start to my endevours.
dsteingass wrote:I'm very excited to see a toilet mold around here!
It does bring the possibility of scale toilets that bit closer.
I want to get the moulds for the boxes done before I move on the casting as it will be more efficient the mix one batch of resin and cast many things than mixing many smaller batches of resin for each individual mould. (time permitting, as the resin has a short pot life so there is a balancing act of quantity and time). So your patience is still required...
nerdfest09 wrote:I never knew a thread being updated with toilets would actually be so enticing and enjoyable to follow! ........
And I never knew that I'd be casting (and enjoying the making of) replicas of my own hand crafted scale toilets...
Below is a picture to show you how the two parts of the mould separated (top) and the final, cleaned and tidied, mould.
You can see that the cisterns broke in the process, but that was to be expected as I've broken them like that before while cleaning them up (It's probably easier to replace the pipes with bits of paperclip as was originally used).
The only bubbles I've noticed are one where the sprue meets one of the toilets (not a problem as that will need chopping off anyway), One where the air channel meets the top of the lower cistern (also not a problem), and then each toilet has a bubble where I had drilled out the hole (not a major problem, as most people will either be drilling the holes deeper for empty toilets, or filling them in with water effects).
Running water into the "in" hole also leads to water coming out of all (I repeat, ALL) the "out" holes, almost simultaneously, so that shows promise.
It's not the best looking mould, nor the best constructed, but if it proves to be serviceable then it's all good.
I have also poured the first half of the first box mould:
That is all for now. Come back later.
Automatically Appended Next Post:
shasolenzabi wrote: Brilliant! they look great! mold process did not fail you!
Thanks Shas, it did not indeed. Lets hope my luck holds out for a while longer.
I have heard of this caffeine but I don't drink anything with it in and anyway I would have to be up and awake to go and get some to wake myself up with...
I'm just not a morning person. I'm more awake now, as it approaches 1am than I am at 1pm most days...
This thread has clogged the drain. Wake up Dr H. Wake up Dr H! Drink some Tea in the morning, and eat a breakfast full of fruits. You find you wake right up.
dsteingass wrote:Erm..aren't you supposed to buy it at the grocery store and bring it home so you can make it in the morning?
That still requires waking up and getting out of bed... and that's waking up as in rising from the dead, not just shifting from zombie to human
I am awake now and I have poured the second half of the box mould.
All was going fine with the preparations for the pour until I realised that I hadn't added registration keys to the first pour So I've cut a few into the first pour and the actual shape of the two halves should help with lining them up, so should be fine.
You know hey make coffee pots that start on a timer right? Not that I condone the use of stimulants , just tired of driving this bus through the holes in your "I can't wake up in the morning" story
In other news I have spent most of today going through my "downloads" folder and sorting out all the inspirational pictures into relevant folders. This means that I can now find useful things like the tips for casting and making moulds...
And I can now start to plan what will be next to build for the army... Options are many, Ideas are more and Inspirations are much more... Technically, going on my alternating build plan, it should be something "big" next (having just finished some "small" troop models), so planning starts... NOW!
Well, after I check the latest mould. That's about due to be separated...
dsteingass wrote: I love your moldwork (even with the entirely necessary extra vowel), especially the locator pins! That's very important to the throne-making.
Thanks Dave. Fixed your post for you Yeah, I like how the locator pins turned out on the toilet mould. Which makes it all the more annoying that I forgot them on this next mould.
However, the mould has turned out well. No problem bubbles, the details have been picked up well and the two halves seem to fit together neatly (no thanks to my inadequate keys that I cut in at the last minute).
Also of note is I experimented with using plasticine to fill holes in the channels and to create the air channels. This means less cutting of the mould to make these channels (that's the theory anyway, I don't know if anyone else does this).
Never-the-less, there are a few bits that require some cutting and the last remnants of plasticine to remove and this mould is done.
Ruglud wrote:There's some nice moulds developing here...
Yeah, leave anything laying about for long enough and moulds will start to develop... Thanks.
cormadepanda wrote:Yay casting! Something I always wanted to do, but not invest in financially.
I'm hoping that it will eventually pay for itself. I can be patient 'til then.
Something to keep in mind for anyone thinking of it; you will go through silicone for the moulds quicker than you expect...
dsteingass wrote: I still think the BIG buckets of OOMOO seem like the most cost-effective way, even though it's expensive.
Indeed. I'll certainly shop around and go big next time. Now I know what to expect.
I've just poured the first half of the mould for box 3 (the large, plain one). I forgot to take a picture before I poured the silicone in, so you'll have to wait to see that one. I remembered to add the keys this time as well.
From what I calculate there is enough silicone to finish this mould and then maybe do a small one (box 2) at a push. So depending on that, I'll be moving on to playing with the resin soon.
I shall crack on with some painting this evening and try and decide what I will be making next...
Breaking bad! yet another show i need to actually watch one day! i'll put it on the list with The walking dead & Game of thrones! I hear good things about them! nearly as good as your toilet molds! :-) I love the fact you're showing us every step of your rather steep learning curve, it's nice to see everyone get involved with the project!
nerdfest09 wrote:Breaking bad! yet another show i need to actually watch one day! i'll put it on the list with The walking dead & Game of thrones! I hear good things about them!
You're not alone NF. I've not seen any of them either. I don't watch a lot of TV these days and if I do it's more likely to be comedy or documentaries rather than dramas.
nearly as good as your toilet molds! :-)
Why thank you kind Sir.
I love the fact you're showing us every step of your rather steep learning curve, it's nice to see everyone get involved with the project!
It is quite a steep learning curve and that's why I took my time to do most of the learning before I started anything and why I'm moving slowly and carefully through the process.
And if I didn't show these, there wouldn't be much to show in here anyway. I promise, I will get back to building the army soon...
On that note, I've poured the second half of the current mould. Here's what it looked like just before then.
The most difficult part in each mould is deciding how to lay out the pieces.
I'm trying to be as efficient as possible and to stretch the silicone as far as possible.
Whether I've pushed it too far will not show until I attempt the casting...
Yeah, time will tell if these are good moulds or not.
And on that note, this mould is done...
I don't have a huge amount of silicone left, but there is enough to make one the size of that for the thrones.
I will make up the plasticine base for the small box (number 2) and see how much that needs.
Either way, casting might happen next week...
Excellent...chaos is obviously still reigning here as I randomly opened a page to find....toilets
Love those eldar a few pages back too, the ranger's cloak is great.
Nice to see you playing with moulds too (that 'u' is most necesary Dave ), hopefully I'll b out of the warp long enough to see more random bits coming through.
monkeytroll wrote: Excellent...chaos is obviously still reigning here as I randomly opened a page to find....toilets
Love those eldar a few pages back too, the ranger's cloak is great.
Nice to see you playing with moulds too (that 'u' is most necesary Dave ), hopefully I'll b out of the warp long enough to see more random bits coming through.
Welcome back MT.
Yeah, my blog of ultimate, true chaos took a turn for the chaotic recently... Not something I expected to happen, but I guess that's the nature of chaos...
Thanks, yeah those Eldar have been the main project recently (from before, and since, the hut). I'm in the planning stages of the next build, so your timing is pretty good.
sorry doc for neglecting your thread for so long.... totally unintentional...
the mold looks highly professional!!!...
that really leaves the question tho.... will you go the typical way and sell the boxes... or will you go the hirst arts way and actually sell the molds?...i bet you could suitably raise the prices and eventually customers still would have to come back to replace old molds...
Viktor von Domm wrote: sorry doc for neglecting your thread for so long.... totally unintentional...
and you seemed so enthusiastic about the finished Eldar... No worries. Can't be helped sometimes. Good to see you back around these parts.
the mold looks highly professional!!!...
Thank you. I'm still learning at the moment and have yet to test them properly. Lets hope they work as well as they look.
that really leaves the question tho.... will you go the typical way and sell the boxes... or will you go the hirst arts way and actually sell the molds?...i bet you could suitably raise the prices and eventually customers still would have to come back to replace old molds...
I hadn't really considered selling the moulds. I would need a reliable way of replicating them and I would want them to look a bit better than they do now if I was to ask for money for them.
And, as I said, I need to actually check that these work as moulds. I've ran water into the closed moulds and it comes out the out holes and don't appear to leak, but the true test will be when I throw some resin at them...
well.... if you have a working mold after your own parameters... go for clay or even tin... then you have your true master and then you can make as many molds as you like...
and i was lurking but not commenting... especially i liked your argument about the antenna... or to be more precise about your point ...if the antenna had stayed red......that was a highly enjoyable lil piece of comedy of the situation
Viktor von Domm wrote: well.... if you have a working mold after your own parameters... go for clay or even tin... then you have your true master and then you can make as many molds as you like...
We shall see. I may have to make more moulds if they prove popular anyway.
and i was lurking but not commenting... especially i liked your argument about the antenna... or to be more precise about your point ...if the antenna had stayed red......that was a highly enjoyable lil piece of comedy of the situation
Looking exciting. How soon do you think you might be able to have a product for sale here? Only ask because just entered Skalk Bloodaxes terrain comp. and your boxes might make a wonderful debut.
Camkierhi wrote:Looking exciting. How soon do you think you might be able to have a product for sale here? Only ask because just entered Skalk Bloodaxes terrain comp. and your boxes might make a wonderful debut.
Thanks Cam.
Once I've checked that they come out well and decided on some kind of pricing scheme (I currently have no idea what I should or could charge for them, I need to do a little research as well as discover how much resin is used for each box).
That is all the main job for the coming week, so soon.
Viktor von Domm wrote:the point is...i am interested... but currently money...well...we´ll see if richness is suddenly getting the better of me all of a sudden
It is interesting that you are interested. I'm sure we can come to some mutually agreeable agreement.
In other news; As Camkierhi mentioned, Skalk is starting up a competition to build a small piece of terrain. So if there's anyone here that hasn't heard about it yet or follows Skalk's thread (it's very much worth a look in any case), have a look here.
- Pieces would be intentionally small. Bases would be no larger than a 40K 60mm round base, but no smaller than a WFB 40mm square base (exceptions- 25X50mm WFB calvary base, 25X70mm 40K bike base, WFB 20x80mm troop base). You do NOT have to use a GW base, I’m mentioning them only for scale ref.
- Timeframe would be 4 weeks w/ a one week 'stress extension' if absolutely necessary for extenuating circumstances, but no exceptions beyond that flex time and I would prefer to not have to use it. On average it takes (me) a few hrs to build and paint one of these. The only reason I'm going 4 weeks is because I want to make sure the latecomers have a chance to enter and finish a piece, also the opportunity to catch up for people that find IRL is suddenly affecting hobby time.
- I'm also thinking about assigning 3 classes for judging- Expert (we all know who these guys are), Normal People (ha!), and special category Lurker. Come on lurkers, I know you guys are out there. Speak up and join the fun!
Important note, no WIP pics here. My opinion is that participation drops when WIP pics are posted. That coupled w/ the 3 judging categories will (hopefully) increase participation.
All- PLEASE do not let this take time from your primary projects, ESPECIALLY if you are in the LoER contest or a paint competition or finishing up an army for a Tourney. This contest is intended to be a fun pastime as you wait for glue / paint to dry. It won't be a huge project for most of you to do on 'spare time' but I wanted to be clear on that.
As mentioned it's only meant as a quicky, fun, side-project and there's plenty of time to think about what you want to do as it doesn't start yet.
Start- 0000 Your time zone Friday Nov 15th
End- 5pm MY time zone (EST) Friday Dec 13th
Get your thinking caps on (I have) but don't glue anything yet.
Good news; I appear to have enough silicone to make one more mould. This is of the small box, which however, leaves the large box with the cross beam un-moulded for now.
This means, that by Monday I'll have no more moulds to make and can therefore look at filling these moulds with resin.
As the resin cures in 10 minutes (although I'll probably leave it longer to fully harden), it shouldn't take too long to see if the moulds are any good and therefore I'll have casts to sell hopefully by the end of the week...
Then if these sell well and I make enough money, I'll be able to buy more silicone (and more resin as required) and make more moulds of more things (that I've yet to make), there will then be more things to buy and so on...
Viktor von Domm wrote:if i ever travel down the mold making and casting road... i think i would get even balder way quicker.... i bet this is a hairpulling suspense, eh?
It is as you start to think if you missed or forgot something, or will a bubble be trapped somewhere... and there's no repair work you can do if it does go wrong (you can remove bits, but you can't add material at least as far as I know) and it's a reasonable chunk of money to just throw away.
But in reality, the silicone is "self-degassing" in which I assume means that it stays fluid for long enough for bubbles to rise to the surface (although I do bash the sides and bottom of the mixing pot and then the mould box with a hefty scalpel handle). And it has behaved itself throughout my adventure, so probably shouldn't be that scary.
The main thing is to really thoroughly plan out everything you need and everything you will do before you start (my lab training probably helps here). There's plenty of tutorials out there that give a very accurate idea of what it needed.
if you start selling... then give me a shout...
K. Will do.
shasolenzabi wrote:Looking good
Oh yeah, I will be making pics soon of Batou back from the cyber-eye doc.
Viktor von Domm wrote: banging...hmmm....i know RS Jake once told us that he used to use a massage thingy
Yeah, I don't have any personal massage thingies to hand right now, so I just have to make do manually... I could probably rig something up with an old electric toothbrush I have laying about, but that requires effort...
and yep... the whole money wasting aspect and the fact that you work with live chemicals at home is currently keeping me from testing it myself...
Compared to what I'm used to the chemicals are pretty tame and for the average person (never mind the extra special person that you are ) the silicone chemicals aren't that bad. Avoid eating it, or sticking it in your eyes and try not to get any on your skin (some people may have allergic reactions) and it's fine. Obviously it says wear suitable protective clothing and eye protection, but it says that on some dishwasher tablets (or other household chemicals) and who has safety spec's in the kitchen...
The chemicals for the resin are slightly more harmful, but I've not looked closely at the MSDS yet, so I'm not sure.
The mould is ready.
All good again. You can see I had a couple of bubbles in this one. I actually think that these were water that I think I dripped on when marking the volumes on the mixing pot. No harm done though and top tip; keep water off your moulds.
Getting close to finishing the latest commission piece, so that's another nice big tick.
I will soon start to collect pieces together for the next build in here and there will be Skalk's competition piece to do in the background...
I'll be back soon to report on my casting exploits...
Just a thought, but as the crates are built out of six one-sided casts did you need to do a two-part mould for them? If there's one completely flat surface isn't a one-piece mould more efficient?
monkeytroll wrote: Just a thought, but as the crates are built out of six one-sided casts did you need to do a two-part mould for them? If there's one completely flat surface isn't a one-piece mould more efficient?
Technically, yes.
But I wanted to produce them with nice angled edges so they fit together (reasonably) well, and it's good practice for my moulding of future things.
If I was going that far, I could have also just done the moulds with three of the sides and cast twice for each box (at the expense of halving the life of the mould, however long that may be).
dsteingass wrote:2-part molds are quite impressive! Damn professional looking for your first one too!
Thanks. Hopefully it follows to what comes out of them, as that's what I want to look professional.
Camkierhi wrote:Also you possibly have the option of producing a detailed interior mould in the future with a two part mould.
Looking great, very professional. You make these things look very easy, but I know they are not.
Thanks. You didn't see all the head scratching while staring intently at pieces of box laid out on a lego board... And there's all the time reading tutorials and collecting all the things together that I would need... and smoothing out the plasticine (the clay shapers that I got for the putty work are also useful for this)...
Mould update: I've just finished testing the moulds for leaks and discovering the internal volumes. The only leak issues I found were from not securing the mould halves together firmly enough and only required the swapping of rubber bands and trimming of the pieces of plastic I'm using for the boards (that go either side of the mould so the rubber bands don't bite into the silicone). The toilet mould did require a little cutting here and there to open up channels a bit more, although the thin pipes of the cisterns may prove to be a problem, we will have to see how they turn out in the end.
The moulds are now being dried and I may attempt a cast later, if not it'll be a job for tomorrow.
Well I had a go and it didn't really go to plan...
I was over-ambitious as to how quickly I could fill the moulds, mixed enough to fill all of them and it set before I got the second one half full...
I started with the toilet mould and took too long trying to get the resin to come out of the far toilet and the upper cisterns (which I ended up top filling) that before I got the box 2 mould filled my syringe became stiff and I noticed that the mixing pot had changed from clear to white. So I've ended up with a nice cast of the bottom of my mixing pot and the inside of my syringe...
Also, you will see the result of the bubbles in the two Tiny Toilets (tm). The one on the right is not that bad, but the other one is a bit too big. Which is a shame, because the one with the large bubble has a flat rear to the toilet and the other one (with the smaller bubble) has a large space in the rear as it wasn't properly filled...
You can also see that of what there is of the box has quite a few bubbles inside it...
There's also a fair amount of flashing...
However, Two of the Tainted Toilets (tm) seem to have come out well and the cisterns seem ok too.
So, lessons learnt:
Mix smaller amounts and do moulds one at a time.
Find a way to hold the mould halves together a little firmer.
Don't bother filling one of the Tiny Toilets (tm) as that bubble is a bit too problematic.
Lets hope for more success with the next attempt...
Viktor von Domm wrote: even with bubbles i see much use for these toilets...and holes/bubbles in the box boards is no obstacle either as it looks almost as knotholes...
but patience of course always win ...i keep my fingers crossed for more ^^
also... th mixing pot and the syringe casts...well they will be useful...eventually...a good hobbiest never throws anything worthwhile away...
Indeed not. All the waste/scraps are being saved (I even collected up most of the waste from the silicone too as it, y'know, might be useful one day...).
Also notice that my sprue is already wood textured... to encourage it's use for things.
A bubble at the bottom of the pan is no biggy, in fact can be used. Tiny bubbles in anything are perfectly acceptable to be honest. (have you seen a forgeworld kit!!!!) We are modellers after all and can get over these little things easy enough. The bits of box are all good to my eyes also, I could easily use them as broken open crates, or battle damaged crates. Honestly its all good.
Also I did notice before you using textured sprue in the mould and wondered a bit, and now it all makes sense. Fantastic. You are a genius.
dsteingass wrote:That's soo brilliant! Texture the sprue to make even it useful! You Sir..are a Genius!
Ha ha, Thanks Dave.
Camkierhi wrote:Brilliant work, don't be so down on it dude.
I'm not that down. It's early days and at least the mould making went well. I'm just showing the downs along with the ups (if only to show that I'm not as perfect as may seem sometimes... ).
A bubble at the bottom of the pan is no biggy, in fact can be used. Tiny bubbles in anything are perfectly acceptable to be honest. (have you seen a forgeworld kit!!!!) We are modellers after all and can get over these little things easy enough. The bits of box are all good to my eyes also, I could easily use them as broken open crates, or battle damaged crates. Honestly its all good.
The thing with the bubbles in the pans are that the bubble is in the mould and that gives a blob in place of a hole. In all the toilets there's a little blob, except for the one that has a relatively huge blob (that isn't even central). It is removable, I have done it, but it's a pain in the backside to do without damaging the bowl (and the bowl is tricky to get right, I should know ). I'm not expecting a huge demand for those toilets, so one working mould cavity is fine.
I've not actually seen any commercial resin kits in the "flesh", but I've heard/read the horror stories.
On that note (and a pleasant surprise) the mould lines are really easy to remove. Does anyone know how this stuff compares to Forgeworld stuff, for example?
Indeed, the partial bits will find uses. But I would prefer to make complete boxes...
Also I did notice before you using textured sprue in the mould and wondered a bit, and now it all makes sense. Fantastic. You are a genius.
I did wonder if anyone noticed that while I was showing the moulds. So, Now you know.
Automatically Appended Next Post: And in other news:
Even though it appears to have been shown in most of the threads I'm following I will also pimp Skalk's competition here in my humble (admittedly no longer all that small) thread.
The rules are up and there are many entrant categories that you can enter, so all entrants are likely to get a good competition and stand a chance of winning something, no matter what skill level you see yourself at. Have a look, join in and give it a go (although, wait for the competition to start first).
Skalk's Junk Pile Competition
Been to the cinema (to see Gravity, not a bad film, go see if you like space) so not achieved much today.
But I did try another cast...
This time I was on the other side of the resin mishap coin. This time I apparently didn't mix for long enough and some of it hasn't set and is still gooey after 5-6 hours... On the good side, it did at least fill the whole mould, so the mould works.
shasolenzabi wrote:Ah, all the ups and downs of molding materials
lone dirty dog wrote:We learn from our mistakes look at this way you will know everything you need to know by the third pull
Indeed. It's just a matter of finding that sweet spot in the middle.
Camkierhi wrote:Can't go to the movies, too far and too expensive.
You're not wrong, but every once in a while is not so bad. Usually I'm content to wait for it to come on tv.
I heard it was better to see it in 3D and that was by the critic that hates the format
That'll be Mr Kermode then. Not having seen any other films in 3D, I can't comment on it's relative quality. But it didn't seem to go out of it's way to force the 3D down your throat like some of the clips of other 3D films I have seen (like someone randomly throwing something at the camera).
Theophony wrote:Man I thought I warned everyone about that movie .
Did you not like it Theo?
My brothers were going so I tagged along.
Anyways, will the resin eventually set?
Looks good, nice clean mouldings.
The casting is coming along really well.
Thanks, I think we can call the moulds a success. The casts will be a little bit longer.
I'm not sure if it will set, I'll leave them laying about / experiment on them and see what happens. I'll let you all know what happens. At the very least I can just cut off the gooey bits and keep the rest.
I think your going overboard for Skalks terrain competition. When I posted the pic of the toilet waterfall I didn't expect you to build it .
I hated that movie , my wife gets motion sick easy, she usually drives as I am lead footed and that's not good for her. She picked it thinking it was the other Sandra Bullock movie that was out at the same time . I just saw what was going to happen next at every step, even the ghost part, and so it was to long and drawn out for me. The effects were good, we didn't pay extra for 3d, but the story sucked.
I think NASA would have better choices on who to send up.
Nothing needs go to waste there is always a use for partial casts, cut the edges of goo of and use them as partial buried or destroyed boxes
There are no disasters in model making only options
Looking at it this morning the gooey bits have hardened, but haven't become white like the rest of it and appear to be brittle. But at least it's not gooey any more...
Theophony wrote:I think your going overboard for Skalks terrain competition. When I posted the pic of the toilet waterfall I didn't expect you to build it .
Ha ha, Theo. I haven't decided what I'm doing for the comp' yet. I may not even use any of my boxes/toilets in it and may just use some of the rather large collection of random household junk that I have amassed (I'll post up a picture of some of it when I come to going through it).
lone dirty dog wrote:The one and only he hates 3D movies so when he said see it in 3D I was kind of surprised
He did explain it was the first film due to it's setting ( space ) that actually benefited from the technology.
Yeah, one of my brothers listens to his podcasts, so I've heard second hand about his hatred of 3D.
Also saw the Hobbit trailer in 3D and wasn't so impressed by that (too busy to be able to focus on anything). So being in space does work in it's favour.
And just because it's Spaaaaaaaaaaaaaaaaaaaaaaaaaaaaaaaaaaaaaaaaaaaaaaaaace:
Spoiler:
I hated that movie , my wife gets motion sick easy, she usually drives as I am lead footed and that's not good for her. She picked it thinking it was the other Sandra Bullock movie that was out at the same time . I just saw what was going to happen next at every step, even the ghost part, and so it was to long and drawn out for me. The effects were good, we didn't pay extra for 3d, but the story sucked.
I think NASA would have better choices on who to send up.
I can see how it wouldn't be good for motion sickness, but I think that'd be the same problem with any 3D film.
Yeah, it's more of a "look at the pretties" film than a plot driven film. But the shots are nicely done. I watched a good conversation (mostly) about the film here: The Adam Savage Project It's long, but interesting. Don't watch it if you haven't seen the film!
Today's test:
The resin was mixed properly and completely before adding to the mould.
The resin was poured before it went off.
Consequently the resin has set properly inside the mould.
The mould just wasn't completely full... It was also the most flash-tastic of the moulds. I will find a better way to secure these moulds together before the next attempt.
I'll have a look at the channels for the two that didn't fill fully, I couldn't pour any more resin in as the pour spout was full...
Conveniently the two that didn't fill are neighbours in the box construction, so that at least worked out ok.
Sorry but I pissed my self with laughter just due to the fact you got the mix right but not enough classic
But at least you have a matching pair of unfinished sections "Options"
Yes, I felt the Hobbit movie was full of unnecessary scenes just to use 3D effects, thats the problem with these formats the movie losses out due to new technology
Ok I got to 47 seconds and began to bang my head against the coffee table, plus the misses was staring at me with a look of annoyance and disappointment
lone dirty dog wrote: Sorry but I pissed my self with laughter just due to the fact you got the mix right but not enough classic
But at least you have a matching pair of unfinished sections "Options"
I had made enough, but it wouldn't go in the mould... Hopefully some doctoring of the mould will help.
Yes, I felt the Hobbit movie was full of unnecessary scenes just to use 3D effects, thats the problem with these formats the movie losses out due to new technology
It's just when they stick in something happening, just because it's in 3D and not because it's relevant to the story is when it gets me.
Ok I got to 47 seconds and began to bang my head against the coffee table, plus the misses was staring at me with a look of annoyance and disappointment
lol. Was that because you were banging your head on the table or because of SPAAAAAAAAAAACE! That thing does make more sense if you've played through Portal 2.
You know that you don't have to watch the 3D version..I never do. The prism in my glasses just makes it look like gak. the non-3d theatre is always less packed too.
Thanks for the sympathy LDD I appreciate the hilarity though
dsteingass wrote:You know that you don't have to watch the 3D version..I never do. The prism in my glasses just makes it look like gak. the non-3d theatre is always less packed too.
I don't usually, it was just a one off. But watching them in 2D just makes the special 3D features even more pointless...
Galorn wrote:Did you inject the resin with a syringe or just a grav feed?
as for secureing the mold halves I reccommend using some hardboard, or Plasticard cut to the rough size of the mould clamped around the mold.
I was grav-feeding the last couple, but I'll keep a syringe to hand next time.
I'm currently using bits of old chopping board (thin plastic one) and rubber bands. I think it's just getting them tight enough without distorting the mould.
Theophony wrote: Well it looks like you have a nice fire damaged box from this cast, so it's getting better
Every day, in every way, I'm getting better and better...
I'm going to finish off my commission piece today, so I may do more casting later, but after I've finished this chap off.
In other news and in case you've somehow missed it, Skalk's competition now has it's own thread with updated rules. Check it out. Skalk's Terrain Challenge
When I did casting I just rapped the mould in grease poof paper and placed it back in the lego mould maker, it works and no fitting issues might work for you.
lone dirty dog wrote: When I did casting I just rapped the mould in grease poof paper and placed it back in the lego mould maker, it works and no fitting issues might work for you.
lone dirty dog wrote: When I did casting I just rapped the mould in grease poof paper and placed it back in the lego mould maker, it works and no fitting issues might work for you.
That's quite a clever idea.
Yes, but it was not my idea totally I kept spilling resin on the table so the misses threw the grease paper at me to put on the table, then it struck me I could use this to stop the resin sticking to the lego and hey presto
No proper update. I finished the commission piece and have attempted some more casts, but have mostly succeeded in making more broken things. Getting ever closer though.
Yeah, I'm building a stockpile of future terrain bits at the moment.
I'm currently sorting the "failed" casts into
a) sprue,
b) bits that can be used as spares/whole parts,
c) bits that can be used as broken parts
and scrap.
apart from the scrap pile, c) is the largest collection so far...
Talking of collections, I may have a look though my various boxes of random "junk" for pieces that could be used as "junk" in Skalk's junk pile contest. Just for a change of pace.
Although seriously, I not sure if I will use any of my casts for the junk comp' yet. I have plenty of other actual real-life junk stored up, I may not need to. We will have to see, there's no rush yet.
Good News; I have a cast that has come out without missing any pieces and is set properly... Still too much flash from this mould, but I know why... the flash is thicker nearer the middle (top to bottom) of the mould, which must be due to the tightness of the rubber bands giving it a slight bow. I have a solution to this that I will try next time.
The trick (if you can call it that) to getting this cast was to give myself enough time to let the resin level out within the mould. As it always fills the parts nearest the "in" first. You have to let the resin flow by itself into the further parts of the mould and then continue to fill the mould.
Once I have a complete cast from each mould I will start building a stock of casts and then I'll be ready to start selling them off. You patience has been appreciated.
Theo, I assume that's an american show that (judging from the picture) I'm glad to have missed. and lol at 7 edits.
Galorn wrote:Try two boards and sandwich the molds. Also did you use a syringe this time?
Thanks Galorn. I think I have it solved (well minimised) with the addition of some cylindrical objects (pens) under the rubber bands in the middle of the boards I'm using.
Yes I'm using a syringe as it allows a little positive pressure to get the resin down into the mould.
I will have to buy some more syringes as the one I'm using is starting to look a little battle-worn.
Question: What does every scientist like?
Answer: Repeatable results!
That's a full set, cast one after the other, with no mishaps and minimal flash (mostly removed for these pictures). I think I have this casting thing down.
So now I know what I'm doing and the moulds appear to be behaving, how many of what thing do you want?
With reference to the above picture:
Toilets.
Tiny toilets (separate, not on sprue) ,
Tainted toilets (FO3 style, on sprue) .
Boxes (top to bottom);
Box 3,
Box 2,
Box 1.
Let me know by PM as it's probably easiest like that.
This is not for orders just yet (and is not a binding agreement for you), this is just so I can get an idea of how many I need to be making.
I will let you all know when I'm ready to start taking orders and have decided on what these will cost...
i am currently without any need for toilets... but i am definetly in it for some awesome wooden boxes...at least i would need for our something like that...depends on pricing if i would go fully ballistic... and of course i would like to wait till you have that oblong version you keep teasing me with
but i am definetly in it for some awesome wooden boxes...at least i would need for our something like that...depends on pricing if i would go fully ballistic... and of course i would like to wait till you have that oblong version you keep teasing me with
Box 3 there is one of the two oblong boxes I designed. The other one with the cross-beam will have to wait until I have more (money for) silicone.
I will let you know when I know how much I'm thinking of selling these for...
I have been casting today and I'm currently on the third set of casts. So progress is being made (albeit slowly) but is no more exciting than the previous picture...
and by way of a teaser (as I've decided to keep my actual junk pile under wraps when I eventually get round to making it) here's a picture to show where the pieces are coming from... amongst this junk, a junk pile awaits...
Top left is my small plastic bits collection,
Top right is my small metal bits collection,
Middle is my medium sizes bits collections,
Bottom left is my "odd" materials collection,
Bottom right is my "tubes" collection...
Not shown are my "Large bits", Springs, Wires, Basing stuff, Sprue, Sprue waste, Putty waste, Lids/flat objects, GW bitz and "Other model" bitz collections...
...did I mention my hoarding habit...
From those things show above, I have selected interesting looking things for the junk pile. But this may be added to or cut down when it comes to actually building the pile... You will just have to wait...
i see lots of stuff i have collected too...that pink bref cup/spoon... i think we have to thank you brits for that color in my collection... bref and other british cleaning substances get more ´n more popular these days...
Yeah We've had this conversation before. That in the picture is only a fraction of my model parts collection that ranges from the stripped remains of a broken (most definitely is now ) cd/radio, through soap dispenser and pill bottles, through what you see here, down to shavings/clippings of sprue... It'll all be useful one day...
nice lil and curiosly hue homogen collection pics
i see lots of stuff i have collected too...that pink bref cup/spoon... i think we have to thank you brits for that color in my collection... bref and other british cleaning substances get more ´n more popular these days...
Those are from "Vanish" in my case.
We can't help what the starting colouration of our bits are when you collect these things. But that's what paint is for.
It was tempting to make use of my boxes and toilets, but I don't think they would score many points in the "make use of junk to make junk" area.
I may throw in a broken bit or two though.
looks amazing how productive you have become!
Thanks. It's slower going than I expected, but then I'm currently cleaning and re-using the equipment for each cast and only really have the space to have 2 on the go at a time... I will have to streamline things if these prove popular.
Automatically Appended Next Post:
Casey's Law wrote: Adversity breeds... something. I forget. Success? Innovation? I think I'm mixing up quotes now.
Adversity breeds toilets! Yeah... that'll do just fine.
Good question. I think, classically, the most important features are the tracks, the armour and the main turret cannon. But the most interesting features is what you asked for, that's a toughy... Maybe the details. The markings, any gear that's been strapped on, anything that builds a story of the crew and the action they've seen. In fact, maybe the crew is the most interesting feature of a tank?
Junk pile! Your ruined hut looked like a five star palace, how are you going to manage a junk pile!
Tanks, well, I am no expert, for me it's the detailing, the hatches and extras that are attached. (Casey had it spot on here.) The binoculars hanging for the commander to grab. The bed rolls, and camo netting. Extra fuel cans. Silly bits of extra armour. Extra couple track links and a spanner.
My grot assistants assure me (after a brief discussion involving big spannas) that the most interesting things on a tank are the dakka, the dakka, the big jet engine and the dakka.
Good question. I think, classically, the most important features are the tracks, the armour and the main turret cannon. But the most interesting features is what you asked for, that's a toughy... Maybe the details. The markings, any gear that's been strapped on, anything that builds a story of the crew and the action they've seen. In fact, maybe the crew is the most interesting feature of a tank?
Yes indeed.
Yeah, I nearly asked for "important" and then thought "what would I answer" and then "dur, stooopid question, tracks, armour and guns", That's not what I was after. Interesting features is what I really wanted.
I have a couple of plans for the crew that you may like, you may not, but it will at least be interesting...
Theophony wrote:Castings are looking good
The junk piles are giving me nightmares of leaning out the grandparents basement and attic again
There you have the perfect real-life example to follow, don't pass up inspiration...
cormadepanda wrote:I will take 100 boxes Dr H. I have a plan for the grandest piece of terrain for my club.
You do hoard... who doesn't these days?
Congrats on casting, you are superb.
I must start on my junk too.
At my current rate 100 boxes may take a little while... would definitely look impressive though.
JUNK FOR THE JUNK GOD!!!
Camkierhi wrote:All looking good here.
Junk pile! Your ruined hut looked like a five star palace, how are you going to manage a junk pile!
It will be getting the same level of attention to detail though. But randomness is key... I can do random (after all I've gone from carving swords to sculpting toilets...).
Tanks, well, I am no expert, for me it's the detailing, the hatches and extras that are attached. (Casey had it spot on here.) The binoculars hanging for the commander to grab. The bed rolls, and camo netting. Extra fuel cans. Silly bits of extra armour. Extra couple track links and a spanner.
Good to see we are mostly on the same page.
monkeytroll wrote:My grot assistants assure me (after a brief discussion involving big spannas) that the most interesting things on a tank are the dakka, the dakka, the big jet engine and the dakka.
Hope that helps......
Thanks Monkey. There will be Dakka. and I was thinking of an engine of some kind (there's more room in a tank than a Wave Serpent... ).
lone dirty dog wrote:I can see a Dr H crapper comp appearing so, just think a diorama using a toilet
Nice job on the production line mate
Thanks, LDD.
hk1x1 wrote:Great looking selection of junk you have there, you could build almost anything from that lot,
look forward to seeing what emerges from the scrap. .
Indeed I could, and may do when I get round to it (hopefully before I get crushed beneath a pile of my own junk... ).
as for the tank... well tracks... but now after reading your more recent comments... i am blank...hmmmm....you´re up for something but i have no clue... so i just sit back, relax and wait for what is happening
Vik: I will try to explain better then. We all know what tanks should have that make them tanks, Big gun, heavy armour and tracks (although in this setting, you can have alternatives).
What I'm after from you here, is not what makes a tank, a tank, but what is it about a tank (any tank, all tanks or a specific tank) that really grips your attention/interest. What is the first thing you look for in a tank? What, if it was missing, wouldn't stop it being a tank, but would be missed by you?
As you can probably tell, the "mystery" big thing I've been planning to build next for my army, is a tank. Which tank, I shall keep quiet for now so I don't influence you thoughts (and can keep you guessing Although those of you that can read, can easily find out... ).
As you can see from my Wave Serpent build, it will be heavily modified but will keep it's identity.
However, I can keep all the tank-y bits and it'll still be a tank, but I don't want to dilute it: The WS is a fast, agile, aerodynamic, troop-carrying vehicle, and that's what I aimed to keep with my WS (outside modifications were all aerodynamic and inside I made the troop compartment more "homely"). So I want to know what is the essence of a tank?
And in other news; I should stop procrastinating...
This is what you have been waiting for *drum-roll*
Those of you that are interested in my boxes and/or my toilets, form an orderly queue and send me a PM to discuss.
Obviously I can only work so fast, so patience will be required if demand outstrips production. But I will now take your orders.
ok... so with that explanation above... and with that better question...
i think for me (even with alien/xenos variations to the theme...) a tank should be firstly a bulky opnonent that dwarves any oposing force, is able to provide cover for allied troops on foot and does the heavy jobs...the mere presence of the tank should speak of crushing stuff under it´s "heels"...
maybe should look like it would be immoble but betrays this sensation by simply rolling over something...nothing is as terrifying as seeing a turret turn towards you and you will feel the shellshock soon...a hulking behemoth that makes options to run for cover seem slim to none...
well... you stated that you droped some info already... but my mind is like a seave^^... will you attempt a scratchbuild or a kitbash?...(wasn´t there some orky stuff about to join the ranks of chaos sooner or later?...)
Viktor von Domm wrote: well... you stated that you droped some info already... but my mind is like a seave^^... will you attempt a scratchbuild or a kitbash?...(wasn´t there some orky stuff about to join the ranks of chaos sooner or later?...)
No, this is a kit I got quite a while before the Orks. But that doesn't mean that bits of the final tank will not be scratch-built / Kit-bashed / involve Ork (or Tau, Eldar or SM bits)... But I have a GW model kit tank, that I will (Mad)-i-fy.
cormadepanda wrote:For me a tank is all about the big gun and robust armor.
Good to know.
Lol, Ruglud. Maybe that's something Theo could do for his servo-skull janitors.
Could have a lawnmower, toilet, sofa/armchair, etc... (they've all been done irl).
No other major excitements here, more casting and I've started to construct the junk pile (I had to do the base first, which will make more sense when you eventually see it ).
My ideas of a tank is something huge, heavily armored, and not good o be in the way of. I also believe they MUST have treads. I know some games have grav tanks, but those are just gun carriages to me. Tanks need to take a pounding and be able to give it back in spades.


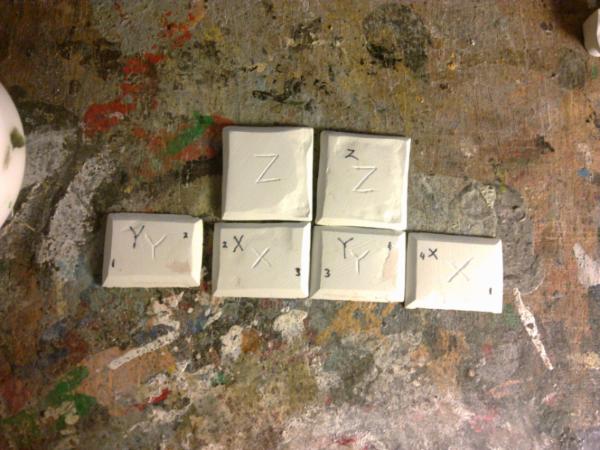


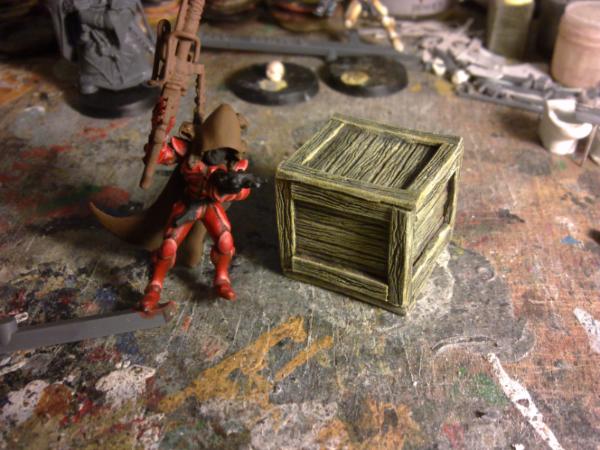
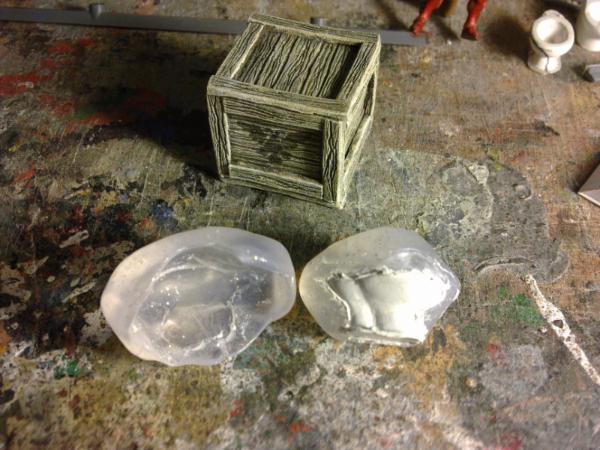
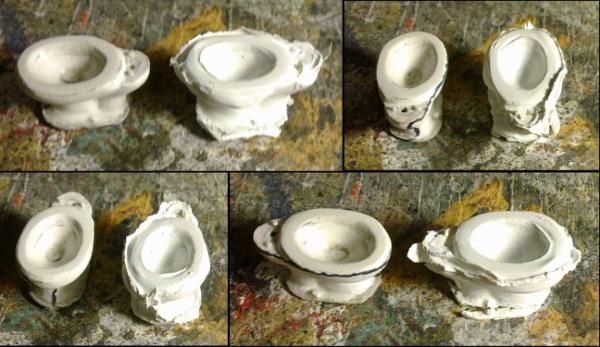


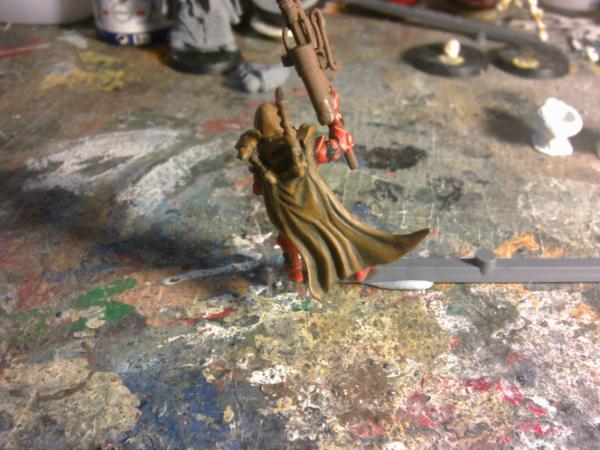


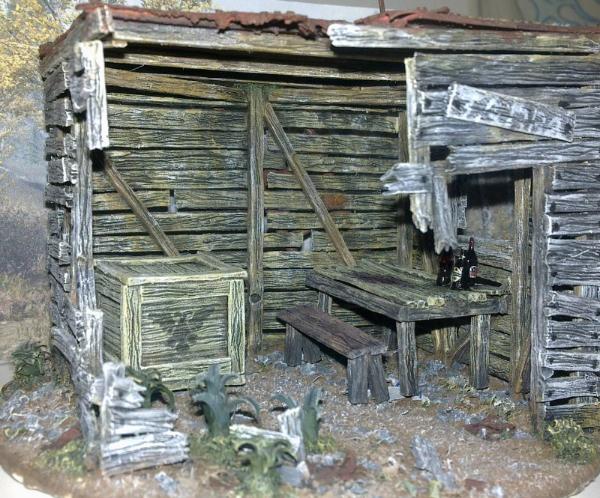
 , I don't think I looked at the labels on the bottles before
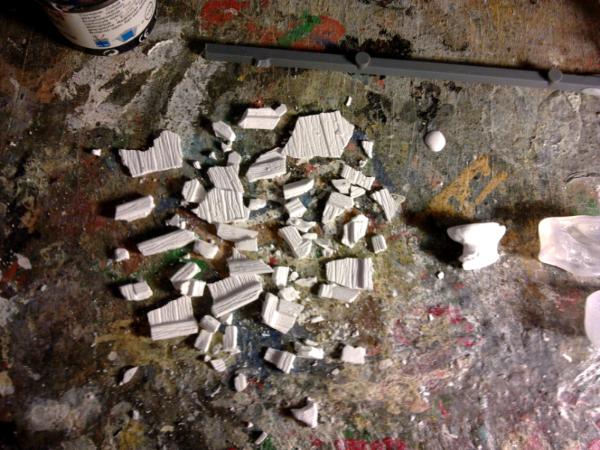
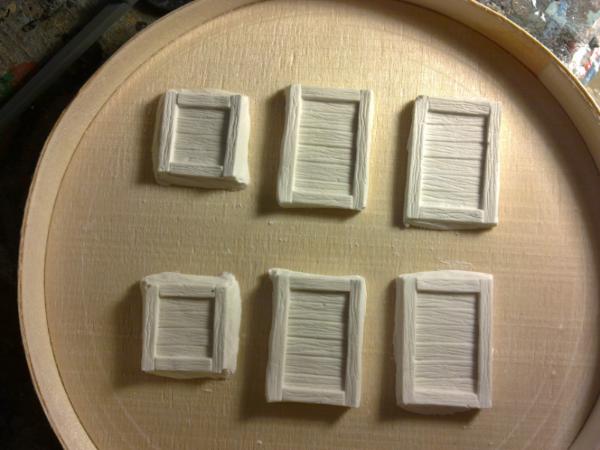
 )
)

 In order for the plaster to be strong enough to not break they are at least twice as thick as the milliput ones I did for the previous box. This means that when I come to cast these I'm going to end up using more resin per box, and as I'm hoping to cast many boxes that's going to add up quicker than using some milliput for a single original.
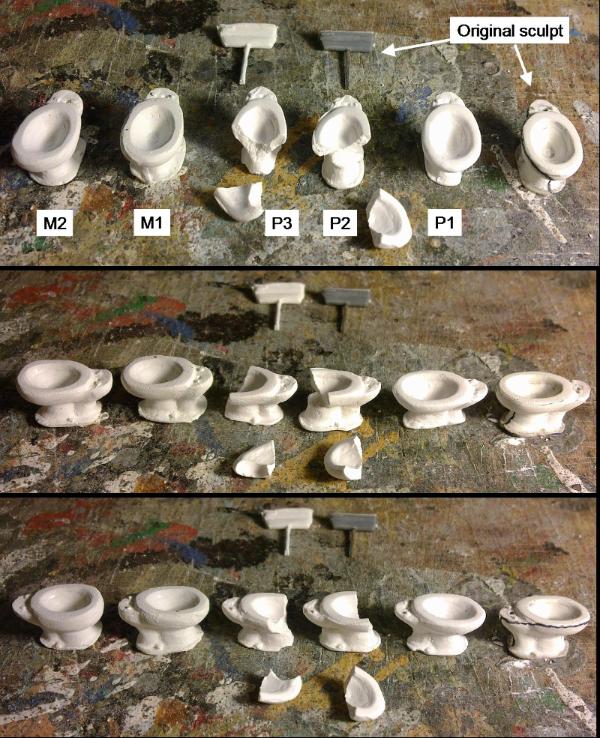
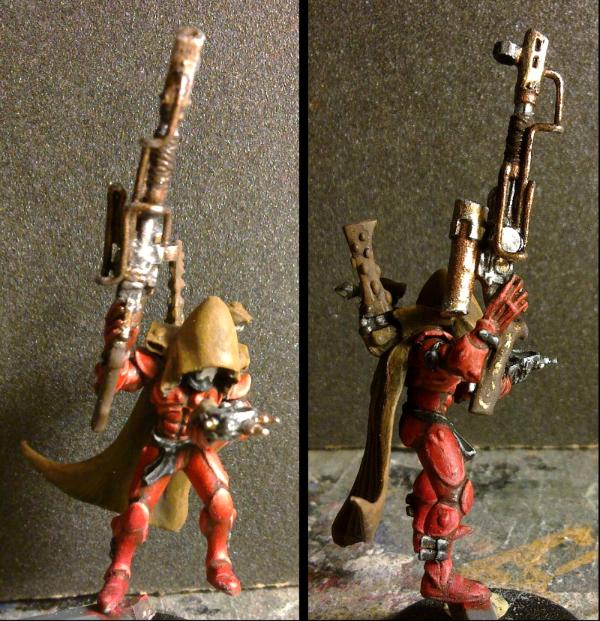

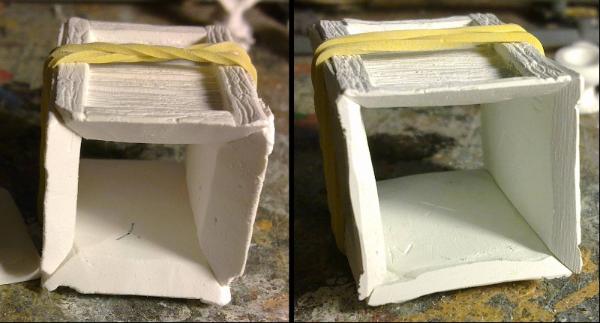
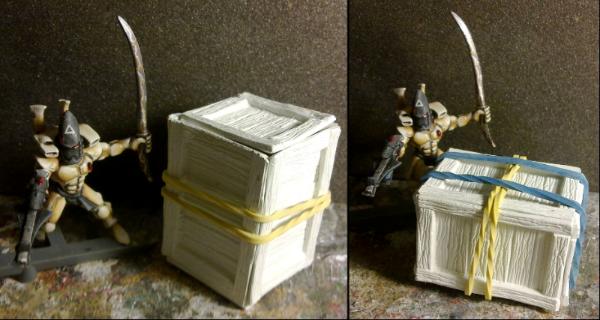
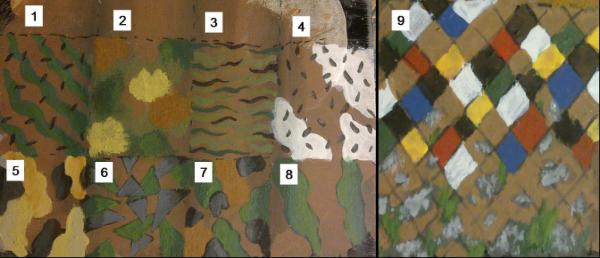
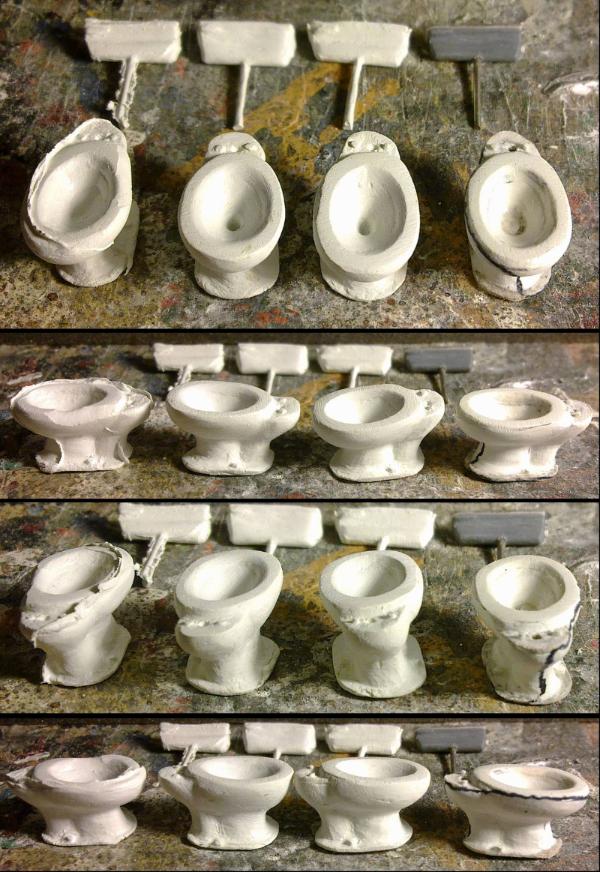

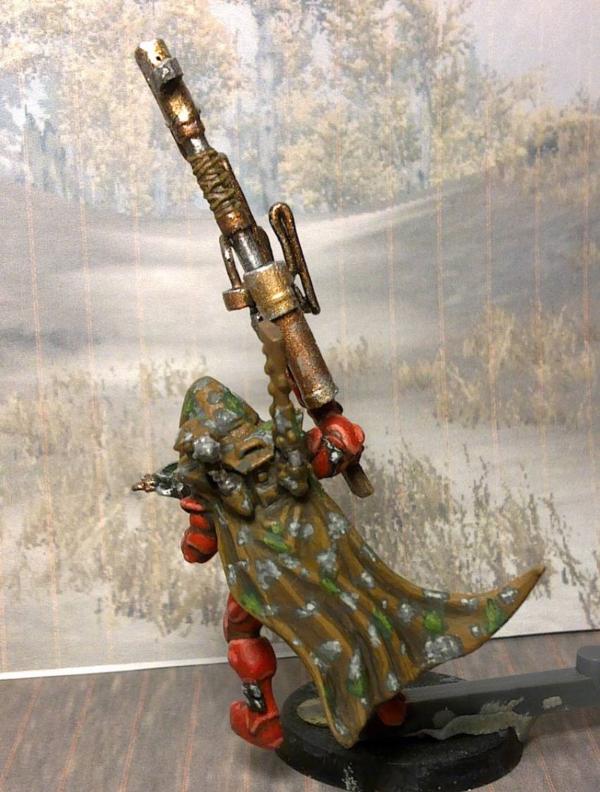


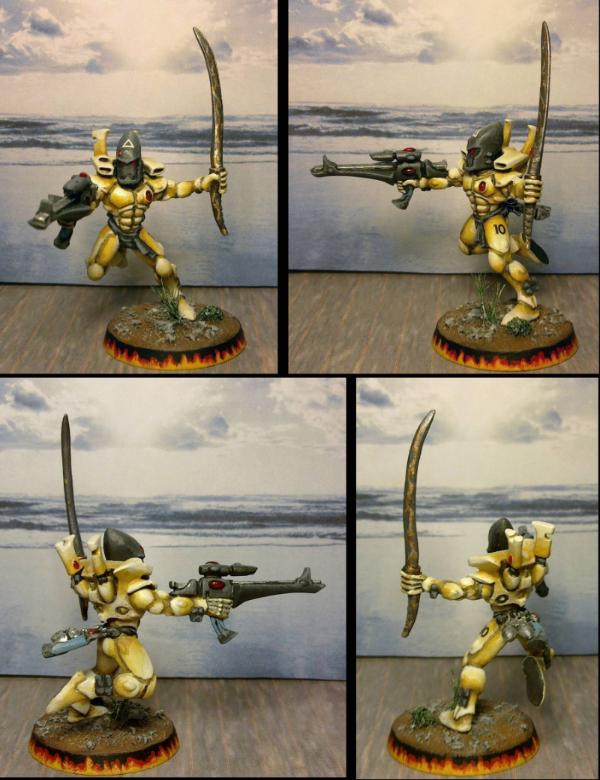


 , just tired of driving this bus through the holes in your "I can't wake up in the morning" story
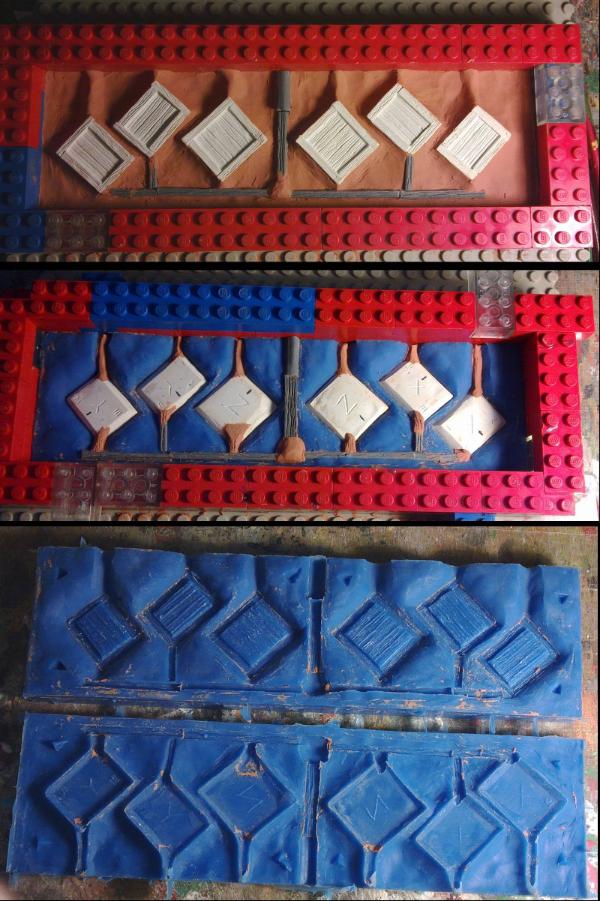
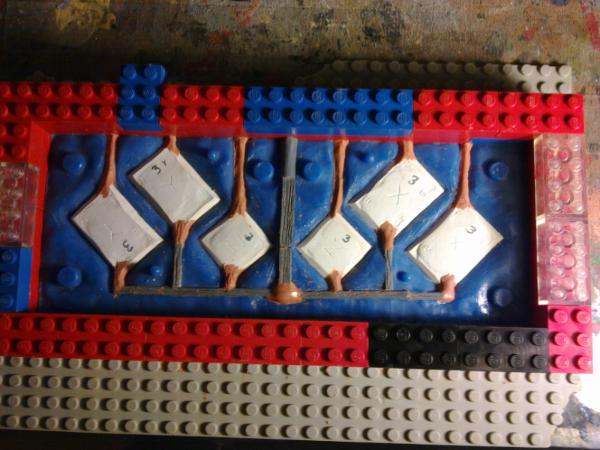
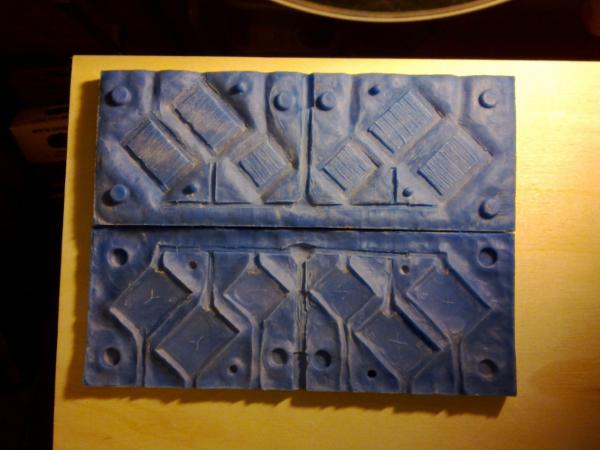

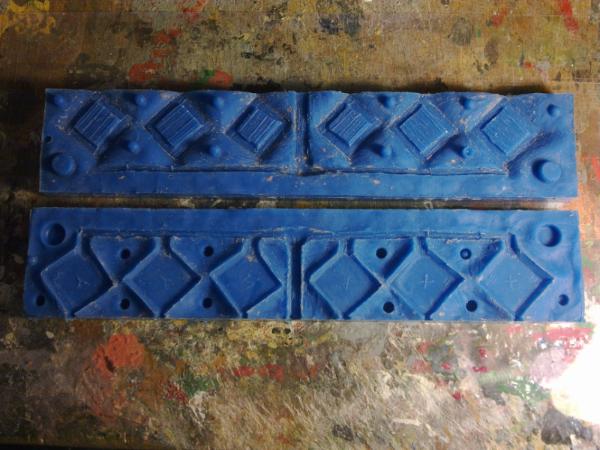
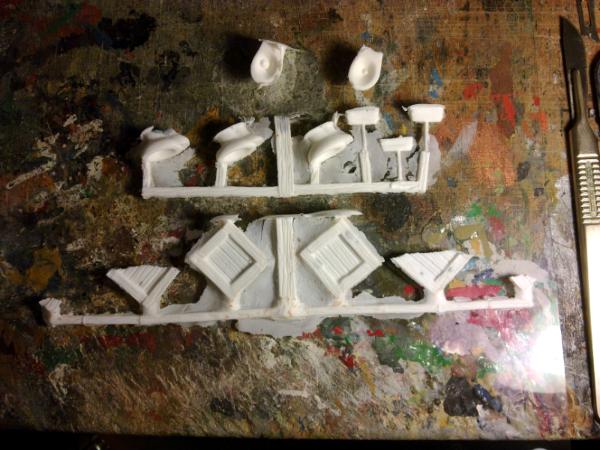
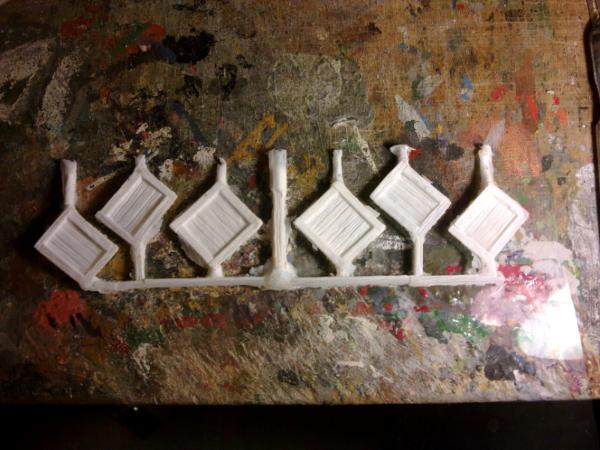
 far and too


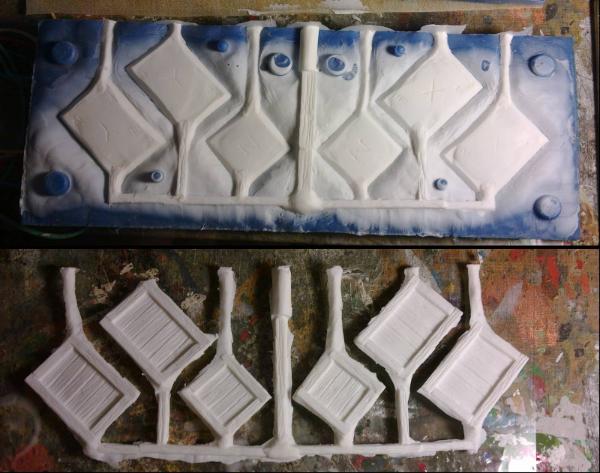

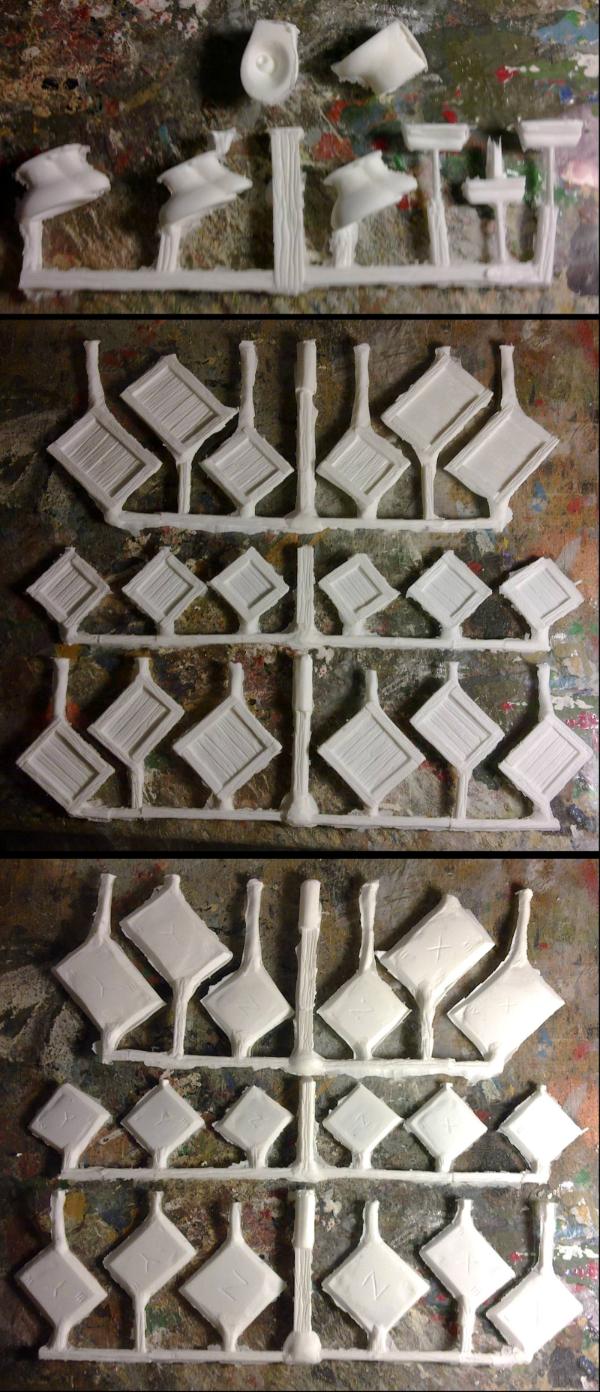

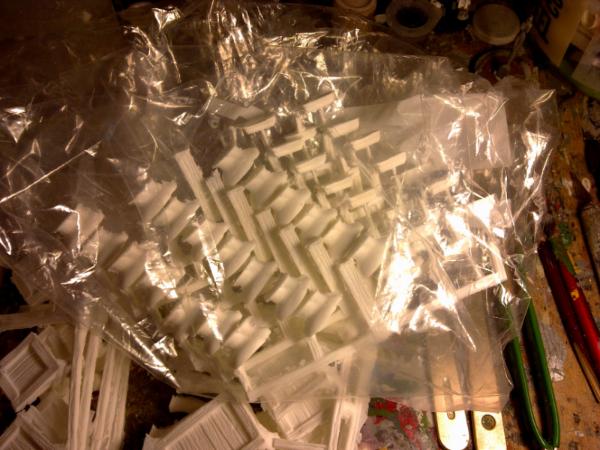

 Although those of you that can read, can easily find out...