As some of you might know, I have been working on a cardboard temple.
The problems I faced with the temple were the lack of detail (although it was very detailed for your standard scenery, and texturing it with sand helped a lot) and the need of a laser cutter and lots of gluing time to duplicate the pieces in order to make such a large building.
So, with the lesson learnt, I want to build a better piece of scenery. The final goal is to build a more detailed, resin based, modular cathedral, of over 1 metres long and about 60 centimeters high.
I want to create one piece of each type with cardboard, then detail them with putty, texture them with sand, and duplicate them. Since the final temple I am going for would involve the use of over 35 different pieces and I am unexperienced with resin, I will start with a much simpler proyect, involving a smaller ammount of pieces, which will still be useful for the cathedral.
Here is a concept design I drawed. The result will have less skulls xD, and less sculpting quality, since I am a better artist than sculptor:
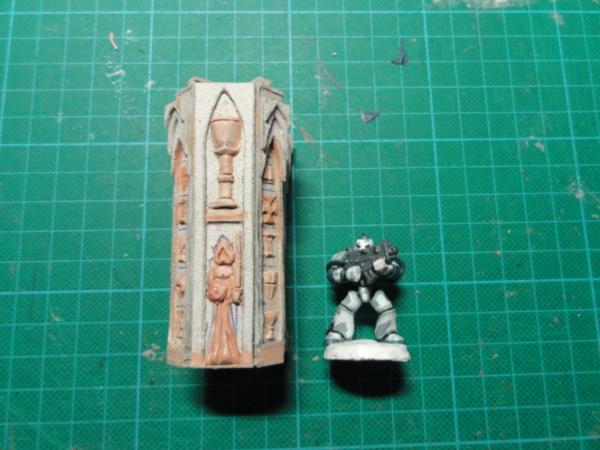
My primary goal will be to build a tower of nearly 1.5 times the size of an imperial bastion. It should be able to contain 25 warhammer fantasy miniatures in a 5x5 formation in each of it's storeys, which I hope is more than enough room for a full warhammer 40k squad. Then, I will be able to give casting with resin a try. If I can make it work, I will be able to duplicate the pieces and continue with the proyect to expand into a bigger building with an increased range of walls, pillars and arches.
Maybe I will divert my attention with some side-proyects in the same style, in order to build other kinds of resin based scenery from time to time.
I will be posting pics of my progress with each piece, if everything goes as expected. Wish me luck!
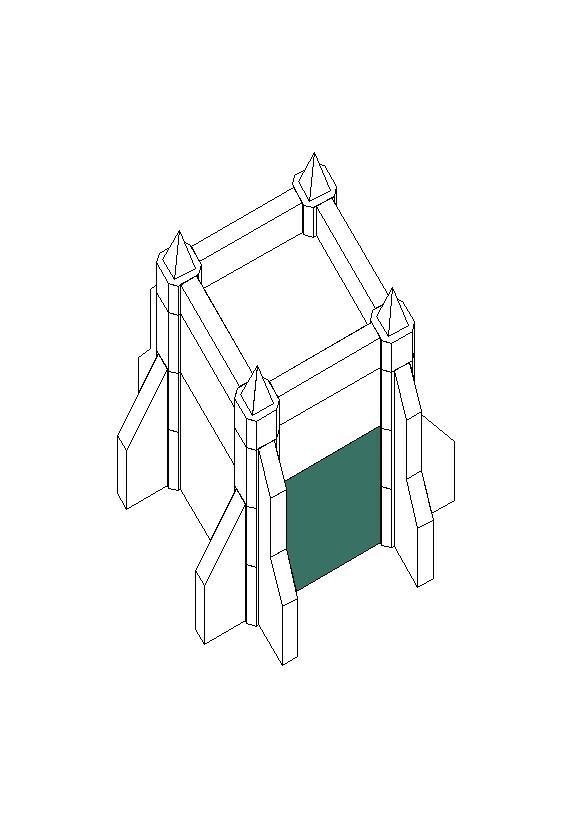
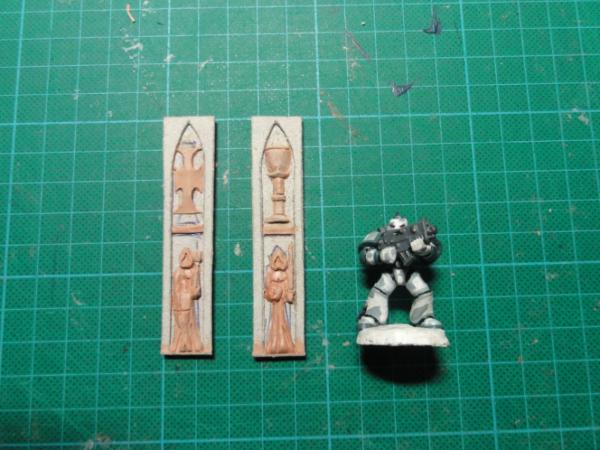
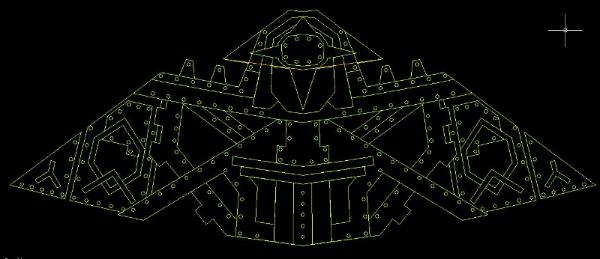
This is the initial design for the standalone tower. The blue colour marks the piece I have been showing you.
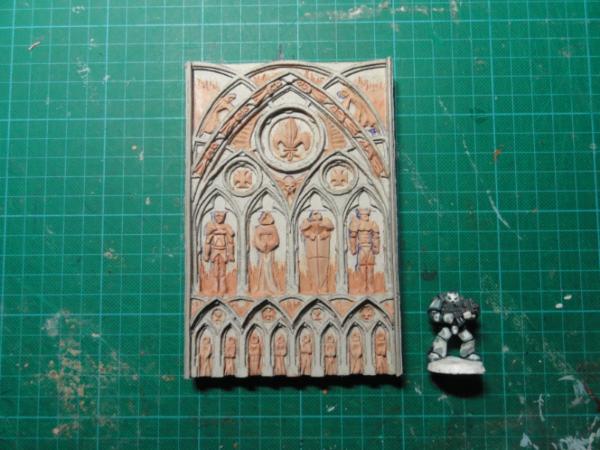
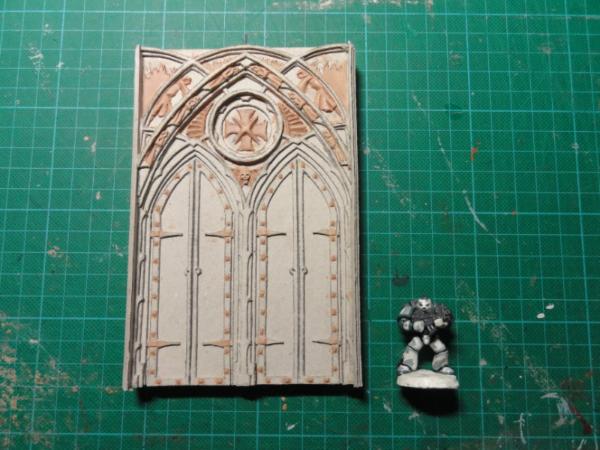
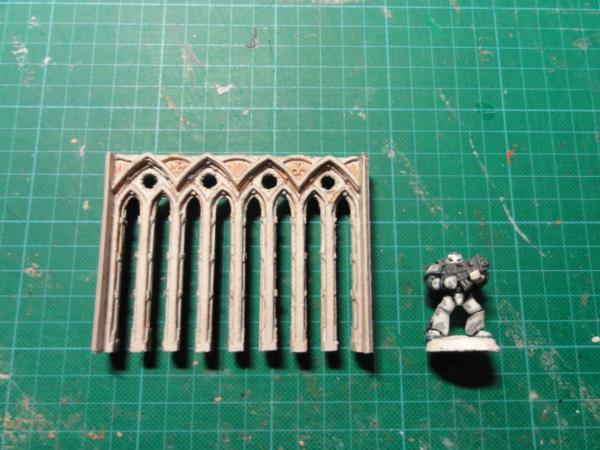
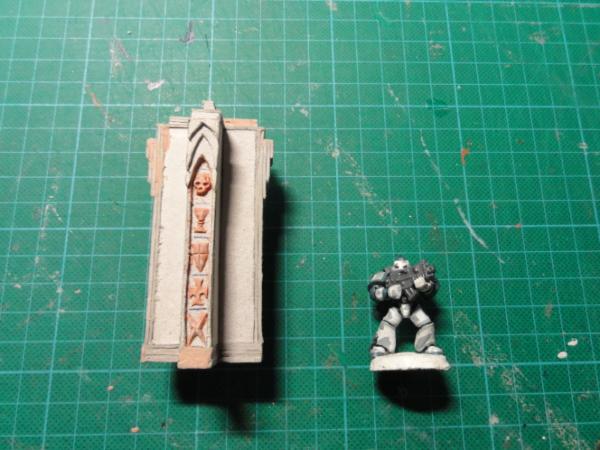
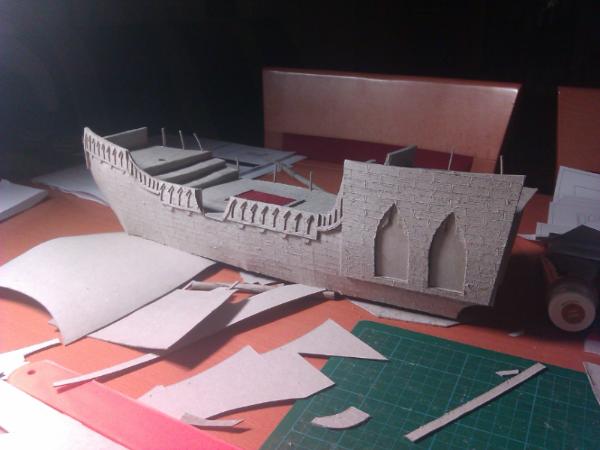
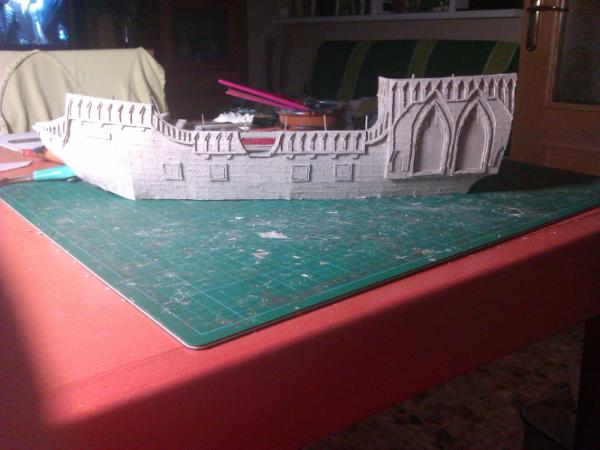
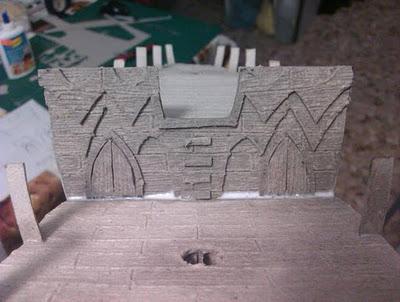
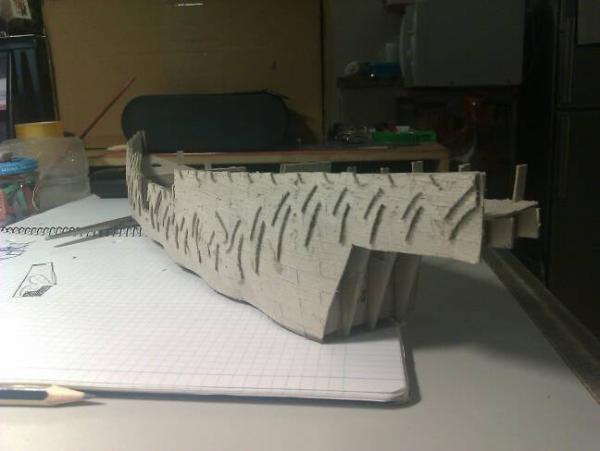
And here I present you one side of the wall which I have already finished. I am worried about the sand+pva glue I want to use to texture the wall will eat too much detail, beyond obscuring most imperfections on the sculpt. I hope it won't be a problem, or all this work will be ruined, just as if I was not able to cast the pieces in resin for some reason. After all, I have never given resin casting a try, so it's a whole new world for me.
I am really not sure that adding texture with PVA glue and sand would give you the result you wanted without obscuring a lot of the detail.
If you wanted a stone texture have you considered using a textured spray primer, like GW's Rough Coat, which will add a textured, sandy finish without obsuring much detail?
If you did want to add sand though my best suggestion would be to use very fine grade coral sand which you can get from aquarium shops, and applying it with either hairspray or spraymount, and then varnishing it.
The only downside I can think of would be warpage on the card when using sprays?
What you have done so far is lovely though, although considering the amount of effort that's gone into the sculpting I might have used plasticard rather than card, but I am not used to working in card and presume it's pretty durable?
I also intended to use the "watered down pva glue+sand" layer to make the cardboard resistant to liquids. Maybe that is not necessary. Can anyone with some experience with casting with resing give me advice on the matter? If that protective layer was not necessary, textured spray paint would be an option if I can find it in Spain.
I'd like to get a small degree of texture into the material, in order to make the pieces easy to paint, with just a basecoat and two layers of drybrushing, each one less wet and with a lighter colour than the previous one. Just like the Games-Workshop Imperial Bastion walls have a fine texture on them. This will also absorb some of the small putty "stains" and irregularities that are unavoidable in such a sculpt with my limited skills.
I am not really worried about the cardboard warping, since most of goes from 2 mm thick to 17 mm thick, which I am quite confident won't warp easily. The surface texture is what worries me the most. Maybe a coat of pva glue, without sand, would also absorb many irregularities. But then, does the wall have enough detail to be just drybrushed without a texture and look good? In my mind, it's bastion style versus citadel ruins style, which if I'm right, are not textured. And I am quite sure the wall detail is not crisp enough to leave it untextured and still look good.
Umm, I would assume that the waterproof would be necessary but, having never casted Im not sure. The fine texture could be achived by sanding down on the cardboard lightly.
I might give the pieces a coat of watered-down pva glue in order to make them waterproof. Then, I will look for textured spray paint, although I have no Idea of where to find something like that in Valencia (Spain).
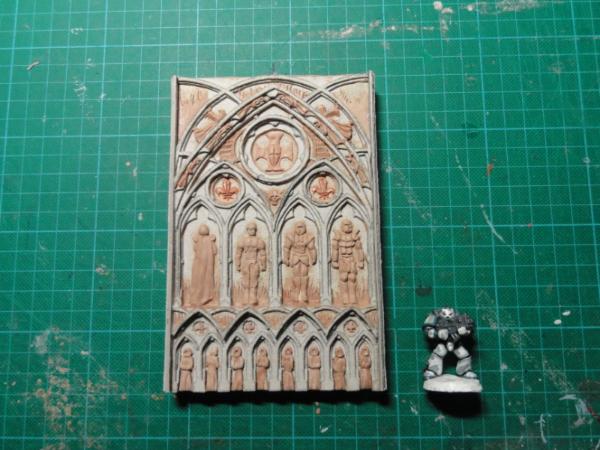
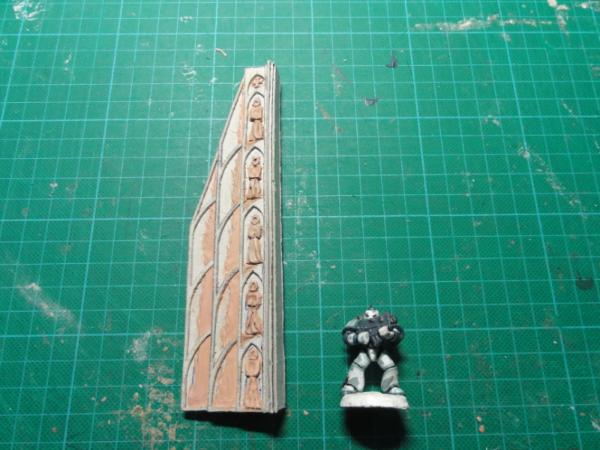
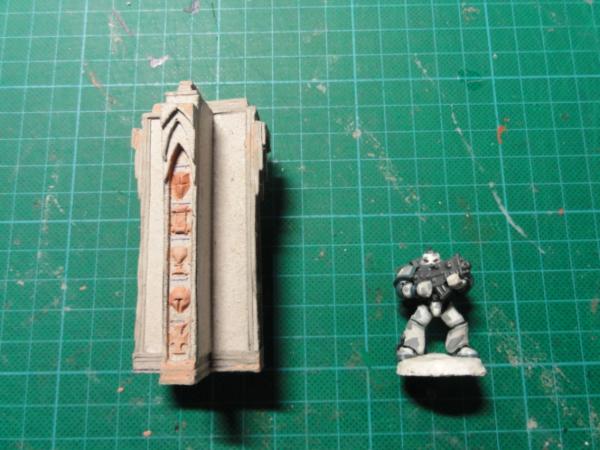
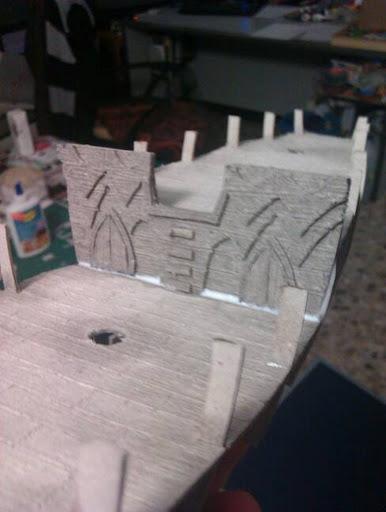
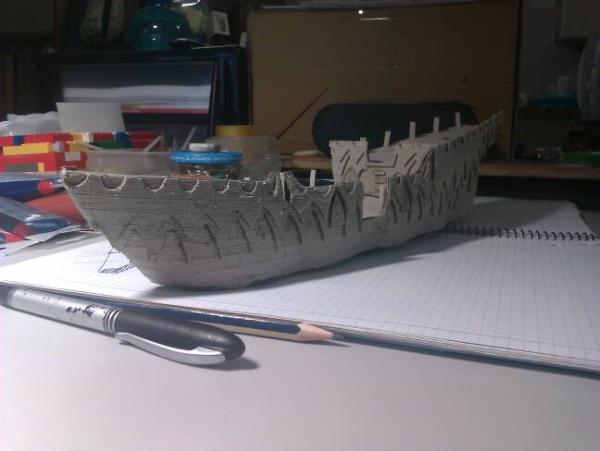
I have completed the other side of the previous wall segment:
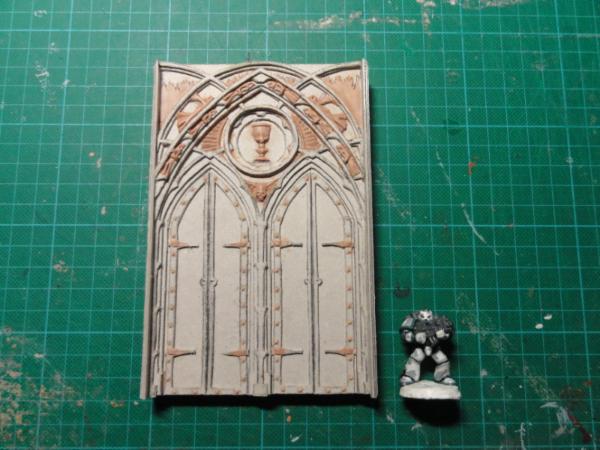
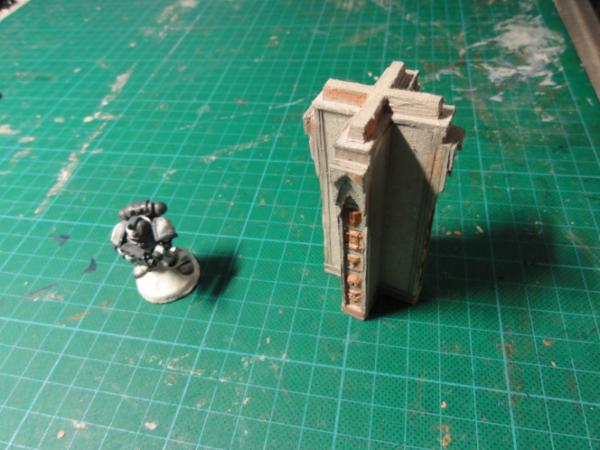
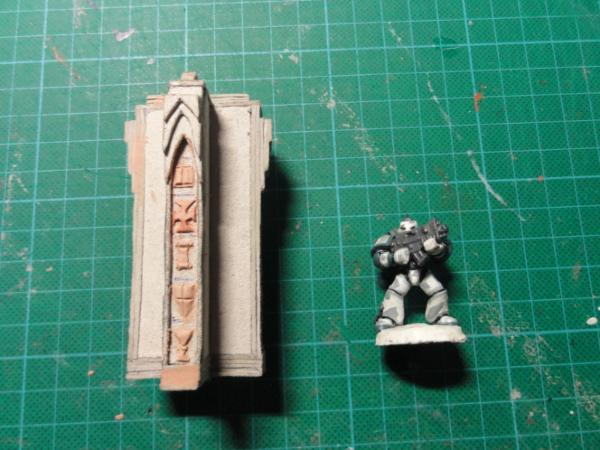
And although the next piece was not necessary in the initial design of the cathedral, I thought the tower needed gates, so I built this variation on that previous wall segment.
The doors themselves should not get textured, of course.
Be careful of the PVA glue and cardboard. The PVA glue really shrinks a lot when it dries. My buddy made all his terrain and coated it with PVA, all of the cardboard bases warped alot.
Maybe, try giving it a spray sealant? or making sure it will not warp by securing it in a vise or something? But I just don't want to see your great work get ruined because of PVA glue.
Me, I would jsut prime, maybe with 2-3 thin coats.
Yes, I agree. If that is made with the pasteboard type of cardboard that I think it is made of, PVA will probably warp it. Priming could even warp it if it isnt first fixed to something un-warpable. Maybe glue a thin piece of plastic card to the back first for stability? Your master is amazingly detailed, ruining it would make both of us cry! Be careful!
Maybe I could cast the pieces first with the waterproof layer only, and then give a try at texturing them? If you were to get these pieces, would you want them just as they are, with no sand-like texture? or would you preffer them textured?
To be honest, I am quite confident about the masters not warping. Both sides of the wall sections are glued back to back, and each one is composed of several layers of 1mm thick cardboard, glued using PVA glue. The thinnest part of the master is always of no less than 2mm thick, with most of it being 4-6mm thick, and some arches being up to 20mm thick.
The fact that I already used plenty of pva glue to glue each cardboard layer and was able to prevent warping to a degree, and having such a thick piece in general makes me less worried about warping, and more worried about being able to give it the right texture. Not too thick so it obscures most of the detail, but not too light so it leaves any mistakes in sculpting and rough edges clearly visible.
if you ask me, i would skip the sand too...sealing it pva and then varnishing it for the mouldcasting i think would be as you described the former works on the piece be ok in my book...
i would leave the surfaces as be and if there are some smaller errors in the details i would look at them in the same kind as someone would deliberatly add weathering chips and such things... the risk to loose such fine deatails as you did is too great as to make extra texture to flatter surfaces would be gained...if this fails i guess i have to start begging^^
I agree with Vik, cast them first, then you can experiment with texture on the casted pieces. Personally, I don't think they need texturing. I would buy casts of these from you untextured, exactly like these masters!
wouldnßt be curretnly able to buy them but would love to^^ and as dsteingass said, cast first and then you are free to do as you please... and the loose then is somehwat irrelevant as you can always redo from start^^
as a personal opinion... i think thse pieces would have great potential to be sold...if i was you i would send then the first casted versions to someone like chapterhouse or scibor... this is there style of work so would be a good addition of their current ranges...and i guess there is definite money in those pieces to be wrung out...
That detailing looks amazing, keep going, I will be checking back for updates.
The only problem I can see with selling them is the sheer size of the pieces. Casting them in resin is going to be quite expensive, i would say probably a pound of resin or more per building. I would say retail price for the piece would have to be at least $50 USD, to make it even worth the time and effort, probably more likely around $70-$80 USD.
If you have a dchance to do something you love my friend, don't save for it, don't plan for it, don't wait for it....you need to just go do it! Life is too short.
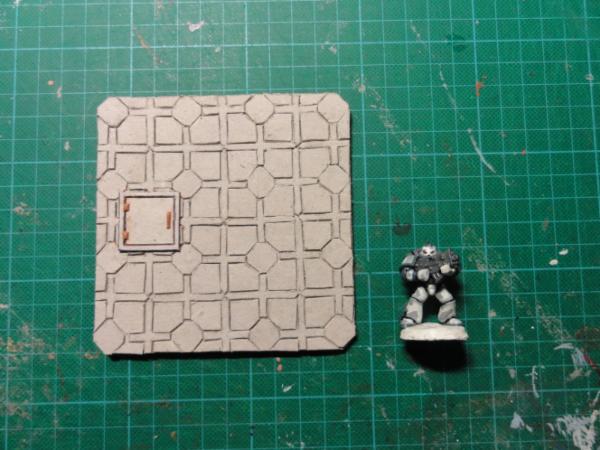
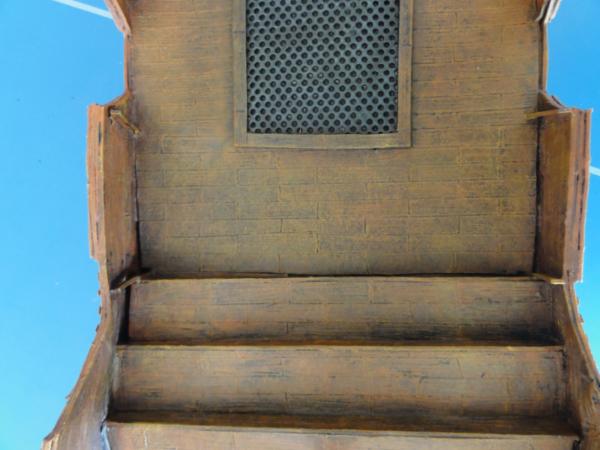
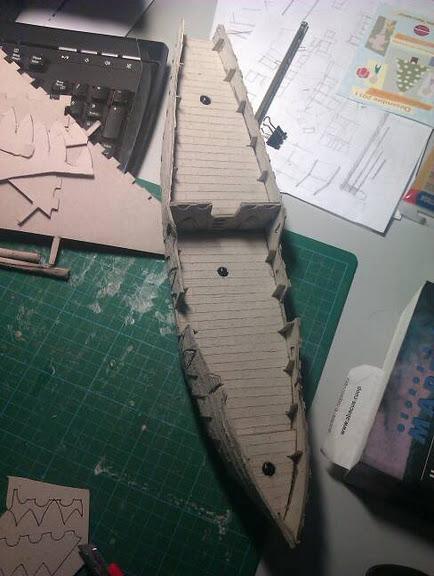
could you please show us some times a WIP pic of this work of yours? this would be so helpfu to understand how you are able to come up with some artful stuff like that from scratch... the floor looks awsome and how many modlers care for the underside of a floor anyway? truly exceptional!!!
To be honest, the way I create these is really easy. I just cut cardboard in layers, which I then glue on top of another, and then I sculpt over the cardboard. It's just time consuming, but it works.
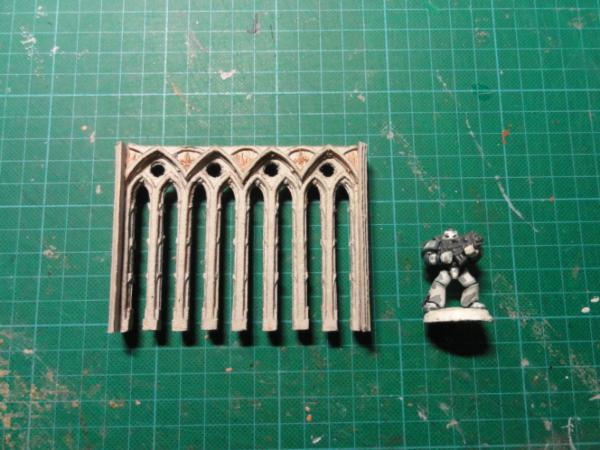
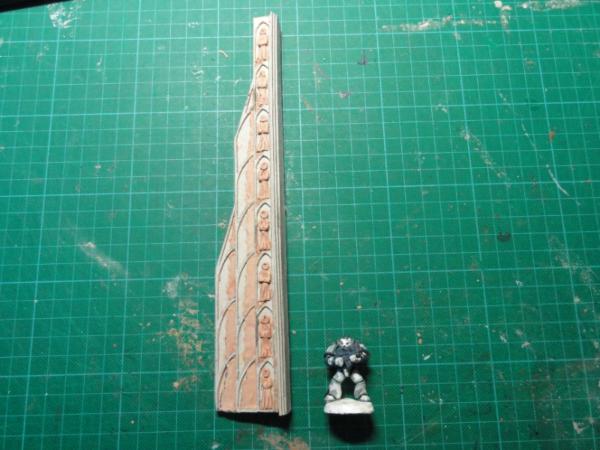
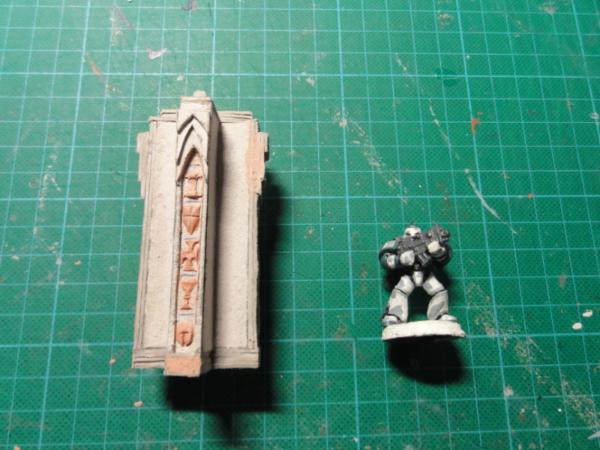
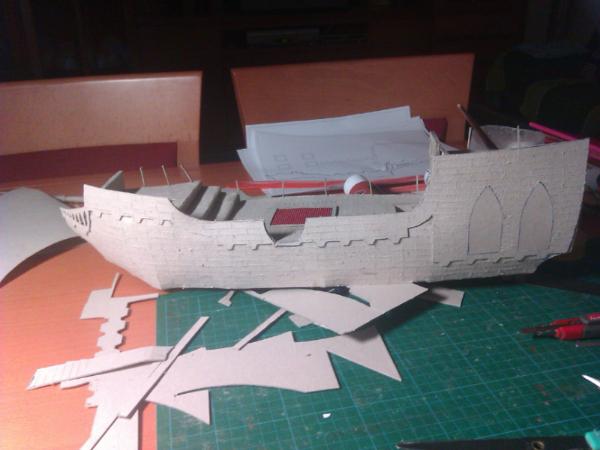
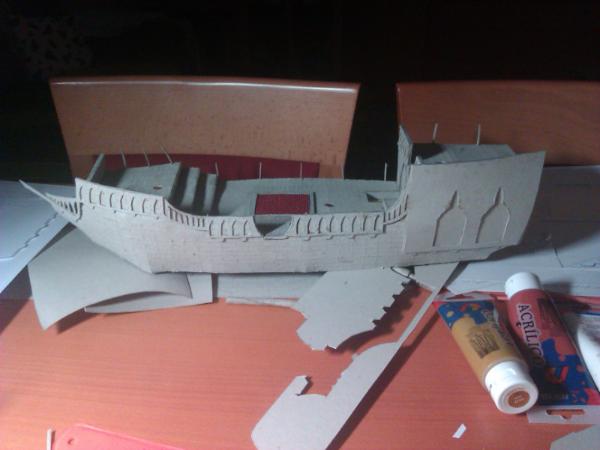
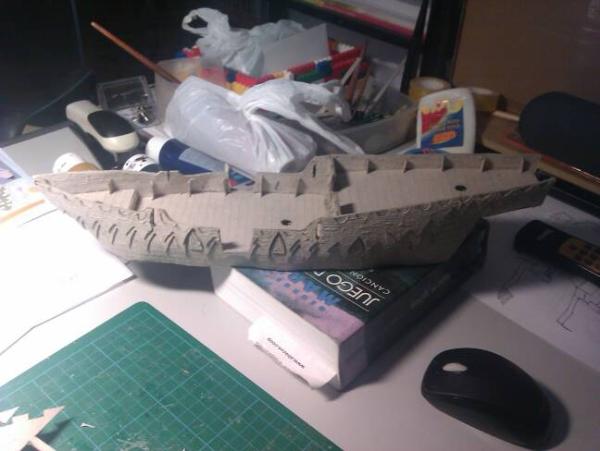
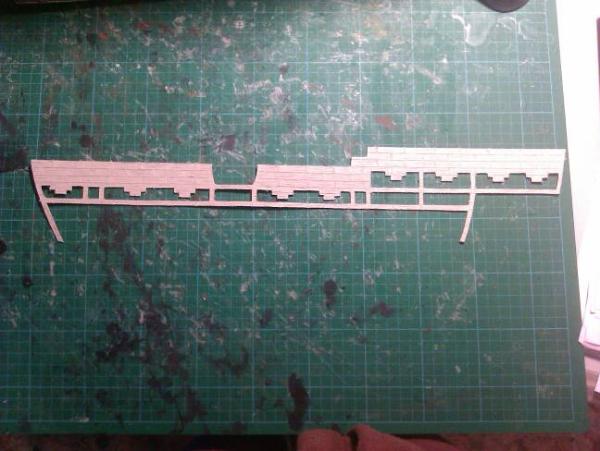
Here I present you the upper floor walls
These go directly on top of the high walls you saw in the previous page.
I have been researching regarding resin casting.
After building a 3d model of the tower to calculate it's volume. If my numbers are not wrong, the quantity of material needed is reasonable, so I could duplicate it without being a huge money sink.
The problem is the initial investment: The moulding material.
We would be speaking of about 123€ for about 5 kg of material, which I guess is what I would need to build a mould of each piece.
It is not a price I can pay right now, as I am unemployed :-(
I would cast each piece seperately, not make a huge mold. And yes, the good resin (OOMOO) should be based on volume, so if you use dry rice to measure the volume of each piece, then that exact amount of resin should be needed. Molds can be made from LEGO and DIY silicone in a caulking tube to save money.
how about later to use plaster instead? this could then be added with pva and you have a sturdy reproduction material...oh and those arches are lovley!
as i see it south eurpoe is currently not a nice place to be living in... seems economy is doing down the drain wherever one looks...greece, italy and spain... maybe even france... seems like a europaen collaps is bound to happen...
dsteingass wrote:I would cast each piece seperately, not make a huge mold. And yes, the good resin (OOMOO) should be based on volume, so if you use dry rice to measure the volume of each piece, then that exact amount of resin should be needed. Molds can be made from LEGO and DIY silicone in a caulking tube to save money.
That was my plan. Individual moulds and lego pieces. Each piece with its own mold, 1.5 centimeters bigger than the piece itself in all but one side (to pour the resin on the mould) After calculating the external volume of each mould and substracting the volume of the piece, then multiplying the totals by the density of silicon, I got my figures: nearly 5.8 kg of silicon is needed. I can get special moulding silicon at 23€ per Kg. As you can see, it adds up very quickly. I might save a bit by using DIY silicon... but I would be saving only 4€ per Kg at most, at the expense of a silicon of inferior quality and a lower mould lifespan.
Viktor von Domm wrote:how about later to use plaster instead? this could then be added with pva and you have a sturdy reproduction material...oh and those arches are lovley!
as i see it south eurpoe is currently not a nice place to be living in... seems economy is doing down the drain wherever one looks...greece, italy and spain... maybe even france... seems like a europaen collaps is bound to happen...
What is this method you are talking about? can you give me any link to tutorials or exemples? I am interested in any alternative to silicon. I am quite worried about the pieces needing the flexibility of the silicon to be propperly extracted from the mould, however. Specially the columns, as I have designed them.
Digits wrote:This is incredible!
Thanks a lot! I will continue building one piece of each, even if cloning the pieces is not an option yet, hoping for someone to come to me with a posible solution.
at 2500kgm3 i ws refering to an alternative to the expensive resin...the mould making of course could only be done with silicone...nothing else would be able to be pulled off in a way that it could be used for casting afterwards... was in an artshop recently and i saw the prices for all the stuff needed for reproduction... let me say just... this is currently out of the question for me... but the whole process is so damn tempting....
Maybe I could start a Kickstarter for this project... I am not totally sure about how that works, however.
How about 35€ + postage for an unassembled resin tower of 22cm wide and 29 cm tall (about a GW bastion and a half) whose 3 floors can be accessed during gameplay simply by sliding the walls in order to move miniatures on them, and can hold up to 25 WFB miniatures (or a full squad in WH40k) on each floor?
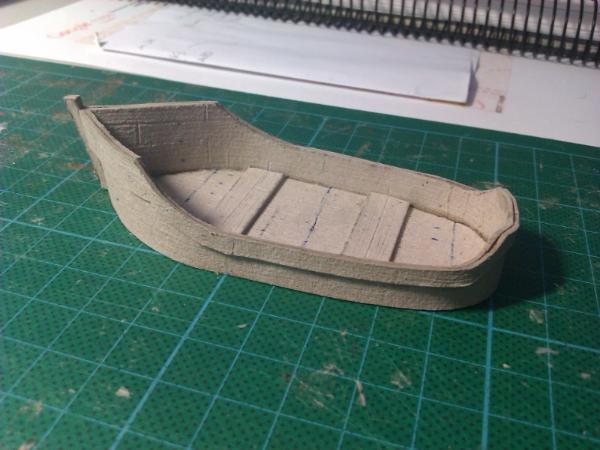
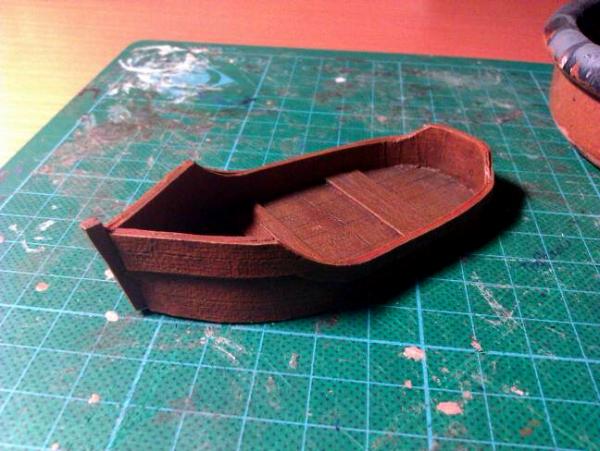
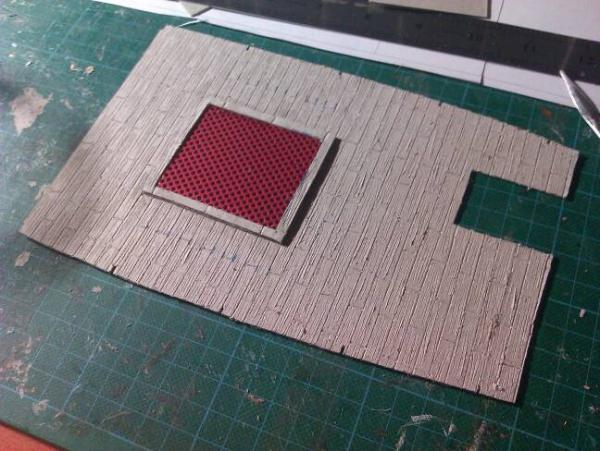
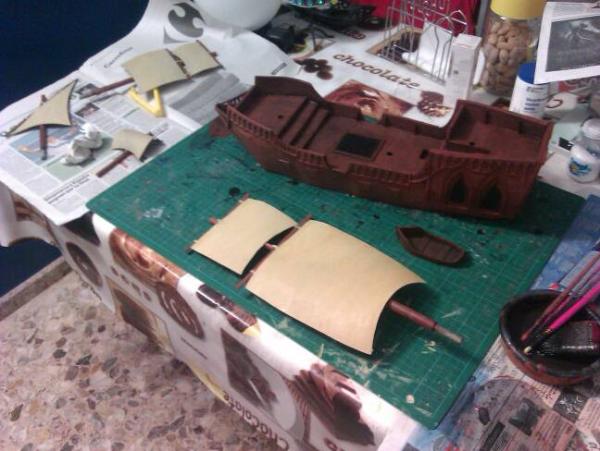
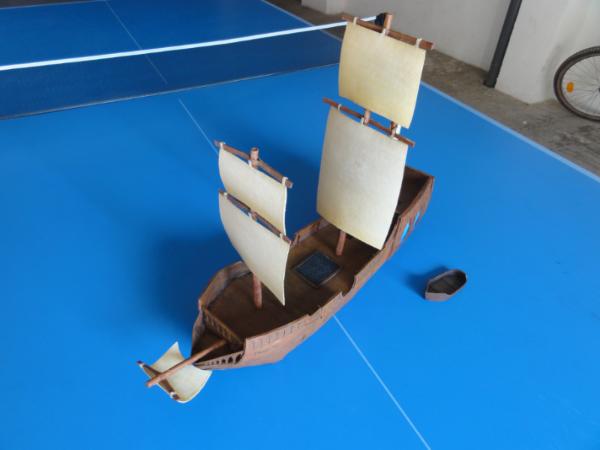
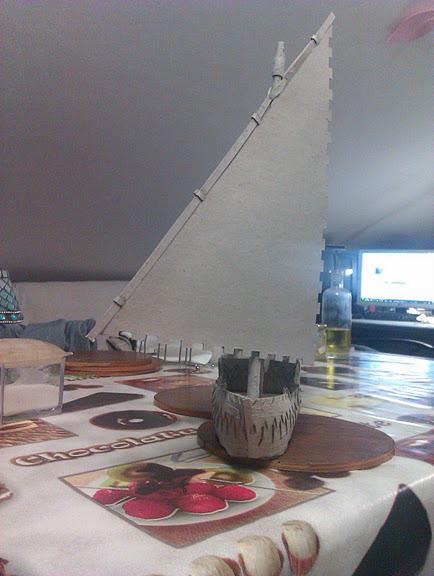
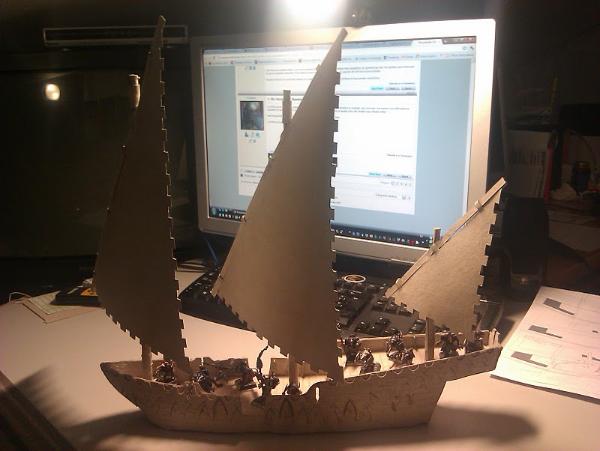
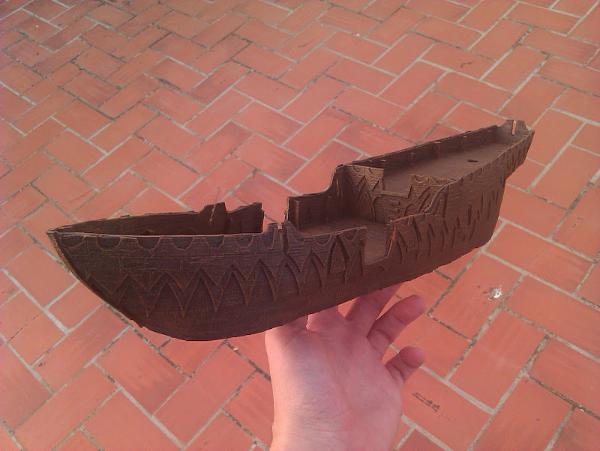
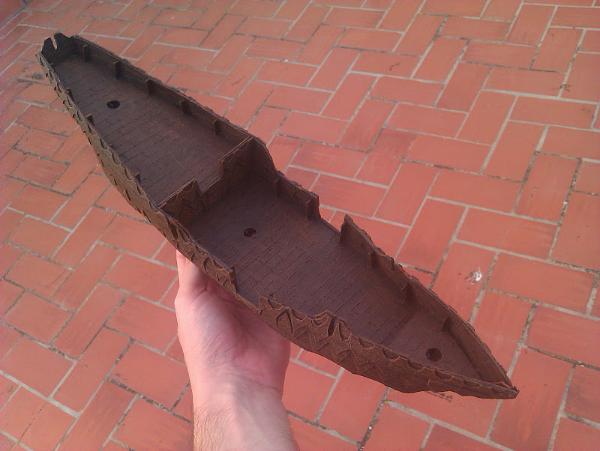
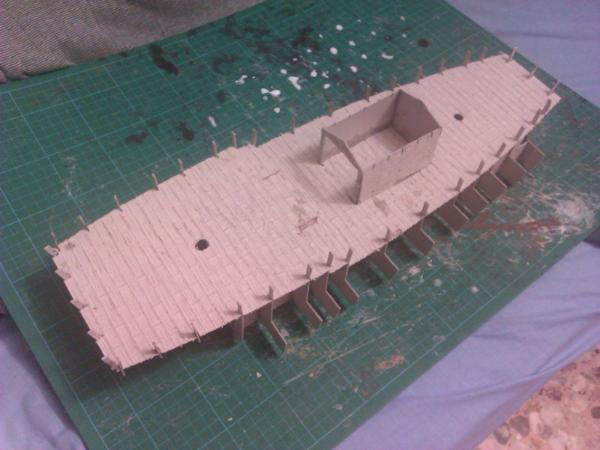
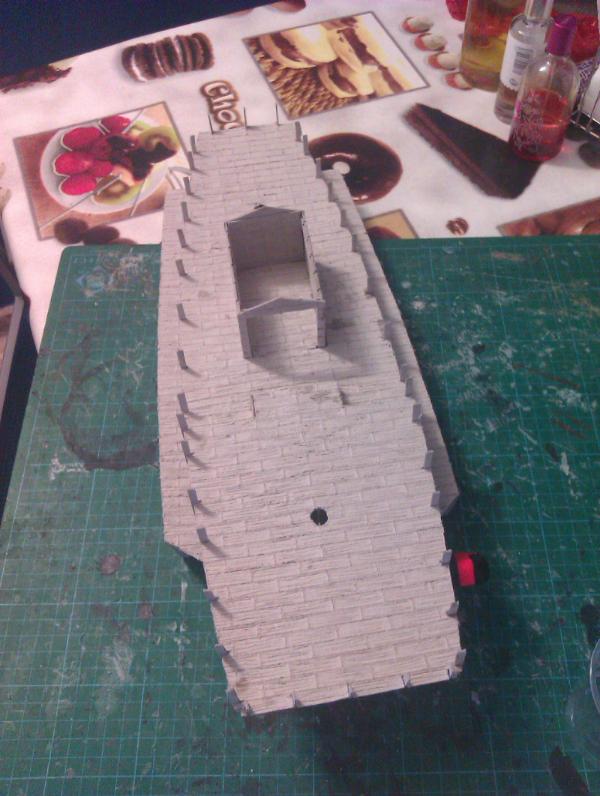
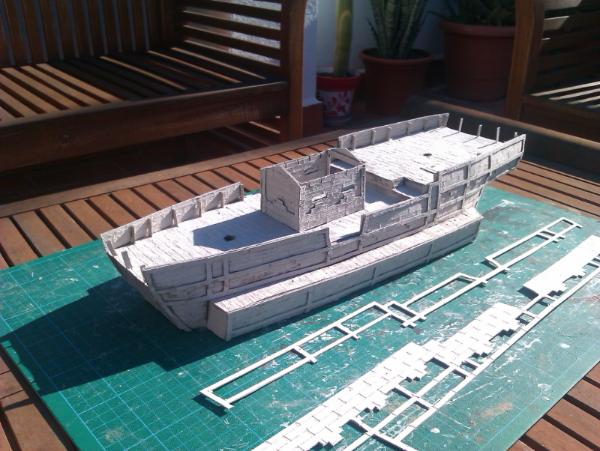
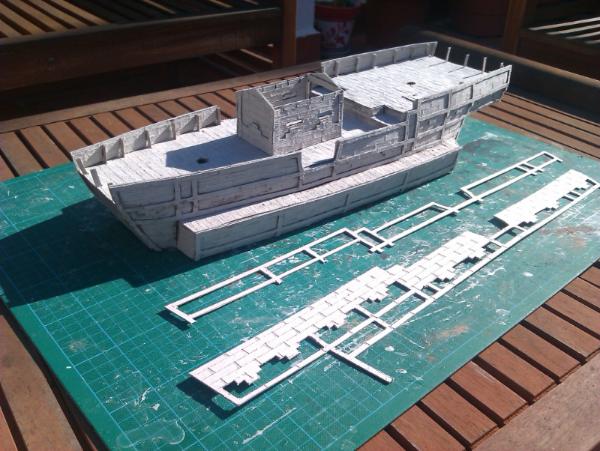
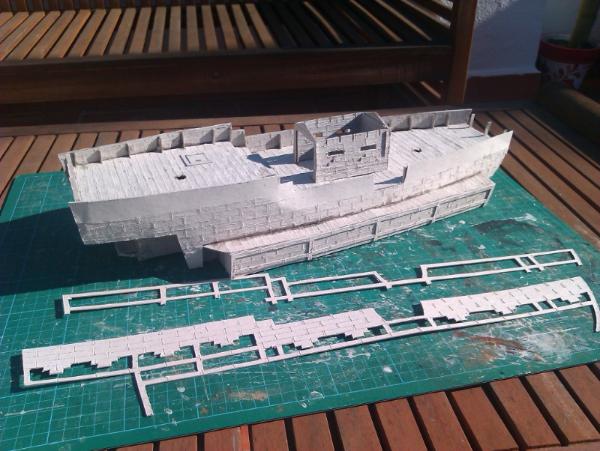
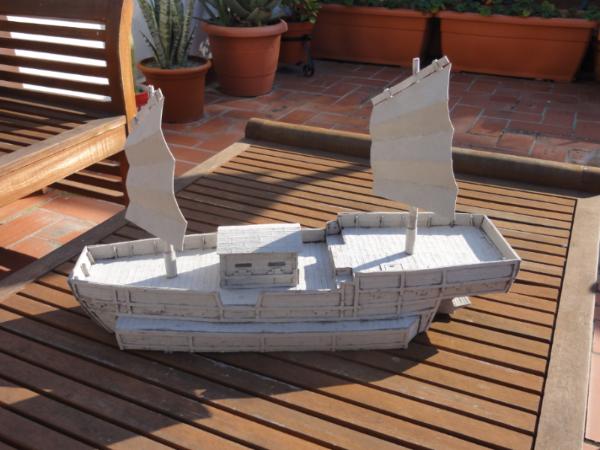
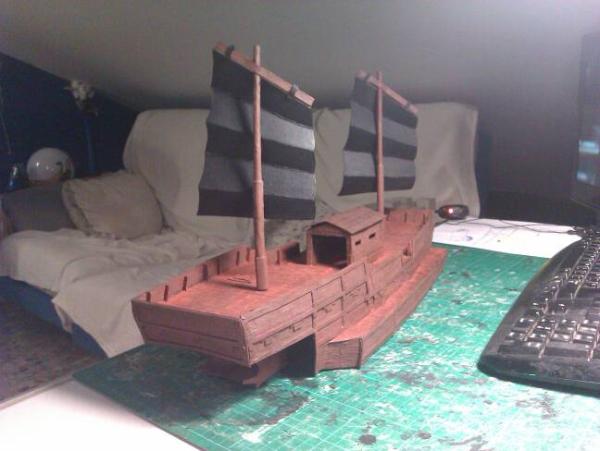
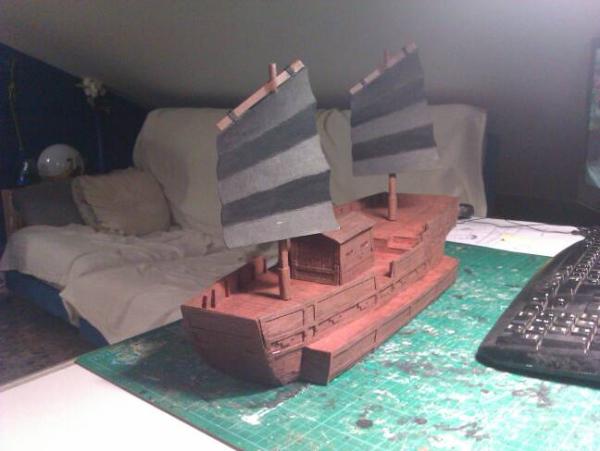
Since I have not found a way to afford silicone yet, and my spare time will be drastically reduced by university, I have diverted my attention to some small sideproyects, such as this one, a test of a wodden texture on cardboard:
I was not aiming for a great paintjob in this case. Basecoated black, some brown on top of that and just a drybrush of a lighter brown. I wanted to see how that texture ended looking after a fast paintjob.
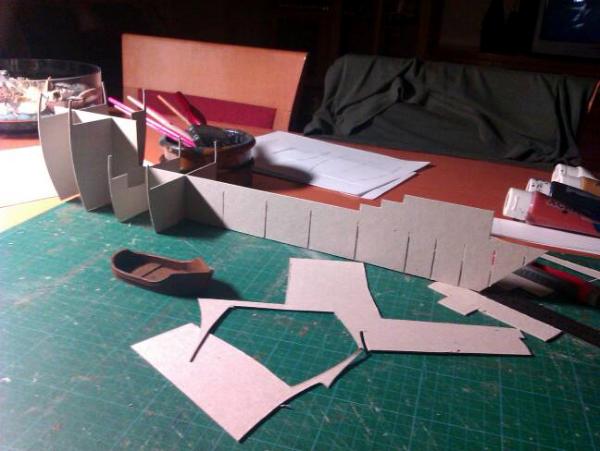
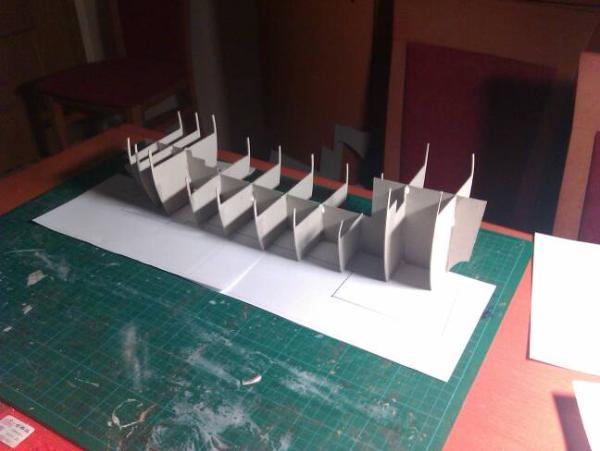
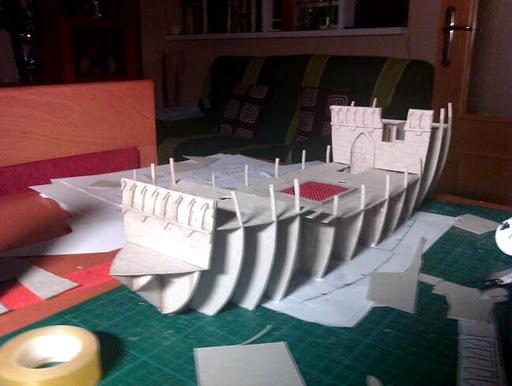
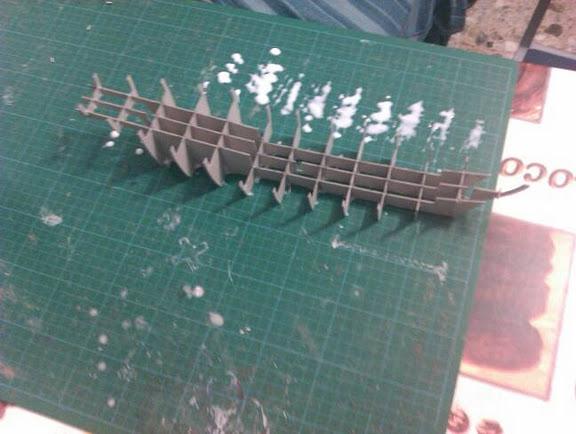
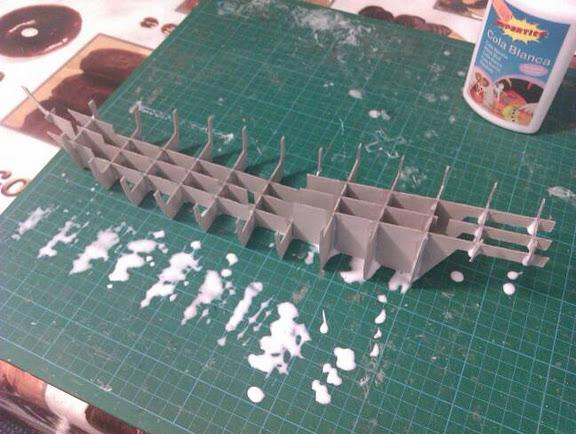
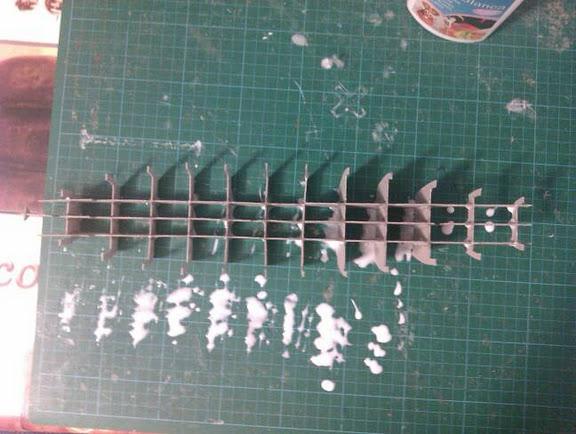
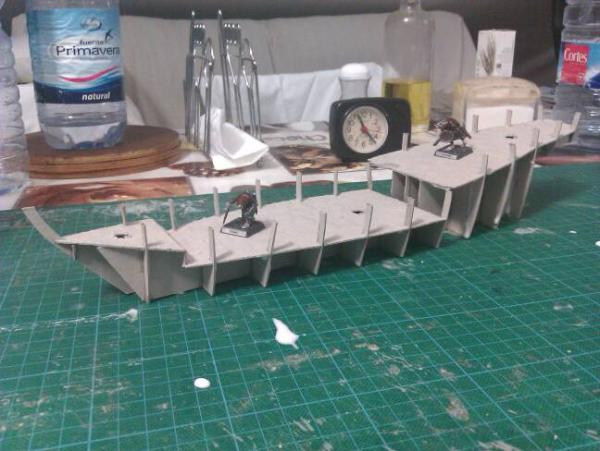
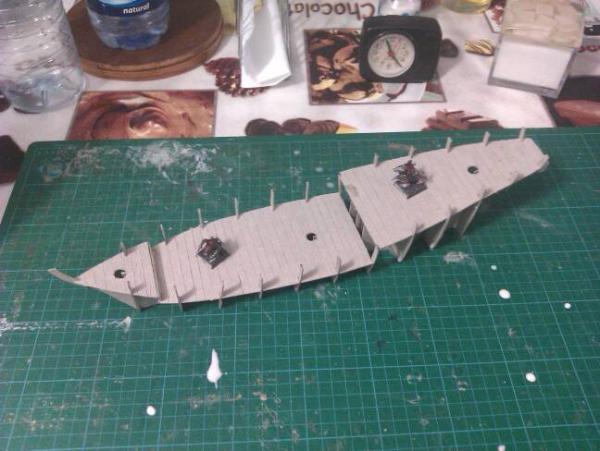
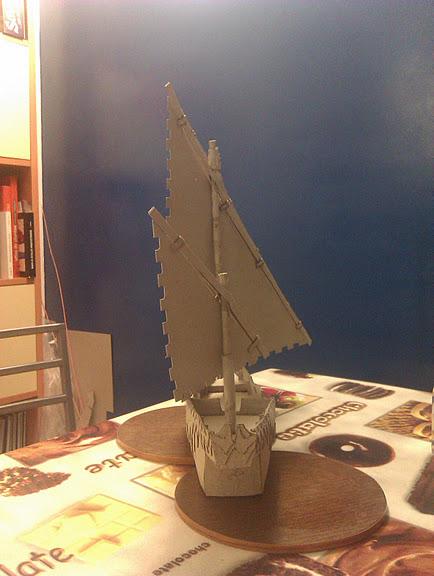
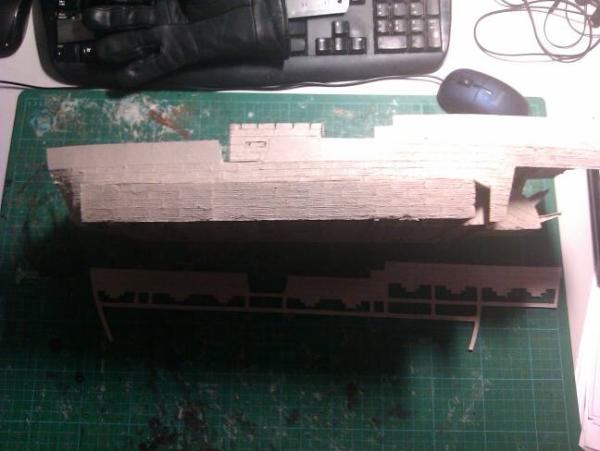
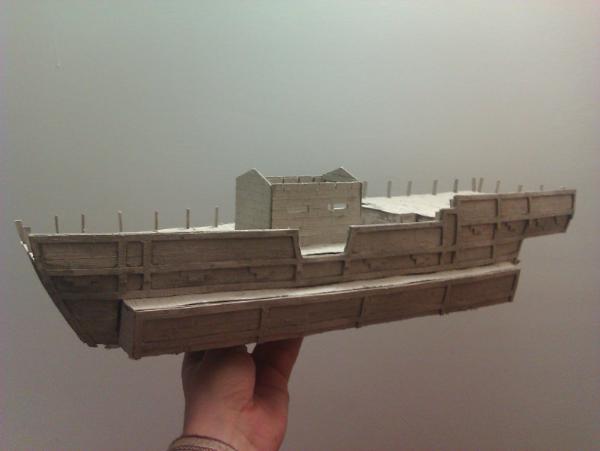
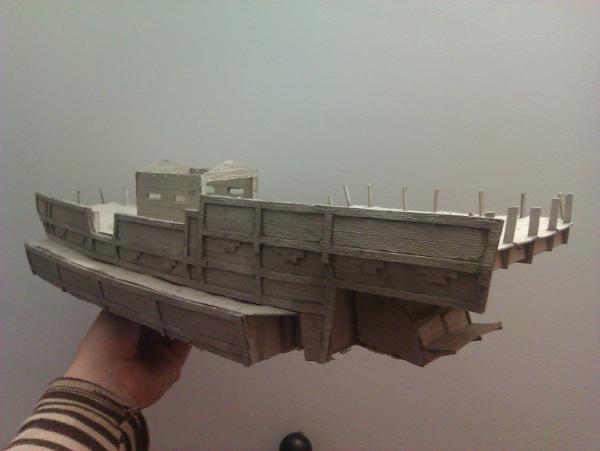
HAH!!! well now you have fooled us good^^ what a behemoth this will be!!! and you made us think the dinghy was the main project^^
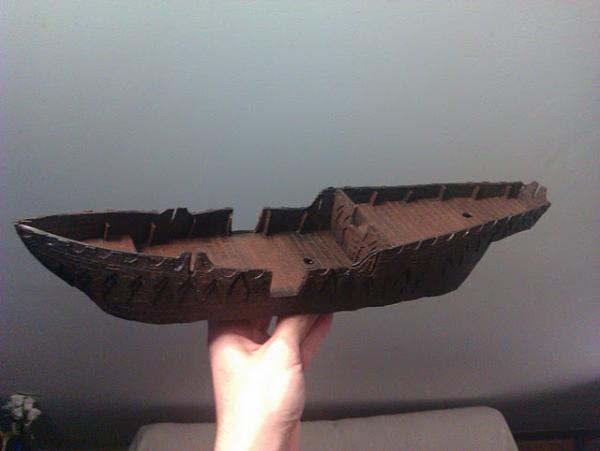
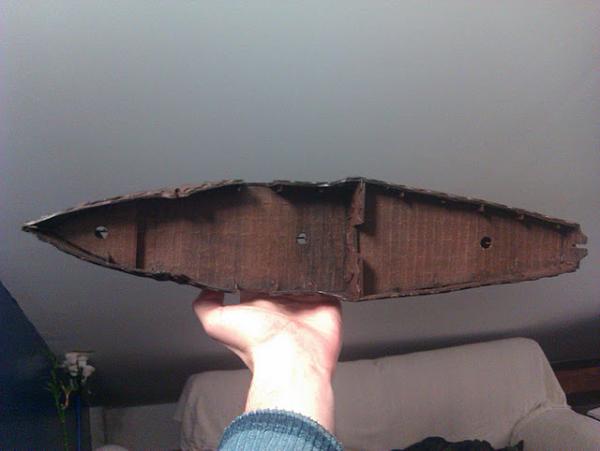
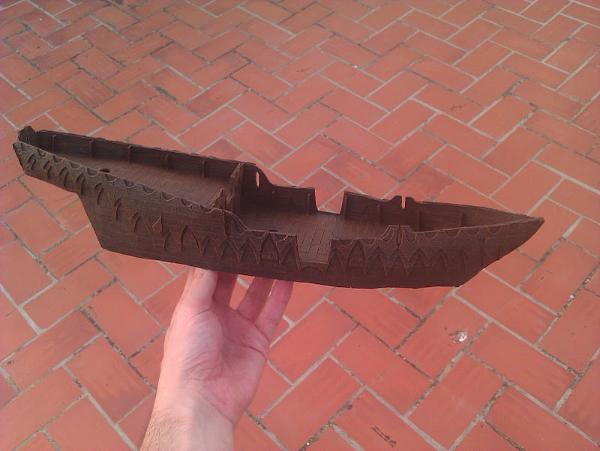
one question tho... will this one middlesection provide enough structural stability? will you coat it for further sturdiness? how long will this finally be?
Viktor von Domm wrote:will this one middlesection provide enough structural stability? will you coat it for further sturdiness? how long will this finally be?
vik
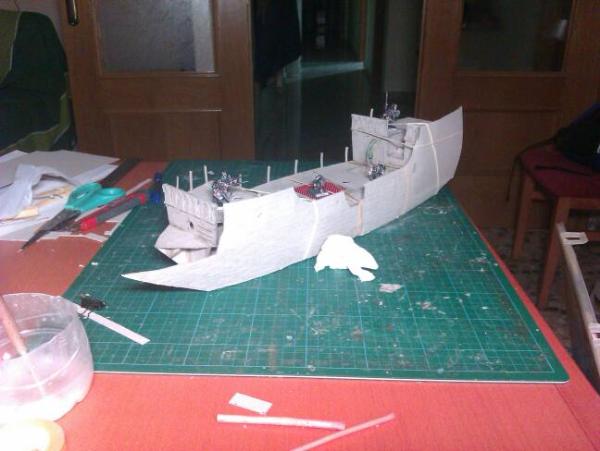
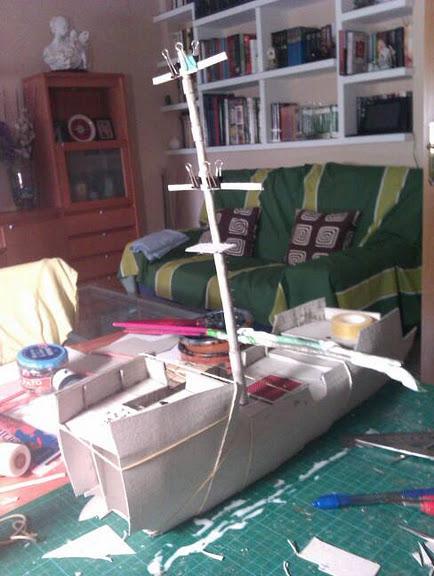
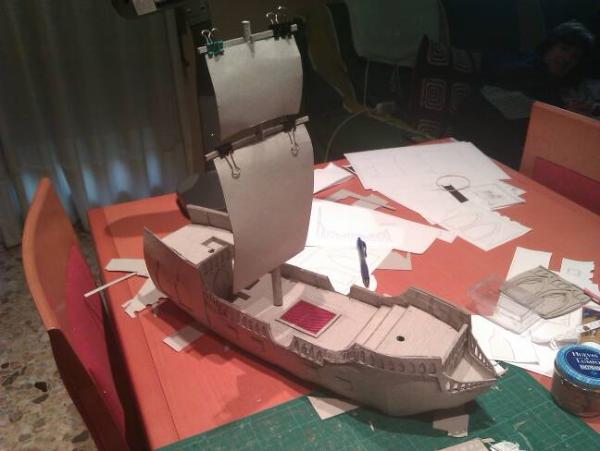
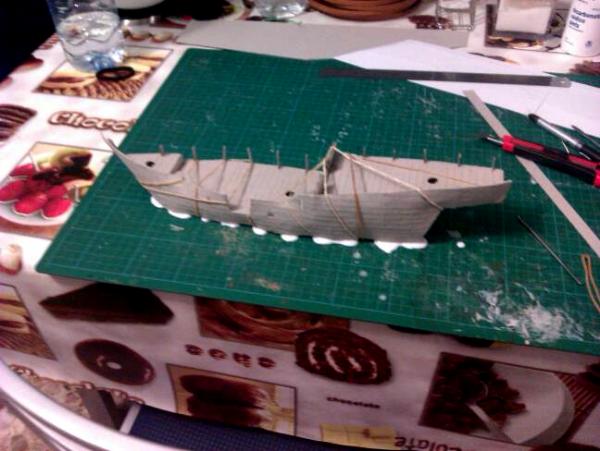
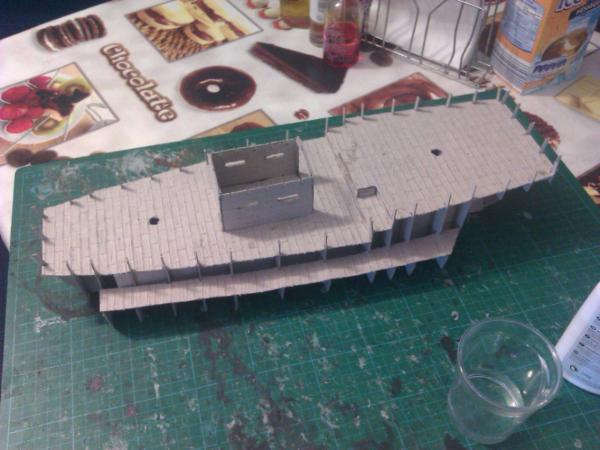
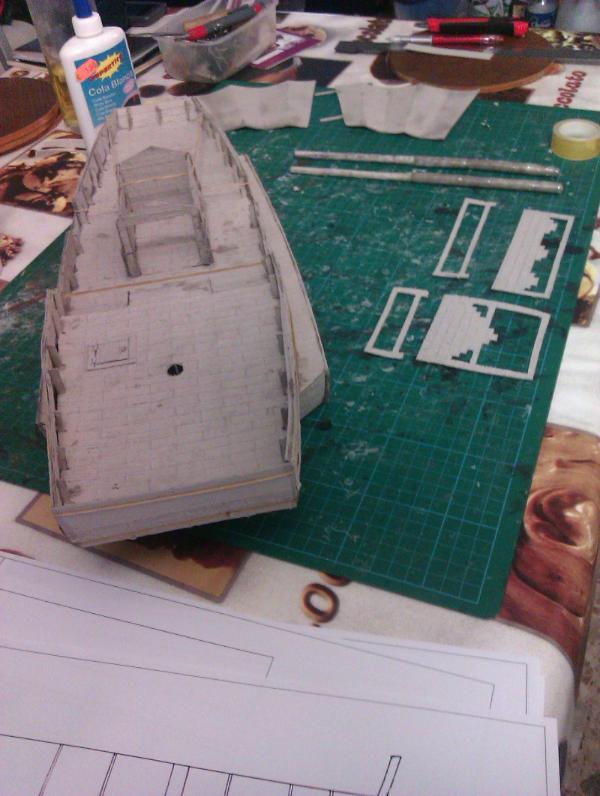
No, it surelly won't provide enough structural stability. However, the deck of the ship will fix the position of both the main axis piece and the ribs. The total length will be of nearly 50cm.
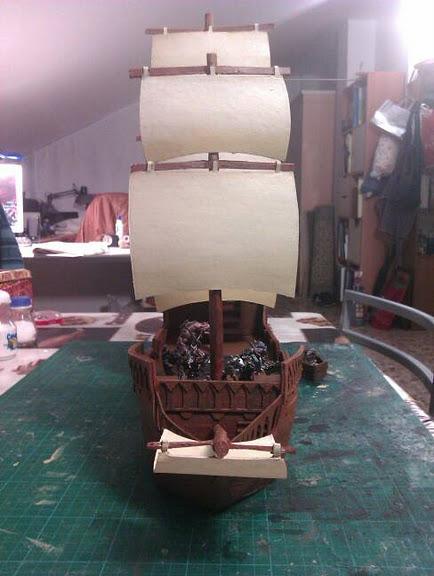
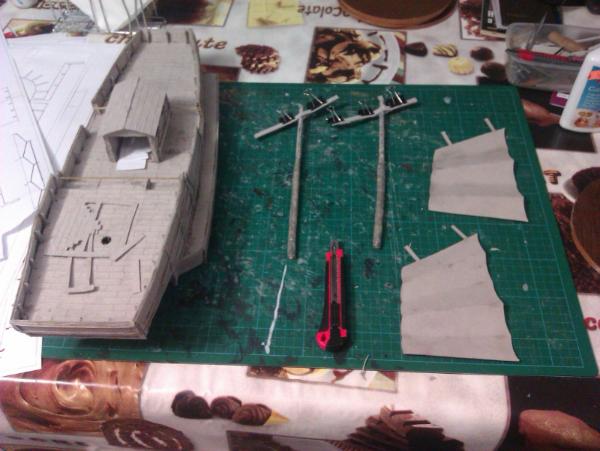
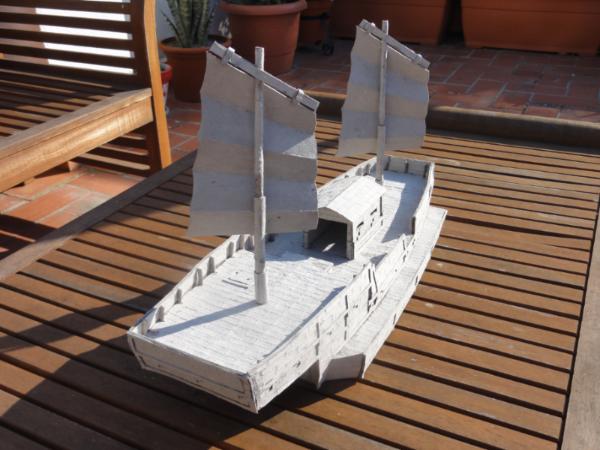
My main question right now is, do I put masts on the ship? only the lower part of the masts, as if these had been broken? I feel the masts will probably be problematic for both storage and piece manipulation, specially if I put sails on them. I doubt that would be a good idea. What do you think?
from what material will the mast be made? maybe it would be possible to make the mast to be pulled out for transport?
and i would definatly make not a ruin (or is that really your intention?) but a fully functioning ship...and thus i would make the masts go down to the ground for maximum stability... also i would probably add a sort of base to be held in position on the ground there... like a nail or a sort of resting tube/ring...sails would be nice if i sai so myself and i think you could go wild on that then^^
Regarding masts, I have not an easy solution for the material yet, since cardboard would not be suitable for its rounded section, and it must support being textured. I was thinking about some thick plastic markers I have lying around here, which would be good, but are not long enough for a full mast. Almost nothing is long enough and I am not sure I could get hold of something suitable.
The model was supposed to be a fit for my hypotetic Mordheim modular table, so it would fit in a river tile, making it easy to fill the gap between both sides of the river by jumping. And it would suit the style of the bands of pirates my friends are painting, as if they had sailed up to that point and run aground. Therefore, I considered building it as a ruin. But if I get hold of a suitable pole to work as a mast and a good way to storage the ship, I could reconsider my decision
How about a wooden dowel rod? Chuck a piece of dowel rod in an electric drill, and while it is tirning at high speed, take a rasp or file to the dowel rod to taper the mast(s) down slightly at the top.
hmm... given your tallent with cardboard i would ponder about using a hexagon (or even more sides) shaped mast...the wooden idea bears in my opinion possibilities in surfacetextures...but i think the weigjht and the leaverage problems would soon overrule the opartunities and later on could be more of a threat to the model...
if this is "only" a ruined piece of terrain then i say go for th makers...but honestly...a cool idea like that only to be seen ruined...argh^^
by the way... i had some nice results by aplining sloppyly PVA glue on cardboard...after some time when the glue is setting to dry you use a hrash brush and go ofer the glue and create lots of "noses" / scratches in the setting glue... they then will stay and create a nice texture...hope that was comprehensible^^
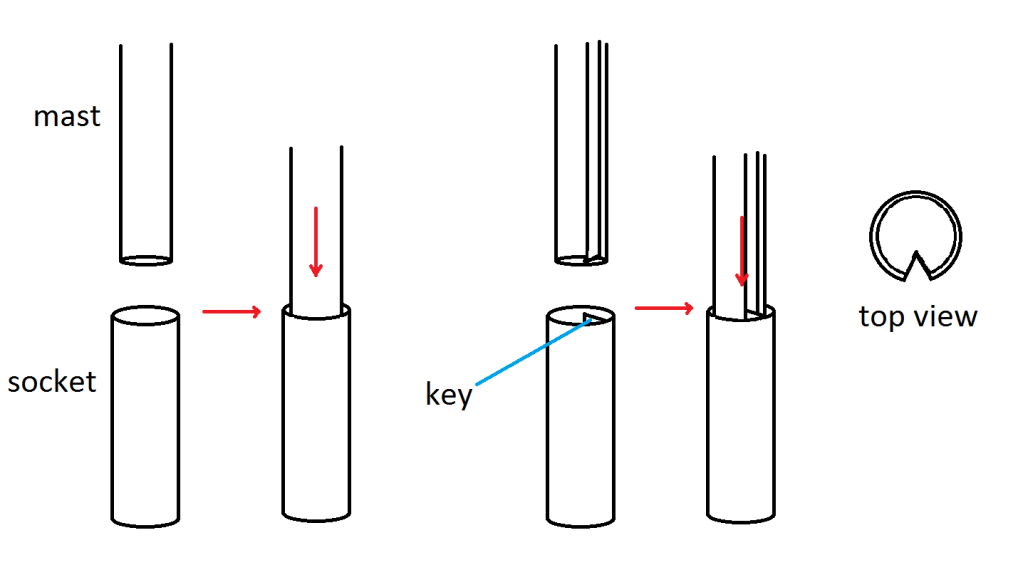
I agree with using dowels for the masts. As for making them modular, I'd think that it wouldn't be too hard to find or make a tube for them to fit down into snugly. You could make that tube the whole height of the ship, so there's plenty of torque to keep the masts straight and upright, but still be easily removable for storage and transit. If you want to get really fancy, add a key into the tube and rout/carve out a matching slot in the dowel so that the masts don't twist either, and stay straight on in reference to the ship.
The mini boat looks perfect , you have a great sense of the simple clean lines , a project like this requires . the bigger ship is going to be stunning ! as for the mast the hexagonal column that vik suggested sounds great , and would add to the sense of majesty. have you considered rolling A4 paper in to tight tubes then adding bands between them to add extra height and to mask the join. i wouldn't worry too much about texture if you have rope and metal bands wrapped around the mast these would add enough variation to the pole .
Spoiler:
Spoiler:
Spoiler:
I vote making it abandoned , would look great as a wreck ,with raggedy sails billowing in the salt air
While the hexagon idea could work, I don't feel such a small ship (yes, its quite big for scenery standards, but with the scale of the game its hull would does not measure more than 22 meters -72 feet-) deserves such a great treatment.
My idea right now is to roll the cardboard I am working with around these sticks and gluing them, increasing the thickness of the stick and getting a great surface to work with.
Obviously, this way of working also allows for bands wrapped around the pole.
The main problem: the joint of the cardboard, and how to treat it. I am thinking about putting a carboard line from top to bottom of the pole over that joint, and consider it a metal reinforcement or something. Maybe even a ladder? don't think the pole will end up being thick enough for that...
And I have not figured out how to get the masts in and out of the ship, yet.
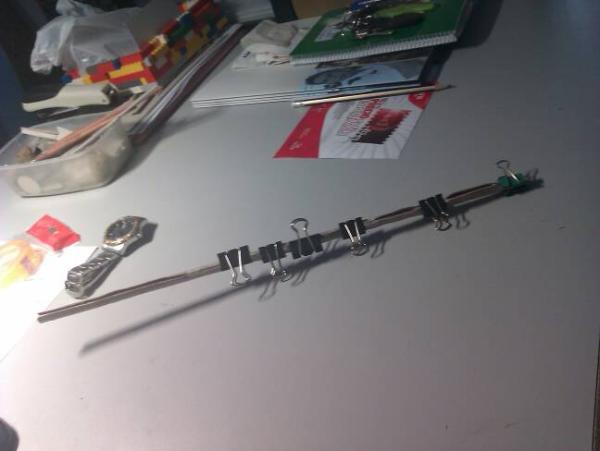
So I went out and got some very cheap thin wodden sticks (coloured, used for decoration in jars and the like). These are not perfectly straight, but I hope to be able to straighten them a bit more.
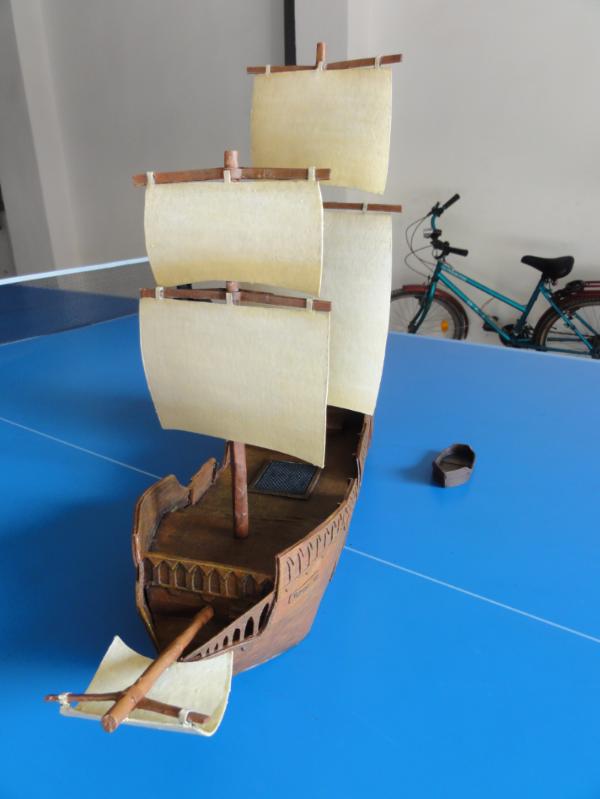
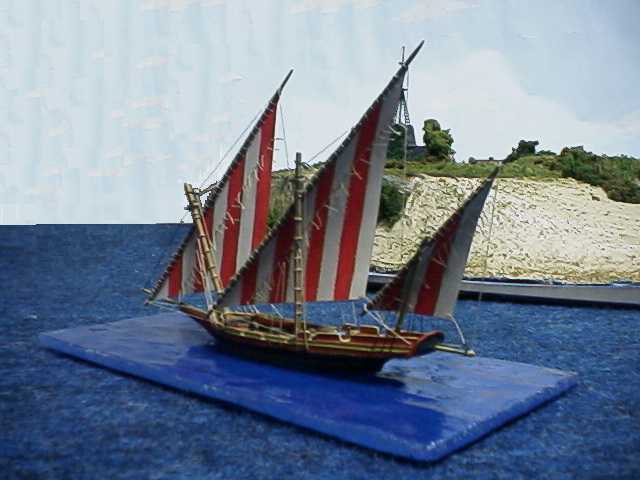
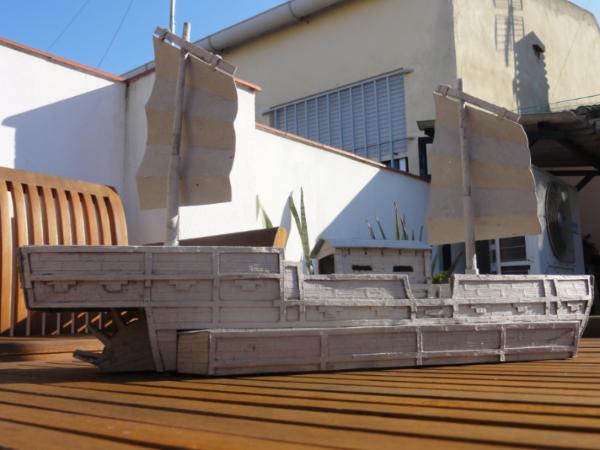
EDIT: As this is a really small ship, with the sails I am aiming for a Xebec look: a small ship used by corsairs and pirates in the mediterranean sea, and used in more recent times by the French, British and Spanish, with two main lanteen sails and a small rear third lanteen sail. http://en.wikipedia.org/wiki/Xebec
However, the hull profile will be the classic galley profile with forecastle and aftercastle. Not sure if this is will turn to be a mesh... but I also feel the classical square galley sails would look ridiculous on such a small ship.
EDIT2: I have come across a portughese caravel with lanten sails and aftercastle (only two masts, however). And it seems early caravels measured from 20m to 30m. So maybe the ship I am building can be considered a caravel?
for the masts, you could use some styrene rods, hollow, juuust larger than your mast dowels. Then, you put the tubes into the ship (through the deck) and just drop the dowels in.
You could accomplish this by wrapping cardboard around your dowels as well, taping/gluing. Same result.
Briancj wrote:for the masts, you could use some styrene rods, hollow, juuust larger than your mast dowels. Then, you put the tubes into the ship (through the deck) and just drop the dowels in.
You could accomplish this by wrapping cardboard around your dowels as well, taping/gluing. Same result.
That was basically what I was trying to get across, might have gotten lost in all the replies.
This might help illustrate what I meant with the keys:
The key keeps everything aligned so they mast won't just spin around in its slot. Magnetizing it could work too, and trying both would probably work really well.
@Zefig , that idea seems sound , caravels are great i researched them a while back whilst doing a comic , by all accounts its what made the Portuguese so powerful back in the day. A for xebec , thats kinda weird , my son came home last year and said he had formed a band and thats what it was called . when i googled it , he said it was because they had all crash landed on a desert island and had to pick instruments to survive or something..
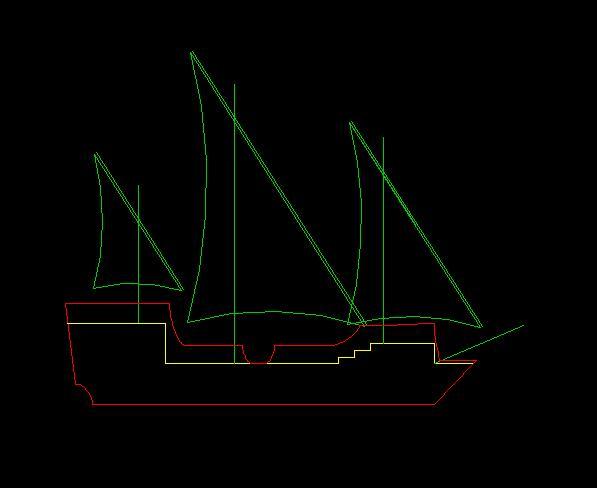
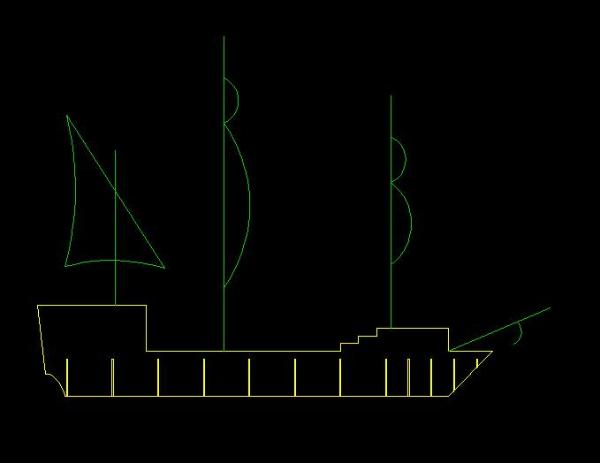
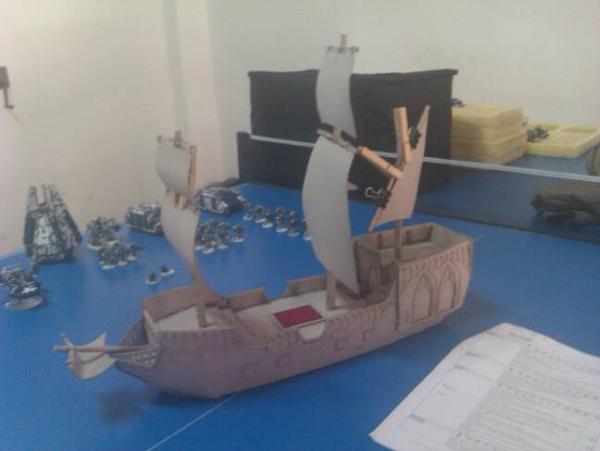
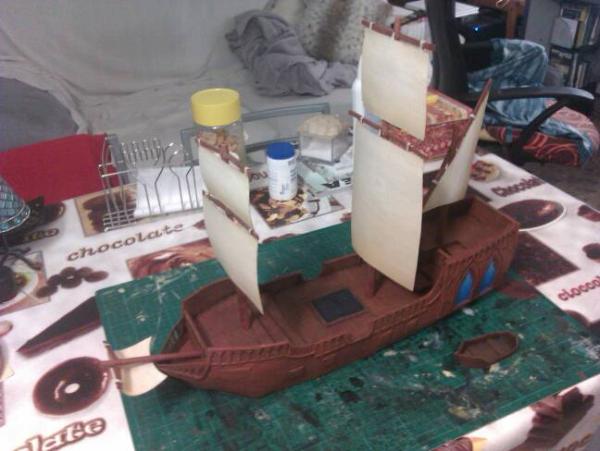
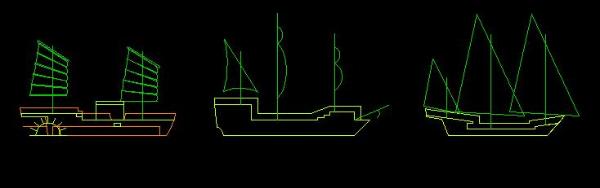
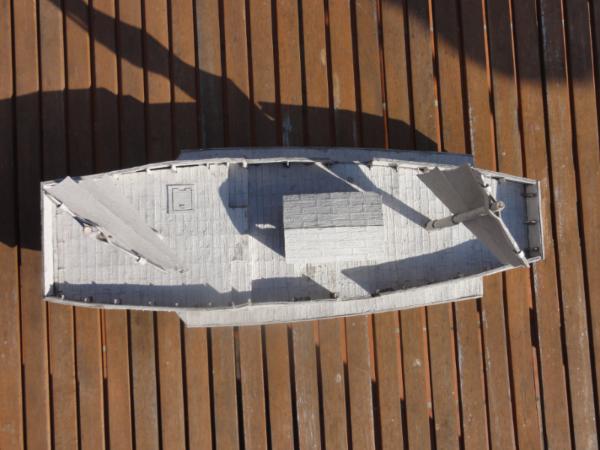
This is an elevation view of the ship as I have planned it. the front of the ship is more similar to a galley than a caravel, but I hope it will end looking fine
this will be spectacular...can´t add any more new ideas to the masts discussion... zeifigs plan looks so techinical secure... you should be working in that field!
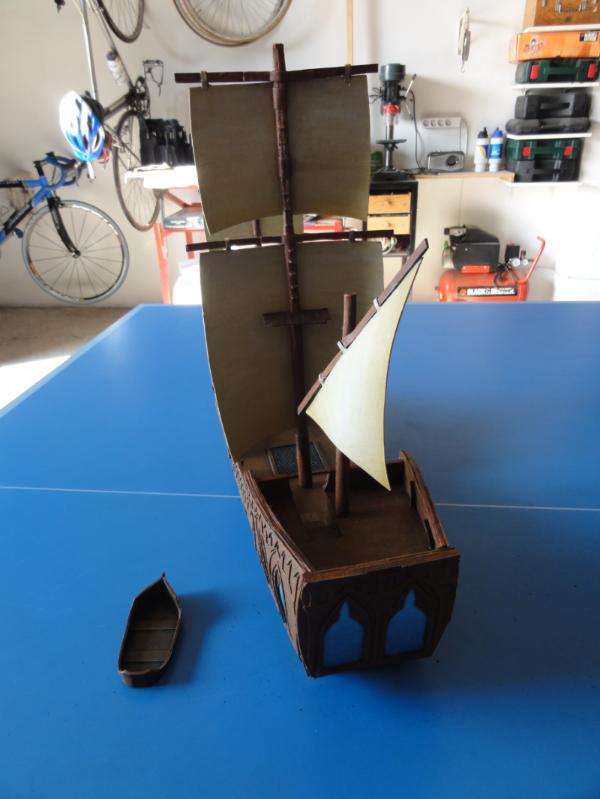
A friend of mine which is on the know of victorian era vessels has told me this sail configuration is not suitable for a caravel, and that small galleons existed. He told me a galleon sail configuration would fit the model better.
So what do you think of this other sail configuration?
And yes, I have already thought of a way to insert the masts to the ship deck. Not exactly the way Zefig pictured it, but it should work in the same way.
That cathedral/sentry tower is looking absolutely stunning! More of that please.
About the boat? IMO, the first set of sails looks a lot better. It's just sleek and eyecatching really. Doesn't bother me that it wouldn't be historically correct lol. To be honest, most people will look at it and say 'Wow! That's a sexy looking boat!' not 'Oh my, that galleon has completely the wrong sail configuration for it's era!'
To be honest, I like the first sail configuration more. However, hystorical accuracy is important, and I really respect the person who told me about the mistakes on sail configuration. I am not really sure of what to do.
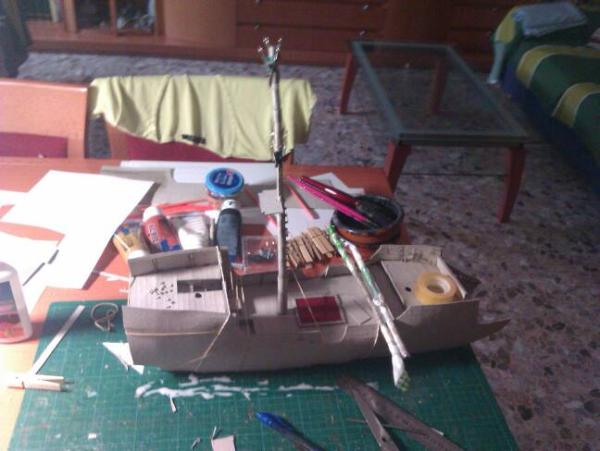
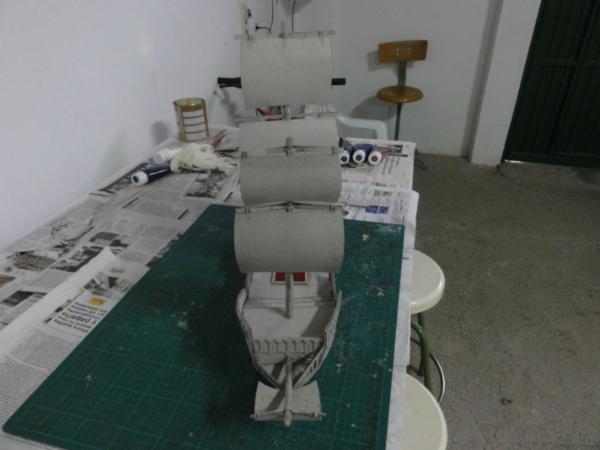
Meanwhile, I started with the masts (which will be a pain to work on, as rolling the cardboard in such a small cilinder is not easy, specially if you have to hold the whole mast during hours for glue to dry) and on the main deck.
of course, that would work better with the second configuration...
so you can decide for each game how many mast sections you want to use
you could even make broken versions
Thats an interesting idea for sure... but since I have not decided on the wail configuration, I try to keep it versatile for now, as yesterday I was advised to add two more sails. I will show you how I am building the masts. I rolled cardboard around some wodden tubes. I plan to roll more cardboard on some sections to vary the thickness of the masts. I fear I will have to do the rolling during at least two different sesions (half and half?), because I am not able to keep the whole length of the mast fixed. I think as I get to wider diameters it will turn out to be much easier.
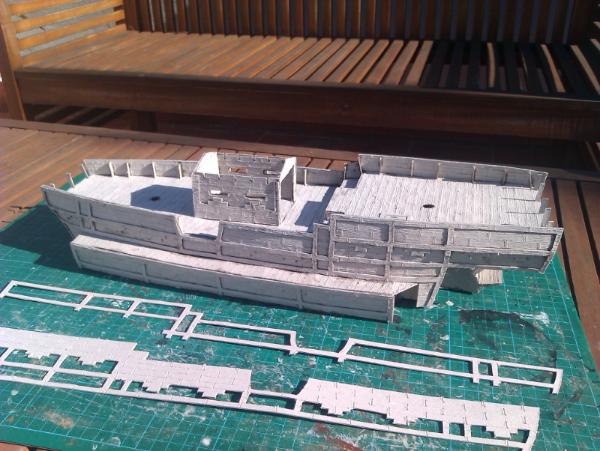
The legos you can see in the pic are what would become the moulds for the sentry tower which has been put on the side because of money. If only I could be sure to sell 10 copies, I go on being sure I would not lose too much money with that enterprise.
i am totally thrilled how the different heights of the decks turned out! i imagine you sitting there and working on the ship and going constantly : "arrrrrr" as a good pirate does^^
We have stairs now! and I think after the third mast section, I have perfected the mast-building process so it will at least not look horrible
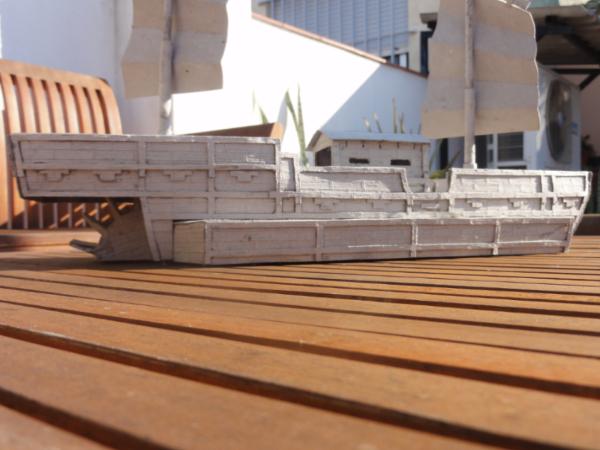
Next is the side of the ship, which is one of the most difficult parts of the building process, since it is a BIG piece of cardboard that must bend in two different directions. I'll do my best.
i rather go for a multitude of lenght of cardboard here...or get it a coat of PVA drenched paper to firstly make it sturdy...then you will have a good base to build the cardboard hide upon...
As you might have already noticed, Life has not been kind to me this week. As I have been working 20 hours a day sitting in front of my computer. Finally, I have had some good sleep and I was able to work on the ship again.
So yes, I will be showing you more progress.
Some of you might already have seen this pic, with my mordheim rats showing the scale of the ship.
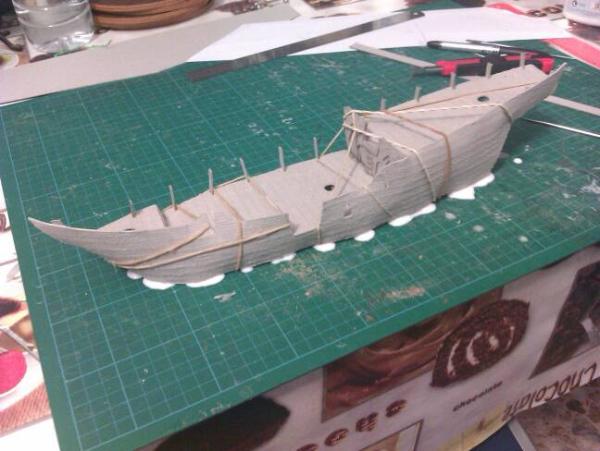
As I was going on, I noticed I had to build one side to completition and coat it with watered pva glue before working on the other side of the ship, as the rubber bands would break the cardboard otherwise. Therefore, I proceded with aplying the detail layers to the side.
layer 1
layer 2
layer 3
layer 4... and so on, until getting this final result:
Next will be gluing the other side of the ship and getting the rear wall of the aftercastle ready. Then detailing the new side of the ship, finishing the front of it, and finally building masts and sails. - - - And then paintiing. So yes, there is still a lot of progress to report on
I have continued work on the ship... but I found due to asymetry during assembly, the other side piece was not long enough to cover the whole side, so I need to scrap it and build it again. Certainly a minor setback
I was wondering, what do you think should be the name of the ship? I was thinking about my favourite TV series, and "John Sheridan" or "Serenity" came to my mind. Any suggestions?
too bad to hear about yopur problems...i cross fringers for you to get a good ripping of the false start...and then start over again with more luck...
by the way i have planned a similar project...for my kids...they are soon on a three week holiday with my wife and they are atm totally in the pirate scheme...so in those long and lonley days i want to build them a pirate ship from scratch...the scale will be fitting for their playmobil figures...
would yoiu be able to share your suportive sections...those walls you built the hull with with me to make a substructure for the ship for my kids? this would give me a good headstart in that project...the built will be from wood and cardboard...and later on should withstand the strenght of a five and three year old couple of sons^^
thanks in advance, vik
oh i forgott....as for names... i can´t help you with those shows...but i tink you should name it fitting to the faction this ship is supposed to belong...so if it is an imperial vessel it should be a name that sound like shipnames of british, spainish or french origin...
Viktor von Domm wrote:too bad to hear about yopur problems...i cross fringers for you to get a good ripping of the false start...and then start over again with more luck...
by the way i have planned a similar project...for my kids...they are soon on a three week holiday with my wife and they are atm totally in the pirate scheme...so in those long and lonley days i want to build them a pirate ship from scratch...the scale will be fitting for their playmobil figures...
would yoiu be able to share your suportive sections...those walls you built the hull with with me to make a substructure for the ship for my kids? this would give me a good headstart in that project...the built will be from wood and cardboard...and later on should withstand the strenght of a five and three year old couple of sons^^
thanks in advance, vik
I do have my own playmobil pirate ship (the official plastic one) laying around somewhere. I remember it was one of the most sought after toys among kids during my childhood.
I see you received my PM. If your kids ever let go of that pirate mood and get into echlesiastic mood, I do have pdf plans for the cardboard building you can see in the first post of that thread xD
Viktor von Domm wrote:
oh i forgott....as for names... i can´t help you with those shows...but i tink you should name it fitting to the faction this ship is supposed to belong...so if it is an imperial vessel it should be a name that sound like shipnames of british, spainish or french origin...
I have been suggested other names like "phantom", "surprise", "Iron maiden", "Acheron", "the feared" (or "El Temido", after Espronceda's poem) "Queen Anne's Revenge" or "Ship Happens"
I do not want to name it after other naval ships, however, but I would like it to be a cool sounding name. Quite short too. Any other suggestions or opinions?
Briancj wrote:"...You can't take my cardboard from me..."
Maybe the "Malcolm Reynolds" would be a bit (a tiny bit) more subtle xD
I have always wanted to build a full-female human Mordheim warband, but my devotion to only use plastic miniatures (no resin, nor metal) has prevented me to do so. I am waiting for some mainstream company to create cool fantasy plastic female adventurer miniatures. When I manage to build the warband, Inara Serra will be the name of one of these girls. That's for sure. Maybe I should name the mage after Lyta Alexander too... Until some company makes decent heroic scale plastic female adventurers, it's only a dream.
I have started correcting the mistakes on the other side of the ship, and it is currently drying. I also worked a bit on the masts. here you can see more progress:
And no, while I know I should be screaming "Arrr" while building the ship, A horrible song is stuck in my head while building the ship. A song that I find hilariously fitting xD
http://youtu.be/R7yfISlGLNU <---- I told you it is a horrible song, you have already been warned xD
well the names all sound very good to me... the spanish ones i personally find very colorful but i think thats a speach thing... for you they might not sound so special...^^ as i expect you are a native speaker^^
so what about:
"la tempestad" ? to use the fastness of that built and it´s look to be covered in the name?
too bad i couldn´t listen to the first vid^^
and... are you sure about the height of the mast? looks really long...but i am no good judge here...but may play hop with your gaming possibilities...
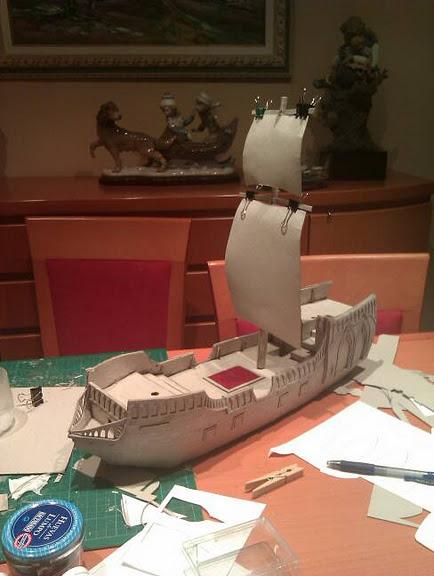
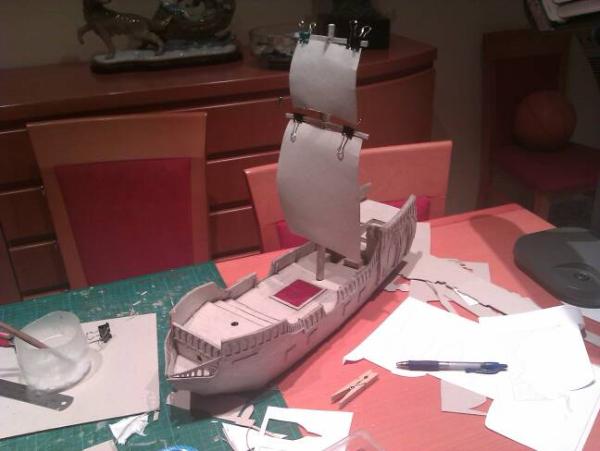
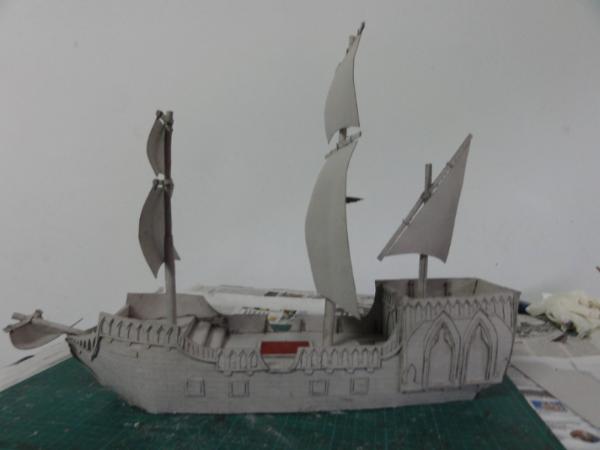
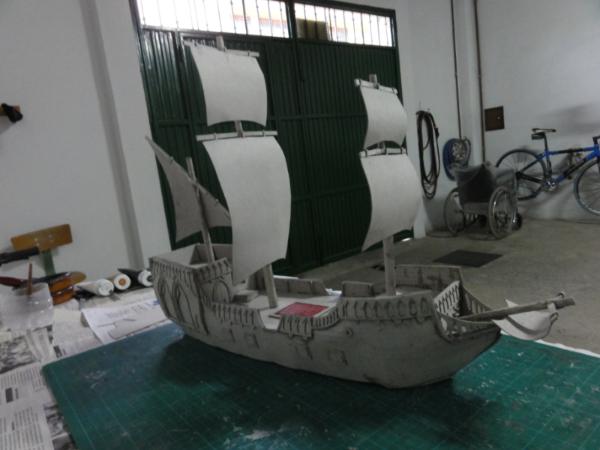
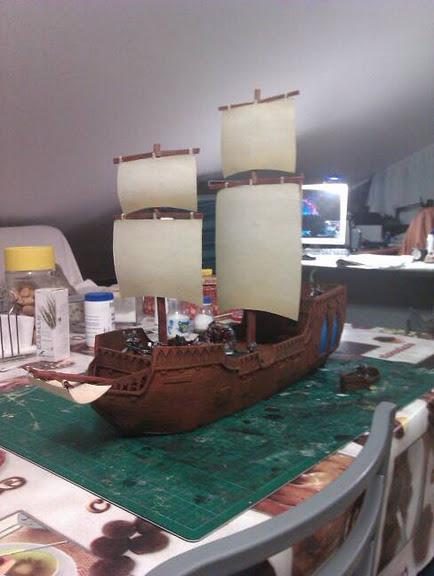
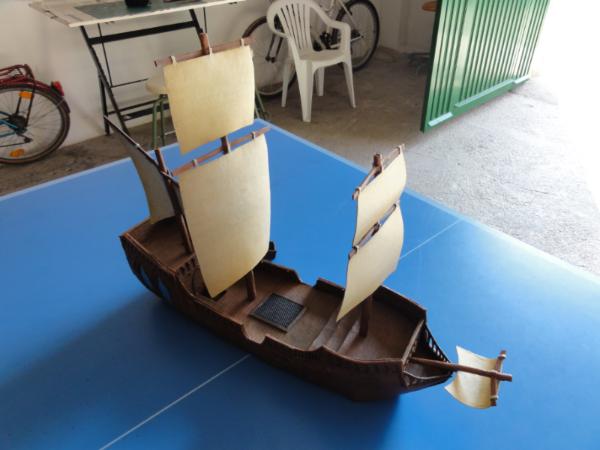
Most of the hull has already been finished. So I present you the ship with the main mast attached. Work on the other masts will have to wait a bit, since the drying process is really slow.
well what could one say to your work...we can´t offer criticism or helpfull comments... we are but able to see a true master at work...when seeing this i feel privileged that you share these gems with us...
To be honest, if you had not been there boosting my ego, I doubt I would have been able to reach this stage, so you do have played a very important part on this proyect.
Now that I am aproaching the end of this project, as the main hull is nearly finished, I am asking my gaming group what would be good to do next. My initial intention was to create a Mordheim modular board I have already designed, where this boat would serve as a "bridge" of sorts to cross the central river.
However, now I am considering building different boats for every warband (this boat for a pirate user, small Chinese boarding rowing boats for my skaven, a Xebec for another pirate friend, maybe a dwarven steam battleship for someone I know, and a long and sleek vampire counts ship -maybe a ghostship?-) And then, put some islands together to create neutral landmasses, with maybe one featuring a tower of sorts. That way we could arrange all the ships and islands as static scenery for Mordheim games, or even play with moving ships...
I think it will depend mostly on my group reactions, but what do you think about that?
like dreadfleet with a scale of 28mm? how could you ask...sounds incredible...the whole scenario sounds super to me...but the mere words don´t account for the weeks and weeks of hard work...be sure to choose wisely^^ as this miht get out of hand...also the islands idea is very intriguing to me too...creativity is a twinedged sword...but you do know that^^
The ship is looking very nice, i have to agree with dst , the railings are a great addition. athe port idea sounds brilliant.
if you havent seen dagobahdaves papercraft thread i highly reccomend it , his buildings are very inspiring.
dsteingass wrote:Oh, that would be a great idea, having the ship in the Port of Mordheim when the comet hit!
neil101 wrote: athe port idea sounds brilliant.
In order to clarify... there is no port. There was a port in one of my early designs (I built a virtual board where there was a 60*60 port section with a broken pirateship) but it changed, in order to accomodate all the possible missions of the mordheim rulebook, as well as a much more fulfilling multilevel paths.
There are two options. Either...
A) build a typical mordheim modular board with lots of buildings, a road and a river across it where the ship would be stuck, as if the ship had sailed up to that point and gone aground.
or...
B) build three to four small islands and five to six ships, which could be connected in several ways from game to game, or could be even controlled by the players. That would not be a port, but more like a rocky area not too deep into the sea, with several islands having one building on them. Now that I think about it, it would be like the scenery in Dreadfleet, but in a much smaller scale.
just as a simple update: I am currently working on developing some rules compatible with the Mordheim rulebook in order to add ships of this size to campaigns, and be able to maneuver them and partake in naval warfare. This will take some time, and should be tested, of course.
I am writing this in Spanish, Maybe I can translate it into English once the early testing is completed, although my lack of experience with Mordheim ensures these rules will need tweaking.
by the way... as i am stunned by these pics of your ship i gotta ask... how did you got the billowing look of the sails done? how did you bend them so nice?
and...
any plans when you will be hitting that beauty with some paint? and have you chosen a paintschmee already?
yeah definatly... as i am a fan on wooden texture and as you are making a ton of that i would love to see some closeups... also what paints did you use on the ships hull for the wooden color?
While the first ship was supposed to be sometype of ship-of-the-line, or belong to an armada before it was taken by pirates, the next boat will be more... exotic. Like a smaller corsair ship from the Mediterranean Sea.
many thanks for the video and the hires pics! much apreciated...!
one quiestion tho... since i am atm working on a bigger scale pirate ship of my own...if you are interrested you can have a look at my blog...^^ i wondered if you will on this or a future projects involve ropes and ladders... you now that stuff ol erol flynn climbed around and such likes...
or will you skip that stuff for playability? not that your ship lacks them i was just interested... because i think for my sons ship i can´t get away without those...it is playmobil sized and will need more options in gaming...
Viktor von Domm wrote:many thanks for the video and the hires pics! much apreciated...!
one quiestion tho... since i am atm working on a bigger scale pirate ship of my own...if you are interrested you can have a look at my blog...^^ i wondered if you will on this or a future projects involve ropes and ladders... you now that stuff ol erol flynn climbed around and such likes...
or will you skip that stuff for playability? not that your ship lacks them i was just interested... because i think for my sons ship i can´t get away without those...it is playmobil sized and will need more options in gaming...
vik
I will skip these, but I think I would do them by cutting the shape of the cables into a 1mm thick piece of cardboard, substracting several polygons to be left with a web-like pattern in cardboard.
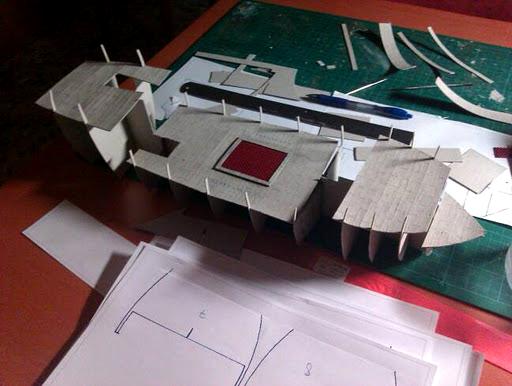
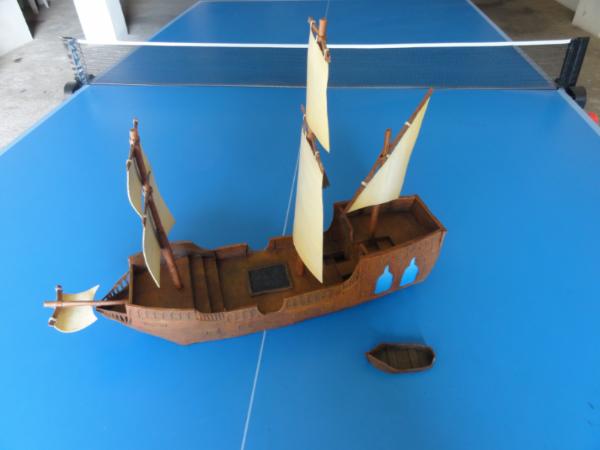
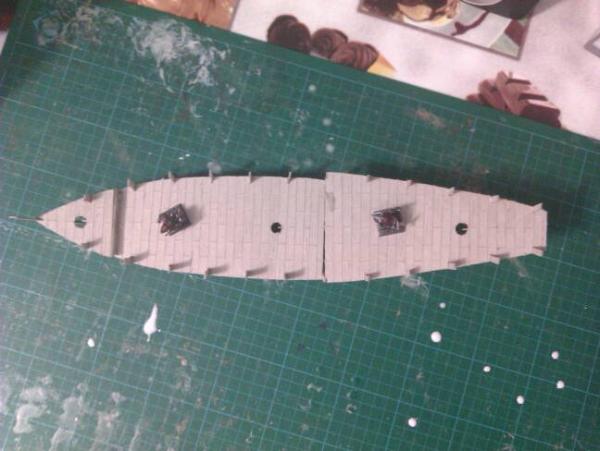
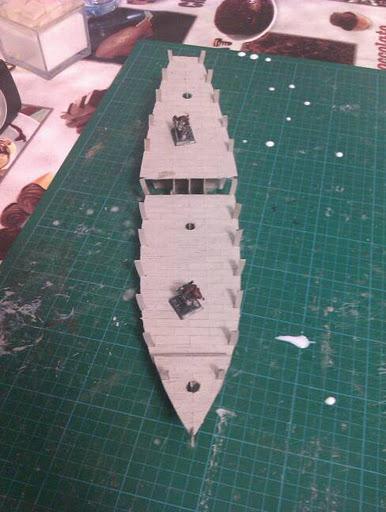
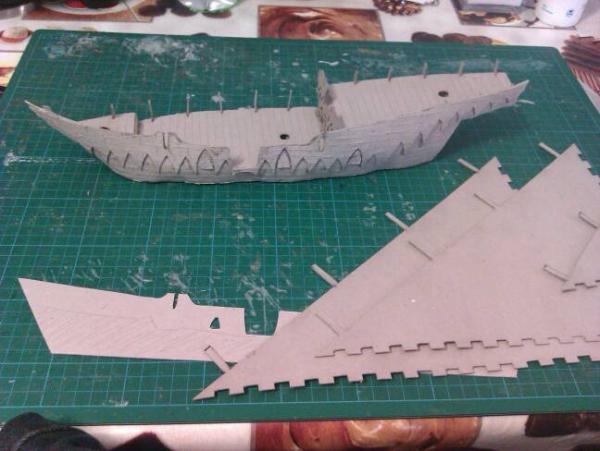
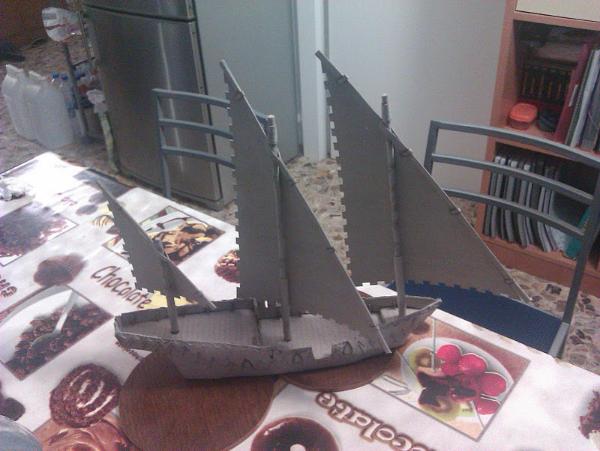
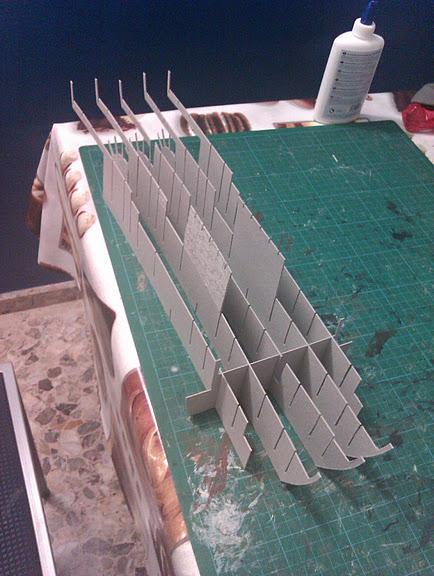
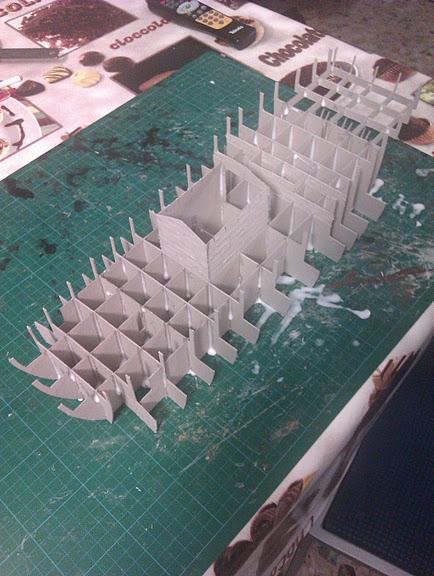
I have started working on the second ship. It will be much smaller than the previous one, as you can already see from the structure in these pics.
I am quite worried about it being way too small indeed. I will build it, however. I suppose I will find a way to use it. I intended it to be smaller, but now that I have it in my hands, it looks much smaller... a full sized warband will be pretty tight there.
and i dunno, i think you need to make more progress to finally say if it is too small... after all you are dealing with fantasy here and so i think there is room for many sizes of ship hulls...who says it has to be a certain size? your built as is looks very promising!
Capitansolstice wrote:IT Could be like a viking rowing style empire ship, maybe with a steam driven oars?
I plan to equip the ship with huge lanteen sails, in this fashion:
I think that is what might save the model, as it will look huge even if its hull is smaller.
I will do a pair of rowing boats after this one, based on some ancient chinese transport and boarding boats, for the skaven. After all, they have the slaves needed to propell the boat with raw man(rat)power.
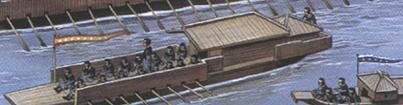
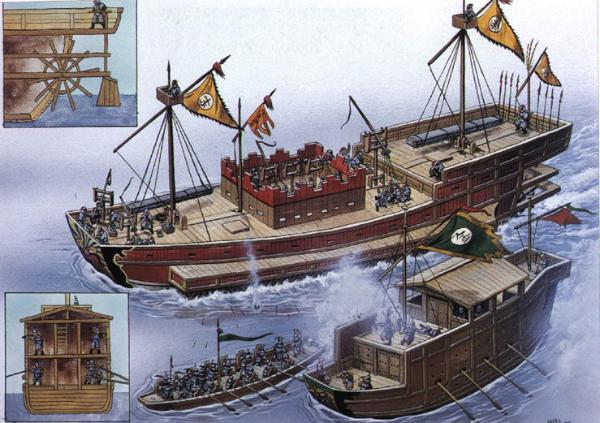
It will be mostly based on the rowing boat filled with soldiers in the bottom of this picture.
After that, maybe I shall start with the dwarven ironclad (which will be mostly based on the Dreadfleet model)
Yeah, Giant Dreadfleet would be awesome, don't you think so? xD
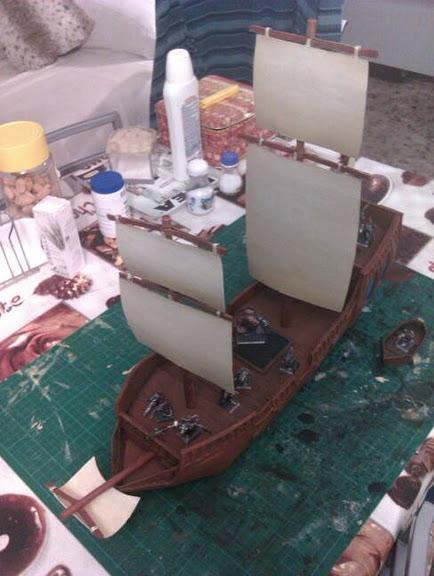
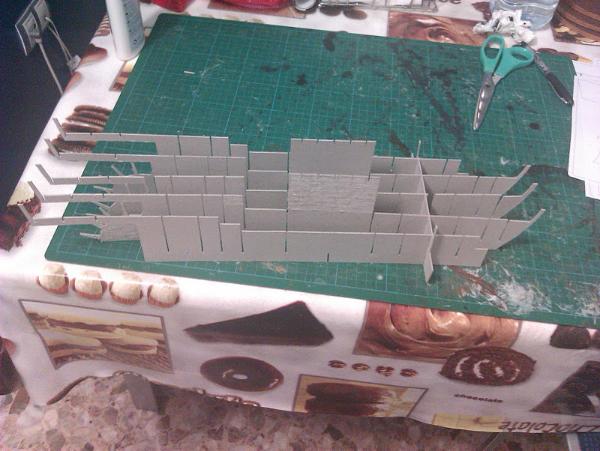
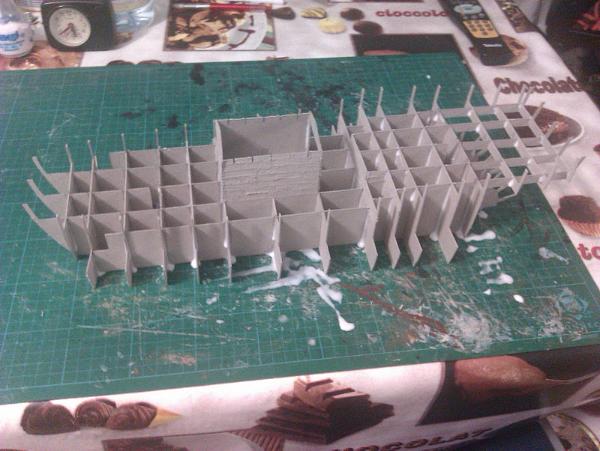
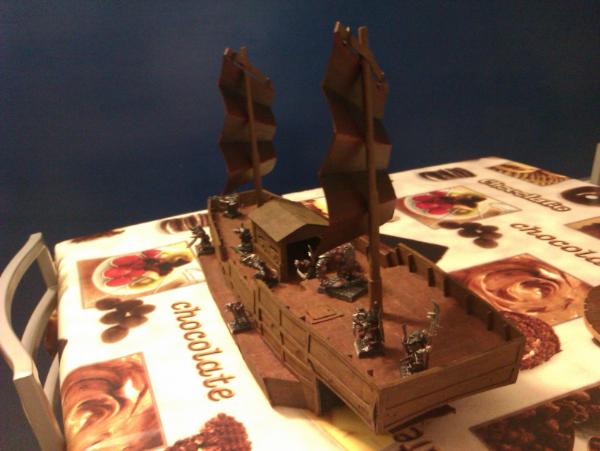
The main deck has been assembled, and I have put some reference models on it, so you can judge its size:
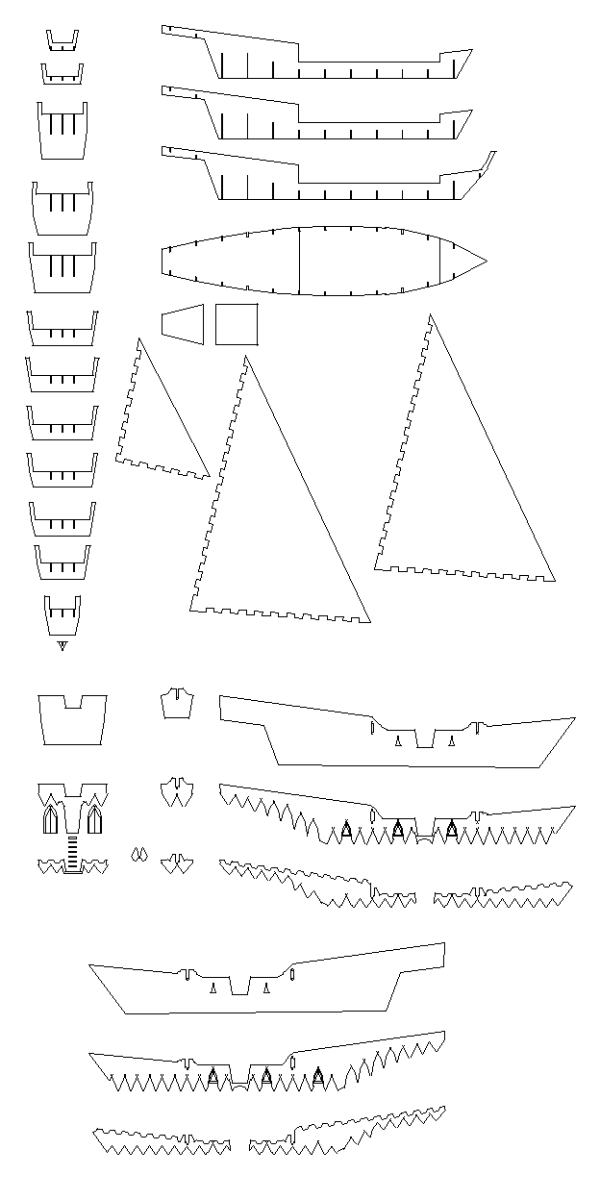
Rogue Wolves wrote:i am loving the work here, and i ask might i take that template of yours so that it can be used for mordheim terrain?
The closest thing I have to templates is the pic you have seen in this pic. Otherwise, the *.Cad file is a mess. Maybe some day I will do a manual with templates, like I did with this:
But it takes time, and I'd rather build the fleet before and have the rules I have written to play with ships translated and tested. Maybe templates and instructions could go together with the final rules "release"
I just built the Lego Black Pearl and the Queen Anne's Revenge, so that is the limit of my shipbuilding experience but It is amazing how sturdy the masts need to be even to support lego spars and rigging. Can you use wood with the cardboard construction?
Viktor von Domm wrote:slightly warped due to the rubber abnds... but i think it gained a lot for looks that way...feels more weathered now...very cool work!
It is a real pity, but it is either using rubber bands, or keeping it in place with my hands for 24 hours straight.
Viktor von Domm wrote:will it include waves? hat was my first thought... some nice foam waves and you could look it like you wanted it from the start....
I don't think I will be doing waves on this one, but I am considering doing waves in the larger rowboats
so you have thought up a cosmetic way of getting rid of the warping? if you ask me i would leave it as is... or possibly if you really want to add a good cosmetic way... what about shells? on the hull? is that doable at all?
A bit of waving can not be avoided, and may give the boat some more character, but I agree: in this scale, the waving is way excessive. I have managed to reduce it a bit, at least on that side. As the other side is not built yet, I hope I can keep it to a minimum there too.
ok... had a spontaneous flash of idea... what about a leak in the hull? if you add some torn or broken planks and such things you could make this warped space (lol...) work to your benefit... heck you could even make a special rule for a scenario out of that detail...like the ship has to be abondoned in a certain amount of time...
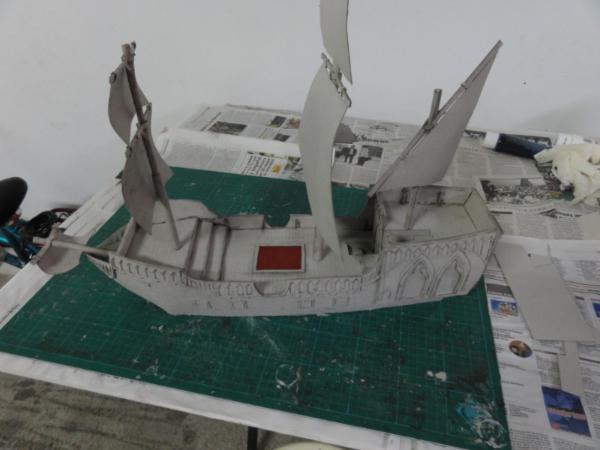
The other side of the ship has been completed. Here you can take a look at the side of the ship, after I tried to repair the warping:
And now, my question of the day. Would you build TWO chinese style small boarding rowing boats for skaven, in this style:
Or...
Should I just scrap that and go for a mutated fish-ship such as the one in dreadfleet, even if I am not quite sure of how to build it yet?
I am not even sure of the second option being doable, since my usual techniques would not be enough, but... What do you think?
Viktor von Domm wrote:ok... had a spontaneous flash of idea... what about a leak in the hull? if you add some torn or broken planks and such things you could make this warped space (lol...) work to your benefit... heck you could even make a special rule for a scenario out of that detail...like the ship has to be abondoned in a certain amount of time...
That I had reserved for an hypotetical Vampire Count's ghots ship. So it is not completely unlikely to happen in another ship. It is not a high priority proyect, however. Skaven, Dwarves and islands come first.
well...why cut your own options... it could be a battlegroup with two smaller ships flanking one big one in the middle... in my opinion that could look very good on the table...pretty menacing!
As you can see the warping was reduced to a minimum.
However, as I have started to pain the ship with the black basecoat, the warping was back. With a vengeance. Right now, the warping is worse than ever on one side only. I don't know the reason, since I took my time to make sure that would not happen. But it happened, and I am not sure of being able to fix it this time, since the method I used to correct the warping can not be used again.
Ok, cool, but it did not have square rigged sails like European Imperial ships? The sails just remind me of the same type of sails that a Sloop carried. All three masts rotate for the maneuverability right? With all the awesome dreadfleet-inspired ship craze that is overwhelming Dakka and me, I think I need to get some sailing ship education.
hmmm... the warping wasn´t really an issue for me... but i would like to see the primed ship now... how did you fix the warping before? and why was it now redoable?
i cross fingers for your hard work to be not in vain!
The warping was fixed by applying liquid glue on the opposite surface of the warped cardboard in the ammount required for the tension created in the surface to neutralize the warp after the cardboard has dried for 24 hours.
I have tried to create more supports along the warped surface. If that does not fix the warping, it should at least make it less noticeable.
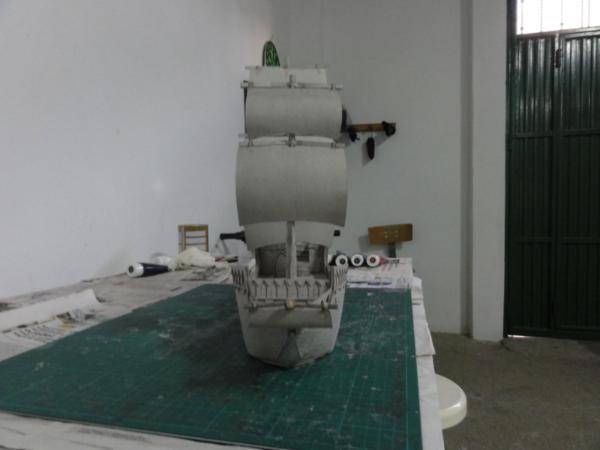
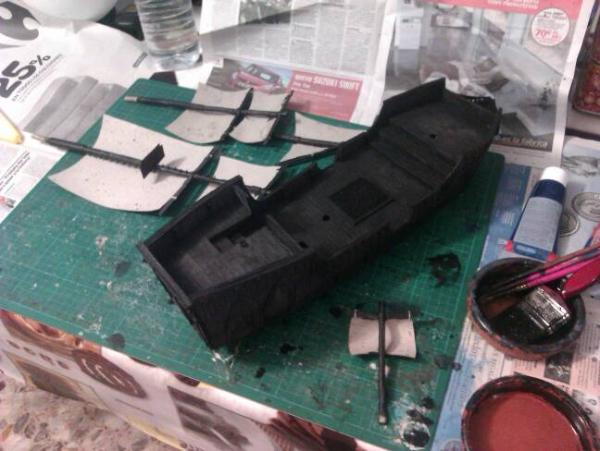
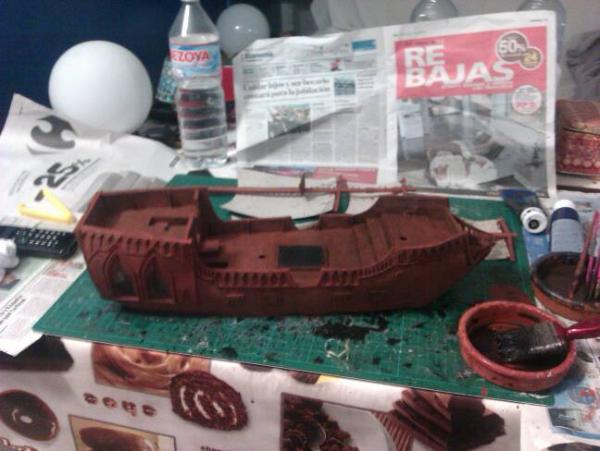
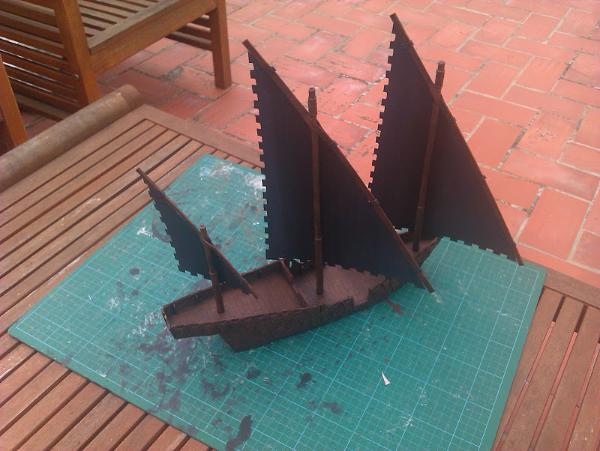
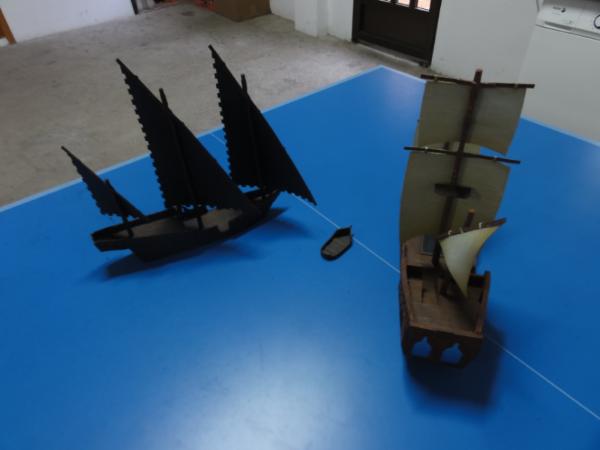
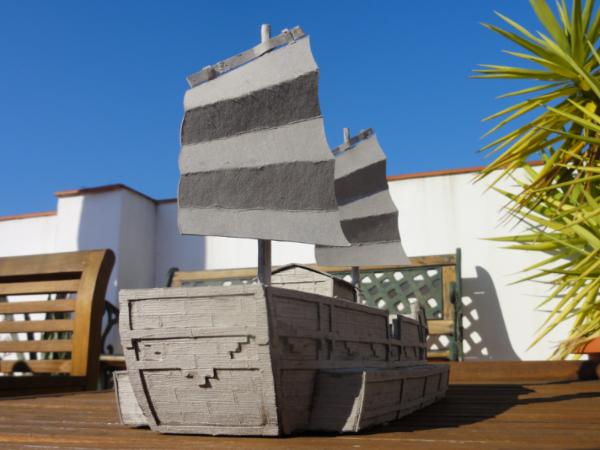
Painting has started. I started with the basecoat and inking. Sails and highlighting are still on my to-do list.
I had some problems with my home made black ink and some parts of the ship ended way darker than intended. Therefore I did the only thing I could do. Darken the whole hull and consider this ship is built out of dark, strong exotic wood.
At least, it looks like a ruthless corsair ship now, doesn't it?
What do you think about painting the sails red? would it be way too dark?
i think the red would be a great addition... true it would be quite dark then but heck... it would be totally cool looking...
the texture and the paintjob of the hull as is i think looks very suitable for a corsair ship...you have done the right thng by accident it seems^^ i really like that soaked old wooden look!
I have no idea what people are talking about, I can't see anything wrong at all with this build. I challenge anyone at all on Dakka to try layering gothic arches and see just how hard that is.
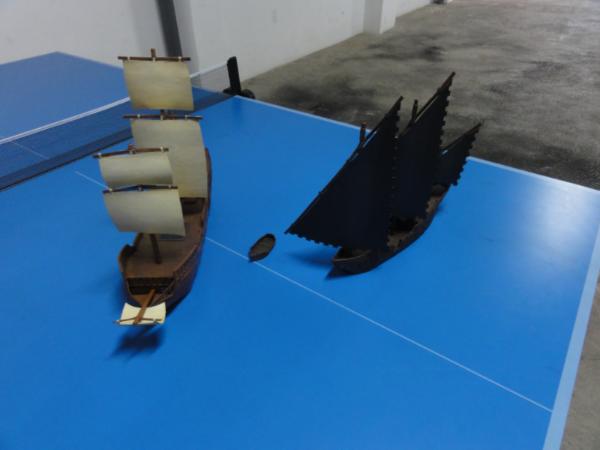
Finally, I went for black sails, mostly because I have changed my mind about my next proyect: It will not be a pair of rowboats, and I am saving my red sails for that.
However, I had the rowboats already designed, so that means I will have to redesign the next ship
The black fades to grey along the sails, but it is not really visible on these shots
will there be any freehand on the sails? as is it looks cool and dark...but then again the major aspect is indeed dark^^ ...something to break up the big surfaces would be blessing...
Viktor von Domm wrote:will there be any freehand on the sails? as is it looks cool and dark...but then again the major aspect is indeed dark^^ ...something to break up the big surfaces would be blessing...
Honestly, I don't feel too comfortable with the freehanding stuff, since my painting skills are not up to par... specially since I would be painting on a surface wich is not painted of a flat color, but goes from grey to black, and therefore any mistake on that surface would be a pain to correct.
I prefer to keep a balance between quality and quantity, so I prefer to design my third ship instead of spending so much time (and risking what has been already done) improving something wich already is of a good quality.
Would it look better? definately. Do I dare to try? I don't xD
What do you think of this?
The first ship is the next proyect. Second ship is the first one I built. Third ship is the one I just finished
Viktor von Domm wrote:looks Asian... that will be a nice addition to the fleet...
and i understand you... ...tho i think maybe a decal could then be used?
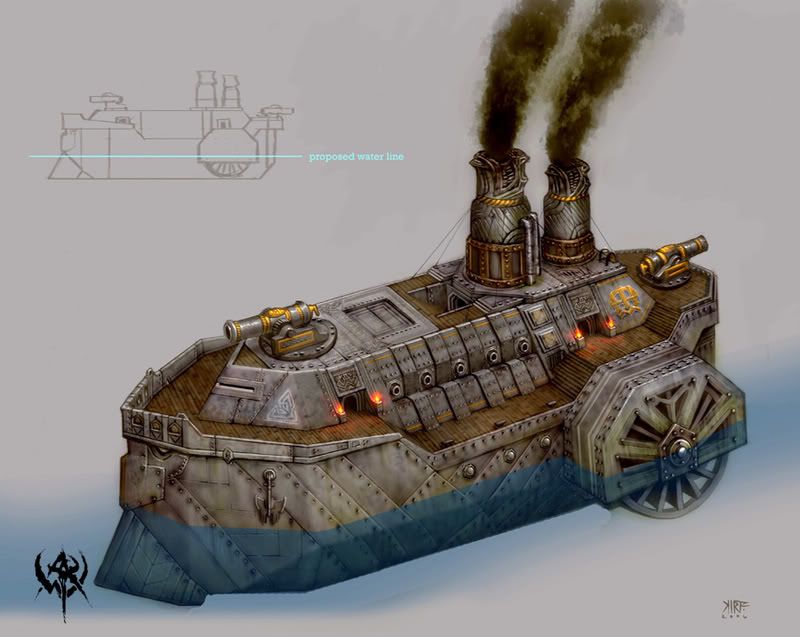
That is really neat I like the steamwheel
@ El vic, Where would he get a huge decal?
there is slefmade decal sheets available in stores so i have been told... you can then design your own stuff and print them out... it is doable and i would recommend that for such big and possibly uneven surfaces... also
maybe make some stripes of different colors at least? that would be helpful too and you could maks the spaces then before to get it smooth and easy...
Maybe I will come back to touch these ships in the future. Who knows. I do agree some more colour in the sails would be good. I like the idea of the stripes, since it keeps the ship kinda generic, in order to be able to be used by many different warbands, instead of using a certain symbol.
Carving the texture out of the main deck of this ship is burning my fingers out. I think I will have to use gloves, or something to protect them, since my skin has fallen from the places I hold the tools with.
Anyway, The main deck has been finished. I will try to glue it soon and take some pics, while my fingers recover. I don't want to think in all the surface of the sides of the ship, whose texturing is still pending...
the steam wheel is a very nice addition and i probably would have done it absolutly wrong as i would have forgotten about the waterlevel... i probably would have built a full wheel and then later just faepalmed my way through eternity... i do those mistakes all of the time...^^
and merry christmas to ye too... is spain celebrating on the 24st or later on?
Viktor von Domm wrote:the steam wheel is a very nice addition and i probably would have done it absolutly wrong as i would have forgotten about the waterlevel... i probably would have built a full wheel and then later just faepalmed my way through eternity... i do those mistakes all of the time...^^
and merry christmas to ye too... is spain celebrating on the 24st or later on?
Facepalming is a very common activity when creating scenery xD
And yes, we celebrate Christmas on the 24th, so we gather our loved ones for supper, go to our houses to sleep, and on the 25th, we have dinner with the family.
Zefig wrote:Wow, that's very impressive. Steam wheel is cool, are there going to be some huge smokestacks to go along with it?
I was not planning on creating smokestacks. I am reserving that for the dwarven ship.
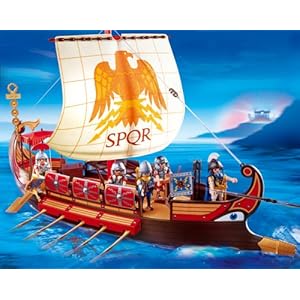
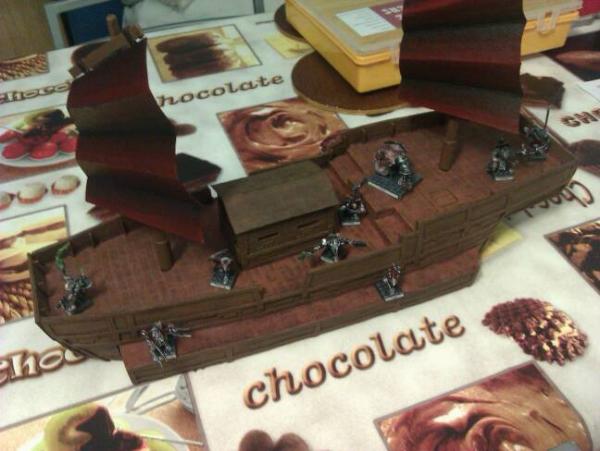
This ship is loosely (or not so loosely) inspired on this image:
It is much smaller, so I am scaling down the whole concept. It retains the two-mast configuration, but the center "fort" has become an enclosed hut of sorts, and I am considering fitting up to six per side oars on the lower decks. I am not sure of how to make them fit yet, however, since the deck is barely 2cm wide (the width of a warhammer fantasy infantry miniature base) and I don't want them getting into the way of the miniatures.
Any suggestions for that? Maybe I can find help here, as you helped me with the removable mast system.
runmymouth wrote:Are you just modeling these or do you plan on painting them as well? They look fantastic.
Take a look at the rest of the thead. If you are careful, you will notice I have documented the painting process of the two ships I have already finished.
In addition, you can find two videos featuring these ships here:
well then i hope you have a good and tasty dinner ahead of ye...and from what i have heard... ye spanish are quite capable cooks...and a half^^
as for the oars... in that pic you showed...on the bog ship there are no oars to be seen? are you sure there should be any? i thought the steam wheel would be all for the propulsion... or if the lower decks as you siad should hold some means for propulsion there too i would guess some more wheels...smaller ones now would be a good idea... also you could use a trick...the oars could be from playmobil or lego maybe and thus be much more sturdy than anything selfmade... currently i see no way to make removable ones... i think the pull and tear possibilities on that part of the ship would work against such an idea...my thoughts only...^^
Ooh, yeah, oars are probably going to be a lot more difficult. I'm assuming they come out of those small rectangular portholes on the sides? How do you feel about magnetizing?
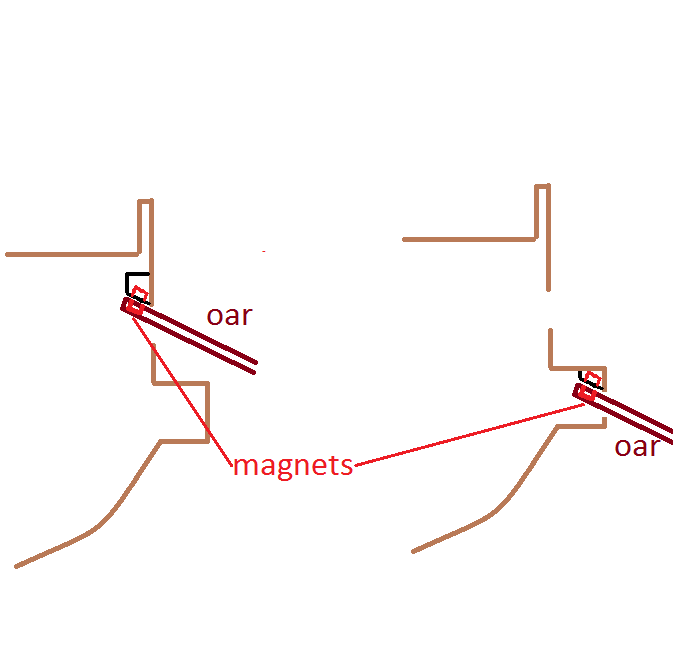
If you're okay with magnetizing, something like this might work:
The one on the left is using the portholes as given. On the right, they're coming out of the walkway, which would completely avoid interference from minis on the walkway, and I think it would still make some sense from a shipbuilder's point of view. Maybe not though, I'm not too studied in that arena.
The structure in black is just to hold magnets, and tilts at an angle to give the oars a tilt into the "water" or what-have-you. Mounting them with magnets makes them removable, and also provides a pivot point so you'll be able to pose the oars to some extent.
Viktor von Domm wrote:well then i hope you have a good and tasty dinner ahead of ye...and from what i have heard... ye spanish are quite capable cooks...and a half^^
as for the oars... in that pic you showed...on the bog ship there are no oars to be seen? are you sure there should be any? i thought the steam wheel would be all for the propulsion... or if the lower decks as you siad should hold some means for propulsion there too i would guess some more wheels...smaller ones now would be a good idea... also you could use a trick...the oars could be from playmobil or lego maybe and thus be much more sturdy than anything selfmade... currently i see no way to make removable ones... i think the pull and tear possibilities on that part of the ship would work against such an idea...my thoughts only...^^
Maybe you're right and I am overdoing this boat. I should keep it more simple.
Zefig wrote:Ooh, yeah, oars are probably going to be a lot more difficult. I'm assuming they come out of those small rectangular portholes on the sides? How do you feel about magnetizing?
I intended to keep them fixed to the main hull, since I am not very good with magnets.
Viktor von Domm wrote:that could be an option too... maybe magnetized oars made from sprue parts?`to get that extra bit of sturdiness?
I was thinking of wodden toothpics, even if it's kind of cheating as the oars would not be made of cardboard, something I sometimes find myself boasting of xD
Zefig wrote:If you're okay with magnetizing, something like this might work:
[IMAGE]
The one on the left is using the portholes as given. On the right, they're coming out of the walkway, which would completely avoid interference from minis on the walkway, and I think it would still make some sense from a shipbuilder's point of view. Maybe not though, I'm not too studied in that arena.
The structure in black is just to hold magnets, and tilts at an angle to give the oars a tilt into the "water" or what-have-you. Mounting them with magnets makes them removable, and also provides a pivot point so you'll be able to pose the oars to some extent.
I am not studied in ship-building either. Most times, I get the proportions of the boats and the general disposition... and I just go by rule of cool and ease of construction.
Your diagrams are quite interesting. The first one would be interfering with the miniature path, but your second one is fine. What I had in mind, however, was creating a small seabase glued to the ship where the oars would sink on the water, to make them more sturdy, then create some kind of supporting structure for the oars, so they could be grabbed by miniatures on the lower decks.
But maybe that's way too much work and will make the model busier. Maybe Vik is right, and I should keep it simpler and forget about the oars. In addition, it would be much easier to paint and give a coat of varnish.
What I had in mind, however, was creating a small seabase glued to the ship where the oars would sink on the water, to make them more sturdy, then create some kind of supporting structure for the oars, so they could be grabbed by miniatures on the lower decks.
...
that!
i like that idea... a base...kind of.,.. that is the right way to do it... and a work can never be too complicated or too busy... not on that size anyway... the oars i would not leave off if i was you... i think maybe you should go for more like...chineese food sticks...you get those in restaurants...once usable... would be better as they are a bit thicker... you dont want to get too punny looking for them oars... if you want a good looking mdel to everything in your ability to make it happen... and the amount of work you already did and did to others... you just don´t want it done cheapo now...i think that is not your style... your models look expensive... and heck... when you think about it... wood is just densed cardboard^^
Finally some progress has been done, even if it is minor. The holidays are an awful time for me to work. I hope to be back to my usual working rate soon (but not yet).
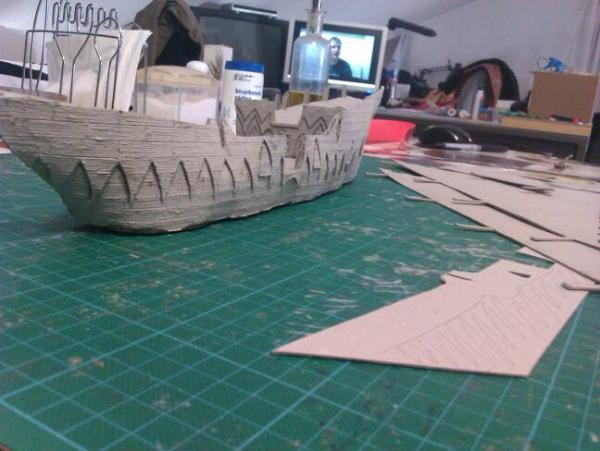
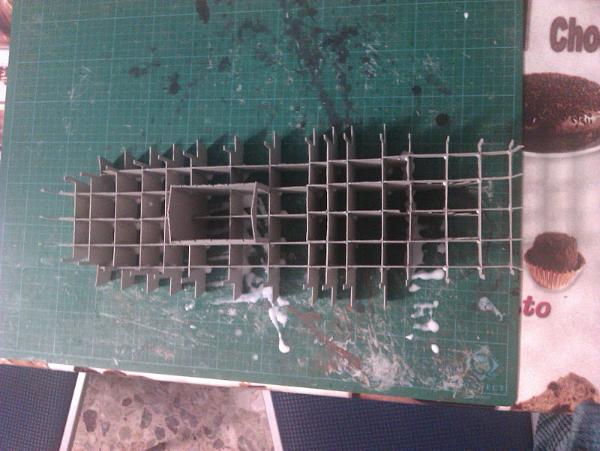
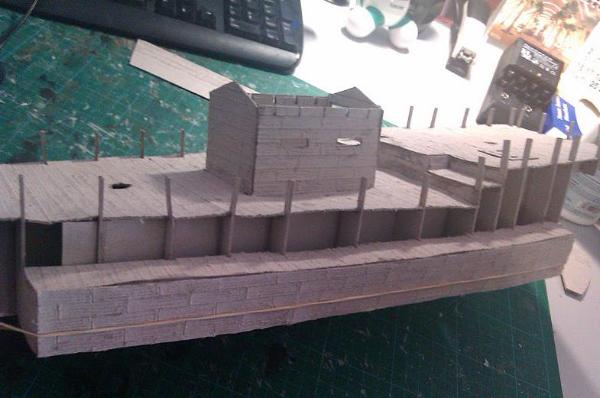
In short, I have assembled a small part of the lower hull. The main hull will be next. And then, detailing should come.
Note I also added a hatch in the rear deck, since this ship has no door to go below decks.
very good looking... and may i say this... begun with making my own tries at generating wooden textures...this time with plasticcard...you have inspired me to do that^^
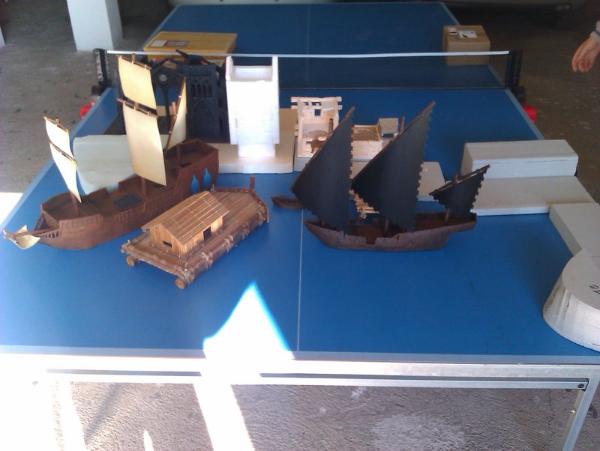
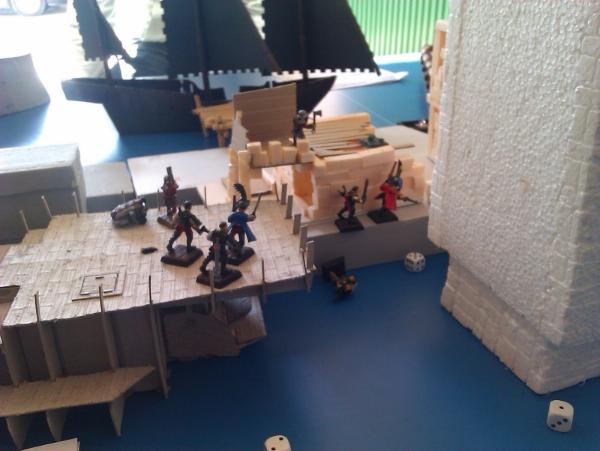
By the way, I just had a chance to give Mordheim a try, so I rushed something to be able to create a table to play. The only thing which was final on that table was the two ships you have already seen, and they saw a lot of action.
There were three warbands, two pirates and my skaven. Fast rats who try to jump onboard a ship only to miscalculate, collide into the hull, and drown, were hilarious. And one pirate captain fell from 7cm high when he was trying to get off his boat, and hit the floor so hard he was taken out of action and he lost an arm forever. No more two-handed weapons for you, pirate man! Fortunately, pirate warbands have the option to get hook weapons if they lose an arm, like that captain did. He might even consider it a good outcome!
The narrative aspect of Mordheim is great, and it's inexpensive when compared to 40k or Fantasy. It was so much fun, my urge to finish my Space Marine force has decreased, and I can't wait to play a propper campaign with propper scenery.
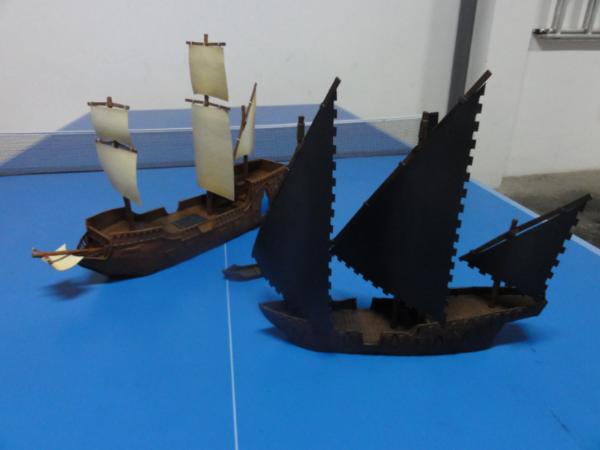
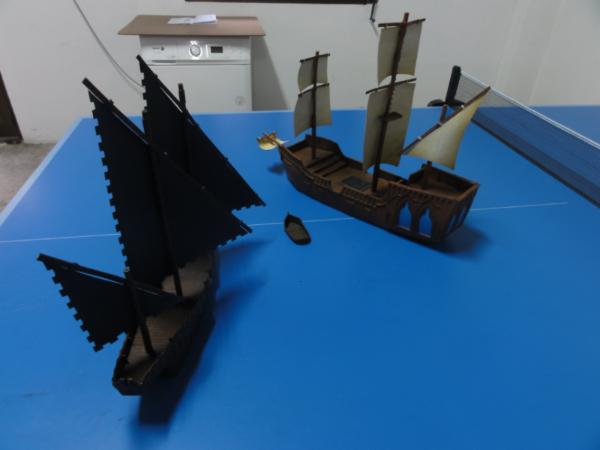
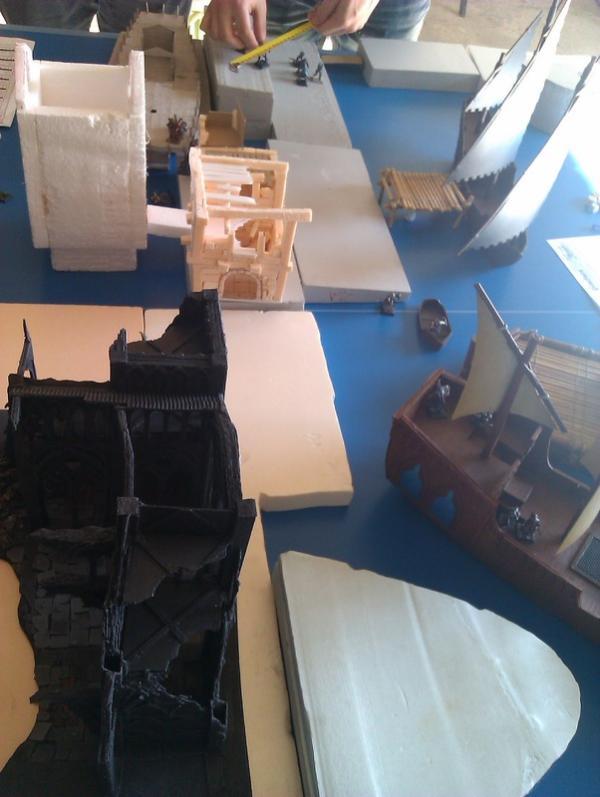
Some pics of the rushed scenery. I only had the cardboard ships and temple at my home, so we improvised a harbour with the half-done scenery and wodden ship my friends brought:
sounds like you had a heap of fun!
if there where still peeps here that play munda or mordheim...i probably would have a running game by now... i like the storyline aspect of that game way better than epic battles...
also my ever tried hame in tabletaop was actually a german adaption of the mordheim game in the universe of the black eye...(german game of pen and paper rpg...)
that small rushed up scene looks lovley... who did that styropor tower? nice detailing already to be seen...
is that glove for handprotection when cutting? that must be really straining for you all that cutting...i can just imagine how sore your fingers become after so much detailwork...but it was worth it!
Viktor von Domm wrote:is that glove for handprotection when cutting? that must be really straining for you all that cutting...i can just imagine how sore your fingers become after so much detailwork...but it was worth it!
Exactly! After losing my finger skin and having my muscle exposed two times, and having to wait for it to heal again, the leather glove allows me to work without pain, with a minimal loss of control. a worthy tradeoff.
safety always comes first!!!
after all we are really depending on your to chuck out more eyecandy ^^
Viktor von Domm wrote:is that glove for handprotection when cutting? that must be really straining for you all that cutting...i can just imagine how sore your fingers become after so much detailwork...but it was worth it!
Exactly! After losing my finger skin and having my muscle exposed two times, and having to wait for it to heal again, the leather glove allows me to work without pain, with a minimal loss of control. a worthy tradeoff.
I used to wrap my fingertips in duct tape after my third or fourth accidental cut to the bone ... I am used to modeling at that scale in wood, which has been easier to utilize once I completed my steam box.
Just a question, but what sort of 'cardboard' is that? Where do you get your materials from?
A softer handle is not an option, as the item I am using has no handle, but a blade on each end. It's not exactly a blade, however, but something used to carve, slice and mark into ceramics before they are fired. A hard leather glove will do, however.
Kazwulf wrote:
Just a question, but what sort of 'cardboard' is that? Where do you get your materials from?
It is just 1mm thick cardboard from a modelling supplies shop. Nothing special.
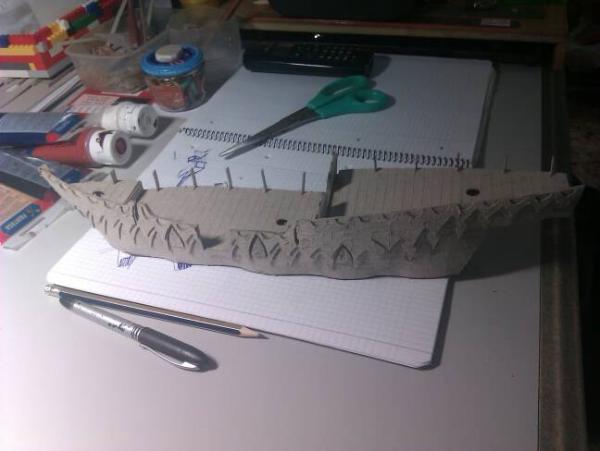
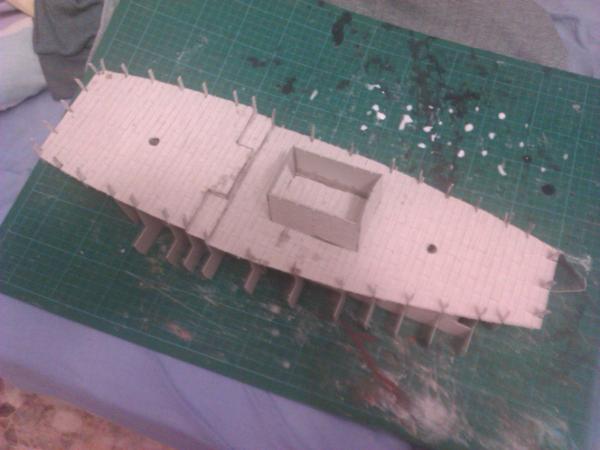
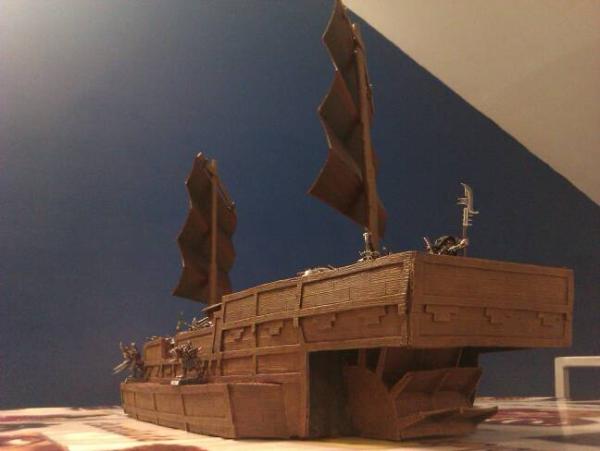
It's time to show you some more progress. One side of the hull has been finished. Maybe I will put some kind of scale under the parapet opening in the middle deck.
I have not thought about oars yet, and I don't see an easy way to get them in, because of them being a very fragile part of the ship... One of my main goals is to get very sturdy scenery. These oars and the water base they would be mounted on should be removable? I am not sure of what to do at all, since having oars would it much harder for the ship to get in contact with any terrain or dock for miniatures to get to land.
Among other things, I have heard about some of my friends wanting to do a Kislevite warband. I am not really savvy about fantasy russian-style ships. Although this ship is not a priority right now, do you have any ideas about what could be a fitting design?
Anyway, the promised pics.
EDIT: Whoho! 100th post. Nothing crazy for many, but a milestone for a lurker-born like me xD
I like that one.
But is there any chance that you fill those little gaps with some modelling compound?
Would give it that last touch, you know what I mean.
IPS wrote:I like that one.
But is there any chance that you fill those little gaps with some modelling compound?
Would give it that last touch, you know what I mean.
It would not be easy, since the cardboard still moves with humidity and paint, while putty does not. I think cracks would appear where these two materials enter in contact. I expect those gaps to not to be so visible after painting by leaving those recesses in a darker tone. I am not sure if it will do, however.
Maybe you could use papier-mâché?
It should react simmilar to the carboad, but still fill the gaps.
You could even use the very same cardboard
that is used for the rest of the model and mix it really fine.
dsteingass wrote:Maybe you need a softer knife handle?
Viktor von Domm wrote:no real clue about that possible russian ship...but maybe a kogge?
but your frist one was already close to that design...
as for the oar issue...
will hopefully not forget to uplaod a solution playmobil did with their galley roman ship...
the oars are one piece... and can be dismounted if needed... i´ll show you later on...
A lot of people are telling me to go for oars. I am not that sure about that, but I'll go with the majority and give it a try. I might make them going out from the lower hull, as they will be much more durable than in any other way. But they won't such a prominent feature as if they came from a higher location. I doubt it really matters, however. I could even avoid making them removable in that way, too.
IPS wrote:
Maybe you could use papier-mâché?
It should react simmilar to the carboad, but still fill the gaps.
You could even use the very same cardboard
that is used for the rest of the model and mix it really fine.
I am trying to insert some of the same cardboard. It will work well in some places, while I won't be able to insert it in some other locations. It is a pity the decks warped that hard.
I mean like in, mix the cardboard to a fine mixture, add some wood glue + water and use it like a putty.
Shouldn't that also work pretty much everywhere?
IPS wrote:I mean like in, mix the cardboard to a fine mixture, add some wood glue + water and use it like a putty.
Shouldn't that also work pretty much everywhere?
grinding the cardboard is not really an option, but I have cutted some cardboard to fit in the recesses. I will do so for every hole in the hull. There are some problems with the deck, however.
And now, more pictures with both sides at least partially assembled.
This is definatly my favorite thread on Dakka, your ships are absolutly beatiful, I cant wait to see this current boat finished and painted. Keep up the amazing work
Today, I finished the other side of the hull. Both the front part of the hull and the rear part of the hull are still missing. The "hut" in the center of the main deck still lacks a roof (it will be a pitched roof) and the masts and sails are still being worked on. (and then I must paint everything, of course)
That means, although I still have a lot of progress and updates to make, I am already thinking about my next proyect. Those who follow this thread since the very beginning will remember my target is to make some sort of "utilitarianscale" Dreadfleet, with several big ships, as many as needed for each warband my friends may have -and I am finding more friends each day that passes, so dwarves (ironclad), elves (catamaran), vampire counts (trirreme), norses (drakkar)... are all considered as ships I could build next- and scenery to get a good looking table. You might also remember I stated after my third ship, I would focus on getting a playable basic table before going on with more ships. After three more ships, I may get back to adding to the basic scenery, and repear this cycle for as long as I have money to buy cardboard.
What I had in mind originally was just reproducing some of the "island" pieces you get in Dreadfleet. And this is still considered. But this is still being built to play Mordheim on, and you know Mordheim is all about jumping from roof to roof to drop from a balcony on top of your enemy, and multilayer skirmishes. A plain rocky formation may not be as interesting as I would desire.
A rocky formation with a tower would be better, yes, but it is still a single, isolated What about an atoll? Such as the one in Waterworld, but with a pirate theme? Or a fortified stone city built in an atoll? could that be made out of modular, so I could make an atoll with a different shape each game? Could I even be able to make an atoll I could break and spread across the table and the pieces would still look good in isolation?
I have always been impressed with the level of collaboration I have gotten as a response in this thread when I asked questions, so I am inviting you to participate in the design of this scenery. Any inspirational pictures you can find and post, ideas, concept art... If you can doodle something, take a pic of it and post it for us all to see.
I can't promise I will use all these ideas and designs, but I hope some of your ideas will end represented on my final design
As you can expect my main building material would be cardboard, of course, maybe insulation foam for the rocks... xD
DeadGaurd wrote:This is definatly my favorite thread on Dakka, your ships are absolutly beatiful, I cant wait to see this current boat finished and painted. Keep up the amazing work
Thanks, it is participation and feedback in this thead that keeps me going. You have managed to get me excited about this project for at least two more days xD
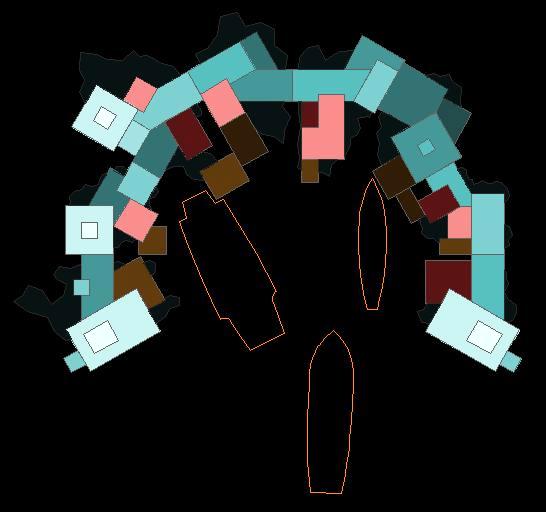
As you can see by comparison with the ships that I have already built, it is no small project. It is composed of eight "dowels" which are completely interchangeable and can be rearranged in any order, or in several groups of various sizes and shapes.
Lighter means taller, blue means masonry, red means tile roofing, brown means it's a deck made of wodden planks. Greenish grey symbolizes rock.
whao mate... i so totally wanna see you doing that all... and this will take probably ages... i hope you have enough shelf space to store all this... but if you see this all through like you did your other projects it will be brilliant! when completed i suggest you invest n a small cam like this:
to make nice scenic pics of your terrain and minis... i think that would be a cool thing...
Viktor von Domm wrote:whao mate... i so totally wanna see you doing that all... and this will take probably ages... i hope you have enough shelf space to store all this... but if you see this all through like you did your other projects it will be brilliant! when completed i suggest you invest n a small cam like this:
to make nice scenic pics of your terrain and minis... i think that would be a cool thing...
I think I should invest in a regular camara first, in order to be able to make vlogs about the building process, don't you think so?
dsteingass wrote:You are gonna drive up the price of cardboard all over the world!
To be honest, I have at least enough cardboard saved for no less than 2 more ships, maybe 3. It is all because I had bought something in a supply store that I did not need any longer, so I exchanged it for 20€ of cardboard. As I study architecture, I figured it would be useful sooner or later. I have finally found a way to use that cardboard, although I never predicted this.
Rogue Wolves wrote: wow thats an amicious project... me like
I am reconsidering it, since I have not decided yet how to build the atoll, and it would be BIG and really time consuming.
Therefore I am really considering to build the fourth ship before going into the atoll. It would be a dwarven ironclad, as you know. Do you think it would be a good idea to delay the atoll in favour of a very distinct ship?
Viktor von Domm wrote:if you built that dwarven ironclad along the lines of this:
i would rather look forward to a new ship then the atoll...^^
i would love to see this hulk being build!
What I have designed is more of a dreadfleet ironclad, scaled upwards. But I have not designed the ornamental layers yet, so I can manage to get some of that kind of steel plating and decoration motifs there.
By the way, Vik, I think that ironclad has already been built.
Mine will be waay smaller, and based on the Dreadfleet Ironclad instead. In addition, it is the first time I will try to build a metal riveted surface, so I think my ironclad will not be nearly as good as that one.
thanks for those pics... they are a good inspirational help... downloaded them imidiatly^^ well.... i currently have not seen the dreadfleet version but i will have a look what is in store for us soon^^
for rivets and carboard i recommend the holepunch methode... it is vik aproved^^
Ah, that was more like the Warhammer world of diorama tables, but the inspiration for a player to make one not attached to the table is always a good thing. OP is a maestro of cardboards.
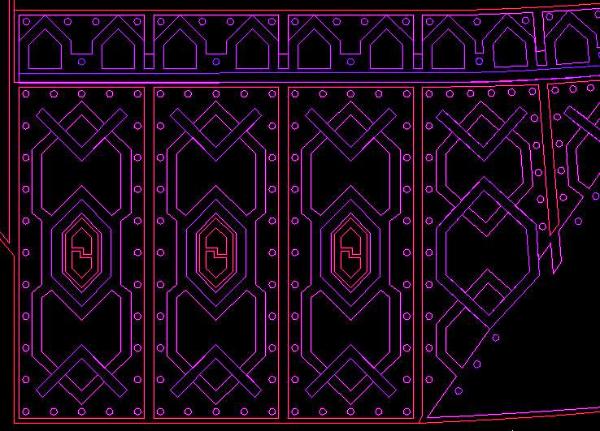
I made some advancements in designing the layering and ornamentations for the ironclad hull. I have still a loong way to go, since the bow, stern, steamwheel protection, and main decks of the ironclad are not yet started.
But I can show you a bit of the hull which houses the cannon hatches
This picture might not be comprehensible until you see the propper cardboard layers one over another, but each line separates two layers at different levels
As I have seen, there use to be dwarven faces sculpted on the bow of the dwarven ironclads. What other motifs tend to fit with this use of decoration in dwarven art? axes? dragons? I have lots of places to fill with iconography and I will need suggestions.
definatly hammers mate! lots of them... and anvils... possibly the odd beermug too... even some ram heads would be fitting.... if all else fails...look for inspiration to wow dwarven things...
Vik's got some great ideas there. I'd also suggest maybe gemstones, anvils, forges, other smithing stuff. Possibly mountains, although I have a hard time envisioning that.
Yep, Dwarves hold icons of their ancestors, book of grudges, beer mugs, and anvils as sacred icons. As such, they adorn their constructions. Their constructions are NEVER built of wood either. Wood is fer' Burnin! Dwarves use the same word interchangeable for "man-made" and "shoddy"
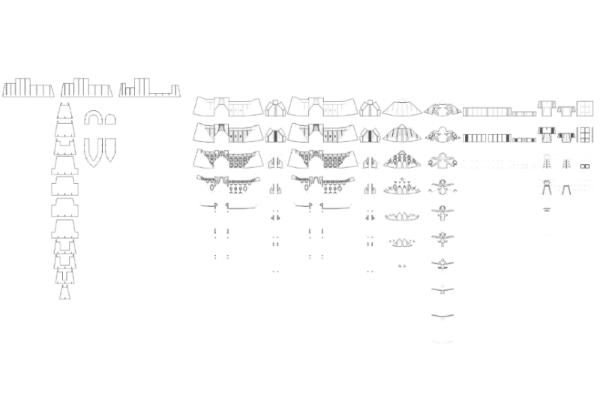
So, while I have not been able to do any progress in the real world of cardboard, I have finished the design of the templates of the Dwarven Ironclad. I have sneaked some mountains and anvil motifs for the stern of the ship, while a huge dwarf face on the bow of the ship. Also, I used axes on the sides of the ship.
I can't even aspire to count how many rivets the ship will have.
I will try to simulate metal by just not giving any texture to the cardboard. The decks will be made of wood-like cardboard, in my usual style.
Here you can see the plans. The most intrincate designs might not ve visible due to the sheer size of the ship and the resolution of the image, however.
This will be by far the most difficult and time consumming ship I have ever built, since in some places, the detailing requires up to 10 different cardboard layers, while the most complex ship I already finished has no more than 6, and only in very scarce places. In addition, painting will be really hard, since there are some really hard to reach places inside the ship.
i can see...for this you gonna have to kiss sanity good by... 10 layers of details ...i doubt if i could stay focused and motivated that long.... i am torn between feeling pitty for ye or for envying you...
dsteingass wrote:that is just nuts. Are you sure you just don't want to simplify it a bit?
To be honest, I could not honour the intrincate designs of the dwarves in any other way. And if I am going to build an atoll after that, which will be a much bigger project, I should be raising the stakes by now, in order to prove myself capable of doing the gargantuan scenery piece that the atoll will be.
Viktor von Domm wrote:i can see...for this you gonna have to kiss sanity good by... 10 layers of details ...i doubt if i could stay focused and motivated that long.... i am torn between feeling pitty for ye or for envying you...
In order to stay motivated, I am considering videoblogging about it. I have no camera, however, so I will have to experiment a bit with my mobile phone, lightning, video editing... you know, everything involved in that xD.
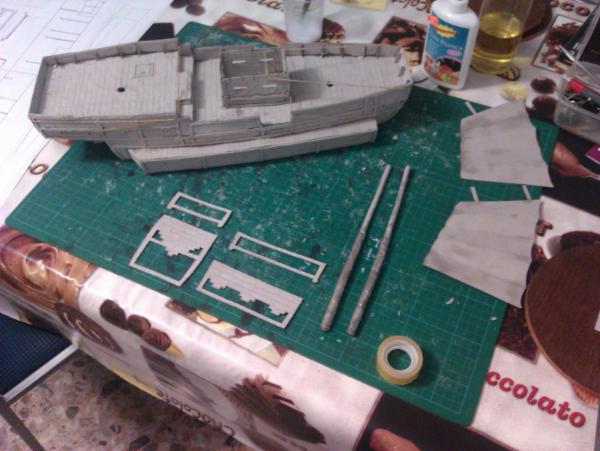
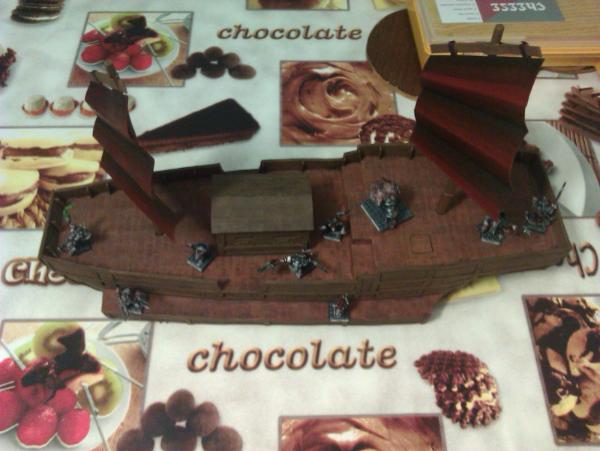
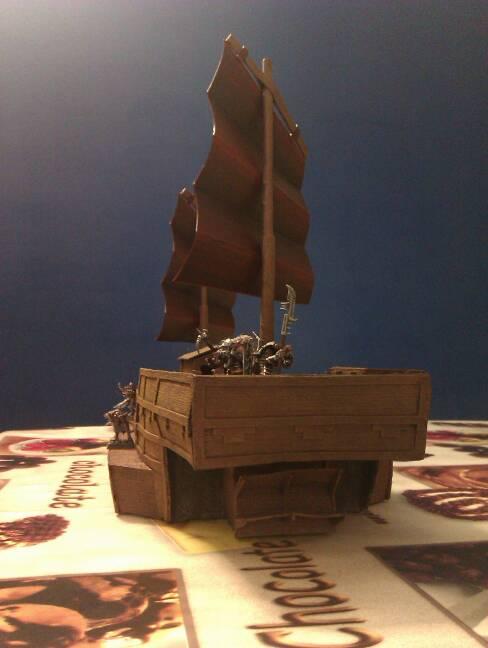
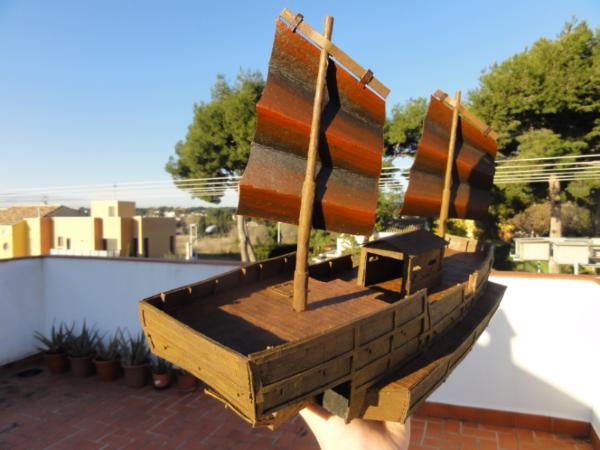
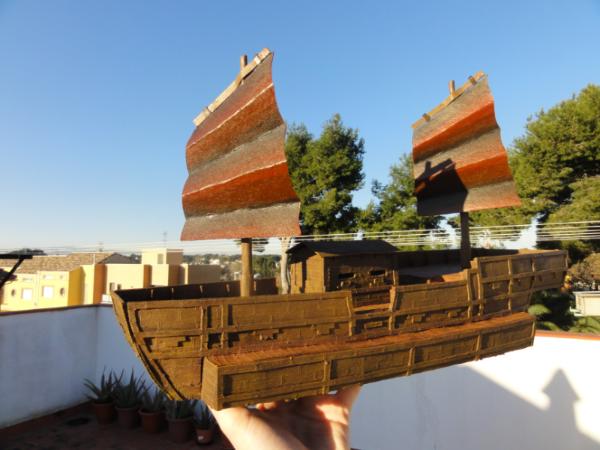
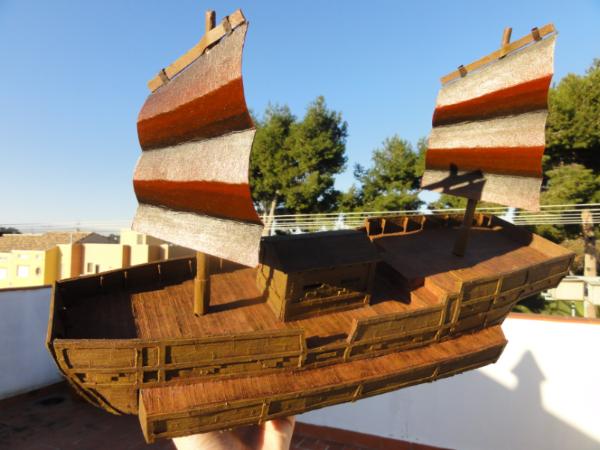
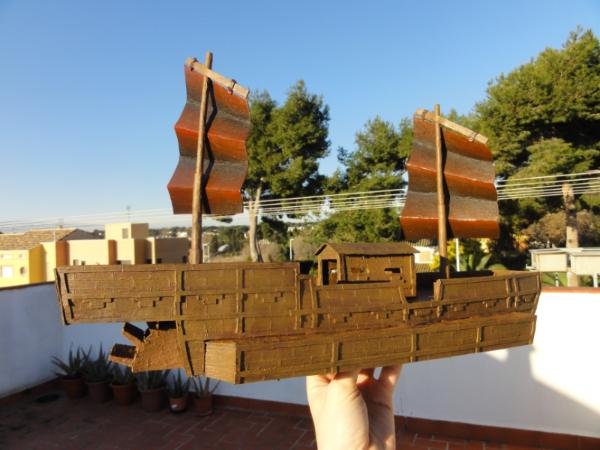
I finally managed to work a bit more into my asian ship. I glued both the bow and stern hull bases and got the detailing ready for gluing too. I also built a roof for the center hut, and I also worked on masts and sails, whose shape I hope you will like.
sails i really like... masts have to have more work...for example putting into place to really judge them...
vid blog... good idea... and yep... i am totally for having as much detail as is needed... there isn´t any way around it... you would only feel gakky about it later if you would not do it as planned... thats waht i tell my wfe with her sewing and knitting works... you have to see it through... if you fail..redo from start... don´t get frustrated by the amount of work... get motivated by the future outcome!!!
I think a video blog would be very cool if you did it. Im not sure how long your phone takes videos, but there is an app on my phone that takes a picutre every few moments in like a time lapse, you might be able to get something like that and just string the photos together. I'm really looking forward to the dwarf iron clad.
TaWaaagh wrote:Looks amazing. How many hours did you put into that?
I tend to work on wargaming scenery about 4-5 hours a week, usually on tuesdays and fridays. It took me about one month and a half to build this ship, so you can do the math. It would be about 30 hours tops. I still need to paint it, however.
IPS wrote:Nice
But the sails look a bit carelessly...
Not really fitting imo : /
I'd say that is because of the long vertical distance from the bottom of the sail to the deck. It is a problem my previous ship also has, although it is not so obvious there, as sails are bigger and taller. That problem is not an easy one, however. A compromise must be achieved between gameplay and aestetics. Shorter masts would look better, but the sails would totally block both the path of the miniatures and line of sight. In addition, no miniature would fit under the sails, and in most ships, lanteen sails would cut the ship deck in several sections.
So it's an aestetic problem I ran into in order to fix a gameplay problem which, in my rule-lawyer heavy heavy environment, took preference xD.
But maybe you're not referring to that. If so, tell me what problem did you detect that I did not recognize.
It's not so much about their size, but the folds are uneven and broken.
Maybe you should use a thinner carboard for the sails?
+you could add little details the the sails themselfs.
Would ´make em look much nicer : )
(u know, ropes and little holes and stuff)
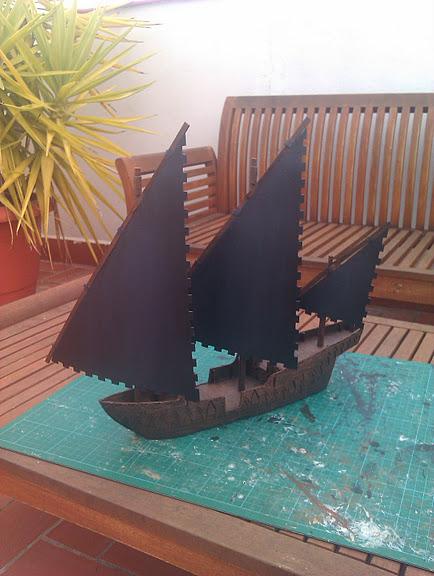
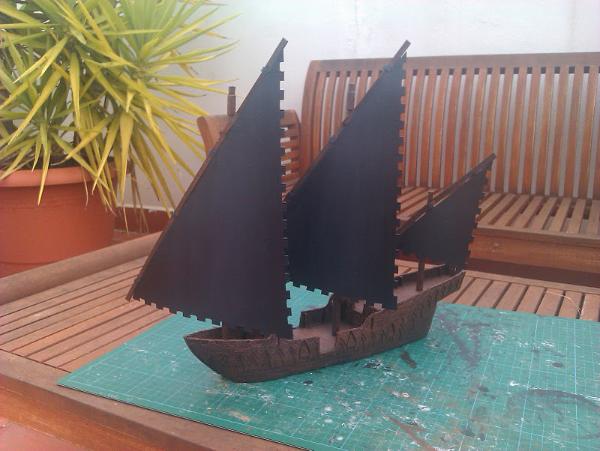
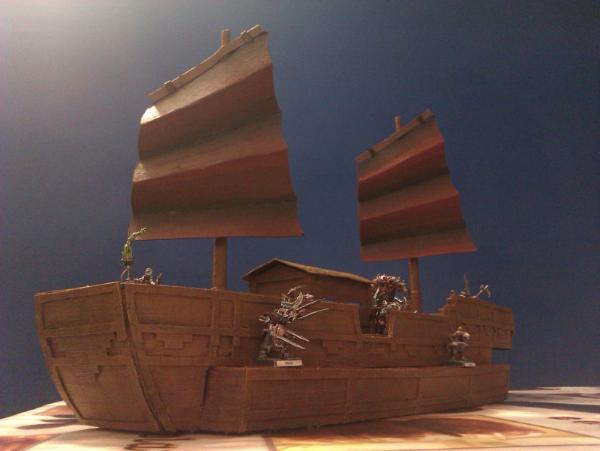
After some inactive weeks, I have finally been able to basecoat and give a black ink to the ship. I still need to paint several red coats to the sails, and highlight everything. I hope to be able to hightlight the wodden planks propperly. I expect to have it protected by varnish by the next weekend.
This third ship is finally done! and as you can see, someone has smelled the cheese stored under the decks! only the varnish layer is still to be done. What do you think? I have some work to do for University, but I expect to be able to start with the dwarven ship in a week or two.
simply beautiful... a daytime pic would be nice...as i only on the last pics could say for sure that it wasn´t just sprayed brown all over...that lighting is way too shabbby for such beautiful models...
Viktor von Domm wrote:simply beautiful... a daytime pic would be nice...as i only on the last pics could say for sure that it wasn´t just sprayed brown all over...that lighting is way too shabbby for such beautiful models...
I have basecoated the ship in black, painted it in brown, applied a black ink twice, and highlighted the surfaces with drybrushing. I fear I was way too subtle in the drybrushing, however, so it won't be noticeable.
mxwllmdr wrote:This thing has a very nice Pirate junk felel to it. Did the chinese ever use any paddle wheels types at all?
According to my limited research, they did. This ship has been built in order to closely resemble a design which appeared on an academic book.
well it might have looked good with a bit stronger drybrush... but now in daylight it looks very cool...spanish sun does it good it seems^^ in that light the sails particular look very good...

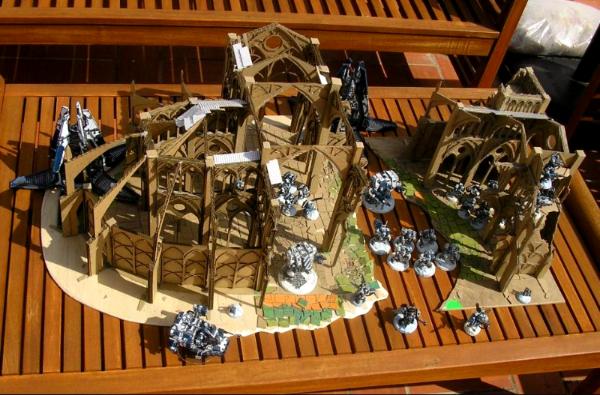
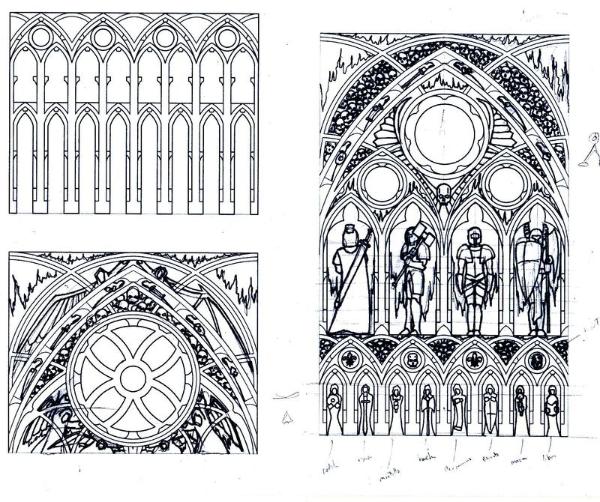
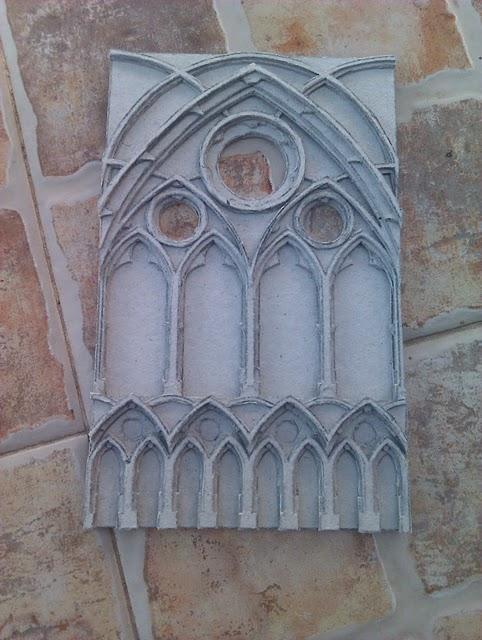
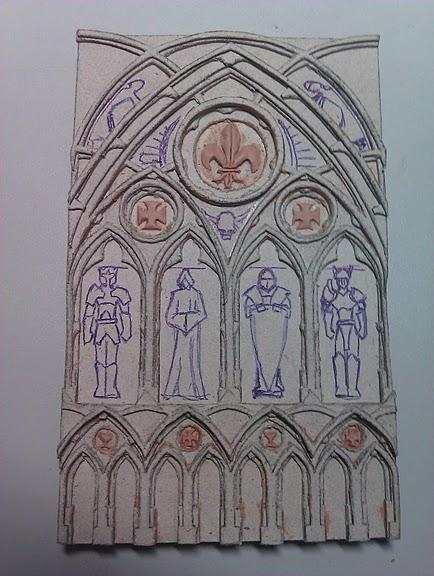
 Vik
Vik