74909
Post by: Sveamore
Plan: Build a Space Hulk in 3D
3
74909
Post by: Sveamore
First photo's are not good but I want to show the whole process of the build, perhaps these are better?
3
10972
Post by: Ruglud
TBH Sveamore, you had me at the floor tile stage. I do like a 3D Space Hulk board, almost as much as Necromunda scenery... And Hirst Arts are great, one of these days I'll get some and do something similar to this
As long as you post regular(ish) updates you'll quickly get a following on your thread - in fact you can consider me subscribed... I'm looking forward to your journey down those dark and forbidding corridors - there certainly appears to be plenty of them if the MDF bases are anything to go by 
74909
Post by: Sveamore
Hi Ruglud, glad your on board, all photos are usually a combination of glued in place & dry fit with no gaps filled. That is usually corrected much later.
1
74909
Post by: Sveamore
A couple more progress shots as the Hulk expands. Figure for scale.
2
27147
Post by: Solar_lion
Very Impressive.. Did you mold everything yourself out of pre-bought molds?
Thinking painting all those details will take a long time.
Well done!
74909
Post by: Sveamore
Yes I did & your right, the painting will take forever too, there's about a 7ft footprint.
30672
Post by: Theophony
this is really ambitious, 7' of this table will be shear awesome. ill be following up on this.
74909
Post by: Sveamore
Exposed MDF awaiting machinery pieces that have yet to be built.
1
24190
Post by: rodgers37
What an impressive project!! Space Hulk is pretty cool in 2D, this is so much better, and you've only just begun! Can't wait to see it progress.
74909
Post by: Sveamore
Cheers, thanks also to some great advice I am now trying to give a sense of claustrophobia without infringing on the floor plans.
1
94
Post by: combat engineer
This is amazing. So far, what size foot print have you constructed using your casts?
Consider me subscribed!
Mat
69676
Post by: Big H
Mate , first off , what a great project ! I started my own go at Space hulk but rather smaller , a few 3D rooms joined by the card corridors !
I'm Subbed !
Couple of questions , I think you got the scale of it just right ( go big early ) but .... Where do you plan to store it all ? What are you going to put it in to prevent damage , dust build up etc !!!
Awesome job fella !
74909
Post by: Sveamore
Mat
The current footprint is roughly 1 metre by 1/2 metre in size.
Big H
She will be stored in containers as the whole thing breaks down into sub assemblies. To prevent damage all the pieces fit into large plastic containers with lids.I have my eye on some I noticed at my local hardware.
69676
Post by: Big H
Ha , I check out the plastic box's at the Hardware store too !
Thats a similar way to I was going , tho I was hoping to fit it all in 1 maybe 2 large box's 
By the way , EVERYONE should start on German Tanks !!!
74909
Post by: Sveamore
Some of the 'structural support' of the hulk. I think you need to show something like this to help to break up the maze of corridors. Also working on a gantry.
3
10972
Post by: Ruglud
I notice that some of the wall sections don't butt up with each other - is this intentional or something you'll fix (have fixed) later in the build? I can imagine having cabling in these gaps would be a good option...
Gantry idea is great idea, brings an even greater 3D dynamic to the game
as for the painting, unless you're using an airbrush I would imagine it could take forever...
74909
Post by: Sveamore
I currently don't have enough wall sections with the industrial pieces (these are the cables at the base of most sections) so am using some double sided industrial pieces which then causes those gaps that you mentioned. I do have an airbrush but once built I will base coat with spray cans.
74909
Post by: Sveamore
Update
2
69676
Post by: Big H
Love the work so far mate , really good work.
Gantry is a cool idea.
Will it come apart to spray so you don't miss all those undercuts ?
74909
Post by: Sveamore
Yes it will all come apart to paint, here's a photo of 3 wall sections & 3 machinery 'bits' to give you an idea.
1
27147
Post by: Solar_lion
Very nice.. Love the effect.. it will take forever to detail.
16367
Post by: Slain'e
Lovin this, keep it going sir....and sub'd
74909
Post by: Sveamore
Thanks Guys,
Service door.
4
27147
Post by: Solar_lion
How many molds do you own in order to produce this at the speed your going? you must be making peices every day ( assuming overnight curing)
What material are you using?
74909
Post by: Sveamore
You are quite right, I am making pieces every day.The material I am using is Hydrostone. Anyway, here's a few photo's to show my stock pile & a prior project that will show a little of my painting style that will eventually be apparent on the Space Hulk. I own 17 of the Si Fi molds.
4
27147
Post by: Solar_lion
what is the set time and where are you purdchasing this dental plaster?
is it power'y after solid? are you using a release material?
I like the colors you are using. not overwealming
69676
Post by: Big H
Mate , I'm not even sure there's a word in English that properly describes this project but it goes something like :
fethinawesomecastmadasaboxoffrogscrazybeautiful.
Quite possibly made my day !

74909
Post by: Sveamore
The set time is typically 20 miunutes before turning out the cast pieces from the molds, slightly longer in the winter months. It is not 'powdery' after set, I do know what you mean as I have experienced that with a small batch of dental plaster I once used. The feel of Hydrostone is definitely ceramic and clicking pieces together the same way a gambler plays with his chips will give you the same sound/feel as ceramic. I am not using dental plaster in this build, I am using Hydrostone. You would need to do a Google search to find a local supplier near you as I am in Australia. No release material is needed or used when demolding, simply pour-scrape (so they are all level)-wait-demold-done.
Here's one more photo of an industrial project I worked on previously using Hydrostone.
1
15115
Post by: Brother SRM
If this looks anything like those "earlier project" pictures, this is gonna rule. All I know is that I want to play on this board, like yesterday.
74909
Post by: Sveamore
Big H: "...box of frogs..." that's pretty funny, I have no idea what it means but I still found it funny.
Brother SRM: Once complete my Space Hulk will look incredibly rusted & old.
Completed airlock, this was a first attempt & while I am happy with it, it does need tweaking. The doors actually slide in/out too.
3
69676
Post by: Big H
Thats the point !!
Seriously , you never heard of "mad as a box of frogs " ? Crikey.
Mate , you've inspired me back on to my Space Hulk soon as I get chance , I got some hirst arts bits a while back from ebay , best put them to some use !
74909
Post by: Sveamore
...have you got any pictures of your Space Hulk? I'd really like to see them if you do...And nope, never heard of a box of frogs, In Australia it's "spat the dummy" (pacifier)
69676
Post by: Big H
Hi mate , I'm afraid at the minute I'm working away from home and won't be back till Aug. but in essence I "found" a ton of wooden trays all about 100mm deep x 600mm long x 450mm wide.
I'm using my overly full bitz box and some Hirst Arts stuff to build rooms inside the box's which I then intend to connect initially with the Space Hulk card corridors until I build some in 3D.
Being inside the trays I'm hoping they'll store easily with too much falling out and be fairly protected.
Ref. Frogs . What about " Mad as the ship's cat" for mad things or "..its like herding cats " for something difficult ?
74909
Post by: Sveamore
Big H: It sounds really interesting not to mention practical, as for the sayings well not the 1st but I have heard the second one:-)
Airlock door (with gaps)
2
74909
Post by: Sveamore
Getting very 'maze' like, that's not necessarily a bad thing, however, it can be a little difficult for the eye when built in 3D. The 1st photo gives you a good perspective of the width, as always please forgive the gaps.
2
74909
Post by: Sveamore
Another quick update, this time a splash of colour. Sorry if they appear a little out of focus as I run a programme that sacrifices a little quality when posting photo's for convenience, originals are sharp & clear.
1
14392
Post by: nerdfest09
Oh MAH GAAAAHD! I am totally along for this ride! looks absolutely impressive so far, even contemplating the start of this project would have been a huge step but you are well on the way and it's simply beautiful! I will follow this with anticipation as you go!
74909
Post by: Sveamore
nerdfest09: Thanks.
Now a little atmosphere having been taken in the afternoon sun. Next post will be the final version of the airlock configuration and some cross bracketing.
5
74909
Post by: Sveamore
...almost forgot, I have been working on some wall signs for my Space Hulk, so I thought I'd share what I have managed to complete so far, still lots to do though.
1
14392
Post by: nerdfest09
Nicely done dude! I am planning my own home built board as we speak thanks to some inspiration from your thread and Panics version too! the signs are a great touch, have you thought about getting very tricky? perhaps printing the designs on clear acetate and either using them to fill a hole in a wall like a window or even using a small l.e.d to light them from behind as if a monitor or info screen?
69676
Post by: Big H
 nerdfest09 wrote: nerdfest09 wrote:Nicely done dude! I am planning my own home built board as we speak thanks to some inspiration from your thread and Panics version too! the signs are a great touch, have you thought about getting very tricky? perhaps printing the designs on clear acetate and either using them to fill a hole in a wall like a window or even using a small l.e.d to light them from behind as if a monitor or info screen?
Thats a very good idea , tricky to do but LED's in that layout would be beyond cool !!
I stole your wall signs for my humble attempt .......!
9681
Post by: Falhurk
Awesome to see some Hirst stuff around these boards. Keep up the good work!
Also.. I guess I should bust out my molds...
74909
Post by: Sveamore
Big H: Glad I could be of some help.
Falhurk: I am a big fan of Hirst Arts (it obviously kinda shows:-) My molds get used a lot! How many do you have?
74909
Post by: Sveamore
As promised here then are some of the cross supports. I have also been working on some new numbers.
5
9681
Post by: Falhurk
Heya, I actually have 12 of them, though only one sci-fi one (the station builder) which I actually haven't used.
I started with Hirstarts back when the Octagon Tower mold first came out (around 1999 I think). I don't actually have anything I built previously anymore but am intent on building some terrain for when my tablescapes tabletop gets here.
I will be getting the Schematic Pyramid mold along with the corrisponding floor mold pretty soon (maybe duplicates, I'm not sure yet). This way I can make some kickass necron terrain for my new Necron army!!
This is a pretty awesome hulk project though.
Also, shameless plug, come see my necron project, I'm keen on getting feedback!
74909
Post by: Sveamore
Falhurk: Thanks for the reply, I posted and answered on your thread too.
The plastic containers coming into view denotes that I am closing in on the edge of the table. That means 7 feet later. Also a photo showing some pieces being prepared as masters for a mold, after a lot of trial and error I am happy with this layout.
4
74909
Post by: Sveamore
Progress continues.
6
14392
Post by: nerdfest09
Coming along very nicely! as it stands how far are you away from having it all cast? and where oh where will you keep it? :-) I'd say my place would be a good idea?
74909
Post by: Sveamore
...that's pretty hard to say, I guess I'm looking at a further couple of months, plus. To answer your other question: I have a dedicated hobby room to keep it in so no problems there.
74909
Post by: Sveamore
The painting finally starts after a long hiatus, the focus is on completing the first four sections that are five tiles long. Sorry about the crappy photo's, I'm stuck using my phone camera for now.
3
61618
Post by: Desubot
Oh boy he is back
14392
Post by: nerdfest09
Squeeeee! :-) so happy to see movement at the station again!
17349
Post by: SilverMK2
Sweet mother of god...!!!
85436
Post by: RileyJessup
This is awesome you can consider me subscribed!
9594
Post by: RiTides
This is looking amazing!!! Man, so much work, but so awesome  . Can't wait to see more painting, what you showed at the bottom of last page was excellent and really brought it to life!
74909
Post by: Sveamore
Cheers, another shot then.
1
39666
Post by: GiraffeX
This is getting even more exciting now we have paint 
74909
Post by: Sveamore
Struggling a bit with the rust.
10667
Post by: Fifty
Looks awesome.
Bigger brush? Spray?
5601
Post by: Kelly502
This is amazing! I'll agree with an earlier post, I want to play on this board now!!
9394
Post by: Malika2
Man, the level of detail here is frightingly awesome!
74909
Post by: Sveamore
Fifty:
It's more to do with finding a simple technique as there are so many pieces.
Malika2
Maar niet gemakkelijk:-)
9394
Post by: Malika2
Haha, do you speak Dutch, or did you just use a translator? 
Anyhow, checking out both this and gwaahr's thread really makes me wonder if my own ventures in designing terrain to be 3d printed really makes sense. I mean, I'd imagine that that you are doing would probably cost a fraction of the costs a 3d printed and then cast in resin or plastic kit would be. Gwaahr's stuff is even cheaper since it's e-waste. Also, you guys actually managed to get the result I was trying to go for with my own stuff, so I'm a bit in a predicament whether I should keep on going with my terrain or simply stick to creatures and bits.
Have you also considered adding multi leveled stuff?
74909
Post by: Sveamore
Malika2...I speak enough to hold reasonable conversations but just can't write it so I had to use the translator because I didn't know how to spell gemakkelijk:-)
I think the mold approach would be a bit expensive initially but once your up and running it works out cheap & you could always sell the molds once finished, they hold their value really well. I use Hydrostone to cast, resin is very expensive by comparison & destroys the molds.
1
74909
Post by: Sveamore
This will be the BASE coat for the layout (these are test/sample pieces). The white is too bright in these photos but has since been toned down.
3
32676
Post by: Meph
Godverdomme, dat ziet er cool uit!
That's an amazing level of detail there, and the ground-level photo really takes you right into the corridor. Good stuff!
81166
Post by: Hanskrampf
This is really awesome. Great work OP.
Having just bought the 2014 Space Hulk, this will definetely be a future project.
66045
Post by: Radu Lykan
just clicked on this and the first pic showing all the base sections made me think omg you f*****g crazy b*****d! having calmed down and looked through the progress pics all i can say is i want one
the corridor pic above is very atmospheric, any chance of flickering leds, maybe an awesome horror sound track whilst playing would improve it but its already great
74909
Post by: Sveamore
Meph: Bedankt:-)
Radu Lykan: Lights are a vague possibility.
9394
Post by: Malika2
Just awesome stuff! by the way, will you also be adding some 'Imperial' details?
5601
Post by: Kelly502
Looking great!!!!!! I can't wait to see it done, I'm working on my Blood Angel Terminators now so maybe by the time I get them done I'll get a ticket to Australia to visit and play Space Hulk with you. Typical American, I just invited myself.
5601
Post by: Kelly502
Here's the BA Terminator WIP, 1st of 10. Getting ready for that awesome board!
67097
Post by: angelofvengeance
This is nuts- but frickin' awesome
83441
Post by: Boba Fett
Great project! I really like the colors you picked, can't wait to see the whole think finished. Which of the hirstarts molds did you use for this epic table?
86879
Post by: Relentless136
Wow! So much wow!
68345
Post by: xXWeaponPrimeXx
Welp, I'll just have to come visit you and beg you to teach me your witchcraft.
This is amazing.
13225
Post by: Bottle
Holy gak! Incredible!
26800
Post by: Commander Cain
Looking awesome! You'll have to do model the new Space Hulk tiles from the latest release, the section that is open to the void of space would be awesome. Also the boarding torpedoes could be fun.
74909
Post by: Sveamore
Malka2: I think some Imperial details would look great but it will be towards the end as a fun treat.
Kelly602: Your Terminators look great.
Boba Fett: I have almost all of the sifi range from Hirst Arts but I also added all 3 of the robot molds for extra detail & even one of the blocks from the Roman Temple mold.
Commander Cain: Way tooooo much to do as it stands but who knows once this gets done?
74909
Post by: Sveamore
Base coating (80-90% matt white over matt black). Next, a basic rust wash which will tone down the white along with really rusting out & staining large areas.
4
74909
Post by: Sveamore
Early stages of painting
3
76303
Post by: Warboss_Waaazag
I really love the clutter and claustrophobia of these layouts. Awesome work!
74909
Post by: Sveamore
...Thanks:-)
44899
Post by: squall018
This is one of the coolest things I've ever seen. Keep up the amazing work!!!
74909
Post by: Sveamore
Thanks, I will post a new update next Sunday. Hopefully I can have a lot more done by then.
47296
Post by: Biohazard
This is incredibly impressive. Great work.
74909
Post by: Sveamore
I am a little over the 4 corridor sections I have been working on so have started assembly of my first room but it is not going well. I have several design floors to work out but at least I have a lot of pre assembled parts so it shouldn't take too long.
9594
Post by: RiTides
Sveamore wrote:Thanks, I will post a new update next Sunday. Hopefully I can have the majority of these first corridor sections finally finished (minus hazard stripes and signs) by then.
That'd be great! It's got to be all about the assembly line with this. The base coating method you were using above sounded smart, and it looked like you were doing a big wave of them at once. I'd like to see a pic of all the corridors you've painted together
27147
Post by: Solar_lion
 RiTides wrote: RiTides wrote:Sveamore wrote:Thanks, I will post a new update next Sunday. Hopefully I can have the majority of these first corridor sections finally finished (minus hazard stripes and signs) by then.
That'd be great! It's got to be all about the assembly line with this. The base coating method you were using above sounded smart, and it looked like you were doing a big wave of them at once. I'd like to see a pic of all the corridors you've painted together
Seconded!
74909
Post by: Sveamore
At this stage 4 corridor sections and one room (the one I am having issues with) are under final construction and painting, each one is 5 tiles in length.
74909
Post by: Sveamore
I have been asked for a photo of all the corridor sections, however this is just an update of some work I have done this week.
1
74909
Post by: Sveamore
Update: An overall shot is so hard to do with my phone camera, sorry, best I have is this.
2
74909
Post by: Sveamore
Want to use something similar.
2
74909
Post by: Sveamore
Detailing finally goes in for final (top) layer
5
52201
Post by: evildrcheese
Mother of mercy. This is sooo cool.
D
20983
Post by: Ratius
Good god this is incredible stuff, kudos for the sheer amount of effort put in. Looking brill.
32676
Post by: Meph
Dude, that's looking só good...
67097
Post by: angelofvengeance
++Sergeant of the Squad, accept your orders++
This looks brilliant Keep it up!
81831
Post by: SRSFACE
I've seen a lot of ludicrously cool things at DakkaDakka. This takes the cake. Well done, sir.
Have you had your terminators mauled by xenos filth yet inside the walls or you waiting til the project is 100% done before you play with it at all?
74909
Post by: Sveamore
SRSFACE: I don't own a single Terminator/Genesteeler but when this is complete I will:-)
One more for giggles....
1
74909
Post by: Sveamore
Sorry...forgot to re-post the original photo
1
63987
Post by: wurrkop
This is an amazing project!
Madness as you say
83441
Post by: Boba Fett
I want this table!! This might be one of the best projects i've ever seen. Keep up the great work
74909
Post by: Sveamore
Have now added an unpainted eagle icon to the first door. I am going to try replicating these for all doors (both sides) Also weathering powders go on (2nd photo)
2
74909
Post by: Sveamore
Outer wall painting well under way, also my silver paint finally arrived so tomorrow I will be working on internal highlights & continuing the outer walls.
1
74909
Post by: Sveamore
Added a couple of home made signs which you can just see the rear of with the red & white hazards.
1
83441
Post by: Boba Fett
Looks great! Very realistic and detailed look. I really like the small eagles on the doors, very cool idea.
74909
Post by: Sveamore
Cheers. Should have my gold paint in a couple of days to make the ones I have really pop
12188
Post by: Coldsnap

Holy crap that is a lot of detail! Stunning work so far!
87654
Post by: ayoku
pure awesomeness
keep up the good work!
regards
Mark
74909
Post by: Sveamore
Just a couple of shots showing some basic exterior work.
2
90550
Post by: Big Borg
Quite impressive. I will be following your progress.
14392
Post by: nerdfest09
That rust effect is absolutely perfectly done it gives such a realistic feel to your board! I love it mate can't wait to see more
74909
Post by: Sveamore
Here's another of the rust, this one's not quite finished yet as it needs to be built up some more.
1
19968
Post by: deadmeat85
Is it possible if you could explain how you do your rust or show us a link to it?
88591
Post by: Franko
Words don't really do this project justice. Fantastic.
I now have an urge to watch Alien.
22192
Post by: whalemusic360
Man, this is really cool!
74909
Post by: Sveamore
deadmeat85: I will try to get a tutorial up this coming weekend.
39973
Post by: Galorn
the rust kinda looks like layers of baking soda.
74909
Post by: Sveamore
It is, It's an old armour modellers trick, the Bi Carb helps fill/hide gaps & once painted really has the perfect texture for rust that has corroded and 'bubbled' the metal. You either need spray glue or spray matt varnish & cover the intended area, then drop the bi carb on randomly (its amazing how real it looks as you do this) then another coat of spray to seal it and then just let it set. Once it dry's it becomes rock hard. You can use tube glue too for more of a bubble effect but try not to play with it too much with your finger as you usually end up making the bi carb flat & that's not what you want. You also usually have to add more bi carb a lot of the time as the glue soaks a lot of it up Hope that helps.
19968
Post by: deadmeat85
Helps alot. Will keep this in mind.
39973
Post by: Galorn
Sveamore wrote:That's because it is, It's an old armour modellers trick . I'm guessing you have made the odd armoured model or two:-) It's pretty basic stuff really, you just need to keep in mind a couple of things & your good to go. Actually maybe a tutorial isn't really needed. Here is my earlier answer to the same question on another forum:
The Bi Carb though helps fill/hide gaps & once painted really has the perfect texture for rust that has corroded and 'bubbled' the metal. You either need spray glue or spray matt varnish & cover the intended area, then drop the bi carb on randomly (its amazing how real it looks as you do this) then another coat of spray to seal it and then just let it set. Once it dry's it becomes rock hard. It's an old armour model makers trick from back in the day.
Footnote: You can use tube glue too for more of a bubble effect but try not to play with it too much with your finger as you usually end up making the bi carb flat & that's not what you want. You also usually have to add more bi carb a lot of the time as the glue soaks a lot of it up Hope that helps.
Sorta I got a similar effect by accident with sand and super glue. (I rubbed the big grains off after the glue set) Amazing the corrosion things you find by playing nurgle...
74909
Post by: Sveamore
New
Received my first Terminators (Deathwing x 5). They are a low priority for now, still, it's great having them.
3
87654
Post by: ayoku
awesome work
Like the dark/rusty atmosphere
Keep those updates comming
Grtz
Mark
83441
Post by: Boba Fett
The rust looks perfect! Very cool amd effective.
Thanks for the little "how-to" on the rust. I will give that a try.
Keep up the excellent work!
74909
Post by: Sveamore
A WIP shot
1
74909
Post by: Sveamore
Am taking a break (family commitments). As mentioned I have included the 1st photo of my Terminators as they begin their own journey.
2
74909
Post by: Sveamore
Terminators based on larger corks now with both legs attached, gun barrels drilled out & shadow coat added.
3
14392
Post by: nerdfest09
These guys look as enticing as the board dude! interested to see them progress with this method, should be fun to watch! :-)
74909
Post by: Sveamore
Hopefully I should be able to start back on the Hulk in the next few days.
80778
Post by: ahzek
Any chance of a few longshots of the entire project so far?
74909
Post by: Sveamore
"Any chance of a few longshots of the entire project so far?"
Page 4 3rd photo down, I am currently only using a camera phone so trying to get an over-all shot is difficult.
40919
Post by: spiralingcadaver
Wow, really great atmospheric stuff. I love the weight of the terrain.
74909
Post by: Sveamore
Working on a few emblems & supports, still needs work
3
9394
Post by: Malika2
I'm gonna keep on drooling for a bit now...
74909
Post by: Sveamore
Working on the bottom edge, the icon is also hydrostone.
2
26800
Post by: Commander Cain
Awesome stuff as always! The bubbles on the eagle seem to work in your favour, makes it look doubly cool.
74909
Post by: Sveamore
Here are the Terminators having their shadow coat added, still early days but no rush.
1
81638
Post by: kb_lock
How have you been going with this Sveamore?
I have been casting and planning my set for a while now and am about to start getting MDF together to base it properly - keen to see how you are progressing
90550
Post by: Big Borg
How is the project coming along?
94
Post by: combat engineer
The terrain is amazing. Love the detail in the painted portions. Any thought in adding in Battlefield debris, accumulated trash, xeno/ human remains?
Mat
90550
Post by: Big Borg
Has this project been completed?
76303
Post by: Warboss_Waaazag
Love the detail on the hulk corridor.
10667
Post by: Fifty
Each time I look at this, I wonder how many hours and hours you have spent on it. Serious dedication!
52201
Post by: evildrcheese
Such an amazing project.
EDC
86442
Post by: bobbuilder
i love projects with a lot of detail and this certainly fits the bill, awsome work, another level of detail that you could add would be leaking pipes using greens stuff, paint and lots of gloss varnish, look forward to more updates
74909
Post by: Sveamore
To answer questions:
Yes I have happily picked this thread up again.
Yes, battlefield debris will be added at some point.
No the project has not been completed.
The four Corridor sections of five tiles now built, painting is not yet complete. Floor tiles only base coated at this stage.
5
103099
Post by: Sherrypie
Emperor's sweet mercy is that pretty or what
Though my personal preferences might lie on the scratchbuilt side of things, seeing such a pile of neatly cast walls and floortiles together and painted to this standard is really exciting. Lucky are the bastards who get to play on such a beauty.
74909
Post by: Sveamore
Oversized hazard stripes need to be smaller. Next-loose wiring.
2
9394
Post by: Malika2
Woooohoooooo you're back!
74909
Post by: Sveamore
I am :-)
Burnt Offerings
Got side tracked with this project but I am back on track with the Space Hulk which is below this.
Trenches in a Lava Field?...That's just crazy!
7
74909
Post by: Sveamore
Passageways have Green Stuff added for a few blankets & to help hide some repetitive pieces. First room is also now built.
6
74909
Post by: Sveamore
A Right of Passage
Section now complete, next, the first room.
5
26800
Post by: Commander Cain
Beautiful stuff!
120621
Post by: LordMcAllister
Wow, this is amazing! I liked the tiles even before painting, but afterwards it's even more glorious! It creates a really oppressive atmosphere!
83414
Post by: Sneshy
Take my money!!!!
74800
Post by: Master Azalle
Love the progress you've got going on here. Great work
74909
Post by: Sveamore
Making Yourself at Home
Cheers Guys,
The first rooms floor almost finished, revisited a passageway to add Genestealer infestation & finally the first 1/2 painted trial door despite needing gap filler.
3
106010
Post by: Meer_Cat
I have never seen anyone make such heavy and personally inspired use of Hirst molds- extremely well done! The level of detail you've built in is fantastic- I hope your posting some of the best shots (and they're all very good) to his web site as well- sales would go through the roof! The space hulk stuff is one thing, but the lava field trench system goes 'way beyond "obsessive"!
The skill that went into the painting, rusting and weathering is very high grade as well.
Can't praise the work enough. 
74909
Post by: Sveamore
Cheers Meer_Cat.
One more.
1
74909
Post by: Sveamore
Another room, sealed & base coated, next, the rust base coat.
2
74909
Post by: Sveamore
White 3
Room one, basic painting complete, next: detail/highlights & extras.
4
120028
Post by: The Allfather
 Kelly502 wrote: Kelly502 wrote:Here's the BA Terminator WIP, 1st of 10. Getting ready for that awesome board!
Hello. Could you describe the paints used here and methods Shades etc for getting this color scheme.
 Thanks.
74909
Post by: Sveamore
Sorry, that is not possible, I did not do it. Kelly502 did, it's his photo on my thread. You will need to contact him, good luck.
74909
Post by: Sveamore
White & Yellow
White 3 complete, Yellow 3 is close.
7
22192
Post by: whalemusic360
You are blowing through these now!
74909
Post by: Sveamore
whalemusic360: I had some pre-made prior to posting.
6
106010
Post by: Meer_Cat
Truly great work- the amount of detail you've packed in- and the sections are still playable- simply amazing!
74800
Post by: Master Azalle
Did you cast those doors or build them individually?
74909
Post by: Sveamore
They are from mold number 276 (2 casts gives you one door) The icon I made my own mold of.
1
106580
Post by: Marxist artist
I am speechless, this is some of the most impressive stuff I have ever seen.
74909
Post by: Sveamore
Thank you everyone, next up will be another 3 way room, then more passage ways.
74909
Post by: Sveamore
Green 3
Not finished...but close. Terminator for scale.
10
74909
Post by: Sveamore
Small chapel, eagle needs to be recessed plus a lot of other work to still do. Also progress on the 17 doors required.
Also adding some overhead lighting, still building up the layers for now. Cheers.
7
74909
Post by: Sveamore
I took my mallet to the chapel floor, it was a little disconcerting to say the least.
The overhead lighting has it's final coat too.
10
22192
Post by: whalemusic360
Hitting things with a hammer is always a risky move. Looks like it worked out though.
2889
Post by: Jin
Man, the painted sections are really coming together quite nicely!
I had to retrace this thread from the beginning, since I'm pretty sure I recall following this when you started oh so many years ago. Glad you're back to show us more progress!
74800
Post by: Master Azalle
Your work is just fantastic!
74909
Post by: Sveamore
Whalemusic360: I know right, after I painted the base coat I thought it would look all better cracked but holding the mallet in my hand & looking at the room then back at the mallet you start thinking, this is not going to end well.
Jin: I have just completed the final build of the hard part of page 2 of the HA plans. This means I have a nice stock pile of ready pieces to paint. It also means the hardest part to this process is now over. Cheers.
Master Azalle: Thanks, I am glad you think so:-)
106010
Post by: Meer_Cat
Very hard to take something you've worked hard to make as perfect as possible and then flink it up beyond all recognition. Some of us can't do it with just weathering, even knowing we can go back and repaint if we have to. Well done here- fantastic look achieved.
74909
Post by: Sveamore
Meer_Cat: Cheers, today I accidentally stood on one of the pieces I had drying in the sun, Argh! Still, the worst is now over.
Why Susan, Why?
I also made what we here in Australia call a 'Lazy Susan' Basically it's the condiments tray thingy that sits in the middle of the dinner table that rotates 360 so you can grab what you want. I picked up a ball baring base plate, cut a slab of MDF, sanded it round-ish & then slapped the two together. Now the base painting has flown along & is so much easier to do. Here are some of the new pieces already prepped.
2
74909
Post by: Sveamore
Page 2 of the HA plans almost assembled as per the instructions, however, I still need to complete 3 more rooms. Page 2 is the most work but the end of the build/base coat stage is now in sight. The last page, page 3 is thankfully small by comparison. Miscast pieces you see were used & will be turned into battle damage or wear.
3
18980
Post by: Arakasi
Inspiring and atmospheric work. With the terminator, you can just feel the claustrophobia.
106010
Post by: Meer_Cat
Astounding volume of work! I know the pictures don't even begin to convey how many pieces and castings it takes to make each room. I use a variety of Hirst Arts molds myself- have been tempted to try some Space Hulk terrain myself- but the sheer volume of what you're doing is incredible. you must have cast those molds dozens, if not a couple hundred, of times.
74909
Post by: Sveamore
Yup, I think it's 34 casts each to get the basic plan foot print of X floor tiles then the diamond & then the grate & a few Xs as well (the X with a slight diamond pattern) Then there's the industrial edge too that's required but of course I then added industrial edge to the top of the walls doubling my work load as well and finally there is all the little extra detail to the walls & even the walls themselves. That took a lot of casts as they are double thick. Smart money would have been to buy several of each mold but I only have one of each! That's the crazy approach.
74909
Post by: Sveamore
The Chapel
Just an update on the chapel, including heavy dry brushing as the gothic molds really lend themselves well to this, next, the finer detail begins. I've decided to call the Terminator Bwian, he's not a real terminator:-) Cheers.
2
106010
Post by: Meer_Cat
"He's not the Messiah, he's a very naughty boy."
Excellent work.
11
Post by: ph34r
All the tiles you've made for this project are amazing, great stuff.
69676
Post by: Big H
Great stuff mate, really looks very nice !
74909
Post by: Sveamore
Meer_Cat: Maybe I should call him Cardinal Fang instead? No, Bwian suits him, he's a Bwian:-)
Ph34r: Cheers mate.
Big H: Appreciate it H, will finish her this time, there are 75 tiles for the basic plan of which I have 9 more to make so the hard parts now over.
22192
Post by: whalemusic360
That is going to be one hell of a ZM game if you use them all at once. I'm looking forward to seeing your models painted up as well.
74909
Post by: Sveamore
Whalemusic360: I have so many pieces built now it's crazy, I am wondering if they will all fit on my dining table...and I have a big dining table:-)
Here I am building up the texture for the more pronounced rust, base coating the skull & detailing consoles. It's a bit of a mix as work continues. The difference in the floor is that this one is base coated black which I feel is too harsh & needs to be redone in line with the others (it was a test). Floors will only be half done until the very end so they eventually all match. Cheers.
1
74909
Post by: Sveamore
Orange 3
A new room basically complete. I need to tidy up some of the paint work & spend a little more time on the rust otherwise were good for now. Eventually more writing needs to go in and some decals too but that can all wait as there is just so much to do.
Bwian is hiding.... because of the loud noises............. in the corridor.
5
74800
Post by: Master Azalle
Great progress. Love your work on these
74909
Post by: Sveamore
Master Azalle: Thanks a bunch, glad you're liking it.
Final detail to an earlier room & a new corridor starts to take shape too. Bwian on the other hand seems a little lost. Cheers.
4
74909
Post by: Sveamore
Two sections currently being worked on. One, with all the detail painted in & the other already heavily rusted. Obviously I will tie everything together later on, they are just at different stages of completion for now. Cheers.
Bwian's on another deck:-)
3
74800
Post by: Master Azalle
Your work is just fantastic. it will be EPIC to play on!
69676
Post by: Big H
Truely inspirational work here mate.
Makes me itch to finish the Space Hulk tiles I started way too long ago !
74909
Post by: Sveamore
Master Azalle: Cheers, it will be epic to finish:-)
Big H: Thanks, It is a labour of love, SH 3D boards really are a lot of work, I get that you're still busy-ish with yours.
Pipes added, new sections well under way, more cargo too.
4
2889
Post by: Jin
Looking great!
And Bwian looks a little boxed in, so to speak (pun largely unintended)
22687
Post by: MajorTom11
Amazing... I wanted to do something like this with my SH set, finished painting em, but they went in a box for the past 7 years. Sure hope after all this you use em! Great work brother -
74909
Post by: Sveamore
Jin: 'Boxed in" LOL that was great, if I'd thought of it I would have used it myself:-)
MajorTom11: Thanks, glad you're enjoying it.
I was recently asked for a rust tutorial (not on Dakka) & without going into all of the details here are most of the photo's from it.
Last couple of photos, Bwian's backed into a corner...it doesn't look good.
7
99
Post by: insaniak
Fantastic stuff!
74909
Post by: Sveamore
Insaniak: Thanks.
Unpainted skulls starting to be added, I have a lot of work ahead of me, I will also add Genestealer slime before calling it done.
Bwian's made some new fwiends, I mean friends. Cheers.
6
69676
Post by: Big H
Absolutely stunning! Top notch work matey !
I hope you play a lot of Space Hulk to justify the effort !
74909
Post by: Sveamore
Big H: Cheers, glad you're continuing to enjoy it & yes it will get a lot of use. I don't actually have the game, my mate does so at some point I will pick up my own dedicated mini's but first the ship.
OK, I got around to painting the first of the skulls & adding the slime, I kept it away from the gaming area as much as possible & am thinking of running a bit of super glue down some of the finer lines for added strength. Not sure if it will go cloudy or not but that could be an interesting effect too. There are 2 tiles together in the photo's with only one obviously being completed at this point. Cheers.
Bwian doesn't like spiders, Bwian's a bit of a sook.
3
74909
Post by: Sveamore
New room build complete, painting only in early stages. Cheers
4
22192
Post by: whalemusic360
Not digging the hexagon room. Just seems like an effect for effects sake.
74909
Post by: Sveamore
It won't be to everyone's taste, I get that, thanks for taking the time to post. Cheers.
74909
Post by: Sveamore
Outside of base coating some Deathwing ages ago I have never painted a Warhammer figure of any sort I am sorry to say. Space Hulk is my thing so I have finally stated on my first ever figure with the goal of finishing him. I found an online tutorial & although I changed some things around I used it as a starting point to get a feel for what I am doing & how to go about it. Like the tutorial I chose brother Goriel to keep things simple & although progress is far past these photo's I thought I'd upload now with the view to showing the near completed figure tomorrow (it's late here now) Please keep in mind this is a first ever attempt & my 28mm painted inventory currently stands at 0. :-)
The tutorial I am referencing:
https://taleofpainters.blogspot.com/2014/09/tutorial-how-to-paint-space-hulk-blood.html
22192
Post by: whalemusic360
Looking good. You’ve got lots of practice working on the board, that will largely transfer to the minis.
74909
Post by: Sveamore
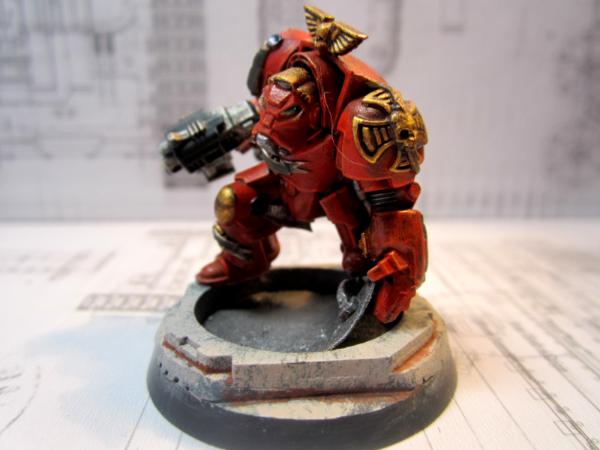
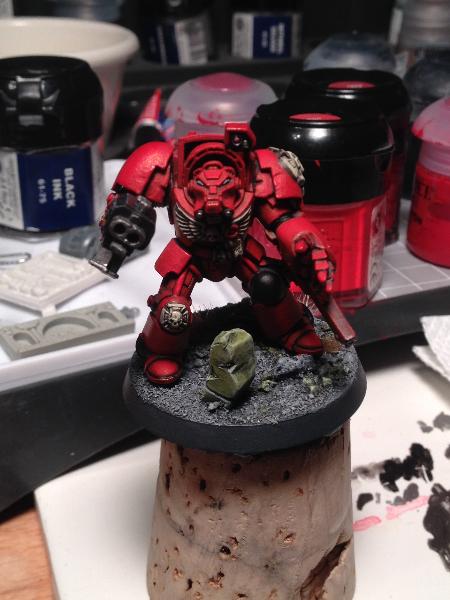
Thanks, Have to admit I was a little nervous attempting a figure as it's really unfamiliar ground & I have never worked on red as a main colour either...just so different. Anyway, basically now finished although the extra goo on the Genestealer corspe I added still needs some extra work to brighten it up. There is a little touch up work still to do too but for a for a first attempt I am happy with it. Cheers.
1
74909
Post by: Sveamore
No Bwian anymore....now that I have finished him it's Goriel!
5
22192
Post by: whalemusic360
Looks solid. My only suggestion on future SH dudes would be to hack them off of their original bases if you are going to put them on proper round bases. It's pretty easy to do on all but the guy digging into the ground.
74909
Post by: Sveamore
Whalemusic360: Good tip, I had thought about it but for some strange reason I really like the existing bases too, I know, weird...but their shape really appeals to me. I think I am going to forget about the round ones for now.
Meer_cat: Don't worry, Bwian will still be around, maybe just in the background, someone has to maintain the compactor after all:-) Thanks for the compliment.
Here is Brother Noctis, my second ever Terminator, still learning lots & lots more still to learn too. Added some wet green slime to the base more for colour & something a little different. Cheers.
4
26800
Post by: Commander Cain
Looking good! Your skills transfer very well onto minis it seems
If you do decide to use round bases (it makes playing actual games of Space Hulk quite cramped I should add) the guy tearing up the floor fits in well if you do some chopping and give him a hatch to open instead
Keep up the good work!
74909
Post by: Sveamore
Commander Cain: Thanks for the compliment & the encouragement, the base idea is great. For now I think I am going to stick with just the original bases but at some point I will do what you have done too as it really is a great idea.
Brother Zael, improvements on my figure painting but still not to a level I am happy with just yet, but still learning & experimenting. Also a few shots all together. Cheers.
6
74909
Post by: Sveamore
These are a mix of work in progress & completed figures.
4
|