Welcome to the Mini Details of Dr H modelling blog.
I will be showing here, all the models that I paint, scratch-build, carve, sculpt, mould and cast that are not for my personal use.
or my Mastodon account (@DrH@warhammer.social) *where I am most active*.
Below is the first, of many, models that I have painted for sale, this kind of project is interspersed with different projects that range from wargaming terrain to sculpting and casting my own model kits, presents for friends and family and random art projects that use the same skills that are useful for miniature wargaming.
Links to the finished items so they are easily found and can work as a list of completed jobs.
Pages 1-50:
*to continue with the original post*
So here is the Dark Angels Tactical squad Raphael (from the Dark Vengeance box).
and the individual shots.
The troops are painted up to my "bronze" level. Which is what I consider tabletop quality, anything less (to me) just isn't finished.
The Sergeant is painted to my "silver" level. Which has had some more complex painting techniques used, such as blending etc...
And I have a question: What do I do with the bases?
If you were going to (and I hope you will want to) buy these, what will you want for the bases?
a) Plain black, no flock, no sand, nothing. To allow you to base them yourself to match the rest of your army.
b) Simple sand-alike. So you can at least call them "based", but are able to add to them to again match the rest of your army.
c) Based in the same way as I do my own models. Which is mud and rocks, (have a look at my models in the gallery for examples). Not so easy to fit in with your other models. Note; they wouldn't get the flame pattern around the edges, that's so my army is tied together (see my blog for why this is).
d) Done up to a professional level. With flock and complex additions (like rubble, plants, etc...). I don't have any of the materials to do this and would likely push up the price to add this sort of thing.
Let me know what you think. Comments, hints, tips, ideas, etc... all welcome.
hmmm.... it is really difficult to anticipate what the future customer of yours would want to have for bases...
so... i might be totally in the wrong here... but i would keep them just black... if then afterwards a customer wants styled bases... future enterprises the way so many peeps make use of thrid party bases... i think these will end up on completly different bases anyway...
Viktor von Domm wrote: hmmm.... it is really difficult to anticipate what the future customer of yours would want to have for bases...
Yeah, that's the problem we are having.
so... i might be totally in the wrong here... but i would keep them just black... if then afterwards a customer wants styled bases... future enterprises the way so many peeps make use of thrid party bases... i think these will end up on completly different bases anyway...
That was my first thought. But bare in mind that these are all slot-bases. So to add these onto a new, third-party, base the buyer will have to do a little chopping first.
The other side of the coin is, that if someone is buying these for gaming with and wants to play them straight away, they're going to want playable bases...
also... very crisp looking DA!
Thanks. Quite a lot of the effort went into giving them a clean paint-job. I can't say "job done" until you can pick them up and look at them from any angle and still be happy with them. I even did most of the painting on the guns and chests without them being attached (not something I do on my own models).
Hum, very nice looking DA, not a very dark green just how I like them This is just a curiosity, not badmouthing your miniatures or anything like that: You mention your "Silver" level has some blending, was it the technique used to create the shadows between the Sergeant's tabard?
As for bases, I think I would play safe and keep them black. That way anyone who cares can quickly create a base matching their own army and and those who don't, I don't think they mind
TheDraconicLord wrote: Hum, very nice looking DA, not a very dark green just how I like them This is just a curiosity, not badmouthing your miniatures or anything like that: You mention your "Silver" level has some blending, was it the technique used to create the shadows between the Sergeant's tabard?
As for bases, I think I would play safe and keep them black. That way anyone who cares can quickly create a base matching their own army and and those who don't, I don't think they mind
Just my 2 cents
I'm glad you like them. I was pretty much aiming at the colour you see in the book that comes in the box..
Yeah, that's right. The tabard and his head has various shades and colours added with blending.
As opposed to the armour on all of them, which is mostly dry-brushed to create the shading and highlights.
My gold standard would get more blending etc. and more effort put in to make it smoother.
I may do one of the HQs next and see how far I can push the quality...
We've decided to base the models, as per option b) for now. As most of what we've seen on ebay are based one way or another and it's no great loss if the buyer decides to change bases.
IMO a model isn't finished until the base is done.
I think a "basic" standard base should at least have ballast that is painted. Personally, I think flocking would be part of the basic package too (static grass or clump only) but that's just me.
I think a "basic" standard base should at least have ballast that is painted. Personally, I think flocking would be part of the basic package too (static grass or clump only) but that's just me.
I agree with you. Hence giving the bases some love.
We just don't know if people who buy painted models want the bases done beforehand (as they are unlikely to match their army).
Or if they want to base the models themselves... (but then why buy painted models if you're going to do the base yourself?).
We are thinking about offering base customisation to the successful buyer (in the future), so they can choose a basing method the match their army (at the cost of waiting a little longer for the models).
Once we get an idea of what people want and what my painting is actually worth, we'll be able to offer more options and/or accept direct commissions.
Thanks for your input, good to know what people think.
those are some proper space marines! If i where you i would do up some bases but not attach the models. that way the customer can stick em if they like. Also just outa curiosity how much you selling them for?
Largeblastmarker wrote: those are some proper space marines! If i where you i would do up some bases but not attach the models. that way the customer can stick em if they like. Also just outa curiosity how much you selling them for?
Thanks LBM.
That would work for models that sit on top of their bases, but these are slot bases and so the basing goes over the top of the bit of plastic that joins the legs. But it's only attached with PVA, so it shouldn't be too difficult to remove them if the owner really wants to.
These will be going up for an ebay auction soon, so they will cost whatever people are willing to pay for them. We hope for more than the cost of the models and paint...
And here's the squad picture with the completed bases.
Automatically Appended Next Post: Well, that was quick. They were sold in about 5 minutes!
I'm quite chuffed that my painting is actually worth something.
I agree with the "simple bases" path you went on for the Tac Squad...
Easy to touch up to match with almost any battlefield around !
Also, how much did you sell the Squad ?
As for the Librarian, depending on how much the "on sprue" version costs, 39$ likely seem a bit too much for me...
Not wanting to troll you, I absolutely LOVE your camo'ed Marines, but the Librarian seems a bit under the "pro-painted" standard you (or your ebay buddy) claim...
However, if it gets sold, all the better for you !!! I'm always impressed by people who can sell their models !!! So congrats !
Yggdrasil wrote: I agree with the "simple bases" path you went on for the Tac Squad...
Easy to touch up to match with almost any battlefield around !
Cool, Thanks.
Also, how much did you sell the Squad ?
They went for £40, and really surprised us at how fast they were snapped up.
As for the Librarian, depending on how much the "on sprue" version costs, 39$ likely seem a bit too much for me...
Yeah, as the previous squad went so quick we thought that we'd start high and see how it goes.
Not wanting to troll you, I absolutely LOVE your camo'ed Marines, but the Librarian seems a bit under the "pro-painted" standard you (or your ebay buddy) claim...
I think you're thinking of Big H with the camo Marines...
Compared to the majority of the "pro-painted" things on ebay (which clearly aren't) we couldn't not put them down as "Pro-"...
I accept that I'm not going to be winning any golden daemons any time soon (if ever), and there are many people on DDakka alone that are better than me (yourself included). But it's early days yet and we're just finding our feet and I hope this will help improve my painting by pushing me further.
However, if it gets sold, all the better for you !!! I'm always impressed by people who can sell their models !!! So congrats !
wow... if this goes on.. you soon have enough to buy yourself your own island
congratz on the auction...!
tho I have to say even as it looks very good.. the libby is at the same price tag as the squad... that would be totally out of my reach... and I rather play with clumsy painted minis (done by me ) than such expensive stuff...I would have trouble handling that model each time it needed handling...
Not wanting to troll you, I absolutely LOVE your camo'ed Marines, but the Librarian seems a bit under the "pro-painted" standard you (or your ebay buddy) claim...
I think you're thinking of Big H with the camo Marines...
and then, multiple
Indeed, I just screwed everything up... I'm just hiding under my desk at the moment (yeah, you cannot check that I did, but I swear I really DID hide in shame).
My points still stand though ! 40£ for a painted Tac Squad seems less prohibitive to me than for the Libby. They're definitely some neat, good-looking tabletop models, so that's nice with me.
Libby's still a bit high for me, but your point about the other "pro-painted" stuff on ebay is a very valid one. There's a ton of crap you can find that claims the "pro-painted" label... And yours definitely is better than a lot that I've seen !!
So I just have to wish you some good fortune, and if it helps pushing you to greater works, then... enjoy the chance !!!
No worries, it's easily done and I've done it before.
Viktor von Domm wrote:wow... if this goes on.. you soon have enough to buy yourself your own island
congratz on the auction...!
Or maybe a small moon... Thanks Vik.
tho I have to say even as it looks very good.. the libby is at the same price tag as the squad... that would be totally out of my reach... and I rather play with clumsy painted minis (done by me ) than such expensive stuff...I would have trouble handling that model each time it needed handling...
My points still stand though ! 40£ for a painted Tac Squad seems less prohibitive to me than for the Libby. They're definitely some neat, good-looking tabletop models, so that's nice with me.
Libby's still a bit high for me, but your point about the other "pro-painted" stuff on ebay is a very valid one. There's a ton of crap you can find that claims the "pro-painted" label... And yours definitely is better than a lot that I've seen !!
So I just have to wish you some good fortune, and if it helps pushing you to greater works, then... enjoy the chance !!!
Thanks for the compliments and feedback. It all really helps for the future.
Yeah, at the moment we're still trying to find out what my painting is worth so there will probably be more models yet that are either too cheap or too expensive for some.
While it looks bad that the squad of 10 models were the same price as a single HQ model, the squad sold very quickly and we probably could have got more for them and then the libby would seem cheaper by comparrison... Something's only worth what someone is willing to pay for it, and that's what we're trying to find out.
and the time I spent painting the librarian (which was probably too long and something else I need to work on for the future) was almost exactly half the time I spent on the whole 10 man squad so that needs factoring in to the equation as well to make it worthwhile the effort.
That's why we started on Dark Vengeance, as it has a nice selection of different models that will help us iron out the bumps.
Thanks again.
I've now started on the Terminator squad, so keep your eyes peeled.
and for your patience I have a slightly blurry (sorry) painting in progress shot of the Terminators.
This is just to give you the impression of what the armour looks like, everything else is still to do and then a final round of tidying up and bases then they'll be ready.
The Librarian is still available, if people are interested.
Thanks Comrade. The armour is smoother now. Also, the greens and greys are done. The metals and the reds are basecoated.
But as it amuses me at this stage...
Also, as it's actually relevant to this blog (even though I've been posting them in my other blog ), here's a preview of what will become boxes that I will be selling once they are cast up and ready to go.
cormadepanda wrote: Great looking terminators. Box lids... or 1 side of a 6 sided object. Nice.
Thanks Comrade. Don't you think they look manly with those pink weapons? (They are actually being made red at the moment)
Those are the sides of the boxes, you'll get two of each of the two sides you see here for each box and then two tops / bottoms (these are at the planning stage as they need to fit the sides once built). It'll make sense when I'm nearer completion.
On a related note, the Librarian is still available at a new lower price if anyone is interested: Here
I going to go out and say, you are charging too steep in my opinion. Character models professionally painted typically go for 20-30% more then their value(for a quick sale). That particular model's value is not justifying that cost. If it sells good job! But don't be sad if it doesn't.
Yeah I know what you mean Comrade. Thanks for the numbers I'll pass it on to my friend. It'll go when we find the right price and then we'll know for the future.
Well after much deliberation and far too long, I'm calling the Terminators done.
I could spend many more hours touching up the tiniest bits, but it's just not worth the extra time.
So, may I present the Dark Angels Deathwing Terminator Squad Barachiel.
Notice that this is an opportunity to acquire some of my sprue work in the shape of some hand-crafted plants on each of their bases.
Well, since technicaly you're doing commisions now, I reserve the right to be very critical of the tiniest errors. Look closely at the crossed sword emblem on the chainfist armed Terminator. You seem to have some paint bleed onto the fist ermer. Other than that, solid job. Just don't charge an arm and a leg, 0k?
Edit; gripe 2; the green on the terminators exactly matches the plants. what a coincidence
Largeblastmarker wrote: Well, since technicaly you're doing commisions now, I reserve the right to be very critical of the tiniest errors.
I expect nothing less as I am highly critical of all my work.
Look closely at the crossed sword emblem on the chainfist armed Terminator. You seem to have some paint bleed onto the fist ermer. Other than that, solid job.
You mean around the emblem? That's meant to be there, a dark outline like all the armour plates. It's a dark brown, whereas the emblem is shaded from a bronze through gold to silver so it probably does look just like bleed.
Edit; gripe 2; the green on the terminators exactly matches the plants. what a coincidence
The base green of the plants is actually a different green, but yes the highlights are the same green as is on the other green although the highlights on the plants do go more brown/beige than on the terminators.
The close matching of the green is intentional though as it adds a little more green to largely un-green models. I could make up a more pretentious excuse but that was it really (e.g. it shows that they are upholding the virtues of the "predominantly green" Dark Angels chapter and stepping in-front of their brothers to protect them... )
Just don't charge an arm and a leg, 0k?
My friend sets the prices as he's more in-tune with ebay then I am, but if they don't go then the price will drop as it did for the Librarian.
bebopdrums2424 wrote: Awesome work Dr. H! Its a different style that what im used to seeing from your grittier dark stuff! Really sharp Thanks for sharing!
Thanks bebop. They are also all the same colour as well, not something I normally do in my army either
Viktor von Domm wrote: Brilliant looking creaminess! The red makes a very good looking eyecatcher...
Thanks Vik. Yeah, I really wanted the red to jump out at you.
There has been some interest in them already, but they are still currently available. The Librarian sold a few days ago, so he is off helping his new master keep their books in order.
Viktor von Domm wrote: personally i probably need one box shaped to hold a lost ark...so not cuibic shaped but more longer... i think i soon will build an ark...
Absolutely. There are two flavours of not so cubic box in the pipeline, so you may get your wish.
For comparison, the one shown here is 26x25x22mm (l, w, h).
The large plain box (ideal for an ark) is 22x22x35mm.
The large box with cross beams is 24x25x35mm.
and I have a small box which is 18x19x23mm.
These are rough measurements from the original carvings and may change a little (+ or - 1mm) by the time I make the final casts.
I have many plans for more boxes (as well as other objects) in the future, but you have to start somewhere.
Been a little quiet on the commission front for a little while as I have been finishing some models for my own army.
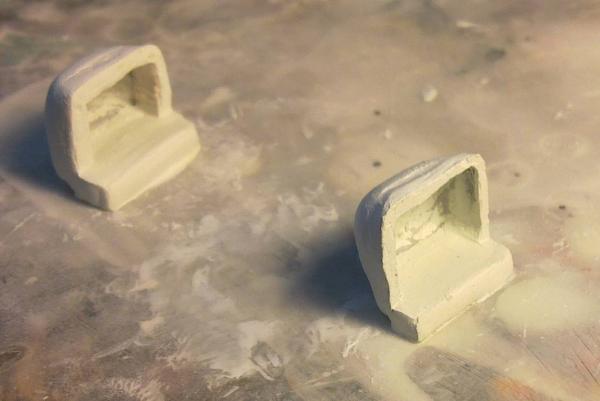
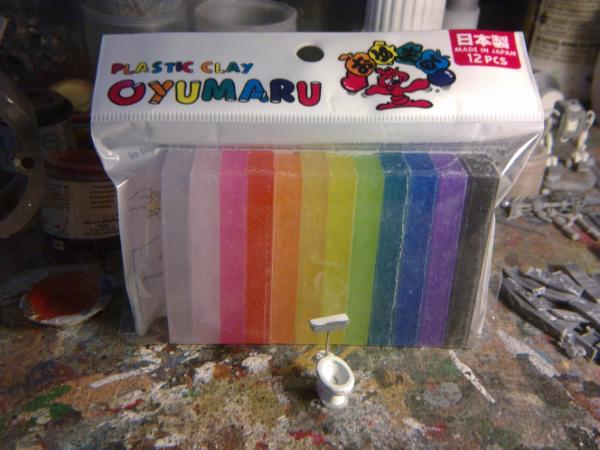
I have also been working on the boxes and toilets and should be attempting the casting of them soon.
I asked in my other blog about what people wanted me to make (hence the boxes and toilets) but if anyone here has an idea of something they would like to see (and potentially buy) let me know. I have a long list of possibilities which I'll add below, so if you see something you like or have something to add, feel free to chime in...
Not all necessarily made as separate entities (possible base decorations) and if something can be made from different materials (wood or metal...), it will be.
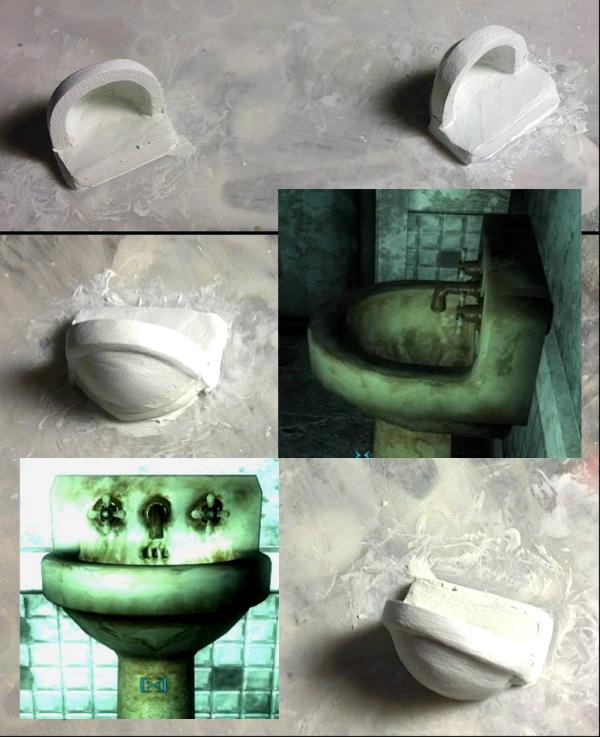
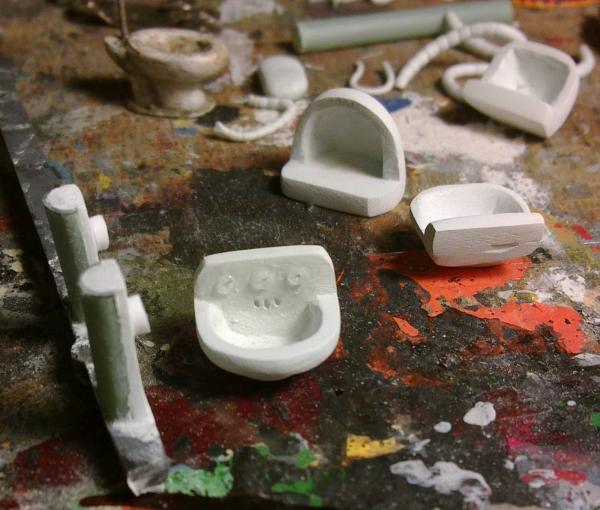
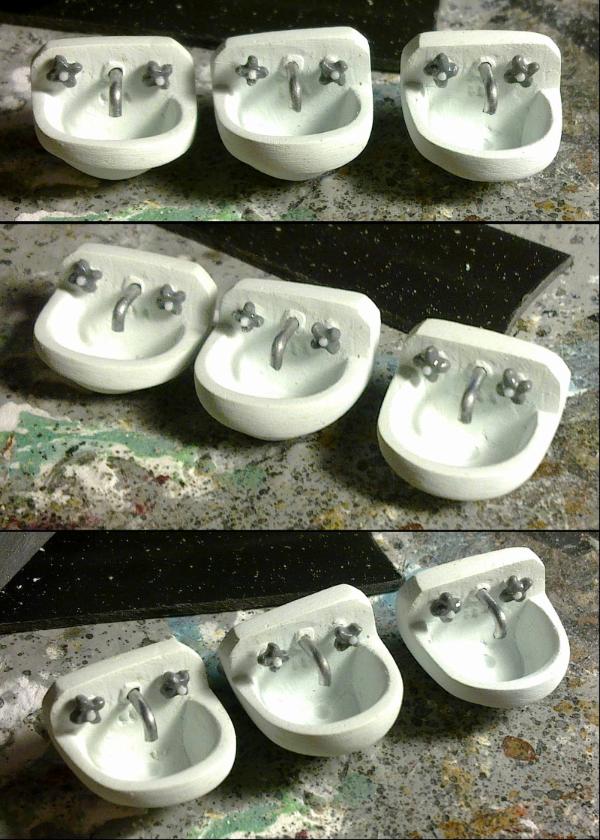
Sinks are currently the next thing to look at (to match the toilets), but it'll be nice to get an order to attempt things in...
However, work has started on the next model from Dark Vengeance, the company master;
I've only done the green and bone so far, long way to go yet.
Largeblastmarker wrote: He is such a PITA to paint. I've had mine for almost a year, and I've finished; the second highlight on the cloak.
Yeah, pretty much every bit on him is in the way of another bit when you try to paint...
I have done more on him, namely purples, reds and whites. I may show some more before I move on to the metals.
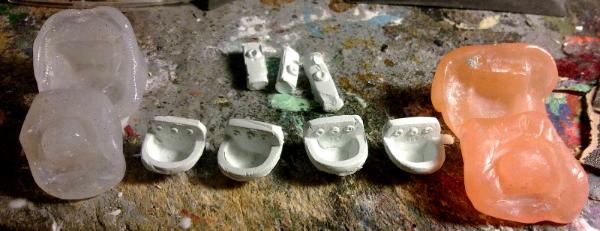
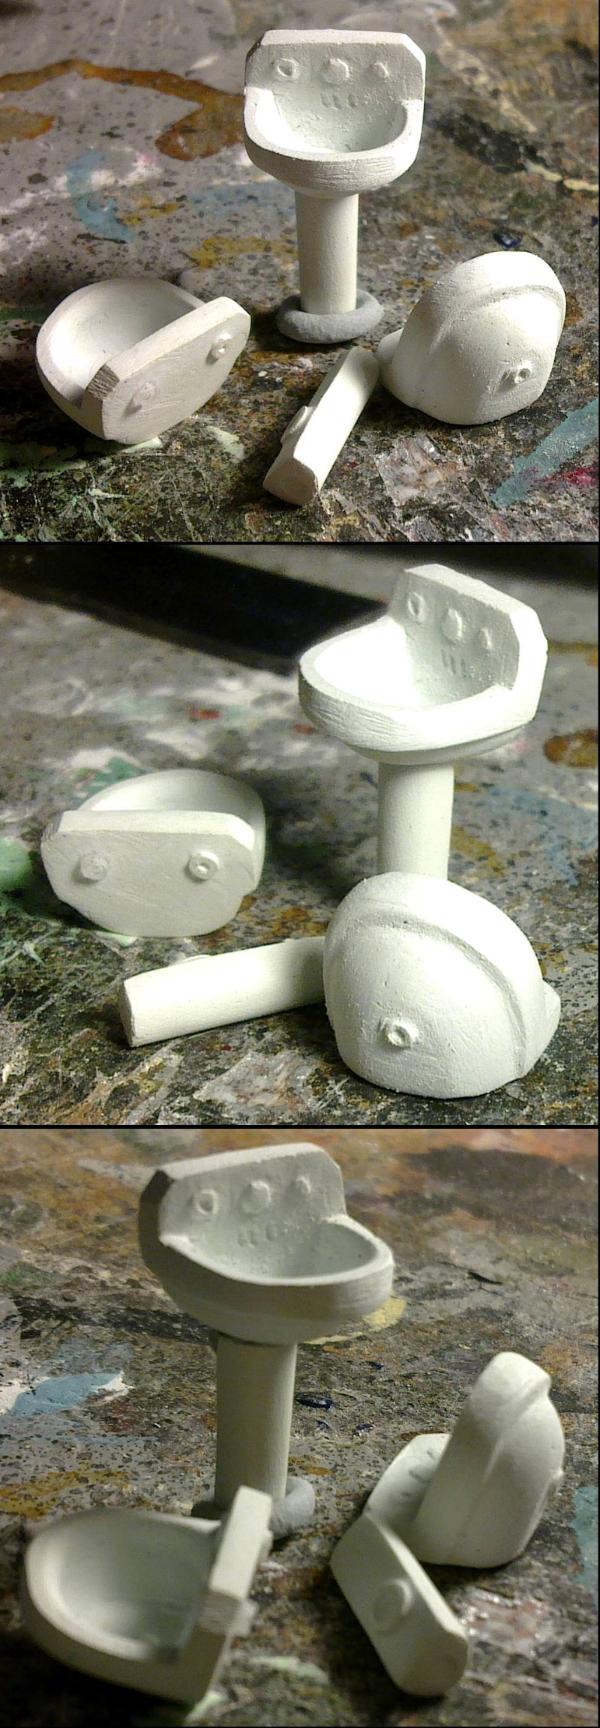
I'm currently busy with attempting a mould of some toilets... coming soon: Toilets...
So I said I would update before I started the metals, so here is the Chapter Master as he is so far.
I'm about to start on the various metals and then I'll move on to the odds and ends, like the strap for his combi-plasma.
There are bits that need touching up, so he won't look as rough when he's finished.
For those of you not following my other blog, the moulds are coming along and I will soon be casting not only the toilets, but the boxes as well. Keep you eyes peeled for that (but don't hold your breath... ).
Viktor von Domm wrote: rather strong shades on the cloth.... but they work for me... looks really good... the left arm is still WIP right?
Yeah, I wanted to experiment with stronger contrast on folded fabric and was the perfect opportunity.
There is still more to do (and has been done since then) on the arm as with the rest of him.
What were you seeing (or not seeing) on the arm in particular?
Viktor von Domm wrote: well the arm...(cloth there) is almost completly black still...i bet you are working gradually up there ...(?)
The sleeve is purple (although the lower half of it is in shadow there), same colour as his posh loin cloth (with the wings on).
The contrast on the photo is a little off though, as the white bits were coming out very bright, so that probably adds to it as well.
ah....now i get it... i didn´t see it as purple...my fault......sometimes i really have to use the zoom function and not only look at the pics in the thread
Wow! I'm liking the Company Master a lot. The cloth is much different from what I'm seeing, and I'm glad of it. Usually people do orange shadows on tan cloth, which doesn't really make sense to me.
The wings on the helmet are stunning as well.
Best of luck on your sales -- commission-based painting is a roller coaster of emotions :-\
Johnnyhorse wrote: Wow! I'm liking the Company Master a lot. The cloth is much different from what I'm seeing, and I'm glad of it. Usually people do orange shadows on tan cloth, which doesn't really make sense to me.
The wings on the helmet are stunning as well.
Best of luck on your sales -- commission-based painting is a roller coaster of emotions :-\
Hey, thanks a lot. I've usually been too subtle with my cloth work to date and I've seen quite a few people recently that have done very high contrast cloaks and things and decided to give it a go. Having recently done the Deathwing Terminators in here, and an Eldar Guardian for my army, both with brown shadows to bone to white highlights I didn't even think of doing any different here. I do use a sand colour mid-blend which is slightly orange, but that doesn't dominate the overall colour, just adds a hint of warmth to the cloth.
I think the photo is being a little kind to me on the wings, they're a little rough in places.
Thanks again.
Automatically Appended Next Post:
Moltar wrote: DV dude is coming along nicely, Dr H! Cloth looks great, even if it is a little exaggerated.
bebopdrums2424 wrote: Solid Jackson! Fantastic looking progress H. These Dark Angels are shaping up to be quite a striking looking unit
Thanks BB. And I've nearly finished all the Dark Angels in the box (just the bikes to do), then I'll start on the chaos models... still not decided what scheme or schemes I'll use for them.
The company master is very nearly done. The metals are done, the tidying is done (mostly, the photo has shown that the wing on his head needs a little attention). The purity seals need their final highlight and then squiggles, a final going over the check everything is neat and I may try and add a DA transfer to his (mostly hidden) shoulder pad... And I really need to decide what I'm doing with the sword...
hmmm.... the sword is a toughy... mebbe let it stay inactivated? just add a bit of brass to the electric thingies to the hilt and base of the blade?...if you do lightning effects to it I think it could draw too much attention from the rest of your work...
Viktor von Domm wrote: hmmm.... the sword is a toughy... mebbe let it stay inactivated? just add a bit of brass to the electric thingies to the hilt and base of the blade?...if you do lightning effects to it I think it could draw too much attention from the rest of your work...
Interesting point you make there, Vik. Any bright energy effects would likely dominate the model... I could do it with my Metalcote paint and just buff it up shiny...
hmmm.... the whole model for now has a rather mint look to it... so the buffed up effect would work...BUT I have to add here that I currently like the detailed "ruined" /stained look of the blades tip...there is something in it that "speaks" to me...can´t really explain it...
IF you still consider some kind of energy effect then please do something about the eyes too as for now they look a bit dead to me...
Camkierhi wrote:Maybe, just put the super bright buff on the cutting edges, maybe make the middle of the blade a bit darker, brass bits as Vik says.
Like to add, looks bloody awesome.
That's a thought, make use of the paint's matt to shiny nature.
Thanks, he's had about 5 and a half hours of "sit down" work on him so far... so he's a faster job than the Librarian (who had over 9 hours of work).
Viktor von Domm wrote:hmmm.... the whole model for now has a rather mint look to it... so the buffed up effect would work...BUT I have to add here that I currently like the detailed "ruined" /stained look of the blades tip...there is something in it that "speaks" to me...can´t really explain it...
Ha, that's the result of a black basecoat, a layer of gun-metal, a quick black wash and then some gentle sanding to smooth out parts... I'll keep that in mind for when I have a "dirty" model to paint.
IF you still consider some kind of energy effect then please do something about the eyes too as for now they look a bit dead to me...
Yeah, I was considering re-highlighting the eyes. I went too bright when I first did them and dulled them down, but a little too far. They're also in shadow in the photo that doesn't help the dark look...
I had a go at getting the metal to "fade" from dull to shiny, but it didn't really work and made the whole blade look dull no matter how much I polished the edge. So I polished the whole thing. You're not going to find a shinier sword this side of a GDnmm job.
I also gave him brighter eye lenses.
And if none of you can see any issues, we can call him done.
Let me know what you think and if there's no issues I'll let you know when he's up on the bay of e.
Intentionally left blank in case the owner wants to give him a unique name or something to fit in with their army. I did the same on the previous models.
If that's the only thing, all is good. Thanks.
In my experience, ALWAYS include 'standard' (grit, sand, little bit of static grass or tufts) basing in the commission cost (and definitely photos). The axiom 'faces and bases' should be ringing in your ears any time you're presenting work.
Given what you can do, I'd be careful about offering lower level work - it's an incredibly disciplined thing to 'dial back' technique - it's far too easy to just push things a bit because it looks better, but that takes time for which you're not quoting/charging. That's the main reason I don't do anything under 'high end tabletop'. You'll also find that the customers wanting cheap jobs aren't the same guys that will pay for the higher end jobs - so maintaining consistency of that lower level work becomes a key factor in keeping your cashflow going.
winterdyne wrote: In my experience, ALWAYS include 'standard' (grit, sand, little bit of static grass or tufts) basing in the commission cost (and definitely photos). The axiom 'faces and bases' should be ringing in your ears any time you're presenting work.
Given what you can do, I'd be careful about offering lower level work - it's an incredibly disciplined thing to 'dial back' technique - it's far too easy to just push things a bit because it looks better, but that takes time for which you're not quoting/charging. That's the main reason I don't do anything under 'high end tabletop'. You'll also find that the customers wanting cheap jobs aren't the same guys that will pay for the higher end jobs - so maintaining consistency of that lower level work becomes a key factor in keeping your cashflow going.
Thanks winterdyne. Sound advice indeed. I think the greatest challenge for commission painting is getting a good (or even adequate) hourly wage considering the time and effort involved.
It's early days yet. I'm still practising with the varying levels (avoiding techniques, etc.), I'm getting quicker (the Company Master took 3 hours less than the Librarian) and I'm still finding what my painting is actually worth to other people.
I'm hoping the casting that I'm moving into will help increase the cash to time ratio a little.
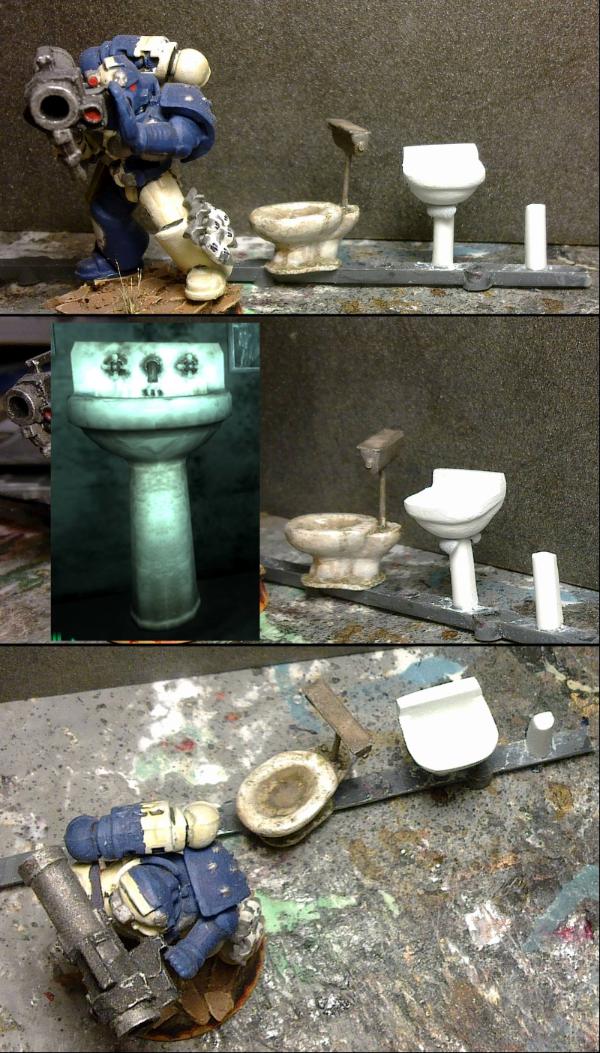
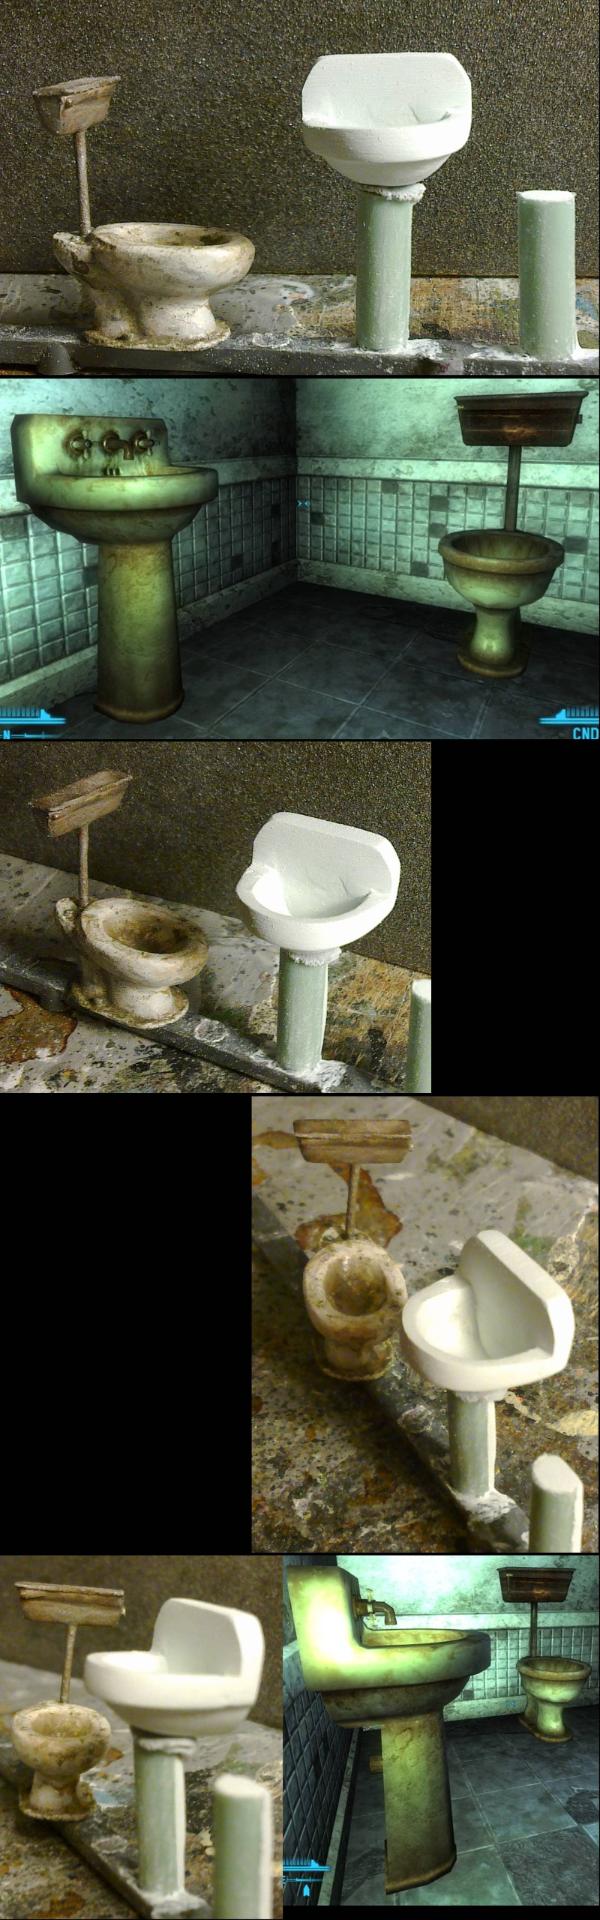
Now available for orders of the following :
From top to bottom;
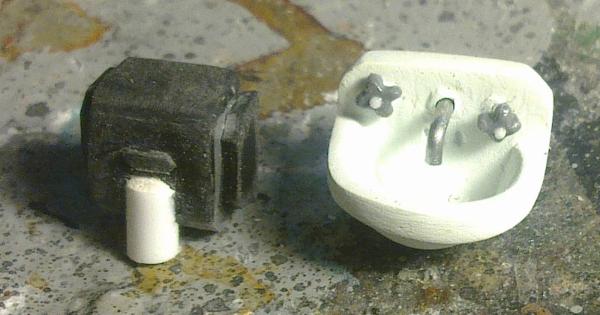
Tiny Toilet (separate/no sprue) - designed to sit up against a wall with no visible cistern.
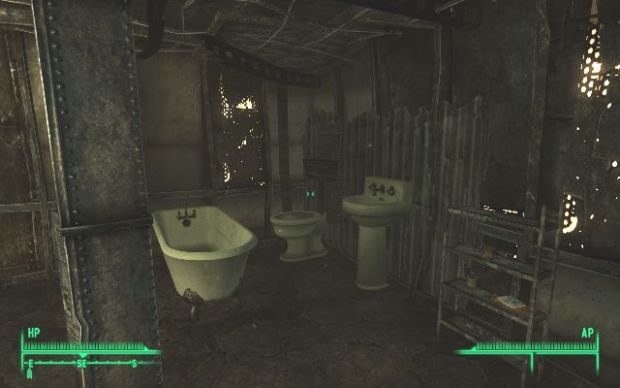
Tainted Toilet (on sprue) - Based on the toilets from the computer game, Fallout 3. Cistern is supplied separate, as shown.
Ideal for adding that extra level of detail to your terrain pieces.
Box 3 - 22x22x35mm (l, w, h) when constructed.
Box 2 - 18x19x23mm (l, w, h) when constructed.
Box 1 - 26x25x22mm (l, w, h) when constructed.
The boxes are supplied as show here. The individual pieces are thin so that the final box is lightweight and they can be cut to make broken boxes.
The sprues of both the toilets and boxes are textured with my unique wood-grain, to encourage their use in your modelling and save on wastage.
You can indeed (just PM me), there are still some in stock.
Thanks.
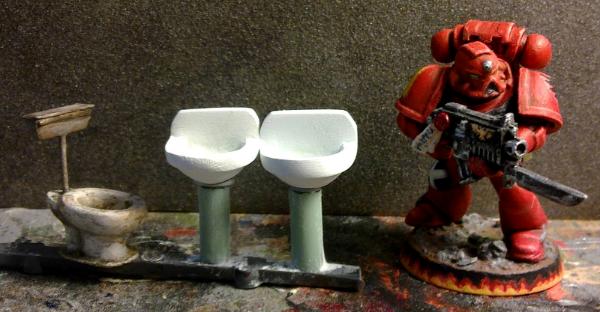
I've just finished an example of what you can do with one of the Tainted Toilets:
The Company Master is still available.
I've not started the next commission piece(s) yet as I'm currently starting up a major project for my army (in my other blog). There will be more soon though.
I've been quiet round this blog for a while. This is due to starting a tank for my main army (and I've not even finished the interior yet).
But I can now share what is next on the painting list...
...Bikes
I'm working on getting a very subtle blend on the black (I've only started on the front mud-guard, the rest is just black ) before I move on to highlights and then the other colours...
I can already tell that these will be difficult to paint due to them being built in one part, but I will persevere.
There are still plenty of boxes and toilets left in stock, just send me a PM.
And Company Master Balthasar is still available after my friend took a short holiday (He also has a limited selection of bitz available in his shop too).
So the first experiment with black either produced too subtle a blend and just looked black or produced a visible blend but looked grey...
Here's the result of the second experiment aimed at producing edge highlights that blend into the black...
Quite possibly it is even harder photographing a black thing with a black to dark grey gradient on than it is to paint it...
Not overly pleased with the result, looks a bit messy up close once it's dried as you can't tell what you're doing while it's wet.
I may just resort to neat grey edge highlights with one dark grey layer over flat black... Keep it simple and effective (on the table).
I can't help you much here..I could never get black highlights to work right either. I think you need a darker shade (or 3) of grey-black mix from what I've read. Or maybe your black isn't black enough? I duno.
Thank for the input, Dave.
I've done black fine in the past with just dry-brushing, I'm just trying to push myself on these commission pieces and have probably just come up against my current skill-wall.
There is two shades of grey in the highlights and I did try to get a dark grey line between the highlight and the black, but it just made the lines look too fat rather than blending in and in neatening the lines up it pretty much got covered over with black.
I may try giving the blended bike a fine line highlight (which I will probably mess up) and the lined bike a dilute wash of black (which will probably be too black)...and then start over...
I have to say, I would go with the tried and tested drybrushing, you have achieved great results with it. This thing of, got to go with new techniques, is great but we are forgetting the amazing results we used to get. I get the idea behind NMMMMNNNNNNMMMM! But what is wrong with mixing up some metallic in there. And what would be wrong with using Gloss?
I know it's supposed to be photo friendly or something, blah, blah, blah.
Anyways, Personally not a fan of the lining method. Looking forward to the rest of it though. Sorry for rant.
No worries, Cam. I do generally agree with you. I like the metallic paints (the engine parts of both bikes have metallic on already) I have and I have a nice selection of gloss paints.
But if you don't try new things, then you may be missing something better, and you always have the tried and tested method to fall back on.
Thanks. I'll be back later with further experimental progress...
it took me a while to actually see what these last pics were ment to show...... well I am in with the crowd...drybrushing... those lines are not looking like what you want...and more tips wont be coming from me because...well...ask a better painter
also... looked at the ebay shop of you two... and I have to say... you´re offering an old second edition arm sprue of SM with needed arms and three old style bolters... but only one pound more expensive than the three separate un- sprued bolters...that makes rather little sense... if you didn´t charge an extra fee for the loose ones as they are already de- molded
Viktor von Domm wrote: it took me a while to actually see what these last pics were ment to show...... well I am in with the crowd...drybrushing... those lines are not looking like what you want...and more tips wont be coming from me because...well...ask a better painter
Yeah, as I said, it's difficult to photograph something so dark and keep it looking like it actually looks (they are slightly darker irl). And you can see the issue with the way the light catches the surfaces; I've been twisting these bikes this way and that to get the various surfaces at just the right angle to the light to see what I'm doing (although that's more an issue with my lighting set-up than the model).
They have now been reset (that is; painted black). The washing, that I mentioned earlier, did tone down the lines as intended. But didn't make them any straighter...
I'll be back when they've had some dry-brushing.
also... looked at the ebay shop of you two... and I have to say... you´re offering an old second edition arm sprue of SM with needed arms and three old style bolters... but only one pound more expensive than the three separate un- sprued bolters...that makes rather little sense... if you didn´t charge an extra fee for the loose ones as they are already de- molded
K. I'll let 'im know. He runs the shop, I just paint things for him to sell.
Shallow edges are a pain, they don't look bad just maybe a bit too many edges highlighted, less is better.
Only advice I can give is; the tip "the best way to paint white is not to paint white" applies equally to greyscale
so rather than try and do greys try using blue/greys at 3 (or so, depending how bored you are) shades, dark, mid and light depending on the surface, layered thicker the darker going thinner when lighter in shade.
Personally I hate painting black and given how excellent the rest of your painting is I'm sure you'll pull it off nicely in the end
OneManNoodles wrote: Shallow edges are a pain, they don't look bad just maybe a bit too many edges highlighted, less is better.
Only advice I can give is; the tip "the best way to paint white is not to paint white" applies equally to greyscale
so rather than try and do greys try using blue/greys at 3 (or so, depending how bored you are) shades, dark, mid and light depending on the surface, layered thicker the darker going thinner when lighter in shade.
Personally I hate painting black and given how excellent the rest of your painting is I'm sure you'll pull it off nicely in the end
Thanks, Noodles. Very useful. Yeah, I know about the white technique. Should have thought about that. I do have a nice blue/grey paint, I'll pull that out and use it for the (less is more) edge highlights that I'll add after the dry-brushing.
I'm usually quite happy painting black, I was just trying out something new on these to make them stand out a bit. More practice needed.
Well, it made sense to me in one way or another...
So these are the bikes after 4 dry-brushing steps (Dark grey, Grey, Blue/Grey and light grey)...
I now need to let these dry thoroughly before toning them down a little (yes they are a little too grey) with a black wash and then a very light dry-brush to finish (hopefully)... The third bike should catch them up by then.
Camkierhi wrote:Now that is more like it. I know it has to be a bit blacker, and you have that in hand. But the toning across the edges and panels are excellent.
Thanks Cam. That's dry-brushing for you...
Viktor von Domm wrote:how I hate to chime in with the gang... but... with that drybrushing... what will you do to make it black like ravenwing?...people need to know...
Reavsie wrote:You're right, we have to know.
Watching this very carefully as I have some Ravenwing bikes to paint in the next couple of months, and wondering how I'm going to do the black.
Quite simply, I added blackness...
...that is, a dilute wash of black over everything (it was, however perhaps a little too dilute).
I have then added a light dry-brush of my blue/grey with a little light grey in, and just tried to catch the highest and most prominent edges.
To be fair... they don't look terribly different in the picture (only one of these here has had the final highlight DBrush and I'll leave it to you to spot the difference and make my point).
However, once I've added all the other colours (which involves a fair amount of white and the bright red guns) the black-that-isn't-quite-black here should look black... That's the theory anyway. If it doesn't I can always darken bits later when I know where it's needed.
I also have a picture of the third bike at (nearly) each stage of the dry-brushing:
From top to bottom;
Black,
Dark grey,
Grey,
Blue/grey(missing a picture for some reason),
Blue/grey plus light grey. You will also notice I didn't do the black wash step, as I was more restrained with the brushing on this bike and I think the extra lightness and blue-ness will make this bike stand out a little (as he is the sergeant).
Thanks for doing all the experimenting for us lazy ones.
It's in my nature to experiment anyway, and I'm happy to share. If you want to be really lazy, these will be available on ebay once I've finished them...
Hmm painting black, I've found the trick is to blend in your darkest grey with your black and then work up. I also find that highlighting in straight lines along the edges doesnt always work sometimes, I seem to be doing this more now, I paint in lots of small lines going down from the lightest part while building up my colours giving an uneven approach it adds a feeling of shadow.
dsteingass wrote:The other colors are really bringing it out now. MOAR other colors!
Glad it's working. There will be more soon.
GiraffeX wrote:Hmm painting black, I've found the trick is to blend in your darkest grey with your black and then work up. I also find that highlighting in straight lines along the edges doesnt always work sometimes, I seem to be doing this more now, I paint in lots of small lines going down from the lightest part while building up my colours giving an uneven approach it adds a feeling of shadow.
Not sure if that makes sense or not lol
I think I know what you mean. Are you talking parallel (as I tried earlier) or perpendicular lines (as often done on Tyranid carapaces)?
I did also try the blending from black to grey. I think the way I tried I spread the blend over too much of each surface and should have done it nearer the edges (leaving more plain black space).
Thanks.
Yeah perpendicular lines like how you would paint Tyranid carapaces
Not painted a bike before though so it may not work.
GiraffeX wrote: Yeah perpendicular lines like how you would paint Tyranid carapaces
I'll keep that in mind for something in the future. Possibly with bikes or other "fast" vehicles it may be good to do the lines in the direction from front to back. Might give the impression of speed.
Not painted a bike before though so it may not work.
Me neither, these are my first.
My first thoughts on building these were;
They are tiny (but at least in scale with the riders) and,
They would be so much easier to paint in pieces. Sadly, these being Dark Vengeance models, they are pretty much one piece. I even thought about chopping them up into more convenient pieces (and probably would have if they were for my army).
There's a surprising amount of small surfaces on these too, which is the problem with the edge highlight painting.
I agree some more colour touches would be good to give better depth to the grey-blacks, will be waiting for those to come up.
Maybe a fuller black, rubber like, could be used on the tires? There, it could be then lightly weathered or soiled in earth or dust tones, instead of requiring shading over black... (and by lightly I also mean keeping in mind it will be put up for sale, and should keep basing options open as well).
Littletower wrote: I agree some more colour touches would be good to give better depth to the grey-blacks, will be waiting for those to come up.
Maybe a fuller black, rubber like, could be used on the tires? There, it could be then lightly weathered or soiled in earth or dust tones, instead of requiring shading over black... (and by lightly I also mean keeping in mind it will be put up for sale, and should keep basing options open as well).
This is what I've been doing today. The white bits.
...and I'm glad I only have 3 of these to do...
On top of the grey/blue I showed earlier, I have layered a "middle" blue and blended that into a light grey mixed with the blue.
Then layered the pure light grey over that and finally a layer of white over that.
Not terribly pretty up close, but should look nice on a table.
They have not stayed pink though...
Still to do are the gold and brass bits, highlights on all the metals, the tires, and a few touch-ups here and there.
And then there's the cloth and skin on the sergeant...
Gogsnik wrote: Very nice paintjobs throughout and the tarmac is brilliant, how do you achieve that, GW gravel flock rolled flat? Great technique.
Thanks, Gogsnik. Welcome to my second (internet) home.
The tarmac is actually made with the same material that I have made the other bases with in this thread; that is the black gravel-like stuff (I assume activated carbon) from a water filter.
Instead of just sprinkling it onto PVA, as I did for the other bases, I added much more and pressed it into the glue to get as flat a surface as possible with minimal gaps. Then when it was dry I gave it a light sanding to flatten out the pointy bits and give it that compressed, tarmac look.
Paint black, dry-brush grey, add lines to flavour...
Water filter contents may differ, but what I acquired contained a mixture of the black gravel (activated carbon) and white beads (molecular sieves?). These needed separating, which I achieved with a little patience and the help of a brush and an inclined plane (Brush the black bits up and let the spherical white bits roll down). It's not entirely perfect, but does a lot of the hard work for you. Use the black for gravel (or tarmac as it happens) and the white for round-head rivets.
So today I have finished off the metals, touched up the white, started on the bases (taking photos and may make a mini-tutorial if people are interested), and just painted the pouches and holsters... edging nearer completion...
I actually like the "robes" looking like leather, not sure if you are finished with them or not, but right now they actually look really good. Over all it's looking brilliant so far.Amazing how the colour takes the black down nicely.
Camkierhi wrote: I actually like the "robes" looking like leather, not sure if you are finished with them or not, but right now they actually look really good. Over all it's looking brilliant so far.Amazing how the colour takes the black down nicely.
Ah no, the robes have just had the same base dark brown that the pouches, holsters, seats and his head got while I had it mixed up a ready.
I was planning on blending the cloak up to the usual Dark Angel off white, with the brown in the creases like on the company master.
However, I could be persuaded otherwise if you can convince me that the die-hard gamers, that will hopefully buy these, won't be put off by a non-codex colour...
Thanks. I'm glad it appears to be working. There are a few patches I've noticed that need a little darkening and I'll do that when I touch up the black areas that have received some painting slips.
Gogsnik wrote: Very nice paintjobs throughout and the tarmac is brilliant, how do you achieve that, GW gravel flock rolled flat? Great technique.
The tarmac is actually made with the same material that I have made the other bases with in this thread; that is the black gravel-like stuff (I assume activated carbon) from a water filter.
Oh that's clever, I like that, especially if you get some nice round head rivets out of it too. Thanks for the info
Thanks Gogsnik. You even get a variety of sizes of round rivets.
I've been a little quiet here, but I have been busy. The list of things to do on these bikes is now very short, so they will be finished soon (and then I'll be back on my tank ).
Sorry to disappoint you, Cam, but I have finished off the cloak in typical DA colours.
Here's a teaser picture to tie you all over until I finish all three bikes.
There's a few slips I can see that need attention in addition to all the others in the queue...
and yes, I still need to do his skin. Not started on that yet.
MagosBiff90 wrote: Hey mate.... those grey metals look great! slightly rough but actually quite a solid and robust look to them! cool!
Thanks Magos. They're just a gun metal base, wash of black and dry-brush silver. I think it's just a matter of not making it entirely uniform in your application.
Do not worry though, as these are the last of the DA models in the box. That means that I'll be moving on to the chaos models soon and, as far as I can tell, they have far more scope for varying colour schemes.
So much so, that I'm struggling to decide on what schemes to use for them. Which was why I started with the DA models...
Ah chaos. I would suggest that Black and gold everyone seems to be doing, at least thats what the old codex I have kicking about is full of. Was Red and gold years ago. I know you will make it all lok brilliant.
Camkierhi wrote: Ah chaos. I would suggest that Black and gold everyone seems to be doing, at least thats what the old codex I have kicking about is full of. Was Red and gold years ago.
Yeah, I've seen both those schemes. Black and Gold appears to be the poster-boys of the current chaos marines codex. But it's possible to get away with variations on the theme in a way that isn't really accepted for the non-chaos marines (or so it seems from the internet).
Also the different units don't have to match so I can do a few different schemes. In the box there is: The Chaos Lord. He is named, so may get a more "standard" scheme. Some Chosen. Who look suitable for a more "interesting" paint scheme. A whole bunch (20?) cultists. Who come complete with plenty of leather and I'm definitely thinking of a Mad Max look, for some of them at least. And the [sarcasm]Much Loved[/sarcasm] Hellbrute. Which I may as well go all out to make it look as good as possible with a unique paint-job, or nobody will be interested.
Ruglud wrote: Man alive, you have serious patience to separate the contents of your water filter, but the tarmac bases prove that it was time well spent...
Ha Ha, yeah.
I did do it in several sittings though, while letting paint dry and watching tv.
Thanks.
I do like how the black finally ended up, the contrast with the other colours just did the trick for that.
Thanks LT.
I did darken the middle of the black areas a little with a dry-brush of black (using a very short bristle brush that lost it's point ages ago), so it's not all just the addition of the other colours.
Camkierhi wrote:Quite brilliant. They definately look the part. Beautiful work.
Pink primer for the guns, then added the red, LOL! so many things military used to get pink primer before the camo was applied. The Allies of WW-II sure had a flair for military fashion, as primer is to a plane/tank/sub what underwear is to their clothing.
shasolenzabi wrote: Pink primer for the guns, then added the red, LOL! so many things military used to get pink primer before the camo was applied. The Allies of WW-II sure had a flair for military fashion, as primer is to a plane/tank/sub what underwear is to their clothing.
In this case, a pink undercoat gives a nice vibrant red.
As opposed to a brown undercoat, that would give a darker, more earthy, red.
It's one of the rare occasions that it actually makes a difference with my paints... most of them don't care what's underneath.
And don't forget that My boxes and toilets are available too.
Also also, the final pictures of all my models are very zoom-able (if you haven't tried yet) and also vote-able (if you feel inclined).
Thanks
I'm in the early stages of researching the Chaos models and will be back soon.
In the mean-time I'm building a tank in my main, army blog. Check out the link in my Sig' if you like crazy conversions...
cormadepanda wrote:I really like your black on your bikes. Its smooth, and not flat. Nicely done Dr H. I will be using your style for black in the future.
Cool. Thanks Comrade. It's easier than edge highlighting or wet-blending anyway...
dsteingass wrote:The black turned out great once all the other colors were added. Great job!..Even if this project lacked sprue
Thanks Dave. Yeah, sadly these click-together models don't really lend themselves to conversions. And all the extra effort will only really add time to the projects without adding much money...
However, my modelling seems to be somewhere where I can make more money (at least until my painting gets better and/or faster). So there may be more "unique" models on sale at a later date... Watch this space.
And I will get round to the sinks and baths soon...ish.
So, both the bikes and the company master have gone off to their new owners, and this means it's time to start the next job...
As I've mentioned, and if you are familiar with the DV box, you will know that the Chaos army is next.
I thought that I would start with the Chosen as I had an idea for a scheme for them...
What do you think of a quartered black and white armour with gold and/or silver trim?
They are not even glued together yet (and I'm still working on my tank...), so there is plenty of time to change and I'd like to hear what people think (especially those familiar with Chaos Marines).
I was hoping for something like fallen Dark Anels, the black you've done on the ravenwing has been awesome, so you could do the pre heresy Dark Angel Livery on them.
Theophony wrote: I was hoping for something like fallen Dark Anels, the black you've done on the ravenwing has been awesome, so you could do the pre heresy Dark Angel Livery on them.
Thank you kindly.
Yeah, part of the reason for choosing black and white is that many people seem to have problems painting them and therefore that should up the desirability of these.
However, if I do them solid black (had to look up the pre-heresy scheme) then what colour do I do the bling? If it's done in gold, then that's black legion (maybe?). I wanted something different and I quite like the one quartered marine I painted a while ago (and a couple of half/half models), combine that with the black and white thinking above AND that you don't see white on Chaos models (this is the part that I'm not sure if people will accept), you have a unique selling point.
Well if you look at blacklibrary.com they have the Horus Hersey covers for the Dark Angels. Most show silver trim with white shoulder pads, but they have some gold as well. You could also do red which I've seen a lot for the Dark Angels symbols, or even green as they started the color transition once Caliban had been located and their primarch found.
Black and white quartered reminds me of The Sons of Malice chaos marines. If you google their image you'll find them. They worship the fifth chaos god Malaal I believe who has been written out of the current rules.
How about black armour (instead of the "official" red), with bone trim (instead of the gold), and dark green cloth...?
Then pick out the various (and many) extra bits in metal (gold and/or silver) and the odd red touch (like the evil eyes etc...).
That could all work as a corruption of Dark Angels. But is that a unique scheme in the armies of chaos?
I don't recall any black and bone colored armies, so I think your good there, though swapping around the red and green I think would be better as the original Dark Angels had the red markings, forget what color lenses, but I've seen some sweet green oath seals before.
Theophony wrote: I don't recall any black and bone colored armies, so I think your good there,
Good good.
though swapping around the red and green I think would be better as the original Dark Angels had the red markings, forget what color lenses, but I've seen some sweet green oath seals before.
The thinking behind the green cloth and red spots was that the whole model will be mostly dark and then the little patched of red will jump out. But that doesn't need to be set in stone yet. We can see how dark they look with the black and bone and decide then.
Thanks Theo.
So, progress on the Chosen. They have been fairly boring looking up to this stage which is why I haven't shown the earlier stages.
This is after a black base coat, a heavy dry-brush of dark grey, followed by a light dry-brush of light grey (trying to catch only the upper sides, edges and faces). Then the trim was based in brown then blended/layered from a medium brown to bone and highlighted with white.
Again, I think it will look better then it does now once I've added the other colours. Thanks for stopping by.
Very kind, Cam. Thanks.
There's much more to do on them and some tidy-up is required already in places.
So, to go with this scheme, do we think the cloaks etc... should be DA green with small touches of red, OR... Should they be red with small touches of green?
Baring in mind that I'm planning on doing the tentacles and possessed bits of armour in a pink-purple...
Well they don't look all that different here at first glance, but there is a good couple of hours work poured onto them...
I've painted the grey bits, which includes the bone shaped bits, a few horns and all the little teeth-like bits that are randomly spread over the models (two layers of grey).
I've also base coated most of the possible metals bits with gunmetal and washed all of that with black and I also added the black wash to some of the black armour plates to enhance shadows and clean up edges. I used a damp brush to clean up the trim where the wash went over, although in places this left a nice shadow effect that I decided to leave.
Looking at them like this, I'm leaning towards the dark green cloaks as they aren't all that dark and to make them red would only lighten them further. I'm still open to opinions at the moment.
For the weapons, I'm seeing a trend of bare metal or black for the chaos armies... So, I can't use black as the armour is black and that leaves metal (which I could do with a wash of brown to make them look well used). Or, I could do them a dark, dirty red to contrast them with the bright red of the DA models I have painted...
I originally wanted to blend the possessed bits up to a flesh colour from the black armour, via purple/red. But I could not get that to work, purple and flesh do not blend unless you want grey...
So I went for pink to purple to black...
I also lightened the "bone" bits and smoothed out the blending on them in places.
monkeytroll wrote: Oh, like the look of those doc Only just realised you had this thread
If you want to go purple-flesh have you thought about working up to flesh from black then using a purple wash or glaze to tint the blend?
Thanks Monkey. Yeah, it's fairly new. I started this one to keep my army thread for just the army.
Yeah, I did think that. I did even try to save the flesh disaster with a wash of the purple, but that didn't work well either. A glaze probably would work, but I don't have any... well, any that are purple (green and red clearcote paints at least). I just saw it as nature telling me that they were not meant to have flesh paint on them... Maybe I'll do some highlights with the flesh though... Those bits aren't quite finished yet, but I had to let the paint dry before doing any more.
For today's update we have the chosen fully assembled as all the hard to reach places have had all the paint they're going to get.
This also means that the red and green are now set in place (sorry Theo, I went for green cloaks and red spots).
As the purple/pink ended up slightly shiny (due to using a gloss red in the mixtures), I'm not going to give them any more highlights and will leave the shiny effect to do this job and make all the tentacles look a little moist.
The green has also ended up a little glossy in places, but this will be fixed with a matt varnish.
In contrast to the DA earlier, I've made the red duller and not as vibrant by using a dark red/brown undercoat (as opposed to the pink from before). I've still got to do some highlights on these bits, so they are not finished yet.
All the metals are still to do or finish and a few other bits as well.
I think I'm going to call the Chosen done. All the eyes ended up orange as I've been watching the LotR commentaries so big, orange, evil eyes had to be done.
There is the occasional chip / dirty patch on the armour which I chose not to touch up as, being chaos, they should be a little knocked about.
The two identical models in the box have had a few differences added in the painting to make them a little less identical.
and I gave the man in charge a really ill-looking skin tone and left his "normal" eyes without pupils just to add to his Chaos-ness...
These are meant to be an exercise in painting to a reasonable level, quickly... although they took slightly longer than the bikes (at 32.5 hours), there are twice the number of models, I had the issue with the possessed skin/armour and I've placed these on the bronze level (so I could have spent much longer on the blending etc...).
I think they are a nice, unique, table-top level squad and I'm pleased at how they have turned out even if I could have taken twice as long to make them really nice, but that was not the aim for these.
I hope you like them and I'll post the link once they are up on ebay.
monkeytroll wrote: Great job Doc Good quality table-top is what you've acheived alright. The purple fleshy parts turned out ok in the end.
Thanks MT. Yeah, some of them turned out better than others and I'm still not entirely sure what a couple of them are supposed to be, but they are painted...
Theophony wrote:Very nicely done Dr. H, your colors worked out great . Like the eyes too.
Thanks Theo, glad you like.
The eyes were just a gloss orange followed by gloss yellow towards the middle, while wet. Then a bit more yellow in the middle to make it more vibrant and finally a black line/dot/splodge depending on how well I managed it. Had to re-do the ones on the axe as I totally ed them up first time round.
Camkierhi wrote:Looking brilliant. And I definately love the colour scheme.
Thanks Cam.
I'm working on a few little surprises to drum up a bit more interest in my casts (that is the boxes... which are still available along with the toilets... PM me if you are interested)
A couple of things for the next round of casting are in the planning stage, one of which is very sink shaped...
and the first layers of paint have been added to the tank interior for my army, so expect and update over there within the next couple of days...
So here's a few examples of what you can do with my (your) boxes:
These pictures show all three currently available sizes of box (small, medium and large).
These boxes were made with some mis-casts I had and so allowed me to do this with the addition of a few random items...
You can do this with the boxes as each side is separate and thin enough the cut with a hobby knife.
The new boxes in these pictures were painted with a grey undercoat, followed by a white dry-brush and then coloured with an acrylic ink (that I bought recently and thought I'd try out. Burnt Umber for those taking notes) and then patches of dark brown/black wash were added to darken areas as needed.
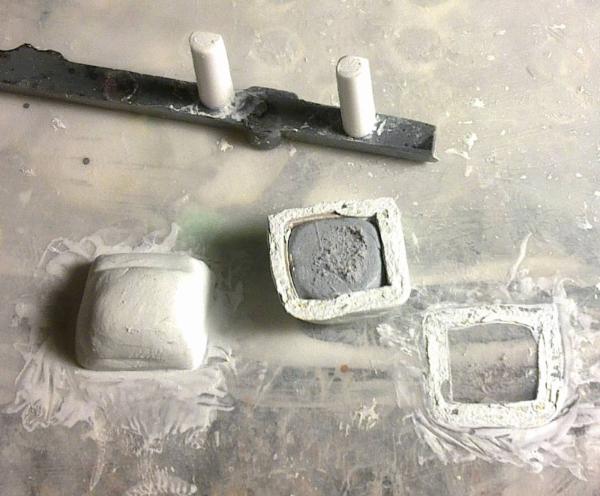
Thanks. Those are made with a sausage of milliput (GS would also work) of the desired thickness, a flat surface (slightly wet to avoid the putty sticking) and a comb. Pull the comb over the sausage as straight as possible, letting it roll on the surface, then bend to whatever shape you like.
I tend to do this with any left over putty I have when doing other things and then leave them to one side until I need a cable/worm/tentacle and then select one (or many) to fit.
It doesn't always work out well, but you can just roll it up and try again...and again...
Alternatively, you can buy a cable/tentacle maker which produce more repeatable results... for a price.
Indeed you can.
I've also heard it's useful to put a length of wire down the centre of the putty sausage to allow positioning without the effect of gravity getting in the way.
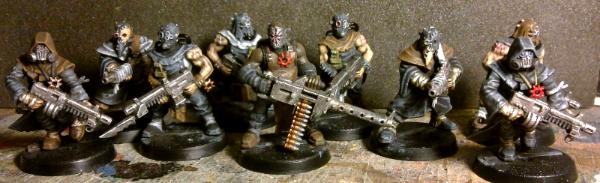
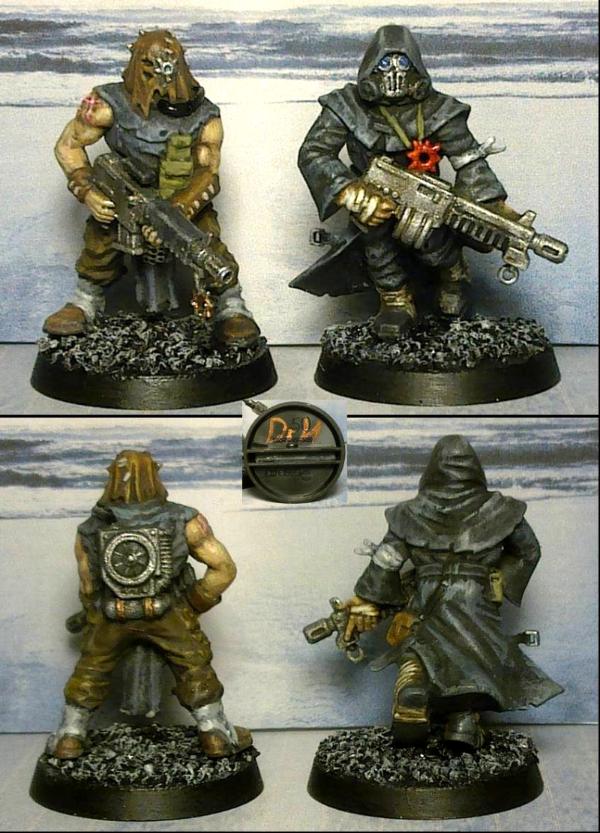
I've decided to limit the colours with these and try and get a Mad Max look to them, with black and brown leather, brown, white and beige cloth and only use other colours for small touches.
As many of them are repeat casts, I'm trying to give them all individuality in their colour layout.
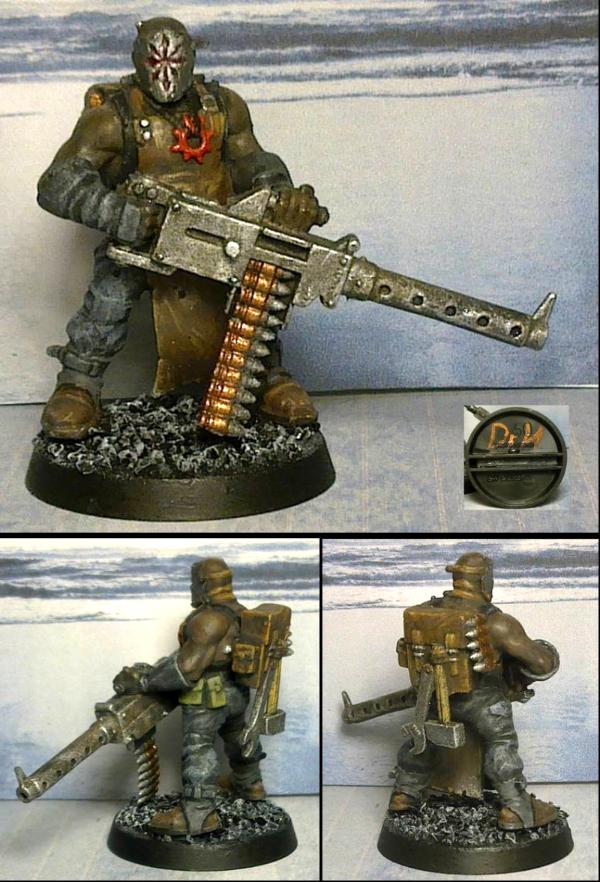
Skin tones will vary between them, but undecided on by how much except that the heavy weapon chap will be the token black guy... or at least the darkest of the bunch.
This is with just the base coats on and the start of building up the depth in some of the colours.
OneManNoodles wrote:Looking good so far, I'm starting on the CC cultists and was thinking of going for a similar scheme (damn you!).
Thanks OMN. Ha ha, sorry. Do not be discouraged though, these cultists do scream out for this kind of scheme.
That said, I will probably go very different with the other squad.
So, I've done a bit more work on these. A bit more highlighting on the black areas and mostly done the skin. I've tried to get a variation in the skin tones, some a quite light and some are (slightly) darker. It's actually quite difficult to depart from the Caucasian tone really. I've done a little research, but it's difficult to pick out the paint layer colours required for non-Caucasian. Need to do a bit more research and practice. But I am happy with the tone on the heavy weapon chap.
The skin may get a bit more work once I've added more of the other colours and can see how they contrast (the heavy weapon in particular).
Yeah, at least these are not over-detailed, unlike some of the other chaos models (and some of the other GW models too). Not that I can talk really (with my adding details to things), but more is not always better. Not mentioning any names, Chaos Lord Krannon...
Anyway, it's also to do with me painting one colour, thinking I'm all done and moving on to the next and then finding something that I meant to paint with the previous paint... So, some of these have one colour all done from shadows to highlights and then another colour that is only part done.
I would have uploaded this yesterday, but the server migration prevented it. However, thanks to Lego it is fixed and the perpetual "show and tell" can continue...
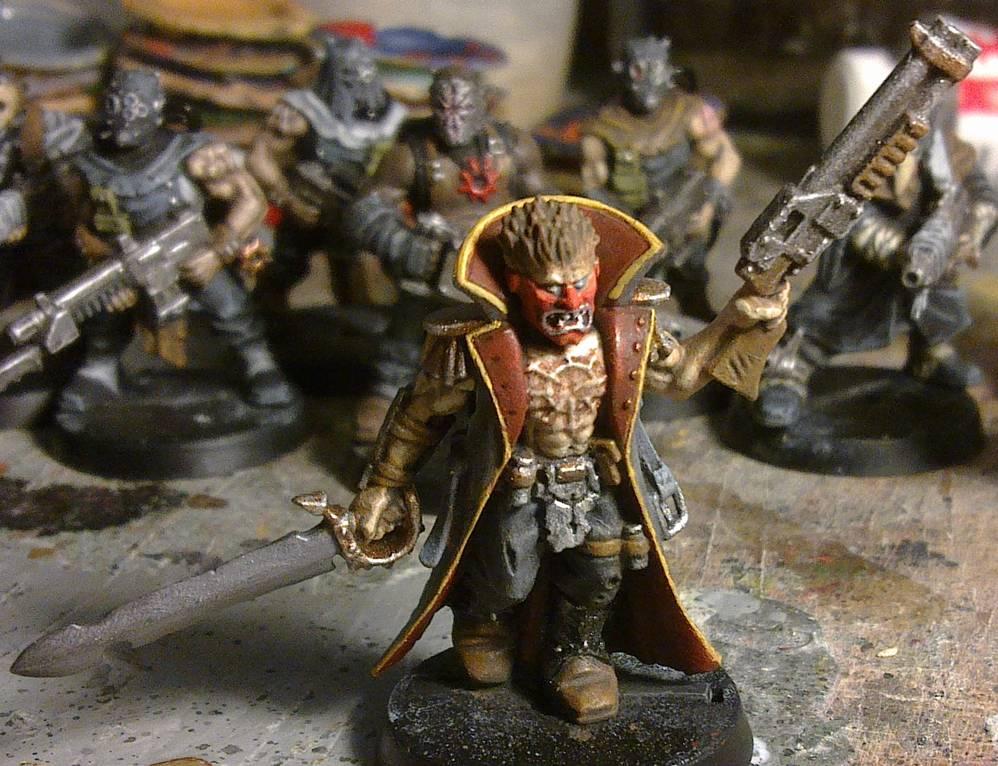
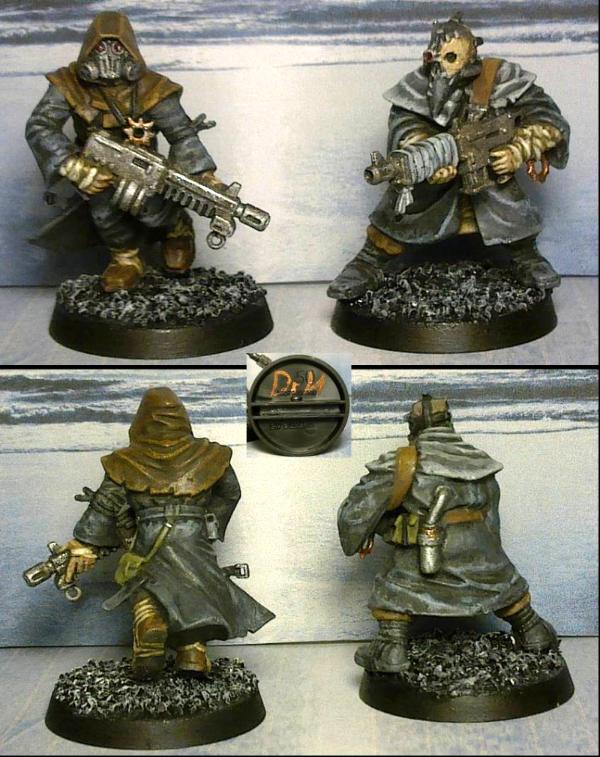
The cultists are pretty much finished (still got the bases to do), if you spot any issues speak now, thanks.
You may also have noticed that the leader of this group has been missing from the last couple of updates. This is because he has lagged behind on the painting front and today's job is to get him done...ish... then I'll base them all and they will be up for sale (hopefully by the weekend).
Littletower wrote:Nothing to add, looking really good, in their own, odd chaosy way.
Nicely achieved skin tones, with contrast and variety.
Thanks LT. Glad everyone is liking the skin, I've not done a lot in the past and not had any comments on whether it was good or not (ignoring the Ork Driver for now).
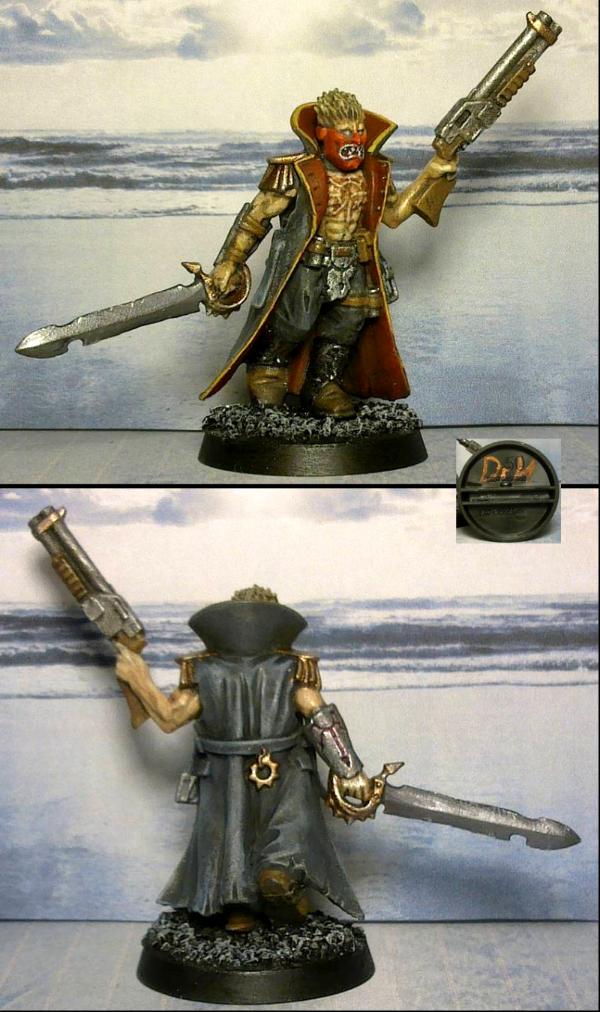
dsteingass wrote:I love that piping along the leader's coat! I wish I had that kind of brush control!
Thanks Dave, resting both hands on a solid object and against each other and take your time to do it little by little (took about half hour to do a layer of orange then the yellow). The piping is moulded on to this model, which makes it a little easier. Still required a fair bit of tidying along the outside edge as I went though.
Can I offer one slight suggestion though? the grey highlights look a bit too pasty/drybrushed. May I suggest a grey glaze over it all to soften it up a bit?
In contrast, the arms already have that effect with the dirt/grime.
Camkierhi wrote:Excellent job, leader looks brilliant. Glad you did something with his hair. Here's hoping for a quick sale.
Thanks Cam. I was originally planning on giving him blond hair and then thought I'd try to make it look like sun-bleached brown hair (hence the brown first coat), but I ended up going a little too far with the bleaching and he wound up blond anyway... Instead of going down the path of back-and-forth with the hair, I called it done.
Moltar wrote:Nice cultists, Doc!
I prefer their muted color palette.
Thanks Moltar. Yeah, another experiment. I don't usually limit myself with colour but thought I'd see if I could give them individuality (on identical models) within the colour palette limits. I think that worked well and it leads to a uniform look to the squad (as mutually exclusive that may seem as first).
I'll post up the link once they are on ebay.
And with these done, we all know what that means... back to the tank...
Can I offer one slight suggestion though? the grey highlights look a bit too pasty/drybrushed. May I suggest a grey glaze over it all to soften it up a bit?
In contrast, the arms already have that effect with the dirt/grime.
Hey Dave. Thanks. Yeah, I was tempted to give his gun hazard stripes but, limited palette.
Yeah, I know what you mean. I did go far too far with them on the first go and toned them down then re-highlighted again... and in places gone a bit too far again. It looks worse in the blown up pictures then IRL. These are meant as only tabletop level, but I'll see how they get on and re-visit them if they're not snapped up. If they were for my own army, or silver / gold level, then I would have gone further to make these better.
Also, I set a personal best time of just under 2 hours each on these. So that's also good news.
Next up is Kranon the Relentless.
Due to the unique way he is assembled (i.e. his arms attach the the cloak piece, but only after that is attached to the body... ) he is best painted in pieces.
There's so much detail crammed on this model it's really difficult to tell what you are actually painting, even with a magnifying glass. I expect many occasions in the coming days of " that's supposed to be this colour, not that colour".
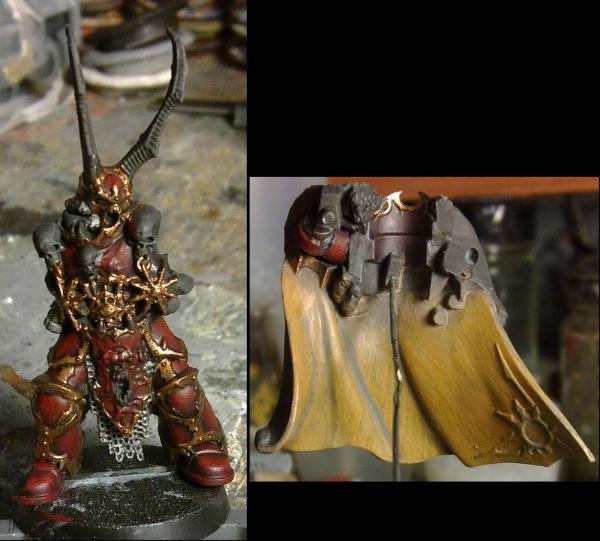
I have mostly settled on a scheme and it is mostly based on the official Crimson Slaughter scheme of red and gold.
A few changes though; The red will be deeper and darker (the main paint I'm using is called Crimson... seemed to make sense).
To contrast with this, the gold trim will be quite light.
The cloak, however, will not be blue. As I don't think it goes with the chaos thing, especially the lighter blue I'm often seeing. Yes, it's probably referencing back to his loyal past (but even then he seemed to be a pretty brutal chap, so would he really pick a nice bright blue cloak... I don't think so). A darker blue may be better, but I'm going to go with black (to start with) on the outside and then a cream/bone colour to the inside. The chaos details on the cloak I'm currently planning on red, possibly a brighter red than the armour.
The ghost-y faces that are all over the place will likely be a greeny-blue, the bone and skull bits with likely be bone coloured and the fur will be something that works with the rest of it when I get there... and there's probably more things that I've missed and will decide when I find them...
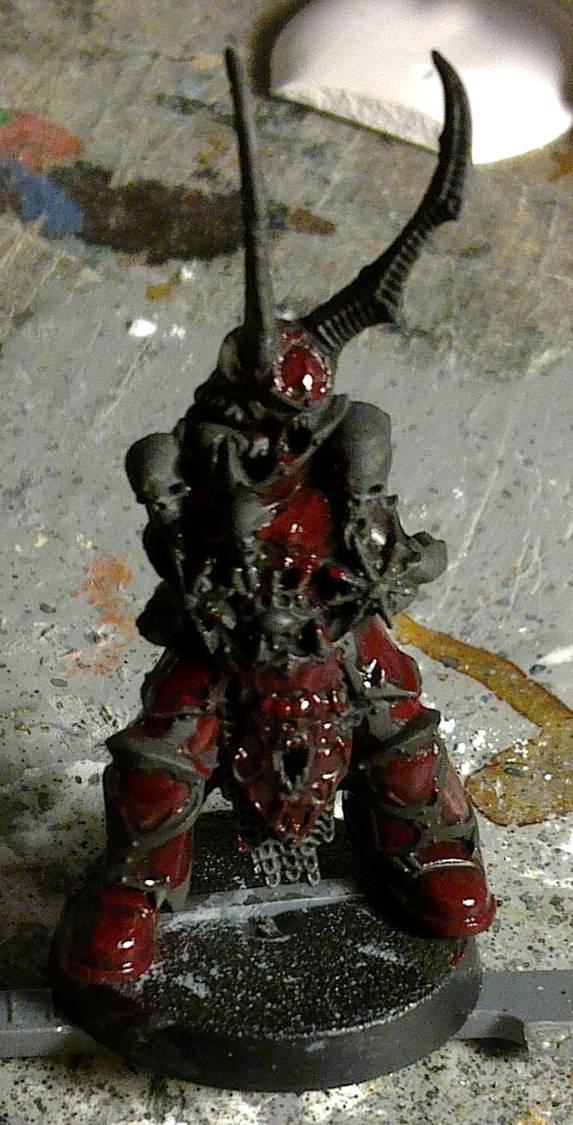
Here's the armour colour as it is, but will get a bit more highlighting once dry.
The paint I'm using is a gloss, but he won't be so glossy when I've finished.
dsteingass wrote: I like the gloss contrasting the flat, actually. It looks like blood.
Thanks Dave. Well maybe I'll gloss it up at the end if it looks like it'll work once I've done all the bling on him (most of those matt surfaces will be metal so there won't be that much matt left).
For now though, I've given him a matt coat. Although I think the matt-ness of my current tin of matt varnish is getting as low as the volume, as he's ended up more satin than matt. I'll accept it for now.
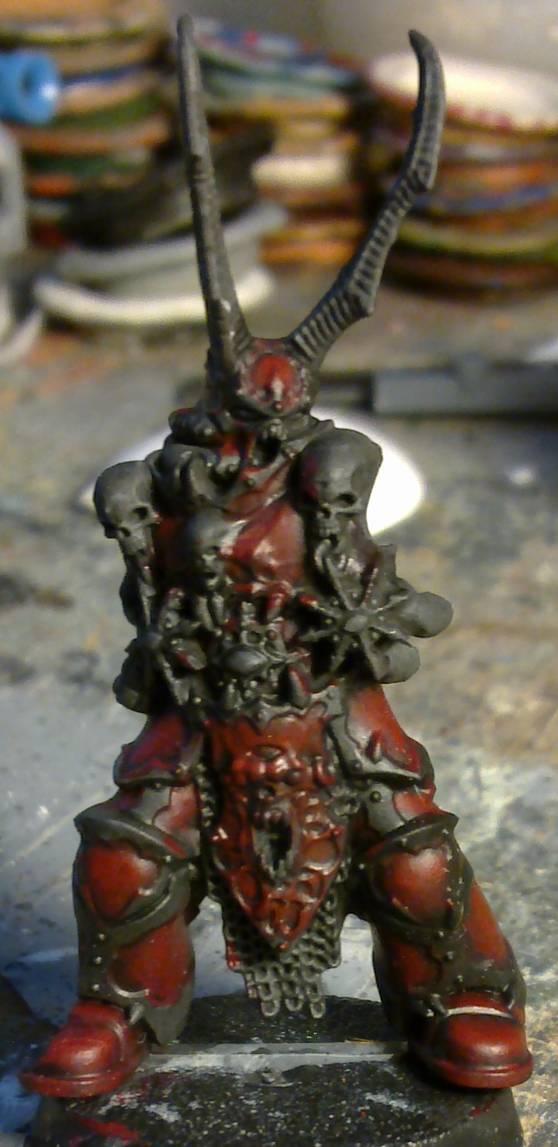
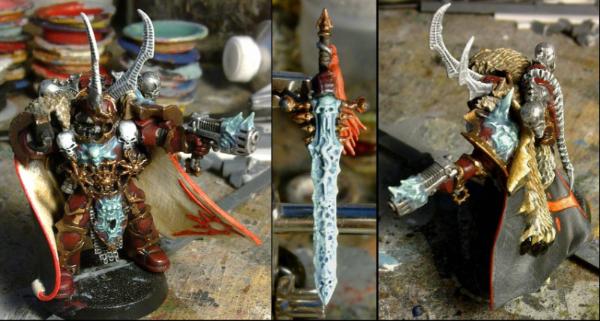
So the red is done. It's very dark unless you have a bright light on him like in the below photo'. The blending was pretty quick and painless and I hope it actually shows.
Next job, I think (it's quite difficult to decide what to do with all the bling... enough complaining, Doc, get on with it...), will be to base coat the metals and then do the inside of the cloak. Then I can stick him together and see what's going on with the gun arm/shoulder/where it meets the body and then probably do the ghosty bits before finishing the metals... maybe...
I have base-coated the metals with my usual brass paint for what will be the light gold parts, and gunmetal for the (few) silvery metal parts. Some may or may not change as I progress (there really is a lot of gold parts...).
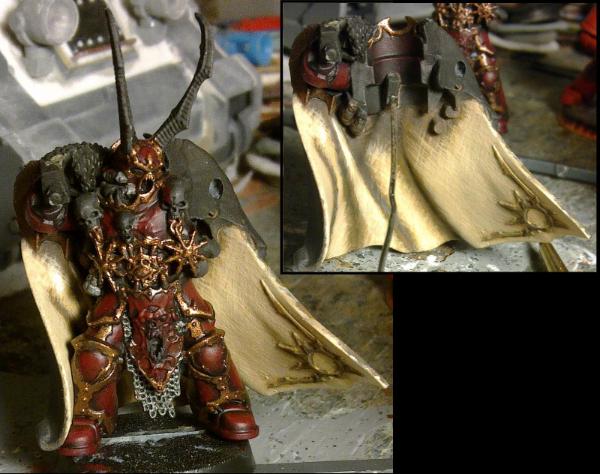
I've also started on the inside of the cloak. This is only 1/3rd done really, it'll go all the way up to bone eventually.
I'm attempting to paint in some texture to the cloth, so if you can see streaks in the paint, those are intentional (for the moment...).
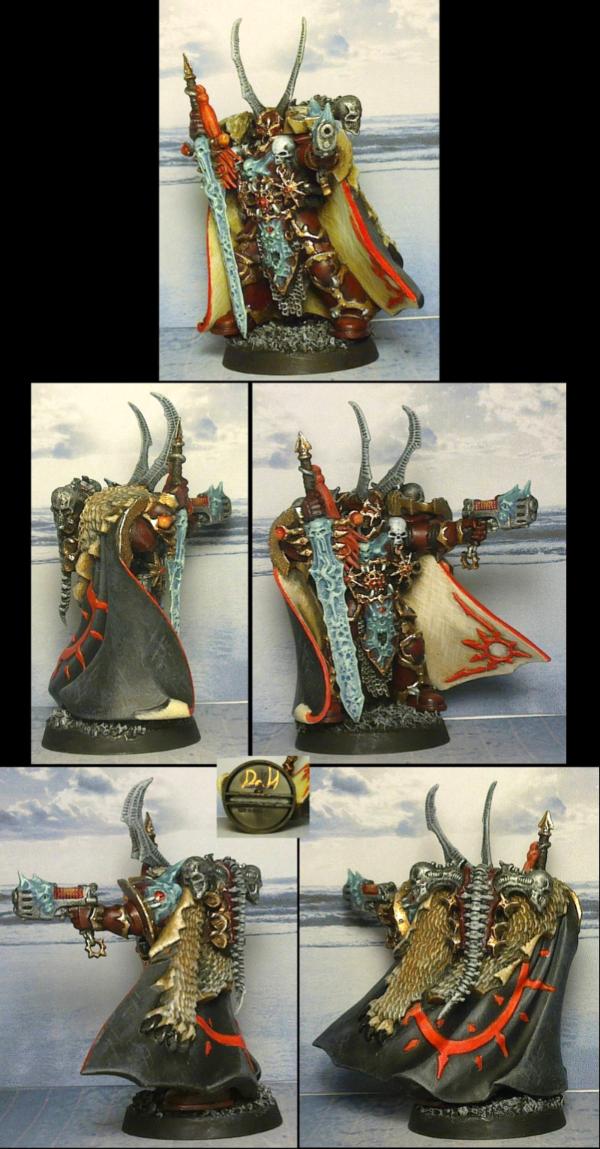
and here's the progress on the cloak and how it looks on the model.
The cloak will get lighter still on the parts that are more visible. I think it frames the dark armour nicely.
Thoughts?
Automatically Appended Next Post: And here he is with an arm on. Not glued yet, but can't see any more issues. The sword arm will have to stay off until the end.
I might do the outside of the cloak with the same technique. Be consistent an' all.
Thanks Cam. Glad you think so, it's tough to get that feeling without using purple (often the colour of the rich and powerful).
Next job is...erm... the sword, maybe... need to have that ready for when I do the ghosty bits.
I can also start on the outside of the cloak...
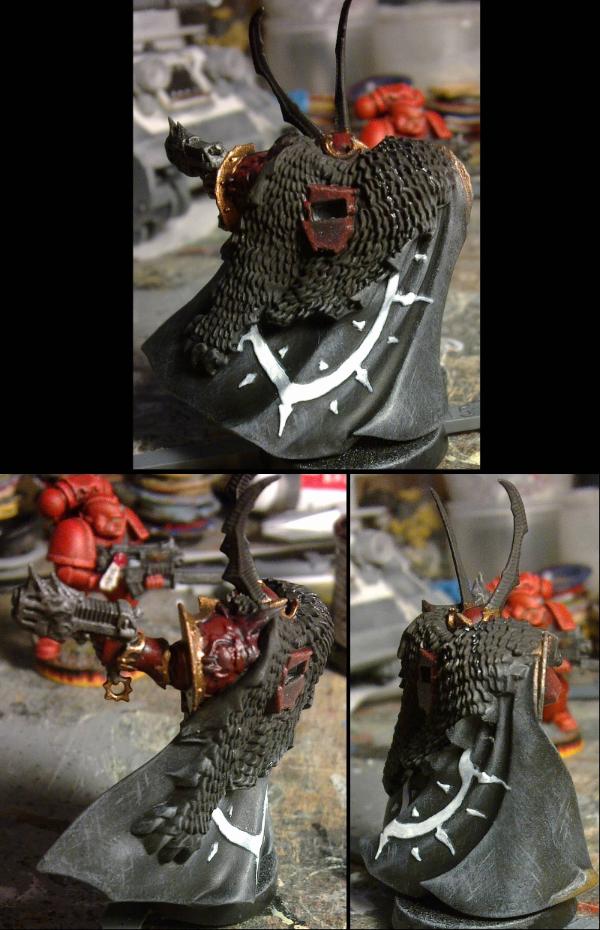
Cloak update today.
I've been back and fourth over the outside of the cloak. I base-coated it black and then attempted to add the thin lines to give it a similar texture to the inside. However, over black the grey lines just showed up far too much and eventually made the cloak look grey and not black. So I washed it over with black and tried again... Then washed that over with black again as it still wasn't looking right.
I then settled on giving it a couple of dry-brushes with 2 or 3 greys and then did only a few lines in certain areas.
The white will be bright red (a bit like the blood angel in the background, who is nearly finished and will be posted up in my main blog soon), and the fur will be a light (but not as light as the inside) brown.
Thanks
Automatically Appended Next Post: Oh yeah, does anyone know what that is meant to be on his shoulder pad? I can't figure it out...
Some sort of leering daemon-thing was my bet, so I pained it (and all the other bits like it) as such, like something trying to enter from the warp or whatever.
Looks great so far! Lovely blending on the cloak interior and armour, the cross hatching looks great, not something I usually see
OneManNoodles wrote:Some sort of leering daemon-thing was my bet, so I pained it (and all the other bits like it) as such, like something trying to enter from the warp or whatever.
Yeah, what I'm seeing at the moment is a one-eyed thing, with it's mouth full of a large ball (probably another chaos eye). I'll see what I make of it when I come to the ghost/warp painting stage.
Looks great so far! Lovely blending on the cloak interior and armour, the cross hatching looks great, not something I usually see
Thanks. Yeah, I like to try new things and I'm making use of these commission models to do so. Give them that unique touch that hopefully helps them sell (doesn't appear to have hindered their sale anyway).
Camkierhi wrote:Nice black. No idea on the thingy.
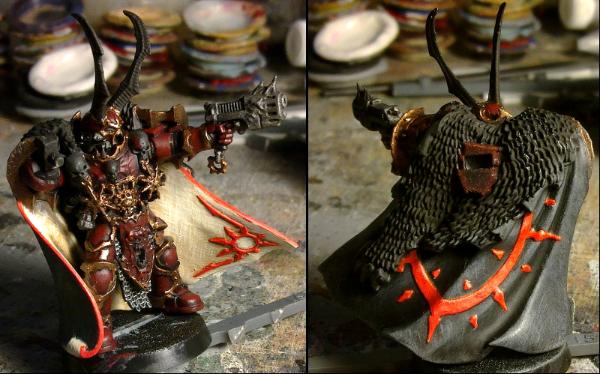
You can't give out advice and then tell people to not listen to it... Unless you're doing that double-bluff thing whereby telling people not to listen they end up doing what you want...
Anyway, What I see you saying is "more brown-ness" and I see what you mean. So, more brown-ness added:
Mr. The Relentless now has his backpack on. The spine on said backpack and the skulls on his chest have been painted to be bleached bone as the usual "bone" colour would look too similar to the inside of the cloak.
The skull exhausts on his backpack have been painted a nice shiny silver/chrome that may make more sense when I do all the shiny gold.
Work has started on the sword and depending on how that turns out the ghosty bits will see paint soonish. I will have to do something with the gun before that though.
However, I am stuck for what to do with his horns.
I'm thinking at the moment that they can be either bone (like the spine, that's grey-scale) or silver (like the backpack skulls).
Thoughts, opinions, ideas welcome?
Phutarf wrote: Personally I'd go with bone for the horns - silver I think would distract from the gold on the rest of the front? Otherwise looking good
Yeah, bone for the horns. Once you've done the 'ghosty bits' maybe a subtle wash over the horns and spine...depending on what colours happen with inky, pinky, blinky and clyde
Once you've done the 'ghosty bits' maybe a subtle wash over the horns and spine...depending on what colours happen with inky, pinky, blinky and clyde
...and they're just on the sword.
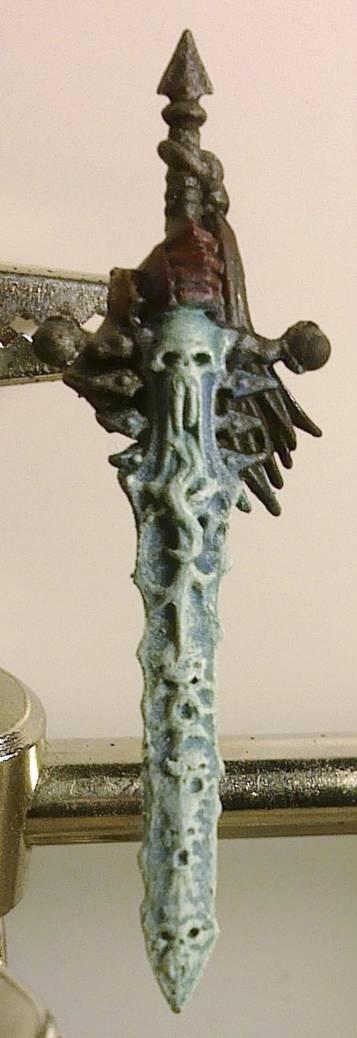
Speaking of which, this is roughly what I was thinking of for the ghosty bits.
This was a black basecoat, covered with blue. Then blended/dry-brushed up to white and then washed over with a blue/green and a final highlight of white with a tiny bit of green in.
Maybe - and I'm not the one to comment on painting - re-darkening the deeper crevices again, especially those nearer the tip, to regain their depth a bit?
Good good. Glad you are liking it. going to be interesting doing this on the armour and gun.
Just based the metals on the sword and the tassel will be bright red. The pistol will be mainly grey metal but will get the ghosty bit on top to match the others and the coil may be orange-y and will match the various evil-eyes.
Just been watching a bit of Star Wars. May the fourth be with you.
Automatically Appended Next Post: Oh yeah, and darkening crevices may happen when I next have a suitable paint out.
monkeytroll wrote: Looking good. As there seems to be a slight osl look to the ghosts will you be doing something with the plasma coil?
And is it just the light or have you made the reds on the cloak a bit more orange?
No, the red's are still red. Probably just the colour balance of the photos (it's tricky to get right and I wasn't looking at the red when I checked the photos).
Speaking of orange though, I'm thinking of doing the plasma coil and the evil-eyes in orange. Probably a red-based orange as I'm wary of adding too many colours on him.
Camkierhi wrote: Looks fabulous, really liking the ghost effect,
Thanks. Yeah, I'm pleased with how that's turned out.
I'm going to have to remember it and do a full ghost member of The Scientist's army (would also need some imaginative fluff too).
and the whole thing is falling in nicely. This is turning out to be a real cracker matey.
Thanks. It's nice when a model reaches this stage, the list of things to do is shorter than the list of things done, and you can see the finish line (should have him done this week; I have been busy with other things which has slowed progress, honest).
Unless someone can see anything I've missed in these quick pictures then I'll finish the base tomorrow and post up decent photos and he'll be up on ebay at some point after that.
Dr H wrote: Unless someone can see anything I've missed in these quick pictures then I'll finish the base tomorrow and post up decent photos and he'll be up on ebay at some point after that.
Truly brilliant, exceptional work, I really like him.
Looking very hard for any problems, the only thing I might see, check the edge of the cloak, where the red comes to the cream, a bit about half way down his left, looks maybe like the red is over a bit far, not absolutely straight. Tiny touch on that of the cream and I think it is the masterpiece I thought it would be.
I am being silly mind you. You really are pushing the limits of brilliance and especially with paints of a completely different breed.
I think you may have missed the stacks of pancakes in the background...at least one of them appears to have gone green....never a good sign with flour-based treats.
Wow. I love that paintjob especially the sword and how the colors really work to give it that ghostly look. I've tried to do the same before and can never seem to get the colors and blending right, very impressive.
Camkierhi wrote:Truly brilliant, exceptional work, I really like him.
Looking very hard for any problems, the only thing I might see, check the edge of the cloak, where the red comes to the cream, a bit about half way down his left, looks maybe like the red is over a bit far, not absolutely straight. Tiny touch on that of the cream and I think it is the masterpiece I thought it would be.
I am being silly mind you. You really are pushing the limits of brilliance and especially with paints of a completely different breed.
Thanks Cam. Not silly at all, that is the kind of thing I am after. I too noticed that fleck of red when I posted the picture. It has been expunged
I'm flattered you think so. Just goes to show that using Enamel paints are not an excuse for a poor paint-job.
monkeytroll wrote:I think you may have missed the stacks of pancakes in the background...at least one of them appears to have gone green....never a good sign with flour-based treats.
Thanks Monkey. I'll... er... get on to that...
Incidentally that green one (as opposed to any of the other possible green ones) is the colour of the wash I used on the ghosty bits.
OneManNoodles wrote:Really awesome work on that
Loving the cool contrast on the daemon-y bits to the rest of the armour. Can't see anything glaringly obvious.
Thanks Noodles. I'm quite pleased at how the various contrasts have worked out. Can't say whether it was through luck or judgement though.
Ir0njack wrote:Wow. I love that paintjob especially the sword and how the colors really work to give it that ghostly look. I've tried to do the same before and can never seem to get the colors and blending right, very impressive.
Thanks Jack. Glad you like it.
I spent a fair amount of time researching the right colour for ghosts and then looked at what colours were used. Except for the occasional monotone green one, I found that the most pleasing ones had a blue tint to the shadows and were highlighted with white.
So, I painted the shading in blue (3 layers of dry-brushing) with a highlight of white. Then washed over everything with a blue-green that I mixed by eye. A final highlight with white (with a tiny touch of green) and then used a dilute wash of blue (the original base colour) applied to some of the recesses to darken them if they needed it.
The few little touch ups are done and here's the final pictures. He'll be up on ebay soon-ish and I'll post the link here.
"I spent a fair amount of time researching the right colour for ghosts"......
So.....you watched Ghostbusters right?
The effect worked really well, good job. The only thing I can think of now (pancakes were distracting me earlier ) is to have had a bit of metal showing on the sword blade to counterpoint the ghost effect, in my mind that would have been more of a possessed sword as opposed to a ghostly sword - if that makes sense. But that's a purely personal view and entirely depends on what look you were going for
monkeytroll wrote: "I spent a fair amount of time researching the right colour for ghosts"......
So.....you watched Ghostbusters right?
I so should have done. But it wasn't that long ago I last watched it anyway.
The effect worked really well, good job. The only thing I can think of now (pancakes were distracting me earlier ) is to have had a bit of metal showing on the sword blade to counterpoint the ghost effect, in my mind that would have been more of a possessed sword as opposed to a ghostly sword - if that makes sense. But that's a purely personal view and entirely depends on what look you were going for
I did think about giving the edges a dry-brush of silver to do that, but the effect was so nice I decided that I didn't want to disturb it and so, ghost-sword it is.
While Kranon still looks for a welcoming home and I continue to scratch my head over what kind of dozer blade to add to my tank, I've started on the next product that I will cast up and sell with the boxes and toilets...
Needs to have a deeper back for the taps to sit on.
I can see where the monitors come from.
The backs will be extended, see below.
monkeytroll wrote:White part's a giant scatter pillow, the grey part's a pouffe?
Agree with Cam, needs a deeper back for the taps
The grey part is actually not-so-blu tack.
Due to my previous experience with the toilets and seeing Cam and his bath, I decided to use a former to make the shell of the sink around it.
These are to match the Tainted toilets in my "of course they are not Fallout models" range.
The backs will be built up (as below) and the insides need some putty to give the proper shape.
I'm doing two so that I can try different things with them and hopefully end up with at least one good sculpt.
Here's the progress on the back of the sinks and a picture of what they are aimed at.
Spoiler:
A lot more work is needed. Needs the lip and the whole shape has to be rounded.
and I'm not yet sure if the scaling is right yet. So these are test pieces to see how it goes...
Ahah...I'd forgotten what Fallout sinks looked like, I was referring to making the 'lip' wider at the back for the taps to rise out of - guess that's more a UK style
A little progress on the sinks. I added some putty inside the bowls to give that shape and I added a lip around one of them (with the left over putty from the insides). I then gave that sink a good sanding to try are get the shape.
Here's a comparison shot with a Tainted toilet and SM #9.
While the shape is ok, I think the basin is a little too large (compared to the toilet) and this makes the pedestal look too thin. But then the pedestal looks too thin compared to the base of the toilet in the earlier picture I showed... May need to be a little taller overall as well...
I don't have a good picture that shows both sink and toilet, so I'm going to have to have a wander about and find one.
Automatically Appended Next Post: That didn't take long. I found the perfect bathroom in Novac and now have many reference pictures.
What they show, however, is that my drawings that I made from previous reference pictures weren't right. I made the basin too square, it should be rounder on the front. The whole sink needs to be about as high as the cistern. The pedestal is indeed too thin... ...and the basin just slightly too large.
I may still carry one of these on as a variant, but will make some new ones from scratch.
monkeytroll wrote: The pedestal did look a little thin there, but the basin doesn't seem too large to me.
Yeah, the thickness was based on calculations of the scale on a drawing. The same kind of calculations were off when I did the toilets too.
It helps to give an idea of what you are building, but you have to make them to see how they measure up.
Good thing too, as the new basins are currently slightly larger... blame the addition of the lip.
They will be sanded down a bit. A mm here of there is not the end of the world, so long as they look right.
Keeping the back separate was probably a wise move
Yeah, it's a pain in the backside to try and get a smooth finish inside a hole/dip that is smaller than your finger. Had the same issue with the toilets.
Here's the sinks at their new height (with SM #2 for scale)
And I've started adding details to the basins and pedestals.
Locations for the taps and spout, the overflow and the water connections at the back.
I keep making a mess of the overflow on the second sink and having to re-fill it.
Next job will be to make some quick putty casts of these with the wonder material that is Oyumaru. Then I can fine tune the shape and detail before they can be moulded and cast proper.
I also still need to attempt the taps and spout...
Thanks Vik.
Yeah, the putty casts may be sanded down a little more.
Remember that these won't be standing on a piece of sprue when in place, so will look much shorter next to a model standing on a base.
Camkierhi wrote:Look pretty special matey. Excellent work.
Taps will be interesting.
Thanks Cam. Still not looked at taps yet...
cormadepanda wrote:Sinky sink of sinking feelings of sinkness.
More Sink in Progress for you.
Well, a little progress. I've been making copies of the better basin and the pedestals using the amazing stuff that is Oyumaru (I love this stuff).
They are not the best of casts, but they will be touched up and sanded down and I will hopefully get a couple of good casting masters out of them which I will then make a silicone mould from.
There's also something else I want to make before I get around to the moulding and casting stage though.
Thanks. Good to hear. Yeah, it looks like a similar stuff, a heat softened polymer. It looks like that stuff has a lower temperature for it's transition than Oyumaru (which is about 70degC)
Oyumaru is the Chinese version of Instant mold.
The pack looks like this:
I got it off ebay.
Viktor von Domm wrote:I like how detailed even the stands are...
Thanks. Well the sinks in-game have a pipe connection out the back of the pedestal, so it must be added.
I've had a few problems getting a good cast of the sinks, but I now have that pretty much sorted.
I also remembered to add location details on the bottom of the basin and top of the pedestal, so that the position is obvious.
Still more work to be done on these to tidy them up, but here's the progress so far.
scuzz_bucket wrote: ...so I totally read 'sinks', thought you meant 'skinks' like the Lizardmen, and found actual miniature sinks. What will people come up with next?
lol I have a long list of things to make, it's just a matter of time before I get around to it.
Where else do you wash your hands after using the Dr's toilets? Ofcourse you need sinks. It is what all those ruins have been missing for all these years. Broken down old buildings always have the bathroom exposed.
Sinks look fantastic, I will definately be ordering up some of these.
Have to admit, pretty cool. If you can do stuff like that to scale, people who do other sorts of modelling (dollhouses, larger scale railroad, etc) may be interested too. This hobby of ours encompasses a pretty small group. Cast a wider net for more fish, er potential customers.
Lamby wrote:Sinks - not something I ever thought I'd see someone modelling in 40k...
It's not something I thought I'd be modelling Not just for 40k though. They are just at that scale.
Oyumaru - awesome stuff and half the price of Instamold!
That's why I got it and not Instantmold.
I too, was distracted by your dozer blade work - very clever construction.
Thanks Lamby.
dsteingass wrote:Fantastic!! I can't wait to be your first customer!
Good to hear.
Retrogamer0001 wrote:Sinks? Why?
Partly the below, and that when I started out with making things to sell, I asked what people wanted to buy. The first answers I got were for boxes/crates and toilets (specifically those to match Fallout). Once I'd made the toilets, I had to continue to complete the bathroom items and produce a complete set. These and the other things I sell (currently boxes) and plan to make and sell are all to add that extra level of detail to terrain features or model bases. You could represent a ruin with two walls with a few cracks in, or you could make a ruin as you would find in reality with old/unused/broken tables, chairs, toilets, sinks and baths... These things don't disappear just because the building got hit with a shell. Little details make all the difference in modelling.
dsteingass wrote:Because of humans, and hygiene being important to our survival. And rads.
Camkierhi wrote:Where else do you wash your hands after using the Dr's toilets? Ofcourse you need sinks. It is what all those ruins have been missing for all these years. Broken down old buildings always have the bathroom exposed.
Sinks look fantastic, I will definately be ordering up some of these.
Thanks Cam. Good to hear.
Red Harvest wrote:^^^Wash?... Hands? ... What is this odd notion?
Have to admit, pretty cool. If you can do stuff like that to scale, people who do other sorts of modelling (dollhouses, larger scale railroad, etc) may be interested too. This hobby of ours encompasses a pretty small group. Cast a wider net for more fish, er potential customers.
Thanks Red. Yeah, that is part of the long term plan. Need to build up a good stock collection and practice my carving/sculpting before branching out. There are so many things I want to make I could do with many more hands and the time to use them...
Dr H wrote: Need to build up a good stock collection and practice my carving/sculpting before branching out. There are so many things I want to make I could do with many more hands and the time to use them...
Sounds familiar .
Sinks look almost finished, so put me down for your second customer and thanks for the oyumaru tip.
I've had a look at making the fittings for the sinks.
Part way through the carving of the sprue spout I remembered that wire would be easier to use in scale.
The paperclip appears to be the best as it's slightly thicker than the copper wire I have. I will add a thicker end to the spout with some putty to give it a proper spout look.
The taps are still a wip here. I will make quite a few and then pick the best of the ones that don't break (I had one break today).
These are cut from a half-thickness piece of sprue and then sanded smooth and round and thinner. They will be then mounted on a short length of wire to make the final pieces.
Dr H wrote: Need to build up a good stock collection and practice my carving/sculpting before branching out. There are so many things I want to make I could do with many more hands and the time to use them...
Sounds familiar .
Sinks look almost finished, so put me down for your second customer and thanks for the oyumaru tip.
They are not far off. The fittings need to be done first and I have something else I want to make first before moulding and casting (as the resin needs to be used once it's open). I will let you all know when they are ready.
The detail that Oyumaru picks up is great. You do have to make sure you get it into all the corners to get a good mould. It's silicone as well, so things like GS and milliput don't stick to it. It's reusable and you can chop it up to make 2-part moulds and then stick it back together to make larger moulds. So far, after many uses, the bits I've been using (there are some in that pack that I haven't touched yet) still work as well as the first time. You can't use it for resin casting really, as the heat of the curing will likely soften the Oyumaru and you loose the detail in the mould.
Automatically Appended Next Post:
monkeytroll wrote:Progressing nicely....agree that the paperclip looks to be the best fit...not hollow though
Ta.
The putty versions will be though, or at least look it...
OneManNoodles wrote:Good luck casting those, I was just thinking about making my own.
Yeah, they are going to be the main challenge. I think it's possible though.
At first I thought "what the hell?" but now that I see what you're doing, I think it's great on so many levels. How much are you going to be selling the sink and toilet combos for?
Azazelx wrote: At first I thought "what the hell?" but now that I see what you're doing, I think it's great on so many levels. How much are you going to be selling the sink and toilet combos for?
I seem to get that often with my modelling. Thanks. It depends on how much resin is required per sink (which I won't know until I've done the moulds), but they should be similar to the toilets. The Tainted toilets (the ones based on Fallout) are currently going for £0.80 each, or £2 for 3 (as they are cast on a sprue of 3, makes life easier for everyone). So if the sinks use about the same amount of resin and end up at 80p each, then I may do a sink and toilet together for £1.50... They may use less and therefore it'll be less overall. I'm also planning a sprue of 3 for the sinks and so some offer for 3 of each may also happen.
I've found a better way to make the taps. Rather than cut a square and then cut the shape out of that, I've been cutting grooves into the sides of a piece of sprue, rounding the exposed edges and then cutting the tap off. A little more sanding and then drill a central hole and you have much more standardised taps. They still need a little more work, but I should be able to get a good pair out of those.
The taps needed a fair amount of sanding down to get them in scale (and so they didn't catch on the edge of the sink...) and I've now added the rod for them.
I also made a full set of 6 and I've made the spouts for all 3 sinks.
However, putting these 3 sinks together (without glue) has left me with a question.
Should I have the taps separate, or have them moulded on to the basin?
The thing is, they are quite difficult to stick in the hole and require the use of tweezers. Many of you will have a set of tweezers and some of you may use them regularly. But from comments I've seen about DDakka, many people don't seem comfortable with handling very small parts of models, especially those that only have experience with GW models and not with Airfix etc... kits (that often come with many small parts). I don't really want to put people off by using small parts and the difference in the final models will only be very slight. They will also be much easier to cast...
To give an idea of scale, the white rod that is through the centre of the taps is 0.5mm (0.02") and sticks out the back of the tap by about 1mm. They are very tiny pieces.
What do we think;
Separate, easily lost, easily catapulted across a room, slightly sticking out, taps...
Or easy, not all that different looking, moulded on taps... ?
While I decide upon the tap on or tap off casting of the sinks (hint hint) and before I start on the next item (which I need to do a few scale calculations for), I made a quick extra item for the set...


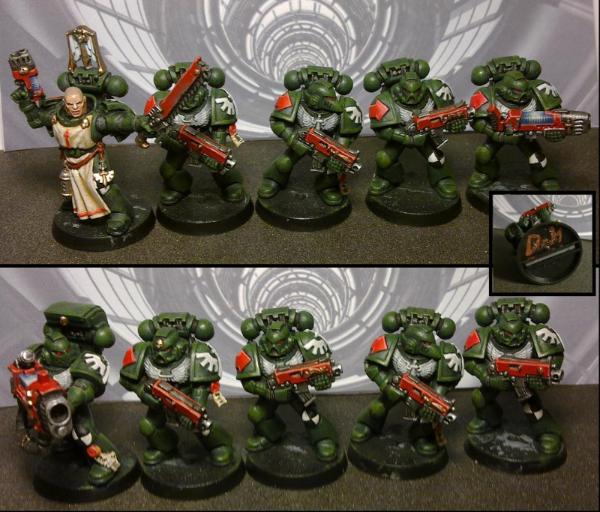
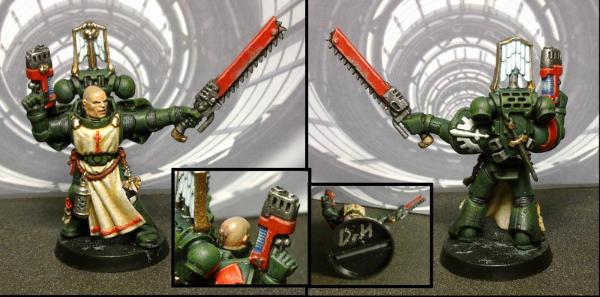
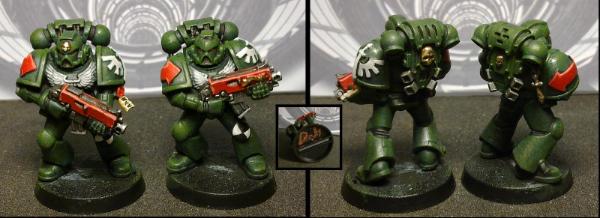
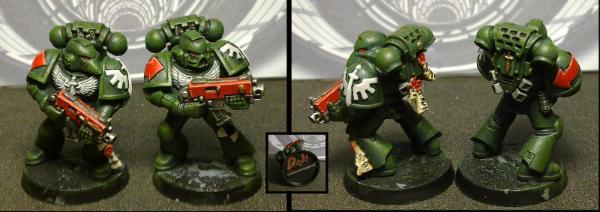
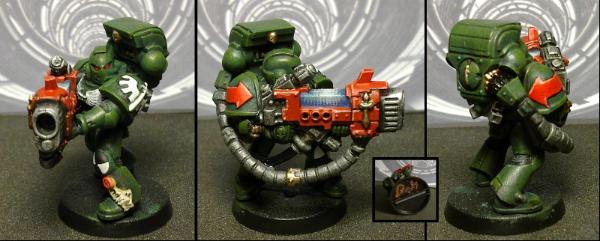
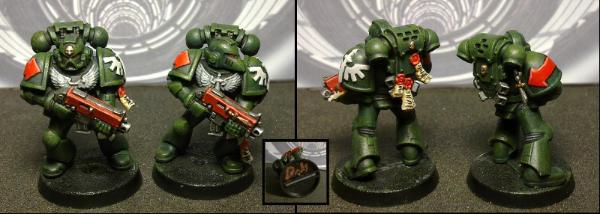
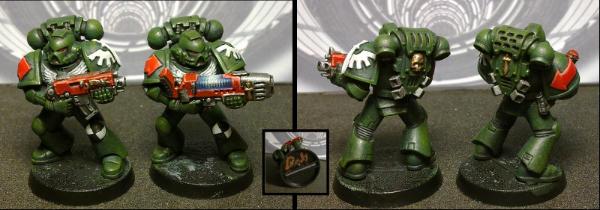

 This is just a curiosity, not badmouthing your miniatures or anything like that: You mention your "Silver" level has some blending, was it the technique used to create the shadows between the Sergeant's tabard?


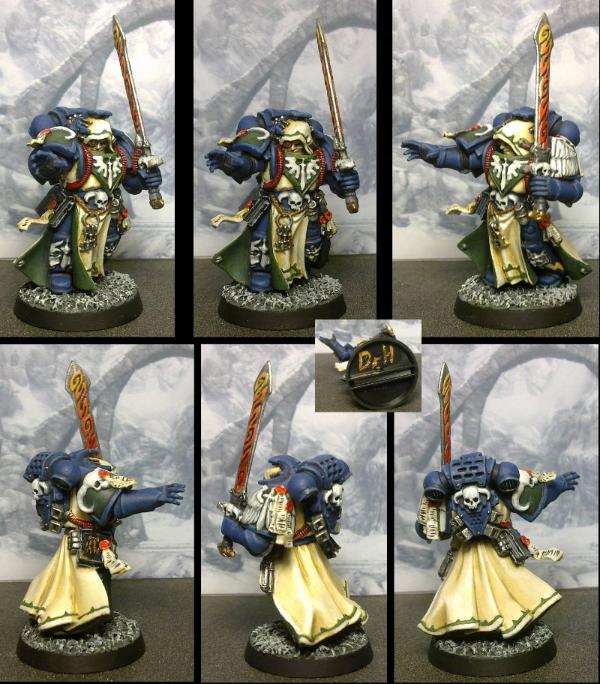


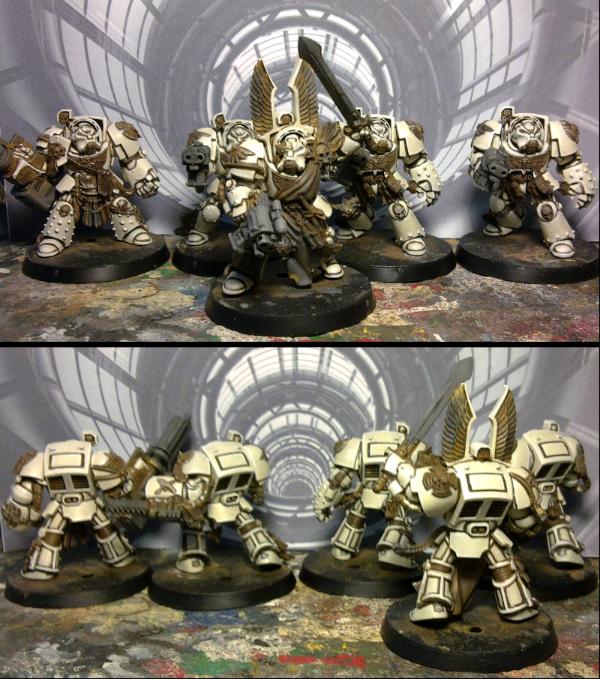
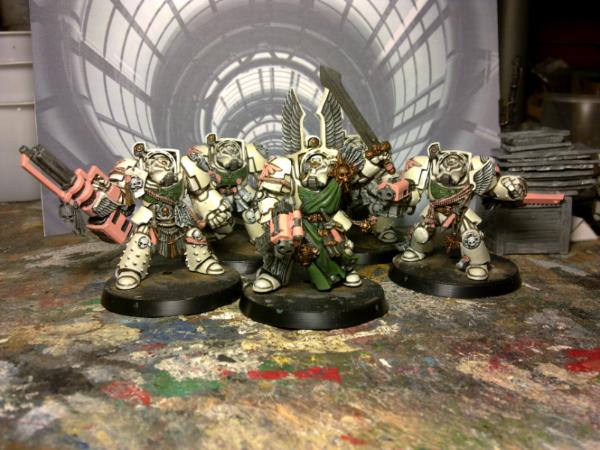
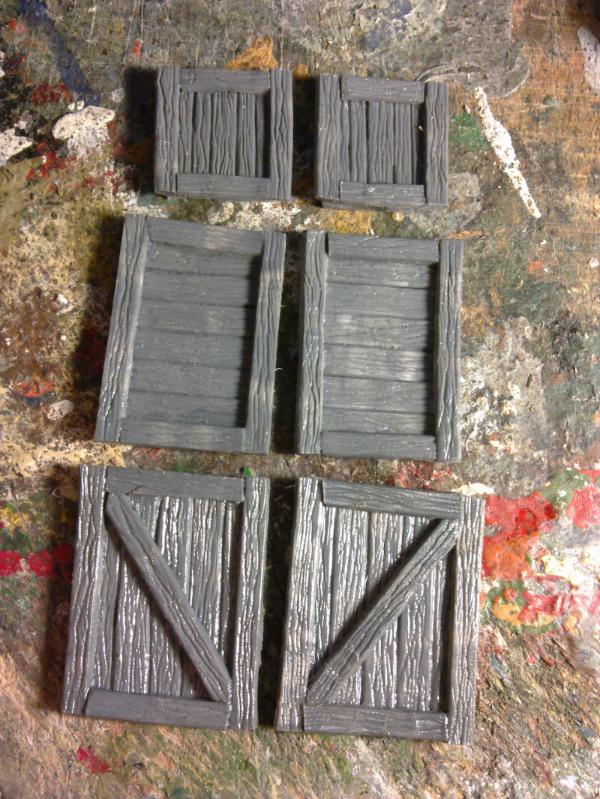

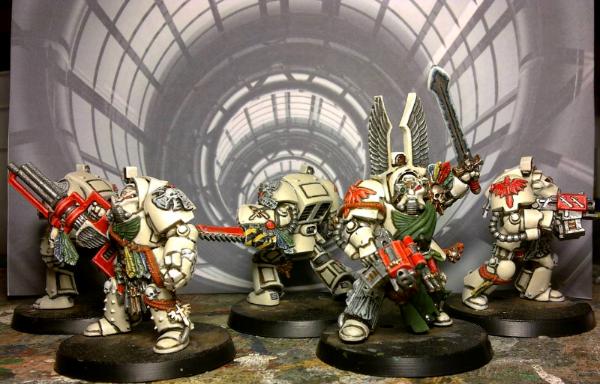
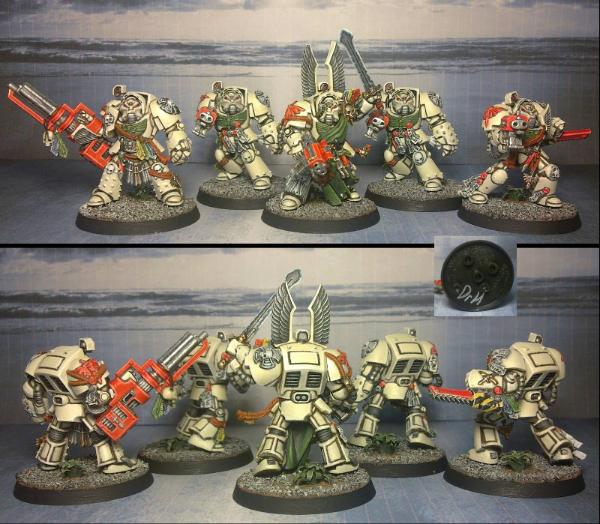
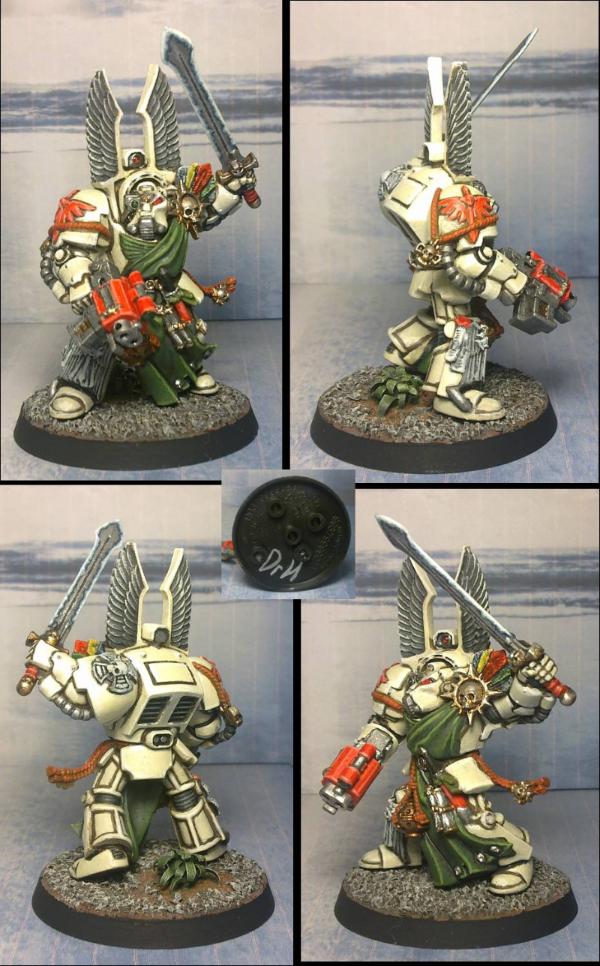
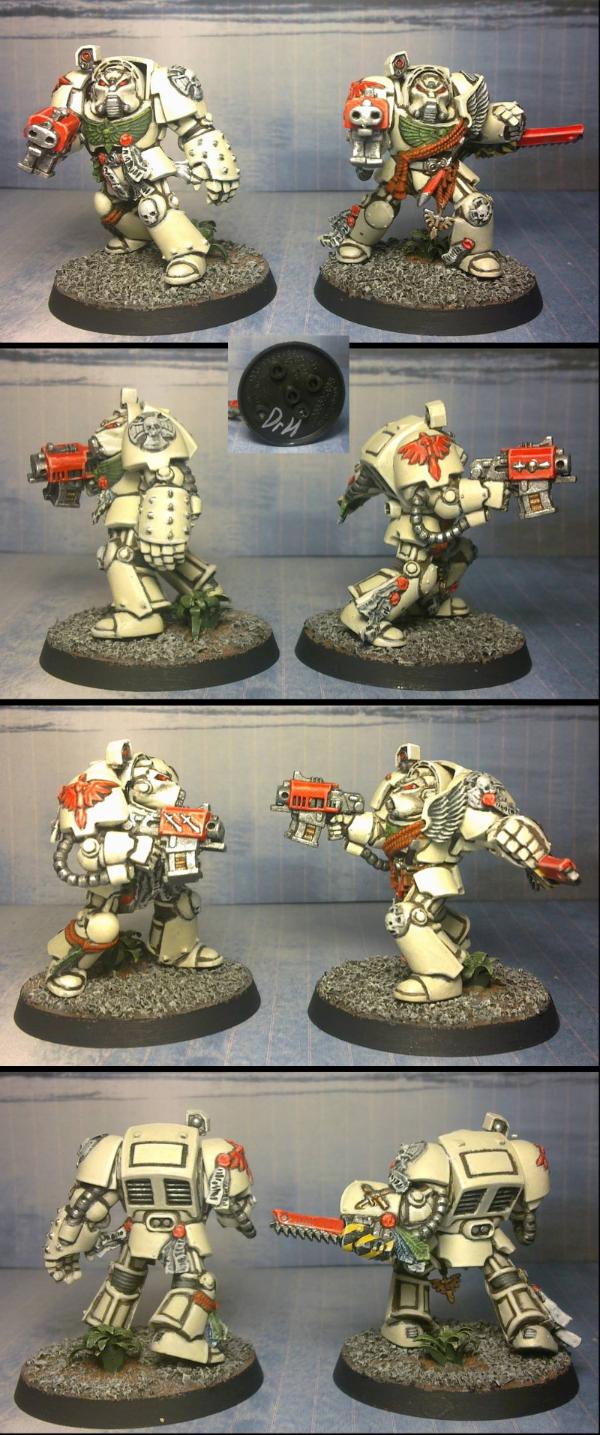
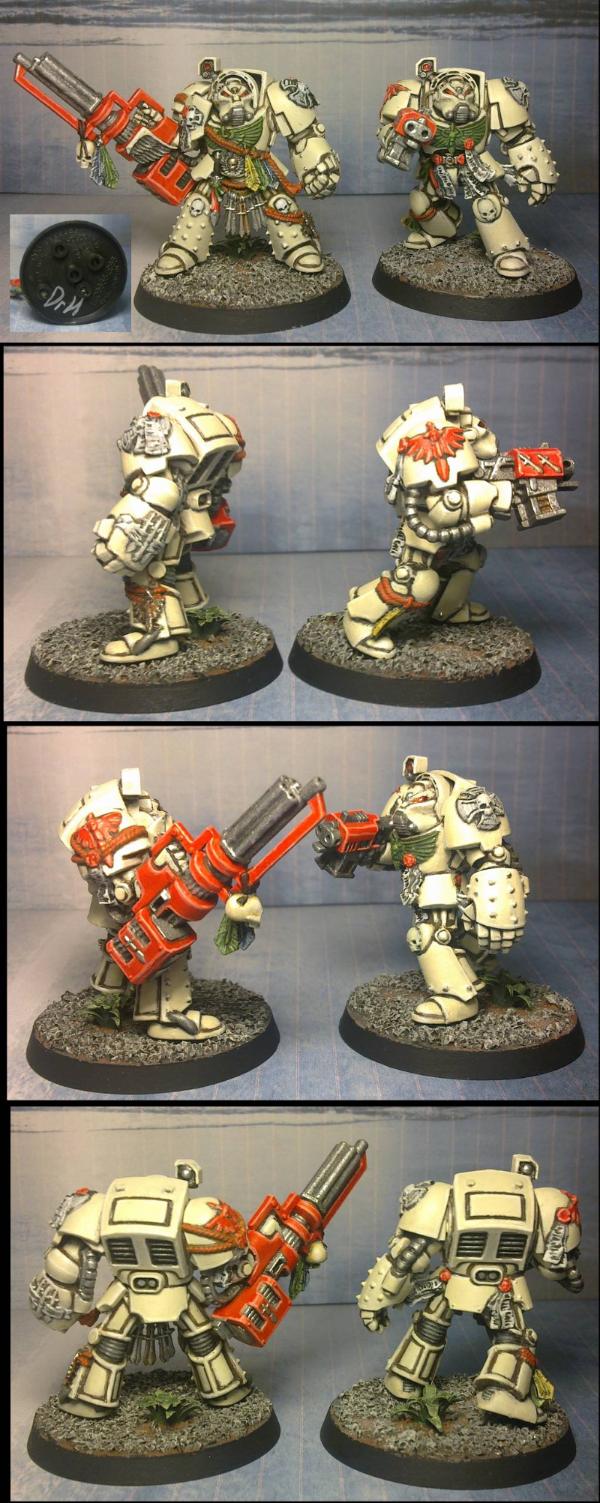


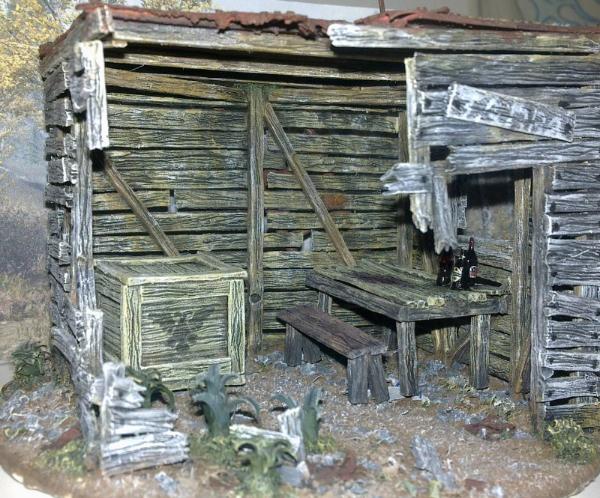

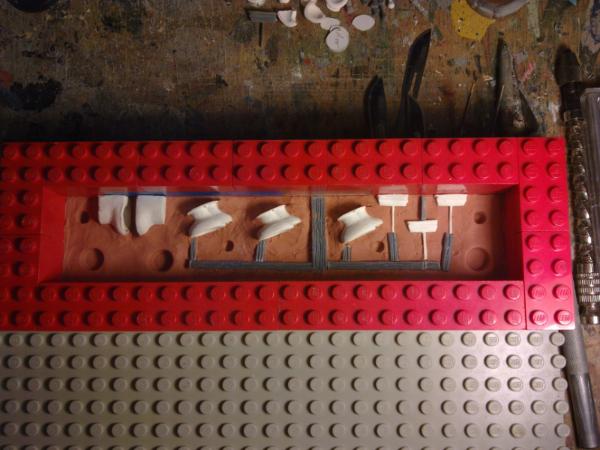
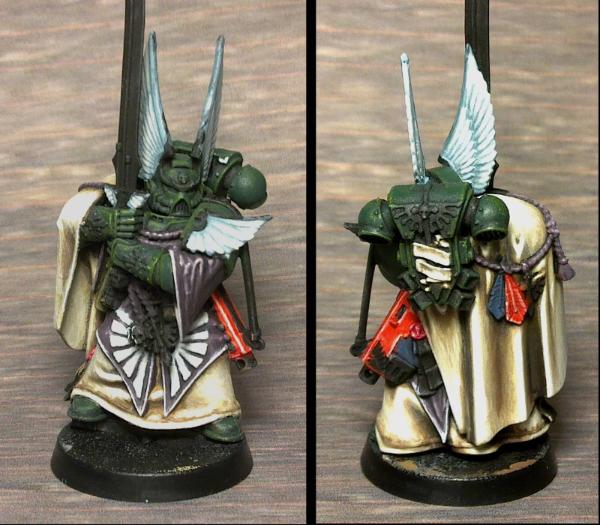
 ).
). 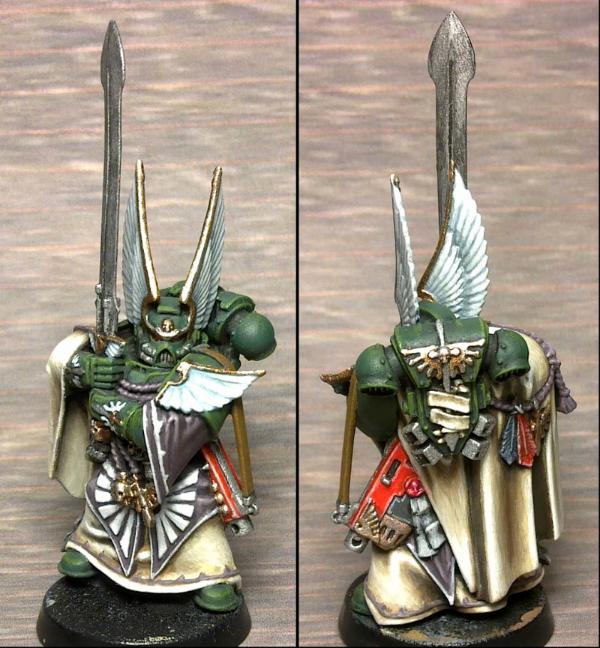

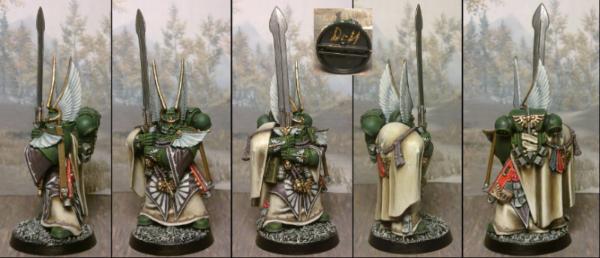
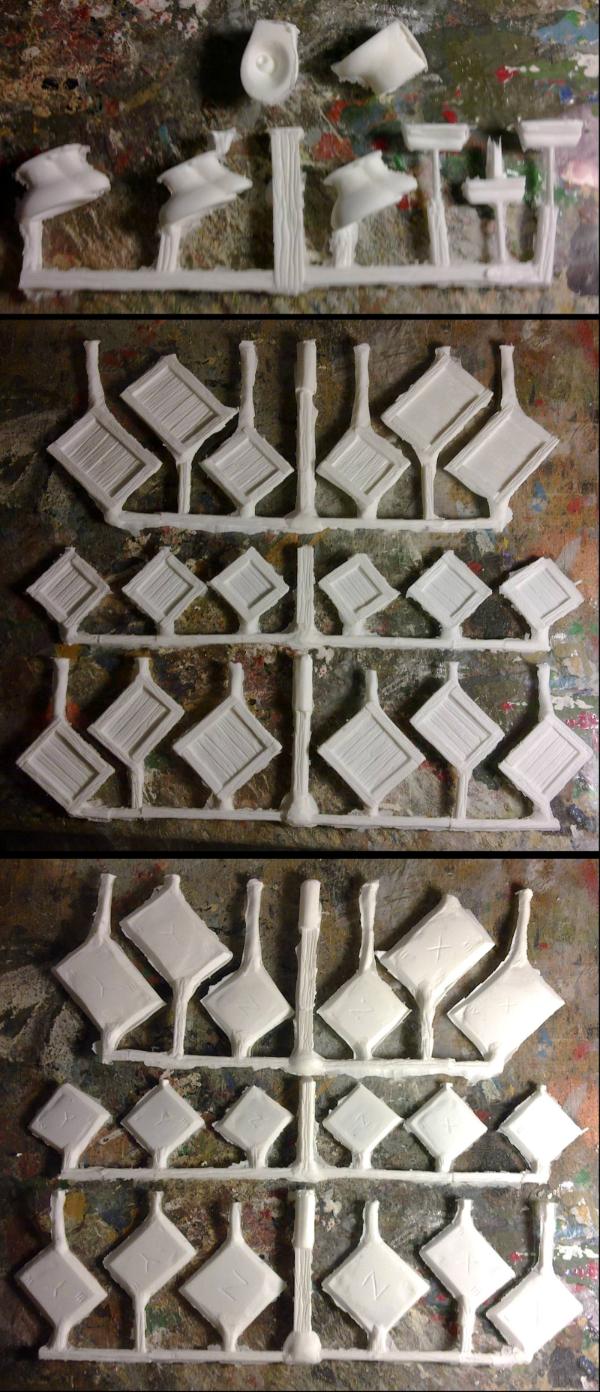
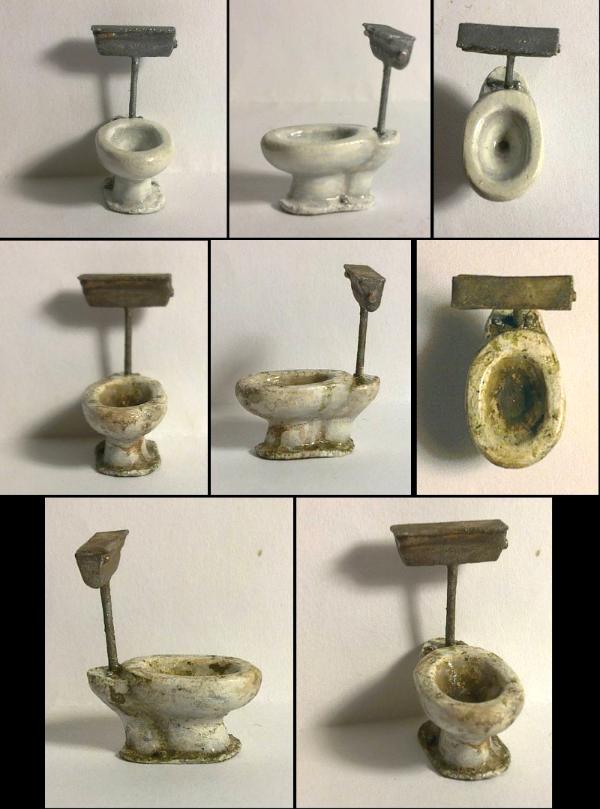
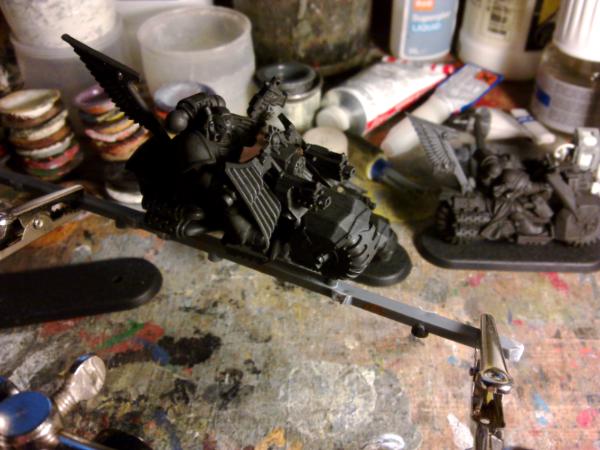

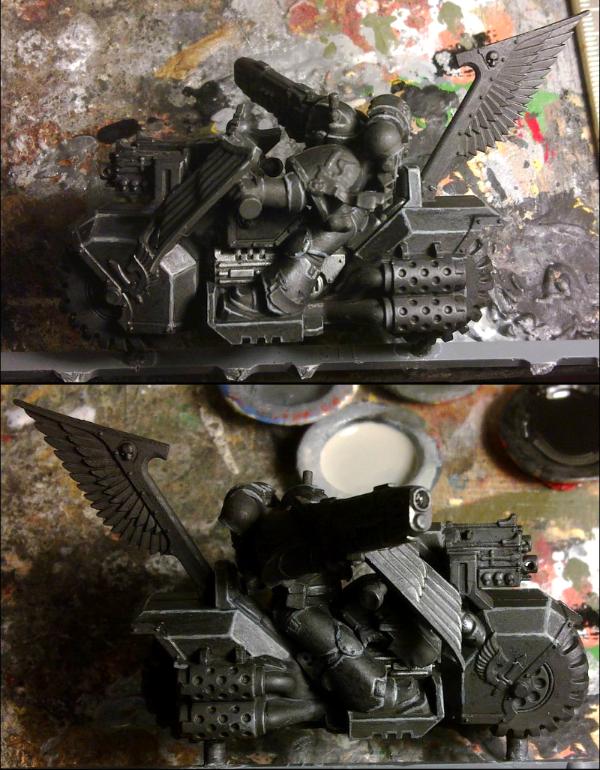


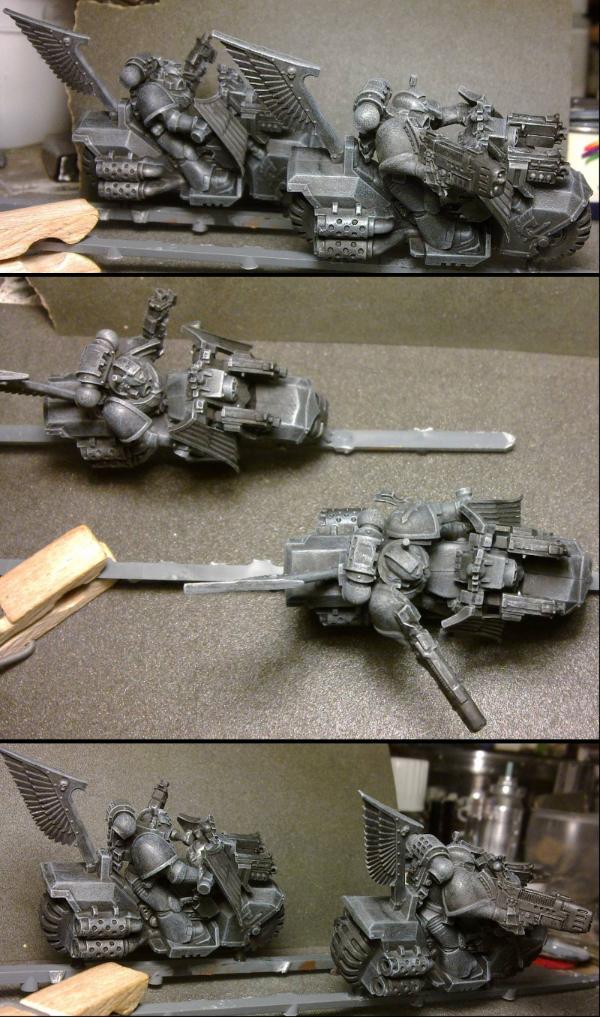
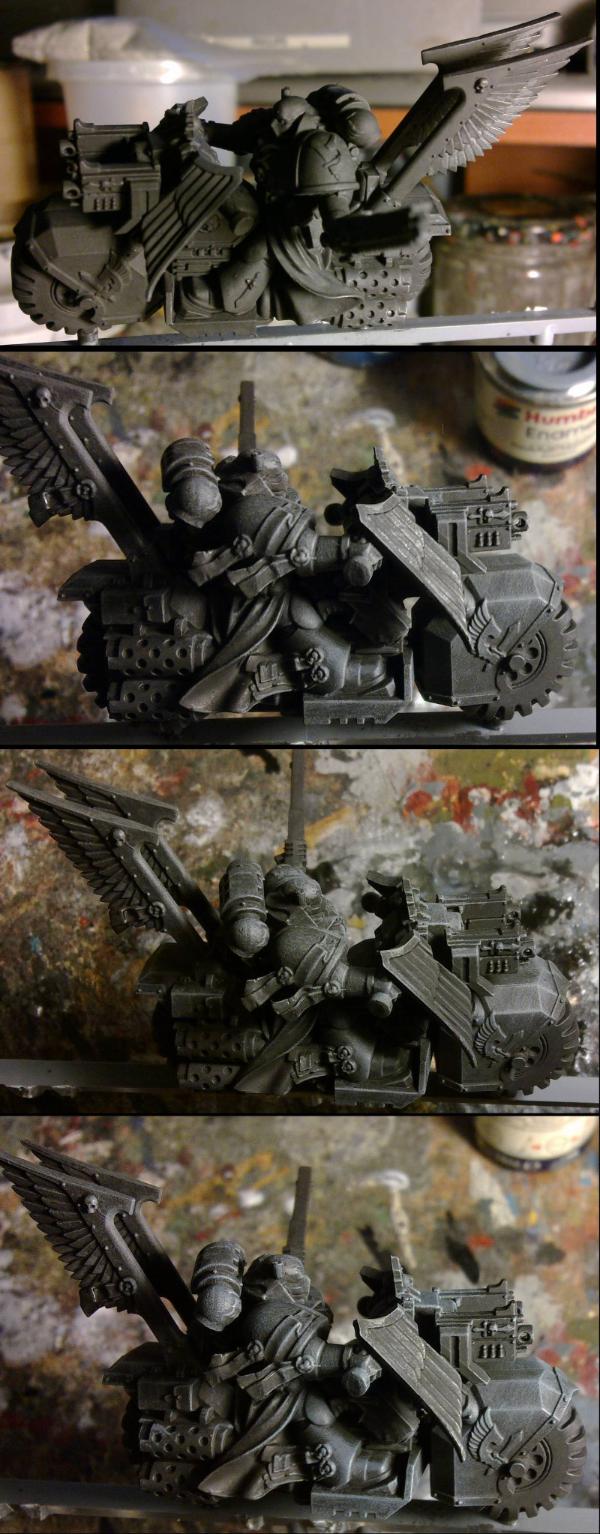
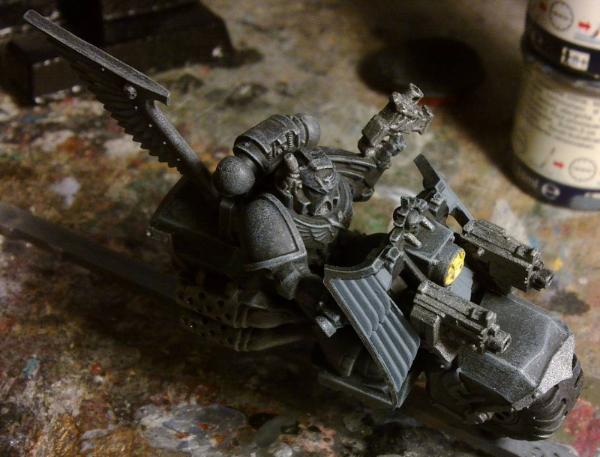
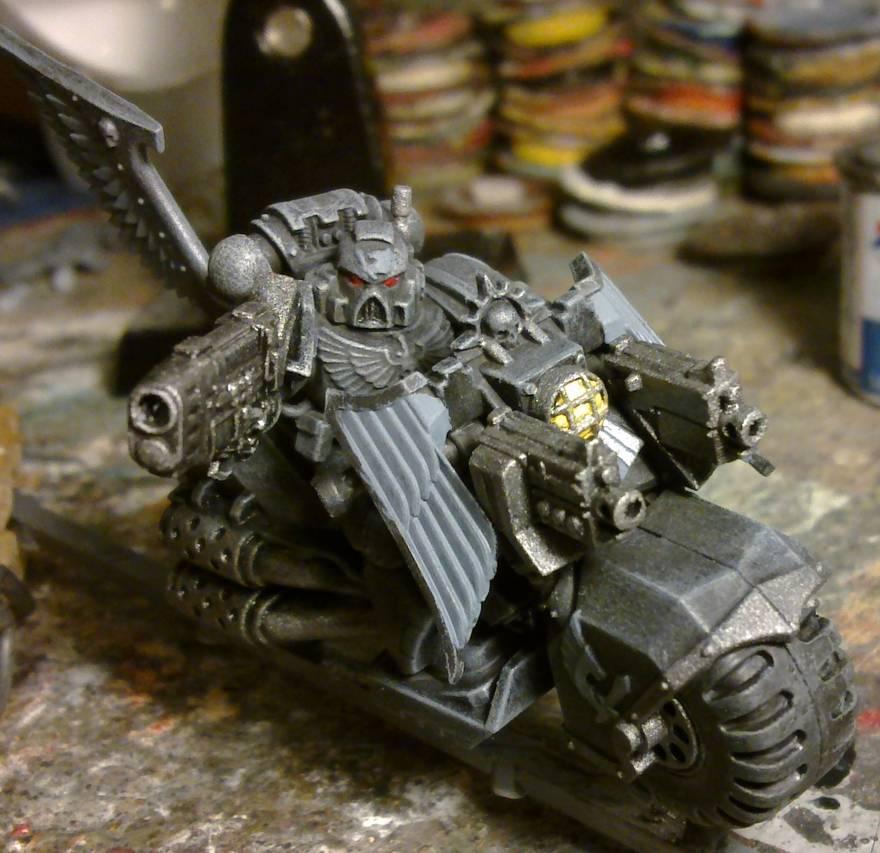
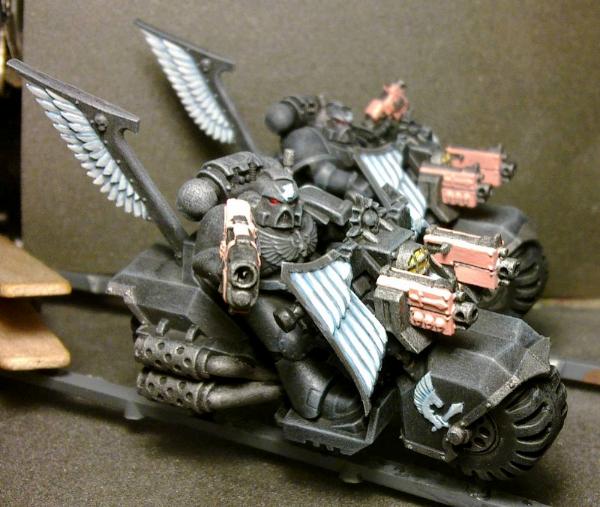
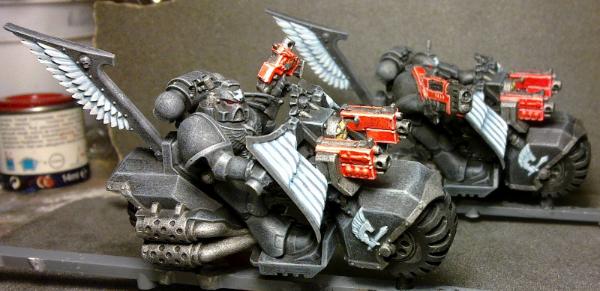
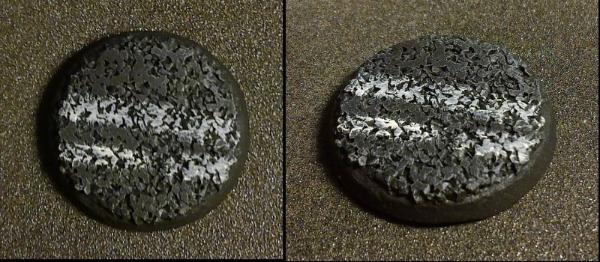
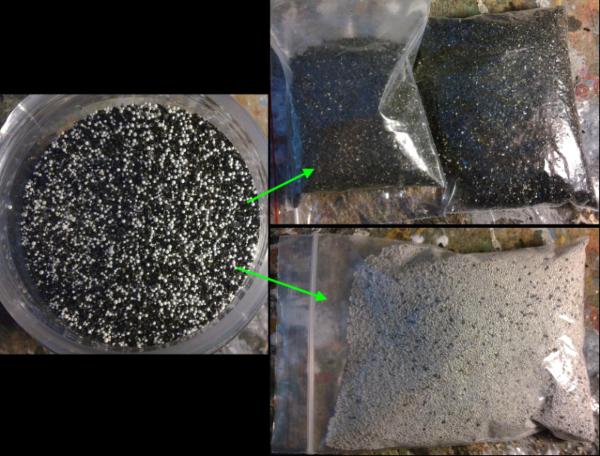
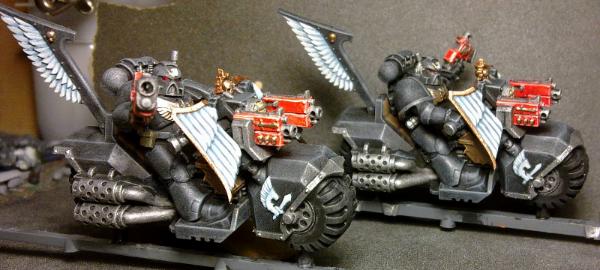
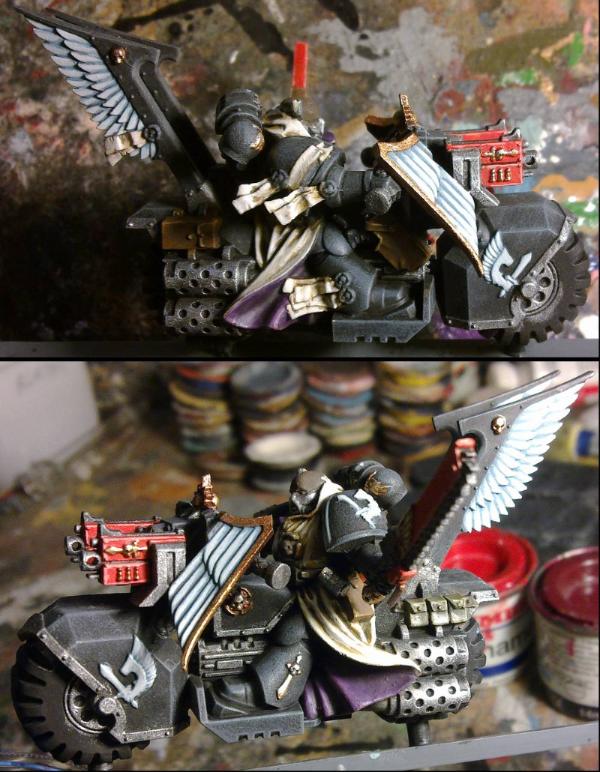
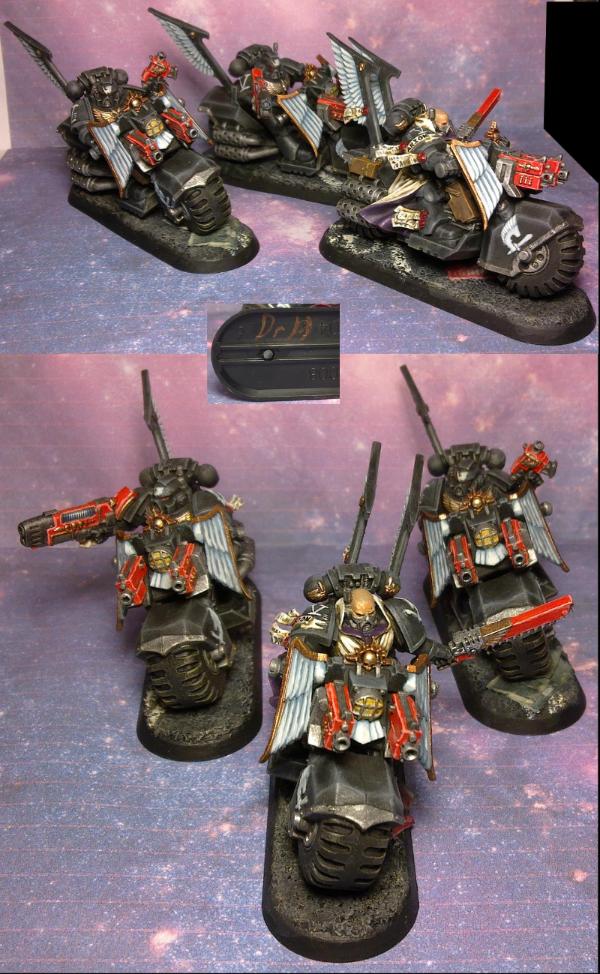
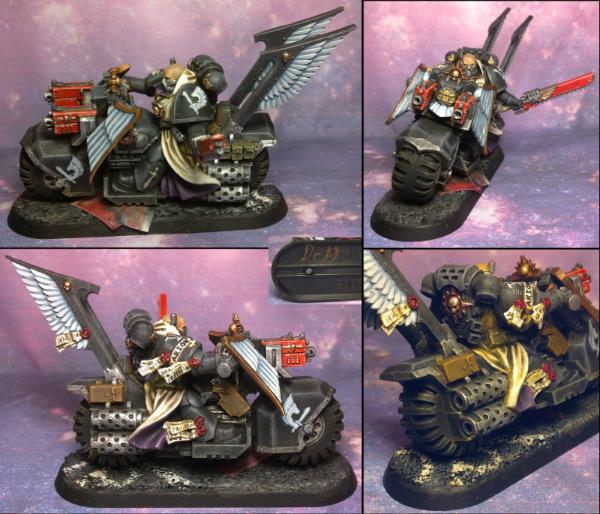
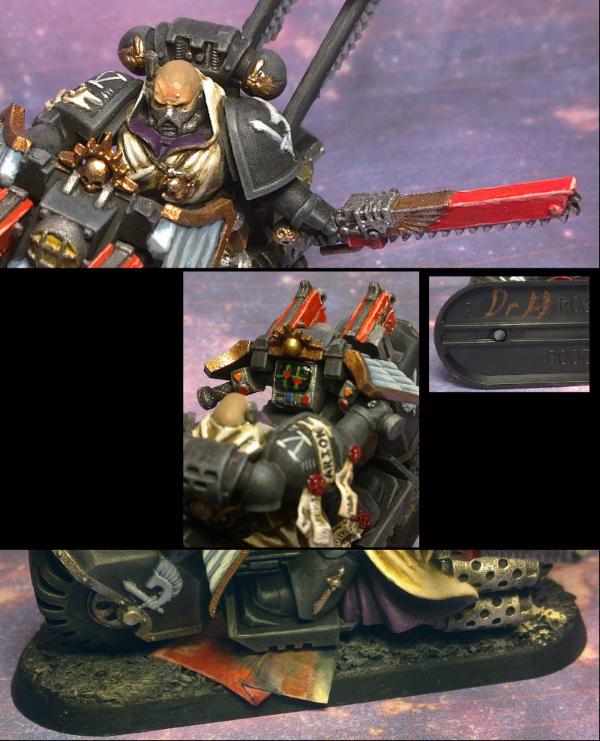
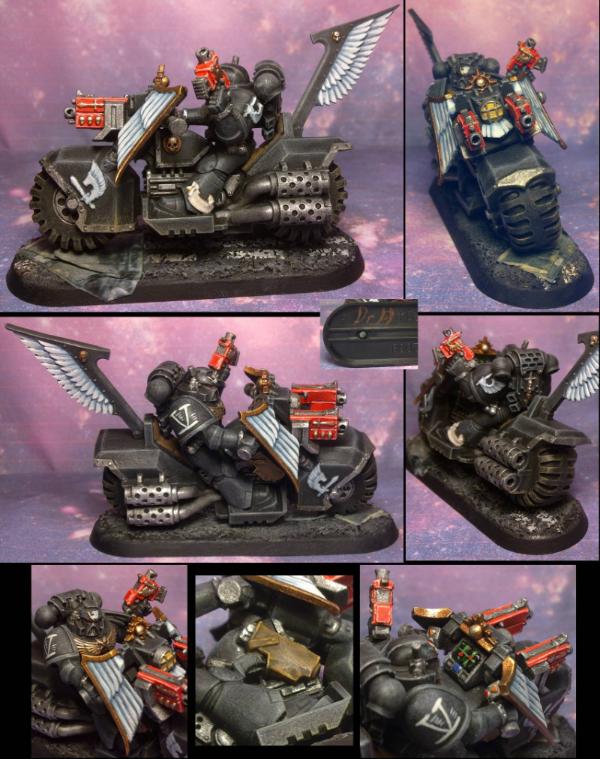
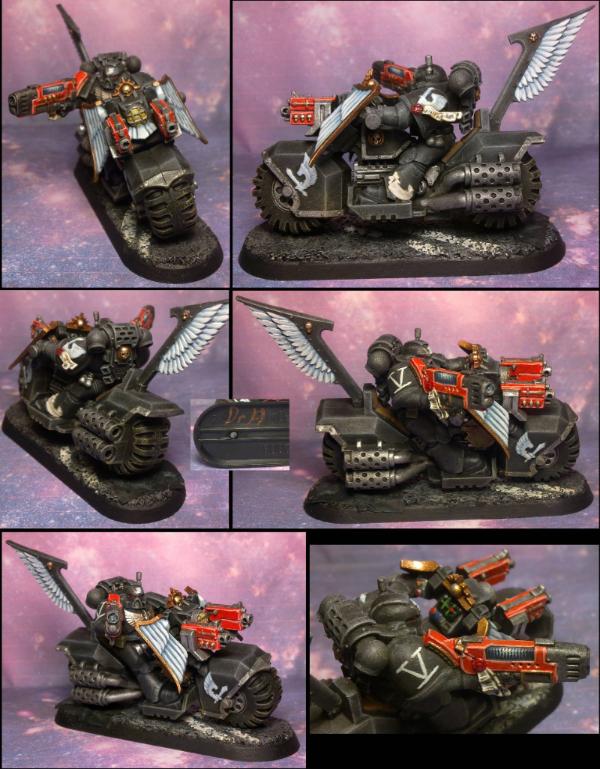
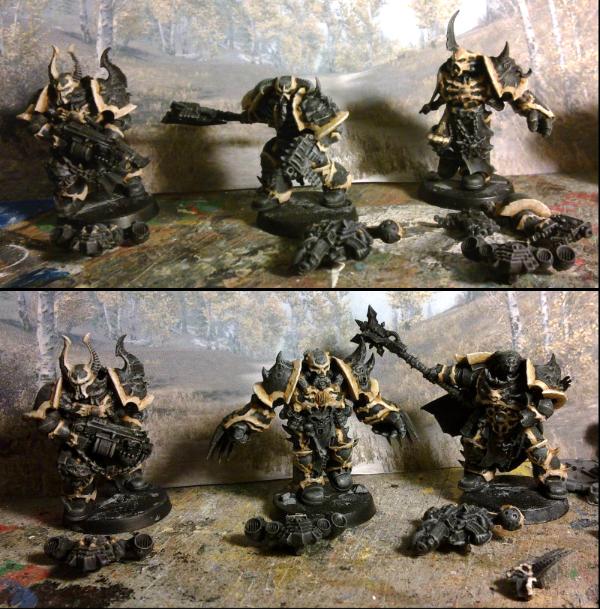
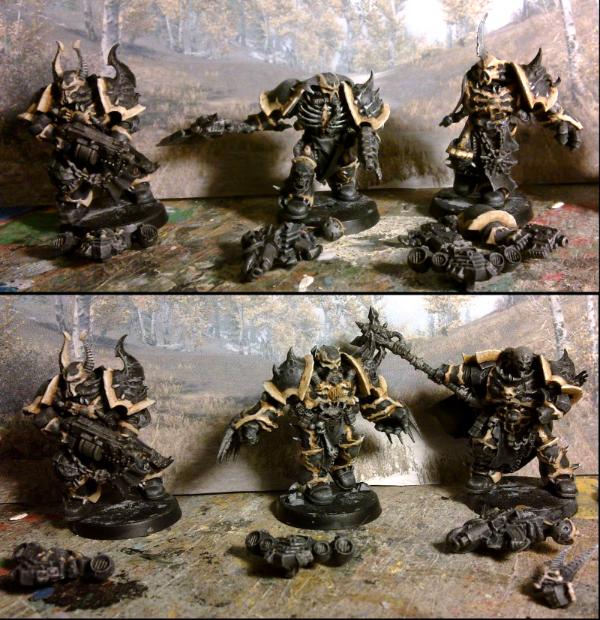

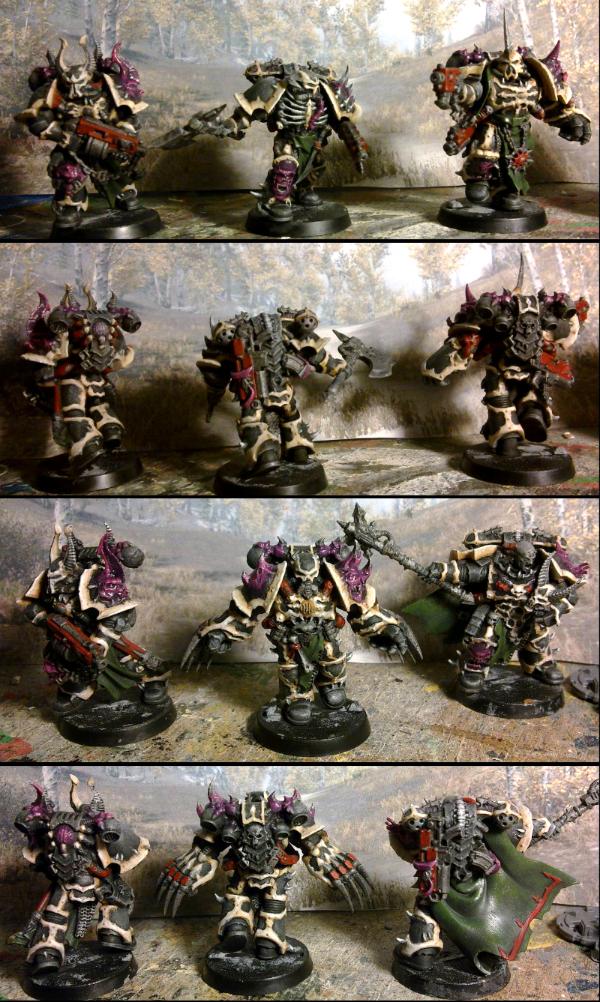
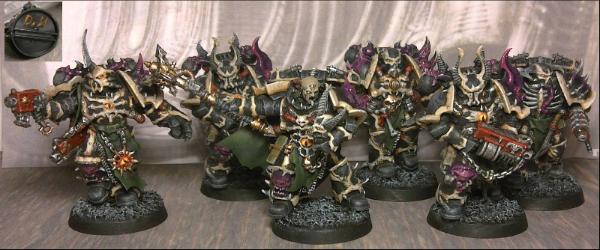
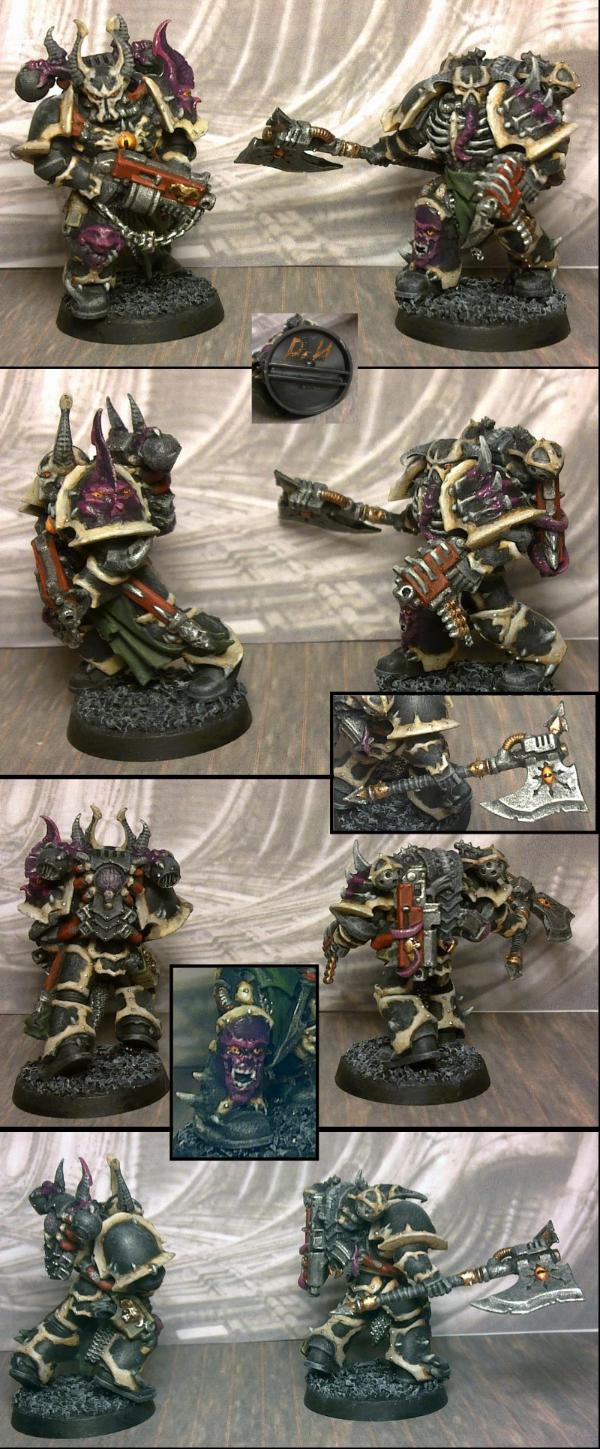
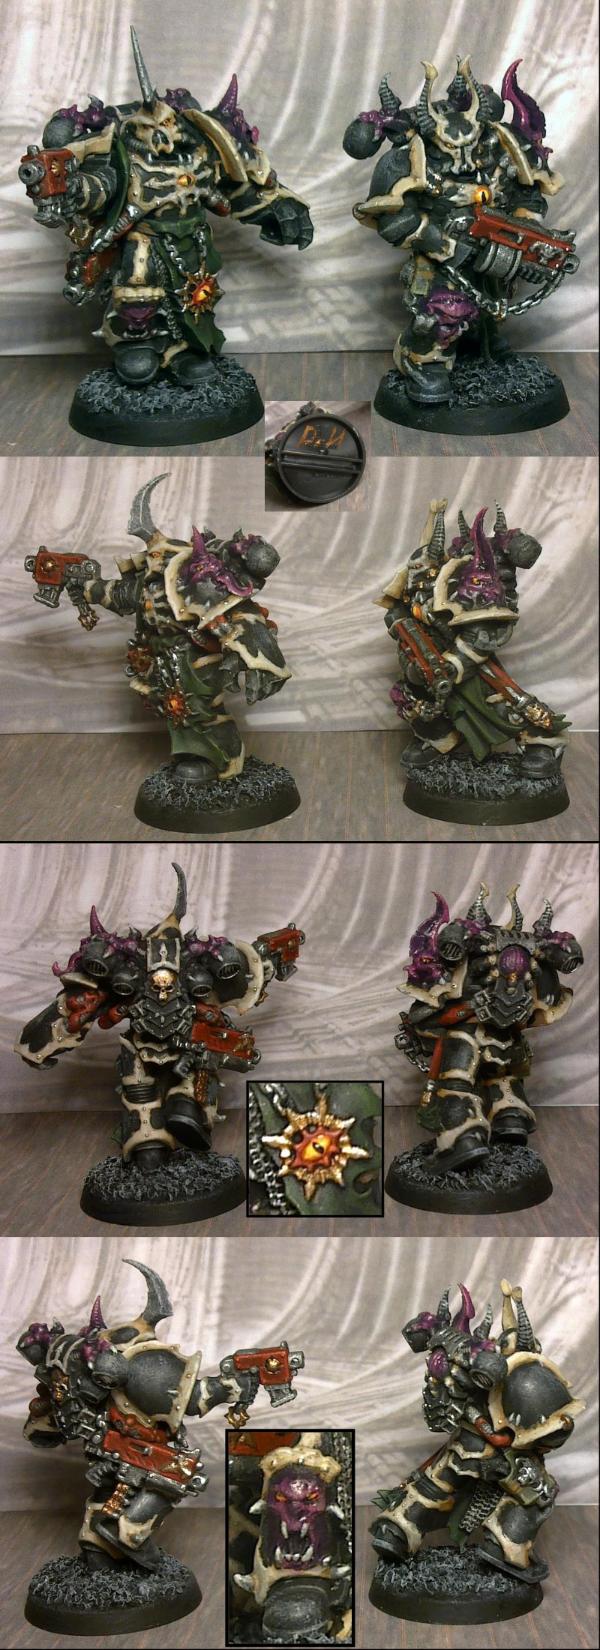
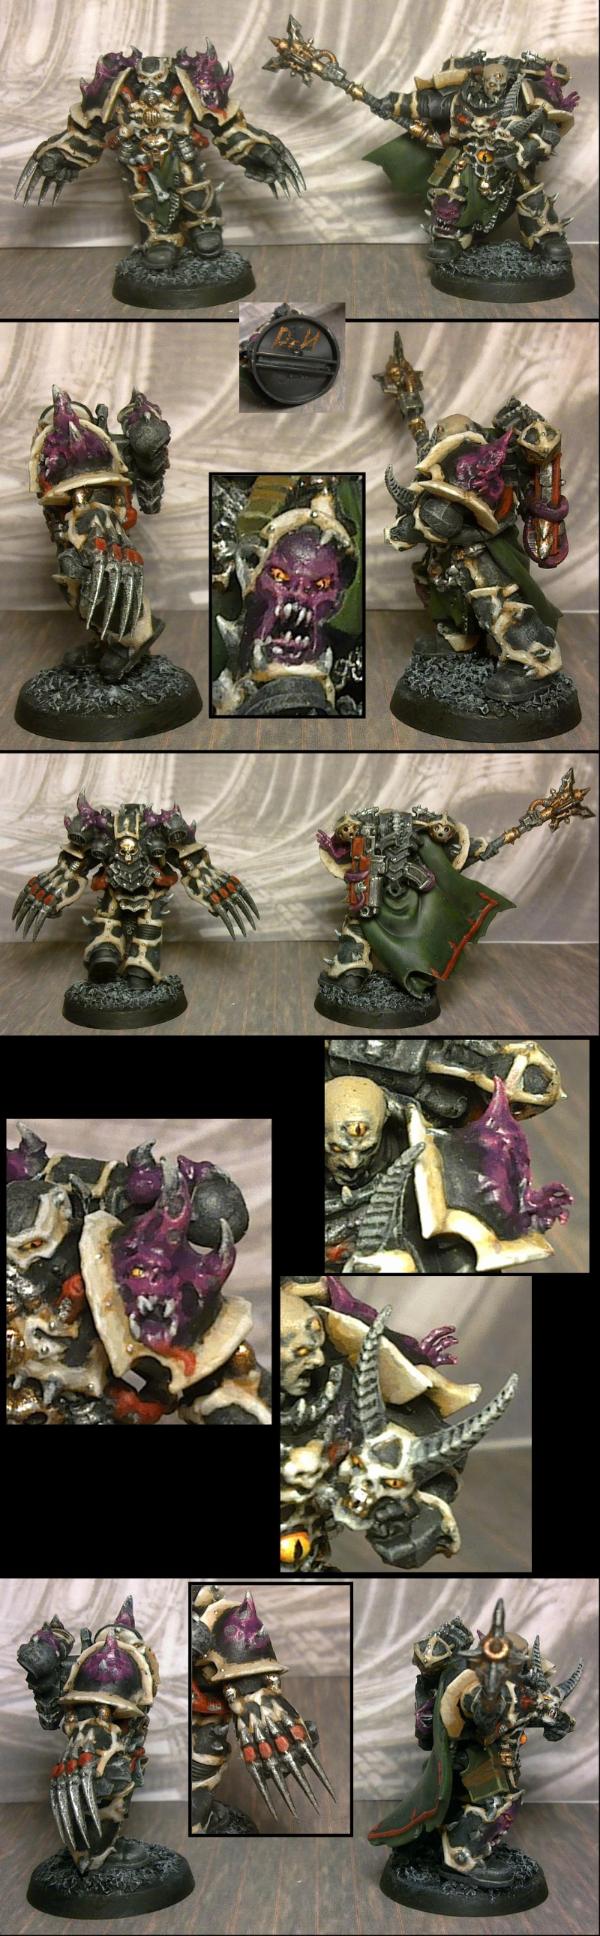
 ed them up first time round.
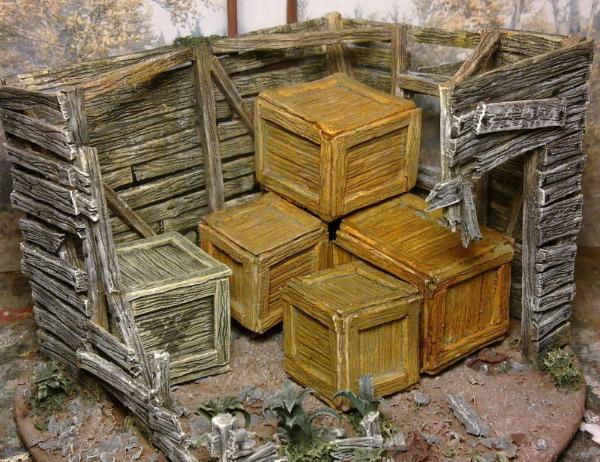
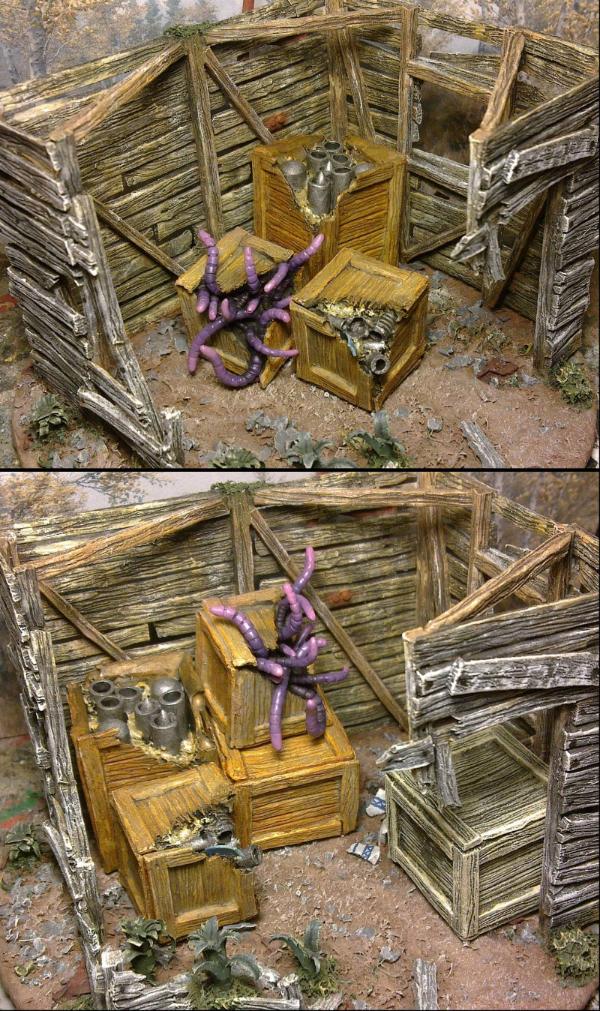
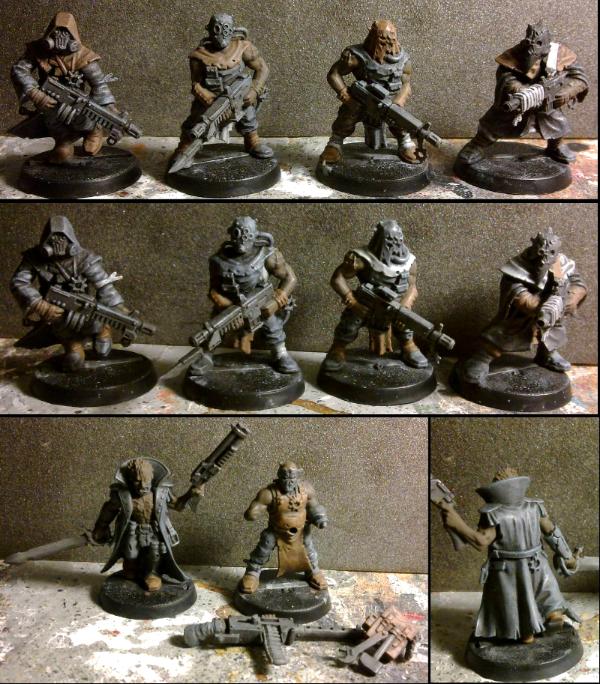
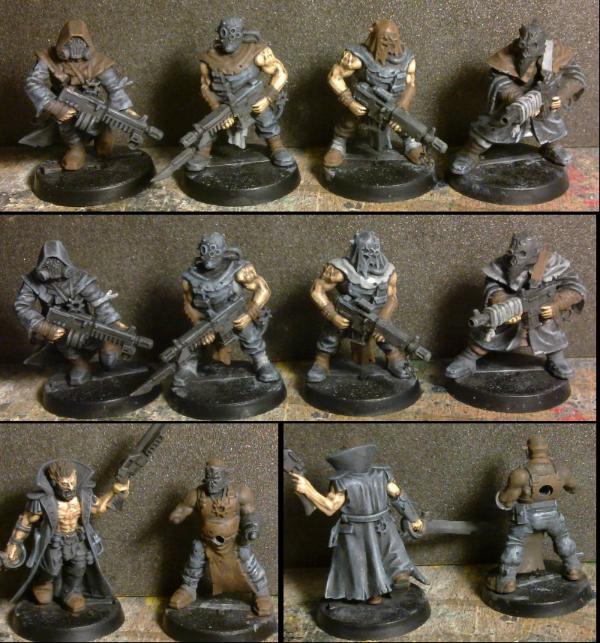
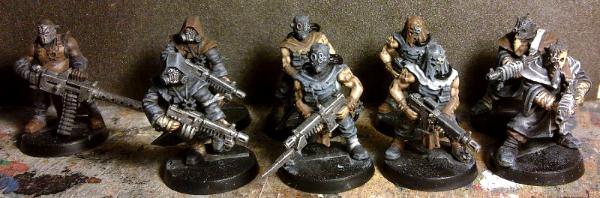
 Not mentioning any names, Chaos Lord Krannon...