…or, One man’s ongoing confrontation with the second-most reviled material in the gaming world.
Resin plastic, AKA restic, premium plastic, bones, or whatever name Privateer Press uses for their material, is almost universally despised. I say “almost” because I have no real complaints about any of the models I have worked with. I admit that it handles differently than hard styrene, but I have been collecting and painting miniatures since 1980, and have worked with lead and lead alloys, Rallidium, pewter, whatever superhard adamantium alloy that GW used to use, as well as styrene and restic, and it really seems like just another material requiring a slightly different approach to work well.
Since first discovering Kickstarter, I have backed a number of projects that have netted me a rather daunting backlog of things to paint. I have been working slowly but steadily over the last couple of years, and I like to think I have gotten good results. I would like to share them with everyone reading this blog.
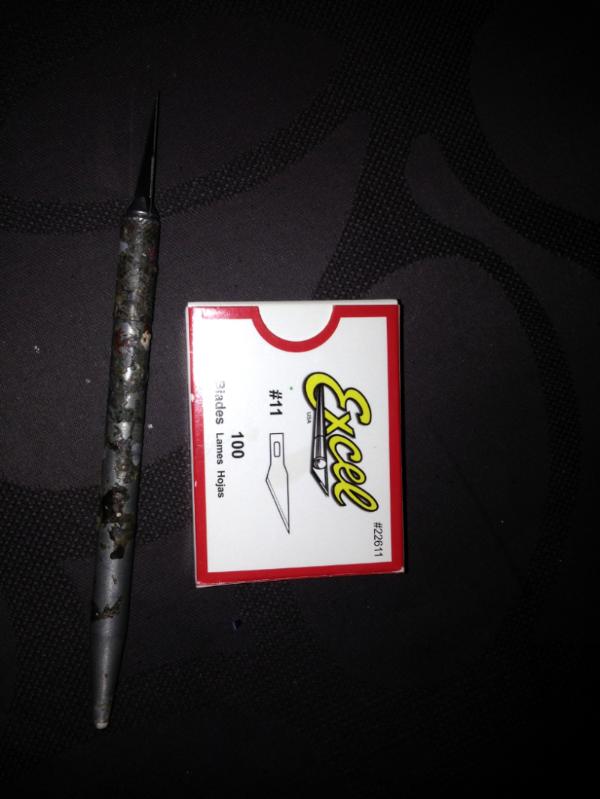
Before posting and photos of minis, I’d like to introduce the essential toolkit for working with restic. First: my Exacto knife and a 100-pack of #11 blades:
Mold lines and flash on restic models can’t be scraped off like with styrene plastic. Instead, you have to slice it off. Just lay the blade flat against the part that needs trimming, and slowly and patiently shave off the offending material. This takes longer than it would with hard styrene, but I have found it no worse than working with pewter. The secret is using a very sharp blade. As soon as it gets dull, switch it out. I have a little pile of blades that are too dull for restic but perfectly acceptable for other materials.
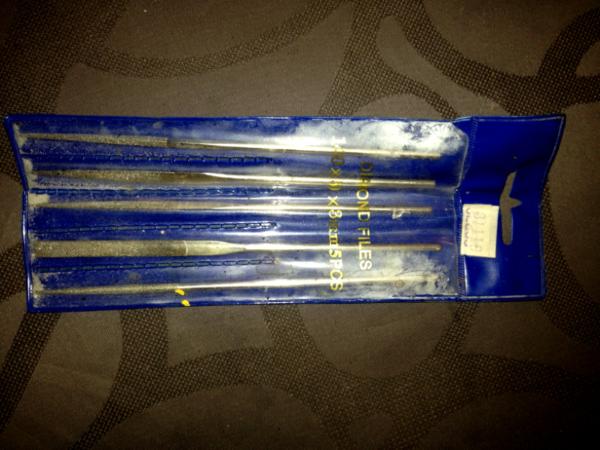
Second, my diamond-coated needle files:
I got these from MicroMark years before I moved to Japan, and they have served me well for years. They work great on metal, and they take restic off much more smoothly than standard steel files. You do end up with little burrs after filing, but this is the only case that scraping works better than slicing. I’ve heard good stuff about brass brushes, but these do the job just fine for me.
One tool I don’t use for restic models: primer. I find that paint sticks just fine on bare restic after it’s been washed. I had a series of bad experiences with Ral Partha spray primer back in the day, and have since primed with black or dark grey paint, thinned down and brushed all over the mini. With restic I can eliminate that step entirely.
Huh. I've never had to use pins to straighten bent parts. I have had trouble with superglue bonding to my fingers faster than the restic parts, as well as it bonding so fast I couldn't adjust the fit of the parts I was gluing. I'll go into that a little in the next post.
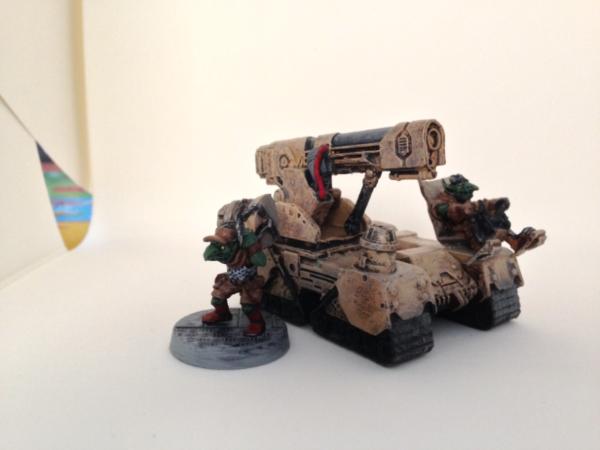
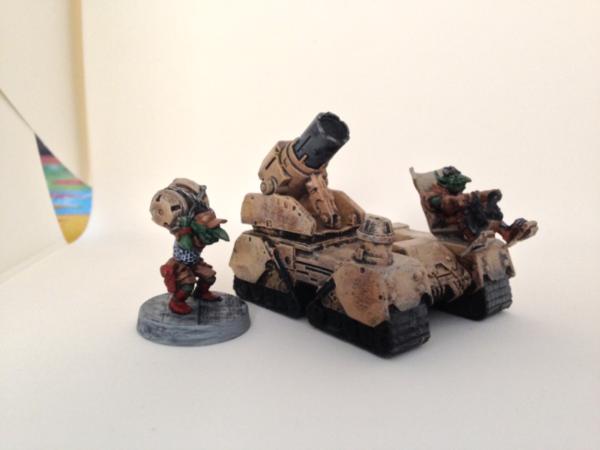
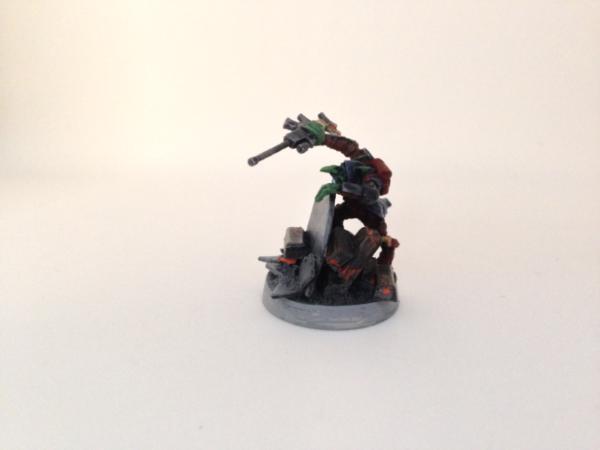
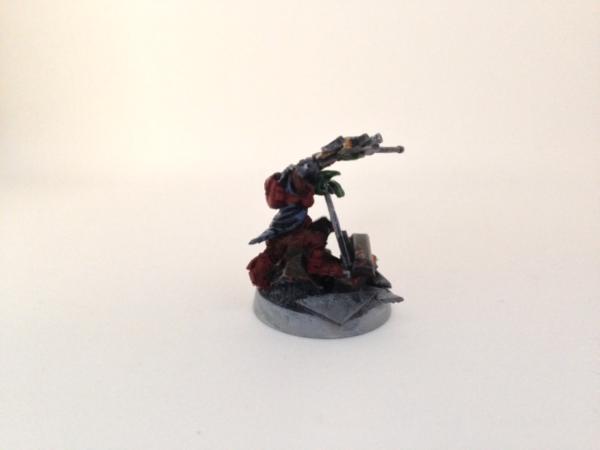
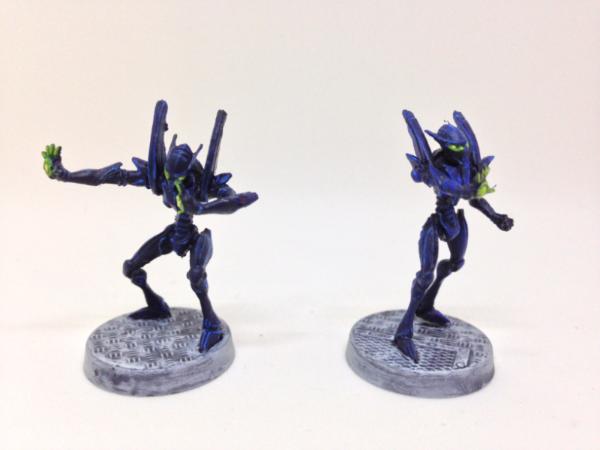
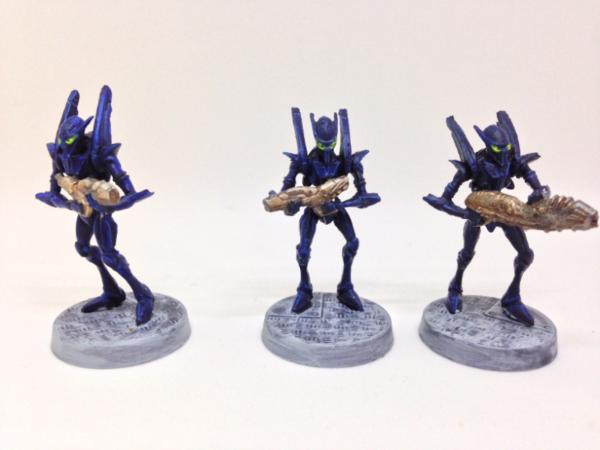
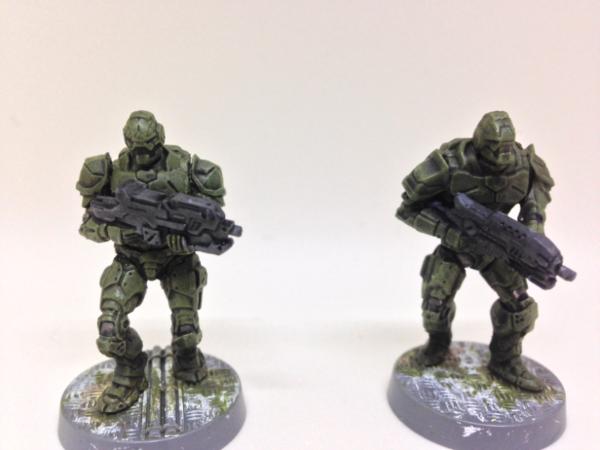
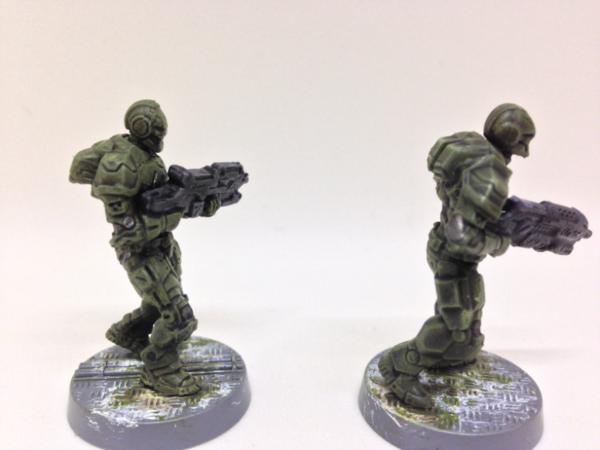
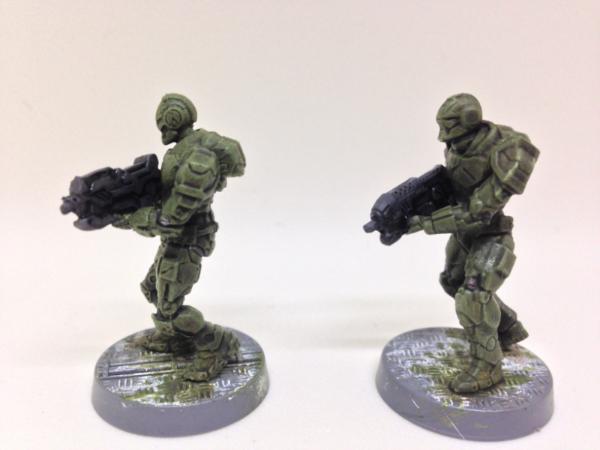
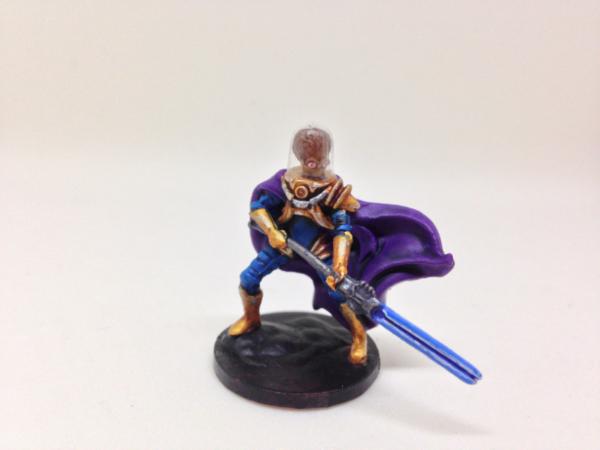
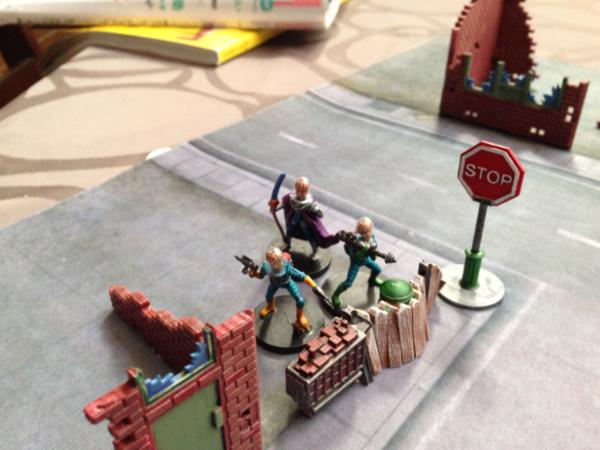
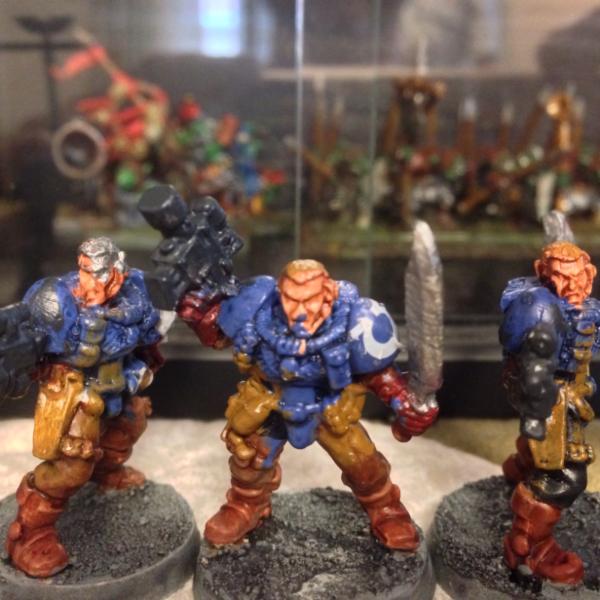
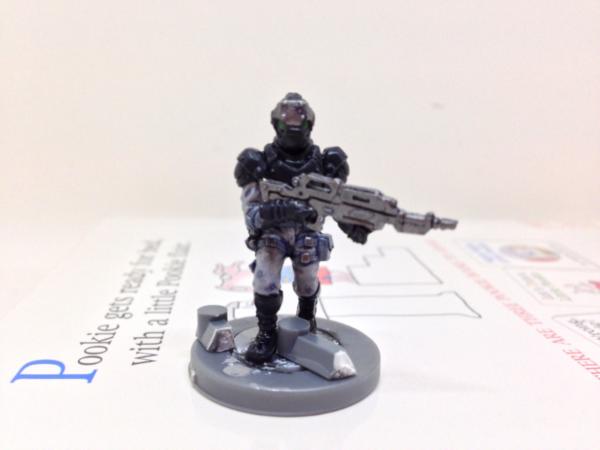
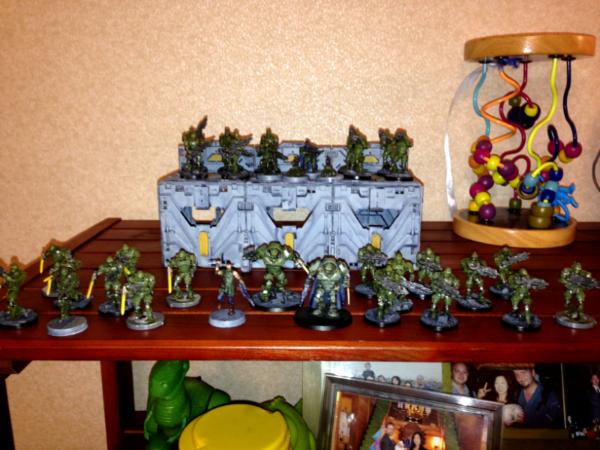
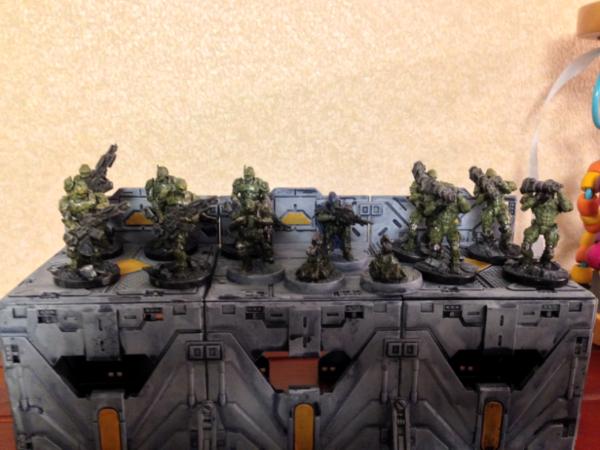
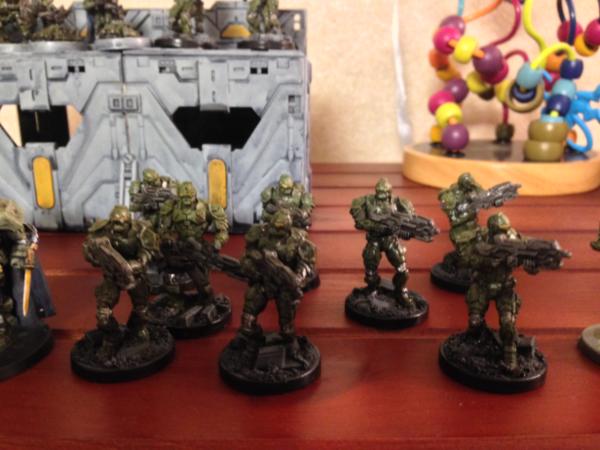
Automatically Appended Next Post: My first experience with restic was Mantic’s Enforcers. I bought into the Kings of War kickstarter after hemming and hawing over their Orcs for well over a year. Along the way, I subscribed to the mantic newsletter, and was quite impressed with the Enforcer concept art. I pre-ordered the Strike Protocol set (45 plastic Enforcers plus the metal captain), then sat back and waited.
The package arrived just in time for my birthday two years ago, in a box far too big for the number of models it contained. At first, I tried to assemble them like I would a set of Space Marines, and was more than a little confused why the plastic cement wasn’t working (the failure at due diligence was all mine). A little Google-fu straightened that out, and I got out the superglue and got to work.
The first set I tried to assemble just refused to go together. Unlike the Deadzone Enforcers, the arms and torsos are flat rather than slotting together. While I suppose this does make the minis more poseable, superglue doesn’t bond restic quite as fast as it does skin, so the arms kept sliding around. Also, there is no way to tell which arms pair up, so getting everything together without making them look deformed. My ultimate solution was to drill-and-pin the shoulders and cut off the tabs on the wrists. I find that this works equally well for restic-on-restic as the metal-restic hybrid models.
The waists were also a little problematic, as the torso doesn’t fit quite snugly in the legs. The solution here was simpler: just heat up the waist until it softens, then mash the torso down into the cup. Easy as pie, and I found this technique quite useful when I did my Orc boar riders (a future update).
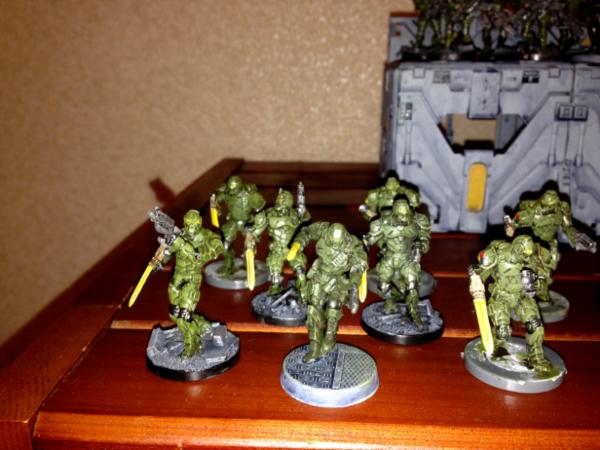
When it came time to paint, I first tried an Iron Man-inspired scheme, but this just seemed to obvious. One thing that has always bugged me about 40K is all the troops running around in primary colors. I won’t presume to judge anyone who goes this route-- my smallish Howling Griffon army makes me just as guilty of this—but I wanted my Enforcers to look something like a military force. I ended up painting them with Tamiya NATO Green, washing them with GW Devlan Mud/Army Painter Strong Tone, then drybrusing up to a 50-50 mix of NATO Green and Bleached Bone. I tried and failed at OSL for their eyes, and added rank and unit insignias using decals from Company B.
So after that wall of text, here are some photos.
Spoiler:
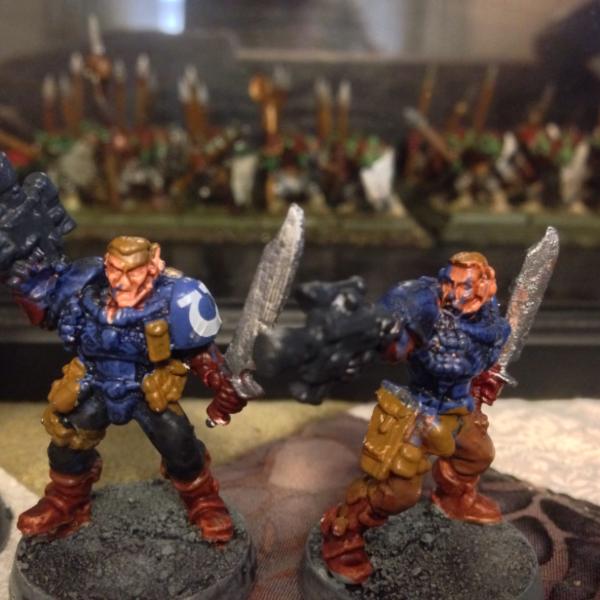
Overall, I’m happy with the results. I know that a lot of people don't like the skinny-leg, knock-kneed look, but I always assumed that Enforcers were subject to extensive cybernetic modification, so they wouldn't need big bulky legs armor because they don't have legs to armor. I still have another 15 or 20 to paint, not counting the DZ wave 2 stuff I have coming. Here’s hoping Warpath turns out to be fun.
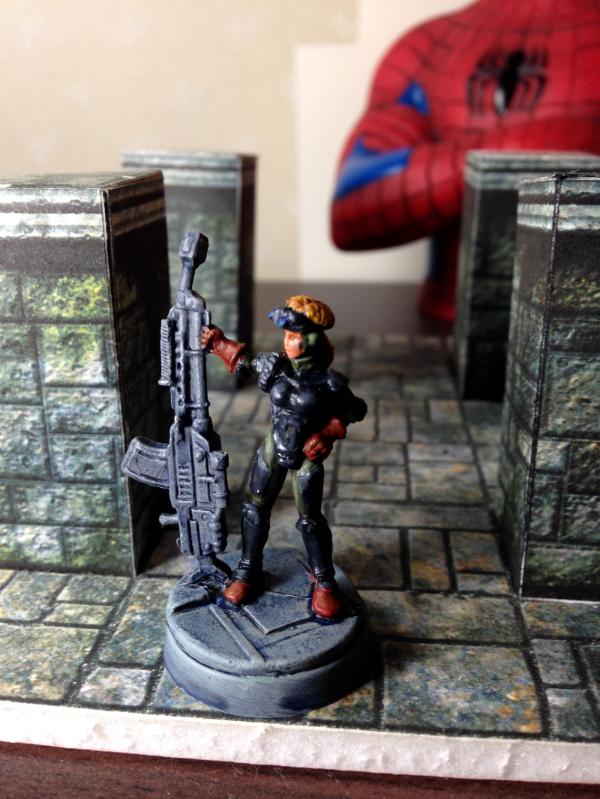
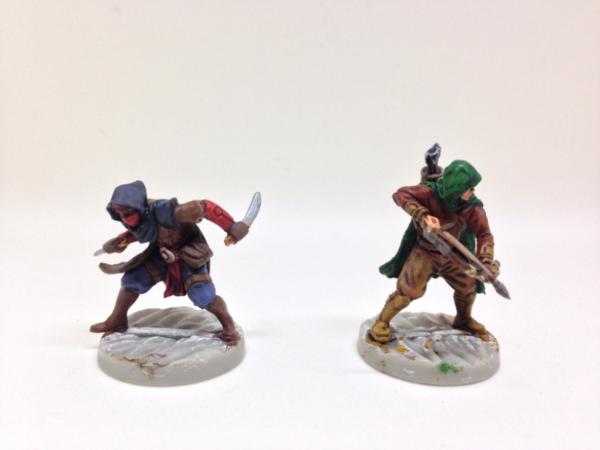
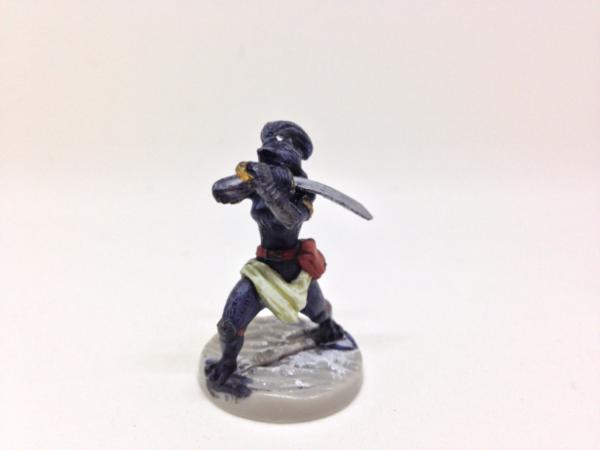
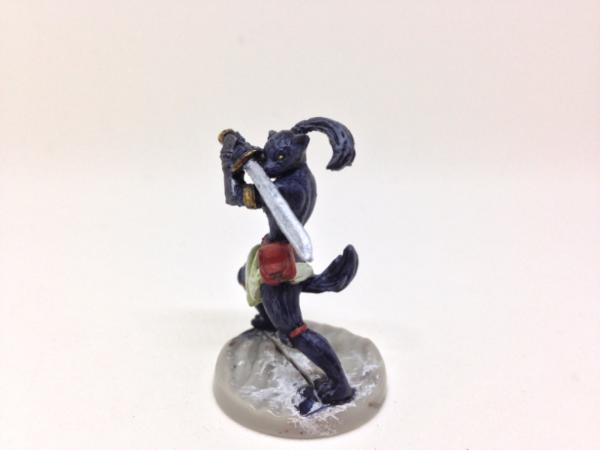
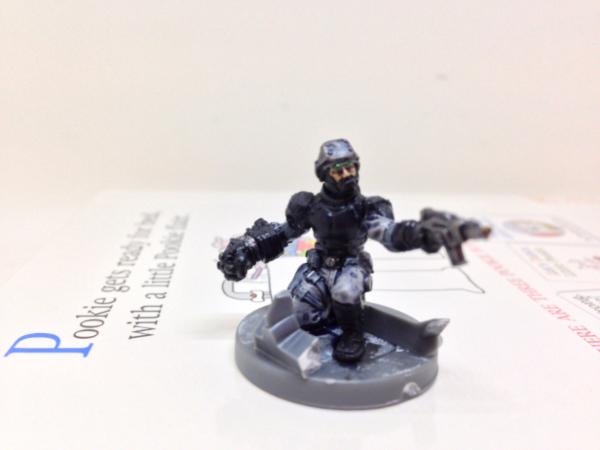
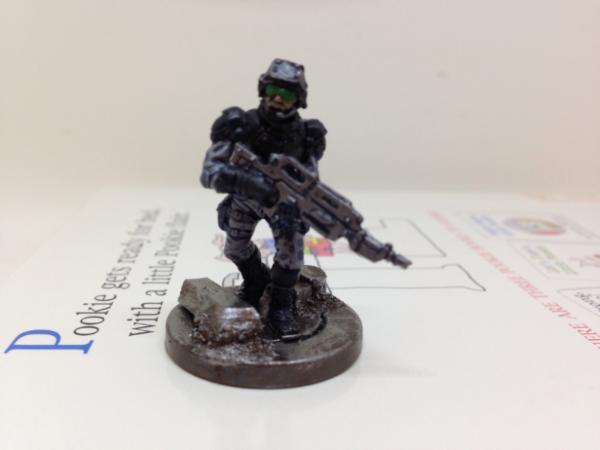
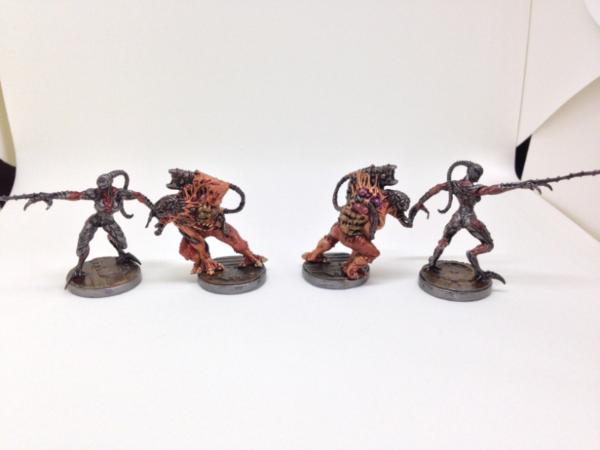
In my previous post about the Enforcers, I said that they were the first restic models I ever worked with. In retrospect, Sedition Wars may have come first—it’s been so long that I don’t really remember. Anyway, here are some photos.
Spoiler:
I used the same technique with these minis as with the Enforcers: Tamiya NATO green, Devlan Mud/Strong Tone wash, then drybrushed back up. I also followed the only really useful piece of advice ever given by Jervis Johnson and didn't bother painting the eyes. I know that the mold lines were minimal to the point where I basically ignored them. My only other issue with the human models is the cocked hips on all the female troopers. That’s been hashed over quite extensively in other threads, so I won’t go into much detail. I’ll just say that, at my age, sexy female soldier miniatures don’t do anything for me.
Spoiler:
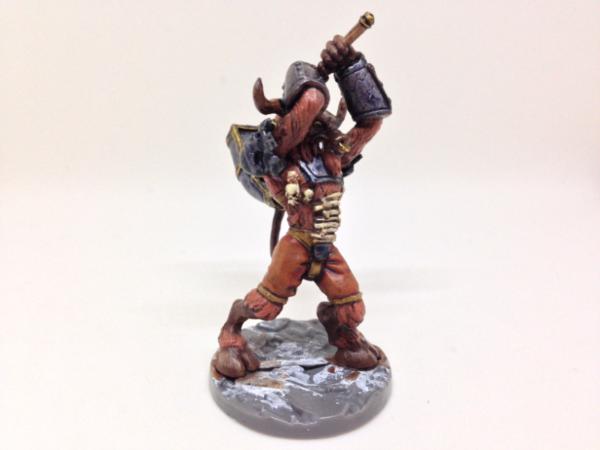
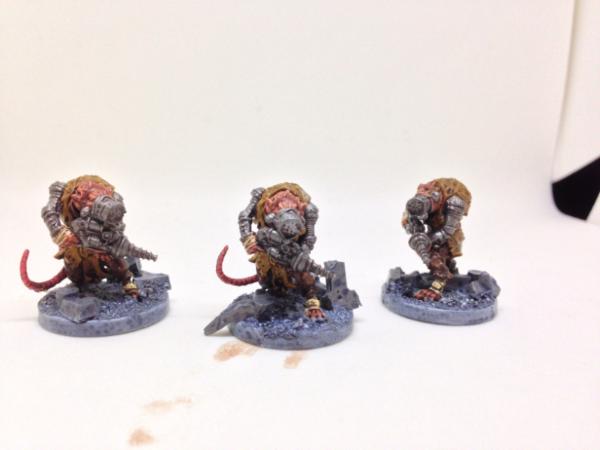
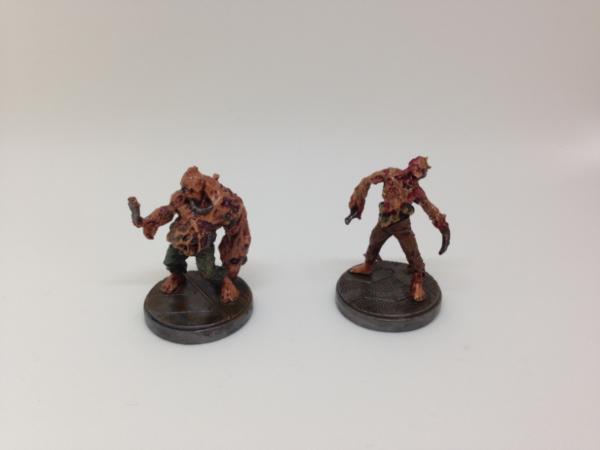
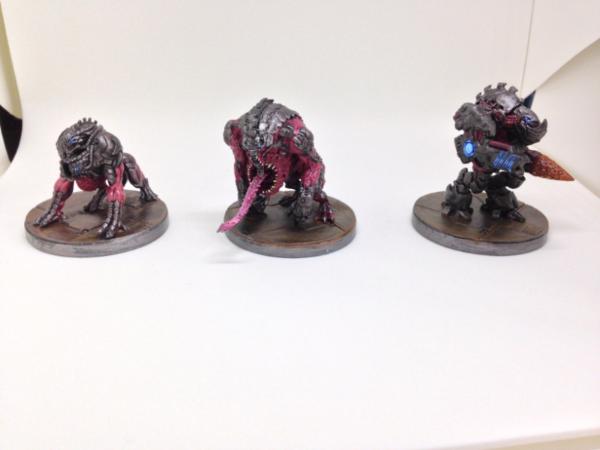
For the Strain, I went entirely with basecoats and washes. The flesh-tones are Army Painter Barbarian Flesh, that pants are in a variety of neutral tones, and the whole thing slathered with Ogryn Flesh wash. I picked out areas of broken skin in Baal Red (I think- I ran out long ago and don’t remember the name of the wash), with some Green wash where guts appear to be spilling out. Metallics are Army Painter gunmetal with badab Black/Dark Tone.
Spoiler:
The bigger models has little to no skin, so I did the musculature with whatever the Citadel red base paint was before they changed the name, drybrushed with 50%/50% red and bleached bone, then a heavy red wash. Metallics are the same as the stage one Strain models.
I have never played Sedition Wars, and it seems likely that I never will. I like the models, however, and plan to use them for Deadzone or whatever SF skirmish game I end up playing when I finally get a gaming group going. My tiles came perfectly flat, and will supplement my Battlesystems terrain nicely, I think. I went for the Biohazard upgrade, and so I have quite a few left to paint, but they are way back in the queue.
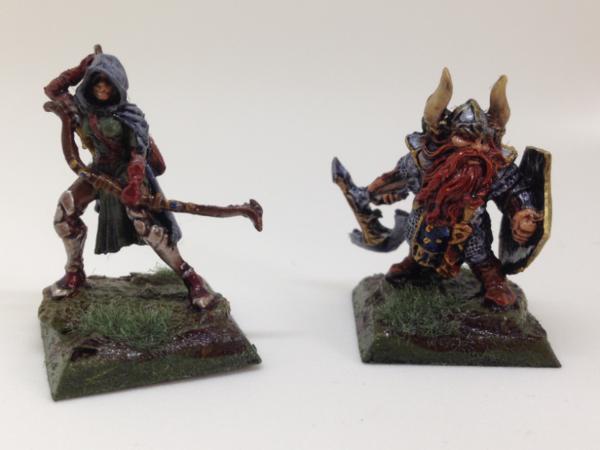
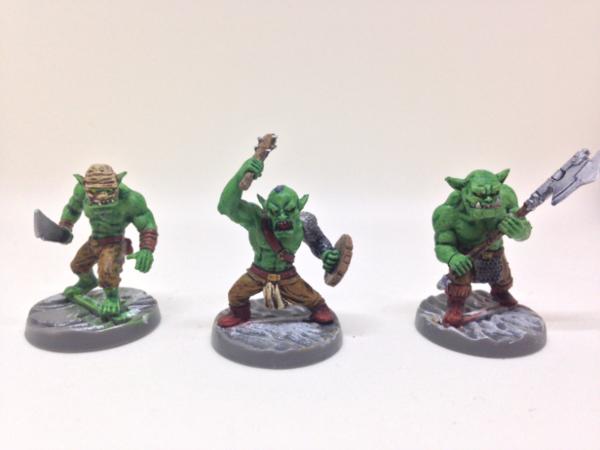
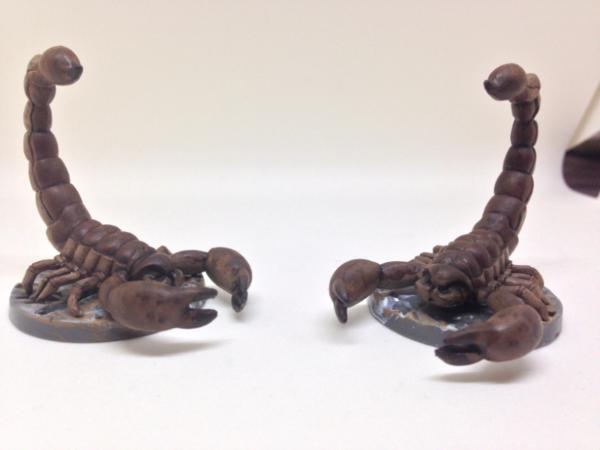
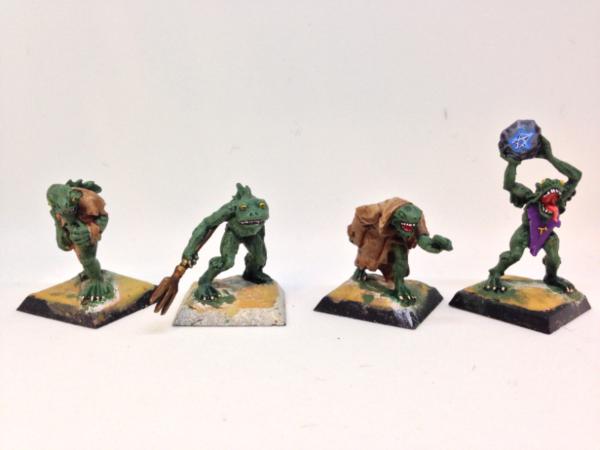
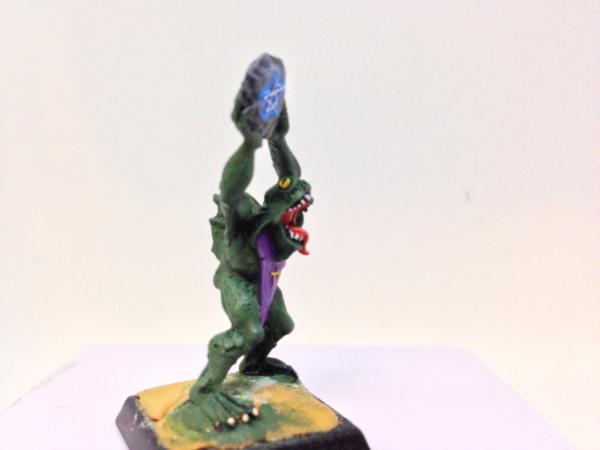
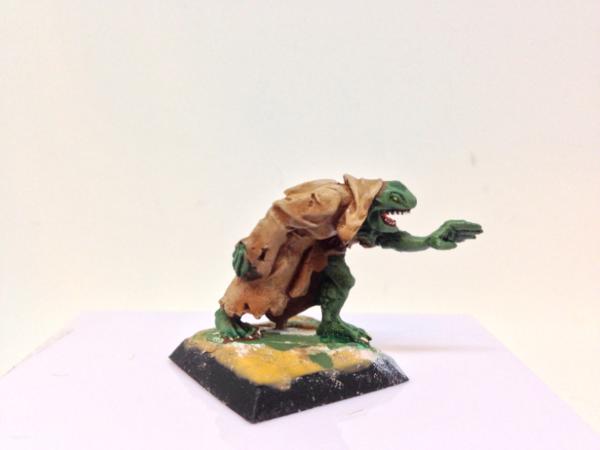
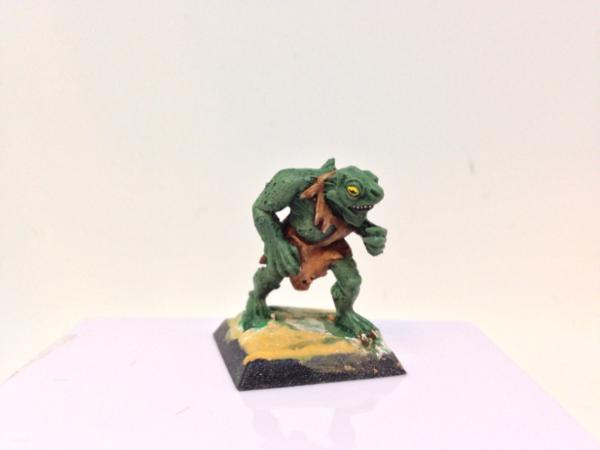
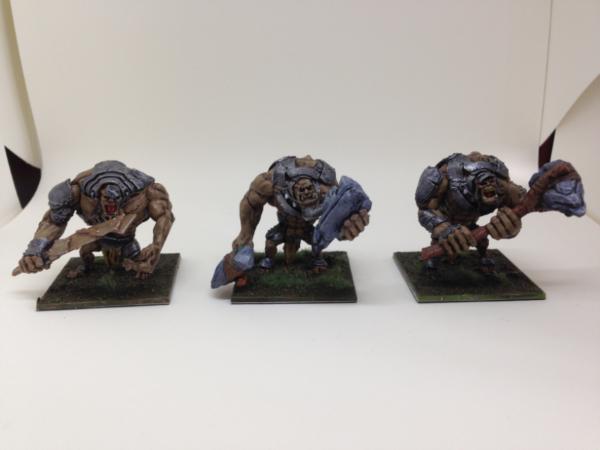
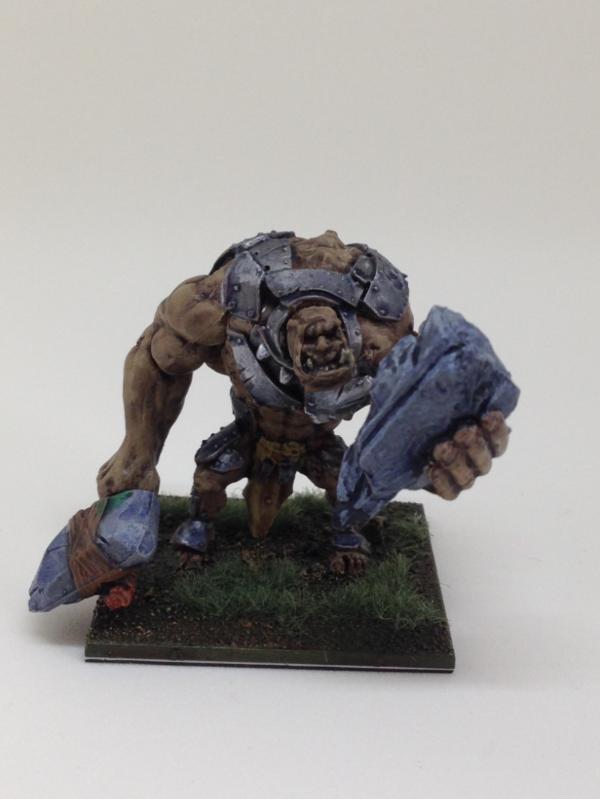
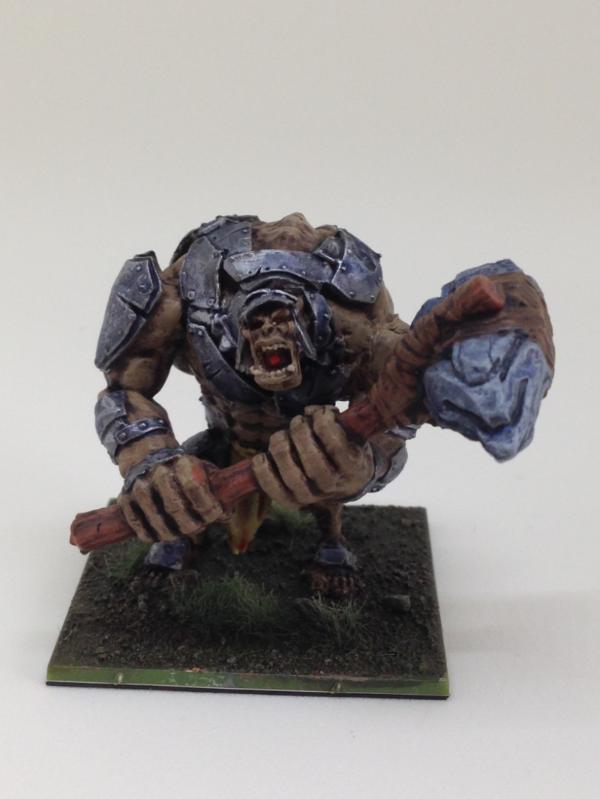
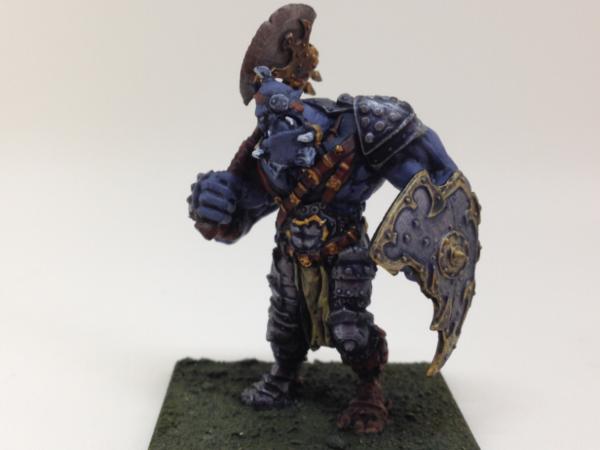
Kings of War was my first Kickstarter project. I had been debating starting a Mantic orc army for a long time before, but I just couldn't get past the postage to Japan. Kickstarter pricing cancelled that out, and I went it fairly big. Luckily for me, I have enough fantasy armies that pretty much all of the freebies had a home waiting for them. Here are some of what I've gotten painted so far. First, the much-maligned trolls.
Spoiler:
I suppose I can understand why so many people were disappointed in these models. The concept art really was better, and the sculpts (particularly the faces) probably should have been sent back to the sculptor for at least one more pass. That said, I like the massive upperbody/teeny tiny legs look. They are certainly no more goofy than any trolls GW has ever produced. At about the time I painted these models, I had started experimenting with what I call "power washes," which is to say the Army Painter technique of a single heavy wash over a solid basecoat. The skin is Army Painter monster brown washed with Strong tone ink, the armor is gunmetal and the rocks are a Vallejo medium grey, both washed with a Payne's grey wash, a technique I found in an article here on Dakka. Please note that I didn't bother cleaning the mold lines on these models. I have at least nine more of these trolls, so when I get around to doing them, I won't be so lax.
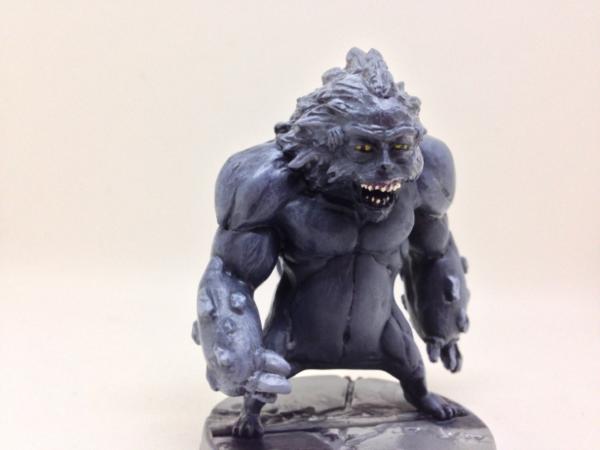
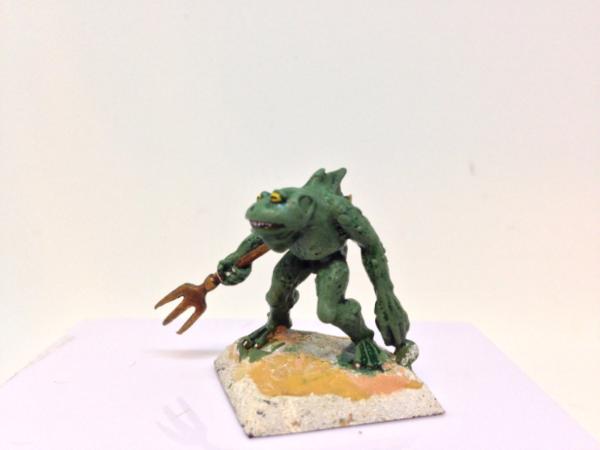
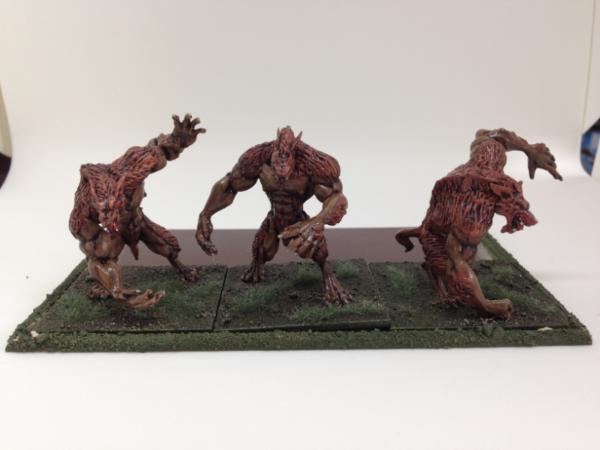
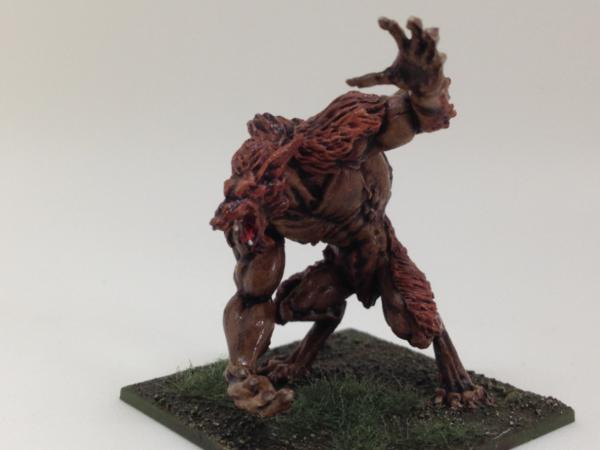
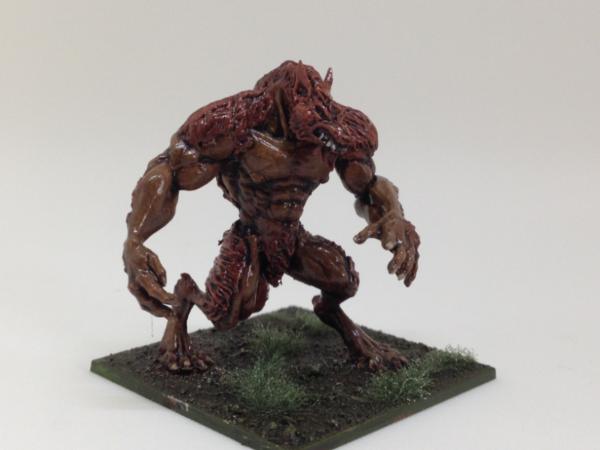
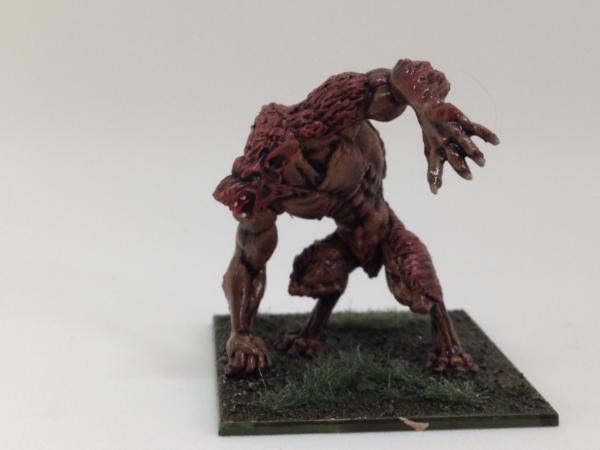
Next up: werewolves.
Spoiler:
These, I think, are much better models than the trolls. My biggest complaint with them was just how naked they looked, and the official Mantic paint job didn't help. My solution was to add fur using Kneadatite. LIke the trolls, I went the basecoat/wash route. The fur is Fur brown, the skin is Monster brown, all washed with Strong Tone. Of course, I went back to pick out teeth, nails and tongues. I didn't order any extra of these, but I did get three Owlbears from the Bones I kickstarter that I will count as werewolves when I get around to painting them.
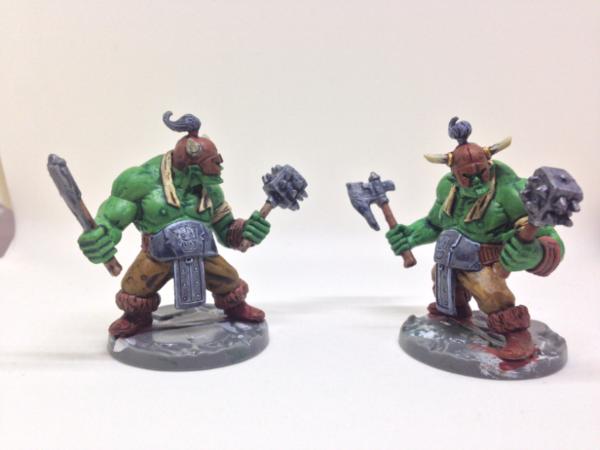
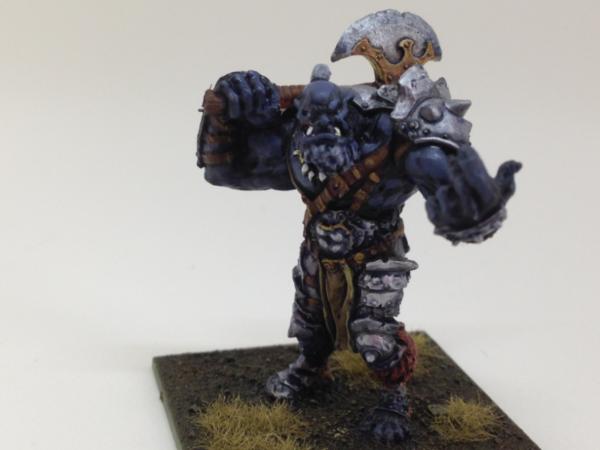
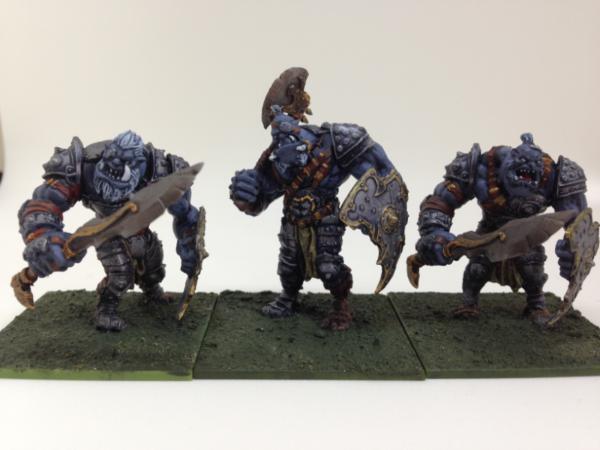
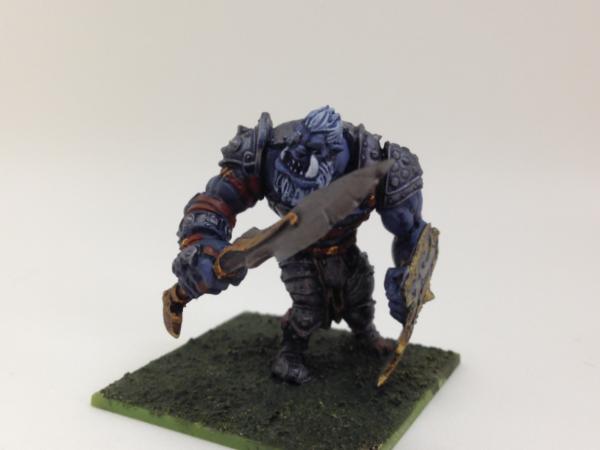
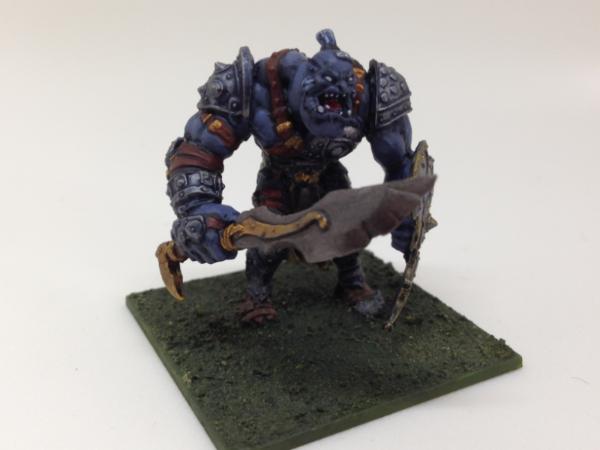
Of all the minis produced in the Kings of War kickstarter project, the ogres were probably the most successful. Here are the ones I have painted so far:
Spoiler:
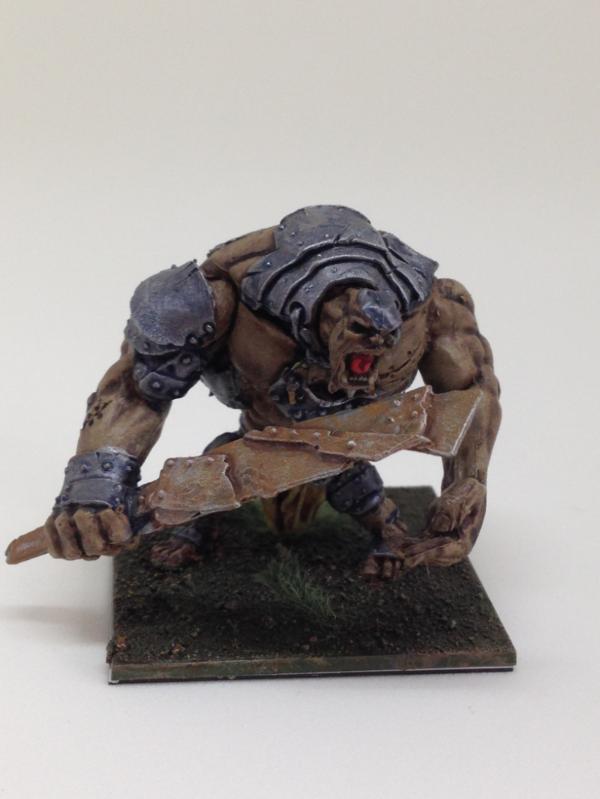
The Ogre Captain was apparently popular enough to put on a T-shirt, and I was quite enthusiastic about painting him. I originally wanted to do his skin in grey, as with my old CItadel ogres from the 80's, but I grabbed Vallejo Sombre Grey by mistake, and he ended up a lot more blue than I had planned. I liked the result more than I figured I would, so I kept it. I made all his straps and accoutrements lighter than I normally would so they would stand out more.
Here's a troop of ogres that I finished about two weeks ago. I did the captain over a year ago, but I managed to remember most of how I did the captain so everything matches pretty well. I also painted up a set of Golgfag's ogres in the same style, but those will have to wait for my next blog: adventures in lead.
Mantic catches a lot of flack for their giant-torso-tiny-legs aesthetic, but I like it on their ogres. It's certainly no more ludicrous than GW's spherical guts and Fu Manchu moustaches, and the ogres look pretty good on the tabletop.
That's quite a nice take on the Ogres. I also very much like what you did with the Werewolves and the Strain. I need to do what you've done with both, at some stage.
Azazelx wrote: That's quite a nice take on the Ogres. I also very much like what you did with the Werewolves and the Strain. I need to do what you've done with both, at some stage.
Thanks kindly. I know you were less than enthusiastic about the ogres, but I do think they paint up nicely. They add a little variety to the limited number of Citadel ogres that I have, as well.
"...at some stage." That's my mantra whenever I think about my eternal backlog of unpainted minis.
To be fair, they do look good when painted up. They're just a right pain in the arse to paint up.
Speaking of "at some stage", I've got 6 of those ogres (amongst much other stuff) half-painted on my painting desk. And have had them there for close to a year now...
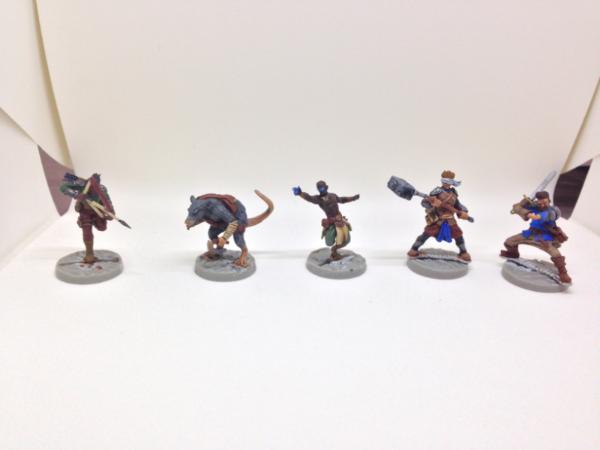
Reaper's Bones I kickstarter was the third that I backed, and (caught up as I was in Kickstarter fever at the time), I went in pretty heavily. When the box finally arrived, I was more than a little surprised at the volume of little plastic baggies. To date, I have only painted a few, with somewhat mixed results:
Spoiler:
First, a couple of adventurers. As with my Sedition Wars minis, these are just basecoats and washes. The dwarf turned out better than the elf, mostly because the figure is so much craggier that even in bones plastic little detail is lost. I tried straightening the elf's bow using hot water, but it just went back. I gave up pretty quickly.
I painted these two for my Deadzone rebs. Their faces are mostly featureless blobs, but you can't really tell at arms length.
This is where Bones really work, I think. The model is big enough that there is minimal loss of detail, it's light enough to assemble without pinning (which is one of the reasons I haven't tackled the metal version of this mini that sits in a box in the closet, taunting me). I acutally drybrushed/highlighted this one as well, since it will be a centerpiece in my Kings of War undead army, assuming I ever actually play.
I have lots and lots of Bones waiting for attention. Not yet attempted: three Griffons to use as Drakon riders, three Ouwlbears to stand in for Werewolves, Cthulhu, the clockwork dragon, and Kaladrax (which is too big for any tabletop use that I can think of. maybe I'll turn it into a lamp). My only real complaint with Bones minis is that the white plastic is nearly 100% reflective of light, meaning detail is invisible without a basecoat and black paint wash. This, in my mind, defeats one of my favorite features of PVC minis-- they don't need a primer coat for paint to stick. I have so many of these little things that I'll never paint them all, but they were cheap enough that I can give them to my 5-year old son to start learning how to paint.
I know I promised undead, but I'm trying to keep this more or less chronological. I started working on these well before I started this blog, and they had been sitting and waiting for dullcoat for probably two months before I took these photos.
Spoiler:
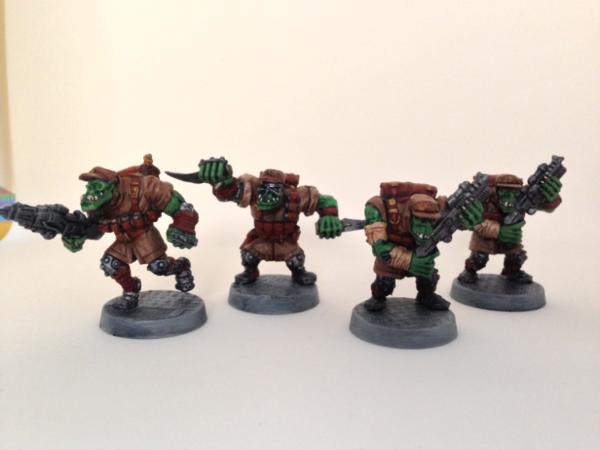
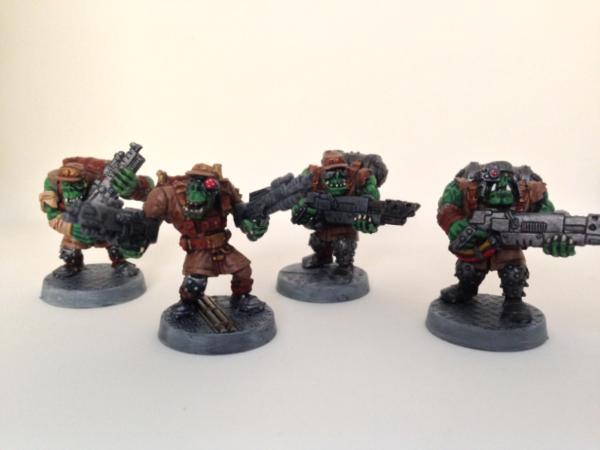
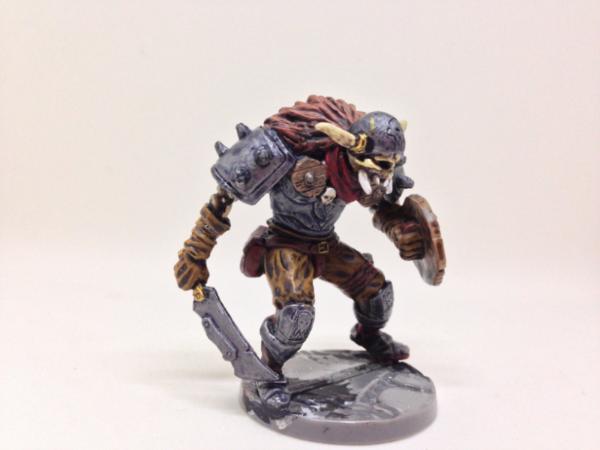
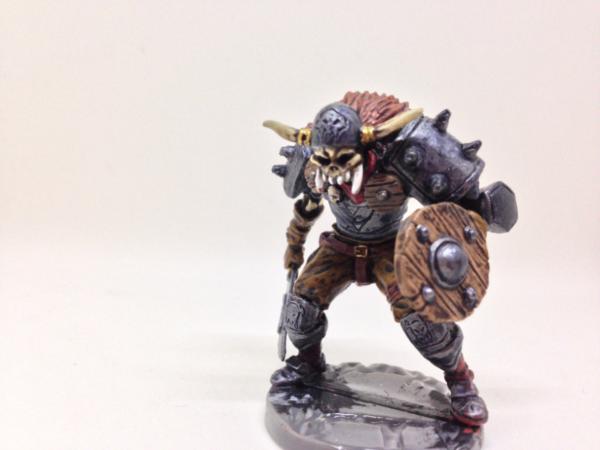
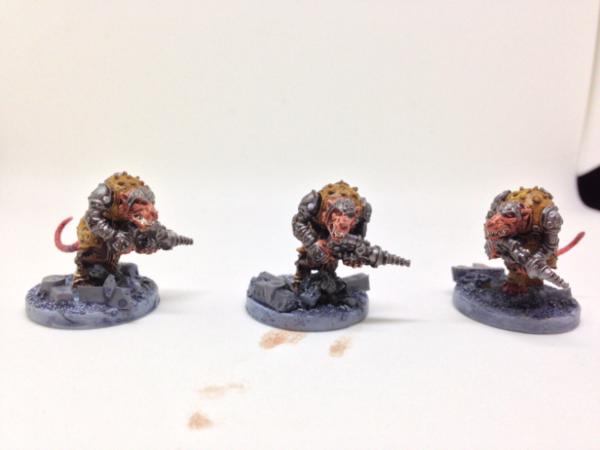
Just some basic Marauders. I have something like 5,000 points of 40K orks (I have no idea what points costs are in the current edition), and I debated going non-greenskin with these models. Laziness won out, and I went with a technique that I can do in my sleep. The current version is Army painter orc flesh, washed with a custom mix based on Liquitex deep hue green. One thing I like about the Marauders is that they are a professional army, and decided to paint their uniforms, er, uniformly. I went with a khaki/brown to represent a Marauder faction that hightailed it out of another theater to raid a newly-declared Deadzone.
I think I posted about this elsewhere, but I found the flamethrower guys something of a challenge until I realized that you can't see the back of the gun (the face that is held against the body). I chopped off the detailing on that side, and the left hand fit right into the arm. Also, note the GW ork head. After I assembled the first one, I set him up on a bookshelf to dry. Shortly thereafter, an earthquake knocked him down, and one of the dogs got to him before I could and chewed off his restic head. The GW ork face doesn't quite fit in with the rest, but it's close enough for jazz.
Ripper suits seem to be one of the more divisive models in the Marauders range. After fighting with 10 MegaNobz, I won't complain about two guys who aren't walking forward with their gun pointed straight ahead. I tried for a desert-tan color with these, and I guess it worked well enough that I will do this across the collection.
I did this guy before the Rippers, and tried to recreate the paintjob in the Deadzone book. Then I got bored and ended up with this. Note the failed attempt at OSL on the gun.
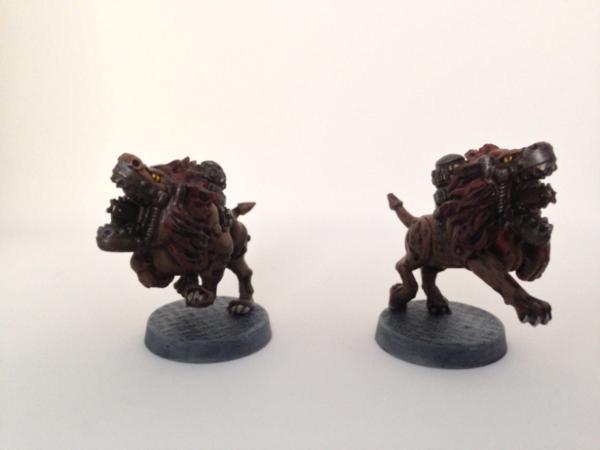
These guys were pretty simple. I have a troop of Mawbeasts that came with the Goblin army I got in the KoW Kickstarter, and I painted them with essentially the same technique: Army painter Monster Brown and Fur Brown, washed with Strong tone. I gave them pupils instead of the solid red eyes that I have seen (and been guilty of) so often in the past.
I suppose I can see why so many people dislike the guntrak. I honestly couldn't tell where the gunner was supposed to sit, and in the end I sliced off the corssbar by his feet and just stuck him down where you see him in the photo. Otherwise, it was a pretty standard model. I did this one before the rippers, but after the hulk, and the khaki represents my attempt to avoid buying new paints. I used a Tamiya acrylic that didn't really take the wash or mix with the ivory I used to highlight, giving a gummy feel when it was wet and a kind of splotchy effect when dry. It looks OK in the photo, but in person the paintjob lacks something. I have another one, though, so when I decided to revisit the Marauders I'll have to rethink my cheapness.
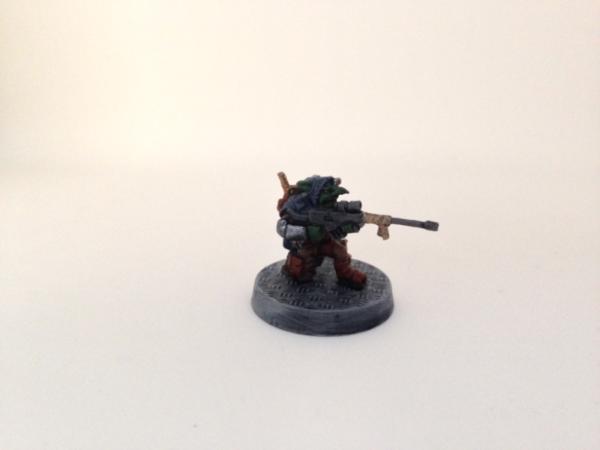
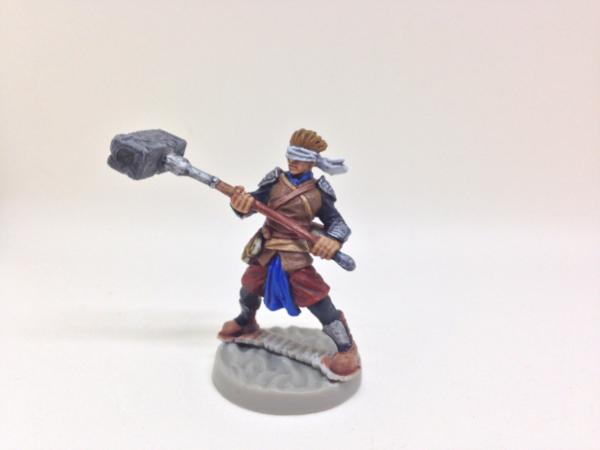
Here's the kneeling sniper. I like this model.
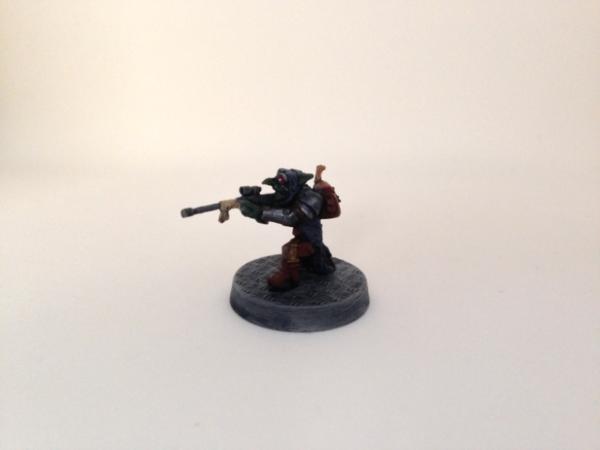
And here's my take on the dancing sniper. it took me a while, but I figured out that he's supposed to be climbing, rather than dancing or running away. For this one, I built him a rubble pile to clamber over in his search for a good spot to shoot from. If I hadn't hacked apart my other one, I would cut down a ladder from the Accessory Sprue for him to clamber up. Does anyone want to trade...?
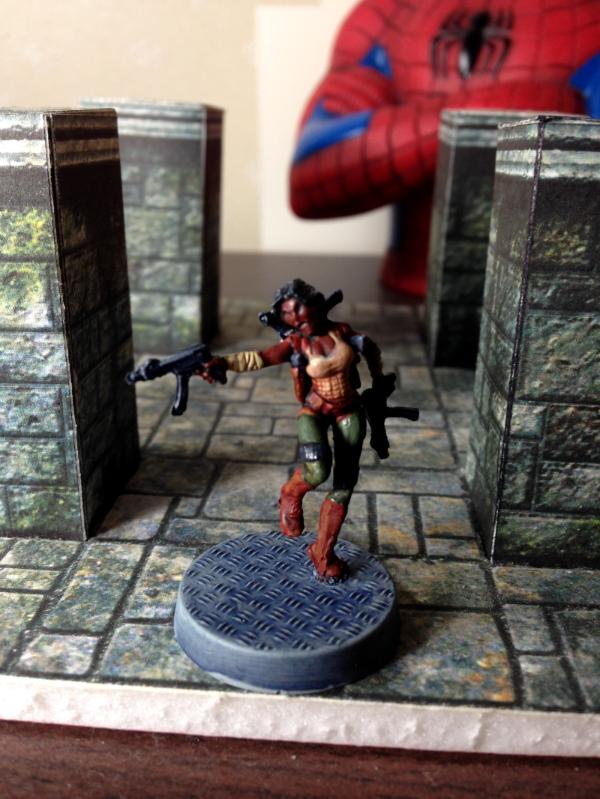
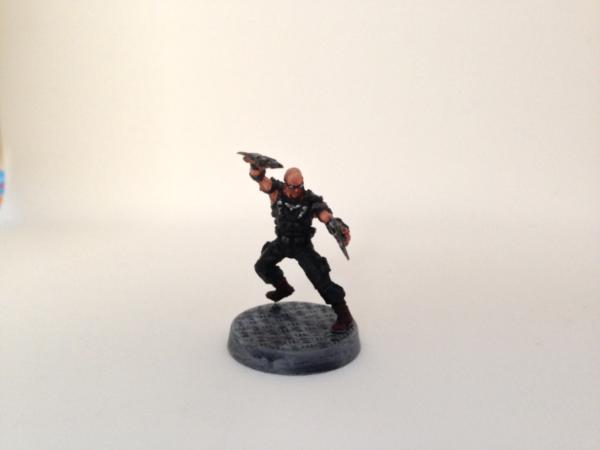
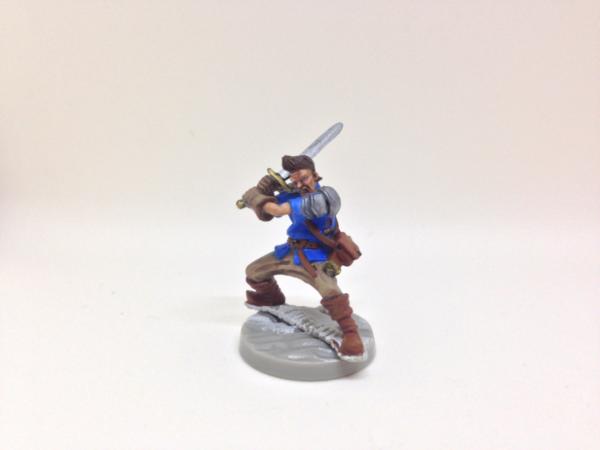
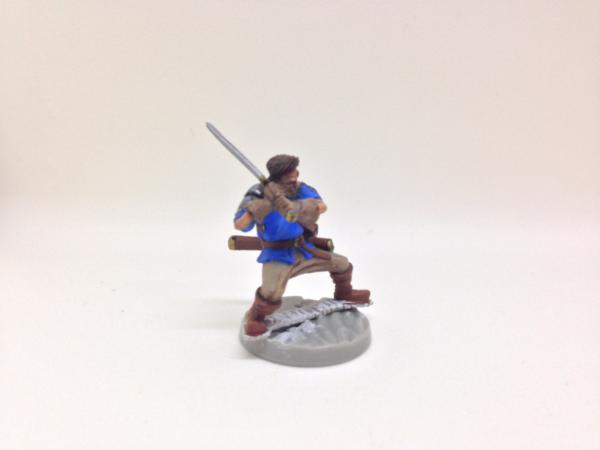
Automatically Appended Next Post: Also, not-Riddick from my Sedition Wars pledge:
I like a lot of the heroes from SW. I might count this guy as Blaine v2.
GrimDork wrote: I like that Riddick, I always thought blane had kind of a Riddick vibe as it was. Nice Marauders.
Thanks kindly. I really liked "Pitch Black," so getting this mini was kind of a no-brainer. I wish they had accounted for shrinkage or whatever it was that made the second wave of heroes so much smaller, but he'll work on the tabletop. I like the Marauders as well as any of the other Deadzone minis released so far. Easy to paint, and full of character without descending into caricature. Good thing I have more waiting for me!
Yeah that's one thing I'm really loving about my Mars Attacks minis, the martians especially. There's just enough detail there that you've got something interesting to paint, but not so much that you get bogged down filling out little details. And if you wanna do that, hell look at the studio scheme with the Hawaiian shirt
Infinity models are great but sometimes it's nice to paint up something a little simpler.
I kind of feel like I missed out on the sedition wars kickstarter, but at the same time it seemed to have a lot of problems.
I kind of feel like I missed out on the sedition wars kickstarter, but at the same time it seemed to have a lot of problems.
Even if I never play the game (which seems quite likely), I got a bunch of SF minis, and some tiles marked with 25mm squares I can use with my Battlesystems stuff. You'll not hear many complaints from me.
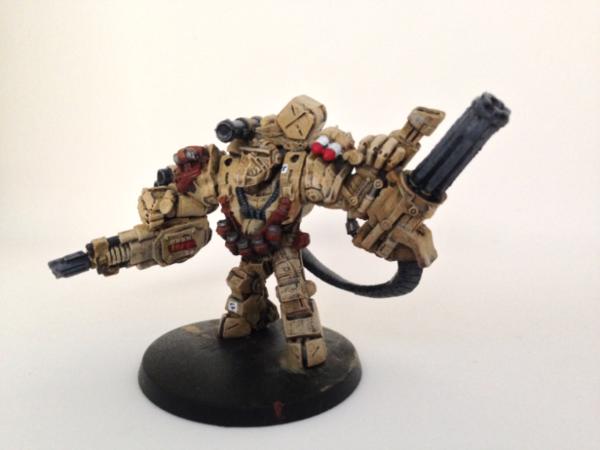
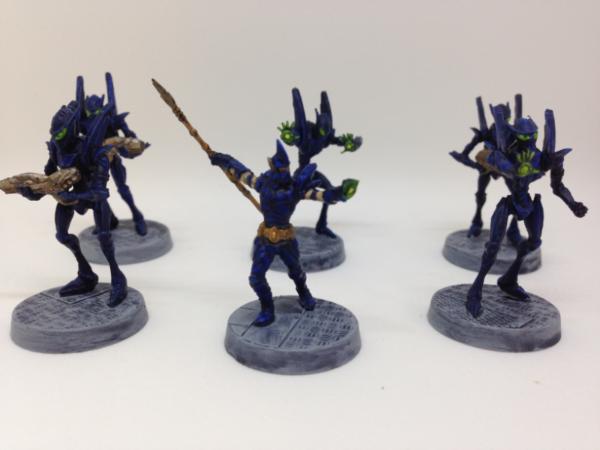
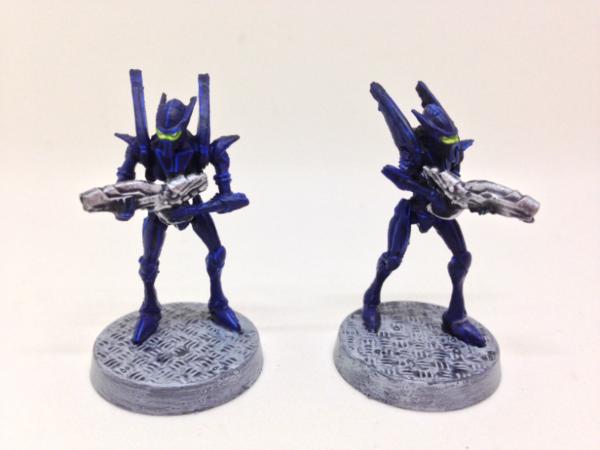
I went pretty much all in on the Deadzone Kickstarter—between my initial pledge and the second and third surveys, I have spent well over $1,000, which is an awful lot for a game that I have yet to actually play. I even pledged for both Asterians and Forge Fathers before there was even concept art. In retrospect, this may have been foolish. Luckily, I actually like how the Asterians turned out.
My initial conception of Cyphers came from this issue of Dreadstar, a comic I loved to death back in high school:
The Lord Papal had an army of 100 trained drone controllers, and 10,000 drones in place to kill Dreadstar and his team. That’s how I envisioned the Asterians working: a seemingly-endless stream of robot bodies to throw at the enemy. The official version came out quite differently, but I think I’ll hang on to my idea, at least for now.
I had originally planned on doing them in metallic green, like in the comic, but that would have involved actually buying new paints. Having spent so much on this game already, I opted to use supplies I already have on hand:
I started with a basecoat of Necron Abyss (which I bought in anticipation of the Crimson Fists army that I have since decided not to build), edge highlighted with a Vallejo light blue that I’ve had for so long that I can’t read the label. I put a layer of Vallejo Imperial blue over everything. Straight out of the bottle, the paint is so thin that I works more like a glaze, softening the highlights and bringing out the various armor plates while leaving the dark recesses. It seems to work.
The eyes and Noh blasters (or whatever they are called) are Vallejo Sick Green highlighted up to Yriel Yellow mixed with a little white. I like to think the OSL is working a little better than on my Enforcers, but if anyone has useful advice I’d love to hear it. The guns are just Mithril silver with an Ogre Flesh wash. They look OK in person, but terrible in these photos. I plan to redo them before I put them in the display case.
The commander has a very different look to the cyphers, multiple overlapping armor plates rather than broad, flat surfaces, and after initially trying the same technique I decided to go with my standard basecoat and layered highlights technique:
The colors are the same, plus some small areas of exposed skin for some reason. I really think this model would have been better in metal, as Mantic’s metal models tend to have crisper details, and that would have made it easier to paint all the fiddly details this model has.
Next up: undead! No, really, I even have photos uploaded, I just need to write about them. Stay tuned!
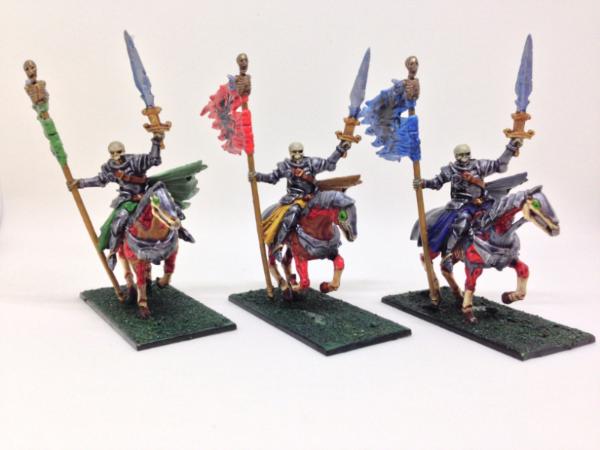
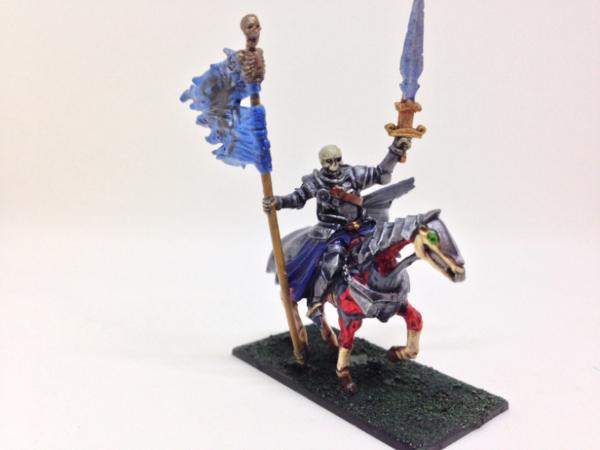
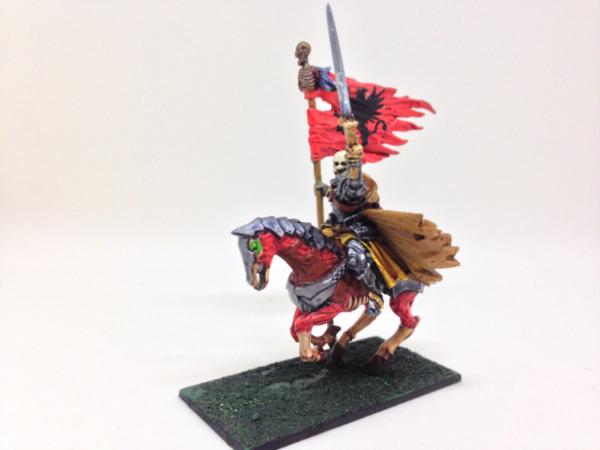
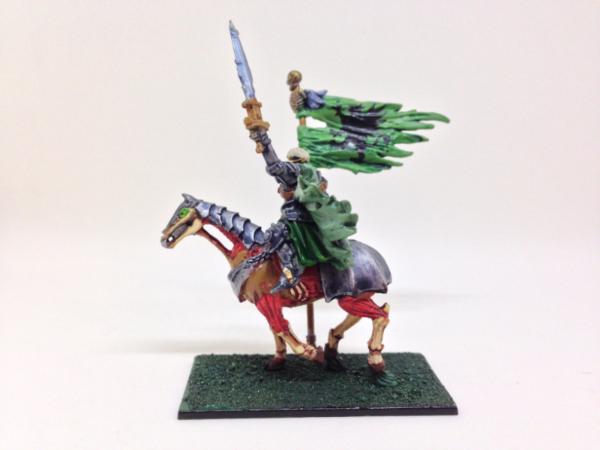
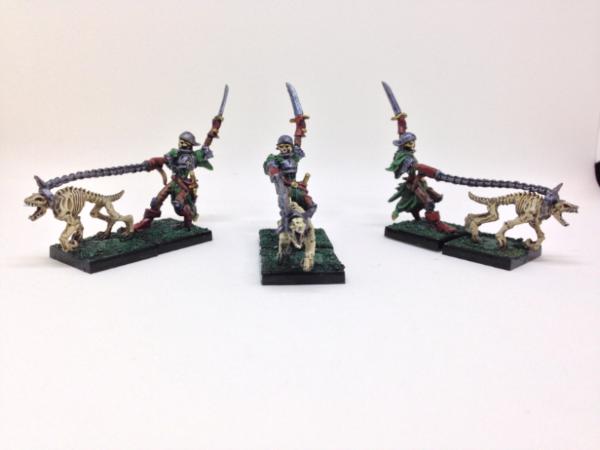
Depending on how you define “army,” my very first was either Warriors of Chaos or Undead. Back in the days of WHFB 2nd edition, Warriors (as opposed to Thugs) were so expensive (in points, the minis were cheap) that four or five of them were enough to count as an army. However, the first real “unit” I ever bought was the original Citadel Horde. I learned how to drybrush with them, as well as the importance of posing minis so that they can rank up. I still have those first plastic skeletons, plus a whole bunch more from Citadel, Ral Partha, RAFM and Grenadier.
In theory, I like the Kings of War undead list (I say in theory because I still haven’t found an opponent), so picking up more undead models in the KoW Kickstarter was pretty much a no-brainer. Here are the results:
I don’t really have a unified theme for my older undead, so I just went with basic colors for these three standard bearers. Likewise, having no consistent heraldry, I just used some Howling Griffon transfers (downloaded from Bolter and Chainsword) I had left over from a Marine project I got bored with.
The horses look more flayed than decayed, but I can live with that.
I did all three dog(rat?) handlers pretty much identically. I don’t have much to say about them, but I think they’ll look good in a skeleton unit.
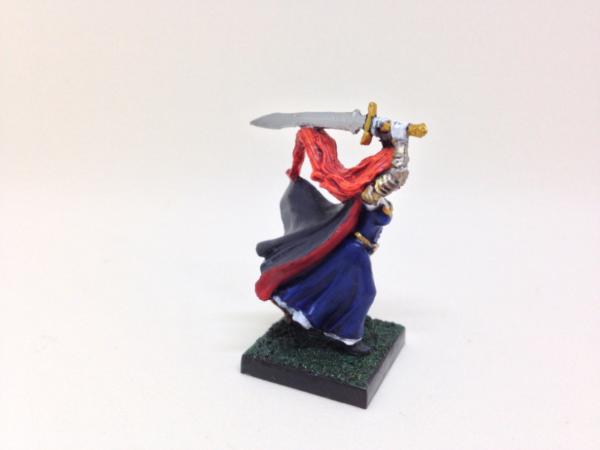
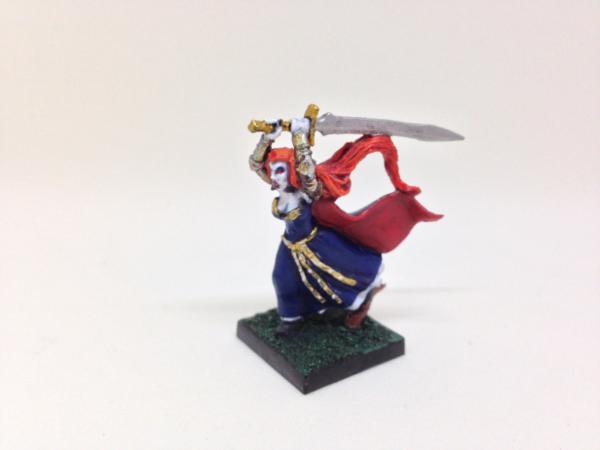
Lady Ilona here suffers more from being restic than almost any other mini in this project log. If she were in metal, the detail in her face would have been sharper and easier to paint. As it is, from the right angle she is not as derpy as the official model makes her look. Sadly, I didn’t get a photo from that position. Also, in 28mm, vampire fangs look like rodent incisors, no matter who sculpted the model. She probably won’t be seeing action on the battlefield, though, since I prefer my vampires to look like monsters rather than sexy ladies.
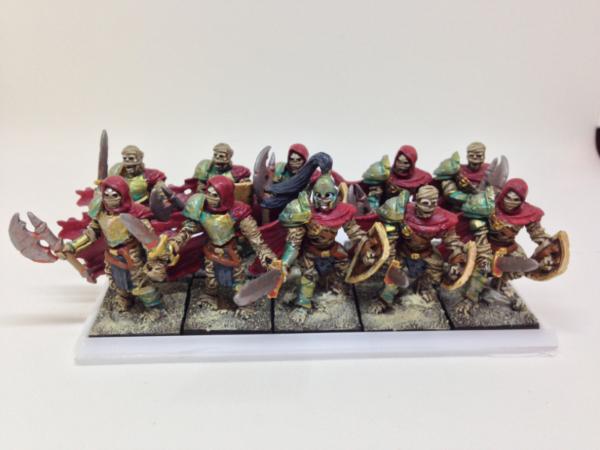
Finally, we have some mummies. I recall that a lot of people complained about these models when they were finally revealed, for a variety of reasons. I think the overall aesthetic is fine. They don’t look particularly Egyptian, but then again the first Tomb Kings army book had a sidebar about Barrow Kings that I actually kind of prefer to the Khemri version, although I have both in my collection. That said, the poses are a little stiff, requiring hot water bending on the arms, and the capes restrict positioning in a most irritating way. I have another 30 of these to paint, so it’s a good thing they paint up well with just basecoat and power wash. The bandages are just Army Painter bone with an Ogryn Flesh wash, then dried back up. The skulls are progressive layers or dark brown, leather brown, ivory and then white. The verdigris is gold with a wash made from two shades of blue pastel chalk, a technique I first picked up from Game Face Nation.
Carlos: Yeah, I should have mentioned that. Everything in that post is from the Kings of War Kickstarter.
GrimDork: Thanks for the kind words. I wish I could say the result was intentional, but the glowy look is mostly an artifact of the paint being so thin...
Great stuff as always Josh! And, as always, your production is putting my meagre output to shame! I hope you get a chance to get some games in at some point with all those lovelies!
Nice stuff here. Love seeing so many mantic blogs. I especially like the trolls. I have a box of my own that I haven't painted up yet. Yours might have just inspired me!
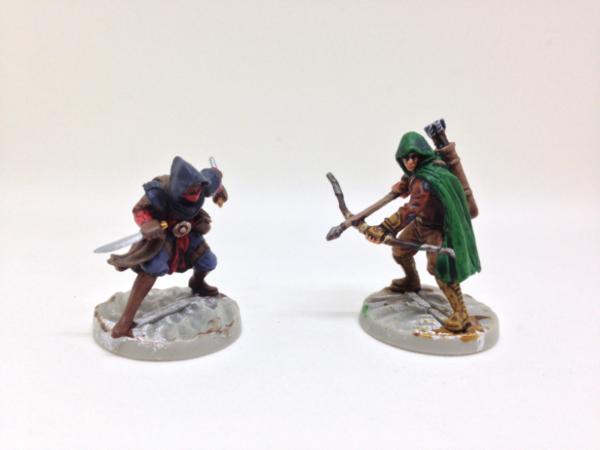
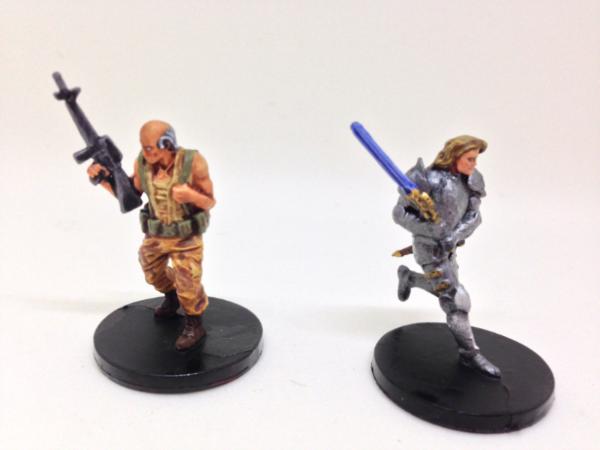
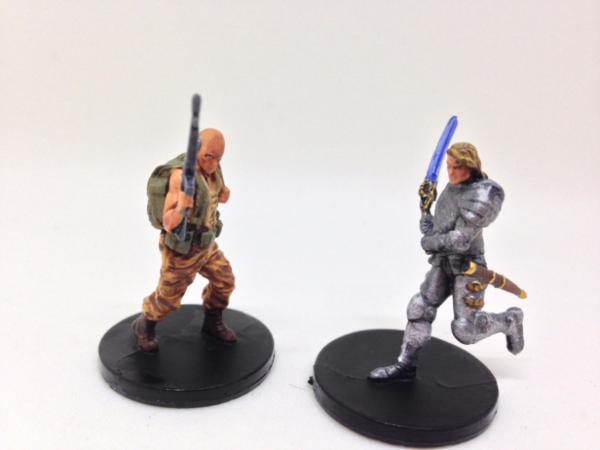
I haven't updated this blog in three weeks, but I have actually been quite busy. Shortly after I posted all those photos of undead, I received (almost) all of the stuff I pledged for in the MYTH kickstarter. While I have yet to play (of course), I have been enjoying the models. First up: heroes.
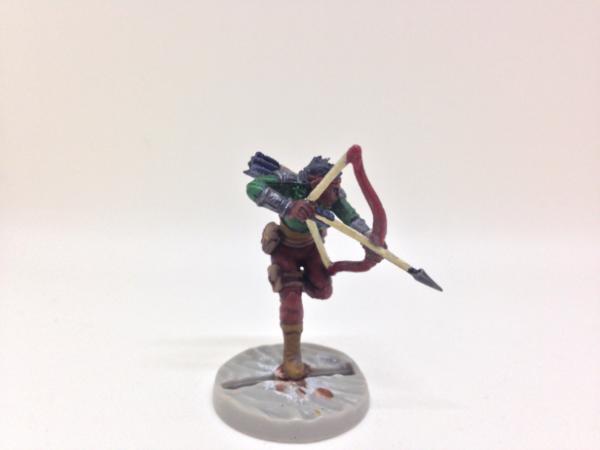
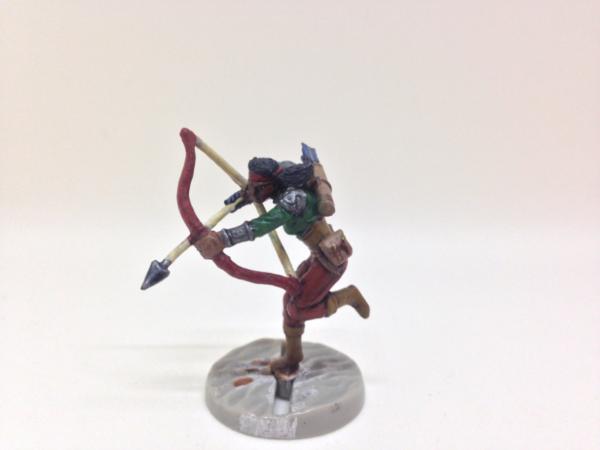
Unlike pretty much everything else in this blog, I took my time with these, and used more layering/highlighting than just washes. The heroes are nifty little models, very characterful and easy to paint, plus since they'll be on the tabletop for the entire game, I wanted them to look a little better than "acceptable tabletop." The standouts for me were the Acolyte and the Brigand, while the Archer probably could have used a little more touch-up work on the original sculpt.
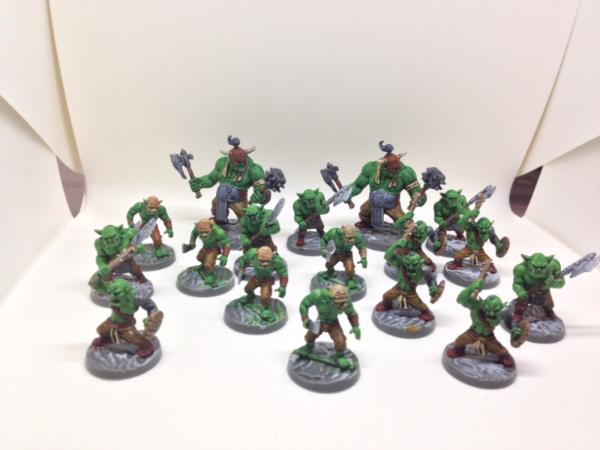
Next: Orcs.
For all of the monsters and captains, I am sticking with the base-color-then-wash technique, and doing them all the same. I painted the little guys in about three hours spread over as many days, and the captains took about two hours each, including drying time. They came out pretty well, I think, especially considering how quickly they will die in the game.
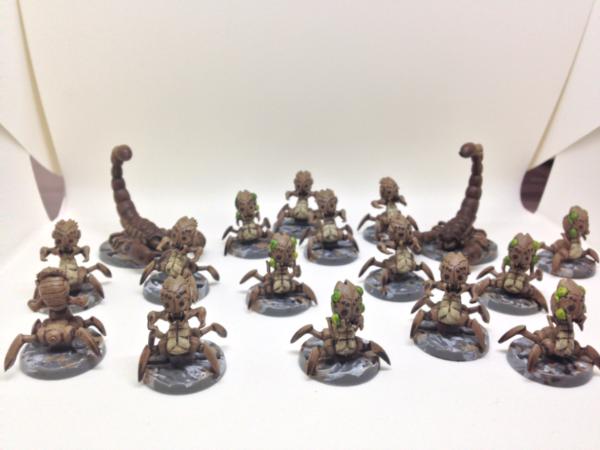
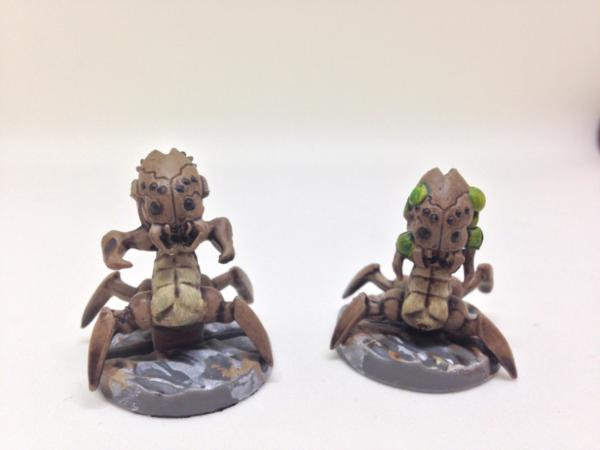
Last: Arachnids.
These were even simpler than the Orcs, because I'm treating them as giant, monotone bugs. I prettied-up the venom sacks on the Spitters (or whatever they are called), but otherwise they are just brown. Specifically, Army Painter Monster brown on the carapace, ivory on the bellies, then hit with a homemade glaze of Floquil Burnt Umber and Black in a solution of Painting Medium.
I have the bosses for each faction sitting on my painting station, freshly washed and slowly, slowly drying. After those are finished, I'll crank out another 16 of each minion and 3 of each captain and be ready to play!
I should mention: the bases are unfinished because I'm not sure what to do with them. The tiles in the game represent a variety of settings, and I don't want the bases to clash. I will most likely transfer them to clear acrylic bases, but that won't happen until after the new year, for financial reasons.
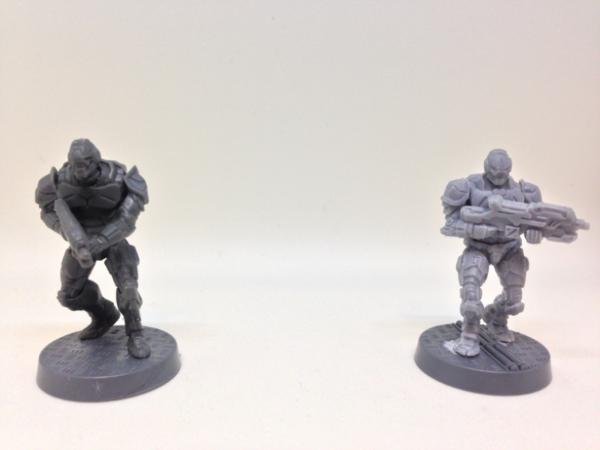
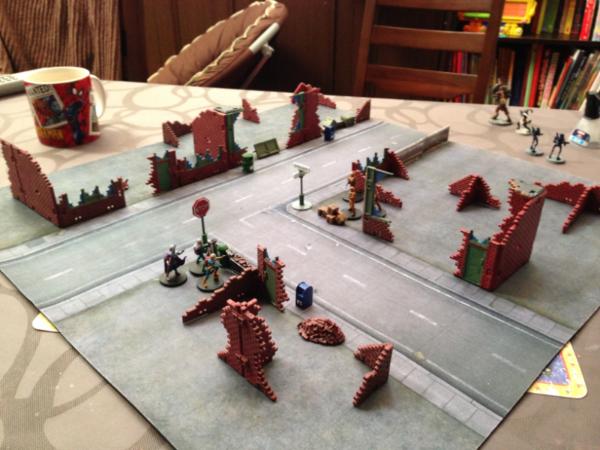
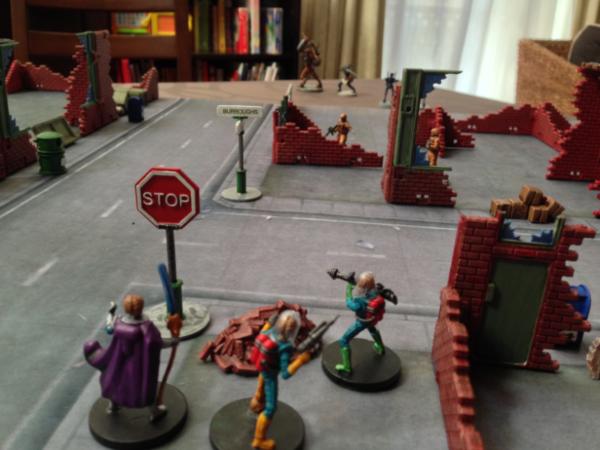
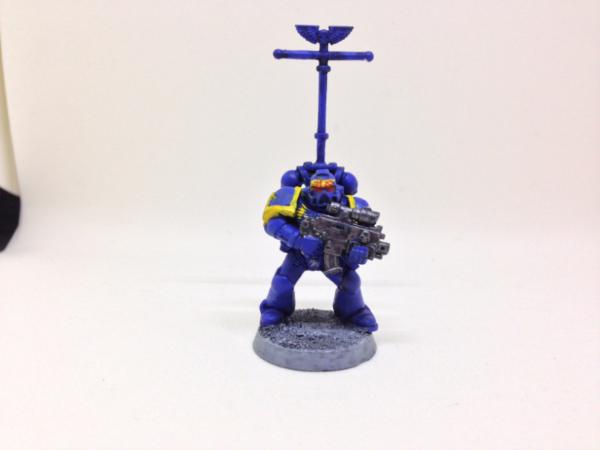
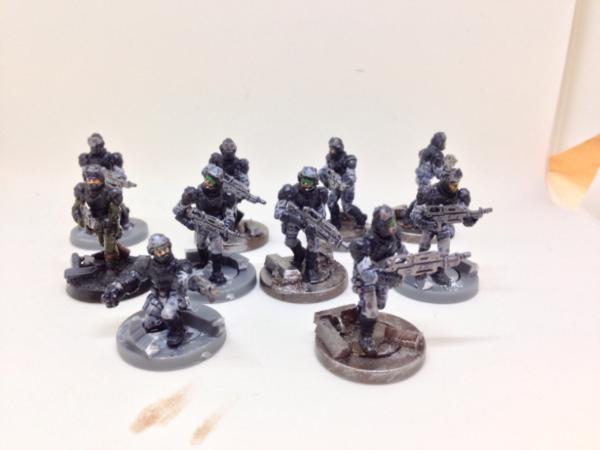
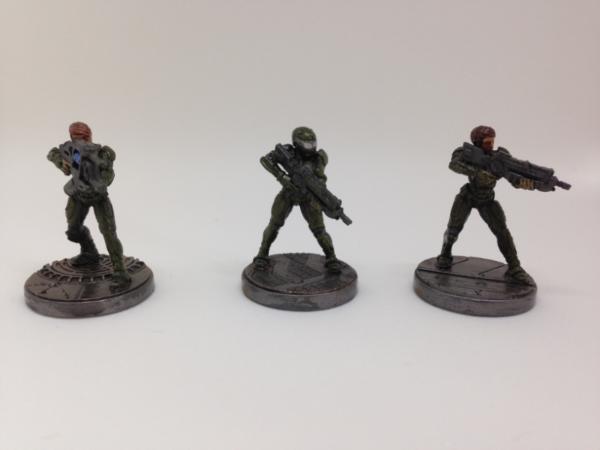
The third shipment for Deadzone arrived last week, adding another 6.4 kg of unpainted minis to the collection. I'm trying to focus on getting Mars Attacks playable, but I wanted to at least try one of the new plastic Enforcers. I decided to do one plastic and one restic side-by-side for comparison. Here they are assembled. I'll post again to show the final results.
The new plastics are bulkier than the old restic versions, but I found this first one a little more difficult to assemble. I matched right leg A, left leg A, and torso A, and holding them in place long enough for the cement to weld the parts was just a little challenging. The arms were more challenging, as there is no easy way to tell which arms fit together. I think I got it right, but the shoulders are rolled a little to far forward, in my opinion.
The restic version was easier to put together, mostly because I've already done 40 other ones. I cut the integrated base off to put him on a PDC plastic base. I dipped the waist in hot water before fitting the torso, so I didn't have to shave any material off. Instead of pinning the shoulders, I glued the left arm on the the gun, then did the hot water thing to fit the arms to the shoulder sockets. As I write this, the Gesso (which I prime everything with after reading the dakka article) is drying. I'll put the basecoat and wash on later this morning.
Looking forward to it. So you are liking the Gesso? Can you use the white? I usually prime in batches and it seems like using gesso would slow that down.. but i've heard good things.
I use both black and white Gesso, depending on what base color I'll be using. Just like regular primers, I suppose. I'm prejudiced against spray primers mostly due to my negative experiences with Ral Partha spray primer back when that was a thing. The gesso brushes on easily and sticks to anything, and it goes on thin enough that I don't worry about clumping or obscuring details. Of course, bushing takes longer than spraying, so if you want to get a lot done in a short time, it's probably not the best.
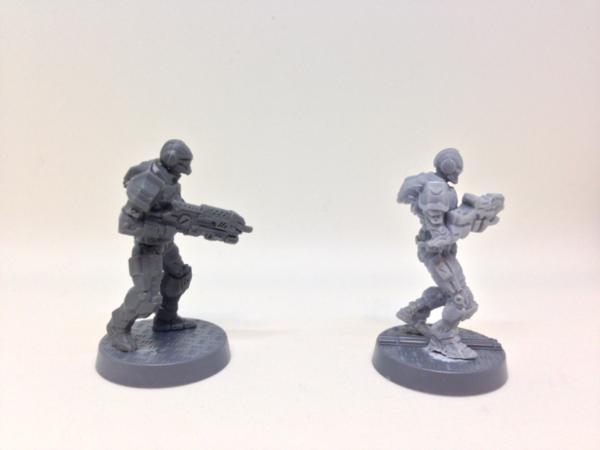
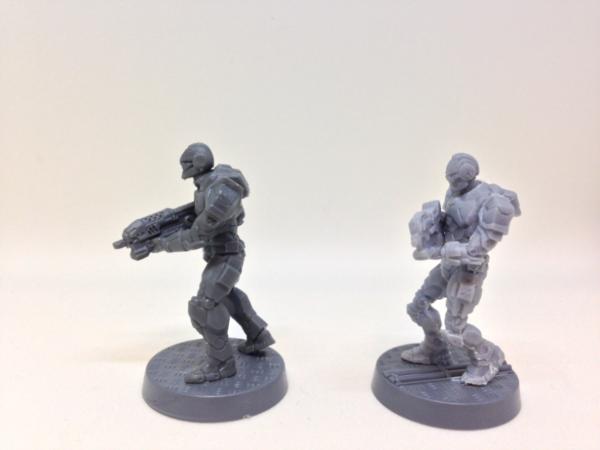
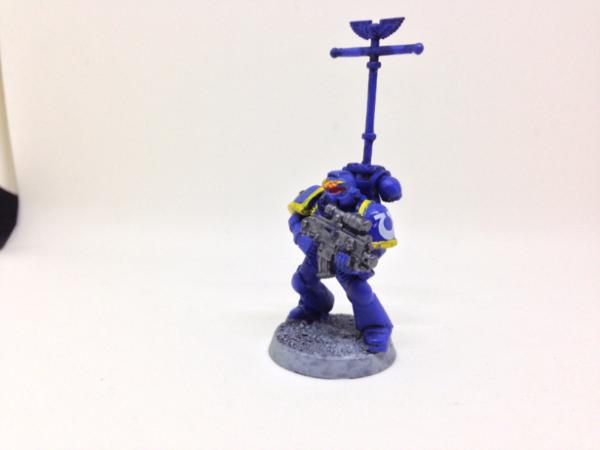
Here are the Enforcers after 1)a basecoat of Tamiya NATO green, 2)devlan mud wash, 3)drybrush of NATO green, then NATO green/bleached bone (70:30). then NATO green/bleached bone (50:50). The guns are a Vallejo medium grey, with a wash of Army Painter dark tone.
Strangely, the restic Enforcer has sharper details than the plastic version. On the tabletop, it shouldn't make much difference, but up close it's quite striking. Also, I like the more angular restic guns better than the rounded plastic version.
I think the original design is superior in several ways but I like the knees and weapon style for the new ones. They're also a a fair bit easier to clean up and magnetize. Gonna eventually have a bunch of both though
I have decided to change the focus of this pblog to non-army specific miniatures, since I'm doing so much with board game plastic and I don't want to start a whole new thread.
Today's update: Myth!
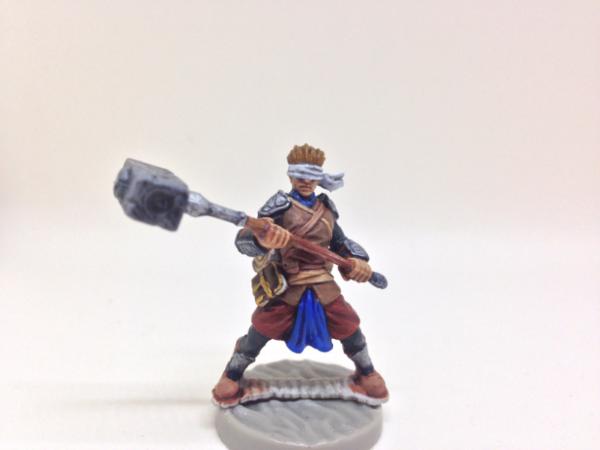
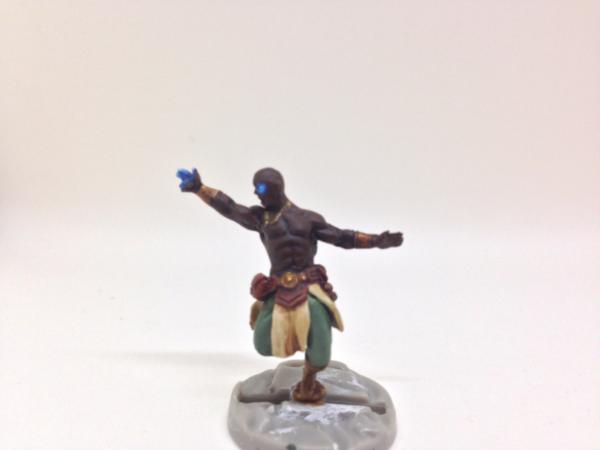
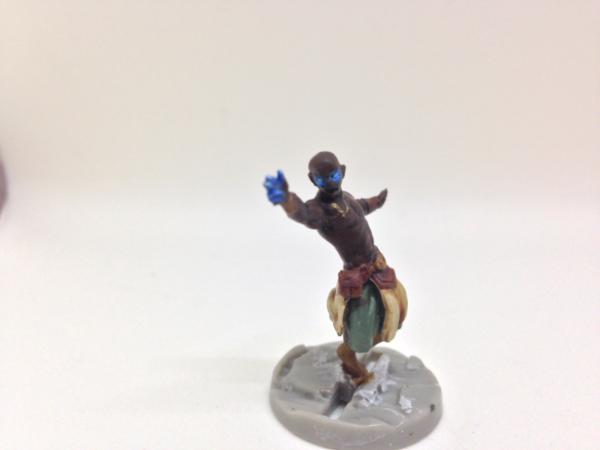
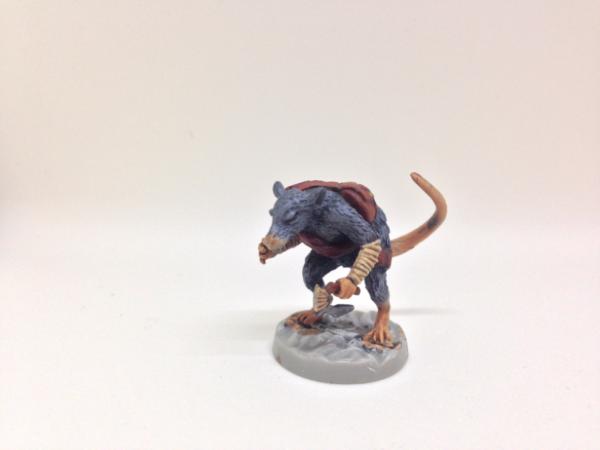
I actually did a lot of painting over the winter, but haven't gotten around to photographing anything until now. Back in November, I had an intellectual breakthrough after reading the Myth v1 rulebook about twenty times, and I became convinced that there is a pretty fun game hidden in the rules. My enthusiasm prompted me to cranks out the following minis in November/December:
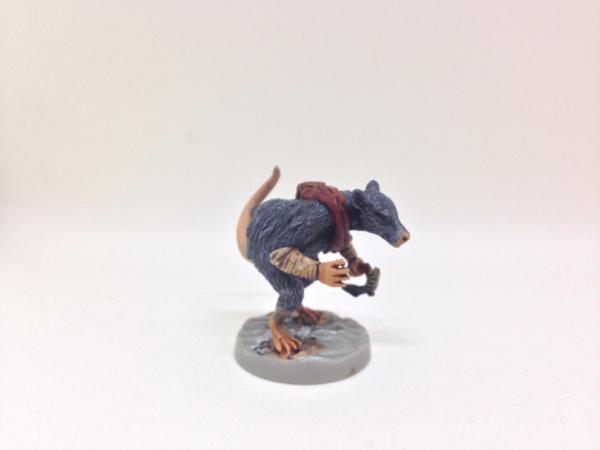
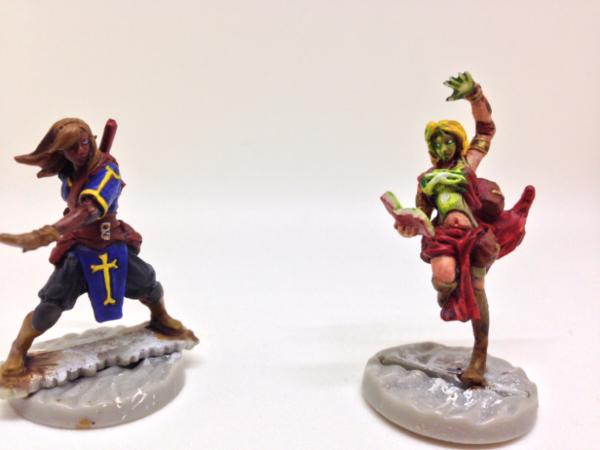
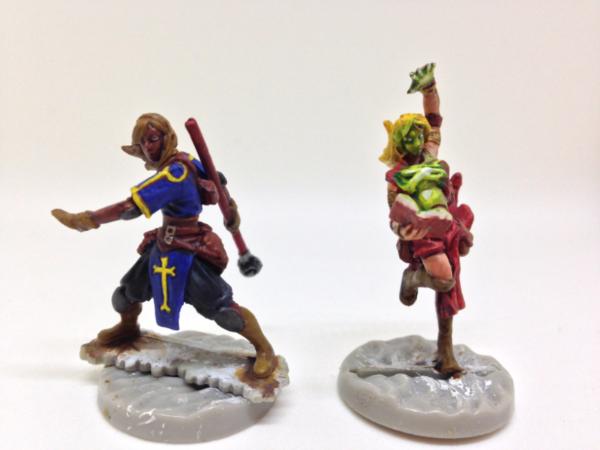
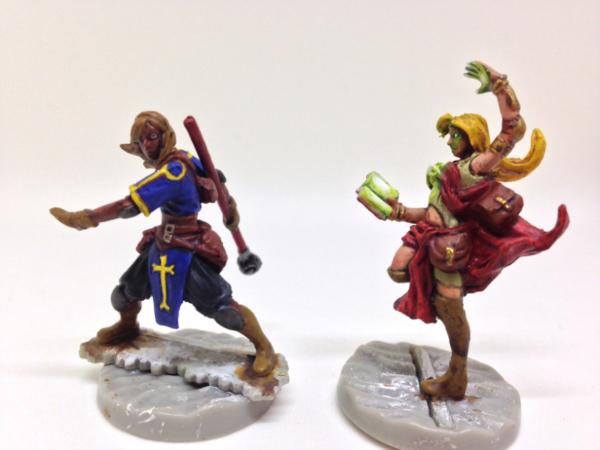
Here we have the alternate-gender Bandit and Archer. The rat-guy was fun/easy to paint, but I the human bandit is just as good, I think. The female archer is posed really weird, but the male is pretty non-descript.
These are the alternate-gender Acolyte and Apprentice. I am making an effort to do more non-Caucasian skin tones where possible to keep mysef from getting bored. The OSL on this version of the Apprentice turned out pretty well, I think. The secret seems to be: Go Big.
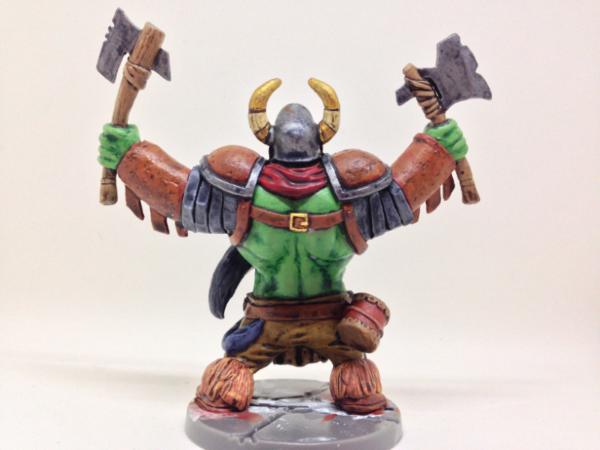
Orcenas, Master of Masters! This guy will do double duty as a giant for my KoW Orcs and Goblins army.
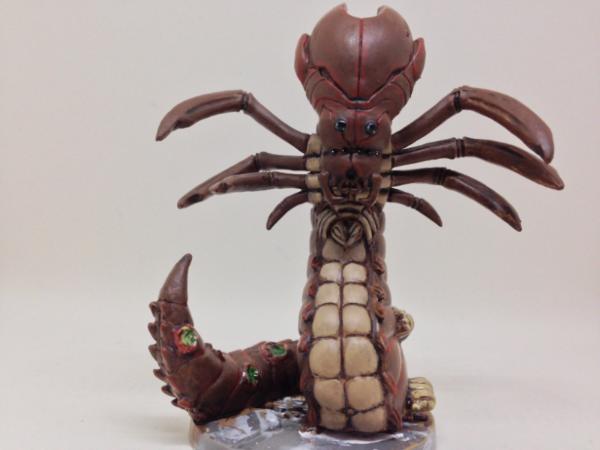
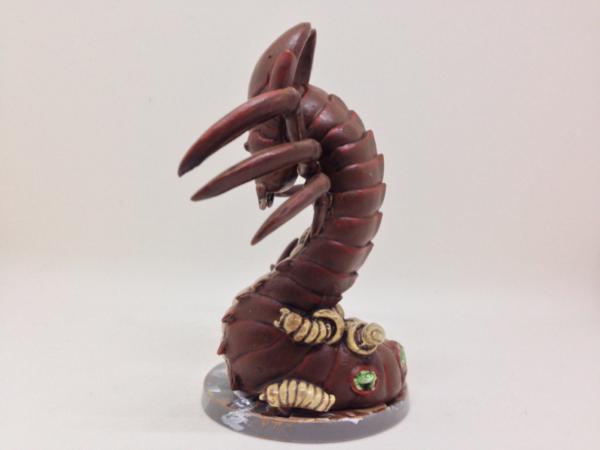
The Terror With 1,000 Legs! A nice Lovecraftian beastie. It doesn't really show in the photos, but the grubs are gloss-coated to make it seem like they just burrowed out of the big beastie's body.
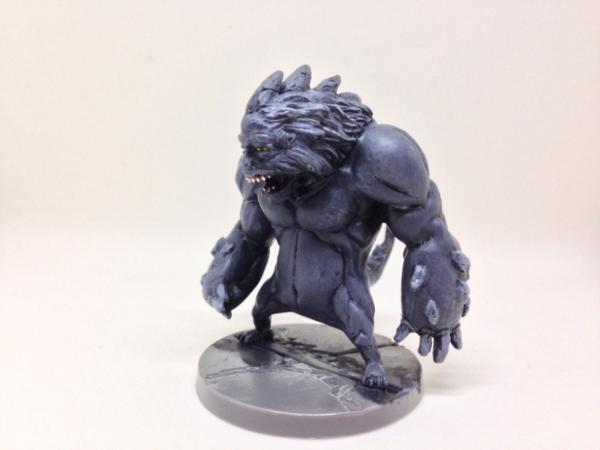
The Razorfiend! The face turned out pretty derpy, but that matches the concept art pretty well. In fact, this sculpt is more faithful to the original concept than pretty much any other mini in my collection. Kudos the the sculptor, I guess.
Yardu! This guy makes a nice ogre-sized undead monster. He was fun to paint.
You will no doubt have noticed that I haven't done anything with the bases. That's because I'm not sure what to do abou the atrocious gaps some of the minis with narrow stances end up with. Clear acrylic? Kneadatite? Just ignore them? The jury is still out...
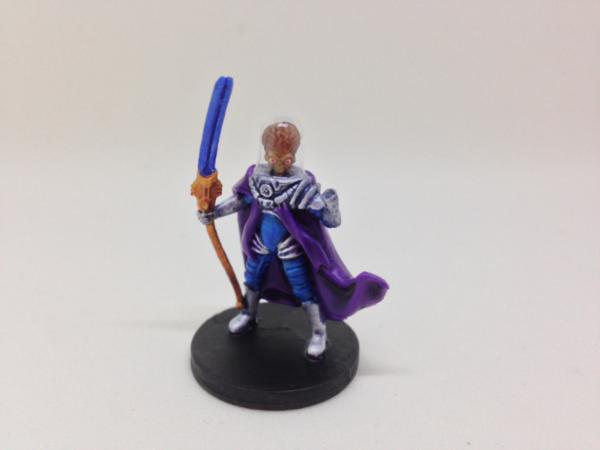
Stuff looks great! Some of the monsters are a bit cartoony for my taste, but the painting on everything looks quite good. The purple guy doesn't look so much derpy to me, kind of terrifying actually. The eyes creep me out. I just hope he runs slow with those teeny legs
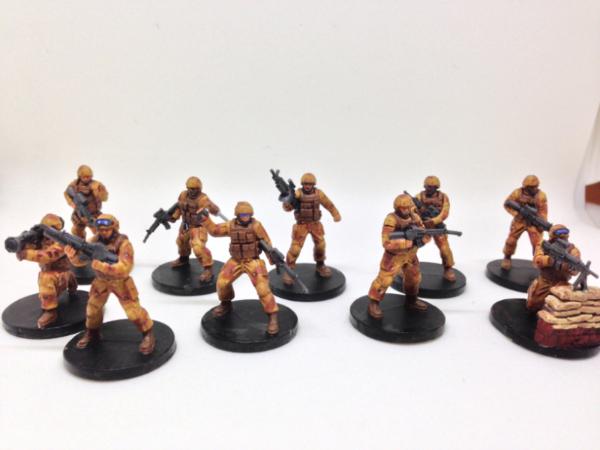
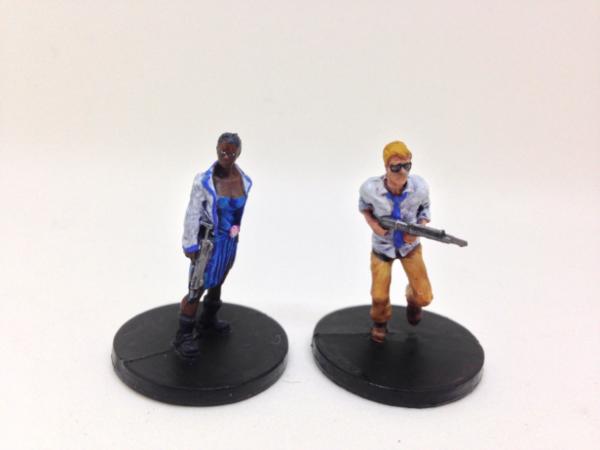
The Myth stuff I posted previously was from the end of 2014. I took a break over the New Year's holiday, and then finally broke open my Mars Attacks! box. Here are the results:
The human soldiers are nice enough for their size and material. I figured they'll be dying in droves, so I just went with a basecoat/wash technique, with some token camouflage. After finishing them, I began to regret not getting more of them. Ah, well, there is no shortage of modern army minis out there, and some variety will be nice.
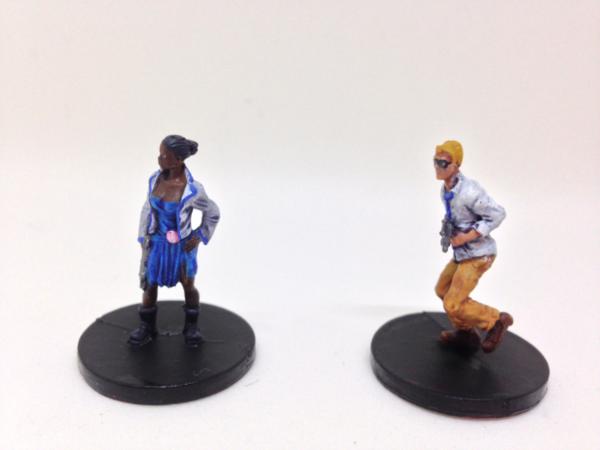
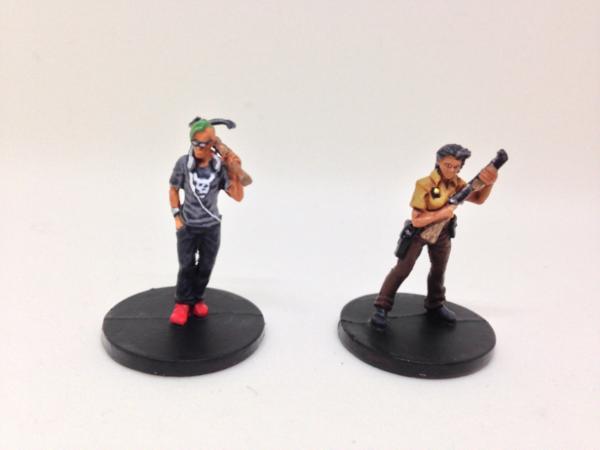
Ashely and Phil. Ashley was supposed to be at prom, so I gave her a white tuxedo jacket that she borrowed from her date. Note that the piping matches her dress. Not much to say about Phil, except that the glasses don't really work. I filled in the lenses with white glue, but it dried clear. Maybe another layer?
Deke and Edwyn. Deke was one of the first heroes that I painted from this set, so I put a little more effort into him. He has the same basic uniform as the soldiers, but with some mismatched accessories, probably from the army surplus shop. Edwyn was one of the last from this set, so I kind of half-a$$ed him. I straightened his sword before priming, but it went right back. Oh, well.
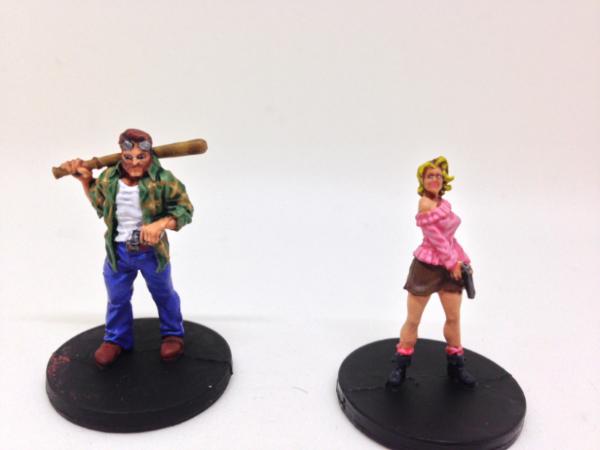
Eva and Troy. I painted Eva like a Pima County Sherrif's Deputy, rather than the standard blue. Troy's black-and-greym ensemble was too boring, so I gave him green hair and red shoes to make him more interesting visually.
Buddy and Brandi. Buddy's long sleeves seemed inconsistent with a Hawaiian shirt, so I made it flannel instead. Brandi has a leather skirt, and teeny-tiny eyes that were too hard to pick out.
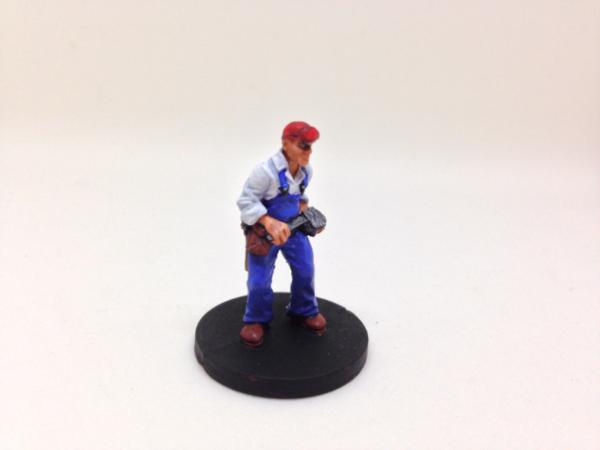
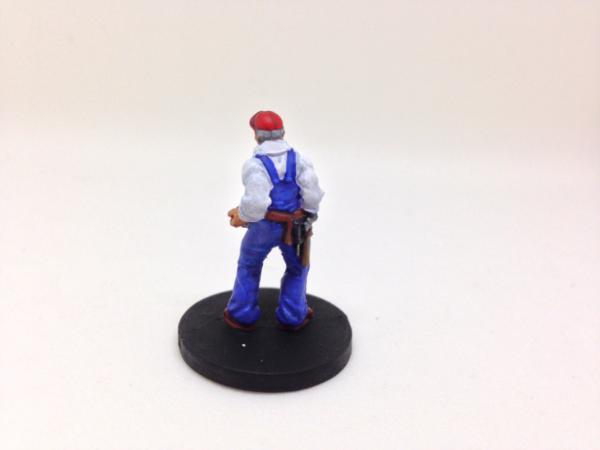
Finally, Joe. I like this guy. His Goober Pyle cap, the tool belt, the overalls, the giant pipe wrench. Everything about his is delightful.
All in all, I like working with boardgame plastic. Restic or metal gives better detail, but BG plastic is harder and easier to clean up than restic.
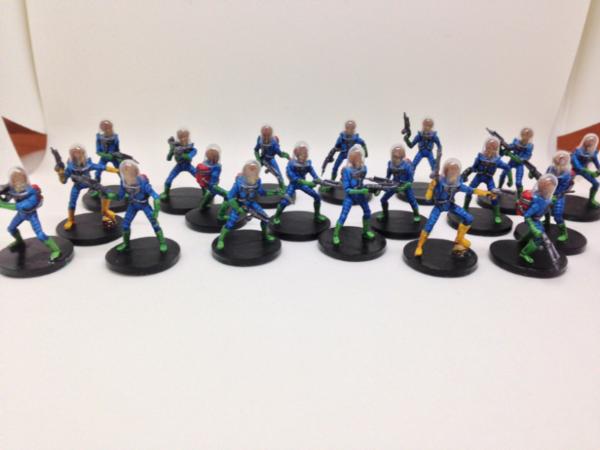
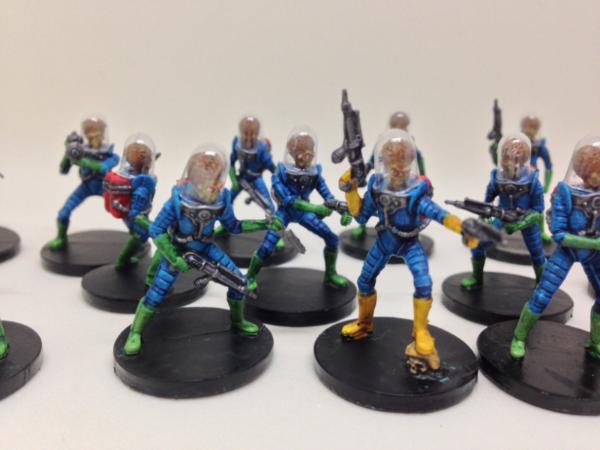
Yesterday, I posted photos of the human soldiers and heroes from Mars Attacks. Now it's time to show the martians:
Twenty Martian grunts. I followed this tutorial , except that I didn't bother highlighting anything. The only missing item from MA was the helmets that were supposed to come with the starter box. I had these guys sitting in the case with bare heads for almost two months, and I thought they looked fine like that. When I put their helmets on, I changed my mind. The little domes really make the models.
The two Martian heroes got essentially the same treatment as the grunts, with just a little more detailing. I put a lot more work into the gold guy than I did for the silver guy, but it's hard to tell from arm's length.
In addition to the minis, I also cranked out three MA "battlezones" and one accessory sprues-worth of scenery. I used the Talk Wargaming technique, substituting Mr. Color's Russet because I can get it locally. MA scenery has one big advantage over DZ Battlezones: they come de-sprued. I have two giant boxes full of battlezones on sprue taking up space in the closet and causing marital strife.
These are just some close up shots. I have one more set of buildings to assemble and paint, including the chain-link fence and the stuff that attaches to the sides of the buildings, and I think three of the Antocenti sets as well. Those will have to wait until I get a little further along on the samurai , though.
As I mentioned in my other blog, I had a handful of minis sitting, staring at me, preventing me from starting a new unit of Samurai. I finished them yesterday.
The alternate-gender Soldier from Myth. This is a really boring mini that I just couldn't make myself pick up and paint. It doesn't help that it's a furry wet-dream. Why didn't they just make a woman wearing armor carrying a sword?
The minotaur mini-boss, also from Myth. A nice enough model, I suppose. A little busy, and I have a bunch of classic Citadel minotaurs that I like more, which helped kill my motivation. It looks pretty good finished up, though.
And a pair of Asterians. Identical to all the other ones I have, which made them quick to paint once I finally got started.
having knoccked them out, I can get back to working on the samurai, linked in my blog below.
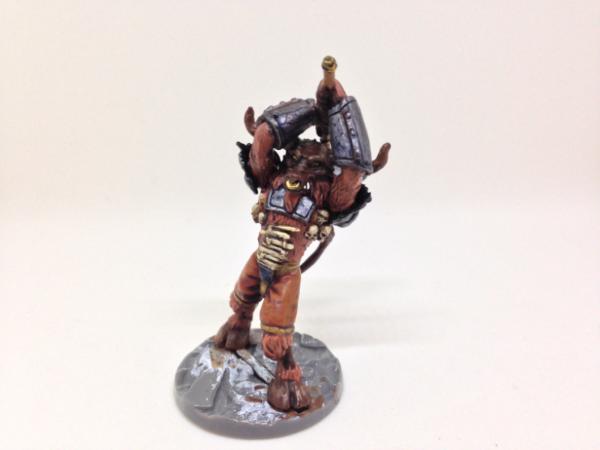
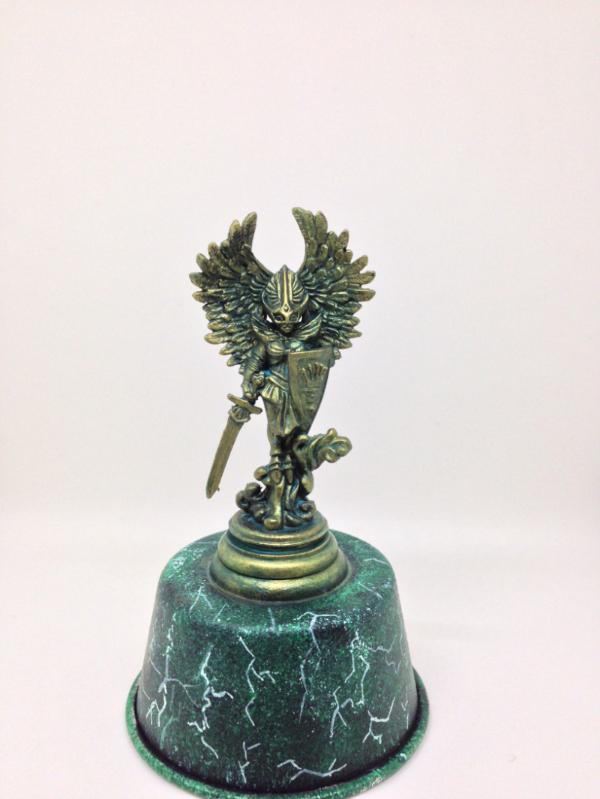
Two Christmases ago, I picked up two Mantic Crazy Boxes. I got some neat stuff, but also some things I would never have a use for, including a couple of Loka miniatures. One is a wizard/druid-looking guy, the other is an angel of some sort. Digging through the boxes, it occured to me I could use the latter as a piece of terrain:
The statue was painted with Vallejo Old Gold, then given a heavy wash made from turquoise pastel chalk and water, followed by a slightly drier wash of light green chalk. I followed up with a drybrush of Old Gold. The base is a green marble effect that I found somewhere on Youtube. This will make a nifty piece of scatter terrain for just about any system, and it gets one completely random miniature used.
And here's a fun little bonus piece: an Ultramarine, painted by my 5-year old son (with some touch-ups by me):
I have little-to-no interest in playing 40K ever again, but I still have piles and piles of 40K minis. The boy can practice on these relatively simple miniatures and build up his own little army without spend anything. It's kind of fun to watch him stage little adventures for the minis he paints.
The space marine looks good too, probably better than my first marines and I was a wee bit older than 5
Thanks. I'm happy with how the statue turned out. I probably have dozens of older metal models in stiff poses that I can turn into terrain in a similar fashion.
The marine took a lot of touching up, but even before that it was better than his first efforts over a year ago. It's interesting to see how his fine motor control develops over time.
Yeah bones 2. I"m having fun speed painting the disposable ones though But yeah, if she exhibits a marked improvement and actually starts trying to use different colors on different parts of her victims... I will certainly sacrifice some to her continued learning
Those alkemy models or w/e they are would be a good place to look too.
GrimDork wrote: But yeah, if she exhibits a marked improvement and actually starts trying to use different colors on different parts of her victims... I will certainly sacrifice some to her continued learning
I'm dealing with the opposite issue. He likes bright (one might even say clashing) colors on the minis he paints. The Eldar rangers he painted last year remind me of the "Paint It Red" days of 40Kv2 or WHFBv4...
Are you talking about the Mars Attacks stuff or the Myth stuff? Those are both made of a harder plastic that for some reason doesn't want to straighten. I tried, and then gave up and just painted it.
My son likes it when I share the minis he paints, so here is a squad of Ultramarine scouts:
He chose the color scheme, and did everything but the bases and transfers. I did almost no touchup work this time. I got the models in a trade long before I came to Japan, and they were heavily coated in detail-obscuring primer, so I figure these models were perfectly suited for him to practice on, since they wouldn't end up much worse than when they started.
You should come to Nagoya this coming weekend and bring your Deadzone/Mars attack stuff to play that would be a nice game to demo. Pity you live so far away (Iwate IIRC?)
Great work by your son. It might be time to start roping him into basecoating for your armies. You'll get to paint stuff together, and he'll get valuable practice in doing all of the basics while you get to watch him do it (or TV, your call!)
Looks like he's getting the hang of both washes and drybrushing there, as well as a start on weathering of the powered armour plates. Great job, mate!
In addition to the skeletons I painted last week, I managed to crank out these Deep Ones from RAFM.
These were all super simple to paint: Gnarloc green with washes and drybrushing, and Kermit The Frog eyes. Their bases have me stumped. I'm thinking some kind of broken sidewalk/pavement with grass in the cracks to represent the dying town of Innsmouth, but I'm not sure how to do it. Ideas?
Also, I painted up these Corporation Troopers from the Projectandora box I picked up on clearance years ago:
My son has been bugging me to paint these ever since he discovered the box sitting on a shelf by my desk. Technically, these are his minis, in that he chose the colors and did as much basecoating as his five year-old attention span allowed. For nine of them, we went with shades of grey for the uniform, with Army Painter gunmetal for the guns and blast shields on their helmets and green visors, all brush-dipped in Payne's Grey. That stuff really is miraculous. I painted up that one green guy right after I first picked up the game, but lost steam almost as soon as he was finished. Watch this space for P veer-myn.
They are nice models, and if I didn't have so many Alternative Armies conscript/levy minis I would consider picking up more of them.
Re: dipping. I have a bucket of Army Painter strong tone that I use for my Mantic goblins, but for everything else I make my own acrylic glazes with Liquitex artist colors and a generic Japanese version of this product. It thins with water and dries in an hour instead of overnight, and gets great results (IMO).
Huh, cool. Sounds like a thing to try. Especially for Reaper's bones material. That stuff reacts weirdly to.. a lot of things. Some of my dipped minis have stayed a bit tacky so maybe I'll look into that, thanks for pointing it out.
I like the stuff because I can mix up any color of glaze I need from the paints I have on hand. The only thing the glaze medium doesn't do is make the impenetrable armored shell that urethane varnish does, so you need some sort of varnish on top.
Yeah, though most dipping methods leave the models pretty shiny anyway so matte sealer over the top is pretty common, at least for me. Doing it in different tones than various shades of brown/almost black could be pretty useful too.
Those corporate wage-slaves have come up quite well. The grey uniforms suit them well. Deep ones look good, also. Any plans to use them for anything specific?
I got the Deep Ones decades ago, with no specific use of in mind. I pulled them out intending to do a Deadzone mod of cultists vs investigators. Full deep ones would be Plague Stage 2s, hybrids Stage 3, and the Father Dagon/Mother Hydra I should recieve someday would ld ge Stage1. Sonething like Pulp Alley that allows custom profiles might work better, though.
In addition to the sohei, I put in some painting time with my son working on the veer-myn that come in the Projectandora box. here are the first six:
I went with a quick-and-dirty paintjob, browns+gunmetal, followed by a hame-made dark brown glaze, just to get them finished and ready to play with. It turns out that I rather like these models. and if I didn't enough unpainted minis for the next three generations of the ~InJapan family, I would pick up an army deal while they are still available in metal. As it is, the ten that come with the game will probably be enough.
My son found the P box on a shelf almost two years ago, but he really got interested in it about a month ago. Now that we have some of both factions painted, he really wants to "play" the game. Note the quotation marks-- what he actually wants to do is plonk the minis down on the tiles and then go "pew-pew" at each other until he wins. I suggested the training scenario in the rulebook, but he couldn't wrap his mind around an unwinnable scenario, so the actual game with actual rules will have to wait, I think.
In addition to the undead stuff I posted on my other P&M blog, I finished off this guy:
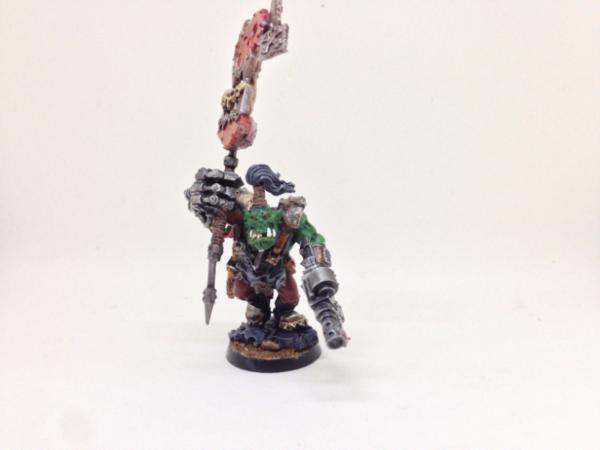
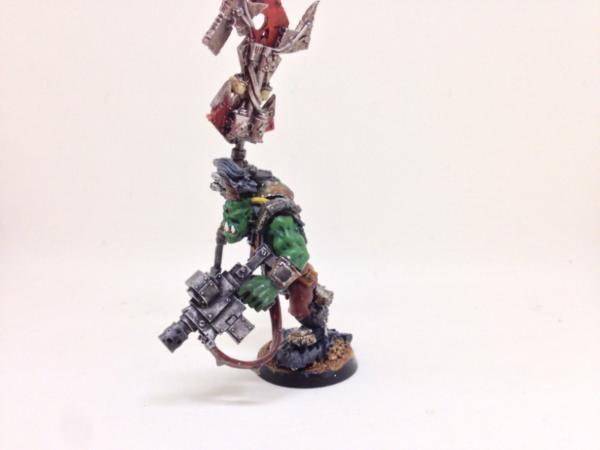
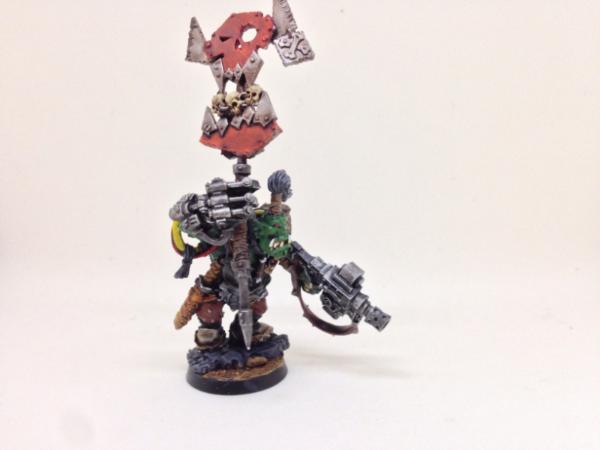
When I came to Japan back in 2002, I brought the core of a 40K Ork army to paint. I enjoyed painting and playing the army so much that it just grew and grew to a truly unmanageable size. Then I got sick of 40K and started working on other projects, leaving this guy half finished on my painting station. He's a pretty nifty model that deserves a better paint job than this, but I mostly just wanted to see it finished.
I've done that myself a number of times. Sometimes it really is more important to me to get some models painted than to paint them as well as I'd like.
He looks like nice work to me, and you can always spend an afternoon touching up anything that you're not satisfied with. I know all about how satisfying it can be to finally finish stuff that's been on the shelf for a long time. Now onto the rest of the greenskins?
Thanks for the kind words. I really am glad to see him finished. That said, the only other greenskins I'll be painting will be the Orcs and goblins I got in the first KoW kickstarter. Even if I ever decide to play 40K again, I have more Orks than I will ever need or want to field.
Thanks, carlos. It's a pretty simple paint scheme-- three different greys, with a heavy Payne's Grey glaze.
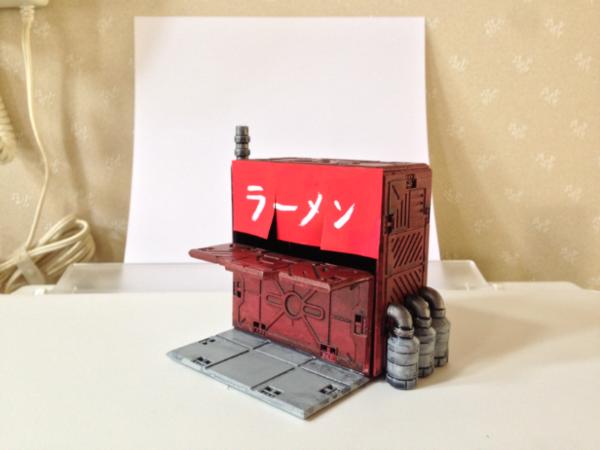
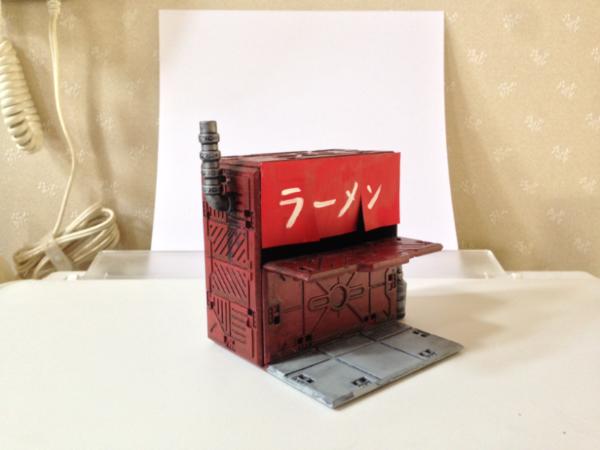
This has been sitting on a shelf, taunting me since last summer. Now it's finished:
I saw something like this online somewhere, and was inspired to make my own little ramen stand for Deadzone. The pipes came from a Platformer set that I decided was too fiddly to bother assembling. The sign is hand-painted paper, superglued in place. Someday, I may try to build a little shopping district to fight over, maybe during summer vacation.
Been meaning to do this for awhile now, I think the bazaar/market would be great fun for a map. Especially if you added some living quarters on top of all of the shops for height
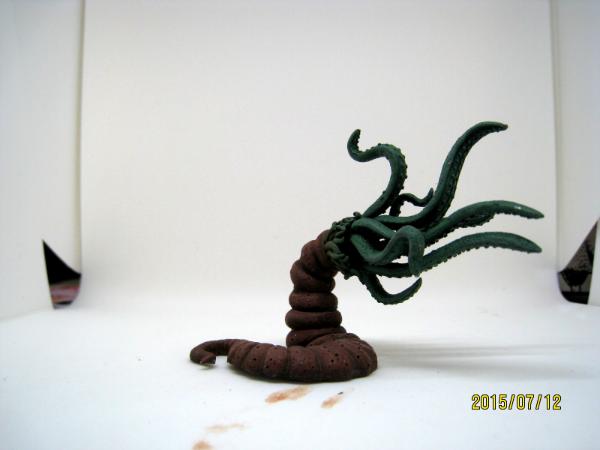
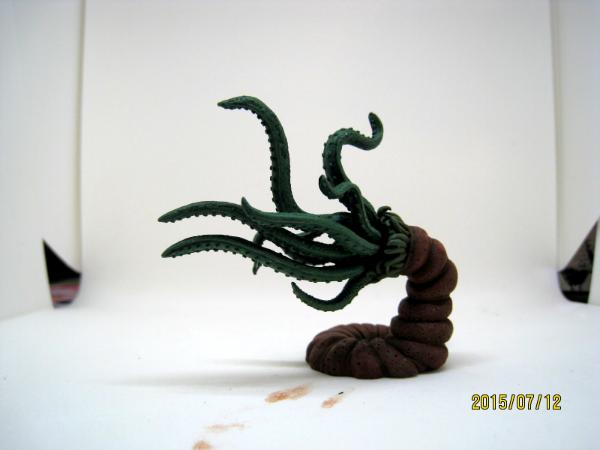
When I was digging out the Nightmare Legion for my other pblog, I found these guys as well:
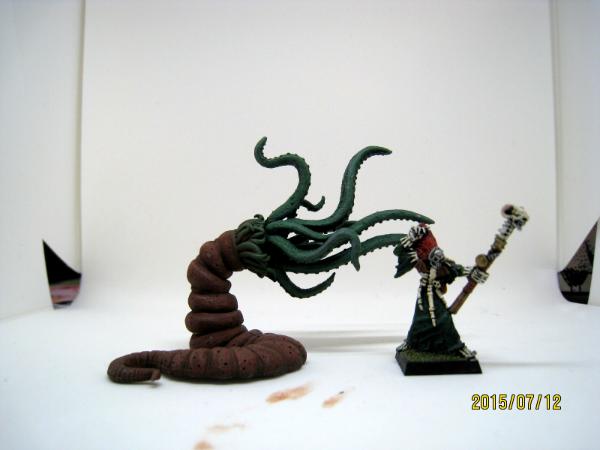
This is a Cthonian from RAFM's Call of Cthulhu line. I used him as a Chaos Spawn for my beastmen army at one point, which is why he is brown and green instead of rocky grey. Here's a shot of him with a Chaos Sorcerer for scale:
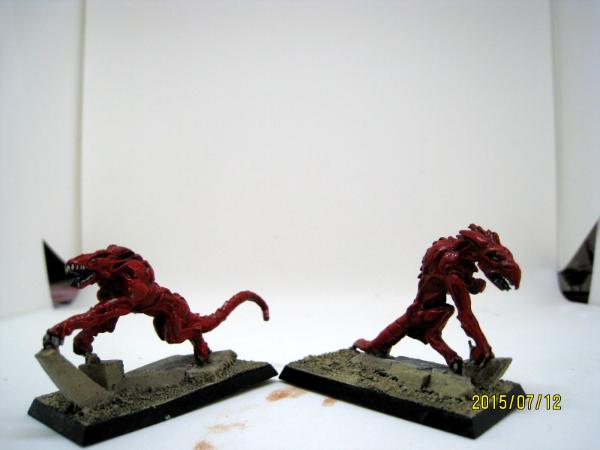
These guys are Hounds of Tindalos from the same line, painted up as hellhounds for a short-lived D&D campaign I was in about eight years ago.
Not new paintjobs, but I like the models enough that I wanted to share.


 Thanks for the kind words!