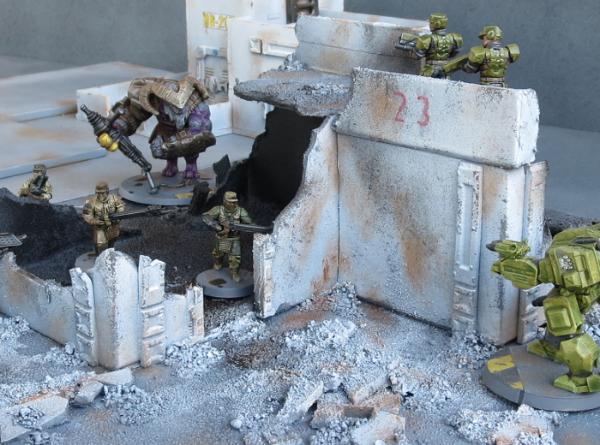
So, I was lucky enough to be sent a bunch of early sprues of the Maelstrom's Edge terrain to play with.
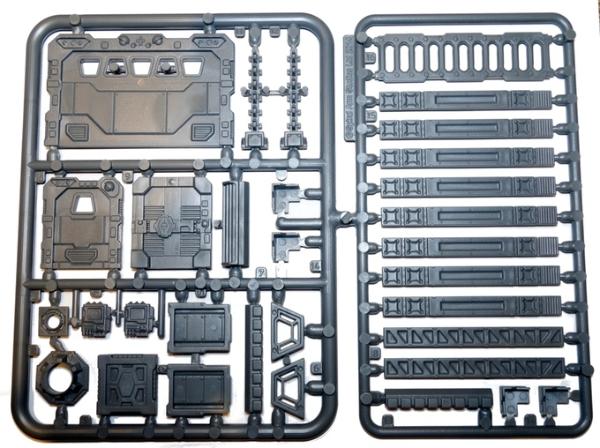
For those who haven't seen it, the sprue looks like this:
Some of my efforts have been shown in the Kickstarter updates, but I thought it might be fun to show what I've been working on, in the hope it might inspire others along the way.
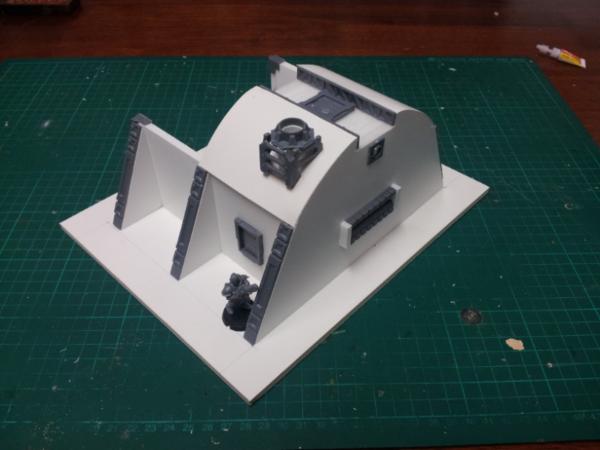
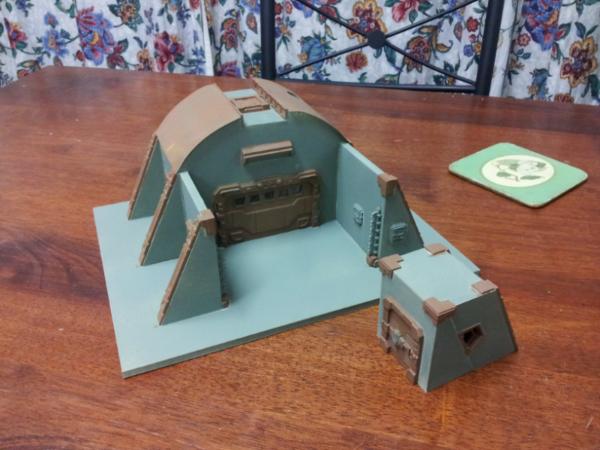
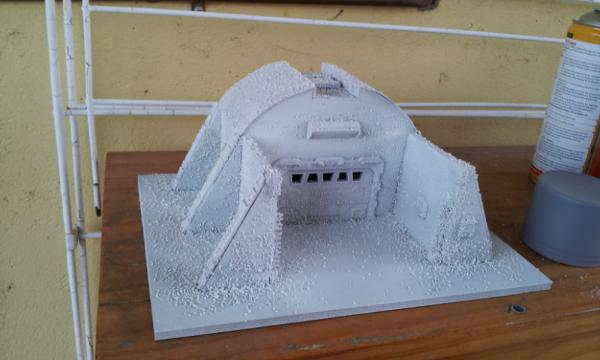
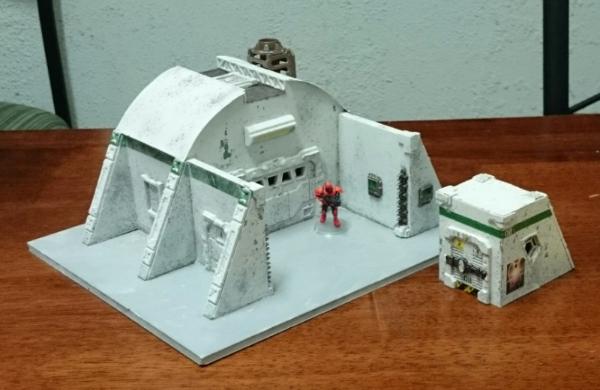
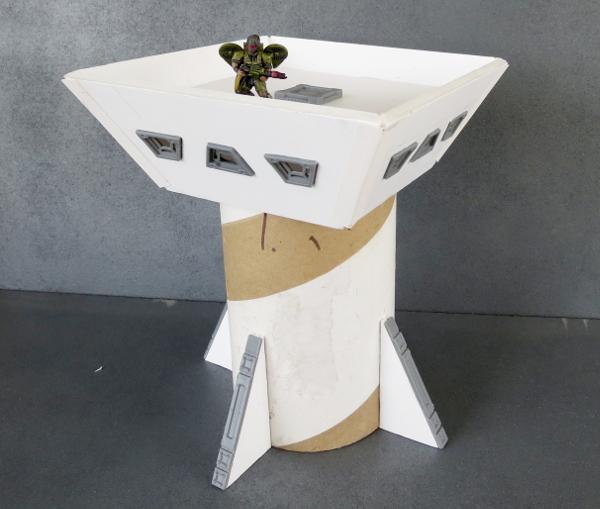
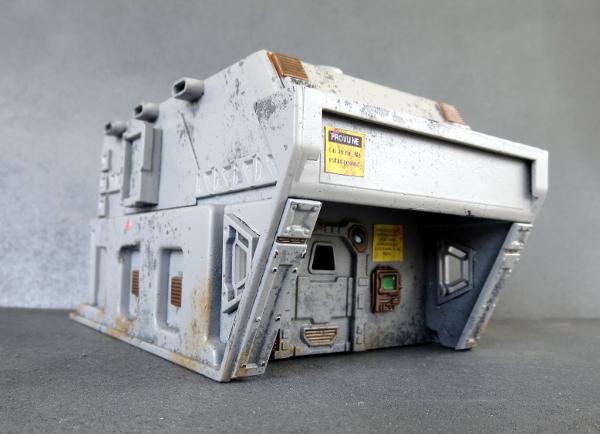
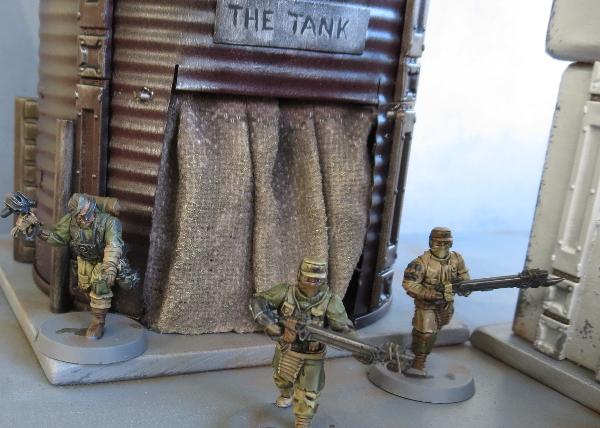
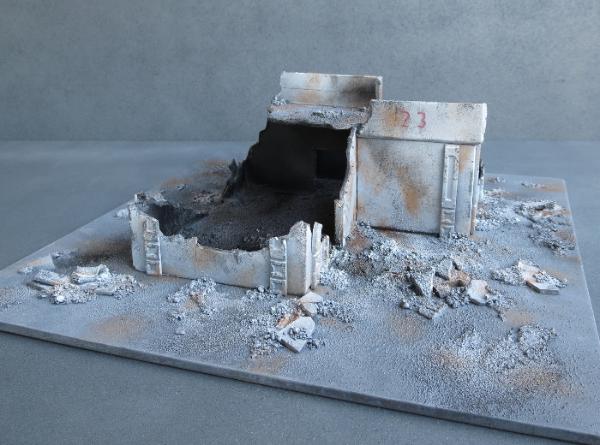
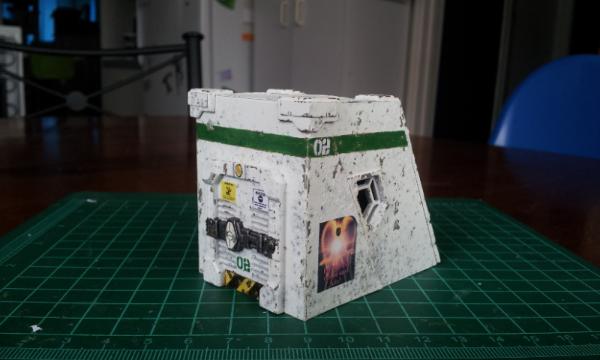
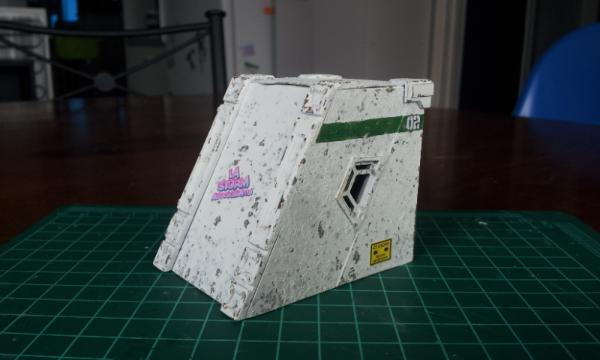
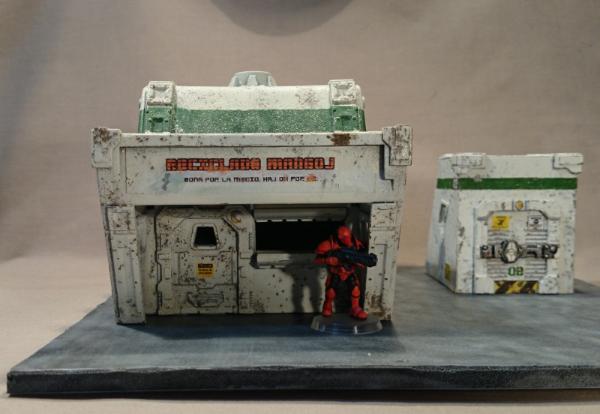
The fun thing about this kit is that you can add parts to just about anything. My very first experiment was a small bunker entrance, made from foamcore and card, which wound up looking like this :
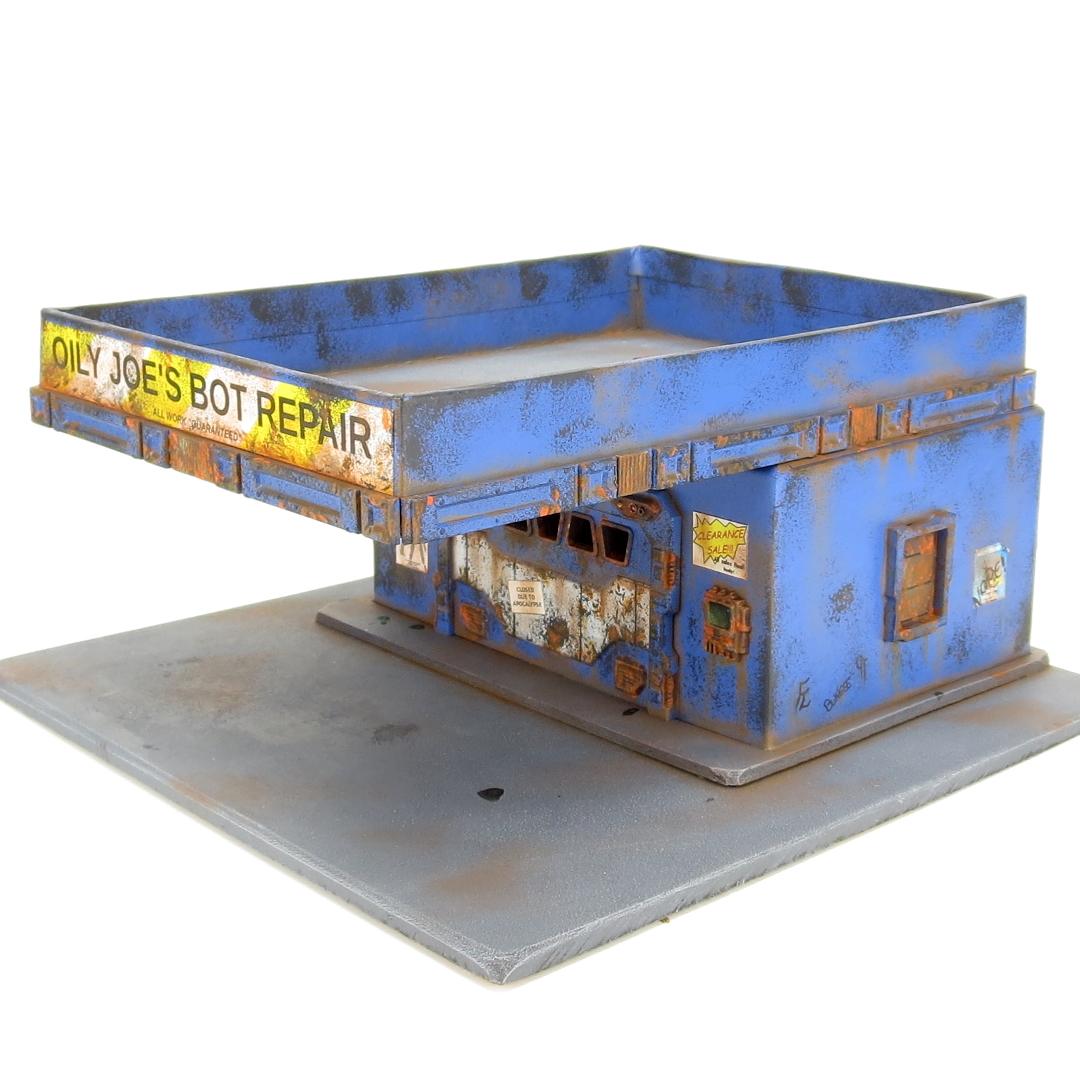
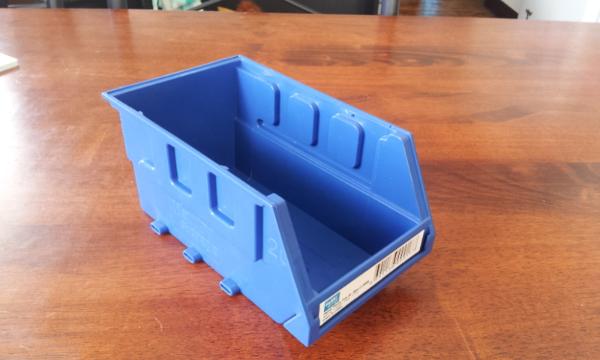
Automatically Appended Next Post: For a less foamcorial option, I found some storage trays at the local hardware store...
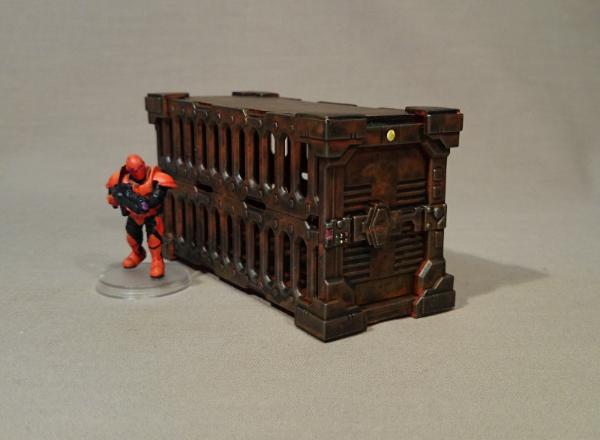
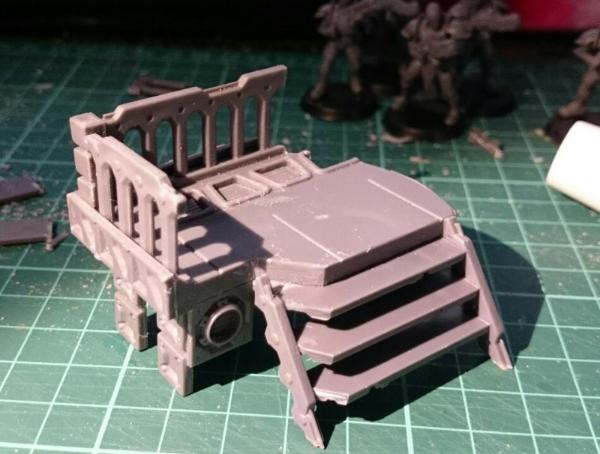
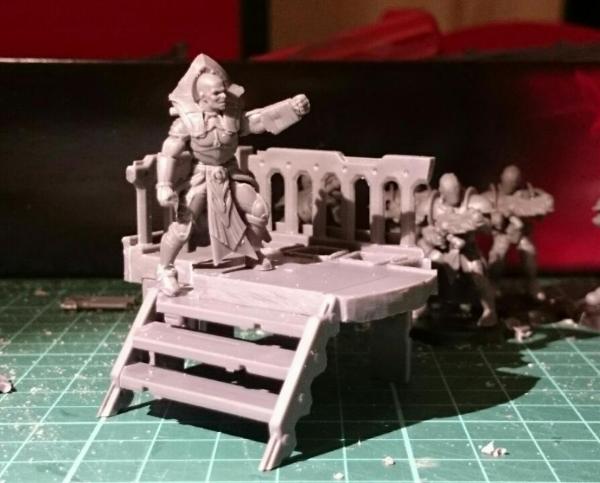
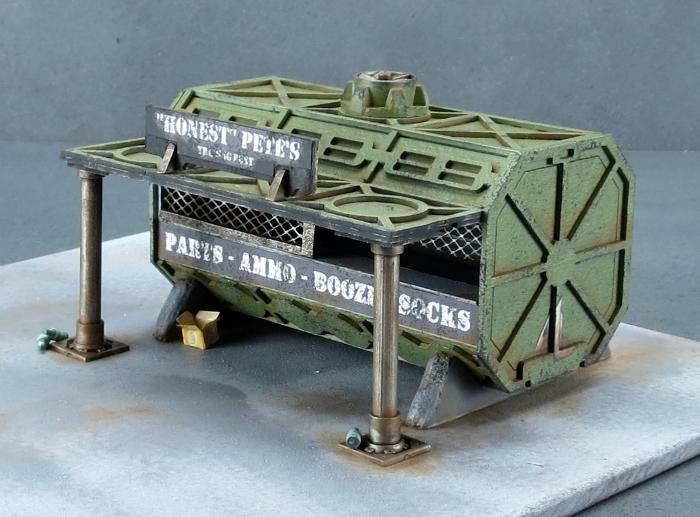
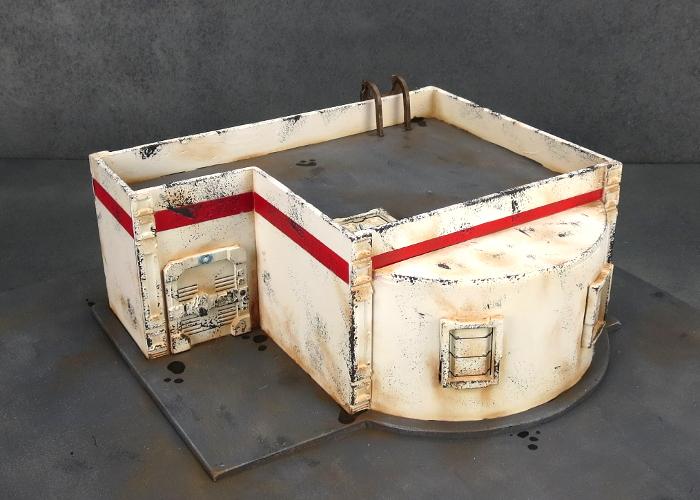
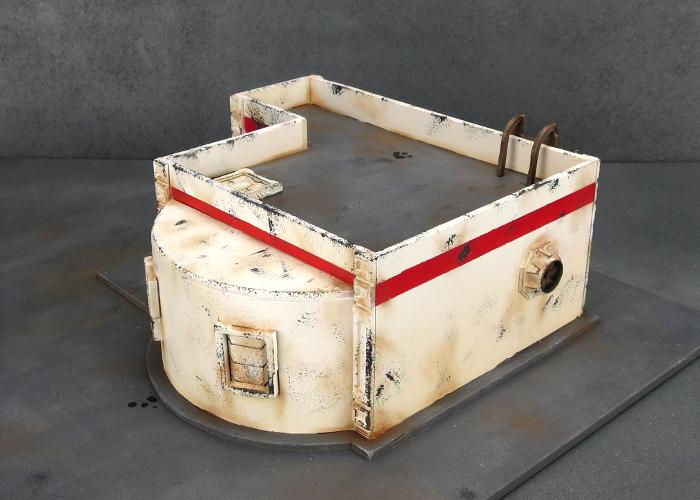
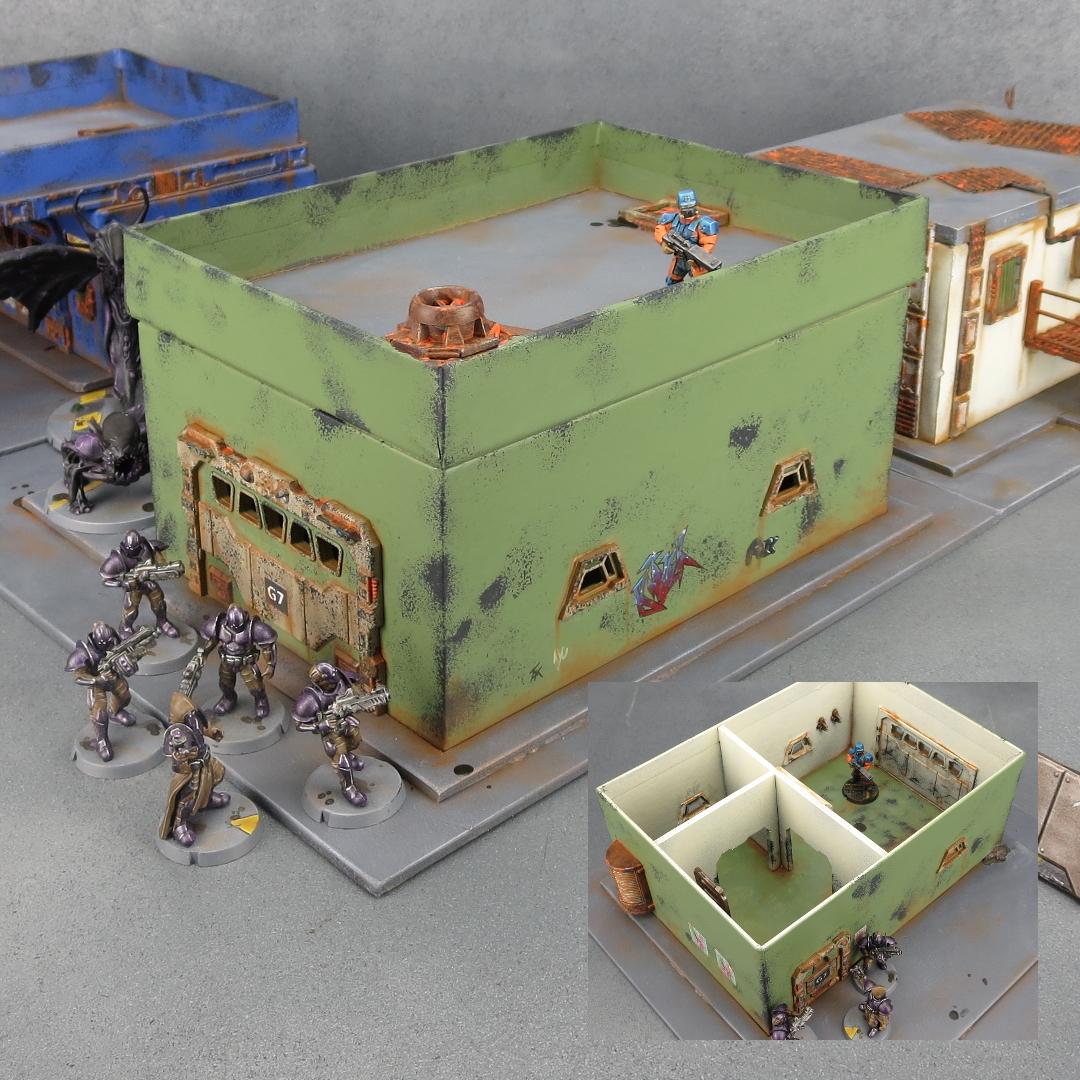
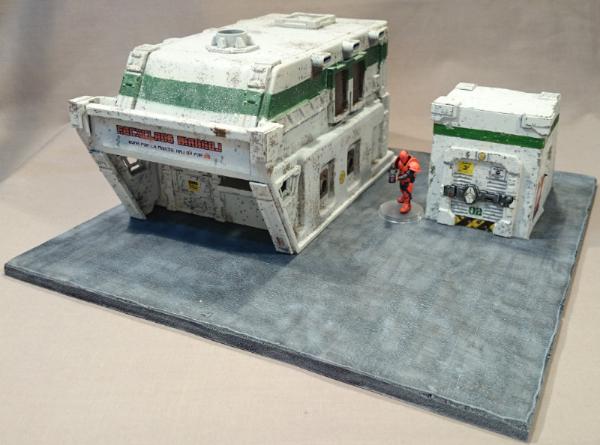
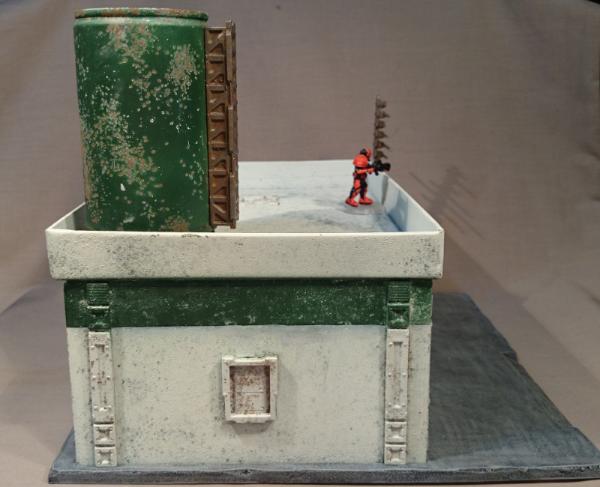
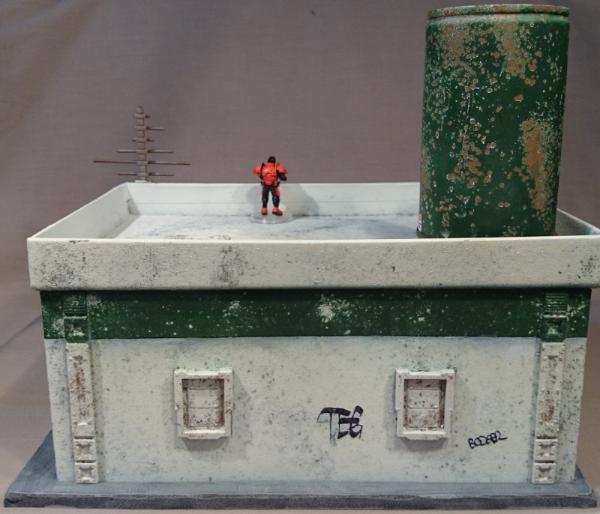
insaniak wrote: A livestock shipping container, made from 2 doors, 4 ladders, 8 corner pieces and a couple of pieces of foamcore (for the floor and roof)
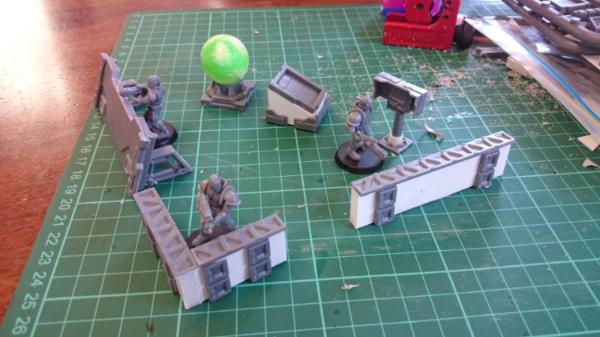
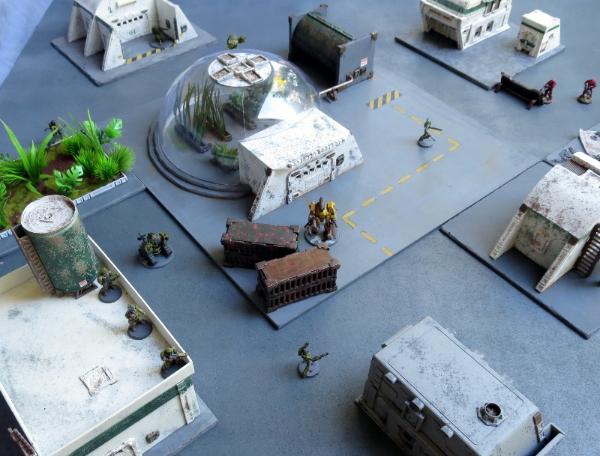
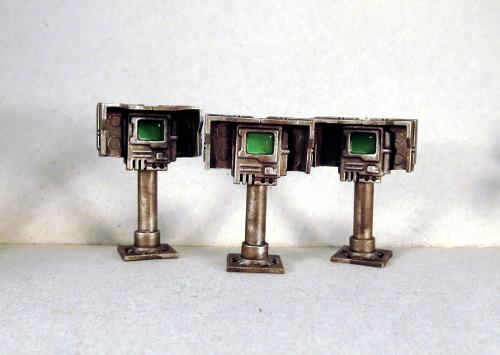
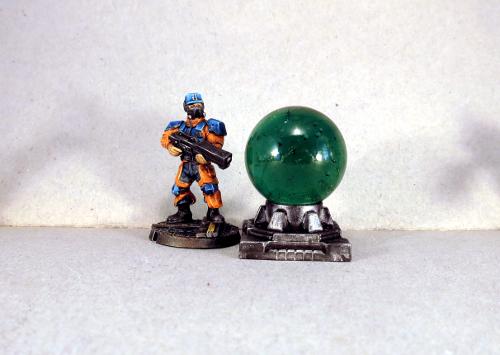
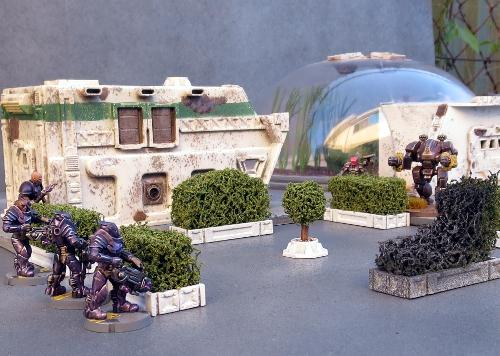
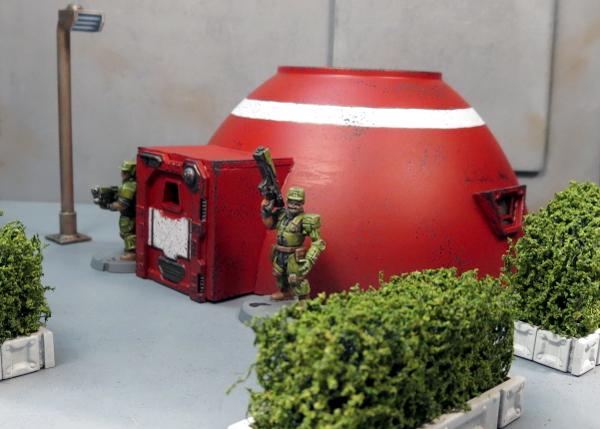
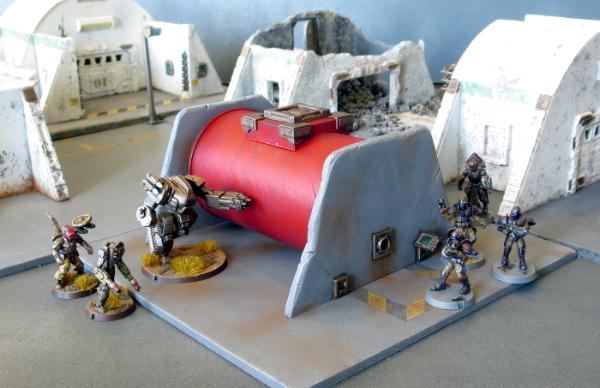
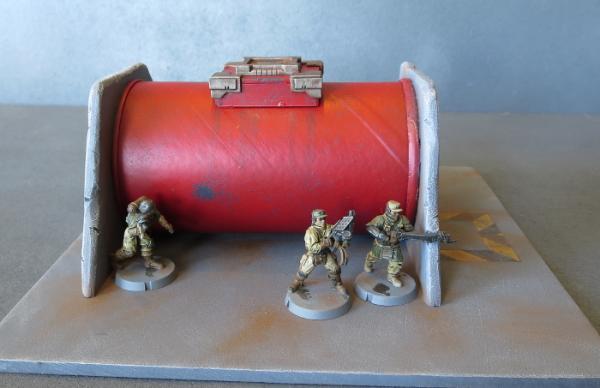
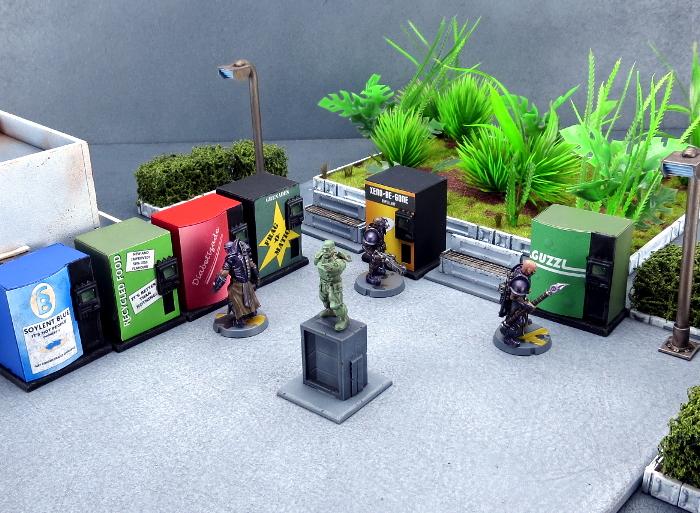
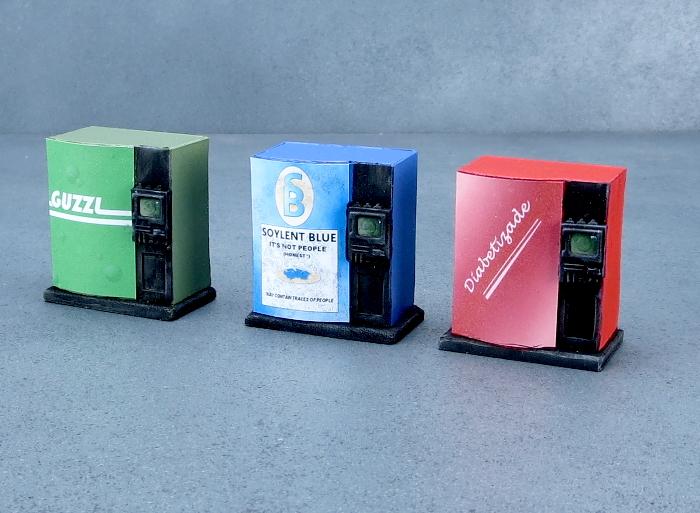
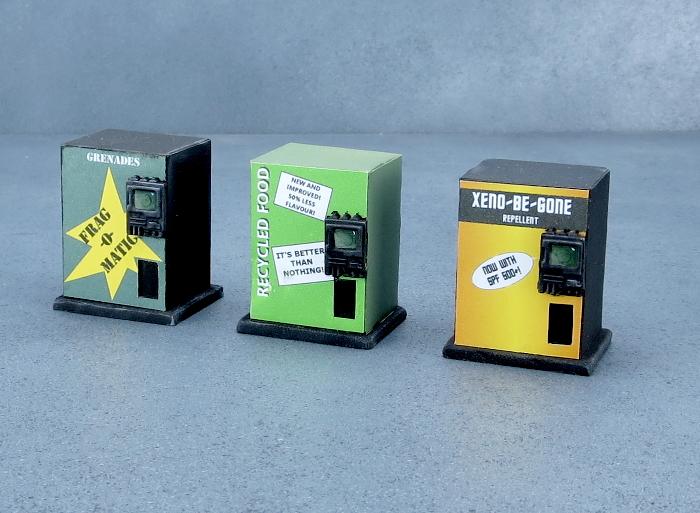
And some scatter terrain... I'm particularly pleased with the freestanding comm unit, and the big green holomap/powercell/shield generator/whatever...
And as an additional little extra, the round sprue that this stuff comes on is also rather useful!
Used here with a little plastic rod to make some pipes...
Is the curved roof just cardstock? I'm curious if I could make walls from plasticard and foamboard and then just use cardstock for the roof.
What are you using for the bases of the pieces? I'm specifically talking about the 1/4-1/2 inch thick piece at the bottom, that looks to be about 12 inches square.
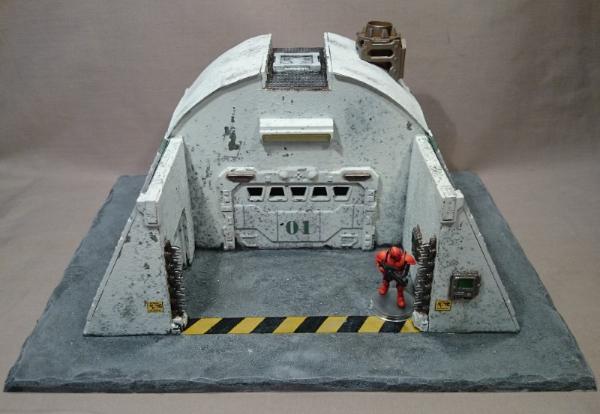
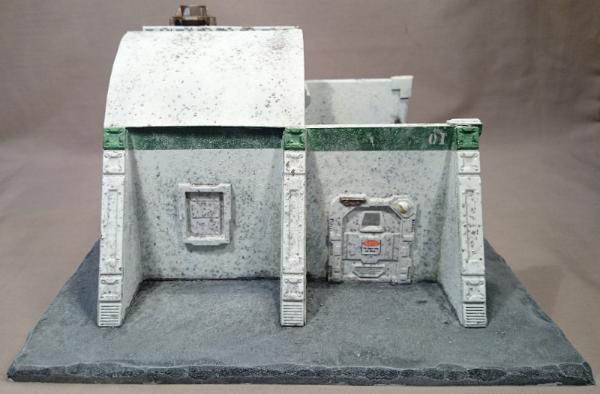
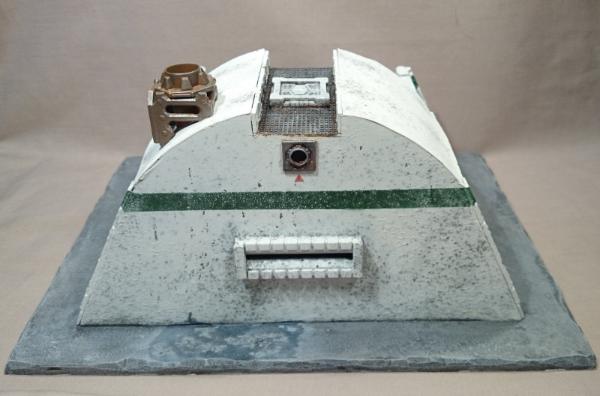
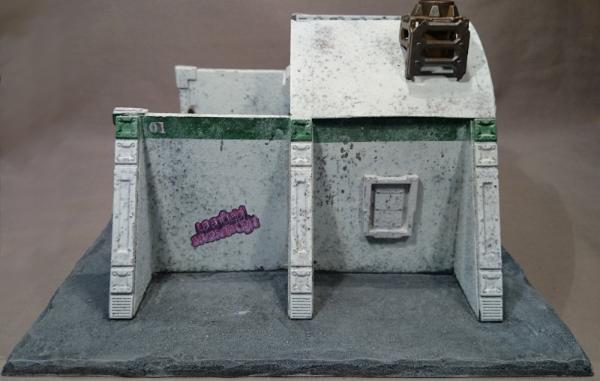
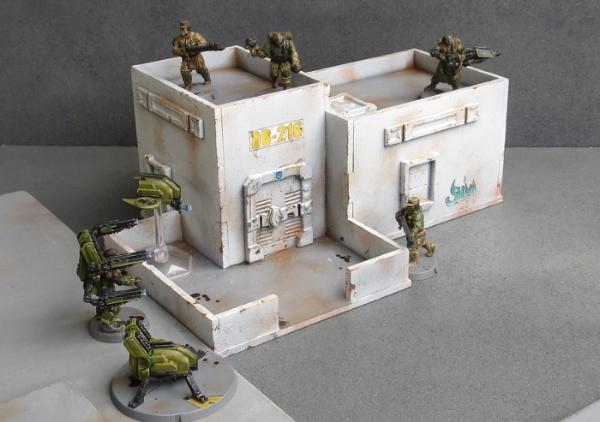
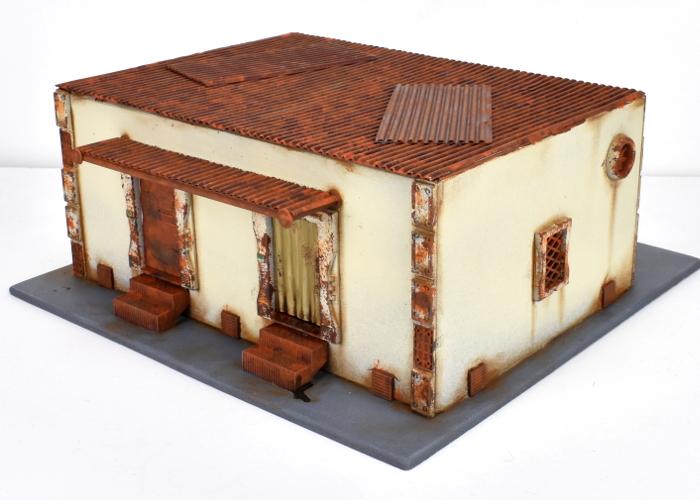
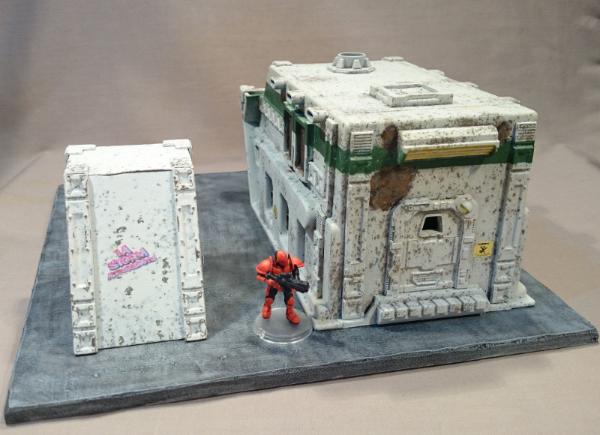
Some build shots of the first building of mine shown in the Kickstarter...
Built from Foamcore, roof from card, the rooftop walkway from a bit of embroidery mesh, and a liberal dose of MEdge bits. All of the bits on this building come from one sprue, with some leftovers.
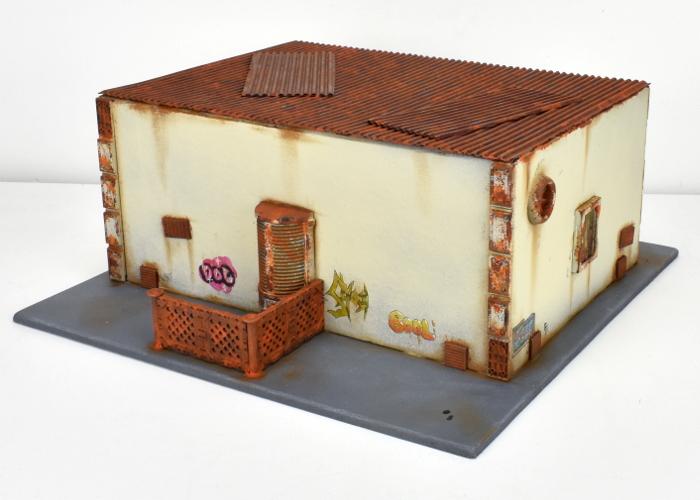
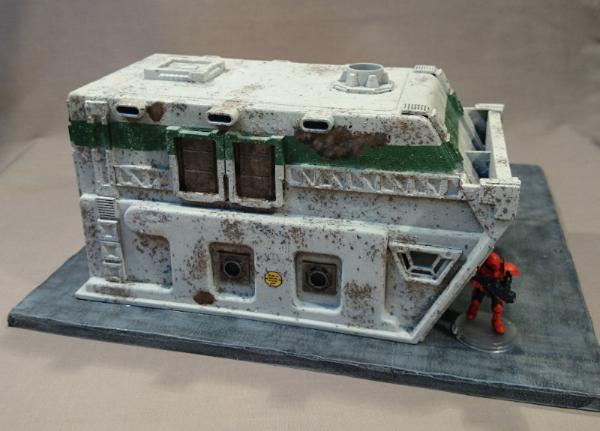
Painting...
Salty...
Nearly there....
Done...
Automatically Appended Next Post:
ziggurattt wrote: What are you using for the bases of the pieces? I'm specifically talking about the 1/4-1/2 inch thick piece at the bottom, that looks to be about 12 inches square.
It's 5mm foamcore, the same as I'm using for the main construction of most of my buildings. Not quite as durable as basing on MDF or the like, but convenient (and what I have on hand )and since my terrain generally doesn't have to travel very far should hold up ok...
Heck yea these are awesome! I would love to play on a board using these. Love the design on that last one most of all, reminds me of an underground base entrance or something. Very believable and lived in.
Is that all plastic foamcore or poster board foamcore?
You made me go out and buy some storage trays to make those small buildings. although they will probably sit in my pile of future terrain ideas for an eternity. Lol
insaniak wrote: Not sure what you mean by 'plastic foamcore'... It's the standard stuff with foam in the middle and paper on the outsides.
Might this be referring to foamed PVC?
Yeah, that. It's plastic sheets with foam in between instead \of cardboard. We had a bunch of very nice buildings based on the cardboard stuff a while back and ended up tossing them after a while because they all warped and looked chewed up on the corners. If these are your personal buildings and not transported though they might hold up better.
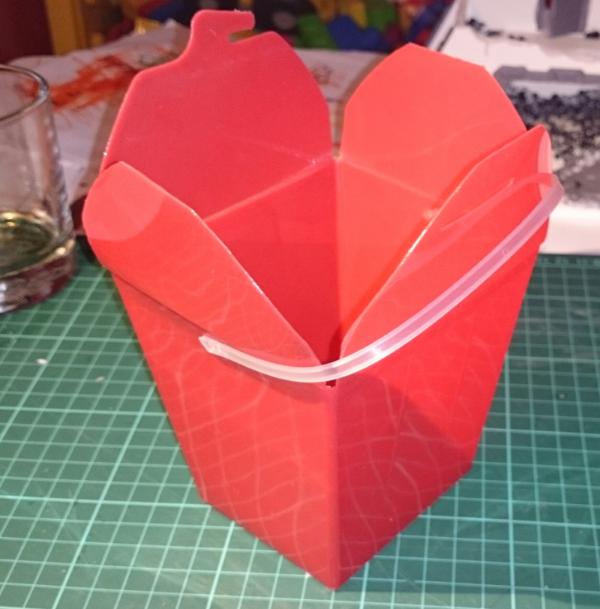
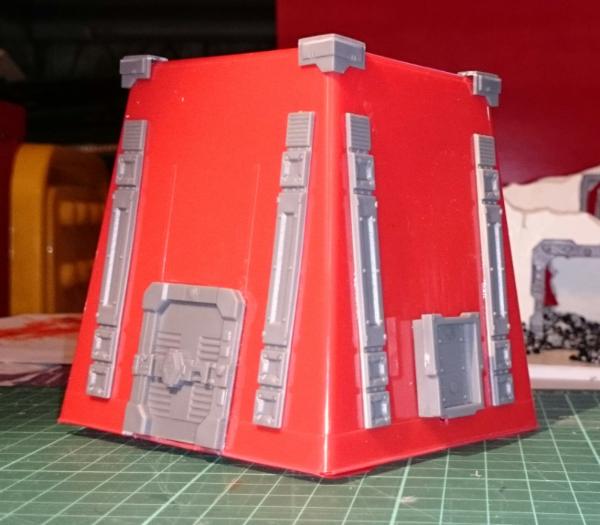
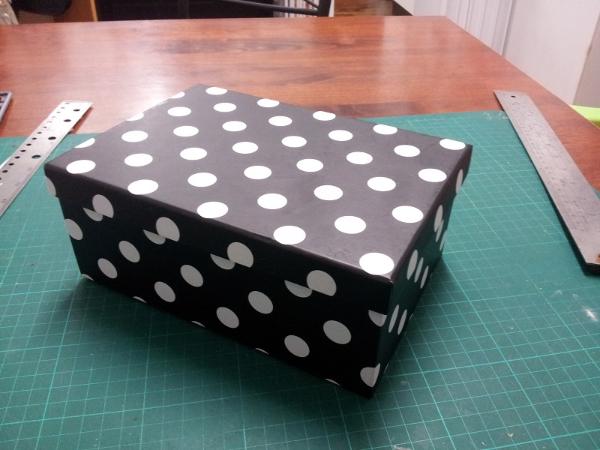
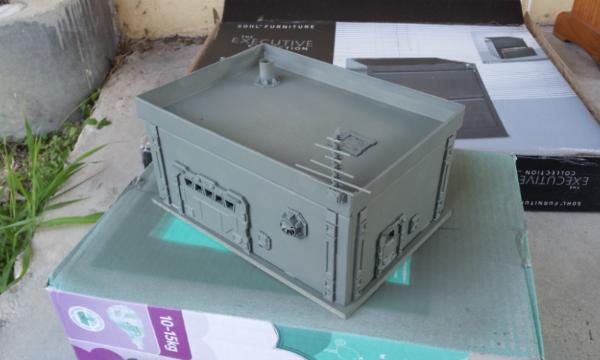
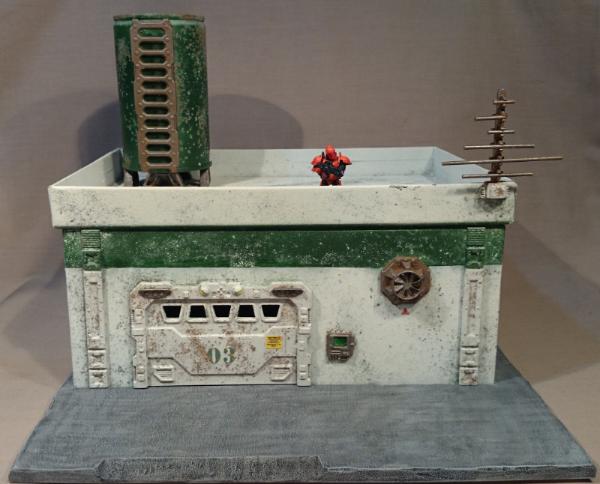
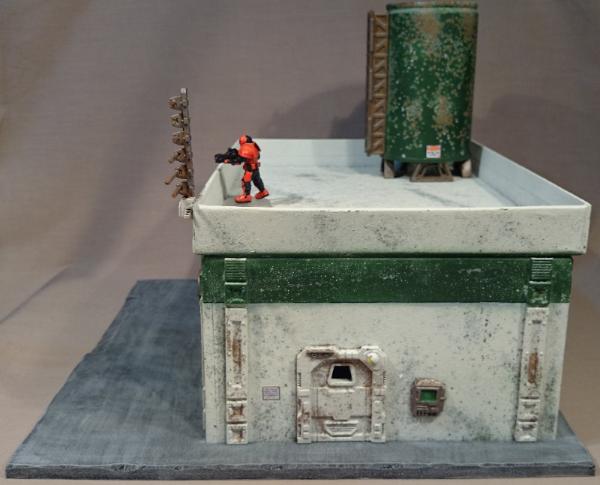
A small outbuilding made from an Ultrapro card box:
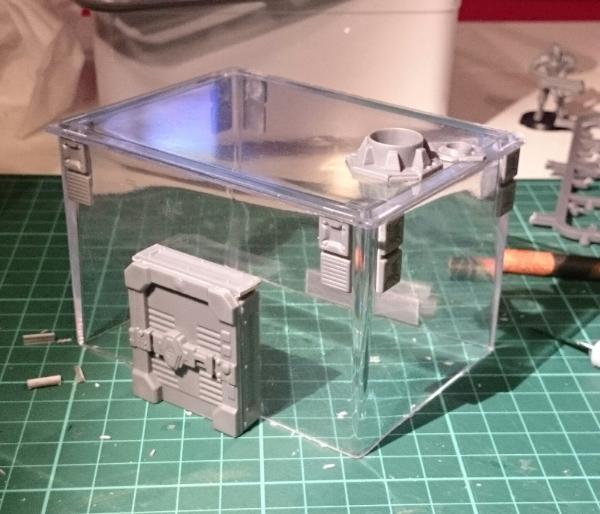
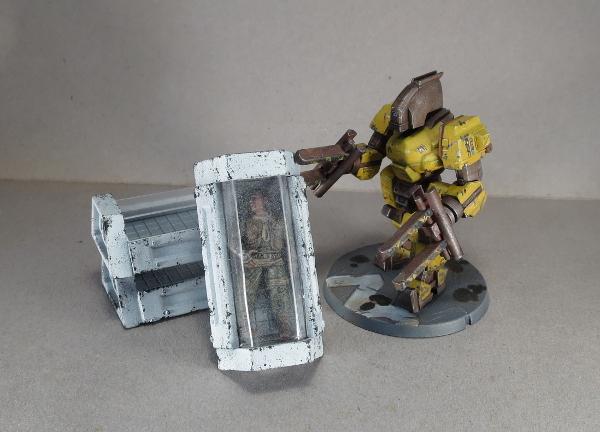
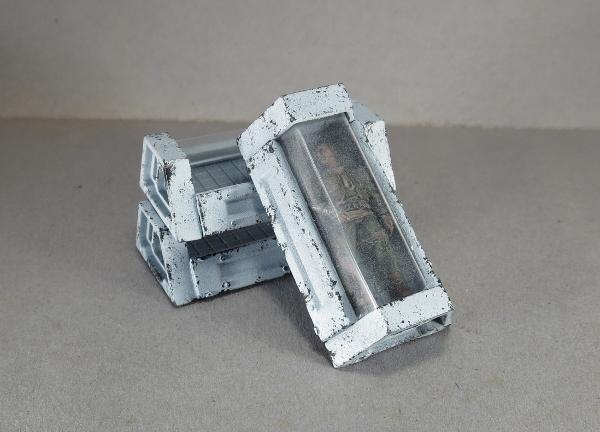
This one will be painted solid, but I doubt I will be able to restrain the impulse to make another one with clear walls as some sort of containment unit
I have to admit, the idea of scratch building stuff brings me out in hives mainly because I have the creativity and artistic vision of a withered grape but seeing the very simple techniques and examples that you have produced gives me some hope that I can at least emulate something approaching what you have done (alongside Panic's gutter based terrain which also looks awesome)
insaniak wrote: Not sure what you mean by 'plastic foamcore'... It's the standard stuff with foam in the middle and paper on the outsides.
Might this be referring to foamed PVC?
Yeah, that. It's plastic sheets with foam in between instead \of cardboard.
Any idea what that's called and where to buy in in the USA?
Gatorplast. ~$90 for a 48"x96" 3/16" sheet. Buy online or find a local plastics distributor and they can probably get it/have it in stock. Ask them for offcuts if they have them. It's a nice material, but not effective for scale modeling. It's best cut with a table saw/chop saw, if you have access. If you want something more sturdy than your standard paper foamcore, try Gatorboard. You can get it at most art supply stores in a reasonable size. It's also harder to cut by hand, but it's doable.
The real winner for me though is cardboard box with flipped lid to create the walled roof. such a great idea that I will be borrowing
Go for it!
The best part is that those little gift boxes are readily available (at least down here) from most discount shops, and come in a whole range of different sizes, so it would be really, really easy to put together a table of varied buildings with them.
insaniak wrote: Not sure what you mean by 'plastic foamcore'... It's the standard stuff with foam in the middle and paper on the outsides.
Might this be referring to foamed PVC?
Yeah, that. It's plastic sheets with foam in between instead \of cardboard.
Any idea what that's called and where to buy in in the USA?
I think it's called "foamboard" or "foamcore", they have it at Michaels in the US and it's black. You need to slice it with a hobby knife, not cut it with scissors.
But personally, we're going to go with the electrical / junction boxes instead I think, looks a bit more straightforward to me
I love the graffiti that you have scattered about the place too.
Any chance you would be able to take some measurements from the largest door piece? (Top left of sprue)
I have an idea I would like to look into but it depends on the size of that bit. Of course if you are unable to for any reason then I understand and it is not a problem.
Those are all amazing. I'm probably going to steal the gift box idea, too, as it's just so brilliant. Are those the same material as shoe boxes?
Have you seen the big plastic bins they sell biscotti in at Costco? I want to use the terrain sprue to make a command center out of one, but I am worried the plastic might not be stable enough. Any advice on working with thing packaging plastic?
Some great and creative work here. I especially like the gift box buildings with the graffiti - though lots more graffiti along those rear walls would make them (sadly) more realistic. It's the little details like your graffiti and the salt weathering that really brings terrain up to the next level for me.
Dang, those buildings are all truly awesome. Now I really wish I had the money to back the KS at the time, just to get some of those sprues. I'll just have to wait for retail, I suppose. More updates, please!
Sorry for the lack of updates... There's been a little bit happening behind the scenes, and life keeps getting in the way as well, just to keep things interesting...
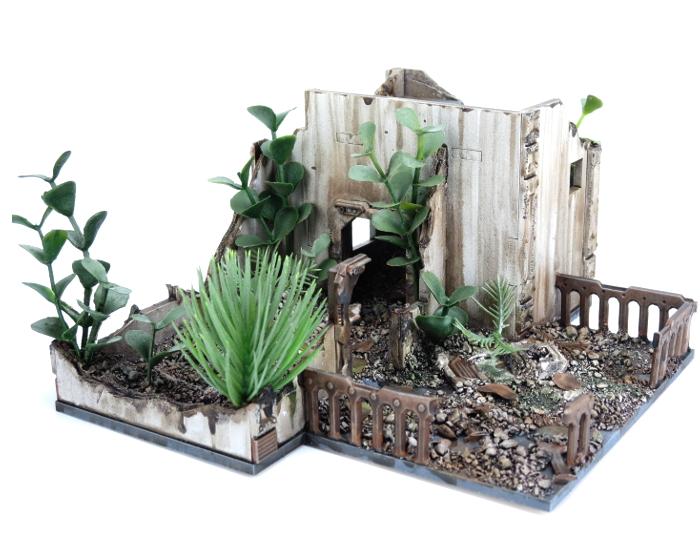
And I started work on a garden area, to add some more area terrain to my increasing urban sprawl... Plants from cut-down aquarium plants. I've been keeping an eye out in discount stores for cheap ones that still look reasonable.
Awesome, excited to see some paint and I notice your Karist Trooper there is progressing as well I think the garden/terrain hybrid is one of the best uses for the plastic so am excited to see what you do. Thanks once again for sharing!
Trying something a little different for the graffiti this time... I've painted it in directly over the undercoat, before the salt layer. This should hopefully result in it coming out all weathered and faded.
1. Paint the item, or area, in rust or other "under" color.
2. Hairspray, or other lightly sticky spray, the thing.
3. Sprinkle some rough salt (like Kosher salt) on it, which sticks to the piece.
4. Paint the item the final color.
5. After it dries, brush the stuck on salt off with a brush. As it comes off, it reveals the rust/under color underneath the main color.
Sorry, I had intended to post up a quick how-to using the next building I'm working on, but then got side-tracked with the lead-up to Christmas and all.
But zigguratt's break-down is the general gist of it. The size and amount of the salt you use obviously has an impact on the overall effect, so a little expirmentation can be handy to find the exact effect you're looking for.
You can also do multiple layers of salt weathering with different colours to provide more interesting paint weathering or rust effects.
Could you apply hairspray to a stick or qtip of some kind, and rub it into battle damage or a gash, instead of spraying it if you wanted to have that weathering in only a certain area on a large model?
Is there anywhere that shows a step by step tutorial on how this works? I get the steps and everything. Just would love to see a piece from start to finish.
There are various tutorials online, if you google 'salt weathering'... Or just watch this space. Still planning on putting one up, but may take a week or two to get there as I have a few other things going on just now.
insaniak wrote: There are various tutorials online, if you google 'salt weathering'... Or just watch this space. Still planning on putting one up, but may take a week or two to get there as I have a few other things going on just now.
Oh I will be watching. Never hurts to learn something new.
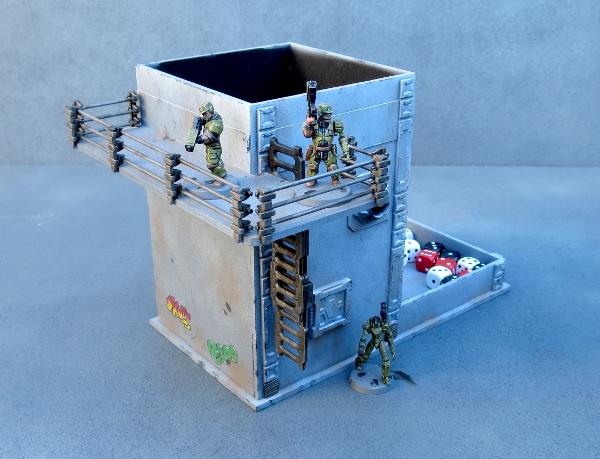
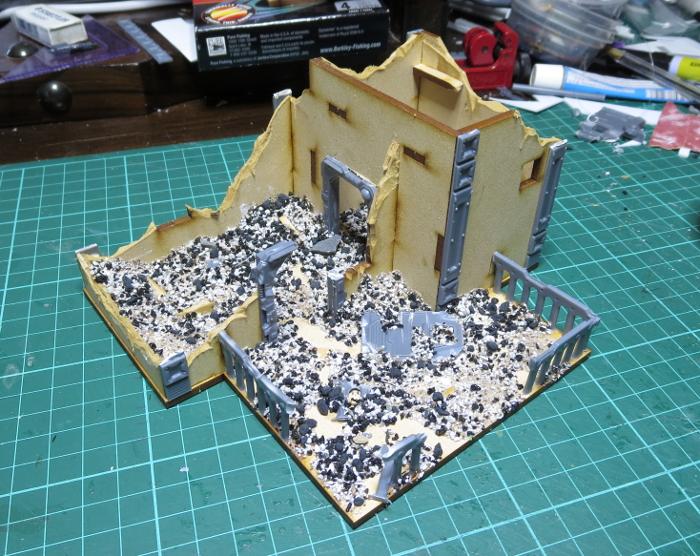
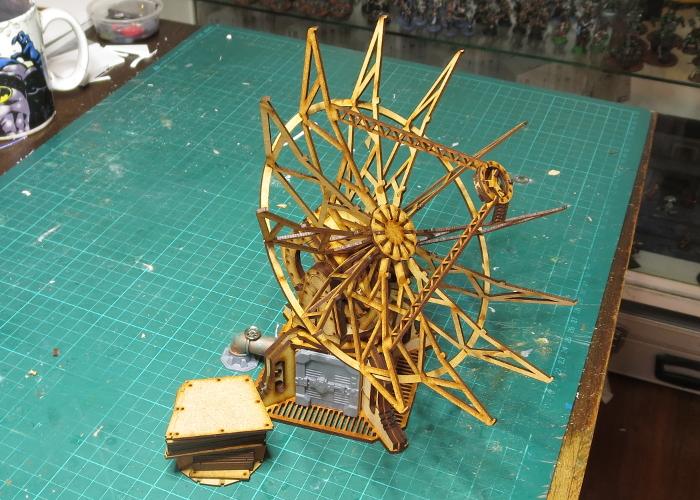
I'm currently building a little diorama over in my P&M Blog, but since the terrain sprue components feature quite prominently, I figured it was worth adding in here as well... Still quite WIP:
I wanted to make one of them a ruin, so hacked the top off one of them, using a soldering iron as a hot knife.
I wouldn't recommend this... But if you do feel inclined to replicate it, do it somewhere well ventilated, and count your fingers before and afterwards...
Then cut a bunch of duplicates, with holes added for the doors.
The door hole isn't on the template, as the fronts will have various different configurations as I make more of these. The prototype had the double wide door instead.
Then it's just down to slapping bits on, pretty much.
Went for minimal hole cutting for these, for convenience and speed. Only the trapezoid windows are cut into the trays... Something I remembered after doing the first two should have been done before I glued the front walls in place...
Ruin is pretty much done here. The one beside it is nearly finished... Just needs the buttressing on the front.
Can I ask how you intend on painting them? Do you sand them before painting or cover in plaster or something? I find any type of paint - spray included flakes off things like the storage boxes, drain pipe ends etc.
Yes they are! The real online store is coming soon, but until it arrives you can use the pre-order store that's linked from the maelstromsedge.com homepage. Pre-orders are shipped about every 10 days.
12 bucks for one sprue. Ugh. ..
I do however want to look into the epirian hunter a bit more. Have there been any scale shots to gw stuff? I wonder how they'd work as count as tau Battlesuits?
usernamesareannoying wrote: 12 bucks for one sprue. Ugh. ..
I do however want to look into the epirian hunter a bit more. Have there been any scale shots to gw stuff? I wonder how they'd work as count as tau Battlesuits?
The sprues are huge with lots of goodies on them. As far as the hunters go, they are very nice but not as big as Tau battlesuits.
Can I ask how you intend on painting them? Do you sand them before painting or cover in plaster or something? I find any type of paint - spray included flakes off things like the storage boxes, drain pipe ends etc.
I've been doing fine with a regular spray undercoat so far. If you're wanting to be sure, though, an etching primer would probably do the trick.
I do however want to look into the epirian hunter a bit more. Have there been any scale shots to gw stuff? I wonder how they'd work as count as tau Battlesuits?
Closest I have to a complete battlesuit, pulled from my second-hand bits...
So, smaller than the current Broadside suits, but would be fine as a Crisis stand-in.
Here's how I add the trapezoid windows to the plastic trays.
First, hold the window firmly in place in the position that you want it on the building, and then without cutting off any of your fingers , trace around the outside of the window with an exacto knife. ..
Put the window down somewhere that you won't lose it, and then use the knife to trace carefully along the outline to deepen the cuts. I recommend not slicing of any of your fingers while doing this.
Don't try to use to much pressure here... That just makes it easier to slip and mess it up. Apply light pressure, and just keep going over the line letting it gradually deepen.
If you accidentally slice too far on a stroke, so long as your knife is really sharp you can often get away with it... Just turn the knife sideways and scrape along the scratch. Because this plastic is softish, the burred edges close back over the scratch.
When you've scored a reasonable way through the plastic (exactly how far depends on the specific plastic of the containers you have, and how much you like your fingers) you can fast-forward the process a bit by pushing the tip of the knife into one end of the cut and rocking it gently to cut down the line.
When done, push the plastic piece out, and push the window in. Check for fit and shave around the edges of the hole as necessary before applying glue...
The mould line of the window gives a handy guideline to ensure all of your windows protrude the same amount from the walls...
Once the window is in place, this is a good time to count your fingers.
I like the idea of making a taller structure! Breaking up the profile would be good so folks can't make the easy connection that it's two stakced up (when put next to the singles for instance).
The fact that it's just two units stacked up is the whole point I wanted to keep the modular look, as if they're generic pods that are customised and used all over for different applications, in much the same way as demountable offices or shipping containers are used now.
insaniak wrote: When you've scored a reasonable way through the plastic (exactly how far depends on the specific plastic of the containers you have, and how much you like your fingers) you can fast-forward the process a bit by pushing the tip of the knife into one end of the cut and rocking it gently to cut down the line.
When done, push the plastic piece out, and push the window in. Check for fit and shave around the edges of the hole as necessary before applying glue...
The mould line of the window gives a handy guideline to ensure all of your windows protrude the same amount from the walls...
Once the window is in place, this is a good time to count your fingers.
What are the dimensions of those magical boxes you use, sir?
How are you getting the bits to stay glued in place. I am working on something similar but the 'plastic' they are made from doesn't hold superglue too well.
insaniak wrote: As with plastic models, a wash in hot soapy water before you start is a good idea, as they often have a quite oily residue on them that will interfere with glue or paint.
Glue will depend somewhat on the specific plastic used, and the surface texture... some of these tubs are smooth, some have a bit of a rough finish which will cause superglue to not work as well. A quick-setting Epoxy glue would probably work, although I've been using one like this: http://www.loctiteproducts.com/p/sg_plstc/overview/Loctite-Plastics-Bonding-System.htm
It's essentially a strong superglue formula with an activator... You 'paint' the pieces to be glued with the activator, add a drop of glue and press them together. Bonds almost instantly on just about any type of plastic.
I've had no problems with spraypaint sticking to the tubs I've been using, but success there may vary depending on the specific plastic used. I've undercoated with both regular spray paint and a 'undercoat' spray, and both worked fine. Otherwise, a coat of matte sealer first might help.
Looks awesome. Dumb question, but where do you guys get foamcore? Found some on Amazon but I'm not sure if its legit. Going to try to pop in the local dollar store tomorrow for some cheap plastic trays to give the terrain sprue a shot.
grumpy_newenglander wrote: Looks awesome. Dumb question, but where do you guys get foamcore? Found some on Amazon but I'm not sure if its legit. Going to try to pop in the local dollar store tomorrow for some cheap plastic trays to give the terrain sprue a shot.
Any framing shop or big arts and crafts store sells them by the sheet.
Thanks man, will need to check it out this weekend.
Just recently picked up the box set and started getting into this, hope I didn't miss the bandwagon. You guys have done such a wonderful job with this game- love the models so far and have really enjoyed flipping through the rulebook.
grumpy_newenglander wrote: Looks awesome. Dumb question, but where do you guys get foamcore? Found some on Amazon but I'm not sure if its legit. Going to try to pop in the local dollar store tomorrow for some cheap plastic trays to give the terrain sprue a shot.
Another suggestion is dollar stores lke Dollar Tree. It is in same place they keep the poster board.
Thank you, this is just brilliant. I really like the giftbox idea, that's something anybody could do, no foamcore required. Buy a box, glue plastic bits on, paint and done! I guess you could magnetise the roof, and then use the box as an actual box to store other terrain bits in - scatter, barrels, etc.
grumpy_newenglander wrote: Looks awesome. Dumb question, but where do you guys get foamcore? Found some on Amazon but I'm not sure if its legit. Going to try to pop in the local dollar store tomorrow for some cheap plastic trays to give the terrain sprue a shot.
Another suggestion is dollar stores lke Dollar Tree. It is in same place they keep the poster board.
This was an awesome suggestion, thanks for the heads up. Stopped by the local dollar store and picked up two boards. Also nabbed a couple of interesting plastic containers that looked like they could turn into cool buildings. Will post some pics once I figure out what I'm doing.
Please do - I'd like to see what you come up with!
Additionally, please PM me your New England location - maybe we're close enough neighbors to get a game in! :
I'm actually a displaced New Englander...currently living in the Washington, DC Metro area. Hopefully my wife and I will be making our way back to Maine in the next couple of years.
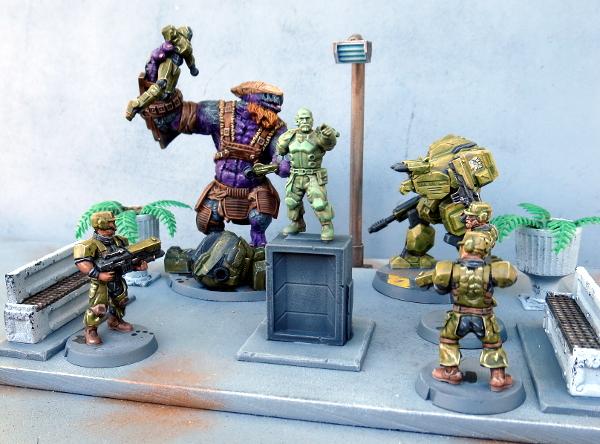
Been having a blast building and painting these models...they're really well made and the multi-pose thing is awesome.
Here are a few pictures of the five or six models I've finished. Certainly open to feedback, I'm always trying to step up my paint game and know it could use some work.
Links because the images were taken on my phone and are unnecessarily large...don't know how to resize.
Nice stuff grumpy You might want to start a new thread here so that it gets more eyeballs compared to being buried in this terrain thread. Check out the dakka gallery as well, as then your images get automatically resized and can be easily embedded in posts too!
legoburner wrote: Nice stuff grumpy You might want to start a new thread here so that it gets more eyeballs compared to being buried in this terrain thread. Check out the dakka gallery as well, as then your images get automatically resized and can be easily embedded in posts too!
Good call, will try to do that later today. Thanks!
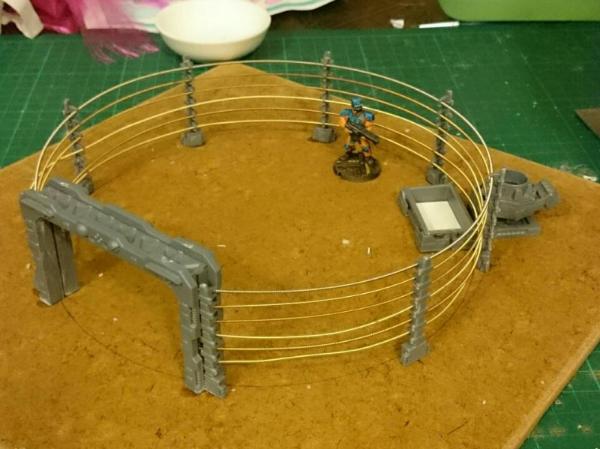
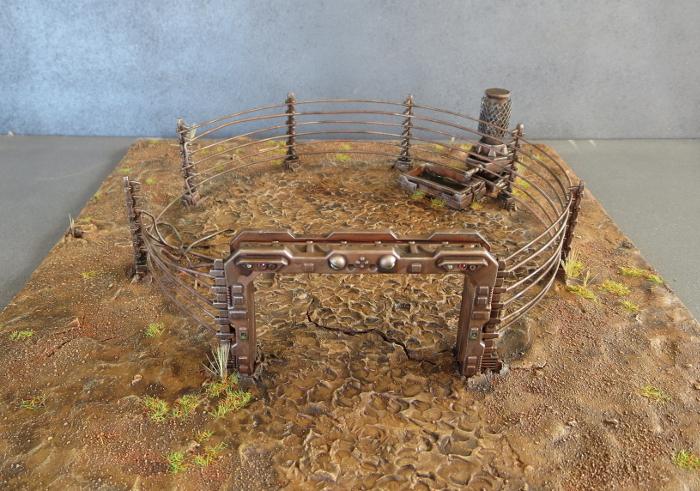
Nice cattle pen! I'm so inspired by how much use you can get out of these parts, it's encouraged me to make my own terrain again. Thank you for posting all this!
Dude. Excellent terrain work. While I am out and about tomorrow, I need to get a box so I can make a MEdge has unit with my terrain spruce from the kick starter
I made a bunch of assorted signs up in Gimp, which I just print off in whatever size is appropriate as I need them.
Sample below... Text is in (Google translated, so probably very bad) Esperanto, just because it seemed appropriate and because it let me have some fun with the text without being really obvious about it...
yeah,
Looks great.
Reminds me of Brave Starr, The town all closed up when the bad guys came into town.
Doors/Shutters closed and awnings and porches retracted into the buildings.
They'll probably be fixed buildings, just because it's easier for detailing to not have to think about how they can pull apart and still look good. My original Necromunda stuff was never glued together, but 9 times out of 10 we still wound up just assembling it as standard... Being able to reconfigure catwalks and scatter terrain was generally enough to keep things interesting.
Kid_Kyoto wrote: If only there was some way to make them ourselves!
If only I had the time
This is one problem I wouldn't mind throwing some money at, especially if I'm throwing it at fine folks like Spiral Arm I loved the terrain sprue, more terrain would definitely get bought.
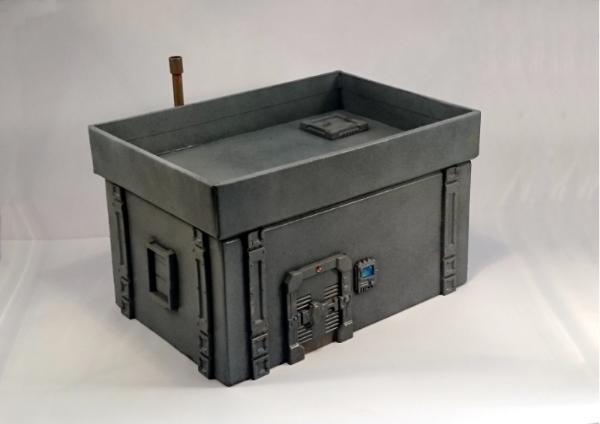
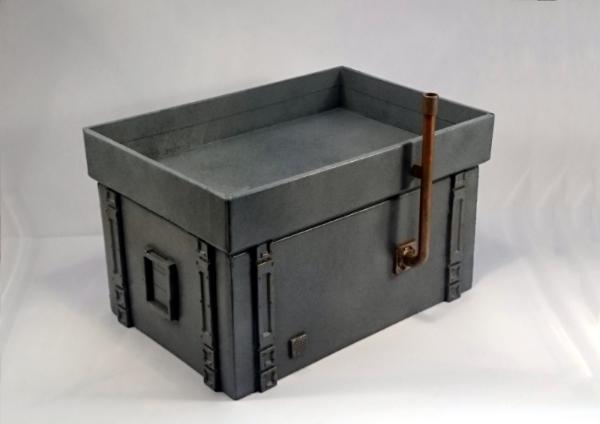
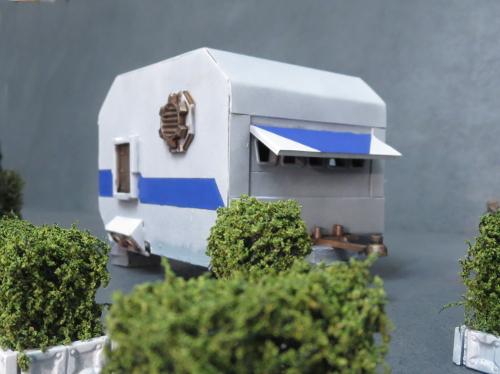
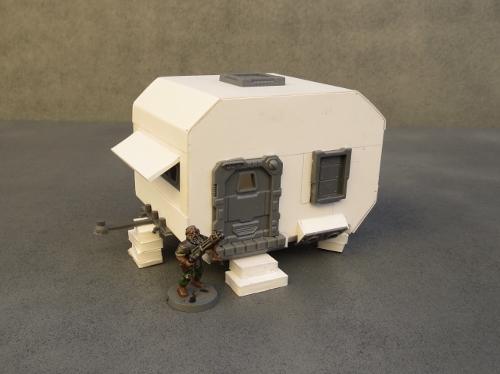
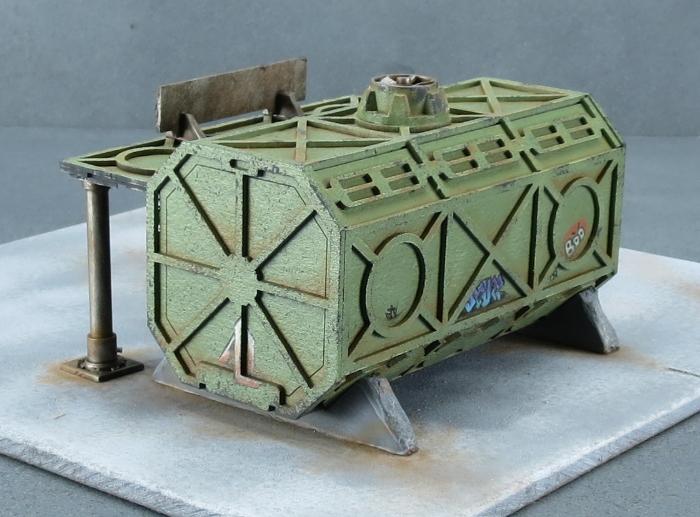
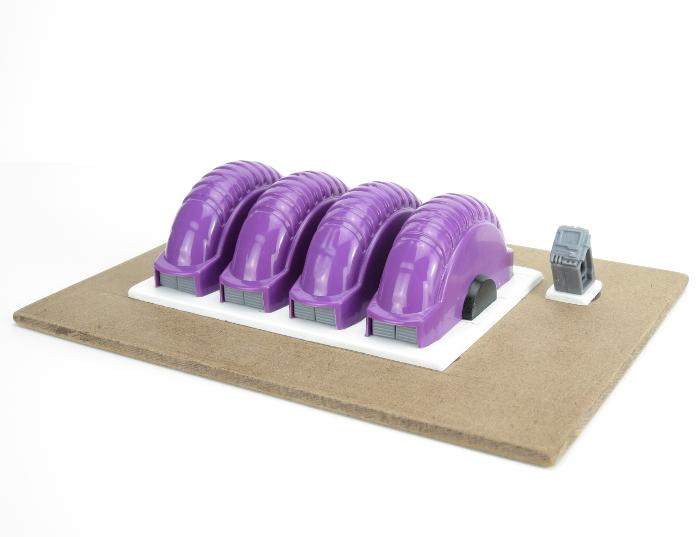
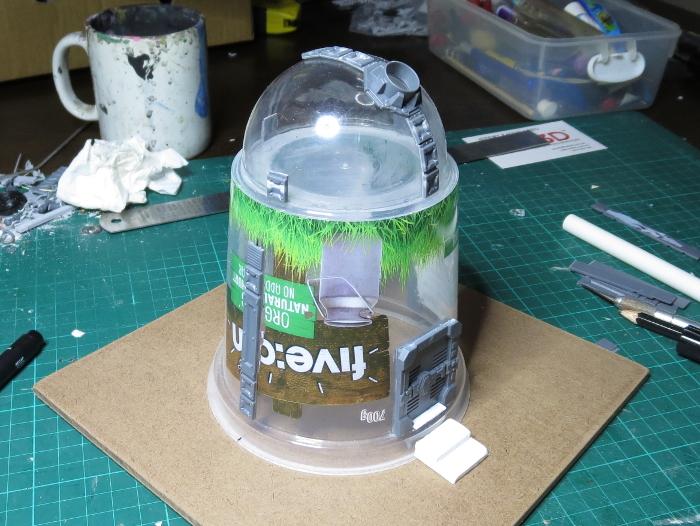
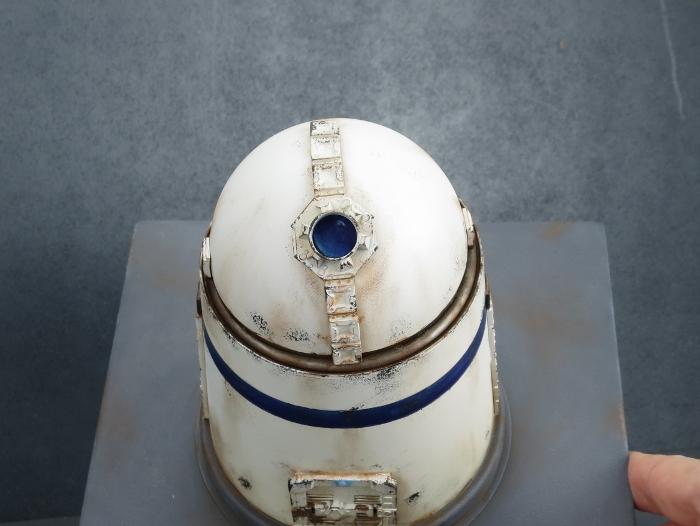
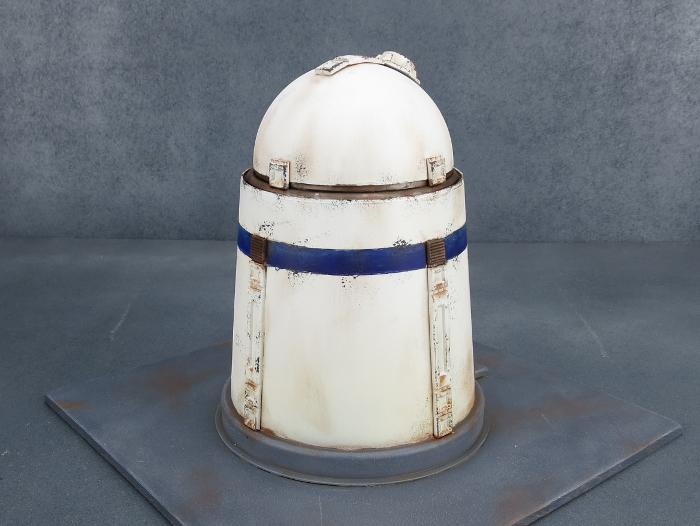
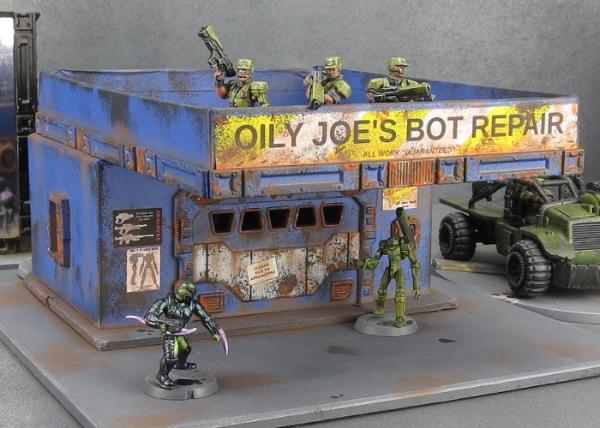
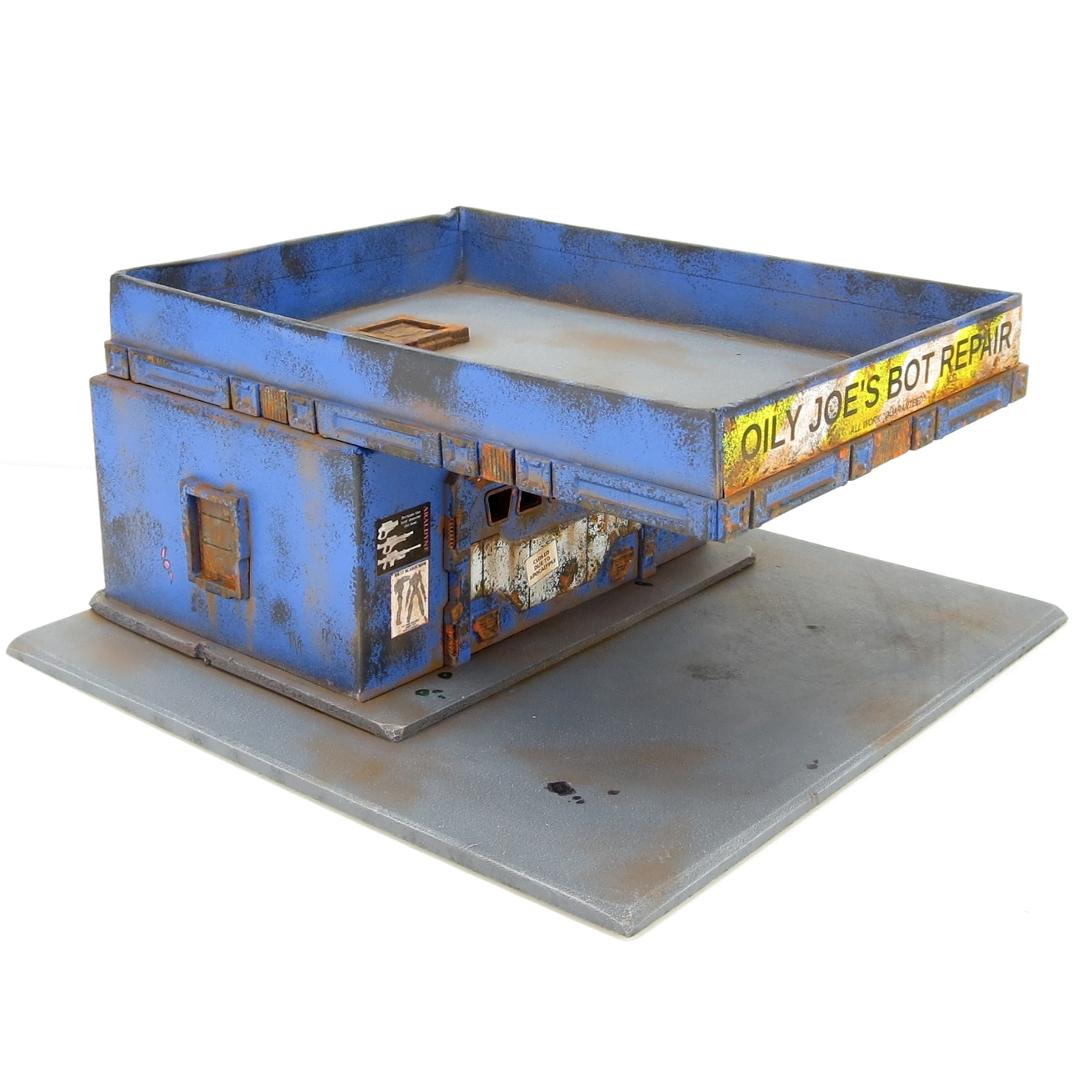
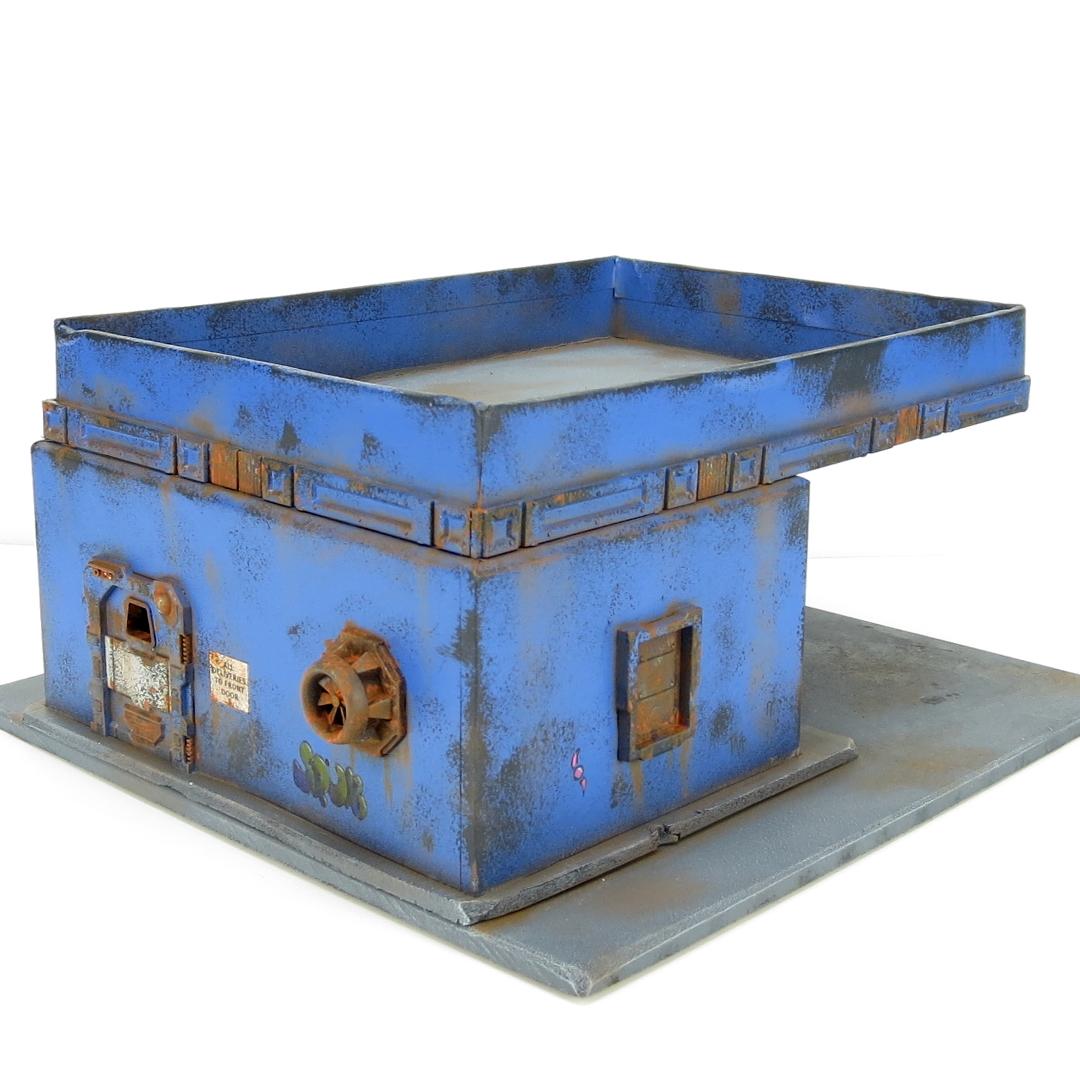
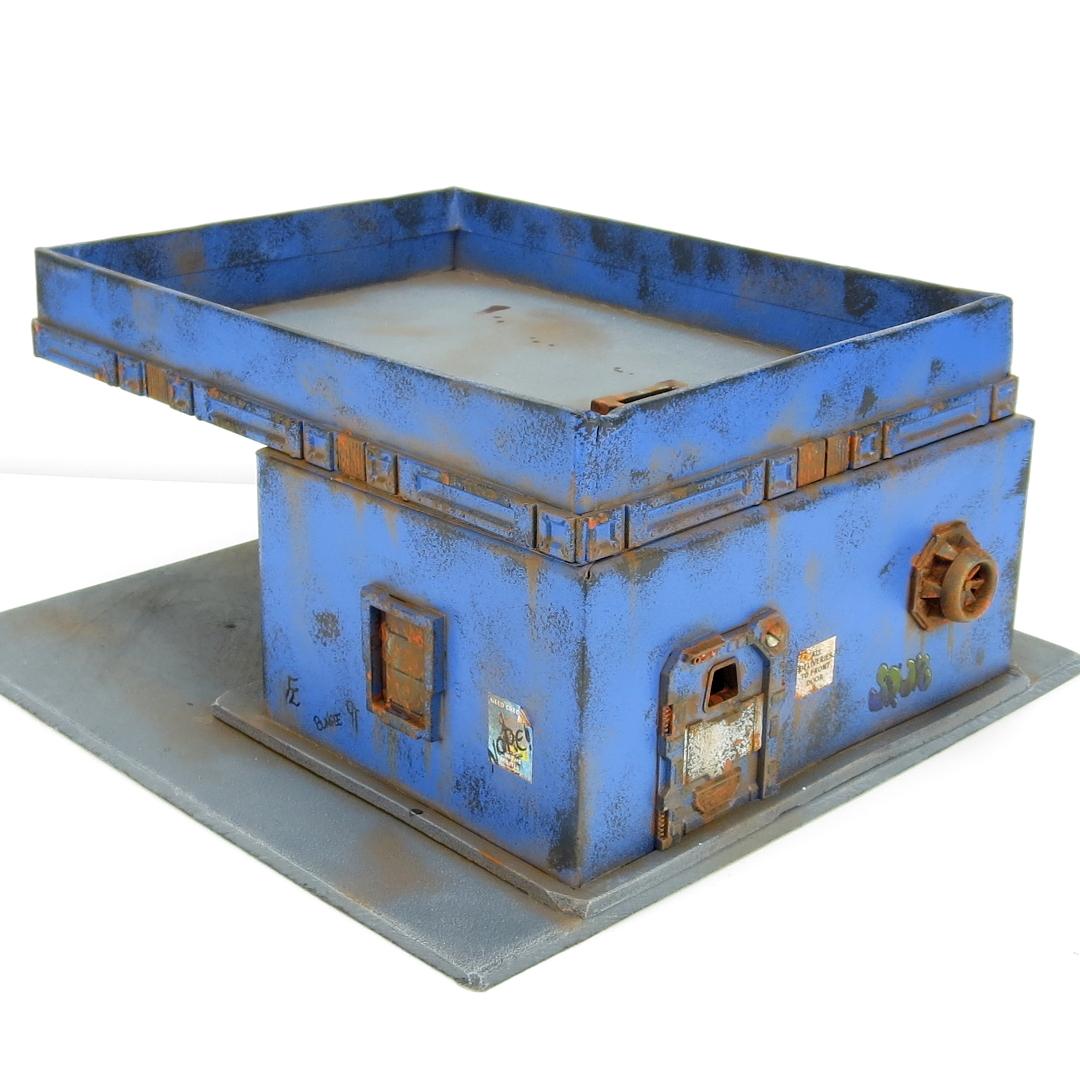
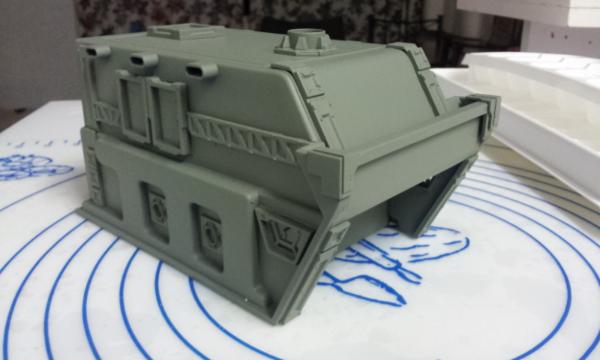
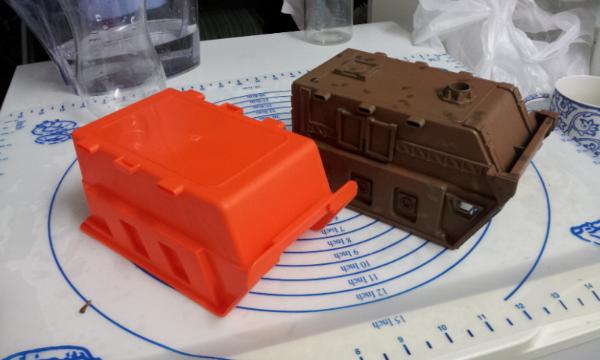
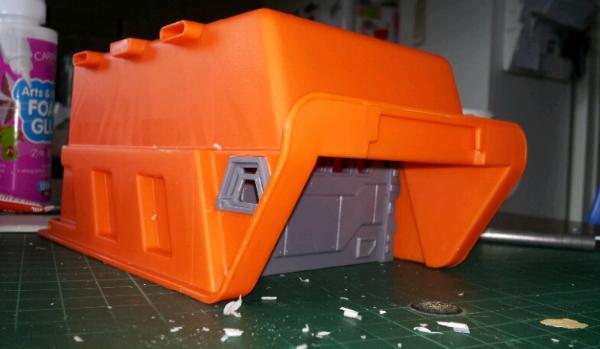
For a less foamcorial option, I found some storage trays at the local hardware store...
Which turn into this :
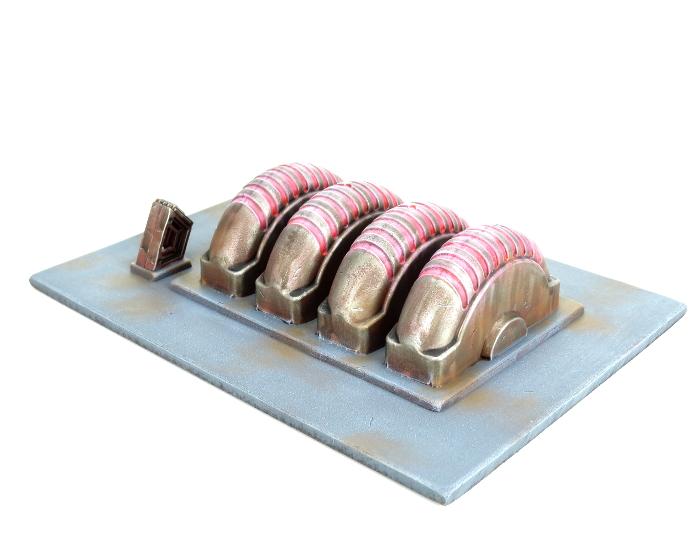
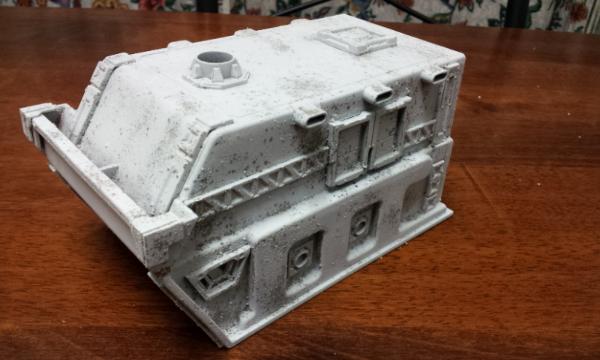
Painting about half done...
More shortly...
Could you tell use the dimensions of the container?
I have some but they aren't the right size. I would like to duplicate the model but I have to order the containers online since I can't find any at local stores .
Could you tell use the dimensions of the container?
I have some but they aren't the right size. I would like to duplicate the model but I have to order the containers online since I can't find any at local stores .
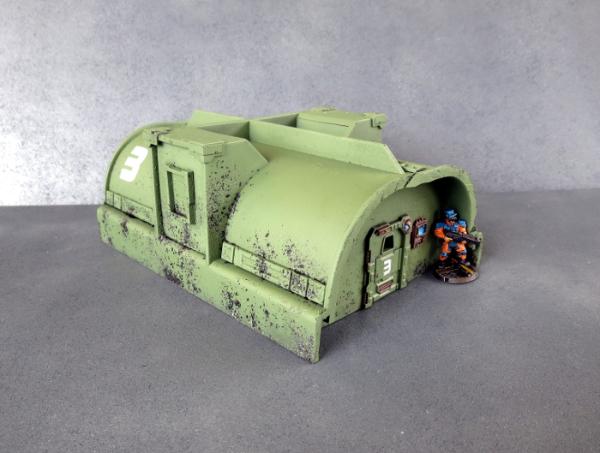
The specific size is going to vary depending on the actual containers you can find, as they're not all standard. But for buildings around the size of mine, you're looking for trays around about 9" long and 5-6" wide and tall.
Could you tell use the dimensions of the container?
I have some but they aren't the right size. I would like to duplicate the model but I have to order the containers online since I can't find any at local stores .
The specific size is going to vary depending on the actual containers you can find, as they're not all standard. But for buildings around the size of mine, you're looking for trays around about 9" long and 5-6" wide and tall.
I drew around a dinner plate, and then just cut along the line with an exacto knife.
If you press reasonably hard with the pencil, it actually makes a groove in the paper lining of the foamcore, which gives you a guide for the knife. As long as you go carefully, it's not too difficult to stick to the line.
The bigger trick is learning to cut straight up and down, which is partly down to practice holding the knife, and partly down to making multiple passes rather than trying to cut all the way through in one go, to avoid the blade bending and warping the cut.
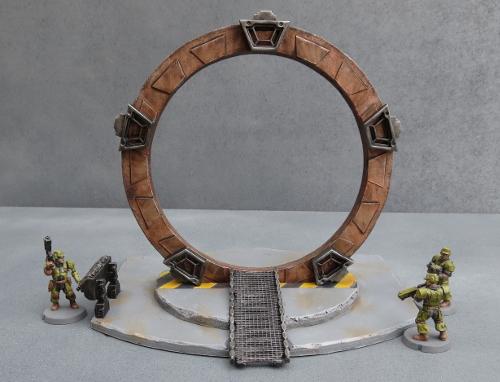
No, although that would have been considerably easier
They were cut out of 2mm plasticard. There was originally only going to be a missing A, but I got sick of cutting them out and decided to drop the second G as well...
Looks good. Sleek, yet recognizable. There's just one problem...
With a Stargate like that one, you know the civilization who created it will be extinct in two, maybe three episodes. Especially if one of their leaders has any romantic tension with Carter.
The article has a bit of a walkthrough of how this building was put together, and will carry on with some other buildings and assorted bits and pieces to flesh out the settlement.
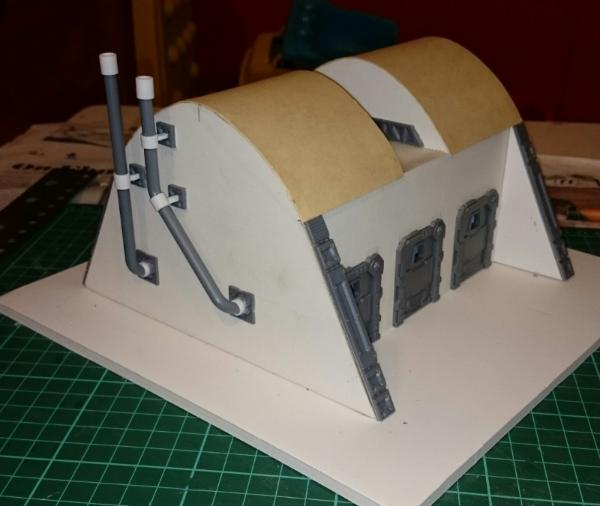
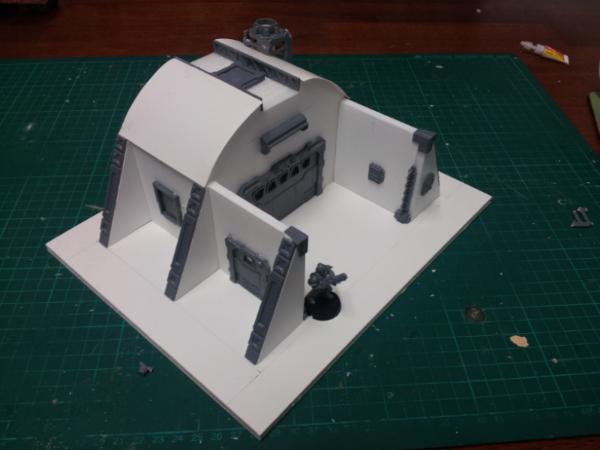
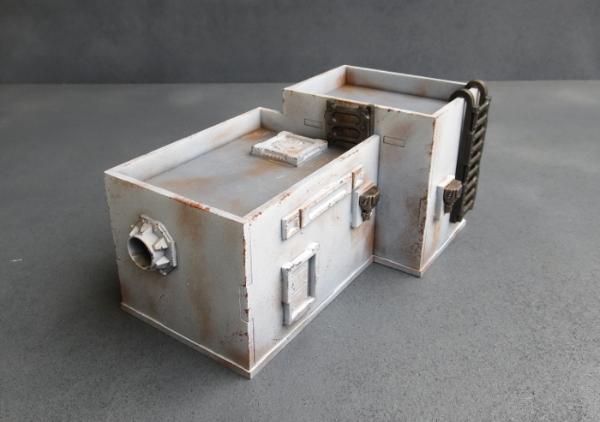
New building made as something of a prototype, playing around with foamed PVC. Now that I have a proof of concept, I'll be turning out some more to go along with this one, and having some fun with curves...
Not this time - I was relying on the boxing around the window to allow it to protrude out from the curve. Not entirely happy with the result, so I'm thinking for the next one I'll file a curve into the back of the window frame and just glue it onto the wall rather than cutting the window hole and inserting it.
Regular superglue works, but on softer plastic it can pop off if it gets knocked or warped. I found the best option was an 'all plastic' superglue system, which is a two-part product that includes a tube of superglue and a primer pen - you 'paint' both parts to be glued with the primer and then glue them together with the superglue. Grabs instantly and sets like a rock.
There are also some 'all plastic' glues out there that are just a goopy clear glue in a tube. The one I tried looked promising initially, but shrinks as it sets, which made the thinner parts curl and pop off.
Paint-wise, I use a spraycan primer, and if I'm doing something rough like salt-weathering I apply a coat of sealer over the primer. They would probably still scratch if they were all thrown in a box or something, but for my relatively careful terrain use it works fine. You can improve the paint adherence by lightly sanding before spraying. An etching primer might also be worth a go, although I'm not sure what that would do to the terrain sprue components...
Apparently I had been a little lax in updating this thread...
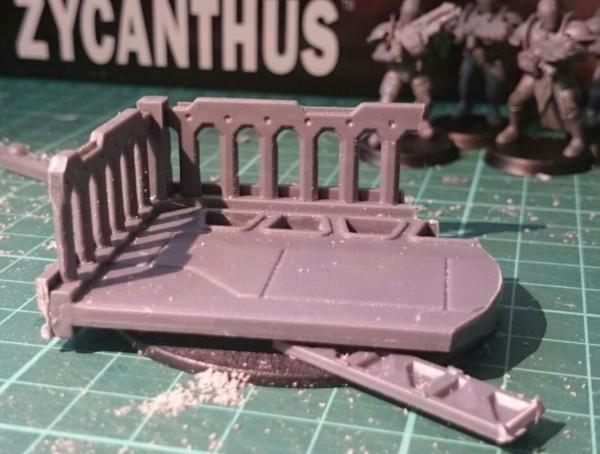
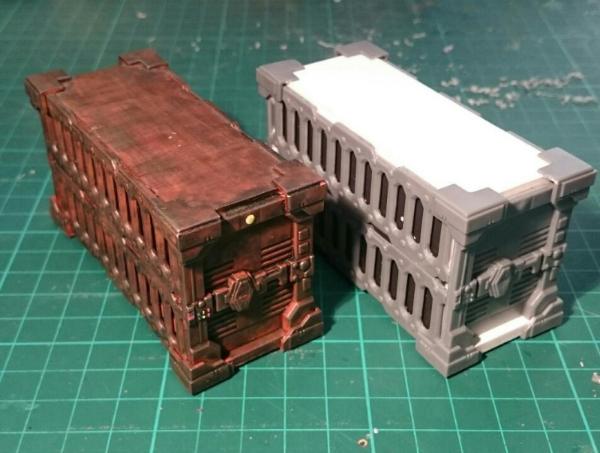
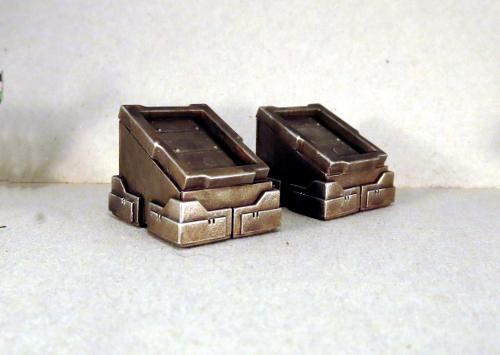
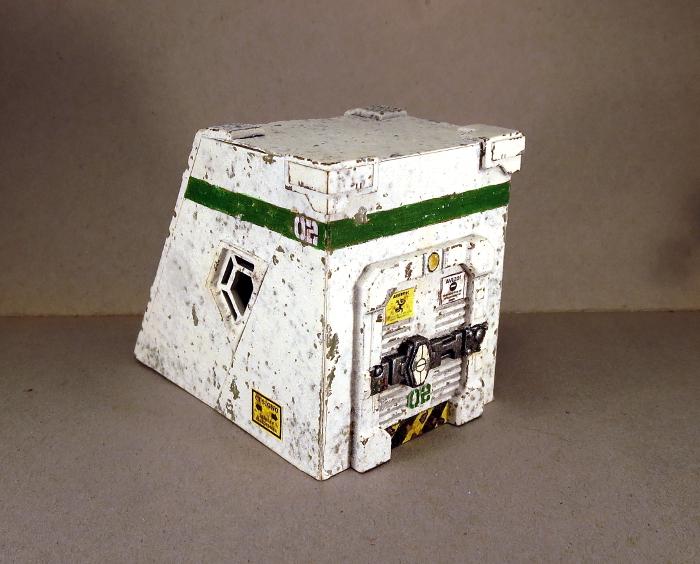
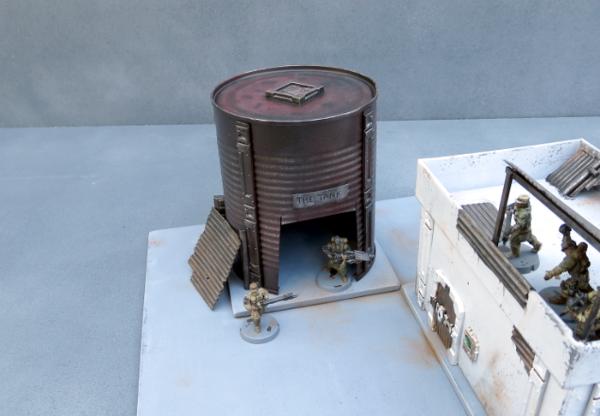
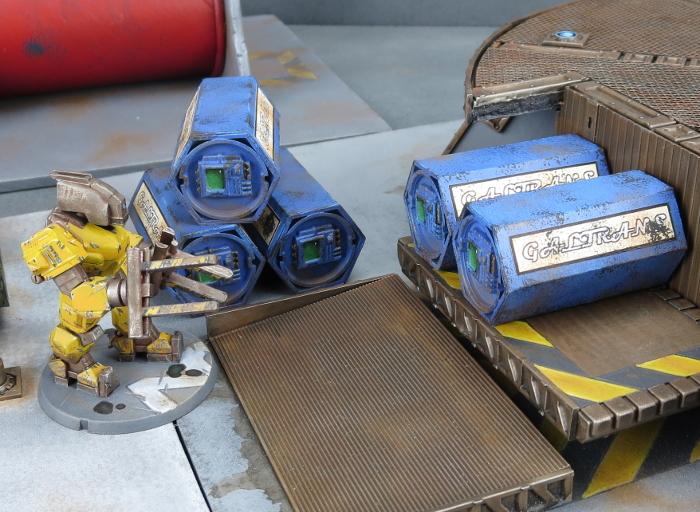
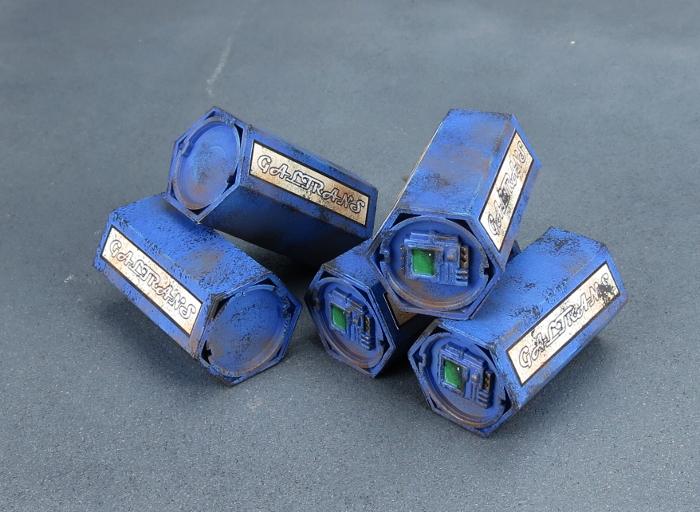
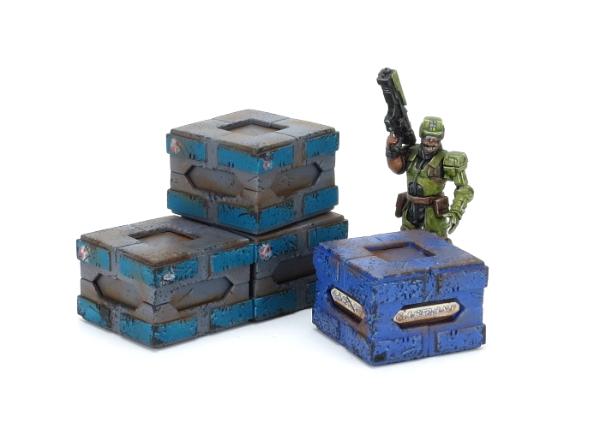
Some crates:
And the accompanying tutorial:
Spoiler:
- by Iain Wilson
Time for another quick and easy build!
The Maelstrom's Edge terrain sprue includes a nifty corner bracing piece, which would normally be used on the roof corners of flat-roof buildings to pretty them up a little. Because a lot of my buildings have angled buttresses or ballustraded roofs, I collect a lot of spares of this part. Looking for something easy and effective to do with them, I hit on the idea of turning them into shipping crates!
To replicate these, for each crate you will need some 1mm thick plasticard or cardboard - two pieces 21mm square, two pieces 21mm x 12mm, and two pieces 19mm by 12mm, and you will also need eight corner braces.
Start by placing the corner braces flat side down, and gluing them together in sets of four along the flat edges, as below:
Glue your large squares into the two resultant boxwork shapes. If you're using plasticard, you can use polystyrene cement for this. Use superglue if you have gone with cardboard.
Next, take the 21mm long strips, and glue them along the inside of one of the boxes, along opposite sides. It doesn't matter which two sides you go with, so long as they are opposite each other.
The 19mm strips should then fit neatly in on the other two sides. It's a good idea to check them for fit, and trim up if necessary before gluing them in. If you wind up with the corners of the strips not all meeting up exactly, it's not a problem, as they'll be hidden by the boxwork when you put the other side on.
Speaking of the other side, you can now glue this on by sliding it on over the strips, until it butts up neatly against the first side.
And that's it. They're really easy to put together, so (assuming you have enough corner braces knocking around) you can quickly assemble a few of them to stack up and scatter around the table for a bit of low cover.
They're fairly light, so while they sit neatly on top of each other, you may find it beneficial to glue the stacks together so that they don't get knocked awry mid-game. This also gives you less surface to paint, since you won't need to paint the faces that are touching other crates!
Keen to give it a go? You can pick up the Maelstrom's Edge terrain sprue, along with the rest of the Maelstrom's Edge model range from the webstore here.
As always, feel free to pop along and share your work, or ask any Maelstrom's Edge- or hobby-related questions on the Comm Guild Facebook page!
For other Maelstrom's Edge modeling articles, including tutorials and walkthroughs of a wide range of different building and miniature projects, check out the article roundup here.
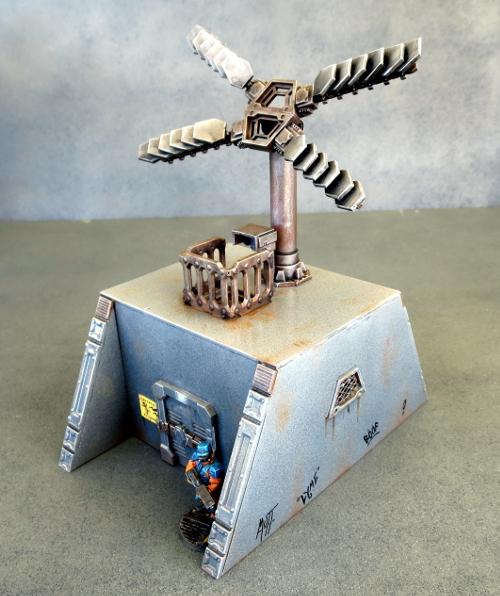
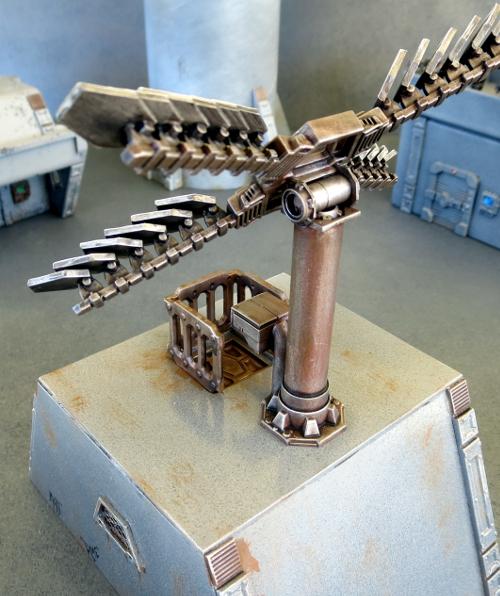
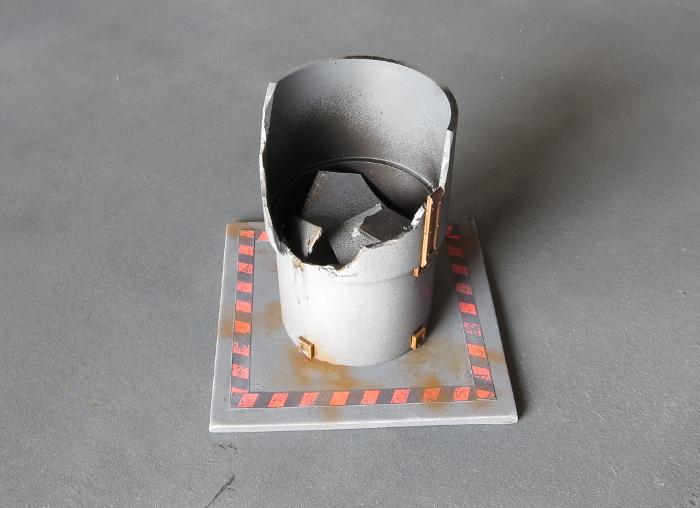
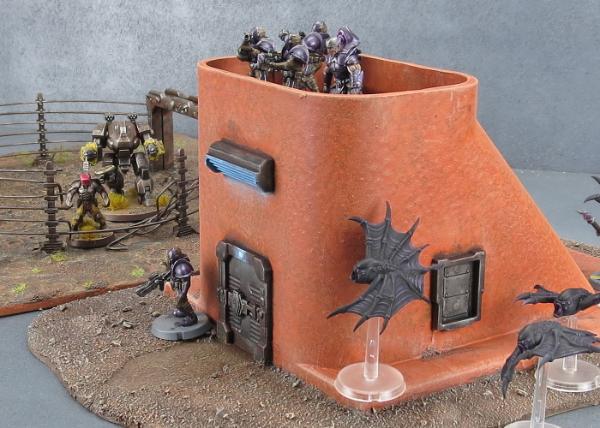
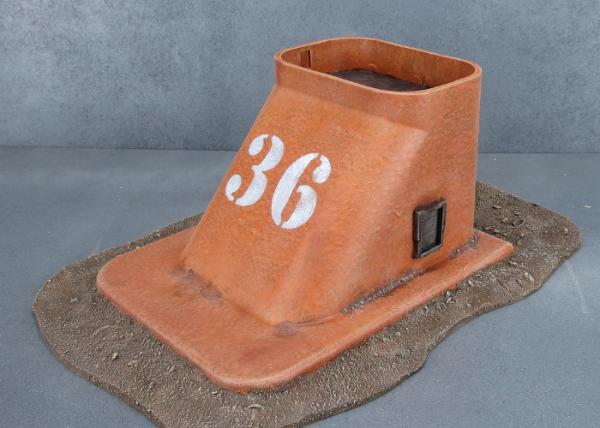
Automatically Appended Next Post: A bunker - built from a plastic plant pot.
Automatically Appended Next Post: And another bunker made from an air conditioner fitting that I found while I was at the hardware store looking for something else entirely...
Made from an old electric toothbrush head, a little plasticard, a piece from the Maelstrom's Edge terrain sprue, and a piece off the end of a superglue lid.
I love checking this page. I know I can always find some good inspiration. I just received a double pack of the terrain sprues and I am excited to get to work.


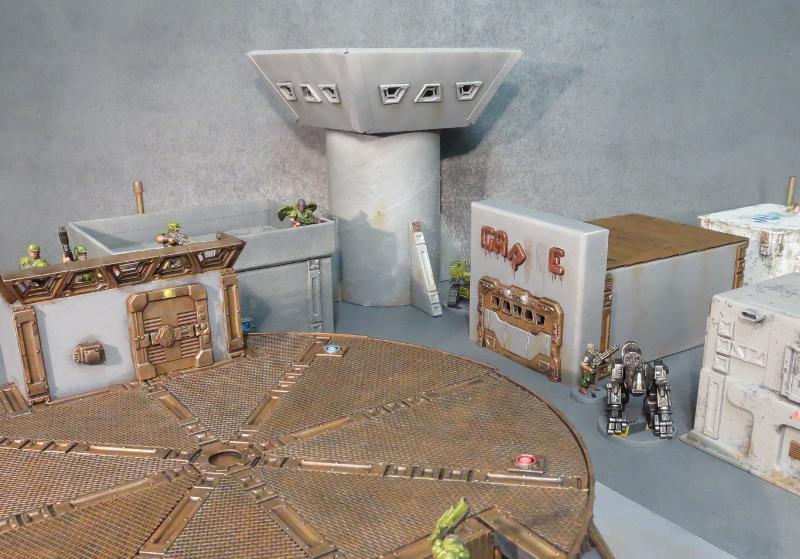
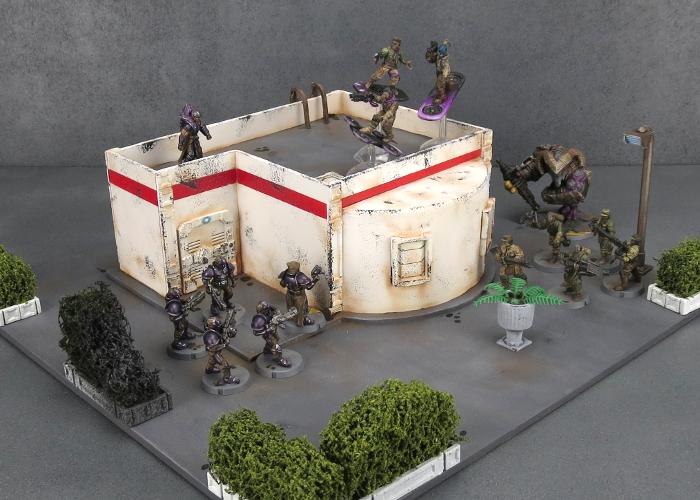
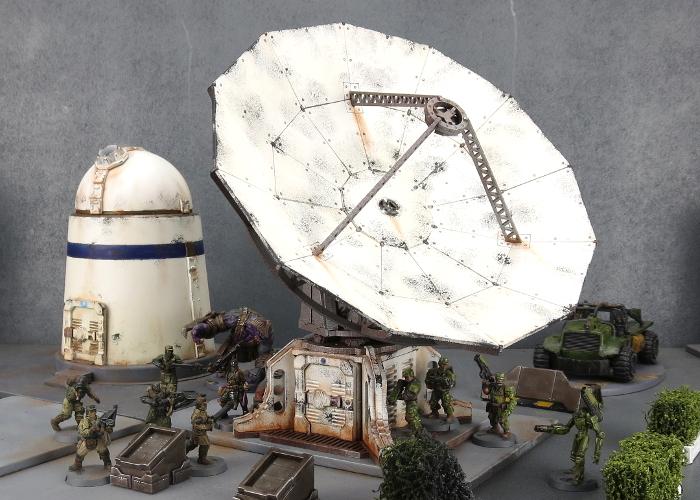
 The official table and some of the other terrain shown were done by others.