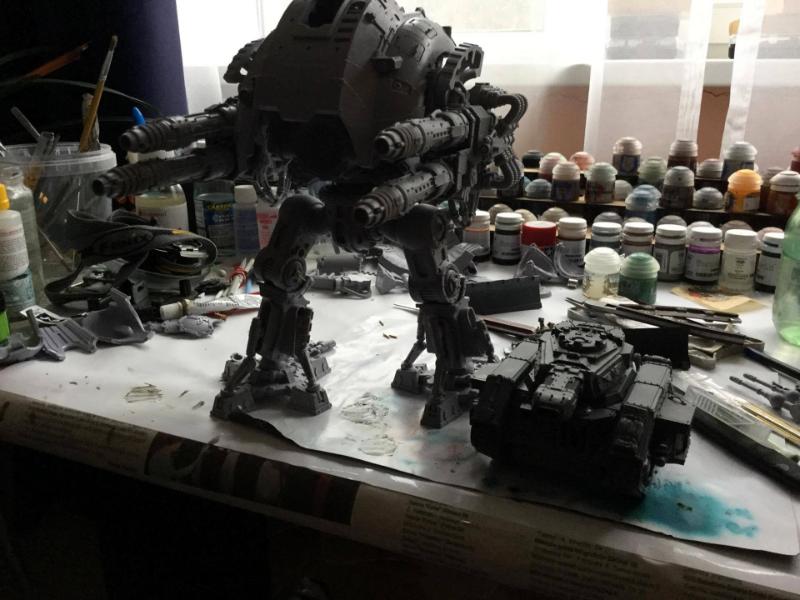
[youtube]After creating some post in swap shop, I thought to myself: why not delve into this DakkaDakka thing deeper? And here I see this awesome thing. Especially, when blogging on "blogger" is just soo damn boring. And there I have a bunch on Cadians, that need their flakk armor pimped, bases done and, ofc, themselves painted. Then there's Dreadfleet, Leman Russ tanks, various commanders who need magnetising, kitbashing veterans and pimping a razorback, asa it arrives
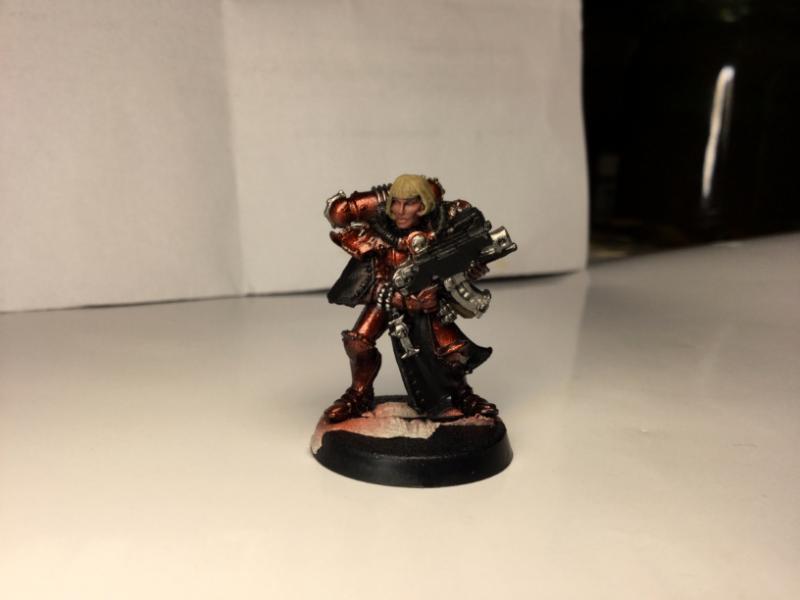
So here it goes, my 10 cadians. The bases are nothing fancy, just gravel I bought from store dedicated to all those realistic models. I suppose, I could've made some sand patches in random locations, for more pimpier looks, or for it to cover the bases more perfectly. I think, I will have to go back to that store and buy some more finer sand, just to make sure, it doesn't look better. Anyways:
Spoiler:
I also bought etched brass. Just because there can never be too much Emperor. The small Aquilas will go on shoulder pad, leaving the other one for squad markings. Smallest ones - regular guardsmen, larger ones - veterans. Should add them in few upcoming days, depending on the level of lazyness, lelel.
Try getting a mix of the gravel you have and smaller stuff, mix it together, it will look nicer.
I would also run my finger around the base and remove the "loose" bits along the side.
Guys walking on a bunch of 1" round gravel would be having a hard time!
I see you worked hard at trying to get those mold lines removed off of helmets and shoulder pads, well done!
Good luck with the Aquila, fitting those on shoulder pads I would expect to be difficult.
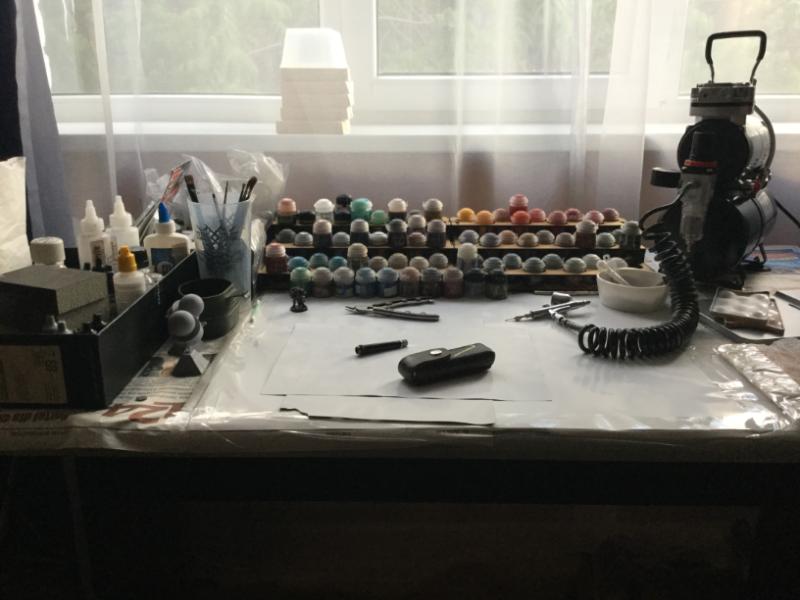
It certainly looks like you have a lot of paint ready to go.
Haha, so after reading your comments, I brutalized those bases the same evening. Today went to modelling shop again and grabbed TWO packs of basing matereal. One being quartz sand, other - some tiny gravel stuff. Whole trip took me 2+ hours, but it was worth it, just because of the way the salesgirl looked at me Her face expression was like: "and what on earth are you going to do with that??".
Spoiler:
So, here's my first "pancake" (we have a certain saying, which involves pancakes, lel):
Spoiler:
I tried using the adhessive tape method to stick that tiny Aquila into place, but I found that the tape also reacted with super glue. So I took a needle, some white tac, made a small bubble on one side. The super glue was enough to leave Aquila sticking in place. Thought I have some problems with placing them in middle correctly, due to glue being extra stronk and cementing in seconds :(
For the base I just mixed all three matereals in once place. I think, it really turned out well Might need to fix the edges a bit later, but I'm quite happy with it.
Make sure you "rough-up" the brass parts so both glue and paint stick. They need surface area to grab onto, smooth is bad. This advice works for any smooth surface unless using a "weld" bond.
I must admit, the Aquila looks really good.
I would suggest using a mix of fine sand vs course of about 3 to 1. You want it to look like rough terrain that happen to have bigger bits lying around.
By the way: you are in Lithuania? I game with a Polish guy and a Russian guy: what "stereotypical behavior" would make you different from these guys? The commonality is if they are not loud and arguing they are not having fun. I like them so...
Moving on. Finished 10 regular guardsmen. Man, I have to tell, glueing that brass is a bitch. Or I just MUST find some super glue with a dedicated brush applicator, cause it's overspilling now and creating unwanted bumps. For the bases I tried adding some more sand, instead of larger gravel. I just noticed, some barrels look really ugly and will need firther fixing. Also don't mind the sand spilling over edges, I wil clean it, as soon as the glue dries
Spoiler:
I am also really happy I wound some wire for LR hatch:
Spoiler:
When I first assembled troops, I kinda skipped officers, cause I wanted to magnetize them. The magnets have finally arrived, so it's drilling time! Tbh, IDK why I'm doing this There's some green stuff added to one arm pit, which needs some minor fixing as well.
Spoiler:
So, in conclusion, I have the following things to do:
*Find super glue with brush applicator to reduce the ammount of extra glue spilled over shoulder pads.
*Clean the bases when they dry
*Clean the Aquilas from excess glue.
*Fix barrels on some lasguns.
*Tidy the greenstuff on magnetised seargent.
*And, ofc, more on with the rest guardsmen. 30 more left
By the way: you are in Lithuania? I game with a Polish guy and a Russian guy: what "stereotypical behavior" would make you different from these guys? The commonality is if they are not loud and arguing they are not having fun. I like them so...
Yeah, I'm from Lithuania. I'm afraid, I can't really think of any stereotypes, cause there are so few of us, compared to Poland and Russia (though I have no idea, how many people play wargames in Russia). But I can say, that both 40k/WHF are not amongst popular systems (it's mostly Infinity and WM/H) and the upcomming 40k tourney will, most likely, have 10 players. It's just that a lot of players don't think that both systems are that good and worth all the investment. Or they are just veterans, played Warhammers in their time and moved to other systems. Yet those who play, tend to talk about "fun vs competitive", "balance" and "superheavies/LOW's: yes or no" topics.
Crazy little (big?) thing called laziness, damn it. Anyways, here’s what I’ve been up to for the last weeks:
1) Finished adding Aquilas to guardsmen. Based and primed them. Not really happy with the overall looks of those Aquilas, was expecting a bit more detail. I guess, I’ll have to try paint a few test models and see how it goes.
Spoiler:
Spoiler:
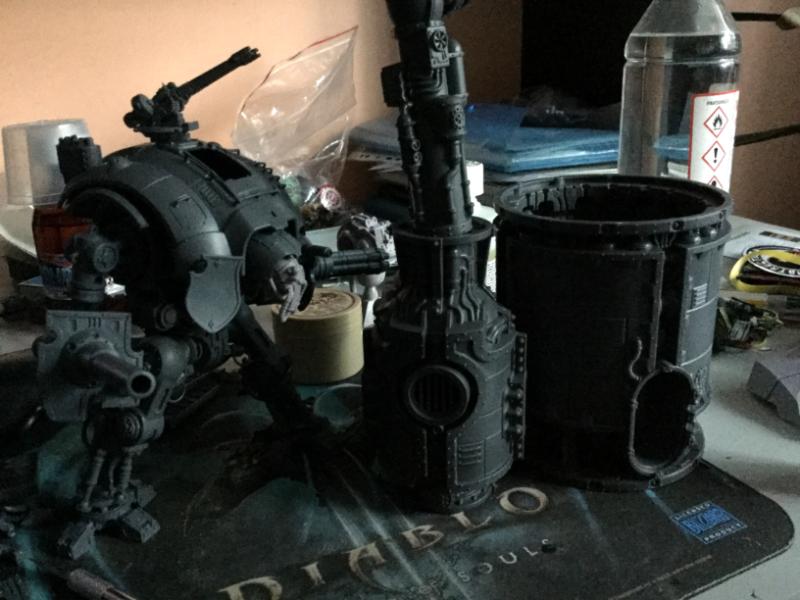
2) Drilled all of them sponsor weapons for one Leman Russ. Not really worth the pictures. Just basic holes
3) Kitbashed? 4 sergeants for compulsory troop choices. Discarded the idea of magnetising (way too much complex work to be worth the time and if I will ever want some power fist armed sergeants, I'll just get the stock ones from ebay, or just buy additional box and glue them). Still, I tried to make these look somewhat more unique from the rest 9 guardsmen.
Uh. From now I'll know, that magnetizing Dozer Blades should be done from the very first steps of assembly, not when the whole hull is already glued :| Still, I somehow managed to magnetize two Lemans so they can be more pimpier than they were before. There's still quite a lot of job to be done on the second Russ (have to glue all those extra bits, duh).
AFAIK, old Russ kits had a separate place for all those jerry cans? Anyways, I didn't really want to glue then straight, so made special holders.
Spoiler:
That look like this, when glued to the tank. You might also notice the track armor bits are misplaced. That's because of two reasons: why would some1 want shorter armor on the front and larger on the back, when Leman is generally fethed anyways if some1 gets to it's back. The second reason is, I think, these tank upgrade sprues were meant for older Russess, as there's just no place for the longer bit - it gets pushed to the outer side way too much. Though I agree that the older way looks more kewl.
Spoiler:
I also decided to add seats to Chimera. By now they have some green stuff on them to simulate that stuffing effect. AND I ordered a LED kit, so will try to add that sweet red light to the inside.
Spoiler:
And this is what I've been up to when glueing stuff gets boring. My counts as Pask, or "Drive me Closer".
Lol, you know you can just twist the drill bit with your hand to go through plastic? no thumbs/fingers need near misses with a power drill! nice start to your guard, are you working towards a set list or just making stuff up as you go?
Lol, you know you can just twist the drill bit with your hand to go through plastic? no thumbs/fingers need near misses with a power drill! nice start to your guard, are you working towards a set list or just making stuff up as you go?
Yeah. I usually do that when I need a 3mm hole. But this one was as safe, as it could get: reduced power and minimal force applied to push it deeper
Tbh, there's no list, but I'm mostly thinking about foot conscripts with Inquisition. Oh, and Marauder Destroyer with Warhound Titan
As always took more than expected. But still, I'm quite happy with it. Besides, I also got an opportunity to try Typhus Corrosion (super cool product) Oh, and in the end I gave those leds an extra coat of simple red dye so the light is kinda warmer now.
Very cool man! Glad to see everything is still coming along, we got a guy at my store who does a lot of LED stuff and I always like seeing other people do it also.
Oh man, nearly 70 days have passed since last entry ;O So here I am, doing everything, EXCEPT working on my poor guardsmen. Srsly though, my new years promise is going to make this stuff more active, just for my personal motivation.
Boozing:
Spoiler:
Painting Sigmarines (those are now finished, but in the end I still got extremely lazy):
Spoiler:
Painting Dreadball Orcs:
Spoiler:
Painting some marines for some random custom chapter a friend decided to create for his possible future kill team games. Or maybe trying to get better at straight highlights and ooooh man, do they look horrible in photos
Hell yeah, finally managed to get something going!
Batch painted (and washed) 9 Cadians:
Spoiler:
Closer look:
Spoiler:
Aaand, got some basecoating going on the next 9 that still need some fixing and washing. And after that there's still 18 more poor souls, not counting sergeants and platoon commanders.
Uh, so nearly month passed. And I have to sai it's been quite productive month: managed to paint (basecoat+wash) 35 cadians! That brings me to somewhat 50ish guardsmen total. 100 more to go (not counting these 50 that will need layering, detailing, etc).
Though while painting I just couldn't stop noticing ninja mold lines I missed (or wasn't bothered to scrap away at first, because I thought I ain't gonna see them). So while models are indeed +- clean and could be passable on a tabletop, my inner perfectionist decided to make war
Spoiler:
Anyways, lesson learned: clean those bastards before priming ant painting. Oh, and nevermind the blunted blade
Here it goes, a loooong report of what I’ve been FAILING these few months. I will start from where I left…
So, the war on mold lines wasn’t as splendind as I expected it to be. But after a handful of swearing, I finally managed to pass my own quality check. Don’t be mistaken - I’d still gladly throw some of them away, because they are too imperfect for my liking. The biggest problem was failure] to take a very fine sanding paper and remove the excess (w/e it’s spelled) super glue right at the beginning. Actually, now I would say that it’s the only way to do so. DO NOT ever try to remove it with a knife, because it will most likely come off unequally, leaving huuge mess right where the edge of the etched brass meets plastic. I also kindafailed to remove some of the smaller mold lines perfectly and ended up damaging some of the details, especially the tiny lines on their helmets. An optimist could possibly say “hey, it’s just combat damage”. But I sai – DEFINITELY not good.
Spoiler:
Just look at that monstrosity, how hideously its armor is deformed :|
After cleaning the mold lines off of already half way painted models, I decided to assemble the leftover Cadian troops I still had. This process, kinda, went pretty smoothly, because the previous Cadians showed me the most problematic places to clean.
Spoiler:
The third thing on assembly line was the Inquisition Rhino. I have to say, it was pretty smooth run, until I bumped into magnetising Rhino to Razorback hatch and Razorback’s weapons (not that I’m ever planning on using Lascannons, but still). This was yet another fail: no matter what, the doors still seem to hang in the air and the heavy bolters are pure mess, even though they do get covered by the armor plate. I’m planning into this by buying more led kits, but still not sure if it’s worth it.
Spoiler:
So, Leman Russ. FAILED to glue the tow cable properly, ended up messing side armor.
Spoiler:
The Leman Russ has some more gakky places like overspilled glue which I’ll try sanding away with some 200isg sanding paper. Just to, most likely, ruin it more.
Spoiler:
CERASTUS KNIGHT – ATRAPOS. I just simply can’t describe the proportions of my failing when I misunderstood an actual detail with a friking mold line. Ended up filing it away, but in turn filed some depth from the front armor plate (facepalm x999999). Tried to restore it to some extent, but the result is clear
Spoiler:
Oh, and there’s more: guns that will possibly won’t hold in place (that’s what you get for trying to articulate an arm in 3 places) and the torso that now appears to be too low then it should be (because I also magnetised it).
Spoiler:
Arm joints, where, due to my failure in removing more mold lines, I simply made the matters worse. Again, liquid green stuff didn’t help at all. Maybe primer will hide some of it…
Spoiler:
I also got an opportunity to practice painting skin tones. Am I satisfied from what I’ve got? Not really.
Rakarth flesh->Purple wash = meh.
Spoiler:
Rakarth flesh->Red wash = meh.
Spoiler:
Rakarth flesh->Reikland Flesshade = pretty good for pale flesh.
Spoiler:
Rakarth flesh->Sepia wash = meh.
Spoiler:
Bugman’s Glow->Reikland Fleshade = nothing new.
Spoiler:
Cadian Fleshtone->Reikland Fleshade = pretty good, gives a noticeable lighter tone on the flesh.
Spoiler:
Then I kinda had an opportunity to also practice painting some skulls. Or, to say so, experimenting how different washes work. And to be honest, I haven’t really noticed any real difference between Agrax and Nuln Oil.
Which leads me to the Servo Skulls I never really finished
Spoiler:
So that’s it for this time. Think I'm going to puke from all these imperfections. And after that - off to fix at least some of them (pictures did show what a nekked eye could not see). Bleh.
STG wrote: No need to be so negative, I think you've done some good work. Some of these mistakes are easily fixed
Will see. Hopefully the primer will hide some of those failings.
Anyways, Imperial Navy reinforcements (x2 Thunderbolts and x2 Vultures) and two arms for a my Titan (I didn't even started assembling ). Still, at the moment I have to finish posing that Knight and then go on with these sexy things.
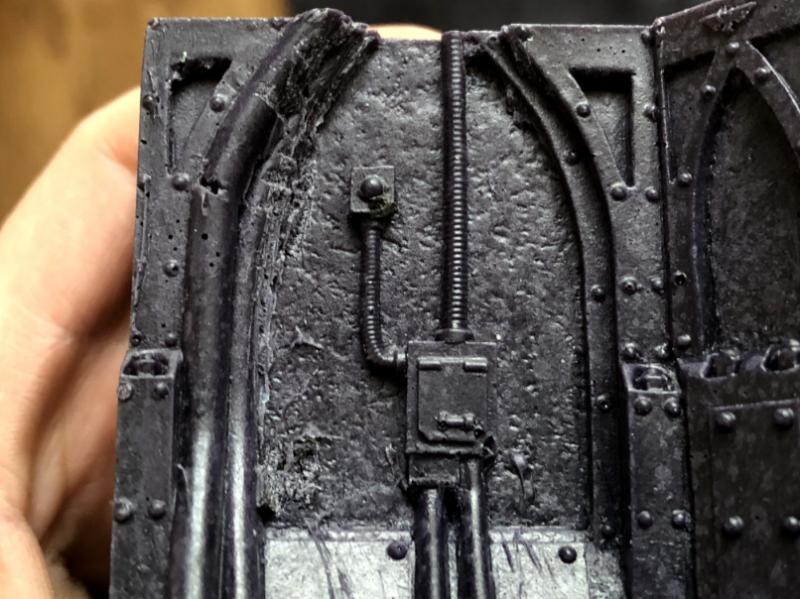
Uh, today was an interesting day, because for the first time I tried weathering, oil washing and varnishing on my Inquisition Rhino :> And, i have to say, it's harder than it looks. Though, I guess I could say that I learned to following things today:
*Be modest with weathering. Too much can be bad, while too little can always be fixed. Ensure that there's not a lot of paint on the sponge and DON'T RUSH.
*MOAR clear varnish. I kinda went half-jew this time and thought it was going to be enough. Nope, the oil wash still went thru in some places. Definitly not as planned. Still, in the end I managed to wipe most of it away. So next time - at least two strong coats.
*MOAR white spirit into those oil paints. Better thinner than thicker.
And, I guess, that's mostly it. Oh, and I really need to work on painting those screens. Heck, maybe i should just buy a bunch of them from ebay, just to get that thing staight.
Some pictures.
Panel:
Spoiler:
Side interior:
Spoiler:
Hatch parts:
Spoiler:
Without roof:
Spoiler:
With roof:
Spoiler:
And daaayum, how I missed that horribly warped back door
STG wrote: looks pretty neat, would like to see what you've done with all your guardsmen from earlier in the thread
To be honest - not much. I just pretty much base colored and washed them (there should be a picture somewhere of how one of them looks), so the rest kinda look the same. Didn't have time (or was just slacking too much) to paint more. Though I should add some layers soom - I'm really curious myself wether after all those failings with etched brass they will still be at least decent... because from what I've already tried, the etched brass, especially after priming it and adding a base color over it, tends to lose a lot of details.
Here's a small update on the Rhino. The whole thing looked quite bland so i decided to add more colors to contrast a bit. I also brought back some of the original pre wash color to make interior to look a bit cleaner, but kinda messed up with the door spaces and places where I put masking tape on (shouldn't rely on them that often)
Spoiler:
Also put FWs Extra Armor. Hand't I lost the order details, I would've defeinitely contacted them and asked for few replacement parts, because MAN, IS THAT THING A BITCH TO PUT ON - needed A LOT of filing and dipping in hot water and in the end I stil couldn't get some parts to fit right.
Knightley wrote: Very cool, I like the design for the rhino and yes, those panels are a nightmare to affix.
Also you shouldn't need to hide your pictures behind spoiler tags I would imagine most people have fast enough internet
Well, if the casts are good, you just need to squeeze hard and it comes good. Now if there's a mold slip... :(
The reason I'm doing this is that I always forget to resize when uploading. And after that I'm just too lazy to re-upload them again. But the problem is that, as far as I know, mobiles get their resolution raeiped if they click on a topic that has large photos in it. So the spoilers are like a lazy attempt to mitigate that. In other words - view ant your own discretion But I will try this Dakka gallery thing in the future. Hope it's better than some flickr.
Automatically Appended Next Post: There, creatted a gallery. And some more wip servo skulls
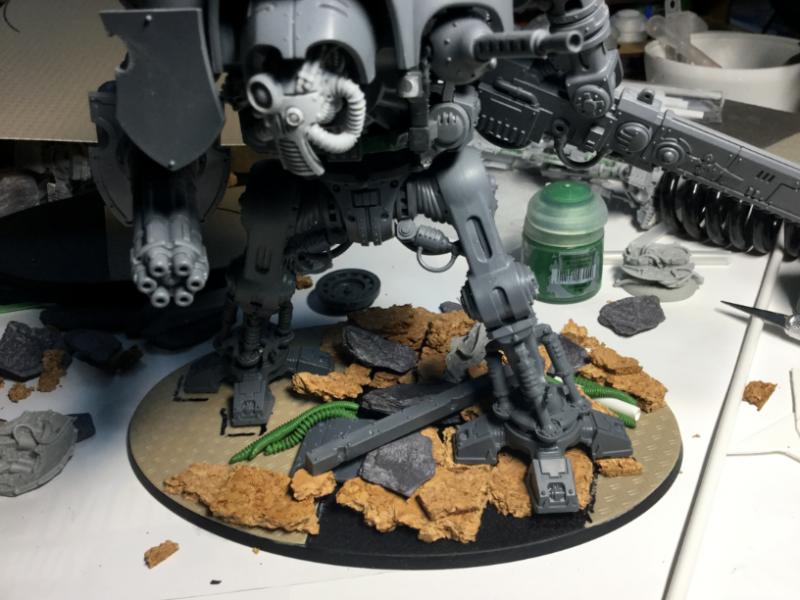
Ended up messing previous bases, because I had no idea how to paint them and ended up having 4 different results. So scrapped everything off and made some new ones. I really, really wanted to make a guardsmans skeleton poking thru some rocks, but couldn't find any bits, so had to work with what I found. Kinda happy how they turned out. Will probably prime and paint them tomorrow
Damn, I feel so easily distracted. i was about to paint those bases, but then decided to also prime some of my Cerastus Knight parts, because the basing bits are already on their way... So yeah, spent the last two or three days painting interior. Still a wip, and still not happy (doubt I will ever be )
Also, does any of you know is it normal for resin to be so textured/grainy ? Or maybe it could be a bad combination or spray primer and airbrush?
Added some more details. Sprayed gloss varnish. Might've overdone with weathering. Will have to wait for tomorrow for everything to fully dry now and see how the varnish holds :|
The Extra bits of detail really make a huge difference in bringing the interiors alive.
The weathering is Nice as well for a used look, but not an old, extended campaign, everything is starting to take a beating look, so don't worry about it being too much, it looks just right IMHO.
Keep it up!
I tried washing with oil paints and here's how it turned out. Kinda dislike the granulated pigment effect in some parts. Maybe it's because it got diluted by whitespirit too much? Apart from that, the only thing that's left is the big lense (I'm thinking either red or green? Or maybe blue, but I'm feeling there's a lot of blue in there already), maybe some soot effects on exhaust things, some black/sepia wash on pipe connections and a coat of matt varnish
Also did some work on Servo Skull bases. They are almost done too, just need some extra details/highlights/weathering effects.
Whew, done with interior (wil upload pictures next time, because I made some pictures first, then found some more things I wasn't happy with so decided to adjust it bit more).
Anyways, moving on on to the main body. I just couldn't decide what glue to use (epoxy or regular 'super moment') and as the epoxy was drying too slowly for my liking, glued some of the parts with regular "super glue". Epoxy will, most likey, be used for magnets where I actually need extremely strong bond.
So today I worked on shoulder joints. Those who have ever built a Cerastus Knight will most likely know the shoulder part where you need to insert the piston, fixing arm position in a certain place. Well, I wasn't really happy with the idea, so I just stuffed a bunch of liquid greenstuff inside those holes, POSSIBLY adding more fricture. TL;DR, at least at the moment shoulders stay in a certain position without the need for piston. Though will see how it turns out when I add weapons, because the bastards weight a lot.
Soo...It came to be that "super moment" was actually a really bad idea as the whole torso part came apart easily. Let's hope JB Weld will do its job well (I had to buy that from ebay, because I didn't fancy using products from Russia )
While the epoxy was drying, I got pretty boring and found a Hellbrute with Dreadball's Buzz hanging around in my bitz box. So why not to paint them now and maybe trade them for some paint bottles
Also, today I received my the basing material for Atrapos. I have to say, I'm REALLY impressed by the value of this kit (or how much it contains). Really amazing stuff, can't wait to ravage it
Gorgeous work, friend. You have a good eye for the little details and you really pick up new techniques surprisingly fast. You're an encouragement for me to get out the oils and pigments again!
Bishop_Blank wrote: Gorgeous work, friend. You have a good eye for the little details and you really pick up new techniques surprisingly fast. You're an encouragement for me to get out the oils and pigments again!
Keep up the good work, beautiful stuff.
Aaaw, you are flattening me
Besides my usual slacking, I did a raw sketch for the Knight's base. At first I had the idea of putting one of the smaller mausoleum houses under its feet, but got somewhat inspired by the good old "Sacred" game where you would see these small statues/cemetaries in the wide open. The biggest problem I see is the balance that the base needs to supplement whole model, not be a whole terrain piece by itself. So what you, guys, think? Should reposition the fences in the back? Bend them in a certain way? Remove them completely? I also had this idea about breaking the whole statue in more places (mostly the sword and somewhere at its feet) to add more realistic look.
General Kroll wrote: I really like what you've done with the interior of those vehicles, they look great.
The base for the Knight looks cracking too, may have to steal that idea!
That would, actually, be a steal from an already stolen idea well, At a certain degree, to be exact. I saw some picture on the internets with the knight standing on a base made from Garden of Morr pieces, but didn't want to make a direct copypasta, so started to place all of them pieces randomly, until something more suitable came out. I really like it, because it fits the whole gothic feeling
And here's a Knight who has some existentionalistic problems :(
Man, I feel so bad for not doing anything really productive and not taking a brush in nearly two weeks :(
Anyways, here's what I've been slowly working on. When I started to glue all the things in place for the previous version (the one with the fences), I kinda quickly dismissed the idea, because I don't want any of the Knights parts to be obsured. So then I looked for some inspiration and realised that I freaking LOVE pavement bricks
So, what you think? Oh, I still have to find a way to implement the whole statue on there too, so it's more than likely to have more rubble onto it in the future.
RazgrizOne wrote: Very impressive vehicule interior.
I laughed at the Rodin Knight !
Thanks. But I still don't feel that way about the interiors :|
Anyways, finally managed to get the knight upright. Here are two posees for consideration. One is more static and the other one would most probably make the knight look like it's in a running motion . And the worst part is that I can't decide which is better. And so far my friends voted 2:2 :|
Uh. Two weeks of travelling, building freaking bonfires,
Spoiler:
finally hearing NIFELHEIM and VENOM live and I'm back at home building my Atrapos again I have to seriously let it go with perfectionism.
And here's how it all turned out. Here I think the torso needs to more straight, but I'm kinda quite happy with it.
And here's a side view:
Ofcourse, problems never walk alone. Now, after almost completing it, I'm hungry for more NEW resin crack. Maybe I should liquor myself to near loss of conscience and buy a Warlord titan :(
Big Mac wrote: Mostly cool, but not a fan of the interior weathering, it looks too weathered for the interior.
The last photo of the Knight's interior was prior varnishing so it might've changed a tiny bit. But the weathering effects were mostly an experiment, inspired by Phil Stutcinskas works And as with all experiments, errors might've happened
evildrcheese wrote: Looking awesome dude. Great work on the base and the Knight speaks for itself.
EDC
Thanks. Actually, I tried to make the arms fully posable, hence the random "yo bro, got some problems" pose If everything's just as planned, the arms will have 3(4) magnetised joints to allow movement. The hardest part though, is to angle to torso-leg position, so it's not vividly leaning forwards, nor backwards (I never understood poeple posing them to look somewhere at the ground). Been doing that since...7 am now
Reinforcements are on their way.
As well as a set of FW metallics (always wanted to try them out and see what's difference between regular GW ones. I will also make a direct comparison guide when they arrive :> ) and a bunch on Clear paints. Still haven't decided what paint scheme should I go for: clear over metallics or clear/basics over pre shaded whites. Oh, and curse my post soviet country for not allowing to buy FW Solution. 500 ml for 10 quid is such a good deal, compared to what I can get here...
Anyways, I also messed up with Priming my Knight in some places. Cursed hot weather. Though it's an important (175 quid important) lesson for next time. gak happens.
Ruthless way to learn though, I had that happen on my chapter master on a bike, I didn't wash the model as best I could, all the primer and layer paint came off, was not a happy camper at all.
Ruthless way to learn though, I had that happen on my chapter master on a bike, I didn't wash the model as best I could, all the primer and layer paint came off, was not a happy camper at all.
At least it came off...mine's stuck
Here's some work I did on the base...In certain places you can see the roughness of badly applied primer. I'm almost on the verge of ripping everything off and making a simple 'martian' cork base
I really like the interior you did and the screen is my favorite part. The blue lines are well done.
That said i enjoy the weathering a lot. I like the idea of a knight who has been through and is just in the grind of knighting.
No warlord. :(
But awesome flame tank. Not disappointed.
Thanks! I came to finally love that part as well Yyyeah, no Warlord. Actually, I just really needed some clear paints so the rest were an excuse. And a somewhat half b-day present...I'll buy Warlord when euro is like 1: 0.90+ GBP. Even now its +- 200 euro savings, but I'm a one greedy jew
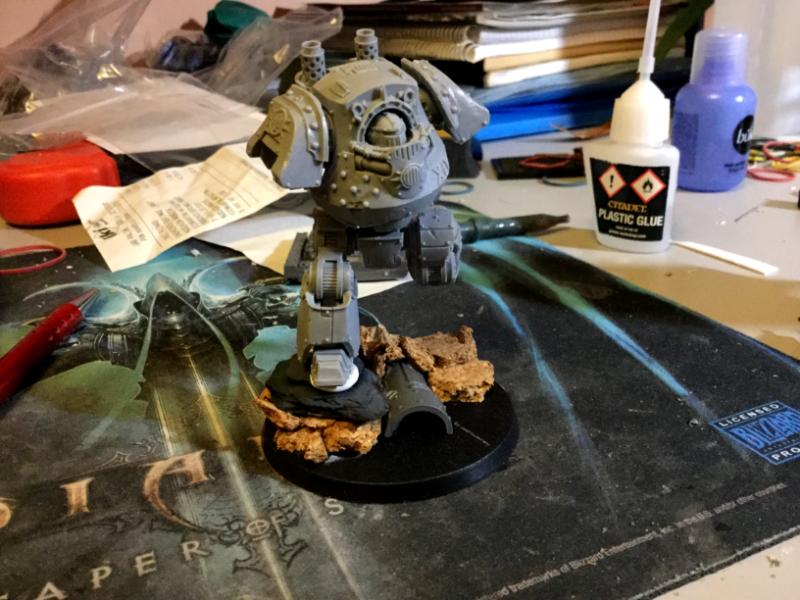
Oh, and here's something new. A friend of mine bought (resqued) some marines with the idea of me painting them later for his custom chapter, because he doesn't know how to (not that I know how to do that well to ). So here's an Apothecary. Still needs washes and layers...
The Atrapos has found himself a new master. I just couldn't make piece with my perfectionism and while the Knight looks just fine on the table, I knew that every time I looked at it, I would be torn by the knowledge of the small imperfections. I'll just buy a new one
The second biggest thing that happened was yesterday. Striking deals while drunk is sooo damn fun thing to do. In other words, our main FLGS/Hobby Club is pretty much becoming a GW stockist and I'll be responsible for all the promotions, sales, tournaments and other GW related things (ignoring the fact, that now there would be 3 stockists in a country that has fewer than 3 million people and, maybe, 20 active players at best )
Moving on...
I washed the apothecary. Looks better irl, though.
And bought a batch of GWs Brazzers colors. Gotta collect them all. And when I do, I'll be sure to make a detailed comparison/review on them :>
As my Forge World metallic paints finally arrived, I decided to check WHAT'S THE ACTUAL DIFFERENCE between the old/ever increasing mass of metallic paints under GW/FW logos. So here it goes, the first part of 'metallic' metallics (the other two will be golds and coppers).
Currently there are 6 'silvery paints': Leadbelcher, Ironbreaker, Runefang Steel, Stormhost Silver, Iron Hands Steel and Grey Knights Steel , with the last two belonging to Forge World metallic range. Now the reason I included Valdor Gold is because it actually looks silvery on the outside, but as you will later see, it's like a mix between gold/copper/silver.
For this comparison I decided to do the most simple method - slap them on a piece of white paper (I know the photo is not ideal due to me taking photos in the evening, but I will try to reshoot it in a sunny environment). And, as you can see, the difference is...weird. At first I was afraid that these would be pretty much indentical to each other and the while 'Forge World' and new GW paints (Stormhost Silver) thing was just a money grab. But it's...not?
As I've guessed, the whole range goes from lighter to darker with some being very close to each other, others having a huuge difference in their tone. Here are some more close up shots:
Leadbelcher vs Iron Hands Steel. The difference is so minor, it's really hard to tell. Maybe, the Leadbelcher is slightly darker, but Iron Hands Steel, IMO, looks way better. "Softer?" Also, while looking at the photos, "IH Steel" seems more... metallic? Anyways, that's my new favorite base 'steel' from now on.
Now Ironbreaker walks alone. It's a like a mixture, where shiny metallics have more parts.
Here you can see how Ironbreaker compares to Runefang Steel and Stormhost Silver.
Speaking of the latter, Stormhost Silver looks like the brighter one of the two. Also (it could be because I once forgot to close Runefang Steel, it became a jelly like substance so I diluted it with water), but the Stormhost Silver looks like a better quality paint.
The last two - Valdor Gold and Grey Knights Steel are completely different metalics. With Valdor Gold being more goldish/coppery and Grey Knights Steel speaking for itself - an IDEAL paint for Grey Knights due to their blueish tint. It could also be nice for painting larger metallic areas (like Titans) and adding it for more metallic tone variation.
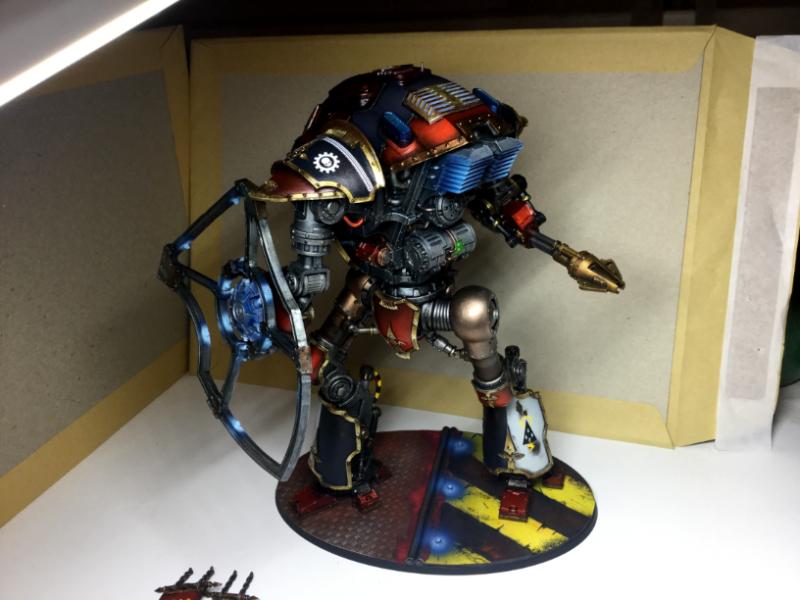
Oh my, it's been quite some time now So, besides messing around with GW's imperial knight (gotta get those magnets staight) and contemplating on what to buy to start AoS (damn, that Magma Dragon is a sweet looking model), I've been messing around with this Dread a friend of mine gave it to me to paint to him. And me, being selfish, accepting it, just so I could try new stuff on free models One thing though: 30+ celsius and airbrush acrylics don't go well together.
Aw, thanks, but it's nothing really. I'd say airbrushing skills are novice at best
Anyways, as we started selling GW at our local store, one guy bought a bunch of Sylvaneth. He also single handedly bought 5 gaming mats for us to use, so I offered to put quick basecoats on his army. He was happy with it too. So for the past month I've been painting there. Sadly, no pics.
At my spare time, when not painting Drayds, I did some work assembling Knights. The carapace handles are messed at at certain degree (because GW designers think it's a very good idea for every handle to fit in its designated place, NOT anywhere else, derp). It's also pretty poor kit in terms of cutsomisation, after getting to mess with FW Knights. So the 175 quid price COULD be justified by the amount of extra details and posing abilities. By the way, we actually tried playing Knight Renegade and we quite enjoyed it
I also bought more Forge World. I seriously, seriously need to start assembling it. Or get more shelf space. But I'll wait for Porphyrion to show up
Huh. There's going to be some 'CON where all the nerds and geeks are going to go. So we decided "why not to give some Warhammer to them?". And, besides some demo game, there's going to be a painting table for people to come and paint their marine.
Us, being the jews as we are, gathered all our oldschool stuff (not that I had any marines at all) and brought to me to prepare them... /sigh.
So there's 20ish or so marines (featuring some 2nd and older editions, but NO FREAKING BEAKIES!) I have to clean, base and prime until this Saturday
And 10 more to paint for our Kill Team.
/sigh again. At least I'll have a 700 ml bottle of rum to secretly booze myself at the CON's painting table
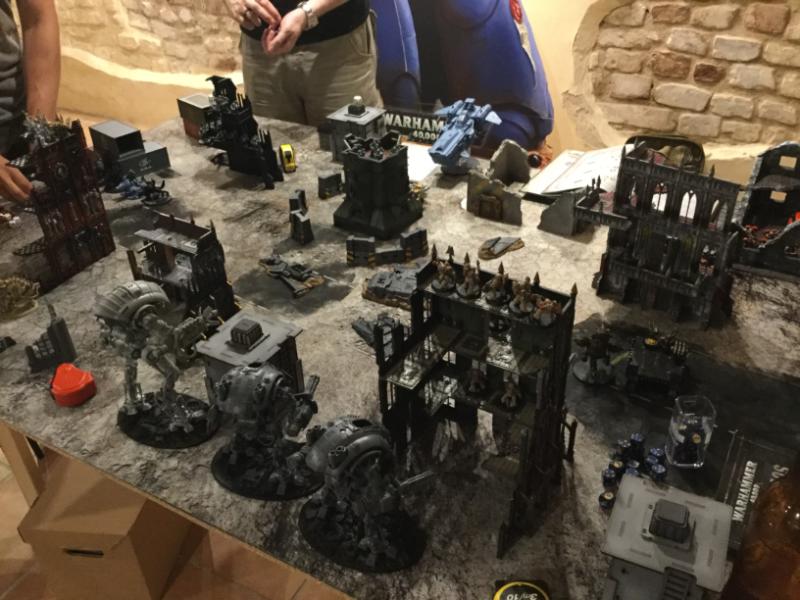
So, our thing ar the 'CON was more successful than I thought it would be. People painted every single marine. And the demo game attracted quite a few people too, who stayed after and asked if they could roll some dice.
Sadly, I spent more time painting (liquoring), so here's a friend's photo from the demo battle:
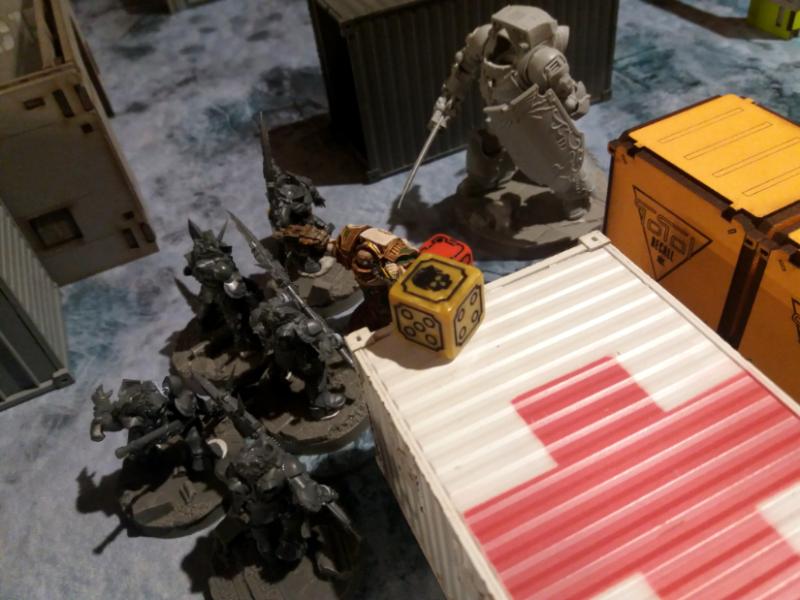
Sooo, this evening we finally tried Kill Team.
35 guardsmen vs 2 squads of vets with Carapace. Grenades are actually very, very useful. Unless we got it wrong But who cares, as we still had some laughs.
And here's the joy of running 35 guardsmen that act like separate units And never mind the slowed terrain - we used what we had.
whalemusic360 wrote: Junkyard terrain is always good. Doesn't 35 guardsmen kinda defeat the draw of Killteam though?
Yyeah, we kinda thought about that later. The reason we (I) did that, because those are the only assembled models I have and making, say, Inquisition KT without a slightest WYSIWYG would've been a nightmare, as we already had problems with special weapons that looked like regular guardsmen (even though we also marked them). So we will definitel try it next time with more 'teamish' kill teams
Definitely taking the 'clog their guns with the bodies of our dead' to a new level!
EDC
Funny thing was that we also rolled for 'break through' scenario. We also gave the defending side to deploy with more cover/LoS. Man, the casualties on attacking started to really add up once they were in 12 - 8" range
After playing so Kill Team, I began to think that it's a perfect oportunity to start some new army. And I've been wanting to have some Eldar Corsairs for quite some time now. Yeah, yeah, I know - filthy fething xenos. But I kinda like them. Regular eldar are way too pansy, and while dark eldar seem tempting, I find most of their models looking kinda...meh? So this happened. I'm also contemplating whether to buy Hornet as well, but I'll most likely wait for Porphyrion, to get that free shipping
Aaaand, today I also finished base painting 18 freaking Sigmar tress (just because the guy who bought them thinks "if I can have more, why should I have less?" So here's me, all bored, tired and angry, trying to finish the last sets. I also started wearing proper dust mask right after one painting session when I started coughing green colored mucus On to Kurnoth Hunters and other living tree things....
So, finally brought my compressor back home, gave it a good cleaning and now I'm ready to do things I actually want to do. More or less. Because there might still be Sigmarines to paint this month.
Anyways, I finally assembled my Tau Homo Warrior Kill Team. I've no idea what the rules are, nor how many points do they cost, just glued the parts that I liked mostly Assembly wise, they are literally guardsmen with more bits. This is how I imagine Guardsmen/Veteran combo box should be.
I also found some spare plastic models to play with alternate paint schemes for my corsairs and Mechanicum Knights. I will try to paint that marine using FW Angron klear, the Chaos Warriors and the Vyper will be dedicated either Sunblitz Brotherhood or Sky Raiders
Aw, Captain, you made me smile. I'm actually afraid of that moment, because I tend to mess things up. Like this Fire Warrior. Actually, others have some less weathering. And this still needs some more contrasting color (I will try adding those commie transfers here), but...yeah.
Thanks! But I personally think I overdid. I clearly remember one protip regarding weathering: "add less, because you can always add more later", but I just can't hold on to it
Finished washing these fish faced commies. Now some details, some highlights and on to...Eldar. But it should be cool, painting eldar vehicles is soo much fun.
CragHack wrote: Thanks! But I personally think I overdid. I clearly remember one protip regarding weathering: "add less, because you can always add more later", but I just can't hold on to it
Finished washing these fish faced commies. Now some details, some highlights and on to...Eldar. But it should be cool, painting eldar vehicles is soo much fun.
Nice work on the Tau. Nice, bright paint scheme to make xenab removal easier for the Emperor's Finest.
(I know, corny joke. But the Guardsman in your avatar reminds me of that old meme).
STG wrote: How did you do your weathering on the Tau, they look cool as
Oh, it's really easy. Just take a piece of sponge... It's been covered here:
And today I finally got this cutie pie!
I also asked to buy the termi praetor, but then decided that I ain't going to actually use him anywhere so sold it to a friend. This, on the other hand, I'm planning to use as part of Librarius Conclave to add some cheese to Imperial Knights
Soo, first things first, I played around with some klear paints. I tried doing it two ways: shading it with orange and then going for yellow (the back of the Vyper) and just spraying it regular yellow with some darker metallics in the deepest areas (front part). I have to say that I'm leaning towards the second variant as the first one turned out to be more orange. I will also have to try using just two metallics for layering, as 3 seem to be too much.
The other news are that we finally received our Kill Team campaign pack.
The contents are:
4 sets of badges featuring Skitarii, Marines that were featured on KT box, TAU and Harlies. There are also sheets of counters and some odd double sided tokens with Inquisition/Skull logos on each side. Some scenario sheets and guidelines on how to run a campaign.
Now the scenarions are quite different from what we have in the KT box: 1 of them is all about picking an HQ choice, gearing him in any ways possible, but keeping 200 point limit, and putting in a 2x2 or 4x4 arena with lots (up to 8?) other players. Oh, and the characters have a slight chance to keep returning once they are slain, because Khorne.
The second one features a 4vs4 FFA match with a center relic type thing that can not be carried.
The third lets one player pick any MC/Walker/Vehicle (but not FMC), WITHOUT ANY POINTS LIMIT, and the other has to try to kill it with his 200 pts KTeam.
The fourth one, as I understood, can be also played with bigger point values. One's a target, the other one's assassin. Target gets to use 2x points more than assassin, but assassin's units gets butloads of special rules.
Take these with a pinch of salt, because I'm writing from what I remember
The campaign itself basically lets you upgrade your Kill Team. By winning scenarions you earn laurels of victory, which you can later spend on units. I/e, little timmy won his match and got a laurel. Now he can redeem that laurel for 25 pts and buy a SINGLE sternguard (assuming the only took troops for his KT). Oh, and your troops can permanently die
That is a unique look for an Eldar vehicle...your Vyper is unlike any I have every seen before. Did you get some inspiration from the ForgeWorld corsairs?
That is a unique look for an Eldar vehicle...your Vyper is unlike any I have every seen before. Did you get some inspiration from the ForgeWorld corsairs?
Cheers,
CB
Yes, indeed. Actually, I've looked for "Sunblitz Brotherhood" over the internet found some Falcon (or was it Warp Hunter, I don't really remember). The thing is that I fell in love with the yellow metallic scheme and been wanting to try it out for a very long time. I will also try painting the drivers in a darker, non metallic yellows too
Sooo, I finally finished those bloody TAU warriors (they are in the shop now and I'm too lazy to make a final picture). Well, actually, they aren't THAT finished - some need more highlights, extreme highlights and minor details to finalize, but I simply can't work on multiple models - it's just no my thang. (Yeah, I know, guardsmen... )
We still ended up taking them to some expo and people got quite excited to be able to play with painted miniatures.
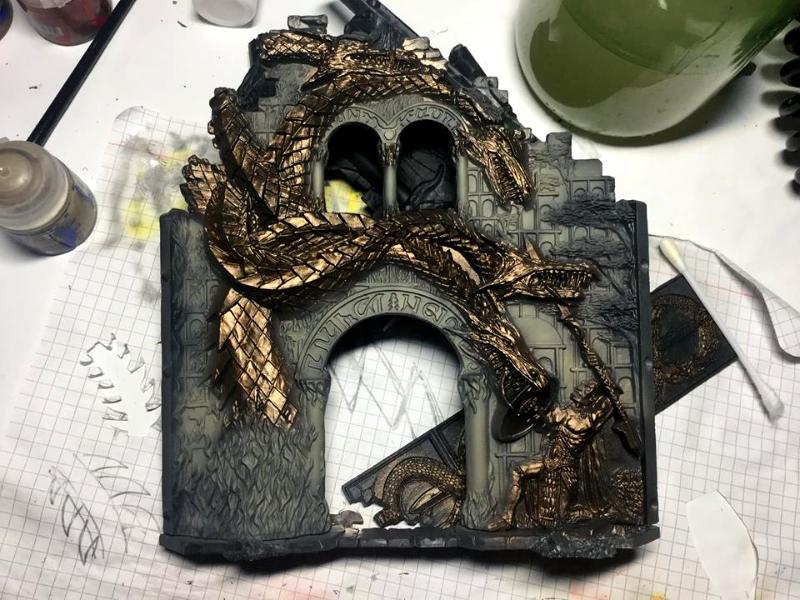
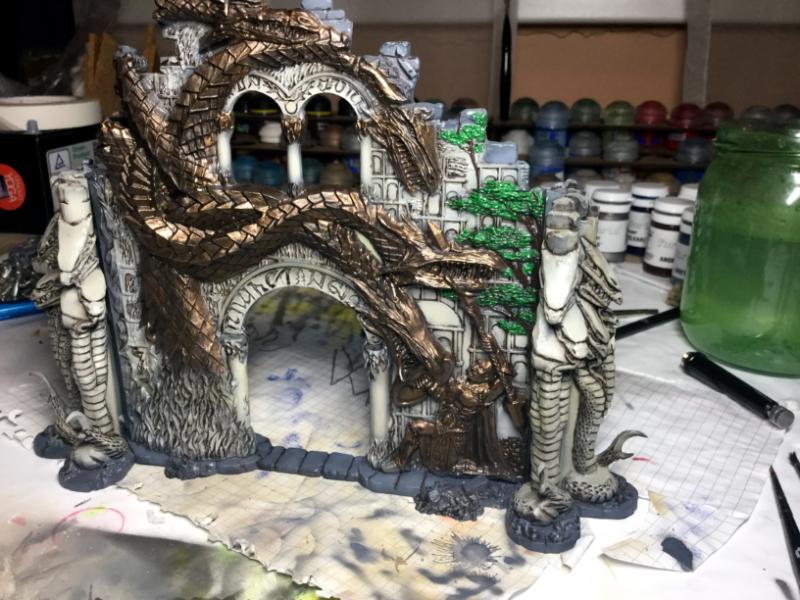
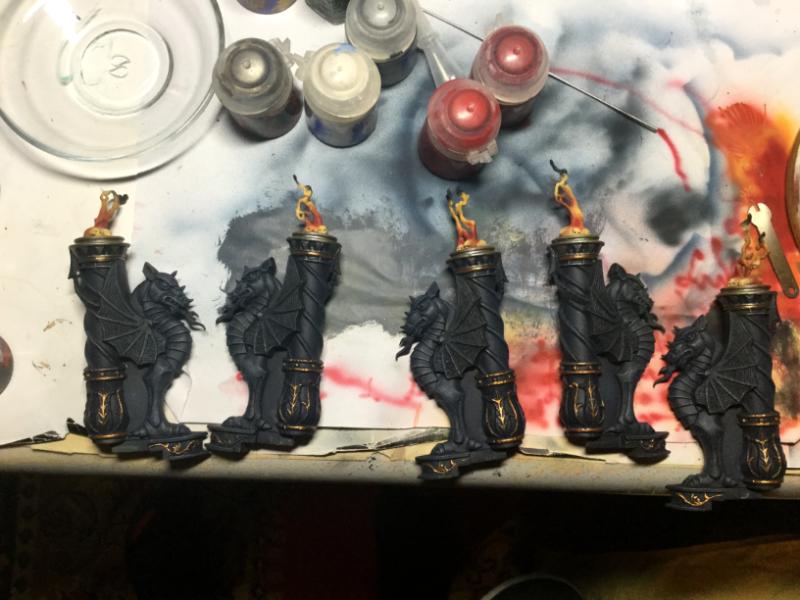
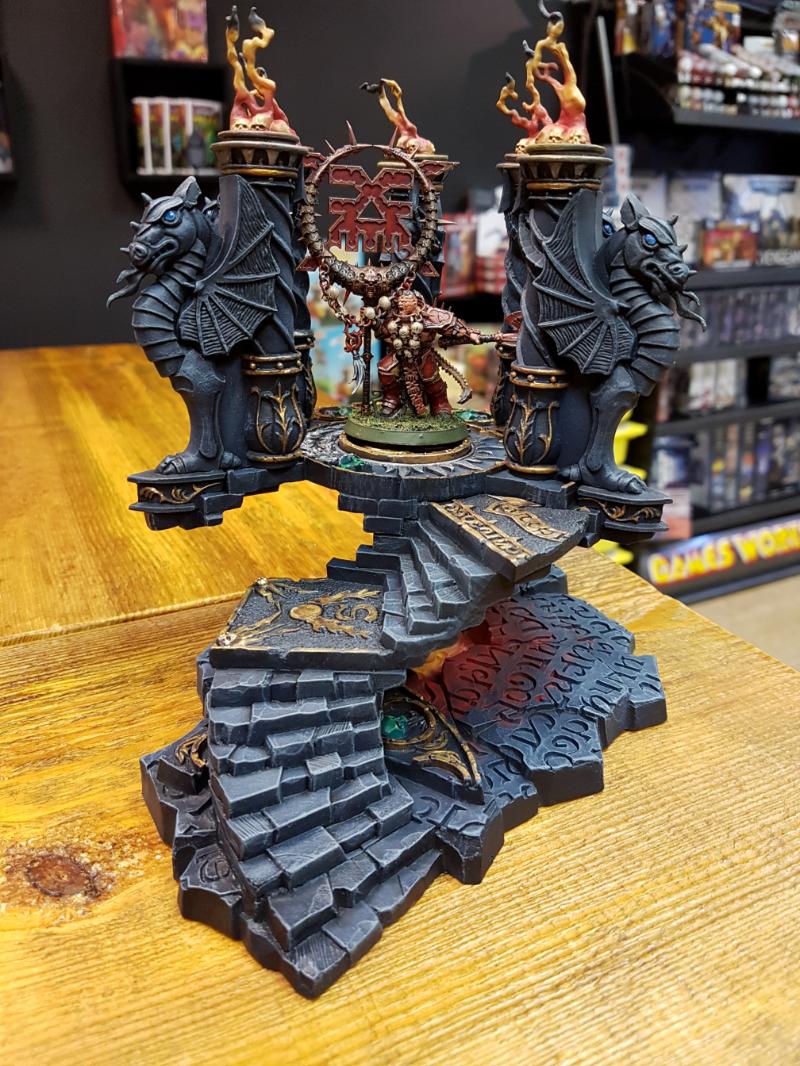
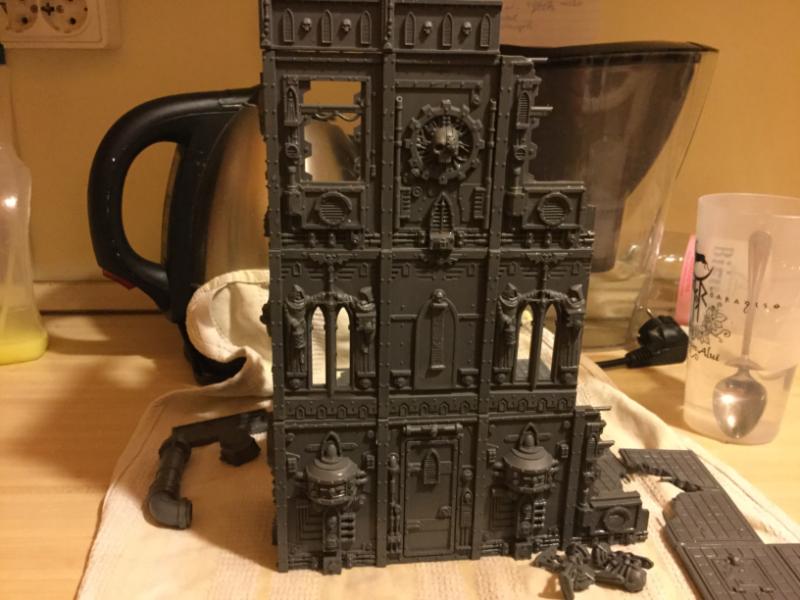
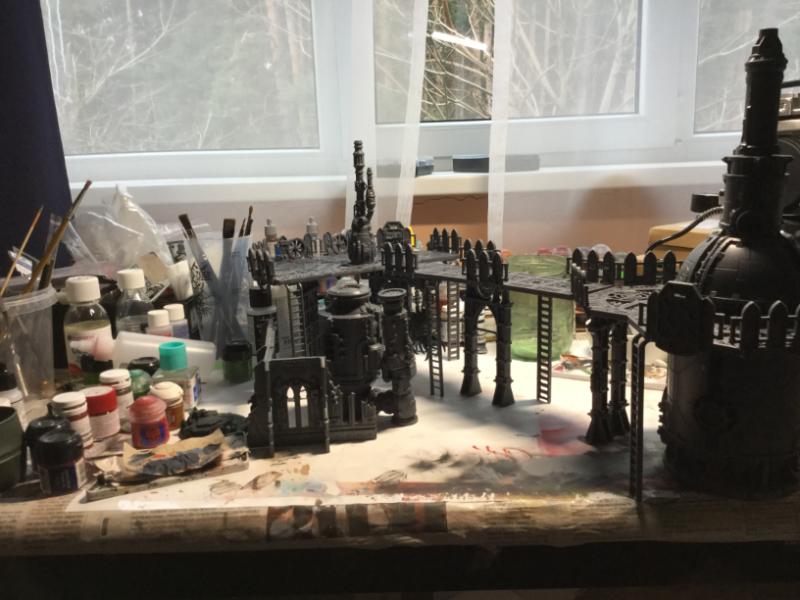
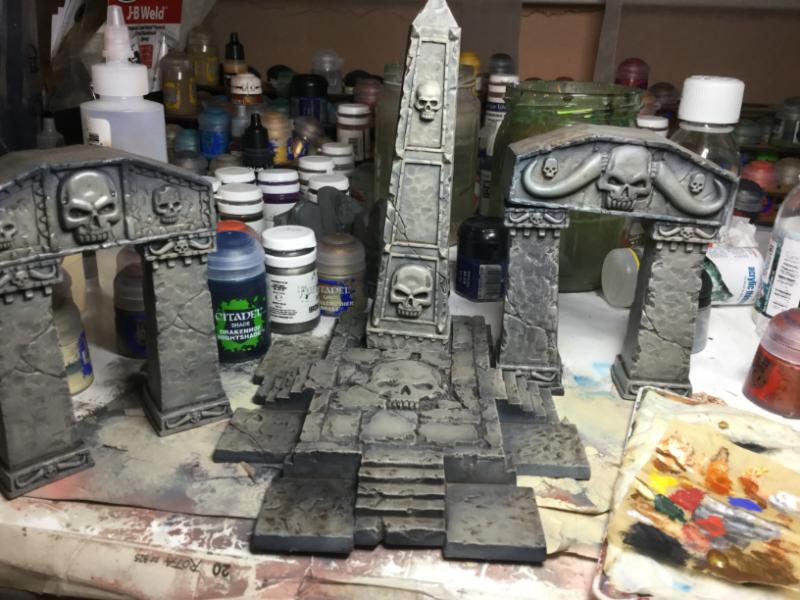
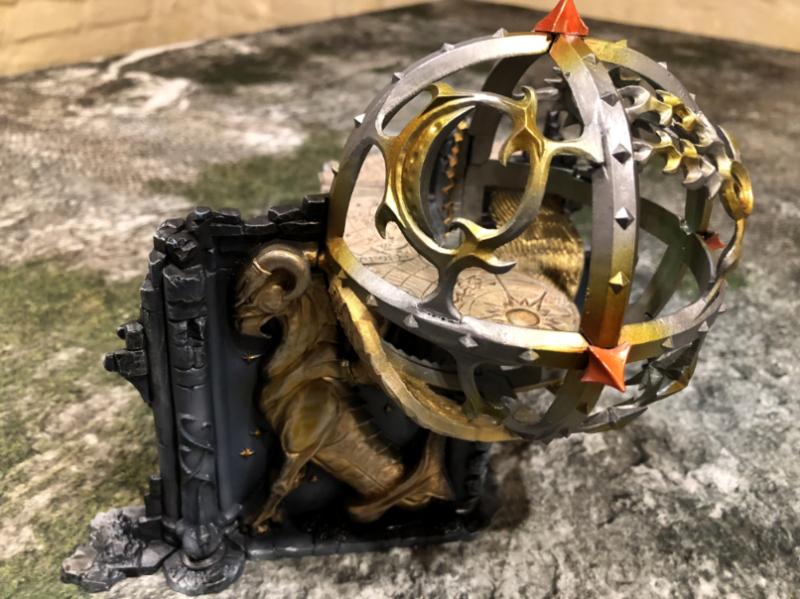
As this is finished, I can finally start working on Ophidian Archway(s) and Dragonfate Dais. So here's a picture for the first Archway wip:
I also pre-ordered some FW Knight heads, so I can finally finish assembling them Ended taking these ones:
and
So, I did some more work on Ophidian Archway: put a second layer, some details, washes and some drybrush on the brazen/golden dragon, though I still think it needs to be a bit brighter...Other than that, it s like 80% finished, just a few drybrushes, few highlights... Though I have to admit that I would rather hihlight than drybrush - I never manage to get the right amount of paint and end up overbrushing :(
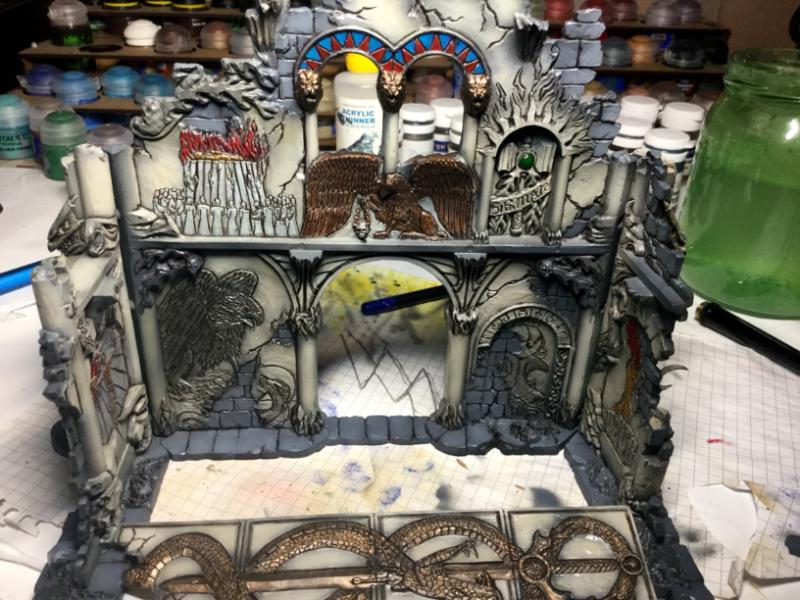
Having finished Ophidian Archway, I decided not to waste any more time and move on to the next terrain piece - Dragonfate Dais.
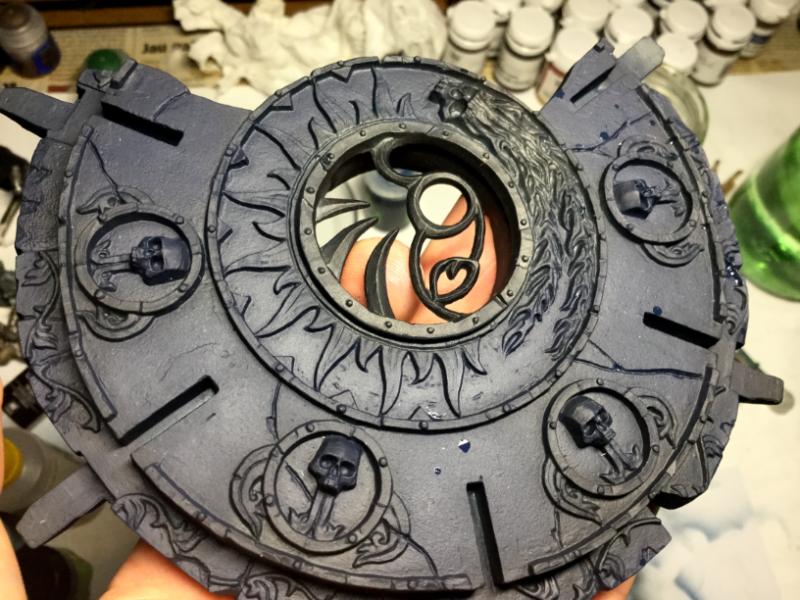
A rather cool looking kit. As one person once said, "true black does not exist", so I decided to add a blueish tint to it. I don't think I'll be spending too much time on it: some gold details, some silver details, some osl for the flaming skulls, a lava pool at the bottom and some drybrush (as much as I'd hate it).
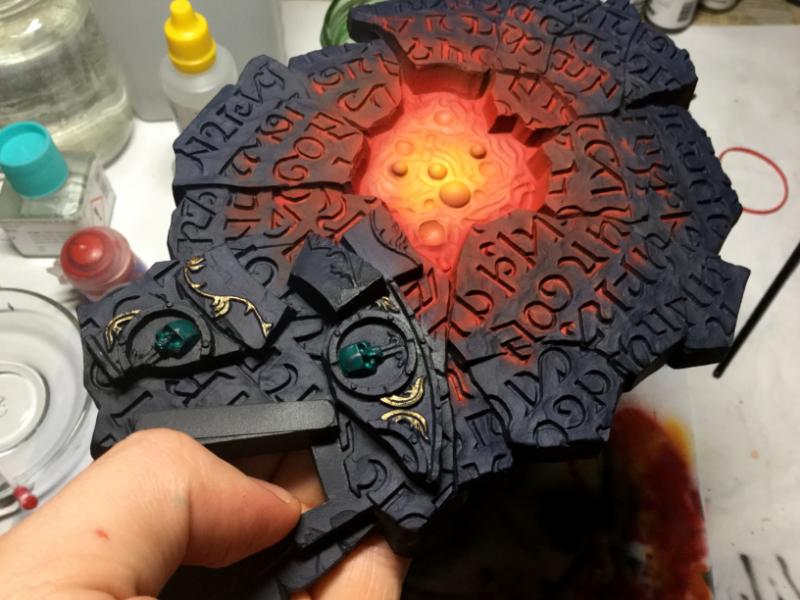
Soo, moving forwards with Dragonfate Dais. Did some lava effects, gold parts and decided to try to make the skulls jade - darker, cooler color, imo, kinda fits here.
Also, my Questoris Knights heads arrived. Despite crappy FW phots (and some easily cleanable mold lines) these came out to be nearly perfect (because nothing is really perfect, except Slaanesh himself).
Sooo, did some more work on the pillars. At first I thought to make the fires green, but then I opened this months WD and saw regular ones, that looked pretty awesome. Also, it KINDA makes more sense with the lava at the bottom, etc.
Protip: DON'T use isopropyl as a thinner. Just don't. I mean, don't even try. Bloody hell
Sooo, I finally finished painting Dragonfate Dais.
Here I have to say that while the plastic seems sturdyer, this kit (as well as the previous Archway) is a bitch to put together: gaps, gaps, more gaps, wobbly parts and some places that simply refuse to glue...bleh.
Moving on onto the next Ophidian Archway which I'm planning to paint in greys/blacks/reds and maybe some blue glow. Jeez..
Soo, I finally managed to get some work done on second Ophidian Archway. Didn't want them to look all the same, so decided to go with a black/red paint scheme. Though black/red, IMO, looks kinda cheesy. You know, "cool" colors.
Anyways...
*Assembled Atrapos.
*Bought some more resin crack.
*Played some Kill Team.
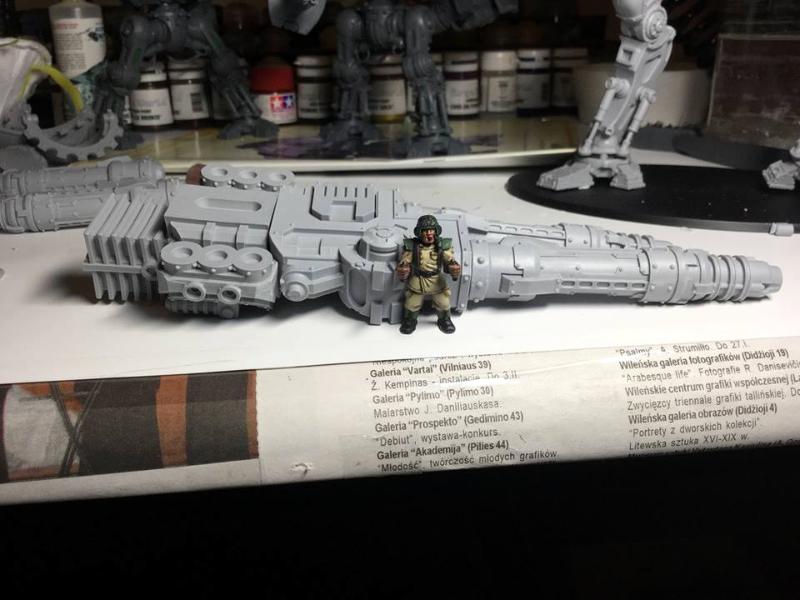
Aaand, most importantly, started working on Porphyrion! I really wanted to begin from the Interior, but since it had some broken parts, I decided to start with weapons, until replacements come.
So the first impressions are: WOW, WHAT A MESSY KIT. Really, mold lines freaking everywhere. Luckily, most of them appear to be on parts that will look straight down or be covered by armor plates, so they won't be really seen. But seriously, mold lines on pipes/hoses are just way too annoying to handle well.
The second thing is that I FINALLY got to know those legendary ForgeWorld gaps. Seriously, there's like 0.5 mm if not whole 1 mm gaps. At first I thought I'd wait for the greenstuff to arrive, but I think I'll just fill them with epoxy and be gud, since I won't be using super glue for the heavy parts anyway.
As for now, I kinda finished pinning all the needed parts, but I'm not sure, whether I should magnetize it in a fancy way (drill a 15 mm hole) or just slap the magnet on top and then greenstuff the other magnet inside, so it fits well.
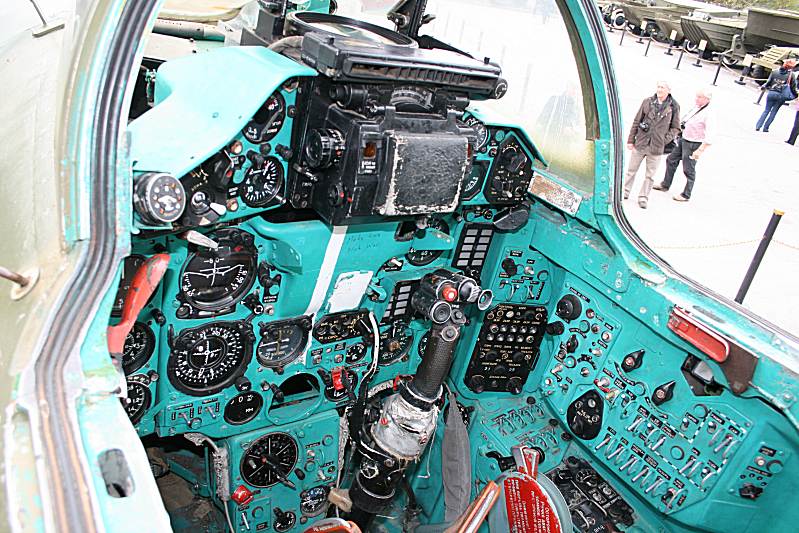
As for the cockpit, I'm planning to paint it teal, like you would see it in some russian jets.
General Kroll wrote: I really like what you've done with the interior of those vehicles, they look great.
The base for the Knight looks cracking too, may have to steal that idea!
That would, actually, be a steal from an already stolen idea well, At a certain degree, to be exact. I saw some picture on the internets with the knight standing on a base made from Garden of Morr pieces, but didn't want to make a direct copypasta, so started to place all of them pieces randomly, until something more suitable came out. I really like it, because it fits the whole gothic feeling
And here's a Knight who has some existentionalistic problems :(
that made me laugh and startle my dog. he needs to be based like this, sitting on a heap of ork bodies like gimli in lotr two towers extended edition.
Haha, actually, that was an old Knight. So my inner perfectionist went crying (and I also badly needed cash at that time), so I ended up selling it and later buying a new one (which I still kinda failed at).
Anyways, moving on with my Knight. Heck, I don't even know why I'm painting those bloody interiors - nobody's going to be looking at them anyways. It's kinda a copy pasta of my old idea, though with different palette. It was also my first time painting red lenses. Gosh, it's a slowed color to paint.
I really doubt that will happen any time soon :( I mean, the Knight is almost finished, but I'm just not happy with it. I just might sell it and buy a new one... I'm afraid, I'm more concerned about the imperfections* than being happy with it (though it's a truly stunning kit)
*To some they might be simple green stuffed areas that won't be seen once the model is primed, but deep down inside I'll always know it. And that SHOULDN'T happen with ForgeWorld kits. Especially ones for 350 euros.
Nah, it's not the posing. IMO, it shouldn't be super mobile for its bulk. Actually, I'm pretty happy the way its pose turned out.
It's the minor imperfections, like small mold slips I only really noticed when I glued the whole arms together, so it was too late to ask FW for replacements.
I/e,
So, I just checked and it appears that I have exactly 370 quid in my paypal (thank you, maniacs, who auctioned those referees, dice cubes and data cards for x2-x10 retail price). If I won't feel any better by tomorrow, I'll buy a new one. And the Sword and Shield Custodes dread :>
Gah, maybe you, guys, are right. Maybe I should prime it, give it some decent basecoat and see where that takes me.
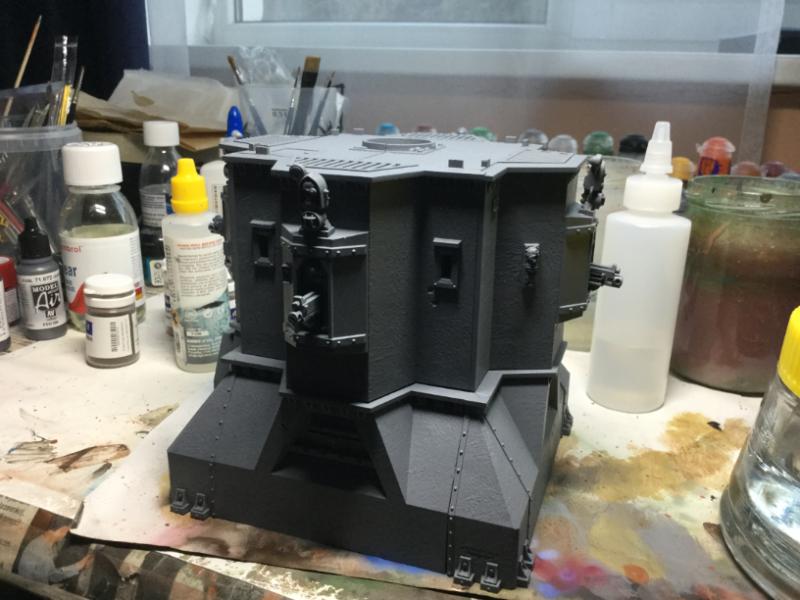
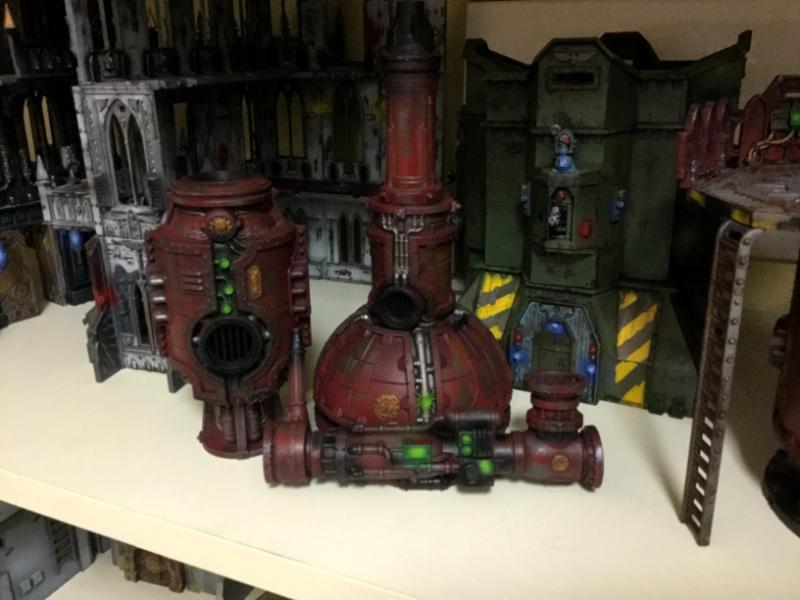
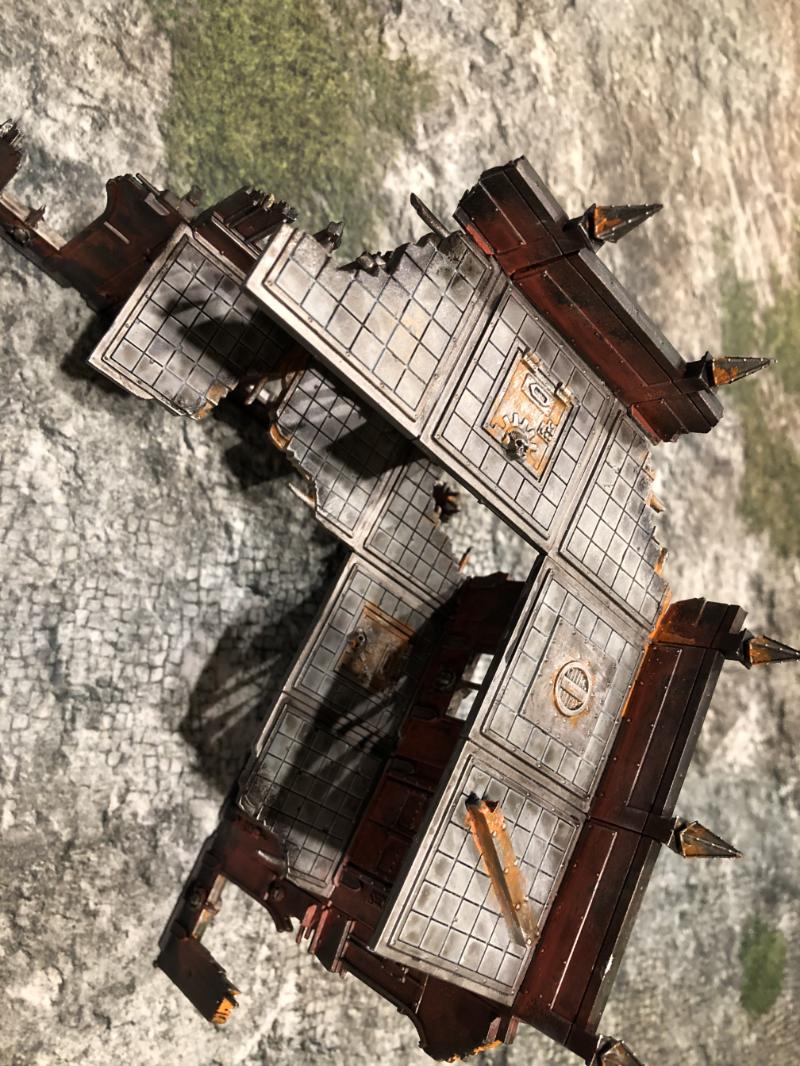
And in the meantime (mostly while epoxy was drying), I opened some terrain kits I accumulated over the time and built something, as our LGS badly needs terrain. I'll paint this in some vivid Mechanicum reds :>
You have some skills buddy. I understand the forge world conundrum. Expectations are always high. But sometimes it just isn't right. The reality is whalemusic is right. They all have imperfections. Clean them up. Paint like you do and no one will notice. Even you will feel better for putting one on the table and crushing some poor fool across the table. Lol
Gave it a good brush. Should have made the weathering powders as a paste, because the powder just went missing after varnishing. Might've also needed some brighter, more 'rusty' color spots too. But I'm just not sure how Mechanicum views rust :C
Looks like a nice change from the normal grey buildings we always see. The details should tone it down quite a bit. I assume they wouldn't like rust, but they'd like having half their building blown away even less.
Timing isn't great, but if you do decide to sell the Knight let me know.
Yeah, Mechanicum and half destroyed buildings doesn't add up either
Anyways, my Porphyrion is now travelling to New Philadelphia, where whalemusic360 will, no doubt, take care of it. And I might just buy a new one tomorrow, since there's the "women's day" and I'll definitely need some good vibes/good distraction.
Besides that, I've started working on the Deathguard Centemptor, that's been on the shelf for quite some time. The arms, the torso and the head are all magnetized. Now all I need it some water effects to make a murky/toxis pool.
Lastly, there's the terrain piece - still adding weathering effects.
Thanks! Did some more work...Eh, I just don't know what to do now...how to merge several weathering techniques, because I want to use everything! I need Phil Stutcinskas to appear in my dream and show me the proper ways of weathering
Did some more work...Eh, I just don't know what to do now...how to merge several weathering techniques, because I want to use everything!
Me too, but You do wonders already! Congratulations on progress!
Thanks! I was about to ask, why is our forum so quite, but then I looked into your profile and saw what you've been up to!
nwns wrote: Great thread, really enjoyed reading it from start to finish
I'm amazed that you had the patience Thanks, though. It really adds up to the whole morale
About 60% done now. I kinda managed to add some more sponging to the most extreme areas and, imo, they kinda blend in well. I also "finished" all the tiles, but they will need some more fixing later, as when I got too tired and just wanted to finish painting them blasted small squares faster, many, yet tiny, accidents happen. Which I'm not pleased with
So now I still need to paint more metallic parts, wash it, tidy it up, add some more weathering and iit's done!
Today I finally finished adding details. Tomorrow is washing time! ....NOPE, just saw some more details to add :(
I also did some work on Death Guard Contemptor...
Some more work. Now it looks like an actual Death Guard dread. I think, I'll add a white stripe on shoulders. So then he's going to be true "tri paloski patsanchik" Idk why, but the details would be better if you zoomed in via gallery.
Eh, still a lot of work to do. Can't wait for the water effects to arrive so I can at least finish the base.
In the meantime, I spent like 3 hours washing the whole thing yesterday. Bleh.
Oh, and I also bought some textured plasticard for the next terrain piece. Kinda thought that having a 3x4 tiles wall made just from windows is kinda boring. And expensive. So one A4 sheet gives me 6 double sided tiles. Which allows me to use the other tiles on a new building and break the monotonie on the existing one.
Just a feeeeew more details ant it's DONE. What kind of OSL would look better: green or blue? I think Ima gonna throw up from inhaling too much white spirit
Thanks for the comments Manufactorum is now finished! I also started working on friends Blood Bowl team - he asked me to make them as."pride", as possible, so yeah... Painting metal is a major pain though. Definitely need some kind of stand so the miniature is not touched at all.
Blue lights make wonders. Should I start something resembling 40K just to get to play at this coolness?! Great stuff!
Regarding the textured plasticard - it makes even better impression when used as a slightly recessed into some broken tiles, as if plaster and finish were blown off from the building. But sitting that long with clippers, carving holes... Brrr!
We actually talked with Danis about using it for Warmachine and yeah, the thing with plasticard would take extreme lot of time...I guess it's just not worth it. Especially, since I have 2-3, maybe 4 other buildings to assemble/paint. What I'm planning to do though, is that if we're ever going to make bases for the terrain kits, I'll use the leftovers as pieces of pavement, poking through sand/dirt.
Whalemusic, yeah, I laughed my ass off while painting them. Everyone who saw them also did. They are now +- finished. Got a custom play mat from Deepcutstudio :>
Roudy beer drinking nights with people who have unpainted miniatures -ain't such a great idea. Besides having to work on two more (3 story high) buildings (AND my army of Knights ) I took another BB team to paint...this time for some cash, though.
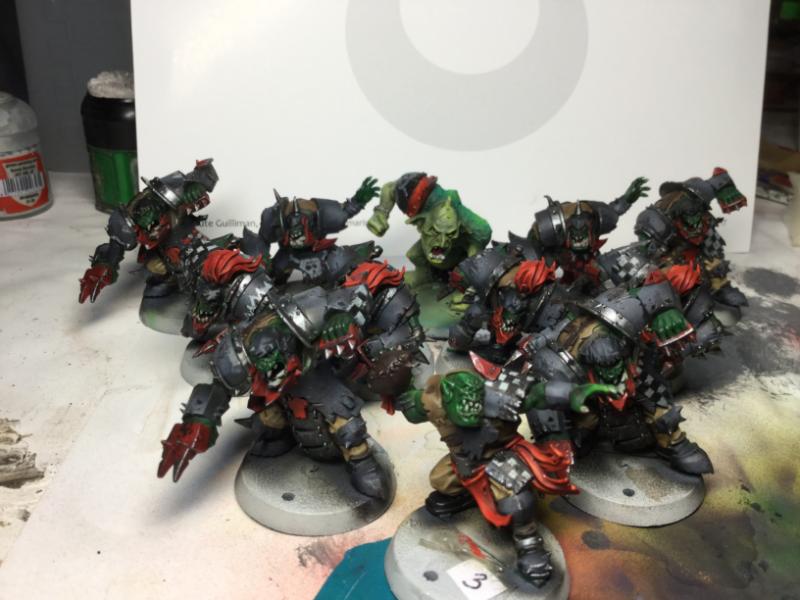
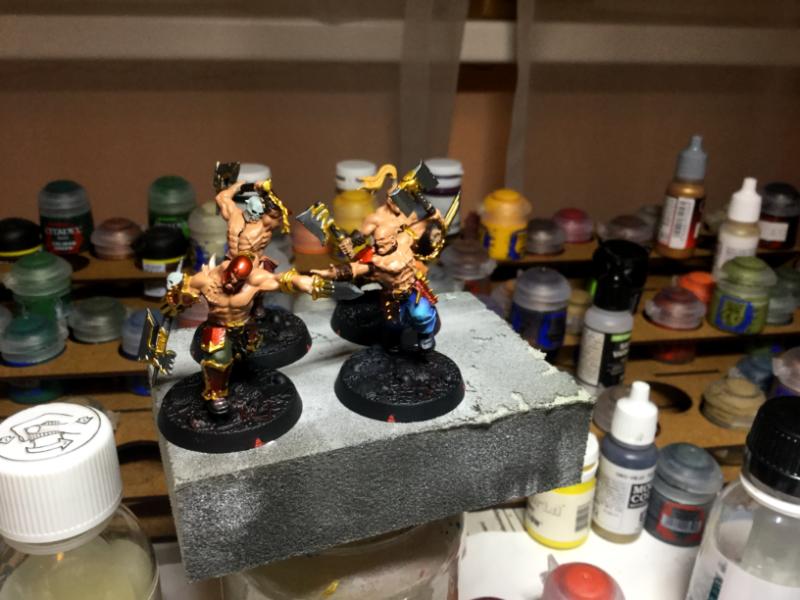
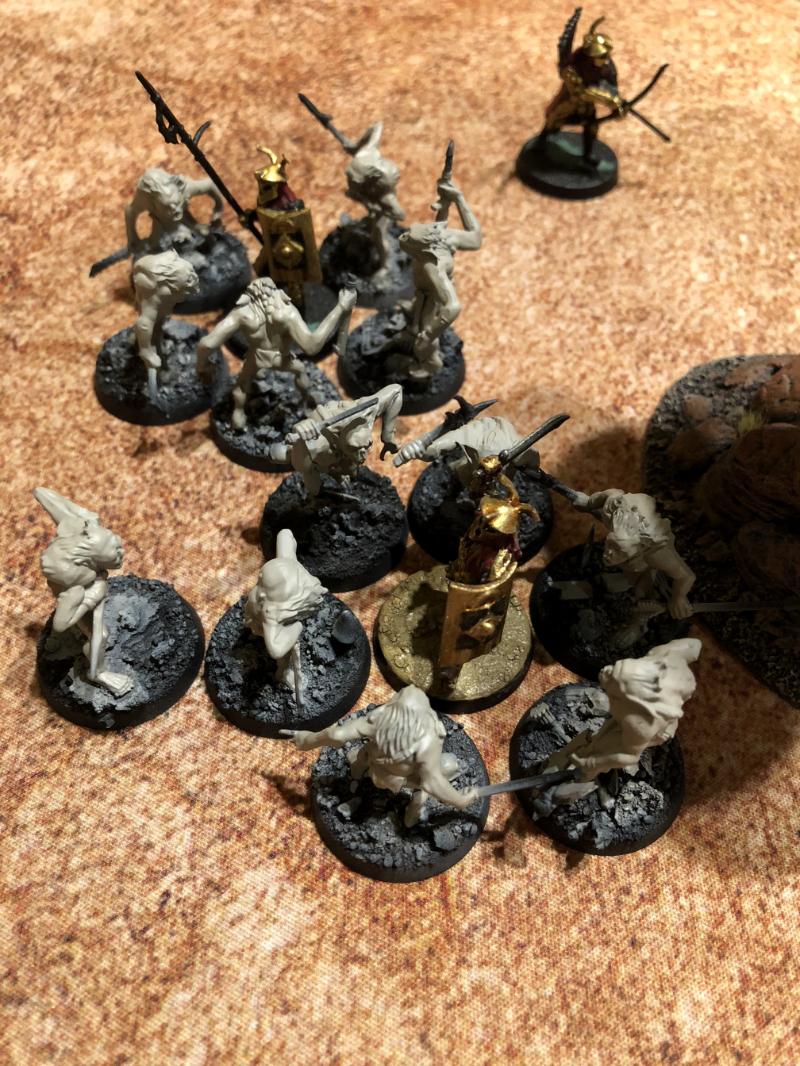
So here's some orcs, troll and a bunch of buildings I've been working on for the past...week, I guess? Funnily, the orcs are like 50% done - just some minor fixes, some washes, some highlights, some wear ant tear and voila! Then I can go back to buildings... and after that, possibly, Knights and some LOTR stuff
Wooh, some more work on BB orcs. I think, I nailed technique for painting checkers. Well, after painting 8 or 9 models
So now my to do list is (the one I should really, really do)
*Finish this Blood Bowl team.
*Finish Contemptor dread.
*Finish assembling two buildings.
*Paint those blasted buildings.
And the one I'd wish to do:
*Paint some LOTR.
*Assemble 1k Custodians for Mortalis games (just ordered two Custodian dreads, Boltodian upgrades, transfers and have 20 custodians in shelf)
*FINALLY finish assembling 2 regular GW Imperial Knights ( )
*Fix Atrapos (used too little epoxy)
*Assemble Lancer and Porphyrion
Aand, I think that's enough :(
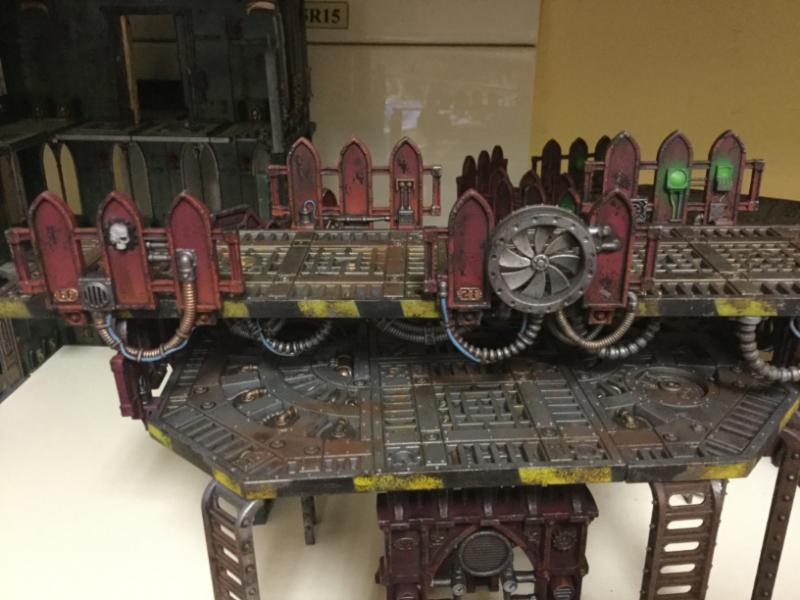
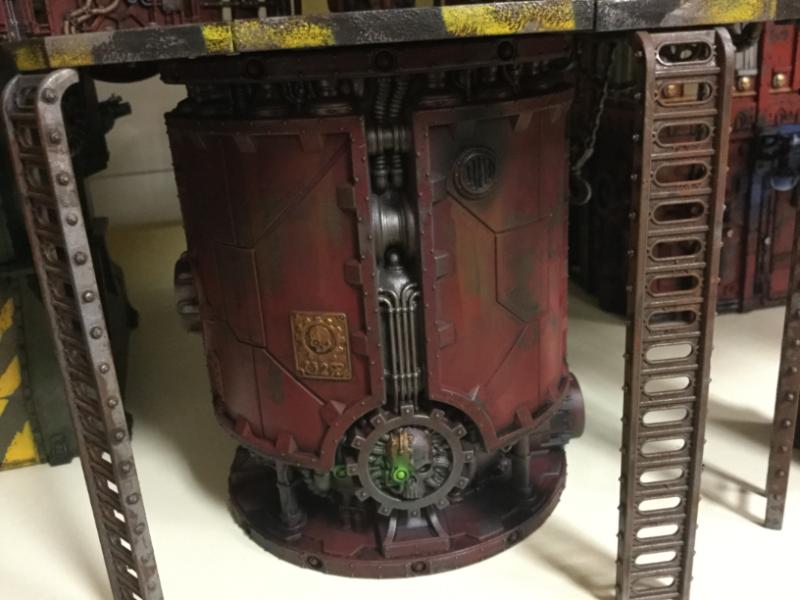
Anyways, having finished BB team, I'm moving on to further terrain pieces. Today I managed to finish sorting and washing all the bits for one more 3 story building (will prime it tomorrow), AND I started working on the Shadow War terrain as well. Which is, pretty much, the first kit I've started assembling w/o hesitating too much And, boi, it's gonna be awesome :>
Went from "awesome" to "hm, ok" today, because of the false 'modularity. While they DO include clippers, so no actual glue is needed in theory (for the gantries, you do have to glue the silos, obviously), everything just falls apart in practice :(
Went from "awesome" to "hm, ok" today, because of the false 'modularity. While they DO include clippers, so no actual glue is needed in theory (for the gantries, you do have to glue the silos, obviously), everything just falls apart in practice :(
That's a shame; would rare earth magnets be an option in your opinion?
I'm planning to mag a few chimneys, so there's some variety in placement. If you were to take full advantage of the whole system, you'd have to use A LOT of magnets and there'd still be no guarantee it would work. I'll just go by the instruction manual: glue the platforms and use the clippers to tie separate glued parts together.
Soo, "few chimneys" turned into full blown magnetization - used a total of 11 magnets and could manage more if I'd really like to (but, honestly, I REALLY DON'T)
Nothing's really glued here, just the main gantries. And one Chimey, which I was just too lazy to magnetize
So now I'll leave this thing in FLG for guys to enjoy and move onto painting one more regular building, which I - FINALLY - primed today. Oh, and Army Painter sucks ass, GW master race primer roxxx. And smells better Unfortunately, we can't get it due to lousy shipping regulations :(
Yeah, the weather is really "promising" right now. If it all freezes overnight... On the more gaming side, shadows on that facade look really pretty. A bit in a painted way, my eyes keep seeing things "illuminated" from below rather than from above, but still - a cool building it will be.
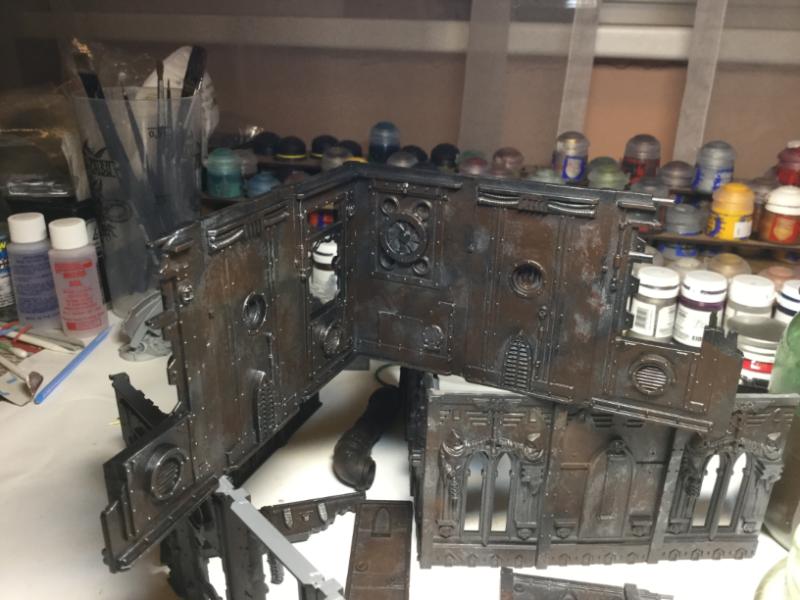
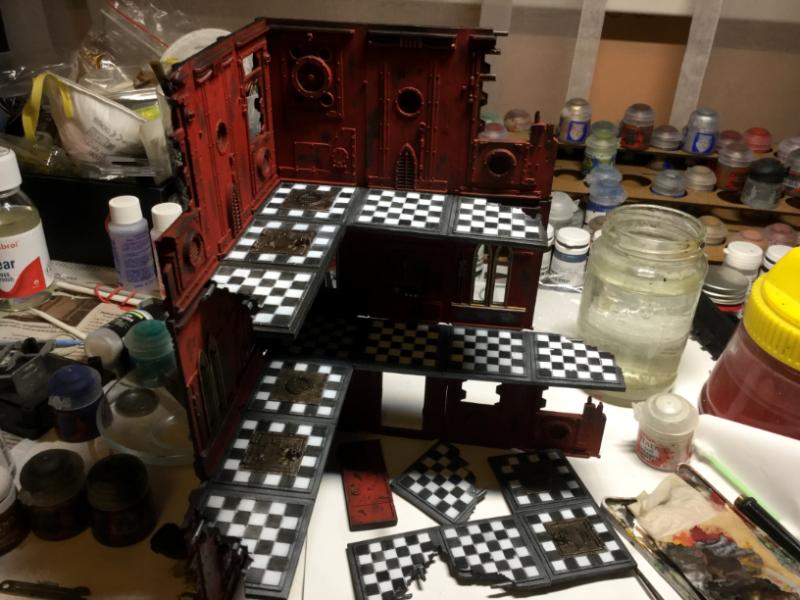
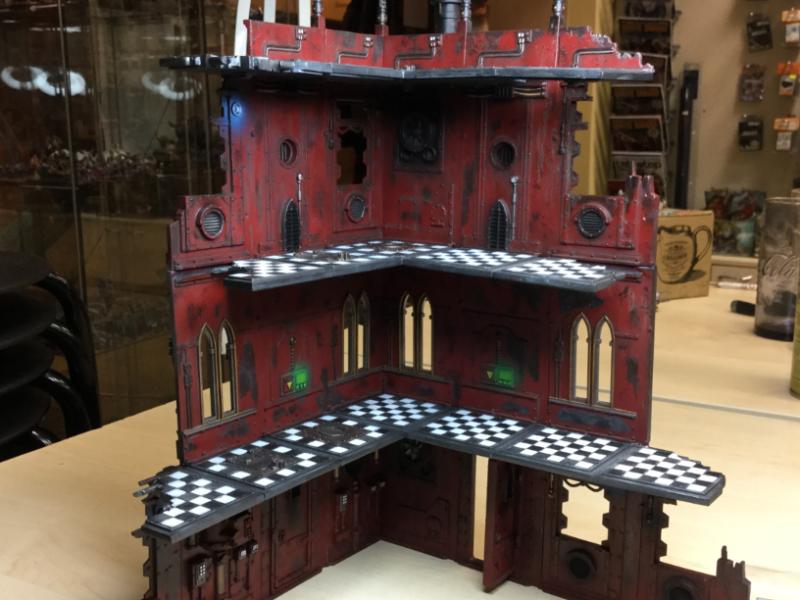
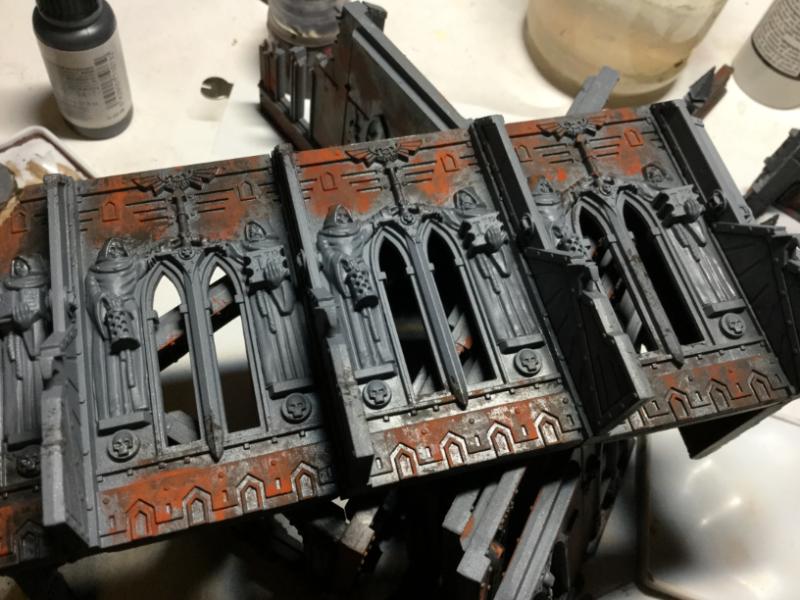
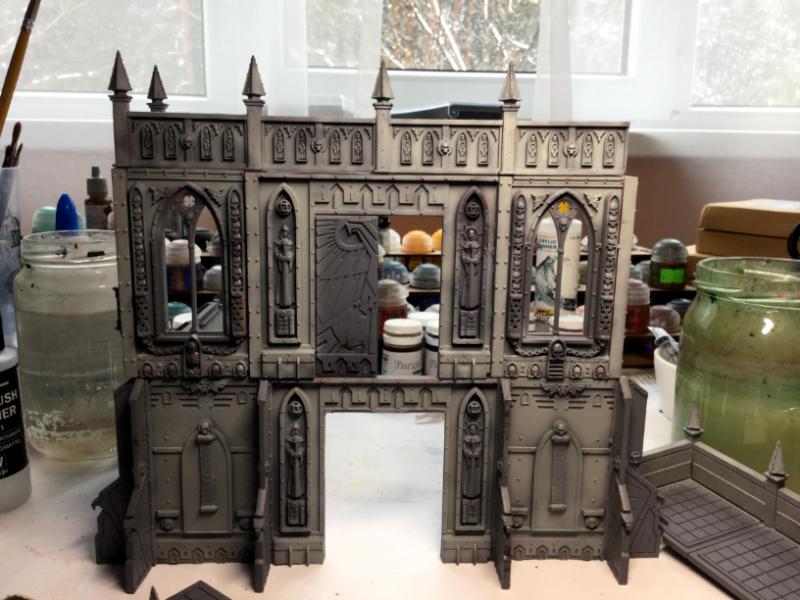
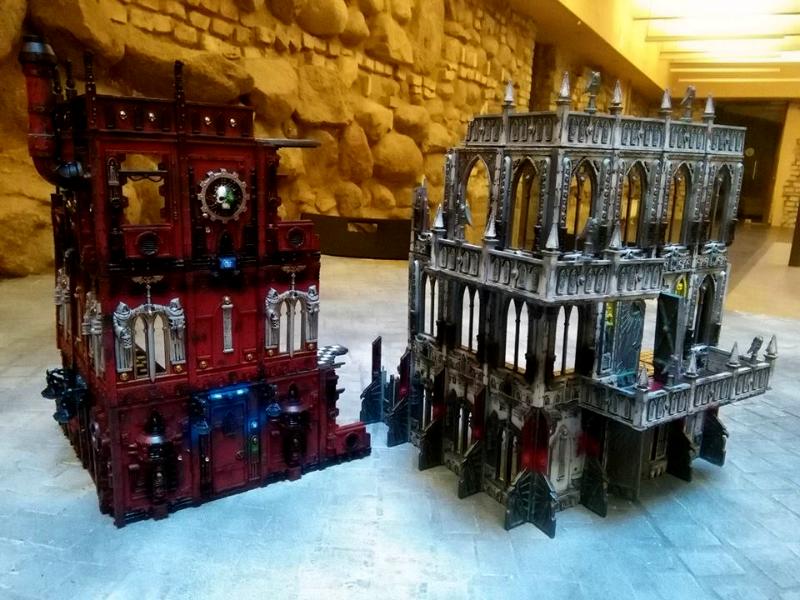
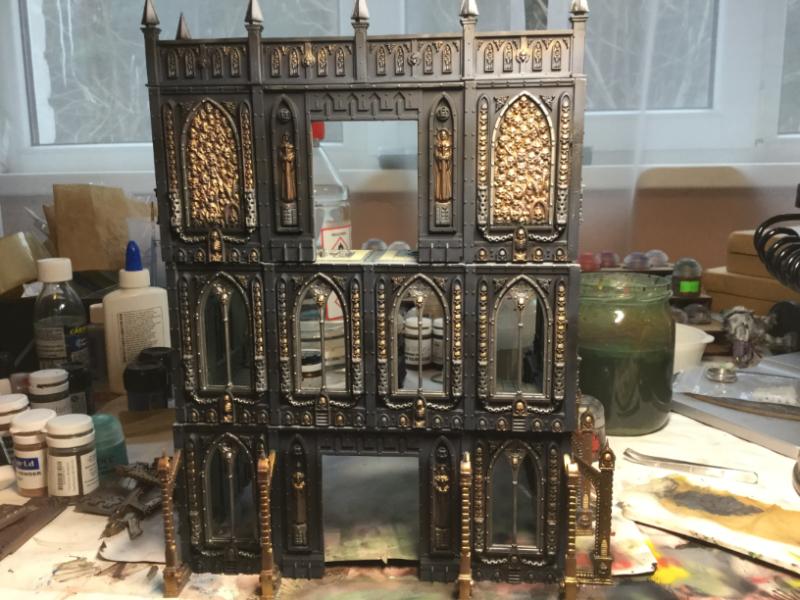
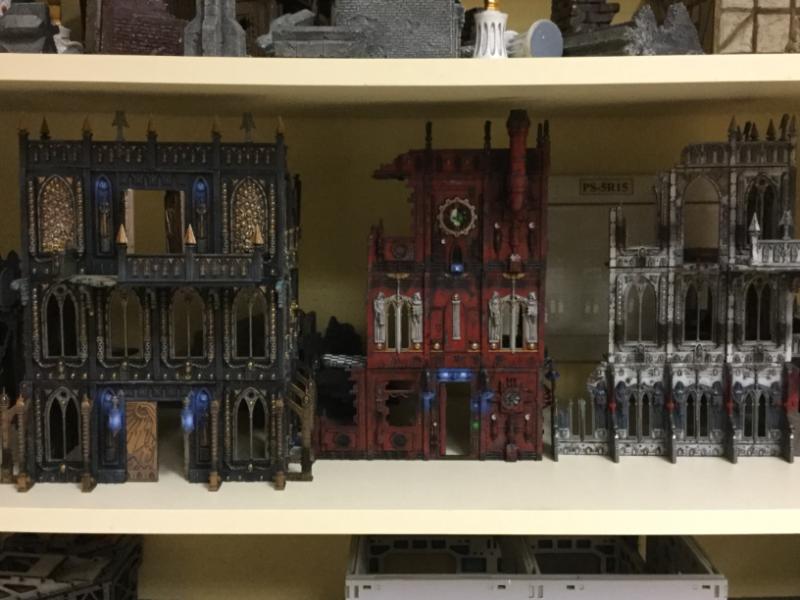
Dum, dum, dum, Sanctum Imperialis (as I call it) is now FINISHED
And here's how it looks next to Manufactorum
And, I also started working on the 3rd building. Primed it today, but BLOODY HELL, grey primer is a bitch to spray. Mostly because it's really hard to see where the primer already settled and, thus, easy to over spray :(
whalemusic360 wrote: I agree. Grey buildings are great, but kinda boring when that's all you have.
And they are so simple to paint... In fact, I got soo tired of all these fancy painting techniques, that I decided to paint my next building in simple black/gold/grey dry brush scheme and, maybe if at the time i'm not pissed enough, some osl lights too. I mean, spending 2-3 weeks on a terrain piece is just way too much. Especially, when I still have Bastion and Shadow War terrain waiting in line as well...And after that, there's like 5 Cerastus Knights, 1 Porphyrion, ~1,5k points of Custodians, 1 Warhound, 2 Thunderbolts, 2 Vultures, Avenger, Lightning, Malcador Infernus, Magma Dragon... Oh, and a whole set of Escape From Goblin Town...
And today I started thinking about actually playing Shadow War, instead of just doing everything so others could play it. After scouring through available kill teams (boo hoo, no Secutari Horplites, no Eldar Corsairs), I decided to settle on Sisters of Battle. So today ima buy: Canoness, SoB booster (5 sisters inside), Sister with icon, Sister with HB and Sister with MM (or maybe just two Sisters with HBs, since they look so damn cool). And a pack of 32mm bases, because the 25 ones are ugly.
And as I (we) are organizing a one day Shadow War campaign at the end of May, it will be a perfect opportunity to up my paintings and at least try to put some basecolors. So now I have roughly 2 weeks until they arrive. At this time I must, MUST finish all other WIPS... sigh.
Now to decide on the colors scheme...
-Argent Shroud. Silver with some reds and whites.
-Valorous Heart. Black with some whites.
-Ebon Chalice. Black with whites and reds.
-Martyred Lady. Black with dark reds.
-Bloody Rose. Red with blacks.
-Sacred Rose. White with blacks and reds.
Honestly, the most interesting schemes are those of Sacred/Bloody Rose and Martyred Lady... On one hand, white is a bitch to paint, but I already have some experience with it. On second hand, the red I could paint two ways: blend simple reds or use FW Angron Red clear paints... Decisions, decisions...
Terrific work- I'm getting lots of ideas I want to try both in terms of painting buildings, but trying out OSL for the first time. The blue lighting on the red building- super! I look forward to seeing more of your work.
Thanks. OSL is really nothing special if you have an airbrush: just spray brighter colors on top and that's pretty much it
So today, instead of sleeping longer, I did some work on more terrain. As slavs would say - Chaltura I'm actually pretty curious if it will be as ugly as i think it will be
I also derped around with water effects. Had some leaks and the instructions said the whole thing is mutagenic and causes skin burns (AND me being me - not using any safety gear), I was really not in a mood to touch it and fix it so it turned out how it turned out
Had a chance to look at these marvels with my own eyes on Thursday - despite low light an awesome sight! OSLs are neat, but in our underground conditions some LEDs would have been more proper.
Leds, while an awesome idea, take quite some time...maybe a week drilling holes, fixing wires and building some chambers to hide batteries in. And I'm rushing to finish all these terrain pieces and finally move on to my ever increasing pile of resin/plastic crack
THOUGH, we had this crazy idea to take all the leftover lamp poles from these kits and make a fully led-lit road. Sometime in next life, probably...
As for the water effects, I've learned two things: they leak like crazy. I mean, even 0.5mm gap is enough for them to go anywhere you don't want them to be.
And if I will ever again decide to do something similar (water effects on the bases edge - I will reinforce the wall with white tac).
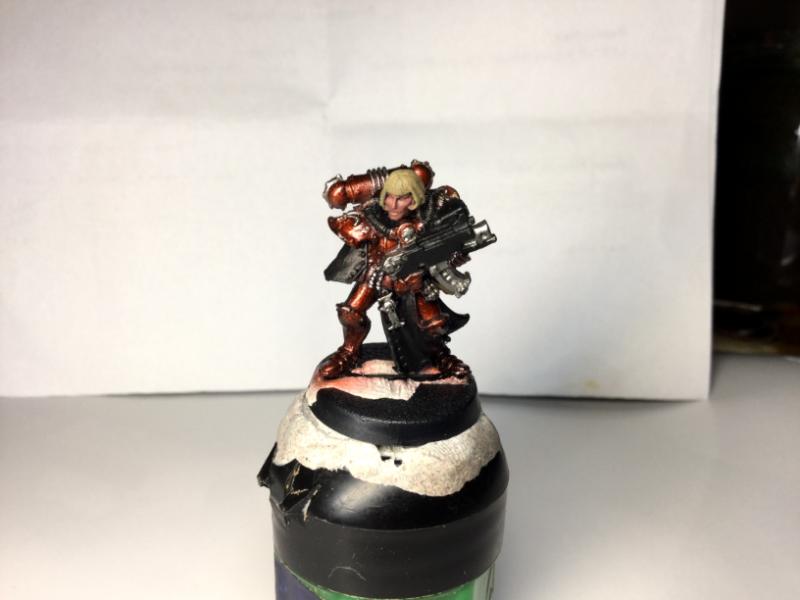
They will definitely take some time. I got lucky - a friend gave me one his Sisters to try different paint schemes on. So while washes on terrain piece were drying, I did a quick test scheme for Order of the Bloody Rose. This one kinda looks dark, maybe I shouldn't have layered the metallics and sprayed everything in Stormhost Silver for max brightness. Anyways, here's how it turned out:
Bastion is now washed. Just need to add Nihilakh Oxide to the brass parts, some lenses, some lights, more rust on top and powders at the bottom (it's gonna be a great opportunity to learn some powder caking effects)
Also bought some hobby supplies. The big one is for them Knights, the small one - Zone Mortalis Custodians ant those odd 8 sisters. And some new and shiny tools, to make everything as close to perfect, as possible
Thanks. It's nearing completion: just this and some more Shadow War terrain. Hopefully I'll be able to finish it by the end of the month and can move on to building a decent army to play with
Aand, it's done, Imperial Bastion is now finished. Got reasonably lazy at the end, shoudl've weathered more. Totally forgot to dust the foumdations as well. Meh, still looks passable. Next - Shadow War terrain.
Some layerimg, some weathering...all that's left now is to pick all the hoses and pipes in different metallic colors and wash the crap out of everything. In the end decided to gi with bare metal, since It felt like there was too much red.
Good job! It's such a relief to finish something that has been sat in the 'to do' pile for aages.
What airbrush do you have? and would you reccomend it? i'm looking into them and i dont really know where to start.
It's a no name, with a name "BD 130", I bought for 20 euros. Does the basecoating and medium details pretty well, I'd say (pretty much all terrain I've painted so far was airbrushed).
Though I'm starting to look for high end brands like H&S, as I personally think that price is directly proportional to quality (at least in products I'm mostly interested in) though you would first have to have some experience with low quality product to actually feel the difference. And mostly, in my case, because they are sold locally, while Iwata's I'd have to buy from ebay, which I do not want to do.
So my advice would be, buy a cheap one, get to know how it works in general, get some practice at cleaning/disassembling/handling the needle and if you will feel like you need something better - buy a quality one. Just DON'T buy anything directly from China, ala Aliexpress, ebay sellers, etc - I once bought a similar airbrush from there and it appeared to be a knockoff of the already cheap BD130 I was talking about. Stopped spraying after first go...
So, after getting rekt by the skellie fetish in Durance of Hate, I decided to do a small break. Cobbled something together...wanted to resemble something to a heavy industrialized Mars surface. The cork is not yet glued, still needs some sand, maybe a touch of citadel base technicals...And not happy. Not by a slightest :(
Trying not to see the rest of the picture - but isn't Mars more light sand and layered rock than cork? Personally I'd at least try something that shrinks a good deal when curing, like acrylic water effects... or break cork in much smaller pieces and then press them into layers. In fact that's what I plan to do soon.
I actually looked for some Mars pictures...Found at least 3 different surface textures: one being sand with half sunken rocks, other being sorta beaten ground with loads of medium sized rocks, third looking like some dried up river
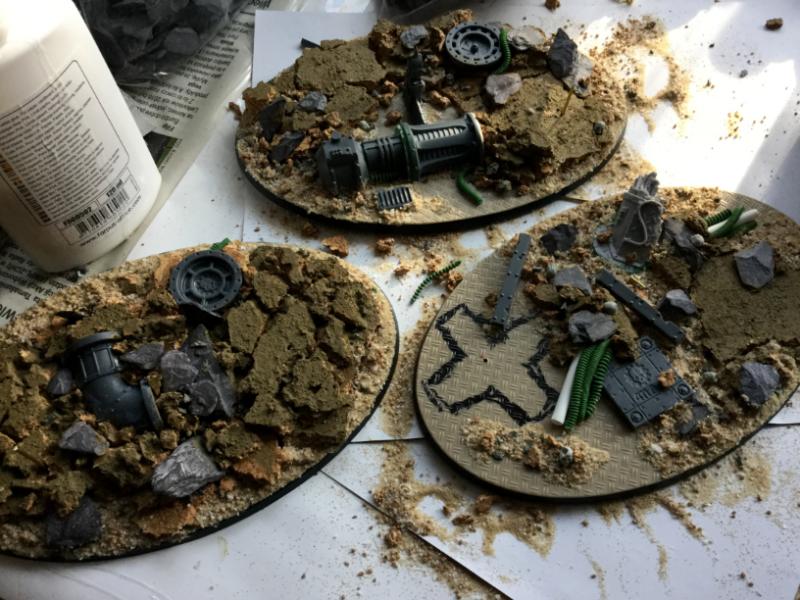
Did a few more tests and finally came up with these results:
You obviously need skulls for Warhammer. Let's say these are from some Martian wars...
Took me 'only' 4 days to finish second base..gah. Only one more left and then it's time to paint or at least prime them. I also tried using 15mm drill to mag Cerastus torso and it works just fine!
I would just add some finer grained sand to the base and you cover all the terrain of Mars. (I was going to say you covered all the bases, but that pun was just bad)
Yeah.. I did a pic and saw I forgot to add some sand Here are the finished bases. Just to add some paint now
On that occasion, I brought out my Knights for a few games. What can I say...it would suck to play them against a dedicated "anti" list, but as for all comers, they perform just great
Finally, having finished Knight bases, I'm now on a dilemma what to assemble next: Warhound, Porphyrion, Lancer, Acheron or Castgator
Aight, Warhound it is. Which part would you recommend starting with? Interior seems like a whole lot of fun to paint, especially the cockpit.
I also heard that toes are actually the hardest and most annoying part and should be done first?
Interior is where most start because you can do that while still working on the posing of the beast. I don't think the toes are any harder to paint, just that they are important to get a good, flat base since the model is so top heavy. Becomes a bit moot if you are going to base it though.
Edit: Disclaimer, I had someone else do mine because I am a mediocre painter. But I got feedback the whole time.
I think I already decided on the pose Will do this, just with right leg in front and left in back. Will also save me some time with toes, since I'm not planning on making a scenic base for it.
For largest parts I always use slow curing epoxy. It 's a bit of a pain, because it's slow, but at the same time gives time to make adjustmens if necessary. Unless there's some other toe line up magic I'm not aware of...but I think I'll understand what you are talking about once I start dry fitting it anyways, just started cleaning the parts and booooy, it's a mess.
Now when I think, it wasn't really a good time to start, since after a couple of days from when I cut the first gate, I went on a two week alko trekking camping journey So for the last few days I've been cleaning ALL THE MOLDLINES and cutting gates off.
So now all that's left is to wash everything, man up, start gluing and pray I won't mess anything badly
Oddly, everything's going smoother than expected (bless FW and their replacements as there were some quite awful parts). Heck, the middle toe joints were a nightmare even after I got replacements - they should seriously fix those molds.
Just finished cleaning most of the torso parts (CIF abrasive>Fairy any day now), will try priming and putting some paint onto them tomorrow. Going to google some pro painted ones for inspiration
Yeah, you are right. Seen someone assemble a Lucius pattern titan - the thing had a ~5mm gap. Or maybe they don't even have time for fixing and just pull out parts from other kits in warehouse.
Anyways, THAT MOMENT when you start assembling Cerastus chassis just for lulz, because it's SO MUCH EASIER Also did a comparison of red and yellow paints And oh snap, forgot to add Word Bearer red...gah, needs fixing.
Anyways, THAT MOMENT when you start assembling Cerastus chassis just for lulz, because it's SO MUCH EASIER Also did a comparison of red and yellow paints And oh snap, forgot to add Word Bearer red...gah, needs fixing.
That is VERY informative, thank You! (And I may need to steal some drops of these reds from You one day...)
Why doesn't it work? The reason I've been active lately is simple: vacation, so I pretty much wake up and start doing something About the paints - sure, just give me a shout and I'll leave them at Rikis
Got distracted from painting Titan - I just don't feel capable enough to paint tarnished metallics, yet :( So I glued legs for Knight Acheron...DEM LEGS!
Someone might say that I seriously suffer from inability to focus on one thing: I now started assembling Custodian jetbikes (facepalm). Some pretty ugly casts, even after bunch of replacements. Or maybe I'm being too much of a perfectionist. As usual
Anyway, the Fate of (John) Konor finally arrived. Some sexy things inside: two huge posters, dice bags, wrist bands, stickers, punch out tokens...can't wait for 27th
Global Campaign. Much like Blitzmania or the previous AoS one You buy the kit - your store gets to participate in the campaign. Kinda cool, gives more drive for players to be active and play more. Plus exclusive goodies
Haha, not that I'm doing much painting anyway Sigh, I wish I could just take the bloody kit and simply glue it...but nooo... Ain't even going to glue the heads on, until I start painting them.
And still so many more to go, gah. I also ended up quite disappointed with the dread kit, since there's no point in magnetizing its waist, due to extremely limited movement :/
So, firstly, we've had some Konor battles. Mostly 2v2, 3v3, as we found them to be somewhat more fun.
Boi, Knights surely pack a good punch: one Knight just bbbbrrt Sanguinor and 5 man unit of golden boys in a single volley. But then again, they crumble so fast, once focused.
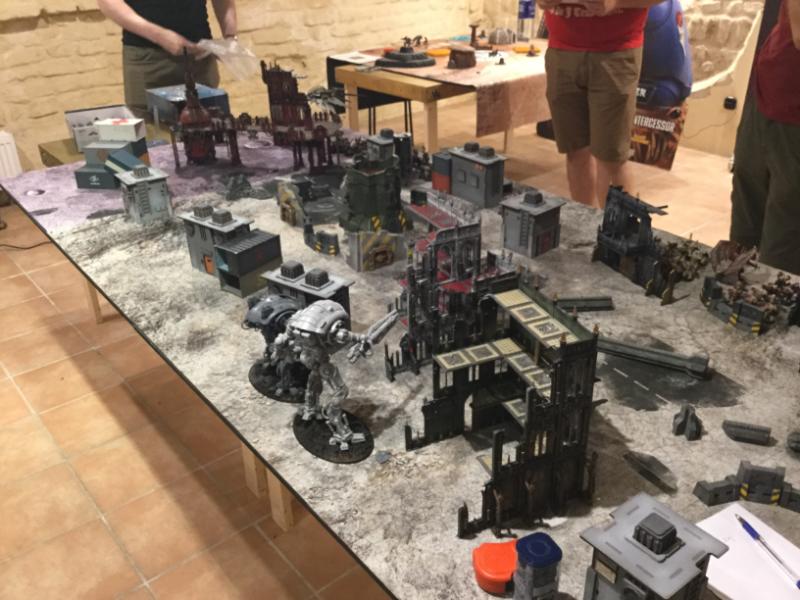
We also inherited some terrain from the very first FLG that opened here in Lithuania. As you can see, painting standards were pretty low back in the day, 10ish years ago.
But there's nothing good old isopropyl and other, more arcane fluids can't fix. Would've cleaned them more, but got soo bored in the process
Airbrush = instant painting skillz
Finally, did some work on Knights interior (once again ). Sadly, there's a slight scratch on a *mostly* not important place, but I'll still have to fix that :(
As for August, I will do my best to finish assembling Knight Acheron and maybe Porphyrion or Castigator. And finish painting that Aquila lander. And maybe do some work on Custodians.
It's just that nobody else wants to paint them. We have all the equipment in out FLGS: airbrush with compressor, selection of brushes and paints, yet everyone prefer using, not painting so it's more of a duty, I KINDA (until I get bored, mostly), enjoy
Speaking of out FLGS, we finally got a decent gaming area!
And I decided that I really want to read about Luther, so I bought these
Having +- fethed up my Acheron (will have to buy new one in the end), I decided to try something different: Vallejo metallic black and Scale 75 golds. And that's what happens when you have too much free paint on palette
Also, got myself a box for Mechanicum dice. While these look cool, it's often hard to make the difference between 6 Cog Mechanicus and 1 skull. I still like the Tzeentch ones most..
I will most likely paint it, maybe keep it for a while and sell it. Tried Acheron in a small game yesterday and it didn't perform well as well.
Did some work on a base. The plan is to add some more sand, maybe debris ant it's done. Doesn't look good now, but Iwant to think it will once primed, or painted
Aesthetic of these things does not connect with me, but the amount of work. Oh, my... And that "here's a small family photo" is borderline insane. Keep up and stay motivated!
Could you just reglue the break in the acheron? If its a small tube, you could cut it away and replace it, if its a bit bit, it should stick into the old place fairly easily.
Daemon, I tried. Did some greenstuff work as well. Have to prime it and see if it's still passable. Missed an opportunity to grab some spare Acheron parts for 100 quid on ebay :/ Eh, gak happens...
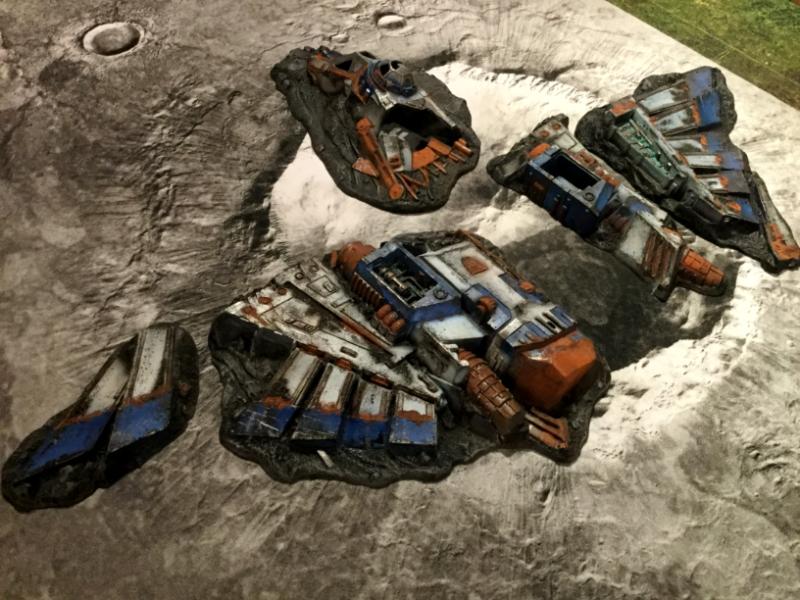
Finished Crashed Aquila Lander today...a really quick and lazy paintjob
More than good enough for gameplay. Especially when you consider how often you want a crashed lander in your games...while great for a specific theme...it tends to no be a great objective marker as it is so large when spread out on the table.
We mostly use it as a scatter terrain between buildings, when there happens to be a space too small to fit any other building, without overcrowding the table, yet too empty for it to look good since there's not much of the kind of stuff available. Honestly, the closest thing to that could be Promethium Pipes...
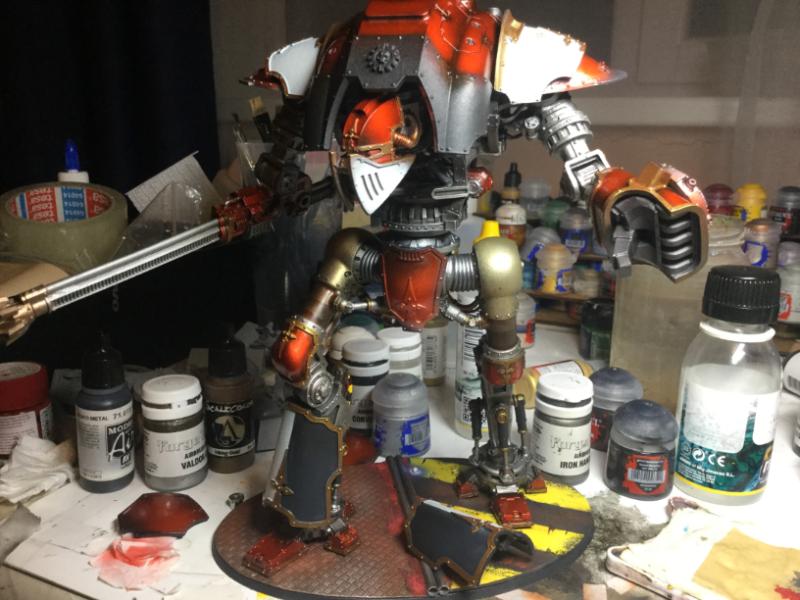
10 days of (not) slacking. Well, mostly Assembled my Cerastus Lancer and since we're having a small tourney this Saturday (a Lancer in a 500 pts game shouldn't be that harsh, I think ) decided to do some paintwork. Gonna prime the whole thing tomorrow, but here's something I did with the base. It's p/m done, just need to add some highlights, light effects and matte varnish
One guy is bringing Abaddon+Defiler Abaddon alone, while not so shooty, has almost the same survivabily as a Knight and can dish out even more cc damage. But I really don't care, I'm going for the lulz and to get drunk
Pinned the bastard in place. Primed some parts as well...gotta fix the blue lights - expand the osl, it looks too concentrated now :/
OK, so after all I decided to go with Angron Red. But before that I wanted to play with IA:Masterclass vol 2 effects. Have to say that I really, REALLY don't know what I'm doing right now
Tried the oil staining effects on leg pistons. They sorta? look OK, might need to add at least one more marking line.
Tried to add black pistons (for contrast, lel). So far they seem to be more invisible than contrasting anything. This might change when I'll wash everything, but still think gold ones or original silver ones would've looked more fancy
Lastly, leg piston housing, aka, drybrushing gold over tin bitz. It's not washed too, buut... SIGH. Gotta stay optimistic.
There, added some Angron Red and it finally started taking shape. Gotta say I just looove Scale 75 Viking Gold - the coverage and tone are just AMAZING.
It's almost 1 am and I forced myself to call it a day. All that's left now is trimmings, washes, highlights, some extra small details I missed and transfers. Oh, and armor plate weatherings...damn, and here I though I was close to finishing
The golden leg piston housing also kinda looks out of place. i might have to repaint it with some brazen color and give it some nihilax oxide.
Washes, layers, transfers and final touches. But getting there. Would've finished washing legs today, but realized that I haven't used nuln oil for ages.
One interesting thing though: if you want a really strong wash finish - add gloss varnish. Also, if you ever want to gloss varnish a white surface that has a strong dark color underneath - be sure to add several layers of white as, I there's some kind of funny chemical reaction going on.
The black/gold pistons started to contrast really nicely
And just couldn't hold myself from painting most of the wires on the outside...
Lastly, some surprise Arcane Ruins. A really fast and lazy paintjob. Gonna do it for tabletop. Maybe some terminatus stone as a final drybrush...
To be honest, I started hating it, how much love I'm putting into it
Anyways, got out Shadespire demo copy today and decided to start painting. Before I dump the photo, I have to say this: PUSH FITS ARE PURE fething CANCER! Jeez, seriously, I ended up cutting one of the head and gluing it inside like I would with normal models.
Went for the edgy Angron Red metallic. And the Sigmarines...well, I have a plan for them, but I've no idea how will I be able to accomplish that Oh, and I have time until this Saturday... :(
And wow, how gakky the photo turned out to be I swear, they look better irl
CragHack wrote: One interesting thing though: if you want a really strong wash finish - add gloss varnish. Also, if you ever want to gloss varnish a white surface that has a strong dark color underneath - be sure to add several layers of white as, I there's some kind of funny chemical reaction going on.
Gold is good.
Regarding strange chemistry - its more physics than chemistry. Aircraft modelers say "before using wash on a smooth surface - make sure the surface is extra smooth". Like, quickly dipped into strong gloss lacquer (resin, vinyl etc) and then ledt to drip and dry. Do not try to mop off the excess, because thiss stuff may peel off acrylics quite easily. And when dry - do all Your wash. This works much better than any usual gloss warnish. Never helped me though...
Same goes for white - I've read some people advocating actually basecoating everything in dead-white primer like Tamya, then masking out all surfaces that are going to be white or just very bright to avoid any dark color on them.
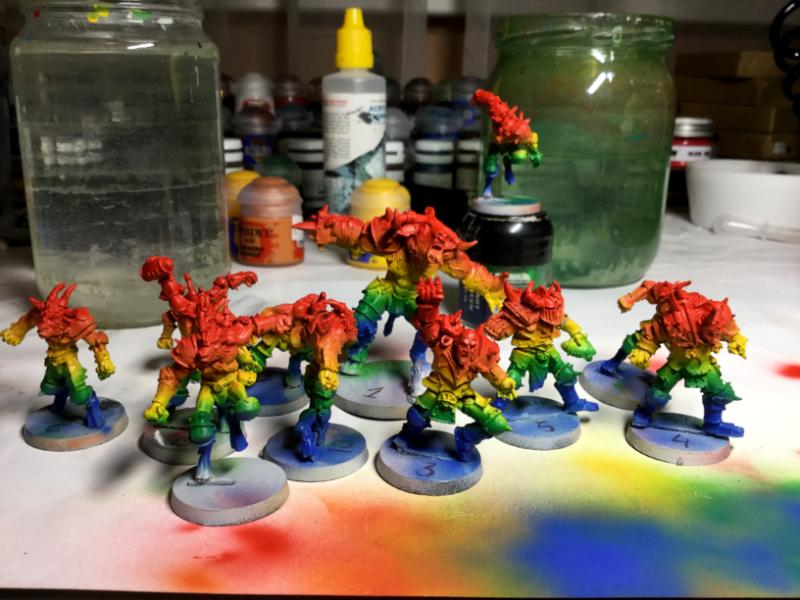
Did some more paintwork on Khorne team. I think I’m doing something wrong, but just can’t understand what. Maybe lack of contrast and airbrush? You can see, how a much more brighter color makes some difference and imo looks better than regular highlighting.
I think they look off because they are overall very bright right now. Bright skin, bright metals, bright armor, even the blue is highlighted up to be bright on the pants.
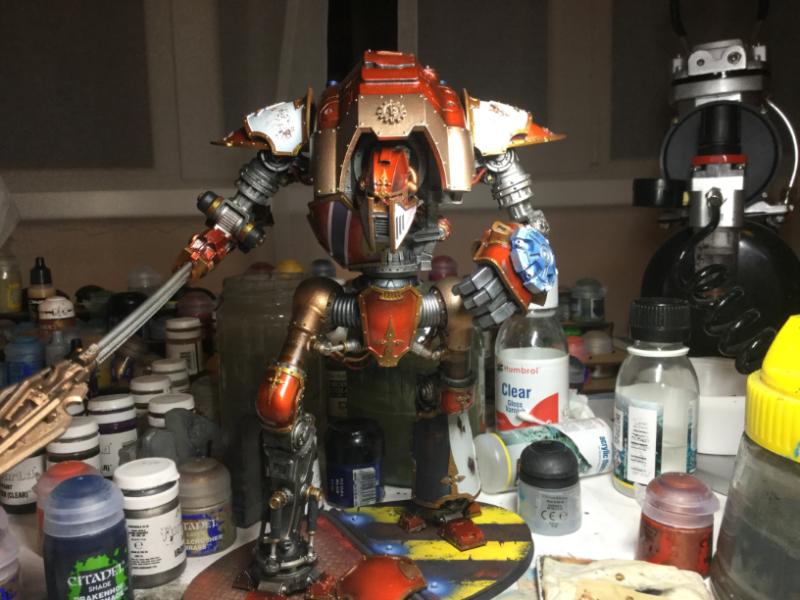
BOOOM, Knight - Lancer is now finished! It's so hard to describe how much love I actually put in this model. Sadly, will have to try to sell it now, since I need cash for other things
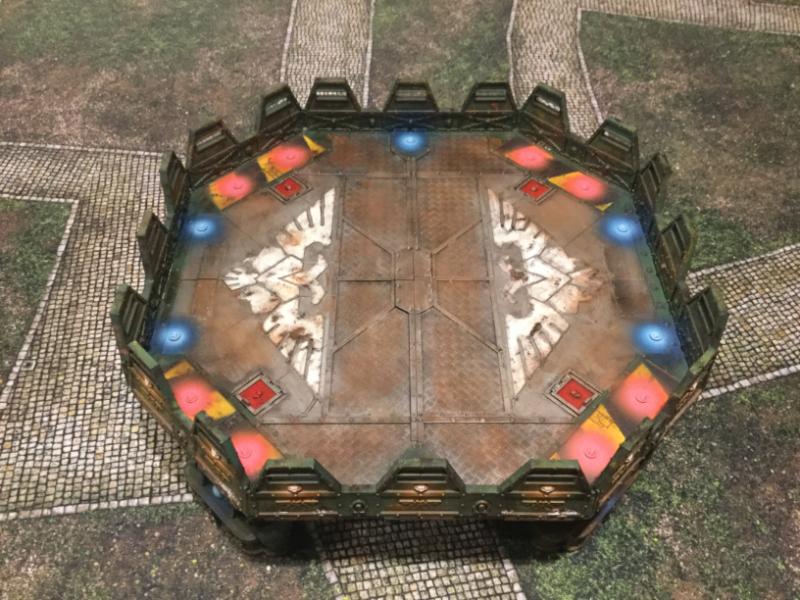
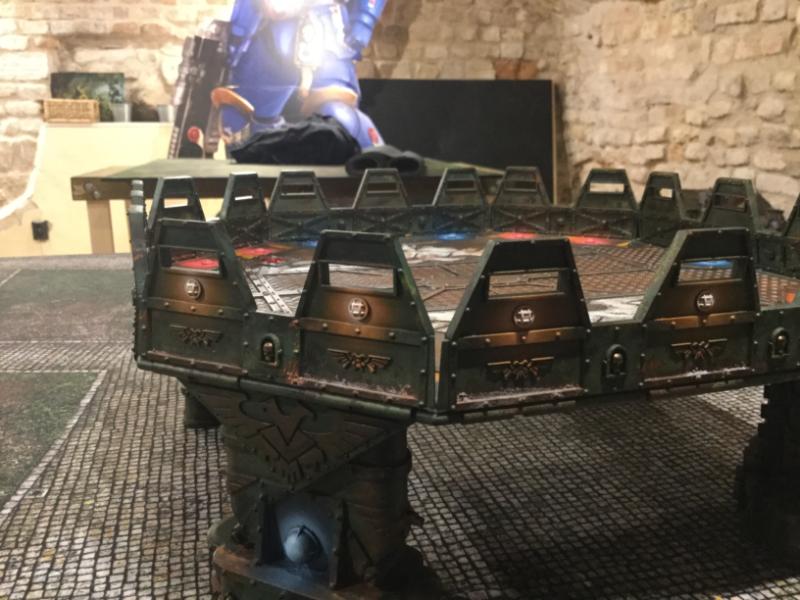
Uh, not posted for a long time. To be honest, haven’t really done much: sold most of plastic/resin stuff I’ve hoarded in years, started working on Knight Porphyrion and, most of all, put some paint on Skyshield Landing Pad. AND found a good secondary use for it!
Still lots of details, weatherimgs and washes to go.
Yeeah, that's most likely the case. I tend to lose motivation when painting something for others and not for cash. Heck, I even lose motivation when painting for cash as well.
Looks passable though. Here it is in action:
On the bright side, I ALMOST finished selling all my crap and ended up with 1k euros in my Paypal. Now, what to do with them...
Wait for Cyraxus and buy into Mechanicum?
Sell my IG and buy KRIEG/Elysians?
Start collecting Marines? That Thunderhawk and Spartan are soo damn pretty to look at.
feth everything and buy Warlord titan?
People have been using it quite often, so I guess it's OK :'D
Been out for quite some time and a few things happened. Most importantly - Middle Earth (or LotR) SBG. Yeah, I managed to find one more crazy person who also really liked the whole Battle Companies idea. So we jumped in and I bought some Iron Hills dwarfs. Maaan, these are some sexy figures! And the quality/level of detail is just outstanding!
Soo, I built some bases for them. The one of the middle might fix, but I'm overall happy. I mean, stunties and rocks are like...dunno
Lastly, there was a cristmas discount for Infinity airbrushes. Instead of 230, I payed "only" 180 But that''s a thing of beauty!
Can't decide on Iron Hills paint scheme. Or maybe I'm just overthinking and all the beauty lays in simplicity.
The first one I tried with FWs GKnights Steel. Has some bluinsh tint to it. Might have to redo this, since I bought some Vallejo Metal Color range and kept pushing Dull Aluminium everywhere I could. And it's extraordinary dull and vivid.
The second one I tried to be more conservative. Added some brownish glazes. Still not finished, might add more shadows to it.
Oh, and I tried making fancy glazed gold, instead of regular method.
Lastly, the third (well, technically 4th, but gallery would not let me upload one more image and I was too lazy to reshoot) is going to be the simplest of them all: Iron Hands steel, agrax/nuln wash and a basic gold highlight.
So, after plenty of thinking and some opinion-asking, I decided to stick with the fensi gold. Now to get the steel right...
And this happened today.. On top of the 3 Knights, a Warhound, 6 Navy planes and pile of other things :'D
I really, really need to stop buying. But at least now I have EVERYTHING than can be used in ZM game. Except for new GW plastics...which I'm not planning to buying anyways. Maybe the ones with skirts, to make them represent 30k units...
So, since getting the right color takes some time, I decided to start with Goblin Town instead. Even though the models come mono posed, there’s some variety going on. What’s more is that these models feel so chaotic and unorganized, adding random bits or new weapons is pure joy. In other words, they use what they find or manage to plunder from unfortunate adventurers and seem worthy keeping. Or just using skulls as trinkets. This, imo, also adds a modest amount of extra grimdarkness too
Started painting goblins. Basecoated Rakarth flesh and aded first highlight of Pallid Wych Flesh. Will add a third highlight with some Wych flesh mixed with white and then give them a strooomgly dilluted red glaze.
Well, as soon as new airbrush parts arrived. Who could’ve thought Infinity runs on 1/4 and my hose is 1/8 :(
Anyway, got my first game of Hobbit SBG. Have to say that I really, really liked it and see myself playing it more and more. Here are some pics:
Finished x6 Citadel Woods. Lazy job, but looks decent from viewing perspective.
Aaand, did some more work on Numinous Oculum pieces. Again, a very lazy, backhanded paintjob, because, really, I can't be THAT bothered by terrain for a game I don't even play...The last two are, obviously, WIPs, so they might look a wee bit better when finished.
to be fair for a 'lazy job' those woods look pretty awesome.
looking forward to seeing what you'll do with the lake town kit, I think that's one of the best kits gw has put out.
Wirecat wrote: I need to see these with my own eyes. They almost look to bright!
Are they?
So, after quite some time, and just before putting everything onto toothpicks for ease of painting, me and my friend decided to finally have a small pseudo Zone Mortalis game. Basically, this allowed me to build up some hype and friend just got an opportunity to buy more models, since he sworn not to buy anything else until at least 1 game.
Man, 4 sentinels charging into 10 man marine blob, which happens to fire overwatch at full bs, taking 0 wounds in return and then proceeding to wipe out everything with their superior initiative, weapon skill and strength. Or a DG Contemptor charging into Galatus and getting blown up without even having an option to swing back...In the end, my 4 Guard, 5 Sentinels, Galatus and Shield Captain (who spent 4 turns in reserves - why?) wiped out 20 tacticals, 5 man plasma, 5 man rocket launcher, plasma Contemptor and Praetor, taking 4 unsaved wounds and 1 HP off Galatus in return
So now my painting plans are:
Tribune Ixion Hale
5 Custodian Guard
5 Sentinels
1 Galatus
And maybe Pallas, since it looks like a major fun to paint overall.
Wirecat wrote: I need to see these with my own eyes. They almost look to bright!
Are they?
Well, I've seen them and must say - in a somewhat dimly lit room they are OK. These golden sculls on the photo were a bit offputting, but I'm taking my words back - they are very good and look great on the table. AoS scenery is slowly getting my interest aroused.
Ah, the latest -white one- is stil a work in progress, so it needs washes and weathering which might tone it down a bit. We were joking that it’s Slaanesh themed building, withall the whites, golds and purples
We need more of the scenery, though. Like some huge centerpiece models. Might grab that re-released Lair of the Astromancer
Sooo, been trying out some new gold schemes. And kinda failed to prime my models perfectly, so I might just throw them out, once I get the scheme sorted
SO, Zone Mortalis arrived yesterday...Man, what a bad kit it is. Not to mention billion bubbles, resin spillage and knife scarring, they even have "quality control" guys "fix" them, by randomly putting a blob of putty here and there.
What is more, according to the customer service, this is absolute norm for the casting process. So I asked them if I could get a straight out the mold casting, without anyone putting their hands on it, so I could fix it myself, or, simply, my money back.
Yup, exactly. For something that costs 450 pounds, if should be way better. I mean, you should be able to prime it and play it, not spend another 450 hours fixing it...
But, ironically, I’ve seen plenty other photos where people seem to have lost their quality standards and accept this, ant paint over it! Seriously...
They will, yes. In fact, I won't even have to send it myself, they will arrange UPS pickup. Though the whole pickup will most likely cost them as much as the whole dang board
BUT, since it's pretty much the only way I'd ever play Warhammer again (and I just abhor any kind of 3rd party or DIY Mortalis themes), I asked them if they could pick this up and send me a new board that has not been touched by these quality control "experts". In other words, I would accept it with holes and mold spillage and rather fix it myself with all the love, than fix both miscasts and incompetence.
You know something, I honestly think I could do better for you, and it would not cost you nothing like as much. I would only ask for the material costs.
But still looking forward to seeing your work on this.
Thanks. It's just soo hard to get it right, as there are quite a few methods in doing it: using purple ink, using red glaze ant glazing it down with darker colors, using red ink and blasting a dot or purple...I think the hardest thing is to achieve the right balance between shadows and bling parts
As for the Zone Mortalis, I finally decided to go for a full refund, especially when FW CAN NOT guarantee the replacement blocks will be of better quality. Have a lot of other things to do right now anyway and by the time I'm finished, they might even renew the molds...Heck, for 450 quid I could by myself 1k pts of Auxilia... or just...keep them safely in my bank account
UPS guy comes in.
-Hey, you have something for us?
-Yeah, wait a moment, I'll dress up, help you out.
-Wait, wait, the postage is registered for 2 kilos only...
-Huh, okai.
UPS guy leaves, I put everything on scales... 23 kilos total So unless they have some kind of deal, it's 200 euros for postage alone.
UPS did not take it. Apparently, they (at FW)did not expect that, because usually everything is picked no matter the weight, but this time it was different. So now they will have to arrange a new pickup...it just sucks that now I will also have to arrange my time accordingly.
So, now that the Armigers are stored under my bed, to be glued after a year or so and the trashy Mortalis tiles are under their way back to Nottingham, I started working on some more terrain...And yesterday finished this piece. Again, I feel like I've lost my motivation somewhere, but it still kinda looks OK (photos make it look better than it actually looks, so keep that in mind).
It appears, copper does not oxidate as harsh as brass does
Ryza rust is good for a lazy ass paintjob like this, but I still prefer weathering powders - they look soo much more realistic.
Up next: Imperial Sector+Imperial Bastion+Big ass eagle head shrine. Will try kitbashing some huge ass building - something we are lacking
Moving on to next building...Good news, this is the last one of the assembled bunch. The bad news? I have 6 freaking Lake Town houses waiting for me Besides having to finish this...
It's a bit Christmas-y with the red and green osl. I think it may have looked better without. The blues and whites look fantastic with the metals there.
I have no idea how You make all that acid look nice enough... It is definitely not rasta - natural concoctions cannot achieve such profound effect. My safes bet would be something lysergic... not acrylic. Thumbs up!


 Her face expression was like: "and what on earth are you going to do with that??".


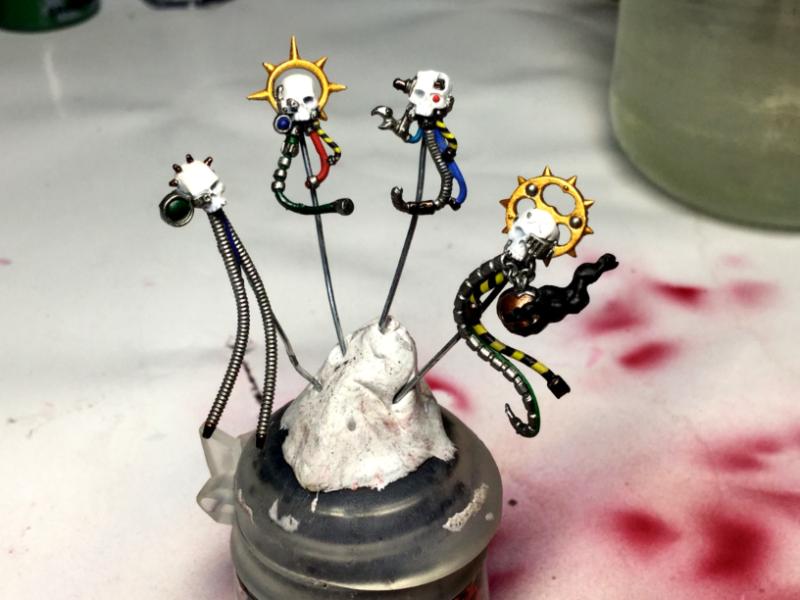


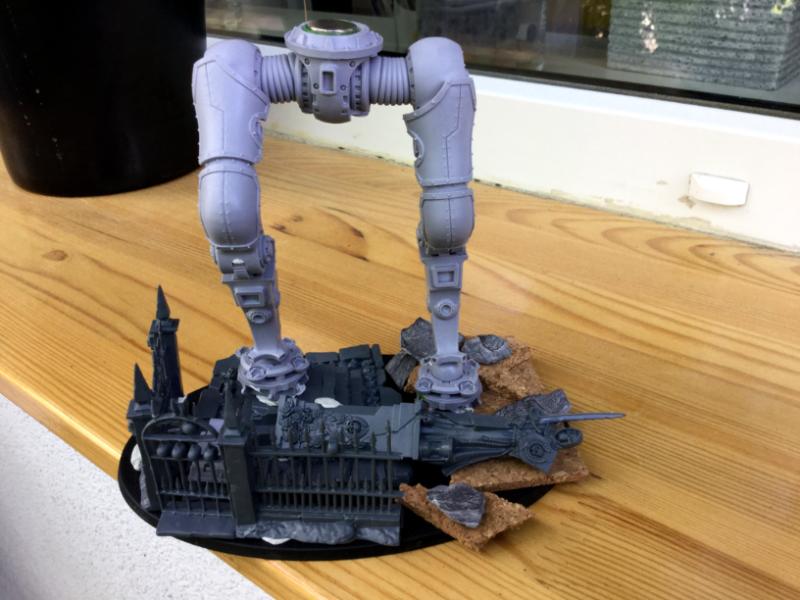
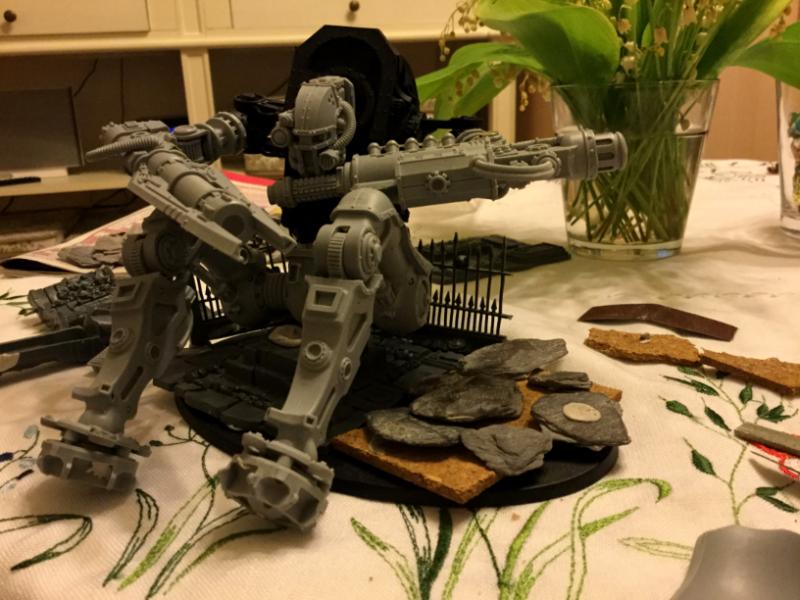
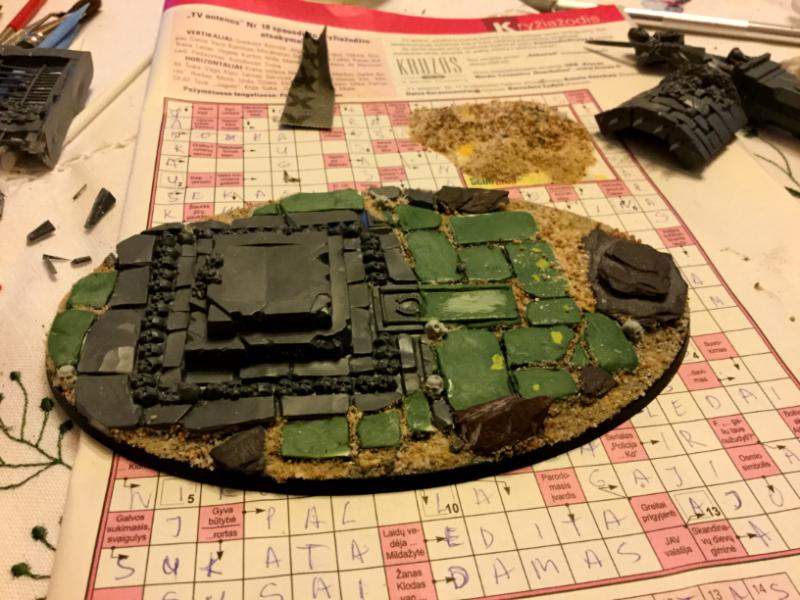
 and the other one would most probably make the knight look like it's in a running motion
  . And the worst part is that I can't decide which is better. And so far my friends voted 2:2 :|


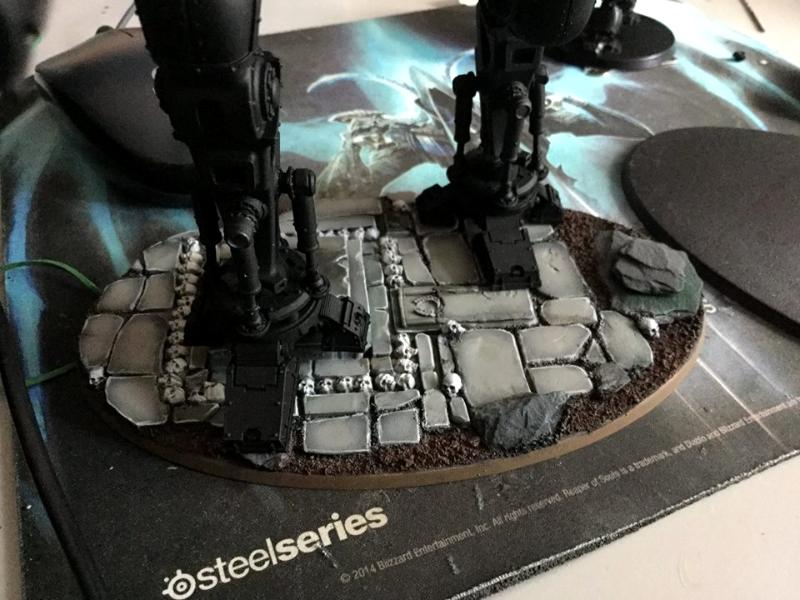
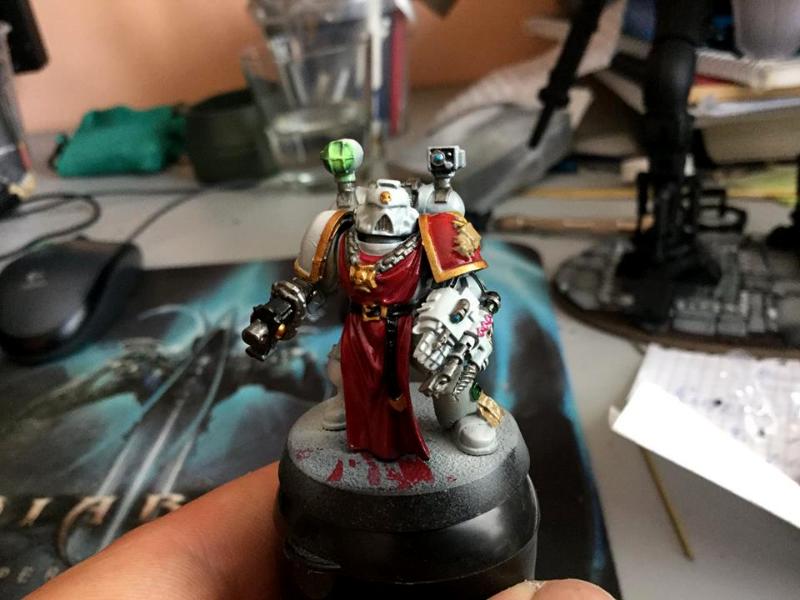
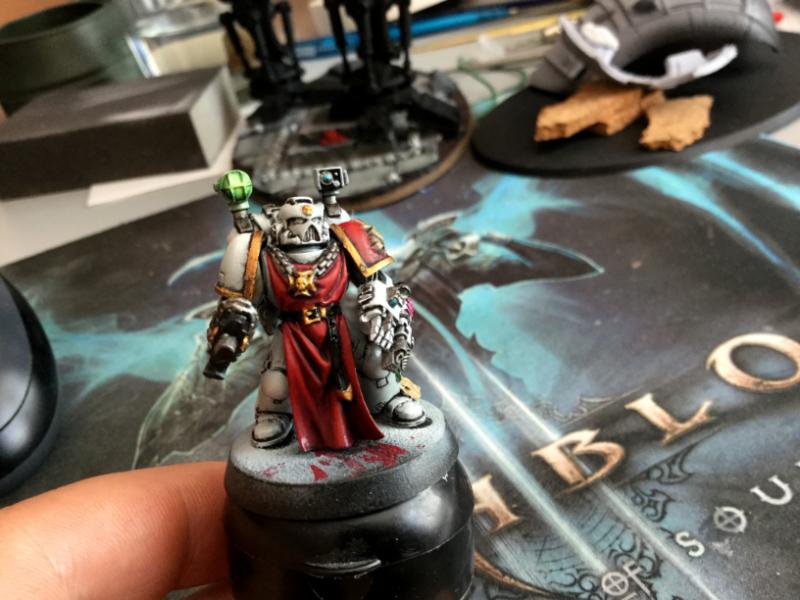
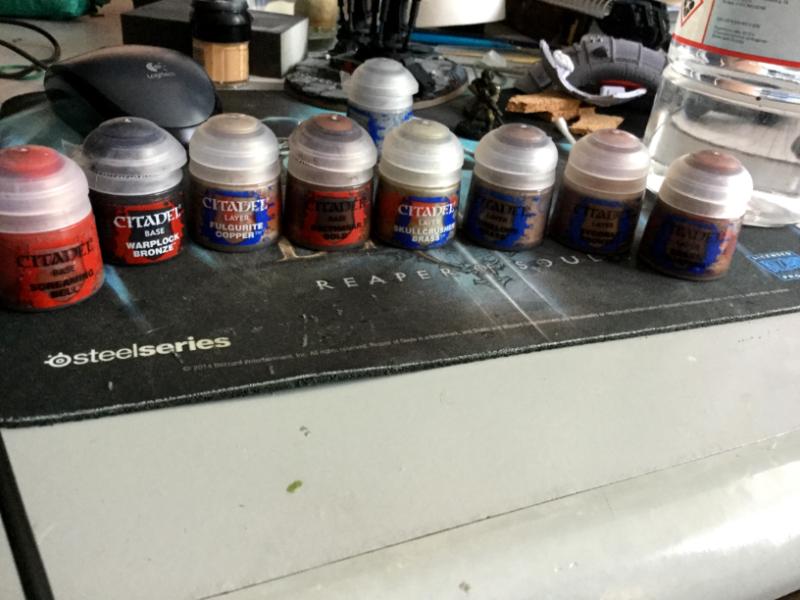
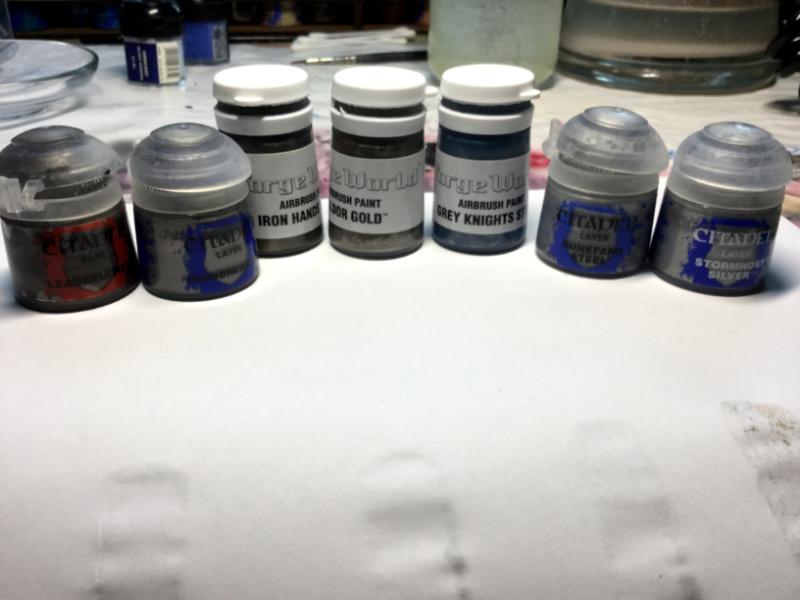
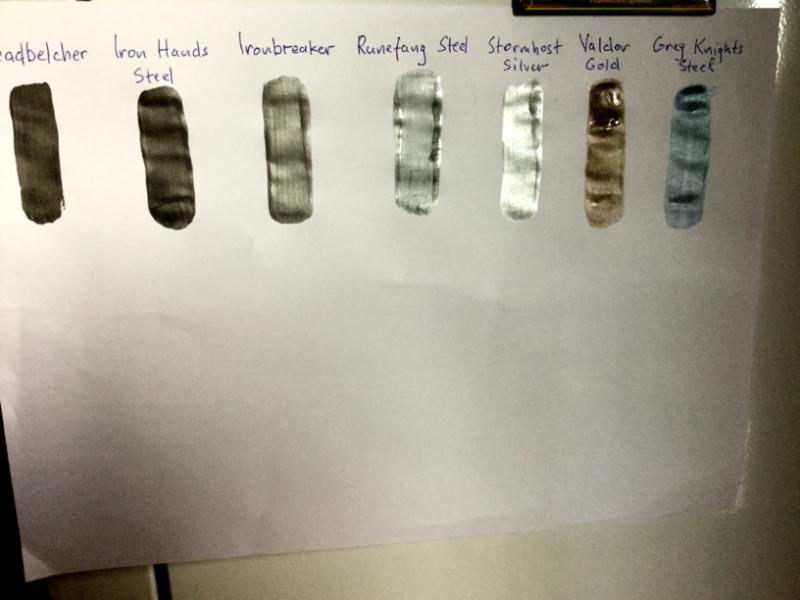
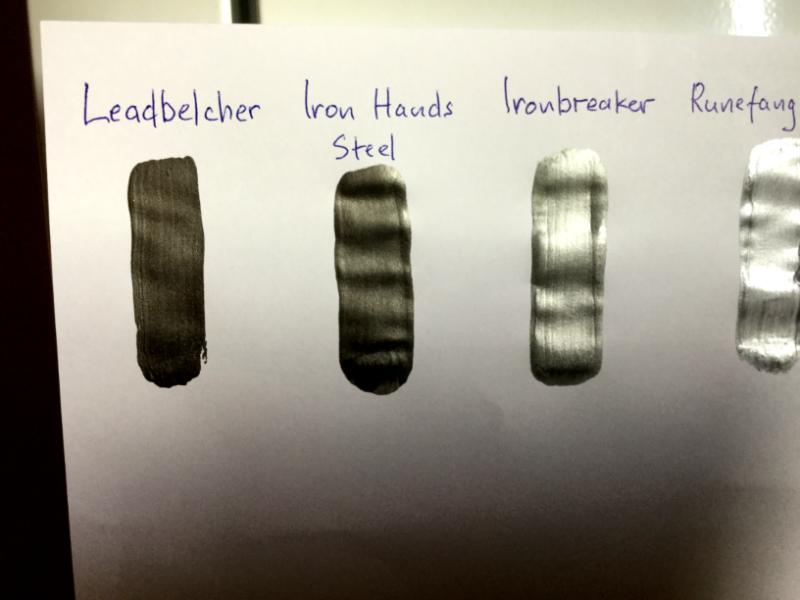
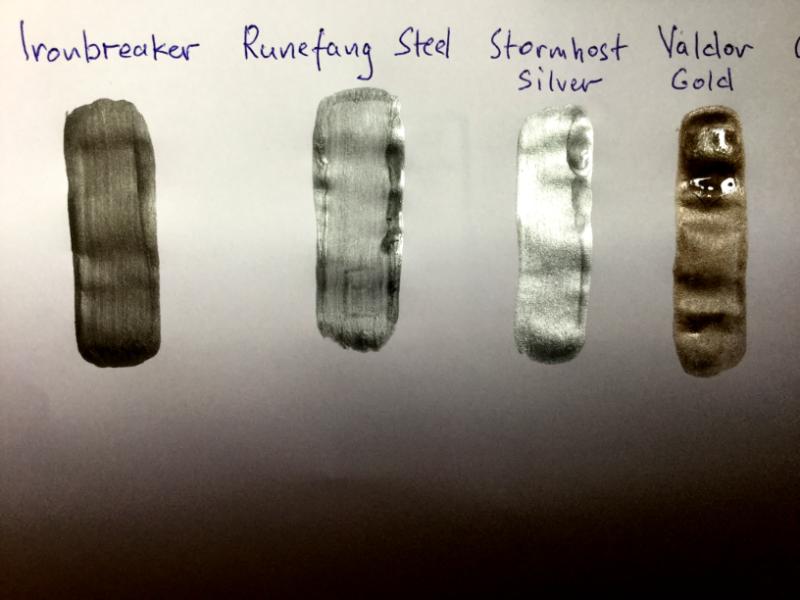
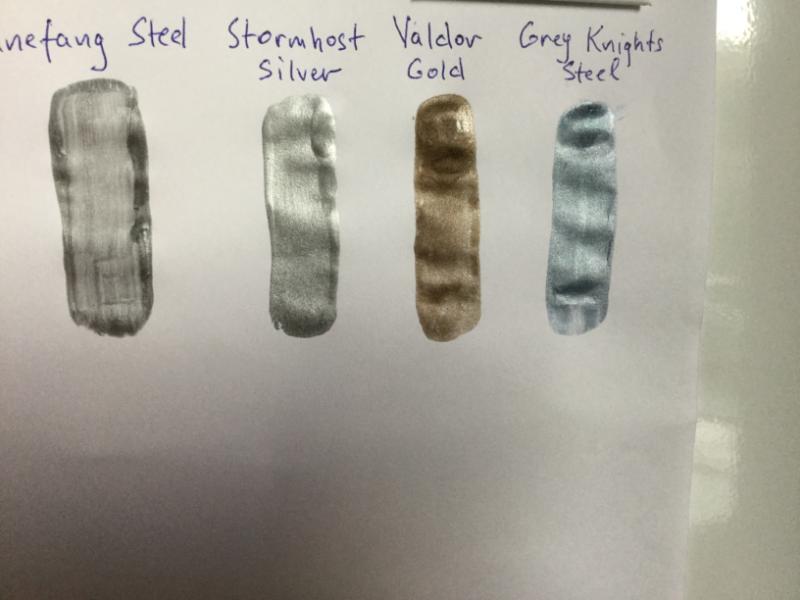
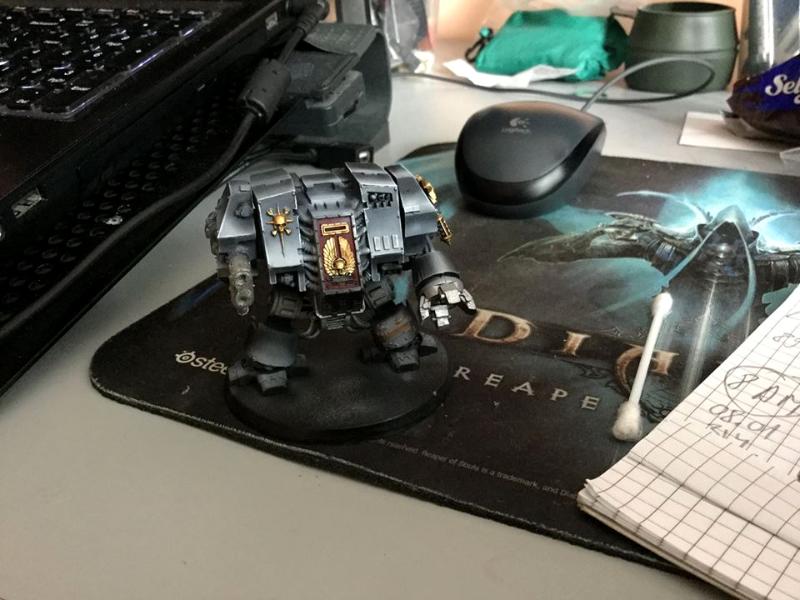
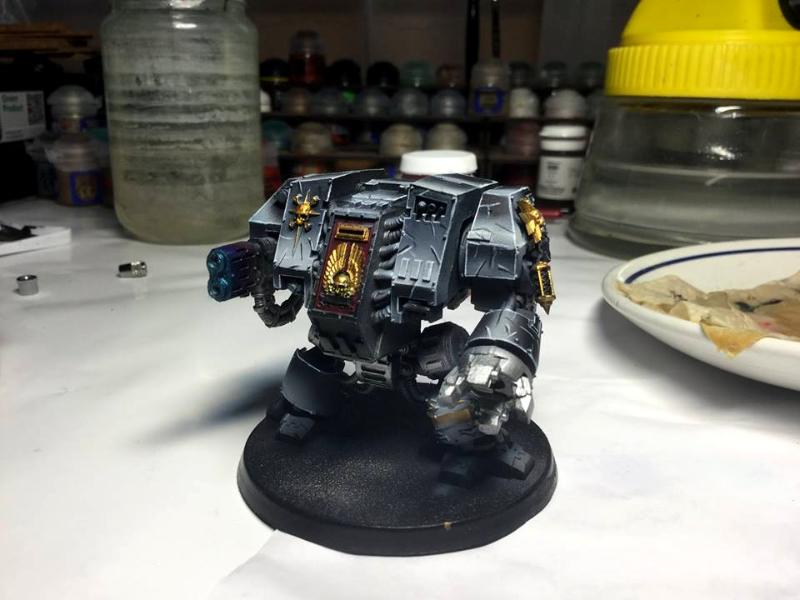
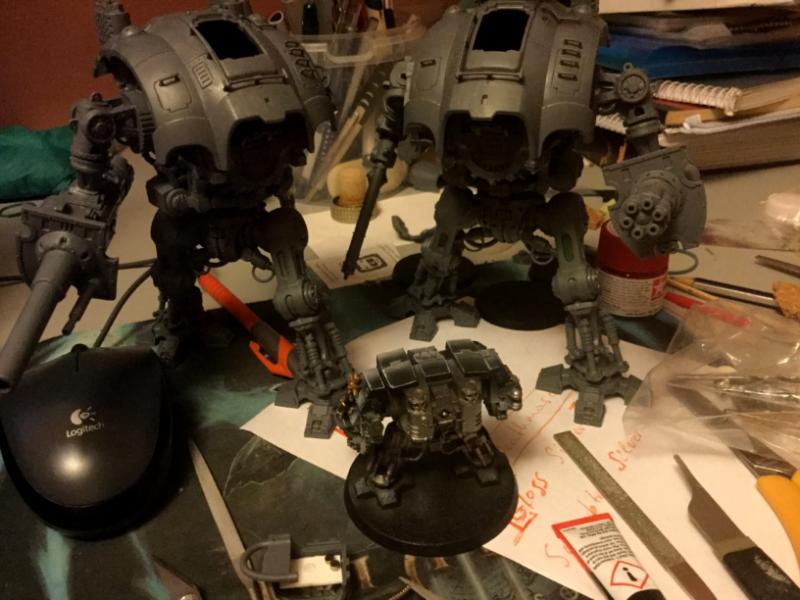


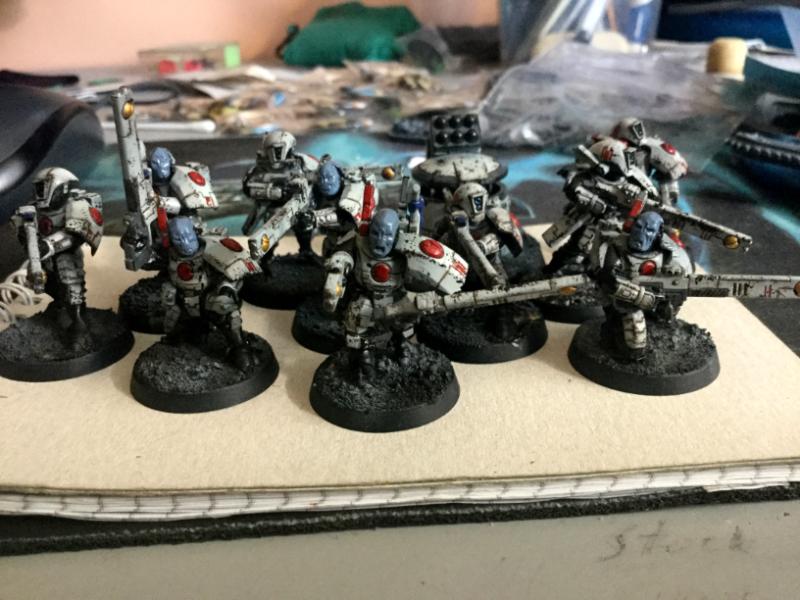


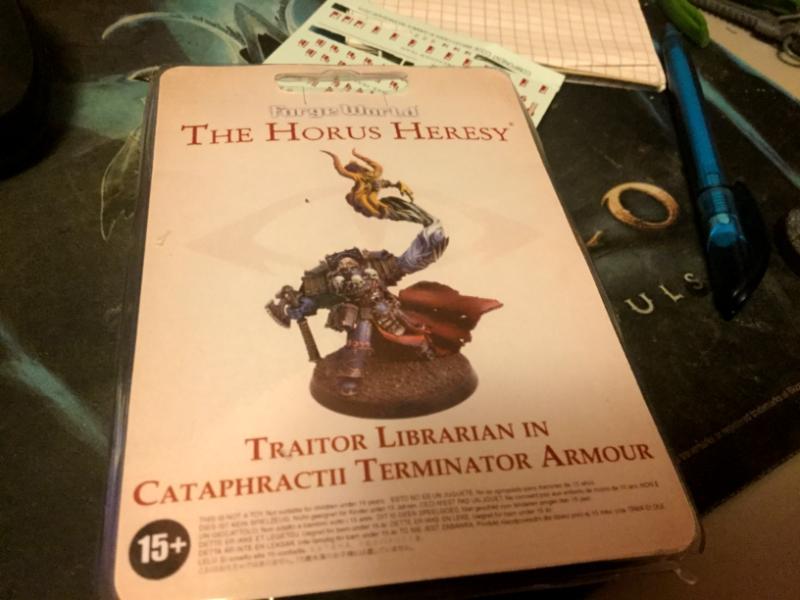 I also asked to buy the termi praetor, but then decided that I ain't going to actually use him anywhere so sold it to a friend. This, on the other hand, I'm planning to use as part of Librarius Conclave to add some cheese to Imperial Knights