106010
Post by: Meer_Cat
[i]Hello all! I've been following DakkaDakka for more than a year now, and learned a lot and enjoyed the projects that you all are putting out. I've been impressed greatly by the encouragement and truly constructive criticism that so many of you have provided others and am encouraged to put some of my own work out there, with hopes of getting some constructive criticism and critiques myself.
I've been building model kits since I was 11 (more than 40 years ago!) but it wasn't until I got into Rogue Trader that I was really encouraged to start 'deviating from the instructions'. At that time, Games Workshop/Marauder Miniatures/Citadel just didn't have that many figures or vehicles. I built the deodorant stick landspeeder that was featured in the original rules book and also built my first Baneblade when the article came out in White Dwarf. I kitbashed/scratchbuilt a Space Marine (Kierkegaard Volunteer Rifles Chapter) before I knew what one was supposed to look like (the terminators that carry them hadn't been released yet). In retrospect, my kitbash didn't look very much like a storm bolter, but it was fun to build and it got used in games quite a bit; I still have the figure.
So, my blog/thread is focused mostly on things I've made to simulate something not yet released, or because it was cheaper or because I just could. I hope you find some of my things interesting and will share your opinion.
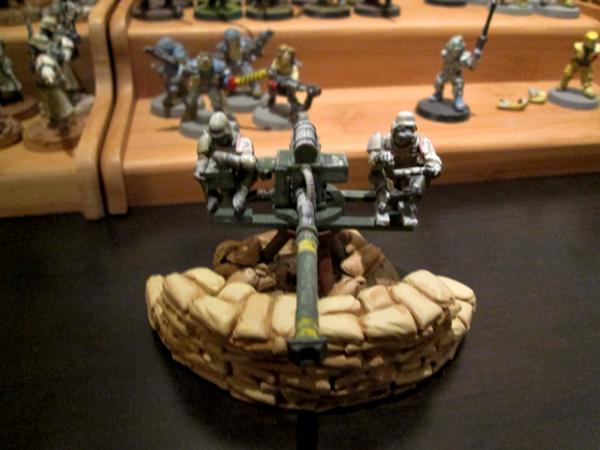
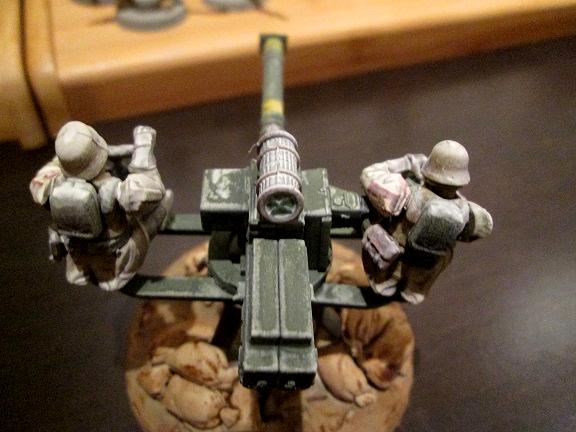
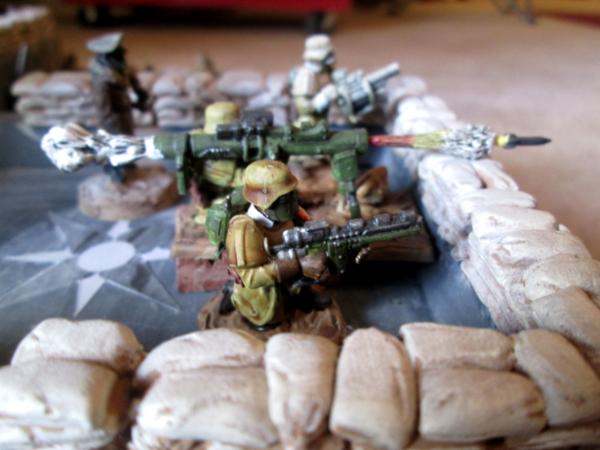
First up is an 'Aegis Line Autocannon & Crew'. This was built entirely with figures, weapons and sprue that came in the old Wargames Foundry Greatcoat Troopers Heavy Weapons kit. It is patterned after a WWII-era 40mm Bofors gun and was a lot of fun to put together. The gun is part of my Imperial Guard army and belongs to the 1st Battalion, 7th Infantry (The Lucky 7's). The legs of the gun mount that you can see here were made by making a pyramid of the three mortar tubes that came in the kit.
Here's a closer shot of the Gunner. His control box for aiming the autocannon is the power supply for the lascannon and the optics you see behind him are two of the drum magazines for the twin gatling gun glued together.
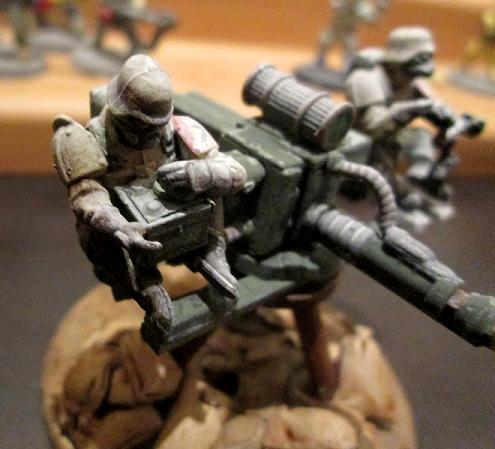
Next is the Trainer. He controls left and right movement of the gun and elevation. His controls are modified from the bipod for the mortar from the Wargames Foundry kit. You can see the pivot point for the gun system in the center of the picture- this was made from the circular boss that keeps the different sprue frames from crushing together in the box.

Finally, here's a shot looking over the Gunner and Trainer's shoulders. The autocannon is primarily made up of the receiver from the gatling gun, the body and barrel of the lascannon and a missile launcher, with some odd other bits from the same kit. The gun mount is entirely made from sprue pieces from the kit. The sandbags are made from Mold #340 by Hirst Arts.
I look forward to your comments and hope to put some more material up soon- I've several with actual WIP shots that might be more helpful and fun.
106010
Post by: Meer_Cat
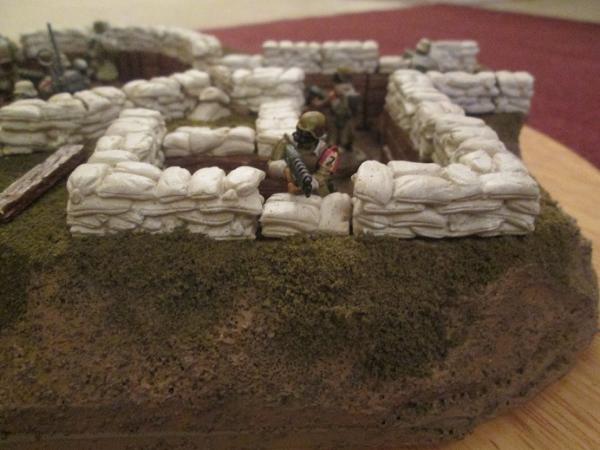
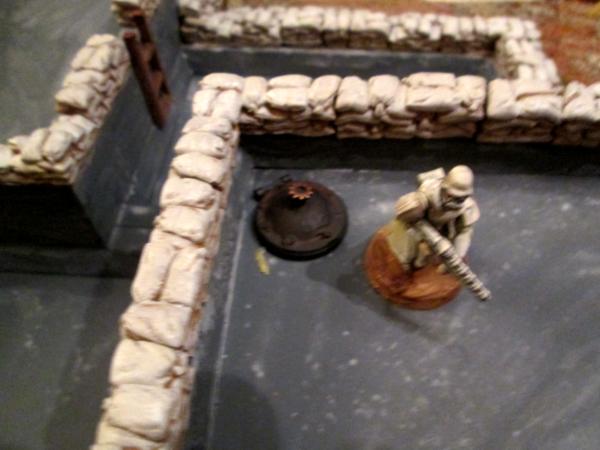
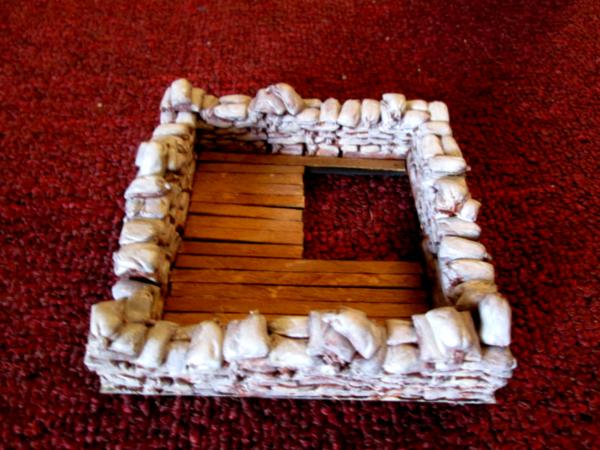
This is an overhead view showing a trench strong point. I intended it for artillery, and you can see the ammo cutter's position in its own revetment. It could also be a platoon command post and the ammo cutter's space becomes a flanking machinegun position. The basic material is pink foam board on a base of poster board, covered with a thinned solution of artist's media gel, painted and flocked. The sandbags are from Hirst Arts Mold# 340.
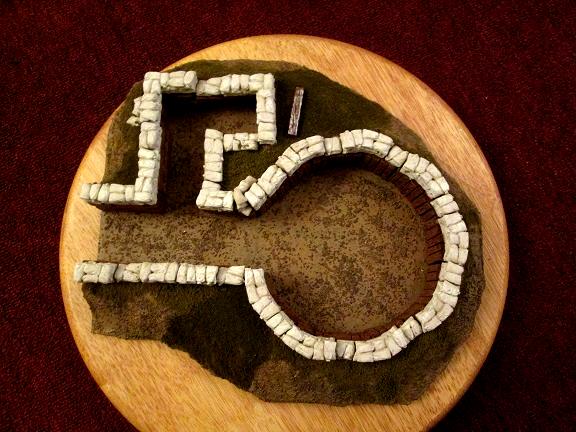
This is the first piece shown in my blog, and yes, I made the walls of the trench strong point the right height so the autocannon could fire over the top.

This artillery vignette is based on an old music CD or movie DVD. The space in the strong point was cut to exactly fit a base with that diameter.
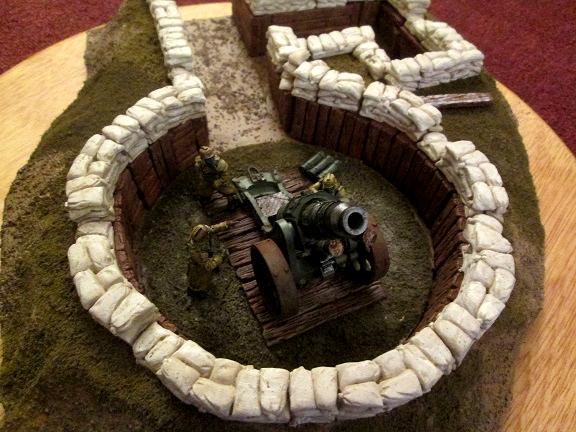
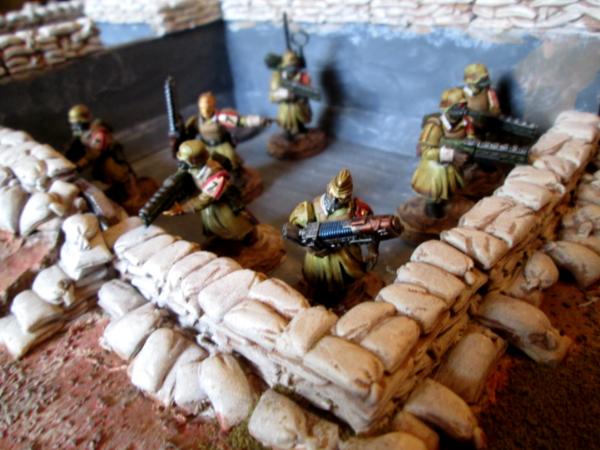
Here's an overhead shot showing the piece being used by infantry. I intend this piece to be able to marry up with others to create configurable terrain for gaming.

Another shot showing infantry occupying the piece. The sandbags are Hirst Arts Mold# 340, the wooden trench wall pieces are Hirst Arts Mold# 222. Next time I make one of these, I'll recess the sandbags into the lip of the 'earth' and wash them with a diluted solution of plaster to fill in the gaps between molded pieces.
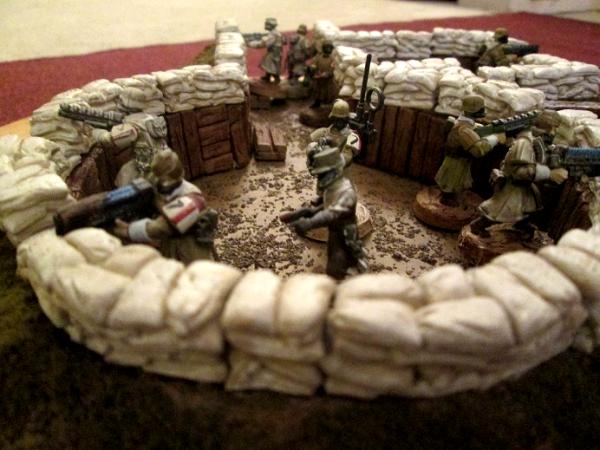
Here's a trooper from the Lucky 7's (1st Bn, 7th Infantry) occupying the ammo cutter's space.
Here's a Quad Gun occupying the strong point, complete with camo netting. The netting supports are made from coffee stir straws with engineering t-pins inserted at the top.

I hope you enjoyed seeing some of my pieces and I look forward to your constructive criticism.
106010
Post by: Meer_Cat
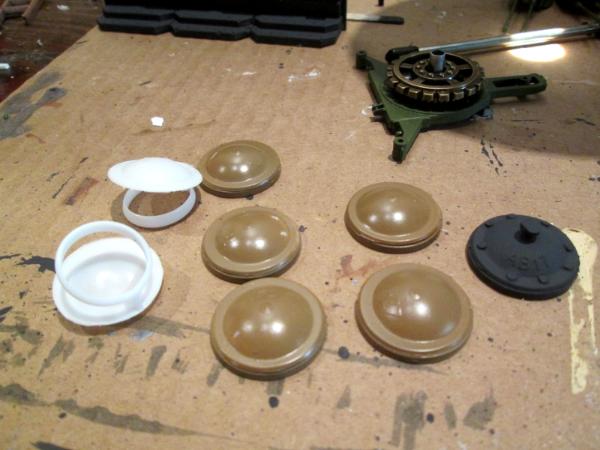
This next project is a genuine scratch build. I noticed that the pull-rings from a half gallon carton of milk looked a lot like a tank hatch- especially when the ring part was left attached to the plug part of the item. This series of pictures shows how to use the ring as the basis for a quick and easy and fairly realistic hatch.
The pull rings from half gallon milk cartons are made from what used to be called 'engineering plastic'- it's very slippery and many paints won't stick. I use Rust-o-leum spray paint to prime them, then hobby acrylics to paint.
I used a hobby punch to make rivets- on these hatches they are 1/16 inch, and glued them on at regular intervals around the rim. The valve stem on the top is made from a very short piece of 1/8 inch coffee stir straw with a slightly larger diameter 'rivet' on top of that (I think it is 3/16 inch). The hinge you see is a piece of thin sprue inserted into two more very short pieces of coffee stir straw.
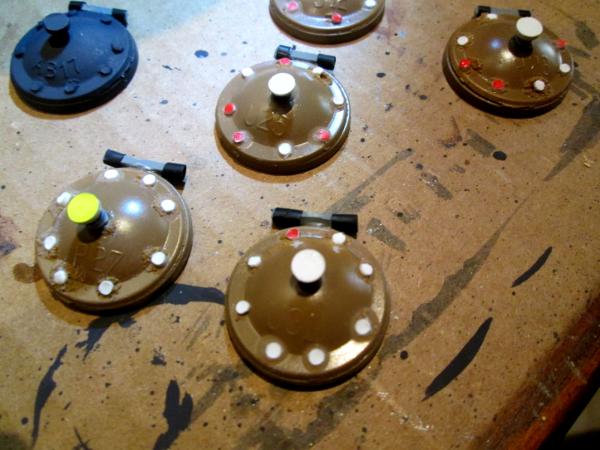
A coat of grey acrylic paint and it's really starting to look like something! I like the molded on serial number from the pull ring itself- makes it look like a real metal casting.

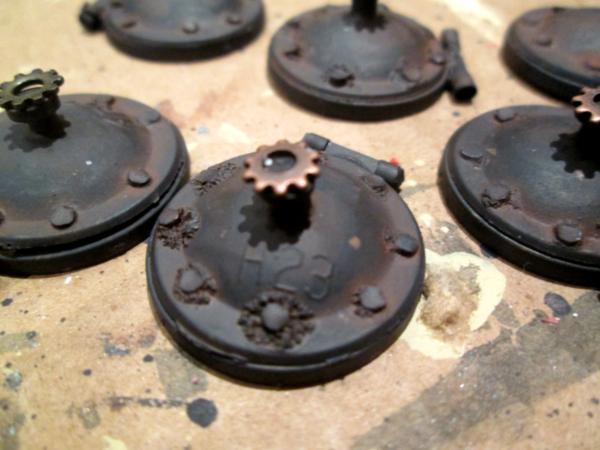
I hit the hatch with a heavy coat of rust wash- I use Micro-mark's "Rust'n'Dust" 4 step solution. The vale gear on top is actually a steampunk gear I got from Michael's- a package of about 100 cost me around $4.00. You can also see in this picture how the superglue I used to stick the rivets on ate at the plastic a bit and enhanced the 'rust-eaten' effect.
Here's a shot of a completed hatch on an Imperial firebase I built (shortly to be uploaded).

Here's another shot of a hatch in the firebase, with an Imperial Guardsman for scale. The figure is one of the Wargames Foundry Greatcoat Troopers, painted as a member of the Lucky 7's.
Hit them with a coat of matt varnish and that's it. I think these are handy for terrain building, as I've used them here, but also for tanks, other vehciles- especially orkish ones- anything that needs a hatch. I hope you enjoyed another piece of my work and I look forward to your feedback.
65595
Post by: Camkierhi
Nice work, intrigued and subbed.
The hatches look great.
106010
Post by: Meer_Cat
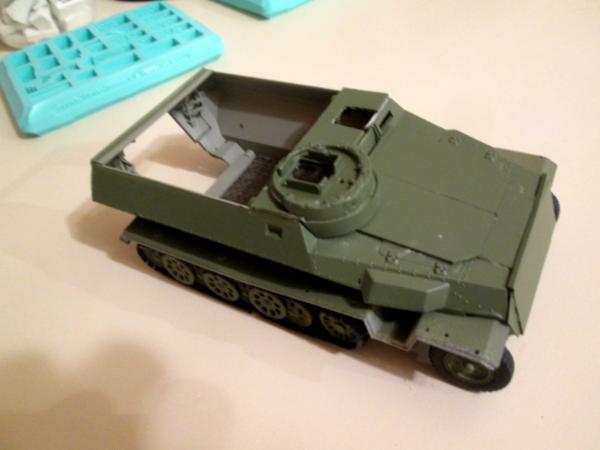
This next project I took a lot of pictures as I was going along, as I intended to post it up as a WIP. I very much liked the look of the Russian Bronekorpus tanks- these are the same folks that make the Robogear line of kits. At US$8.00, I bought two amongst some other things I couldn't live without. Here's the first stages of converting their flak tank into a 'counts-as-Hydra'. Overall, the Bronekorpus model is a bit shorter and narrower than a Chimera/Hydra, and even with the high turret, the quad guns are going to be lower as well. But it was a very fun project to make, and I'm still figuring out what to do with the other kit. It'll be something similar, but different enough to post here. I used almost all of the parts that came with the flak tank kit, plus a few from other Robogear kits, some Games Workshop bits and a few sandbag castings from Hirst Arts. Plus bits and bobs from Michaels, of course!
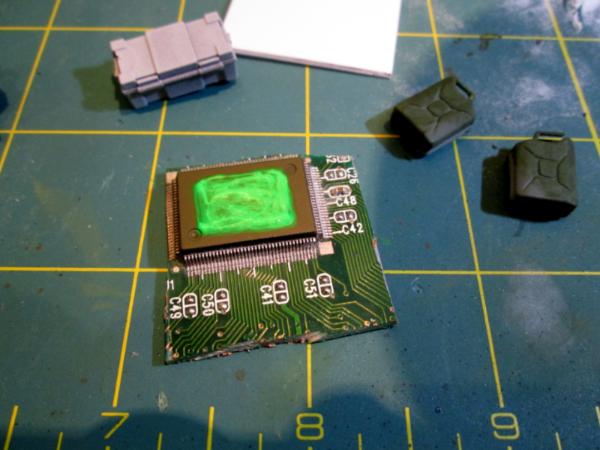
Here are the basic tank pieces that come with the kit:
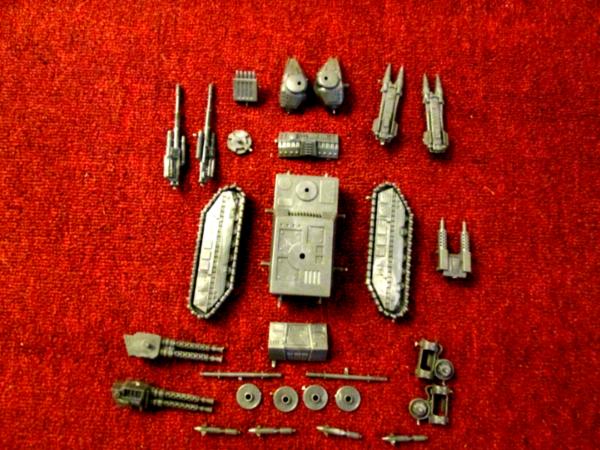
Here is a close up of the weapons that come with kit. I magnetized the three pairs you see (the autocannon pair, quad machineguns and quad laser cannon) and also used the paired machineguns you see in the upper right as the engine exhausts.

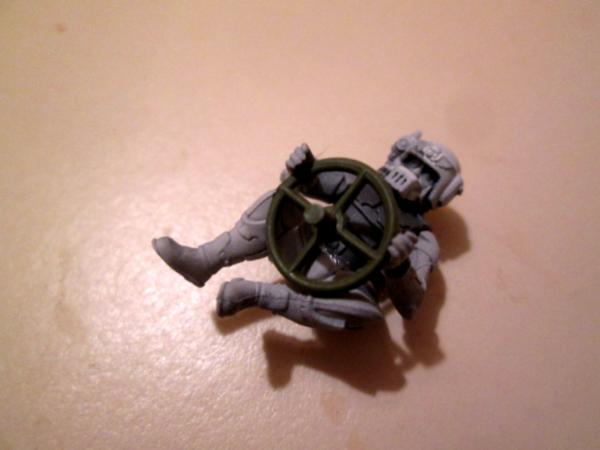
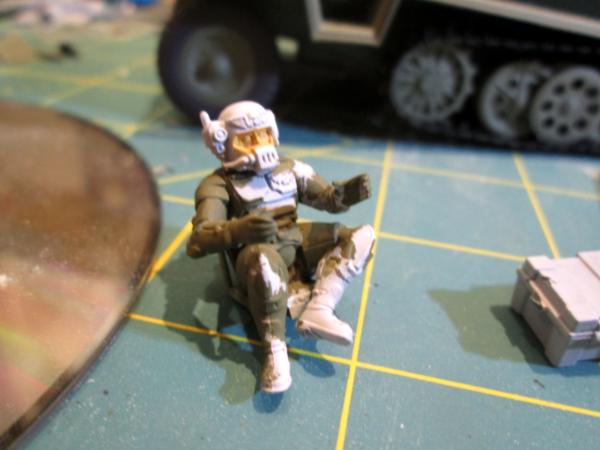
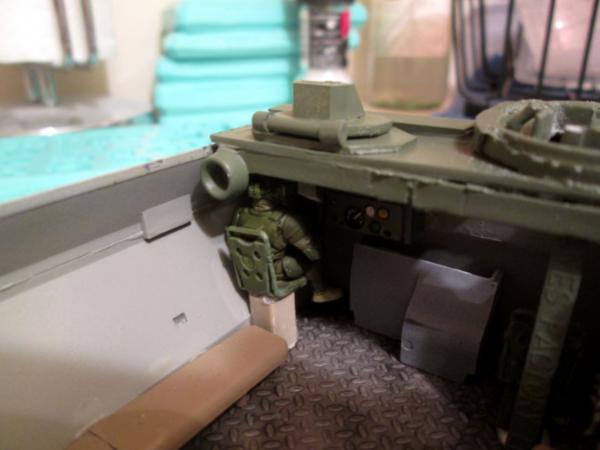
I had to shape the tank commander a considerable amount to get him to fit in the hatch the way I wanted. I know it looks cool in the movies, but after riding in an armored vehicle a time or two after 30 years in the Marine Corps and the Army, I can tell you that resting your butt in the edge of the hatch while moving over rough terrain is _not_ recommended.
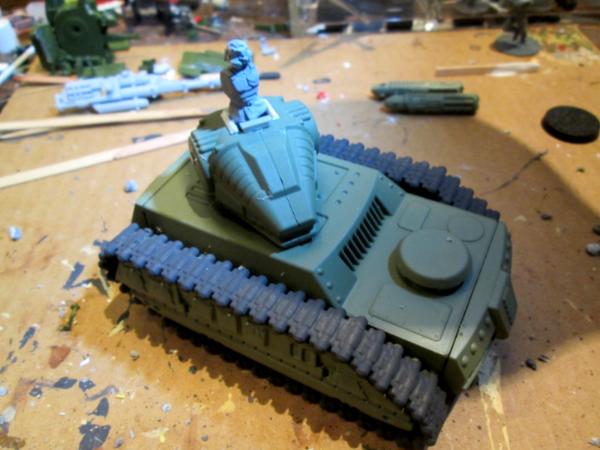
A bisc fit of the primary guns and the commander. You can see how I lined the edge of the hatch to frame it in, using some strips of yard sale sign cut up. The hatch will end up being square, due to space constraints on the top of the turret. Even with the extra weight of the magazine holders on the back, the quad machineguns still balance nicely on the magnetic pivot points. This was not the case with the quad laser cannon, but we'll see that build a bit later.

These missiles are from the Robogear T-rex War Walker. I'm cutting them in half, and will use the lower piece as the magazine for one of the quad machineguns. Total needed of course, is four.

Another shot showing the 'magazine racks' and the commander in place. The muzzles of the guns are chewed up because this was my first time trying to drill out the barrels. In the end, I actually like the look- I think it makes them look battleworn, like the iridium lined barrels of the tanks in David Drake's "Hammers Slammers" series. Better pictures follow on later.

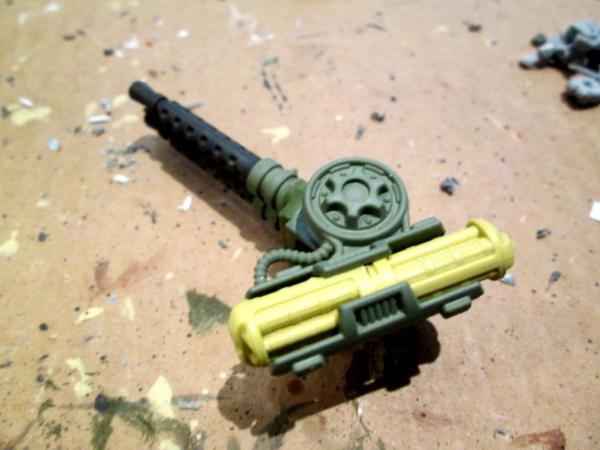
And here is a shot of the guns with their magazine rack complete with magazines.
Next chance I get to upload some more, I'll show you how to make cheap ammunition belts for just about anything.
8330
Post by: kestral
I'd like to know how to do cheap ammunition belts! Cool stuff, keep it up!
52201
Post by: evildrcheese
Awesome conversions. I'm really liking what you've done with the tanks.
EDC
106010
Post by: Meer_Cat
Camkierhi, Kestral and evildrcheese- thank you for your kind comments and interest- more postings follow shortly!
106010
Post by: Meer_Cat
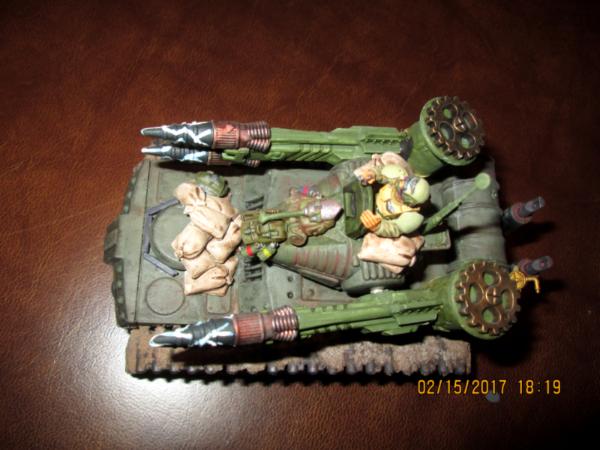
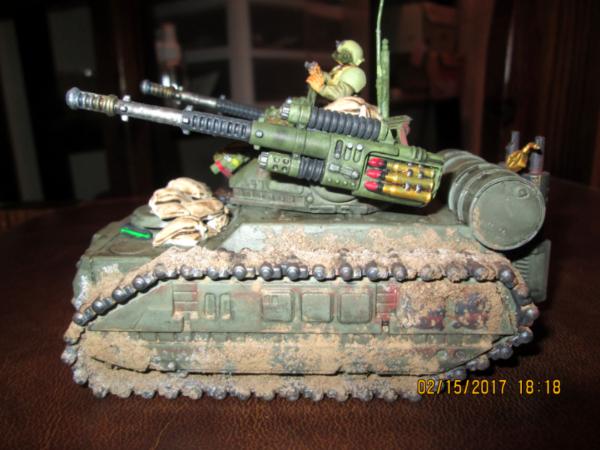
I wanted to add something to the back deck of the tank to make it look more 'built-up', so I took two Tamiya 55 gallon drums and glued them together, then carved out a notch in what will become the underside so it looks more integral to the hull.

Fuel tank added, but needed to move the turret forward slightly so it would clear the tank, also so the paired weapons could elevate and traverse. So I just punched a hole forward of the original.
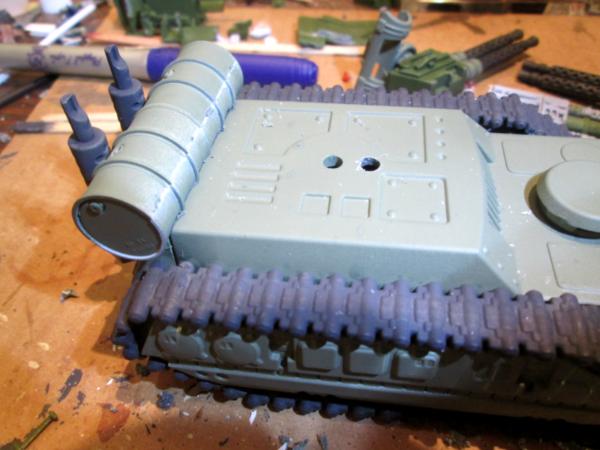
So, here now is the fuel tank added, the exhausts (which were included as a paired set of light machineguns) and the turret in place.

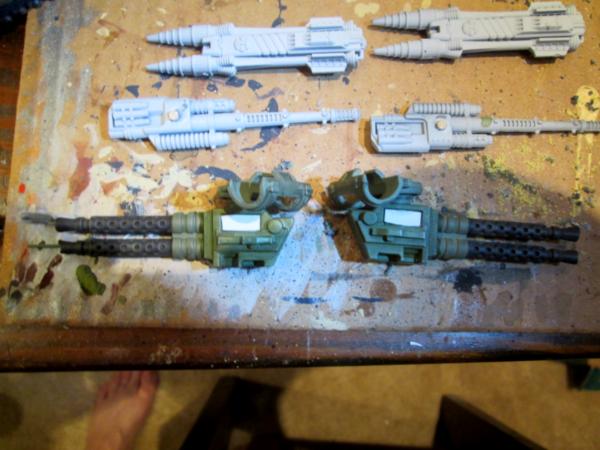
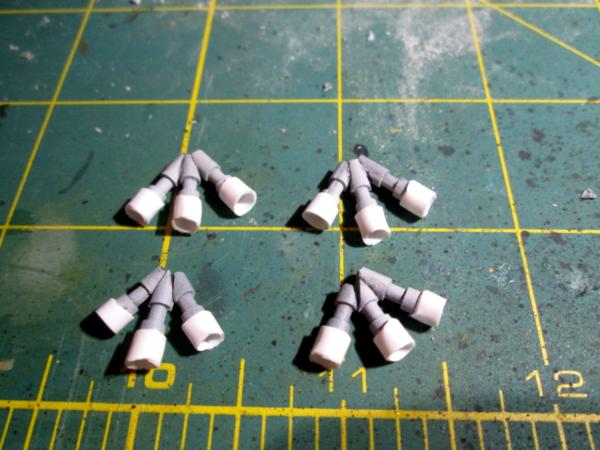
Here are the three pairs of weapons, now magnetized, that I want to use with the flak panzer. The ejection ports on the quad heavy machineguns (or autocannon) are covered over, because this is where the ammunition belts will attach. And even with the added weight of the magazines and racks, the guns still balance nicely on the magnet. So does the pair of heavy cannon- they won't need any modification. But the quad lascannon- they don't balance well at all- I had to add a counter weight and I think it came out looking ok- we'll see that shortly.
Two major steps to go- building the ammunition belts for the quad .50's and painting and weathering the whole vehicle and its commander. More follows soonest.
106010
Post by: Meer_Cat
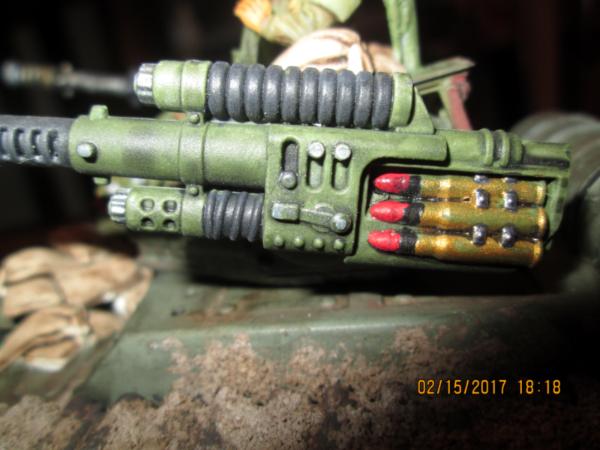
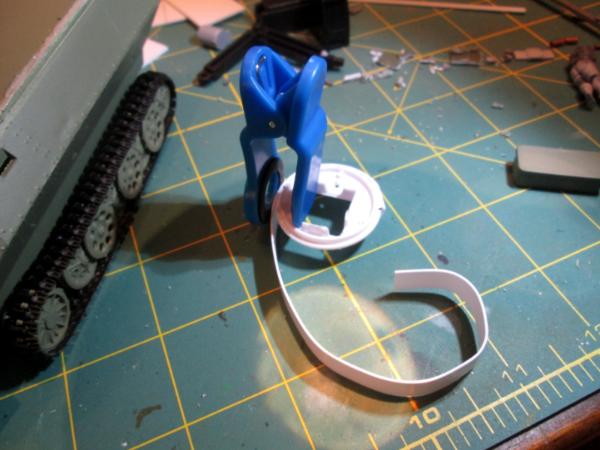
Here's how the belted ammunition for the quad machineguns came about: I started by clipping off a piece of 'plastic canvas' the length I wanted for my belt. You can get this stuff almost anywhere- Walmart, Michaels, even the Dollar Store, and it comes in very handy. I use it a lot for vehicle floor matting, for instance. The plastic canvas strip forms the belt that the individual rounds of ammunition will glue to. 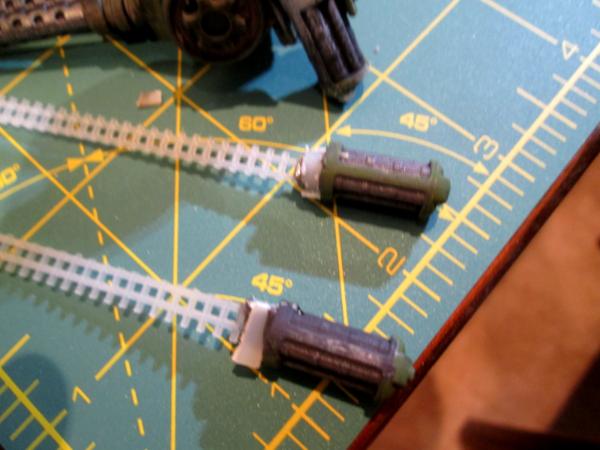 A test fit to show how the belts will stick out from the magazine, and bend around to attach to the gun itself.  Another view.  Belts are now glued in place at the magazine end and the gun feed port end, stuck to the turret by their magnets and test fitted to make sure they clear the decking- so that the turret can rotate. Also checking to make sure the belts aren't in the way to keep the guns from elevating. Towards weathering, I've added some dirt to the treads, but more later. 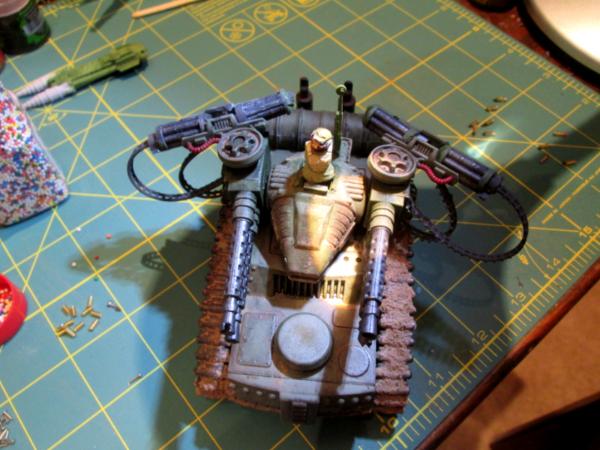 Here are the three components you need to make the rounds of ammunition: everyday pins cut to about 1/4 inch length, candy sprinkles (like for cakes or ice cream cones) and #2 Czech glass beads. I get the beads from Michaels, they cost about US$2.00 for 70 or so and come in different sizes, so you can make belted ammo for light machineguns up to heavy tank rounds and everything in between.  Dip the cylindrical bead in white glue and insert the pin 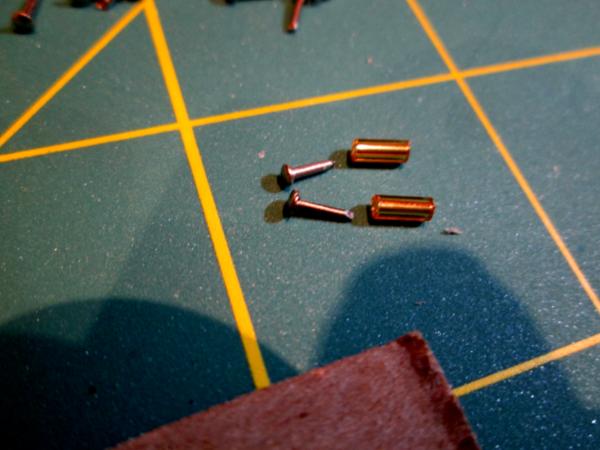 This forms a very nice brass casing with rim and primer base. You can scatter these around a heavy weapon- autocannon, etc, and they look darn good as expended brass  Glue a candy on the end as the projectile- try to pick uniform sizes as you go. 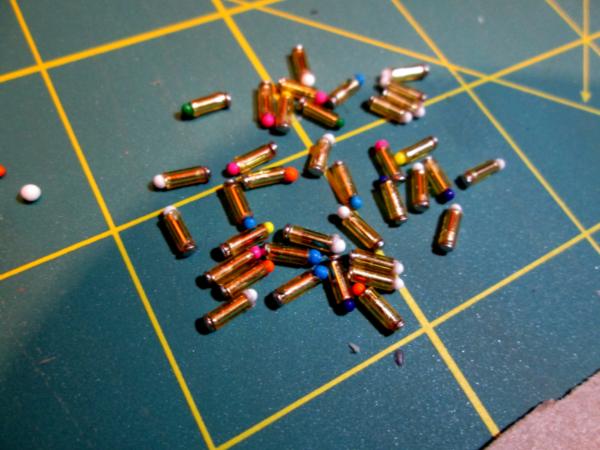 Glue the rounds onto the plastic canvas belt, and there you have it. Next instalment: weathering the tank, the commander and finished photos. 
106010
Post by: Meer_Cat
I misspoke in my last post- there was one more step to build out to be done with the construction phase of this project. The Bronekorpus/Robogear kit came with multiple weapons options, including three paired weapons systems- the dual autocannon, quad cannon and quad lasers.
I wanted to be able to use all three pairs, depending on the game. The dual autocannon balanced perfectly on the magnets. The quad cannon- even with all the weight (rather, _because_ of all the weight) of the belts and magazines and racks also balanced just fine. But the quad lasers just didn't have enough weight behind the balance point.
So, I cut open a 'do not eat' desiccant cylinder from a vitamin bottle and replaced the light silica gel crystals with sand.
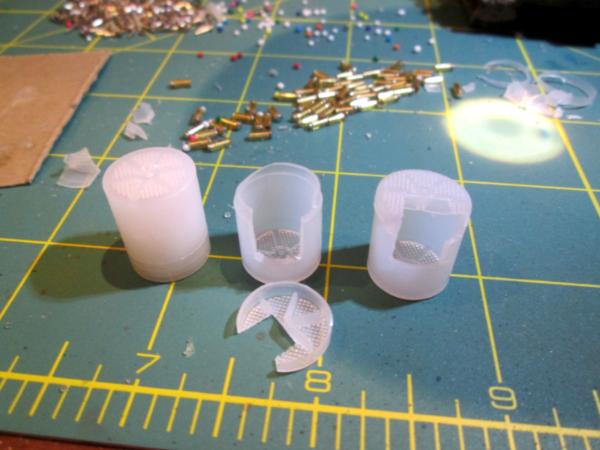
Even that wasn't enough, so I added a steampunk gear to the top, and finally, I had enough weight behind and before the balance point to work.
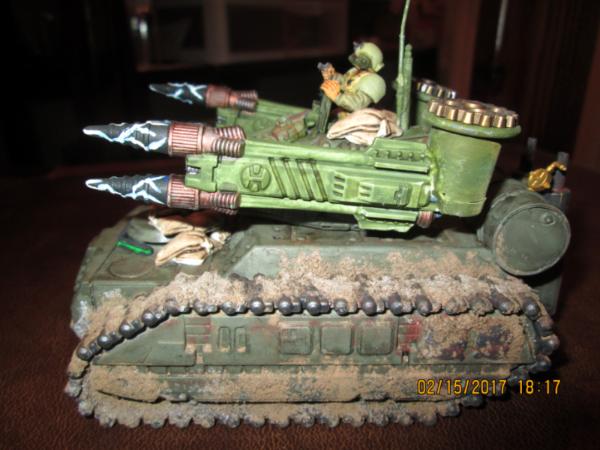
Now, all three weapon pairs can be elevated to about 45 degrees, and the turret rotates 360. Here's a number of shots showing what we started with, and how it came out:


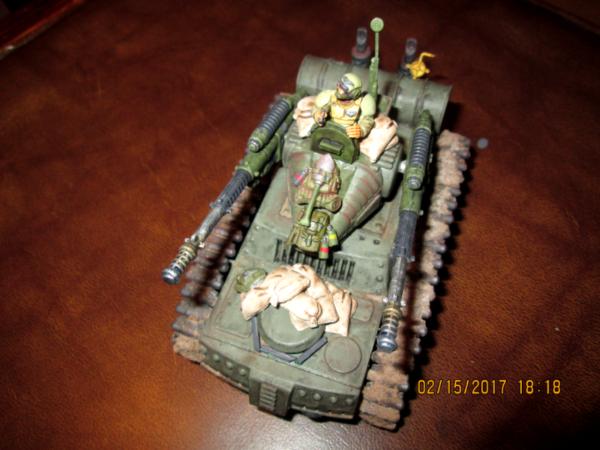
This project was a lot of fun to make, and cost (counting shipping for the Robogear tank kit) about US$15.00. I hope you like dseeing it, and hopefully there was something in the story that might come in handy one day. I look forward to your comments and constructive criticism.
Next up- I FINALLY learn how to paint eyes (thank you Dr. Faust!).
76303
Post by: Warboss_Waaazag
I can't believe you made bullets out of candy and brass tubes. Simply stunning.
65595
Post by: Camkierhi
That is looking fantastic, really nice work, annd for the money they are amazing.
Oh BTW your insane, those ammo belts? Going to steal the idea, had those same beeds sat in a drawer for over a year with similar thoughts, but now seeing it, excellent. As a BTB, instead of the slightly irregular candy, you could try the silicon beads from inside those sachets you get in everything to keep them dry, they tend to be a regular size.
106010
Post by: Meer_Cat
Hi Camkierhi- and thank you for the kind words; this project was really a lot of fun. The idea for the silicate beads from the sachets is terrific! I fooled around with a number of different items before I settled on the candy beads, never thought about the 'do not eats'. Twist of fate, after I had read your post I got into my car to head to the market to do the grocery- there were _two_ sachets on the floorboards of the passenger seat (and I usually keep a very clean car). They must have fallen out of something and slid under the eat, and re-appeared when I needed them.
BTW: I call those desiccant/keep dry packets 'do not eats' because they also came in certain components of our field rations while I served in the Army. They were labeled 'do not eat' so that some of our more civilizationally challenged soldiers didn't mistake them for a seasoning packet and sprinkle them onto something else pretending to be actual food. Altohugh how we were supposed to see the warning in the dark, which was mostly when we had time to eat, I'll never know.
10953
Post by: JohnnyHell
Love these - much respect from a fellow Bronekorpus converter! Great work, and the new artillery/AA style tank looks nice. May have to pick some up to go with my MBT/AFV style ones.
Automatically Appended Next Post:
One tip - if you want a bit more height, glue the tracks onto the hull sat just below where the locator pins normally snap-fit. Gives a taller tank.
106010
Post by: Meer_Cat
That is a great tip! I'm thinking if I do that, to get a bit more height, and add a bit of tubing to the 'snap-on' pins to widen the track base (and hide the gap with some sheet plastic track shrouds) I'll have a vehicle that comes very close to the dimensions of a standard Chimera.
I have a couple of the Bronekorpus MBT kits waiting their turn- I have an idea to convert one of them into a Salamander recon vehicle or even maybe a Griffin mortar carrier. I've also ordered one of the new Caban Pattern Assault Cyber tanks from the Ciberion Robogear line- it was too interesting to pass up. Not sure what I'll do with it yet, but something will come!
At US$8.00 per kit, it's no big deal to experiment with converting and learning new skills.
106010
Post by: Meer_Cat
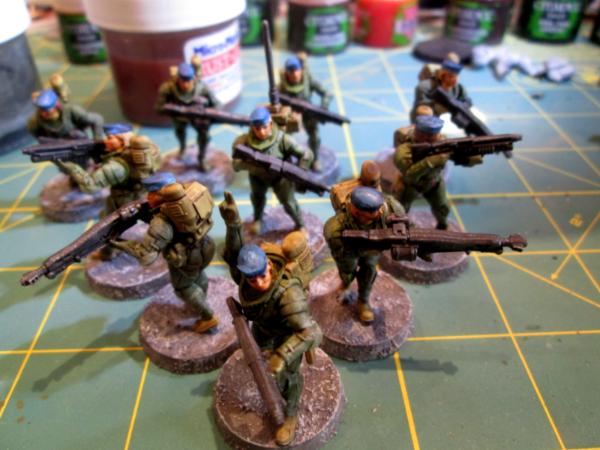
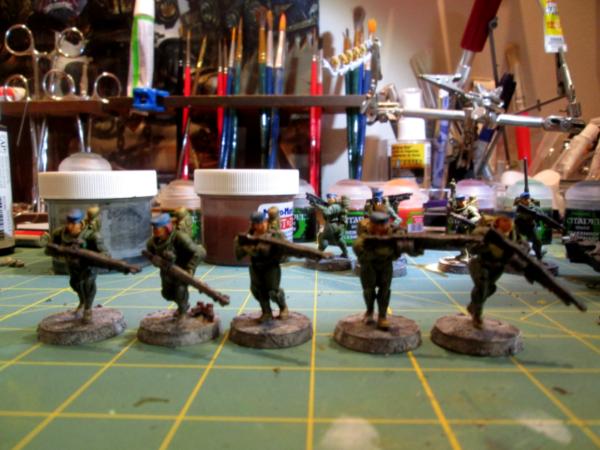
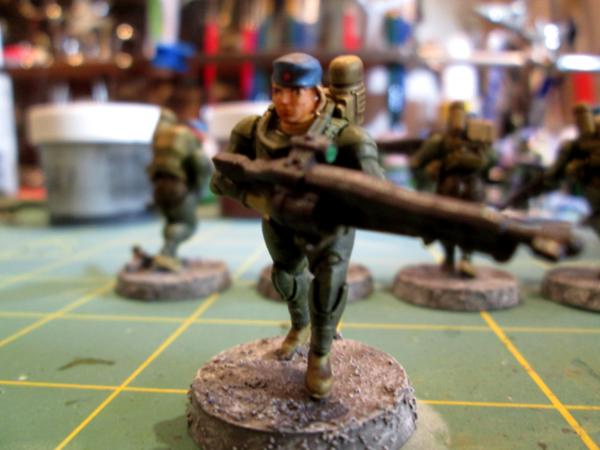
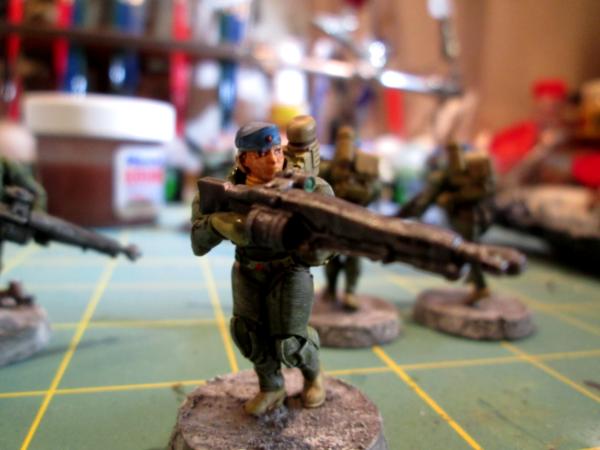
I finally have a chance to work here some more, so here are some photos of the latest squad to be painted- female Panzerjeagers by DreamForge Games. This post is actually three product reviews in one, because I'm very pleased with the figures, the Citadel Paints Astrogranite, ,Citadel washes and the quick and easy painting tutorial by Dr. Faust on YouTube on how to paint eyes. 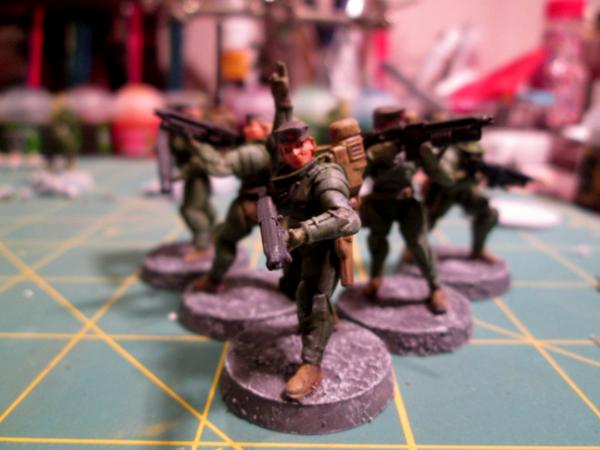 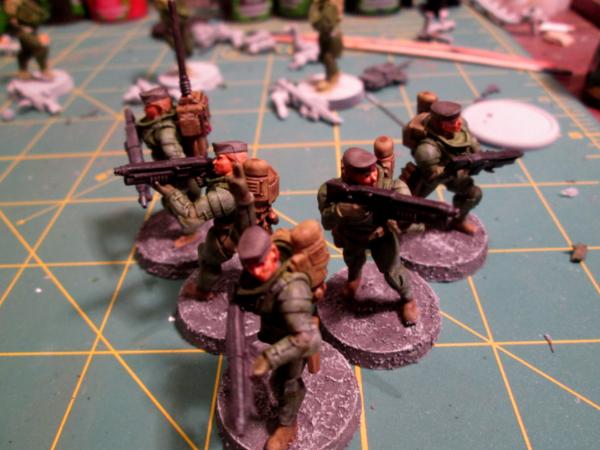 The DreamForge Games figures (formerly part of Wargames Factory, I think, and now under independent manufacture) are terrific. The moldings are crisp and clean- almost no clean up needed for mold lines. The articulation and animation are very realistic and there are enough extra parts in the kit to go crazy making variations. And they are very reasonably priced ( IMO). 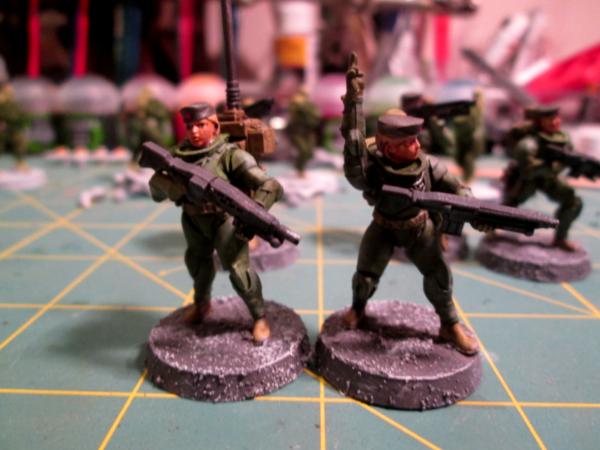  This is the first project that I undertook to be more than 'gaming quality'. I'm quite happy to be my age and still trying to learn new things, and you folks here at DakkaDakka inspire me all the time to try new things. These are the first figures where I've tried to deliberately use washes in targeted areas, rather than generally apply a coat to blend things together. On these figures, I used several different washes in different places, and also tried adding dry-brushed highlights. I chose the field cap option, rather than the various helmet options, both to accentuate the fact that these are female panzertruppen and also to have a color a bit different from the greens and browns of the uniform and kit to try to make the figures pop a bit. 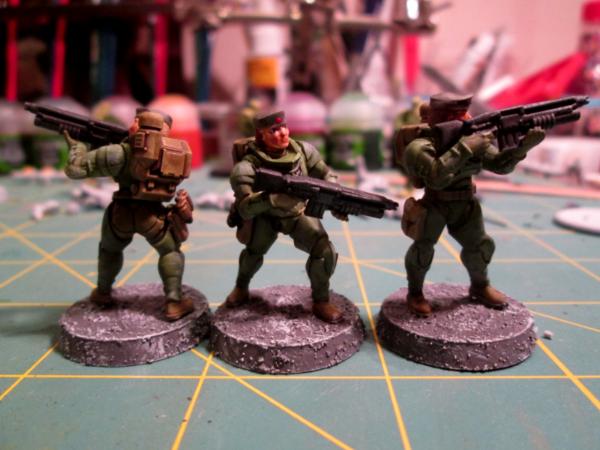  I used Citadel Texture Astrogranite on the bases, dry-brushed with white. This product is as close to Base-tex as I have seen in many years. I only ever found Base-tex in Great Britain, when I was stationed in North Yorkshire and loved the stuff. It went on a bit more gravelly than the Citadel Texture, but I'm happy not to have to mix my own from Artists' Media Gel and sand. It makes painting up a common base very easy. 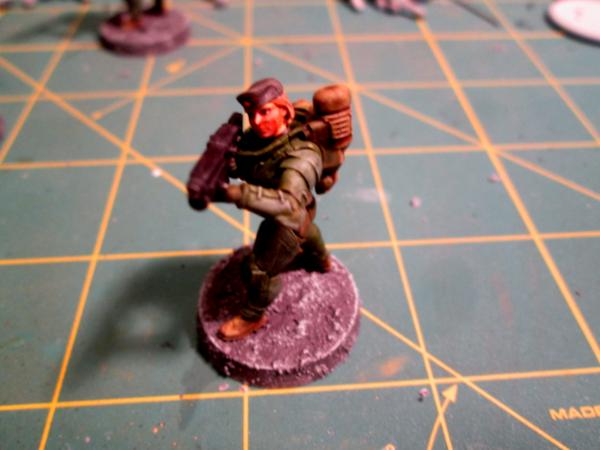 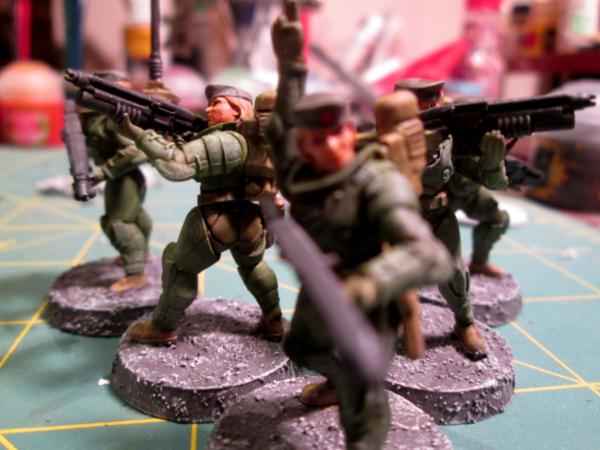 Finally, I've been looking over the great work you all do here on DakkaDakka, and viewing various YouTube videos that try to teach heavy handed painters like me how to paint more betterly. I found a tutorial by Dr. Faust for doing eyes that was just right for me. It relies heavily on painting _up to a line_, rather than trying to paint the line itself, which is what I need. The link is here: https://www.youtube.com/watch?v=dhH-GWvHG00&t=287s As you'll see in these last two pics, I think I'm correct in believing that I've come along way in my skill doing human faces. The radioman is a Kromlech Imperial Guardsman Highlander figure, and was my previous best effort.  So, I like the Citadel Texture, I like the Citadel washes (talent in a bottle, indeed!), I love the DreamForge figures and thanks to Dr. Faust, I believe I'm a better painter. I hope you enjoyed seeing some more of my work and I appreciate any constructive criticism you care to leave. Now all I have to do is go back and repaint the face on every figure I've ever done!
106010
Post by: Meer_Cat
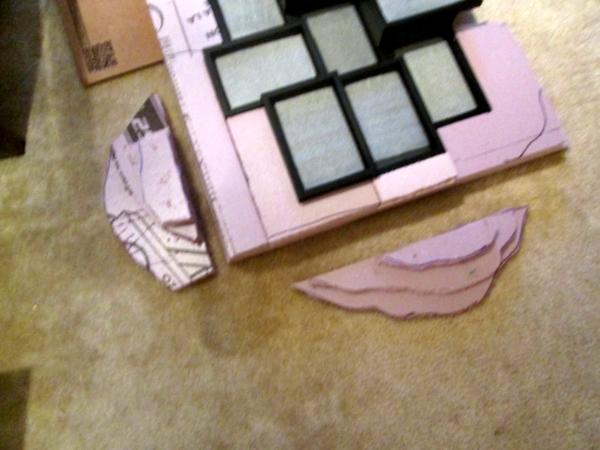
Next up is the most ambitious terrain projects I've undertaken to date. It literally started in a Goodwill store when I saw a multi-picture, multi-level frame and I thought "For $5 bucks, I bet I can make something out of that!"
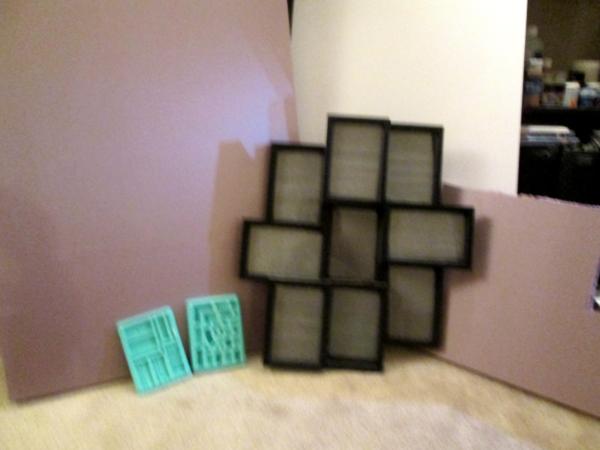
The picture is blurry, but the basic materials were the multi-picture frame, some poster board, some pink insulation foam and many castings from the Hirst Arts Sandbag and girder bridge molds.
First, I needed to shape the general outline. I wanted a vehicle bay big enough to admit a Leman Russ, and this semi-dictated the width and height of the piece, as I wanted reasonable slopes for infantry to assault up when finished. The ultimate goal wasn't to build a static diorama, but to have a great piece of terrain for gaming.

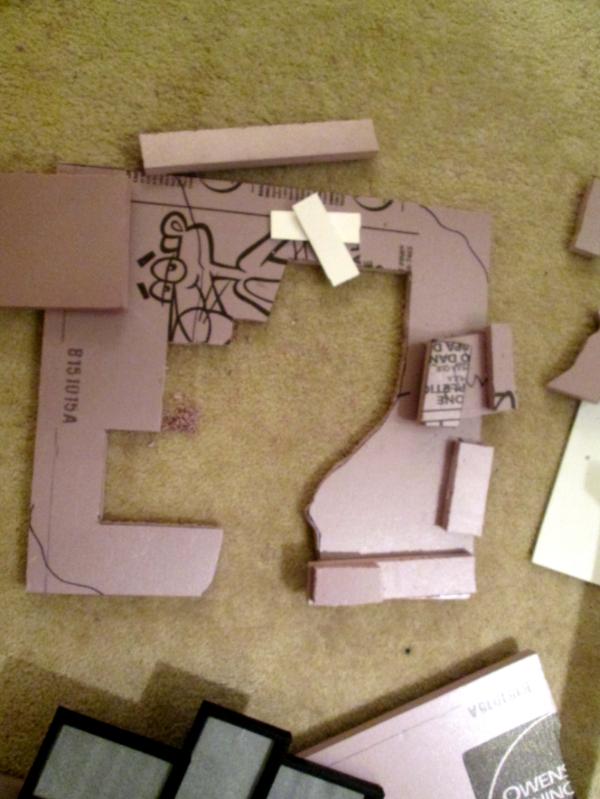
As I created the layers, with the vehicle bay cavity, I had to add spacers to help create the surface I wanted.

More follows soonest.
106010
Post by: Meer_Cat
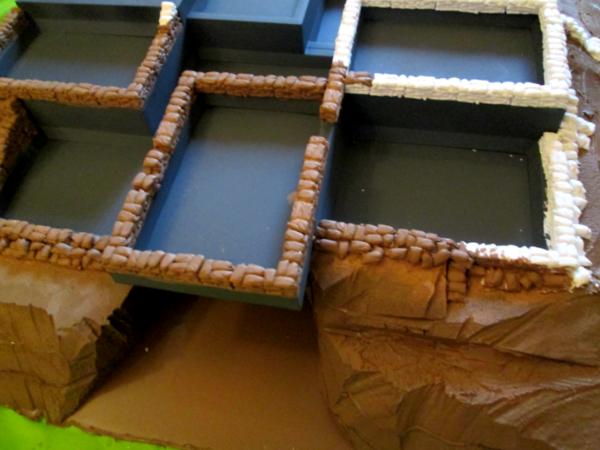
In this next photo, you can see that the sections forming the main firebase (with the vehicle bay) have been glued together and mounted to a piece of foam board. The spacers have been added so that the picture frame fits in quite nicely. I may add another piece of wood paneling underneath to stiffen everything up and make it less likely to break during transport- the project got 'way bigger than I imagined and I actually would like to sell it one day (local pick up or delivery, I don't see any way to pack this thing to mail and have it arrive in one piece).
The 'wings' are additions I want to fit on to break up the otherwise very square outline of the 'hill'. I always imagined the Imperial Guard to be rather arrogant when dealing with Mother Nature- like the Romans- and building exactly what they want exactly where they want. But even the Empire of Man has its limits, so I figure that even the vaunted Imperial Engineer Corps will have to accept landscaping only 'mostly' everything. Also, the piece was getting too big and heavy, so I added contours to only the two sides you see.

Another photo showing the 'hill' and the 'wings' to be added, plus I've gotten some sculpting in with my hot wire foam cutter:

So here you see everything assembled- toothpicks to help hold the layers together and also to stick the wings into the foam of the hill itself. I painted everything with one basecoat of Rustoleum spray paint and then spackled the joins. This first layer dried fairly well (and is advertised to be flexible, so I'm hoping it doesn't crack if flexed a little bit in moving) and I added a second layer to smooth everything out.

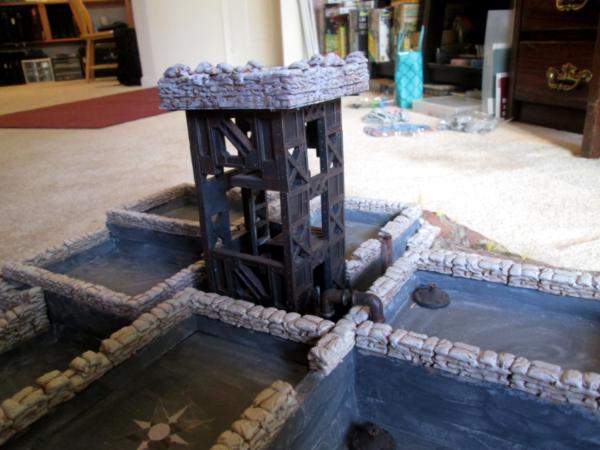
Next is to fit the picture frame in permanently and start seriously addressing painting the terrain. Upcoming builds: adding sandbags to all the revetments, a 'water extractor plant', an observation tower, anti-aircraft guns for the tower and signage (the military base hasn't been built where there aren't a million signs telling you what to do every step of the way).
More follows soonest.
65595
Post by: Camkierhi
Very interesting shape and concept, like it.
52201
Post by: evildrcheese
Such a brilliant idea, looking forward to seeing how this turns out.
EDC
106010
Post by: Meer_Cat
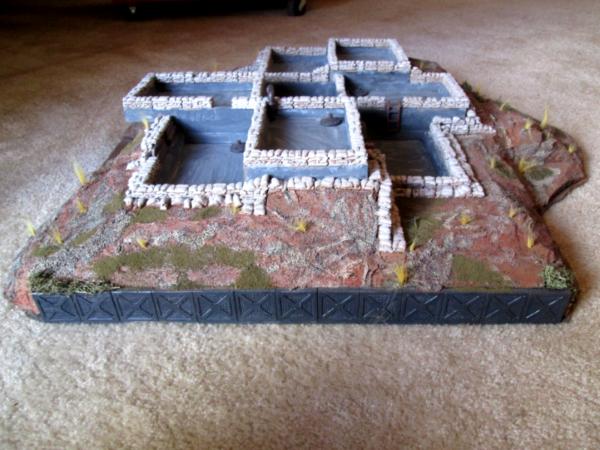
This next photo of the firebase shows all the layers of pink foam insulation fastened together and base-coated with Rust-o-leum, the wings attached to round out the hill shape and the picture frame epoxied down. This angle is looking directly into the vehicle bay and you can see the sculpting that has been done with a hot wire foam cutter (lots of fun!):

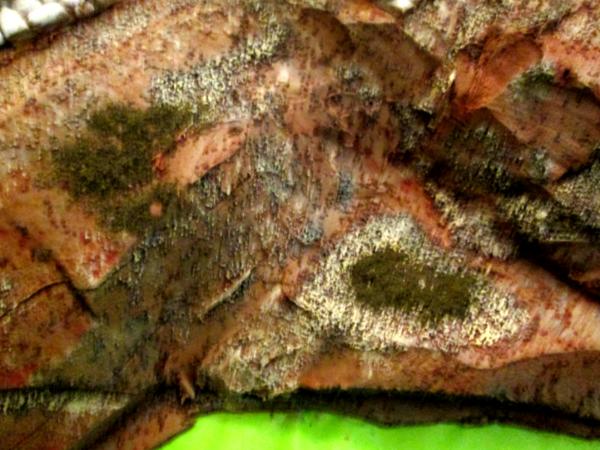
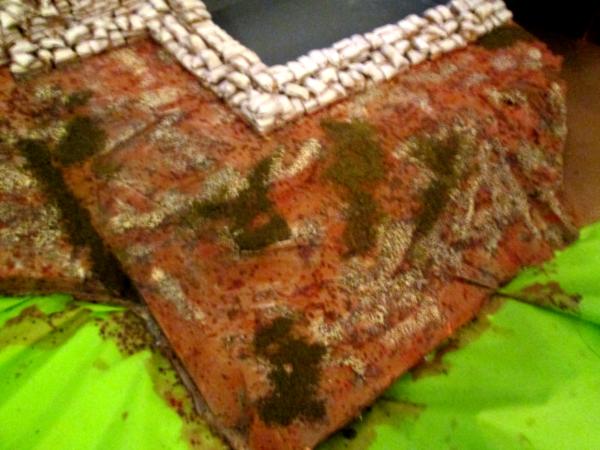
Now the sandbags are added (made of dental plaster and cast in Hirst Arts Mold #340) and base-coated with inexpensive acrylic craft paint (the kind you get at Walmart for 50 cents a bottle):
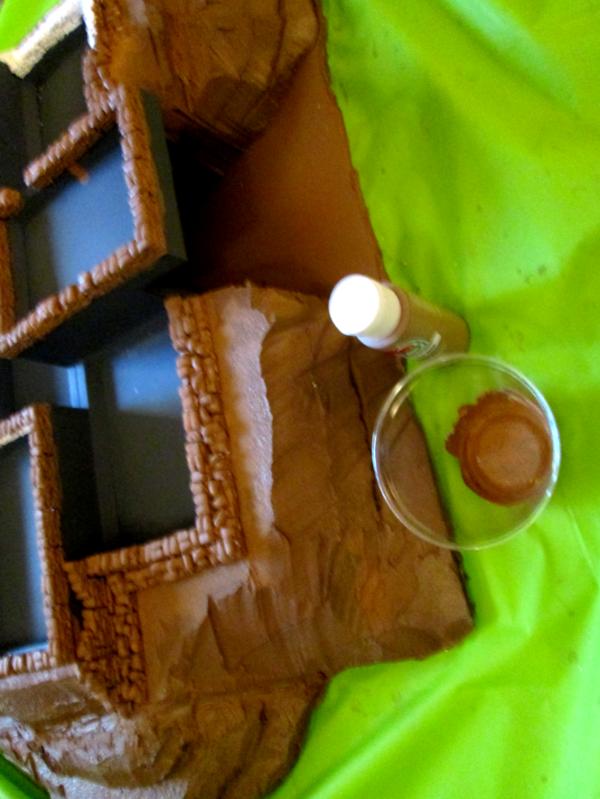
These next three shots show the process of creating a textured, earthy, weathered look by layering first light grey painted splotches and dollar store sand:
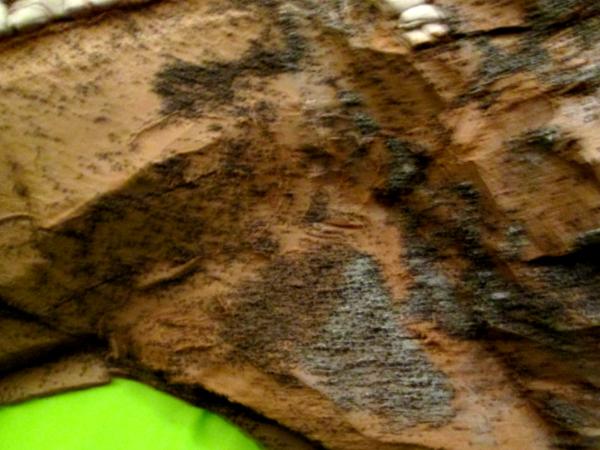
Then a heavy wash of orange water color paint also from the dollar store, a kid's set and dry-brushing highlights in cream color acrylic:

And finally adding a wash of grey, then some grass flocking and 'scrub brush':
I deliberately left some indication of the joint lines between the layers of foam- they're one inch thick and can be used to visually determine the distance infantry figures can move up the slopes without having to apply a tape measure.
Next up, some good overall shots of the basic firebase showing all the sandbagged revetments and the weathering for the 'concrete'. Then, the water extractor, details of the fighting positions, finishing the vehicle bay, building the observation tower and a good anti-aircraft gun to stick up on top.
Thank you for looking over my work- your constructive criticism is very much appreciated.
106010
Post by: Meer_Cat
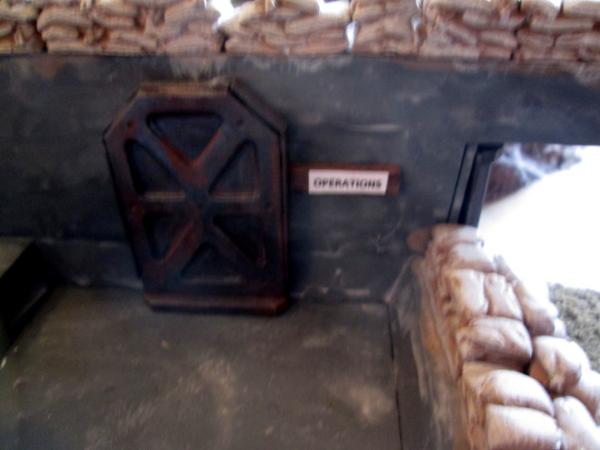
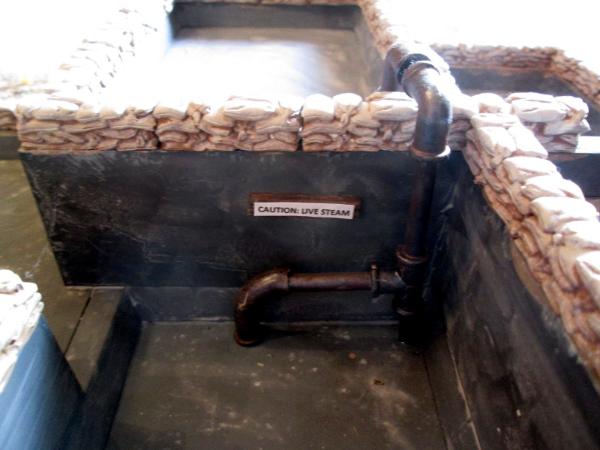
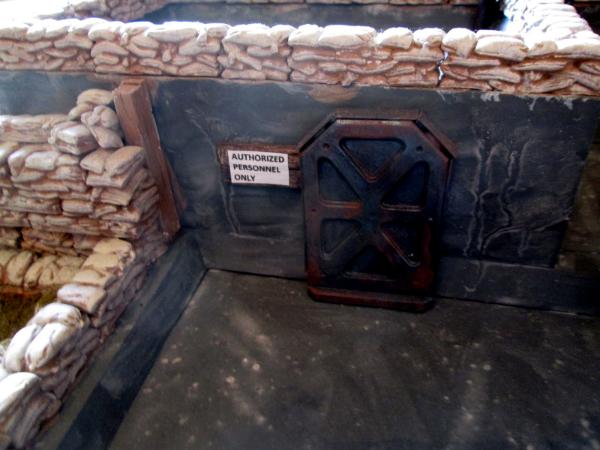
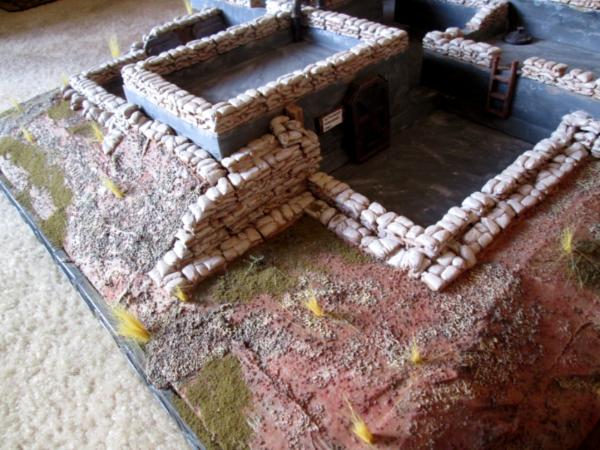
Here are some 'overall shots' of the firebase, with all sandbags, hatches, doors and signage in place:
The overhead view (you can see the compass orientation arrow for in-bound flights painted on the center revetment; a windsock hangs from the observation tower- pics coming soon- to indicate wind direction for incoming Vulture and Valkyrie):

Entrance to the Operations Bunker (sorry for fuzzy shot- I'm getting a new camera sometime in the near future):
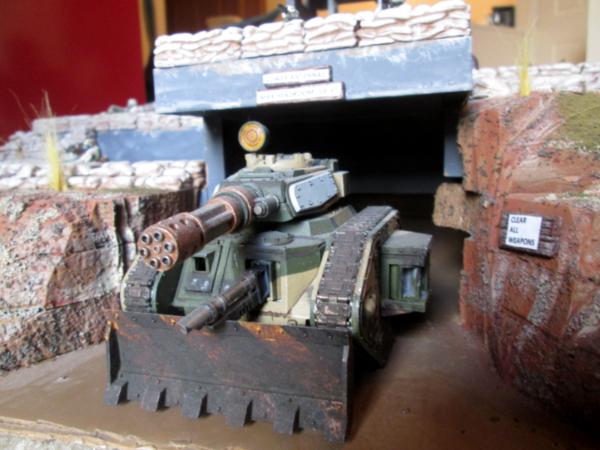
The entrance to the vehicle bay:

The 'water extractor plant' pipage (made from a kid's crazy straw kit from the local supermarket and some extra rivets):
The Commissars' Entrance to the 'Emperor's Fighting Platform':
The Northern Spur:

The Eastern Face:
Another shot of the Eastern Face, showing the retaining wall the combat engineers installed (no spur or wing here to break up the square outline of the hill to save width and weight):
I 'weathered' the concrete/grey surfaces with a wash of two different shades of grey watercolor- not sure I like how it came out, but it is playable, I reckon. The sandbags came out better than on earlier projects I've done using Hirst Arts molds. I need to hit the retaining wall with another coat of rust wash- it is entirely too civilized looking.
Next up, the observation tower, the anti-aircraft gun and pics of the firebase fully manned by elements of the 1st Battalion, 7th Regiment of Infantry (the Lucky Sevens).
As always, thank you for an opportunity to show off some of my work- especially the techniques that I've learned right here on DakkaDakka. Your constructive criticism and feedback are most appreciated.
106010
Post by: Meer_Cat
Here are some shots of the observation tower for the firebase with its fighting platform and the anti-aircraft gun to go on it:


All the sandbags were cast from Hirst Arts Mold #340 (I use that one a lot). The steel girders are pieces cast from Hirst Arts Mold #274- you can build bridges, landing pads, anything from this one. I painted the tower pieces base coat Pavement Grey (which is really a black), then washed heavily with Gunmetal Grey then washed lightly with MicroMark's Rust-n-Dust. The wooden boards on the fighting platform are coffee stir sticks.
Here's the tower fitted into the center of the firebase (those retaining wall panels are cast from Hirst Arts Mold #276- they make great floor panels for Space Hulk layouts):

Here's a long shot and a close up of the gun:


The gun commander and gunner are from the Wargames Factory Heavy Weapons kit, the gun itself is a 1/35 Tamiya quad 20mm kit and the gunshield is the transmission case cover from a first edition Land Raider (circa 1991). I can post additional pictures if there is any interest.
Thank you for the chance to show off some of my work- your constructive criticism is most welcome.
Next posting: final pics of the firebase fully manned and featuring armored vehicles sallying out the vehicle bay.
106010
Post by: Meer_Cat
And here's the finished firebase, manned and ready:

There are seven fighting platforms in the firebase, each can hold 15-20 figures, so the whole she-bang can accommodate an Imperial Company, with heavy weapons, and two vehicles to sortie from the vehicle bay. Here's a Leman Russ exiting:
And a Chimera:

The blast doors that close the opening at other times are freestanding and cast from molds by Hirst Arts.
Here are some views of the infantry manning the fighting platforms:


This project was a lot of fun and started with a $5 picture frame from Goodwill. I hope you enjoyed seeing it- I enjoyed the chance to show it off. I look forward to your constructive criticism.
Next chance I get to post, I have an update on the Panzerjaegers I built a little bit ago, plus a heavily converted transport for them.
61618
Post by: Desubot
Oh wow thats cleaver. never though to use one of those crazy photo frame things.
106010
Post by: Meer_Cat
When I spotted the frame at the Goodwill, it was on it's side- facing up. If it had been hanging on the wall, or on the shelf but verticle, it probably wouldn't have caught my eye.
But lying over as it was, I couldn't help but say 'Oh man, for $5 I can make something out of this!"
Automatically Appended Next Post: So, having finished the panzerjaeger squad, they need a transport.
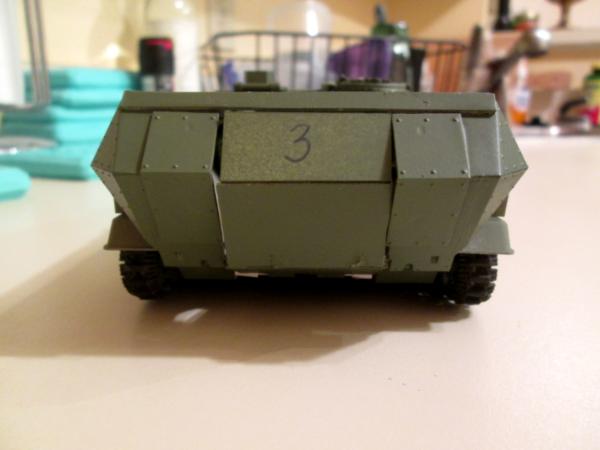
The next project, then, is to take this:
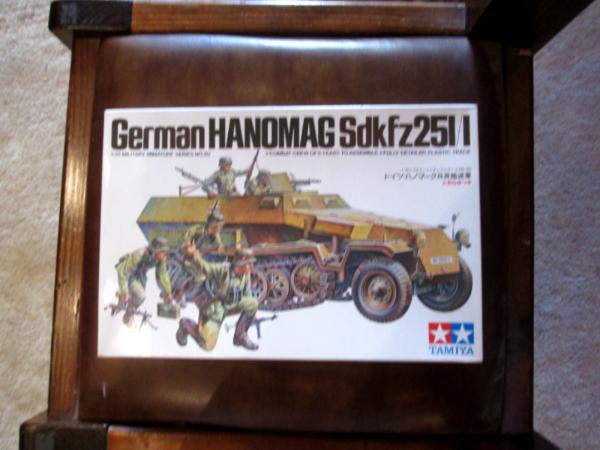
And make it look something more like this:

I picked up the Hanomag kit for US$8.00 on eBay with free shipping. As much as I like the Kielerkopf kit from DreamForge, the price was a little steep. And as noted earlier, I like converting things.
Thank you for the opportunity to show off some of my work, and I look forward to your constructive criticism and comments.
69676
Post by: Big H
Great use of "stuff" here mate! All very Rogue Trader, being of a similar vintage I also made the deodorant land speeder !
106010
Post by: Meer_Cat
Thank you Big H! In the earliest days, Games Workshop had several figure lines, but no vehicles. It was deodorant sticks and homemade arts and crafts or nothing, as you know!
106010
Post by: Meer_Cat
A friend wondered what the area I kitbashed/painted/etc looked like. Here's a couple of shots:

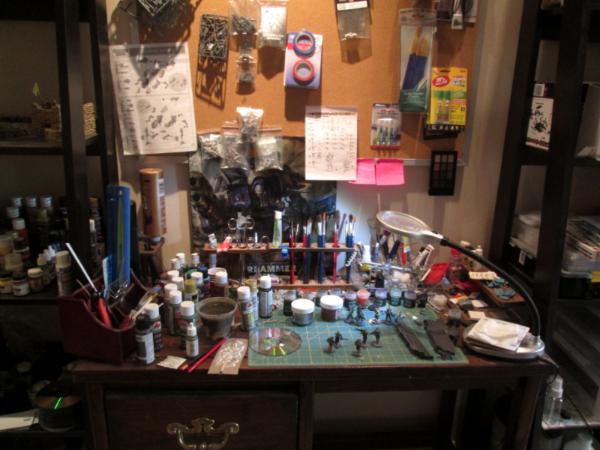
Some of the handiest things came from Goodwill:
- The pipe stands make great racks for paint brushes, tubing, coffee stirrers, styrene and tubes of glue,
- The acrylic makeup stand is very good for separating out small bits and having them easily seen when looking for just the right bit.
- The remote control caddy at the front left holds clippers, tweezers, small pliers and rulers.
The grow-lamp you see in the first picture swings around and can flood the desk when I need bright light, otherwise I work mostly through the desk LED lamp with the magnifier.
106010
Post by: Meer_Cat
Getting back to the counts-as Chimera conversion:
I wanted a transport for the DreamForge Panzerjaegers squad I just finished and- while I don't get any chance to play just now- wanted it to be reasonably compliant with the rules for Warhammer 40k. I also wanted it to look a lot like the Keilerkopf transport that DreamForge puts out.
I got a terrific price on a 1/35 scale Tamiya Hanomag kit (Sdkz 251) for US$8 and free shipping, so that will be the base kit for the conversion. It will need a lot of work to mimic the footprint of a Chimera, while still looking like the Keilerkopf. So, I did what any good converter does and took a perfectly good kit:

And cut it in half:
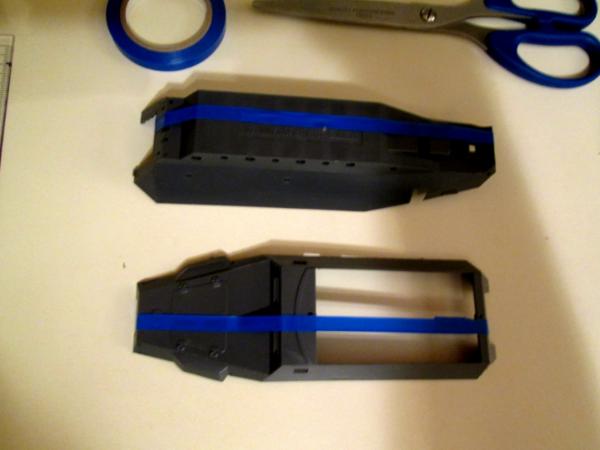
A little work with an emery board and the cut lines were fairly clean. I've seen other conversions based on the Hanomag, and some of them are very good. But all of them struck me as being too long and narrow to fit in well with other GW/ WH40K vehicles, which tend to be bulky and give an impression of brute force.
So, I glued the upper side pieces to the lower and inserted 55mm of plasticard to widen the body:

This gave me a chassis with the width of a Chimera, but in retrospect turned out to be a little long. The next one of these I do I'll shorten the engine compartment. I use a verity of materials as 'plasticard', including actual, store-bought plasticard. But I find that yard sale signs are cheaper and old motel key cards (I travel a lot for my work, so I get a fair few of these) are the perfect thickness and a good size to work with for a lot of the work.
Next up was how to close in the top, cover the engine compartment, get the tracks on and think about how to arrange the interior. Originally, this was going to be a closed vehicle, with no need for a lot of fancy embellishment. Doing a closed job means you can stick guns and hatches wherever you like, they don't have to sensibly inter-relate between inside and outside.
But you guys out in Dakkadakkaland have inspired me, and I'm having a lot of fun with this project so far, so I'm going to make it so the rear ramp drops and the top deck lifts off. That will let me change the configuration from Chimera to Hellhound to Basilisk as needed, by building different top plates. But it means the interior needs finishing off and must be a sensible layout.
Thank you for the chance to show some more of my work, more follows soonest. Please leave feedback to give me an idea of how I'm doing!
69676
Post by: Big H
Nice use of a hanomag ! I was planing something similar for my zombie Nazi traitor guard , so interested how you go about this !
Tho you have already done a ton more than I was going to ...  
106010
Post by: Meer_Cat
Hi Big H- Yup, I'm already 'way over scope for what I was envisioning at first. As I work I keep thinking of things that might make the finished product better (for instance, I _really_ want to wire something up for micro-lights, like some of the projects I see here).
My wife accuses me of finding a brick by the road as I walk back from work (figuratively) and having built the Taj Mahal in my mind by the time I get home!
106010
Post by: Meer_Cat
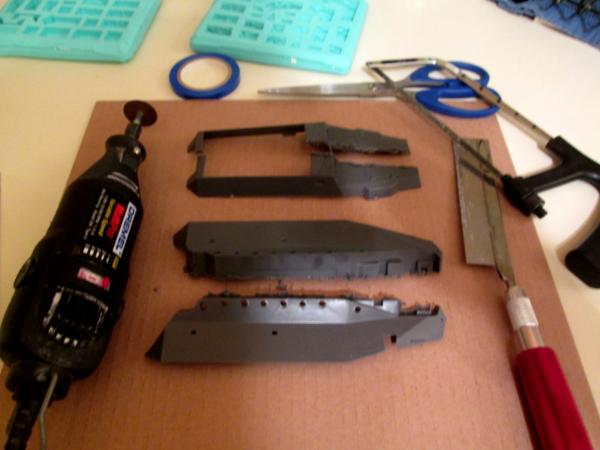
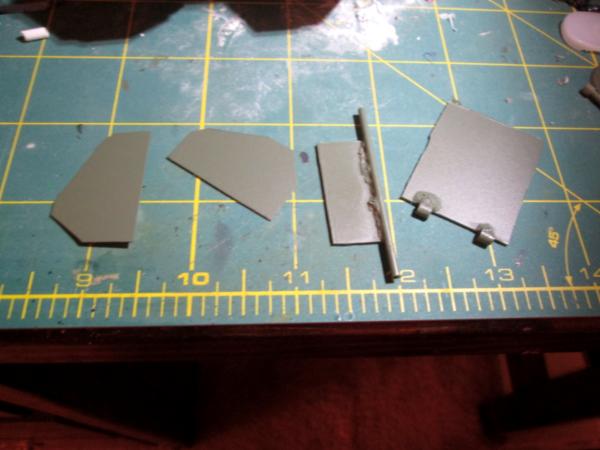
This next bit I started fiddling with the interior. As it turns out, I should have been more aggressive in scratch-building the consoles, benches and firewalls, etc- would have saved a lot of trial and error fitting. But then, that's the fun part, isn't it?
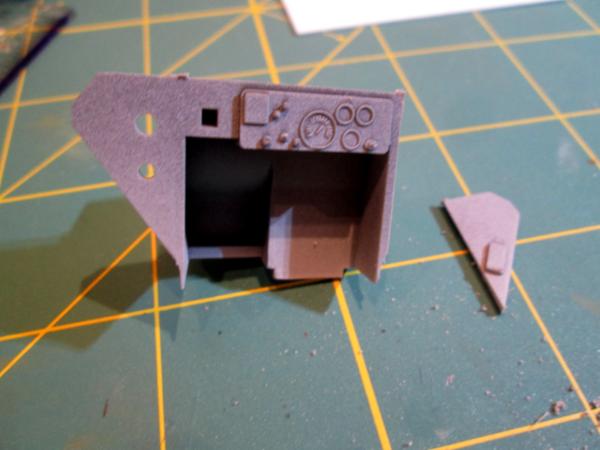
I took the original kit's firewall/driver's panel and thought I could cut one wing off, fit the two pieces into the odd-shaped edges of the forward end of the compartment and then piece in a bit of plasticard in the middle. That didn't work- it placed the driver 'way too far forward into the engine compartment- so I cut both wing pieces off and fitted a panel in between them at the right depth. I later cut the dashboard gauges bit off and attached it directly to the panel:

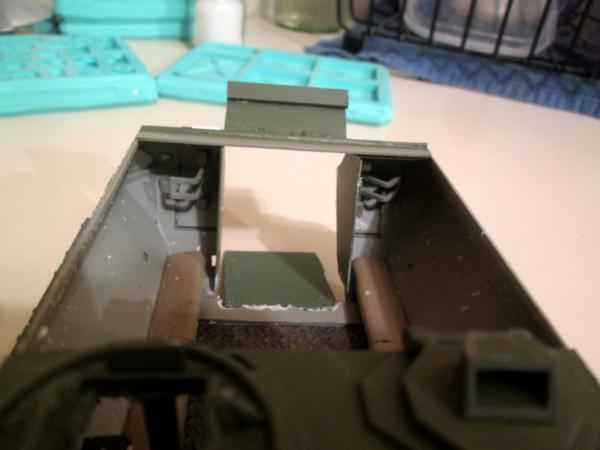
The engine compartment itself was easy to cover over. Not sure what I'm going to do with the odd hinge- grind or slice it off, or just leave it and add more. I scored the line down the middle to simulate to opening sections or a fold over with a dull pocket knife:
This is a piece of non-slip diamond plate that will cover the fighting compartment floor, suitably dirtied:

The effect was created with a base coat of Gunmetal Gray acrylic, drybrush of silver and a liberal splash of Nuln Oil wash (gotta love me some washes!)
I've got more pics on my camera to get transferred over to the laptop and I can post some more.
Hope you're enjoying some of my work- and thank you for the opportunity to show it off a bit. Please leave any constructive criticism and/or suggestions- I'm learning new thigns every day!
65595
Post by: Camkierhi
Looking brilliant, really nice work, nice and tidy.The checker plate could maybe stand a little dusting around the edges.
106010
Post by: Meer_Cat
Hi Cam- and thank you for the kind words. By 'dusting around the edges' do you mean it could stand some dry brush highlighting? Or use weathering powders to dull them down a bit? I'm happy to give it a try when I understand what you're suggesting!
69676
Post by: Big H
I would probably do both !
A lighter shade dry brush, and if it suits the model, some rust spots and grime or dust on top.
When I do stuff like this I always either trawl google for pics of old construction / farm machinerery or my own memories of stuff like it I have been in.
106010
Post by: Meer_Cat
Thanks Big H- I'll give it a whirl. The nice thing about having the basic army built, is I'm spending 'way more time on individual pieces now- having fun with the little details, trying techniques I never have before because it was more important to slap some paint on and get 'em on the table! I never had time for major custom jobs like this before. Now it only makes sense to take the time to do the job properly, if I'm going to invest more than basic time required anyway.
I'm looking at my own farm equipment with an artist's eye now, looking for the change in color and texture and thinking 'how do I replicate that with paint?'
More follows soonest!
106010
Post by: Meer_Cat
Welp, here's some next steps in converting the Hanomag into a Keilerkopf-esque transport for my grenadier Panzerjaegers.
Here's an interesting kitbash to make up two crewmembers for the vehicle- I need a driver and an NCO. The legs are extra bits from the Panzerjaeger set, combined with a Cadian torso. The legs were intended to form a kneeling figure, but if you swap the pieces, you get two seated postures:

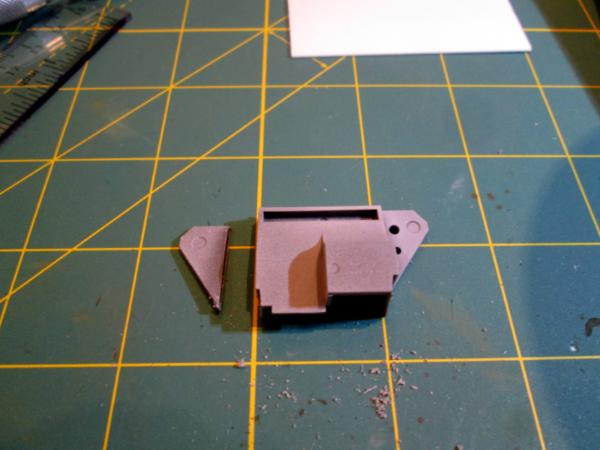
Here's a couple of shots of the dashboard installed. I was hoping to use the whole thing, with the knee-well and all, but it just didn't work. So I sawed off the dashboard with its dials and gauges, and will save the rest for another project:

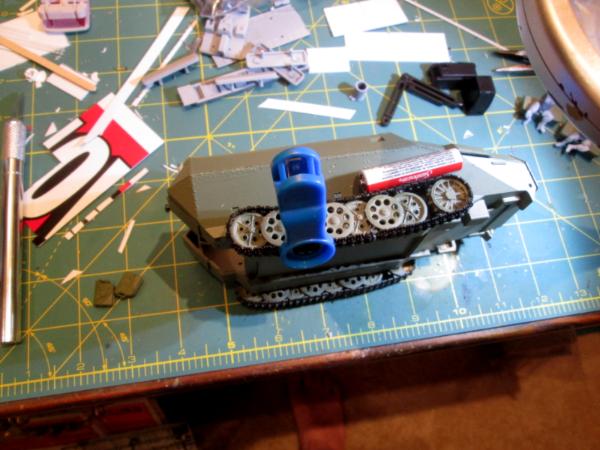
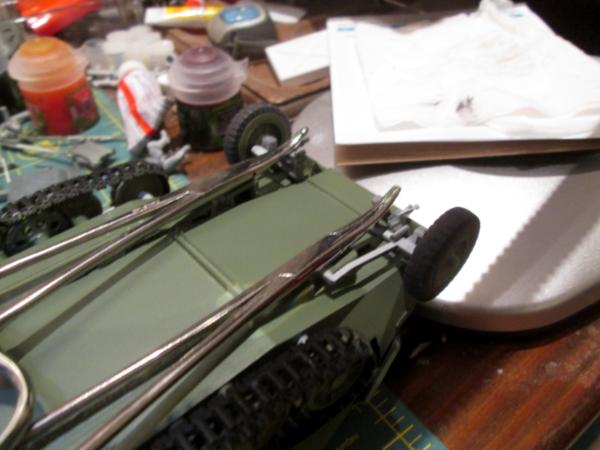
I attached all the bogie wheels as standard- per the kit- and added the treads. They are that slippery, engineer-plastic/rubbery stuff, so I base coated them with Rust-o-leum, then hit them with flat black. I'll weather/muddy them with everything else when the time comes. I had to clamp them down and glue them in place so that the tracks didn't stretch straight across the top road wheels unrealistically; all the photos of the real vehicle in action showed them slumped along the tops of all the bogies. I didn't want to stretch out the tread lengths themselves and risk warping or breaking them, so just glued them and clamped them in place:
This is the undercarriage assembly for the wheels, their steering arms and shocks/leaf springs. I cut them in half and will fit a piece of sprue between to match the new width of the vehicle:

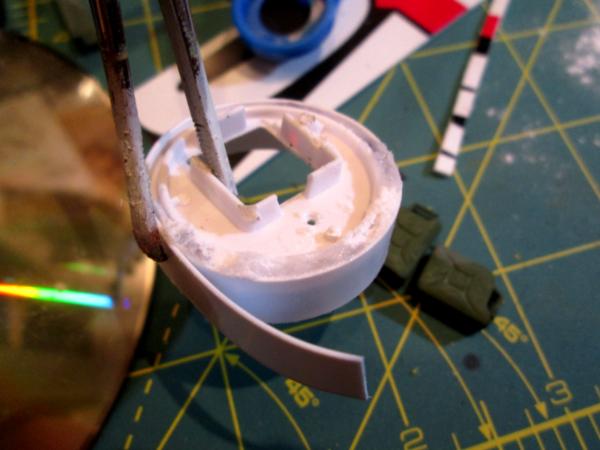
And finally (for now), my current nemesis. I want a small turret for the commander's hatch and found a great piece of junk in my parking lot the other day- I believe it is the front face from a dual USB charging connecter, Wherever it comes from, it is exactly the right size and round along the outer edge. Also, there is a bit that sticks out that us exactly right for the base of a pintle mount for a heavy bolter, that will take the place of the one that would normally be mounted in the bow, on a Chimera. I cut a piece of styrene out to bend around and glue in place- as you can see in the photo- and it will sit just perfectly over the front edge of the cab.
The problem is, nothing I've tried so far will actually stick to both the USB face it thing and the styrene. I've tried superglue (no dice), Testor's plastic model cement (nope), Testor's Cement for Wood and Metal, Jet Styrene Glue and JB Weld 2 Part Epoxy. Everything just pops right off after it dries. I'm trying Eileen's Tacky Glue now, which is my go-to product whenever everything else fails. If _that_ doesn't work, I'll have to build the turret out of something else:
The good part is I'm almost done with the major exterior bits, and can look to start finishing off the interior in the near future.
That's it for now, more follows soonest. Please leave any tips, suggestions or constructive criticism. I'm still a'learnin'!
27140
Post by: ChaoticMind
Genius! Simple, effective, inexpensive, and great looking to boot.
If you don't mind I'll be borrowing the Sdkfz 251 turned pulp Sci-fi transport idea.
65595
Post by: Camkierhi
On the glue side, try roughing up the surface a little, just to give the glue a key, and have you tried Bicarbonate of soda on the super glue. Sprinkle a little on the wet glue and it instantly sets, it actually has a chemical reaction producing heat. It seems to form a weld almost on anything. Glue and clamp the bits together and then sprinkle on the bicarb, works a treat on most stuff I have tried.
As to your model, it is looking stunning bud, nice work on the converted driver etc. and the whole thing is really coming together.
106010
Post by: Meer_Cat
Hey ChaoticMind- thank you for the kind words! I can honestly say that I've been eyeballing the Hanomag kit for some time with the idea of converting it for 'the far future', but I've also gotten some good ideas since I've started work from what shasolenzabi and Inso have done- they've both got some great pics on their blogs. For mine, it'll crry a squad of ten, like a Chimera, have the pintle mounted heavy bolter at the commander's hatch to account for the hull/bow gun and I'm going to fashion an articulated arm-mounted splinter cannon at the rear, on top of the deck, to account for the normal Chimera turret-mounted gun.
Hi Cam- and thanks for the tip! And the kind words! I'll try the bicarb trick as soon as I can- I'm in New Orleans for work the next few days, so it will probably be Friday or Saturday before I can go all 'evil mad scientist in the lab'. I'm excited to give it a try. I reckon to include a folded-up tripod for the heavy bolter inside the crew compartment- like the Army APC's I served with I figure the squad would take the heavy weapon with them sometimes when they dismount to dig in.
Of course, mech infantry don't like to get out and walk that much, which is why Airborne Infantry like me refer to them as 'drive by shooters'.
More follows soonest!
52201
Post by: evildrcheese
Awesome conversions dude.
EDC
106010
Post by: Meer_Cat
Hi Doc- and thank you!
Sorry I've been out of the loop for a few days- I've been itching to try Cam's suggestion of adding bicarbonate of soda (baking soda) to the superglue to find something that would stick styrene plastic to the more slippery 'engineering' plastic. To date, I had tried everything in my arsenal- superglue, Testor's Plastic Model Cement, Testor's All-purpose Cement, Eileen's Tacky Glue and even two part epoxy- nothing stuck.
I formed the styrene strip around the turret plate (it's the face off a two-outlet USB charger I found in my parking lot) and clamped it in place with a pair of over-size hemostats (the fancy medical name for what we use to remove fish hooks and that you can get many places for cheap). This formed a raised ridge around the edge, which I filled liberally with superglue. When I added the bicarb, it 'froze' instantly into slush and hardened within seconds after that.
Cam, I can't thank you enough for this tip. In addition to fastening these pieces together, I think I can use this mixture to fill rough areas on a model and then sand smooth- the trial pieces I glued together this way were easy to sand. I'd use this in places where it was hard to get regular body putty, modeler's putty or green stuff into- it flows like water until you add the bicarb. Things are still drying in this picture, but the trial piece is dang-near indestructible- those pieces aren't _ever_ coming apart.
And because I haven't been able to work on this project since last Monday (was in New Orleans for business) I glued the wheels into the front of this beast, just to say I'd made some progress:
Once I get the commander's turret in place, I can roll on with outfitting the front portion of the fighting compartment with elevation-adjustable seats, the driver's flat hatch and the commander's workstation inside (a la' the APC in "Aliens", which I've seen done here on DakkaDakka several times and done very well).
Hopefully more progress tonight and tomorrow to show soon- please leave any tips, suggestions or constructive criticism- I'm having fun trying all these new techniques!
106010
Post by: Meer_Cat
Okay- a lot of work this week- fiddly, nerve-wracking work- that yields a couple of pics to show some progress!
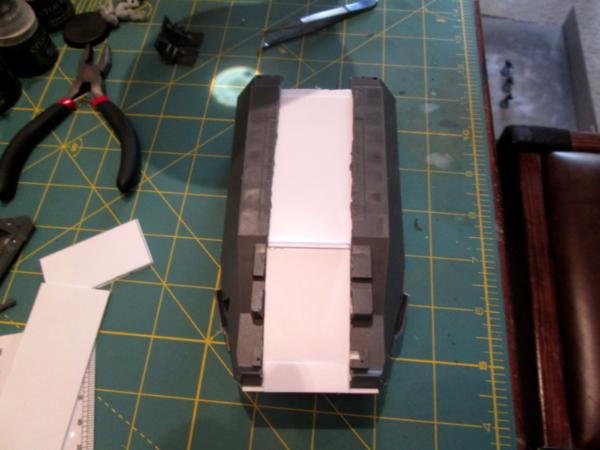
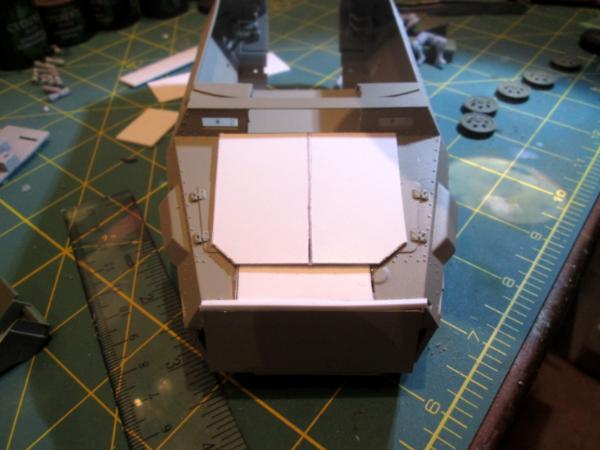
Here's the new forward bulkhead frame and hatches for the fighting compartment. The hatch plate is made from the dual-USB charger piece, the rest is a couple of pieces of plasticard and some sprue. Thanks to Camkieri's tip about using baking soda (bicarbonate of soda) as an accelerant for the super glue, everything is fastened tight. The two upright bits of sprue you see hanging from the bottom are the chair rails- the driver and TC can elevate their seats to ride with heads outside (fresh air, better visibility) or drop them down and button up (less visibility, but much, MUCH safer in a hostile environment). This piece will glue permanently into the forward end of the fighting compartment and will be open to the rear portion of the compartment. One of the first projects I described in this thread was making hatches out of milk carton pull rings- I'll do one of those for the driver's hatch. The TC's hatch will have a heavy bolter on a limited traverse pintle mount, the equivalent of the bow weapon on a Chimera. I may magnetize that, so it can be exchanged for a heavy flamer or meltagun.
This is the side that will face to the rear, into the fighting compartment:
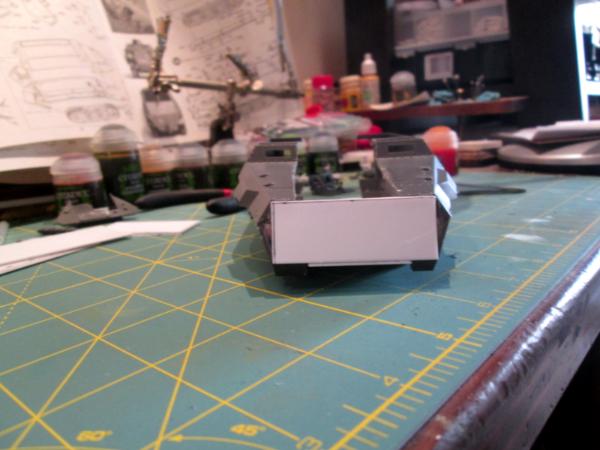
Here's the front face- the rounded hatch portion will actually overhang the edge of the vehicle windscreen itself- pics as soon as the glue dries!
And in other news, the front wheels are now attached and the fenders over the track runs- it's starting to look more like a hanomag (or even a Keilerkopf) now. Most of the crew stowage will go on top of the fenders. I need to keep the top deck relatively clear, because I want to install an articulated arm with a splinter laser similar to what the Keilerkopf carries. I have to figure out a way to put a whip antenna on that will be out of the way of the main gun (possibly mounting it onto the main gun articulated arm). I know in the 41st century they probably don't need HF, VHF or even UHF antenna-based comms- but what's an armored vehicle without a whip antenna, I ask you?

More follows soonest!
76303
Post by: Warboss_Waaazag
Without a whip antenna? Why nothing at all. Clearly.
106010
Post by: Meer_Cat
A couple of updates- but not as much as I had hoped: I finally am home and had a block of time to use to work on the conversion, when the light strip over the workbench blew out. Bulbs test good, breaker box is good, I can only assume that it's an internal fuse in the light strip itself. I'll have to call the property manager to get it looked at and in the meantime buy a stand lamp to be able to continue to work. But as I've heard said "if miniature painting was easy- everyone would do it". 
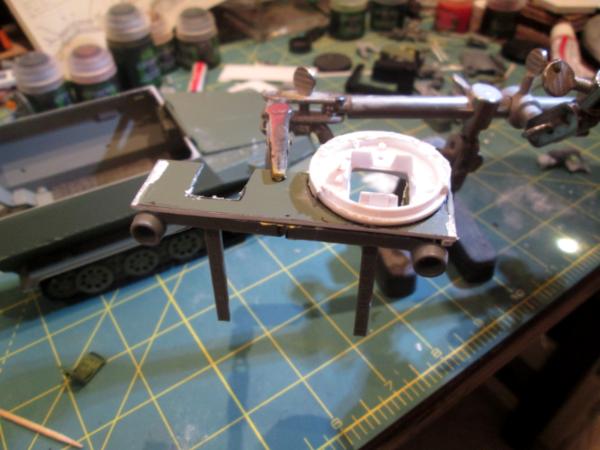
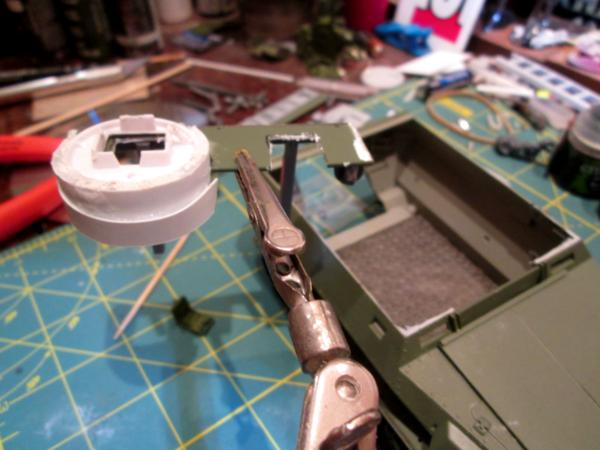
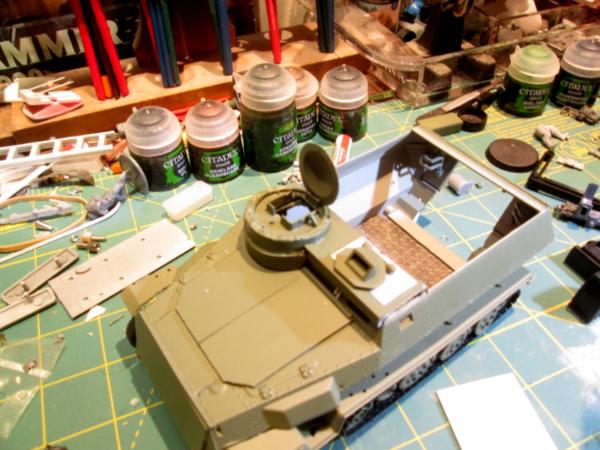
Here's what I got done anyway. In these first pics, the forward deck section is installed with the commander's turret ring in place. Hopefully easier to see now where the seats will attach to the vertical pieces of sprue. A little putty work and the outer hull is nearly done:

And here's the driver, all assembled. I may not go with the Hanomag kit's steering wheel, as pictured, it seems a bit out of scale. On the other hand, only the driver's head will be visible, stuck out of the hatch, and the wheel and everything else relatively hard to see. In which case the exaggeration for effect might be a good thing, to have the wheel visible at all from the sight angles it will have. Or I can clip away half or three quarters of the wheel and leave just a steering bar- like on the M-1 Abrams tank. I'd be interested to hear all y'alls opinion whilst I cogitate:
More follows soonest- especially if I can get some light to work by again!
76303
Post by: Warboss_Waaazag
Can we get a shot if the driver in place so as to better inform our opinions?
52201
Post by: evildrcheese
I think it'll be alright as it is to be honest.
EDC
106010
Post by: Meer_Cat
Hi Warboss, EDC, BigH,
And thank you for the feedback! I went to take a photo of the driver more-or-less in place, per Warboss Waaazag's suggestion (still working on my kitchen counter, as I haven't gotten a temporary lamp for the work table and the overhead light strip has now developed the amusing habit of clicking on and off at random intervals), and discovered that no matter how I try, the driver won't fit up into the hatch with the helmet/head outside the driver's compartment. The darn instrument panel gets in the way, and it's stuck on entirely too well to the firewall bulkhead to remove without taking everything with it.
So, as the musicians say, it's not a mistake, it's a variation on a theme. Now the driver will be in the 'buttoned up' position, with the seat lowered all the way and using a view screen to see by. The TC will still be topside, manning the heavy bolter. The original question still obtains- to keep the full steering wheel or cut it down. It's not as important now though, I think, because the driver will not be very visible at all except looking in through the rear ramp (when it's down). I'm inclined to leave the wheel full-size though- that notoriously poor Imperial power steering, doncha know.
Here's pics:


Looking at it this way, I'm re-thinking and believe that I can raise the seat (the gas can is temporary) halfway up, so the figure is looking out the armored viewport. I cut the vertical rail out trying to fit the driver up into the hatch opening- I'll glue that onto the back of the seat and use some putty to hide the join line. A bit of paint and bob's your uncle.
Not sure if I want to do the driver's hatch up/open or closed, with the driver inside the hull.
I still want to try to build in a whole 'commander's suite' on the right hand side- computer screens, switches, dials and meters and the machine that goes 'bing'. We'll see how that goes when I get past this road block- I need to make some good progress so as to feel like I'm moving forward a bit, not hung up on one thing.
I look forward to your suggestions and comments! More follows soonest. Automatically Appended Next Post: As a postscript to the post above- don't get me wrong- I love the challenges that a conversion like this poses. Otherwise, I'd stick to building kits as they are and having fun with the painting, or some other aspect. I'm so wrapped up in how the whole thing is going to fit together that some times it seems like nothing is happening. Didn't mean to sound like I was whining. 
518
Post by: Kid_Kyoto
Great blog, that base is an epic project and a real education in how to use found objects.
Thanks for sharing!
106010
Post by: Meer_Cat
Thank you for the kind words Kid! It's a great boon to having a base army painted up and being able to focus on the interesting possibilities that a particular object might present. My wife just shakes her head sometimes when she sees me rooting around through the trash can, or running across the parking lot to grab some piece of junk (treasure) that looks promising. But hey, it keeps me off the streets (at least when I'm not 'gleaning')!
More follows soonest.
9910
Post by: CommissarKhaine
Ah well, the vagaries of conversions. Still works out nicely!
Will you be doing something with that front? It seems a tad bland in my (not so humble) opinion. A radiator grill or something would help out tremendously.
106010
Post by: Meer_Cat
Hi CommissarKhaine!
Yes, I plan to louver the front grill, add air injection filter intakes and add armored covers to the existing ports. I'm thinking about breaking up the bland expanse of the hood/engine cover with grab handles and possibly raised access panels. From my own experience in the military, I know that there isn't any existing vehicle that is actually used by real soldiers or marines that isn't over-run with personal gear, so I'll add a ton of ammo boxes, packs, tarps, etc in all the logical places (is it out of the way of the gun? Of air intakes? Oil/fuel? Then I'm puttin' my junk there). The rest of the fighting compartment will be covered over also, but the main gun will be mounted up there and will (should) fill out nicely.
Please keep the ideas/suggestions/constructive criticisms coming- they're all helping shape what this ends up looking like!
9910
Post by: CommissarKhaine
Sounds like you hav it all planned out then .
Don't worry, I'll happily post up C&C, it's why I love dakka in the first place: it's a very open and constructive community.
106010
Post by: Meer_Cat
So, little steps and big ones. I'm finally at a point where I can start finishing things off for the interior, so I can get started on the exterior.
Here's a shot of the pieces to make the driver's hatch:
And the hatch test fitted to the driver's compartment, along with the TC's hatch in the open position:
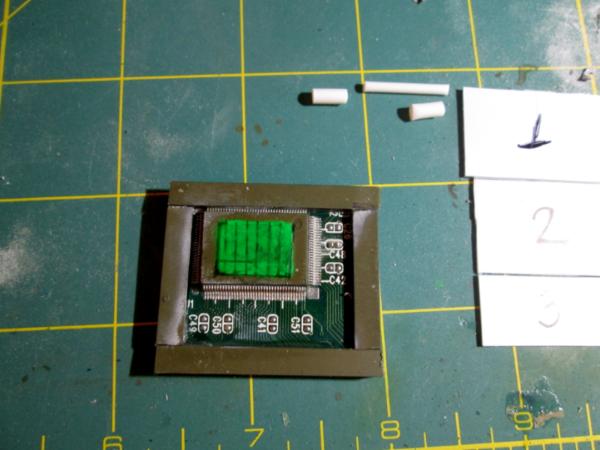
I also started working on the TC's 'command screen'- this will be located on the forward bulkhead in front of the TC's seat adjustment rail (the darn glowy green paint needs several coats to cover smoothly- I used Testor's spray enamel as a base coat, apparently it's pretty slippery). The bit of circuit board is an old sound card I got from Goodwill for 50 cents- it's harder to cut than it looks and will need a bit of edging added around the rim:
And started to basecoat the driver. I can't assemble anything in the front part of the hull until the driver, along with the seat and the seat adjustment rail all as one piece, gets glued in place. Most of the effort will go into the eyes (should be visible through the vision slot) and the helmet. The rest gets a good basecoat, a little bit of wash and that's it. Although it goes against my grain, it isn't worth the time to put more effort in when it really can't be seen.
More follows soonest!
65595
Post by: Camkierhi
Excellent work.
106010
Post by: Meer_Cat
Hi all,
I try to maintain good project discipline and only work on one thing at a time (ok, ok, maybe three things at one time), but I wanted to take a quick minute to share some picks of a new 'bit' for converting, kitbashing and scratchbuilding I found. I will be working on the Hanomag conversion some more tonight, and hope to have some real progress photos soon.
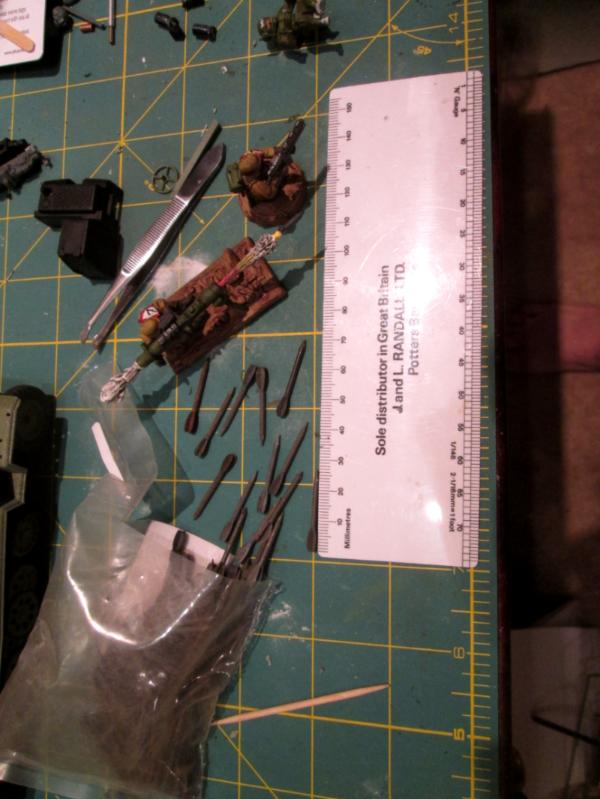
These are flechettes from a de-militarized 'beehive' round. These were outlawed back in the 1970's, I believe, and were intended as an anti-personnel round particularly for use in areas of heavy foliage. I got these from the Sportsman's Guide catalog, who offer them as a military curiosity.

These are about an inch long/25mm and in profile look very much like a missile or rocket, to me. The catalog sells them in packets of 2 ounces (as you see in the phot, which is more than 100 of them) for about US$8.00 or by the pound (16 ounces) for a higher price (I forget what). They are metal, but fairly light and as you see from the color, almost don't need weathering.
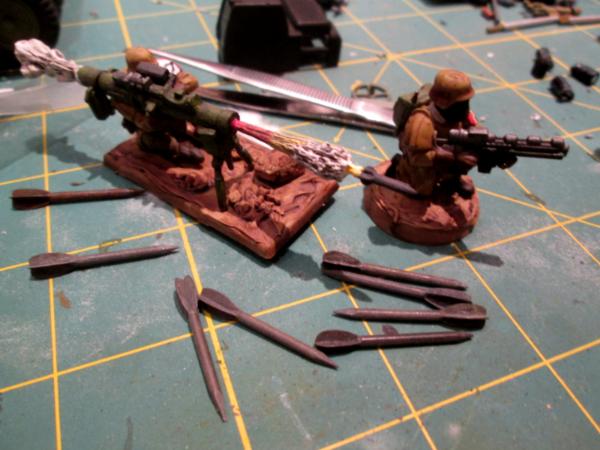
I put this Imperial Guard Dragon anti-tank crew in the photo for perspective. The missile in the 'firing' addition I added is much smaller (see Klaus- Not Santa's blog on how to make these for yourself) but the missile that comes with the IG Heavy Weapons set is much larger. These actually look well-scaled next to the infantry. I also see these as good in batteries on flying vehicles, as ammunition for quad launchers or thud guns and as great detail on scenic'd bases and/or objective markers.
You could even hang these on top of armored vehicle cannon barrels and they'd look a lot like the 1960's/70's NATO Shillelagh ATGM.
More follows soonest.
106010
Post by: Meer_Cat
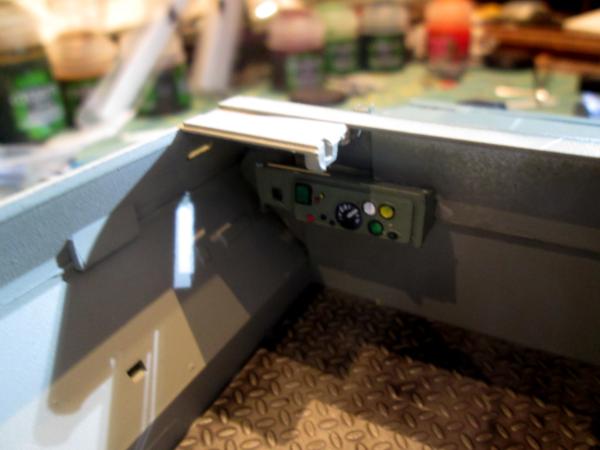
Some forward motion in completing the interior:
I finished up what I'm going to do as far as painting the driver goes. I knew the figure wasn't going to be very visible, but figured to put some modest effort into the eyes. As it turns out, the viewport is too small to see anything through, so really, the driver is a faceless shape huddled at the front of the fighting compartment. Here's a pic before the entombment:

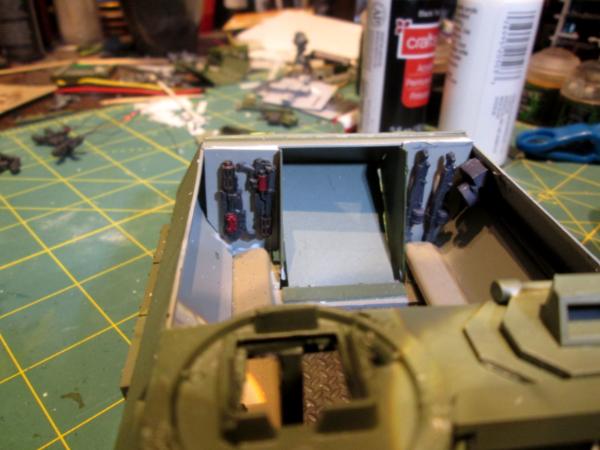
And here are some views of the interior so far. The elevating rails are in place, the TC's seat is glued in, a comm center installed to the left and slightly behind the TC's seat and the troop benches installed. Everything needs to be weathered yet, and I have a ton of stowage to insert (need to fill up that too-wide fighting compartment with something- that something is going to be a heavy bolter and tripod for deploying in ground mount mode when the infantry squad is debarked):

(Clearly, this elevating rail came from the Thames Factory, LLC!)

(The comm center to the right is a capacitor doo-hickey thing from the broken up sound card. The computer console I made was too big to fit into the vehicle, so it'll wait on my bench until another project comes that needs it.)
Once the interior is done I'm happy to move on to the exterior, adding a lot of exterior stowage, and finally the TC and the pintle mounted heavy bolter. As always, thank you for the opportunity to show off some of my work, and your comments, suggestions and constructive criticism is welcomed and, frankly, required if I'm to continue to improve.
More follows soonest.
9910
Post by: CommissarKhaine
I like it. Interesting use of a broken computer card as well .
106010
Post by: Meer_Cat
Thanks, CommissarKhaine! Here's the computer screen that was going to go into the TC's position, but there just isn't room. It's from another part of the sound card and I'm still in the process of painting it up. There are several projects on Dakka that I've seen where the modelers have really done a terrific job of painting the screens:
A bit of a slog, but another fairly productive evening and I've still got a bit more time to work: I've admired many of the projects here on Dakka where the modeler has built his or her own ramp hinges- some of you folks are extremely precise in your measurements and cuts! I've decided I'm going to try to make the rear troop ramp into the fighting compartment in three sections and try my hand at building my own hinges at the bottom. (I see much fiddly work in the future as I shave bits of sprue to act as spacers to keep the three ramp sections in the right angle relationship to one another, but that's for another day.)
Here's the main pieces laid out:

Here's the set of angles I'm trying to bridge (I'm cheating on the first section and covering the first angle with one piece):
And here's the first half of the hinges glued/fused onto the hull. The other half is glued/fused onto the first ramp section. I wanted to get the hinges set before I attached the rest of the ramp, to keep things a bit easier to maneuver. I can't thank Camkhieri enough for the tip about bicarbonate of soda (baking soda) added to superglue/cyano-acrylite to act as an accelerant and hardener- to quote him 'it really works a treat'. These fiddly little bits would never stayed glued without it. Any excess baking soda that sticks on around the hinges just became the foundation for mud, when I get to weathering the underside. So far, most of the excess is easily brushed away:

Sorry that last pic is blurry, I'm still working with stand lamps and such (very 19th century) until management fix the track light. More follows soonest!
65595
Post by: Camkierhi
Looking great. Nice work on the crew. The hinged door will be interesting, glad the tip is helping. I often leave the excess and paint it as rust, looks effective to me. Great work all round bud, look forward to seeing how you do with the door.
106010
Post by: Meer_Cat
Thanks Cam! I've enjoyed/admired your work for awhile now, so your observations mean a lot. Ever since I saw your tutorial on making an entire Catachan jungle base/fighting tower using only the box and the sprues the infantry set came with I've closely followed your projects.
With the baking soda accelerant for superglue, the resulting weld looks a lot like a real armor weld on an actual fighting vehicle, So, like you, I plan to leave it rough in places and lightly wash as for rust- because that's how it looks in real life.
The scope of this project got completely away from me- originally I hadn't planned to make it a filled out interior with a working ramp or anything like that- just a buttoned up 'counts as' Chimera. But there were just too many opportunities to try things I've seen here on Dakka, so it's been a hoot.
I look forward to your observations and constructive suggestions!
106010
Post by: Meer_Cat
A little bit of progress on the ramp before I get subsumed in pony-rescue ops for the weekend:
Here's a shot of the three panels glued up to form the ramp. I had to add the bit of round tube between to give them something to stick to, even using the baking soda/bicarbonate of soda accelerant. I used the bit of blue masking tape you see to help hold things at the correct angle whilst appIying the glue- it'll come off before painting (you Ork guys could maybe leave it on though- I think it looks suitably 'patchy' and ork-ish). reckon they'll look like additional hinged sections once painted up. The bottom section will stick up when the ramp is in the lowered position- the grunts will just have to jump a little as they run out the back. There is a bit of a gap between the edges of the ramp and the opening I've made in the back of the fighting compartment- I'll add a flange to either the ramp itself or the opening and that will take care of that.
You can see the second half of the hinge bits here on the ramp that will mate with the other half on the hull; a plastic tube used as a pin will join them together.
The opening itself was shaped and formed by gluing the original clamshell doors of the Hanomag in place- the space that left was pretty much perfect for the width I made the vehicle.


106010
Post by: Meer_Cat
So, here's the ramp installation:
I set the hinge pins in the ramp cylinders and pushed them to the center, to allow the ramp to fit between the cylinders mounted on the hull:
Then I fitted the ramp in place and pushed the pins outward, so that they engaged both the ramp and the hull cylinders- I can glue a small plug in place later to keep the pins from working back out:

Here's the ramp in the up position:
And down:

And having fiddled with it all evening, I don't think I'll keep it.
The upside is, it's proof of concept that my adaptation of the hinge idea I saw here on DakkaDakka works. The downside is, I just wasn't precise enough in the angles for this ramp to look good- too many angles that aren't _quite_ lining up. Tomorrow I may mess around with some trim and see what I can do, but really, I think it needs a single plane (much straighter, instead of three angled sections) ramp that fits the opening better. The bits of the hull that extend past the ramp on either side I can make into external fuel tanks, as in the upgraded M113's (the external tank is intended to blow out and away if hit, unlike the internal 90 gallon fuel tank- that armor is only an aluminum alloy, you know). We'll see.
I would be interested in all y'all's opinion: add trim to hide a multitude of sins, or redo the ramp as a straight, flat plane?
More follows soonest.
27140
Post by: ChaoticMind
I think the singe piece ramp and fuel tanks is the way to go. I wasn't sure about the ramp turning back up in the first place.
52201
Post by: evildrcheese
Man you've been busy. I like the idea of the command screen from an old sound card. Shame the hinge for the rear door didn't work out.
EDC
65595
Post by: Camkierhi
Brilliant work on the hinge.
2 thoughts...
Keep it as is, trim it up, will look fine as it will look like it is armoured and structural. I originally thought you were going to hinge each section, which would be cool, but seeing it in place, it actually looks quite good as is, as the "lip" at the top of the door acts as a fighting screen once down, nice shield to hide behind whilst exiting the vehicle.
Single ramp sounds a better idea, add a slight trim at the top to act as a shelter for when the door is open, and you are golden.
Oh and just for being a pain, how about you do it as a split top and bottom, larger bottom becomes the ramp, top goes up and acts as shield. Nice chance to do some pistons. 
Don't be down on the efforts so far they are excellent and always a good learning experience. Even if you start from scratch on the rear door, nothing was wasted in the trying.
106010
Post by: Meer_Cat
Thanks to all of you for the advice!
ChaoticMind: Agreed- I had my doubts about the last raised section of the ramp, didn't think it would be that steep. As a former grunt, the last thing I want to have to worry about is hurdling something at the end of my exit from what we fondly refer to as 'the moving big-a*sed target' at my highest rate of speed. But, it was worth trying just for the experience- this project is 'way different than I thought it would be at the beginning.
EDC: Glad you liked the 'command screen' idea. I actually saw a diorama of the interior of a space ship (must have been back in the early '90's, as I was fairly new to Warhammer 40k) in which the modeler used circuit boards for an entire wall of the venue- and had added peanut lights (pre-LEDs, of course); it was highly effective. As for the ramp, I got some great experience out of it so far, and have some great ideas to try next!
Cam: Thank you for all three ideas! I hadn't thought about hinging all three panels together- that would have been something to try (and I just might, on the next project that needs a ramp)! But I think I'm going to go with a combination of ChaoticMind's vote and your third idea and go with a split ramp. I've never tried to do pistons before, but have seen them done here on DakkaDakka.
So, tonight I'll get the old ramp off and try three variants:
1) Cut a piece of plasticard (actually a motel room card) to form a one piece, flat faced ramp that fills the whole opening or
2) Cut a piece of card that fills the bottom 2/3 of the opening and another piece that fills the top 1/3 and do the piston-driven split door thing or
3) Adapt the pieces I have already and do the 2/3 / 1/3 idea; looking at the model, the sections might be fitted in snugly with a little bit of trim if they were separated. This would give the bottom section a bit of angular curve to run down, with no high hurdles at the end
Thank you all again for your suggestions- I look forward to more. And more (pics) follow soonest.
106010
Post by: Meer_Cat
This is more like it!
Based on the advice from ChaoticMind, Evildoctorcheese and Camkieri, I went with a two panel, flat sloped ramp idea that came out looking much more like I wanted.
Cut the new ramp to size and glued the hinge cylinders on (the technique that seems to work best for me is to use Eileen's Tacky Glue to help temporarily hold the pieces the way I want them, then position baking soda exactly where I need and in the right depth/quantity and then drip superglue onto the bicarbonate of soda):

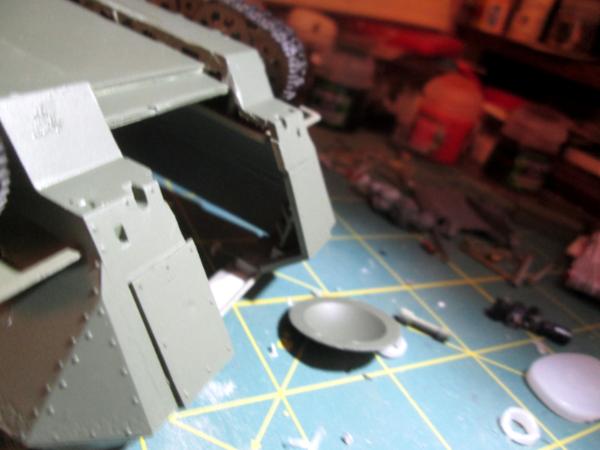
Here are the four pieces I needed to make the new approach work- the two wing pieces shape the entry way, the smaller flat panel is the upper ramp section that swings up and the lower ramp section that swings down. The upper ramp section only has one set of hinge cylinders that will fasten directly to the hull- the long hinge pin fastens to the ramp section and makes for a smoother, narrower join. You can also see where the baking soda/superglue mix welded the plastic pieces together; if done more neatly than I have here (although I'm getting better with practice) I think it will paint up looking like a real metal weld line:
Ramp sections in the closed position:

And ramp in the open position (from outside):

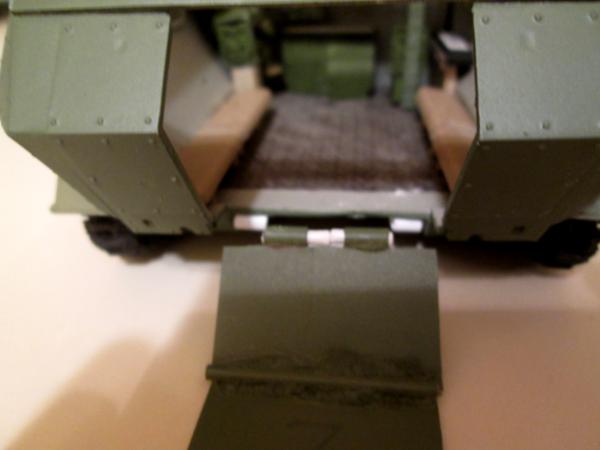
Here's the ramp in the open position looking from 'inside' the vehicle:
The chewed up lip you see right at the edge of the lower ramp section is where I had to grind out more room for the panel to swivel- the hinge line didn't quite line up. I've already painted a small trim piece to glue in on top of it and it looks fine. The cabinet spaces you see to either side of the ramp were going to be closed in, and from the outside fitted out to look like external fuel tanks. Seeing them as they are, I think instead they will become weapons lockers for meltaguns and flamers. The plastic bits in the upper area you see are the original kit's hinges for the clamshell doors on the Hanomag; I fitted them in with some idea of mounting special weapons (meltagun, flamer, grenade launcher) to them to fire out of the back to support the deploying infantry squad. They would have been controlled by the driver, who would be aiming them via a TV screen in his compartment, whilst the TC provided overwatch 360 from his station with the heavy bolter and/or the main gun.
I have yet to add some trim pieces to break up that flat, blank space and there are rivets- lots and lots of RIVETS that need to be added on, but I'm happy with how it's going now and can actually see the end in sight (sooner or later- as some say, "the destination is nothing, the journey is everything").
Thanks again all for the suggestions- I'm very interested to hear your opinion of how this came out. More follows soonest.
27140
Post by: ChaoticMind
Ah yes, the joy of 40K. Humans can't remember how to weld, therefore: ALL THE RIVETS!
One advantage in letting you do it first, I can learn from your mistakes.
106010
Post by: Meer_Cat
Rangers lead the way ChaoticMind! Just don't follow too close if all you see is pieces of a pair of boots- it means I found the landmine the hard way!
65595
Post by: Camkierhi
Excellent work, looks perfect.
106010
Post by: Meer_Cat
Thanks Cam! Last night I needed a break from plasticard, so wound up mostly painting the stowage and other bits that will get attached to the hull last. But really, the next step is to fit the pistons to the two ramp sections. I'm having a ball with the plasticard tubes (round and square) that I got as a deal bundle on eBay- the sizes all nest inside one another, and the possibilities are _very_ interesting.
I'm also thinking that, since the footprint on this APC is the same width but longer than a Chimera, it needs a reason for being bigger. So if I make it a command and control vehicle, that explains the larger size (need room for extra radios and antennas and bling). Which means I can redesign the fighting compartment to include the computer screen, a workstation and several radios. Instead of being the transport for the panzerjaeger grenadier squad, it becomes the transport for a platoon or even company command squad.
I have another hanomag kit, I can apply a lot of what I've learned here in building it and would make it a slight bit narrower (I like the proportions on Inso's build) and a lot shorter. Frankly, I think if you shortened the nose a bit on a hanomag, you have something that looks a great deal like a Taurox.
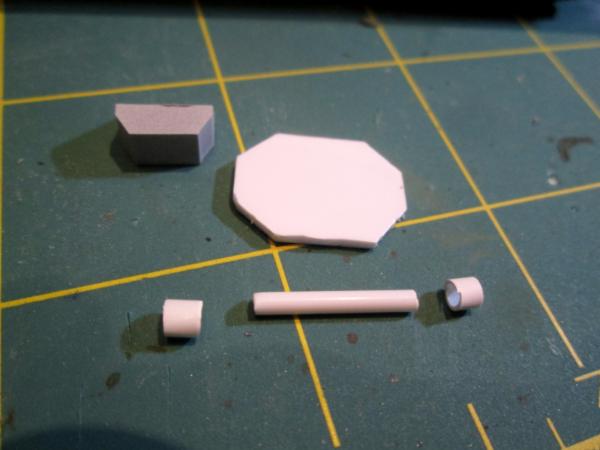
Thanks for all the encouragement, and all the inspiration from your work! Automatically Appended Next Post: I needed smoke launchers for my Panzerjaeger APC and didn't have any in my bits box, so in addition to base painting some doo-dads last night I also scratchbuilt these. I took the offcuts from the axles for the drive wheels of the Hanomag (but you could use pieces of sprue or plasticard tubing as well):

Shaved the base end of the stem (on both sides for the middle launcher, on just one side for the end launchers):

Glued them together:
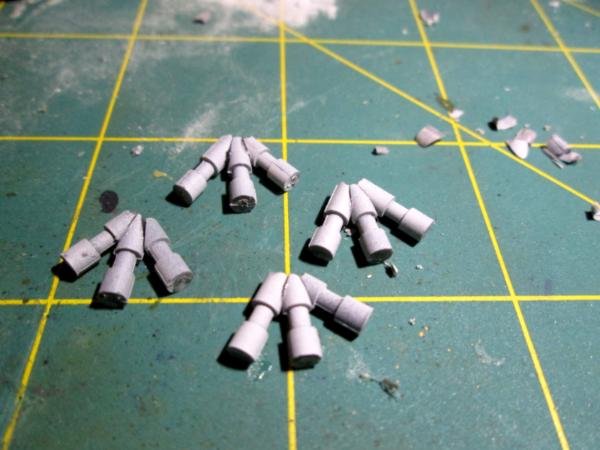
And added a rim made from plasticard tubing:
A small wedge of flat card under them to give them some elevation, primer, basecoat of Pavement Black, drybrush of Boltgun Metal, a little Nuln Oil and Bob's your uncle- smoke launchers.
I hope this comes in useful for someone, and thank you for the chance to show off some of my work. I look forward to your comments and constructive criticism.
More follows soonest.
106010
Post by: Meer_Cat
Lots of progress in many areas- not many worth photographing until they're slightly more assembled/installed.
What I can show here is a shot of the panels that close in the rear 'wings' of the fighting compartment that were created when the trim went in for the crew ramp. These are to represent weapons lockers, or racks:

And here they are installed (you can see the lower ramp section lowering mechanism in the upper right hand side- a better shot follows when the interior is finished, which is 'soon now'):
I've also gotten work done on finishing the smoke launchers (sure they were 'done' before, but now they're OVERDONE), plus the TC and the flag bearer.
Thanks for the chance to show off some of my work, and your comments, suggestions, constructive criticism are most welcome.
More follows soonest.
76303
Post by: Warboss_Waaazag
Shouldn't those machine guns have trigger handles?
I really like the ramp fix you've done. And I like the details on the interior. Those triggerless guns are just nagging at me for some reason.
106010
Post by: Meer_Cat
Hey Warboss! And thank you for the feedback. The machine guns actually do have triggers and guards, but the drum magazine obscures them in the pic from the angle I used to shoot from. This pair are from the DreamForge Panzerjaeger set, and the detailing on them is pretty fine. Is there a fix you could suggest that would make the pieces look more balanced?
106010
Post by: Meer_Cat
A small component finished off:
I think I mentioned very early in this thread that I have a tendency to overbuild things. For instance, this transport (Tamiya 1/35 scale Hanomag kit conversion) was supposed to be a closed-compartment, fairly straightforward job. But as I was busy cutting the hull sections apart the possibilities of kitting out the interior immediately leapt to mind, and the scope of the project got a lot bigger, a lot faster. Don't get me wrong, I'm having a blast nd learning a lot as I go, with the help of the advice, suggestions and constructive criticism of all you' ns Dakkanauts.
So, I wanted to add smoke launchers (as a Chimera would have), but didn't have any bits floating around, so I scratch built something that I think looks pretty good out of bits of sprue laying around on my desk. Naturally, that was okay at first, but after looking at them twice, I decided I could improve on the basic design (if it isn't Over-worked, it isn't worked enough, amirite?)
I found these Swarovski pearl beads for cheap on the clearance shelf at my local Michael's (these are 3mm):

Glued them into the launcher tubes (the empty cells had too much glue from adding the rims, so they are now either expended tubes needing reloading, or non-functioning units in need of repair or replacement):

I braided four 'wiring harnesses' out of 28 gauge wire. I don't know if I like the red, black and blue colors the wire came in, I may wind up painting it so the colors are more consistent with the matte of the rest of the vehicle- you'll be able to see a bit better in the last photo in this set. The armored vehicles I crewed on in the Army had smoke launchers, and their wiring ran right through the armored hull to complete the actuator circuit:

I drilled some 1/64th inch holes at the base of the tubes (these finger drills are from Micromark, and I've finally found something that I can control well enough to drill very small holes like this, and also drill out gun barrels, etc. I may do a product review later when I'm done with the Hanomag conversion):

I inserted the braided end of the harness into the small tube that elevates the smoke launcher unit, trimmed the free ends to shorter length, crimped a kink into the end, inserted them into their respective holes (one per launcher tube), dropped a small bead of superglue on to hold them and bob's your uncle- smoke launchers with the wiring actuators in place:

Two questions I'd like your advice on:
Should the wires be primed and painted because they're too glossy, or are they okay as is?
Should the smoke 'cartridges' be painted grey, green and or red, to indicate the color smoke they produce when discharged?
Thank you for the opportunity to show some of my work, and more follows soonest.
76303
Post by: Warboss_Waaazag
To cut the gloss on the wires you could hit them with an acrylic wash (virtually any color watered down). I recommend painting the shell ends with some sort of color indicator if for no other reason than to add some color to the pieces.
As to the machine guns - virtually every weapon in the 40k universe has a pistol grip. If you add a shirt stick to the spot where the grip is or would be I think it would look better. But you also have the option of ignoring my input. I was feeling cranky when I made my comment and I took it out on your detail work. Sorry about that. They're a small detail amongst many that makes this build awesome and not adding a pistol grip to the dreamforge details you've added in isn't going to break the effect of the overall build.
106010
Post by: Meer_Cat
Hi Warboss!
I like your suggestions for the smoke launchers themselves- I was pretty sure those bright wires would need some dulling down and I can make a wash easily to handle that, and still have some of the underlying color show through.
Your observation on those machine guns is spot on! I looked them over when you made the comment (and cranky or not- I asked for input and as it turns out- you are right) and I saw the trigger housings, but couldn't put my finger on what wasn't 'quite right'.
Now that you call 'em out- of course the pistol grips are missing- it's very plain, I just couldn't see it before. They're made so you can attach them directly to a DreamForge figure's hand, so no grip is molded on. 'In the rack', as they are here, they need a grip added to look balanced. I'm going to do that- just have to figure out how to maneuver the pieces into that tight space to get it done.
But if I've taken the time to do the build well up to this point, it would be petty not to continue to do it 'right'. Otherwise, I might as well just glue the top armor on and not worry about it.
I appreciate your input and look forward to more!
More follows soonest.
76303
Post by: Warboss_Waaazag
Those dreamforge minis are quite nice in that, when assembled, they actually look like they are carrying a firearm and not a ridiculously large pistol *cough* space marines *cough* bolters *cough*, but that also means that the guns on the sprue come sans grip.
106010
Post by: Meer_Cat
I had a good block of time to work tonight and got a major sub-assembly done: The remotely operated turret gun system.
I started with one of those document hanger clasp things that has pins to stick into the fabric of certain kinds of cubicle partitions and a couple more bits/gubbins from the sound card. I drilled a hole into the back of the sound card bits so as to use the pins to keep everything lined up overall. The short lengths of plasticard tubing were fitted onto the pins to act as spacers between the back of the clasp and the gubbin:

Next I fixed a bigger diameter piece of tubing into the face of the clasp (which will be the underside of the gun system) to act as a pivot. I started to go crazy making a bunch of complicated bits to allow for rotation of the turret and elevation of the guns, and then decided I actually wanted to get this conversion done sometime this decade and went with this simpler approach:

The guns themselves are tri-barrels (a' la Hammer's Slammers) but can represent gatlings, mini-guns or scatter lasers- whatever the gaming group will allow. These are built up using the sound card bit, three lengths of small diameter tubing and three (not two as pictured) retaining bands:

Here you see a partial basecoat of WWII US Bomber Green, but more importantly, the antenna bases for the all-important whip antennas. These were made by sawing off the bottoms of the rocket/missile units from one of my Robogear kits that also provided the drum magazines for my 'counts as Hydra' conversion earlier in this thread. I inserted short lengths of brass tubing to act as supports/guides for the piano wire that will form the HF whips:

Here's another angle of the (mostly) finished gun system. The base is a part from a novelty book-light gotten from the Dollar Tree:
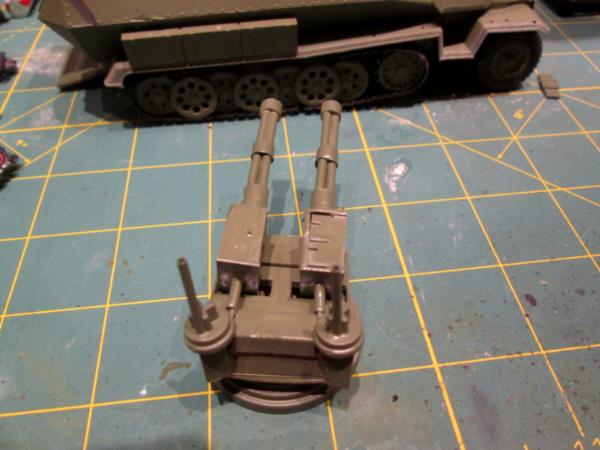
And here's a last shot with the gun system test fitted onto the top deck of the vehicle (going to have to think of a suitably heroic/mythological name for this beast). The idea is that it is operated from inside the fighting compartment, so I reckon I'm going to have to build a weapons station in. Fortunately, Camkierhi has shown the way on how to build good looking computer workstations and screens, so I'm going to be following his lead to make the weapons console:

There are still additional bits to add to everything (not just the weapon turret), but I can actually anticipate beginning properly painting and weathering things in the near future.
I'm very pleased with what I've gotten done, and hope to have more to show you soon. Thank you in advance for your constructive criticism, comments and suggestions.
27140
Post by: ChaoticMind
Looks really good. Wish I could offer more but all I can think of is fine detailing that would drag the build into eternity.
65595
Post by: Camkierhi
Looks pretty darn brilliant to me bud. I would like to see some rivets but then again the whole vehicle is a smooth finish so it fits in well. Brilliant use of materials, excellent work.
11029
Post by: Ketara
Your work is really very imaginative. Do you ever do entire scratchbuilds completely from plasticard?
106010
Post by: Meer_Cat
Thank you all for the comments and observations:
ChaoticMind- please make any suggestions for detailing you might have; if they don't get used on this piece, they're very likely to get used on another project. I have some more detailing I want to do- louvers on the engine cowls, hinges and handles on the access panels and a lot of personal gear slung around- not to mention a TC and possibly a flagbearer riding topside, so there is plenty of time to add other nice touches as well. And there is all the painting and weathering to do yet, also.
Camkierhi- thank you for the encouragement throughout this build! I've never spent so much time on a single model before and am quite enjoying the opportunity to try new things. I've seen guys like Klaus-Not Santa build gatlings in their blogs and was itching for a try myself. At the rate I'm going, I'll be giving OSL a try on this model, rather than one in the future. I was definitely planning rivets, LOTS of rivets. I made a bunch using a leather punch, but the smallest that it will produce is 1/16" and I'm not sure they would blend well with the ones that are molded onto the model already. The fix there is to just cover all the molded rivets with my punched rivets. I'm also thinking about a way to make my own 'rolling riveter' like the aircraft modelers use. To buy one is too much, but if I could simulate the look of the semi-recessed rivets that are already molded on, that would look best (as I see it now- that can always change). But there will be more rivets.
Hi Ketara! I haven't yet tried a total scratch build, but with the skills and competence I'm developing with these conversions, that day is coming closer all the time. I'm very impressed with a lot of the scratch builds I see here on Dakka, which is what got me messing about with major conversions to begin with. I like to think of it as being in Phase 2 on a scale of 3. Phase 1 was buying a kit and building it pretty much as the directions indicated. 1.5 was adding some bits of my own where they would fit. Phase 2 is making significant changes to something that already exists, either as a kit or something that looks like part of something else (like using the picture frame for the basis of the firebase). I may scratch build subassemblies- like the smoke launchers- but am still relying on something to give the basic look tot he piece. Eventually I'm sure I'll move into Phase 3, where I'll design/imagineer my own thing and build it from the wheels up from raw material.
There's just so many possibilities! When finished with this conversion, I'm not sure what to go onto next. I have several more vehicle kits- all awaiting conversion into something cool. Not to mention many figure sets waiting, like more Eisenkern troopers to fill out the Headquarters Platoon, or Wargames Factory Greatcoat Stormtroopers to build another line squad. Plus some Beyond the Gates of Antares troopers (I'm thinking about doing a Rough Rider squad built out of their jet-bike models- I can find them for quite good prices sometimes on eBay). But I've also got a WWII Soviet B4 203mm tracked howitzer kit that is just begging to made over into a Basilisk.....
93572
Post by: Yorkright
Hey Meer, been lurking here for a bit. Have to say your conversion work is outstanding, I am always in awe of people who can scratch build. Looking forward to the finished project.
106010
Post by: Meer_Cat
Hey Yorkright- I went through all your blog pages earlier, and I'll swap some of my meager converting skills for your ability with flesh tones for an even trade! I've never done any really major converting before, but Dakkadakka has got me interested in trying new things. It's amazing how having an avenue to others with similar interests makes it so much more fun to get creative. If we can't share our work, get some constructive feedback and possibly the odd word of praise, the hobby loses something. I was a fiend for painting and army building back in the late 80's, early 90's- when I could take my 'treasures' down to the gaming store for tournament play and show them off. I kept my hand in for the next 20 years, but never really captured those heady early days. Now I've got all of Dakka to interact with, get ideas and feedback from- I'm more productive than ever!
It _does_ help to have a basic army built, and not be in a rush tog et something done so it can immediately go into battle. Makes projects like this Hanomag conversion a lot more fun not to be under a deadline.
In the 'naming of the beast' competition, I'm thinking about calling this command and control carrier the Athena after the Greek goddess of wisdom, strategy and undoubtedly other attributes that I have forgotten from school. The companion troop carrier would then be the Artemis class armored vehicle. The female mythological names in tribute to DreamForge Games' female Panzerjaeger that the transports are being built for.
More follows soonest.
9910
Post by: CommissarKhaine
Totally agree, the ability to share stuff on dakka and get friendly and helpful advice is worth a lot to me as well. I've grown lots thanks to all the people commenting in the blogs and showing how they do things. And the beauty of dakka: everybody shares their tricks, and makes tutorials on demand.
76303
Post by: Warboss_Waaazag
I'm floored by the simplicity of your conversion materials. And yet the end product still looks convincingly complex. Really cool turret design, Meer. I like it a lot.
106010
Post by: Meer_Cat
CommissarKhaine: The tutorials are what I find the most striking. Most of us would love the chance to show off a trick or technique, but to take the time to explain how it is done? Ours is a very generous hobby (or obsession, take your pick).
Warboss: Thank you for the kind words! I have a lot of fun looking at some random article lying about and imagining what it could become. That clasp has been sitting in my parts tray for almost a year- primered white!- waiting for a chance to become a gun turret. On the principle that nothing is done until it's OVERDONE I was looking at it and it seemed kind of spindly. So I worked up some ammo drums and fastened them onto the sides of the receivers and there is much better balance to the piece. Pics are still on the SD card in my camera- I'll get them up shortly.
Since the 'remotely operated gun system' needs a weapons position inside the vehicle (got to get into the habit of calling it the Athena) I tore out the right hand benches, cut down the oversize computer monitor I had made out of a piece of circuit board and installed that. I've trimmed pieces to act as the keyboard and have a seat/stool on hand to install when time permits. Pics follow for that shortly also.
Really, MORE follows shortly! Thank you all for looking in and for all your comments.
106010
Post by: Meer_Cat
I'm headed out tomorrow at o'dark thirty for Seattle and business, so wanted to get a little something to show for the week posted up.
Here's a quick mini-tutorial on doing cheap ammo drums for the gatlings I just completed:
You'll need a couple of nozzles from old superglue/cyano-acrylite tubes (one per drum you want to make); cut the nozzle bit off:

I used a couple pieces of sprue from the Wargames Factory Greatcoat Troopers because the half-round extrusion was exactly the right size to fit into the glue cap; I trimmed the arm fairly short, so that the drum will fit snug up to the gun- conversely, you could cut the arm longer and make a feed-ramp for a belt that would then run into the gun; you'll also need two 3/16" circles cut out of thin plastic card/yard sale sign (I used the largest setting on my leather punch)- these glue over the hole in the front of the glue cap:

I drilled a hole into the side of the Gatling's receiver and viola', cheap ammo drums. I think the addition of the drums gives a better balanced look to the whole system:
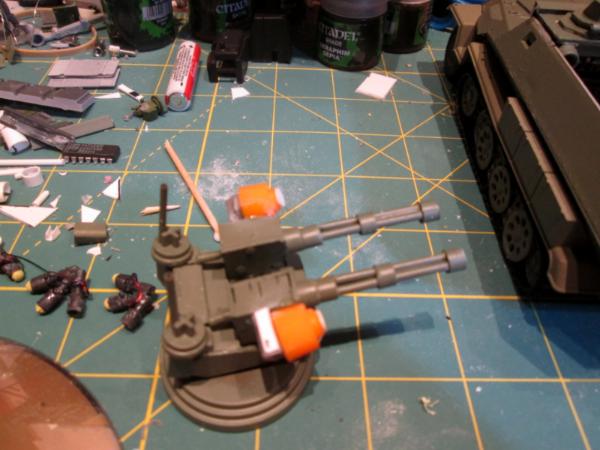
Of course, they look better now that they've been base coated WWII US Bomber Green. When I get back, I have the gunner's console to finish (Thanks for the inspiration and the 'how-to' Cam- saw your pictures and the computer screens look great!) and I believe I can actually get started on the top deck armor and adding stowage. Also the TC figure and possibly the flagbearer to finish. Then painting, weathering, highlighting and I'm already itching to get started on the Artemis version for one of the line squads.
More follows soonest.
106010
Post by: Meer_Cat
Howdy all- safely back from the West Coast and got a few things done tonight. I (perhaps presumptuously) feel that things are finally coming together. You folks will be the judge of that.
First up, put some finishing touches on the ramp, adding no-slip diamond tread to the inner surface and 'zimmereit' to the outer (this is a piece of the kit's original flooring cut to size). Some weathering, and perhaps hazard stripes on the outer skin, and done:


The holes will be covered/filled with fuel cans, packs and other stowage.
Next, I completed the gunner's console in the interior. This necessitated pulling out half of one of the troop benches, but on the plus side, I got to use the big-screen-tv monitor I built earlier. I'm going to buld the TC figure such that she can be sitting nonchalantly in the TC's cupola when the model is displayed closed, and at the gunner's console when the top is off:


Inking, highlighting and the interior is nearly done. I want to add a tripod mounted to the wall for the ring mounted heavy bolter and (ripped of from Camkierhi) I'm putting some speakers in to relay for the radio that will be mounted next to the gunner's console. Also some loose stowage- packs, submachinegun, that sort of thing.
Finally, I took a look at the top deck whilst everything else was drying and figured it looked a little bald. So I added some 'terrain' to the armor to break up the outline. These can be ammo bins, armored hydraulic lines/pumps or unicorn dust stowage- but the outline is broken up pretty well:

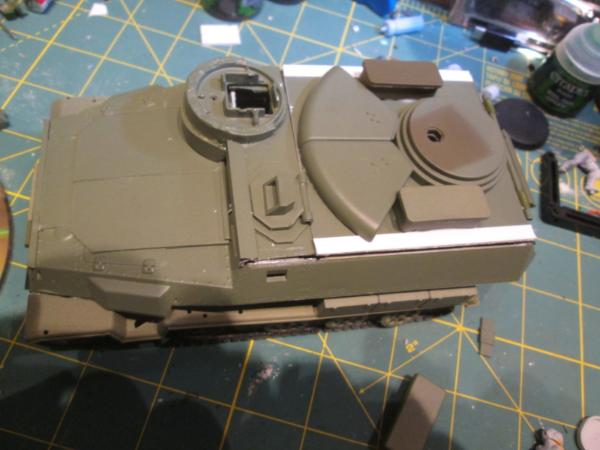

Unfortunately, the top plate only goes on one way, and I accidently added all the gubbins to the wrong end- they were supposed to go _behind_ the gatlings. Now the back of the gun system looks bare. To rectify this, I'm going to add a search and acquisition radar to the back (like on a ZSU-23mmx4) to fill that hole in. I've got some tow chain to add and some ammo boxes and such and the top is mostly done (except for the weathering, highlighting, etc).
I put in some developmental work on other pieces of the total model, so should have some more progress to report shortly. In the meantime, thank you for the chance to show off some of my work,and I look forward to your comments, suggestions and constructive criticism.
If it ain't overdone, it ain't done yet. More follows soonest.
69676
Post by: Big H
The difference between a stock Hanomag and what you have created is crazy
well done mate thats seriously good use of scrap and non hobby "stuff"
106010
Post by: Meer_Cat
Thanks Big H! I'm having a ball trying new things- techniques I never figured I'd get a chance to try out, including scratchbuilding a lot of sub-systems. I'm even going to try OSL on the headlamps- something I never thought I'd get the hang of. Making use of the odd 'treasures' I've scavenged over the years is great too, and let's me justify stopping my wife from throwing them out every couple of months.
With that in mind, I'm going to post a couple more WIP shots of the side plate bustle racks I built, so as to have someplace for the line doggies to hang their rucksacks (and because those big, long, blank sides were just screaming for 'something' to fill them in- did I mention I keep going over scope/out of scope on this project?).
So, I sawed off a couple of 0.75 inch sections of 'girder' plasticard; I got a huge assortment of shapes and sizes for cheap off eBay and have been having fun trying it out in various applications on this project:

Split those in half to form the corner angles:
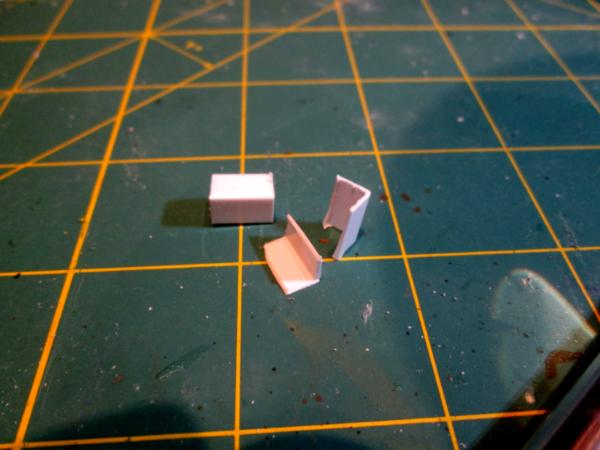
Next cut a bunch of slats:

Glued the side slats on:

And the bottom slat:

A little paint, and presto- side storage bustle racks:

(Technically, the bustle rack is on the back of a fighting vehicle turret- so named because it sticks out like the bustle on a 19th century fancy dress. But it seemed the appropriate name.)
I honestly think I'm nearly done with this project- a few more bits to glue on for the vehicle itself, a bunch of stowage to glue on, the TC to finish painting (around 75% now) and then weathering everything (the inside is done). So this is probably the last WIP entry for the Athena Panzerjaeger Transport project. The next entry will be finished photos. And then on to the next! (So many vying for attention....)
And remember: It ain't done until it's OVERDONE!
More follows soonest.
15735
Post by: Bash the Bosh
Fantastic stuff. I've been really impressed with your ability to take seemingly boring regular items and make them into something quite the opposite. Consider me on board!
106010
Post by: Meer_Cat
Thanks very much, Bash! I love finding an odd 'gubbin' or bit and imagining what it might be used for- the spring clasp that forms the basis for the twin gatlings I've had for more than a year, with the idea of using it in very much this way always in mind. And I've got a lot of other 'junk' lying around waiting for its moment.
I think I was motivated by reading books like "The Borrowers" and the Miss Bianca mouse stories, in which the characters used real, human-sized items in completely different ways to fit their size.
I'm thinking of trying my hand at resin casting in the near future, so that when I make something that actually works (like the smoke launchers) I can reproduce it accurately and easily to use on multiple models.
More follows soonest!
65595
Post by: Camkierhi
Excellent work on the stowage, really brings a model to life for me.
Scary how much "junk" I have kicking about waiting for me to get my finger out.
As to casting, before you go diving in ask us about it, several great pieces of advise have come from dakka on the subject, and I do it regularly, not necessarily to a high standard, but works for me.
106010
Post by: Meer_Cat
Thanks Cam! I do have to admit that my triumphant 'HA!' when I showed my wife how I used a couple of the bits that have been banging around for awhile was immediately deflated by her penetrating glare at all the other junk piled up on and around my worktable. She's pretty understanding, actually. But she doesn't get that I need to see things to make up something new sometimes, so it needs to be out of boxes and drawers and spread out on the desk (or the floor, the nearby shelves, etc). I do pick up between projects though, and am pretty obsessive/compulsive orderly about everything else (30 years in the armed Forces will do that to you), so it works out.
When I do vehicles, they just aren't 'realistic' to me unless they have people and stowage. Other than tanks under direct fire in a meeting engagement, I never once saw any kind of military vehicle that didn't have the crew hanging out of it as much as possible (unless it was raining) and that wasn't covered with packs, duffles, extra crates, ammo boxes and anything else you can think of. The big brains that design these things make allowance (sometimes) for the fuel and ammunition that the platform requires, but rarely think about the men (or the real ammo requirements- extra is always 'meets the minimum').
I've seen your resin casting work and would very much appreciate any advice for getting started you might have- and that of anyone else who has experimented with casting their own parts. My 'research' up to this point has only been to read al the product descriptions in the Micro Mark catalogue, so I truly know nothing about any of it.
Next project will either be:
a) Converting an Mi-24 into a Valkyrie or
b) Converting a Soviet B4 203mm howitzer into a Basilisk or
c) Converting a British WWI Mark IV 'Mother' tank into a Malcador or
d) Painting up the command squad for Raging Heroes Red Hammers KST troops (to start forming a Company Command Group, the Panzerjaeger form a Platoon Command Group)
And there are others, but these are the most interesting to me at the moment. I'm very blessed to have the resources and the time (for the moment) to have 'first world' problems like which project to do next.
More follows soonest!
106010
Post by: Meer_Cat
Welp, this project is finished. I may go back and build an alternate weapon platform that looks more like a multi-laser, but for the moment I'm very pleased with how this has come out. And I think I've met my motto that "It's not done until it's OVERDONE" considering that this project started out to be a closed-hull vehicle and instead has a fully detailed interior.
Some things I got to try that I hadn't before were: using circuit boards as building bits, weathering powders, Camkierhi's magic baking soda plus superglue welding method, employing multiple washes and practice doing a good job (I think, anyway) on faces.
The original goal of the effort was to take this:
And make it look more like this:
The vehicle is to be the transport for a squad of DreamForge Panzerjeager, which will also be the HQ squad for a Platoon or Company, so this became the Athena Command and Control Vehicle (C2V) and wound up looking like this:
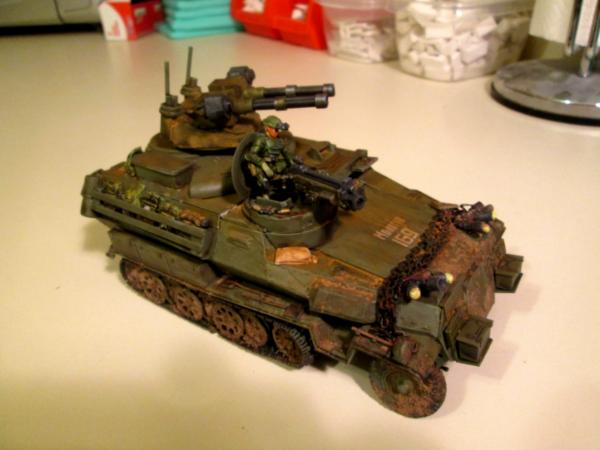
I think of it as a "counts-as" Chimera, and so it has a Heavy Bolter and the twin gatlings you see can (with the acceptance of a generous gaming group) stand-in as the multi-laser. I'm very pleased with the Track Commander ( TC) figure, as the face came out decent, the shading on the armor I think is pretty good and the posing looks like she is using the charging handle on the HB to chamber the first round of the belt. Note the stowage added to her left (your right) and in the pictures that follow- I added a ton of things. My service in the military taught me that the only armored vehicle you see that doesn't have twice the vehicle weight in added bags and boxes and personal effects is the one going into a parade.
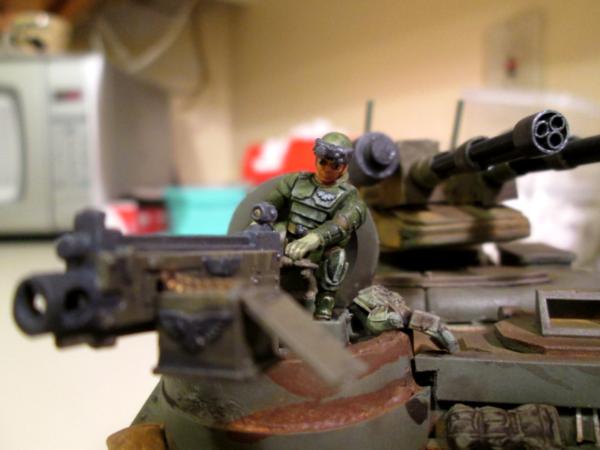
Per the example of many of you Dakkanauts, I used Russian WWII decals to give some personality to what otherwise would have been a broad, blank hood. It's been awhile since I've used water-slide transfers, so I'll need some more practice (and some better decal fix to hide the edges). I didn't get to try Object Source Lighting ( OSL) as I tossed on too much grubby, but will do the next vehicle a bit cleaner and will try it then.
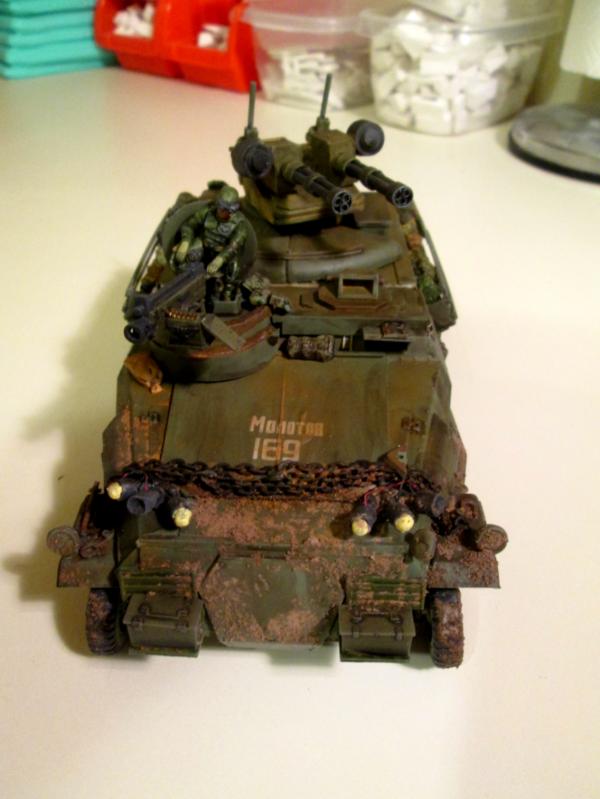
Here's the left side, more stowage, more decals and more mud:
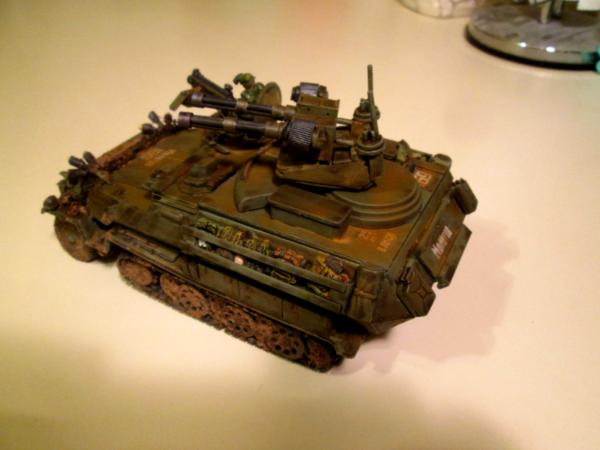
A shot of the top half of the rear ramp and its decal:
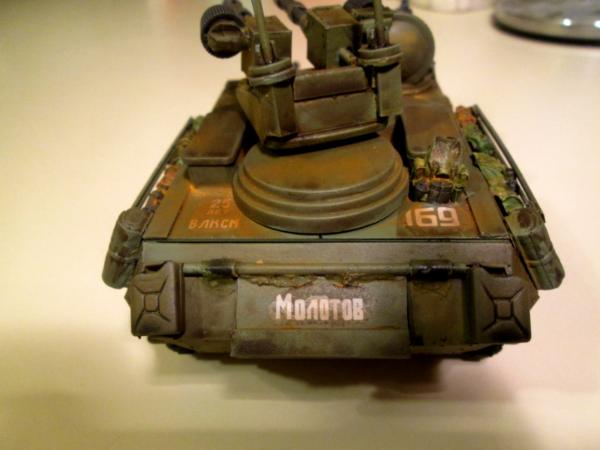
And the right side, with its bustle racks for packs, stowage boxes and pioneer tools (the great thing about pictures is they let you see things as they really are- I may go back and add some more grunge to this side).
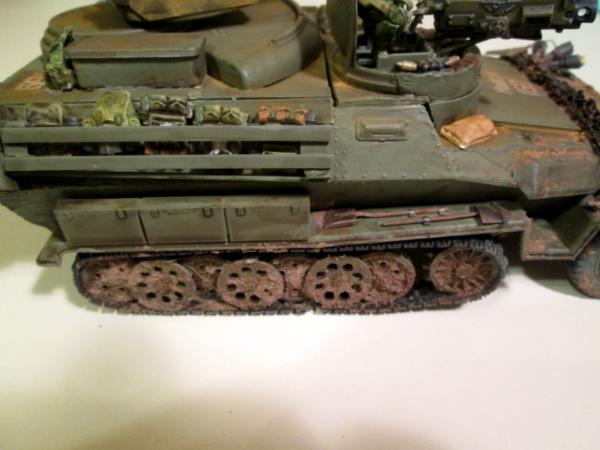
Here's the Athena with the squad deploying and using the vehicle for cover:
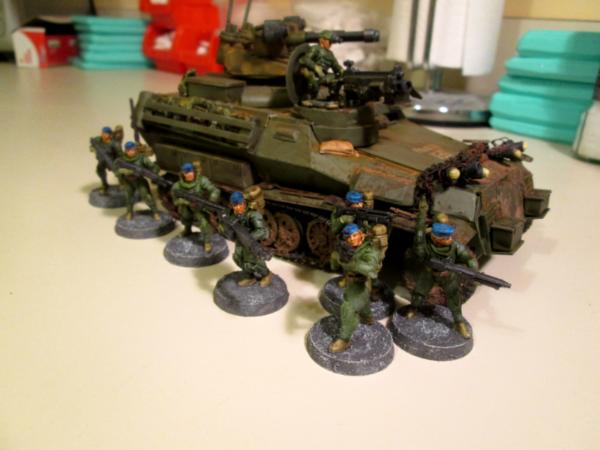
And a close up showing the squad leader:
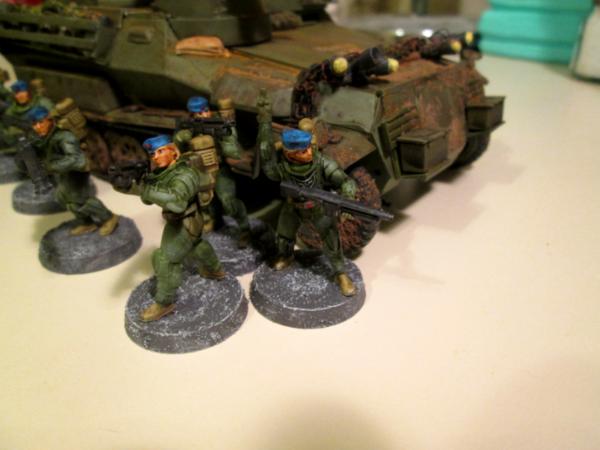
Here's a shot showing the squad deploying via the rear ramp:
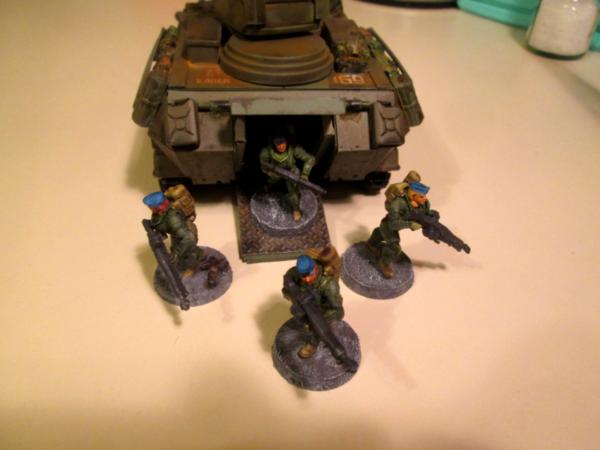
Here's a shot with the top lifted off to reveal the interior. The gunner sits at her console to provide overwatch for the squad using the remotely controlled twin gatlings. There is a standard issue voxcaster mounted to the frame upright beside her, and a manpack radio on the bench to her other side. There is a crew speaker mounted to the left side of the cross member located forward. The driver has carelessly shoved her walkabout kit onto the bench behind her seat- the squad won't be terribly impressed by that when they re-embark:
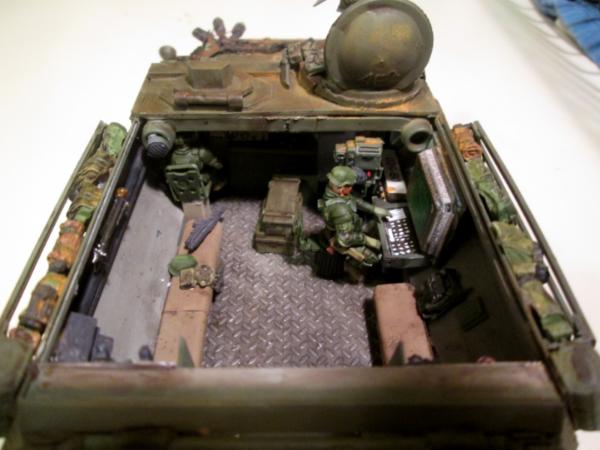
A closer shot of the interior taken through the rear ramp:
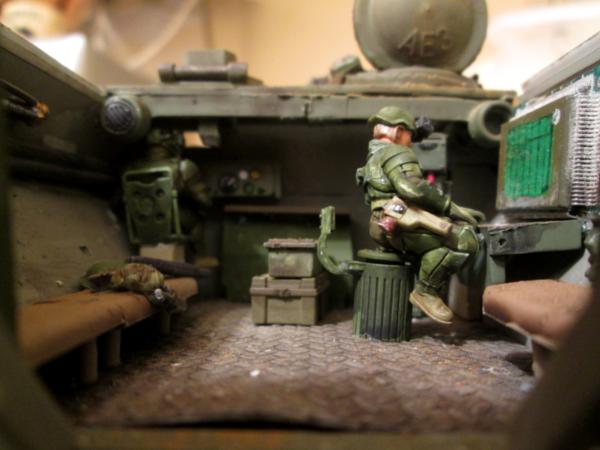
A high-angle view of the squad deploying:
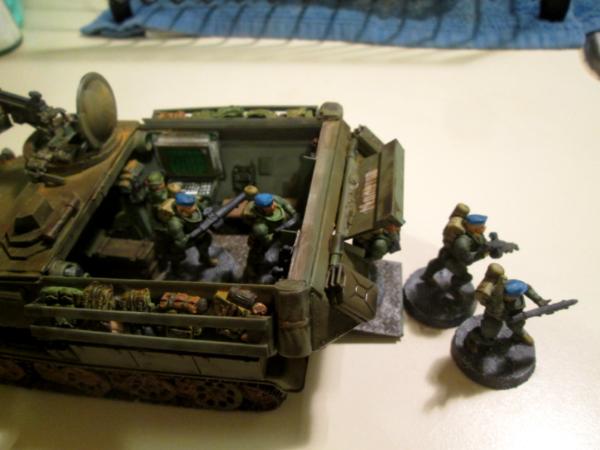
The squad leader signals the Panzerjaegers to close up:
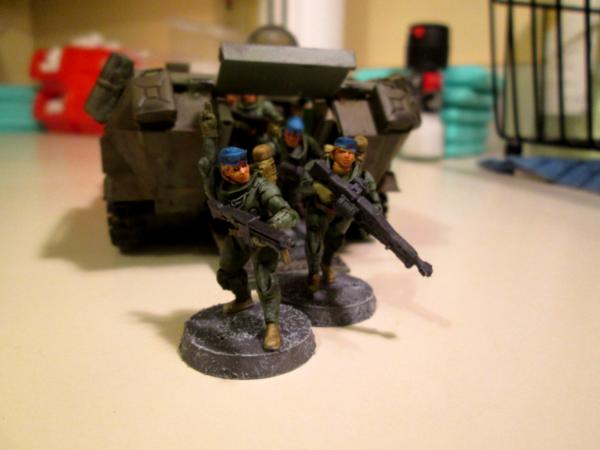
A last view of the squad exiting. You can see the ground mount tripod for the Heavy Bolter affixed to the compartment wall in the background:
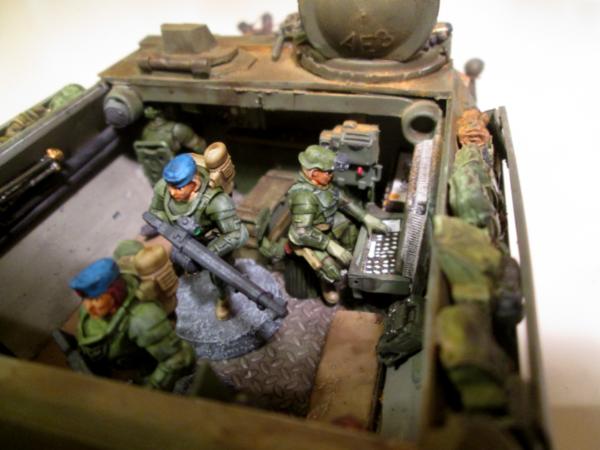
So that's it. A long time, a lot of work and a lot of fun. I especially like the opportunity to show off the WIP to you as it has progressed, and very much appreciate the many comments and ton of feedback you've given me- it all helped to result in this finished product.
One last shot of something you almost never see:
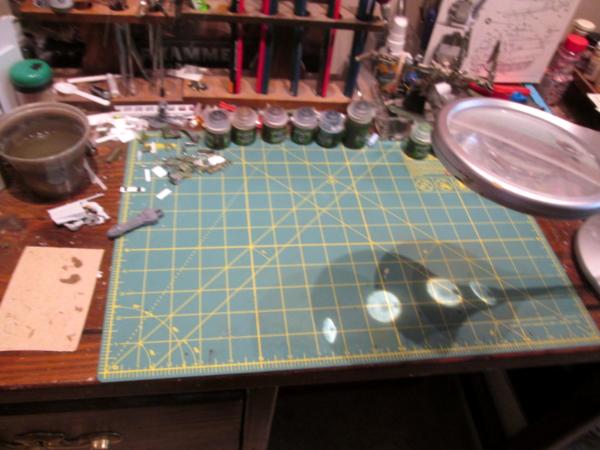 A Clean Workbench Waiting For The Next Project!
More follows soonest.
65595
Post by: Camkierhi
Fantastic and inspirational stuff, excellent build, love the detailing. Brilliant posing on the figures, love the little things like the kit on the bench, she is sat on a bin, TC preping the HB. All excellent stuff. Did a good job with the weathering.
Looking forward to the next project.
106010
Post by: Meer_Cat
Thanks Cam! I need to put up a couple more shots of the interior- there is more detailing that can't be seen in what I've got so far (but this was one of the longest posts I've ever put up, so was running out of steam by the end!).
My track had a seat made out of a trash can with a broken seat back welded on by the engineers during the First Gulf War- it became a legacy item, bequeathed by out-going track commanders to new track commanders. It was very comfortable (compared to sitting on your helmet or the ground) and we fought over who got to use it.
The TC figure I had fun with posing just so she could be shifted between sitting perched up on the cupola and sitting on the trash can at the gunner's console. As with everything, in the end it was 70% plan and prep and 30% luck that it came out the way it did. I like it a lot. This is easily my most elaborate model to date (with 40 years of modeling under my belt) and also easily my favorite to date. It's amazing what lurking on Dakka Dakka for a year, soaking up tips and advice, can do for your modeling game.
I've started a squad of Eisenkern riflemen that will start forming the platoon for which the Panzerjaegers are the HQ for. That's fairly cut and dried techniques that I've used for a long time- although I want to try some new things there as well, not rush to get finished.
But then comes either converting a Soviet WWII B4 203mm howitzer into a Basilisk or a Mi-24 into a Valkyrie. The Emperor needs one!
More follows soonest.
106010
Post by: Meer_Cat
As an addendum, I added the Russian tank decals for aesthetics and to fill in some of that big blank space on the hood- but I don't read Cyrillic (I speak some Russian, but can't read). My wife, however, is a very accomplished Russian linguist;
The decals read "Molotov" after the Soviet Foreign Minister during WWII.
The gas-filled bottles were nicknamed Molotov Cocktails after his exhortations to defend Leningrad, Stalingrad and Moscow using anything at hand against the Nazis.
106010
Post by: Meer_Cat
Here's a counts-as Rough Rider squad I did awhile back. These are by Offensive Miniatures and are from their 'Law Enforcement' line. These were originally mounted police with riot batons in hand. I cut the batons away and epoxied the lances (I think they're from the Tomb Kings by GW) in place. The figures are quite nice, but a bit smaller than heroic 28mm- they'd go well with Bolt Action, for instance, but are really more like true scale 28mm or big 25mm. Nonetheless, I like 'em and they're Rough Riders for me. Somewhere I've got a mounted Captain Chenkov Valhallan figure, and that will be the commander for the element.
I added the heavy barrel .50 caliber rifles to back up the hunting lances (one good stick and you're out of ammo!). The squad is composed of a captain, a lieutenant, a radioman and six troopers.
I did the horses with a technique that I learned painting Napoleonic cavalry: a good white base coat, then smear oil based paints (burnt umber, greys or sienna or other browns) and then immediately wipe off the excess. The more you wipe, the more is removed. This creates natural highlights and darker low points and is a quick way to do a lot of horses fast. When completely dry, you then paint the horse furniture.
The bases were created using artist's gel media brushed on and then sculpted to get the look I wanted. When it dried I painted the colors. Attached to the underside is a strip of magnetic paper (like those fridge magnet ads that come stuck onto the new phone books). This is to help keep the figures from sliding around in their transport box, which is an old metal biscuit tin from Yorkshire.
I'm looking forward to touching these up, and to painting some more, given the new techniques and materials I've been learning and using lately.
Thank you for the opportunity to show some more of my work. I look forward to your comments, observations and constructive criticism.

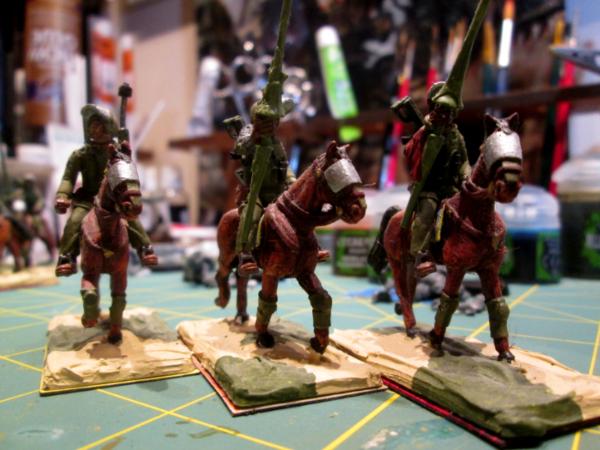
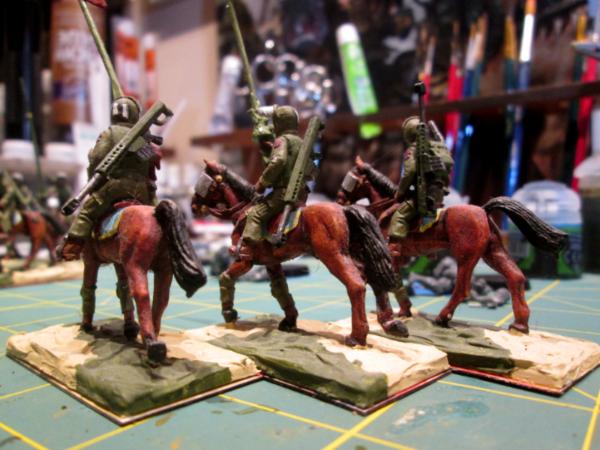


106010
Post by: Meer_Cat
Here's another project I finished up a bit ago, so no WIP pictures (although it is really only a minor conversion/kitbash using a couple of GW bits and some furniture fasteners). I wanted (I don't game enough to say I 'needed') a Hellhound, and really, REALLY wanted an excuse to build a Polish 7TP tank kit, so I merged the two.
Here are shots from the right-front oblique and the front, showing the flammpanzer with elements of the 7th Regiment of Infantry (the Lucky 7's) acting as screen:

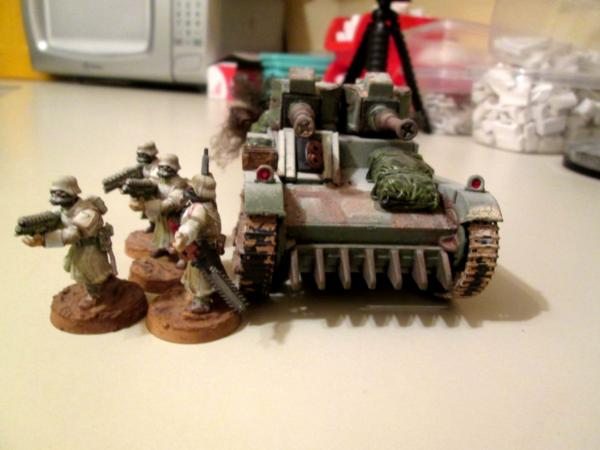
Those pics give a pretty good view of the muzzles of the flame projectors. They're wood fasteners from a pre-cut/drilled Ikea/Saunders type shelving unit, one of the ones visible in the pic of my workspace shown earlier in the blog. I like how the rust came out on them using the 4 step process materials from Micro Mark. You can also see the flamer installed in the bow armor, replacing the heavy bolter that would normally be there. The grunts in Vietnam nicknamed the flame tracks used there Zippos- after the famous lighters. I reckon that's a good name for this vehicle.
Here are some more views of the track:


The fuzzy stuff at the back, stuffed in front of the fuel canisters, is a hair net pretending to be camouflage netting.
The 7TP was a light tank armed with either two machineguns, each in its own turret, or a single 37mm anti-tank gun mounted in one turret. It was the export version of the British Vickers Mark VI. They were too light to take on other armored vehicles and too vulnerable to infantry anti-tank weapons and did not see frontline use after the fall of Poland in 1939. Still, an interesting vehicle and a lot of fun to use as a basis for a conversion. Later, I'll throw up some pics showing size comparisons between the Zippo, the Athena, a Chimera and a Leman Russ MBT.
Thank you for the opportunity to show some more of my work. Your comments, observations and constructive criticism are always most welcome.
More follows soonest.
27140
Post by: ChaoticMind
Mmm, crazy pyro vehicle, always a good choice. Looks somewhat impractical for real world combat but perfect for 40K. Only thing I'm unsure on is the camouflage netting, looks a little loose.
100624
Post by: oldravenman3025
Nice work here, Meer_Cat. I especially like your work on the 251.
15735
Post by: Bash the Bosh
Brilliant stuff as always, and great mini tutorial on the Gatling drums. Consider it borrowed!
52201
Post by: evildrcheese
Nice work on the Rough Riders and tank.
Great weathering on the tank.
EDC
65595
Post by: Camkierhi
Great work, certainly building a rep for awesome bud.
Rough riders are great, always love the idea of them, nice models.
The little tank is looking awesome, nice work.
106010
Post by: Meer_Cat
Thank you all for the encouragement and kind words!
ChaoticMind: Yep, the camo netting on the Zippo looks to fluffy to me, too. I'm just not sure the best way to flatten it down some. I figure I can either: apply light heat and melt it a bit, soak some thinned down white glue and collapse it and then paint it again when it's dry or create some stowage- a baulk of timber, a steel beam, sand/mud runners, or even just boxes and crates and weight the thing down. Thoughts?
Oldravenman3025: The Hanomag is easily the most elaborate kitbash/conversion I've ever attempted, what a lot of fun! When my project scope crept past an enclosed vehicle to include a detailed interior, it helped having had served in armored vehicles before- gave me an idea of what, realistically, should be inside and where it should be.
Bash: I'm glad the tip on the ammo drums might come in useful (I'm still marveling at your use of spent brass to make battle cannon on your recent Sicaran) and am looking for a project to try that trick myself. I painted my drums flat black as a base, then boltgun metal then silver dry brushings, but am not entirely pleased with how they came out. My only real-life referent were the detachable box magazines for the M249 SAWs, and those were basically flat black plastic. I was trying for that look and missed, I fear. May try something different 'next time'.
EDC: I was trying for a winter/cold weather look with the white highlights and lots of rust- something like the Russian equipment must have had during their invasion of Finland prior to WWII. I think I came pretty close to the look I wanted, but it was as much happy accident as design: the matte varnish over-coating I was using at the time had gone bad and spit out the white-tinged stuff- you can even see it on the Lucky 7's that I painted at about the same time. I decided it looked like snow/grunge/wintery crap and kept it!
Cam: The Rough Riders were fun, and I will game them (if I ever get the chance), but they are a bit small. I think they would blend in very well with Bolt Action stuff. Jackie over at Offensive Miniatures is really good people and their figure lines are really well sculpted (IMO).
I am working on some infantry to go with the Panzerjaegers and when finished- another armored vehicle for the Emperor (I should probably look to play Armageddon more!).
Thank you all again, and more follows soonest!
106010
Post by: Meer_Cat
Here's another set of pieces that I painted a _long_ time ago- more than 15 years, in fact. This is a section of High Elf 'Lothern Seaguard' that I did up for my WFB High Elf Army. This would have been around 1999.
I first started playing Warhammer Fantasy Battle (it was just 'Warhammer', back in the day) and Warhammer 40k when my friends and I discovered it in 1989. We literally drew straws to see who would model which armies for both- everything looked fascinating. I got Imperial Guard for WH40K and High Elves.
This detachment I named 'Lothern Harathoi' which- if their Codex is to be believed means 'Youthful (or Boundless) Stormbringers'. The kneeling spearmen are a kitbash of High Elf plastic Spearmen and Archers sets, and the standing second rank are long out of print white metal figures. The command group are plastic from the archers set, although the commander is another white metal oop. . The design on the banners are the Elvish characters for Lothern Harathoi and are painted freehand, as is the character on the shields.
I would have loved to add the arrow quivers to the pieces, to show that Seaguard (at least back in that Codex) could not only fight three ranks deep but could use both bow and spear- but the figures were a bit crowded with just the spears and shields.
I'm not generally good at selecting complementary (and/or complimentary) colors, but am really pleased at how these came together. Now that I have them out, I'm thinking I'll hit them with some washes and highlighting and try to make them even a little bit better.
Somewhere I have the rear (third) rank of bowmen, all with bows pitched up to shoot over the front two ranks- as soon as I can find them (plus some other High Elf units) I'll post pictures.
Your comments, observations and constructive criticism are always welcome.
More follows soonest.
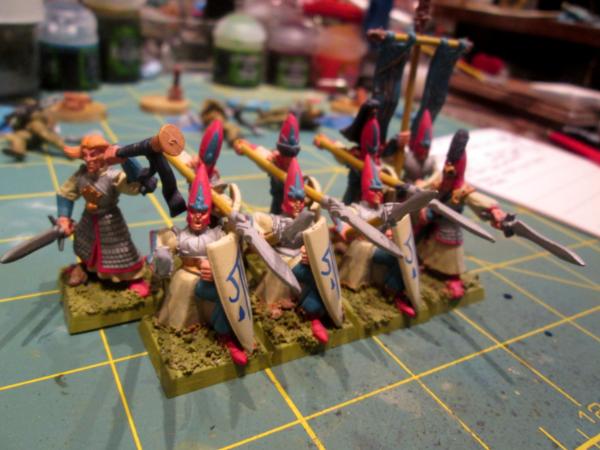


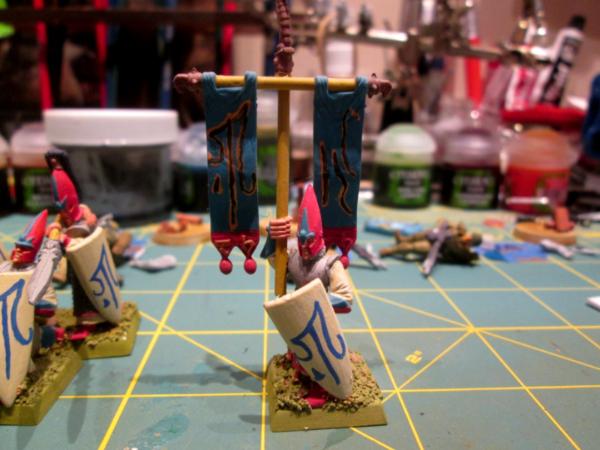

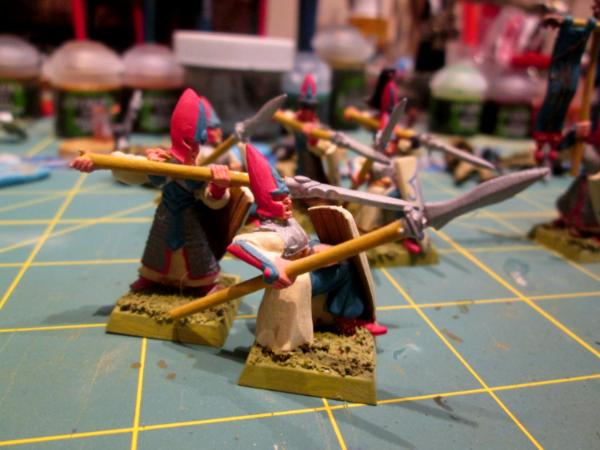
65595
Post by: Camkierhi
So you have always been talented then?
They look great, compared to todays work they look slightly flat, so a wash or too and a highlight should bring them bang up to date. Nice work on the conversions.
106010
Post by: Meer_Cat
Got no talent- everything I can do one you Dakkanauts showed me! Genetics did give me a steady hand though- or drilling to apply a 'steady hold' for pistol fire has translated over to being able to control a brush (although really fine details like eyes are still a real challenge for me).  These Seaguard were truly a happy accident in the color and posing coming together. I remember showing them to one of the staff at a Games Workshop back in the day, who said something to the effect "Great job basecoating- now you need to ink, wash and highlight!" I was really deflated, because I'd put all this time into doing even as good a job as it came out, and now this pro was telling me I was really only half done! Now, I'm not so much in a hurry, and I really want to develop some of the skills that the other painters have that I see here on Dakka Dakka.
At risk of ruining work that I did so long ago, I am going to 'upgrade' these with the next step and see if I can't bring some better life into them. I nice thing about photographing your work is you can see the details better that need to be fixed- that musician's horn is really glaring at me to be drilled out.
I really appreciate the forum to show off some of my things and get some feedback- for the most part I don't have the chance to interact with other modelers except through Dakka Dakka- the collegiate environment here, and its very positive atmosphere, is very much like back in the 80's when I first got started!
More follows soonest!
15735
Post by: Bash the Bosh
I've always enjoyed rank and file spear troops, and your High Elves are no exception.
And I totally agree about the feeling of shared interest on dakka. It's what helps build my confidence in trying to push my modelling skills.
Looking forward to seeing your Elves updated.
69676
Post by: Big H
Mate, the problem with figure painting is they never actually get finished, you just keep revising them !!!
106010
Post by: Meer_Cat
Hey Big H! Ain't that the truth? I finally develop one skill- painting eyes, for instance- and now I want to go back and redo everything that came before! There is a window of time though: I'm finding that there are some things from long enough ago that even though I know I could touch 'em up a bit with new skills and (especially) new paints and materials- I don't want to. Partly because I'm afraid if I mess them up, I can't get replacements to try again. And partly because they are part of who I was- to change them is to- perhaps- appear to be trying to change who _I_ was.
However, vanities such as this are only acceptable so long as I can afford the storage space, and for the moment, I can. Otherwise, out they go, like so much of my other Rogue Trader era stuff that fell by the wayside during 19 moves over 27 years in the military. I'm glad I've still got a couple of keepsakes, though, and even a few more than pictured here. They'll show up eventually.
The following photos show figures I painted between 1987 and '89.
Here's a group shot, and believe it or not, according to The Book (no version, no Codex, no addendum, the Basics) all this counted as Imperial Guard. There just weren't the figures out on the market to specialize- certainly not as heavily specialized as things have become today. IG were allowed to have powered armor- it was very common to use the Space Marine Beakies to model it. There were no Leman Russ tanks out yet, so we gleefully used Predators. Same deal with Rhinos (although kits for Leman Russ followed only a year or two later). Baneblades were 'way in the future- the article in White Dwarf to scratchbuild your own hadn't even come out yet- it was a couple of months away. A buddy of mine built one when the mag did come out- which was odd, because he played Orks.
So this pic is a command group with tank support:
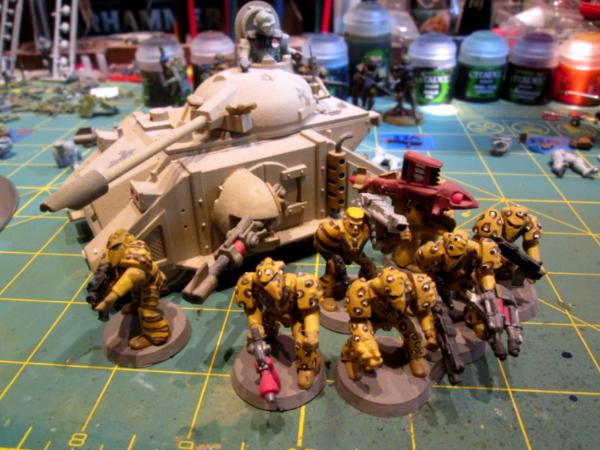
Here's a closeup of one figure showing off both his custom 'Leopard Spot Camouflage pattern armor' and his custom scratchbuilt Storm Bolter. Following the backstory about the Native American Terminators that supported the Space Hulk game, we all speculated as to what this 'storm bolter' might look like. This was my attempt to model one. You can see it is the pauldron from a space marine arm piece and a few las rifle barrels, but I loved kitbashing and scratchbuilding even back then:
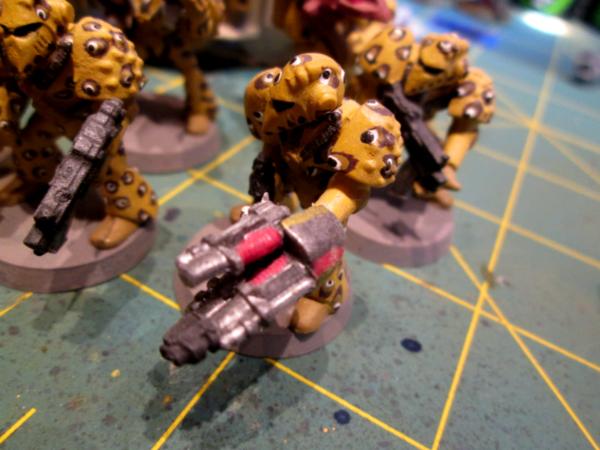
The platoon leader, with powered armor, leopard spot camo and power fist:
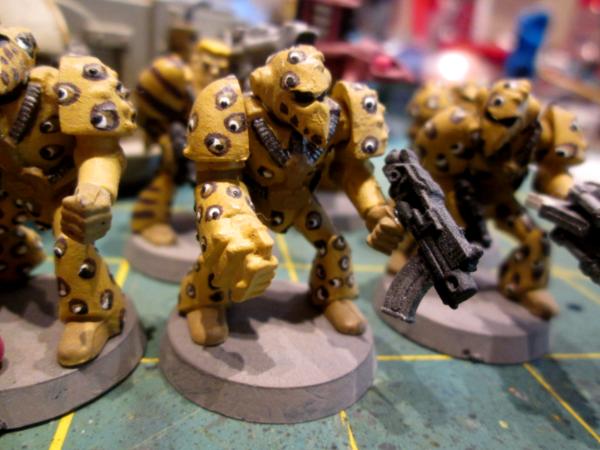
Heavy Weapons section in powered armor- one sporting the alternative 'tiger stripe' camo pattern:
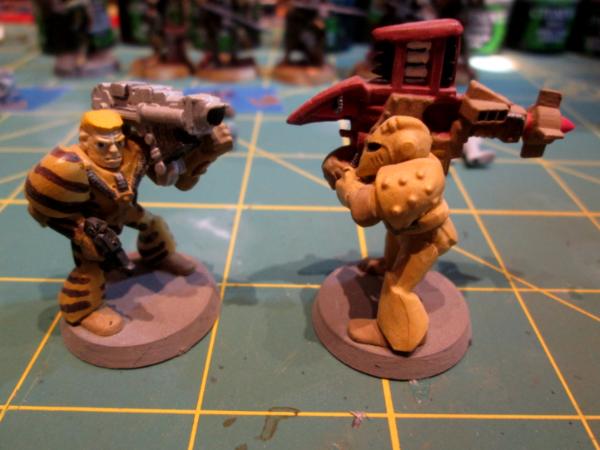
Command Squad security detail trooper (read that as 'expendable Red Shirt') in tiger tripe:
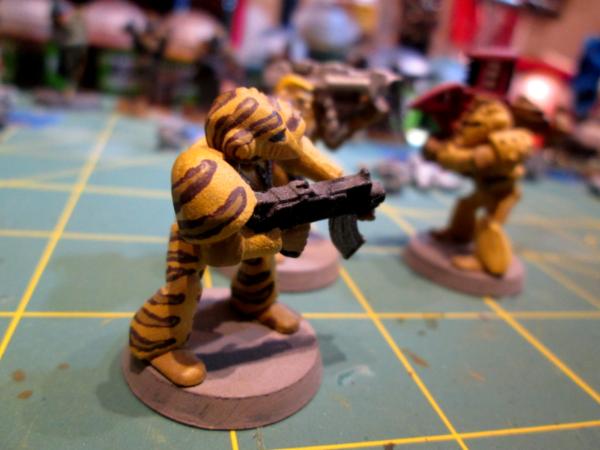
A close up of the Imperial Guard Predator Track Commander. I had been attached briefly to the 11th Armored Cavalry Regiment- this figure's red and white unit badge is in honor of them- nicknamed the Black Horse:
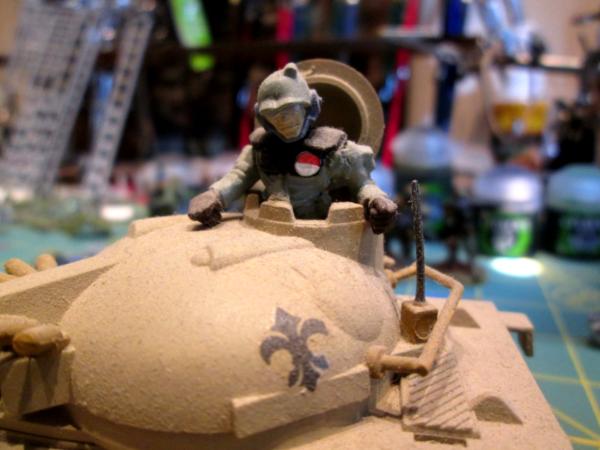
And here's another shot of the Predator:
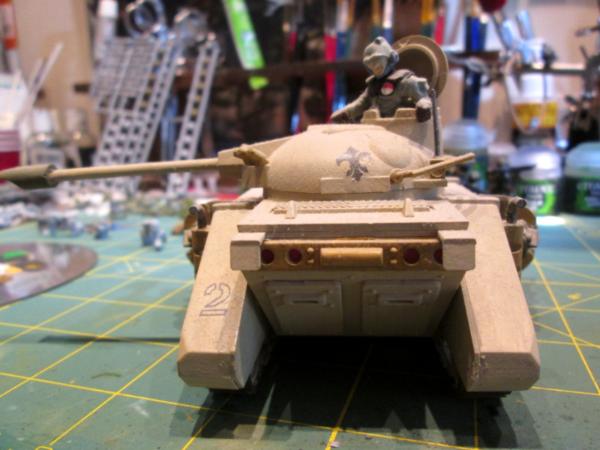
Games Workshop used to sell a three-pack of Rhinos; I must have converted nine or more into vehicles described in the books but not available as kits at that time: open topped troop carriers, a Whirlwind (using a 1/35 Nebelwerfer rocket launcher kit as the missile pod), a tank destroyer (using a 1/35 TOW anti-tank missile launcher mounted in the fighting compartment as the Vanquisher cannon), and others. Some may still be around in boxes someplace, but most I know are gone.
Oh well, you can't keep everything. Nowadays I do the best I can, take lots of photos and store them here on Dakka Dakka and am quite content. The wife unit frequently suggests selling off the things I'm cranking out now, and I just may do that when things settle down a bit.
Thank you all for allowing me to scamper down Memory Lane for a bit, and showing off some of my _very_ early work. Comments and critiques welcome, although I'm not looking to touch these guys up just yet. (The Lothern Seaguard, yes- I painted them around 1999/2000.)
More follows soonest!
106010
Post by: Meer_Cat
A quick time out to talk a minute about a very useful bit/gubbin that I came across quite by accident. I was working on a household repair project (replacing wax ring on a commode) and I found this on the floor when it came to cleaning up time (those are one inch/25mm gridded squares, figure for size comparison):

I was puzzled for awhile, trying to figure out what it was. The house is over 140 years old (I know, I know- practically brand new to my European friends) so I was thinking it was some antique component of jewelry, or whalebone, or ivory or some such thing. Then it hit me, and I stopped by a shop and purchased an item from which I extracted these:

And here's the item I purchased at the Dollar Tree (Everything's A Dollar!):

There are 7 rows of 17 hairbrush pins each, or 119 potential bits for making almost anything from:

But Meer Cat, I hear you say, these things are useless- what can you make from them? Well, I needed a manpack radio for my latest counts-as Tempestus Scions squad, and kitbashed one from a bit and a backpack from Robogear:

Other uses that come to mind are guidance antenna on Hellstrike missiles, the focus element on an antenna dish, antennae generally and curb feelers on an Ork Trukk, to name a few. Cheap hairbrushes come with pins in a variety of sizes and some difference even in shape. The pins just pull out with a gentle tug from a pair of pliers.
More follows soonest!
65595
Post by: Camkierhi
Very interesting little doda, will have to investigate.
52201
Post by: evildrcheese
Cool stuff.
Gotta admit in my early morning tired state i though5the leopard print camo was googly eye armour...
EDC
106010
Post by: Meer_Cat
Hey EDC- it's not your early morning tired state- 30 years ago my buddy that got me started into Warhammer 40k said the same thing! He couldn't figure out if I was trying googley-eyes or peacock feathers- 'leopard print' never occurred to him! I think I was trying to paint something ('way to advanced for me then, and probably now, too) like the saddle blankets of the (Napoleonic French) Empress' Own Dragoons. But we had a rule that to game 'em, the figures had to be painted. And these were painted. Still look a bit funny to me, too.
106010
Post by: Meer_Cat
This project was made using Hirst Arts Mold Number 340 and some plasticard salvaged from an old yard sale sign. The figures are Highland Imperial Guardsmen from Kromlech, and I've decided that- they being the wild Scots- fire is their best friend so they are over-represented in meltaguns, plasma guns and flamers. The kilts are my best effort to paint my own clan colors- Clan Leslie. Historically, Clan Leslie fielded a regiment of infantry in the Royal Army titled the King's Own Scottish Borderers. I toyed with the idea of naming mine the Emperor's Own Space Borderers, but like the KOSB better, so KOSB they remain. I need to go back and touch up the faces and add some washes and highlights to them- as Big H mentioned a couple of posts back: Figures are never done, they just get revised!
Here's a shot of the sandbag bunker, pieces assembled (lower section, roof section, entrance defilade):
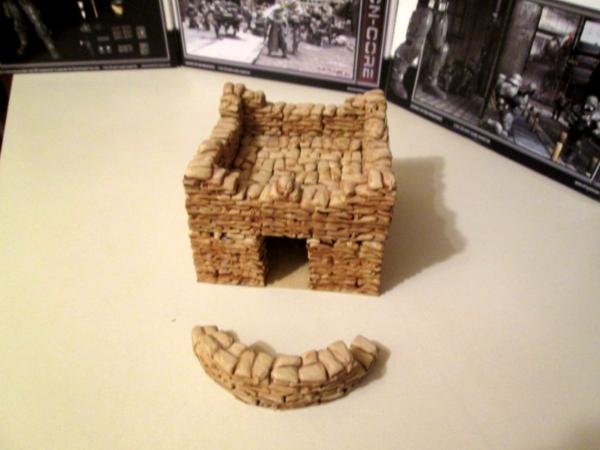
And the pieces separated:

'Front' side firing aperture:

The structure was build to accommodate a heavy weapon at the forward firing aperture (there are rifle slits in the sides). Here's a KOSB Autocannon team:
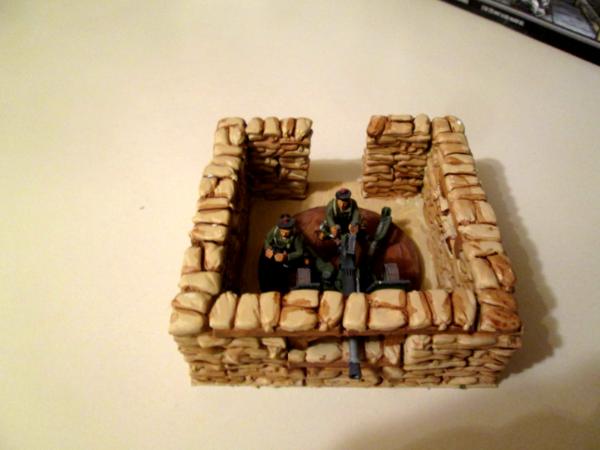
And another view:
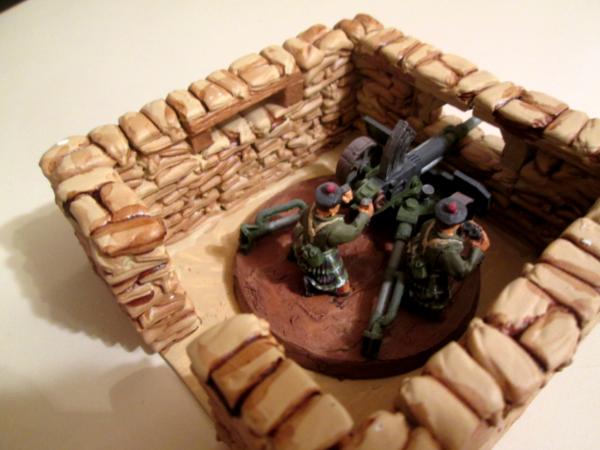
The rooftop emplacements can hold another heavy weapon:


Or infantry, in this case, a command squad:

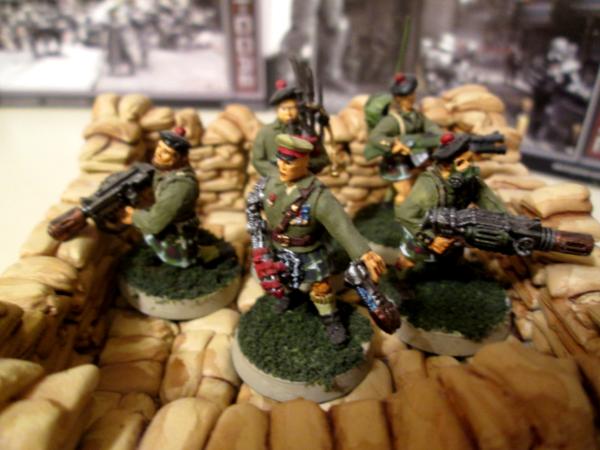
And with the defilade, the personnel entrance to the bunker can be heavily guarded:
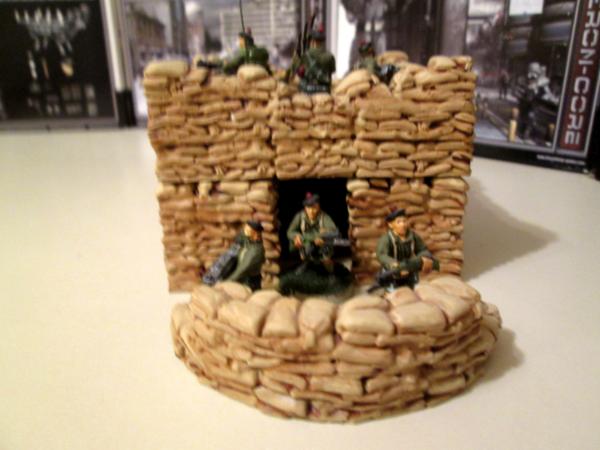
I really like the Hirst Arts molds- this one particularly has been very useful to me, I've one a lot with it. I'm finishing up a squad of counts-as Tempestus Scions using Dream Forge storm troopers and hope to have picture soon.
In the meantime, thanks for looking in and for the opportunity to show off some of my work.
More follows soonest!
2326
Post by: shasolenzabi
Good stuff! I especially liked the Athena Hanny!
106010
Post by: Meer_Cat
Thanks Shas! Your "Searching for Oddball Tanks" was one of the first blogs a started following- and a big push towards getting a Dakka Dakka account and stop lurking and start being a part of the community. I follow with great interest your new builds- especially the latest Malcador-style build- from scratch with the idea that, having moved up from tacking 40k bits onto normal models into heavily modifying the models themselves (and _then_ tacking 40k bits on) it's time to actually build something myself from the plasticard up.
Thanks to all the advice and instruction available here on Dakka, I'm starting to mess around with greenstuff quite a bit, and will eventually move on (after suitable and sufficient tutelage from others who have the experience here) to learning how to cast my own bits.
For now, I'm quite happy to keep developing my own skills in assembly, painting and especially weathering (and faces- still can't do faces very well).
More follows soonest!
106010
Post by: Meer_Cat
Right then- I've finished up the next squad using Dream Forge stormtroopers as 'counts-as' Tempestus Scions and forming the First Squad of the Headquarters Platoon (the female Panzerjaegers are the HQ Squad). The new things I've tried with these are: additional detail to the bases beyond artist's media gel and paint/flocking/sand, decals on the shoulder pouldrons and both washes for deep detail and drybrushing for highlighting.
Here's the whole squad:

The sergeant and his corporal (and yep- those are 2nd Ranger Battalion scrolls on the shoulder armor from Bolt Action; I served for three of my 27 years in the 1st Ranger Battalion, was very pleased to add these to the Grenadiers):
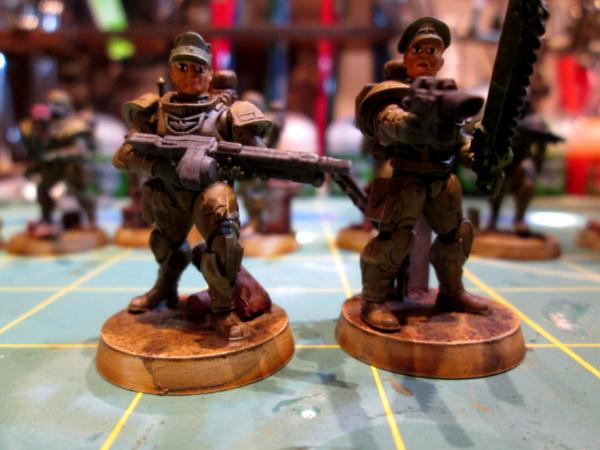
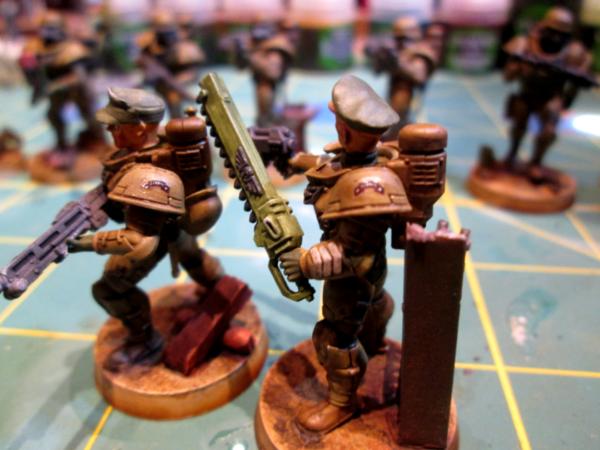
Since this is a Veteran Squad, they have two missle-eers and a special weapon, here are the missle-eers:
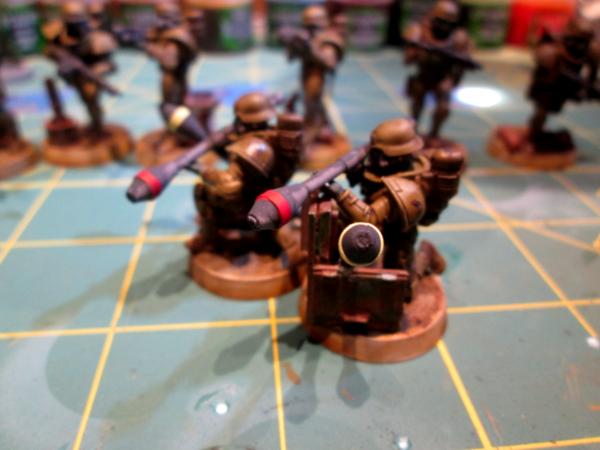
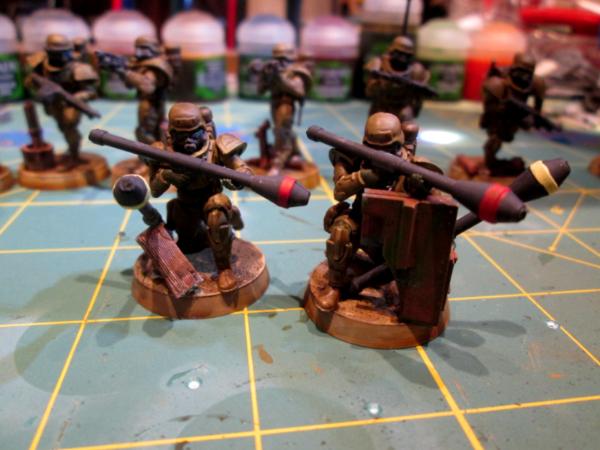
The flamer and radioman (gotta go back and drill out that barrel!):

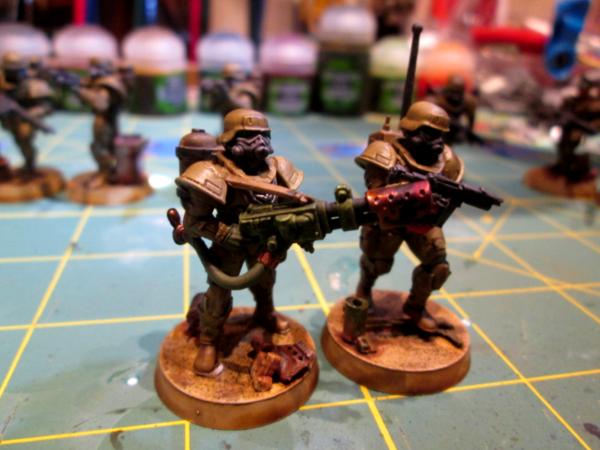
And here are the 'gun boys' that make up the rest of the squad (I've been trying to use a mold line scraper to get rid of said mold lines, but I can see from two of the helmets that I'm not doing enough- I'll try filing with an emery board next time):


A detail I hadn't added before is the 'dirk'; Dream Forge includes this item with all their kits, so for this squad I tried to put some effort into adding them and painting them:
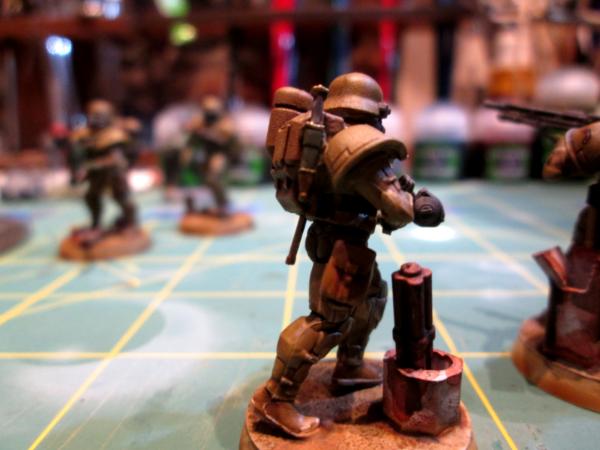
So, another squad completed towards building an ever-expanding Guard for the glory of the Emperor. Next up is to take this:
...and kitbash, customize and overdo it until it is a Super Basilisk.
This is a terrific kit from Eastern Express of a Soviet WWII B4 203mm towed howitzer/heavy artillery piece. The moldings are very crisp and nice, solid plastic. The kit has individual track links and, as assembled looks like it will scale out closely to the footprint of a Basilisk. Roughly, I'm figuring to add a cab to the front and a loading platform at the back. I have extra tread/track units from Robogear, but may scratchbuild my own for the rear. I've also got a shell hoist from Bitspudlo, but may also build my own if the scale isn't quite right.
And all of that will most certainly change as I get started and encounter reality, plus 'bright idea fairy' moments as the build goes on.
More follows soonest!
106010
Post by: Meer_Cat
So I'm working on getting the major sub-assemblies of the howitzer together and finally know which way I'm going with it. I think it's going to be a lot of fun, and - if the vision I have right now actually pans out- will not look anything like the original model _or_ a Basilisk.
In the meantime, here are a couple of shots of a minor conversion I did a bit ago. This Dragon style Anti Tank Guided Missile team was included in a shot of the manned Imperial firebase earlier in this thread but not featured, so some of the details were masked.
The bits used include the seated and kneeling heavy weapons crewmembers from the Wargames Factory Greatcoat Troopers Heavy Weapons set, a GW missile launcher, a night vision scope from the Dream Forge Panzer Jaeger set and a WGF mortar bipod. The ammo carrier's backpack is from Robogear. I'll have to look up the name of the company that makes the flame and smoke castings to make it look like the gunner is firing, but I really like how the piece came out. Per Klaus- Not Santa's blog, I'm going to try to make my own next time. He has several excellent Tutorials in his pages on how to make them.
I wanted to make an ATGM team in the seated firing position because everyone always makes the missile guy kneeling, and I'm here to tell you that is the most uncomfortable and inaccurate firing positon you could possibly take. Your upper body is weaving back and forth because you have no anchor point, there's always gravel under your knee and that kills and your raised knee offers no support whatsoever. Seated, you have a tight body position and better stability and one's rear end is padded enough to be able to ignore all but the biggest, sharpest rocks one might sit upon.
My two cents anyway.
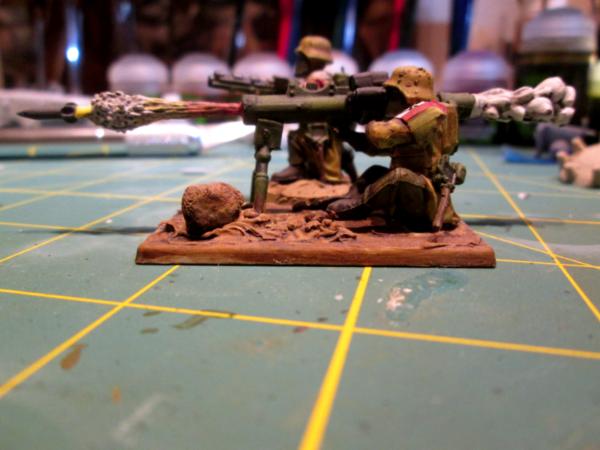
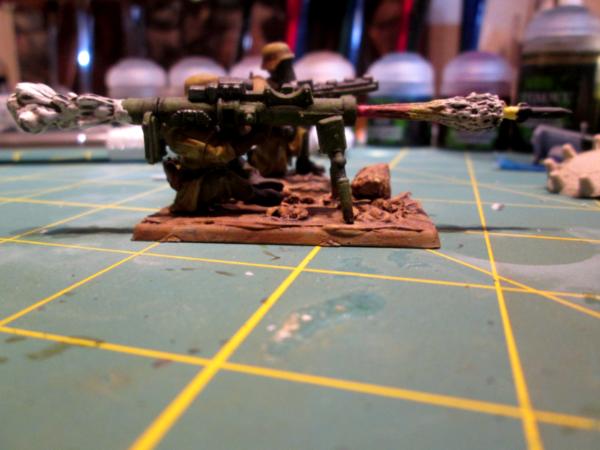

I'm fulltime on the new project, so more follows soonest!
106010
Post by: Meer_Cat
I'm getting the major sub-assemblies completed- the parts from the actual kit that will go together and mostly get left alone. Then the real fun begins, with integrating those assemblies into a new framework and scratch-building a lot of things. I'm still very impressed with this kit, and can't believe the detail that goes into everything. There are literally details either molded into the pieces or constructed that then later can't be seen as the kit builds up- a very true representation of the B4 Tracked and Towed Heavy Howitzer.
Here's a photo to give an idea of how complex the kit is (all the pieces in the foreground are required to produce the track unit in the background):
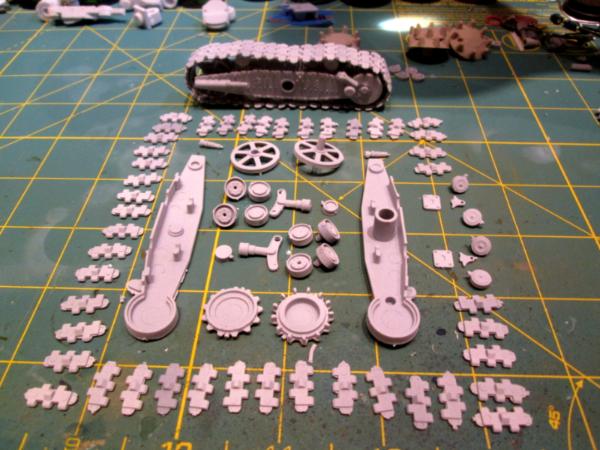
Like I mentioned, the real fun should be starting shortly. I (think) I know what I want t build and have the materials, it remains only to see if I have the skills. I reckon to have something for all y'all to critique directly down the road.
Thanks for looking in and giving me the chance to show off some of my work, and for all your help and advice.
More follows soonest!
69676
Post by: Big H
HaHa, I concur about the kneeling / seated position !
"Not Basilisk" looks like a good start, and certainly looks a good alternative, GW make some terrific figures, tho expensive, but its true there tanks seem to have a long way to go before they catch up with historical models.
Nice work buddy !
106010
Post by: Meer_Cat
Thanks Big H! And good to hear from you again.
When I picked up the B4 Howitzer kit, I was hoping that the gun platform itself would be the right side (or close enough) to form the skeleton of the mobile vehicle platform, but that hasn't turned out to be the case. It turned out to be 'way too long and just a little bit too narrow. I cogitated on that for some time, but I believe I have a good plan to build something innovative and new, and make good use of the existing parts. Without going into details (partly because I don't truly know how I'm going to do it and partly because I'm excited to see if it even might work) picture a 155mm Paladin self-propelled howitzer with its own articulated ammo hauler.
Commenting back on the Dragon ATGM- I hated the kneeling firing position, but was really too short for the seated- the darn front folding leg only had two adjustments and the one was 'way to low and the other was just a scooch too high. I usually wound up sitting on my protective mask case to 'fit'. Fortunately, I got shifted over onto a gun crew relatively quickly and only had to lug the Dragon around for a few months. I did get to fire a training load twice- they are a hoot and when they say it has a 40-50 meter back blast area- they meant it!
I intend to over-do the 'not basilisk' like a I did the Hanomag- more follows soonest!
27140
Post by: ChaoticMind
I'd never thought about kneeling vs sitting for heavy weapons until now but what you said makes total sense.
I will however still argue that the WGF Greatcoat sitting legs still look "off". They look like they're doing yoga, if they were actually crossed or one was extended they would look much better.
As for the insanity of the artillery kit, sounds about right. I used to build historical plastic models and TBH those track units don't look too bad. Worst I encountered was a kit I never finished for other reasons of a WWII German scout half-track. 5 overlapping/interlaced road wheels (SDKFZ 250/251 family) and drive wheel with track links around half as wide.
106010
Post by: Meer_Cat
Yup- seated behind a tripod mounted weapon, the Greatcoat Troopers seated figures are a little goofy, IMO the legs should be bent at the knee a bit more, a bit more flexion. I've modified a couple to look a little bit better but really to make them fit the basing I was using- it's pretty easy to saw a bit behind the knee and then carefully bend the leg.
But for a monopod or bipod mounted weapon, the seated pose is almost exactly right. One's legs tend to be a bit straighter (unless you're taller than me, in which case you still have to flex the knee) because you're trying to scooch your heels into the dirt a bit for stability (you're leaning forward into the bipod, but pushing back with your heels). The toes should point up a bit more though.
You're right about the track units- it was intimidating at first because I hadn't built an historical kit since I was in my teens, and never one with individual track links- always the 'rubber band' type treads. But these went together pretty easily in the end, just had to develop a different technique to have the glue ready and the pieces ready at the right time.
I've been looking over the customized and scratch built Bassies here on Dakka Dakka for inspiration- ;lots of good work to go by here. I think the rough concept I have will work, and I'm almost to the point where I can start really messing around with it.
Thanks for your input ChaoticMind- I really appreciate it!
More follows soonest!
27140
Post by: ChaoticMind
I happily bow to your greater experience regarding heavier weapons. All I've ever fired is pistols (mix of .22 and 9mm caliber, standard and long barrels), and a .22 rifle. Always at a range with a bench and at most a bag or small bipod for the long barreled pistols, rather different from any sort of "real world" weapon use.
However I'm glad I wasn't making a complete fool of myself!
106010
Post by: Meer_Cat
ChaoticMind: Definitely not making a fool of yourself: the principles for accurately aiming a weapon are basically the same, whether it's a 9mm pistol or a shoulder-fired missile launcher. In every case, a stable platform is created by a push-pull dynamic. In the case of the pistol, one 'pushes' out with the pistol against the 'pull' of the attachment point of the arm to the shoulder. The second hand that supports the firing hand and arm is actually more helping to control left and right weave, if the push-pull against the shoulder is strong enough. Using an isosceles triangle stance, or a modified Weaver, creates a number of triangles of the different portions of the body, all of which re-inforce each other and yield the stable firing platform. Same thing with a shoulder weapon, just different push-pull points. The most stable seated firing position for any long weapon is the modified cross-legged sit, in which the legs are crossed and the elbows rest on the knees (knees are optimally on the ground, or otherwise supported by something).
As for the Basilisk conversion, a bit of forward motion tonight. Here are the major sub-components from the kit that I reckon to use more or less 'as-is':

The first thing that came to mind is that I didn't do a very good job on the track units- very uneven and loose. Fine for cultists or Orks, but not the mighty Guard. So, in modeling as in carpentry, trim hides a multitude of sins. Track boxes/guards seemed the best way to go, so I needed a fairly stiff piece of plastic for the top of the track box and some aligning struts:

Added some end caps to break up the outline:

And viola, Bob's your uncle: track boxes:

In the last pic, the boxes are just floating on the track units themselves. They still need gap filling, sanding, more panels added and (this time for sure) RIVETS.
I think next step will be to build the forward crew/driver's compartment. This will form the attachment point for the tread units, counter-balance the loading platform that will go on the back and act as the base for the gun platform (which is going to get chopped roughly in half- the back part will form the chassis for the articulated ammo carrier). And believe me, I'm quite sure that all those triangular offcuts are going to come in handy going forward.
More follows soonest (it's too early to say 'it isn't done until it's OVERDONE').
106010
Post by: Meer_Cat
Here's the next bit done:
I've cut out the basic 'bed' of the entire vehicle from a piece of stiff 'Beware of Dog' sign (good styrene building plastic for cheap and I need another one as I'm running out) and built out the cab for the driver and the engine compartment:

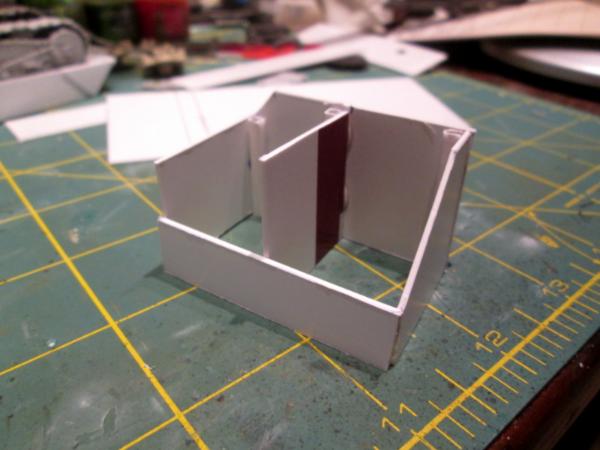

And also built the firing platform for the gun:
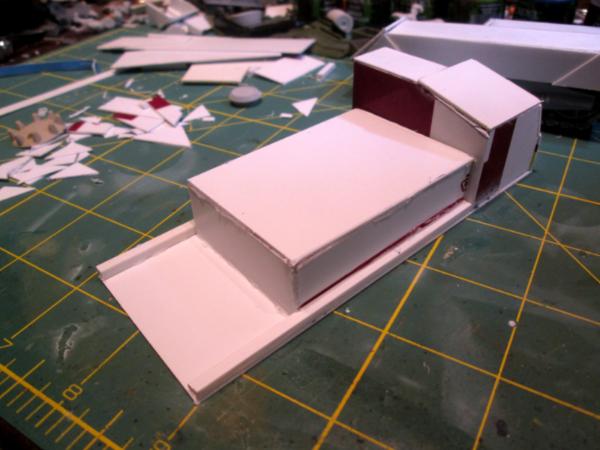
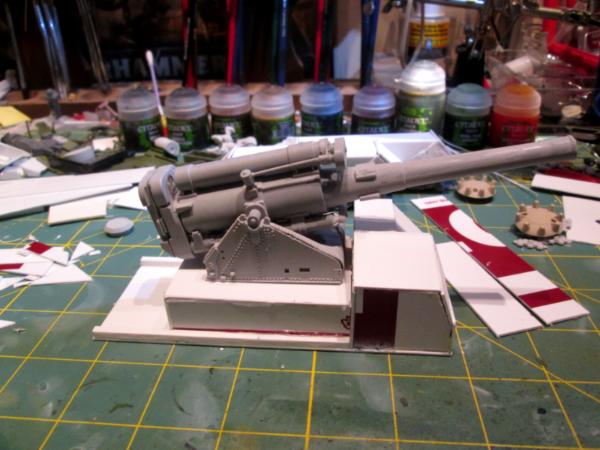
Filling, sanding to follow and the next step (I think) is to build out the gunners' platform behind the gun and then add the rest of the bits (especially the fire director's seat, and the traverse and point aimer positions) to the trunnion structure. Then detailing panels, crew items, the gun crew and everything else.
More follows soonest.
106010
Post by: Meer_Cat
I had some time tonight, so here's the next piece done on the self-propelled Earthshaker howitzer:
I built out the bottom of the hull and added the first of many, many trim pieces (both to add depth to the model and to hide my many errors). I debated on whether or not to cut the bottom and top pieces to length, and then build out the sides, or cut the side pieces and then add the tops and bottoms. I went with the former strategy, as all the proportions are based off the length of the gun stand. The basic footprint I measured from a chimera, but the cab-forward, and the crew platform at the rear, are based off their relationship to where the gun mount sits- so I went with the length sections rather than the sides first. The 'lip' added to the front of the cab, where the upper and lower hull sections join, is the closing latch from an Old Bay seasoning canister- it'll be the hinge for access to the engine compartment. I'm also almost out of 'Beware of Dog' and 'Yard sale' sign sheet plastic- I'll need to drop by the DIY/Home Depot and get another of each- good plastic, cheap!

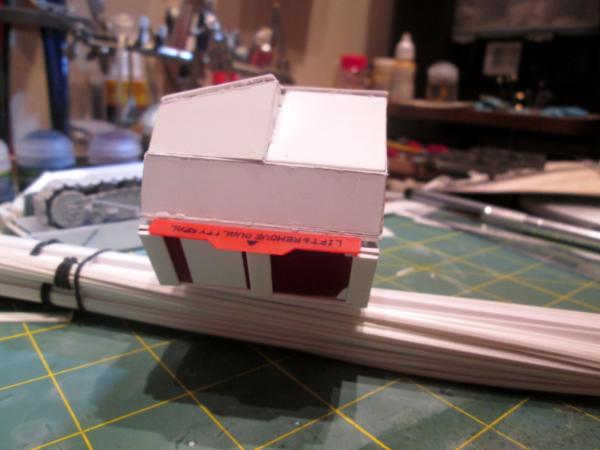
And I've added the track boxes- this started as a precise, surgical operation that rapidly 'went south' and required a ton of glue to hold together. And, as you can see, still requires a ton of trim and putty and greenstuff. _But_, for my first 'nearly totally scratch built' I'm not totally disappointed and there isn't anything I see here that can't be fixed and/or hidden. Looking at the pic, I chuckled to see the 'Made in USA' label- that was totally an accident, but perfectly placed!

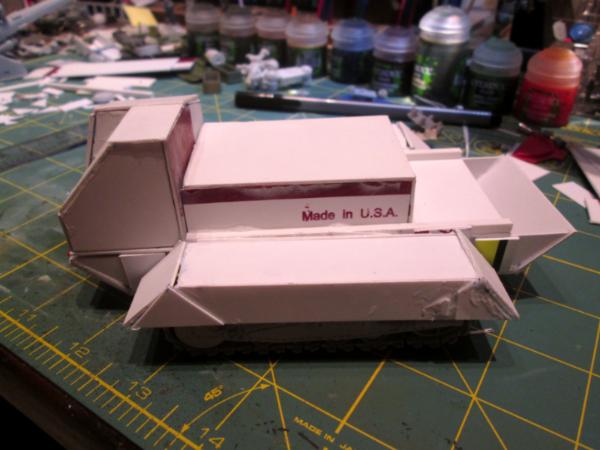

So, it's starting to look like something now. Next will be the crew platform in the back and the start of panel details around the engine compartment and driver's box. I'm almost to the point of being able to over-do it.
More follows soonest!
106010
Post by: Meer_Cat
It's been a very good week for getting time in on the project- here's what's gotten done so far tonight:
Got some work done on the driver's side of the cab- the hatch on top is actually made from a rubber golf cleat (I got a package of 50 from the local thrift shop for $1.00). Also started applying body putty (the Handyman's friend!), but still more trim and putty to go:
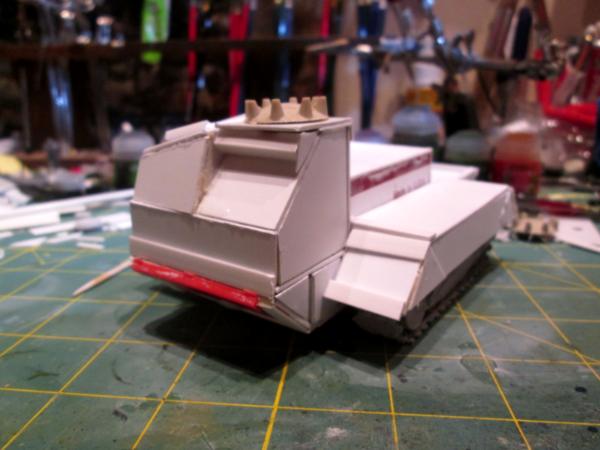
Another shot from the forward end, I think I've been able to square up the track fenders pretty well, and still have a couple of tricks to try to get it the rest of the way. I also scratch built the louvers for the engine air intake:

Also got the fighting deck started on the other end- hard to see with the glare in this pic, but the treadplate deck is laid and the edge rim installed. Also the track fender plates are on (to hide the cant) and are ready for their tread plate to be added on top:
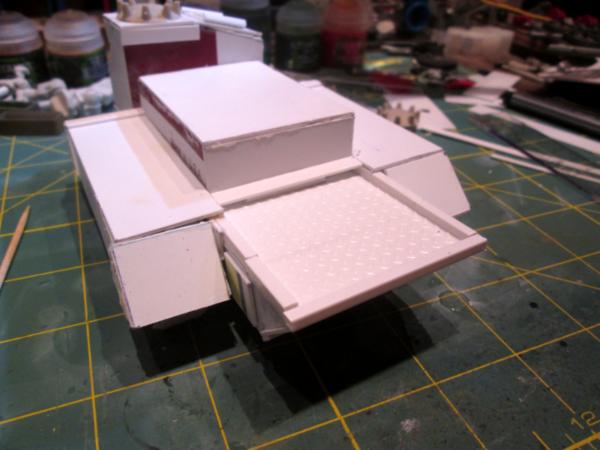
Started building out the right side:
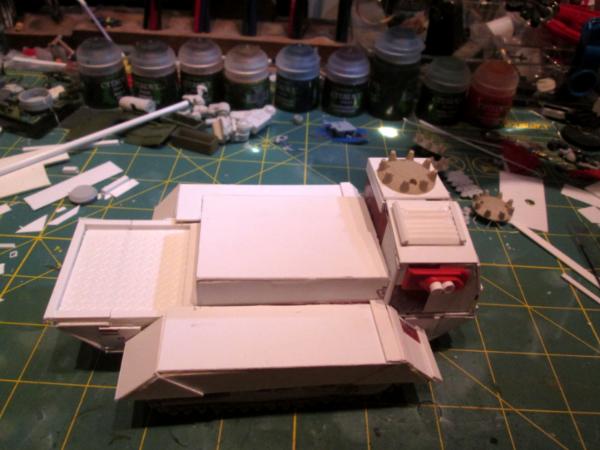
And you could see this doo-dad in other pictures, here's a closer shot- it's going to be part of the exhaust louver for the engine compartment. This piece is made from another bit from the spice can lid and a couple of pieces of straw. I'm still debating running hoses from the pipes you see sticking out to vertical exhaust stacks (that will line up depending on where the gun barrel ends up) or leaving them be:
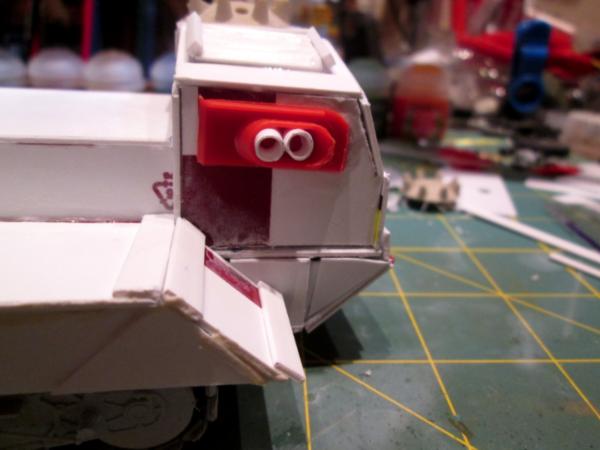
So, a lot of fiddley work again, but my own fault for not cutting precisely in the first place. I am still happy with how things are shaping up though, and looking forward to getting the 'basic' work done so I can start over-doing things.
Your comments, suggestions and constructive criticism are always welcome- it's how I've learned what little I know now!
More follows soonest.
106010
Post by: Meer_Cat
Only had a little time tonight, so got the last trim onto the track boxes, and put the tread plate down. Next up, some more filling, a little more trim, and then time to add all the vehicle fittings- grab handles, vision slits, armor panels, etc. Then on to the gun and primering!
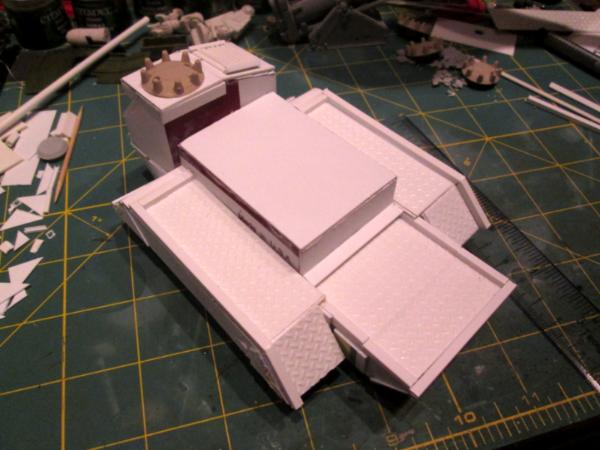
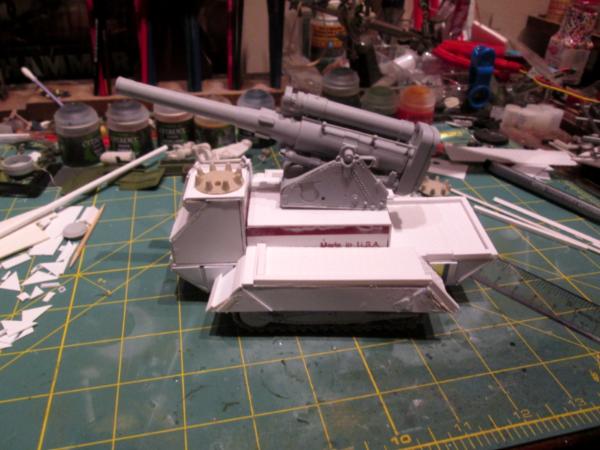
106010
Post by: Meer_Cat
Big steps and little ones- tonight was a lot of fiddling for a little bit of gain, but I think I'm happy with it.
First of all, I've been thinking about how to mount/where to put a hull mounted weapon, to match the real Basilisk's load out. I decided that the driver's compartment just became a driver/gunner's compartment- it was really the only place on the hull to put something; I didn't want to go with another TC's pintle mounted weapon, as it would foul the main gun. But, now I have to build in a TC position, as the driver has quite enough to do what with driving, firing the hull weapon and not getting parboiled by the engine sitting right next to him (as in the M113).
I didn't have a hull-mount heavy bolter to give up, but I did have the sawn-off front half from an earlier project, so a little trimming and some styrene and I had the basic parts to go forward with:

I also wanted some sort of optic, not just a vision slit (so WWII Sherman), so I pulled some scraps together to make this:
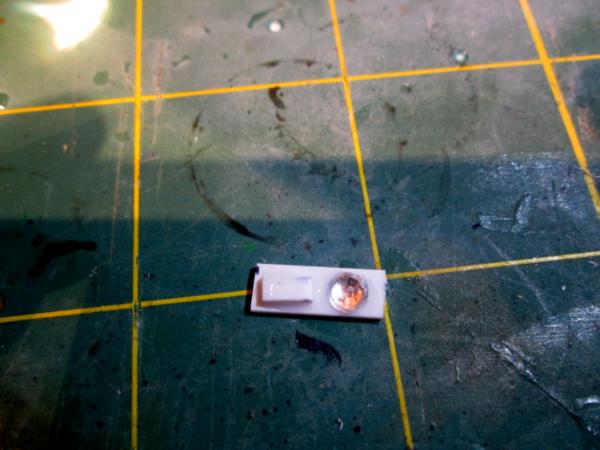
And here's how it looks all mounted and trimmed (hiding a multitude of sins) up:
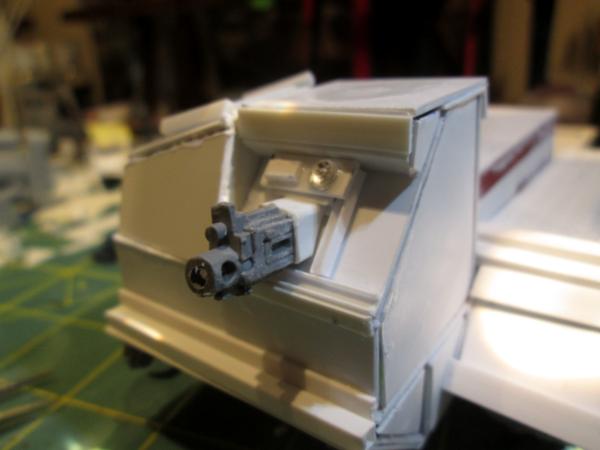
And here's another shot, a little lower, to show the addition of the front tow hooks (from a Leman Russ kit, I think, they were part of a large lot of vehicle bits I got a good deal for on eBay):

Still lots to go, not least rivets, but I think the next big push will be the gun mount- the B4 203mm howitzer had two seats for crewmembers to sit in whilst they lay the gun- one of those is getting framed in to become the TC's perch. It's okay for the rest of the gun bunnies to ride back on the firing platform in the freezing cold- but no self-respecting gun captain would.
More follows soonest, and thank you for the opportunity to show off a bit of my work. This is the closest to a scratch build as I've come, up to date.
65595
Post by: Camkierhi
Really shaping up bud, details will pull it together. Definitely looks the business. Great work again.
106010
Post by: Meer_Cat
Thanks Cam! And the main framework I think is just about done, so it's getting to be time to be thinking of the details- especially the loading apparatus. Still not sure if I want to mini-diorama/scenic this at the moment of firing or showing the crew loading. Definitely the beast will not be on the move. A fair bit to do before applying paint to anything- but I am scoping the stencils from Fallout Games and Anarchy Miniatures 'just in case' for 'when the time comes'!
I always appreciate your stopping by and dropping the encouraging word- it means a lot.
More follows soonest!
Automatically Appended Next Post: So here's soonest- and a question for anyone to chip in on:
I was messing around, wanting to mount the gun-plate on a turntable, to allow for at least limited traverse without relaying the entire weapon platform, when it occurred to me that the contours of the vehicle hull implied a lot of internal space that was being completely ignored. On a GW Basilisk, the gun is set into the hull space, so everything works out right. On mine, the gun is perched up on top and all the space below it is really just lockers, at best.
So, which looks more realistic/believable and/or better, this:

Or this:
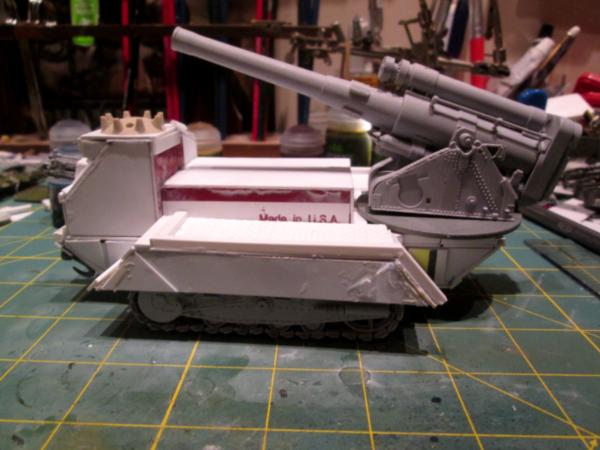
I've got my own favorite, of course, but really want to know what all y'all think. For either configuration, I'm planning to add deployed spade jacks and shock absorbers/recoil rods.
And whilst we're at it, which do you think is the better vignette- the gun firing, or the crew loading?
I'm looking forward to hearing from you!
110727
Post by: ApaceKittens
Crew loading. definately
106010
Post by: Meer_Cat
Good to hear from you ApaceKittens- and thanks! I'm leaning that way (crew loading) and am really liking the gun mounted at the back of the platform instead of higher up top.
Here's some of the work from tonight, based on the new position for the gun mount on a turntable. The vehicle will need stabilizers to help control recoil and keep the platform from shifting left or right upon firing, so here's the first (and hopefully only required) attempt to build something:
First, needed some basic components for 'landing leg' type stabilizers-something that can be extended to deal with uneven terrain, but be retracted and swung back up out of the way when the track is on the move. Started with some baby bottle party favors from the dollar store and cut the caps off:

This gave me almost everything I needed:
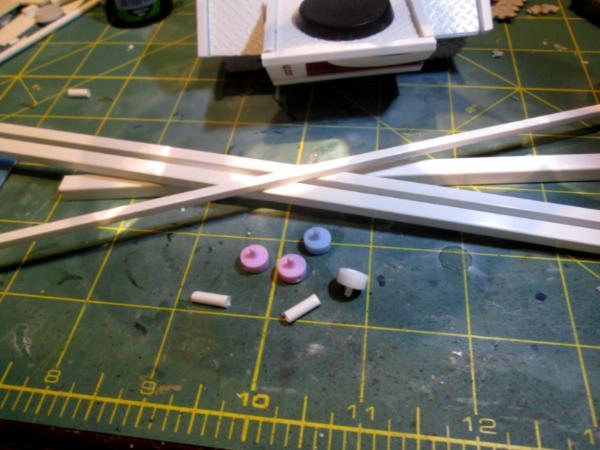
Then glued them to a piece of styrene straw to act as a hinge pin:

I used JB Weld, which may have been a mistake as it's not setting yet (may have not put in enough hardener) so I can't start gluing things up to the track itself. I next cut a 0.75 inch length of every size of styrene channel that I own and found some steampunk gears to act as 'feet':

And here's what the stabilizer will (mostly) look like when it's fixed in place:
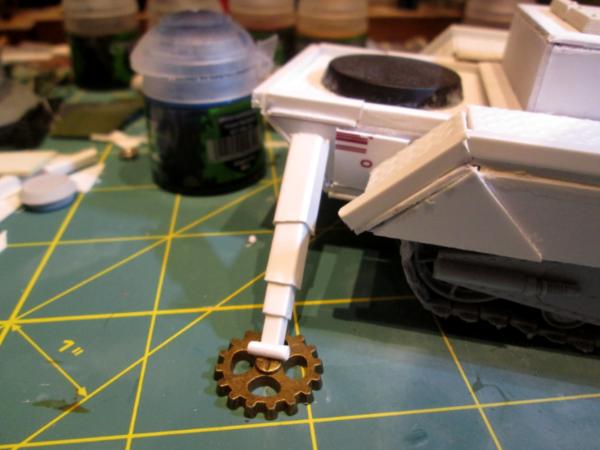
All that is missing in this last shot is the large hinge (still drying) and a bit of boxing out to form the attachment point to the hull. The turntable will sit on top of this and then it's on to the next sub-assembly. I'm thinking that a big bore piece like this will need a travel lock to keep the barrel from bouncing on the trunnions when on the move, so that's probably next. Plus the TC still needs a place to sit.
I look forward to your constructive criticism, suggestions and comments.
More follows soonest!
65595
Post by: Camkierhi
Damn it, thought I had commented earlier.
All looking great work bud. Couple points.
Crew loading would be better.
Not sure on the gun position, I understand where you are coming from on both, and your point is taken about the space beneath the gun.. Not sure how moving it back does it any favours though. Certainly the barrel would need a slight extension, and if it is at the back I would be afraid of the thing tipping backward when it fired, I like the legs stabilisers, but would say they maybe need to be angled slightly back the way.
Two cents spent, hope you don't mind the ramblings of a daft old fart.
106010
Post by: Meer_Cat
Not rambling at all- points well taken and I appreciate them. I can definitely angle the stabilizers outward, and that makes good sense, both for recoil and side-to-side balance. I'm afraid I painted myself into a bit of a corner with the hull superstructure though, short of tearing it down and keeping the best bits and starting over, not sure which way to go. I am thinking of keeping the gun to the rear and rigging it something like the old M110 (which was an eight inch/210mm self-propelled in the US inventory until well into the '80's). The loading was done from the ground via ramp and plunger.
I like the idea of a barrel extension- it would give balance to have the breach hanging off the back to have the barrel protruding forward of the cab. I'm thinking I may also augment the barrel shock absorbers- the three that are on now (original parts of the kit) don't look robust enough for a track mounted gun (the original kit is for a towed, albeit tracked, artillery piece). Something 'more bigger' is needed to control all that kinetic energy.
I also think to ramp up the scenic base- by creating a lot of realistic action around the gun, I'm thinking it will add realism to the platform.
I'll play with it some more, and- the worst that happens is I've learned what _didn't_ work and go back and try something new.
Thanks for the honest input and keep it coming! As my pop used to say 'you don't get better shooting pool by playing people less skilled than yourself.' This is how I (hopefully) improve my skills and my game.
More follows soonest!
106010
Post by: Meer_Cat
We are now officially 'out of scope' from the original project. I kept trying to puzzle out a way to go forward with the self-propelled gun based on the first concept, which was to adapt a Soviet World War II heavy howitzer onto a scratchbuilt platform and use the treads from the kit as the motive power. No matter how I positioned the gun, it just didn't look right.
If a put it up top of the fighting platform, as I had originally planned, it looked ungainly- and left the open question of what was in all that space underneath (too deep for storage, too short for crew):
If I moved the gun turntable to the rear of the vehicle, it looked too unbalanced, and only allowed the main gun to depress down to about 15 degrees, instead of zero, as would be customary for movement:
So, the answer that finally came to me is IT'S TIME TO OVERDO THINGS!
Instead of a single vehicle, possibly with an ammunition trailer, we will now create TWO separate vehicles. This first one will be the ammo hauler- akin to the US M548 that supported the M109 self-propelled 155mm howitzers (replaced by the Paladins with their own, upgraded ammo hauler). All that extra space below the decking is now armored, vented, low-fat ammo crate stowage. It will need a hoist system to
get the crates out, and then a mechanical arm to sling the set rounds onto the loading foil.
Tonight I got a start on the hoist system. I cut some styrene channel:
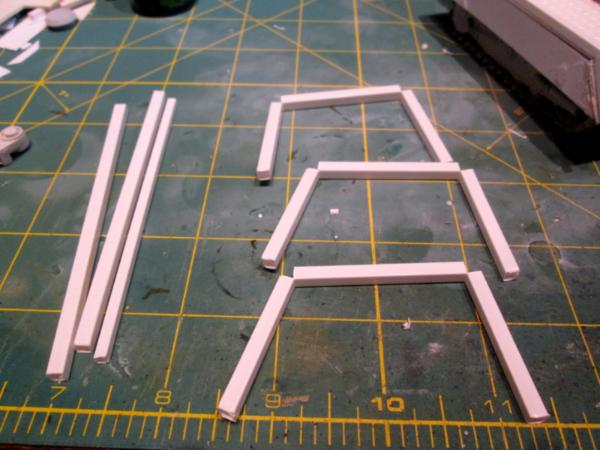
Roughed out the frame:
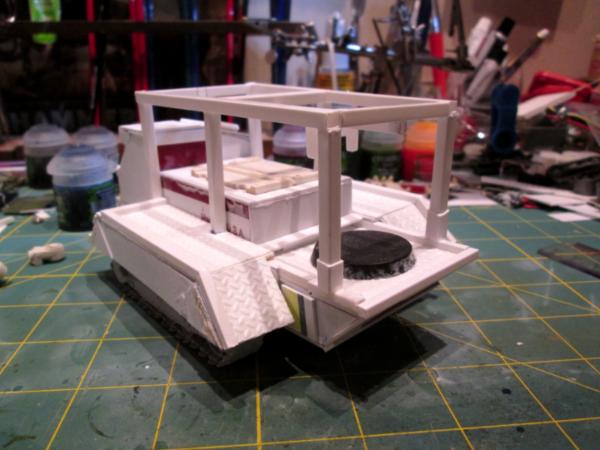

And fastened in a bit to form the basis of the hoisting clamp:

So far, I like how this is shaping up. I need to finish the panels on the hull sections to fill out some of the blank spots, fill a lot of gaps with greenstuff or putty, finish the hoist and add the mechanical loading arm (I have a store bought one from Kromlech, or possibly Bitspudlo). At the same time, I'm looking for something to use as the basis for tread units for the new gun platform- or may possibly scratchbuild my own- I've been reading a lot of articles and seeing the great work a lot of you are doing in that regard.
Any way- out goes the nice, simple, somewhat converted/somewhat scratchbuilt, closed easy Basilisk counts-as, and in comes the greatly expanded, two vehicle set with a lot of detailing to be figured out.
I'm happier this way, I think.
More follows soonest!
106010
Post by: Meer_Cat
A little bit more done tonight- a bit of work on the chain hoist, added the base for the mechanical arm, added some hatches and grab-irons. Too late to do more now, but tomorrow I hope to finish the bondo-putty work on the hull so I can get a basecoat of primer on the beast. Trying to think up a good 'workhorse/hauler' type name for this vehicle series, too.
Will definitely pose the ammo hauler and its Basilisk in the 'crew loading' position, with a crewman operating the chain hoist, bringing another ammo crate forward, one or two crewman shoving a fixed round down the loading glacis into the breach and others in the trainer, pointer and gun captain positions. I want to base the two vehciles separately, but in such a way that the bases can be pushed together or interlock and display as one piece.
More follows soonest.
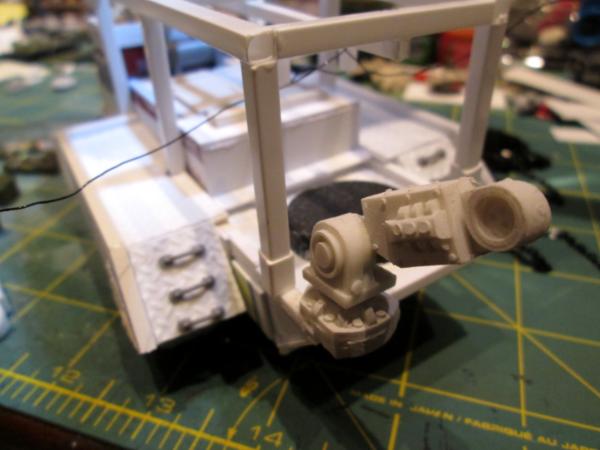
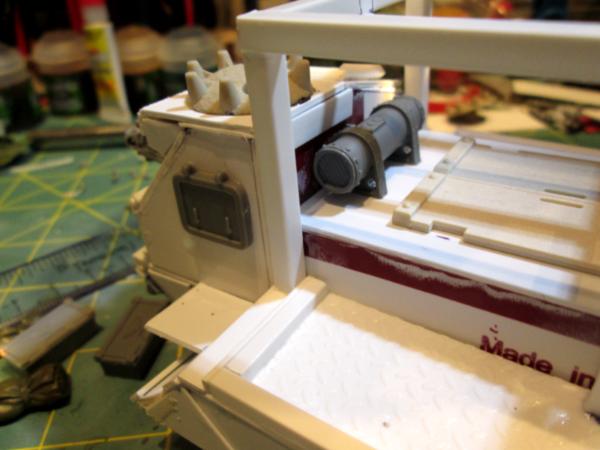

106010
Post by: Meer_Cat
Been a tough few days to get some work in, but I finally think I've made enough progress to show some pictures.
This work has actually been done for a bit- it's the chain hoist and sliding rail for lifting ammunition crates up and out of the armored storage area and moved to the back arming platform of the hauler. Here's a fairly poor side view:

And from the top:

And the top rear. The wires will get braided into a lifting cable and will have a crate suspended over the arming platform, where the projectile is removed and the fuse set for whatever is needed (timed aerial burst, proximity, point detonation, ground penetrating time delay detonation):
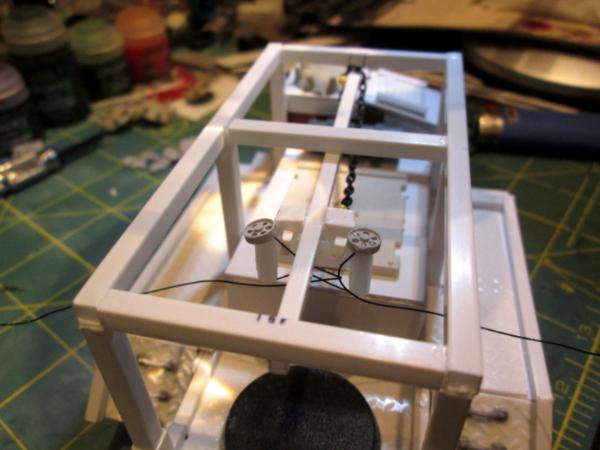
Here's the step that was holding me up- adding the rivets. I had made these a long time ago (months), so they were ready to go. They're 1/16 inch punch outs using a multi-size hole punch and a bit of old yard sale sign for the plastic. I just needed to sit down and actually glue them on:


I had glued down the 60mm base to use as a turntable for the gun, when this was still going to be the self-propelled howitzer/counts-as Basilisk, and now I can't get it pried off- so on it stays:

And, finally, a primer coat, which may also act as the basecoat. I'm thinking about doing this vehicle in a desert camo scheme, as a departure from the previous 'army green' or woodland greens I've used before. I'm looking over Klaus, Not Santa's and Shazolenzabi's work again, as both have excellent camo schemes to use as a guide. I must admit, I think it is starting to take on a more finished 'Imperial' look, rather than the previous 'rough and ready' Orkish look:
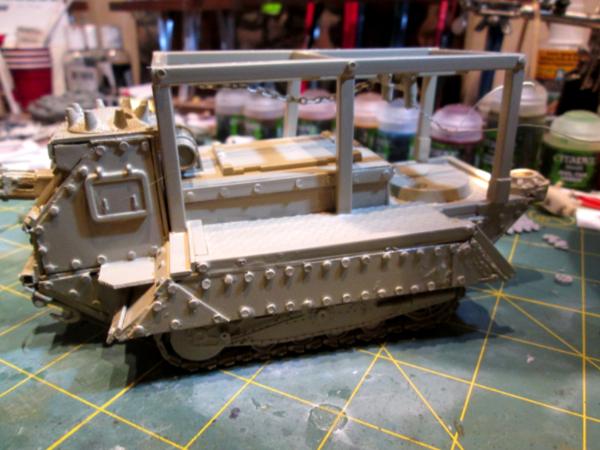
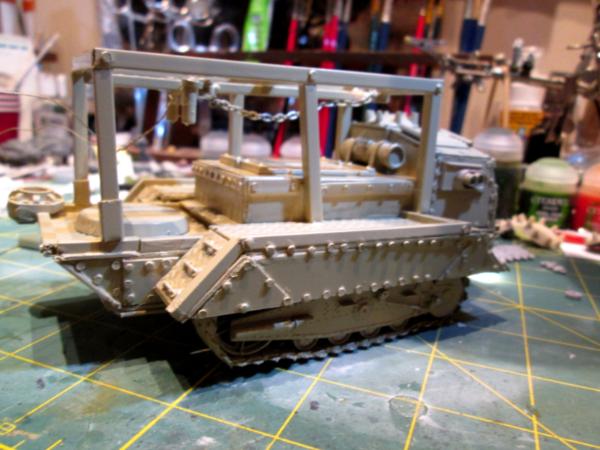
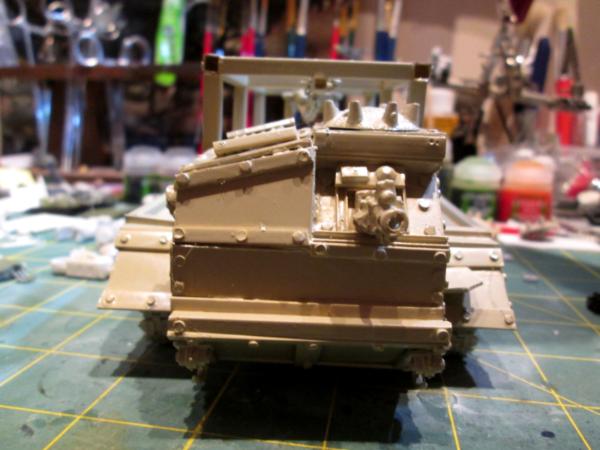
So, next up I think is either the addition of camo stripes/splotches if I go that route, or a nice, grungy weathering wash of Nuln oil around the engine compartment and Agrax Earthshade everywhere else. Then the detail work can start, followed by painting up a couple of crew members posed in the act of bringing up ammo crates and arming a shell.
Your constructive criticism and suggestions are always most welcome.
More follows soonest.
106010
Post by: Meer_Cat
A bit of painting progress. I know in the last set of pics it was hard to tell that the base coat was Rustoleum Khaki (I had a spray can on hand, and I know it sticks to anything, and I used a lot of lawn sale sign plastic in this project), but I think the camo pattern additions bring that out a bit better.
First, I needed to see what contrasting and complimentary colors I wanted to use, so I took a bit of scrap and made a test pallet:
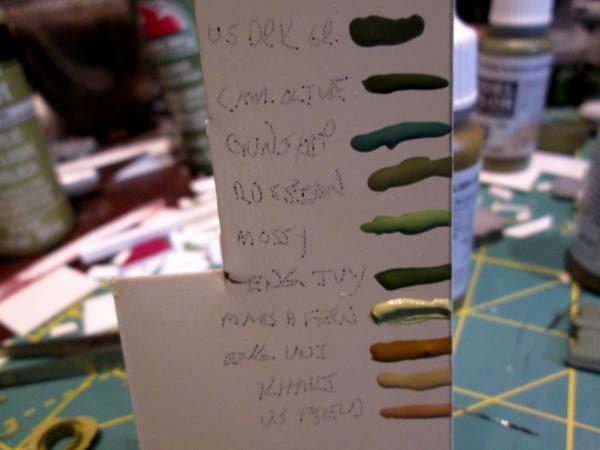
Then I added the dark green (which is Vallejo US Dark Green):
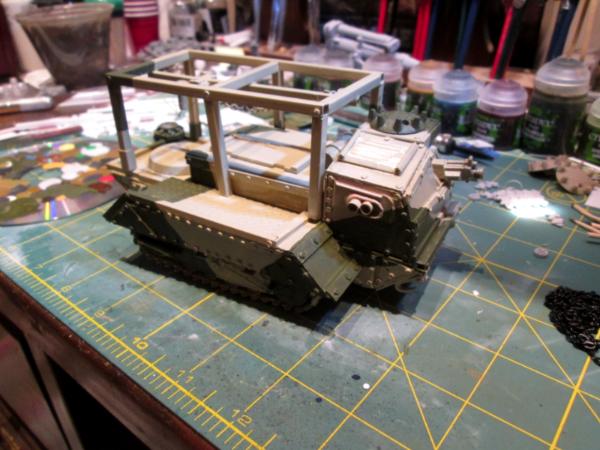
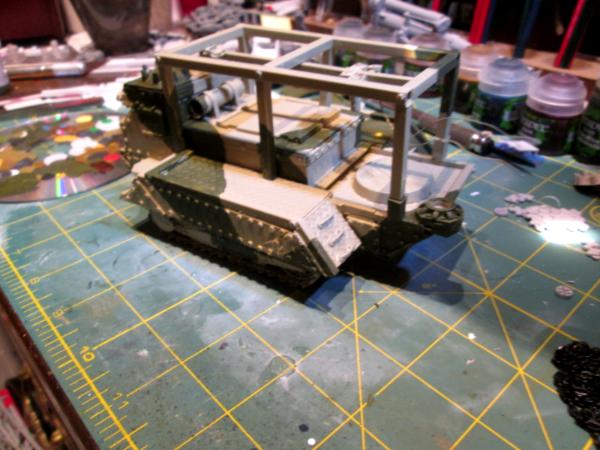
Followed by the brown (Vallejo US Field Drab):

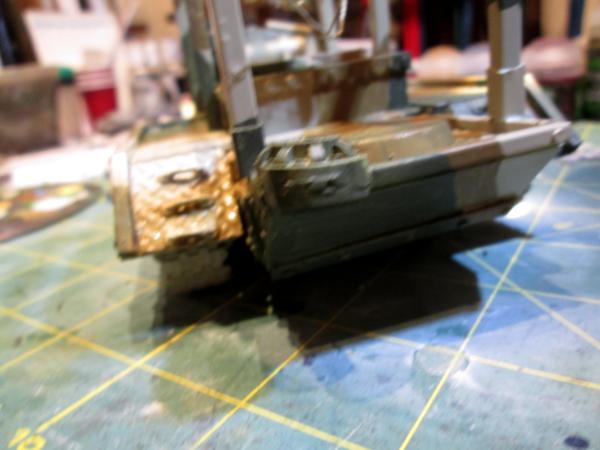
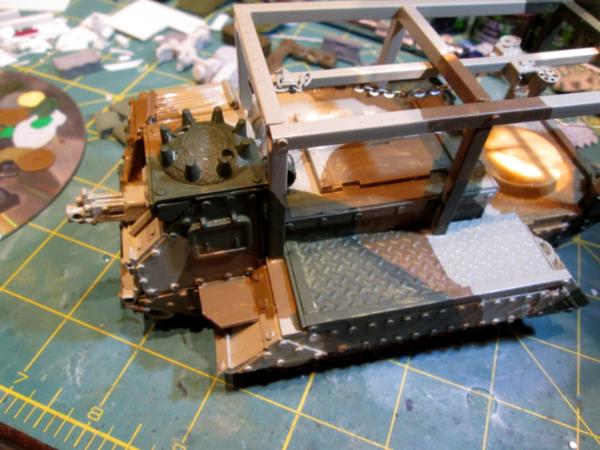
And finally flat black lines to separate wherever any other two colors came together:
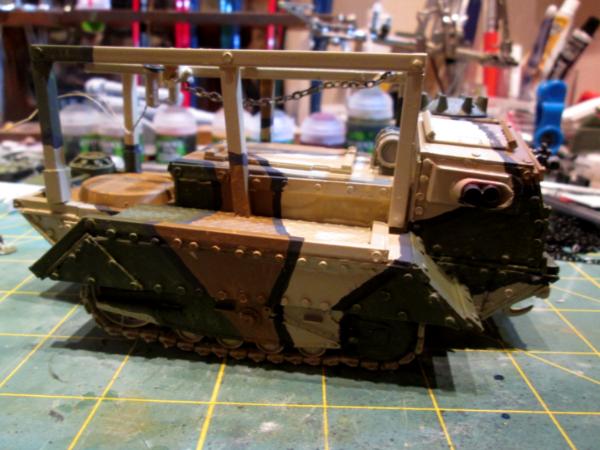

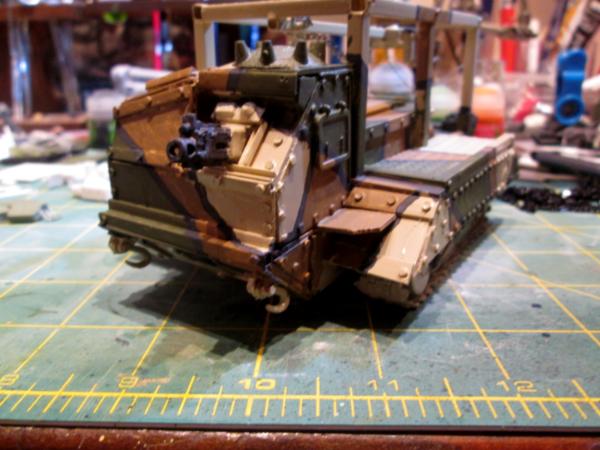
And I've started base coating some of the other items (the heavy bolter, lifting system pulleys, etc).
The next step will be to go back with a thin wash of each primary camo color and touch up the splotches, then hit the whole thing with a wash of Nuln Oil. More base coating and then rusting of the muffler, exhaust and tracks. Add on the stowage, ammo crates and crew, and I'm done- simple, yes?
Thanks for looking in, your comments and suggestions are always welcome. More follows soonest.
93572
Post by: Yorkright
I keep checking in and seeing all these tanks being built, wonderful stuff Meer. Any chance you could throw us a pic of your army together?
27140
Post by: ChaoticMind
Looking good!
I just have one grump; You're making me want to paint some (small scale) armor!
100624
Post by: oldravenman3025
I like where you are going with the transport's camo scheme. Nice progress so far.
106010
Post by: Meer_Cat
Many thanks for all the positive feedback!
Yorkright: I'm flattered that you would be interested in a pic of my army, such as it is. I'm very happy to set something set up, shot and posted, and thank you. When I started painting Warhammer 40k in 1989, I was still a barracks rat in the Army. Needless to say, most of the other guys around couldn't care less about 'toy soldiers', so having anyone other than another 'toy soldier geek' show any interest was rare. To have the opportunity here to show off my pieces is a rare privilege indeed.
ChaoticMind: Very good to hear from you again- and get painting- the world needs more armor! (and, according to Alice Cooper, guts).
Oldravenman: Thank you as well- between the camo that you paint and that shazolensabi does, I felt like giving this WWI-style scheme a try. I wasn't going to originally, was going to stick with my usual 'base of olive drab and a lot of dirt' approach. Of course, originally, this piece was going to be a 'counts as' Basilisk, too.
The Bassie is coming, but for now it is nice to get back into the painting mode.
More follows soonest!
27140
Post by: ChaoticMind
I wish! I traded one problem (No income) for another (A trucking job where I can’t bring minis with YET)
I really want to get back to a point where I’m regularly working on my minis again.
106010
Post by: Meer_Cat
I do wish you luck and hope for the best outcome for you with that- I went through a period as well where I was on the road a lot (I still travel away for a week or more at a time several times a year) and that arrangement just doesn't support a full-time hobby life.
Having said that, for smaller, more limited number painting projects with little or no customization or conversion, I did use a small Plano tackle box at one point that held half a dozen figures (I was doing Napoleonics by the six's, back in the day), a few tools and the paints. For a very brief period (a few months) it worked- more than that and it's just a pain.
Good luck! And I hope to hear from you again soon.
65595
Post by: Camkierhi
That is looking pretty amazing bud, great camo, really nice model, got a lot of character.
27140
Post by: ChaoticMind
Yeah, I have a moderate sized toolbox that I’ve been working out of for a while ready for when I get my own cab but I’m waiting to get in a trainer’s truck right now.
106010
Post by: Meer_Cat
Hey Cam- thank you for the kind words! This has been a bit of a different experience for me, as this is the closest to a complete scratchbuild as I have yet come. I've been able to put a lot of the practices I've seen here on Dakka Dakka into the project, and always learn a lot (whether it comes out the way I intended or not). I've been following your Village Build with great interest and will drop in over there to leave appropriately congratulatory words as well.
ChaoticMind- hang in there and I hope you're more settled soon- you do some great work and I've learned a lot following your blog. As the Romans used to tell us "Fortune favors the prepared mind and resolute will". (I write fortune cookie fortunes on the side [kidding]). 
106010
Post by: Meer_Cat
1) Still working on the Basilisk Ammunition Hauler (will have to come up with a name for the vehicle series) and hope to have some more pictures later tonight.
2) Still setting up pieces to take some army shots- and very flattered to have the encouragement to show a group shot off!
3) Here's a new bit of kitbashing, converting and/or customizing material I recently picked up at my local grocery store (Giant Foods):

These are cheap, fiber optic, led lights that are intended for kids to wear on their fingers and run around like maniacs in the dark (at least, that's what I did with mine, 'testing' them out). The package of three cost me US$2.00.
The main body of the device is about 2.25 inches long (approximately 60mm):
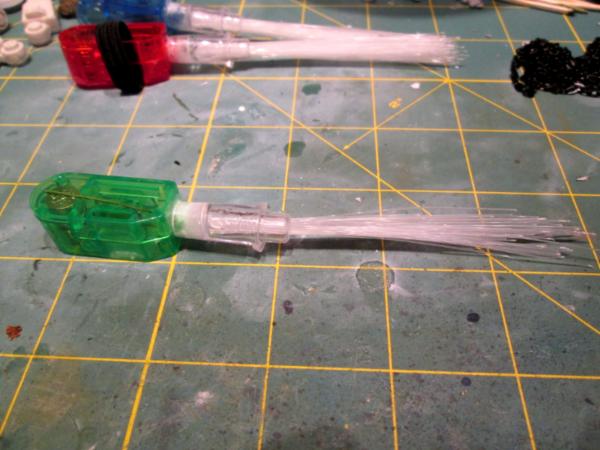
To me, the main bit looks a lot like a las-cannon or other heavy weapon barrel- wanting only a bit of tube in the front and a tripod or vehicle mount:

_OR_, this could be a source of cheap illumination for a vehicle hit. Look how bright these trands are; imagine of you bundled them into smaller bunches, and ran those to your various lights on a Chimera, Leman Russ, or even a Titan (or Eldar Wraith Knight)? You could run them inside or outside the hull, creating either points of light (run inside) or 'cables' of light (outside). These things seem tailor made for Tau.

I'm looking forward to finishing the ammo hauler- it doesn't seem like a good candidate for lighting, and the interior is sealed away, I can't easily get in there. But once finished, I want to start something else to try these on!
Hope this was helpful to someone, but at least I had fun playing with them for now!
More follows soonest.
106010
Post by: Meer_Cat
To start, I got the Nuln Oil wash done on the new ammo hauler (sounds like not much, but some days a little is all there is time for!):


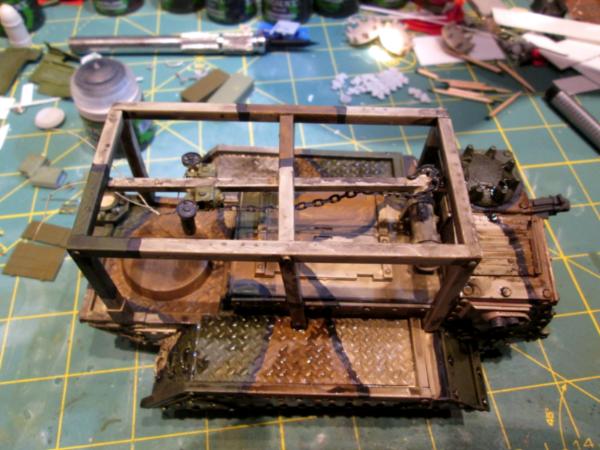
Ink still wet in places, but I'm happier now that the vehicle looks like someone took it places other than the motor pool (Murphy's Law: No combat ready unitever passed inspection; no inspection ready unit survived combat).
Next up, here are a metric-crap ton of pics of 'the army'. The quotation marks are because I haven't really painted a balanced force (for any rules set) yet, this is just what I've painted since I've been posted in Northern Virginia. If I can get in with a gaming group again, I'll build out a more regular assortment, with some Stra-Tee-gery behind the composition.
So, here's an aerial shot of the whole group:

The heavy artillery (and lots more coming- as someone mentioned elsewhere on Dakka, it takes cojones to bring towed artillery to the 41st Millenium battlefield- and the Imperial Guard are loaded with it):

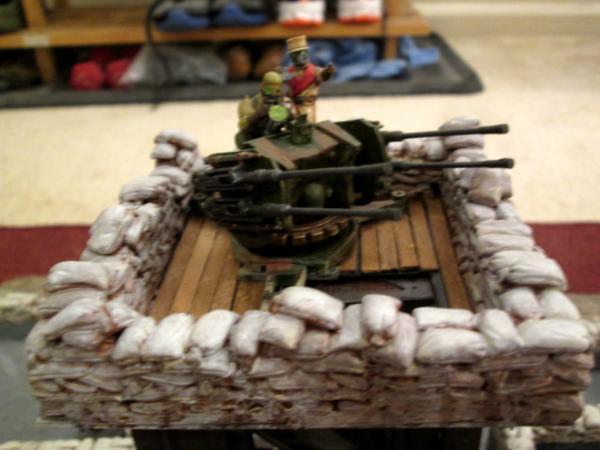
There's a Quad Launcher in the big picture, but the close up didn't come out very well. It has some features I'm rather proud of, so I'll probably run a separate spread on it later.
Here's the Infantry, starting with the Light Battalion of the King's Own Scottish Borderers (Clan Leslie). These are the nucleus of the Headquarters Platoon. The figures are by Kromlech:


Next up are elements of the 1st Battalion, 77th Infantry (the Lucky Sevens). There are three squads of these painted up so far and I have the components to add two more squads, a special weapons squad and a Platoon Command Squad. The figures are Greatcoat Troopers from Wargames Foundry (anxiously awaiting Bolt Action, who bought up WGF, to release more of these):

Here are the first and second squads of the First Platoon, A Company, 1st Regiment of Grenadiers. Figures by Dream Forge:

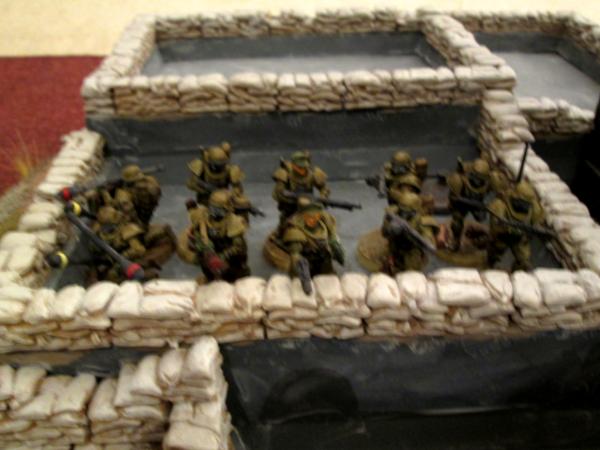
Armor- the Baneblade pic didn't come out very well, so it's in the group shot only, for now. It is basecoat painted, and needs weathering and detailing anyway, so more and better pictures later. Here's my only true Chimera so far:

The mighty Athena (which is the prime transport for the First Squad of the Grenadiers- the Ladies from Hades [ hat tip to Robert Heinlein]):
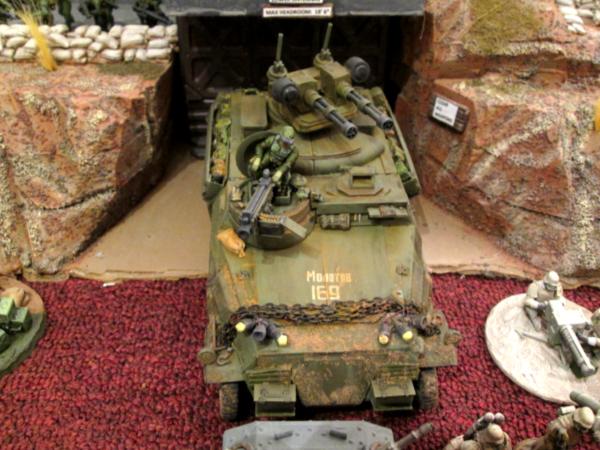
My 'counts as' Hydra (a Bronekorpus SPAAG somewhat converted):
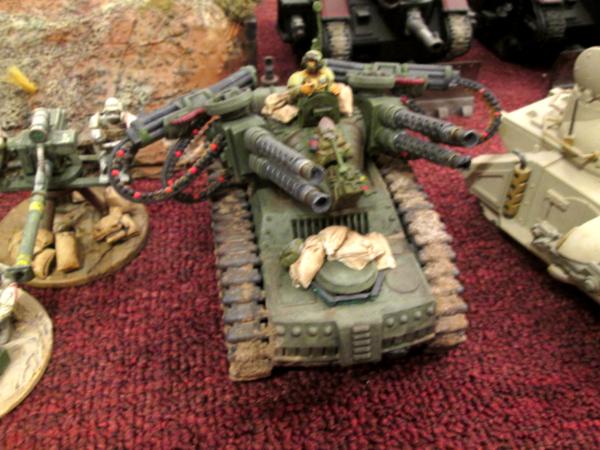
An old school Predator (from the late '80's, when the IG could have them):

My best Leman Russ, with magnetized weapons:
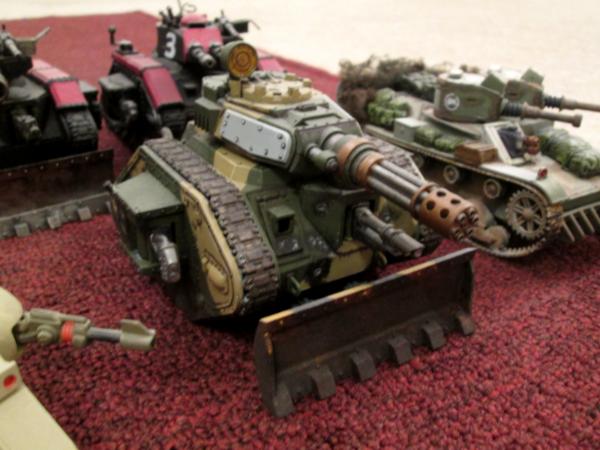
And the bought-from-ebay-for-fantastic-price-but-yet-to-be-repainted Leman Russ gunline:
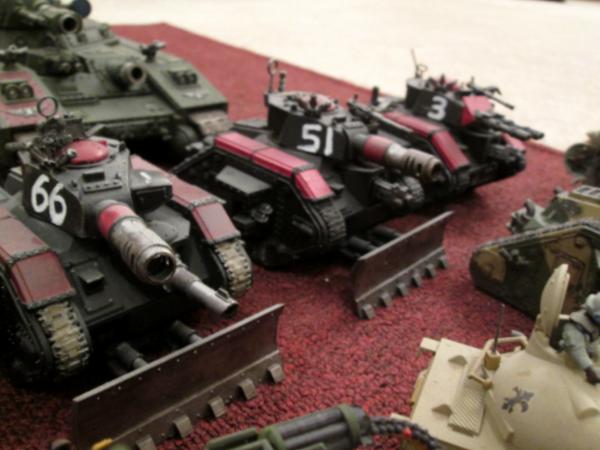
And my 'counts-as' Hellhound. This is a 1/35 scale 7TP early WWII Polish tank, although I believe the actual design is a British Vickers:
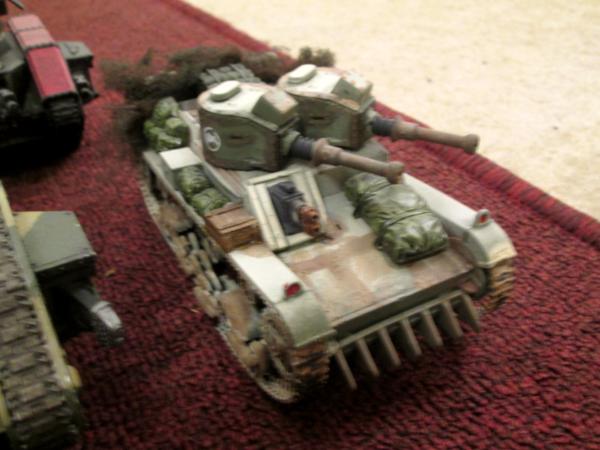
And the Heavy Weapons crews:

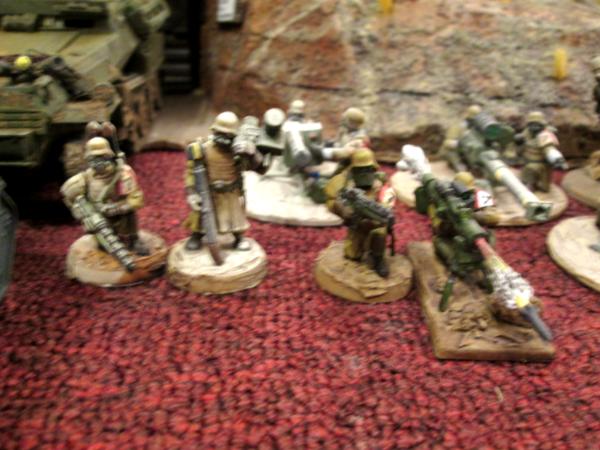

Those last (extremely poor photo) heavy weapons crews are from RAFM, who are not out of business after all. I bought them about twenty years ago and only recently (within the last year) painted them- trying for a somewhat cartoonish color scheme. I found and bought more figures to make up an infantry squad to go with them and they are tongue-in-cheek named the Knights of Cydonia- with all credit to the music group Muse for the title.
So that's it, for now. I have an awful lot of Rogue Trader era stuff still packed up in boxes that will have to come out some day. Apologies for the photography, but I'm very willing to reshoot anything that might be of interest to anyone (and would be very proud to have the interest in any of my work).
Looking t the whole assemblage, the KOSB I painted almost two years ago, ditto for the Hellhound. Since that time you folks have taught me an awful lot, and my figures are getting better and I'm not taking 'as-is' model kits and tacking some random bits of Games Workshop kit on them- I'm modifying more heavily and the most recent project- the ammo hauler- is almost entirely scratchbuilt.
So if I keep studying what you people do, stretch my talents a bit, leave my comfort zone and try something new- maybe I'll get even a little bit better.
And when I'm tied of IG? I have a literal _ton_ of Eldar stuff I've been picking up, just to REALLY try something new!
I look forward to your comments and observations- and more follows soonest!
And finally, the Army Commander (for now- I have a Raging Heroes figure that will probably take his place, and he'll drop down to command one of the platoons):
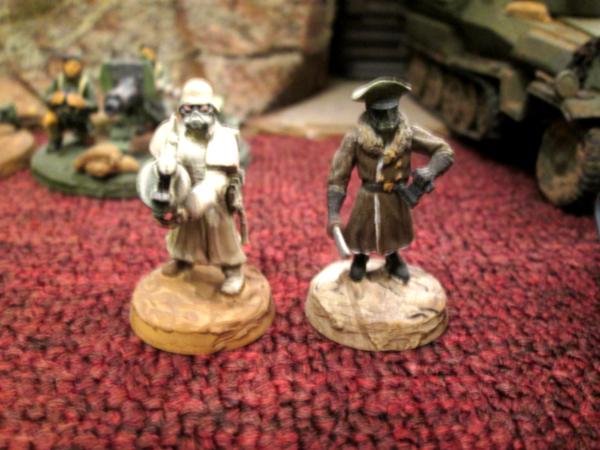
93572
Post by: Yorkright
Outstanding work Meer, thank you for giving us a look at your army. It is definitely a one of a kind army, all your conversions are well done, I especially like the Aethena. Is the fort going to be part of your display board?
95956
Post by: Gulgog TufToof
Apologies if you’ve already answered this, but where did you get the thousands of sandbags? Are they off the shelf or did you make them?
106010
Post by: Meer_Cat
Hi Gulgog- The answer is a little bit of both- off-the shelf molds that I use to make as many sandbags and planks as I need. While I've probably mentioned them elsewhere in this thread, I haven't really called out the silicon molds that Hirst Arts produce, and I really should. These things are terrific! Bruce Hirst has fantastic imagination and posts 'how to' articles on his website plus project instructions to make the most fantastic terrain pieces- everything from Egyptian pyramids to Gothic cathedrals to space ship floor plans and conduit pieces. The molds are about US$30 each, but are very sturdy and good for hundreds of castings. You can even use two part plastic molding fluids and cast plastic or resin pieces (although this is harder on the molds than plaster- I use commercial dental plaster).
I've used the sandbag and plank molds on several pieces that I've done- as an Imperial Guard gamer, they're a natural fit for terrain plus vehicle embellishment.
Here's some pics of the molds and the castings:
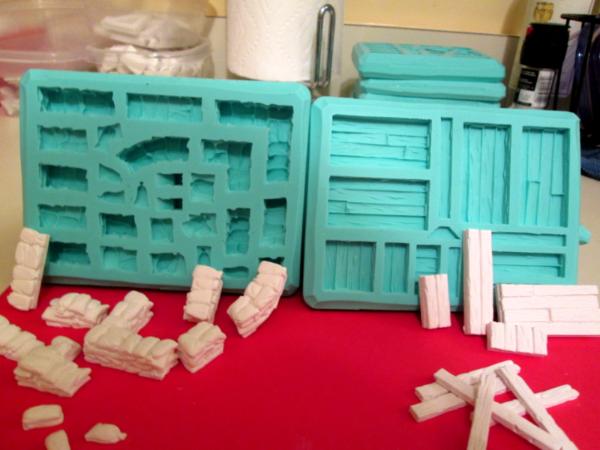
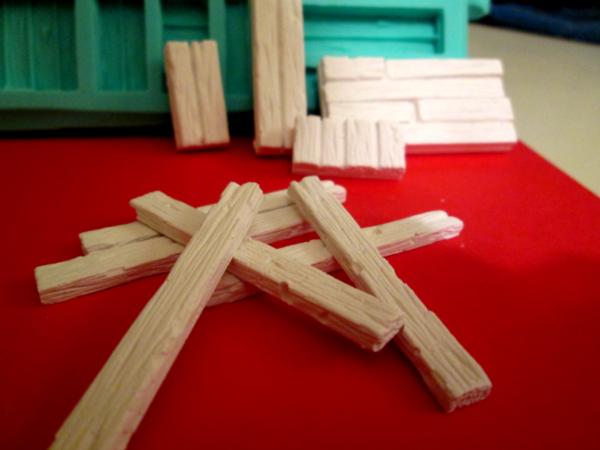

The imperfections you see are my fault- didn't tap the molds enough tor remove air bubbles, etc. Bruce gives very good directions both on his website and with the molds when you order them. It's pretty straight forward and I highly recommend them if you need a lot of parts.
Hi Yorkright- and thank you for the kind words. I think calling my eclectic assemblage of disparate models an army is presumptuous on my part- at least until I actually game them! I intend to eventually, when I can find a group that I can get to. Of the vehicles, the Athena is undoubtedly my best piece, a nice Hanomag conversion. The infantry are pretty much standard, but I'm learning a lot about painting them. You can see the difference clearly between the early troop types (the Scots) and the most recent (the Eisenkerns). I think I've made some progress, although far to go.
Plus, as Big H said once, as we learn new and better ways, or our skills get better, we have to go back and touch up everything we ever did- we're never truly finished.
The fort was a project of madness predicated on finding a multi-picture, multi-dimensional frame at Goodwill for US$5 and thinking- I can make something out of this. I've got some WIP pictures earlier in the thread. Now, really, I'd like to sell it as it takes a bit of room- but it's big enough and not so strong as it could be that it would be difficult to advertise it with the expectation of mailing it to a customer. So for now, it makes for a nice backdrop for taking some pictures.
I really appreciate the interest and the comments and hope for more as I get the chance to put up more finished work. I'm finishing off the ammo hauler now (need a name for it- 'Mule' is to cliché) and then need to build the howitzer it's meant to serve.
More follows soonest!
106010
Post by: Meer_Cat
Just a brief update tonight, but wanted to throw out a 'sign of life', as I haven't been able to get any pics taken lately to show forward progress on the ammo hauler (note to self: Got to think up a name for this beast). Truth is, work has been busy enough to use as an excuse to justify a session of 'painter's block'; I know if I just sit down at my desk I'll be engaged for a couple of hours without looking up. It's just sitting down that's the first step to get done. I got a little frustrated with this project, for all that I was able to try some new things and have learned a lot, because it didn't really go the way I wanted it to. Remember, this was supposed to be a self-propelled gun, a Basilisk, originally. In comparison, the Athena/Hanomag conversion just clicked along- even though I never really planned ahead, the steps just seemed to naturally flow one into the next.
Having said that, I really do like how the ammo hauler is turning out. Starting tomorrow, I sit down and do the first thing that comes to mind, just to get rolling again. I'm confident that the old urge will take over from there.
The reason for getting serious on finishing this job up (and hopefully the SPG that the hauler will support) is that I've backed the Empire of Men Kickstarter, and the figures should be coming sometime in February next. I opted in at a fairly good level, and have a couple of vehicles coming and another platoon's worth (including its command squad) of infantry to paint up. The figures are by Archon Studies out of Poland, and are fantastic. I think they will be a good stand in for Death Korps of Krieg. Their opponents are obviously stand-ins for Dark Eldar and are equally well sculpted and detailed. It's been a long time since I've been this excited about a product coming out.
I was able to find a couple of the promotional pictures on-line to show:
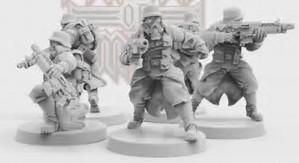
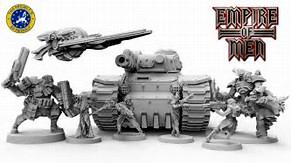
More _definitely_ follows soonest!
65595
Post by: Camkierhi
Those troops definitely have promise. Good to see you around. Love the sand bags.
106010
Post by: Meer_Cat
Thanks Cam! I stumbled across those Hirst Arts molds back when I was wild to build a real castle for Warhammer Fantasy Battle. At the moment, I have what I believe is a very respectable gate house with drawbridge, primered, and waiting for time to be available to finish off the paint. I'll get pictures up at some point. The best thing is- taking a leaf from Bruce Hirst's projects- the whole thing separates into pieces so you can game in every level of the towers and in the courtyard.
For tonight, I finally got myself back into action- all it took was actually sitting down in the chair and the madness was upon me. The first thing I started working on was a base for what will actually be half of a diorama (the other half will be the actual howitzer that the ammo hauler supports). Per the question I asked earlier, the two halves together will be a Basilisk in the process of loading shell and propellent, and the hauler resupplying the Bassie.
Here are the materials I used to texture the base, which I cut out of a piece of foam board:
[url=https://www.dakkadakka.com/gallery/915854-Basilisk%2C%20Conversion%2C%20Howitzer%2C%20Imperial%20Guard%2C%20Tracked.html]  [/url
I used the spoon to toss a couple of glops (official unit of measure for modelers, I swear) onto the board, then the knife to spread it. I actually meant to use the artists thick gel medium that I had on hand, but this artists' paste needed using up before it all hardened anyway, so all good:
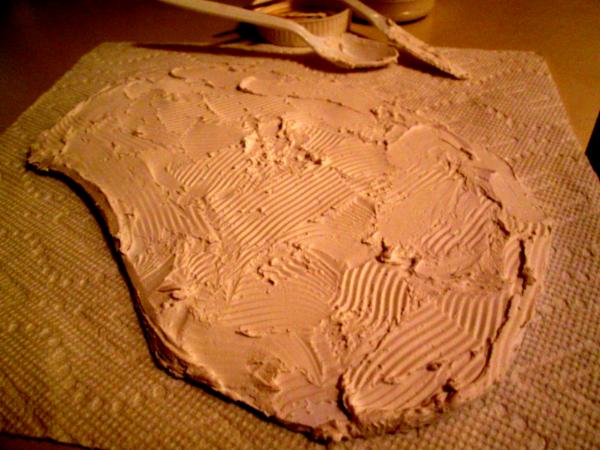
I then used the spoon to flatten out the serrated tracks in the paste, and the knife again to hack in some tread marks into the 'soil'. I tried pressing the actual ammo hauler treads into the paste, but it had already set up too much to take much of an impression:
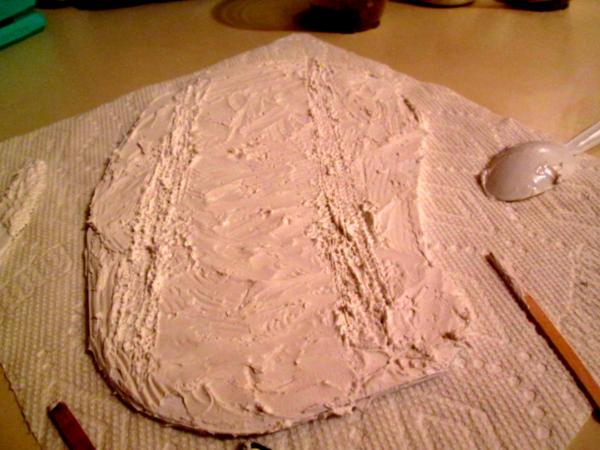
Next was to add some real texture- rocks and gravel. The paste was still soft enough to press these in by hand, and if they loosen up I'll hit 'em with a bit of white glue mixed with water and Bob's your uncle:

As I finished, I noticed that the foam board was curling, because the paste was more damp than I expected, so I weighted everything down with my Hirst Arts Molds (is there _anything_ they can't do?). When the paste hardens fully, the base will remain straight:
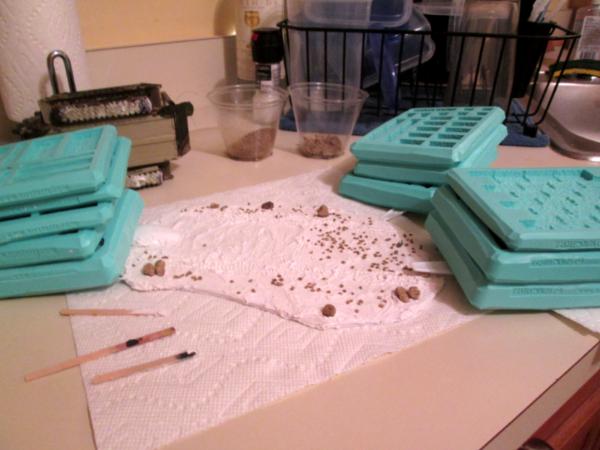
The next thing was to assemble the parts for a three man (for now, maybe more later when I see how full or empty the diorama base seems) ammo detail. I got a tremendous deal on ebay for a bunch of Imperial Guard Cadian parts for cheap, and I've been needing/wanting a project with a lot of guys running around to use them on and this is it:

After a lot of trimming, kitbashing and fabricating, here's what I ended up with. This first fellow (on the left) will be operating the hoist that runs ammo cases from the hatches in the forward part of the hull to the loading/fusing platform at the back. He and the guy in the middle are pretty much straight GW Cadian parts, with the exception of the left hands, which are from DreamForge Games Eisenkern Stormtrooper Accessory set. The guy on the right was really fun- I learned a lot. He's a base of Cadian parts, a Wargames Foundry Greatcoat Trooper right arm and Eisenkern right and left hands:

I scratch built the little shell cart after seeing something similar in a pic here on Dakka Dakka:
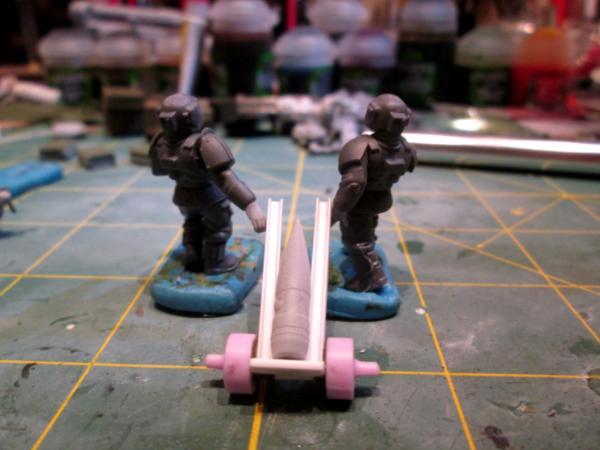
The final posing will be better than you see here, but I couldn't resist mocking the scene up to see how they were going to look. The cart needs a couple of doodads and cross pieces added, and some handle grips. I've got a ton of bling to add to the track and the area around the back of the track in the form of crates, fuse boxes, propellant tubes, and extra shells. I plan to make more shells per the instructions Klaus- Not Santa give early in his blog, by sharpening a bit of sprue stuck into a drill on a piece of sandpaper. Plus some more scenicking of the base and some more work on the track and we're about done with this one and can move on to the howitzer itself.
As always, I look forward and appreciate your candid constructive criticism, observations and suggestions.
More follows soonest!
106010
Post by: Meer_Cat
Gaaaaah! What a night! Have you ever tried to knock something out quickly, so you can get on to something more fun- something that should be easy and take 5 minutes, but then turns out to be one sticking point after another and takes an hour? I have now joined your club!
As it turns out, the base for the mini-diorama that the ammo hauler (I'm thinking of the name 'Phaethon', which was Apollo's chariot, in keeping with the theme set by the Athena Command and Control vehicle) is supposed to sit on continued to curl and warp even with weight sitting on it for a few days- completely unusable.
"Right," says I, "I'll find a cheap source of some kind of wood for the base, that'll fix that stupid 'artists putty'." So I found some cheap, hardboard clipboards at my local dollar store, and picked up a cheap $8.00 coping saw to cut it with:

Did my $8 coping saw cut it? No. Did my Dremel high speed steel saws cut it? No. Did my hobby knife make a dent when I tried to stab the stupid thing to death? No. What worked? My $1 cheapo little hack saw from the dollar store. I had to drill a million holes and then cut from one to another, but it worked:

So, with the rough shape cut out (and the floor cleaned up, and fortunately no neighbors calling the police, because it probably sounded like I was torturing a cat in a blender trying to shape my brilliant clipboard idea) I got the rest of the 'artists putty' out to coat the board as the first step in sculpting the terrain. It never was any fun to work with, but now it must have dried out a little more from the other day, because it was stiff and did not want to stick to the board (I even roughed the board up to try to help). I had to scrape it all off (and threw the whole useless jar in the bin) and found a couple of jars of Dex wall spackle left over from making the firebase. This stuff went on fine and I was able to coat the whole board like icing a cookie (biscuit, for my English-speaking cousins). But when I went to smooth everything out, the spackle stuff to everything, making a fine mess. I finally had to wet my fingers and smooth it out that way.
I wanted to make track marks in the wet/dampish spackle as a foundation mark, so I pressed the Phaethon's tracks into it, only to discover that the spackle really likes sticking to all the nooks in the tracks, and pulled away from the board. So, back to the wet fingers to smooth the junk back out, and I had to hack up the spackle with a wettened (if that's even a word) plastic knife to simulate the track marks in the ground:

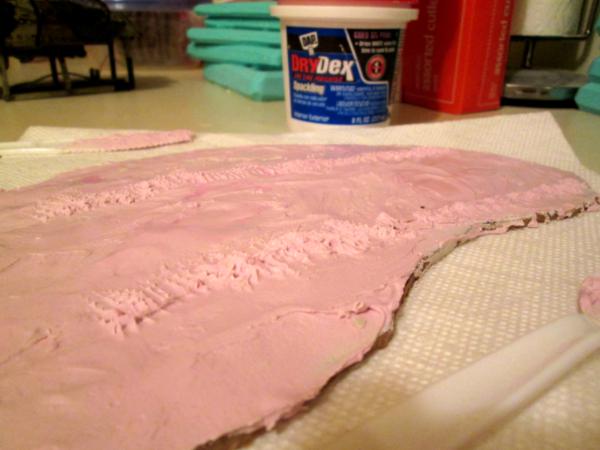
So now, an hour later, I'm almost back to where I was last Monday- but hopefully with a more stable base that won't curl or flex. The Dex is good stuff- I've had no problem with it cracking on the firebase and that is large and has a bit of flex to it. I can enhance the tread mark effect in the soil with painting and weathering later, so that should be okay. If I have some more time tonight, I want to finish the shell cart and crew so they can be primered and then I can get started painting. I've also got a ton of stowage to put on and around the Phaethon, and I like that part of things.
Still trying to get the Phaethon (and its howitzer!) done before my Archon Studios Kickstarter figures come in February, so lots to do and need to stay focused. Thanks for letting me vent some air out!
More follows soonest!
93572
Post by: Yorkright
The usual cool DIY update, too bad about the first attempt, hoping it all stays together now. Your analogy of the neighbors thinking you are torturing your cat got a laugh out of me.
106010
Post by: Meer_Cat
Hi Yorkright- yup, this second approach seems to be holding up. I don't mind the failures really, it's part of learning; what fun is it to go into a project knowing how it's going to come out? But last night was a bit of a stretch, even for that kind of philosophy- especially when I was trying to cut the hardboard with the Dremel! The Dremel was screaming, the hardboard was vibrating and throwing off a high pitched whine- man, something else!
But, in the end, all worth it. The hardboard remained flat, the spackle has thoroughly dried and I was able to start some painting tonight- both on the scenic base and on the crew for the Phaethon. I gathered some materials: hobby sand for texture, white glue (I added the special-bought ballast cement- which is just thinned white glue anyway- as an alternative) and some cheap craft paint for a base color:

I dumped some white glue in a cup, added some water, added a little bit of the sand and added paint and stirred it up. I painted this onto the base:
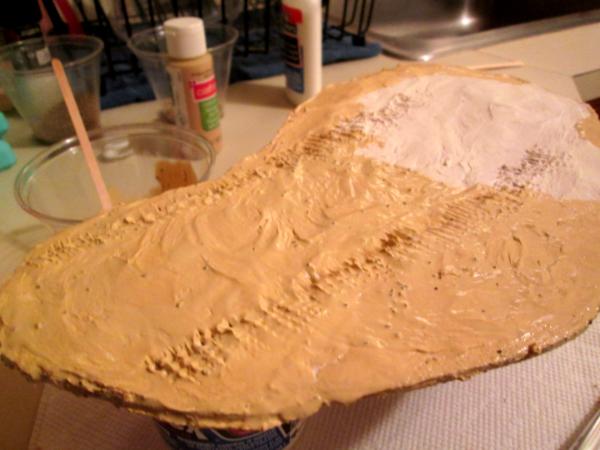
And then to provide even a bit more grit, sprinkled some more sand onto the wet paint/glue mixture:

This was similar to how I did the basic texturing for the firebase, towards the beginning of this blog. I wasn't entirely happy with how the sand came out in that, so modified the process slightly. I let this dry for awhile, then painted over everything with some of the remaining paint/glue mix. This was both to firmly glue down any loose sand, and also to dull down the shiny black color the sand had. You could also just spray the whole thing with matte varnish, or even Rust-o-leum paint in the base color of your choice, but I had paint/glue stuff left over, so used it. I figure to go over the base with three or four more washes to get the colors I want (sounds like a lot, but how hard is it to paint on a wash, really?) which should tie everything together nicely.

The base will get some flocking and/or sawgrass bits added as well as some larger rocks- those go on when the crew figures get added so that I don't put them down right in the way of good posing.
The shell cart is mostly done, just needs some rusting and the figures are about half base coated- I hope to have pics of them up for tomorrow (just base coated, nothing fancy yet).
Thanks for looking in, and for the chance to show off a little bit of my work. Comments and constructive criticism are always welcome!
More follows soonest!
106010
Post by: Meer_Cat
A quick update- I got a lot of painting done tonight on the crew and stowage and things, but not a lot that's worth taking space up with WIP pictures until I've got a more final stage to cap them off with. I did want to throw up a couple of shots of the diorama base, which is coming along nicely (I think) and show two of the final four washes in place.
The last pic above showed a nice even base coat of some inexpensive craft paint or other in the basic shade the piece is to have. This next pic shows a fairly liberal wash of Agrax Earthshade applied (love them Games Workshop Washes):

Next was a dry brush (I lied, after the base coat were a couple of washes and then a couple of dry brushings and then maybe one more wash) of a very light cream- something a couple shades lighter than the base coat to highlight the gravel and ridges in the soil:
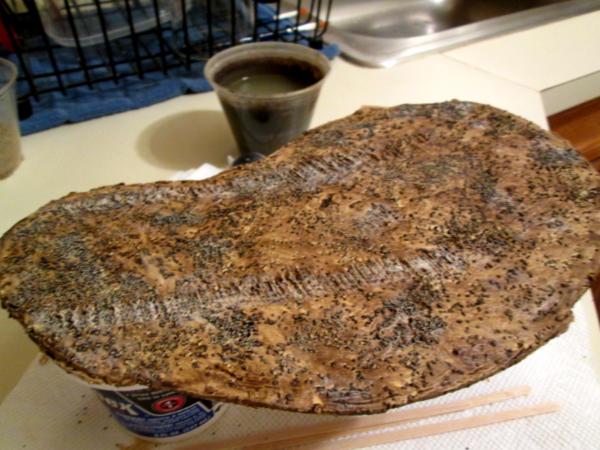
This brought out the tread marks in the soft soil a bit, and gave the illusion of depth to the rest of the flat surface area. I'll hit the track marks again with white and a very light dry brush, will add some dark brown ink into the deepest hollows in between the high points of the tracks and will probably do a light wash of orange from my water colors set ($1.00 at your local cheap store) just to give the flattest areas a bit of difference. Add some 'boulders' and tumbleweed and I'm done with the base.
Then we'll get the Phaethon epoxied down and start adding the boxes, crates and artillery residue that always accompany an ammo hauler in the field, get the crew and the loadmaster finished and then on to the next!
Thanks for looking in, and more follows soonest.
106010
Post by: Meer_Cat
More painting done- almost all the basecoating is complete and I'm almost at the assembly stage- this will be (hopefully) the last 'intermediate' posting, as there isn't much left to show except for the assembled mini-diorama.
Here are the basecoated crew, ammunition and propellant boxes, sand mats, shell cart and assorted other stowage:
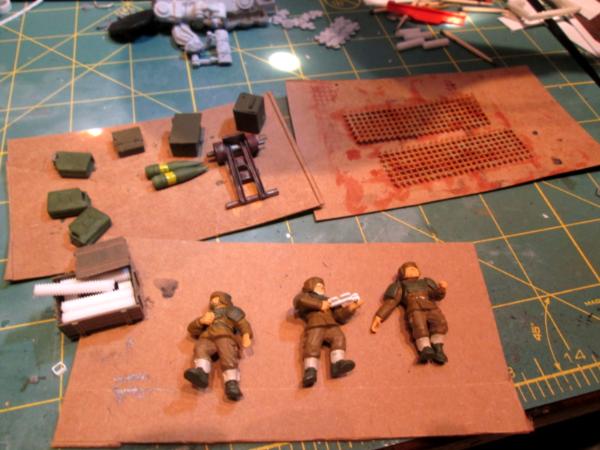
Here are the other pieces that I need to basecoat yet (hopefully finished tonight):

I'm not entirely happy with how the uniforms are shaping up- that's two different shades of brown between the jackets and the trousers and it doesn't really show. I've still got the inking, washes and highlighting to do, but I'm not warm and fuzzy going into it. On the other hand, I really like how the sand mats are coming out. We had these steel mesh sections that we could throw down to help keep from tromping the earth into mud as we ran back and forth to the gun with shells and such. They're impossible to keep looking 'inspection ready' and these that I've painted look the part, I think.
I do have a couple more refinements I'd like to make on the Phaethon vehicle itself, but as with the Athena C2V project before this- if I keep making all those small refinements, the thing will never get done.
So, a reasonable amount of progress, and a measurable amount to go.
More follows soonest.
93572
Post by: Yorkright
Base will look like a mini diorama when you are finished. Love how the base looks like it’s seen a lot of travel, can’t really see how the uniforms are turning out but they look good from that angle.
106010
Post by: Meer_Cat
Thanks Yorkright! Sorry about the pics of the crew- even to me they look like brown blobs in the photos, and I know what I'm looking at! I've got to invest in another lamp that will let me get rid of the shadows so I can take better close ups and from directly overhead; right now I can because all I've got is ceiling track lighting and I have to position myself so as to not cast shadows over everything.
I actually saw a cheap 'spray paint booth' in the Sporty's Tool shop catalog that is made of nylon and designed to fold flat when not need- I think it would make a very good light booth for taking even better pictures. I need to build a display/photography base anyway- I could keep the dimensions such that it would fit in the booth.
I'm glad the base suggests a lot of wear and tear to you; it's been my experience that whether you're looking at a civilian campsite or a military artillery position, it doesn't take long to tromp everything into paste. I do want to add some flocking, to simulate sere grass or what-not, but need to wait until I've got everything else glued down to see where it can go.
I really appreciate you dropping in and leaving the words of suggestion and encouragement- it means a lot.
More follows soonest!
65595
Post by: Camkierhi
The base is looking fantastic. Nice difference in tones, very realistic. Shame about the first try. But all good in the end.
Crew are looking fine to me, good start.
Going to have to get you in to, making your own washes. Just for cost. GW washes are very good .
106010
Post by: Meer_Cat
Thanks Cam! I'm fairly decent at terraining, still learning in a lot of other areas. I have had a go at making my own washes- I'm really just getting back into the habit of using them at all. The guy at my FLGS got me into trying the GW ones, but I'll probably go back to improvising my own once they're used up, because of cost, as you point out.
I've seen all the trends over the last thirty years- basecoat with outlining, then highlighting, then drybrushing, then inks, then washes then glazes and then washes again.... what I like now are the number of modelers here on Dakka that combine multiple techniques for a very appealing and unique look. I'm still more of an inking then washing kind of guy, although both squads of grenadiers have used extensive layers of wash to get their colors.
In the past I've thinned acrylic paints to get a wash, used isopropyl alcohol to thin inks, thinned oil paints with turps and added decal-fix to weathering powders. All had strengths and weaknesses (or advantages and disadvantages).
Would love some tips and/or guidance on how you go about things- I like your work and your style!
More follows soonest!
106010
Post by: Meer_Cat
A small victory tonight, and still time to get some more work done on the vignette itself- I'm so close to the 'gluing things down to the base' stage I can almost taste it! I didn't anticipate posting anything until the final, but I tackled a sub-assembly that lends itself to a couple of WIP pics, so here we go.
The conop for the Phaethon is that it is basically an armored box on treads, to carry ammunition for a heavy howitzer or seige gun (I'm thinking of calling the one I'm fixin' to build directly the Ajax). The whole rail system with hoist that you see is to lift the heavy shell crates out of the hold and convey them to the rear arming platform, where the shells would have their fuses set and fixed in place. The smaller mechanical arm would then lift the armed shell either over to the howitzer or down to the crewmen waiting with the shell cart. The crewmen then drag the cart over to the gun and the loading ram takes over from there.
So, I needed a way for the crates to be attached to the hoisting cable. The easy answer seemed to be to attach carry handles to the crates and thread a piece of chain (cheap necklace from the dollar store) through each and then wire the whole thing to the hoist.
I clipped some short lengths of wire from straight pins and formed them around the end of my wider pliars (which serendiptitously were exactly the width I wanted):
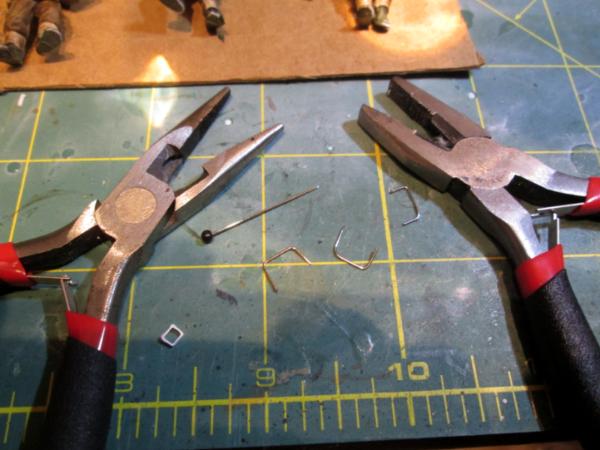
Then I used my marvelous finger drills from Micro-Mark to drill in a couple of holes:
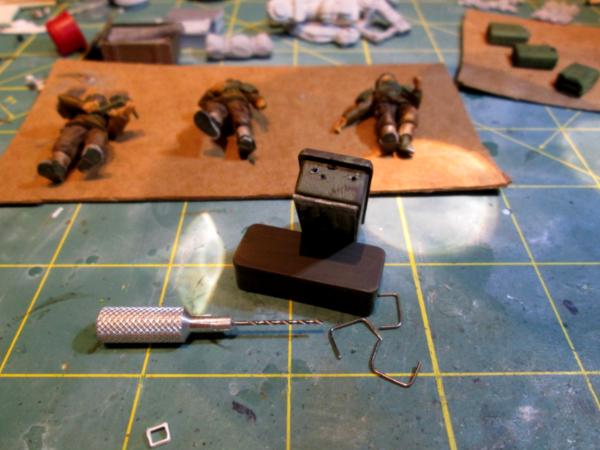
Then threaded the chain through the handles, put a dab of jeweller's glue over each hole and pressed the handles in:
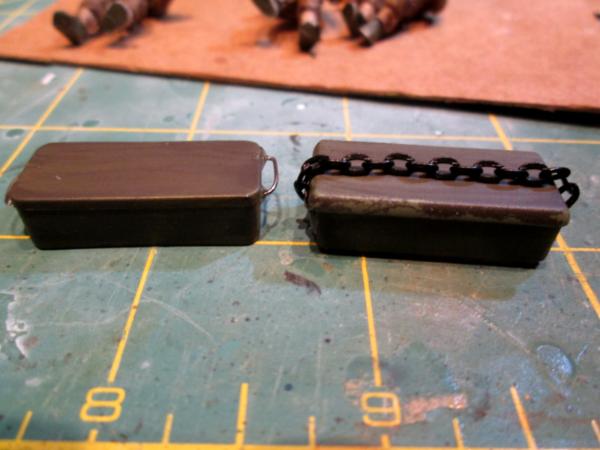
Presto! Two ammo crates, one rigged for the hoist. The other will be either on the arming platform or down on the ground. The boxes themselves are made from the plastic covers for old 25 pin computer cable connecters (work was throwing a bunch out and I practically dove into the dumpster to rescue a few needful bits). I'll dull the bright metal a little with a thick wash made from some acrylic paint (I do lsiten to your advice Cam!) and call it good.
I hope to have some serious progress made tonight and tomorrow, but will probably not be abl eot finish up until next Monday and post pics maybe Tuesday.
More follows soonest!
106010
Post by: Meer_Cat
Right then, the Phaethon is officially done. And by done, I mean, I've done all I'm going to do. There is a lot more that I could do, want to do, should do, but I'm calling the TOD (Time of Done) and we're clearing the ER. So, without further ado (get it?), here is the Phaethon, with its attendant ammo handlers, Detail Leader and additional features of interest:
This right side shot gives a good view of the overall mini-diorama: you can see the Detail Leader up on the deck utilizing the remote to operate the chain hoist, the crate in the right foreground filled with propellant charges and the ammo cutters hauling a fused shell off along the sand mats (in the general direction of where the other half of this vignette will one day be- the actual howitzer this Phaethon is serving):

A slightly blurry (sorry!) view of the bow of the Phaethon, showing the properly drilled out heavy bolter barrel:

This left side view is different from the right side in that you can see the heap of discarded shell packing tubes (this heap inevitably builds near any artillery site- ask any Red Leg):

Here's a shot from aft showing the ammo cutters hauling their shell cart, behind them two additional tubes that have been cut open in preparation for arming the next shells (thanks to Klaus- Not Santa for the tip on using adrill or dremel tool to spin a bit of sprue against a nail file to sharpen the end to use as additional shells- please see his wonderful blog) and the mechanical arm behind them lowering the next crate with two more shells:

A close up of the hard working (and drinking, and cursing and...) ammo cutters:
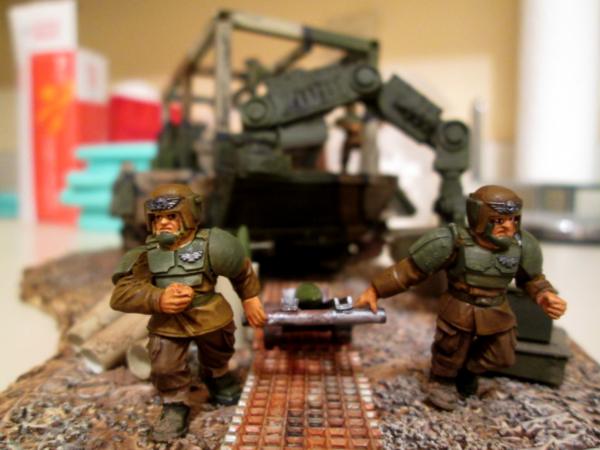
The mechanical arm in action:
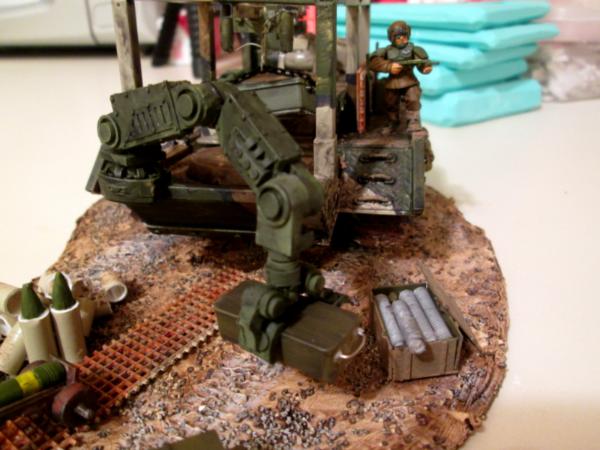
A close up of the Detail Leader and the chain hoist in the background:

Right front quarter showing the spare track links:

Left front quarter:
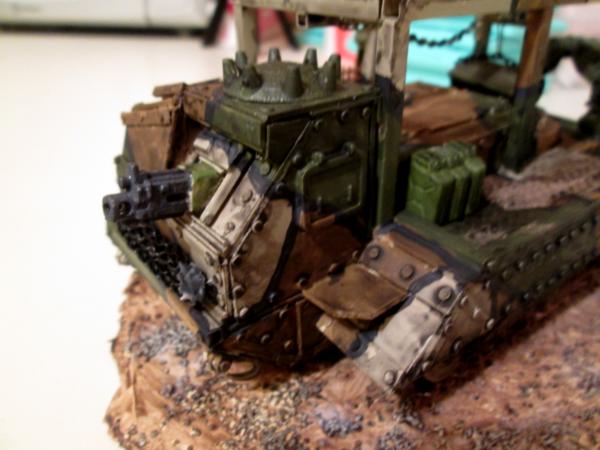
Close up of the packing tubes:
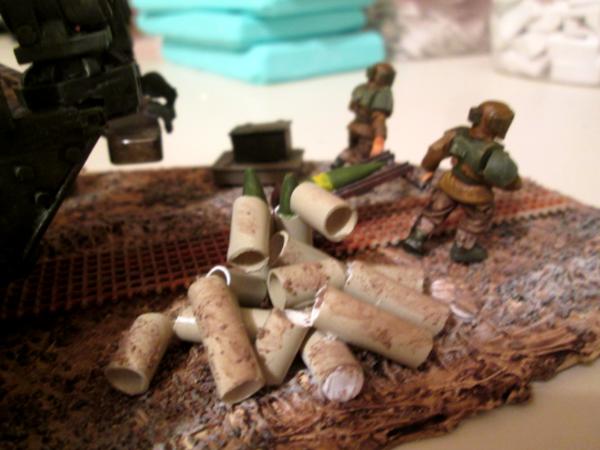
Another view of the ammo cutters scurrying away:

And a reprise of my preferred shot of the whole scene:
This has been a terrific project, and I learned a lot. In the process of building a self-propelled gun, I wound up with an ammunition hauler and a great little vignette. New things I tried:
- Sanding sprue down into my own, hand-made shells
- Scratch-building a significant portion of the entire vehicle (everything but the tracks)
- Using Jeweler's Cement to fasten much of the detail work down to the uneven base
- Tried a new camouflage pattern that I like very much (but absolutely _love_ the one Kestrel did on his Earthshaker)
- More practice doing eyes and facial details (I think I'm getting better)
I'm in the process of cleaning up my bench now, and then it's on to the next. Thank you for looking in, and please leave your constructive criticism, observations and comments. If I'm improving my skills at all, it's because of what I learn from all y'all Dakkanauts.
More follows soonest!
100273
Post by: STG
Finished product looking great bruh. I like the fact you did a little conclusion about the new stuff you tried, I agree about the camo, looks cool as!
Nice one
106010
Post by: Meer_Cat
Thanks STG! I'm past the half-century mark and still have so much to try out- OSL is definitely on the list and I see all these cool projects with micro-lighting, I want to try that again. I've rigged lights for model railroad buildings and train cars and the like, but I can't truly be happy until I've lit up a Titan, or at least a speeder. If I'd had something like Dakka Dakka back in the day, I probably wouldn't have gone dark for 15 years!
93572
Post by: Yorkright
Finished project is so cool looking Meer, your paint job on the guardsman is very good. All the little bitz you added to the project look great, really like the wagon full of shells.
100624
Post by: oldravenman3025
Outstanding work, Meer. I like it.
106010
Post by: Meer_Cat
Hello Yorkright and Oldravenman, and thank you for looking in. I still kid myself a little bit that I'm paintng pieces to game with one day- but really, adding a base to a 'counts as' Chimera (in a pinch) isn't terribly practical for something that will need LOS calculated, and other considerations for moving about the board. So, making things with substantive bases is what really lets me detail the action, to have the piece try to tell a story at a glance.
It is fun to think of all the things I used to see around when I was part of a gun crew myself, and try to replicate them here. It's even more fun for me to find 'found bits' and scratch build them myself, instead of buying purpose made. For instance, the exhaust on the left side of the cab/engine compartment is made with two bits of straw stuck into the underside of one of the flip lids from a small can of Old Bay spice.
Thank you for the kind words- I had a lot of fun building this piece, but it is nice to get some feedback from someone other than myself; I tend to be very biased in my own favor!
More follows soonest!
62749
Post by: Dr H
Great job on the Phaethon. Nice build.
I have been lurking. Good work throughout.
106010
Post by: Meer_Cat
Thanks very much for stopping by, Dr. H, and for the kind words. I've learned a fair amount lurking on your threads and look forward to more.
Up to this point, it has been sometimes difficult but mostly manageable to stick to one project at a time. I know me, if I let myself get out of hand, I'll start three or more, all in different media (figures, a vehicle and a terrain piece) or venues (Imperial Guard, Eldar, Fantasy) and never finish anything ever again. But with the Phaethon done, I've got so many new things I've seen on everyone's blogs to try- it's very hard to be reasonable with myself!
I look forward to seeing everyone's new projects with the new year and hope to report some modest endeavors myself.
There was an Irish pundit on the Beeb when I was stationed in Yorkshire (quite few years ago, now), I think his name was James Allen, who used to close his program with "Take care, and my your God go with you" (he himself was an Atheist. But for Christmas, every year he would say "May our God go with us".
For all of us out there, whether we seek order in the Universe based in ourselves, or in a power greater than ourselves, I offer "may our God go with us".
Merry Christmas, and more follows soonest.
17738
Post by: Briancj
Very lovely work, Meer. Look forward to your work in the new year.
106010
Post by: Meer_Cat
Thank you briancj- I've been nosing about your galleries and I have a lot I can be learning from you! Good building to you in the New Year!
106010
Post by: Meer_Cat
Welp, first post of the new year, so some news on the next project, some on the (hopefully) project after that and some interesting bits I came across for $1.00 at my local Goodwill thrift shop.
First up, with the Phaethon Ammo Carrier complete, it really needs a siege gun to service. The cannon and mount from the original Soviet WWII tracked, towed 203mm howitzer will still do stand-in duty for the Earthshaker that a Basilisk would carry:
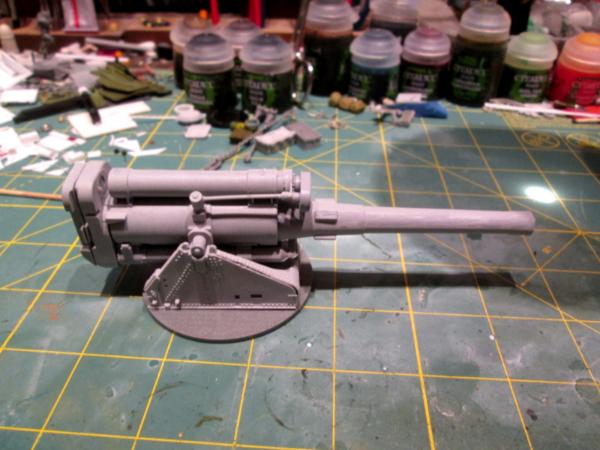
It's just not going to be the _next_ project, it's going to be the _next after_ project. I figure to scratchbuild the whole vehicle, with the gun being the only part that comes from a prefab kit. That's a lot of work (for me) and I've just come off a long build for the Phaethon, so I'm going to do something a bit simpler, and quicker, first to have some fun and try a couple of new things.
Specifically, I'm going to use this Soviet WWII BA-64 armored car kit:
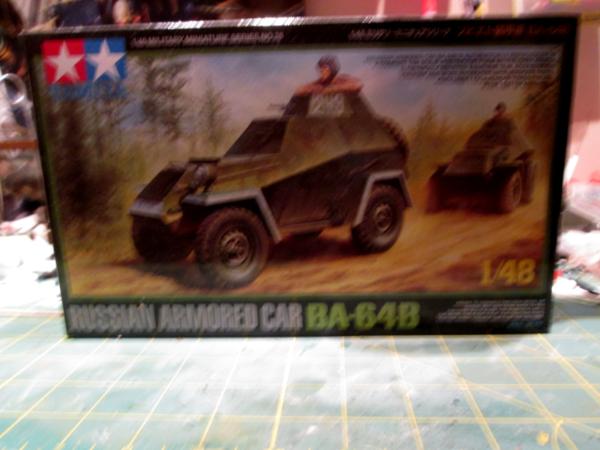
(Sorry for the horrid picture- I didn't notice how blurry it was until now) I've been wild to build a 'rat patrol' type recon buggy ever since I saw Brushfire's IG Rat Patrol models based on Russian GAZ light trucks. I am shamelessly ripping off his ideas and applying them to this BA-64 to make a two man, light, fast, possibly counts-as IG Walker model. (To find Brushfire's work all you have to do is go to the Gallery page and search for 'GAZ'- his stuff comes right up at the top. I'd include one of his pictures here, but I'm not sure that is a) within the rules to use someone else's stuff without permission and b) ethical in any event. But do take a look- he's done some great work with those two vehicles- very dynamic.)
In the interesting bits category, I found this toy at Goodwill for a buck:
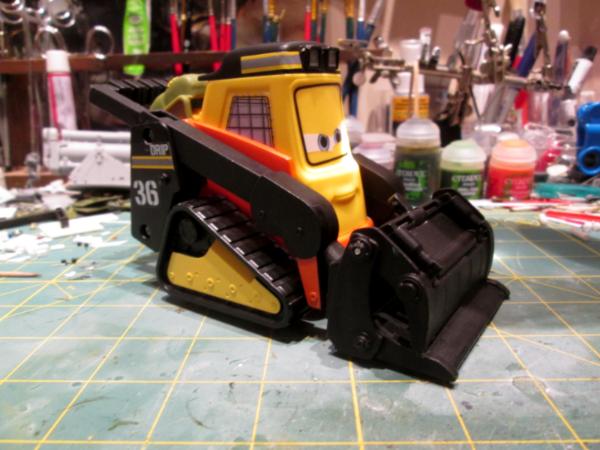
Some may only see an amusing child's toy, but when you take it apart:

I see a pair of external fuel tanks for any combat vehicle, possibly even for a Valkyrie, or that could also be used for corridor bling in a space ship table; I see a pair of treads for a large Thunderfire cannon or similar type of self-propelled artillery; what was the parachute for the toy can now be a large tarp for deck stowage; three hatch covers or access panels that can be glued straight onto anything; a remote security camera, an engine cover and tell me that computer card doesn't look exactly like a ready made instrument panel for a Valk or anything that needs one?
But there is also the dozer blade, which lends itself to a lot of things, like maybe the snout of a Hades Drill vehicle, perhaps?

Separate the top blade from the lower, and you have two blades for two different vehicles:

But Meer Cat, I hear you scoff, what do I do with the long armatures that are left? Well, they seem to be exactly the right size to be the arms for a lifting boom, if one were to want to scratchbuild or convert a hull into a repair vehicle like a bergepanzer:
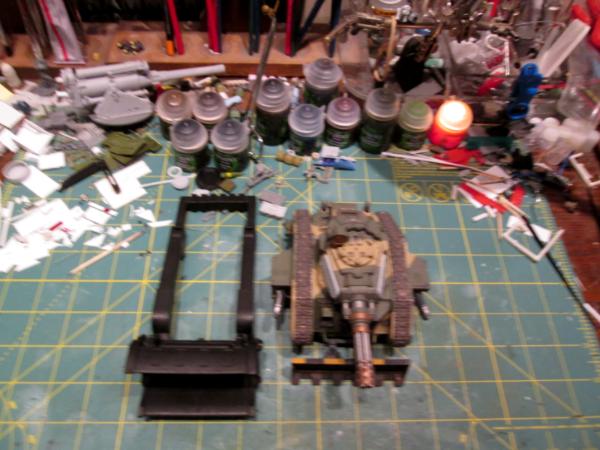
In fact, with the dozer blades off, the arms could form the basis for building a mine clearing vehicle, which could be magnetized so that the Leman Russ could be used as a speicalty vehicle or returned to regular service as a straight fighting vehicle. (This LR is also magnetized for all it's turret and sponson and hull weapons, so it is already a chameleon.)
So there you have it- this is what I'm up to and fixin' to get up to. I hope everyone's New Year is starting off with new and exciting ideas, and new techniques to try. I know mine is!
More follows soonest!
65595
Post by: Camkierhi
Very promising and interesting. Looking forward to following you.
100624
Post by: oldravenman3025
Looking forward to what you cook up.
106010
Post by: Meer_Cat
Thank you both for looking in- it means a lot to me.
Cam: I've been watching the Underhive crew growing- can't wait to see the oil rig box building terrain start to emerge. Of course, given how fast you put an entire village together for the friends in Canada, what are you doing day after tomorrow when you're finished with that?
oldravenman3025: I've been watching your projects as well- and a lot of your supply drops and future projects with envy. I've been eyeballing some of those same kits for awhile now; really looking forward to seeing what you make of them!
9910
Post by: CommissarKhaine
Some interesting bits in here, as always. I'm looking forward to what you're going to do with that armoured car!
106010
Post by: Meer_Cat
Thanks for looking in CommissarKhaine! I'm afraid that this BA-64 Armoured Car model isn't going to work for my Rat Patrol project- it's just a squidge too small. For real-scale figures it would be very close for what I had in mind, which is something along the lines of a Pennscouer assault vehicle (the dune buggies with the elevated gunner's position at the back from the First Gulf War). But for 'heroically scaled' figures, it just won't work.
I've ordered another off eBay, this time in 1/35 scale, to do the Rat Patrol thing. I'll use the bits from this one as add-ons to other combat vehicles and I'm thinking that the hull itself, inverted, might actually make a good jet bike frame.... so there are still possibilities for something unusual and fun.
I reckon this is the Modelling Gods way of telling me to do another squad of infantry next, not another vehicle, so I may move on to some of my Raging Heroes backlog.
I hope to have some pics to put up soon!
9910
Post by: CommissarKhaine
Yeah, I'm always torn between 1/48 and 1/35 for scale. Would grots fit in there? It would be a fun buggy.
106010
Post by: Meer_Cat
Summary: I ordered a 1/48 scale BA-64 Soviet WWII Armored Car with the intention of building a 'Rat Patrol' type vehicle- preferably in a highly dynamic evolution a' la Brushfire- but it was 'way too small for the 28 mm (pushing 30mm) figure that I wanted use to man it. So I ordered the same type car in 1/35 scale and per an excellent suggestion from ComissarKhaine have also order a mixed lot of Grots to kitbash/customize into a crew for the 1/48 scale version. The 1/35 scale will now become the Rat Patrol vehicle, and then I'll get back to work on the self-propelled that goes with the Phaethon Ammunition Hauler. (And that, children, is what we mean when we say "scope creep"....)

I offer as a suggestion for one of you waughhhhh modelers out there that you could make a sort of Ork battle buggy out of a 1/35 scale BA-64, and have it closely followed by a Grot battle buggy made from the 1/48 scale kit....
Here's some pics to illustrate what's described above. Some of you may remember Staff Sergeant Shauna Abernathy, of the 1st Battalion Grenadiers (although, with a name like Abernathy, those fine people being a sept of my own Clan Leslie, she's probably a transfer over from the King's Own Scottish Borderers); she's the targeting/gunnery officer from the Athena Command and Control Vehicle (C2V) covered earlier in this blog:
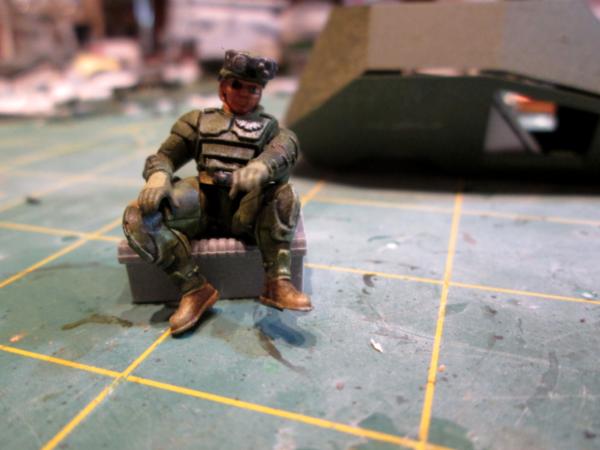
Here's the good staff sergeant sitting on the 1/48 scale BA-64; it's _almost_ big enough, but as is, is just small enough to look like a toy ride in front of a grocery store and she's waiting for someone to put a quarter in:

Now here she is on the 1/35:
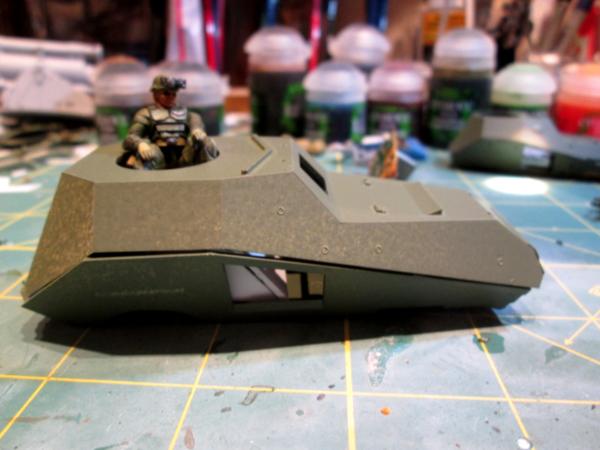
This is much more the proper size for balance, but is actually almost a little bit _too_ big. I wanted something small and nimble and in balalnce, like the GAZ trucks that Brushfire used. Don't get me wrong- I like this kit and think it'll work fine. I believe that chopping the engine compartment off at the point of the air intake vent will bring it more into line with what I want, and I think I'll try cutting out some of the armor panels and installing some round sprue as roll bars; give the whole thing a more open, light, mobile feel and at the same time give some good view into the interior fittings (so, now we're doing the interior too, maybe- NOT on the original build plan...). For dynamism, I want Abernathy to be firing a heavy bolter, with muzzle flash effects per instructions given in Klaus- Not Santa's blog and maybe even an explosion rocking the vehicle over onto its side (but not flipping it).
Finally, I took apart a defunct battery operated quartz clock movement tonight, and the copper winding looks to me like a winch that should be fitted onto the front of the new armored car (name forthcoming, possibly Hyperion....):
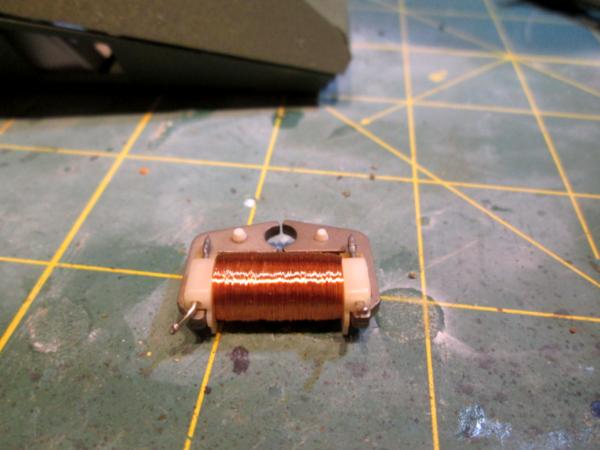
So that's what I'm up to now, lots of things to work on, and very much looking for my Empire of Men Kickstarter figures to get here next month. What a great gift you Dakka Dakka folks ahve given me: the enthusiasm of a small kid at Christmas for a package to come, thanks to your support, advice and freindship here. No small boon, indeed!
Your comments, suggestions and constructive criticism are always welcome.
More follows soonest!
9910
Post by: CommissarKhaine
haha, the squeaky waagh is spreading!
I see what you mean with the scale shots, the 1/35 is much more in line with a human-sized model. Making it nimble can be done by adding proper wheels (with suspension), exhausts, maybe some roll cage/fender type thingies to suggest it occasionally bumps into things?
106010
Post by: Meer_Cat
I'll definitely incorporate the items you suggest; I think I can do roll cage with the some narrow sprue that I've been saving for just such an occasion or with some styrene channel left over from the Athena build. Exhaust I can do- but would welcome suggestions as to where to run them: up alongside the driver's vision port- as in a HMMWV, or straight out the sides and angled down from the engine compartment (as in a hotrod) or even running underneath and rising up at the back (risky though, in a rough terrain vehicle)?
Not sure how to modify the tires that came with the kit, may have to buy some. I can augment the suspension pieces that came with it, though.
Already doing some cutting, to open the piece up, make it look lighter, show off some interior bits.
It's funny, in real life this vehicle was only 3 meters long and less than 2 meters high- it's no wonder the 1/48 looked so small- the real thing was!
Should have pics shortly and I'm looking forward to advancing this build. More follows soonest!
100624
Post by: oldravenman3025
Looking forward to seeing it!
9910
Post by: CommissarKhaine
Where to run the exhausts will depend on what exactly you cut away . How are the kit's wheels anyway, Don't think I saw them in the pics?
100273
Post by: STG
looking promising, i'll be interested to see what you do with it.
Nice one!
106010
Post by: Meer_Cat
Hi Oldravenman, , CK and STG- and thank you for looking in!
Last night was one of those good nights where every measurement is precise, every cut is true and lots gets done- a really fun evening hacking up a perfectly good model kit. The kind where you have to stop at one point just to clear the offcuts and debris away because it starts getting fouled up in the glue.
I roughed out where I thought needed cut away to start getting the look I wanted. As the piece emerged (I think it was Michelangelo who said that he saw the sculpture in the piece of marble and simply removed everything that wasn't part of the statue) I stopped thinking of it as a counts-as Sentinel and started thinking of it more as a counts-as Tauros:
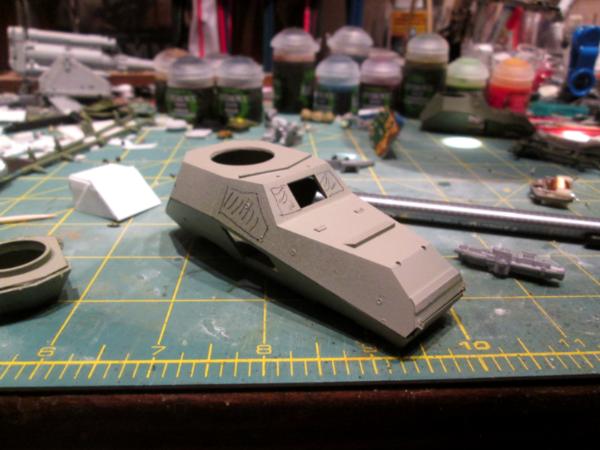

Cut those areas out and started sanding them smooth. I imagine I'll edge them with some bits of styrene to get a really sharp straight edge, but it's a start for now:
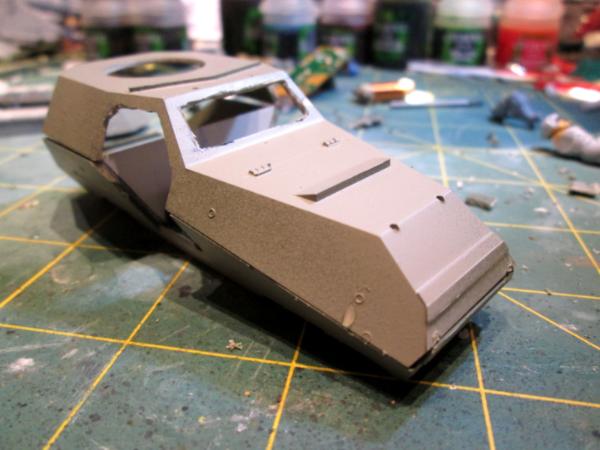

Next, needed a bulkhead between the gunner/ TC's compartment and the driver's hole, and the start of the driver's seat:
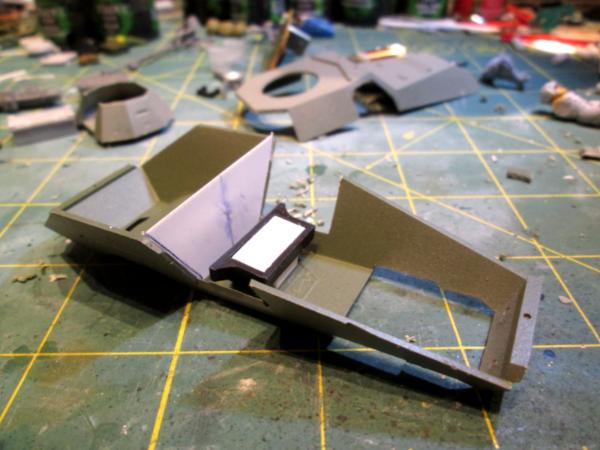
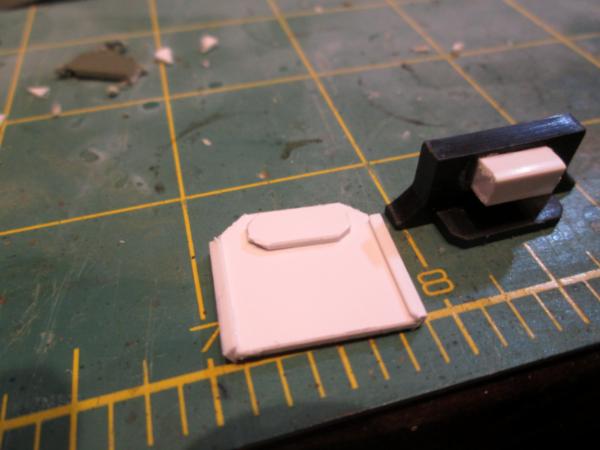
I've included this shot with the start of the driver figure to give a sense of scale:
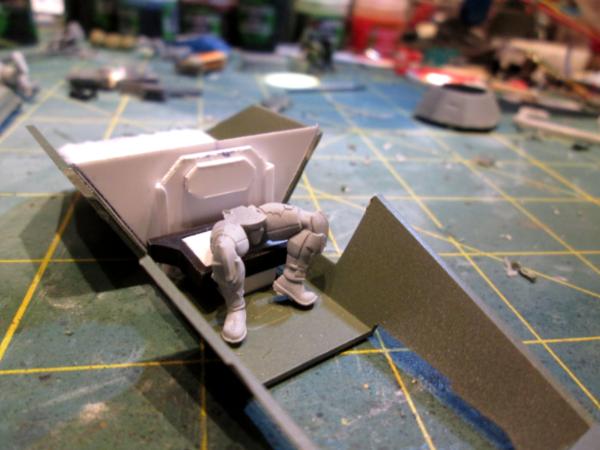
And finally, CommissarKhaine had asked about the kit's original tires. Here's a shot of them next to the car body- in my opinion they are too small and too narrow; I really like the look of the real Tauros model's heavy duty tires, especially in the rear where they are dualies:
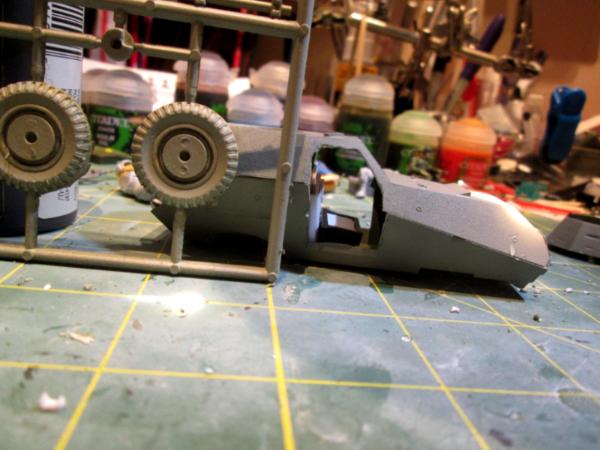
Here's a shot with some tires left over from a 1/35 Flak37 trailer kit:
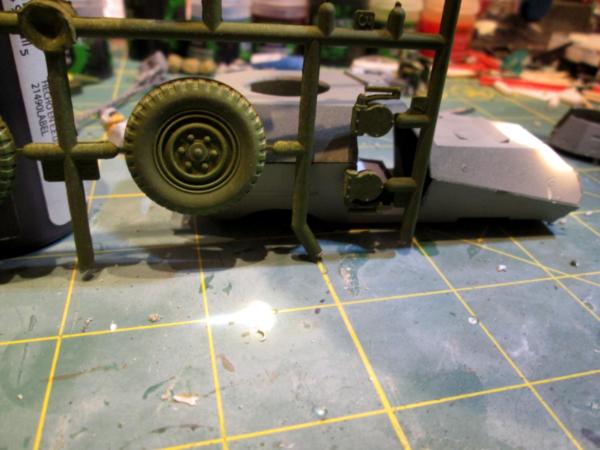
These are bigger than the ones that come with the kit, but are still pretty narrow. I also only have two of them, so would want four more so as to have dualies in the back and a pair up front. I could even use the fenders from the Flak37 trailer over the rear tires.
As for the exhaust, well, the Tauros builds I saw on Google didn't seem to have any. Doesn't mean I can't model some though, so would definitely be interested in folks' opinion's on whether to have them or not, and if so, where to run them. I also saw a ton of ideas for rear bumper/step plates, ammo boxes, and other gubbins to trick the build out with. This one is definitely shaping up to be fun.
I look forward to your ideas, and more follows soonest!
8330
Post by: kestral
I feel your scale woes - but some some early/interwar vehicles really were like the fun ride in front of the grocery store, so I usually just go for it myself. Keep up the good work!
9910
Post by: CommissarKhaine
The tires do seem rather thin for the 40K universe... Good thing there are plenty of 3rd party sites that offer titres and tracks - or you could try cutting them in half and thickening them up with plasticard and gs?
106010
Post by: Meer_Cat
CommissarKhaine- your suggestion put me on what I think is the right track for how I'm going to do the tires for this critter.
But first- here's a couple of in-work pics to show a little bit of advancement for the chassis. First, the no-slip is installed in the gunner's compartment:

And here's a look at how the heavy bolter scales with the turret and body itself- I'll need to integrate a substantial mount that looks like an extension of the turret itself to keep the balance of the look right (essentially, I see the 'turret' becoming really a heavy ring mount that offers the gunner a little bit of protection):

And here's the bit for the tires. I was looking through all my bits and came across a set of toy construction vehicles that I bought on clearance from Ollie's (an American discount store) last Christmas for US3.00. It had something like seven or eight construction trucks, dozers, back-hoes, etc and I saw a lot of potential for all the dozer blades, tracks, treads and wheels. I sized one of the wheels up and it looked quite promising, but like the other, proper model kit wheels I had, it seemed too thin. I wanted dualies in the back anyway, so I started pulling things apart to see what could be made of all these parts:
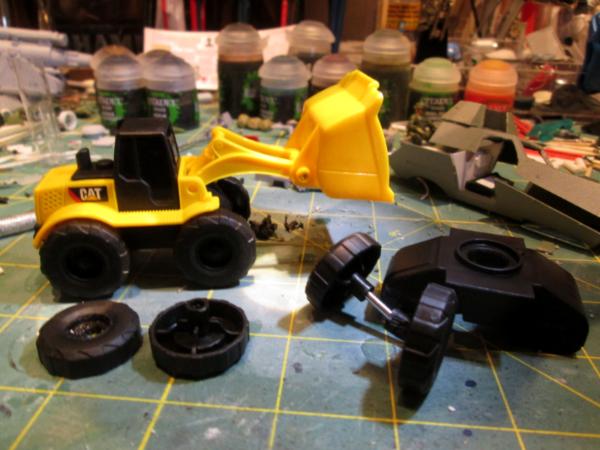
Drilled out the centers of half the pieces:
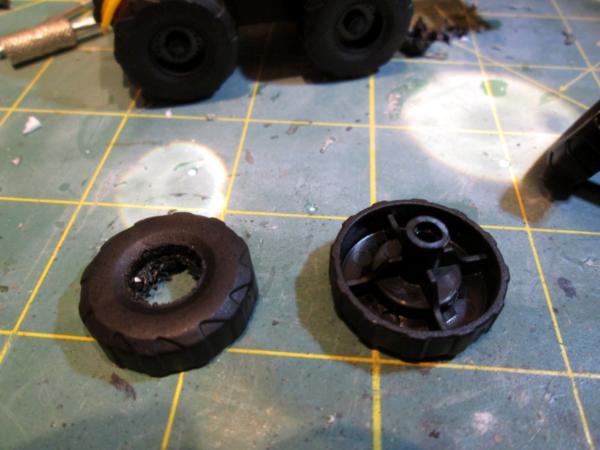
And doubled up- but not dualies, I think they're going to do just fine. Nice, fat, all-terrain tires for the recon vehicle:
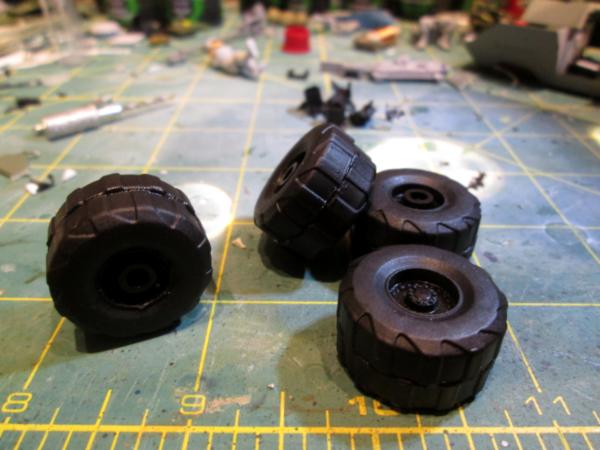
Here's how the size compared to the body of the vehicle- I'll definitely give them heavy duty fenders, either tubular steel, the fenders that came with the kit, plasticard or the fenders from the Flak-37 trailer:

CommissarKhaine had suggested cutting the wheels I had in half and building them out with greenstuff and/or plastic card; this is essentially doing that, just with a different set of tires. I like 'em.
I'm hoping to get quite a bit done this week (it always depends on work, and especially how much of it they want from me) because I've got so many other things to try and there's always the Kickstarter figures coming in a few weeks, so- more follows soonest!
Your observations and comments are always welcome.
65595
Post by: Camkierhi
Looking brilliant bud. Wheels are looking 40k, I.e. Far to ridiculously big but suitable all the same. Good find, got a box full of the same myself.
As to the gun mount, look to some round sprue, often you get a nicely curved bit, couple easy snips and she's a nice slide rail. Overall this is looking wonderful and promising. Can't wait for more.
9910
Post by: CommissarKhaine
Nice solution for the tires! And I Agree 4 wheels is plenty, it'll make it look faster IMO. Have you consider offsetting the bolter? That might create some room in the turret.
106010
Post by: Meer_Cat
Hi Cam! I'm glad to see you 'up and about' on the blogs again- it was worrisome hearing the details, but you're on the slog now and it's great to have your kind words. Funny, isn't it, that 'heroic scale' isn't just for the figures, but for their vehicles and everything else too! Somebody somewhere is compensating for something.
Hi CommissarKhaine! Yup, I think four fat tires will be plenty, especially after getting some work in tonight and getting the axles and wheels attached to the under-carriage (and wasn't _that_ fun- fitting, filing and coming up with ideas on the fly to adjust for imagination bumping into reality).
I do think that an extended mount of some kind- that get more of the gun out of the turret- is going to be the way to go, something along the lines of the ring mount on a US WWII deuce and a half truck, or maybe the mount on an M20 armored car. I like the idea of a slide rail, as I think I've got some sprue and it sounds like a quick and fairly easy route to go (famous last words). I'm trying not to get all fancy and bogged down on this one, as there are so many other projects in the offing, but by golly, it's fun and I'm learning a lot.
CK- I've also got my grots in and want to do that little buggy- I've never tackled anything like that before- all kinds of new territory to learn!
More follows soonest, with pics.
100624
Post by: oldravenman3025
Clever solution to your tire dilemma. I'm looking forward to seeing how this vehicle turns out.
9910
Post by: CommissarKhaine
Hi CommissarKhaine! Yup, I think four fat tires will be plenty, especially after getting some work in tonight and getting the axles and wheels attached to the under-carriage (and wasn't _that_ fun- fitting, filing and coming up with ideas on the fly to adjust for imagination bumping into reality).
Somehow, the underside of mdoels tends to take more time than the top
CK- I've also got my grots in and want to do that little buggy- I've never tackled anything like that before- all kinds of new territory to learn!
Ooh nice. Awaiting eagerly
106010
Post by: Meer_Cat
So, here's the beginnings of the undercarriage, and the axles and wheels in place. CommissarKhaine has stoked the fires of my OCD-ism, and now I want/need to trick out the underside much more realistically than I had originally thought- but it's all good. Much like learning how to assemble the Athena so that the outside reflected the internal arrangement, so too this scout vehicle is shaped to some degree by its drive train and suspension.
I used a couple of pieces of styrene tube as channels to guide the axle shafts, which are the metal rods from the toy that provided the wheels; they weren't long enough to use one and attach both wheels, so I had to clip them shorter and epoxy them into the tube:
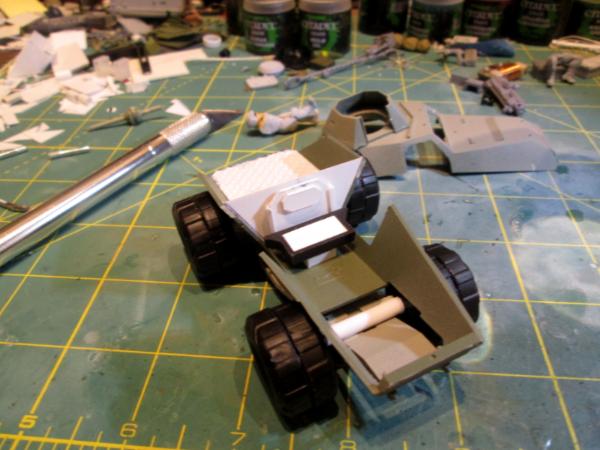
I first ran the axle below the frame, as the model kit would have done, but it made the vehicle sit too high, so I ran the rear axle between the hull and the frame:

And this is how she sits tacked together. The overall vehicle still sits higher than I would have liked, but I think that means that it is a medium reconnaissance vehicle, and not a light one. If you examine the turret you can see the start of the gunner's perch:
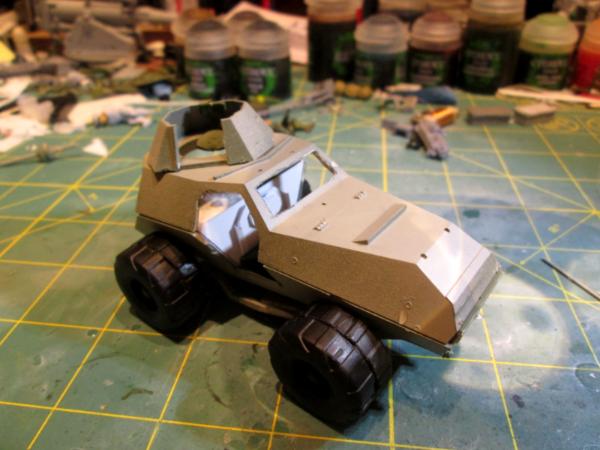
And I couldn't resist a couple of shots of Abernathy in both the driver's and the gunner's positions, to see how it was going to look:

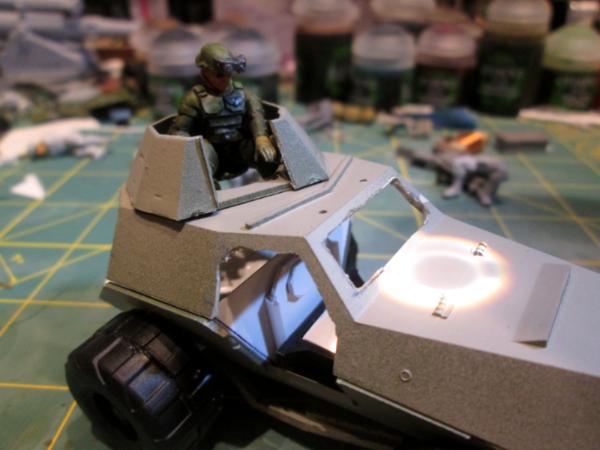
I'm glad I didn't shorten the hood- it would have looked too short and flat without the length. The photos also let me see where the rivets need to go; I'm thinking about maybe investing in one of those 'rolling rivet maker' tools like the scale model aircraft guys use- I don't mind rivets in the 41st millennium, but I do mind over-sized ones.
And the plan is still for the vehicle to be mounted on a substantial base and under fire, very dynamic: lights, explosions, dirt flying- it's gonna be great!
Thank you for your comments, observations and constructive criticism, and more follows soonest.
106010
Post by: Meer_Cat
Only a little bit of an update tonight- I'm still working on the BA-64 armored car conversion and would like to have a bit more accomplished so as to throw up some pics that are worth looking at. Per CommissarKhaine, I'm really looking at how to detail the undercarriage, even though I never really intended that to be a feature of the build. But hey- if it isn't overdone, it isn't done yet, amirite?
Meanwhile, here are some treasures I got from the Goodwill. Thy had a basketful of them (I think I showed admirable restraint in only grabbing four) and were selling for a dollar apiece:

These little Star Wars games fold up into a cube, and unfold to form a terrain diorama layout and have fairly simple rules for playing a quick game:

The little explosion/hit markers will make excellent terrain or shell impact details for a 28mm scene, I think (if used on a lava board, might not even really need painting):
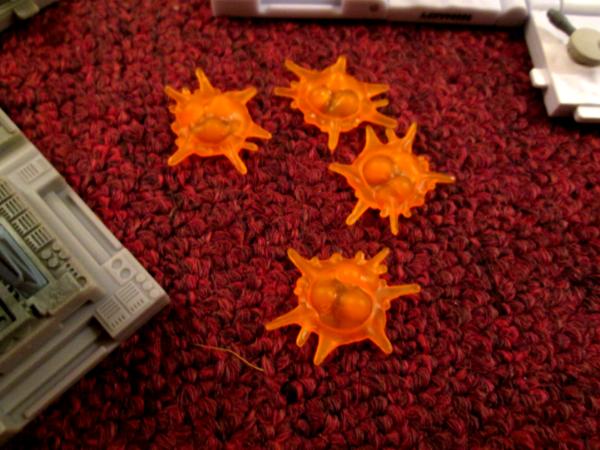
Folded up, the cube is 1.5 inches (about 40mm) on a side, and should make a good truck transport container, or even an airdrop rig, like to support Elysians via airhead from a Valkyrie:
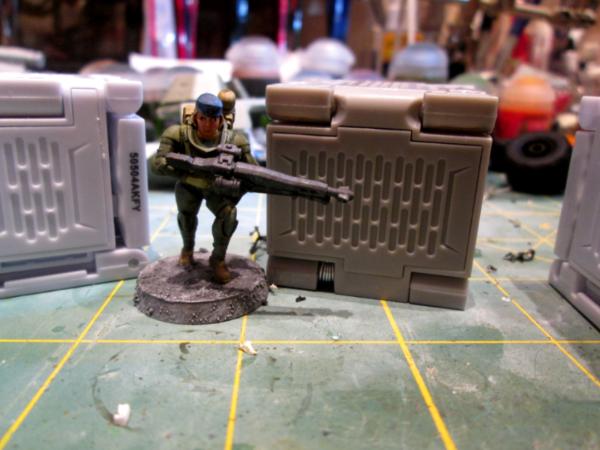
Or, glue them together and you have something about the size of a Munitorium container:
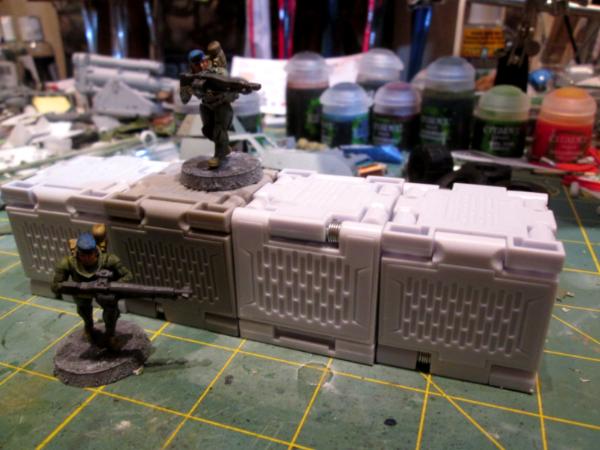
I figure to hit them with a Nuln Oil-like wash and then try out sponging on some rust and paint flaking effects- gotta learn sometime!
More follows soonest.
9910
Post by: CommissarKhaine
CommissarKhaine has stoked the fires of my OCD-ism, and now I want/need to trick out the underside much more realistically than I had originally thought- but it's all good.
Sorry about that :p
Much like learning how to assemble the Athena so that the outside reflected the internal arrangement, so too this scout vehicle is shaped to some degree by its drive train and suspension.
This is somehing I always try yo keep in mind: a vehicle, how fantastical it may be, needs the worky bitz aligned properly. Otherwise, it jus tlooks off in my mind.
Excellent sgtart, and nice find on the star wars toys, those should come in real handy
106010
Post by: Meer_Cat
That darn 'work' thing is getting in the way of my painting/modeling again- but I actually had some time to get some real work done tonight. Not enough real progress to show a lot of pics, but the intermediate step where you have a dozen pieces in varying stages of paint, wash, highlighting and/or gluing up.
Hey CK- very sorry not to respond earlier than this, but I'm in total agreement that there has to be some sort of 'form follows function', else the piece just doesn't look right.
Here's a WIP shot to give a (very) rough idea of what the vignette is going to (hopefully) look like- the vehicle dynamically poised with the intrepid TC engaging an unseen target with the heavy bolter as a near miss rocks the scout car:

I see I am definitely going to have to do something about the join line between the tire halves- tire 'mold lines' are one thing- these gaps are too much. But I can see the way forward now, and a lot of the niggling detail bits are getting done, so I'm excited to start planning the actual base. The chassis will look a lot better when the fenders are installed and the door openings trimmed in.
Your ideas, suggestions and constructive criticisms welcome- more follows soonest!
65595
Post by: Camkierhi
Excellent work.
Need more time to model, break a hip, it's bloody painful, but your hands are free to model.
Agree on the tyres, bit drastic and depends on the terrain this is ploughing across, but you could use the superglue/bi-carb trick to "dirty" up the tyres in general and disguise the joint. Otherwise it is probably best to get out the gap filler.
Whole thing is really coming together nicely, can see where it is going, really fine work.
PS.... TC legs make them look like they need a pee! Just saying....will be fine once everything is in place, probably just the angle of the dangle. 
106010
Post by: Meer_Cat
Thank you for the kind words Cam, and you've got me laughing. I didn't notice the 'intense concentration' pose of the TC until you pointed it out- I'll need to make a rush of getting the arms on him and the heavy bolter installed before the driver starts making fun of him!
I'll pass on the broken hip as a means of gaining modeling time- got broken up a bit parachuting many years ago and will pass on the refresher course (at the time, I wasn't yet into painting miniatures an such- all that time wasted!).
I'm planning to crud up the tires (tyres, on your side of the pond?) and I want some dirt flying around from the near miss- but it's one thing to not over-work an aspect of a model because the planned work will cover it, and another entirely to make extra work trying to correct a flaw that should be put right to begin with and save a lot of trouble down the line. I'll have to do something I rarely do during a build and actually think ahead and imagine more closely what I'm actually trying to do (head hurts already just anticipating!)
Thanks again for the observations- you've always been a big help getting me aimed straight on my little projects.
518
Post by: Kid_Kyoto
Always cool to see some Toyhammer!
9910
Post by: CommissarKhaine
ey CK- very sorry not to respond earlier than this, but I'm in total agreement that there has to be some sort of 'form follows function', else the piece just doesn't look right.
No worries, hobby time is limited- I know that all too well.
Loving where you're going with it, tough I would probably have aligned the ridges on the wheel. benefit of hindsight, of course. I agree that some greenstuffing is jn order, but other than that I love where you're going with the model
93572
Post by: Yorkright
Scout car is looking good, fraid I dont have much for CC on your projects as I am not much of a modeler.
106010
Post by: Meer_Cat
Yes, I put some deliberate thought into whether to align the ridges on the tire halves or not- and went with alternating thinking it would look ore 'off-road'. Now- in retrospect as you point out- it looks clunky and is going to make smoothing the gaps out a little more difficult.
But if I wanted easy- I'd have stuck to the instructions that came with the kit, right?  Automatically Appended Next Post: Automatically Appended Next Post: Hi Yorkright- sometimes the completely casual observer is the most honest- no built-in biases!
Hey Kid- One man's toy is another man's core unit, right?
9910
Post by: CommissarKhaine
Yes, I put some deliberate thought into whether to align the ridges on the tire halves or not- and went with alternating thinking it would look ore 'off-road'. Now- in retrospect as you point out- it looks clunky and is going to make smoothing the gaps out a little more difficult
You learn by doing things - and hindsight is a wonderful thing . Don't fret, I'm sure it'll work out perfectly fine like this as well. No mistakes, only happy accidents
But if I wanted easy- I'd have stuck to the instructions that came with the kit, right?
Why on earth do people follow instructions? Where's the fun in that? :p
62749
Post by: Dr H
I think what I'd do with the tyres would be to run a strip of plasticard around the centre of them... as with many of my ideas it's not a simple as it first sounds...
...I'd cut off 1-2mm of the tread bits to give a gap down the middle and then choose the plasticard to match the depth of the tread and run a strip of 2-4mm around the tyres. Merge them all together with putty and done.
This will hide the join and make the tread pattern look more "natural" (for a tyre) where I get a mental picture of tyres having a central line to push the water etc. outwards.
Just a thought.
106010
Post by: Meer_Cat
Hey Doc! That sounds very viable- and actually fits within my skill set with a Dremel tool. Something I've forgotten is that the top portion of the tires will actually be covered by the fenders. I think I need to test fit those, and if too much of the gap is exposed I'll go the plasticard strip route. What I was looking for was a more realistic off-road tread pattern from my $3 set of little kid construction vehicle toys bits!
Thank you for looking in, and for the advice
106010
Post by: Meer_Cat
This will probably be the last update of the WIP on the scout car (still need a name) before final pics after addition of stowage and weathering.
This first shot makes me laugh, because I had to add the seat cushion and back padding because the driver literally couldn't see over the dash- he needed a phone book to sit on!
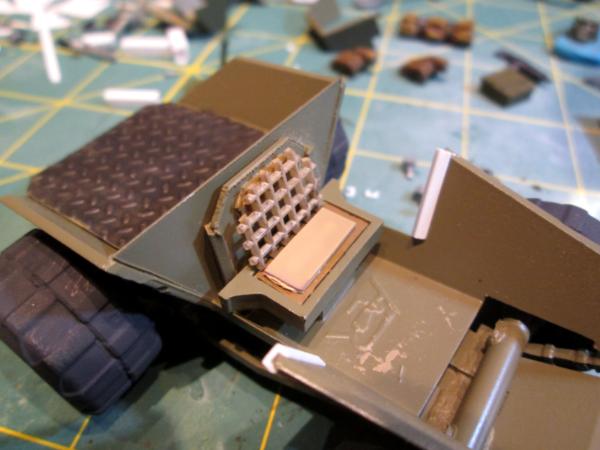
Here's the driver fitted into place:
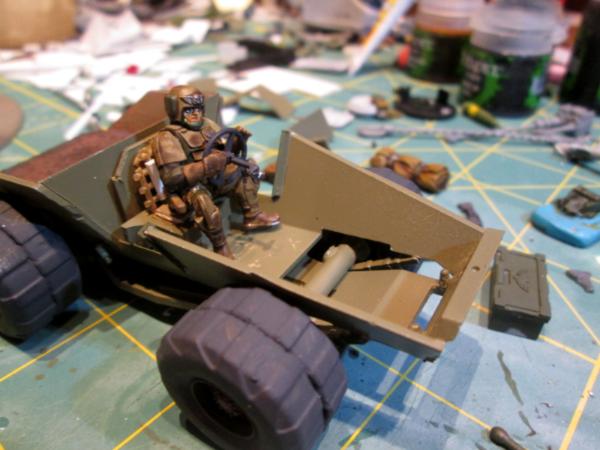
I figured the rear compartment would be a little hard to get at once the model is buttoned up, so the weathering is done first:
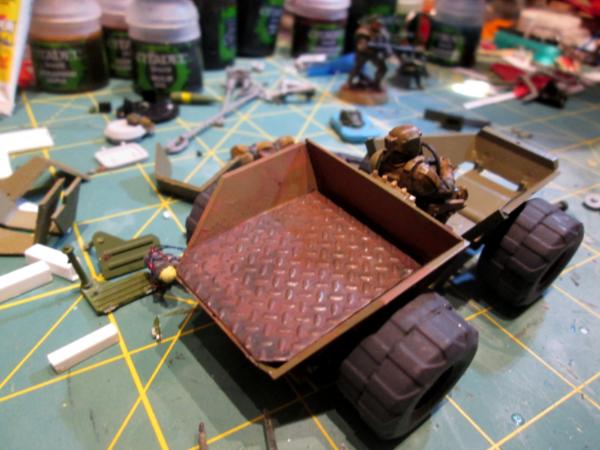
And this is a rough approximation of the placement of the model on its base- canted over from a near miss explosion, gunner engaging with the heavy bolter- trying to achieve some dynamism in the piece:
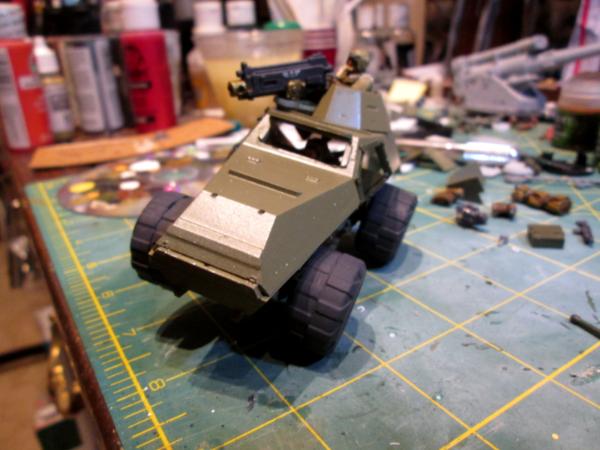
I also want to try some object source lighting from the muzzle flash of the HB. I have made a muzzle flash effect (a' la Klaus- Not Santa's tutorial on his blog) and I think there will be enough vehicle hull under the barrel to try some yellowish OSL effects. I also want to try adding some lens effects to the running lights that will go on as well (what self-respecting mud-bogger wouldn't have half a dozen or more fog lamps and other assorted glaring annoyances?).
I also test fitted the fenders, and they hide a lot of the tire seam. Between them and some dirt, the tires should come out looking fine.
With some luck, I'll have time to work tomorrow and Thursday, and may actually wrap this build up before I head off to my other job (Shetland Pony rescue) for the weekend.
Thank you for looking in, and for your comments. More follows soonest!
9910
Post by: CommissarKhaine
Ambitious. I like it
93572
Post by: Yorkright
Looking good Meer, I really like how you painted up the crew.
106010
Post by: Meer_Cat
Thanks CK- I'm working on the basing tonight; I've got the scout car itself mounted and I really like the 'catching air' sense it conveys (at least to me- all y'all will be the real judges!). I think it came out better even than I thought it looked in the pic I posted, just mocked-up.
Hi Yorkright! I used the same uniform scheme/colors as the Second Platoon Grenadiers (who are actually armed with missile launchers as their heavy weapon, but there you go...) and it seemed to come out okay. Big step backwards for painting faces though, these are not as good (I think) as the Phaethon crew from last project build. The effort I like the best was on the First Squad Grenadiers- the female Eisenkern Panzerjaeger figures. Dunno what was different with me for them and not these others though.
I'll just have to keep watching the examples you guys provide and keep trying!
9910
Post by: CommissarKhaine
Looking forward to it! For the face: try to not get white underneath the eyes, it makes them look either scared or doped up.
106010
Post by: Meer_Cat
Good advice and I'll try it soon- I have another squad of infantry to try to get done before the Empire of Men figures get here from the Kickstarter. Can't wait!
100624
Post by: oldravenman3025
You scout vehicle looks to be coming along nicely.
106010
Post by: Meer_Cat
Thanks ORM- better than it looks in the last photos, really. It's mounted on the base and I'm almost done with texturing and terrain effects- it's just hard to find any time to model, some days! I've been in Charlottesville, VA for the past two days supporting an exercise, I'm back now and hoping to have finished pics to show off soon.
More follows soonest! 
106010
Post by: Meer_Cat
Except for some dirt on those dang front tires (to hide the bad join line), this project is finished. In the Imperial Army lists these vehicles are known as Hyperion Light Reconnaissance Vehicles (LRVs), to the men who crew them they are affectionately known as 'Midges' or not so affectionately as 'Rent-a-Coffins'. Here's the shots of the final build, basing and weathering:
I cut a 90 degree angled piece of sprue to use as a 'kickstand' to hold the model at the angle I wanted:

A little greenstuff (which I have just now started trying to do anything with- you guys that use it all the time make it look _easy_) to hide the base a bit:
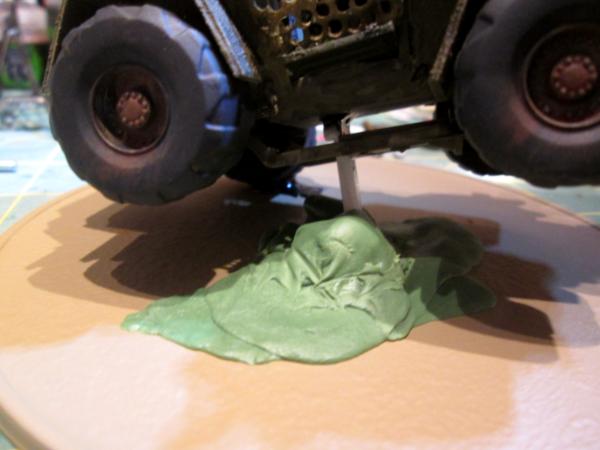
I used my foam cutter to shape a 'shoe' (sabot) that is the dune, or little hillock, that the car is leaping over:

And glued it in place:

Add some rocks (which won't stay 'natural', everything has to get painted):

Paint everything on the base plate a bottom coat of khaki, add some brown ink wash over the top, stick in some deer moss to look like a bush and hide the kickstand, stick some ejected shells and the muzzle flash on the heavy bolter, and this is what you get:

The smoke launchers are from the Athena build, the ejected shell casings are described in the Self-propelled Anti-Aircraft counts-as Hydra build:
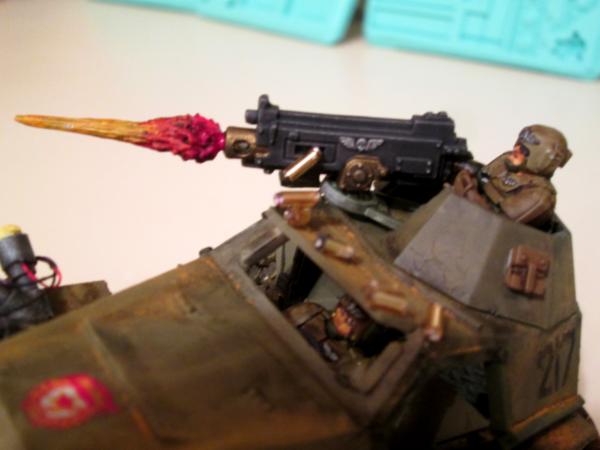
The 'safety mesh' covering the lower door openings is left over from making rivets, the running boards are left over from a Flak-38 kit (I used the rest of the gun in the Imperial Firebase build):
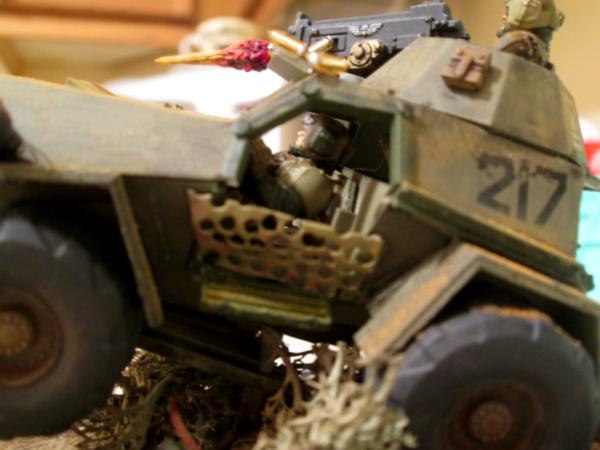
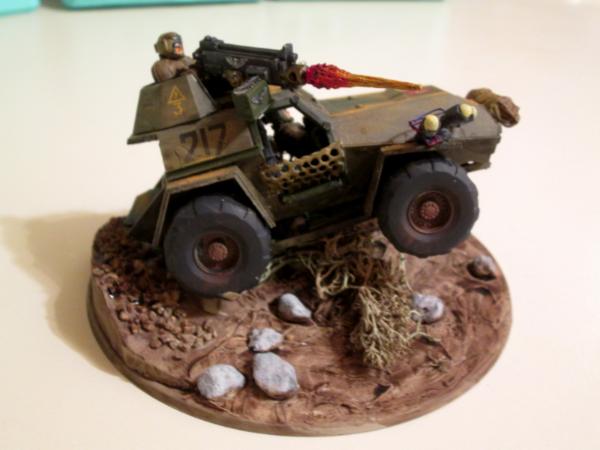

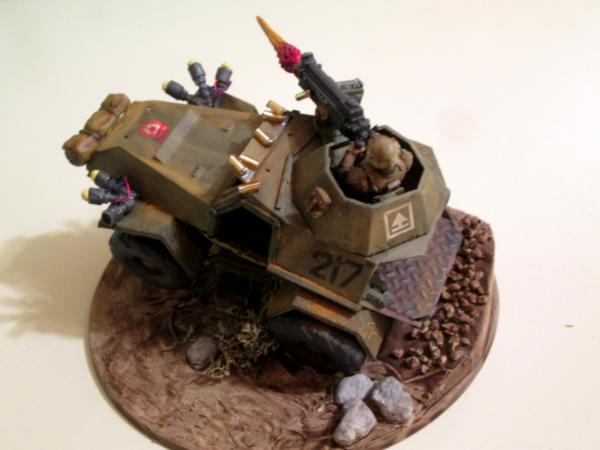

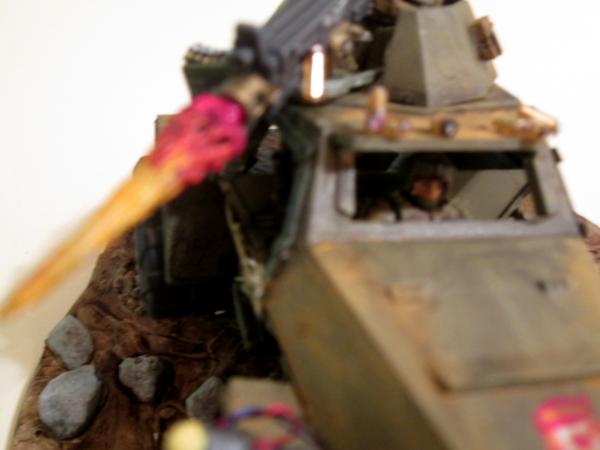
Everything is still in final stages of drying, but tomorrow I'll dab on some dirt for the tires, look at the close ups again and make sure I haven't missed anything obvious, and tehn on to the next.
New things I tried/learned for this project:
- Still gotta work on doing faces, especially eyes
- Really tried to convey an attitude of motion in this piece, from the dynamic positioning on the base to the ejected shells
- Decals- they really liven up a weatherbeaten camo scheme!
- Edge weathering using pastel chalks, I like it, but you can't put purity seal over top
- More rust effects
As always, I look forward to your comments, observations and constructive criticism. Thanks for looking in!
65595
Post by: Camkierhi
That is looking fan-bloomin-tastic bud.
It looks balanced and "meant to be", and very dynamic, really captured the movement well.
looking forward to the finished article.
100928
Post by: Alaricuk
That’s looking fantastic, Agree with Cam, really captured the movement well. Loving the muzzle flash
106010
Post by: Meer_Cat
Hi Cam, Alaricuk, and thank you for looking in. I had a lot of fun with this one and to finish off (or at least all I'm going to do before moving on to the next project) is add some heat colors to the barrel of the heavy bolter and some grubby to the tires. Like the Athena build, all sorts of things occurred to me to do as the build went along- especially after I cut out the rear of the vehicle hull to make it look lighter and I had all that visible space to do something with. And I was going to trick out the undercarriage, after seeing some of ComissarKhaine's builds and all the detail he puts in there.
But _unlike_ the Athena build, I kept the Midge on track and stuck to what I intended to do. The one thing I wish I had done a bit differently is to angle the turret slightly more forward, so I would have had some good armor to try OSL on. But, there's always the next vehicle for that.
Overall, a _lot_ of fun making this one. I've actually got the 1/48 scale version of the BA-64 and some grots to try out for my first ever Squeaky Waaagh! build!
32373
Post by: Klaus, not Santa
Oh I so love it!
That's exactly the scene I envisioned for my buggy! The speed, the dynamic ... it's all there!
Awesome!
100624
Post by: oldravenman3025
Nice work on the scout car.
106010
Post by: Meer_Cat
Hi Klaus, Oldravenman,
Thank you both for looking in. I take it as high praise indeed when fellow modelers- whose work I use to inform my own- speak well of a project I've really put some effort into.
I'm at another crossroads in my development as a modeler: up 'til now I've considered that everything I do must be 'game-able', a counts-as, or at least loosely within a rules set. There are certain limitations inherent in that, though, because there is a certain element of 'toy' or 'game piece' within the constraints of usability.
So, now I need to figure out if I want to really just do a diorama or vignette, and try for a higher level of realism?
Don't get me wrong, I very much like how the SPAAG, Athena, Midge and even the Hellhound counts-as came out (gotta do something with that wad of hairnet posing as camo netting on the back of the 'Hound), and that may be the upper limit of my painting talents. Which is okay, because there is so much more to try, like OSL, NMM and other techniques. Not to mention micro-lighting a scene or vehicle (or vehicle in a scene)!
I think the motto "You're only as good as your next project" is very appropriate at this juncture. I'm happy with what I've done, am working on a small, easy terrain piece and need to really think about what I'm going to do next.
More follows soonest!
65595
Post by: Camkierhi
 Meer_Cat wrote: Meer_Cat wrote:Hi Klaus, Oldravenman,
Thank you both for looking in. I take it as high praise indeed when fellow modelers- whose work I use to inform my own- speak well of a project I've really put some effort into.
I'm at another crossroads in my development as a modeler: up 'til now I've considered that everything I do must be 'game-able', a counts-as, or at least loosely within a rules set. There are certain limitations inherent in that, though, because there is a certain element of 'toy' or 'game piece' within the constraints of usability.
So, now I need to figure out if I want to really just do a diorama or vignette, and try for a higher level of realism?
Don't get me wrong, I very much like how the SPAAG, Athena, Midge and even the Hellhound counts-as came out (gotta do something with that wad of hairnet posing as camo netting on the back of the 'Hound), and that may be the upper limit of my painting talents. Which is okay, because there is so much more to try, like OSL, NMM and other techniques. Not to mention micro-lighting a scene or vehicle (or vehicle in a scene)!
I think the motto "You're only as good as your next project" is very appropriate at this juncture. I'm happy with what I've done, am working on a small, easy terrain piece and need to really think about what I'm going to do next.
More follows soonest!
Really hope I am not speaking out of turn here.
A simple question for you....Do you game?
If you are genuinely hoping to be able to play a game one day with your models then you need to carry on as you are.
If you are planning to sell any of the pieces, I would say continue as you are.
However if you really enjoy the modelling and don't realistically ever see these making it to the table top, then welcome to a whole new world.
I hope Klaus will not mind me saying this, for me Klaus and a few others, are the peak of this art. There are many fantastic painters, and here on Dakka we are privilege to see a great deal of their art. But taking it to the next level and modelling a piece, such as Klaus's Athena, is leaving the rulebook on the shelf and stepping into pure creativity. True Art.
An awful lot of my modelling is made with playable in mind, and is always restrained. What I truly love is making a dio or piece simply for the joy of it, no rules. It may end up being a playable piece, but when I am making it that is not a factor.
Personally I would love to see you unrestrained. Make it because you want to, and without restraint.
Lastly I would say one of the biggest lessons I have learnt over the last while is, do it for you, not for anyone else, not to anyone but your standards, aim for where you want to be, but do it for you.
106010
Post by: Meer_Cat
Thank you for your thoughts, Cam- definitely not out of turn.
I think you've hit on something that is basic to the projects I'm doing at the moment, which is: they are what I want to do. I think I'm kidding myself (for some 'must show practicality' reason) that the pieces are for gaming "down the road". I haven't actually been able to game myself since the late 90's, and haven't been able to drop in and observe a game for months now, just lately.
The problem is, I'd love to be able to game regularly! I loved those heady days In the late 80's when everything was new, we all had a the same (lack of) full understanding of the rules and grown men in the Army would actually get together in the evenings in the Day Room and paint toy soldiers (and Harlequins, and Eldar, and Orks, and Squats, and...).
I'm not trying to revive my youth through painting, but DakkaDakka sure fills in a need for recognition of effort expended, and the occasional good and creative idea. It just isn't in the cards to be able to game for awhile longer yet, as I work in Northern Virginia during the week, and then drive up to Southern Pennsylvania (about two hours) to spend the weekend at home with my wife and rescue Shetland ponies. There's still so much work to be done there, that there is no time to game, or paint over the weekends.
One day, in the not so distant future, I'll probably start selling off what I've got finished. But something that I've learned here, and that you, chief among others, have taught me, is that I can keep a hand in painting and building and sell or give away the products. The pictorial record of the builds here on DakkaDakka is most satisfactory for remembering the fun, the high points and the occasional disasters.
For the next big project up, well- I need a display board so I can take better photos. That might be next.
Of course, I still really want to light up a model, cast my own parts, try OSL, and I really need to finish the gun that goes with the Phaethon and, and, and....!
Thanks for the honest conversation and the chance to 'think things out' here on the blog.
Audace, l'audce, toujours l'audace!
More follows soonest!
32373
Post by: Klaus, not Santa
Hi Meer_Cat,
a
throwing off the shakles of "game ready" can be quite motivation - thoug a bit of a downer too, as you will uncounciously admit that there is no "playing with these babies".
It is really nice working without the restraints, but even while working on the ZEUS or the ATHENA I still thought about gaming with them - though the ATHENA more of a terrain piece for a low-figure-count skirmish game.
The possibilities of building, painting and story telling are just so vast without the gaming restricions. And story-telling that is what is currently the most important aspect of my building and painting. And this also urges me to try new things with each project. Kind of pushing the envelope.
If you do have some time to spare (a lot of time actually) I can recommend this video from Donato Giancola - https://www.youtube.com/watch?v=L9fIQKk_2oQ - I love what he's doing. His Joan of Arc is simply stunning. But in this artist talk he talks a lot about motivation, skills and all of this. And actually I did take some notes (!) while watching it.
To me they are motivators, and I'd like to share them with you if you don't mind
- It's all in the story telling
- the story preceeds the craft
- Don't let the technique get in the way of your ideas
- If you don't take chances, you'll never have the epiphany of success
And this is what's driving me these days. The idea, the story. Then how to tell it. And once I start to tell the story I look at the techniques and how to realize the project.
I learn something new every time and my technique is constantly changing.
Sometimes the story is getting boring in the process, or no longer convincing... well, there is shelf space
I look forward to the journey you'll embark on.
I look forward to the postcards you'll share with us
HAVE FUN!
106010
Post by: Meer_Cat
My thanks to both of you- Klaus and Camkierhi- for taking the time to provide such thoughtful and extensive encouragement. I think between what the two of you have offered is the total answer to the (perceived) dilemma/indecision on my part. It's important for me not to lose perspective and paint/build because I feel I need to get something done, or do what someone else is doing, or even meet a deadline; if you're not having fun at your 'hobby'- you're not doing it right.
Further, I think for me the key is realizing that the desire/hope to game 'one day' is the story- I've been using the hypothetical game of one day in the future as the thread that links the projects, and really- I need to craft the story. (I will watch the video you recommend at the soonest opportunity, Klaus- quite likely tomorrow evening.)
Having the story first, I can see where that is critical. It's like trying to build a vehicle without considering that everything inside has to fit logically into the outside (the shell or hull). I'm going to have to think about the next piece.
I have to admit, I had a lot of fun with the scout car- everything I've done prior has been very static. I'm thinking I really do need a display board, and there is always the howitzer to go with the Phaethon (I did get some feedback to my query that the scene should be in the process of loading).
It's all good- the day to worry about is the one in which I can't think of _anything_ to work on; and that day ain't yet!
More follows soonest
62749
Post by: Dr H
Great job on the dio'. Great feeling of movement to it.
Nice paint job too.
As to the modelling for display Vs. gaming.
I too am in the mindset that "one day" I'll play the game. One day I'll have the space to build my own gaming table and have it modular and all will be right with the world... Some of those things may come to be.
However, I am more of a modeller than a gamer (otherwise I may have put in more effort to get a game in) and my models are built with details in mind.
But when I think of what details to add to a model, I think of the purpose of those details, and as you have been discussing here it's to do with telling a story.
I don't just stick things on for the sake of making the model look more interesting and busy (something that bugs me about many GW models; bling for the sake of it). Each little thing I add has a reason to be there; I have a story in my mind that tells of why that item is there.
Cables will run from a power source to something that requires power, a table in the corner will have a coffee mug on it (I'll even point the handle in such a way as I see where the owner was stood/seated when they last touched it).
While a piece destined for gaming needs to be sturdy (to stand up to constant handling), open (in the case of terrain, to allow mini's to be placed within), etc. there is still scope to add these story elements and clever placement of small details can avoid them being knocked off during gaming.
And don't feel like you need to telegraph the story either, so long as the placement of items are "logical" to how you see the story, other's will pick up on it and create their own story to fit.
Don't just think of the moment that the model is representing, think about the past year of it's life; what has been happening to bring it to now.
9910
Post by: CommissarKhaine
Wow Meer-Cat, you really pushed sopme bondarie son this one, nice job!
When it comes to modelling vs gaming: I mmake most of my models for gaming, because we have an active gaming club. once in a while though, i'll just make a model because I can, and want to, gaming purpose be damned.
106010
Post by: Meer_Cat
Dr. H: Thank you for your thoughts on this subject. I've also always enjoyed the modeling aspect more than the actual gaming- it was a source of great frustration to the others in our circle who quickly (and serviceably, they didn't take a spray can and knock out thirty figures at a crack) painted up the basics of an army and were ready to play, and I was still basing my first squad. We literally drew lots to see who got what once we had discovered our first Games Workshop in Laurel, Maryland, outside of Fort Meade. I got Imperial Guard and have never regretted it. I am expanding into Eldar though, I've always had a sneaking liking for them, and Commissar Khaine has me set on a Grot project now, which will be fun. I do like what I'm doing lately, but I expect that a lot more 'mini-dioramas' or vignettes are in the offing, thanks to the thinking I've been able to do with all the input from you, CK, Klaus and Cam.
CK: Thank you for the kind words, and- stringing along with the thought started with Dr. H- yup, if it's a chore to work on the projects I pick, then I'm not doing the right projects. One of the biggest changes I expect I'll start really looking to make is to add basing always to the vehicles I do (whether that basing supports 'gaming' later or not) so as to tell that story that Klaus mentioned and that Dr. H amplified on.
Questions should be posed and answered (and you guys have given me the lexicon to do so now) as to why is something placed like it is, how did something get like it is, who is performing the action and in response to what?
I reckon it's going to be fun. Maybe an Imperial Guard Valkyrie, with Grot gunners and an Eldar Harlequin pilot, eh?
More follows soonest, and thank you all!
99
Post by: insaniak
That scout car is great!
62749
Post by: Dr H
Meer_Cat wrote:...I reckon it's going to be fun. Maybe an Imperial Guard Valkyrie, with Grot gunners and an Eldar Harlequin pilot, eh?...
If you ever need an excuse to do this have a look over my "army" blog https://www.dakkadakka.com/dakkaforum/posts/list/471119.page#4673874
Specifically, the Predator tank that has an Ork driving and a Tyranid gunner.
True, I've come up with a whole load of fluff around a concept to give an in-universe meaning to the mixture of species in the army, but it's just an excuse to build what I want.
I even create rules for the crazy mixtures I build so that I "can" play with them should I ever get around to it.
65595
Post by: Camkierhi
And why would a bunch of mercenary space pirates need any excuse, sounds bloody good to me.
Who knows what goes on at the fringe of space, beyond Imperial control and species based warfare, maybe the Harlequins an outcast and grots aren't known for being fussy about who they hangout with.
106010
Post by: Meer_Cat
I know that Pred! I didn't make the connection at the time that it was your build- been awhile since I looked at it. I'm going to have to go through your blog again and read the reasoning behind that scene- excellent project!
62749
Post by: Dr H
Yes, I think I remember you commenting on one or two photos in the gallery.
You can now see where I'm coming from with the building / gaming and story elements.
It's a playable model, with (slightly modified) rules, and quite a bit of fluff just for itself. But it has a lived-in look and a story to tell.
There's links to the build in the OP of the thread.
2326
Post by: shasolenzabi
i like that scout car
100624
Post by: oldravenman3025
Meer_Cat wrote:Hi Klaus, Oldravenman,
Thank you both for looking in. I take it as high praise indeed when fellow modelers- whose work I use to inform my own- speak well of a project I've really put some effort into.
I'm at another crossroads in my development as a modeler: up 'til now I've considered that everything I do must be 'game-able', a counts-as, or at least loosely within a rules set. There are certain limitations inherent in that, though, because there is a certain element of 'toy' or 'game piece' within the constraints of usability.
So, now I need to figure out if I want to really just do a diorama or vignette, and try for a higher level of realism?
Don't get me wrong, I very much like how the SPAAG, Athena, Midge and even the Hellhound counts-as came out (gotta do something with that wad of hairnet posing as camo netting on the back of the 'Hound), and that may be the upper limit of my painting talents. Which is okay, because there is so much more to try, like OSL, NMM and other techniques. Not to mention micro-lighting a scene or vehicle (or vehicle in a scene)!
I think the motto "You're only as good as your next project" is very appropriate at this juncture. I'm happy with what I've done, am working on a small, easy terrain piece and need to really think about what I'm going to do next.
More follows soonest!
Don't limit yourself to just the tabletop. You have skill and imagination. Just go hog wild and have a rip-roarin' good time with your projects. Hell, most of the stuff I do isn't playable, and won't ever be unless GW gives us some actual updated vehicle design rules (not just this half-assed deal with custom loadouts on canon units). But I have fun doing it. And I get a kick out of your (and everybody else here's) work. I look forward to more.
100928
Post by: Alaricuk
To echo what others have already said, I’m no gamer and mostly build concept stuff or just something quirky ( like the 40k forklift) I try and push my skills and learn something new with each project, be it building, casting or painting techniques. Your ideas are great and I’m looking forward to what you come out with next.
100273
Post by: STG
Looks great mate, finished product came out awesome. really characterful piece!
106010
Post by: Meer_Cat
 Dr H wrote: Dr H wrote:Yes, I think I remember you commenting on one or two photos in the gallery.
You can now see where I'm coming from with the building / gaming and story elements.
It's a playable model, with (slightly modified) rules, and quite a bit of fluff just for itself. But it has a lived-in look and a story to tell.
There's links to the build in the OP of the thread.
Thanks for the great example and encouragement Doc- I'll be studying the build at the link!
Thanks shas! About 200 more vehicles, and I can challenge you to an Armegeddon match!
 oldravenman3025 wrote: oldravenman3025 wrote: Meer_Cat wrote:Hi Klaus, Oldravenman,
Thank you both for looking in. I take it as high praise indeed when fellow modelers- whose work I use to inform my own- speak well of a project I've really put some effort into.
I'm at another crossroads in my development as a modeler: up 'til now I've considered that everything I do must be 'game-able', a counts-as, or at least loosely within a rules set. There are certain limitations inherent in that, though, because there is a certain element of 'toy' or 'game piece' within the constraints of usability.
So, now I need to figure out if I want to really just do a diorama or vignette, and try for a higher level of realism?
Don't get me wrong, I very much like how the SPAAG, Athena, Midge and even the Hellhound counts-as came out (gotta do something with that wad of hairnet posing as camo netting on the back of the 'Hound), and that may be the upper limit of my painting talents. Which is okay, because there is so much more to try, like OSL, NMM and other techniques. Not to mention micro-lighting a scene or vehicle (or vehicle in a scene)!
I think the motto "You're only as good as your next project" is very appropriate at this juncture. I'm happy with what I've done, am working on a small, easy terrain piece and need to really think about what I'm going to do next.
More follows soonest!
Don't limit yourself to just the tabletop. You have skill and imagination. Just go hog wild and have a rip-roarin' good time with your projects. Hell, most of the stuff I do isn't playable, and won't ever be unless GW gives us some actual updated vehicle design rules (not just this half-assed deal with custom loadouts on canon units). But I have fun doing it. And I get a kick out of your (and everybody else here's) work. I look forward to more.
Thanks ORM- more follows soonest!
Alaricuk wrote:To echo what others have already said, I’m no gamer and mostly build concept stuff or just something quirky ( like the 40k forklift) I try and push my skills and learn something new with each project, be it building, casting or painting techniques. Your ideas are great and I’m looking forward to what you come out with next.
Thanks Alaricuk- I think it's the 'pushing the skills' part that makes it a conscious choice- keep going with what I'm doing (which is fun and fairly decent) or push on and try to get better. I think expansion is in my future!
 STG wrote: STG wrote:Looks great mate, finished product came out awesome. really characterful piece!
Thanks STG- now if I could just get my rate of production up to yours!
Thank you all! I hope to have something new to show you (at least a start) very soon!
106010
Post by: Meer_Cat
So, for the last week, ten days, I've taken some advice that many of you gave and just fooled around with a little project just to have some fun and also to learn a little bit at the same time.
It all started with my Yankee penuriousness regarding all the little bits of this and that, and tiny scraps of plastic and bits and bobs all over my work desk. On the one hand, I didn't want to throw all that potentially good junk away, but on the other I didn't want to stick it in a box or jar where it would never see the light of day again or- the horror- just throw it out. So I decided to do a small piece of Necromunda-type terrain, also usable for WH40K, to make a basic pile of junk. At the same time, this gave me the opportunity to practice some rust/weathering techniques and try a few things I'd never had the chance to before. I also compared different products that I've had bouncing around forever to see if there was any difference.
I mocked up a quick base platform out of an old mini-CD, some blue masking tape and a couple of bits of foam core board:
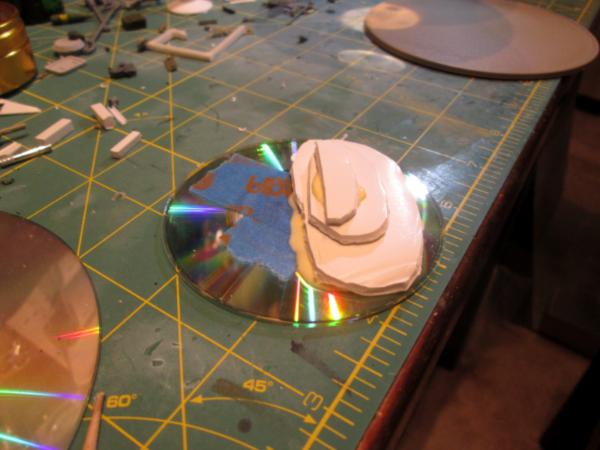
I hit that with some of my favorite modeling compound- Dex Flexible Spackle (never leave home without it):

Then started gluing things down- bigger things first, then small bits. This included everything from leftover small gubbins from other model kits, broken pieces of sprue, a button snap I found in the laundry room, glue nozzles, even the scrunge paint crud that froms around the lip of your favorite dollar store acryllic paint. I did this in layers so I could see where needed building up and where was good:
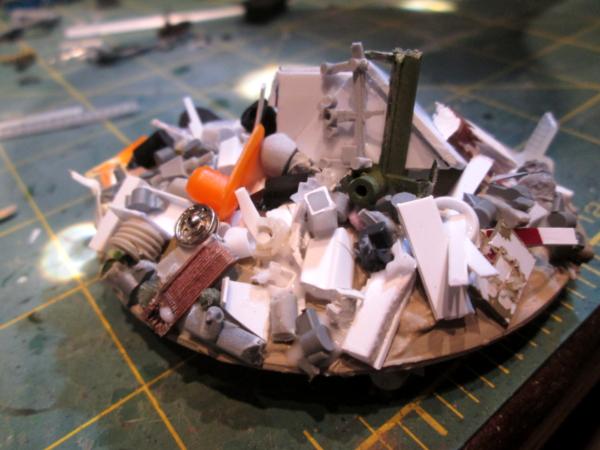
Then a basecoat of a brown shade of Rust-o-leum spray paint I had on hand:
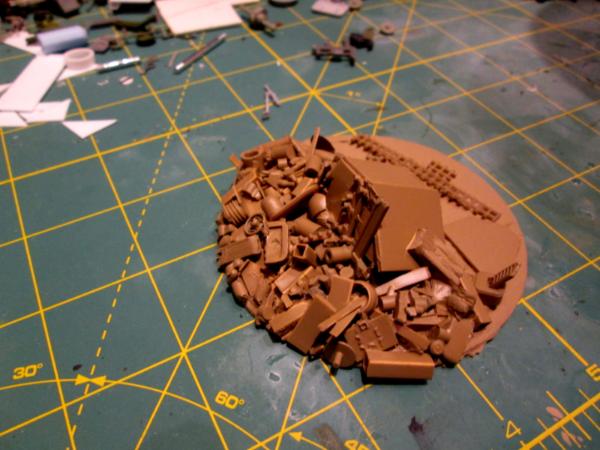
I picked out some pieces in a good, dark grey that either I wanted to hit with a metallic or use as a palette for rust:

Then some in a 'vehicle scrap' color:
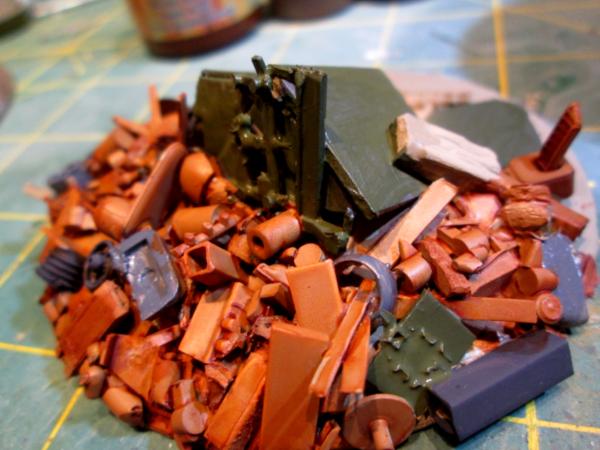
I also tried both of the 'ready made' rust products I have on hand. I used these:
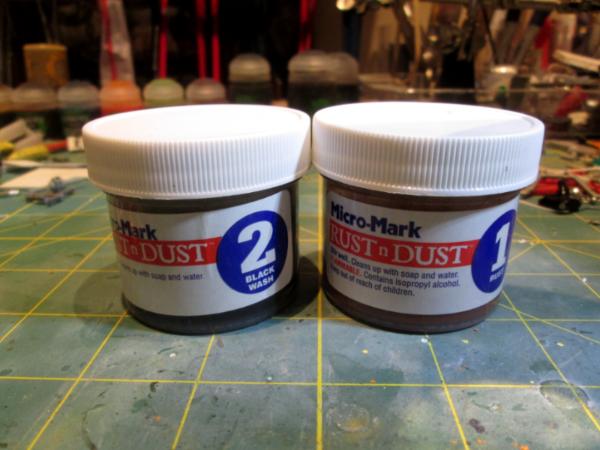

Of them, both yielded a fairly similar result. I'd have to say that the Vallejo Rust Wash as heavier, easier to put down where I wanted coverage (ie: the whole surface was rusty). The Micro Mark 2 part product was thinner, and dried lighter. The nice thing about it is you can go back and 'layer up' areas in either the red rust solution or the black oxidizing solution, depending on what you want. The black oxidizing solution also work in simllar fashion on the Vallejo wash, so go figure. One's as good as another for my money.
I also used two shades of Model Color WWII German camo paints: Camo Black Brown and Camo Medium Brown. With highlighting and washing it gave a simlar coloration for rust, but was a lot more work to achieve:
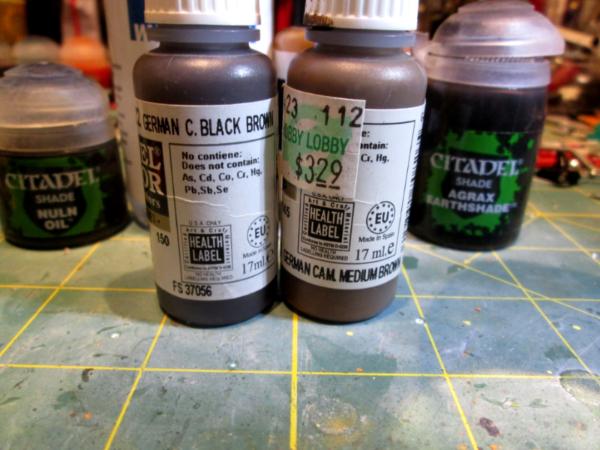
As you can see in the earlier photo I also used the old reliable Nuln Oil and Agrax Earthshade washes from GW. I found some good videos on YouTube on how to make my own of both, and will be trying that when these run out (cheaper). I also wanted some areas of very, _very_ advanced rust, so found a cheap box of 'soft pastel chalks' at my local hobby/art store for US$5 and tried scraping some flakes off with my utility knife:
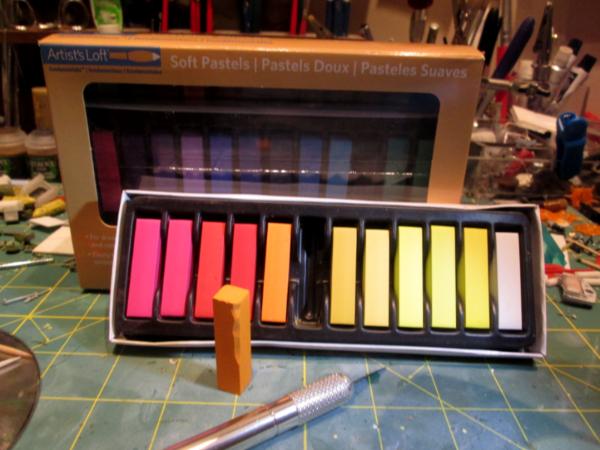
That didn't actually work too well- the 'soft pastel' wasn't and the flakes came off pretty big. Next go-round I'm going to try grinding them into powder in a mortar and pestle I have handy. For this buld though, I doused them in decal setting solution (I used the Walthers, but also have some Decal-fix hanging about somewhere). This dissolved some fot he flake, caused it to run into the cracks, which is what I wanted, and generally toned the color down a bit:

I really wanted to try the 'sponge application' method of doing some scrapes and rust, which is why that chunk of track cover is stuck on the top. The guys at work had one of those foam lined transport cases that you can pick and pluck the foam bits out to the exact shape you want, and they were just going to throw out the bits they had pulled out, so they gave them to me:

I figure this amount will last me approximately 53 years, so I'm good. I cut the small pieces andstippled on some darker grey, followed by silver, followed by a light touch of thin Micro Mark rust solution:
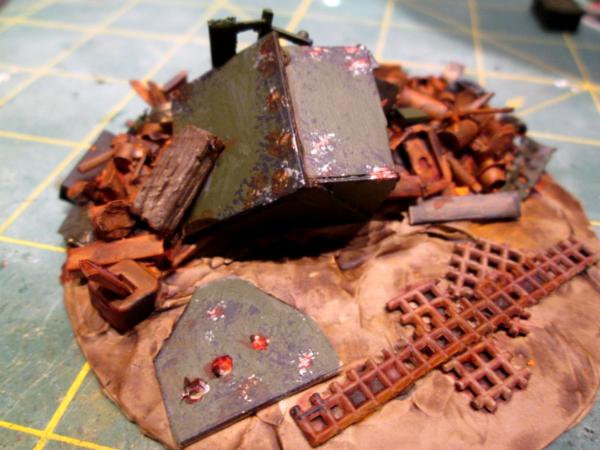
I hit the dirt part with Agrx, the whole rusty pile with Nuln, highlighted with a cheap acrylic that bills itself as 'Warm Buff', hit the whole thing with matte varnish and called it done:
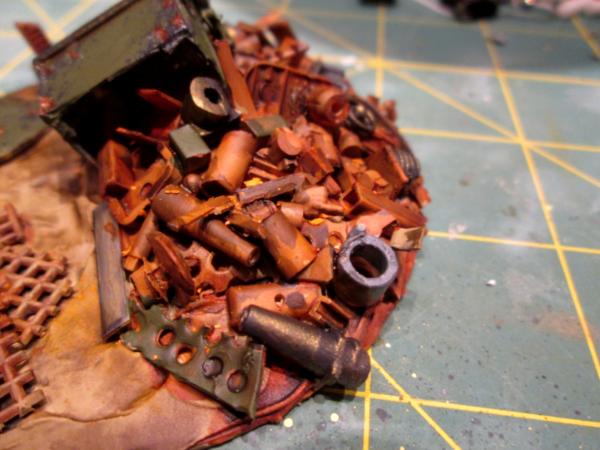
Here's a couple of shots with some Jaegers (the squad leader from 1st Squad and a missileer from 2nd) for scale:
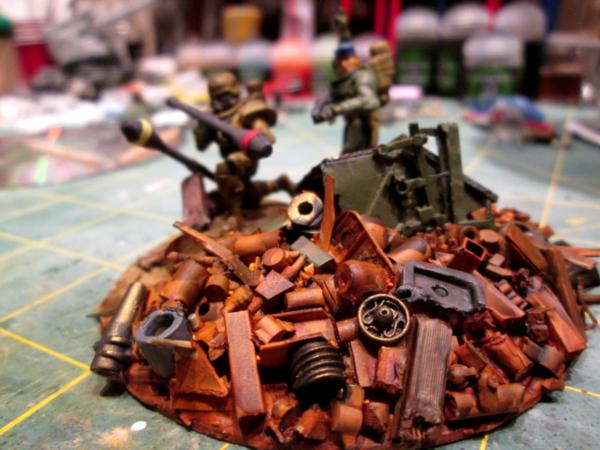
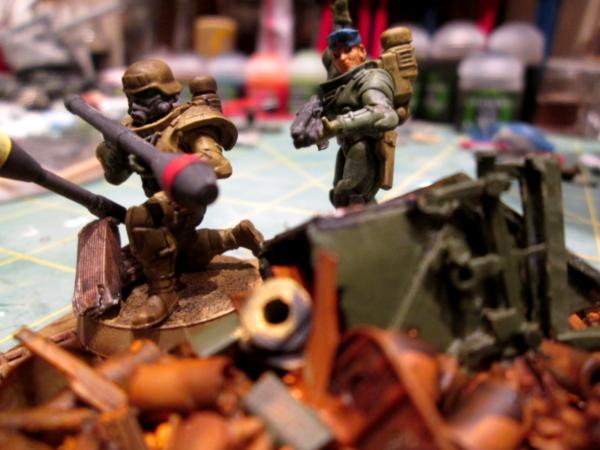
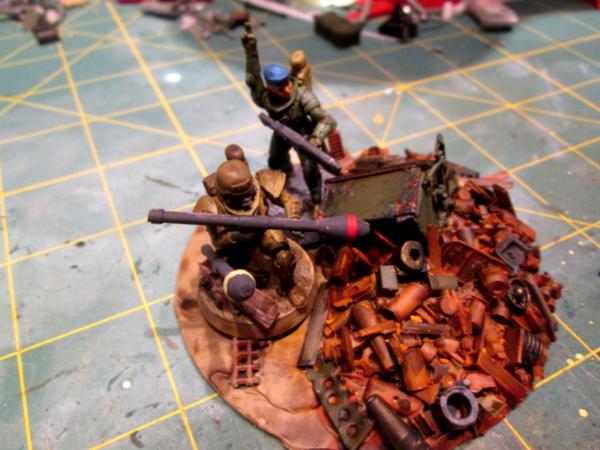
So, mission accomplished:
* I used up almost all the little scrap junky pieces getting in the way on my desk
* I made a bit of fun terrain 'just to do'
* I learned a little about how my rust products stack up to each other
* I had a go at sponge application for weathering, rust, scrape damage
All in all, a neat little project and I can definitely apply what I've learned to the next project coming.
Thank you for the opportunity to learn from you, and to try it out here. Your comments, suggestions and constructive criticisms are most welcome.
More follows soonest!
9910
Post by: CommissarKhaine
Excellent work, and a lovely piece of terrain to boot. For scraping of pastels, try a file or sanding paper.
I figure this amount will last me approximately 53 years, so I'm good.
Trust me, once you start using it, it'll ge tused up real fast .
17738
Post by: Briancj
Excellent work! Looks great, and was a great self-taught lesson! Bravo!
As for pastels, I have a coffee grinder I bought for $3 at a thrift store.
--B.
27140
Post by: ChaoticMind
Looks like a fun learning experience!
That mortar and pestle are going to be removed from food service, right?
93572
Post by: Yorkright
A very nice piece of terrain Meer, I do think your painting skills are getting better. Really like how you walked us through each stage of the project some day I might try my hand at bit of kitbashing too.
106010
Post by: Meer_Cat
Hello CK- and thank you for the kind words- I've been meaning to play around with rust for awhile, and finally just said 'now's as good as any time' and did it. I still want to try the 'salt' method of weathering, and there is a method I saw when doing model railroading where you dab some rubber cement on the basecoated piece, paint over it and when dry- pull the rubber cement off. It leaves tears and strips of paint hanging, like you see sometimes. I will try using a file or sandpaper on the pastels next time, rather than a hobby knife.
Hi Briancj- thank you for looking in! I like the idea of the cheap coffee grinder, but how do you clean it up between colors? The pastels I got are what you'd expect for US$5- not exactly crayons- not waxy, but almost 'plastic' feeling- hard to describe. But the method is worth a try- anything worth doing is worth doing to excess, amirite?
Great to see you active, CM! I'm puzzled, because you make it sound like grinding pastels and food preparation are separate endeavors. Next you're going to be telling me not to do the dishes in the wash machine with my work clothes.... 
Hi Yorkright! This project was fun, and I'm glad that putting up the blow-by-blow wasn't too boring. I really appreciate better now what it felt like for you to add weathering/rust to your armored vehicle recently. We work hard to paint everything up just so, and then deliberately go out and ruin it. The little piece of track cover was coming along just nicely using my traditional techniques- and then I was going to potentially ruin it by trying something new. But trying, learning something new was what this was all about, so silly not to go forward. I really need to try these techniques on a proper vehicle though- something with more flat surfaces to 'distress'. And do try a kitbash or customization sometime- I find it very liberating!
Thanks again all y'all for your suggestions and encouragement- more follows soonest!
17738
Post by: Briancj
The grinders are designed to be washed, so they come apart for cleaning, or are easy to clean. Mine can be cleaned with a wet paper towel.
65595
Post by: Camkierhi
Excellent piece of work. Great to see you going for it.
With the pastels, when you scrapped, did you have the blade perpendicular to the pastel. It does not have to be a sharp blade, the side of a metal ruler would do.
I have fancied a grinder for ages, but struggling to find one here.
Also scrape the pastel into a cup and mix with a little water. Brush it on, once it dries, it leaves a nice chalky type wash effect.
And on the next piece, scatter a few other metals through the pile, a bit of verdigris on some copper or brass, a nice bit of white powdery aluminium. Breaks it up, but falls well into the piece.
Excellent all round bud, now on to the next.
27140
Post by: ChaoticMind
Edit, sleepy brain mis understanding your response, you did understand my first comment.
Original post explaining why I can’t use my family’s for hobby grinding.
106010
Post by: Meer_Cat
I did understand, Chaotic Mind- was pulling your leg a bit. Per other comments here, I'll try altering the angle of the scrape or sandpaper before using the mortar- for all that it is porcelain, why grub it up if there is an easier (and cheaper) way?
Might still give an eyeball to see what's at my local Goodwill/thrift store in the way of grinders though....
I think I'm going to have a go at some Raging Heroes figures next- try getting some more practice in with skin tones and eyes, or perhaps the grot armored car that CommissarKhaine has gotten me interested in trying. I picked up some extra greens just to have on hand.
More follows soonest!
62749
Post by: Dr H
Nice pile o' junk.
Good rust tones.
As Cam' mentioned, a few touches of contrasting colours/materials can help. You do have some things there, but they are not heavily contrasting. Consider adding "painted" items or less rusty pieces; in a range of stages from chipped paint through to rusted. The cleaner pieces make the rusty things look more rusty.
True, in reality I'd be the first to sort out all the different materials and ranges of corrosion, but on a model a mixture can look better.
Also, consider different tones of rust: Newer orange rust to older brown/red rust. And then throw in some purple-y rust etc. That also helps to break up the piece and highlight certain items.
You can tell I've put a lot of thought into rust piles... I've built one in the past.
106010
Post by: Meer_Cat
Thank you for the advice Doc- you described in detail how to get the effect I wanted- the contrasting colors- but didn't get. I'm almost tempted to go through my bits and do another bit of scatter terrain, and try some of these things now, while the mood and the time are upon me and the 'knowin' ' is in my mind!
Contrasting colors, new ways to prepare pastels for use as washes, plus applying what I've learned through experimentation on the first pile o' junk.
Although I'm really groovin' on prepping the Raging Heroes figures- I've never worked with any before (nor resin castings, for that matter) and the level of detail is excellent and everything is new to learn here, also.
I might have to get to coin flipping to figure out which way to go- everyone should have my problems: too many projects, 'way too little time!
106010
Post by: Meer_Cat
No longer groovin' on the Raging Heroes figures. Not that there is anything wrong with them per se, they are actually very detailed and well animated (and I got them for cheap from Cool Mini or Not). But this is my first time working with resin, nd I can't get the darn things glued together!
I applied the advice I've read here over the past year (washing the parts in soapy water, drying thoroughly, slightly roughing he surface [although ost of the parts are really too small for that]) and nothing I have will stick. I've tried a couple of different types of Cyanoacrylate superglues, one gel superglue, Testor's Cement for Metal and Wood and my go-to Jewelry making glue- nothing sticks.
For the superglues, I don't have any Zip, or other type of accelerant, and the parts are really too small and fine to try to add some baking soda (which Camkierhi suggested during one of my vehicle builds and to quote him 'it works a treat'- just not for this application).
I've done some searching through the articles here on DakkaDakka, and I've been searching on YouTube as well, with no joy so far.
So, help please! What technique do I need to perform, or what better sort of glue should I use? Should I try joining the parts with greenstuff?
Thanks very much!
93572
Post by: Yorkright
With resin I have had to sometimes let them sit in a bath of dawn dishwashing soap and water for a week. You will see little globules of whatever they use to make sure the resin does not stick to the mold after a few days in the soak.
69676
Post by: Big H
How cold is your house Meer cat ?
Superglue is heat sensitive, glue stored in a fridge will not cure, put a hairdryer on it and it will go super quick.
Maybe it needs a gentle warming, I normally don't have any trouble and I do way less prep than you seem to have done !
106010
Post by: Meer_Cat
Thanks for the advice Big H! I wouldn't think the glue was particularly cool or cold, but I have a desk lamp with an incandescent bulb for close work, I can try holding the pieces under that while the bond is setting to see of the heat helps.
Thanks again and good to hear from you!
Automatically Appended Next Post:
Also- to clarify- I'm not this fastidious in prepping a figure. I'd read often enough that resin can have mold release or other contaminants on it fresh out of the box, so I started with a rinse and called it good.
At each successive stage, as the glue continued to not stick, I tried something new to try to improve the bond.
Normally, I toss the pieces in the air, squirt some adhesive (whatever is closest to hand) and hope the right bit latches onto the right body. Plastic is so forgiving!
69676
Post by: Big H
I virtually only buy plastics for that very reason my friend, except for the odd character figure or some homecast bits !
Try a slow deep breath on the parts to warm the glue as it sets, but watch you don't get the fumes in your eyes as that stings like a real stingy thing.
106010
Post by: Meer_Cat
Where I work is in the area affected by the US East Coast winter storm today, and work was closed down (14 inches of snow). I thought that I could make some nice progress on a command group composed of Raging Heroes figures that could be used with my female Panzerjaegers, and also with the Empire of Man female storm troopers coming next month from the Kickstarter.
It's the first time I've ever worked with resin. Which fething sucks on ice. None of the glues I had seemed to want to set a bond, no matter what I did to prep the figures: washed them with detergent, scrubbed them with a toothbrush, dried them, roughed up the matching surfaces to form a key, applied heat from a lamp to help the stuff set- nothing worked. At one point I hiked to a gas station down the road that was open and got one of every kind of superglue they had.
Finally, after using straight pins to pin the arms in place (like we used to have to do with heavy _metal_ castings) the figures seem to be holding together, for now, but I don't want to even use harsh language around them for fear the joins are too brittle and will fall apart. I'm hoping they hold together until I can get some primer on them, and then maybe the fething _paint_ will hold the stinking things together. I'm not sure if I'm kidding or not in that last statement.
Here are the glues I had on hand:

The Testor's plastic glue I didn't use- it's only for normal plastic and works by acting as a solvent and dissolving the join edges which then reform and fuse together.
The Testor's Cement for Metal and Wood was easy to work with, being very sticky and helping to hold the pieces together fairly quickly, but when dry simply crumbled apart- couldn't get a grip.
The generic 'Superglue' in the yellow tube has always been a good choice for me, I built practically the whole of the Athena out of it and some styrene. But no good here- I couldn't hold the pieces together long enough for it to set even into a soft set (in some cases I tried to hold the pieces together for more than two minutes).
The Loctite Super Control Gel, isn't (a gel that is). It's very liquid, but after pinning the arms and such it seems to be able to form a soft set, and we'll see if it holds up. The dispenser is actually pretty good for putting just a little dab where you want it. I needed to hold the parts together for about one minute to get the soft set to occur. I had a bottle of this stuff before and it hardened in the spout and dried and was useless, but we'll see.
The Gorilla Superglue was very liquid and didn't work well when there was any irregularity to the surfaces- but it seems to have made a soft set when the two faces to be joined are very flat and can butt up perfectly. This also needed about a minute to form a soft set.
The Krazy Glue actually has a brush applicator and a very large opening so it doesn't harden up and clog. This seemed to form a soft set in about 20 seconds, and so far nothing has fallen off. Of them all, I'd have to say that this one was the most successful for gluing up these figures.
I also got very, very good using my finger drills to make tiny, tiny holes in very small, very small, pieces of resin.
So here's what all day working off and on looks like:

I like the figures- the detail is amazing, the animation superb and the personality conveyed outstanding, but man, today was a high tuition for learning! Still, it's a good company command group, I think, with leader, medic, standard-bearer, bodyguard and the figure on the far left I believe I will paint up in blues and have her represent an Officer of the Fleet (love me some orbital bombardments).
And I need to get better at working with resin, because I have a metric crap-ton of resin figures coming from the Empire of Man Kickstarter- I've been looking forward to these 'way too much to let a little thing like no-stick glues to get in the way! I'll use direct heat to melt 'em together if I have to. Excelsior!
More follows soonest.
65595
Post by: Camkierhi
Ah Paduan, resin is hell. However pinning and superglue are about it. The joints are too small for epoxy. I would add though, very careful and considered use of The Superglue trick will help.micro- dusting with bi-carb. Fiddley as hell, but work. Just watch where you get your glue. And yes it works with gel also..
Good luck. Looking brilliant and envious of a beautiful command group.
106010
Post by: Meer_Cat
Thanks Cam- it is reassuring to know that resin isn't a challenge just for me (misery loves company, right?) I'll have to look more at the bicarb trick- especially where there is a bit of a gap anyway at a join. A trick I used myself when you first told me about bicarb as an accelerant was to add the dust first, then flow the glue onto it, for those times when I didn't wasn't the look of a rough weld seam.
Ah well, live and learn. For future Kickstarters- no matter how attractive- no more resin! Plastic, white metal, pewter, lead or nothing!
Glad you like the command group- I really want to take my time and do the best prep I can and maximize the outcome by doing all the tedious 'little steps' that yield such great looking figures from other folks. Want to try getting the eyes right on these.
More follows soonest.
93572
Post by: Yorkright
Models look great Meer as you said very dynamic. Looking forward to seeing some paint flowing soon.
17738
Post by: Briancj
Resin is, regretfully, tricky (he said, having just bought another ton of it). My go-to is "Zap-A-Gap" Medium CA, pinning where needed, and zip-kicker. I try to avoid the ZK, because it makes a brittle bond, but sometimes you just need it.
Sorry your experience is so negative!
--Brian
106010
Post by: Meer_Cat
Hi Yorkright! Painting has begun and the focus is on the faces, once that's done the rest is more in my line of experience and skill level.
Hi briancj- Thanks for the advice- especially about the zip kicker; I've read about it, had never used it, but was going to pick some up to try. I may hold off and work with better ways of introducing a little bicarbonate of soda/baking soda into the glue (or vice versa) and see how that goes. The experience wasn't so much negative as (childishly) disappoitning- with the snow day, I was hoping to get a lot more done. Things are as they are, not what we'd like them to be. It did honestly startle me at how slickery the resin was though- after all the reading about it here on dakkadakka, that was the last thing I was expecting!
More follows soonest!
32373
Post by: Klaus, not Santa
Ah, they look great - I simply love these girls - but as you experienced they are hell to handle.
I think one time I used Greenstuff to get an arm attached - that did work surprisingly well.
And I also took part in the Empire of Men Kickstarter
I look forward to see these at my doorstep.
Really a nice Command Group!
69676
Post by: Big H
They look good Meer cat ! Get some paint on them !
106010
Post by: Meer_Cat
Thanks to all for tips, advice, and encouragement- paint follows soonest. The object of the exercise with this lot is to focus on skin and face, and try to up my game in what are historically areas I invest minimal effort into and then move on (you can't get better if you don't try new things, right?)
I think resin and I will come to understand one another, now that I have first hand knowledge of how to work better with it. Wash it, dry it, rough it up and use an accelerant. And if necessary (and the join will permit) greenstuff it.
My problem this go-round was that- being ignorant of reality- I thought the assembly would go quickly and let me do other things. Now I know better, and as the old GI Joe cartoon tells us "Knowing is half the battle"! 
More follows soonest.
62749
Post by: Dr H
My only experience with resin models is the stuff I've cast and a few bits I got from OMN.
I've not had any problems with using whatever superglue I have on hand to stick it together or to other things.
I still prefer plastic though. I like using poly-cement on my models.
Good luck moving forwards.
9910
Post by: CommissarKhaine
Ah resin... Have you washed it with dishwasher soap? Seems the best for me. Wash, let it dry thoroughly, and for an insta bond: wood glue (elmer's glue in the states?) on one side, superglue on the other
106010
Post by: Meer_Cat
Hi Doc- plastic is going to remain a favorite with me also, but as someone noted earlier, there are some really cool figs that only come in resin. I'm going to have to Curb My Enthusiasm for entire units made of resin though- right now it strikes me as 'way more aggravation to get them together than I'm willing to invest (I say that now, but expect that with practice and experience the threshold for more and more resins will gradually become less and less).
Hi CK- yep, I'm washing, drying, tucking into bed and singing a lullaby. Hadn't heard of the wood glue/superglue trick before- I'm looking forward to trying it. Between that and the baking soda accelerant trick, these little guys might be worth putting together. I'm getting very good at pinning tiny parts also.
Thank you both for your comments and suggestions!
More follows soonest.
106010
Post by: Meer_Cat
Hi all,
I'm actively getting the basecoating done on the Raging Heroes command group, but came across a new product at my local big box DIY store (Lowe's) that I found very interesting and which will certainly feature in a build in the near future.
This stuff is some kind of edge trim, I think I found it in the department where they sell siding and such like. It's made of vinyl, is 1.25 inches wide on each edge and comes in 10 foot lengths and sells for US$2.89 per length:

It cuts easily with scissors into any number of shapes (as the old Hasbro toys used to proclaim: The Only Limitation Is Your Imagination!) and is very flexible:
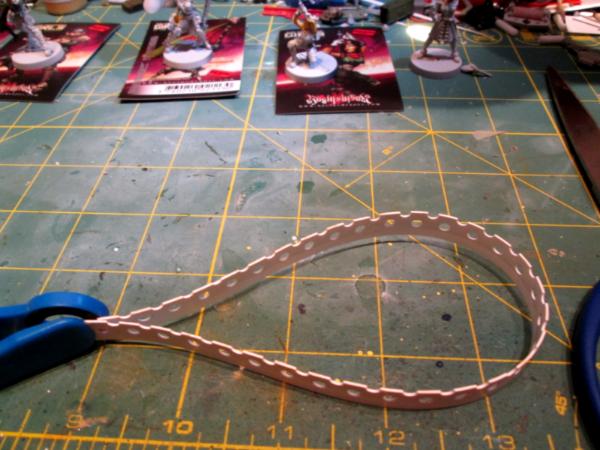
If you lightly score the underside, you can flex it into very realistic track tread angles, that will look very good wrapped around drive sprockets or laying atop return rollers for a tracked vehicle:
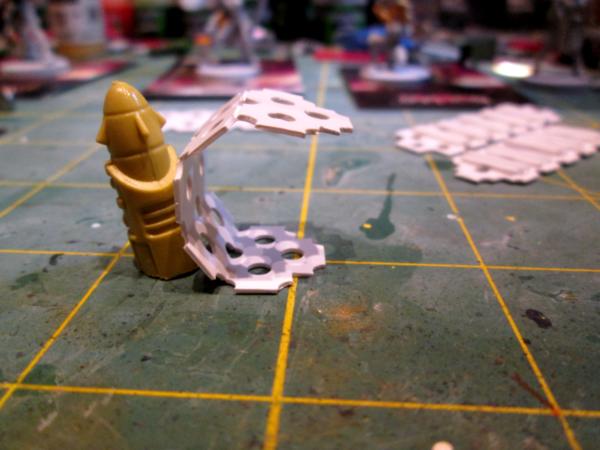
Here are a couple of quick configurations I came up with in just a few minutes using only the loose bits on my workbench showing just a couple of the endless possibilities for making up track sections:
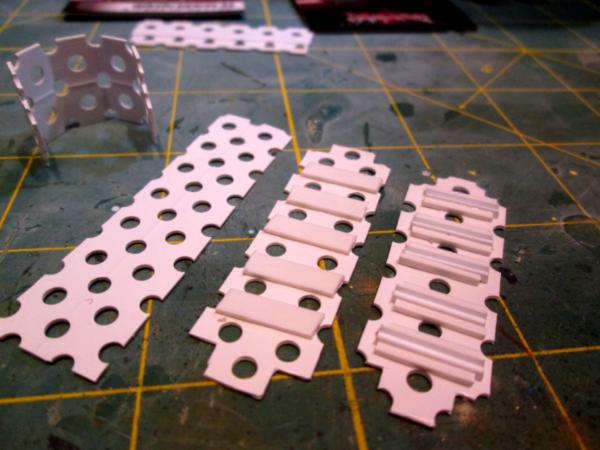
I came across this stuff when my wife and I headed down to the store to find something to install on the corners of our outdoor shelters for our rescue Shetland ponies to stop them chewing on the corners. I tacked it onto the corners with deep staples (and then we sprayed No-Chew all over everything) and had to trim some bits to get it to match the building edges and found how easy it was to work with.
When I looked at my offcuts, I had one of those "I can make something out of this" moments and took time out from the command squad to mess around a bit.
Hope this proved at least interesting to someone, and hopefully helpful/useful to at least one person.
Thanks for dropping by and I look forward to your ideas, suggestions, observations and constructive criticism.
More follows soonest!
65595
Post by: Camkierhi
I have had a similar product in the cupboard for ages. Been wondering what to do with it. This is an excellent example, brilliant idea bud. There are different ones available, this looks like the one used for corner beading up before plastering. I have one used to trim the corners when tiling. Good shout bud. Thank you.
10953
Post by: JohnnyHell
That is a VERY cool tracks trick! Nice find!
69676
Post by: Big H
That track doesn't look bad at all matey !
Does it take glue ok ? I find industrial plastics frustrating to stick.
65595
Post by: Camkierhi
If you use the plumbers solvent works OK, and sticks any plastic. But looks like you got it nailed already Meer_cat, what did you use?
45565
Post by: cormadepanda
You need to do a soapy wash/scrub on resin with active drying. Future tips.
9910
Post by: CommissarKhaine
That's a brilliant find in the hardware store Meer_Cat! Will have to go raid one nearby soonish
62749
Post by: Dr H
Good find. Good ideas.
106010
Post by: Meer_Cat
Thank you all for the comments!
Cam: I noticed there were other pieces at the shop- this style suited what we needed, but I'll have to get a kitchen pass and sneak back and see what else I might can use!
JohnnyHell: Thanks much! I was only messing around quickly the other night- for starters when I sit down to build track units two things come to mind: one is that I'll notch the ends of the sections male and female so that they can mate up easier- without a big clunky overlap and two, I'll run the cleats the width of the track piece, instead of short like they are here. Loads more playing around to do, though!
Big H: I used superglue (cyano-acrylite) for these and was pleasantly surprised tonight when I picked them up and flexed them that nothing popped off. I think for a permanent build though I would use plumber's PVC solvent like Cam suggested- it should form a stronger, flexible bond and is pretty cheap. Just don't sniff the fumes too long!
Cormadepanda: Thanks for the advice and boy will I follow it! I did ultimately scrub these in dish detergent and the other night a leg still popped off the Commander figure. I had half facetieously suggested in my earlier rant using greenstuff to stick resin together- but Klaus, Not Santa said he had actually used it to render a fix one time, so that's how I fixed this figure- with greenstuff!
ComissarKhaine: Thanks pal! I'm gld though that I had offcuts from a piece- not sure what I would do with a full ten foot length (although as you layer pieces to make full, thick tracks it goes more quickly than I would have thought); when I have leftovers I have to keep an eye on the wife-unit who has trouble telling the difference between my 'treasures' and junk.
Dr. H: Thanks Doc!
Tonight, more work on the Ragin Heroes figs- trying a different process workflow and am starting with the faces, slow going (for me) for now. It'll break out soon though. Toujours en avant! 
116601
Post by: Syro_
Meer_Cat, I've only finished the first page of your blog so far, but I'm really enjoying it. What you created from that multi-picture frame is amazing. I'm glad you like converting vehicles, that makes it fun for all of us. Most of all, I'm glad you mentioned your background in the Marines and Army, because I immediately thought you must have some military background, or are a military history buff, when you were explaining the artillery emplacement you made. It has a realism to it, that I feel most people wouldn't think to include when building.
P.S. I'm glad to see someone else thinks milk pulls look like hatches, I use them for that too
30672
Post by: Theophony
 I never thought about using that drywall cornerbead for anything game wise . Brilliant work on the tracks. I think that corner bead will find all sorts of uses in Necromunda.
2326
Post by: shasolenzabi
Interesting looking tracks!
106010
Post by: Meer_Cat
 Syro_ wrote: Syro_ wrote:Meer_Cat, I've only finished the first page of your blog so far, but I'm really enjoying it. What you created from that multi-picture frame is amazing. I'm glad you like converting vehicles, that makes it fun for all of us. Most of all, I'm glad you mentioned your background in the Marines and Army, because I immediately thought you must have some military background, or are a military history buff, when you were explaining the artillery emplacement you made. It has a realism to it, that I feel most people wouldn't think to include when building.
P.S. I'm glad to see someone else thinks milk pulls look like hatches, I use them for that too
Thank you for the kind words, Syro- and thank you for looking in. The picture frame/firebase was a lot of fun, and the biggest project I'd ever tried up to that time. The milk pulls had been bugging me for a long time- they were just too perfect to _not_ use for something!
 Theophony wrote: Theophony wrote: I never thought about using that drywall cornerbead for anything game wise . Brilliant work on the tracks. I think that corner bead will find all sorts of uses in Necromunda.
Thanks Theo! Now that you mention it, the corner bead could be trimmed to any size and make girder-work for Necromunda- I didn't think of that when I saw it. I do like that it glues up and cuts easily- a treat to work with.
Thanks shas! These were literally thrown together in just a few minutes as a 'proof of concept' project- I'm quite sure that there's a lot better can be done with them. I've still got a howitzer to scratchbuild (after the command team, after the grot tankette- no scope creep here, no sir!) so I'll be messing with them some more!
Thanks all for looking in- more follows soonest
|
|