118486
Post by: Andykp
I was lucky enough to grab one of Kromlechs “God-busta”. The limit release gargant model for their Orktober promotion.
It is a very detailed and clever HDF model with wood and resin parts as well. I intend to build it pretty much stock and then add details to it as I go along. This thing is HUGE! And so clever the way it goes together. I’m going to document the build and paint job and the home brew rules I’m making for it here.
Any C+C welcome.
4
118486
Post by: Andykp
This is going to take a while.
1
72249
Post by: beast_gts
That's an... intimidating build!
21358
Post by: Dysartes
...wouldn't C&C be how they made it in the first place?
Looks like quite a beefy kit - how tall is it to the shoulders?
118486
Post by: Andykp
Its oddly satisfying to put together. Like one of those 3D jigsaws, the instructions are good and the numbering and layout of the sheets makes it a joy. More pics soon but have done the main hull, will compare to a stompa and measure tonight for yous.
They say they will make more available at the end of the month and I have to say it’s worth, doesn’t feel like it likes details and there’s no compromise because of the material it’s made from.
118486
Post by: Andykp
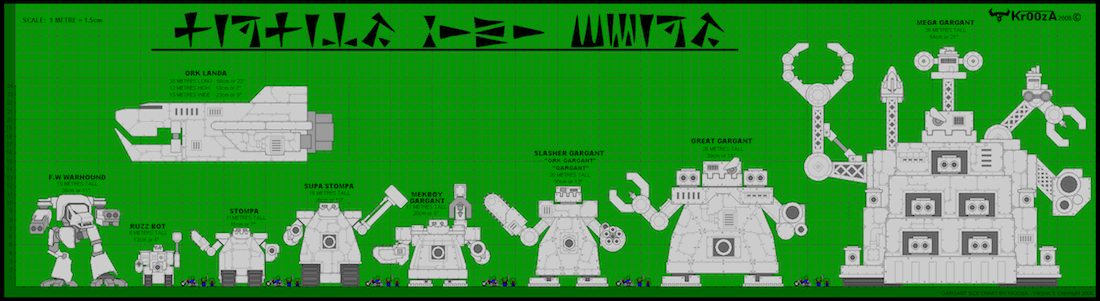
Hull pretty much done, popped it next to my stompa to show how big the thing is.
It’s 9” or round about 22cm to the supports for the shoulder armour. And has no feet as yet. Kromlech say it’s 18” when built.
3
118486
Post by: Andykp
Tonight’s work.
2
29418
Post by: Veldrain
Priming that magnificent beast is going to take a case of rattle cans.
118654
Post by: Bellerophon
That's a really interesting model, looks to be very cleverly designed and it's already great even at this WIP stage. I'll be watching with interest!
118486
Post by: Andykp
Veldrain wrote:Priming that magnificent beast is going to take a case of rattle cans.
Yeah painting it is going to be whole new challenge! Automatically Appended Next Post:  Bellerophon wrote: Bellerophon wrote:That's a really interesting model, looks to be very cleverly designed and it's already great even at this WIP stage. I'll be watching with interest!
I am very impressed with how much detail they have got out of flat pieces of HDF.
21358
Post by: Dysartes
Veldrain wrote:Priming that magnificent beast is going to take a case of rattle cans.
Depends on whether Andy seals the MDF before undercoating it, which would reduce how much the wood drinks.
118486
Post by: Andykp
 Dysartes wrote: Dysartes wrote:Veldrain wrote:Priming that magnificent beast is going to take a case of rattle cans.
Depends on whether Andy seals the MDF before undercoating it, which would reduce how much the wood drinks.
And how would I go about that? Made some mdf terrain before and just used normal primer but was thinking of wood primer this time? But very open to advice on treating the thing to make painting easier.
4003
Post by: Nurglitch
Water down some white glue and essentially varnish the surface before spraying. It's very good advice.
72249
Post by: beast_gts
 Nurglitch wrote: Nurglitch wrote:Water down some white glue and essentially varnish the surface before spraying. It's very good advice.
There's also actual MDF sealer (such as this from TT), but I've not used any.
21358
Post by: Dysartes
Aye, I think that's what I was thinking of - I'm pretty sure I got a bottle at one of the UKGE shows for some MDF terrain then, true to form, haven't done anything with the terrain...
118486
Post by: Andykp
Thank you all that’s great advice. I have painted the odd bit of mdf terrain very simple and found it really porous so this is great to hear.
Sadly I though the build would take a couple of days then I could start painting but I think that’s a couple of weeks away. Sorry this blog will drag on for a bit.
Kromlech say they are releasing more of this kit soon, and if anyone is thinking of getting one I would recommend it highly. It’s well worth the money and is giving more model goodness than anything I’ve built recently.
Planning on getting some green stuff works moulds and making hex bolts and rivets for the body, hide the mdf plugs and adding some more armour panels. Also thinking of making some tread plates moulds and making green stuff thin tread plate sheets to apply where the hdf has tread plates etched in, but that might be ambitious.
I like all the cut away details but the one down the right hand flank (as you look front on) is a bit too big for my tastes, ruins the silhouette, so am going to panel in some bits of it.
118486
Post by: Andykp
Progress in the power plant today. Trickiest bit so far. Any small misalignments made on the hull really come back to haunt you when you come attach big bits that cross over lots of layers and have numerous angles to them.
Cocked up as well, thinking they hadn’t provided two small parts of dowel needed for the bend in the exhaust, I set about what I thought was a spare bit with a saw, only to find I needed it later and that the small bits (21Mm and 16mm each) were provided in resin. But I fudged it by recreating the sawn up dowel with the off cuts and the resin bits. It’s very hidden so won’t be noticeable when painted.
3
118486
Post by: Andykp
Started on the belly gun. Very clever design. You build the frame seen here and then use push card to line the barrel and casing.
3
21358
Post by: Dysartes
I suspect I'll have to wait for the next set of WIP shots to get what you mean, though I think I understand.
Definitely firing a significant shell, that's for sure.
118486
Post by: Andykp
You wrap the card around to create the round shape. Used super glue to good effect on another bit, pva soaks the card and damages it if you handle it too much. But because of the shapes here I ended up glued to it as much as it was to the gun.
2
72249
Post by: beast_gts
Andykp wrote:They say they will make more available at the end of the month and I have to say it’s worth, doesn’t feel like it likes details and there’s no compromise because of the material it’s made from.
It's back until 31st October, and I am very tempted...

23306
Post by: The_Real_Chris
So mekboy or slasha gargant sized in old money?
118486
Post by: Andykp
Do it. You’ll regret not doing and it’s cracker of a kit.
Automatically Appended Next Post:
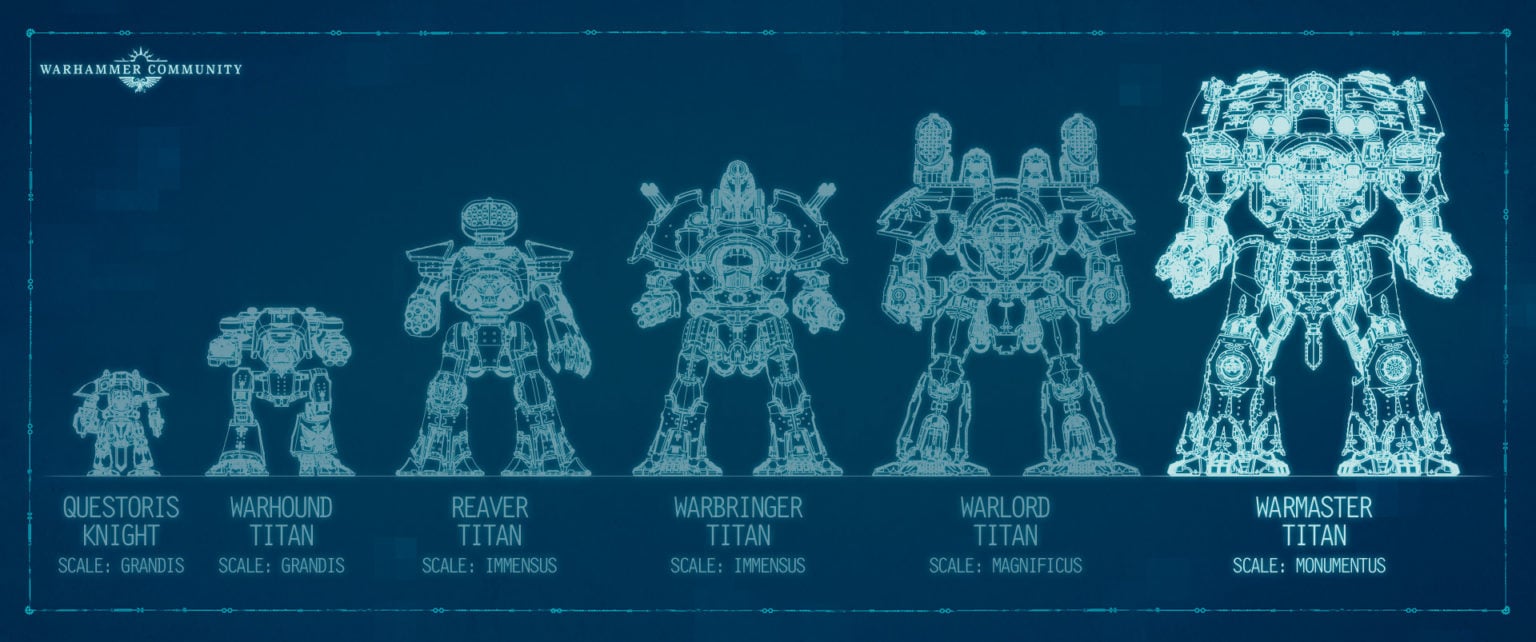
It’s just shorter than a warlord titan, I was thinking slasher sized but building it feels more like a great gargant. Having said that I haven’t seen a forgeworld warlord in the flesh (resin) so it’s really a good size slasha.
1
72249
Post by: beast_gts
Looking at that scale photo against the Warhound, it looks at least Reaver sized
118486
Post by: Andykp
So hight wise it’s 18”. Warlord is 20 to the top of carapace. So it sits between a reaver and a warlord. So I would say a chunky slasha gargant, if I remember right the old epic slasha model sat a bit shorter than a reaver.
38561
Post by: MDSW
What a phenomenal example of ingenious engineering for all the MDF to be slotted and be fitting together so well. A lot of care went into its design, that's for sure and what an impressive centerpiece to your army - super job so far!!
72249
Post by: beast_gts
I'm not sure how official or accurate the first one is:
118486
Post by: Andykp
 MDSW wrote: MDSW wrote:What a phenomenal example of ingenious engineering for all the MDF to be slotted and be fitting together so well. A lot of care went into its design, that's for sure and what an impressive centerpiece to your army - super job so far!!
Thank you, it’s a Labour of love but I am continuously impressed by the design. Not just the construction but the effort that has gone into labelling up the bits and making sure they only got together a certain way makes feel like a 3D puzzle with instructions. It’s a joy to stick together.
Size wise, definitely a slasha gargant. See old pic and side comparison.
2
118486
Post by: Andykp
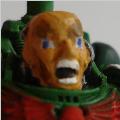
Head built and added, good detail again and clever design!
4
118486
Post by: Andykp
Close combat weapon built and added, more very clever design here. One thing I’m not keen on is the hinges are free moving, but because there’s no control on it the just hang to the lowest point. So will most likely have to glue them in place but waiting to get all the arms built and in place before decking on a pose. Need to make sure I can still remove the arms for painting and transport etc. but it look good and feels beefy.
4
21358
Post by: Dysartes
I can see why you think Slasha Gargant, with that as a CC weapon - not sure about the two saw blades partway up the arm, but it seems quite Orky.
118486
Post by: Andykp
Dysartes wrote:I can see why you think Slasha Gargant, with that as a CC weapon - not sure about the two saw blades partway up the arm, but it seems quite Orky.
I agree with weird extra blades but leaving them for now. They will be easy enough to remove and hide if I change my mind. It does somehow work, just I think. Best not to think about it too practically.
Been and got some mdf sealer, epoxy resin and a mole of rivets and bolts for Green stuff world, all from the excellent element games. Also got a cable maker to add pipes and cables in some of the recesses etc.
121268
Post by: Gwyn chan 'r Gwyll
What an impressive build! Very cool.
118486
Post by: Andykp
Epoxy resin doesn’t work in the mould. Too many air bubbles. Will have to go with green stuff. Going to take a while, nearly finished the basic build, will seal it and then add the details. Automatically Appended Next Post:
Thanks. It’s a lot of fun, and work.
38561
Post by: MDSW
It really suits itself to be painted up as sections of metal, just exactly the way Orks would assemble it - throw together plates and slabs of steel, one atop the other, until you end up with a bloated monstrosity.
128752
Post by: edstuff
I bought this kit
your fault
No idea when I'll ever build it with my current back log though
118486
Post by: Andykp
edstuff wrote:I bought this kit
your fault
No idea when I'll ever build it with my current back log though
Sorry, not sorry! It is so satisfying to build but I have put all other hobby stuff on hold since I git it. It’s all consuming. Set aside a few weeks to do it. I have finished main build yesterday. So 2-3 weeks solid.
I never liked the lifta droppa on this kit and couldn’t figure out why but after I built it I realised it’s the lack of pistons. It doesn’t look like it would work. And all the ORK models look as if they may function, just. So I have decided to add pistons.
These pics are the fist or 4 I think I will add and show of the green stuff word moulded bolts that I intend to cover the kit with.
2
128752
Post by: edstuff
That looks great! I'll probably customize mine and add a ton of rivets as well. I've found these little resin half circle things at Joann's work great for rivets
118486
Post by: Andykp
I’m enjoying making rivets with the green stuff world moulds but off on holidays so no models for a few days. But think after the mammoth task of the build a break will be good before tackling the job of adding rivets and stuff.
130540
Post by: dubman
hey champ, did you finnish playing Orruk,
in old edition Necromunda
yet ?
Automatically Appended Next Post:
Orrus, jakara , malcadon , yeld
Automatically Appended Next Post:
its complications,
the Goliath gang, favours the most,
Yeld, but i dont know from which house he is,
maybe from Ko'iron
House Helmawr, House Catallus, House Ty, House Ulanti, House Greim, House Ran Lo and House Ko’Iron.
Automatically Appended Next Post:
well, i have 3 books for Necromunda
editions from 1993 , in paper
but i always try , to find the information in the internet
i'm still thinking, maybe its only half of game, that GW is publishing,
118486
Post by: Andykp
Finished making the lifta droppa look more to my tastes. But now want to change the firing nozzle?? As it looks too wooden. Bit of plumbing and glued my fingers together a few times but happy enough with it.
3
118486
Post by: Andykp
I made a datasheet with rules for the beast. Have run them by my group and a friendly fb group and they seem to be ok. Any thoughts welcome.
1
118486
Post by: Andykp
First dry fit of all the components together. It’s a lovely big beast. And WIP shots of cables and rivets being made.
4
21358
Post by: Dysartes
Which weapon's firing nozzle did you think ended up looking a bit wooden, Andy? Any chance of a close-up of it to offer opinions on?
The extra details you've added to some of the arms definitely look like a good move - planning on doing more (besides the rivets)?
118486
Post by: Andykp
Got plans to add rivets, pipe work and cables in recesses, git some valves and dials coming so in all the inlaid areas will have piping and stuff knocking about. Got some guys with big shootas from an old battle wagon kit and about 15 grot crew on the way to be added. Will add platforms and stuff round he back to it as well for them.
The picture is the end of lifta droppa, going to swap it out for a piece from a kustom force field one. From the flyer.
1
128752
Post by: edstuff
This is 100% your fault
1
118486
Post by: Andykp
Amazing mate! Enjoy. My advice is do things in the order they say and don’t mess with bits your not using yet. It will all just confuse you late and some parts will just drop out of the sheets.
Please share pics and thoughts as you go or a link to your blog.
21358
Post by: Dysartes
I can see changing the central prong of the Supa-Lifta-Droppa - the end of it doesn't look right without being a sphere.
118486
Post by: Andykp
Dysartes wrote:I can see changing the central prong of the Supa-Lifta-Droppa - the end of it doesn't look right without being a sphere.
Exactly. The eye one is the same as well.
128752
Post by: edstuff
Andykp wrote:
Amazing mate! Enjoy. My advice is do things in the order they say and don’t mess with bits your not using yet. It will all just confuse you late and some parts will just drop out of the sheets.
Please share pics and thoughts as you go or a link to your blog.
So I found a Deffstomper head on ebay for around 20 shipped and bought it to be practice with this material. It smells great btw. Like a bonfire. What kind of glue did you use? Anything special or just plain ol super glue?
125820
Post by: Killatores
Really impressive project!
Is this a file you bought somewhere / you are designing and cutting the pieces with a machine, or you bought the model with all the pieces and building it following instructions?
118486
Post by: Andykp
edstuff wrote:Andykp wrote:
Amazing mate! Enjoy. My advice is do things in the order they say and don’t mess with bits your not using yet. It will all just confuse you late and some parts will just drop out of the sheets.
Please share pics and thoughts as you go or a link to your blog.
So I found a Deffstomper head on ebay for around 20 shipped and bought it to be practice with this material. It smells great btw. Like a bonfire. What kind of glue did you use? Anything special or just plain ol super glue?
No not super glue. PVA. I used gorilla glue wood glue. Super strong bind when dry and holds after a few seconds. Had to use rubber bands here and there. Experimented with super glue on the soft card bits but pva is better. Just gets messy other wise and I glued myself to the belly gun quite badly!
Automatically Appended Next Post:
 Killatores wrote: Killatores wrote:Really impressive project!
Is this a file you bought somewhere / you are designing and cutting the pieces with a machine, or you bought the model with all the pieces and building it following instructions?
Pre designed and cut kit from kromlech. They did it as a limited run for orktober. They still do their bigger stomp as though. Lots of instructions. .
128752
Post by: edstuff
Ha I got impatient and decided to just try super glue gel. Worked great but as you said I glued myself quite a bit. Like if I was to commit a crime now would be the time to do it. No need to wear gloves ha ha. Not to derail your thread but here is where I got yesterday with the head. I have to say I will definitely be buying the body to complete him after this little bit of work. This was easily one of the most fun builds I've ever put together. Everything so far goes in like it should with the only slop being my own fault. Instructions sometimes don't label parts correctly but that's the only issue I've had so far. Kudos to Kromlech
1
118486
Post by: Andykp
Don’t worry about derailing, it can become the gargant building thread happily.
Wood glue let’s you correct mistakes if you notice soon enough. Another advantage. And that gorilla glue, after 24 hours nothing will part it. It’s great.
The instructions are pretty good on the gargant, it’s the layout of the spores/sheets that impressed me. They flow methodically along in order. Very easy to follow.
128752
Post by: edstuff
I've asked a couple questions in other groups and one guy prime painted his with cheap black primer. Had no issues. I figure I'll keep some of the "sprues" to practice on before hitting the actual build. I'm going to hunt down some gorilla wood glue when I get the body. I've got a lot left on the head. I'm debating using clay to blend the teefs. They're made up of 3 sheets so I'm thinking blending and then carving some cuts into it should make it look like thick steel. Oh and add rivets. Tons of 'em. Might take a page out of your book for the tubing as well because that looks awesome
118486
Post by: Andykp
I used this stuff today, got it from element games. I can did two coats on the whole model, smelt like pure thinners and was sticky as hell but is basically a thick varnish that has sealed it all.
I have painted mdf before and didn’t want the rough graining finish you get so after advice on here sealed it. This was neater than thinned pva sloshed all over the shop. Feels good, smooth.
1
118486
Post by: Andykp
Started adding detail now it’s sealed. Rivets, so many rivets. Something about the chimneys made me start here and glad I did. I like the look it achieved.
4
128752
Post by: edstuff
I'm going to look for a can of that sealer. Love the chimneys
Edit: Looks like I'm going to have to go with Mod Podge as I can't find your sealer anywhere. Not even in a google search
118486
Post by: Andykp
https://thecolourforge.com/where-to-buy/
Might be all uk based. Firm is just starting out but it looks good after 24hours to dry.
128752
Post by: edstuff
I can get modge podge at my dollar store and I have a bunch of old brushes so I'm going to test that out on the deffstomper head.
118486
Post by: Andykp
edstuff wrote:I can get modge podge at my dollar store and I have a bunch of old brushes so I'm going to test that out on the deffstomper head.
Any diluted pva should do you ok from what I have read. Been adding rivets and gluing rivets to everything including me and the dog. Now need to make more rivets but progressing along. Will add photos as I get further on.
21358
Post by: Dysartes
Andykp wrote:edstuff wrote:I can get modge podge at my dollar store and I have a bunch of old brushes so I'm going to test that out on the deffstomper head.
Any diluted pva should do you ok from what I have read. Been adding rivets and gluing rivets to everything including me and the dog. Now need to make more rivets but progressing along. Will add photos as I get further on.
...we need to see the dog with the attached rivets. FOR SCIENCE!
118486
Post by: Andykp
Bit more work detailing, the gauges and valves have arrived too. Automatically Appended Next Post: Dysartes wrote:Andykp wrote:edstuff wrote:I can get modge podge at my dollar store and I have a bunch of old brushes so I'm going to test that out on the deffstomper head.
Any diluted pva should do you ok from what I have read. Been adding rivets and gluing rivets to everything including me and the dog. Now need to make more rivets but progressing along. Will add photos as I get further on.
...we need to see the dog with the attached rivets. FOR SCIENCE!
I will see what I can do, even if I have to re-attach revolts to him. For science.
128752
Post by: edstuff
man that is looking so cool
118486
Post by: Andykp
Thank you, it’s coming together. Need another few batches of bolts making, someone on a fb group I am in suggested meng models rivets and bolts so might try those.
https://www.google.co.uk/url?sa=t&rct=j&q=&esrc=s&source=web&cd=&ved=2ahUKEwiznKTSwJD0AhVBolwKHf19BN0QFnoECBwQAQ&url=https%3A%2F%2Fwww.amazon.co.uk%2FMENG-Model-Bolts-Large-Multi-Colour%2Fdp%2FB00DUQ7PVS&usg=AOvVaw22KI9_rxXqDwYVG4cpaRmW
I like the green stuff ones but it’s labour intensive for a project this size.
I am being weary too that Will have to paint all the detail I add so don’t want to shoot myself in the foot. I think adding detail to the inside areas like the pipes etc is a good way to stop it looking wooden. Simple but effective.
128752
Post by: edstuff
Yea I might steal that idea when I eventually get to building mine
118486
Post by: Andykp
My only worry about using them is cutting them off the strip to apply them. Will update when I get them.
94888
Post by: JamesY
Looking great so far.
Have you tried using milliput in the river moulds, rather than green stuff? I have them as well, and found milliput much easier and faster to use with them.
118486
Post by: Andykp
I will have to get some. Curing time is the main problem with green stuff in them. And how sticky it is.
I have tried the meng ones linked above and they are great but the big ones are so hard to cut off the sprue. I have a couple of nasty cuts from using them so miliput will be tried while I heal!!
94888
Post by: JamesY
Milliput is sticker, but a bit of talcum powder on your hands and it handles fine. I find it much easier to get into the moulds, and to cut off the excess without pulling the putty out of the mould than I did with green stuff, and then rubbed it with a damp finger to smooth out the pull marks.
118486
Post by: Andykp
 JamesY wrote: JamesY wrote:Milliput is sticker, but a bit of talcum powder on your hands and it handles fine. I find it much easier to get into the moulds, and to cut off the excess without pulling the putty out of the mould than I did with green stuff, and then rubbed it with a damp finger to smooth out the pull marks.
Thanks mate, ordered some to come for element games so should be here tomorrow. Talc is a good tip too. I know what you mean about pulling the pieces out of the mould when cutting excess off. I will update you the progress with it.
118486
Post by: Andykp
JamesY wrote:Milliput is sticker, but a bit of talcum powder on your hands and it handles fine. I find it much easier to get into the moulds, and to cut off the excess without pulling the putty out of the mould than I did with green stuff, and then rubbed it with a damp finger to smooth out the pull marks.
Ok, got some milliput. Great stuff. Weird but exactly like you said works much better in the moulds. And the talc was a top tip. So with this should hopefully be ready to put some paint on by the weekend. Things have been a bit slowed by my daughter getting covid (she’s fine but we she is trapped in the house). But will be gluing bolts on like mad from Wednesday. Then priming on the weekend.
118486
Post by: Andykp
So rivets and details done. Paint ready to go on.
9
118486
Post by: Andykp
Primed. Black will be the base, them I’m am going to preshade with grey up to near white in paces and also use a red/brown and them silver in places for priming the metallic areas.
1
118486
Post by: Andykp
I am thinking of this as a basic idea for the colour scheme. Any thoughts. Alternative is all red like my stompa. It has to be evil SUNZ, but as it is tribes ultimate idol to the gods clan colours might need to take a back seat a little.
1
18509
Post by: endtransmission
Only just found this, but that's one mighty impressive kit and build. I'm kind of thankful I missed the kit though as I would have been very tempted 
118486
Post by: Andykp
 endtransmission wrote: endtransmission wrote:Only just found this, but that's one mighty impressive kit and build. I'm kind of thankful I missed the kit though as I would have been very tempted
Thanks for having a look. It’s an amazing kit. And sooooo big! I would recommend any of there mdf/Hdf kits. It’s like wizardry the detail they get into a thing made of flat pieces. But I now officially hate rivets.
128752
Post by: edstuff
Oh man now you're on the fun stage
118486
Post by: Andykp
Primed and pre shaded.
Used a car primer for the grey, and mournfang brown for the rust colours, all the arms and feet and all brown too for now.
Next stage will be to lay down the dark green on the hull and and some metallics.
7
128752
Post by: edstuff
Awesome
30344
Post by: monkeytroll
Now that's a gargant. Lovely detailing work, very nice indeed 
100513
Post by: Squidsy22
Oh, I can't wait to see this beast painted!
(edited because manual italicizing is a  and I can't press i to save the life of me apparently)
118486
Post by: Andykp
Thanks for the comments folks, sorry progress is slow. Bear with me, I work for the ambulance service and as you can imagine it’s a busy time so it keeps getting in the way of hobby, very annoying!
128752
Post by: edstuff
No worries man. I work in manufacturing 6 days a week and I'm in class 4 nights a week so my progress on anything is slow. Including cleaning my house
118486
Post by: Andykp
edstuff wrote:No worries man. I work in manufacturing 6 days a week and I'm in class 4 nights a week so my progress on anything is slow. Including cleaning my house
Sucks when life gets in the way of a good hobby project!
118486
Post by: Andykp
Finally started with the head. Covid has made my job pretty busy since Christmas so not got much done. Started with persuading the under side areas with mournfang brown and snakebite leather. Then added Mephistopheles red over the top, highlight with evil SUNZ scarlet. Don’t want that “airbrush” look with highlights up to white and that just it’s so big I am using the airbrush to add texture and definition.
Then I marked out the metal parts, next up will be some markings, weathering and than a gloss varnish. Oil washes and streaking. not too much weathering mind.
5
79426
Post by: Mothsniper
OMG this is EPIC!
21358
Post by: Dysartes
Nah, this is 40k - if it were EPIC, it'd be much smaller...
Nice to see the paint starting to go on, though, Andy.
118486
Post by: Andykp
Thanks guys. Sorry it took so long. Will do more tonight. While I have the airbrush out I’m going to work on the body next.
And don’t worry, I plan on some funky energy effects on the gaze or mork/gork.
130965
Post by: DoctorDanny
Will there be lots of grots all over the thing when it's ready? Please say yes.
118486
Post by: Andykp
 DoctorDanny wrote: DoctorDanny wrote:Will there be lots of grots all over the thing when it's ready? Please say yes.
Yes.
In every nook and cranny. I have a full set of forgeworld grot riggers and a full crew from a mek gun to go on there and some ORK gunners and maybe a mek too. With my stompa I had the back of the thing crawling with grotz so it looked like it was having to foxed as it went along. I want this the same but with all the inlaid detail they may be be more in it than all over it.
Might get to building some crew tomorrow.
For now, the first coat of the hulls green is on. Next I want to darken it down in places, probably with thinned black templar maybe with green mixed in, see how dark it goes. But that’s for tomorrow.
The skull in the belly will be white I think, but can’t decide in the “teeth” on the hull up by the head. I am thinking red like the head, but open to ideas. Also the belly gun, can’t decide if green but with checks and things, or black, or red? Or just metal?
1
18509
Post by: endtransmission
That is looking amazing. I can't wait to see it all finished with the grot crew all over!
118486
Post by: Andykp
Thanks, it’s going to take a while, but you guys are helping keep me focussed. Don’t do many blogs, but this one is really helping me. It’s such a daunting model. It’s huge!
118486
Post by: Andykp
Built the crew. Just Grots for now, want a mek and a gunner too or two.
1
128752
Post by: edstuff
God this is epic. Godbusta epic
118486
Post by: Andykp
Full crew, some gunners, a mek shouting at folk and an ORK spotter.
1
118486
Post by: Andykp
More tonal variation to the green, I am not a huge fan of airbrushes but for big models like this they are the best tool for the job, stops them looking like 1 slab of colour.
2
118486
Post by: Andykp
Got a base coat on the skull design. Coming together nicely.
1
84491
Post by: gobert
 it’s looking even more amazing now the painting has commenced. As for the head teef, I reckon black would be cool and checks for the belly gun sounds awesome
118486
Post by: Andykp
 gobert wrote: gobert wrote: it’s looking even more amazing now the painting has commenced. As for the head teef, I reckon black would be cool and checks for the belly gun sounds awesome
I have just noticed there is a flame pattern on the belly gun so going black with flames in red or yellow. Going to paint the teeth today and the belly gun tonight. Will try out black on the teeth.
128752
Post by: edstuff
Man it looks like Kromlech and you both knocked this one out of the park
118486
Post by: Andykp
So, finally got round to getting the base colours where I am happy with them.
For the metallics I have used a mournfang brown base, Vallejo metal colour burnt iron (amazing paints, new to me but blown my mind with their goodness) then washed over really thinned down mournfang. They will be weathered as well. Only got to wash the head and big power plant at the back. Wanted the recesses to be really grimey, so they get extra treatment before oil washes and pigments for the fresh grime.
Happy with the red, more highlights will be done via chipping.
The white is really clean, for now, but pleased with it. It’s going to get some markings on it, tribal type stuff before being weathered.
Wish I had done the arms at the same time but I am getting better at airbrushing so it won’t take long to catch up. Feet will be metal as above and lots of dirt.
Sorry to those who have followed it’s a bit feast or famine at the minute but so is my spare time.
21358
Post by: Dysartes
Looking good so far, Andy - and I see various areas of surface detail to come back to once the airbrush stages are over and done with...
118486
Post by: Andykp
More work on the power plant. Love this bit of the model. It’s a salvaged imperial train type thing bolted onto the back of the gargant. Very clever. Bit more work to do on the icon on the back but happy with it so far. Used a bit of hair spray technique on the chipped paint. Automatically Appended Next Post: Dysartes wrote:Looking good so far, Andy - and I see various areas of surface detail to come back to once the airbrush stages are over and done with...
Started on the engine, now going to move round adding the details, then will come some chipping, not too heavy, I want thing to look looked after. The narrative is that its the warlords pride and joy and his homage to the gods so it will have an army of me,s, spanner’s and riggers who maintain it. Once I have done chipping it will get a coat of gloss varnish then the oils will come out. Automatically Appended Next Post: Dysartes wrote:Looking good so far, Andy - and I see various areas of surface detail to come back to once the airbrush stages are over and done with...
Started on the engine, now going to move round adding the details, then will come some chipping, not too heavy, I want thing to look looked after. The narrative is that its the warlords pride and joy and his homage to the gods so it will have an army of me,s, spanner’s and riggers who maintain it. Once I have done chipping it will get a coat of gloss varnish then the oils will come out.
118486
Post by: Andykp
More progress. Colours on the arms, more detail on the power plant. Getting the feet looking grim.
6
93473
Post by: Vejut
Coming along nicely, and looking good!
118486
Post by: Andykp
Cheers mate. Fell like it’s coming together finally. Bit of detail on the main body and then chipping and oils.
118486
Post by: Andykp
Took a break from the monster of a machine to paint some normal sized models.
2
1823
Post by: MegaDave
Beastsnaggas look good, I particularly like the painboy or whatever it's called.
Glad I found this thread, can't wait to see the gargant finished!
21358
Post by: Dysartes
It's definitely looking less like an MDF kit the more the paint goes on, which is cool.
And the Boyz have come out nicely, too.
118486
Post by: Andykp
 MegaDave wrote: MegaDave wrote:Beastsnaggas look good, I particularly like the painboy or whatever it's called.
Glad I found this thread, can't wait to see the gargant finished!
Welcome aboard. It’s not a roller coaster ride, but slower but making progress. Thanks for looking in. Automatically Appended Next Post: Dysartes wrote:It's definitely looking less like an MDF kit the more the paint goes on, which is cool.
And the Boyz have come out nicely, too.
Cheers. That’s my goal really, have it so it doesn’t look like a wooden kit. Daunted by how big the bloody thing is though. Was nice to throw paint on the little guys for a change.
118486
Post by: Andykp
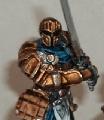
Took a break from the big guy, dauntingly huge model, did get these guys painted, a 50PL Beastsnaggas themed force to add to my waargh. Good fun and go my mojo back, played about with oils and lights and volumes. Good fun.
1
118486
Post by: Andykp
Also painted up these guys who have been sat around for years! (Maybe decades??) they are now on eBay as a bit of a fund raiser.
1
118486
Post by: Andykp
But back to the big guy, progress is a going on.
- Added a rough dry brush to add definition to the green.
- Gloss varnish applied all over.
- Decals applied. Wanted it to look a bit like those building it had marked it and added glyphs as they went along, haphazard and a bit like graffiti but respectful. Things a big idol so as ORKS come to pay respect, or as they made it they added their marks.
- and lastly I have glues the arms in place and the feet on.
Automatically Appended Next Post:
So, still to do in order of them needing doing.
- chipping, with a sponge and touched up to make interesting.
- general oil wash….
[Black and green for body]
[Black and burnt umber for the metallics]
[Magenta don burnt umber for the reds]
—-Applied and rubbed off for effect.—-
- grime and weathering….
[oil paints applied neat and streaked etc]
[dark inks airbrushed into grimey areas to effect]
- energy effects on the big gun and gaze of gork/mork.
Finished!!
Automatically Appended Next Post:
Oh, and paint crew! Forgot them. Thinking of applying a furnace type glow to the eyes too.
5
93473
Post by: Vejut
Nice! I like the orkus mechanicus icon, and the paint looks good!
18509
Post by: endtransmission
Those new beastsnaggas look great, I do like the models. The MechanORKus icon looks fantastic too!
A furnace glow to the eyes would be a nice addition
118486
Post by: Andykp
endtransmission wrote:Those new beastsnaggas look great, I do like the models. The MechanORKus icon looks fantastic too!
A furnace glow to the eyes would be a nice addition
This is my main inspiration for the look I want, maybe a bit darker. But it has a furnace glowing in its middle so the eyes doing the same fits well.
The snaggas were fun to paint. Using oil paints to highlight is an absolute joy, don’t think I will paint ORKS any other way now, blending is so simple. Learnt so much from the first ones to the last and improved a lot. Automatically Appended Next Post: Vejut wrote:Nice! I like the orkus mechanicus icon, and the paint looks good!
Thanks. There are nice touches all over the model, loads of detail, didn’t want to paint the symbol exactly like the admech one, cos they are ORKS. But still wanted it to be clearly a nod to admech.
1
118486
Post by: Andykp
Chipping done, oils tonight. Shading and streaking I am going for.
3
84491
Post by: gobert
The big lad is really coming along now Andykp! The chipping and glyphs help fill out the details nicely. Good luck with the oils!
118486
Post by: Andykp
gobert wrote:The big lad is really coming along now Andykp! The chipping and glyphs help fill out the details nicely. Good luck with the oils!
Will post pics later. Did a lot last night but it hasn’t shaded as much as I wanted but has given it a grimey look, still a lot to do. So bloody messy on a model that size.
130965
Post by: DoctorDanny
Awesome model! Would love to play against that monster.
118486
Post by: Andykp
Needs a sturdy table. Weighs a ton!
118486
Post by: Andykp
Weathering done, I think, always hard to know when to stop. Maybe did more than I intended but it given it a solid look, no longer looks wooden at all.
5
118486
Post by: Andykp
Now working in the crew. Look messy now but an oil wash will blend the colours a lot and then highlights and they are done.
2
93473
Post by: Vejut
Nice! That is indeed some nice texture!
118486
Post by: Andykp
Thanks, it’s hard to photograph. No flash and the finish isn’t visible. Flash and it looks starker than it really does. Will need to get some good pics when it’s done but it’s huge!
128752
Post by: edstuff
This is really coming along! Love the color choices so far too
118486
Post by: Andykp
Started work on the final bits, glowing eyes and zappy gun. Very much wip. Not tried these effects in this scale and it’s pretty unforgiving. Lots of transparent layers to be added. More pics soon.
3
38411
Post by: Ragsta
You’re doing Fork’s work here, it’s shaping up awesome. Where the frag do they keep the shells for that belly cannon??
118486
Post by: Andykp
 Ragsta wrote: Ragsta wrote:You’re doing Fork’s work here, it’s shaping up awesome. Where the frag do they keep the shells for that belly cannon??
I love the fact they added rifling to the barrel as well, as it was in some a precision weapon. It’s one of those rules of cool, things. Don’t think about it too much is my advice. Just enjoy the orkyness of it all.
118486
Post by: Andykp
Getting there. The glowing effect isn’t perfect up close but viewing the model as a whole it works, made an error glueing the arms on before painting this. Made it very tricky so have done it all with airbrush and glazes.
6
118486
Post by: Andykp
And with the crew added. Only two things left to do, a pic of it stomping along with some other boyz and name it!
It’s been a mammoth task painting and building this thing, it has dominated my hobby time since November and I have no idea where I am going to keep it. It’s huge! (I might have mentioned). Doing this log has helped keep me on track, and thank you to those that have followed and commented. Got the bug now and got a kruleboyz project I have been itching to start.
Last pics for tonight. Then the other pics and naming tomorrow.
8
118486
Post by: Andykp
More!!
93473
Post by: Vejut
Almost there! glow is coming along nicely!
62835
Post by: IGtR=
Loving the glow, and the whole piece is a triumph!
Thanks for sharing
118486
Post by: Andykp
 IGtR= wrote: IGtR= wrote:Loving the glow, and the whole piece is a triumph!
Thanks for sharing
Thank you, I am pretty happy with the way it’s turned out.
118486
Post by: Andykp
I am done with this monster. Keep coming back to the name Stompsmaha, from art work and stories in codex titanicus. So that’s what she will be known as. Best as o could do for action shots too.
Thank you all for following.
6
93473
Post by: Vejut
Came out nice! Definitely a big boy!
306
Post by: Boss Salvage
Way to see a gigantic project through to the finish! End result is immense and looks really excellent, particularly in the flash-less full body shots. Here's hoping you get to have her reign in terror from the tabletop every so often 
118486
Post by: Andykp
 Boss Salvage wrote: Boss Salvage wrote:Way to see a gigantic project through to the finish! End result is immense and looks really excellent, particularly in the flash-less full body shots. Here's hoping you get to have her reign in terror from the tabletop every so often
Thank you, I definitely need to get better at taking pictures. It’s turned out better than I hoped and was definitely a slog but well worth it. Automatically Appended Next Post:
Chunky monkey.
128752
Post by: edstuff
Came out awesome!
Since it was a mammoth of a project, why not name it "mammoth"?
94888
Post by: JamesY
He looks great. Well done for seeing it through; looked like a hell of a commitment!
118486
Post by: Andykp
edstuff wrote:Came out awesome!
Since it was a mammoth of a project, why not name it "mammoth"?
It certainly was. Automatically Appended Next Post: JamesY wrote:He looks great. Well done for seeing it through; looked like a hell of a commitment!
My painting table seems empty now, 6 months of graft but well worth it.
17796
Post by: Slinky
Very nice work! I wouldn't want to be shot with that belly gun!
84491
Post by: gobert
Fantastic work andykp! Must’ve been a real slog, but the end result is one to be proud of. I love the grots eye view pic at the end, gives a great sense of scale. How do you follow that up?
53351
Post by: laam999
Amazing. I would LOVE to see that on a table!
118486
Post by: Andykp
Thanks guys, couldn’t resist a grots eye view pic. As for following this thing up, a smaller project log started painting a kruleboyz army. Very different set of challenges. Some day I’d like to tackle a forgeworld Titan but this thing has satisfied my big model itch for a good while.
128752
Post by: edstuff
You need a deffstomper next
118486
Post by: Andykp
I thought the same, then had a very serious word with myself and decided I needed not be so bloody daft. Still haven’t got anywhere to store this monster so he just sits on the dining table or knocks about the living room like an extra guest.
|
|