Forum adverts like this one are shown to any user who is not logged in. Join us by filling out a tiny 3 field form and you will get your own, free, dakka user account which gives a good range of benefits to you:
No adverts like this in the forums anymore.
Times and dates in your local timezone.
Full tracking of what you have read so you can skip to your first unread post, easily see what has changed since you last logged in, and easily see what is new at a glance.
Email notifications for threads you want to watch closely.
Being a part of the oldest wargaming community on the net.
If you are already a member then feel free to login now.
Welcome to the re-imagined League of Extraordinary Riveters Hobby Challenge, Round 37. This round's theme is Biomes (described below) and the round ends on Saturday, April 30. A public voting mechanic similar to the painting challenge is still in the works. Our goal is to elevate and celebrate the aspects of the hobby beyond painting miniatures-- the scratch-building, theme-evoking, and detail-obsessing construction efforts that help immerse our models in a believable and richly textured world. Come one, come all!
The theme for Round 37 was selected by public poll and was originally phrased as follows:
BIOMES: Your build should embrace a specific environment, ecosystem, habitat, or climate, and could extend to lairs, dungeons, menageries, stasis chambers, alien worlds, as well as good old desert, swamp, snow, etc... as long as it makes the specific setting clear.
Since a model's base represents the terrain the model or unit is crossing, please consider entering a freshly based unit of any size crossing the deserts of Mars, a frozen tundra, a lava field, a temple floor, a boggy swamp, a toxic wasteland... literally anything fits. In addition to bases, please consider building and painting playable terrain pieces, decorative scatter terrain, display plinths and dioramas, table tiles or modular components, game aids, restoration or conversion projects... if it isn't a wargaming figure, it probably qualifies.
Please complete the build and paint phases in the course of the two-month challenge period. Please post up to six (6) high-quality photos in this thread before the deadline expires in your local time zone. A member of the League will compile and post the finished work for public review. Please post materials and progress photos here as well, ask and answer questions, offer insights and advice, and celebrate the work as much as the finished products.
This message was edited 1 time. Last update was at 2022/03/05 16:45:07
Going to see if I can get something done for this one. Need more terrain for my arctic table. Nothing fancy, but I’m going to try to make some ice crystal “forests” and maybe finish some hills that have been sitting around for a while.
Alien woods for me a combination of fishing tank plants and pinecones maybe a few other odds and sods.
"But me no buts! Our comrades get hurt. Our friends die. Falkenburg is a knight who swore an oath to serve the church and to defend the weak. He'd be the first to tell you to stop puling and start planning. Because what we are doing-at risk to ourselves-is what we have sworn to do. The West relies on us. It is a risk we take with pride. It is an oath we honour. Even when some soft southern burgher mutters about us, we know the reason he sleeps soft and comfortable, why his wife is able to complain about the price of cabbages as her most serious problem and why his children dare to throw dung and yell "Knot" when we pass. It's because we are what we are. For all our faults we stand for law and light.
Von Gherens This Rough Magic Lackey, Flint & Freer
Mekagorkalicious -Monkeytroll
2017 Model Count-71
Saw biomes winning got exited and could not wait, began work before the poll ended lolz. 2 days on it so far
MacPhail
Thank you for sharing Expanded PVC material, I got it and it is awesome to work with!
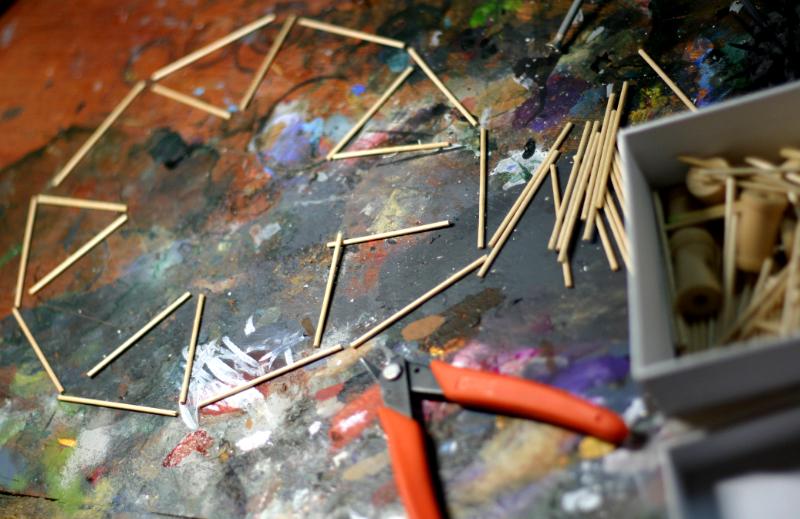
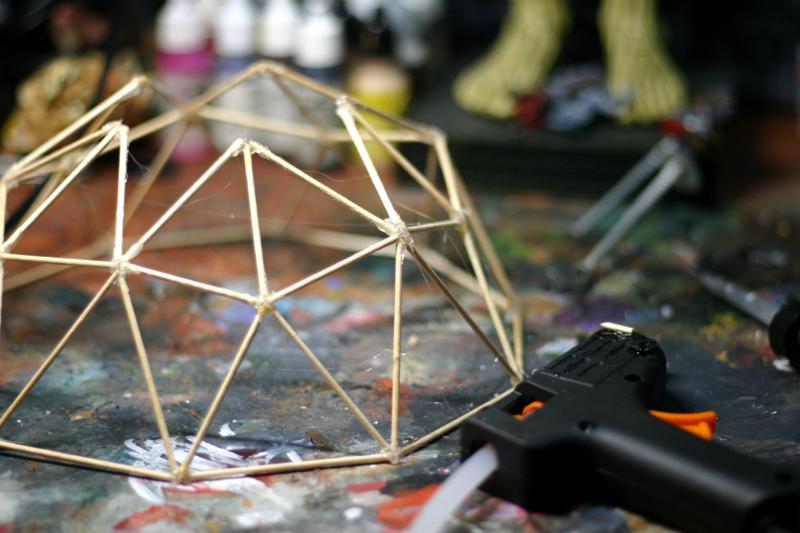
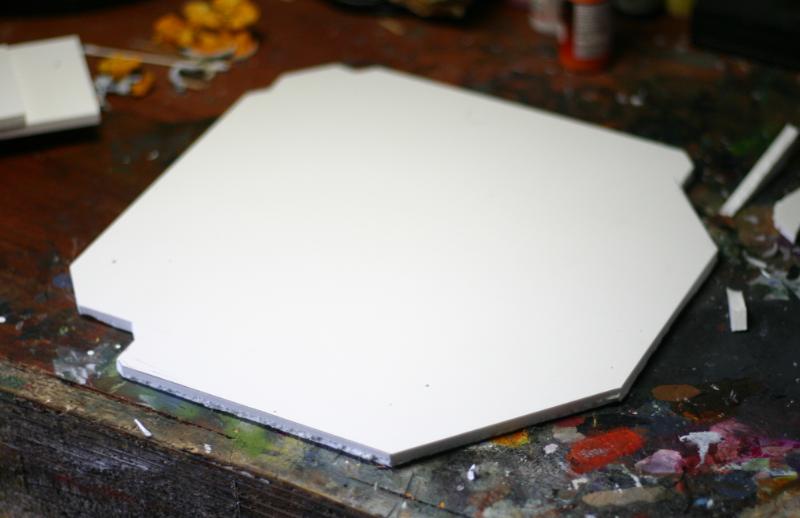
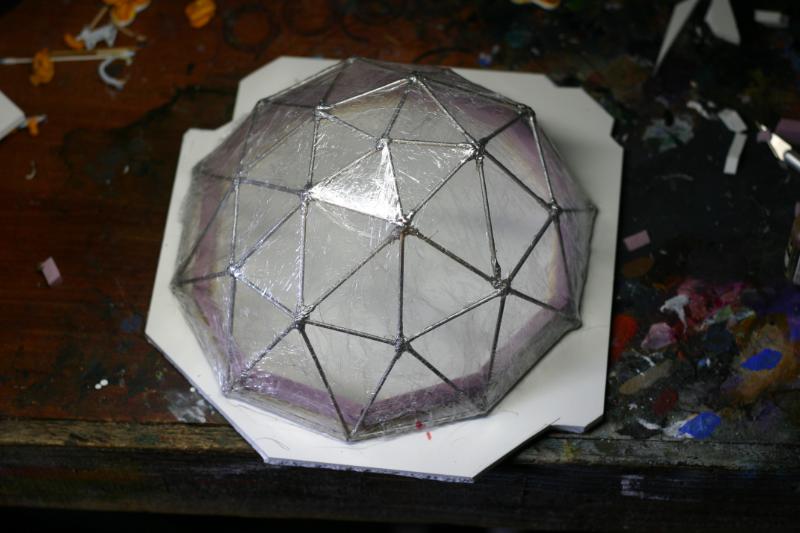
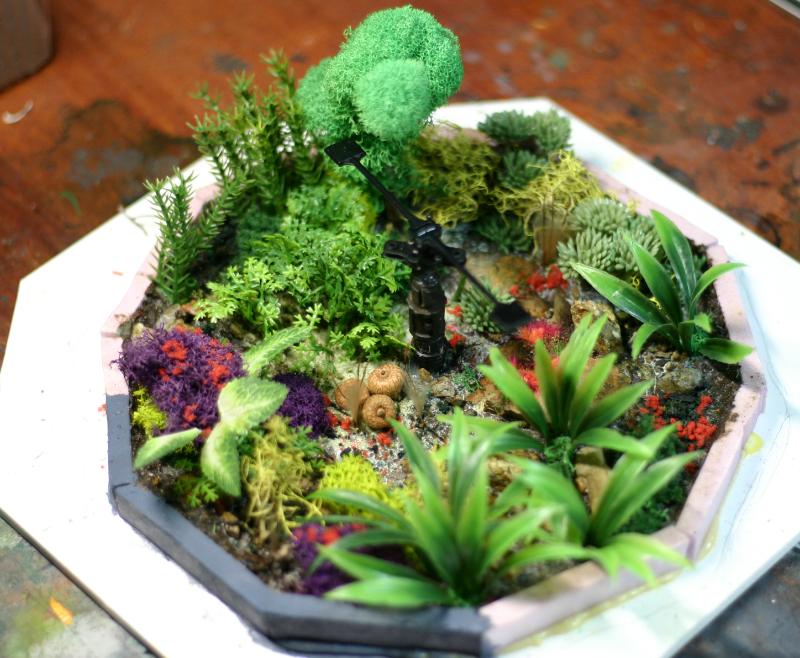
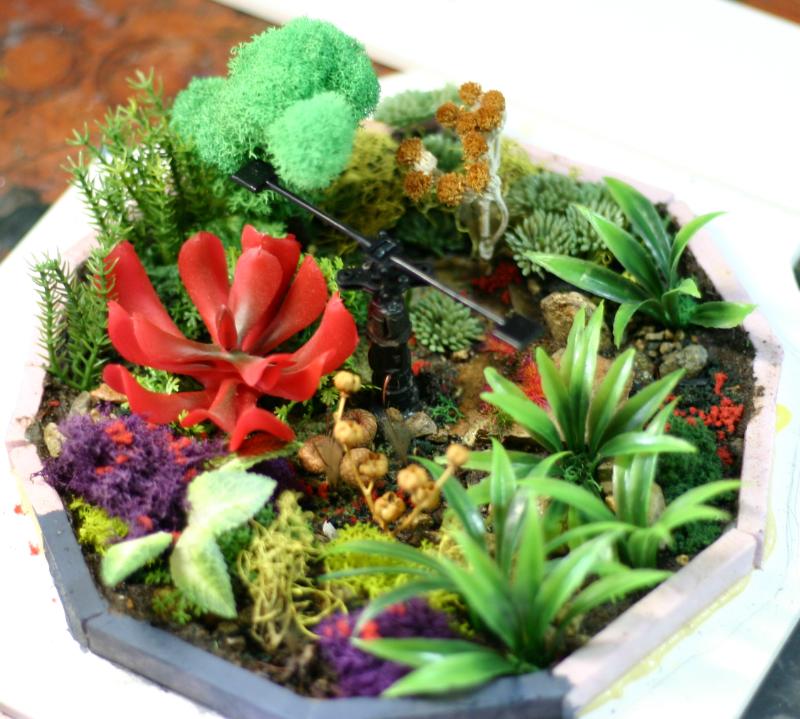
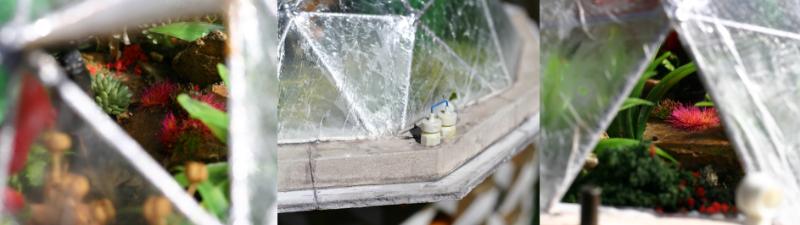
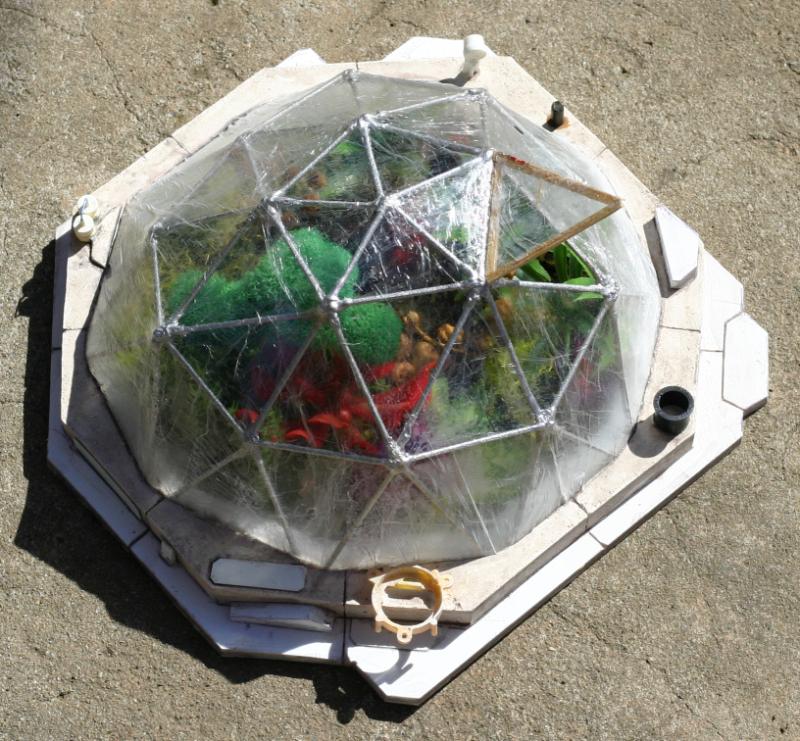
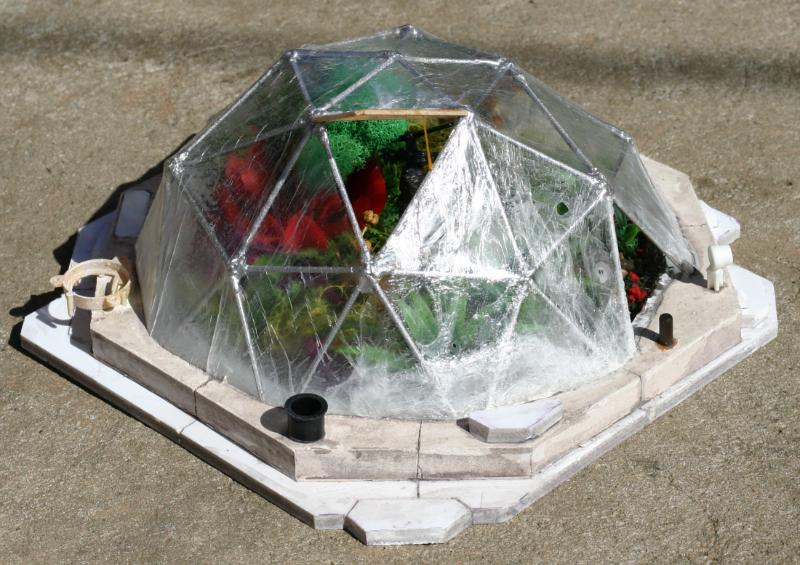
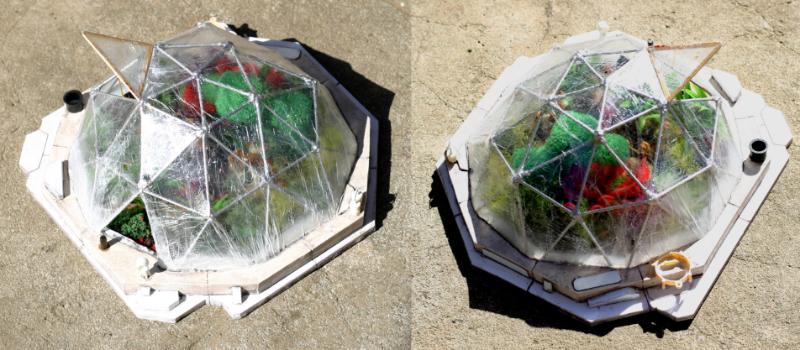
Biodome
Looked up how to build one.
Spoiler:
Without getting into the math I followed simple template instructions. The dome came out a bit lopsided (probably should of got into the math...)
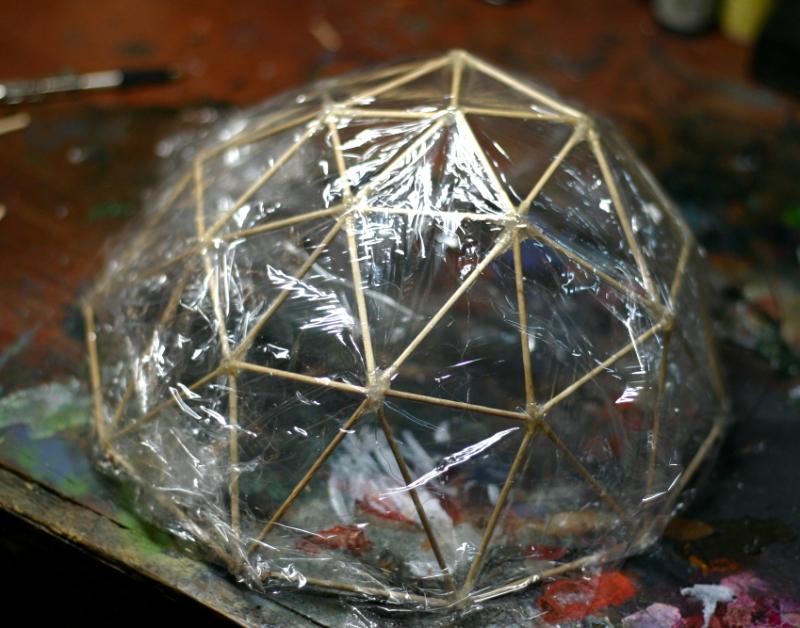
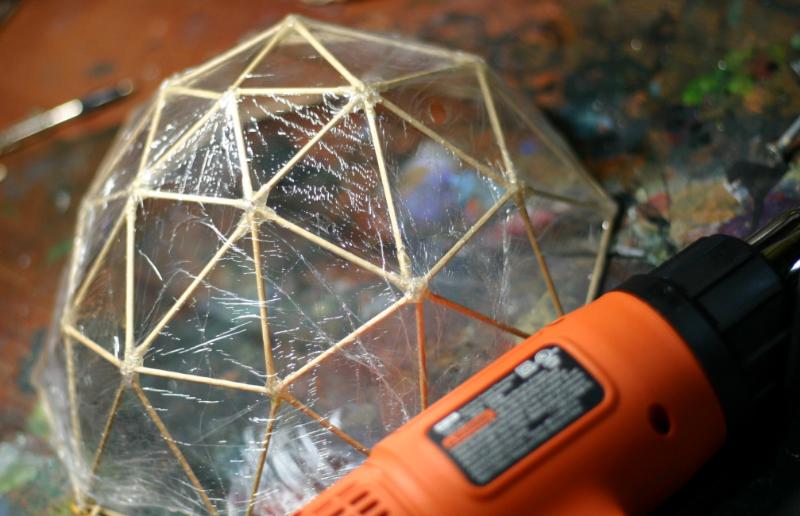
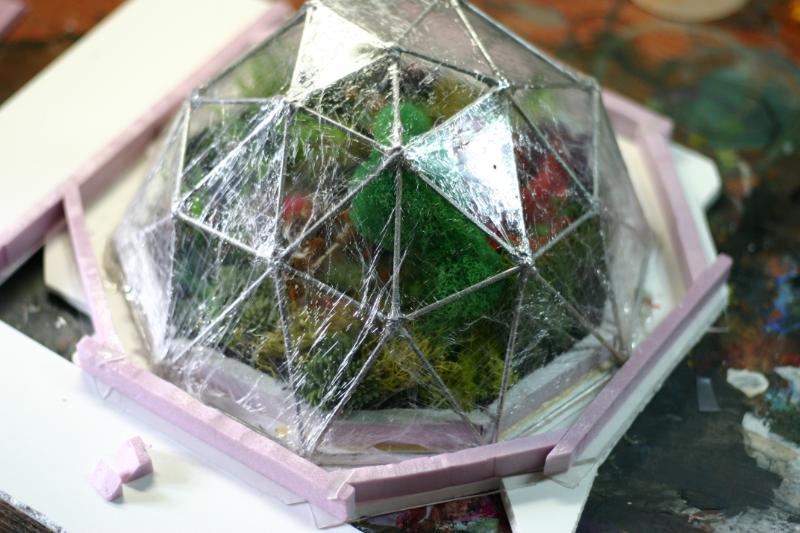
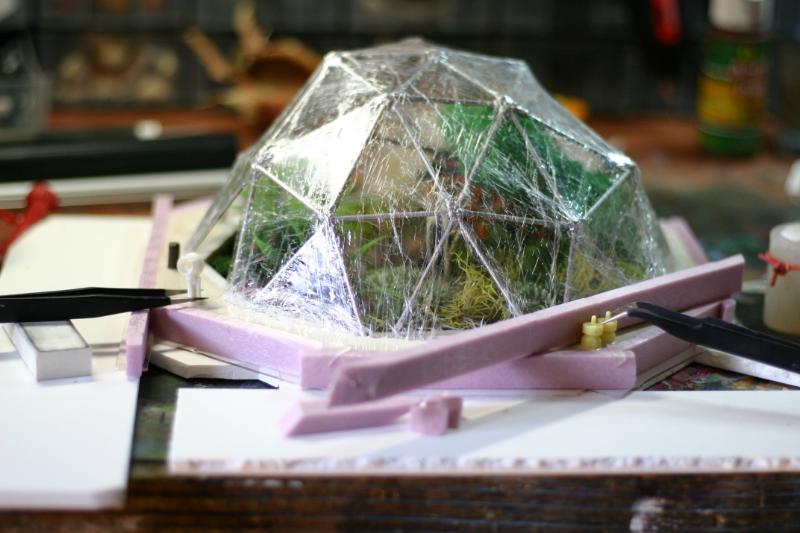
Did a test for the "glass"
Used plastic food wrap to cover the dome, then used heat gun to shrink it tight over the frame. Worked beautifully! Took it off, will paint it first re plastic shrink it and hope this project will go smoothly unlike the last one.
Automatically Appended Next Post: Firs time using Expanded PVC. This stuff is amazing.
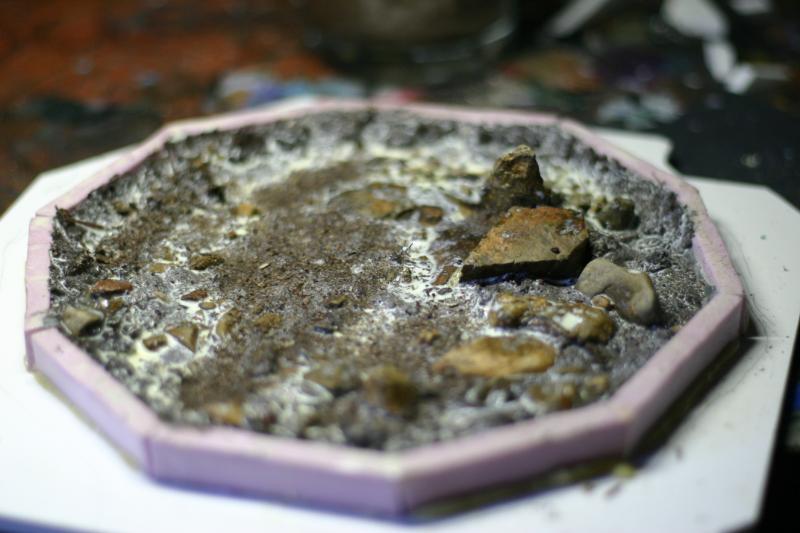
Test fit
Woodglue+dirt+rocks
Small piece of junk toy worked out as "sprinkler"
With plenty of PerfectCast left from previous project though to cement the dome with plaster.
Used thick doublesided tape to layout the shape for the walls to sit on.
Foam stuck to that tape really well. Inside and outside barrier set.
Perfect pour. Stuck some details into wet plaster before it set.
This message was edited 1 time. Last update was at 2022/03/05 21:04:08
Nevelon, I'm glad we could entice you this round... I was definitely picturing your snowy bases as I wrote the post!
endtransmission, your hexes are without equal, and I can't wait to see what you've got planned. Also, I'm going to challenge my wife to a game of Settlers of Catan in your honor.
Llamahead, my alien woods back in the day were inspired by an old White Dwarf... the styrofoam balls and eggs from the craft store, painted teal and studded with red pipe cleaners. Your aquarium plants will be a clear upgrade.
Mothsniper, I'm glad the Expanded PVC worked out... I'm about to order up some more of my own for this build. Also, what are you going to do for the rest of the two months? You just cranked that thing out overnight, and it looks great!
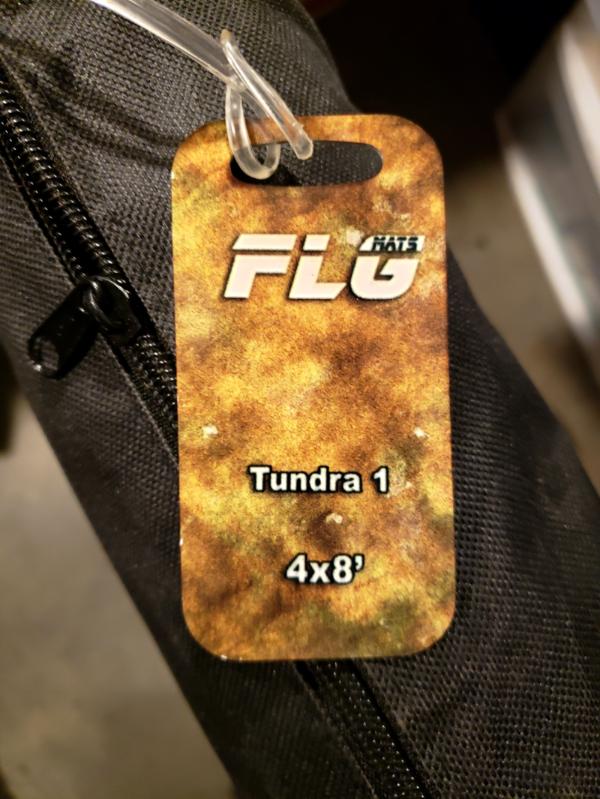
I'm going to let my new neoprene battle mat lead me on this one. I bought a Frontline Games 4'x8' after the new sizes very released... they discounted it, and I realized I could cut a 30"x44" and a 60"x44" out of it and have both common sizes. The theme is "Tundra 1", shown below. I tucked a couple of extra photos of recent games in spoilers because the tag makes it look more brown than it is. It's mottled brown, green, and gray, with a little stone texture, but not my detail overall. I'm not sure what I'll do, but I want to go way more organic with my shapes and textures and get busy with some lichen bushes, wire vines, green stuff roots, and whatever flocking I can find in my supply drawers.
Well i figured since last challenge took me 2 months and caused me weird issues and bunch of unplanned work, I though something light, quick, and fun be good this round
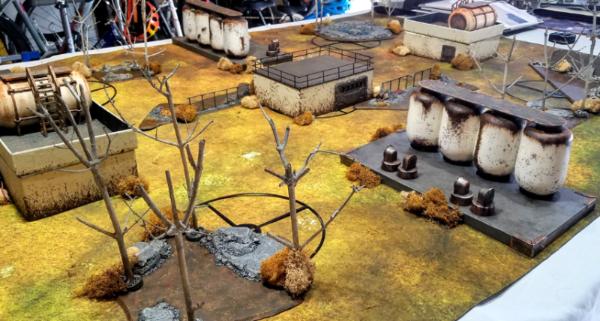
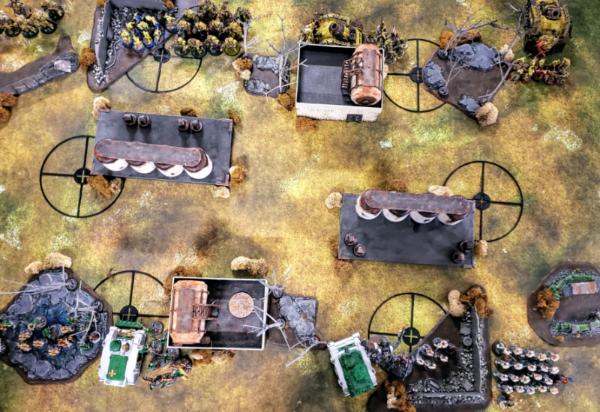
I don't know that "Post-Apocalyptic Industrial Ruins" is a biome, per se . . .
I may just keep trucking on last round's terrain, and I may paint up my kickstarter stuff. At least "Overgrown Graveyard" feels a little closer to on theme.
Tips I have learned:
1 - Use smaller sticks to buildup smaller windows, it would look better.
2 - Do some math with online dome calculator before eyeballing and gluing!
3 - Add half inch extra for the bottom of the dome. Plaster part took some height, and the dome ended p lower than planned.
4 - Use real Shrink-Wapp instead of 4 layers of food plastic wrap. Windows would of turned out much cleaner.
5 - Mask out the dome, because matte varnish does dull the windows.
I do love how easy it was to heat shrink windows, and how plaster cemented the dome to the base.
@Mothsniper, tremendous progress in such short time.
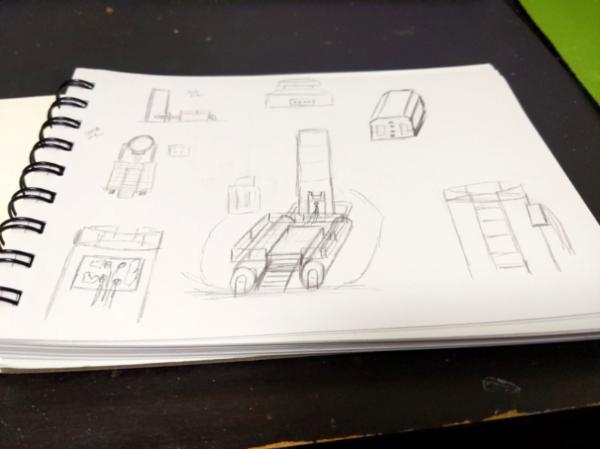
I just have a sketch of what I think I'm going to do. A pumping station for an industrial zone. Will hopefully start working on it in the next day or two.
This message was edited 1 time. Last update was at 2022/03/08 10:10:40
I'm getting some inspiration for my tundra terrain from looking at photos and videos, some close to home (the Colorado Rockies) and some far away (Stanage Edge in England's Peak District). I even made it as far as Mongolia... The Hu is an excellent rock band, and I would be happy if I could emulate any of the rock formations in this video:
I'm also getting excited to try my hand at armature wire trees, and see if I can work the roots into my rock formations:
Zed wrote: *All statements reflect my opinion at this moment. if some sort of pretty new model gets released (or if I change my mind at random) I reserve the right to jump on any bandwagon at will.
Jadenim wrote: Do entries in this have to be completely unbuilt at the start? Because I have some built & partially built terrain that needs finishing and painting.
I think unfinished terrain is perfect for LoeR imo.
We even had "unfinished business" as one of the requirements challenge.
Automatically Appended Next Post:
MacPhail wrote: I'm getting some inspiration for my tundra terrain from looking at photos and videos, some close to home (the Colorado Rockies) and some far away (Stanage Edge in England's Peak District). I even made it as far as Mongolia...
Spoiler:
The Hu is an excellent rock band, and I would be happy if I could emulate any of the rock formations in this video:
I'm also getting excited to try my hand at armature wire trees, and see if I can work the roots into my rock formations:
Seen that video awhile back, that is their best one. Love it when artists mix old traditional musics with a modern beat.
Have you tried to use the glue gun to form the roots with?
I just have a sketch of what I think I'm going to do. A pumping station for an industrial zone. Will hopefully start working on it in the next day or two.
Spoiler:
I know right! It was not much work, I did not even notice, everything went smoothly.
Good sketch. Is the station free standing or will be on a rounded base?
Automatically Appended Next Post:
DJJazzyJeff wrote: I don't know that "Post-Apocalyptic Industrial Ruins" is a biome, per se . . .
I may just keep trucking on last round's terrain, and I may paint up my kickstarter stuff. At least "Overgrown Graveyard" feels a little closer to on theme.
If "Post-Apocalyptic Industrial Ruins" have some post-apocalyptic dry shrubs then it counts "Overgrown Graveyard" sounds interesting too! Your call.
This message was edited 4 times. Last update was at 2022/03/11 09:00:38
Jadenim, I'm sure that's fine, and the more unfinished, and the longer it's been sitting around, the better. Welcome!
Peterhausenn, your sketches look pretty cool... are there materials driving the design, or is it straight from the imagination?
DJJazzyJeff, I think the apocalypse that wrecked your terrain might have opened some ecological niches for evolutionary biology to take hold... any weirdly mutated plants and animals populating those ruins? I'm reminded of how completely wildlife has taken over the area around Chernobyl.
For my part, I'm on spring break now, so I'm looking at a big hobby week. I intend to finish at least one more set of the ruins I started last Challenge before switching to this project, which might start with some materials shopping online... I want some new flock to experiment with, another bag of lichen, and maybe some bulk sculpting material. for these roots. I'll definitely try the hot glue trick... I know from experience that I can't put it right onto the foam without melting it, but maybe I can lay out some stripes to cool and then move them. I can picture doing it with Green Stuff... is there a better sculpting putty for large scale rough work? I assume I need something that dries/cures hard, but not brittle, takes paint, etc.
Peterhausenn, your sketches look pretty cool... are there materials driving the design, or is it straight from the imagination?
Mostly from imagination, but also seeing the various industrial buildings on my way to and from work each day. I am also a big fan of the Borderlands game series and a lot of my terrain ideas take inspiration and design cues from it.
Good sketch. Is the station free standing or will be on a rounded base?
It will be on a base. I will be using the same kind of floor tile I used for the river pieces. It has the benefits of being easy to work with, cheap, thin, and has a little weight to it. Another aspect I am hoping to leverage is that there is a slight texture to the tile. I expect most of the tile to be covered but for the areas that aren't, that aspect may help.
This message was edited 1 time. Last update was at 2022/03/13 01:26:42
Speaking of, I am sure you can use green-stuff for roots and such. My reasoning for the glue gun is that a glue stick is cheaper than greenstuff.
The downside, glue cools to a slick and shiny surface that the paint don't stick to very well.
Perhaps brown or beige pre-colored sticks will help. Or perhaps not, cuz roots still needs painting.
For me the hot glue does melt the foam. Perhaps I was putting it on right away without letting glue to cool for few seconds. Just need to be a fraction bellow foam melt point. More testing needed.
Victor and Mothsniper, I'll be experimenting with a mix of those... I have a steel workbench that is perfect for cooling hot glue on waxed paper, and I've ordered up some green stuff, brown stuff, and something else that comes in a 1 lb. tub... if that works, I'll have roots for days.
In other news, I finished up another set of the archways I made for the last challenge, and I used them to test out some ideas for lichens growing on stone. I used my favorite natural sponge and some art store acrylics, one bright green and the other burnt sienna. I'd say it's good enough for this round's tundra/alpine forest biome, once I get that built. I've also ordered a bunch of flock and leaf litter from GSWorld, another bag of lichen, and some armature wire to try the twist tree technique from The Terrain Tutor's YouTube channel.
I'm going to try to get a project complete for this round of competition. My conundrum is that while I can do nicely detailed work, I am limited in time available and work more slowly than many, so that I can't get a project done by the suspense (which is very generous, I don't think it should be longer).
So this project is more to have another entry and help keep the thread at the top of the stack for people looking around to see what the LOER is up to, with no expectation of seriously competing against the several very fine projects already listed here. As part of my own 'themed months' on my project page, finishing the THREE previous LOER projects never finished and lying about is already scheduled in!
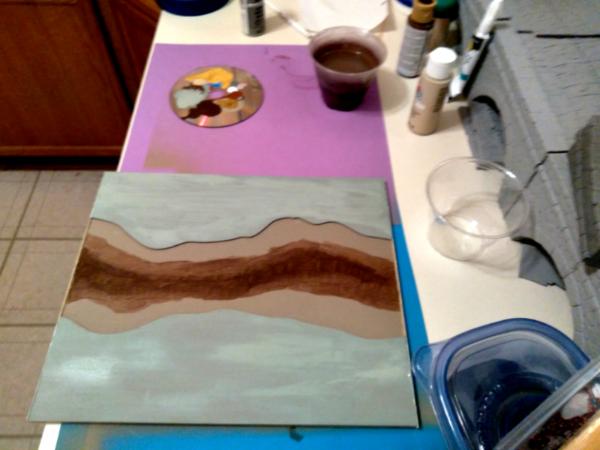
This project is a simple section of river terrain with flora and (if time permits, ha!) fauna. I intend the piece to be playable, so there is a limit to what I can add to it for the detail us Riveteers so greatly prize, but I'll work in what I can without making it impossible to move figures through.
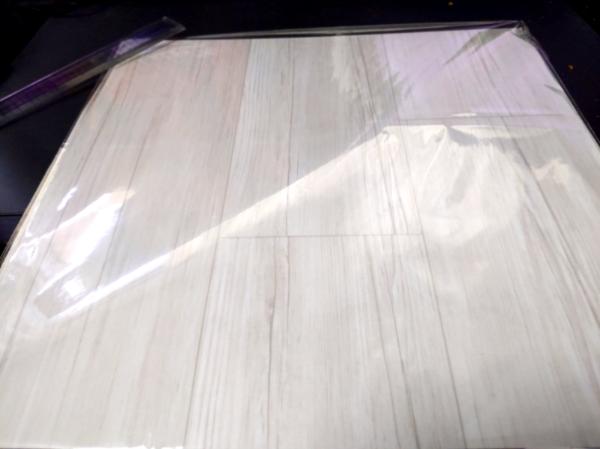
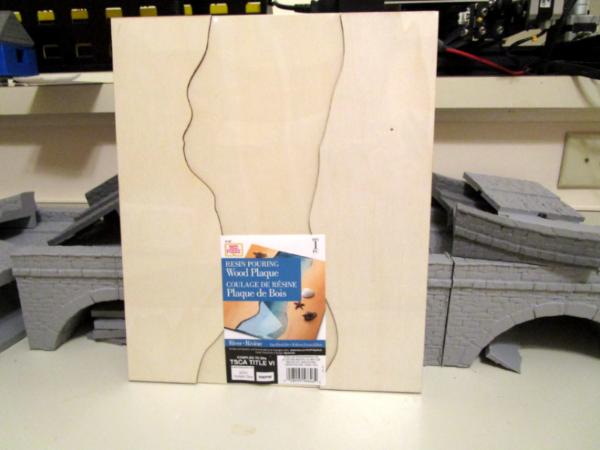
I started my second attempt to use one of these craft boards from Walmart Online on 10 March 2022:
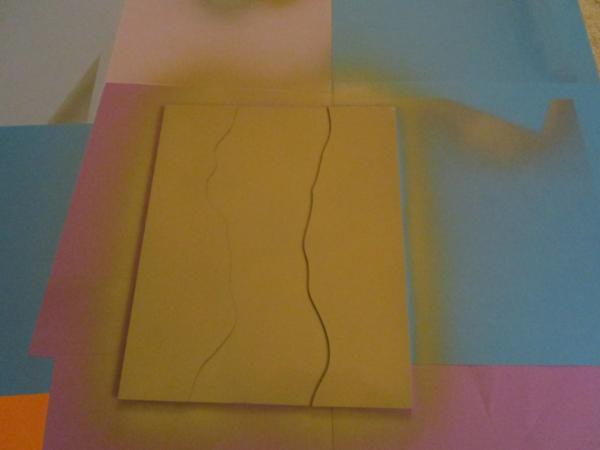
Here is its primered khaki (spray can):
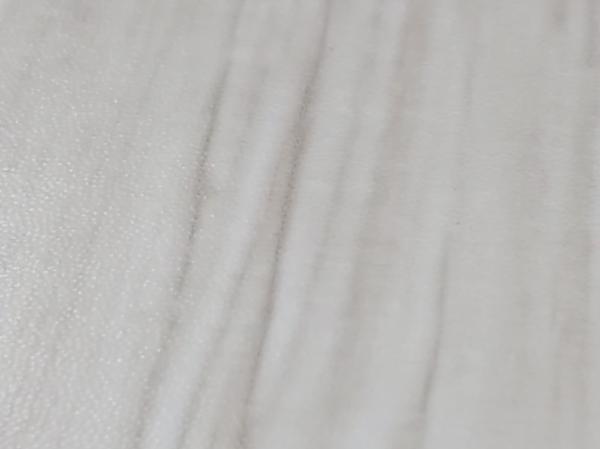
And basecoated:
I'll add another layer of Italian Sage green paint to the banks, but they're going to be covered with flocking and other basing materials, so not too worried. It's hard to see in this picture, but I had to glue styrene strips across the river openings at the ends of the boards- a problem with the first effort was that the Woodland Scenics Realistic Water liquid kept seeping through the tape and other oddments I was trying to use to keep it in. I'd have preferred to use a piece of clear plastic from a cookie package or something, naturally had nothing like that in the apartment, so rather than let the perfect be the enemy of the good (and blow the timeline) I used white styrene and painted it khaki to match the rest of the board.
Next step is to tint the water material and pour and add terrain paste (spackle with some PVA/White glue mixed in for flexibility and paint for base color) and let everything dry well.
More follows soonest.
"He fears his fate too much, or his desserts are small, who will not put it to a single touch; to win- or lose- it all."
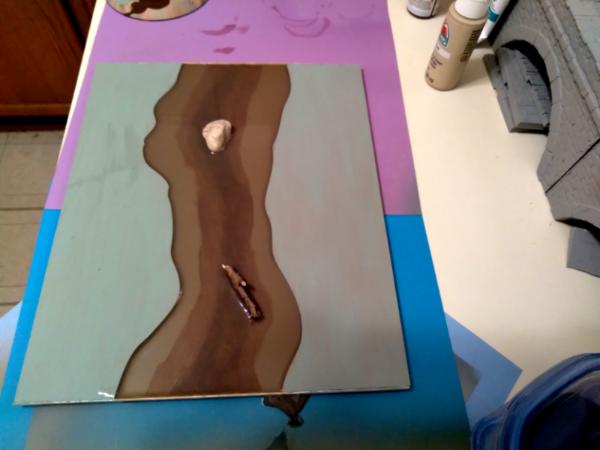
Second go 'round: I don't like this riverbed coloring either. The water material pour- even tinted- is too shallow to get away with coloring the bottom this much, I think an even, greenish-brown would probably have been better instead of trying for the depth illusion. Having said that, I'll bull through on this as I don't want to throw out more reasonably usable terrain to no purpose:
I saw a technique on YouTube whereby you pour out some of the water resin onto wax paper in circular pools to make 'ripples'- I want to try that upstream of the boulder, with a bit of whitewater/foam downstream. And it is now time to get scenicking on the banks themselves.
More follows soonest.
"He fears his fate too much, or his desserts are small, who will not put it to a single touch; to win- or lose- it all."
Starting late but not planning anything too complex. Just a set of underground tunnel pieces. To be used like dungeon tiles in an underground kind of game.
I’m planning some stone slabbed style sewer systems or paved crypt pieces and the rest to be just dirt tunnels. I’m designing them to be of Various widths and lengths to make a variety of challenges for larger or smaller figures.
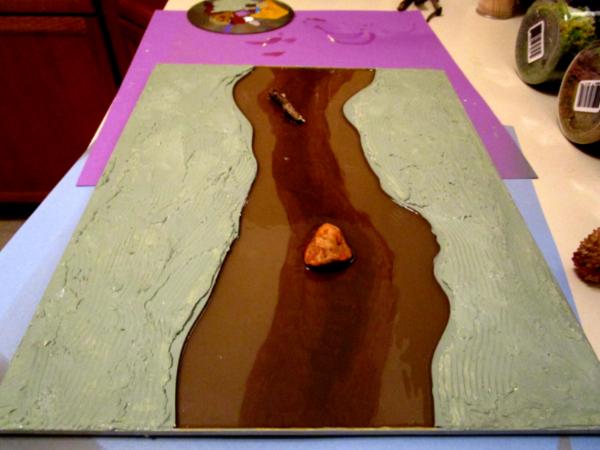
The spackle has dried and received a(nother) base coat:
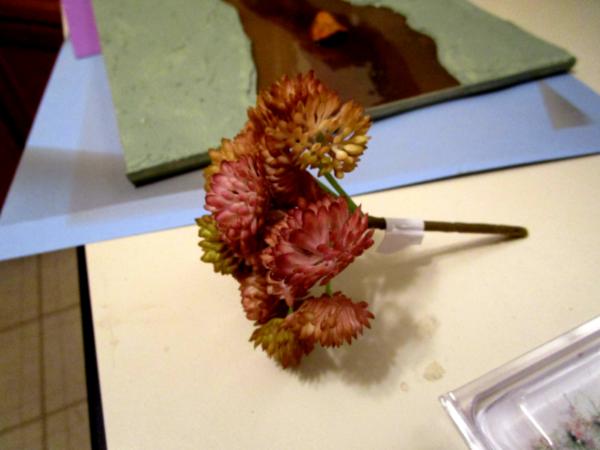
Here's a floral pick I got for 50 cents that looks all alien-y already- I'll cut it up and find a way to add it as shrubbery:
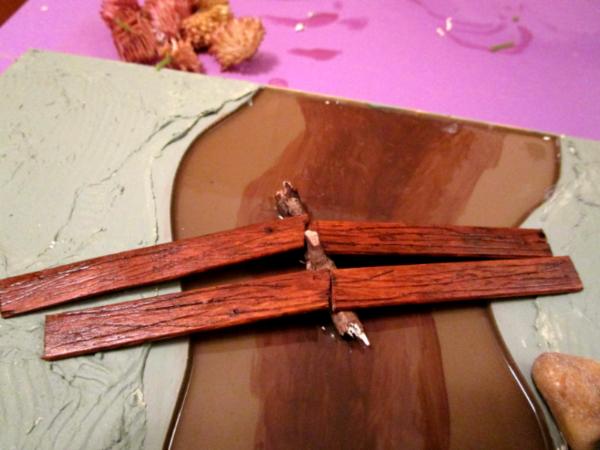
The foot bridge the way it's more or less going to look. I trimmed the popsicle sticks, scored them with a gribbler (for working greenstuff and clay), base painted them chestnut and hit 'em with Huge Miniature's Dark Wash. The wood 'grain' ain't rivets, but it is finer detail, to help out with LOER philosophy. They're still drying in this picture:
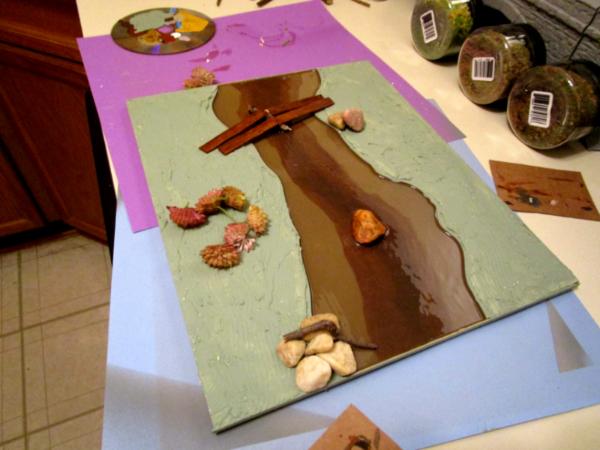
And a preliminary look at how things might get arranged. I've got flocking, reeds, stick-down grass tufts and flowers to spread over the blank green spaces:
I'll add some brown wash and pigment where a footpath would naturally occur going to and from the bridge once I know where everything else is going to sit. Hot glue gun time- need to borrow Syro for an evening!
I've got a couple of critters from the Signum Games Heroes & Animals kickstarter that are nearly done also.
"He fears his fate too much, or his desserts are small, who will not put it to a single touch; to win- or lose- it all."
Starting late but not planning anything too complex. Just a set of underground tunnel pieces. To be used like dungeon tiles in an underground kind of game.
I’m planning some stone slabbed style sewer systems or paved crypt pieces and the rest to be just dirt tunnels. I’m designing them to be of Various widths and lengths to make a variety of challenges for larger or smaller figures.
Nothing complex hu
Already witnessed how your simple portal entry turned into a narrative modular diorama!
The spackle has dried and received a(nother) base coat:
Here's a floral pick I got for 50 cents that looks all alien-y already- I'll cut it up and find a way to add it as shrubbery:
The foot bridge the way it's more or less going to look. I trimmed the popsicle sticks, scored them with a gribbler (for working greenstuff and clay), base painted them chestnut and hit 'em with Huge Miniature's Dark Wash. The wood 'grain' ain't rivets, but it is finer detail, to help out with LOER philosophy. They're still drying in this picture:
And a preliminary look at how things might get arranged. I've got flocking, reeds, stick-down grass tufts and flowers to spread over the blank green spaces:
I'll add some brown wash and pigment where a footpath would naturally occur going to and from the bridge once I know where everything else is going to sit. Hot glue gun time- need to borrow Syro for an evening!
I've got a couple of critters from the Signum Games Heroes & Animals kickstarter that are nearly done also.
RIver section is looking great! I actually do like that painted in depth and the color of the riverbed. When your tape leaked, That was a missed opportunity to feed cookie addiction and do an emergency cookie run to stock up on that clear plastic 50C for that plant, where did you get it? That is like at least $4 at hobbylobby
Much encouragement and perseverance for ya! Cant wait to see it all dressed up.
This message was edited 3 times. Last update was at 2022/03/25 01:50:13
Things are looking good, everyone! I have no new pics to share, but I did cut a bunch of thin slices of XPS foam on the Proxxon to break or cut into rough shapes and then texture in my very high tech and sophisticated oatmeal can full of driveway gravel. I should start building rock outcrops this weekend, and I expect it will go quickly. Lots of fiddly little green and brown earthy bits are on their way from Green Stuff World as well. I have two packs of armature wire for the twisted trees, and hot glue cooled on waxed paper is looking like the right stuff after a few tests... certainly the easiest.
Keep up the good work, and I'll try to post pics this weekend!


 Ultramarines, 3rd Co. and friends, 16k+
  4k
4k  4k Points
 Competition Index