| Author |
Message |
 |
|
|
|
|
Advert
|
Forum adverts like this one are shown to any user who is not logged in. Join us by filling out a tiny 3 field form and you will get your own, free, dakka user account which gives a good range of benefits to you:
- No adverts like this in the forums anymore.
- Times and dates in your local timezone.
- Full tracking of what you have read so you can skip to your first unread post, easily see what has changed since you last logged in, and easily see what is new at a glance.
- Email notifications for threads you want to watch closely.
- Being a part of the oldest wargaming community on the net.
If you are already a member then feel free to login now. |
|
 |
2012/05/02 15:46:20
Subject: Make Your own Miniatures Case 2.0. The 19 dollar Plano Wonder!
|
|

Furious Raptor
Fort Worth, TX
|
I used the spray Elmer's adhesive and I'm running into some of the same issues the OP talked about. It looks like I'll be switching to Pliobond as well.
|
I  out with out with  in both 40k and WHFB. in both 40k and WHFB.
Co-host of the HittingOn3s Podcast
|
|
|
 |
|
2012/05/02 20:00:16
Subject: Make Your own Miniatures Case 2.0. The 19 dollar Plano Wonder!
|
|
Trollkin Champion
|
Eilif, where did you buy Pliobond? I haven't looked to hard yet but the first hardware store I tried didn't have it.
|
|
|
|
|
2012/05/02 22:16:09
Subject: Make Your own Miniatures Case 2.0. The 19 dollar Plano Wonder!
|
|
Brigadier General
|
Ace hardware has it in small containers. I had them order me the larger containers.
If you're willing to wait a few days...
I just bought a can of contractors Contact Cement today from Menards. It's cheaper, more common and less thick than Pliobond. I'll give it a go in a few days and report back on the results.
|
|
|
|
|
|
2012/05/05 22:06:58
Subject: Re:Make Your own Miniatures Case 2.0. The 19 dollar Plano Wonder!
|
|
Brigadier General
|
Update: Contact Cement and Electric Carving knife
I just finished making a tray with the Dap (original) Contact Cement. As far as I can tell it's holding really well.
http://www.dap.com/product_details.aspx?product_id=35
Pros
-Cheap 6 bucks for a quart!
-Still sticky, but goes on smoother than Pliobond.
-Less thick, so much less product needed than Pliobond
-Dries smooth so you don't have sticky residue if you apply to much or in an area that won't be joined
-Very common
Cons
-you have to coat both sides and wait 15 minutes before joining
-Still has the bad smell
-Bonds instantly when applied, so you better have your stuff lined up right.
I'm going to let it sit for a while, to see if the smell goes away, but 5 minutes after putting the two parts together it the bond is super strong. Not at all like spray adheseive which you can pull apart without much difficulty.
One note, there is a fast-drying version of this product, but it doesn't list foam or rubber as materials it will join, where as the "original" brand does.
More details about the product here:
http://www.dap.com/docs/tech/00030503.pdf
Secondly, I had the chance to try out an old GE electric carving knife that I bought at a resale shop. It oscilates back and forth rapidly. It cuts through foam like butter and makes it easy to cut long, perfectly strait lines in foam with no rough edges. One thing it can't do is dig into the foam so if you're cutting out cavities, you will have to make the first hole with a razor knife or one of your circular foam cutters.
I'm not sure how other carving knifes work, but mine has two blades side by side. It's too large to cut small cavities, but the copper foam cutters do that very well. I am never going back to using a razor knife for cutting foam trays to size again.
I'll post pics later.
|
|
|
|
|
|
2012/05/07 20:21:46
Subject: Make Your own Miniatures Case 2.0. The 19 dollar Plano Wonder! (5/5 Contact Cemt. and Elec Knives)
|
|
Brigadier General
|
2 Days later...
-The join is absolutely solid to the point where if you tried to pull the base off, the foam would probably rip rather than the join.
-The smell is gone to the extend that you have to get your nose right up to it and inhale to smell any of the chemical smell.
Looks like I've got a new adhesive!
Will update the first post momentarily.
|
|
|
|
|
|
2012/05/10 21:10:16
Subject: Make Your own Miniatures Case 2.0. The 19 dollar Plano Wonder! (5/5 Contact Cemt. and Elec Knives)
|
|
Bloodthirsty Bloodletter
|
Nice case, I actually bout two of these, with army included, off of eBay. I see maybe the got the idea off this page too.
|
The Good: 8,000
Ultramarine, Scouts, Blood Angels, Dark Angels
The Bad: 8,000
Chaos, Daemons, Dark Eldar, Orks
      VS VS    |
|
|
|
|
2012/06/14 01:13:45
Subject: Make Your own Miniatures Case 2.0. The 19 dollar Plano Wonder! (5/5 Contact Cemt. and Elec Knives)
|
|
Widowmaker
|
So i picked up two of these but for some reason they have apparently stopped including the pluck and pull foam in them and instead just include some regular old foam that appears to be a little bit thinner anyone else run across this? any ideas on how to make it work?
|
Khador - 25pts
 Tau Empire - 500pts Tau Empire - 500pts |
|
|
|
|
2012/06/14 19:16:53
Subject: Make Your own Miniatures Case 2.0. The 19 dollar Plano Wonder! (5/5 Contact Cemt. and Elec Knives)
|
|
Brigadier General
|
The Ravening Jaw wrote:So i picked up two of these but for some reason they have apparently stopped including the pluck and pull foam in them and instead just include some regular old foam that appears to be a little bit thinner anyone else run across this? any ideas on how to make it work?
How thick is the piece of non-pluck flat foam? There are several suggestions.
1) Use large cutters or razor knife to cut larger holes in which to lay miniatures flat.
2) Get a third sheet of thicker foam or Eggshell. Either bought, or scavenged from packaging. Ask your friends, you probably know someone who works somewhere where things are delivered in eggshell foam. I got a few sheets for other cases this way.
3) Buy a sheet of pluck foam. I recently split an order of pluck with a friend from this place. Here's a what used it for (pasted from another forum),
Thought you all might want to see the storage and transport system I've worked out for my post apoc vehicles. This was a somewhat heavily used (no hardware or strutural damage though) case I found at a resale shop for 5 bucks. It had a layer of pluck on the bottom and a piece of mattress foam that had been cut in the shape of microphones.
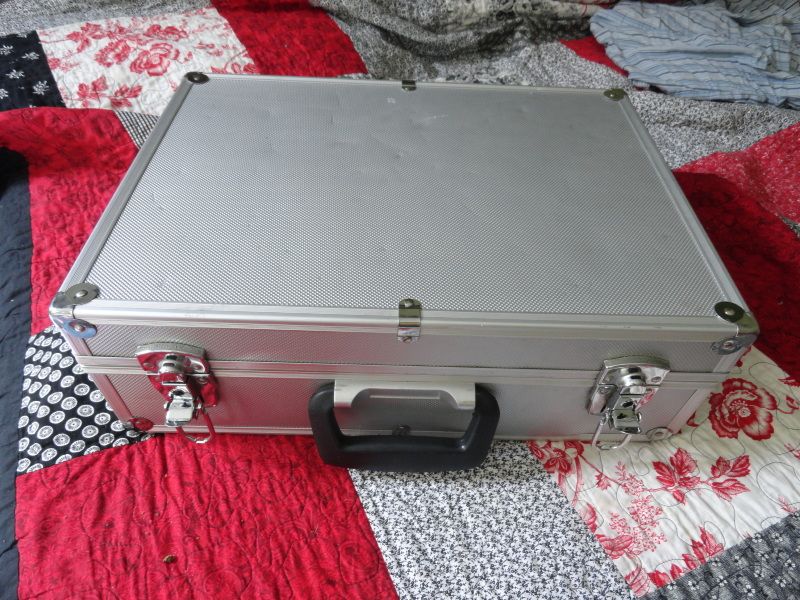
Open it up and you find a cardboard box/tray that I've added, and a layer of foam on top.
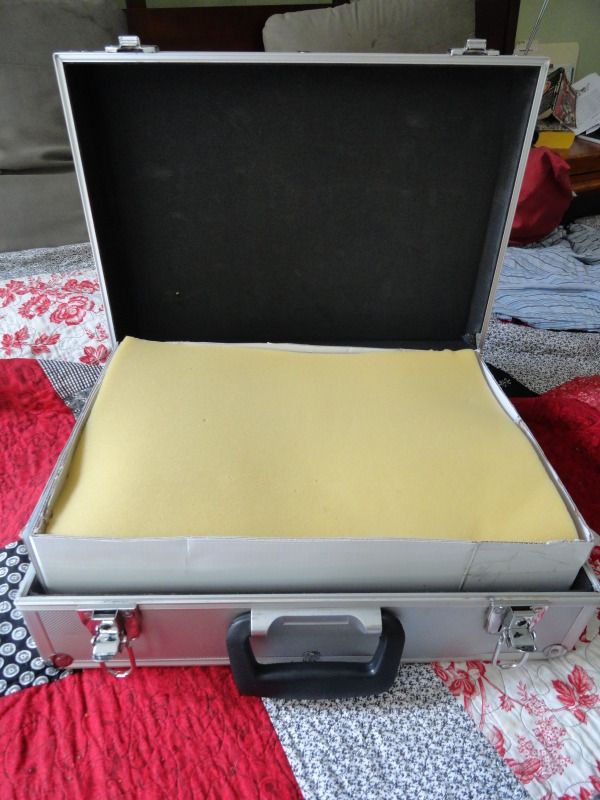
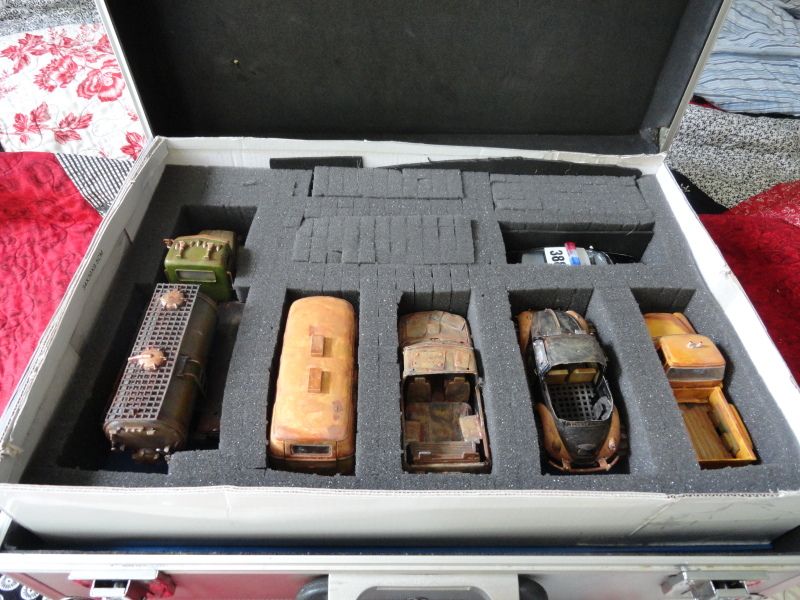
Under that my largest cars are in a foam the tray filled with 2.5 inch pluck foam that I purchased from the foam factory who has great prices on large pieces of pluck foam in different thicknesses. You can see where I plucked out cavities for some future cars but put the foam back for support until I have cars to put in there.
http://www.thefoamfactory.com/packagingfoam/picknpluckcr.html
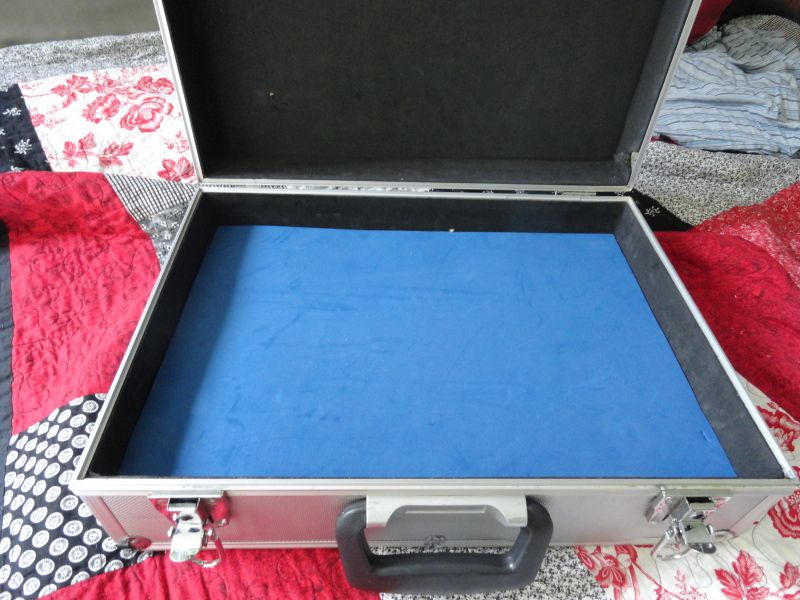
Below that I have a layer of 3mm EVA foam I use this for the bottom most of the custom figure trays I make. It's available at craft stores for a buck a sheet and is called "Funky foam". It's the same stuff (though slightly thinner) that sabol uses for the bottom of their trays. It's also the same material that this case came lined with.
Below that the rest of my cars are seated in the layer of pluck that came with the case.
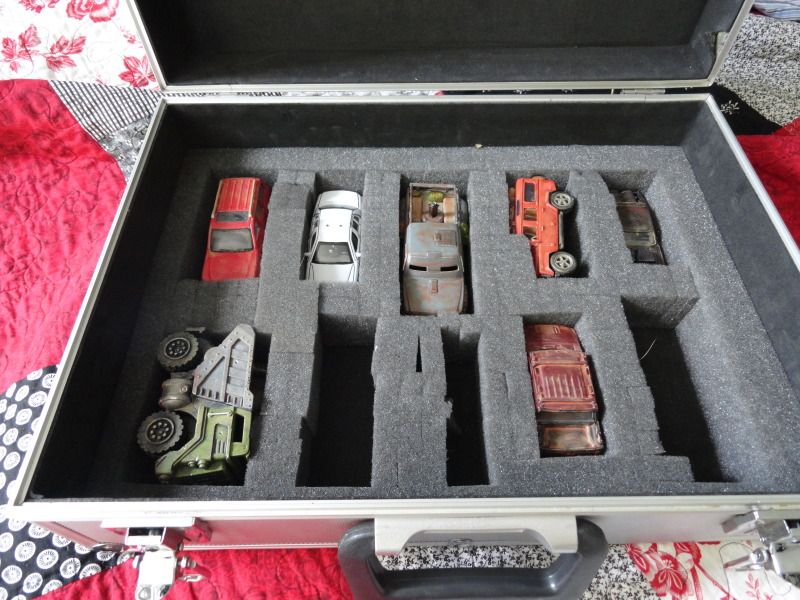
I'm really happy with the way this case came out. I was thinking that I was going to have to use one of the plano 1401 cases that had purchased for figure storage ( as I've done here: http://www.dakkadakka.com/dakkaforum/posts/list/362407.page ) but this box has worked out perfectly and including the foam used, I've probably got only 12 bucks invested in it. It worked great for taking my vehicles to the Little Wars convention, and as the club alternates between the FLGS and member's homes, it will likely prove useful in the future.
|
|
|
|
|
|
2012/06/15 19:03:12
Subject: Make Your own Miniatures Case 2.0. The 19 dollar Plano Wonder! (5/5 Contact Cemt. and Elec Knives)
|
|
Furious Raptor
Fort Worth, TX
|
The Ravening Jaw wrote:So i picked up two of these but for some reason they have apparently stopped including the pluck and pull foam in them and instead just include some regular old foam that appears to be a little bit thinner anyone else run across this? any ideas on how to make it work?
This was the point that I tried to make before.
What I did was take two of those thinner sheets and adhere them together. From there, I cut rhino sized holes out and then reinforced it with some extra foam I had after adhering foam to the bottom to make a base. It works fine and the case that I took the second thin piece from isn't missing it.
|
I out with in both 40k and WHFB.
Co-host of the HittingOn3s Podcast
|
|
|
|
|
2012/06/19 10:26:38
Subject: Make Your own Miniatures Case 2.0. The 19 dollar Plano Wonder! (5/5 Contact Cemt. and Elec Knives)
|
|
Bloodthirsty Bloodletter
|
I made one of these using 2 inch thick foam. I went through a couple razor blades but for $1 you can get those packs of 3 with 10 blades in them. 30 blades got the job done. I used the AoBR box as the case holder. But after a while I got tired of taking them in and out on their backs.
SO, I moved on to using magnets under the bases, and strong Tupperware with medal sealed to the lid. When it is time to play, I open the Tupperware, and flip the lid over. As my guys die I put them right back on the lid.
|
The Good: 8,000
Ultramarine, Scouts, Blood Angels, Dark Angels
The Bad: 8,000
Chaos, Daemons, Dark Eldar, Orks
VS |
|
|
|
|
2012/06/21 18:05:33
Subject: Re:Make Your own Miniatures Case 2.0. The 19 dollar Plano Wonder! (5/5 Contact Cemt. and Elec Knives)
|
|
Trollkin Champion
|
So, I've been slowly drifing away from 40k and into Warmahordes. As I've been looking at different blogs and forums I came across this guide to magnetizing units and making a case.
Link
If you buy the box from the site he recommends it comes out to be pretty cost effective. Naturally, you can upgrade to a Sabol bag or something else more expensive and get similar results but I figured it would give us cheap bastards some more options 
|
|
|
|
|
2013/04/02 16:51:26
Subject: Re:Make Your own Miniatures Case 2.0. The 19 dollar Plano Wonder! (5/5 Contact Cemt. and Elec Knives)
|
|
Fresh-Faced New User
|
For those of you who do not have access to a dremel or want to sit and grind out your edge, there is a very cheap tool called a Pencil Reamer. They are very cheap. And, it works quite quickly at making an internal edge. All you do is place the reamer on the inside edge of the copper fitting and turn the blade. The only trick is to continue in the direction that you started with. Trying to switch directions in the middle of reaming out the fitting is a pain.
|
|
|
|
|
|
2013/04/06 18:18:25
Subject: Make Your own Miniatures Case 2.0. The 19 dollar Plano Wonder! (5/5 Contact Cemt. and Elec Knives)
|
|
Boosting Ultramarine Biker
Maryville, TN
|
This is great, I have quite a few old plastic case like that and will certainly put them to use. Thanks
|
|
|
|
|
2013/06/21 21:47:04
Subject: Make Your own Miniatures Case 2.0. The 19 dollar Plano Wonder! (5/5 Contact Cemt. and Elec Knives)
|
|
The Hive Mind
|
|
My beautiful wife wrote:Trucks = Carnifex snack, Tanks = meals.
|
|
|
|
|
2013/06/22 11:21:17
Subject: Make Your own Miniatures Case 2.0. The 19 dollar Plano Wonder! (5/5 Contact Cemt. and Elec Knives)
|
|
Brigadier General
|
rigeld2 wrote:http://sport.woot.com/plus/boyt-harness-gun-cases
More expensive but potentially higher quality
Interesting. Seems to be on par for quality and price with brands like UK and Pelican. Far more protection than most wargamers would need, but if you need a waterproof hardshell for you minis, it could be a good option.
|
|
|
|
|
|
2013/06/25 02:47:57
Subject: Make Your own Miniatures Case 2.0. The 19 dollar Plano Wonder! (5/5 Contact Cemt. and Elec Knives)
|
|
Doc Brown
The Bleak Land of Gehenna (a.k.a Kentucky)
|
For curiosity's sake, is there any way of adapting this method for use with Warmachine/Hordes? For that matter, exactly how effective would the Plano method be for PP models?
Automatically Appended Next Post:
Aside from 30mm models, that is. I mean, obviously it's not going to work for anything larger than 50mm models, but I'm concerned with its use for 40mm and 50mm models.
|
|
This message was edited 1 time. Last update was at 2013/06/25 02:48:57
|
|
|
|
|
2013/06/25 03:00:48
Subject: Make Your own Miniatures Case 2.0. The 19 dollar Plano Wonder! (5/5 Contact Cemt. and Elec Knives)
|
|
The Hive Mind
|
It's the same method - just use a different size "bit"/cutter.
|
My beautiful wife wrote:Trucks = Carnifex snack, Tanks = meals.
|
|
|
|
|
2013/06/25 12:02:50
Subject: Make Your own Miniatures Case 2.0. The 19 dollar Plano Wonder! (5/5 Contact Cemt. and Elec Knives)
|
|
Brigadier General
|
 grayshadow87 wrote: grayshadow87 wrote:For curiosity's sake, is there any way of adapting this method for use with Warmachine/Hordes? For that matter, exactly how effective would the Plano method be for PP models?
Automatically Appended Next Post:
Aside from 30mm models, that is. I mean, obviously it's not going to work for anything larger than 50mm models, but I'm concerned with its use for 40mm and 50mm models.
You can do larger dimensions, you just need to glue the foam layers together to form thicker trays. Check out the case I made for Mechwarrior figures a couple pages back and the one I made for my friend's fantasy figures. Both of them have a thick lower tray made by glueing two pieces of eggshell together interlocking, and a thinner top tray. It might require one more piece of foam.
|
|
|
|
|
|
2013/06/27 14:47:13
Subject: Make Your own Miniatures Case 2.0. The 19 dollar Plano Wonder! (5/5 Contact Cemt. and Elec Knives)
|
|
Privateer
|
I've seen this thread floating around before, but never paid it much thought. Finally clicked into it, as my green army transport case doesn't have enough space for my DE or Cryx.
I'm really liking this tutorial. Excellent stuff. I've seen that hardshell case around before, and never really thought of using it that way. Less than $30 for a protective case, large enough to hold an army? HELL YEAH.
Bring on the Walmart/Hobbylobby adventure...
|
We all need to look into the dark side of our nature..
that is where the passion is..the energy..
It is part of who we are...do not fear it ..embrace it
become whole....
we are both darkness and light..... |
|
|
|
|
2013/06/27 17:11:45
Subject: Make Your own Miniatures Case 2.0. The 19 dollar Plano Wonder! (5/5 Contact Cemt. and Elec Knives)
|
|
Boosting Space Marine Biker
Sidney (Home of Nothing), OH. USA
|
Great idea! Now if only I could find someplace local that sells the d@#med things!
|
WarPaint Miniature Studios is currently accepting select commissions! PM if interested!
http://www.facebook.com/WarPaintMiniatureStudios/
|
|
|
|
|
2015/06/18 19:41:19
Subject: Re:Make Your own Miniatures Case 2.0. The 19 dollar Plano Wonder! (5/5 Contact Cemt. and Elec Knives)
|
|
Cultist of Nurgle with Open Sores
|
I would like to apologize in advance to those of you who dislike reviving old threads, but I felt it necessary. This is still a very relevant topic.
I found it yesterday. along with the original Kutzmon post. It is absolutely amazing. Gaming cases are so absurdly overpriced, and most of the alternatives (tackle boxes, tool boxes...shoe boxes, etc) just do not provide the protection needed for miniatures.
Walmart now has the Plano case listed at $11.97 online. I plan to purchase two today, one for vehicles and one for troops.
I do have a couple of questions:
Has anyone attempted to use hole saws? They would increase the price of the project a little(maybe $10), but I'd imagine that you could cut the hole-cutting process down to 5 or 10 minutes, maybe even less. You also wouldn't have to worry about resharpening.
Also, I noticed that a few people mentioned that the Plano case either doesn't always come with the pluck foam, or that it no longer comes with it. Can anyone verify this? Is it something that differentiates alternate versions of the case? It was mentioned that the case may be listed as Plano Protector series 4 pistol case, Plano Reel case, or Plano XL Accessory case. are these names provided by the retailer or are they actually different cases? Perhaps this is what differentiates between those with pluck foam and those without. And for those cases that do not come with the pluck foam, what are the dimensions of the foam that is in its place? Is it identical in size to the pluck foam?
Thanks
|
  I can clearly not choose the wine in front of you I can clearly not choose the wine in front of you |
|
|
|
|
2015/06/18 20:07:02
Subject: Make Your own Miniatures Case 2.0. The 19 dollar Plano Wonder! (5/5 Contact Cemt. and Elec Knives)
|
|
Brigadier General
|
No problem for the necro-thread. I'm happy to see folks getting use of it.
As for the hole saw, I've not tried it. It might work, but I tend to make some of the holes very close together to maximize capacity and I think the potential for tearing the walls between the cavities would be much greater with a hole saw. Still, if you've got bits of the right size, it's definitely worth a try.
Regarding the pluck-or-not, I've bought them with the same label (probably the same sku, but I don't know) and found some that have pluck and some without at different times. The solid foam piece I've found in it's place was similar in thickness to the pluck foam.
As for the different names, as near as I can tell this is the exact same case with different stickers on it. I haven't been able to track if differing labels correspond to the presence or lack of pluck. I haven't bought any in about a year however, and I don't recall if the last ones (from walmart) had pluck so I'm not sure what the case has now. I know that in the listings they seem to not specify. I would recommend taking the item numbers from different listings and calling the Plano corporation directly to find out.
http://www.planomolding.com
|
|
This message was edited 1 time. Last update was at 2015/06/18 20:07:24
|
|
|
|
|
2015/06/19 00:31:21
Subject: Re:Make Your own Miniatures Case 2.0. The 19 dollar Plano Wonder! (5/5 Contact Cemt. and Elec Knives)
|
|
Privateer
|
 Arth-Rytis wrote: Arth-Rytis wrote:
I do have a couple of questions:
Has anyone attempted to use hole saws? They would increase the price of the project a little(maybe $10), but I'd imagine that you could cut the hole-cutting process down to 5 or 10 minutes, maybe even less. You also wouldn't have to worry about resharpening.
Also, I noticed that a few people mentioned that the Plano case either doesn't always come with the pluck foam, or that it no longer comes with it. Can anyone verify this? Is it something that differentiates alternate versions of the case? It was mentioned that the case may be listed as Plano Protector series 4 pistol case, Plano Reel case, or Plano XL Accessory case. are these names provided by the retailer or are they actually different cases? Perhaps this is what differentiates between those with pluck foam and those without. And for those cases that do not come with the pluck foam, what are the dimensions of the foam that is in its place? Is it identical in size to the pluck foam?
Thanks
This is absolutely a relevant topic today, so your thread-necro is sound; these miniature cases are quite pricey; anything to help the gaming community is appreciated, and I bet there's quite a few new gamers that hadn't seen this will now be the wiser for transportation options.
1: I wouldn't suggest using a hole saw. IMO, they're too aggressive, as they're meant for wood. I can see you tearing a big ugly whole in your foam, and then that sheet is toast. If you do try it, please share the results, as I may be wrong.
2: My plano did NOT come with pluck, but I also purchased mine 2nd hand. Ymmv if you purchase it new. I might suggest going to your local outdoor sporting shop, and seeing how much pluck foam would be for a pistol case. They probably provide foam at reasonable rates, as people choose to keep different firearms and equipment in boxes as those belongings change hands and such.
I personally traced the piece of egg-crate foam that mine did have onto another piece, and cut that out with a good pair of utility shears. It's now the home of my Warmachine Colossal Galleon 
3: The official Plano code is "Plano 1404", and you're in luck: of all the places I've looked, Walmart is indeed the cheapest (after 2nd hand, of course).
|
We all need to look into the dark side of our nature..
that is where the passion is..the energy..
It is part of who we are...do not fear it ..embrace it
become whole....
we are both darkness and light..... |
|
|
|
|
2015/06/19 05:34:58
Subject: Make Your own Miniatures Case 2.0. The 19 dollar Plano Wonder! (5/5 Contact Cemt. and Elec Knives)
|
|
Longtime Dakkanaut
|
Oh wow, cool that this came up. My friend suggested buying one of these so I did.
I am going to try to wrap a metal sheet and rivet it to the case, and embed small earth magnets into my miniature's bases to hold them in. Then cut the foam to fit, remove the miniatures and adhere it. (Not all that in that order but, you get the gist.)
Very great case, it's at Walmart for like 11$.
|
|
|
|
|
|
2015/08/27 06:38:10
Subject: Make Your own Miniatures Case 2.0. The 19 dollar Plano Wonder! (5/5 Contact Cemt. and Elec Knives)
|
|
Regular Dakkanaut
Nashville, TN
|
 Eilif wrote: Eilif wrote:2 Days later...
-The join is absolutely solid to the point where if you tried to pull the base off, the foam would probably rip rather than the join.
-The smell is gone to the extend that you have to get your nose right up to it and inhale to smell any of the chemical smell.
Looks like I've got a new adhesive!
Will update the first post momentarily.
Question about when you put the DAP on the foam, do you put it all over the foam, or just part of it? I'm wanting to recreate this and I'm not sure if I should just put a layer all over the foam or not.
Thanks!
|
Joe Smash. |
|
|
|
|
2015/09/04 13:04:21
Subject: Make Your own Miniatures Case 2.0. The 19 dollar Plano Wonder! (5/5 Contact Cemt. and Elec Knives)
|
|
Brigadier General
|
Nuwisha wrote: Eilif wrote:2 Days later...
-The join is absolutely solid to the point where if you tried to pull the base off, the foam would probably rip rather than the join.
-The smell is gone to the extend that you have to get your nose right up to it and inhale to smell any of the chemical smell.
Looks like I've got a new adhesive!
Will update the first post momentarily.
Question about when you put the DAP on the foam, do you put it all over the foam, or just part of it? I'm wanting to recreate this and I'm not sure if I should just put a layer all over the foam or not.
Thanks!
Sorry about the late reply.
I just layer it over all of the bottom of the foam and the top of the base sheet. It dries non-tacky so you don't have to worry about getting the contact cement on the areas of the base sheet that will contact the bottom of your figures.
|
|
|
|
|
|
2017/04/01 06:56:15
Subject: Make Your own Miniatures Case 2.0. The 19 dollar Plano Wonder! (5/5 Contact Cemt. and Elec Knives)
|
|
Nurgle Predator Driver with an Infestation
|
Revives for days!
Still my favorite and most used Tutorial on Dakka!
I'm currently using this tutorial for my Malifaux and Infinity Minis, But since I'm need space for 20ish minis I'm using the Pistol Case (fits 2 pistols) It will fit a Large Based Mini (Dreadnaught in size) laying down.
I have 6 bigger Plano cases: 2 for X-wing, 2 For 40k Orks, 1 for Saga/ Malifaux, and 1 for my Space Wolves.
I use Hot Glue for the Kids foam to the Egg Crate its worked pretty well, probably takes more time but its what I've got on hand.
|
|
|
|
|
2017/04/01 12:35:38
Subject: Make Your own Miniatures Case 2.0. The 19 dollar Plano Wonder! (5/5 Contact Cemt. and Elec Knives)
|
|
Brigadier General
|
Thanks M_D,
Great to hear that folks are using this. The Hot glue solution is a good one. I think I used Hot glue to repair a couple of the early trays that I used the less-than-ideal spray adhesive on. It worked great. I've been thinking about doing a new version of this tutorial sometime and if I do I'll include that.
Since this article I've also made a couple cases using resale shop Video camera bags that have roughly the same dimensions as Sabol bags. I bought some used trays for a buck or two each and rearranged the pluck foam bits for my figs. I used hot glue for all those as well.
|
|
|
|
|
|
|
|


