| Author |
Message |
 |
|
|
|
|
Advert
|
Forum adverts like this one are shown to any user who is not logged in. Join us by filling out a tiny 3 field form and you will get your own, free, dakka user account which gives a good range of benefits to you:
- No adverts like this in the forums anymore.
- Times and dates in your local timezone.
- Full tracking of what you have read so you can skip to your first unread post, easily see what has changed since you last logged in, and easily see what is new at a glance.
- Email notifications for threads you want to watch closely.
- Being a part of the oldest wargaming community on the net.
If you are already a member then feel free to login now. |
|
 |
2017/07/20 21:37:51
Subject: Re:sCratchbuilding and Citbashing by Meer_Cat: 7/18 Now with more archers!
|
|

[DCM]
Boom! Leman Russ Commander
|
Hey Big H! Ain't that the truth? I finally develop one skill- painting eyes, for instance- and now I want to go back and redo everything that came before! There is a window of time though: I'm finding that there are some things from long enough ago that even though I know I could touch 'em up a bit with new skills and (especially) new paints and materials- I don't want to. Partly because I'm afraid if I mess them up, I can't get replacements to try again. And partly because they are part of who I was- to change them is to- perhaps- appear to be trying to change who _I_ was.
However, vanities such as this are only acceptable so long as I can afford the storage space, and for the moment, I can. Otherwise, out they go, like so much of my other Rogue Trader era stuff that fell by the wayside during 19 moves over 27 years in the military. I'm glad I've still got a couple of keepsakes, though, and even a few more than pictured here. They'll show up eventually.
The following photos show figures I painted between 1987 and '89.
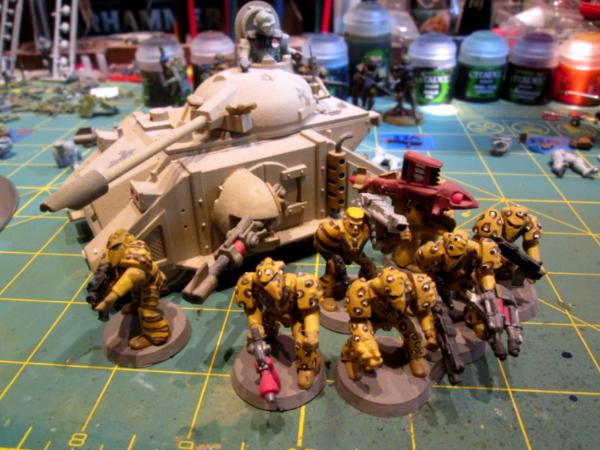
Here's a group shot, and believe it or not, according to The Book (no version, no Codex, no addendum, the Basics) all this counted as Imperial Guard. There just weren't the figures out on the market to specialize- certainly not as heavily specialized as things have become today. IG were allowed to have powered armor- it was very common to use the Space Marine Beakies to model it. There were no Leman Russ tanks out yet, so we gleefully used Predators. Same deal with Rhinos (although kits for Leman Russ followed only a year or two later). Baneblades were 'way in the future- the article in White Dwarf to scratchbuild your own hadn't even come out yet- it was a couple of months away. A buddy of mine built one when the mag did come out- which was odd, because he played Orks.
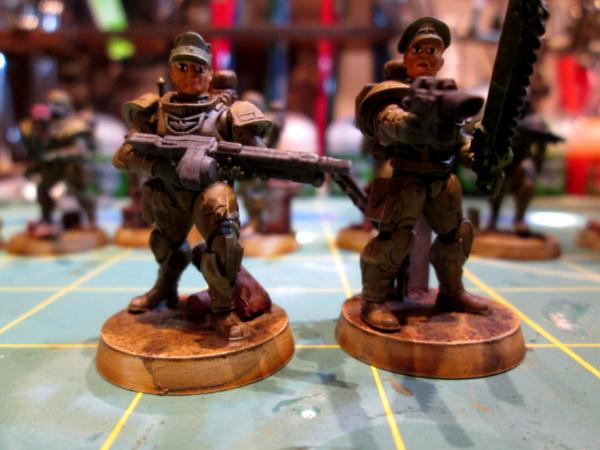
So this pic is a command group with tank support:
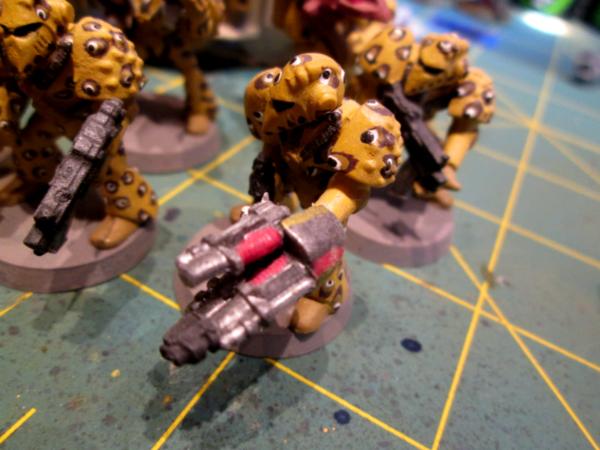
Here's a closeup of one figure showing off both his custom 'Leopard Spot Camouflage pattern armor' and his custom scratchbuilt Storm Bolter. Following the backstory about the Native American Terminators that supported the Space Hulk game, we all speculated as to what this 'storm bolter' might look like. This was my attempt to model one. You can see it is the pauldron from a space marine arm piece and a few las rifle barrels, but I loved kitbashing and scratchbuilding even back then:
The platoon leader, with powered armor, leopard spot camo and power fist:
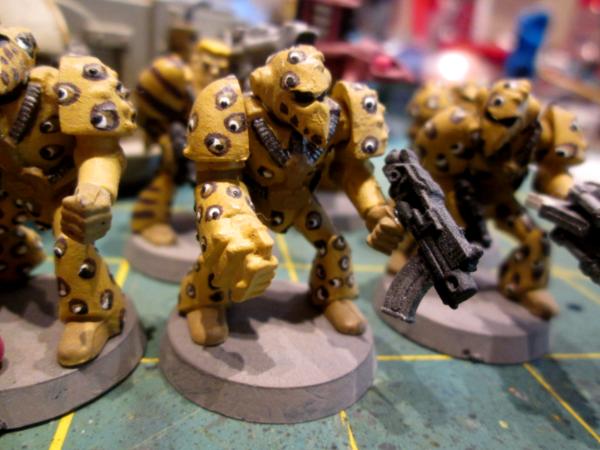
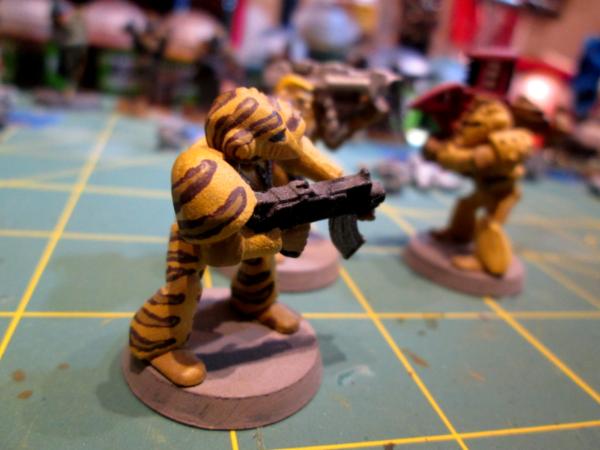
Heavy Weapons section in powered armor- one sporting the alternative 'tiger stripe' camo pattern:
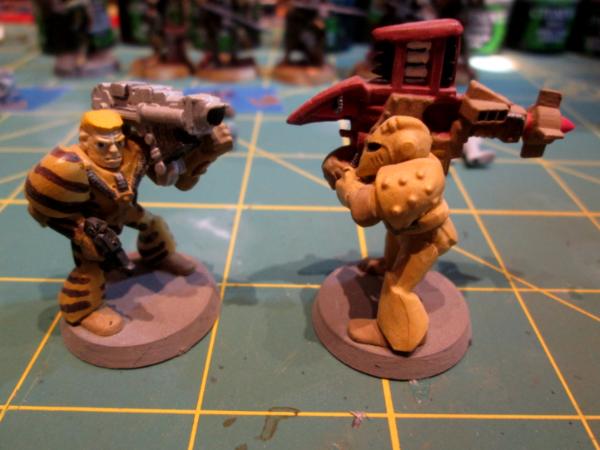
Command Squad security detail trooper (read that as 'expendable Red Shirt') in tiger tripe:
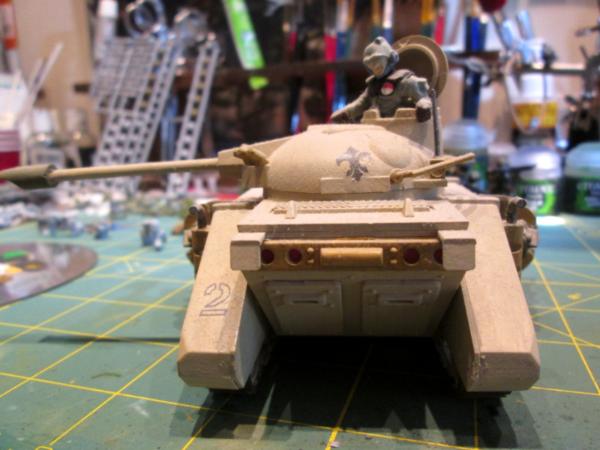
A close up of the Imperial Guard Predator Track Commander. I had been attached briefly to the 11th Armored Cavalry Regiment- this figure's red and white unit badge is in honor of them- nicknamed the Black Horse:
And here's another shot of the Predator:
Games Workshop used to sell a three-pack of Rhinos; I must have converted nine or more into vehicles described in the books but not available as kits at that time: open topped troop carriers, a Whirlwind (using a 1/35 Nebelwerfer rocket launcher kit as the missile pod), a tank destroyer (using a 1/35 TOW anti-tank missile launcher mounted in the fighting compartment as the Vanquisher cannon), and others. Some may still be around in boxes someplace, but most I know are gone.
Oh well, you can't keep everything. Nowadays I do the best I can, take lots of photos and store them here on Dakka Dakka and am quite content. The wife unit frequently suggests selling off the things I'm cranking out now, and I just may do that when things settle down a bit.
Thank you all for allowing me to scamper down Memory Lane for a bit, and showing off some of my _very_ early work. Comments and critiques welcome, although I'm not looking to touch these guys up just yet. (The Lothern Seaguard, yes- I painted them around 1999/2000.)
More follows soonest!
|
"He fears his fate too much, or his desserts are small, who will not put it to a single touch; to win- or lose- it all."
Montrose Toast

|
|
|
 |
|
2017/07/24 23:15:16
Subject: Re:sCratchbuilding and Citbashing by Meer_Cat: 7/20 Rogue Trader era Marines and Predator
|
|
[DCM]
Boom! Leman Russ Commander
|
A quick time out to talk a minute about a very useful bit/gubbin that I came across quite by accident. I was working on a household repair project (replacing wax ring on a commode) and I found this on the floor when it came to cleaning up time (those are one inch/25mm gridded squares, figure for size comparison):

I was puzzled for awhile, trying to figure out what it was. The house is over 140 years old (I know, I know- practically brand new to my European friends) so I was thinking it was some antique component of jewelry, or whalebone, or ivory or some such thing. Then it hit me, and I stopped by a shop and purchased an item from which I extracted these:

And here's the item I purchased at the Dollar Tree (Everything's A Dollar!):

There are 7 rows of 17 hairbrush pins each, or 119 potential bits for making almost anything from:

But Meer Cat, I hear you say, these things are useless- what can you make from them? Well, I needed a manpack radio for my latest counts-as Tempestus Scions squad, and kitbashed one from a bit and a backpack from Robogear:

Other uses that come to mind are guidance antenna on Hellstrike missiles, the focus element on an antenna dish, antennae generally and curb feelers on an Ork Trukk, to name a few. Cheap hairbrushes come with pins in a variety of sizes and some difference even in shape. The pins just pull out with a gentle tug from a pair of pliers.
More follows soonest!
|
"He fears his fate too much, or his desserts are small, who will not put it to a single touch; to win- or lose- it all."
Montrose Toast
|
|
|
|
|
2017/07/25 03:39:33
Subject: sCratchbuilding and Citbashing by Meer_Cat: 7/24 41st Millenium Curb Feelers!
|
|

Gargantuan Great Squiggoth
|
Very interesting little doda, will have to investigate.
|
|
|
|
|
|
2017/07/25 05:59:01
Subject: sCratchbuilding and Citbashing by Meer_Cat: 7/24 41st Millenium Curb Feelers!
|
|
Pious Palatine
|
Cool stuff.
Gotta admit in my early morning tired state i though5the leopard print camo was googly eye armour... 
EDC
|
|
|
|
|
2017/07/25 11:21:25
Subject: Re:sCratchbuilding and Citbashing by Meer_Cat: 7/24 41st Millenium Curb Feelers!
|
|
[DCM]
Boom! Leman Russ Commander
|
Hey EDC- it's not your early morning tired state- 30 years ago my buddy that got me started into Warhammer 40k said the same thing! He couldn't figure out if I was trying googley-eyes or peacock feathers- 'leopard print' never occurred to him! I think I was trying to paint something ('way to advanced for me then, and probably now, too) like the saddle blankets of the (Napoleonic French) Empress' Own Dragoons. But we had a rule that to game 'em, the figures had to be painted. And these were painted. Still look a bit funny to me, too.
|
"He fears his fate too much, or his desserts are small, who will not put it to a single touch; to win- or lose- it all."
Montrose Toast
|
|
|
|
|
2017/08/02 00:38:19
Subject: Re:sCratchbuilding and Citbashing by Meer_Cat: 7/24 41st Millenium Curb Feelers!
|
|
[DCM]
Boom! Leman Russ Commander
|
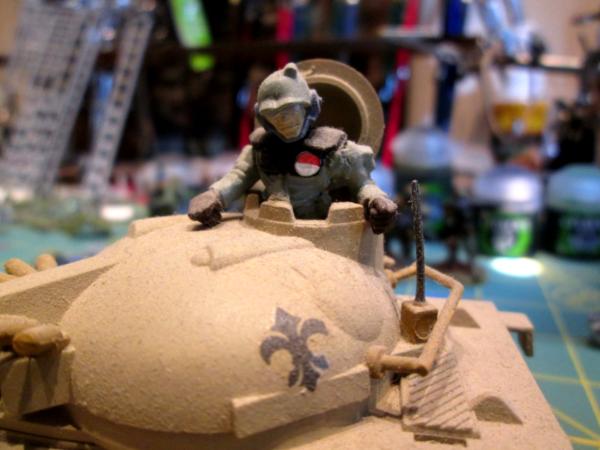
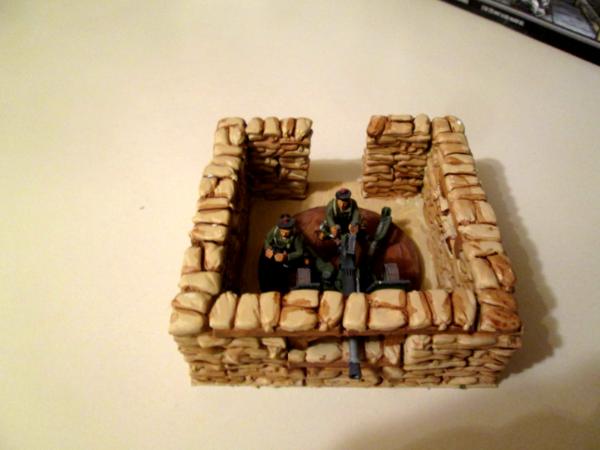
This project was made using Hirst Arts Mold Number 340 and some plasticard salvaged from an old yard sale sign. The figures are Highland Imperial Guardsmen from Kromlech, and I've decided that- they being the wild Scots- fire is their best friend so they are over-represented in meltaguns, plasma guns and flamers. The kilts are my best effort to paint my own clan colors- Clan Leslie. Historically, Clan Leslie fielded a regiment of infantry in the Royal Army titled the King's Own Scottish Borderers. I toyed with the idea of naming mine the Emperor's Own Space Borderers, but like the KOSB better, so KOSB they remain. I need to go back and touch up the faces and add some washes and highlights to them- as Big H mentioned a couple of posts back: Figures are never done, they just get revised!
Here's a shot of the sandbag bunker, pieces assembled (lower section, roof section, entrance defilade):
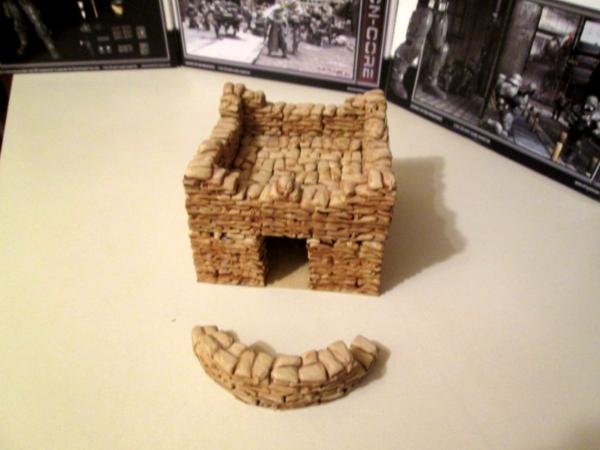
And the pieces separated:

'Front' side firing aperture:

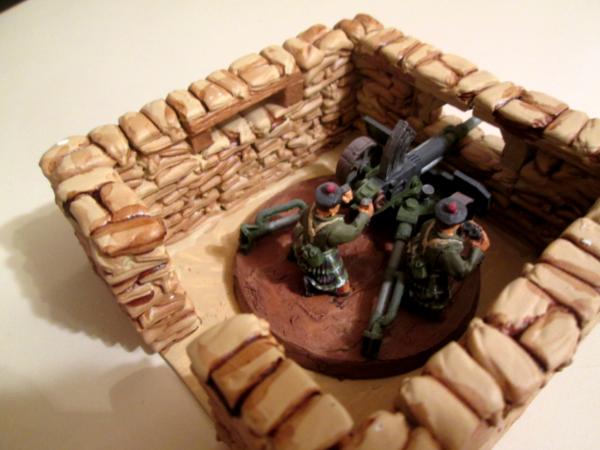
The structure was build to accommodate a heavy weapon at the forward firing aperture (there are rifle slits in the sides). Here's a KOSB Autocannon team:
And another view:
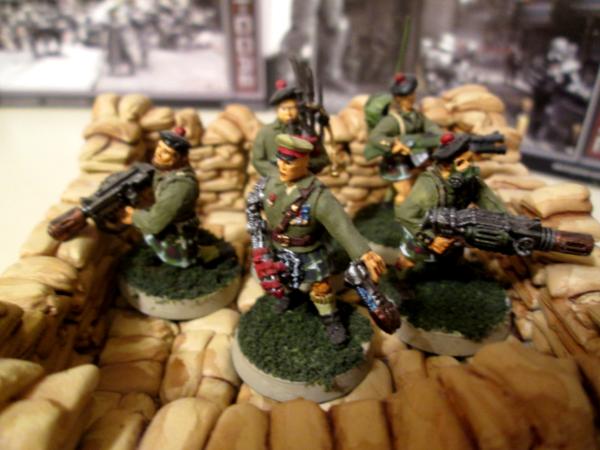
The rooftop emplacements can hold another heavy weapon:


Or infantry, in this case, a command squad:

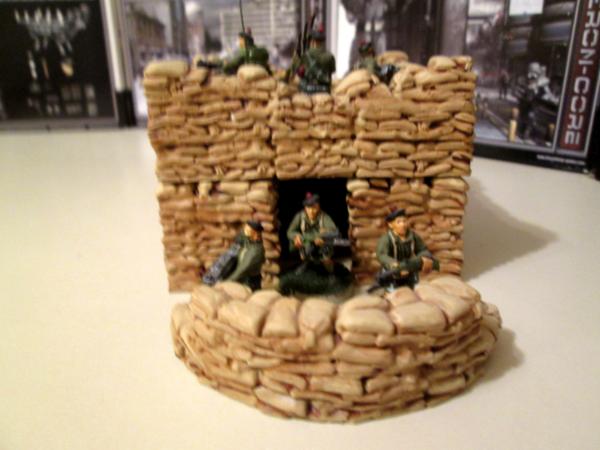
And with the defilade, the personnel entrance to the bunker can be heavily guarded:
I really like the Hirst Arts molds- this one particularly has been very useful to me, I've one a lot with it. I'm finishing up a squad of counts-as Tempestus Scions using Dream Forge storm troopers and hope to have picture soon.
In the meantime, thanks for looking in and for the opportunity to show off some of my work.
More follows soonest!
|
"He fears his fate too much, or his desserts are small, who will not put it to a single touch; to win- or lose- it all."
Montrose Toast
|
|
|
|
|
2017/08/09 01:48:42
Subject: sCratchbuilding and Citbashing by Meer_Cat: 8/1 Sandbag Bunker
|
|
Rogue Inquisitor with Xenos Bodyguards
|
Good stuff! I especially liked the Athena Hanny! 
|
"Your mumblings are awakening the sleeping Dragon, be wary when meddling the affairs of Dragons, for thou art tasty and go good with either ketchup or chocolate. "
Dragons fear nothing, if it acts up, we breath magic fire that turns them into marshmallow peeps. We leaguers only cry rivets!


|
|
|
|
|
2017/08/09 15:10:56
Subject: Re:sCratchbuilding and Citbashing by Meer_Cat: 8/1 Sandbag Bunker
|
|
[DCM]
Boom! Leman Russ Commander
|
Thanks Shas! Your "Searching for Oddball Tanks" was one of the first blogs a started following- and a big push towards getting a Dakka Dakka account and stop lurking and start being a part of the community. I follow with great interest your new builds- especially the latest Malcador-style build- from scratch with the idea that, having moved up from tacking 40k bits onto normal models into heavily modifying the models themselves (and _then_ tacking 40k bits on) it's time to actually build something myself from the plasticard up.
Thanks to all the advice and instruction available here on Dakka, I'm starting to mess around with greenstuff quite a bit, and will eventually move on (after suitable and sufficient tutelage from others who have the experience here) to learning how to cast my own bits.
For now, I'm quite happy to keep developing my own skills in assembly, painting and especially weathering (and faces- still can't do faces very well).
More follows soonest!
|
"He fears his fate too much, or his desserts are small, who will not put it to a single touch; to win- or lose- it all."
Montrose Toast
|
|
|
|
|
2017/08/09 23:48:11
Subject: Re:sCratchbuilding and Citbashing by Meer_Cat: 8/1 Sandbag Bunker
|
|
[DCM]
Boom! Leman Russ Commander
|
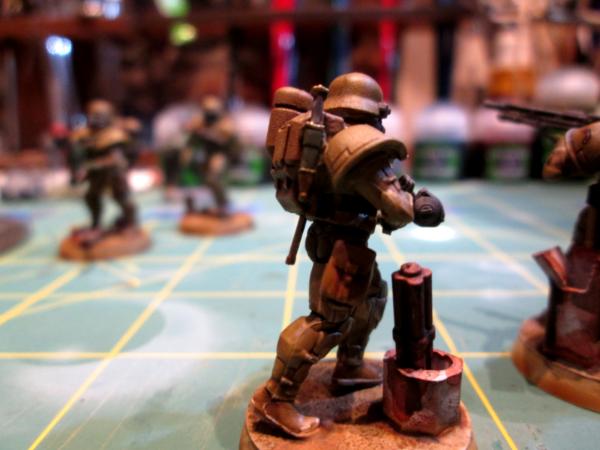
Right then- I've finished up the next squad using Dream Forge stormtroopers as 'counts-as' Tempestus Scions and forming the First Squad of the Headquarters Platoon (the female Panzerjaegers are the HQ Squad). The new things I've tried with these are: additional detail to the bases beyond artist's media gel and paint/flocking/sand, decals on the shoulder pouldrons and both washes for deep detail and drybrushing for highlighting.
Here's the whole squad:

The sergeant and his corporal (and yep- those are 2nd Ranger Battalion scrolls on the shoulder armor from Bolt Action; I served for three of my 27 years in the 1st Ranger Battalion, was very pleased to add these to the Grenadiers):
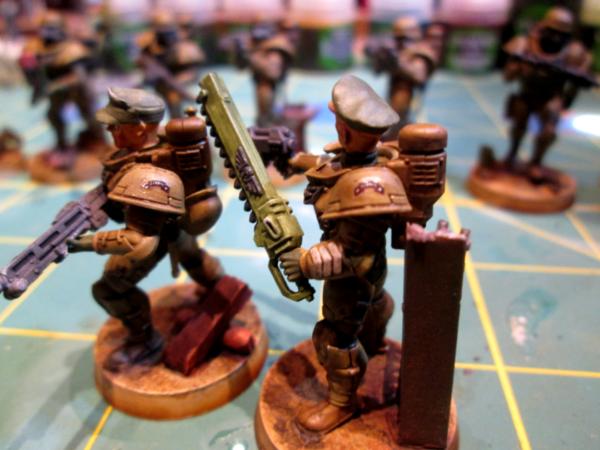
Since this is a Veteran Squad, they have two missle-eers and a special weapon, here are the missle-eers:
The flamer and radioman (gotta go back and drill out that barrel!):

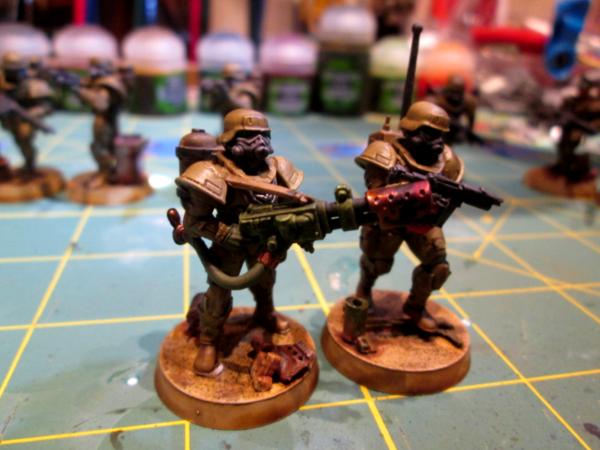
And here are the 'gun boys' that make up the rest of the squad (I've been trying to use a mold line scraper to get rid of said mold lines, but I can see from two of the helmets that I'm not doing enough- I'll try filing with an emery board next time):


A detail I hadn't added before is the 'dirk'; Dream Forge includes this item with all their kits, so for this squad I tried to put some effort into adding them and painting them:
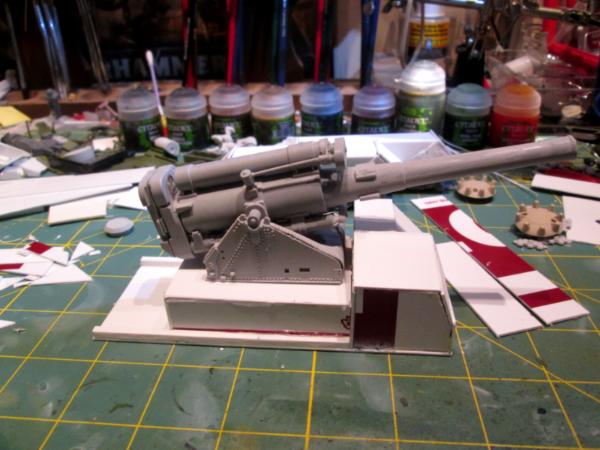
So, another squad completed towards building an ever-expanding Guard for the glory of the Emperor. Next up is to take this:
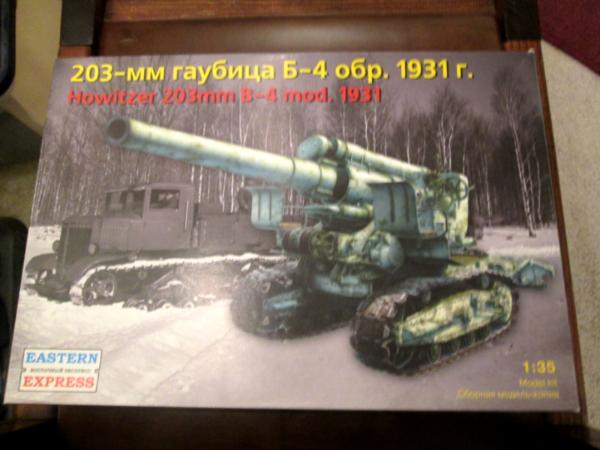
...and kitbash, customize and overdo it until it is a Super Basilisk.
This is a terrific kit from Eastern Express of a Soviet WWII B4 203mm towed howitzer/heavy artillery piece. The moldings are very crisp and nice, solid plastic. The kit has individual track links and, as assembled looks like it will scale out closely to the footprint of a Basilisk. Roughly, I'm figuring to add a cab to the front and a loading platform at the back. I have extra tread/track units from Robogear, but may scratchbuild my own for the rear. I've also got a shell hoist from Bitspudlo, but may also build my own if the scale isn't quite right.
And all of that will most certainly change as I get started and encounter reality, plus 'bright idea fairy' moments as the build goes on.
More follows soonest!
|
"He fears his fate too much, or his desserts are small, who will not put it to a single touch; to win- or lose- it all."
Montrose Toast
|
|
|
|
|
2017/08/21 23:38:31
Subject: Re:sCratchbuilding and Citbashing by Meer_Cat: 8/9 new Grenadier Squad added
|
|
[DCM]
Boom! Leman Russ Commander
|
So I'm working on getting the major sub-assemblies of the howitzer together and finally know which way I'm going with it. I think it's going to be a lot of fun, and - if the vision I have right now actually pans out- will not look anything like the original model _or_ a Basilisk.
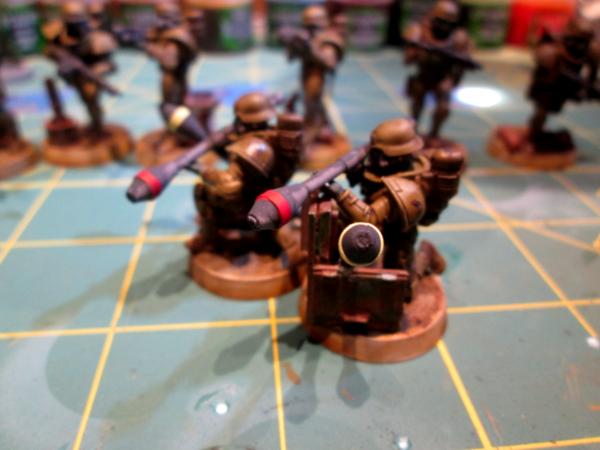
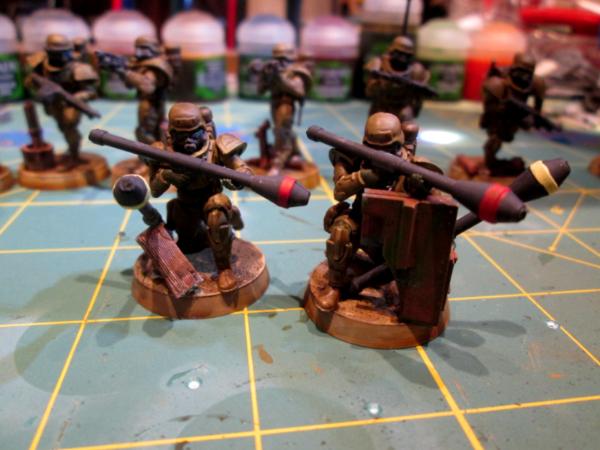
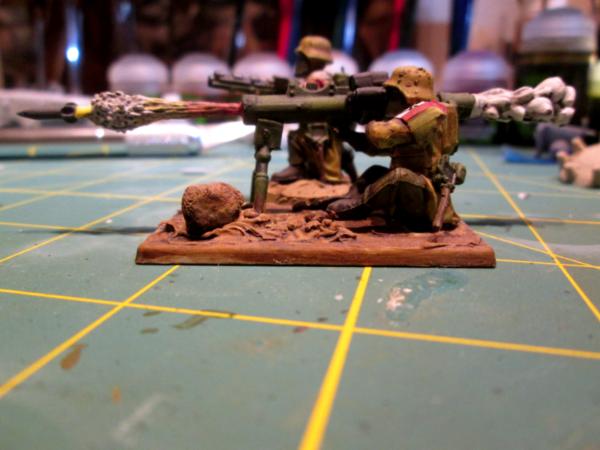
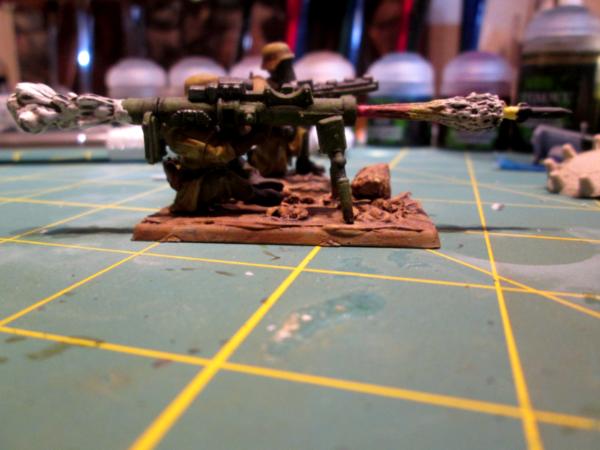
In the meantime, here are a couple of shots of a minor conversion I did a bit ago. This Dragon style Anti Tank Guided Missile team was included in a shot of the manned Imperial firebase earlier in this thread but not featured, so some of the details were masked.
The bits used include the seated and kneeling heavy weapons crewmembers from the Wargames Factory Greatcoat Troopers Heavy Weapons set, a GW missile launcher, a night vision scope from the Dream Forge Panzer Jaeger set and a WGF mortar bipod. The ammo carrier's backpack is from Robogear. I'll have to look up the name of the company that makes the flame and smoke castings to make it look like the gunner is firing, but I really like how the piece came out. Per Klaus- Not Santa's blog, I'm going to try to make my own next time. He has several excellent Tutorials in his pages on how to make them.
I wanted to make an ATGM team in the seated firing position because everyone always makes the missile guy kneeling, and I'm here to tell you that is the most uncomfortable and inaccurate firing positon you could possibly take. Your upper body is weaving back and forth because you have no anchor point, there's always gravel under your knee and that kills and your raised knee offers no support whatsoever. Seated, you have a tight body position and better stability and one's rear end is padded enough to be able to ignore all but the biggest, sharpest rocks one might sit upon.
My two cents anyway.

I'm fulltime on the new project, so more follows soonest!
|
"He fears his fate too much, or his desserts are small, who will not put it to a single touch; to win- or lose- it all."
Montrose Toast
|
|
|
|
|
2017/08/23 23:45:39
Subject: Re:sCratchbuilding and Citbashing by Meer_Cat: 8/21 IG Dragon ATGM team added
|
|
[DCM]
Boom! Leman Russ Commander
|
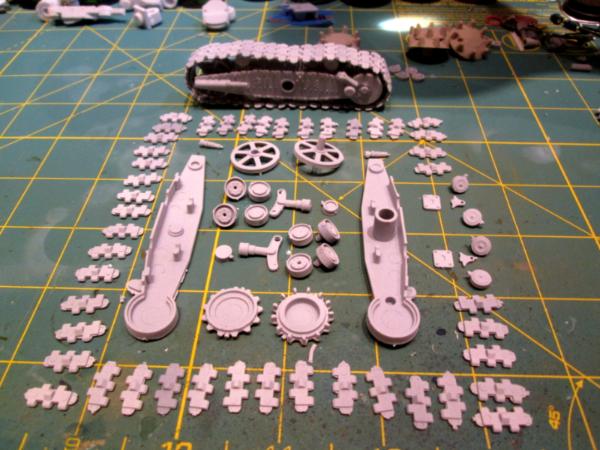
I'm getting the major sub-assemblies completed- the parts from the actual kit that will go together and mostly get left alone. Then the real fun begins, with integrating those assemblies into a new framework and scratch-building a lot of things. I'm still very impressed with this kit, and can't believe the detail that goes into everything. There are literally details either molded into the pieces or constructed that then later can't be seen as the kit builds up- a very true representation of the B4 Tracked and Towed Heavy Howitzer.
Here's a photo to give an idea of how complex the kit is (all the pieces in the foreground are required to produce the track unit in the background):
Like I mentioned, the real fun should be starting shortly. I (think) I know what I want t build and have the materials, it remains only to see if I have the skills. I reckon to have something for all y'all to critique directly down the road.
Thanks for looking in and giving me the chance to show off some of my work, and for all your help and advice.
More follows soonest!
|
"He fears his fate too much, or his desserts are small, who will not put it to a single touch; to win- or lose- it all."
Montrose Toast
|
|
|
|
|
2017/08/24 18:36:20
Subject: Re:sCratchbuilding and Citbashing by Meer_Cat: 8/23 Basilisk Conversion Begun
|
|
Longtime Dakkanaut
|
HaHa, I concur about the kneeling / seated position !
"Not Basilisk" looks like a good start, and certainly looks a good alternative, GW make some terrific figures, tho expensive, but its true there tanks seem to have a long way to go before they catch up with historical models.
Nice work buddy !
|
|
|
|
|
|
2017/08/24 21:52:48
Subject: Re:sCratchbuilding and Citbashing by Meer_Cat: 8/23 Basilisk Conversion Begun
|
|
[DCM]
Boom! Leman Russ Commander
|
Thanks Big H! And good to hear from you again.
When I picked up the B4 Howitzer kit, I was hoping that the gun platform itself would be the right side (or close enough) to form the skeleton of the mobile vehicle platform, but that hasn't turned out to be the case. It turned out to be 'way too long and just a little bit too narrow. I cogitated on that for some time, but I believe I have a good plan to build something innovative and new, and make good use of the existing parts. Without going into details (partly because I don't truly know how I'm going to do it and partly because I'm excited to see if it even might work) picture a 155mm Paladin self-propelled howitzer with its own articulated ammo hauler.
Commenting back on the Dragon ATGM- I hated the kneeling firing position, but was really too short for the seated- the darn front folding leg only had two adjustments and the one was 'way to low and the other was just a scooch too high. I usually wound up sitting on my protective mask case to 'fit'. Fortunately, I got shifted over onto a gun crew relatively quickly and only had to lug the Dragon around for a few months. I did get to fire a training load twice- they are a hoot and when they say it has a 40-50 meter back blast area- they meant it!
I intend to over-do the 'not basilisk' like a I did the Hanomag- more follows soonest!
|
"He fears his fate too much, or his desserts are small, who will not put it to a single touch; to win- or lose- it all."
Montrose Toast
|
|
|
|
|
2017/08/25 03:13:01
Subject: sCratchbuilding and Citbashing by Meer_Cat: 8/23 Basilisk Conversion Begun
|
|
Combat Jumping Rasyat
|
I'd never thought about kneeling vs sitting for heavy weapons until now but what you said makes total sense.
I will however still argue that the WGF Greatcoat sitting legs still look "off". They look like they're doing yoga, if they were actually crossed or one was extended they would look much better.
As for the insanity of the artillery kit, sounds about right. I used to build historical plastic models and TBH those track units don't look too bad. Worst I encountered was a kit I never finished for other reasons of a WWII German scout half-track. 5 overlapping/interlaced road wheels (SDKFZ 250/251 family) and drive wheel with track links around half as wide.
|
|
|
|
|
2017/08/26 16:19:13
Subject: Re:sCratchbuilding and Citbashing by Meer_Cat: 8/23 Basilisk Conversion Begun
|
|
[DCM]
Boom! Leman Russ Commander
|
Yup- seated behind a tripod mounted weapon, the Greatcoat Troopers seated figures are a little goofy, IMO the legs should be bent at the knee a bit more, a bit more flexion. I've modified a couple to look a little bit better but really to make them fit the basing I was using- it's pretty easy to saw a bit behind the knee and then carefully bend the leg.
But for a monopod or bipod mounted weapon, the seated pose is almost exactly right. One's legs tend to be a bit straighter (unless you're taller than me, in which case you still have to flex the knee) because you're trying to scooch your heels into the dirt a bit for stability (you're leaning forward into the bipod, but pushing back with your heels). The toes should point up a bit more though.
You're right about the track units- it was intimidating at first because I hadn't built an historical kit since I was in my teens, and never one with individual track links- always the 'rubber band' type treads. But these went together pretty easily in the end, just had to develop a different technique to have the glue ready and the pieces ready at the right time.
I've been looking over the customized and scratch built Bassies here on Dakka Dakka for inspiration- ;lots of good work to go by here. I think the rough concept I have will work, and I'm almost to the point where I can start really messing around with it.
Thanks for your input ChaoticMind- I really appreciate it!
More follows soonest!
|
"He fears his fate too much, or his desserts are small, who will not put it to a single touch; to win- or lose- it all."
Montrose Toast
|
|
|
|
|
2017/08/26 17:59:02
Subject: Re:sCratchbuilding and Citbashing by Meer_Cat: 8/23 Basilisk Conversion Begun
|
|
Combat Jumping Rasyat
|
I happily bow to your greater experience regarding heavier weapons. All I've ever fired is pistols (mix of .22 and 9mm caliber, standard and long barrels), and a .22 rifle. Always at a range with a bench and at most a bag or small bipod for the long barreled pistols, rather different from any sort of "real world" weapon use.
However I'm glad I wasn't making a complete fool of myself!
|
|
|
|
|
2017/08/29 23:38:31
Subject: Re:sCratchbuilding and Citbashing by Meer_Cat: 8/23 Basilisk Conversion Begun
|
|
[DCM]
Boom! Leman Russ Commander
|
ChaoticMind: Definitely not making a fool of yourself: the principles for accurately aiming a weapon are basically the same, whether it's a 9mm pistol or a shoulder-fired missile launcher. In every case, a stable platform is created by a push-pull dynamic. In the case of the pistol, one 'pushes' out with the pistol against the 'pull' of the attachment point of the arm to the shoulder. The second hand that supports the firing hand and arm is actually more helping to control left and right weave, if the push-pull against the shoulder is strong enough. Using an isosceles triangle stance, or a modified Weaver, creates a number of triangles of the different portions of the body, all of which re-inforce each other and yield the stable firing platform. Same thing with a shoulder weapon, just different push-pull points. The most stable seated firing position for any long weapon is the modified cross-legged sit, in which the legs are crossed and the elbows rest on the knees (knees are optimally on the ground, or otherwise supported by something).
As for the Basilisk conversion, a bit of forward motion tonight. Here are the major sub-components from the kit that I reckon to use more or less 'as-is':

The first thing that came to mind is that I didn't do a very good job on the track units- very uneven and loose. Fine for cultists or Orks, but not the mighty Guard. So, in modeling as in carpentry, trim hides a multitude of sins. Track boxes/guards seemed the best way to go, so I needed a fairly stiff piece of plastic for the top of the track box and some aligning struts:

Added some end caps to break up the outline:

And viola, Bob's your uncle: track boxes:

In the last pic, the boxes are just floating on the track units themselves. They still need gap filling, sanding, more panels added and (this time for sure) RIVETS.
I think next step will be to build the forward crew/driver's compartment. This will form the attachment point for the tread units, counter-balance the loading platform that will go on the back and act as the base for the gun platform (which is going to get chopped roughly in half- the back part will form the chassis for the articulated ammo carrier). And believe me, I'm quite sure that all those triangular offcuts are going to come in handy going forward.
More follows soonest (it's too early to say 'it isn't done until it's OVERDONE').
|
"He fears his fate too much, or his desserts are small, who will not put it to a single touch; to win- or lose- it all."
Montrose Toast
|
|
|
|
|
2017/08/31 22:16:14
Subject: Re:sCratchbuilding and Citbashing by Meer_Cat: 8/29 Track Boxes done
|
|
[DCM]
Boom! Leman Russ Commander
|
Here's the next bit done:
I've cut out the basic 'bed' of the entire vehicle from a piece of stiff 'Beware of Dog' sign (good styrene building plastic for cheap and I need another one as I'm running out) and built out the cab for the driver and the engine compartment:

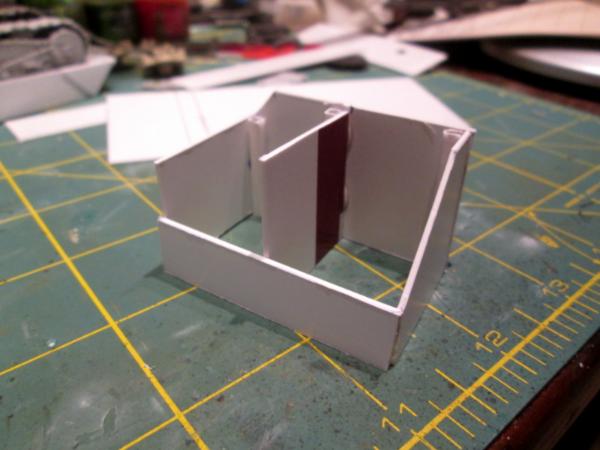

And also built the firing platform for the gun:
Filling, sanding to follow and the next step (I think) is to build out the gunners' platform behind the gun and then add the rest of the bits (especially the fire director's seat, and the traverse and point aimer positions) to the trunnion structure. Then detailing panels, crew items, the gun crew and everything else.
More follows soonest.
|
"He fears his fate too much, or his desserts are small, who will not put it to a single touch; to win- or lose- it all."
Montrose Toast
|
|
|
|
|
2017/09/06 00:47:06
Subject: Re:sCratchbuilding and Citbashing by Meer_Cat: Basilisk conversion 8/31
|
|
[DCM]
Boom! Leman Russ Commander
|
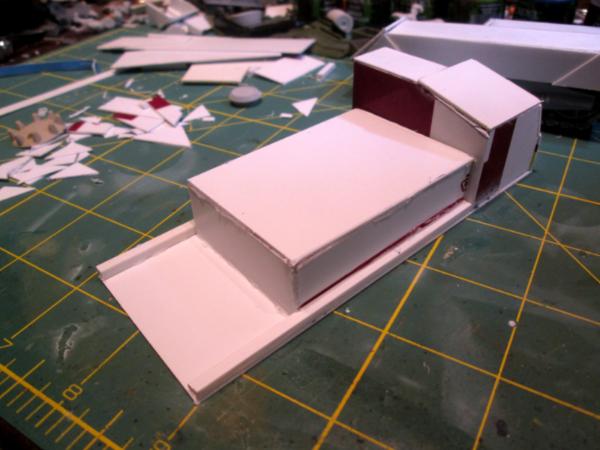
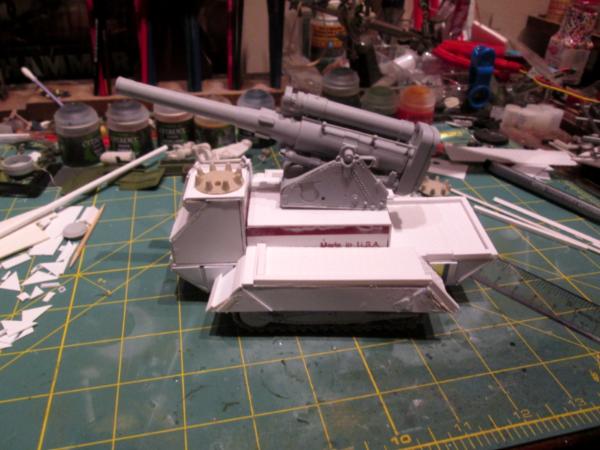
I had some time tonight, so here's the next piece done on the self-propelled Earthshaker howitzer:
I built out the bottom of the hull and added the first of many, many trim pieces (both to add depth to the model and to hide my many errors). I debated on whether or not to cut the bottom and top pieces to length, and then build out the sides, or cut the side pieces and then add the tops and bottoms. I went with the former strategy, as all the proportions are based off the length of the gun stand. The basic footprint I measured from a chimera, but the cab-forward, and the crew platform at the rear, are based off their relationship to where the gun mount sits- so I went with the length sections rather than the sides first. The 'lip' added to the front of the cab, where the upper and lower hull sections join, is the closing latch from an Old Bay seasoning canister- it'll be the hinge for access to the engine compartment. I'm also almost out of 'Beware of Dog' and 'Yard sale' sign sheet plastic- I'll need to drop by the DIY/Home Depot and get another of each- good plastic, cheap!

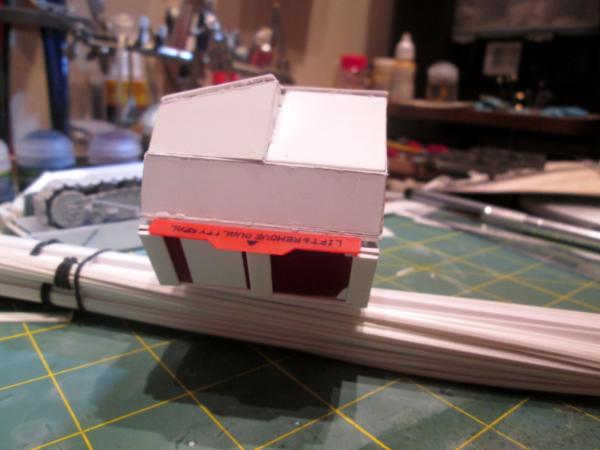
And I've added the track boxes- this started as a precise, surgical operation that rapidly 'went south' and required a ton of glue to hold together. And, as you can see, still requires a ton of trim and putty and greenstuff. _But_, for my first 'nearly totally scratch built' I'm not totally disappointed and there isn't anything I see here that can't be fixed and/or hidden. Looking at the pic, I chuckled to see the 'Made in USA' label- that was totally an accident, but perfectly placed!


So, it's starting to look like something now. Next will be the crew platform in the back and the start of panel details around the engine compartment and driver's box. I'm almost to the point of being able to over-do it.
More follows soonest!
|
"He fears his fate too much, or his desserts are small, who will not put it to a single touch; to win- or lose- it all."
Montrose Toast
|
|
|
|
|
2017/09/06 23:45:05
Subject: Re:sCratchbuilding and Citbashing by Meer_Cat: Basilisk conversion 9/5
|
|
[DCM]
Boom! Leman Russ Commander
|
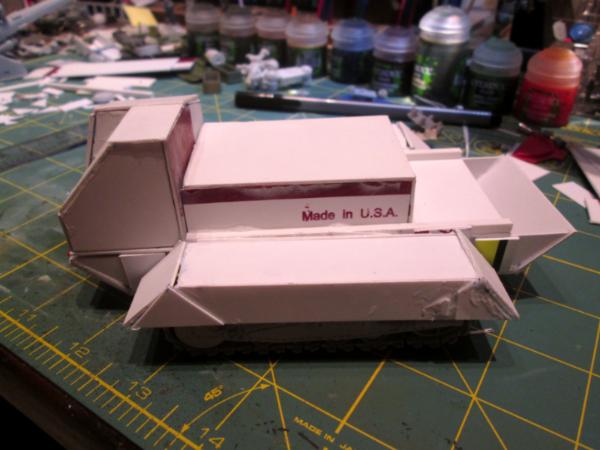
It's been a very good week for getting time in on the project- here's what's gotten done so far tonight:
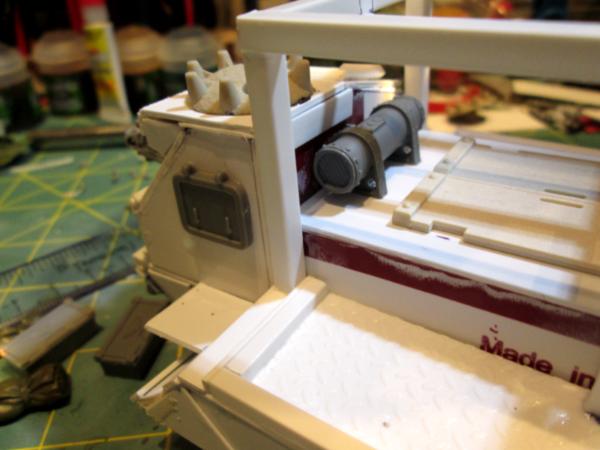
Got some work done on the driver's side of the cab- the hatch on top is actually made from a rubber golf cleat (I got a package of 50 from the local thrift shop for $1.00). Also started applying body putty (the Handyman's friend!), but still more trim and putty to go:
Another shot from the forward end, I think I've been able to square up the track fenders pretty well, and still have a couple of tricks to try to get it the rest of the way. I also scratch built the louvers for the engine air intake:

Also got the fighting deck started on the other end- hard to see with the glare in this pic, but the treadplate deck is laid and the edge rim installed. Also the track fender plates are on (to hide the cant) and are ready for their tread plate to be added on top:
Started building out the right side:
And you could see this doo-dad in other pictures, here's a closer shot- it's going to be part of the exhaust louver for the engine compartment. This piece is made from another bit from the spice can lid and a couple of pieces of straw. I'm still debating running hoses from the pipes you see sticking out to vertical exhaust stacks (that will line up depending on where the gun barrel ends up) or leaving them be:
So, a lot of fiddley work again, but my own fault for not cutting precisely in the first place. I am still happy with how things are shaping up though, and looking forward to getting the 'basic' work done so I can start over-doing things.
Your comments, suggestions and constructive criticism are always welcome- it's how I've learned what little I know now!
More follows soonest.
|
"He fears his fate too much, or his desserts are small, who will not put it to a single touch; to win- or lose- it all."
Montrose Toast
|
|
|
|
|
2017/09/08 00:33:01
Subject: Re:sCratchbuilding and Citbashing by Meer_Cat: Basilisk conversion 9/6
|
|
[DCM]
Boom! Leman Russ Commander
|
Only had a little time tonight, so got the last trim onto the track boxes, and put the tread plate down. Next up, some more filling, a little more trim, and then time to add all the vehicle fittings- grab handles, vision slits, armor panels, etc. Then on to the gun and primering!
|
"He fears his fate too much, or his desserts are small, who will not put it to a single touch; to win- or lose- it all."
Montrose Toast
|
|
|
|
|
2017/09/12 01:24:30
Subject: Re:sCratchbuilding and Citbashing by Meer_Cat: Basilisk conversion 9/7
|
|
[DCM]
Boom! Leman Russ Commander
|
Big steps and little ones- tonight was a lot of fiddling for a little bit of gain, but I think I'm happy with it.
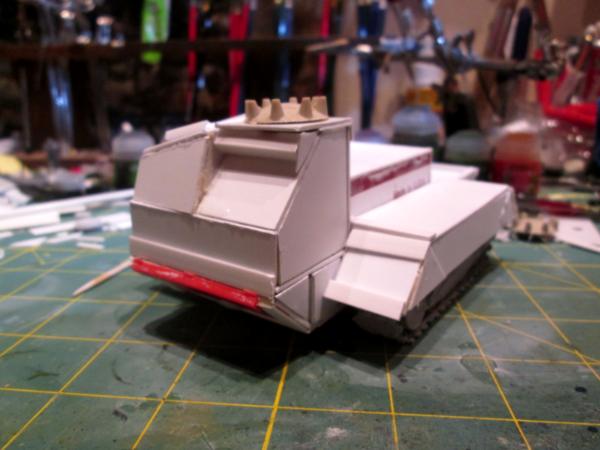
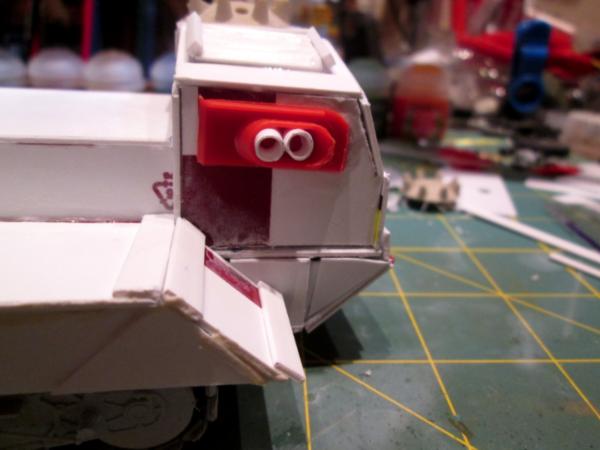
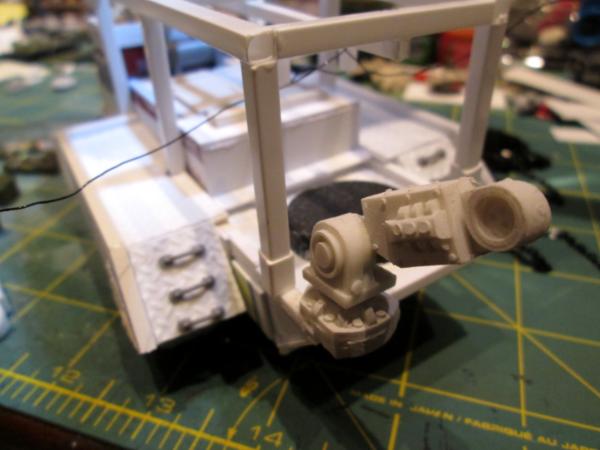
First of all, I've been thinking about how to mount/where to put a hull mounted weapon, to match the real Basilisk's load out. I decided that the driver's compartment just became a driver/gunner's compartment- it was really the only place on the hull to put something; I didn't want to go with another TC's pintle mounted weapon, as it would foul the main gun. But, now I have to build in a TC position, as the driver has quite enough to do what with driving, firing the hull weapon and not getting parboiled by the engine sitting right next to him (as in the M113).
I didn't have a hull-mount heavy bolter to give up, but I did have the sawn-off front half from an earlier project, so a little trimming and some styrene and I had the basic parts to go forward with:

I also wanted some sort of optic, not just a vision slit (so WWII Sherman), so I pulled some scraps together to make this:
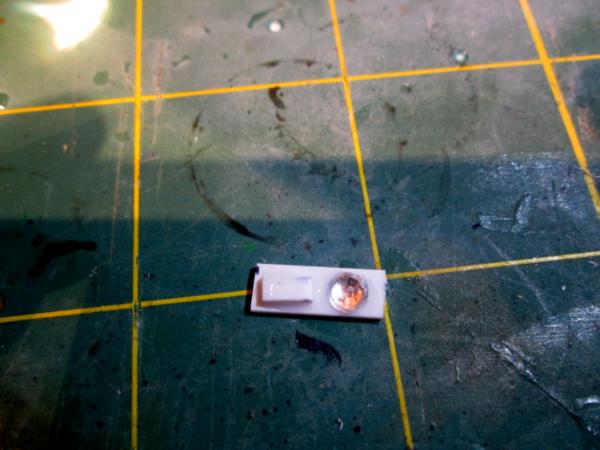
And here's how it looks all mounted and trimmed (hiding a multitude of sins) up:
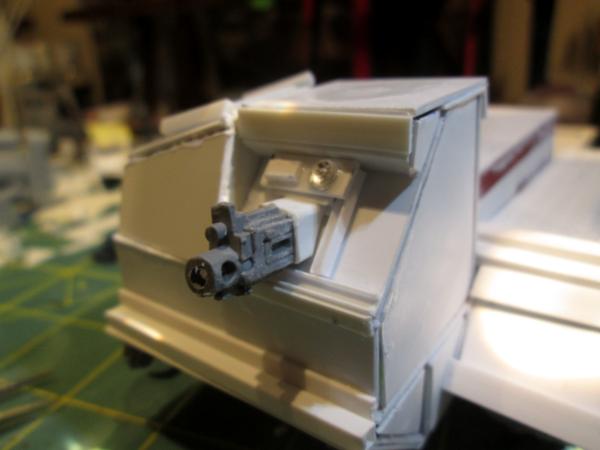
And here's another shot, a little lower, to show the addition of the front tow hooks (from a Leman Russ kit, I think, they were part of a large lot of vehicle bits I got a good deal for on eBay):

Still lots to go, not least rivets, but I think the next big push will be the gun mount- the B4 203mm howitzer had two seats for crewmembers to sit in whilst they lay the gun- one of those is getting framed in to become the TC's perch. It's okay for the rest of the gun bunnies to ride back on the firing platform in the freezing cold- but no self-respecting gun captain would.
More follows soonest, and thank you for the opportunity to show off a bit of my work. This is the closest to a scratch build as I've come, up to date.
|
"He fears his fate too much, or his desserts are small, who will not put it to a single touch; to win- or lose- it all."
Montrose Toast
|
|
|
|
|
2017/09/12 05:21:17
Subject: sCratchbuilding and Citbashing by Meer_Cat: Basilisk conversion 9/11
|
|
Gargantuan Great Squiggoth
|
Really shaping up bud, details will pull it together. Definitely looks the business. Great work again.
|
|
|
|
|
|
2017/09/13 00:18:12
Subject: Re:sCratchbuilding and Citbashing by Meer_Cat: Basilisk conversion 9/11
|
|
[DCM]
Boom! Leman Russ Commander
|
Thanks Cam! And the main framework I think is just about done, so it's getting to be time to be thinking of the details- especially the loading apparatus. Still not sure if I want to mini-diorama/scenic this at the moment of firing or showing the crew loading. Definitely the beast will not be on the move. A fair bit to do before applying paint to anything- but I am scoping the stencils from Fallout Games and Anarchy Miniatures 'just in case' for 'when the time comes'!
I always appreciate your stopping by and dropping the encouraging word- it means a lot.
More follows soonest!
Automatically Appended Next Post: So here's soonest- and a question for anyone to chip in on:
I was messing around, wanting to mount the gun-plate on a turntable, to allow for at least limited traverse without relaying the entire weapon platform, when it occurred to me that the contours of the vehicle hull implied a lot of internal space that was being completely ignored. On a GW Basilisk, the gun is set into the hull space, so everything works out right. On mine, the gun is perched up on top and all the space below it is really just lockers, at best.
So, which looks more realistic/believable and/or better, this:

Or this:
I've got my own favorite, of course, but really want to know what all y'all think. For either configuration, I'm planning to add deployed spade jacks and shock absorbers/recoil rods.
And whilst we're at it, which do you think is the better vignette- the gun firing, or the crew loading?
I'm looking forward to hearing from you!
|
|
This message was edited 1 time. Last update was at 2017/09/13 01:33:42
"He fears his fate too much, or his desserts are small, who will not put it to a single touch; to win- or lose- it all."
Montrose Toast
|
|
|
|
|
2017/09/13 02:24:58
Subject: sCratchbuilding and Citbashing by Meer_Cat: Basilisk questions for y'all 9/12
|
|

Stalwart Skittari
|
Crew loading. definately
|
"I do not like broccoli. And I haven't liked it since I was a little kid, and my mother made me eat it. And I'm president of the United States, and I'm not going to eat anymore broccoli." George W. Bush. |
|
|
|
|
2017/09/13 23:29:46
Subject: Re:sCratchbuilding and Citbashing by Meer_Cat: Basilisk questions for y'all 9/12
|
|
[DCM]
Boom! Leman Russ Commander
|
Good to hear from you ApaceKittens- and thanks! I'm leaning that way (crew loading) and am really liking the gun mounted at the back of the platform instead of higher up top.
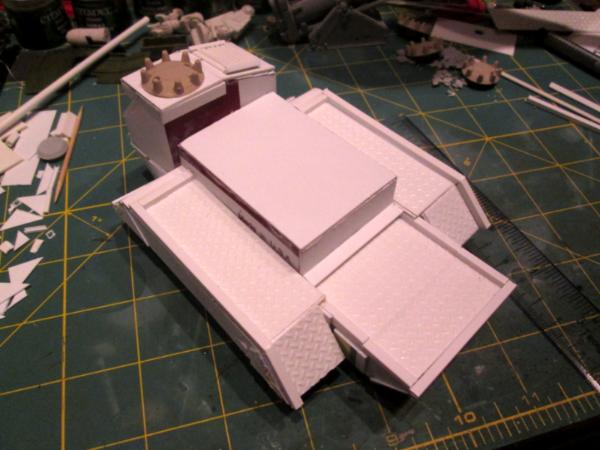
Here's some of the work from tonight, based on the new position for the gun mount on a turntable. The vehicle will need stabilizers to help control recoil and keep the platform from shifting left or right upon firing, so here's the first (and hopefully only required) attempt to build something:
First, needed some basic components for 'landing leg' type stabilizers-something that can be extended to deal with uneven terrain, but be retracted and swung back up out of the way when the track is on the move. Started with some baby bottle party favors from the dollar store and cut the caps off:

This gave me almost everything I needed:
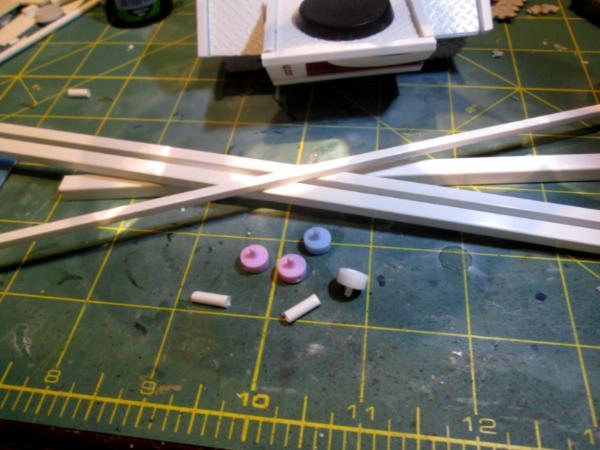
Then glued them to a piece of styrene straw to act as a hinge pin:

I used JB Weld, which may have been a mistake as it's not setting yet (may have not put in enough hardener) so I can't start gluing things up to the track itself. I next cut a 0.75 inch length of every size of styrene channel that I own and found some steampunk gears to act as 'feet':

And here's what the stabilizer will (mostly) look like when it's fixed in place:
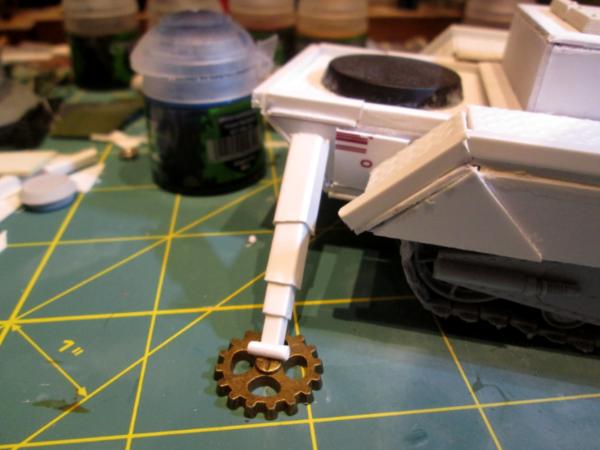
All that is missing in this last shot is the large hinge (still drying) and a bit of boxing out to form the attachment point to the hull. The turntable will sit on top of this and then it's on to the next sub-assembly. I'm thinking that a big bore piece like this will need a travel lock to keep the barrel from bouncing on the trunnions when on the move, so that's probably next. Plus the TC still needs a place to sit.
I look forward to your constructive criticism, suggestions and comments.
More follows soonest!
|
"He fears his fate too much, or his desserts are small, who will not put it to a single touch; to win- or lose- it all."
Montrose Toast
|
|
|
|
|
2017/09/14 01:40:10
Subject: sCratchbuilding and Citbashing by Meer_Cat: Basilisk questions for y'all 9/13
|
|
Gargantuan Great Squiggoth
|
Damn it, thought I had commented earlier.
All looking great work bud. Couple points.
Crew loading would be better.
Not sure on the gun position, I understand where you are coming from on both, and your point is taken about the space beneath the gun.. Not sure how moving it back does it any favours though. Certainly the barrel would need a slight extension, and if it is at the back I would be afraid of the thing tipping backward when it fired, I like the legs stabilisers, but would say they maybe need to be angled slightly back the way.
Two cents spent, hope you don't mind the ramblings of a daft old fart.
|
|
|
|
|
|
2017/09/14 01:58:19
Subject: Re:sCratchbuilding and Citbashing by Meer_Cat: Basilisk questions for y'all 9/13
|
|
[DCM]
Boom! Leman Russ Commander
|
Not rambling at all- points well taken and I appreciate them. I can definitely angle the stabilizers outward, and that makes good sense, both for recoil and side-to-side balance. I'm afraid I painted myself into a bit of a corner with the hull superstructure though, short of tearing it down and keeping the best bits and starting over, not sure which way to go. I am thinking of keeping the gun to the rear and rigging it something like the old M110 (which was an eight inch/210mm self-propelled in the US inventory until well into the '80's). The loading was done from the ground via ramp and plunger.
I like the idea of a barrel extension- it would give balance to have the breach hanging off the back to have the barrel protruding forward of the cab. I'm thinking I may also augment the barrel shock absorbers- the three that are on now (original parts of the kit) don't look robust enough for a track mounted gun (the original kit is for a towed, albeit tracked, artillery piece). Something 'more bigger' is needed to control all that kinetic energy.
I also think to ramp up the scenic base- by creating a lot of realistic action around the gun, I'm thinking it will add realism to the platform.
I'll play with it some more, and- the worst that happens is I've learned what _didn't_ work and go back and try something new.
Thanks for the honest input and keep it coming! As my pop used to say 'you don't get better shooting pool by playing people less skilled than yourself.' This is how I (hopefully) improve my skills and my game.
More follows soonest!
|
"He fears his fate too much, or his desserts are small, who will not put it to a single touch; to win- or lose- it all."
Montrose Toast
|
|
|
|
|
2017/09/26 01:10:45
Subject: Re:sCratchbuilding and Citbashing by Meer_Cat: Basilisk questions for y'all 9/13
|
|
[DCM]
Boom! Leman Russ Commander
|
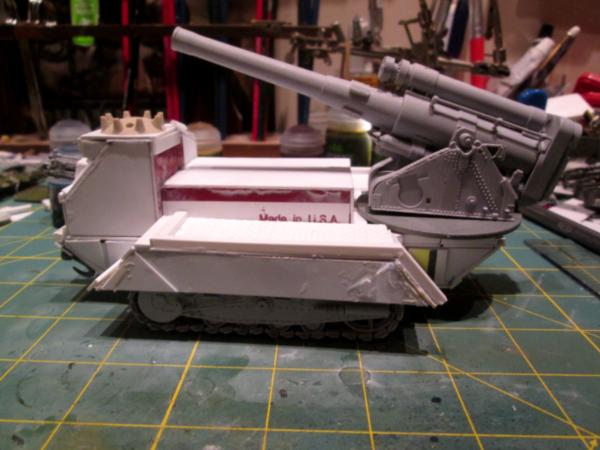
We are now officially 'out of scope' from the original project. I kept trying to puzzle out a way to go forward with the self-propelled gun based on the first concept, which was to adapt a Soviet World War II heavy howitzer onto a scratchbuilt platform and use the treads from the kit as the motive power. No matter how I positioned the gun, it just didn't look right.
If a put it up top of the fighting platform, as I had originally planned, it looked ungainly- and left the open question of what was in all that space underneath (too deep for storage, too short for crew):
If I moved the gun turntable to the rear of the vehicle, it looked too unbalanced, and only allowed the main gun to depress down to about 15 degrees, instead of zero, as would be customary for movement:
So, the answer that finally came to me is IT'S TIME TO OVERDO THINGS!
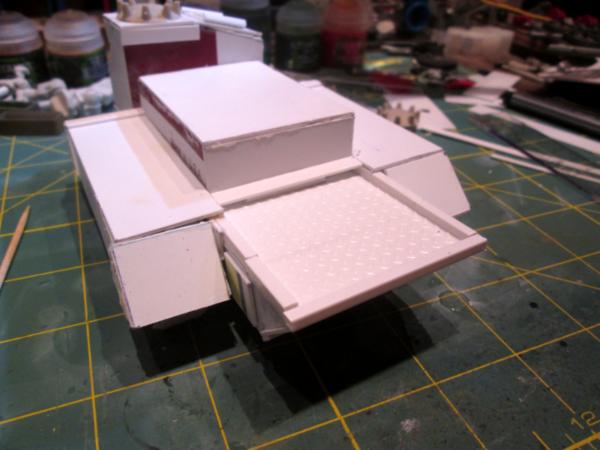
Instead of a single vehicle, possibly with an ammunition trailer, we will now create TWO separate vehicles. This first one will be the ammo hauler- akin to the US M548 that supported the M109 self-propelled 155mm howitzers (replaced by the Paladins with their own, upgraded ammo hauler). All that extra space below the decking is now armored, vented, low-fat ammo crate stowage. It will need a hoist system to
get the crates out, and then a mechanical arm to sling the set rounds onto the loading foil.
Tonight I got a start on the hoist system. I cut some styrene channel:
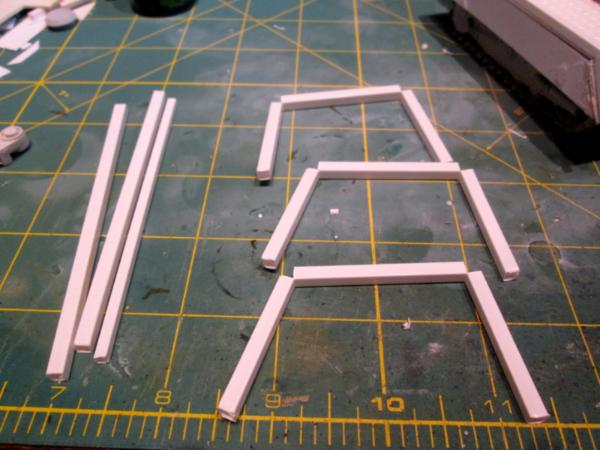
Roughed out the frame:

And fastened in a bit to form the basis of the hoisting clamp:

So far, I like how this is shaping up. I need to finish the panels on the hull sections to fill out some of the blank spots, fill a lot of gaps with greenstuff or putty, finish the hoist and add the mechanical loading arm (I have a store bought one from Kromlech, or possibly Bitspudlo). At the same time, I'm looking for something to use as the basis for tread units for the new gun platform- or may possibly scratchbuild my own- I've been reading a lot of articles and seeing the great work a lot of you are doing in that regard.
Any way- out goes the nice, simple, somewhat converted/somewhat scratchbuilt, closed easy Basilisk counts-as, and in comes the greatly expanded, two vehicle set with a lot of detailing to be figured out.
I'm happier this way, I think.
More follows soonest!
|
"He fears his fate too much, or his desserts are small, who will not put it to a single touch; to win- or lose- it all."
Montrose Toast
|
|
|
|
|
2017/09/27 01:46:22
Subject: Re:sCratchbuilding and Citbashing by Meer_Cat: Basilisk- massive change in scope- let's overdo it! 9/25
|
|
[DCM]
Boom! Leman Russ Commander
|
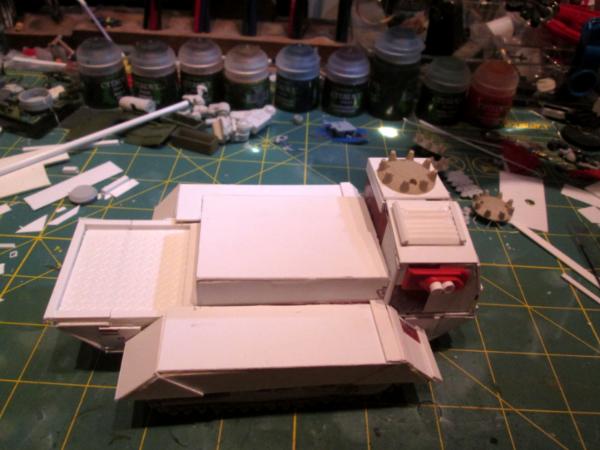
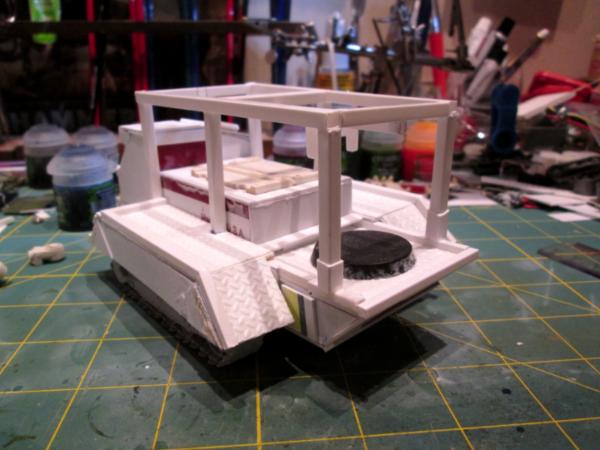
A little bit more done tonight- a bit of work on the chain hoist, added the base for the mechanical arm, added some hatches and grab-irons. Too late to do more now, but tomorrow I hope to finish the bondo-putty work on the hull so I can get a basecoat of primer on the beast. Trying to think up a good 'workhorse/hauler' type name for this vehicle series, too.
Will definitely pose the ammo hauler and its Basilisk in the 'crew loading' position, with a crewman operating the chain hoist, bringing another ammo crate forward, one or two crewman shoving a fixed round down the loading glacis into the breach and others in the trainer, pointer and gun captain positions. I want to base the two vehciles separately, but in such a way that the bases can be pushed together or interlock and display as one piece.
More follows soonest.

|
"He fears his fate too much, or his desserts are small, who will not put it to a single touch; to win- or lose- it all."
Montrose Toast
|
|
|
|
|
|
|


