| Author |
Message |
 |
|
|
|
|
Advert
|
Forum adverts like this one are shown to any user who is not logged in. Join us by filling out a tiny 3 field form and you will get your own, free, dakka user account which gives a good range of benefits to you:
- No adverts like this in the forums anymore.
- Times and dates in your local timezone.
- Full tracking of what you have read so you can skip to your first unread post, easily see what has changed since you last logged in, and easily see what is new at a glance.
- Email notifications for threads you want to watch closely.
- Being a part of the oldest wargaming community on the net.
If you are already a member then feel free to login now. |
|
 |
2018/08/06 09:03:25
Subject: The -=]_=- Terrain Competition Thread -=]_=- LoER Terrain Contest #26 "Hold the line!"
|
|

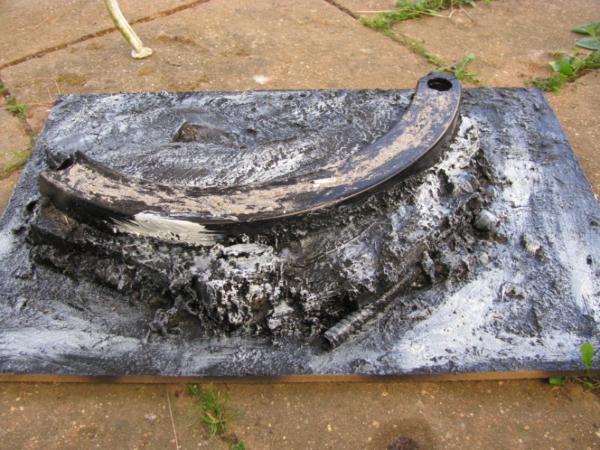
Gargantuan Great Squiggoth
|
So much wonderful work, keep it up folks. Remember the more of you finish the harder my job, make it really difficult folks.
How we all doing with the time left.
|
|
|
|
 |
|
2018/08/06 18:23:00
Subject: The -=]_=- Terrain Competition Thread -=]_=- LoER Terrain Contest #26 "Hold the line!"
|
|

Potent Possessed Daemonvessel
|
Got sidetracked by entering a knight titan in july's painting competition, but I can finally report some progress on my bunker. The texture of the lower half is done, and I applied some first layer of paint, mostly to locate area that needed further texture work. Next step, finishing the upper half...

Awesome progress on all the other entries folks ! And damn monkeytroll, that demon barricade should have rules of its own with a move characteristic, and maybe a pink-horror like ability to split !
|
|
|
|
|
|
2018/08/07 01:37:00
Subject: Re:The -=]_=- Terrain Competition Thread -=]_=- LoER Terrain Contest #26 "Hold the line!"
|
|

[DCM]
Boom! Leman Russ Commander
|
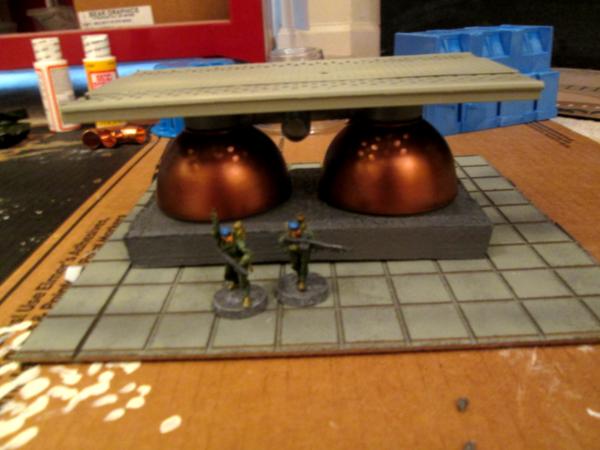
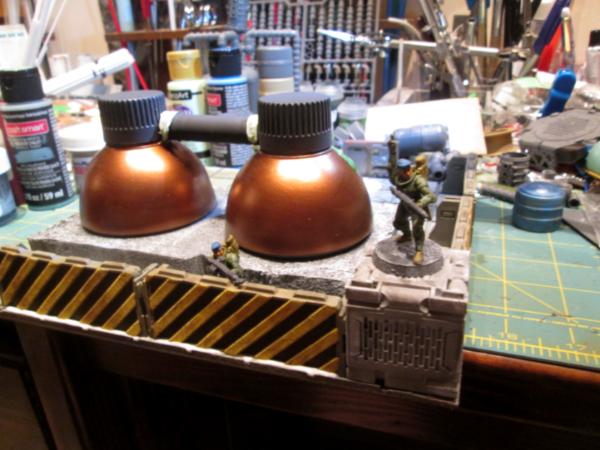
So here's what we've gotten done tonight- lots of little things that don't look like much, but I can feel the waterfall building and- if I stay on task- will burst in a flurry and before I know it, the project is done.
Here's the scale shot first. The tanks got another wash of copper- now it's time to start messing that nice finish up! I wish the base had a bit more room for figures, but the clipboard I used kind of dictated the footprint:
I figured a promethium processing plant (or any kind of chemical plant, for that matter) needed a computerized control station to run it from, and I didn't have one. But I had some bits:

And now I have one. The heavy stubber with anti-aircraft shoulder grips is actually a Tehnolog (love that company!) simple kit with some extra gubbins glued on:

I also wanted a gun tower- something that looked like it had been welded together by somebody who knew what they were doing, but using improvised parts. The bits I used included parts from a Robogear set, a toothpaste cap, a mineral supplement syringe we use for our Shetland ponies and the inevitable and ubiquitous greenstuff:
And now I have a gun tower:

Tomorrow I hope to get some paint on some of these, start laying down the improvised barricades at the ground level and maybe finish the cracking tower part (with its attached sniper's eyrie). We'll see what tomorrow brings!
|
"He fears his fate too much, or his desserts are small, who will not put it to a single touch; to win- or lose- it all."
Montrose Toast

|
|
|
|
|
2018/08/07 14:37:04
Subject: Re:The -=]_=- Terrain Competition Thread -=]_=- LoER Terrain Contest #26 "Hold the line!"
|
|
Mastering Non-Metallic Metal
|
Good work, all. 
monkeytroll wrote:Nice work on the flag. Any ideas on a design as yet, or waiting till you start the colouring?
That's for future me to worry about. It'll fit the imperial theme though.
Anvildude wrote:Heh. Hey Dr. H... "Can you hear the people sing?"
Ha, no I had to look that up. In the future there is only misery...
Good job Apollinaire. Looks functional from here.
Good texture KernelTerror.
No pics this time. Priming today... not done yet, hence no pictures.
|
     Mastodon: @DrH@warhammer.social Mastodon: @DrH@warhammer.social
The army-                   ~2295 points (built). ~2295 points (built).
 
* -=]_,=-eague Spruemeister General. * A (sprue) Hut tutorial *
Dsteingass - Dr. H..You are a role model for Internet Morality!  // inmygravenimage - Dr H is a model to us all // inmygravenimage - Dr H is a model to us all 
Theophony - Sprue for the spruemeister, plastic for his plastic throne! // Shasolenzabi - Toilets, more complex than folks take time to think about! |
|
|
|
|
2018/08/07 19:36:38
Subject: The -=]_=- Terrain Competition Thread -=]_=- LoER Terrain Contest #26 "Hold the line!"
|
|
Mysterious Techpriest
|
Some fantastic work coming along here.
That Copper looks amazing Meer_Cat
I admit I have been slacking, I may have run out of creativity on this one for a bit, but I should be able to finish on time, just have the interior to add some stuff to.
|
|
|
|
|
|
2018/08/07 20:57:09
Subject: The -=]_=- Terrain Competition Thread -=]_=- LoER Terrain Contest #26 "Hold the line!"
|
|
Potent Possessed Daemonvessel
|
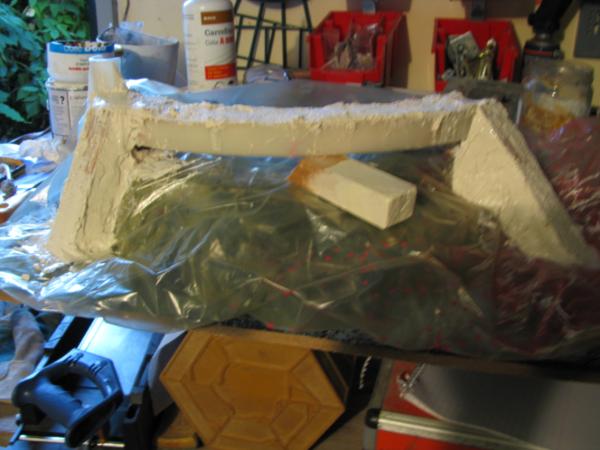
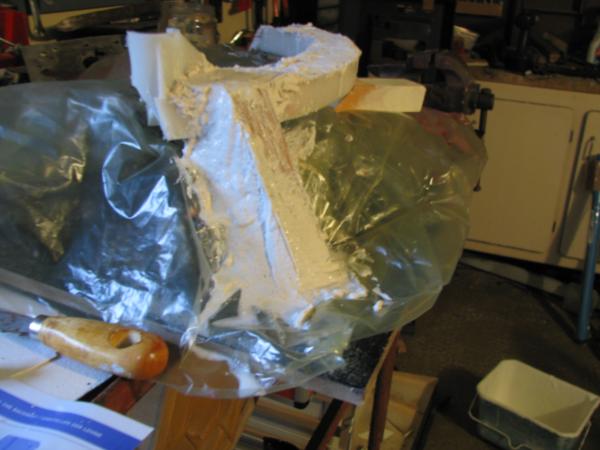
Thanks Dr H !
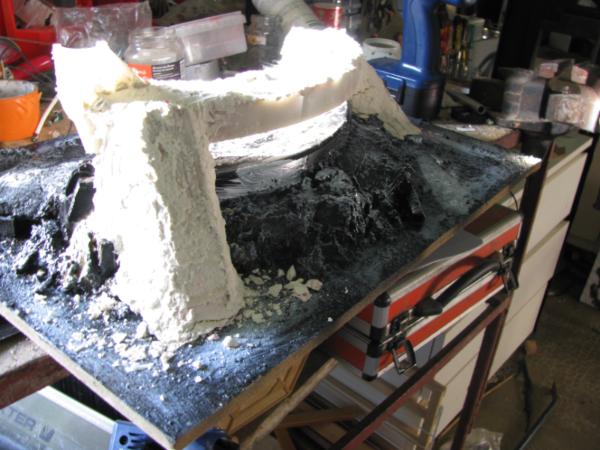
Made some progress earlier, by applying plaster to the buttresses. A plastic bag separates the two parts, but should let the top half dry into shape and stay in place on its own.
|
|
|
|
|
|
2018/08/08 01:22:47
Subject: Re:The -=]_=- Terrain Competition Thread -=]_=- LoER Terrain Contest #26 "Hold the line!"
|
|
[DCM]
Boom! Leman Russ Commander
|
Love what you're getting done, Kernel! I like messing about with plaster/stucco to get a real, gritty concrete look also- well done!
Here's what's gotten done tonight:
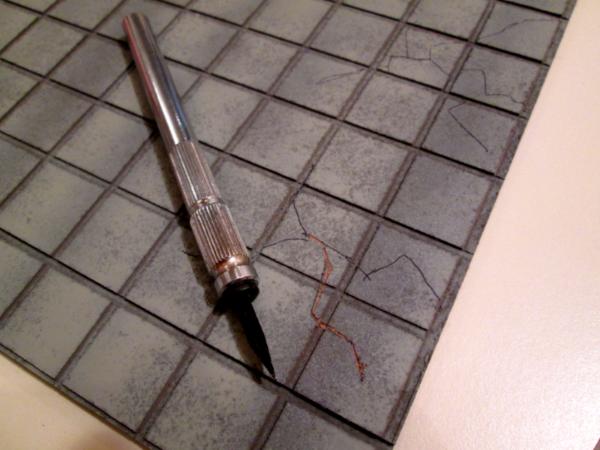
I was looking at the clipboard fiberboard base, and I really like how the grey shading (accidently) came out, but it was looking too clean cut, too fresh poured concrete to be a proper industrial site, so I went to work jacking it up. I drew some cracks with fine point Sharpie pen and started scraping them with a mold line remover I got from Micro Mark (as a scribing tool, it works very well):
Here's the finished shot of the whole platform. The big blank areas you see will actually be covered by other items, so no need to scribe them:
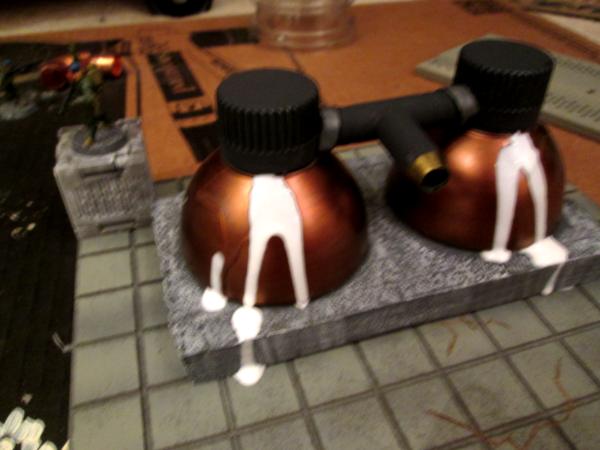
Next, I'm kind of anxious to get the tanks part of the chemical plant installed on the board- so many other things can't be measured out properly until that happens. So I drybrushed the concrete 'plinth' that the tanks are on to help distinguish them from the also grey platform, painted the tank tops pavement grey and dry brushed them gun metal grey, added some bronze to what will be a spigot on the front and then started dripping Puzzle Saver stuff (it's really just a type of PVC glue, thinned- I got this from the dollar store); this'll get painted and shaded suitably bilious shades of glowing green to represent nuclear waste leakage:

Also got the base painting done on the heavy stubbers and drybrushed some gun metal grey and added bronze bits (still need to add heat burn to the muzzle and drill them out, and have to whip up some drum magazines to add to the sides:

And built another gun tower. The first one was just slightly too small to fit a heavy weapons team on a 60mm base onto- so to game it, it will accommodate a special weapon. This one will hold a 60mm base. I'll probably wind up using both on this project:

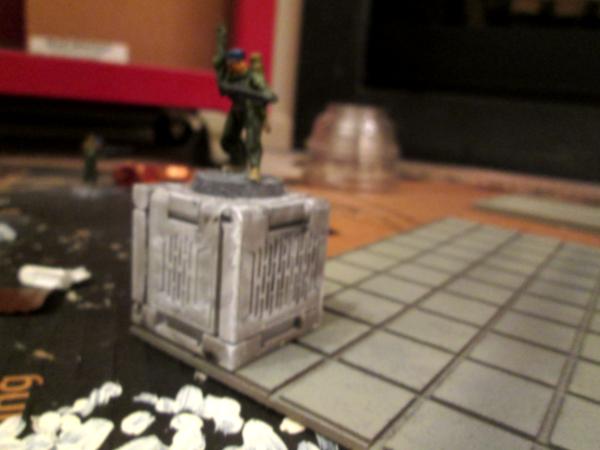
And, mostly to be able to say I did, I officially glued the first bit down to the platform for the improvised barricades. This huge crate is actually one of the Star Wars toys games that unfold into a little playmat game thing; closed up it is this crate. I spray painted it grey, hit it with ersatz nuln oil, found it was 'way too close in color to every other grey thing around it, so added a lot of white dry brushing. I may have to hit it with some rust to make it even a bit more different yet:
I'm enjoying the momentum now on this project and am looking forward to what I can get done tomorrow (if all goes to plan). Your input always welcome.
More follows soonest!
|
"He fears his fate too much, or his desserts are small, who will not put it to a single touch; to win- or lose- it all."
Montrose Toast
|
|
|
|
|
2018/08/08 17:50:39
Subject: The -=]_=- Terrain Competition Thread -=]_=- LoER Terrain Contest #26 "Hold the line!"
|
|
Potent Possessed Daemonvessel
|
Thanks Meer_Cat, nice work on the leakage and on cracking the platform floor !
|
|
|
|
|
|
2018/08/09 02:12:18
Subject: Re:The -=]_=- Terrain Competition Thread -=]_=- LoER Terrain Contest #26 "Hold the line!"
|
|
[DCM]
Boom! Leman Russ Commander
|
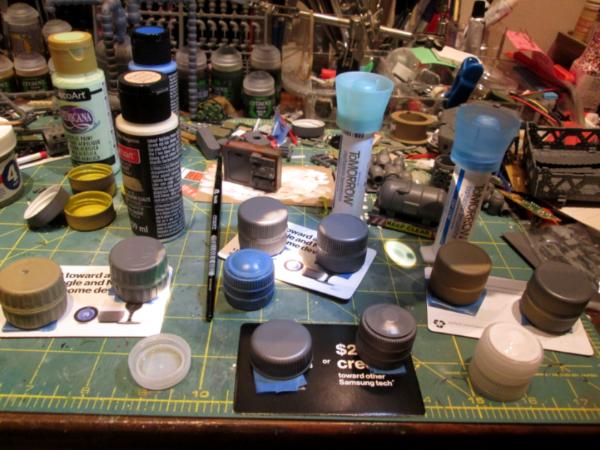
Aaaaand here's tonight's lot. A _lot_ of freehand painting that I was hoping to avoid, but the other method didn't work, so not a lot of other things to report. Repainted the muzzles on the heavy stubber silver- to better show the muzzle burn, rather than the bronze/brass that I used originally.
Found these stencils at Michael's hobby/art shop for US$3, they're one inch tall and I'll use them to add some industrial looking markings to the chem plant:

Added some more drips to the tanks and glued the whole assembly down onto the base (from here on, everything gets detailed on the base piece itself- or as much as I can manage; I'm hoping to get my desk top back):
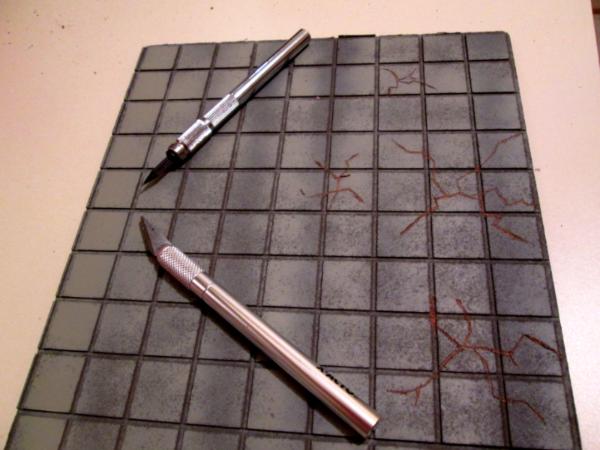
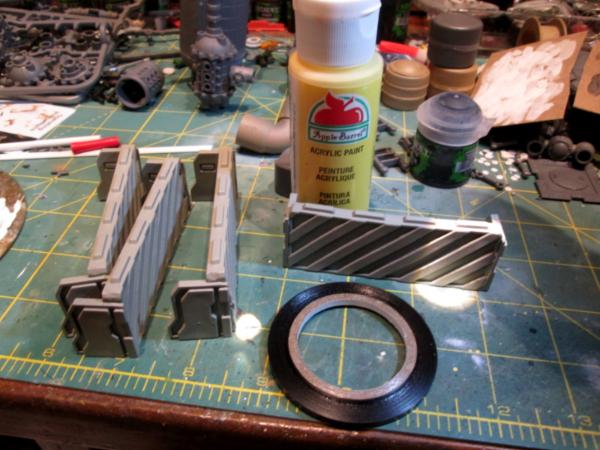
I got these car barriers (what we call 'jersey walls' after the great state of New Jersey which seems to have them all over the place) off eBay some time ago and want to use them as part of the improvised barricades. As you can see, the molding is screaming to have hazard stripes added. I figured to use the art/trim masking tape as a quick easy way to do the black stripes in the lower relief stripes, and then I'd freehand the yellow. Unfortunately, I seem to have purchased trim tape that was surplus to a NASA space launch and is tougher than the hubs of Hades- I couldn't cut it neatly even with a brand new blade in my hobby knife:
So I freehanded both the black and the yellow stripes:
I'll add one more layer of yellow paint to smooth those stripes out and then grime 'em up with weathering powders. I hate working with yellow, because I have to lay a base coat of white, then thin the yellow and then do multiple layers to get an even coat (first world problems, I know- somebody call the waaaah-mbulance!  ).
I hope to have some time tomorrow to work, and I'll start layering the chemical leak colors, finish the jersey walls and get them glued down, add stenciled numerals to the upper platform and maybe even get started on the control console.
More follows soonest!  
|
"He fears his fate too much, or his desserts are small, who will not put it to a single touch; to win- or lose- it all."
Montrose Toast
|
|
|
|
|
2018/08/10 01:53:12
Subject: Re:The -=]_=- Terrain Competition Thread -=]_=- LoER Terrain Contest #26 "Hold the line!"
|
|
[DCM]
Boom! Leman Russ Commander
|
And here's tonight's work done:
First up, the chemical leaks from the tanks- this is three layers of Modge-Podge white glue stuff and then three different shades of greens and red/oranges:

I also managed to get some other bits fastened down, like the big drain pipe in the center (with its greenstuff collar that needs rivets) and the tarp on the right with the gears leaning against it:
And now here's a shot with the jersey walls in place (they need weathering- I ran out of time to do that, and maybe some light ersatz-nuln wash, but otherwise good to go, I think):

I really think, with this lot done, that I can glue the upper deck in place and start really wroking on getting the cracking tower sorted out. There's still the rest of the barricades, but I've got a ton of junk lined up for that. And thanks to sveamore, I've got some terrific signage to put up- I scaled them out on photo paper and printed out two sheets worth- that's going to be fun! The problem will be getting enough flat surfaces to hang everything up!
More follows soonest!
|
"He fears his fate too much, or his desserts are small, who will not put it to a single touch; to win- or lose- it all."
Montrose Toast
|
|
|
|
|
2018/08/10 06:06:04
Subject: The -=]_=- Terrain Competition Thread -=]_=- LoER Terrain Contest #26 "Hold the line!"
|
|
Decrepit Dakkanaut
|
Really impressive hazard stripes. I mean awesome build, too, but they are really snazzy.
|
Theophony"... and there's strippers in terminator armor and lovecraftian shenanigans afoot."
Solar_Lion: "Man this sums up your blog nicely."
Anpu-adom: "being Geek is about Love. Some love broadly. Some love deeply. And then there are people like Graven. |
|
|
|
|
2018/08/10 15:48:32
Subject: The -=]_=- Terrain Competition Thread -=]_=- LoER Terrain Contest #26 "Hold the line!"
|
|
Mastering Non-Metallic Metal
|
Good progress, KernelTerror.
I found a good way to give plaster a nice texture while doing my "crash" piece, lightly tapping the wet surface of the plaster with my finger; it pulls the surface up into peaks, kind of like an artex ceiling.
Good work M'Cat. Coming together well.
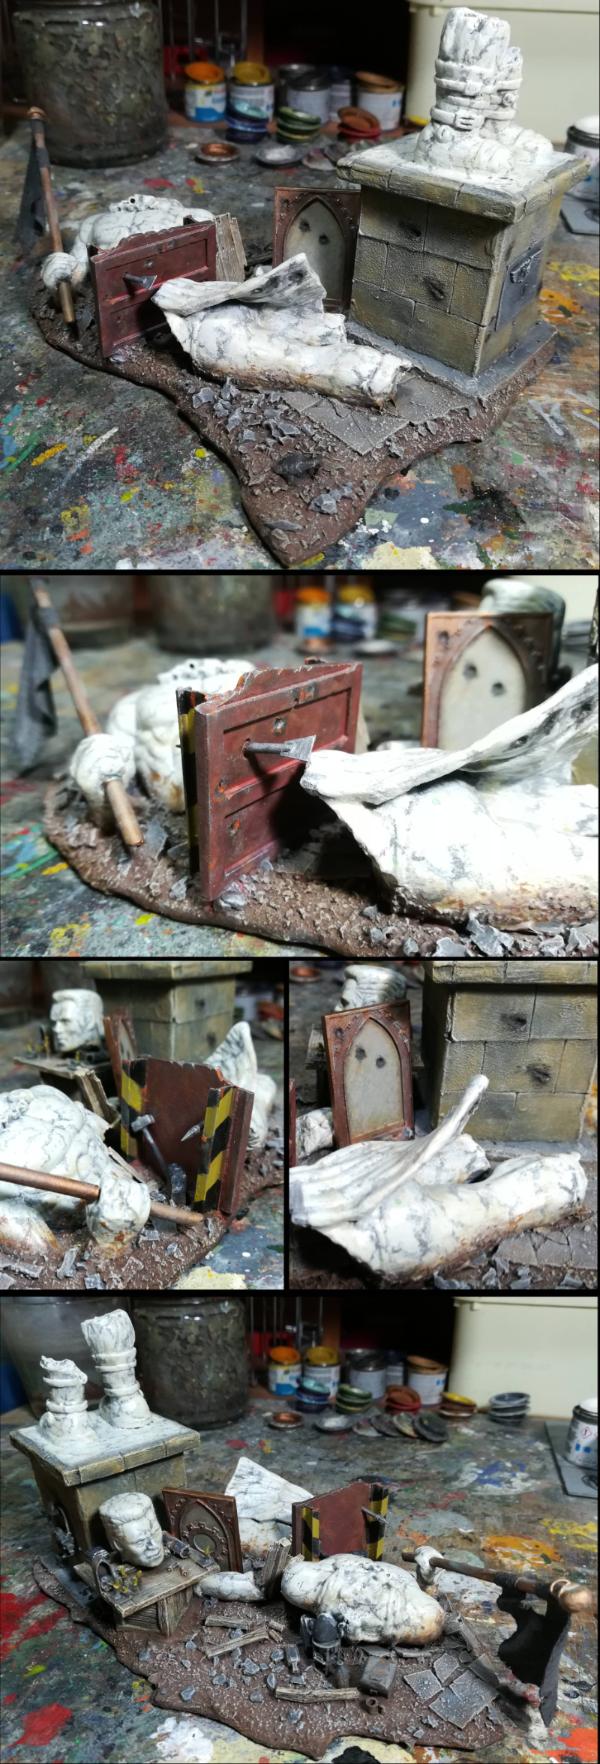
I forgot to show you all here the primed piece, and have since moved on. So here's the next stage, painting the statue.
Went a bit more up-market than basic stone... 'coz he's worth it...
Should look fine with some dirt and grime added.
|
Mastodon: @DrH@warhammer.social
The army- ~2295 points (built).
* -=]_,=-eague Spruemeister General. * A (sprue) Hut tutorial *
Dsteingass - Dr. H..You are a role model for Internet Morality! // inmygravenimage - Dr H is a model to us all
Theophony - Sprue for the spruemeister, plastic for his plastic throne! // Shasolenzabi - Toilets, more complex than folks take time to think about! |
|
|
|
|
2018/08/10 16:51:12
Subject: The -=]_=- Terrain Competition Thread -=]_=- LoER Terrain Contest #26 "Hold the line!"
|
|
Gargantuan Great Squiggoth
|
Excellent progress peeps, been away for a couple days. Back now. Seriously good work everyone.
|
|
|
|
|
|
2018/08/10 17:35:05
Subject: Re:The -=]_=- Terrain Competition Thread -=]_=- LoER Terrain Contest #26 "Hold the line!"
|
|
[DCM]
Boom! Leman Russ Commander
|
I'll second Cam's sentiments everyone- I'm learning a lot from all of you!
Thanks Graven- there is some relief molded/cast into the stripes, which made it a lot easier. That darn art tape was driving me nuts! 
|
"He fears his fate too much, or his desserts are small, who will not put it to a single touch; to win- or lose- it all."
Montrose Toast
|
|
|
|
|
2018/08/10 19:18:03
Subject: Re:The -=]_=- Terrain Competition Thread -=]_=- LoER Terrain Contest #26 "Hold the line!"
|
|
Fixture of Dakka
|
Looks great Kernel - the split levels are really interesting to me.
Coming together nicely Meer_Cat last few updates have sped through. Agree that the haz-barricades look sweet, looking forward to seeing them get hit with a bit of weathering. The toxic leaks feel a little bright to me against the rest of the piece so far, but they are toxic goo, and that is purely a personal preference.
Great work on that marble Doc.
|
|
|
|
|
|
2018/08/11 00:13:47
Subject: Re:The -=]_=- Terrain Competition Thread -=]_=- LoER Terrain Contest #26 "Hold the line!"
|
|
[DCM]
Boom! Leman Russ Commander
|
I take your point about the chem leak being too bright, Monkeytroll. Originally though, I was going to do just a single wash of copper, so semi-translucent- mount LEDs inside each tank and mask where the leak on the outside wasn't- but on the inside, so the light would shine through the leak material and _really_ glow. Unfortunately, one of my self-set goals for this project was too make the contest deadline, and I don't think I could've swung all that and still got in under the wire.
I need to see how bright that stuff looks when the upper deck is in place- it'll be a bit shadowed and then maybe the leak will be the right amount of bright. We'll see!
|
"He fears his fate too much, or his desserts are small, who will not put it to a single touch; to win- or lose- it all."
Montrose Toast
|
|
|
|
|
2018/08/11 18:05:10
Subject: The -=]_=- Terrain Competition Thread -=]_=- LoER Terrain Contest #26 "Hold the line!"
|
|
Mysterious Techpriest
|
Looking forward to seeing how this turns out Meer_Cat
I've got my bunker ready to paint now, hope I can get it done on time.
|
|
|
|
|
|
2018/08/11 20:18:45
Subject: The -=]_=- Terrain Competition Thread -=]_=- LoER Terrain Contest #26 "Hold the line!"
|
|
Gargantuan Great Squiggoth
|
Impressive guys all looking amazing.
|
|
|
|
|
|
2018/08/13 20:50:12
Subject: Re:The -=]_=- Terrain Competition Thread -=]_=- LoER Terrain Contest #26 "Hold the line!"
|
|
Mastering Non-Metallic Metal
|
Good work chaps.
I've now done the plinth, the wood, and the paving slabs.

Mud next, details later...
Keep it up people, there's still plenty of time.
|
Mastodon: @DrH@warhammer.social
The army- ~2295 points (built).
* -=]_,=-eague Spruemeister General. * A (sprue) Hut tutorial *
Dsteingass - Dr. H..You are a role model for Internet Morality! // inmygravenimage - Dr H is a model to us all
Theophony - Sprue for the spruemeister, plastic for his plastic throne! // Shasolenzabi - Toilets, more complex than folks take time to think about! |
|
|
|
|
2018/08/13 22:43:12
Subject: Re:The -=]_=- Terrain Competition Thread -=]_=- LoER Terrain Contest #26 "Hold the line!"
|
|
Fresh-Faced New User
|
 Dr H wrote: Dr H wrote:Good work chaps.
I've now done the plinth, the wood, and the paving slabs.
Looks fantastic, what's your technique for painting marble?
|
|
|
|
|
2018/08/13 23:04:32
Subject: Re:The -=]_=- Terrain Competition Thread -=]_=- LoER Terrain Contest #26 "Hold the line!"
|
|
Mastering Non-Metallic Metal
|
Orsino wrote:Looks fantastic, what's your technique for painting marble?
Thanks.
I actually followed a tutorial I found for painting faux marble on tables etc.
Link: https://www.wikihow.com/Paint-Marble
The basic process I did was to start with a mid-grey and then heavily over-brush / dry-brush white over that, leaving recesses and the very bottom areas: This gives some shadow that is not required for the furniture in the tutorial.
I didn't worry about getting an even finish on the white as it's meant to be uneven to look more natural.
I then used a sand colour (fairly watered down) to paint wide (~5mm) streaks across/around the pieces. These were blurred / blended in while wet with more white (heavy dry-brush loaded brush).
These are meant to be very subtle.
Let that dry.
I then used a dark grey to do the fine lines, following a picture I found of my chosen marble, and these were also blurred with the white, as above.

This was more uneven in the blurring, some areas were more heavily brushed over with the white than others.
And then some of the "junctions" of the grey veins were darkened more by a little more dark grey, sometimes with a little more back-and-fourth with the white.
Then a satin varnish to finish. (this will get toned down a bit more in the weathering stage).
For most of the time, I thought that the dark veins were too harsh and too numerous... until I varnished it and took photos.
Don't be put off part way through.
|
Mastodon: @DrH@warhammer.social
The army- ~2295 points (built).
* -=]_,=-eague Spruemeister General. * A (sprue) Hut tutorial *
Dsteingass - Dr. H..You are a role model for Internet Morality! // inmygravenimage - Dr H is a model to us all
Theophony - Sprue for the spruemeister, plastic for his plastic throne! // Shasolenzabi - Toilets, more complex than folks take time to think about! |
|
|
|
|
2018/08/14 16:40:23
Subject: Re:The -=]_=- Terrain Competition Thread -=]_=- LoER Terrain Contest #26 "Hold the line!"
|
|
Fresh-Faced New User
|
Dr H wrote:Orsino wrote:Looks fantastic, what's your technique for painting marble?
Thanks.
I actually followed a tutorial I found for painting faux marble on tables etc.
Link: https://www.wikihow.com/Paint-Marble
The basic process I did was to start with a mid-grey and then heavily over-brush / dry-brush white over that, leaving recesses and the very bottom areas: This gives some shadow that is not required for the furniture in the tutorial.
I didn't worry about getting an even finish on the white as it's meant to be uneven to look more natural.
I then used a sand colour (fairly watered down) to paint wide (~5mm) streaks across/around the pieces. These were blurred / blended in while wet with more white (heavy dry-brush loaded brush).
These are meant to be very subtle.
Let that dry.
I then used a dark grey to do the fine lines, following a picture I found of my chosen marble, and these were also blurred with the white, as above.
This was more uneven in the blurring, some areas were more heavily brushed over with the white than others.
And then some of the "junctions" of the grey veins were darkened more by a little more dark grey, sometimes with a little more back-and-fourth with the white.
Then a satin varnish to finish. (this will get toned down a bit more in the weathering stage).
For most of the time, I thought that the dark veins were too harsh and too numerous... until I varnished it and took photos.
Don't be put off part way through.
Thanks for this, I'm trying to paint some black marble veined with white at the moment and I was reasonably happy with it until I saw yours Looks really natural and realistic and I like the way your piece tells a story.
|
|
|
|
|
2018/08/14 21:46:02
Subject: The -=]_=- Terrain Competition Thread -=]_=- LoER Terrain Contest #26 "Hold the line!"
|
|
Potent Possessed Daemonvessel
|
That marble is just amazing... And thanks a lot for the plaster texture tip earlier Dr H, I'll have to try that !
|
|
|
|
|
|
2018/08/16 00:41:41
Subject: Re:The -=]_=- Terrain Competition Thread -=]_=- LoER Terrain Contest #26 "Hold the line!"
|
|
[DCM]
Boom! Leman Russ Commander
|
Hello all- I'm back, after several busy days helping at my mother's house in the Finger Lakes region of upstate New York. I'm still worn out, but got myself back on task tonight to get some more work done, and as ever, once I sat down and actually touched a paintbrush- the time just flew.
I started weathering the jersey walls- this is a thinned black wash on the back panels (I'm fixing to add some graffitti and maybe some poster on this side) and I'll use some weathering powders on the other, hazard stripe, side:

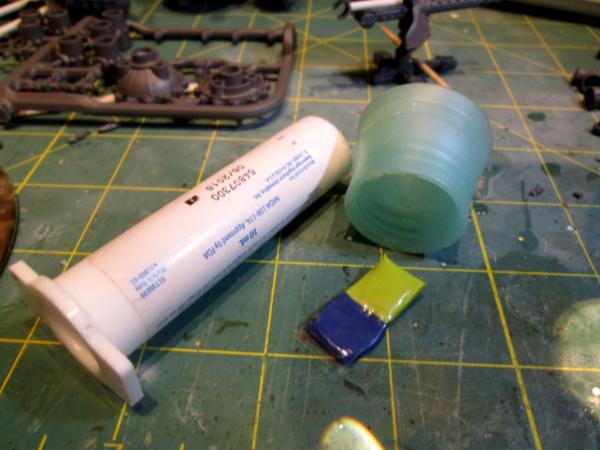
On the base itself (nearly ready to glue down the second deck platform) I dulled the toxic waste leaks with some washes of green and red- I think the resulting look is a little more like what I was going for. I also painted the greenstuff tarp on the right hand corner blue (a thin wash of acrylic hobby paint) and added another gear to the pile. You can also see the start of some 'oil' stains on the cracked pavement- I've a couple of more layers to add to finish those:

I also started weathering/rusting the control console, and thanks to sveamore I have a cool poster to mount in that big blank spot on the left. You can also see the start of the rubble filled astro-barrels that will form part of the barricades:

And lastly, I primed and started painting up this extra storage tank. It came as a Matchbox pack with an armored vehicle and scaled out perfectly; it will also (probably) wind up as part of the barricade- not sure if on the ground level or on the upper deck:

So, that's it for now. I enjoyed being home, but I'm glad to be back at this project, too. More follows soonest!
|
"He fears his fate too much, or his desserts are small, who will not put it to a single touch; to win- or lose- it all."
Montrose Toast
|
|
|
|
|
2018/08/17 00:43:13
Subject: Re:The -=]_=- Terrain Competition Thread -=]_=- LoER Terrain Contest #26 "Hold the line!"
|
|
[DCM]
Boom! Leman Russ Commander
|
Only a small update tonight- not a lot of time to work:
Hazard stripe side of the jersey walls- before and after dirt dusting:

Jersey walls glued down to the base (they'll get spritzed later with one more light coat of dollar store hairspray and about three drops of black ink):
That crate in the corner is going to get an armored surround, by the way.
And the big thing was gluing, priming and prepping to paint multiple barrels for the next stage of the lower barricade (plus the two gun tower support posts):
More follows soonest- and I'm glad briancj mentioned this contest- I'm having a blast and I ight even make the deadline!
|
"He fears his fate too much, or his desserts are small, who will not put it to a single touch; to win- or lose- it all."
Montrose Toast
|
|
|
|
|
2018/08/17 07:26:44
Subject: Re:The -=]_=- Terrain Competition Thread -=]_=- LoER Terrain Contest #26 "Hold the line!"
|
|
Fixture of Dakka
|
All looking good peeps!
Beautiful solid build ONM - but then I expect no less from you
Great work, and great marble Doc
Progressing at a rate of knots M_C, and those barricades look great, whole thing looks like a lot of fun.
Hoping to make progress with the flesh-vats this weekend, but I can feel a few distractions in the air (received a care package from graven, and accidentally picked up my Pholus rhino from ONM the other day as I found some Inq doors).........Still have a long weekend to go after this one though, and if worse case comes I have at least finished the flesh walls themselves, the vats are just the added spice
|
|
|
|
|
|
2018/08/17 17:50:20
Subject: The -=]_=- Terrain Competition Thread -=]_=- LoER Terrain Contest #26 "Hold the line!"
|
|
Potent Possessed Daemonvessel
|
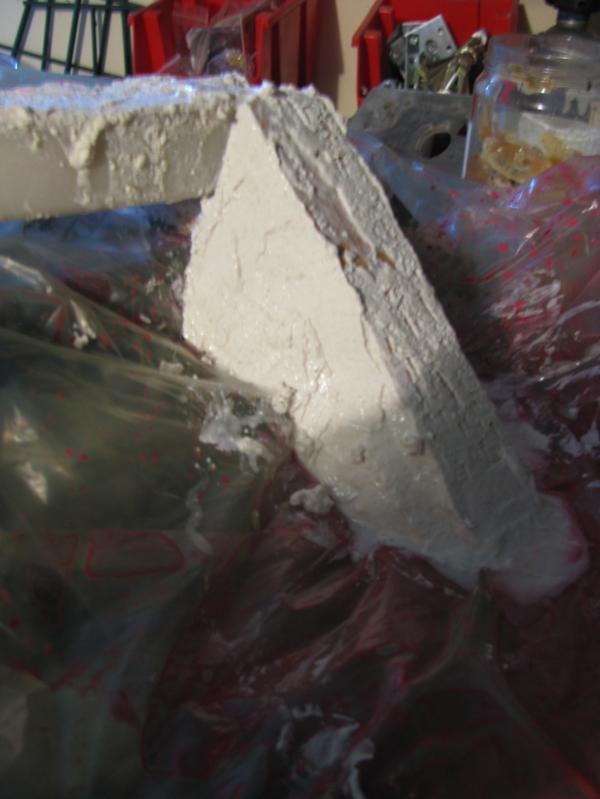
The buttresses are dry, making the top half ready to receive its basecoat. So little time remaining to add details to this piece though...
|
|
|
|
|
|
2018/08/18 16:50:58
Subject: Re:The -=]_=- Terrain Competition Thread -=]_=- LoER Terrain Contest #26 "Hold the line!"
|
|
Mastering Non-Metallic Metal
|
Good progress, people.
No problem, Orsino. Always willing to share methods.
and thanks.
Thanks and no prob's, KernelTerror.
The mud n' rocks (some of which will be made whiter to be marble rubble) are on, as are most of the metals (there's a few small pieces that still need doing).
Old rusty metal plate, and I had to get some hazard stripes in somewhere.
The mechanicus cog piece is painted to be a concrete slab with steel and then brass around it.
Weathering, and therefore streaking on things like the bullet holes, still to do after all the little bits... and there's still the flag...
|
Mastodon: @DrH@warhammer.social
The army- ~2295 points (built).
* -=]_,=-eague Spruemeister General. * A (sprue) Hut tutorial *
Dsteingass - Dr. H..You are a role model for Internet Morality! // inmygravenimage - Dr H is a model to us all
Theophony - Sprue for the spruemeister, plastic for his plastic throne! // Shasolenzabi - Toilets, more complex than folks take time to think about! |
|
|
|
|
2018/08/19 01:59:37
Subject: Re:The -=]_=- Terrain Competition Thread -=]_=- LoER Terrain Contest #26 "Hold the line!"
|
|
Fixture of Dakka
|
Looking good Kernel, seems it'll be pretty intimidating with the second layer on. (Although obviously not as big as Tek's super fast, super-high work )
Coming together nicely now Doc, look forward to the weathering.
Tiny progress, but progress:

Tracks are staying attached to the side of the vats, but they are getting a cover unit just above them....a bit of both options Squares cut from 1mm plasticard then my trusty circle cutter used to remove....a circle!
And, although my circle cutter was trusty, my measurements weren't quite, and so a tiny bit of shaving and filing was required to get them to slip over the tubes
Eyeballed measurements for the side parts, and cut front and back pieces to fit the different sides.
And started to bring detailing down from the vent controls.
Also started work on the potential Master-Vat.
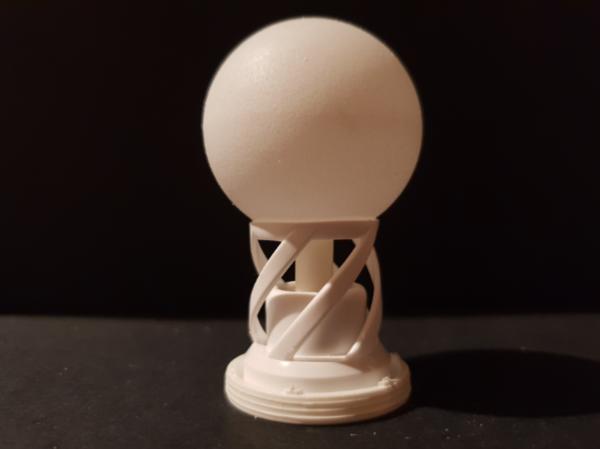
This is the container vessel (ping-pong ball, a piece of plastic tubing, and the lid from the tube used for the vats), which, if it goes on a similar body to the other two vats, will be placed directly above rather than to the side. It'll probably get different, bigger, tracks to compensate for the bigger ball. In fact....I think I have just spotted the right tracks.....hmmmm
|
|
|
|
|
|
2018/08/19 10:59:08
Subject: Re:The -=]_=- Terrain Competition Thread -=]_=- LoER Terrain Contest #26 "Hold the line!"
|
|
Nasty Nob
|
Whoo-whee, so many good project photos. Nice work folks!
As for me, I got a little side-tracked with Kill Team (fun!), but I'm back to it.
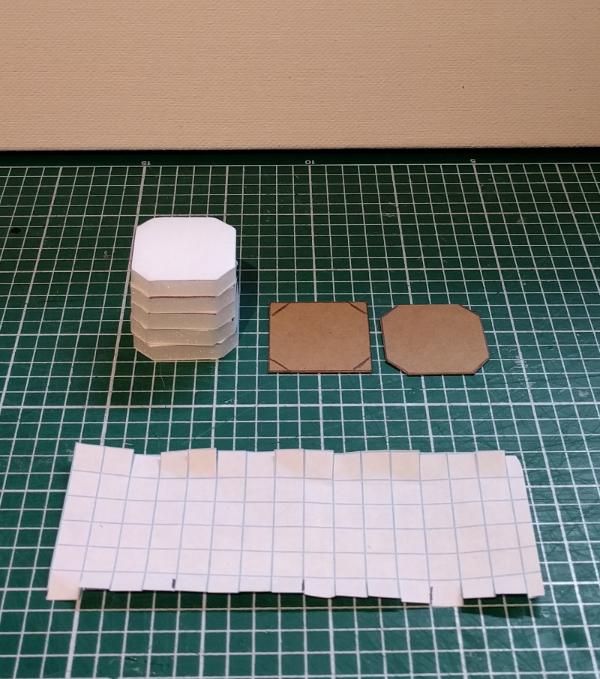
I made some scatter terrain liven up my piece. Misc containers, a box that will probably be some sort of instrument panel, and a work bench.
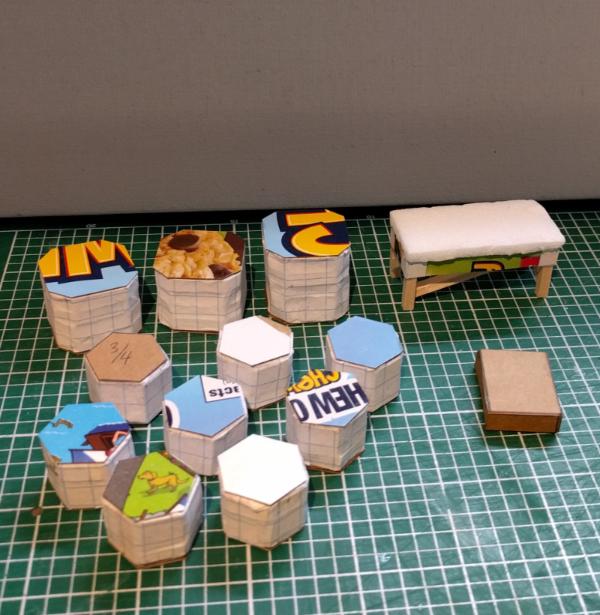
I decided that square or round containers were boring, so I crafted some hexagon and octagon containers. Seems more sci-fi.
Here's a quick WIP assembly photo that shows how I made them:
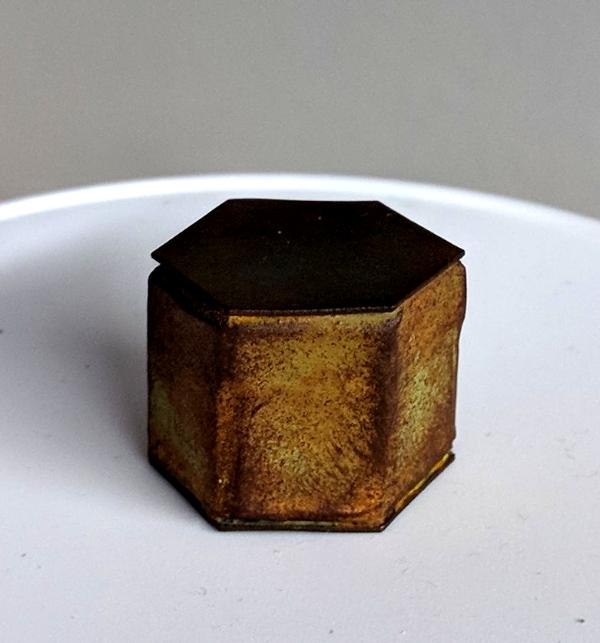
And here's one of the small containers painted up with some rust effects:
It's taking a long time to get the actual chunk of terrain painted, but I'm chipping away at it. I have primed and base-coated the whole thing in black. Just finished touch-ups on the crevices this morning. The dry brushing should go pretty quickly, will start on that this afternoon. I might add in some other tones (browns, reds, etc.) to give the stone more variation. Keep it interesting. Depends on time of course. August is starting to run out quick!
|
|
|
|
|
|
|
|