| Author |
Message |
 |
|
|
|
|
Advert
|
Forum adverts like this one are shown to any user who is not logged in. Join us by filling out a tiny 3 field form and you will get your own, free, dakka user account which gives a good range of benefits to you:
- No adverts like this in the forums anymore.
- Times and dates in your local timezone.
- Full tracking of what you have read so you can skip to your first unread post, easily see what has changed since you last logged in, and easily see what is new at a glance.
- Email notifications for threads you want to watch closely.
- Being a part of the oldest wargaming community on the net.
If you are already a member then feel free to login now. |
|
 |
2013/07/06 10:17:15
Subject: (Not) Santas Workshop of the Strange, Wierd, and Wonderful - 4 July - ATHENA!
|
|

Raging Ravener
|
Great stuff you have here, keep up the good work.
|
|
|
|
 |
|
2013/07/06 16:44:25
Subject: (Not) Santas Workshop of the Strange, Wierd, and Wonderful - 4 July - ATHENA!
|
|

Rogue Inquisitor with Xenos Bodyguards
|
@Cam; Klaus does that to everybody 
|
"Your mumblings are awakening the sleeping Dragon, be wary when meddling the affairs of Dragons, for thou art tasty and go good with either ketchup or chocolate. "
Dragons fear nothing, if it acts up, we breath magic fire that turns them into marshmallow peeps. We leaguers only cry rivets!


|
|
|
|
|
2013/07/08 08:49:53
Subject: Re:(Not) Santas Workshop of the Strange, Wierd, and Wonderful - 8 July - ATHENA!
|
|

Dakka Veteran
|
Thanks guys!
@Vik - actually these lights are pure white - the blueish tint is from the white balance of the photo.
@Ruglund - THANKS! This is probably the best compliment I ever received - Thank You 
@Camkierhi - I always hope my projects and posts can inspire other fellow hobbyists and the feedback of you guys is what pushes me on, trying new things.
@Storag - 
You mean something like these 3 sailors on paint duty?
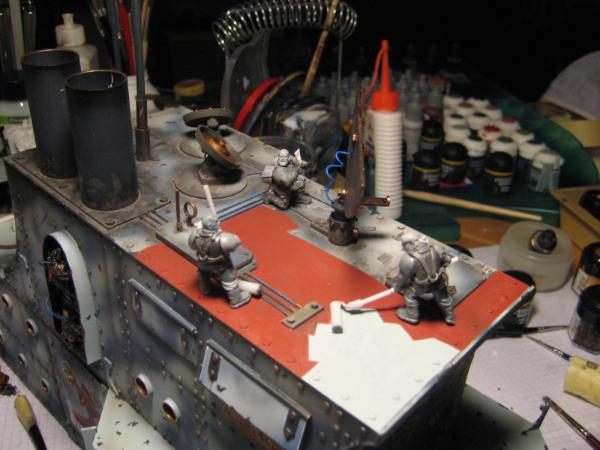
 - http://fischers-design-shop.blogspot.de/2009/12/athena-steampunk-airship-67.html
Well, even though my shoulder still hurts and hinders me from building as much as I'd like, I was able to make some progress.
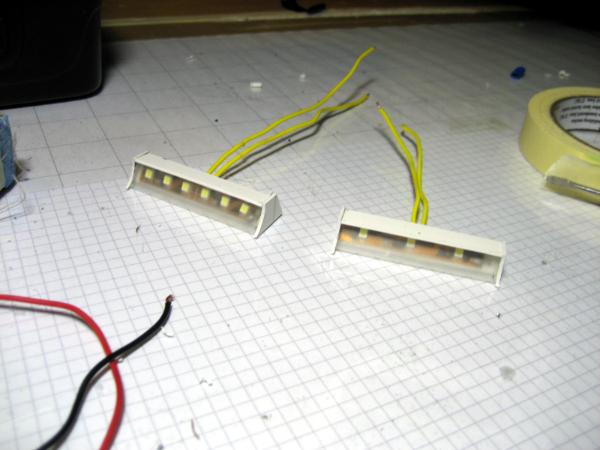
First I build some casings for the LED strips and since I don't want the individual LEDs being visible, I decided to add some matte covers. For this I took some clear plastic and sanded it for a while, creating a nice matte finish. On the casings this looks rather nice.
For the jump deck I want red lights, so I painted them with red ink.
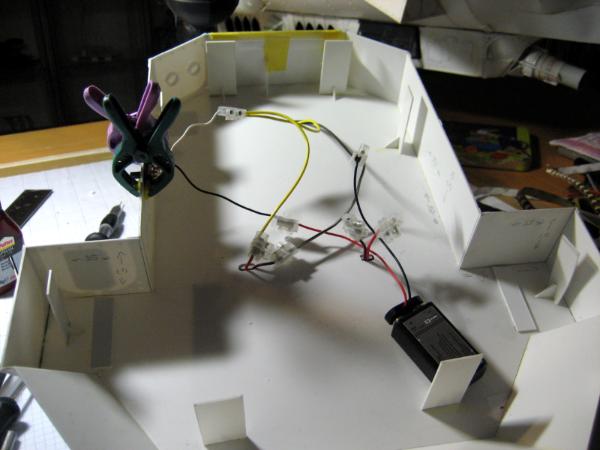
During daylight this isn't very visible. Next I added a light switch on the landing pad, so I can keep the battery (9V block) mounted on the inside. Another LED strip was added to the rear mural.

In the evening the lighting becomes a lot more prominent and now the red is a lot better visible.
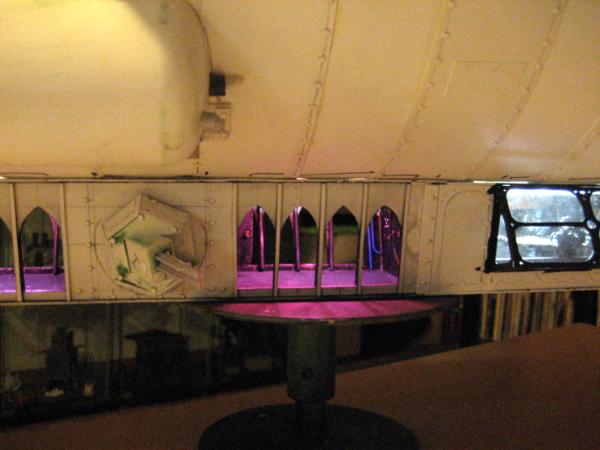
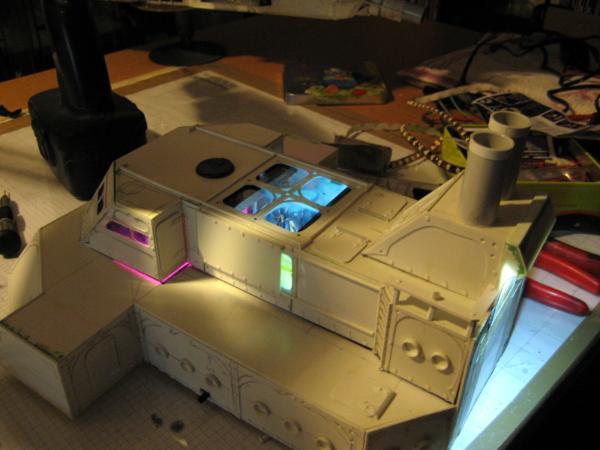
The next section to light was the bridge and conference room. I built casings for the LED strips, added matte clear plastic, painted the casings in Tiny Tin and mounted them (looks crooked here as the cable was too inflexible, but I got that worked out in the end)

After the bridge (red lights again) and conference room, I built another light set for the ATHENA mural on the rear wall.
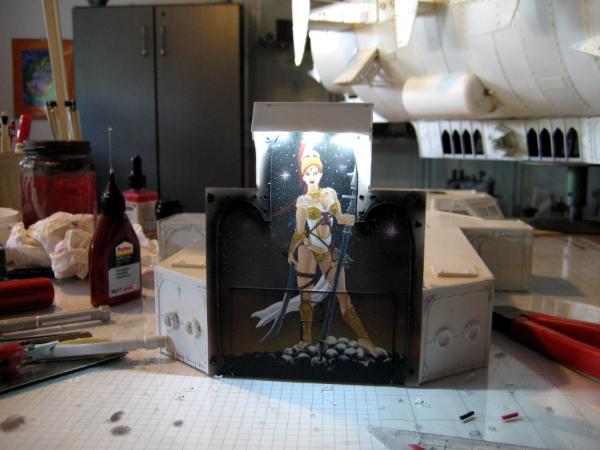
A nice effect I think
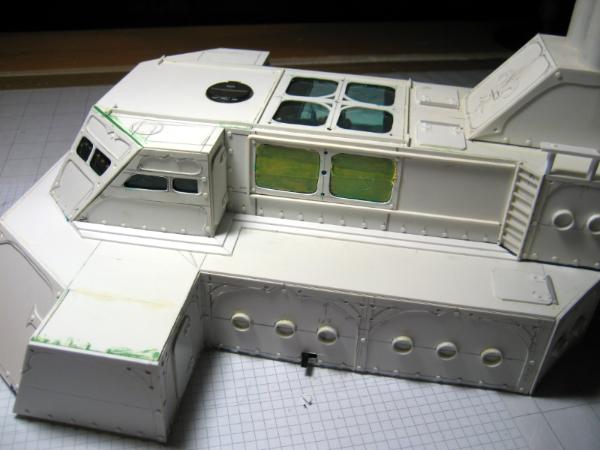
Before closing everything up, I quickly added a coat of Astronomican Grey to the ceiling and walls. At this stage the wiring still looks very cluttered
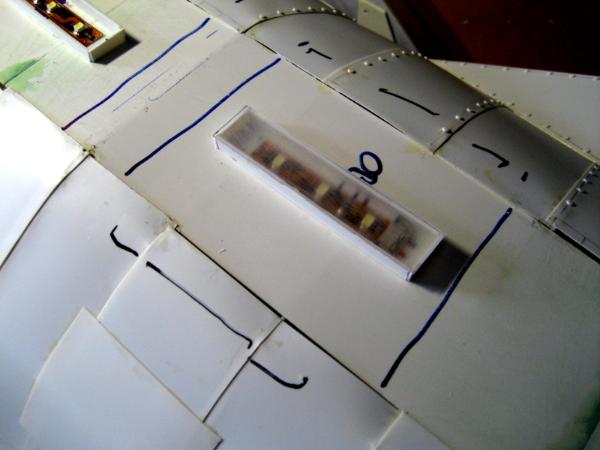
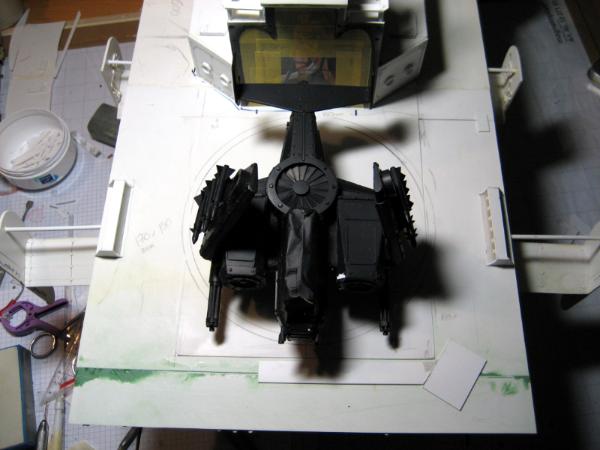
Before I mounted the bridge section and glued it in place I added a coat of liquid mask to the windows.
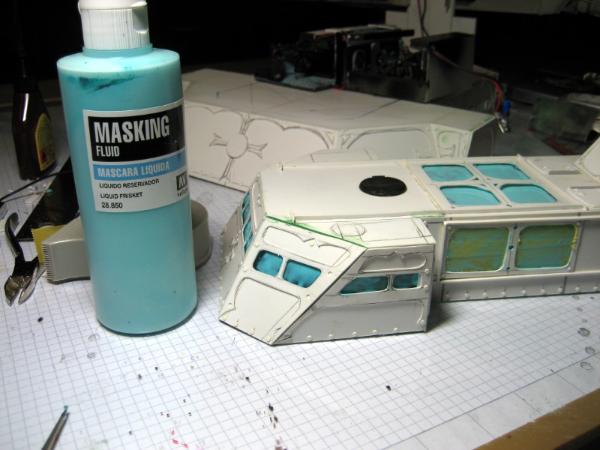
I will have to freshen it up before I do the actual paint job, but its a good base.
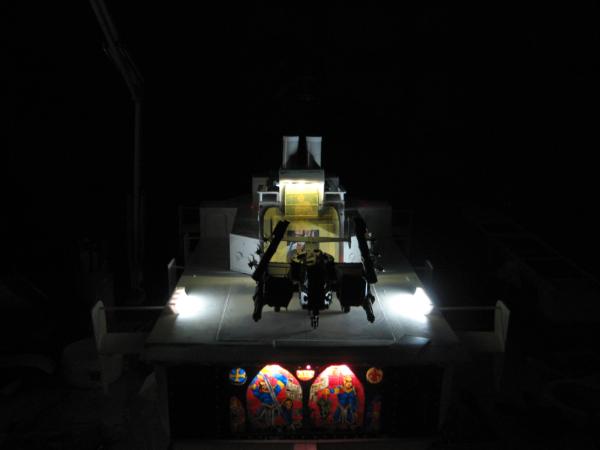
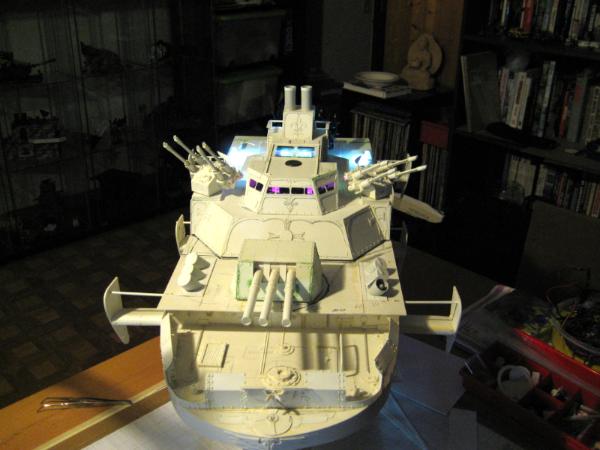
And then it was time for a lights test
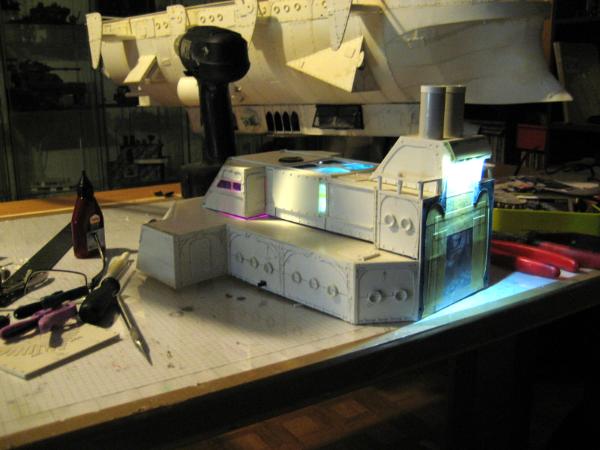
If you look closely you may see I added another light switch to the lower side wall.
Aaaah
I think this will be great
Tonight I will bring order to the wiring and clean it up, then another set of lights on the left and right side of the landing pad (shining up in an angle at the STRIX aircraft), and then I can look into the remaining CIWS.
I'm very exited that this project is finally nearing completion.
Cheers
Klaus
|
|
This message was edited 1 time. Last update was at 2013/07/08 08:53:08
|
|
|
|
|
2013/07/08 09:50:48
Subject: Re:(Not) Santas Workshop of the Strange, Wierd, and Wonderful - 8 July - ATHENA!
|
|
Posts with Authority
Boston-area [Watertown] Massachusetts
|
Just remember to take it easy, do your shoulder exercises, and don't re-injure yourself!
|
Falling down is the same as being hit by a planet — "I paint to the 20 foot rule, it saves a lot of time." -- Me
ddogwood wrote:People who feel the need to cheat at Warhammer deserve pity, not anger. I mean, how pathetic does your life have to be to make you feel like you need to cheat at your toy army soldiers game?
 |
|
|
|
|
2013/07/08 12:02:06
Subject: (Not) Santas Workshop of the Strange, Wierd, and Wonderful - 8 July - ATHENA!
|
|
Decrepit Dakkanaut
|
Hey Klaus, I don't usually ask for much, but would you mind taking a closeup pic of the window masking coming off when you take it off? I've never used the stuff before.
|
"dave you are the definition of old school..." -Viktor Von Domm    My P&M Blog : My P&M Blog :
It's great how just adding a little iconography, and rivets of course, can make something look distinctly 40K-adamsouza
"Ah yes, the sound of riveting.....Swear word after swear word and the clinking of thrown tools" "Nope. It sucks do it again..."- mxwllmdr
"It puts together more terrain, or else it gets the hose again...-dangledorf2.0
"This is the Imperium, there is no peace, there are only rivets" -Vitruvian XVII
"I think rivets are the perfect solution to almost every problem"- Rawson
More buildings for the Building God! -Shasolenzabi
  |
|
|
|
|
2013/07/08 12:58:05
Subject: (Not) Santas Workshop of the Strange, Wierd, and Wonderful - 8 July - ATHENA!
|
|

Growlin' Guntrukk Driver with Killacannon
|
You're making something amazing, even moar amazing 
|
|
|
|
|
|
2013/07/08 13:01:48
Subject: (Not) Santas Workshop of the Strange, Wierd, and Wonderful - 8 July - ATHENA!
|
|

Hard-Wired Sentinel Pilot
Somewhere just South of nowhere
|
Oh gawd....Why did I not know this thread existed? Subbed, subbed, a million times subbed.
Also, lava boat? wut?
|
Armies
 (2000pts) (2000pts)  (2500pts) (2500pts)  (5000pts) (5000pts)  (6000pts) Adeptus Titanicus (1500pts) (6000pts) Adeptus Titanicus (1500pts)
DA:80-S+GM++B++IPW40K06-D++A+++/areWD180R+++T(M)DM+
Projects: Warhound and Stuff |
|
|
|
|
2013/07/09 08:42:02
Subject: (Not) Santas Workshop of the Strange, Wierd, and Wonderful - 8 July - ATHENA!
|
|
Shroomin Brain Boy
|
ah... thanks for the info klaus... see that is the stuff of perspectives... when picture taking can distirt reality that way...
and good looking lightshow there... how will you conceal those switches by the way... or will you hope that they don´t be that much seeable after the paintwork?...
|
|
|
|
|
|
2013/07/09 09:49:32
Subject: (Not) Santas Workshop of the Strange, Wierd, and Wonderful - 8 July - ATHENA!
|
|
Rogue Inquisitor with Xenos Bodyguards
|
Painting minis looks to me like they were inspired by Red Dwarf!
|
"Your mumblings are awakening the sleeping Dragon, be wary when meddling the affairs of Dragons, for thou art tasty and go good with either ketchup or chocolate. "
Dragons fear nothing, if it acts up, we breath magic fire that turns them into marshmallow peeps. We leaguers only cry rivets!
|
|
|
|
|
2013/07/11 11:41:23
Subject: Re:(Not) Santas Workshop of the Strange, Wierd, and Wonderful - 11 July - ATHENA!
|
|
Dakka Veteran
|
Thank you for your feedback and welcome to all the new passengers of this little journey
Today is the last post about lighting the ATHENA
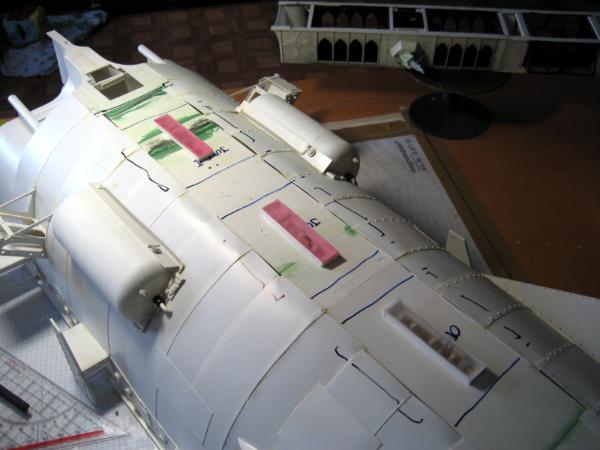
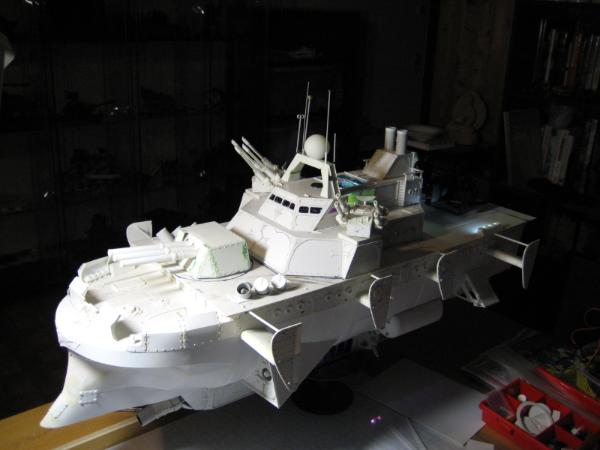
Here are the last two lights, for the landing pad.
I tried to give the lights housing a kind of steampunky touch, to make it fit with the rest of the ship. The lights are slightly angled, so the should shine up to the STRIX aircraft. From top you can also see that I used one of the housings to cover the light switch
Lights out!
Spot on!
Nice!
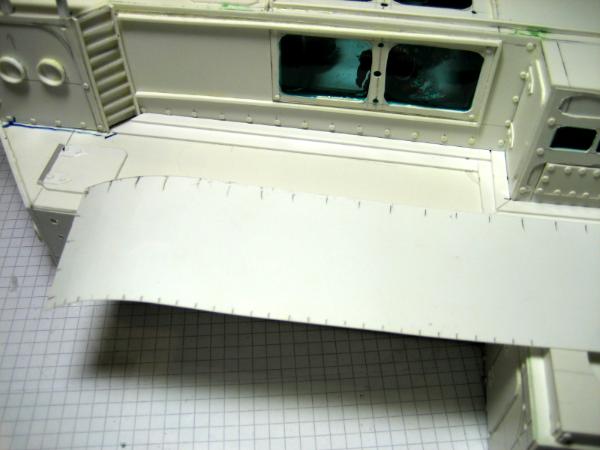
As you may have seen, there is a slight lights "spillage" around the bridge. The reason is that the plastic warped a bit over the months in storage, so the bridge superstructure is not 100% flush against the lower section. So I've build a little border that seals everything, without looking too much out of place.
Now the bridge section is "lights tight"
I've also glued the HYDRA gun mounts in position and this face means business

Obviously this wouldn't be complete without rivets. Vik asked me if I always measure my rivet positions. And I have to admit yes I do. Especially for such a huge model like the ATHENA I don't want to come back later and discover some uneven spacing of the rivets that may spoil the whole show.
But I also have a little helper.
It is made of thin (.25mm) plastic cards, very flexible and I have drawn a 5mm and 10mm scale on the two sides. Since it is so flexible it is very easy to mark the spacing.
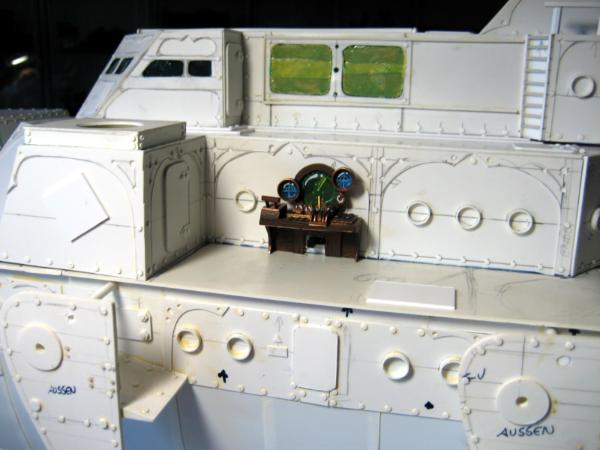
Some final images
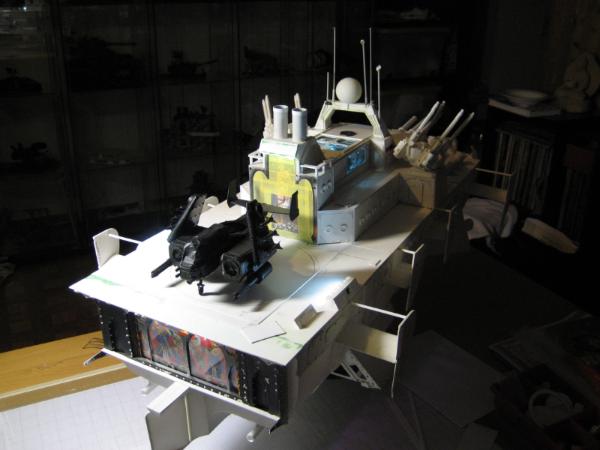
And last not least I was looking at a way to cover-up the other lights switch. So I removed two of the portholes, and positioned an old console that I've built for the aircraft version a few years (gasp!) ago.
Next will be either the remaining CIWS or the engines and rotors...
and then a million of rivets...sigh...
Cheers
Klaus
|
|
|
|
|
|
2013/07/11 12:04:13
Subject: (Not) Santas Workshop of the Strange, Wierd, and Wonderful - 11 July - ATHENA!
|
|
Shroomin Brain Boy
|
It is made of thin (.25mm) plastic cards, very flexible and I have drawn a 5mm and 10mm scale on the two sides. Since it is so flexible it is very easy to mark the spacing.
that idea gets nicked... instantly... i need to make me that tool!... very useful and when you have measured the middle of any section thus you can determine EXACTYL where any rivet should be placed! genius at work... for sure!!!
that "old" console is a true gem!!! and it again shows us what a beautiful piece this athena one day will be! and what a clever idea to hide the switch too!
make no mistake...and don´t view the next comment as just sweet talk... seeing full scale shots of the athena sends shivers down my spine!...
and...
As you may have seen, there is a slight lights "spillage" around the bridge. The reason is that the plastic warped a bit over the months in storage, so the bridge superstructure is not 100% flush against the lower section. So I've build a little border that seals everything, without looking too much out of place.
not really sure what you are talking about here as i don´t see any spillage of light... but if the PC warps...that is a rather graven circumstance...!
|
|
|
|
|
|
2013/07/11 13:04:41
Subject: (Not) Santas Workshop of the Strange, Wierd, and Wonderful - 11 July - ATHENA!
|
|
Mastering Non-Metallic Metal
|
Awesome work as always Klaus.
Looks amazing.
Good tip for riveting too.
|
     Mastodon: @DrH@dice.camp Mastodon: @DrH@dice.camp
The army-                  ~2295 points (built). ~2295 points (built).
 
* -=]_,=-eague Spruemeister General. * A (sprue) Hut tutorial *
Dsteingass - Dr. H..You are a role model for Internet Morality! // inmygravenimage - Dr H is a model to us all
Theophony - Sprue for the spruemeister, plastic for his plastic throne! // Shasolenzabi - Toilets, more complex than folks take time to think about! |
|
|
|
|
2013/07/11 15:02:05
Subject: (Not) Santas Workshop of the Strange, Wierd, and Wonderful - 11 July - ATHENA!
|
|
Decrepit Dakkanaut
|
Amazing Klaus! simply Amazing! Nice rivet tool too, I'll definitely be stealing that too!
|
"dave you are the definition of old school..." -Viktor Von Domm My P&M Blog :
It's great how just adding a little iconography, and rivets of course, can make something look distinctly 40K-adamsouza
"Ah yes, the sound of riveting.....Swear word after swear word and the clinking of thrown tools" "Nope. It sucks do it again..."- mxwllmdr
"It puts together more terrain, or else it gets the hose again...-dangledorf2.0
"This is the Imperium, there is no peace, there are only rivets" -Vitruvian XVII
"I think rivets are the perfect solution to almost every problem"- Rawson
More buildings for the Building God! -Shasolenzabi
|
|
|
|
|
2013/07/11 16:22:04
Subject: (Not) Santas Workshop of the Strange, Wierd, and Wonderful - 11 July - ATHENA!
|
|
Decrepit Dakkanaut
|
Really stunning. I'm fairly sure you actually have Tony Cottrell chained up in your basement.
|
Theophony"... and there's strippers in terminator armor and lovecraftian shenanigans afoot."
Solar_Lion: "Man this sums up your blog nicely."
Anpu-adom: "being Geek is about Love. Some love broadly. Some love deeply. And then there are people like Graven. |
|
|
|
|
2013/07/11 16:34:05
Subject: (Not) Santas Workshop of the Strange, Wierd, and Wonderful - 11 July - ATHENA!
|
|
Fresh-Faced New User
|
I'm simply amazed by this project, the lighting puts this so over the top, I'm all aboard this ship!
|
The Emperor cannot solve your problems, the Emperor is your problem. |
|
|
|
|
2013/07/12 08:50:06
Subject: Re:(Not) Santas Workshop of the Strange, Wierd, and Wonderful - 12 July - ATHENA!
|
|
Dakka Veteran
|
Thanks guys! I really appreciate your feedback!
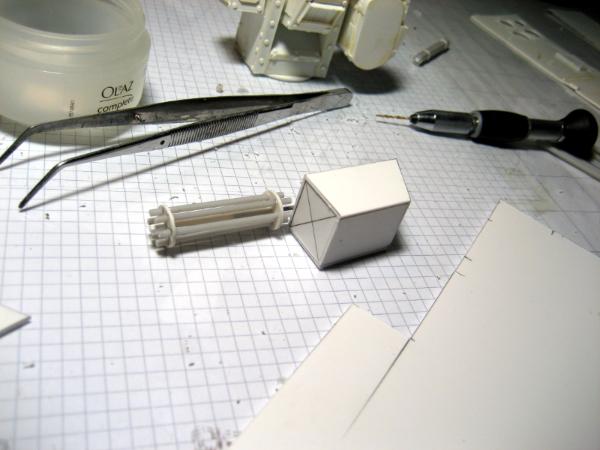
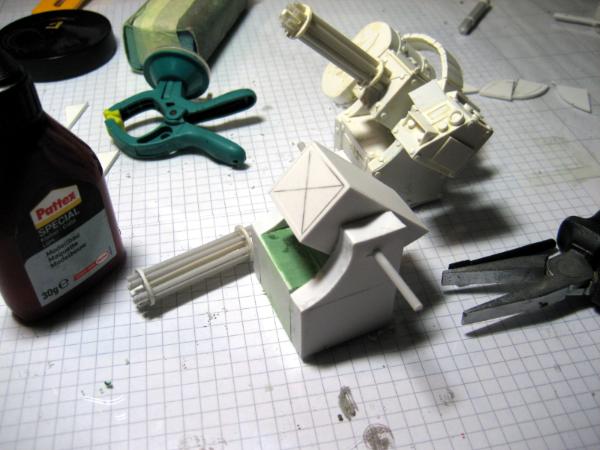
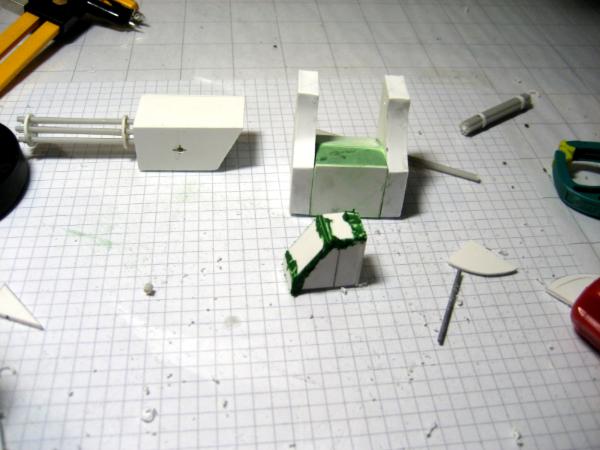
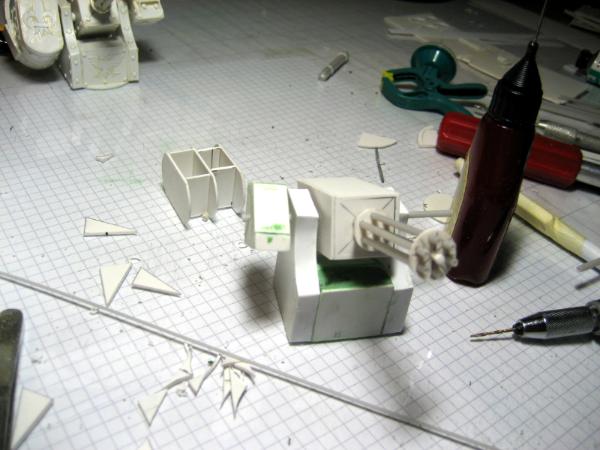
As mentioned yesterday the next piece for the ATHENA is a second CIWS "NEMESIS Mk MCMLXIX CWIS Trieste Pattern".
I initially thought I could use one of the gatling barrels I had lying around from some previous project, but realized its too flimsy.
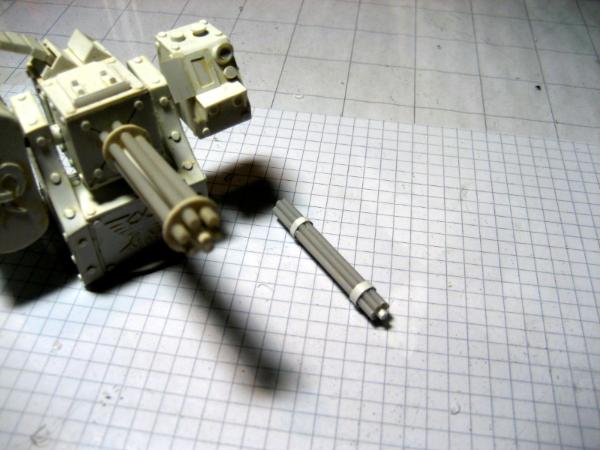
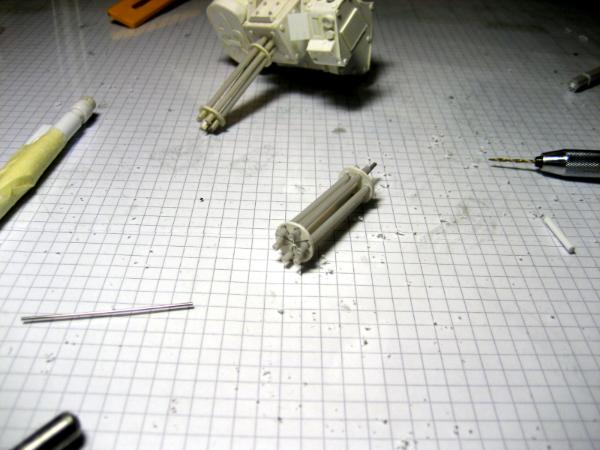
So I started to create another gatling barrel.
First cutting two disks and drilling the appropriate holes, then cutting the 6 barrels and 1 central rod to the proper length and push them through the first disk, aligning them in length. Then through the second disk and straightening everything and gluing it together.
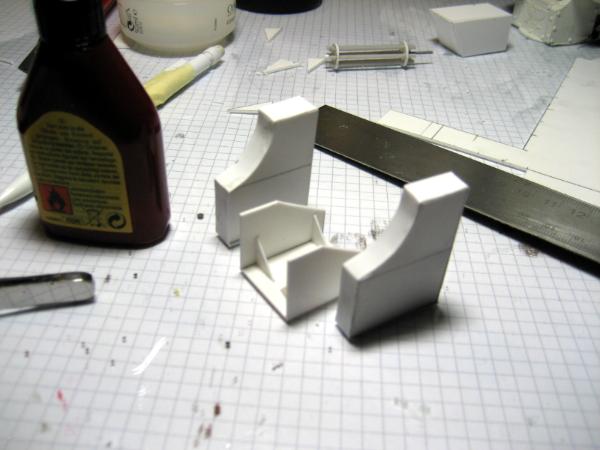
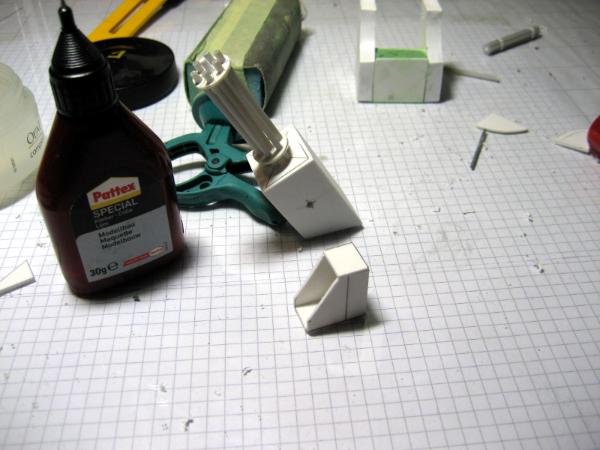
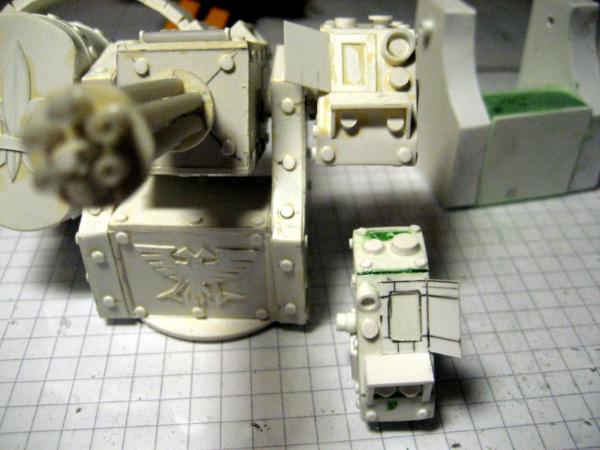
Satisfied with the barrel I started the main gun housing.
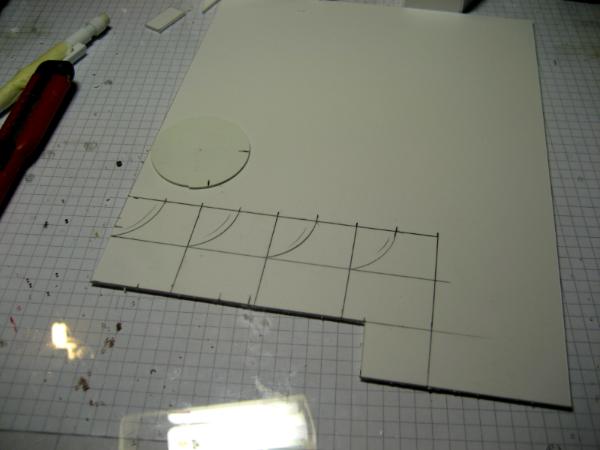
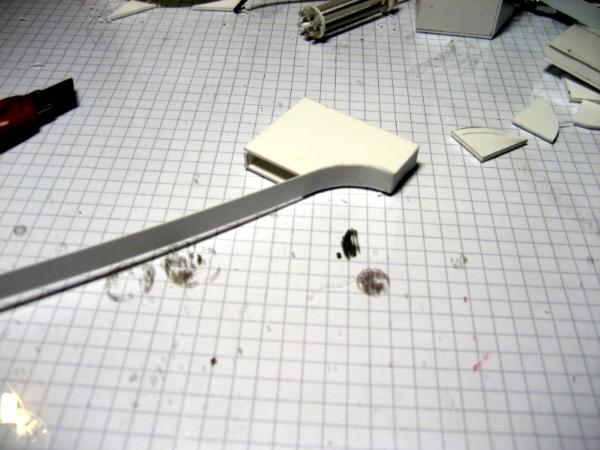
Next were the two sides connecting the main turret body with the gun. For the proper curve I used a disk of plastic card that I used as a scale, with two markings for the upper and lower corner and then simply traced the outline.
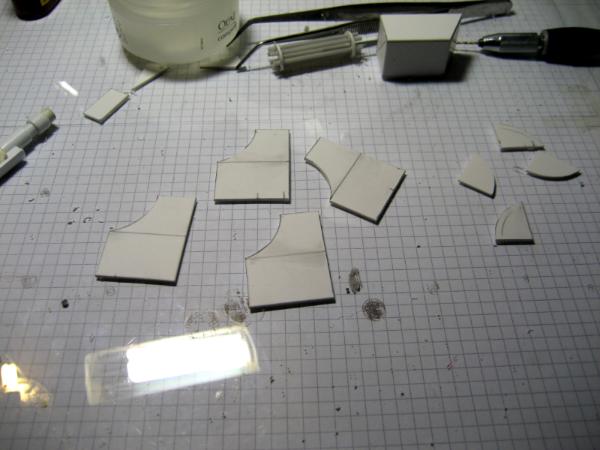
a set of 5mm spacers to keep the sides apart.
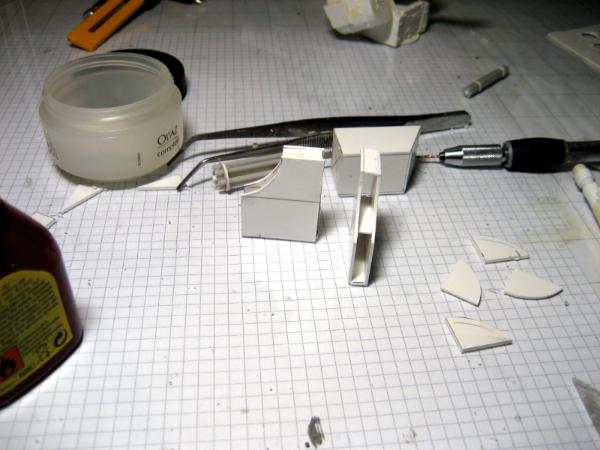
To cover the gap and give it a nice smooth surface, I cut a 8mm wide strip of .25mm plastic card, which I glued to the sides,
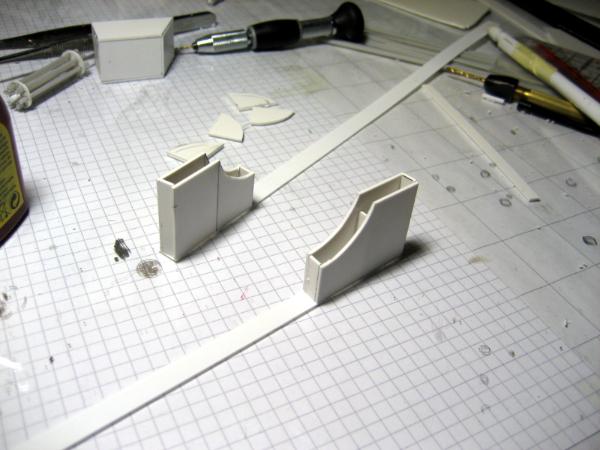
and as each side cured I wrapped it around the next side, following the curve nicely.
Most of the base parts already completed!
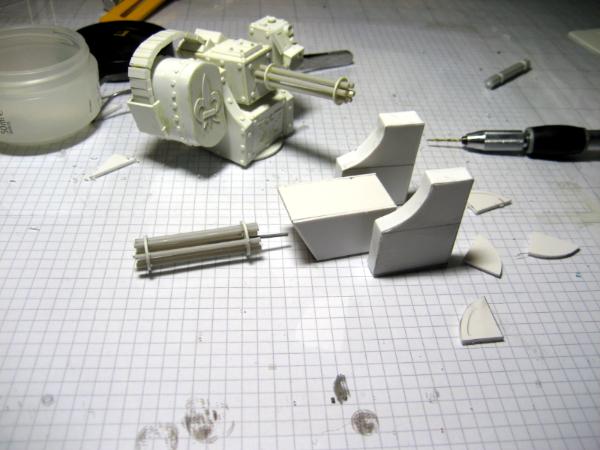
Since I had a few minutes left last night I also started the main turret body, but only got a part of it.
That went pretty well.
Now I have to complete the main body, then the sights box and the ammo drum. And after that:
details, details, details
I hope you like todays update and look forward to your feedback
Cheers
Klaus
|
|
|
|
|
|
2013/07/12 08:55:36
Subject: (Not) Santas Workshop of the Strange, Wierd, and Wonderful - 12 July - ATHENA!
|
|
Shroomin Brain Boy
|
ach.... I always like a nice step by step update!!!
looks very promising and I like the lil tools like the disc for marking the cutouts! these are such valuable lil helpers!
and one of these days I need me to get me one of these hand drills too... my akku drill is just too quick and messing stuff up too often...
|
|
|
|
|
|
2013/07/12 12:50:53
Subject: Re:(Not) Santas Workshop of the Strange, Wierd, and Wonderful - 12 July - ATHENA!
|
|
Is 'Eavy Metal Calling?
|
I too appreciate th step by step pics  . Never know when something really basic will be a godsend to someone struggling with their projects.
|
LOL, Theo your mind is an amazing place, never change.-camkierhi 9/19/13
I cant believe theo is right.. damn. -comradepanda 9/26/13
None of the strange ideas we had about you involved your sexual orientation..........-Monkeytroll 12/10/13
I'd put you on ignore for that comment, if I could...Alpharius 2/11/14 |
|
|
|
|
2013/07/12 13:00:04
Subject: (Not) Santas Workshop of the Strange, Wierd, and Wonderful - 12 July - ATHENA!
|
|

Chaplain with Hate to Spare
|
This project is looking simply stunning Klaus! hard to imagine that it's scratch built, the level of detail is phenomenal and beautifully executed as usual! how long before paint? looks like it will take as long to paint her as it took to build her! :-)
Automatically Appended Next Post:
Ooooh wow, i just became an Ancient Venerable Dreadnought! yay for me! :-)
|
|
This message was edited 1 time. Last update was at 2013/07/12 13:00:48
Flesh Eaters 4,500 points
" I will constantly have those in my head telling me how lazy and ugly and whorish I am. You sir, are a true friend " - KingCracker
"Nah, I'm just way too lazy to stand up so I keep sitting and paint" - Sigur
"I think the NMM technique with metals is just MNMM. Same sound I make while eating a good pizza" - Whalemusic360 |
|
|
|
|
2013/07/12 21:51:10
Subject: (Not) Santas Workshop of the Strange, Wierd, and Wonderful - 12 July - ATHENA!
|
|
Growlin' Guntrukk Driver with Killacannon
|
Keep going with the step-by-step update please...
I'm a looter and loving It
|
|
|
|
|
|
2013/07/12 22:48:22
Subject: (Not) Santas Workshop of the Strange, Wierd, and Wonderful - 12 July - ATHENA!
|
|
Decrepit Dakkanaut
|
Nerd, that means old fart in High Gothic
|
"dave you are the definition of old school..." -Viktor Von Domm My P&M Blog :
It's great how just adding a little iconography, and rivets of course, can make something look distinctly 40K-adamsouza
"Ah yes, the sound of riveting.....Swear word after swear word and the clinking of thrown tools" "Nope. It sucks do it again..."- mxwllmdr
"It puts together more terrain, or else it gets the hose again...-dangledorf2.0
"This is the Imperium, there is no peace, there are only rivets" -Vitruvian XVII
"I think rivets are the perfect solution to almost every problem"- Rawson
More buildings for the Building God! -Shasolenzabi
|
|
|
|
|
2013/07/14 13:08:24
Subject: (Not) Santas Workshop of the Strange, Wierd, and Wonderful - 12 July - ATHENA!
|
|
Fixture of Dakka
|
Astounding as always! The LEDs will have a particularly stunning effect after paint no doubt.
|
|
|
|
|
|
2013/07/15 08:44:36
Subject: Re:(Not) Santas Workshop of the Strange, Wierd, and Wonderful - 15 July - ATHENA!
|
|
Dakka Veteran
|
Thank you!
Painting? well, yes....
It will definately take a lot of my guts and patience to get her painted
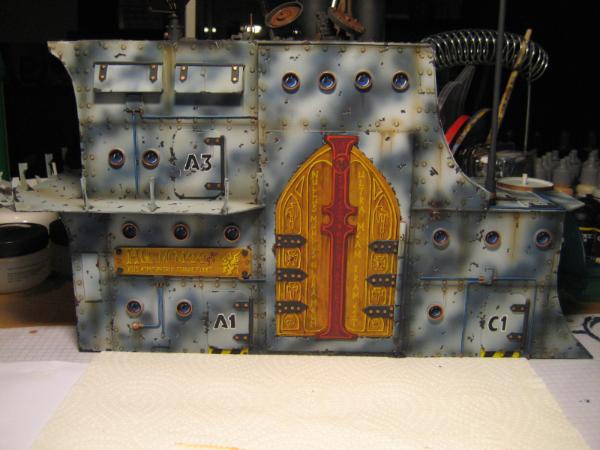
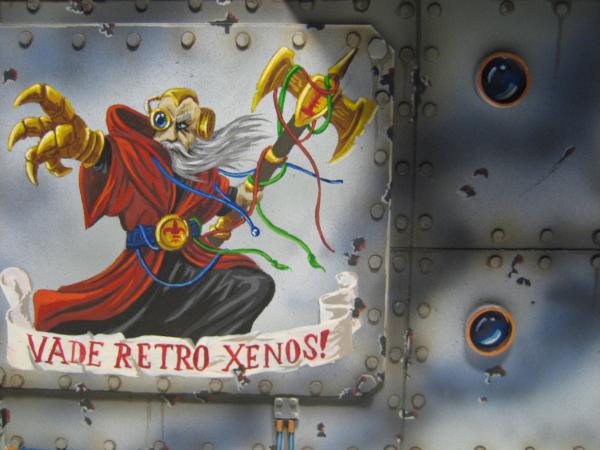
The plan is to do a basic "cloud" camo pattern, add a lot of weatehring, and then add slogans and banners like on the ZEUS.
So, somewhere along the lines of what I did with the old ATHENA bridge, when she was still an aircraft carrier...
So you can imagine this will be a lot of work.
I had a pretty busy weekend with lots of good weather, family and friends. So hobby time was relatively limited.
But I got to work on the CIWS a bit more. First I completed the main turret body - I had to do some gap filling and sanding.
Next I drilled the holes for the main gun axle.

and then I was able to glue the two sides in place. The gun body fits nicely and elevation and depression is like on the original NEMESIS.
Once this was verified I mounted the barrels to the gun body and started with the sights box.
I'm not sure if the weather was too hot for me, but when building the sights housing I created some rather big gaps, so I had to fill and sand a lot...
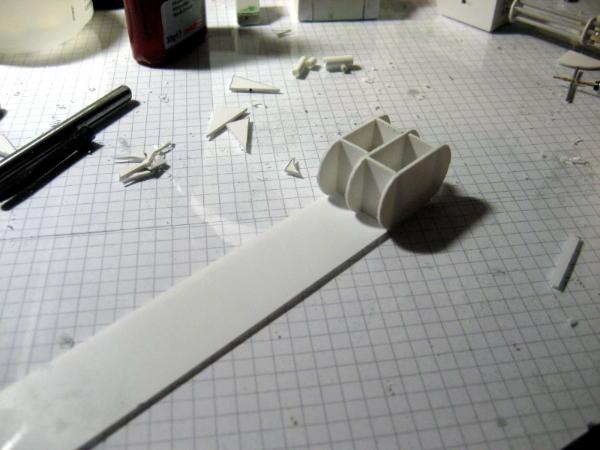
While the putty cured I started with the ammo drum. Using the marked disk as scale again, I drew the 3 sections onto the plastic card.
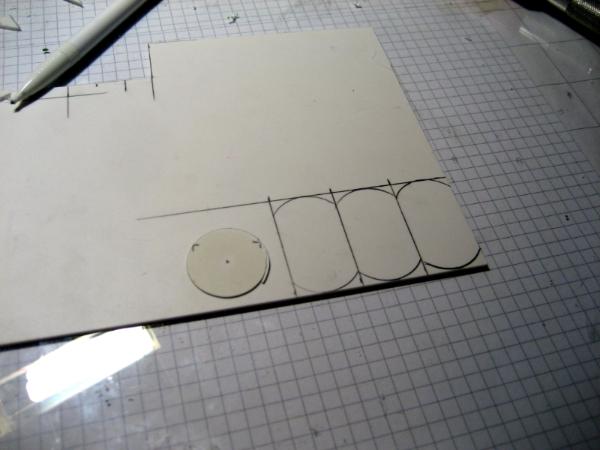
When cutting such rather "delicate" shapes I tend to keep the main section still attached to the plastic card (cutting the curves first).
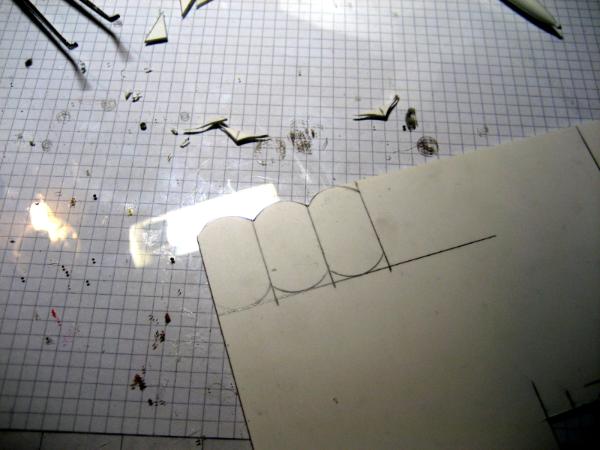
The three sections look rather good, but they are not really identical. For this purpose I tape them together (ensuring they are aligned perfectly) and then sand them together to the same exact shape.
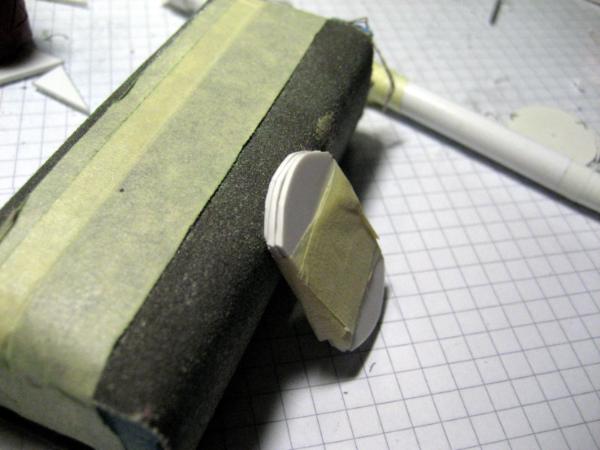
Once I was satisfied with the shape, I glued them together, separated by 1cm strips of plastic card. While the basic shape for the ammo drum now cured, I sanded down the sights box.
This NEMESIS will be a mirrored model, so the sides for the sights and ammo drum will be swapped. That's as far as I got.
Yes, it looks a bit warped right now, but as soon as I glued the spacers in position, the sights will align properly.
Cheers
Klaus
|
|
|
|
|
|
2013/07/15 09:44:25
Subject: Re:(Not) Santas Workshop of the Strange, Wierd, and Wonderful - 15 July - ATHENA!
|
|
Is 'Eavy Metal Calling?
|
Once again great little steps shown like taping them together and sanding them to be the same also the fact that there's a center piece and not just spanning the whole distance with pc, which is what I would have done, gotten pissed off, and scrapped the project.
|
LOL, Theo your mind is an amazing place, never change.-camkierhi 9/19/13
I cant believe theo is right.. damn. -comradepanda 9/26/13
None of the strange ideas we had about you involved your sexual orientation..........-Monkeytroll 12/10/13
I'd put you on ignore for that comment, if I could...Alpharius 2/11/14 |
|
|
|
|
2013/07/17 11:29:31
Subject: Re:(Not) Santas Workshop of the Strange, Wierd, and Wonderful - 17 July - ATHENA!
|
|
Dakka Veteran
|
Thank you
I try to keep this build report as detailed as possible.
The weather outside is beautiful and time is fleeting...
But I still got some hobby time.
First I used my Secret Weapon, the .25mm Plastic Card to do the ammo drum
While the first section cured, I started detailing the sights box. As these little pieces set, I started to wrap the plastic card around the ammo drum housing. I also used the .25mm card for the little sight.
With rivets and details the sights box looks nice, but it is quite considerably slimmer than the original
The next item on my agenda was the ventilation grill on the rear of the gun mount. For this I cut some strips of (you guessed it!) .25mm card...
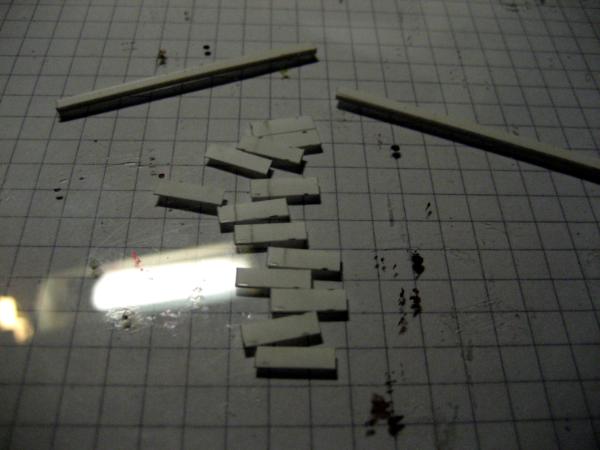
And carefully glued them in place, slightly overlapping.
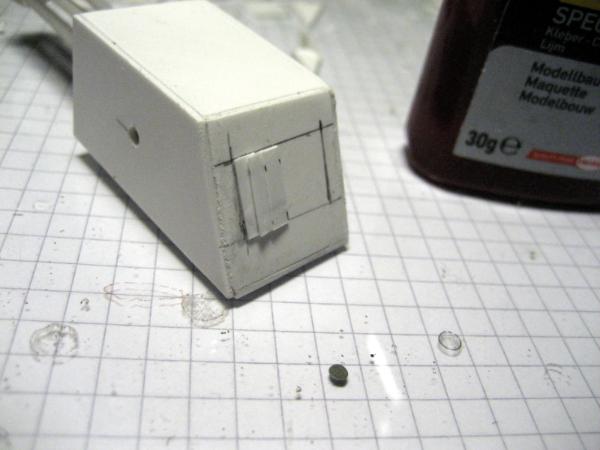
Its quite a task to keep them aligned and spaced properly.
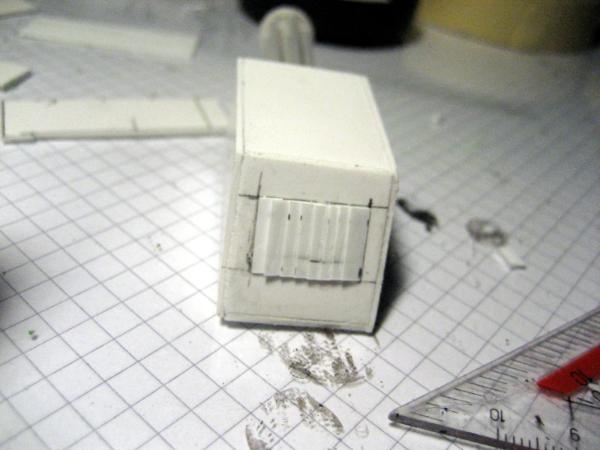
But with the little frame around it, it looks great
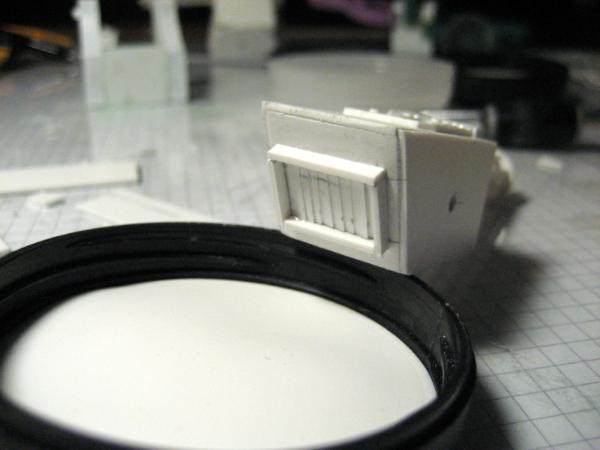
Some more details on the gun top, and I was able to glue the gun to the central axle.
Nice
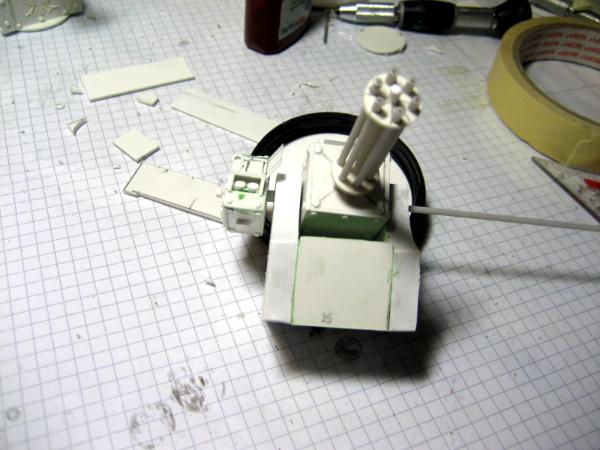
Due to my unique, unrivaled and superior calculation skills, I was able to....
...well...
...create a rather thin and flimsy ammo drum! :(
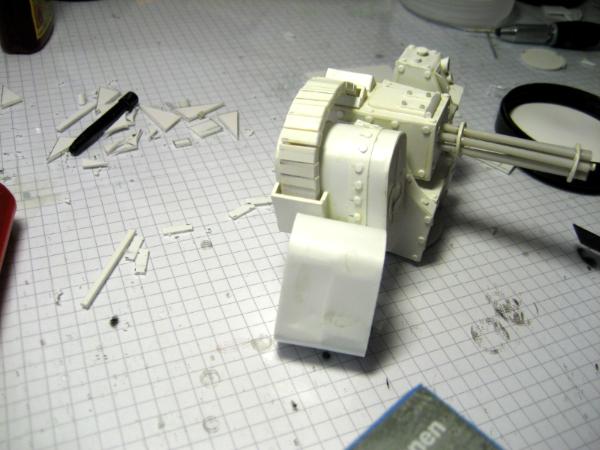
Crap on toast.
Aaargh!
I don't know what I calculated, but the drum is a good 1cm to small.
So I ripped the plastic card back off.
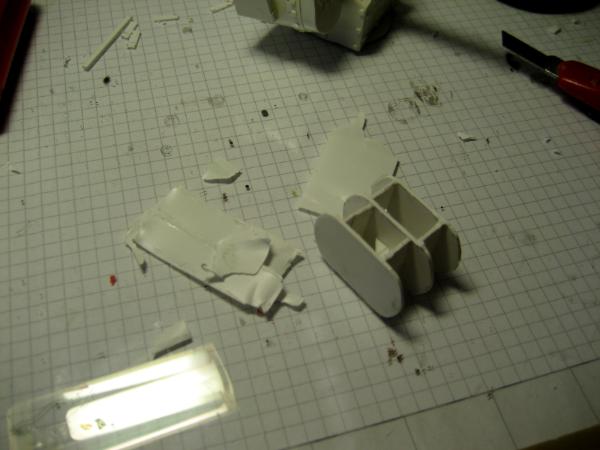
The mistake was that I used 1cm wide spacers instead of 1.5cm wide one. Somehow I calculated with the sections I'd need 3 spacers...
Haha, I only have 2 spacers.
So you see - I AM NOT SANTA
Well, I hope I can wrap this NEMESIS CIWS up by the end of the week.
Cheers
Klaus
|
|
|
|
|
|
2013/07/17 11:35:23
Subject: (Not) Santas Workshop of the Strange, Wierd, and Wonderful - 17 July - ATHENA!
|
|
Decrepit Dakkanaut
|
What's great about your blog is not how simply awesome the end products are, but how you take us through every step of the process. Those vents were something I'd wanted to try my hand at, and you clearly show the best way to go about it. Much appreciated, and inspiring as always.
|
Theophony"... and there's strippers in terminator armor and lovecraftian shenanigans afoot."
Solar_Lion: "Man this sums up your blog nicely."
Anpu-adom: "being Geek is about Love. Some love broadly. Some love deeply. And then there are people like Graven. |
|
|
|
|
2013/07/17 12:15:02
Subject: (Not) Santas Workshop of the Strange, Wierd, and Wonderful - 17 July - ATHENA!
|
|
Shroomin Brain Boy
|
ah.... he is no god... a mere mortal...
yet... even if you make crap on toast...it still looks yummy.... i think i am feeling a bit weird now
with me, most errors happen due to me miscalculating the thicknesses wrong of the materials... somehow this train of thought so often derails me... 
|
|
|
|
|
|
2013/07/17 13:47:37
Subject: (Not) Santas Workshop of the Strange, Wierd, and Wonderful - 17 July - ATHENA!
|
|
Fixture of Dakka
|
The detail you put into these posts is really great, Klaus! Reading the most recent one I think something just clicked into place in my mind and I might be able to give plasticard a good shot now. Thanks!
|
|
|
|
|
|
2013/07/17 14:50:34
Subject: (Not) Santas Workshop of the Strange, Wierd, and Wonderful - 17 July - ATHENA!
|
|
Mastering Non-Metallic Metal
|
Great to see the little details coming together to make an awesome model. That's what it's all about.
Ah, easy mistake to make. I'm sure we've all been there.
|
Mastodon: @DrH@dice.camp
The army- ~2295 points (built).
* -=]_,=-eague Spruemeister General. * A (sprue) Hut tutorial *
Dsteingass - Dr. H..You are a role model for Internet Morality! // inmygravenimage - Dr H is a model to us all
Theophony - Sprue for the spruemeister, plastic for his plastic throne! // Shasolenzabi - Toilets, more complex than folks take time to think about! |
|
|
|
|
2013/07/17 22:00:12
Subject: (Not) Santas Workshop of the Strange, Wierd, and Wonderful - 17 July - ATHENA!
|
|
Growlin' Guntrukk Driver with Killacannon
|
Thanks again for the step-by-step!
I probably will never be able to do It in such a precise fashion tho (I do Orkz, 'cause I'm ork )
|
|
|
|
|
|
|
|


