| Author |
Message |
 |
|
|
|
|
Advert
|
Forum adverts like this one are shown to any user who is not logged in. Join us by filling out a tiny 3 field form and you will get your own, free, dakka user account which gives a good range of benefits to you:
- No adverts like this in the forums anymore.
- Times and dates in your local timezone.
- Full tracking of what you have read so you can skip to your first unread post, easily see what has changed since you last logged in, and easily see what is new at a glance.
- Email notifications for threads you want to watch closely.
- Being a part of the oldest wargaming community on the net.
If you are already a member then feel free to login now. |
|
 |
2017/10/12 22:52:17
Subject: Re:sCratchbuilding and Citbashing by Meer_Cat: Basilisk- massive change in scope- let's overdo it! 9/26
|
|

[DCM]
Boom! Leman Russ Commander
|
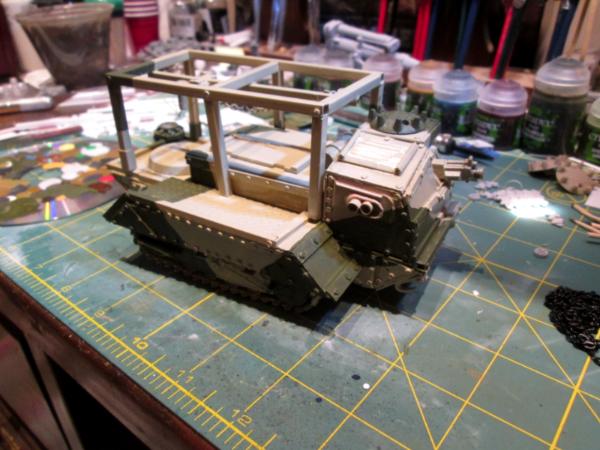
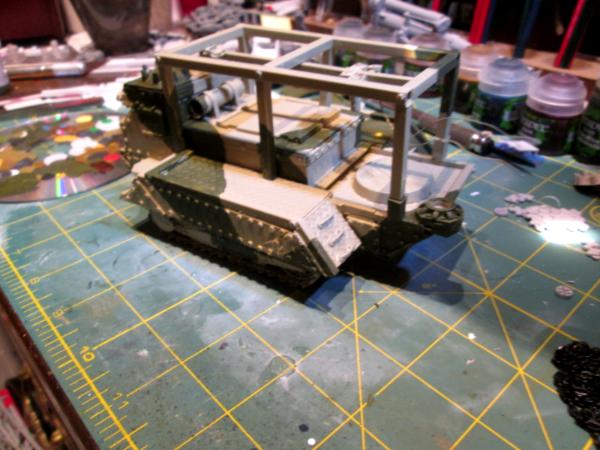
Been a tough few days to get some work in, but I finally think I've made enough progress to show some pictures.
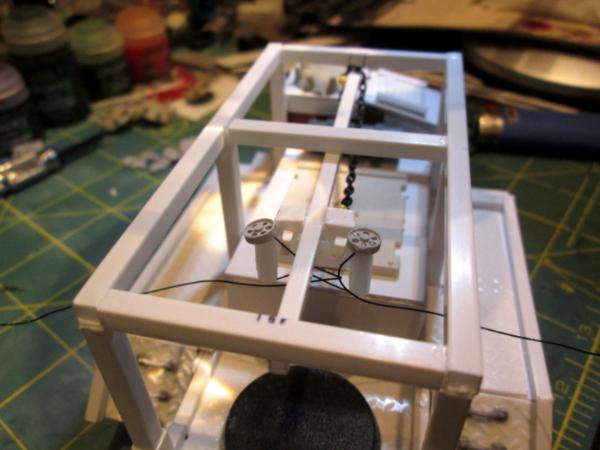
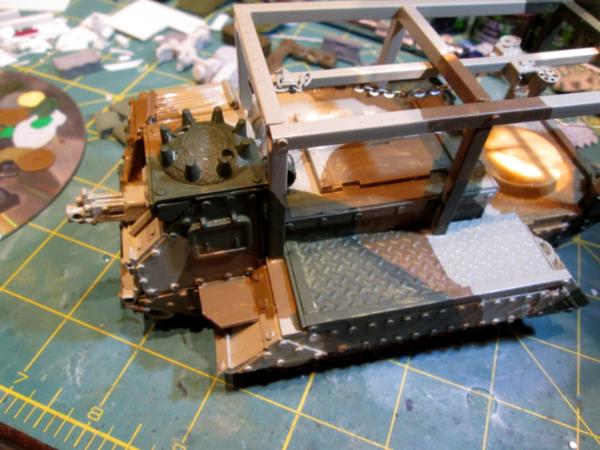
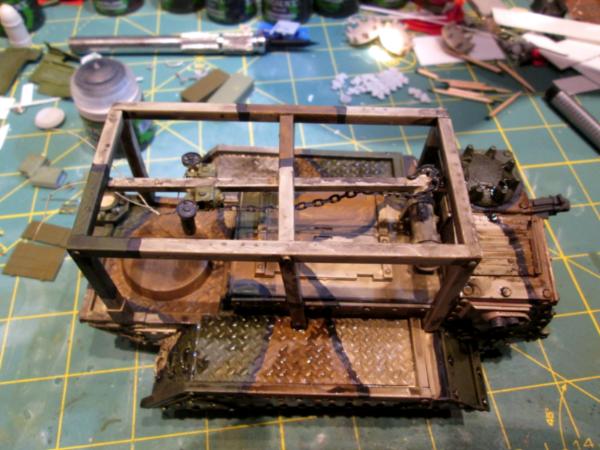
This work has actually been done for a bit- it's the chain hoist and sliding rail for lifting ammunition crates up and out of the armored storage area and moved to the back arming platform of the hauler. Here's a fairly poor side view:

And from the top:

And the top rear. The wires will get braided into a lifting cable and will have a crate suspended over the arming platform, where the projectile is removed and the fuse set for whatever is needed (timed aerial burst, proximity, point detonation, ground penetrating time delay detonation):
Here's the step that was holding me up- adding the rivets. I had made these a long time ago (months), so they were ready to go. They're 1/16 inch punch outs using a multi-size hole punch and a bit of old yard sale sign for the plastic. I just needed to sit down and actually glue them on:


I had glued down the 60mm base to use as a turntable for the gun, when this was still going to be the self-propelled howitzer/counts-as Basilisk, and now I can't get it pried off- so on it stays:

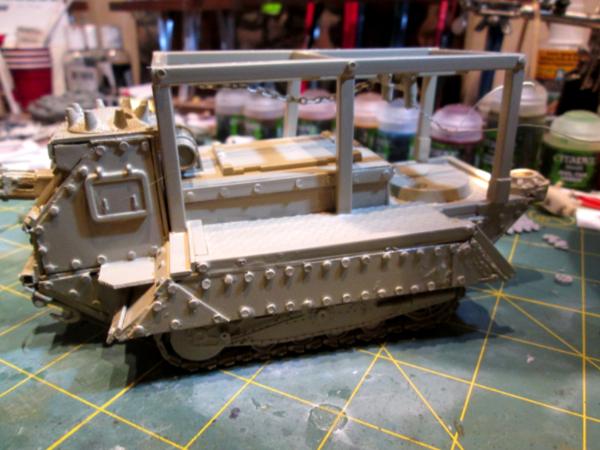
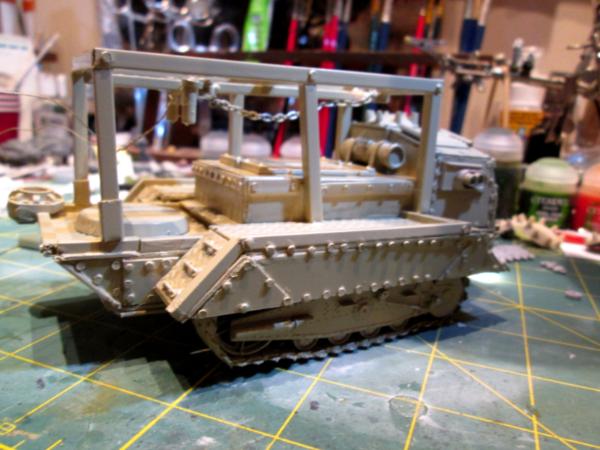
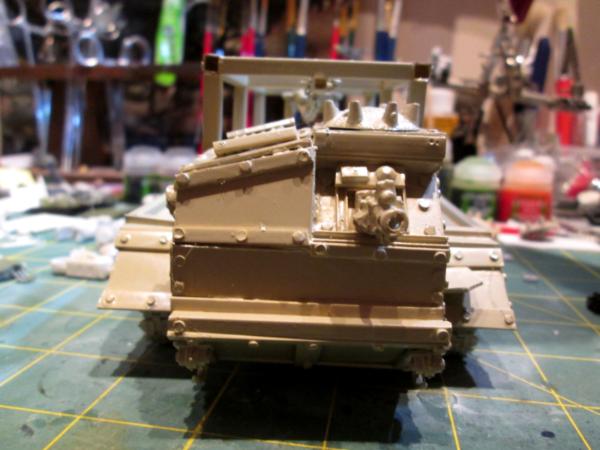
And, finally, a primer coat, which may also act as the basecoat. I'm thinking about doing this vehicle in a desert camo scheme, as a departure from the previous 'army green' or woodland greens I've used before. I'm looking over Klaus, Not Santa's and Shazolenzabi's work again, as both have excellent camo schemes to use as a guide. I must admit, I think it is starting to take on a more finished 'Imperial' look, rather than the previous 'rough and ready' Orkish look:
So, next up I think is either the addition of camo stripes/splotches if I go that route, or a nice, grungy weathering wash of Nuln oil around the engine compartment and Agrax Earthshade everywhere else. Then the detail work can start, followed by painting up a couple of crew members posed in the act of bringing up ammo crates and arming a shell.
Your constructive criticism and suggestions are always most welcome.
More follows soonest.
|
"He fears his fate too much, or his desserts are small, who will not put it to a single touch; to win- or lose- it all."
Montrose Toast

|
|
|
 |
|
2017/10/25 23:50:47
Subject: Re:sCratchbuilding and Citbashing by Meer_Cat: Ammo Carrier- now with more rivets! 10/12
|
|
[DCM]
Boom! Leman Russ Commander
|
A bit of painting progress. I know in the last set of pics it was hard to tell that the base coat was Rustoleum Khaki (I had a spray can on hand, and I know it sticks to anything, and I used a lot of lawn sale sign plastic in this project), but I think the camo pattern additions bring that out a bit better.
First, I needed to see what contrasting and complimentary colors I wanted to use, so I took a bit of scrap and made a test pallet:
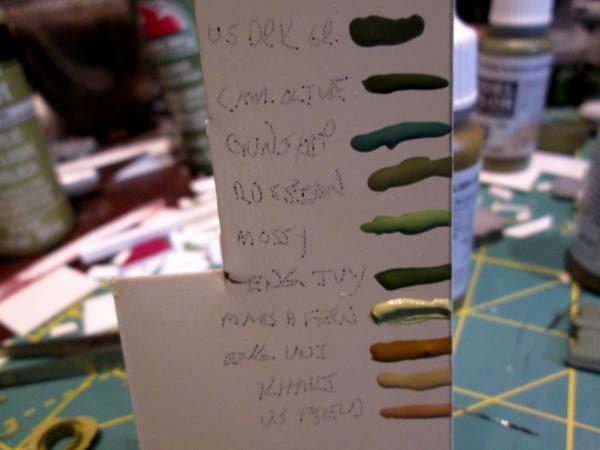
Then I added the dark green (which is Vallejo US Dark Green):
Followed by the brown (Vallejo US Field Drab):

And finally flat black lines to separate wherever any other two colors came together:
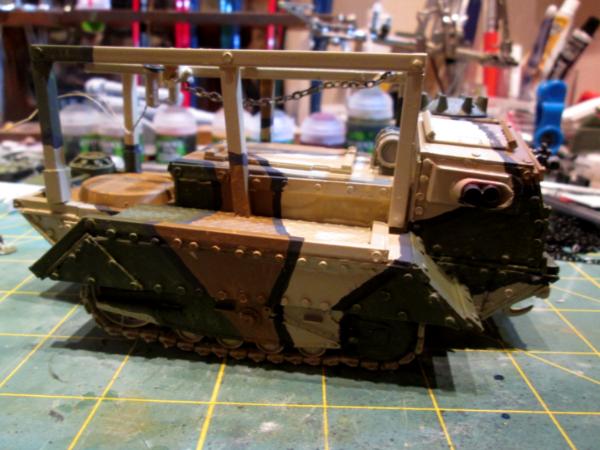

And I've started base coating some of the other items (the heavy bolter, lifting system pulleys, etc).
The next step will be to go back with a thin wash of each primary camo color and touch up the splotches, then hit the whole thing with a wash of Nuln Oil. More base coating and then rusting of the muffler, exhaust and tracks. Add on the stowage, ammo crates and crew, and I'm done- simple, yes?
Thanks for looking in, your comments and suggestions are always welcome. More follows soonest.
|
"He fears his fate too much, or his desserts are small, who will not put it to a single touch; to win- or lose- it all."
Montrose Toast
|
|
|
|
|
2017/10/26 03:57:18
Subject: Re:sCratchbuilding and Citbashing by Meer_Cat: Ammo Carrier- camo primary colors done 10/25
|
|
Longtime Dakkanaut
|
I keep checking in and seeing all these tanks being built, wonderful stuff Meer. Any chance you could throw us a pic of your army together?
|
|
|
|
|
2017/10/26 12:11:56
Subject: sCratchbuilding and Citbashing by Meer_Cat: Ammo Carrier- camo primary colors done 10/25
|
|
Combat Jumping Rasyat
|
Looking good!
I just have one grump; You're making me want to paint some (small scale) armor!
|
|
|
|
|
2017/10/26 21:00:29
Subject: Re:sCratchbuilding and Citbashing by Meer_Cat: Ammo Carrier- camo primary colors done 10/25
|
|
Longtime Dakkanaut
|
I like where you are going with the transport's camo scheme. Nice progress so far. 
|
Proud Purveyor Of The Unconventional In 40k |
|
|
|
|
2017/10/26 21:41:00
Subject: Re:sCratchbuilding and Citbashing by Meer_Cat: Ammo Carrier- camo primary colors done 10/25
|
|
[DCM]
Boom! Leman Russ Commander
|
Many thanks for all the positive feedback!
Yorkright: I'm flattered that you would be interested in a pic of my army, such as it is. I'm very happy to set something set up, shot and posted, and thank you. When I started painting Warhammer 40k in 1989, I was still a barracks rat in the Army. Needless to say, most of the other guys around couldn't care less about 'toy soldiers', so having anyone other than another 'toy soldier geek' show any interest was rare. To have the opportunity here to show off my pieces is a rare privilege indeed.
ChaoticMind: Very good to hear from you again- and get painting- the world needs more armor! (and, according to Alice Cooper, guts).
Oldravenman: Thank you as well- between the camo that you paint and that shazolensabi does, I felt like giving this WWI-style scheme a try. I wasn't going to originally, was going to stick with my usual 'base of olive drab and a lot of dirt' approach. Of course, originally, this piece was going to be a 'counts as' Basilisk, too.
The Bassie is coming, but for now it is nice to get back into the painting mode.
More follows soonest!
|
"He fears his fate too much, or his desserts are small, who will not put it to a single touch; to win- or lose- it all."
Montrose Toast
|
|
|
|
|
2017/10/27 00:41:16
Subject: sCratchbuilding and Citbashing by Meer_Cat: Ammo Carrier- camo primary colors done 10/25
|
|
Combat Jumping Rasyat
|
I wish! I traded one problem (No income) for another (A trucking job where I can’t bring minis with YET)
I really want to get back to a point where I’m regularly working on my minis again.
|
|
|
|
|
2017/10/27 01:24:48
Subject: Re:sCratchbuilding and Citbashing by Meer_Cat: Ammo Carrier- camo primary colors done 10/25
|
|
[DCM]
Boom! Leman Russ Commander
|
I do wish you luck and hope for the best outcome for you with that- I went through a period as well where I was on the road a lot (I still travel away for a week or more at a time several times a year) and that arrangement just doesn't support a full-time hobby life.
Having said that, for smaller, more limited number painting projects with little or no customization or conversion, I did use a small Plano tackle box at one point that held half a dozen figures (I was doing Napoleonics by the six's, back in the day), a few tools and the paints. For a very brief period (a few months) it worked- more than that and it's just a pain.
Good luck! And I hope to hear from you again soon.
|
"He fears his fate too much, or his desserts are small, who will not put it to a single touch; to win- or lose- it all."
Montrose Toast
|
|
|
|
|
2017/10/27 01:26:52
Subject: sCratchbuilding and Citbashing by Meer_Cat: Ammo Carrier- camo primary colors done 10/25
|
|

Gargantuan Great Squiggoth
|
That is looking pretty amazing bud, great camo, really nice model, got a lot of character.
|
|
|
|
|
|
2017/10/27 04:57:01
Subject: sCratchbuilding and Citbashing by Meer_Cat: Ammo Carrier- camo primary colors done 10/25
|
|
Combat Jumping Rasyat
|
Yeah, I have a moderate sized toolbox that I’ve been working out of for a while ready for when I get my own cab but I’m waiting to get in a trainer’s truck right now.
|
|
|
|
|
2017/10/27 13:04:47
Subject: Re:sCratchbuilding and Citbashing by Meer_Cat: Ammo Carrier- camo primary colors done 10/25
|
|
[DCM]
Boom! Leman Russ Commander
|
Hey Cam- thank you for the kind words! This has been a bit of a different experience for me, as this is the closest to a complete scratchbuild as I have yet come. I've been able to put a lot of the practices I've seen here on Dakka Dakka into the project, and always learn a lot (whether it comes out the way I intended or not). I've been following your Village Build with great interest and will drop in over there to leave appropriately congratulatory words as well.
ChaoticMind- hang in there and I hope you're more settled soon- you do some great work and I've learned a lot following your blog. As the Romans used to tell us "Fortune favors the prepared mind and resolute will". (I write fortune cookie fortunes on the side [kidding]). 
|
"He fears his fate too much, or his desserts are small, who will not put it to a single touch; to win- or lose- it all."
Montrose Toast
|
|
|
|
|
2017/10/30 22:36:43
Subject: Re:sCratchbuilding and Citbashing by Meer_Cat: Ammo Carrier- camo primary colors done 10/25
|
|
[DCM]
Boom! Leman Russ Commander
|
1) Still working on the Basilisk Ammunition Hauler (will have to come up with a name for the vehicle series) and hope to have some more pictures later tonight.
2) Still setting up pieces to take some army shots- and very flattered to have the encouragement to show a group shot off!
3) Here's a new bit of kitbashing, converting and/or customizing material I recently picked up at my local grocery store (Giant Foods):

These are cheap, fiber optic, led lights that are intended for kids to wear on their fingers and run around like maniacs in the dark (at least, that's what I did with mine, 'testing' them out). The package of three cost me US$2.00.
The main body of the device is about 2.25 inches long (approximately 60mm):
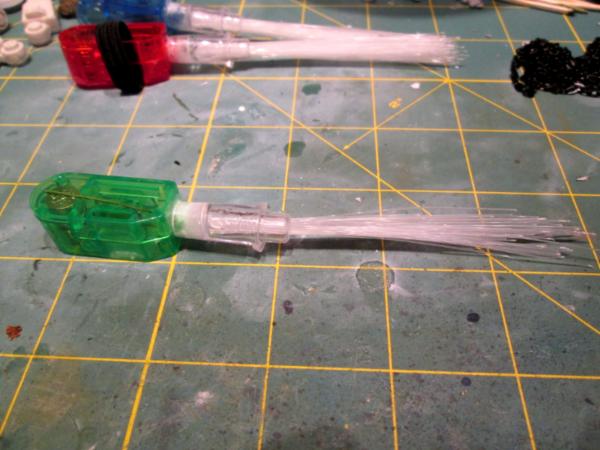
To me, the main bit looks a lot like a las-cannon or other heavy weapon barrel- wanting only a bit of tube in the front and a tripod or vehicle mount:

_OR_, this could be a source of cheap illumination for a vehicle hit. Look how bright these trands are; imagine of you bundled them into smaller bunches, and ran those to your various lights on a Chimera, Leman Russ, or even a Titan (or Eldar Wraith Knight)? You could run them inside or outside the hull, creating either points of light (run inside) or 'cables' of light (outside). These things seem tailor made for Tau.

I'm looking forward to finishing the ammo hauler- it doesn't seem like a good candidate for lighting, and the interior is sealed away, I can't easily get in there. But once finished, I want to start something else to try these on!
Hope this was helpful to someone, but at least I had fun playing with them for now!
More follows soonest.
|
"He fears his fate too much, or his desserts are small, who will not put it to a single touch; to win- or lose- it all."
Montrose Toast
|
|
|
|
|
2017/10/31 23:26:26
Subject: Re:sCratchbuilding and Citbashing by Meer_Cat: Ammo Carrier- Cheap fibre optics! 10/30
|
|
[DCM]
Boom! Leman Russ Commander
|
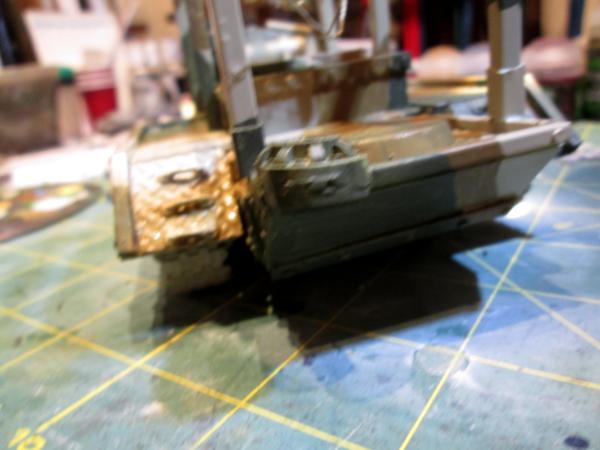
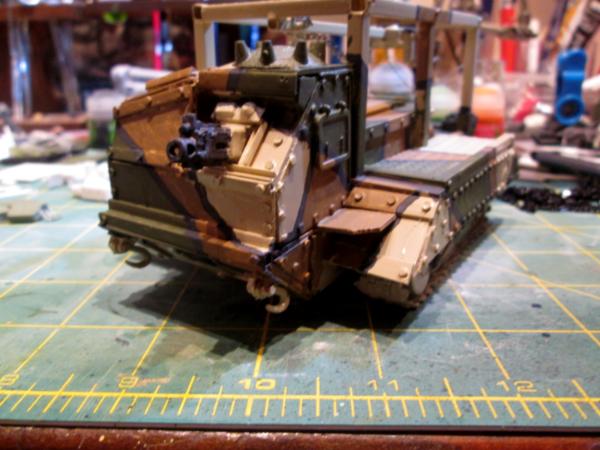
To start, I got the Nuln Oil wash done on the new ammo hauler (sounds like not much, but some days a little is all there is time for!):


Ink still wet in places, but I'm happier now that the vehicle looks like someone took it places other than the motor pool (Murphy's Law: No combat ready unitever passed inspection; no inspection ready unit survived combat).
Next up, here are a metric-crap ton of pics of 'the army'. The quotation marks are because I haven't really painted a balanced force (for any rules set) yet, this is just what I've painted since I've been posted in Northern Virginia. If I can get in with a gaming group again, I'll build out a more regular assortment, with some Stra-Tee-gery behind the composition.
So, here's an aerial shot of the whole group:

The heavy artillery (and lots more coming- as someone mentioned elsewhere on Dakka, it takes cojones to bring towed artillery to the 41st Millenium battlefield- and the Imperial Guard are loaded with it):

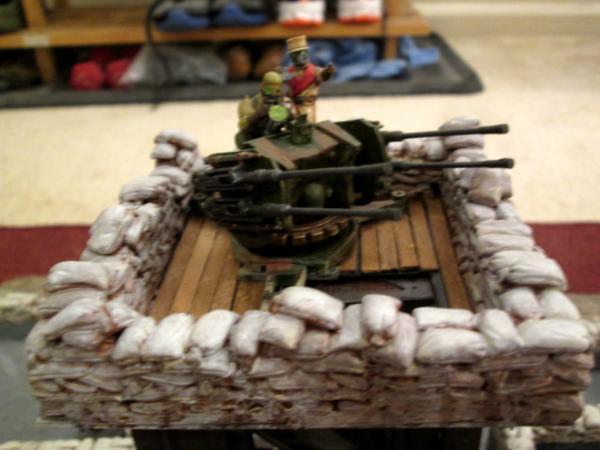
There's a Quad Launcher in the big picture, but the close up didn't come out very well. It has some features I'm rather proud of, so I'll probably run a separate spread on it later.
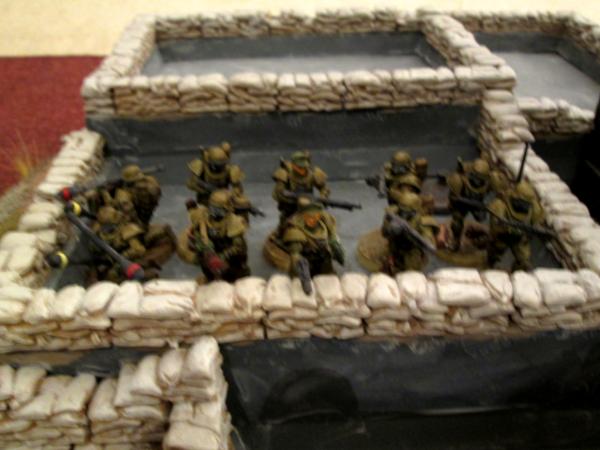
Here's the Infantry, starting with the Light Battalion of the King's Own Scottish Borderers (Clan Leslie). These are the nucleus of the Headquarters Platoon. The figures are by Kromlech:


Next up are elements of the 1st Battalion, 77th Infantry (the Lucky Sevens). There are three squads of these painted up so far and I have the components to add two more squads, a special weapons squad and a Platoon Command Squad. The figures are Greatcoat Troopers from Wargames Foundry (anxiously awaiting Bolt Action, who bought up WGF, to release more of these):

Here are the first and second squads of the First Platoon, A Company, 1st Regiment of Grenadiers. Figures by Dream Forge:

Armor- the Baneblade pic didn't come out very well, so it's in the group shot only, for now. It is basecoat painted, and needs weathering and detailing anyway, so more and better pictures later. Here's my only true Chimera so far:

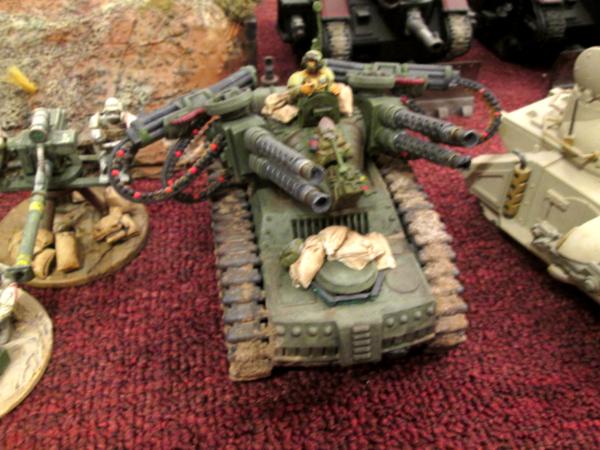
The mighty Athena (which is the prime transport for the First Squad of the Grenadiers- the Ladies from Hades [ hat tip to Robert Heinlein]):
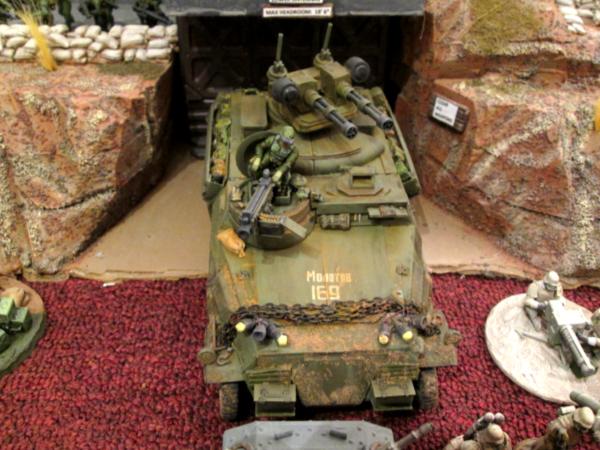
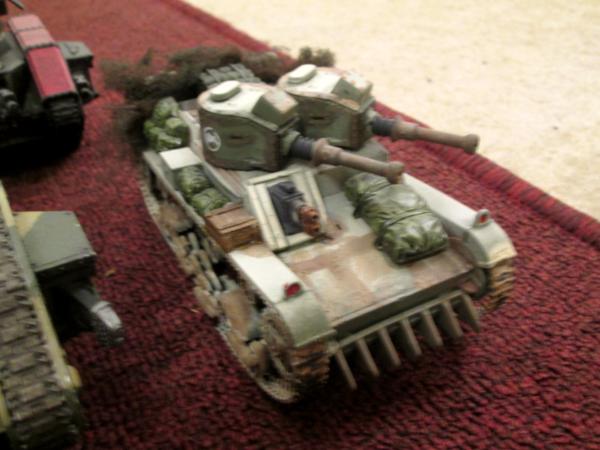
My 'counts as' Hydra (a Bronekorpus SPAAG somewhat converted):
An old school Predator (from the late '80's, when the IG could have them):

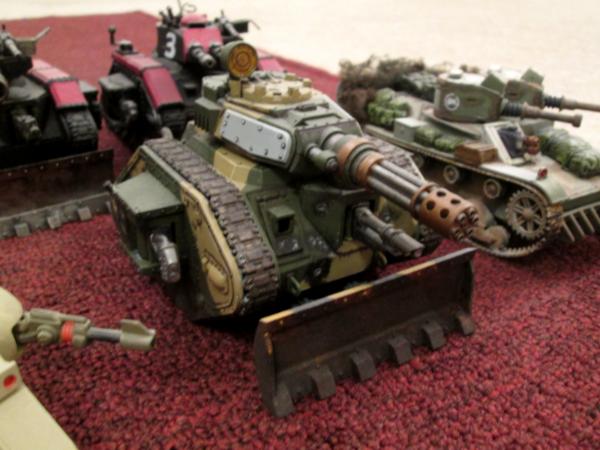
My best Leman Russ, with magnetized weapons:
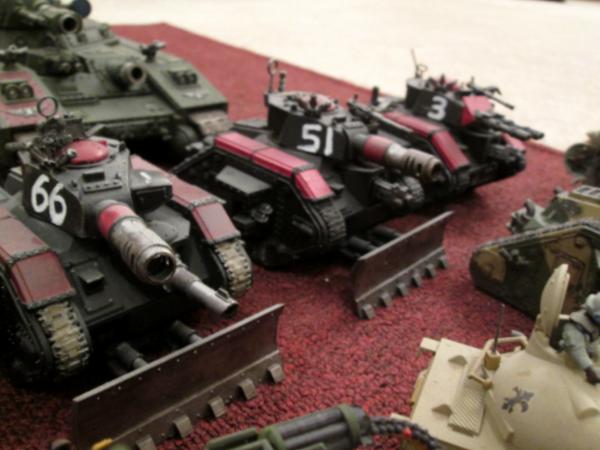
And the bought-from-ebay-for-fantastic-price-but-yet-to-be-repainted Leman Russ gunline:
And my 'counts-as' Hellhound. This is a 1/35 scale 7TP early WWII Polish tank, although I believe the actual design is a British Vickers:
And the Heavy Weapons crews:

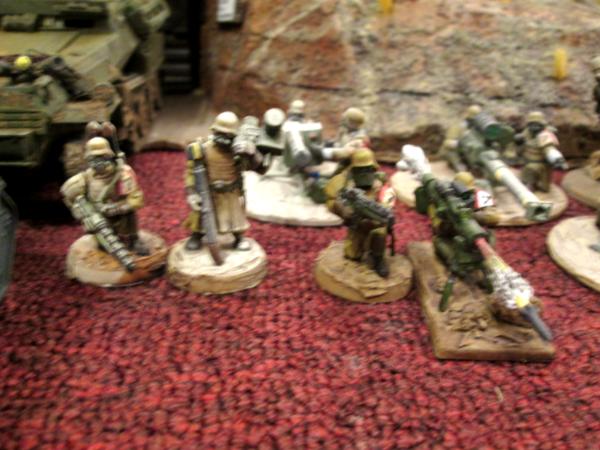

Those last (extremely poor photo) heavy weapons crews are from RAFM, who are not out of business after all. I bought them about twenty years ago and only recently (within the last year) painted them- trying for a somewhat cartoonish color scheme. I found and bought more figures to make up an infantry squad to go with them and they are tongue-in-cheek named the Knights of Cydonia- with all credit to the music group Muse for the title.
So that's it, for now. I have an awful lot of Rogue Trader era stuff still packed up in boxes that will have to come out some day. Apologies for the photography, but I'm very willing to reshoot anything that might be of interest to anyone (and would be very proud to have the interest in any of my work).
Looking t the whole assemblage, the KOSB I painted almost two years ago, ditto for the Hellhound. Since that time you folks have taught me an awful lot, and my figures are getting better and I'm not taking 'as-is' model kits and tacking some random bits of Games Workshop kit on them- I'm modifying more heavily and the most recent project- the ammo hauler- is almost entirely scratchbuilt.
So if I keep studying what you people do, stretch my talents a bit, leave my comfort zone and try something new- maybe I'll get even a little bit better.
And when I'm tied of IG? I have a literal _ton_ of Eldar stuff I've been picking up, just to REALLY try something new!
I look forward to your comments and observations- and more follows soonest!
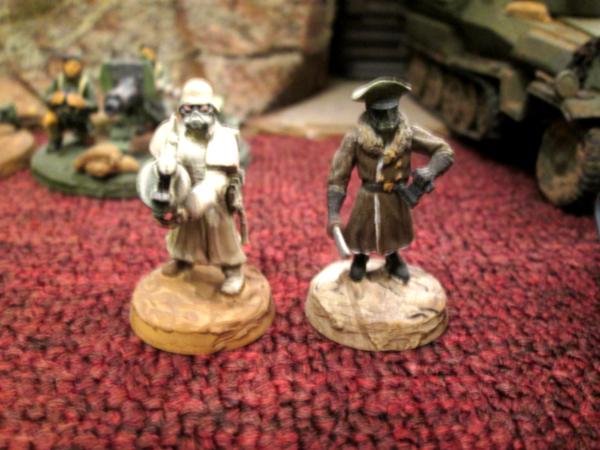
And finally, the Army Commander (for now- I have a Raging Heroes figure that will probably take his place, and he'll drop down to command one of the platoons):
|
"He fears his fate too much, or his desserts are small, who will not put it to a single touch; to win- or lose- it all."
Montrose Toast
|
|
|
|
|
2017/11/01 02:04:11
Subject: Re:sCratchbuilding and Citbashing by Meer_Cat: Total Army- pciture heavy 10/31
|
|
Longtime Dakkanaut
|
Outstanding work Meer, thank you for giving us a look at your army. It is definitely a one of a kind army, all your conversions are well done, I especially like the Aethena. Is the fort going to be part of your display board?
|
|
|
|
|
2017/11/01 03:44:35
Subject: sCratchbuilding and Citbashing by Meer_Cat: Total Army- pciture heavy 10/31
|
|
Stabbin' Skarboy
|
Apologies if you’ve already answered this, but where did you get the thousands of sandbags? Are they off the shelf or did you make them?
|
|
|
|
|
|
2017/11/01 22:10:27
Subject: Re:sCratchbuilding and Citbashing by Meer_Cat: Total Army- pciture heavy 10/31
|
|
[DCM]
Boom! Leman Russ Commander
|
Hi Gulgog- The answer is a little bit of both- off-the shelf molds that I use to make as many sandbags and planks as I need. While I've probably mentioned them elsewhere in this thread, I haven't really called out the silicon molds that Hirst Arts produce, and I really should. These things are terrific! Bruce Hirst has fantastic imagination and posts 'how to' articles on his website plus project instructions to make the most fantastic terrain pieces- everything from Egyptian pyramids to Gothic cathedrals to space ship floor plans and conduit pieces. The molds are about US$30 each, but are very sturdy and good for hundreds of castings. You can even use two part plastic molding fluids and cast plastic or resin pieces (although this is harder on the molds than plaster- I use commercial dental plaster).
I've used the sandbag and plank molds on several pieces that I've done- as an Imperial Guard gamer, they're a natural fit for terrain plus vehicle embellishment.
Here's some pics of the molds and the castings:
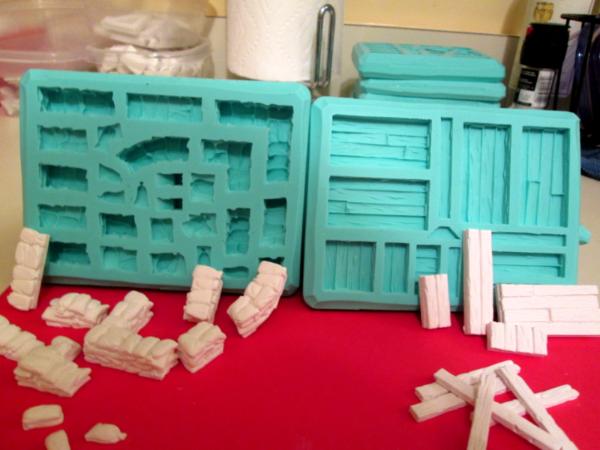
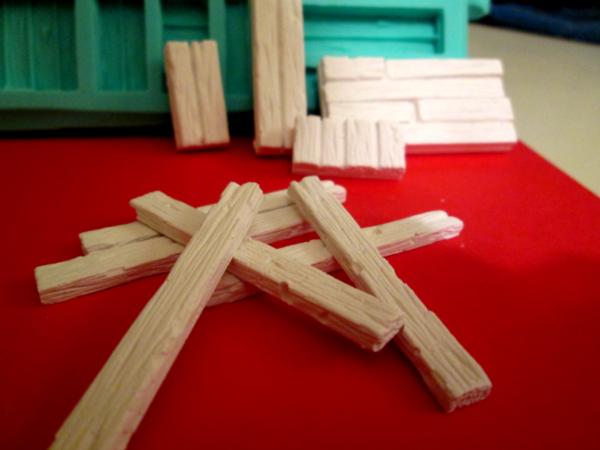

The imperfections you see are my fault- didn't tap the molds enough tor remove air bubbles, etc. Bruce gives very good directions both on his website and with the molds when you order them. It's pretty straight forward and I highly recommend them if you need a lot of parts.
Hi Yorkright- and thank you for the kind words. I think calling my eclectic assemblage of disparate models an army is presumptuous on my part- at least until I actually game them! I intend to eventually, when I can find a group that I can get to. Of the vehicles, the Athena is undoubtedly my best piece, a nice Hanomag conversion. The infantry are pretty much standard, but I'm learning a lot about painting them. You can see the difference clearly between the early troop types (the Scots) and the most recent (the Eisenkerns). I think I've made some progress, although far to go.
Plus, as Big H said once, as we learn new and better ways, or our skills get better, we have to go back and touch up everything we ever did- we're never truly finished.
The fort was a project of madness predicated on finding a multi-picture, multi-dimensional frame at Goodwill for US$5 and thinking- I can make something out of this. I've got some WIP pictures earlier in the thread. Now, really, I'd like to sell it as it takes a bit of room- but it's big enough and not so strong as it could be that it would be difficult to advertise it with the expectation of mailing it to a customer. So for now, it makes for a nice backdrop for taking some pictures.
I really appreciate the interest and the comments and hope for more as I get the chance to put up more finished work. I'm finishing off the ammo hauler now (need a name for it- 'Mule' is to cliché) and then need to build the howitzer it's meant to serve.
More follows soonest!
|
"He fears his fate too much, or his desserts are small, who will not put it to a single touch; to win- or lose- it all."
Montrose Toast
|
|
|
|
|
2017/11/15 02:49:21
Subject: Re:sCratchbuilding and Citbashing by Meer_Cat: Hirst Arts Molds 11/1
|
|
[DCM]
Boom! Leman Russ Commander
|
Just a brief update tonight, but wanted to throw out a 'sign of life', as I haven't been able to get any pics taken lately to show forward progress on the ammo hauler (note to self: Got to think up a name for this beast). Truth is, work has been busy enough to use as an excuse to justify a session of 'painter's block'; I know if I just sit down at my desk I'll be engaged for a couple of hours without looking up. It's just sitting down that's the first step to get done. I got a little frustrated with this project, for all that I was able to try some new things and have learned a lot, because it didn't really go the way I wanted it to. Remember, this was supposed to be a self-propelled gun, a Basilisk, originally. In comparison, the Athena/Hanomag conversion just clicked along- even though I never really planned ahead, the steps just seemed to naturally flow one into the next.
Having said that, I really do like how the ammo hauler is turning out. Starting tomorrow, I sit down and do the first thing that comes to mind, just to get rolling again. I'm confident that the old urge will take over from there.
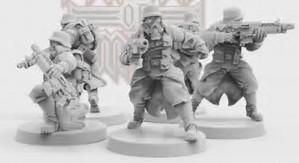
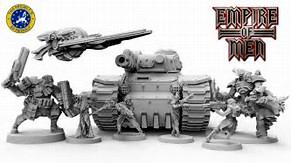
The reason for getting serious on finishing this job up (and hopefully the SPG that the hauler will support) is that I've backed the Empire of Men Kickstarter, and the figures should be coming sometime in February next. I opted in at a fairly good level, and have a couple of vehicles coming and another platoon's worth (including its command squad) of infantry to paint up. The figures are by Archon Studies out of Poland, and are fantastic. I think they will be a good stand in for Death Korps of Krieg. Their opponents are obviously stand-ins for Dark Eldar and are equally well sculpted and detailed. It's been a long time since I've been this excited about a product coming out.
I was able to find a couple of the promotional pictures on-line to show:
More _definitely_ follows soonest!
|
"He fears his fate too much, or his desserts are small, who will not put it to a single touch; to win- or lose- it all."
Montrose Toast
|
|
|
|
|
2017/11/15 08:22:46
Subject: sCratchbuilding and Citbashing by Meer_Cat: 11/14 Still plugging away
|
|
Gargantuan Great Squiggoth
|
Those troops definitely have promise. Good to see you around. Love the sand bags.
|
|
|
|
|
|
2017/11/16 02:46:50
Subject: Re:sCratchbuilding and Citbashing by Meer_Cat: 11/14 Still plugging away
|
|
[DCM]
Boom! Leman Russ Commander
|
Thanks Cam! I stumbled across those Hirst Arts molds back when I was wild to build a real castle for Warhammer Fantasy Battle. At the moment, I have what I believe is a very respectable gate house with drawbridge, primered, and waiting for time to be available to finish off the paint. I'll get pictures up at some point. The best thing is- taking a leaf from Bruce Hirst's projects- the whole thing separates into pieces so you can game in every level of the towers and in the courtyard.
For tonight, I finally got myself back into action- all it took was actually sitting down in the chair and the madness was upon me. The first thing I started working on was a base for what will actually be half of a diorama (the other half will be the actual howitzer that the ammo hauler supports). Per the question I asked earlier, the two halves together will be a Basilisk in the process of loading shell and propellent, and the hauler resupplying the Bassie.
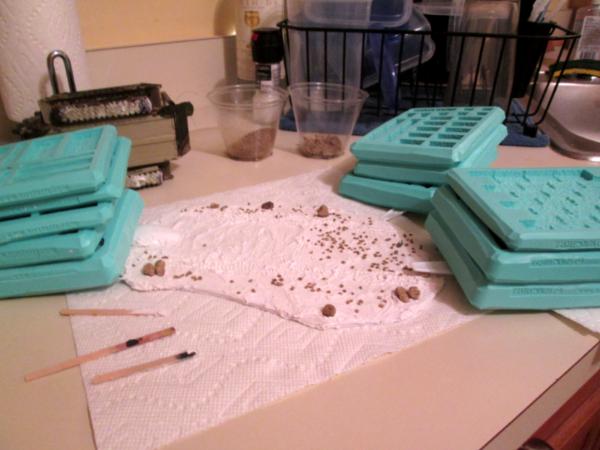
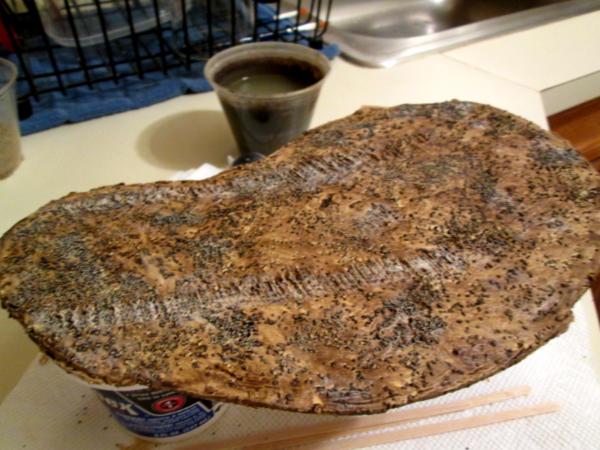
Here are the materials I used to texture the base, which I cut out of a piece of foam board:
[url=https://www.dakkadakka.com/gallery/915854-Basilisk%2C%20Conversion%2C%20Howitzer%2C%20Imperial%20Guard%2C%20Tracked.html]  [/url
I used the spoon to toss a couple of glops (official unit of measure for modelers, I swear) onto the board, then the knife to spread it. I actually meant to use the artists thick gel medium that I had on hand, but this artists' paste needed using up before it all hardened anyway, so all good:
I then used the spoon to flatten out the serrated tracks in the paste, and the knife again to hack in some tread marks into the 'soil'. I tried pressing the actual ammo hauler treads into the paste, but it had already set up too much to take much of an impression:
Next was to add some real texture- rocks and gravel. The paste was still soft enough to press these in by hand, and if they loosen up I'll hit 'em with a bit of white glue mixed with water and Bob's your uncle:

As I finished, I noticed that the foam board was curling, because the paste was more damp than I expected, so I weighted everything down with my Hirst Arts Molds (is there _anything_ they can't do?). When the paste hardens fully, the base will remain straight:
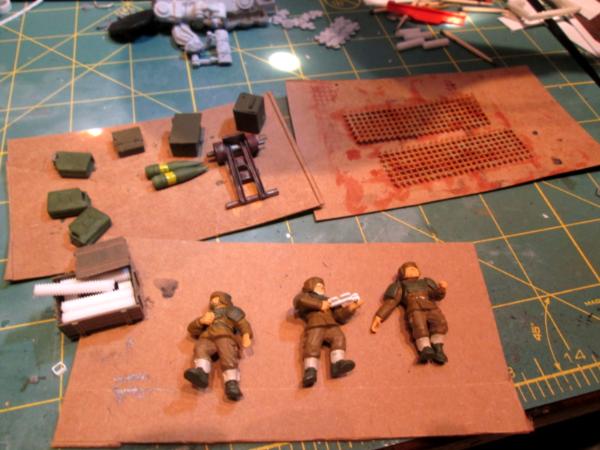
The next thing was to assemble the parts for a three man (for now, maybe more later when I see how full or empty the diorama base seems) ammo detail. I got a tremendous deal on ebay for a bunch of Imperial Guard Cadian parts for cheap, and I've been needing/wanting a project with a lot of guys running around to use them on and this is it:

After a lot of trimming, kitbashing and fabricating, here's what I ended up with. This first fellow (on the left) will be operating the hoist that runs ammo cases from the hatches in the forward part of the hull to the loading/fusing platform at the back. He and the guy in the middle are pretty much straight GW Cadian parts, with the exception of the left hands, which are from DreamForge Games Eisenkern Stormtrooper Accessory set. The guy on the right was really fun- I learned a lot. He's a base of Cadian parts, a Wargames Foundry Greatcoat Trooper right arm and Eisenkern right and left hands:

I scratch built the little shell cart after seeing something similar in a pic here on Dakka Dakka:
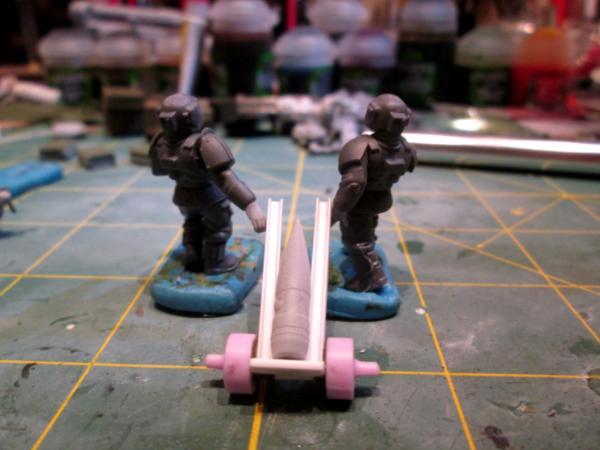
The final posing will be better than you see here, but I couldn't resist mocking the scene up to see how they were going to look. The cart needs a couple of doodads and cross pieces added, and some handle grips. I've got a ton of bling to add to the track and the area around the back of the track in the form of crates, fuse boxes, propellant tubes, and extra shells. I plan to make more shells per the instructions Klaus- Not Santa give early in his blog, by sharpening a bit of sprue stuck into a drill on a piece of sandpaper. Plus some more scenicking of the base and some more work on the track and we're about done with this one and can move on to the howitzer itself.
As always, I look forward and appreciate your candid constructive criticism, observations and suggestions.
More follows soonest!
|
"He fears his fate too much, or his desserts are small, who will not put it to a single touch; to win- or lose- it all."
Montrose Toast
|
|
|
|
|
2017/11/27 23:47:15
Subject: Re:sCratchbuilding and Citbashing by Meer_Cat: 11/15 Vehicle base and crew assembled
|
|
[DCM]
Boom! Leman Russ Commander
|
Gaaaaah! What a night! Have you ever tried to knock something out quickly, so you can get on to something more fun- something that should be easy and take 5 minutes, but then turns out to be one sticking point after another and takes an hour? I have now joined your club!
As it turns out, the base for the mini-diorama that the ammo hauler (I'm thinking of the name 'Phaethon', which was Apollo's chariot, in keeping with the theme set by the Athena Command and Control vehicle) is supposed to sit on continued to curl and warp even with weight sitting on it for a few days- completely unusable.
"Right," says I, "I'll find a cheap source of some kind of wood for the base, that'll fix that stupid 'artists putty'." So I found some cheap, hardboard clipboards at my local dollar store, and picked up a cheap $8.00 coping saw to cut it with:

Did my $8 coping saw cut it? No. Did my Dremel high speed steel saws cut it? No. Did my hobby knife make a dent when I tried to stab the stupid thing to death? No. What worked? My $1 cheapo little hack saw from the dollar store. I had to drill a million holes and then cut from one to another, but it worked:

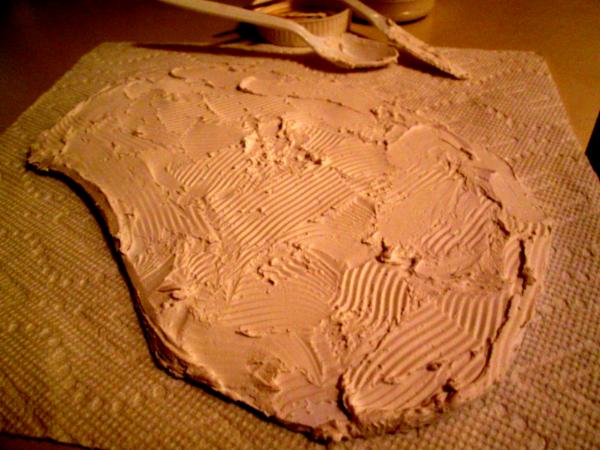
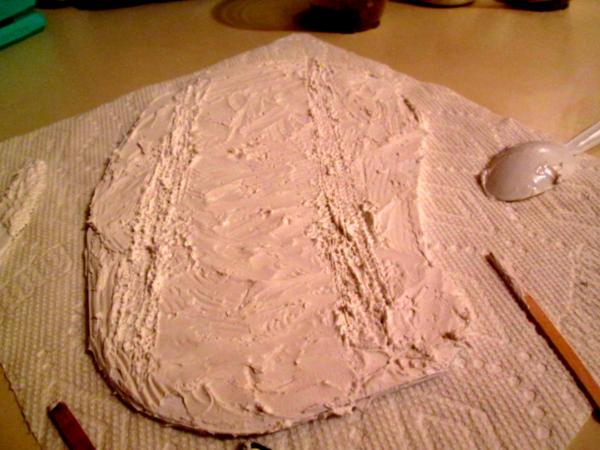
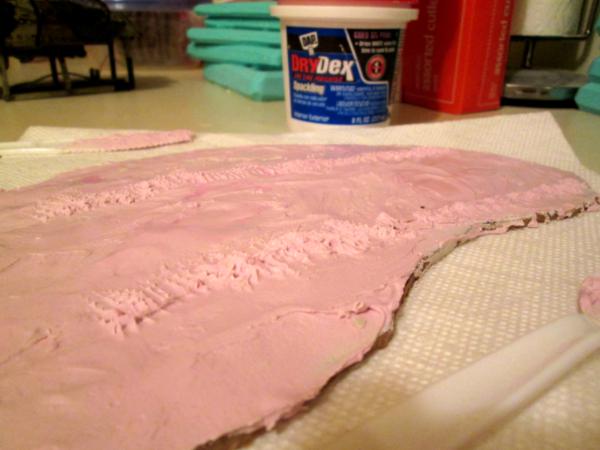
So, with the rough shape cut out (and the floor cleaned up, and fortunately no neighbors calling the police, because it probably sounded like I was torturing a cat in a blender trying to shape my brilliant clipboard idea) I got the rest of the 'artists putty' out to coat the board as the first step in sculpting the terrain. It never was any fun to work with, but now it must have dried out a little more from the other day, because it was stiff and did not want to stick to the board (I even roughed the board up to try to help). I had to scrape it all off (and threw the whole useless jar in the bin) and found a couple of jars of Dex wall spackle left over from making the firebase. This stuff went on fine and I was able to coat the whole board like icing a cookie (biscuit, for my English-speaking cousins). But when I went to smooth everything out, the spackle stuff to everything, making a fine mess. I finally had to wet my fingers and smooth it out that way.
I wanted to make track marks in the wet/dampish spackle as a foundation mark, so I pressed the Phaethon's tracks into it, only to discover that the spackle really likes sticking to all the nooks in the tracks, and pulled away from the board. So, back to the wet fingers to smooth the junk back out, and I had to hack up the spackle with a wettened (if that's even a word) plastic knife to simulate the track marks in the ground:

So now, an hour later, I'm almost back to where I was last Monday- but hopefully with a more stable base that won't curl or flex. The Dex is good stuff- I've had no problem with it cracking on the firebase and that is large and has a bit of flex to it. I can enhance the tread mark effect in the soil with painting and weathering later, so that should be okay. If I have some more time tonight, I want to finish the shell cart and crew so they can be primered and then I can get started painting. I've also got a ton of stowage to put on and around the Phaethon, and I like that part of things.
Still trying to get the Phaethon (and its howitzer!) done before my Archon Studios Kickstarter figures come in February, so lots to do and need to stay focused. Thanks for letting me vent some air out!
More follows soonest!
|
"He fears his fate too much, or his desserts are small, who will not put it to a single touch; to win- or lose- it all."
Montrose Toast
|
|
|
|
|
2017/11/28 05:03:05
Subject: Re:sCratchbuilding and Citbashing by Meer_Cat: 11/27 _New_ vehicle base started
|
|
Longtime Dakkanaut
|
The usual cool DIY update, too bad about the first attempt, hoping it all stays together now. Your analogy of the neighbors thinking you are torturing your cat got a laugh out of me. 
|
|
|
|
|
2017/11/29 02:03:00
Subject: Re:sCratchbuilding and Citbashing by Meer_Cat: 11/27 _New_ vehicle base started
|
|
[DCM]
Boom! Leman Russ Commander
|
Hi Yorkright- yup, this second approach seems to be holding up. I don't mind the failures really, it's part of learning; what fun is it to go into a project knowing how it's going to come out? But last night was a bit of a stretch, even for that kind of philosophy- especially when I was trying to cut the hardboard with the Dremel! The Dremel was screaming, the hardboard was vibrating and throwing off a high pitched whine- man, something else!
But, in the end, all worth it. The hardboard remained flat, the spackle has thoroughly dried and I was able to start some painting tonight- both on the scenic base and on the crew for the Phaethon. I gathered some materials: hobby sand for texture, white glue (I added the special-bought ballast cement- which is just thinned white glue anyway- as an alternative) and some cheap craft paint for a base color:

I dumped some white glue in a cup, added some water, added a little bit of the sand and added paint and stirred it up. I painted this onto the base:
And then to provide even a bit more grit, sprinkled some more sand onto the wet paint/glue mixture:

This was similar to how I did the basic texturing for the firebase, towards the beginning of this blog. I wasn't entirely happy with how the sand came out in that, so modified the process slightly. I let this dry for awhile, then painted over everything with some of the remaining paint/glue mix. This was both to firmly glue down any loose sand, and also to dull down the shiny black color the sand had. You could also just spray the whole thing with matte varnish, or even Rust-o-leum paint in the base color of your choice, but I had paint/glue stuff left over, so used it. I figure to go over the base with three or four more washes to get the colors I want (sounds like a lot, but how hard is it to paint on a wash, really?) which should tie everything together nicely.

The base will get some flocking and/or sawgrass bits added as well as some larger rocks- those go on when the crew figures get added so that I don't put them down right in the way of good posing.
The shell cart is mostly done, just needs some rusting and the figures are about half base coated- I hope to have pics of them up for tomorrow (just base coated, nothing fancy yet).
Thanks for looking in, and for the chance to show off a little bit of my work. Comments and constructive criticism are always welcome!
More follows soonest!
|
"He fears his fate too much, or his desserts are small, who will not put it to a single touch; to win- or lose- it all."
Montrose Toast
|
|
|
|
|
2017/12/01 02:18:38
Subject: Re:sCratchbuilding and Citbashing by Meer_Cat: 11/28 Vehicle base progress
|
|
[DCM]
Boom! Leman Russ Commander
|
A quick update- I got a lot of painting done tonight on the crew and stowage and things, but not a lot that's worth taking space up with WIP pictures until I've got a more final stage to cap them off with. I did want to throw up a couple of shots of the diorama base, which is coming along nicely (I think) and show two of the final four washes in place.
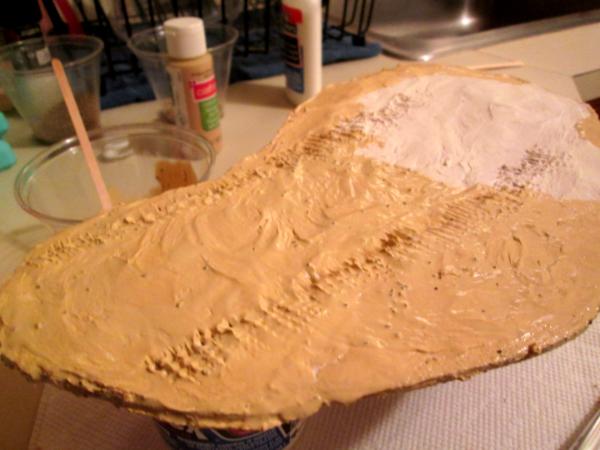
The last pic above showed a nice even base coat of some inexpensive craft paint or other in the basic shade the piece is to have. This next pic shows a fairly liberal wash of Agrax Earthshade applied (love them Games Workshop Washes):

Next was a dry brush (I lied, after the base coat were a couple of washes and then a couple of dry brushings and then maybe one more wash) of a very light cream- something a couple shades lighter than the base coat to highlight the gravel and ridges in the soil:
This brought out the tread marks in the soft soil a bit, and gave the illusion of depth to the rest of the flat surface area. I'll hit the track marks again with white and a very light dry brush, will add some dark brown ink into the deepest hollows in between the high points of the tracks and will probably do a light wash of orange from my water colors set ($1.00 at your local cheap store) just to give the flattest areas a bit of difference. Add some 'boulders' and tumbleweed and I'm done with the base.
Then we'll get the Phaethon epoxied down and start adding the boxes, crates and artillery residue that always accompany an ammo hauler in the field, get the crew and the loadmaster finished and then on to the next!
Thanks for looking in, and more follows soonest.
|
"He fears his fate too much, or his desserts are small, who will not put it to a single touch; to win- or lose- it all."
Montrose Toast
|
|
|
|
|
2017/12/05 01:44:26
Subject: Re:sCratchbuilding and Citbashing by Meer_Cat: 11/30 Vehicle base washes
|
|
[DCM]
Boom! Leman Russ Commander
|
More painting done- almost all the basecoating is complete and I'm almost at the assembly stage- this will be (hopefully) the last 'intermediate' posting, as there isn't much left to show except for the assembled mini-diorama.
Here are the basecoated crew, ammunition and propellant boxes, sand mats, shell cart and assorted other stowage:
Here are the other pieces that I need to basecoat yet (hopefully finished tonight):

I'm not entirely happy with how the uniforms are shaping up- that's two different shades of brown between the jackets and the trousers and it doesn't really show. I've still got the inking, washes and highlighting to do, but I'm not warm and fuzzy going into it. On the other hand, I really like how the sand mats are coming out. We had these steel mesh sections that we could throw down to help keep from tromping the earth into mud as we ran back and forth to the gun with shells and such. They're impossible to keep looking 'inspection ready' and these that I've painted look the part, I think.
I do have a couple more refinements I'd like to make on the Phaethon vehicle itself, but as with the Athena C2V project before this- if I keep making all those small refinements, the thing will never get done.
So, a reasonable amount of progress, and a measurable amount to go.
More follows soonest.
|
"He fears his fate too much, or his desserts are small, who will not put it to a single touch; to win- or lose- it all."
Montrose Toast
|
|
|
|
|
2017/12/05 02:59:32
Subject: Re:sCratchbuilding and Citbashing by Meer_Cat: 12/04 Base coating done
|
|
Longtime Dakkanaut
|
Base will look like a mini diorama when you are finished. Love how the base looks like it’s seen a lot of travel, can’t really see how the uniforms are turning out but they look good from that angle.
|
|
|
|
|
2017/12/06 00:30:43
Subject: Re:sCratchbuilding and Citbashing by Meer_Cat: 12/04 Base coating done
|
|
[DCM]
Boom! Leman Russ Commander
|
Thanks Yorkright! Sorry about the pics of the crew- even to me they look like brown blobs in the photos, and I know what I'm looking at! I've got to invest in another lamp that will let me get rid of the shadows so I can take better close ups and from directly overhead; right now I can because all I've got is ceiling track lighting and I have to position myself so as to not cast shadows over everything.
I actually saw a cheap 'spray paint booth' in the Sporty's Tool shop catalog that is made of nylon and designed to fold flat when not need- I think it would make a very good light booth for taking even better pictures. I need to build a display/photography base anyway- I could keep the dimensions such that it would fit in the booth.
I'm glad the base suggests a lot of wear and tear to you; it's been my experience that whether you're looking at a civilian campsite or a military artillery position, it doesn't take long to tromp everything into paste. I do want to add some flocking, to simulate sere grass or what-not, but need to wait until I've got everything else glued down to see where it can go.
I really appreciate you dropping in and leaving the words of suggestion and encouragement- it means a lot.
More follows soonest!
|
"He fears his fate too much, or his desserts are small, who will not put it to a single touch; to win- or lose- it all."
Montrose Toast
|
|
|
|
|
2017/12/06 03:00:32
Subject: Re:sCratchbuilding and Citbashing by Meer_Cat: 12/04 Base coating done
|
|
Gargantuan Great Squiggoth
|
The base is looking fantastic. Nice difference in tones, very realistic. Shame about the first try. But all good in the end.
Crew are looking fine to me, good start.
Going to have to get you in to, making your own washes. Just for cost. GW washes are very good .
|
|
|
|
|
|
2017/12/07 00:25:07
Subject: Re:sCratchbuilding and Citbashing by Meer_Cat: 12/04 Base coating done
|
|
[DCM]
Boom! Leman Russ Commander
|
Thanks Cam! I'm fairly decent at terraining, still learning in a lot of other areas. I have had a go at making my own washes- I'm really just getting back into the habit of using them at all. The guy at my FLGS got me into trying the GW ones, but I'll probably go back to improvising my own once they're used up, because of cost, as you point out.
I've seen all the trends over the last thirty years- basecoat with outlining, then highlighting, then drybrushing, then inks, then washes then glazes and then washes again.... what I like now are the number of modelers here on Dakka that combine multiple techniques for a very appealing and unique look. I'm still more of an inking then washing kind of guy, although both squads of grenadiers have used extensive layers of wash to get their colors.
In the past I've thinned acrylic paints to get a wash, used isopropyl alcohol to thin inks, thinned oil paints with turps and added decal-fix to weathering powders. All had strengths and weaknesses (or advantages and disadvantages).
Would love some tips and/or guidance on how you go about things- I like your work and your style!
More follows soonest!
|
"He fears his fate too much, or his desserts are small, who will not put it to a single touch; to win- or lose- it all."
Montrose Toast
|
|
|
|
|
2017/12/14 00:30:25
Subject: Re:sCratchbuilding and Citbashing by Meer_Cat: 12/04 Base coating done
|
|
[DCM]
Boom! Leman Russ Commander
|
A small victory tonight, and still time to get some more work done on the vignette itself- I'm so close to the 'gluing things down to the base' stage I can almost taste it! I didn't anticipate posting anything until the final, but I tackled a sub-assembly that lends itself to a couple of WIP pics, so here we go.
The conop for the Phaethon is that it is basically an armored box on treads, to carry ammunition for a heavy howitzer or seige gun (I'm thinking of calling the one I'm fixin' to build directly the Ajax). The whole rail system with hoist that you see is to lift the heavy shell crates out of the hold and convey them to the rear arming platform, where the shells would have their fuses set and fixed in place. The smaller mechanical arm would then lift the armed shell either over to the howitzer or down to the crewmen waiting with the shell cart. The crewmen then drag the cart over to the gun and the loading ram takes over from there.
So, I needed a way for the crates to be attached to the hoisting cable. The easy answer seemed to be to attach carry handles to the crates and thread a piece of chain (cheap necklace from the dollar store) through each and then wire the whole thing to the hoist.
I clipped some short lengths of wire from straight pins and formed them around the end of my wider pliars (which serendiptitously were exactly the width I wanted):
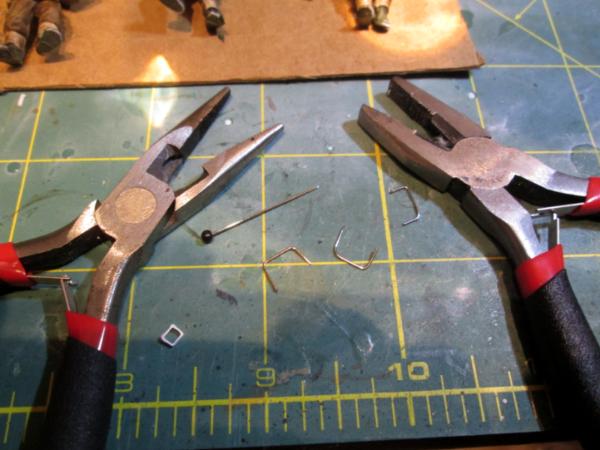
Then I used my marvelous finger drills from Micro-Mark to drill in a couple of holes:
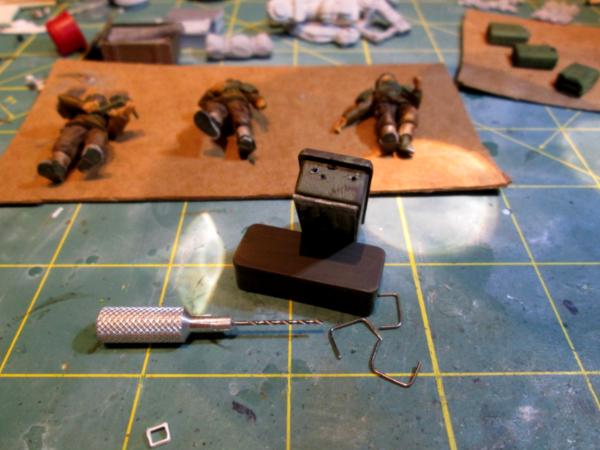
Then threaded the chain through the handles, put a dab of jeweller's glue over each hole and pressed the handles in:
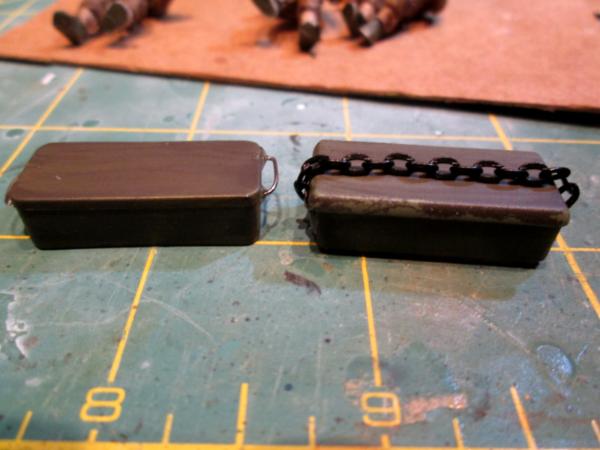
Presto! Two ammo crates, one rigged for the hoist. The other will be either on the arming platform or down on the ground. The boxes themselves are made from the plastic covers for old 25 pin computer cable connecters (work was throwing a bunch out and I practically dove into the dumpster to rescue a few needful bits). I'll dull the bright metal a little with a thick wash made from some acrylic paint (I do lsiten to your advice Cam!) and call it good.
I hope to have some serious progress made tonight and tomorrow, but will probably not be abl eot finish up until next Monday and post pics maybe Tuesday.
More follows soonest!
|
"He fears his fate too much, or his desserts are small, who will not put it to a single touch; to win- or lose- it all."
Montrose Toast
|
|
|
|
|
2017/12/19 02:19:29
Subject: Re:sCratchbuilding and Citbashing by Meer_Cat: 12/13 Shell crates wrapped up
|
|
[DCM]
Boom! Leman Russ Commander
|
Right then, the Phaethon is officially done. And by done, I mean, I've done all I'm going to do. There is a lot more that I could do, want to do, should do, but I'm calling the TOD (Time of Done) and we're clearing the ER. So, without further ado (get it?), here is the Phaethon, with its attendant ammo handlers, Detail Leader and additional features of interest:
This right side shot gives a good view of the overall mini-diorama: you can see the Detail Leader up on the deck utilizing the remote to operate the chain hoist, the crate in the right foreground filled with propellant charges and the ammo cutters hauling a fused shell off along the sand mats (in the general direction of where the other half of this vignette will one day be- the actual howitzer this Phaethon is serving):

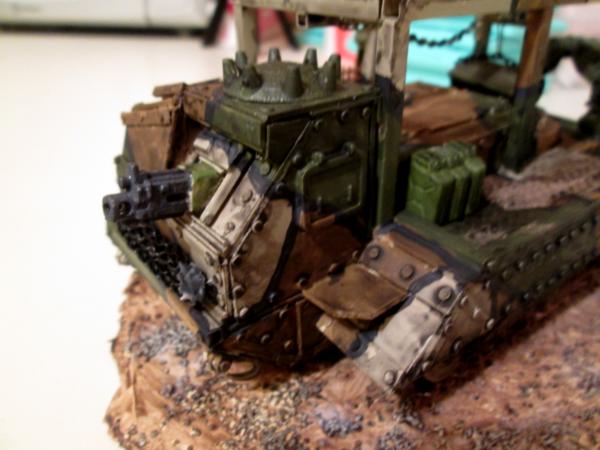
A slightly blurry (sorry!) view of the bow of the Phaethon, showing the properly drilled out heavy bolter barrel:

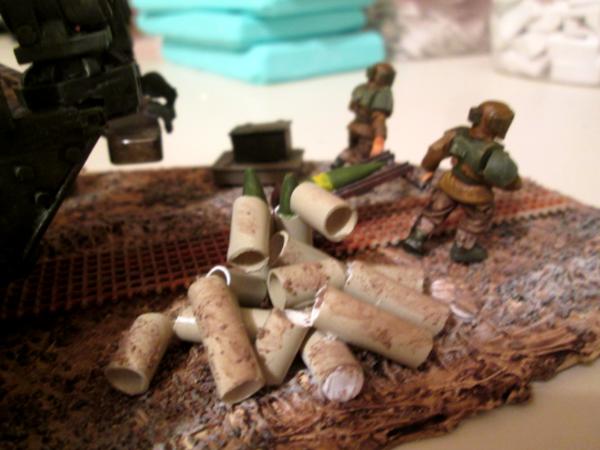
This left side view is different from the right side in that you can see the heap of discarded shell packing tubes (this heap inevitably builds near any artillery site- ask any Red Leg):

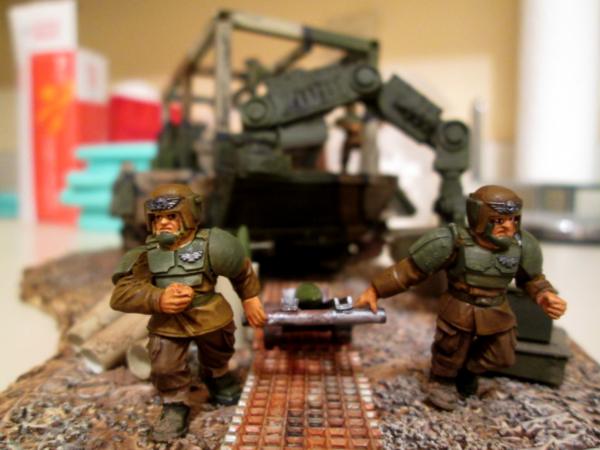
Here's a shot from aft showing the ammo cutters hauling their shell cart, behind them two additional tubes that have been cut open in preparation for arming the next shells (thanks to Klaus- Not Santa for the tip on using adrill or dremel tool to spin a bit of sprue against a nail file to sharpen the end to use as additional shells- please see his wonderful blog) and the mechanical arm behind them lowering the next crate with two more shells:

A close up of the hard working (and drinking, and cursing and...) ammo cutters:
The mechanical arm in action:
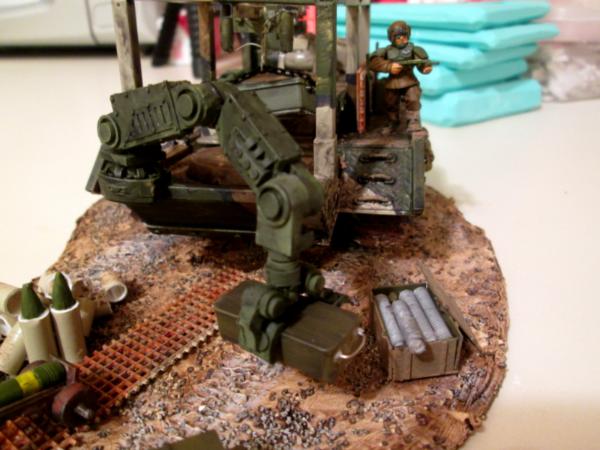
A close up of the Detail Leader and the chain hoist in the background:

Right front quarter showing the spare track links:

Left front quarter:
Close up of the packing tubes:
Another view of the ammo cutters scurrying away:

And a reprise of my preferred shot of the whole scene:
This has been a terrific project, and I learned a lot. In the process of building a self-propelled gun, I wound up with an ammunition hauler and a great little vignette. New things I tried:
- Sanding sprue down into my own, hand-made shells
- Scratch-building a significant portion of the entire vehicle (everything but the tracks)
- Using Jeweler's Cement to fasten much of the detail work down to the uneven base
- Tried a new camouflage pattern that I like very much (but absolutely _love_ the one Kestrel did on his Earthshaker)
- More practice doing eyes and facial details (I think I'm getting better)
I'm in the process of cleaning up my bench now, and then it's on to the next. Thank you for looking in, and please leave your constructive criticism, observations and comments. If I'm improving my skills at all, it's because of what I learn from all y'all Dakkanauts.
More follows soonest!
|
"He fears his fate too much, or his desserts are small, who will not put it to a single touch; to win- or lose- it all."
Montrose Toast
|
|
|
|
|
|
|


