| Author |
Message |
 |
|
|
|
|
Advert
|
Forum adverts like this one are shown to any user who is not logged in. Join us by filling out a tiny 3 field form and you will get your own, free, dakka user account which gives a good range of benefits to you:
- No adverts like this in the forums anymore.
- Times and dates in your local timezone.
- Full tracking of what you have read so you can skip to your first unread post, easily see what has changed since you last logged in, and easily see what is new at a glance.
- Email notifications for threads you want to watch closely.
- Being a part of the oldest wargaming community on the net.
If you are already a member then feel free to login now. |
|
 |
2019/02/25 00:58:46
Subject: Snrub's Angels: Building the 1st Legion
|
|

Regular Dakkanaut
|
Looking good Snrub! I'm liking the colour scheme idea
|
|
|
|
 |
|
2019/02/25 21:54:59
Subject: Snrub's Angels: Building the 1st Legion
|
|

Mastering Non-Metallic Metal
|
Good work on the knight modifications. 
|
     Mastodon: @DrH@warhammer.social Mastodon: @DrH@warhammer.social
The army-                   ~2295 points (built). ~2295 points (built).
 
* -=]_,=-eague Spruemeister General. * A (sprue) Hut tutorial *
Dsteingass - Dr. H..You are a role model for Internet Morality!  // inmygravenimage - Dr H is a model to us all // inmygravenimage - Dr H is a model to us all 
Theophony - Sprue for the spruemeister, plastic for his plastic throne! // Shasolenzabi - Toilets, more complex than folks take time to think about! |
|
|
|
|
2019/02/26 03:12:33
Subject: Re:Snrub's Angels: Building the 1st Legion
|
|
Fixture of Dakka
|
@Arakasi - I used .5mm plasticard to cover the toe on the raised foot and 1. mm for the grounded foot. Given a choice I would have used .5 for both, but the extra thickness on the grounded foot helped make up for a height issue. The 1mm stuff just makes the foot pad a little too thick for my taste. It's probably not at all noticeable if you don't know about it, but it's gaking me up the wall. 
As it happens, I think the ill fitting shin armour is actually a much easier fix then I initially thought. It appears that the plate is just getting snagged on quite literally, two rivets on the stuts. It should just be as simple as shaving off the rivets (which i'm quite sure is some sort of heresy).
@Nev - I've got a bunch of plague marines sitting there ready to be used for a project. It's not nurgle related though. 
@Zahnib - Thanks mate. I'm hoping it doesn't turn out to be more hassle then it's worth.
@Doc H - Thanks muchly. This is the most converting i've done to a single model (one that is also large and expensive) and it can be a little nerve wracking hacking it up hoping that it comes out right. It's gratifying that it's worked so far.
PROGRESS!
Quick bit before I head off to work.
First off DON'T DO THIS!
So the Knights feet don't really lend themselves well to being pinned. Lots of thin edges and no bulk to drill through. I (thought) I came up with an ingenious solution. It was not, and in hindsight I should have known better considering i've been at the hobby a decade and a half now.
What I did was take a bunch of small sprue clippings and packed them into a toe, then I poured a bit of plastic glue in as well so they'd melt down bit and harden into a solid mass I could drill in to.
It worked. Actually quite well. However it did also eat through the side of the toe....  As evidenced by the big  of a bubble.

So now, both sides and the top of the toe have bubbles in them from where the plastic glue went out of control. As the keen eyed may have noticed, the plasticard foot pad is already in place at this point, which I believe may have contributed slightly as it would have sealed off the glue from the air so it couldn't dry and gas off.
Anyway, i cut the plasticard off, scrapped all the plastic out, drilled the bubbles, and have now filled the whole thing with greenstuff, which is what I should have done in the first place. 
Moooooving on. 
The hip struts where next in line for some modding.
This is the end result. The left one went on normally, because the left leg is unmodified. The right one actually took very little cutting to line it up properly at the new angle.
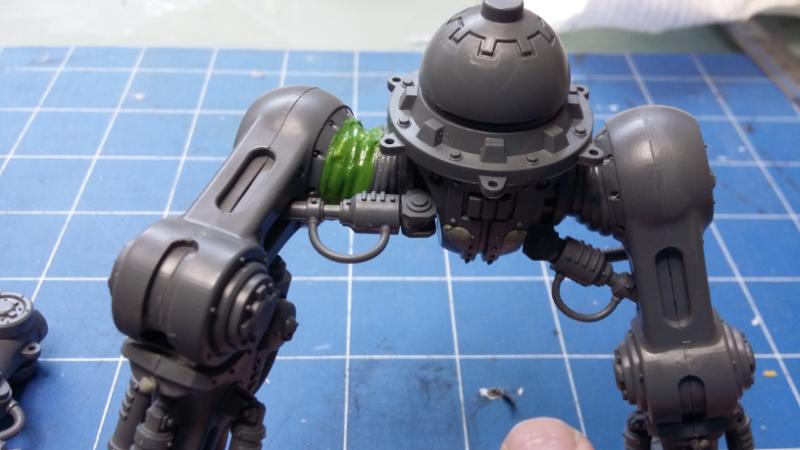
Basically...
Take the strut (I've been calling all these hydraulic things struts. I don't even know if it's the correct term...)

Cut here like so...

Shave down the little square bit so it looks like this...

Then glue it back together making sure the cable points in the correct facing. And that's it really.
And lastly, here's a shot of everything ready to be primed
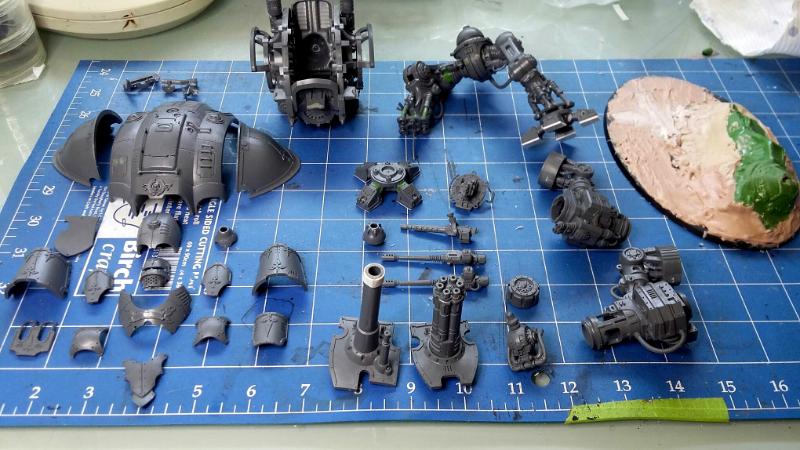
Armour on the left will be grey. Skeleton will be black and the base... Probably also black.
The two guns were a small misstep. I got a little excited and glued the barrels to shield, despite the two parts needing different primers. Not the end of the world though, i'll just have to do some careful taping before I prime them.
Anyway. That's all for now. I should prime them tomorrow, if all goes well with the few final checks and minor mods left over.
Thanks for looking!
|
|
|
|
|
|
2019/02/26 05:23:11
Subject: Re:Snrub's Angels: Building the 1st Legion
|
|
Ragin' Ork Dreadnought
|
This watching others mistakes is very helpful and enlightening - keep it up!
I think I've got some 0.25mm plasticard to cover the toes if I want to avoid gakking myself up the wall
Just remember to add four rivets elsewhere - heresy avoided!
I hadn't considered feet pinning yet - so adding that to the list. Would it have been easier to cut some sprue to size and plastic glue it in normally? (I don't have my Knight toes nearby to check...) I knew where this was going as soon as I saw the word "poured"... How solid is the greenstuff for pinning? At least those bubbles were easy to fix...
If I was to critique one thing - it would be how far the modified leg extends out from the hip joint - but I'm picky.
Ack - I've already glued by RFBC shield to the barrel too - I didn't even think about the different primers. I was secretly impressed I'd got it all in one piece. As luck would have it, the Thermal Cannon and Las-Impulsor share the same shield, so necessity has meant I've lucked into at least having that separate. I'll need to rethink when I get to the Avenger Gatling Cannon....
Excellent work again, keep it up, I will live vicariously through your progress until I can get back to mine, avoid your mistakes and make some more of my own.
Catchya
|
|
|
|
|
|
2019/02/26 16:36:34
Subject: Snrub's Angels: Building the 1st Legion
|
|

Walking Dead Wraithlord
|
Nice work on the foot fix. Now the real fun can start.
|
|
|
|
|
2019/03/03 04:02:14
Subject: Re:Snrub's Angels: Building the 1st Legion
|
|
Fixture of Dakka
|
Hey folks, just a quick update today.
@Arakasi - 25mm plasticard would work the best for sure. Regarding the toes, yes, properly gluing bits of sprue in would work well if you can be arsed doing it. Greenstuff is fine for drilling through and pinning and I don't expect any problems from it. If I encounter any, i'll let you know. And yeah, pouring plastic glue, not recommended!
For the hip joint, yes I see what you mean. To be honest, I hadn't given that particular aspect of realism a thought when I started modifying it. In hindsight I should have just cut all the soft piping away and started that whole area from scratch rather then going the route I did. Certainly don't regret going the way I did, I'm quite pleased with the results, sub-par sculpting not withstanding. But it's definitely something to keep in mind for any future modifications.
I had a good idea for spraying the guns with different primers (an actual good idea, not a gakky good idea like last time ) that's low effort and yielded really good results. I'll post a picture after.
Thanks for your thoughts though. I'm still keen to see how your avengers come out.
@Youwashock - Cheers buddy. I'm looking forward to the painting aspect of the Knight/s. Got a few techniques that i'm really looking forward to trying out.
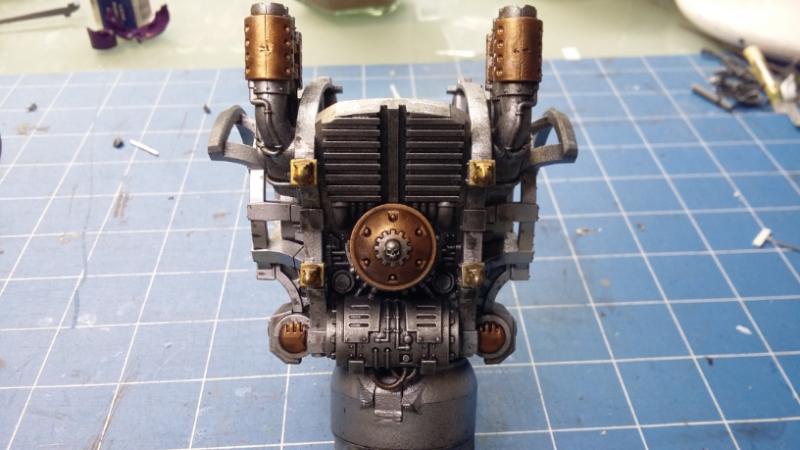
PROGRESS!
Ok, so this beastie is primed and ready for painting. All the armour panels have been hit with a coat of grey. The skeleton and weapon mounts were primed black and then given a coat of aluminum spray. The base was given a layer of black and the crashed aquila got a quick squirt of grey.
Not that this image really shows any of it.
So my next steps are to paint little details on the skeleton different metallic colours. Golds, bass, etc. Just to break up the silver a bit then give the entire skeleton a coat of Nuln Oil, of which I have a brand new pot, bought solely for this purpose.
The base will be painted brown and then another different shade of brown. The legs will (probably) then be attached to the base after which static grass and various grass tufts will be applied. (I have placed an order with Greenstuffworld for the grass tufts as they are really hard to find locally)
The armour will come last as that's the most involved. But will essentially boil down to be salt weathering, followed by lots of white, followed by sponging brown all to simulate old paint work.
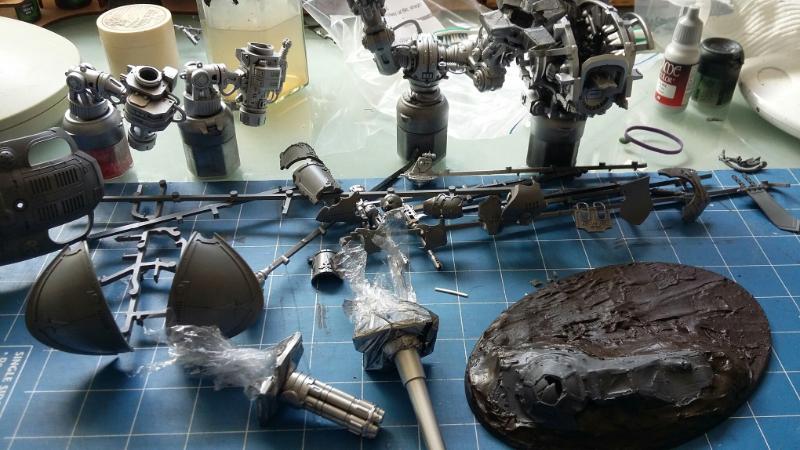
As mentioned earlier. I over came the problem of priming bits multiple colours by simply using cling wrap.
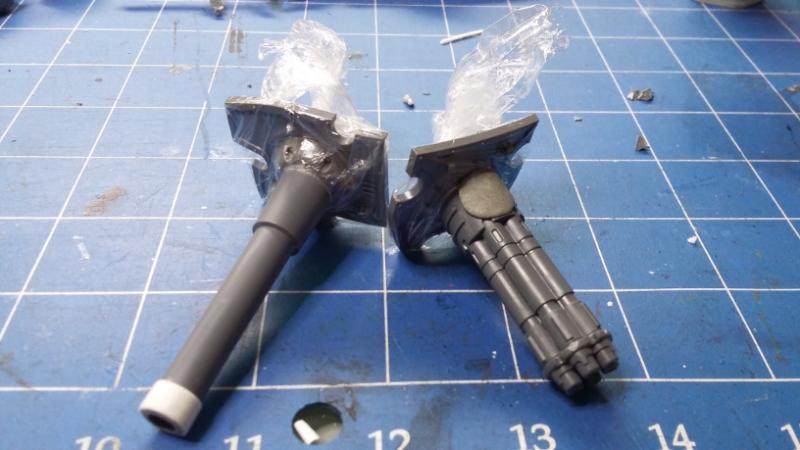
I took a small piece if cling wrap, poked a tiny in the centre of it, pushed the barrel of the weapon through the hole, wrapped the wrap tightly around the shield and gave it a twist so it would stay tight. And the results are rather satisfactory.
So here you can see where the cling wrap sat on the barrels leaving a small unpainted area. Just a small touch up need on each to match the rest of the barrel.

It take all of 10 seconds to prepare and gives results on par with using painters tape, which is fantastic, but can be fiddly work getting it to cover ever last spot you need.
Anyway, that's it for now.
Thanks for looking.
|
|
|
|
|
|
2019/03/03 06:16:44
Subject: Snrub's Angels: Building the 1st Legion
|
|
Ragin' Ork Dreadnought
|
Nice update!
|
|
|
|
|
|
2019/03/03 06:18:53
Subject: Snrub's Angels: Building the 1st Legion
|
|
Walking Dead Wraithlord
|
Interesting technique and a good bit of progress. Keep it up!
|
|
|
|
|
2019/03/05 04:24:51
Subject: Re:Snrub's Angels: Building the 1st Legion
|
|
Fixture of Dakka
|
Thanks fellas.
PROGRESS!
Proper quick update today.
Got the skeleton all but done. It's part has been given two coats of nuln oil. I've got spot colours of brass, tin and gold scattered throughout. Gold for the eagle heads, tin for any ribbed piping/cabling and brass for any part that needed to stand out. All these colours got a slathering of Agrax Earthshade (I can see why people love this stuff.). The gun casings have been painted black, although I only intend it as an interim colour, until I can find one that suits better.


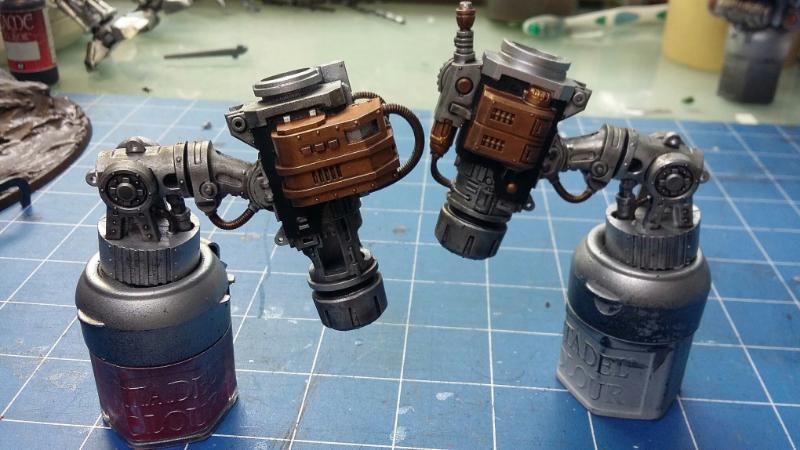
I'm not entirely sold on the brass ammo hoppers, but it seemed like a good idea at the time. Whether or not they stay that way will depend on how they look along aside the armour.
That's all for now.
Thanks for looking!
|
|
|
|
|
|
2019/03/05 16:17:57
Subject: Snrub's Angels: Building the 1st Legion
|
|
Walking Dead Wraithlord
|
I like the hoppers in that color. You are really rolling now. Looking forward to more.
|
|
|
|
|
2019/03/12 22:34:52
Subject: Snrub's Angels: Building the 1st Legion
|
|
Mastering Non-Metallic Metal
|
Good progress.
When deciding on areas of colour, always consider the whole piece constructed; what may look unbalanced on a part may be perfect balance for something else on the far side of a model.
In short, dry-fit it all together with the basecoats on to see if the hoppers "work" with the whole model.
|
Mastodon: @DrH@warhammer.social
The army- ~2295 points (built).
* -=]_,=-eague Spruemeister General. * A (sprue) Hut tutorial *
Dsteingass - Dr. H..You are a role model for Internet Morality! // inmygravenimage - Dr H is a model to us all
Theophony - Sprue for the spruemeister, plastic for his plastic throne! // Shasolenzabi - Toilets, more complex than folks take time to think about! |
|
|
|
|
2019/03/20 10:20:11
Subject: Re:Snrub's Angels: Building the 1st Legion
|
|
Fixture of Dakka
|
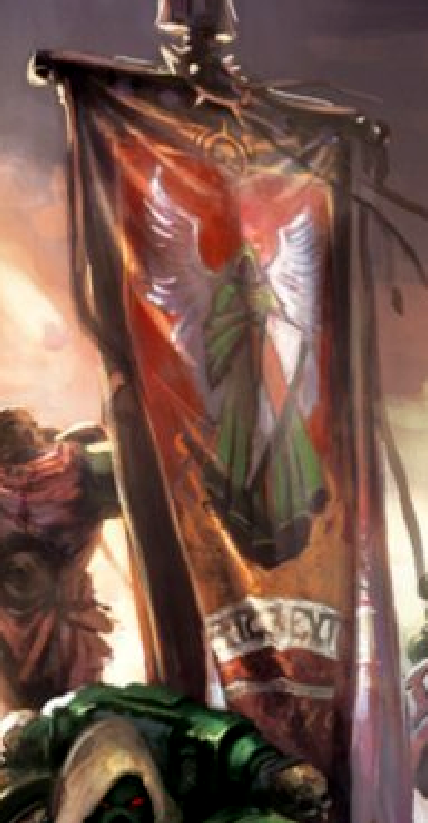
So two good things happened today. 1, I had a moment of... something. Clarity, inspiration, epiphany, call it what you will, I had one on the way home from work.  I knew what needed to happen with that mongrel of a company standard. 2. I missed a parcel. Two parcels in fact, but one's not important for the moment. One though, has all the materials needed for me to base my knight. Goody gumdrops PROGRESS! Yes, it's back to the DAngels. Specifically the witch of a company standard that was doing my head in before I threw it in the "i'll tackle that again in the future" pile. The source art. First up the background. 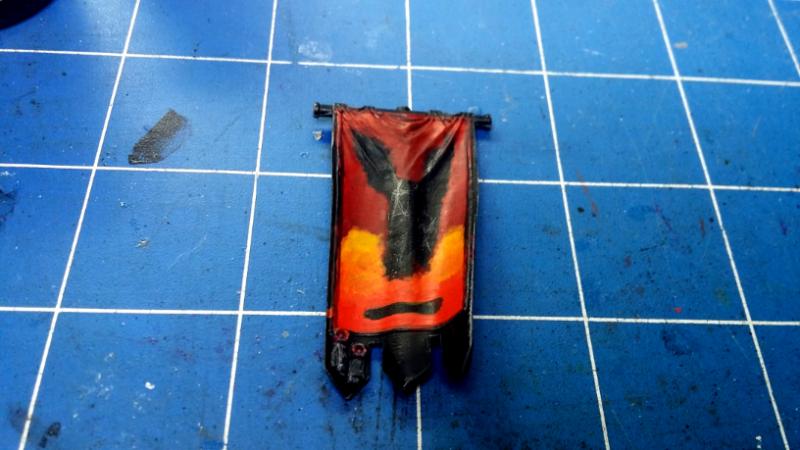 The blending came out pretty satisfactory. The red towards the top of the banner is a lot lighter then the picture shows. I've gone with more of a firestorm rather then individual flames like I had initially and like the art has. Which I think was bit of my problem, I was trying to blend flames in when I wasn't experienced and talented enough too. The fade from red to orange on the right side could be better, but I'm happy with the firestorm otherwise.  Next up blocked in the angel and the scroll. 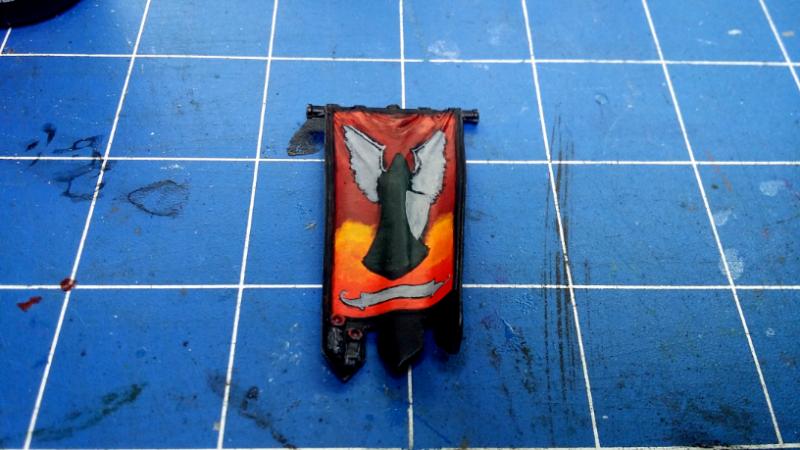 And here I've laid down the base colours. I decided to reposition the shield as well. It was annoying me going across the body, so now it's smaller and just points down. Alright, that's all I've got for now. Thanks for looking!
|
|
This message was edited 1 time. Last update was at 2019/03/20 22:20:51
|
|
|
|
|
2019/03/20 11:42:44
Subject: Snrub's Angels: Building the 1st Legion
|
|
The Marine Standing Behind Marneus Calgar
|
Nice freehand work. Good luck with it. Not a huge fan of painting banners myself.
|
|
|
|
|
|
2019/03/20 13:41:03
Subject: Snrub's Angels: Building the 1st Legion
|
|
Ragin' Ork Dreadnought
|
Looking very promising.
|
|
|
|
|
|
2019/03/20 17:56:02
Subject: Snrub's Angels: Building the 1st Legion
|
|
Walking Dead Wraithlord
|
Looking solid so far.
|
|
|
|
|
2019/03/22 23:43:54
Subject: Re:Snrub's Angels: Building the 1st Legion
|
|
Fixture of Dakka
|
Thanks lads!
PROGRESS!
So I powered on with the banner, it's almost done bar a few details.

I'm stuck with two bits though.
I'm struggling to come up with a good design to put on his wee shield. Anything that I might have normally done is already somewhere else on the banner.
The other part is the dangly bit in the middle between the company symbol and the purity seals.
If anyone can think of a good design for either area, i'm all ears!
Aside form those bits though, I just need to highlight the company symbol, paint the banner pole and attach the topper. Then that will be the company standard done.
OTHER STUFF
So I went and picked up my missed parcels.
One was a package from Kromlech. Just a bunch of gubbinz and a few heads. Very good, but largely unimportant stuff for my current projects.
The other one was from Greenstuff World and is far more immediately exciting.
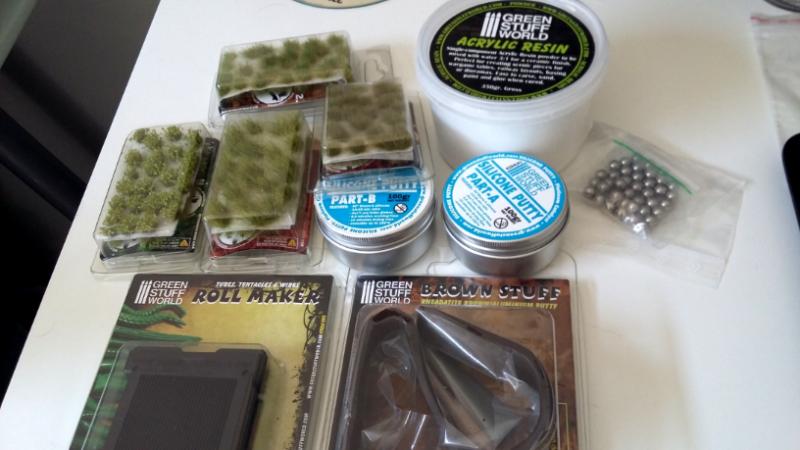
Top left we have a whole mess of foliage. This gak's going on my Knight bases.
Next to that we have two part silicone putty, for making very basic moulds
Above, powered acrylic resin. Mix it water, pour into aforementioned moulds.
To the right paint agitators.
Bottom, brown stuff. Similar to greenstuff but better for sharp details supposedly.
And left of that is a tentacle roller for making putty cables, tentacles, etc. Was sold on that after watching one video of someone using it.
Lotsa fun stuff to play around with.
|
|
|
|
|
|
2019/03/23 00:22:47
Subject: Re:Snrub's Angels: Building the 1st Legion
|
|
Ragin' Ork Dreadnought
|
First up, banner is looking very good - well done!
With regards to the wee shield - what is wrong with the red bar from the original image?
Doing a quick google search on Dark Angels banners, most likely choices for your dangly middle bit are: Dark Angels winged sword iconParchmentOr Imperium Two Headed eagle
I have that tentacle roller - in both sizes. Still yet to use (forward planning for Imperial Knights, cables not tentacles, specifically Hulk Gallant to build up illusion of muscles - but I'm sure I will eventually find many other uses too! )
|
|
|
|
|
|
2019/03/23 03:00:06
Subject: Re:Snrub's Angels: Building the 1st Legion
|
|
Is 'Eavy Metal Calling?
|
Middle bit could be a picture of Caliban of old, just a green world.
Maybe the shield could have a Roman Numeral on it for the 1st Legion.
Banner is looking great by the way
|
LOL, Theo your mind is an amazing place, never change.-camkierhi 9/19/13
I cant believe theo is right.. damn. -comradepanda 9/26/13
None of the strange ideas we had about you involved your sexual orientation..........-Monkeytroll 12/10/13
I'd put you on ignore for that comment, if I could...Alpharius 2/11/14 |
|
|
|
|
2019/03/23 05:35:36
Subject: Snrub's Angels: Building the 1st Legion
|
|
Walking Dead Wraithlord
|
You're crushing that banner. I vote chapter symbol for the lower part and maybe a simple half or quartered design for the shield.
|
|
|
|
|
2019/03/23 12:22:27
Subject: Re:Snrub's Angels: Building the 1st Legion
|
|
Fixture of Dakka
|
Thanks for the input guys.
I've made a mock up of some different options. Although I forgot to make any of the shields 1/4ed, I think it's easy enough to imagine.
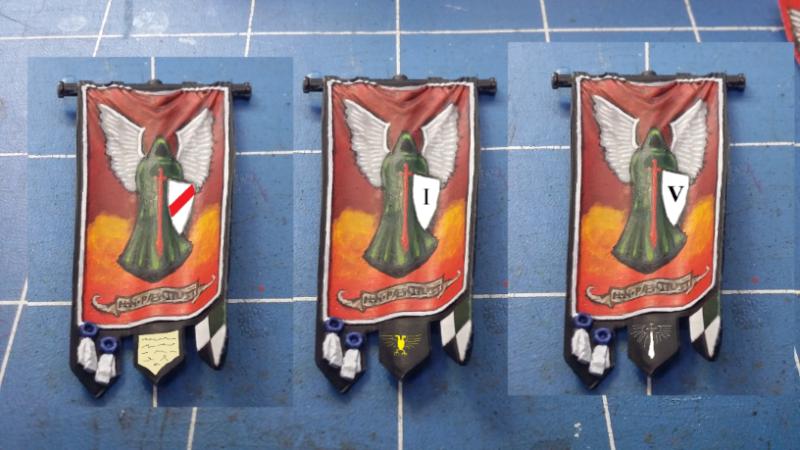
@Arakasi - Thank you kindly, sir. My only problem with the red bar form the art work is that it's far to similar to the symbol of the 9th company.  And I just think it might look a little odd having what appears to be a different companies icon on their banner. I have to say though, looking at my MSpaint mock up, i'm not entirely disregarding it now that i've seen it. I'm also liking the parchment block on the dangly bit.
Also, Hulk Gallent with cable muscles sounds fantastic. Now with the AT knights, will you be considering a tiny Antman knight? The correct answer is of course, Yes.
@Theo - Cheers, mate. The image of old Caliban is an interesting one. I'd say worthy of a banner in and of itself. Defo's gonna be locking that one away for future use. The first legion I is a good choice too. What colour would you make the shield if you were to do it? My first choice would be white or grey, but I feel that might be a little too stark a contrast.
@YWS - Thank you very much. Chapter symbol is another very good option. Gotta remind those helmeted cannon fodder which chapter they belong too. What colorus would you be using for a half/quartered shield? Company logo colours or others?
|
|
|
|
|
|
2019/03/23 12:25:10
Subject: Snrub's Angels: Building the 1st Legion
|
|
[MOD]
Villanous Scum
|
Looking good mate, if you are looking for votes I would go the bend sinister from 1 with the angels symbol from 3.
|
On parle toujours mal quand on n'a rien à dire. |
|
|
|
|
2019/03/25 03:16:58
Subject: Re:Snrub's Angels: Building the 1st Legion
|
|
Fixture of Dakka
|
Well, thanks to you, Ingaer, I now know what a bend sinister is. I thought it was a typo or autocorrect gone wild at first. And yes, that's the combo i'm leaning towards at the moment.
But i'm still open to completely different suggestions if any one has one.
Anyway...
PROGRESS!
So jumping back to Knight for a hot minute. The armour has been asalted.  
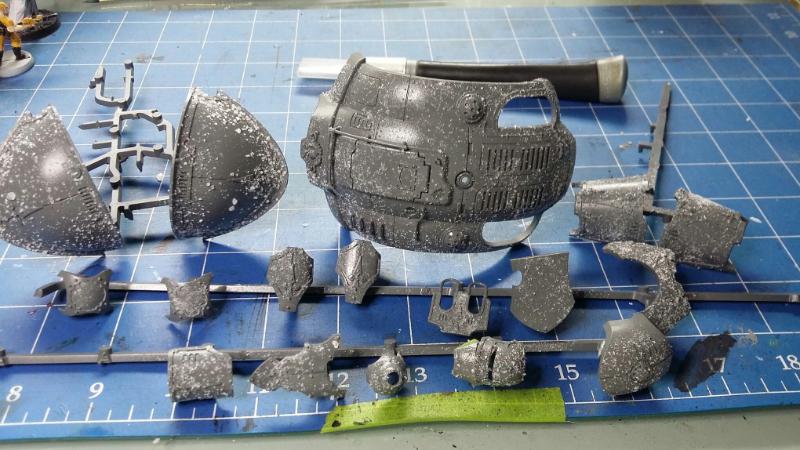
Have I ever used this technique before? No.
Is there a chance this will go tits up? Absolutely.
Have I gone to far to back down and will now continue to power through it regardless? You bet'cha.
Lets see how this ends.
|
|
|
|
|
|
2019/03/25 04:37:10
Subject: Snrub's Angels: Building the 1st Legion
|
|
Walking Dead Wraithlord
|
Oh, wow. Not doing that dalt thing by halves, are you? Best of luck!
I concur with ingtaer. Simon Bar Sinister from 1 and the chapter symbol from 3.
|
|
|
|
|
2019/03/25 05:52:52
Subject: Re:Snrub's Angels: Building the 1st Legion
|
|
Fixture of Dakka
|
Nope! And I have no idea what the results are gonna be!
Nothing like learning from your hideous, irreparable mistakes!
Slightly More Progress!
The head is finished. I've gone with purple for the lenses. Hopefully a nice counter point to the majority white and metal.

|
|
|
|
|
|
2019/03/25 05:58:58
Subject: Snrub's Angels: Building the 1st Legion
|
|
[MOD]
Villanous Scum
|
That is one sexy looking head (as far as big robot heads can be sexy) really like the purple.
I am excited to see how your salt weathering goes, I was contemplating doing it on a ship the other day but ended up chickening out.
On the heraldry, well a day where you learn some strange obscure piece of knowledge isn't a day wasted! I think. Actually it is probably a waste of memory cells, but it might win you a pub quiz someday! Or not 
|
On parle toujours mal quand on n'a rien à dire. |
|
|
|
|
2019/03/25 10:30:34
Subject: Snrub's Angels: Building the 1st Legion
|
|
The Marine Standing Behind Marneus Calgar
|
Very nice work on the stompy robot skull. The lenses are perfect!
|
|
|
|
|
|
2019/03/25 11:21:36
Subject: Re:Snrub's Angels: Building the 1st Legion
|
|
Is 'Eavy Metal Calling?
|
Perhaps do the shield in the white and black quartered scheme like the bottom corner with a big red Roman numeral in the center of it.
Robot eyes are looking great, you are doing fantastic work on the standard.
|
LOL, Theo your mind is an amazing place, never change.-camkierhi 9/19/13
I cant believe theo is right.. damn. -comradepanda 9/26/13
None of the strange ideas we had about you involved your sexual orientation..........-Monkeytroll 12/10/13
I'd put you on ignore for that comment, if I could...Alpharius 2/11/14 |
|
|
|
|
2019/03/25 17:42:04
Subject: Snrub's Angels: Building the 1st Legion
|
|
Walking Dead Wraithlord
|
Beautiful lenses. Liz Taylor's got nothing on him.
|
|
|
|
|
2019/03/26 10:24:12
Subject: Re:Snrub's Angels: Building the 1st Legion
|
|
Fixture of Dakka
|
Thanks for the kind words, all.
Ingtaer - If you mean on your wee B5 ships. It might work, it might not. They might be too small to get a properly random effect. YMMV. I'd certainly give it a go though. As I think if it came out well, then you'd get a lovely battered up old warship. If not, run it under the hot tap and if everything i've read about this style of weathering holds true, the hair spray should lift and take all the paint with it.
Theo - Quartered shield could work. I'll put it in the pile for further consideration with the Bend Sinister.
ON THE SUBJECT OF HIDEOUS IRREPARABLE MISTAKES!
I got lucky and they didn't happen.
So here's the armour, reprimed and ready for scrubbing.

And here is the everything went better then expected results.


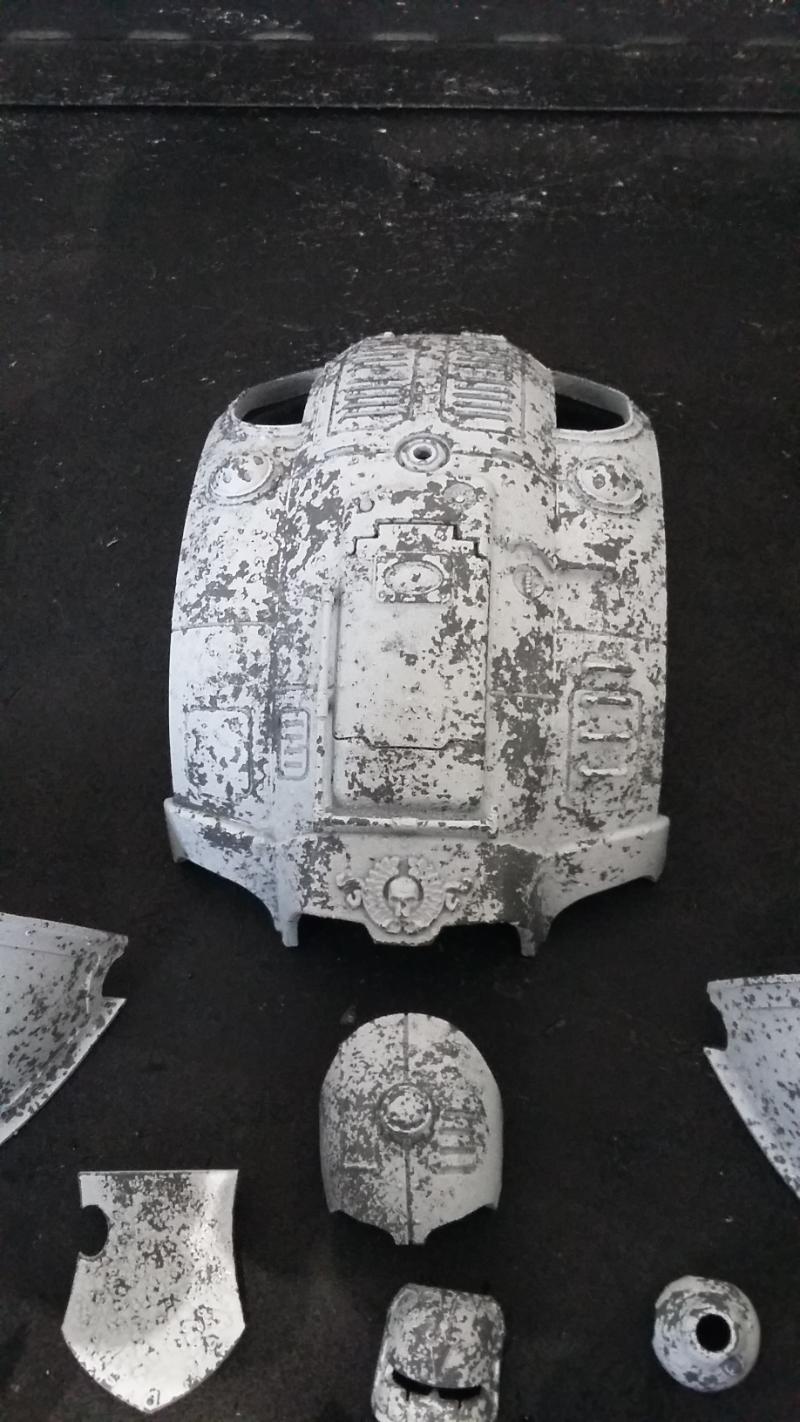
Thoughts? Feelings? Gut Instincts?
Any questions of interest on my experience with this method of weathering?
Also looking for thoughts on this.
Left or Right?

|
|
|
|
|
|
2019/03/26 10:56:01
Subject: Snrub's Angels: Building the 1st Legion
|
|
The Marine Standing Behind Marneus Calgar
|
Weathering looks legit. Like something that was actually out in the elements and took a beating. Chalk that up to a win.
Something needs to be done with the sub-lenses. I can’t think of anything other then doing them the same as the main.
|
|
|
|
|
|
|
|

 Imperial Knights: The Avengers Initiative
 Arakasi vs Infinity
 Ultramarines, 3rd Co. and friends, 16k+
  4k
4k  Competition Index