| Author |
Message |
 |
|
|
|
|
Advert
|
Forum adverts like this one are shown to any user who is not logged in. Join us by filling out a tiny 3 field form and you will get your own, free, dakka user account which gives a good range of benefits to you:
- No adverts like this in the forums anymore.
- Times and dates in your local timezone.
- Full tracking of what you have read so you can skip to your first unread post, easily see what has changed since you last logged in, and easily see what is new at a glance.
- Email notifications for threads you want to watch closely.
- Being a part of the oldest wargaming community on the net.
If you are already a member then feel free to login now. |
|
 |
2007/10/13 07:54:59
Subject: My Baneblade Blog
|
|

The Last Chancer Who Survived
|
So I got home yesterday and cracked open the box faster than a kid at christmas. The box is the same size as the old game starter sets, and it was packed full of plasticy goodness. 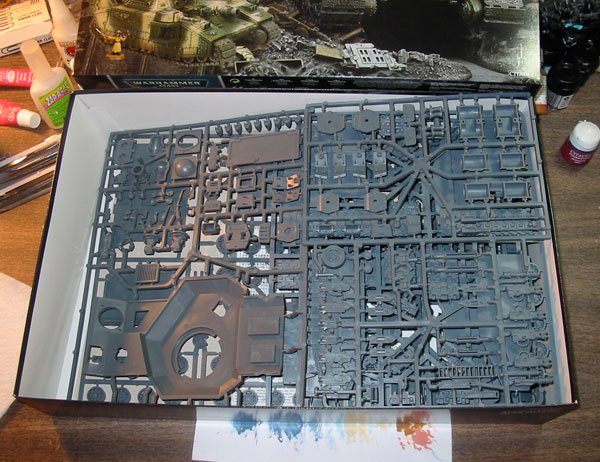 First thing I did was spread everything out and make sure I had everything. I was expecting to have one of those apocalypse command sprues too but apparently that's not included  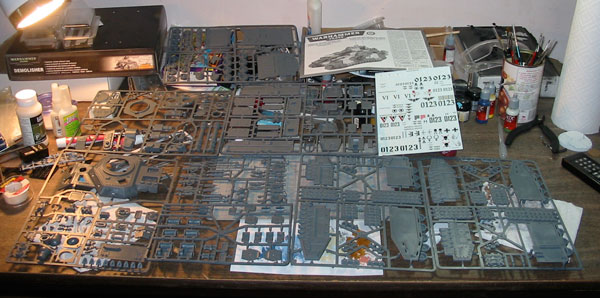 First thing it tells you to do is build the front and rear add-on wheels because they're not molded onto the chassis like the rest of the wheels are 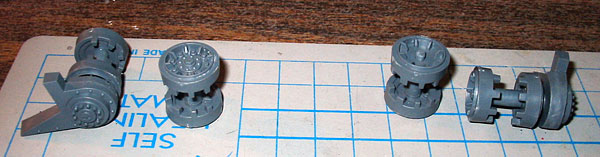 This is where I left off last night. I built both sides and got 1 tread added on. It took a while because I had to file the edges of every pieces just to get rid of mold lines.. the treads took the longest to file down because of all those little areas that all seemed to wanna have a teeny bit of flash that no one will notice except me and my OCD when I'm painting it. The mold lines and stuff like that was very minor, but enough for me to notice so I had to clean em all up  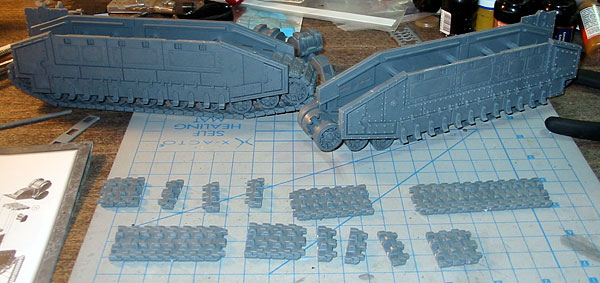 So tonight, I had a lot more filing on the rest of the treads and then I put both side parts together completely. Everything was pretty straight forward just like the rules show. They tell you to start the sponsons now, but I"m saving that for the very end as I have some conversion ideas I wanna try first. 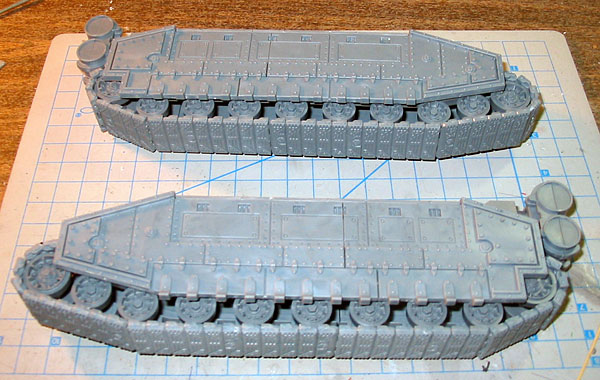 And here is where I'm leaving off tonight. There's a lot of moving parts in the main hull so I have to build those pieces. The demolisher cannon sits in a ball & socket joint as you can see but I'm thinking of gluing it down. I'm thinking it may be tough to get paint all over the ball part and if you move it around it may scratch off a little. 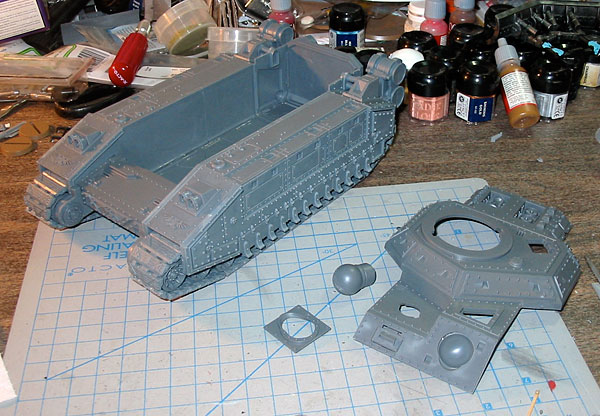 Tomorrow I hope to get the rest of the hull finished. And I also hope my forge world order comes (it's been 2 weeks now!) .. I ordered some death korps tank commanders and some chimera doors and also brass etched inquisition symbols that I'd like to use on this feller, and the inquisitor chimera I'm working on that's gonna be in limbo for a while now thanks to this. So far I'm really enjoying building this model. It's gotta be GW's most detailed and complex (in a good way) model to date. It will definitely be a challenge for any modeller just due to the sheer amt of pieces and extra bitz. Because of the price and the size and detail I'm putting a lot more effort into this than most other models. I don't expect it to be "done" for quite a while. I want it to be more like a centerpiece for the army. Anyway, more to come tomorrow! Oh, and also here's a closeup of the Baneblade transfer sheet. Nice big numbers and symbols that will work great for any tank really 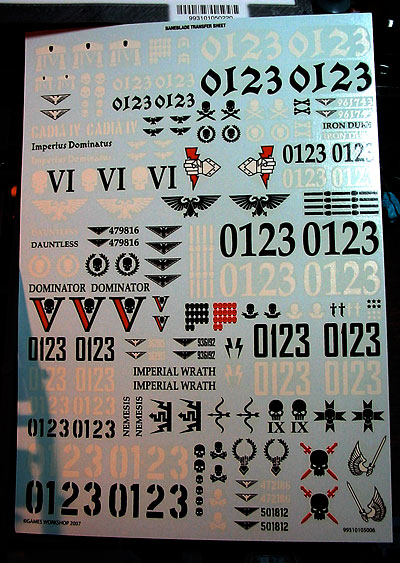
|
|
|
|
 |
|
2007/10/13 08:22:46
Subject: RE: My Baneblade Blog
|
|
[DCM]
Illustrator
|
It'll be really cool to watch this thing shape up ^_^. And I'm sure it'll prove useful to a few people as well.
|
-Aaron
Call For Fire
DA:80+S+GM(DPC)B++++I+Pw40k99+D++A++/mWD247R++T(M)DM+++++ |
|
|
|
|
2007/10/13 08:36:11
Subject: RE: My Baneblade Blog
|
|
The Last Chancer Who Survived
|
That first part was from yesterday, i started the blog on my club's board. Got a lot done this morning & afternoon. Time to stop for the day but I have enough time to post all this Got a lot of pics! So, we're ready to add the top of the hull to the rest of the body. When you put it in place, keep your eyes peeled for big gaps, like the one in the very front here.. 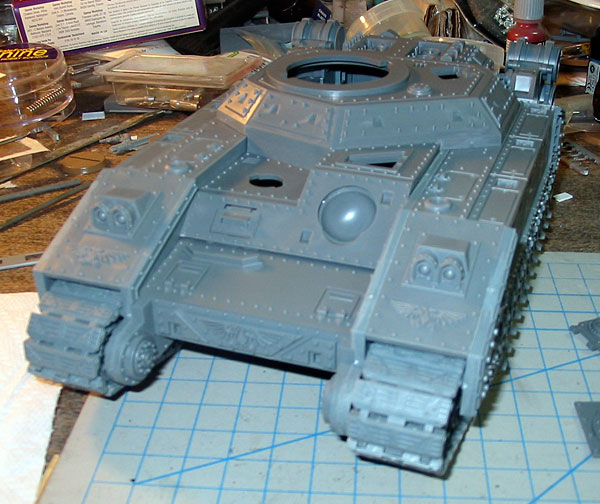 Just make sure you glue that area down but hold the whole thing tight while the whole thing dries so there's no gaps like that anymore 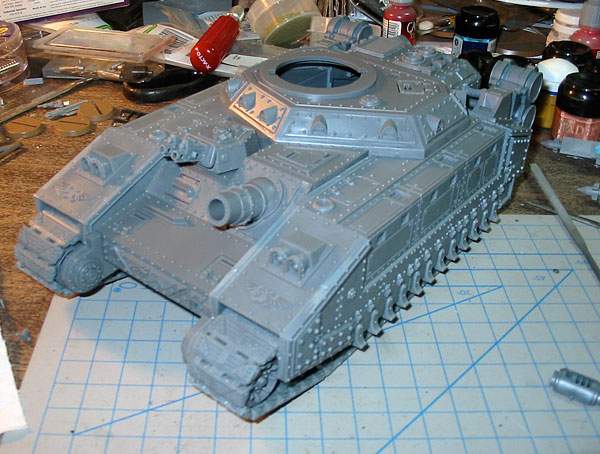 Now that that's taken care of, it's time to start the turret. Take out all the pieces, and test fit everything to make sure everything will line up right. 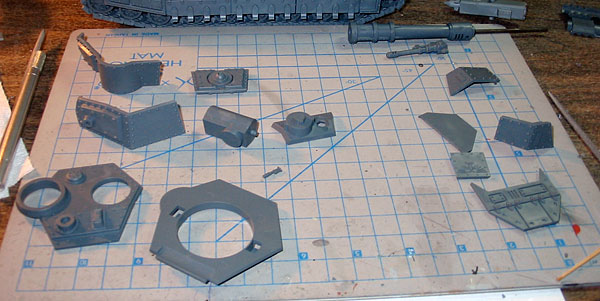 I built the main turret first. The back has a little hole for a lasgun to poke through. Looks a little too small and wimpy like this, so I'm going to add the back portion too 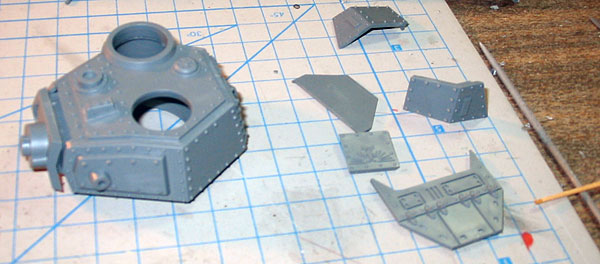 And here's the body of the turret all done. I added a little magnet to the part that attaches to the barrel, so I can swap between a Baneblade and Hellblade.. and I'll show ya how in a sec 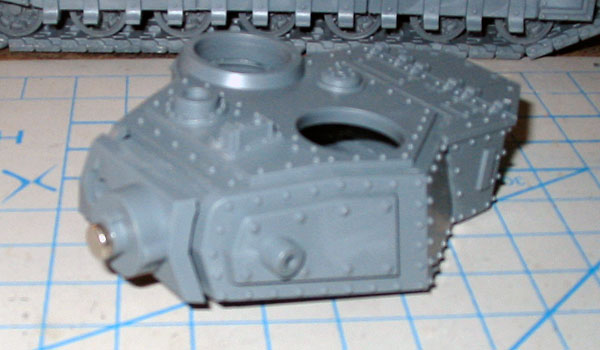 I built the baneblade cannon already before I added the magnet. Oops. No biggie, I just stuck a piece of sprue in the barrel then superglued the magnet to that. IMPORTANT! Make sure your magnets are facing the right way.. there's no + or - on the mini magnets and if you get the directions messed up they'll push away instead of stick to each other. Just be careful 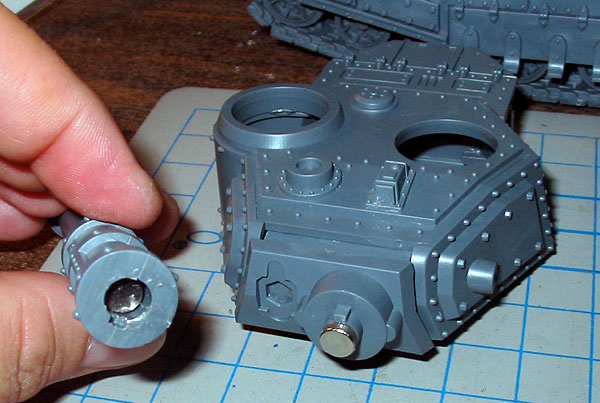 Now for the hellblade cannon, it's got a little "wall" on the inside the you would normally glue to the turret. 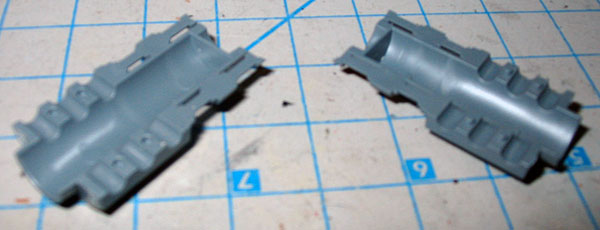 What we're gonna do is carve out that wall carefully with a knife, then glue a little round piece of plasticard farther back and make our own new wall. 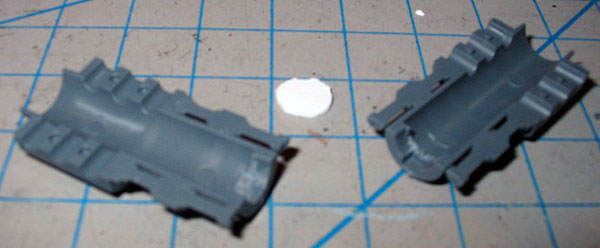 Put everything together and glue your magnet inside. 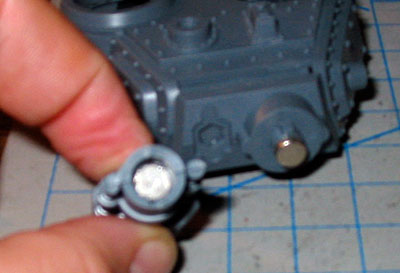 Here's a shot with the baneblade cannon attached. 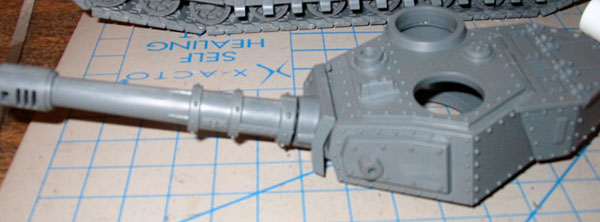 I didn't make the new wall back far enough in the Hellblade cannon, so I had to add some little bitz of plastic rod on the end to fill the gap. You shouldn't be able to tell the difference when it's all done. 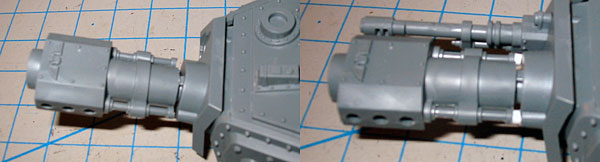 And that's where I'm leaving off today. Here she is so far! 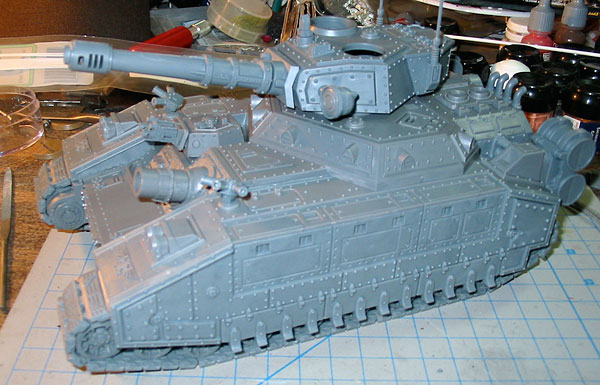 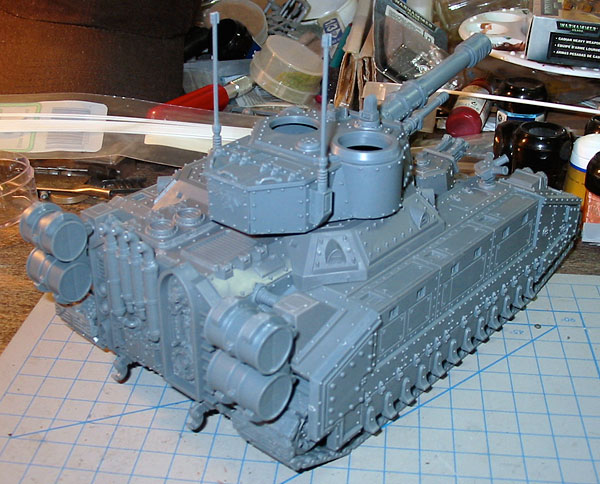 One nice thing about the turret is the holes in the top are both the same size so you can have 2 hatches with 2 guys, this is probably how I'll have mine in the end... 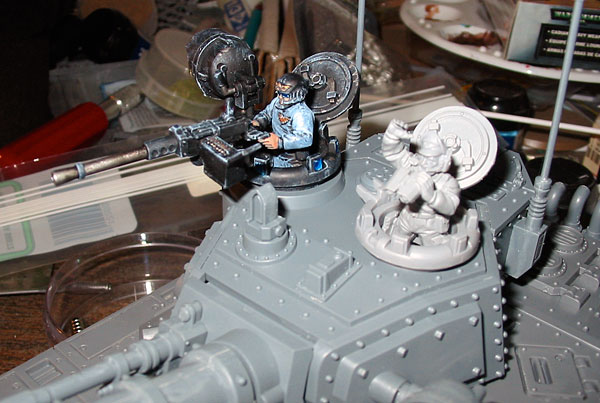 Next on the list will be the dozer blade. I'll have to scratch build that with a lot of bitz and plasticard. That will be tomorrows project
|
|
|
|
|
|
2007/10/13 09:29:17
Subject: RE: My Baneblade Blog
|
|

Fixture of Dakka
Canada
|
Very nice! I'm waiting on mine until FW releases their upgrade kits. My favourite FW super heavies have always been: 1) Stormblade 2) Stormsword 3) Lucius Pattern Baneblade Since we've already seen that they did a conversion kit for the Shadowsword based on the new plastic kit, I'm hoping we'll see the three kits above too
|
"Nothing from the outside world can be imported into Canada without first being doused in ranch dressing. Canadian Techs have found that while this makes the internet delicious it tends to hamper the bandwidth potential. Scientists are working furiously to rectify the problem. "
--Glaive Company CO |
|
|
|
|
2007/10/14 15:37:10
Subject: RE: My Baneblade Blog
|
|
The Last Chancer Who Survived
|
Lots of progress today but not so many pics. I started doing the sponsons then stopped and went back to the dozer blade again. I kind of just made it up as I went along. I took a lot of pics but they really don't illiustrate much of how I did it. I used that sisters of battle tank FW does as my inspiration. I'm almost done but I have about 20 hours worth of making rivets to go... Here's some pics of where I left off..  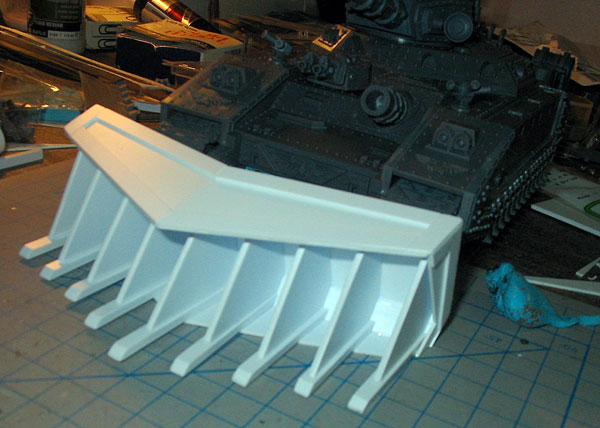
|
|
|
|
|
|
2007/10/15 12:29:28
Subject: RE: My Baneblade Blog
|
|
[ADMIN]
President of the Mat Ward Fan Club
|
Good lord. To quote Crocodile Dundee:
"That's not a bullbozer blade. This is a bulldozer blade."
Sheesh. You're going to need a bigger gaming table just to play with that model now! But it sure does look impressive.
|
|
|
|
|
|
2007/10/15 14:06:29
Subject: RE: My Baneblade Blog
|
|
The Last Chancer Who Survived
|
Like all the good ladies say... "Whoever said size doesn't matter was lying." Gonna get the blade finished up before I move on to the sponsons.. trying to see if I can get a 2nd set anywhere.. I'd really like to have 2 on this fella
|
|
|
|
|
|
2007/10/15 21:47:30
Subject: RE: My Baneblade Blog
|
|

Longtime Dakkanaut
|
mm, I don't think that dozer blade looks right. Looks more like a digger than a dozer. Where is the stuff it is 'dozing meant to go, at the moment it is trapped in the blade instead of 'flowing' round it.
|
|
|
|
|
2007/10/16 00:05:22
Subject: RE: My Baneblade Blog
|
|
The Last Chancer Who Survived
|
OK so then it's a digger blade I just made it to look big & mean, and besides at least there will always be plenty of conscripts around to clean out all the dirt and body parts after a battle Actually I'm going to be adding a lot of dirt on this thing, using spackle instead of sand & flock, so I plan to have a lot of it in there, like it just scooped something
|
|
|
|
|
|
2007/10/16 01:25:34
Subject: RE: My Baneblade Blog
|
|

Plastictrees
|
I like your work, but i gotta agree bout the dozer blade. Check out some of the work over at the WIP Forums  You might like the dozerblades constructed over there: http://z11.invisionfree.com/Work_In_Progress/index.php?showtopic=8743 http://z11.invisionfree.com/Work_In_Progress/index.php?showtopic=7211&st=60 Sorry, this editor is driving me crazy, if someone could actually post links, it would be appreciated.
|
|
|
|
|
2007/10/16 03:00:37
Subject: RE: My Baneblade Blog
|
|
The Last Chancer Who Survived
|
Actually, both of those blades are pretty much the same shape I started with.. that 2nd one is pretty much where I was going with it.. then the next thing I knew I was making all those forks and inner blades and it just kind of went from there. I just want something big & mean looking and I think it'll all fit together once it's all painted, if not I'll try again
|
|
|
|
|
|
2007/10/16 06:02:12
Subject: RE: My Baneblade Blog
|
|
Omnipotent Lord of Change
|
Great blog Necros, and the tank is really coming together fast. I think it would drive me nuts, cleaning all that flash and crushing out all those gaps ...
The exchangable barrels look good, and very simple to do too. The dozer is pretty large, but it IS mean looking. I will note that Rictus (I think that's his name) on Warseer made an amazing dozer blade for his IW baneblade sometime in the last year, and had a nice linkage to hook it to the tank - he labored long on how to do that bit, dunno if you're having the same trouble. Worth a look, if you haven't seen his log before.
- Salvage
|
|
|
|
|
|
2007/10/19 03:53:31
Subject: RE: My Baneblade Blog
|
|
Fresh-Faced New User
Shrewsbury, UK
|
I love the idea of adding the dozer blade to the beast and am impressed by your modelling skills.
One thing though - have you thought of getting pre made model rivets - there is professional scenery builder just up the road from me who has these things and they cost £2.50 for a pack of 100. I thnik that it is a dirt cheap way to save your sanity AND you can have them with nuts and bolts as well which could be very cool - although having looked at my Banebalde it is definitely rivets rather than bolts.
|
'The purpose of life is to be happy'; the Dalai Lama |
|
|
|
|
2007/10/19 05:06:08
Subject: RE: My Baneblade Blog
|
|
The Last Chancer Who Survived
|
Actually, I just did the rivets yesterday. First I cut a thin plastic rod into 10,000 little pieces and was gonna glue them on. After about 9 of em I got sick of doing it that way and the glue was making it all weird. I read about another method on WIP about using PVA glue, so that's what I did. I just took a toothpick and dipped it in some glue, then dabbed on a little rivet. Went much quicker They're a little "flat" looking compared to the rest of the tank but when it's all painted I think it'll look fine. I haven't had a chance to get any new pics yet but maybe tonight.. I have the tank all built now, but I'm still trying to figure out how to get the dozer blade mounted with the magnets. I don't really have any chunks of metal to glue to the bottom or anything like that. I could use an old can lid or something maybe... but then I also don't really have anything to cut the metal with really well.
|
|
|
|
|
|
2007/10/19 19:11:50
Subject: RE: My Baneblade Blog
|
|
Fresh-Faced New User
Shrewsbury, UK
|
Its probably a bit late now but you could have placed one magnet on the inside of the tank - we are doing this for modular scenery tiles where we put them on the inside of an mdf carcass with the intention of having metal strips on the tables to hold them in place.
The magnets are pretty strong and they will work through a small thickness of plastic or wood so there is no reason that this wouldn't work here.
|
'The purpose of life is to be happy'; the Dalai Lama |
|
|
|
|
2007/10/20 01:56:50
Subject: RE: My Baneblade Blog
|
|
The Last Chancer Who Survived
|
Actually what I was thinking of was cutting a strip of metal off a can or something like that and gluing it inside the front of the tank. The hole for the turret on top is big enough for me to stick something in there and I can use a rod to push it to the front part of the tank, then the magnets can stick to it through the plastic up front
|
|
|
|
|
|
2007/10/20 03:37:05
Subject: RE: My Baneblade Blog
|
|
The Last Chancer Who Survived
|
OK Finally got some new pics together. I didn't have much time to work during the week, but I managed to get the blade done, except for the mounting parts. The rivets were done with white glue, I just took a toothpick and put a little dot of glue there. Quick n easy Someone on WIP gave me that idea. The eagle is a little off center, hopefully it won't be too noticeable when it's painted. I stuck it on with superglue and it bonded pretty much instantly so I didn't have the few seconds to move it into position that I was hoping for. Oh well. 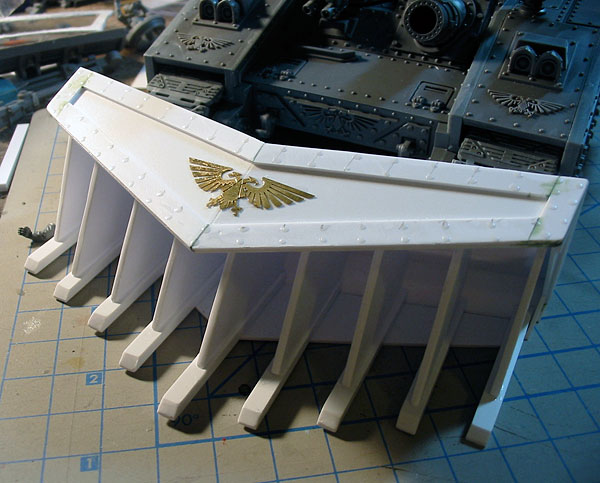 I'm going to be attaching the blade's mounting bitz to the tank with magnets. So I think for now I'm going to hold off on finishing it cuz I really wanna start painting. And since it will be removable, it won't matter if I paint the whole thing now and add it later. So I finished building everything. I was hoping to have 2 sets of sponsons but wasn't able to find anyone selling theirs so I went ahead and just glued the armor plates on the side (sponsons will get painted first then added at the end). As my crappy luck would have it, the guy at my local shop emailed me and said he had some spare sponsons! If only I checked my email before I started gluing. Oh well So I went ahead and finished everything. Here's the tank commander and gunner. The guy on foot isn't gonna go there, I think I may paint his coat black and use him as a comissar. He's got a great big comissar looking hat anyway... 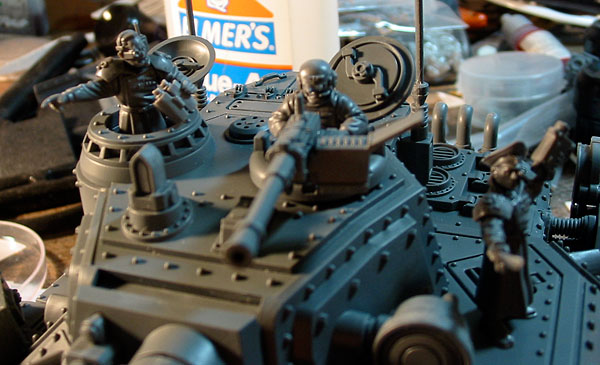 I ran into another problem with the magnets in the cannon barrel. The magnets are so strong that when I try to switch them around, the superglue can't hold them and they pop off the model I guess I need an ultra strong epoxy or something. So, in light of the sponson issues and the fact that I can't swap the flamer and bolter sponsons around, I decided to just glue the big cannon to the turret and not try the Hellblade swap idea. So now, here's everything all ready for a trip outside to get primed. I'm going to paint the top and bottom parts of the sponsons separately and glue them at the end, so that the lascannons can turn easier  One thing I didn't do is add any battle damage like I did to my other tanks. I just didn't want to carve up the sides and stuff because I was afraid I might slip and mess up some of the details I wanna keep. But there will be plenty of painted on scratches & wear & tear, so it should look fine in the end anyway.
|
|
|
|
|
|
2007/10/20 16:06:31
Subject: RE: My Baneblade Blog
|
|
The Last Chancer Who Survived
|
hmm that sounds like it might work anyway I had a rather productive day today. I started painting finally. I started with black spray primer. Then when it was dry, I used masking tape to cover the parts I wanted to stay black, then sprayed the rest of the body with Shadow Gray spray paint. Then, I masked off a band on the side that will be a lighter gray. I mixed up a mix of 3 parts shadow gray and 2 parts space wolf gray and painted it on. But... it was the same color as the spray! Ick. It appears the spray is a lot lighter than the color you get in the little jars. Oh well This pic is after I painted on the mix. Can you see a difference? I barely can...  So, i wanted a lighter gray there instead but didn't feel like mixing again, so I used straight Space Wolf Gray, right out of the pot.  Now you can really see a difference. You can also see the difference between the spray Shadow Gray and the jar kind. The darker spots along the side of the light band were painted on spots. This band of light gray will be where the tank's number will be. i got the idea from Forge World's Macharius vulcan that they have on their site. I'm even stealing the logo in the diamond idea too, but mine will have a number. Anyway, i can't leave it that bright, it sticks out like a sore thumb, so it's time to wash the tank to make it dirty. I had a mostly empty pot of chaos black left. To that added about 7 drops of matte medium and filled it the rest of the way with water. This is what I'll be using to wash the whole tank. So I did it on one side now, and then did some light drybrushes of space wolf gray to pick out some of the edges. You can really see the difference the wash made if you compare it to that unpainted middle spot.  And that's where I'm at now. Still a long long way to go...
|
|
|
|
|
|
2007/10/21 12:52:30
Subject: RE: My Baneblade Blog
|
|
Perfect Shot Black Templar Predator Pilot
|
This work looks outstanding, Necros. I'm definitely going to be following your progress to learn how to better weather my vehicles.
CK
|
"War is an ugly thing, but not the ugliest of things. The decayed and degraded state of moral and patriotic feeling, which thinks that nothing is worth war, is much worse. The person, who has nothing for which he is willing to fight, nothing which is more important than his own personal safety, is a miserable creature who has no chance of being free unless made and kept so by the exertions of better men than himself."
-- John Stuart Mill
 Black Templars (8000), Black Templars (8000),  Imperial Guard (3000), Imperial Guard (3000),  Sanguinary Host (2000), Sanguinary Host (2000),  Tau Empire (1850), Tau Empire (1850),  Bloodaxes (3000) Bloodaxes (3000) |
|
|
|
|
2007/10/21 15:34:18
Subject: RE: My Baneblade Blog
|
|
The Last Chancer Who Survived
|
Thanks. I have the whole body washed now. I use the black wash and then do a light shadow gray drybrush all around, and then space wolf gray to get the edges highlighted. The wash went on a little streaky in some parts, but I didn't mind. The whole idea is I want it to look really dirty and after the drybrushing the streaks look more like it got all dirty, then rained on then dirty again and over and over Next I have to do the turret and the sponsons, after that I'll go back and start the metal parts. I'm thinking I might want to break up the gray a bit and go with a red band on the front part.. maybe have that 2nd panel in be red with the rest gray. The eagles will be gold eventually but I don't think that will be enough.
|
|
|
|
|
|
2007/10/21 16:45:53
Subject: RE: My Baneblade Blog
|
|
Crafty Bray Shaman
|
Great work Necros! Would you mind if I borrowed that chaos black/matte medium/water mixture to wash my 12 guard tanks? Also, could you explain the matte medium a bit better, I do not follow what a matte medium is. 
|
Jean-luke Pee-card, of thee YOU ES ES Enter-prize
Make it so!
  |
|
|
|
|
2007/10/22 01:08:12
Subject: RE: My Baneblade Blog
|
|
The Last Chancer Who Survived
|
I read somewhere that Matte medium will help the paint flow better into all the cracks, etc, and makes washing easier. Honestly I don't know if it did anything at all other than make the paint look really dull. Maybe I just didn't mix it all right. I don't know if you really need it, but you can get it at pretty much any art store where they sell the acrylic paints. Just watered down chaos black or black ink should do the trick. You want to do thin washes and build up the darker areas with multiple coats. The black worked well for the shadow gray areas, but the lighter band of space wolf gray turned out a little "grittier" than I wanted, I think if I did a shadow gray wash there instead of black it might have looked better. I fixed it with some drybrushing though so it's OK I guess.
Also I had a problem with the first coat of the wash beading up a bit and not sticking. I had to keep it wet and keep the brush moving around the area till the wash would eventually stick. I'm not sure if it was from the wash or matte medium, or from the shadow gray spray paint I used.. I think it may have been the spray because I didn't remember it doing it as bad on the lighter parts that were painted on.
|
|
|
|
|
|
2007/10/22 11:27:37
Subject: RE: My Baneblade Blog
|
|
Phanobi
|
A little bit of liquid soap may do the same thing. I guess that the matte medium just breaks up the surface tension of the water and lets it flow into the cracks better.
Ozymandias, King of Kings
|
My name is Ozymandias, King of Kings.
Look on My works, Ye Mighty, and despair.
Chris Gohlinghorst wrote:Holy Space Marine on a Stick.
This conversation has even begun to boggle my internet-hardened mind.
A More Wretched Hive of Scum and Villainy |
|
|
|
|
2007/10/22 13:18:41
Subject: RE: My Baneblade Blog
|
|
Highlord with a Blackstone Fortress
Adrift within the vortex of my imagination.
|
I am taking my Baneblade own slowly.
I have had to replace the lascannon, as I only had one (long story) I had some spare IG heavy weapons so I used them.
I was also considering replacing the heavy stubber with an autocannon, as you can get them as upgrades for Forgeworld Baneblades. I wanted to place that in the plug that the gothic arched periscope sits, because I dont like it very much. However the autocannon and heavy bolter miniatures are too deep behind the pivot and wont fit there with a decent fire arc. So its back to a pintel mounted heavy stubber.
What irks me about the tank recently is that the main cupola, the one where the heavy stubber is supposed to sit, is right behind the main gun, it leave no room for loading, or even recoil. What do you think?
|
n'oublie jamais - It appears I now have to highlight this again.
It is by tea alone I set my mind in motion. By the juice of the brew my thoughts aquire speed, my mind becomes strained, the strain becomes a warning. It is by tea alone I set my mind in motion. |
|
|
|
|
2007/10/22 14:07:40
Subject: RE: My Baneblade Blog
|
|
The Last Chancer Who Survived
|
Posted By Orlanth on 10/22/2007 6:18 PM
What irks me about the tank recently is that the main cupola, the one where the heavy stubber is supposed to sit, is right behind the main gun, it leave no room for loading, or even recoil. What do you think?
It's 40K, it's not supposed to be realistic. Screw physics and all that stuff, just make it look cool The way the top gun is set up, you can even have 2 guys with heavy stubbers up there just for looks, if you have the pare bitz. But I like how the baneblade stubber is fatter.
|
|
|
|
|
|
2007/10/22 14:32:59
Subject: RE: My Baneblade Blog
|
|
[DCM]
Illustrator
|
I really like the look of the chassis a ton. But when I saw the size of the turret, it just looks so tiny. It feels like it should be bigger by at least another half the current size in all directions.
Btw your weathering is looking awesome necros. I can't wait to see that entire side completed.
|
-Aaron
Call For Fire
DA:80+S+GM(DPC)B++++I+Pw40k99+D++A++/mWD247R++T(M)DM+++++ |
|
|
|
|
2007/10/23 15:20:49
Subject: RE: My Baneblade Blog
|
|
The Last Chancer Who Survived
|
Thanks here's an update .. Tonight I got all the main armor parts finished. In the first pic one of my Russes is in the background, all of my other tanks are black like that but I think this dark gray will still fit in fine. The red parts on the russ will also be on this guy too, only much dirtier  And here's 2 closeups to show the colors and stuff on the armor 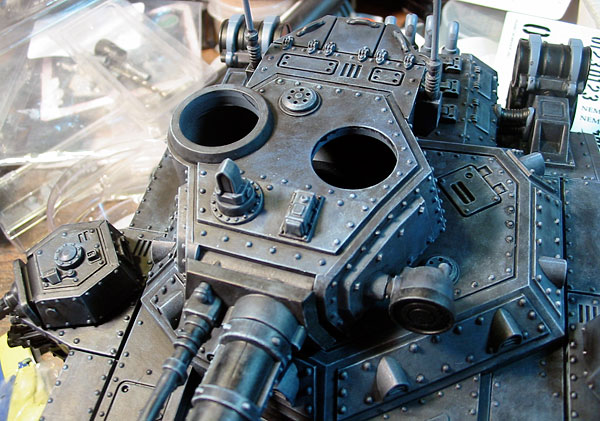 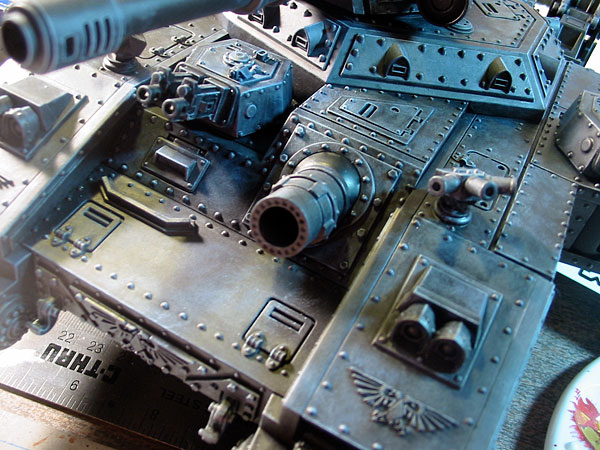 So the whole thing was done in 4 big steps. First a base coat of shadow gray and space wolf gray for the light colored band on the side. Next was a wash of watered down chaos black with acrylic matte medium added in, but I don't know if the medium did anything really other than take any kind of gloss out of the paint. After that, I did very light drybrushes of shadow gray all around to blend in any streaks that were in the wash. And last was a very light drybrush of space wolf gray to pick out some edges and highlights. Next I will be doing the metalic parts, including the treads. These will be done in a similar technique, with boltgun metal as a basecoat, then the same black wash, then boltgun metal drybrush followed by mithril silver. I probably won't do the silver on the treads though. They're going to get dirtied up a lot more with mud and stuff and the end anyway. I'm hosting a 6 on 6 apocalypse game in about 3 weeks. I hope I can finish this guy in time...
|
|
|
|
|
|
2007/10/24 10:36:42
Subject: RE: My Baneblade Blog
|
|
Crafty Bray Shaman
|
That puppy looks like a whole lot of meanness Necros! Superb job on the weathering as well, how did you get your matte medium to adhere to the rivets without producing a white area? Di you use something to break the surface tension of the water?
|
Jean-luke Pee-card, of thee YOU ES ES Enter-prize
Make it so!
|
|
|
|
|
2007/10/24 11:23:52
Subject: RE: My Baneblade Blog
|
|
The Last Chancer Who Survived
|
I have no idea what surface tension is, I just painted the stuff on and it worked It did bead up in some areas but I just kept going back and forth over the same spot until eventually it stopped beading. I also painted it 1 armor plate/area at a time so there wouldn't be any drying edges .. just took it slow I tried to let it pool a little around the rivets too so it would be darker around them. I also did a couple of layers / coats on the parts I wanted darker. I think this wash worked good because the shadow gray was a medium color. You can see the streaks a bit on the ligher band on the sides, I probably should have done shadow gray as a wash over there. But I was able to still kill most of the streaks with some light drybrushing. Gonna start working on the metalics tonight
|
|
|
|
|
|
2007/10/25 12:24:51
Subject: RE: My Baneblade Blog
|
|
Crafty Bray Shaman
|
Posted By Necros on 10/24/2007 4:23 PM I have no idea what surface tension is, I just painted the stuff on and it worked It did bead up in some areas but I just kept going back and forth over the same spot until eventually it stopped beading. I also painted it 1 armor plate/area at a time so there wouldn't be any drying edges .. just took it slow I tried to let it pool a little around the rivets too so it would be darker around them. I also did a couple of layers / coats on the parts I wanted darker. I think this wash worked good because the shadow gray was a medium color. You can see the streaks a bit on the ligher band on the sides, I probably should have done shadow gray as a wash over there. But I was able to still kill most of the streaks with some light drybrushing. Gonna start working on the metalics tonight
What I was talking about is this For some reason something is happening around the rivets and pigment isn't drying around them. It might be possible that my base coat went on too thick and/or the temperature wasn't right. I hope the metallics come out nice, would really make that model stand out.
|
Jean-luke Pee-card, of thee YOU ES ES Enter-prize
Make it so!
|
|
|
|
|
|
|


