| Author |
Message |
 |
|
|
|
|
Advert
|
Forum adverts like this one are shown to any user who is not logged in. Join us by filling out a tiny 3 field form and you will get your own, free, dakka user account which gives a good range of benefits to you:
- No adverts like this in the forums anymore.
- Times and dates in your local timezone.
- Full tracking of what you have read so you can skip to your first unread post, easily see what has changed since you last logged in, and easily see what is new at a glance.
- Email notifications for threads you want to watch closely.
- Being a part of the oldest wargaming community on the net.
If you are already a member then feel free to login now. |
|
 |
2018/12/12 03:07:53
Subject: Re:(Not) Santas Workshop of the Strange, Wierd, and Wonderful - 11 Dec -EREBUS tank - pg 74!
|
|

[DCM]
Boom! Leman Russ Commander
|
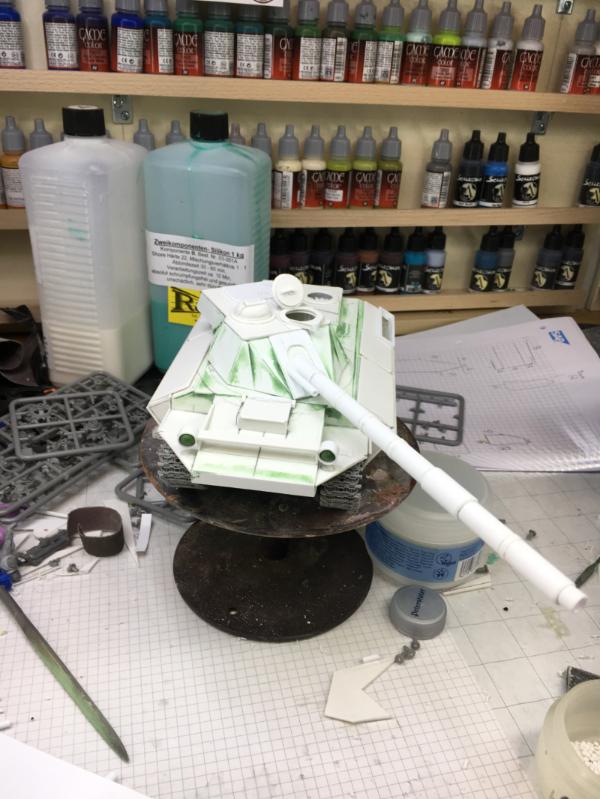
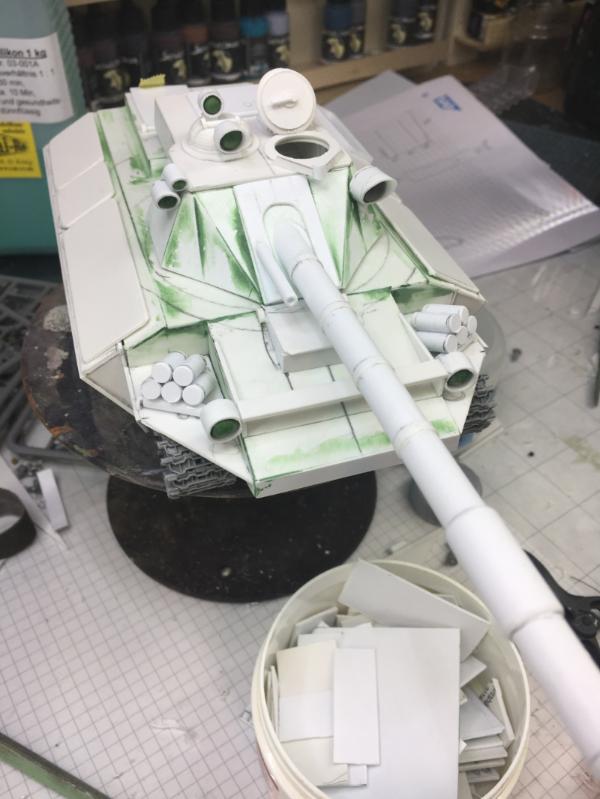
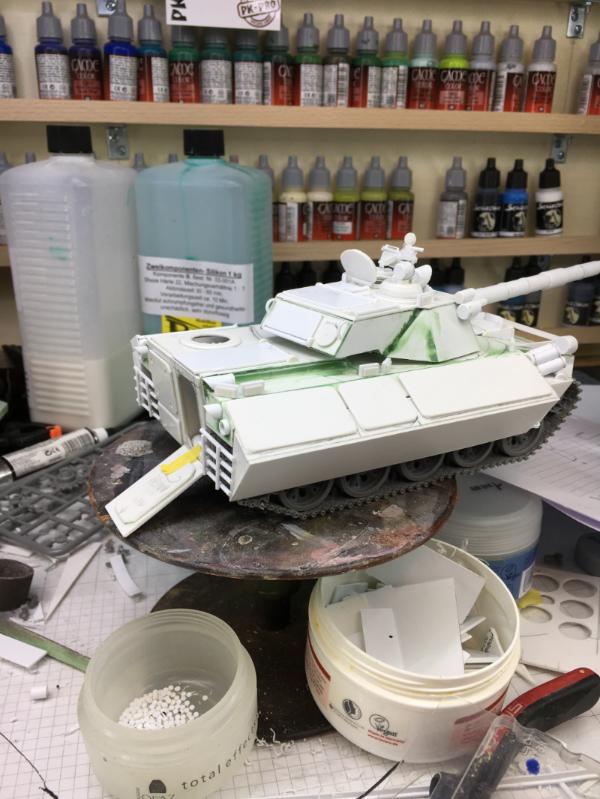
The longer barrel is very real world, and in good balance with the body of the vehicle. Especially with rifled main gun barrels, the longer the barrel, the more rifling, the more spin on the round- the longer the range and the flatter the trajectory of the round. Or, if engaging enemy armor at closer range, the more kinetic energy delivered through the penetrator core of the armor-piercing round. Boom! Out go the lights!
I like it.   
|
"He fears his fate too much, or his desserts are small, who will not put it to a single touch; to win- or lose- it all."
Montrose Toast

|
|
|
 |
|
2018/12/12 11:04:22
Subject: (Not) Santas Workshop of the Strange, Wierd, and Wonderful - 11 Dec -EREBUS tank - pg 74!
|
|

Omnious Orc Shaman
A long time ago in a galaxy far, far, away...
|
Yep, I concur. Looks the 'bees-knees' to me 
What I most admire though, is your ability to accept when a build is not shaping up as you've envisioned it and starting over from scratch - that's a real skill right there and one I struggle with...
|
|
|
|
|
|
2018/12/13 11:19:51
Subject: (Not) Santas Workshop of the Strange, Wierd, and Wonderful - 11 Dec -EREBUS tank - pg 74!
|
|

Dakka Veteran
|
whalemusic360 wrote:I think in 40k, tank barrels are generally shorter for the sake of playability. They are actually pretty damn long in the real world. So I think you can't go wrong here. Short, long, whatever floats your boat.

sounds like a plan, eh? Thanks whalemusic
monkeytroll wrote:Yeah, think it only looks too long in comparison to 40k tanks. Works for me.
And handy trick on mounting the wheels
Thanks Mate!
Glad if my tip is a bit of use
Meer_Cat wrote:The longer barrel is very real world, and in good balance with the body of the vehicle. Especially with rifled main gun barrels, the longer the barrel, the more rifling, the more spin on the round- the longer the range and the flatter the trajectory of the round. Or, if engaging enemy armor at closer range, the more kinetic energy delivered through the penetrator core of the armor-piercing round. Boom! Out go the lights!
I like it.
Thank you!
Ruglud wrote:Yep, I concur. Looks the 'bees-knees' to me
What I most admire though, is your ability to accept when a build is not shaping up as you've envisioned it and starting over from scratch - that's a real skill right there and one I struggle with...
Thank you - if I didn't start over, I would later be pissed, that I didn't and regret it - or even through the whole built into the bin
Well, thank you for the positive feedback and comments!
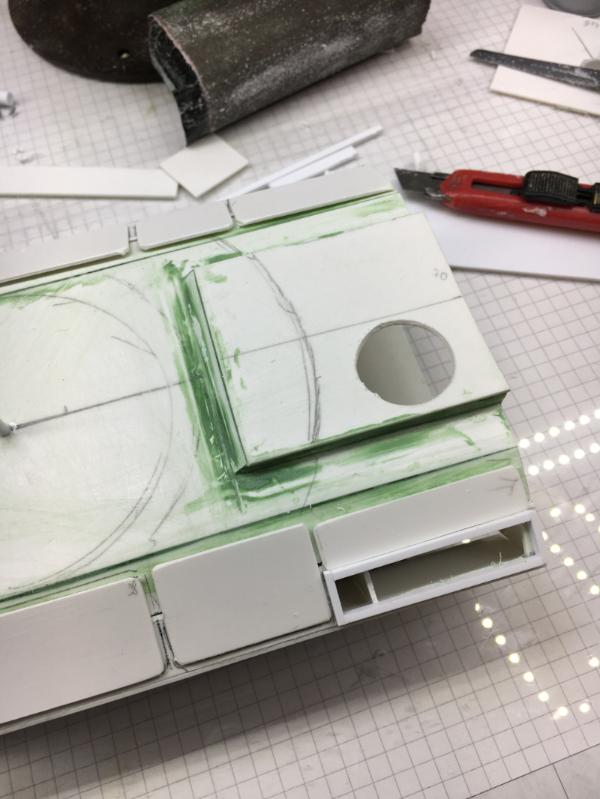
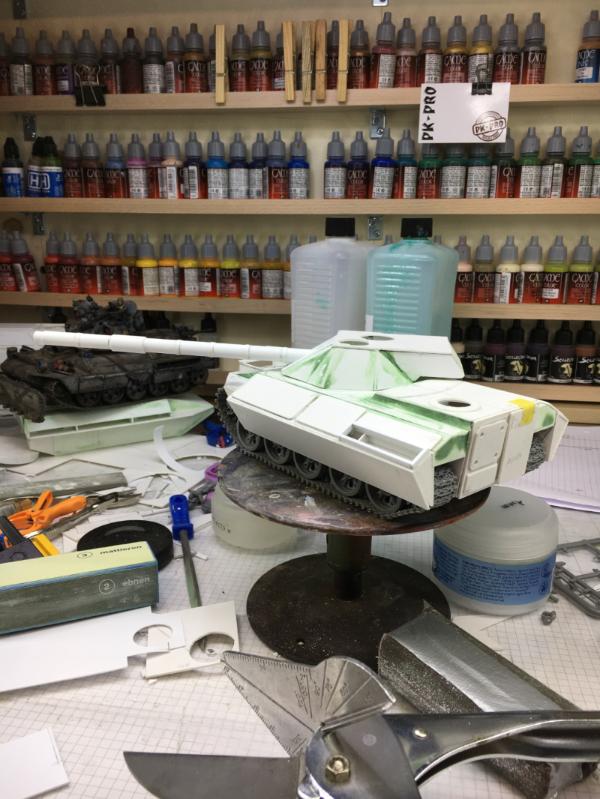
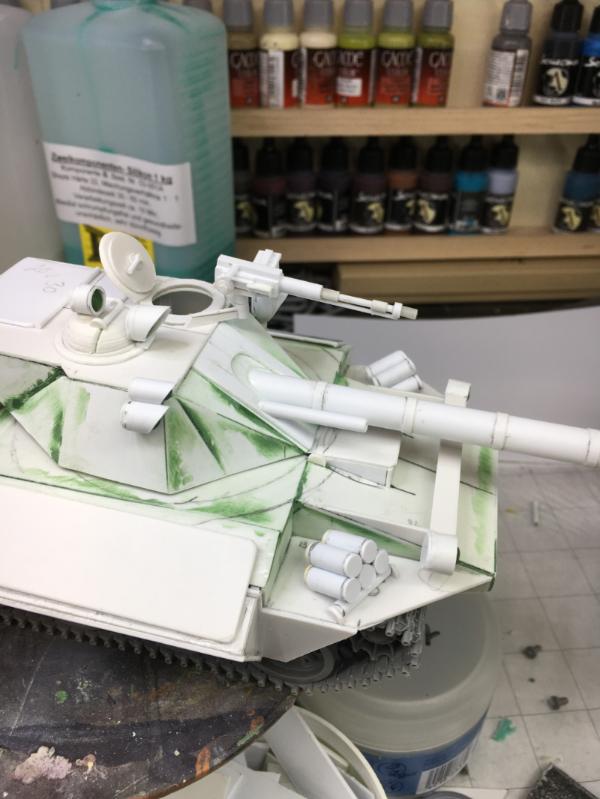
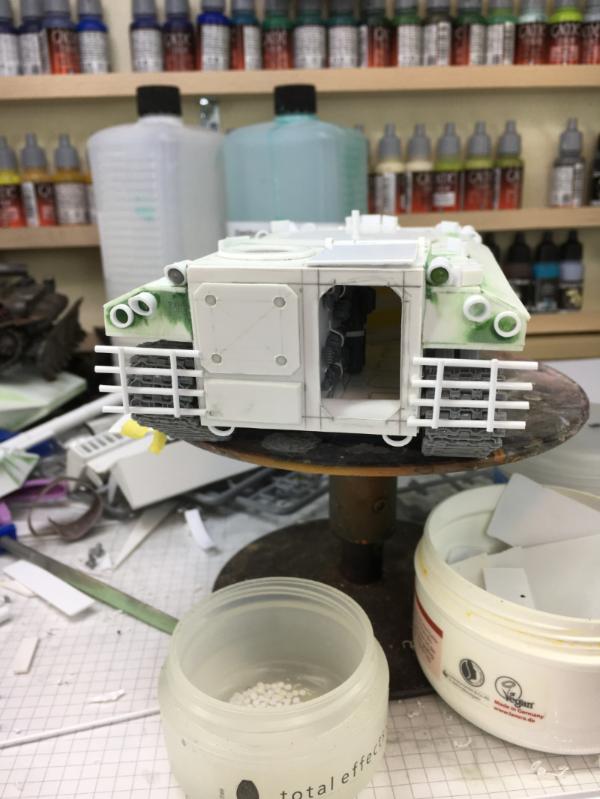
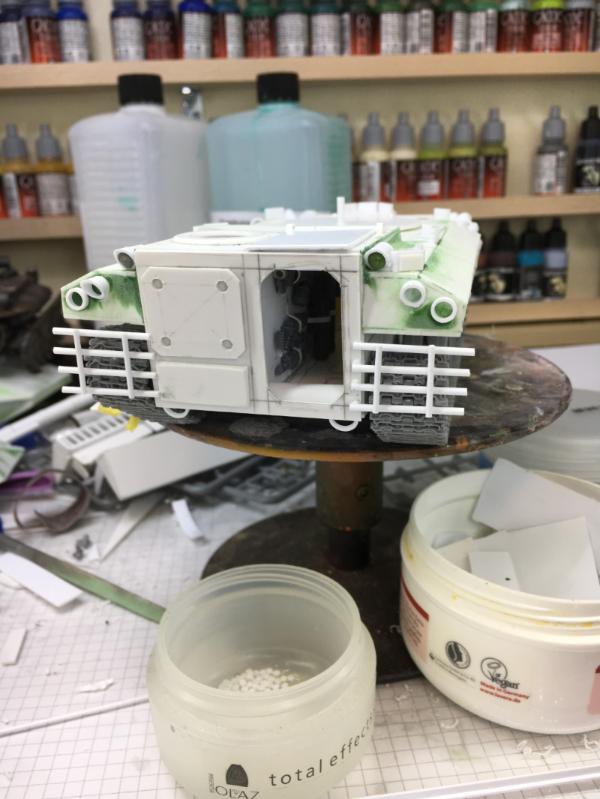
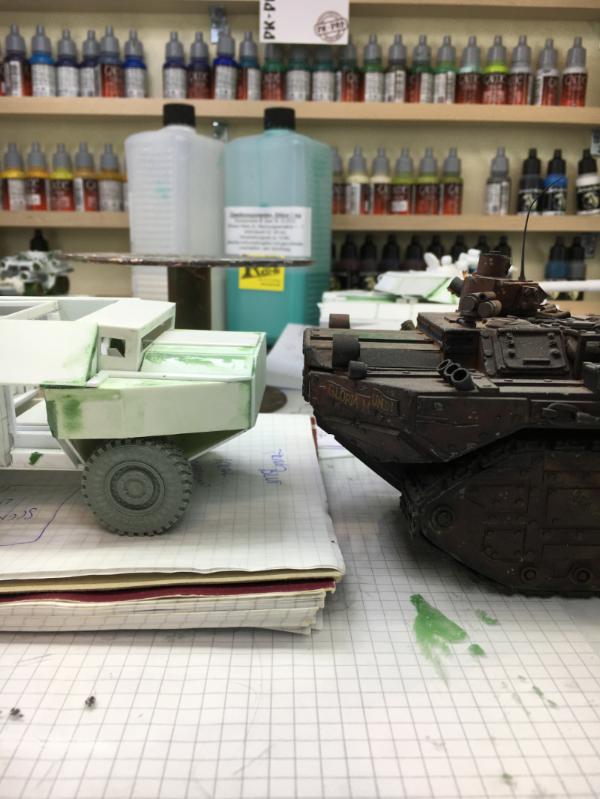
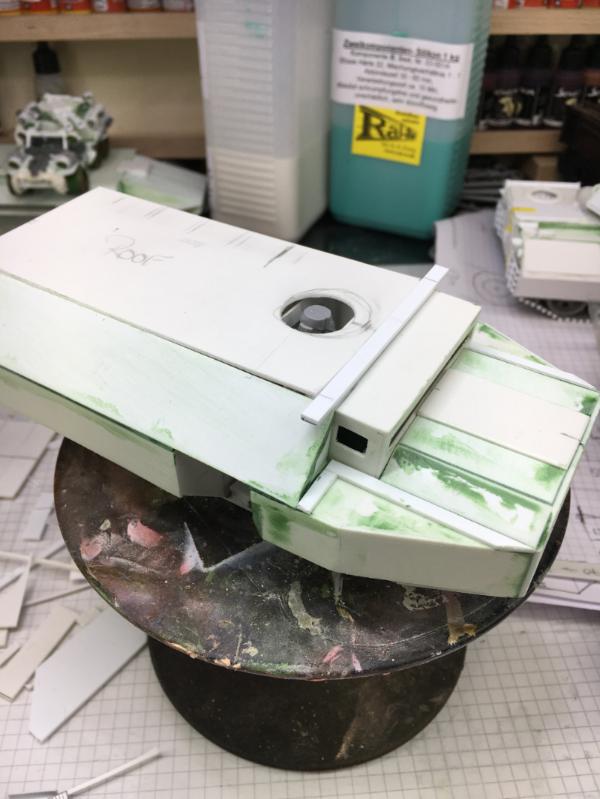
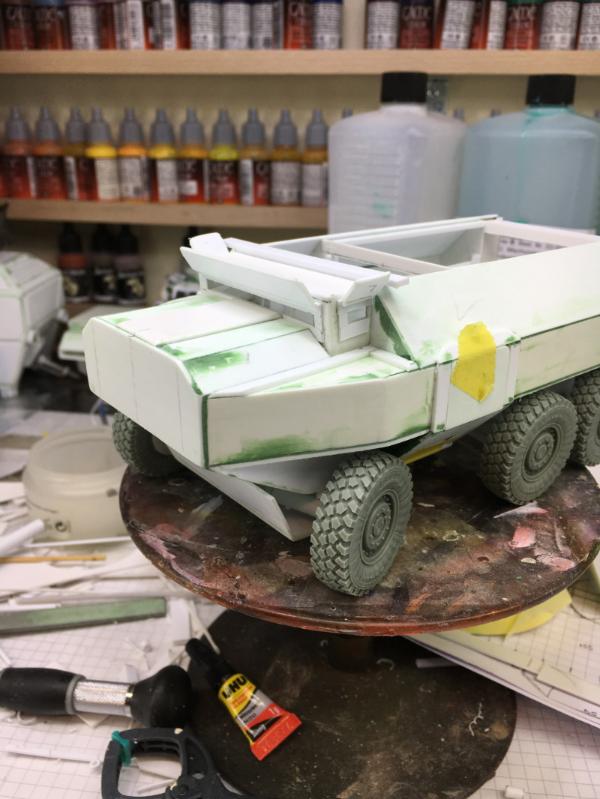
Continuing form the last post I worked with the engine deck.
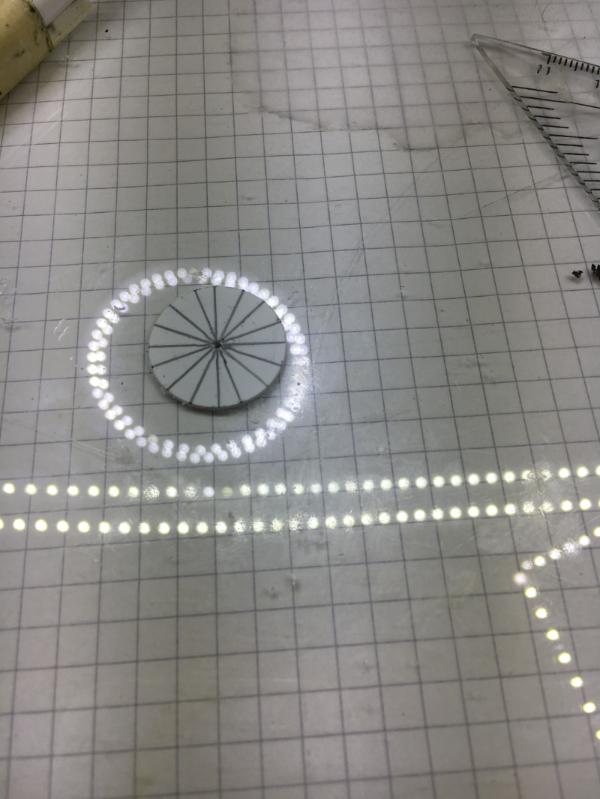
Instead of the long grill the other vehicles have decide to give it a turbine look.
So I cut a hole into the deck
Then I cut a second thinner, but slightly larger disk and drew the fan blades
I cut them to about a few millimeters to the center and then carefully twisted them up with a set of tweezers - not careful enough, as one blade broke off
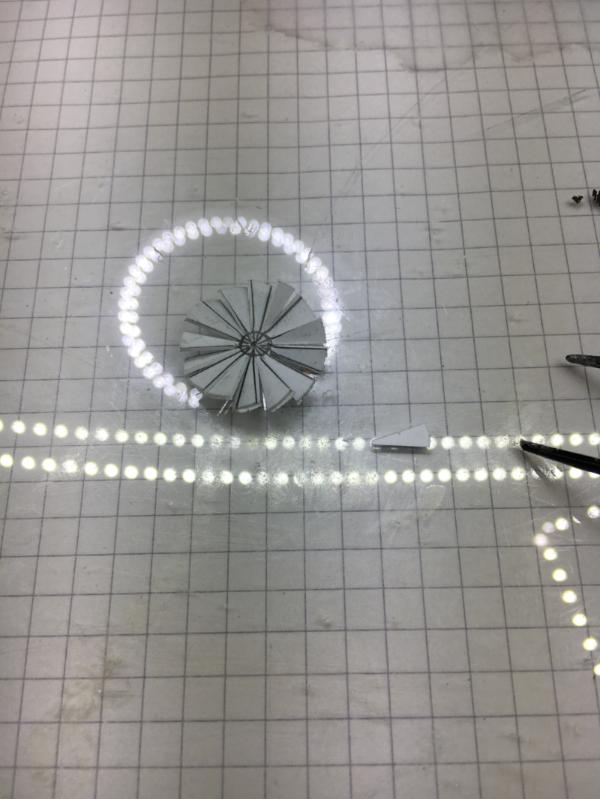
Finally I glued the "fan onto a piece of plastic card, re-aligning the blades in the proper angle.
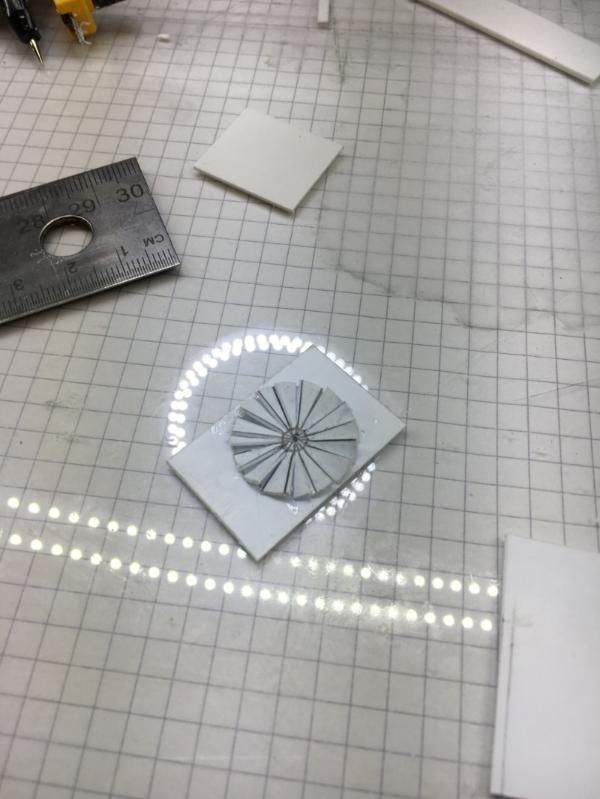
A set of spacers for the proper distance

And then glued in place.

To make things complete, I added a cover ring

I think it will look better, than the original deck - and it is different
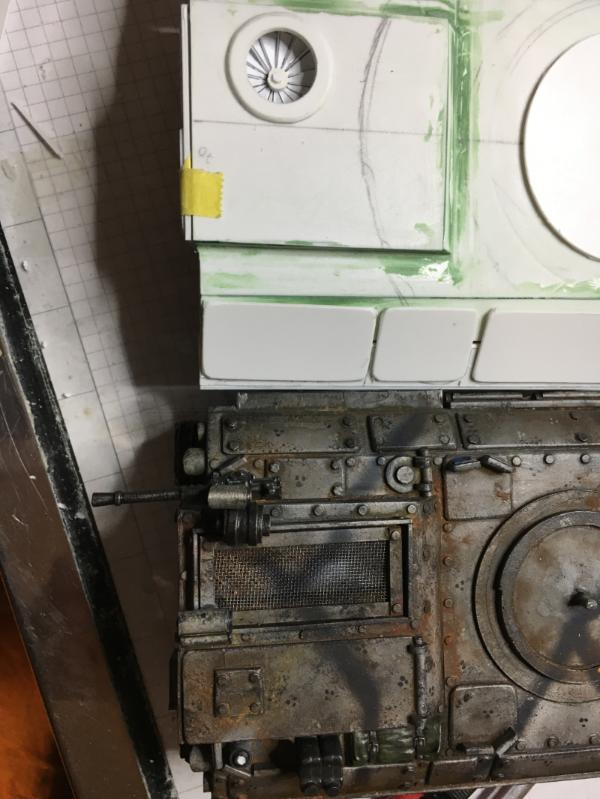
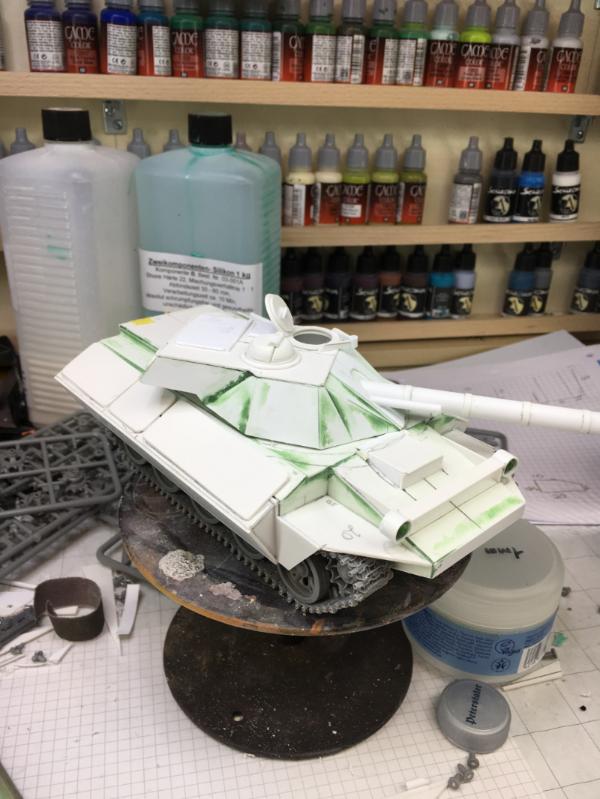
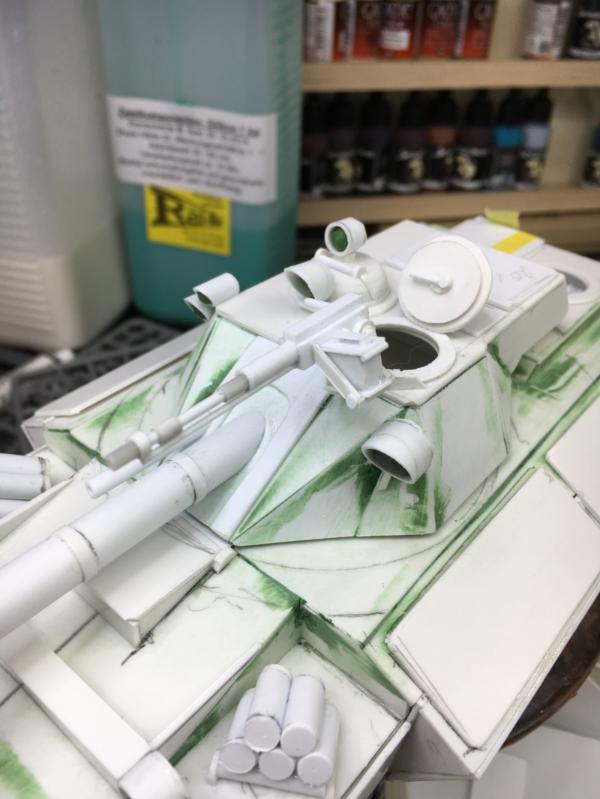
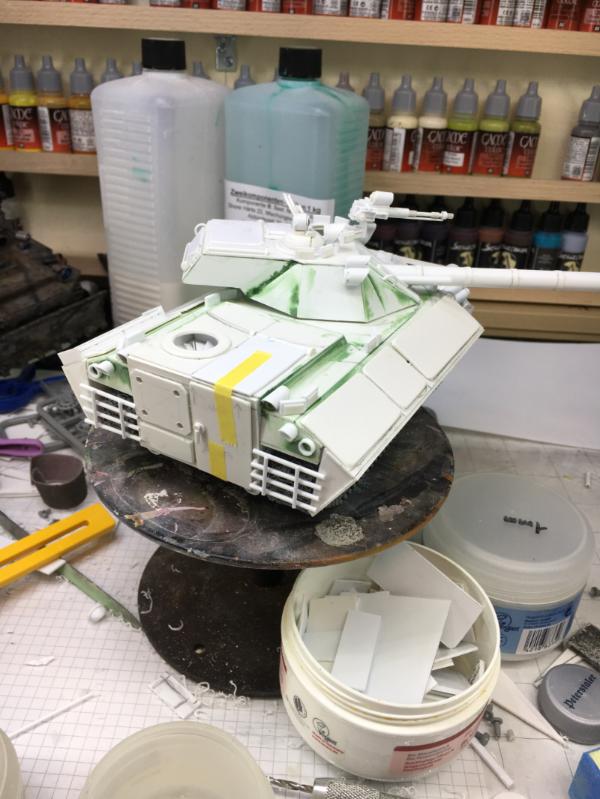
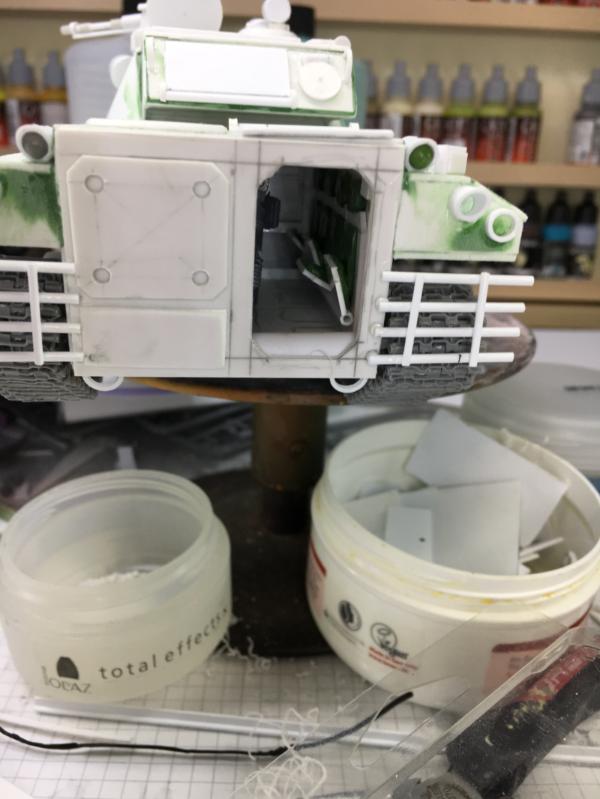
Next I added the drivers hatch and the mounts for the lights
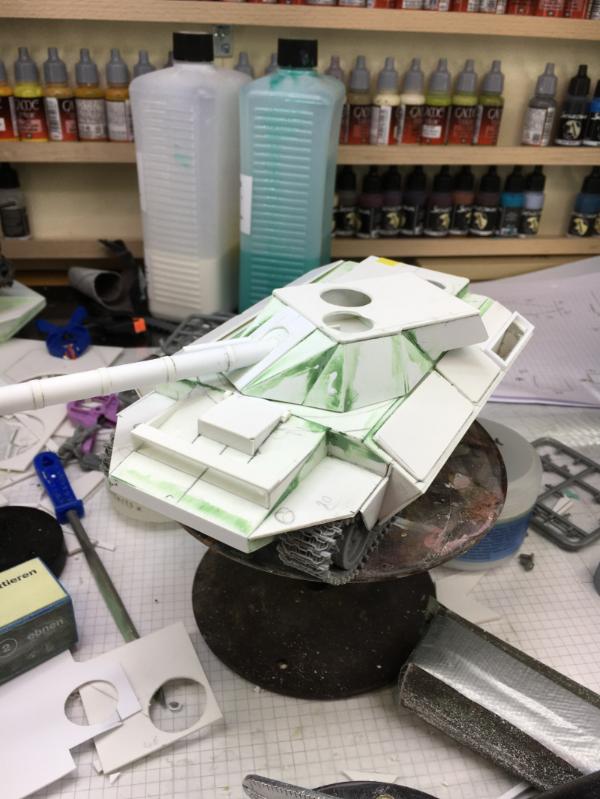
Next up was the hatch for the loader with the MG mount

I also added the hatches for the ammo load and cartridge ejection (the little round one) as well as access panels
Last not least I added the front lights and the closed commanders cupola
Still a lot of detailing, hatches, sights and lights to do
Well, that's as far as I got.
Cheers
Klaus
|
|
|
|
|
|
2018/12/18 13:09:46
Subject: Re:(Not) Santas Workshop of the Strange, Wierd, and Wonderful - 18 Dec -EREBUS tank - pg 75!
|
|
Dakka Veteran
|
Hi all,
thank you for your comments and feedback
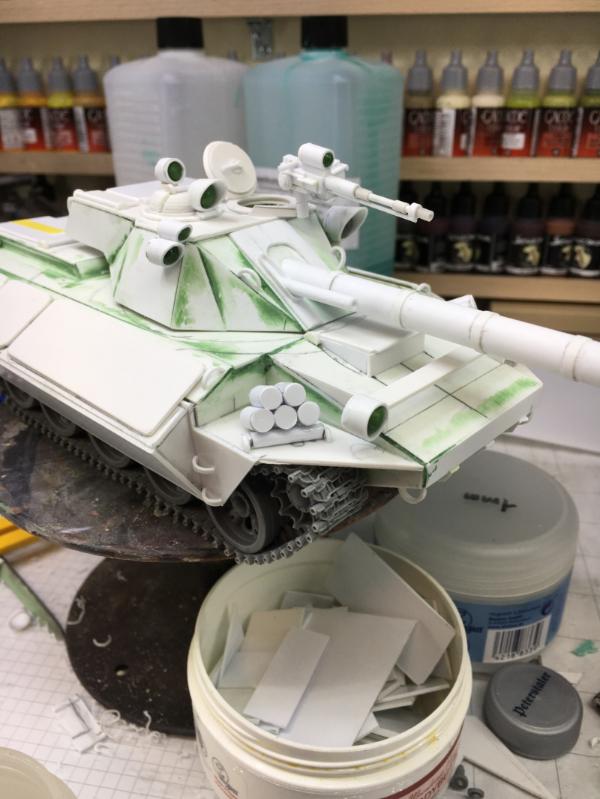
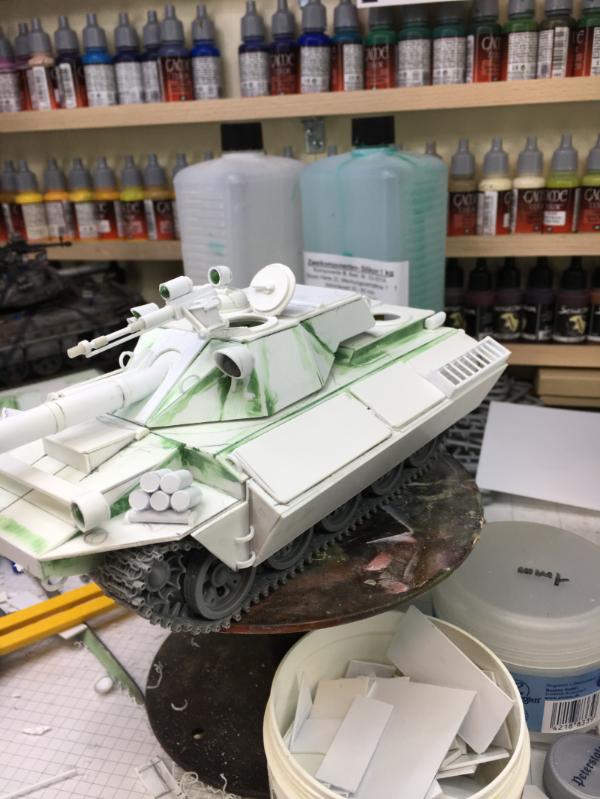
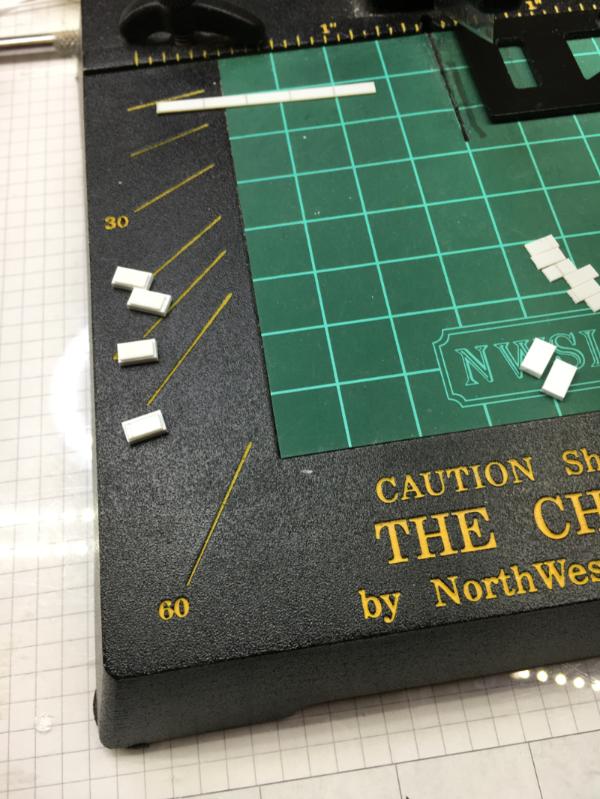
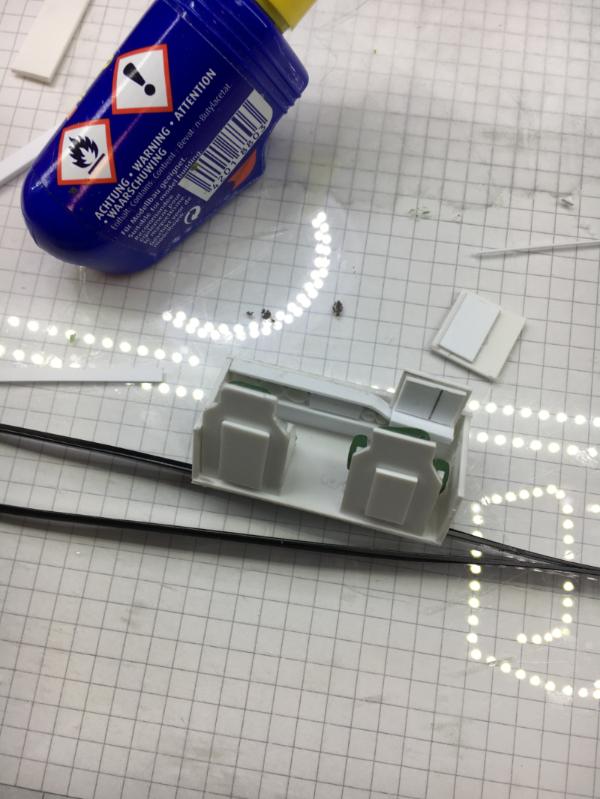
Continued from last time I began to create the various lights and sights. For this I have a collection of balls - from left-over GreenStuff - which I then match to the fitting plastic rods, cut to the proper size.
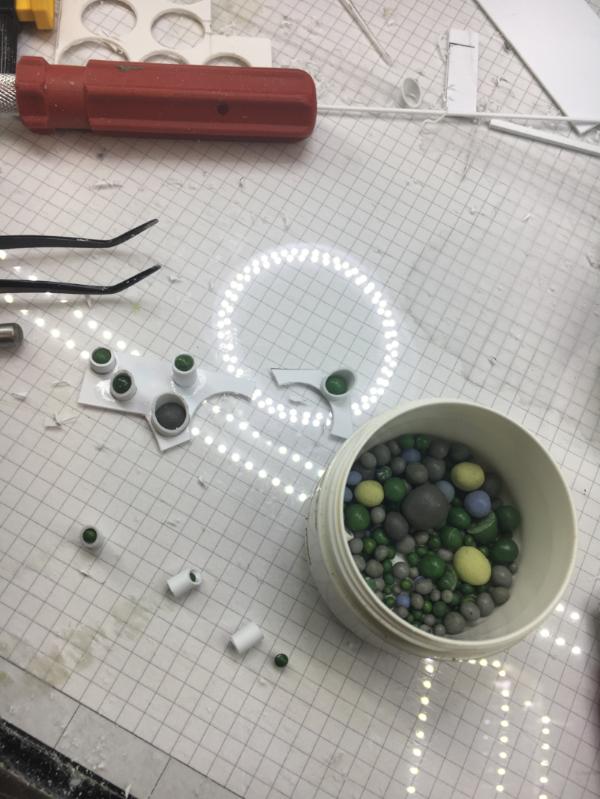
Here are the first lights and sights mounted.
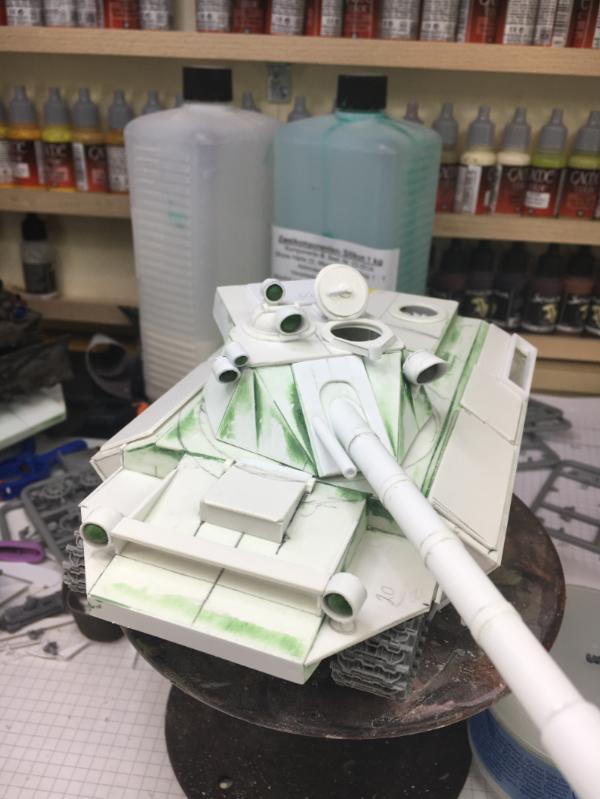
Changes the look quite a lot.

Next I created some " RPG-Grills" to protect the rear tracks.

Again the trick was to keep the sides removable.

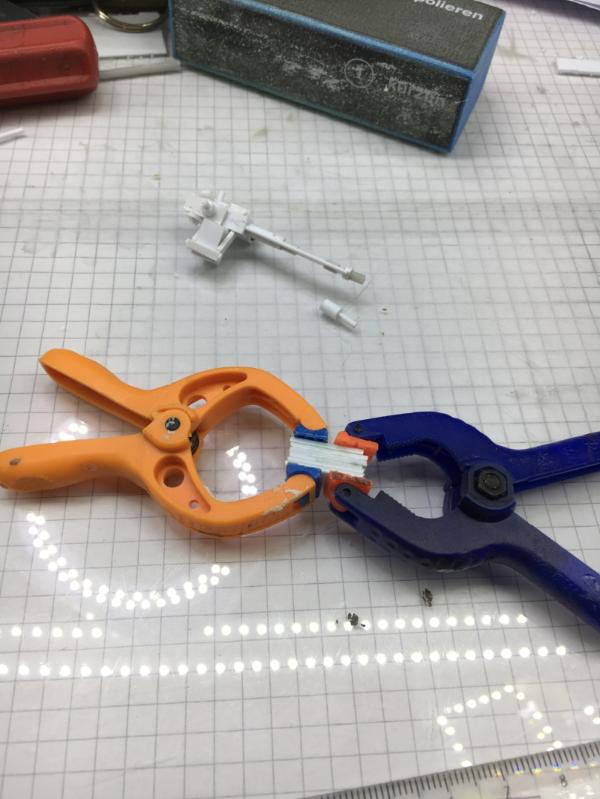
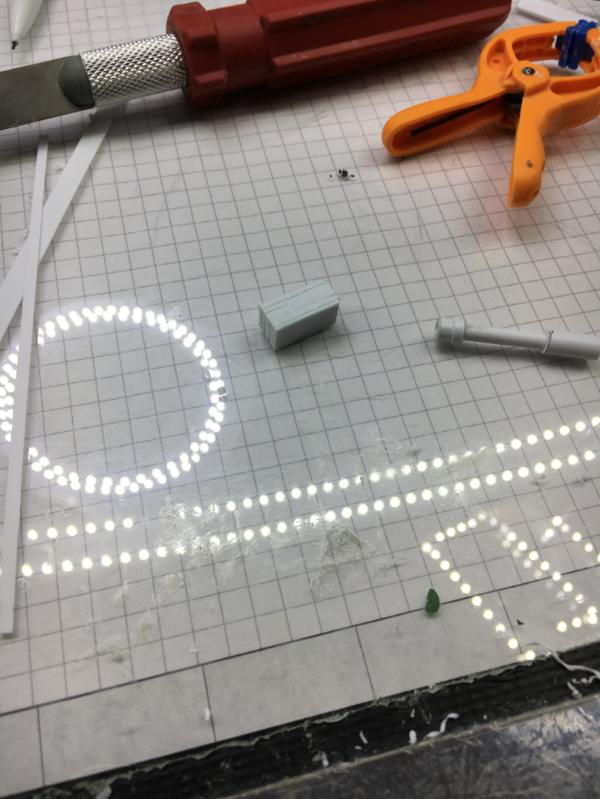
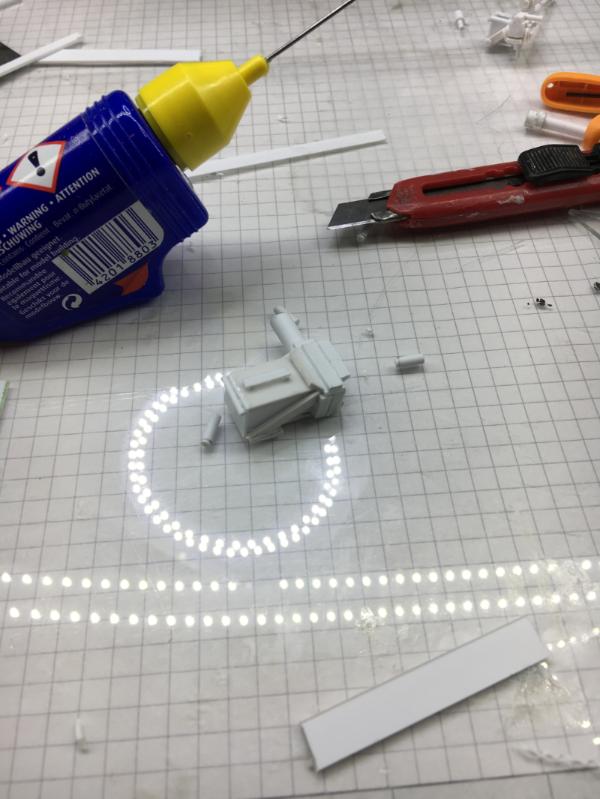
Next I created the smoke launchers.
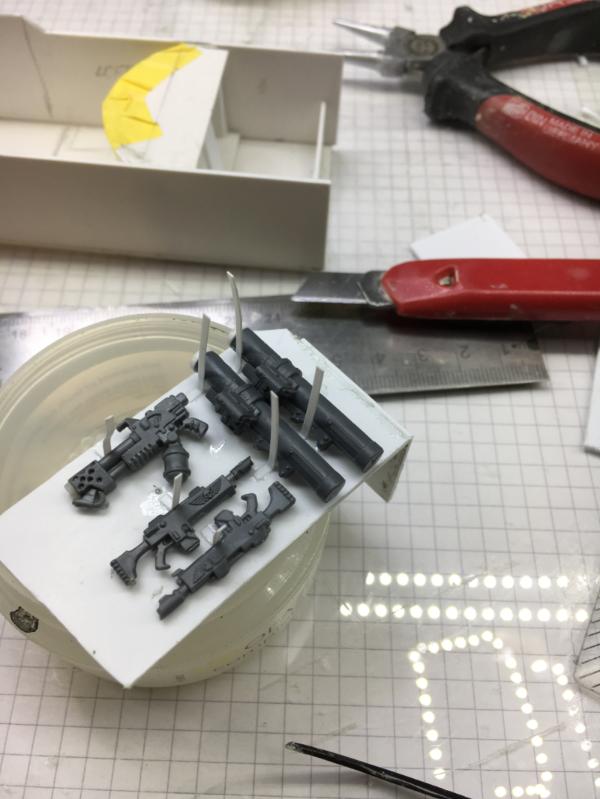
And then I built a machine-gun.
A bit Russian style
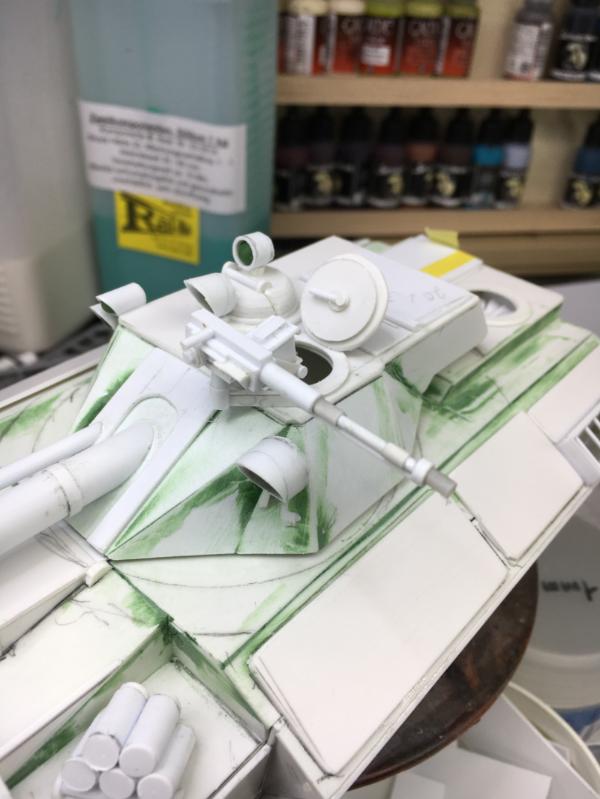
and all scratch-built.
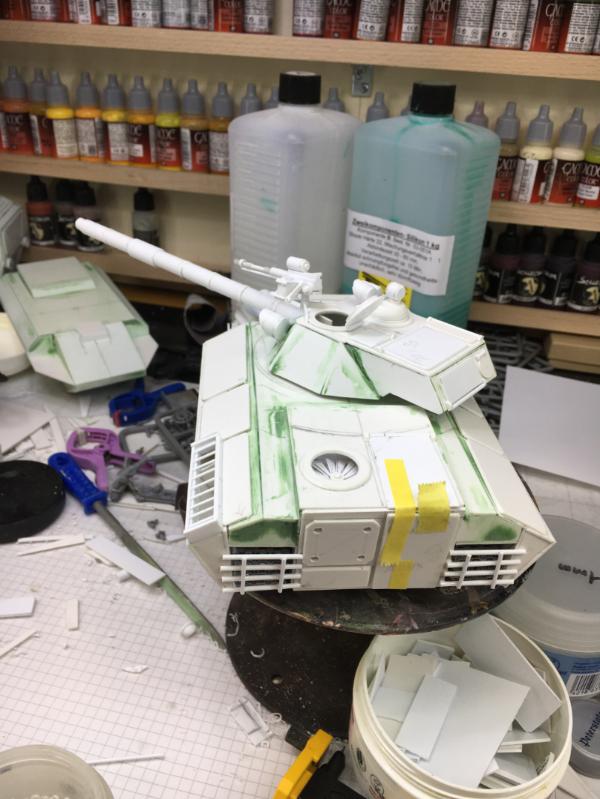
Then I added tie-downs and hooks.
Rear lights

and handle for the rear door
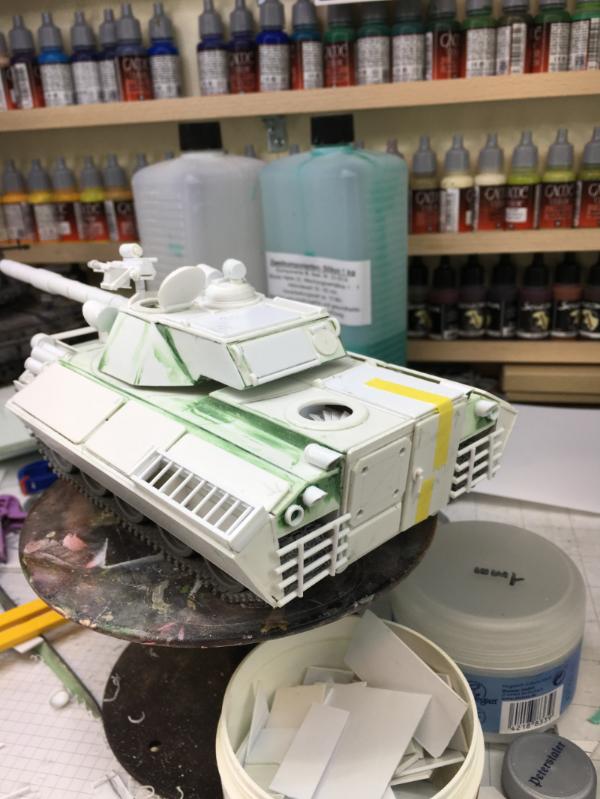
plus steps for the crew
With my trusted Chopper I cut pieces for the vision ports
and installed them.

The two vision ports visible here on the rear left are later removed, as this is the engine area - and no one will be using them there 
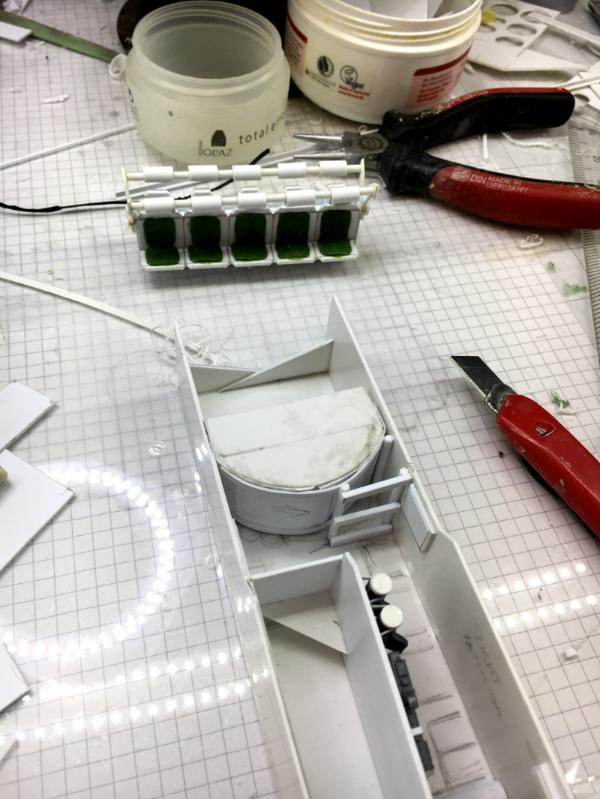
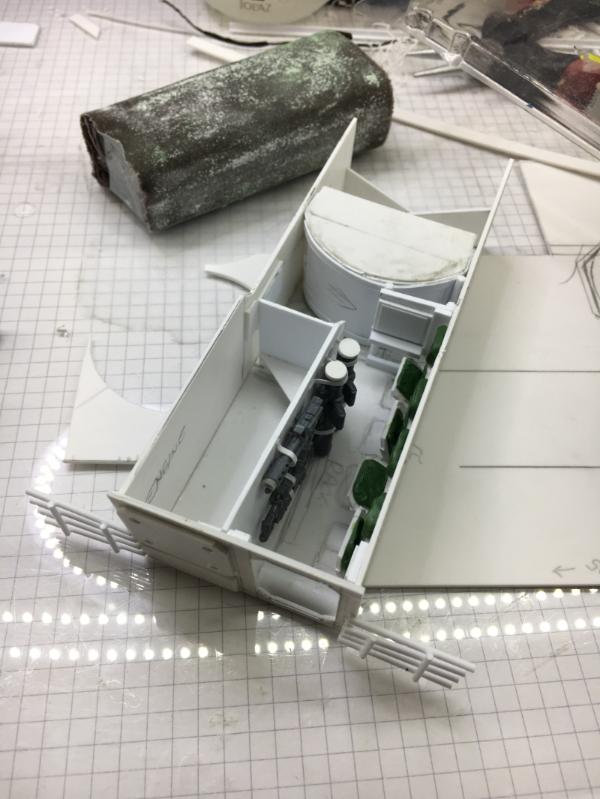
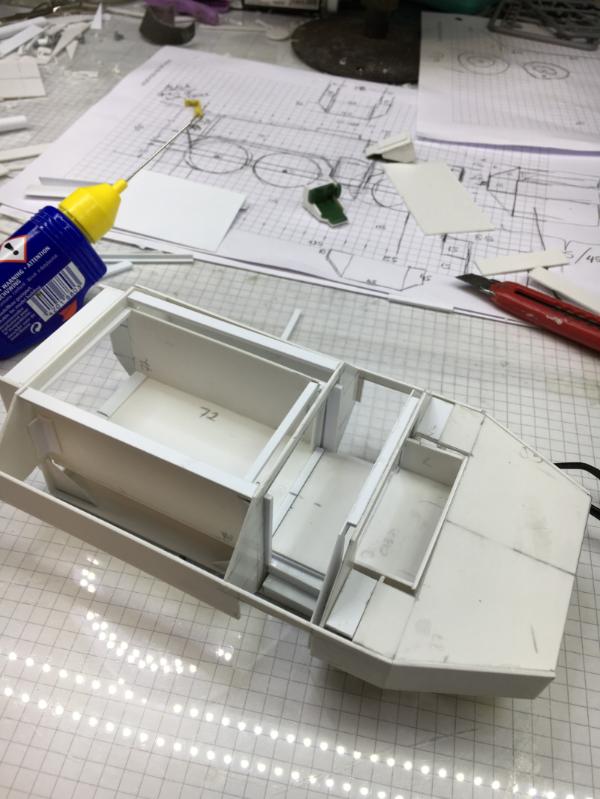
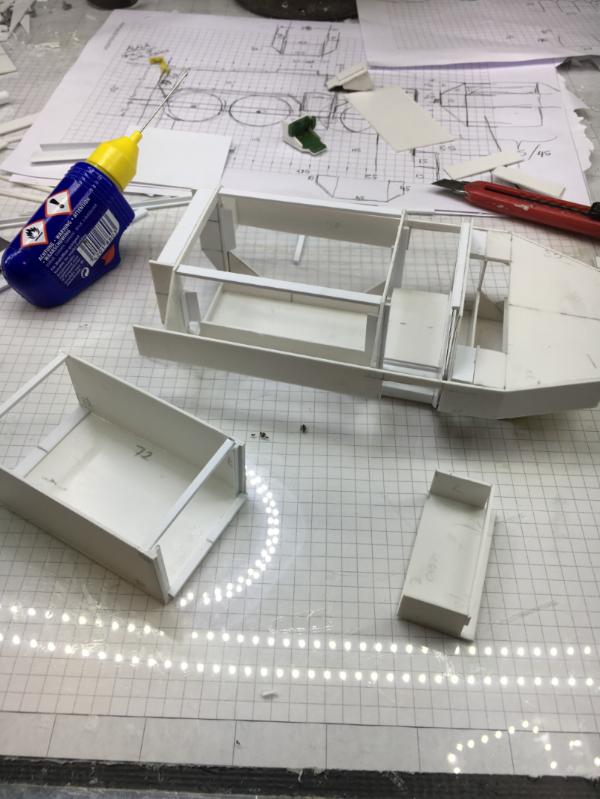
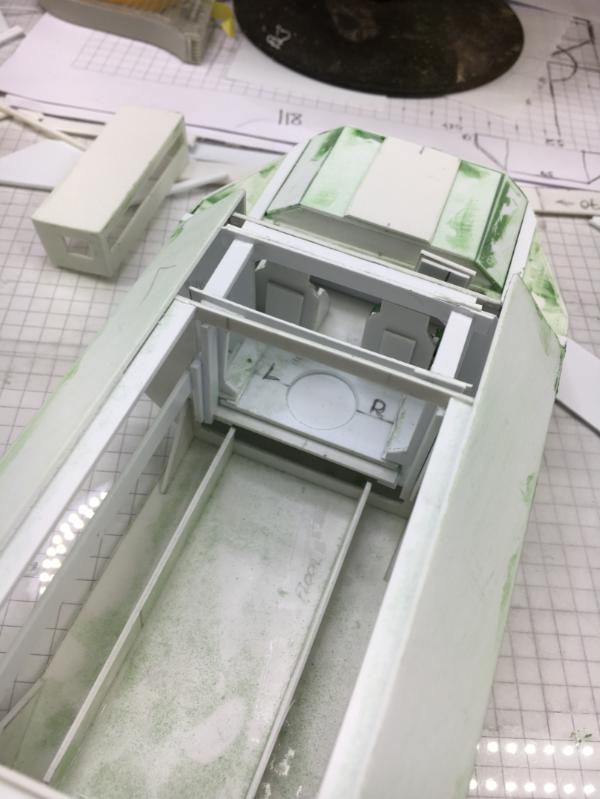
With most of the exterior done (yes, I know, tons of rivets are still missing), I started to build the slide-out interior
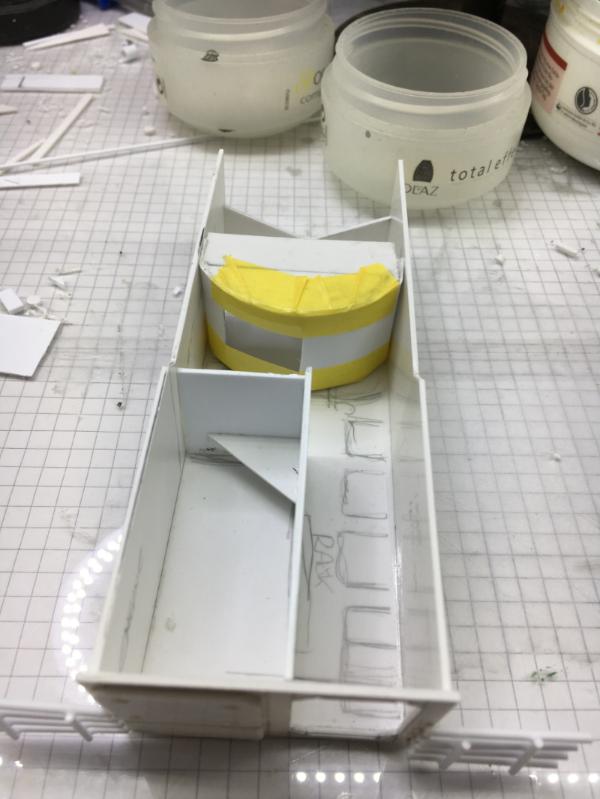
On the left is the engine section and in the center the blast wall and door to the turret basket.
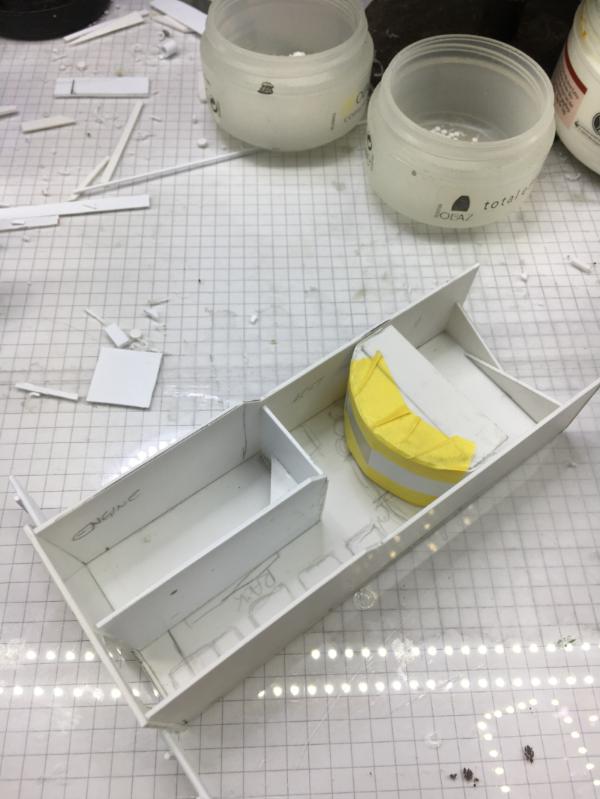
To flesh things out, I added a weapons rack, with a little Flamethrower, two assault rifles and two AT-tubes
And this is how it would look...
Not much to see...
But we all know it is there, right?
Well, I'm not really sure how much time I will spend on the interior, if so little is to see...
Cheers
Klaus
|
|
|
|
|
|
2018/12/18 13:27:56
Subject: Re:(Not) Santas Workshop of the Strange, Wierd, and Wonderful - 18Dec -EREBUS tank - pg 75!
|
|
Fixture of Dakka
|
Fantastic work as always.
Good work on the turbine, it does indeed help mark it out as a different build.
Nice idea for the lights, always interesting to see what people do with their excess green-stuff (obviously I make tentacles with mine ).
My favourite bit : "And then I built a machine gun." 
|
|
|
|
|
|
2018/12/18 21:42:27
Subject: (Not) Santas Workshop of the Strange, Wierd, and Wonderful - 18Dec -EREBUS tank - pg 75!
|
|
Leader of the Sept
|
It's amazing work. I'm just a bit distressed at the idea that you threw away the hull that was not quite right. Could you not have smashed it up in some way as basing material or a wrecked tank scenery piece? (Or given it to me? )
|
Please excuse any spelling errors. I use a tablet frequently and software keyboards are a pain!
 Terranwing - w3;d1;l1 Terranwing - w3;d1;l1
 51st Dunedinw2;d0;l0 51st Dunedinw2;d0;l0
 Cadre Coronal Afterglow w1;d0;l0 Cadre Coronal Afterglow w1;d0;l0 |
|
|
|
|
2018/12/18 22:48:16
Subject: Re:(Not) Santas Workshop of the Strange, Wierd, and Wonderful - 18Dec -EREBUS tank - pg 75!
|
|
[DCM]
Boom! Leman Russ Commander
|
|
"He fears his fate too much, or his desserts are small, who will not put it to a single touch; to win- or lose- it all."
Montrose Toast
|
|
|
|
|
2018/12/22 14:42:48
Subject: (Not) Santas Workshop of the Strange, Wierd, and Wonderful - 18Dec -EREBUS tank - pg 75!
|
|
Mastering Non-Metallic Metal
|
Great work. Lovely detailing.
|
     Mastodon: @DrH@warhammer.social Mastodon: @DrH@warhammer.social
The army-                 ~2295 points (built). ~2295 points (built).
 
* -=]_,=-eague Spruemeister General. * A (sprue) Hut tutorial *
Dsteingass - Dr. H..You are a role model for Internet Morality! // inmygravenimage - Dr H is a model to us all
Theophony - Sprue for the spruemeister, plastic for his plastic throne! // Shasolenzabi - Toilets, more complex than folks take time to think about! |
|
|
|
|
2018/12/24 21:56:27
Subject: (Not) Santas Workshop of the Strange, Wierd, and Wonderful - 18Dec -EREBUS tank - pg 75!
|
|
Gargantuan Great Squiggoth
|
Absolutely stunning, as always, where you lead we follow.
Merry Christmas my friend, hope you have a wonderful day.
|
|
|
|
|
|
2018/12/28 20:19:29
Subject: (Not) Santas Workshop of the Strange, Wierd, and Wonderful - 18Dec -EREBUS tank - pg 75!
|
|
Dakka Veteran
|
Merry Christmas and Happy New Year to you all!
I hope you all had a good time with your family and hopefully some time off work.
I had a wonderful time with my wife, family and the cats -despite catching a cold and lots of sniffing :-P
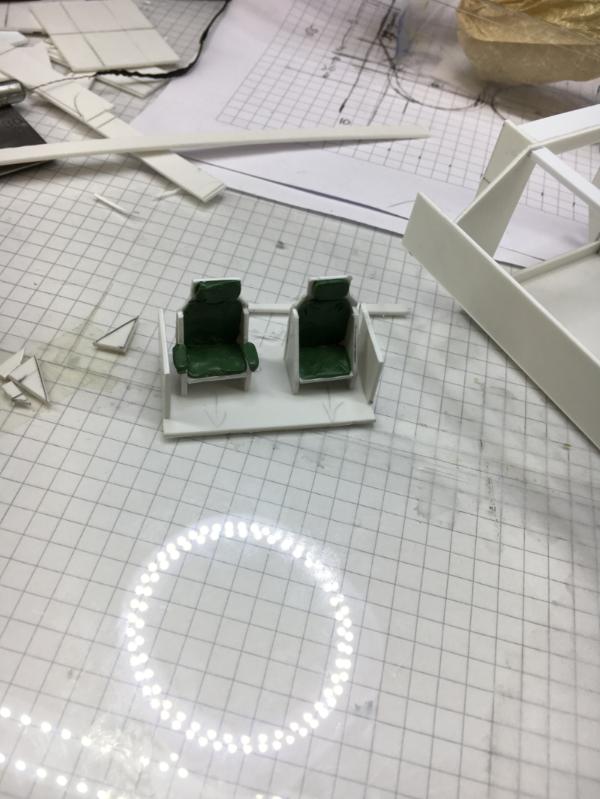
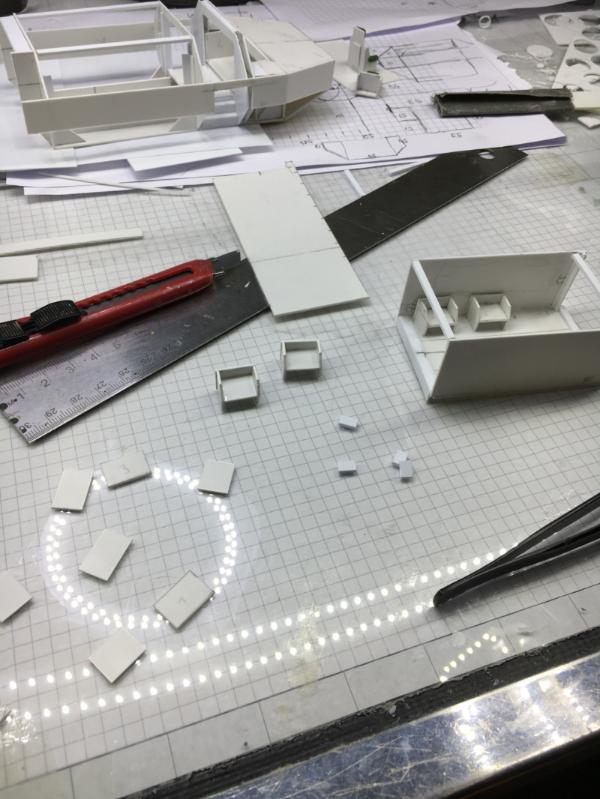
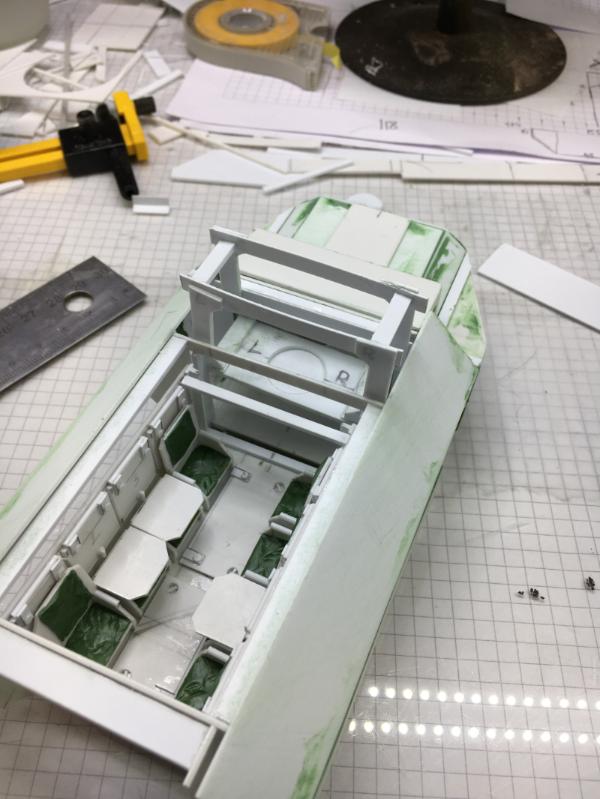
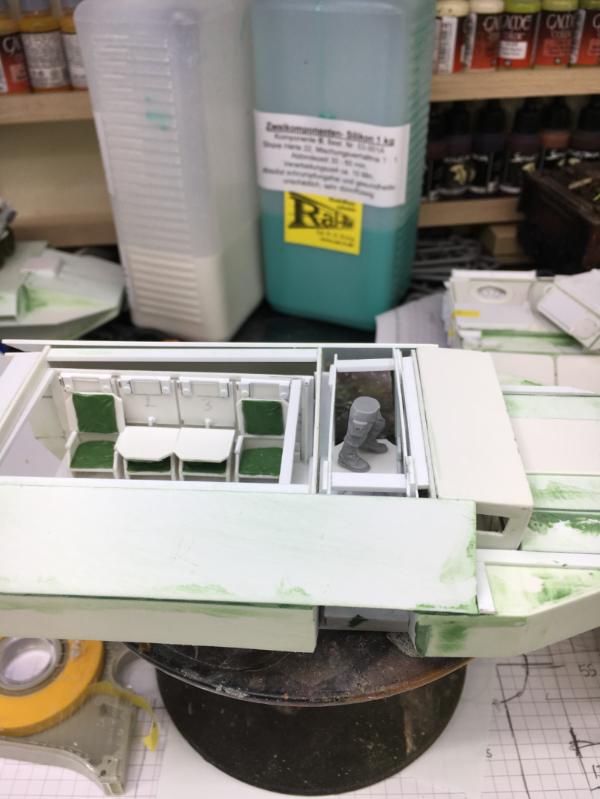
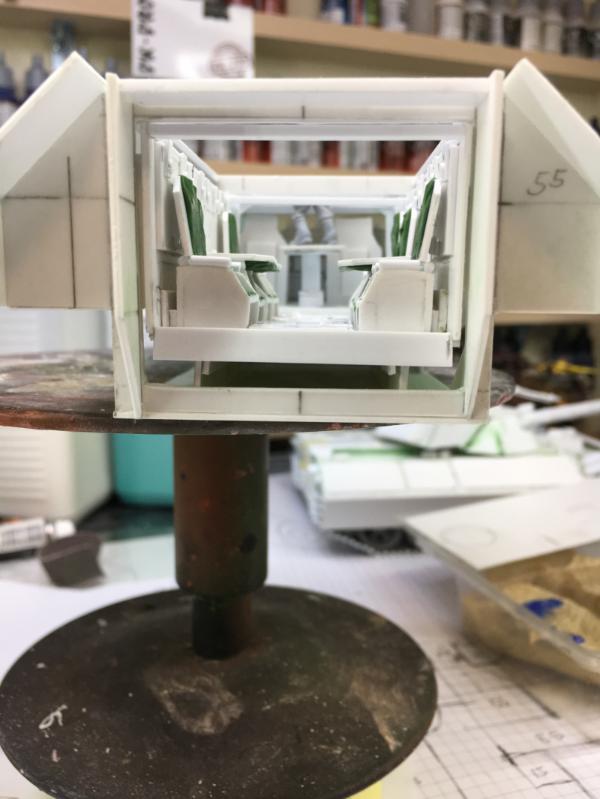
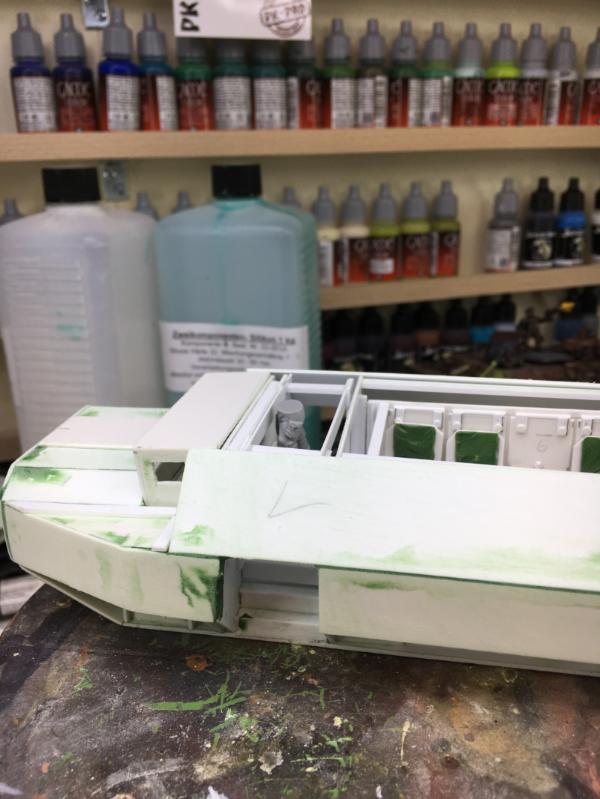
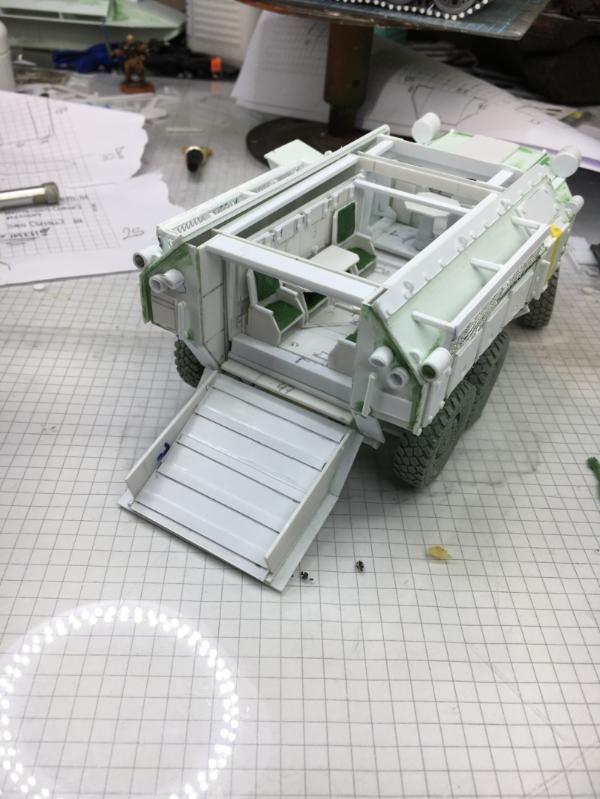
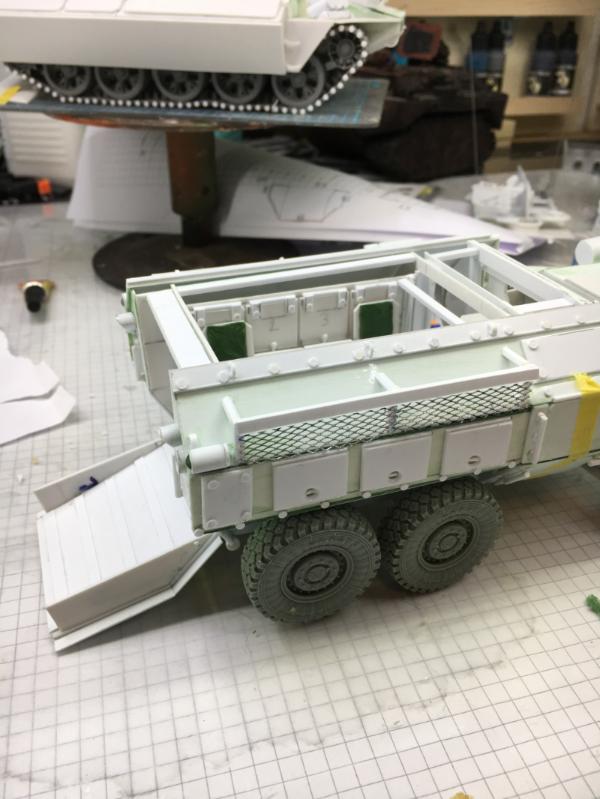
To finish the interior of the EREBUS I still had to build some seats - for this I used the seats from the HERMES as a sample.
When glued in place I made them look as if some of the seats were flipped up.
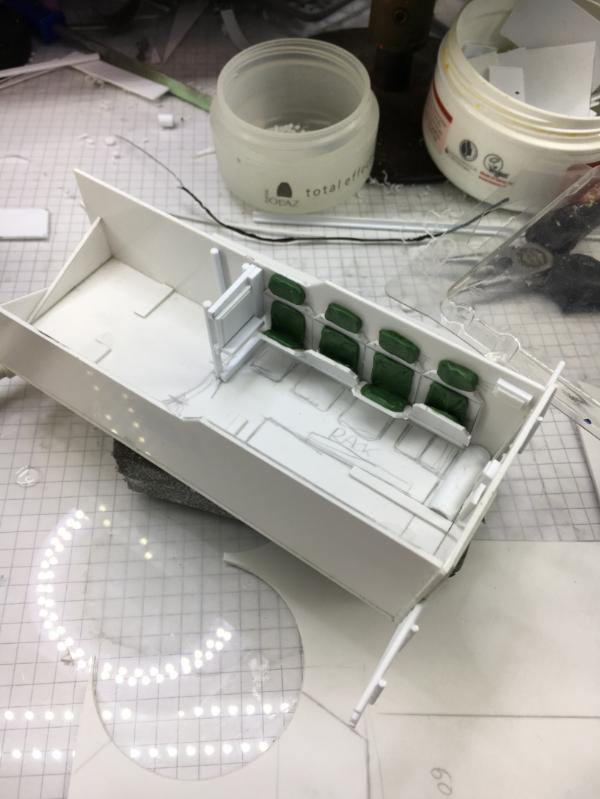
The finished interior
and slid into the tank.
It's actually a pity that hardly anything will be visible.

The final images with the ramp lowered down.

This will most likely be the way it will be positioned in the diorama.
Oh, and BTW, the first hull was not destroyed. It still exists.
I don't know what to do with it, but it's still here on my desk

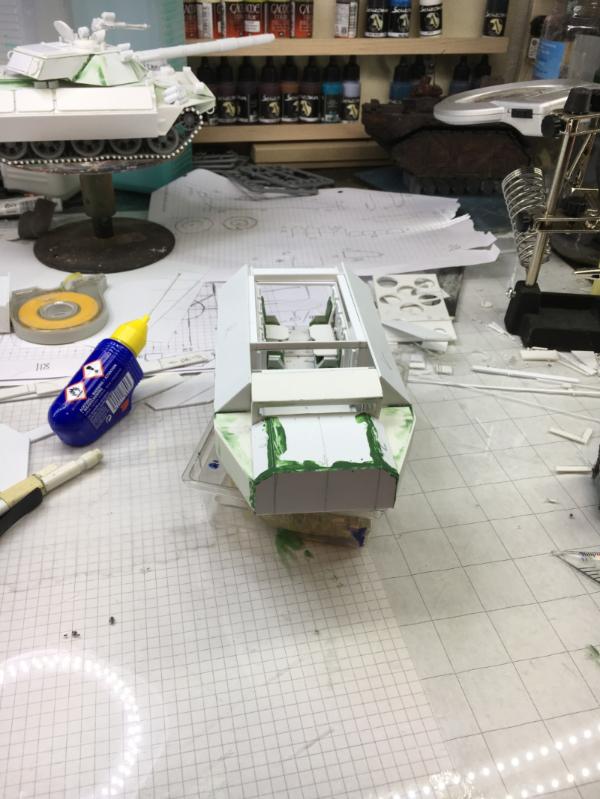
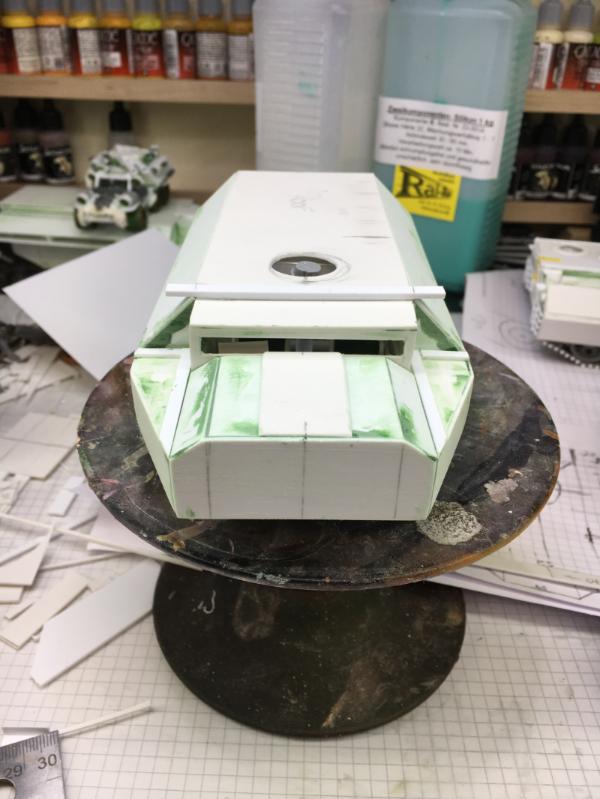
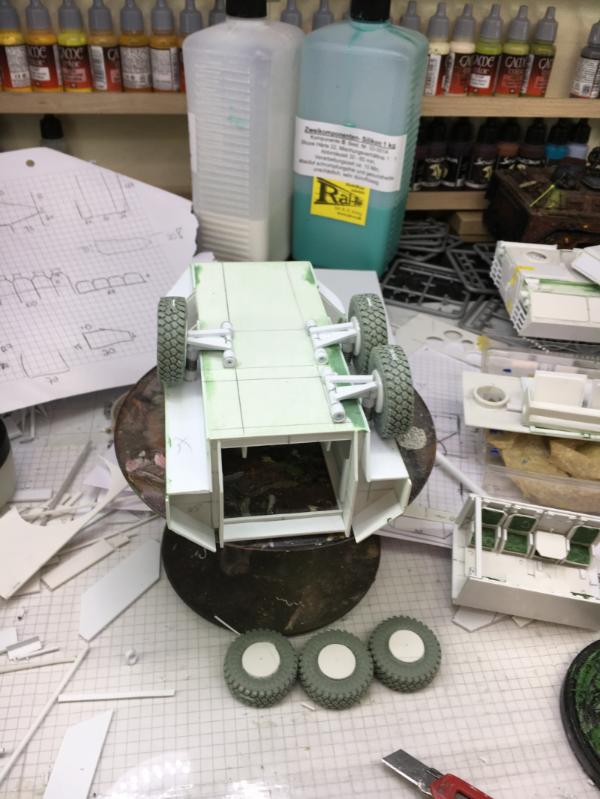
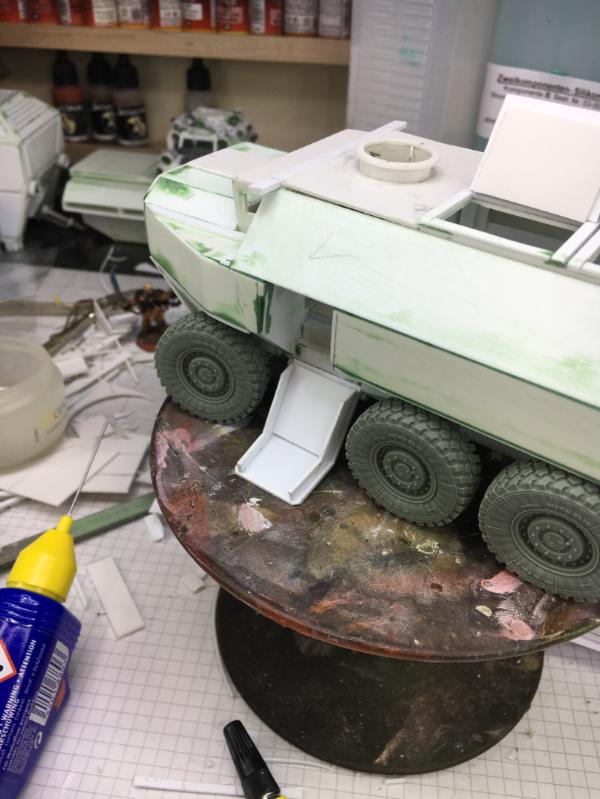
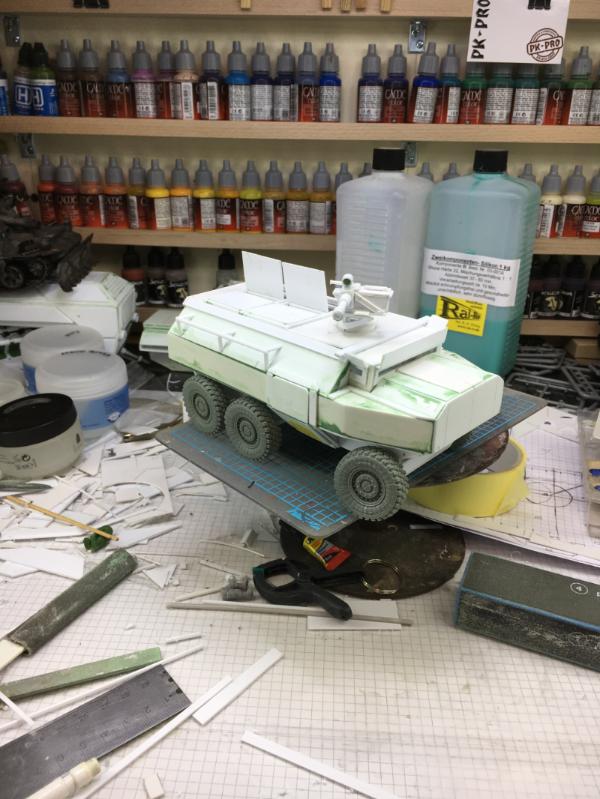
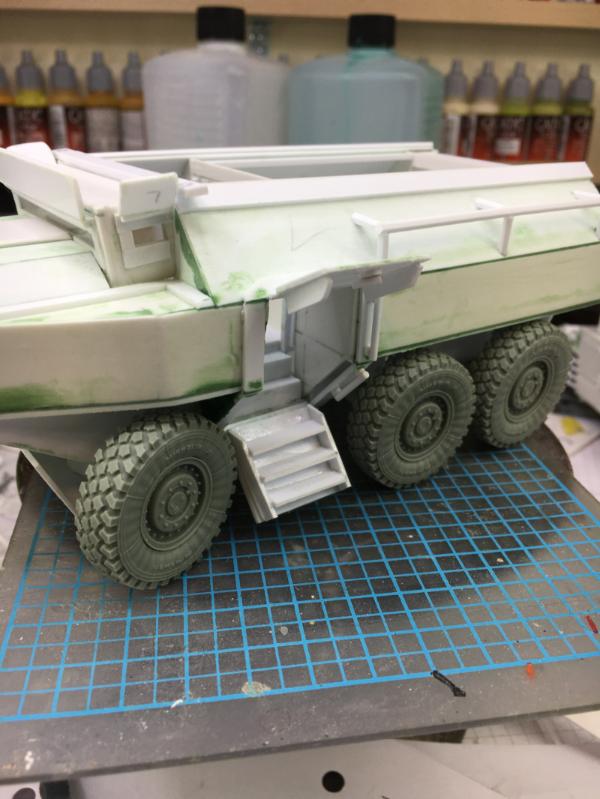
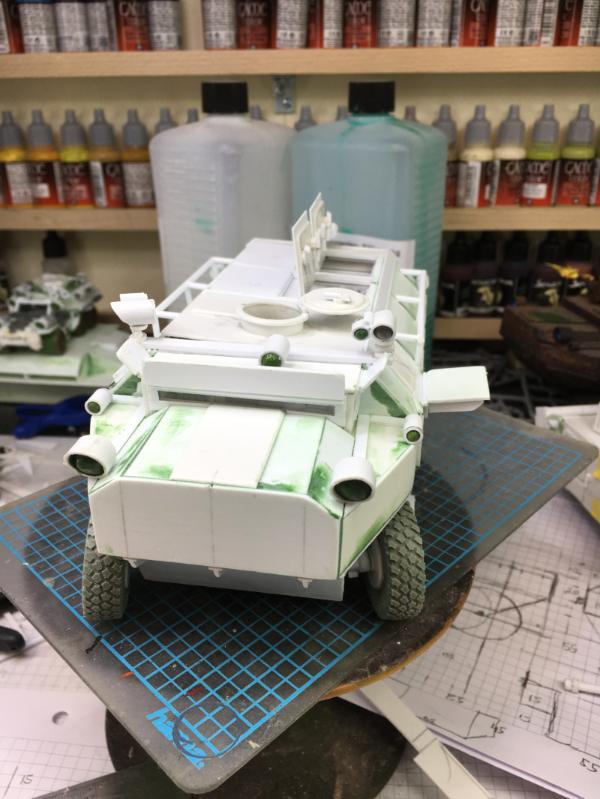
Well, as mentioned I plan to do a diorama. And some of you may remember the PONOS from " Orkalypse Now" and that I always wanted to do a wheeled version of it.

So I ordered a set of [URL=https://www.dersockelshop. de/zubehoer/1-35-umbausaetze/modern-us-cougar-6x6-mrap-road-wheels-ver.b-6-2pces-for-meng- ss-005-1-35_voyagermodels_pea361.html]Cougar Wheels by Voyager Model from Sockelshop. de
[/url] 
These are 1:35 and I think they fit the role for 40K perfectly
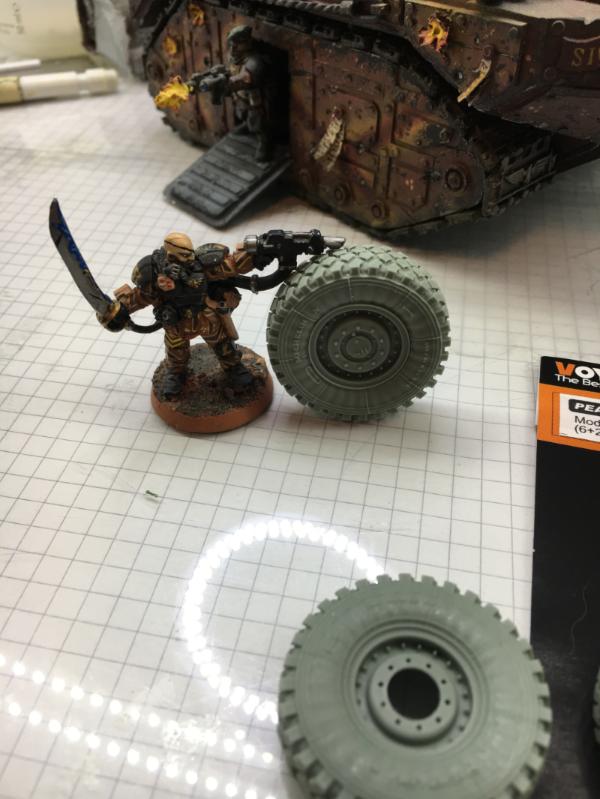
Here I drew a first sketch of the wheeled PONOS - the ALALA, Spirit of the War Cry

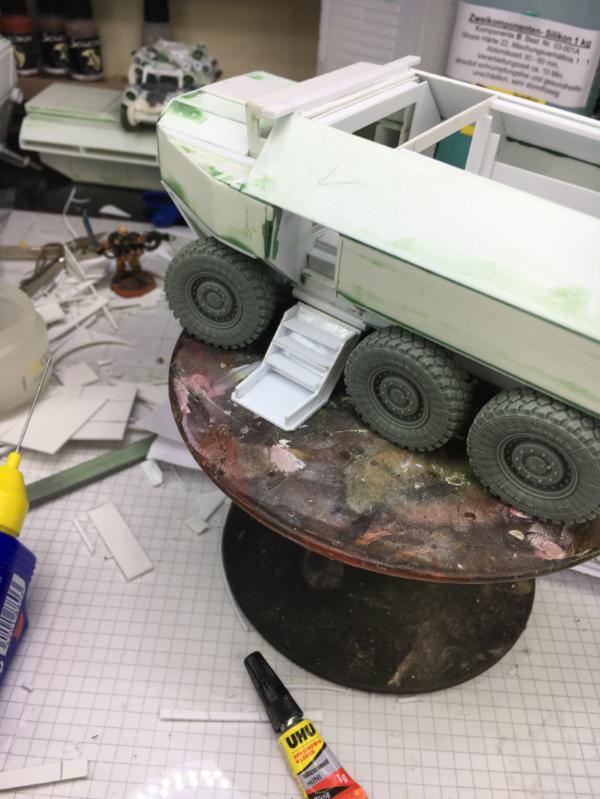
Since I was hoping to to have a visible interior I have to build a bit differently than normal
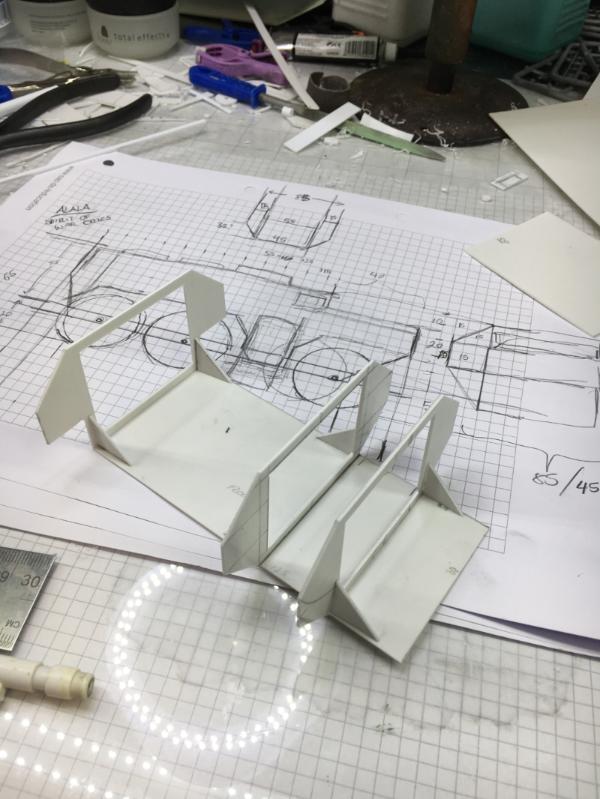
The basic frame was quickly built

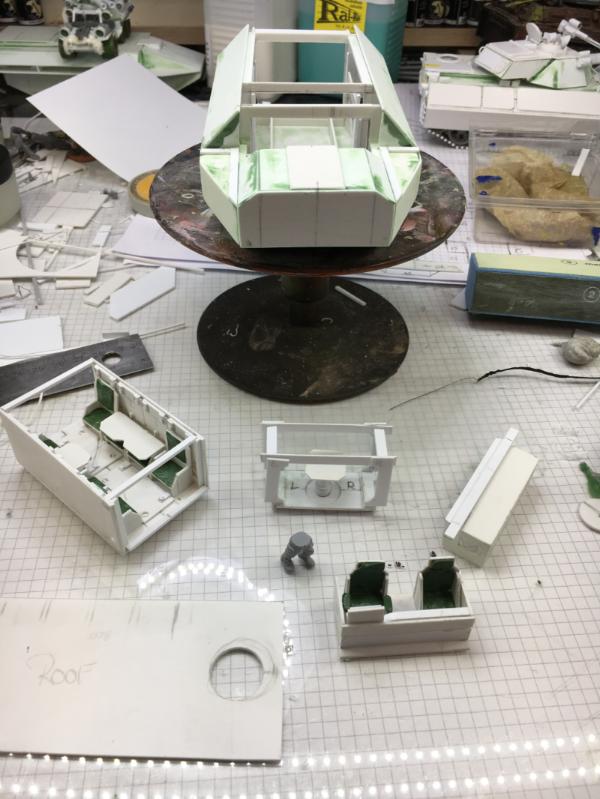
For the interior i started with the drivers cabin.
The chairs for the driver and commander - I guess it's visible who will sit where
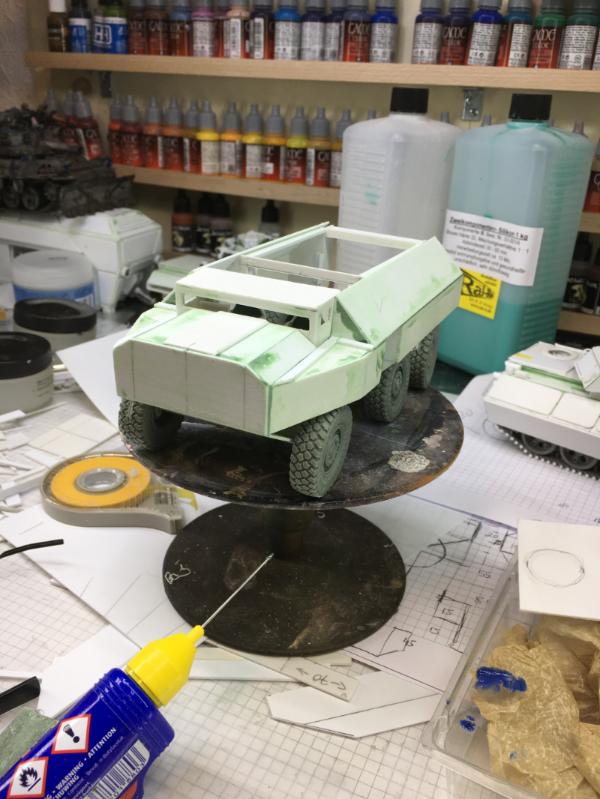
A quick check with the wheels.
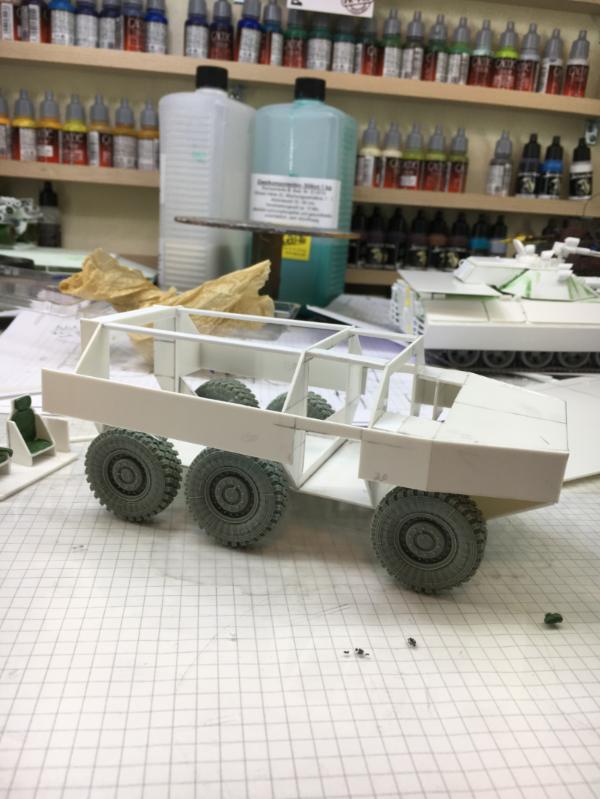
I think this will look pretty neat
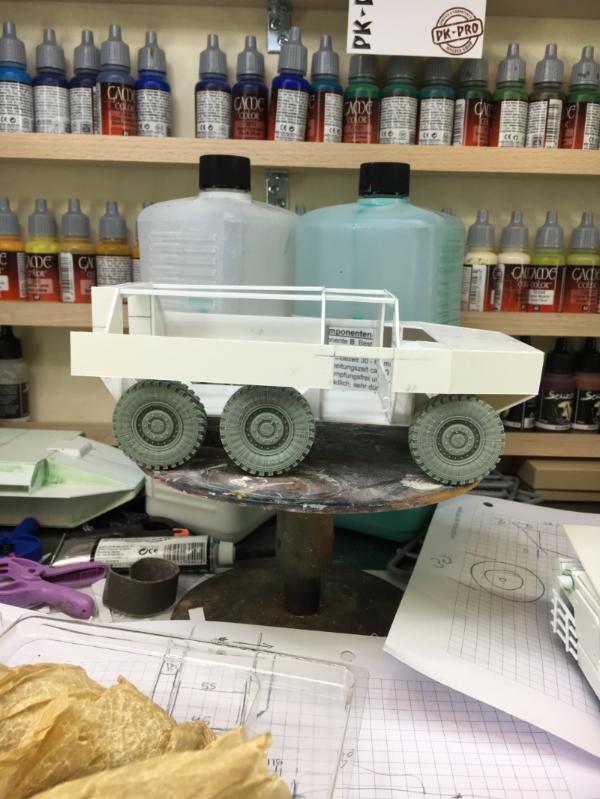
A bit higher than the EREBUS tank.
In the meantime Luna did a quality check for the chairs.
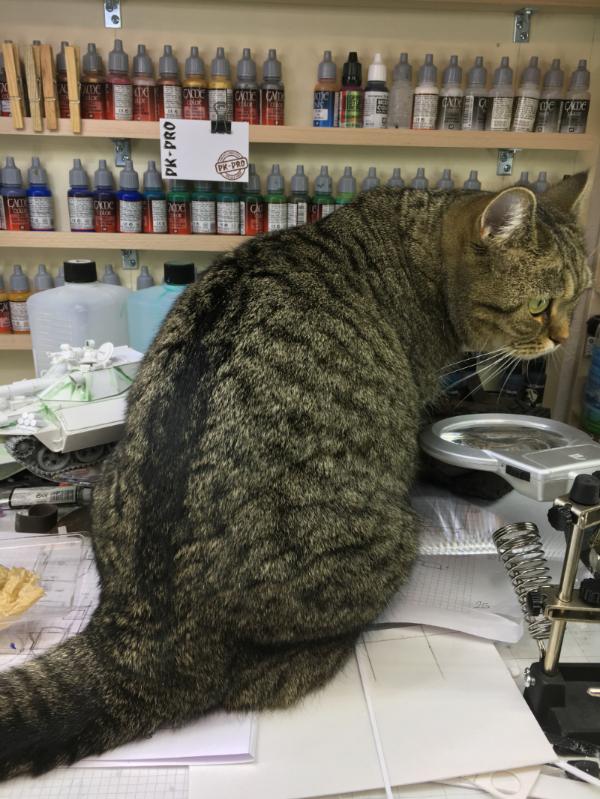
They passed

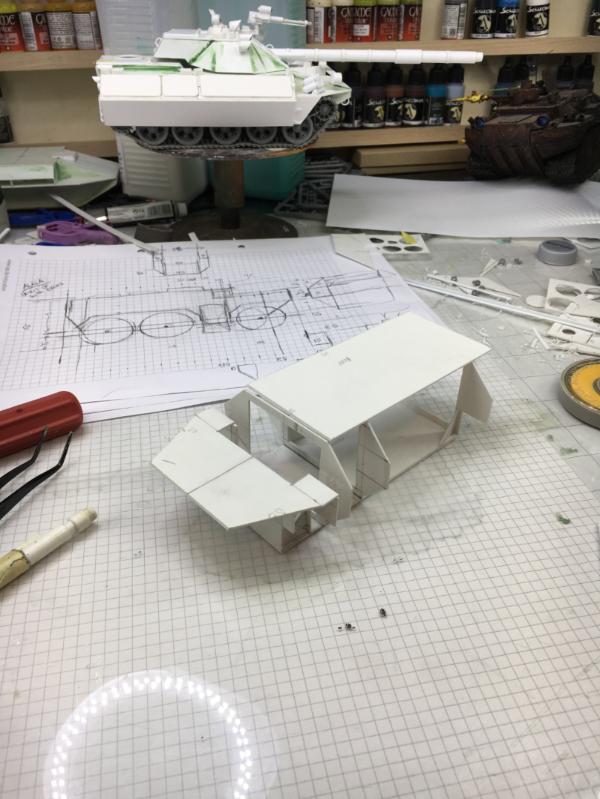
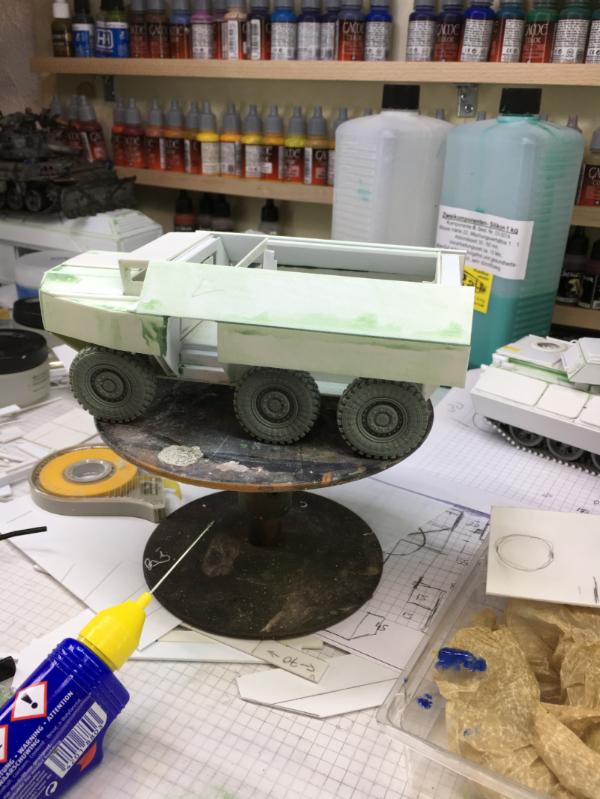
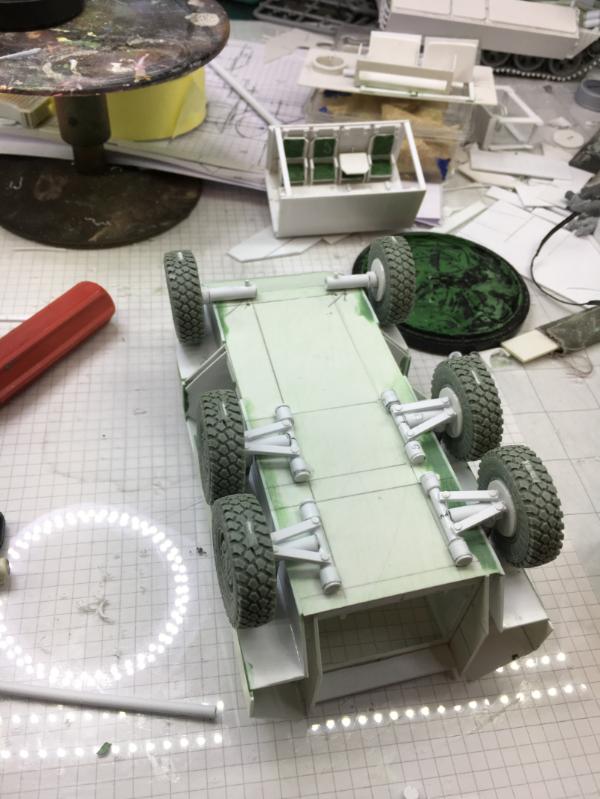
Next I built another slide-in cabin for the passenger compartment
The two sections
Next I had to build 8 chairs
Small scale mass production
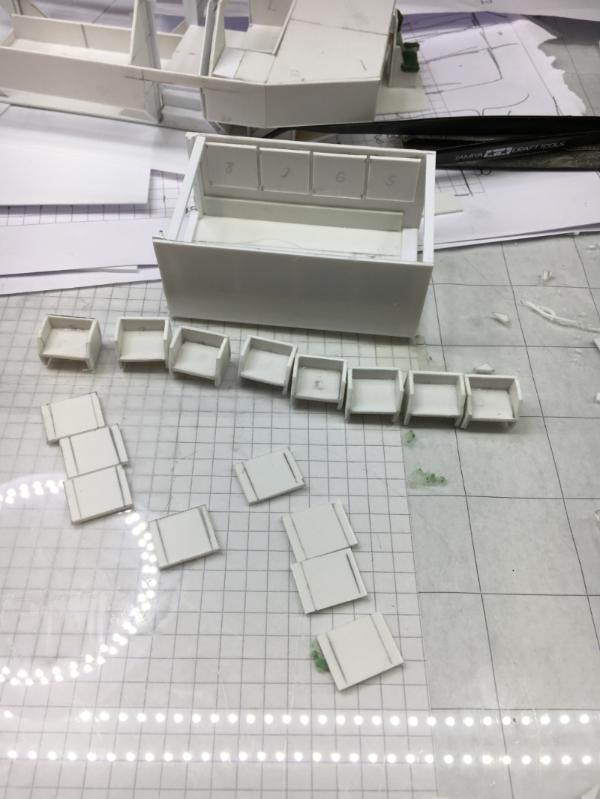
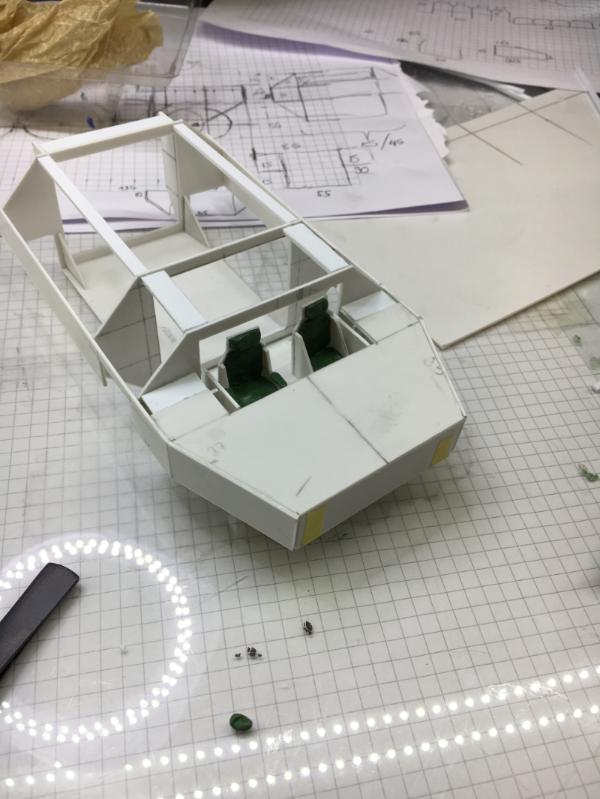
With GreenStuff I sculpted the leather cushions
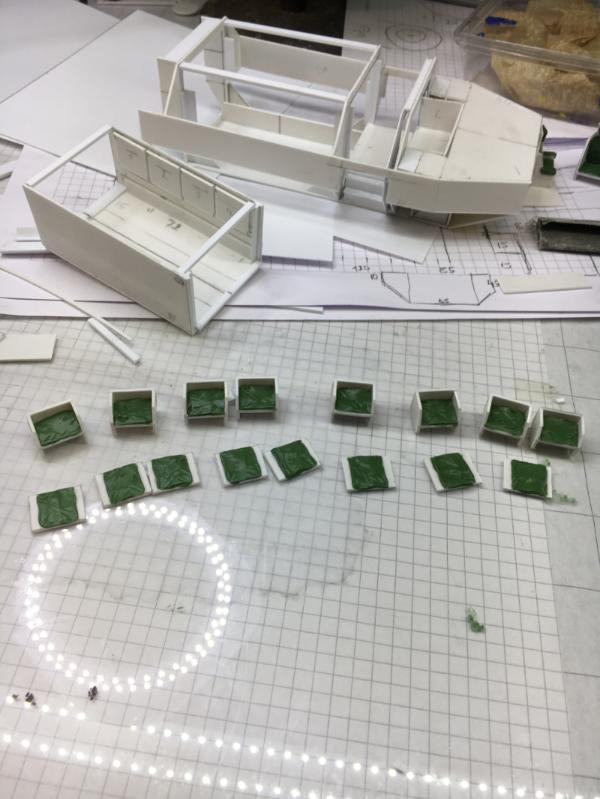
And everything in Position

Maybe it is visible that there are storage compartments on the floor, as well as behind the seats.
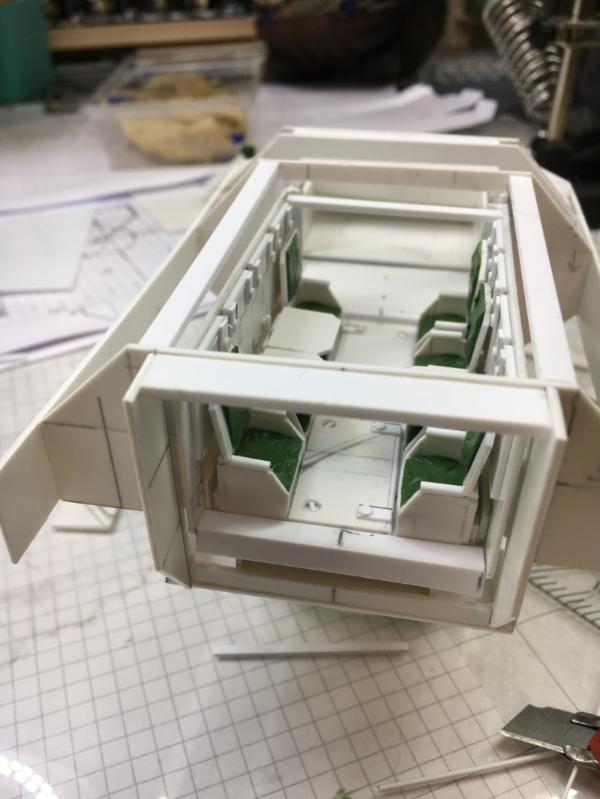
The backrests fold down for access and also create a platform to access the roof hatches - as firing positions.
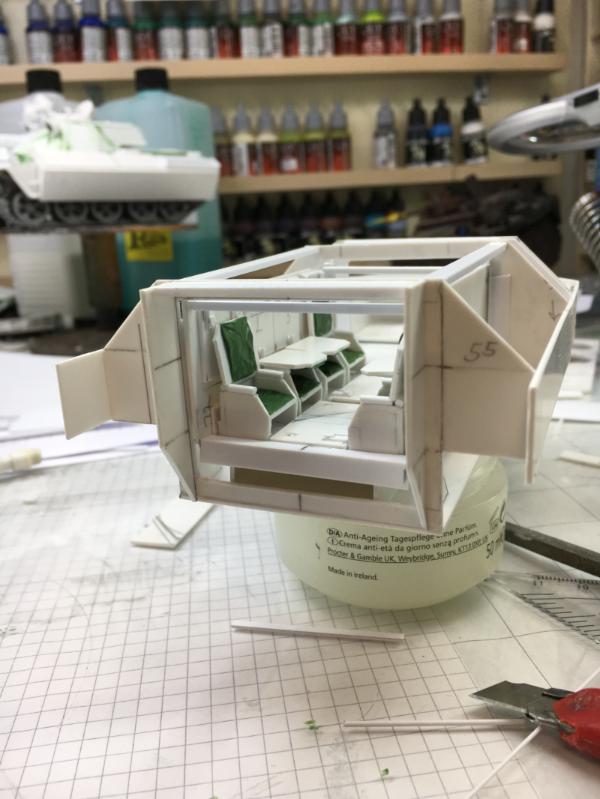
Here you can look through to the drivers dashboard

The drivers compartment
The interior sections (so far) in position


It already has the typical PONOS "face"
I hope you like the update.
Cheers
Klaus
|
|
|
|
|
|
2018/12/28 20:30:03
Subject: (Not) Santas Workshop of the Strange, Wierd, and Wonderful - 28. Dec -EREBUS tank - pg 75!
|
|
Crushing Black Templar Crusader Pilot
|
I really love your diorama's. I can't wait to see how this one turns out.
|
|
|
|
|
|
2018/12/29 06:05:57
Subject: (Not) Santas Workshop of the Strange, Wierd, and Wonderful - 28. Dec -EREBUS tank - pg 75!
|
|
Gargantuan Great Squiggoth
|
Looking great so far. Loving the interior detailing.
|
|
|
|
|
|
2018/12/29 11:57:37
Subject: Re:(Not) Santas Workshop of the Strange, Wierd, and Wonderful - 28. Dec -EREBUS tank - pg 75!
|
|
Fixture of Dakka
|
Lovely work. I like that idea of the chair backs being the folding part, to create a flat surface/platform.
|
|
|
|
|
|
2018/12/29 17:01:25
Subject: (Not) Santas Workshop of the Strange, Wierd, and Wonderful - 28. Dec -EREBUS tank - pg 75!
|
|

Shroomin Brain Boy
|
not even finished with the first one and already halfway into the next tank...
i love the flipped up seats...very lifelike!
|
|
|
|
|
|
2019/01/03 19:56:22
Subject: (Not) Santas Workshop of the Strange, Wierd, and Wonderful - 3 Jan - ALALA APC - pg 75!
|
|
Dakka Veteran
|
xXWeaponPrimeXx wrote:I really love your diorama's. I can't wait to see how this one turns out.
Thnaks
I still don't know how this one develops either
I have a vague idea though ... and a plan
Camkierhi wrote:Looking great so far. Loving the interior detailing.
Thank you Cam!
monkeytroll wrote:Lovely work. I like that idea of the chair backs being the folding part, to create a flat surface/platform.
Thanks - yes I kinda love the idea too
Viktor von Domm wrote:not even finished with the first one and already halfway into the next tank...
i love the flipped up seats...very lifelike!
Thanks Vik!
Yes I was thinking a lot on the interior layout and storage - and this came almost natural
Well then
Happy New Year and best wishes to you!
I hope you had a good start into the new year and are now rested and fit, eager to continue running projects or ready to start something new.
Luckily I'm still with this project and so continued from the last update.
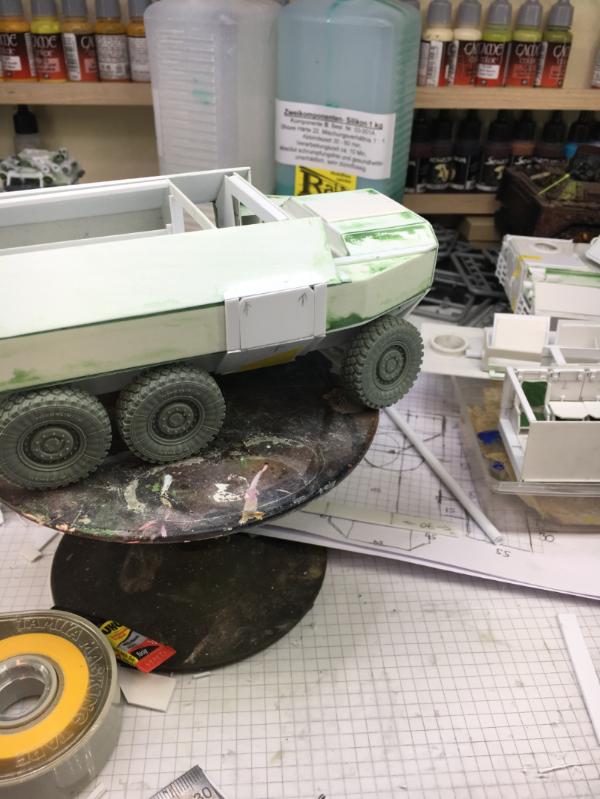
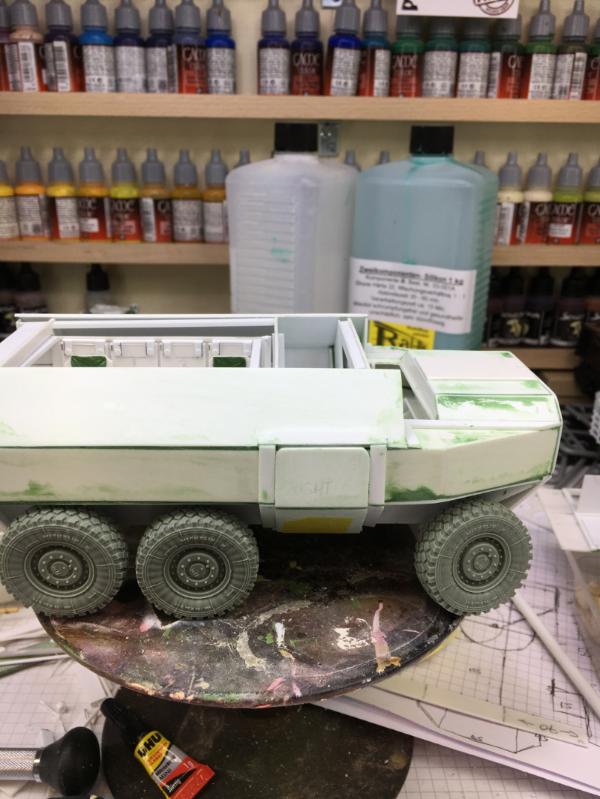
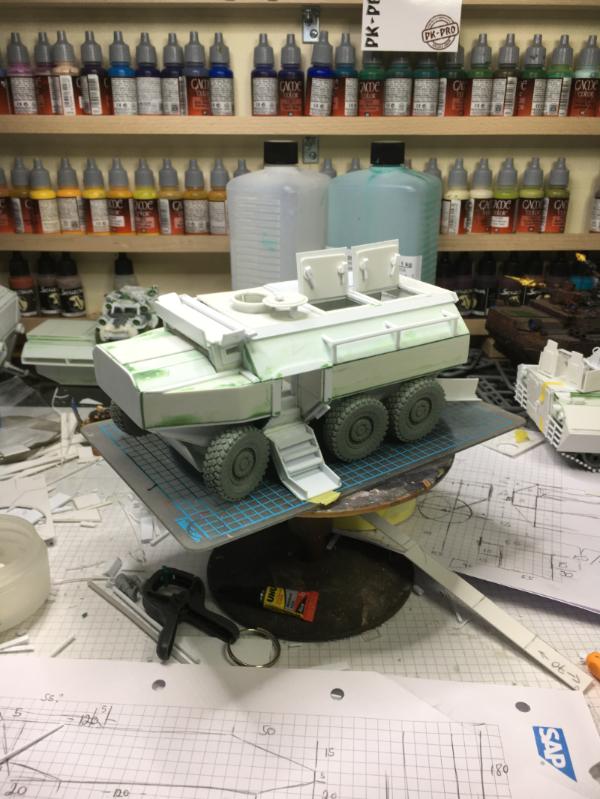
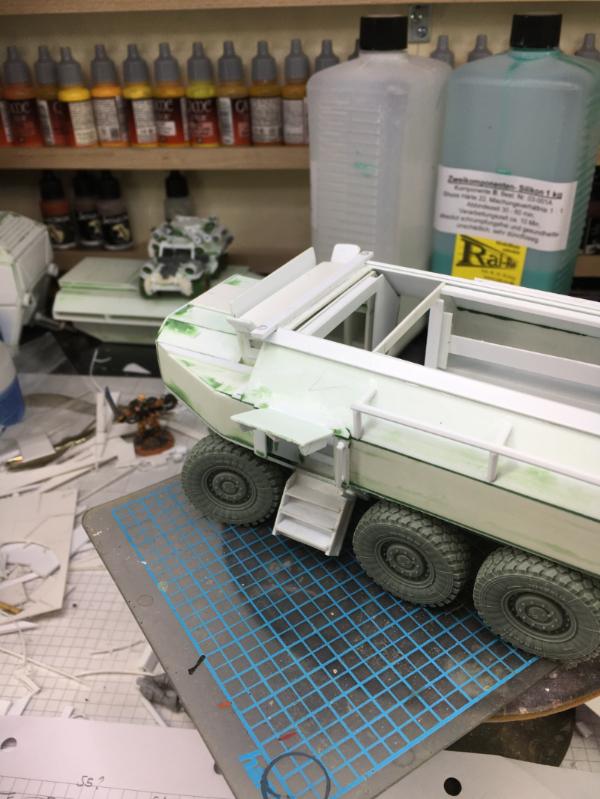
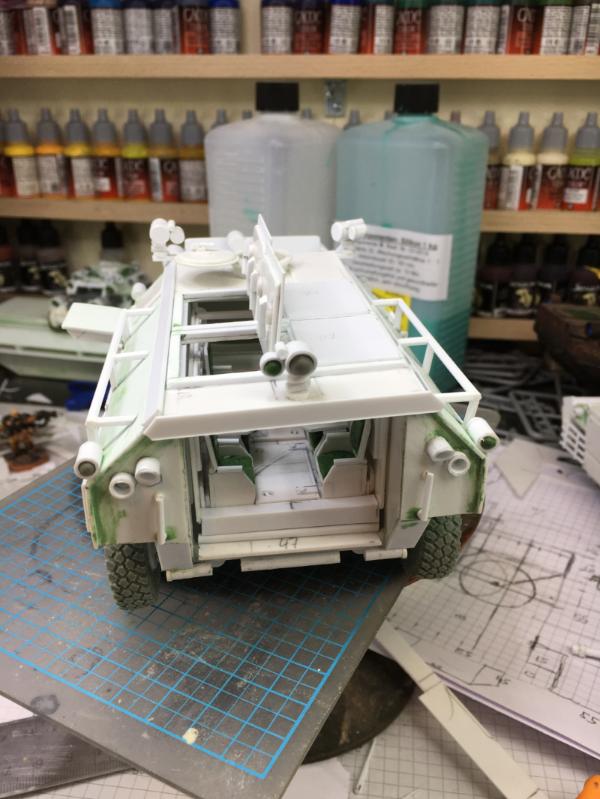
After sanding the outer armor I loosely fitted the wheels again for a visual concept check.
Yes, looks pretty much the way I intended.
I still have to figure out how to keep the interior visible in the final scene

most likely the rear ramp will be open.

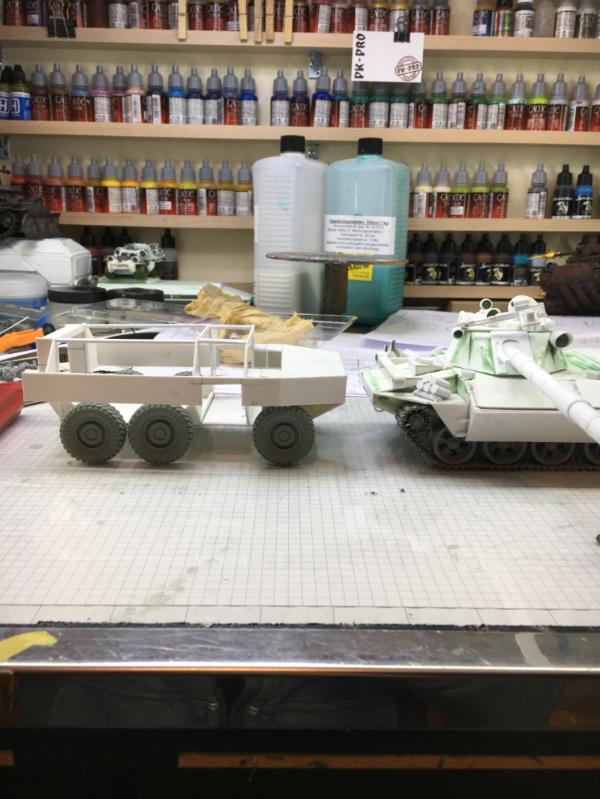
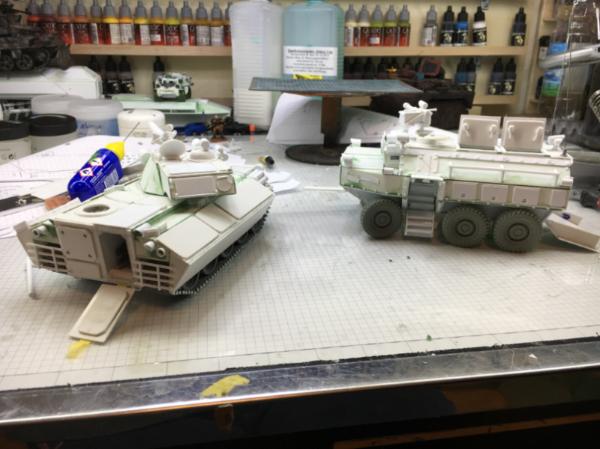
Two comparison shots with the big brother

Siblings
One section of the interior that I had not tackled so far was the center
Again slide-in-and-out
And a raised platform (on hydraulics) for the gunner
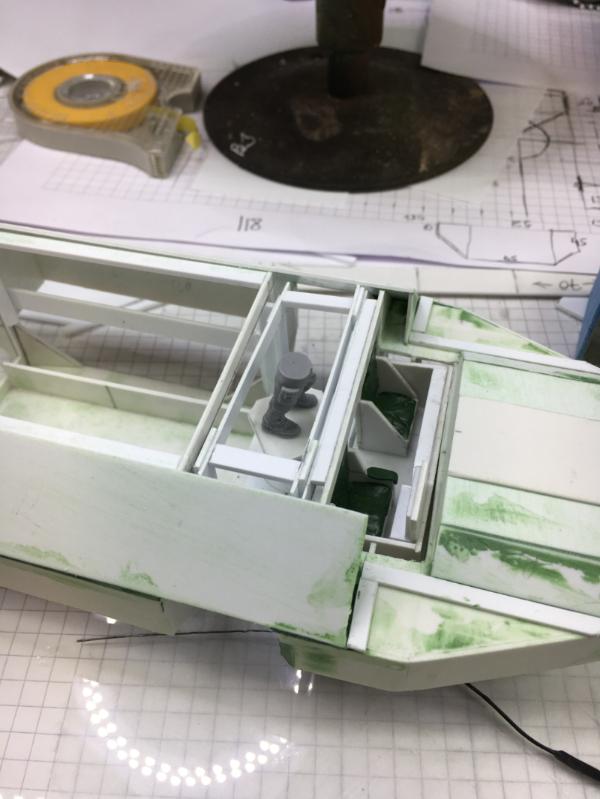
these are standard WH40K legs
So on the platform the gunner is raised waist high

again, the view through the rear ramp
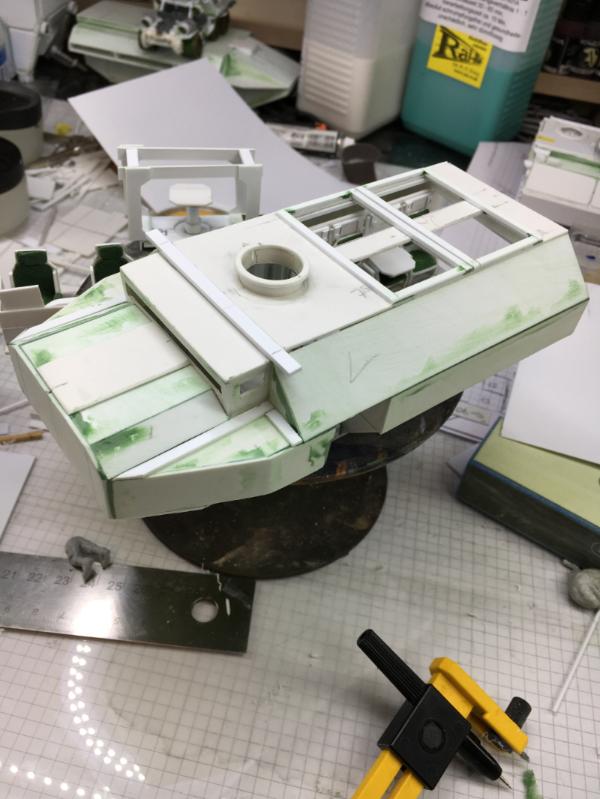
Next I need to adjust the roof accordingly
the roof hatch cut out
Cool look
And the pieces spread out
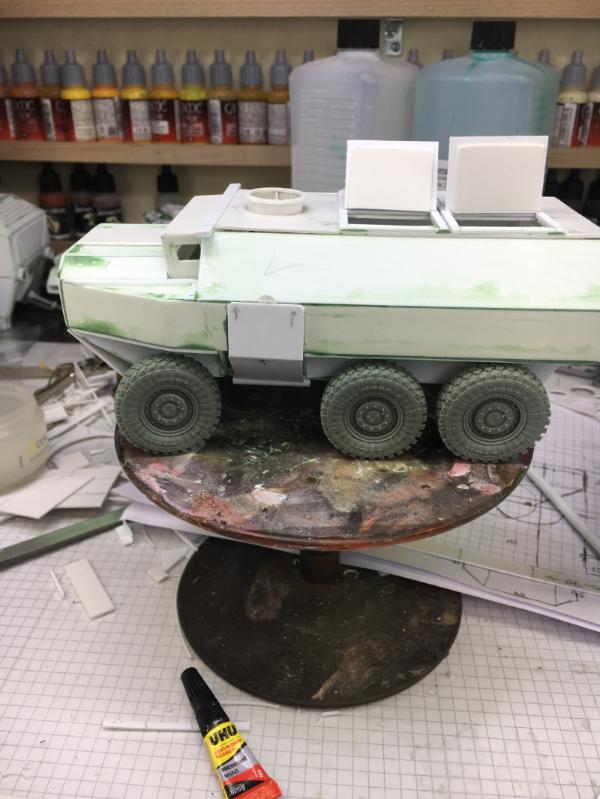
The next evening I cut the opening for the crew hatches and the raised turret ring for the MG.
Last night I then worked on the suspension.
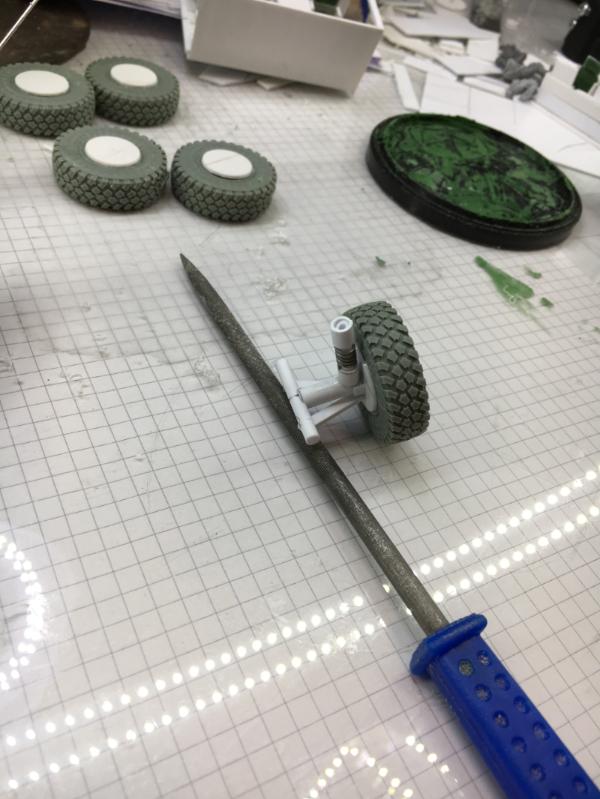
The first test mount

I finished and mounted 3 wheels...
more to come
The front wheels will also need a different set-up
I hope you like today's update.
Cheers
Klaus
|
|
|
|
|
|
2019/01/03 20:06:36
Subject: (Not) Santas Workshop of the Strange, Wierd, and Wonderful - 3 Jan - ALALA APC - pg 75!
|
|
Gargantuan Great Squiggoth
|
Genius and brilliance all round as usual, really great stuff yet again.
|
|
|
|
|
|
2019/01/03 20:13:03
Subject: (Not) Santas Workshop of the Strange, Wierd, and Wonderful - 3 Jan - ALALA APC - pg 75!
|
|
[SWAP SHOP MOD]
Robot Cat
OH-I Wanna get out of here
|
 Klaus, not Santa wrote: Klaus, not Santa wrote:xXWeaponPrimeXx wrote:I really love your diorama's. I can't wait to see how this one turns out.
Thnaks
I still don't know how this one develops either
I have a vague idea though ... and a plan
Any thoughts to including both the tank and apc on the same diorama? I don't recall seeing a diorama with two vehicles of that size in a shared scene.
|
|
|
|
|
2019/01/08 12:15:12
Subject: (Not) Santas Workshop of the Strange, Wierd, and Wonderful - 8 Jan - ALALA APC - pg 75!
|
|
Dakka Veteran
|
whalemusic360 wrote: Klaus, not Santa wrote:xXWeaponPrimeXx wrote:I really love your diorama's. I can't wait to see how this one turns out.
Thnaks
I still don't know how this one develops either
I have a vague idea though ... and a plan
Any thoughts to including both the tank and apc on the same diorama? I don't recall seeing a diorama with two vehicles of that size in a shared scene.
Thank you!
Well I did the "Meeting of Scouts" with two vehicles
And, yes, it will be a diorama with both vehicles on it. But most likely not an action diorama...well, maybe 
Camkierhi wrote:Genius and brilliance all round as usual, really great stuff yet again.
Thank you Cam!
Hi all,
beware of a 40 images update
I hope you are all fine and are now back into a normal working pattern and you're all OK.
I used my last vacation days as much as possible, so this is a rather big update.
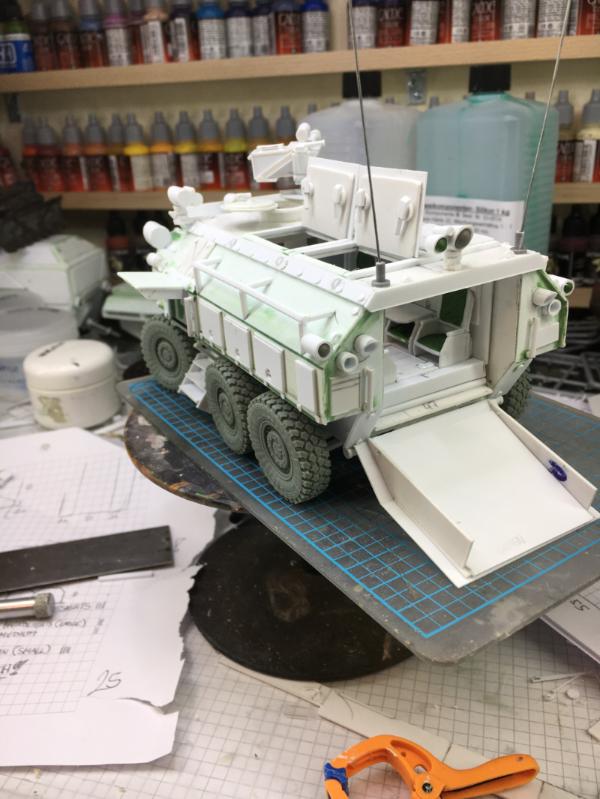
Continuing from the last update I mounted the last rear wheel and then started to mount the front wheels
As mentioned I needed to build a different mount to allow steering.

My solution is relatively crude and simple

but it works

And so the ALALA is now wheeled

and ready for completion.

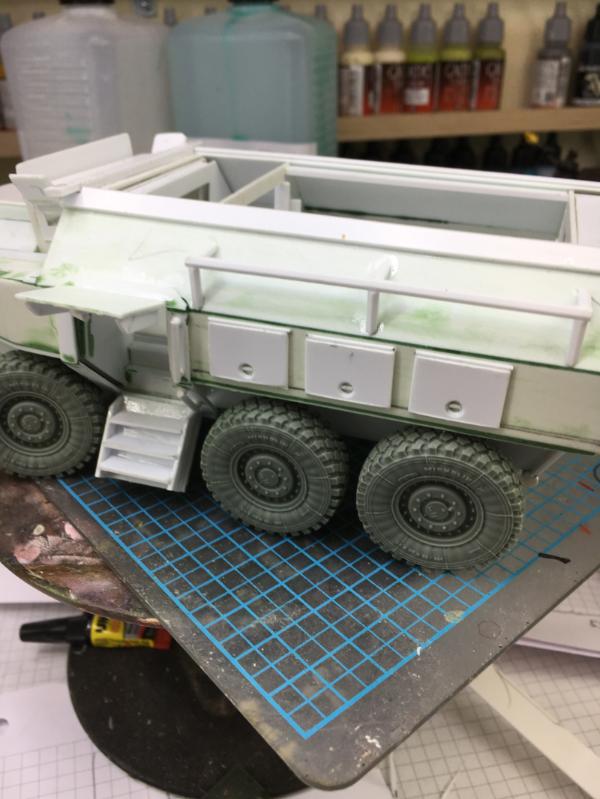
To protect the front axle I added another armor plate

Next was then the first side door
In the diorama it will be open
so I added steps to it
and made sure it can still be closed.

Then I added a frame around it

and repeated everything on the other side.
With the side doors completed I started the rear ramp

This will also be open in the diorama.

The following evening I sanded the doors and frames.
For the drivers cabin I had to include the windows

I'm not sure if it will ever be visible that there is clear plastic...especially after adding the armor shutters.
Since I didn't really fancy the large armor plate for the front, I replaced the steering protection with a smaller armor plate

I think this looks better now

Even though the ALALA has large storage compartments on the inside, I still added storage racks to the outside

They just add a bit more flavor - especially once equipment will be stored in them

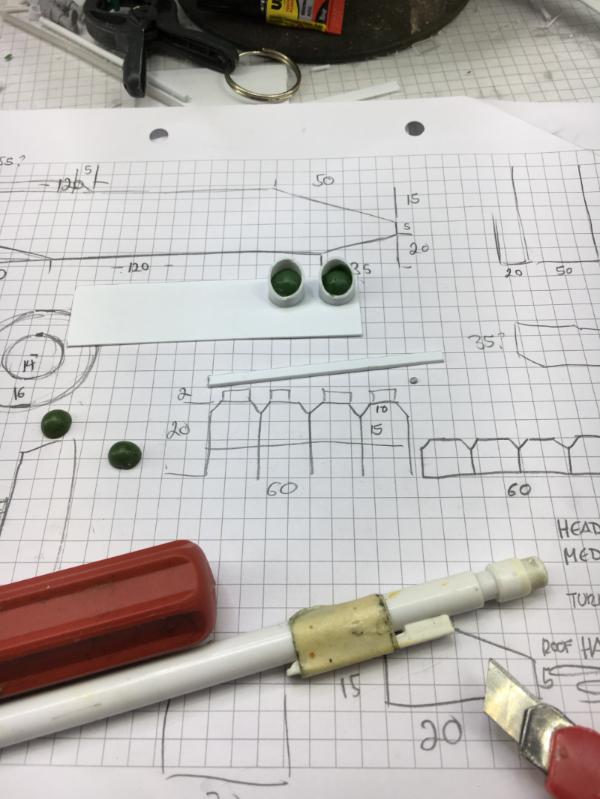
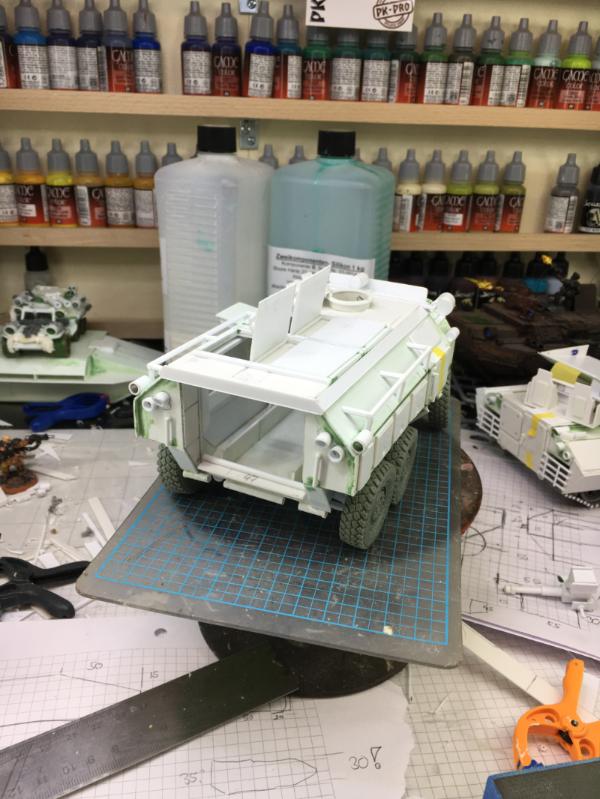
The following evening I began to build the armament for the ALALA.
Instead of a MG it will be armed with a Automatic Grenade launcher ( AGL), like the US Mk19.
The mount is a bit stronger than for the MG

Since some of you were asking for more build images when I did the MG, here are some images of the AGL build.
First I glued some sheets of plastic card together (5x15mm)
For the barrel I wanted to have a muzzle break, and since the next bigger piece of pipe would be to thick, I wrapped a thin strip of .25mm plastic card around it.

Just 2 or 3 layers are enough

and for decoration another, thinner Strip

Barrel and muzzle break

Once the sheets for the base block were cured I sanded them down to a nice solid block
and started to add some details

and built an ammo box for the grenades

together with a mount
Fits nicely to the ALALA

It still needs the handle/trigger section, but that will most likely come with the gunner/trooper manning it.

Compared to the MG you can see the larger ammo box and thicker barrel

Finally it received a sight.
The following evening I added the locks for the troop hatches
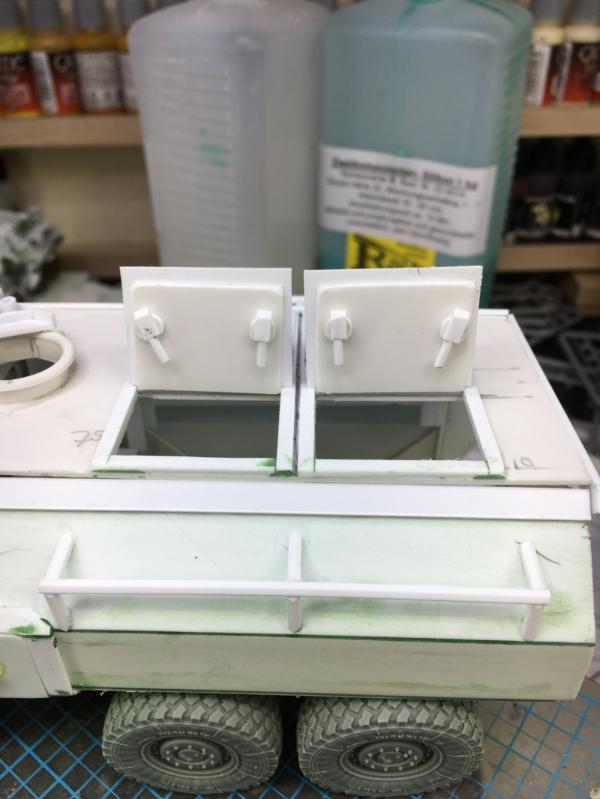
and started to build the headlights
The gunners position got its hatch

and the side doors got handles and openers

And this is as far as I got
I hope you like the update and look forward to your feedback, comments and suggestions.
Cheers
Klaus
|
|
|
|
|
|
2019/01/08 23:51:19
Subject: Re:(Not) Santas Workshop of the Strange, Wierd, and Wonderful - 8 Jan - ALALA APC - pg 75!
|
|
[DCM]
Boom! Leman Russ Commander
|
What a marvelous New Year's present- you really got a lot done! The overall shape and arrangement puts me in mind of a South African Buffalo- but yours has so much more real-world functionality. Absolutely _love_ the idea of the side door/exit/ramp that allows crew to un-ass the vehicle from more than one choke point- that little gem surely would have come in handy more than once in my career!
Always a pleasure to come here and learn new things (like layering styrene and then carving it- now I have to try it out!)
|
"He fears his fate too much, or his desserts are small, who will not put it to a single touch; to win- or lose- it all."
Montrose Toast
|
|
|
|
|
2019/01/09 00:04:52
Subject: (Not) Santas Workshop of the Strange, Wierd, and Wonderful - 8 Jan - ALALA APC - pg 75!
|
|
Gargantuan Great Squiggoth
|
Really excellent yet again.
With the "visors" up like that it looks like it has bushy eyebrows, kinda russian for some reason.
Loving the detail work, like the handles and locks. For the body of guns I tend to make a box rather than solid blocks, but I should imagine it is a nice solid and sturdy construction this way, might have to think this one over for next time.
|
|
|
|
|
|
2019/01/11 10:15:50
Subject: Re:(Not) Santas Workshop of the Strange, Wierd, and Wonderful - 11 Jan - APC done - pg 75!
|
|
Dakka Veteran
|
Thank you Cam and Cat ,
thank you all for the feedback and comments.
Some of you have pointed out, that the low reaching side doors are a hazard - especially in an armored assault, where the ALALA would potentially still be rolling and the doors already open for exiting troops.
Even though from the layout the main troop exit would be the rear ramp and the side doors are more for the gunner, commander and driver I do see the point, so...
"It's only a little cut" the doctor said
Actually I do like the new look of the door
Once the doors were done I added access panels to the storage compartments
and the headlights.

That evening I also added the rear and secondary lights.
The following evening I added sights and sensors

Including a sight for the driver in case the armor shutters are closed
Rear sights
Antennae - they are not glued in place yet, that's why they are a bit wobbly

I also added a bunch of small hooks and tie-downs

The sides of the nose also received ornaments (parchment style)


Ready for rivets!

And the final images with rivets

I like to call it done

Though I will add packs and accessories
once it is in the scene and the troopers are with it.

Speaking of the scene
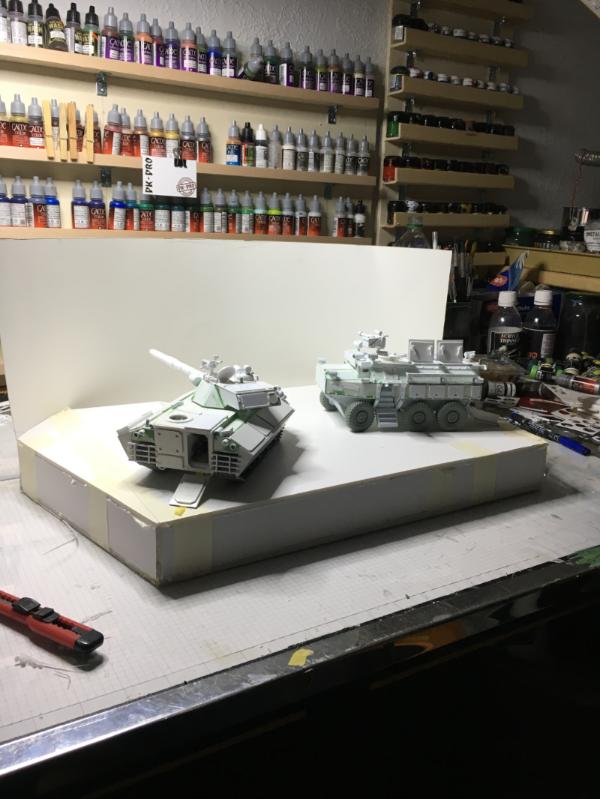
This is pretty much the set up I have in mind for the scene

I think they look good together.
What do you think?
Cheers
Klaus
|
|
|
|
|
|
2019/01/11 10:55:25
Subject: Re:(Not) Santas Workshop of the Strange, Wierd, and Wonderful - 11 Jan - APC done - pg 75!
|
|
Xeno-Hating Inquisitorial Excruciator
London
|
Ausgezeichnet, Klaus!
You are utterly insane
|
|
|
|
|
2019/01/11 12:38:22
Subject: (Not) Santas Workshop of the Strange, Wierd, and Wonderful - 11 Jan - APC done - pg 75!
|
|

Regular Dakkanaut
|
Man, this is amazing, awesomeness at every point. I was thinking about making my own attack bike for 40k, wanted to go easy, but your works inspired me to make it properly. Thanks for sharing your stuff!
|
|
|
|
|
2019/01/11 23:19:14
Subject: Re:(Not) Santas Workshop of the Strange, Wierd, and Wonderful - 11 Jan - APC done - pg 75!
|
|

Ragin' Ork Dreadnought
|
Awesome work. The back ramp looks a little unfinished though? I was originally thinking maybe adding tread plate - but looking at some reference pictures, bars should do it (unless you want to add an access door too )
|
|
|
|
|
|
2019/01/15 10:31:27
Subject: Re:(Not) Santas Workshop of the Strange, Wierd, and Wonderful - 15 Jan - dio base - pg 75!
|
|
Dakka Veteran
|
War Drone wrote:Ausgezeichnet, Klaus!
You are utterly insane
I take this as a compliment
Thank you Mate!
Oshii wrote:Man, this is amazing, awesomeness at every point. I was thinking about making my own attack bike for 40k, wanted to go easy, but your works inspired me to make it properly. Thanks for sharing your stuff!
Thank you! Viel Erfolg with the bike - make sure to share your progress please
Klaus
Arakasi wrote:Awesome work. The back ramp looks a little unfinished though? I was originally thinking maybe adding tread plate - but looking at some reference pictures, bars should do it (unless you want to add an access door too )
Thankj you Arakasi! Thanks for pointing out - I had indeed planned but forgotten the steps.
Thanks!
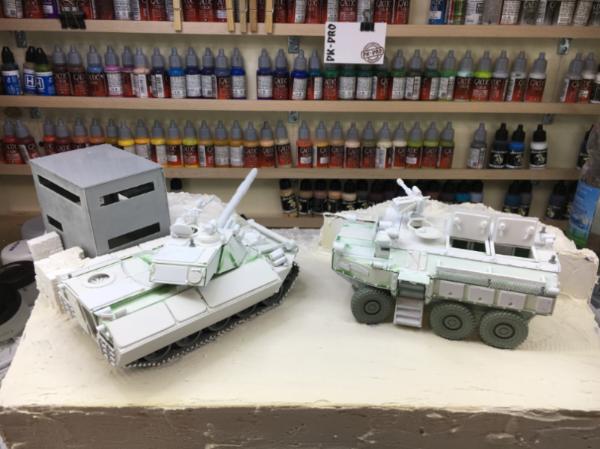
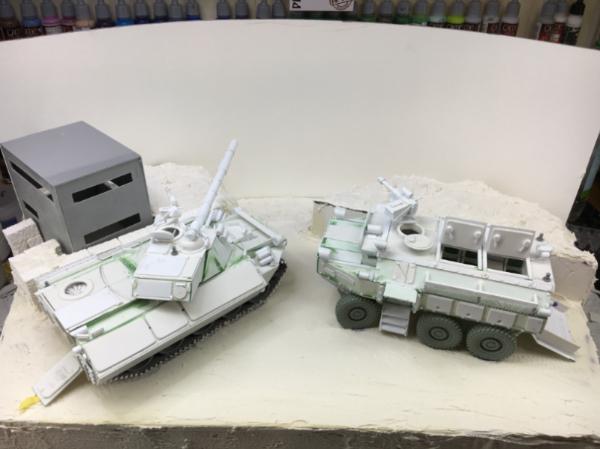
Hi all,
thank you for the feedback, comments and suggestions!
Since the last update I added metal grilles to the storage compartments.

And as some of you pointed out, I forgot to add footing to the ramp. So I added these plastic strips.
With the updated ramp and storage grilles it is pretty much done
So it was time to look at the actual scene.
My intention is to do another painted background to give the scene more depth

And to make it more interesting I also added some height to it.
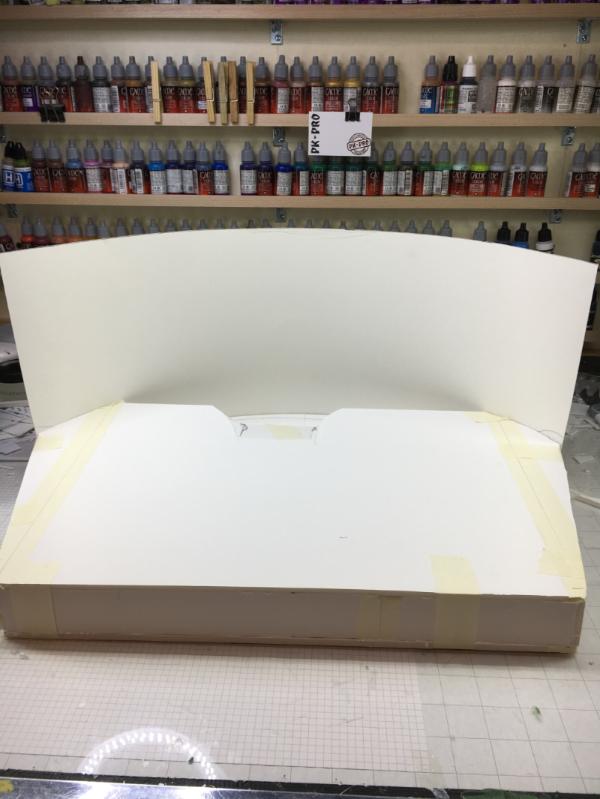
The scene will be an observation post on a ridge line over a valley
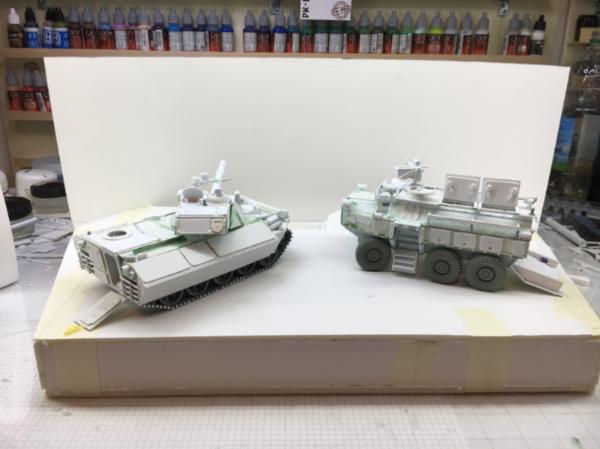
I think this will look pretty cool....hopefully
To flesh out the observation post I added two walls - one looking like regular masonry and one like pored concrete
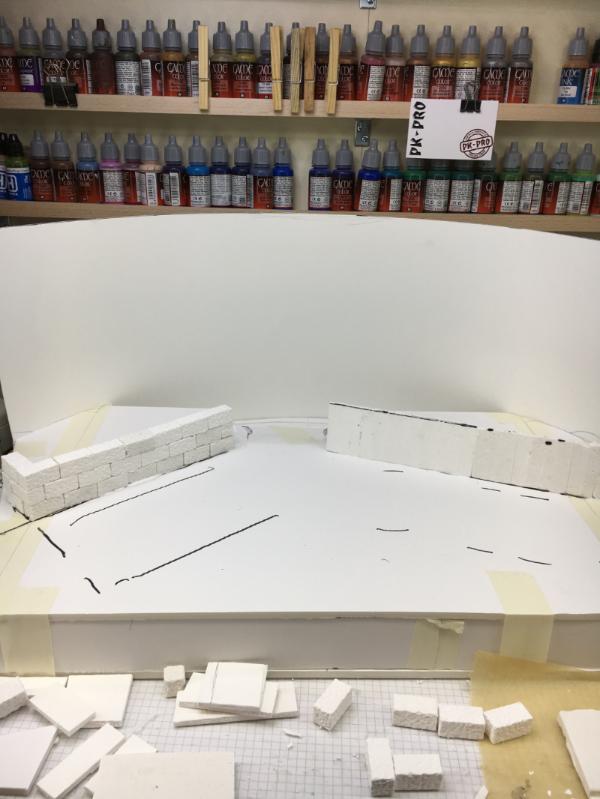
Even though the vehicles will obscure most of the walls

The actual observation post will be a simple two story pillbox with some sensors and stuff on the roof
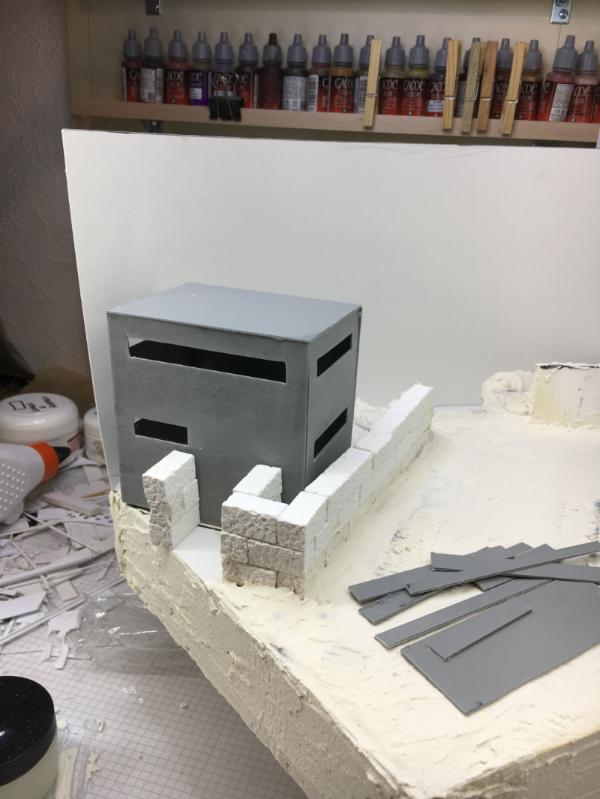
With a whole load of plaster

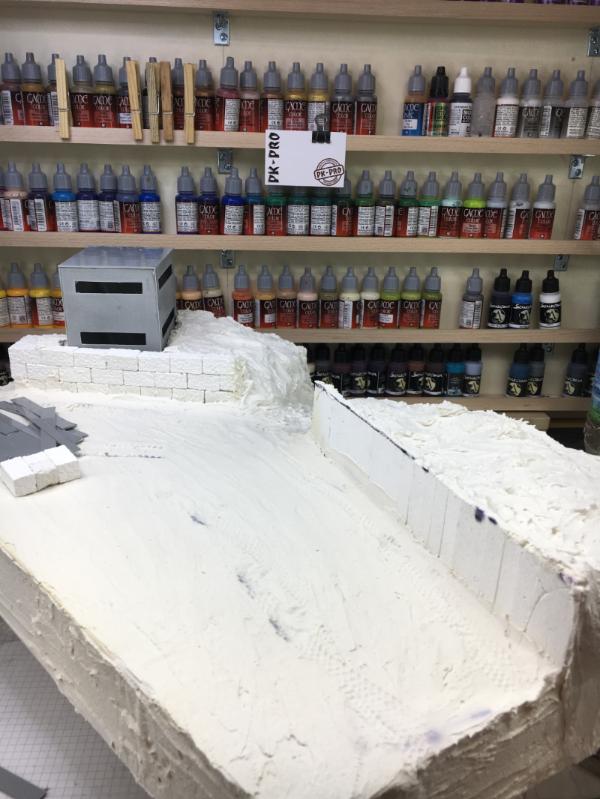
I think this gives the scene quite some depth
Here's a quick photoshop preview of what I imagine...
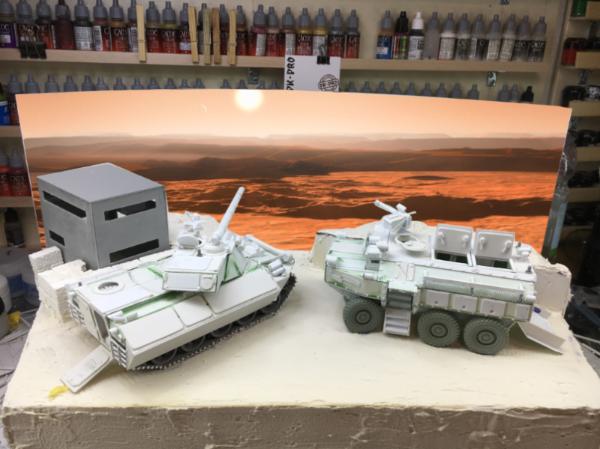
So what do you think?
Cheers
Klaus
|
|
|
|
|
|
2019/01/15 16:56:57
Subject: Re:(Not) Santas Workshop of the Strange, Wierd, and Wonderful - 15 Jan - APC done - pg 75!
|
|
Posts with Authority
Boston-area [Watertown] Massachusetts
|
Das sieht gut aus!
--Brian
|
Falling down is the same as being hit by a planet — "I paint to the 20 foot rule, it saves a lot of time." -- Me
ddogwood wrote:People who feel the need to cheat at Warhammer deserve pity, not anger. I mean, how pathetic does your life have to be to make you feel like you need to cheat at your toy army soldiers game?
 |
|
|
|
|
2019/01/16 02:16:37
Subject: Re:(Not) Santas Workshop of the Strange, Wierd, and Wonderful - 15 Jan - APC done - pg 75!
|
|
[DCM]
Boom! Leman Russ Commander
|
The setting and scene look great Klaus- the vehicles are wonderful builds. I got my handle/nickname in a scenario somewhat like this- although there were only walls, no pillbox structure. I was standing on the hood of my HMMWV scoping with binos and one of platoon sergeants drove up and said "You look like one of those critters that stand up on top of kopjes."
And I asked him "you mean meer cats?" To which he replied in the affirmative.
And I told him "Staff Sergeant, you are undoubtedly the only American I know who knows the word in Afrikaans for a small, stone hillock and can't remember the word 'meer cat'".
And it stuck.
Keep on buildin', brother! This one's gonna be great!
|
"He fears his fate too much, or his desserts are small, who will not put it to a single touch; to win- or lose- it all."
Montrose Toast
|
|
|
|
|
2019/01/16 16:48:15
Subject: Re:(Not) Santas Workshop of the Strange, Wierd, and Wonderful - 15 Jan - APC done - pg 75!
|
|
Fixture of Dakka
|
Beautiful build on the vehicle, and the scene looks great so far - the painted viewpoint should work really well to build the world.
|
|
|
|
|
|
2019/01/16 22:30:04
Subject: (Not) Santas Workshop of the Strange, Wierd, and Wonderful - 15 Jan - APC done - pg 75!
|
|
Mastering Non-Metallic Metal
|
Great work on the vehicles.
Looks to be a nice set piece too. 
|
Mastodon: @DrH@warhammer.social
The army- ~2295 points (built).
* -=]_,=-eague Spruemeister General. * A (sprue) Hut tutorial *
Dsteingass - Dr. H..You are a role model for Internet Morality! // inmygravenimage - Dr H is a model to us all
Theophony - Sprue for the spruemeister, plastic for his plastic throne! // Shasolenzabi - Toilets, more complex than folks take time to think about! |
|
|
|
|
2019/01/18 09:11:29
Subject: Re:(Not) Santas Workshop of the Strange, Wierd, and Wonderful - 15 Jan - APC done - pg 75!
|
|

Sneaky Striking Scorpion
|
Great work, as ever.
FTL
|
|
|
|
|
|
|
|


 Imperial Knights: The Avengers Initiative
 Arakasi vs Infinity