Switch Theme:

Tyranid 'Re-skin' Project  [RSS] Share on facebook Share on Twitter Submit to Reddit
»
Author Message
Advert


Forum adverts like this one are shown to any user who is not logged in. Join us by filling out a tiny 3 field form and you will get your own, free, dakka user account which gives a good range of benefits to you:
  • No adverts like this in the forums anymore.
  • Times and dates in your local timezone.
  • Full tracking of what you have read so you can skip to your first unread post, easily see what has changed since you last logged in, and easily see what is new at a glance.
  • Email notifications for threads you want to watch closely.
  • Being a part of the oldest wargaming community on the net.
If you are already a member then feel free to login now.


Made in us
Regular Dakkanaut


EDIT: Renamed to 'Tyranid Re-Skin Project'

My entry into Warhammer and table top gaming was a tremendous deal on a Tyranid army. A very good friend new exactly how to get me hooked. In the past two years I've spent much of my painting time on Orcs and Goblins, but I decided to go to the Baltimore GT and this required some new 'Nids to be assembled and painted. With a painting score of 21 and a definite difference between the newer models and those I inherited, I've decided I want to slowly 're-skin' many of the minis I inherited so I can eventually say that I painted my own army.

After coming home from the GT I spent a couple hours painting a Hormagaunt that was in the parts bin I had acquired. He had a broken arm, but only primer paint. With a little carving and some minor greenstuffing, I reattached his arm in a new pose and decided to paint him as a 'prototype' of where I'd maybe like to paint the little Hormies... I used shading, washing and even striped his little carapace. I'll eventually add more Hormagaunts and he'll serve as the model for the new additions, but I quickly realized it was perhaps too much effort for the reskinning. I grabbed one of my previously painted 32 hormies and decided to drybrush him and shade him in a manner similar to the three Carnifexes, twelve Genestealers, two Zoanthropes and Brood Lord I had painted for Baltimore. While he isn't as pretty as the prototype... he matches the new look very nicely... and I figure I can do about six of these guys in two hours... maybe three hours. In two or three nights I can have all the Hormies reskinned.

Below are three Hormagaunts... the darker one with white scything talons is the paint job I inherited. It used Dark Angels Green with Snot Green highlighting and scorpion green detailing. The talons were based with Dark Flesh and then white. The carapace (top only) was based with a 50/50 mix of Codex Grey and Chaos Black and then dry brushed with Codex Gray. I'm not sure another color was used although some appear to have a lighter drybrush after that. My 'reskin' uses a Dark Angels Green basecolor for the flesh and then a heavy drybrush coat of Snot Green. A lighter drybrush of Goblin Green is then applied and finally a very light highlight drybrush of Scorpion Green. The carapace painting is now extended to the ribcage and begins with a 50/50 mix again, but them I layer it with Codex Grey, 50/50 Codex and Fortress Gray and then a touch of Fortress Gray. Details are now Warloch Purple or the Darker Purple... with a purple wash over them. Talons begin with Dark Flesh and then a Bleached Bone overcoat and then are washed with a brownish color. I then try to match up the basing with a Dark Flesh basecoat and drybrushings of Vermin, Vomit and one other Brown (I forget the color).

Thoughts? Does this seem worth it?

Here is a top view of the three Hormagaunts for comparison... (Original / Reskin / Prototype)


Here is a side view of the three... (Original / Reskin / Prototype)


And their glamour shot for the camera... (Reskin / Original / Prototype)


Your thoughts are appreciated.

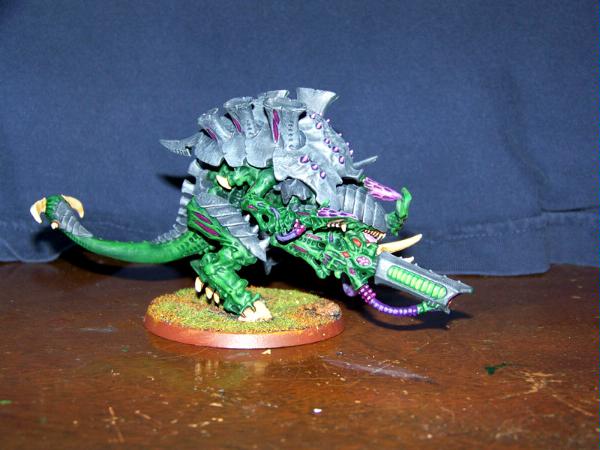
For comparison... here are some models with the new paint scheme:

This Carnifex was a Ninjafex built for the Baltimore GT...


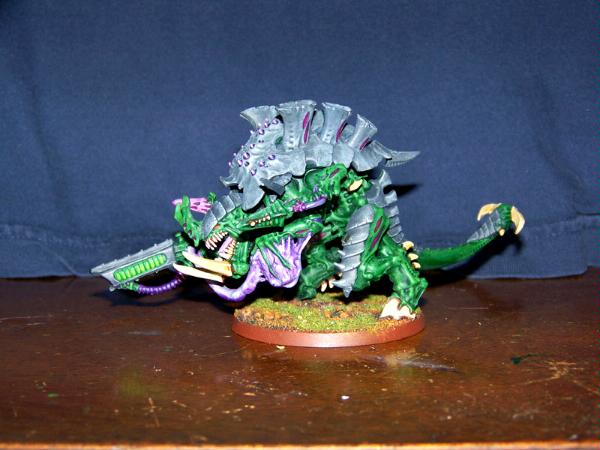
This Carnifex was actually reskinned as well...


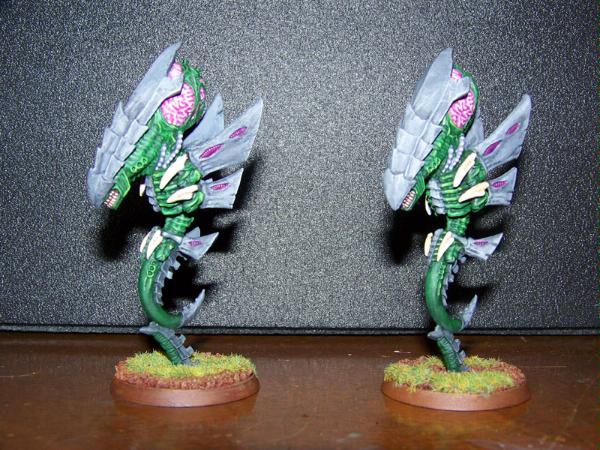
And a pair of Brain Bugs...

This message was edited 1 time. Last update was at 2008/12/12 03:35:35


Slaanesh isn't all cocaine and unicorns. -- Nurglitch 
   
Made in us
[ARTICLE MOD]
Huge Hierodule


North Bay, CA

I think the newer ones look pretty good. Much more vibrant that the older scheme and the colors work well together.

   
Made in us
Regular Dakkanaut


One question I do have for everybody is this... I've just been cleaning these plastic models (sometimes trimming them up as well) before applying new base coloring (where needed). Then... I add the rest of the paint and eventually clear coat them with sealer. I am losing a small amount of detail... and I did a test and it doesn't seem like the new paint will chip off.

It saves a lot of time and they do look better afterwords (in my opinion at least)....

Your thoughts?

Slaanesh isn't all cocaine and unicorns. -- Nurglitch 
   
Made in gb
Towering Hierophant Bio-Titan


Bristol, England

I tend not to seal/varnish plastic models.
They tend not to chip, just breal/snap when stood on / crammed into boxes!

Good job on the reworking of those models, much better!

Let's see some full army pics when you are done!

Oli: Can I be an orc?
Everyone: No.
Oli: But it fits through the doors, Look! 
   
Made in gb
Deadshot Weapon Moderati


South Lakes

the last one is my favourote, if maybe with very slightly less highlighting on the green but im nit-picking; Everything looks fantastic! would like to see a whole army and i love the bases too.


Made in us
Committed Chaos Cult Marine


Lawrence, KS (United States)

Eventually, with enough handling, the oils in your fingers will eat right through the paint on the model (Even right past the primer to the plastic). So even if a dullcoat does kind of wash out your colors, it's worth it if you're going to be playing with your minis. Try a paint-on dullcoat if that's not already what you're using. I could see a spray sealant obscuring more of the detail.

Anyway, I think the prototype is the best of the three. The highlighting is much more drastic, and will probably look much better on the tabletop. That, and it matches the inherent brightness of the colors you've already chosen.

This message was edited 1 time. Last update was at 2008/12/12 19:23:35


Pain is an illusion of the senses, Despair an illusion of the mind.


The Tainted - Pending

I sold most of my miniatures, and am currently working on bringing my own vision of the Four Colors of Chaos to fruition 
   
Made in us
Regular Dakkanaut


Here is a picture of the Shooty 'fex that has been affectionately been named Fred... Before and After his re-skin for the Baltimore GT:

Before (Right Side)


Before (Left Side)


And here is Fred after the re-skin:

After


After (Right Side)


After (Left Side)


Slaanesh isn't all cocaine and unicorns. -- Nurglitch 
   
Made in us
Dakka Veteran


Your new paint scheme is very good--the models look natural, but the details still pop, (both close up and from a decent distance) which is a hard thing to achieve.

I feel that it's extremely important to protect your models after painting. Instead of spray coats, I use Vallejo brush-on coats. This may take more time, but it obscures less detail and allows me to pick out individual parts in the gloss level that I want.

"Success consists of going from failure to failure without loss of enthusiasm." 
   
Made in us
Swamp Troll


Can you throw up how you did the skin step by step? It is the same green skin I have been looking for.

Successful Trades 84 (Dakka Swap Shop)


Forum Index » Dakka P&M Blogs
Go to: