| Author |
Message |
 |
|
|
|
|
Advert
|
Forum adverts like this one are shown to any user who is not logged in. Join us by filling out a tiny 3 field form and you will get your own, free, dakka user account which gives a good range of benefits to you:
- No adverts like this in the forums anymore.
- Times and dates in your local timezone.
- Full tracking of what you have read so you can skip to your first unread post, easily see what has changed since you last logged in, and easily see what is new at a glance.
- Email notifications for threads you want to watch closely.
- Being a part of the oldest wargaming community on the net.
If you are already a member then feel free to login now. |
|
 |
2009/02/20 10:38:35
Subject: "Forward to Germany" - Soviet WW2 T34/76 Diorama
|
|

Regular Dakkanaut
|
As mentioned in my Thunderbolt Diorama, I'm also currently working on a WW2 1:48 Scale Diorama as a gift for a relative.
I decided on 1:48 scale for two reasons, firstly its the closest scale to what I'm used to working with on Citadel and Forgeworld items, and second it is compact and easier to transport (which is vital as the finished piece would have to travel overseas with me to Minsk to be delivered).
Having spent my new year celebrations in Minsk (Belarus), with my girlfriends family we spent sometime in the "Great Patriotic War Museum" which is what the former USSR countries and Russia refer to WW2 as. This term specifically relates to what we know as the Eastern front. Having seen the amazing exhibits at the museum I felt inspired to model a Red Army peice as I felt it only appropriate.
Incidently the displays in the museum were fantastic with a huge collection that focussed only on Partisan resistance groups, the Red Army, and Nazi Concentration camps in Belarus and Southern Russia. To see such a large collection focussed on just Russian and USSR WW2 History was very interesting as most museums I've visited in the UK and Europe have been wide ranging covering German and Allied forces, allowing little depth for each.
I decided to go with Tamiya 1:48 kits for this project as I was very impressed with the components I used in my Thunderbolt Diorama from Tamiya. As reference I'm working from the following two books by Osprey Publishing, In particular the work of Mig Jimenez of MIG Productions fame was a huge influence and inspiration. He really is a fantastic modeller and painter.
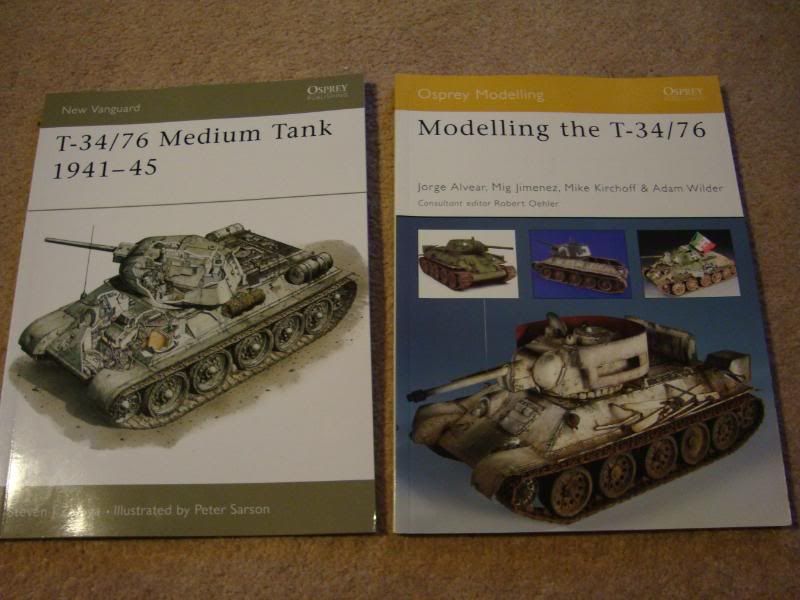
These really are great books, not only very interesting in terms of history and background, but also as modelling guides they are four star and easily on the level of the Forgeworld Masterclass Book (which obviously owes alot to books likes these and Mig's F.A.Q book). They also have lots of full colour plates and cross sections which is very interesting generally speaking in Tank design, where principles could be easily transfered over to 40K Imperial Guard Armour.
The Diorama plan:
The diorama will be a small peice with a T34/76 Tank driving through a battlefield scene with Infantry riding the tank as well as running along side the vehicle. The idea is to have a muddy battlefield with effects such as tank tracks pressed into the ground, craters from shelling, as well as a great deal of water effects filling muddy puddles and craters etc. I want to try and give the piece a gritty realistic look whilst not going too over the top with the mud effects and weathering.
The Models:
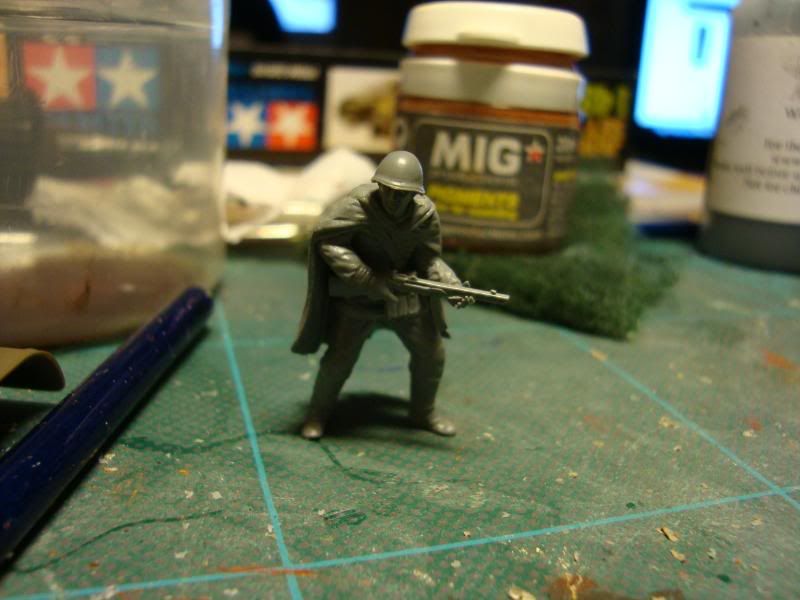
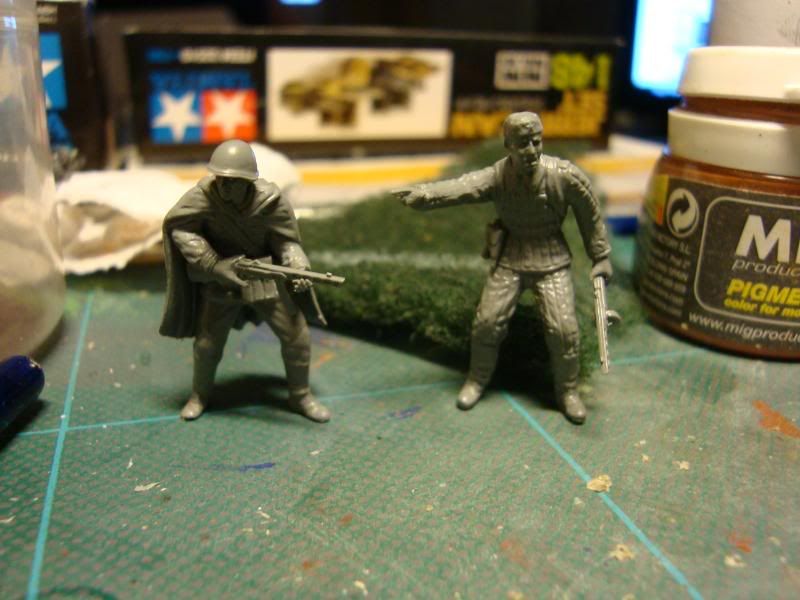
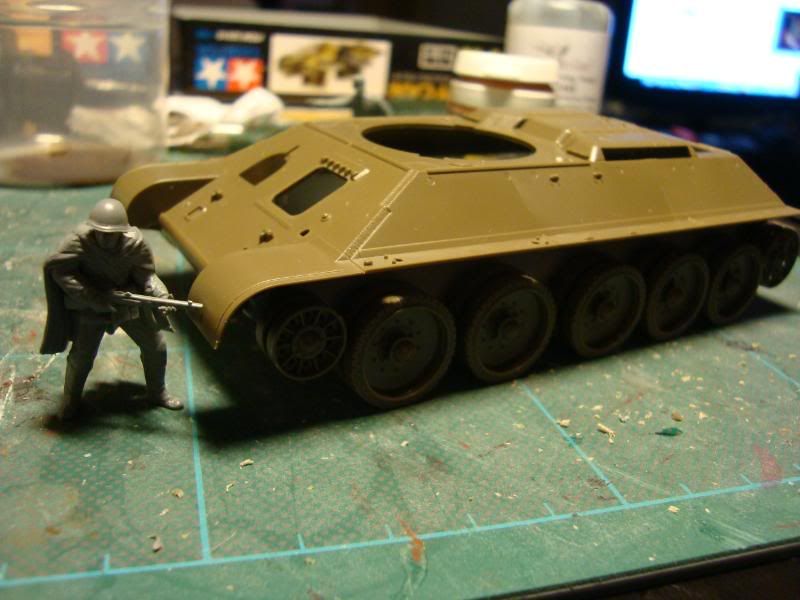
As you can see the detail on the Tamiya kits is fantastic for plastic models, and easily on par with forgeworlds resin infantry in terms of scale and detail. It was really nice to get away from "heroic" scale figues and work on something that was actually much more realistic in terms of proportion and sculpt.
Here's a scale comparision next to a forgeworld infantry sized miniature:
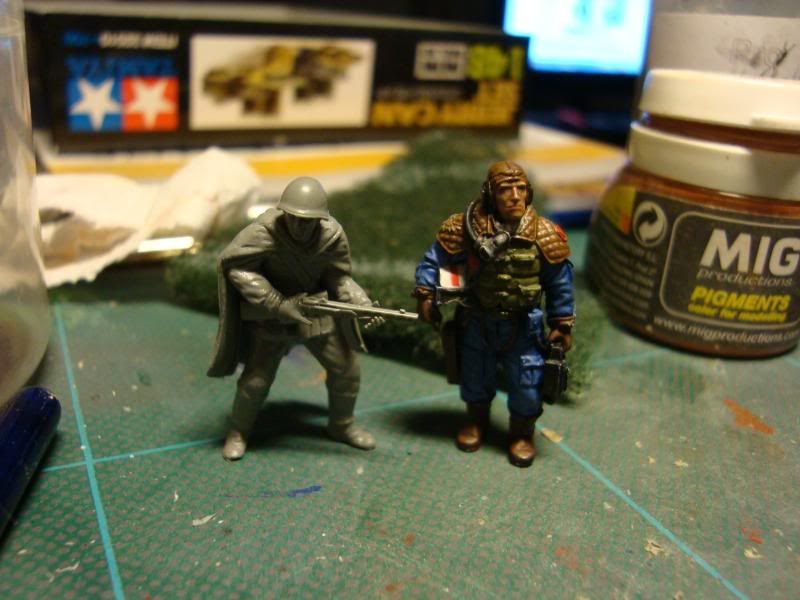
Scale wise they are a close match and as I found with my Thunderbolt ground crew the plastic Tamiya components fit very nicely with the forgeworld troops and really open up some interesting and exciting conversions opportunities.
The Tank:
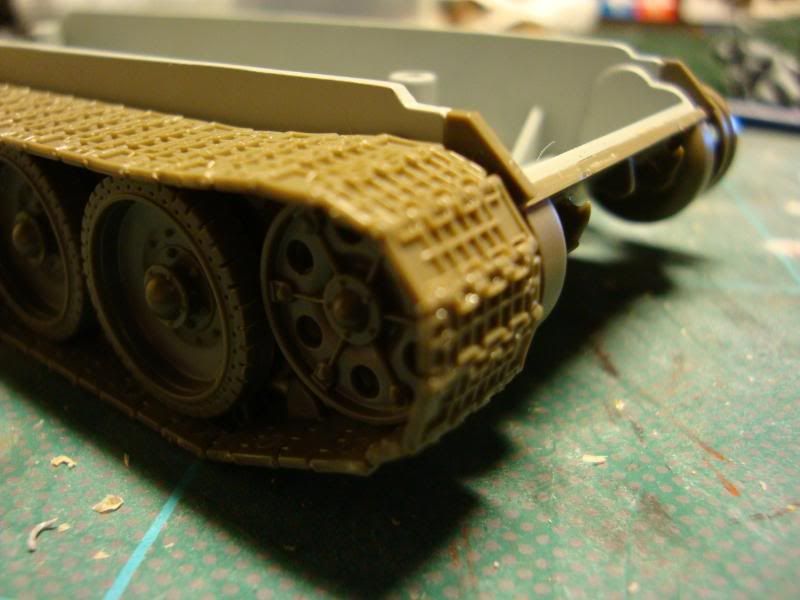
Scale wise the Tank is just right and looks great next to the Infantry. Also much like the troopers the level of detail is very high even at this small 1:48 scale. The wheels and Treads especially were very nicely done. I thought Imperial Guard Vehicles were tough treads to make... these ones were even more challenging! Lots of tiny little links that fitted together especially around the front wheels, however the effect is well worth it and even though these are the basic plastic parts that come with the kit they give a really nice finished effect.
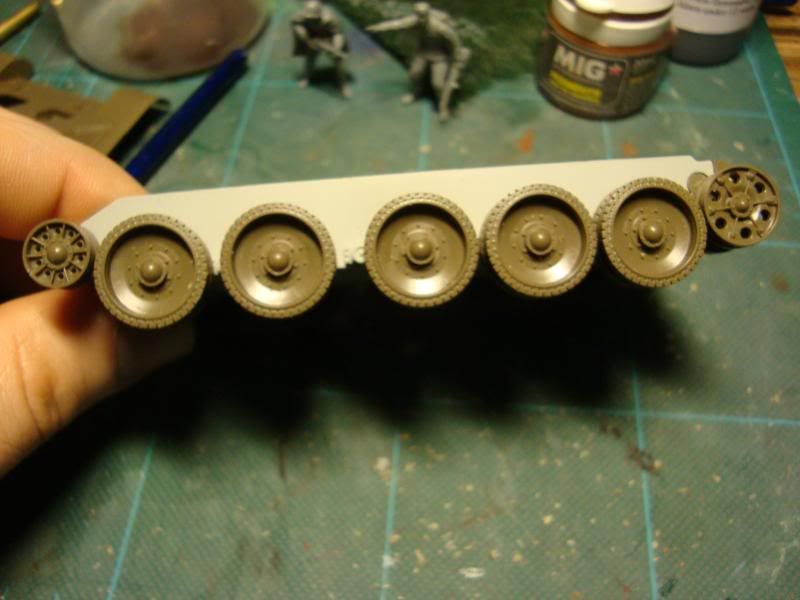
The Wheels and lower hull (the Hull is made from cast metal to give extra weight to the kit)
Scale comparision
Assembelled Tank with upper hull and extra rivet details on the rear fuel tanks
|
|
This message was edited 2 times. Last update was at 2009/02/20 10:49:23
|
|
|
 |
|
2009/02/20 12:02:23
Subject: "Forward to Germany" - Soviet WW2 T34/76 Diorama
|
|

Mutilatin' Mad Dok
|
Very interesting. And double the amount of post increase I get for commenting on two different blogs... Niehehehehe....
|
|
This message was edited 1 time. Last update was at 2009/02/20 12:02:56
|
|
|
|
|
2009/02/20 18:42:45
Subject: Re:"Forward to Germany" - Soviet WW2 T34/76 Diorama
|
|

Tough Traitorous Guardsman
|
Looking good Gundam, I'm excited to see the types of weathering you use on this project.
Cheers
Dave
|
|
|
|
|
|
2009/02/22 05:57:33
Subject: "Forward to Germany" - Soviet WW2 T34/76 Diorama
|
|
[ARTICLE MOD]
Huge Hierodule
|
Always nice to see something historical every now and then. I used to paint 15mm Napeoleonics.
|
|
|
|
|
|
2009/02/22 07:36:57
Subject: "Forward to Germany" - Soviet WW2 T34/76 Diorama
|
|

Pyromaniac Hellhound Pilot
|
GW's never made a tank as attractive as the T-34.
EDIT: In my humble opinion.
|
|
This message was edited 1 time. Last update was at 2009/02/22 07:37:20
It's better to simply be an idiot, as no one can call you on it here. -H.B.M.C.
Cap'n Gordino's instant grammar guide:
"This is TOO expensive." "I'm going TO the store, TO get some stuff."
"That is THEIR stuff." "THEY'RE crappy converters."
"I put it over THERE." "I'll go to the store THEN."
"He knows better THAN that." "This is NEW." "Most players KNEW that." |
|
|
|
|
2009/02/22 23:39:55
Subject: "Forward to Germany" - Soviet WW2 T34/76 Diorama
|
|
Battle-tested Knight Castellan Pilot
|
I'm excited to see how you make the craters. I've always wanted to create some realistic looking ones but have never had the time or the technique.
|
Stick to the shadows - Strike from the darkness - Victorus aut Mortis - Ravenguard 1st Company |
|
|
|
|
2009/02/23 09:31:51
Subject: Re:"Forward to Germany" - Soviet WW2 T34/76 Diorama
|
|
Regular Dakkanaut
|
Time for some more updates.
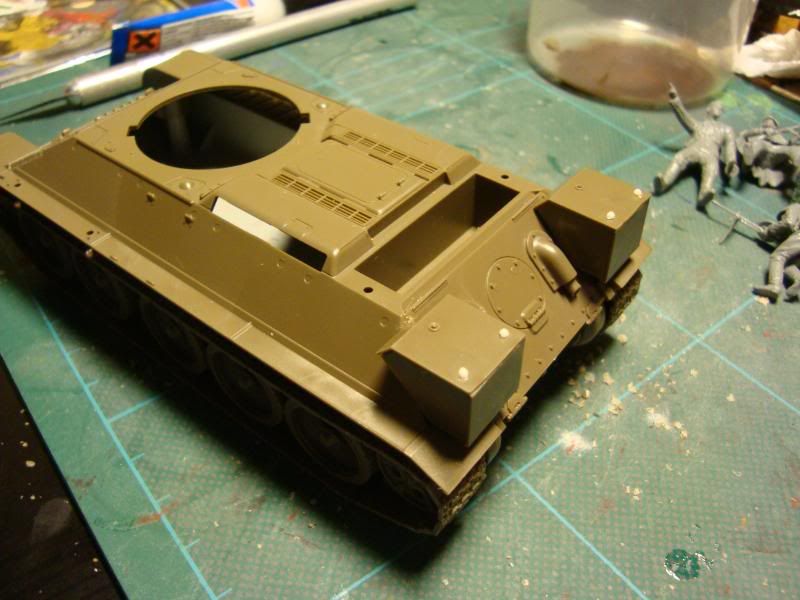
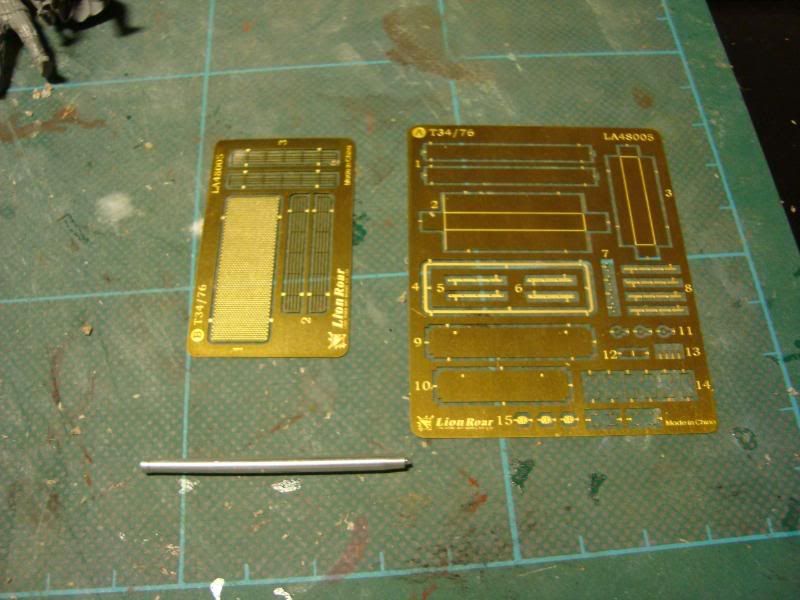
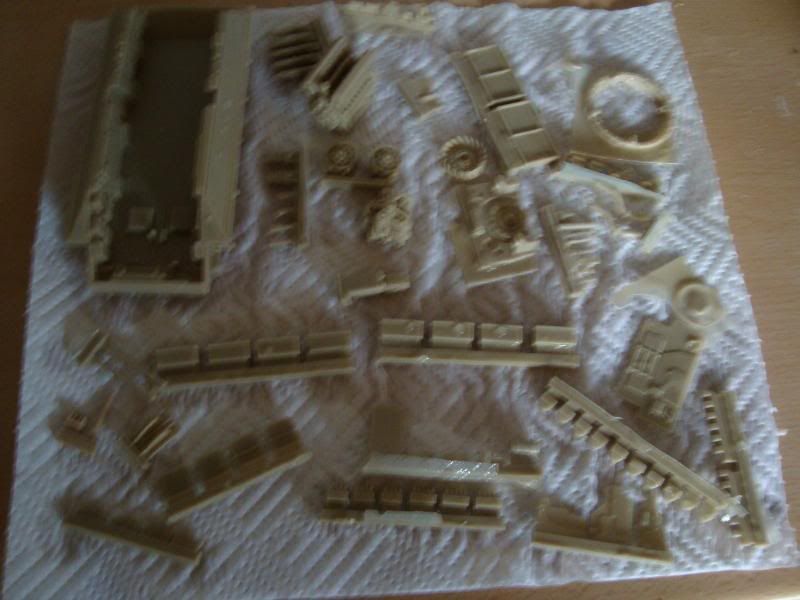
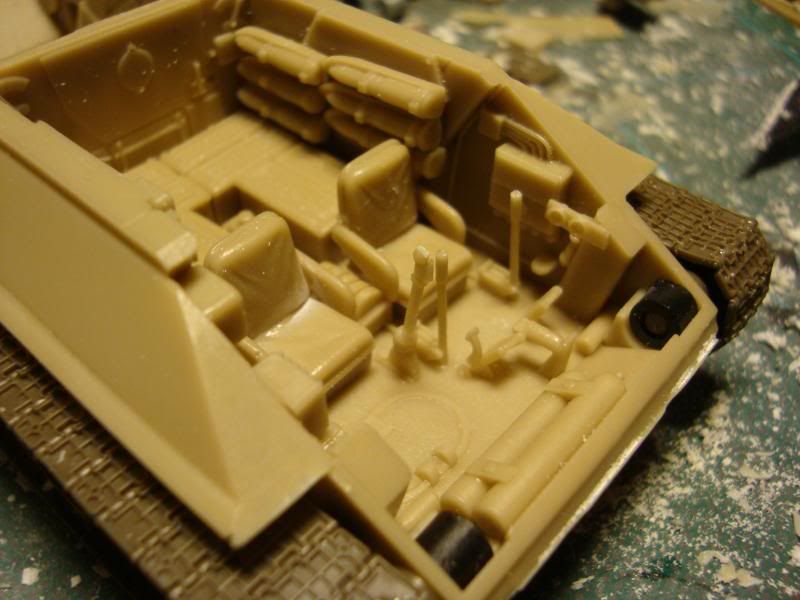
I finally received the photo etch and resin upgrade parts for the Tamiya kit that I've been waiting for. The bad news is I didn't realise that the resin interior detail set actually included not just interior detail sections but an entirely new resin lower hull... when I read the words "discard the Tamiya Cast Metal Hull..." my heart sank! It took a lot of work but I managed to remove all of the plastic components from the metal hull without any damage. Wheels, Treads, and hull sections. A modellers saw, a scalpel blade, and an improvised chisel and a whole lot of patience later and I was back good to go.
The Photo etch components and the metal main gun barrel:
The Resin detail parts:
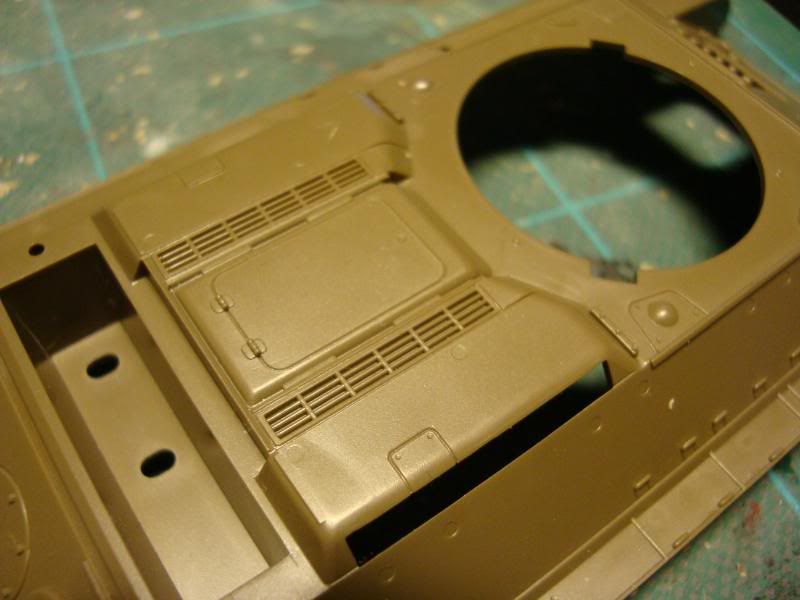
The Photo etch looks great but was a real challenge, it required me to chop up a lot of the plastic Tamiya upper hull. Very small sections that required a lot of very careful cutting and very precise work. One slip and a whole load of the kit would be ruined. It took some time but the results are really worth it.
I also had to rebuild some parts of the hull with plasticard to accommodate the new photo etch parts.
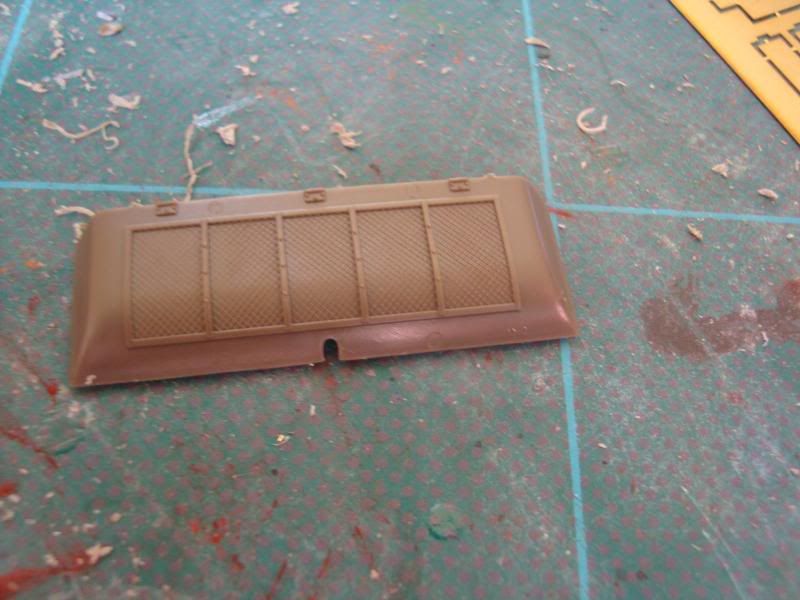
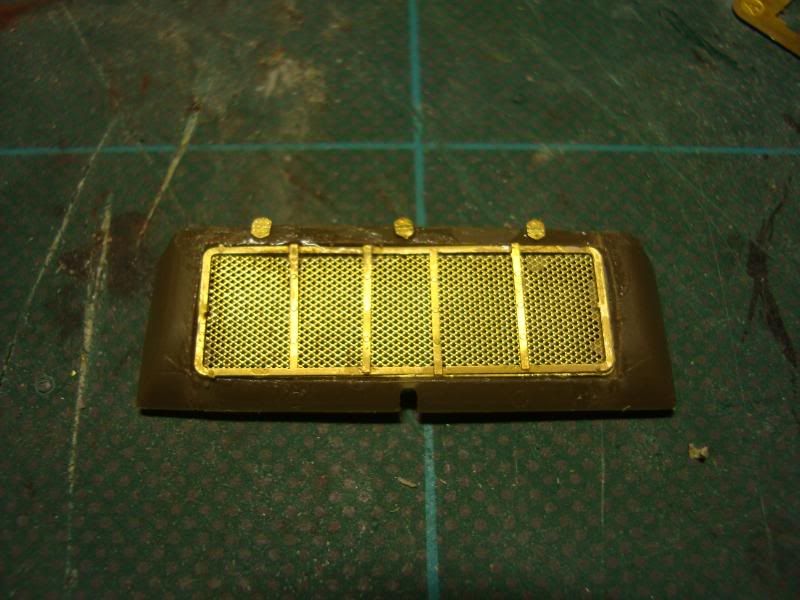
Step one, the grills:

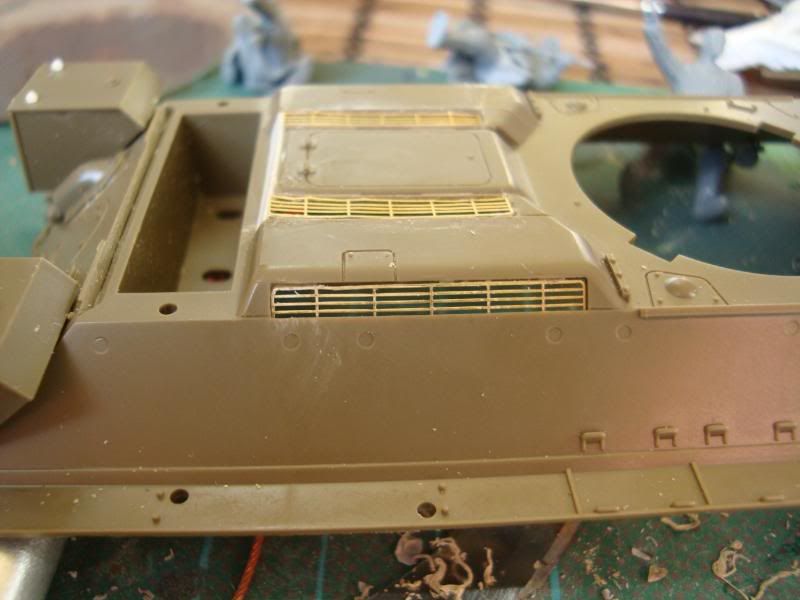
As you can see the original plastic detailed sections had to be carefully cut out and removed for the new etch parts to fit in.
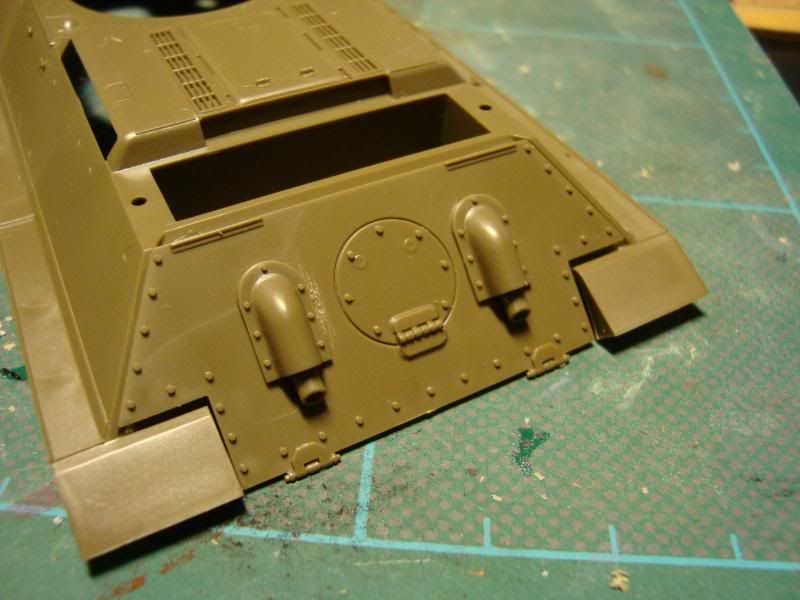
Step two, removing the plastic engine hatch and adding the engine vents:

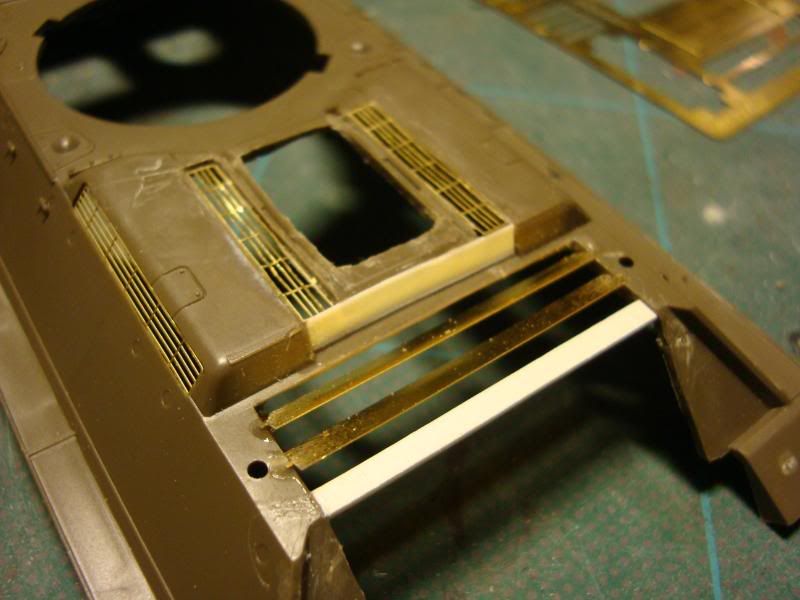
Again a large part of the rear of the upper hull had to be very carefully removed and the engine hatch between the grills was especially tricky to cut out. I also had to rebuild part of the new missing plastic areas with a beam of plasticard to fit the photo etch vents. These plastic areas had to be removed to accommodate the resin engine components.
Top engine hatch (before):
Top engine hatch (after):
The resin lower hull:
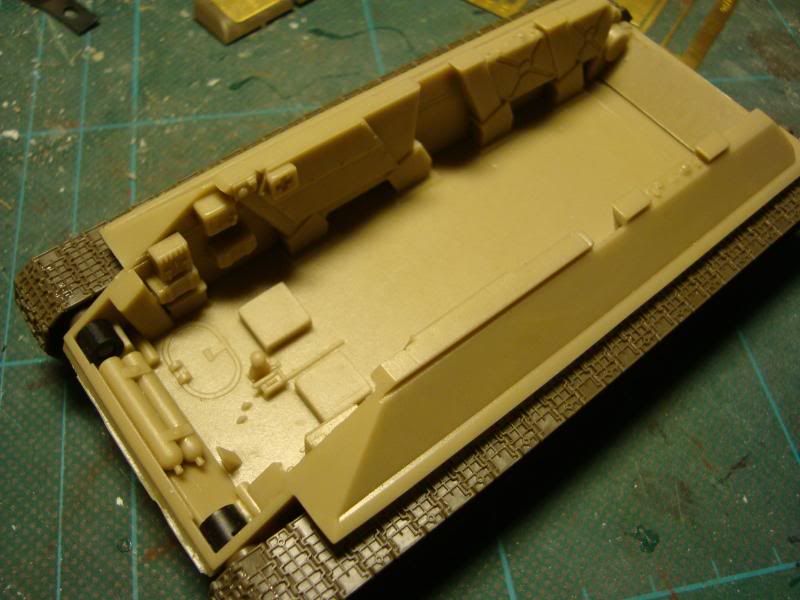
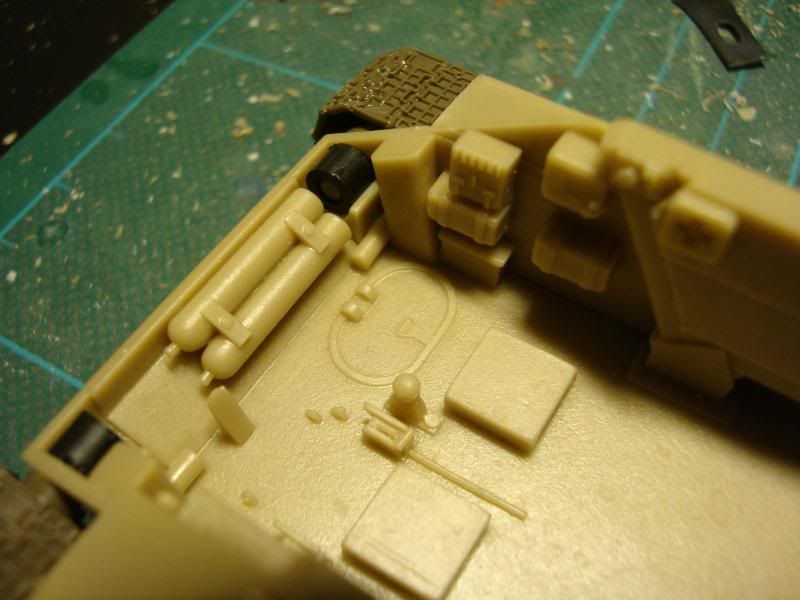
Crew cabin closeup ( WIP):
Next I moved onto the turret and the main gun:
Main gun with metal barrel:
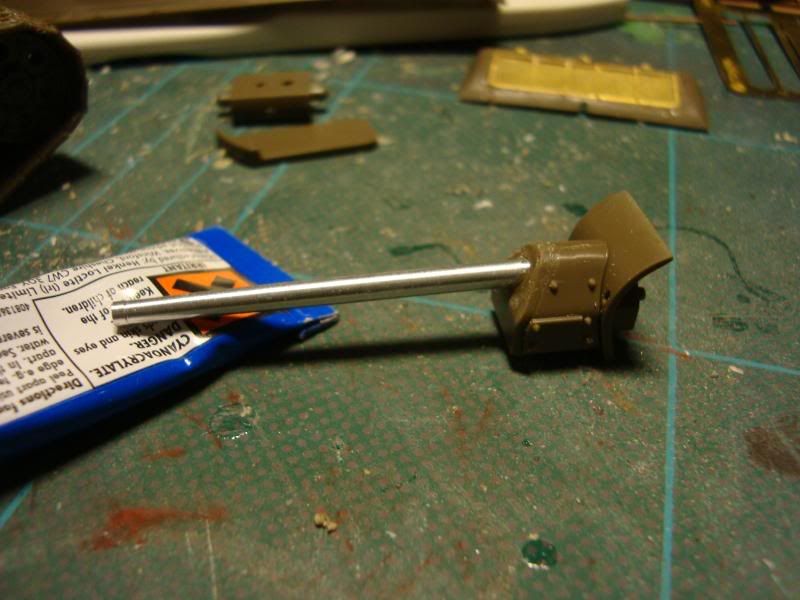
The resin gun breach upgrade parts, these were a nightmare to put together and the instructions provided by the manufacturer were close to terrible. You needed a degree in engineering to make sense of them! In the end I had rely on the reference photos from my Osprey books!
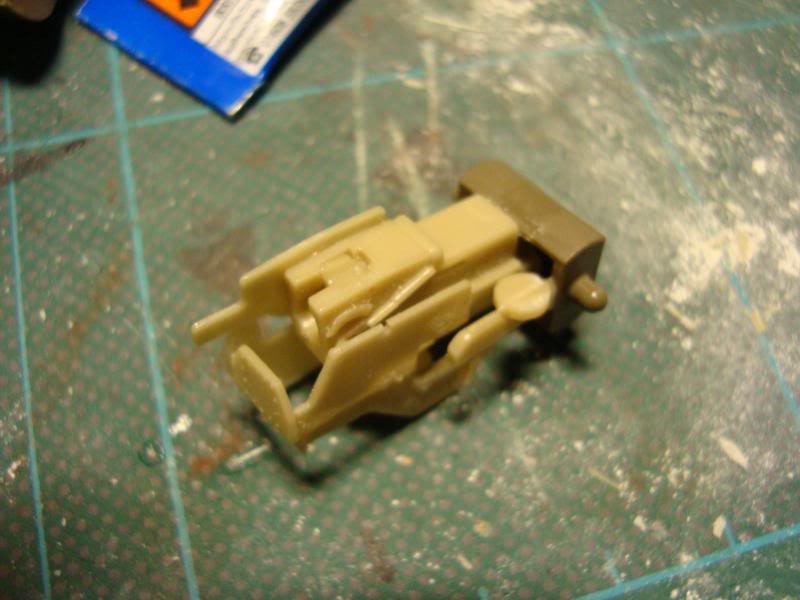
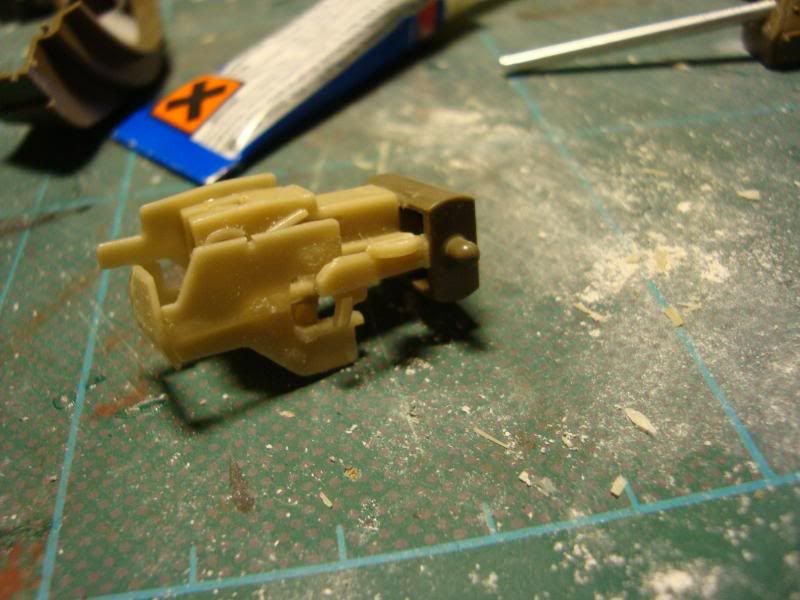
As you can see it has a co-axial machine gun.
|
|
|
|
|
|
2009/02/24 00:14:34
Subject: "Forward to Germany" - Soviet WW2 T34/76 Diorama
|
|

Homicidal Veteran Blood Angel Assault Marine
|
Wow
Impressive level of modeling.
Looks great.
|
|
|
|
|
|
2009/02/24 10:06:08
Subject: Re:"Forward to Germany" - Soviet WW2 T34/76 Diorama
|
|
Regular Dakkanaut
|
Thanks Tallmantim!
I did a whole load of new stuff last night. Mostly the interior details in the crew cabin and the detailing on the outer hull.
I also worked on a conversion of a tank driver to go inside. Tamiya give you a tank driver upper torso and arms but no legs. He has just a stump that is supposed to glue directly to the hull. So I had to kit bash together a lower body and some legs from various parts of an old Tamiya German tankers set. I've now gotten him to a pose I like the only problem is that at present he's a little too tall and the upper hull wont fit properly. So I'm working on shaving him down so I can fit him in without any problems.
I'll post some new update photos tonight.
|
|
|
|
|
|
2009/02/24 12:14:43
Subject: "Forward to Germany" - Soviet WW2 T34/76 Diorama
|
|
Homicidal Veteran Blood Angel Assault Marine
|
LOL
He's Russian, so a Vodka diet should see him shed a few pounds to fit into the tank!
;-)
|
|
|
|
|
|
2009/02/24 19:19:48
Subject: Re:"Forward to Germany" - Soviet WW2 T34/76 Diorama
|
|
Regular Dakkanaut
|
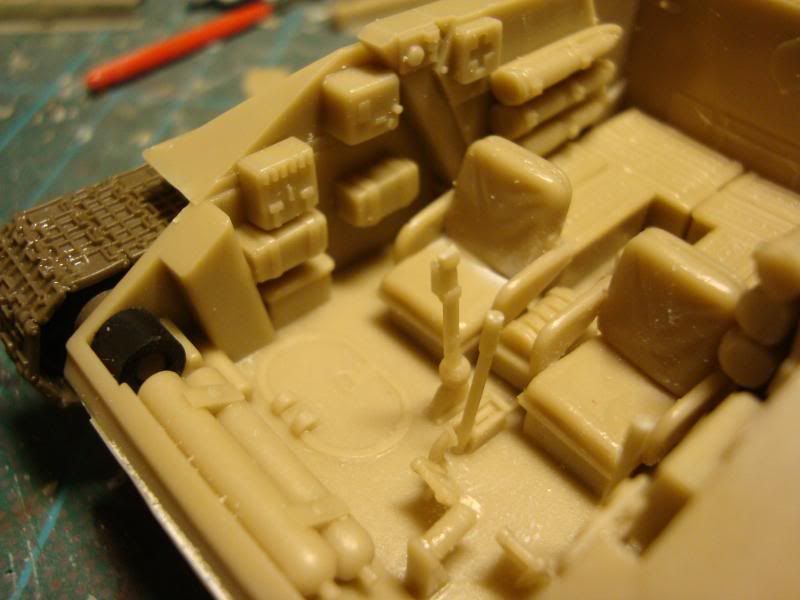
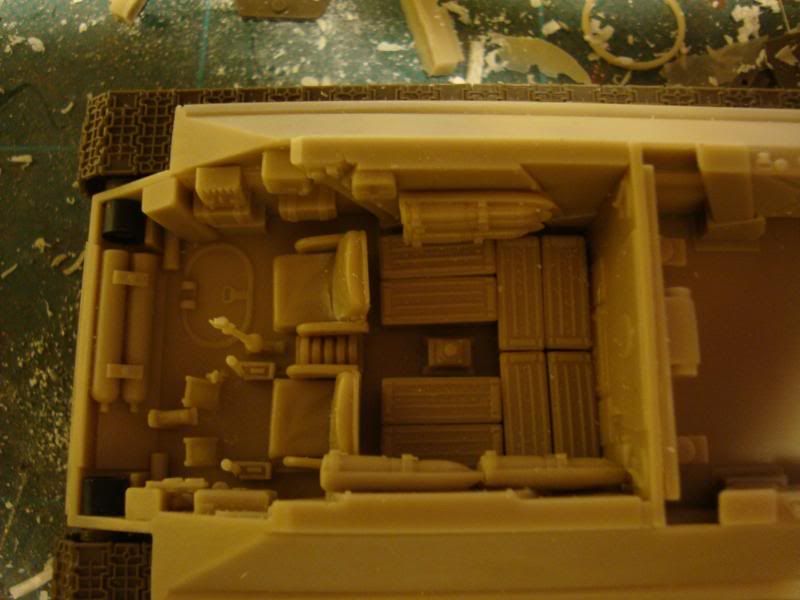
Some more updates:
Crew Cabin:
The Tank Driver:
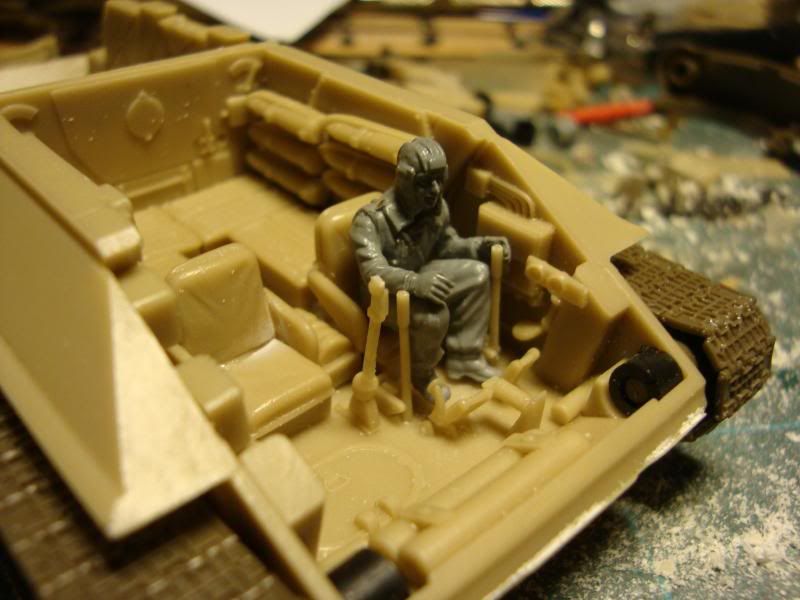
The Vodka and cigarette diet seemed to pay off, he finally fits into the tank! 
|
|
|
|
|
|
2009/02/24 21:59:05
Subject: "Forward to Germany" - Soviet WW2 T34/76 Diorama
|
|
Battle-tested Knight Castellan Pilot
|
That's great detail. I wouldn't like to sit infront of all that live ammunition stacked up on the wall!!
|
Stick to the shadows - Strike from the darkness - Victorus aut Mortis - Ravenguard 1st Company |
|
|
|
|
2009/02/25 08:43:26
Subject: "Forward to Germany" - Soviet WW2 T34/76 Diorama
|
|

Paingiver
|
For the motherland some sacrifices like safety have to be made 
Great looking building, I'm waiting for you to get to the painting.
|
|
|
|
|
|
2009/02/25 09:14:03
Subject: Re:"Forward to Germany" - Soviet WW2 T34/76 Diorama
|
|
Regular Dakkanaut
|
Yes, occupational hazard I guess! 
Thanks for the feedback guys, I will start painting the Tank soon, once all the interior in the turret is done. The engines I'll build and paint separately since it will be close to impossible to paint the detail once its in the lower hull.
|
|
|
|
|
|
2009/02/25 11:40:17
Subject: "Forward to Germany" - Soviet WW2 T34/76 Diorama
|
|

Skink Chief with Poisoned Javelins
Belgium, political ass-end of the old continent
|
Ahh, the good old T-34, the forefather of all russian deathtraps...
|
I can bend minds with my spoon... 
KingCracker wrote:PanzerSmurf, you win the trophy for most accident posts ever. Dear lord man!
|
|
|
|
|
2009/02/25 11:52:26
Subject: "Forward to Germany" - Soviet WW2 T34/76 Diorama
|
|
Rampaging Reaver Titan Princeps
|
Uhh compared to "The Ronson" or the "Tommy Cooker" the T34 was fairly safe. The Sherman was notorious for going up in flames at the first opportunity. That was also more due to the fuel exploding than ammunition cooking off though.
How much does the internal detailing kit cost and how does it compare to Forgeworld? What are you using with the etched brass? Can't wait to see more good work
|
"But me no buts! Our comrades get hurt. Our friends die. Falkenburg is a knight who swore an oath to serve the church and to defend the weak. He'd be the first to tell you to stop puling and start planning. Because what we are doing-at risk to ourselves-is what we have sworn to do. The West relies on us. It is a risk we take with pride. It is an oath we honour. Even when some soft southern burgher mutters about us, we know the reason he sleeps soft and comfortable, why his wife is able to complain about the price of cabbages as her most serious problem and why his children dare to throw dung and yell "Knot" when we pass. It's because we are what we are. For all our faults we stand for law and light.
Von Gherens This Rough Magic Lackey, Flint & Freer
Mekagorkalicious -Monkeytroll
2017 Model Count-71
|
|
|
|
|
2009/02/25 11:55:59
Subject: "Forward to Germany" - Soviet WW2 T34/76 Diorama
|
|
Lead-Footed Trukkboy Driver
Brighton, Uk
|
Looking good so far.
keep it up!
|
"Get on the Ready Line!"
Orkeosaurus wrote:Yeah, but when he get's out he'll still be in Russia, so joke's on him.
|
|
|
|
|
2009/02/25 12:01:38
Subject: Re:"Forward to Germany" - Soviet WW2 T34/76 Diorama
|
|
Regular Dakkanaut
|
Hi Llamahead
The internal detail set was from a scale model company called Verlinden. I ordered it from Historex Agents online, and it cost about £20 for the full kit.
In terms of resin quality, cast quality, and detail it surpasses forgeworld resin items. The resin was very clean, with very little flash, and the gates were well positioned and easy to remove (unlike FW gate that I've experienced being directly above an important detail area).
The quality of the actual items and the sculpts was also spot on, very very detailed and nicely done. They are also very true to the actual components of a real life T34, so you can tell that a good amount of research has gone into the kit to check for accuracy and authenticity.
The Photo etch is from a company called Lions Roar, they are based in China and make some great scale model upgrade parts. This one was specifically for the 1:48 Tamiya T34/76 kit.
Lion Roar work mainly in 1:35 scale, their 1:48 catalogue is smaller.
|
|
|
|
|
|
2009/02/25 12:03:02
Subject: Re:"Forward to Germany" - Soviet WW2 T34/76 Diorama
|
|
Regular Dakkanaut
|
Thanks Apone!
I'll be moving onto painting shortly, so I hope to have some better updates for you all soon.
|
|
|
|
|
|
2009/02/25 14:22:08
Subject: "Forward to Germany" - Soviet WW2 T34/76 Diorama
|
|
Mutilatin' Mad Dok
|
That must have cost more than forgeworld.
Brilliant work, by the way.
|
|
This message was edited 1 time. Last update was at 2009/02/25 14:22:28
|
|
|
|
|
2009/02/25 15:03:01
Subject: Re:"Forward to Germany" - Soviet WW2 T34/76 Diorama
|
|
Sinister Chaos Marine
|
the guy in the third pic down looks like such a tattler. "mom! he took my helmet! waaaaaaahhhhh" Where is a Comissar when you need one?
|
|
|
|
|
2009/02/25 15:05:24
Subject: "Forward to Germany" - Soviet WW2 T34/76 Diorama
|
|
Rebel_Princess
|
Nice to see some good scale modelling on Dakka!
BTW, is this solely going to be a diorama piece or will it double as a gaming model?
|
sig's are dumb |
|
|
|
|
2009/02/25 15:22:33
Subject: Re:"Forward to Germany" - Soviet WW2 T34/76 Diorama
|
|
Legendary Dogfighter
|
Looks great, keep posting!
|
|
|
|
|
|
2009/02/26 08:14:28
Subject: "Forward to Germany" - Soviet WW2 T34/76 Diorama
|
|
Lone Wolf Sentinel Pilot
|
Work faster we wanna see the finished project cause it looks so cool right now.
|
My Blog http://ghostsworkfromthedarkness.blogspot.com/
Ozymandias wrote:
Pro-painted is the ebay modeling equivalent of "curvy" in the personal ads...
H.B.M.C. wrote:
Taco Bell is like carefully distilled Warseer - you get what you need with none of the usual crap. And, best of all, it's like being a tourist who only looks at the brochure - you don't even have to go, let alone stay.
DR:90S+GMB+I+Pw40k01-D++A++/areWD 250R+T(M)DM+ |
|
|
|
|
2009/02/26 10:01:17
Subject: "Forward to Germany" - Soviet WW2 T34/76 Diorama
|
|
Skink Chief with Poisoned Javelins
Belgium, political ass-end of the old continent
|
@Lamahead: I did say RUSSIAN deathtraps
|
I can bend minds with my spoon...
KingCracker wrote:PanzerSmurf, you win the trophy for most accident posts ever. Dear lord man!
|
|
|
|
|
2009/02/26 11:52:01
Subject: Re:"Forward to Germany" - Soviet WW2 T34/76 Diorama
|
|
Regular Dakkanaut
|
@ Paul - actually no it was considerably cheaper than forgeworld kits.
The Tamiya plastic kit was only £13 and the Verlinden Resin upgrade kit was £20. When you consider how much you get in the resin kit thats pretty good value. A complete new lower hull with full details, all the components to make all the chairs, steering gears, controls, shells for the walls, ammo crates, full detailed engine, extra hatches, full gun breach, full turret interior detail, full upper hull interior detail (machine gunners station etc). Actually its a rather big bag of bits. Most of which are tiny little micro detail for the larger components such as gun breach and engine. The only bad thing about this kit was Verlindens awful assembly instructions, they used extremely vague exploded diagrams that were very hard to follow. For the most part I had to rely on the technical drawings and reference photos in my Osprey books!
@ Silverdaemon - you can never find a good political comissar when you need one!
@ No such luck, Covenant84, Ghost in the Darkness - Thanks guys I'm working as fast as I can on it at the moment. My Thunderbolt has taken a little step to the side right now. Got a lot more done last night on the turret and interior and engine. I also made another few infantry figures. I plan to start the base shortly. This will only be a diorama peice, as its going to be given to a relative as a gift for display in their house. Thats why I'm going to such lengths on the modelling and details. I plan to have the tank open (not completed closed) so you can remove lots of parts to see inside and get to all the detail.
@ Panzer Smurf, from what I've read on T34's especially during Barabossa, most of them eneded up in swamps and bogs! Nature was the biggest deathtrap to the tank its seems! 
|
|
|
|
|
|
2009/02/26 23:26:54
Subject: "Forward to Germany" - Soviet WW2 T34/76 Diorama
|
|
Battle-tested Knight Castellan Pilot
|
I read that the battle of kursk was more of a anit-tank gun and air support battle than it was a tank on tank battle.
The T34 was so instrumental with its sloped armour sides that Hitler ordered a complete redesign on the panzer mk IV to have sloped fronts and added sloped armour plates onto existing panzers where they could be refitted!
What I want to know is what colour you're going to paint the armour!!!
|
Stick to the shadows - Strike from the darkness - Victorus aut Mortis - Ravenguard 1st Company |
|
|
|
|
2009/02/27 00:07:54
Subject: "Forward to Germany" - Soviet WW2 T34/76 Diorama
|
|
Homicidal Veteran Blood Angel Assault Marine
|
How about painting as part of the German army?
;-)

|
|
|
|
|
|
2009/02/27 10:31:31
Subject: Re:"Forward to Germany" - Soviet WW2 T34/76 Diorama
|
|
Regular Dakkanaut
|
@ S.J - It's going to be the standard Russian dark green with a fading winter white wash coat over the top. I'm looking at trying lots of techniques on the tank, various kinds of weathering and rust, and some mud etc. I'm also looking at adding snow to the diorama and playing with that. There is a technique for ice in the Imperial Armour Masterclass book that I'm keen to try out. Mark Bedford did it on his Malcador Diorama and it looked really nice I think.
I also have a large selection of materials I ordered from Woodland scenics and other places that I'm keen to try out. Tread tracks in the fresh mud, troopers foot prints, lots of water effects. Stuff like that.
@ Tallmantim - Blasphemy! Actually one of my Osprey books covers T34's in service with Axis forces. They have an example of both an Italian T34 and a captured T34 used in German service. In fact Mig's T34 in the book is a German one. It was quite common for the German forces to recycle them. Although the Nazi's were unable to mass produce them back in Germany, a fact that horrified them at the time, that a Slav tank could (in the early parts of the war) out perform an Aryian Tank.
|
|
|
|
|
|
2009/02/27 12:19:19
Subject: Re:"Forward to Germany" - Soviet WW2 T34/76 Diorama
|
|
Lord Commander in a Plush Chair
|
Gundam-Mecha wrote:@ Paul - actually no it was considerably cheaper than forgeworld kits.
The Tamiya plastic kit was only £13 and the Verlinden Resin upgrade kit was £20. When you consider how much you get in the resin kit thats pretty good value. A complete new lower hull with full details, all the components to make all the chairs, steering gears, controls, shells for the walls, ammo crates, full detailed engine, extra hatches, full gun breach, full turret interior detail, full upper hull interior detail (machine gunners station etc). Actually its a rather big bag of bits. Most of which are tiny little micro detail for the larger components such as gun breach and engine. The only bad thing about this kit was Verlindens awful assembly instructions, they used extremely vague exploded diagrams that were very hard to follow. For the most part I had to rely on the technical drawings and reference photos in my Osprey books!
Yup, forgeworld are inferior as resin manufacturers go, and expensive too. All resin is expensive, but it shows the domination GW has that people think that to get an even better product elsewhere you'd have to pay even more again, and you don't. More work goes into these than the forgeworld stuff, for a start they have to be scale accurate which isn't a straigtforward matter when you have to take into account mould shrinkage and the like.
Gundam-Mecha wrote:@ Tallmantim - Blasphemy! Actually one of my Osprey books covers T34's in service with Axis forces. They have an example of both an Italian T34 and a captured T34 used in German service. In fact Mig's T34 in the book is a German one. It was quite common for the German forces to recycle them. Although the Nazi's were unable to mass produce them back in Germany, a fact that horrified them at the time, that a Slav tank could (in the early parts of the war) out perform an Aryian Tank.
I've seen photos of captured T-34s where the gemans have built up and squared off the sides off the hull with wood. I'm guessing it was to change the profile of the tank to avoid friendly fire. Rather than simply do a T-34 with a german cupola and markings you could make it look very different indeed.
|
|
|
|
|
|
|


 I'm coming to get you