| Author |
Message |
 |
|
|
|
|
Advert
|
Forum adverts like this one are shown to any user who is not logged in. Join us by filling out a tiny 3 field form and you will get your own, free, dakka user account which gives a good range of benefits to you:
- No adverts like this in the forums anymore.
- Times and dates in your local timezone.
- Full tracking of what you have read so you can skip to your first unread post, easily see what has changed since you last logged in, and easily see what is new at a glance.
- Email notifications for threads you want to watch closely.
- Being a part of the oldest wargaming community on the net.
If you are already a member then feel free to login now. |
|
 |
2009/04/07 04:52:15
Subject: Cadian 11th Assault Regiment and the Dawning of 10th Edition (starting Gaunt's Ghosts)
|
|

Fixture of Dakka
|
I'm upgrading my original Eye of Terror Cadian unit by making it fully mechanized.
The lists that I'm tossing around can be found in more appropriate areas of Dakka Dakka. If you're curious, look at this thread on mech IG lists or my IG page
In this thread, I'm covering the models built, converted, and painted to put my dream list on the table top.
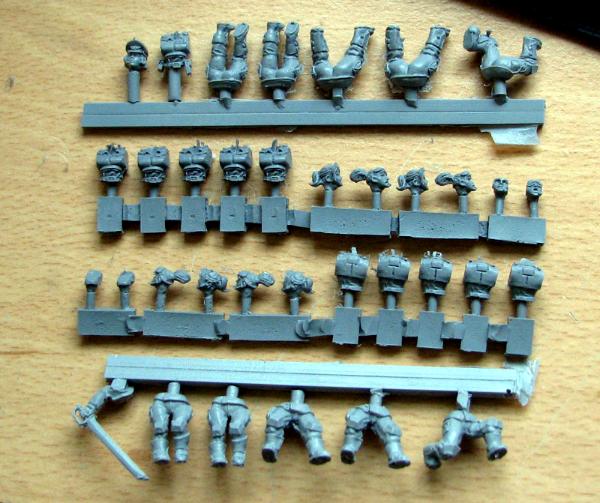
I'll start with a plasma gunner conversion that began with an idea from The Manufactorum
This conversion used a head, torso, and kneeling legs from the Cadian HW set. The arms are the pair for the flamer from the infantry box, The backpack is a trimmed down vox from the infantry box. The flamer is modified as described in The Manufactorum by cutting off the end of the weapon. Then the top front portion of a SM plasma pistol and a trimmed down hand guard from a SM bolter are neatly trimmed, dry fitted to ensure a clean fit, and then glued together. A tiny amount of GS is used to fill the surprisingly few gaps.
Edit: Yes, my camera reveals all mold lines...curses! I'll fix those.
I still need to extend the power cable from the plasma gun so that it connects to the backpack. I'll work on that tomorrow.
|
|
This message was edited 27 times. Last update was at 2023/08/05 18:57:44
The secret to painting a really big army is to keep at it. You can't reach your destination if you never take any steps.
I build IG...lots and lots of IG. |
|
|
 |
|
2009/04/08 03:01:00
Subject: Re:Cadian 11th Mech Build, Convert, and Paint
|
|
Fixture of Dakka
|
Ok, today I finish the kneeling Cadian plasma gunner conversion. I'm not going to recommend this technique to anyone since it takes meticulous precision and patience. I'm convinced that there is an easier way to do a power cable but found it reasonably easy for me. YMMV.
1. I trimmed all of the mold lines and then started work on extending the plasma gun power line back to the gunner's power pack. First I cut the existing power cable on the model short at the ammo pouch so that the loop of the cable was no longer bending upwards.
2. I used a Cadian ammo pouch that I cut free from the attached frag grenade. I used a simple Emery board to sand this down on all sides that needed it so that I had a nice grey brick. I glued this to the side of the power pack.
3. I took a new Cadian flamer and neatly cut the fuel line, with fitting, free from the flamer and the ammo pouch. I cut the fitting loose and glued it to the bottom of the grey 'brick' on the side of the power pack.
4. I measured, re-measured, and then trimmed a piece of the rest of the cable so that it would connect to the fitting and to the flush cut end of the model's original power cable. This required a 90 degree cut at the ammo pouch side and about a 30 degree cut on the other end.
5. GS was used in minute amounts to fill gaps at both ends.
6. I added a SM ribbon to the gunner's right shoulder pad since he's a veteran.
The pics below are the finished conversion. He's ready to prime.
Tonight I continue painting Chimeras in camouflage. Tomorrow, I've got to work on my tax returns but will start work on a standing plasma gunner. The challenge will be to make him look different from the kneeling guy. That will mean some major arm work.
|
|
This message was edited 1 time. Last update was at 2009/04/08 03:08:17
The secret to painting a really big army is to keep at it. You can't reach your destination if you never take any steps.
I build IG...lots and lots of IG. |
|
|
|
|
2009/04/08 03:06:45
Subject: Re:Cadian 11th Mech Build, Convert, and Paint
|
|
Sister Vastly Superior
|
That looks pretty cool. Can't wait to see it painted.
|
"...I hit him so hard he saw the curvature of the Earth."
|
|
|
|
|
2009/04/08 03:12:13
Subject: Cadian 11th Mech Build, Convert, and Paint
|
|
Fixture of Dakka
|
@Napalm
Thanks! I'm not going to paint him until I finish converting all three plasma gunners.
1. Kneeling
2. Standing
3. Either lying down or running
I'm looking forward to the challenge.
|
The secret to painting a really big army is to keep at it. You can't reach your destination if you never take any steps.
I build IG...lots and lots of IG. |
|
|
|
|
2009/04/08 10:19:56
Subject: Re:Cadian 11th Mech Build, Convert, and Paint
|
|

One Canoptek Scarab in a Swarm
|
Nice conversion simple but effective. Once the three have been painted give us a heads up, they should really good.
A Humble Tech Priest
|
Sarcasm is the lowest form of wit, Terrorism is the lowest form of war. |
|
|
|
|
2009/04/08 16:30:40
Subject: Cadian 11th Mech Build, Convert, and Paint
|
|
Hellacious Havoc
|
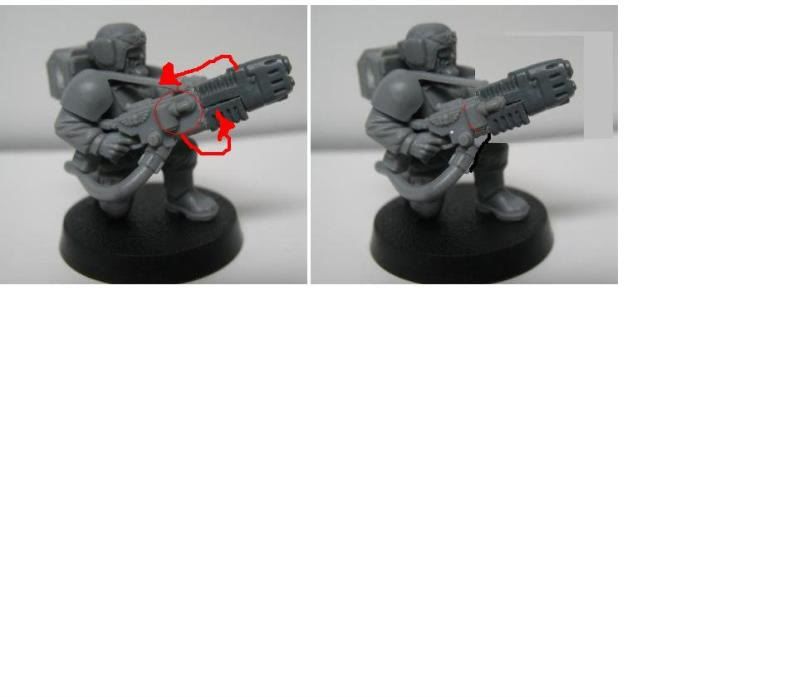
I like the idea behind your Plasma Gun...
But it looks like the front half of a plasma gun stuck on the end of a Flamer.
In particular, the area where the two bits join looks off. The heating coils on the plasma gun just "end". If possible, try to cut a little further down the plasma gun next time, to preserve the entirety of the coil structure.
Failing that, look into using plasma pistols - the coils are shorter, allowing you to keep the weapon's length down.
|
Bellus bellum gratia.
<Make war for war's sake.> |
|
|
|
|
2009/04/08 17:07:40
Subject: Cadian 11th Mech Build, Convert, and Paint
|
|

Dakka Veteran
|
I like however the grip doesn't make any sense
Maybe file it off or gs it in
|
|
|
|
|
|
2009/04/08 18:28:25
Subject: Cadian 11th Mech Build, Convert, and Paint
|
|
Decrepit Dakkanaut
The Battle Barge Buffet Line
|
i like it. i've been thinking about how to convert special weapons myself with the plastics as i'm changing the load outs due to the new codex. i like the current metal models that have a backpack to power the weapons (except for the grenade laucher, the simplest weapon). it differentiates the guard from the marines that can just plug the weapon into their armor USB ports, lol!
|
We Munch for Macragge! FOR THE EMPRUH! Cheesesticks and Humus! |
|
|
|
|
2009/04/08 19:03:23
Subject: Re:Cadian 11th Mech Build, Convert, and Paint
|
|
Fixture of Dakka
|
Thanks for the comments!
@ Blue Orphen
I did use a plasma pistol. That's as far as the coils go. It's more cost effective to use the PP instead of a full plasma gun since I have lots of Cadian flamers and quite a few SM plasma pistols. Plastic plasma guns are few and far between. The other issue is that I want my conversions to have the full backpack, long cable, heavy looking weapon that the metal figures possess. I should use a little GS to elimate the seam in the area where the front PP part of the weapon joins the flamer part. The seam is OK at the top (coils) and bottom (handgrip) but doesn't make sense in between them. I may try to correct that tonight once I finish my taxes. I also should have placed the PP part a little bit lower so the coils were lower than the top edge of the gun. I'll try that on the second model to see if it looks better.
@ Septic
Are you referring to the bottom hand grip? I like it. I may have the standing model hold the weapon using the hand grip with his left hand. I originally was planning not to use a 'stick grip' on the side but the metal gunners have a stick grip (placed oddly enough on the top of the plasma gun). I think stick grips make more sense on the side or underneath the weapon and the side option was easier.
@warboss
Thanks. I was trying to come up with ways to make an easy conversion that would both provide variety (I use a lot of plasma guns in my list) and make use of readily available bits. As you know, metal gunners are expensive and you only have one pose. I will try some options on the next two models that make the power cable easier. My goal is to make the conversion so simple that a Youngblood could do it (with adult supervision). I'm not there yet.
|
|
This message was edited 1 time. Last update was at 2009/04/08 19:06:35
The secret to painting a really big army is to keep at it. You can't reach your destination if you never take any steps.
I build IG...lots and lots of IG. |
|
|
|
|
2009/04/24 00:56:41
Subject: Re:Cadian 11th Mech Build, Convert, and Paint
|
|
Fixture of Dakka
|
Sorry for the long delay between updates (if anyone cared). I stopped working on plasma gunners in order to finish four more Chimeras (thank goodness for Bartertown). I'll throw up some pics of all of my company's mechanized vehicles. I'm currently building two Griffons thanks to a guy in Colorado that kindly traded a NOS one to me. He also sent me a NOS Chimera so I could use my old Griffon bits. I plan to use the old metal crew figures because I like them.
I also lost some interest in the plasma gun conversions because I have nine metal figs (5 painted) and two Forge World models on the way. Since my army list only requires five plasma gunners, I'm more interested in building and painting models that I need in order to play test the list at my FLGS. This means the Griffons, the Psyker Battle Squad, seven melta gunners, four veteran sergeants with shotguns, and the two advisors. Everything else is already finished except for detail work (washes, highlights, unit markings, and some decals that are on their way from Forge World). I'll resume conversions of plasma and melta gunners after I have a full playable army since I want to have unique gunners (no two alike).
My [edited] test list is shown below for the curious:
CCS, 3 meltas, Chimera HF 135
CCS, 3 meltas, Chimera HF 135
Astropath 30
Techpriest w/2 tech servitors 75
Vet Sqd, Sgt w/shotgun, 3 meltas, AC, Chimera HF 165
Vet Sqd, Sgt w/shotgun, 3 flamers, Chimera HF 140
Vet Sqd, Sgt w/shotgun, 3 GL, AC, Chimera HB 150
Vet Sqd, Sgt w/shotgun, 3 GL, AC, Chimera HB 150
Vet Sqd, Sgt w/shotgun, 3 GL, AC, Chimera HB 150
Hellhound HB 130
LRBT HB 150
LR Executioner HB 190
2 Griffons HF 150
TOTAL: 1750 points
My question for the day is: What's the best way to put unit numbers on Cadian shoulder pads? I don't like the decal numbers because they are not numbers I want to use. Has anyone tried something else? Paint pen?
[Edit to add veteran sergeants with shotguns to my To Do list. Another debt to Forge World.]
[2nd Edit to modify list to reflect my latest changes.]
|
|
This message was edited 2 times. Last update was at 2009/05/30 04:04:57
The secret to painting a really big army is to keep at it. You can't reach your destination if you never take any steps.
I build IG...lots and lots of IG. |
|
|
|
|
2009/04/26 20:25:34
Subject: Re:Cadian 11th Mech Build, Convert, and Paint
|
|
Fixture of Dakka
|
Time for another weekly update...
My four new Chimeras are finished except for the big white Imperial Eagle decals on the way from Forge World. Is there anyone else that wishes GW would update the IG vehicle transfer sheet? How long have they used this version? Nine or ten years? Longer?
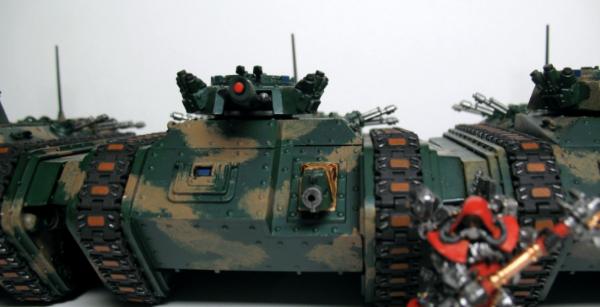
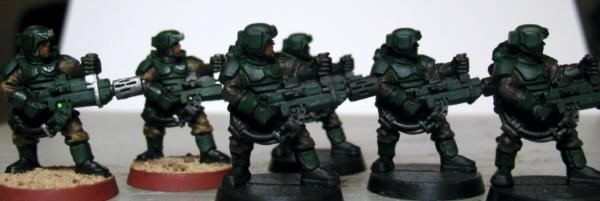
I'm currently priming two OOP GW Griffons and painting details on my two Company Command Squads. Each will have three melta gunners. Shown below are two WIP photos:

The photo above shows you my CCS figures after getting a nice wash of Devlan Mud on their uniforms and belts. Once they dry, I'll wetbrush a highlight of Bleached Bone mixed 1:1 with Desert Yellow (which is the base color of the uniforms).

The last picture shows a side by side comparison of my normal tabletop figures and the more detailed look that I'm using for my 50 veterans. The color scheme is slightly different from the current (soon to be old) IG Codex.
Here are the colors used by GW side by side with the colors that I prefer in parentheses:
Skin: basecoat Dwarf Flesh/highlight Elf Flesh (Vermin Brown/Dwarf Flesh)
Uniform: basecoat Desert Yellow/highlight 1:1 Desert Yellow and Bleached Bone (Scorched Brown/same highlight as GW)
Body Armor: basecoat Catachan Green/highlight Camo Green (Dark Angels Green/Snot Green)
Leather: basecoat Chaos Black/highlight Codex Grey (Scorched Brown/no highlight)
Pouches, canteens, sheaths, holsters: Chaos Black/highlight Codex Grey (Dark Angels Green/Snot Green)
I use the same colors as GW for metal and the imperial eagle badges.
For weapon indicator lights, I use Blood Red (over a basecoat of Vermin Brown to make the red look rich and bright) and Enchanted Blue.
My question for the day: Why do many older IG players (myself excluded) give new IG players grief if they paint Cadians to look like GW Cadians? It's not a bad looking scheme and I have seen very, very few IG armies (other than mine) that use a scheme similar to GW's standard. I was looking at CMON today and saw a guy give a paint score 1 point less than he said it deserved simply because it was the GW standard scheme.  [Edit] Here's the link to see what I'm talking about.
As usual, if anyone has requests for specific details or images, just ask.
|
|
This message was edited 1 time. Last update was at 2009/04/26 21:29:57
The secret to painting a really big army is to keep at it. You can't reach your destination if you never take any steps.
I build IG...lots and lots of IG. |
|
|
|
|
2009/05/04 05:08:23
Subject: Re:Cadian 11th Mech Build, Convert, and Paint
|
|
Fixture of Dakka
|
Another week has gone by and I'm still hard at work on upgrading my Cadian army into a veteran mechanized force.
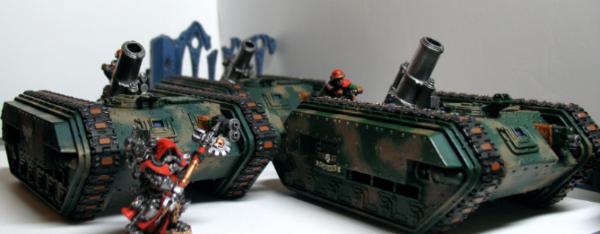
I did not finish my two CCS or my two Griffons this week but got a lot of work done on them. About mid-week I got a third Griffon (thanks to Bartertown and a nice guy named Jason) so I added that to my WIP. I uploaded some pics to show you where I'm at now and so I can explain how I go about building and painting these models. Note that all of my Griffons are the OOP GW plastic and metal models (not Forge World's variant with the spiffy gun shield).
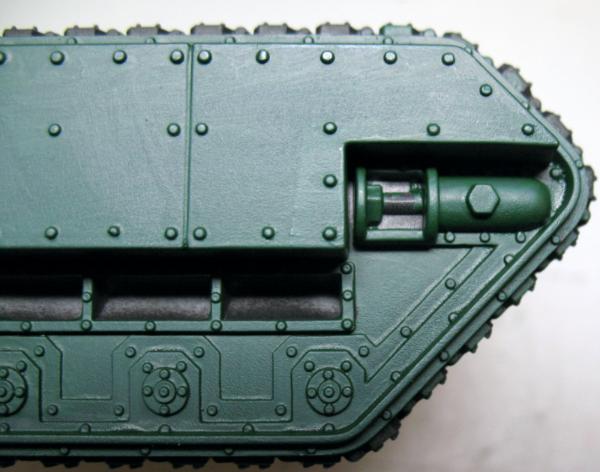
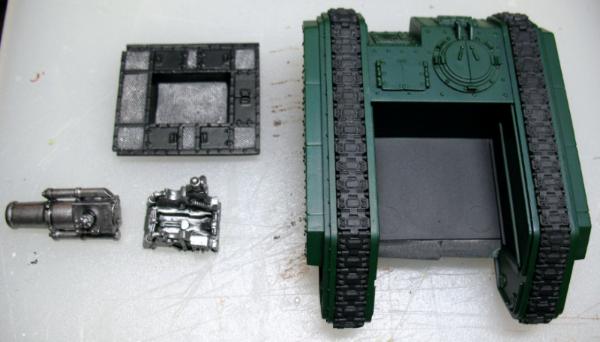
The first pic just shows all of the pieces except for two rear end panels that I left on my desk. I like to build the Griffons without the metal deck plate, gun carriage, gun, decorative side panel, rear end panels, and hull weapons. I paint these separate components on their own to avoid getting a lot of Dark Angels Green and Graveyard Earth on them. While these base colors are not really a problem for the rear end panels, I keep these unattached because I won't know what angle to glue them until after I drop the metal deck plates into their final resting place.
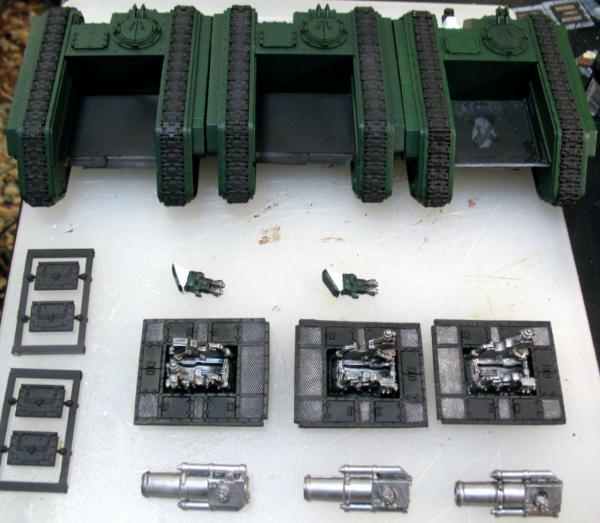
The side pic below is just to show you two areas that are a pain. The three vents are practically impervious to spray primer so I have to remember to get into them with a Citadel large brush or small drybrush loaded with Chaos Black. The piston to the right of the vents gets a coat of Chaos Black on the piston and the square area around it (to give an illusion of depth). Later, I paint the piston Boltgun Metal and eventually use Brown Ink on each end of the piston to make it look oily.
The deck plate, gun carriage, and gun are basically two colors: Chaos Black and Boltgun Metal with a highlight of Chainmail. The gun gets a lot of Chainmail. It's not an appropriate look for a military weapon in today's armies but it fits in the technology worshipping, look good for the Emperor, spit and polish armies of the 41st Century.
In addition to the third Griffon, I also received my Forge World Cadian Veterans with Shotguns bitz packs ( http://www.forgeworld.co.uk/cadvets.htm). I'll use these to make my four veteran sergeants for my mechanized veteran squads.
I also received some resin female IG bitz packs from the guy that casts them. See pic below from Spack's site, Age of Strife, where even more great photos of female IG bits by DarkSoul are posted. I haven't decided what to use these for yet. The opportunity to trade for them came up out of the blue so the models are not yet part of my overall plan. I may use some of them for Griffon crews and for melta gunners or grenade launchers. I'm also retooling two autocannon crews so one or more of the female IG may end up there.
I haven't worked with resin before but I've read that it requres special treatment - cleaning, avoidance of resin dust when sanding/sawing, and best glued with super glue. I guess I'll try all of the above. I do have some FW stowage but have done little with it other than washing and trimming. I will get to it when I detail my LRBTs and Chimeras.
|
|
This message was edited 2 times. Last update was at 2009/05/26 23:52:20
The secret to painting a really big army is to keep at it. You can't reach your destination if you never take any steps.
I build IG...lots and lots of IG. |
|
|
|
|
2009/05/04 05:35:22
Subject: Re:Cadian 11th Mech Build, Convert, and Paint
|
|
Fixture of Dakka
|
I forgot to mention my mental block with CCS melta gunners. I call it "Melta Monotony". I had five of these guys already (two painted) and acquired ten more. As it turns out, my test list will only require nine total but I'm going to paint ten just in case. Right now I'm touching up the two that were already painted while also adding four more for my two CCS with meltas. It's not fun doing the base layers. I'm almost ready to move to the good parts.
Topping off a great week for receiving shipments was a pack of the Forge World Cadian special weapons ( http://www.forgeworld.co.uk/cadspecialweapons.htm). The pack includes all of the pieces (including 25mm round bases) to make complete models (unlike the vets with shotguns pack). The heads with respirators are separate so you can use plastic heads without respirators if you wish. I like these guys and ordered a second pack along with an IG decal sheet in a separate order that I'm still waiting on.
For the next update, I hope to show you the finished Griffons and two CCS. After they're done I want to move onto my fun conversion project: a Psyker Battle Squad with an overseer and eight psykers. I think I'll use the non-marine dude from the Battle for Macragge set as the overseer and Empire flagellants as the psykers. The fun will come in modifying these figures to make them more appropriate. Guess it's almost time to start diving into my bitz boxes.
|
|
This message was edited 1 time. Last update was at 2009/05/04 12:55:36
The secret to painting a really big army is to keep at it. You can't reach your destination if you never take any steps.
I build IG...lots and lots of IG. |
|
|
|
|
2009/05/04 06:03:04
Subject: Cadian 11th Mech Build, Convert, and Paint
|
|
Ollanius Pius - Savior of the Emperor
Gathering the Informations.
|
On the subject of the color scheme:
I really don't get why they dislike it. Maybe it's because they associate it with the same contempt people do with Ultramarines?
But anyways: Your stuff's great 
|
|
|
|
|
2009/05/04 13:06:46
Subject: Cadian 11th Mech Build, Convert, and Paint
|
|
Fixture of Dakka
|
@Kanluwen
Thanks! You make a good point. People often dislike the common standard. Ultramarines are the vanilla SM and Cadians are the norm for IG. However, while I often see Ultramarines painted up as in the Codex, I've never seen a tabletop Cadian army that uses the GW basic painting instructions. Maybe the reason people like variant schemes with Cadians is because you can use them - unlike the warriors of Ultramar.
|
The secret to painting a really big army is to keep at it. You can't reach your destination if you never take any steps.
I build IG...lots and lots of IG. |
|
|
|
|
2009/05/11 02:00:47
Subject: Re:Cadian 11th Mech Build, Convert, and Paint
|
|
Fixture of Dakka
|
Another week gone by so it's time to add a bit more covering this week's progress.
I did not get any work done on my two CCS squads but melta monotony was not the problem. I spent my limited time putting FW Imperial Eagles on my recently finished Chimeras and two of my three new Griffons. Unfortunately each decal sheet only has 12 of the eagles that I like so I'll need another sheet for my third Griffon, Basilisk, and LR Executioner (once I convert it).
I'll post finished pics of the Griffons later this evening. For now, here's the "How to" on the side plates. I used the exact same method for my eight Chimeras and Hellhound.
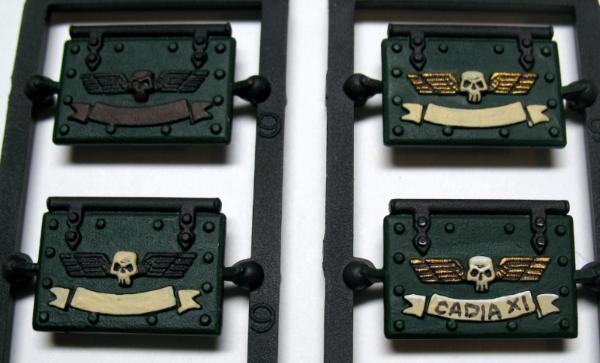
The image shows the progression as I paint the Griffon side plates step by step. First, DA Green on the black primer with Scorched Brown on the scroll and the skull. Second, Bleached Bone over the Scorched Brown areas, leaving some brown showing in certain seams and crevices. Third, Shining Gold carefully brushed over the wings. Finally, Skull White highlights and script using a .30mm Micron 02 #1 Archival Ink pen. I will also highlight the rivet heads later with Snot Green when I highlight and weather the rest of the vehicle.
My experience is that the Bleached Bone and Skull White dry really fast so I take extra care to thin them with clean water. I use Citadel Standard Brushes for every single color, but I use separate brushes and cleanup jars for metallic colors to avoid getting the metal paint flakes into my other brushes and colors.
I'll get the other Griffon pics up later and talk a bit about how I apply the camouflage pattern to my vehicles. The only other news this week is that I still can't lay hands on a new IG codex. My FLGS was sold out of their 20 copies on Day 1. I would order it but I like to buy certain items from my FLGS to support it. Since I suscribe to White Dwarf and mostly trade for my IG minis (it's what you do when you have tons of unused minis), I buy new releases, codexes, paints, brushes, tools, and GS at the FLGS. Just my way... Thanks to BarterTown, A guy in Rhode Island traded me a nice Commissar Yarick mini (unassembled and unpainted) for a NOS Cadian IG HW team. I threw in some new GF9 Cygnar counters too because I don't play WarMachine. I also have a Lord Castellan Creed that needs paint. I'm looking forward to painting these Heroes of the Imperium after my mechanized company is completely upgraded.
|
|
This message was edited 1 time. Last update was at 2009/05/11 02:02:47
The secret to painting a really big army is to keep at it. You can't reach your destination if you never take any steps.
I build IG...lots and lots of IG. |
|
|
|
|
2009/05/11 03:20:33
Subject: Cadian 11th Mech Build, Convert, and Paint
|
|
Auspicious Aspiring Champion of Chaos
|
you should make a platoon/company out of those female sets! (btw, who casts them???)
|
I collect:
Grand alliance death (whole alliance)
Stormcast eternals
Slaves to Darkness - currently Nurgle but may expand to undivided.
|
|
|
|
|
2009/05/11 04:20:16
Subject: Cadian 11th Mech Build, Convert, and Paint
|
|
Fixture of Dakka
|
I don't plan on using the female IG for a full platoon or company but I do plan to mix them into squads and units within my mech company.
The caster is named Thomas.
There is a thread for them: Female IG Thread
|
The secret to painting a really big army is to keep at it. You can't reach your destination if you never take any steps.
I build IG...lots and lots of IG. |
|
|
|
|
2009/05/11 05:26:57
Subject: Re:Cadian 11th Mech Build, Convert, and Paint
|
|
Fixture of Dakka
|
It's late here in Kansas, but I finally did get pics of my newly painted Griffons. They still need highlighting, weathering, and work on their decals but they are table top ready. Don't ask where the crews are yet. We'll just say they're enjoying a few brewskis somewhere. I plan to use standard plastic Cadians for the crews with some of my recently acquired resin female IG figs mixed in.
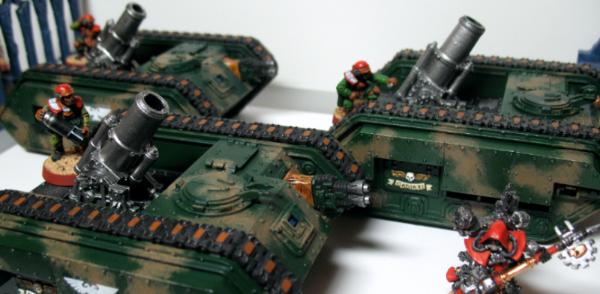
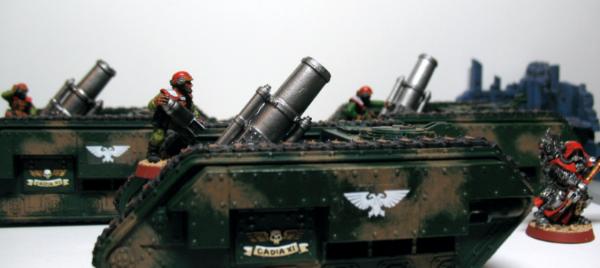
In the week ahead, I hope to finish my two CCS, acquire a box of Empire Flagellants, and begin building my Psyker Battle Squad. I also need that IG Codex before I can play a few battles with my test mech list. There is also a small matter of painting three more melta gunners. 
Kid Kyoto has already begun building his Psyker Battle Squad. Go look. It's cool. 
I'm still hunting ways to paint/ink/decal the numbers on my Cadians' shoulder pads. I wish Micron made a pen with white ink. Elmer's makes Painters Pens but the Fine is not fine enough. I may try their Very Fine pen. I think that is as small as they go.
|
|
This message was edited 2 times. Last update was at 2009/05/14 00:09:14
The secret to painting a really big army is to keep at it. You can't reach your destination if you never take any steps.
I build IG...lots and lots of IG. |
|
|
|
|
2009/05/13 05:50:48
Subject: Re:Cadian 11th Mech Build, Convert, and Paint
|
|
Fixture of Dakka
|
|
|
This message was edited 2 times. Last update was at 2011/02/15 04:11:34
The secret to painting a really big army is to keep at it. You can't reach your destination if you never take any steps.
I build IG...lots and lots of IG. |
|
|
|
|
2009/05/26 05:42:33
Subject: Re:Cadian 11th Mech Build, Convert, and Paint
|
|
Fixture of Dakka
|
I'm a week and a day late with an update but who's counting?
I still have not finished my CCS melta gunners, but they do have a bit more paint on them. Unfortunately for them, I'm still enamoured with building crewmen for my three Griffons. I also wish to add some extra details to them.
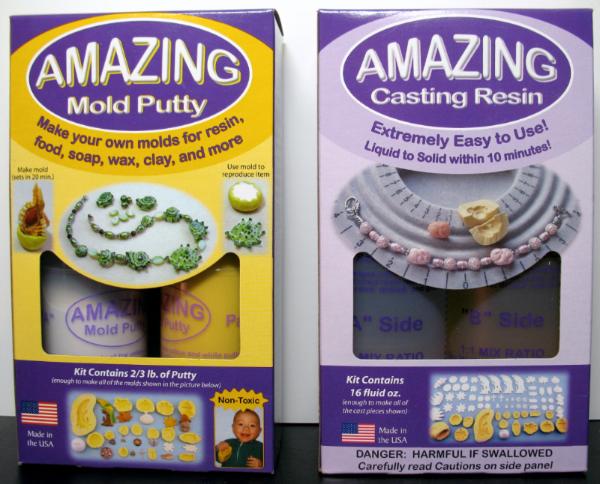
I discussed green stuff casting in an earlier post, but I decided to give that up in favor of resin casting. I blame BrotherArgos' thread for this tangent. His work is stunning and inspirational.
I looked at several products online and then went to my local craft store and picked up the Amazing Casting Resin and Amazing Mold Putty by Alumilite. The total cost was $35 USD and their product looked like the easiest way to experiment with resin casting. I may move up to rubber molds and better resins but not until after much experimentation.
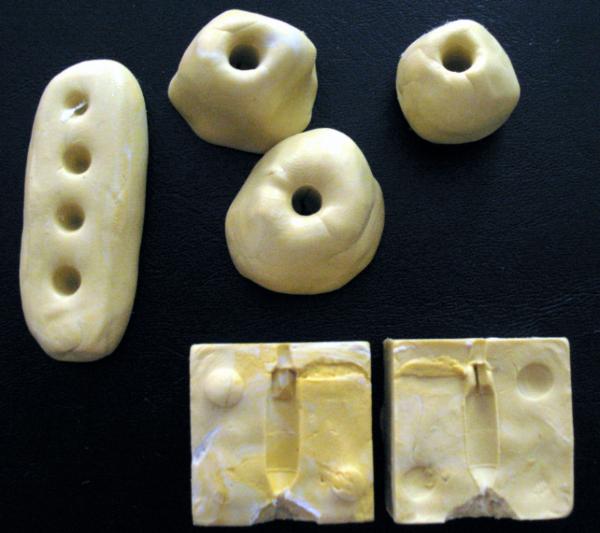
I've used this product for simple one-piece molds and two-piece molds (Griffon Mortar Shell). The one-piece molds were perfect.
The one-piece molds are very simple. My only advice is to use a nice, flat, non-stick surface to press the originals into the mold putty so that you get a level surface. This matters later when you pour resin and it pools on top of your mold. I also recommend that you scrape a level object across the surface of the mold after you pour your resin to remove most of the excess on top of the mold. That will reduce the amount of flash that you have to trim later.
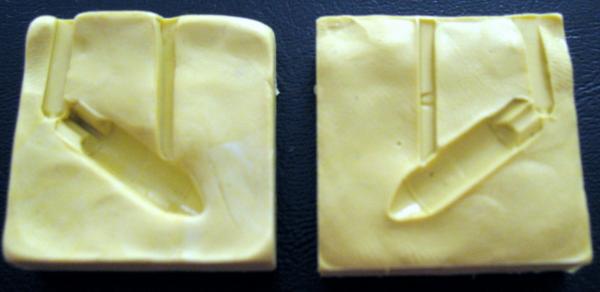
I had several failures with one- and two-piece molds for the mortar shell. After several trials (shown below), I finally succeeded.
From the failures I learned that a two-piece mold with proper pour and vent channels was the key to success. My first two-piece mold had its vent channel in the worst possible place (bottom of the mold).  Learn from me. Put your vents at the highest point on the casting with the opening(s) somewhere high on the mold. Resin flows very, very well.
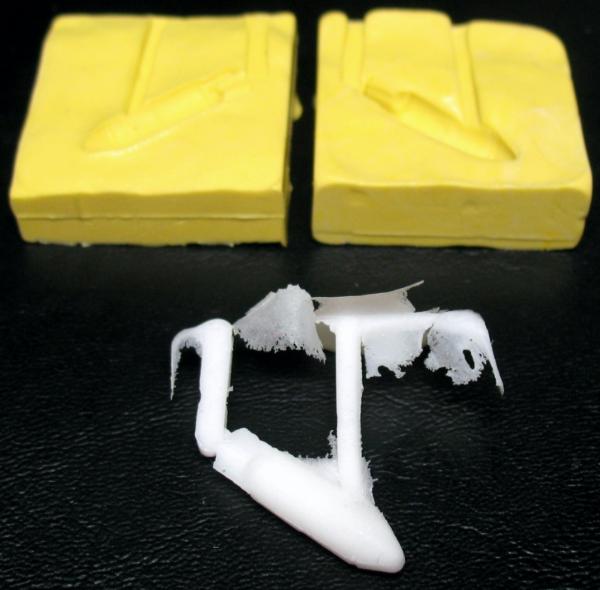
This photo (above) shows the mold making process right before the final step. This process is well described with photos by BrotherArgos on pages 3 and 4 of his Dakka P&M blog. Note that BrotherArgos is using poured rubber to make his molds rather than mold putty. If you prefer that method, Alumilite makes a USD $70 kit.
Like BrotherArgos, I used three steps. The first requires modelling clay as the base inside of a mold frame made of two layers of thin Lego bricks. It looks similar to the picture above but has the plastic pieces set in modelling clay instead of molding putty and the section of the original plastic pieces set in the clay are the reverse side of the one shown above. Step 2 is applying the first half of molding putty on top of the plastic pieces (no mold release required) . Then you remove the clay, clean the plastic pieces, and reinsert them into the dried half of casting putty. This looks like the picture above. Step 3 (final) is to coat the plastic and dried half of casting putty with either thin oil or mold release before putting the top half of casting putty into the mold frame. Note that I add a third level of Legos for this step. I tamp down each layer of mold putty with a square of Legos to make sure the putty gets down into all of the crevices on the plastic pieces.
The finished two-piece mold is shown below:
After pouring resin into the mold, I realized that I needed a wider mouth on the pour channel. I made a second mold that incorporated this feature (sorry, no picture). I found it was important to use plastic pieces (neatly trimmed bits of sprue) to clearly define all of the vent and pour channels because cutting them into the finished mold is damn near impossible. In my mold, the pour channel is in the middle and the vent channel is on the right hand side. When I pour resin into the pour channel, I occasional thump the mold on the table top between quick pours to shake out air bubbles. I also pay attention to the vent channel because when you have enough resin poured, you will see it rising up the vent channel. You don't need to pour resin until the vent channel is fully filled up. Just seeing it coming up the vent channel tells you that you should stop pouring resin.
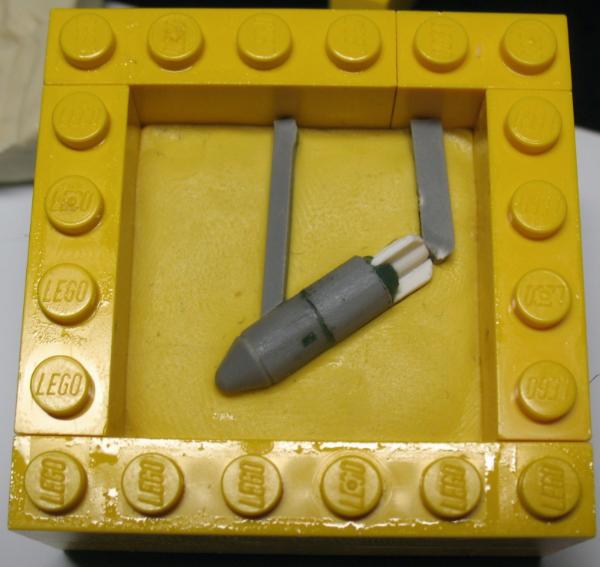
The final picture shows a casting pulled straight from the mold. Unfortunately the white resin makes it almost impossible to make out any detail. I'll paint up some shells and snap a photo for my next post. I plan to have about four to six shells as well as six to eight shell storage canisters per Griffon. I just have to work out the details for building the storage containers as well as lasgun rifle racks. I also plan to finish my six Griffon crewman in appropriate artilleryman poses. That will entail some arm conversions.
Some castings will have air bubbles. I think most can be eliminated by proper vent channels and thumping your mold in between pours of resin. The trick is to add a vent channel after you have finished the mold and produced your first air-bubbly casting. One of my Griffon shell molds is perfect and the other puts a big air bubble at the rear of each shell. I can easily fill each bubble hole with GS, but I prefer to fix the problem. I plan to cut a thin air channel with a hobby knife or a pin vise into the mold. It need not be a large channel as it only allows air to flow. We'll see if my solution ends the problem. 
Thanks for reading. I hope I gave you something useful to think about. I know that many other blogs on Dakka are helping me.
|
|
This message was edited 1 time. Last update was at 2011/02/15 04:13:06
The secret to painting a really big army is to keep at it. You can't reach your destination if you never take any steps.
I build IG...lots and lots of IG. |
|
|
|
|
2009/05/26 07:39:18
Subject: Cadian 11th Mech Build, Convert, and Paint
|
|

Pyromaniac Hellhound Pilot
|
Thank you ever so much for posting this. It's interesting, and I like your work. Pity Meltagunners don't come in different poses..
|
It's better to simply be an idiot, as no one can call you on it here. -H.B.M.C.
Cap'n Gordino's instant grammar guide:
"This is TOO expensive." "I'm going TO the store, TO get some stuff."
"That is THEIR stuff." "THEY'RE crappy converters."
"I put it over THERE." "I'll go to the store THEN."
"He knows better THAN that." "This is NEW." "Most players KNEW that." |
|
|
|
|
2009/05/26 14:40:22
Subject: Re:Cadian 11th Mech Build, Convert, and Paint
|
|

Liberated Grot Land Raida
|
If you're getting bored with the meltagunners, both the cadian and catachan command sets contain meltaguns, allowing you different posing. Also, the chimney from the COD manufactorum make for nice meltamuzzles, allowing for some conversion options.
|
A Squeaky Waaagh!!
Camkhieri: "And another very cool thing, my phones predictive text actually gave me chicken as an option after typing robot, how cool is that."'
Meercat: "All eyes turned to the horizon and beheld, in lonely and menacing grandeur, the silhouette of a single Grot robot chicken; a portent of evil days to come."
From 'The Plucking of Gindoo Phlem' |
|
|
|
|
2009/05/26 18:30:13
Subject: Cadian 11th Mech Build, Convert, and Paint
|
|
Fixture of Dakka
|
Captain.Gordino,
Thanks. Forge World makes a Cadian melta gunner but I would still like more variety. Two poses is about five options too few for me.
Off-topic, how did you put full face shields on the models in your gallery?
CommissarKhaine, I am bored with the melta gunners. I will get them done, but I am going to make some converted gunners after I finish other projects (Griffon crews, veteran sergeants, battle psykers, grenade launchers, autocannons, and land mines). I'll take a look at that chimney.
Tonight's project will be a step-by-step process for mold making because I thought of some ways to improve my Griffon shell mold.
|
The secret to painting a really big army is to keep at it. You can't reach your destination if you never take any steps.
I build IG...lots and lots of IG. |
|
|
|
|
2009/05/26 19:53:01
Subject: Cadian 11th Mech Build, Convert, and Paint
|
|
Auspicious Aspiring Champion of Chaos
|
i like your color scheme. very neat. is that just DA green for the armor?
|
I collect:
Grand alliance death (whole alliance)
Stormcast eternals
Slaves to Darkness - currently Nurgle but may expand to undivided.
|
|
|
|
|
2009/05/26 23:37:27
Subject: Cadian 11th Mech Build, Convert, and Paint
|
|
Fixture of Dakka
|
Lord Marcus,
Thanks, I tend to paint in a crisp, neat style instead of using a shaded, realist approach. Yes, I use DA green with Snot Green contrast edging for helmets, pouches, armor, scabbards, vehicles, and weapons. That color scheme is different than GW, which uses Catachan Green with Camo Green edges. Automatically Appended Next Post: Here is a quick update to fully acknowledge the source of the superb picture of resin female IG. I had a link to the original source located on the picture site in the Dakka gallery but many of you may not have clicked the pic to go there.
The pic below comes from Spack's site, Age of Strife, where even more great photos of female IG bits - cast in resin by DarkSoul (AKA Thomas Sexton) - are posted. I do not know the name of the sculptor. There was a club in Arizona with a website dedicated to new sculpting projects and getting the good models cast but the site is no longer up.
|
|
This message was edited 1 time. Last update was at 2009/05/27 00:03:54
The secret to painting a really big army is to keep at it. You can't reach your destination if you never take any steps.
I build IG...lots and lots of IG. |
|
|
|
|
2009/05/27 08:14:09
Subject: Cadian 11th Mech Build, Convert, and Paint
|
|
Sacrifice to the Dark Gods
Birmingham, UK
|
Thanks for the credit on the pic  I'm glad the pic helped you to track down the figs and get hold of some, they really are nice pieces.
I can't remember who the original sculptor was and it looks like the details were lost when Doc Thunder updated the initial forum post on the Phoenix site.
Darksoul did the officer/sarge head, torso, and sword arm, these were additional parts that he added when he took over the casting - the original casts (not by Darksoul but someone else but again I can't remember who it was) of the figures weren't great, although I seemed to have fewer bubbles in mine than some of the other recipients reported having.
Thanks for the credit on the image When the jungle fighters turn up I'll be posting of those too, and I still have the "cadians" unbuilt on my desk - it's taken me a while to trade enough to get all the lasgun arms needed to equip them all, and the next step will be to modify them all to turn the lasguns to bullpups; the rest of my built cadians all use Elysian weapons but that's an expensive path for a large force hence the converting for future models.
JB, I'll keep my eye on this blog as I'm interested in seeing what you do with the female figs.
And as to meltaguns, when you get around to working on them again, I ended up getting the FW models with respirators (melta and plasma), and then built the rest of mine using the Elysians meltaguns. The weapon pack gives you multiple meltas, plasmas, pistols, lasguns, and sniper rifles. This works out cheaper than the cadian or catachan command boxes as they only include 1 melta per box, although if you can make use of the rest of the box contents they may be a better option.
|
|
This message was edited 1 time. Last update was at 2009/05/27 08:16:57
|
|
|
|
|
2009/05/27 10:55:44
Subject: Re:Cadian 11th Mech Build, Convert, and Paint
|
|
Regular Dakkanaut
|
Great work, I love those tanks.
I have to say I agree with Blue Orphan.
Why not try something like this?
Take a bit off the front of the flamer casing, move the plasma part further down, shave off that little cylinder and place it over the top?
Might help to blend the parts in a bit more?
Automatically Appended Next Post:
Great Resin castings as well by the way. I've never tried casting before myself. How do you find it?
|
|
This message was edited 2 times. Last update was at 2009/05/27 10:57:34
|
|
|
|
|
2009/05/27 18:38:55
Subject: Re:Cadian 11th Mech Build, Convert, and Paint
|
|
Fixture of Dakka
|
Spack,
Thanks for the great pictures of DarkSoul's castings! I'm looking forward to seeing the new ones. Thanks also for the note about the Elysian weapons from FW. I'll take a look at them. If you are interested in seeing how another Dakkite handled Bullpups, check out Flinty's blog. I believe that he uses Hasslefree "Bullpup" style weapons with the normal Cadian arms. He also has some very nice vehicles and heavy weapon teams. All of his IG figures use heads from Iron Pig.
Gundam-Mecha,
Your photo edit makes sense to me. I will try that on my next plasma gunner. I don't know how long it will be before I get to him, but I will try out your suggestion.
As for resin casting, the idea came from seeing BrotherArgos' work. His Steel Legion are looking very, very nice. I intend to do a lot more to detail my Cadian veterans. That will mean using 20-30 infantry for experimentation but that's simple enough.
I finished building a new mold last night and took step-by-step photos for a tutorial, which I will post tonight. I like the Amazing Mold Putty far more than the Amazing Resin, but I will try pre-warming the mold (recommended in the instructions for small casts) to see if that helps the resin harden to a more desirable finish.
|
|
This message was edited 1 time. Last update was at 2009/05/27 18:40:17
The secret to painting a really big army is to keep at it. You can't reach your destination if you never take any steps.
I build IG...lots and lots of IG. |
|
|
|
|
2009/05/27 19:12:15
Subject: Re:Cadian 11th Mech Build, Convert, and Paint
|
|
Sacrifice to the Dark Gods
Birmingham, UK
|
JB wrote:If you are interested in seeing how another Dakkite handled Bullpups, check out Flinty's blog. I believe that he uses Hasslefree "Bullpup" style weapons with the normal Cadian arms.
I bought a pack of the Hasslefree pulse rifles and they're still sat in a bag, I much prefer the Elysian weapons and converted Cadian weapons (my rough first conversion will form the basis of my mass conversion push in the next few weeks). Flinty's do look pretty good with the weapons he used, but I still think they look a little flimsy compared to the heroic scale weapons all the other units in my army have.
Old pics of my Cadians are here (there's a pic of some cadians with elysian meltaguns in the last pic in the album, and a couple of pics of the Hasslefree pulse rifle next to IG and Elysian lasguns) - I've since added a Lightning and 3 more Valkyries (2 GW, 1 FW) for a total of 8 aircraft, and of course the female figures (I've got 50 in total, which will likely form a platoon or two), so my AirCav is building up quite nicely.
My "standard" infantry/armour IG army is made up of FW Death Korp, so these guys/girls are all just for use in my airborne lists
|
|
This message was edited 1 time. Last update was at 2009/05/27 19:15:44
|
|
|
|
|
|
|


