Switch Theme:

My Version of Flecktarn: Tutorial  [RSS] Share on facebook Share on Twitter Submit to Reddit
»
Author Message
Advert


Forum adverts like this one are shown to any user who is not logged in. Join us by filling out a tiny 3 field form and you will get your own, free, dakka user account which gives a good range of benefits to you:
  • No adverts like this in the forums anymore.
  • Times and dates in your local timezone.
  • Full tracking of what you have read so you can skip to your first unread post, easily see what has changed since you last logged in, and easily see what is new at a glance.
  • Email notifications for threads you want to watch closely.
  • Being a part of the oldest wargaming community on the net.
If you are already a member then feel free to login now.


Made in gb
Lone Wolf Sentinel Pilot


London, England

Hello!

In thanks to all the people who have helped me, I'm writing up a quick tutorial on a quick and easy camouflage called Flecktarn. I decided to do this because A. I'm featuring this on some models of my own, and think it's good to share ideas; and B. Guardsmen in general are boring. It's nice to spruce them up from time to time.

This is used a lot by German and Scandanavian Forces, and features, instead of tiger stripes or large splashes, or even geometric (Digital) DPMs, small dots.

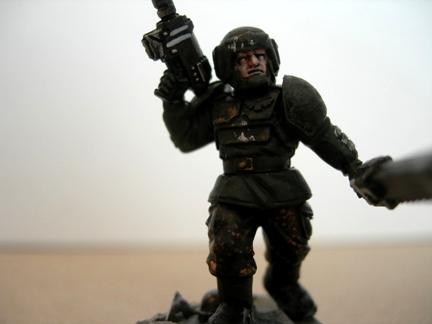
Here, have an example:


This is a nice, effective, good looking camouflage, and looks great upsized on tanks or jets.

Main Composition

Light Base -> Medium Tone -> Black Splotches -> Different Medium Tone.

Black & the 2nd Medium Tone can be interchangeable, however.

But be careful! The dots/splotches must be well defined! Try dipping just the tip in, then doing the patches. I find it helps to work this out on a piece of card before hand, then looking at examples next to the figure I want to apply it to, bearing in mind the scale difference.

A Few Examples

Woodland - (Personal favourite. It's also worth adding that a more vivid one can be acheived by adding a tiny bit of orange to layer 3.)

1. Camo Green + .5 Rotting Flesh,
2. Camo Green + 2 Rotting Flesh (Direct 2 stage layer for base.)
3. Dotty splodges of Graveyard Earth, medium Spaced,
4. Smaller dotty-er splotches of Chaos Black, spaced loosely,
5. Large splotches of Catachan green, Medium/Close spaced.

Urban A - (This gives a nice satisfying contrast from the dark grey -> light boney colour. Effective if last layer is less closely spaced.)

1. Codex Grey,
2. Codex Grey + .5 Rotting Flesh, (Base highlight again!)
3. Dotty splodges of Codex Grey + .5 Chaos Black, medium Spaced,
4. Smaller dotty-er splotches of Chaos Black, spaced loosely,
5. Large splotches of Rotting Flesh, Medium spaced.

Urban B - (Pretty much the same as before, different top layer)

1. Codex Grey,
2. Codex Grey + .5 Skull White, (Base highlight again!)
3. Dotty splodges of Codex Grey + .5 Chaos Black, medium Spaced,
4. Smaller dotty-er splotches of Chaos Black, spaced loosely,
5. Large splotches of Fortress Grey + .25 Skull White, Medium spaced.

(More when I have more time! )

~sA

My Loyalist P&M Log, Irkutsk 24th

"And what is wrong with their life? What on earth is less reprehensible than the life of the Levovs?"
- American Pastoral, Philip Roth

Oh, Death was never enemy of ours!
We laughed at him, we leagued with him, old chum.
No soldier's paid to kick against His powers.
We laughed - knowing that better men would come,
And greater wars: when each proud fighter brags
He wars on Death, for lives; not men, for flags. 
   
Made in us
Longtime Dakkanaut


Las Vegas

Do you have any models painted with this pattern yet? I see your IG in the gallery but no vehicles. I plan on using this for my Blood Axes and have the colors already picked out (for decent contrast but not too lurid) but it'd be great to see someone's models done to get an idea how it looks. Like the tutorial.

This message was edited 1 time. Last update was at 2009/04/19 05:11:38


Made in gb
Lone Wolf Sentinel Pilot


London, England

In used a muted, beaten up variant of this on my first Verdan model, Wronx.

Pictured:


I used a random version, and hard to see from the photo, but from memory it's something like:

1. VMC Medium Brown Camo Basecoat.
2. Washed with watered down Chaos Black.
3. Dotted with VMC Salmon Pink.
4. Dotted with VMC Ochre Camo.
5. Lightly washed with another Chaos Black tint.

Peace.

sA

This message was edited 2 times. Last update was at 2009/04/19 12:41:31


My Loyalist P&M Log, Irkutsk 24th

"And what is wrong with their life? What on earth is less reprehensible than the life of the Levovs?"
- American Pastoral, Philip Roth

Oh, Death was never enemy of ours!
We laughed at him, we leagued with him, old chum.
No soldier's paid to kick against His powers.
We laughed - knowing that better men would come,
And greater wars: when each proud fighter brags
He wars on Death, for lives; not men, for flags. 
   
Made in us
Ollanius Pius - Savior of the Emperor


Gathering the Informations.

<3 Smiling. This is EXACTLY the kind of color scheme I've been planning for my Guard, just with the camo done as jags rather than dotting.

   
Made in us
Incorporating Wet-Blending


Houston, TX

Interesting article. From painting WW2 SS I can tell you that you have to be careful with scale on this. To scale, the dotting would be undecipherable and it is easy to get too busy with this kind of patterning. Instead, you have to overscale the effect a bit and sometimes drop colors. I find that three or four color patterns work well and is quite quick for large numbers of troops. For example, for forest/foliage color base in an olive green, patch brown, then spot black and spot khaki. Switch the brown and green for and alternate woodland. You could easily sub in urban/fantasy colors for the green and brown and adjust the khaki to more of a white if necessary(blue and grey with white and black spotting for example, or maroon and brown for volcanic, or brown and khaki with black and white spotting for sandy/arid.)

-James
 
   
Made in gb
Lone Wolf Sentinel Pilot


London, England

Yes. The key here is to not stick to what you see as conventional. Pink, white, cream, and other otherwise outstanding colours fit in perfectly in a version of this camouflage.

And, to get the scale, I got a cocktail stick:


and I used it to put in the dots. If you want to go with a brush, you'll find yourself licking it every other dot to keep its point sharp, whereas you only need to change toothpick to change colour.

@ Kanluwen: That would work well. I'm planning on doing some sort of jags for my vehicles -- it's more like Splittermuster actually:


My reasoning was that the dots, apart from being scaleless, will be much harder to upsize for the large flat areas of a tank. Also, on a miniature, the geometry of the straight lines and the points can often get lost amongst the folds and lines of clothes and fatigues. It's also harder to define the jags, because it looks better (when scaled down) if it's outlined in black, or another contrasting colour.

The HM team didn't seem to fond of Camouflage, but threw some (quite odd) jags for the Studio's Kasrkin:


These are easier, as they're on the armour plates. (Lazy buggers.)

Anyway, good luck, I look forward to seeing other peoples' efforts, and how you interpret the camouflage of the 41st Millenium.

Peace.

sA

sA

My Loyalist P&M Log, Irkutsk 24th

"And what is wrong with their life? What on earth is less reprehensible than the life of the Levovs?"
- American Pastoral, Philip Roth

Oh, Death was never enemy of ours!
We laughed at him, we leagued with him, old chum.
No soldier's paid to kick against His powers.
We laughed - knowing that better men would come,
And greater wars: when each proud fighter brags
He wars on Death, for lives; not men, for flags. 
   
 
Forum Index » Painting & Modeling Tutorials
Go to: