| Author |
Message |
 |
|
|
|
|
Advert
|
Forum adverts like this one are shown to any user who is not logged in. Join us by filling out a tiny 3 field form and you will get your own, free, dakka user account which gives a good range of benefits to you:
- No adverts like this in the forums anymore.
- Times and dates in your local timezone.
- Full tracking of what you have read so you can skip to your first unread post, easily see what has changed since you last logged in, and easily see what is new at a glance.
- Email notifications for threads you want to watch closely.
- Being a part of the oldest wargaming community on the net.
If you are already a member then feel free to login now. |
|
 |
2009/05/08 02:42:07
Subject: Sculpting the Insaniak Way: Wreath Badges
|
|

[MOD]
Making Stuff
|
 Time for another tutorial...
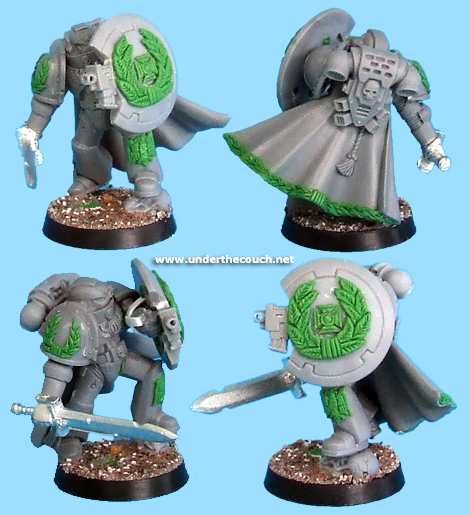
I decided to focus on another staple of Space Marine decorations: The Wreath.
Bestowed (according to the older background material) upon marines for bravery, it tends to feature quite a lot on characters, and so learning to sculpt the wreath from scratch can be rather handy for customising or creating your own characters.
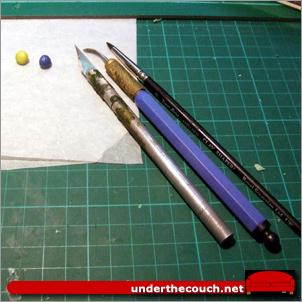
First off: Tools. You'll need putty (obviously), your sculpting tool of choice (shown here are a standard sculpting tool and a wax carver, which has a rubber tip that is just perfect for green stuff work where you don't need particularly hard edges) and a hobby knife.
A cup of water is also handy for dipping your tools before working the putty. It's best to keep metal tools wet (not dripping, but just lightly damp) otherwise the putty tends to stick to them. Some sculptors lubricate their tools with petroleum jelly (vaseline) or the like, but I find water generally does the job.
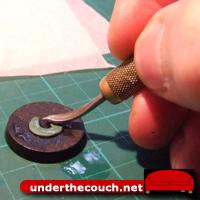
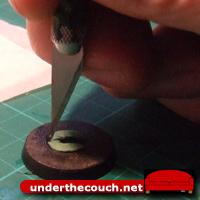
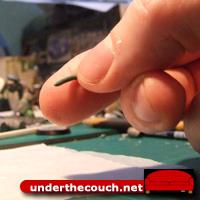 Step 1:
Start by rolling a small sausage of putty between your fingers. The thickness you want depends on how you want the wreath to look. A thinner sausage will get you a skinnier wreath, while a thicker one will get you a bulkier looking wreath.
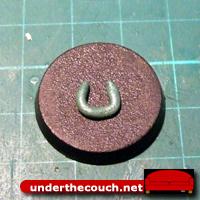 Step 2:
Bend the sausage around into a horseshoe shape, and press it lightly into place. You might want to try practicing a few on scrap plastic or a spare base to get the hang of it before you try sculpting one in place on a miniature.
 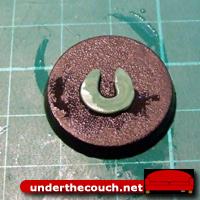 Step 3:
Flatten out the horsehoe with the flat back of a sculpting too. As you push the putty down flat, you can shape it slightly so that it retains a rough (but much fatter) horseshoe shape. You want the end result to be fairly flat and an even thickness.
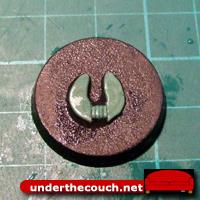
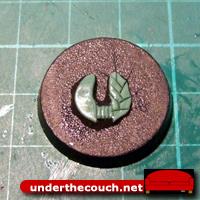
 Step 4:
Take your knife, and cut two vertical slices into the putty at the bottom of the curve, as pictured. Don't cut right through... just deep enough so that the cuts are clearly visible.
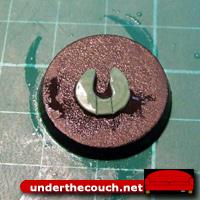
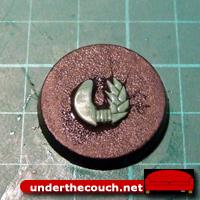
 Step 5:
Next, cut across horizontally at the top and bottom between the two vertical lines to form the shape for the wreath's binding. This time, you do want to cut right through, as you need to pull away the excess putty at the top and bottom.
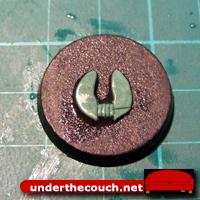
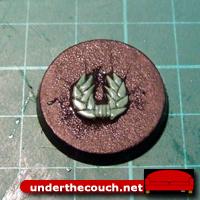
  Step 6:
Score some more vertical indents into the binding piece with your knife. I generally do one down the middle, and then another either side of that first line.
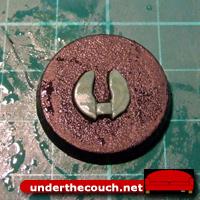
Finish these lines off by holding your knife vertically, and scoring lightly into the top and bottom of the binding.
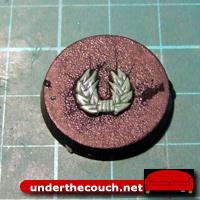
 The proto-wreath with binding completed.
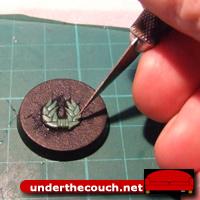
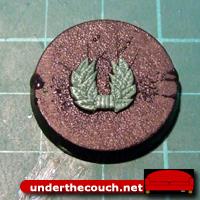
 Step 7:
Next, use your knife to score a line horzontally, from about halfway up the binding and out to the edge of the wreath. This forms the first leaf.
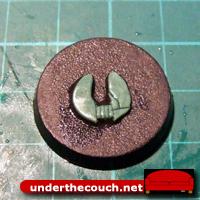 Step 8:
Form the second leaf by scoring another line starting about a third of the way along the first leaf, and out to the inside edge of the wreath
 Step 9:
Repeat this procedure on alternating sides until you reach the top.
 Step 10:
You'll have a small triangle of putty at the top of the wreath 'arm' once you have formed all of your leaves. This can be cut away with the knife. Then, work your way down the leaves, cutting away the protruding corners where the side of each leaf touches the tip of the previous leaf.
 Step 11:
Repeat steps 7-10 on the other side. Try to get the leaves to more or less match up with the first side, but don't worry if they're not perfectly symmetrical. So long as both sides have the same number of leaves, and they're more or less the same size and shape, it will look fine.
 Step 12:
Now take your knife and score a small line running up the centre of each leaf, from the base and extending about two-thirds of the length of the leaf. This gives a slightly stylised impression of the veins on the leaves.
 At this point, you have a basic wreath. For small wreaths, or for a basic larger wreath, this is finished.
If you want a slightly more detailed wreath, however, there's one more step:
 Use the tip of the knife to score small lines running out from the centre vein on each leaf. These should angle forwards, and extend about halfway to two-thirds of the way out to the edges of the leaf.
You may find afterwards that you need to go back and tidy up or deepen the cuts on the edges of the leaves.
And that's it: One wreath.
Edit - spelling
|
|
This message was edited 6 times. Last update was at 2009/05/31 13:04:14
|
|
|
 |
|
2009/05/08 04:58:18
Subject: Sculpting the Insaniak Way: Wreath Badges
|
|

Automated Rubric Marine of Tzeentch
|
This is even better than the last. Great success!
|
|
|
|
|
2009/05/08 08:11:50
Subject: Sculpting the Insaniak Way: Wreath Badges
|
|
Pyromaniac Hellhound Pilot
|
If I have anything to say about it, you're going to get some money to spend at Wayland games. Although, there's still lots of time for more entries I suppose....
|
It's better to simply be an idiot, as no one can call you on it here. -H.B.M.C.
Cap'n Gordino's instant grammar guide:
"This is TOO expensive." "I'm going TO the store, TO get some stuff."
"That is THEIR stuff." "THEY'RE crappy converters."
"I put it over THERE." "I'll go to the store THEN."
"He knows better THAN that." "This is NEW." "Most players KNEW that." |
|
|
|
|
2009/05/08 09:00:55
Subject: Sculpting the Insaniak Way: Wreath Badges
|
|

Junior Officer with Laspistol
|
I like it more then the one you did on skulls.(atleast I think it was you)
I am hoping to see more of your great sculpting tutorials.
|
"I refuse to join any club that would have me as a member."-Groucho Marx
|
|
|
|
|
2009/05/08 10:04:00
Subject: Sculpting the Insaniak Way: Wreath Badges
|
|

Servoarm Flailing Magos
|
Yes, post all your sculpting secrets. I need them!
|
http://www.teun135miniaturewargaming.blogspot.com/ https://www.instagram.com/teun135/
Foxphoenix135: Successful Trades: 21
With: romulus571, hisdudeness, Old Man Ultramarine, JHall, carldooley, Kav122, chriachris, gmpoto, Jhall, Nurglitch, steamdragon, DispatchDave, Gavin Thorne, Shenra, RustyKnight, rodt777, DeathReaper, LittleCizur, fett14622, syypher, Maxstreel |
|
|
|
|
2009/05/08 12:15:22
Subject: Sculpting the Insaniak Way: Wreath Badges
|
|

Battlefortress Driver with Krusha Wheel
|
Again, genius and yet so simple.
|
|
|
|
|
|
2009/05/08 12:26:12
Subject: Sculpting the Insaniak Way: Wreath Badges
|
|
Longtime Dakkanaut
Springhurst, VIC, Australia
|
Outstanding, this worked well for me and i suck at greenstuff, thankyou!!
|
|
|
|
|
|
2009/05/08 13:16:38
Subject: Re:Sculpting the Insaniak Way: Wreath Badges
|
|
2nd Lieutenant
|
more please  its an inspiration to change the appearance of models and it makes easy veterans!
|
*Ex Username: Gutteridge*

|
|
|
|
|
2009/05/09 16:20:40
Subject: Sculpting the Insaniak Way: Wreath Badges
|
|

Did Fulgrim Just Behead Ferrus?
|
That one is great! Keep up making those kick ass sculpting tutorials!
|
|
|
|
|
|
2009/05/14 10:30:32
Subject: Sculpting the Insaniak Way: Wreath Badges
|
|

Boosting Space Marine Biker
|
this make my tutorial suck big time.
|
[http://www.youtube.com/user/sneekygreenman] |
|
|
|
|
2009/05/14 12:28:22
Subject: Re:Sculpting the Insaniak Way: Wreath Badges
|
|
Bounding Assault Marine
|
Great tutorial, love it, just wish I could do it!
Do you have problems getting green stuff to actually adhere to your models. Everytime I try modelling stuff directly onto my models it refuses to stay put...I even tried using pro-create with more or less the same results. I really am a sculpt-virgin despite my 20 year love afair with modelling and converting...I normally just use putty for gap filing so if you can point me at some good basic BASIC tutorials (or even post one here) that'd be fantastic.
|
|
|
|
|
2009/05/14 12:52:36
Subject: Re:Sculpting the Insaniak Way: Wreath Badges
|
|
Monster-Slaying Daemonhunter
|
Cypher871 wrote:Great tutorial, love it, just wish I could do it!
Do you have problems getting green stuff to actually adhere to your models. Everytime I try modelling stuff directly onto my models it refuses to stay put...I even tried using pro-create with more or less the same results. I really am a sculpt-virgin despite my 20 year love afair with modelling and converting...I normally just use putty for gap filing so if you can point me at some good basic BASIC tutorials (or even post one here) that'd be fantastic.
Make sure both surfaces are dry, if that doesn't work just use more yellow in the mix.
|
|
|
|
|
|
2009/05/14 16:00:33
Subject: Re:Sculpting the Insaniak Way: Wreath Badges
|
|
Bounding Assault Marine
|
I will give it a go...I can only get better. 
|
|
|
|
|
2009/05/14 18:23:10
Subject: Sculpting the Insaniak Way: Wreath Badges
|
|
Scuttling Genestealer
|
YAY! Now I can make my veterans look...veteran-y
But this thread shows why I hate you sculpting vets so much...you make it look so  -ing easy!
|
|
This message was edited 1 time. Last update was at 2009/05/23 20:27:10
I know. I'm evil.
I saw weird stuff in that place last night. Weird, strange, sick, twisted, eerie, godless, evil stuff. And I want in.
|
|
|
|
|
2010/05/13 09:00:43
Subject: Sculpting the Insaniak Way: Wreath Badges
|
|
Snord
|
 NICE
|
 
 Kreig - 2850 pts Kreig - 2850 pts
 Skaven - 3450 pts Skaven - 3450 pts
 Orks - 1950 (pro painted) Orks - 1950 (pro painted)
|
|
|
|
|
2010/05/13 21:57:12
Subject: Sculpting the Insaniak Way: Wreath Badges
|
|
Bewitched Vassal of Angmar
|
Awesome tutorial 
|
|
|
|
|
2010/05/14 23:26:15
Subject: Sculpting the Insaniak Way: Wreath Badges
|
|
Last Remaining Whole C'Tan
|
How do you get the GS from the base to the mini while still soft, so it adheres to the shape of whatever, without deforming it?
|
 lord_blackfang wrote: lord_blackfang wrote:Respect to the guy who subscribed just to post a massive ASCII dong in the chat and immediately get banned.
 Flinty wrote: Flinty wrote:The benefit of slate is that its.actually a.rock with rock like properties. The downside is that it's a rock
|
|
|
|
|
2010/05/15 07:01:31
Subject: Sculpting the Insaniak Way: Wreath Badges
|
|
[MOD]
Making Stuff
|
The base was just a convenient surface to sculpt on for the tutorial. You would normally just sculpt it straight onto the miniature.
|
|
|
|
|
|
2010/05/15 12:08:57
Subject: Re:Sculpting the Insaniak Way: Wreath Badges
|
|
Last Remaining Whole C'Tan
|
I'm going to try this out later this morning, I think.
|
lord_blackfang wrote:Respect to the guy who subscribed just to post a massive ASCII dong in the chat and immediately get banned.
Flinty wrote:The benefit of slate is that its.actually a.rock with rock like properties. The downside is that it's a rock
|
|
|
|
|
2010/05/15 12:44:48
Subject: Re:Sculpting the Insaniak Way: Wreath Badges
|
|
Boosting Black Templar Biker
Australia, NSW, Blue Mountains
|
Nice tutorial. An even better avatar... 
|
DOUBLE RAINBOW ALL THE WAY ACROSS THE SKY!! WHAT DOES IT MEAN?!  |
|
|
|
|
2010/05/15 12:56:51
Subject: Re:Sculpting the Insaniak Way: Wreath Badges
|
|
Decrepit Dakkanaut
|
Wonderful tutorial, thank you!
|
|
|
|
|
|
2010/05/16 19:51:03
Subject: Sculpting the Insaniak Way: Wreath Badges
|
|
Focused Dark Angels Land Raider Pilot
|
Is it possible to see this on a model? Great tut, by the way!
|
|
|
|
|
2010/05/16 21:22:59
Subject: Sculpting the Insaniak Way: Wreath Badges
|
|
[MOD]
Making Stuff
|
|
|
|
|
|
|
2010/05/17 00:20:20
Subject: Sculpting the Insaniak Way: Wreath Badges
|
|
Focused Dark Angels Land Raider Pilot
|
Woah. That's awesome.
|
|
|
|
|
2010/05/17 02:53:40
Subject: Re:Sculpting the Insaniak Way: Wreath Badges
|
|
Decrepit Dakkanaut
|
That cloak trim is to die for.... I've GOT to try that!! Thanks for blazing the way insaniak... that's just mind blowing!
|
|
|
|
|
|
2010/05/21 19:11:02
Subject: Sculpting the Insaniak Way: Wreath Badges
|
|
Yellin' Yoof on a Scooter
|
I'm just starting to sculpt with Green Stuff. This tutorial was really educational for me. Thanks for posting it.
|
|
|
|
|
|
2010/05/22 00:28:49
Subject: Sculpting the Insaniak Way: Wreath Badges
|
|
Focused Dark Angels Land Raider Pilot
|
I may have to try this now..... I just got a 36 inch roll of Green Stuff today. That's right.... 36 inches! I don't mean to advertise but buy from Greg Dorrance:
http://www.gregdorrance.com/kneadatite-green-stuff-ribbon-epoxy-brick-p-1166.html
It's really cheap, really good quality, and Greg is great to deal with.
|
|
|
|
|
2010/05/26 14:37:01
Subject: Re:Sculpting the Insaniak Way: Wreath Badges
|
|
Annoyed Blood Angel Devastator
|
Very nice tutorial - i love wreaths but you never get enough of the plastic ones, will defo be sculpting my own in future!
Thanks.
-Jaxn
|
 2000+ pts 2000+ pts
 2000+ pts 2000+ pts |
|
|
|
|
|
|