Switch Theme:

Free Handing for Dummies!  [RSS] Share on facebook Share on Twitter Submit to Reddit
»
Author Message
Advert


Forum adverts like this one are shown to any user who is not logged in. Join us by filling out a tiny 3 field form and you will get your own, free, dakka user account which gives a good range of benefits to you:
  • No adverts like this in the forums anymore.
  • Times and dates in your local timezone.
  • Full tracking of what you have read so you can skip to your first unread post, easily see what has changed since you last logged in, and easily see what is new at a glance.
  • Email notifications for threads you want to watch closely.
  • Being a part of the oldest wargaming community on the net.
If you are already a member then feel free to login now.


Made in us
Bounding Dark Angels Assault Marine


U.S.

Free Handing for Dummies!

Before I jump right into the painting there are some things that are very crucial to making freehand work on your model. Some things to consider first off are Placement, Size, Color, and Subject.

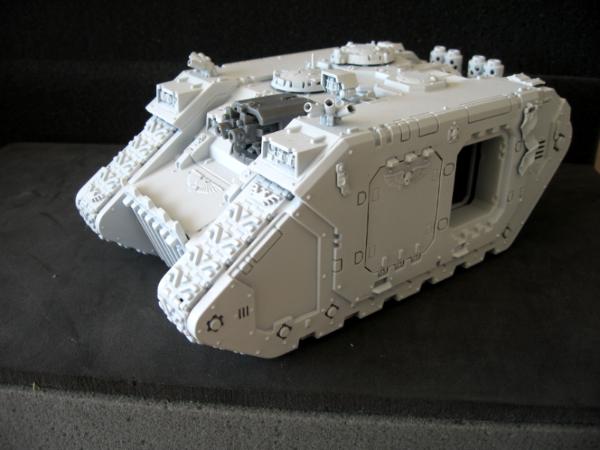
The Canvas: Otherwise known as the model I’ll be working with through this tutorial. Simply put, a land raider.


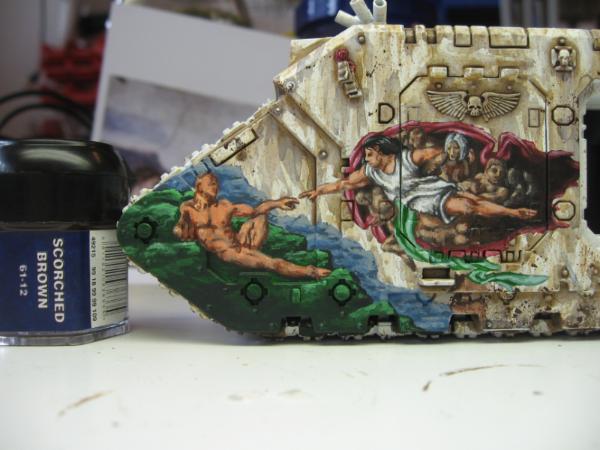
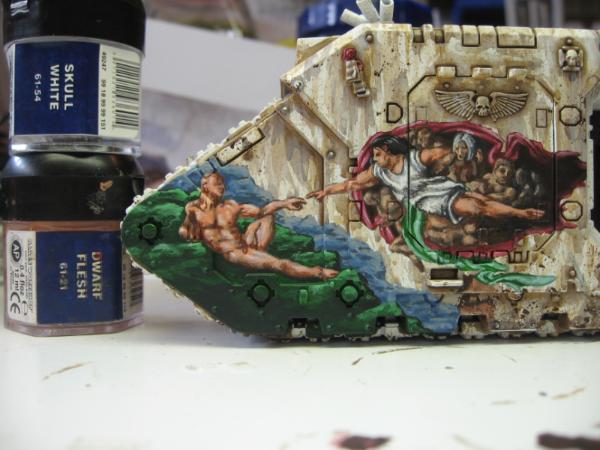
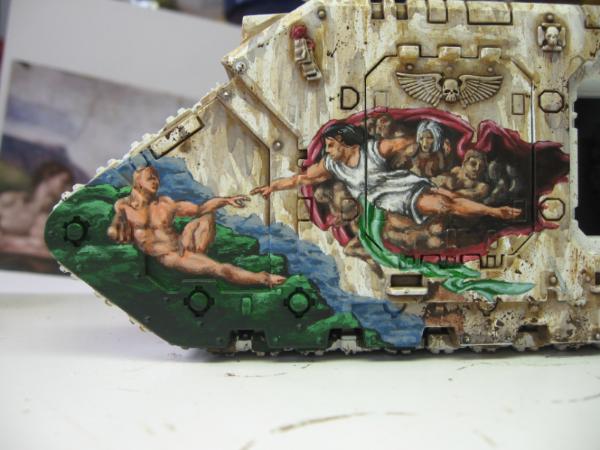
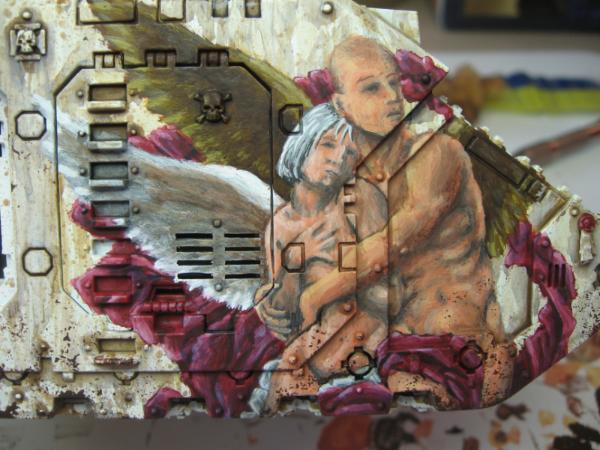
Subject: A loose topic as everyone has different opinions of what is aesthetically pleasing. Basically make sure the freehand you want to do won’t feel out of place. For my land raider I chose to do a 40k fluff based mural based on existing artwork. (I changed Adam into a Marine and God into the Emperor) My chapter’s paint scheme is Cracked marble with deep red accents. The chapter has a renaissance art/cathedral theme, thus the subject matter fits.
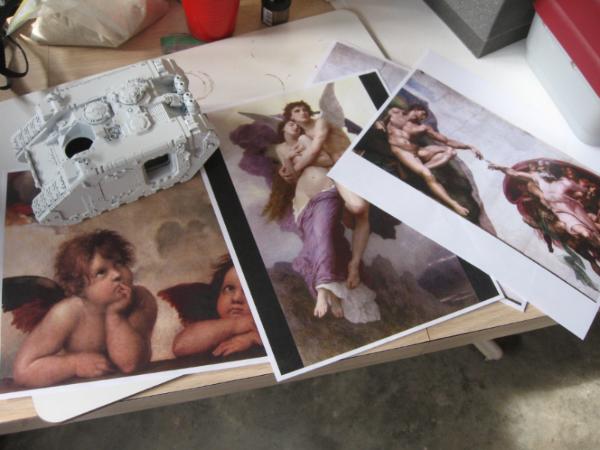


Size: Pretty simple really. If the artwork is too small it will not get noticed and if too large it will draw too much attention to the mural and not add to the model as a whole.

Placement: Like other art you generally don’t want it placed right in the middle of the surface area. For instance, you wouldn’t want the free hand piece to be placed right in the middle of the land raider wall, as it will not create interest or motion. Find a good placement that makes your eyes move around to see different aspects of the model.

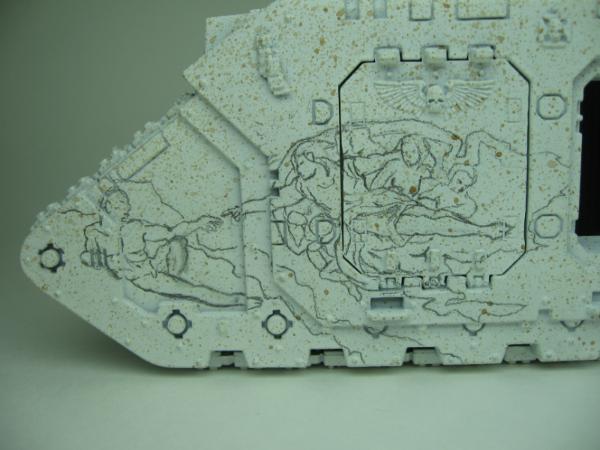
Transfer: First paint your vehicle in its base coat or how ever you plan to paint it. Leave the weathering step out as dirt and bullets are indiscriminant against your mural and will get on your fancy freehand without a care. This makes the over all piece feel more realistic. For transferring your idea onto the surface there are two good ways to accomplish this. 1) Simply use a number 2 pencil and draw it on there as I did below. (Use a chalk pencil if it’s a dark base coat.) 2) For the less artistically inclined you can print off your mural or freehand to scale on a printer and take carbon paper or “coffee paper” and place it in between the printed copy and the surface and trace the shape onto the surface.


Color: This is a rather large subject. I would suggest looking up tutorials or theory on the color wheel and light sources and how to pick colors and so on and so forth. It will easily pay off if you can pick great colors that accent the piece you are working with.

Painting: Now that you have your idea sitting there on the canvas starring at you it can look like a daunting, sometimes impossible task. In the Following I will show you how I deal with this problem by taking the “big picture” and breaking it into small bite size pieces at a time.

Starting to Paint: Wheeeee!!!!....... sigh….

First bite size task I decided to start with the grassy hill the marine will be sitting on. It’s generally a good idea to start with the back of the piece and start making your way to the top layer. I painted the hill dark angels green. Done!
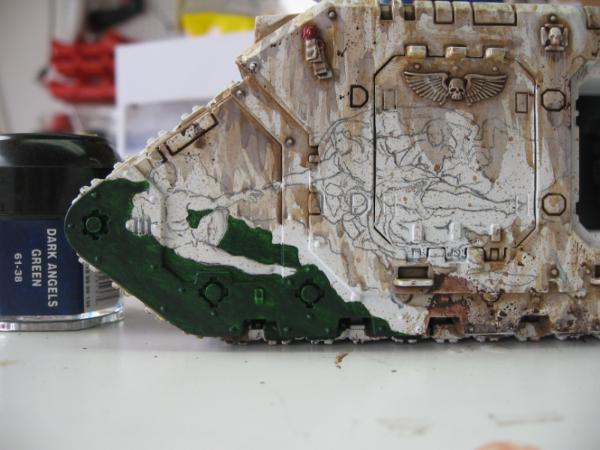


In this step I used snot green to cover almost all the dark angel green layer only allowing certain really dark spots to remain untouched. You should always have your reference picture or inspiration near by to know where to add the highlights or shadows.
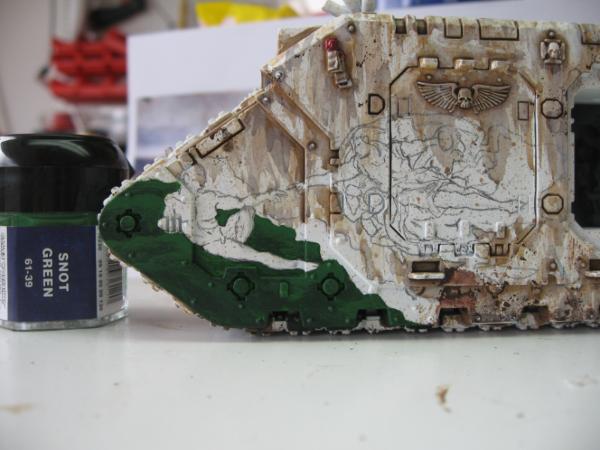


Next I blended skull white and snot green 50/50 and added a highlight to the existing layer just as you would do to an infantry model picking up on the high points.
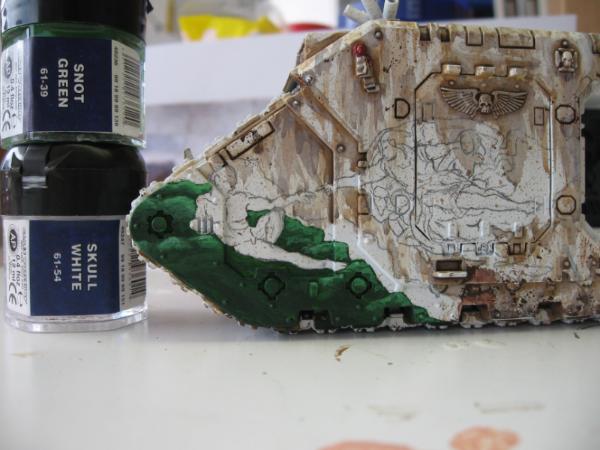


I added a 50/50 mix of black ink and dark angels green to the bottom part of the hill as it goes out of focus. I also added some under the marine for a shadow.
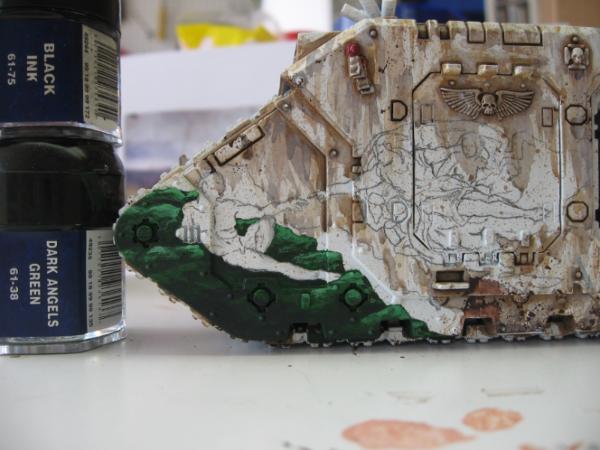


On the hill in the distance I made a 50/50 mix of regal blue and fortress gray and laid down the base coat.
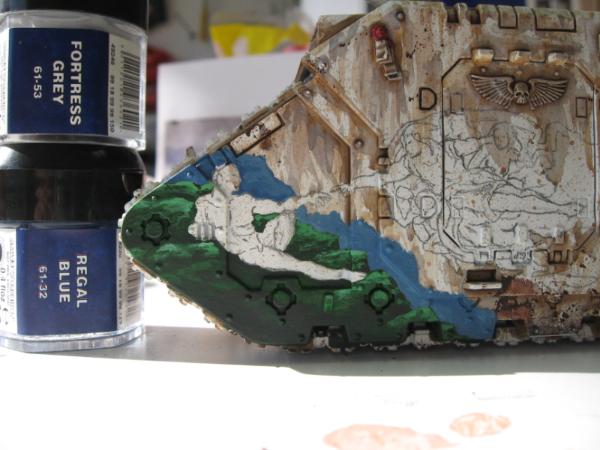


I added pure fortress gray highlights to the background hill in a similar fashion as the green hill.
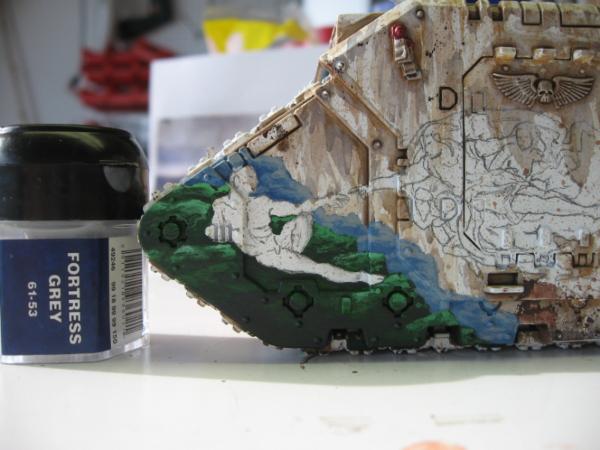


And back to the shading step I made my 50/50 mix of regal blue and fortress gray and added a touch of black ink to it and filled in the shadows of the distant hill.
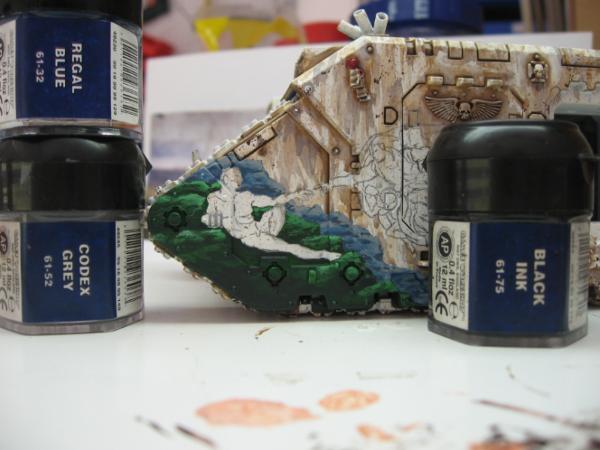


Keeping in my earlier philosophy of painting from the back up, I went to the darkest part of the fabrics surrounding the Emperor and company and painted it a scab red and black ink mixture.
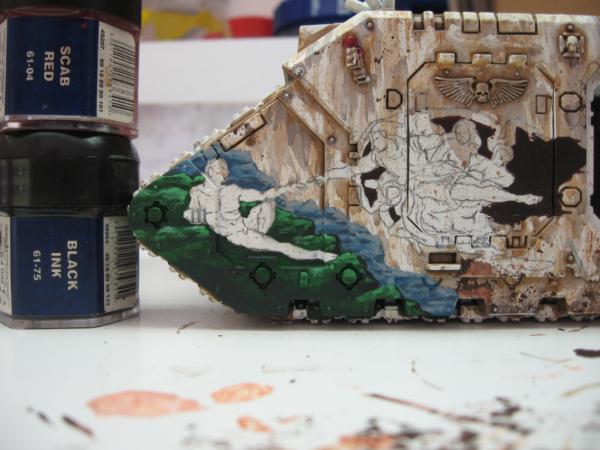


The edge of the fabric rolling up I painted pure scab red.
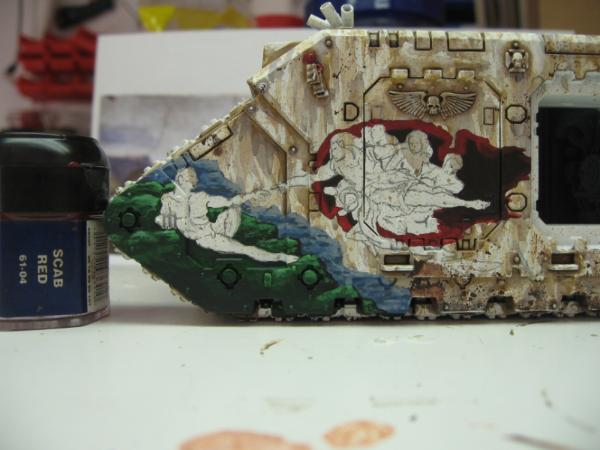


I now added a mix of 1/3 skull white to scab red to add highlights while referencing the original picture to see where the folds were.
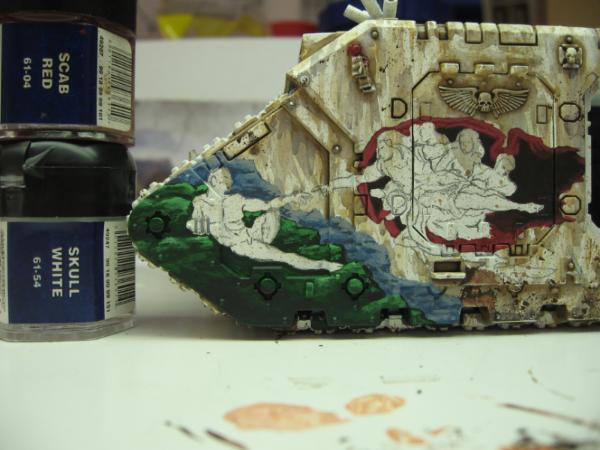


I now use 50/50 skull white and scab red mix to further highlight the folds constantly checking my reference picture.
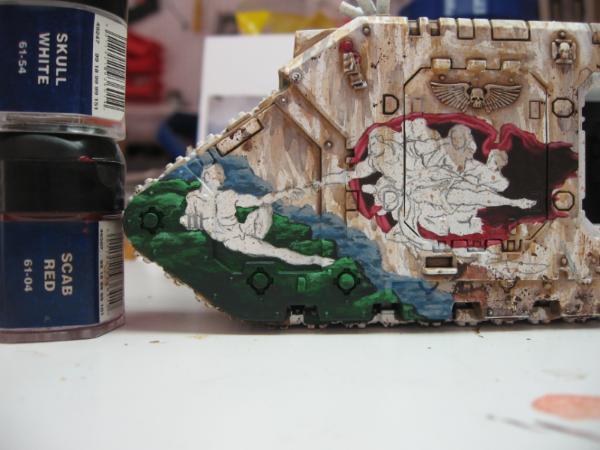


I now use a pure skull white with a very fine tip brush to pick the brightest points in the fabric.
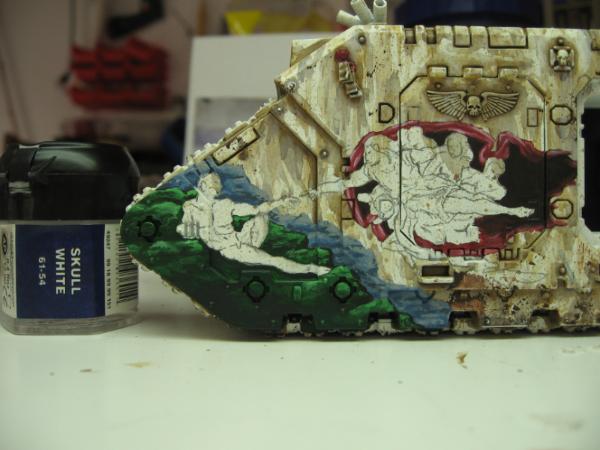


Next I apply a 50/50 mix of scab red and black ink to the deep part of the folds that light can not get too.
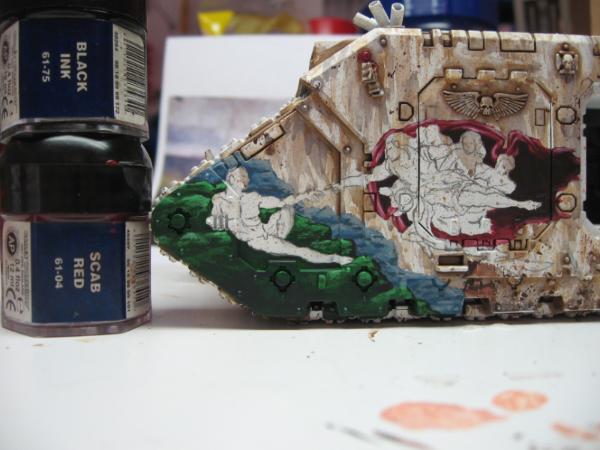


Now to start on the “Retinue” of followers hanging out behind the Emperor. I want their skin tones to be darker and more muted than that of the Emperor not to steal the focus away from his holiness. I start with their base coat, a 50/50 mix of dwarf flesh and codex gray.
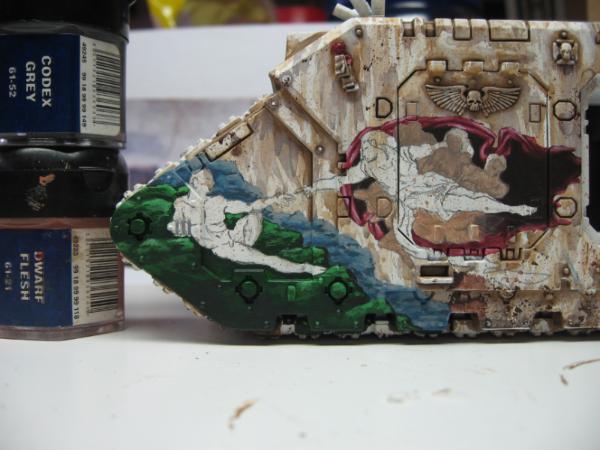


I added the first shadow to the “Retinue” by adding more codex gray to the previous mix. Then I added black ink to this mix and added fine lines to separate arms and heads and such to add definition.
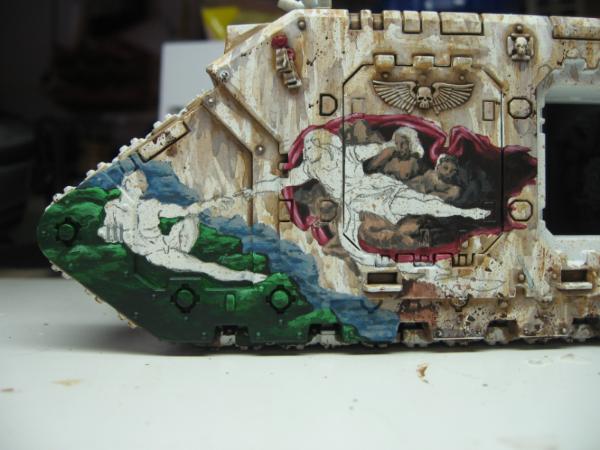


Now I apply scorched brown to blend the skins in with the dark back ground of the fabric their fading into.
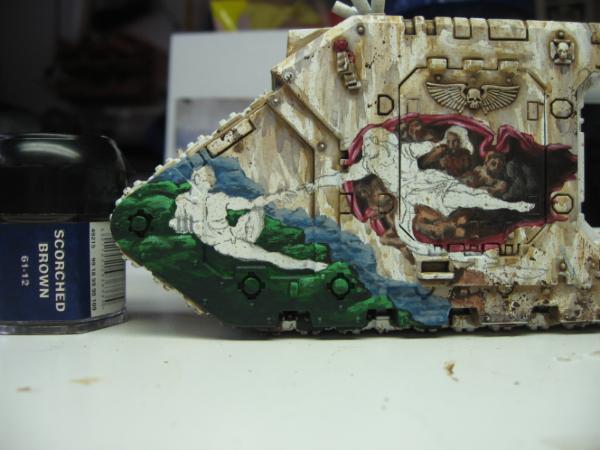


The only highlight I add is elf flesh and only pick up on the highest part of their muscle to keep them mostly faded and muted in the background. Notice how I don’t paint the sister of battles hair. This is because it will be hanging over the Emperors arm so it will technically be the closest color set.
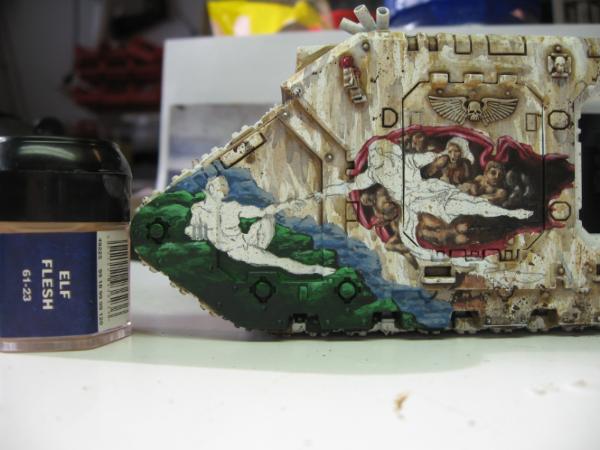


Next I start on the silk banner hanging down from the Emperor. I set the base with a 50/50 mix of goblin green and ice blue making a jade color.
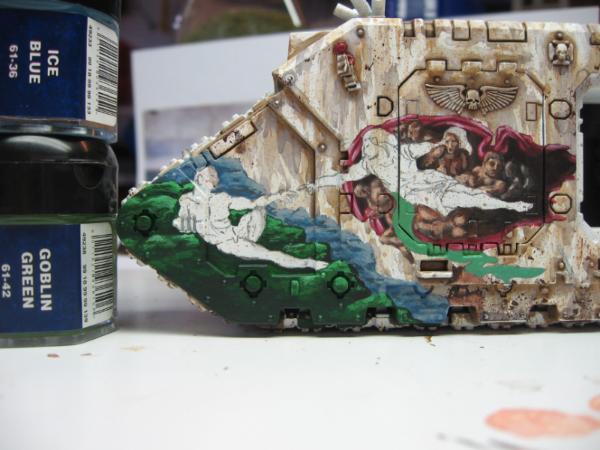


I add the highlights using the same jade color with white mixed in and the shadows with the previously used jade color and adding dark angels green using the technique used on the out rim of the red fabric.
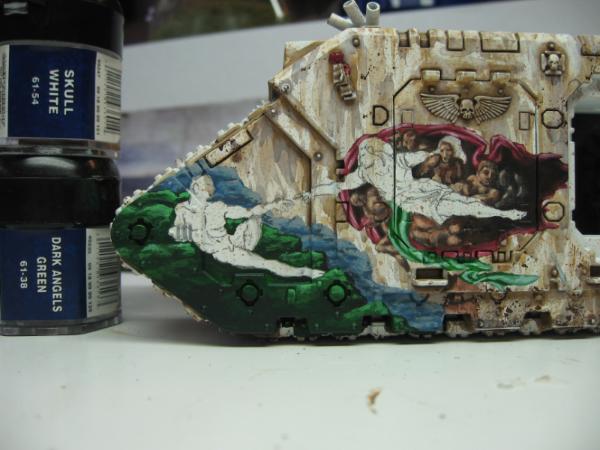


The Emperor! Base coat in dwarf flesh! Grrrrr!
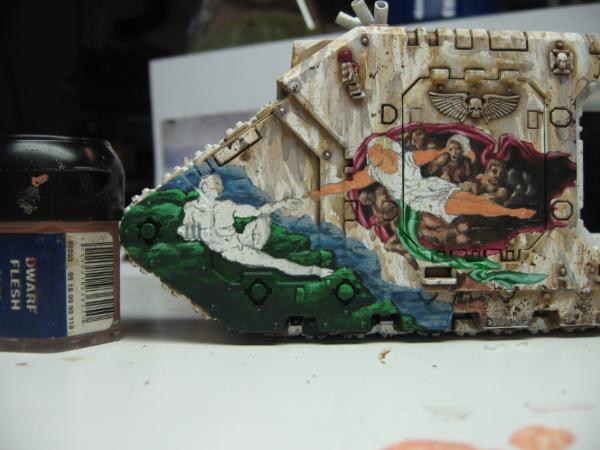


Using the picture as a reference I find and pick out the first layer of shading with 50/50 codex gray and dwarf flesh.
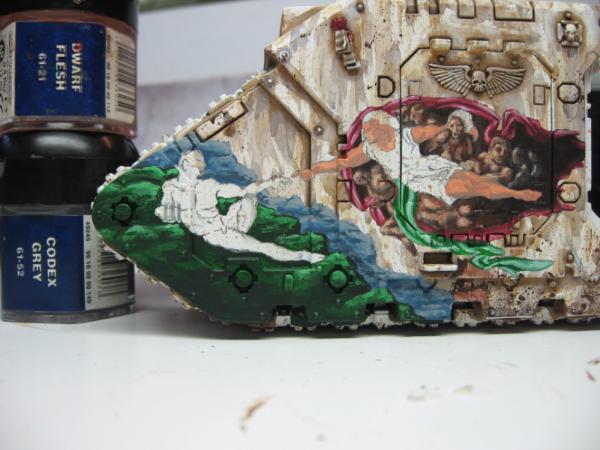


I now use scorched brown to pick out the darker shadows in the skin.
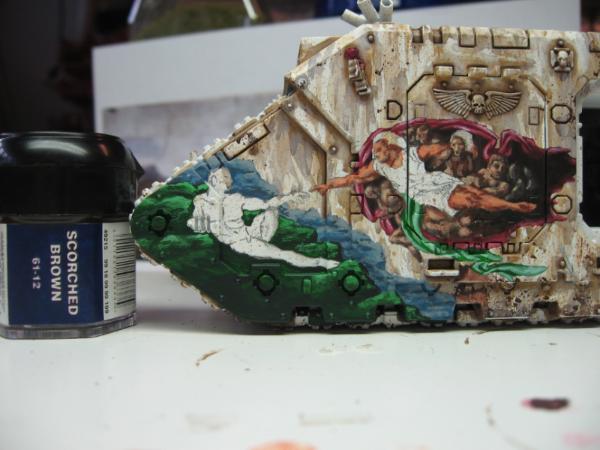


Now I pick out the highlights by again referencing to my picture and applying a 50/50 mix of dwarf flesh and skull white.
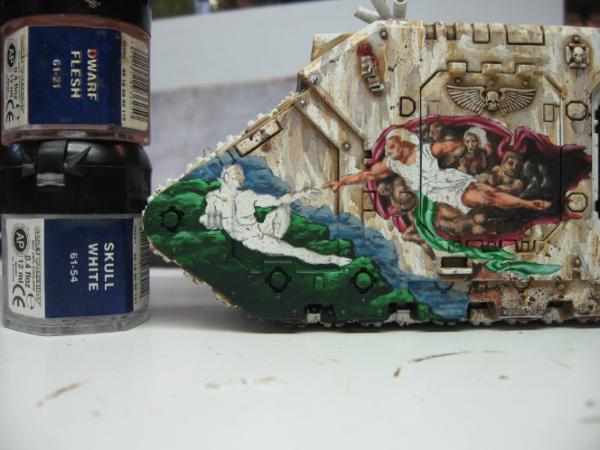


Next the robe and sisters hair will both be done using the same techniques as the Emperors skin. (Only with gray’s instead of flesh.) Basing fortress gray, shadowing codex gray, deep shadow, black ink/fortress gray, highlight with skull white/fortress gray and final highlight with skull white.
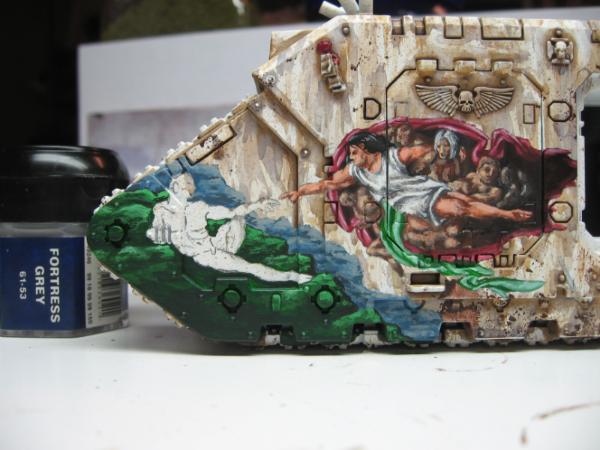


I will now work on the Marine using the same technique as the Emperors skin
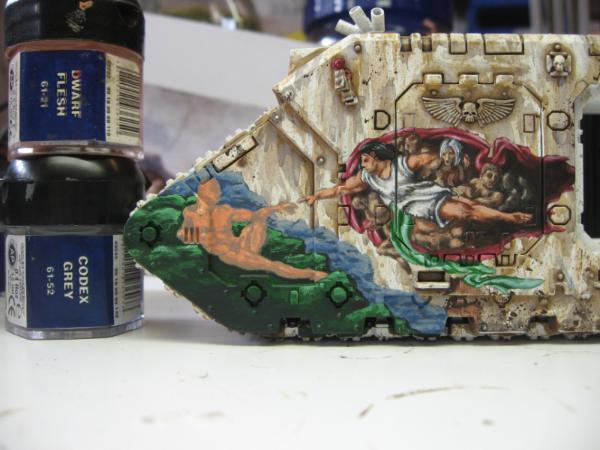


Now to an unusual step I enjoy. I apply washes to the freehand to add extra detail the model will bring out. (Like around rivets, creases, and textures.) I mostly stuck to washing a color over the color used in each “bite” or color step. Thrakka green over the hill and so on. I then mix it up a bit by adding earth tone washes like devlun mud, ogryn flesh, badab black, and gryphon sepia to areas to tone down the individual colors to look more earthy or natural to blend it all into one cohesive piece instead of 7 different colored sections. I also used gryphon sepia to turn the robes of the Emperor into a gold color.
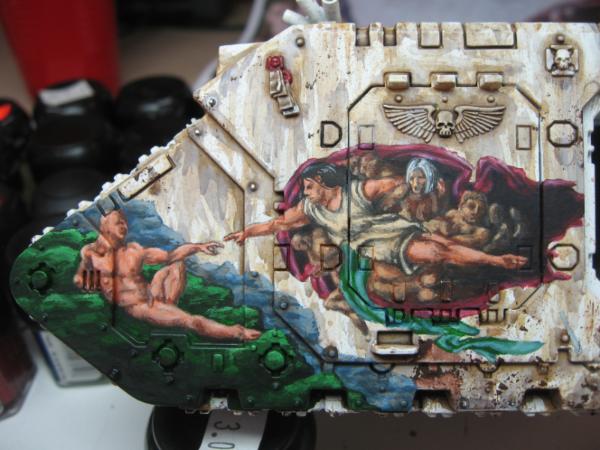


I’ve yet to add the weathering to this mural because I’m not done with this section of the model. However here is another example of how a finished freehand/mural looks with the weathering on top to bring it into the rest of the piece as a whole.


To Summarize

First get an idea, place it where it is aesthetically pleasing and transfer it onto your based model.

Pick the freehand apart into bite size chunks comprised of different colors or levels of depth.

Start from the back of the piece and work forward.

Once into a one color section, simply paint the whole section with the base color allowing the pencil lines to show through, add your first shadow with a modified version of the base color, add deep shadow using a darker color or an even further modified version of the base paint, apply the first highlight using a brighter version of the base, add the brightest highlight by using a lighter color or modifying your first highlight.

After all sections are painted apply colored washes where needed and earth tones on anything that you fancy. This will change your “sections” from being bland and expanding the hues of the color and making it less flat.

Add weathering on top of the freehand to bring it all into coherency.

Finally, clear coat it in a flat or lusterless paint.


And that is how to paint freehand murals… the littleboyblues way!

(Hope that is helpful... that took me 3.5 hours to do! haha!)

This message was edited 1 time. Last update was at 2009/05/21 04:08:13


Made in us
Servoarm Flailing Magos


Alaska

This....... is..... EPIC! Great writeup of your stellar freehanding skills, LBB. This will definitely get my vote for the month's best tutorial, mainly because I think your stuff is just so freakin' cool, and I wish I had that sort of artistic talent!

http://www.teun135miniaturewargaming.blogspot.com/ https://www.instagram.com/teun135/
Foxphoenix135: Successful Trades: 21
With: romulus571, hisdudeness, Old Man Ultramarine, JHall, carldooley, Kav122, chriachris, gmpoto, Jhall, Nurglitch, steamdragon, DispatchDave, Gavin Thorne, Shenra, RustyKnight, rodt777, DeathReaper, LittleCizur, fett14622, syypher, Maxstreel 
   
Made in ca
Long-Range Ultramarine Land Speeder Pilot


Portsmouth, UK

Wow! Nice step by step that even I could follow.

Beautiful work.

Stubby


Made in au
Owns Whole Set of Skullz Techpriests


Versteckt in den Schatten deines Geistes.

I said it in your other thread, but your stuff is simply amazing. I can't say much more than just how fantastic it is.

Industrial Insanity - My Terrain Blog
"GW really needs to understand 'Less is more' when it comes to AoS." - Wha-Mu-077


Made in au
Killer Klaivex


Forever alone

Cripes, I don't think any of us will ever be able to do that.

People are like dice, a certain Frenchman said that. You throw yourself in the direction of your own choosing. People are free because they can do that. Everyone's circumstances are different, but no matter how small the choice, at the very least, you can throw yourself. It's not chance or fate. It's the choice you made. 
   
Made in ca
Calculating Commissar


Kamloops, B.C.

so wait.... You're telling me this tutorial will allow me to finally draw a mural on the side of my Land Raider depicting Jeebus eating a Burrito while shooting zombies in the face?

Kick-friggin-ass!

Dakka Code:
DR:80+S++G++M++B++I+Pw40k00+D+++A++/areWD-R++T(M)DM+

U WAN SUM P&M BLOG? MARINES, GUARD, DE, NIDS AND ORKS, OH MY! IT'S GR8 M8, I R8 8/8 
   
Made in us
Whiteshield Conscript Trooper


Chicago

Amazing work and great tutorial layout, not that I can do it at this stage. But defiantly going to save this so one day I might get some details like this on my russes and/or valks.

Feel free to share anymore of your wisdom! Love it!!
   
Made in za
Junior Officer with Laspistol


South Africa

Very nicely done tutorial and a well painted mini, thanks

This message was edited 1 time. Last update was at 2010/04/22 16:26:04


"I refuse to join any club that would have me as a member."-Groucho Marx
 
   
Made in gb
Krazy Grot Kutta Driva


England.

My Goodness
Amazing painting.
Really good tutorial unachievable for me but still really good
   
Made in us
Furious Raptor


Earth

Amazing


This message was edited 1 time. Last update was at 2009/05/21 18:16:12


1500 vs 1500 -40k
2500 vs 2500 -fantasy


Made in us
Fixture of Dakka


Lancaster PA

Most Excellent! The Emperor will be pleased!

Exalt!


Woad to WAR... on Celts blog, which is mostly Circle Orboros
"I'm sick of auto-penetrating attacks against my behind!" - Kungfuhustler 
   
Made in us
Longtime Dakkanaut


wow

In the dark future, there are skulls for everyone. But only the bad guys get spikes. And rivets for all, apparently welding was lost in the Dark Age of Technology. -from C.Borer 
   
Made in nl
Did Fulgrim Just Behead Ferrus?


The Netherlands

An art normally only for those amazing French painters now is available for the rest of us!

Thank you!

Bits Blitz Designs - 3D printing a dark futuristic universe 
   
Made in gb
Horrific Hive Tyrant


London (work) / Pompey (live, from time to time)

This is the shame of playing orks :(
no chance to really free hand with em.

However, im starting a small deathwing army, so i may try out your way of doing it as it seems to be fething great.

Suffused with the dying memories of Sanguinus, the warriors of the Death Company seek only one thing: death in battle fighting against the enemies of the Emperor.  
   
Made in nl
Did Fulgrim Just Behead Ferrus?


The Netherlands

I posted a link of this tutorial over at the Troll Forged forums, one of our members named Nightsword had the following to ask:

Brilliant, but still bloody difficult. I'll give this a try one day, but it still requires practice and the ability to control the d**n paint. It would have been cool if he'd described his paint consistencies though. I'm not on Dakka, but would you mind asking? Unless i missed it of course

Bits Blitz Designs - 3D printing a dark futuristic universe 
   
Made in us
Bounding Dark Angels Assault Marine


U.S.

I thin my paints with a little water. (I've yet to try flow medium, although I've heard nothing be great things by great painters) I thin my paints some where in between paint and milk. The most Important think to keep in mind is, as the paint is slightly runny to not keep too much on the brush. You don't want a fully loaded brush or it will come out too watery on the model. I use sable hair art brushes from art stores they'll run you about 6-10 USD a piece. I'm learning new techniques for models almost every day. I've only been painting models for about 2 years so I still have a lot to learn.

Littleboyblues
   
Made in gb
Decrepit Dakkanaut


Swindon, Wiltshire, UK

You sir are a god of miniature freehand.
   
Made in us
Sacrifice to the Dark Gods


You all gawk at this and say you cant do it. Why the hell are any of you reading these forums? . . . Well why? To get an idea of how to do what you never could by yourself. I am an awful painter, and have tried free-handing myself. What the hell im going to give free-handing another try following this advice, though i know ill probably wreck the paint and model as a whole. I pity the lot of you unwilling to try and fail, and the learn from those failures.

This message was edited 2 times. Last update was at 2009/05/26 16:02:13


Heart of Iron. Soul of Steel. Eyes Burning Bright with horrid Zeal.

Iron Warriors
Farsight Enclave
Da' Bluest Boyz Der' Ar' 
   
Made in se
Perturbed Blood Angel Tactical Marine


Really amazing tutorial. Just.. wow.

And @ Lorgar: Noone said they would never be able to do it. I see a few comments saying that at their current level it's not possible to get that good results, but thats not the same.

May the mass*acceleration be with you

Irony - means sort of like Iron 
   
Made in us
Sacrifice to the Dark Gods


And @ Lorgar: Noone said they would never be able to do it. I see a few comments saying that at their current level it's not possible to get that good results, but thats not the same.


Forgive me as now that i reread what i said it comes across a little harsher than i meant it. Please inform me as to some form of chastisement to repent for my actions.

This message was edited 1 time. Last update was at 2009/05/27 16:40:49


Heart of Iron. Soul of Steel. Eyes Burning Bright with horrid Zeal.

Iron Warriors
Farsight Enclave
Da' Bluest Boyz Der' Ar' 
   
Made in gb
Monster-Slaying Daemonhunter


Yeh I think to be fair the title should be less 'freehanding for dummies' and more 'freehanding for pople with a certain amount of existing skill.' Other than that it's a great tutorial.

   
Made in us
Death-Dealing Dark Angels Devastator


Saltillo, MS

I'm going to give this s try with my scratchbuilt Thunderhawk, but maybe not this big..If that works out, I'll try it with my Land Raiders to make them unique, right now, they are identical.
   
Made in us
Junior Officer with Laspistol


The eye of terror.

Shas'o Lorgar wrote:
And @ Lorgar: Noone said they would never be able to do it. I see a few comments saying that at their current level it's not possible to get that good results, but thats not the same.


Forgive me as now that i reread what i said it comes across a little harsher than i meant it. Please inform me as to some form of chastisement to repent for my actions.


20 Hail Dorns, and 30 Our Emperor on His Golden Thrones.

Why did the berzerker cross the road?
Gwar! wrote:Willydstyle has it correct
Gwar! wrote:Yup you're absolutely right

New to the game and can't win? Read this.


Made in us
Been Around the Block


Very nice tutorial! I will have to work on something like this on some plasticard to see if I can pull off anything before trying it on an actual model!


Made in nz
Chosen Baal Sec Youngblood


The wonder of man are limitless
you are a god amoung mere mortals
really cool tut
cheers

2500pt
2500pt
2000-3000pt
2000pt
new amy
 
   
Made in us
Black Templar Recruit Undergoing Surgeries


this is so helpfull. when you paint the tanks with the washs do you turn the tank on its side to reduce running or do you let it dry standing normal?

Burn the body.
sear the soul.  
   
Made in us
Fluttering Firewyrm of Tzeentch


Great tutorial. Even without that level of painting skill, I feel I've gotten some really useful tips.

One problem for me is that my freehand drawing is awful. I can treat it like a color-by-number once it's on the model though and maybe get passable results. Can anyone think of a good way to transfer something from from, say, paper to the model? I'm trying to come up with a way I could either get an insignia from a codex or get one of my friends' drawings (got a few who can actually draw) transferred on so I can paint it from there.
   
Made in us
Raging Ravener


Daemon infested warp gate

Uh i think i hers jesus crying bacause of your land raider's beouty
too bad i couldnt do that

TheCyben: Seriously though, I'm not advocating GW to model any Boosh characters. If they have to pick one, it would have to be Tony Harrisson... but that would be an outrage.
 
   
Made in au
Stormin' Stompa


YO DAKKA DAKKA!

Damned awesome, I already Gallery voted this but didn't realise there was a thread to go with it. The second painting... the raised bolts/rivets on the tank look like some sort of terrible pox... heheh.
   
Made in us
Serious Squig Herder


Your painting skill is phenomenal!

Not to offend anyone - but am I the only one who finds renaissance-ish type paintings on a tank to be a little silly and out of character for the 40k universe?

I could maybe see the Sisters of Battle doing something like that... but Space Marines strike me as too "War and prepare for War" to care about art.

Kudos on the murals though, me thinks you should strive for bigger canvases
   
 
Forum Index » Painting & Modeling Tutorials
Go to: