Preparation Part 1 - The Plan:
Always plan your terrain projects. I have a little worksheet that I plan everything with, even if it is just a rock on a base. Plans are awesome and keep your work to a minimum.
This is the plan I sketched for this project:
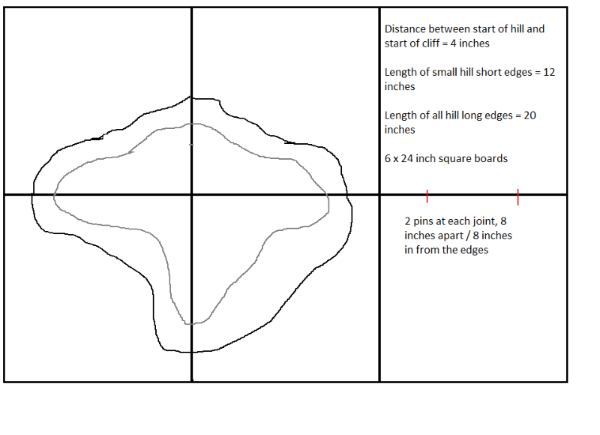
The
RoB board has 6 2"x2" tiles, 2 of which are flat, 2 have short quarter hills and 2 have long quarter hills. The long edges are 20" long, the short hill edges are 12".
Preparation Part 2 - The Materials:
(Boards here are sold in metric sizes. 600x1200mm is standard and is very slightly smaller than 2'x4'. Multiples of 2
ft are what you are looking for, so I'll do some weird semi-imperial semi-metric quoting of sizes)
• 6 2x2
MDF boards. I used 16mm thickness (5/8" or something) to match the rest of my terrain, though 12mm or even 9mm would work fine. Buy this as big as you can transport home, and cut it to size yourself. I would actually NOT recommend getting it cut at the store: this caused no end of hassle for me when things were cut too short. This will form the base-board.
• 1 2'x4' 3mm (1/8")
MDF board. This will be used to reinforce your hills.
• 1.20 m / 4
ft of 8mm dowel - (or 6mm or 4mm depending on what thickness of baseboard you get). This will be used as pins to stop the boards sliding from each other whilst playing.
• 2 2'x4' 25mm (1 inch) polystyrene sheets. Blue/Pink sheets are better, but very difficult to find in Australia. I just use the white beaded stuff. TIP: If looking for pink/blue stuff, search for 'Styrofoam brand' or 'Foamular brand' for better results.
• Filler. I use powdered stuff that I mix with water, called Polyfilla. This can be helpful to smooth out the hills.
• PVA Glue
• Bark, rocks and slate. For doing the cliffs with.
A quick trip to Bunnings (my favourite local discount hardware / planet construction warehouse) netted me all the
MDF, dowel, filler and glue for $75. The polystyrene I got twice the amount I needed for $25 - so put the cost to $13. I get my foam from Rockingham Foam + Upholstery, however, Clark Rubber is a national chain that supplies 2'x4' sheets and its reasonably easy to find a store near you. Bark and small rocks came from the local park.
Preparation Part 3 - The Tools:
Assuming you don't have any of the following, and for some reason can't beg, borrow or steal them, you can get away with buying only a Jigsaw. Buy a jigsaw. They're fantastically useful. A hot wire cutter is near essential, and you can make one of these yourself for almost no cost.
• A jigsaw. The one i'm using was reputedly an expensive on in its day: perhaps because it ran on electricity rather than steam. You can buy something equivalent to this for $20 from KMart - although when I replace this one, you can get fairly decent ones from Bunnings from $35.
(From left to right)
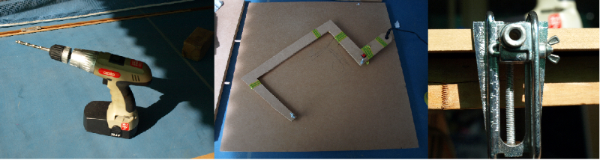
• Drill. Again, can be bought for incredibly cheap. Will be used to put the 'pins' in.
• A hot wire cutter. Almost essential for working with polystyrene. I made this one myself for $5 using some leftover
MDF, a old transformer from some computer speakers, and a switch/some wire from Dick Smith (RadioShack equiv)
• Dowelling jig. Can range from $20 to over $200, aim for the cheaper end of the range. This device makes putting pins in so quick easy that it is almost essential for that stage, though you can skip it if you want to spend 10x the amount of time on that step.
• Drill bits: get one the exact size of the dowel you need to use, or (if your dowelling jig will take it) 0.5mm bigger. I used an 8mm bit. If you're not using a jig, get a small bit (2mm) and a large bit (dowel size + 0.5mm)
• Some clamps. Don't buy these in plastic, and don't buy big ones you don't need.
• Sandpaper
• Pencil, Permanent marker, steel ruler, toothpicks.
• Plunge Router with mitre bit. Not strictly necessary, but I used it in the very last step to add extra details.
Again at Bunnings, this would cost you $150 IF for some reason you don't know a single person who owns a single power tool. And really, it's an investment, and I really wouldn't chalk this up as 'price of my terrain board'.
On the other hand, I only needed to buy a drill bit and some clamps, I walked away relatively unscathed for a mere $30.
Wow that's probably the longest tutorial introduction ever, but I'm being thorough.
Construction Part 1 - The Baseboard:
Take your
MDF board and cut it to size

It's that simple.
I would recommend buying the biggest boards you can possibly take home and cutting it yourself. The guys at Bunnings at least aren't big on accuracy which caused my no end of problems when i tried to demonstrate 'you can get this cut at Bunnings for free'....
In case you're having trouble cutting it at home:
You want these to be 2ft square. I had to use 600x600mm, which is about half an inch shy of 'real' size. Considering that our current game tables aren't even straight along the edges this is a big improvement.
Use the clamps and some spare
MDF boards to set up a rig like this:
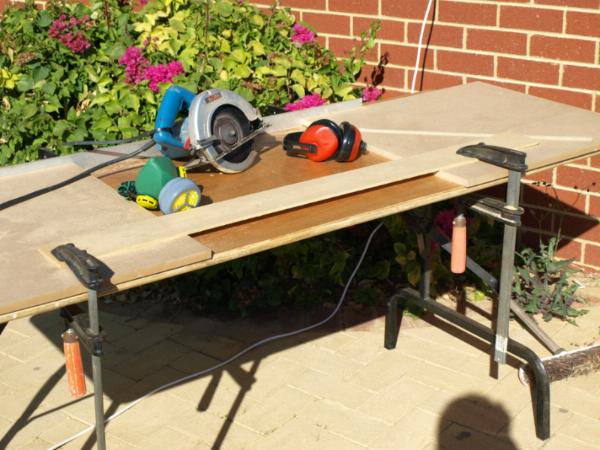
Lay a straight-edge metal bar (or spare
MDF board if you don't have any handy) along the back.
Place 2 spare pieces of timer/
MDF 2
ft apart with one edge on the guide at the back.
Clamp a guide on top of these pieces, leaving such a distance between the forward edge of the guide and the closest edge of your cutting blade that the distance from the metal bar to the saw is exactly 2
ft.
Plant a bougainvillea bush (can be skipped if short on time)
You'll notice I'm using earmuffs (always a good idea when working with power tools), and a filter mask. You don't need to go that fancy with a filter (a cheap medical-style mask is fine) but its a good idea to not breathe in
MDF particles. Also, a circular saw makes the cutting easier, but a jig-saw is perfectly fine.
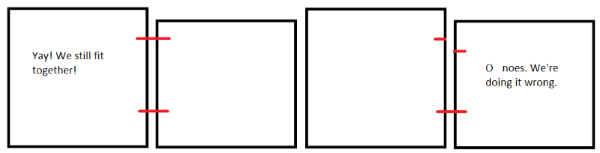
Next you need to drill in holes for your positioning pins. Put these approximately 8 inches in from each corner. HOWEVER, measure in 8' from one corner, mark for the hole, and measure 8' from that mark to the next mark. Just in case one of your boards comes out smaller, this saves you from the situation below if you measure in from each edge:
Then use your nifty dowelling jig to perfectly place the holes. I highly recommend this tool, it cuts so much time down its unbelievable. Simply line up the notch on the jig with the mark you just made: make sure the depth is set correctly: and drill into guide. I would also recommend using some tape or rubber band around your drillbit to make sure you don't go in too far. If you DONT splurge on a dowelling jig, make sure you measure precisely how far down from the top face you need to drill. Use a very small drill bit (2mm or so) first to 'pilot' the hole - mistakes made with the small bit are easier to fix than mistakes made with a large one!
It helps at this stage to mark the upper face of each board. Just write UP on it in permanent marker. That way you know which side to stick everything to and you don't get height differences between boards later on.
Third step is to cut your dowel to length. Before you cut it, give it a sand with some rough grit sandpaper. Do this to make sure that the dowel will slide easily in and out of the holes you just drilled. They still obviously won't have any lateral movement, but taking them out can be a pain otherwise.
Cut your dowel to lengths of 2x your drill depth, with the jigsaw. My dowel length came out at 50mm (2 inches).
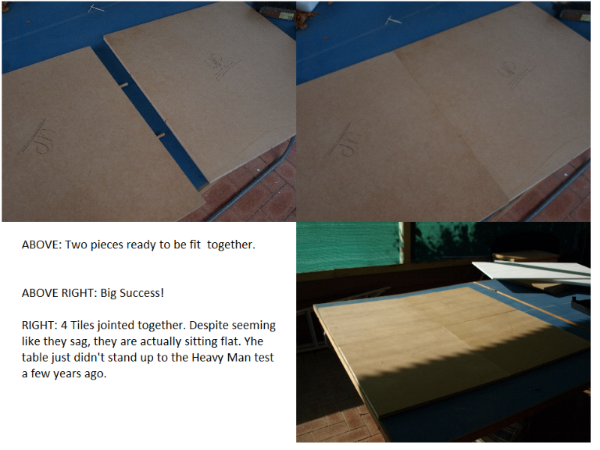
Now for a test fit:
 Construction Part 2 - The Hill Templates:
Seeing as i make my terrain with the white polystyrene, it can take a beating sometimes. I like to reinforce all of my bases and sides of quarter hills with
MDF board so that it doesn't chip away.
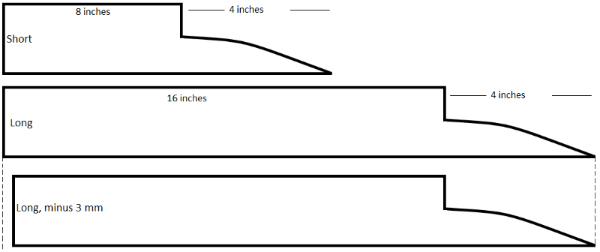
I set up another cutting rig and cut 8 strips of 5cm (2 inch) tall, 3mm thickness
MDF. I then came up with a rough design on one of them for the silhouette of the hill: I called this one the master and used it to trace out the same design onto the other boards.
Then it was a simple matter of using the jigsaw again to cut these designs out. You need to cut 6 lots of the LONG side, and 2 lots of the SHORT side. Then, select 2 of the LONG pieces, and trim 3mm off their back edge to get the LONG MINUS 3 piece. This is needed so that when you join the 2 sides together, you don't get one side longer than the other.
In the end you should have 4 LONG pieces, 2 LONG MINUS pieces and 2 SHORT pieces, like so:
Keep your master piece and use it to trace the outline onto the edges of a piece of polystyrene. Due to the design of the
RoB board, I built up both layers of the hill separately: one larger layer of which the majority was gently sloping hillside, and a smaller, higher altitude layer which had most of the rocky cliff faces.
Construction Part 3 - The Hills:
They say a picture says a thousand words. That means 9 pictures, plus some text explaining it... WHAT!! OVER 9000?!
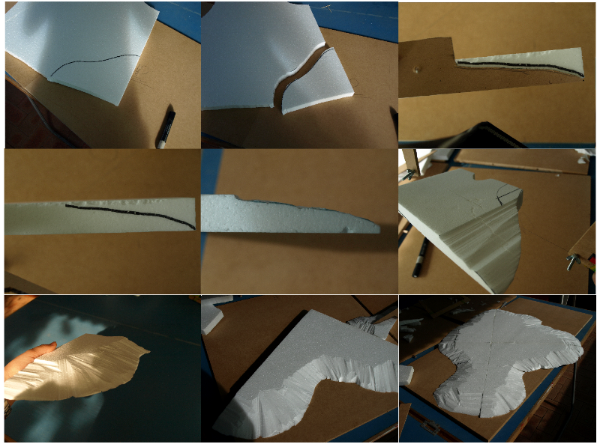
1) Trace the outline of the base of the hill onto your polystyrene sheet. Use your templates for the sides to make sure they have the correct length.
2) Cut this out with the hot wire cutter. If this is your first time using a cutter, they are amazing, but it might be best just to play around with a few scrap bits of foam to get the hand of what speed you need to move at and how to do the cuts.
If you make the hill too big, you'll probably need to cut it in half and join in back together later. Instead of just doing a straight cut out to the edge, cut a little jigsaw-type divvy (see the hill in pic 6) that will let your pieces line up easier later.
3+ 4) Trace the outline of the sloping part of your template onto the polystyrene
5) Cut it with the hot wire cutter. One reason why I made my scrappy cutter was to get one with a wide enough mouth to do shallow hills. You'll find that small cutters really won't work for shallow angles: find either a hot knife, or make your own

.
6) Use the hot wire cutter on a slight angle to cut gently it into a gently sloping hill. Anything less than 30 degrees is good: any more and models start falling over.
7) You'll end up with one hill like this...
8) And then this...
9) And number 9 is the end result you're aiming for.
Use your next bit of polystyrene sheeting to cut out the tops of the hills, after you get a rough idea of what sizes they need to be.
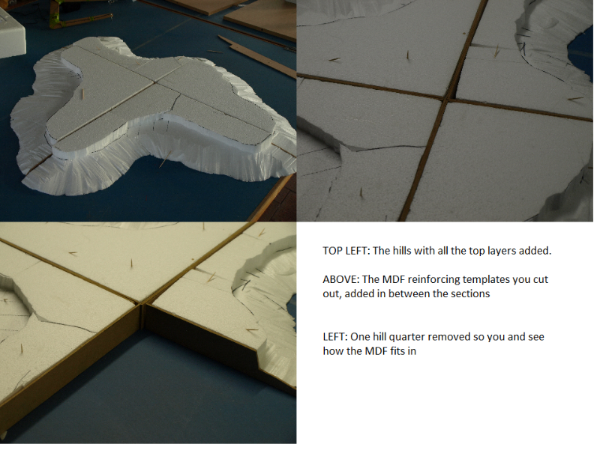
This shows the hills with their top layers added:
By now you should have the hang of using your cutter, so I shouldnt need to explain how to get these shapes.
You can see how I made up the top layer with scrap pieces of polystyrene that don't fit exactly together: we'll fix that later, but i ended up using only one and a half sheets of polystyrene, giving me more for other projects. You can also see how i used toothpicks pressed through the polystyrene to hold it all together for this photo!
Next step: glue it all to the baseboard. This requires lots of that white PVA glue, and some heavy/immovable objects are useful for keeping the
MDF sides upright whilst gluing. But then again, you've been gluing stuff since you were 4 years old, you shouldn't need a tutorial on that!
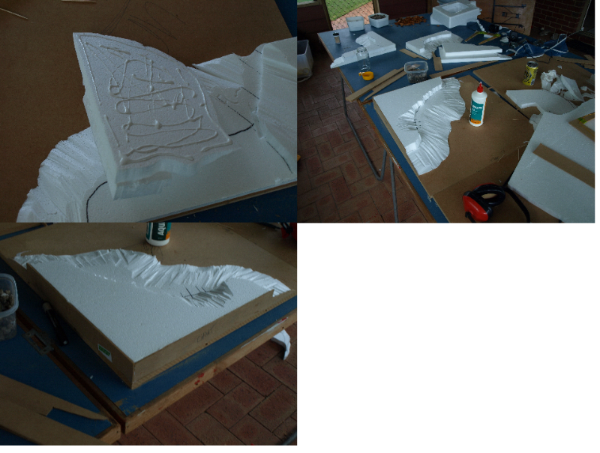
You can see how the
MDF panels we cut earlier are stuck to the outside edges of the hills. This serves 2 purposes.
1) It protects the corners and edges from being chipped and damage with use
2) It makes sure the sides meet smoothly and evenly when you put the boards together.
Construction Part 4 - Plastering:
Next step is to use the filler plaster to smooth out the hills.
Mix together your plaster in some plastic or glass container with an old knife. This cup cost me $50 from the casino (if you get my drift), but an empty jam jar is fine

. Make sure you follow the mix ratio exactly - i've been a victim of wanting to add too much water to mine which has had disastrous consequences.
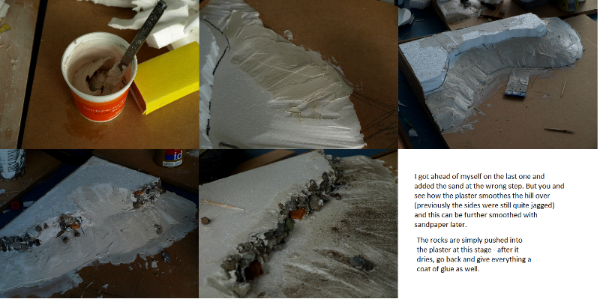
Then use either a small scrap piece of
MDF or a cheap plastering scraper ($1 each from Bunnings) to smooth it over your hill. The plaster I use sets hard within 1 hour (well, 30 mins in summer or 2 hours in winter) so there is plenty of time to work on it. Do one hill at a time, so you don't waste any filler.
At this stage, I add rocks and bark to the cliff so that the plaster sets over it. Use your favourite rock-imitation material. I'm not overly happy with the finish on mine and may redo it with slate or cork. But you get the general idea of what needs to be done.
Once the plaster is dry, you can sand it back smoother.
My last step was to give the entire hill section a coat of PVA glue and a light sprinkle of sand.
Construction Part 5 - Detailing the flat boards
This is where I use the plunge router. This is just adding extra detail that can also be recreated using thick card. I like using the router tho as it 'sinks' the terrain in, giving a perfectly flat finish.
The coolest feature of the
GW Realm of Battle board, in my opinion, is the rocky terrain in the ground. I wanted to recreate that on mine, which is a little difficult as everything is made from reasonably sturdy
MDF. However, there is no problem that cannot be solved by precise application of more power tools!
First step was to trace on the board the rough outline of the stones I wanted. The board will probably end up with lava flowing in the cracks to match my chaos army (but that's another article). I made sure to have plenty of big stones, and very small stones where they meet on the ground.
You could possibly adapt this method to drawing designs of paving stones or something similar.
Next, I turned on the router, pushed it down and traced over all my drawings. The result? very small channels criss-crossing the board, in the shape of stones.
Pictures again show what I'm talking about
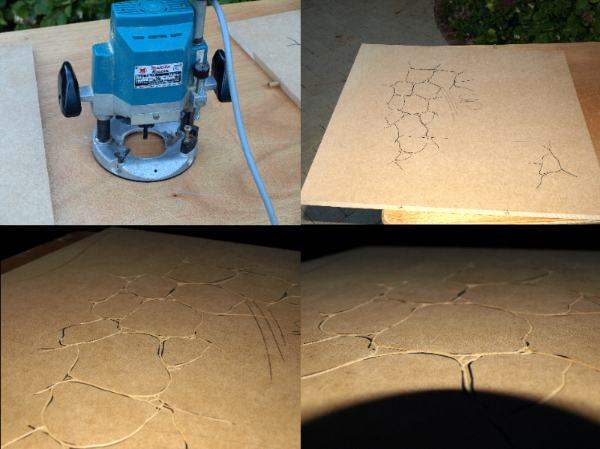
The channels are up to 2mm deep/2mm across (3/32 of an inch or something) - deep enough
I used a router with a 45 degree miter bit (ie a pointy cutting bit) and a plunge range between 0-~2mm.
You can see how the channels differentiate between the rocks: when painted it should come up nicely!
The Finished Board
I'm only going as far as completing the actual baseboard here; after Uni exams are over I'll update with a painted version.
Here are some pics:

You can see how the two boards meet smoothly on the hill. When painted the seam will be even less noticable
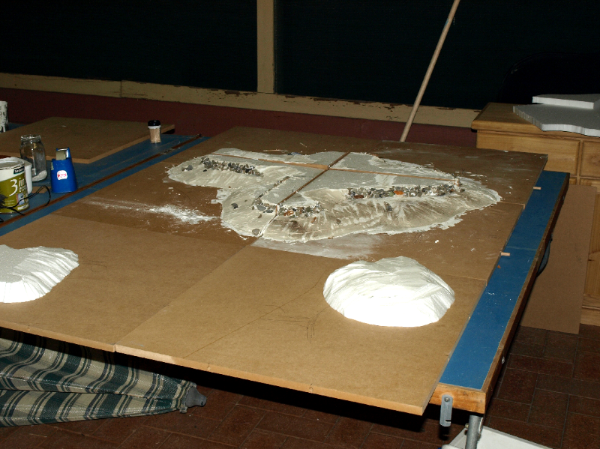
So I quickly made two boards, each with a single stand-alone hill. It is really that easy to add more tiles! With the
GW board I'd need to spend another $450, for identical tiles : you now have infinite customization and possibilities.
I hope you found this useful! Soon I'll write a tut for Making your own Hot Wire Cutter and painting this 'Realm of Battle' board.
Enjoy!


 Any Cadian who can't field-strip his own lasgun by age ten was born on the wrong planet! Anon


 2000 points
 500 points

 1500 points "You don’t want to play Blood Angels to be different you play them because you finally realized that they go crazy and drink blood yet haven’t been killed off by the Inquisition. Proving that they are just bada**”
 Waaaaaagh!!
  For The Emperor
  Dice for the Dice God


 No madam, 40,000 is the year that this game is set in. Not how much it costs. Though you may have a point. - GW Fulchester
  The Gatling Guns have flamethrowers on them because this is 40k